90
Oracle® Communications Unified Inventory Management Installation Guide Release 7.2.2 E36041-02 April 2013
| Date post: | 04-Apr-2018 |
| Category: |
Documents |
| Upload: | nguyenthuan |
| View: | 224 times |
| Download: | 3 times |

Oracle® Communications Unified Inventory ManagementInstallation Guide
Release 7.2.2
E36041-02
April 2013

Oracle Communications Unified Inventory Management Installation Guide, Release 7.2.2
E36041-02
Copyright © 2012, 2013, Oracle and/or its affiliates. All rights reserved.
This software and related documentation are provided under a license agreement containing restrictions on use and disclosure and are protected by intellectual property laws. Except as expressly permitted in your license agreement or allowed by law, you may not use, copy, reproduce, translate, broadcast, modify, license, transmit, distribute, exhibit, perform, publish, or display any part, in any form, or by any means. Reverse engineering, disassembly, or decompilation of this software, unless required by law for interoperability, is prohibited.
The information contained herein is subject to change without notice and is not warranted to be error-free. If you find any errors, please report them to us in writing.
If this is software or related documentation that is delivered to the U.S. Government or anyone licensing it on behalf of the U.S. Government, the following notice is applicable:
U.S. GOVERNMENT END USERS: Oracle programs, including any operating system, integrated software, any programs installed on the hardware, and/or documentation, delivered to U.S. Government end users are "commercial computer software" pursuant to the applicable Federal Acquisition Regulation and agency-specific supplemental regulations. As such, use, duplication, disclosure, modification, and adaptation of the programs, including any operating system, integrated software, any programs installed on the hardware, and/or documentation, shall be subject to license terms and license restrictions applicable to the programs. No other rights are granted to the U.S. Government.
This software or hardware is developed for general use in a variety of information management applications. It is not developed or intended for use in any inherently dangerous applications, including applications that may create a risk of personal injury. If you use this software or hardware in dangerous applications, then you shall be responsible to take all appropriate fail-safe, backup, redundancy, and other measures to ensure its safe use. Oracle Corporation and its affiliates disclaim any liability for any damages caused by use of this software or hardware in dangerous applications.
Oracle and Java are registered trademarks of Oracle and/or its affiliates. Other names may be trademarks of their respective owners.
Intel and Intel Xeon are trademarks or registered trademarks of Intel Corporation. All SPARC trademarks are used under license and are trademarks or registered trademarks of SPARC International, Inc. AMD, Opteron, the AMD logo, and the AMD Opteron logo are trademarks or registered trademarks of Advanced Micro Devices. UNIX is a registered trademark of The Open Group.
This software or hardware and documentation may provide access to or information on content, products, and services from third parties. Oracle Corporation and its affiliates are not responsible for and expressly disclaim all warranties of any kind with respect to third-party content, products, and services. Oracle Corporation and its affiliates will not be responsible for any loss, costs, or damages incurred due to your access to or use of third-party content, products, or services.
iii
Contents
Preface ................................................................................................................................................................ vii
Audience...................................................................................................................................................... viiRelated Documentation............................................................................................................................. viiDocumentation Accessibility ................................................................................................................... viii
1 Unified Inventory Management Installation Overview
Directory Placeholders Used in This Guide ....................................................................................... 1-1Overview of the UIM Installation Procedure ..................................................................................... 1-1Directory Structure................................................................................................................................... 1-2Ensuring a Successful UIM Installation .............................................................................................. 1-3
2 Unified Inventory Management System Requirements
Software Requirements........................................................................................................................... 2-1Supported Operating Systems ......................................................................................................... 2-1Additional Software Requirements ................................................................................................. 2-1
Hardware Sizing Guidelines ................................................................................................................. 2-2Information Requirements ..................................................................................................................... 2-3
3 Installing and Configuring the Oracle Database
Installing Oracle Database ..................................................................................................................... 3-1Configuring Oracle Database ................................................................................................................ 3-1
Database Connection Information................................................................................................... 3-1Setting the Database Parameters...................................................................................................... 3-2Setting the Database Time Zone ...................................................................................................... 3-2Creating and Configuring Your Tablespaces................................................................................. 3-2Creating the Database (MetaData) Schema for UIM .................................................................... 3-3
Schema User Name Information .............................................................................................. 3-3Installing and Configuring Oracle Database Real Application Clusters ................................... 3-5
Database Connection Information for Real Application Cluster Database........................ 3-5Tuning the Database .......................................................................................................................... 3-5
4 Installing and Configuring Oracle WebLogic Server
About Java Requirements....................................................................................................................... 4-1Installing IBM Java............................................................................................................................. 4-1
iv
Installing the Oracle JDK .................................................................................................................. 4-2Downloading and Installing Oracle WebLogic Server..................................................................... 4-2
Installing Patches................................................................................................................................ 4-2Installing Oracle Application Development Runtime 11g .............................................................. 4-3Creating a WebLogic Domain for a Single Server Installation....................................................... 4-3
WebLogic Server Connection Information..................................................................................... 4-3Creating the Standalone WebLogic Domain.................................................................................. 4-4
Setting Memory Requirements for UIM ............................................................................................. 4-5Setting Memory Requirements for UIM in UNIX Environments ............................................... 4-5Setting Memory Requirements for UIM in AIX Environments .................................................. 4-6Setting Memory Requirements for UIM in Solaris Environments.............................................. 4-6
Creating a WebLogic Domain for a Server Cluster Installation .................................................... 4-6Installation Scenario........................................................................................................................... 4-7
Server Cluster Example.............................................................................................................. 4-7Server Cluster Prerequisites ...................................................................................................... 4-8Overview of Steps for Setting Up a Server Cluster................................................................ 4-8Installing Oracle WebLogic Server in a Clustered Environment......................................... 4-9Creating a Domain...................................................................................................................... 4-9Starting WebLogic Server ....................................................................................................... 4-12Starting the Cluster Servers .................................................................................................... 4-13Configuring the WebLogic Server StuckThreadMaxTime Value .................................... 4-14
Installing and Configuring Additional Software ........................................................................... 4-14Installing and Configuring an Authentication Provider ........................................................... 4-14Configuring WebLogic Server for the Authentication Provider.............................................. 4-15Configuring Custom Authentication Providers ......................................................................... 4-16
5 Installing Unified Inventory Management
About the UIM Installer.......................................................................................................................... 5-1Installing UIM in the GUI Mode .......................................................................................................... 5-1Installing UIM in Silent Mode .............................................................................................................. 5-8
About the Response File.................................................................................................................... 5-8Populating the Response File .................................................................................................... 5-9
Starting Silent Mode Installation ..................................................................................................... 5-9
6 Unified Inventory Management Post-Installation Tasks
Configuring a Trusted Certificate for UIM ......................................................................................... 6-1Deploying UIM Cartridges..................................................................................................................... 6-1Connecting the UIM Web Service Interface to a Remote Application .......................................... 6-2Configuring Ehcache for the Cluster .................................................................................................... 6-3
Enabling Ehcache for the Cluster..................................................................................................... 6-3Enabling Ehcache Manual Discovery.............................................................................................. 6-4Enabling Ehcache for JGroups ......................................................................................................... 6-5
Installing and Configuring the AspectJ Libraries ............................................................................. 6-7
7 Verifying the Unified Inventory Management Installation
Checking the Installation Logs .............................................................................................................. 7-1

v
Checking the State of Installed Components ..................................................................................... 7-1Logging In to Unified Inventory Management .................................................................................. 7-2
8 Upgrading Unified Inventory Management
About Upgrading UIM ............................................................................................................................ 8-1Supported Upgrade Paths ................................................................................................................ 8-1
Planning Your Upgrade........................................................................................................................... 8-1Testing the Upgrade in a Test Environment ....................................................................................... 8-2Upgrade Impacts....................................................................................................................................... 8-2
Upgrade Impacts From 7.2.x to 7.2.2............................................................................................... 8-2Schema Changes ......................................................................................................................... 8-3Database and Client Changes ................................................................................................... 8-3WebLogic Server Changes......................................................................................................... 8-3Application Component Changes ............................................................................................ 8-3Design Studio Changes .............................................................................................................. 8-3Cartridge Changes ...................................................................................................................... 8-3Localization Changes ................................................................................................................. 8-3
Upgrading from 7.2.x to 7.2.2.................................................................................................................. 8-4Pre-Upgrade Tasks (7.2.x to 7.2.2) ................................................................................................... 8-4Upgrading UIM (7.2.x to 7.2.2)......................................................................................................... 8-6Post-Upgrade Tasks (7.2.x to 7.2.2)............................................................................................... 8-10
About Rolling Back UIM ..................................................................................................................... 8-11
9 Installing UIM Patches
About Patching UIM................................................................................................................................ 9-1Planning Your Patch Installation .......................................................................................................... 9-2Installing a Patch ...................................................................................................................................... 9-2
10 Configuring Oracle Maps
Choosing a Map Option....................................................................................................................... 10-1Pointing to the Oracle Map Service (Default) ............................................................................. 10-1Using Existing Map Data ............................................................................................................... 10-1Using a Sample Map....................................................................................................................... 10-2
Configuring MapViewer ..................................................................................................................... 10-2Defining the Map Data Source ...................................................................................................... 10-2Defining Base Maps ........................................................................................................................ 10-4Modifying the Map Profile Defaults ............................................................................................ 10-5Linking UIM Map Profile to MapViewer .................................................................................... 10-5Installing Map Builder.................................................................................................................... 10-6Defining Custom Icons................................................................................................................... 10-6
Viewing MapViewer Documentation ............................................................................................... 10-6
11 Uninstalling Unified Inventory Management
About Uninstalling UIM...................................................................................................................... 11-1Uninstalling UIM or UIM Components ........................................................................................... 11-1
vi
12 Troubleshooting the Unified Inventory Management Installation
Common Problems and Their Solutions .......................................................................................... 12-1Problem: Installer Fails to Update Application KEYSTORE Table.......................................... 12-1
Solution...................................................................................................................................... 12-1Problem: Installer Fails to Update Application INFORMATION Table................................. 12-2
Solution...................................................................................................................................... 12-2Problem: Database Server and Application Server Have Different Dates ............................. 12-2
Solution...................................................................................................................................... 12-2Problem: Unable to Create the UIM Administrator User Except During Installation.......... 12-3
Solution...................................................................................................................................... 12-3Reporting Problems .............................................................................................................................. 12-4
A Sequence Table Information
Specification-based Sequence Generation......................................................................................... A-1Context-based Sequence Generation .................................................................................................. A-2
vii
Preface
This guide provides instructions for installing Oracle Communications Unified Inventory Management (UIM).
AudienceThis document is for system administrators, database administrators, and developers who install and configure UIM. The person installing the software should be familiar with the following topics:
■ Operating system commands
■ Database configuration
■ Oracle WebLogic Server
■ Network management
Before reading this guide, you should have familiarity with UIM. See UIM Concepts.
UIM requires Oracle Database and Oracle WebLogic Server. See the documentation for these products for installation and configuration instructions.
Related DocumentationUIM Installation Guide is one book in the Oracle Communications Unified Inventory Management Release 7.2.2 documentation set. For more information, refer to the following documents:
■ UIM System Administrator’s Guide: Describes administrative tasks such as working with cartridges and technology packs, maintaining security, managing the database, configuring Oracle Map Viewer, and troubleshooting.
■ UIM Security Guide: Provides guidelines and recommendations for setting up UIM in a secure configuration.
■ UIM Concepts: Provides an overview of important concepts and an introduction to using both UIM and Design Studio.
■ UIM Developer’s Guide: Explains how to customize and extend many aspects of UIM, including the data model, life-cycle management, topology, security, rulesets, Web services, user interface, and localization.
■ UIM Information Model Reference: Describes the UIM information model entities and data attributes, and explains patterns that are common across all entities.
■ Oracle Communications Information Model Reference: Describes the Oracle Communications information model entities and data attributes, and explains
viii
patterns that are common across all entities. The information described in this reference is common across all Oracle Communications products.
■ UIM Cartridge and Technology Pack Guide: Provides information about how you use cartridges and technology packs with UIM. Describes the content of the base cartridges.
■ UIM technology pack implementation guides: Describe the content of product technology packs as well as configuration guidelines and implementation considerations.
For step-by-step instructions for performing tasks, log into each application to see the following:
■ Design Studio Help: Provides step-by-step instructions for tasks you perform in Design Studio.
■ UIM Help: Provides step-by-step instructions for tasks you perform in UIM.
Documentation AccessibilityFor information about Oracle's commitment to accessibility, visit the Oracle Accessibility Program website at http://www.oracle.com/pls/topic/lookup?ctx=acc&id=docacc.
Access to Oracle SupportOracle customers have access to electronic support through My Oracle Support. For information, visit http://www.oracle.com/pls/topic/lookup?ctx=acc&id=info or visit http://www.oracle.com/pls/topic/lookup?ctx=acc&id=trs if you are hearing impaired.
1
Unified Inventory Management Installation Overview 1-1
1Unified Inventory Management Installation Overview
This chapter provides an overview of the installation process of Oracle Communications Unified Inventory Management (UIM).
Directory Placeholders Used in This GuideTable 1–1 lists the placeholders that are used in this guide to refer to directories related to the UIM application.
Overview of the UIM Installation ProcedureInstalling UIM involves a number of steps that you or others must complete:
1. Review system requirements. See "Unified Inventory Management System Requirements".
2. Install Oracle Database and configure it for UIM. See "Installing and Configuring the Oracle Database".
3. Install Oracle WebLogic Server and configure it for UIM. See "Installing and Configuring Oracle WebLogic Server".
4. Install UIM. See "Installing Unified Inventory Management".
5. Perform post-installation configuration tasks. See "Unified Inventory Management Post-Installation Tasks".
6. Verify the installation. See "Verifying the Unified Inventory Management Installation".
Table 1–1 Directory Placeholders
Placeholder Directory Description
UIM_Home The directory in which the UIM software is installed. This directory contains various installation-related files.
MW_Home The directory in which the Oracle Fusion Middleware products are installed. This directory contains the base directory for the WebLogic Server, a utilities directory, and other files and directories.
WL_Home The directory in which the WebLogic Server is installed. It is located in the MW_Home directory.
Domain_Home The directory containing the configuration for the domain into which UIM is installed. The default location is MW_Home/user_projects/domains/domain_name, where domain_name is the name of the WebLogic server domain for UIM.
Directory Structure
1-2 UIM Installation Guide
7. Upgrading UIM. See "Upgrading Unified Inventory Management".
8. Install UIM patches. See "Installing UIM Patches".
9. (Optional) Configure Oracle Maps. See "Configuring Oracle Maps".
10. (Optional) Uninstall UIM. See "Uninstalling Unified Inventory Management".
11. (Optional) Troubleshooting UIM. See "Troubleshooting the Unified Inventory Management Installation".
Directory StructureExample 1–1 provides an example of the directory structure found in the UIM_Home directory.
Example 1–1 UIM Directory Structure
- app/ (Directory for UIM applications) - 7_2_2/ - custom.ear - uim_core_lib.ear - uim_custom_lib.ear - uim_external_lib.ear - mapviewer.ear - plan/ - AppFileOverrides/ - platform/ - runtime-poms.properties - plan.xml - inventory-adapter.ear - inventory.ear- cartridges/ (Directory for UIM base and sample cartridges) - base/ - studioProjects/ - ora_uim_baseextpts_cartproj.zip - ora_uim_basemeasurements_cartproj.zip - ora_uim_basephone_mgmt_cartproj.zip - ora_uim_baserulesets_cartproj.zip - ora_uim_basespecifications_cartproj.zip - ora_uim_basetechnologies_cartproj.zip - ora_uim_canada_tn_cartproj.zip - ora_uim_geocoder_sample_cartproj.zip - ora_uim_norway_tn_cartproj.zip - ora_uim_pathanalysis_sample_cartproj.zip - ora_uim_saudi_arabia_tn_cartproj.zip - ora_uim_servicetopology_sample_cartproj.zip - ora_uim_uk_tn_cartproj.zip - ora_uim_us_tn_cartproj.zip - ora_uim_baseextpts_cartproj.jar - ora_uim_basemeasurements_cartproj.jar - ora_uim_basephone_mgmt_cartproj.jar - ora_uim_baserulesets_cartproj.jar - ora_uim_basespecifications_cartproj.jar - ora_uim_basetechnologies_cartproj.jar - ora_uim_canada_tn_cartproj.jar - ora_uim_mds_cartproj.zip - ora_uim_model_cartproj.zip - ora_uim_norway_tn_cartproj.jar - ora_uim_saudi_arabia_tn_cartproj.jar - ora_uim_uk_tn_cartproj.jar
Ensuring a Successful UIM Installation
Unified Inventory Management Installation Overview 1-3
- ora_uim_us_tn_cartproj.jar - sample/ - ora_uim_geocoder_sample_cartproj.jar - ora_uim_localization_reference_cartproj.jar - ora_uim_pathanalysis_sample_cartproj.jar - ora_uim_servicetopology_sample_cartproj.jar - tools/ - studioProjects/ - ora_uim_entity_sdk_cartproj.zip- config/ (Directory for UIM property and configuration files)- doc/ (Directory for UIM deployment files) - ora_uim_delta.war - ora_uim_javadoc.war- images/ (Directory for custom company logos)- lib/ (Directory for UIM .jar and .war files)- logs/ (Directory for UIM server logs)- scripts/ (Directory for UIM scripts)- tmp/ (Directory for UIM)- util/ (Directory for Utilities) - ora_uim_dbtools.jar- webservices/ (Directory for UIM web services) - reference_webservice.zip - schema_webservice.zip - schema_serviceFulfillment_webservice.zip
Ensuring a Successful UIM InstallationUIM installation should be performed only by qualified personnel. You must be familiar with the following before you begin the installation:
■ UNIX operating system
■ Oracle WebLogic Server administration
■ Oracle Database 11gR2 administration
Additionally, you should have experience installing Java-related packages.
Follow these guidelines:
■ Pay close attention to the system requirements. Before you begin installing the application, ensure your system has the required base software. In addition, ensure that you know all of the required configuration values, such as host names and port numbers.
■ Make a note of any new configuration values as you create them. You will be required to enter configuration values later in the procedure.
■ As you install each component, verify that it installed successfully before continuing the installation process.
■ Monitor the installation log files, to verify the installation events. Refer to "Checking the Installation Logs" for information on the installation log files.

Ensuring a Successful UIM Installation
1-4 UIM Installation Guide
2
Unified Inventory Management System Requirements 2-1
2Unified Inventory Management System Requirements
This chapter describes the software and hardware requirements for installing Oracle Communications Unified Inventory Management (UIM).
Software RequirementsUIM is installed on an Oracle WebLogic domain. It uses an Oracle database for data storage, and it can optionally connect to a report publishing tool.
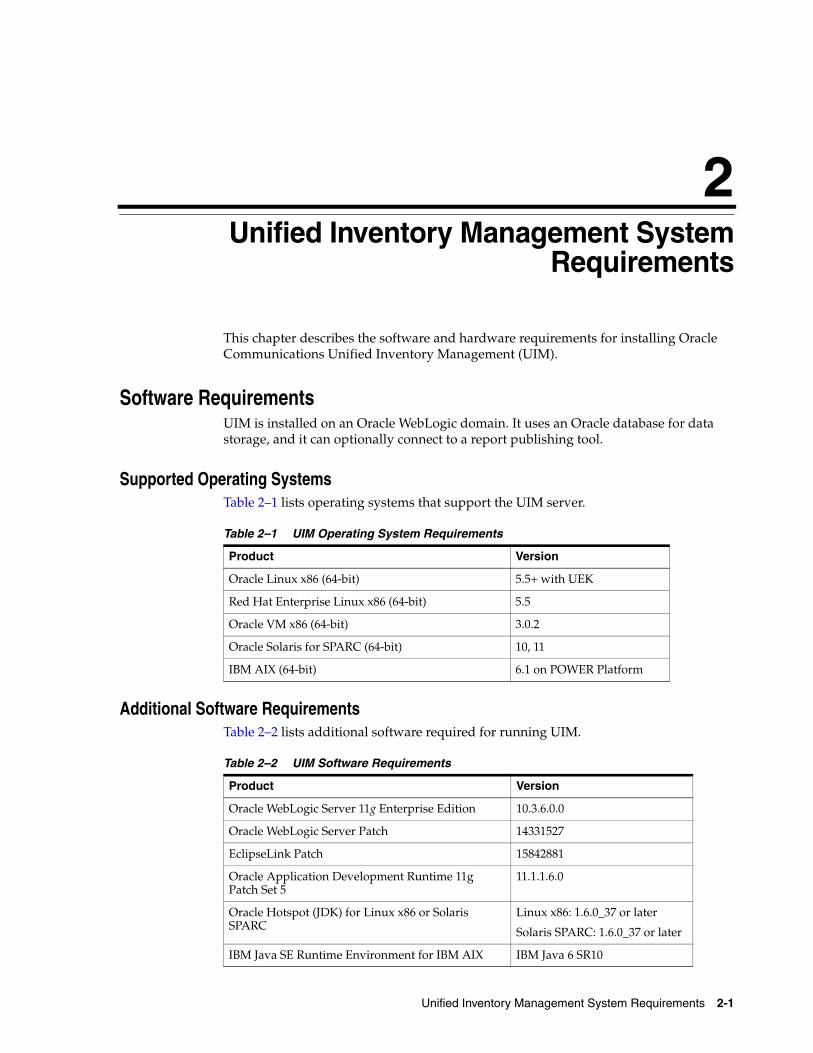
Supported Operating SystemsTable 2–1 lists operating systems that support the UIM server.
Additional Software RequirementsTable 2–2 lists additional software required for running UIM.
Table 2–1 UIM Operating System Requirements
Product Version
Oracle Linux x86 (64-bit) 5.5+ with UEK
Red Hat Enterprise Linux x86 (64-bit) 5.5
Oracle VM x86 (64-bit) 3.0.2
Oracle Solaris for SPARC (64-bit) 10, 11
IBM AIX (64-bit) 6.1 on POWER Platform
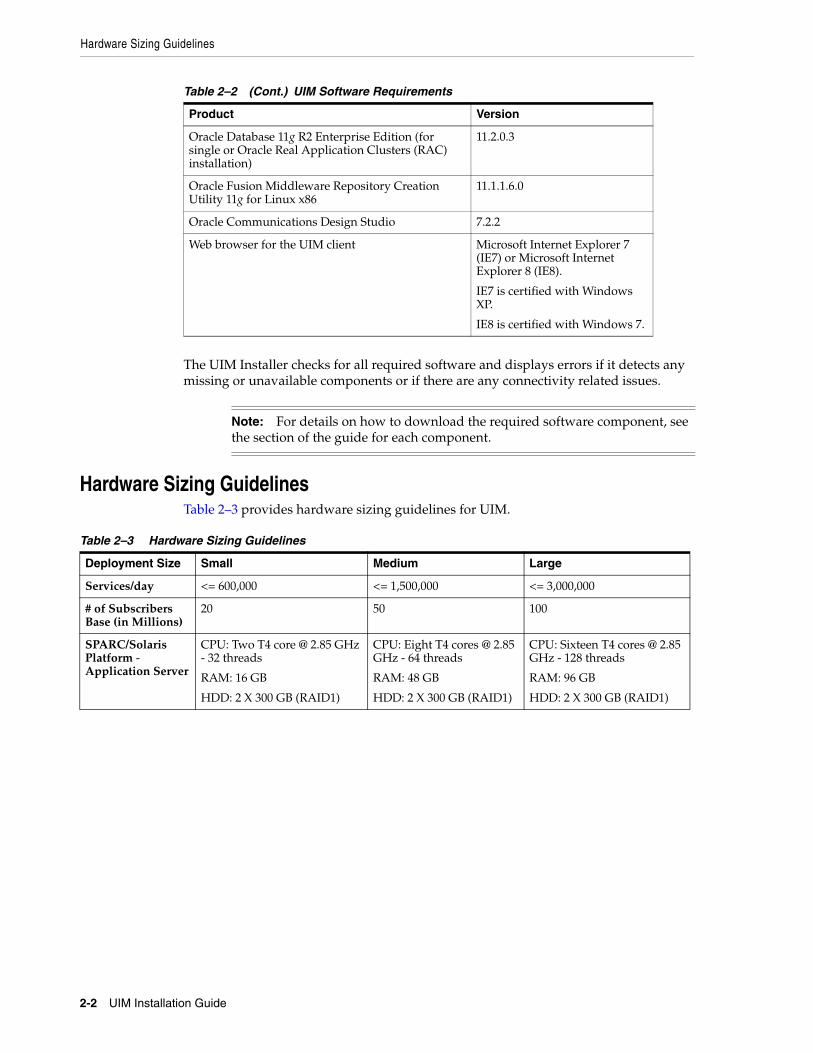
Table 2–2 UIM Software Requirements
Product Version
Oracle WebLogic Server 11g Enterprise Edition 10.3.6.0.0
Oracle WebLogic Server Patch 14331527
EclipseLink Patch 15842881
Oracle Application Development Runtime 11g Patch Set 5
11.1.1.6.0
Oracle Hotspot (JDK) for Linux x86 or Solaris SPARC
Linux x86: 1.6.0_37 or later
Solaris SPARC: 1.6.0_37 or later
IBM Java SE Runtime Environment for IBM AIX IBM Java 6 SR10
Hardware Sizing Guidelines
2-2 UIM Installation Guide
The UIM Installer checks for all required software and displays errors if it detects any missing or unavailable components or if there are any connectivity related issues.
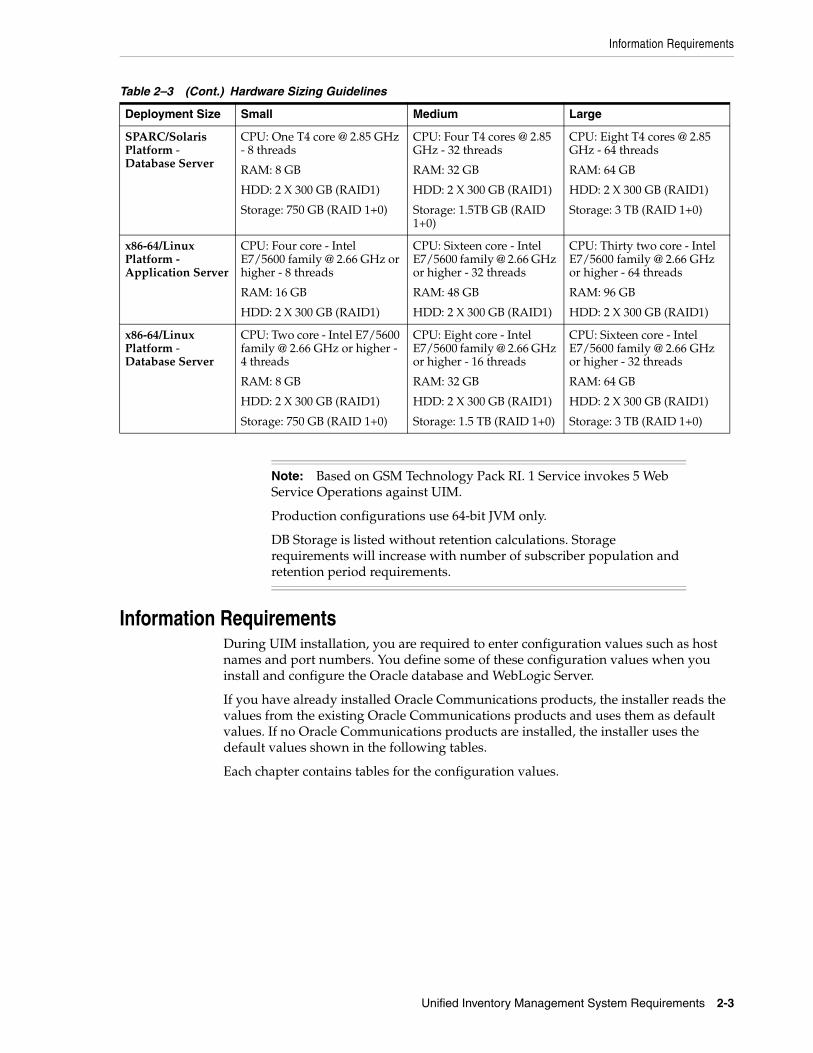
Hardware Sizing GuidelinesTable 2–3 provides hardware sizing guidelines for UIM.
Oracle Database 11g R2 Enterprise Edition (for single or Oracle Real Application Clusters (RAC) installation)
11.2.0.3
Oracle Fusion Middleware Repository Creation Utility 11g for Linux x86
11.1.1.6.0
Oracle Communications Design Studio 7.2.2
Web browser for the UIM client Microsoft Internet Explorer 7 (IE7) or Microsoft Internet Explorer 8 (IE8).
IE7 is certified with Windows XP.
IE8 is certified with Windows 7.
Note: For details on how to download the required software component, see the section of the guide for each component.
Table 2–3 Hardware Sizing Guidelines
Deployment Size Small Medium Large
Services/day <= 600,000 <= 1,500,000 <= 3,000,000
# of Subscribers Base (in Millions)
20 50 100
SPARC/Solaris Platform - Application Server
CPU: Two T4 core @ 2.85 GHz - 32 threads
RAM: 16 GB
HDD: 2 X 300 GB (RAID1)
CPU: Eight T4 cores @ 2.85 GHz - 64 threads
RAM: 48 GB
HDD: 2 X 300 GB (RAID1)
CPU: Sixteen T4 cores @ 2.85 GHz - 128 threads
RAM: 96 GB
HDD: 2 X 300 GB (RAID1)
Table 2–2 (Cont.) UIM Software Requirements
Product Version
Information Requirements
Unified Inventory Management System Requirements 2-3
Information RequirementsDuring UIM installation, you are required to enter configuration values such as host names and port numbers. You define some of these configuration values when you install and configure the Oracle database and WebLogic Server.
If you have already installed Oracle Communications products, the installer reads the values from the existing Oracle Communications products and uses them as default values. If no Oracle Communications products are installed, the installer uses the default values shown in the following tables.
Each chapter contains tables for the configuration values.
SPARC/Solaris Platform - Database Server
CPU: One T4 core @ 2.85 GHz - 8 threads
RAM: 8 GB
HDD: 2 X 300 GB (RAID1)
Storage: 750 GB (RAID 1+0)
CPU: Four T4 cores @ 2.85 GHz - 32 threads
RAM: 32 GB
HDD: 2 X 300 GB (RAID1)
Storage: 1.5TB GB (RAID 1+0)
CPU: Eight T4 cores @ 2.85 GHz - 64 threads
RAM: 64 GB
HDD: 2 X 300 GB (RAID1)
Storage: 3 TB (RAID 1+0)
x86-64/Linux Platform - Application Server
CPU: Four core - Intel E7/5600 family @ 2.66 GHz or higher - 8 threads
RAM: 16 GB
HDD: 2 X 300 GB (RAID1)
CPU: Sixteen core - Intel E7/5600 family @ 2.66 GHz or higher - 32 threads
RAM: 48 GB
HDD: 2 X 300 GB (RAID1)
CPU: Thirty two core - Intel E7/5600 family @ 2.66 GHz or higher - 64 threads
RAM: 96 GB
HDD: 2 X 300 GB (RAID1)
x86-64/Linux Platform - Database Server
CPU: Two core - Intel E7/5600 family @ 2.66 GHz or higher - 4 threads
RAM: 8 GB
HDD: 2 X 300 GB (RAID1)
Storage: 750 GB (RAID 1+0)
CPU: Eight core - Intel E7/5600 family @ 2.66 GHz or higher - 16 threads
RAM: 32 GB
HDD: 2 X 300 GB (RAID1)
Storage: 1.5 TB (RAID 1+0)
CPU: Sixteen core - Intel E7/5600 family @ 2.66 GHz or higher - 32 threads
RAM: 64 GB
HDD: 2 X 300 GB (RAID1)
Storage: 3 TB (RAID 1+0)
Note: Based on GSM Technology Pack RI. 1 Service invokes 5 Web Service Operations against UIM.
Production configurations use 64-bit JVM only.
DB Storage is listed without retention calculations. Storage requirements will increase with number of subscriber population and retention period requirements.
Table 2–3 (Cont.) Hardware Sizing Guidelines
Deployment Size Small Medium Large

Information Requirements
2-4 UIM Installation Guide
3
Installing and Configuring the Oracle Database 3-1
3Installing and Configuring the Oracle Database
This chapter describes the process of installing the Oracle Database and configuring the Oracle database for Oracle Communications Unified Inventory Management (UIM).
Installing Oracle DatabaseThe Oracle Universal Installer checks for a database to connect to during the installation process. Ensure that a database is running before you start installing UIM. If you already have a database running, you must create a tablespace for UIM.
Download and install Oracle Database for this version of UIM. Refer to Table 2–2, " UIM Software Requirements", for the appropriate version of Oracle Database to install.
For information on installing Oracle Database, see the Oracle Database installation documentation.
Configuring Oracle DatabaseThe Oracle database must be configured for UIM. Specifically, this section covers the following:
■ Database Connection Information
■ Setting the Database Parameters
■ Setting the Database Time Zone
■ Creating and Configuring Your Tablespaces
■ Creating the Database (MetaData) Schema for UIM
■ Installing and Configuring Oracle Database Real Application Clusters
■ Tuning the Database
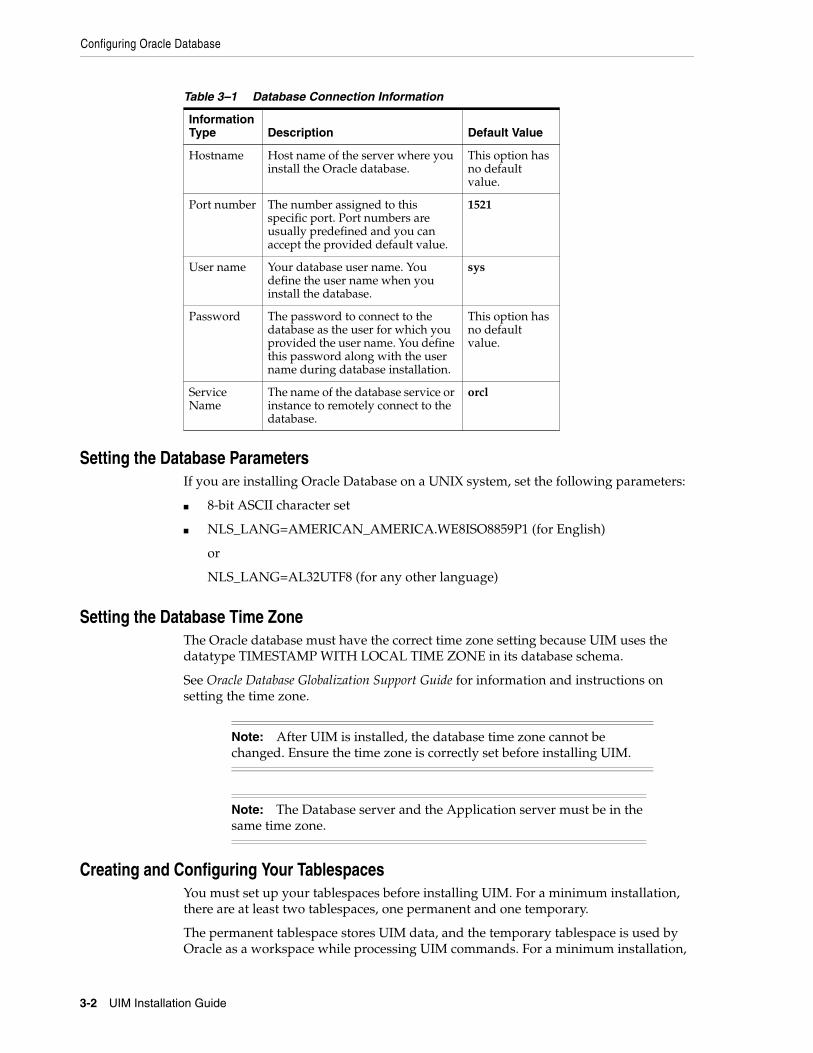
Database Connection InformationTable 3–1 lists database connection details that you are required to provide during the Oracle Database installation.
Note: Ensure that the Oracle Spatial and Graph feature are enabled in the database. The UIM installation could fail if this feature is not enabled. Refer to the Oracle Database installation documentation for more information.
Configuring Oracle Database
3-2 UIM Installation Guide
Setting the Database ParametersIf you are installing Oracle Database on a UNIX system, set the following parameters:
■ 8-bit ASCII character set
■ NLS_LANG=AMERICAN_AMERICA.WE8ISO8859P1 (for English)
or
NLS_LANG=AL32UTF8 (for any other language)
Setting the Database Time ZoneThe Oracle database must have the correct time zone setting because UIM uses the datatype TIMESTAMP WITH LOCAL TIME ZONE in its database schema.
See Oracle Database Globalization Support Guide for information and instructions on setting the time zone.
Creating and Configuring Your TablespacesYou must set up your tablespaces before installing UIM. For a minimum installation, there are at least two tablespaces, one permanent and one temporary.
The permanent tablespace stores UIM data, and the temporary tablespace is used by Oracle as a workspace while processing UIM commands. For a minimum installation,
Table 3–1 Database Connection Information
Information Type Description Default Value
Hostname Host name of the server where you install the Oracle database.
This option has no default value.
Port number The number assigned to this specific port. Port numbers are usually predefined and you can accept the provided default value.
1521
User name Your database user name. You define the user name when you install the database.
sys
Password The password to connect to the database as the user for which you provided the user name. You define this password along with the user name during database installation.
This option has no default value.
Service Name
The name of the database service or instance to remotely connect to the database.
orcl
Note: After UIM is installed, the database time zone cannot be changed. Ensure the time zone is correctly set before installing UIM.
Note: The Database server and the Application server must be in the same time zone.
Configuring Oracle Database
Installing and Configuring the Oracle Database 3-3
place the UIM data in one permanent tablespace. Tablespaces should be created by an experienced Oracle DBA. For assistance, contact Oracle.
In a high-throughput system, create each tablespace or set of data files on a different physical disk. Place the Oracle redo log files on a separate physical disk. You should not have any other load on this disk.
In a production system, use a RAID device for physical storage.
This example shows how to create your permanent tablespace:
create tablespace large_datadatafile ’/u01/oradata/UIM/data_001M01_01.dbf’ size 2200Mextent management localuniform size 1M;
This example shows how to create your temporary tablespace:
create temporary tablespace large_temptempfile ’/u01/oradata/UIM/temp_001M01_01.dbf’ size 1600Mextent management localuniform size 1M;
Creating the Database (MetaData) Schema for UIMDownload Oracle Fusion Middleware Repository Creation Utility 11g for Linux x86 or Oracle Fusion Middleware Repository Creation Utility 11g for Microsoft Windows (refer to Table 2–2, " UIM Software Requirements" for the appropriate version) from the Oracle Communications Unified Inventory Management 7.2.2 media pack, which is available on the Oracle Software Delivery Cloud.
For information on creating the MetaData schema, see the Oracle Fusion Middleware Repository Creation Utility User's Guide.
Schema User Name InformationTable 3–2 lists schema user details that you are required to provide during schema installation.
Note: If you are using Chinese UTF8 characters, the block size for the tablespaces must be configured larger than 2 KB.
Note: The Repository Creation Utility can run on the Microsoft Windows platform. A Windows system can be used to remotely access and configure the database.
Table 3–2 Schema User Information
Information Type Description Default Value
Schema User Name
Your schema user name that you will use to access the UIM schema.
This option has no default value.
Schema User Password
The password to access the UIM schema for the schema user you defined.
This option has no default value.

Configuring Oracle Database
3-4 UIM Installation Guide
To create the schema for UIM using RCU:
1. Extract the RCU package.
2. Run the following command:
For Unix:
RCU_Home/bin/rcu
For Windows:
RCU_Home/bin/rcu.bat
The Welcome screen of the Repository Creation Utility Installation wizard appears.
3. Click Next.
The Create Repository screen appears.
4. Select Create and click Next.
The Database Connection Details screen appears.
5. Do the following:
a. From the Database Type list, select Oracle Database.
b. In the Host Name field, enter the hostname of the machine hosting the database.
c. In the Port field, enter the port number for the machine hosting the database.
d. In the Service Name field, enter the service name.
e. In the Username field, enter the user name for the database user.
f. In the Password field, enter the password for the database user.
g. In the Role list, select SYSDBA.
h. Click Next.
The Select Components screen appears.
6. Select Create a new Prefix, and enter the prefix value in the corresponding text field.
The prefix is any appropriate name for your schema. RCU adds a suffix to this name.
7. When specifying components, expand Oracle AS Repository Components; then, expand AS Common Schemas and select Metadata Services.
8. Click Next.
The Schema Passwords screen appears.
9. Select Use same password for all schemas.
Note: This user account must have the following privileges: CATALOG, CONNECT, Create User, Create Session, Grant Any Privilege, Grant Any Role, Select Any Table, Select any Dictionary.
Configuring Oracle Database
Installing and Configuring the Oracle Database 3-5
10. In the Password field, enter the password for the schema.
11. In the Confirm Password field, enter the password for the schema again and click Next.
The Map Tablespaces screen appears.
12. Select the required tablespace and click Next.
The Summary screen appears.
13. Review and verify the information you have provided and click Create to create.
The Completion Summary screen appears, which shows details of the newly created repository.
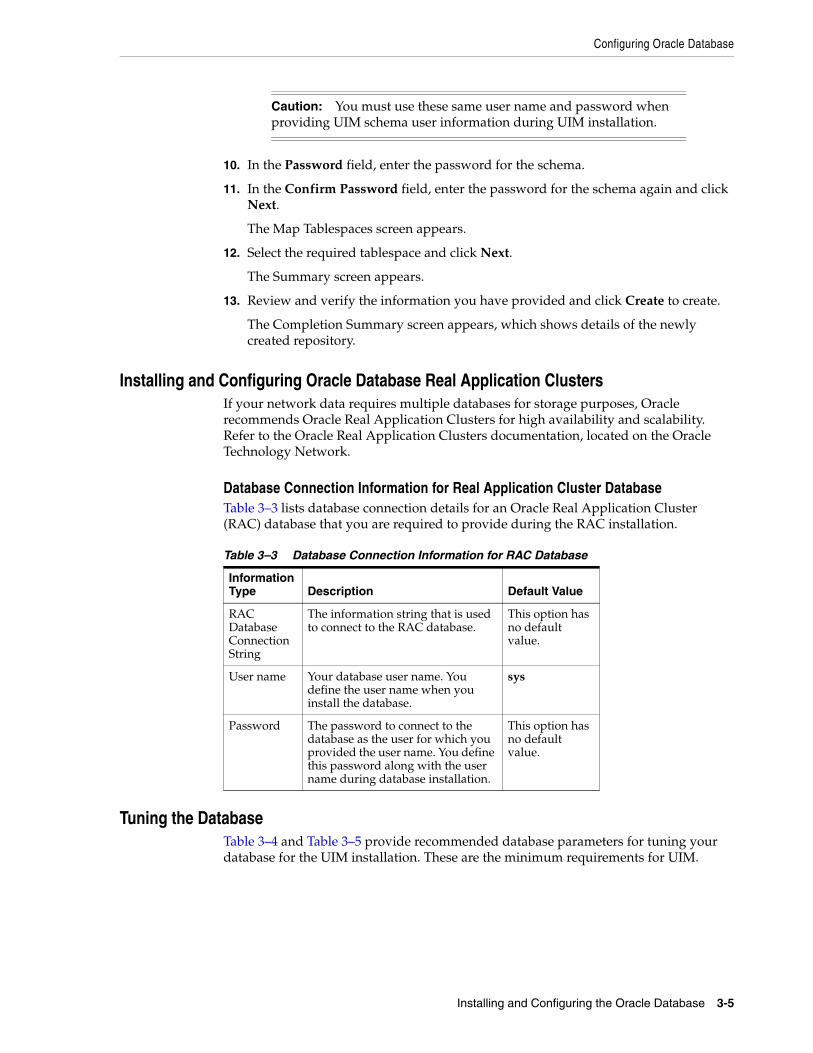
Installing and Configuring Oracle Database Real Application ClustersIf your network data requires multiple databases for storage purposes, Oracle recommends Oracle Real Application Clusters for high availability and scalability. Refer to the Oracle Real Application Clusters documentation, located on the Oracle Technology Network.
Database Connection Information for Real Application Cluster DatabaseTable 3–3 lists database connection details for an Oracle Real Application Cluster (RAC) database that you are required to provide during the RAC installation.
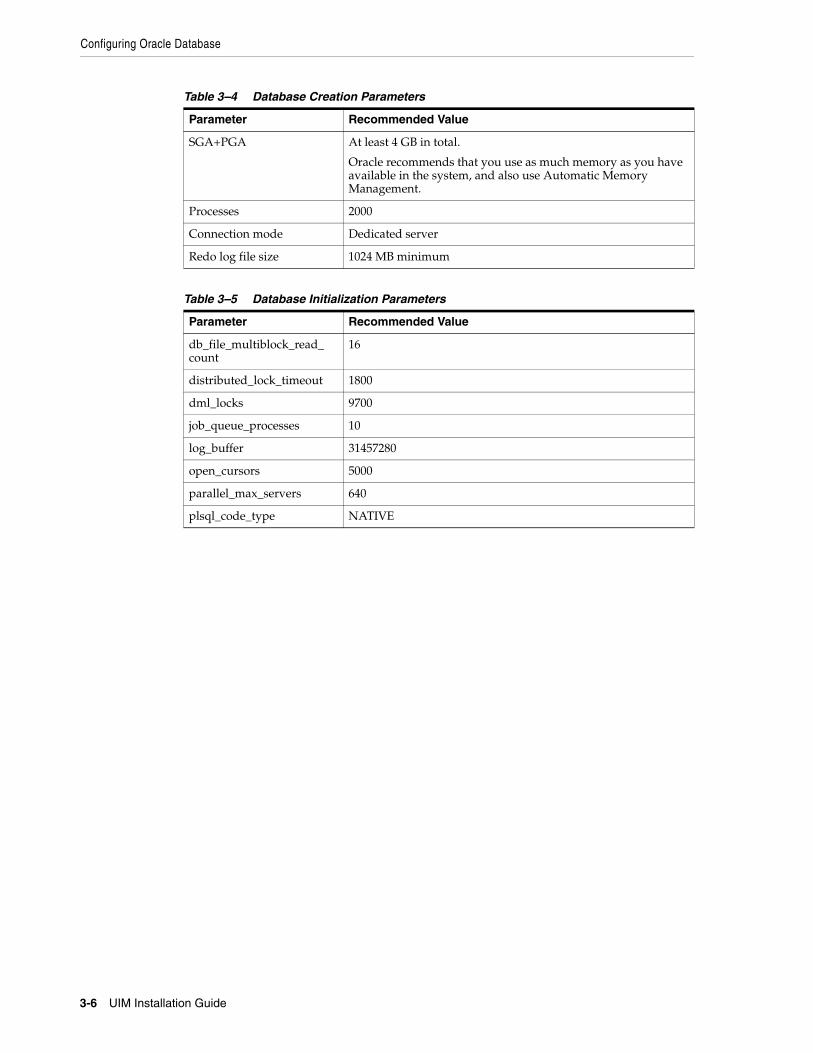
Tuning the DatabaseTable 3–4 and Table 3–5 provide recommended database parameters for tuning your database for the UIM installation. These are the minimum requirements for UIM.
Caution: You must use these same user name and password when providing UIM schema user information during UIM installation.
Table 3–3 Database Connection Information for RAC Database
Information Type Description Default Value
RAC Database Connection String
The information string that is used to connect to the RAC database.
This option has no default value.
User name Your database user name. You define the user name when you install the database.
sys
Password The password to connect to the database as the user for which you provided the user name. You define this password along with the user name during database installation.
This option has no default value.
Configuring Oracle Database
3-6 UIM Installation Guide
Table 3–4 Database Creation Parameters
Parameter Recommended Value
SGA+PGA At least 4 GB in total.
Oracle recommends that you use as much memory as you have available in the system, and also use Automatic Memory Management.
Processes 2000
Connection mode Dedicated server
Redo log file size 1024 MB minimum
Table 3–5 Database Initialization Parameters
Parameter Recommended Value
db_file_multiblock_read_count
16
distributed_lock_timeout 1800
dml_locks 9700
job_queue_processes 10
log_buffer 31457280
open_cursors 5000
parallel_max_servers 640
plsql_code_type NATIVE
4
Installing and Configuring Oracle WebLogic Server 4-1
4Installing and Configuring Oracle WebLogic Server
Oracle Communications Unified Inventory Management (UIM) is installed and run on an Oracle WebLogic Administration Server. This chapter describes procedures relating to installing the WebLogic Administration Server and configuring it for UIM.
This chapter describes how to install and configure WebLogic Server for UIM. Installation and configuration tasks include:
■ Installing IBM Java
■ Installing the Oracle JDK
■ Downloading and Installing Oracle WebLogic Server
■ Installing Oracle Application Development Runtime 11g
■ Creating a WebLogic Domain for a Single Server Installation
■ Setting Memory Requirements for UIM
■ Creating a WebLogic Domain for a Server Cluster Installation
■ Installing and Configuring Additional Software
About Java RequirementsWebLogic Server is a Java application and needs a Java environment in which to run.
When WebLogic Server is installed on IBM AIX, Oracle recommends installing IBM Java.
When WebLogic Server is installed on Linux x86 or Solaris, Oracle recommends that you use the Oracle JDK.
Installing IBM JavaDownload the Java6_64.sdk.tar Java SDK from the IBM Web site.
For information on installing IBM Java, refer to IBM Java Installation documentation.
Note: Ensure that the Administration Server is up and running in the WebLogic domain before you install UIM.
Downloading and Installing Oracle WebLogic Server
4-2 UIM Installation Guide
Installing the Oracle JDKUse a 64-bit Java Development Kit (JDK) on a 64-bit operating system (OS) for a successful UIM installation.
Download the Oracle JDK for the required platform from the Oracle Software Delivery Cloud.
To extract the Oracle JDK, perform the following commands:
chmod a+x jdk-6u37-linux-x64.bin./jdk-6u37-linux-x64.bin
Downloading and Installing Oracle WebLogic ServerOracle WebLogic Server is available as a component of the Oracle Communications Unified Inventory Management 7.2.2 media pack. Oracle Communications Unified Inventory Management 7.2.2 includes WebLogic Server, JDeveloper, and other software. Refer to Table 2–2, " UIM Software Requirements" for the appropriate versions.
Download Oracle WebLogic Server from the Oracle software delivery Web site:
https://edelivery.oracle.com/
For information about installing Oracle WebLogic Server, see the Oracle WebLogic Server documentation.
Installing PatchesAfter you install Oracle WebLogic Server, you must install any applicable patches. The patches must be downloaded from the My Oracle Support web site and can be applied using the WebLogic Smart Update tool.
Download the following patch(es), from the My Oracle Support web site:
Note: Oracle recommends installing the 64-bit Java Virtual Machine (JVM).
Note: The commands to extract the Oracle JDK need to be run from the JAVA_HOME directory.
Note: The Oracle WebLogic Server software is available in a 32-bit version, for each supported platform, and in a generic 64-bit version, supported across all the platforms.
Tip: You can launch the Oracle WebLogic Server installation from a command line by entering the following:
JAVA_Home/bin/java -jar wls1036_generic.jar
Note: The first time you use the update tool, you will be prompted to perform an upgrade. Accept this upgrade, as the tool shipped with the WebLogic Server is outdated.
Creating a WebLogic Domain for a Single Server Installation
Installing and Configuring Oracle WebLogic Server 4-3
https://support.oracle.com
14331527 (WebLogic Server patch)
15842881 (EclipseLink patch)
For information about downloading and applying patches, see Knowledge Article 1302053.1 - Master Note: How to Locate and Download Patches for WebLogic Server Using My Oracle Support and Knowledge Article 1075833.1 - Master Note on WebLogic Server (WLS) Patches, Upgrade Installers, and Full Installers.
Installing Oracle Application Development Runtime 11gDownload Oracle Application Development Runtime 11g from the Oracle Software Delivery Cloud. This software is used to create and manage applications used by UIM.
For installing Oracle Application Development Runtime 11g, see the Oracle WebLogic Server documentation on the Oracle Technology Network.
For more information on the Application Development Framework, see Oracle Fusion Middleware Fusion Developer's Guide for Oracle Application Development Framework.
Creating a WebLogic Domain for a Single Server InstallationThis section provides instructions on installing UIM on a single server. A single server arrangement is used for a small UIM deployment.
WebLogic Server Connection InformationTable 4–1 lists WebLogic Server connection details that you are required to provide during the WebLogic Server installation.
Note: The Oracle Fusion Middleware 11g Application Developer Installer installs both Oracle Application Development Runtime and Oracle Enterprise Manager.
Table 4–1 Application Server Connection Information
Information Type Description Default Value
Host Name The host name for this WebLogic Server instance.
current_hostname
Port Number
The number assigned to this specific port. Port numbers are usually predefined and you can accept the provided default value.
7001
User Name Your WebLogic Server user name. You define this name when you install WebLogic Server.
weblogic
Password The password to connect to WebLogic Server as the user for which you provided the user name. You define this password along with the user name during the WebLogic Server installation.
This option has no default value.

Creating a WebLogic Domain for a Single Server Installation
4-4 UIM Installation Guide
Creating the Standalone WebLogic DomainTo create a standalone WebLogic domain:
1. Navigate to the following directory:
WL_Home/common/bin
2. Enter the following command:
./config.sh
The Welcome screen of the Fusion Middleware Configuration Wizard appears.
3. Select Create a New WebLogic domain and click Next.
The Select Domain Source screen appears.
4. Select Generate a domain configured automatically to support the following products, and from the provided list, select the following products:
■ Oracle Enterprise Manager - 11.1.1.0 [oracle_common]
■ Oracle JRF - 11.1.1.0 [oracle_common]
■ Oracle WSM Policy Manager - 11.1.1.0 [oracle_common]
5. Click Next.
The Specify Domain Name and Location screen appears.
6. In the Domain name field, enter a domain name.
7. In the Domain location field, enter the path and directory where the domain files will be created. For example, enter WLServer_Home/user_projects/domains/base_domain.
8. Click Next.
The Configure Administrator User Name and Password screen appears.
9. In the User name field, enter the administrator user name.
10. In the User password field, enter the administrator user password. The password must be a minimum of eight alphanumeric characters, and must contain at least one number or special character.
11. In the Confirm password field, re-enter your password.
12. (Optional) In the Description field, enter information about the administrator. For example, enter This user is the default administrator (or whatever text fits your business practices).
13. In the WebLogic Domain Startup Mode section, select one of the following:
■ Development Mode, or
■ Production Mode (recommended mode)
14. In the JDK Selection section, select the required JDK (Oracle JDK 1.6.0._37) by doing the following:
■ Select Available JDKs and select a JDK from the list provided or
■ Select Other JDK and browse to the location of another JDK. Ensure that this JDK is supported. See Table 2–2, " UIM Software Requirements" for details.
Setting Memory Requirements for UIM
Installing and Configuring Oracle WebLogic Server 4-5
15. Click Next.
The Select Optional Configuration page appears.
16. Select the following:
■ Administration Server
17. Click Next.
The Configure the Administration Server screen appears.
18. Do the following:
a. In the Name field, enter the Administration Server name.
This single server serves as the UIM domain Administration Server.
b. In the Listen Address field, select a DNS or an IP address.
c. In the Listen Port field, accept the default.
d. In the SSL Listen Port field, enter a port that is not used by another domain.
e. Select SSL enabled if you are enabling SSL.
It is not a requirement to either enable or disable SSL.
f. Click Next.
The Configuration Summary screen appears.
19. Review the summary to verify the contents of your domain.
Click Previous to return to prior screens to modify their content.
20. Click Create to create the domain.
21. To finish the domain creation process, click Done, after the domain is created successfully.
22. To set memory requirements, see "Setting Memory Requirements for UIM".
23. Continue with the procedures in "Starting WebLogic Server".
For more information on WebLogic domains, see Oracle WebCenter Content 11gR1 documentation.
You can now manually start the Administration Server, and log in to the WebLogic Server Administration Console.
Setting Memory Requirements for UIMIn UNIX, AIX, and Solaris environments, you must set appropriate memory requirement values in the WebLogic server to be able to install UIM. Not allotting enough memory space for the WebLogic domain can cause errors during installation.
Setting Memory Requirements for UIM in UNIX EnvironmentsThe example shows the entries in the setDomainEnv.sh file for setting the memory requirement values for UIM:
Note: Use listener addresses that are equal to a resolvable DNS host or IP address. Do not use localhost or 127.0.0.1. Those addresses interfere with clustered servers.

Creating a WebLogic Domain for a Server Cluster Installation
4-6 UIM Installation Guide
1. In the Domain_Home/bin directory, open the setDomainEnv.sh file.
2. Set the memory arguments for your JVM as follows:
WLS_MEM_ARGS_64BIT="-Xms4g -Xmx4g"
3. Set Perm size as:
MEM_PERM_SIZE_64BIT="-XX:PermSize=1024m"MEM_MAX_PERM_SIZE_64BIT="-XX:MaxPermSize=1024m"
Setting Memory Requirements for UIM in AIX EnvironmentsThe example shows the entries in the startWebLogic.sh file for setting the User memory argument values for UIM:
1. In the Domain_Home/bin directory, open the startWebLogic.sh file.
2. Set the user memory arguments as follows:
USER_MEM_ARGS="-Xms1024m -Xmx3000m -Xmn850m -XX:PermSize=1024m"export USER_MEM_ARGS
Setting Memory Requirements for UIM in Solaris EnvironmentsThe example shows the entries in the setUIMEnv.sh file for setting the User memory argument values for UIM:
1. In the Domain_Home/bin directory, open the setUIMEnv.sh file.
2. Set the user memory arguments as follows:
USER_MEM_ARGS="-Xms1024m -Xmx2560m -Xmn850m -XX:PermSize=512m -Xrs -XX:+HeapDumpOnOutOfMemoryError -XX:+UseConcMarkSweepGC -XX:+CMSClassUnloadingEnabled -XX:+CMSPermGenSweepingEnabled"export USER_MEM_ARGS
Creating a WebLogic Domain for a Server Cluster Installation A server cluster arrangement is used for load balancing, scalability, and failover. A clustered server installation (also called an Administration Server with cluster-managed servers installation) is one in which one or more WebLogic server instances are managed by a separate Administration Server. In this arrangement, clustering the Managed Servers in WebLogic allows the servers to work together as one unit, rather than as several independent processing units. This is the configuration Oracle recommends because it provides protection if a server fails.
When working with a cluster, deploy the Cartridge Management Web Services (CMWS) and UIM adapters on the machine where the Administration server is running.
Note: These values can be adjusted based on the available system memory. The configuration values shown are examples of the memory sizes that can be entered. If your system has sufficient memory resources, you can increase the size of the memory allocation.
Creating a WebLogic Domain for a Server Cluster Installation
Installing and Configuring Oracle WebLogic Server 4-7
Installation ScenarioThis installation scenario includes two clustered Managed Servers (uim01 and uim02) that are separate from the Administration Server, an Administration server, and a hardware load balancer, used for load balancing. Managed Servers are instances of WebLogic used to host enterprise applications; in this case, UIM.
This example uses a shared disk storage environment.
For cluster deployments, it is mandatory that the UIM_Home directory and the DOMAIN_Home/bin folder be placed in a shared disk location. The advantages of using shared disk storage include easier UIM installation, maintenance, and cartridge deployment. In addition, using shared disk storage allows the Administration Server and all of the managed servers in the cluster to use the same instance of WebLogic. The machines on which the servers reside must have access to the shared storage.
UIM does not support session replication, but it does support server failover.
Server Cluster ExampleRefer to Table 4–2 and Table 4–3 to set up the cluster arrangement.
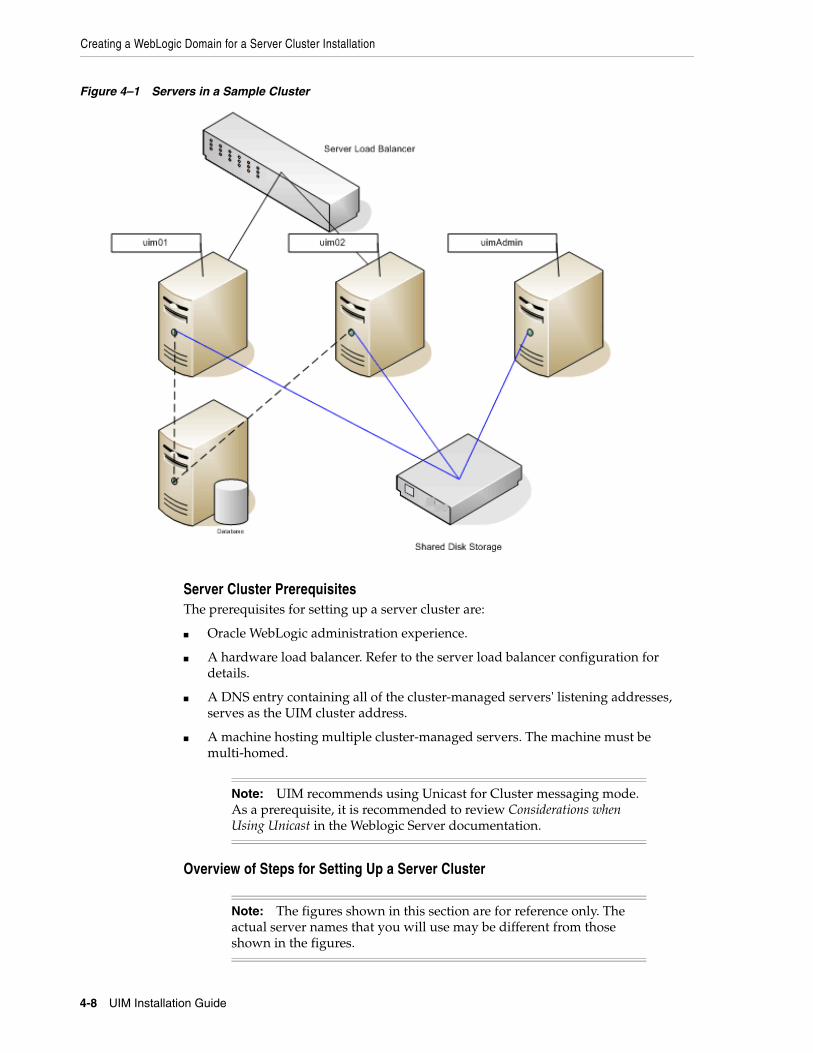
Figure 4–1 shows the servers in a sample server cluster.
Note: For more information on configuring the load balancer, see UIM System Administrator’s Guide.
Table 4–2 Server Cluster Example Values
Information Type Values
WL_Home Home/
Domain_Home directory WL_Home/user_projects/domains/cluster01
Domain login weblogic
Domain password uimcluster
Cluster DNS UIMClusterDNS
(includes the uim01 and uim02 listening IP addresses.)
Table 4–3 Servers in a Sample Cluster
Information Type Administration Server Cluster-Managed Server #1 Cluster-Managed Server #2
WebLogic server uimAdmin uim01 uim02
Listening port XX.XX.XX.XX:8063 XX.XX.XX.XX:8065 XX.XX.XX.XX:8066
Machine UIM1 UIM2 UIM3
Creating a WebLogic Domain for a Server Cluster Installation
4-8 UIM Installation Guide
Figure 4–1 Servers in a Sample Cluster
Server Cluster PrerequisitesThe prerequisites for setting up a server cluster are:
■ Oracle WebLogic administration experience.
■ A hardware load balancer. Refer to the server load balancer configuration for details.
■ A DNS entry containing all of the cluster-managed servers' listening addresses, serves as the UIM cluster address.
■ A machine hosting multiple cluster-managed servers. The machine must be multi-homed.
Overview of Steps for Setting Up a Server Cluster
Note: UIM recommends using Unicast for Cluster messaging mode. As a prerequisite, it is recommended to review Considerations when Using Unicast in the Weblogic Server documentation.
Note: The figures shown in this section are for reference only. The actual server names that you will use may be different from those shown in the figures.
Creating a WebLogic Domain for a Server Cluster Installation
Installing and Configuring Oracle WebLogic Server 4-9
Installing an Oracle WebLogic Server cluster arrangement involves:
■ Installing Oracle WebLogic Server in a Clustered Environment
■ Creating a Domain
■ Starting WebLogic Server
■ Starting the Cluster Servers
■ Configuring the WebLogic Server StuckThreadMaxTime Value
Installing Oracle WebLogic Server in a Clustered EnvironmentInstall WebLogic Server on the shared disk storage by following the procedures in "Downloading and Installing Oracle WebLogic Server".
After you install WebLogic Server:
■ Create a domain
■ Start the WebLogic server
Creating a DomainTo create a domain:
1. Navigate to the WL_Home/common/bin directory and run the following command:
./config.sh
The Welcome screen appears.
2. Select Create a new WebLogic domain and click Next.
The Select Domain Source screen appears.
3. Select the Generate a domain configured automatically to support the following products: option, and from the provided list, select the following products:
■ Oracle Enterprise Manager - 11.1.1.0 [oracle_common]
■ Oracle JRF - 11.1.1.0 [oracle_common]
■ Oracle WSM Policy Manager - 11.1.1.0 [oracle_common]
The Specify Domain Name and Location screen appears.
4. Do the following:
a. In the Domain name field, enter an appropriate domain name as per your requirements or standards.
b. In the Domain location field, enter the path and directory where the domain files will be created. For example, enter WLServer_Home/user_projects/domains/base_domains.
c. In the Application location field, enter the path where the application will be saved.
d. Click Next.
The Configure Administrator User Name and Password screen appears.
5. Do the following:
a. In the User name field, enter the administrator user name.

Creating a WebLogic Domain for a Server Cluster Installation
4-10 UIM Installation Guide
b. In the User password field, enter the administrator user password. The password must be a minimum of 8 alphanumeric characters, and must contain at least one number or special character.
c. In the Confirm password field, re-enter your password.
d. (Optional) In the Description field, enter information about the administrator.
For example: This user is the default administrator.
e. Click Next.
The Configure Server Start Mode and JDK screen appears.
6. In the WebLogic Domain Startup Mode section, select one of the following:
■ Development Mode, or
■ Production Mode (recommended mode)
7. In the JDK Selection section, select the required JDK (Oracle JDK 1.6.0._37) by doing the following:
■ Select Available JDKs and select the JDK from the list provided or
■ Select Other JDK and browse to the location of another JDK. Ensure that this JDK is supported. See Table 2–2, " UIM Software Requirements" for details.
8. Click Next.
The Select Optional Configuration page appears.
9. Select the following:
■ Administration Server
■ Managed Servers, Clusters and Machines
■ Deployments and Services
10. Click Next.
The Configure the Administration Server screen appears.
11. Do the following:
a. In the Name field, enter your Administration Server name.
b. In the Listen Address field, select a DNS or an IP address.
c. In the Listen Port field, accept the default.
d. In the SSL Listen Port field, enter a port that is not used by another domain.
e. Select SSL enabled if you are enabling SSL
It is not a requirement to either enable or disable SSL.
f. Click Next.
The Configure Managed Servers screen appears.
Note: Use listener addresses that are equal to a resolvable DNS host or IP address. Do not use localhost or 127.0.0.1. Those addresses interfere with clustered servers.
Creating a WebLogic Domain for a Server Cluster Installation
Installing and Configuring Oracle WebLogic Server 4-11
12. Do the following:
a. Click Add to add a managed server to the cluster.
b. In the Name field, enter a name for the managed server.
c. In the Listen address field, enter the host, or IP address of the machine where the managed server is running.
d. In the Listen port field, enter the number of the port where the managed server will listen for incoming messages.
e. In the SSL listen port field, enter the appropriate value only if SSL is selected.
f. Select SSL enabled as required.
g. (Optional) Click Add to add more managed servers as required on your UIM deployment.
h. Click Next
The Configure Clusters screen appears.
13. Do the following:
a. Click Add to start configuring the cluster.
b. In the Name field, enter the name for the cluster.
c. In the Cluster messaging mode field, select unicast as the messaging mode to use in the cluster.
d. In the Cluster address field, provide the cluster address information.
The cluster address contains each managed server along with the managed server’s port separated by a comma. Separate the managed server and the port number by a colon.
e. Click Next.
The Assign Servers to Clusters screen appears.
14. Assign the servers to the cluster by moving the managed servers in the left pane to the required cluster in the right pane.
15. Click Next.
The Configure Machines screen appears. Use this screen to change the configuration information for the machines. A machine is the logical expression of the system that hosts one or more WebLogic Server instances. The Administration Server and the Node Manager application use the machine definition to start remote servers.
16. (Optional) Add the machines by doing one of the following:
■ Select the Machine tab, and do the following:
a. Click Add to create the first machine.
b. In the Name field, enter a name for the machine.
Note: Use listener addresses that are equal to a resolvable DNS host or IP address. Do not use localhost or 127.0.0.1. Those addresses interfere with clustered servers.
Creating a WebLogic Domain for a Server Cluster Installation
4-12 UIM Installation Guide
c. In the Node manager listen address field, enter the host, or IP address of the node manager.
d. In the Node manager listen port, enter the port number for the node manager.
e. Create further machines as required on your UIM deployment.
f. Click Next.
The Target Deployments to Clusters or Servers screen appears.
■ Select the Unix Machine tab, and do the following:
a. Click Add to create the first UNIX machine.
b. If required, select Post bind GID enabled. The default state is unselected.
c. In the Post bind GID field, enter a value or select the default.
d. In the Post bind UID field, enter a value or select the default.
e. In the Node manager listen address field, enter the host, or IP address of the node manager.
f. In the Node manager listen port field, enter the port number of the node manager.
g. (Optional) Create further machines or UNIX machines as required on your UIM deployment.
h. Click Next.
The Target Deployments to Clusters or Servers screen appears.
17. Select clusters or servers in the left pane, and click Select All to select all of the applications in the right pane to target them to the selected clusters or servers.
18. Click Next.
The Target Services to Clusters or Servers screen appears.
19. Select clusters or servers in the left pane, and click Select All to select all of the services in the right pane to target them to the selected clusters or servers.
20. Click Next.
The Configuration Summary screen appears.
21. Review the summary to verify the contents of your domain. Click Previous to return to prior screens to modify their content.
22. Click Create to create the domain, and then click Done.
23. To set memory requirements, see "Setting Memory Requirements for UIM".
24. Continue with the procedures in "Starting WebLogic Server".
You can now log in to the WebLogic Server Administration Console and start the Administration Server manually.
Starting WebLogic ServerTo start the WebLogic server:
Note: Create domains for remote machine in the same manner, in the respective machines.
Creating a WebLogic Domain for a Server Cluster Installation
Installing and Configuring Oracle WebLogic Server 4-13
1. Open a command window.
2. Navigate to the Domain_Home directory, and enter the following command:
./startWebLogic.sh
The script starts the WebLogic server.
3. Verify that the server started:
a. In a Web browser, enter:
http://ServerName:Port/console
where ServerName is the name of the Administration Server machine and Port is the Administration Server port number.
b. Enter the WebLogic server administration user name and password.
c. In the Domain Structure tree, expand Environment, and click Servers.
The Summary of Servers screen appears.
d. View the State of the AdminServer and see RUNNING.
If the State is not RUNNING, you may need to wait a short period and refresh the page.
4. Look at the bottom of the Administration server command window.
The command window should contain the following lines:
Server state changed to RUNNINGServer started in RUNNING mode
Starting the Cluster Servers
To start the cluster servers:
1. Log in to the first cluster server machine.
2. Navigate to the Domain_Home/bin directory.
3. Start the cluster server by running the following command from the machine where the managed server is defined:
./startManagedWebLogic.sh cluster_server_name admin_server_URL
4. Repeat steps 1 through 3 for each cluster server.
5. Verify that the server started:
a. In a Web browser, enter:
http://ServerName:Port/console
where ServerName is the name of the Administration Server machine and Port is the Administration Server port number.
b. Enter the WebLogic server administration user name and password.
Note: If you have configured the node manager, you can start the UIM cluster servers using the WebLogic Server Administration Console. See the Oracle WebLogic Server documentation on the Oracle Technology Network.
Installing and Configuring Additional Software
4-14 UIM Installation Guide
c. In the Domain Structure tree, expand Environment, and click Servers.
The Summary of Servers screen appears.
d. View the State of the cluster servers and see RUNNING.
If the State is not RUNNING, you may need to wait a short period and refresh the page.
Configuring the WebLogic Server StuckThreadMaxTime Value During the installation of Oracle WebLogic Server and UIM in a clustered environment, if the execute thread takes more time than the Stuck Thread Max Time: declared in WebLogic, a Stuck Thread Max Time: error is displayed.
Stuck Thread Max Time: is a configurable property in WebLogic for performance tuning. It is defined as “The number of seconds that a thread must be continually working before this server considers the thread stuck”. The minimum value is 0 seconds; the default value is 600 seconds.
Consider setting Stuck Thread Max Time: from its default 600 seconds to a larger value such as 3600 seconds.
Use the WebLogic Server Administration Console to change this value:
1. Log in to the WebLogic Server Administration Console.
2. In the Home page, select Environment.
3. Select Servers, and then click each Managed Server.
4. For each Managed server select Configuration, and then click Tuning.
5. Increase the value of Stuck Thread Max Time: to 3600.
6. Restart your domain. Your changes will take effect only after a restart.
Installing and Configuring Additional SoftwareYou can perform the following steps to enhance UIM performance:
■ Installing and Configuring an Authentication Provider
■ Configuring WebLogic Server for the Authentication Provider
■ Configuring Custom Authentication Providers
Installing and Configuring an Authentication ProviderThe WebLogic Server includes an embedded LDAP store that acts as the default security provider data store for the Default Authentication, Authorization, Credential Mapping, and Role Mapping providers. You manage the embedded LDAP store using the WebLogic Server Administration Console. The Oracle Universal Installer uses this embedded LDAP server by default as the security provider. During installation, you can change the setting to use third-party security providers with WebLogic Server. See Oracle Fusion Middleware Securing Oracle WebLogic Server 11g (10.3.6) for information on the embedded LDAP server.
You can use an external LDAP store or security provider if your requirements are greater and you need more security options than are provided by the embedded LDAP server.
Oracle recommends Oracle Internet Directory as an external LDAP store.
Installing and Configuring Additional Software
Installing and Configuring Oracle WebLogic Server 4-15
You require the following information to configure the Oracle Internet Directory:
■ A static IP address
You require a static IP address in order to install the IDM 11g suite.
■ Oracle Database 11g
■ WebLogic server 10.3.6
■ Application Development Runtime
■ Identity Management 11g
■ Fusion Middleware Patchset1
For information on installing and configuring Oracle Internet Directory, see Oracle Fusion Middleware Installation Guide for Oracle Identity Management.
Configuring WebLogic Server for the Authentication ProviderTo enable the WebLogic Server to work with an external LDAP store, or Oracle Internet Directory:
1. Log in to the WebLogic Server Administration Console.
2. Under Your Application’s Security Settings, click Security Realms.
The Summary of Security Realms screen appears.
3. Select the realm YourRealmName, for which you need to set the Oracle Internet Directory as the external LDAP store.
The Settings For YourRealmName screen appears.
4. Click the Providers tab, and then click the Authentication tab.
5. Click New.
The Create a New Authentication Provider screen appears.
6. In the Name field, enter the name of the authenticator.
7. From the Type list, select OracleInternetDirectoryAuthenticator.
8. Click OK.
The Settings For YourRealmName screen appears, showing the newly created authentication name in the Authentication tab.
9. Click the link for the authentication name.
The Settings for AuthenticatorName screen appears.
10. In the Control Flag list, select SUFFICIENT.
11. Click Save.
12. Click the Provider Specific tab.
13. Under the Connection section, in the following fields, enter the relevant values:
■ Host
Note: The use of Oracle Internet Directory requires a separate license. Contact your Oracle representative for information on acquiring a license.
Installing and Configuring Additional Software
4-16 UIM Installation Guide
■ Port
■ Principal
■ Credentials
■ Confirm Credentials
14. Under the Users section, in the following fields, enter the relevant values:
■ User Base DN
Ensure that you provide the following value:
cn=Users,dc=idc,dc=oracle,dc=com
■ All User Filter
■ User From Name Filter
■ User Search Scope
■ User Name Attribute
■ User Object Class
15. Under the Groups section, in the following fields, enter the relevant values:
■ Group Base DN
Ensure that you provide the following value:
cn=Groups,dc=idc,dc=oracle,dc=com
■ All Groups Filter
■ Group From Name Filter
■ Group Search Scope
■ Group Membership Searching
■ Max Group Membership Search Level
16. Click Save.
17. Restart the WebLogic server.
18. Log in to the WebLogic Server Administration Console.
19. Navigate to the Settings For YourRealmName screen, and click Reorder.
The Reorder Authentication Providers screen appears.
20. Use the Up and Down arrows to reorder the listed Authentication Providers, and click OK.
Configuring Custom Authentication ProvidersYou can configure custom authentication providers for your external security provider. In which case, you are required to manually create users and groups before starting UIM installation.
Create the following group and user in the new authentication provider store:
■ Group: uim-users
■ User: uimuser
(uimuser is a member of the uim-users group.)

Installing and Configuring Additional Software
Installing and Configuring Oracle WebLogic Server 4-17
Note: Ensure that you create the groups and users in the default security realm.

Installing and Configuring Additional Software
4-18 UIM Installation Guide
5
Installing Unified Inventory Management 5-1
5Installing Unified Inventory Management
This chapter describes how to install Oracle Communications Unified Inventory Management (UIM). Specifically, the chapter covers:
■ About the UIM Installer
■ Installing UIM in the GUI Mode
■ Installing UIM in Silent Mode
About the UIM InstallerYou install UIM using the Oracle Universal installer (the installer). This GUI-based installer installs the core application and configures connections with the components, based on the connection details you provide. You can install UIM in the GUI mode or in silent install mode.
■ GUI mode: Use the GUI mode when you want to interact with the Installer GUI during installation, such as installing a UIM production environment. See "Installing UIM in the GUI Mode".
■ Silent install mode: Use the silent install mode when you are installing UIM using the same configuration repeatedly, such as installing multiple UIM test environments. Silent install mode does not use the GUI and it runs in the background. See "Installing UIM in Silent Mode".
Installing UIM in the GUI ModeTo install UIM in the GUI mode:
Important: In the event that the installation fails for some reason, you are required to create a new WebLogic domain and a new database user before you begin installation again.
For upgrade scenarios, retry the installation and if the installation fails again contact My Oracle Support.
See "Installing and Configuring Oracle WebLogic Server".
Important: The UIM Installer must be launched from a host which has access to Domain_Home on the UIM AdminServer. If UIM is installed using a shared file system, then this is not an issue.
Installing UIM in the GUI Mode
5-2 UIM Installation Guide
1. Create a temporary directory (temp_dir).
2. Download the software pack for your operating system from the Oracle Software Delivery Cloud and save it to temp_dir:
■ Oracle Communications Unified Inventory Management 7.2.2 for Linux x86
■ Oracle Communications Unified Inventory Management 7.2.2 for Solaris
■ Oracle Communications Unified Inventory Management 7.2.2 for IBM AIX
3. Unzip the software pack in a folder of your choice using the following command:
unzip UnifiedInventoryManagement-7.2.2.0.0-<OS>.zip
The uim/Disk1/install/ folder structure is created.
4. Run the Oracle Universal Installer (OUI) executable file runInstaller using the following command:
./runInstaller -jreloc jre_Path
Where jre_Path is the JRE location.
The Welcome screen of the OUI installation wizard appears.
5. Click Next.
The Select Installation Type screen appears.
Note: The installer does not include the JRE component. Download the latest version of the JRE from the Oracle Technology Network web site.
Note: For Solaris 11 and Linux installations, the UIM installation will fail due to an Out of Memory error. To fix this issue perform the following:
1. Navigate to the oraparam.ini file, located in the uim/Disk1/install/folder.
2. Open the file and locate the JRE_MEMORY_OPTIONS parameter.
3. Change the default value for the JRE_MEMORY_OPTIONS parameter to the following:
JRE_MEMORY_OPTIONS="-d64 =mx256m -XX:MaxPermSize=512m"
Note: The OUI can also be run by specifying the install user group and Oracle Inventory directory location.
./runInstaller.sh -invPtrLoc ~/orainst.loc
where orainst.loc contains:
inst_group=uimcluster
inventory_loc=/share/uimcluster/oraInventory

Installing UIM in the GUI Mode
Installing Unified Inventory Management 5-3
6. Select the type of UIM installation you require, and click Next.
■ If you select Complete, this option installs all the components. The Specify Home Details screen appears.
Skip to step 8.
■ If you select Custom, this option allows you to specify which components to install. This option is used for UIM upgrades. The Available Product Components screen appears.
Continue with step 7.
7. In the Available Product Components screen, select the components you wish to install, and click Next.
8. In the Specify Home Details screen, do the following:
a. In the Name field, enter an appropriate name for the folder that will contain all of the installation files.
b. In the Path field, enter the path to the folder where you wish to install UIM.
c. Click Next.
The WebLogic Administration Server Connection Information screen appears.
9. Do the following:
a. In the Host Name field, enter the Listen address of the Admin server (IP address or the host name of the host machine).
b. In the Port Number field, enter the Administration server port number.
c. In the User Name field, enter user name with which you connected to the Administration Server.
d. In the Password field, enter the password for the user name that you provided in the User Name field.
e. Click Next.
The WebLogic Server/Cluster Selection screen appears.
10. Select the option for the server, or cluster, where you wish to deploy UIM, and click Next.
Note: The OUI creates an Inventory directory if it does not detect any installed Oracle products on the system. The Inventory directory manages all Oracle products installed on your system.
Note: You can also select the name for the installation from the list of names the Oracle Universal Installer provides.
You can also browse for the path where UIM will be installed from the provided list using the explorer GUI.
Note: This user should belong to the WebLogic Server Administrator’s group.
Installing UIM in the GUI Mode
5-4 UIM Installation Guide
The Database Type Selection screen appears.
11. Select the option for the database type to be used and click Next.
■ If you select Standard Oracle 11g Enterprise Database, the MDS Schema information screen appears. Proceed to step 14.
■ If you select Oracle 11g Real Application Cluster Database, the RAC DB for MDS screen appears. Proceed to step 12.
12. Enter the RAC DB for MDS Schema information, by doing the following:
a. In the RAC Database Connection String field, enter the MDS schema information to connect to the RAC database.
For example:
HOST_NAME1:PORT1:SERVICE_NAME; HOST_NAME2:PORT2:SERVICE_NAME
b. In the User Name field, enter the prefix_MDS schema user name.
c. In the Password field, enter the password for the user name that you provided in the User Name field.
d. Click Next.
The RAC DataBase Nodes Connection Information screen appears.
13. Enter the RAC DataBase Nodes Connection information, by doing the following:
a. In the RAC Database Connection String field, enter the connection details to connect to the RAC database.
For example:
HOST_NAME1:PORT1:SERVICE_NAME; HOST_NAME2:PORT2:SERVICE_NAME
b. In the User Name field, enter the user name for the RAC database server.
c. In the Password field, enter the password for the user name that you provided in the User Name field.
d. Click Next.
The UIM User Information (Optional) screen appears.
Proceed to step 21.
Note: If you select a managed server, ensure that the managed server and the node manager are running.
Caution: You must use these same user name and password provided when the UIM MDS schema was created.
Note: The user must have the following privileges: CATALOG, CONNECT, Create User, Create Session, Grant Any Privilege, Grant Any Role, Select Any Table, Select any Dictionary.
Installing UIM in the GUI Mode
Installing Unified Inventory Management 5-5
14. Enter the MDS Schema information by doing the following:
a. In the Host Name field, enter the IP address or host name of the machine where the database server is installed.
b. In the Port Number field, enter the port number with which the installer will connect to the database server.
c. In the User Name field, enter the user name for the MDS schema.
d. In the Password field, enter the password for the user name that you provided in the User Name field.
e. In the Service Name field, enter the service name for that uniquely identifies your database on the system.
f. Click Next.
The DataBase Connection Information screen appears.
15. Enter the DataBase Connection information by doing the following:
a. In the Host Name field, enter the IP address or host name of the machine where the database server is installed.
b. In the Port Number field, enter the port number with which the installer will connect to the database server.
c. In the User Name field, enter the user name for the database server.
d. In the Password field, enter the password for the user name that you provided in the User Name field.
e. In the Service Name field, enter the service name for that uniquely identifies your database on the system.
f. Click Next.
The UIM database schema creation screen appears.
16. Select whether or not to create the UIM database schema and click Next.
The Unified Inventory Management Schema Information screen appears.
Caution: You must use the same user name and password that you provided when you set up the database schema using the Repository Creation Utility (RCU).
The user must have the following privileges: CATALOG, CONNECT, Create User, Create Session, Grant Any Privilege, Grant Any Role, Select Any Table, Select any Dictionary.
See "Creating the Database (MetaData) Schema for UIM" for more information.
Note: If you select to create the UIM database schema, the schema will be empty.
If you select not to create the UIM database schema, then you are using an existing schema (from a previous install or a manually created UIM schema).

Installing UIM in the GUI Mode
5-6 UIM Installation Guide
17. Enter the UIM database schema information, by doing the following:
a. In the User Name field, enter the user name for the Unified Inventory Management schema.
b. In the Password field, enter the password for the user name that you provided in the User Name field.
c. In the System Tablespace field, enter the name for the permanent tablespace.
d. In the Temp Tablespace field, enter the name for the temporary tablespace.
e. Click Next.
The Security Provider Selection screen appears.
18. Select the security provider you want to use and click Next.
■ If you select the Default WebLogic Security Provider (Embedded LDAP) option, the CMWS User Information screen appears. Continue with step 20.
■ If you select External Security Provider option, the External Security Provider Connection Information screen appears. Continue with step 19.
19. Enter the External Security Provider information, by doing the following:
a. In the LDAP Server Host Name field, enter the host name for the external LDAP server.
b. In the LDAP Server Port Number field, enter the port number for the external LDAP server.
c. In the LDAP Server User Name field, enter the user name for the external LDAP server.
d. In the LDAP Server Password field, enter the password for the external LDAP server.
e. In the User Base DN field, enter the user base DN.
f. In the Group Base DN field, enter the group base DN.
g. Click Next.
The CMWS User Information screen appears.
20. Enter the CMWS User information, by doing the following:
a. In the User Name field, enter the user name for the CMWS user.
b. In the Password field, enter the password for the user name that you provided in the User Name field.
c. In the Confirm Password field, enter the password again.
d. Click Next.
The UIM User Information (Optional) screen appears.
21. In the Unified Inventory Management User Information (Optional) screen, do the following:
a. In the User Name field, enter the user name for the UIM user.
This user accesses and uses Unified Inventory Management.
b. In the Password field, define a password for the UIM user.

Installing UIM in the GUI Mode
Installing Unified Inventory Management 5-7
In the Confirm Password field, enter the password again, to confirm it.
c. Click Next.
The Do you want to create the UIM file store or JDBC store? screen appears.
22. Select the type of store to create, and click Next.
The SSL enable Information screen appears.
23. Select whether or not to enable SSL, and click Next.
The Do you want to deploy MapViewer? screen appears.
24. Select whether or not to deploy MapViewer, and click Next.
■ If you select Yes, the Summary screen appears.
■ If you select No, the MapViewer information screen appears. Do the following:
a. If MapViewer is already installed, enter the URL for MapViewer in the URL field, and click Next.
The Summary screen appears.
25. Review the selections you have made in the preceding screens, and click Install.
The Install screen appears.
26. You can view the installation progress.
On successful installation of Unified Inventory Management, the End of Installation screen appears.
27. Restart the Admin server by using the following command from within the Domain_Home/bin directory:
./startWebLogic.sh
Note: The UIM user password can be a maximum of 12 letters long, and should contain at least one numeric value and one capital letter. For example, Weblogic123.
Also, the user name must not be part of the password.
Note: If File Store is selected, a file store (inv_jms_store) is created at the Domain_Home/UIM location.
Note: If you select Yes, enter the Port number and click Next.
Note: Record the URL that is displayed in the End of Installation screen, to access UIM.
Installing UIM in Silent Mode
5-8 UIM Installation Guide
28. Start the managed server by using the following command:
./startUIM.sh Managed_Server_Name Admin_URL
For information on verifying the successful installation of UIM, see "Verifying the Unified Inventory Management Installation".
Installing UIM in Silent ModeUse silent install mode when you are installing UIM using the same configuration repeatedly. Silent install mode does not use the GUI, instead it uses a response file that must be setup with the configuration values required for your specific installation. The silent install runs in the background and is not visible to the user.
About the Response FileThe UIM installer uses a response file, which contains a pre-defined set of values, such as server connection details.
The following two response file templates come as part of the UIM installation package:
■ oracle.communications.uim.Complete.rsp
Use this file template if you are doing a complete installation.
■ oracle.communications.uim.Custom.rsp
Use this file template if you are doing a custom installation.
The response file templates contain all the fields that the installer requires values for to connect to various servers during the silent, unattended installation.
When you untar the UIM package, the response file templates are saved in the Response folder at the following location:
uim/Disk1/stage/Response
Populate the response file with the required server and connection values for the installer to use during installation, before you begin the silent installation. The provided response file is a template with pre-defined places where you fill in the required values of the required type. Shown here is sample section of a response file:
#Name : DATABASE_TYPE#Datatype : String#Description: #Example: DATABASE_TYPE = #---------------------------------------------------------------DATABASE_TYPE="Non Clustered-DB" #---------------------------------------------------------------#Name : MANAGED_SERVER_NAME#Datatype : String
Note: For clustered deployments, you need to edit the setDomainEnv.sh file and set the WLS_JDBC_REMOTE_ENABLED parameter to true. The setDomainEnv.sh file is located in the Domain_Home/bin directory.
The following is an example of the parameter:
WLS_JDBC_REMOTE_ENABLED="-Dweblogic.jdbc.remoteEnabled=true"
Installing UIM in Silent Mode
Installing Unified Inventory Management 5-9
#Description: #Example: MANAGED_SERVER_NAME = #---------------------------------------------------------------MANAGED_SERVER_NAME="Managed_Server_1"
In this section of the response file sample, you would provide values for the following:
DATABASE_TYPE=MANAGED_SERVER_NAME=
Similarly, provide values for all variables described in the response file.
Populating the Response FileTo populate the response file manually:
1. Navigate to the following directory:
uim/Disk1/stage/Response
2. Open the appropriate .rsp template and make a copy for your current requirement.
3. Enter the required input values in the provided locations.
Starting Silent Mode InstallationBefore you begin installing UIM in silent mode, ensure that you have provided all required input values in the response file template.
To install UIM in silent mode:
1. Use the following command, where path is the response file location, to start the installation:
./runInstaller -responseFile path -silent -jreloc jdk_Path/jre_Path
Where path is the response file location and jdk_Path/jre_Path is the JDK or JRE location.
The installation will run silently in the background.
2. When the installation completes, manually shut down all of the servers.
3. Restart the Admin server by using the following command from within the Domain_Home/bin directory:
./startWebLogic.sh
4. Restart the managed servers by using the following command:
./startUIM.sh Managed_Server_Name Admin_URL
5. Open the following file once the installation is complete, to get the URL to access UIM:
UIM_Home/install/readme.txt
For example: /opt/uim/OracleCommunications/install/readme.txt
6. Copy and paste the URL in a Web browser and press Enter to access UIM.
You can now access the UIM application.
For information on verifying the successful installation of UIM, see "Verifying the Unified Inventory Management Installation".

Installing UIM in Silent Mode
5-10 UIM Installation Guide
6
Unified Inventory Management Post-Installation Tasks 6-1
6Unified Inventory Management Post-Installation Tasks
This chapter provides instructions for Oracle Communications Unified Inventory Management (UIM) post-installation tasks.
Post-installation tasks for UIM include:
■ Configuring a Trusted Certificate for UIM
■ Deploying UIM Cartridges
■ Connecting the UIM Web Service Interface to a Remote Application
■ Configuring Ehcache for the Cluster
■ Installing and Configuring the AspectJ Libraries
Configuring a Trusted Certificate for UIMOracle WebLogic Server provides a default certificate that automatically configures the Secure Sockets Layer (SSL) settings in your Web browser. To use another certificate, you must manually reconfigure SSL.
For information about configuring SSL for UIM, see UIM System Administrator’s Guide.
Deploying UIM CartridgesOracle recommends that you deploy all of the base cartridges into UIM. Base cartridges are located in the UIM_Home/cartridges/base directory. For information on base cartridges, see UIM Cartridge and Technology Pack Guide.
Note: UIM uses a default certificate provided by Oracle WebLogic Server. As a result, when you connect to the UIM UI for the first time, the Web browser displays a warning page with a message indicating that the security certificate presented is not issued by a trusted certificate authority.
This is expected behavior. Accept this untrusted certificate to continue to connect to the UIM UI.
Connecting the UIM Web Service Interface to a Remote Application
6-2 UIM Installation Guide
You can deploy a cartridge into UIM from Design Studio, or from the Cartridge Deployer Tool. Design Studio can only deploy a single cartridge; it cannot deploy a cartridge that contains other cartridges, such as a technology pack. For instructions on how to deploy a cartridge into UIM from Design Studio, see the Design Studio online Help. For instructions on how to deploy a cartridge using the Cartridge Deployer Tool, see UIM Cartridge and Technology Pack Guide.
Connecting the UIM Web Service Interface to a Remote ApplicationOracle recommends that you create a SAF agent between the UIM WebLogic server and a remote application server. Oracle recommends this SAF agent for the Web Service interfaces to ensure reliable communication.
Figure 6–1 illustrates an example SAF configuration between the Web Service interface on UIM and a Web Service client on a remote application, in this case, the Oracle Order Service and Management (OSM) application.
Important: The ora_uim_mds_cartproj.zip and ora_uim_model_cartproj.zip cartridges are located in this same directory, but these two cartridges should not be deployed into UIM.
Note: When working in a Development Environment, with several cartridge deployments, you might see NullPointerException and ORA-01653 errors. Refer to Knowledge Article 1505444.1 - NullPointerException and 'ORA-01653: unable to extend table DEV_MDS.MDS_COMPONENTS' Errors When Deploying UIM Cartridges to resolve the errors.
Configuring Ehcache for the Cluster
Unified Inventory Management Post-Installation Tasks 6-3
Figure 6–1 SAF Agent Configuration Between UIM and a Remote Application (OSM)
In this example, an OSM SAF agent sends requests to the UIM request queue, and UIM returns responses through the UIM SAF agent to the OSM reply-to queue.
For detailed instructions for creating SAF queues and topics between UIM and OSM, see Knowledge Article 1431235.1 - Configuring WebLogic Resources for OSM Integration With ASAP And UIM On Different Domains on the My Oracle Support web site:
https://support.oracle.com
This article is applicable to any remote application that uses a WebLogic JMS server to send and receive Web Service messages.
Configuring Ehcache for the ClusterThis section provides instructions for configuring the ehcache file for the clustered server.
The configuration tasks include:
■ Enabling Ehcache for the Cluster
■ Enabling Ehcache Manual Discovery
■ Enabling Ehcache for JGroups
Enabling Ehcache for the ClusterTo enable ehcache for the cluster, do the following:
1. Ensure you are logged in to the shared disk storage through a command window.
Configuring Ehcache for the Cluster
6-4 UIM Installation Guide
2. Make a backup copy of ehcache.xml. For example, you can copy the file to ehcache.xml.single.
3. Open the ehcache.xml file in a text editor.
4. Scroll down to the cacheManagerPeerProviderFactory entry.
5. Change the value of the port entry to any unused port number.
6. Save and close the file.
Enabling Ehcache Manual DiscoveryUse the following checklist to verify that manual discovery is the correct setting to use, for peer discovery:
■ By default, the peer discovery setting for ehcache is automatic (which employs multi-casting). Multi-cast is known to be unreliable, has bandwidth overload issues and is unsecure. If you feel multi-casting is not the right setting for your environment, perform the steps to enable the ehcache manual discovery setting for the cluster.
■ The cacheManagerPeerListenerFactory port defined in the ehcache.xml file shouldn't conflict with any other process running on the same port. Use the netstat command or lsof command to find out which ports are available.
■ When the ehcache manual discovery setting is enabled, instead of automatic discovery, the port numbers in the rmi URLS setting should be same as the cacheManagerPeerListenerFactory port defined in the ehcache.xml file.
■ In case of single node cluster (i.e different managed servers on the same node), before starting each managed server the cacheManagerPeerListenerFactory port should be modified so that each managed server gets started with a unique cacheManagerPeerListenerFactory port to listen to and avoiding any port binding exceptions.
To enable the ehcache manual discovery setting, do the following:
1. Ensure you are logged in to the shared disk storage through a command window.
2. Open the ehcache.xml file in a text editor.
3. Scroll down to the cacheManagerPeerProviderFactory entry.
4. Comment out the cacheManagerPeerProviderFactory entry.
Example of automatic discovery entry:
<cacheManagerPeerProviderFactoryclass="net.sf.ehcache.distribution.RMICacheManagerPeerProviderFactory"properties="peerDiscovery=automatic, multicastGroupAddress=230.0.0.1,multicastGroupPort=4446"/>
5. Add the following entry to the file:
Example of manual discovery entry:
<cacheManagerPeerProviderFactoryclass="net.sf.ehcache.distribution.RMICacheManagerPeerProviderFactory"properties="peerDiscovery=manual,rmiUrls=//host1:41001/frameworkCache|//host2:1001/frameworkCache|//host1:41001/invIsolatedCache|//host2:41001/invIsolatedCache"/>
where host1 and host2 are host names of managed servers, correspondingly
Configuring Ehcache for the Cluster
Unified Inventory Management Post-Installation Tasks 6-5
6. Change the value of the port entry to any unused port number.
7. Save and close the file.
Enabling Ehcache for JGroupsTo enable the ehcache for Jgroups (UDP + Unicasting), do the following:
1. Ensure you are logged in to the shared disk storage through a command window.
2. Open the ehcache.xml file in a text editor.
3. Scroll down to the cacheManagerPeerProviderFactory entry.
4. Comment out the cacheManagerPeerProviderFactory entry which uses the "RMICacheManagerPeerProviderFactory", which by default makes the transport mechanism as multicast.
Example of automatic discovery entry:
<!-- <cacheManagerPeerProviderFactoryclass="net.sf.ehcache.distribution.RMICacheManagerPeerProviderFactory"properties="peerDiscovery=automatic, multicastGroupAddress=230.0.0.1,multicastGroupPort=4446"/> -->
5. Add the following entry to the file:
Example of manual discovery entry:
<cacheManagerPeerProviderFactoryclass="net.sf.ehcache.distribution.jgroups.JGroupsCacheManagerPeerProviderFactory"properties="connect=UDP(ip_mcast=false;mcast_addr=224.0.0.35;mcast_port=45566;ip_ttl=32;mcast_send_buf_size=150000;mcast_recv_buf_size=80000):PING(gossip_host=adminserverhost;gossip_port=5555;gossip_refresh=15000;timeout=2000;num_initial_members=3):MERGE2:FD_SOCK:VERIFY_SUSPECT:pbcast.NAKACK:UNICAST:pbcast.STABLE:FRAG:pbcast.GMS"propertySeparator="::" />
Note: The port values for the host1 and host2 are for example purposes only. Use the netstat command or lsof command to find an available port.
Configuring Ehcache for the Cluster
6-6 UIM Installation Guide
6. Save and close the file.
7. Start the Gossip router, by using the following command:
java org.jgroups.stack.GossipRouter -port gossip_port -bindaddress gossip_host
8. Configure the caches in the ehcache.xml file to use JGroupCacheReplicatorFactory. For example:
<cache name="inv" maxElementsInMemory="10000" eternal="true"
Note: The protocol stack with UDP and PING as the bottom protocols uses IP multicasting by default to send messages to all members (UDP) and for discovery of the initial members (PING). However, if multicasting cannot be used, the UDP and PING protocols can be configured to send multiple unicast messages instead of one multicast message (UDP) and to access a well-known server (GossipRouter) for initial membership information (PING).
To configure UDP to use multiple unicast messages to send a group message instead of using IP multicasting, the ip_mcast property has to be set to false.
To configure PING to access a GossipRouter instead of using IP multicast the following properties have to be set:
■ gossip_host: The name of the host on which GossipRouter is started.
■ gossip_port: The port on which GossipRouter is listening.
■ gossip_refresh: The number of milliseconds to wait before refreshing the address entry of the GossipRouter.
Before any members are started, the GossipRouter has to be started and the administration server is the ideal candidate to be the Gossip Router.
Note: The GossipRouter is essentially a lookup service for groups and members. It is a process that runs on a well-known host and port and accepts GET (group) and REGISTER(group, member) requests. The REGISTER request registers a member's address and group with the GossipRouter. The GET request retrieves all member addresses given a group name. Each member has to periodically (gossip_refresh) re-register their address with the GossipRouter, otherwise the entry for that member will be removed (accommodating for crashed members).
The property ip_mcast is set to false in UDP and the gossip properties in PING define the GossipRouter to be on the local host at port 5555 with a refresh rate of 15 seconds. If PING is parameterized with the GossipRouter's address and port, then gossiping is enabled, otherwise it is disabled. If only one parameter is given, gossiping will be disabled. Make sure to run the GossipRouter before starting any members, otherwise the members will not find each other and each member will form its own group
Installing and Configuring the AspectJ Libraries
Unified Inventory Management Post-Installation Tasks 6-7
timeToIdleSeconds="0" timeToLiveSeconds="0" overflowToDisk="false" memoryStoreEvictionPolicy="LRU"><cacheEventListenerFactoryclass="net.sf.ehcache.distribution.jgroups.JGroupsCacheReplicatorFactory"properties="replicateAsynchronously=false, replicatePuts=true,replicateUpdates=true, replicateUpdatesViaCopy=true, replicateRemovals=true "/></cache>
Installing and Configuring the AspectJ LibrariesThe aspectJ libraries are not included in the UIM application installation. The aspectJ libraries must be manually installed and configured after UIM has been installed.
To install and configure the aspectJ libraries, perform the following:
1. Download the aspectj-1.6.11.jar library from the following web site:
http://www.eclipse.org/downloads/download.php?file=/tools/aspectj/aspectj-1.6.11.jar
2. Manually extract the aspectj-1.6.11.jar file to a temporary folder (aspectj-1.6.11), enter the following command:
java -jar aspectj-1.6.11.jar
3. Copy the aspectjweaver.jar file from the aspectj-1.6.11/lib folder to the UIM_Home/lib folder and change the permissions to executable, for both the copied files (applicable for non-Windows platforms).
4. Copy the aspectjrt.jar and aspectjtools.jar files from the aspectj-1.6.11/lib folder to the UIM_Home/lib folder and change the permissions to executable, for the copied file (applicable for non-Windows platforms).
Note: The following step is required if dynamic extensibility (for custom extension points) is to be used.

Installing and Configuring the AspectJ Libraries
6-8 UIM Installation Guide
7
Verifying the Unified Inventory Management Installation 7-1
7Verifying the Unified Inventory Management Installation
This chapter describes how to verify that Oracle Communications Unified Inventory Management (UIM) is installed correctly.
Checking the Installation LogsYou can verify the UIM installation by viewing the installation logs. The installation logs can be found at CentralInventorylocation/logs. You can use the following log files to monitor installation and post-installation events:
■ installActionsTimeStamp.log
■ oraInstallTimeStamp.err
■ dbScriptsTimeStamp.log
■ silentInstallTimeStamp.log (for Silent Mode installation)
Checking the State of Installed ComponentsYou can verify that UIM is installed by checking the state of all installed components.
To check the state of all installed components:
1. Log in to the WebLogic Administration Server.
2. In the left panel, in the Domain Structure section, click Deployments.
The Summary of Deployments page appears.
3. Ensure that all of the managed servers are running.
4. If UIM is installed successfully, the following deployments appear in the Active state:
■ cartridge_management_ws (1.2.0.0.0)
■ DMS Application (11.1.1.1.0)
■ em
■ FMW Welcome Page Application (11.1.0.0.0)
■ oracle.communications.inventory
■ oracle.communications.inventory.cartridgeadapter
■ oracle.communications.inventory.javadoc

Logging In to Unified Inventory Management
7-2 UIM Installation Guide
■ oracle.communications.inventory.mapviewer
■ wsil-wls
Logging In to Unified Inventory ManagementYou can verify that UIM is installed by logging in to the UIM application.
To log in to UIM:
1. Open a Web browser. Refer to Table 2–2, " UIM Software Requirements" for supported Web browsers.
2. Enter the URL as provided by the Installer at the end of the installation.
3. Press the Enter key.
The Unified Inventory Management login page appears.
4. Do the following:
a. In the User Name field, enter the UIM user name.
b. In the Password field, enter the password for the UIM user name.
The Unified Inventory Management home page appears, verifying that UIM is installed successfully.
Note: Use the same UIM user name and password that you provided when you installed UIM.
8
Upgrading Unified Inventory Management 8-1
8Upgrading Unified Inventory Management
This chapter explains how to upgrade your existing system to the latest release of Oracle Communications Unified Inventory Management (UIM).
This chapter explains how to recover your system after an upgrade failure. See "About Rolling Back UIM" for more information.
In this chapter, the release you are upgrading from is called the old release. The release you are upgrading to is called the new release.
About Upgrading UIMUpgrading to a new release of UIM consists of the following tasks:
■ Planning the upgrade
■ Performing the pre-upgrade tasks
■ Upgrading UIM
■ Performing the post-upgrade tasks
Supported Upgrade PathsThis release of UIM supports the following direct upgrade paths:
■ From release 7.2.x to release 7.2.2.
Planning Your UpgradeDepending on the components affected by the upgrade, your upgrade team may include the following:
■ A database administrator, to manage the database upgrade and tune the database.
■ A system integrator, to handle new and existing customizations.
■ A system administrator, to manage the WebLogic Server and UIM software upgrade.
■ A UNIX administrator, to manage accounts, network setup, and IP configurations.
Identify who might be affected by the upgrade. For example:
Note: If you are currently at UIM 7.1.x or earlier, you must first upgrade to UIM 7.2.x and then you can upgrade to UIM 7.2.2.

Testing the Upgrade in a Test Environment
8-2 UIM Installation Guide
■ You might need to give your system administrators and UIM users notice of any system downtime.
■ Tell your system administrators in advance about any changes to the system architecture (for example, Oracle database, client, or WebLogic Server upgrades).
■ Train your administrators, users, cartridge developers, or system integrators on new functionality introduced by the upgrade that has an impact on their role.
You might need to make changes to your system after the upgrade is complete to accommodate new or modified features or functionality. For example, if the new release provides new security functionality, additional system configuration steps may be required. See "Upgrade Impacts" for more information.
The best way to estimate the duration of an upgrade is to perform the upgrade procedure on a test system with a copy of the production data. See "Testing the Upgrade in a Test Environment" for more information.
It is not necessary to shut down UIM or the UIM WebLogic Server domain before an upgrade. However, you must ensure that UIM is not running any operations.
Oracle recommends scheduling your upgrade during non-peak hours to minimize the disruption to your operations.
Testing the Upgrade in a Test EnvironmentOracle recommends running the upgrade procedure on a test system with a copy of your production data before upgrading your production system. Test the upgrade by doing the following:
■ Successfully completing all the pre-upgrade, upgrade, and post-upgrade tasks.
■ Comparing the default behavior between the old and the new releases.
■ Recreating any custom configurations and extensions.
■ Confirming that all new behavior and functionality works.
■ Ensuring that the database tables are properly installed.
■ Ensuring that the database data is correct.
■ Starting the WebLogic Server domain.
■ Ensuring that users and user permissions are correct.
■ Ensuring that productized and custom cartridges build and deploy properly.
■ Logging into UIM and verifying the version number of installed components
Upgrade ImpactsThis section explains any important system changes introduced by an upgrade.
New features and new functionality are described in UIM Release Notes.
Upgrade Impacts From 7.2.x to 7.2.2Upgrading to UIM 7.2.2 applies the following changes:
■ Schema Changes
■ Database and Client Changes
■ WebLogic Server Changes
Upgrade Impacts
Upgrading Unified Inventory Management 8-3
■ Application Component Changes
■ Design Studio Changes
■ Cartridge Changes
■ Localization Changes
Schema ChangesThis version of UIM requires an updated database schema. The Installer upgrades the schema automatically. Migrate the database data to conform with the new schema. See "Upgrading UIM (7.2.x to 7.2.2)" for more information. As a precaution against a failed upgrade, backup your Oracle Database Schema for UIM before starting the upgrade. See UIM System Administrator’s Guide for more information.
Database and Client ChangesThere are no database changes introduced in this version of UIM. As a precaution against a failed upgrade, backup your Oracle Database data for UIM before starting the upgrade. See UIM System Administrator’s Guide for more information.
WebLogic Server ChangesThis version of UIM requires an updated version of WebLogic Server. As a precaution against a failed upgrade, backup your WebLogic Server domain for UIM before starting the upgrade. See your WebLogic Server documentation for more information.
Application Component ChangesThe Installer updates all the UIM components.
Design Studio ChangesThis version of UIM requires an updated version of Oracle Communications Design Studio. See "Unified Inventory Management System Requirements"for version information. Design Studio can be set up before or after you upgrade UIIM. See the Design Studio installation documentation for more information. Do not remove your old version of Design Studio until after you have finished upgrading UIM.
Cartridge ChangesYou must delete cartridges that you do not want migrated to the new release before beginning the upgrade. See "Pre-Upgrade Tasks (7.2.x to 7.2.2)" for more information.
After the upgrade is complete, cartridges must be migrated to the new release of UIM. It is possible that migrated cartridges contain minor compilation errors that prevent them from building and deploying. If a cartridge fails to build, open it in Design Studio and correct any compilation errors. See "Post-Upgrade Tasks (7.2.x to 7.2.2)" for more information.
Localization ChangesThe Installer updates the localization pack to be compatible with the new release of UIM, however any new fields and labels introduced in the new release are not localized. Edit the localization pack for the new fields and labels. See "Post-Upgrade Tasks (7.2.x to 7.2.2)" for more information.
Upgrading from 7.2.x to 7.2.2
8-4 UIM Installation Guide
Upgrading from 7.2.x to 7.2.2This section details the upgrade procedure to upgrade UIM from version 7.2.0 to version 7.2.2.
Pre-Upgrade Tasks (7.2.x to 7.2.2)Complete all of the following pre-upgrade tasks before upgrading UIM:
1. Ensure that SQL*Plus Instant Client is installed on the Administration Server from where you launch the Installer.
2. Back up the UIM database schema. See UIM System Administrator’s Guide for more information.
3. Back up the UIM database. See UIM System Administrator’s Guide for more information.
4. Back up the UIM WebLogic Server domain. See your WebLogic Server documentation for more information.
5. Back up the MW_Home directory.
6. Delete all cartridges that you do not want migrated to the new version of UIM.
For example, you should delete cartridges that you are no longer licensed to use or cartridges that provide functionality you no longer want to use.
It is not possible to delete a non-migrated cartridge after upgrading UIM. Failure to delete cartridges that cannot or are not migrated causes UIM to not function.
7. Download the latest version of the Java Runtime Environment (JRE) from the Oracle Technology Network web site.
8. Upgrade WebLogic Server from 10.3.5 to 10.3.6 and ADF from 11.1.1.5 to 11.1.1.6 following the steps documented in the knowledge article How to upgrade a WLS domain extended with ADF libraries [ID 1408663.1].
After WebLogic Server has been upgraded to 10.3.6, apply any required patches. Refer to "Installing Patches".
9. Apply patch 14390252 to the Oracle database, refer to the Oracle Database documentation for information about applying patches to the database.
10. Import the UIM 7.2.x database dump into the 11.2.0.3 Oracle database.
11. Upgrade the UIM schema by performing the following steps:
a. Prepare the ora_uim_dbtools.jar file for execution and extract the ora_uim_dbtools.jar file into a temporary directory (temp_dir).
b. Open the temp_dir/config/databases.xml file and modify the attribute value (SID) of the database element and the text content (DBHostName:port:SID) of the connectionUrlString element to match the database you want to run the upgrade against.
c. Grant the execute permission for the runDB.sh script.
Note: Verify that the file/folder being backed up meets the file size or pathname length requirements for the backup utility being used. For example, the maximum pathname length for the tar application is 256 characters.
Upgrading from 7.2.x to 7.2.2
Upgrading Unified Inventory Management 8-5
d. Run the DB upgrade in upgrade mode, by performing the following:
Execute the runDB.sh file in upgrade mode by entering the following parameters:
DBTOOLS_HOME directory - location where the dbtools is being executed from
JAVA_HOME directory
RUN TYPE - upgrade
Example:
./runDB.sh /home/uimdev/download/dbupgrade /usr/jdk1.6.0_37/bin upgrade
You will be prompted to enter the database SID, the userid, and the password of the DB you want to migrate.
You will be prompted to enter the RUN TYPE once again to confirm that an upgrade has to be run on the database.
The following is an example of the DBVersionController.log file:
07/01/12 1:43:31 PM IST: B9067805 - Update has already run 07/01/12 1:43:31 PM IST: 07/01/12 1:43:31 PM IST: B13570930 - Start 07/01/12 1:43:31 PM IST: B13570930 - Ended Successfully 07/01/12 1:43:31 PM IST: 07/01/12 1:43:31 PM IST: DbVersionController Completed Tuesday, July 01, 2012 1:43:31 PM IST 07/01/12 1:43:31 PM IST: ----------------------------------------------------------- 07/01/12 1:43:31 PM IST:
View the DBVersionController.log file to verify that all the scripts were successful or have already been run.
12. Upgrade the UIM MDS Schema by performing the following steps:
a. Launch the Patch Set Assistant (psa) tool for upgrading the PS4 MDS schema to PS5. Run the psa tool from the MW_Home/oracle_common/bin directory.
The Welcome screen appears.
b. Click Next.
The Select Component screen appears.
c. Select the Oracle Metadata Services check box and click Next.
The Prerequisites screen appears.
d. Confirm that the database backup is complete, by selecting the Database backup completed and Database version is certified by Oracle for Fusion Middleware upgrade check boxes and click Next.
Note: The database contains tables that record if a script has been run against the database and if the script can be re-run. If the script has been previously run and it has been identified as Not re-runnable then the message Update has already run will display next to the script name in the DBVersionController.log file.
Upgrading from 7.2.x to 7.2.2
8-6 UIM Installation Guide
The MDS Schema screen appears.
e. Enter the MDS Schema information by doing the following:
In the Database Type field, select the database type.
In the Connect String field, enter the hostname:portnumber/servicename string.
In the DBA User Name field, enter the user name for the MDS schema. The user must have SYSDBA priveleges.
In the DBA Password field, enter the password for the user name that you provided in the DBA User Name field.
Click Connect.
f. If the provided details are valid then the Schema User Name and Schema Password files are enabled. Select the Schema User Name and provide the Schema Password.
The Examine screen appears.
g. Click Next.
The Upgrade Summary screen appears.
h. Verify the details of the Oracle Metadata services to be upgraded and click Upgrade.
The Upgrading Components screen appears.
i. You can monitor the progress of the upgrade from this screen. After the upgrade is completed, click Next.
The Upgrade Success screen appears.
j. Verify that the upgrade was successful and click Close.
13. Delete the WLS_LLS_servername tables.
For example, if there were two managed servers (uim_ms1 and uim_ms2) from the previous UIM 7.2.x release, you would need to delete the following tables:
WL_LLR_UIM_MS1 and WL_LLR_UIM_MS2
Upgrading UIM (7.2.x to 7.2.2)To upgrade UIM:
1. Create a temporary directory (temp_dir).
2. Download the software for your operating system from the Oracle software delivery Web site:
https://edelivery.oracle.com
and save it to temp_dir:
3. Extract the contents of the software pack to temp_dir, using the following command:
unzip -xvf UnifiedInventoryManagement-7.2.2.0.0-<OS>.zip
The extracted software pack has the following structure:
uim/Disk1/install/
4. Start the installer, from temp_dir/uim/Disk1/install/, run the following command:

Upgrading from 7.2.x to 7.2.2
Upgrading Unified Inventory Management 8-7
./runInstaller -jreloc jre_Path
where jre_Path is the JRE location.
The Installer Welcome screen appears.
5. Click Next.
6. In the Select Installation Type screen, select Complete and click Next.
The Specify Home Details screen appears.
7. Do the following:
a. In the Name field, enter, browse to, or confirm the name of the folder that contains the installation files for the old version of UIM.
b. In the Path field, enter, browse to, or confirm the directory where the folder specified in the Name field is located.
c. Click Next.
The Installer scans the specified directory and folder.
The Installer displays a warning message if it detects a pre-existing installation of UIM.
8. Acknowledge the message by clicking Yes.
The WebLogic Administration Server Connection Information screen appears.
9. Do the following:
a. In the Host Name field, enter the Listen address of the Admin server (IP address or the host name of the host machine).
b. In the Port Number field, enter the Administration server port number.
c. In the User Name field, enter user name with which you connected to the Administration Server.
d. In the Password field, enter the password for the user name that you provided in the User Name field.
e. Click Next.
The WebLogic Server/Cluster Selection screen appears.
10. Select the same target WebLogic server or cluster of servers belonging to the WebLogic Server domain to upgrade and click Next.
If you are upgrading a cluster of servers, the Cluster Member Server Selection screen appears, where you can select a cluster member for UIM to install or upgrade.
The Database Type Selection screen appears.
Note: This user should belong to the WebLogic Server Administrator’s group.
Note: In the following steps, the 7.2.x WebLogic Server should be running.

Upgrading from 7.2.x to 7.2.2
8-8 UIM Installation Guide
11. Select the same database type that is used by your old UIM installation:
■ If your old installation is connected to a standalone database, select Standard Oracle 11g Enterprise Database and click Next.
The Database Connection Information screen appears.
Do the following:
a. Verify that the retrieved field values are correct and click Next.
b. In the Password field, enter the database server password for the user specified in the User Name field.
c. Click Next.
■ If your old installation is connected to an Oracle Real Application Cluster (RAC) database, select Oracle 11g Real Application Cluster Database and click Next.
The RAC DB for MDS screen appears.
Do the following:
a. Verify that the retrieved field values are correct and click Next.
b. In the Password field, enter the database server password for the user specified in the User Name field.
c. Click Next.
The RAC DB Nodes Connection Information screen appears.
Do the following:
a. Verify that the retrieved field values are correct and click Next.
b. In the Password field, enter the database server password for the user specified in the User Name field.
c. Click Next.
The MDS Schema Information screen appears.
12. Enter the MDS Schema information by doing the following:
a. In the Host Name field, enter the IP address or host name of the machine where the database server is installed.
b. In the Port Number field, enter the port number with which the installer will connect to the database server.
c. In the User Name field, enter the user name for the MDS schema.
d. In the Password field, enter the password for the user name that you provided in the User Name field.
e. In the Service Name field, enter the service name for that uniquely identifies your database on the system.
f. Click Next.
The DataBase Connection Information screen appears.
13. Provide the database user name and password and click Next.
Upgrading from 7.2.x to 7.2.2
Upgrading Unified Inventory Management 8-9
The UIM database schema creation screen appears.
14. Enter the UIM database schema information, by doing the following:
a. In the User Name field, enter the user name for the Unified Inventory Management schema.
b. In the Password field, enter the password for the user name that you provided in the User Name field.
c. In the System Tablespace field, enter the name for the permanent tablespace.
d. In the Temp Tablespace field, enter the name for the temporary tablespace.
e. Click Next.
The Security Provider Selection screen appears.
15. Select the security provider you want to use and click Next.
The CMWS User Information screen appears.
16. Enter the CMWS User information, by doing the following:
a. In the User Name field, enter the user name for the CMWS user.
b. In the Password field, enter the password for the user name that you provided in the User Name field.
c. In the Confirm Password field, enter the password again.
d. Click Next.
A warning message will appear, as the "cmwsuser" already exists.
17. Acknowledge the message by clicking Ok.
The UIM Administrator user creation (Optional) screen appears.
18. Enter the UIM User information, by doing the following:
a. In the User Name field, enter the user name for the UIM user.
b. In the Password field, define a password for the UIM user.
Caution: You must use the same user name and password that you provided when you set up the database schema using the Repository Creation Utility (RCU).
The user must have the following privileges: CATALOG, CONNECT, Create User, Create Session, Grant Any Privilege, Grant Any Role, Select Any Table, Select any Dictionary.
See "Creating the Database (MetaData) Schema for UIM" for more information.
Note: The user will be created in WebLogic embedded LDAP. Provide the CMWS user name and password which you entered in the installation of the UIM 7.2.0 application.

Upgrading from 7.2.x to 7.2.2
8-10 UIM Installation Guide
In the Confirm Password field, enter the password again, to confirm it.
c. Click Next.
A warning message will appear, as the "uimuser" already exists.
19. Acknowledge the message by clicking Ok.
The Do you want to create the UIM file store or JDBC store? screen appears.
20. Select the same type of store you selected when UIM was initially installed and click Next.
The SSL enable Information screen appears.
21. Select whether or not to enable SSL and click Next.
The Do you want to deploy MapViewer? screen appears.
22. Select whether or not to deploy MapViewer, and click Next.
■ If you select Yes, the Summary screen appears.
■ If you select No, the MapViewer information screen appears. Do the following:
If MapViewer is already installed, enter the URL for MapViewer in the URL field, and click Next.
The Summary screen appears.
23. Review the selections you have made in the preceding screens, and click Install.
The Install screen appears.
24. You can view the installation progress.
On successful installation of Unified Inventory Management, the End of Installation screen appears.
25. Restart the WebLogic server.
Post-Upgrade Tasks (7.2.x to 7.2.2)Complete all of the following post-upgrade tasks after upgrading UIM, if necessary:
1. Verify that the upgrade was completed successfully. See "Verifying the Unified Inventory Management Installation" for more information.
2. If your UIM system is set up using Oracle RAC, and runs on multiple systems or across networks, update and re-enable cache coordination. See "Configuring Ehcache for the Cluster" for more information.
3. Deploy all the 7.2.2 base cartridges into the upgraded UIM 7.2.2 environment. For information on base cartridges, see UIM Cartridge and Technology Pack Guide.
4. Redeploy any custom cartridges and technology packs, after migrating and compiling the cartridges and technology packs using Design Studio 7.2.2. Refer to the Design Studio documentation for more information.
Note: The UIM user password can be a maximum of 12 letters long, and should contain at least one numeric value and one capital letter. For example, Weblogic123.
Also, the user name must not be part of the password.
About Rolling Back UIM
Upgrading Unified Inventory Management 8-11
5. Install and configure the AspectJ libraries. Refer to "Installing and Configuring the AspectJ Libraries".
6. For cluster server upgrades, increase the Stuck Thread Max Time of each server from 600s to 1200s.
7. For cluster server upgrades, add the following entry to the Proxy configuration file, located at Domain_Home/apps/OracleProxy4_cluster1_uim_proxy/WEB-INF/web.xml:
<init-param>
<param-name>WLIOTimeoutSecs</param-name>
<param-value>500000</param-value>
</init-param>
8. Convert the Logical Devices from UIM 7.2.x to UIM 7.2.2. Execute the ruleset CONVERT_LD_SR1_TO_SR2, by giving it a list of associated Logical Device specifications. The list of Logical Device specifications is passed to the ruleset via a text file. For example, if you text file contains the following specifications:
■ Analog Telephony Adapter
■ IP Phone
■ Data Networking Device
Then all the Logical Device instances that have those respective specifications will be converted.
To execute the ruleset, perform the following:
a. Create a text file and list all the Logical Device Specifications for which you want to upgrade. You should list one specification per line.
b. Login to UIM and from the Tasks menu select the link Execute Rule.
c. From the Ruleset dropdown menu, select CONVERT_LD_SR1_TO_SR2.
d. Using the Browse button, select the text file that contains the list of Logical Devices to be converted.
e. Click the Process button (upper-right corner of the UIM UI) to start the conversion.
If there is a large number of Logical Device instances per Logical Device specifications, then the conversion process should be split into multiple executions.
About Rolling Back UIMIf the Installer fails to successfully upgrade UIM, you must manually restore the WebLogic server domain, the database schema, and the database domain. See UIM System Administrator’s Guide for more information about restoring the database. See your WebLogic Server documentation for more information about restoring the WebLogic Server domain.
Note: This parameter is available from the WebLogic admin console at the following location: Environment -> Servers -> Select Managed Server -> Tuning

About Rolling Back UIM
8-12 UIM Installation Guide
9
Installing UIM Patches 9-1
9Installing UIM Patches
This chapter describes how to install patches on Oracle Communications Unified Inventory Management (UIM).
See the patch ReadMe file, included in the patch download, for information about the contents of a patch.
About Patching UIMUIM patches are posted on the My Oracle Support Web site:
https://support.oracle.com
Most UIM patches are installed using the Oracle Universal Installer. If the Installer fails to install the patch, you must restore your database schema and domain, and your WebLogic Server domain.
The patch ReadMe file specifies whether to use the Installer to install a patch or whether to follow other installation instructions.
UIM patches are released as cumulative patches. This means that if there is more than one patch, the last patch will contain the changes for the other patches. For example, patch #3 will contain the changes for patch #1 and patch #2.
Some patches contain fixes and functionality that may not be of any interest to you or may apply to features that you have not installed or purchased. Read the patch ReadMe file to determine if you must install the patch.
Some patches are password protected. To request the password to download a protected patch, open a Service Request on the My Oracle Support Web site.
Important: Always read the patch ReadMe file in its entirety before installing a patch.

Planning Your Patch Installation
9-2 UIM Installation Guide
Planning Your Patch InstallationBefore installing a patch, verify your version of UIM and ensure the patch is not already installed.
Oracle recommends scheduling your patch installation during non-peak hours to minimize the disruption to your operations.
Ensure that UIM is not running any operations.
As a precaution against a failed patch installation, Oracle recommends that you back up your database schema for UIM, database domain for UIM, WebLogic Server domain for UIM, the UIM_Home directory (UIM install directory), and the OUI inventory directory. See UIM System Administrator’s Guide for more information about backing up and restoring the database. See your WebLogic Server documentation for more information about backing up your WebLogic Server domain.
Oracle recommends installing a patch on a test system with a copy of your production data before installing the patch on your production system. Test the patch by logging into UIM and verifying the version number of installed components
Installing a PatchTo install a patch on UIM:
1. Create a temporary directory (temp_dir).
2. Download the patch from the My Oracle Support Web site:
https://support.oracle.com
and save it to temp_dir.
3. Unzip the patch package and select a patch installer package based on your specific platform.
4. Extract the contents of the installer package to temp_dir.
The extracted software pack has the following structure:
PatchSet-UnifiedInventoryManagement-7.2.2.0.0-version/uim/Disk1/install/
Note: If you have multiple UIM installations on the same machine, you need to specify the appropriate UIM home details for the current installation. Perform the following:
1. Open installer log of the last successful installation of UIM 7.2.x
2. Look for the ORACLE_HOME and ORACLE_HOME_NAME entries in the installer log.
3. Select the value for ORACLE_HOME_NAME from the drop down menu as the name in the Specify Home Details installer screen.
4. Browse to the directory referred by ORACLE_HOME in the Specify Home Details installer screen.
Note: The package contains patch installer packages for the Linux, Solaris, and AIX platforms.

Installing a Patch
Installing UIM Patches 9-3
5. Run the following command:
/dir/PatchSet-UnifiedInventoryManagement-7.2.2.0.0-version/Disk1/install/runInstaller
The JRE Location command prompt appears.
6. Enter the path to the Java Runtime Environment (JRE) JAR used by UIM.
For example: UIM_Home/jre/1.6.0
The Oracle Universal Installer Welcome screen appears.
7. Click Next.
The Specify Home Details screen appears.
8. Do the following:
a. In the Name field, confirm the name of the folder that contains the installation files for UIM.
b. In the Path field, confirm the directory where the folder specified in the Name field is located.
c. Click Next.
The Installer scans the specified directory and folder and retrieves information about your UIM installation, such as connection details and user names.
The WebLogic Administration Server Connection Information screen appears, displaying the current connection information.
9. Do the following:
a. In the Host Name field, confirm the IP address or host name for the server that UIM was installed on.
b. In the Port Number field, confirm the port used by UIM.
c. If SSL is not being used, uncheck the Use SSL? box.
d. In the Password field, enter the WebLogic Administration server password.
e. Click Next.
The WebLogic Server/Cluster Selection screen appears.
10. Select the same target WebLogic server or cluster of servers belonging to the WebLogic Server domain and click Next.
If you are installing a patch on a cluster of servers, the Cluster Member Server Selection screen appears, where you can select a cluster member for UIM to patch.
The Database Type Selection screen appears.
11. Select the same database type that is used by your old UIM installation:
■ If your old installation is connected to a standalone database, select Standard Oracle 11g Enterprise Database and click Next.
The Database Connection Information screen appears.
Note: The Installer does not proceed from the WebLogic Administration Server Connection Information screen if any field contains errors.

Installing a Patch
9-4 UIM Installation Guide
Do the following:
a. Verify that the retrieved field values are correct and click Next.
b. In the Password field, enter the database server password for the user specified in the User Name field.
c. Click Next.
The UIM Schema User Information screen appears.
■ If your old installation is connected to an Oracle Real Application Cluster (RAC) database, select Oracle 11g Real Application Cluster Database and click Next.
The RAC DB Nodes Connection Information screen appears.
Do the following:
a. Verify that the retrieved field values are correct and click Next.
b. In the Password field, enter the database server password for the user specified in the User Name field.
c. Click Next.
The UIM Schema User Information screen appears.
12. Do the following:
a. Verify that the retrieved value in the Schema User Name field is correct.
b. In the Schema User Password field, enter the schema user password for the user specified in the Schema User Name field.
c. Click Next.
The Summary screen appears.
13. Review the Summary screen and click Install.
The Install screen appears, showing the status of the installation.
When the Installer completes the installation, the End of Installation screen appears. This screen provides the URLs for accessing the new release of UIM. Make a note of the URLs.
14. Click Installed Products and verify that the patch is listed.
15. Click Exit.
16. It is recommended to restart the WebLogic Administration server by using the following command from within the Domain_Home/bin directory:
./startUIM.sh
Note: The Installer does not proceed from either the Database Connection Information screen or the RAC DB Nodes Connection Information screen if any field on these screens contains errors.
10
Configuring Oracle Maps 10-1
10Configuring Oracle Maps
This chapter provides instructions on configuring Oracle MapViewer for use with Oracle Communications Unified Inventory Management (UIM). Oracle MapViewer is installed by default with UIM. Configuration tasks include:
■ Choosing a Map Option
■ Configuring MapViewer
■ Viewing MapViewer Documentation
Choosing a Map OptionUIM provides different options for you to point to your map data. UIM supports the following options:
■ Point to the Oracle Map service (default). See "Pointing to the Oracle Map Service (Default)".
■ Use existing map data. See "Using Existing Map Data".
■ No existing map data. See "Using a Sample Map".
Pointing to the Oracle Map Service (Default)UIM is preconfigured for the Oracle Map service.
The default map can be previewed from the following link: http://elocation.oracle.com/elocation/ajax/
To review the proprietary information statements, refer to: http://elocation.oracle.com/elocation/legal.html
World Mercator (Oracle Spatial SRID 54004) is a projection coordinate system widely used by tile-based online mapping services. The elocation_mercator.world_map served by elocation.oracle.com is rendered in this coordinate system.
See "Linking UIM Map Profile to MapViewer".
Using Existing Map DataIf you already have map data, you can define a custom data source that points to it. See the steps starting from "Defining the Map Data Source".
Configuring MapViewer
10-2 Product Title/BookTitle as a Variable
Using a Sample MapIf you do not have map data but would like to see your UIM data on a map background, you may download a world sample map from the Oracle Technology Network at the following link:
http://www.oracle.com/technetwork/middleware/mapviewer/downloads/navteq-data-download-168399.html
After you have accessed the link, download the sample:
1. You must accept the OTN License Agreement to download this software. Click Accept License Agreement.
2. Click Download Data Bundle.
3. Follow the instructions in the downloaded ZIP file.
Next, see the steps starting from "Defining the Map Data Source".
Configuring MapViewerMapViewer is installed as part of the UIM installation process. To configure it for UIM, perform the procedures in the following sections:
1. Defining the Map Data Source
2. Defining Base Maps
3. Modifying the Map Profile Defaults
4. Linking UIM Map Profile to MapViewer
5. Installing Map Builder
6. Defining Custom Icons
Defining the Map Data SourceTo define the data source:
1. Log in to MapViewer by entering the following in a Web browser:
http://ServerName:PortNumber/mapviewer
where ServerName is the application server used by UIM and Port is the port used by UIM.
2. Select Admin in the top right corner.
The Log In page is displayed.
3. Enter the user name and password that you used for the WebLogic Server installation and then select Log In.
The Manage MapViewer page is displayed.
4. Select DataSources.
The predefined UIMDATA data source is displayed. UIMDATA is the connection between the map data and the UIM data.
5. To point to your local map data, you must build a map data source to connect the map data to the UIM data. This map data can be your own map data (in Oracle Spatial format) or the world sample map.
6. To define the map data source, select Configuration.
Configuring MapViewer
Configuring Oracle Maps 10-3
The Edit mapViewerconfig.xml file is displayed.
7. Scroll down to the Predefined Data Sources section within the file. Refer to Example 10–1.
Example 10–1 mapViewerConfig.xml File
<!--***************************************************************************--><!--**************************Predefined Data Sources**************************--><!--***************************************************************************-->
<!--Uncomment and modify the following to predefine one or more data sources. Note: You must precede the jdbc_password value with a "!" (exclamation point), so that when MapViewer starts the next time, it will encrypt and replace the clear text password.--><!--<map_data_source name ="mvdemo" jdbc_host ="elocation.us.oracle.com" jdbc_sid="orcl" jdbc_port="1521" jdbc_user="scott" jdbc_password="tiger" jdbc_mode="thin" number_of_mappers="3" allow_jdbc_theme_based_foi="fals">--><map_data_source name="UIMDATA" container-ds="jdbc/InventoryMapDataSource"number_of_mappers="7"/> 8. Copy the entire contents starting from the map_data_source tag to the end and
paste the copied information below the existing predefined data source information within the Predefined Data Sources section. Refer to Example 10–2.
Example 10–2 Contents of mapViewerConfig.xml File to Copy
<!--<map_data_source name ="mvdemo" jdbc_host ="elocation.us.oracle.com" jdbc_sid="orcl" jdbc_port="1521" jdbc_user="scott" jdbc_password="tiger" jdbc_mode="thin" number_of_mappers="3" allow_jdbc_theme_based_foi="fals">--><map_data_source name="UIMDATA" container-ds="jdbc/InventoryMapDataSource"number_of_mappers="7"/>
9. Modify the copied XML code, using settings that match your environment. Use the database connection that points to your map data.
<map_data_source name="Give your data source name"container_ds="JNDI URL of Map Datasource" number_of_mappers="7"
The data source should be created on the domain where the mapviewer is installed and should be pointing to the UIM database, otherwise this step will fail.
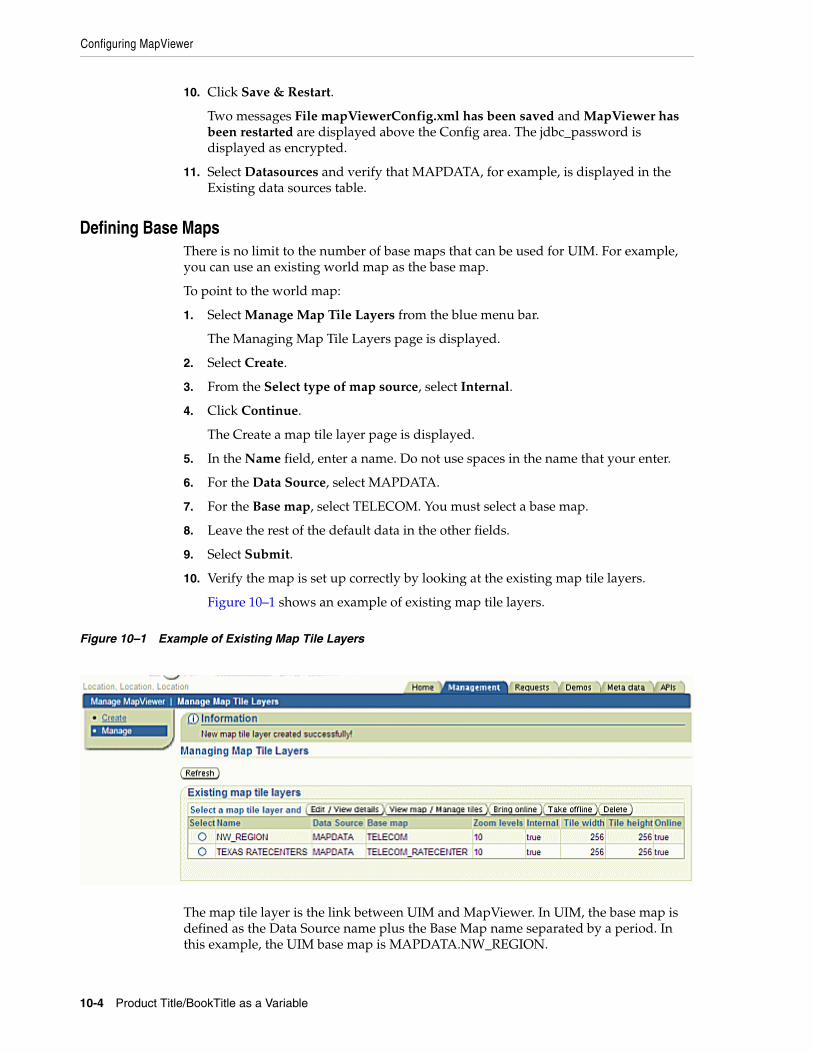
Configuring MapViewer
10-4 Product Title/BookTitle as a Variable
10. Click Save & Restart.
Two messages File mapViewerConfig.xml has been saved and MapViewer has been restarted are displayed above the Config area. The jdbc_password is displayed as encrypted.
11. Select Datasources and verify that MAPDATA, for example, is displayed in the Existing data sources table.
Defining Base MapsThere is no limit to the number of base maps that can be used for UIM. For example, you can use an existing world map as the base map.
To point to the world map:
1. Select Manage Map Tile Layers from the blue menu bar.
The Managing Map Tile Layers page is displayed.
2. Select Create.
3. From the Select type of map source, select Internal.
4. Click Continue.
The Create a map tile layer page is displayed.
5. In the Name field, enter a name. Do not use spaces in the name that your enter.
6. For the Data Source, select MAPDATA.
7. For the Base map, select TELECOM. You must select a base map.
8. Leave the rest of the default data in the other fields.
9. Select Submit.
10. Verify the map is set up correctly by looking at the existing map tile layers.
Figure 10–1 shows an example of existing map tile layers.
Figure 10–1 Example of Existing Map Tile Layers
The map tile layer is the link between UIM and MapViewer. In UIM, the base map is defined as the Data Source name plus the Base Map name separated by a period. In this example, the UIM base map is MAPDATA.NW_REGION.
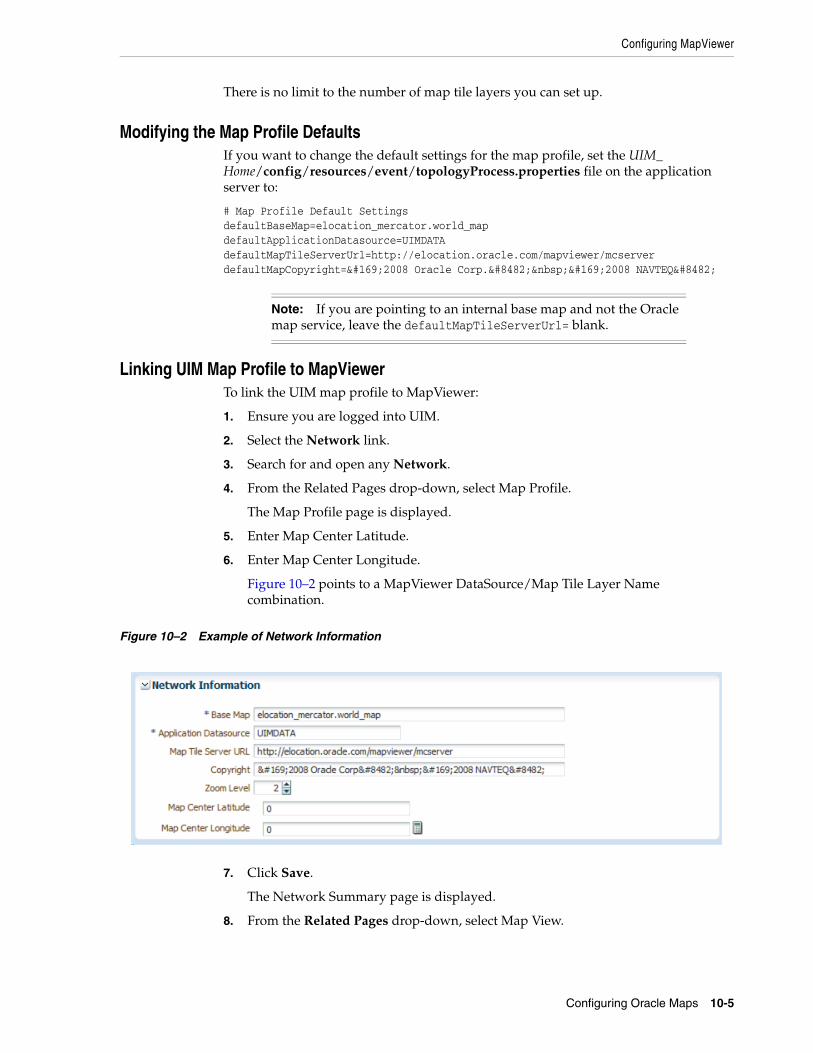
Configuring MapViewer
Configuring Oracle Maps 10-5
There is no limit to the number of map tile layers you can set up.
Modifying the Map Profile DefaultsIf you want to change the default settings for the map profile, set the UIM_Home/config/resources/event/topologyProcess.properties file on the application server to:
# Map Profile Default SettingsdefaultBaseMap=elocation_mercator.world_mapdefaultApplicationDatasource=UIMDATAdefaultMapTileServerUrl=http://elocation.oracle.com/mapviewer/mcserverdefaultMapCopyright=©2008 Oracle Corp.™ ©2008 NAVTEQ™
Linking UIM Map Profile to MapViewerTo link the UIM map profile to MapViewer:
1. Ensure you are logged into UIM.
2. Select the Network link.
3. Search for and open any Network.
4. From the Related Pages drop-down, select Map Profile.
The Map Profile page is displayed.
5. Enter Map Center Latitude.
6. Enter Map Center Longitude.
Figure 10–2 points to a MapViewer DataSource/Map Tile Layer Name combination.
Figure 10–2 Example of Network Information
7. Click Save.
The Network Summary page is displayed.
8. From the Related Pages drop-down, select Map View.
Note: If you are pointing to an internal base map and not the Oracle map service, leave the defaultMapTileServerUrl= blank.
Viewing MapViewer Documentation
10-6 Product Title/BookTitle as a Variable
9. The Map View canvas is displayed.
Installing Map BuilderOracle Map Builder is a standalone application that lets you create and manage the mapping metadata (styles, themes, and base maps) that is stored in the database.
Oracle Map Builder is downloaded as a JAR file (mapbuilder.jar) from the Oracle Software Delivery Cloud web site. You can run it as a standalone Java application in a Java Development Kit (J2SE SDK) 1.5 or later environment:
java -jar mapbuilder.jar [Options]
It is important to use the Mapbuilder.jar file that is downloaded from the Oracle Software Delivery Cloud web site in order to stay on the same release with the MapViewer application that is shipped with UIM.
For MapViewer details, refer to the User’s Guide For Oracle MapViewer. For a link to the document, see "Viewing MapViewer Documentation".
Defining Custom IconsAll of the icons used by UIM’s network systems can be loaded into MapViewer MapBuilder so that the same icon representation is used in the UIM network topological view and the UIM network map view. The icons are available in the eDeliveryMaps.zip file. You can use the same technique to load your own custom images.
Follow these steps:
1. Start MapViewer Map Builder.
2. Connect to the UIM database using the Application Datasource.
3. Select Styles and then select Markers.
4. Select the marker you wish to modify.
5. Select Image and then select Load Image.
6. Browse the eDeliveryMaps.zip file for the correct image.
7. Click Select.
8. Select Mark Size and then select the size of the image to fit your needs. The recommended size is height =20 and width=20.
Viewing MapViewer DocumentationThe Oracle Fusion Middleware User’s Guide For Oracle MapViewer contains detailed MapViewer documentation. The following is a link to the library page, where the document is located:
http://www.oracle.com/technetwork/middleware/mapviewer/documentation/index.html
Note: The Map View is not enabled until you enter the map center latitude and longitude in the Map Profile.
11
Uninstalling Unified Inventory Management 11-1
11Uninstalling Unified Inventory Management
This chapter describes how to uninstall Oracle Communications Unified Inventory Management (UIM).
About Uninstalling UIMYou use the Oracle Universal Installer (OUI) to uninstall UIM. The installer uninstalls the core application and other components of UIM.
GUI mode: Use the GUI mode when you want to interact with the GUI during installation. See "Uninstalling UIM or UIM Components".
Uninstalling UIM or UIM ComponentsTo uninstall UIM, or a component belonging to the UIM product:
1. From a command line, navigate to the UIM_Home/oui/bin directory and run the following command to initiate the OUI runInstaller executable file:
./runInstaller
The Oracle Universal Installer installation wizard starts.
The Welcome screen appears.
2. Click Deinstall Products.
The Inventory screen appears.
3. Select the components you want to uninstall.
4. Click Remove.
The User Input screen appears.
5. In the WebLogic User Password field, enter your WebLogic user password, and click OK.
Note: WebLogic server must be running before proceeding with the uninstall procedure.
Note: Selecting Show Empty Homes displays any previously created Oracle product homes. Select displayed homes, or folders, to remove them.

Uninstalling UIM or UIM Components
11-2 UIM Installation Guide
The Confirmation screen appears.
6. View and confirm your selection, and click Next.
You can see the progress as the selected components are uninstalled.
The installer removes all of the files except the logs. If required, delete the log files manually. The logs can be found at the following location:
CentralInventorylocation/logs/
7. Remove the MDS schema user. Refer to Oracle Fusion Middleware Repository Creation Utility User's Guide for details on removing/dropping the schema.
Important: Ensure that the correct password is entered. There is no password validation for this step. If the password is incorrect, the uninstall will continue and the UIM .jar and .ear files are not undeployed from the WebLogic domain.
Note: The UIM schema, UIM user, Cartridge Deployer Client and CMWS user will not be removed during uninstallation. The database schema and application users can be used by other applications, so they should not be deleted.
12
Troubleshooting the Unified Inventory Management Installation 12-1
12Troubleshooting the Unified Inventory Management Installation
This chapter describes how to troubleshoot the Oracle Communications Unified Inventory Management (UIM) installation. To verify that the installation was successful, see "Verifying the Unified Inventory Management Installation"
Common Problems and Their SolutionsThis section describes the following installation problems, and how to resolve them:
■ Problem: Installer Fails to Update Application KEYSTORE Table
■ Problem: Installer Fails to Update Application INFORMATION Table
■ Problem: Database Server and Application Server Have Different Dates
■ Problem: Unable to Create the UIM Administrator User Except During Installation
Problem: Installer Fails to Update Application KEYSTORE TableIf the installer fails to update the application KEYSTORE table, the installer is interrupted and the following error message appears:
Unable to update application key store 'AppKeyStore', please check log files for more details. Refer UIM documentation for executing this step manually.
SolutionClick the Continue button to complete the installation. Manually update the application KEYSTORE table when the installation is complete.
To manually update the application KEYSTORE table:
1. Navigate to UIM_Home/POMSClient.
2. Execute the following command:
Java_Home/bin/java -javaagent:lib/eclipselink.jar -cp POMSClient.jar oui.j2ee.poms.client.UpdateAppKeyStore DB_HostName DB_Port DB_ServiceName UIM_Schema_UserName UIM_Schema_Password default aes 128
where:
■ DB_HostName is the database host name
■ DB_Port is the database port number
■ DB_ServiceName is the database service name or system ID

Common Problems and Their Solutions
12-2 UIM Installation Guide
■ UIM_Schema_UserName is a valid UIM database user name for the schema
■ UIM_Schema_Password is the password for the UIM schema user name
3. Connect to the application KEYSTORE table and verify the following:
■ That the COMPONENT column has a value of default.
■ That the ENCRYPTALGORITHM column has a value of aes.
■ That the KEYLENGTH column has a value of 128.
Problem: Installer Fails to Update Application INFORMATION TableIf the installer fails to update the application INFORMATION table, the installer is interrupted and the following error message appears:
Unable to update application details 'ApplicationInfo', please check log files for more details. Refer UIM documentation for executing this step manually.
SolutionClick the Continue button to complete the installation. Manually update the application INFORMATION table when the installation is complete.
To manually update the application INFORMATION table:
1. Navigate to UIM_Home/POMSClient.
2. Execute the following command:
Java_Home/bin/java -javaagent:lib/eclipselink.jar -cp POMSClient.jar oui.j2ee.poms.client.UpdateAppInfoTable DB_HostName DB_Port DB_ServiceName UIM_Schema_UserName UIM_Schema_Password "UIM" UIM_Version SUCCESS
where:
■ DB_HostName is the database host name
■ DB_Port is the database port number
■ DB_ServiceName is the database service name or system ID
■ UIM_Schema_UserName is a valid UIM database user name for the schema
■ UIM_Schema_Password is the password for the UIM schema user name
■ UIM_Version is the version of UIM being installed
3. Connect to the application INFORMATION table and verify the following:
■ That the NAME column has a value of UIM.
■ That the VERSION column has the correct version of UIM.
■ That the STATUS column has a value of SUCCESS.
Problem: Database Server and Application Server Have Different DatesIf the DB server and the Application server have different dates, then the two servers will not be able to communicate with each other.
SolutionEnsure that the Database server and Application server dates are set close to each other. They can have different dates due to time zone differences, but they should not be in different weeks.

Common Problems and Their Solutions
Troubleshooting the Unified Inventory Management Installation 12-3
See Oracle Database Globalization Support Guide for information and instructions on setting the date.
Problem: Unable to Create the UIM Administrator User Except During InstallationIf the UIM Administrator user is not created during installation, then the user will not be able to login to the UIM user interface or the UIM Web services.
SolutionTo create the UIM Administrator user, after UIM the UIM installation has been completed, perform the following:
1. Log in to the WebLogic Administration Server.
2. Click Lock & Edit.
3. In the left panel, in the Domain Structure section, click SecurityRealms.
The Summary of Security Realms page appears.
4. Click myrealm.
The Settings for myrealm page appears.
5. Click the Users and Groups tab.
6. Click the Groups tab, click New and enter the following group properties:
■ Group name
■ Group description
■ Provider (select from the dropdown list)
7. Create the new group, click OK.
8. Click the Users tab, click New and enter the following user properties:
■ User name
■ User description
■ Provider (select from the dropdown list)
■ User password
9. Create the new user, click OK.
10. Click Release Configuration.
11. Log in to the Enterprise Manager console.
12. In the left panel, expand WebLogic Domain and select the domain name.
13. Right-click the domain name, select Security, and then select Application Roles.
The Application Roles page appears.
14. In the Application Stripe field, select oracle.communications.inventory from the dropdown list, and then click the search icon.
A list of role names will appear.
15. Select the uimuser role and click Edit.
The Edit Application Role: uimuser page appears.
16. In the Members panel, click Add.
Reporting Problems
12-4 UIM Installation Guide
The Add Principal dialog box appears.
17. In the Type field, select Group from the dropdown list and then click the search icon.
18. Select the group created in steps 6 and 7, then click OK.
19. Click OK to save and close the Edit Application Role: uimuser page.
Reporting ProblemsBefore calling Oracle Global Support, perform the following:
■ Problems can often be fixed by shutting down Network Integrity and restarting the computer that it runs on. See UIM System Administrator’s Guide for more information.
■ If that does not solve the problem, the first troubleshooting step is to look at the error log for the application or process that reported the problem.
■ Prepare and gather the following pertinent information:
– A clear and concise description of the problem, including when it began to occur.
– Relevant portions of the relevant log files.
– Relevant configuration files.
– Recent changes in your system, even if you do not think they are relevant.
– List of all Network Integrity components and patches installed on your system.
When you are ready, report the problem to Oracle Global Support.

A
Sequence Table Information A-1
ASequence Table Information
This appendix provides information on the SEQUENCE table, specifically:
■ Specification-based Sequence Generation
■ Context-based Sequence Generation
Specification-based Sequence GenerationA specification-based sequence is used to generate a sequence within a specified context, where the sequence is defined by a sequence specification. A sequence specification is defined in Design Studio. It defines the minimum value, maximum value, and increment by value for the sequence.
A specification-based sequence is requested by invoking the next(String sequenceSpecName, String context) method on the SequenceGenerator interface, where sequenceSpecName is the name of the sequence specification. The method returns the next sequence value for the combination of sequence specification name and context.
Prior to the UIM 7.2.0 release, the first time a sequence was requested for the combination of sequence specification name and context, a SEQUENCE row was created that stored the context value, the sequence specification, and the last generated value for the sequence. Each subsequent request for a sequence value for the combination of sequence specification name and context returns a value equal to the last generated value plus the increment by value defined on the sequence specification, and results in an update to the current value on the SEQUENCE row.
In UIM 7.2.0, the request for a specification-based sequence results in the creation of an Oracle native sequence, created with a name that follows the naming convention:
<CONTEXT>_<SequenceSpecification ENTITYID>
where <SequenceSpecification ENTITYID> is the internal primary key ENTITYID value on the SEQUENCESPECIFICATION row for the given sequence specification, and <CONTEXT> is the given context value. This Oracle sequence is used to generate subsequent sequence values for the combination of sequence specification name and context.
The maximum length for the CONTEXT portion of the name for a specification-base Oracle native sequence is 10 characters. This constraint is due to the fact that the maximum length of an Oracle native sequence name is 30 characters, and the ENTITYID, (defined as NUMBER(19)) and the underscore take up 20 of the 30 characters.
Context-based Sequence Generation
A-2 UIM Installation Guide
Context-based Sequence GenerationA context-based sequence is used to generate a sequence within a specified context, where the sequence is not defined by a Sequence specification.
A context-based sequence is requested by invoking the next(String context) method on the SequenceGenerator interface. The method returns the next sequence value for the given context. The starting sequence value is 1 and increments by 1 with each request for a new value.
Prior to the UIM 7.2.0 release, the first time a sequence was requested for the context, a SEQUENCE row was created that stored the context value and the last generated value for the sequence. Each subsequent request for a sequence value for the context returns a value equal to the last generated value increment by 1, and results in an update to the current value on the SEQUENCE row.
In UIM 7.2.0, the request for a context-based sequence results in the creation of an Oracle native sequence is created with a name that equals the context value. This Oracle sequence is used to generate subsequent sequence values for the context. The maximum length of an Oracle sequence name is 30 characters. Therefore, the context value for a context-based sequence cannot exceed 30 characters.


