116
Oracle Data Integrator Knowledge Modules Reference Guide 10g Release 3 (10.1.3) June 2009

Oracle Data Integrator Knowledge Modules Reference Guide
10g Release 3 (10.1.3)
June 2009

Knowledge Modules Reference Guide 2/116
Oracle Data Integrator Knowledge Modules Reference Guide, 10g Release 3 (10.1.3)
Copyright © 2009, Oracle. All rights reserved.
The Programs (which include both the software and documentation) contain proprietary information; they are provided
under a license agreement containing restrictions on use and disclosure and are also protected by copyright, patent, and
other intellectual and industrial property laws. Reverse engineering, disassembly, or decompilation of the Programs,
except to the extent required to obtain interoperability with other independently created software or as specified by law, is
prohibited.
The information contained in this document is subject to change without notice. If you find any problems in the
documentation, please report them to us in writing. This document is not warranted to be error-free. Except as may be
expressly permitted in your license agreement for these Programs, no part of these Programs may be reproduced or
transmitted in any form or by any means, electronic or mechanical, for any purpose.
If the Programs are delivered to the United States Government or anyone licensing or using the Programs on behalf of the
United States Government, the following notice is applicable:
U.S. GOVERNMENT RIGHTS Programs, software, databases, and related documentation and technical data delivered to
U.S. Government customers are "commercial computer software" or "commercial technical data" pursuant to the applicable
Federal Acquisition Regulation and agency-specific supplemental regulations. As such, use, duplication, disclosure,
modification, and adaptation of the Programs, including documentation and technical data, shall be subject to the licensing
restrictions set forth in the applicable Oracle license agreement, and, to the extent applicable, the additional rights set forth
in FAR 52.227-19, Commercial Computer Software--Restricted Rights (June 1987). Oracle USA, Inc., 500 Oracle Parkway,
Redwood City, CA 94065.
The Programs are not intended for use in any nuclear, aviation, mass transit, medical, or other inherently dangerous
applications. It shall be the licensee's responsibility to take all appropriate fail-safe, backup, redundancy and other
measures to ensure the safe use of such applications if the Programs are used for such purposes, and we disclaim liability
for any damages caused by such use of the Programs.
Oracle, JD Edwards, PeopleSoft, and Siebel are registered trademarks of Oracle Corporation and/or its affiliates. Other
names may be trademarks of their respective owners.
The Programs may provide links to Web sites and access to content, products, and services from third parties. Oracle is not
responsible for the availability of, or any content provided on, third-party Web sites. You bear all risks associated with the
use of such content. If you choose to purchase any products or services from a third party, the relationship is directly
between you and the third party. Oracle is not responsible for: (a) the quality of third-party products or services; or (b)
fulfilling any of the terms of the agreement with the third party, including delivery of products or services and warranty
obligations related to purchased products or services. Oracle is not responsible for any loss or damage of any sort that you
may incur from dealing with any third party.

Knowledge Modules Reference Guide 3/116
Table of Contents Introduction........................................................................................................................................ 6 Files ................................................................................................................................................... 7
Knowledge Modules ...................................................................................................................... 7 Generic SQL...................................................................................................................................... 8
Knowledge Modules ...................................................................................................................... 8 Hyperion Essbase ........................................................................................................................... 12
Knowledge Modules .................................................................................................................... 12 Platform Support .......................................................................................................................... 12 Specific Requirements................................................................................................................. 12
Hyperion Financial Management..................................................................................................... 13 Knowledge Modules .................................................................................................................... 13 Platform Support .......................................................................................................................... 13 Specific Requirements................................................................................................................. 13
Hyperion Planning ........................................................................................................................... 14 Knowledge Modules .................................................................................................................... 14 Platform Support .......................................................................................................................... 14 Specific Requirements................................................................................................................. 14
Hypersonic SQL .............................................................................................................................. 15 Knowledge Modules .................................................................................................................... 15
IBM DB2 UDB.................................................................................................................................. 16 Knowledge Modules .................................................................................................................... 16 Specific Requirements................................................................................................................. 17
IBM DB2/400 ................................................................................................................................... 19 Knowledge Modules .................................................................................................................... 19 Specific Requirements................................................................................................................. 20
Informix............................................................................................................................................ 22 Knowledge Modules .................................................................................................................... 22
JD Edwards EnterpriseOne............................................................................................................. 24 Introduction .................................................................................................................................. 24 Installation and Configuration ...................................................................................................... 24 Working with Oracle Data Integrator JDE EnterpriseOne KMs ................................................... 25 Knowledge Module Options Reference ....................................................................................... 28
JMS ................................................................................................................................................. 32 Knowledge Modules .................................................................................................................... 32
Microsoft Access ............................................................................................................................. 34 Knowledge Modules .................................................................................................................... 34
Microsoft SQL Server ...................................................................................................................... 35 Knowledge Modules .................................................................................................................... 35
Knowledge Modules Reference Guide 4/116
Specific Requirements................................................................................................................. 37 Netezza ........................................................................................................................................... 39
Knowledge Modules .................................................................................................................... 39 Oracle Changed Data Capture Adapters ........................................................................................ 41
Introduction .................................................................................................................................. 41 Installation and Configuration ...................................................................................................... 42 Working with the Oracle CDC KM ............................................................................................... 42 Knowledge Module Options Reference ....................................................................................... 44
Oracle Database.............................................................................................................................. 45 Knowledge Modules .................................................................................................................... 45 Specific Requirements................................................................................................................. 49
Oracle Data Quality ......................................................................................................................... 51 Specific Requirements................................................................................................................. 51
Oracle E-Business Suite ................................................................................................................. 52 Introduction .................................................................................................................................. 52 Installation and Configuration ...................................................................................................... 53 Working with EBS KMs................................................................................................................ 53 Knowledge Module Options Reference ....................................................................................... 58
Oracle Enterprise Service Bus ........................................................................................................ 62 Introduction .................................................................................................................................. 62 Overview of the XREF KM Process............................................................................................. 63 Installation and Configuration ...................................................................................................... 63 Working with XREF using the Oracle Data Integrator ESB Cross-References KMs .................. 63 Knowledge Module Options Reference ....................................................................................... 65
Oracle OLAP ................................................................................................................................... 68 Introduction .................................................................................................................................. 68 Installation and Configuration ...................................................................................................... 69 Working with Oracle OLAP KMs.................................................................................................. 69 Knowledge Module Options Reference ....................................................................................... 71
Oracle PeopleSoft ........................................................................................................................... 74 Introduction .................................................................................................................................. 74 Installation and Configuration ...................................................................................................... 74 Working with PeopleSoft KMs ..................................................................................................... 74 Knowledge Module Options Reference ....................................................................................... 76
Oracle Siebel CRM.......................................................................................................................... 77 Introduction .................................................................................................................................. 77 Installation and Configuration ...................................................................................................... 79 Working with the Siebel KMs....................................................................................................... 79 Knowledge Module Options Reference ....................................................................................... 81
SalesForce ...................................................................................................................................... 84
Knowledge Modules Reference Guide 5/116
Knowledge Modules .................................................................................................................... 84 Specific Requirements................................................................................................................. 84
SAP ABAP....................................................................................................................................... 86 Introduction .................................................................................................................................. 86 Installation and Configuration ...................................................................................................... 87 Working with the SAP ABAP KMs ............................................................................................... 88 Knowledge Module Options Reference ....................................................................................... 90
SAS ................................................................................................................................................. 95 Knowledge Modules .................................................................................................................... 95 Specific Requirements................................................................................................................. 96
Sybase ASE .................................................................................................................................... 98 Knowledge Modules .................................................................................................................... 98 Specific Requirements................................................................................................................. 99
Sybase IQ...................................................................................................................................... 100 Knowledge Modules .................................................................................................................. 100 Specific Requirements............................................................................................................... 101
Teradata ........................................................................................................................................ 102 Knowledge Modules .................................................................................................................. 102 Specific Requirements............................................................................................................... 106 KM Optimizations for Teradata .................................................................................................. 106
Appendix........................................................................................................................................ 108 Appendix A - SAP ABAP Required Privileges ........................................................................... 108

Knowledge Modules Reference Guide 6/116
Introduction This document lists the Knowledge Modules included with Oracle Data Integrator 10g Release 3 (10.1.3)
After importing a Knowledge Module into your project, please make sure to refer to the specific description for details of usage. Every Knowledge Module may contain restrictions and operating system / database specific commands. Please refer to the appropriate technology documentation set for further details.
Oracle Data Integrator includes Knowledge Modules that are not technology dependant. Knowledge Modules listed in sections: Generic SQL and JMS are designed to work on most databases and most JMS compliant middleware. However, we recommend using specific pre-built Knowledge Modules for one technology whenever the Knowledge Module exists for that technology.
Oracle Data Integrator uses JDBC Connectivity to access the different database. We recommend using Type 4 JDBC drivers whenever possible. JDBC drivers should be defined in the Java Class Path of each machine running the Oracle Data Integrator UIs or Agents. For your convenience, you can copy your drivers jar files into the /drivers sub-directory of your Oracle Data Integrator installation folder. Please refer to the documentation provided with your JDBC Driver for more information.
The preceding comment also applies to JMS specific clients and, in general, to any API required by a Knowledge Modules. All required Java Archive files (jar files) should be defined in the Java Class Path or alternatively copied into the /drivers directory.
Knowledge Modules Reference Guide 7/116
Files
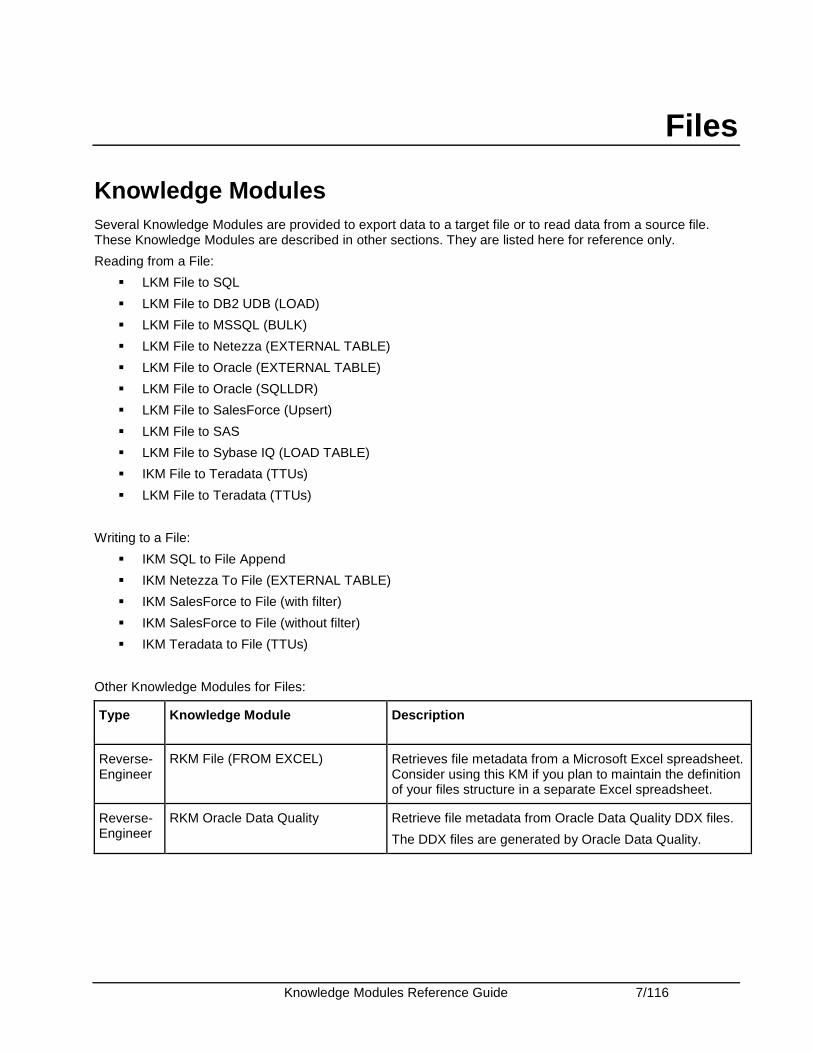
Knowledge Modules Several Knowledge Modules are provided to export data to a target file or to read data from a source file. These Knowledge Modules are described in other sections. They are listed here for reference only.
Reading from a File:
� LKM File to SQL
� LKM File to DB2 UDB (LOAD)
� LKM File to MSSQL (BULK)
� LKM File to Netezza (EXTERNAL TABLE)
� LKM File to Oracle (EXTERNAL TABLE)
� LKM File to Oracle (SQLLDR)
� LKM File to SalesForce (Upsert)
� LKM File to SAS
� LKM File to Sybase IQ (LOAD TABLE)
� IKM File to Teradata (TTUs)
� LKM File to Teradata (TTUs)
Writing to a File:
� IKM SQL to File Append
� IKM Netezza To File (EXTERNAL TABLE)
� IKM SalesForce to File (with filter)
� IKM SalesForce to File (without filter)
� IKM Teradata to File (TTUs)
Other Knowledge Modules for Files:
Type Knowledge Module Description
Reverse-Engineer
RKM File (FROM EXCEL) Retrieves file metadata from a Microsoft Excel spreadsheet. Consider using this KM if you plan to maintain the definition of your files structure in a separate Excel spreadsheet.
Reverse-Engineer
RKM Oracle Data Quality Retrieve file metadata from Oracle Data Quality DDX files.
The DDX files are generated by Oracle Data Quality.
Knowledge Modules Reference Guide 8/116
Generic SQL
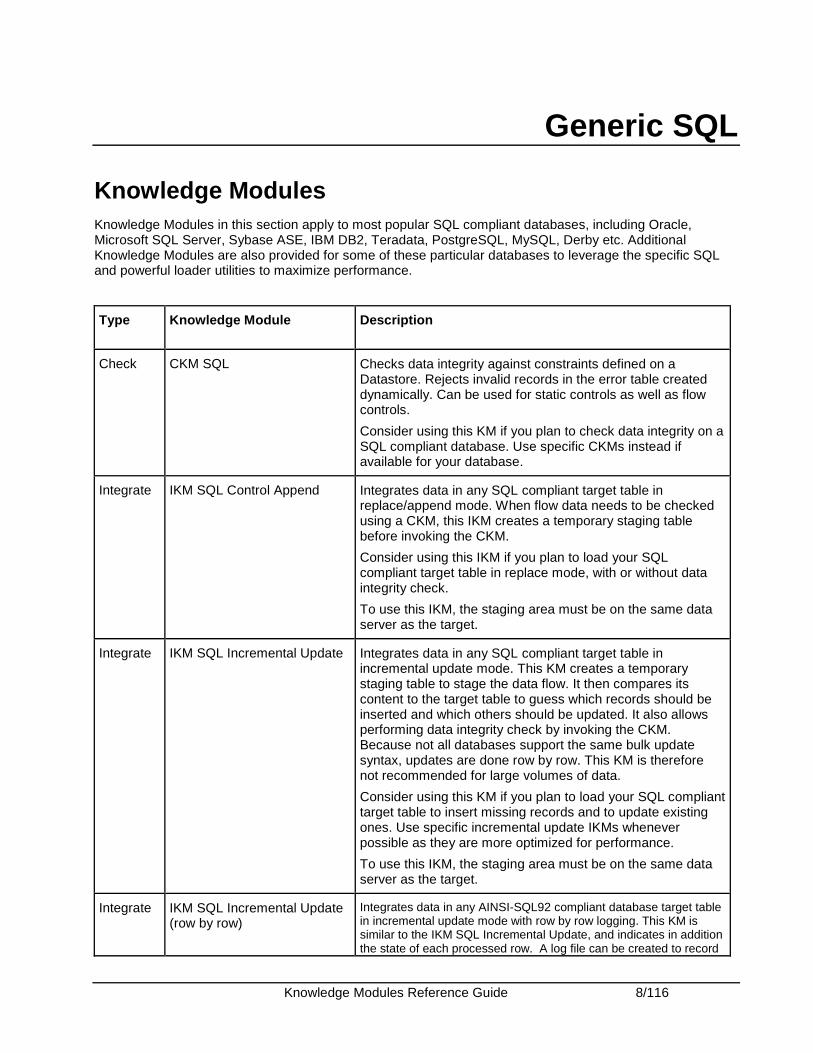
Knowledge Modules Knowledge Modules in this section apply to most popular SQL compliant databases, including Oracle, Microsoft SQL Server, Sybase ASE, IBM DB2, Teradata, PostgreSQL, MySQL, Derby etc. Additional Knowledge Modules are also provided for some of these particular databases to leverage the specific SQL and powerful loader utilities to maximize performance.
Type Knowledge Module Description
Check CKM SQL Checks data integrity against constraints defined on a Datastore. Rejects invalid records in the error table created dynamically. Can be used for static controls as well as flow controls.
Consider using this KM if you plan to check data integrity on a SQL compliant database. Use specific CKMs instead if available for your database.
Integrate IKM SQL Control Append Integrates data in any SQL compliant target table in replace/append mode. When flow data needs to be checked using a CKM, this IKM creates a temporary staging table before invoking the CKM.
Consider using this IKM if you plan to load your SQL compliant target table in replace mode, with or without data integrity check.
To use this IKM, the staging area must be on the same data server as the target.
Integrate IKM SQL Incremental Update Integrates data in any SQL compliant target table in incremental update mode. This KM creates a temporary staging table to stage the data flow. It then compares its content to the target table to guess which records should be inserted and which others should be updated. It also allows performing data integrity check by invoking the CKM. Because not all databases support the same bulk update syntax, updates are done row by row. This KM is therefore not recommended for large volumes of data.
Consider using this KM if you plan to load your SQL compliant target table to insert missing records and to update existing ones. Use specific incremental update IKMs whenever possible as they are more optimized for performance.
To use this IKM, the staging area must be on the same data server as the target.
Integrate IKM SQL Incremental Update (row by row)
Integrates data in any AINSI-SQL92 compliant database target table in incremental update mode with row by row logging. This KM is similar to the IKM SQL Incremental Update, and indicates in addition the state of each processed row. A log file can be created to record

Knowledge Modules Reference Guide 9/116
the processing activities. The following options are used for the logging mechanism:
• LOG_LEVEL: This option is used to set the granularity of the data logged.
The following log levels can be set:
o 0: nothing to log o 1: any JDBC action will be indicated such as
‘select action’, ‘delete action’, ‘insert action’… o 2: in addition to level 1, all records that
generate an error will be logged o 3: in addition to level 2, all processed records
will be logged
• LOG_FILE_NAME: Full path to the log file used.
• MAX_ERRORS: Specify the maximum number of errors. The IKM process stops when the maximum number of errors specified in this option is reached.
Important Note: This Knowledge Module is NOT RECOMMENDED when using LARGE VOLUMES. Other specific modules using Bulk utilities (SQL*LOADER, BULK INSERT...) or direct links (DBLINKS, Linked Servers...) are usually more efficient.
Integrate IKM SQL to File Append Integrates data in a target file from any SQL compliant staging area in replace mode.
Consider using this IKM if you plan to transform and export data to a target file. If your source datastores are located on the same data server, we recommend using this data server as staging area to avoid extra loading phases (LKMs)
To use this IKM, the staging area must be different from the target.
Integrate IKM SQL to SQL Append Integrates data in a target SQL compliant table from any SQL compliant staging area in replace mode.
Consider using this IKM if you plan to use a staging area different from the target. If most of your source datastores are located on the same data server, we recommend using this data server as staging area to avoid extra loading phases (LKMs)
To use this IKM, the staging area must be different from the target.
Load LKM File to SQL Loads data from an ASCII or EBCDIC File to any SQL compliant database used as a staging area. This LKM uses the Agent to read selected data from the source file and write the result in the staging temporary table created dynamically.
Consider using this LKM if one of your source datastores is an ASCII or EBCDIC file. Use specific LKMs for your target staging area whenever possible as they are more optimized for performance. For example, if you are loading to an Oracle database, use “LKM File to Oracle (SQLLDR)” or “LKM File to Oracle (EXTERNAL TABLE)” instead.
Knowledge Modules Reference Guide 10/116
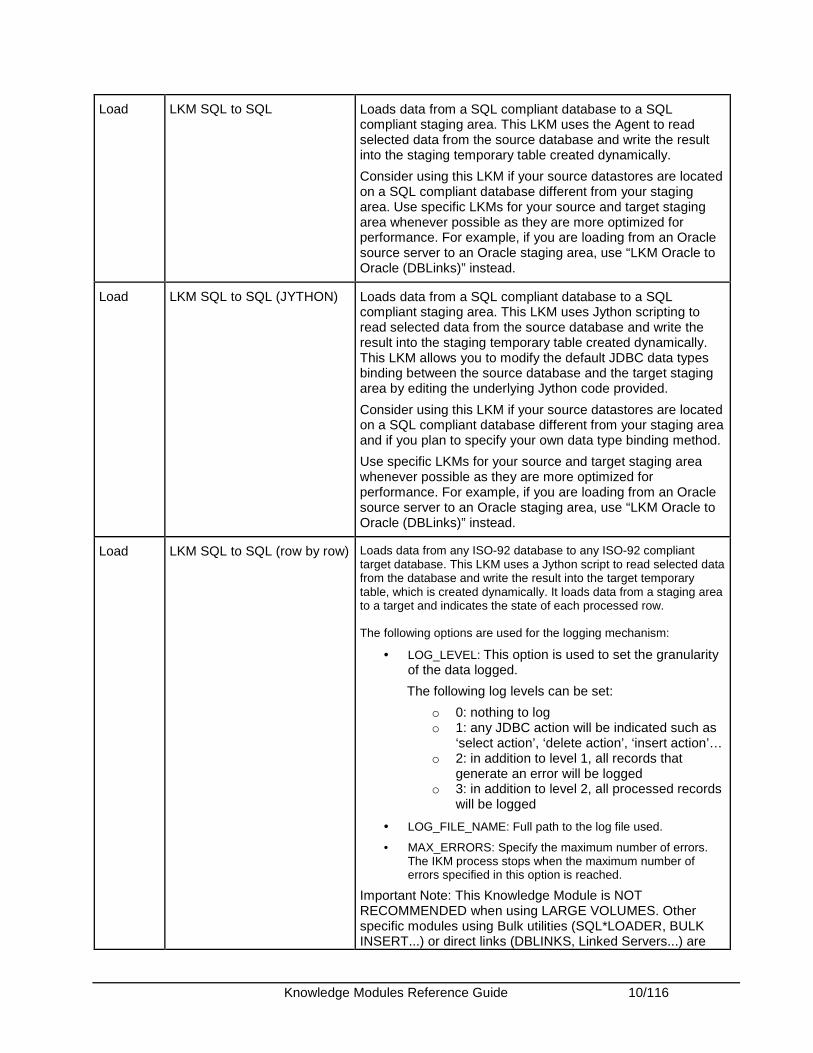
Load LKM SQL to SQL Loads data from a SQL compliant database to a SQL compliant staging area. This LKM uses the Agent to read selected data from the source database and write the result into the staging temporary table created dynamically.
Consider using this LKM if your source datastores are located on a SQL compliant database different from your staging area. Use specific LKMs for your source and target staging area whenever possible as they are more optimized for performance. For example, if you are loading from an Oracle source server to an Oracle staging area, use “LKM Oracle to Oracle (DBLinks)” instead.
Load LKM SQL to SQL (JYTHON) Loads data from a SQL compliant database to a SQL compliant staging area. This LKM uses Jython scripting to read selected data from the source database and write the result into the staging temporary table created dynamically. This LKM allows you to modify the default JDBC data types binding between the source database and the target staging area by editing the underlying Jython code provided.
Consider using this LKM if your source datastores are located on a SQL compliant database different from your staging area and if you plan to specify your own data type binding method.
Use specific LKMs for your source and target staging area whenever possible as they are more optimized for performance. For example, if you are loading from an Oracle source server to an Oracle staging area, use “LKM Oracle to Oracle (DBLinks)” instead.
Load LKM SQL to SQL (row by row) Loads data from any ISO-92 database to any ISO-92 compliant target database. This LKM uses a Jython script to read selected data from the database and write the result into the target temporary table, which is created dynamically. It loads data from a staging area to a target and indicates the state of each processed row. The following options are used for the logging mechanism:
• LOG_LEVEL: This option is used to set the granularity of the data logged.
The following log levels can be set:
o 0: nothing to log o 1: any JDBC action will be indicated such as
‘select action’, ‘delete action’, ‘insert action’… o 2: in addition to level 1, all records that
generate an error will be logged o 3: in addition to level 2, all processed records
will be logged
• LOG_FILE_NAME: Full path to the log file used.
• MAX_ERRORS: Specify the maximum number of errors. The IKM process stops when the maximum number of errors specified in this option is reached.
Important Note: This Knowledge Module is NOT RECOMMENDED when using LARGE VOLUMES. Other specific modules using Bulk utilities (SQL*LOADER, BULK INSERT...) or direct links (DBLINKS, Linked Servers...) are
Knowledge Modules Reference Guide 11/116
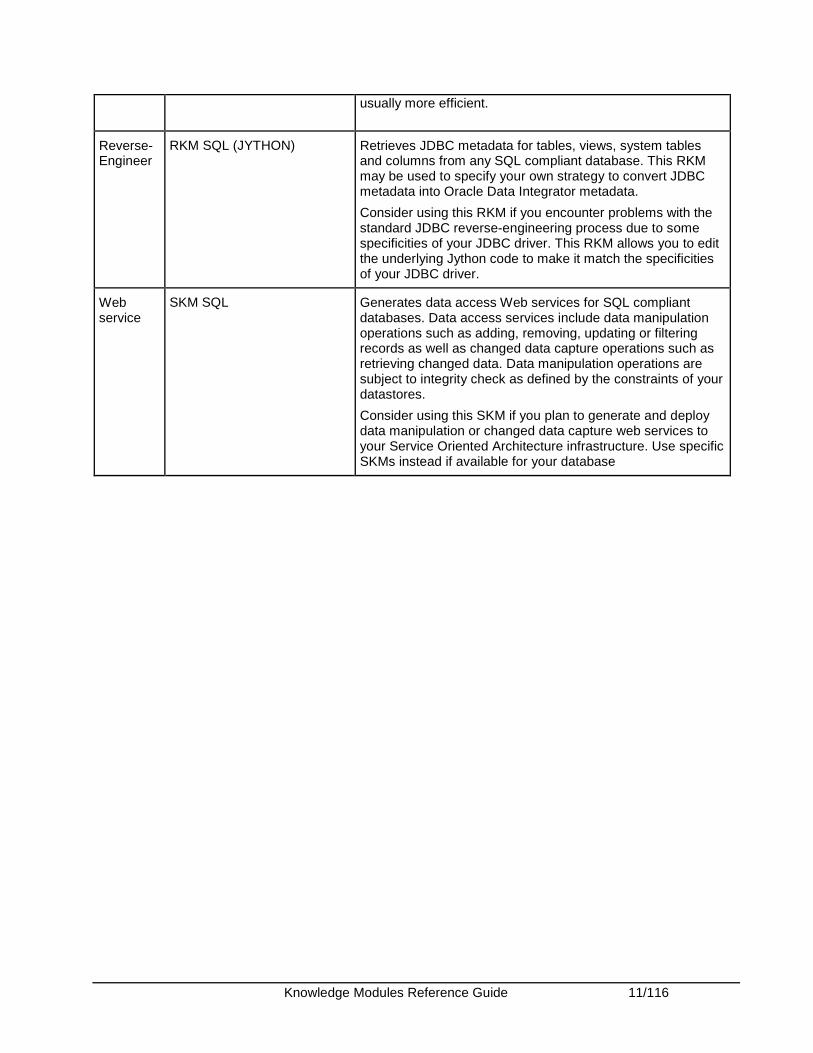
usually more efficient.
Reverse-Engineer
RKM SQL (JYTHON) Retrieves JDBC metadata for tables, views, system tables and columns from any SQL compliant database. This RKM may be used to specify your own strategy to convert JDBC metadata into Oracle Data Integrator metadata.
Consider using this RKM if you encounter problems with the standard JDBC reverse-engineering process due to some specificities of your JDBC driver. This RKM allows you to edit the underlying Jython code to make it match the specificities of your JDBC driver.
Web service
SKM SQL Generates data access Web services for SQL compliant databases. Data access services include data manipulation operations such as adding, removing, updating or filtering records as well as changed data capture operations such as retrieving changed data. Data manipulation operations are subject to integrity check as defined by the constraints of your datastores.
Consider using this SKM if you plan to generate and deploy data manipulation or changed data capture web services to your Service Oriented Architecture infrastructure. Use specific SKMs instead if available for your database
Knowledge Modules Reference Guide 12/116
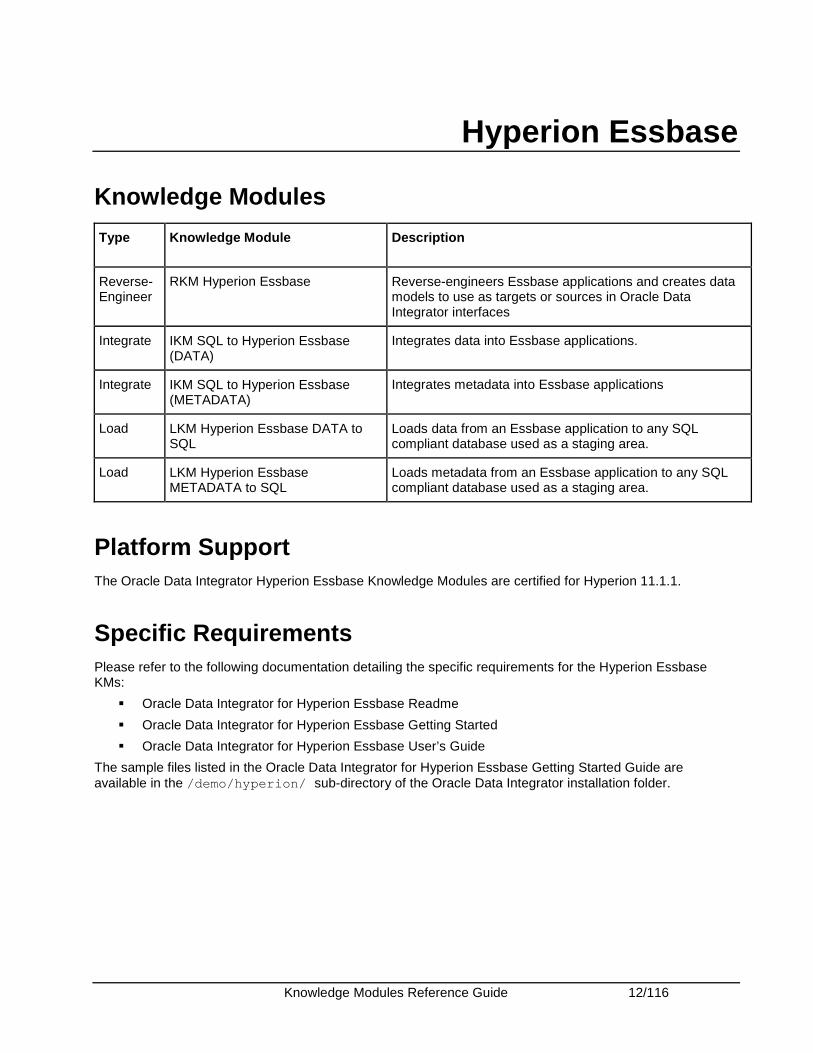
Hyperion Essbase
Knowledge Modules
Type Knowledge Module Description
Reverse-Engineer
RKM Hyperion Essbase Reverse-engineers Essbase applications and creates data models to use as targets or sources in Oracle Data Integrator interfaces
Integrate IKM SQL to Hyperion Essbase (DATA)
Integrates data into Essbase applications.
Integrate IKM SQL to Hyperion Essbase (METADATA)
Integrates metadata into Essbase applications
Load LKM Hyperion Essbase DATA to SQL
Loads data from an Essbase application to any SQL compliant database used as a staging area.
Load LKM Hyperion Essbase METADATA to SQL
Loads metadata from an Essbase application to any SQL compliant database used as a staging area.
Platform Support The Oracle Data Integrator Hyperion Essbase Knowledge Modules are certified for Hyperion 11.1.1.
Specific Requirements Please refer to the following documentation detailing the specific requirements for the Hyperion Essbase KMs:
� Oracle Data Integrator for Hyperion Essbase Readme
� Oracle Data Integrator for Hyperion Essbase Getting Started
� Oracle Data Integrator for Hyperion Essbase User’s Guide
The sample files listed in the Oracle Data Integrator for Hyperion Essbase Getting Started Guide are available in the /demo/hyperion/ sub-directory of the Oracle Data Integrator installation folder.

Knowledge Modules Reference Guide 13/116
Hyperion Financial Management
Knowledge Modules
Type Knowledge Module Description
Reverse-Engineer
RKM Hyperion Financial Management
Reverse-engineers Financial Management applications and creates data models to use as targets or sources in Oracle Data Integrator interfaces.
Integrate IKM SQL to Hyperion Financial Management Data
Integrates data into Financial Management applications.
Integrate IKM SQL to Hyperion Financial Management Dimension
Integrates metadata into Financial Management applications.
Load LKM Hyperion Financial Management Data to SQL
Loads data from a Financial Management application to any SQL compliant database used as a staging area.
This Knowledge Module will not work if you change the column names of the HFMData data store reverse engineered by the RKM Hyperion Financial Management Knowledge Module.
Load LKM Hyperion Financial Management Members To SQL
Loads member lists from a Financial Management application to any SQL compliant database used as a staging area.
Platform Support The Oracle Data Integrator Hyperion Financial Management Knowledge Modules are certified for Hyperion 11.1.1.
Specific Requirements Please refer to the following documentation detailing the specific requirements for the Financial Management KMs:
� Oracle Data Integrator Adapter for Hyperion Financial Management Readme
� Oracle Data Integrator Adapter for Hyperion Financial Management Getting Started
� Oracle Data Integrator Adapter for Hyperion Financial Management User's Guide
The sample files listed in the Oracle Data Integrator Adapter for Hyperion Financial Management Getting Started Guide are available in the /demo/hyperion/ sub-directory of the Oracle Data Integrator installation folder.
Knowledge Modules Reference Guide 14/116
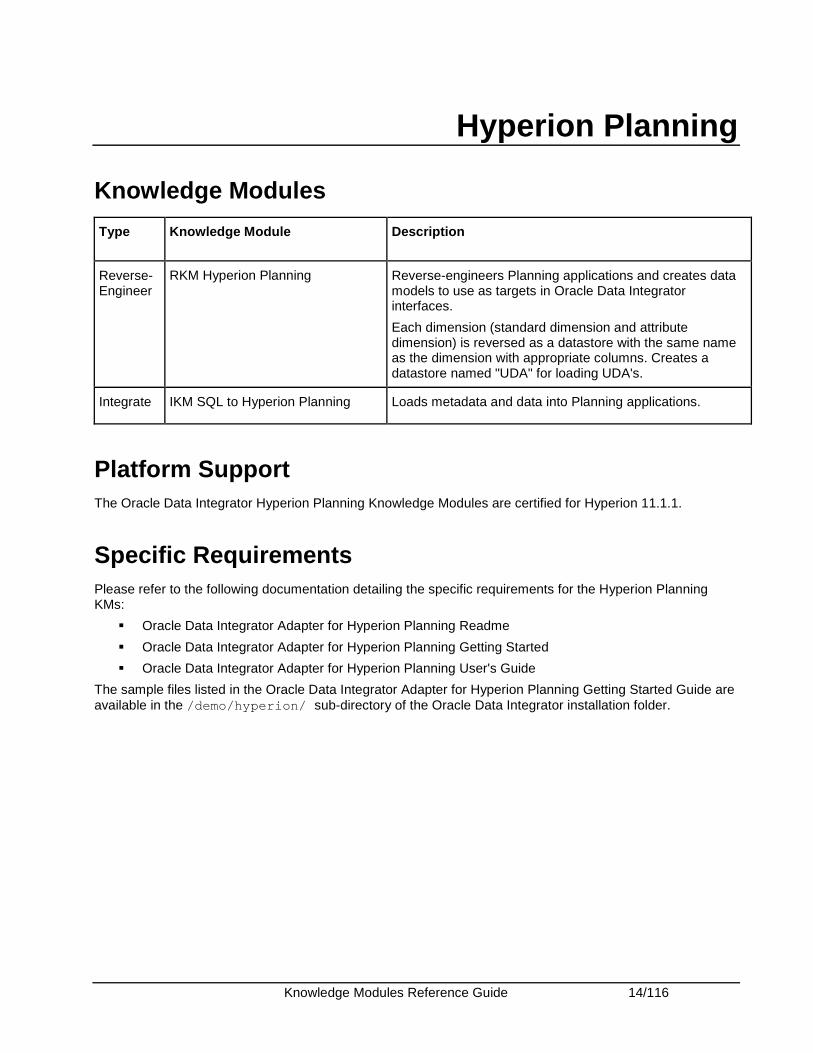
Hyperion Planning
Knowledge Modules
Type Knowledge Module Description
Reverse-Engineer
RKM Hyperion Planning Reverse-engineers Planning applications and creates data models to use as targets in Oracle Data Integrator interfaces.
Each dimension (standard dimension and attribute dimension) is reversed as a datastore with the same name as the dimension with appropriate columns. Creates a datastore named "UDA" for loading UDA's.
Integrate IKM SQL to Hyperion Planning Loads metadata and data into Planning applications.
Platform Support The Oracle Data Integrator Hyperion Planning Knowledge Modules are certified for Hyperion 11.1.1.
Specific Requirements Please refer to the following documentation detailing the specific requirements for the Hyperion Planning KMs:
� Oracle Data Integrator Adapter for Hyperion Planning Readme
� Oracle Data Integrator Adapter for Hyperion Planning Getting Started
� Oracle Data Integrator Adapter for Hyperion Planning User's Guide
The sample files listed in the Oracle Data Integrator Adapter for Hyperion Planning Getting Started Guide are available in the /demo/hyperion/ sub-directory of the Oracle Data Integrator installation folder.
Knowledge Modules Reference Guide 15/116
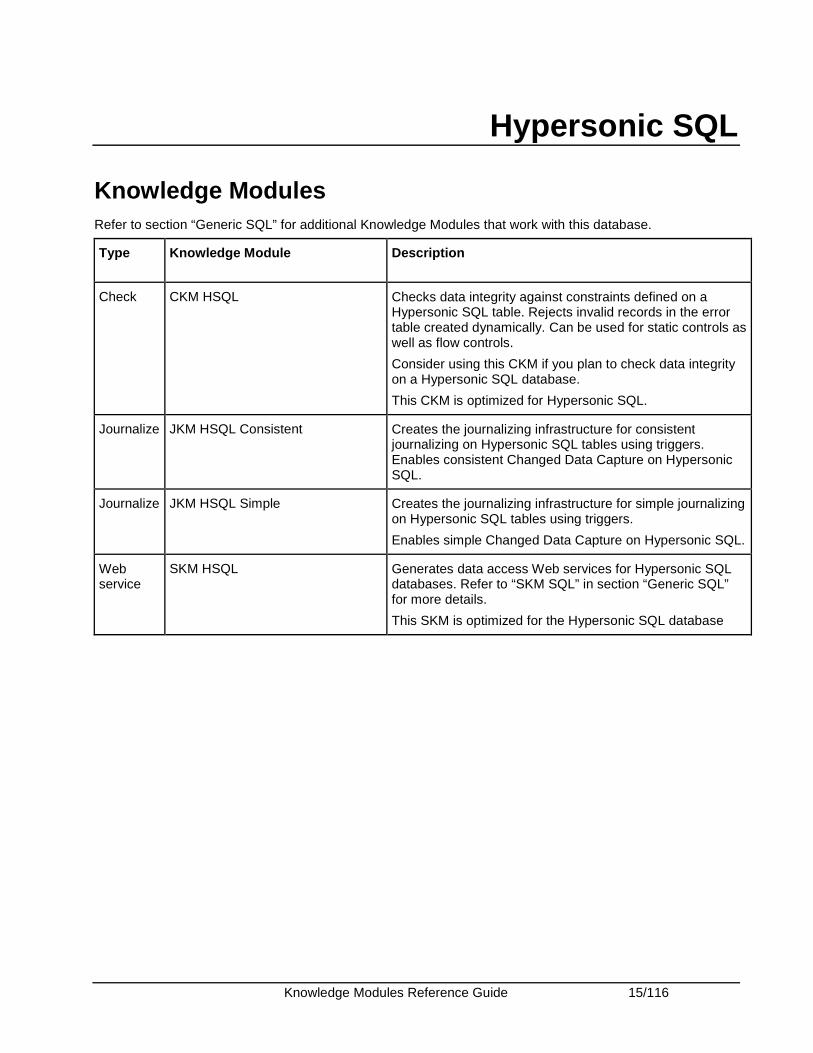
Hypersonic SQL
Knowledge Modules Refer to section “Generic SQL” for additional Knowledge Modules that work with this database.
Type Knowledge Module Description
Check CKM HSQL Checks data integrity against constraints defined on a Hypersonic SQL table. Rejects invalid records in the error table created dynamically. Can be used for static controls as well as flow controls.
Consider using this CKM if you plan to check data integrity on a Hypersonic SQL database.
This CKM is optimized for Hypersonic SQL.
Journalize JKM HSQL Consistent Creates the journalizing infrastructure for consistent journalizing on Hypersonic SQL tables using triggers. Enables consistent Changed Data Capture on Hypersonic SQL.
Journalize JKM HSQL Simple Creates the journalizing infrastructure for simple journalizing on Hypersonic SQL tables using triggers.
Enables simple Changed Data Capture on Hypersonic SQL.
Web service
SKM HSQL Generates data access Web services for Hypersonic SQL databases. Refer to “SKM SQL” in section “Generic SQL” for more details.
This SKM is optimized for the Hypersonic SQL database
Knowledge Modules Reference Guide 16/116
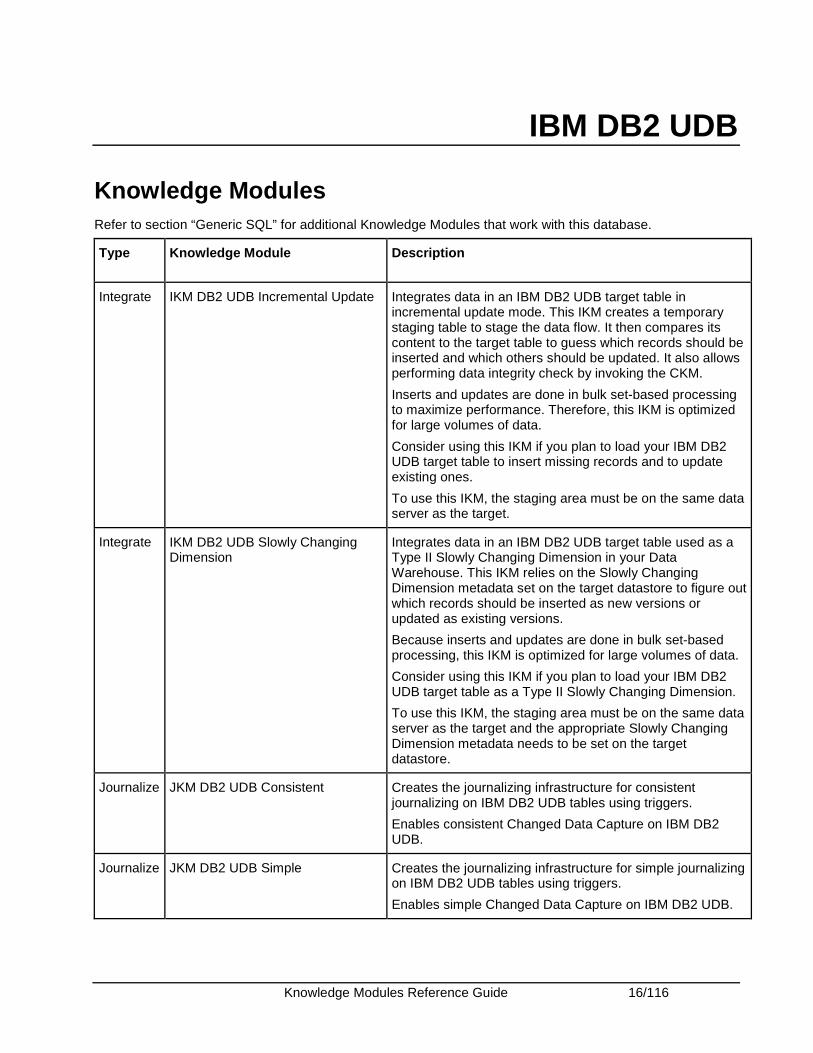
IBM DB2 UDB
Knowledge Modules Refer to section “Generic SQL” for additional Knowledge Modules that work with this database.
Type Knowledge Module Description
Integrate IKM DB2 UDB Incremental Update Integrates data in an IBM DB2 UDB target table in incremental update mode. This IKM creates a temporary staging table to stage the data flow. It then compares its content to the target table to guess which records should be inserted and which others should be updated. It also allows performing data integrity check by invoking the CKM.
Inserts and updates are done in bulk set-based processing to maximize performance. Therefore, this IKM is optimized for large volumes of data.
Consider using this IKM if you plan to load your IBM DB2 UDB target table to insert missing records and to update existing ones.
To use this IKM, the staging area must be on the same data server as the target.
Integrate IKM DB2 UDB Slowly Changing Dimension
Integrates data in an IBM DB2 UDB target table used as a Type II Slowly Changing Dimension in your Data Warehouse. This IKM relies on the Slowly Changing Dimension metadata set on the target datastore to figure out which records should be inserted as new versions or updated as existing versions.
Because inserts and updates are done in bulk set-based processing, this IKM is optimized for large volumes of data.
Consider using this IKM if you plan to load your IBM DB2 UDB target table as a Type II Slowly Changing Dimension.
To use this IKM, the staging area must be on the same data server as the target and the appropriate Slowly Changing Dimension metadata needs to be set on the target datastore.
Journalize JKM DB2 UDB Consistent Creates the journalizing infrastructure for consistent journalizing on IBM DB2 UDB tables using triggers.
Enables consistent Changed Data Capture on IBM DB2 UDB.
Journalize JKM DB2 UDB Simple Creates the journalizing infrastructure for simple journalizing on IBM DB2 UDB tables using triggers.
Enables simple Changed Data Capture on IBM DB2 UDB.
Knowledge Modules Reference Guide 17/116
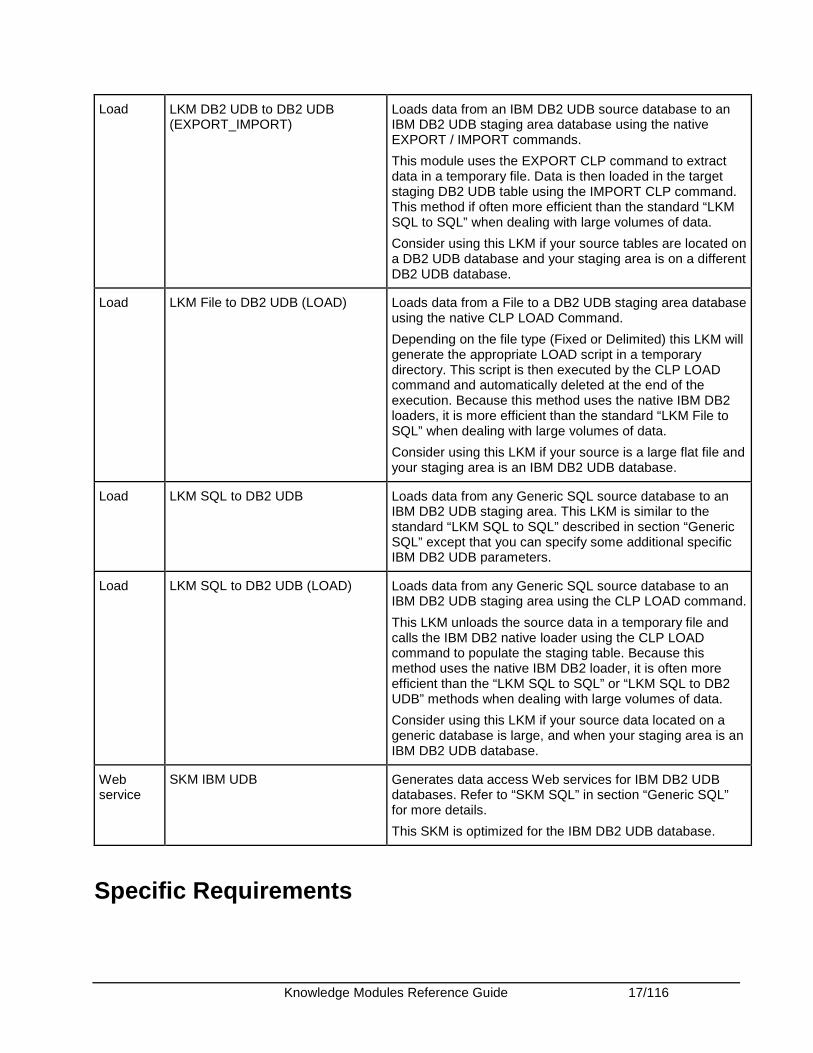
Load LKM DB2 UDB to DB2 UDB (EXPORT_IMPORT)
Loads data from an IBM DB2 UDB source database to an IBM DB2 UDB staging area database using the native EXPORT / IMPORT commands.
This module uses the EXPORT CLP command to extract data in a temporary file. Data is then loaded in the target staging DB2 UDB table using the IMPORT CLP command. This method if often more efficient than the standard “LKM SQL to SQL” when dealing with large volumes of data.
Consider using this LKM if your source tables are located on a DB2 UDB database and your staging area is on a different DB2 UDB database.
Load LKM File to DB2 UDB (LOAD) Loads data from a File to a DB2 UDB staging area database using the native CLP LOAD Command.
Depending on the file type (Fixed or Delimited) this LKM will generate the appropriate LOAD script in a temporary directory. This script is then executed by the CLP LOAD command and automatically deleted at the end of the execution. Because this method uses the native IBM DB2 loaders, it is more efficient than the standard “LKM File to SQL” when dealing with large volumes of data.
Consider using this LKM if your source is a large flat file and your staging area is an IBM DB2 UDB database.
Load LKM SQL to DB2 UDB Loads data from any Generic SQL source database to an IBM DB2 UDB staging area. This LKM is similar to the standard “LKM SQL to SQL” described in section “Generic SQL” except that you can specify some additional specific IBM DB2 UDB parameters.
Load LKM SQL to DB2 UDB (LOAD) Loads data from any Generic SQL source database to an IBM DB2 UDB staging area using the CLP LOAD command.
This LKM unloads the source data in a temporary file and calls the IBM DB2 native loader using the CLP LOAD command to populate the staging table. Because this method uses the native IBM DB2 loader, it is often more efficient than the “LKM SQL to SQL” or “LKM SQL to DB2 UDB” methods when dealing with large volumes of data.
Consider using this LKM if your source data located on a generic database is large, and when your staging area is an IBM DB2 UDB database.
Web service
SKM IBM UDB Generates data access Web services for IBM DB2 UDB databases. Refer to “SKM SQL” in section “Generic SQL” for more details.
This SKM is optimized for the IBM DB2 UDB database.
Specific Requirements

Knowledge Modules Reference Guide 18/116
Some of the Knowledge Modules for IBM DB2 UDB use operating system calls to invoke the IBM CLP command processor to perform efficient loads. The following restrictions apply when using such Knowledge Modules:
1. The IBM DB2 UDB Command Line Processor (CLP) as well as the DB2 UDB Connect Software must be installed on the machine running the Oracle Data Integrator Agent.
2. The server names defined in the Topology must match the IBM DB2 UDB connect strings used for these servers.
Refer to the IBM DB2 documentation for additional information on these topics.
Knowledge Modules Reference Guide 19/116
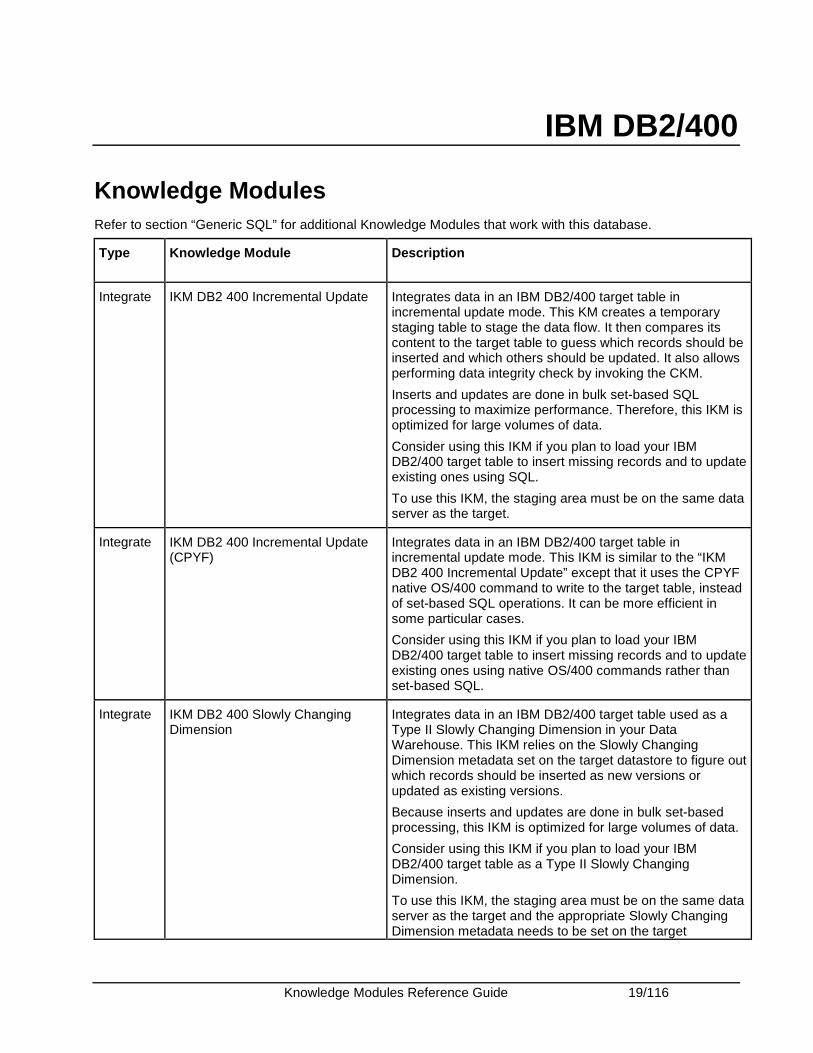
IBM DB2/400
Knowledge Modules Refer to section “Generic SQL” for additional Knowledge Modules that work with this database.
Type Knowledge Module Description
Integrate IKM DB2 400 Incremental Update Integrates data in an IBM DB2/400 target table in incremental update mode. This KM creates a temporary staging table to stage the data flow. It then compares its content to the target table to guess which records should be inserted and which others should be updated. It also allows performing data integrity check by invoking the CKM.
Inserts and updates are done in bulk set-based SQL processing to maximize performance. Therefore, this IKM is optimized for large volumes of data.
Consider using this IKM if you plan to load your IBM DB2/400 target table to insert missing records and to update existing ones using SQL.
To use this IKM, the staging area must be on the same data server as the target.
Integrate IKM DB2 400 Incremental Update (CPYF)
Integrates data in an IBM DB2/400 target table in incremental update mode. This IKM is similar to the “IKM DB2 400 Incremental Update” except that it uses the CPYF native OS/400 command to write to the target table, instead of set-based SQL operations. It can be more efficient in some particular cases.
Consider using this IKM if you plan to load your IBM DB2/400 target table to insert missing records and to update existing ones using native OS/400 commands rather than set-based SQL.
Integrate IKM DB2 400 Slowly Changing Dimension
Integrates data in an IBM DB2/400 target table used as a Type II Slowly Changing Dimension in your Data Warehouse. This IKM relies on the Slowly Changing Dimension metadata set on the target datastore to figure out which records should be inserted as new versions or updated as existing versions.
Because inserts and updates are done in bulk set-based processing, this IKM is optimized for large volumes of data.
Consider using this IKM if you plan to load your IBM DB2/400 target table as a Type II Slowly Changing Dimension.
To use this IKM, the staging area must be on the same data server as the target and the appropriate Slowly Changing Dimension metadata needs to be set on the target
Knowledge Modules Reference Guide 20/116
datastore.
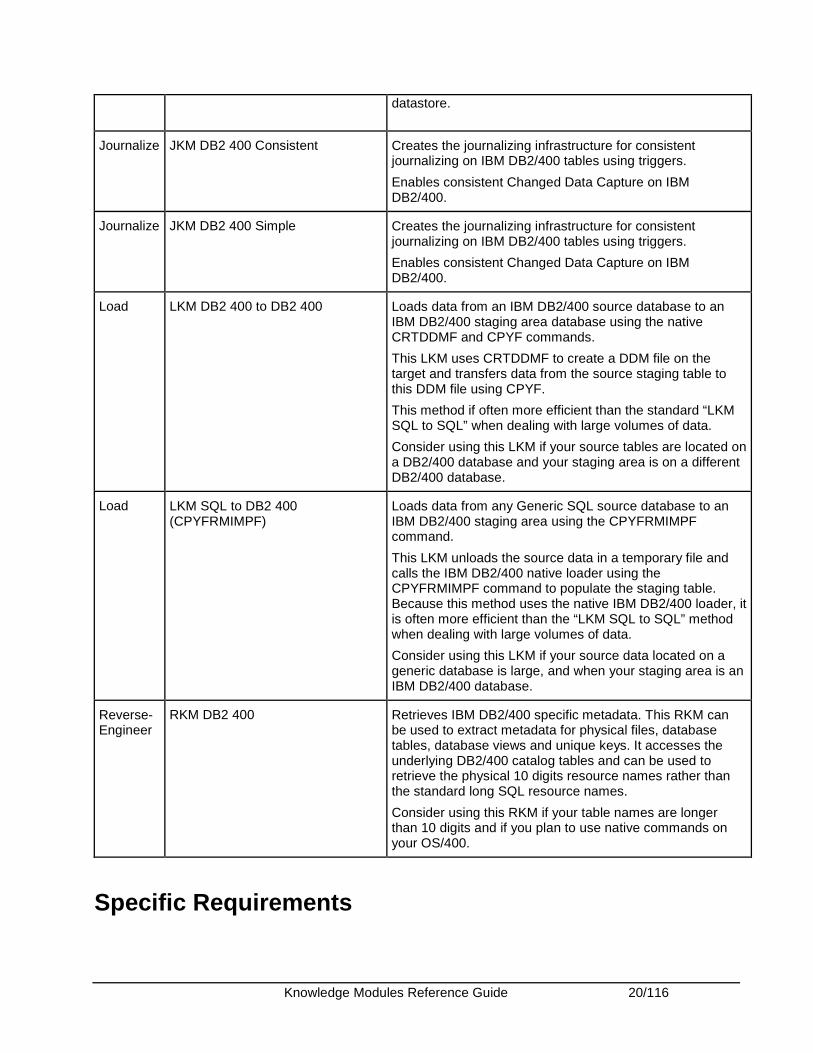
Journalize JKM DB2 400 Consistent Creates the journalizing infrastructure for consistent journalizing on IBM DB2/400 tables using triggers.
Enables consistent Changed Data Capture on IBM DB2/400.
Journalize JKM DB2 400 Simple Creates the journalizing infrastructure for consistent journalizing on IBM DB2/400 tables using triggers.
Enables consistent Changed Data Capture on IBM DB2/400.
Load LKM DB2 400 to DB2 400 Loads data from an IBM DB2/400 source database to an IBM DB2/400 staging area database using the native CRTDDMF and CPYF commands.
This LKM uses CRTDDMF to create a DDM file on the target and transfers data from the source staging table to this DDM file using CPYF.
This method if often more efficient than the standard “LKM SQL to SQL” when dealing with large volumes of data.
Consider using this LKM if your source tables are located on a DB2/400 database and your staging area is on a different DB2/400 database.
Load LKM SQL to DB2 400 (CPYFRMIMPF)
Loads data from any Generic SQL source database to an IBM DB2/400 staging area using the CPYFRMIMPF command.
This LKM unloads the source data in a temporary file and calls the IBM DB2/400 native loader using the CPYFRMIMPF command to populate the staging table. Because this method uses the native IBM DB2/400 loader, it is often more efficient than the “LKM SQL to SQL” method when dealing with large volumes of data.
Consider using this LKM if your source data located on a generic database is large, and when your staging area is an IBM DB2/400 database.
Reverse-Engineer
RKM DB2 400 Retrieves IBM DB2/400 specific metadata. This RKM can be used to extract metadata for physical files, database tables, database views and unique keys. It accesses the underlying DB2/400 catalog tables and can be used to retrieve the physical 10 digits resource names rather than the standard long SQL resource names.
Consider using this RKM if your table names are longer than 10 digits and if you plan to use native commands on your OS/400.
Specific Requirements

Knowledge Modules Reference Guide 21/116
Some of the Knowledge Modules for IBM DB2/400 use operating system calls to invoke the IBM iSeries commands to perform efficient loads. The following restrictions apply when using such Knowledge Modules:
1. OS/400 commands accept only 10 digits table names. Make sure to use the specific “RKM DB2/400” to retrieve the physical table names for your datastores rather than the SQL table names.
2. Oracle Data Integrator agent must be installed on the target iSeries machine. Refer to the installation guide for the appropriate procedure.
Knowledge Modules Reference Guide 22/116
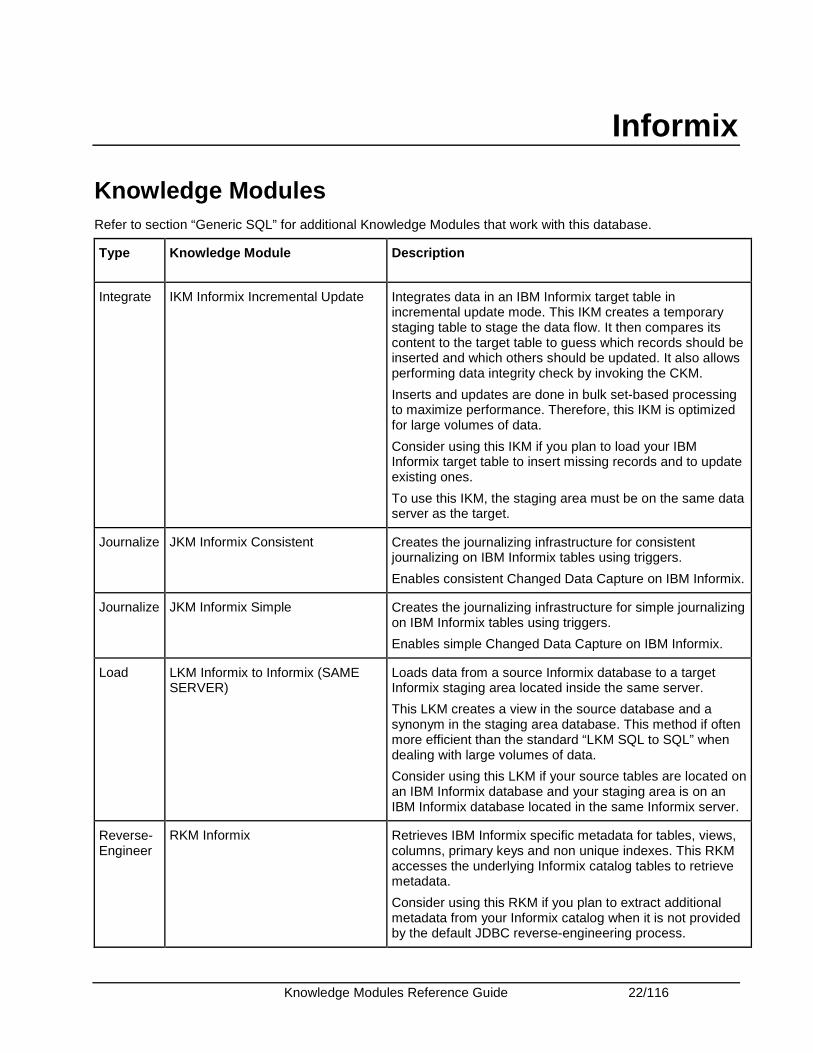
Informix
Knowledge Modules Refer to section “Generic SQL” for additional Knowledge Modules that work with this database.
Type Knowledge Module Description
Integrate IKM Informix Incremental Update Integrates data in an IBM Informix target table in incremental update mode. This IKM creates a temporary staging table to stage the data flow. It then compares its content to the target table to guess which records should be inserted and which others should be updated. It also allows performing data integrity check by invoking the CKM.
Inserts and updates are done in bulk set-based processing to maximize performance. Therefore, this IKM is optimized for large volumes of data.
Consider using this IKM if you plan to load your IBM Informix target table to insert missing records and to update existing ones.
To use this IKM, the staging area must be on the same data server as the target.
Journalize JKM Informix Consistent Creates the journalizing infrastructure for consistent journalizing on IBM Informix tables using triggers.
Enables consistent Changed Data Capture on IBM Informix.
Journalize JKM Informix Simple Creates the journalizing infrastructure for simple journalizing on IBM Informix tables using triggers.
Enables simple Changed Data Capture on IBM Informix.
Load LKM Informix to Informix (SAME SERVER)
Loads data from a source Informix database to a target Informix staging area located inside the same server.
This LKM creates a view in the source database and a synonym in the staging area database. This method if often more efficient than the standard “LKM SQL to SQL” when dealing with large volumes of data.
Consider using this LKM if your source tables are located on an IBM Informix database and your staging area is on an IBM Informix database located in the same Informix server.
Reverse-Engineer
RKM Informix Retrieves IBM Informix specific metadata for tables, views, columns, primary keys and non unique indexes. This RKM accesses the underlying Informix catalog tables to retrieve metadata.
Consider using this RKM if you plan to extract additional metadata from your Informix catalog when it is not provided by the default JDBC reverse-engineering process.

Knowledge Modules Reference Guide 23/116
Reverse-Engineer
RKM Informix SE Retrieves IBM Informix SE specific metadata for tables, views, columns, primary keys and non unique indexes. This RKM accesses the underlying Informix SE catalog tables to retrieve metadata.
Consider using this RKM if you plan to extract additional metadata from your Informix SE catalog when it is not provided by the default JDBC reverse-engineering process.
Web service
SKM Informix Generates data access Web services for IBM Informix databases. Refer to “SKM SQL” in section “Generic SQL” for more details.
This SKM is optimized for the IBM Informix database.
Knowledge Modules Reference Guide 24/116
JD Edwards EnterpriseOne
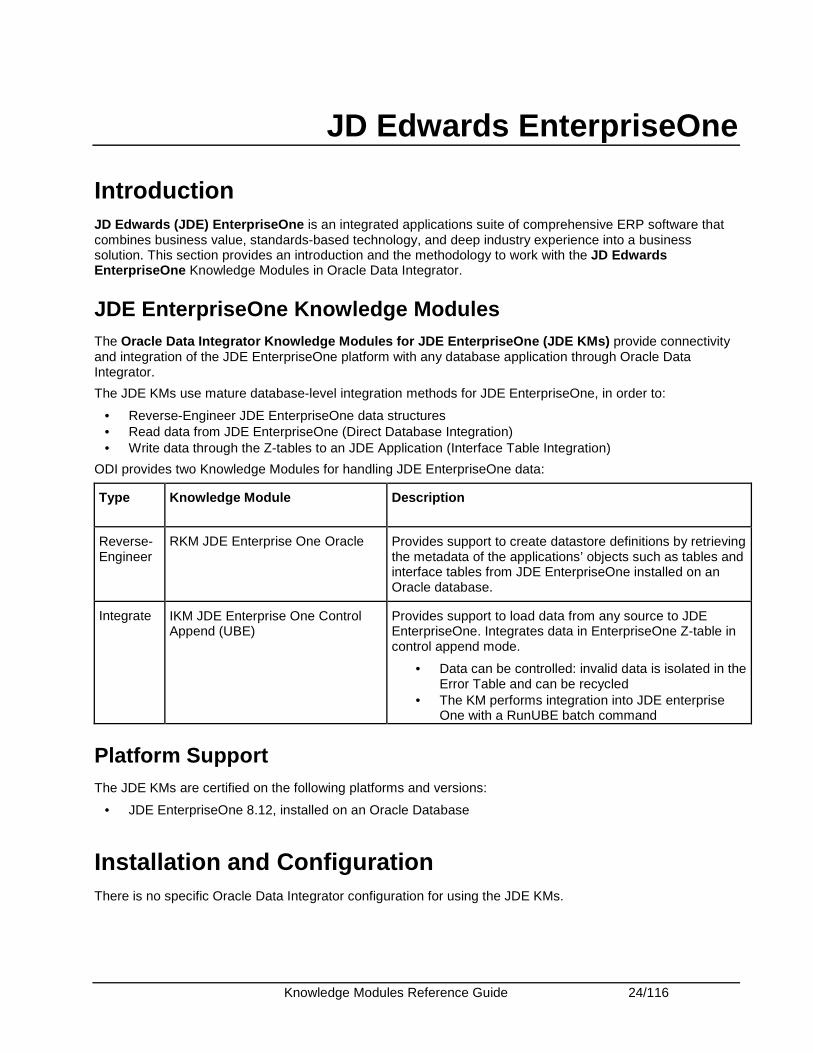
Introduction JD Edwards (JDE) EnterpriseOne is an integrated applications suite of comprehensive ERP software that combines business value, standards-based technology, and deep industry experience into a business solution. This section provides an introduction and the methodology to work with the JD Edwards EnterpriseOne Knowledge Modules in Oracle Data Integrator.
JDE EnterpriseOne Knowledge Modules The Oracle Data Integrator Knowledge Modules for JDE EnterpriseOne (JDE KMs) provide connectivity and integration of the JDE EnterpriseOne platform with any database application through Oracle Data Integrator.
The JDE KMs use mature database-level integration methods for JDE EnterpriseOne, in order to:
• Reverse-Engineer JDE EnterpriseOne data structures • Read data from JDE EnterpriseOne (Direct Database Integration) • Write data through the Z-tables to an JDE Application (Interface Table Integration)
ODI provides two Knowledge Modules for handling JDE EnterpriseOne data:
Type Knowledge Module Description
Reverse-Engineer
RKM JDE Enterprise One Oracle Provides support to create datastore definitions by retrieving the metadata of the applications’ objects such as tables and interface tables from JDE EnterpriseOne installed on an Oracle database.
Integrate IKM JDE Enterprise One Control Append (UBE)
Provides support to load data from any source to JDE EnterpriseOne. Integrates data in EnterpriseOne Z-table in control append mode.
• Data can be controlled: invalid data is isolated in the Error Table and can be recycled
• The KM performs integration into JDE enterprise One with a RunUBE batch command
Platform Support The JDE KMs are certified on the following platforms and versions:
• JDE EnterpriseOne 8.12, installed on an Oracle Database
Installation and Configuration There is no specific Oracle Data Integrator configuration for using the JDE KMs.
Knowledge Modules Reference Guide 25/116
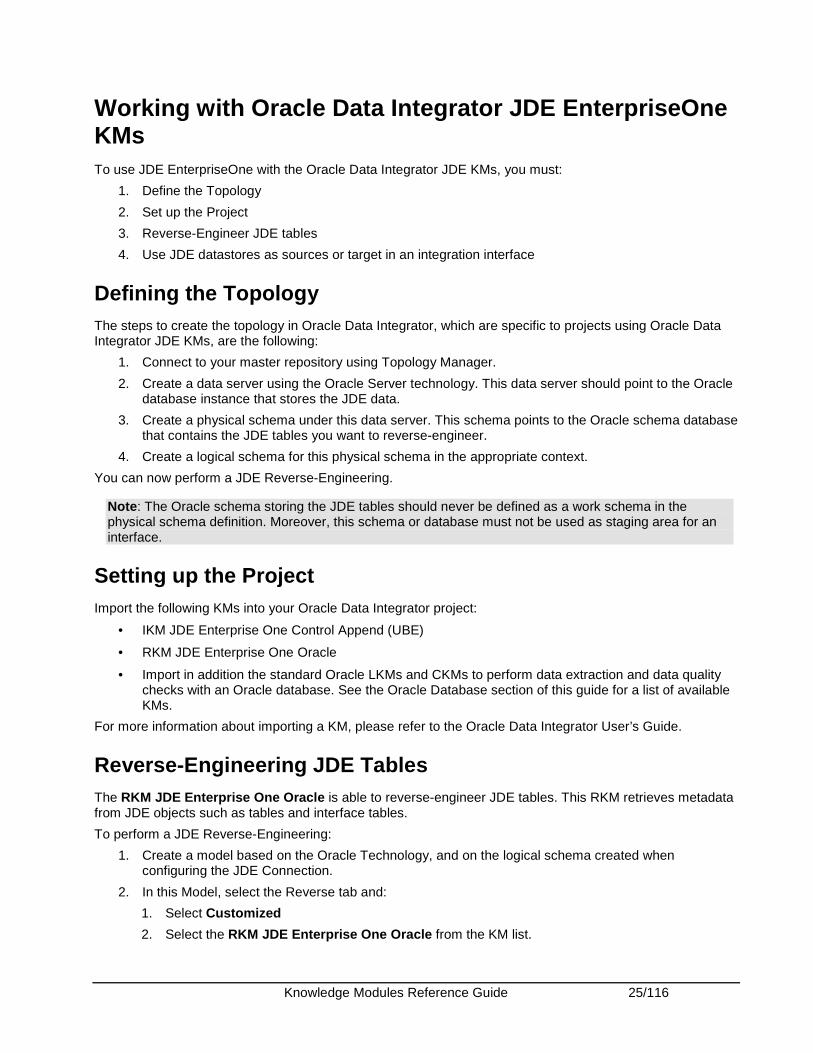
Working with Oracle Data Integrator JDE EnterpriseOne KMs To use JDE EnterpriseOne with the Oracle Data Integrator JDE KMs, you must:
1. Define the Topology
2. Set up the Project
3. Reverse-Engineer JDE tables
4. Use JDE datastores as sources or target in an integration interface
Defining the Topology The steps to create the topology in Oracle Data Integrator, which are specific to projects using Oracle Data Integrator JDE KMs, are the following:
1. Connect to your master repository using Topology Manager.
2. Create a data server using the Oracle Server technology. This data server should point to the Oracle database instance that stores the JDE data.
3. Create a physical schema under this data server. This schema points to the Oracle schema database that contains the JDE tables you want to reverse-engineer.
4. Create a logical schema for this physical schema in the appropriate context.
You can now perform a JDE Reverse-Engineering.
Note: The Oracle schema storing the JDE tables should never be defined as a work schema in the physical schema definition. Moreover, this schema or database must not be used as staging area for an interface.
Setting up the Project Import the following KMs into your Oracle Data Integrator project:
• IKM JDE Enterprise One Control Append (UBE)
• RKM JDE Enterprise One Oracle
• Import in addition the standard Oracle LKMs and CKMs to perform data extraction and data quality checks with an Oracle database. See the Oracle Database section of this guide for a list of available KMs.
For more information about importing a KM, please refer to the Oracle Data Integrator User’s Guide.
Reverse-Engineering JDE Tables The RKM JDE Enterprise One Oracle is able to reverse-engineer JDE tables. This RKM retrieves metadata from JDE objects such as tables and interface tables.
To perform a JDE Reverse-Engineering:
1. Create a model based on the Oracle Technology, and on the logical schema created when configuring the JDE Connection.
2. In this Model, select the Reverse tab and:
1. Select Customized
2. Select the RKM JDE Enterprise One Oracle from the KM list.

Knowledge Modules Reference Guide 26/116
3. Set the RKM options as follows:
• JDE_CENTRAL_OBJECTS: Specify the Oracle Schema storing the JDE Central objects
• JDE_DATA_DICTIONARY: Specify the Oracle Schema storing the JDE data dictionary
• JDE_OBJECT_LIBRARIAN: Specify the Oracle schema storing the JDE Object librarian
• JDE_CONTROL_TABLES: Specify the Control Tables schema
Note: To find the schema required in the options JDE_CENTRAL_OBJECTS, JDE_DATA_DICTIONARY, JDE_OBJECT_LIBRARIAN, and JDE_CONTROL_TABLES you can either ask your application manager or query the table F98611(Data Source Master).
• JDE_DATA_TABLES: Set this option to YES to reverse-engineer data tables
• JDE_Z_TABLES: Set this option to YES to reverse-engineer interface tables (Z-tables)
• JDE_MODULES: Indicate the JDE System Short Name, for example 00 for Foundation Environment, 01 for Address Book, and 02 for Electronic Mail.
• JDE_LANGUAGE: Indicate the language used for retrieving object descriptions, for example E for English, F for French, and S for Spanish.
4. Specify the reverse mask in the Mask field in order to select the tables to reverse. The Mask field, in the Reverse tab, filters reverse-engineered objects based on their name. The Mask field must not be empty and must contain at least the percentage symbol (%).
5. Click Apply, and then click Reverse.
6. You can follow the reverse-engineering process in the Execution Log.
Note: The reverse-engineering process may take several minutes. Please wait until the reversed datastores appear under the reversed module in the tree of the execution Log.
The reverse-engineering process returns the datastores grouped per module. You can then use these datastores as a source or a target of your interfaces.
Using JDE as a Source in an Integration Interface After performing a reverse-engineering using the RKM JDE Enterprise One Oracle, you can use JDE data tables as a source of an interface to extract data from the JDE application and integrate them into another system (Data warehouse, other database...). Using JDE as a source in these conditions is the same as using Oracle database as a source in an interface. The standard Oracle KMs can be used for this purpose.
Using JDE Z-Tables as a Target in an Integration Interface After performing a reverse-engineering using the RKM JDE Enterprise One Oracle, you can use JDE Z-tables as a target of an interface to load data from any system to the JDE application with the IKM JDE Enterprise One Control Append (UBE).
Integrating Data into JDE with the IKM JDE Enterprise One Control Append (UBE) The integration of data into JDE Enterprise One is performed in two steps: during the first step a set of Z-tables (staging table) is loaded, and during the second step the RunUBE command is launched to integrate the data from these Z-tables into JDE Enterprise One.
Knowledge Modules Reference Guide 27/116
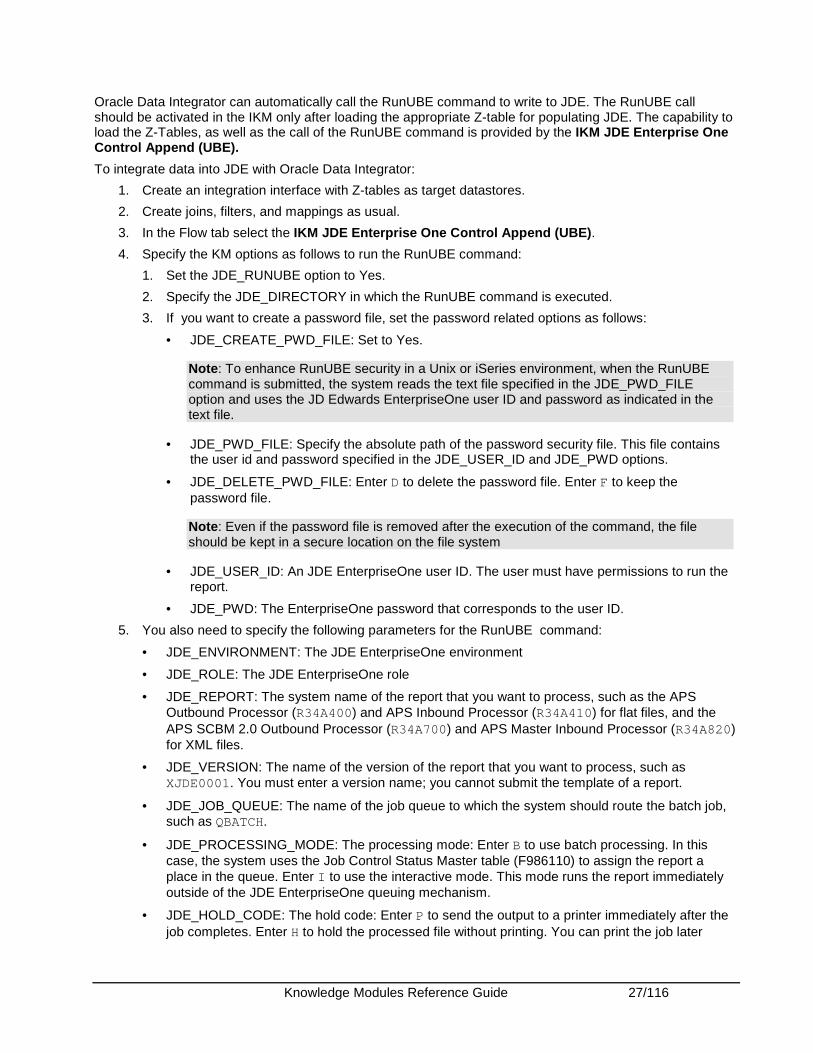
Oracle Data Integrator can automatically call the RunUBE command to write to JDE. The RunUBE call should be activated in the IKM only after loading the appropriate Z-table for populating JDE. The capability to load the Z-Tables, as well as the call of the RunUBE command is provided by the IKM JDE Enterprise One Control Append (UBE).
To integrate data into JDE with Oracle Data Integrator:
1. Create an integration interface with Z-tables as target datastores.
2. Create joins, filters, and mappings as usual.
3. In the Flow tab select the IKM JDE Enterprise One Control Append (UBE).
4. Specify the KM options as follows to run the RunUBE command:
1. Set the JDE_RUNUBE option to Yes.
2. Specify the JDE_DIRECTORY in which the RunUBE command is executed.
3. If you want to create a password file, set the password related options as follows:
• JDE_CREATE_PWD_FILE: Set to Yes.
Note: To enhance RunUBE security in a Unix or iSeries environment, when the RunUBE command is submitted, the system reads the text file specified in the JDE_PWD_FILE option and uses the JD Edwards EnterpriseOne user ID and password as indicated in the text file.
• JDE_PWD_FILE: Specify the absolute path of the password security file. This file contains the user id and password specified in the JDE_USER_ID and JDE_PWD options.
• JDE_DELETE_PWD_FILE: Enter D to delete the password file. Enter F to keep the password file.
Note: Even if the password file is removed after the execution of the command, the file should be kept in a secure location on the file system
• JDE_USER_ID: An JDE EnterpriseOne user ID. The user must have permissions to run the report.
• JDE_PWD: The EnterpriseOne password that corresponds to the user ID.
5. You also need to specify the following parameters for the RunUBE command:
• JDE_ENVIRONMENT: The JDE EnterpriseOne environment
• JDE_ROLE: The JDE EnterpriseOne role
• JDE_REPORT: The system name of the report that you want to process, such as the APS Outbound Processor (R34A400) and APS Inbound Processor (R34A410) for flat files, and the APS SCBM 2.0 Outbound Processor (R34A700) and APS Master Inbound Processor (R34A820) for XML files.
• JDE_VERSION: The name of the version of the report that you want to process, such as XJDE0001. You must enter a version name; you cannot submit the template of a report.
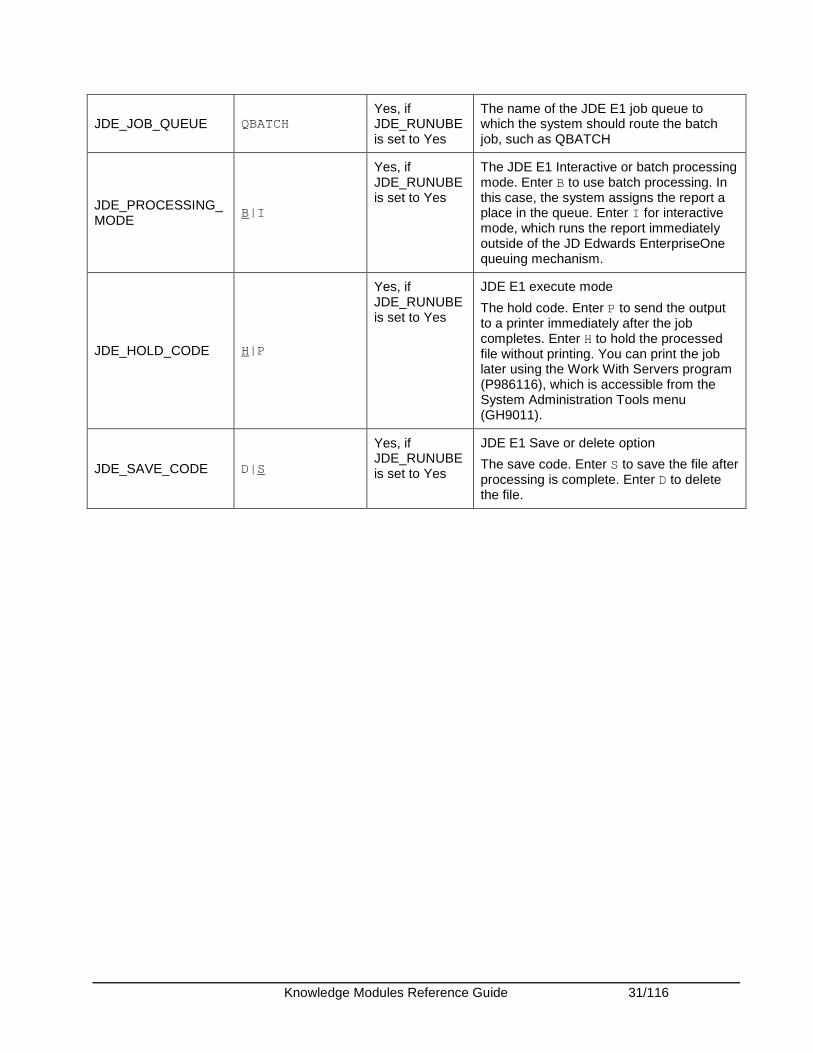
• JDE_JOB_QUEUE: The name of the job queue to which the system should route the batch job, such as QBATCH.
• JDE_PROCESSING_MODE: The processing mode: Enter B to use batch processing. In this case, the system uses the Job Control Status Master table (F986110) to assign the report a place in the queue. Enter I to use the interactive mode. This mode runs the report immediately outside of the JDE EnterpriseOne queuing mechanism.
• JDE_HOLD_CODE: The hold code: Enter P to send the output to a printer immediately after the job completes. Enter H to hold the processed file without printing. You can print the job later
Knowledge Modules Reference Guide 28/116
using the Work With Servers program (P986116), which is accessible from the System Administration Tools menu (GH9011).
• JDE_SAVE_CODE: The save code: Enter S to save the file after processing is complete. The delete option (D) is reserved for future use. Currently, the delete option is disabled.
Limitations of the IKM JDE Enterprise One Control Append (UBE)
• The TRUNCATE option cannot work if the target table is referenced by another table (foreign key).
• When using the RECYCLE_ERRORS option, an Update Key must be set for your interface.
• When using this module with a journalized source table, data is automatically filtered to not include source deletions.
• The FLOW_CONTROL and STATIC_CONTROL options call the Check Knowledge Module to isolate invalid data (if no CKM is set, an error occurs). Both options must be set to No when an integration interface populates a TEMPORARY target datastore.
• The RunUBE command must be executed on the JDE server.
• The Oracle Data Integrator run-time agent must be installed on this server.
• Besides the information whether the RunUBE command has been started or not, the RunUBE command does not give any further details about the execution of the program. To know more about the execution of the program you can either view the log file created by the JDE server or connect to your JDE application and look for the application View Job Status (Application = P986110, Form = W986116A).
Knowledge Module Options Reference
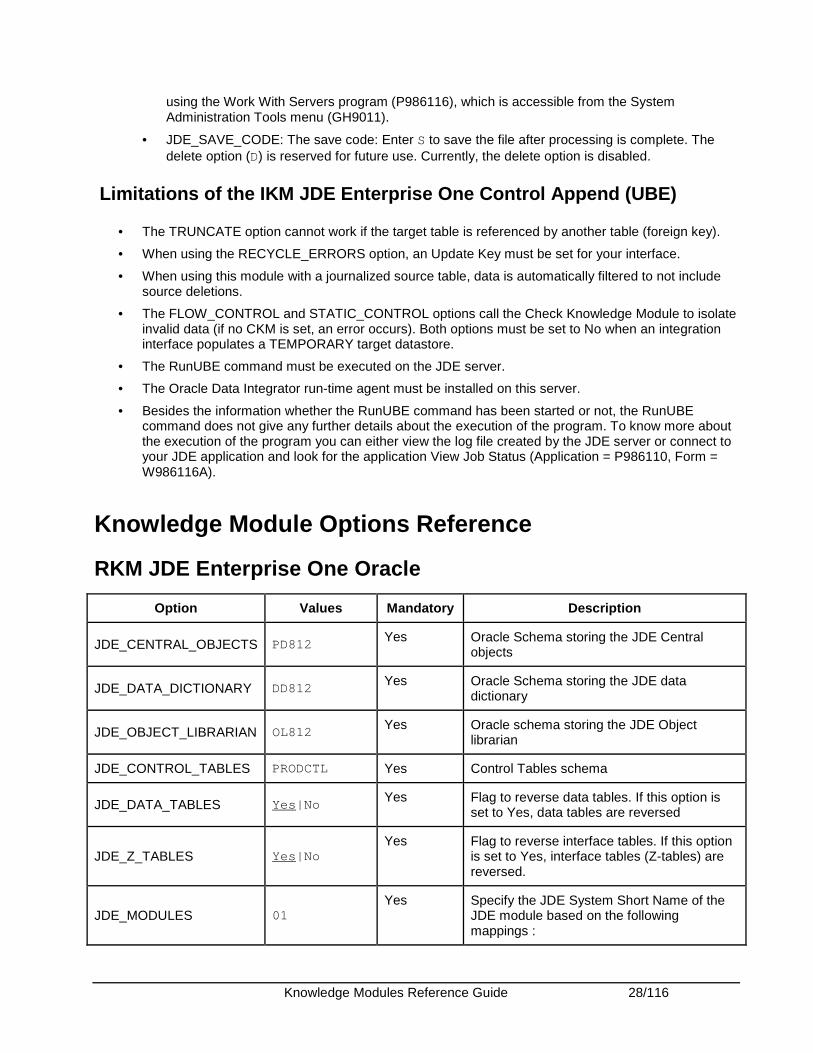
RKM JDE Enterprise One Oracle
Option Values Mandatory Description
JDE_CENTRAL_OBJECTS PD812 Yes Oracle Schema storing the JDE Central
objects
JDE_DATA_DICTIONARY DD812 Yes Oracle Schema storing the JDE data
dictionary
JDE_OBJECT_LIBRARIAN OL812 Yes Oracle schema storing the JDE Object
librarian
JDE_CONTROL_TABLES PRODCTL Yes Control Tables schema
JDE_DATA_TABLES Yes|No Yes Flag to reverse data tables. If this option is
set to Yes, data tables are reversed
JDE_Z_TABLES Yes|No Yes Flag to reverse interface tables. If this option
is set to Yes, interface tables (Z-tables) are reversed.
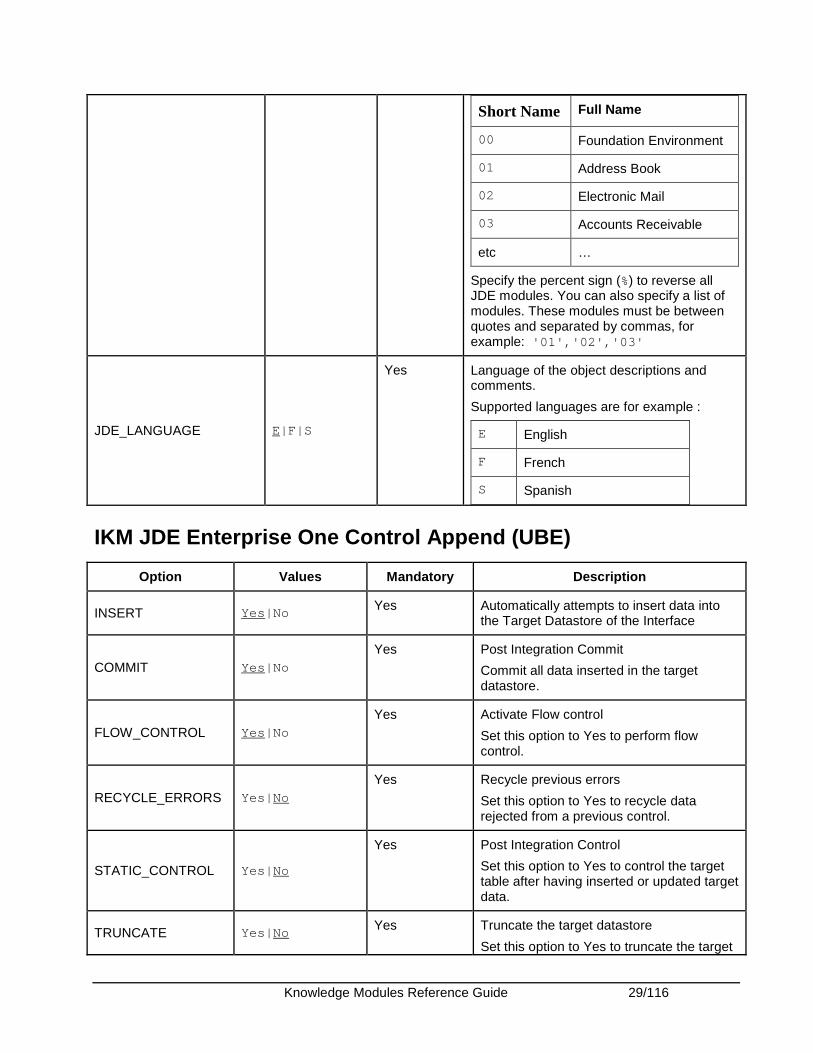
JDE_MODULES 01 Yes Specify the JDE System Short Name of the
JDE module based on the following mappings :
Knowledge Modules Reference Guide 29/116
Short Name Full Name
00 Foundation Environment
01 Address Book
02 Electronic Mail
03 Accounts Receivable
etc …
Specify the percent sign (%) to reverse all JDE modules. You can also specify a list of modules. These modules must be between quotes and separated by commas, for example: '01','02','03'
JDE_LANGUAGE E|F|S
Yes Language of the object descriptions and comments.
Supported languages are for example :
E English
F French
S Spanish
IKM JDE Enterprise One Control Append (UBE)
Option Values Mandatory Description
INSERT Yes|No Yes Automatically attempts to insert data into
the Target Datastore of the Interface
COMMIT Yes|No
Yes Post Integration Commit
Commit all data inserted in the target datastore.
FLOW_CONTROL Yes|No
Yes Activate Flow control
Set this option to Yes to perform flow control.
RECYCLE_ERRORS Yes|No
Yes Recycle previous errors
Set this option to Yes to recycle data rejected from a previous control.
STATIC_CONTROL Yes|No
Yes Post Integration Control
Set this option to Yes to control the target table after having inserted or updated target data.
TRUNCATE Yes|No Yes Truncate the target datastore
Set this option to Yes to truncate the target
Knowledge Modules Reference Guide 30/116
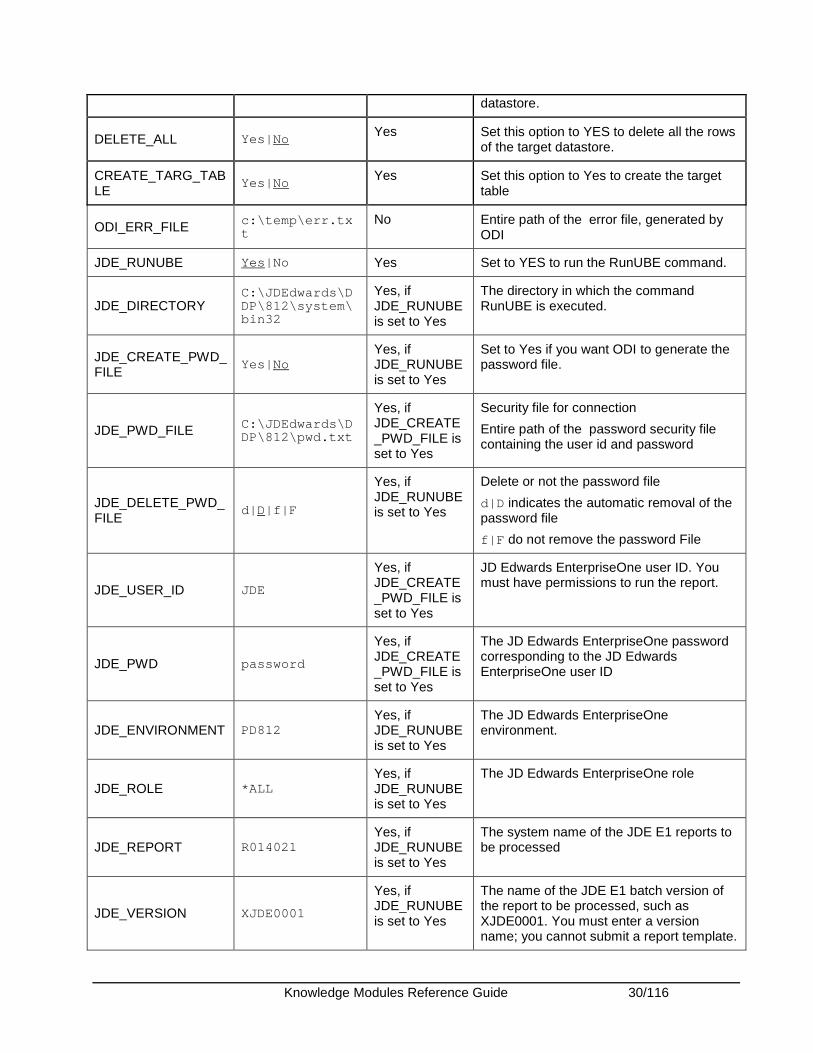
datastore.
DELETE_ALL Yes|No Yes Set this option to YES to delete all the rows
of the target datastore.
CREATE_TARG_TABLE
Yes|No Yes Set this option to Yes to create the target
table
ODI_ERR_FILE c:\temp\err.txt
No Entire path of the error file, generated by ODI
JDE_RUNUBE Yes|No Yes Set to YES to run the RunUBE command.
JDE_DIRECTORY C:\JDEdwards\DDP\812\system\bin32
Yes, if JDE_RUNUBE is set to Yes
The directory in which the command RunUBE is executed.
JDE_CREATE_PWD_FILE
Yes|No Yes, if JDE_RUNUBE is set to Yes
Set to Yes if you want ODI to generate the password file.
JDE_PWD_FILE C:\JDEdwards\DDP\812\pwd.txt
Yes, if JDE_CREATE_PWD_FILE is set to Yes
Security file for connection
Entire path of the password security file containing the user id and password
JDE_DELETE_PWD_FILE
d|D |f|F
Yes, if JDE_RUNUBE is set to Yes
Delete or not the password file
d|D indicates the automatic removal of the password file
f|F do not remove the password File
JDE_USER_ID JDE
Yes, if JDE_CREATE_PWD_FILE is set to Yes
JD Edwards EnterpriseOne user ID. You must have permissions to run the report.
JDE_PWD password
Yes, if JDE_CREATE_PWD_FILE is set to Yes
The JD Edwards EnterpriseOne password corresponding to the JD Edwards EnterpriseOne user ID
JDE_ENVIRONMENT PD812 Yes, if JDE_RUNUBE is set to Yes
The JD Edwards EnterpriseOne environment.
JDE_ROLE *ALL Yes, if JDE_RUNUBE is set to Yes
The JD Edwards EnterpriseOne role
JDE_REPORT R014021 Yes, if JDE_RUNUBE is set to Yes
The system name of the JDE E1 reports to be processed
JDE_VERSION XJDE0001
Yes, if JDE_RUNUBE is set to Yes
The name of the JDE E1 batch version of the report to be processed, such as XJDE0001. You must enter a version name; you cannot submit a report template.
Knowledge Modules Reference Guide 31/116
JDE_JOB_QUEUE QBATCH Yes, if JDE_RUNUBE is set to Yes
The name of the JDE E1 job queue to which the system should route the batch job, such as QBATCH
JDE_PROCESSING_MODE
B|I
Yes, if JDE_RUNUBE is set to Yes
The JDE E1 Interactive or batch processing mode. Enter B to use batch processing. In this case, the system assigns the report a place in the queue. Enter I for interactive mode, which runs the report immediately outside of the JD Edwards EnterpriseOne queuing mechanism.
JDE_HOLD_CODE H|P
Yes, if JDE_RUNUBE is set to Yes
JDE E1 execute mode
The hold code. Enter P to send the output to a printer immediately after the job completes. Enter H to hold the processed file without printing. You can print the job later using the Work With Servers program (P986116), which is accessible from the System Administration Tools menu (GH9011).
JDE_SAVE_CODE D|S
Yes, if JDE_RUNUBE is set to Yes
JDE E1 Save or delete option
The save code. Enter S to save the file after processing is complete. Enter D to delete the file.
Knowledge Modules Reference Guide 32/116
JMS
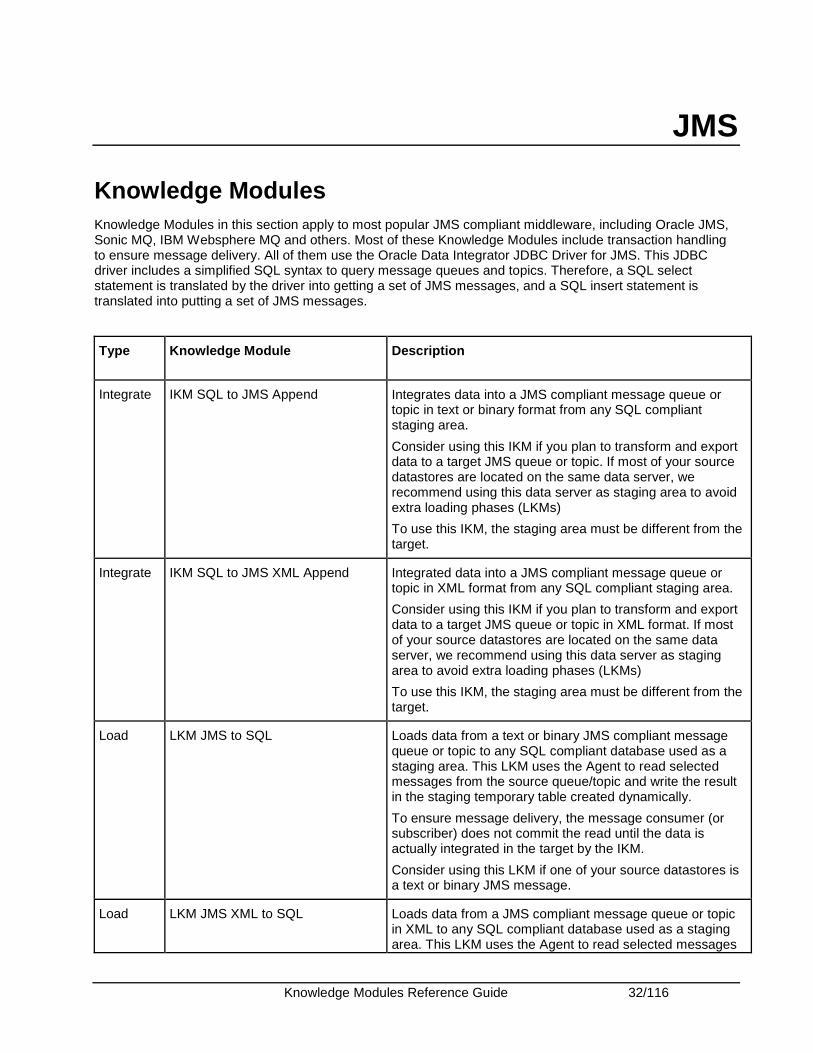
Knowledge Modules Knowledge Modules in this section apply to most popular JMS compliant middleware, including Oracle JMS, Sonic MQ, IBM Websphere MQ and others. Most of these Knowledge Modules include transaction handling to ensure message delivery. All of them use the Oracle Data Integrator JDBC Driver for JMS. This JDBC driver includes a simplified SQL syntax to query message queues and topics. Therefore, a SQL select statement is translated by the driver into getting a set of JMS messages, and a SQL insert statement is translated into putting a set of JMS messages.
Type Knowledge Module Description
Integrate IKM SQL to JMS Append Integrates data into a JMS compliant message queue or topic in text or binary format from any SQL compliant staging area.
Consider using this IKM if you plan to transform and export data to a target JMS queue or topic. If most of your source datastores are located on the same data server, we recommend using this data server as staging area to avoid extra loading phases (LKMs)
To use this IKM, the staging area must be different from the target.
Integrate IKM SQL to JMS XML Append Integrated data into a JMS compliant message queue or topic in XML format from any SQL compliant staging area.
Consider using this IKM if you plan to transform and export data to a target JMS queue or topic in XML format. If most of your source datastores are located on the same data server, we recommend using this data server as staging area to avoid extra loading phases (LKMs)
To use this IKM, the staging area must be different from the target.
Load LKM JMS to SQL Loads data from a text or binary JMS compliant message queue or topic to any SQL compliant database used as a staging area. This LKM uses the Agent to read selected messages from the source queue/topic and write the result in the staging temporary table created dynamically.
To ensure message delivery, the message consumer (or subscriber) does not commit the read until the data is actually integrated in the target by the IKM.
Consider using this LKM if one of your source datastores is a text or binary JMS message.
Load LKM JMS XML to SQL Loads data from a JMS compliant message queue or topic in XML to any SQL compliant database used as a staging area. This LKM uses the Agent to read selected messages

Knowledge Modules Reference Guide 33/116
from the source queue/topic and write the result in the staging temporary table created dynamically.
To ensure message delivery, the message consumer (or subscriber) does not commit the read until the data is actually integrated in the target by the IKM.
Consider using this LKM if one of your source datastores is an XML JMS message.
Knowledge Modules Reference Guide 34/116
Microsoft Access
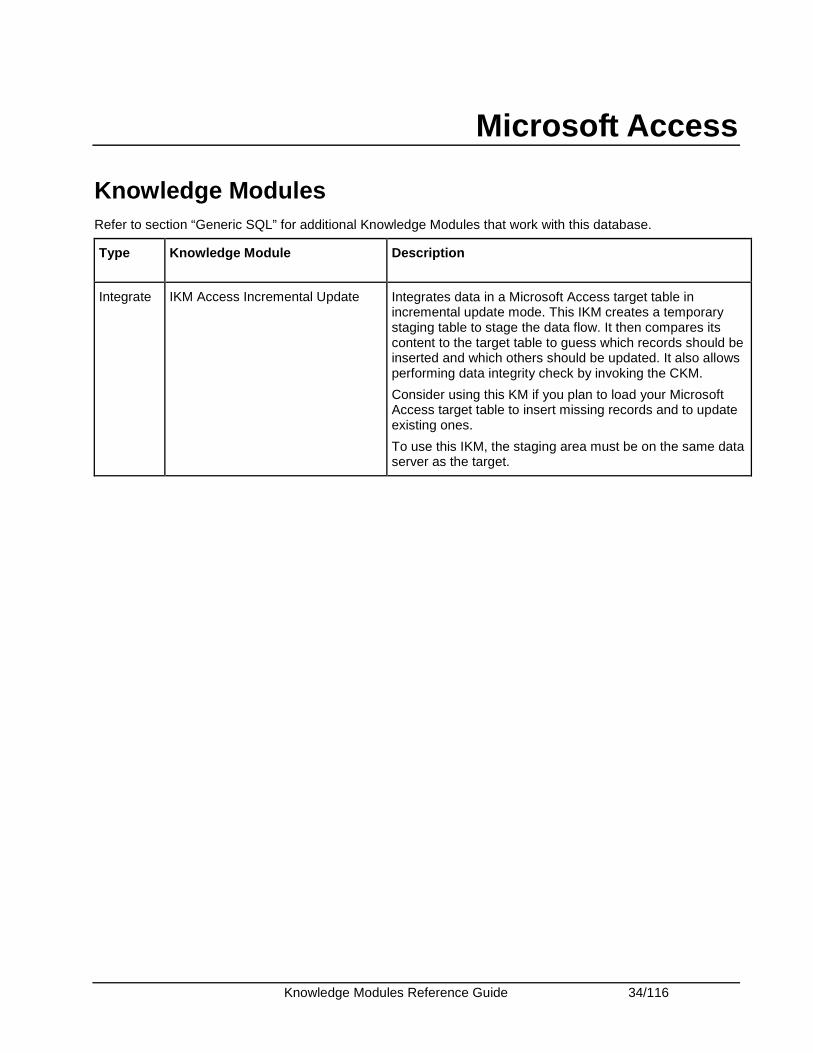
Knowledge Modules Refer to section “Generic SQL” for additional Knowledge Modules that work with this database.
Type Knowledge Module Description
Integrate IKM Access Incremental Update Integrates data in a Microsoft Access target table in incremental update mode. This IKM creates a temporary staging table to stage the data flow. It then compares its content to the target table to guess which records should be inserted and which others should be updated. It also allows performing data integrity check by invoking the CKM.
Consider using this KM if you plan to load your Microsoft Access target table to insert missing records and to update existing ones.
To use this IKM, the staging area must be on the same data server as the target.
Knowledge Modules Reference Guide 35/116
Microsoft SQL Server
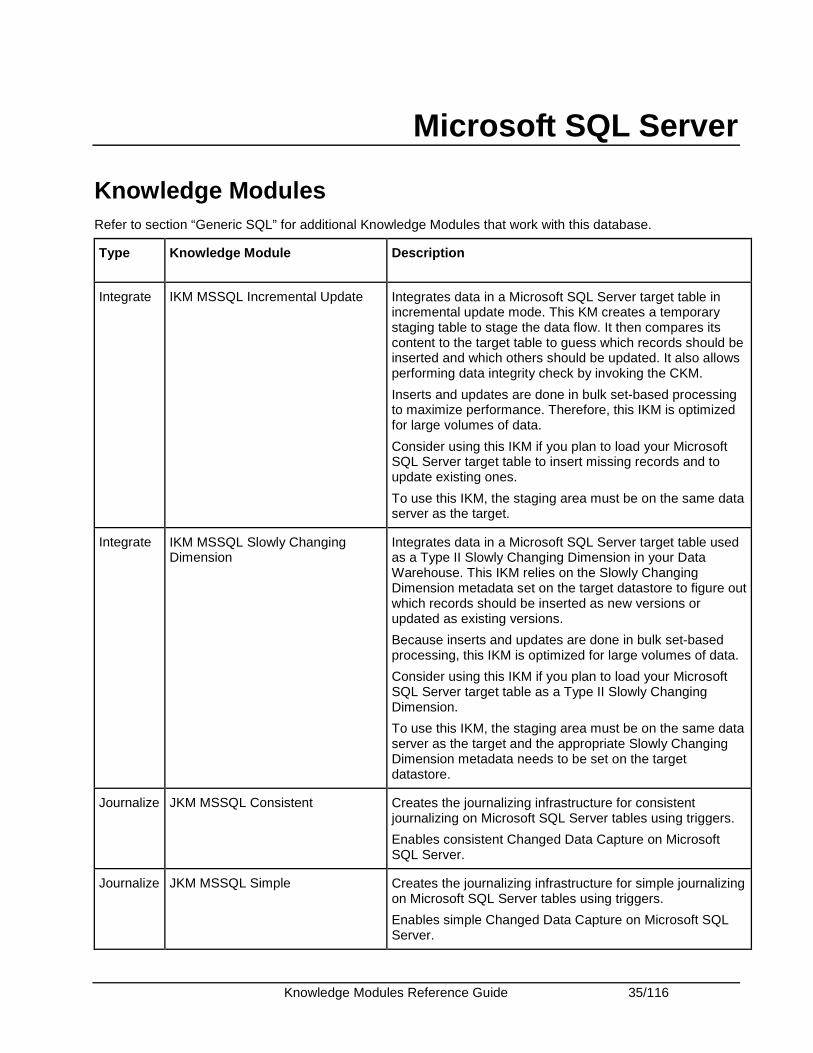
Knowledge Modules Refer to section “Generic SQL” for additional Knowledge Modules that work with this database.
Type Knowledge Module Description
Integrate IKM MSSQL Incremental Update Integrates data in a Microsoft SQL Server target table in incremental update mode. This KM creates a temporary staging table to stage the data flow. It then compares its content to the target table to guess which records should be inserted and which others should be updated. It also allows performing data integrity check by invoking the CKM.
Inserts and updates are done in bulk set-based processing to maximize performance. Therefore, this IKM is optimized for large volumes of data.
Consider using this IKM if you plan to load your Microsoft SQL Server target table to insert missing records and to update existing ones.
To use this IKM, the staging area must be on the same data server as the target.
Integrate IKM MSSQL Slowly Changing Dimension
Integrates data in a Microsoft SQL Server target table used as a Type II Slowly Changing Dimension in your Data Warehouse. This IKM relies on the Slowly Changing Dimension metadata set on the target datastore to figure out which records should be inserted as new versions or updated as existing versions.
Because inserts and updates are done in bulk set-based processing, this IKM is optimized for large volumes of data.
Consider using this IKM if you plan to load your Microsoft SQL Server target table as a Type II Slowly Changing Dimension.
To use this IKM, the staging area must be on the same data server as the target and the appropriate Slowly Changing Dimension metadata needs to be set on the target datastore.
Journalize JKM MSSQL Consistent Creates the journalizing infrastructure for consistent journalizing on Microsoft SQL Server tables using triggers.
Enables consistent Changed Data Capture on Microsoft SQL Server.
Journalize JKM MSSQL Simple Creates the journalizing infrastructure for simple journalizing on Microsoft SQL Server tables using triggers.
Enables simple Changed Data Capture on Microsoft SQL Server.
Knowledge Modules Reference Guide 36/116
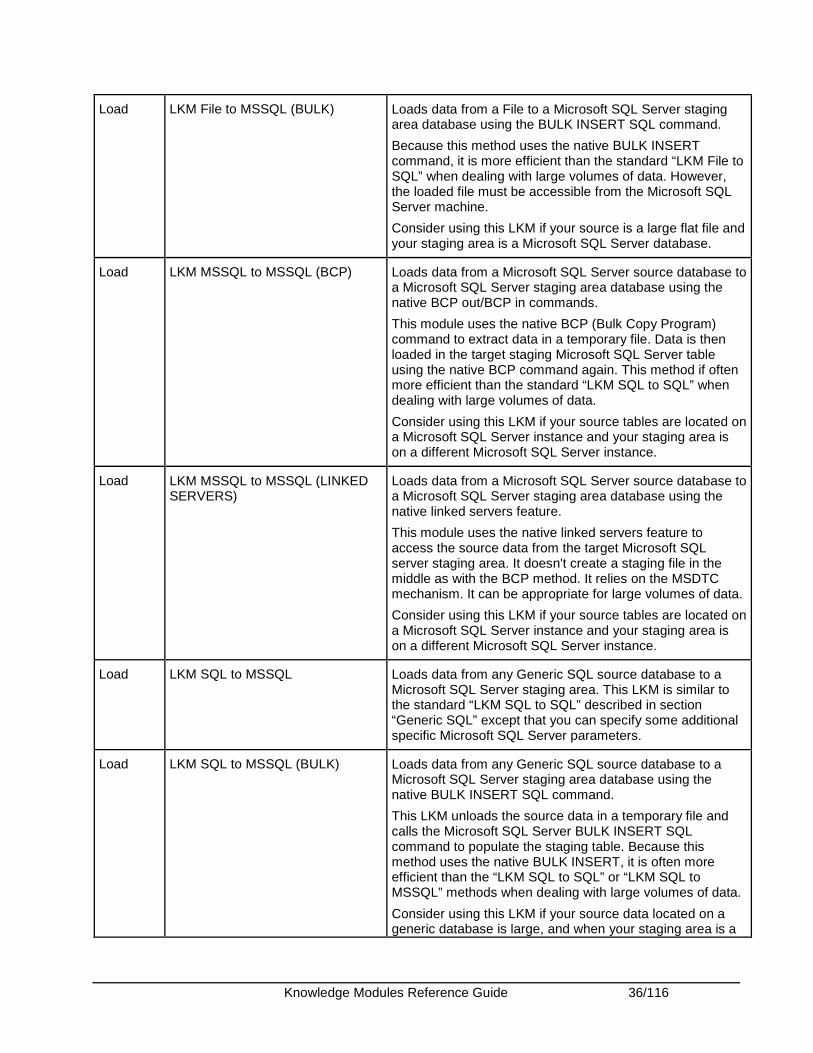
Load LKM File to MSSQL (BULK) Loads data from a File to a Microsoft SQL Server staging area database using the BULK INSERT SQL command.
Because this method uses the native BULK INSERT command, it is more efficient than the standard “LKM File to SQL” when dealing with large volumes of data. However, the loaded file must be accessible from the Microsoft SQL Server machine.
Consider using this LKM if your source is a large flat file and your staging area is a Microsoft SQL Server database.
Load LKM MSSQL to MSSQL (BCP) Loads data from a Microsoft SQL Server source database to a Microsoft SQL Server staging area database using the native BCP out/BCP in commands.
This module uses the native BCP (Bulk Copy Program) command to extract data in a temporary file. Data is then loaded in the target staging Microsoft SQL Server table using the native BCP command again. This method if often more efficient than the standard “LKM SQL to SQL” when dealing with large volumes of data.
Consider using this LKM if your source tables are located on a Microsoft SQL Server instance and your staging area is on a different Microsoft SQL Server instance.
Load LKM MSSQL to MSSQL (LINKED SERVERS)
Loads data from a Microsoft SQL Server source database to a Microsoft SQL Server staging area database using the native linked servers feature.
This module uses the native linked servers feature to access the source data from the target Microsoft SQL server staging area. It doesn't create a staging file in the middle as with the BCP method. It relies on the MSDTC mechanism. It can be appropriate for large volumes of data.
Consider using this LKM if your source tables are located on a Microsoft SQL Server instance and your staging area is on a different Microsoft SQL Server instance.
Load LKM SQL to MSSQL Loads data from any Generic SQL source database to a Microsoft SQL Server staging area. This LKM is similar to the standard “LKM SQL to SQL” described in section “Generic SQL” except that you can specify some additional specific Microsoft SQL Server parameters.
Load LKM SQL to MSSQL (BULK) Loads data from any Generic SQL source database to a Microsoft SQL Server staging area database using the native BULK INSERT SQL command.
This LKM unloads the source data in a temporary file and calls the Microsoft SQL Server BULK INSERT SQL command to populate the staging table. Because this method uses the native BULK INSERT, it is often more efficient than the “LKM SQL to SQL” or “LKM SQL to MSSQL” methods when dealing with large volumes of data.
Consider using this LKM if your source data located on a generic database is large, and when your staging area is a
Knowledge Modules Reference Guide 37/116
Microsoft SQL Server database.
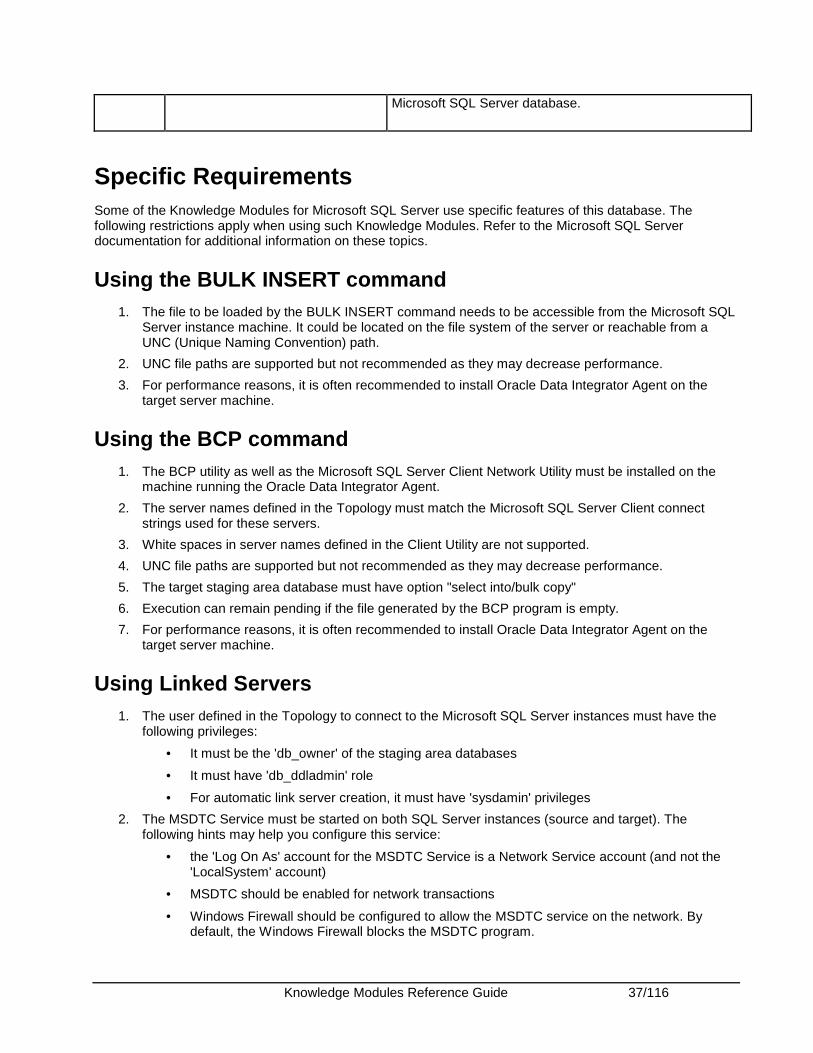
Specific Requirements Some of the Knowledge Modules for Microsoft SQL Server use specific features of this database. The following restrictions apply when using such Knowledge Modules. Refer to the Microsoft SQL Server documentation for additional information on these topics.
Using the BULK INSERT command 1. The file to be loaded by the BULK INSERT command needs to be accessible from the Microsoft SQL
Server instance machine. It could be located on the file system of the server or reachable from a UNC (Unique Naming Convention) path.
2. UNC file paths are supported but not recommended as they may decrease performance.
3. For performance reasons, it is often recommended to install Oracle Data Integrator Agent on the target server machine.
Using the BCP command 1. The BCP utility as well as the Microsoft SQL Server Client Network Utility must be installed on the
machine running the Oracle Data Integrator Agent.
2. The server names defined in the Topology must match the Microsoft SQL Server Client connect strings used for these servers.
3. White spaces in server names defined in the Client Utility are not supported.
4. UNC file paths are supported but not recommended as they may decrease performance.
5. The target staging area database must have option "select into/bulk copy"
6. Execution can remain pending if the file generated by the BCP program is empty.
7. For performance reasons, it is often recommended to install Oracle Data Integrator Agent on the target server machine.
Using Linked Servers 1. The user defined in the Topology to connect to the Microsoft SQL Server instances must have the
following privileges:
• It must be the 'db_owner' of the staging area databases
• It must have 'db_ddladmin' role
• For automatic link server creation, it must have 'sysdamin' privileges
2. The MSDTC Service must be started on both SQL Server instances (source and target). The following hints may help you configure this service:
• the 'Log On As' account for the MSDTC Service is a Network Service account (and not the 'LocalSystem' account)
• MSDTC should be enabled for network transactions
• Windows Firewall should be configured to allow the MSDTC service on the network. By default, the Windows Firewall blocks the MSDTC program.

Knowledge Modules Reference Guide 38/116
• The Microsoft SQL Server must be started after MSDTC has completed its startup
• The links below can help you further configure you MSDTC Service: http://support.microsoft.com/?kbid=816701 and http://support.microsoft.com/?kbid=839279

Knowledge Modules Reference Guide 39/116
Netezza
Knowledge Modules Refer to section “Generic SQL” for additional Knowledge Modules that work with this database.
Type Knowledge Module Description
Check CKM Netezza Checks data integrity against constraints defined on a Netezza table. Rejects invalid records in the error table created dynamically. Can be used for static controls as well as flow controls.
Consider using this KM if you plan to check data integrity on a Netezza database.
This CKM is optimized for Netezza.
Integrate IKM Netezza Control Append Integrates data in a Netezza target table in replace/append mode. When flow data needs to be checked using a CKM, this IKM creates a temporary staging table before invoking the CKM.
Consider using this IKM if you plan to load your Netezza target table in replace mode, with or without data integrity check.
To use this IKM, the staging area must be on the same data server as the target.
Integrate IKM Netezza Incremental Update Integrates data in a Netezza target table in incremental update mode. This IKM creates a temporary staging table to stage the data flow. It then compares its content to the target table to guess which records should be inserted and which others should be updated. It also allows performing data integrity check by invoking the CKM.
Inserts and updates are done in bulk set-based processing to maximize performance. Therefore, this IKM is optimized for large volumes of data.
Consider using this IKM if you plan to load your Netezza target table to insert missing records and to update existing ones.
To use this IKM, the staging area must be on the same data server as the target.
Integrate IKM Netezza To File (EXTERNAL TABLE)
Integrates data in a target file from a Netezza staging area in replace mode. This IKM requires the staging area to be on Netezza It uses the native EXTERNAL TABLE feature of Netezza.
Consider using this IKM if you plan to transform and export data to a target file from your Netezza server.
To use this IKM, the staging area must be different from the
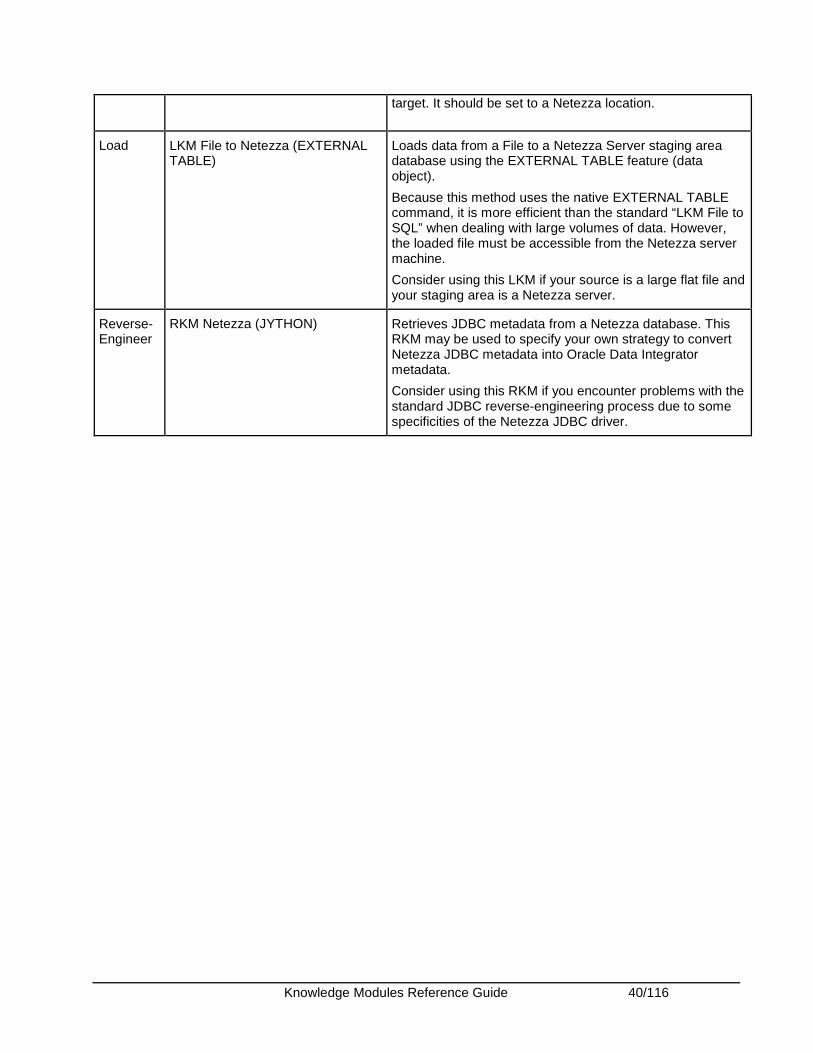
Knowledge Modules Reference Guide 40/116
target. It should be set to a Netezza location.
Load LKM File to Netezza (EXTERNAL TABLE)
Loads data from a File to a Netezza Server staging area database using the EXTERNAL TABLE feature (data object).
Because this method uses the native EXTERNAL TABLE command, it is more efficient than the standard “LKM File to SQL” when dealing with large volumes of data. However, the loaded file must be accessible from the Netezza server machine.
Consider using this LKM if your source is a large flat file and your staging area is a Netezza server.
Reverse-Engineer
RKM Netezza (JYTHON) Retrieves JDBC metadata from a Netezza database. This RKM may be used to specify your own strategy to convert Netezza JDBC metadata into Oracle Data Integrator metadata.
Consider using this RKM if you encounter problems with the standard JDBC reverse-engineering process due to some specificities of the Netezza JDBC driver.
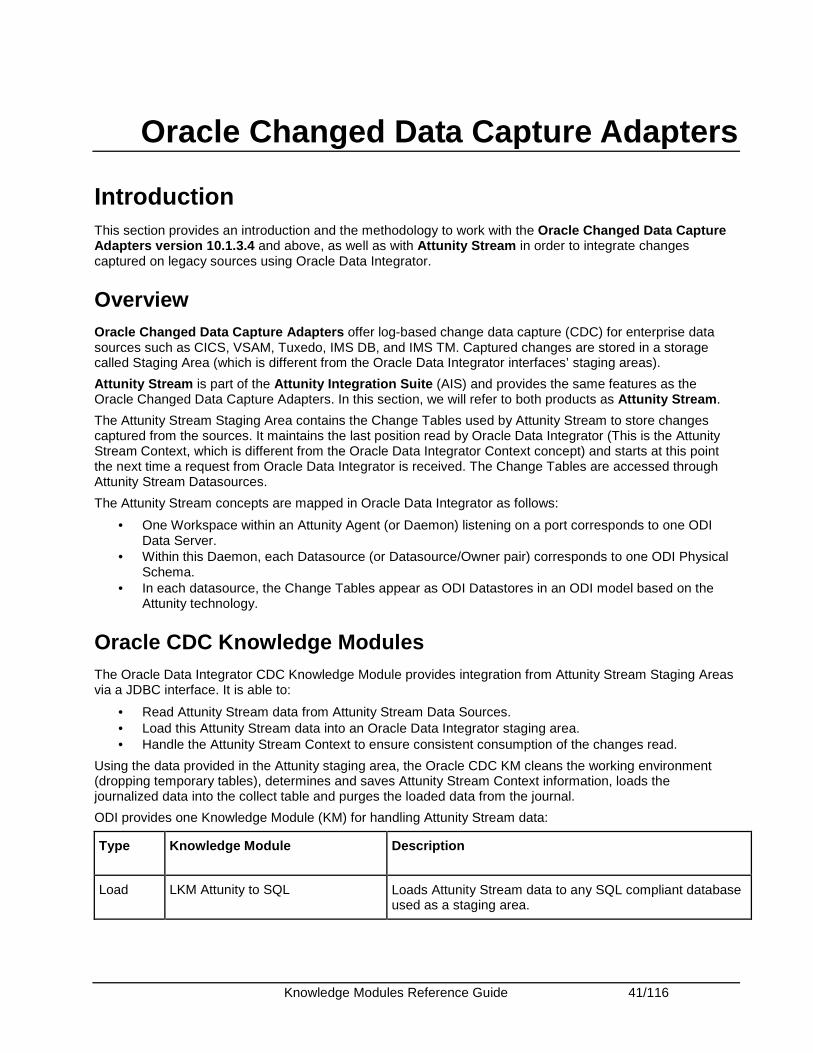
Knowledge Modules Reference Guide 41/116
Oracle Changed Data Capture Adapters
Introduction This section provides an introduction and the methodology to work with the Oracle Changed Data Capture Adapters version 10.1.3.4 and above, as well as with Attunity Stream in order to integrate changes captured on legacy sources using Oracle Data Integrator.
Overview Oracle Changed Data Capture Adapters offer log-based change data capture (CDC) for enterprise data sources such as CICS, VSAM, Tuxedo, IMS DB, and IMS TM. Captured changes are stored in a storage called Staging Area (which is different from the Oracle Data Integrator interfaces’ staging areas).
Attunity Stream is part of the Attunity Integration Suite (AIS) and provides the same features as the Oracle Changed Data Capture Adapters. In this section, we will refer to both products as Attunity Stream.
The Attunity Stream Staging Area contains the Change Tables used by Attunity Stream to store changes captured from the sources. It maintains the last position read by Oracle Data Integrator (This is the Attunity Stream Context, which is different from the Oracle Data Integrator Context concept) and starts at this point the next time a request from Oracle Data Integrator is received. The Change Tables are accessed through Attunity Stream Datasources.
The Attunity Stream concepts are mapped in Oracle Data Integrator as follows:
• One Workspace within an Attunity Agent (or Daemon) listening on a port corresponds to one ODI Data Server.
• Within this Daemon, each Datasource (or Datasource/Owner pair) corresponds to one ODI Physical Schema.
• In each datasource, the Change Tables appear as ODI Datastores in an ODI model based on the Attunity technology.
Oracle CDC Knowledge Modules The Oracle Data Integrator CDC Knowledge Module provides integration from Attunity Stream Staging Areas via a JDBC interface. It is able to:
• Read Attunity Stream data from Attunity Stream Data Sources. • Load this Attunity Stream data into an Oracle Data Integrator staging area. • Handle the Attunity Stream Context to ensure consistent consumption of the changes read.
Using the data provided in the Attunity staging area, the Oracle CDC KM cleans the working environment (dropping temporary tables), determines and saves Attunity Stream Context information, loads the journalized data into the collect table and purges the loaded data from the journal.
ODI provides one Knowledge Module (KM) for handling Attunity Stream data:
Type Knowledge Module Description
Load LKM Attunity to SQL Loads Attunity Stream data to any SQL compliant database used as a staging area.
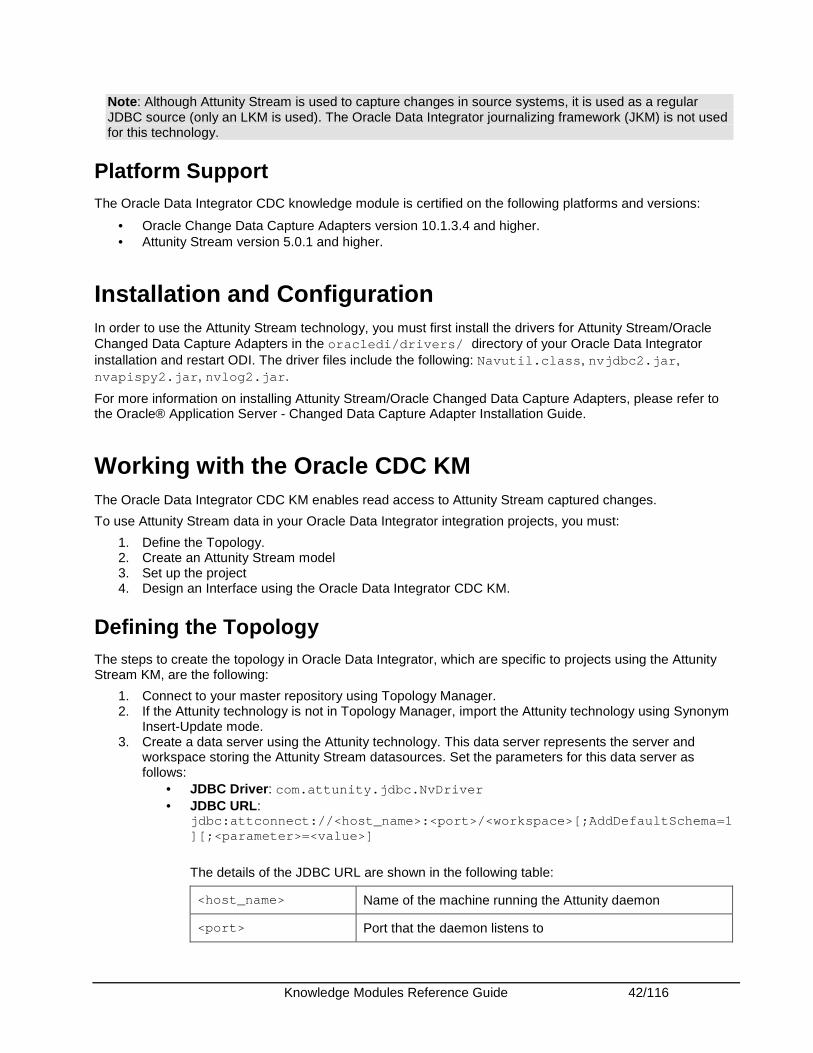
Knowledge Modules Reference Guide 42/116
Note: Although Attunity Stream is used to capture changes in source systems, it is used as a regular JDBC source (only an LKM is used). The Oracle Data Integrator journalizing framework (JKM) is not used for this technology.
Platform Support The Oracle Data Integrator CDC knowledge module is certified on the following platforms and versions:
• Oracle Change Data Capture Adapters version 10.1.3.4 and higher. • Attunity Stream version 5.0.1 and higher.
Installation and Configuration In order to use the Attunity Stream technology, you must first install the drivers for Attunity Stream/Oracle Changed Data Capture Adapters in the oracledi/drivers/ directory of your Oracle Data Integrator installation and restart ODI. The driver files include the following: Navutil.class , nvjdbc2.jar , nvapispy2.jar , nvlog2.jar .
For more information on installing Attunity Stream/Oracle Changed Data Capture Adapters, please refer to the Oracle® Application Server - Changed Data Capture Adapter Installation Guide.
Working with the Oracle CDC KM The Oracle Data Integrator CDC KM enables read access to Attunity Stream captured changes.
To use Attunity Stream data in your Oracle Data Integrator integration projects, you must:
1. Define the Topology. 2. Create an Attunity Stream model 3. Set up the project 4. Design an Interface using the Oracle Data Integrator CDC KM.
Defining the Topology The steps to create the topology in Oracle Data Integrator, which are specific to projects using the Attunity Stream KM, are the following:
1. Connect to your master repository using Topology Manager. 2. If the Attunity technology is not in Topology Manager, import the Attunity technology using Synonym
Insert-Update mode. 3. Create a data server using the Attunity technology. This data server represents the server and
workspace storing the Attunity Stream datasources. Set the parameters for this data server as follows:
• JDBC Driver: com.attunity.jdbc.NvDriver • JDBC URL:
jdbc:attconnect://<host_name>:<port>/<workspace>[;A ddDefaultSchema=1][;<parameter>=<value>]
The details of the JDBC URL are shown in the following table:
<host_name> Name of the machine running the Attunity daemon
<port> Port that the daemon listens to

Knowledge Modules Reference Guide 43/116
<workspace> Daemon’s workspace (default is “Navigator”)
AddDefaultSchema=1 This parameter specifies that a schema shows a default owner name ("public") if the data source does not natively support owners. It may be needed in some cases as Oracle Data Integrator makes use of the owner value.
<parameter>=<value> Any parameter available for the JDBC driver. Note that it is not needed to specify the datasource using the DefTdpName driver parameter, as Oracle Data Integrator accesses the change tables using the full qualified syntax: DATASOURCE:OWNER.TABLE_NAME.
For more information on the JDBC URL connection details, refer to the Attunity Stream documentation.
• JDBC User: User profile to connect the workspace. If you are using anonymous access or specifying the user and password on the URL, leave this field and the JDBC Password field empty.
• JDBC Password: Master password for the user profile. 4. Create a physical schema under this data server corresponding to the Attunity Stream datasource
from which you want to read the changed data. While defining the physical schema, the list of datasources and owners available for your workspace is displayed (“public” if none exist), provided that the data server is correctly configured.
5. Create a logical schema for this physical schema in the appropriate context.
Creating and Reverse-Engineering an Attunity Stream Model To create an Attunity Stream model, use the ODI standard procedure for model creation. Standard reverse-engineering returns the change tables stored in the datasource as datastores. The change tables contain some CDC header columns in addition to the data columns used for integration. These columns include timestamps, table_name, operation, transactionID, context, etc. Refer to the Attunity Stream documentation for more information on the header columns content.
Setting up the Project Import the LKM Attunity to SQL into your ODI project, if it is not already in your project. For more information about importing a KM, please refer to the Oracle Data Integrator User’s Guide.
Designing an Interface Using the LKM Attunity to SQL To create an integration interface, which loads Attunity Stream data into your Oracle Data Integrator integration project, run the following steps:
1. Create an integration interface with Attunity Stream source datastores and SQL compliant target datastores.
2. Create joins, filters and mappings as usual. Note that joins between change tables are not allowed on the source. They should be performed on the interface’s staging area.
3. In the Flow tab of the interface, select the source set containing the source change table(s) and select the LKM Attunity to SQL.
4. Set the KM options as follows: • DELETE_TEMPORARY_OBJECTS - Set this option to No, if you wish to retain temporary
objects (files and scripts) after integration.
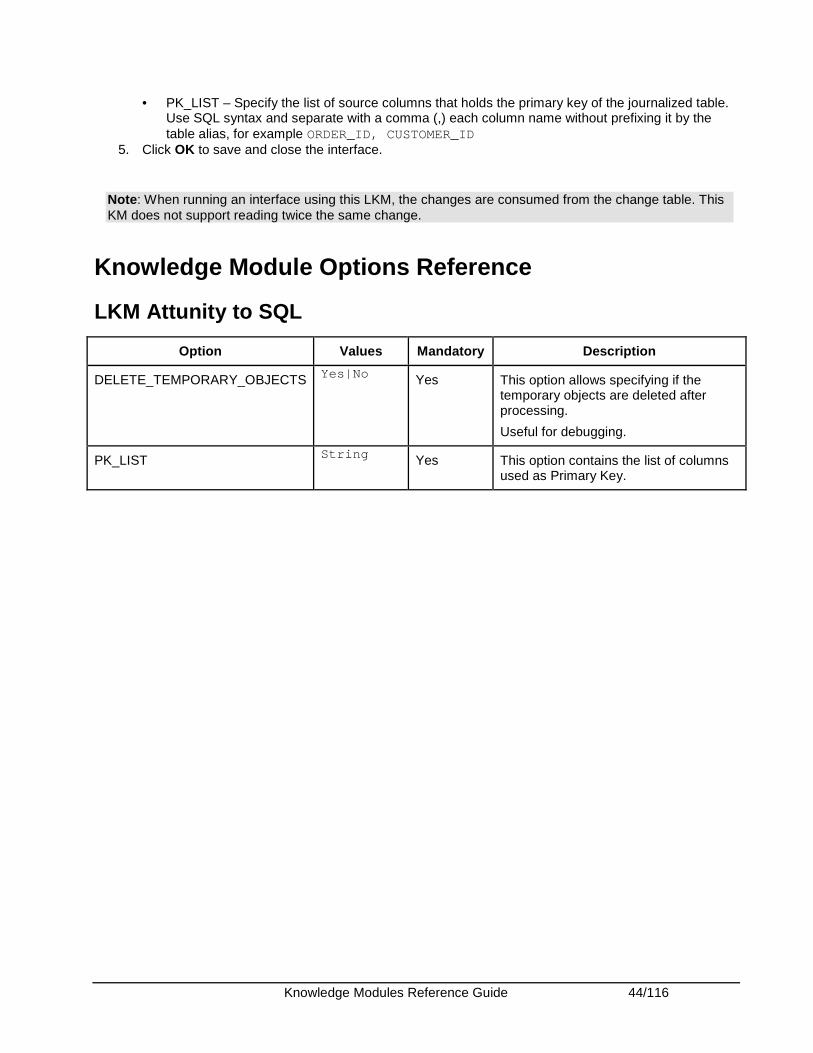
Knowledge Modules Reference Guide 44/116
• PK_LIST – Specify the list of source columns that holds the primary key of the journalized table. Use SQL syntax and separate with a comma (,) each column name without prefixing it by the table alias, for example ORDER_ID, CUSTOMER_ID
5. Click OK to save and close the interface.
Note: When running an interface using this LKM, the changes are consumed from the change table. This KM does not support reading twice the same change.
Knowledge Module Options Reference
LKM Attunity to SQL
Option Values Mandatory Description
DELETE_TEMPORARY_OBJECTS Yes|No Yes This option allows specifying if the temporary objects are deleted after processing.
Useful for debugging.
PK_LIST String Yes This option contains the list of columns used as Primary Key.
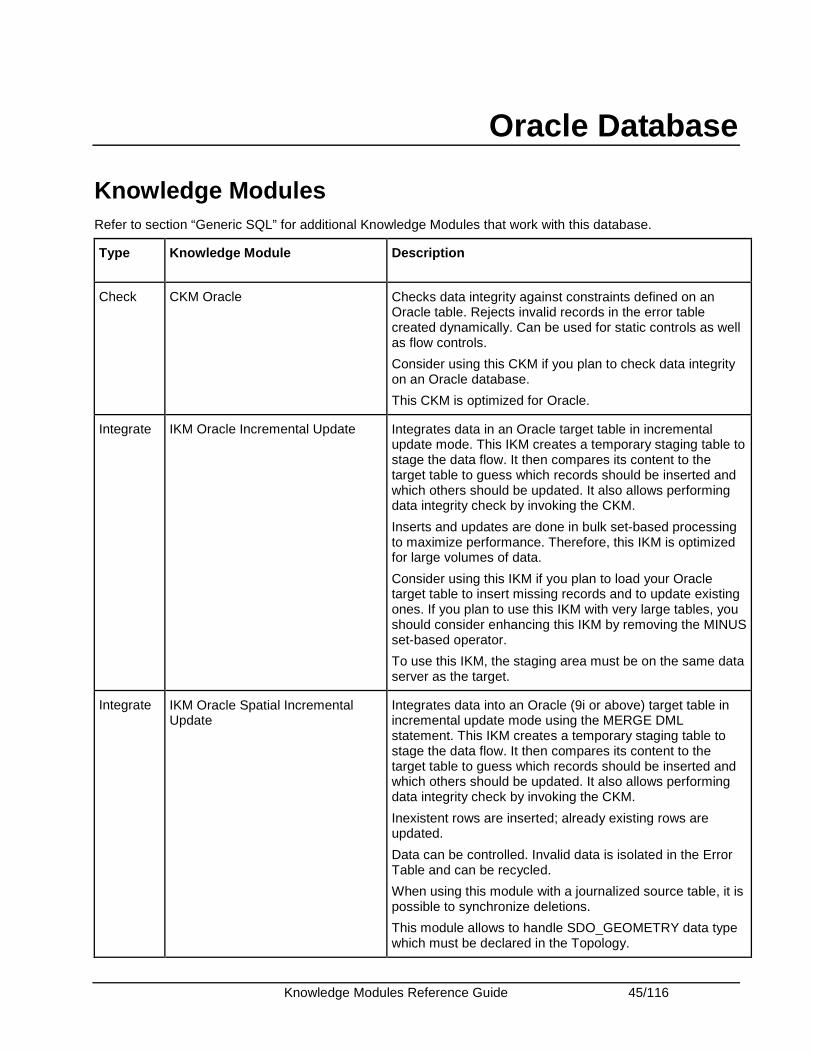
Knowledge Modules Reference Guide 45/116
Oracle Database
Knowledge Modules Refer to section “Generic SQL” for additional Knowledge Modules that work with this database.
Type Knowledge Module Description
Check CKM Oracle Checks data integrity against constraints defined on an Oracle table. Rejects invalid records in the error table created dynamically. Can be used for static controls as well as flow controls.
Consider using this CKM if you plan to check data integrity on an Oracle database.
This CKM is optimized for Oracle.
Integrate IKM Oracle Incremental Update Integrates data in an Oracle target table in incremental update mode. This IKM creates a temporary staging table to stage the data flow. It then compares its content to the target table to guess which records should be inserted and which others should be updated. It also allows performing data integrity check by invoking the CKM.
Inserts and updates are done in bulk set-based processing to maximize performance. Therefore, this IKM is optimized for large volumes of data.
Consider using this IKM if you plan to load your Oracle target table to insert missing records and to update existing ones. If you plan to use this IKM with very large tables, you should consider enhancing this IKM by removing the MINUS set-based operator.
To use this IKM, the staging area must be on the same data server as the target.
Integrate IKM Oracle Spatial Incremental Update
Integrates data into an Oracle (9i or above) target table in incremental update mode using the MERGE DML statement. This IKM creates a temporary staging table to stage the data flow. It then compares its content to the target table to guess which records should be inserted and which others should be updated. It also allows performing data integrity check by invoking the CKM.
Inexistent rows are inserted; already existing rows are updated.
Data can be controlled. Invalid data is isolated in the Error Table and can be recycled.
When using this module with a journalized source table, it is possible to synchronize deletions.
This module allows to handle SDO_GEOMETRY data type which must be declared in the Topology.
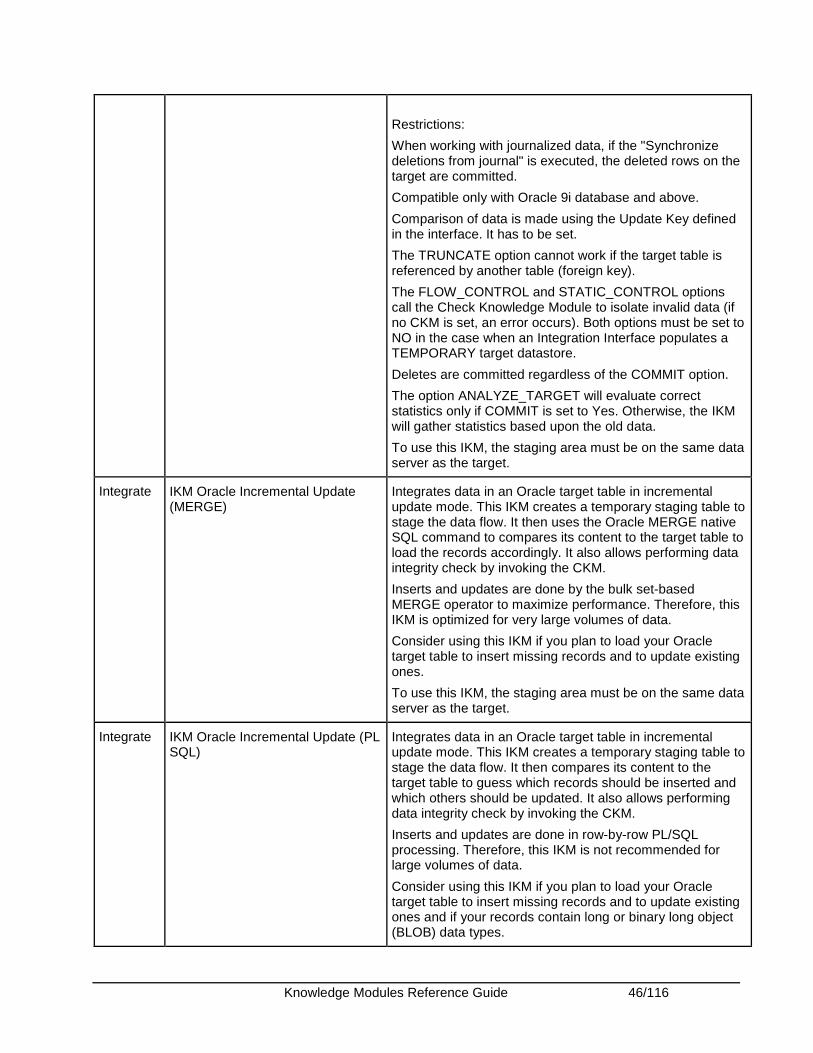
Knowledge Modules Reference Guide 46/116
Restrictions:
When working with journalized data, if the "Synchronize deletions from journal" is executed, the deleted rows on the target are committed.
Compatible only with Oracle 9i database and above.
Comparison of data is made using the Update Key defined in the interface. It has to be set.
The TRUNCATE option cannot work if the target table is referenced by another table (foreign key).
The FLOW_CONTROL and STATIC_CONTROL options call the Check Knowledge Module to isolate invalid data (if no CKM is set, an error occurs). Both options must be set to NO in the case when an Integration Interface populates a TEMPORARY target datastore.
Deletes are committed regardless of the COMMIT option.
The option ANALYZE_TARGET will evaluate correct statistics only if COMMIT is set to Yes. Otherwise, the IKM will gather statistics based upon the old data.
To use this IKM, the staging area must be on the same data server as the target.
Integrate IKM Oracle Incremental Update (MERGE)
Integrates data in an Oracle target table in incremental update mode. This IKM creates a temporary staging table to stage the data flow. It then uses the Oracle MERGE native SQL command to compares its content to the target table to load the records accordingly. It also allows performing data integrity check by invoking the CKM.
Inserts and updates are done by the bulk set-based MERGE operator to maximize performance. Therefore, this IKM is optimized for very large volumes of data.
Consider using this IKM if you plan to load your Oracle target table to insert missing records and to update existing ones.
To use this IKM, the staging area must be on the same data server as the target.
Integrate IKM Oracle Incremental Update (PL SQL)
Integrates data in an Oracle target table in incremental update mode. This IKM creates a temporary staging table to stage the data flow. It then compares its content to the target table to guess which records should be inserted and which others should be updated. It also allows performing data integrity check by invoking the CKM.
Inserts and updates are done in row-by-row PL/SQL processing. Therefore, this IKM is not recommended for large volumes of data.
Consider using this IKM if you plan to load your Oracle target table to insert missing records and to update existing ones and if your records contain long or binary long object (BLOB) data types.
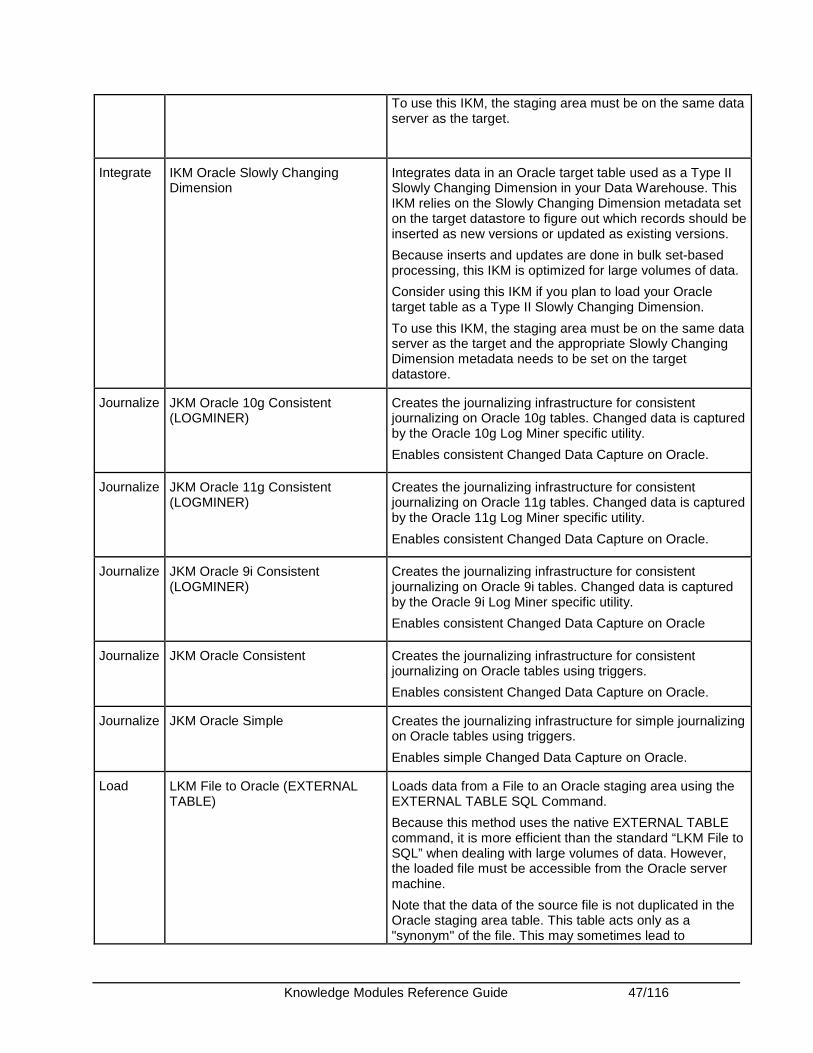
Knowledge Modules Reference Guide 47/116
To use this IKM, the staging area must be on the same data server as the target.
Integrate IKM Oracle Slowly Changing Dimension
Integrates data in an Oracle target table used as a Type II Slowly Changing Dimension in your Data Warehouse. This IKM relies on the Slowly Changing Dimension metadata set on the target datastore to figure out which records should be inserted as new versions or updated as existing versions.
Because inserts and updates are done in bulk set-based processing, this IKM is optimized for large volumes of data.
Consider using this IKM if you plan to load your Oracle target table as a Type II Slowly Changing Dimension.
To use this IKM, the staging area must be on the same data server as the target and the appropriate Slowly Changing Dimension metadata needs to be set on the target datastore.
Journalize JKM Oracle 10g Consistent (LOGMINER)
Creates the journalizing infrastructure for consistent journalizing on Oracle 10g tables. Changed data is captured by the Oracle 10g Log Miner specific utility.
Enables consistent Changed Data Capture on Oracle.
Journalize JKM Oracle 11g Consistent (LOGMINER)
Creates the journalizing infrastructure for consistent journalizing on Oracle 11g tables. Changed data is captured by the Oracle 11g Log Miner specific utility.
Enables consistent Changed Data Capture on Oracle.
Journalize JKM Oracle 9i Consistent (LOGMINER)
Creates the journalizing infrastructure for consistent journalizing on Oracle 9i tables. Changed data is captured by the Oracle 9i Log Miner specific utility.
Enables consistent Changed Data Capture on Oracle
Journalize JKM Oracle Consistent Creates the journalizing infrastructure for consistent journalizing on Oracle tables using triggers.
Enables consistent Changed Data Capture on Oracle.
Journalize JKM Oracle Simple Creates the journalizing infrastructure for simple journalizing on Oracle tables using triggers.
Enables simple Changed Data Capture on Oracle.
Load LKM File to Oracle (EXTERNAL TABLE)
Loads data from a File to an Oracle staging area using the EXTERNAL TABLE SQL Command.
Because this method uses the native EXTERNAL TABLE command, it is more efficient than the standard “LKM File to SQL” when dealing with large volumes of data. However, the loaded file must be accessible from the Oracle server machine.
Note that the data of the source file is not duplicated in the Oracle staging area table. This table acts only as a "synonym" of the file. This may sometimes lead to
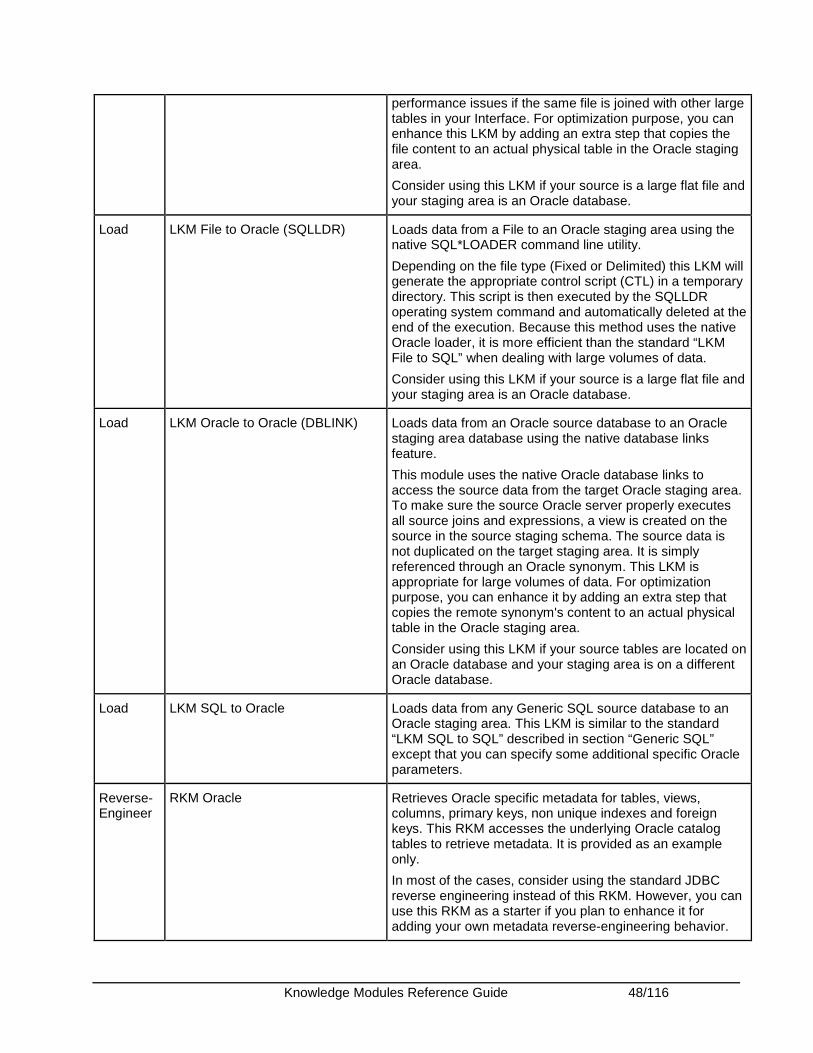
Knowledge Modules Reference Guide 48/116
performance issues if the same file is joined with other large tables in your Interface. For optimization purpose, you can enhance this LKM by adding an extra step that copies the file content to an actual physical table in the Oracle staging area.
Consider using this LKM if your source is a large flat file and your staging area is an Oracle database.
Load LKM File to Oracle (SQLLDR) Loads data from a File to an Oracle staging area using the native SQL*LOADER command line utility.
Depending on the file type (Fixed or Delimited) this LKM will generate the appropriate control script (CTL) in a temporary directory. This script is then executed by the SQLLDR operating system command and automatically deleted at the end of the execution. Because this method uses the native Oracle loader, it is more efficient than the standard “LKM File to SQL” when dealing with large volumes of data.
Consider using this LKM if your source is a large flat file and your staging area is an Oracle database.
Load LKM Oracle to Oracle (DBLINK) Loads data from an Oracle source database to an Oracle staging area database using the native database links feature.
This module uses the native Oracle database links to access the source data from the target Oracle staging area. To make sure the source Oracle server properly executes all source joins and expressions, a view is created on the source in the source staging schema. The source data is not duplicated on the target staging area. It is simply referenced through an Oracle synonym. This LKM is appropriate for large volumes of data. For optimization purpose, you can enhance it by adding an extra step that copies the remote synonym's content to an actual physical table in the Oracle staging area.
Consider using this LKM if your source tables are located on an Oracle database and your staging area is on a different Oracle database.
Load LKM SQL to Oracle Loads data from any Generic SQL source database to an Oracle staging area. This LKM is similar to the standard “LKM SQL to SQL” described in section “Generic SQL” except that you can specify some additional specific Oracle parameters.
Reverse-Engineer
RKM Oracle Retrieves Oracle specific metadata for tables, views, columns, primary keys, non unique indexes and foreign keys. This RKM accesses the underlying Oracle catalog tables to retrieve metadata. It is provided as an example only.
In most of the cases, consider using the standard JDBC reverse engineering instead of this RKM. However, you can use this RKM as a starter if you plan to enhance it for adding your own metadata reverse-engineering behavior.
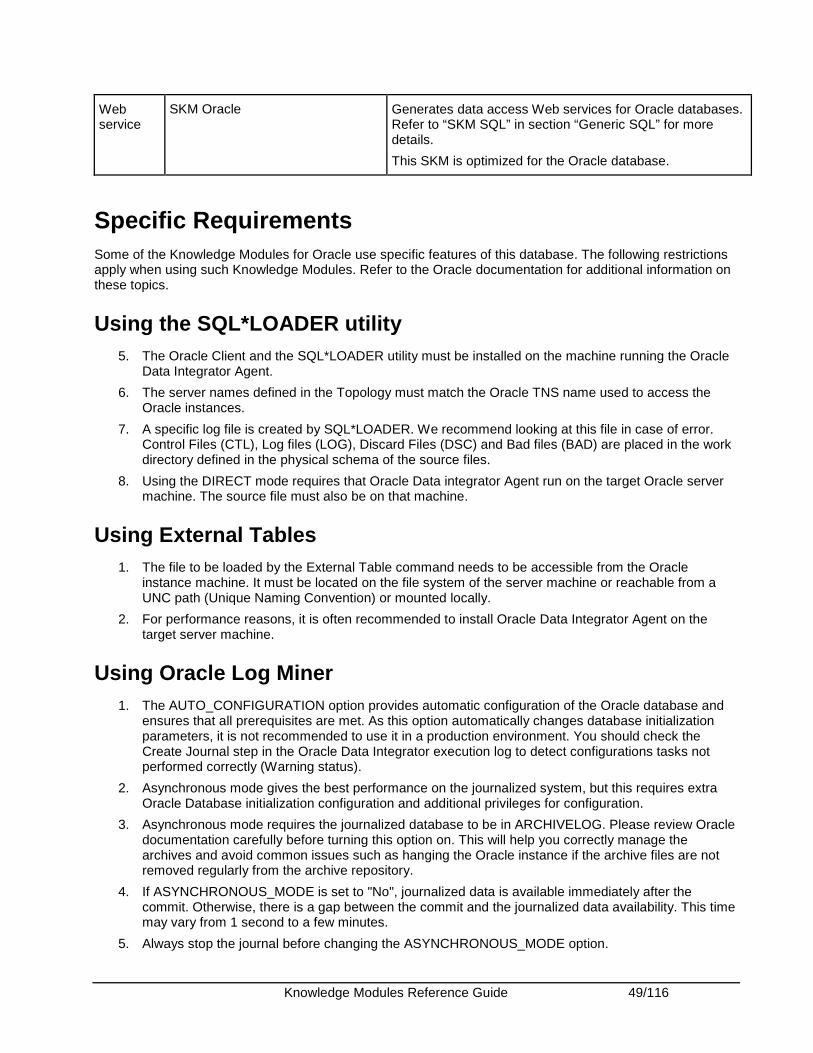
Knowledge Modules Reference Guide 49/116
Web service
SKM Oracle Generates data access Web services for Oracle databases. Refer to “SKM SQL” in section “Generic SQL” for more details.
This SKM is optimized for the Oracle database.
Specific Requirements Some of the Knowledge Modules for Oracle use specific features of this database. The following restrictions apply when using such Knowledge Modules. Refer to the Oracle documentation for additional information on these topics.
Using the SQL*LOADER utility 5. The Oracle Client and the SQL*LOADER utility must be installed on the machine running the Oracle
Data Integrator Agent.
6. The server names defined in the Topology must match the Oracle TNS name used to access the Oracle instances.
7. A specific log file is created by SQL*LOADER. We recommend looking at this file in case of error. Control Files (CTL), Log files (LOG), Discard Files (DSC) and Bad files (BAD) are placed in the work directory defined in the physical schema of the source files.
8. Using the DIRECT mode requires that Oracle Data integrator Agent run on the target Oracle server machine. The source file must also be on that machine.
Using External Tables 1. The file to be loaded by the External Table command needs to be accessible from the Oracle
instance machine. It must be located on the file system of the server machine or reachable from a UNC path (Unique Naming Convention) or mounted locally.
2. For performance reasons, it is often recommended to install Oracle Data Integrator Agent on the target server machine.
Using Oracle Log Miner 1. The AUTO_CONFIGURATION option provides automatic configuration of the Oracle database and
ensures that all prerequisites are met. As this option automatically changes database initialization parameters, it is not recommended to use it in a production environment. You should check the Create Journal step in the Oracle Data Integrator execution log to detect configurations tasks not performed correctly (Warning status).
2. Asynchronous mode gives the best performance on the journalized system, but this requires extra Oracle Database initialization configuration and additional privileges for configuration.
3. Asynchronous mode requires the journalized database to be in ARCHIVELOG. Please review Oracle documentation carefully before turning this option on. This will help you correctly manage the archives and avoid common issues such as hanging the Oracle instance if the archive files are not removed regularly from the archive repository.
4. If ASYNCHRONOUS_MODE is set to "No", journalized data is available immediately after the commit. Otherwise, there is a gap between the commit and the journalized data availability. This time may vary from 1 second to a few minutes.
5. Always stop the journal before changing the ASYNCHRONOUS_MODE option.

Knowledge Modules Reference Guide 50/116
6. When using asynchronous mode, the user connecting to the instance must be granted admin authorization on Oracle Streams. This is done using the DMBS_STREAMS_AUTH.GRANT_ADMIN_PRIVILEGE procedure when logged in with a user already having this privilege (for example the SYSTEM user).
7. When using the AUTO_CONFIGURATION option, the logged-in user must also have the DBA role to grant other users with privileges and change instance parameters.
8. The work schema must be granted the SELECT ANY TABLE privilege to be able to create views referring to tables stored in other schemas.
9. For detailed information on all other prerequisites, refer to the Oracle documentation (Data Warehousing Guide - Change Data Capture)
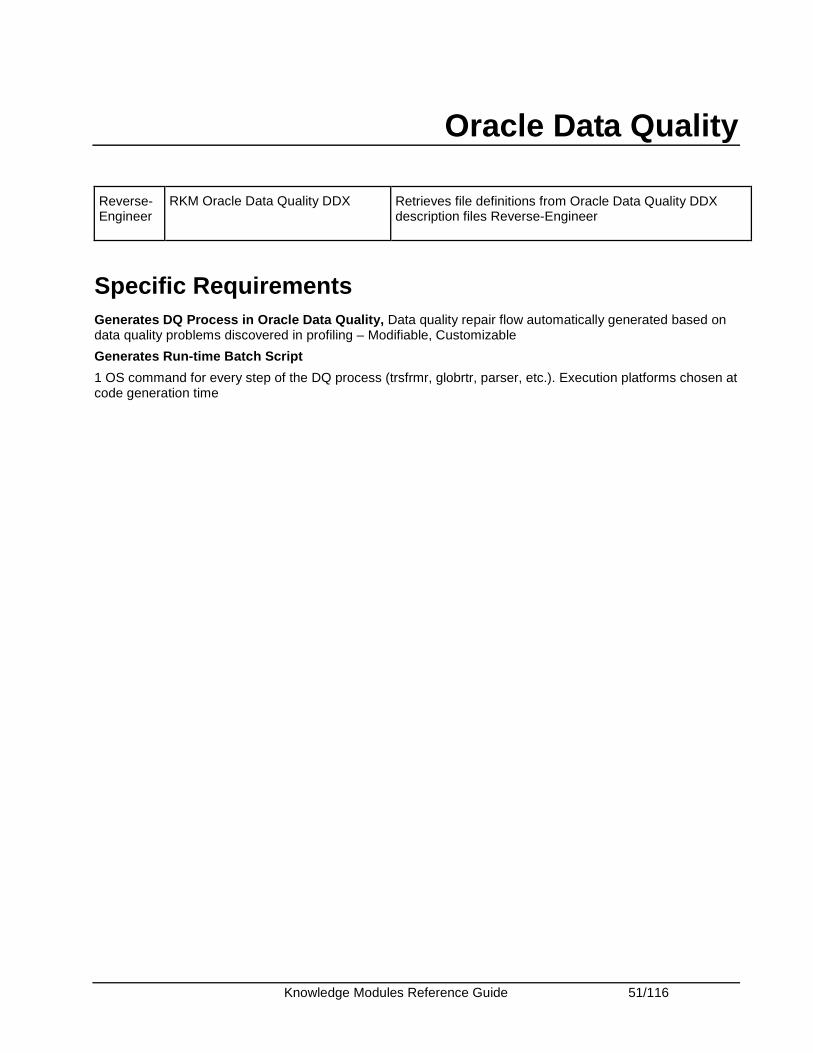
Knowledge Modules Reference Guide 51/116
Oracle Data Quality
Reverse-Engineer
RKM Oracle Data Quality DDX Retrieves file definitions from Oracle Data Quality DDX description files Reverse-Engineer
Specific Requirements Generates DQ Process in Oracle Data Quality, Data quality repair flow automatically generated based on data quality problems discovered in profiling – Modifiable, Customizable
Generates Run-time Batch Script
1 OS command for every step of the DQ process (trsfrmr, globrtr, parser, etc.). Execution platforms chosen at code generation time
Knowledge Modules Reference Guide 52/116
Oracle E-Business Suite
Introduction This section provides an introduction and the methodology to work with the E-Business Suite Knowledge Modules in Oracle Data Integrator.
Oracle E-Business Suite (EBS) is a suite of integrated software applications that provides a complete solution to the business needs of Oracle customers.
E-Business Suite Knowledge Modules Oracle Data Integrator Knowledge Modules for E-Business Suite provide comprehensive, bidirectional connectivity between Oracle Data Integrator and E-Business Suite, which enables you to extract and load data. The Knowledge Modules support all modules of E-Business Suite and provide bidirectional connectivity through EBS objects tables/views and interface tables. The EBS Knowledge Modules provide support for the following capabilities:
• Data extract from EBS: Standard Oracle or SQL LKMs can be used to extract data from E-Business suite using objects such as Tables, Views, and Key Flexfields
• Reverse-engineering EBS objects: RKM E-Business Suite can be used to reverse-engineer E-Business Suite data structures
• Data integration to EBS: IKM E-Business Suite can be used to integrate data to E-Business Suite using Open Interface tables. The “Open Interface” API encapsulates a number of Oracle-specific interfaces and ensures data integrity. An Open Interface is made up of:
o Several Interface tables to be loaded. These tables are the incoming data entry points for E-Business Suite.
o Several programs that validate and process the insertion of the data from the interface tables into E-Business Suite.
Oracle Data Integrator Knowledge Modules for Oracle E-Business Suite interact with the database tier to extract metadata and load data. While loading data, it also interacts with the Concurrent Processing Server of the application tier.
Oracle Data Integrator provides two Knowledge Modules (KMs) for handling E-Business Suite data:
Type Knowledge Module Description
Integrate IKM E-Business Suite (Open Interface)
The IKM E-Business Suite is used to load data to EBS interface tables and submit Concurrent request (which loads from interface tables to base tables).
This Integration Knowledge Module:
• Integrates data from any source to Interface Tables in incremental update mode.
• Enables data control: invalid data is isolated in the Error Table and can be recycled.
In addition to loading the interface tables, it provides the following optional actions:
• Create a Group ID for the first interface in a batch.
Knowledge Modules Reference Guide 53/116
• Use this Group ID in subsequent interfaces. • Delete this Group ID when loading the last table in
the batch. • Execute an Open Interface program if at any point
in a batch it is required to call an E-Business Suite Interface program and once all required interface tables have been loaded.
Note: The IKM E-Business Suite (Open Interface) KM must only be used to load interface tables. Writing directly in the E-Business Suite physical tables is not supported.
Reverse-Engineer
RKM E-Business Suite This KM reverse-engineers E-Business Suite data structures. It reverses EBS objects such as tables, views, flexfields and interface-tables structures in E-Business Suite (columns, primary keys and foreign keys).
Platform Support The Oracle Data Integrator E-Business Suite Knowledge Modules are certified on the following platforms and versions:
• E-Business Suite 11i
• E-Business Suite 12
Installation and Configuration There is no specific Oracle Data Integrator configuration for using the E-Business Suite KMs.
Working with EBS KMs The Oracle Data Integrator E-Business Suite KMs enable read and write access to E-Business Suite Data, stored in an Oracle Database.
To use Oracle Data Integrator E-Business Suite with the Oracle Data Integrator E-Business Suite KMs:
1. Define the Topology
2. Set up the Project
3. Perform an E-Business Suite Reverse-Engineering
4. Use E-Business Suite datastores as sources or targets in an integration interface
Defining the Topology The steps to create the topology in Oracle Data Integrator, which are specific to projects using E-Business Suite KMs, are the following:
1. Connect to your master repository using Topology Manager.
2. Create a data server, based on the Oracle technology. This data server represents the Oracle instance that contains the E-Business Suite data.
3. Create a physical schema under this data server. This schema is the Oracle schema that contains the synonyms pointing to the E-Business Suite tables.
Knowledge Modules Reference Guide 54/116
Note: The physical schema must represent the Oracle schema containing the synonyms pointing to the E-Business Suite tables. This schema is usually called APPS. It must not point directly to the Oracle schemas containing the Application physical tables. These are usually named after the related applications.
Note: For reverse-engineering, the Oracle user specified in the data server to which the Physical Schema is attached, must have the privileges to select from APPLSYS tables
4. Create a logical schema for this physical schema in the appropriate context.
Note: The Oracle schema containing the E-Business Suite tables and the Oracle schema containing the synonyms that point to these tables should never be defined as a Work Schema in a physical schema definition. Moreover, these Oracle schemas must not be used as staging area for an interface.
For more details on creating the topology in Oracle Data Integrator please refer to the Oracle Data Integrator User’s Guide.
Setting up the Project Import the following KMs into your Oracle Data Integrator project, if they are not already in your project:
• IKM E-Business Suite (Open Interface)
• RKM E-Business Suite
Import in addition the standard Oracle LKMs and CKM to perform data extraction and data quality checks with an Oracle database. See the Oracle Database section of this guide for a list of available KMs.
For more information about importing a KM, please refer to the Oracle Data Integrator User’s Guide.
Reverse-Engineering E-Business Suite Tables The RKM E-Business Suite is able to reverse-engineer the installed E-Business Suite tables, enriching them with information retrieved from the E-Business Suite repository.
The reverse-engineering process returns the following information:
• The installed E-Business Suite (Modules) as sub-models
• For each module sub-model, there will be sub-models for Tables, Views, Flexfields, and Interface Tables
• The tables and columns, as well as the primary and foreign keys in the datastores
• Comments on the reversed tables
To perform an E-Business Suite Reverse-Engineering:
1. Create a model based on the Oracle Technology, and on the logical schema created when configuring an E-Business Suite Connection.
2. In this Model, select the Reverse tab and:
1. Select Customized
2. Select the RKM E-Business Suite from the KM list.
3. Set the RKM options as follows: (See the Knowledge Module Options Reference section for more details and take into account the limits of the RKM E-Business Suite).
• Applications List: Enter the list of the applications’ short name, for example ‘INV’
Knowledge Modules Reference Guide 55/116
• Only Installed Applications: Set this option to YES to reverse-engineer only installed and shared applications. If this option is set to NO, all applications are reverse-engineered.
• Min Rows: Leave the default value ‘0’, if you want to reverse-engineer all the tables. If you want to reverse-engineer only tables with a minimum number of rows, specify in this option the minimum number of rows.
• Description Mask: Specify the description mask for filtering the reverse-engineered objects based on their description in E-Business Suite.
• Flexfields: If this option is set to YES, applications’ flexfields are reverse-engineered.
• Interface Tables: If this option is set to YES, applications’ interface tables are reverse-engineered.
4. Specify the reverse mask in the Mask field in order to select the tables to reverse. The Mask field, in the Reverse tab, filters reverse-engineered objects based on their name.
Note: The Mask field and the Description Mask option are implemented using SQL Like. The patterns that you can choose from are:
% The percentage symbol allows you to match any string of any length (including zero length).
Empty value allows you to match a single character.
3. Click Apply, and then click Reverse.
You can follow the reverse-engineering process in the Execution Log.
Note: The reverse-engineering process may take several minutes. Please wait until the reversed datastores appear under the reversed module in the tree of the execution Log.
At the end of the reverse-engineering, the applications and tables are represented as sub-models and datastores. You can then use Oracle Applications as a source or a target in an interface.
Reverse-Engineering E-Business Suite Table Features
Reverse-engineering E-Business Suite Tables involves the following features:
• The E-Business Suite Modules are reversed as sub-models. The sub-model names correspond to the application names.
• Each application sub-model is divided into sub-models for Tables, Views, Flexfields and Interface Tables.
• The tables/views and columns, as well as the primary and foreign keys are reversed in the data-stores.
• A sub-model called Flexfield on <AppName> is created for each application. Data-stores in the Flexfield sub-model correspond to Concatenated_Segment_Views of registered Key flexfields for the application. These objects are a subset of Views. The datastores in the Flexfields sub-folder are named after the flexfields.
• Data-stores in Interface-Table sub-model correspond to tables whose names contain the pattern INTERFACE. These objects are subset of tables.
Note: Some of the Open-interfaces (as specified in EBS Integration Repository) may have interface tables whose names may not contain the pattern INTERFACE in their names.
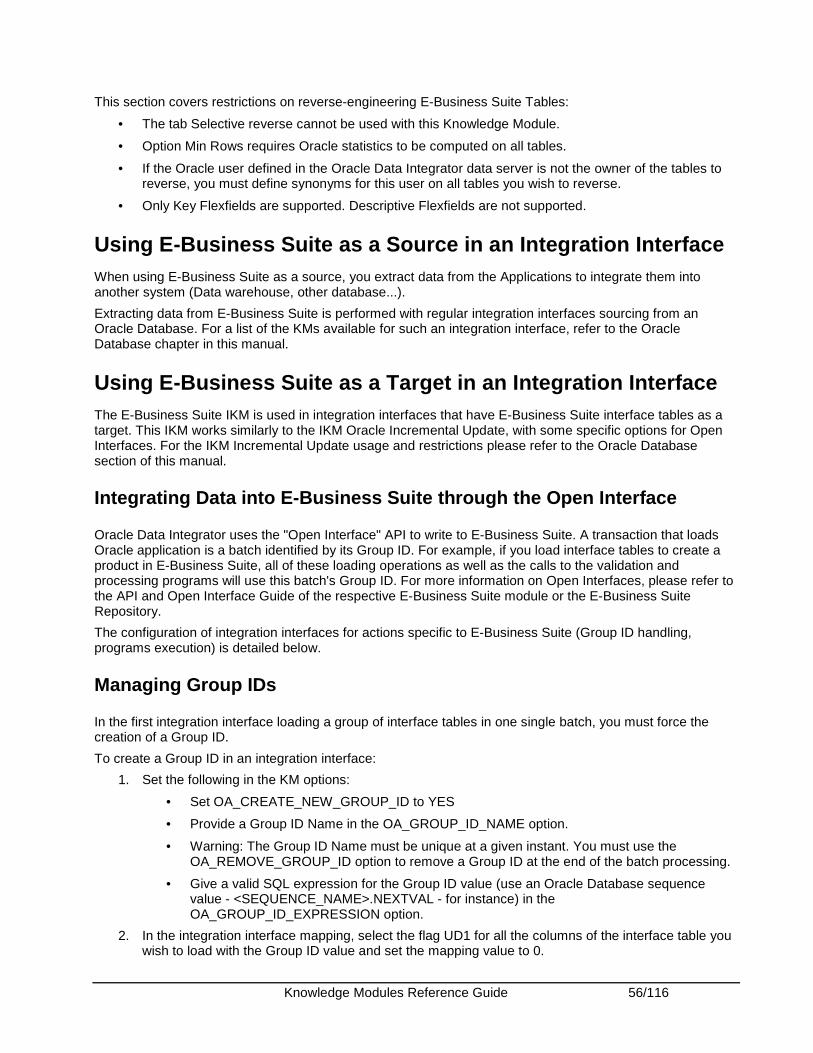
Knowledge Modules Reference Guide 56/116
This section covers restrictions on reverse-engineering E-Business Suite Tables:
• The tab Selective reverse cannot be used with this Knowledge Module.
• Option Min Rows requires Oracle statistics to be computed on all tables.
• If the Oracle user defined in the Oracle Data Integrator data server is not the owner of the tables to reverse, you must define synonyms for this user on all tables you wish to reverse.
• Only Key Flexfields are supported. Descriptive Flexfields are not supported.
Using E-Business Suite as a Source in an Integration Interface When using E-Business Suite as a source, you extract data from the Applications to integrate them into another system (Data warehouse, other database...).
Extracting data from E-Business Suite is performed with regular integration interfaces sourcing from an Oracle Database. For a list of the KMs available for such an integration interface, refer to the Oracle Database chapter in this manual.
Using E-Business Suite as a Target in an Integration Interface The E-Business Suite IKM is used in integration interfaces that have E-Business Suite interface tables as a target. This IKM works similarly to the IKM Oracle Incremental Update, with some specific options for Open Interfaces. For the IKM Incremental Update usage and restrictions please refer to the Oracle Database section of this manual.
Integrating Data into E-Business Suite through the Open Interface
Oracle Data Integrator uses the "Open Interface" API to write to E-Business Suite. A transaction that loads Oracle application is a batch identified by its Group ID. For example, if you load interface tables to create a product in E-Business Suite, all of these loading operations as well as the calls to the validation and processing programs will use this batch's Group ID. For more information on Open Interfaces, please refer to the API and Open Interface Guide of the respective E-Business Suite module or the E-Business Suite Repository.
The configuration of integration interfaces for actions specific to E-Business Suite (Group ID handling, programs execution) is detailed below.
Managing Group IDs
In the first integration interface loading a group of interface tables in one single batch, you must force the creation of a Group ID.
To create a Group ID in an integration interface:
1. Set the following in the KM options:
• Set OA_CREATE_NEW_GROUP_ID to YES
• Provide a Group ID Name in the OA_GROUP_ID_NAME option.
• Warning: The Group ID Name must be unique at a given instant. You must use the OA_REMOVE_GROUP_ID option to remove a Group ID at the end of the batch processing.
• Give a valid SQL expression for the Group ID value (use an Oracle Database sequence value - <SEQUENCE_NAME>.NEXTVAL - for instance) in the OA_GROUP_ID_EXPRESSION option.
2. In the integration interface mapping, select the flag UD1 for all the columns of the interface table you wish to load with the Group ID value and set the mapping value to 0.
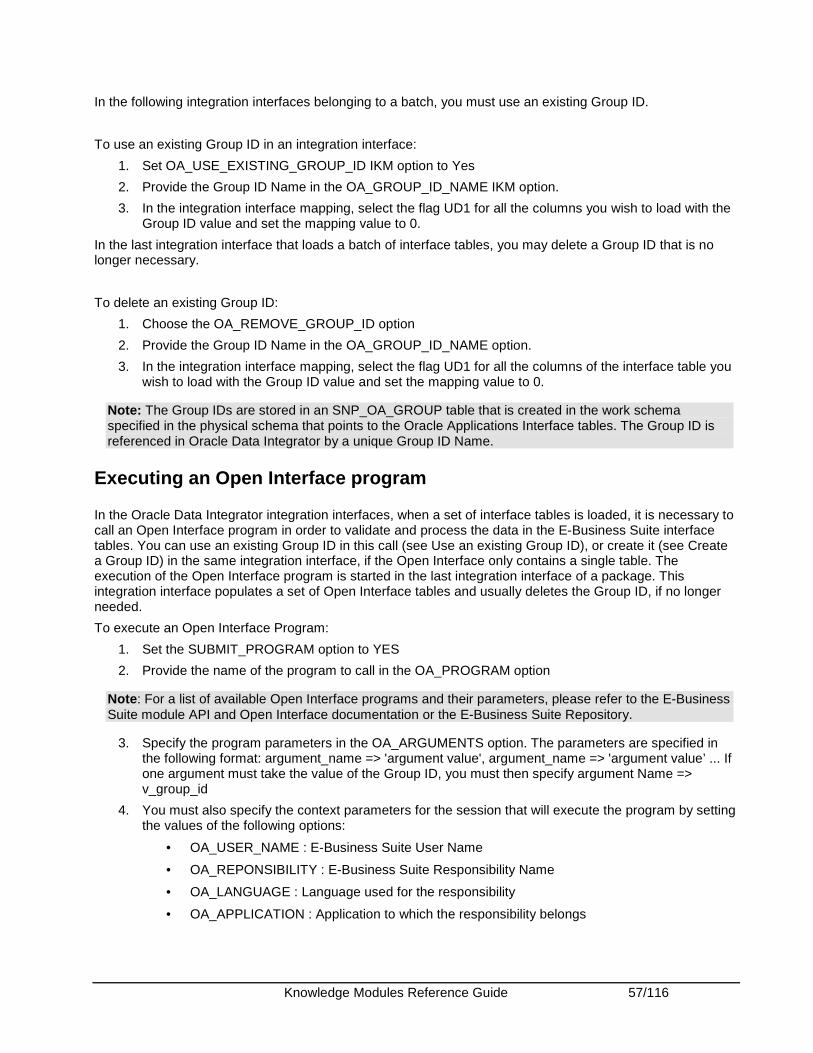
Knowledge Modules Reference Guide 57/116
In the following integration interfaces belonging to a batch, you must use an existing Group ID.
To use an existing Group ID in an integration interface:
1. Set OA_USE_EXISTING_GROUP_ID IKM option to Yes
2. Provide the Group ID Name in the OA_GROUP_ID_NAME IKM option.
3. In the integration interface mapping, select the flag UD1 for all the columns you wish to load with the Group ID value and set the mapping value to 0.
In the last integration interface that loads a batch of interface tables, you may delete a Group ID that is no longer necessary.
To delete an existing Group ID:
1. Choose the OA_REMOVE_GROUP_ID option
2. Provide the Group ID Name in the OA_GROUP_ID_NAME option.
3. In the integration interface mapping, select the flag UD1 for all the columns of the interface table you wish to load with the Group ID value and set the mapping value to 0.
Note: The Group IDs are stored in an SNP_OA_GROUP table that is created in the work schema specified in the physical schema that points to the Oracle Applications Interface tables. The Group ID is referenced in Oracle Data Integrator by a unique Group ID Name.
Executing an Open Interface program
In the Oracle Data Integrator integration interfaces, when a set of interface tables is loaded, it is necessary to call an Open Interface program in order to validate and process the data in the E-Business Suite interface tables. You can use an existing Group ID in this call (see Use an existing Group ID), or create it (see Create a Group ID) in the same integration interface, if the Open Interface only contains a single table. The execution of the Open Interface program is started in the last integration interface of a package. This integration interface populates a set of Open Interface tables and usually deletes the Group ID, if no longer needed.
To execute an Open Interface Program:
1. Set the SUBMIT_PROGRAM option to YES
2. Provide the name of the program to call in the OA_PROGRAM option
Note: For a list of available Open Interface programs and their parameters, please refer to the E-Business Suite module API and Open Interface documentation or the E-Business Suite Repository.
3. Specify the program parameters in the OA_ARGUMENTS option. The parameters are specified in the following format: argument_name => 'argument value', argument_name => 'argument value’ ... If one argument must take the value of the Group ID, you must then specify argument Name => v_group_id
4. You must also specify the context parameters for the session that will execute the program by setting the values of the following options:
• OA_USER_NAME : E-Business Suite User Name
• OA_REPONSIBILITY : E-Business Suite Responsibility Name
• OA_LANGUAGE : Language used for the responsibility
• OA_APPLICATION : Application to which the responsibility belongs
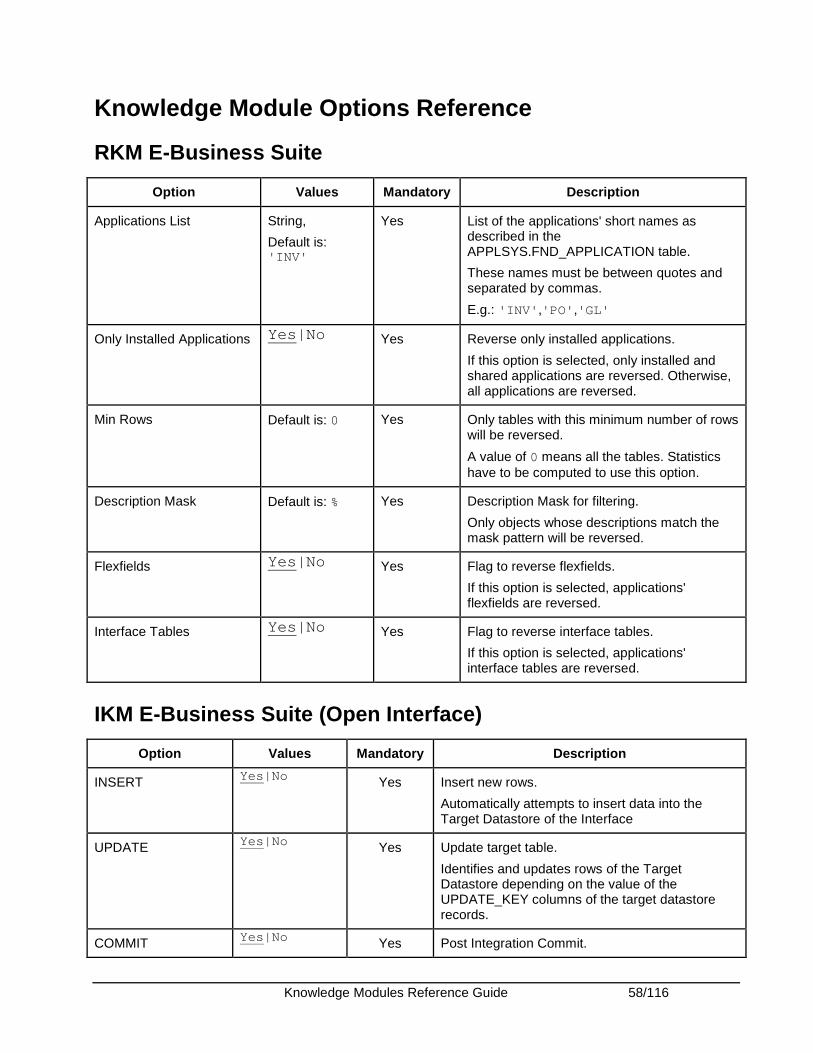
Knowledge Modules Reference Guide 58/116
Knowledge Module Options Reference
RKM E-Business Suite
Option Values Mandatory Description
Applications List String,
Default is: 'INV'
Yes List of the applications' short names as described in the APPLSYS.FND_APPLICATION table.
These names must be between quotes and separated by commas.
E.g.: 'INV' ,'PO' ,'GL'
Only Installed Applications Yes|No Yes Reverse only installed applications.
If this option is selected, only installed and shared applications are reversed. Otherwise, all applications are reversed.
Min Rows Default is: 0 Yes Only tables with this minimum number of rows will be reversed.
A value of 0 means all the tables. Statistics have to be computed to use this option.
Description Mask Default is: % Yes Description Mask for filtering.
Only objects whose descriptions match the mask pattern will be reversed.
Flexfields Yes|No Yes Flag to reverse flexfields.
If this option is selected, applications' flexfields are reversed.
Interface Tables Yes|No Yes Flag to reverse interface tables.
If this option is selected, applications' interface tables are reversed.
IKM E-Business Suite (Open Interface)
Option Values Mandatory Description
INSERT Yes|No Yes Insert new rows.
Automatically attempts to insert data into the Target Datastore of the Interface
UPDATE Yes|No Yes Update target table.
Identifies and updates rows of the Target Datastore depending on the value of the UPDATE_KEY columns of the target datastore records.
COMMIT Yes|No Yes Post Integration Commit.
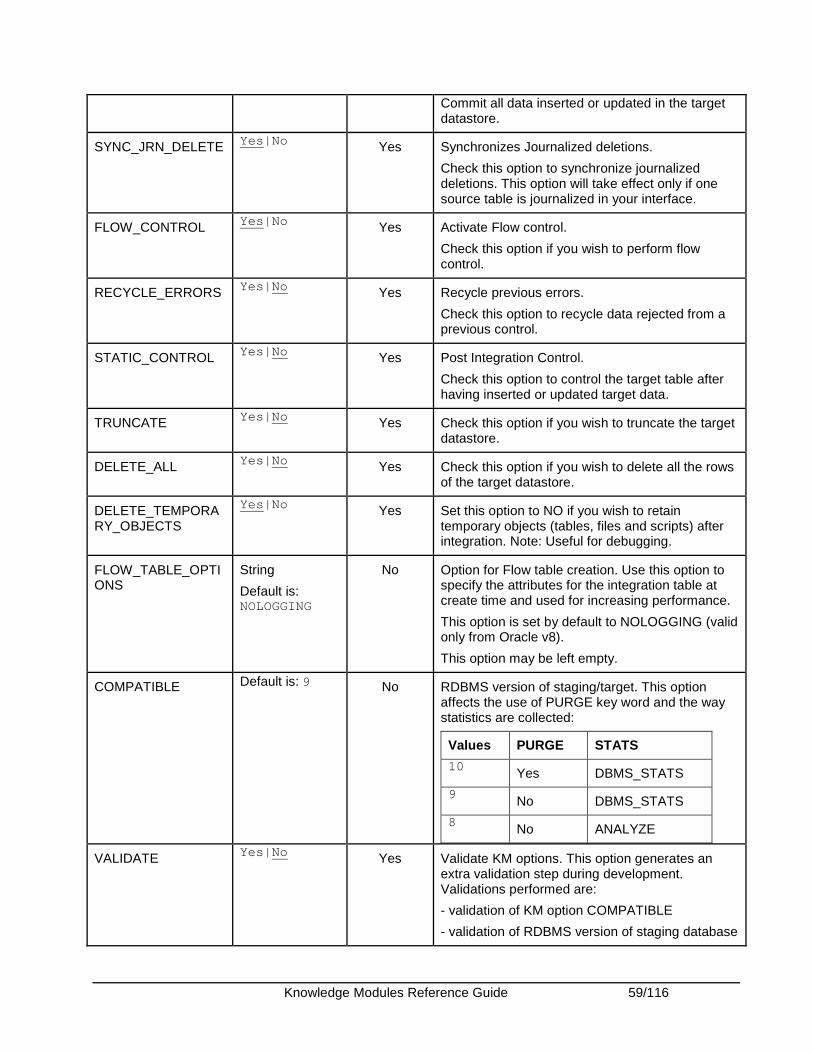
Knowledge Modules Reference Guide 59/116
Commit all data inserted or updated in the target datastore.
SYNC_JRN_DELETE Yes|No Yes Synchronizes Journalized deletions.
Check this option to synchronize journalized deletions. This option will take effect only if one source table is journalized in your interface.
FLOW_CONTROL Yes|No Yes Activate Flow control.
Check this option if you wish to perform flow control.
RECYCLE_ERRORS Yes|No Yes Recycle previous errors.
Check this option to recycle data rejected from a previous control.
STATIC_CONTROL Yes|No Yes Post Integration Control.
Check this option to control the target table after having inserted or updated target data.
TRUNCATE Yes|No Yes Check this option if you wish to truncate the target datastore.
DELETE_ALL Yes|No Yes Check this option if you wish to delete all the rows of the target datastore.
DELETE_TEMPORARY_OBJECTS
Yes|No Yes Set this option to NO if you wish to retain temporary objects (tables, files and scripts) after integration. Note: Useful for debugging.
FLOW_TABLE_OPTIONS
String
Default is: NOLOGGING
No Option for Flow table creation. Use this option to specify the attributes for the integration table at create time and used for increasing performance.
This option is set by default to NOLOGGING (valid only from Oracle v8).
This option may be left empty.
COMPATIBLE Default is: 9 No RDBMS version of staging/target. This option affects the use of PURGE key word and the way statistics are collected:
Values PURGE STATS
10 Yes DBMS_STATS
9 No DBMS_STATS
8 No ANALYZE
VALIDATE Yes|No Yes Validate KM options. This option generates an extra validation step during development. Validations performed are:
- validation of KM option COMPATIBLE
- validation of RDBMS version of staging database

Knowledge Modules Reference Guide 60/116
- validation of KM option DETECTION_STRATEGY
This option should be turned off for all production use in particular for high-frequency execution. There is not added value in production, only processing overhead.
DETECTION_STRATEGY
String,
Default is: NOT_EXISTS
Yes Strategy to identify useless update. Valid values are
- MINUS: used when populating flow table in order to exclude records, which identically exist in target.
- NOT_EXISTS: used when populating flow table in order to exclude records, which identically exist in target.
- POST_FLOW: all records from source are loaded into flow table. After that an update statement is used to flag all rows in flow table, which identically exist in target.
- NONE: all records from source are loaded into flow table. All target records are updated even when target records is identical to flow table record.
ANALYZE_TARGET Yes|No Yes Check this option if you wish to analyze the target table before loading data into the integration table.
OPTIMIZER_HINT No Use this option to specify the hint (string) to be used while loading the integration table.
SUBMIT_PROGRAM Yes|No Yes Check this option if you want to submit Oracle Application Open Interface Program.
OA_USER_NAME String,
Default is: myname
Yes Oracle Application User Name for context initialization.
OA_RESPONSIBILITY
String, Default is: ResponsibilityName
Yes Oracle Application Responsibility to use for context initialization
OA_LANGUAGE String, Default is: US
Yes Default language used for the responsibility.
OA_APPLICATION String, Default is: INV
Yes Oracle Application Name for this interface.
OA_PROGRAM String, Default is: INCOIN
Yes E-Business Suite Program to submit.
OA_ARGUMENTS String, Default is: ,argument1 => 'BATCH'
Yes E-Business Suite program arguments using this syntax :
, argumentX => 'value' , argumentX
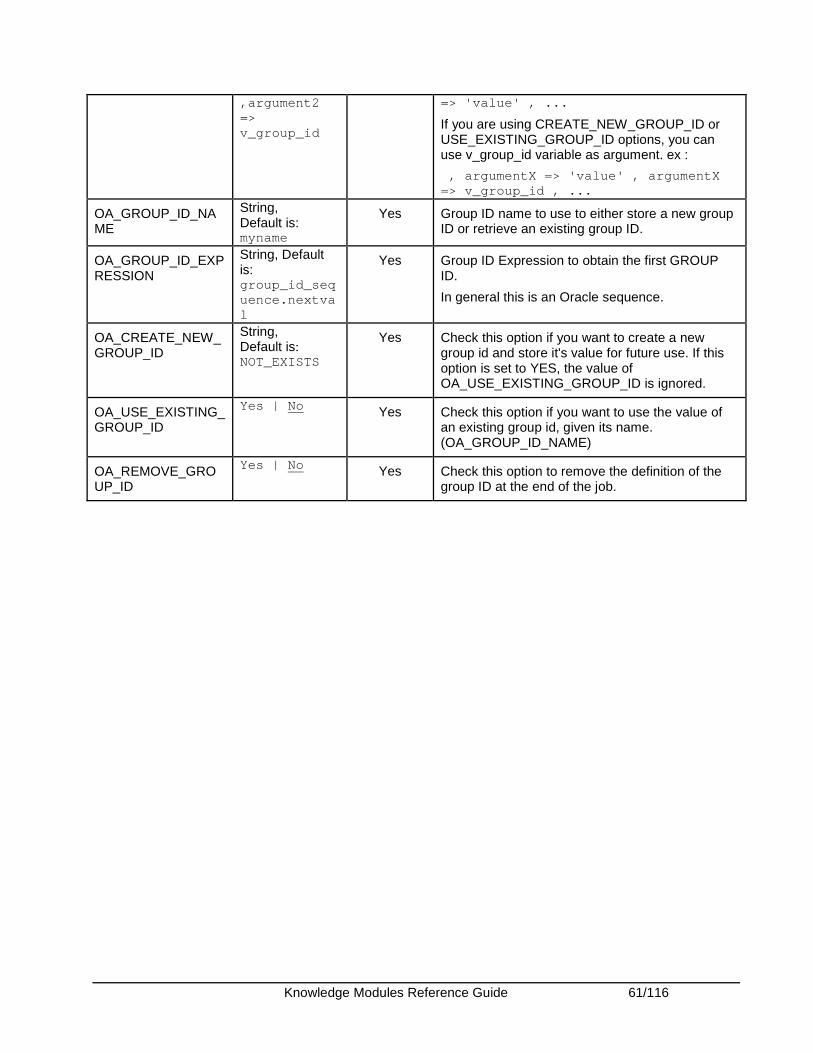
Knowledge Modules Reference Guide 61/116
,argument2 => v_group_id
=> 'value' , ...
If you are using CREATE_NEW_GROUP_ID or USE_EXISTING_GROUP_ID options, you can use v_group_id variable as argument. ex :
, argumentX => 'value' , argumentX => v_group_id , ...
OA_GROUP_ID_NAME
String, Default is: myname
Yes Group ID name to use to either store a new group ID or retrieve an existing group ID.
OA_GROUP_ID_EXPRESSION
String, Default is: group_id_sequence.nextval
Yes Group ID Expression to obtain the first GROUP ID.
In general this is an Oracle sequence.
OA_CREATE_NEW_GROUP_ID
String, Default is: NOT_EXISTS
Yes Check this option if you want to create a new group id and store it's value for future use. If this option is set to YES, the value of OA_USE_EXISTING_GROUP_ID is ignored.
OA_USE_EXISTING_GROUP_ID
Yes | No Yes Check this option if you want to use the value of an existing group id, given its name. (OA_GROUP_ID_NAME)
OA_REMOVE_GROUP_ID
Yes | No Yes Check this option to remove the definition of the group ID at the end of the job.
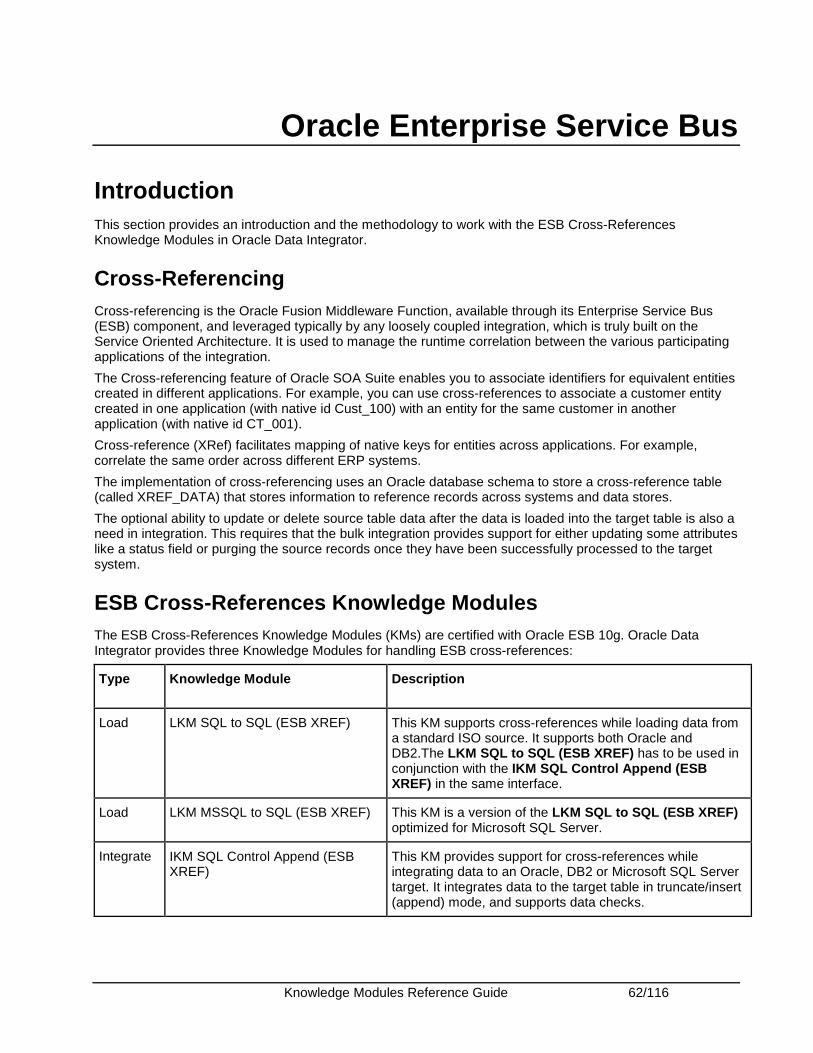
Knowledge Modules Reference Guide 62/116
Oracle Enterprise Service Bus
Introduction This section provides an introduction and the methodology to work with the ESB Cross-References Knowledge Modules in Oracle Data Integrator.
Cross-Referencing Cross-referencing is the Oracle Fusion Middleware Function, available through its Enterprise Service Bus (ESB) component, and leveraged typically by any loosely coupled integration, which is truly built on the Service Oriented Architecture. It is used to manage the runtime correlation between the various participating applications of the integration.
The Cross-referencing feature of Oracle SOA Suite enables you to associate identifiers for equivalent entities created in different applications. For example, you can use cross-references to associate a customer entity created in one application (with native id Cust_100) with an entity for the same customer in another application (with native id CT_001).
Cross-reference (XRef) facilitates mapping of native keys for entities across applications. For example, correlate the same order across different ERP systems.
The implementation of cross-referencing uses an Oracle database schema to store a cross-reference table (called XREF_DATA) that stores information to reference records across systems and data stores.
The optional ability to update or delete source table data after the data is loaded into the target table is also a need in integration. This requires that the bulk integration provides support for either updating some attributes like a status field or purging the source records once they have been successfully processed to the target system.
ESB Cross-References Knowledge Modules The ESB Cross-References Knowledge Modules (KMs) are certified with Oracle ESB 10g. Oracle Data Integrator provides three Knowledge Modules for handling ESB cross-references:
Type Knowledge Module Description
Load LKM SQL to SQL (ESB XREF) This KM supports cross-references while loading data from a standard ISO source. It supports both Oracle and DB2.The LKM SQL to SQL (ESB XREF) has to be used in conjunction with the IKM SQL Control Append (ESB XREF) in the same interface.
Load LKM MSSQL to SQL (ESB XREF) This KM is a version of the LKM SQL to SQL (ESB XREF) optimized for Microsoft SQL Server.
Integrate IKM SQL Control Append (ESB XREF)
This KM provides support for cross-references while integrating data to an Oracle, DB2 or Microsoft SQL Server target. It integrates data to the target table in truncate/insert (append) mode, and supports data checks.
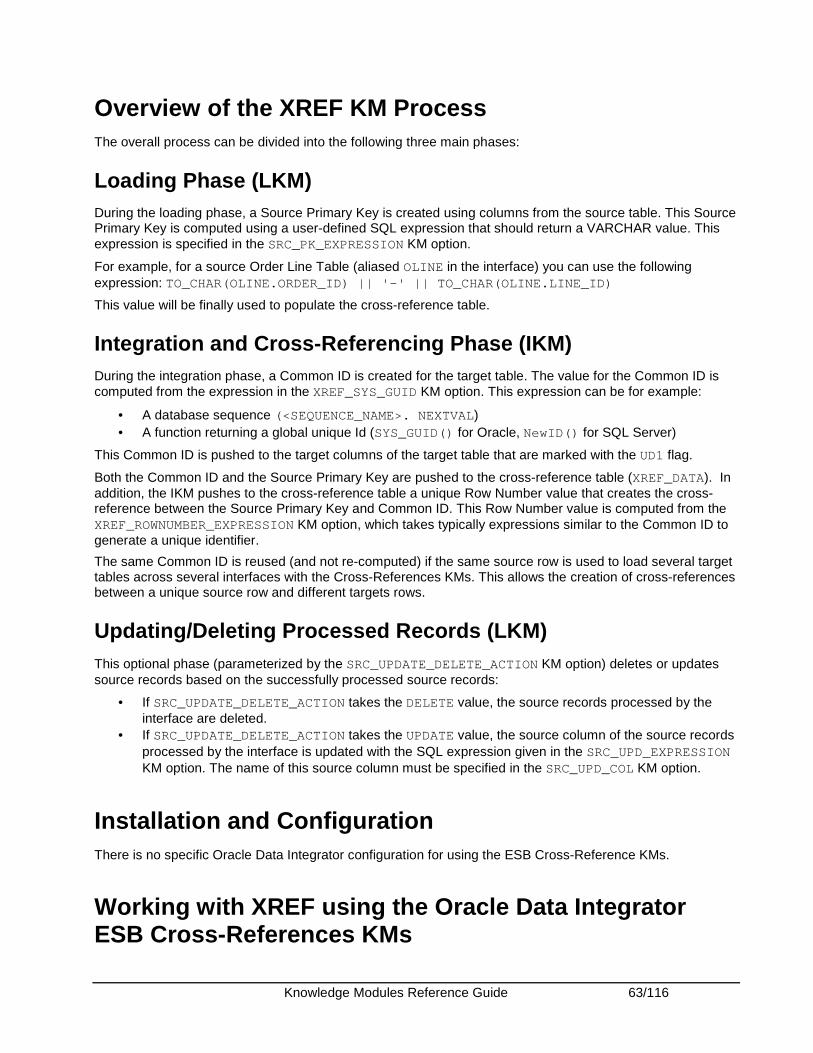
Knowledge Modules Reference Guide 63/116
Overview of the XREF KM Process The overall process can be divided into the following three main phases:
Loading Phase (LKM) During the loading phase, a Source Primary Key is created using columns from the source table. This Source Primary Key is computed using a user-defined SQL expression that should return a VARCHAR value. This expression is specified in the SRC_PK_EXPRESSION KM option.
For example, for a source Order Line Table (aliased OLINE in the interface) you can use the following expression: TO_CHAR(OLINE.ORDER_ID) || '-' || TO_CHAR(OLINE.LIN E_ID)
This value will be finally used to populate the cross-reference table.
Integration and Cross-Referencing Phase (IKM) During the integration phase, a Common ID is created for the target table. The value for the Common ID is computed from the expression in the XREF_SYS_GUID KM option. This expression can be for example:
• A database sequence (<SEQUENCE_NAME>. NEXTVAL) • A function returning a global unique Id (SYS_GUID() for Oracle, NewID() for SQL Server)
This Common ID is pushed to the target columns of the target table that are marked with the UD1 flag.
Both the Common ID and the Source Primary Key are pushed to the cross-reference table (XREF_DATA). In addition, the IKM pushes to the cross-reference table a unique Row Number value that creates the cross-reference between the Source Primary Key and Common ID. This Row Number value is computed from the XREF_ROWNUMBER_EXPRESSION KM option, which takes typically expressions similar to the Common ID to generate a unique identifier.
The same Common ID is reused (and not re-computed) if the same source row is used to load several target tables across several interfaces with the Cross-References KMs. This allows the creation of cross-references between a unique source row and different targets rows.
Updating/Deleting Processed Records (LKM) This optional phase (parameterized by the SRC_UPDATE_DELETE_ACTION KM option) deletes or updates source records based on the successfully processed source records:
• If SRC_UPDATE_DELETE_ACTION takes the DELETE value, the source records processed by the interface are deleted.
• If SRC_UPDATE_DELETE_ACTION takes the UPDATE value, the source column of the source records processed by the interface is updated with the SQL expression given in the SRC_UPD_EXPRESSION KM option. The name of this source column must be specified in the SRC_UPD_COL KM option.
Installation and Configuration There is no specific Oracle Data Integrator configuration for using the ESB Cross-Reference KMs.
Working with XREF using the Oracle Data Integrator ESB Cross-References KMs
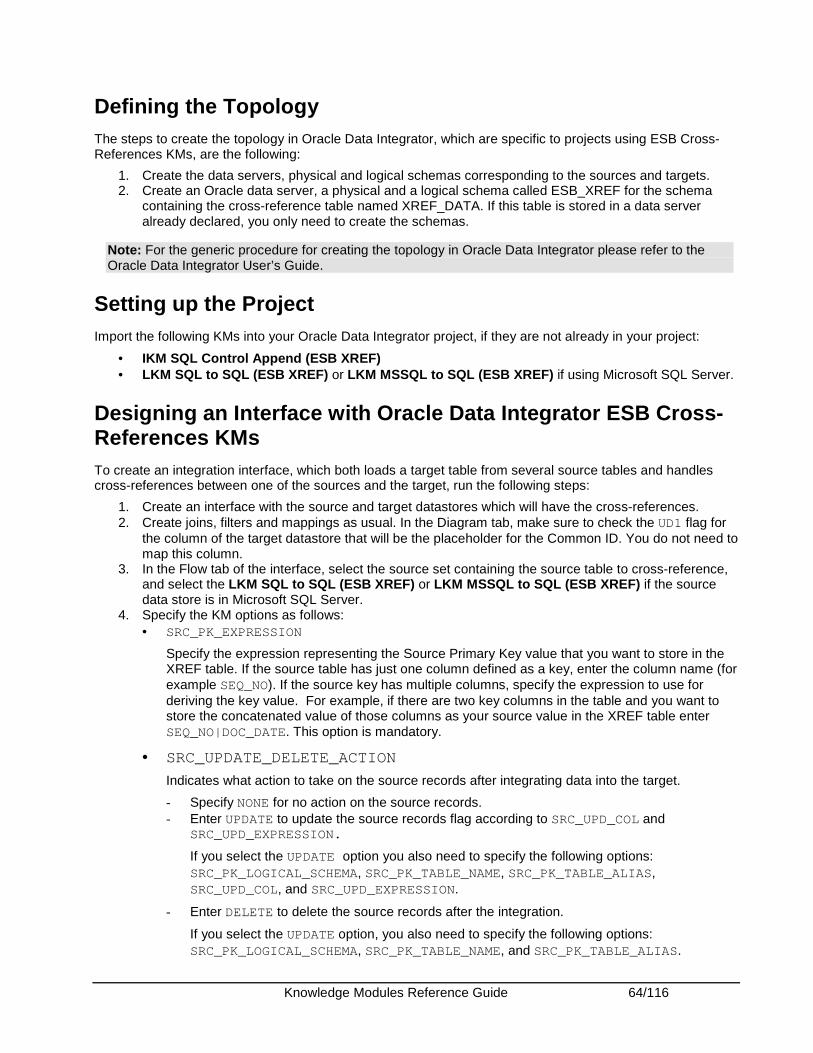
Knowledge Modules Reference Guide 64/116
Defining the Topology The steps to create the topology in Oracle Data Integrator, which are specific to projects using ESB Cross-References KMs, are the following:
1. Create the data servers, physical and logical schemas corresponding to the sources and targets. 2. Create an Oracle data server, a physical and a logical schema called ESB_XREF for the schema
containing the cross-reference table named XREF_DATA. If this table is stored in a data server already declared, you only need to create the schemas.
Note: For the generic procedure for creating the topology in Oracle Data Integrator please refer to the Oracle Data Integrator User’s Guide.
Setting up the Project Import the following KMs into your Oracle Data Integrator project, if they are not already in your project:
• IKM SQL Control Append (ESB XREF) • LKM SQL to SQL (ESB XREF) or LKM MSSQL to SQL (ESB XREF) if using Microsoft SQL Server.
Designing an Interface with Oracle Data Integrator ESB Cross-References KMs To create an integration interface, which both loads a target table from several source tables and handles cross-references between one of the sources and the target, run the following steps:
1. Create an interface with the source and target datastores which will have the cross-references. 2. Create joins, filters and mappings as usual. In the Diagram tab, make sure to check the UD1 flag for
the column of the target datastore that will be the placeholder for the Common ID. You do not need to map this column.
3. In the Flow tab of the interface, select the source set containing the source table to cross-reference, and select the LKM SQL to SQL (ESB XREF) or LKM MSSQL to SQL (ESB XREF) if the source data store is in Microsoft SQL Server.
4. Specify the KM options as follows: • SRC_PK_EXPRESSION
Specify the expression representing the Source Primary Key value that you want to store in the XREF table. If the source table has just one column defined as a key, enter the column name (for example SEQ_NO). If the source key has multiple columns, specify the expression to use for deriving the key value. For example, if there are two key columns in the table and you want to store the concatenated value of those columns as your source value in the XREF table enter SEQ_NO|DOC_DATE. This option is mandatory.
• SRC_UPDATE_DELETE_ACTION
Indicates what action to take on the source records after integrating data into the target.
- Specify NONE for no action on the source records. - Enter UPDATE to update the source records flag according to SRC_UPD_COL and
SRC_UPD_EXPRESSION.
If you select the UPDATE option you also need to specify the following options: SRC_PK_LOGICAL_SCHEMA, SRC_PK_TABLE_NAME, SRC_PK_TABLE_ALIAS, SRC_UPD_COL, and SRC_UPD_EXPRESSION.
- Enter DELETE to delete the source records after the integration.
If you select the UPDATE option, you also need to specify the following options: SRC_PK_LOGICAL_SCHEMA, SRC_PK_TABLE_NAME, and SRC_PK_TABLE_ALIAS.
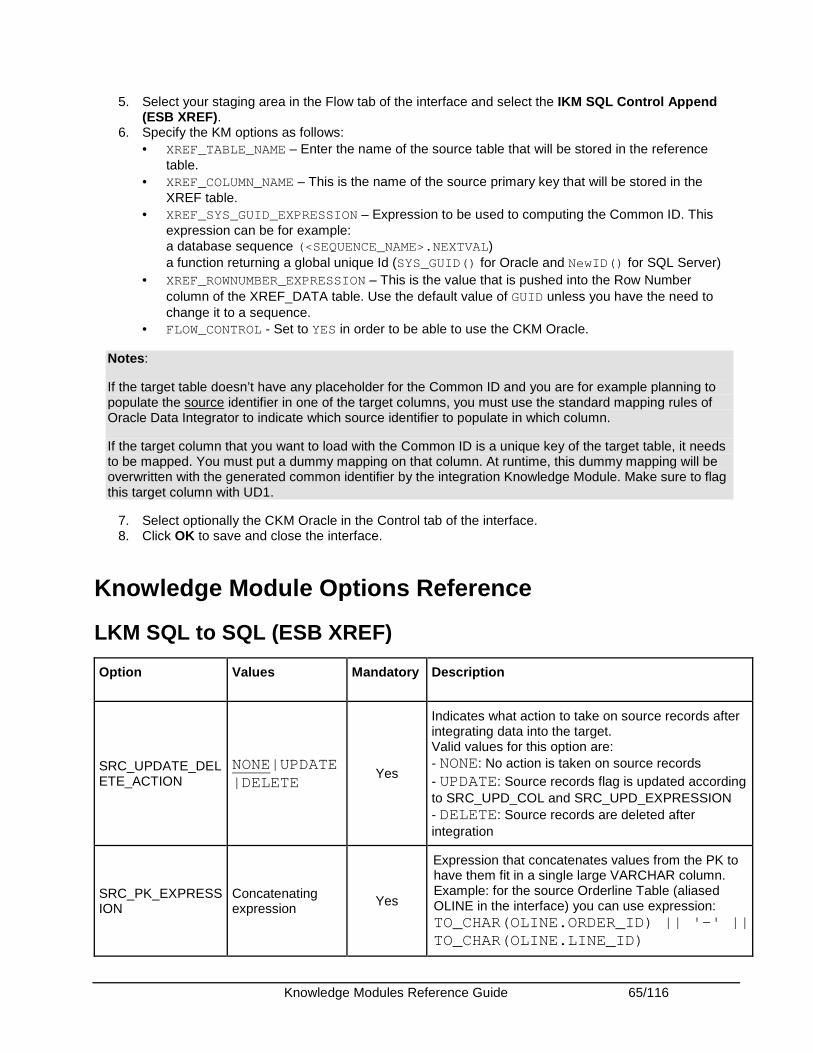
Knowledge Modules Reference Guide 65/116
5. Select your staging area in the Flow tab of the interface and select the IKM SQL Control Append (ESB XREF).
6. Specify the KM options as follows: • XREF_TABLE_NAME – Enter the name of the source table that will be stored in the reference
table. • XREF_COLUMN_NAME – This is the name of the source primary key that will be stored in the
XREF table. • XREF_SYS_GUID_EXPRESSION – Expression to be used to computing the Common ID. This
expression can be for example: a database sequence (<SEQUENCE_NAME>.NEXTVAL) a function returning a global unique Id (SYS_GUID() for Oracle and NewID() for SQL Server)
• XREF_ROWNUMBER_EXPRESSION – This is the value that is pushed into the Row Number column of the XREF_DATA table. Use the default value of GUID unless you have the need to change it to a sequence.
• FLOW_CONTROL - Set to YES in order to be able to use the CKM Oracle.
Notes:
If the target table doesn’t have any placeholder for the Common ID and you are for example planning to populate the source identifier in one of the target columns, you must use the standard mapping rules of Oracle Data Integrator to indicate which source identifier to populate in which column.
If the target column that you want to load with the Common ID is a unique key of the target table, it needs to be mapped. You must put a dummy mapping on that column. At runtime, this dummy mapping will be overwritten with the generated common identifier by the integration Knowledge Module. Make sure to flag this target column with UD1.
7. Select optionally the CKM Oracle in the Control tab of the interface. 8. Click OK to save and close the interface.
Knowledge Module Options Reference
LKM SQL to SQL (ESB XREF)
Option Values Mandatory Description
SRC_UPDATE_DELETE_ACTION
NONE|UPDATE|DELETE
Yes
Indicates what action to take on source records after integrating data into the target. Valid values for this option are: - NONE: No action is taken on source records - UPDATE: Source records flag is updated according to SRC_UPD_COL and SRC_UPD_EXPRESSION - DELETE: Source records are deleted after integration
SRC_PK_EXPRESSION
Concatenating expression
Yes
Expression that concatenates values from the PK to have them fit in a single large VARCHAR column. Example: for the source Orderline Table (aliased OLINE in the interface) you can use expression: TO_CHAR(OLINE.ORDER_ID) || '- ' || TO_CHAR(OLINE.LINE_ID)
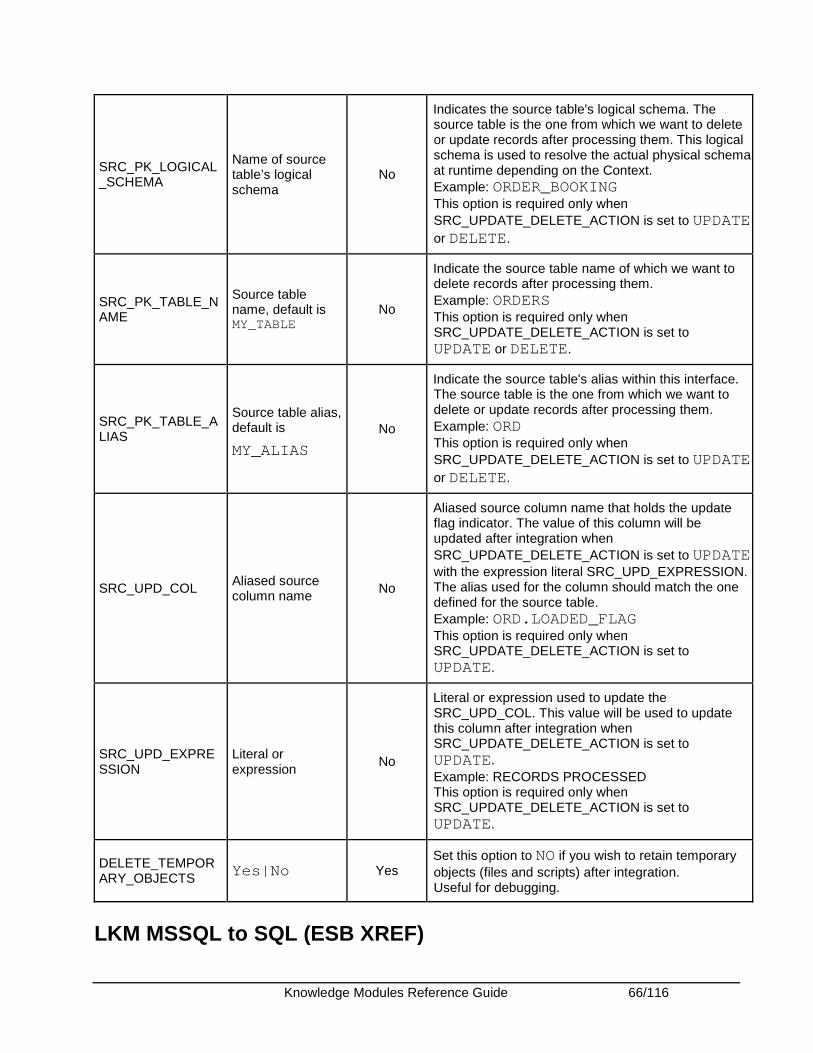
Knowledge Modules Reference Guide 66/116
SRC_PK_LOGICAL_SCHEMA
Name of source table’s logical schema
No
Indicates the source table's logical schema. The source table is the one from which we want to delete or update records after processing them. This logical schema is used to resolve the actual physical schema at runtime depending on the Context. Example: ORDER_BOOKING This option is required only when SRC_UPDATE_DELETE_ACTION is set to UPDATE or DELETE.
SRC_PK_TABLE_NAME
Source table name, default is MY_TABLE
No
Indicate the source table name of which we want to delete records after processing them. Example: ORDERS This option is required only when SRC_UPDATE_DELETE_ACTION is set to UPDATE or DELETE.
SRC_PK_TABLE_ALIAS
Source table alias, default is
MY_ALIAS
No
Indicate the source table's alias within this interface. The source table is the one from which we want to delete or update records after processing them. Example: ORD This option is required only when SRC_UPDATE_DELETE_ACTION is set to UPDATE or DELETE.
SRC_UPD_COL Aliased source column name
No
Aliased source column name that holds the update flag indicator. The value of this column will be updated after integration when SRC_UPDATE_DELETE_ACTION is set to UPDATE with the expression literal SRC_UPD_EXPRESSION. The alias used for the column should match the one defined for the source table. Example: ORD.LOADED_FLAG This option is required only when SRC_UPDATE_DELETE_ACTION is set to UPDATE.
SRC_UPD_EXPRESSION
Literal or expression
No
Literal or expression used to update the SRC_UPD_COL. This value will be used to update this column after integration when SRC_UPDATE_DELETE_ACTION is set to UPDATE. Example: RECORDS PROCESSED This option is required only when SRC_UPDATE_DELETE_ACTION is set to UPDATE.
DELETE_TEMPORARY_OBJECTS Yes|No Yes
Set this option to NO if you wish to retain temporary objects (files and scripts) after integration. Useful for debugging.
LKM MSSQL to SQL (ESB XREF)
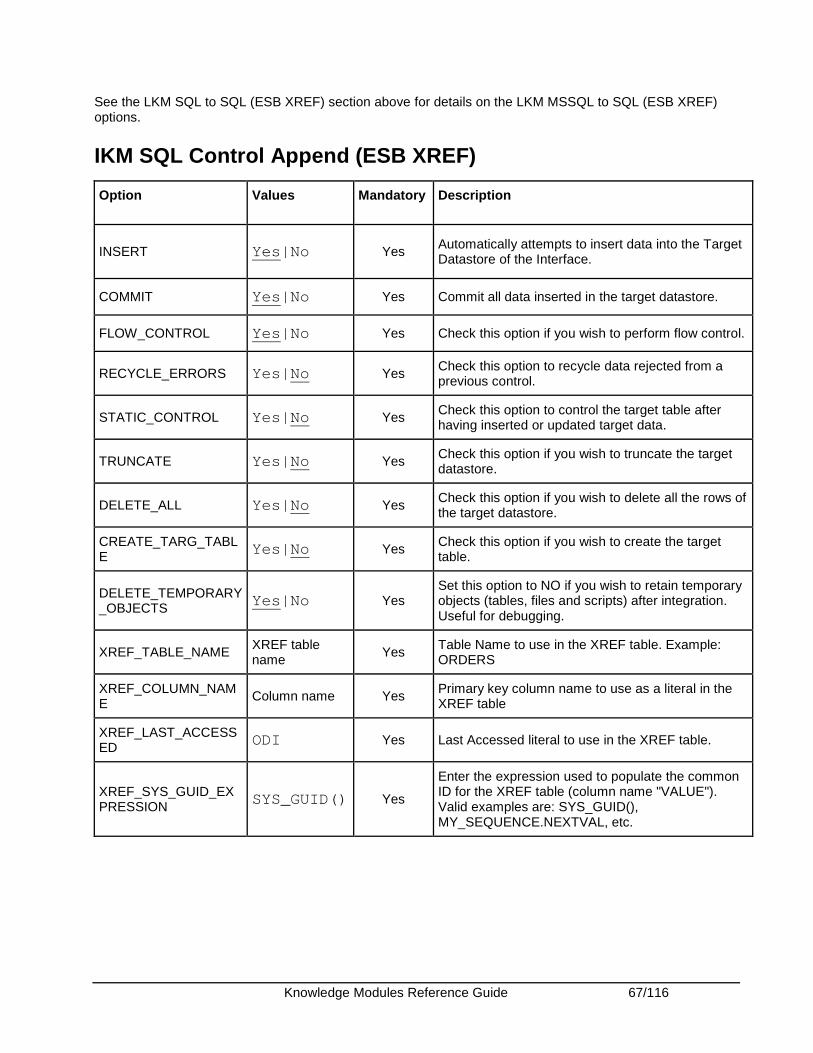
Knowledge Modules Reference Guide 67/116
See the LKM SQL to SQL (ESB XREF) section above for details on the LKM MSSQL to SQL (ESB XREF) options.
IKM SQL Control Append (ESB XREF)
Option Values Mandatory Description
INSERT Yes|No Yes Automatically attempts to insert data into the Target Datastore of the Interface.
COMMIT Yes|No Yes Commit all data inserted in the target datastore.
FLOW_CONTROL Yes|No Yes Check this option if you wish to perform flow control.
RECYCLE_ERRORS Yes|No Yes Check this option to recycle data rejected from a previous control.
STATIC_CONTROL Yes|No Yes Check this option to control the target table after having inserted or updated target data.
TRUNCATE Yes|No Yes Check this option if you wish to truncate the target datastore.
DELETE_ALL Yes|No Yes Check this option if you wish to delete all the rows of the target datastore.
CREATE_TARG_TABLE Yes|No Yes Check this option if you wish to create the target
table.
DELETE_TEMPORARY_OBJECTS Yes|No Yes
Set this option to NO if you wish to retain temporary objects (tables, files and scripts) after integration. Useful for debugging.
XREF_TABLE_NAME XREF table name
Yes Table Name to use in the XREF table. Example: ORDERS
XREF_COLUMN_NAME
Column name Yes Primary key column name to use as a literal in the XREF table
XREF_LAST_ACCESSED ODI Yes Last Accessed literal to use in the XREF table.
XREF_SYS_GUID_EXPRESSION SYS_GUID() Yes
Enter the expression used to populate the common ID for the XREF table (column name "VALUE"). Valid examples are: SYS_GUID(), MY_SEQUENCE.NEXTVAL, etc.
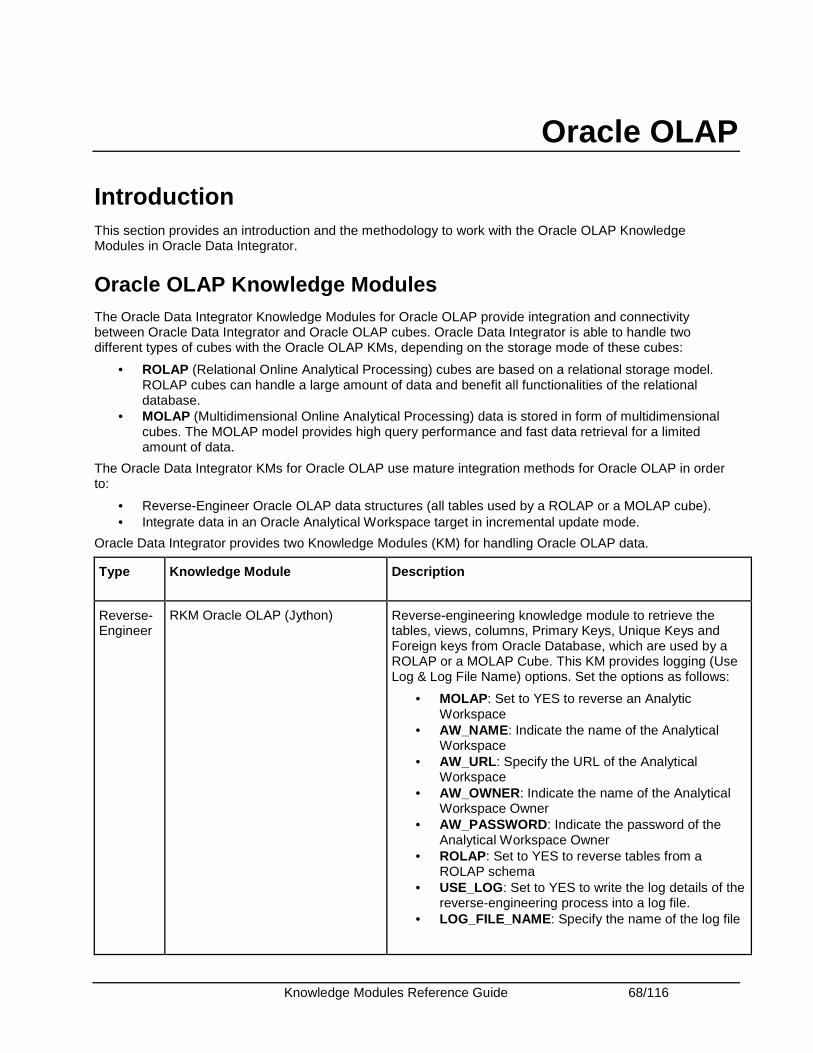
Knowledge Modules Reference Guide 68/116
Oracle OLAP
Introduction This section provides an introduction and the methodology to work with the Oracle OLAP Knowledge Modules in Oracle Data Integrator.
Oracle OLAP Knowledge Modules The Oracle Data Integrator Knowledge Modules for Oracle OLAP provide integration and connectivity between Oracle Data Integrator and Oracle OLAP cubes. Oracle Data Integrator is able to handle two different types of cubes with the Oracle OLAP KMs, depending on the storage mode of these cubes:
• ROLAP (Relational Online Analytical Processing) cubes are based on a relational storage model. ROLAP cubes can handle a large amount of data and benefit all functionalities of the relational database.
• MOLAP (Multidimensional Online Analytical Processing) data is stored in form of multidimensional cubes. The MOLAP model provides high query performance and fast data retrieval for a limited amount of data.
The Oracle Data Integrator KMs for Oracle OLAP use mature integration methods for Oracle OLAP in order to:
• Reverse-Engineer Oracle OLAP data structures (all tables used by a ROLAP or a MOLAP cube). • Integrate data in an Oracle Analytical Workspace target in incremental update mode.
Oracle Data Integrator provides two Knowledge Modules (KM) for handling Oracle OLAP data.
Type Knowledge Module Description
Reverse-Engineer
RKM Oracle OLAP (Jython) Reverse-engineering knowledge module to retrieve the tables, views, columns, Primary Keys, Unique Keys and Foreign keys from Oracle Database, which are used by a ROLAP or a MOLAP Cube. This KM provides logging (Use Log & Log File Name) options. Set the options as follows:
• MOLAP: Set to YES to reverse an Analytic Workspace
• AW_NAME: Indicate the name of the Analytical Workspace
• AW_URL: Specify the URL of the Analytical Workspace
• AW_OWNER: Indicate the name of the Analytical Workspace Owner
• AW_PASSWORD: Indicate the password of the Analytical Workspace Owner
• ROLAP: Set to YES to reverse tables from a ROLAP schema
• USE_LOG: Set to YES to write the log details of the reverse-engineering process into a log file.
• LOG_FILE_NAME: Specify the name of the log file
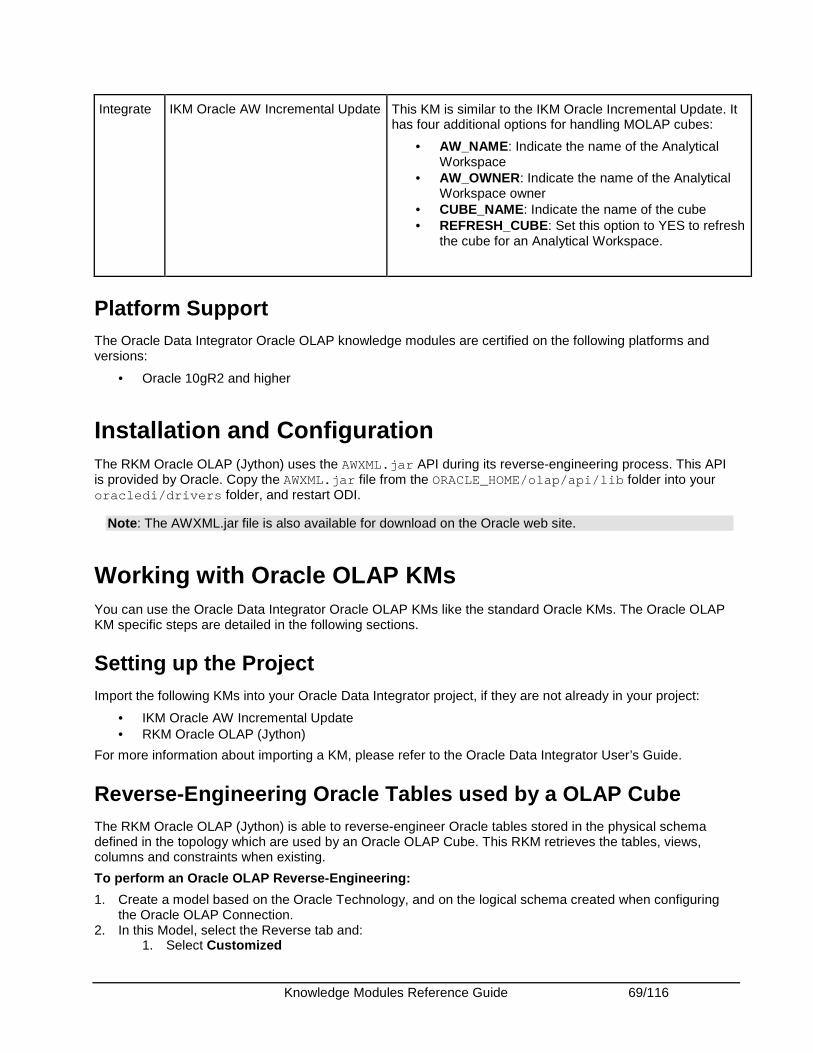
Knowledge Modules Reference Guide 69/116
Integrate IKM Oracle AW Incremental Update This KM is similar to the IKM Oracle Incremental Update. It has four additional options for handling MOLAP cubes:
• AW_NAME: Indicate the name of the Analytical Workspace
• AW_OWNER: Indicate the name of the Analytical Workspace owner
• CUBE_NAME: Indicate the name of the cube • REFRESH_CUBE: Set this option to YES to refresh
the cube for an Analytical Workspace.
Platform Support The Oracle Data Integrator Oracle OLAP knowledge modules are certified on the following platforms and versions:
• Oracle 10gR2 and higher
Installation and Configuration The RKM Oracle OLAP (Jython) uses the AWXML.jar API during its reverse-engineering process. This API is provided by Oracle. Copy the AWXML.jar file from the ORACLE_HOME/olap/api/lib folder into your oracledi/drivers folder, and restart ODI.
Note: The AWXML.jar file is also available for download on the Oracle web site.
Working with Oracle OLAP KMs You can use the Oracle Data Integrator Oracle OLAP KMs like the standard Oracle KMs. The Oracle OLAP KM specific steps are detailed in the following sections.
Setting up the Project Import the following KMs into your Oracle Data Integrator project, if they are not already in your project:
• IKM Oracle AW Incremental Update • RKM Oracle OLAP (Jython)
For more information about importing a KM, please refer to the Oracle Data Integrator User’s Guide.
Reverse-Engineering Oracle Tables used by a OLAP Cube The RKM Oracle OLAP (Jython) is able to reverse-engineer Oracle tables stored in the physical schema defined in the topology which are used by an Oracle OLAP Cube. This RKM retrieves the tables, views, columns and constraints when existing.
To perform an Oracle OLAP Reverse-Engineering:
1. Create a model based on the Oracle Technology, and on the logical schema created when configuring the Oracle OLAP Connection.
2. In this Model, select the Reverse tab and: 1. Select Customized
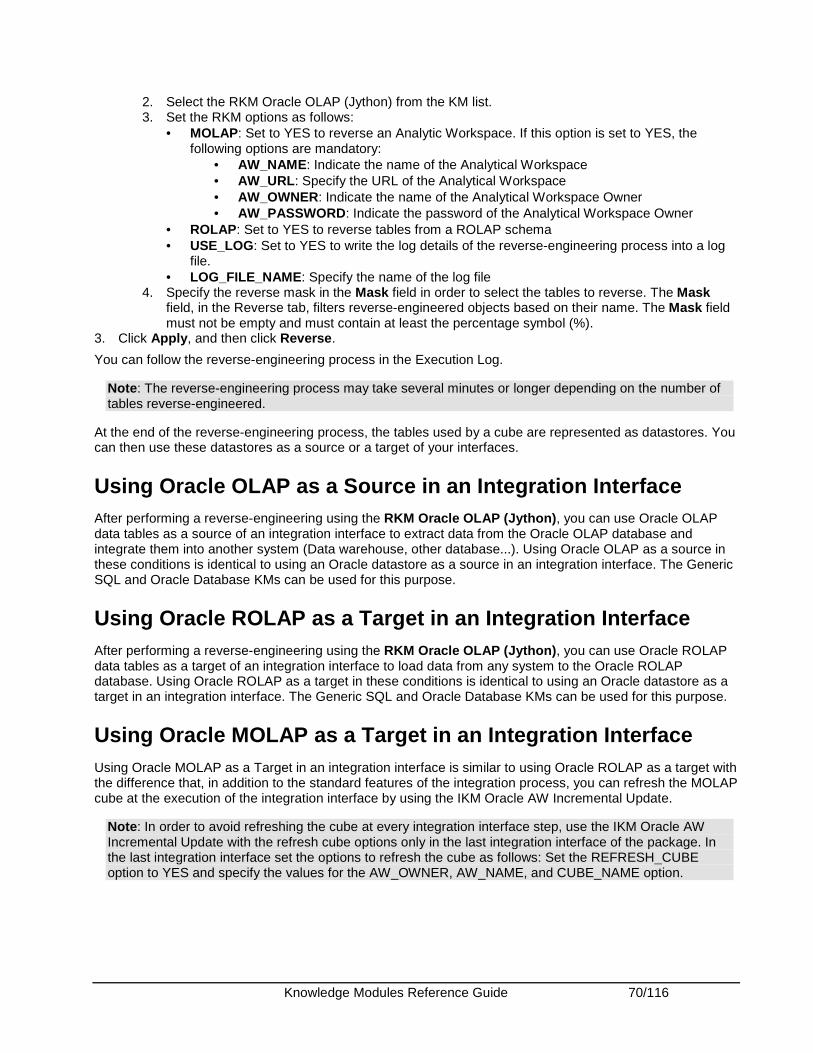
Knowledge Modules Reference Guide 70/116
2. Select the RKM Oracle OLAP (Jython) from the KM list. 3. Set the RKM options as follows:
• MOLAP: Set to YES to reverse an Analytic Workspace. If this option is set to YES, the following options are mandatory:
• AW_NAME: Indicate the name of the Analytical Workspace • AW_URL: Specify the URL of the Analytical Workspace • AW_OWNER: Indicate the name of the Analytical Workspace Owner • AW_PASSWORD: Indicate the password of the Analytical Workspace Owner
• ROLAP: Set to YES to reverse tables from a ROLAP schema • USE_LOG: Set to YES to write the log details of the reverse-engineering process into a log
file. • LOG_FILE_NAME: Specify the name of the log file
4. Specify the reverse mask in the Mask field in order to select the tables to reverse. The Mask field, in the Reverse tab, filters reverse-engineered objects based on their name. The Mask field must not be empty and must contain at least the percentage symbol (%).
3. Click Apply, and then click Reverse.
You can follow the reverse-engineering process in the Execution Log.
Note: The reverse-engineering process may take several minutes or longer depending on the number of tables reverse-engineered.
At the end of the reverse-engineering process, the tables used by a cube are represented as datastores. You can then use these datastores as a source or a target of your interfaces.
Using Oracle OLAP as a Source in an Integration Interface After performing a reverse-engineering using the RKM Oracle OLAP (Jython), you can use Oracle OLAP data tables as a source of an integration interface to extract data from the Oracle OLAP database and integrate them into another system (Data warehouse, other database...). Using Oracle OLAP as a source in these conditions is identical to using an Oracle datastore as a source in an integration interface. The Generic SQL and Oracle Database KMs can be used for this purpose.
Using Oracle ROLAP as a Target in an Integration Interface After performing a reverse-engineering using the RKM Oracle OLAP (Jython), you can use Oracle ROLAP data tables as a target of an integration interface to load data from any system to the Oracle ROLAP database. Using Oracle ROLAP as a target in these conditions is identical to using an Oracle datastore as a target in an integration interface. The Generic SQL and Oracle Database KMs can be used for this purpose.
Using Oracle MOLAP as a Target in an Integration Interface Using Oracle MOLAP as a Target in an integration interface is similar to using Oracle ROLAP as a target with the difference that, in addition to the standard features of the integration process, you can refresh the MOLAP cube at the execution of the integration interface by using the IKM Oracle AW Incremental Update.
Note: In order to avoid refreshing the cube at every integration interface step, use the IKM Oracle AW Incremental Update with the refresh cube options only in the last integration interface of the package. In the last integration interface set the options to refresh the cube as follows: Set the REFRESH_CUBE option to YES and specify the values for the AW_OWNER, AW_NAME, and CUBE_NAME option.

Knowledge Modules Reference Guide 71/116
Knowledge Module Options Reference
RKM Oracle OLAP (Jython)
Option Values Mandatory Description
MOLAP Yes|No Yes Reverse Table from an AW
AW_NAME string Yes, if MOLAP is set to YES
Analytical Workspace Name
AW_URL <server>:1521:<SID>
Yes, if MOLAP is set to YES
Analytical Workspace URL
If your JDBC connection is jdbc:oracle:thin:@<server>:1521:<SID>
the AW_URL should be: <server>:1521:<SID>
AW_OWNER <%=odiRef.getModel("SCHEMA_NAME")>
Yes, if MOLAP is set to YES
Analytical Workspace Owner
AW_PASSWORD String Yes, if MOLAP is set to YES
Analytical Workspace Owner Password
ROLAP Yes|No Yes Reverse tables from a ROLAP schema
USE_LOG Yes|No Yes Set this option to Yes to use a log file.
LOG_FILE_NAME /temp/reverse.log Yes, if USE_LOG is set to Yes
Log File Name
IKM Oracle AW Incremental Update
Option Values Mandatory Description
INSERT Yes|No Yes If set to Yes, automatically attempts to insert data into the Target Datastore of the Interface.
UPDATE Yes|No Yes If set to Yes, identifies and updates rows of the Target Datastore depending on the value of the UPDATE_KEY columns of the target datastore records.
COMMIT Yes|No Yes If set to Yes, commits all data inserted or updated in the target datastore.
SYNC_JRN_DELETE Yes|No Yes If set to Yes, synchronizes journalized deletions. This option will take effect only if one source table is journalized in your interface.
FLOW_CONTROL Yes|No Yes If set to Yes, performs flow control.
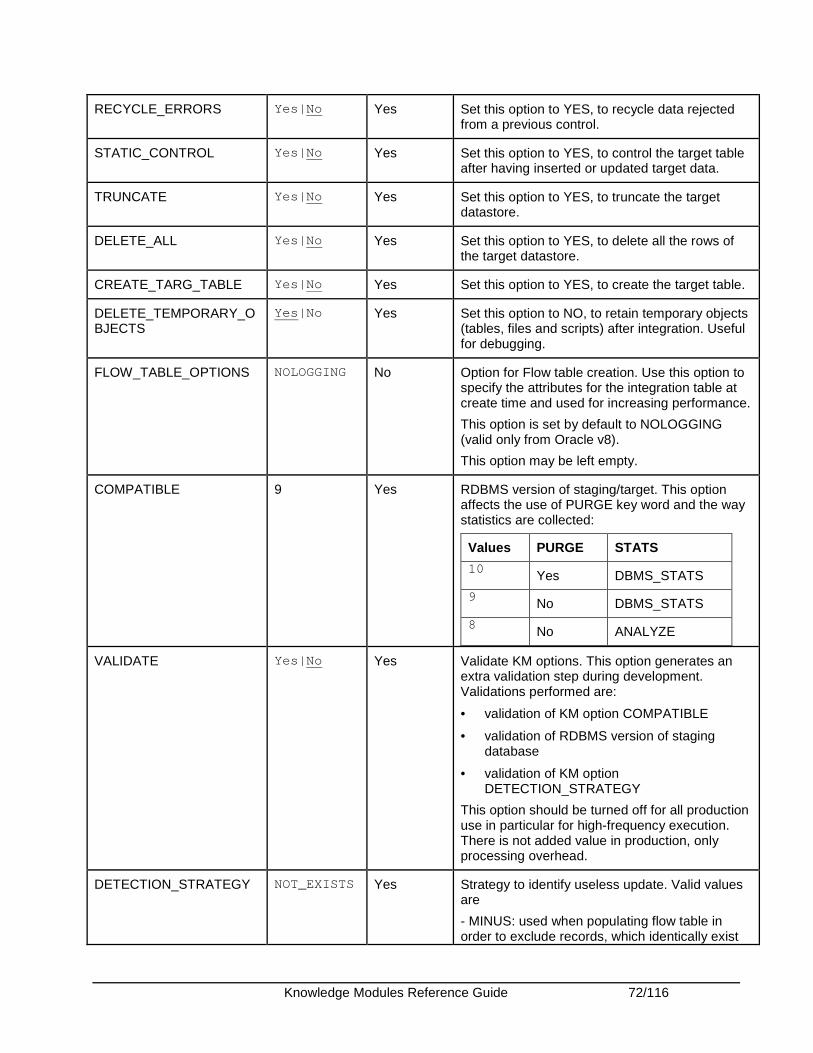
Knowledge Modules Reference Guide 72/116
RECYCLE_ERRORS Yes|No Yes Set this option to YES, to recycle data rejected from a previous control.
STATIC_CONTROL Yes|No Yes Set this option to YES, to control the target table after having inserted or updated target data.
TRUNCATE Yes|No Yes Set this option to YES, to truncate the target datastore.
DELETE_ALL Yes|No Yes Set this option to YES, to delete all the rows of the target datastore.
CREATE_TARG_TABLE Yes|No Yes Set this option to YES, to create the target table.
DELETE_TEMPORARY_OBJECTS
Yes|No Yes Set this option to NO, to retain temporary objects (tables, files and scripts) after integration. Useful for debugging.
FLOW_TABLE_OPTIONS NOLOGGING No Option for Flow table creation. Use this option to specify the attributes for the integration table at create time and used for increasing performance.
This option is set by default to NOLOGGING (valid only from Oracle v8).
This option may be left empty.
COMPATIBLE 9 Yes RDBMS version of staging/target. This option affects the use of PURGE key word and the way statistics are collected:
Values PURGE STATS
10 Yes DBMS_STATS
9 No DBMS_STATS
8 No ANALYZE
VALIDATE Yes|No Yes Validate KM options. This option generates an extra validation step during development. Validations performed are:
• validation of KM option COMPATIBLE
• validation of RDBMS version of staging database
• validation of KM option DETECTION_STRATEGY
This option should be turned off for all production use in particular for high-frequency execution. There is not added value in production, only processing overhead.
DETECTION_STRATEGY NOT_EXISTS Yes Strategy to identify useless update. Valid values are
- MINUS: used when populating flow table in order to exclude records, which identically exist
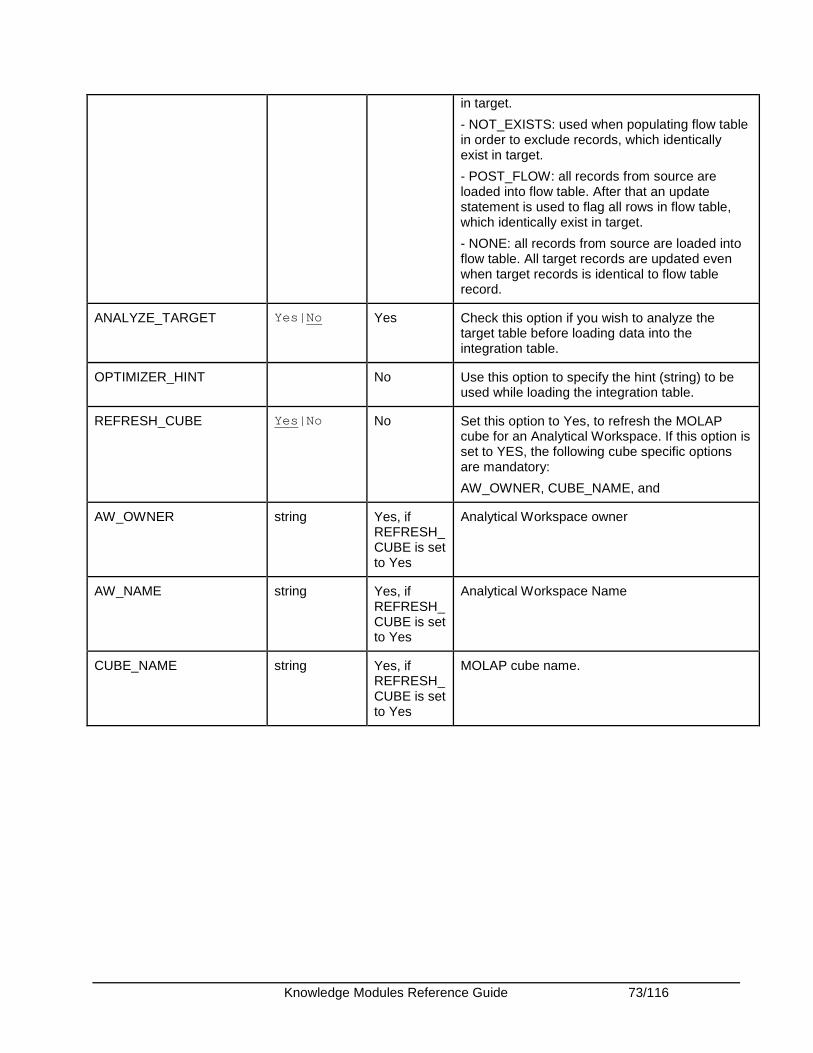
Knowledge Modules Reference Guide 73/116
in target.
- NOT_EXISTS: used when populating flow table in order to exclude records, which identically exist in target.
- POST_FLOW: all records from source are loaded into flow table. After that an update statement is used to flag all rows in flow table, which identically exist in target.
- NONE: all records from source are loaded into flow table. All target records are updated even when target records is identical to flow table record.
ANALYZE_TARGET Yes|No Yes Check this option if you wish to analyze the target table before loading data into the integration table.
OPTIMIZER_HINT No Use this option to specify the hint (string) to be used while loading the integration table.
REFRESH_CUBE Yes|No No Set this option to Yes, to refresh the MOLAP cube for an Analytical Workspace. If this option is set to YES, the following cube specific options are mandatory:
AW_OWNER, CUBE_NAME, and
AW_OWNER string Yes, if REFRESH_CUBE is set to Yes
Analytical Workspace owner
AW_NAME string Yes, if REFRESH_CUBE is set to Yes
Analytical Workspace Name
CUBE_NAME string Yes, if REFRESH_CUBE is set to Yes
MOLAP cube name.

Knowledge Modules Reference Guide 74/116
Oracle PeopleSoft
Introduction This section provides an introduction and the methodology to work with the PeopleSoft Knowledge Modules in Oracle Data Integrator.
PeopleSoft Knowledge Modules The Oracle Data Integrator Knowledge Modules for PeopleSoft provide integration and connectivity between Oracle Data Integrator and the PeopleSoft platform.
These KMs enable Data-level integration for PeopleSoft: Data extraction is performed directly on the PeopleSoft Business Objects tables. This method is read-only.
The Oracle Data Integrator KMs for PeopleSoft use mature integration methods for PeopleSoft, in order to:
• Reverse-Engineer PeopleSoft data structures (Business Objects, tables, views, columns, keys, and foreign keys).
• Extract data from PeopleSoft using a data-level integration approach.
Oracle Data Integrator provides two Knowledge Modules (KMs) for handling PeopleSoft data.
Type Knowledge Module Description
Reverse-Engineer
RKM PeopleSoft ORACLE Reverse-engineering knowledge module to retrieve the business objects, tables, views, columns, keys, and foreign keys from PeopleSoft. The database hosting the PeopleSoft tables is Oracle.
Reverse-Engineer
RKM PeopleSoft MSSQL Reverse-engineering knowledge module to retrieve the business objects, tables, views, columns, keys, and foreign keys from PeopleSoft. The database hosting the PeopleSoft tables is Oracle.
Platform Support The Oracle Data Integrator PeopleSoft knowledge modules are certified on the following platforms and versions:
• Oracle PeopleSoft 8.x or higher
Installation and Configuration There is no specific Oracle Data Integrator configuration for using the PeopleSoft KMs.
Working with PeopleSoft KMs The Oracle Data Integrator PeopleSoft KMs enable read-only access to PeopleSoft data.

Knowledge Modules Reference Guide 75/116
To use PeopleSoft with the Oracle Data Integrator PeopleSoft KM, you must:
5. Define the Topology. 6. Set up the Project 7. Perform a PeopleSoft Reverse-Engineering. 8. Use PeopleSoft datastores as sources in an integration interface
Defining the Topology The steps to create the topology in Oracle Data Integrator, which are specific to projects using PeopleSoft KMs, are the following:
6. Connect to your master repository using Topology Manager. 7. Create a data server using the appropriate Oracle or Microsoft SQL Server technology. This data
server represents the database instance that stores the PeopleSoft data. 8. Create a physical schema under this data server. This schema is, for example, the Oracle schema or
the Microsoft SQL Server database that contains the PeopleSoft tables you want to reverse-engineer.
9. Create a logical schema for this physical schema in the appropriate context.
You can now perform a PeopleSoft Reverse-Engineering.
Note: The Oracle schema or the Microsoft SQL Server database storing the PeopleSoft tables should not be defined as a work schema in the physical schema definition. Moreover, this schema or database must not be used as staging area for an interface.
Setting up the Project Import the following KMs into your Oracle Data Integrator project, if they are not already in your project:
• RKM PeopleSoft ORACLE • RKM PeopleSoft MSSQL
For more information about importing a KM, please refer to the Oracle Data Integrator User’s Guide.
Reverse-Engineering PeopleSoft Tables The RKM PeopleSoft <database> is able to reverse-engineer PeopleSoft data structures at data level, enriching them with information retrieved from the PeopleSoft dictionary.
Data extraction is performed directly on the PeopleSoft Business Objects tables. This access method is read-only.
The reverse-engineering process returns the following information:
• Business Objects as sub-models • Business Objects tables as datastores with their associated columns and constraints • Comments attached to the reversed tables and columns
To perform a PeopleSoft Reverse-Engineering:
1. Create a model based on the Oracle or Microsoft SQL Server Technology, and on the logical schema created when defining the Topology.
2. In this Model, select the Reverse tab and: 1. Select Customized 2. Select the RKM PeopleSoft ORACLE or RKM PeopleSoft MSSQL from the KM list. 3. Set the BUSINESS OBJECT RKM option as follows:
Enter the Business Object code, for example CCM, DBI, or DPO.
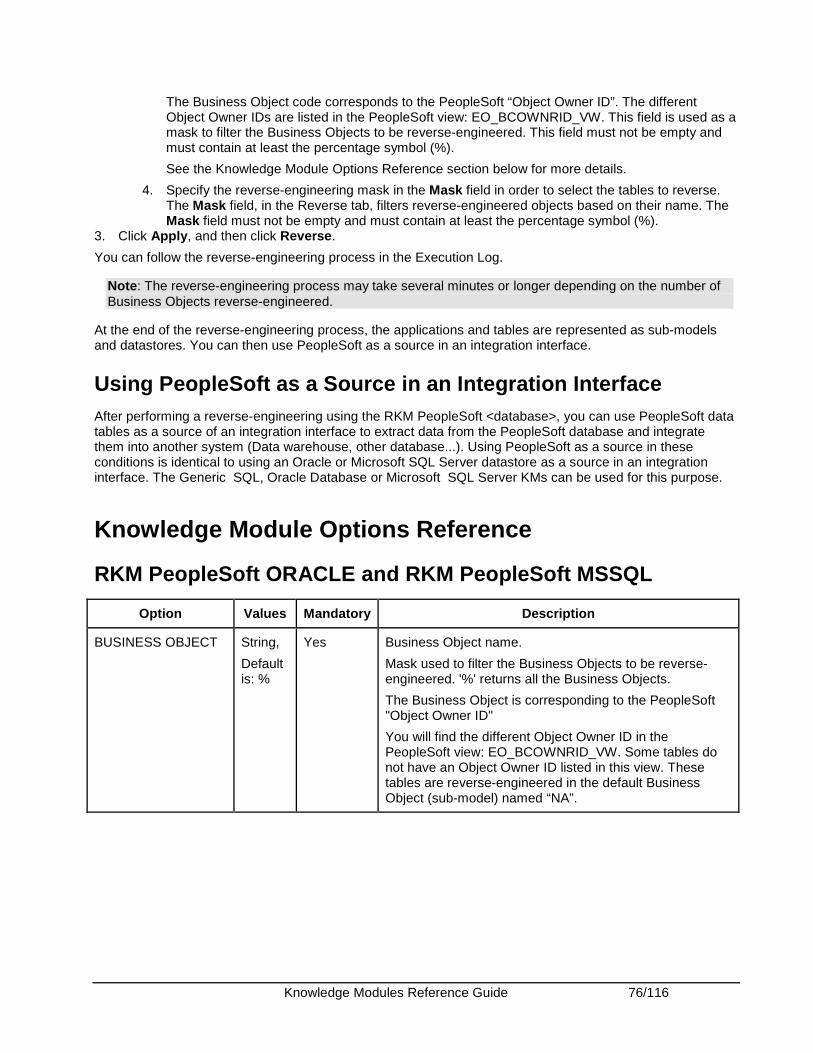
Knowledge Modules Reference Guide 76/116
The Business Object code corresponds to the PeopleSoft “Object Owner ID”. The different Object Owner IDs are listed in the PeopleSoft view: EO_BCOWNRID_VW. This field is used as a mask to filter the Business Objects to be reverse-engineered. This field must not be empty and must contain at least the percentage symbol (%).
See the Knowledge Module Options Reference section below for more details.
4. Specify the reverse-engineering mask in the Mask field in order to select the tables to reverse. The Mask field, in the Reverse tab, filters reverse-engineered objects based on their name. The Mask field must not be empty and must contain at least the percentage symbol (%).
3. Click Apply, and then click Reverse.
You can follow the reverse-engineering process in the Execution Log.
Note: The reverse-engineering process may take several minutes or longer depending on the number of Business Objects reverse-engineered.
At the end of the reverse-engineering process, the applications and tables are represented as sub-models and datastores. You can then use PeopleSoft as a source in an integration interface.
Using PeopleSoft as a Source in an Integration Interface After performing a reverse-engineering using the RKM PeopleSoft <database>, you can use PeopleSoft data tables as a source of an integration interface to extract data from the PeopleSoft database and integrate them into another system (Data warehouse, other database...). Using PeopleSoft as a source in these conditions is identical to using an Oracle or Microsoft SQL Server datastore as a source in an integration interface. The Generic SQL, Oracle Database or Microsoft SQL Server KMs can be used for this purpose.
Knowledge Module Options Reference
RKM PeopleSoft ORACLE and RKM PeopleSoft MSSQL
Option Values Mandatory Description
BUSINESS OBJECT String,
Default is: %
Yes Business Object name.
Mask used to filter the Business Objects to be reverse-engineered. '%' returns all the Business Objects.
The Business Object is corresponding to the PeopleSoft "Object Owner ID"
You will find the different Object Owner ID in the PeopleSoft view: EO_BCOWNRID_VW. Some tables do not have an Object Owner ID listed in this view. These tables are reverse-engineered in the default Business Object (sub-model) named “NA”.
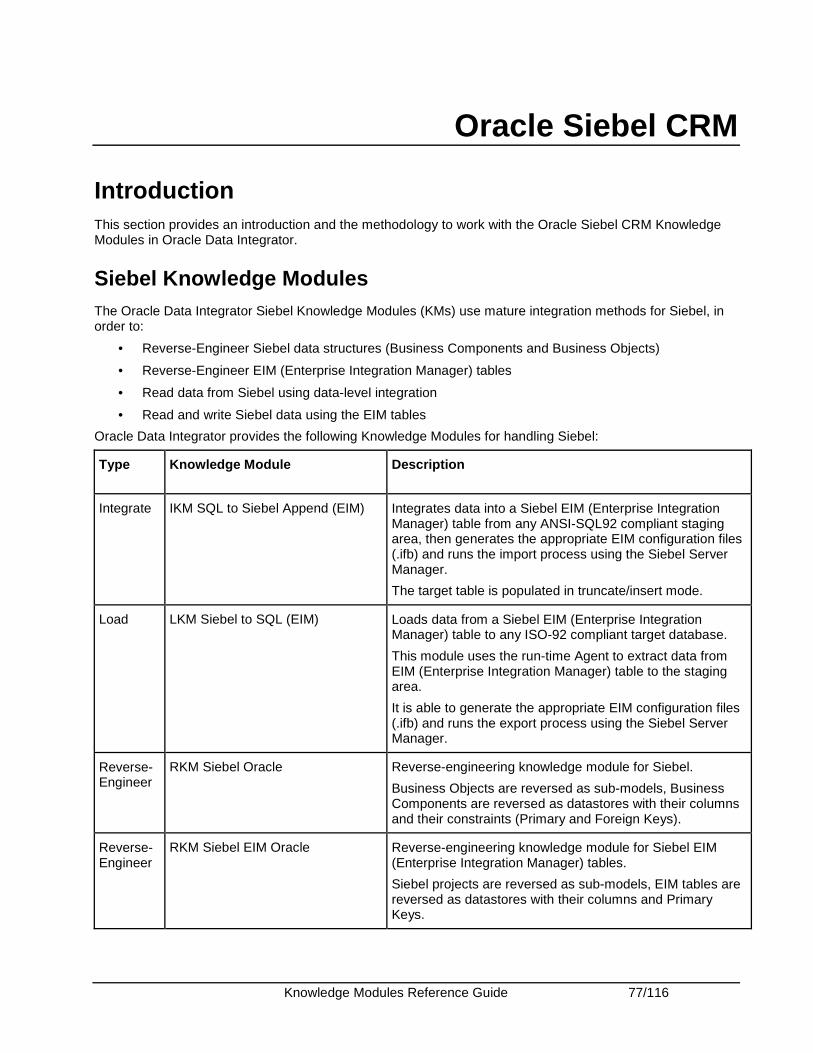
Knowledge Modules Reference Guide 77/116
Oracle Siebel CRM
Introduction This section provides an introduction and the methodology to work with the Oracle Siebel CRM Knowledge Modules in Oracle Data Integrator.
Siebel Knowledge Modules The Oracle Data Integrator Siebel Knowledge Modules (KMs) use mature integration methods for Siebel, in order to:
• Reverse-Engineer Siebel data structures (Business Components and Business Objects)
• Reverse-Engineer EIM (Enterprise Integration Manager) tables
• Read data from Siebel using data-level integration
• Read and write Siebel data using the EIM tables
Oracle Data Integrator provides the following Knowledge Modules for handling Siebel:
Type Knowledge Module Description
Integrate IKM SQL to Siebel Append (EIM) Integrates data into a Siebel EIM (Enterprise Integration Manager) table from any ANSI-SQL92 compliant staging area, then generates the appropriate EIM configuration files (.ifb) and runs the import process using the Siebel Server Manager.
The target table is populated in truncate/insert mode.
Load LKM Siebel to SQL (EIM) Loads data from a Siebel EIM (Enterprise Integration Manager) table to any ISO-92 compliant target database.
This module uses the run-time Agent to extract data from EIM (Enterprise Integration Manager) table to the staging area.
It is able to generate the appropriate EIM configuration files (.ifb) and runs the export process using the Siebel Server Manager.
Reverse-Engineer
RKM Siebel Oracle Reverse-engineering knowledge module for Siebel.
Business Objects are reversed as sub-models, Business Components are reversed as datastores with their columns and their constraints (Primary and Foreign Keys).
Reverse-Engineer
RKM Siebel EIM Oracle Reverse-engineering knowledge module for Siebel EIM (Enterprise Integration Manager) tables.
Siebel projects are reversed as sub-models, EIM tables are reversed as datastores with their columns and Primary Keys.
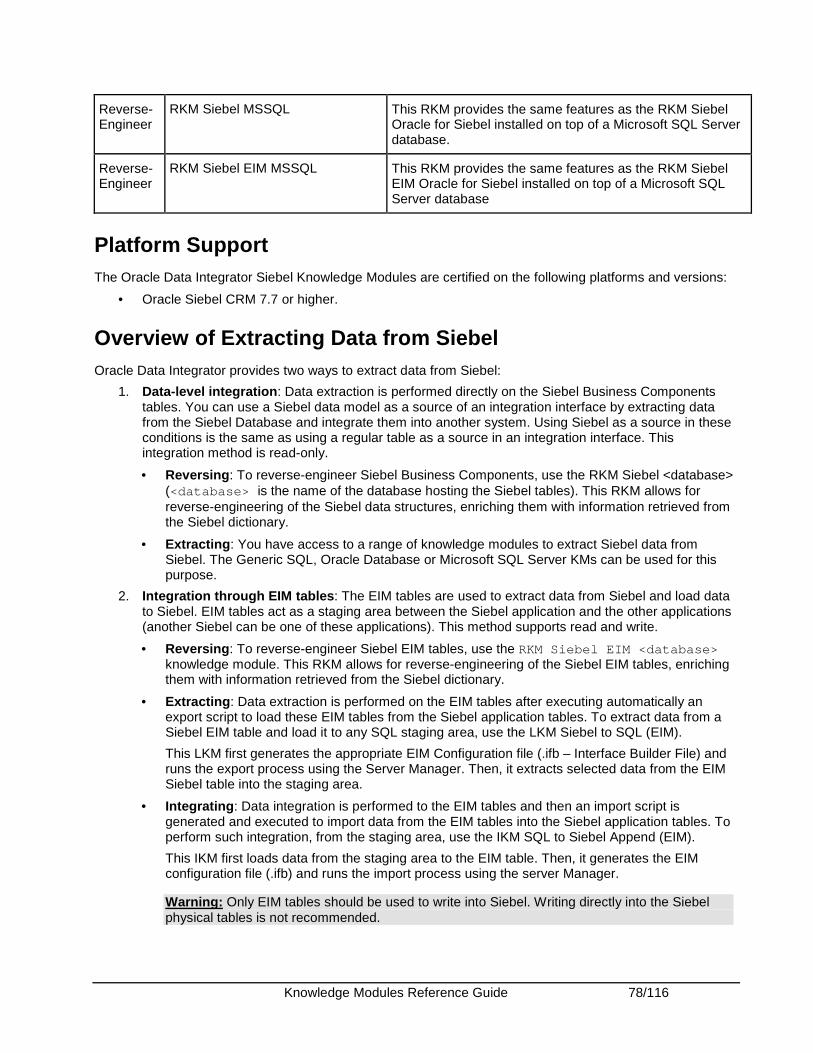
Knowledge Modules Reference Guide 78/116
Reverse-Engineer
RKM Siebel MSSQL This RKM provides the same features as the RKM Siebel Oracle for Siebel installed on top of a Microsoft SQL Server database.
Reverse-Engineer
RKM Siebel EIM MSSQL This RKM provides the same features as the RKM Siebel EIM Oracle for Siebel installed on top of a Microsoft SQL Server database
Platform Support The Oracle Data Integrator Siebel Knowledge Modules are certified on the following platforms and versions:
• Oracle Siebel CRM 7.7 or higher.
Overview of Extracting Data from Siebel Oracle Data Integrator provides two ways to extract data from Siebel:
1. Data-level integration: Data extraction is performed directly on the Siebel Business Components tables. You can use a Siebel data model as a source of an integration interface by extracting data from the Siebel Database and integrate them into another system. Using Siebel as a source in these conditions is the same as using a regular table as a source in an integration interface. This integration method is read-only.
• Reversing: To reverse-engineer Siebel Business Components, use the RKM Siebel <database> (<database> is the name of the database hosting the Siebel tables). This RKM allows for reverse-engineering of the Siebel data structures, enriching them with information retrieved from the Siebel dictionary.
• Extracting: You have access to a range of knowledge modules to extract Siebel data from Siebel. The Generic SQL, Oracle Database or Microsoft SQL Server KMs can be used for this purpose.
2. Integration through EIM tables: The EIM tables are used to extract data from Siebel and load data to Siebel. EIM tables act as a staging area between the Siebel application and the other applications (another Siebel can be one of these applications). This method supports read and write.
• Reversing: To reverse-engineer Siebel EIM tables, use the RKM Siebel EIM <database> knowledge module. This RKM allows for reverse-engineering of the Siebel EIM tables, enriching them with information retrieved from the Siebel dictionary.
• Extracting: Data extraction is performed on the EIM tables after executing automatically an export script to load these EIM tables from the Siebel application tables. To extract data from a Siebel EIM table and load it to any SQL staging area, use the LKM Siebel to SQL (EIM).
This LKM first generates the appropriate EIM Configuration file (.ifb – Interface Builder File) and runs the export process using the Server Manager. Then, it extracts selected data from the EIM Siebel table into the staging area.
• Integrating: Data integration is performed to the EIM tables and then an import script is generated and executed to import data from the EIM tables into the Siebel application tables. To perform such integration, from the staging area, use the IKM SQL to Siebel Append (EIM).
This IKM first loads data from the staging area to the EIM table. Then, it generates the EIM configuration file (.ifb) and runs the import process using the server Manager.
Warning: Only EIM tables should be used to write into Siebel. Writing directly into the Siebel physical tables is not recommended.
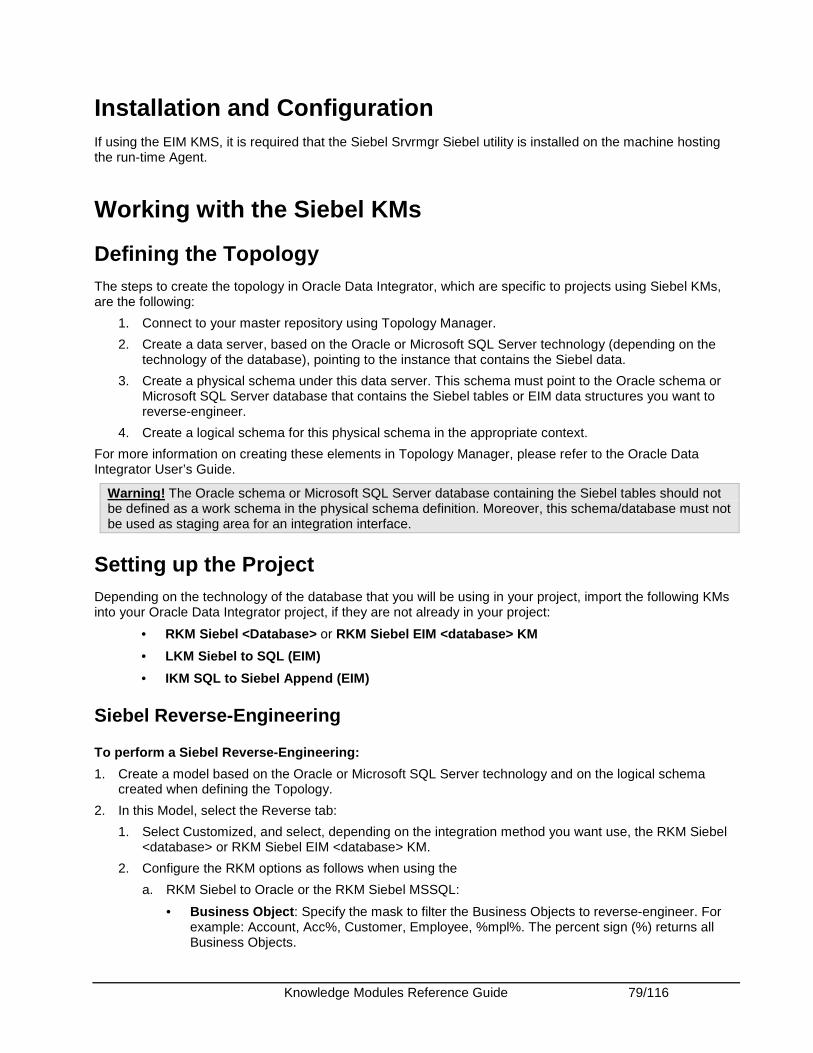
Knowledge Modules Reference Guide 79/116
Installation and Configuration If using the EIM KMS, it is required that the Siebel Srvrmgr Siebel utility is installed on the machine hosting the run-time Agent.
Working with the Siebel KMs
Defining the Topology The steps to create the topology in Oracle Data Integrator, which are specific to projects using Siebel KMs, are the following:
1. Connect to your master repository using Topology Manager.
2. Create a data server, based on the Oracle or Microsoft SQL Server technology (depending on the technology of the database), pointing to the instance that contains the Siebel data.
3. Create a physical schema under this data server. This schema must point to the Oracle schema or Microsoft SQL Server database that contains the Siebel tables or EIM data structures you want to reverse-engineer.
4. Create a logical schema for this physical schema in the appropriate context.
For more information on creating these elements in Topology Manager, please refer to the Oracle Data Integrator User’s Guide.
Warning! The Oracle schema or Microsoft SQL Server database containing the Siebel tables should not be defined as a work schema in the physical schema definition. Moreover, this schema/database must not be used as staging area for an integration interface.
Setting up the Project Depending on the technology of the database that you will be using in your project, import the following KMs into your Oracle Data Integrator project, if they are not already in your project:
• RKM Siebel <Database> or RKM Siebel EIM <database> KM
• LKM Siebel to SQL (EIM)
• IKM SQL to Siebel Append (EIM)
Siebel Reverse-Engineering
To perform a Siebel Reverse-Engineering:
1. Create a model based on the Oracle or Microsoft SQL Server technology and on the logical schema created when defining the Topology.
2. In this Model, select the Reverse tab:
1. Select Customized, and select, depending on the integration method you want use, the RKM Siebel <database> or RKM Siebel EIM <database> KM.
2. Configure the RKM options as follows when using the
a. RKM Siebel to Oracle or the RKM Siebel MSSQL:
• Business Object: Specify the mask to filter the Business Objects to reverse-engineer. For example: Account, Acc%, Customer, Employee, %mpl%. The percent sign (%) returns all Business Objects.
Knowledge Modules Reference Guide 80/116
b. RKM Siebel EIM Oracle or the RKM Siebel EIM MSSQL:
• USE_PROJECT: Set this option to YES to reverse-engineer projects as sub-models in Oracle Data Integrator.
• REPOSITORY: Specify the Siebel Repository name. Default is Siebel Repository.
• PROJECT_NAME: Specify the mask to filter the Siebel projects to reverse-engineer. For example: EIM Accounts and Quotes, EIM Activity, EIM A%. The percent sign (%) returns all Siebel projects.
3. Specify the reverse-engineering mask in the Mask field in order to select the tables to reverse. The Mask field, in the Reverse tab, filters reverse-engineered objects based on their name. The Mask field must not be empty and must contain at least the percentage symbol (%).
4. Click Apply, and then click Reverse.
You can follow the reverse-engineering process in the Execution Log.
Note: The reverse-engineering process may take several minutes or longer depending on the number of business object reverse-engineered.
At the end of the reverse-engineering, the applications and tables are represented as sub-models and datastores.
Features of the Reverse-Engineering
The RKM Siebel <database> process returns:
• The installed Business Objects as sub-models.
• The Business Components as datastores with their columns and their constraints (Primary and Foreign Keys).
• Comments on the reversed tables and columns.
The RKM Siebel <database> EIM process returns:
• Projects as sub-models.
• EIM tables as datastores with their columns and their constraints (Primary and Foreign Keys).
Use Siebel as a Source in an Integration Interface
After performing a reverse-engineering using the RKM Siebel <database>, you can use Siebel data tables as a source for the integration interface.
Using Siebel as a source in these conditions is the same as using a standard Oracle or MSSQL database as a source in an interface. The Generic SQL, Oracle Database or Microsoft SQL Server KMs can be used for this purpose.
Use Siebel as a Source in an Integration Interface through EIM tables
To extract data from Siebel through the EIM tables, create an integration interface with EIM tables as a source. Select the LKM Siebel to SQL (EIM) and set the KM options as follows:
• IFB_PATH: Specify the path where you want to create the EIM configuration file (.ifb).
• SRVRMGR_PATH: Specify the location of the Siebel Srvrmgr binary. This parameter is mandatory.
• SIEBEL_GATEWAY: Specify the network address of the Gateway Server machine.
• SIEBEL_ENTERPRISE: Indicate the name of the Enterprise Server.
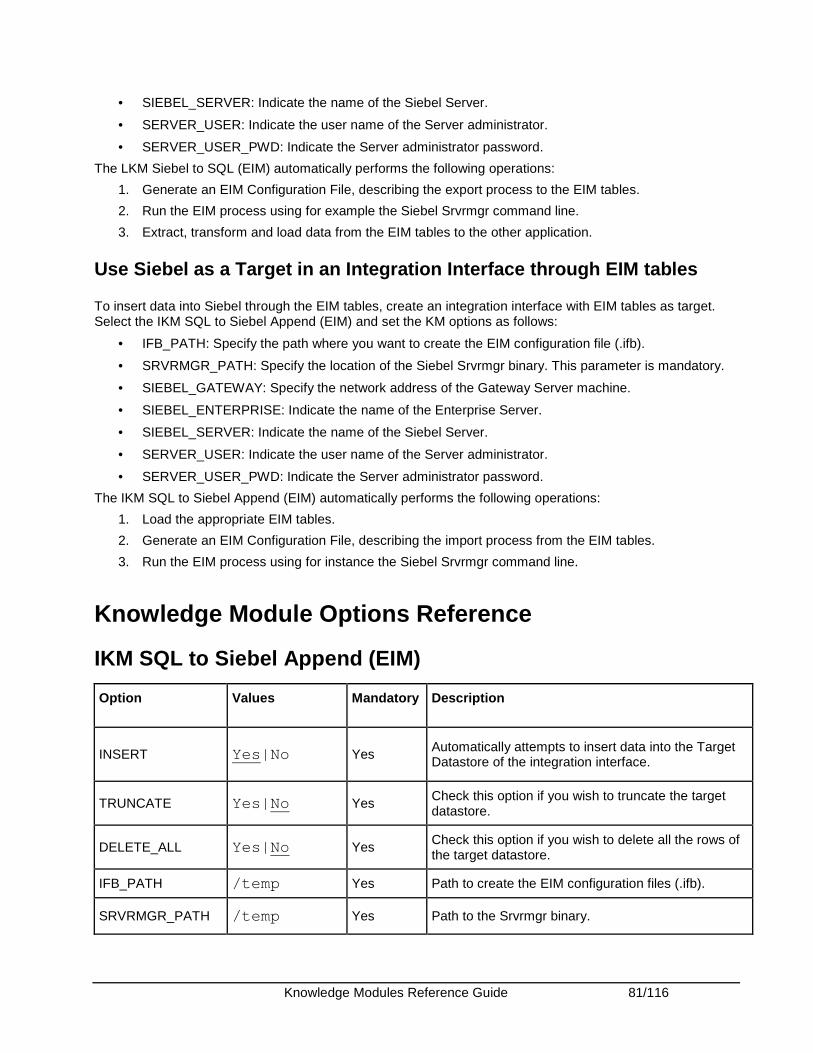
Knowledge Modules Reference Guide 81/116
• SIEBEL_SERVER: Indicate the name of the Siebel Server.
• SERVER_USER: Indicate the user name of the Server administrator.
• SERVER_USER_PWD: Indicate the Server administrator password.
The LKM Siebel to SQL (EIM) automatically performs the following operations:
1. Generate an EIM Configuration File, describing the export process to the EIM tables.
2. Run the EIM process using for example the Siebel Srvrmgr command line.
3. Extract, transform and load data from the EIM tables to the other application.
Use Siebel as a Target in an Integration Interface through EIM tables
To insert data into Siebel through the EIM tables, create an integration interface with EIM tables as target. Select the IKM SQL to Siebel Append (EIM) and set the KM options as follows:
• IFB_PATH: Specify the path where you want to create the EIM configuration file (.ifb).
• SRVRMGR_PATH: Specify the location of the Siebel Srvrmgr binary. This parameter is mandatory.
• SIEBEL_GATEWAY: Specify the network address of the Gateway Server machine.
• SIEBEL_ENTERPRISE: Indicate the name of the Enterprise Server.
• SIEBEL_SERVER: Indicate the name of the Siebel Server.
• SERVER_USER: Indicate the user name of the Server administrator.
• SERVER_USER_PWD: Indicate the Server administrator password.
The IKM SQL to Siebel Append (EIM) automatically performs the following operations:
1. Load the appropriate EIM tables.
2. Generate an EIM Configuration File, describing the import process from the EIM tables.
3. Run the EIM process using for instance the Siebel Srvrmgr command line.
Knowledge Module Options Reference
IKM SQL to Siebel Append (EIM)
Option Values Mandatory Description
INSERT Yes|No Yes Automatically attempts to insert data into the Target Datastore of the integration interface.
TRUNCATE Yes|No Yes Check this option if you wish to truncate the target datastore.
DELETE_ALL Yes|No Yes Check this option if you wish to delete all the rows of the target datastore.
IFB_PATH /temp Yes Path to create the EIM configuration files (.ifb).
SRVRMGR_PATH /temp Yes Path to the Srvrmgr binary.

Knowledge Modules Reference Guide 82/116
SIEBEL_GATEWAY GATEWAY Yes Network address of the Gateway Server machine.
SIEBEL_ENTERPRISE
SIEBEL_ENTERPRISE
Yes Enterprise Server name.
SIEBEL_SERVER SERVER Yes Siebel Server name.
SERVER_USER SERVER_USER Yes Server administrator user name.
SERVER_USER_PWD
SEVER_USER_PWD
Yes Server administrator password.
LKM Siebel to SQL (EIM)
Option Values Mandatory Description
DELETE_TEMPORARY_OBJECTS Yes|No Yes
Set this option to NO if you wish to retain temporary objects (tables, files, and scripts) after the integration. Useful for debugging.
IFB_PATH /temp Yes Path to create the EIM configuration files (.ifb).
SRVRMGR_PATH /temp Yes Path to the Srvrmgr binary. This parameter is mandatory.
SIEBEL_GATEWAY GATEWAY Yes Network address of the Gateway Server machine.
SIEBEL_ENTERPRISE SIEBEL_ENTERPRISE
Yes Enterprise Server name.
SIEBEL_SERVER SERVER Yes Siebel Server name (default is all servers).
SERVER_USER SERVER_USER
Yes Server administrator user name.
SERVER_USER_PWD SERVER_USER_PWD
Yes Server administrator password.
RKM Siebel Oracle / RKM Siebel MSSQL
Option Values Mandatory Description
BUSINESS_OBJECT % Yes
Business object name.
Mask used to filter the Business Objects to be reverse-engineered.
'%' returns all the Business Objects.
RKM Siebel EIM Oracle / RKM Siebel EIM MSSQL
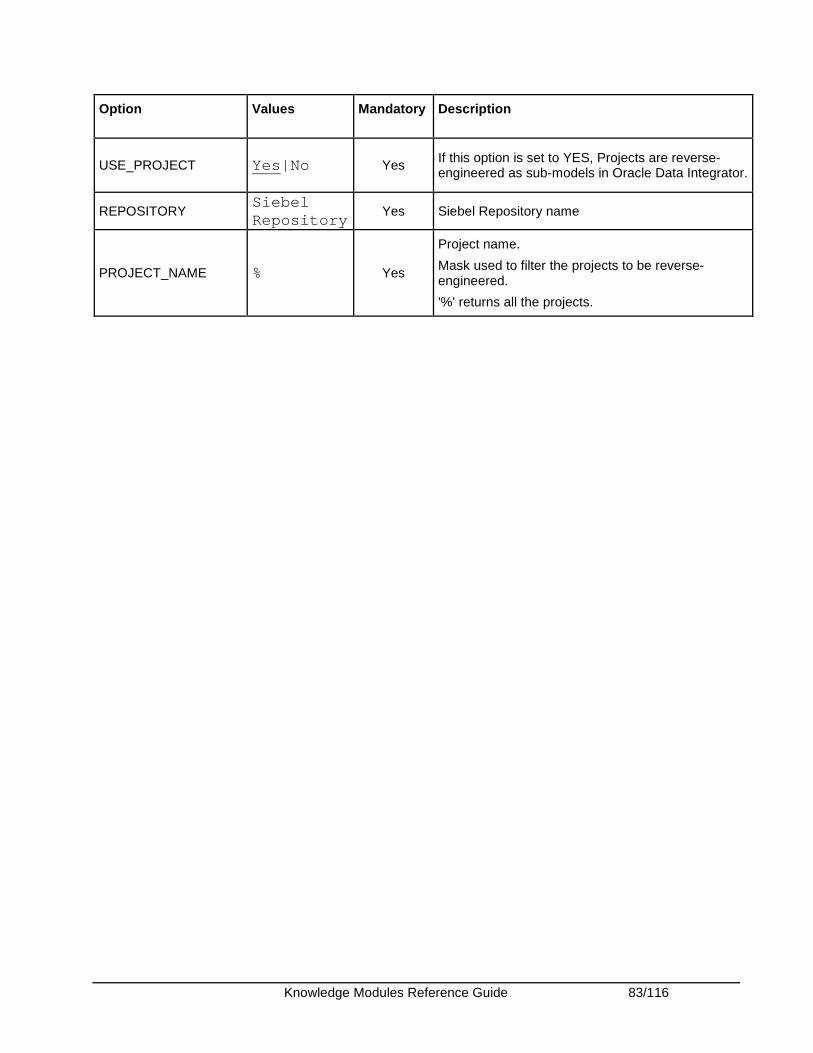
Knowledge Modules Reference Guide 83/116
Option Values Mandatory Description
USE_PROJECT Yes|No Yes If this option is set to YES, Projects are reverse-engineered as sub-models in Oracle Data Integrator.
REPOSITORY Siebel Repository
Yes Siebel Repository name
PROJECT_NAME % Yes
Project name.
Mask used to filter the projects to be reverse-engineered.
'%' returns all the projects.
Knowledge Modules Reference Guide 84/116
SalesForce
Knowledge Modules
Type Knowledge Module Description
Integrate IKM File to SalesForce (Upsert) Integrates data from a file to SalesForce in insert/update mode.
Integrate IKM SalesForce to File (with filter) Retrieves data from SalesForce to a file using a filter
Integrate IKM SalesForce to File (without filter)
Retrieves data from SalesForce to a file without using a filter
Reverse-Engineer
RKM Salesforce.com Reverse engineering Knowledge Module to retrieve the tables, views, system tables and columns from Sales Force.
Specific Requirements Knowledge Modules for SalesForce require the Sforce 6.0 Java QuickStart and the AppExchange Data Loader utilities.
You can follow the following procedure to install these components:
� Sforce 6.0 Java QuickStart: Download this package and copy the quickstart.jar file into the /drivers directory of Oracle Data Integrator.
� AppExchange Data Loader: This utility is used to perform bulk loading from and to Salesforce. It should be installed on the machine where the agent executing Salesforce scenarios runs.
Both these components can be downloaded from Salesforce.com. See their respective documentations for more information.
Note: Oracle Data integrator does not use the JDBC/ODBC drivers. You do not need to provide the JDBC Driver and URL in your Topology.
The following restrictions apply when using these Knowledge Modules:
1. The reverse-engineering uses the Sforce 6.0 Java QuickStart component that requires a specific version of the JVM to run. Make sure that you use the appropriate JVM.
2. The SalesForce schema cannot be used as a staging area.
3. Data integration from and to SalesForce is performed through files. These files should be defined in a File model as comma-delimited file datastores with a 1 line header containing the field names. This header is used by the KM to identify these fields. You can for example drag and drop datastores from the SalesForce model to the File model while keeping the <CTRL> key pressed to quickly copy SalesForce datastores as file datastores.
4. To load data into SalesForce, you must load the file model first, using one interface, and then load the target SalesForce system using the "IKM File to SalesForce (Upsert)". This IKM manages insert and updates to the SalesForce system.

Knowledge Modules Reference Guide 85/116
5. To unload data from SalesForce, you must first load the file model using the "IKM Salesforce to File", and then use this file model as a source for your interface. This IKM comes in two versions, depending on whether data filtering is required on Salesforce of not. Note that filters executed in SalesForce should be coded in Sforce Object Query Language (SOQL), and not in plain SQL.
Note: SalesForce IKMs uses the AppExchange Data Loader component to load data from and to SalesForce. It should be installed in the machine running the sessions integrating data from and to SalesForce. You should also provide this utility location in the KM options.
Knowledge Modules Reference Guide 86/116
SAP ABAP
Introduction This section provides an introduction and the methodology to work with the adapter, which lets Oracle Data Integrator connect to SAP ERP system using SAP Java Connector (SAP JCo) libraries. This adapter allows mass data extraction from SAP ERP systems.
Overview
• RKM SAP ERP enables Oracle Data Integrator to connect to SAP ERP system using SAP JCo libraries and perform a customized reverse engineering of SAP metadata.
• LKM SAP ERP to Oracle (SQLLDR) is in charge of extracting and loading data from SAP ERP system (Source) to an Oracle Staging Area.
Overview of the SAP ABAP Integration Process
Reverse-Engineering Process
Reverse-engineering is using the RKM SAP ERP. This knowledge module automatically installs the required RFC programs to retrieve the metadata about SAP tables. It can extract the list of SAP tables and display it in a tree Metadata Browser graphical interface. The user can select the list of tables to reverse-engineer from this interface. To call the uploaded ABAP code, the KM uses the OdiSAPAbapExecute open tool that must be installed prior to reverse-engineering.
In the reverse-engineering process, tables, primary keys, foreign keys and index are reverse-engineered into an Oracle Data Integrator model.
Integration Process
Data integration from SAP is managed by the LKM SAP ERP to Oracle (SQLLDR). This KM can be used for interfaces sourcing from SAP via ABAP and having a Staging Area located in an Oracle Database engine.
The KM first generates optimized ABAP code corresponding to the extraction required for a given interface. This code includes filters and joins that can be processed directly in the source SAP server. This ABAP program is uploaded and can be executed using the OdiSAPAbapExecute open tool to generate the extraction file.
The KM then transfers this extraction file to a preconfigured FTP server. This file is downloaded from this server using FTP, SFTP, SCP, etc. to the machine where the Oracle Staging Area is located, and finally loaded using SQL*Loader to the staging area. The agent can also directly read the extraction file on the FTP server’s disk.
The rest of the integration process (Data quality check and integration) is managed with regular Oracle Data Integration KMs.
SAP ABAP Knowledge Modules The Oracle Data Integrator SAP ABAP Knowledge Modules provide integration from SAP ERP systems using SAP JCo libraries. This set of KMs has the following features:
Knowledge Modules Reference Guide 87/116
• Reads SAP data from SAP ERP system. • Loads this SAP data into Oracle Staging Area. • Reverse-engineers SAP Metadata and proposes a tree browser to pick up only the required
Metadata. • Uses flexfields to map the SAP table types (Transparent, Cluster and Pool).
Oracle Data Integrator provides following Knowledge Modules (KM) for handling SAP data:
Type Knowledge Module Description
Load LKM SAP ERP to Oracle(SQLLDR) Extracts data from SAP ERP into a flat file and then loads it into Oracle Staging Area using the SQL*LOADER command line utility.
Reverse-Engineer
RKM SAP ERP Reverse-engineering Knowledge Module to retrieve SAP specific metadata for modules, application components, tables, columns, primary keys, foreign keys and indexes.
Platform Support SAP ABAP KM is certified for Oracle Data Integrator 10gR3 (10.1.3.5.1_01) and above.
The Oracle Data Integrator SAP ABAP knowledge modules are certified on the following SAP ERP platforms and versions:
• SAP 4.6c • SAP ECC6.0
Installation and Configuration
Pre-requisites The adapter has the following pre-requisites:
• A version of JCo compatible with the adapter and the java machine used by ODI must be installed. Check the Oracle Data Integrator Certification Matrix available on the Oracle Technology Network. Please note that JCo will require the use of a JVM 1.5 or later.
• The adapter generates the ABAPs in a given function group. This function group must be created before using the adapter, and its name must be specified in the SAP_FUNCTION_GROUP_NAME KM option.
• Appropriate privileges for data access and ABAP execution must be granted to the SAP user that will be defined in the SAP ABAP data server. Refer to Appendix A - SAP ABAP Required Privileges for a detailed list of required privileges.
Configure SAP JCo This procedure explains how to download and install the JCo components (SAP JCo jar and dll files) for your Oracle Data Integrator installation.
Note: SAP JCo API is not included in the Oracle Data Integrator distribution. You can download it from http://service.sap.com/connectors.
Knowledge Modules Reference Guide 88/116
Note: Please check the Oracle Data Integrator Certification Matrix available on the Oracle Technology Network to choose the appropriate SAP JCo version.
To install JCo for Windows:
1. Unzip the appropriate distribution package into an arbitrary directory {sapjco-install-path} .
2. Follow installation instructions in {sapjco-install-path}/javadoc/installation.html for respective platform .
3. Copy sapjco3.jar and sapjco3.dll (or respective binary) into oracledi/drivers directory.
Set up the Topology If you are using this adapter in an existing Oracle Data Integrator version, the topology components required for this adapter are not installed yet.
You must perform the following operations after upgrading your Oracle Data Integrator version:
1. Import the SAP ABAP Technology from the /impexp folder, if this technology does not exist in your master repository.
2. Open the Java BeanShell Technology and check on language tab, that JYTHON language is listed. If not, please add it.
3. Create a File physical schema pointing to an existing FTP Server into which the extraction file will be pushed from SAP and picked up for SQL*Loader. Set the parameters for this data server as follows:
• Host (Data Server): FTP Server IP host name or IP address.
• User: Username to log into FTP server.
• Password: This user’s password.
• Data Schema: Path on FTP server
4. Create a File Logical Schema called File Server for SAP ABAP, if it does not exist yet,. This logical schema name is fixed and must be mapped to the physical schema created in the previous step.
5. Configure the OdiSAPAbapExecute open tool in your repository. The open tool is available in your classpath after an upgrade, and needs to be added to the list of tools in the master repository. This process is described in the Using Open Tools section of the Oracle Data Integrator Tools Reference manual. The class name for this open tool is: oracle.odi.sap.km._OdiSapAbapExecute
Working with the SAP ABAP KMs The Oracle Data Integrator SAP ABAP KMs enable to reverse and extract data from SAP ERP.
To use SAP ERP data in your Oracle Data Integrator integration projects, you must:
1. Define the Topology.
2. Set up the Project.
3. Create a model and reverse-engineer SAP tables.
4. Design an Interface using the LKM SAP ERP to Oracle (SQLLDR). Use the SAP ERP datastore as source of such an integration interface.
Defining the Topology The steps to create the Topology in Oracle Data Integrator, which are specific to projects using the SAP ABAP KMs, are:
Knowledge Modules Reference Guide 89/116
1. Connect to your master repository using Topology Manager.
2. If the SAP ABAP technology is not present in Topology Manager, import the SAP ABAP technology using Synonym Insert-Update mode.
3. Create a data server using the SAP ABAP technology. This data server represents connection information to the SAP system. Set the parameters for this data server as follows:
• Name: Any Name
• Host (Data Server): IP address/Host name of SAP ERP System
• User: SAP Logon/User
• Password: this user’s password
4. Set the following flexfields values for this data server in the Flexfields tab.
• SAP Language: Put EN as the default language.
• SAP Client Number: Client number
• SAP System Number: 00
• SAP System ID: SAP System ID
• SAP SNC Connection Properties: Null by default
• SAP Router String: Null by default
5. Create a Physical Schema under this data server.
6. Create a Logical Schema for this physical schema in the appropriate context.
Note: The Test button for validating SAP Connection definition is not supported.
Setting up the Project Import the following KMs into your Oracle Data Integrator project:
• RKM SAP ERP
• LKM SAP ERP to Oracle (SQLLDR)
• Import in addition the standard LKMs, IKMs and CKMs to perform data extraction and data quality checks for your project.
For more information about importing a KM, please refer to the Oracle Data Integrator User’s Guide.
Creating and Reverse-Engineering a Model Note: Before using SAP ABAP KM, make sure that the OdiSAPAbapExecute open tool has already been installed. For more information, refer to the Installation and Configuration section.
To create and reverse-engineer a SAP ERP Model:
1. Connect to Designer
2. Select Models in the tree
3. Right-click then select Insert Model.
4. In the Definition tab, fill in the Name field.
5. In the Technology field, select the SAP ABAP technology.
6. In the Logical Schema field, select the Logical Schema on which your model will be based.
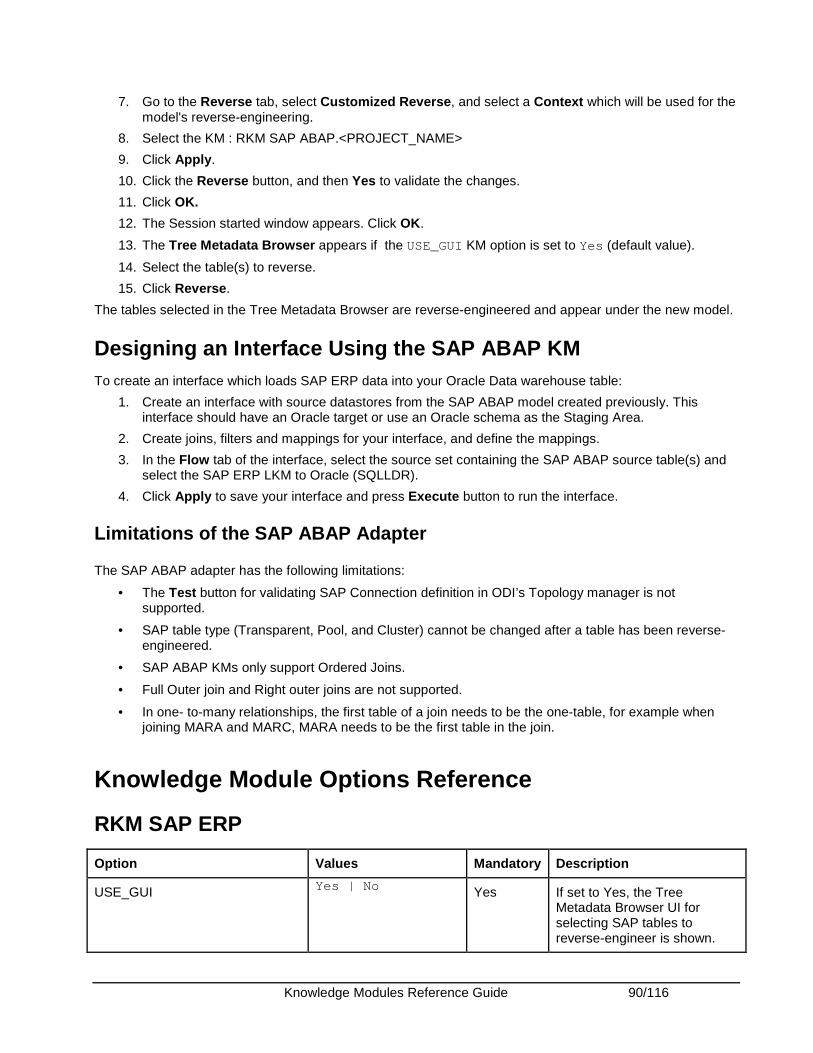
Knowledge Modules Reference Guide 90/116
7. Go to the Reverse tab, select Customized Reverse, and select a Context which will be used for the model's reverse-engineering.
8. Select the KM : RKM SAP ABAP.<PROJECT_NAME>
9. Click Apply.
10. Click the Reverse button, and then Yes to validate the changes.
11. Click OK.
12. The Session started window appears. Click OK.
13. The Tree Metadata Browser appears if the USE_GUI KM option is set to Yes (default value).
14. Select the table(s) to reverse.
15. Click Reverse.
The tables selected in the Tree Metadata Browser are reverse-engineered and appear under the new model.
Designing an Interface Using the SAP ABAP KM To create an interface which loads SAP ERP data into your Oracle Data warehouse table:
1. Create an interface with source datastores from the SAP ABAP model created previously. This interface should have an Oracle target or use an Oracle schema as the Staging Area.
2. Create joins, filters and mappings for your interface, and define the mappings.
3. In the Flow tab of the interface, select the source set containing the SAP ABAP source table(s) and select the SAP ERP LKM to Oracle (SQLLDR).
4. Click Apply to save your interface and press Execute button to run the interface.
Limitations of the SAP ABAP Adapter
The SAP ABAP adapter has the following limitations:
• The Test button for validating SAP Connection definition in ODI’s Topology manager is not supported.
• SAP table type (Transparent, Pool, and Cluster) cannot be changed after a table has been reverse-engineered.
• SAP ABAP KMs only support Ordered Joins.
• Full Outer join and Right outer joins are not supported.
• In one- to-many relationships, the first table of a join needs to be the one-table, for example when joining MARA and MARC, MARA needs to be the first table in the join.
Knowledge Module Options Reference
RKM SAP ERP
Option Values Mandatory Description
USE_GUI Yes | No Yes If set to Yes, the Tree Metadata Browser UI for selecting SAP tables to reverse-engineer is shown.

Knowledge Modules Reference Guide 91/116
If Set to No, only the specified table name or module name, or application component name in the KM option is reverse-engineered.
SAP_MODULE_NAME % No This option is used to select a SAP Module to reverse-engineer. You can use wildcards in this parameter.
SAP_APP_COMP_NAME % No This option is used to select a SAP Application Component to reverse-engineer. You can use wildcards in this parameter.
SAP_PACKAGE_NAME % No This option is used to select a SAP Package to reverse-engineer. You can use wildcards in this parameter.
SAP_TABLE_DESC % No This option is used to select a SAP Table to reverse-engineer using its description. You can use wildcards in this parameter.
SAP_TABLES_NAME No This option is used for selecting multiple tables to reverse-engineer., for example: MARA,BSEG,HRP1270
SAP_CONNECTION_POOL SAP_POOL_NAME_ECC6 Yes SAP Connection Pool name
SAP_CONNECTION_POOL_SIZE Yes Number of SAP connections to be maintained as a pool.
GET_FOREIGN_KEYS Yes | No No Set this parameter to Yes to reverse foreign keys of SAP tables.
GET_INDEXES Yes | No No Set this parameter to Yes to reverse indexes of SAP tables.
GET_PRIMARY_KEYS Yes | No No Set this parameter to Yes to reverse the primary keys of SAP tables.
LOG_FILE_NAME Yes Logs file name and location.
UPLOAD_ABAP_CODE Yes | No Yes Set this flag to Yes to upload the RFCs used by the RKM. This operation is required only when you run the RKM first against your SAP system. This option can be set to NO
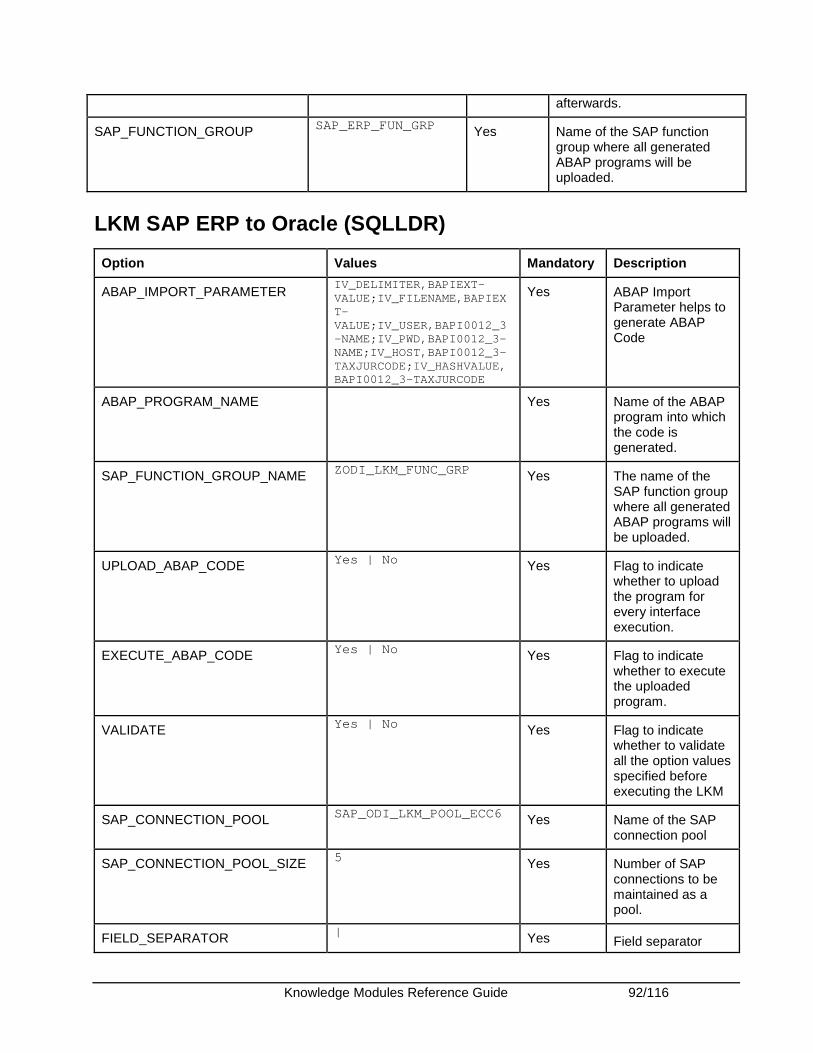
Knowledge Modules Reference Guide 92/116
afterwards.
SAP_FUNCTION_GROUP SAP_ERP_FUN_GRP Yes Name of the SAP function group where all generated ABAP programs will be uploaded.
LKM SAP ERP to Oracle (SQLLDR)
Option Values Mandatory Description
ABAP_IMPORT_PARAMETER
IV_DELIMITER,BAPIEXT-VALUE;IV_FILENAME,BAPIEXT-VALUE;IV_USER,BAPI0012_3-NAME;IV_PWD,BAPI0012_3-NAME;IV_HOST,BAPI0012_3-TAXJURCODE;IV_HASHVALUE,BAPI0012_3-TAXJURCODE
Yes ABAP Import Parameter helps to generate ABAP Code
ABAP_PROGRAM_NAME Yes Name of the ABAP program into which the code is generated.
SAP_FUNCTION_GROUP_NAME ZODI_LKM_FUNC_GRP Yes The name of the SAP function group where all generated ABAP programs will be uploaded.
UPLOAD_ABAP_CODE Yes | No Yes Flag to indicate whether to upload the program for every interface execution.
EXECUTE_ABAP_CODE Yes | No Yes Flag to indicate whether to execute the uploaded program.
VALIDATE Yes | No Yes Flag to indicate whether to validate all the option values specified before executing the LKM
SAP_CONNECTION_POOL SAP_ODI_LKM_POOL_ECC6 Yes Name of the SAP connection pool
SAP_CONNECTION_POOL_SIZE 5 Yes Number of SAP connections to be maintained as a pool.
FIELD_SEPARATOR | Yes Field separator
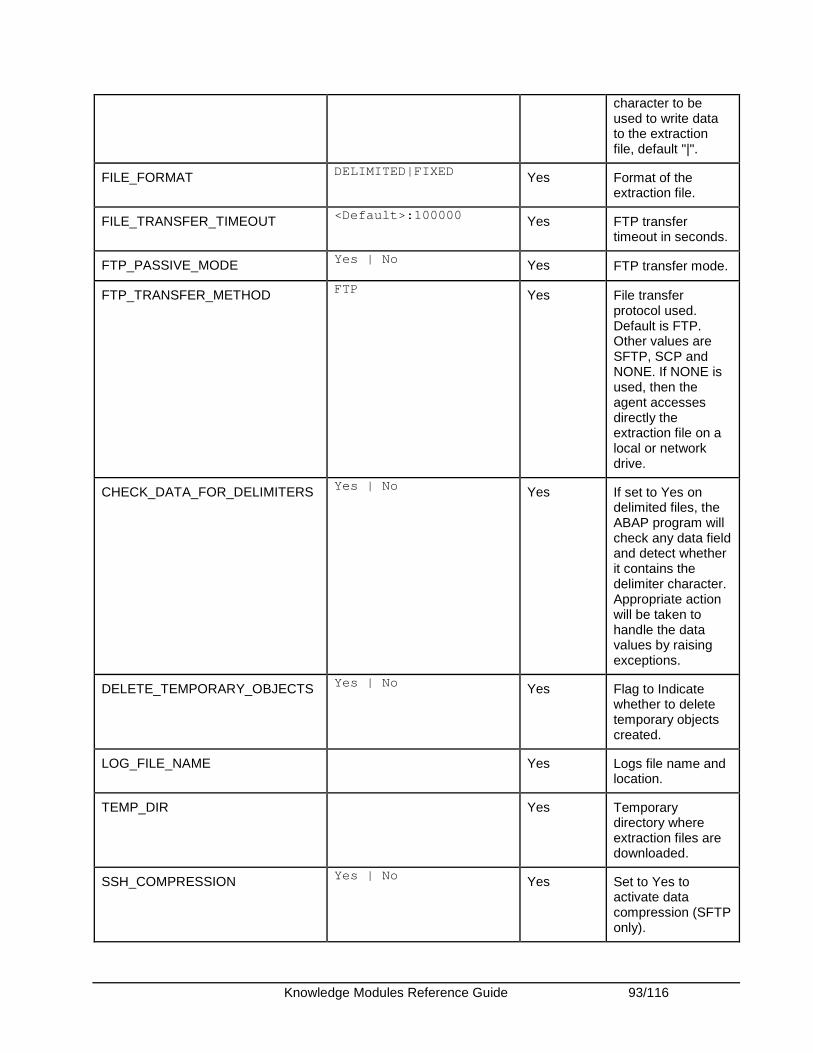
Knowledge Modules Reference Guide 93/116
character to be used to write data to the extraction file, default "|".
FILE_FORMAT DELIMITED|FIXED Yes Format of the extraction file.
FILE_TRANSFER_TIMEOUT <Default>:100000 Yes FTP transfer timeout in seconds.
FTP_PASSIVE_MODE Yes | No Yes FTP transfer mode.
FTP_TRANSFER_METHOD FTP Yes File transfer protocol used. Default is FTP. Other values are SFTP, SCP and NONE. If NONE is used, then the agent accesses directly the extraction file on a local or network drive.
CHECK_DATA_FOR_DELIMITERS Yes | No Yes If set to Yes on delimited files, the ABAP program will check any data field and detect whether it contains the delimiter character. Appropriate action will be taken to handle the data values by raising exceptions.
DELETE_TEMPORARY_OBJECTS Yes | No Yes Flag to Indicate whether to delete temporary objects created.
LOG_FILE_NAME Yes Logs file name and location.
TEMP_DIR Yes Temporary directory where extraction files are downloaded.
SSH_COMPRESSION Yes | No Yes Set to Yes to activate data compression (SFTP only).

Knowledge Modules Reference Guide 94/116
SSH_IDENTITY_FILE <empty> No Specify the identify file name if using the SFTP protocol.

Knowledge Modules Reference Guide 95/116
SAS
Knowledge Modules
Type Knowledge Module Description
Check CKM SAS Checks data integrity against constraints defined on a SAS table. Rejects invalid records in the error table created dynamically. Can be used for static controls as well as flow controls.
Consider using this KM if you plan to check data integrity on a SAS tables.
This CKM is dedicated to SAS.
Integrate IKM SAS Control Append Integrates data in a SAS target table in replace/append mode. When flow data needs to be checked using a CKM, this IKM creates a temporary staging table before invoking the CKM.
Consider using this IKM if you plan to load your SAS target table in replace mode, with or without data integrity check.
To use this IKM, the staging area must be on the same data server as the target.
Integrate IKM SAS Incremental Update Integrates data in a SAS target table in incremental update mode. This IKM creates a temporary staging table to stage the data flow. It then compares its content to the target table to guess which records should be inserted and which others should be updated. It also allows performing data integrity check by invoking the CKM.
Inserts and updates are done in bulk set-based processing to maximize performance.
Consider using this IKM if you plan to load your SAS target table to insert missing records and to update existing ones.
To use this IKM, the staging area must be on the same data server as the target.
Load LKM File to SAS Loads data from a File to a SAS staging area database.
Consider using this LKM if your source is a flat file and your staging area is a SAS server.
Load LKM SAS to SQL Loads data from a SAS source to any Generic SQL staging area. This LKM is similar to the standard “LKM SQL to SQL” described in section “Generic SQL” except that it is dedicated to SAS as source.
Load LKM SQL to SAS Loads data from any Generic SQL source database to a SAS staging area. This LKM is similar to the standard “LKM SQL to SQL” described in section “Generic SQL” except
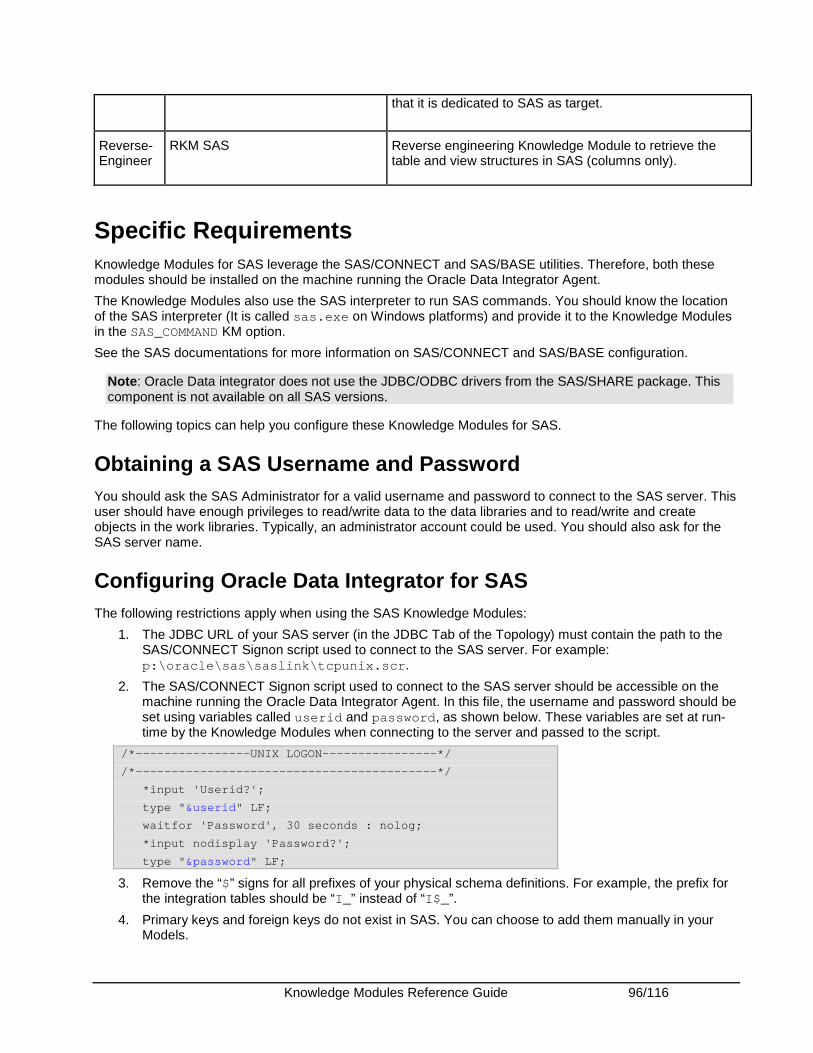
Knowledge Modules Reference Guide 96/116
that it is dedicated to SAS as target.
Reverse-Engineer
RKM SAS Reverse engineering Knowledge Module to retrieve the table and view structures in SAS (columns only).
Specific Requirements Knowledge Modules for SAS leverage the SAS/CONNECT and SAS/BASE utilities. Therefore, both these modules should be installed on the machine running the Oracle Data Integrator Agent.
The Knowledge Modules also use the SAS interpreter to run SAS commands. You should know the location of the SAS interpreter (It is called sas.exe on Windows platforms) and provide it to the Knowledge Modules in the SAS_COMMAND KM option.
See the SAS documentations for more information on SAS/CONNECT and SAS/BASE configuration.
Note: Oracle Data integrator does not use the JDBC/ODBC drivers from the SAS/SHARE package. This component is not available on all SAS versions.
The following topics can help you configure these Knowledge Modules for SAS.
Obtaining a SAS Username and Password You should ask the SAS Administrator for a valid username and password to connect to the SAS server. This user should have enough privileges to read/write data to the data libraries and to read/write and create objects in the work libraries. Typically, an administrator account could be used. You should also ask for the SAS server name.
Configuring Oracle Data Integrator for SAS The following restrictions apply when using the SAS Knowledge Modules:
1. The JDBC URL of your SAS server (in the JDBC Tab of the Topology) must contain the path to the SAS/CONNECT Signon script used to connect to the SAS server. For example: p:\oracle\sas\saslink\tcpunix.scr .
2. The SAS/CONNECT Signon script used to connect to the SAS server should be accessible on the machine running the Oracle Data Integrator Agent. In this file, the username and password should be set using variables called userid and password , as shown below. These variables are set at run-time by the Knowledge Modules when connecting to the server and passed to the script.
/*----------------UNIX LOGON----------------*/
/*------------------------------------------*/
*input 'Userid?';
type " &userid " LF;
waitfor 'Password', 30 seconds : nolog;
*input nodisplay 'Password?';
type " &password " LF;
3. Remove the “$” signs for all prefixes of your physical schema definitions. For example, the prefix for the integration tables should be “I_ ” instead of “I$_ ”.
4. Primary keys and foreign keys do not exist in SAS. You can choose to add them manually in your Models.

Knowledge Modules Reference Guide 97/116
SAS Remote Tables vs. Local Tables The Knowledge Modules process data differently depending on the location of the Oracle Data Integrator Agent. When the Agent is installed on the machine hosting the SAS data, SAS tables are considered as Local Tables. Otherwise, they are considered as Remote tables.
The Local or Remote nature of the SAS tables processed by an Interface can be specified through the REMOTE_LIB KM option. When set to "Yes" , the Knowledge Modules will assume that the tables are Remote.
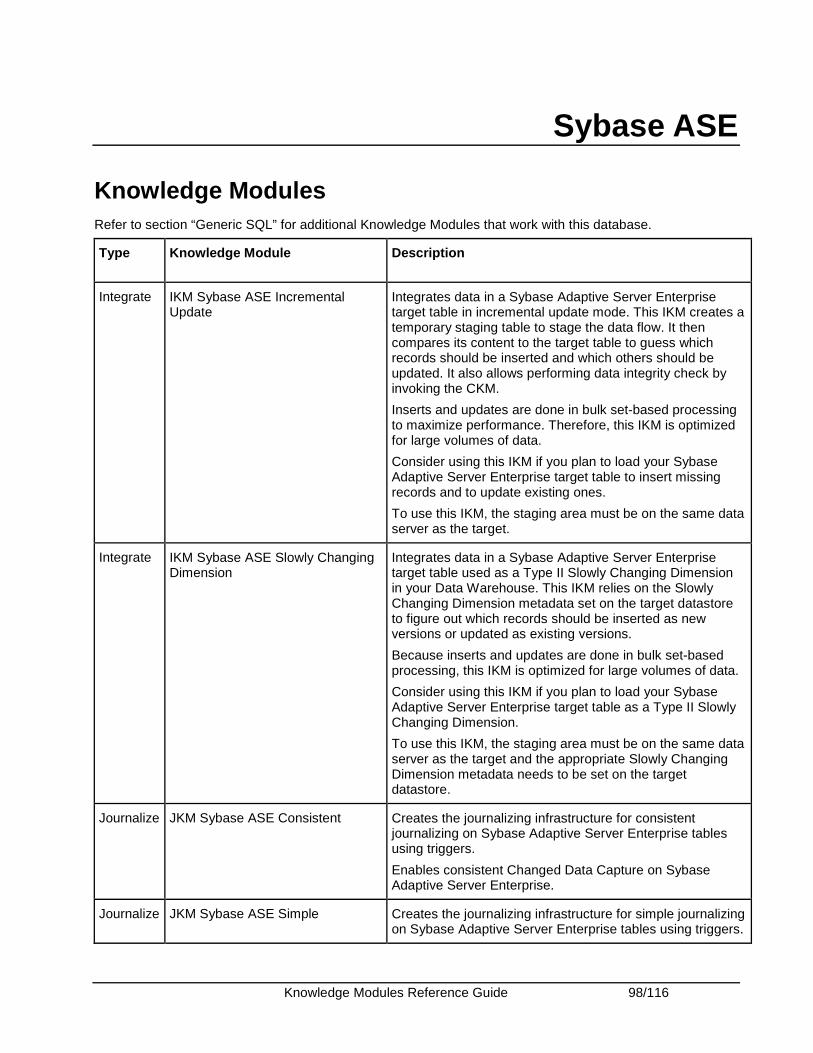
Knowledge Modules Reference Guide 98/116
Sybase ASE
Knowledge Modules Refer to section “Generic SQL” for additional Knowledge Modules that work with this database.
Type Knowledge Module Description
Integrate IKM Sybase ASE Incremental Update
Integrates data in a Sybase Adaptive Server Enterprise target table in incremental update mode. This IKM creates a temporary staging table to stage the data flow. It then compares its content to the target table to guess which records should be inserted and which others should be updated. It also allows performing data integrity check by invoking the CKM.
Inserts and updates are done in bulk set-based processing to maximize performance. Therefore, this IKM is optimized for large volumes of data.
Consider using this IKM if you plan to load your Sybase Adaptive Server Enterprise target table to insert missing records and to update existing ones.
To use this IKM, the staging area must be on the same data server as the target.
Integrate IKM Sybase ASE Slowly Changing Dimension
Integrates data in a Sybase Adaptive Server Enterprise target table used as a Type II Slowly Changing Dimension in your Data Warehouse. This IKM relies on the Slowly Changing Dimension metadata set on the target datastore to figure out which records should be inserted as new versions or updated as existing versions.
Because inserts and updates are done in bulk set-based processing, this IKM is optimized for large volumes of data.
Consider using this IKM if you plan to load your Sybase Adaptive Server Enterprise target table as a Type II Slowly Changing Dimension.
To use this IKM, the staging area must be on the same data server as the target and the appropriate Slowly Changing Dimension metadata needs to be set on the target datastore.
Journalize JKM Sybase ASE Consistent Creates the journalizing infrastructure for consistent journalizing on Sybase Adaptive Server Enterprise tables using triggers.
Enables consistent Changed Data Capture on Sybase Adaptive Server Enterprise.
Journalize JKM Sybase ASE Simple Creates the journalizing infrastructure for simple journalizing on Sybase Adaptive Server Enterprise tables using triggers.
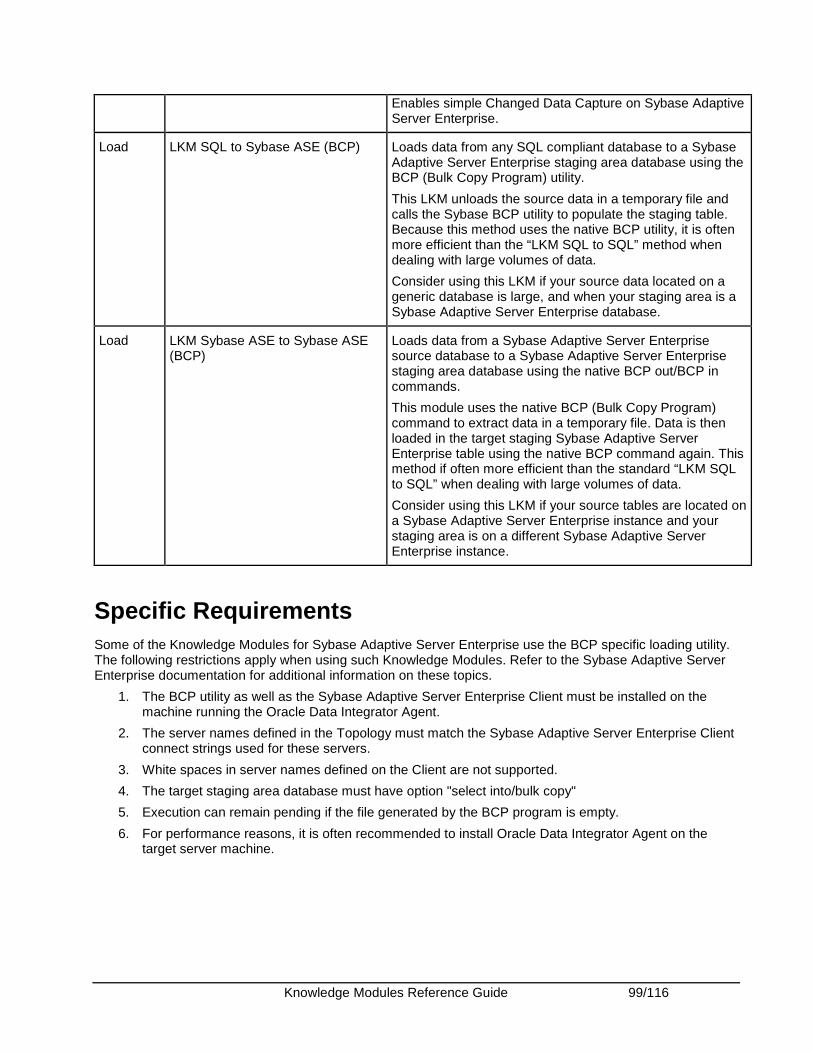
Knowledge Modules Reference Guide 99/116
Enables simple Changed Data Capture on Sybase Adaptive Server Enterprise.
Load LKM SQL to Sybase ASE (BCP) Loads data from any SQL compliant database to a Sybase Adaptive Server Enterprise staging area database using the BCP (Bulk Copy Program) utility.
This LKM unloads the source data in a temporary file and calls the Sybase BCP utility to populate the staging table. Because this method uses the native BCP utility, it is often more efficient than the “LKM SQL to SQL” method when dealing with large volumes of data.
Consider using this LKM if your source data located on a generic database is large, and when your staging area is a Sybase Adaptive Server Enterprise database.
Load LKM Sybase ASE to Sybase ASE (BCP)
Loads data from a Sybase Adaptive Server Enterprise source database to a Sybase Adaptive Server Enterprise staging area database using the native BCP out/BCP in commands.
This module uses the native BCP (Bulk Copy Program) command to extract data in a temporary file. Data is then loaded in the target staging Sybase Adaptive Server Enterprise table using the native BCP command again. This method if often more efficient than the standard “LKM SQL to SQL” when dealing with large volumes of data.
Consider using this LKM if your source tables are located on a Sybase Adaptive Server Enterprise instance and your staging area is on a different Sybase Adaptive Server Enterprise instance.
Specific Requirements Some of the Knowledge Modules for Sybase Adaptive Server Enterprise use the BCP specific loading utility. The following restrictions apply when using such Knowledge Modules. Refer to the Sybase Adaptive Server Enterprise documentation for additional information on these topics.
1. The BCP utility as well as the Sybase Adaptive Server Enterprise Client must be installed on the machine running the Oracle Data Integrator Agent.
2. The server names defined in the Topology must match the Sybase Adaptive Server Enterprise Client connect strings used for these servers.
3. White spaces in server names defined on the Client are not supported.
4. The target staging area database must have option "select into/bulk copy"
5. Execution can remain pending if the file generated by the BCP program is empty.
6. For performance reasons, it is often recommended to install Oracle Data Integrator Agent on the target server machine.
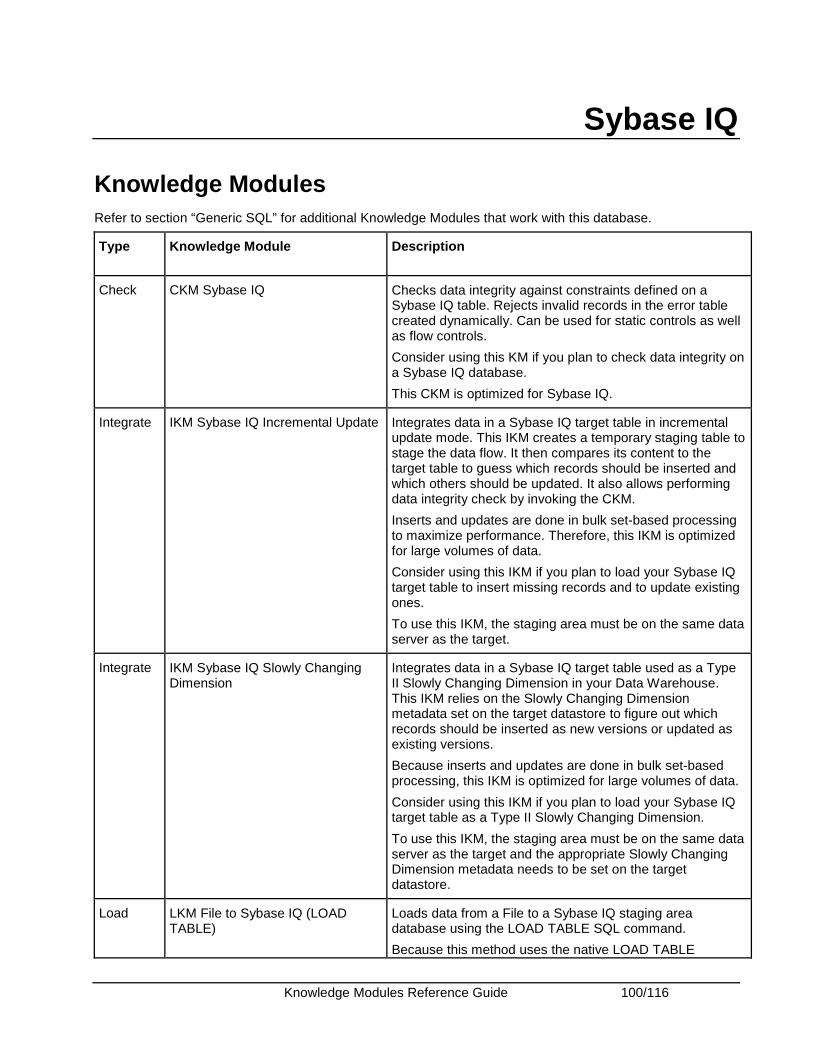
Knowledge Modules Reference Guide 100/116
Sybase IQ
Knowledge Modules Refer to section “Generic SQL” for additional Knowledge Modules that work with this database.
Type Knowledge Module Description
Check CKM Sybase IQ Checks data integrity against constraints defined on a Sybase IQ table. Rejects invalid records in the error table created dynamically. Can be used for static controls as well as flow controls.
Consider using this KM if you plan to check data integrity on a Sybase IQ database.
This CKM is optimized for Sybase IQ.
Integrate IKM Sybase IQ Incremental Update Integrates data in a Sybase IQ target table in incremental update mode. This IKM creates a temporary staging table to stage the data flow. It then compares its content to the target table to guess which records should be inserted and which others should be updated. It also allows performing data integrity check by invoking the CKM.
Inserts and updates are done in bulk set-based processing to maximize performance. Therefore, this IKM is optimized for large volumes of data.
Consider using this IKM if you plan to load your Sybase IQ target table to insert missing records and to update existing ones.
To use this IKM, the staging area must be on the same data server as the target.
Integrate IKM Sybase IQ Slowly Changing Dimension
Integrates data in a Sybase IQ target table used as a Type II Slowly Changing Dimension in your Data Warehouse. This IKM relies on the Slowly Changing Dimension metadata set on the target datastore to figure out which records should be inserted as new versions or updated as existing versions.
Because inserts and updates are done in bulk set-based processing, this IKM is optimized for large volumes of data.
Consider using this IKM if you plan to load your Sybase IQ target table as a Type II Slowly Changing Dimension.
To use this IKM, the staging area must be on the same data server as the target and the appropriate Slowly Changing Dimension metadata needs to be set on the target datastore.
Load LKM File to Sybase IQ (LOAD TABLE)
Loads data from a File to a Sybase IQ staging area database using the LOAD TABLE SQL command.
Because this method uses the native LOAD TABLE
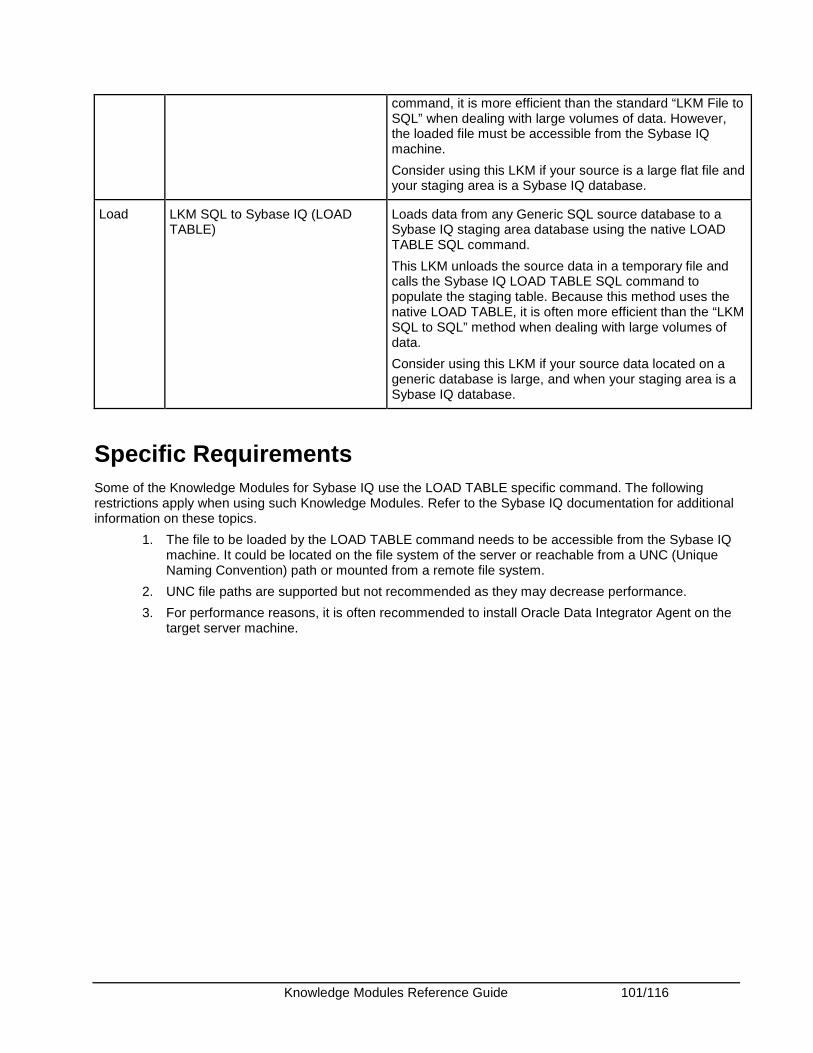
Knowledge Modules Reference Guide 101/116
command, it is more efficient than the standard “LKM File to SQL” when dealing with large volumes of data. However, the loaded file must be accessible from the Sybase IQ machine.
Consider using this LKM if your source is a large flat file and your staging area is a Sybase IQ database.
Load LKM SQL to Sybase IQ (LOAD TABLE)
Loads data from any Generic SQL source database to a Sybase IQ staging area database using the native LOAD TABLE SQL command.
This LKM unloads the source data in a temporary file and calls the Sybase IQ LOAD TABLE SQL command to populate the staging table. Because this method uses the native LOAD TABLE, it is often more efficient than the “LKM SQL to SQL” method when dealing with large volumes of data.
Consider using this LKM if your source data located on a generic database is large, and when your staging area is a Sybase IQ database.
Specific Requirements Some of the Knowledge Modules for Sybase IQ use the LOAD TABLE specific command. The following restrictions apply when using such Knowledge Modules. Refer to the Sybase IQ documentation for additional information on these topics.
1. The file to be loaded by the LOAD TABLE command needs to be accessible from the Sybase IQ machine. It could be located on the file system of the server or reachable from a UNC (Unique Naming Convention) path or mounted from a remote file system.
2. UNC file paths are supported but not recommended as they may decrease performance.
3. For performance reasons, it is often recommended to install Oracle Data Integrator Agent on the target server machine.

Knowledge Modules Reference Guide 102/116
Teradata
Knowledge Modules Refer to section Generic SQL for additional Knowledge Modules that work with this database.
The Oracle Data Integrator KMs include specific optimizations for Teradata. These optimizations and their configuration are detailed in the KM Optimizations for Teradata section.
Type Knowledge Module Description
Check CKM Teradata Checks data integrity against constraints defined on a Teradata table. Rejects invalid records in the error table created dynamically. Can be used for static controls as well as flow controls.
Consider using this KM if you plan to check data integrity on a Teradata database.
This KM support the following Teradata optimizations:
• Primary Indexes and Statistics
Integrate IKM File to Teradata (TTU) This IKM is designed to leverage the power of the Teradata utilities for loading files directly to the target. It is restricted to one file as source and one Teradata table as target.
Depending on the utility you choose, you'll have the ability to integrate the data in either replace or incremental update mode.
Consider using this IKM if you plan to load a single flat file to your target table. Because it uses the Teradata utilities, this IKM is recommended for very large volumes.
To use this IKM, you have to set the staging area to the source file's schema.
This KM support the following Teradata optimizations:
• Primary Indexes and Statistics
• Support for Teradata Utilities
• Optimized Temporary Tables Management
Integrate IKM SQL to Teradata (TTU) Integrates data from a SQL compliant database to a Teradata database target table using Teradata Utilities.
This IKM is designed to leverage the power of the Teradata utilities for loading source data directly to the target. It can only be used when all source tables belong to the same data server and when this data server is used as a staging area (staging area on source). Source data can be unloaded into a file or Named Pipe and then loaded by the selected Teradata utility directly in the target table. Using

Knowledge Modules Reference Guide 103/116
named pipes avoids landing the data in a file. This IKM is recommended for very large volumes.
Depending on the utility you choose, you'll have the ability to integrate the data in either replace or incremental update mode.
Consider using this IKM when:
• You plan to load your target table with few transformations on the source
• All your source tables are on the same data server (used as the staging area)
• You don't want to stage your data between the source and the target
To use this IKM, you have to set the staging area to the source data server's schema.
This KM support the following Teradata optimizations:
• Primary Indexes and Statistics
• Support for Teradata Utilities
• Support for Named Pipes
• Optimized Temporary Tables Management
Integrate IKM Teradata Control Append Integrates data in a Teradata target table in replace/append mode. When flow data needs to be checked using a CKM, this IKM creates a temporary staging table before invoking the CKM.
Consider using this IKM if you plan to load your Teradata target table in append mode, with or without data integrity check.
To use this IKM, the staging area must be on the same data server as the target Teradata table.
This KM support the following Teradata optimizations:
• Primary Indexes and Statistics
• Optimized Temporary Tables Management
Integrate IKM Teradata Incremental Update Integrates data in a Teradata target table in incremental update mode. This IKM creates a temporary staging table to stage the data flow. It then compares its content to the target table to calculate which records should be inserted and which others should be updated. It also allows performing data integrity check by invoking the CKM.
Inserts and updates are done in bulk set-based processing to maximize performance. Therefore, this IKM is optimized for large volumes of data.
Consider using this IKM if you plan to load your Teradata target table to insert missing records and to update existing ones.
To use this IKM, the staging area must be on the same

Knowledge Modules Reference Guide 104/116
data server as the target.
This KM support the following Teradata optimizations:
• Primary Indexes and Statistics
• Optimized Temporary Tables Management
Integrate IKM Teradata Slowly Changing Dimension
Integrates data in a Teradata target table used as a Type II Slowly Changing Dimension in your Data Warehouse. This IKM relies on the Slowly Changing Dimension metadata set on the target datastore to figure out which records should be inserted as new versions or updated as existing versions.
Because inserts and updates are done in bulk set-based processing, this IKM is optimized for large volumes of data.
Consider using this IKM if you plan to load your Teradata target table as a Type II Slowly Changing Dimension.
To use this IKM, the staging area must be on the same data server as the target and the appropriate Slowly Changing Dimension metadata needs to be set on the target datastore.
This KM support the following Teradata optimizations:
• Primary Indexes and Statistics
• Optimized Temporary Tables Management
This KM also includes a COMPATIBLE option. This option corresponds to the Teradata engine major version number. If this version is 12 or above, then a MERGE statement will be used instead of the standard INSERT then UPDATE statements to merge the incoming data flow into the target table.
Integrate IKM Teradata to File (TTU) Integrates data in a target file from a Teradata staging area in replace mode. This IKM requires the staging area to be on Teradata. It uses the native Teradata utilities to export the data to the target file.
Consider using this IKM if you plan to transform and export data to a target file from your Teradata server.
To use this IKM, the staging area must be different from the target. It should be set to a Teradata location.
This KM support the following Teradata optimizations:
• Support for Teradata Utilities
Load LKM File to Teradata (TTU) Loads data from a File to a Teradata staging area database using the Teradata bulk utilities.
Because this method uses the native Teradata utilities to load the file in the staging area, it is more efficient than the standard “LKM File to SQL” when dealing with large volumes of data.
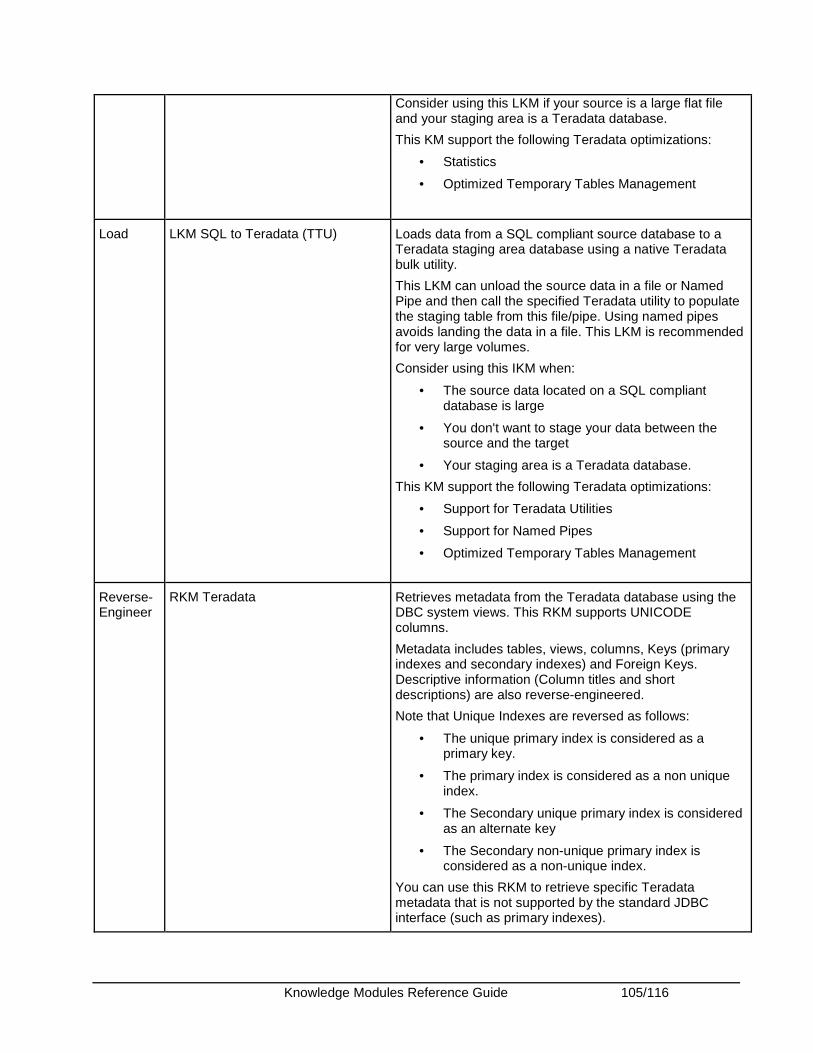
Knowledge Modules Reference Guide 105/116
Consider using this LKM if your source is a large flat file and your staging area is a Teradata database.
This KM support the following Teradata optimizations:
• Statistics
• Optimized Temporary Tables Management
Load LKM SQL to Teradata (TTU) Loads data from a SQL compliant source database to a Teradata staging area database using a native Teradata bulk utility.
This LKM can unload the source data in a file or Named Pipe and then call the specified Teradata utility to populate the staging table from this file/pipe. Using named pipes avoids landing the data in a file. This LKM is recommended for very large volumes.
Consider using this IKM when:
• The source data located on a SQL compliant database is large
• You don't want to stage your data between the source and the target
• Your staging area is a Teradata database.
This KM support the following Teradata optimizations:
• Support for Teradata Utilities
• Support for Named Pipes
• Optimized Temporary Tables Management
Reverse-Engineer
RKM Teradata Retrieves metadata from the Teradata database using the DBC system views. This RKM supports UNICODE columns.
Metadata includes tables, views, columns, Keys (primary indexes and secondary indexes) and Foreign Keys. Descriptive information (Column titles and short descriptions) are also reverse-engineered.
Note that Unique Indexes are reversed as follows:
• The unique primary index is considered as a primary key.
• The primary index is considered as a non unique index.
• The Secondary unique primary index is considered as an alternate key
• The Secondary non-unique primary index is considered as a non-unique index.
You can use this RKM to retrieve specific Teradata metadata that is not supported by the standard JDBC interface (such as primary indexes).
Knowledge Modules Reference Guide 106/116
Specific Requirements The following requirements and restrictions apply for these Knowledge Modules:
1. When using Teradata Utilities enabled KMs, the appropriate Teradata Utilities must be installed on the machine running the Oracle Data Integrator Agent.
2. The server name of the Teradata Server defined in the Topology must match the Teradata connect string used for this server (without the COP_n postfix).
3. It is recommended to install the Agent on a separate platform than the target Teradata host. The machine, where the Agent is installed should have a very large network bandwidth to the target Teradata server.
KM Optimizations for Teradata The Oracle Data Integrator KMs include specific optimizations for Teradata. These optimizations are detailed below:
Primary Indexes and Statistics Teradata performance heavily relies on primary indexes. The Teradata KMs support customized primary indexes (PI) for temporary tables. This applies to Teradata IKMs and CKMs. The primary index for the temporary tables can be defined in these KMs using the PRIMARY_INDEX KM option, which takes the following values:
• [PK]: The PI will be the primary key of the target table. This is the default value for the CKM.
• [UK]: The PI will be the update key of the interface. This is the default value for the IKMs.
• <Column list>: This is a free PI based on the comma-separated list of column names.
• <Empty string>: No primary index is specified. The Teradata engine will use the default rule for the PI (first column of the temporary table).
Teradata MultiColumnStatistics should optionally be gathered for selected PI columns. This is controlled by COLLECT_STATS KM option, which is set to true by default.
Support for Teradata Utilities Teradata Utilities (TTU) provide an efficient method for transferring data from and to the Teradata engine. When using a LKM or IKM supporting TTUs, it is possible to set the method for loading data using the TERADATA_UTILITY option.
This option takes the following values when pushing data to a Teradata target (IKM) or staging area (LKM):
• FASTLOAD: use Teradata FastLoad
• MLOAD: use Teradata MultiLoad
• TPUMP: use Teradata TPump
• TPT-LOAD: use Teradata Parallel Transporter (Load Operator)
• TPT-SQL-INSERT: use Teradata Parallel Transporter (SQL Insert Operator)
This option takes the following values when pushing data FROM Teradata to a file:
• FEXP: use Teradata FastExport.
• TPT: use Teradata Parallel Transporter.
When using TTU KMs, you should also take into account the following KM parameters:

Knowledge Modules Reference Guide 107/116
• REPORT_NB_ROWS: This option allows you to report the number of lines processed by the utility in a Warning step of the integration interface.
• SESSIONS: Number of FastLoad sessions
• MAX_ALLOWED_ERRORS: Maximum number of tolerated errors. This corresponds to the ERRLIMIT command in FastLoad/MultiLoad/TPump and to the ErrorLimit attribute for TPT.
• MULTILOAD_TPUMP_TYPE: Operation performed by the MultiLoad or TPump utility. Valid values are INSERT, UPSERT and DELETE. For UPSERT and DELETE an update key is required in the interface.
For details and appropriate choice of utility and load operator, refer to the Teradata documentation.
Support for Named Pipes When using TTU KMs to move data between a SQL source and Teradata, it is possible to increase the performances by using Named Pipes instead of files between the unload/load processes. Named Pipes can be activated by setting the NP_USE_NAMED_PIPE option to YES. The following options should also be taken into account for using Named Pipes:
• NP_EXEC_ON_WINDOWS: Set this option to YES if the run-time agent runs on a windows platform.
• NP_ACCESS_MODULE: Access module used for Named Pipes. This access module is platform dependant. Refer to the knowledge module option help for a list of values.
• NP_TTU_STARTUP_TIME: This number of seconds for the TTU to be able to receive data through the pipe. This is the delay between the moment the KM starts the TTU and the moment the KM starts to push data into the named pipe. This delay is dependant on the machine workload.
Optimized Management of Temporary Tables Creating and dropping Data Integrator temporary staging tables can be a resource consuming process on a Teradata engine. The ODI_DDL KM option provides a mean to control these DDL operations. It takes the following values:
• DROP_CREATE: Always drop and recreate all temporary tables for every execution (default behavior).
• CREATE_DELETE_ALL: Create temporary tables when needed (usually for the first execution only) and use DELETE ALL to drop the temporary table content. Temporary table are reused for subsequent executions.
• DELETE_ALL: Do not create temporary tables. Only submit DELETE ALL for all temporary tables.
• NONE: Do not issue any DDL on temporary tables. Temporary tables should be handled separately.
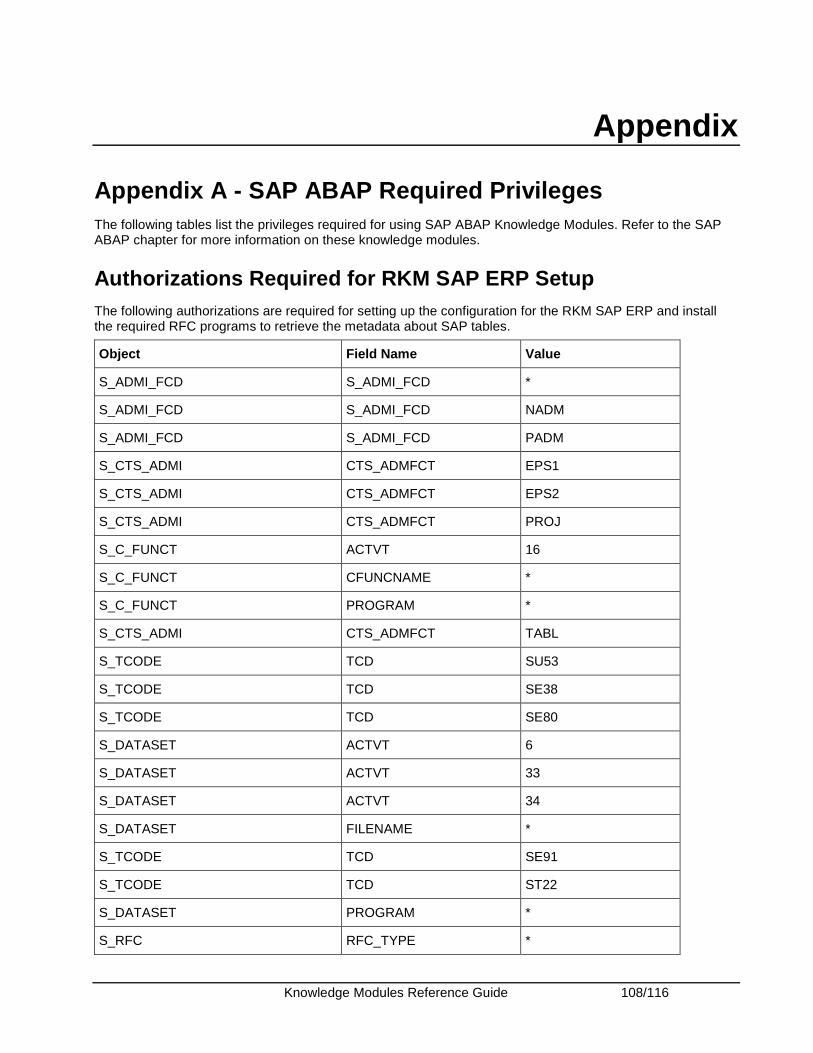
Knowledge Modules Reference Guide 108/116
Appendix
Appendix A - SAP ABAP Required Privileges The following tables list the privileges required for using SAP ABAP Knowledge Modules. Refer to the SAP ABAP chapter for more information on these knowledge modules.
Authorizations Required for RKM SAP ERP Setup The following authorizations are required for setting up the configuration for the RKM SAP ERP and install the required RFC programs to retrieve the metadata about SAP tables.
Object Field Name Value
S_ADMI_FCD S_ADMI_FCD *
S_ADMI_FCD S_ADMI_FCD NADM
S_ADMI_FCD S_ADMI_FCD PADM
S_CTS_ADMI CTS_ADMFCT EPS1
S_CTS_ADMI CTS_ADMFCT EPS2
S_CTS_ADMI CTS_ADMFCT PROJ
S_C_FUNCT ACTVT 16
S_C_FUNCT CFUNCNAME *
S_C_FUNCT PROGRAM *
S_CTS_ADMI CTS_ADMFCT TABL
S_TCODE TCD SU53
S_TCODE TCD SE38
S_TCODE TCD SE80
S_DATASET ACTVT 6
S_DATASET ACTVT 33
S_DATASET ACTVT 34
S_DATASET FILENAME *
S_TCODE TCD SE91
S_TCODE TCD ST22
S_DATASET PROGRAM *
S_RFC RFC_TYPE *
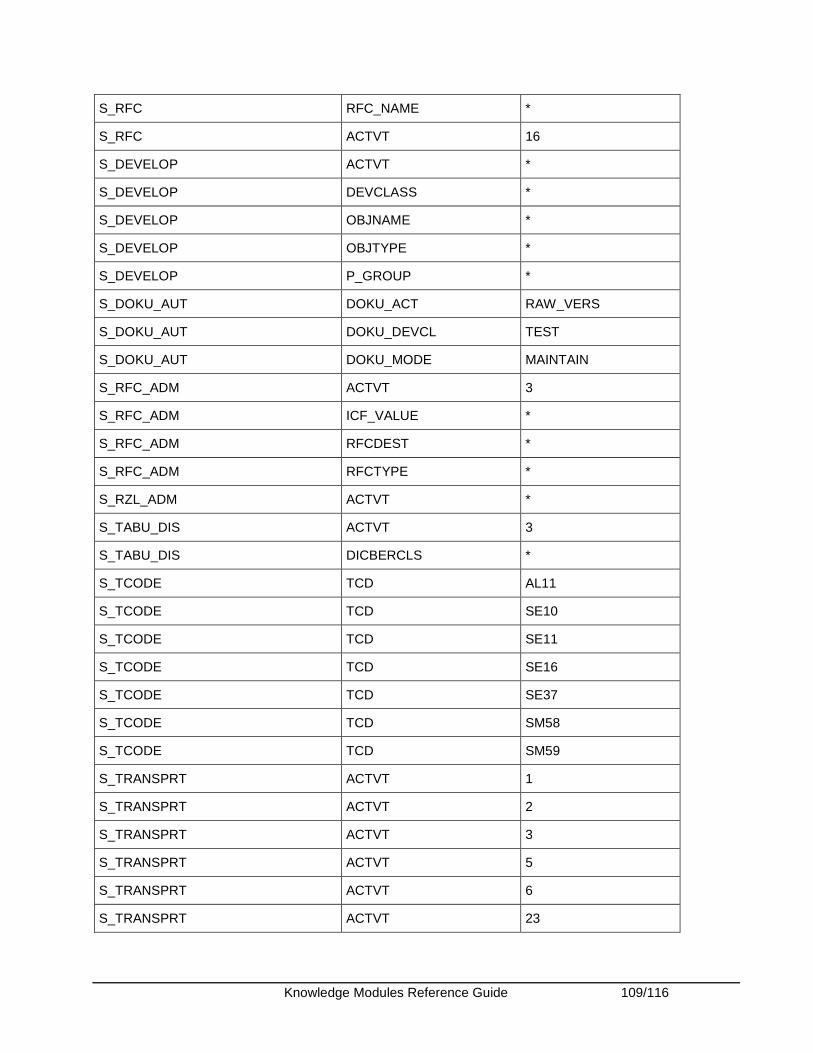
Knowledge Modules Reference Guide 109/116
S_RFC RFC_NAME *
S_RFC ACTVT 16
S_DEVELOP ACTVT *
S_DEVELOP DEVCLASS *
S_DEVELOP OBJNAME *
S_DEVELOP OBJTYPE *
S_DEVELOP P_GROUP *
S_DOKU_AUT DOKU_ACT RAW_VERS
S_DOKU_AUT DOKU_DEVCL TEST
S_DOKU_AUT DOKU_MODE MAINTAIN
S_RFC_ADM ACTVT 3
S_RFC_ADM ICF_VALUE *
S_RFC_ADM RFCDEST *
S_RFC_ADM RFCTYPE *
S_RZL_ADM ACTVT *
S_TABU_DIS ACTVT 3
S_TABU_DIS DICBERCLS *
S_TCODE TCD AL11
S_TCODE TCD SE10
S_TCODE TCD SE11
S_TCODE TCD SE16
S_TCODE TCD SE37
S_TCODE TCD SM58
S_TCODE TCD SM59
S_TRANSPRT ACTVT 1
S_TRANSPRT ACTVT 2
S_TRANSPRT ACTVT 3
S_TRANSPRT ACTVT 5
S_TRANSPRT ACTVT 6
S_TRANSPRT ACTVT 23
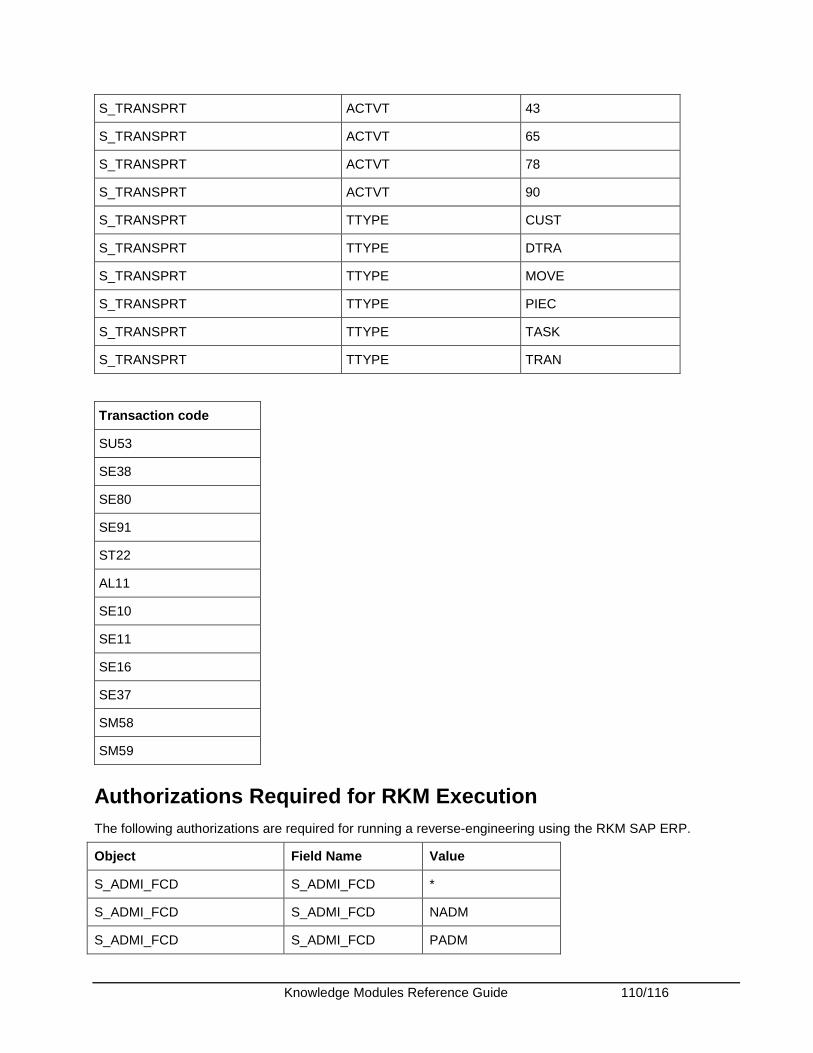
Knowledge Modules Reference Guide 110/116
S_TRANSPRT ACTVT 43
S_TRANSPRT ACTVT 65
S_TRANSPRT ACTVT 78
S_TRANSPRT ACTVT 90
S_TRANSPRT TTYPE CUST
S_TRANSPRT TTYPE DTRA
S_TRANSPRT TTYPE MOVE
S_TRANSPRT TTYPE PIEC
S_TRANSPRT TTYPE TASK
S_TRANSPRT TTYPE TRAN
Transaction code
SU53
SE38
SE80
SE91
ST22
AL11
SE10
SE11
SE16
SE37
SM58
SM59
Authorizations Required for RKM Execution The following authorizations are required for running a reverse-engineering using the RKM SAP ERP.
Object Field Name Value
S_ADMI_FCD S_ADMI_FCD *
S_ADMI_FCD S_ADMI_FCD NADM
S_ADMI_FCD S_ADMI_FCD PADM
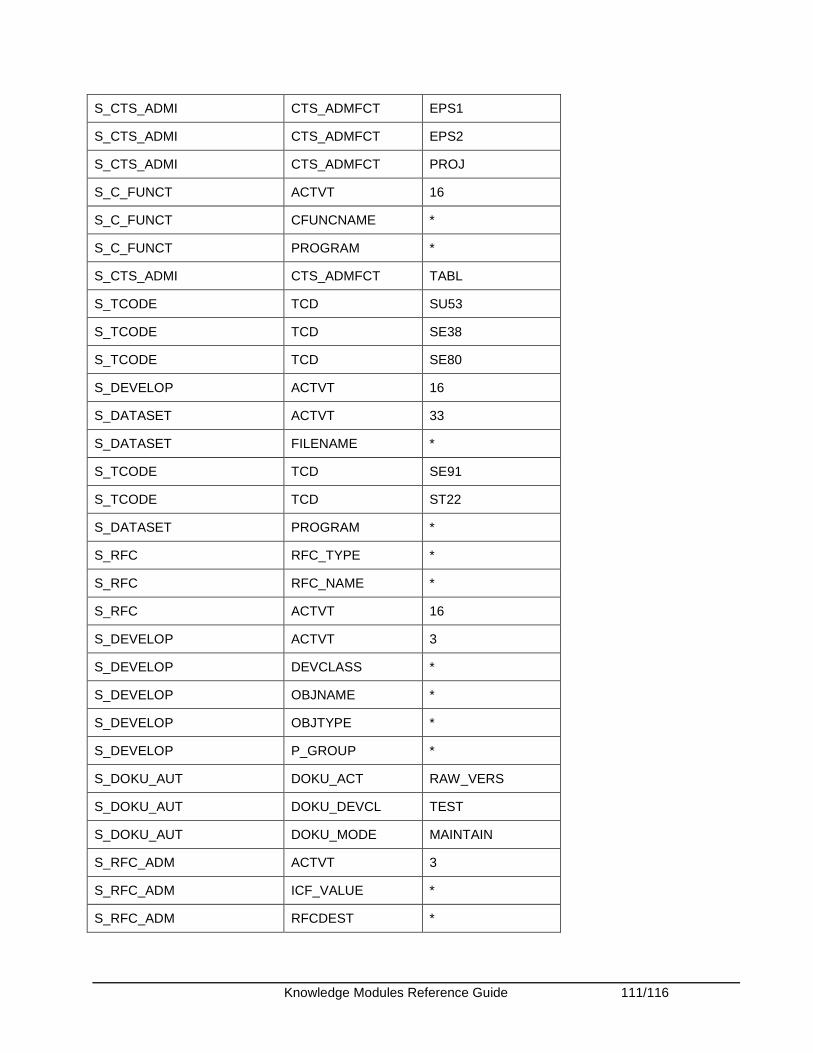
Knowledge Modules Reference Guide 111/116
S_CTS_ADMI CTS_ADMFCT EPS1
S_CTS_ADMI CTS_ADMFCT EPS2
S_CTS_ADMI CTS_ADMFCT PROJ
S_C_FUNCT ACTVT 16
S_C_FUNCT CFUNCNAME *
S_C_FUNCT PROGRAM *
S_CTS_ADMI CTS_ADMFCT TABL
S_TCODE TCD SU53
S_TCODE TCD SE38
S_TCODE TCD SE80
S_DEVELOP ACTVT 16
S_DATASET ACTVT 33
S_DATASET FILENAME *
S_TCODE TCD SE91
S_TCODE TCD ST22
S_DATASET PROGRAM *
S_RFC RFC_TYPE *
S_RFC RFC_NAME *
S_RFC ACTVT 16
S_DEVELOP ACTVT 3
S_DEVELOP DEVCLASS *
S_DEVELOP OBJNAME *
S_DEVELOP OBJTYPE *
S_DEVELOP P_GROUP *
S_DOKU_AUT DOKU_ACT RAW_VERS
S_DOKU_AUT DOKU_DEVCL TEST
S_DOKU_AUT DOKU_MODE MAINTAIN
S_RFC_ADM ACTVT 3
S_RFC_ADM ICF_VALUE *
S_RFC_ADM RFCDEST *

Knowledge Modules Reference Guide 112/116
S_RFC_ADM RFCTYPE *
S_RZL_ADM ACTVT 3
S_TABU_DIS ACTVT 3
S_TABU_DIS DICBERCLS *
S_TCODE TCD AL11
S_TCODE TCD SE10
S_TCODE TCD SE11
S_TCODE TCD SE16
S_TCODE TCD SE37
S_TCODE TCD SM58
S_TCODE TCD SM59
S_TRANSPRT ACTVT 3
S_TRANSPRT TTYPE CUST
S_TRANSPRT TTYPE DTRA
S_TRANSPRT TTYPE MOVE
S_TRANSPRT TTYPE PIEC
S_TRANSPRT TTYPE TASK
S_TRANSPRT TTYPE TRAN
Authorizations Required for LKM Execution The following authorizations are required for using the LKM SAP ERP to Oracle (SQLLDR). This set of authorization is needed to install the ABAP code generated by the LKM and execute it.
Object Field Name Value
S_ADMI_FCD S_ADMI_FCD *
S_ADMI_FCD S_ADMI_FCD NADM
S_ADMI_FCD S_ADMI_FCD PADM
S_CTS_ADMI CTS_ADMFCT EPS1
S_CTS_ADMI CTS_ADMFCT EPS2
S_CTS_ADMI CTS_ADMFCT PROJ
S_C_FUNCT ACTVT 16
S_C_FUNCT CFUNCNAME *
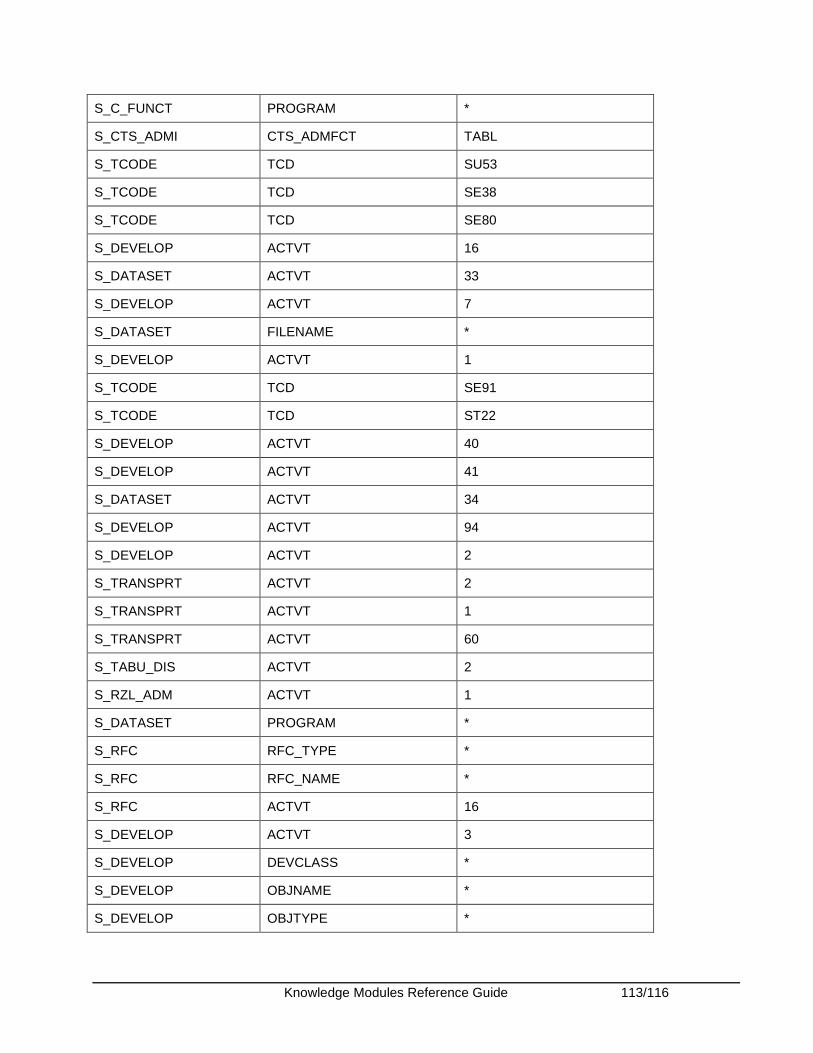
Knowledge Modules Reference Guide 113/116
S_C_FUNCT PROGRAM *
S_CTS_ADMI CTS_ADMFCT TABL
S_TCODE TCD SU53
S_TCODE TCD SE38
S_TCODE TCD SE80
S_DEVELOP ACTVT 16
S_DATASET ACTVT 33
S_DEVELOP ACTVT 7
S_DATASET FILENAME *
S_DEVELOP ACTVT 1
S_TCODE TCD SE91
S_TCODE TCD ST22
S_DEVELOP ACTVT 40
S_DEVELOP ACTVT 41
S_DATASET ACTVT 34
S_DEVELOP ACTVT 94
S_DEVELOP ACTVT 2
S_TRANSPRT ACTVT 2
S_TRANSPRT ACTVT 1
S_TRANSPRT ACTVT 60
S_TABU_DIS ACTVT 2
S_RZL_ADM ACTVT 1
S_DATASET PROGRAM *
S_RFC RFC_TYPE *
S_RFC RFC_NAME *
S_RFC ACTVT 16
S_DEVELOP ACTVT 3
S_DEVELOP DEVCLASS *
S_DEVELOP OBJNAME *
S_DEVELOP OBJTYPE *
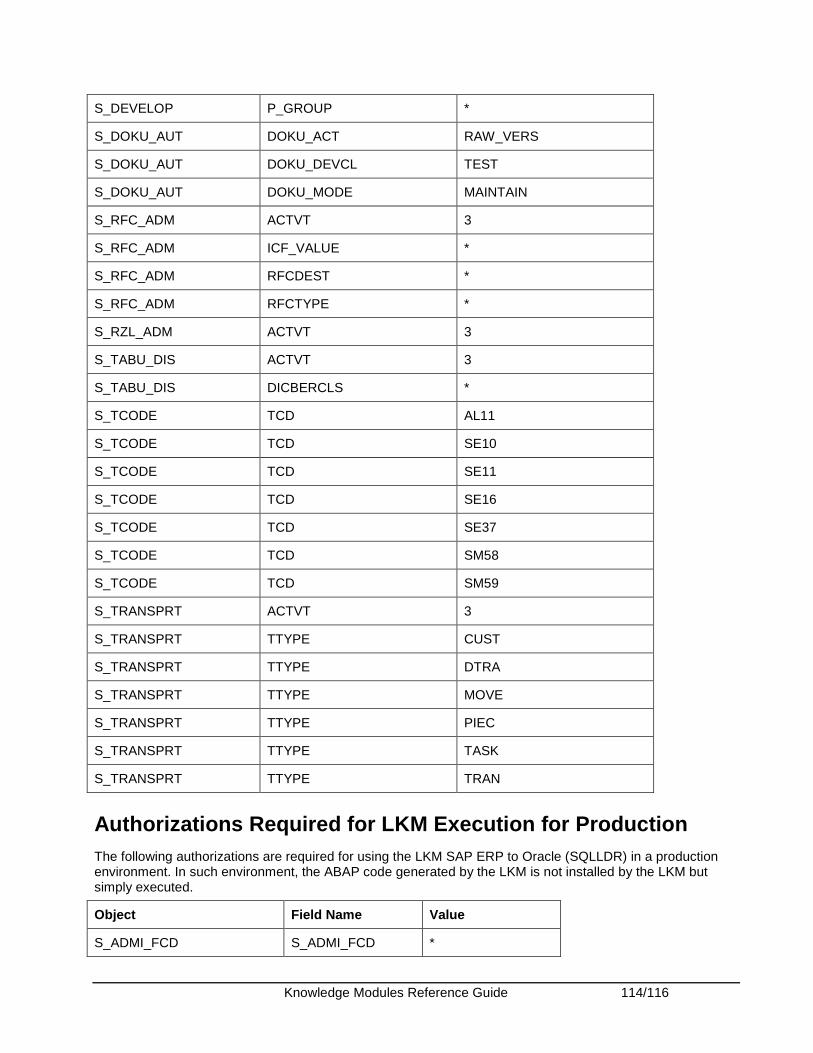
Knowledge Modules Reference Guide 114/116
S_DEVELOP P_GROUP *
S_DOKU_AUT DOKU_ACT RAW_VERS
S_DOKU_AUT DOKU_DEVCL TEST
S_DOKU_AUT DOKU_MODE MAINTAIN
S_RFC_ADM ACTVT 3
S_RFC_ADM ICF_VALUE *
S_RFC_ADM RFCDEST *
S_RFC_ADM RFCTYPE *
S_RZL_ADM ACTVT 3
S_TABU_DIS ACTVT 3
S_TABU_DIS DICBERCLS *
S_TCODE TCD AL11
S_TCODE TCD SE10
S_TCODE TCD SE11
S_TCODE TCD SE16
S_TCODE TCD SE37
S_TCODE TCD SM58
S_TCODE TCD SM59
S_TRANSPRT ACTVT 3
S_TRANSPRT TTYPE CUST
S_TRANSPRT TTYPE DTRA
S_TRANSPRT TTYPE MOVE
S_TRANSPRT TTYPE PIEC
S_TRANSPRT TTYPE TASK
S_TRANSPRT TTYPE TRAN
Authorizations Required for LKM Execution for Production The following authorizations are required for using the LKM SAP ERP to Oracle (SQLLDR) in a production environment. In such environment, the ABAP code generated by the LKM is not installed by the LKM but simply executed.
Object Field Name Value
S_ADMI_FCD S_ADMI_FCD *
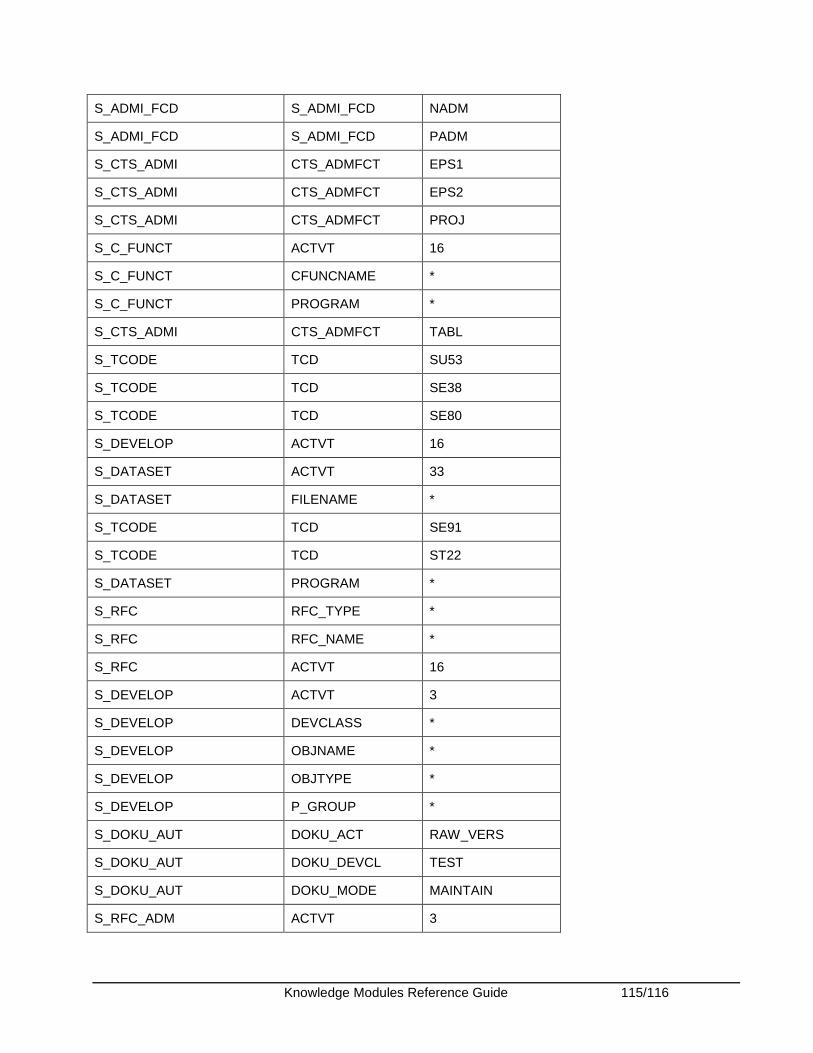
Knowledge Modules Reference Guide 115/116
S_ADMI_FCD S_ADMI_FCD NADM
S_ADMI_FCD S_ADMI_FCD PADM
S_CTS_ADMI CTS_ADMFCT EPS1
S_CTS_ADMI CTS_ADMFCT EPS2
S_CTS_ADMI CTS_ADMFCT PROJ
S_C_FUNCT ACTVT 16
S_C_FUNCT CFUNCNAME *
S_C_FUNCT PROGRAM *
S_CTS_ADMI CTS_ADMFCT TABL
S_TCODE TCD SU53
S_TCODE TCD SE38
S_TCODE TCD SE80
S_DEVELOP ACTVT 16
S_DATASET ACTVT 33
S_DATASET FILENAME *
S_TCODE TCD SE91
S_TCODE TCD ST22
S_DATASET PROGRAM *
S_RFC RFC_TYPE *
S_RFC RFC_NAME *
S_RFC ACTVT 16
S_DEVELOP ACTVT 3
S_DEVELOP DEVCLASS *
S_DEVELOP OBJNAME *
S_DEVELOP OBJTYPE *
S_DEVELOP P_GROUP *
S_DOKU_AUT DOKU_ACT RAW_VERS
S_DOKU_AUT DOKU_DEVCL TEST
S_DOKU_AUT DOKU_MODE MAINTAIN
S_RFC_ADM ACTVT 3
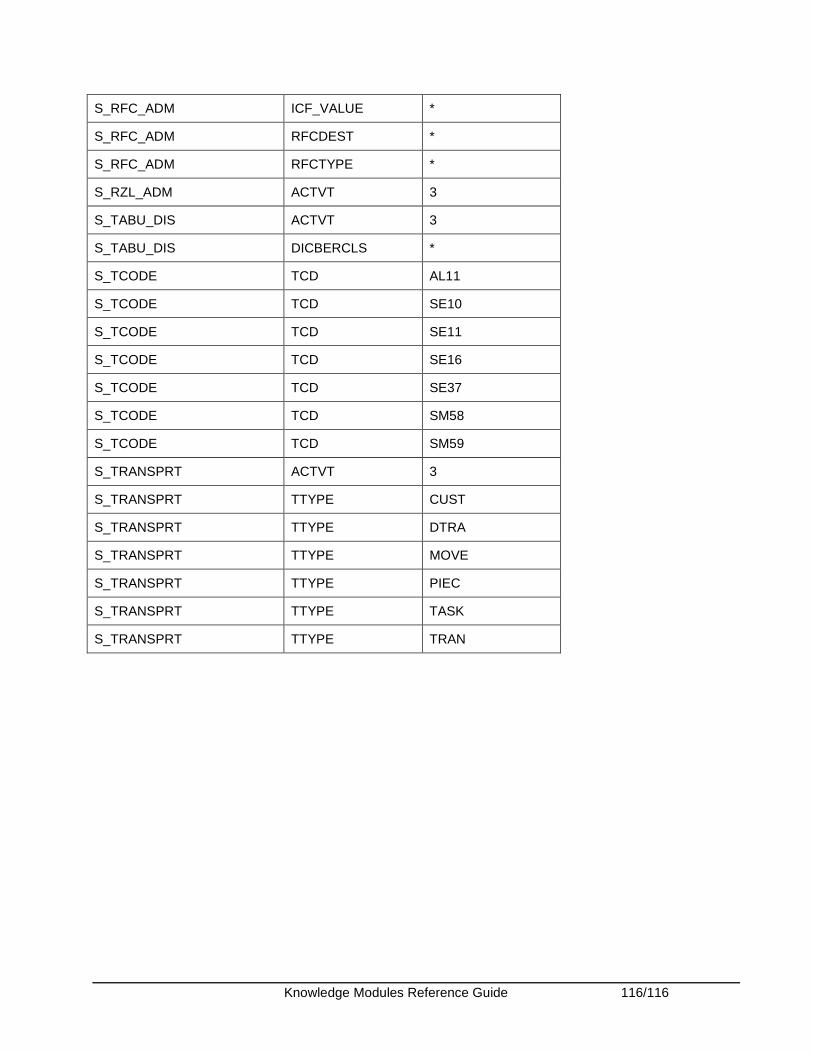
Knowledge Modules Reference Guide 116/116
S_RFC_ADM ICF_VALUE *
S_RFC_ADM RFCDEST *
S_RFC_ADM RFCTYPE *
S_RZL_ADM ACTVT 3
S_TABU_DIS ACTVT 3
S_TABU_DIS DICBERCLS *
S_TCODE TCD AL11
S_TCODE TCD SE10
S_TCODE TCD SE11
S_TCODE TCD SE16
S_TCODE TCD SE37
S_TCODE TCD SM58
S_TCODE TCD SM59
S_TRANSPRT ACTVT 3
S_TRANSPRT TTYPE CUST
S_TRANSPRT TTYPE DTRA
S_TRANSPRT TTYPE MOVE
S_TRANSPRT TTYPE PIEC
S_TRANSPRT TTYPE TASK
S_TRANSPRT TTYPE TRAN


