140
Oracle® Database Express Edition 2 Day + Java Developer’s Guide 11g Release 2 E18805-05 June 2014

Oracle® Database Express Edition2 Day + Java Developer’s Guide
11g Release 2
E18805-05
June 2014
Oracle Database Express Edition 2 Day + Java Developer's Guide, 11g Release 2
E18805-05
Copyright © 2007, 2014, Oracle and/or its affiliates. All rights reserved.
Primary Authors: Tanmay Choudhury, Tulika Das, Deepa Aswani, Rosslynne Hefferan
Contributing Authors: Maitreyee Chaliha, Deepa Aswani, Rosslynne Hefferan, Kathleen Heap, Simon Law
Contributors: Kuassi Mensah, Chris Schalk, Christian Bauwens, Mark Townsend, Paul Lo, Venkatasubramaniam Iyer, Yuri Dolgov
This software and related documentation are provided under a license agreement containing restrictions on use and disclosure and are protected by intellectual property laws. Except as expressly permitted in your license agreement or allowed by law, you may not use, copy, reproduce, translate, broadcast, modify, license, transmit, distribute, exhibit, perform, publish, or display any part, in any form, or by any means. Reverse engineering, disassembly, or decompilation of this software, unless required by law for interoperability, is prohibited.
The information contained herein is subject to change without notice and is not warranted to be error-free. If you find any errors, please report them to us in writing.
If this is software or related documentation that is delivered to the U.S. Government or anyone licensing it on behalf of the U.S. Government, the following notice is applicable:
U.S. GOVERNMENT END USERS: Oracle programs, including any operating system, integrated software, any programs installed on the hardware, and/or documentation, delivered to U.S. Government end users are "commercial computer software" pursuant to the applicable Federal Acquisition Regulation and agency-specific supplemental regulations. As such, use, duplication, disclosure, modification, and adaptation of the programs, including any operating system, integrated software, any programs installed on the hardware, and/or documentation, shall be subject to license terms and license restrictions applicable to the programs. No other rights are granted to the U.S. Government.
This software or hardware is developed for general use in a variety of information management applications. It is not developed or intended for use in any inherently dangerous applications, including applications that may create a risk of personal injury. If you use this software or hardware in dangerous applications, then you shall be responsible to take all appropriate fail-safe, backup, redundancy, and other measures to ensure its safe use. Oracle Corporation and its affiliates disclaim any liability for any damages caused by use of this software or hardware in dangerous applications.
Oracle and Java are registered trademarks of Oracle and/or its affiliates. Other names may be trademarks of their respective owners.
Intel and Intel Xeon are trademarks or registered trademarks of Intel Corporation. All SPARC trademarks are used under license and are trademarks or registered trademarks of SPARC International, Inc. AMD, Opteron, the AMD logo, and the AMD Opteron logo are trademarks or registered trademarks of Advanced Micro Devices. UNIX is a registered trademark of The Open Group.
This software or hardware and documentation may provide access to or information on content, products, and services from third parties. Oracle Corporation and its affiliates are not responsible for and expressly disclaim all warranties of any kind with respect to third-party content, products, and services. Oracle Corporation and its affiliates will not be responsible for any loss, costs, or damages incurred due to your access to or use of third-party content, products, or services.
iii
Contents
Preface ............................................................................................................................................................... xiii
Audience..................................................................................................................................................... xiiiDocumentation Accessibility ................................................................................................................... xiiiRelated Documents ................................................................................................................................... xiiiConventions ............................................................................................................................................... xiv
1 Using Java with Oracle Database XE
Using Java to Connect to Oracle Database XE .................................................................................... 1-1Oracle JDBC Thin Driver................................................................................................................... 1-2Oracle JDBC Packages ....................................................................................................................... 1-2
Using JDeveloper to Create JDBC Applications ................................................................................ 1-2JDeveloper User Interface ................................................................................................................. 1-3JDeveloper Tools ................................................................................................................................ 1-4
Overview of Sample Java Application................................................................................................. 1-4Resources ................................................................................................................................................... 1-6
2 Getting Started with the Application
What You Need to Install ........................................................................................................................ 2-1Oracle Database XE............................................................................................................................ 2-1
Modifying the HR Schema for the JDBC Application ........................................................... 2-1J2SE or JDK.......................................................................................................................................... 2-2Integrated Development Environment ........................................................................................... 2-3Web Server .......................................................................................................................................... 2-3
Verifying the Oracle Database XE Installation................................................................................... 2-3Checking Installed Directories and Files ........................................................................................ 2-3Checking the Environment Variables ............................................................................................. 2-4Determining the JDBC Driver Version............................................................................................ 2-4
Installing Oracle JDeveloper ................................................................................................................. 2-5JDeveloper Studio Edition: Base Installation and Full Installation............................................. 2-5Steps to Install JDeveloper ................................................................................................................ 2-5Starting JDeveloper............................................................................................................................ 2-6
3 Connecting to Oracle Database XE
Connecting to Oracle Database XE from JDeveloper........................................................................ 3-1JDeveloper Database Navigator....................................................................................................... 3-1
iv
Creating a Database Connection...................................................................................................... 3-2Browsing the Data Using the Database Navigator ....................................................................... 3-3
Setting Up Applications and Projects in JDeveloper ........................................................................ 3-4Using the JDeveloper Application Navigator................................................................................ 3-5Creating an Application and a Project ............................................................................................ 3-5Viewing the Javadoc and Source Code Available in the Project Scope .................................... 3-5
Connecting to Oracle Database XE from a Java Application ........................................................... 3-6Overview of Connecting to Oracle Database XE........................................................................... 3-6Specifying Database URLs................................................................................................................ 3-7
Using the Default Service Feature of the Oracle Database XE ............................................. 3-8Creating a Java Class in JDeveloper ................................................................................................ 3-9Java Libraries ................................................................................................................................... 3-10
Overview of the Oracle JDBC Library .................................................................................. 3-10Overview of the JSP Runtime Library .................................................................................. 3-10
Adding JDBC and JSP Libraries.................................................................................................... 3-10Importing JDBC Packages.............................................................................................................. 3-11Declaring Connection-Related Variables..................................................................................... 3-11Creating the Connection Method ................................................................................................. 3-13
4 Querying for and Displaying Data
Overview of Querying for Data in Oracle Database XE................................................................... 4-1SQL Statements................................................................................................................................... 4-1Query Methods for the Statement Object ....................................................................................... 4-2Result Sets ........................................................................................................................................... 4-2
Features of ResultSet Objects .................................................................................................... 4-3Summary of Result Set Object Types ....................................................................................... 4-3
Querying Data from a Java Application .............................................................................................. 4-4Creating a Method in JDeveloper to Query Data .......................................................................... 4-4Testing the Connection and the Query Methods .......................................................................... 4-5
Creating JSP Pages ................................................................................................................................... 4-7Overview of Page Presentation........................................................................................................ 4-7
JSP Tags ........................................................................................................................................ 4-8Scriptlets ....................................................................................................................................... 4-8HTML Tags .................................................................................................................................. 4-8HTML Forms ............................................................................................................................... 4-9
Creating a Simple JSP Page............................................................................................................... 4-9Adding Static Content to a JSP Page ............................................................................................ 4-10Adding a Style Sheet to a JSP Page............................................................................................... 4-11
Adding Dynamic Content to the JSP Page: Database Query Results ......................................... 4-13Adding a JSP useBean Tag to Initialize the DataHandler Class............................................... 4-13Creating a Result Set....................................................................................................................... 4-14Adding a Table to the JSP Page to Display the Result Set......................................................... 4-16
Filtering a Query Result Set ................................................................................................................ 4-18 Creating a Java Method for Filtering Results............................................................................. 4-18Testing the Query Filter Method .................................................................................................. 4-19Adding Filter Controls to the JSP Page........................................................................................ 4-20Displaying Filtered Data in the JSP Page..................................................................................... 4-21
v
Adding Login Functionality to the Application.............................................................................. 4-22Creating a Method to Authenticate Users ................................................................................... 4-22Creating a Login Page .................................................................................................................... 4-24Preparing Error Reports for Failed Logins.................................................................................. 4-25Creating the Login Interface.......................................................................................................... 4-25Creating a JSP Page to Handle Login Action .............................................................................. 4-26
Testing the JSP Page.............................................................................................................................. 4-27
5 Updating Data
Creating a JavaBean ................................................................................................................................. 5-1Creating a JavaBean in JDeveloper.................................................................................................. 5-1Defining the JavaBean Properties and Methods............................................................................ 5-2
Updating Data from a Java Class .......................................................................................................... 5-4Creating a Method to Identify an Employee Record .................................................................... 5-5Creating a Method to Update Employee Data............................................................................... 5-5Adding a Link to Navigate to an Update Page.............................................................................. 5-8Creating a JSP Page to Edit Employee Data................................................................................ 5-10Creating a JSP Page to Handle an Update Action...................................................................... 5-11
Inserting an Employee Record............................................................................................................ 5-12Creating a Method to Insert Data ................................................................................................. 5-12Adding a Link to Navigate to an Insert Page.............................................................................. 5-14Creating a JSP Page to Enter New Data....................................................................................... 5-14Creating a JSP Page to Handle an Insert Action......................................................................... 5-16
Deleting an Employee Record ............................................................................................................ 5-17Creating a Method for Deleting Data........................................................................................... 5-17Adding a Link to Delete an Employee......................................................................................... 5-18Creating a JSP Page to Handle a Delete Action .......................................................................... 5-19
Exception Handling .............................................................................................................................. 5-19Adding Exception Handling to Java Methods............................................................................ 5-20Creating a Method for Handling Any SQLException ............................................................... 5-21
Navigation in the Sample Application ............................................................................................. 5-21Creating a Starting Page for an Application ............................................................................... 5-22
6 Enhancing the Application: Advanced JDBC Features
Using Dynamic SQL ................................................................................................................................ 6-1Using OraclePreparedStatement...................................................................................................... 6-1Using OracleCallableStatement ....................................................................................................... 6-2Using Bind Variables ......................................................................................................................... 6-2
Calling Stored Procedures ...................................................................................................................... 6-3Creating a PL/SQL Stored Procedure in JDeveloper ................................................................... 6-4Creating a Method to Use the Stored Procedure........................................................................... 6-5Enabling Users to Choose the Stored Procedure........................................................................... 6-7Calling the Stored Procedure from the Application ..................................................................... 6-8
Using Cursor Variables ........................................................................................................................... 6-9Oracle REF CURSOR Type Category........................................................................................... 6-10Accessing REF CURSOR Data....................................................................................................... 6-10
vi
Using REF CURSOR in the Sample Application ........................................................................ 6-11Creating a Package in the Database ...................................................................................... 6-11Creating a Database Function ................................................................................................ 6-11Calling the REF CURSOR from a Method............................................................................ 6-12Displaying a Dynamically Generated List ........................................................................... 6-13
7 Getting Unconnected from Oracle Database XE
Creating a Method to Close All Open Objects ................................................................................... 7-1Closing Open Objects in the Application ........................................................................................... 7-2
8 Creating a Universal Connection Pool
Setting JDeveloper Project Properties.................................................................................................. 8-1Creating the Stock Ticker Application................................................................................................. 8-3Observing the Output ............................................................................................................................. 8-6
9 Building Global Applications
Developing Locale Awareness ............................................................................................................... 9-1Mapping Between Oracle and Java Locales ................................................................................... 9-2
Determining User Locales ...................................................................................................................... 9-3Locale Awareness in Java Applications.......................................................................................... 9-3
Encoding HTML Pages............................................................................................................................ 9-3Specifying the Page Encoding for HTML Pages............................................................................ 9-4Specifying the Page Encoding in Java Servlets and JSP Pages .................................................... 9-4
Organizing the Content of HTML Pages for Translation ................................................................. 9-5Strings in Java Servlets and JSP Pages ............................................................................................ 9-5Static Files............................................................................................................................................ 9-6Data from the Database..................................................................................................................... 9-6
Presenting Data by User Locale Convention ...................................................................................... 9-6Oracle Date Formats .......................................................................................................................... 9-7Oracle Number Formats.................................................................................................................... 9-7Oracle Linguistic Sorts....................................................................................................................... 9-8Oracle Error Messages....................................................................................................................... 9-9
Localizing Text on JSP Pages in JDeveloper ....................................................................................... 9-9Creating a Resource Bundle .......................................................................................................... 9-10Using Resource Bundle Text on JSP Pages .................................................................................. 9-11
Index

vii
viii
List of Examples
2–1 Determining the JDBC Driver Version .................................................................................... 2-43–1 Specifying the url Property for the DataSource Object ......................................................... 3-83–2 Default Service Configuration in listener.ora ........................................................................ 3-83–3 Importing Packages in a Java Application ........................................................................... 3-113–4 Declaring Connection Variables and the Connection Object ............................................ 3-123–5 Adding a Method to Connect to the Database .................................................................... 3-144–1 Creating a Statement Object ...................................................................................................... 4-24–2 Declaring a Scroll-Sensitive, Read-Only ResultSet Object .................................................... 4-44–3 Using the Connection, Statement, Query, and ResultSet Objects........................................ 4-54–4 Implementing User Validation .............................................................................................. 4-235–1 Skeleton Code for a Basic Java Bean with Accessor Methods .............................................. 5-35–2 Method for Updating a Database Record................................................................................ 5-75–3 Method for Adding a New Employee Record..................................................................... 5-135–4 Method for Deleting an Employee Record........................................................................... 5-185–5 Adding a Method to Handle Any SQLException in the Application .............................. 5-216–1 Creating a PreparedStatement .................................................................................................. 6-26–2 Creating a CallableStatement .................................................................................................... 6-26–3 Calling Stored Procedures ......................................................................................................... 6-36–4 Creating a Stored Function........................................................................................................ 6-36–5 Calling a Stored Function in Java ............................................................................................. 6-36–6 Creating a PL/SQL Stored Procedure to Insert Employee Data.......................................... 6-46–7 Using PL/SQL Stored Procedures in Java .............................................................................. 6-66–8 Declaring a REF CURSOR Type ............................................................................................ 6-106–9 Accessing REF Cursor Data in Java....................................................................................... 6-106–10 Creating a Package in the Database ...................................................................................... 6-116–11 Creating a Stored Function..................................................................................................... 6-127–1 Creating a Method to Close All Open Objects........................................................................ 7-29–1 Mapping from a Java Locale to an Oracle Language and Territory.................................... 9-29–2 Determining User Locale in Java Using the Accept-Language Header.............................. 9-39–3 Explicitly Specifying User Locale in Java ................................................................................ 9-39–4 Specifying Page Encoding in the HTTP Specification ........................................................... 9-49–5 Specifying Page Encoding on an HTML Page ........................................................................ 9-49–6 Specifying Page Encoding in Servlets Using setContentType ............................................. 9-59–7 Difference Between Date Formats by Locale (United States and Germany)...................... 9-79–8 Difference Between Number Formats by Locale (United States and Germany)............... 9-89–9 Variations in Linguistic Sorting (Binary and Spanish) .......................................................... 9-89–10 Creating a Resource Bundle Class......................................................................................... 9-11

ix
x
List of Figures
1–1 JDeveloper User Interface.......................................................................................................... 1-31–2 Web Pages in the Sample Application..................................................................................... 1-53–1 Specifying Connection Details .................................................................................................. 3-33–2 Viewing the Table Structure and Data..................................................................................... 3-43–3 Selecting the Class to View the Javadoc in JDeveloper ......................................................... 3-63–4 Creating a Java Class .................................................................................................................. 3-93–5 Java Source Editor.................................................................................................................... 3-103–6 Importing Libraries.................................................................................................................. 3-113–7 Java Code Insight ..................................................................................................................... 3-134–1 Test Output for Query Method in Log Window .................................................................... 4-74–2 Creating a JSP Page..................................................................................................................... 4-94–3 Adding Content to JSP Pages in the JDeveloper Visual Source Editor............................ 4-104–4 Formatting a JSP....................................................................................................................... 4-114–5 Selecting a CSS File for the JSP............................................................................................... 4-124–6 Adding Static Content to the JSP Page ................................................................................. 4-124–7 useBean Representation in the employees.jsp File.............................................................. 4-134–8 Preferences Window to Select JSP and HTML Visual Editor Options............................. 4-144–9 Scriptlet Representation in a JSP Page .................................................................................. 4-154–10 Viewing Errors in the Structure Window............................................................................. 4-154–11 Importing Packages in JDeveloper........................................................................................ 4-164–12 Common HTML Components in the Component Palette ................................................. 4-174–13 Table in a JSP Page................................................................................................................... 4-184–14 HTML Form Components in the JSP Page........................................................................... 4-214–15 Using the Scriptlet Properties Dialog Box ............................................................................ 4-224–16 Project CSS Files Panel ............................................................................................................ 4-244–17 Login Page................................................................................................................................. 4-264–18 Login Page for Sample Application in the Browser............................................................ 4-284–19 Unfiltered Employee Data in employee.jsp ......................................................................... 4-294–20 Filtered Employee Data in employee.jsp.............................................................................. 4-295–1 Creating a Java Bean................................................................................................................... 5-25–2 Generate Accessors Dialog Box................................................................................................. 5-35–3 Link to Edit Employees in employees.jsp................................................................................ 5-95–4 Creating a JSP Page to Edit Employee Details..................................................................... 5-115–5 Editing Employee Data ........................................................................................................... 5-125–6 Form to Insert Employee Data ............................................................................................... 5-155–7 Inserting New Employee Data............................................................................................... 5-165–8 Inserting Employee Data ........................................................................................................ 5-175–9 Link for Deleting an Employee from employees.jsp .......................................................... 5-196–1 Adding a Link to Provide the Stored Procedure Option ...................................................... 6-86–2 Using Stored Procedures to Enter Records ............................................................................. 6-96–3 Structure View of ListBox Options........................................................................................ 6-146–4 Dynamically Generated List in Browser............................................................................... 6-158–1 Setting the Default Project Properties ...................................................................................... 8-28–2 Setting the Libraries and Classpath.......................................................................................... 8-28–3 The Add Archive or Directory Screen ..................................................................................... 8-38–4 The Application Navigator Panel Options.............................................................................. 8-38–5 The DbConfig.properties File in the Code Editor .................................................................. 8-48–6 Adding a Source File to a Project.............................................................................................. 8-48–7 The Add to Project Content ....................................................................................................... 8-48–8 The Run Menu Options.............................................................................................................. 8-58–9 The Project Properties Screen for the StockTickerProj Project ............................................. 8-58–10 The Edit Run Configuration Screen ......................................................................................... 8-68–11 Output of the Stock Ticker Application in JDeveloper Log.................................................. 8-68–12 Retrieving Information from the Universal Connection Pool Using the Browser ............ 8-7

xi
8–13 The UCP Properties page........................................................................................................... 8-78–14 The Stock Ticker Page on the Browser..................................................................................... 8-88–15 The UCP Statistics Page on the Browser.................................................................................. 8-88–16 The UCP Properties Update Page on the Browser................................................................. 8-98–17 The Client Simulator Page on the Browser ............................................................................. 8-9

xii
List of Tables
2–1 Directories and Files in the ORACLE_HOME Directory ..................................................... 2-43–1 Standard Data Source Properties............................................................................................. 3-74–1 Key Query Execution Methods for java.sql.Statement......................................................... 4-29–1 Locale Representation in Java, SQL, and PL/SQL Programming Environments ............ 9-2
xiii
Preface
This Preface introduces you to Oracle Database Express Edition 2 Day + Java Developer's Guide, by discussing the intended audience and conventions of this document. It also includes a list of related Oracle documents that you can refer to for more information.
AudienceThis guide is intended for application developers using Java to access and modify data in Oracle Database. This guide illustrates how to perform these tasks using a simple Java Database Connectivity (JDBC) application. This guide uses the Oracle JDeveloper integrated development environment (IDE) to create the application. This guide can be read by anyone with an interest in Java programming, but it assumes at least some prior knowledge of the following:
■ Java
■ Oracle PL/SQL
■ Oracle databases
Documentation AccessibilityFor information about Oracle's commitment to accessibility, visit the Oracle Accessibility Program website at http://www.oracle.com/pls/topic/lookup?ctx=acc&id=docacc.
Access to Oracle SupportOracle customers have access to electronic support through My Oracle Support. For information, visit http://www.oracle.com/pls/topic/lookup?ctx=acc&id=info or visit http://www.oracle.com/pls/topic/lookup?ctx=acc&id=trs if you are hearing impaired.
Related DocumentsFor more information, see the following documents in the Oracle Database documentation set:
■ Oracle® Fusion Middleware Installation Guide for Oracle JDeveloper, 11g Release 1 (11.1.1) and JDeveloper Online Documentation on Oracle Technology Network at
http://www.oracle.com/technology/documentation/jdev.html
■ Oracle Database JDBC Developer's Guide
xiv
■ Oracle Database Java Developer's Guide
■ Oracle Universal Connection Pool for JDBC Developer's Guide
ConventionsThe following text conventions are used in this document:
Convention Meaning
boldface Boldface type indicates graphical user interface elements associated with an action, or terms defined in text or the glossary.
italic Italic type indicates book titles, emphasis, or placeholder variables for which you supply particular values.
monospace Monospace type indicates commands within a paragraph, URLs, code in examples, text that appears on the screen, or text that you enter.
1
Using Java with Oracle Database XE 1-1
1 Using Java with Oracle Database XE
Oracle Database is a relational database that you can use to store, use, and modify data. The Java Database Connectivity (JDBC) standard is used by Java applications to access and manipulate data in relational databases.
JDBC is an industry-standard application programming interface (API) that lets you access a RDBMS using SQL from Java. JDBC is based on the X/Open SQL Call Level Interface (CLI) and complies with the Entry Level of the JDBC escape standard. Each vendor implements the JDBC Specification with its own extensions.
See Also:
http://www.oracle.com/technetwork/java/overview-141217.html
This guide shows you how to use a simple Java application to connect to Oracle Database XE and access and modify data within the database.
This chapter introduces you to the Java application created in this guide, and to the tools you can use to develop the Java application in the following topics:
■ Using Java to Connect to Oracle Database XE
■ Using JDeveloper to Create JDBC Applications
■ Overview of Sample Java Application
Using Java to Connect to Oracle Database XE JDBC is a database access protocol that enables you connect to a database and run SQL statements and queries on the database. The core Java class libraries provide the JDBC APIs, java.sql and javax.sql. However, JDBC is designed to allow vendors to supply drivers that offer the necessary specialization for a particular database.
Note: Oracle Database XE 11g Release 2 support JDK 5 and onward. The JDBC support in this release includes the ojdbc5.jar and ojdbc6.jar files. The ojdbc6.jar file offers JDBC 4.0 compliance. Use ojdbc5.jar with JDK 5 and ojdbc6.jar with JDK 6.
The following sections describe Oracle support for the JDBC standard:
■ Oracle JDBC Thin Driver
■ Oracle JDBC Packages
Using JDeveloper to Create JDBC Applications
1-2 Oracle Database Express Edition 2 Day + Java Developer's Guide
Oracle JDBC Thin DriverOracle recommends using the JDBC Thin Driver for most requirements. JDBC-OCI is only needed for OCI-specific features. The Thin driver will work on any system that has a suitable Java virtual machine (JVM).
The JDBC Thin Driver is a pure Java, Type IV driver. It supports the JavaTM 2 Platform Standard Edition 5.0, also known as Java Development Kit (JDK) 5. It also includes support for JDK 6. It is platform-independent and does not require any additional Oracle software for client-side application development. The JDBC Thin Driver communicates with the server using SQL*Net to access Oracle Database XE.
You can access the Oracle-specific JDBC features and the standard features by using the oracle.jdbc package.
Oracle JDBC PackagesOracle support for the JDBC API is provided through the oracle.jdbc and oracle.sql packages. These packages support all Java Development Kit (JDK) releases from 1.5 through 1.6.
oracle.sqlThe oracle.sql package supports direct access to data in SQL format. This package consists primarily of classes that provide Java mappings to SQL data types and their support classes. Essentially, the classes act as Java wrappers for SQL data. The characters are converted to Java chars and, then, to bytes in the UCS-2 character set.
Each of the oracle.sql.* data type classes extends oracle.sql.Datum, a superclass that includes functions and features common to all the data types. Some of the classes are for JDBC 2.0-compliant data types. In addition to data type classes, the oracle.sql package supports classes and interfaces for use with objects and collections.
oracle.jdbcThe interfaces of the oracle.jdbc package define the Oracle extensions to the interfaces in the java.sql package. These extensions provide access to Oracle SQL-format data. They also provide access to other Oracle-specific features, including Oracle performance enhancements.
The key classes and interfaces of this package provide methods that support standard JDBC features and perform tasks such as:
■ Returning Oracle statement objects
■ Setting Oracle performance extensions for any statement
■ Binding oracle.sql.* types into prepared and callable statements
■ Retrieving data in oracle.sql format
■ Getting meta information about the database and result sets
■ Defining integer constants used to identify SQL types
Using JDeveloper to Create JDBC ApplicationsThe Java application tutorial in this guide uses Oracle JDeveloper release 11.1.1 as the integrated development environment (IDE) for developing the Java application and creating Web pages for users to view and change the data.
Using JDeveloper to Create JDBC Applications
Using Java with Oracle Database XE 1-3
Oracle JDeveloper is an IDE with support for modeling, developing, debugging, optimizing, and deploying Java applications and Web services.
JDeveloper provides features for you to write and test Java programs that access the database with SQL statements embedded in Java programs. For the database, JDeveloper provides functions and features to do the following:
■ Create a connection to a database
■ Browse database objects
■ Create, edit, or delete database objects
■ Create and edit PL/SQL functions, procedures, and packages
JDeveloper User InterfaceOracle JDeveloper is an IDE that uses windows for various application development tools. You can display or hide any of the windows, and you can dock them or undock them to create a desktop suited to your method of working.
In addition to these tools, JDeveloper provides a range of navigators to help you organize and view the contents of your projects. Application and System navigators show you the files in your projects, and a Structure window shows you the structure of individual items.
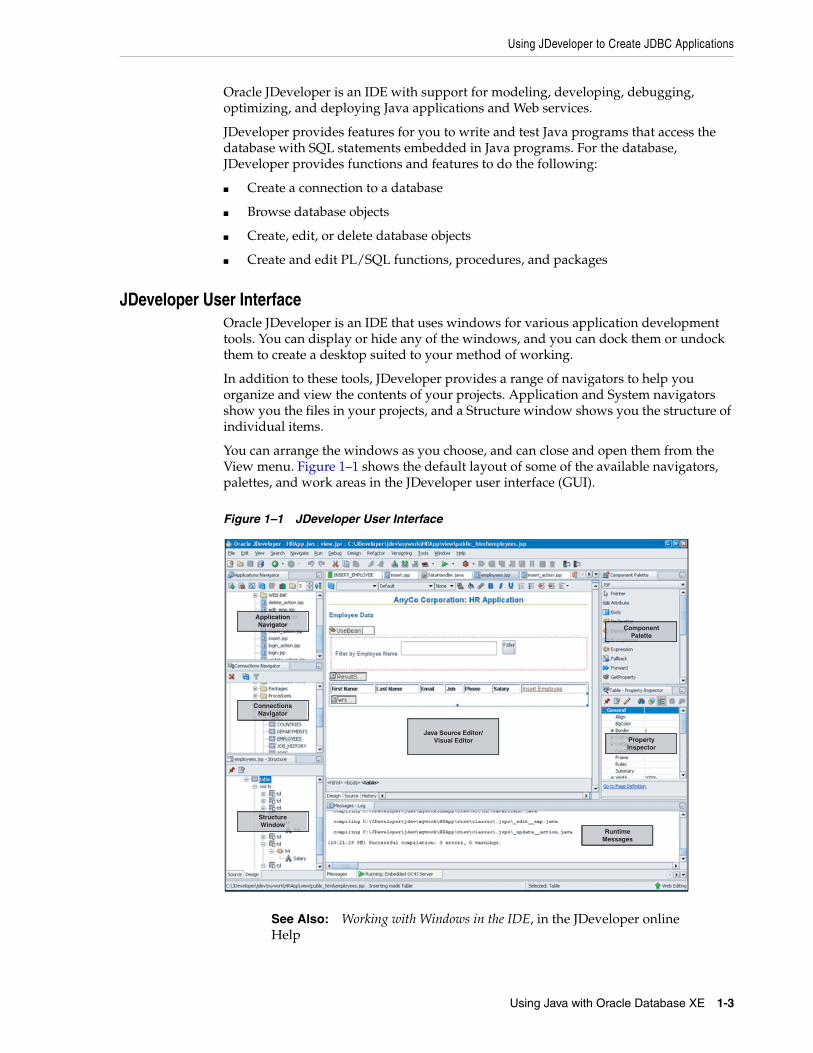
You can arrange the windows as you choose, and can close and open them from the View menu. Figure 1–1 shows the default layout of some of the available navigators, palettes, and work areas in the JDeveloper user interface (GUI).
Figure 1–1 JDeveloper User Interface
Java Source Editor/Visual Editor
ApplicationNavigator
ConnectionsNavigator
ComponentPalette
PropertyInspector
RuntimeMessages
StructureWindow
See Also: Working with Windows in the IDE, in the JDeveloper online Help
Overview of Sample Java Application
1-4 Oracle Database Express Edition 2 Day + Java Developer's Guide
JDeveloper ToolsFor creating a Java application, JDeveloper provides the following tools to simplify the process:
■ Structure window, which provides a tree view of all of the elements in the application currently being edited be it Java, XML, or JSP/HTML.
■ Java Visual Editor, which you can use to assemble the elements of a user interface quickly and easily.
■ JSP/HTML Visual Editor, which you can use to visually edit HTML and JSP pages.
■ Java Source Editor, which provides extensive features for helping in writing the Java code, such as distinctive highlighting for syntax and semantic errors, assistance for adding and sorting import statements, the Java Code Insight feature, and code templates.
Note: The Java Code Insight feature is a facility that provides context-specific, intelligent input when creating code in the Java Source Editor. In this guide, you will see many instances of how you can use Java Code Insight to insert code.
■ Component Palette, from which you select the user interface components, such as buttons and text areas, that you want to display on your pages.
■ Property Inspector, which gives a simple way of setting properties of items such as user interface components.
Refer to Figure 1–1 to get a better idea of these tools.
Overview of Sample Java ApplicationThis guide shows you how to create an application using Java, JDBC and Oracle ADF. In this application, you build in the following functions and features:
1. Allow users to log in and validate the user name and password.
2. Establish a connection to the database.
3. Query the database for data and retrieve the data using a JavaBean.
4. Display the data using JavaServer Pages (JSP) technology.
5. Allow users to insert, update, or delete records.
6. Access and modify information from a master-detail application.
7. Handle exceptions.
Note: The application connects to the HR schema that ships with Oracle Database XE.
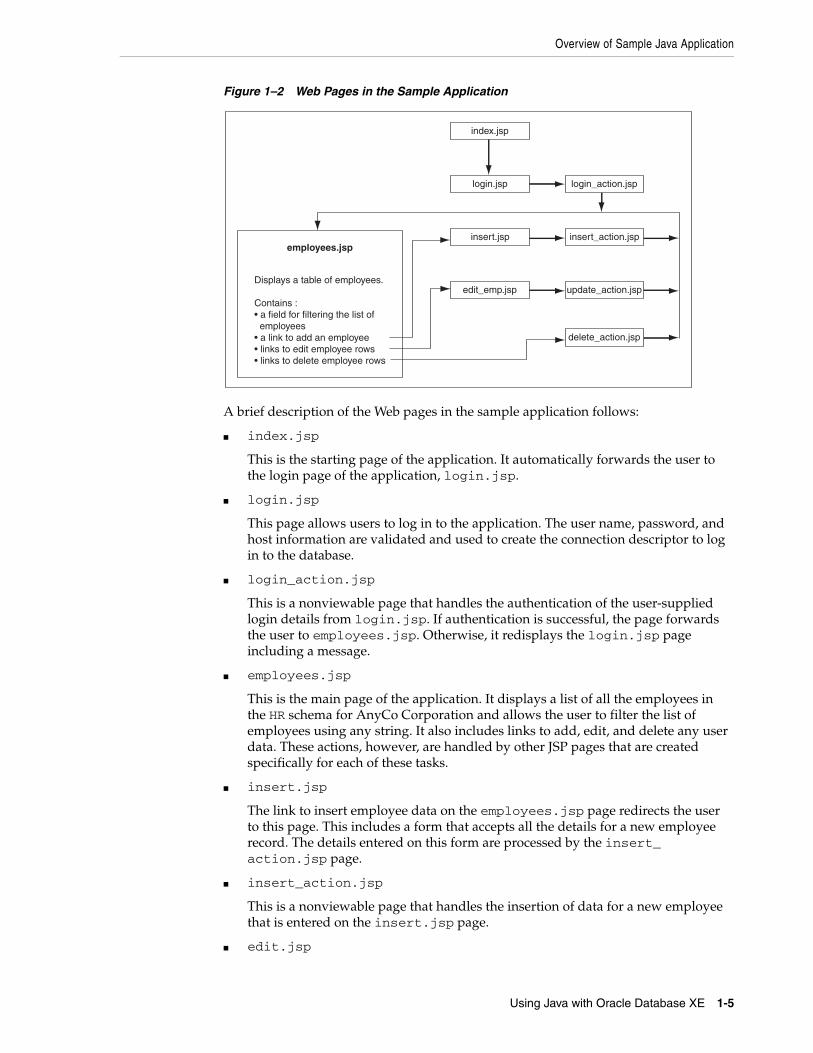
Overview of Application Web Pages (JSP Pages)Figure 1–2 shows the relationships among the pages developed for this application.
Overview of Sample Java Application
Using Java with Oracle Database XE 1-5
Figure 1–2 Web Pages in the Sample Application
employees.jsp
Displays a table of employees.
Contains :• a field for filtering the list of employees• a link to add an employee • links to edit employee rows• links to delete employee rows
index.jsp
login.jsp login_action.jsp
insert.jsp insert_action.jsp
edit_emp.jsp update_action.jsp
delete_action.jsp
A brief description of the Web pages in the sample application follows:
■ index.jsp
This is the starting page of the application. It automatically forwards the user to the login page of the application, login.jsp.
■ login.jsp
This page allows users to log in to the application. The user name, password, and host information are validated and used to create the connection descriptor to log in to the database.
■ login_action.jsp
This is a nonviewable page that handles the authentication of the user-supplied login details from login.jsp. If authentication is successful, the page forwards the user to employees.jsp. Otherwise, it redisplays the login.jsp page including a message.
■ employees.jsp
This is the main page of the application. It displays a list of all the employees in the HR schema for AnyCo Corporation and allows the user to filter the list of employees using any string. It also includes links to add, edit, and delete any user data. These actions, however, are handled by other JSP pages that are created specifically for each of these tasks.
■ insert.jsp
The link to insert employee data on the employees.jsp page redirects the user to this page. This includes a form that accepts all the details for a new employee record. The details entered on this form are processed by the insert_action.jsp page.
■ insert_action.jsp
This is a nonviewable page that handles the insertion of data for a new employee that is entered on the insert.jsp page.
■ edit.jsp
Resources
1-6 Oracle Database Express Edition 2 Day + Java Developer's Guide
The link to edit employee data on the employees.jsp page redirects the user to this page. This form displays current data of a single employee in text fields, and the user can edit this information.
■ update_action.jsp
The submit action on the edit.jsp page directs the data to this nonviewable page, which inserts the edited data into the database.
■ delete_action.jsp
The link to delete an employee record on the employees.jsp page is handled by this nonviewable page, which deletes the employee data and forwards the user back to the employees.jsp page.
ClassesThe sample application includes the following classes:
■ DataHandler.java
This class contains all the methods that are used to implement the important functions of the sample application. It includes methods that validate user credentials, connect to the database, retrieve employee data with and without filters, insert data, update data, handle exceptions, and so on.
■ Employees.java
This class is a JavaBean that holds a single employee record. It contains accessor methods to get and set the values of each of the record fields. It also contains accessor methods to retrieve and modify employee records.
■ JavaClient.java
This class is used only for testing the DataHandler class.
Note: This application is developed throughout this guide in the form of a tutorial. It is recommended, therefore, that you read these chapters in sequence.
ResourcesFor more information about Oracle Database XE, visit the following Web sites:
■ Oracle Database XE home page on Oracle Technology Network
http://www.oracle.com/technetwork/database/express-edition/downloads/index.html
■ Oracle Database XE Documentation Library
http://www.oracle.com/pls/xe112/homepage
■ Discussion forum
http://forums.oracle.com/forums/forum.jspa?forumID=1378
2
Getting Started with the Application 2-1
2 Getting Started with the Application
To develop a Java application that connects to Oracle Database XE, you must ensure that certain components are installed as required. This chapter covers the following topics:
■ What You Need to Install
■ Verifying the Oracle Database XE Installation
■ Installing Oracle JDeveloper
What You Need to InstallTo be able to develop the sample application, you need to install the following products and components:
■ Oracle Database XE
■ J2SE or JDK
■ Integrated Development Environment
■ Web Server
The following subsections describe these requirements in detail.
Oracle Database XETo develop the Java application, you need a working installation of Oracle Database XE Server with the HR schema, which comes with the database. The installation creates an instance of Oracle Database XE and provides additional tools for managing this database. For more information, refer to the following Oracle Database XE installation guides and release notes:
■ Oracle Database Express Edition Installation Guide for Linux x86-64
■ Oracle Database Express Edition Installation Guide for Microsoft Windows
Modifying the HR Schema for the JDBC ApplicationThe HR user account, which owns the sample HR schema used for the Java application in this guide, is initially locked. You must log in as a user with administrative privileges (SYS) and unlock the account before you can log in as HR.
If the database is locally installed, use the Run SQL Command Line to unlock the account as follows:
What You Need to Install
2-2 Oracle Database Express Edition 2 Day + Java Developer's Guide
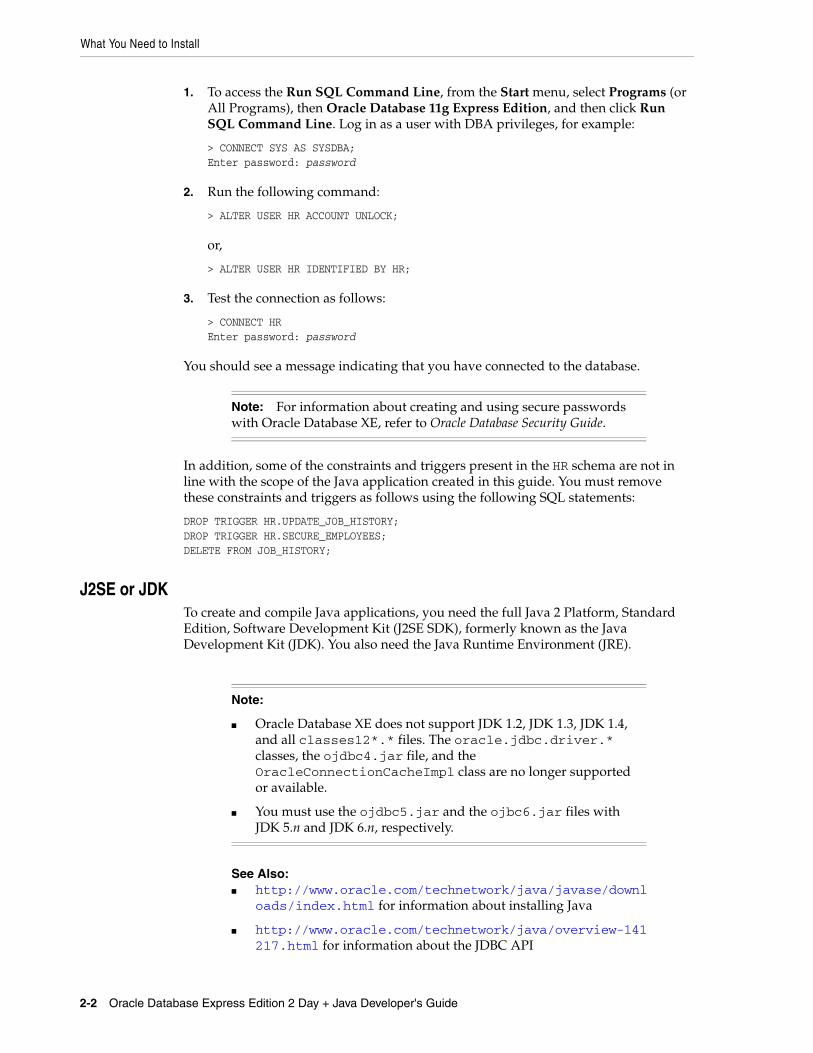
1. To access the Run SQL Command Line, from the Start menu, select Programs (or All Programs), then Oracle Database 11g Express Edition, and then click Run SQL Command Line. Log in as a user with DBA privileges, for example:
> CONNECT SYS AS SYSDBA;Enter password: password
2. Run the following command:
> ALTER USER HR ACCOUNT UNLOCK;
or,
> ALTER USER HR IDENTIFIED BY HR;
3. Test the connection as follows:
> CONNECT HREnter password: password
You should see a message indicating that you have connected to the database.
Note: For information about creating and using secure passwords with Oracle Database XE, refer to Oracle Database Security Guide.
In addition, some of the constraints and triggers present in the HR schema are not in line with the scope of the Java application created in this guide. You must remove these constraints and triggers as follows using the following SQL statements:
DROP TRIGGER HR.UPDATE_JOB_HISTORY;DROP TRIGGER HR.SECURE_EMPLOYEES;DELETE FROM JOB_HISTORY;
J2SE or JDKTo create and compile Java applications, you need the full Java 2 Platform, Standard Edition, Software Development Kit (J2SE SDK), formerly known as the Java Development Kit (JDK). You also need the Java Runtime Environment (JRE).
Note:
■ Oracle Database XE does not support JDK 1.2, JDK 1.3, JDK 1.4, and all classes12*.* files. The oracle.jdbc.driver.* classes, the ojdbc4.jar file, and the OracleConnectionCacheImpl class are no longer supported or available.
■ You must use the ojdbc5.jar and the ojbc6.jar files with JDK 5.n and JDK 6.n, respectively.
See Also: ■ http://www.oracle.com/technetwork/java/javase/downl
oads/index.html for information about installing Java
■ http://www.oracle.com/technetwork/java/overview-141217.html for information about the JDBC API
Verifying the Oracle Database XE Installation
Getting Started with the Application 2-3
Integrated Development EnvironmentFor ease in developing the application, you can choose to develop your application in an integrated development environment (IDE). This guide uses Oracle JDeveloper to create the files for this application. For more information about installing JDeveloper, refer to Installing Oracle JDeveloper.
Web ServerThe sample application developed in this guide uses JavaServer Pages (JSP) technology to display information and accept input from users. To deploy these pages, you need a Web server with a servlet and JSP container, such as the Apache Tomcat application server.
This guide uses the embedded server called the Oracle WebLogic Server in JDeveloper for deploying the JSP pages. If you choose not to install Oracle JDeveloper, then any Web server that enables you to deploy JSP pages should suffice.
JDeveloper supports direct deployment to the following production application servers:
■ Oracle WebLogic Server
■ Oracle Application Server
■ Apache Tomcat
■ IBM WebSphere
■ JBoss
For more information about these servers, please refer to vendor-specific documentation.
Verifying the Oracle Database XE InstallationOracle Database XE installation is platform-specific. You must verify that the installation was successful before you proceed to create the sample application. This section describes the steps for verifying an Oracle Database XE installation.
Verifying a installation involves the following tasks:
■ Checking Installed Directories and Files
■ Checking the Environment Variables
■ Determining the JDBC Driver Version
Checking Installed Directories and FilesInstalling Oracle Java products creates the following directories:
■ ORACLE_HOME/jdbc
■ ORACLE_HOME /jlib
Check if the directories described in Table 2–1 have been created and populated in the ORACLE_HOME directory.
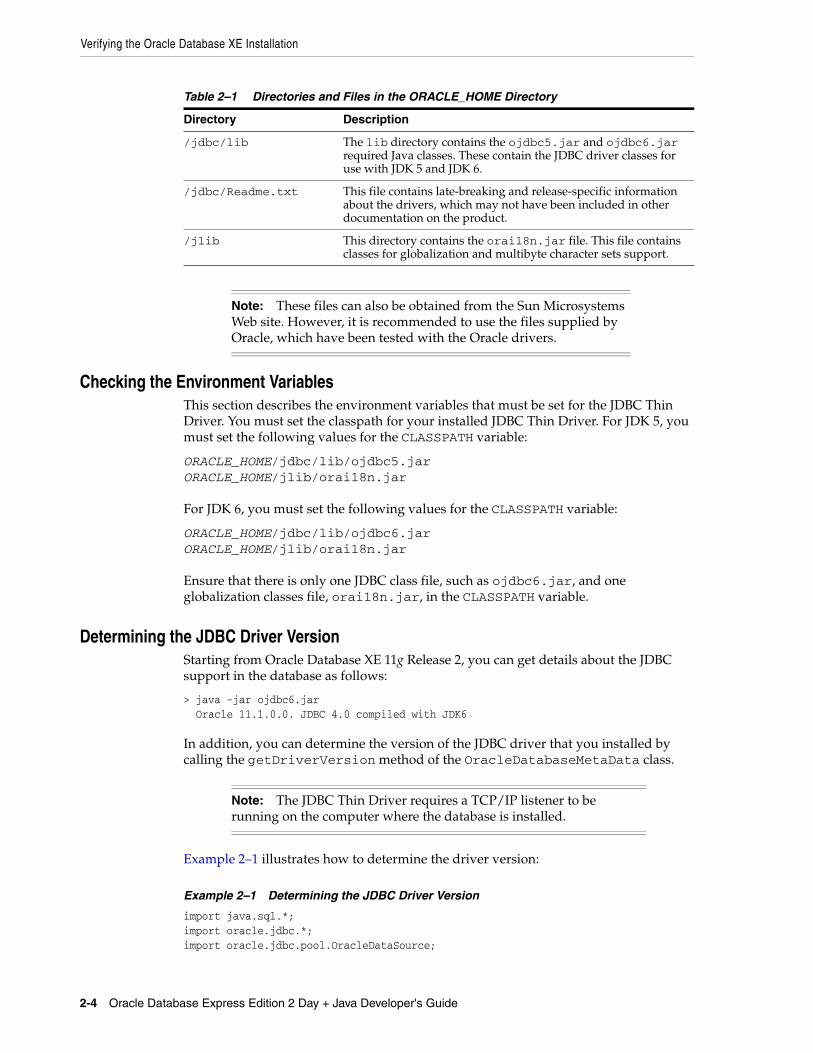
Table 2–1 Directories and Files in the ORACLE_HOME Directory
Directory Description
/jdbc/lib The lib directory contains the ojdbc5.jar and ojdbc6.jar required Java classes. These contain the JDBC driver classes for use with JDK 5 and JDK 6.
/jdbc/Readme.txt This file contains late-breaking and release-specific information about the drivers, which may not have been included in other documentation on the product.
/jlib This directory contains the orai18n.jar file. This file contains classes for globalization and multibyte character sets support.
Note: These files can also be obtained from the Sun Microsystems Web site. However, it is recommended to use the files supplied by Oracle, which have been tested with the Oracle drivers.
Verifying the Oracle Database XE Installation
2-4 Oracle Database Express Edition 2 Day + Java Developer's Guide
Checking the Environment VariablesThis section describes the environment variables that must be set for the JDBC Thin Driver. You must set the classpath for your installed JDBC Thin Driver. For JDK 5, you must set the following values for the CLASSPATH variable:
ORACLE_HOME/jdbc/lib/ojdbc5.jarORACLE_HOME/jlib/orai18n.jar
For JDK 6, you must set the following values for the CLASSPATH variable:
ORACLE_HOME/jdbc/lib/ojdbc6.jarORACLE_HOME/jlib/orai18n.jar
Ensure that there is only one JDBC class file, such as ojdbc6.jar, and one globalization classes file, orai18n.jar, in the CLASSPATH variable.
Determining the JDBC Driver VersionStarting from Oracle Database XE 11g Release 2, you can get details about the JDBC support in the database as follows:
> java -jar ojdbc6.jar Oracle 11.1.0.0. JDBC 4.0 compiled with JDK6
In addition, you can determine the version of the JDBC driver that you installed by calling the getDriverVersion method of the OracleDatabaseMetaData class.
Note: The JDBC Thin Driver requires a TCP/IP listener to be running on the computer where the database is installed.
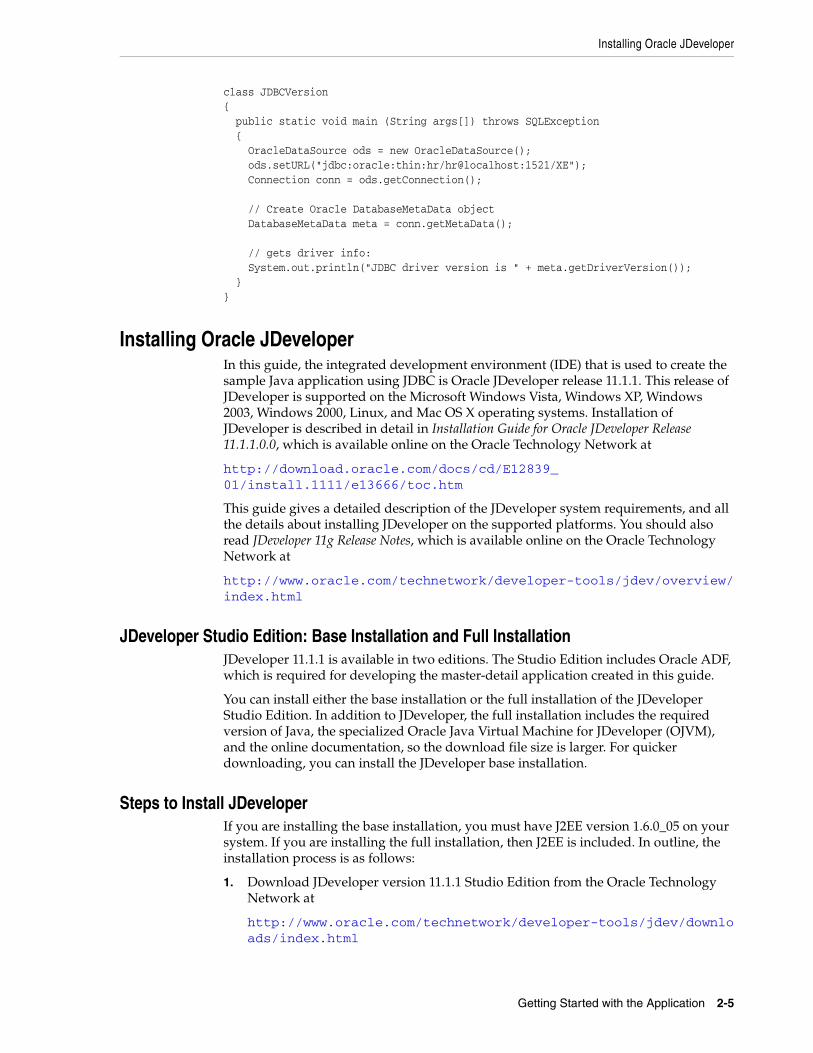
Example 2–1 illustrates how to determine the driver version:
Example 2–1 Determining the JDBC Driver Version
import java.sql.*;import oracle.jdbc.*;import oracle.jdbc.pool.OracleDataSource;
Installing Oracle JDeveloper
Getting Started with the Application 2-5
class JDBCVersion{ public static void main (String args[]) throws SQLException { OracleDataSource ods = new OracleDataSource(); ods.setURL("jdbc:oracle:thin:hr/hr@localhost:1521/XE"); Connection conn = ods.getConnection();
// Create Oracle DatabaseMetaData object DatabaseMetaData meta = conn.getMetaData();
// gets driver info: System.out.println("JDBC driver version is " + meta.getDriverVersion()); }}
Installing Oracle JDeveloperIn this guide, the integrated development environment (IDE) that is used to create the sample Java application using JDBC is Oracle JDeveloper release 11.1.1. This release of JDeveloper is supported on the Microsoft Windows Vista, Windows XP, Windows 2003, Windows 2000, Linux, and Mac OS X operating systems. Installation of JDeveloper is described in detail in Installation Guide for Oracle JDeveloper Release 11.1.1.0.0, which is available online on the Oracle Technology Network at
http://download.oracle.com/docs/cd/E12839_01/install.1111/e13666/toc.htm
This guide gives a detailed description of the JDeveloper system requirements, and all the details about installing JDeveloper on the supported platforms. You should also read JDeveloper 11g Release Notes, which is available online on the Oracle Technology Network at
http://www.oracle.com/technetwork/developer-tools/jdev/overview/index.html
JDeveloper Studio Edition: Base Installation and Full InstallationJDeveloper 11.1.1 is available in two editions. The Studio Edition includes Oracle ADF, which is required for developing the master-detail application created in this guide.
You can install either the base installation or the full installation of the JDeveloper Studio Edition. In addition to JDeveloper, the full installation includes the required version of Java, the specialized Oracle Java Virtual Machine for JDeveloper (OJVM), and the online documentation, so the download file size is larger. For quicker downloading, you can install the JDeveloper base installation.
Steps to Install JDeveloperIf you are installing the base installation, you must have J2EE version 1.6.0_05 on your system. If you are installing the full installation, then J2EE is included. In outline, the installation process is as follows:
1. Download JDeveloper version 11.1.1 Studio Edition from the Oracle Technology Network at
http://www.oracle.com/technetwork/developer-tools/jdev/downloads/index.html
Installing Oracle JDeveloper
2-6 Oracle Database Express Edition 2 Day + Java Developer's Guide
Download the base installation (jdevjavabase11110.zip), or the full installation (jdevstudio11110install.exe). It is recommended that you download the Studio Edition to avail all features.
2. To launch the installer for the base installation, enter the following command at the command line:
java -jar jdevstudio11110install.jar
To launch the installer for the full installation, double click jdevstudio11110install.exe and follow the instructions.
Note: When choosing the Middleware Home directory, ensure that you choose a directory that does not contain spaces. For example, do not use C:\Program Files as the Middleware Home.
To change a JDK location that you have previously specified, you have to modify the jdev.conf file. Set the variable SetJavaHome in the file <install_dir>/jdeveloper/jdev/bin/jdev.conf to the location of your Java installation. Here, Middleware Home directory has been represented by <install_dir>.
For example, in a UNIX environment, if the location of your JDK is in a directory called /usr/local/java, your entry in jdev.conf would be as follows:
SetJavaHome /usr/local/java
Other tasks that you must perform include setting the permissions for all JDeveloper files to read, and giving all users write and execute permissions to files in a range of JDeveloper directories.
3. If you are using the base installation, there are some additional setup tasks, such as setting the location of your Java installation in the JDeveloper configuration file, optionally installing OJVM, and downloading the online documentation so that it is locally available.
See Also: http://download.oracle.com/docs/cd/E12839_01/install.1111/e13666/toc.htm for the JDeveloper Installation Guide
Starting JDeveloperTo start JDeveloper on Windows, click Start, select All Programs, then select Oracle Fusion Middleware 11.1.1.4.0 and select JDeveloper Studio 11.1.1.4.0. You can also run the <install_dir>\jdeveloper\jdev\bin\jdevw.exe file. To use a console window for displaying internal diagnostic information, run the jdev.exe file in the same directory instead of jdevw.exe.
To start JDeveloper on other platforms, run the <install_dir>/jdeveloper/jdev/bin/jdev file.
3
Connecting to Oracle Database XE 3-1
3 Connecting to Oracle Database XE
This chapter is the first in a series of five chapters, each of which describes how to create parts of a Java application that accesses Oracle Database XE and displays, modifies, deletes, and updates data on it. To be able to access the database from a Java application, you must connect to the database using a java.sql.Connection object.
This chapter includes the following sections:
■ Connecting to Oracle Database XE from JDeveloper
■ Setting Up Applications and Projects in JDeveloper
■ Connecting to Oracle Database XE from a Java Application
Connecting to Oracle Database XE from JDeveloperYou can set up and manage database connections in JDeveloper to enable your application to communicate with external data sources, including Oracle Database XE and offline database objects. This is done using the Database Navigator. The same navigator is also used to manage other connections your application needs, such as connections to application servers. The following subsections describe how you can use the Database Navigator to view the database and its objects and to create a connection to the database:
■ JDeveloper Database Navigator
■ Creating a Database Connection
■ Browsing the Data Using the Database Navigator
JDeveloper Database NavigatorThe Database Navigator displays all currently defined connections. To view the Database Navigator, select the Database Navigator tab in the navigator panel on the top left-hand side of the JDeveloper display, if it is displayed, or use the View menu. For an illustration of the default layout of the JDeveloper IDE, see Figure 1–1.
You can use the Database Navigator to browse through the connections it displays. In particular, for a database schema, you can also view database objects, tables, views, and their contents.
Database connections are shown under the IDE Connections node. To view the objects in the database, expand the connection. Expanding a schema displays nodes for the object types in that schema. Expanding the node for an object type displays its individual objects. When you expand a table node, you can view the structure of the table and the data within the table.
Connecting to Oracle Database XE from JDeveloper
3-2 Oracle Database Express Edition 2 Day + Java Developer's Guide
Creating a Database ConnectionYou can connect to any database for which you have connection details. When you create a database connection, you must specify a user name and a password. By default, the connection enables you to browse only the schema of the user that you specify in the connection.
To create a connection, follow these steps:
1. Start JDeveloper.
2. From the View menu, go to Database and select Database Navigator. The Database Navigator is displayed, showing you a list of available connections.
3. Right-click IDE Connection, and from the shortcut menu, select New Connection. The Create Database Connection screen is displayed.
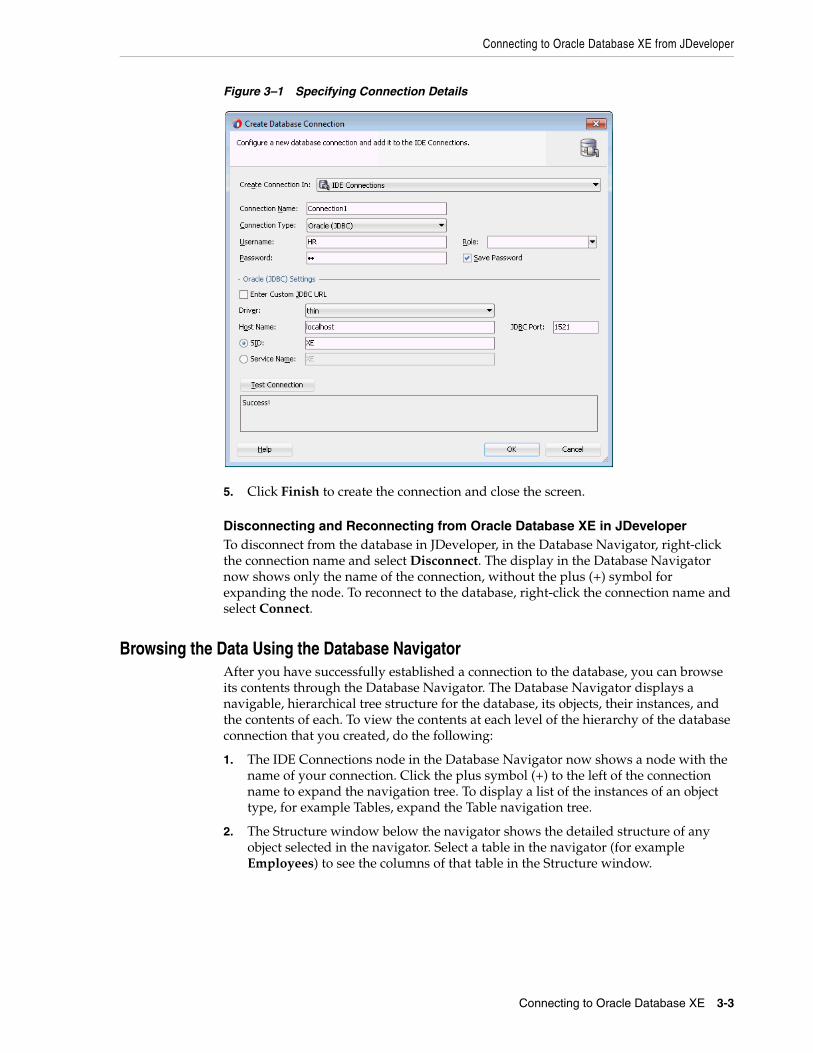
4. On the Create Database Connection screen, do not change the default values for the connection name and type, Connection1 and Oracle (JDBC). Enter HR in both the Username and Password fields. Do not enter a value for Role, and select Deploy Password. You must provide information about the computer where your database is located. Your database administrator should provide you with this information.
Enter the following information:
– Driver: thin
– Host Name: Host name of the computer where Oracle Database XE is installed
If the database is on the same computer, then for the Host Name parameter, enter localhost.
– JDBC Port: 1521
– SID: XE
Click Test Connection. If the connection is successful, the word Success! is displayed in the Status field.
Figure 3–1 shows the Connection screen where you enter these details.
Connecting to Oracle Database XE from JDeveloper
Connecting to Oracle Database XE 3-3
Figure 3–1 Specifying Connection Details
5. Click Finish to create the connection and close the screen.
Disconnecting and Reconnecting from Oracle Database XE in JDeveloperTo disconnect from the database in JDeveloper, in the Database Navigator, right-click the connection name and select Disconnect. The display in the Database Navigator now shows only the name of the connection, without the plus (+) symbol for expanding the node. To reconnect to the database, right-click the connection name and select Connect.
Browsing the Data Using the Database NavigatorAfter you have successfully established a connection to the database, you can browse its contents through the Database Navigator. The Database Navigator displays a navigable, hierarchical tree structure for the database, its objects, their instances, and the contents of each. To view the contents at each level of the hierarchy of the database connection that you created, do the following:
1. The IDE Connections node in the Database Navigator now shows a node with the name of your connection. Click the plus symbol (+) to the left of the connection name to expand the navigation tree. To display a list of the instances of an object type, for example Tables, expand the Table navigation tree.
2. The Structure window below the navigator shows the detailed structure of any object selected in the navigator. Select a table in the navigator (for example Employees) to see the columns of that table in the Structure window.
Setting Up Applications and Projects in JDeveloper
3-4 Oracle Database Express Edition 2 Day + Java Developer's Guide
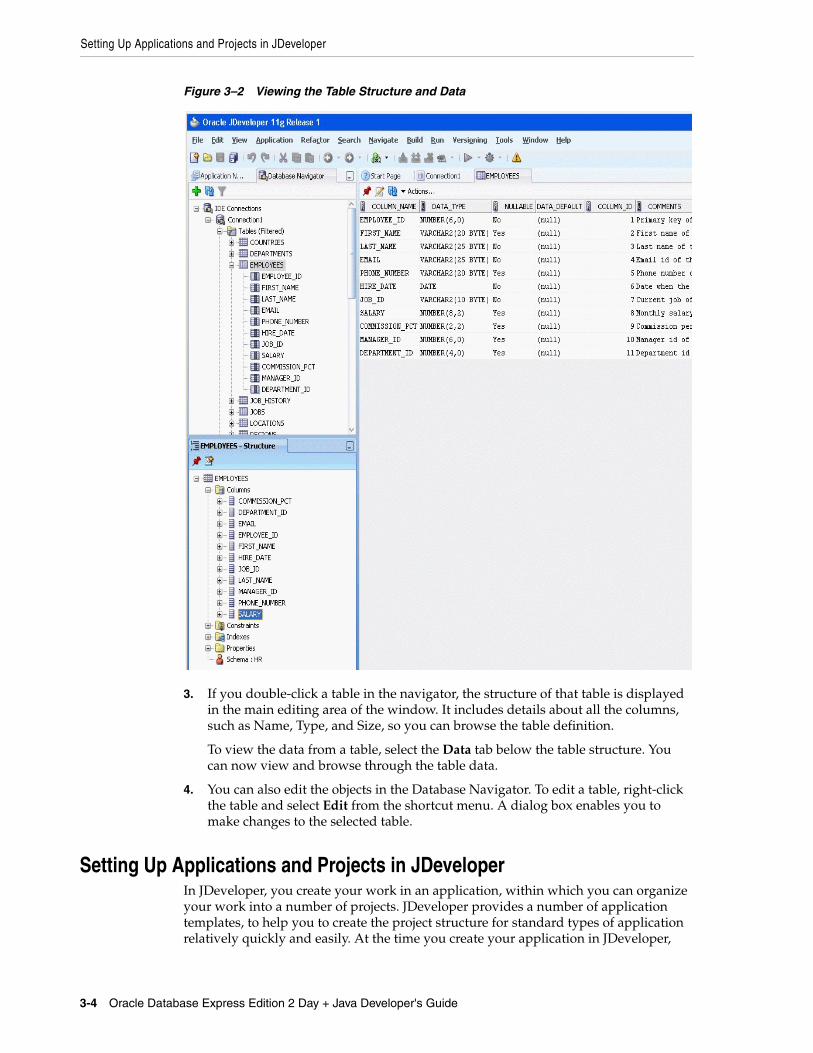
Figure 3–2 Viewing the Table Structure and Data
3. If you double-click a table in the navigator, the structure of that table is displayed in the main editing area of the window. It includes details about all the columns, such as Name, Type, and Size, so you can browse the table definition.
To view the data from a table, select the Data tab below the table structure. You can now view and browse through the table data.
4. You can also edit the objects in the Database Navigator. To edit a table, right-click the table and select Edit from the shortcut menu. A dialog box enables you to make changes to the selected table.
Setting Up Applications and Projects in JDeveloperIn JDeveloper, you create your work in an application, within which you can organize your work into a number of projects. JDeveloper provides a number of application templates, to help you to create the project structure for standard types of application relatively quickly and easily. At the time you create your application in JDeveloper,
Setting Up Applications and Projects in JDeveloper
Connecting to Oracle Database XE 3-5
you can choose the application template that matches the type of application you will be building.
The application template you select determines the initial project structure (the named project folders within the application) and the application technologies that will be included. You can then add any extra libraries or technologies you need for your particular application, and create additional projects if you need them.
Using the JDeveloper Application NavigatorThe Application Navigator displays all your applications and projects. When you first start JDeveloper, the Application Navigator is displayed by default on the left side of the JDeveloper IDE.
To view the Application Navigator when it is not displayed, you can click the Applications tab in the navigator panel on the top left-hand side of the JDeveloper display, or select Application Navigator from the View menu.
The Application Navigator shows a logical grouping of the items in your projects. To see the structure of an individual item, you can select it and the structure is displayed in the Structure window.
From the Application Navigator, you can display items in an appropriate default editor. For example, if you double-click a Java file, the file opens in the Java Source Editor, and if you double-click a JavaServer Pages (JSP) file, it opens in the JSP/HTML Visual Editor.
Creating an Application and a ProjectTo get started with JDeveloper, you must create an application and at least one project in which to store your work, as follows:
1. In the Application Navigator, click New Application.
2. The Create Generic Application wizard is displayed. In the Name your application screen, enter HRApp in the Application Name field, and from the Application Template list, select Generic Application. Click Next.
3. On the Name your project screen, enter View as the name of the project. Click Finish.
4. The new HRApp application is displayed in the Application Navigator.
5. Save your application. To do this, from the File menu, select Save All.
Viewing the Javadoc and Source Code Available in the Project Scope You can view the Javadoc or the code for any of the classes available in the project technology scope within JDeveloper. In addition, you can view the details of all the methods available for those classes.
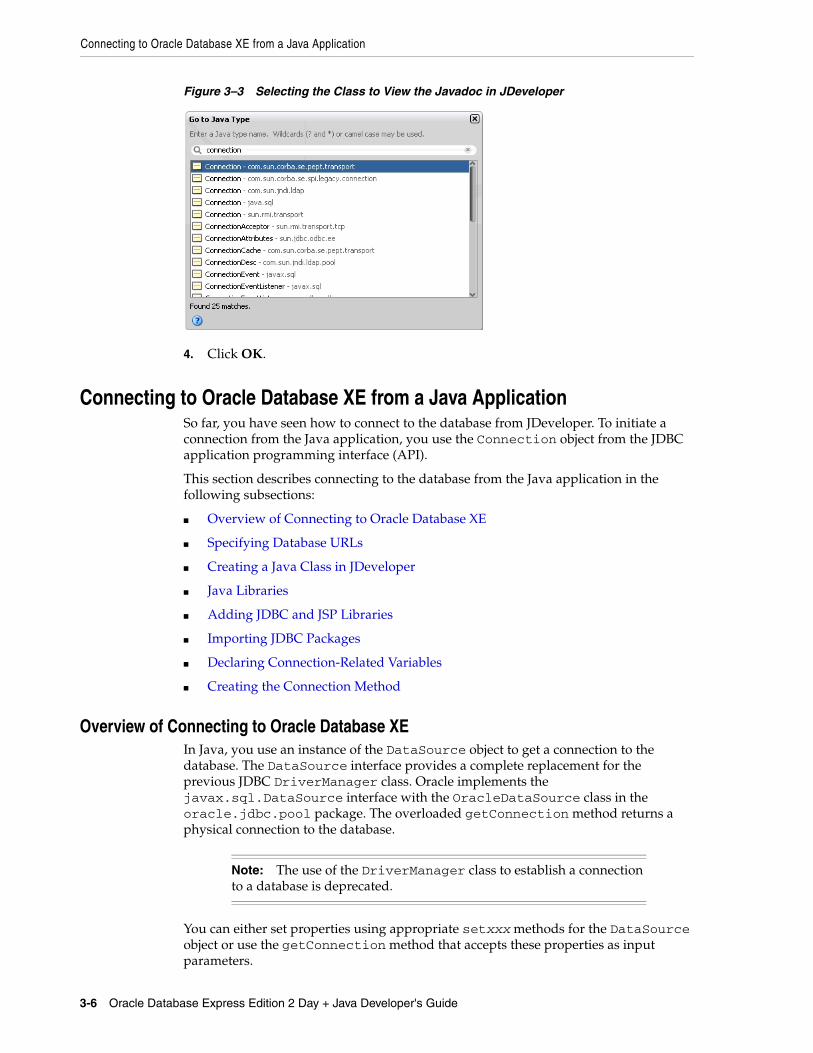
For example, to see the code or Javadoc for the Connection class, do the following:
1. With your project selected in the Application Navigator, from the Navigate menu select Go to Java Type. You can also do this for a specific file in your project.
2. In the Go to Java Type dialog box, type the name of the Java class.
3. Enter the name of the class you want to view in the Name field, or click Browse to find the class. For the Connection class, start to enter Connection, and from the displayed list select Connection (java.sql).
Connecting to Oracle Database XE from a Java Application
3-6 Oracle Database Express Edition 2 Day + Java Developer's Guide
Figure 3–3 Selecting the Class to View the Javadoc in JDeveloper
4. Click OK.
Connecting to Oracle Database XE from a Java ApplicationSo far, you have seen how to connect to the database from JDeveloper. To initiate a connection from the Java application, you use the Connection object from the JDBC application programming interface (API).
This section describes connecting to the database from the Java application in the following subsections:
■ Overview of Connecting to Oracle Database XE
■ Specifying Database URLs
■ Creating a Java Class in JDeveloper
■ Java Libraries
■ Adding JDBC and JSP Libraries
■ Importing JDBC Packages
■ Declaring Connection-Related Variables
■ Creating the Connection Method
Overview of Connecting to Oracle Database XEIn Java, you use an instance of the DataSource object to get a connection to the database. The DataSource interface provides a complete replacement for the previous JDBC DriverManager class. Oracle implements the javax.sql.DataSource interface with the OracleDataSource class in the oracle.jdbc.pool package. The overloaded getConnection method returns a physical connection to the database.
Note: The use of the DriverManager class to establish a connection to a database is deprecated.
You can either set properties using appropriate setxxx methods for the DataSource object or use the getConnection method that accepts these properties as input parameters.
Connecting to Oracle Database XE from a Java Application
Connecting to Oracle Database XE 3-7
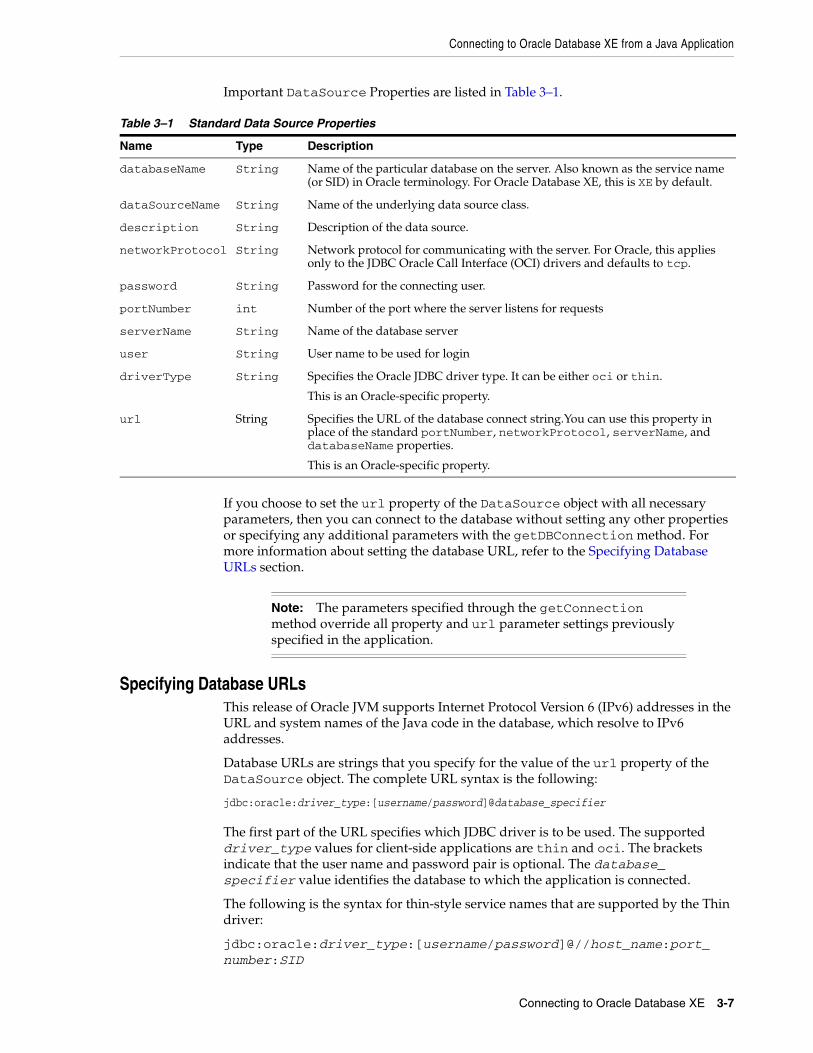
Important DataSource Properties are listed in Table 3–1.
Table 3–1 Standard Data Source Properties
Name Type Description
databaseName String Name of the particular database on the server. Also known as the service name (or SID) in Oracle terminology. For Oracle Database XE, this is XE by default.
dataSourceName String Name of the underlying data source class.
description String Description of the data source.
networkProtocol String Network protocol for communicating with the server. For Oracle, this applies only to the JDBC Oracle Call Interface (OCI) drivers and defaults to tcp.
password String Password for the connecting user.
portNumber int Number of the port where the server listens for requests
serverName String Name of the database server
user String User name to be used for login
driverType String Specifies the Oracle JDBC driver type. It can be either oci or thin.
This is an Oracle-specific property.
url String Specifies the URL of the database connect string.You can use this property in place of the standard portNumber, networkProtocol, serverName, and databaseName properties.
This is an Oracle-specific property.
If you choose to set the url property of the DataSource object with all necessary parameters, then you can connect to the database without setting any other properties or specifying any additional parameters with the getDBConnection method. For more information about setting the database URL, refer to the Specifying Database URLs section.
Note: The parameters specified through the getConnection method override all property and url parameter settings previously specified in the application.
Specifying Database URLsThis release of Oracle JVM supports Internet Protocol Version 6 (IPv6) addresses in the URL and system names of the Java code in the database, which resolve to IPv6 addresses.
Database URLs are strings that you specify for the value of the url property of the DataSource object. The complete URL syntax is the following:
jdbc:oracle:driver_type:[username/password]@database_specifier
The first part of the URL specifies which JDBC driver is to be used. The supported driver_type values for client-side applications are thin and oci. The brackets indicate that the user name and password pair is optional. The database_specifier value identifies the database to which the application is connected.
The following is the syntax for thin-style service names that are supported by the Thin driver:
jdbc:oracle:driver_type:[username/password]@//host_name:port_number:SID
Connecting to Oracle Database XE from a Java Application
3-8 Oracle Database Express Edition 2 Day + Java Developer's Guide
For the sample application created in this guide, if you include the user name and password, and if the database is hosted locally, then the database connection URL is as shown in Example 3–1.
Example 3–1 Specifying the url Property for the DataSource Object
jdbc:oracle:thin:hr/hr@localhost:1521:XE
Using the Default Service Feature of the Oracle Database XEIf you have performed Oracle Database server installation in Typical mode, then the default service name used by the Oracle instance is ORCL, and the following Easy Connect syntax can be used to connect to that instance:
sqlplus /nologSQL> CONNECT username@"host/ORCL"SQL> Enter password: password
The Easy Connect feature, which was introduced in Oracle Database 11g Release 1 (11.1), makes the following parts of the conventional JDBC connection URL syntax optional:
jdbc:oracle:driver_type:[username/password]@[//]host_name[:port][:XE]
In this URL:
■ // is optional.
■ :port is optional.
Specify a port only if the default Oracle Net listener port (1521) is not used.
■ :XE (or the service name) is optional.
The connection adapter for the Oracle Database connects to the default service on the host. On the host, this is set to XE in the listener.ora file.
See Also: Oracle Database Net Services Administrator's Guide for more information about the Easy Connect feature
Example 3–2 shows a basic configuration of the listener.ora file, where the default service is defined.
Example 3–2 Default Service Configuration in listener.ora
MYLISTENER = (ADDRESS_LIST= (ADDRESS=(PROTOCOL=tcp)(HOST=test555)(PORT=1521)) ) DEFAULT_SERVICE_MYLISTENER=dbjf.regress.rdbms.dev.testserver.com SID_LIST_MYLISTENER = (SID_LIST=(SID_DESC=(SID_NAME=dbjf)(GLOBAL_DBNAME=dbjf.regress.rdbms.dev.testserver.com)(ORACLE_HOME=/test/oracle)) )
After making changes to the listener.ora file, you must restart the listener with the following command:
> lsnrctl start mylistener
The following URLs should work with this configuration:
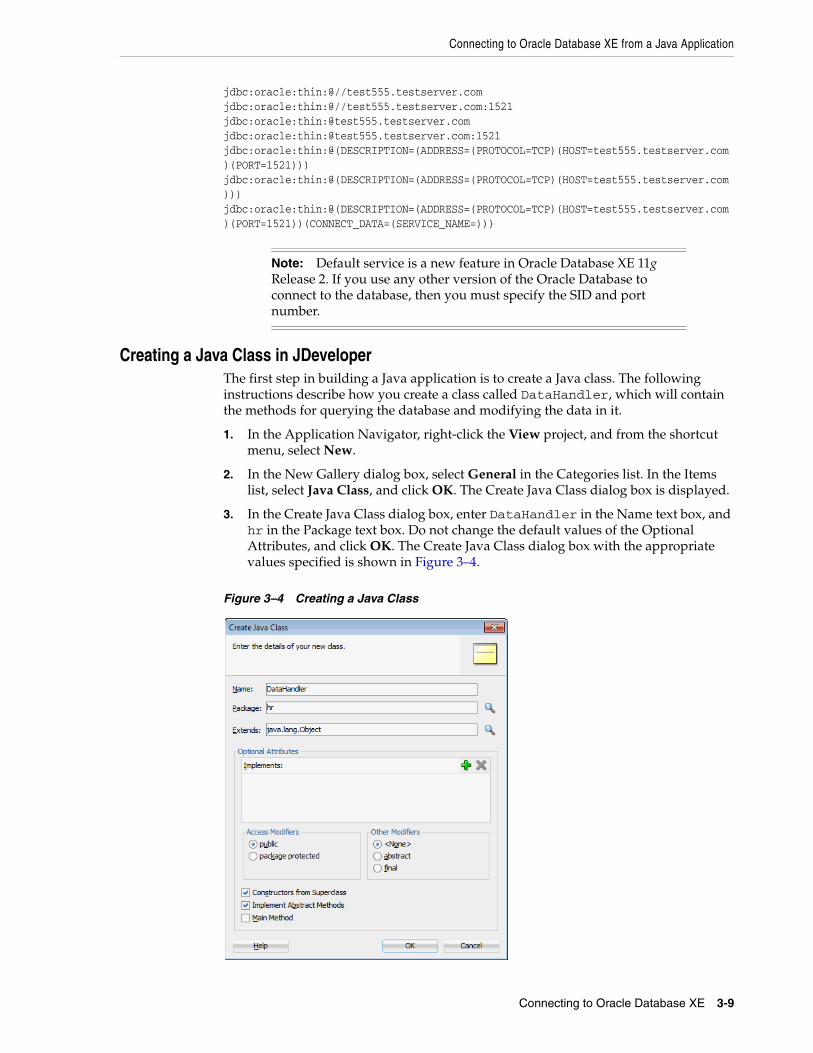
Connecting to Oracle Database XE from a Java Application
Connecting to Oracle Database XE 3-9
jdbc:oracle:thin:@//test555.testserver.comjdbc:oracle:thin:@//test555.testserver.com:1521jdbc:oracle:thin:@test555.testserver.comjdbc:oracle:thin:@test555.testserver.com:1521jdbc:oracle:thin:@(DESCRIPTION=(ADDRESS=(PROTOCOL=TCP)(HOST=test555.testserver.com)(PORT=1521)))jdbc:oracle:thin:@(DESCRIPTION=(ADDRESS=(PROTOCOL=TCP)(HOST=test555.testserver.com)))jdbc:oracle:thin:@(DESCRIPTION=(ADDRESS=(PROTOCOL=TCP)(HOST=test555.testserver.com)(PORT=1521))(CONNECT_DATA=(SERVICE_NAME=)))
Note: Default service is a new feature in Oracle Database XE 11g Release 2. If you use any other version of the Oracle Database to connect to the database, then you must specify the SID and port number.
Creating a Java Class in JDeveloperThe first step in building a Java application is to create a Java class. The following instructions describe how you create a class called DataHandler, which will contain the methods for querying the database and modifying the data in it.
1. In the Application Navigator, right-click the View project, and from the shortcut menu, select New.
2. In the New Gallery dialog box, select General in the Categories list. In the Items list, select Java Class, and click OK. The Create Java Class dialog box is displayed.
3. In the Create Java Class dialog box, enter DataHandler in the Name text box, and hr in the Package text box. Do not change the default values of the Optional Attributes, and click OK. The Create Java Class dialog box with the appropriate values specified is shown in Figure 3–4.
Figure 3–4 Creating a Java Class
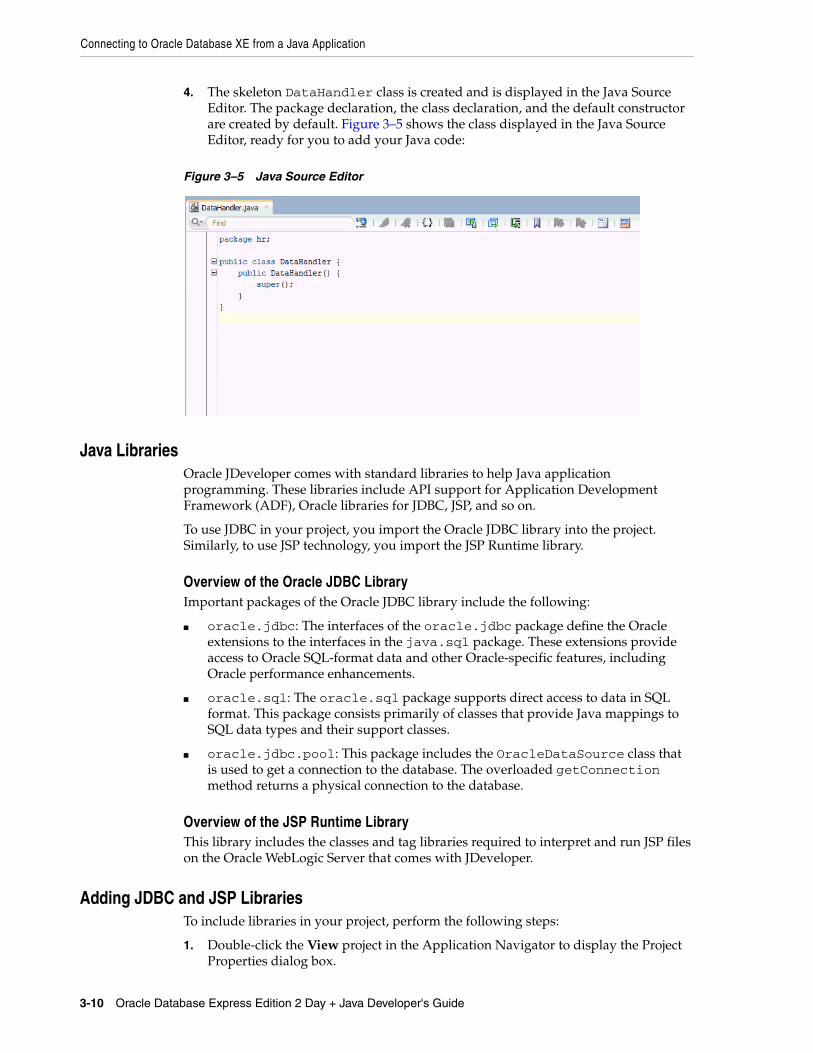
Connecting to Oracle Database XE from a Java Application
3-10 Oracle Database Express Edition 2 Day + Java Developer's Guide
4. The skeleton DataHandler class is created and is displayed in the Java Source Editor. The package declaration, the class declaration, and the default constructor are created by default. Figure 3–5 shows the class displayed in the Java Source Editor, ready for you to add your Java code:
Figure 3–5 Java Source Editor
Java LibrariesOracle JDeveloper comes with standard libraries to help Java application programming. These libraries include API support for Application Development Framework (ADF), Oracle libraries for JDBC, JSP, and so on.
To use JDBC in your project, you import the Oracle JDBC library into the project. Similarly, to use JSP technology, you import the JSP Runtime library.
Overview of the Oracle JDBC LibraryImportant packages of the Oracle JDBC library include the following:
■ oracle.jdbc: The interfaces of the oracle.jdbc package define the Oracle extensions to the interfaces in the java.sql package. These extensions provide access to Oracle SQL-format data and other Oracle-specific features, including Oracle performance enhancements.
■ oracle.sql: The oracle.sql package supports direct access to data in SQL format. This package consists primarily of classes that provide Java mappings to SQL data types and their support classes.
■ oracle.jdbc.pool: This package includes the OracleDataSource class that is used to get a connection to the database. The overloaded getConnection method returns a physical connection to the database.
Overview of the JSP Runtime LibraryThis library includes the classes and tag libraries required to interpret and run JSP files on the Oracle WebLogic Server that comes with JDeveloper.
Adding JDBC and JSP LibrariesTo include libraries in your project, perform the following steps:
1. Double-click the View project in the Application Navigator to display the Project Properties dialog box.
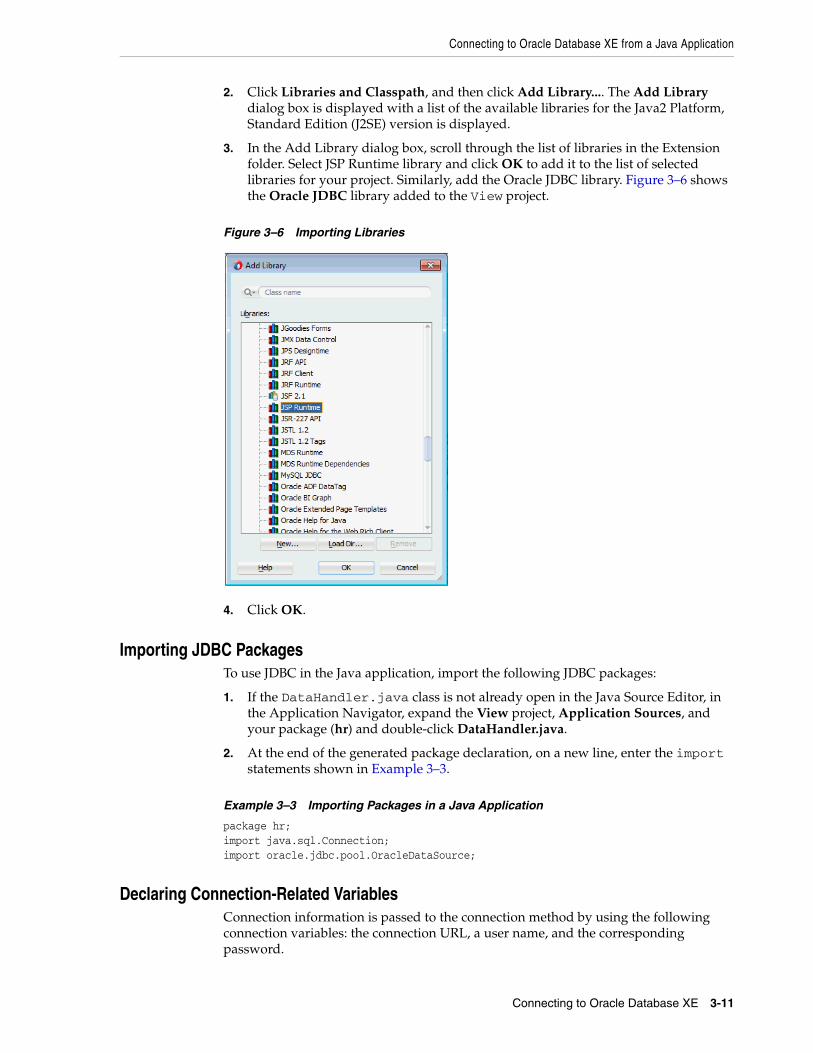
Connecting to Oracle Database XE from a Java Application
Connecting to Oracle Database XE 3-11
2. Click Libraries and Classpath, and then click Add Library.... The Add Library dialog box is displayed with a list of the available libraries for the Java2 Platform, Standard Edition (J2SE) version is displayed.
3. In the Add Library dialog box, scroll through the list of libraries in the Extension folder. Select JSP Runtime library and click OK to add it to the list of selected libraries for your project. Similarly, add the Oracle JDBC library. Figure 3–6 shows the Oracle JDBC library added to the View project.
Figure 3–6 Importing Libraries
4. Click OK.
Importing JDBC PackagesTo use JDBC in the Java application, import the following JDBC packages:
1. If the DataHandler.java class is not already open in the Java Source Editor, in the Application Navigator, expand the View project, Application Sources, and your package (hr) and double-click DataHandler.java.
2. At the end of the generated package declaration, on a new line, enter the import statements shown in Example 3–3.
Example 3–3 Importing Packages in a Java Application
package hr;import java.sql.Connection;import oracle.jdbc.pool.OracleDataSource;
Declaring Connection-Related VariablesConnection information is passed to the connection method by using the following connection variables: the connection URL, a user name, and the corresponding password.
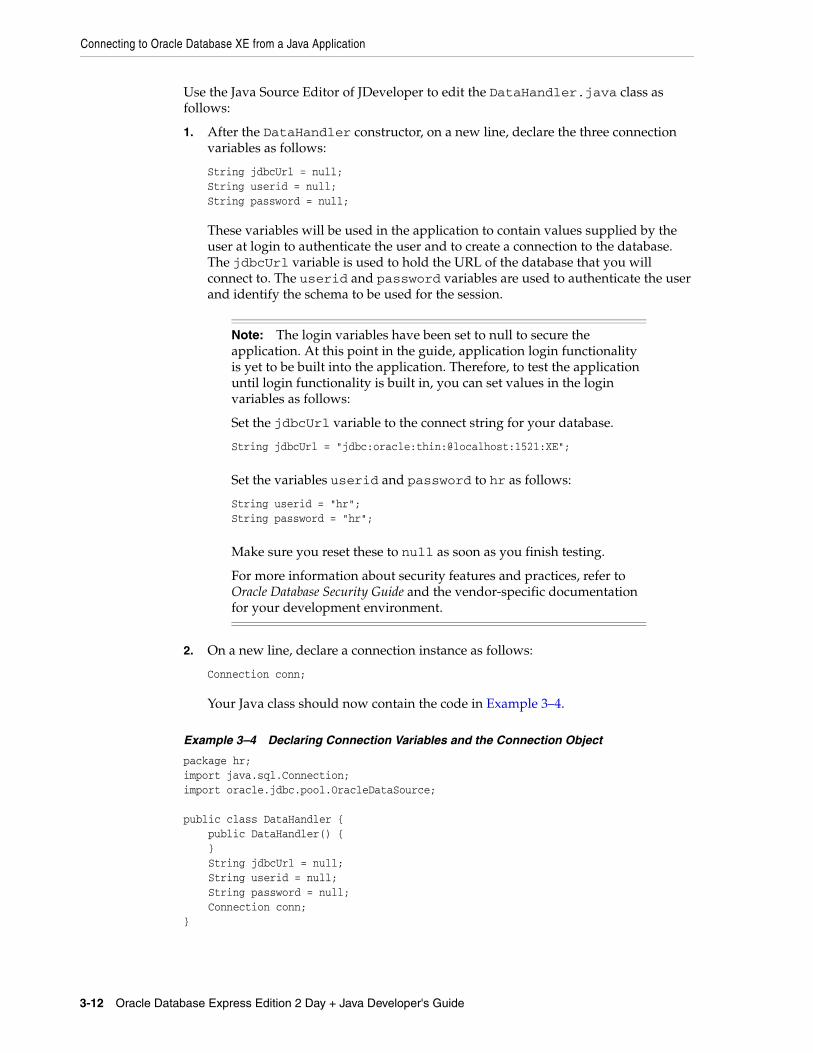
Connecting to Oracle Database XE from a Java Application
3-12 Oracle Database Express Edition 2 Day + Java Developer's Guide
Use the Java Source Editor of JDeveloper to edit the DataHandler.java class as follows:
1. After the DataHandler constructor, on a new line, declare the three connection variables as follows:
String jdbcUrl = null;String userid = null;String password = null;
These variables will be used in the application to contain values supplied by the user at login to authenticate the user and to create a connection to the database. The jdbcUrl variable is used to hold the URL of the database that you will connect to. The userid and password variables are used to authenticate the user and identify the schema to be used for the session.
Note: The login variables have been set to null to secure the application. At this point in the guide, application login functionality is yet to be built into the application. Therefore, to test the application until login functionality is built in, you can set values in the login variables as follows:
Set the jdbcUrl variable to the connect string for your database.
String jdbcUrl = "jdbc:oracle:thin:@localhost:1521:XE";
Set the variables userid and password to hr as follows:
String userid = "hr";String password = "hr";
Make sure you reset these to null as soon as you finish testing.
For more information about security features and practices, refer to Oracle Database Security Guide and the vendor-specific documentation for your development environment.
2. On a new line, declare a connection instance as follows:
Connection conn;
Your Java class should now contain the code in Example 3–4.
Example 3–4 Declaring Connection Variables and the Connection Object
package hr;import java.sql.Connection;import oracle.jdbc.pool.OracleDataSource; public class DataHandler { public DataHandler() { } String jdbcUrl = null; String userid = null; String password = null; Connection conn;}
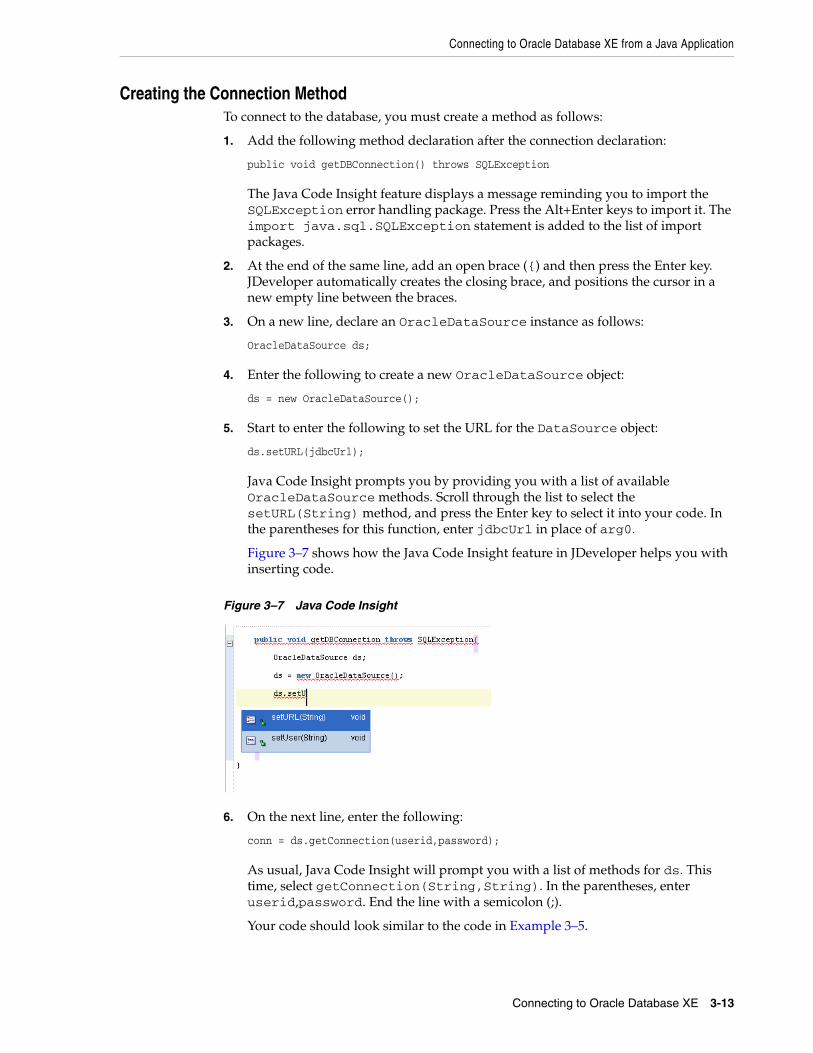
Connecting to Oracle Database XE from a Java Application
Connecting to Oracle Database XE 3-13
Creating the Connection MethodTo connect to the database, you must create a method as follows:
1. Add the following method declaration after the connection declaration:
public void getDBConnection() throws SQLException
The Java Code Insight feature displays a message reminding you to import the SQLException error handling package. Press the Alt+Enter keys to import it. The import java.sql.SQLException statement is added to the list of import packages.
2. At the end of the same line, add an open brace ({) and then press the Enter key. JDeveloper automatically creates the closing brace, and positions the cursor in a new empty line between the braces.
3. On a new line, declare an OracleDataSource instance as follows:
OracleDataSource ds;
4. Enter the following to create a new OracleDataSource object:
ds = new OracleDataSource();
5. Start to enter the following to set the URL for the DataSource object:
ds.setURL(jdbcUrl);
Java Code Insight prompts you by providing you with a list of available OracleDataSource methods. Scroll through the list to select the setURL(String) method, and press the Enter key to select it into your code. In the parentheses for this function, enter jdbcUrl in place of arg0.
Figure 3–7 shows how the Java Code Insight feature in JDeveloper helps you with inserting code.
Figure 3–7 Java Code Insight
6. On the next line, enter the following:
conn = ds.getConnection(userid,password);
As usual, Java Code Insight will prompt you with a list of methods for ds. This time, select getConnection(String,String). In the parentheses, enter userid,password. End the line with a semicolon (;).
Your code should look similar to the code in Example 3–5.
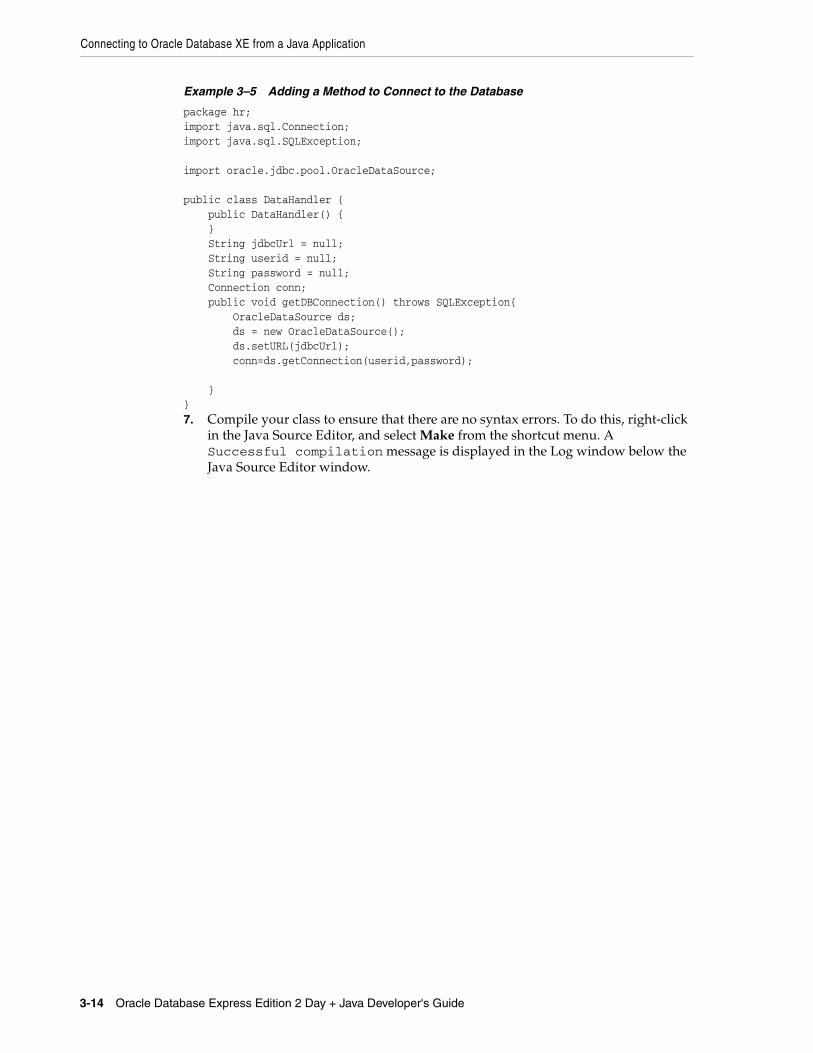
Connecting to Oracle Database XE from a Java Application
3-14 Oracle Database Express Edition 2 Day + Java Developer's Guide
Example 3–5 Adding a Method to Connect to the Database
package hr;import java.sql.Connection;import java.sql.SQLException; import oracle.jdbc.pool.OracleDataSource; public class DataHandler { public DataHandler() { } String jdbcUrl = null; String userid = null; String password = null; Connection conn; public void getDBConnection() throws SQLException{ OracleDataSource ds; ds = new OracleDataSource(); ds.setURL(jdbcUrl); conn=ds.getConnection(userid,password); }}7. Compile your class to ensure that there are no syntax errors. To do this, right-click
in the Java Source Editor, and select Make from the shortcut menu. A Successful compilation message is displayed in the Log window below the Java Source Editor window.
4
Querying for and Displaying Data 4-1
4 Querying for and Displaying Data
This chapter adds functions and code to the DataHandler.java file for querying the database. This chapter has the following sections:
■ Overview of Querying for Data in Oracle Database XE
■ Querying Data from a Java Application
■ Creating JSP Pages
■ Adding Dynamic Content to the JSP Page: Database Query Results
■ Filtering a Query Result Set
■ Adding Login Functionality to the Application
■ Testing the JSP Page
Overview of Querying for Data in Oracle Database XEIn outline, to query Oracle Database XE from a Java class to retrieve data, you must do the following:
1. Create a connection by using the OracleDataSource.getConnection method. This is covered in Chapter 3, "Connecting to Oracle Database XE".
2. Define your SQL statements with the methods available for the connection object. The createStatement method is used to define a SQL query statement.
3. Using the methods available for the statement, run your queries. You use the executeQuery method to run queries on the database and produce a set of rows that match the query conditions. These results are contained in a ResultSet object.
4. You use a ResultSet object to display the data in the application pages.
The following sections describe important Java Database Connectivity (JDBC) concepts related to querying the database from a Java application:
■ SQL Statements
■ Query Methods for the Statement Object
■ Result Sets
SQL StatementsOnce you connect to the database and, in the process, create a Connection object, the next step is to create a Statement object. The createStatement method of the JDBC Connection object returns an object of the JDBC Statement type.
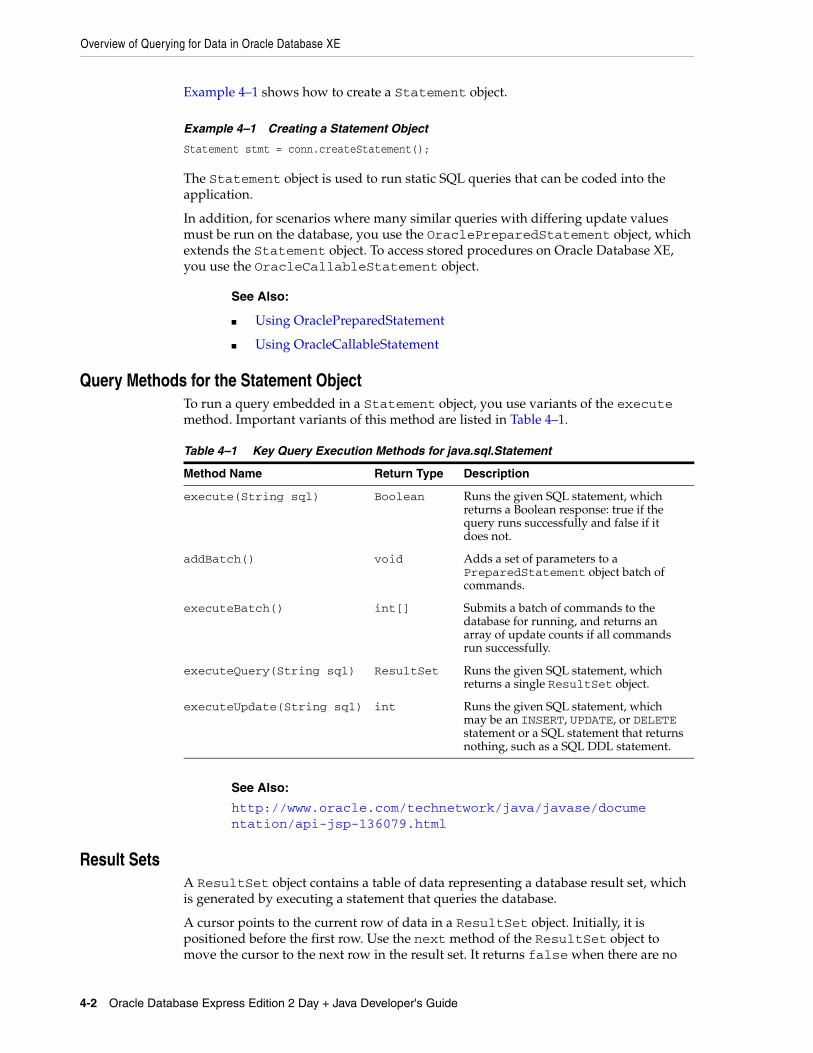
Overview of Querying for Data in Oracle Database XE
4-2 Oracle Database Express Edition 2 Day + Java Developer's Guide
Example 4–1 shows how to create a Statement object.
Example 4–1 Creating a Statement Object
Statement stmt = conn.createStatement();
The Statement object is used to run static SQL queries that can be coded into the application.
In addition, for scenarios where many similar queries with differing update values must be run on the database, you use the OraclePreparedStatement object, which extends the Statement object. To access stored procedures on Oracle Database XE, you use the OracleCallableStatement object.
See Also:
■ Using OraclePreparedStatement
■ Using OracleCallableStatement
Query Methods for the Statement ObjectTo run a query embedded in a Statement object, you use variants of the execute method. Important variants of this method are listed in Table 4–1.
Table 4–1 Key Query Execution Methods for java.sql.Statement
Method Name Return Type Description
execute(String sql) Boolean Runs the given SQL statement, which returns a Boolean response: true if the query runs successfully and false if it does not.
addBatch() void Adds a set of parameters to a PreparedStatement object batch of commands.
executeBatch() int[] Submits a batch of commands to the database for running, and returns an array of update counts if all commands run successfully.
executeQuery(String sql) ResultSet Runs the given SQL statement, which returns a single ResultSet object.
executeUpdate(String sql) int Runs the given SQL statement, which may be an INSERT, UPDATE, or DELETE statement or a SQL statement that returns nothing, such as a SQL DDL statement.
See Also:
http://www.oracle.com/technetwork/java/javase/documentation/api-jsp-136079.html
Result SetsA ResultSet object contains a table of data representing a database result set, which is generated by executing a statement that queries the database.
A cursor points to the current row of data in a ResultSet object. Initially, it is positioned before the first row. Use the next method of the ResultSet object to move the cursor to the next row in the result set. It returns false when there are no
Overview of Querying for Data in Oracle Database XE
Querying for and Displaying Data 4-3
more rows in the ResultSet object. Typically, the contents of a ResultSet object are read by using the next method within a loop until it returns false.
The ResultSet interface provides accessor methods (getBoolean, getLong, getInt, and so on) for retrieving column values from the current row. Values can be retrieved by using either the index number of the column or the name of the column.
By default, only one ResultSet object per Statement object can be open at the same time. Therefore, to read data from multiple ResultSet objects, you must use multiple Statement objects. A ResultSet object is automatically closed when the Statement object that generated it is closed, rerun, or used to retrieve the next result from a sequence of multiple results.
See Also:
■ http://download.oracle.com/javase/1.3/docs/guide/jdbc/getstart/mapping.html for more information about mapping SQL types and Java types
■ Oracle Database JDBC Developer's Guide for more information about result sets and their features
Features of ResultSet ObjectsScrollability refers to the ability to move backward as well as forward through a result set. You can also move to any particular position in the result set, through either relative positioning or absolute positioning. Relative positioning lets you move a specified number of rows forward or backward from the current row. Absolute positioning lets you move to a specified row number, counting from either the beginning or the end of the result set.
When creating a scrollable or positionable result set, you must also specify sensitivity. This refers to the ability of a result set to detect and reveal changes made to the underlying database from outside the result set. A sensitive result set can see changes made to the database while the result set is open, providing a dynamic view of the underlying data. Changes made to the underlying column values of rows in the result set are visible. Updatability refers to the ability to update data in a result set and then copy the changes to the database. This includes inserting new rows into the result set or deleting existing rows. A result set may be updatable or read-only.
Summary of Result Set Object TypesScrollability and sensitivity are independent of updatability, and the three result set types and two concurrency types combine for the following six result set categories:
■ Forward-only/read-only
■ Forward-only/updatable
■ Scroll-sensitive/read-only
■ Scroll-sensitive/updatable
■ Scroll-insensitive/read-only
■ Scroll-insensitive/updatable
Example 4–2 demonstrates how to declare a scroll-sensitive and read-only ResultSet object.
Example 4–2 Declaring a Scroll-Sensitive, Read-Only ResultSet Object
stmt = conn.createStatement(ResultSet.TYPE_SCROLL_SENSITIVE, ResultSet.CONCUR_
Querying Data from a Java Application
4-4 Oracle Database Express Edition 2 Day + Java Developer's Guide
READ_ONLY);
Note: A forward-only updatable result set has no provision for positioning at a particular row within the ResultSet object. You can update rows only as you iterate through them using the next method.
Querying Data from a Java ApplicationThis section discusses how you can use JDeveloper to create a Java class that queries data in Oracle Database XE in the following sections:
■ Creating a Method in JDeveloper to Query Data
■ Testing the Connection and the Query Methods
Creating a Method in JDeveloper to Query DataThe following steps show you how to add a simple query method to your DataHandler.java class. If DataHandler.java is not open in the JDeveloper integrated development environment (IDE), double-click the DataHandler.java file in the Application Navigator to display it in the Java Source Editor.
1. In the DataHandler class, add the following import statements after the existing import statements to use the Statement and ResultSet JDBC classes:
import java.sql.Statement;import java.sql.ResultSet;
2. After the connection declaration, declare variables for Statement, ResultSet, and String objects as follows:
Statement stmt;ResultSet rset;String query;String sqlString;
3. Create a method called getAllEmployees, which will be used to retrieve employee information from the database. Enter the signature for the method:
public ResultSet getAllEmployees() throws SQLException{
4. Press the Enter key to include the closing brace for the method and a new line to start entering the method code.
5. Call the getDBConnection method created earlier:
getDBConnection();
6. After calling the getDBConnection method, use the createStatement method of the Connection instance to provide context for executing the SQL statement and define the ResultSet type. Specify a read-only, scroll-sensitive ResultSet type as stated in the following code:
stmt = conn.createStatement(ResultSet.TYPE_SCROLL_SENSITIVE, ResultSet.CONCUR_READ_ONLY);
The Java Code Insight feature can help you ensure that the statement syntax is correct.
Querying Data from a Java Application
Querying for and Displaying Data 4-5
7. Define the query and print a trace message. The following code uses a simple query to return all the rows and columns in the Employees table, where the data is ordered by the Employee ID:
query = "SELECT * FROM Employees ORDER BY employee_id";System.out.println("\nExecuting query: " + query);
8. Run the query and retrieve the results in the ResultSet instance as follows:
rset = stmt.executeQuery(query);
9. Return the ResultSet object:
return rset;
10. Save your work. From the File menu, select Save All.
The code for the getAllEmployees method should be as shown in Example 4–3.
Example 4–3 Using the Connection, Statement, Query, and ResultSet Objects
public ResultSet getAllEmployees() throws SQLException{ getDBConnection(); stmt = conn.createStatement(ResultSet.TYPE_SCROLL_SENSITIVE, ResultSet.CONCUR_READ_ONLY); query = "SELECT * FROM Employees ORDER BY employee_id"; System.out.println("\nExecuting query: " + query); rset = stmt.executeQuery(query); return rset; }
Testing the Connection and the Query MethodsIn the following steps, you create a simple Java class to test the methods in the DataHandler.java class. To test your application at this stage, you can temporarily set the value of the jdbcUrl variable to the connection string for your database and set the values of the userid and password variables to the values required to access the HR schema.
1. Open the DataHandler.java class in the Java Visual Editor from the Application Navigator.
2. Change the jdbcUrl, userid and password variables to contain the values required for the HR schema as follows:
String jdbcUrl = "connect-string";String userid = "HR";String password = "hr";
where connect-string is, for example:
jdbc:oracle:thin:@localhost:1521:XE
See Also: Declaring Connection-Related Variables in Chapter 3
3. Create a new Java class named JavaClient in the hr package. Make it a public class and generate a default constructor and a main method. Note that you must select the Main Method check box from the Optional Attributes panel to generate the main method.
The skeleton JavaClient.java class is created and displayed in the Java Source Editor.
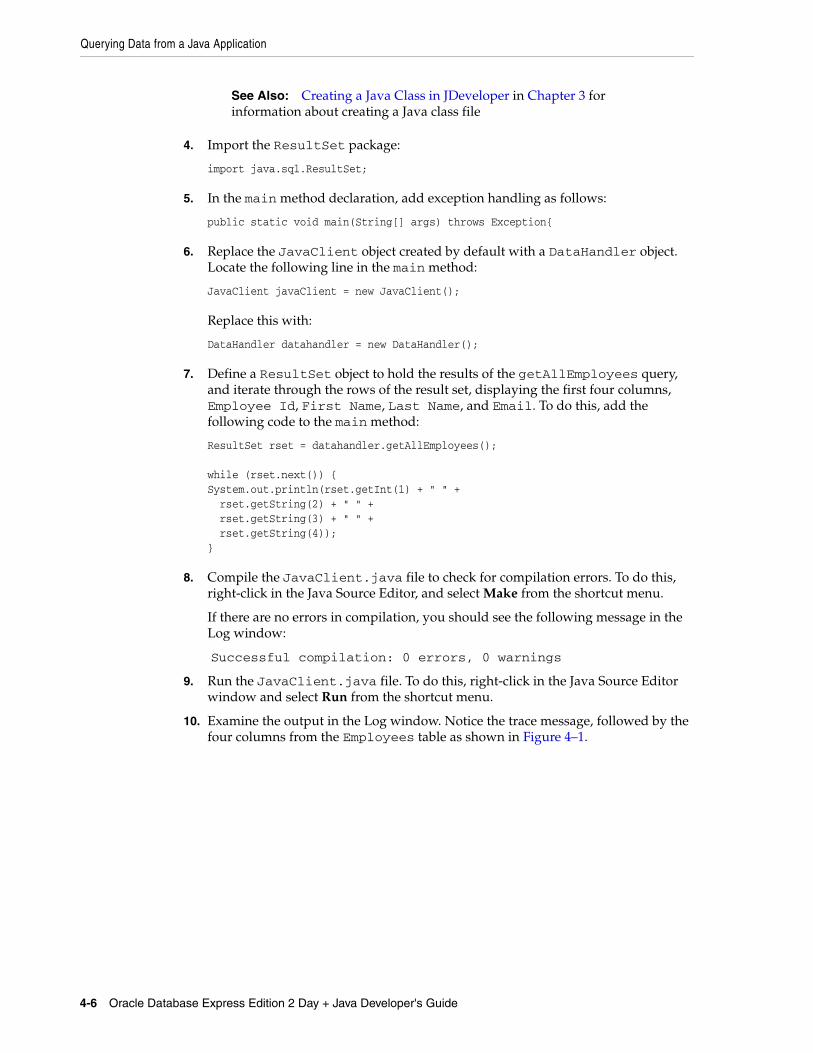
See Also: Creating a Java Class in JDeveloper in Chapter 3 for information about creating a Java class file
Querying Data from a Java Application
4-6 Oracle Database Express Edition 2 Day + Java Developer's Guide
4. Import the ResultSet package:
import java.sql.ResultSet;
5. In the main method declaration, add exception handling as follows:
public static void main(String[] args) throws Exception{
6. Replace the JavaClient object created by default with a DataHandler object. Locate the following line in the main method:
JavaClient javaClient = new JavaClient();
Replace this with:
DataHandler datahandler = new DataHandler();
7. Define a ResultSet object to hold the results of the getAllEmployees query, and iterate through the rows of the result set, displaying the first four columns, Employee Id, First Name, Last Name, and Email. To do this, add the following code to the main method:
ResultSet rset = datahandler.getAllEmployees();
while (rset.next()) {System.out.println(rset.getInt(1) + " " + rset.getString(2) + " " + rset.getString(3) + " " + rset.getString(4));}
8. Compile the JavaClient.java file to check for compilation errors. To do this, right-click in the Java Source Editor, and select Make from the shortcut menu.
If there are no errors in compilation, you should see the following message in the Log window:
Successful compilation: 0 errors, 0 warnings
9. Run the JavaClient.java file. To do this, right-click in the Java Source Editor window and select Run from the shortcut menu.
10. Examine the output in the Log window. Notice the trace message, followed by the four columns from the Employees table as shown in Figure 4–1.
Creating JSP Pages
Querying for and Displaying Data 4-7
Figure 4–1 Test Output for Query Method in Log Window
11. When you finish testing the application, set the jdbcUrl, userid and password variables in DataHandler.java back to null.
See Also: Declaring Connection-Related Variables
Creating JSP PagesThe HRApp application uses JavaServer Pages (JSP) technology to display data. JSP technology provides a simple, fast way to create server-independent and platform-independent dynamic Web content. A JSP page has the .jsp extension. This extension notifies the Web server that the page should be processed by a JSP container. The JSP container interprets the JSP tags and scriptlets, generates the content required, and sends the results back to the client as an HTML or XML page.
To develop JSP pages, you use some or all of the following:
■ HTML tags to design and format the dynamically generated Web page
■ Standard JSP tags or Java-based scriptlets to call other components that generate the dynamic content on the page
■ JSP tags from custom tag libraries that generate the dynamic content on the page
See Also:
http://www.oracle.com/technetwork/java/javaee/jsp/index.html
In this section, you will see how you can create JSP pages for the application in this guide in the following sections:
■ Overview of Page Presentation
■ Creating a Simple JSP Page
■ Adding Static Content to a JSP Page
■ Adding a Style Sheet to a JSP Page
Overview of Page PresentationIn the application created in this guide, JSP pages are used to do the following tasks:
■ Display data
Creating JSP Pages
4-8 Oracle Database Express Edition 2 Day + Java Developer's Guide
■ Hold input data entered by users adding employees and editing employee data
■ Hold the code needed to process the actions of validating user credentials and adding, updating, and deleting employee records in the database
JSP pages are presented to users as HTML or XML. So, you can control the presentation of data in the same way as you do it for static HTML and XML pages. You can use standard HTML tags to format your page, including the title tag in the header to specify the title to be displayed for the page.
You use HTML tags for headings, tables, lists, and other items on your pages. Style sheets can also be used to define the presentation of items. If you use JDeveloper to develop your application, you can select styles from a list.
The following sections describe the main elements used in the JSP pages of the sample application:
■ JSP Tags
■ Scriptlets
■ HTML Tags
■ HTML Forms
JSP TagsJSP tags are used in the sample application in this guide for the following tasks: to initialize Java classes that hold the application methods and the JavaBean used to hold a single employee record, and to forward the user to either the same or another page in the application.
The jsp:useBean tag is used in pages to initialize the class that contains all the methods needed by the application, and the jsp:forward tag is used to forward the user to a specified page. You can drag the tags you need from the Component Palette of JSP tags, and enter the properties for the tag in the corresponding dialog box that is displayed.
ScriptletsScriptlets are used to run the Java methods that operate on the database and to perform other processing in JSP pages. You can drag a scriptlet tag component from the Component Palette and drop it onto your page, ready to enter the scriptlet code. In JDeveloper, the code for scriptlets is entered in the Scriptlet Source Editor dialog box.
In this application, you use scriplets for a variety of tasks. As an example, one scriptlet calls the DataHandler method that returns a ResultSet object containing all the employees in the Employees table, which you can use to display that data in your JSP page. As another example, a scriplet is used to iterate through the same ResultSet object to display each item in a row of a table.
HTML TagsHTML tags are typically used for layout and presentation of the nondynamic portions of the user interface, for example headings and tables. In JDeveloper, you can drag and drop a Table component from the Component Palette onto your page. You must specify the number of rows and columns for the table, and all the table tags are automatically created.
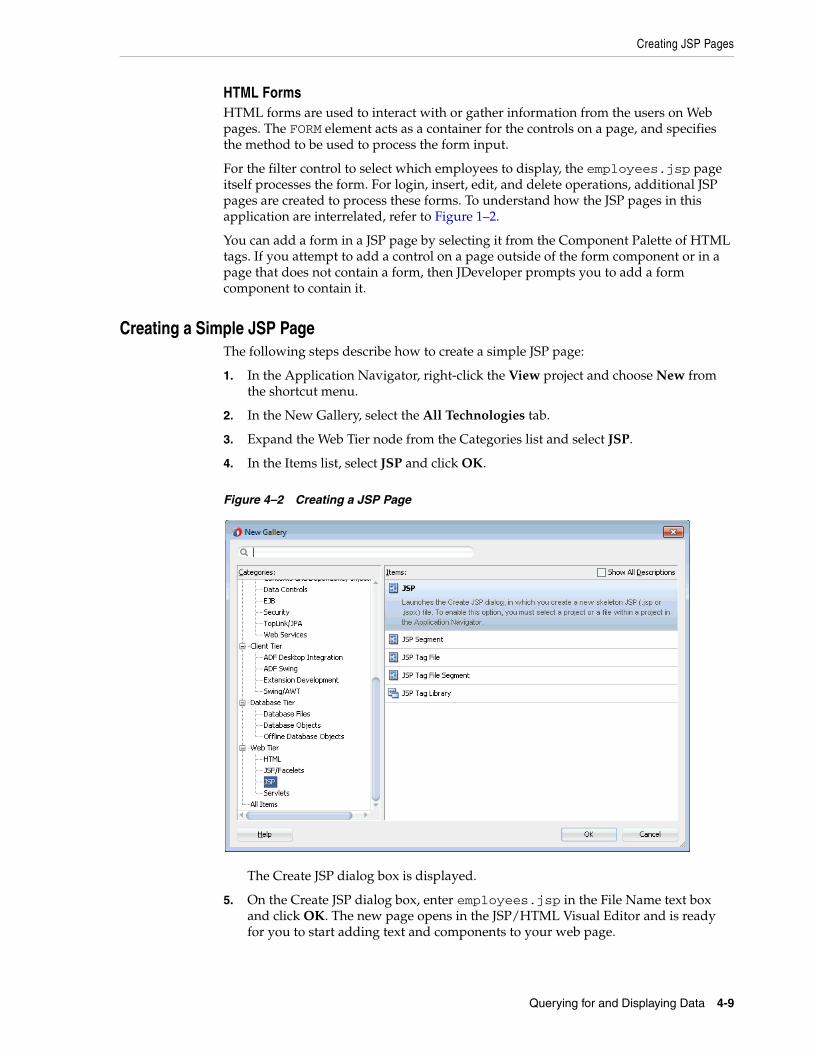
Creating JSP Pages
Querying for and Displaying Data 4-9
HTML FormsHTML forms are used to interact with or gather information from the users on Web pages. The FORM element acts as a container for the controls on a page, and specifies the method to be used to process the form input.
For the filter control to select which employees to display, the employees.jsp page itself processes the form. For login, insert, edit, and delete operations, additional JSP pages are created to process these forms. To understand how the JSP pages in this application are interrelated, refer to Figure 1–2.
You can add a form in a JSP page by selecting it from the Component Palette of HTML tags. If you attempt to add a control on a page outside of the form component or in a page that does not contain a form, then JDeveloper prompts you to add a form component to contain it.
Creating a Simple JSP PageThe following steps describe how to create a simple JSP page:
1. In the Application Navigator, right-click the View project and choose New from the shortcut menu.
2. In the New Gallery, select the All Technologies tab.
3. Expand the Web Tier node from the Categories list and select JSP.
4. In the Items list, select JSP and click OK.
Figure 4–2 Creating a JSP Page
The Create JSP dialog box is displayed.
5. On the Create JSP dialog box, enter employees.jsp in the File Name text box and click OK. The new page opens in the JSP/HTML Visual Editor and is ready for you to start adding text and components to your web page.
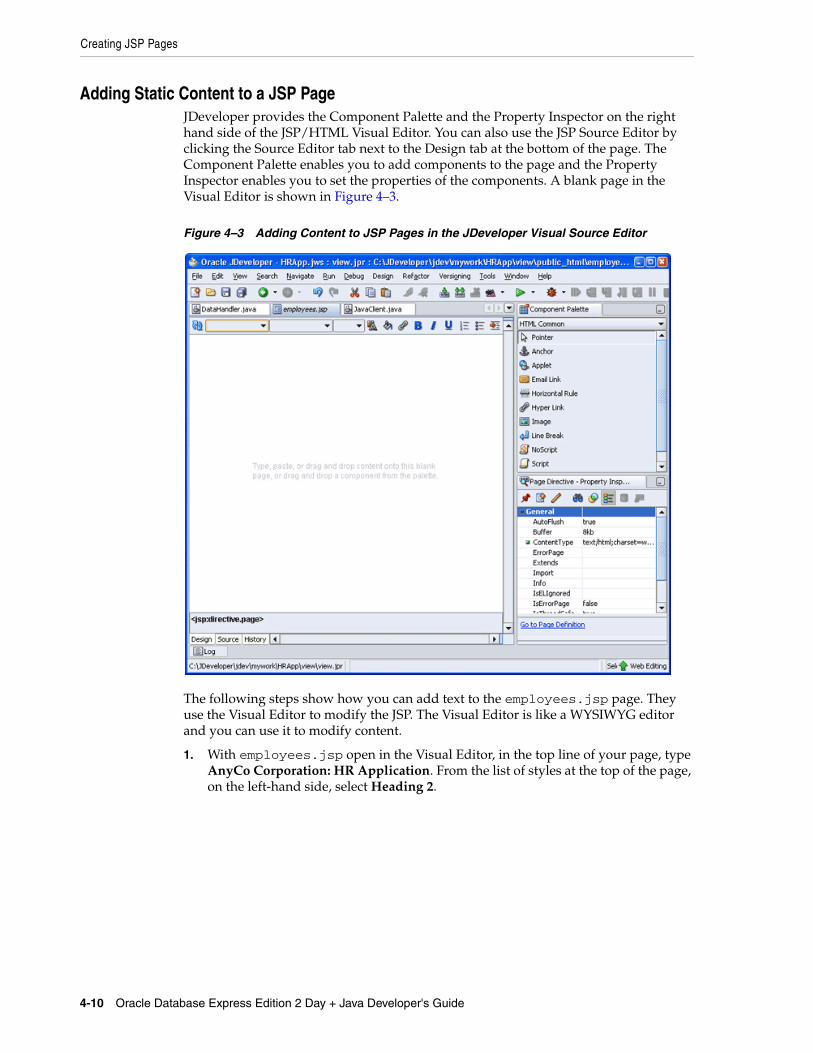
Creating JSP Pages
4-10 Oracle Database Express Edition 2 Day + Java Developer's Guide
Adding Static Content to a JSP PageJDeveloper provides the Component Palette and the Property Inspector on the right hand side of the JSP/HTML Visual Editor. You can also use the JSP Source Editor by clicking the Source Editor tab next to the Design tab at the bottom of the page. The Component Palette enables you to add components to the page and the Property Inspector enables you to set the properties of the components. A blank page in the Visual Editor is shown in Figure 4–3.
Figure 4–3 Adding Content to JSP Pages in the JDeveloper Visual Source Editor
The following steps show how you can add text to the employees.jsp page. They use the Visual Editor to modify the JSP. The Visual Editor is like a WYSIWYG editor and you can use it to modify content.
1. With employees.jsp open in the Visual Editor, in the top line of your page, type AnyCo Corporation: HR Application. From the list of styles at the top of the page, on the left-hand side, select Heading 2.
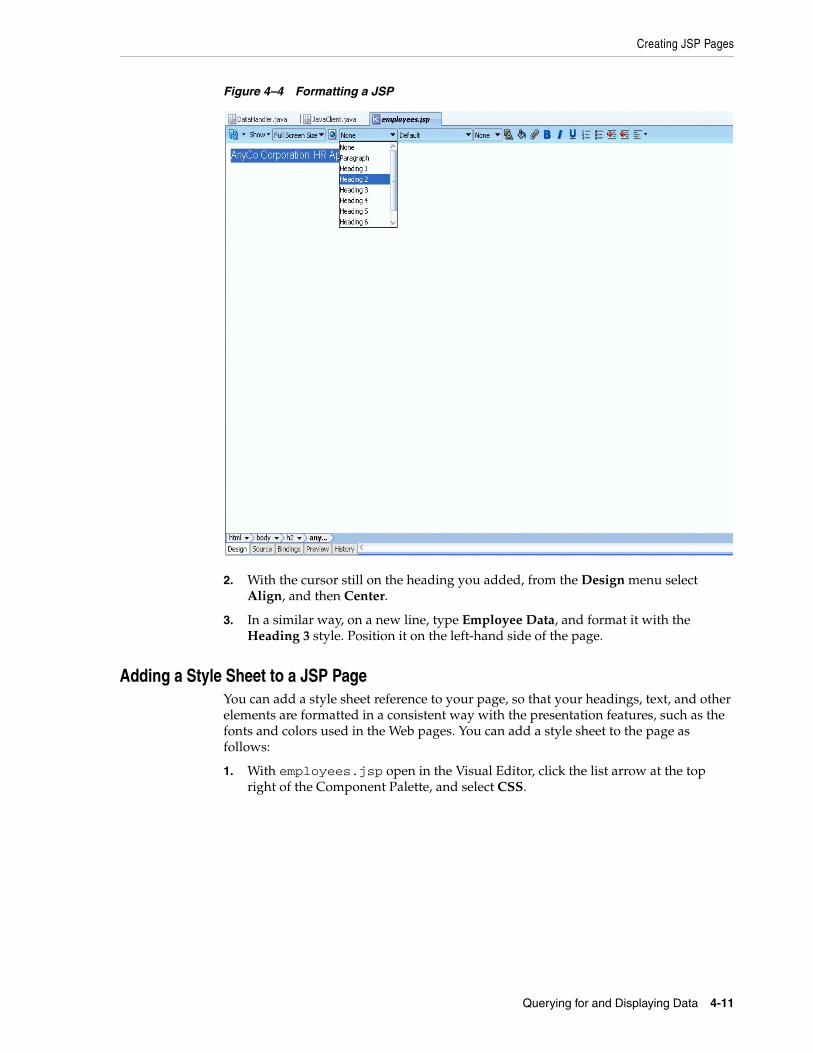
Creating JSP Pages
Querying for and Displaying Data 4-11
Figure 4–4 Formatting a JSP
2. With the cursor still on the heading you added, from the Design menu select Align, and then Center.
3. In a similar way, on a new line, type Employee Data, and format it with the Heading 3 style. Position it on the left-hand side of the page.
Adding a Style Sheet to a JSP PageYou can add a style sheet reference to your page, so that your headings, text, and other elements are formatted in a consistent way with the presentation features, such as the fonts and colors used in the Web pages. You can add a style sheet to the page as follows:
1. With employees.jsp open in the Visual Editor, click the list arrow at the top right of the Component Palette, and select CSS.

Creating JSP Pages
4-12 Oracle Database Express Edition 2 Day + Java Developer's Guide
Figure 4–5 Selecting a CSS File for the JSP
2. From the CSS list, drag JDeveloper onto your page. As soon as you drag JDeveloper onto your page, it will ask you to save the jdeveloper.css file. Save the file in the same location as your JSP file. After you save the CSS file, it formats the page with the JDeveloper styles. Figure 4–6 shows the JSP Page with the content added to it in the previous section and the JDeveloper stylesheet applied to it.
Figure 4–6 Adding Static Content to the JSP Page
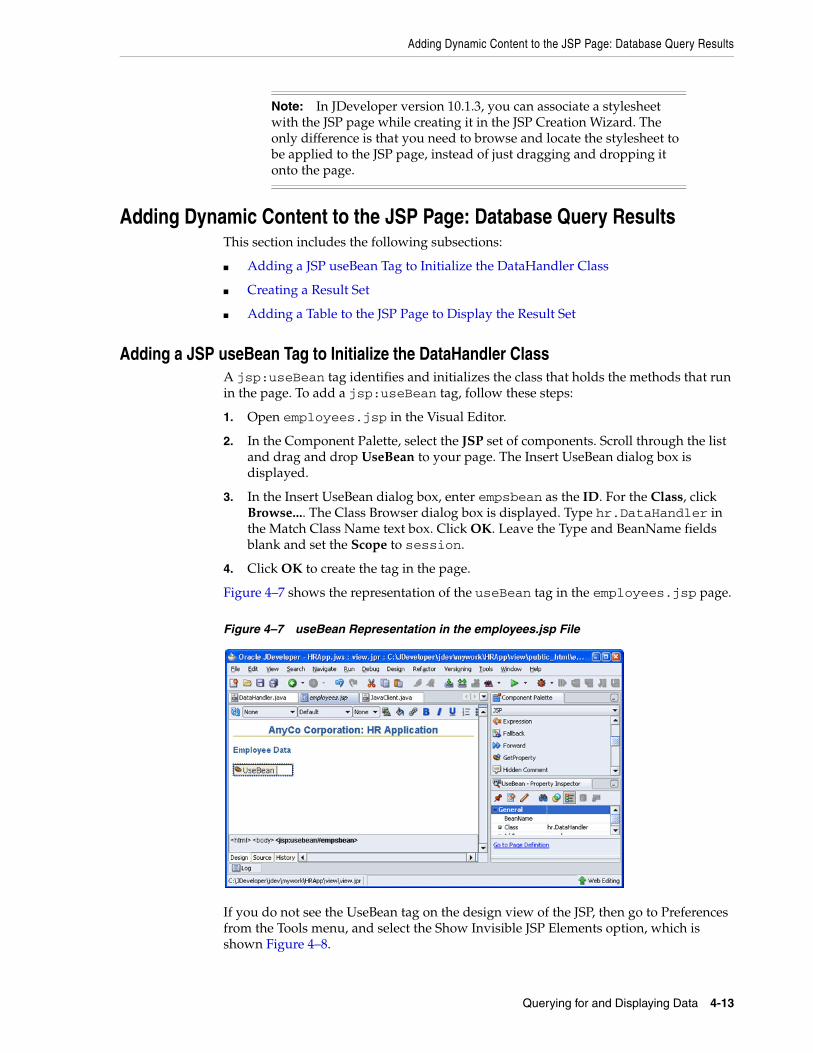
Note: In JDeveloper version 10.1.3, you can associate a stylesheet with the JSP page while creating it in the JSP Creation Wizard. The only difference is that you need to browse and locate the stylesheet to be applied to the JSP page, instead of just dragging and dropping it onto the page.
Adding Dynamic Content to the JSP Page: Database Query Results
Querying for and Displaying Data 4-13
Adding Dynamic Content to the JSP Page: Database Query ResultsThis section includes the following subsections:
■ Adding a JSP useBean Tag to Initialize the DataHandler Class
■ Creating a Result Set
■ Adding a Table to the JSP Page to Display the Result Set
Adding a JSP useBean Tag to Initialize the DataHandler ClassA jsp:useBean tag identifies and initializes the class that holds the methods that run in the page. To add a jsp:useBean tag, follow these steps:
1. Open employees.jsp in the Visual Editor.
2. In the Component Palette, select the JSP set of components. Scroll through the list and drag and drop UseBean to your page. The Insert UseBean dialog box is displayed.
3. In the Insert UseBean dialog box, enter empsbean as the ID. For the Class, click Browse.... The Class Browser dialog box is displayed. Type hr.DataHandler in the Match Class Name text box. Click OK. Leave the Type and BeanName fields blank and set the Scope to session.
4. Click OK to create the tag in the page.
Figure 4–7 shows the representation of the useBean tag in the employees.jsp page.
Figure 4–7 useBean Representation in the employees.jsp File
If you do not see the UseBean tag on the design view of the JSP, then go to Preferences from the Tools menu, and select the Show Invisible JSP Elements option, which is shown Figure 4–8.
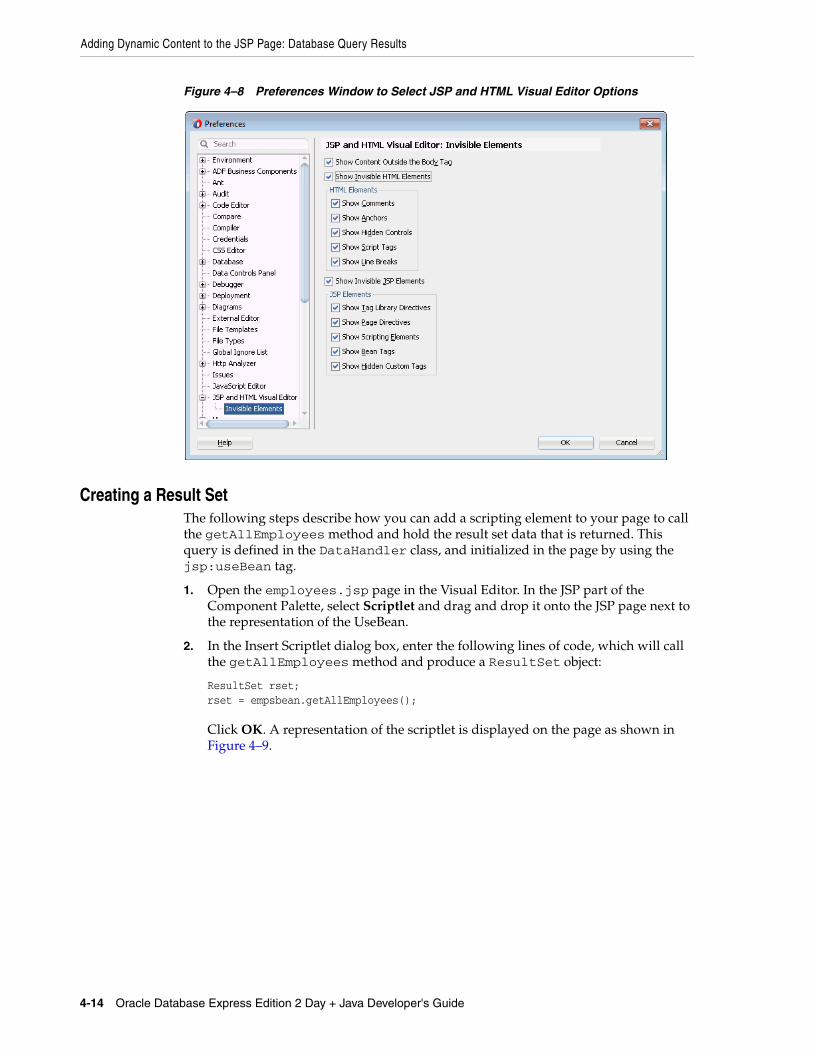
Adding Dynamic Content to the JSP Page: Database Query Results
4-14 Oracle Database Express Edition 2 Day + Java Developer's Guide
Figure 4–8 Preferences Window to Select JSP and HTML Visual Editor Options
Creating a Result SetThe following steps describe how you can add a scripting element to your page to call the getAllEmployees method and hold the result set data that is returned. This query is defined in the DataHandler class, and initialized in the page by using the jsp:useBean tag.
1. Open the employees.jsp page in the Visual Editor. In the JSP part of the Component Palette, select Scriptlet and drag and drop it onto the JSP page next to the representation of the UseBean.
2. In the Insert Scriptlet dialog box, enter the following lines of code, which will call the getAllEmployees method and produce a ResultSet object:
ResultSet rset;rset = empsbean.getAllEmployees();
Click OK. A representation of the scriptlet is displayed on the page as shown in Figure 4–9.
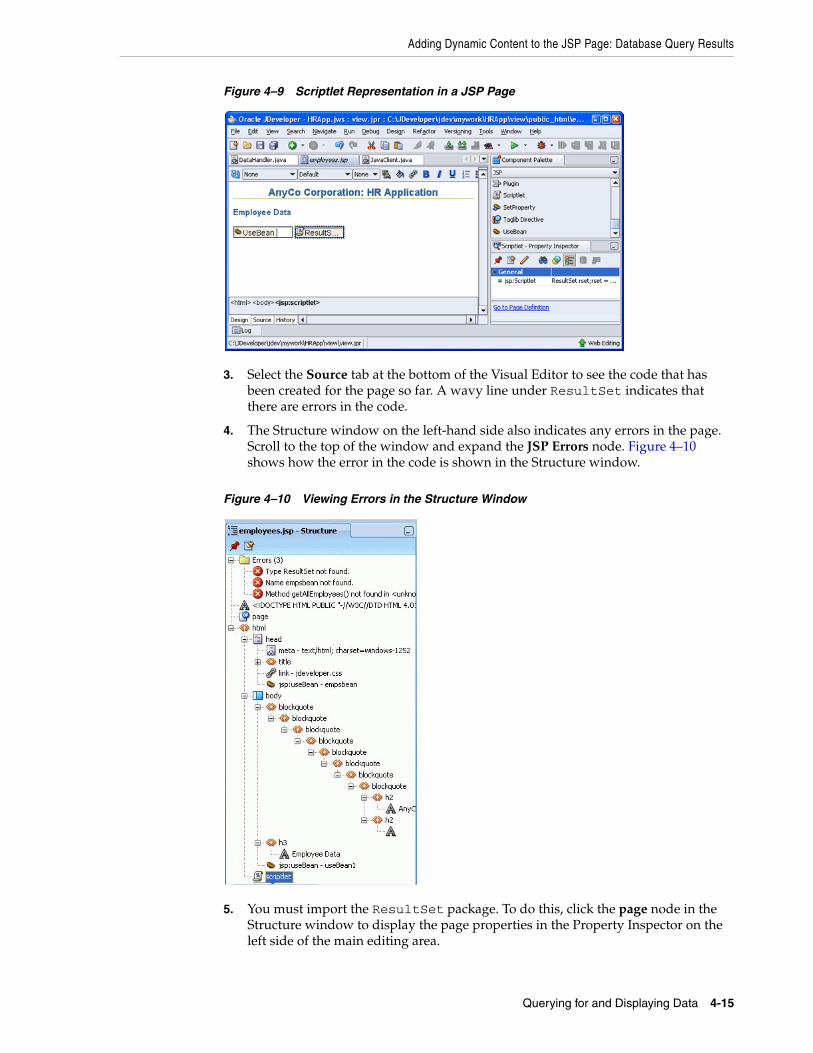
Adding Dynamic Content to the JSP Page: Database Query Results
Querying for and Displaying Data 4-15
Figure 4–9 Scriptlet Representation in a JSP Page
3. Select the Source tab at the bottom of the Visual Editor to see the code that has been created for the page so far. A wavy line under ResultSet indicates that there are errors in the code.
4. The Structure window on the left-hand side also indicates any errors in the page. Scroll to the top of the window and expand the JSP Errors node. Figure 4–10 shows how the error in the code is shown in the Structure window.
Figure 4–10 Viewing Errors in the Structure Window
5. You must import the ResultSet package. To do this, click the page node in the Structure window to display the page properties in the Property Inspector on the left side of the main editing area.
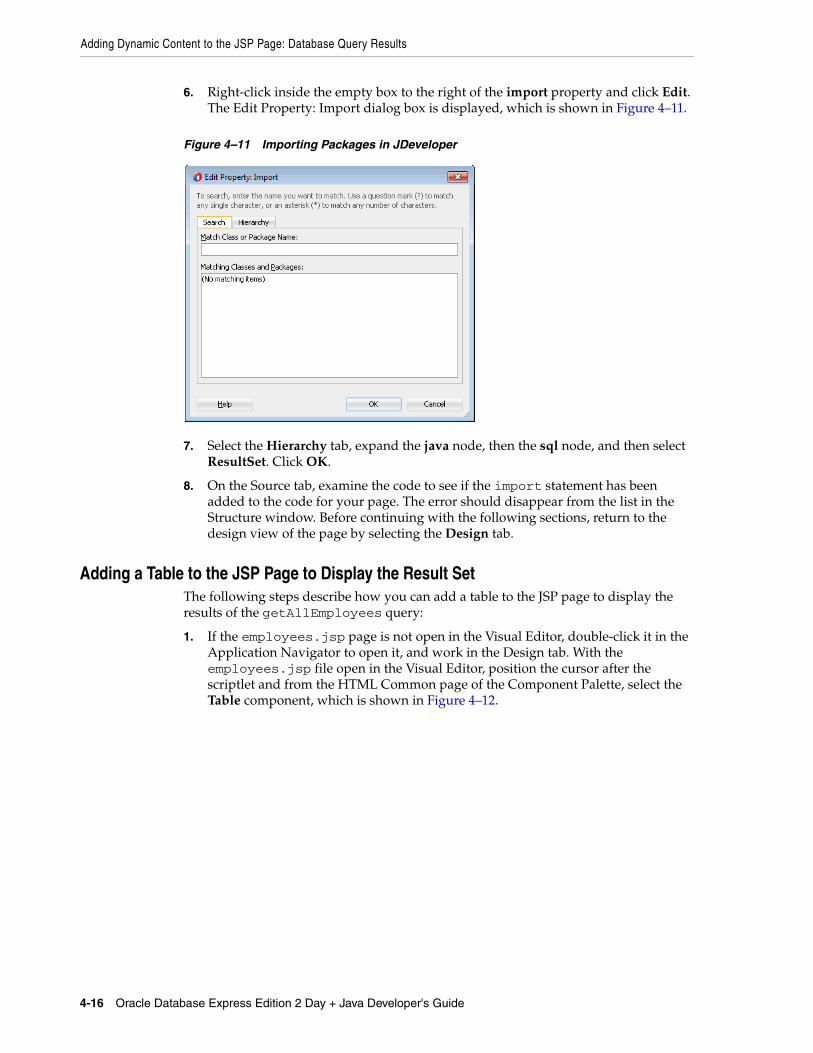
Adding Dynamic Content to the JSP Page: Database Query Results
4-16 Oracle Database Express Edition 2 Day + Java Developer's Guide
6. Right-click inside the empty box to the right of the import property and click Edit. The Edit Property: Import dialog box is displayed, which is shown in Figure 4–11.
Figure 4–11 Importing Packages in JDeveloper
7. Select the Hierarchy tab, expand the java node, then the sql node, and then select ResultSet. Click OK.
8. On the Source tab, examine the code to see if the import statement has been added to the code for your page. The error should disappear from the list in the Structure window. Before continuing with the following sections, return to the design view of the page by selecting the Design tab.
Adding a Table to the JSP Page to Display the Result SetThe following steps describe how you can add a table to the JSP page to display the results of the getAllEmployees query:
1. If the employees.jsp page is not open in the Visual Editor, double-click it in the Application Navigator to open it, and work in the Design tab. With the employees.jsp file open in the Visual Editor, position the cursor after the scriptlet and from the HTML Common page of the Component Palette, select the Table component, which is shown in Figure 4–12.
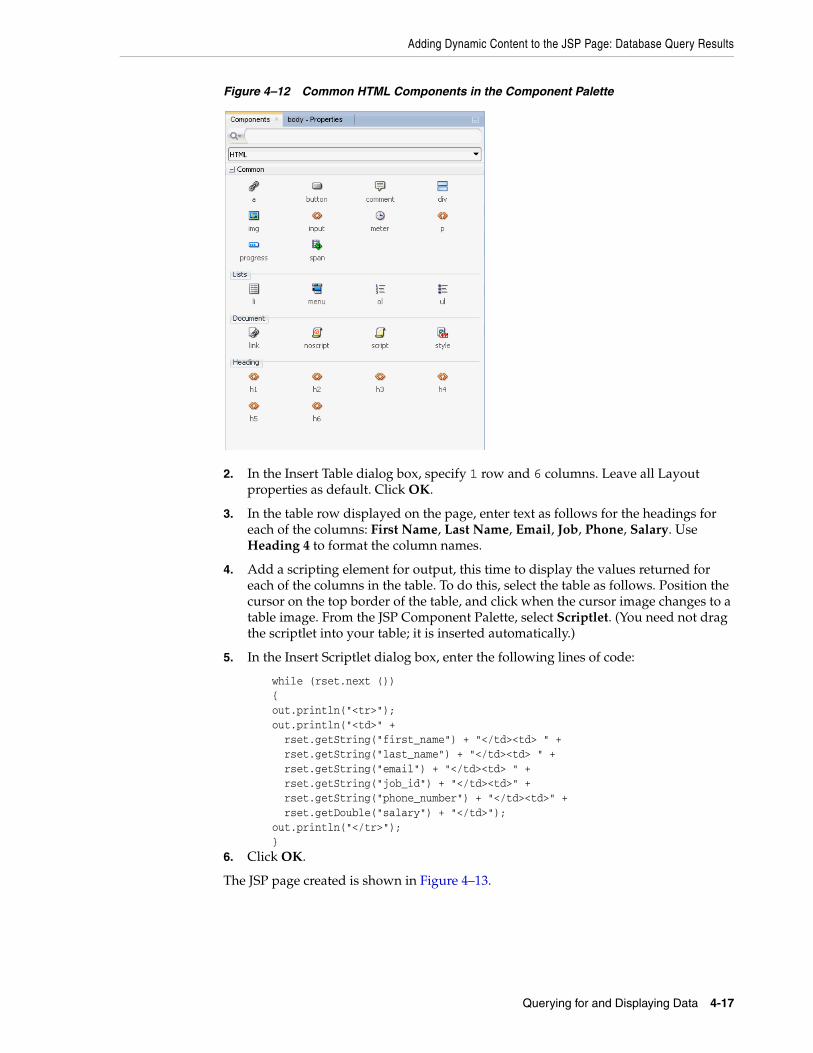
Adding Dynamic Content to the JSP Page: Database Query Results
Querying for and Displaying Data 4-17
Figure 4–12 Common HTML Components in the Component Palette
2. In the Insert Table dialog box, specify 1 row and 6 columns. Leave all Layout properties as default. Click OK.
3. In the table row displayed on the page, enter text as follows for the headings for each of the columns: First Name, Last Name, Email, Job, Phone, Salary. Use Heading 4 to format the column names.
4. Add a scripting element for output, this time to display the values returned for each of the columns in the table. To do this, select the table as follows. Position the cursor on the top border of the table, and click when the cursor image changes to a table image. From the JSP Component Palette, select Scriptlet. (You need not drag the scriptlet into your table; it is inserted automatically.)
5. In the Insert Scriptlet dialog box, enter the following lines of code:
while (rset.next ()) { out.println("<tr>"); out.println("<td>" + rset.getString("first_name") + "</td><td> " + rset.getString("last_name") + "</td><td> " + rset.getString("email") + "</td><td> " + rset.getString("job_id") + "</td><td>" + rset.getString("phone_number") + "</td><td>" + rset.getDouble("salary") + "</td>"); out.println("</tr>"); }
6. Click OK.
The JSP page created is shown in Figure 4–13.
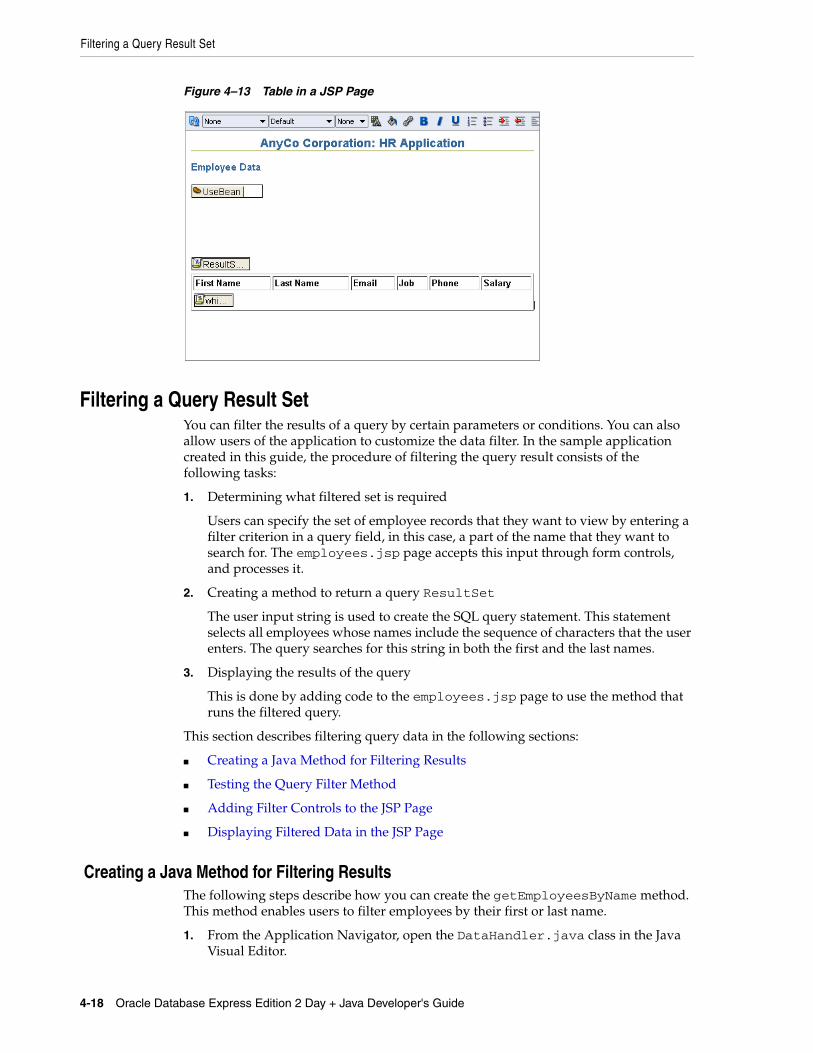
Filtering a Query Result Set
4-18 Oracle Database Express Edition 2 Day + Java Developer's Guide
Figure 4–13 Table in a JSP Page
Filtering a Query Result SetYou can filter the results of a query by certain parameters or conditions. You can also allow users of the application to customize the data filter. In the sample application created in this guide, the procedure of filtering the query result consists of the following tasks:
1. Determining what filtered set is required
Users can specify the set of employee records that they want to view by entering a filter criterion in a query field, in this case, a part of the name that they want to search for. The employees.jsp page accepts this input through form controls, and processes it.
2. Creating a method to return a query ResultSet
The user input string is used to create the SQL query statement. This statement selects all employees whose names include the sequence of characters that the user enters. The query searches for this string in both the first and the last names.
3. Displaying the results of the query
This is done by adding code to the employees.jsp page to use the method that runs the filtered query.
This section describes filtering query data in the following sections:
■ Creating a Java Method for Filtering Results
■ Testing the Query Filter Method
■ Adding Filter Controls to the JSP Page
■ Displaying Filtered Data in the JSP Page
Creating a Java Method for Filtering ResultsThe following steps describe how you can create the getEmployeesByName method. This method enables users to filter employees by their first or last name.
1. From the Application Navigator, open the DataHandler.java class in the Java Visual Editor.
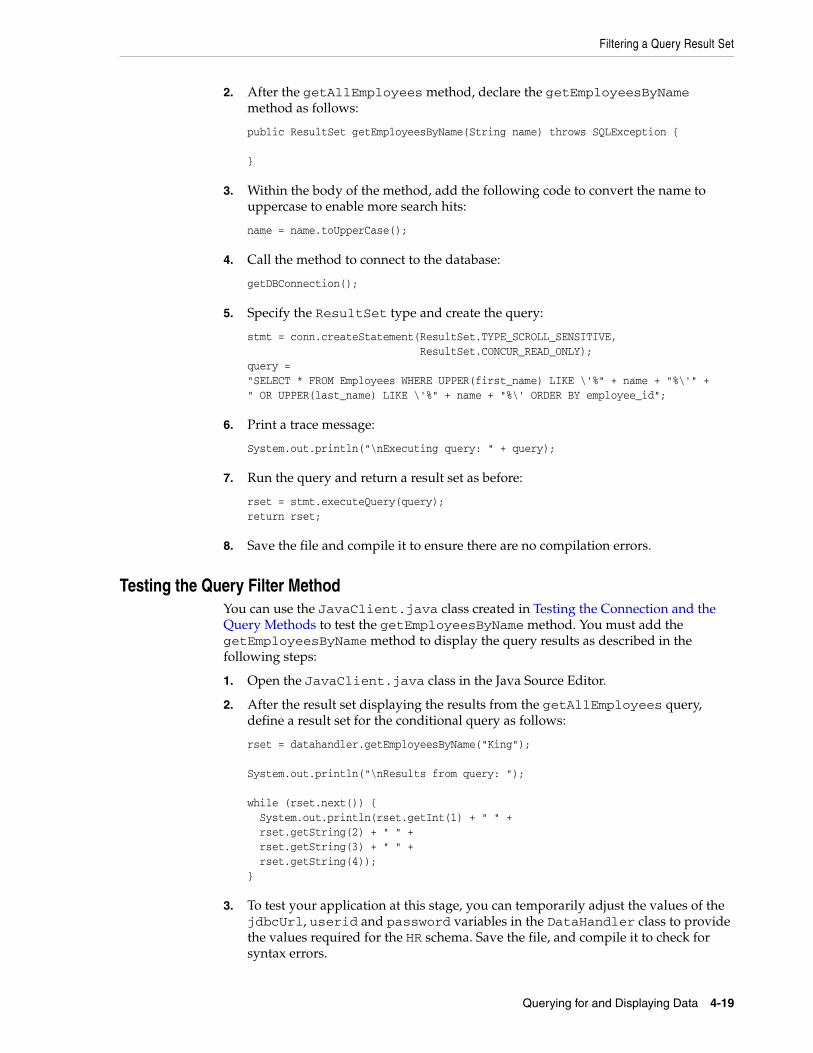
Filtering a Query Result Set
Querying for and Displaying Data 4-19
2. After the getAllEmployees method, declare the getEmployeesByName method as follows:
public ResultSet getEmployeesByName(String name) throws SQLException {
}
3. Within the body of the method, add the following code to convert the name to uppercase to enable more search hits:
name = name.toUpperCase();
4. Call the method to connect to the database:
getDBConnection();
5. Specify the ResultSet type and create the query:
stmt = conn.createStatement(ResultSet.TYPE_SCROLL_SENSITIVE, ResultSet.CONCUR_READ_ONLY);query ="SELECT * FROM Employees WHERE UPPER(first_name) LIKE \'%" + name + "%\'" +" OR UPPER(last_name) LIKE \'%" + name + "%\' ORDER BY employee_id";
6. Print a trace message:
System.out.println("\nExecuting query: " + query);
7. Run the query and return a result set as before:
rset = stmt.executeQuery(query);return rset;
8. Save the file and compile it to ensure there are no compilation errors.
Testing the Query Filter MethodYou can use the JavaClient.java class created in Testing the Connection and the Query Methods to test the getEmployeesByName method. You must add the getEmployeesByName method to display the query results as described in the following steps:
1. Open the JavaClient.java class in the Java Source Editor.
2. After the result set displaying the results from the getAllEmployees query, define a result set for the conditional query as follows:
rset = datahandler.getEmployeesByName("King"); System.out.println("\nResults from query: "); while (rset.next()) { System.out.println(rset.getInt(1) + " " + rset.getString(2) + " " + rset.getString(3) + " " + rset.getString(4));}
3. To test your application at this stage, you can temporarily adjust the values of the jdbcUrl, userid and password variables in the DataHandler class to provide the values required for the HR schema. Save the file, and compile it to check for syntax errors.
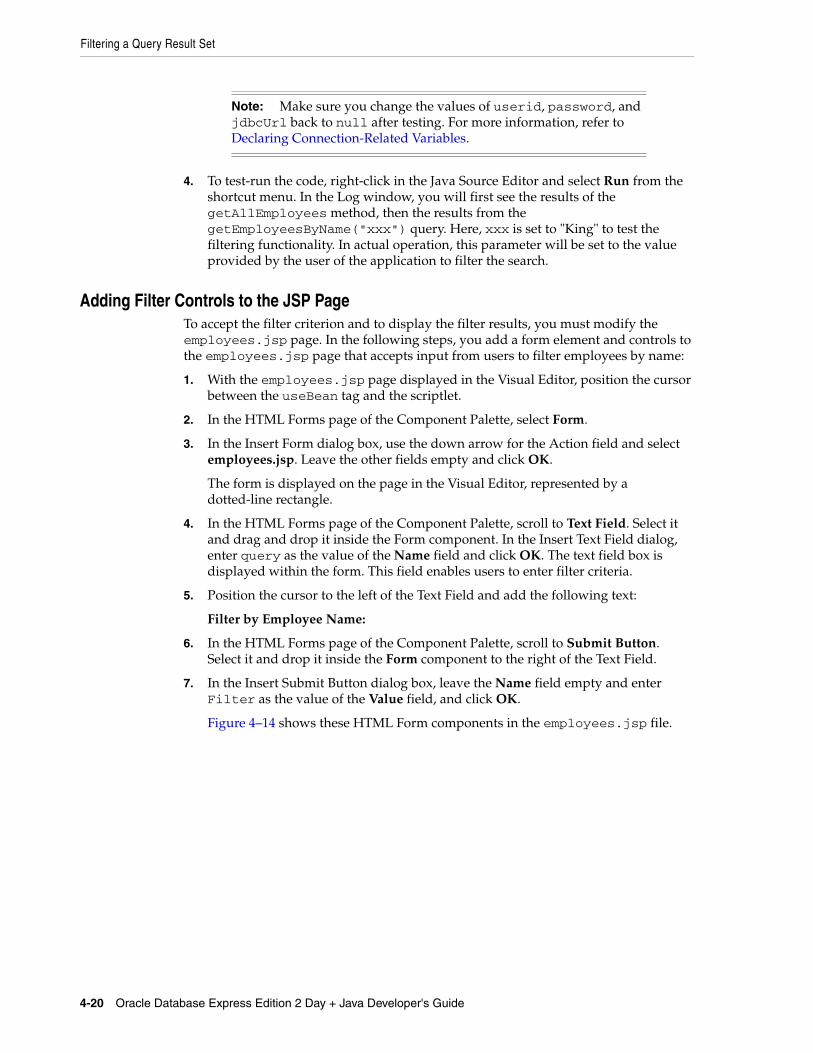
Note: Make sure you change the values of userid, password, and jdbcUrl back to null after testing. For more information, refer to Declaring Connection-Related Variables.
Filtering a Query Result Set
4-20 Oracle Database Express Edition 2 Day + Java Developer's Guide
4. To test-run the code, right-click in the Java Source Editor and select Run from the shortcut menu. In the Log window, you will first see the results of the getAllEmployees method, then the results from the getEmployeesByName("xxx") query. Here, xxx is set to "King" to test the filtering functionality. In actual operation, this parameter will be set to the value provided by the user of the application to filter the search.
Adding Filter Controls to the JSP PageTo accept the filter criterion and to display the filter results, you must modify the employees.jsp page. In the following steps, you add a form element and controls to the employees.jsp page that accepts input from users to filter employees by name:
1. With the employees.jsp page displayed in the Visual Editor, position the cursor between the useBean tag and the scriptlet.
2. In the HTML Forms page of the Component Palette, select Form.
3. In the Insert Form dialog box, use the down arrow for the Action field and select employees.jsp. Leave the other fields empty and click OK.
The form is displayed on the page in the Visual Editor, represented by a dotted-line rectangle.
4. In the HTML Forms page of the Component Palette, scroll to Text Field. Select it and drag and drop it inside the Form component. In the Insert Text Field dialog, enter query as the value of the Name field and click OK. The text field box is displayed within the form. This field enables users to enter filter criteria.
5. Position the cursor to the left of the Text Field and add the following text:
Filter by Employee Name:
6. In the HTML Forms page of the Component Palette, scroll to Submit Button. Select it and drop it inside the Form component to the right of the Text Field.
7. In the Insert Submit Button dialog box, leave the Name field empty and enter Filter as the value of the Value field, and click OK.
Figure 4–14 shows these HTML Form components in the employees.jsp file.
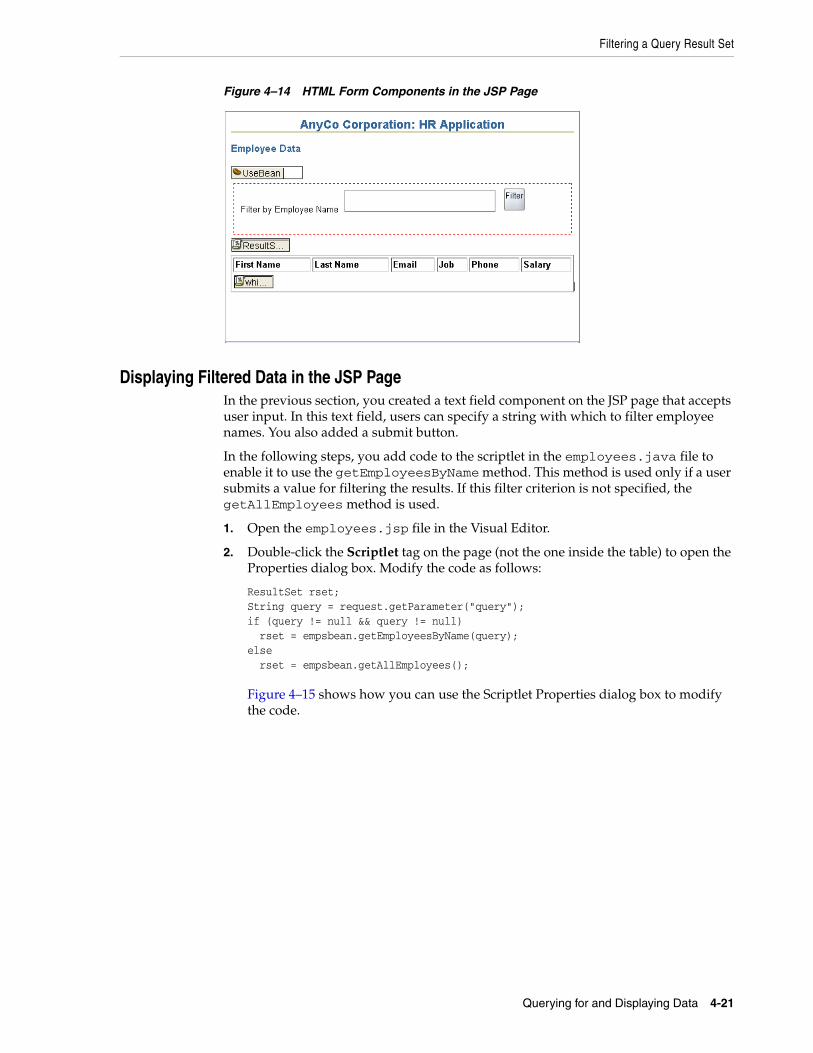
Filtering a Query Result Set
Querying for and Displaying Data 4-21
Figure 4–14 HTML Form Components in the JSP Page
Displaying Filtered Data in the JSP PageIn the previous section, you created a text field component on the JSP page that accepts user input. In this text field, users can specify a string with which to filter employee names. You also added a submit button.
In the following steps, you add code to the scriptlet in the employees.java file to enable it to use the getEmployeesByName method. This method is used only if a user submits a value for filtering the results. If this filter criterion is not specified, the getAllEmployees method is used.
1. Open the employees.jsp file in the Visual Editor.
2. Double-click the Scriptlet tag on the page (not the one inside the table) to open the Properties dialog box. Modify the code as follows:
ResultSet rset;String query = request.getParameter("query");if (query != null && query != null) rset = empsbean.getEmployeesByName(query);else rset = empsbean.getAllEmployees();
Figure 4–15 shows how you can use the Scriptlet Properties dialog box to modify the code.
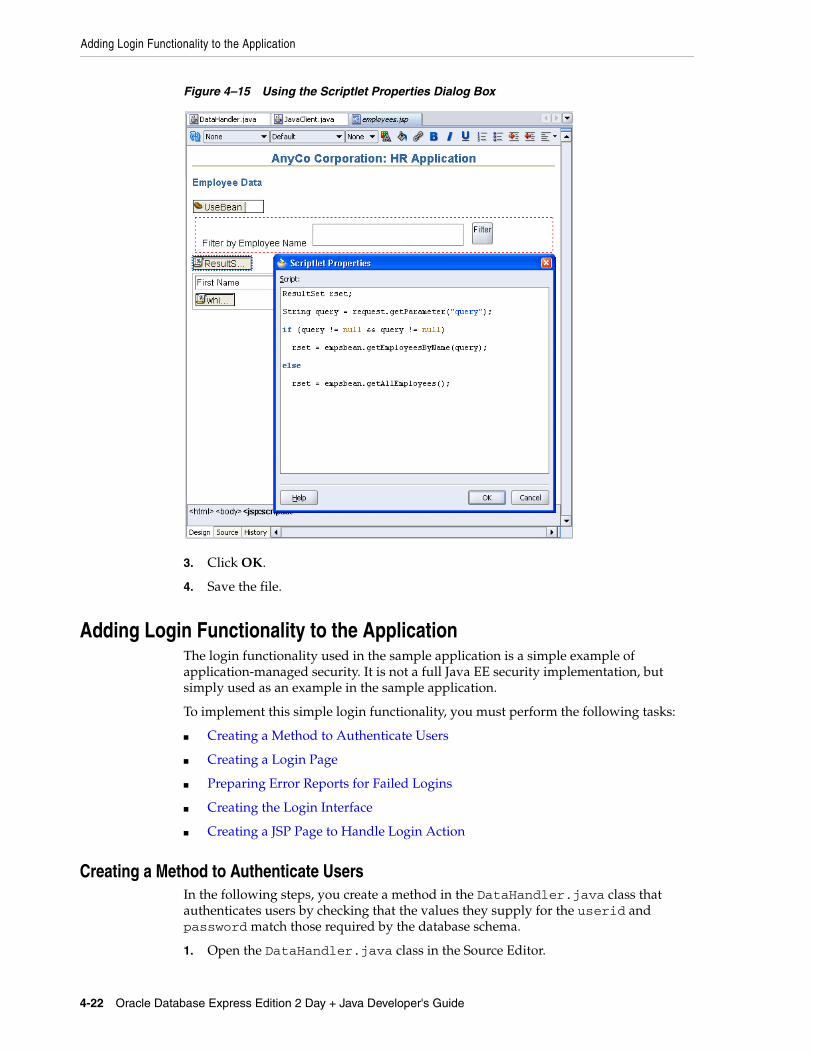
Adding Login Functionality to the Application
4-22 Oracle Database Express Edition 2 Day + Java Developer's Guide
Figure 4–15 Using the Scriptlet Properties Dialog Box
3. Click OK.
4. Save the file.
Adding Login Functionality to the ApplicationThe login functionality used in the sample application is a simple example of application-managed security. It is not a full Java EE security implementation, but simply used as an example in the sample application.
To implement this simple login functionality, you must perform the following tasks:
■ Creating a Method to Authenticate Users
■ Creating a Login Page
■ Preparing Error Reports for Failed Logins
■ Creating the Login Interface
■ Creating a JSP Page to Handle Login Action
Creating a Method to Authenticate UsersIn the following steps, you create a method in the DataHandler.java class that authenticates users by checking that the values they supply for the userid and password match those required by the database schema.
1. Open the DataHandler.java class in the Source Editor.
Adding Login Functionality to the Application
Querying for and Displaying Data 4-23
2. Create a method called authenticateUser that checks if the userid, password, and host values supplied by a user are valid:
public boolean authenticateUser(String jdbcUrl, String userid, String password, HttpSession session) throws SQLException { }
3. JDeveloper prompts you with a wavy underline and a message that you must import a class for HttpSession. Press the Alt+Enter keys to import the javax.servlet.http.HttpSession class.
4. Within the body of the method, assign the jdbcUrl, userid, and password values from the call to the attributes of the current object as follows:
this.jdbcUrl= jdbcUrl;this.userid = userid;this.password = password;
5. Attempt to connect to the database using the values supplied, and if successful, return a value of true. Enclose this in a try block as follows:
try { OracleDataSource ds; ds = new OracleDataSource(); ds.setURL(jdbcUrl); conn = ds.getConnection(userid, password); return true;}
See Also: For information about using try and catch blocks, refer to Exception Handling in Chapter 5.
6. To handle the case where the login credentials do not match, after the try block, add a catch block. The code in this block prints out a log message and sets up an error message. This error message can be displayed to the user if a login attempt fails. The jdbcUrl, userid and password variables are set back to null, and the method returns the value false. To do this, enter the following code:
catch ( SQLException ex ) { System.out.println("Invalid user credentials"); session.setAttribute("loginerrormsg", "Invalid Login. Try Again..."); this.jdbcUrl = null; this.userid = null; this.password = null; return false;}
The complete code is shown in Example 4–4.
Example 4–4 Implementing User Validation
public boolean authenticateUser(String jdbcUrl, String userid, String password, HttpSession session) throws SQLException { this.jdbcUrl = jdbcUrl; this.userid = userid; this.password = password; try { OracleDataSource ds; ds = new OracleDataSource();
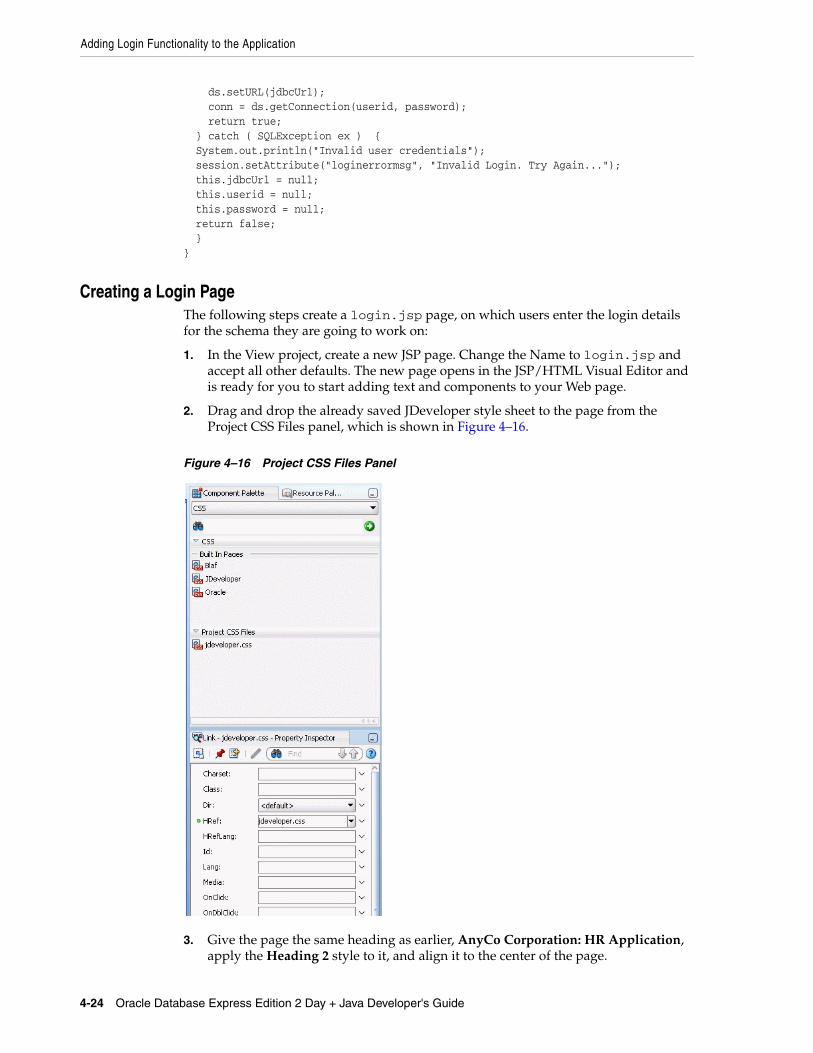
Adding Login Functionality to the Application
4-24 Oracle Database Express Edition 2 Day + Java Developer's Guide
ds.setURL(jdbcUrl); conn = ds.getConnection(userid, password); return true; } catch ( SQLException ex ) { System.out.println("Invalid user credentials"); session.setAttribute("loginerrormsg", "Invalid Login. Try Again..."); this.jdbcUrl = null; this.userid = null; this.password = null; return false; } }
Creating a Login PageThe following steps create a login.jsp page, on which users enter the login details for the schema they are going to work on:
1. In the View project, create a new JSP page. Change the Name to login.jsp and accept all other defaults. The new page opens in the JSP/HTML Visual Editor and is ready for you to start adding text and components to your Web page.
2. Drag and drop the already saved JDeveloper style sheet to the page from the Project CSS Files panel, which is shown in Figure 4–16.
Figure 4–16 Project CSS Files Panel
3. Give the page the same heading as earlier, AnyCo Corporation: HR Application, apply the Heading 2 style to it, and align it to the center of the page.
Adding Login Functionality to the Application
Querying for and Displaying Data 4-25
4. On the next line, enter Application Login, with the Heading 3 style applied. Align this heading to the left-hand side of the page.
Preparing Error Reports for Failed LoginsThe following steps add functions to the login.jsp page for displaying error messages when a user login fails. The scriptlets and expression used in the login.jsp page set up a variable to hold any error message. If the user login fails, the connection method sets a message for the session. This page checks to see if there is such a message, and if present, it displays the message.
1. With the login.jsp page open in the Visual Editor, position the cursor after the text on this page. Then, from the JSP page of the Component Palette, drag and drop the Scriptlet element from the palette onto the page.
2. In the Insert Scriptlet dialog box, enter the following code:
String loginerrormsg = null; loginerrormsg = (String) session.getAttribute("loginerrormsg"); if (loginerrormsg != null) {
3. Add another scriptlet in exactly the same way, and this time enter only a single closing brace (}) in the Insert Scriptlet dialog box.
4. Place the cursor between the two scriptlets and press Enter to create a new line. Apply the Heading 4 style to the new line.
5. With the cursor still on the new line, in the JSP page of the Component Palette, click Expression.
6. In the Insert Expression dialog box, enter loginerrormsg.
7. To see the code that has been added to your login.jsp page, below the Visual Editor, select the Source tab. The code should appear as follows:
<% String loginerrormsg = null; loginerrormsg = (String) session.getAttribute("loginerrormsg"); if (loginerrormsg != null) {%><h4> <%= loginerrormsg %></h4><% }%>
Before continuing with the following sections, return to the design view of the page by selecting the Design tab.
Creating the Login InterfaceIn these steps, you add fields to the login.jsp page on which users enter their login details.
1. If the login.jsp page is not open in the Visual Editor, double-click it in the Application Navigator to open it, and check that the Design tab is selected.
2. Position the cursor after the second scriptlet and select Form in the HTML Forms page of the Component Palette. In the Insert Form dialog box, enter login_action.jsp as the value for the Action field. This file will be used to process the
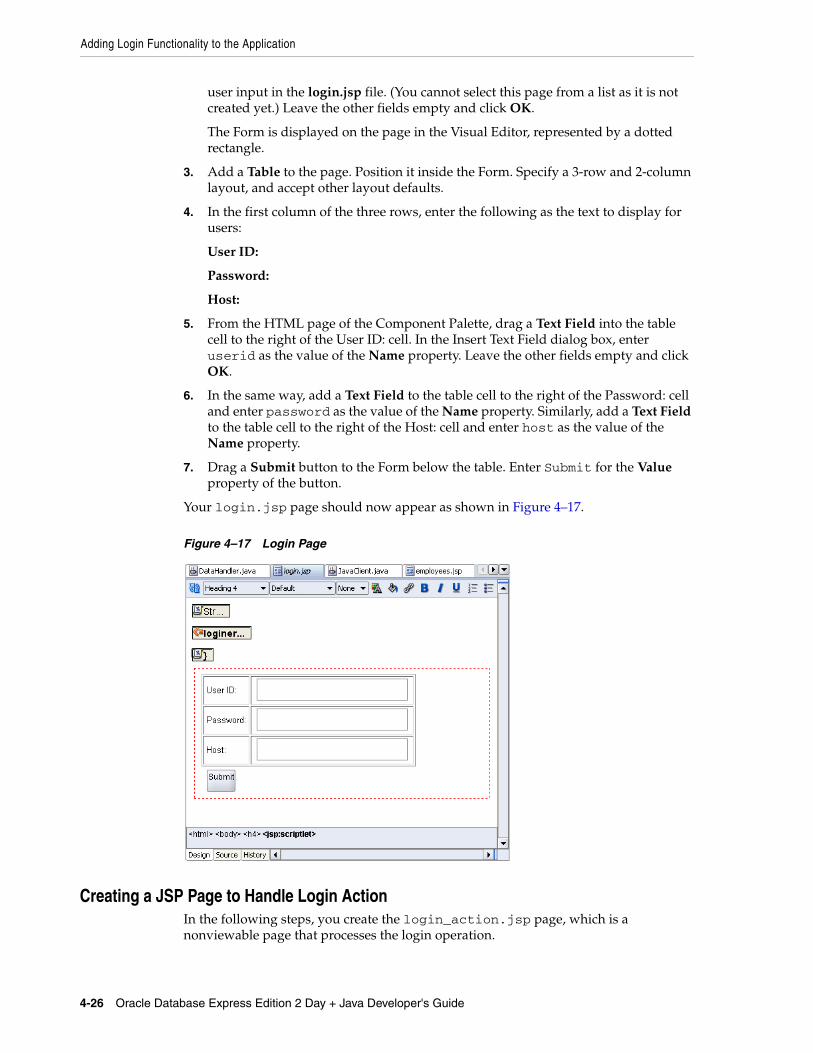
Adding Login Functionality to the Application
4-26 Oracle Database Express Edition 2 Day + Java Developer's Guide
user input in the login.jsp file. (You cannot select this page from a list as it is not created yet.) Leave the other fields empty and click OK.
The Form is displayed on the page in the Visual Editor, represented by a dotted rectangle.
3. Add a Table to the page. Position it inside the Form. Specify a 3-row and 2-column layout, and accept other layout defaults.
4. In the first column of the three rows, enter the following as the text to display for users:
User ID:
Password:
Host:
5. From the HTML page of the Component Palette, drag a Text Field into the table cell to the right of the User ID: cell. In the Insert Text Field dialog box, enter userid as the value of the Name property. Leave the other fields empty and click OK.
6. In the same way, add a Text Field to the table cell to the right of the Password: cell and enter password as the value of the Name property. Similarly, add a Text Field to the table cell to the right of the Host: cell and enter host as the value of the Name property.
7. Drag a Submit button to the Form below the table. Enter Submit for the Value property of the button.
Your login.jsp page should now appear as shown in Figure 4–17.
Figure 4–17 Login Page
Creating a JSP Page to Handle Login ActionIn the following steps, you create the login_action.jsp page, which is a nonviewable page that processes the login operation.
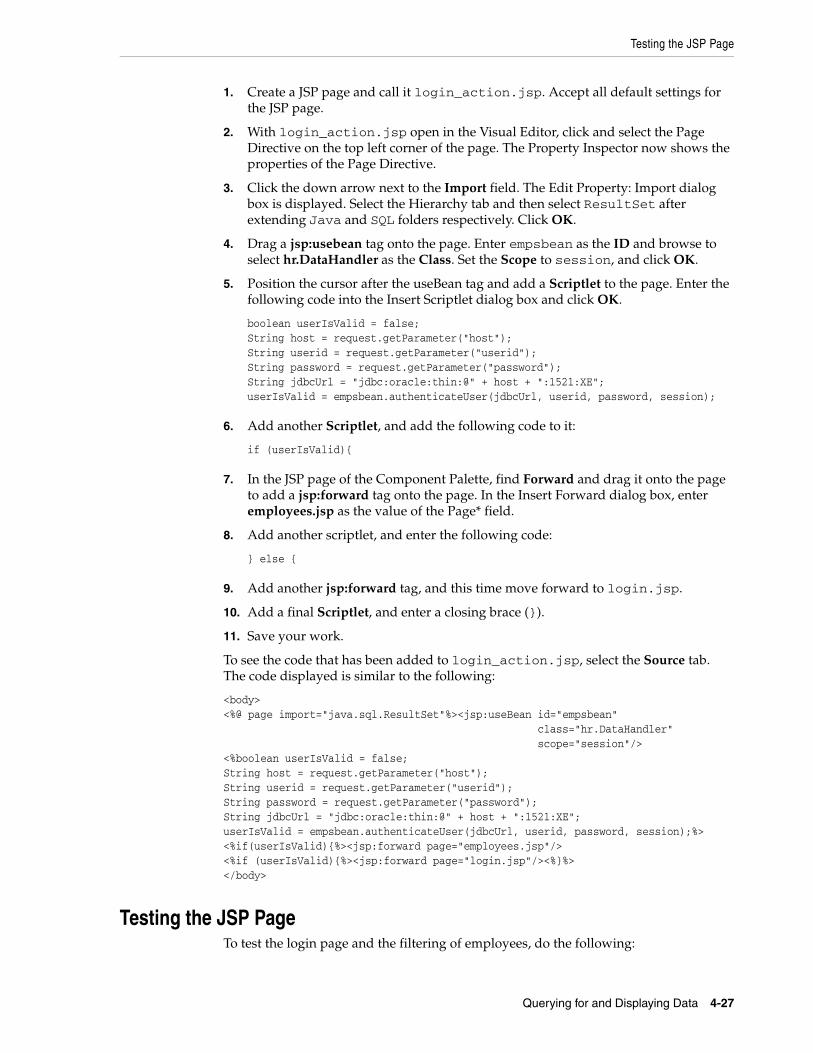
Testing the JSP Page
Querying for and Displaying Data 4-27
1. Create a JSP page and call it login_action.jsp. Accept all default settings for the JSP page.
2. With login_action.jsp open in the Visual Editor, click and select the Page Directive on the top left corner of the page. The Property Inspector now shows the properties of the Page Directive.
3. Click the down arrow next to the Import field. The Edit Property: Import dialog box is displayed. Select the Hierarchy tab and then select ResultSet after extending Java and SQL folders respectively. Click OK.
4. Drag a jsp:usebean tag onto the page. Enter empsbean as the ID and browse to select hr.DataHandler as the Class. Set the Scope to session, and click OK.
5. Position the cursor after the useBean tag and add a Scriptlet to the page. Enter the following code into the Insert Scriptlet dialog box and click OK.
boolean userIsValid = false;String host = request.getParameter("host");String userid = request.getParameter("userid");String password = request.getParameter("password");String jdbcUrl = "jdbc:oracle:thin:@" + host + ":1521:XE";userIsValid = empsbean.authenticateUser(jdbcUrl, userid, password, session);
6. Add another Scriptlet, and add the following code to it:
if (userIsValid){
7. In the JSP page of the Component Palette, find Forward and drag it onto the page to add a jsp:forward tag onto the page. In the Insert Forward dialog box, enter employees.jsp as the value of the Page* field.
8. Add another scriptlet, and enter the following code:
} else {
9. Add another jsp:forward tag, and this time move forward to login.jsp.
10. Add a final Scriptlet, and enter a closing brace (}).
11. Save your work.
To see the code that has been added to login_action.jsp, select the Source tab. The code displayed is similar to the following:
<body><%@ page import="java.sql.ResultSet"%><jsp:useBean id="empsbean" class="hr.DataHandler" scope="session"/><%boolean userIsValid = false;String host = request.getParameter("host");String userid = request.getParameter("userid");String password = request.getParameter("password");String jdbcUrl = "jdbc:oracle:thin:@" + host + ":1521:XE";userIsValid = empsbean.authenticateUser(jdbcUrl, userid, password, session);%> <%if(userIsValid){%><jsp:forward page="employees.jsp"/><%if (userIsValid){%><jsp:forward page="login.jsp"/><%}%></body>
Testing the JSP PageTo test the login page and the filtering of employees, do the following:
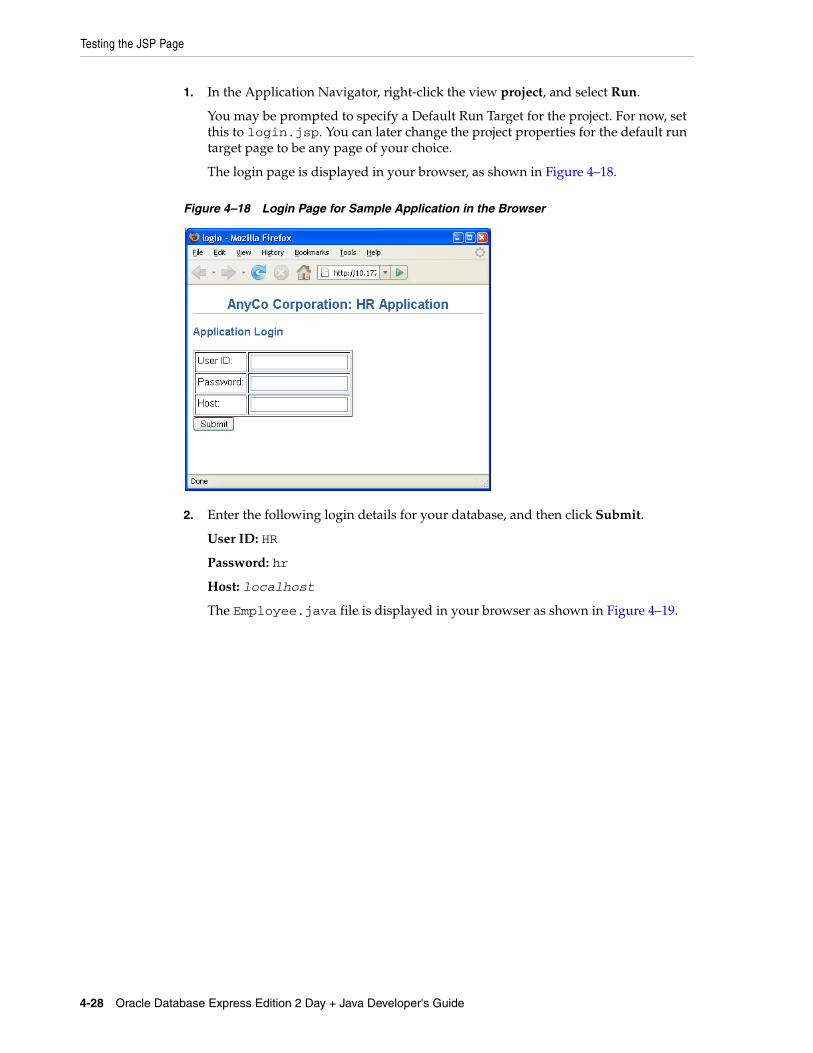
Testing the JSP Page
4-28 Oracle Database Express Edition 2 Day + Java Developer's Guide
1. In the Application Navigator, right-click the view project, and select Run.
You may be prompted to specify a Default Run Target for the project. For now, set this to login.jsp. You can later change the project properties for the default run target page to be any page of your choice.
The login page is displayed in your browser, as shown in Figure 4–18.
Figure 4–18 Login Page for Sample Application in the Browser
2. Enter the following login details for your database, and then click Submit.
User ID: HR
Password: hr
Host: localhost
The Employee.java file is displayed in your browser as shown in Figure 4–19.
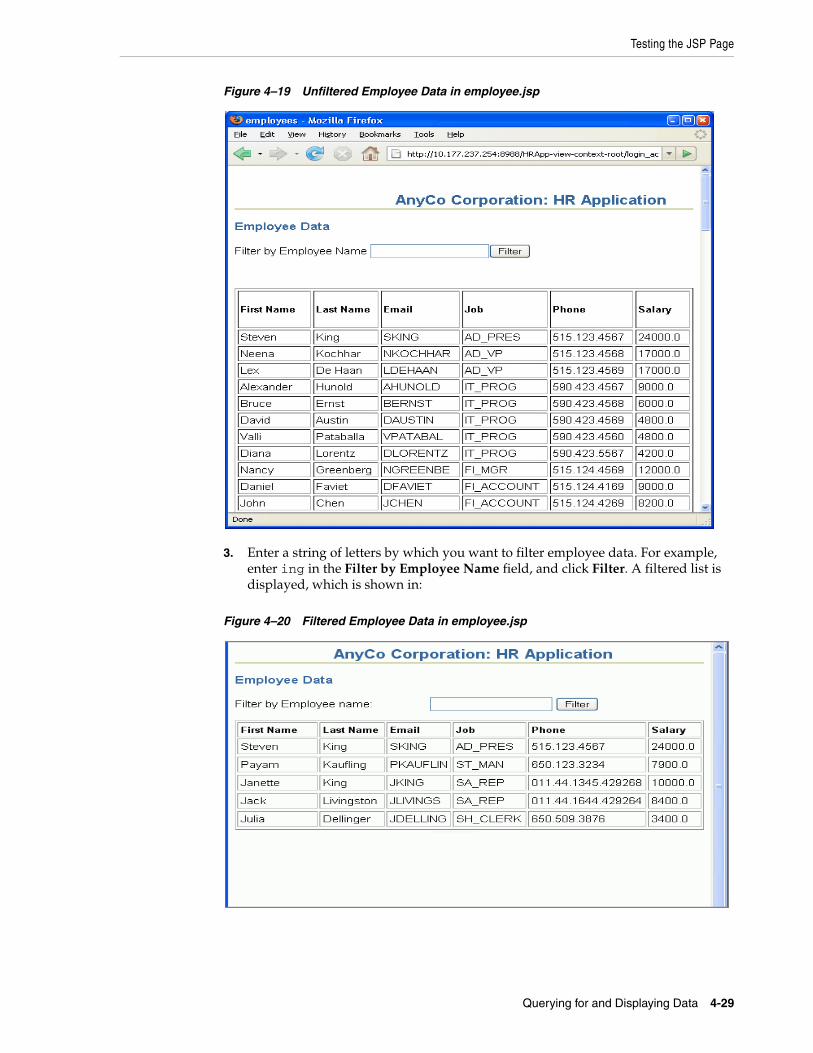
Testing the JSP Page
Querying for and Displaying Data 4-29
Figure 4–19 Unfiltered Employee Data in employee.jsp
3. Enter a string of letters by which you want to filter employee data. For example, enter ing in the Filter by Employee Name field, and click Filter. A filtered list is displayed, which is shown in:
Figure 4–20 Filtered Employee Data in employee.jsp

Testing the JSP Page
4-30 Oracle Database Express Edition 2 Day + Java Developer's Guide
5
Updating Data 5-1
5 Updating Data
In this chapter, you will see how you can modify the sample application and add functionality that enables users to edit, update, and delete data in Oracle Database XE. This chapter includes the following sections:
■ Creating a JavaBean
■ Updating Data from a Java Class
■ Inserting an Employee Record
■ Deleting an Employee Record
■ Exception Handling
■ Navigation in the Sample Application
Creating a JavaBeanIn outline, a bean is a Java class that has properties, events and methods. For each of its properties, the bean also includes accessors, that is get and set methods. Any object that conforms to certain basic rules can be a bean. There is no special class that has to be extended to create a bean.
In the steps for creating a sample application in this chapter, a JavaBean is used to hold a single employee record. When a user wants to edit an existing record or add a new one, it is used as a container to hold the changed or new values for a single row of a table to prepare the row for using to update the database.
The bean contains properties for each field in an employee record, and then JDeveloper creates the accessors (get and set methods) for each of those properties. You will see how to create a JavaBean for the sample application in the following subsections:
■ Creating a JavaBean in JDeveloper
■ Defining the JavaBean Properties and Methods
Creating a JavaBean in JDeveloperEmployee.java is the JavaBean that is used in the sample application to hold a single employee record and modify its contents. To create a JavaBean, do the following:
1. Right-click the View project, and from the shortcut menu, click New.
2. In the New Gallery dialog box, select the All Technologies tab.
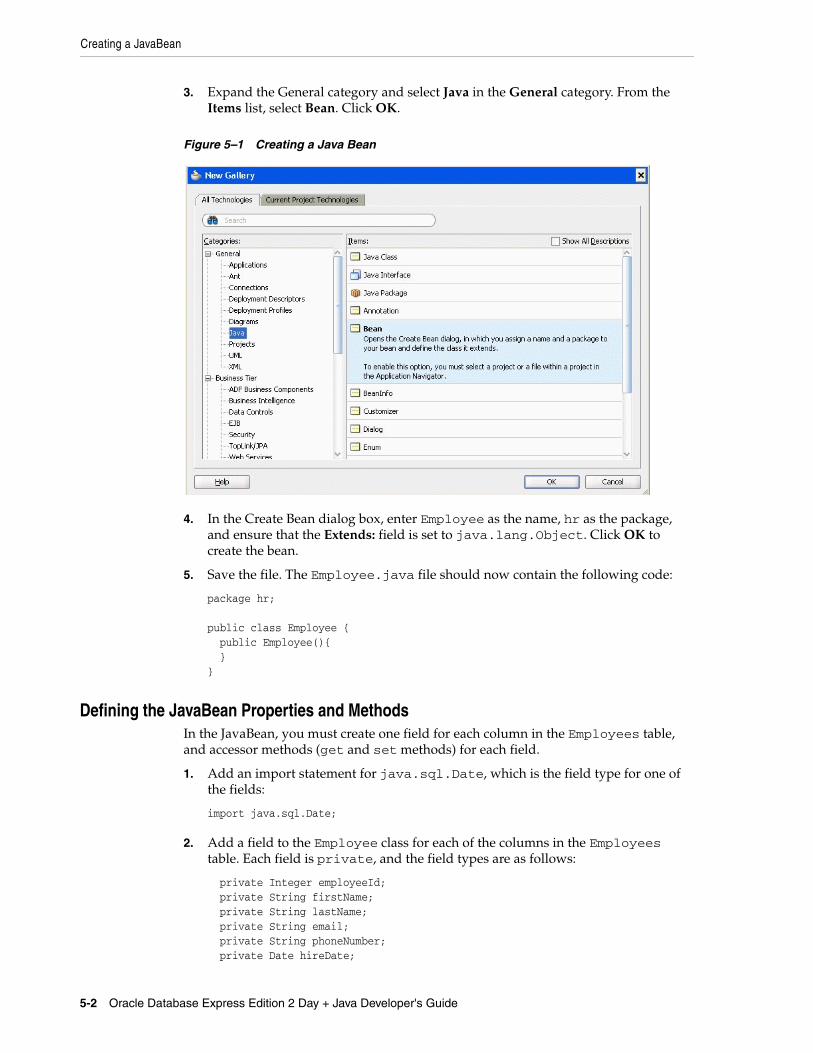
Creating a JavaBean
5-2 Oracle Database Express Edition 2 Day + Java Developer's Guide
3. Expand the General category and select Java in the General category. From the Items list, select Bean. Click OK.
Figure 5–1 Creating a Java Bean
4. In the Create Bean dialog box, enter Employee as the name, hr as the package, and ensure that the Extends: field is set to java.lang.Object. Click OK to create the bean.
5. Save the file. The Employee.java file should now contain the following code:
package hr; public class Employee { public Employee(){ }}
Defining the JavaBean Properties and MethodsIn the JavaBean, you must create one field for each column in the Employees table, and accessor methods (get and set methods) for each field.
1. Add an import statement for java.sql.Date, which is the field type for one of the fields:
import java.sql.Date;
2. Add a field to the Employee class for each of the columns in the Employees table. Each field is private, and the field types are as follows:
private Integer employeeId; private String firstName; private String lastName; private String email; private String phoneNumber; private Date hireDate;
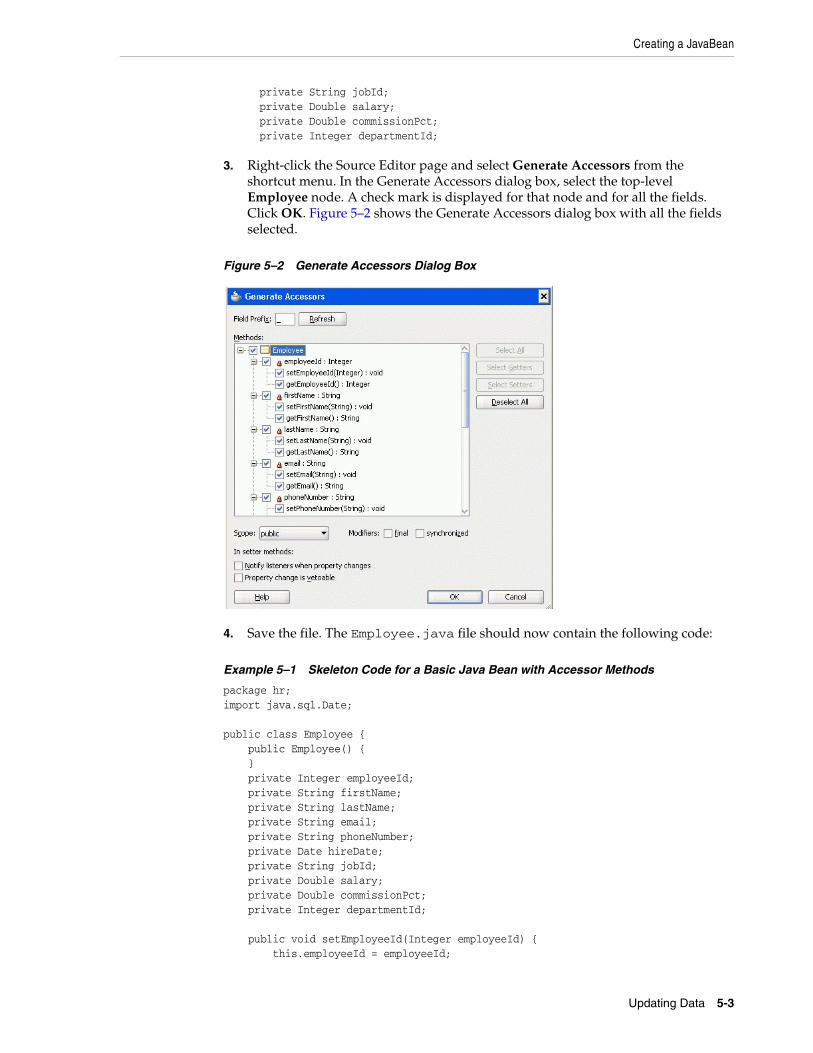
Creating a JavaBean
Updating Data 5-3
private String jobId; private Double salary; private Double commissionPct; private Integer departmentId;
3. Right-click the Source Editor page and select Generate Accessors from the shortcut menu. In the Generate Accessors dialog box, select the top-level Employee node. A check mark is displayed for that node and for all the fields. Click OK. Figure 5–2 shows the Generate Accessors dialog box with all the fields selected.
Figure 5–2 Generate Accessors Dialog Box
4. Save the file. The Employee.java file should now contain the following code:
Example 5–1 Skeleton Code for a Basic Java Bean with Accessor Methods
package hr;import java.sql.Date; public class Employee { public Employee() { } private Integer employeeId; private String firstName; private String lastName; private String email; private String phoneNumber; private Date hireDate; private String jobId; private Double salary; private Double commissionPct; private Integer departmentId;
public void setEmployeeId(Integer employeeId) { this.employeeId = employeeId;

Updating Data from a Java Class
5-4 Oracle Database Express Edition 2 Day + Java Developer's Guide
} public Integer getEmployeeId() { return employeeId; } public void setFirstName(String firstName) { this.firstName = firstName; } public String getFirstName() { return firstName; }............// This list has been shortened and is not comprehensive. The actual code contains // accessor methods for all the fields declared in the bean.
public void setDepartmentId(Integer departmentId) { this.departmentId = departmentId; } public Integer getDepartmentId() { return departmentId; }}
Updating Data from a Java ClassUpdating a row in a database table from a Java application requires you to do the following tasks:
1. Create a method that finds a particular employee row. This is used to display the values for a particular employee on an edit page.
2. Create a method that takes the updated employee data from the bean and updates the database.
3. On the main application page, in every row of employee data, include a link that enables a user to edit the data for that employee. The links take the user to the edit.jsp file with the data for that employee displayed, ready for editing.
4. Create a JSP page called edit.jsp, that includes a form and a table to display all the data of a single employee and enables a user to change the values.
5. Create a JSP page that processes the form on the edit.jsp page, writes the updated values to the Employee.java bean and calls the updateEmployee method.
You will see how to do this in the following sections:
■ Creating a Method to Identify an Employee Record
■ Creating a Method to Update Employee Data
■ Adding a Link to Navigate to an Update Page
■ Creating a JSP Page to Edit Employee Data
■ Creating a JSP Page to Handle an Update Action
Updating Data from a Java Class
Updating Data 5-5
Creating a Method to Identify an Employee RecordThe method you create in these steps is used to find the record for a particular employee. It is used when a user wants to edit or delete a particular employee record, and selects a link for that employee on the Employee.java page.
1. If the DataHandler class is not already open in the Java Source Editor, double-click it in the Application Navigator to open it.
2. In the DataHandler class, declare a new method that identifies the employee record to be updated:
public Employee findEmployeeById(int id) throws SQLException { }
3. Within the body of this method, create a new instance of the Employee bean called selectedEmp.
Employee selectedEmp = new Employee();
4. Connect to the database.
getDBConnection();
5. Create a Statement object, define a ResultSet type, and formulate the query. Add a trace message to assist with debugging.
stmt = conn.createStatement(ResultSet.TYPE_SCROLL_SENSITIVE, ResultSet.CONCUR_READ_ONLY);query = "SELECT * FROM Employees WHERE employee_id = " + id;System.out.println("\nExecuting: " + query);
6. Run the query and use a ResultSet object to contain the result.
rset = stmt.executeQuery(query);
7. Use the result set returned in rset to populate the fields of the employee bean using the set methods of the bean.
while (rset.next()) { selectedEmp.setEmployeeId(new Integer(rset.getInt("employee_id"))); selectedEmp.setFirstName(rset.getString("first_name")); selectedEmp.setLastName(rset.getString("last_name")); selectedEmp.setEmail(rset.getString("email")); selectedEmp.setPhoneNumber(rset.getString("phone_number")); selectedEmp.setHireDate(rset.getDate("hire_date")); selectedEmp.setSalary(new Double(rset.getDouble("salary"))); selectedEmp.setJobId(rset.getString("job_id"));}
8. Return the populated object.
return selectedEmp;
Creating a Method to Update Employee DataIn the following steps, you will see how to create a method to update employee data in the database:
1. Open the DataHandler class.
2. Declare an updateEmployee method as follows:
Updating Data from a Java Class
5-6 Oracle Database Express Edition 2 Day + Java Developer's Guide
public String updateEmployee(int employee_id, String first_name, String last_name, String email, String phone_number, String salary, String job_id) throws SQLException { }
3. Within the body of this method, create an instance of the Employee bean, containing details for the selected employee:
Employee oldEmployee = findEmployeeById(employee_id);
4. Connect to the database.
getDBConnection();
5. Create a Statement object and specify the ResultSet type as before.
stmt = conn.createStatement(ResultSet.TYPE_SCROLL_SENSITIVE, ResultSet.CONCUR_READ_ONLY);
6. Create a StringBuffer to accumulate details of the SQL UPDATE statement that needs to be built:
StringBuffer columns = new StringBuffer( 255 );
7. For each field in an employee record, check whether the user has changed the value and if so, add relevant code to the StringBuffer. For each item added after the first one, add a comma to separate the items. The following code checks if the first_name variable changed, and if so, adds details to the SQL in the StringBuffer that will be used to update the database:
if ( first_name != null && !first_name.equals(oldEmployee.getFirstName() ) ) { columns.append( "first_name = '" + first_name + "'" ); }
For the last_name, before appending the new last name, check to see whether there are already some changes in the StringBuffer and if so, append a comma to separate the new change from the previous one. Use the following code:
if ( last_name != null && !last_name.equals(oldEmployee.getLastName() ) ) { if ( columns.length() > 0 ) { columns.append( ", " ); } columns.append( "last_name = '" + last_name + "'" ); }
Use the samecode logic to check for changes made to email, and phone_number.
Note: Only significant parts of the code are included within this procedure. Example 5–2 contains the complete code for this method.
For the salary field, obtain a String value to add to the StringBuffer as follows:
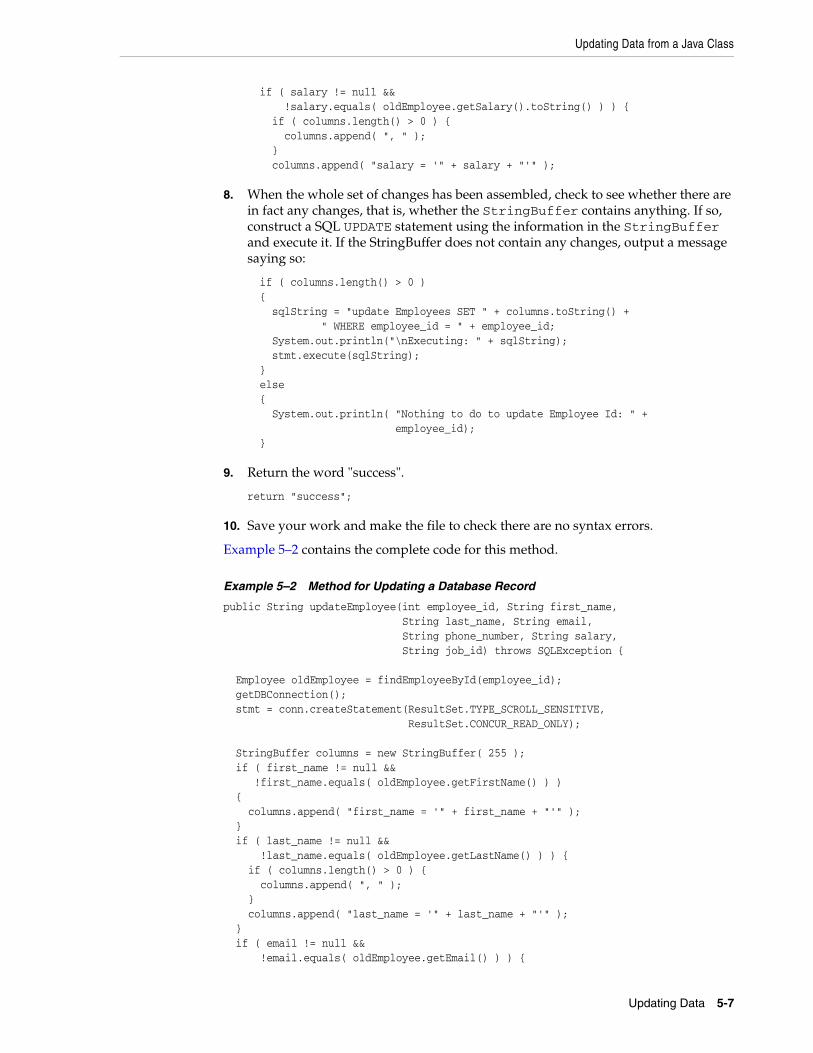
Updating Data from a Java Class
Updating Data 5-7
if ( salary != null && !salary.equals( oldEmployee.getSalary().toString() ) ) { if ( columns.length() > 0 ) { columns.append( ", " ); } columns.append( "salary = '" + salary + "'" );
8. When the whole set of changes has been assembled, check to see whether there are in fact any changes, that is, whether the StringBuffer contains anything. If so, construct a SQL UPDATE statement using the information in the StringBuffer and execute it. If the StringBuffer does not contain any changes, output a message saying so:
if ( columns.length() > 0 ) { sqlString = "update Employees SET " + columns.toString() + " WHERE employee_id = " + employee_id; System.out.println("\nExecuting: " + sqlString); stmt.execute(sqlString); } else { System.out.println( "Nothing to do to update Employee Id: " + employee_id); }
9. Return the word "success".
return "success";
10. Save your work and make the file to check there are no syntax errors.
Example 5–2 contains the complete code for this method.
Example 5–2 Method for Updating a Database Record
public String updateEmployee(int employee_id, String first_name, String last_name, String email, String phone_number, String salary, String job_id) throws SQLException { Employee oldEmployee = findEmployeeById(employee_id); getDBConnection(); stmt = conn.createStatement(ResultSet.TYPE_SCROLL_SENSITIVE, ResultSet.CONCUR_READ_ONLY); StringBuffer columns = new StringBuffer( 255 ); if ( first_name != null && !first_name.equals( oldEmployee.getFirstName() ) ) { columns.append( "first_name = '" + first_name + "'" ); } if ( last_name != null && !last_name.equals( oldEmployee.getLastName() ) ) { if ( columns.length() > 0 ) { columns.append( ", " ); } columns.append( "last_name = '" + last_name + "'" ); } if ( email != null && !email.equals( oldEmployee.getEmail() ) ) {
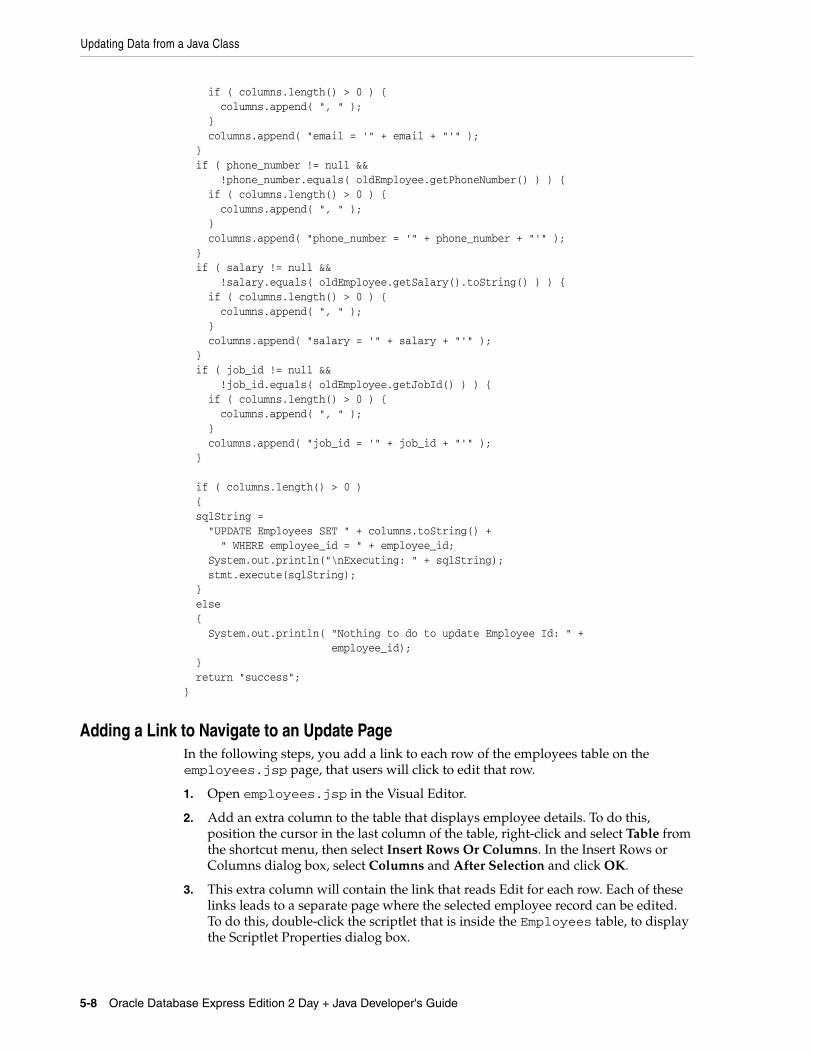
Updating Data from a Java Class
5-8 Oracle Database Express Edition 2 Day + Java Developer's Guide
if ( columns.length() > 0 ) { columns.append( ", " ); } columns.append( "email = '" + email + "'" ); } if ( phone_number != null && !phone_number.equals( oldEmployee.getPhoneNumber() ) ) { if ( columns.length() > 0 ) { columns.append( ", " ); } columns.append( "phone_number = '" + phone_number + "'" ); } if ( salary != null && !salary.equals( oldEmployee.getSalary().toString() ) ) { if ( columns.length() > 0 ) { columns.append( ", " ); } columns.append( "salary = '" + salary + "'" ); } if ( job_id != null && !job_id.equals( oldEmployee.getJobId() ) ) { if ( columns.length() > 0 ) { columns.append( ", " ); } columns.append( "job_id = '" + job_id + "'" ); } if ( columns.length() > 0 ) { sqlString = "UPDATE Employees SET " + columns.toString() + " WHERE employee_id = " + employee_id; System.out.println("\nExecuting: " + sqlString); stmt.execute(sqlString); } else { System.out.println( "Nothing to do to update Employee Id: " + employee_id); } return "success";}
Adding a Link to Navigate to an Update PageIn the following steps, you add a link to each row of the employees table on the employees.jsp page, that users will click to edit that row.
1. Open employees.jsp in the Visual Editor.
2. Add an extra column to the table that displays employee details. To do this, position the cursor in the last column of the table, right-click and select Table from the shortcut menu, then select Insert Rows Or Columns. In the Insert Rows or Columns dialog box, select Columns and After Selection and click OK.
3. This extra column will contain the link that reads Edit for each row. Each of these links leads to a separate page where the selected employee record can be edited. To do this, double-click the scriptlet that is inside the Employees table, to display the Scriptlet Properties dialog box.
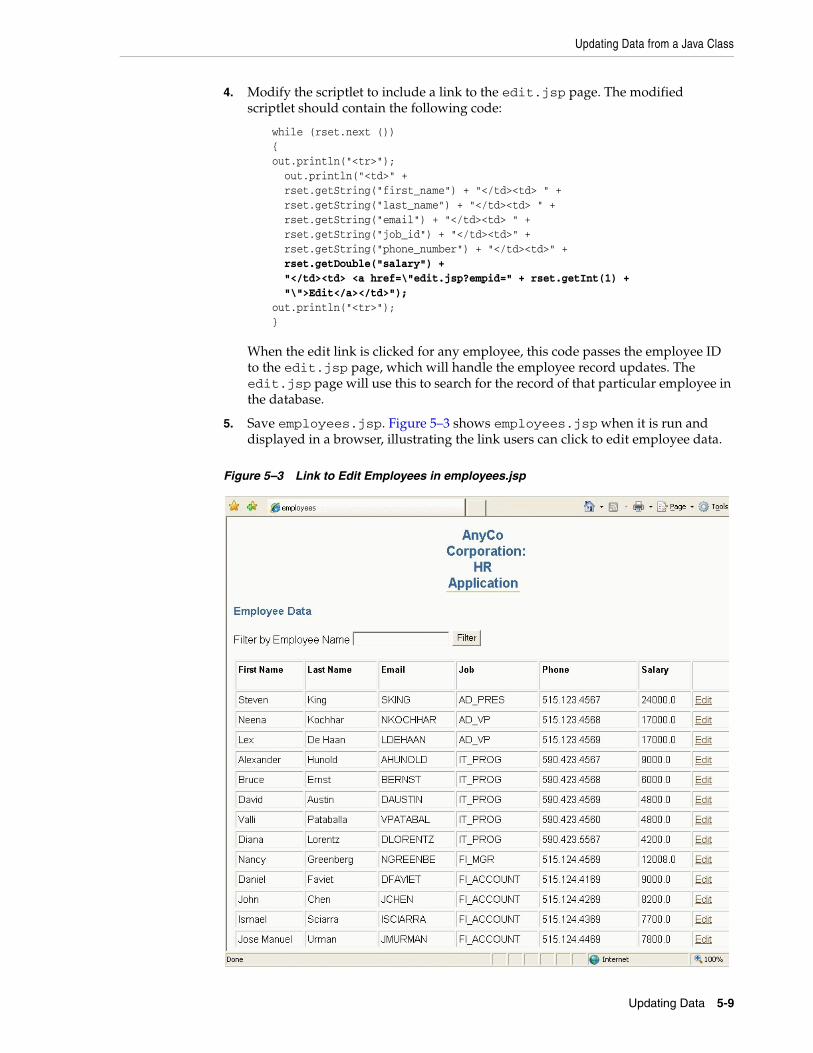
Updating Data from a Java Class
Updating Data 5-9
4. Modify the scriptlet to include a link to the edit.jsp page. The modified scriptlet should contain the following code:
while (rset.next ()) { out.println("<tr>"); out.println("<td>" + rset.getString("first_name") + "</td><td> " + rset.getString("last_name") + "</td><td> " + rset.getString("email") + "</td><td> " + rset.getString("job_id") + "</td><td>" + rset.getString("phone_number") + "</td><td>" + rset.getDouble("salary") + "</td><td> <a href=\"edit.jsp?empid=" + rset.getInt(1) + "\">Edit</a></td>"); out.println("<tr>"); }
When the edit link is clicked for any employee, this code passes the employee ID to the edit.jsp page, which will handle the employee record updates. The edit.jsp page will use this to search for the record of that particular employee in the database.
5. Save employees.jsp. Figure 5–3 shows employees.jsp when it is run and displayed in a browser, illustrating the link users can click to edit employee data.
Figure 5–3 Link to Edit Employees in employees.jsp
Updating Data from a Java Class
5-10 Oracle Database Express Edition 2 Day + Java Developer's Guide
Creating a JSP Page to Edit Employee DataIn this section, you will create the edit.jsp file that enables users to update an employee record.
1. Create a new JSP page and name it edit.jsp. Accept all other defaults.
2. Give the page the same heading as earlier, AnyCo Corporation: HR Application, apply the Heading 2 style to it, and align it to the center of the page.
3. On the next line, type Edit Employee Record, with the Heading 3 style applied. Align this heading to the left of the page.
4. Add the JDeveloper style sheet to the page.
5. Add a jsp:usebean tag. Enter empsbean as the ID, and hr.DataHandler as the Class. Set the Scope to session, and click OK.
6. Position the cursor after the useBean tag and add another jsp:usebean tag. This time enter employee as the ID, browse to select hr.Employee as the class, and leave the Scope as page. Click OK.
7. Add a Scriptlet to the page. The scriptlet code passes the employee ID to the findEmployeeById method and retrieves the data inside the Employee bean. Enter the following code in the Insert Scriptlet dialog box:
Integer employee_id = new Integer(request.getParameter("empid"));employee = empsbean.findEmployeeById(employee_id.intValue());
8. Add a Form to the page. In the Insert Form dialog, enter update_action.jsp for the Action field. You cannot select this page from the list as you have not yet created it.
9. Add a Table to the page. Position it inside the Form. Specify a 6-row and 2-column layout, and accept other layout defaults.
10. In the first column, enter the following headings, each on a separate row: First Name, Last Name, Email, Phone, Job, Monthly Salary.
11. Drag a Hidden Field component from the HTML Forms page of the Component Palette. Drop it in the second column, adjacent to the First Name heading. In the Insert Hidden Field dialog, enter employee_id as the Name property and enter <%= employee.getEmployeeId()%> as the Value property.
12. Drag a Text Field component to this column, adjacent to the First Name heading. In the Insert Text Field dialog, enter first_name in the Name field, and <%= employee.getFirstName()%> in the Value field. Click OK.
13. Drag a second Text Field component to this column, adjacent to the Last Name heading. In the Insert Text Field dialog, enter last_name in the Name field, and <%= employee.getLastName() %> in the Value field. Click OK.
14. In a similar way, add text fields adjacent to each of the remaining column headings, using email, phone_number, job_id, and salary as the field names and the corresponding getter method for each field. These are specified in the following table.
15. Add a Submit button in the form, below the table. Enter Update as its Value.
16. Save the application.
The resultant edit.jsp page should look similar to the page shown in Figure 5–4.
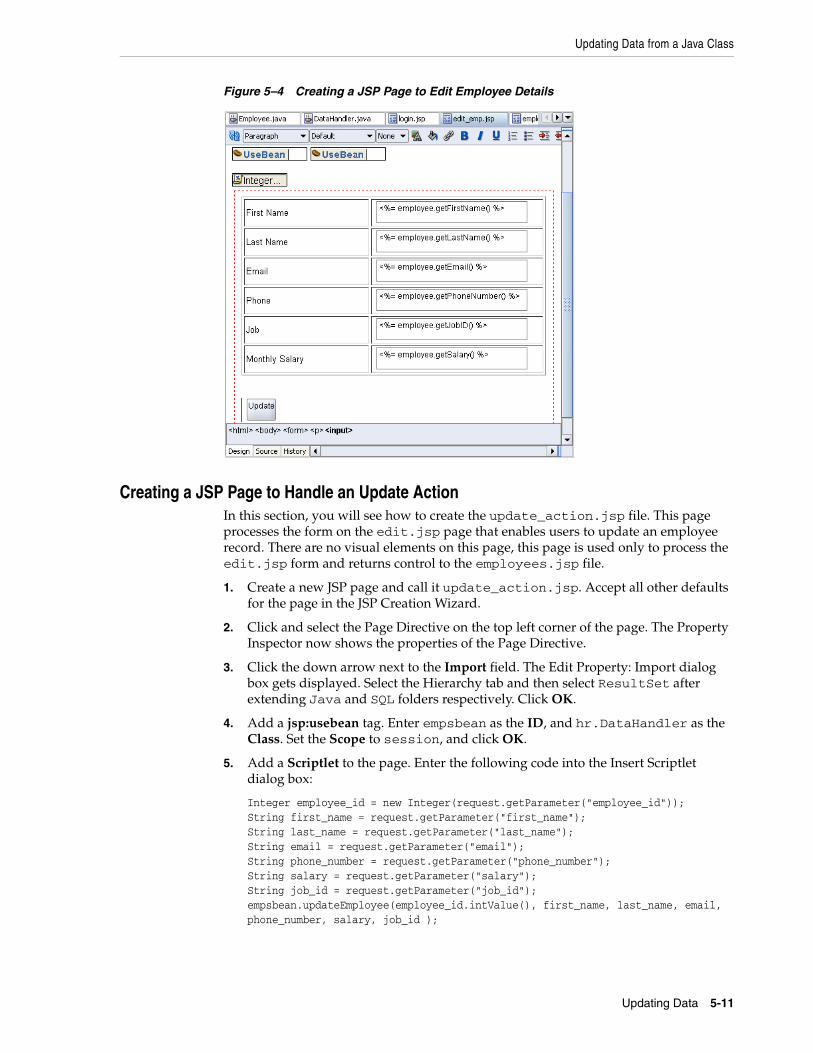
Updating Data from a Java Class
Updating Data 5-11
Figure 5–4 Creating a JSP Page to Edit Employee Details
Creating a JSP Page to Handle an Update ActionIn this section, you will see how to create the update_action.jsp file. This page processes the form on the edit.jsp page that enables users to update an employee record. There are no visual elements on this page, this page is used only to process the edit.jsp form and returns control to the employees.jsp file.
1. Create a new JSP page and call it update_action.jsp. Accept all other defaults for the page in the JSP Creation Wizard.
2. Click and select the Page Directive on the top left corner of the page. The Property Inspector now shows the properties of the Page Directive.
3. Click the down arrow next to the Import field. The Edit Property: Import dialog box gets displayed. Select the Hierarchy tab and then select ResultSet after extending Java and SQL folders respectively. Click OK.
4. Add a jsp:usebean tag. Enter empsbean as the ID, and hr.DataHandler as the Class. Set the Scope to session, and click OK.
5. Add a Scriptlet to the page. Enter the following code into the Insert Scriptlet dialog box:
Integer employee_id = new Integer(request.getParameter("employee_id"));String first_name = request.getParameter("first_name");String last_name = request.getParameter("last_name");String email = request.getParameter("email");String phone_number = request.getParameter("phone_number");String salary = request.getParameter("salary");String job_id = request.getParameter("job_id");empsbean.updateEmployee(employee_id.intValue(), first_name, last_name, email, phone_number, salary, job_id );
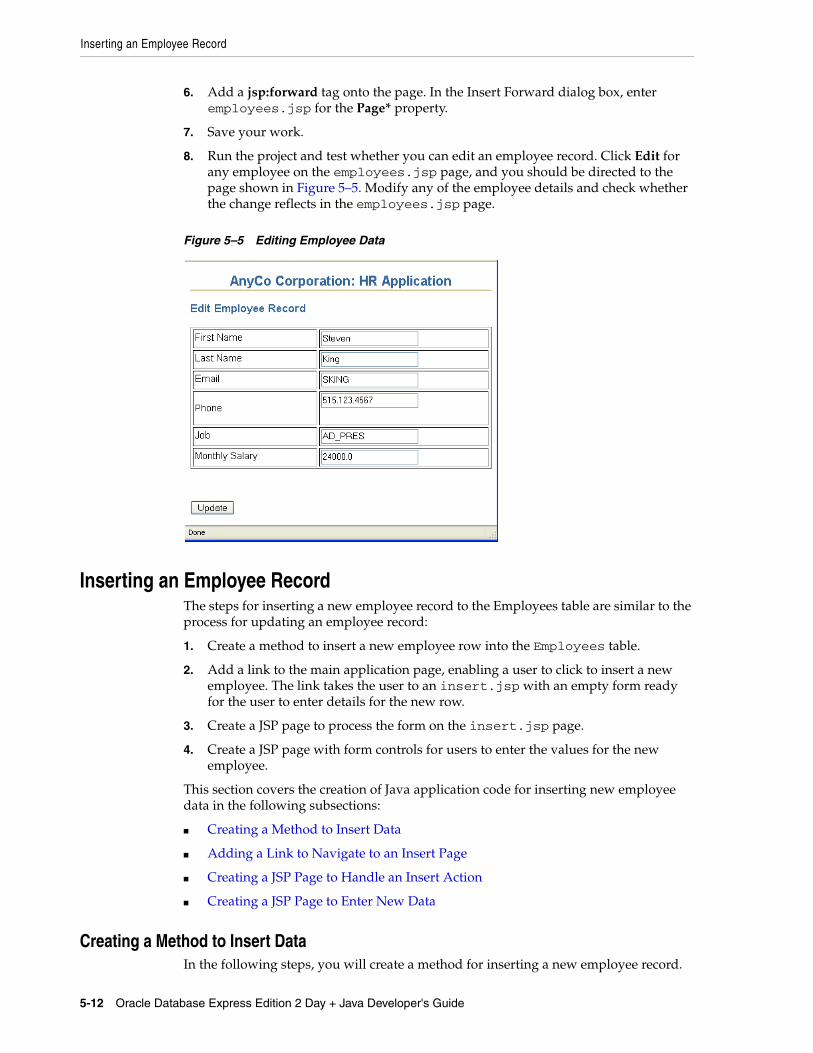
Inserting an Employee Record
5-12 Oracle Database Express Edition 2 Day + Java Developer's Guide
6. Add a jsp:forward tag onto the page. In the Insert Forward dialog box, enter employees.jsp for the Page* property.
7. Save your work.
8. Run the project and test whether you can edit an employee record. Click Edit for any employee on the employees.jsp page, and you should be directed to the page shown in Figure 5–5. Modify any of the employee details and check whether the change reflects in the employees.jsp page.
Figure 5–5 Editing Employee Data
Inserting an Employee RecordThe steps for inserting a new employee record to the Employees table are similar to the process for updating an employee record:
1. Create a method to insert a new employee row into the Employees table.
2. Add a link to the main application page, enabling a user to click to insert a new employee. The link takes the user to an insert.jsp with an empty form ready for the user to enter details for the new row.
3. Create a JSP page to process the form on the insert.jsp page.
4. Create a JSP page with form controls for users to enter the values for the new employee.
This section covers the creation of Java application code for inserting new employee data in the following subsections:
■ Creating a Method to Insert Data
■ Adding a Link to Navigate to an Insert Page
■ Creating a JSP Page to Handle an Insert Action
■ Creating a JSP Page to Enter New Data
Creating a Method to Insert DataIn the following steps, you will create a method for inserting a new employee record.
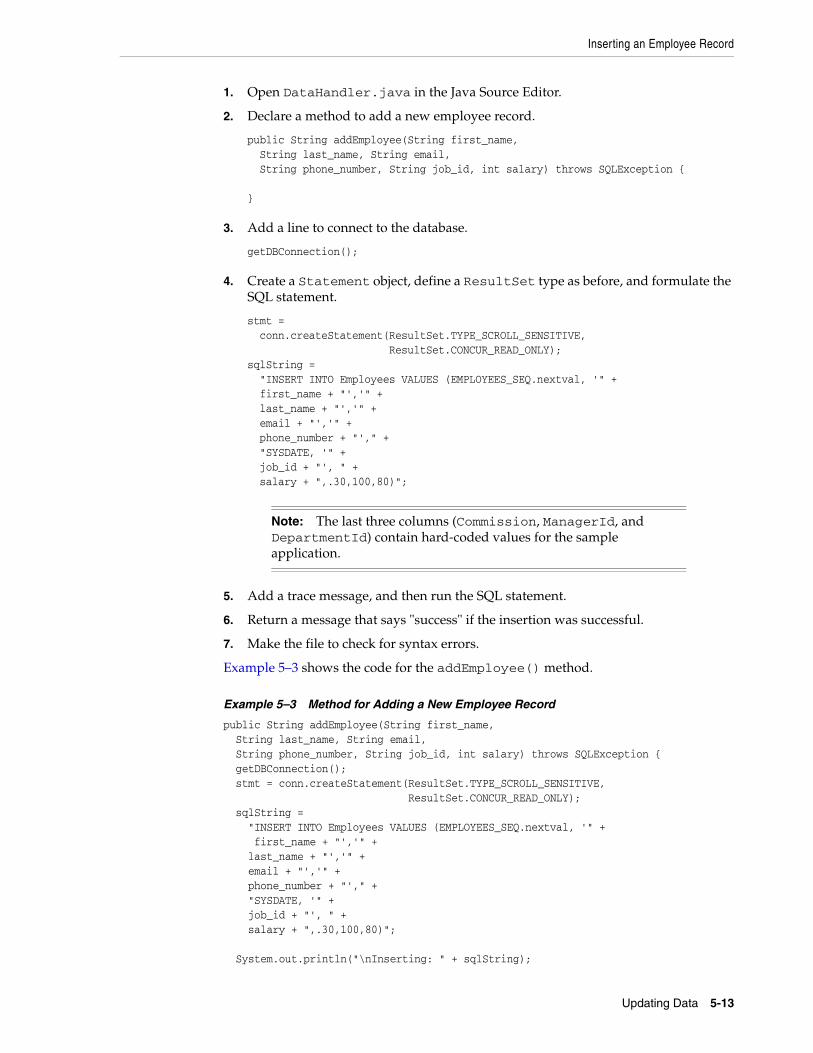
Inserting an Employee Record
Updating Data 5-13
1. Open DataHandler.java in the Java Source Editor.
2. Declare a method to add a new employee record.
public String addEmployee(String first_name, String last_name, String email, String phone_number, String job_id, int salary) throws SQLException { }
3. Add a line to connect to the database.
getDBConnection();
4. Create a Statement object, define a ResultSet type as before, and formulate the SQL statement.
stmt = conn.createStatement(ResultSet.TYPE_SCROLL_SENSITIVE, ResultSet.CONCUR_READ_ONLY);sqlString = "INSERT INTO Employees VALUES (EMPLOYEES_SEQ.nextval, '" + first_name + "','" + last_name + "','" + email + "','" + phone_number + "'," + "SYSDATE, '" + job_id + "', " + salary + ",.30,100,80)";
Note: The last three columns (Commission, ManagerId, and DepartmentId) contain hard-coded values for the sample application.
5. Add a trace message, and then run the SQL statement.
6. Return a message that says "success" if the insertion was successful.
7. Make the file to check for syntax errors.
Example 5–3 shows the code for the addEmployee() method.
Example 5–3 Method for Adding a New Employee Record
public String addEmployee(String first_name, String last_name, String email, String phone_number, String job_id, int salary) throws SQLException { getDBConnection(); stmt = conn.createStatement(ResultSet.TYPE_SCROLL_SENSITIVE, ResultSet.CONCUR_READ_ONLY); sqlString = "INSERT INTO Employees VALUES (EMPLOYEES_SEQ.nextval, '" + first_name + "','" + last_name + "','" + email + "','" + phone_number + "'," + "SYSDATE, '" + job_id + "', " + salary + ",.30,100,80)"; System.out.println("\nInserting: " + sqlString);
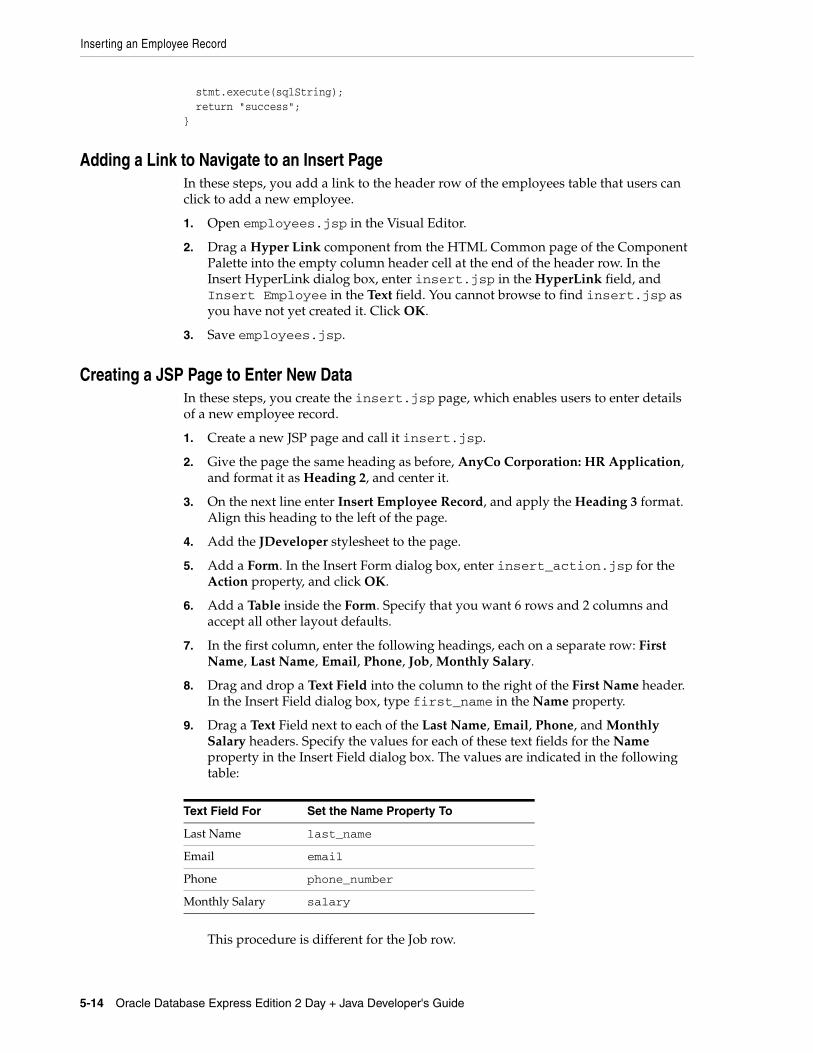
Inserting an Employee Record
5-14 Oracle Database Express Edition 2 Day + Java Developer's Guide
stmt.execute(sqlString); return "success";}
Adding a Link to Navigate to an Insert PageIn these steps, you add a link to the header row of the employees table that users can click to add a new employee.
1. Open employees.jsp in the Visual Editor.
2. Drag a Hyper Link component from the HTML Common page of the Component Palette into the empty column header cell at the end of the header row. In the Insert HyperLink dialog box, enter insert.jsp in the HyperLink field, and Insert Employee in the Text field. You cannot browse to find insert.jsp as you have not yet created it. Click OK.
3. Save employees.jsp.
Creating a JSP Page to Enter New DataIn these steps, you create the insert.jsp page, which enables users to enter details of a new employee record.
1. Create a new JSP page and call it insert.jsp.
2. Give the page the same heading as before, AnyCo Corporation: HR Application, and format it as Heading 2, and center it.
3. On the next line enter Insert Employee Record, and apply the Heading 3 format. Align this heading to the left of the page.
4. Add the JDeveloper stylesheet to the page.
5. Add a Form. In the Insert Form dialog box, enter insert_action.jsp for the Action property, and click OK.
6. Add a Table inside the Form. Specify that you want 6 rows and 2 columns and accept all other layout defaults.
7. In the first column, enter the following headings, each on a separate row: First Name, Last Name, Email, Phone, Job, Monthly Salary.
8. Drag and drop a Text Field into the column to the right of the First Name header. In the Insert Field dialog box, type first_name in the Name property.
9. Drag a Text Field next to each of the Last Name, Email, Phone, and Monthly Salary headers. Specify the values for each of these text fields for the Name property in the Insert Field dialog box. The values are indicated in the following table:
Text Field For Set the Name Property To
Last Name last_name
Email email
Phone phone_number
Monthly Salary salary
This procedure is different for the Job row.
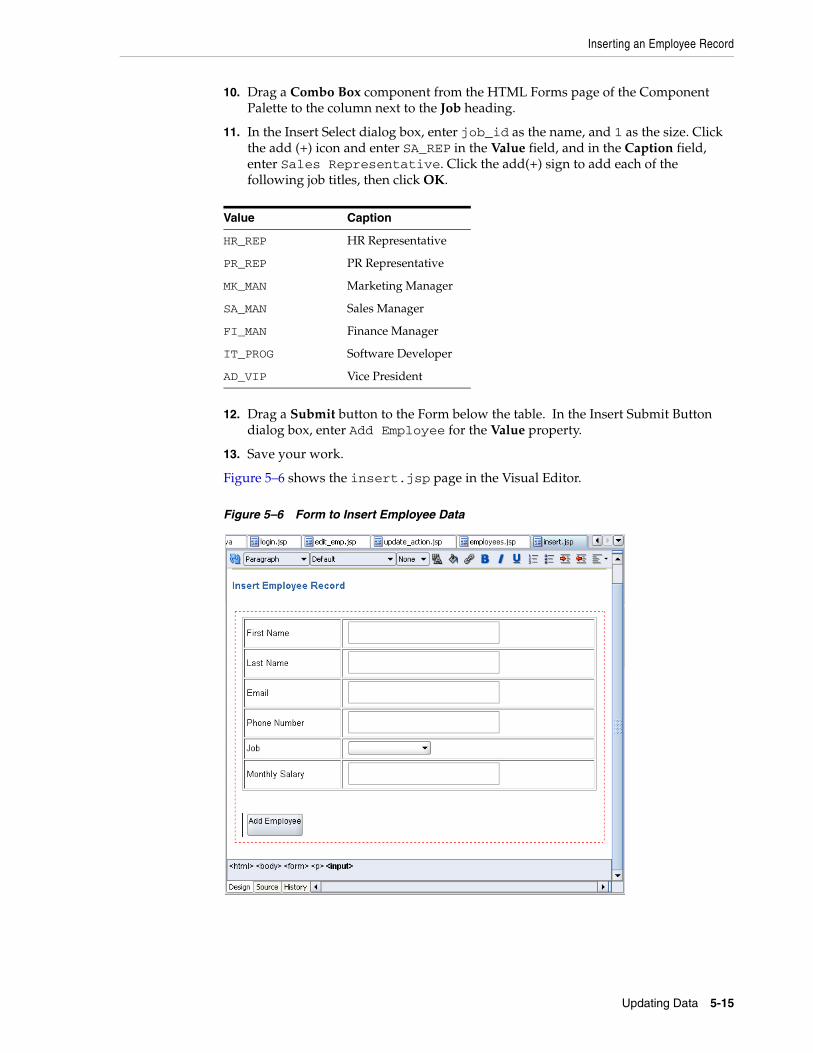
Inserting an Employee Record
Updating Data 5-15
10. Drag a Combo Box component from the HTML Forms page of the Component Palette to the column next to the Job heading.
11. In the Insert Select dialog box, enter job_id as the name, and 1 as the size. Click the add (+) icon and enter SA_REP in the Value field, and in the Caption field, enter Sales Representative. Click the add(+) sign to add each of the following job titles, then click OK.
Value Caption
HR_REP HR Representative
PR_REP PR Representative
MK_MAN Marketing Manager
SA_MAN Sales Manager
FI_MAN Finance Manager
IT_PROG Software Developer
AD_VIP Vice President
12. Drag a Submit button to the Form below the table. In the Insert Submit Button dialog box, enter Add Employee for the Value property.
13. Save your work.
Figure 5–6 shows the insert.jsp page in the Visual Editor.
Figure 5–6 Form to Insert Employee Data
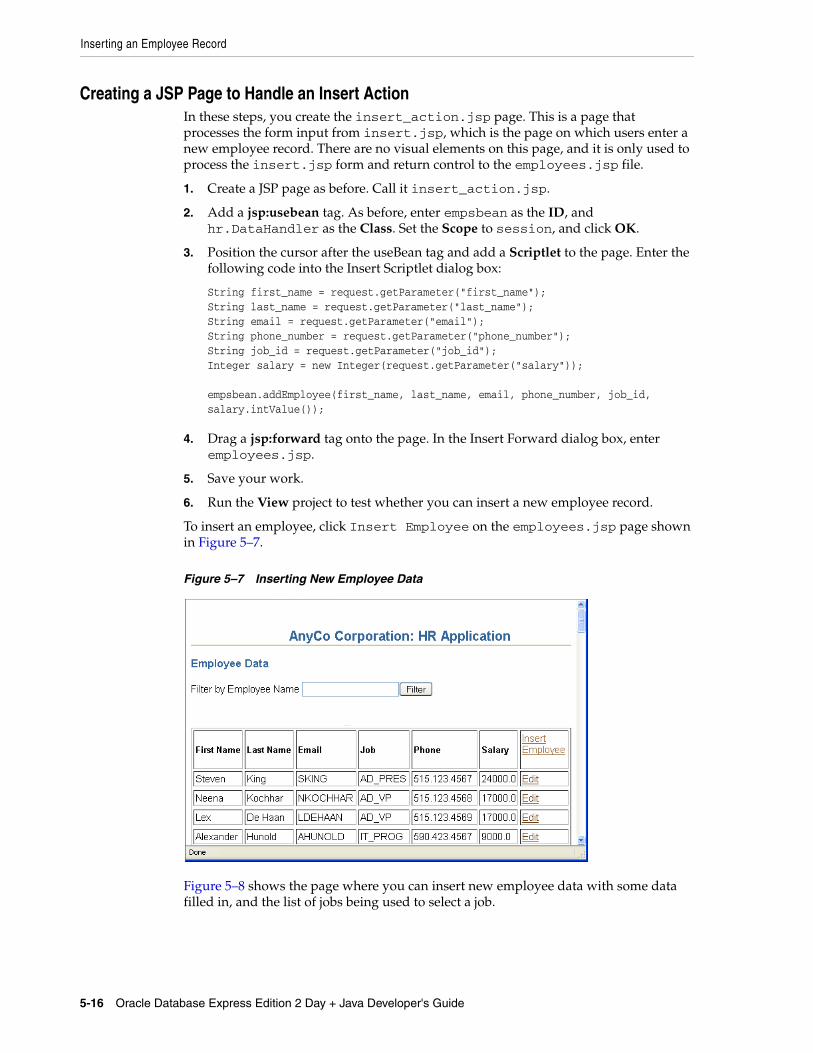
Inserting an Employee Record
5-16 Oracle Database Express Edition 2 Day + Java Developer's Guide
Creating a JSP Page to Handle an Insert ActionIn these steps, you create the insert_action.jsp page. This is a page that processes the form input from insert.jsp, which is the page on which users enter a new employee record. There are no visual elements on this page, and it is only used to process the insert.jsp form and return control to the employees.jsp file.
1. Create a JSP page as before. Call it insert_action.jsp.
2. Add a jsp:usebean tag. As before, enter empsbean as the ID, and hr.DataHandler as the Class. Set the Scope to session, and click OK.
3. Position the cursor after the useBean tag and add a Scriptlet to the page. Enter the following code into the Insert Scriptlet dialog box:
String first_name = request.getParameter("first_name");String last_name = request.getParameter("last_name");String email = request.getParameter("email");String phone_number = request.getParameter("phone_number");String job_id = request.getParameter("job_id");Integer salary = new Integer(request.getParameter("salary")); empsbean.addEmployee(first_name, last_name, email, phone_number, job_id, salary.intValue());
4. Drag a jsp:forward tag onto the page. In the Insert Forward dialog box, enter employees.jsp.
5. Save your work.
6. Run the View project to test whether you can insert a new employee record.
To insert an employee, click Insert Employee on the employees.jsp page shown in Figure 5–7.
Figure 5–7 Inserting New Employee Data
Figure 5–8 shows the page where you can insert new employee data with some data filled in, and the list of jobs being used to select a job.
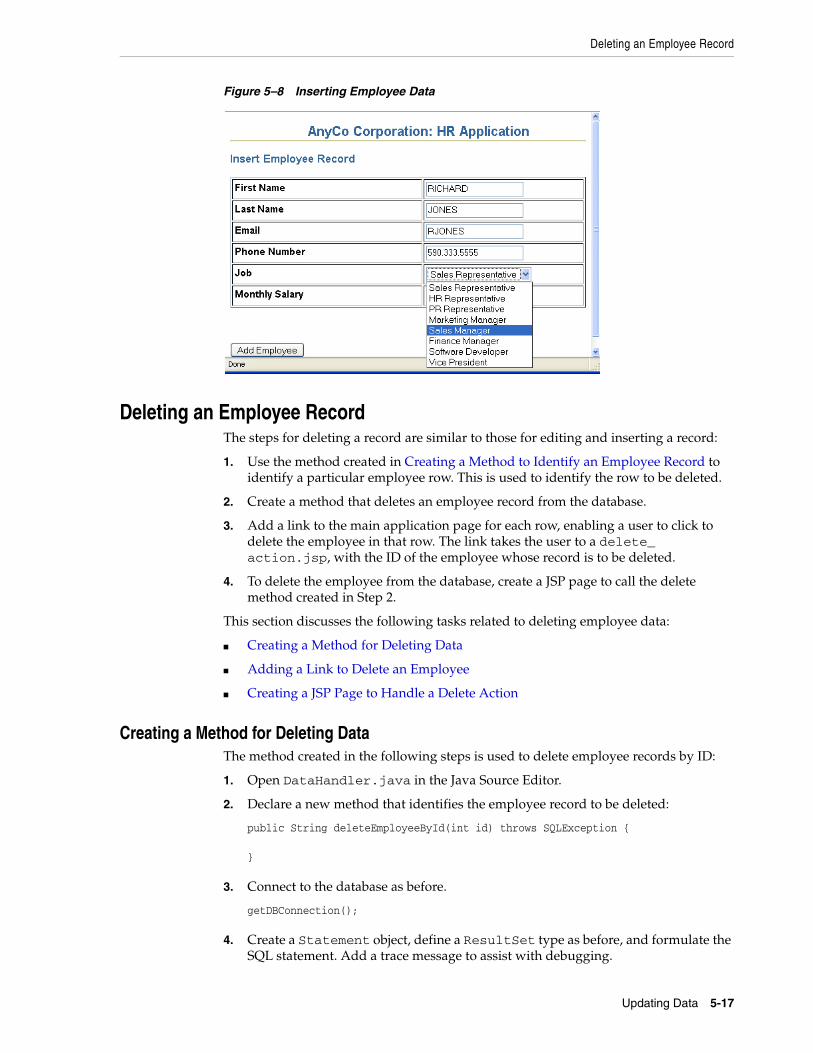
Deleting an Employee Record
Updating Data 5-17
Figure 5–8 Inserting Employee Data
Deleting an Employee RecordThe steps for deleting a record are similar to those for editing and inserting a record:
1. Use the method created in Creating a Method to Identify an Employee Record to identify a particular employee row. This is used to identify the row to be deleted.
2. Create a method that deletes an employee record from the database.
3. Add a link to the main application page for each row, enabling a user to click to delete the employee in that row. The link takes the user to a delete_action.jsp, with the ID of the employee whose record is to be deleted.
4. To delete the employee from the database, create a JSP page to call the delete method created in Step 2.
This section discusses the following tasks related to deleting employee data:
■ Creating a Method for Deleting Data
■ Adding a Link to Delete an Employee
■ Creating a JSP Page to Handle a Delete Action
Creating a Method for Deleting DataThe method created in the following steps is used to delete employee records by ID:
1. Open DataHandler.java in the Java Source Editor.
2. Declare a new method that identifies the employee record to be deleted:
public String deleteEmployeeById(int id) throws SQLException { }
3. Connect to the database as before.
getDBConnection();
4. Create a Statement object, define a ResultSet type as before, and formulate the SQL statement. Add a trace message to assist with debugging.
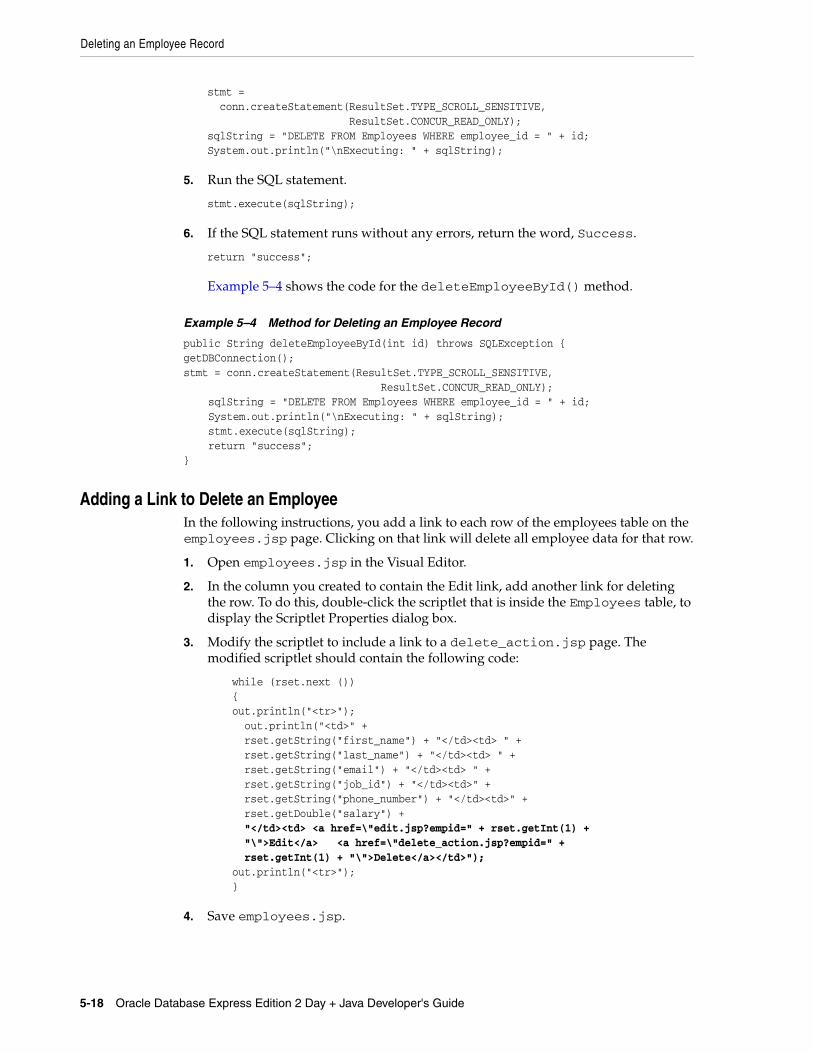
Deleting an Employee Record
5-18 Oracle Database Express Edition 2 Day + Java Developer's Guide
stmt = conn.createStatement(ResultSet.TYPE_SCROLL_SENSITIVE, ResultSet.CONCUR_READ_ONLY);sqlString = "DELETE FROM Employees WHERE employee_id = " + id;System.out.println("\nExecuting: " + sqlString);
5. Run the SQL statement.
stmt.execute(sqlString);
6. If the SQL statement runs without any errors, return the word, Success.
return "success";
Example 5–4 shows the code for the deleteEmployeeById() method.
Example 5–4 Method for Deleting an Employee Record
public String deleteEmployeeById(int id) throws SQLException {getDBConnection();stmt = conn.createStatement(ResultSet.TYPE_SCROLL_SENSITIVE, ResultSet.CONCUR_READ_ONLY); sqlString = "DELETE FROM Employees WHERE employee_id = " + id; System.out.println("\nExecuting: " + sqlString); stmt.execute(sqlString); return "success";}
Adding a Link to Delete an EmployeeIn the following instructions, you add a link to each row of the employees table on the employees.jsp page. Clicking on that link will delete all employee data for that row.
1. Open employees.jsp in the Visual Editor.
2. In the column you created to contain the Edit link, add another link for deleting the row. To do this, double-click the scriptlet that is inside the Employees table, to display the Scriptlet Properties dialog box.
3. Modify the scriptlet to include a link to a delete_action.jsp page. The modified scriptlet should contain the following code:
while (rset.next ()) { out.println("<tr>"); out.println("<td>" + rset.getString("first_name") + "</td><td> " + rset.getString("last_name") + "</td><td> " + rset.getString("email") + "</td><td> " + rset.getString("job_id") + "</td><td>" + rset.getString("phone_number") + "</td><td>" + rset.getDouble("salary") + "</td><td> <a href=\"edit.jsp?empid=" + rset.getInt(1) + "\">Edit</a> <a href=\"delete_action.jsp?empid=" + rset.getInt(1) + "\">Delete</a></td>"); out.println("<tr>"); }
4. Save employees.jsp.
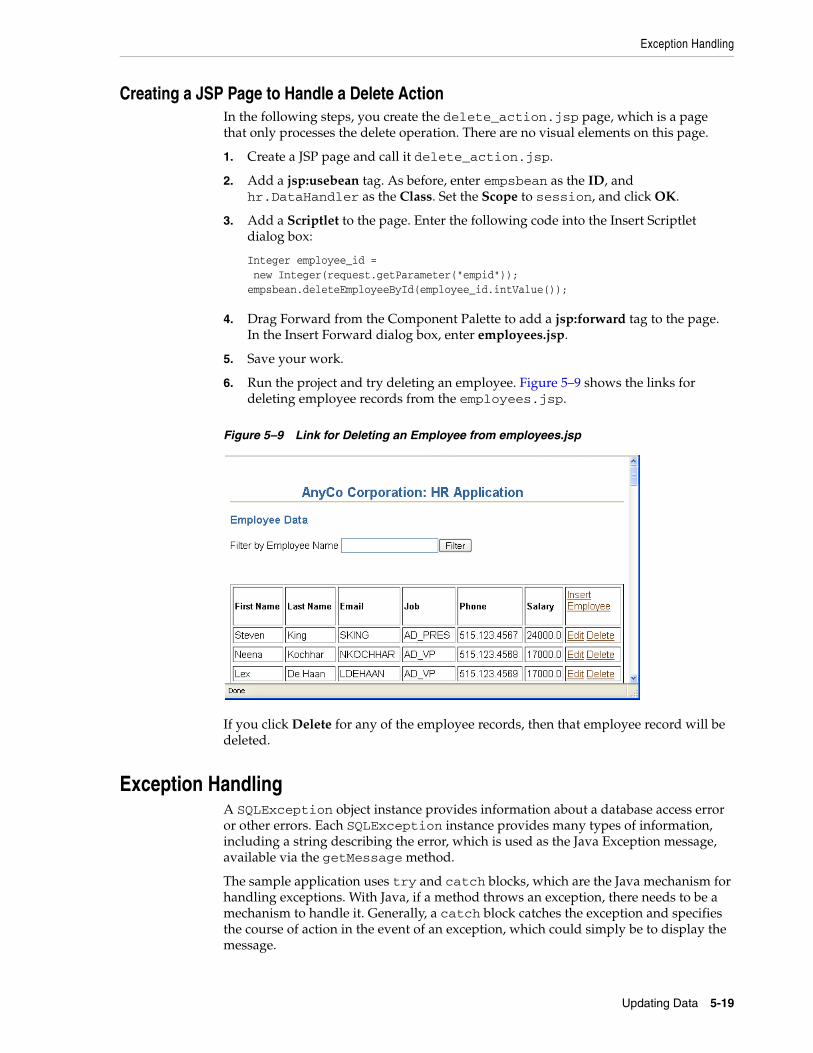
Exception Handling
Updating Data 5-19
Creating a JSP Page to Handle a Delete ActionIn the following steps, you create the delete_action.jsp page, which is a page that only processes the delete operation. There are no visual elements on this page.
1. Create a JSP page and call it delete_action.jsp.
2. Add a jsp:usebean tag. As before, enter empsbean as the ID, and hr.DataHandler as the Class. Set the Scope to session, and click OK.
3. Add a Scriptlet to the page. Enter the following code into the Insert Scriptlet dialog box:
Integer employee_id = new Integer(request.getParameter("empid"));empsbean.deleteEmployeeById(employee_id.intValue());
4. Drag Forward from the Component Palette to add a jsp:forward tag to the page. In the Insert Forward dialog box, enter employees.jsp.
5. Save your work.
6. Run the project and try deleting an employee. Figure 5–9 shows the links for deleting employee records from the employees.jsp.
Figure 5–9 Link for Deleting an Employee from employees.jsp
If you click Delete for any of the employee records, then that employee record will be deleted.
Exception HandlingA SQLException object instance provides information about a database access error or other errors. Each SQLException instance provides many types of information, including a string describing the error, which is used as the Java Exception message, available via the getMessage method.
The sample application uses try and catch blocks, which are the Java mechanism for handling exceptions. With Java, if a method throws an exception, there needs to be a mechanism to handle it. Generally, a catch block catches the exception and specifies the course of action in the event of an exception, which could simply be to display the message.
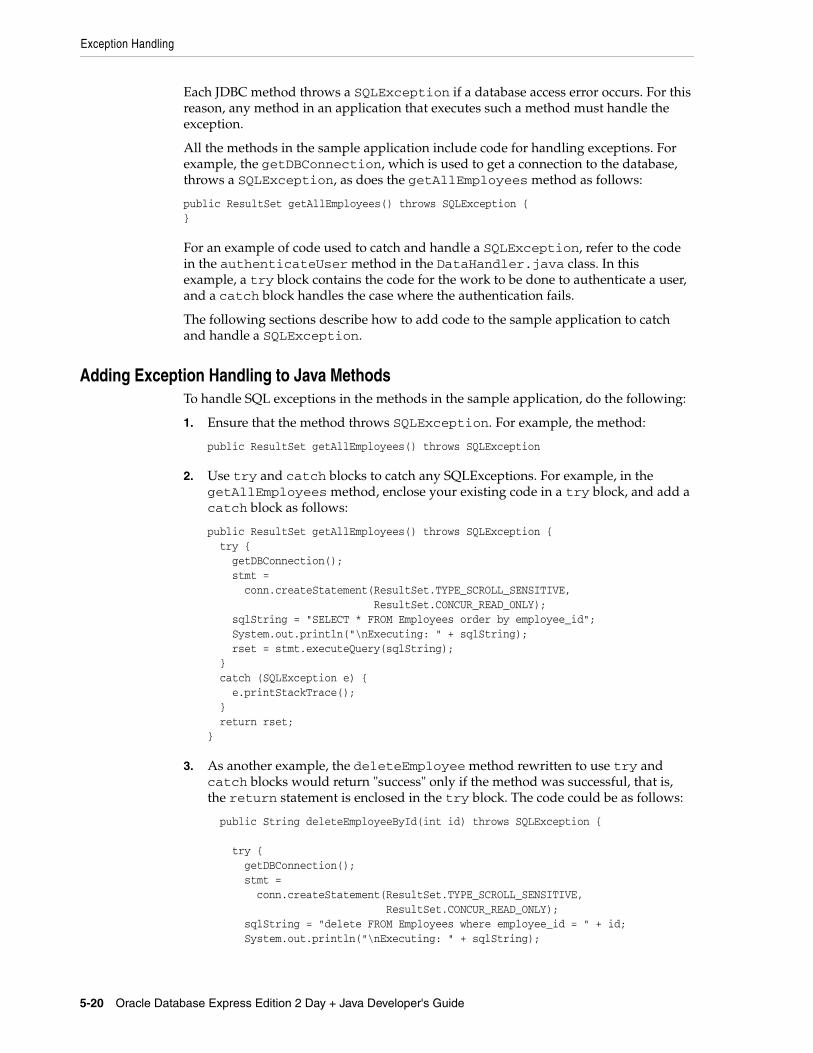
Exception Handling
5-20 Oracle Database Express Edition 2 Day + Java Developer's Guide
Each JDBC method throws a SQLException if a database access error occurs. For this reason, any method in an application that executes such a method must handle the exception.
All the methods in the sample application include code for handling exceptions. For example, the getDBConnection, which is used to get a connection to the database, throws a SQLException, as does the getAllEmployees method as follows:
public ResultSet getAllEmployees() throws SQLException {}
For an example of code used to catch and handle a SQLException, refer to the code in the authenticateUser method in the DataHandler.java class. In this example, a try block contains the code for the work to be done to authenticate a user, and a catch block handles the case where the authentication fails.
The following sections describe how to add code to the sample application to catch and handle a SQLException.
Adding Exception Handling to Java MethodsTo handle SQL exceptions in the methods in the sample application, do the following:
1. Ensure that the method throws SQLException. For example, the method:
public ResultSet getAllEmployees() throws SQLException
2. Use try and catch blocks to catch any SQLExceptions. For example, in the getAllEmployees method, enclose your existing code in a try block, and add a catch block as follows:
public ResultSet getAllEmployees() throws SQLException { try { getDBConnection(); stmt = conn.createStatement(ResultSet.TYPE_SCROLL_SENSITIVE, ResultSet.CONCUR_READ_ONLY); sqlString = "SELECT * FROM Employees order by employee_id"; System.out.println("\nExecuting: " + sqlString); rset = stmt.executeQuery(sqlString); } catch (SQLException e) { e.printStackTrace(); } return rset;}
3. As another example, the deleteEmployee method rewritten to use try and catch blocks would return "success" only if the method was successful, that is, the return statement is enclosed in the try block. The code could be as follows:
public String deleteEmployeeById(int id) throws SQLException { try { getDBConnection(); stmt = conn.createStatement(ResultSet.TYPE_SCROLL_SENSITIVE, ResultSet.CONCUR_READ_ONLY); sqlString = "delete FROM Employees where employee_id = " + id; System.out.println("\nExecuting: " + sqlString);
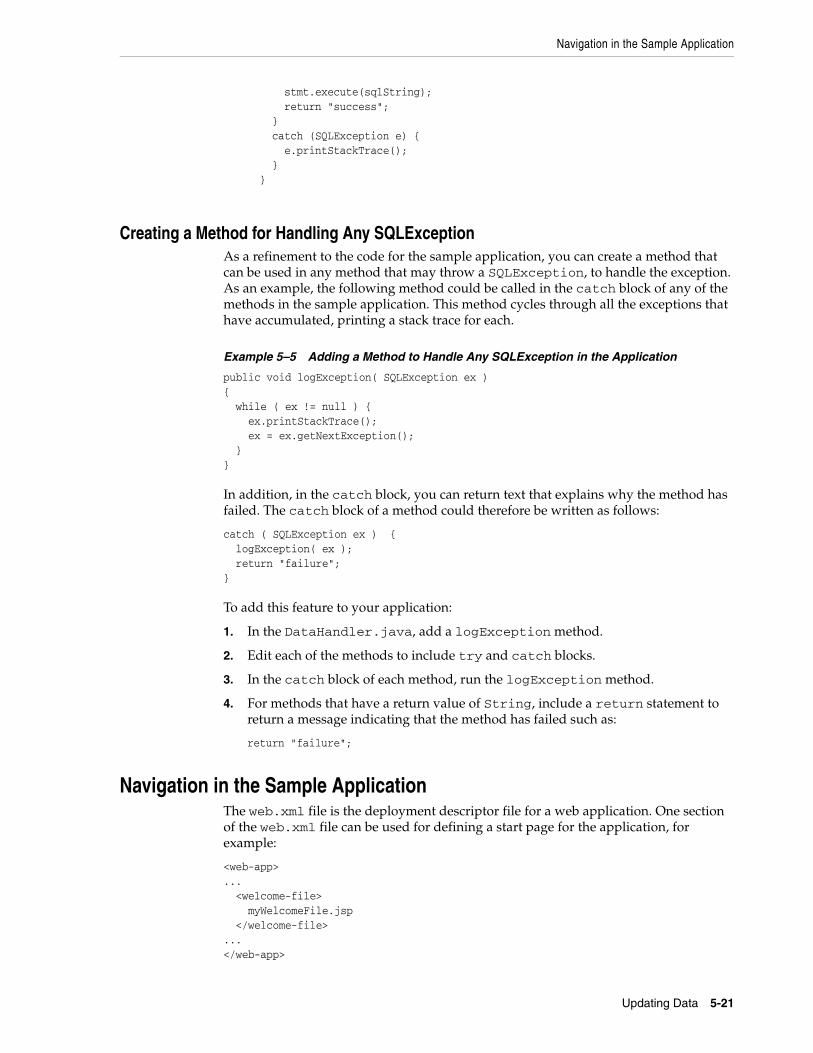
Navigation in the Sample Application
Updating Data 5-21
stmt.execute(sqlString); return "success"; } catch (SQLException e) { e.printStackTrace(); } }
Creating a Method for Handling Any SQLExceptionAs a refinement to the code for the sample application, you can create a method that can be used in any method that may throw a SQLException, to handle the exception. As an example, the following method could be called in the catch block of any of the methods in the sample application. This method cycles through all the exceptions that have accumulated, printing a stack trace for each.
Example 5–5 Adding a Method to Handle Any SQLException in the Application
public void logException( SQLException ex ){ while ( ex != null ) { ex.printStackTrace(); ex = ex.getNextException(); }}
In addition, in the catch block, you can return text that explains why the method has failed. The catch block of a method could therefore be written as follows:
catch ( SQLException ex ) { logException( ex ); return "failure";}
To add this feature to your application:
1. In the DataHandler.java, add a logException method.
2. Edit each of the methods to include try and catch blocks.
3. In the catch block of each method, run the logException method.
4. For methods that have a return value of String, include a return statement to return a message indicating that the method has failed such as:
return "failure";
Navigation in the Sample ApplicationThe web.xml file is the deployment descriptor file for a web application. One section of the web.xml file can be used for defining a start page for the application, for example:
<web-app>... <welcome-file> myWelcomeFile.jsp </welcome-file>...</web-app>
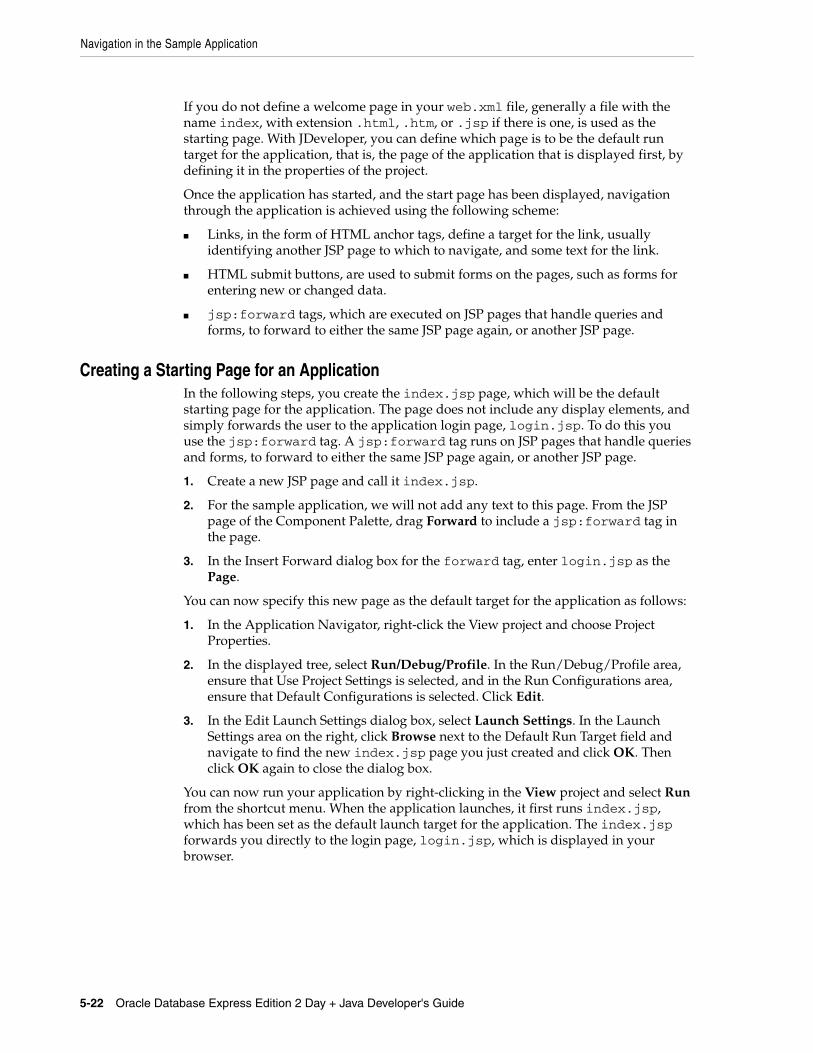
Navigation in the Sample Application
5-22 Oracle Database Express Edition 2 Day + Java Developer's Guide
If you do not define a welcome page in your web.xml file, generally a file with the name index, with extension .html, .htm, or .jsp if there is one, is used as the starting page. With JDeveloper, you can define which page is to be the default run target for the application, that is, the page of the application that is displayed first, by defining it in the properties of the project.
Once the application has started, and the start page has been displayed, navigation through the application is achieved using the following scheme:
■ Links, in the form of HTML anchor tags, define a target for the link, usually identifying another JSP page to which to navigate, and some text for the link.
■ HTML submit buttons, are used to submit forms on the pages, such as forms for entering new or changed data.
■ jsp:forward tags, which are executed on JSP pages that handle queries and forms, to forward to either the same JSP page again, or another JSP page.
Creating a Starting Page for an ApplicationIn the following steps, you create the index.jsp page, which will be the default starting page for the application. The page does not include any display elements, and simply forwards the user to the application login page, login.jsp. To do this you use the jsp:forward tag. A jsp:forward tag runs on JSP pages that handle queries and forms, to forward to either the same JSP page again, or another JSP page.
1. Create a new JSP page and call it index.jsp.
2. For the sample application, we will not add any text to this page. From the JSP page of the Component Palette, drag Forward to include a jsp:forward tag in the page.
3. In the Insert Forward dialog box for the forward tag, enter login.jsp as the Page.
You can now specify this new page as the default target for the application as follows:
1. In the Application Navigator, right-click the View project and choose Project Properties.
2. In the displayed tree, select Run/Debug/Profile. In the Run/Debug/Profile area, ensure that Use Project Settings is selected, and in the Run Configurations area, ensure that Default Configurations is selected. Click Edit.
3. In the Edit Launch Settings dialog box, select Launch Settings. In the Launch Settings area on the right, click Browse next to the Default Run Target field and navigate to find the new index.jsp page you just created and click OK. Then click OK again to close the dialog box.
You can now run your application by right-clicking in the View project and select Run from the shortcut menu. When the application launches, it first runs index.jsp, which has been set as the default launch target for the application. The index.jsp forwards you directly to the login page, login.jsp, which is displayed in your browser.
6
Enhancing the Application: Advanced JDBC Features 6-1
6 Enhancing the Application: Advanced JDBC Features
This chapter describes additional functionality that you can use in your Java application. Some of these features have not been implemented in the sample application, while some features are enhancements you can use in your code to improve performance.
This chapter includes the following sections:
■ Using Dynamic SQL
■ Calling Stored Procedures
■ Using Cursor Variables
Using Dynamic SQLDynamic SQL, or generating SQL statements during run time, is a constant need in a production environment. Very often, and especially in the matter of updates to be performed on a database, the final query is not known until run time.
For scenarios where many similar queries with differing update values must be run on the database, you can use the OraclePreparedStatement object, which extends the Statement object. This is done by substituting the literal update values with bind variables. You can also use stored PL/SQL functions on the database by calling stored procedures through the OracleCallableStatement object.
This section discusses the following topics:
■ Using OraclePreparedStatement
■ Using OracleCallableStatement
■ Using Bind Variables
Using OraclePreparedStatementTo run static SQL queries on the database, you use the Statement object. However, to run multiple similar queries or perform multiple updates that affect many columns in the database, it is not feasible to hard-code each query in your application.
You can use OraclePreparedStatement when you run the same SQL statement multiple times. Consider a query like the following:
SELECT * FROM Employees WHERE ID=xyz;
Using Dynamic SQL
6-2 Oracle Database Express Edition 2 Day + Java Developer's Guide
Every time the value of xyz in this query changes, the SQL statement needs to be compiled again.
If you use OraclePreparedStatement functionality, the SQL statement you want to run is precompiled and stored in a PreparedStatement object, and you can run it as many times as required without compiling it every time it is run. If the data in the statement changes, you can use bind variables as placeholders for the data and then provide literal values at run time.
Consider the following example of using OraclePreparedStatement:
Example 6–1 Creating a PreparedStatement
OraclePreparedStatement pstmt = conn.prepareStatement("UPDATE Employees SET salary = ? WHERE ID = ?"); pstmt.setBigDecimal(1, 153833.00) pstmt.setInt(2, 110592)
The advantages of using the OraclePreparedStatement interface include:
■ You can batch updates by using the same PreparedStatement object
■ You can improve performance because the SQL statement that is run many times is compiled only the first time it is run.
■ You can use bind variables to make the code simpler and reusable.
Using OracleCallableStatementYou can access stored procedures on databases using the OracleCallableStatement interface. This interface extends the OraclePreparedStatement interface. The OracleCallableStatement interface consists of standard JDBC escape syntax to call stored procedures. You may use this with or without a result parameter. However, if you do use a result parameter, it must be registered as an OUT parameter. Other parameters that you use with this interface can be either IN, OUT, or both.
These parameters are set by using accessor methods inherited from the OraclePreparedStatement interface. IN parameters are set by using the setXXX methods and OUT parameters are retrieved by using the getXXX methods, XXX being the Java data type of the parameter.
A CallableStatement can also return multiple ResultSet objects.
As an example, you can create an OracleCallableStatement to call the stored procedure called foo, as follows:
Example 6–2 Creating a CallableStatement
OracleCallableStatement cs = (OracleCallableStatement)conn.prepareCall("{call foo(?)}");
You can pass the string bar to this procedure in one of the following two ways:
cs.setString(1,"bar"); // JDBC standard// or...cs.setStringAtName(X, "value"); // Oracle extension
Using Bind VariablesBind variables are variable substitutes for literals in a SQL statement. They are used in conjunction with OraclePreparedStatement and OracleCallableStatement
Calling Stored Procedures
Enhancing the Application: Advanced JDBC Features 6-3
to specify parameter values that are used to build the SQL statement. Using bind variables has remarkable performance advantages in a production environment.
For PL/SQL blocks or stored procedure calls, you can use the following qualifiers to differentiate between input and output variables: IN, OUT, and IN OUT. Input variable values are set by using setXXX methods and OUT variable values can be retrieved by using getXXX methods, where XXX is the Java data type of the values. This depends on the SQL data types of the columns that you are accessing in the database.
Calling Stored ProceduresOracle Java Database Connectivity (JDBC) drivers support the processing of PL/SQL stored procedures and anonymous blocks. They support Oracle PL/SQL block syntax and most of JDBC escape syntax. The following PL/SQL calls would work with any Oracle JDBC driver:
Example 6–3 Calling Stored Procedures
// JDBC syntaxCallableStatement cs1 = conn.prepareCall ( "{call proc (?,?)}" ) ; // stored procCallableStatement cs2 = conn.prepareCall ( "{? = call func (?,?)}" ) ; // stored func
// Oracle PL/SQL block syntaxCallableStatement cs3 = conn.prepareCall ( "begin proc (?,?); end;" ) ; // stored procCallableStatement cs4 = conn.prepareCall ( "begin ? := func(?,?); end;" ) ; // stored func
As an example of using the Oracle syntax, here is a PL/SQL code snippet that creates a stored function. The PL/SQL function gets a character sequence and concatenates a suffix to it:
Example 6–4 Creating a Stored Function
create or replace function foo (val1 char)return char asbeginreturn val1 || 'suffix';end;
You can call this stored function in a Java program as follows:
Example 6–5 Calling a Stored Function in Java
OracleDataSource ods = new OracleDataSource();ods.setURL("jdbc:oracle:thin:@<hoststring>");ods.setUser("hr");ods.setPassword("hr");Connection conn = ods.getConnection();CallableStatement cs = conn.prepareCall ("begin ? := foo(?); end;");cs.registerOutParameter(1,Types.CHAR);cs.setString(2, "aa");cs.executeUpdate();String result = cs.getString(1);The following sections describe how you can use stored procedures in the sample application in this guide:
Calling Stored Procedures
6-4 Oracle Database Express Edition 2 Day + Java Developer's Guide
■ Creating a PL/SQL Stored Procedure in JDeveloper
■ Creating a Method to Use the Stored Procedure
■ Enabling Users to Choose the Stored Procedure
■ Calling the Stored Procedure from the Application
Creating a PL/SQL Stored Procedure in JDeveloperJDeveloper enables you to create stored procedures in the database through the Database Navigator. In these steps, you create a stored procedure that can be used as an alternative way of inserting an employee record in the sample application.
1. Select the DatabaseNavigatorName tab to view the Database Navigator.
2. Expand the database connection node (by default called Connection1) to see the objects in the HR database.
3. Right-click Procedures, and select New Procedure.
4. In the Create PL/SQL Procedure dialog, enter insert_employee as the object name. Click OK.
The skeleton code for the procedure is displayed in the Source Editor.
5. After the keywords CREATE OR REPLACE, enter the following lines of code replacing the existing line:
PROCEDURE INSERT_EMPLOYEE (p_first_name employees.first_name%type, p_last_name employees.last_name%type, p_email employees.email%type, p_phone_number employees.phone_number%type, p_job_id employees.job_id%type, p_salary employees.salary%type)
6. After the BEGIN statement, replace the line that reads NULL with the following:
INSERT INTO Employees VALUES (EMPLOYEES_SEQ.nextval, p_first_name, p_last_name, p_email, p_phone_number, SYSDATE, p_job_id, p_salary,.30, 100, 80);
You can see that the statement uses the same hard-coded values that are used for the last three columns in the addEmployee method in the DataHandler.java class.
7. Add the procedure name in the END statement:
END insert_employee;
8. Save the file, and check whether there are any compilation errors.
The complete code for the stored procedure is shown in Example 6–6.
Example 6–6 Creating a PL/SQL Stored Procedure to Insert Employee Data
CREATE OR REPLACE PROCEDURE INSERT_EMPLOYEE (p_first_name employees.first_name%type, p_last_name employees.last_name%type, p_email employees.email%type, p_phone_number employees.phone_number%type, p_job_id employees.job_id%type, p_salary employees.salary%type

Calling Stored Procedures
Enhancing the Application: Advanced JDBC Features 6-5
) ASBEGIN INSERT INTO Employees VALUES (EMPLOYEES_SEQ.nextval, p_first_name , p_last_name , p_email , p_phone_number, SYSDATE, p_job_id, p_salary,.30,100,80);END insert_employee;
Creating a Method to Use the Stored ProcedureIn these steps, you add a method to the DataHandler.java class that can be used as an alternative to the addEmployee method. The new method you add here makes use of the insert_employee stored procedure.
1. Select the Application tab to display the Application Navigator.
2. If the DataHandler.java file is not already open in the Java Source Editor, double-click it to open it.
3. Import the CallableStatement interface as follows:
import java.sql.CallableStatement;
4. After the addEmployee method, add the declaration for the addEmployeeSP method.
public String addEmployeeSP(String first_name, String last_name, String email, String phone_number, String job_id, int salary) throws SQLException {}
The method signature is the same as that for addEmployee.
5. Inside the method, add a try block, and inside that, connect to the database.
try { getDBConnection(); }
6. In addition, inside the try block, create the SQL string:
sqlString = "begin hr.insert_employee(?,?,?,?,?,?); end;";
The question marks (?) in the statement are bind variables, acting as placeholders for the values of first_name, last_name, and so on expected by the stored procedure.
7. Create the CallableStatement:
CallableStatement callstmt = conn.prepareCall(sqlString);
8. Set the IN parameters:
callstmt.setString(1, first_name); callstmt.setString(2, last_name); callstmt.setString(3, email); callstmt.setString(4, phone_number); callstmt.setString(5, job_id); callstmt.setInt(6, salary);
9. Add a trace message, and run the callable statement.
System.out.println("\nInserting with stored procedure: " + sqlString);

Calling Stored Procedures
6-6 Oracle Database Express Edition 2 Day + Java Developer's Guide
callstmt.execute();
10. Add a return message:
return "success";
11. After the try block, add a catch block to trap any errors. Call the logException created in Example 5–5.
catch ( SQLException ex ) { System.out.println("Possible source of error: Make sure you have created the stored procedure"); logException( ex ); return "failure";}
12. Save DataHandler.java.
The complete method is shown in Example 6–7.
Note: If you have not added the logException() method (see Example 5–5), JDeveloper will indicate an error by showing a red curly line under logException(ex). This method must be present in the DataHandler.java class before you proceed with compiling the file.
Example 6–7 Using PL/SQL Stored Procedures in Java
public String addEmployeeSP(String first_name, String last_name, String email, String phone_number, String job_id, int salary) throws SQLException { try { getDBConnection(); sqlString = "begin hr.insert_employee(?,?,?,?,?,?); end;"; CallableStatement callstmt = conn.prepareCall(sqlString); callstmt.setString(1, first_name); callstmt.setString(2, last_name); callstmt.setString(3, email); callstmt.setString(4, phone_number); callstmt.setString(5, job_id); callstmt.setInt(6, salary); System.out.println("\nInserting with stored procedure: " + sqlString); callstmt.execute(); return "success"; } catch ( SQLException ex ) { System.out.println("Possible source of error: Make sure you have created the stored procedure"); logException( ex ); return "failure"; }}
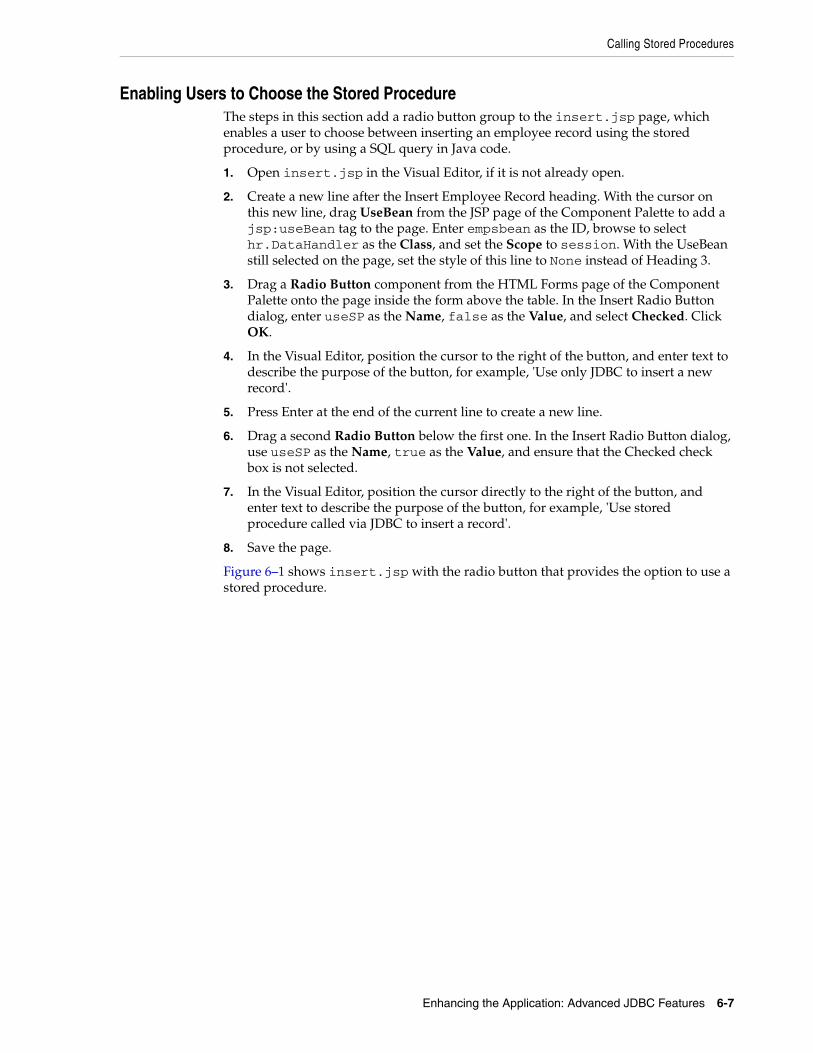
Calling Stored Procedures
Enhancing the Application: Advanced JDBC Features 6-7
Enabling Users to Choose the Stored ProcedureThe steps in this section add a radio button group to the insert.jsp page, which enables a user to choose between inserting an employee record using the stored procedure, or by using a SQL query in Java code.
1. Open insert.jsp in the Visual Editor, if it is not already open.
2. Create a new line after the Insert Employee Record heading. With the cursor on this new line, drag UseBean from the JSP page of the Component Palette to add a jsp:useBean tag to the page. Enter empsbean as the ID, browse to select hr.DataHandler as the Class, and set the Scope to session. With the UseBean still selected on the page, set the style of this line to None instead of Heading 3.
3. Drag a Radio Button component from the HTML Forms page of the Component Palette onto the page inside the form above the table. In the Insert Radio Button dialog, enter useSP as the Name, false as the Value, and select Checked. Click OK.
4. In the Visual Editor, position the cursor to the right of the button, and enter text to describe the purpose of the button, for example, 'Use only JDBC to insert a new record'.
5. Press Enter at the end of the current line to create a new line.
6. Drag a second Radio Button below the first one. In the Insert Radio Button dialog, use useSP as the Name, true as the Value, and ensure that the Checked check box is not selected.
7. In the Visual Editor, position the cursor directly to the right of the button, and enter text to describe the purpose of the button, for example, 'Use stored procedure called via JDBC to insert a record'.
8. Save the page.
Figure 6–1 shows insert.jsp with the radio button that provides the option to use a stored procedure.
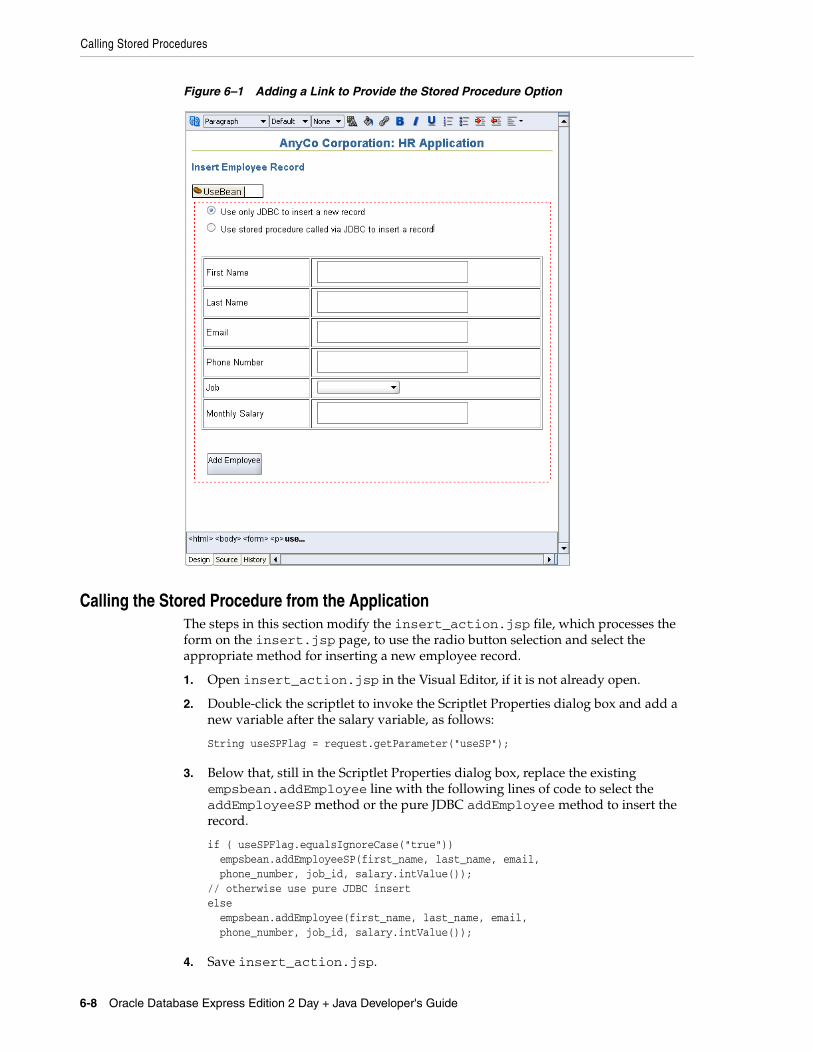
Calling Stored Procedures
6-8 Oracle Database Express Edition 2 Day + Java Developer's Guide
Figure 6–1 Adding a Link to Provide the Stored Procedure Option
Calling the Stored Procedure from the ApplicationThe steps in this section modify the insert_action.jsp file, which processes the form on the insert.jsp page, to use the radio button selection and select the appropriate method for inserting a new employee record.
1. Open insert_action.jsp in the Visual Editor, if it is not already open.
2. Double-click the scriptlet to invoke the Scriptlet Properties dialog box and add a new variable after the salary variable, as follows:
String useSPFlag = request.getParameter("useSP");
3. Below that, still in the Scriptlet Properties dialog box, replace the existing empsbean.addEmployee line with the following lines of code to select the addEmployeeSP method or the pure JDBC addEmployee method to insert the record.
if ( useSPFlag.equalsIgnoreCase("true")) empsbean.addEmployeeSP(first_name, last_name, email, phone_number, job_id, salary.intValue()); // otherwise use pure JDBC insertelse empsbean.addEmployee(first_name, last_name, email, phone_number, job_id, salary.intValue());
4. Save insert_action.jsp.
Using Cursor Variables
Enhancing the Application: Advanced JDBC Features 6-9
You can now run the application and use the radio buttons on the insert page to choose how you want to insert the new employee record. In a browser, the page will appear as shown in Figure 6–2.
Figure 6–2 Using Stored Procedures to Enter Records
Using Cursor VariablesOracle JDBC drivers support cursor variables with the REF CURSOR types, which are not a part of the JDBC standard. REF CURSOR types are supported as JDBC result sets.
A cursor variable holds the memory location of a query work area, rather than the contents of the area. Declaring a cursor variable creates a pointer. In SQL, a pointer has the data type REF x, where REF is short for REFERENCE and x represents the entity being referenced. A REF CURSOR, then, identifies a reference to a cursor variable. Many cursor variables may exist to point to many work areas, so REF CURSOR can be thought of as a category or data type specifier that identifies many different types of cursor variables. A REF CURSOR essentially encapsulates the results of a query.
Oracle does not return ResultSets. To access data returned by a query, you use CURSORS and REF CURSORS. CURSORS contain query results and metadata. A REF CURSOR (or CURSOR variable) data type contains a reference to a cursor. It can be passed between the RDBMS and the client, or between PL/SQL and Java in the database. It can also be returned from a query or a stored procedure.
Note: REF CURSOR instances are not scrollable.
This section contains the following subsections:
■ Oracle REF CURSOR Type Category
■ Accessing REF CURSOR Data
■ Using REF CURSOR in the Sample Application

Using Cursor Variables
6-10 Oracle Database Express Edition 2 Day + Java Developer's Guide
Oracle REF CURSOR Type CategoryTo create a cursor variable, begin by identifying a type that belongs to the REF CURSOR category. For example:
dept_cv DeptCursorTyp ...
Then, create the cursor variable by declaring it to be of the type DeptCursorTyp:
Example 6–8 Declaring a REF CURSOR Type
DECLARE TYPE DeptCursorTyp IS REF CURSOR
REF CURSOR, then, is a category of data types, rather than a particular data type. Stored procedures can return cursor variables of the REF CURSOR category. This output is equivalent to a database cursor or a JDBC result set.
Accessing REF CURSOR DataIn Java, a REF CURSOR is materialized as a ResultSet object and can be accessed as follows:
Example 6–9 Accessing REF Cursor Data in Java
import oracle.jdbc.*;...CallableStatement cstmt;ResultSet cursor;
// Use a PL/SQL block to open the cursorcstmt = conn.prepareCall ("begin open ? for select ename from emp; end;");
cstmt.registerOutParameter(1, OracleTypes.CURSOR);cstmt.execute();cursor = ((OracleCallableStatement)cstmt).getCursor(1);
// Use the cursor like a normal ResultSetwhile (cursor.next ()) {System.out.println (cursor.getString(1));}
In the preceding example:
1. A CallableStatement object is created by using the prepareCall method of the connection class.
2. The callable statement implements a PL/SQL procedure that returns a REF CURSOR.
3. As always, the output parameter of the callable statement must be registered to define its type. Use the type code OracleTypes.CURSOR for a REF CURSOR.
4. The callable statement is run, returning the REF CURSOR.
5. The CallableStatement object is cast to OracleCallableStatement to use the getCursor method, which is an Oracle extension to the standard JDBC application programming interface (API), and returns the REF CURSOR into a ResultSet object.
Using Cursor Variables
Enhancing the Application: Advanced JDBC Features 6-11
Using REF CURSOR in the Sample ApplicationIn the following sections, you enhance the sample application to display a dynamically-generated list of job IDs and job titles in the Job field when they are inserting a new employee record.
■ Creating a Package in the Database
■ Creating a Database Function
■ Calling the REF CURSOR from a Method
■ Displaying a Dynamically Generated List
To do this, you create a database function, GET_JOBS, that uses a REF CURSOR to retrieve a result set of jobs from the Jobs table. A new Java method, getJobs, calls this database function to retrieve the result set.
Creating a Package in the DatabaseThe following steps create a new package in the database to hold a REF CURSOR declaration.
1. Select the DatabaseNavigatorName tab to view it in the Navigator.
2. Expand the Connection1 node to view the list of database objects. Scroll down to Packages. Right-click Packages and select New Package.
3. In the Create PL/SQL Package dialog, enter JOBSPKG as the name. Click OK. The package definition is displayed in the Source Editor.
4. Replace the line /* TODO enter package declarations (types, exceptions, methods etc) here */ with the following line, to declare a REF CURSOR as follows:
TYPE ref_cursor IS REF CURSOR;
5. Save the package.
The code for the package is shown in Example 6–10:
Example 6–10 Creating a Package in the Database
CREATE OR REPLACEPACKAGE JOBSPKG AS TYPE ref_cursor IS REF CURSOR;END;
Creating a Database FunctionThese steps create a database function GET_JOBS that uses a REF CURSOR to retrieve a result set of jobs from the Jobs table.
1. In the Database Navigator, again expand the necessary nodes to view the objects in the HR database. Right-click Functions and select New Function from the shortcut menu.
2. In the Create PL/SQL Function dialog, enter GET_JOBS as the name. Click OK. The definition for the GET_JOBS function displays in the Source Editor
3. In the first line of the function definition, substitute JobsPkg.ref_cursor as the return value, in place of VARCHAR2.
4. After the AS keyword, enter the following:
Using Cursor Variables
6-12 Oracle Database Express Edition 2 Day + Java Developer's Guide
jobs_cursor JobsPkg.ref_cursor;
5. In the BEGIN block enter the following code to replace the current content:
OPEN jobs_cursor FOR SELECT job_id, job_title FROM jobs; RETURN jobs_cursor;
6. Save the function
The code for the function is shown in Example 6–11.
Example 6–11 Creating a Stored Function
CREATE OR REPLACE FUNCTION GET_JOBSRETURN JobsPkg.ref_cursorAS jobs_cursor JobsPkg.ref_cursor;BEGIN OPEN jobs_cursor FOR SELECT job_id, job_title FROM jobs; RETURN jobs_cursor;END;
Calling the REF CURSOR from a MethodThese steps create a Java method, getJobs, in the DataHandler class that calls the GET_JOBS function to retrieve the result set.
1. Double-click DataHandler.java to open it in the Source Editor if it is not already open.
2. Enter the method declaration.
public ResultSet getJobs() throws SQLException { }
3. Within the method body, connect to the database.
getDBConnection();
4. Following the connection, declare a new variable, jobquery:
String jobquery = "begin ? := get_jobs; end;";
5. Create a CallableStatement using the prepareCall method:
CallableStatement callStmt = conn.prepareCall(jobquery);
6. Register the type of the OUT parameter, using an Oracle-specific type.
callStmt.registerOutParameter(1, OracleTypes.CURSOR);
7. When you specify that you want to use an Oracle-specific type, JDeveloper displays a message asking you to use Alt+Enter to import oracle.jdbc.OracleTypes. Press Alt+Enter, and then select OracleTypes (oracle.jdbc) from the list that appears.
8. Run the statement and return the result set.
callStmt.execute(); rset = (ResultSet)callStmt.getObject(1);
Using Cursor Variables
Enhancing the Application: Advanced JDBC Features 6-13
9. Enclose the code entered so far in a try block.
10. Add a catch block to catch any exceptions, and call your logException method as well.
catch ( SQLException ex ) { logException( ex );}
11. After the close of the catch block, return the result set.
return rset;
12. Make the file to check for syntax errors.
The code for the getJobs method is as follows:
public ResultSet getJobs() throws SQLException { try { getDBConnection(); String jobquery = "begin ? := get_jobs; end;"; CallableStatement callStmt = conn.prepareCall(jobquery); callStmt.registerOutParameter(1, OracleTypes.CURSOR); callStmt.execute(); rset = (ResultSet)callStmt.getObject(1); } catch ( SQLException ex ) { logException( ex ); } return rset; }
Displaying a Dynamically Generated ListTo create the list displaying the list of job IDs and job titles in the Insert page, you hard-coded the job IDs and job titles. In the following steps, you replace this with a dynamically-generated list provided by the REF CURSOR created in the previous section.
1. Double-click insert.jsp in the Application Navigator to open it in the Visual Editor, if it is not already open.
2. Click and select the Page Directive on the top left corner of the page. The Property Inspector now shows the properties of the Page Directive.
3. Click the down arrow next to the Import field. The Edit Property: Import dialog box is displayed. Select the Hierarchy tab and then select ResultSet after extending Java and SQL folders respectively. Click OK.
4. Drag a scriptlet onto the page next to the Page Directive. In the Insert Scriptlet dialog box, add the following code to execute the getJobs method and return a result set containing a list of jobs.
ResultSet rset = empsbean.getJobs();
5. Select the ListBox component in the page (the component to enter the job in the form), and click Scriptlet in the JSP Component Palette. (You need not drag and drop the scriptlet onto the page in this case.) The Insert Scriptlet dialog box appears.
6. Enter the following code into the Insert Scriptlet dialog box. Click OK.
while (rset.next ()) { out.println("<option value=" + rset.getString("job_id") + ">" +
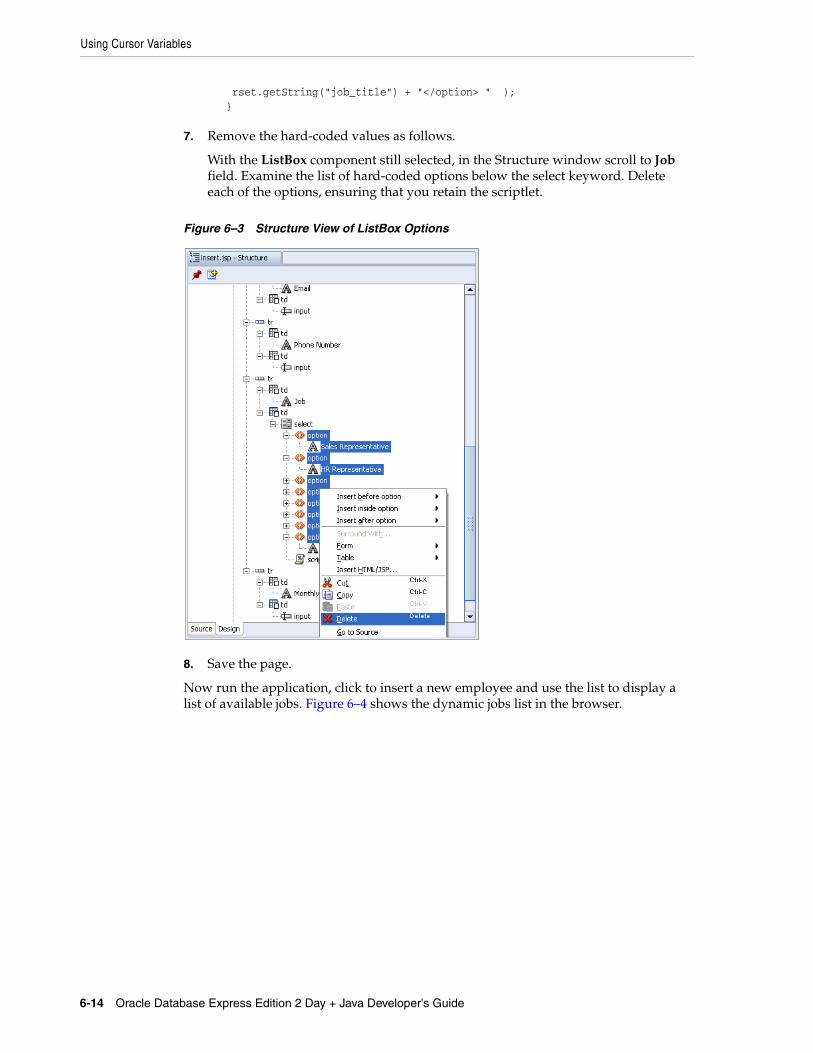
Using Cursor Variables
6-14 Oracle Database Express Edition 2 Day + Java Developer's Guide
rset.getString("job_title") + "</option> " ); }
7. Remove the hard-coded values as follows.
With the ListBox component still selected, in the Structure window scroll to Job field. Examine the list of hard-coded options below the select keyword. Delete each of the options, ensuring that you retain the scriptlet.
Figure 6–3 Structure View of ListBox Options
8. Save the page.
Now run the application, click to insert a new employee and use the list to display a list of available jobs. Figure 6–4 shows the dynamic jobs list in the browser.
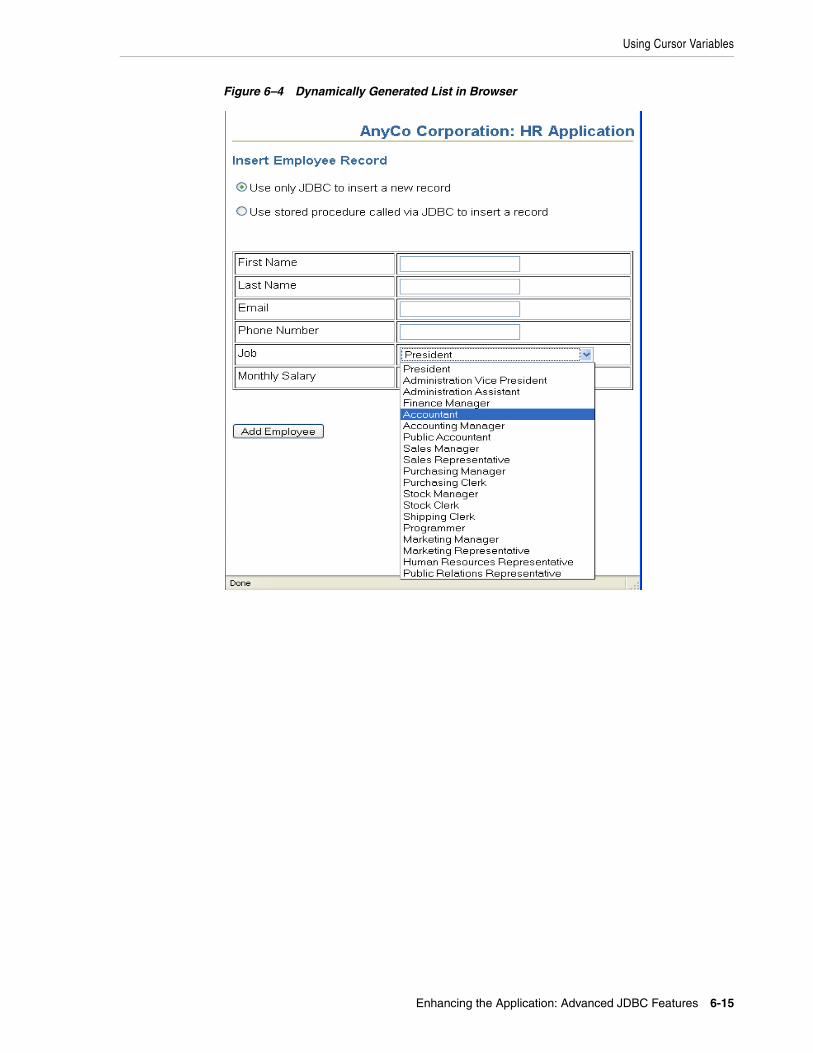
Using Cursor Variables
Enhancing the Application: Advanced JDBC Features 6-15
Figure 6–4 Dynamically Generated List in Browser

Using Cursor Variables
6-16 Oracle Database Express Edition 2 Day + Java Developer's Guide
7
Getting Unconnected from Oracle Database XE 7-1
7 Getting Unconnected from Oracle Database XE
While unconnecting from the database in JDeveloper is a simple task, it is not a process by itself in a Java application. In the application, you must explicitly close all ResultSet, Statement, and Connection objects after you are through using them. When you close the Connection object, you are unconnected from the database. The close methods clean up memory and release database cursors. Therefore, if you do not explicitly close ResultSet and Statement objects, serious memory leaks may occur, and you may run out of cursors in the database. You must then close the connection.
This chapter includes the following sections:
■ Creating a Method to Close All Open Objects
■ Closing Open Objects in the Application
Creating a Method to Close All Open ObjectsThe following steps add a closeAll method to the DataHandler class:
1. Open DataHandler.java in the Java Source Editor by double-clicking it in the Application Navigator.
2. Declare the closeAll method at the end of the DataHandler class as follows:
public void closeAll() { }
3. Within the method body, check whether the ResultSet object is open as follows:
if ( rset != null ) {
4. If it is open, close it and handle any exceptions as follows:
try { rset.close(); } catch ( Exception ex ) {} rset = null;}
5. Repeat the same actions with the Statement object.
if ( stmt != null ) { try { stmt.close(); } catch ( Exception ex ) {} stmt = null;}
Closing Open Objects in the Application
7-2 Oracle Database Express Edition 2 Day + Java Developer's Guide
6. Finally, close the Connection object.
if ( conn != null ) { try { conn.close(); } catch ( Exception ex ) {} conn = null;}
The complete closeAll method should look similar to that shown in Example 7–1.
Example 7–1 Creating a Method to Close All Open Objects
public void closeAll() { if ( rset != null ) { try { rset.close(); } catch ( Exception ex ) {} rset = null; } if ( stmt != null ) { try { stmt.close(); } catch ( Exception ex ) {} stmt = null; } if ( conn != null ) { try { conn.close(); } catch ( Exception ex ) {} conn = null; } }
Closing Open Objects in the ApplicationYou must close the ResultSet, Statement, and Connection objects only after you have finished using them. In the DataHandler class, the insert, update, and delete methods must close these objects before returning. Note that the query methods cannot close these objects until the employees.jsp page has finished processing the rows returned by the query.
In the following steps, you add the appropriate calls to the closeAll method in the DataHandler.java file:
1. Open DataHandler.java in the Java Source Editor.
2. At the end of the addEmployee method, after the closing brace of the catch block, add the following call to the closeAll method in a finally block:
finally { closeAll();}
3. Add the same call to the addEmployeeSP, deleteEmployeeById, findEmployeeById, updateEmployee, and authenticateUser methods.
Closing Open Objects in the Application
Getting Unconnected from Oracle Database XE 7-3
4. Open the employees.jsp file in the Visual Editor. Find the scriptlet inside the Employees table, and double-click to open the Insert Scriptlet dialog box.
5. Add the following statement after the while loop:
empsbean.closeAll();
6. Save your work, and compile and run the application to ensure that everything still works correctly.

Closing Open Objects in the Application
7-4 Oracle Database Express Edition 2 Day + Java Developer's Guide
8
Creating a Universal Connection Pool 8-1
8Creating a Universal Connection Pool
A connection pool is a cache of database connection objects. The objects represent physical database connections that can be used by an application to connect to a database. At run time, the application requests a connection from the pool. If the pool contains a connection that can satisfy the request, it returns the connection to the application. If no connections are found, a new connection is created and returned to the application. The application uses the connection to perform some work on the database and then returns the object back to the pool. The connection is then available for the next connection request.
Universal Connection Pool (UCP) for JDBC provides a connection pool implementation for caching JDBC connections. Java applications that are database-intensive use the connection pool to improve performance and better utilize system resources. A UCP JDBC connection pool can use any JDBC driver to create physical connections that are then maintained by the pool. The pool can be configured and provides a full set of properties that are used to optimize pool behavior based on the performance and availability requirements of an application. For more advanced applications, UCP for JDBC provides a pool manager that can be used to manage a pool instance.
See Also: Oracle Universal Connection Pool for JDBC Developer's Guide
This chapter describes how to create a Universal Connection Pool. This chapter has the following sections:
■ Setting JDeveloper Project Properties
■ Creating the Stock Ticker Application
■ Observing the Output
Setting JDeveloper Project PropertiesTo create a Universal Connection Pool, first you must set JDeveloper project properties by performing the following steps:
1. From the Application menu, select Default Project Properties.
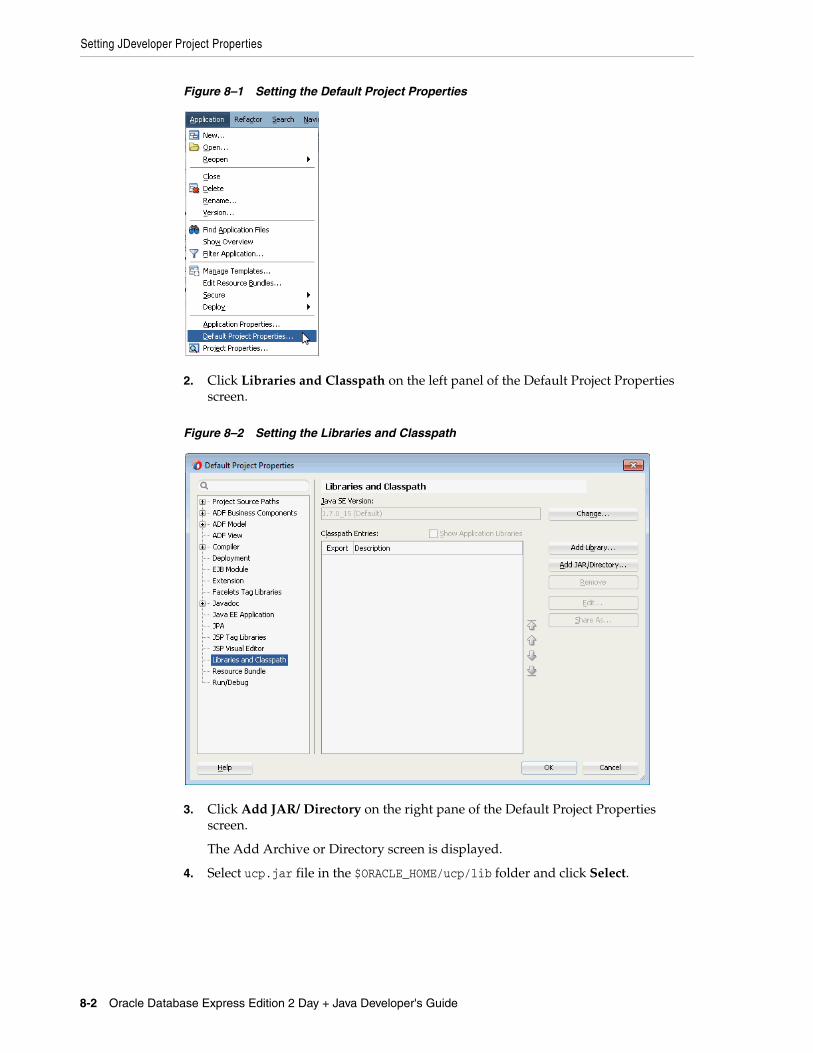
Setting JDeveloper Project Properties
8-2 Oracle Database Express Edition 2 Day + Java Developer's Guide
Figure 8–1 Setting the Default Project Properties
2. Click Libraries and Classpath on the left panel of the Default Project Properties screen.
Figure 8–2 Setting the Libraries and Classpath
3. Click Add JAR/ Directory on the right pane of the Default Project Properties screen.
The Add Archive or Directory screen is displayed.
4. Select ucp.jar file in the $ORACLE_HOME/ucp/lib folder and click Select.
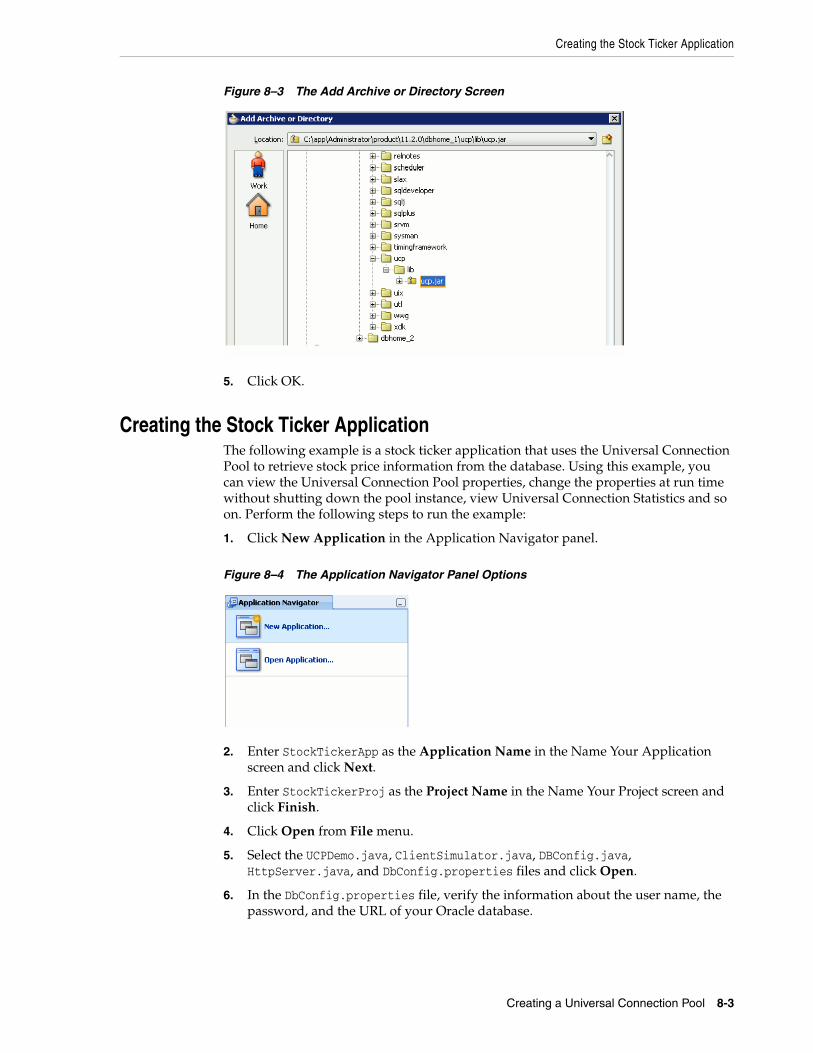
Creating the Stock Ticker Application
Creating a Universal Connection Pool 8-3
Figure 8–3 The Add Archive or Directory Screen
5. Click OK.
Creating the Stock Ticker ApplicationThe following example is a stock ticker application that uses the Universal Connection Pool to retrieve stock price information from the database. Using this example, you can view the Universal Connection Pool properties, change the properties at run time without shutting down the pool instance, view Universal Connection Statistics and so on. Perform the following steps to run the example:
1. Click New Application in the Application Navigator panel.
Figure 8–4 The Application Navigator Panel Options
2. Enter StockTickerApp as the Application Name in the Name Your Application screen and click Next.
3. Enter StockTickerProj as the Project Name in the Name Your Project screen and click Finish.
4. Click Open from File menu.
5. Select the UCPDemo.java, ClientSimulator.java, DBConfig.java, HttpServer.java, and DbConfig.properties files and click Open.
6. In the DbConfig.properties file, verify the information about the user name, the password, and the URL of your Oracle database.
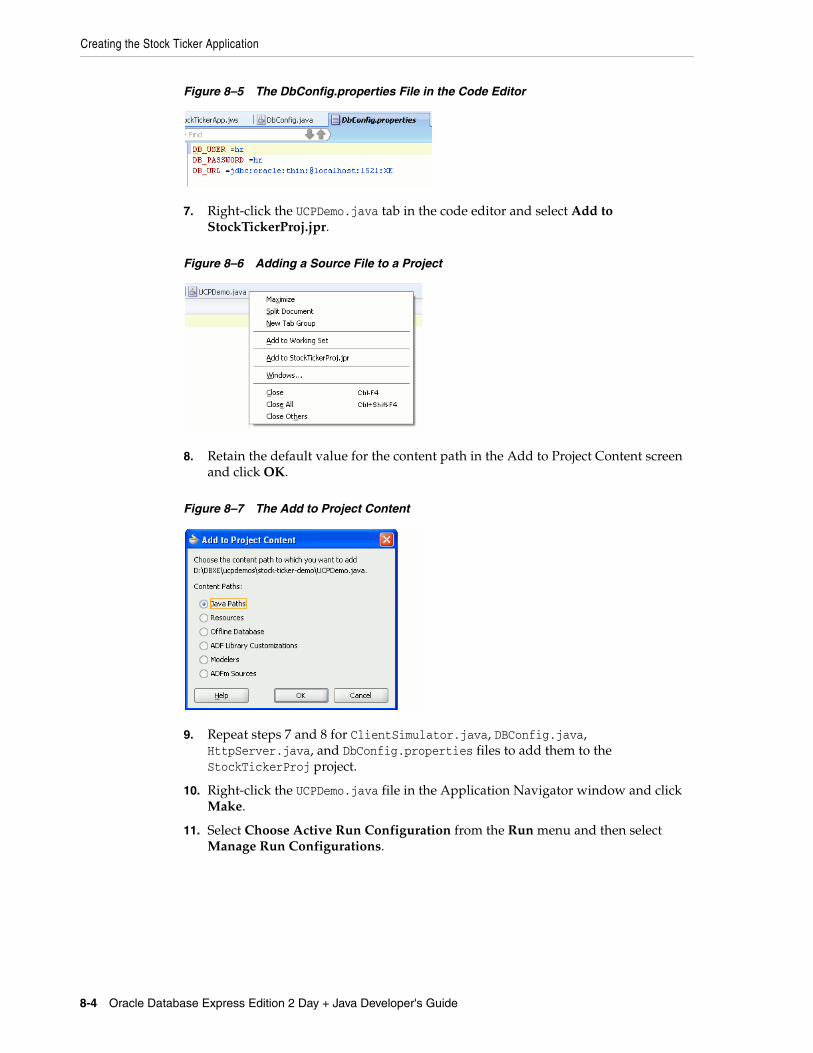
Creating the Stock Ticker Application
8-4 Oracle Database Express Edition 2 Day + Java Developer's Guide
Figure 8–5 The DbConfig.properties File in the Code Editor
7. Right-click the UCPDemo.java tab in the code editor and select Add to StockTickerProj.jpr.
Figure 8–6 Adding a Source File to a Project
8. Retain the default value for the content path in the Add to Project Content screen and click OK.
Figure 8–7 The Add to Project Content
9. Repeat steps 7 and 8 for ClientSimulator.java, DBConfig.java, HttpServer.java, and DbConfig.properties files to add them to the StockTickerProj project.
10. Right-click the UCPDemo.java file in the Application Navigator window and click Make.
11. Select Choose Active Run Configuration from the Run menu and then select Manage Run Configurations.

Creating the Stock Ticker Application
Creating a Universal Connection Pool 8-5
Figure 8–8 The Run Menu Options
12. Click Edit in the Project Properties screen for the StockTickerProj project.
Figure 8–9 The Project Properties Screen for the StockTickerProj Project
The Edit Run Configuration screen is displayed.
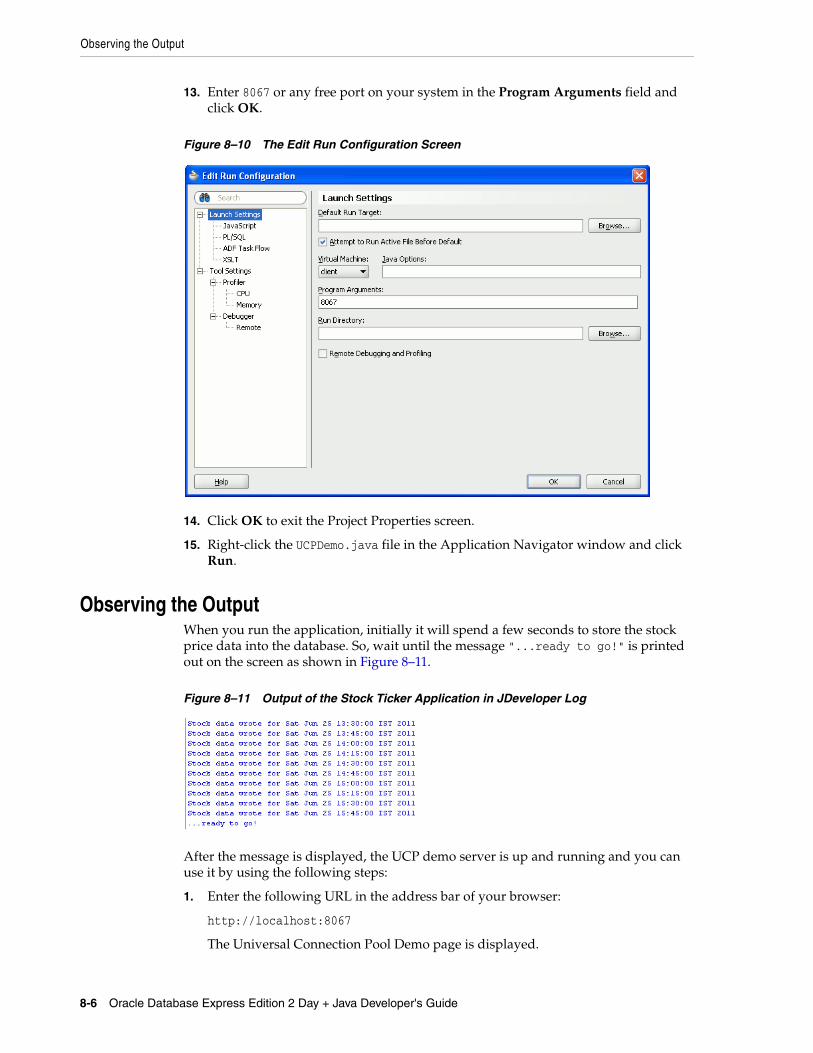
Observing the Output
8-6 Oracle Database Express Edition 2 Day + Java Developer's Guide
13. Enter 8067 or any free port on your system in the Program Arguments field and click OK.
Figure 8–10 The Edit Run Configuration Screen
14. Click OK to exit the Project Properties screen.
15. Right-click the UCPDemo.java file in the Application Navigator window and click Run.
Observing the OutputWhen you run the application, initially it will spend a few seconds to store the stock price data into the database. So, wait until the message "...ready to go!" is printed out on the screen as shown in Figure 8–11.
Figure 8–11 Output of the Stock Ticker Application in JDeveloper Log
After the message is displayed, the UCP demo server is up and running and you can use it by using the following steps:
1. Enter the following URL in the address bar of your browser:
http://localhost:8067
The Universal Connection Pool Demo page is displayed.
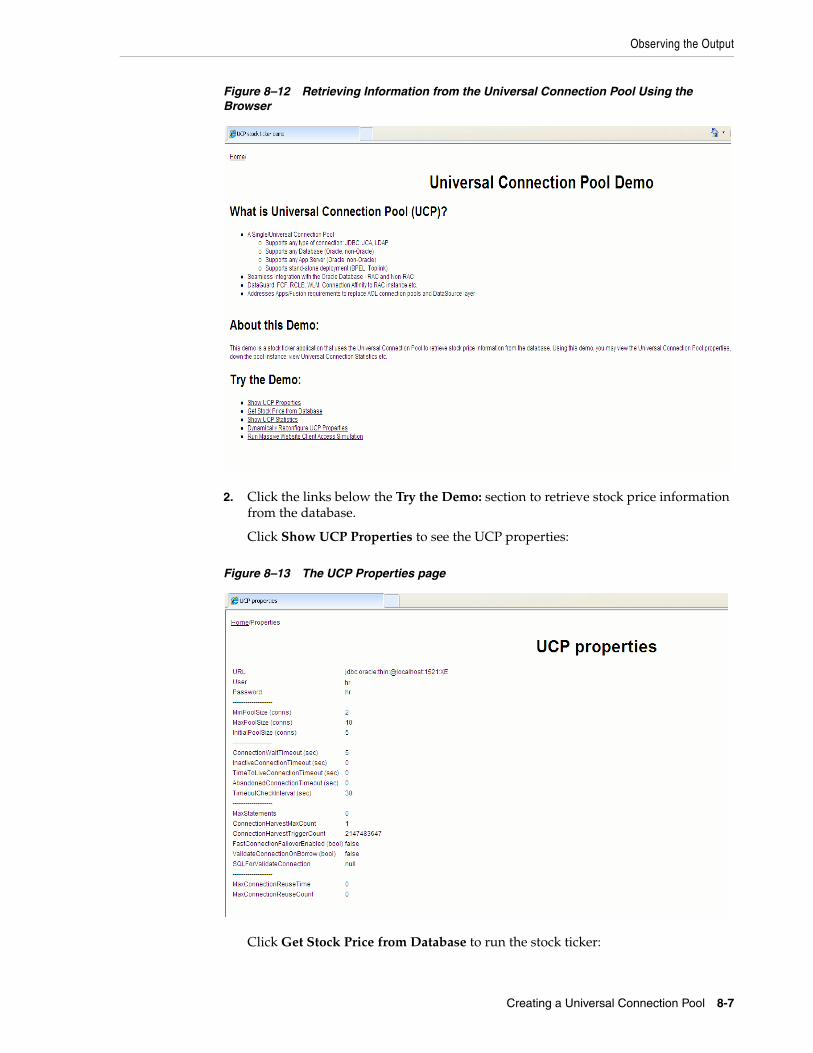
Observing the Output
Creating a Universal Connection Pool 8-7
Figure 8–12 Retrieving Information from the Universal Connection Pool Using the Browser
2. Click the links below the Try the Demo: section to retrieve stock price information from the database.
Click Show UCP Properties to see the UCP properties:
Figure 8–13 The UCP Properties page
Click Get Stock Price from Database to run the stock ticker:
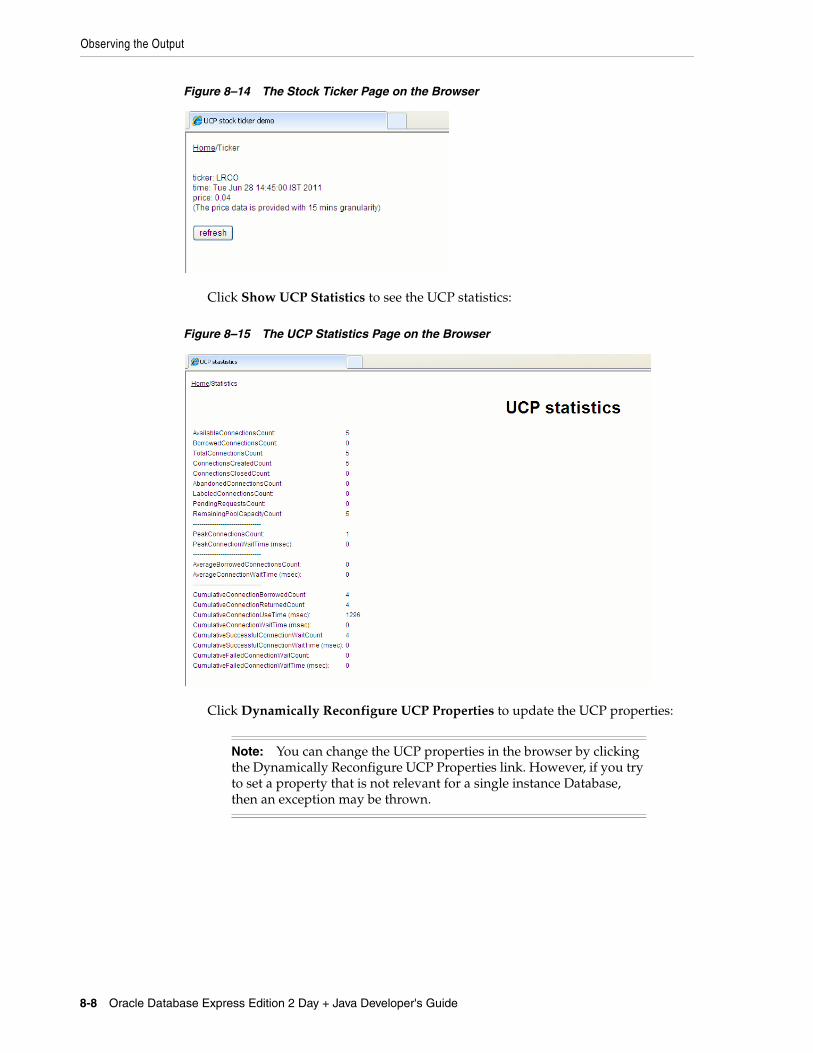
Observing the Output
8-8 Oracle Database Express Edition 2 Day + Java Developer's Guide
Figure 8–14 The Stock Ticker Page on the Browser
Click Show UCP Statistics to see the UCP statistics:
Figure 8–15 The UCP Statistics Page on the Browser
Click Dynamically Reconfigure UCP Properties to update the UCP properties:
Note: You can change the UCP properties in the browser by clicking the Dynamically Reconfigure UCP Properties link. However, if you try to set a property that is not relevant for a single instance Database, then an exception may be thrown.
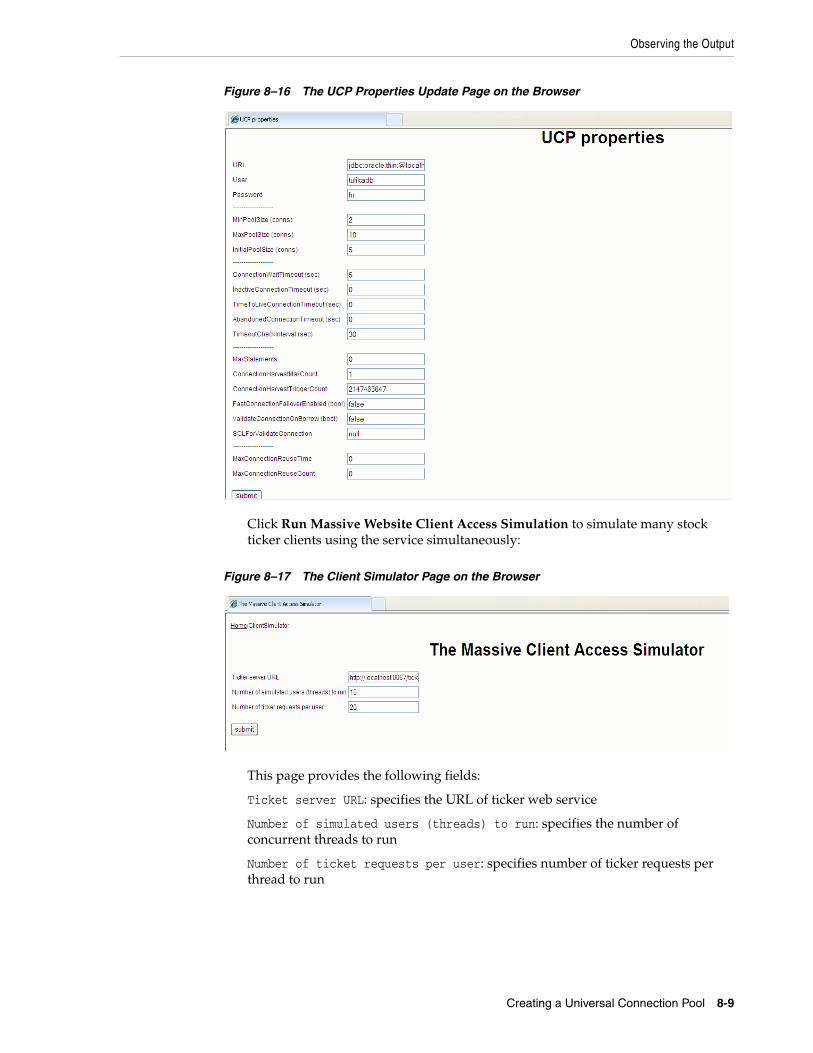
Observing the Output
Creating a Universal Connection Pool 8-9
Figure 8–16 The UCP Properties Update Page on the Browser
Click Run Massive Website Client Access Simulation to simulate many stock ticker clients using the service simultaneously:
Figure 8–17 The Client Simulator Page on the Browser
This page provides the following fields:
Ticket server URL: specifies the URL of ticker web service
Number of simulated users (threads) to run: specifies the number of concurrent threads to run
Number of ticket requests per user: specifies number of ticker requests per thread to run

Observing the Output
8-10 Oracle Database Express Edition 2 Day + Java Developer's Guide
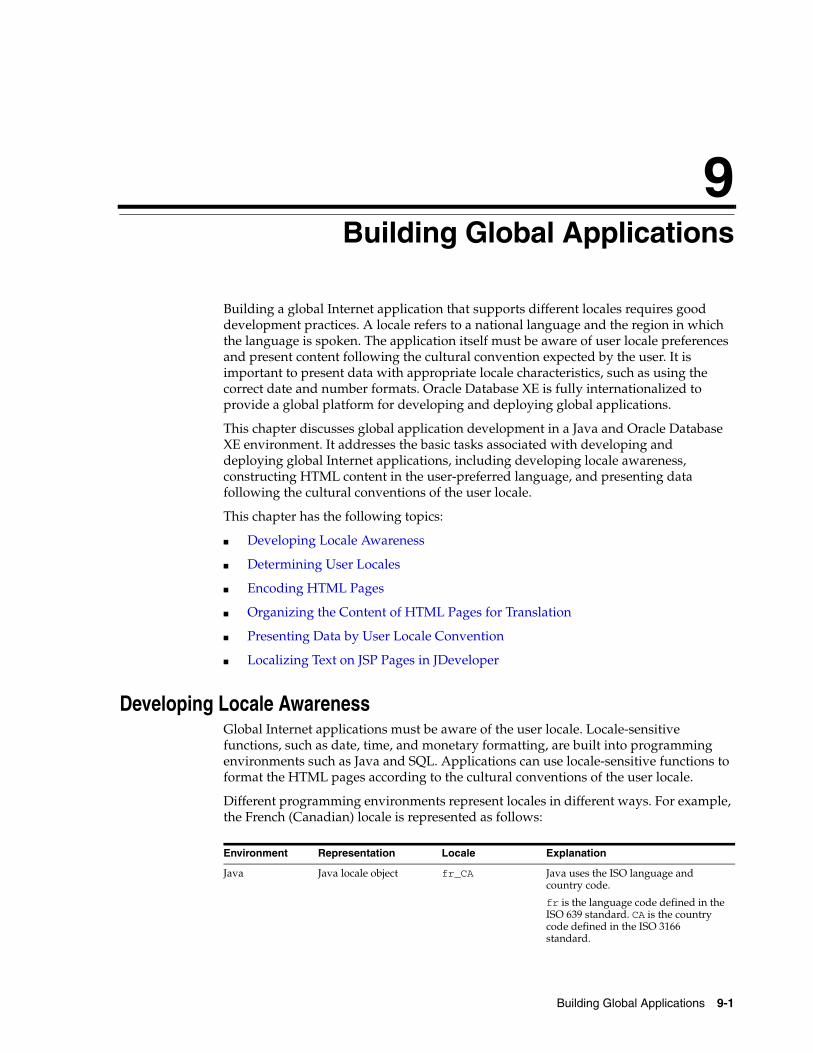
9
Building Global Applications 9-1
9 Building Global Applications
Building a global Internet application that supports different locales requires good development practices. A locale refers to a national language and the region in which the language is spoken. The application itself must be aware of user locale preferences and present content following the cultural convention expected by the user. It is important to present data with appropriate locale characteristics, such as using the correct date and number formats. Oracle Database XE is fully internationalized to provide a global platform for developing and deploying global applications.
This chapter discusses global application development in a Java and Oracle Database XE environment. It addresses the basic tasks associated with developing and deploying global Internet applications, including developing locale awareness, constructing HTML content in the user-preferred language, and presenting data following the cultural conventions of the user locale.
This chapter has the following topics:
■ Developing Locale Awareness
■ Determining User Locales
■ Encoding HTML Pages
■ Organizing the Content of HTML Pages for Translation
■ Presenting Data by User Locale Convention
■ Localizing Text on JSP Pages in JDeveloper
Developing Locale AwarenessGlobal Internet applications must be aware of the user locale. Locale-sensitive functions, such as date, time, and monetary formatting, are built into programming environments such as Java and SQL. Applications can use locale-sensitive functions to format the HTML pages according to the cultural conventions of the user locale.
Different programming environments represent locales in different ways. For example, the French (Canadian) locale is represented as follows:
Environment Representation Locale Explanation
Java Java locale object fr_CA Java uses the ISO language and country code.
fr is the language code defined in the ISO 639 standard. CA is the country code defined in the ISO 3166 standard.
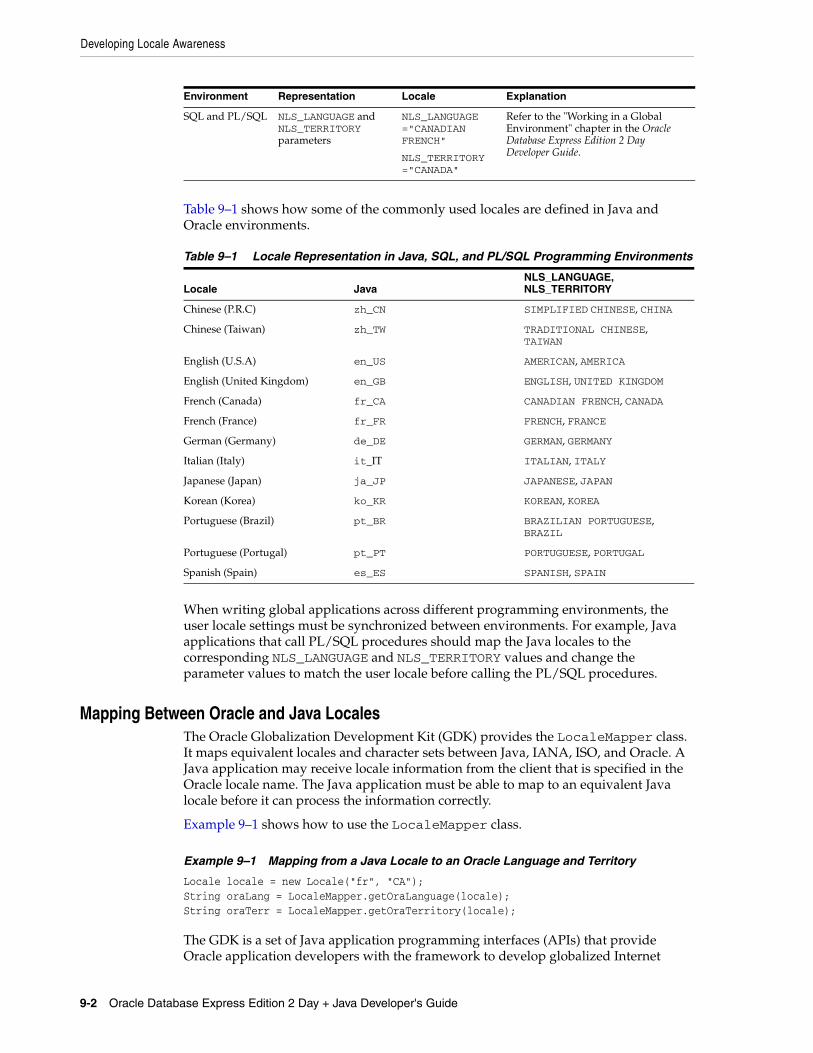
Developing Locale Awareness
9-2 Oracle Database Express Edition 2 Day + Java Developer's Guide
Table 9–1 shows how some of the commonly used locales are defined in Java and Oracle environments.
Table 9–1 Locale Representation in Java, SQL, and PL/SQL Programming Environments
Locale Java NLS_LANGUAGE, NLS_TERRITORY
Chinese (P.R.C) zh_CN SIMPLIFIED CHINESE, CHINA
Chinese (Taiwan) zh_TW TRADITIONAL CHINESE, TAIWAN
English (U.S.A) en_US AMERICAN, AMERICA
English (United Kingdom) en_GB ENGLISH, UNITED KINGDOM
French (Canada) fr_CA CANADIAN FRENCH, CANADA
French (France) fr_FR FRENCH, FRANCE
German (Germany) de_DE GERMAN, GERMANY
Italian (Italy) it_IT ITALIAN, ITALY
Japanese (Japan) ja_JP JAPANESE, JAPAN
Korean (Korea) ko_KR KOREAN, KOREA
Portuguese (Brazil) pt_BR BRAZILIAN PORTUGUESE, BRAZIL
Portuguese (Portugal) pt_PT PORTUGUESE, PORTUGAL
Spanish (Spain) es_ES SPANISH, SPAIN
When writing global applications across different programming environments, the user locale settings must be synchronized between environments. For example, Java applications that call PL/SQL procedures should map the Java locales to the corresponding NLS_LANGUAGE and NLS_TERRITORY values and change the parameter values to match the user locale before calling the PL/SQL procedures.
Mapping Between Oracle and Java LocalesThe Oracle Globalization Development Kit (GDK) provides the LocaleMapper class. It maps equivalent locales and character sets between Java, IANA, ISO, and Oracle. A Java application may receive locale information from the client that is specified in the Oracle locale name. The Java application must be able to map to an equivalent Java locale before it can process the information correctly.
Example 9–1 shows how to use the LocaleMapper class.
Example 9–1 Mapping from a Java Locale to an Oracle Language and Territory
Locale locale = new Locale("fr", "CA");String oraLang = LocaleMapper.getOraLanguage(locale);String oraTerr = LocaleMapper.getOraTerritory(locale);
The GDK is a set of Java application programming interfaces (APIs) that provide Oracle application developers with the framework to develop globalized Internet
SQL and PL/SQL NLS_LANGUAGE and NLS_TERRITORY parameters
NLS_LANGUAGE ="CANADIAN FRENCH"
NLS_TERRITORY ="CANADA"
Refer to the "Working in a Global Environment" chapter in the Oracle Database Express Edition 2 Day Developer Guide.
Environment Representation Locale Explanation
Encoding HTML Pages
Building Global Applications 9-3
applications. The GDK complements the existing globalization features in Java. It provides the synchronization of locale behaviors between a middle-tier Java application and the Oracle database.
Determining User LocalesIn a global environment, your application may have to accept users with different locale preferences. Determine the preferred locale of the user. Once that is known, the application should construct HTML content in the language of the locale, and follow the cultural conventions implied by the locale.
One of the most common methods in determining the user locale, is based on the default ISO locale setting of the browser of the user. Usually a browser sends locale preference settings to the HTTP server with the Accept-Language HTTP header. If this header is set to NULL, then there is no locale preference information available and the application should ideally fall back to a predefined application default locale.
Both JSP pages and Java Servlets can use calls to the Servlet API to retrieve the Accept-Language HTTP header as shown in Example 9–2.
Example 9–2 Determining User Locale in Java Using the Accept-Language Header
String lang = request.getHeader("Accept-Language")StringTokenizer st = new StringTokenizer(lang, ",")if (st.hasMoreTokens()) userLocale = st.nextToken();
This code gets the Accept-Language header from the HTTP request, extracts the first ISO locale, and uses it as the user-desired locale.
Locale Awareness in Java ApplicationsA Java locale object represents the locale of the corresponding user in Java. The Java encoding used for the locale is required to properly convert Java strings to and from byte data. You must consider the Java encoding for the locale if you make the Java code aware of a user locale. There are two ways to make a Java method sensitive to the Java locale and encoding:
■ Using the default Java locale and default Java encoding for the method
■ Explicitly specifying the Java locale and Java encoding for the method
When developing a global application, it is recommended to take the second approach and explicitly specify the Java locale and Java encoding that correspond to the current user locale. You can specify the Java locale object that corresponds to the user locale, identified by user_locale, in the getDateTimeInstance method as in Example 9–3.
Example 9–3 Explicitly Specifying User Locale in Java
DateFormat df = DateFormat.getDateTimeInstance(DateFormat.FULL, DateFormat.FULL, user_locale);dateString = df.format(date); /* Format a date */
Encoding HTML PagesThe encoding of an HTML page is important information for a browser and an Internet application. You can think of the page encoding as the character set used for the locale that an Internet application is serving. The browser needs to know about the
Encoding HTML Pages
9-4 Oracle Database Express Edition 2 Day + Java Developer's Guide
page encoding so that it can use the correct fonts and character set mapping tables to display the HTML pages. Internet applications need to know about the HTML page encoding so they can process input data from an HTML form.
Instead of using different native encodings for the different locales, it is recommended that UTF-8 (Unicode encoding) is used for all page encodings. Using the UTF-8 encoding not only simplifies the coding for global applications, but it allows for multilingual content on a single page.
This section includes the following topics:
■ Specifying the Page Encoding for HTML Pages
■ Specifying the Page Encoding in Java Servlets and JSP Pages
Specifying the Page Encoding for HTML PagesThere are two ways to specify the encoding of an HTML page, one is in the HTTP header, and the other is in the HTML page header.
Specifying the Encoding in the HTTP HeaderInclude the Content-Type HTTP header in the HTTP specification. It specifies the content type and character set as shown in Example 9–4.
Example 9–4 Specifying Page Encoding in the HTTP Specification
Content-Type: text/html; charset=utf-8
The charset parameter specifies the encoding for the HTML page. The possible values for the charset parameter are the IANA names for the character encodings that the browser supports.
Specifying the Encoding in the HTML Page HeaderUse this method primarily for static HTML pages. Specify the character encoding in the HTML header as shown in Example 9–5.
Example 9–5 Specifying Page Encoding on an HTML Page
<meta http-equiv="Content-Type" content="text/html;charset=utf-8">
The charset parameter specifies the encoding for the HTML page. As with the Content-Type HTTP Header, the possible values for the charset parameter are the IANA names for the character encodings that the browser supports.
Specifying the Page Encoding in Java Servlets and JSP PagesYou can specify the encoding of an HTML page in the Content-Type HTTP header in a JavaServer Pages (JSP) file using the contentType page directive. For example:
<%@ page contentType="text/html; charset=utf-8" %>
This is the MIME type and character encoding that the JSP file uses for the response it sends to the client. You can use any MIME type or IANA character set name that is valid for the JSP container. The default MIME type is text/html, and the default character set is ISO-8859-1. In the above example, the character set is set to UTF-8. The character set of the contentType page directive directs the JSP engine to encode the dynamic HTML page and set the HTTP Content-Type header with the specified character set.
Organizing the Content of HTML Pages for Translation
Building Global Applications 9-5
For Java Servlets, you can call the setContentType method of the Servlet API to specify a page encoding in the HTTP header. The doGet function in Example 9–6 shows how you can call this method.
Example 9–6 Specifying Page Encoding in Servlets Using setContentType
public void doGet(HttpServletRequest request, HttpServletResponse response)throws ServletException, IOException{ // generate the MIME type and character set headerresponse.setContentType("text/html; charset=utf-8");
...
// generate the HTML pagePrintwriter out = response.getWriter();out.println("<HTML>");
...
out.println("</HTML>");}
You should call the setContentType method before the getWriter method because the getWriter method initializes an output stream writer that uses the character set specified by the setContentType method call. Any HTML content written to the writer and eventually to a browser is encoded in the encoding specified by the setContentType call.
Organizing the Content of HTML Pages for TranslationMaking the user interface available in the local language of the user is one of the fundamental tasks related to globalizing an application. Translatable sources for the content of an HTML page belong to the following categories:
■ Text strings hard-coded in the application code
■ Static HTML files, images files, and template files such as CSS
■ Dynamic data stored in the database
This section discusses externalizing translatable content in the following:
■ Strings in Java Servlets and JSP Pages
■ Static Files
■ Data from the Database
Strings in Java Servlets and JSP PagesYou should externalize translatable strings within Java Servlets and JSP pages into Java resource bundles so that these resource bundles can be translated independent of the Java code. After translation, the resource bundles carry the same base class names as the English bundles, but with the Java locale name as the suffix. You should place the bundles in the same directory as the English resource bundles for the Java resource bundle look-up mechanism to function properly.
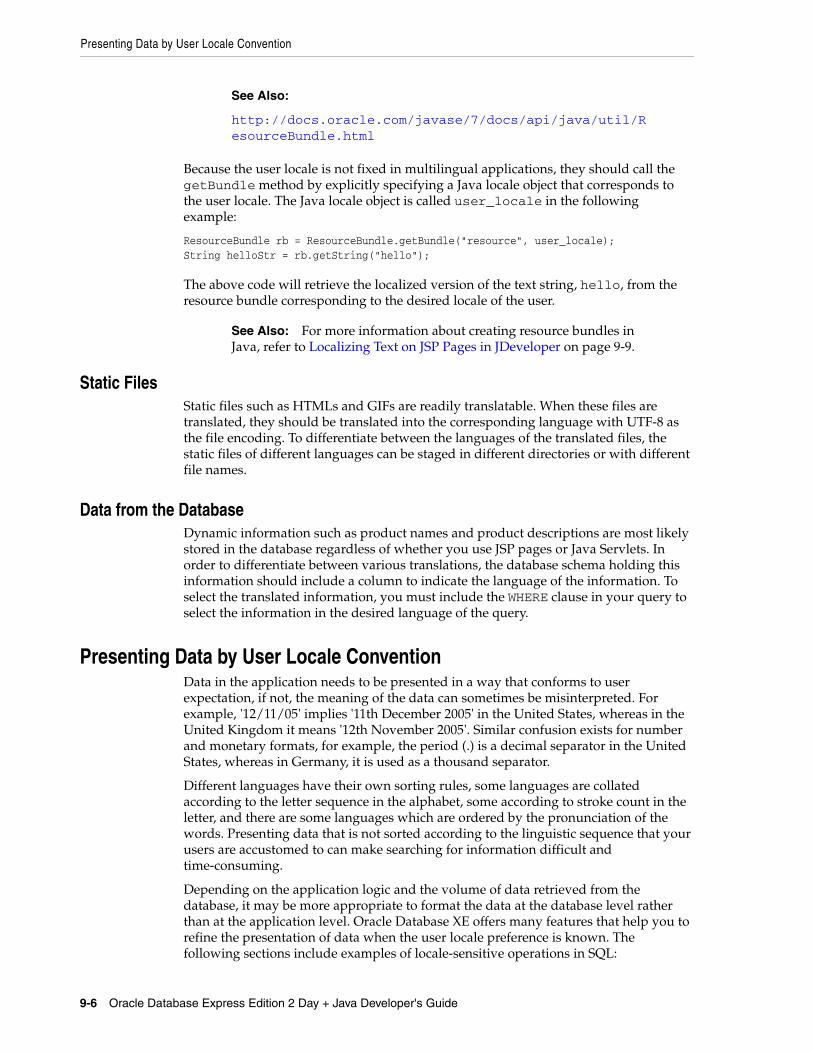
See Also:
http://docs.oracle.com/javase/7/docs/api/java/util/ResourceBundle.html
Presenting Data by User Locale Convention
9-6 Oracle Database Express Edition 2 Day + Java Developer's Guide
Because the user locale is not fixed in multilingual applications, they should call the getBundle method by explicitly specifying a Java locale object that corresponds to the user locale. The Java locale object is called user_locale in the following example:
ResourceBundle rb = ResourceBundle.getBundle("resource", user_locale);String helloStr = rb.getString("hello");
The above code will retrieve the localized version of the text string, hello, from the resource bundle corresponding to the desired locale of the user.
See Also: For more information about creating resource bundles in Java, refer to Localizing Text on JSP Pages in JDeveloper on page 9-9.
Static FilesStatic files such as HTMLs and GIFs are readily translatable. When these files are translated, they should be translated into the corresponding language with UTF-8 as the file encoding. To differentiate between the languages of the translated files, the static files of different languages can be staged in different directories or with different file names.
Data from the DatabaseDynamic information such as product names and product descriptions are most likely stored in the database regardless of whether you use JSP pages or Java Servlets. In order to differentiate between various translations, the database schema holding this information should include a column to indicate the language of the information. To select the translated information, you must include the WHERE clause in your query to select the information in the desired language of the query.
Presenting Data by User Locale ConventionData in the application needs to be presented in a way that conforms to user expectation, if not, the meaning of the data can sometimes be misinterpreted. For example, '12/11/05' implies '11th December 2005' in the United States, whereas in the United Kingdom it means '12th November 2005'. Similar confusion exists for number and monetary formats, for example, the period (.) is a decimal separator in the United States, whereas in Germany, it is used as a thousand separator.
Different languages have their own sorting rules, some languages are collated according to the letter sequence in the alphabet, some according to stroke count in the letter, and there are some languages which are ordered by the pronunciation of the words. Presenting data that is not sorted according to the linguistic sequence that your users are accustomed to can make searching for information difficult and time-consuming.
Depending on the application logic and the volume of data retrieved from the database, it may be more appropriate to format the data at the database level rather than at the application level. Oracle Database XE offers many features that help you to refine the presentation of data when the user locale preference is known. The following sections include examples of locale-sensitive operations in SQL:
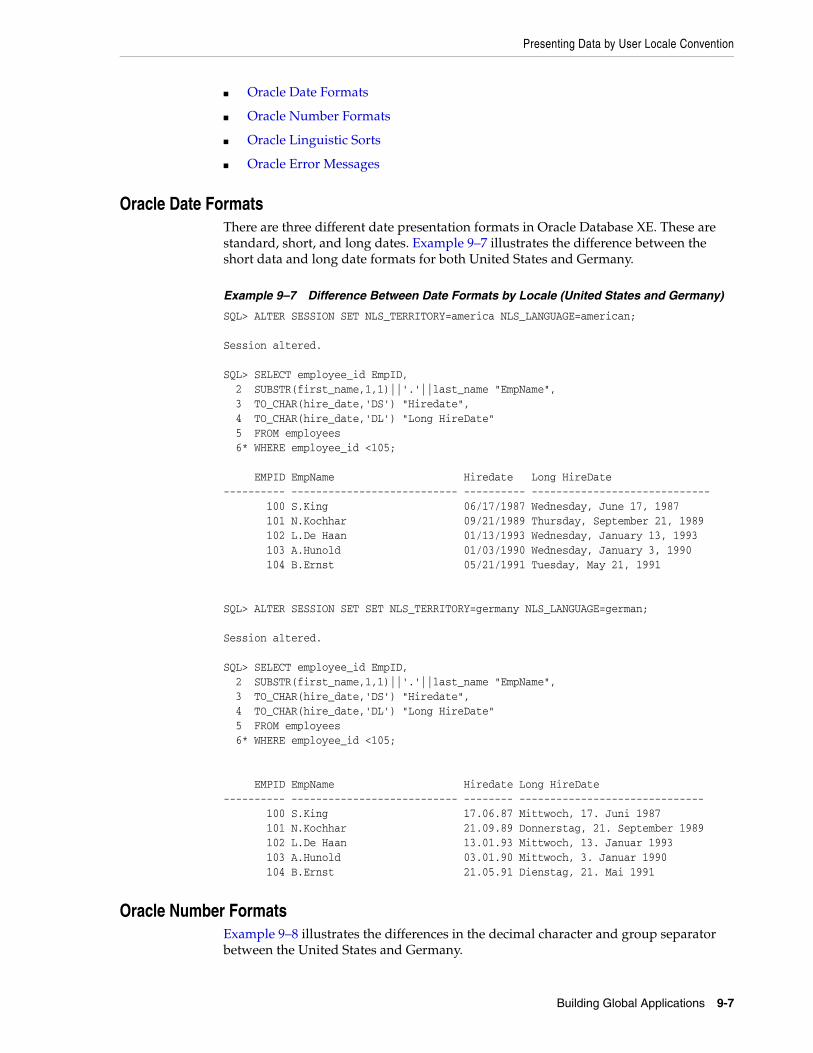
Presenting Data by User Locale Convention
Building Global Applications 9-7
■ Oracle Date Formats
■ Oracle Number Formats
■ Oracle Linguistic Sorts
■ Oracle Error Messages
Oracle Date FormatsThere are three different date presentation formats in Oracle Database XE. These are standard, short, and long dates. Example 9–7 illustrates the difference between the short data and long date formats for both United States and Germany.
Example 9–7 Difference Between Date Formats by Locale (United States and Germany)
SQL> ALTER SESSION SET NLS_TERRITORY=america NLS_LANGUAGE=american; Session altered. SQL> SELECT employee_id EmpID, 2 SUBSTR(first_name,1,1)||'.'||last_name "EmpName", 3 TO_CHAR(hire_date,'DS') "Hiredate", 4 TO_CHAR(hire_date,'DL') "Long HireDate" 5 FROM employees 6* WHERE employee_id <105; EMPID EmpName Hiredate Long HireDate---------- --------------------------- ---------- ----------------------------- 100 S.King 06/17/1987 Wednesday, June 17, 1987 101 N.Kochhar 09/21/1989 Thursday, September 21, 1989 102 L.De Haan 01/13/1993 Wednesday, January 13, 1993 103 A.Hunold 01/03/1990 Wednesday, January 3, 1990 104 B.Ernst 05/21/1991 Tuesday, May 21, 1991 SQL> ALTER SESSION SET SET NLS_TERRITORY=germany NLS_LANGUAGE=german; Session altered. SQL> SELECT employee_id EmpID, 2 SUBSTR(first_name,1,1)||'.'||last_name "EmpName", 3 TO_CHAR(hire_date,'DS') "Hiredate", 4 TO_CHAR(hire_date,'DL') "Long HireDate" 5 FROM employees 6* WHERE employee_id <105; EMPID EmpName Hiredate Long HireDate---------- --------------------------- -------- ------------------------------ 100 S.King 17.06.87 Mittwoch, 17. Juni 1987 101 N.Kochhar 21.09.89 Donnerstag, 21. September 1989 102 L.De Haan 13.01.93 Mittwoch, 13. Januar 1993 103 A.Hunold 03.01.90 Mittwoch, 3. Januar 1990 104 B.Ernst 21.05.91 Dienstag, 21. Mai 1991
Oracle Number FormatsExample 9–8 illustrates the differences in the decimal character and group separator between the United States and Germany.
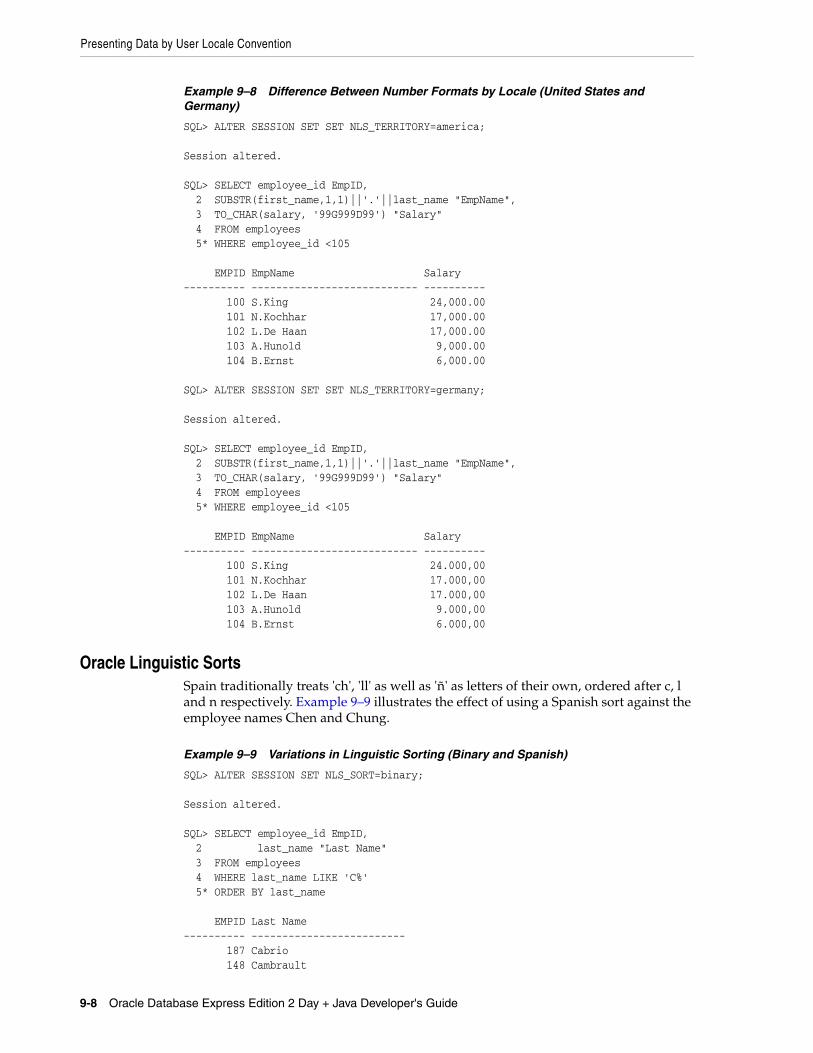
Presenting Data by User Locale Convention
9-8 Oracle Database Express Edition 2 Day + Java Developer's Guide
Example 9–8 Difference Between Number Formats by Locale (United States and Germany)
SQL> ALTER SESSION SET SET NLS_TERRITORY=america; Session altered. SQL> SELECT employee_id EmpID, 2 SUBSTR(first_name,1,1)||'.'||last_name "EmpName", 3 TO_CHAR(salary, '99G999D99') "Salary" 4 FROM employees 5* WHERE employee_id <105 EMPID EmpName Salary---------- --------------------------- ---------- 100 S.King 24,000.00 101 N.Kochhar 17,000.00 102 L.De Haan 17,000.00 103 A.Hunold 9,000.00 104 B.Ernst 6,000.00 SQL> ALTER SESSION SET SET NLS_TERRITORY=germany; Session altered. SQL> SELECT employee_id EmpID, 2 SUBSTR(first_name,1,1)||'.'||last_name "EmpName", 3 TO_CHAR(salary, '99G999D99') "Salary" 4 FROM employees 5* WHERE employee_id <105 EMPID EmpName Salary---------- --------------------------- ---------- 100 S.King 24.000,00 101 N.Kochhar 17.000,00 102 L.De Haan 17.000,00 103 A.Hunold 9.000,00 104 B.Ernst 6.000,00
Oracle Linguistic SortsSpain traditionally treats 'ch', 'll' as well as 'ñ' as letters of their own, ordered after c, l and n respectively. Example 9–9 illustrates the effect of using a Spanish sort against the employee names Chen and Chung.
Example 9–9 Variations in Linguistic Sorting (Binary and Spanish)
SQL> ALTER SESSION SET NLS_SORT=binary; Session altered. SQL> SELECT employee_id EmpID, 2 last_name "Last Name" 3 FROM employees 4 WHERE last_name LIKE 'C%' 5* ORDER BY last_name EMPID Last Name---------- ------------------------- 187 Cabrio 148 Cambrault
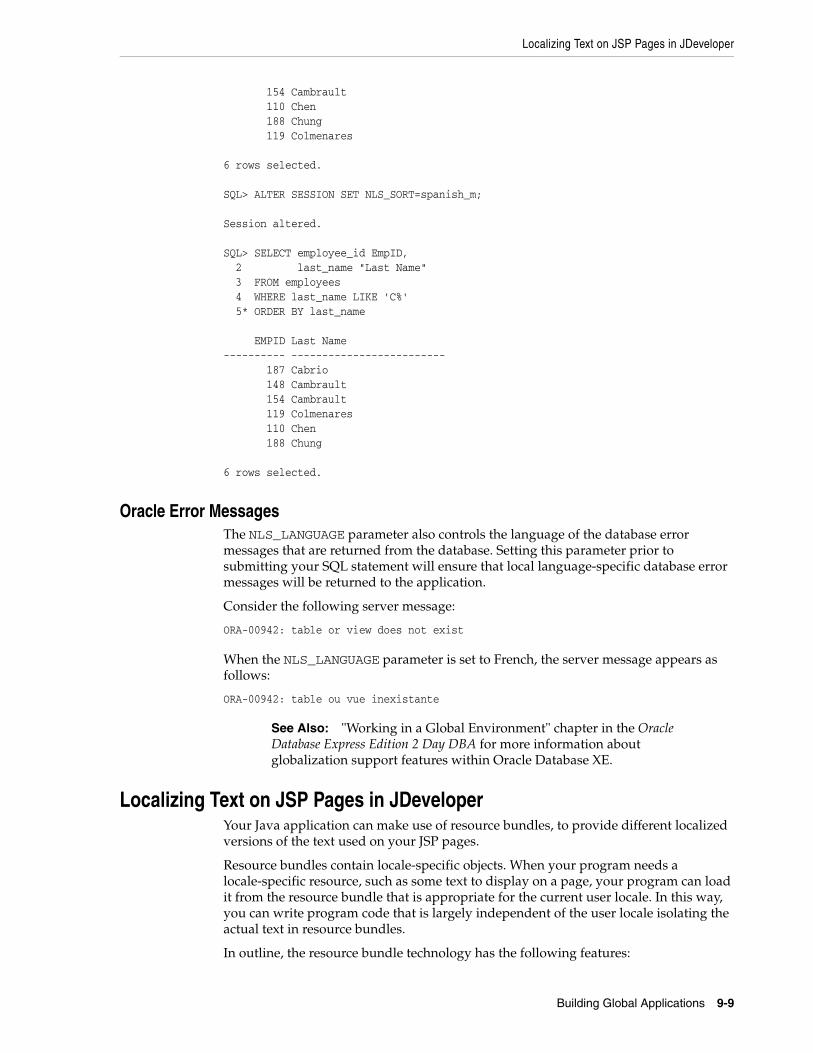
Localizing Text on JSP Pages in JDeveloper
Building Global Applications 9-9
154 Cambrault 110 Chen 188 Chung 119 Colmenares 6 rows selected. SQL> ALTER SESSION SET NLS_SORT=spanish_m; Session altered. SQL> SELECT employee_id EmpID, 2 last_name "Last Name" 3 FROM employees 4 WHERE last_name LIKE 'C%' 5* ORDER BY last_name EMPID Last Name---------- ------------------------- 187 Cabrio 148 Cambrault 154 Cambrault 119 Colmenares 110 Chen 188 Chung 6 rows selected.
Oracle Error MessagesThe NLS_LANGUAGE parameter also controls the language of the database error messages that are returned from the database. Setting this parameter prior to submitting your SQL statement will ensure that local language-specific database error messages will be returned to the application.
Consider the following server message:
ORA-00942: table or view does not exist
When the NLS_LANGUAGE parameter is set to French, the server message appears as follows:
ORA-00942: table ou vue inexistante
See Also: "Working in a Global Environment" chapter in the Oracle Database Express Edition 2 Day DBA for more information about globalization support features within Oracle Database XE.
Localizing Text on JSP Pages in JDeveloperYour Java application can make use of resource bundles, to provide different localized versions of the text used on your JSP pages.
Resource bundles contain locale-specific objects. When your program needs a locale-specific resource, such as some text to display on a page, your program can load it from the resource bundle that is appropriate for the current user locale. In this way, you can write program code that is largely independent of the user locale isolating the actual text in resource bundles.
In outline, the resource bundle technology has the following features:
Localizing Text on JSP Pages in JDeveloper
9-10 Oracle Database Express Edition 2 Day + Java Developer's Guide
■ Resource bundles belong to families whose members share a common base name, but whose names also have additional components that identify their locales. For example, the base name of a family of resource bundles might be MyResources. A locale-specific version for German, for example, would be called MyResources_de.
■ Each resource bundle in a family contains the same items, but the items have been translated for the locale represented by that resource bundle. For example, a String used on a button might in MyResources be defined as Cancel, but in MyResources_de as Abbrechen.
■ You can make specializations for different resources for different countries, for example, for the German language (de) in Switzerland (CH).
To use resource bundles in your application, you must do the following:
1. Create the resource bundles.
2. In pages that have visual components, identify the resource bundles you will be using on the page.
3. For each item of text you want to display on your pages, retrieve the text from the resource bundle instead of using hard-coded text.
See Also:
http://docs.oracle.com/javase/7/docs/api/java/util/ResourceBundle.html
In the sample application, resource bundles can be used in the following places:
■ Headings and labels on JSP pages. In this case, rather than entering text directly on the pages, you can use a scriptlet to find the text.
■ Values for buttons and other controls. In this case, set the value property of the button to an expression that retrieves the text from the resource bundle
This section covers the following tasks:
■ Creating a Resource Bundle
■ Using Resource Bundle Text on JSP Pages
Creating a Resource BundleTo create a default resource bundle:
1. Create a new Java class called MyResources, that extends class java.util.ListResourceBundle.
2. Modify the getContents method in the following way:
public Object[][] getContents() { return contents; }
3. Declare an object array like the following:
static final Object[][] contents = { };}
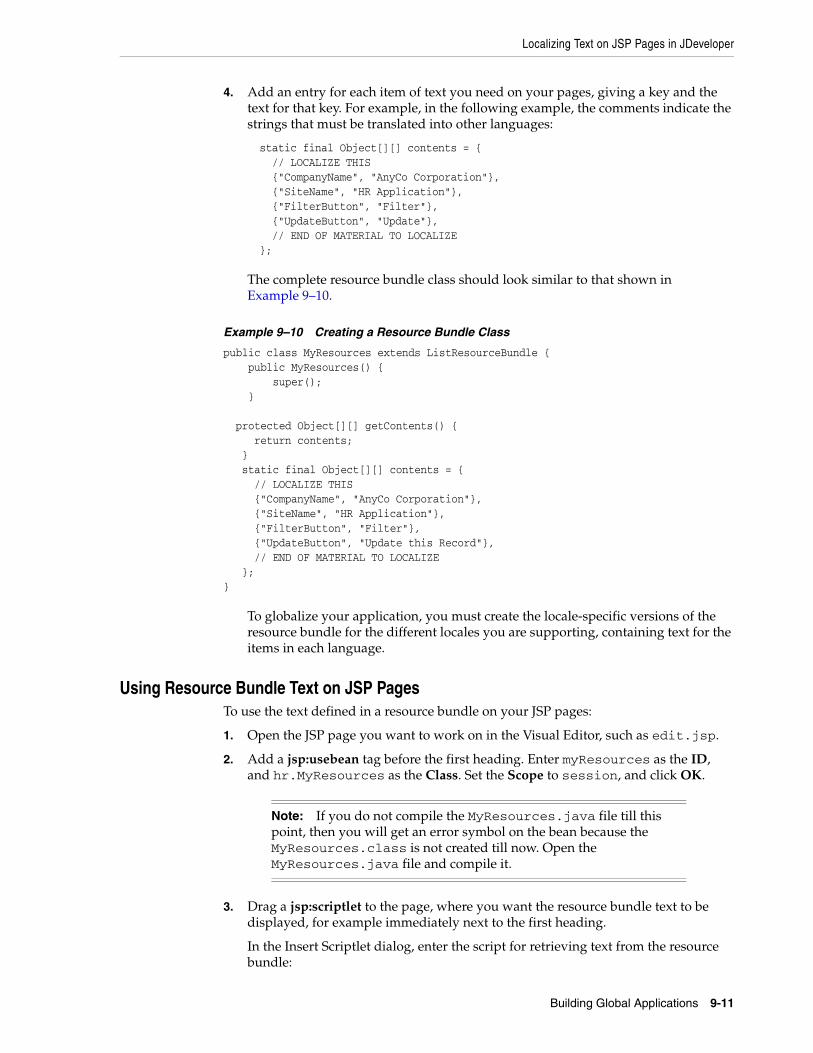
Localizing Text on JSP Pages in JDeveloper
Building Global Applications 9-11
4. Add an entry for each item of text you need on your pages, giving a key and the text for that key. For example, in the following example, the comments indicate the strings that must be translated into other languages:
static final Object[][] contents = { // LOCALIZE THIS {"CompanyName", "AnyCo Corporation"}, {"SiteName", "HR Application"}, {"FilterButton", "Filter"}, {"UpdateButton", "Update"}, // END OF MATERIAL TO LOCALIZE };
The complete resource bundle class should look similar to that shown in Example 9–10.
Example 9–10 Creating a Resource Bundle Class
public class MyResources extends ListResourceBundle { public MyResources() { super(); } protected Object[][] getContents() { return contents; } static final Object[][] contents = { // LOCALIZE THIS {"CompanyName", "AnyCo Corporation"}, {"SiteName", "HR Application"}, {"FilterButton", "Filter"}, {"UpdateButton", "Update this Record"}, // END OF MATERIAL TO LOCALIZE };}
To globalize your application, you must create the locale-specific versions of the resource bundle for the different locales you are supporting, containing text for the items in each language.
Using Resource Bundle Text on JSP PagesTo use the text defined in a resource bundle on your JSP pages:
1. Open the JSP page you want to work on in the Visual Editor, such as edit.jsp.
2. Add a jsp:usebean tag before the first heading. Enter myResources as the ID, and hr.MyResources as the Class. Set the Scope to session, and click OK.
Note: If you do not compile the MyResources.java file till this point, then you will get an error symbol on the bean because the MyResources.class is not created till now. Open the MyResources.java file and compile it.
3. Drag a jsp:scriptlet to the page, where you want the resource bundle text to be displayed, for example immediately next to the first heading.
In the Insert Scriptlet dialog, enter the script for retrieving text from the resource bundle:
Localizing Text on JSP Pages in JDeveloper
9-12 Oracle Database Express Edition 2 Day + Java Developer's Guide
out.println(myResources.getString("CompanyName") + ": " + myResources.getString("SiteName"));
4. Remove the original heading of the page, that is, AnyCo Corporation: HR Application.
5. If you select the Source tab below the Visual Editor, you should see code for the page similar to the following:
<jsp:useBean id="myResources" class="hr.MyResources" scope="session"/> <h2 align="center"> <% out.println(myResources.getString("CompanyName") + ": " + myResources.getString("SiteName"));%> </h2>
6. To use resource bundle text as the label for a button, double-click the button in the Visual Editor. In the button properties dialog, for the Value parameter of the button, enter the following script:
<% out.println(myResources.getString("UpdateButton"));%>
7. If you view the Source code for the page, you will see code similar to the following:
<input type="submit" value=<% out.println(myResources.getString("UpdateButton"));%> />
If you now run your application, you will see the text you defined in your resource bundle displayed on the page.
Index-1
Index
Aabsolute positioning in result sets, 4-3accessor methods, 5-2Apache Tomcat, 2-3application navigation, 5-21
HTML submit buttons, 5-22jsp
forward tags, 5-22Application Navigator, 3-5
using, 3-5
Bbind variables, 6-2
IN, OUT, and IN OUTparameters, 6-3OracleCallableStatement, 6-2OraclePreparedStatement, 6-2using, 6-2
CCLASSPATH, 2-4CLI, 1-1closing objects
application, 7-2closeAll method, 7-1, 7-2Connection, 7-2DataHandler, 7-1DataHandler.java, 7-2employees.jsp, 7-3ResultSet, 7-1Statement, 7-1
Component Palette, 1-4connecting from JDeveloper
driver, specifying, 3-2host name, specifying, 3-2JDBC port, specifying, 3-2service name, specifying, 3-2
connecting to Oracle Database XEDataSource object, 3-6default service, 3-8getDBConnection, 3-7overview of, 3-6using Java, 3-6using JDeveloper, 1-2
Connection objectDataSource, 3-6DriverManager, 3-6
CSSlist of components, 4-12
cursor variablesREF CURSOR, 6-9using, 6-9
DDatabase Navigator, 3-2
browsing data, 3-3database objects, editing, 3-4table data, viewing, 3-4table definition, viewing, 3-4
database URLs, 3-7database_specifier, 3-7driver_type, 3-7syntax, 3-7thin-style service names, 3-7
DataHandler.java, 1-6, 4-4DataSource object, 3-7
databaseName, 3-7dataSourceName, 3-7description, 3-7driverType, 3-7networkProtocol, 3-7password, 3-7portNumber, 3-7properties, 3-7serverName, 3-7url, 3-7user, 3-7
Datasource objectproperties, 3-7url property, 3-7
deafault serviceURLs, examples, 3-8
default servicesyntax, 3-8using, 3-8
delete_action.jsp, 1-6deleting data, 5-17
creating a method, 5-17DataHandler.java, 5-17
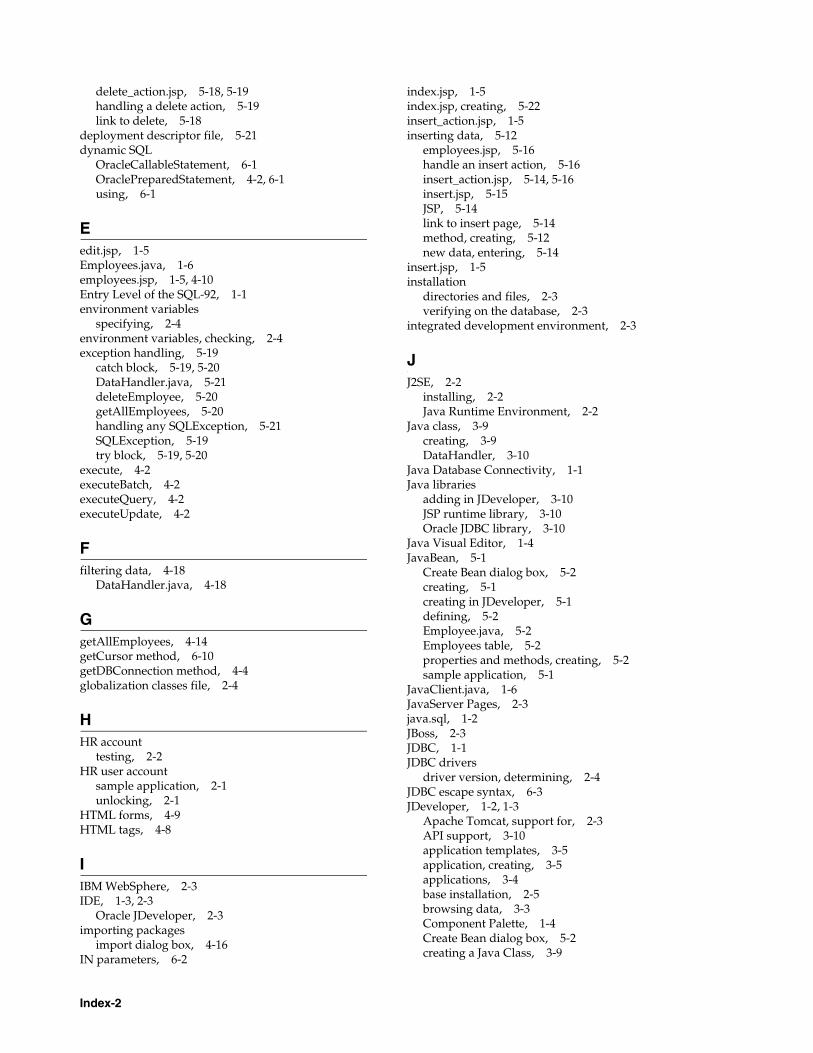
Index-2
delete_action.jsp, 5-18, 5-19handling a delete action, 5-19link to delete, 5-18
deployment descriptor file, 5-21dynamic SQL
OracleCallableStatement, 6-1OraclePreparedStatement, 4-2, 6-1using, 6-1
Eedit.jsp, 1-5Employees.java, 1-6employees.jsp, 1-5, 4-10Entry Level of the SQL-92, 1-1environment variables
specifying, 2-4environment variables, checking, 2-4exception handling, 5-19
catch block, 5-19, 5-20DataHandler.java, 5-21deleteEmployee, 5-20getAllEmployees, 5-20handling any SQLException, 5-21SQLException, 5-19try block, 5-19, 5-20
execute, 4-2executeBatch, 4-2executeQuery, 4-2executeUpdate, 4-2
Ffiltering data, 4-18
DataHandler.java, 4-18
GgetAllEmployees, 4-14getCursor method, 6-10getDBConnection method, 4-4globalization classes file, 2-4
HHR account
testing, 2-2HR user account
sample application, 2-1unlocking, 2-1
HTML forms, 4-9HTML tags, 4-8
IIBM WebSphere, 2-3IDE, 1-3, 2-3
Oracle JDeveloper, 2-3importing packages
import dialog box, 4-16IN parameters, 6-2
index.jsp, 1-5index.jsp, creating, 5-22insert_action.jsp, 1-5inserting data, 5-12
employees.jsp, 5-16handle an insert action, 5-16insert_action.jsp, 5-14, 5-16insert.jsp, 5-15JSP, 5-14link to insert page, 5-14method, creating, 5-12new data, entering, 5-14
insert.jsp, 1-5installation
directories and files, 2-3verifying on the database, 2-3
integrated development environment, 2-3
JJ2SE, 2-2
installing, 2-2Java Runtime Environment, 2-2
Java class, 3-9creating, 3-9DataHandler, 3-10
Java Database Connectivity, 1-1Java libraries
adding in JDeveloper, 3-10JSP runtime library, 3-10Oracle JDBC library, 3-10
Java Visual Editor, 1-4JavaBean, 5-1
Create Bean dialog box, 5-2creating, 5-1creating in JDeveloper, 5-1defining, 5-2Employee.java, 5-2Employees table, 5-2properties and methods, creating, 5-2sample application, 5-1
JavaClient.java, 1-6JavaServer Pages, 2-3java.sql, 1-2JBoss, 2-3JDBC, 1-1JDBC drivers
driver version, determining, 2-4JDBC escape syntax, 6-3JDeveloper, 1-2, 1-3
Apache Tomcat, support for, 2-3API support, 3-10application templates, 3-5application, creating, 3-5applications, 3-4base installation, 2-5browsing data, 3-3Component Palette, 1-4Create Bean dialog box, 5-2creating a Java Class, 3-9
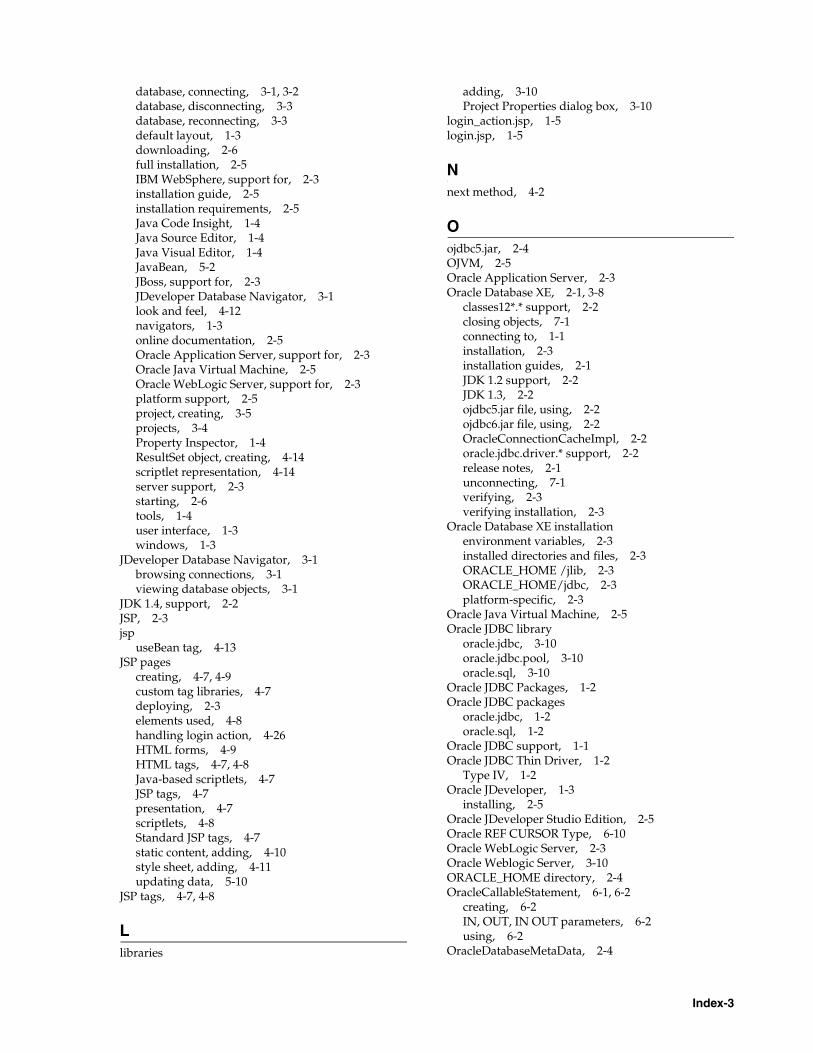
Index-3
database, connecting, 3-1, 3-2database, disconnecting, 3-3database, reconnecting, 3-3default layout, 1-3downloading, 2-6full installation, 2-5IBM WebSphere, support for, 2-3installation guide, 2-5installation requirements, 2-5Java Code Insight, 1-4Java Source Editor, 1-4Java Visual Editor, 1-4JavaBean, 5-2JBoss, support for, 2-3JDeveloper Database Navigator, 3-1look and feel, 4-12navigators, 1-3online documentation, 2-5Oracle Application Server, support for, 2-3Oracle Java Virtual Machine, 2-5Oracle WebLogic Server, support for, 2-3platform support, 2-5project, creating, 3-5projects, 3-4Property Inspector, 1-4ResultSet object, creating, 4-14scriptlet representation, 4-14server support, 2-3starting, 2-6tools, 1-4user interface, 1-3windows, 1-3
JDeveloper Database Navigator, 3-1browsing connections, 3-1viewing database objects, 3-1
JDK 1.4, support, 2-2JSP, 2-3jsp
useBean tag, 4-13JSP pages
creating, 4-7, 4-9custom tag libraries, 4-7deploying, 2-3elements used, 4-8handling login action, 4-26HTML forms, 4-9HTML tags, 4-7, 4-8Java-based scriptlets, 4-7JSP tags, 4-7presentation, 4-7scriptlets, 4-8Standard JSP tags, 4-7static content, adding, 4-10style sheet, adding, 4-11updating data, 5-10
JSP tags, 4-7, 4-8
Llibraries
adding, 3-10Project Properties dialog box, 3-10
login_action.jsp, 1-5login.jsp, 1-5
Nnext method, 4-2
Oojdbc5.jar, 2-4OJVM, 2-5Oracle Application Server, 2-3Oracle Database XE, 2-1, 3-8
classes12*.* support, 2-2closing objects, 7-1connecting to, 1-1installation, 2-3installation guides, 2-1JDK 1.2 support, 2-2JDK 1.3, 2-2ojdbc5.jar file, using, 2-2ojdbc6.jar file, using, 2-2OracleConnectionCacheImpl, 2-2oracle.jdbc.driver.* support, 2-2release notes, 2-1unconnecting, 7-1verifying, 2-3verifying installation, 2-3
Oracle Database XE installationenvironment variables, 2-3installed directories and files, 2-3ORACLE_HOME /jlib, 2-3ORACLE_HOME/jdbc, 2-3platform-specific, 2-3
Oracle Java Virtual Machine, 2-5Oracle JDBC library
oracle.jdbc, 3-10oracle.jdbc.pool, 3-10oracle.sql, 3-10
Oracle JDBC Packages, 1-2Oracle JDBC packages
oracle.jdbc, 1-2oracle.sql, 1-2
Oracle JDBC support, 1-1Oracle JDBC Thin Driver, 1-2
Type IV, 1-2Oracle JDeveloper, 1-3
installing, 2-5Oracle JDeveloper Studio Edition, 2-5Oracle REF CURSOR Type, 6-10Oracle WebLogic Server, 2-3Oracle Weblogic Server, 3-10ORACLE_HOME directory, 2-4OracleCallableStatement, 6-1, 6-2
creating, 6-2IN, OUT, IN OUT parameters, 6-2using, 6-2
OracleDatabaseMetaData, 2-4
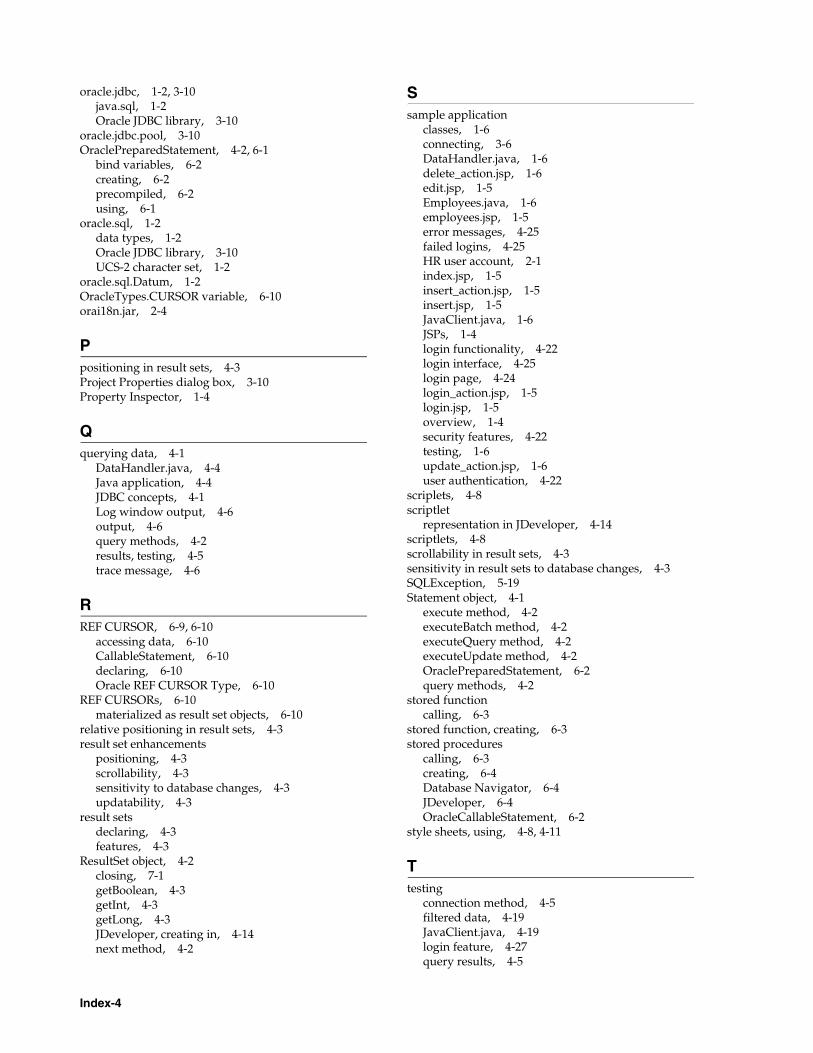
Index-4
oracle.jdbc, 1-2, 3-10java.sql, 1-2Oracle JDBC library, 3-10
oracle.jdbc.pool, 3-10OraclePreparedStatement, 4-2, 6-1
bind variables, 6-2creating, 6-2precompiled, 6-2using, 6-1
oracle.sql, 1-2data types, 1-2Oracle JDBC library, 3-10UCS-2 character set, 1-2
oracle.sql.Datum, 1-2OracleTypes.CURSOR variable, 6-10orai18n.jar, 2-4
Ppositioning in result sets, 4-3Project Properties dialog box, 3-10Property Inspector, 1-4
Qquerying data, 4-1
DataHandler.java, 4-4Java application, 4-4JDBC concepts, 4-1Log window output, 4-6output, 4-6query methods, 4-2results, testing, 4-5trace message, 4-6
RREF CURSOR, 6-9, 6-10
accessing data, 6-10CallableStatement, 6-10declaring, 6-10Oracle REF CURSOR Type, 6-10
REF CURSORs, 6-10materialized as result set objects, 6-10
relative positioning in result sets, 4-3result set enhancements
positioning, 4-3scrollability, 4-3sensitivity to database changes, 4-3updatability, 4-3
result setsdeclaring, 4-3features, 4-3
ResultSet object, 4-2closing, 7-1getBoolean, 4-3getInt, 4-3getLong, 4-3JDeveloper, creating in, 4-14next method, 4-2
Ssample application
classes, 1-6connecting, 3-6DataHandler.java, 1-6delete_action.jsp, 1-6edit.jsp, 1-5Employees.java, 1-6employees.jsp, 1-5error messages, 4-25failed logins, 4-25HR user account, 2-1index.jsp, 1-5insert_action.jsp, 1-5insert.jsp, 1-5JavaClient.java, 1-6JSPs, 1-4login functionality, 4-22login interface, 4-25login page, 4-24login_action.jsp, 1-5login.jsp, 1-5overview, 1-4security features, 4-22testing, 1-6update_action.jsp, 1-6user authentication, 4-22
scriplets, 4-8scriptlet
representation in JDeveloper, 4-14scriptlets, 4-8scrollability in result sets, 4-3sensitivity in result sets to database changes, 4-3SQLException, 5-19Statement object, 4-1
execute method, 4-2executeBatch method, 4-2executeQuery method, 4-2executeUpdate method, 4-2OraclePreparedStatement, 6-2query methods, 4-2
stored functioncalling, 6-3
stored function, creating, 6-3stored procedures
calling, 6-3creating, 6-4Database Navigator, 6-4JDeveloper, 6-4OracleCallableStatement, 6-2
style sheets, using, 4-8, 4-11
Ttesting
connection method, 4-5filtered data, 4-19JavaClient.java, 4-19login feature, 4-27query results, 4-5
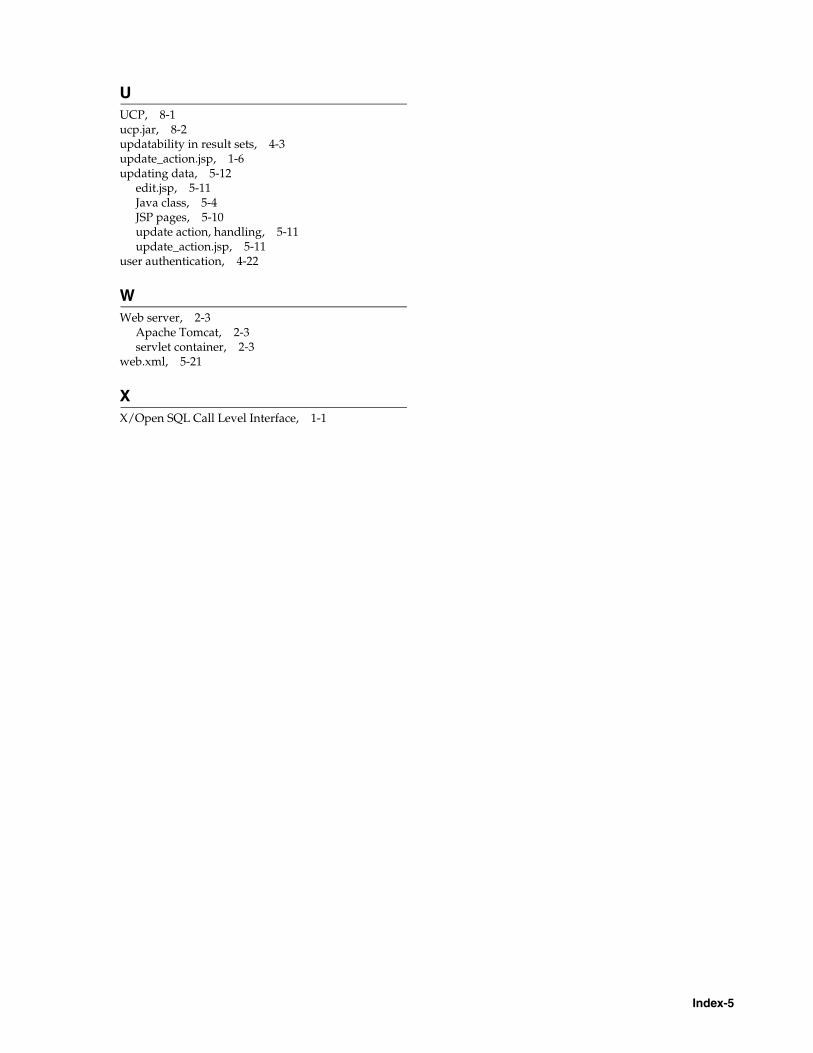
Index-5
UUCP, 8-1ucp.jar, 8-2updatability in result sets, 4-3update_action.jsp, 1-6updating data, 5-12
edit.jsp, 5-11Java class, 5-4JSP pages, 5-10update action, handling, 5-11update_action.jsp, 5-11
user authentication, 4-22
WWeb server, 2-3
Apache Tomcat, 2-3servlet container, 2-3
web.xml, 5-21
XX/Open SQL Call Level Interface, 1-1

Index-6


