INTRODUCTION............................................................................................................ 3
LOGGING INTO DISCOVERER............................................................................................ 4
CREATING NEW REPORTS........................................................................................ 5
CREATING THE QUERY..................................................................................................... 6
CREATING CONDITIONS.................................................................................................... 9
CREATING SORTS........................................................................................................... 12
CREATING CALCULATIONS............................................................................................. 14
DUPLICATING SHEETS IN THE WORKBOOK.................................................................... 16
ANALYZING DATA..................................................................................................... 18
CREATING REPORT PARAMETERS.................................................................................. 19
CREATING TOTALS & SUBTOTALS.................................................................................. 22
CREATING PERCENTAGES............................................................................................... 24
USING EXCEPTIONS........................................................................................................ 26
DRILLING THROUGH THE DATA..................................................................................... 28
CREATING GRAPHS........................................................................................................ 31
MANAGING WORKBOOKS........................................................................................ 33
EXPORTING WORKBOOK DATA...................................................................................... 34
SAVING AND SENDING WORKBOOKS.............................................................................. 36
PRINTING WORKSHEETS................................................................................................ 37
SHARING WORKBOOKS WITH OTHER USERS................................................................. 39
SETTING WORKBOOK PROPERTIES................................................................................ 41
DELETING WORKBOOKS................................................................................................ 42
OPENING EXISTING REPORTS............................................................................... 43
OPENING EXISTING REPORTS......................................................................................... 44
USING PARAMETERS...................................................................................................... 46
USING SHEETS AND WORKBOOKS.................................................................................. 47
DISCOVERER MENU ITEMS.................................................................................... 48
SHEET MENU.................................................................................................................. 49
FORMAT MENU............................................................................................................... 51
TOOLS MENU.................................................................................................................. 53
GRAPH MENU................................................................................................................. 56
VIEW MENU.................................................................................................................... 58
FILE MENU..................................................................................................................... 60
HELP MENU.................................................................................................................... 63
DIMENSIONS................................................................................................................... 1
HIERARCHIES................................................................................................................... 2
TIME................................................................................................................................. 2
COST CENTER................................................................................................................... 3
ACCOUNT......................................................................................................................... 4
BCLE............................................................................................................................... 5
http://oracleapps88.blogspot.com/
ORACLEAPPS88.BLOGSPOT.COM
Raju Ch
SET OF BOOKS.................................................................................................................. 6
AMOUNTS........................................................................................................................ 7
TRANSACTIONS................................................................................................................. 8
BALANCES........................................................................................................................ 9
http://oracleapps88.blogspot.com/
ORACLEAPPS88.BLOGSPOT.COM
Raju Ch
1
INTRODUCTION
This class session will provide an introduction to Discoverer functionality along with the
navigational features of Discoverer and define several key concepts. The topics of discussion
include:
Creating New Reports
Analyzing Data
Managing Workbooks
Opening Existing Reports
Discoverer Menu Items
http://oracleapps88.blogspot.com/
ORACLEAPPS88.BLOGSPOT.COM
Raju Ch
Logging into Discoverer
To log into Discoverer, you will need your User Name, password, and the name of the database
system to which you are connecting.
Process Flow:
From the Start menu in Windows, choose Programs, then Oracle Discoverer 3.1, and then
User Edition.
In the Connect to Oracle Discoverer dialog box, enter your User Name and password.
In the Connect field, do one of the following:
If you are connecting to a database on your hard drive, click Connect.
If you are connecting to a database on a network, type the connect string or server
name provided by your system administrator in the Connect field. Then click
Connect. (Production data is currently resident in prd, development of new queries
can also be done on the test server, in setup).
http://oracleapps88.blogspot.com/
ORACLEAPPS88.BLOGSPOT.COM
Raju Ch
2
CREATING NEW REPORTS
This section discusses creating new reports in Discoverer using the Workbook Wizard. Some of
the functions referred in this section will be discussed in detail in section 2. Topics included in
this section are:
Creating the Query
Creating Conditions
Creating Sorts
Creating Calculations
Duplicating Sheets in the Workbook
http://oracleapps88.blogspot.com/
ORACLEAPPS88.BLOGSPOT.COM
Raju Ch
CREATING NEW REPORTS
Creating the Query
The Workbook Wizard guides you through the steps required to create a new query. After you
have supplied the necessary information, click on Next to continue. All of these steps represent
common functionality that can be accessed from the Discoverer menus, however the Workbook
Wizard can make sure that you don’t leave out any essential information when you are building
your query.
Selecting a Report Template:
When you are first starting up Discoverer, you will come to this screen; to create a new
report during your Discoverer session, choose the File menu, then choose New.
Select a format for displaying the information you retrieve from the database. There are
four formats to choose from:
A Table displays columns of information with headings.
A Crosstab displays table data in a ‘multidimensional’ format, allowing you to pivot
row, column, and page dimensions.
Note: In a crosstab, column titles, such as ‘January 1998’, are data, not headings.
http://oracleapps88.blogspot.com/
ORACLEAPPS88.BLOGSPOT.COM
Raju Ch
A Page-Detail Table allows you to display table information grouped by the criteria
specified on the page axis.
A Page-Detail Crosstab allows you to display crosstab information grouped by the
criteria specified on the page axis.
Selecting Items:
The wizard contains an item selector and uses the following symbols:
A plus sign indicates that there is another level in the hierarchy that is not displayed
but can be opened.
A minus sign indicates that the next level in the hierarchy is displayed.
Select items from the Available list and move them to the Selected list. There are two
mehtods available to move an object from the Available list to the Selected list: Drag the
object from the Available list into the Selected list. Select the object and then click the
right arrow. You can also use these methods to move an object from the Selected list back
to the Available list. Only those items that are not greyed out are available for the query
you are building.
During the Select Items step, you can set certain query options and report setting for this
query. Click on the Options button to access the menu.
http://oracleapps88.blogspot.com/
ORACLEAPPS88.BLOGSPOT.COM
Raju Ch
http://oracleapps88.blogspot.com/
ORACLEAPPS88.BLOGSPOT.COM
Raju Ch
Arrange the items in the layout by dragging them to the positions you want. To create a
page item, select the check box for Show Page Item and drag one or more items to the
Page Items box.
Note: After this step, you are finished with the required steps to create the query, although
you are not quite through with the Workbook Wizard. The next three sections discuss the
optional query functions that the Workbook Wizard will guide you through. These functions
can also be performed from the output window once the query has run.
http://oracleapps88.blogspot.com/
ORACLEAPPS88.BLOGSPOT.COM
Raju Ch
CREATING NEW REPORTS
Creating Conditions
A condition is a filter that you place on an item to restrict the number of rows returned from a
query. For example, you may want to see only those items that have shipped as of a certain
date. The condition prevents the data that does not meet the criteria from being displayed in the
workbook.
The Administrator can predefine conditions that all users can access in any workbook. There are
two types of predefined conditions:
A mandatory condition is automatically applied when you select an item for inclusion in
your query. There are none currently defined in the system.
An optional condition appears in the item selector as a Filter icon. You decide whether or
not to use this condition.
Users can also create conditions. The conditions you create are only available in the workbook
where they were created. If you want to reuse a condition across multiple reports, you may want
to include the reports in the same workbook.
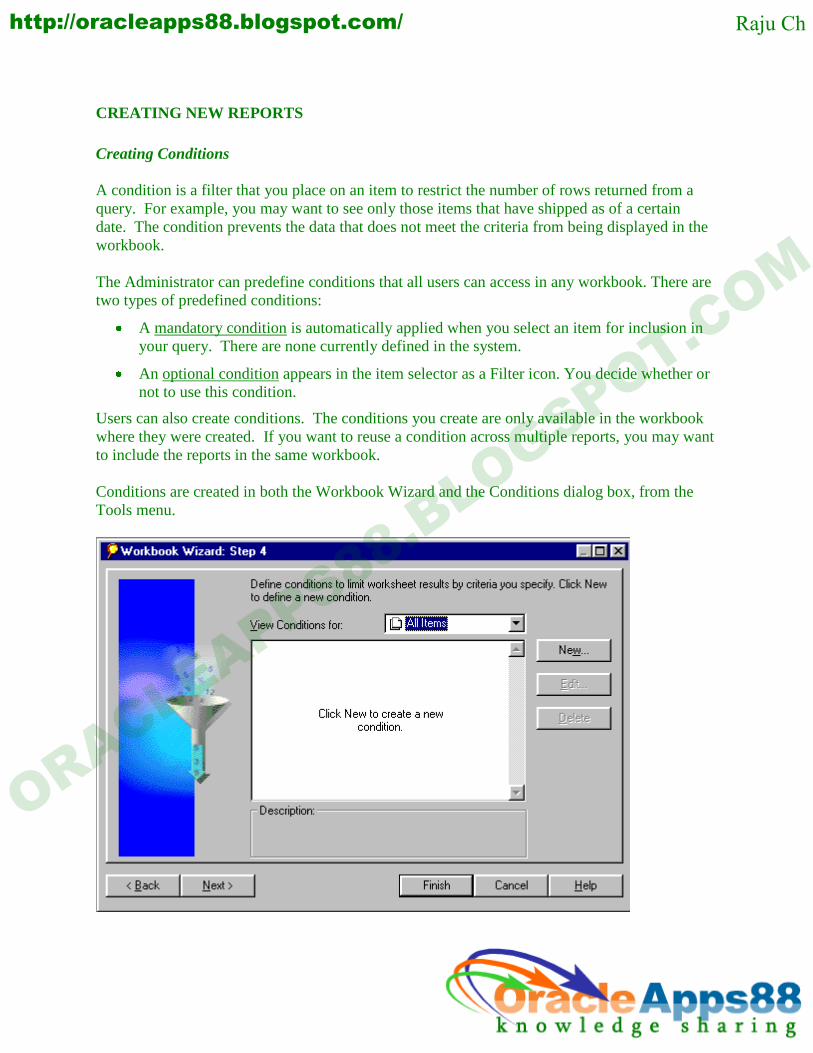
Conditions are created in both the Workbook Wizard and the Conditions dialog box, from the
Tools menu.
http://oracleapps88.blogspot.com/
ORACLEAPPS88.BLOGSPOT.COM
Raju Ch
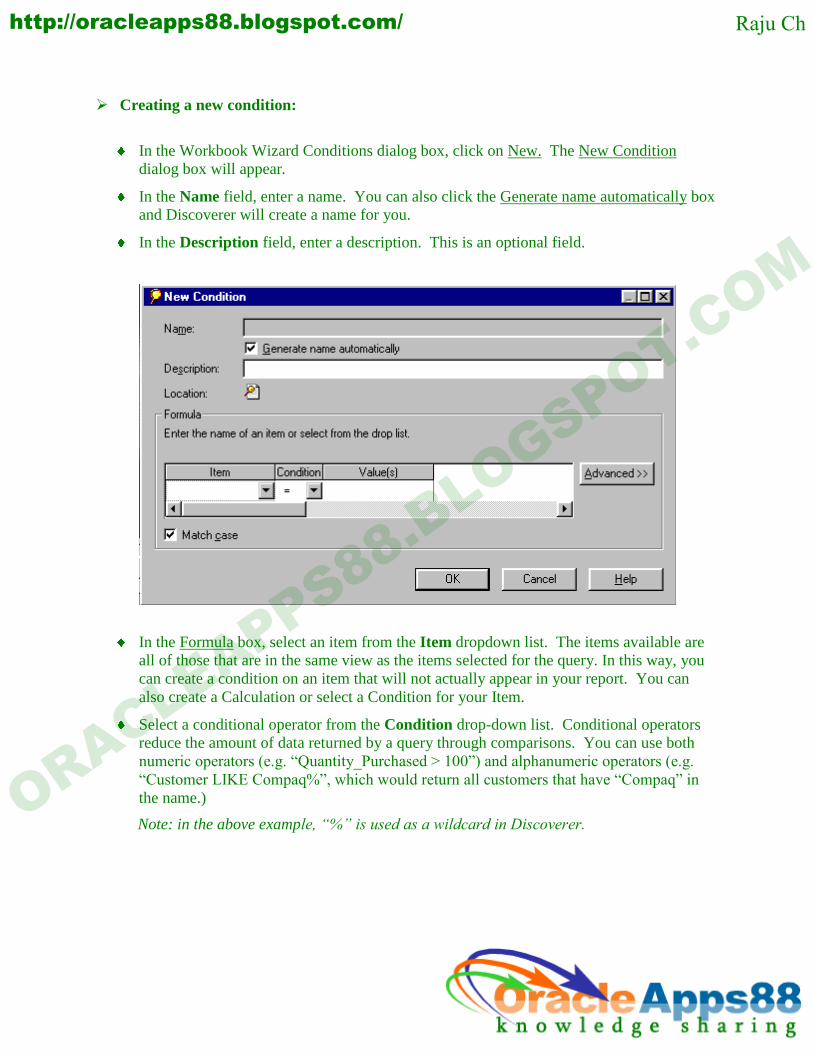
Creating a new condition:
In the Workbook Wizard Conditions dialog box, click on New. The New Condition
dialog box will appear.
In the Name field, enter a name. You can also click the Generate name automatically box
and Discoverer will create a name for you.
In the Description field, enter a description. This is an optional field.
In the Formula box, select an item from the Item dropdown list. The items available are
all of those that are in the same view as the items selected for the query. In this way, you
can create a condition on an item that will not actually appear in your report. You can
also create a Calculation or select a Condition for your Item.
Select a conditional operator from the Condition drop-down list. Conditional operators
reduce the amount of data returned by a query through comparisons. You can use both
numeric operators (e.g. “Quantity_Purchased > 100”) and alphanumeric operators (e.g.
“Customer LIKE Compaq%”, which would return all customers that have “Compaq” in
the name.)
Note: in the above example, “%” is used as a wildcard in Discoverer.
http://oracleapps88.blogspot.com/
ORACLEAPPS88.BLOGSPOT.COM
Raju Ch
Select an option from the Value(s) list. Options include the following.
Select multiple values for the item you selected in the Item list.
Create a calculation for numeric values. Calculations are discussed in detail on page
2-14.
Select an item.
Select a new parameter. This condition is evaluated at runtime, based on the user’s
input. Parameters are discussed in detail on page 3-19.
To create a condition with multiple conditions, click on the Advanced button. You can
group conditions together using the ‘AND’ or ‘OR’ clause to even further control the
query.
Click OK to return to the Workbook Wizard Conditions dialog box. The condition you
created appears in the list, with a check mark.
Click Next to continue working in the Workbook Wizard, or click Finish to complete the
query.
You can add an existing condition to your new query, either one you previously created in your
workbook, or a predefined optional query created by the Administrator. You will only see those
conditions that apply to the items selected for your query. To add conditions to your query, click
in the box to the left of the query name. A checkmark will appear in the box when it is selected.
http://oracleapps88.blogspot.com/
ORACLEAPPS88.BLOGSPOT.COM
Raju Ch
CREATING NEW REPORTS
Creating Sorts
The fifth step in the Workbook Wizard is defining a sort order to organize the results in the
worksheet. The sort order of a worksheet can be modified from the Tools menu as well. Not
each item has to be specified in the sort.
A Group Sort can be used to create breaks in the report based on the item selected. When an
item is used to break the output, duplicates of the item are suppressed so that the item appears
only once. This enhances the readability of the report.
To sort the query results:
In the Workbook Wizard Sort dialog box (or the Sort Table/Crosstab dialog box), click
Add and select items to sort from the list.
To set the sort priority, select an item and click Move Up or Move Down.
For each item in the sort, under Direction select Lo to Hi or Hi to Lo. This indicates
alphabetic or numeric order.
For each item that you want to set a Group Sort, under Group select one of three options:
Group Sort arranges rows with the same value under a single heading.
http://oracleapps88.blogspot.com/
ORACLEAPPS88.BLOGSPOT.COM
Raju Ch
Page Break produces a group sort and displays a dashed horizontal line after each
group. When printed, each new value for the item will start a new page.
None sorts the data without a group sort or page breaks.
If you select Group Sort or Page Break, specify these options:
For Group Sort, under Line choose whether to display a solid horizontal line between
each group and select its thickness, from 1 to 10 pixels. Under Spaces specify how
many line spaces you want between each group.
For Page Break, under Spaces specify the number of line spaces you want after each
page break.
If you want to hide a column so that it does not show up in the report, add the item to the
list of sort items, then select Hidden under the Group dropdown list. This column will
not be displayed on the report, although it will be part of the report.
If you are in the Workbook Wizard, click Next to continue working or click Finish to
complete the query. If you are in the Sort Table/Crosstab dialog box, click OK to sort the
data in the current sheet.
http://oracleapps88.blogspot.com/
ORACLEAPPS88.BLOGSPOT.COM
Raju Ch
CREATING NEW REPORTS
Creating Calculations
The last step in the Workbook Wizard is creating calculations to add data to the worksheet. You
can also access this function from the Tools menu. Calculations can be simple, involving
numeric operations between items in a single folder, or they can be complex mathematical or
statistical expressions.
To create a calculation:
In the Workbook Wizard Calculations dialog box (or the Calculations dialog box), click
New.
In the Edit Calculations box, choose an item and/or function to use in your calculation and
click Paste to insert it into the calculation. Use the Show options to switch between the
display of items and functions.
Items available for selection are those in the same view as the items selected in the
query.
Various Functions are available for complex calculations beyond mathematical
operations. Click on a function to get a brief description.
Conversion – Single-row functions that convert one data type to the same or
another data type.
http://oracleapps88.blogspot.com/
ORACLEAPPS88.BLOGSPOT.COM
Raju Ch
Date – Calculates arithmetic operations on dates.
Group – Includes grouping and counting functions.
Numeric – Single-row numeric functions that return numeric values.
Other – Single-row functions that do not apply to any other grouping. You can
include multiple search criteria and return expressions.
String – Single-row character functions that return character values. For example,
the “substring” function can be used to extract the sales agent number (123) from
the sales representative code (123AWST) with the format substr(sales
representative, 1, 3)
Insert mathematical operators by clicking the buttons below the Calculation box. You can
also type directly in the Calculation box.
Enter a name in the Name box. This name becomes the item name when the calculation
is displayed in the sheet.
Click OK to return to the Calculations dialog box. The new calculation appear in the list
of calculations, with a check mark.
If you are in the Workbook Wizard, click Finish to complete the query. If you are in the
Calculations dialog box, click OK to apply the calculation to the current sheet.
http://oracleapps88.blogspot.com/
ORACLEAPPS88.BLOGSPOT.COM
Raju Ch
CREATING NEW REPORTS
Duplicating Sheets in the Workbook
Each workbook can contain multiple sheets. It is generally a good idea to group common-
themed worksheets together into one workbook, as your user-defined conditions and calculations
can be used multiple times, and also to make sharing reports more efficient. New blank sheets
can be added through the menus, and entire reports can be duplicated into new sheets
To create a new blank worksheet:
From the Sheet menu, choose New Sheet. The New Sheet Wizard (identical to the
Workbook Wizard) will guide you through the process. After each step, click Next.
Select a format for displaying the information you retreive with the query.
Select Items from the Available list and click the right arrow to move them to the
Selected list.
Arrange the items in the layout by dragging them to the positions you want.
Add conditions, sorts, and calculations to your new sheet if you want to. These steps are
optional.
Click Finish to run the query and display the results in a new sheet.
http://oracleapps88.blogspot.com/
ORACLEAPPS88.BLOGSPOT.COM
Raju Ch
To duplicate the current sheet as a table or crosstab:
From the Sheet menu, choose Duplicate as Table (or Duplicate as Crosstab).
In the Duplicate as Table/Crosstab dialog box, drag items to the positions you want in
the layout.
To create a page item, click on the Show Page Items box and drag one or more items
to the Page Items box.
For tables only: to display only unique rows, click on the Hide Duplicate Rows box.
You can also:
Click Select Items to select different items to display in the table/crosstab.
Click Conditions to add, delete, or edit conditions.
Click Sort to sort the columns of data.
Click Calculations to select add, delete, or edit calculations.
Click OK. Discoverer creates a new sheet in the table or crosstab layout.
http://oracleapps88.blogspot.com/
ORACLEAPPS88.BLOGSPOT.COM
Raju Ch
3
ANALYZING DATA
This section discusses Discoverer features that you can use that further enhance the data
retrieved by your queries. Topics discussed include:
Creating Report Parameters
Creating Totals & Subtotals
Creating Percentages
Using Exceptions
Drilling Through the Data
Creating Graphs
http://oracleapps88.blogspot.com/
ORACLEAPPS88.BLOGSPOT.COM
Raju Ch
ANALYZING DATA
Creating Report Parameters
Parameters can be used to control the results of a query when a report is opened, without having
to change the definition of the query. Parameters are similar to conditions in that they can place
limits on item values returned by a query. With a condition, the limits are specified in the
definition of the report. To change the query results, you have to change the definition of the
report. When a parameter is applied to a report, you are prompted for values each time the report
is opened, and each time data is refreshed in the open report. You therefore can change the
query results without having to edit the report definition. Parameters are useful if you are going
to share reports with multiple users.
Parameters can be applied in two ways, as a parameter on the report itself, or as part of a
condition. Parameterized conditions were discussed on page 2-11. This section will discuss
creating report parameters.
Navigation
Tools Parameters
http://oracleapps88.blogspot.com/
ORACLEAPPS88.BLOGSPOT.COM
Raju Ch
Creating report parameters:
From the Tools menu, click on Parameters. This will display the Parameters dialog box.
The Available Parameters box will display those parameters that are available for use in
this worksheet, and a check mark to the left of a parameter indicates that it is in use. You
can create, edit, and delete parameters from this box by clicking on the appropriate
buttons. You can also change the order that parameters appear onscreen during runtime
by clicking on Move Up or Move Down.
Click on New. The New Parameter dialog box will appear.
In the For Item box, select the item from the dropdown list of available items for which
you want to create a parameter.
Create a name for the new parameter in the Name box. This is the name that will appear
in the Available Parameters list.
Select an operator from the Create condition with operator dropdown list. The default
selection is the “=” operator. This is the most frequently used operator, as it will limit
item values to just those specified by the user at report runtime. The box to the left can be
checked on or off. Another useful parameter is “between”, which you would use if you
want to select a From Date and a To Date for a report
Create an instruction in the Prompt box. This is the prompt that will appear when the
parameter is executed at report runtime. It should be simple and explanatory.
Create a description for the parameter in the Description box. This is the description of the
parameter that appears with each parameter. This is a good place to indicate what kind of
response you expect from the user, such as number or range of values expected.
Check the Let users enter multiple values box if you want users to enter in more than one
value for this parameter (e.g., multiple cost centers).
http://oracleapps88.blogspot.com/
ORACLEAPPS88.BLOGSPOT.COM
Raju Ch
You can have default values appear when the parameter is executed, either to prompt the
user, or if the same values are usually selected each time the report is run. Select these
values from the Default Values dropdown list.
Click on OK to save the new parameter.
Click on OK to close the Parameters dialog box.
http://oracleapps88.blogspot.com/
ORACLEAPPS88.BLOGSPOT.COM
Raju Ch
ANALYZING DATA
Creating Totals & Subtotals
Totals can be placed nearly anywhere on a report and are invaluable for quickly analyzing data.
In a table, totals appear below the values of the output item. In a crosstab, totals can be
displayed below columns and to the right of rows.
Each total calculates only one function. If you want to combine subtotals and grand totals in the
report, you have to define separate totals for both functions. The benefit of this is that they can
be formatted differently and can utilize different functions (e.g. Sum vs. Count). You also need
to create separate subtotals for each column/item combination you want to subtotal.
Navigation
Tools Totals
Process Flow:
From the Tools menu, select Totals. The Totals dialog box will appear. The View Totals
For box will display those totals that are available for use in this worksheet, and a check
mark to the left of a total indicates that it is in use. You can create, edit, and delete totals
from this box by clicking on the appropriate buttons.
Click New. The Total dialog box will appear. As you create your total, you will see a
preview of its format under the Preview tab.
http://oracleapps88.blogspot.com/
ORACLEAPPS88.BLOGSPOT.COM
Raju Ch
Under the Calculate tab, select the type of total you want from the first dropdown list.
These are the functions you can use to produce report totals.
Under the Calculate tab, select the datapoint you want from the second dropdown list.
The items selected in the report are available.
Under the Placement tab, select the location where you want to place the total. If you
select Grand Total, the total will be placed at the bottom of the report. If you select
Subtotal at each change in, you can select which items to subtotal, and also control the
appearance of single row subtotals.
Under the Label tab, enter a label for the new total. You can select Generate Label
Automatically or create the label yourself with text and parameters from the dropdown
list. Click the dropdown arrow beside the Label box to see a list of available custom
labels. You can also format the label, by clicking the Format button and making your
changes in the Format Data dialog box.
Click OK to save the total and return to the Totals dialog box. The new total appears in
the list, with a check mark.
Click OK to display the total in the current sheet.
http://oracleapps88.blogspot.com/
ORACLEAPPS88.BLOGSPOT.COM
Raju Ch
ANALYZING DATA
Creating Percentages
A special type of calculation function in Discoverer is the percentage tool. This tool will
calculate specific percentages of subtotals and grand totals of the data. You select the data to use
as a criteria for establishing the total or subtotal, and the tool will calculate the percentage and
create a column on the report to display it.
Only numeric data can be used to calculate percentages. If no numeric data is included in the
worksheet, you will not be able to use the percentage tool. As with totals, each percentage
calculates only one function. If you want to create percentages for both subtotals and grand
totals, you have to define separate percentages for both functions.
Navigation
Tools Percentages
Creating a percentage:
From the Tools menu, select Percentages. The Percentages dialog box will appear. The
View Percentages For box will display the percentages that are available for use in this
worksheet, and a check mark to the left of a percentage indicates that it is in use. You can
create, edit, and delete percentages from this box by clicking on the appropriate buttons.
http://oracleapps88.blogspot.com/
ORACLEAPPS88.BLOGSPOT.COM
Raju Ch
Click New. The Percentage dialog box will appear.
Select the numeric item for which you want to calculate the percentage from the Calculate
percentages for dropdown list.
Under the Calculate as a percentage of tab, select the type of percentage you want to
calculate. The following options are available.
Grand Total will calculate the percentage as a portion of the grand total.
Each change in will calculate the percentage as a subtotal by category for the
selected item, which is selected from a list of items in the report.
A column heading is automatically created in the Column Heading box. You can type
directly in this box and create you own title. This is both the column heading and the
name of the percentage calculation. You can format the heading by clicking on the box to
the right of the Column Heading box.
You can control where and how the percentage is displayed in the report:
Click on Display subtotal and subtotal percentage to display the percentage for each
subtotal.
Click on Display subtotal’s percentage of grand total to display the subtotal’s
percentage of grand total.
The labels for each subtotal are named by default. You can modify these labels by either
typing directly in the label boxes, or by clicking on the dropdown arrow beside the Label
box for a list of available custom labels. You can also format the label, by clicking the
Format button and making your changes in the Format Data dialog box.
http://oracleapps88.blogspot.com/
ORACLEAPPS88.BLOGSPOT.COM
Raju Ch
http://oracleapps88.blogspot.com/
ORACLEAPPS88.BLOGSPOT.COM
Raju Ch
ANALYZING DATA
Using Exceptions
An exceptions is a visual tool which can be used to format data values in a specific way when the
values fall inside or outside of a specific range. It should not be confused with a condition,
which actually removes data from the query results. Exceptions format data but do not exclude
data from appearing in the report.
Navigation
Format Exceptions
Creating an Exception:
From the Format menu, select Exceptions. The Exceptions dialog box will appear. The
View Exceptions For box will display the exceptions that are available for use in this
worksheet, and a check mark to the left of an exception indicates that it is in use. You can
create, edit, and delete exceptions from this box by clicking on the appropriate buttons.
Click New. The Exception dialog box will appear.
Under the When the following exception occurs tab, select the item for which you want to
create the exception from the first dropdown list. The available items are those that are
displayed in the current sheet.
In the second dropdown list, select the comparison that you want to make. This determine
the comparison that will be made against every value of the selected item .
http://oracleapps88.blogspot.com/
ORACLEAPPS88.BLOGSPOT.COM
Raju Ch
In the third dropdown list, select or enter the value against which you want to compare
each value of the selected item. This list will vary depending on the data type of the
selected item. For example, if the item is a code column, you will select a value from a
list. If the item is numeric or is a date, you will type in the value in the specified format.
Under the Display the format tab, use the options displayed to format how you want the
exception to appear. The Sample box will display a preview of the exception formatting.
Click OK to save the exception and return to the Exceptions dialog box. The name of the
exception will automatically be generated by your selections.
Click OK to display the exception in the current sheet.
http://oracleapps88.blogspot.com/
ORACLEAPPS88.BLOGSPOT.COM
Raju Ch
ANALYZING DATA
Drilling Through the Data
Drilling through data is the ability to view data in a report at greater or less levels of detail. As
you view a report, if you want to see more detailed information, you drill down into lower levels
of data. Conversely, if you want to view summarized information, you can drill up to higher
levels of data. As you drill through data, you can either add to the data currently on your report,
or you can replace the current data with the higher or lower levels of data.
A drill path is the set of related items through which you can drill up or down. Drill paths are
defined by the Discoverer Administrator
Drill through data in a report:
You can drill up or down on an item in a report if it has a triangle in the column heading
next to the item name. In the example above, all of the columns except for the numeric
measure are available for drilling.
Place your cursor over the triangle. When you do, it becomes a magnifying glass. Right
click on the triangle. A popup list will display the available items that you can drill up or
down into.
Click on the desired drill level. Discoverer will add a column and refresh the report.
Drill from the menu:
http://oracleapps88.blogspot.com/
ORACLEAPPS88.BLOGSPOT.COM
Raju Ch
Drilling down from the menus offers you more options than drilling inside the report.
Click on the Sheet menu. Click on Drill. The Drill dialog box will appear. If Drill is
greyed out, then you do not have any items in your report that can be drilled on.
Under the What type of drill do you want to do? tab, select the type of drill you want to
perform.
Drill Up/Down: drill to a higher or lower level of detail from the ‘drilling from’ item
(selected in the next tab).
Drill to a Related Item: drill to an item that is either part of the same source folder or
in a related folder, but is not currently in the query.
Drill to Detail in another Sheet: create a new sheet in the workbook, containing the
detail of the selected item.
Under the Where do you want to drill from? tab, select the item that you want to drill on.
The available items are those that are visible on the worksheet.
Under the What do you want to drill to? tab, select the level of detail that you want to drill
into. The choices available are dependent on the type of drill you are doing:
Drill Up/Down: select from a list of items in the drill path.
Drill to a Related Item: select from a list of related items.
Drill to Detail in another Sheet: a default option is selected.
http://oracleapps88.blogspot.com/
ORACLEAPPS88.BLOGSPOT.COM
Raju Ch
Once you have selected the type of drill to run, you can use the Drill Options dialog box to
customize the results of the drill. The options are as follows:
Where drilling to a new item tab: options are available based on the type of drill you
selected. Select Expanded to include new item to add the detail data underneath the
drill item. Select Replace with new item to replace the drill item with the detail item
(this is the only option when drilling up).
Place drill results in tab: select whether to place the drill results in the current sheet,
or place the results in a new sheet within the same workbook.
Display results as tab: if you selected to place the results in a new sheet, you can
select whether to display the results as a table or a crosstab.
Before query is run tab: check the Let me modify query before processing box if
you want to perform additional layout modifications. After you click OK, the Edit
Sheet Wizard will be displayed.
Click OK to after you have set your drill options.
Click OK to perform the drill.
http://oracleapps88.blogspot.com/
ORACLEAPPS88.BLOGSPOT.COM
Raju Ch
ANALYZING DATA
Creating Graphs
Once you have created your reports, you may want to display your results in a graph. The
process of creating a graph from a report is made simple with the Graph Wizard. There are four
steps in the wizard. Once a graph is displayed for the current sheet, you can hide or display it by
toggling Show/Hide in the Graph menu.
Because a graph reflects all data in the current sheet, you might want to reduce the amount of
data displayed in the sheet to make the graph easier to read. You can do this by removing items
and totals from the query or by creating page items.
Navigation
Graph Edit Graph
Creating a graph for the current worksheet:
Click on the Graph menu. Click on Edit Graph. The Graph Wizard will appear. Follow
the steps to create and format the graph for the current sheet.
In Step 1, select the graph type.
In Step 2, select how the graph type should be formatted (e.g. 2D or 3D).
http://oracleapps88.blogspot.com/
ORACLEAPPS88.BLOGSPOT.COM
Raju Ch
In Step 3, indicate how the titles of the graph, axes, and legend should appear. You can
format all of the labels in this step.
In Step 4, indicate the scale for the Y-axis, whether gridlines should be displayed, and
whether to graph the data series by columns or rows. Most tabular reports should be
graphed by column.
Click on Finish to display the graph. The graph will be displayed in a window on top of
the worksheet.
You can modify the graph either from the buttons on the graph window, or by clicking the
various options in the Graph menu. The items in the Graph menu are available only when the
graph is displayed, except for the Edit Graph option. If you click on this item, you will re-
enter the Graph Wizard.
http://oracleapps88.blogspot.com/
ORACLEAPPS88.BLOGSPOT.COM
Raju Ch
4
MANAGING WORKBOOKS
In addition to the functions that allow you to create queries and reports, there are several
functions that help you manage worksheets and workbooks. The topics in this section include:
Exporting Workbook Data
Saving and Sending Workbooks
Printing Worksheets
Sharing Workbooks with other Users
Setting Workbooks Properties
Deleting Workbooks
http://oracleapps88.blogspot.com/
ORACLEAPPS88.BLOGSPOT.COM
Raju Ch
MANAGING WORKBOOKS
Exporting Workbook Data
Discoverer allows you to move data out of the application in several different ways. This allows
you to share your data with people who may not even have the Discoverer application on their
desktops.
Navigation
File Export
To export to a file:
Click on the File menu. Click on Export. The Export dialog box will appear.
Under the What do you want to export? tab, select the type of export you want to perform:
Current Sheet: exports only the current worksheet.
All Sheets: exports all sheets in the workbook.
Selection: exports a selected portion of the current worksheet. You can also use the
Edit—Copy and Edit—Paste menu items to copy and paste selections into other
applications (e.g. Excel, Word).
Graph: exports the current graph.
http://oracleapps88.blogspot.com/
ORACLEAPPS88.BLOGSPOT.COM
Raju Ch
Under the What export format do you want? tab, select the export file type you want to
use.
Under the Where do you want to save the file? tab, type in a file name or use the Browse
button to select the location of the export file.
Click on Finish to export the data.
http://oracleapps88.blogspot.com/
ORACLEAPPS88.BLOGSPOT.COM
Raju Ch
MANAGING WORKBOOKS
Saving and Sending Workbooks
You can save a workbook either in your database account or on your computer. If you save a
workbook to your computer, you cannot share it with anyone else.
If you want to both save the workbook to your computer, and share the contents with someone
else, you can save the workbook and attach the workbook file (.DIS) to an email. The .DIS file
will be located in your Discoverer working directory on your computer. You should verify that
the recipient has access to the views contained in your report.
Navigation
File Save
Saving a file:
Click on the File menu. Click on Save. The Save Workbook dialog box will appear.
Specify where you want to save the report, either to your computer, or to the database.
Click OK to save the file.
http://oracleapps88.blogspot.com/
ORACLEAPPS88.BLOGSPOT.COM
Raju Ch
MANAGING WORKBOOKS
Printing Worksheets
Printing worksheets and workbooks in Discoverer works is simple – the printed report will print
as it appears on the screen. You can print one sheet or the entire workbook.
Navigation: Page Setup
File Page Setup
Formatting for Printing:
Click on the File menu. Click on Page Setup. The Page Setup dialog box will appear.
On the Sheet tab:
In the Print What box, specify whether you want to print the current sheet, all sheets
in the workbook, or the current graph. If the current sheet includes a page item, you
can print a separate set of data for every page item value by checking the All
Page/Detail Combinations box.
In the Page Order box, specify whether to print a worksheet that will not fit on a
single page in one of the two formats listed.
In the Orientation box, check Portrait or Landscape.
In the Scale box, enter a scaling factor if your printer supports scaling.
http://oracleapps88.blogspot.com/
ORACLEAPPS88.BLOGSPOT.COM
Raju Ch
On the Headers tab:
If you want to use an existing header for this report, select the header from the
Available Headers box.
The Line Width box allows you to create a line that will print under the header.
Enter your header in the Left Section, Center Section, and Right Section. Use the
Insert dropdown list to insert a parameter (e.g. workbook name, item name) into the
header. Use the Font button to modify the font settings of the header.
Click on the Preview button to preview your report, and click OK to set the headers.
Use the Footers tab to set up a footer for your report in the same way as headers.
Use the Margins tab to set the Top, Bottom, Left and Right margins, to set the edge
margin for the header and/or footer, and to center the report on the printed page.
Click on the Preview button to preview your report, and click OK to close the dialog box.
Navigation: Print
File Print
Printing the Worksheet/Workbook:
Click on the File menu. Click on Print. The Print dialog box will appear. All typical
printing controls are available. You can also override the Print What settings from the
Page Setup dialog box, and change the printer properties.
http://oracleapps88.blogspot.com/
ORACLEAPPS88.BLOGSPOT.COM
Raju Ch
Click on OK to print your report.
http://oracleapps88.blogspot.com/
ORACLEAPPS88.BLOGSPOT.COM
Raju Ch
MANAGING WORKBOOKS
Sharing Workbooks with other Users
You can share workbooks with one or several users, and you can choose among groups of users
such as ‘Public’ or ‘Private’. If you select ‘Public’, you allow any user to see your workbook.
Users can only run a report that is shared to them if they have access to that particular role or
business area, such as the General Ledger.
Navigation
File Manage Workbooks Sharing
Process Flow:
Click on the File menu. Click on Manage Workbooks. Click on Sharing. The Share
Workbooks dialog box will appear.
You can define workbook sharing in one of two directions. Select the appropriate tab:
Click Workbook > User to pick a workbook to share with specific users.
http://oracleapps88.blogspot.com/
ORACLEAPPS88.BLOGSPOT.COM
Raju Ch
Select the workbook from the Workbook dropdown list. Only those workbooks
you’ve created will be in this list.
Highlight the users you want to share with, and click Add. This will move the
user’s name from the Available box to the Shared box.
To remove a user’s permission to see the workbook, highlight that user’s name in
the Shared box and click Delete.
Click OK to save the permissions.
Click User > Workbook to pick a user to view specific workbooks.
Select a user name from the User dropdown list.
Highlight the workbooks you want to share, and click Add. This will move the
workbooks from the Available box to the Shared box.
To remove a user’s permission to see a specific workbook, highlight the
workbook in the Shared box and click Delete.
Click OK to save the permissions.
http://oracleapps88.blogspot.com/
ORACLEAPPS88.BLOGSPOT.COM
Raju Ch
MANAGING WORKBOOKS
Setting Workbook Properties
The file properties of the active workbook tell you the name and owner of the workbook, the date
created and revised, and also gives you a place to put a description of the workbook.
Navigation
File Manage Workbook Properties
Create a workbook description:
Click on the File menu. Click on Manage Workbooks. Click on Properties. The
Workbook Properties dialog box will appear.
Enter a description in the Description box.
Click OK to save the description.
http://oracleapps88.blogspot.com/
ORACLEAPPS88.BLOGSPOT.COM
Raju Ch
MANAGING WORKBOOKS
Deleting Workbooks
The final task in the “Manage Workbooks” menu is deleting a workbook. You cannot delete any
workbooks of which you are not the owner. You also cannot delete any workbooks saved to
your hard drive. To manually delete reports, you can delete the .DIS file for that report from
your Discoverer working directory.
Navigation
File Manage Workbook Delete
Process Flow:
Click on the File menu. Click on Manage Workbooks. Click on Delete. The Delete
Workbook from Database dialog box will appear.
Select the workbooks that you want to delete.
Click Delete to delete the workbooks.
http://oracleapps88.blogspot.com/
ORACLEAPPS88.BLOGSPOT.COM
Raju Ch
5
OPENING EXISTING REPORTS
This section demonstrates how to log into Discoverer and use the Report Wizard to open up an
existing report. It also discusses the Parameters function of reports, and the relationships of
workbooks and sheets within a workbook. The topics for discussion are:
Logging Into Discoverer
Opening Existing Reports
Using Parameters
Using Sheets and Workbooks
http://oracleapps88.blogspot.com/
ORACLEAPPS88.BLOGSPOT.COM
Raju Ch
OPENING EXISTING REPORTS
Opening Existing Reports
The Workbook Wizard guides you through the steps required to locate and open an existing
report.
Process Flow:
When you are first starting up Discoverer, you will come to this screen naturally; to open a
report during your Discoverer session, choose the File menu, then choose Open. The Open
Workbook dialog box will appear.
Click one of the following to locate the workbook you want to open:
My Computer – displays workbooks saved on your hard drive.
Database – displays workbooks saved in the database to which you are connected.
Scheduling Manager – displays workbooks you have scheduled to run automatically
and any results from scheduled workbooks that have already run. This functionality
is currently not available.
Most Recently Used – displays a list of the workbooks you have recently opened.
Click on the Open button. If you selected ‘Database’, an Open Workbook from Database
dialog box will appear. Highlight the workbook you wish to open, then click Open.
http://oracleapps88.blogspot.com/
ORACLEAPPS88.BLOGSPOT.COM
Raju Ch
A confirmation dialog box will appear if you select a workbook that was created by
another user. As most reports have been created by the ‘rptmgr@prd’ account, you should
proceed by clicking on the “Open the workbook in the current database account” radio
button, and click OK.
Note: Although most workbooks were created from one account, users can create and share
reports from their own account. This topic is discussed in the next section.
The above dialog box will appear. This box is used to determine whether Discoverer should
run the query for the first sheet when the report is opened, or to open the sheet empty without
running the query. For most standard reports, in which the query does not change, you
should click on Yes to retrieve the data and open the report. If you wanted to change the
query, clicking on No would allow you to access the report menus without taking the time to
run the query. This is especially useful if the query takes substantial time to run.
http://oracleapps88.blogspot.com/
ORACLEAPPS88.BLOGSPOT.COM
Raju Ch
OPENING EXISTING REPORTS
Using Parameters
Discoverer uses parameters to filter data returned by the query, allowing users to build reports
that are very specific in nature. This section will discuss opening existing reports that have
parameters already applied; creating parameters in new reports has been discussed in Section 3.
Process Flow:
If you are opening a workbook that has a parameter applied to the first sheet, the above
Parameter Wizard will appear. Parameters can differ in how they operate, but all will
require input from the user. In this example, the parameter is based on shipment date.
The description indicated the date required from the user.
Type in the date in the input box. Use the format specified. A default date is usually
supplied in the input box.
Click on Finish.
Note: As the use of parameters is flexible, this step could change based on the number and
type of parameters applied to the report.
http://oracleapps88.blogspot.com/
ORACLEAPPS88.BLOGSPOT.COM
Raju Ch
OPENING EXISTING REPORTS
Using Sheets and Workbooks
Oracle Discoverer displays the results of a query in a workbook, on a tabbed page called a
sheet. You use the Workbook Wizard, which appears whenever you start Oracle Discoverer, to
specify the criteria for your query. Oracle Discoverer then retrieves the information from the
database and displays the results in a workbook on a specific sheet.
Notes on workbooks and sheets:
A workbook can contain more than one sheet.
The results of your query can appear in a sheet in one of two ways:
as a table, a layout that arranges items in columns; used to display all information
that fits the query criteria
as a crosstab, a layout that arranges items in a matrix of rows and columns; used to
display summary information and show how one item relates to another
http://oracleapps88.blogspot.com/
ORACLEAPPS88.BLOGSPOT.COM
Raju Ch
6
DISCOVERER MENU ITEMS
This section defines the menu functions in Discoverer. Some key concepts are defined, however
detailed instructions on how to use the menu tools are discussed in the next class session. The
Edit and Window menus are not covered in this section, as they function similarly to other
Windows applications and do not contain any key Discoverer functional commands.
The menus covered in this section are:
Sheet Menu
Format Menu
Tools Menu
Graph Menu
View Menu
File Menu
http://oracleapps88.blogspot.com/
ORACLEAPPS88.BLOGSPOT.COM
Raju Ch
DISCOVERER MENU ITEMS
Sheet Menu
The Sheet menu contains functions that affect individual sheets. These functions include
creating and duplicating sheets within a workbook, changing the title of the sheet and report,
refreshing data by executing the sheet query, and counting the number of rows returned by the
query.
Menu Items:
New Sheet - Displays the New Sheet Wizard. Use this wizard to create a new sheet in the
current workbook.
Edit Sheet – Displays the Edit Sheet dialog box. Use this dialog box to edit the Selected
Items, the Table Layout, and the Sort the current sheet in the workbook. This dialog box
also allows you to modify the Conditions and Calculations selected for this sheet, however
modifications made to these items could affect other sheets and workbooks. You should
generally create all Conditions and Calculations you will need for the entire workbook,
and select or deselect them as appropriate for the sheet.
http://oracleapps88.blogspot.com/
ORACLEAPPS88.BLOGSPOT.COM
Raju Ch
Duplicate as Table - Displays the Duplicate as Table dialog box. Use this dialog box to
duplicate the current sheet as a table.
Duplicate as Crosstab - Displays the Duplicate as Crosstab dialog box. Use this dialog box
to duplicate the current sheet as a crosstab.
Rename Sheet - Displays the Rename Sheet dialog box. Use this dialog box to rename the
current sheet.
Delete Sheet – Deletes the current sheet from the workbook, unless it is the only sheet in the
workbook. A workbook must contain at least one sheet.
Edit Title - Displays the Title dialog box. Use this dialog box to change the title of the current
sheet.
Drill - Displays the Drill dialog box. Use this dialog box to expand a query to include related
information.
Collapse – Removes the items under a selected item by rerunning the query with the modified
item selection.
Edit Parameters - Displays the Parameter Wizard. You can modify the parameters applied to
this sheet.
Refresh Sheet – Runs the query for the current worksheet. The displayed data is updated
with current data from the database.
Retrieve All Rows – Displays all rows in a table-formatted sheet. Overrides settings
specified in the “Options” menu for incremental return of rows (e.g. 1000 rows at a time).
This command should be used when you want to print the entire row set returned by the
query; otherwise, only the current rows retreived will be printed.
Count All Rows – Counts all rows in a table-formatted sheet.
http://oracleapps88.blogspot.com/
ORACLEAPPS88.BLOGSPOT.COM
Raju Ch
DISCOVERER MENU ITEMS
Format Menu
The Format Menu options allow you to modify the appearance of the data in the sheet.
Functions include formatting cells, columns, and the sheet itself.
Menu Items:
Data - Displays the Format Data dialog box. Use this dialog box to format data in the cells.
Headings - Displays the Format Headings dialog box. Use this dialog box to format item
headings.
Exceptions - Displays the Exceptions dialog box. Use this dialog box to highlight data that
meets certain criteria by formatting it differently from the data around it (e.g. use red-
yellow-green to highlight thresholds).
Column – Width - Displays the Column Width dialog box. Use this dialog box to specify an
exact width for a selected column in the current sheet.
Column – Auto Size – Sizes the column for a selected item so that the heading and all data
are visible.
http://oracleapps88.blogspot.com/
ORACLEAPPS88.BLOGSPOT.COM
Raju Ch
Sheet – Title - Displays the Format Title dialog box. Use this dialog box to format a sheet’s
title if you specified one in the “Options” menu.
Sheet – Set Background - Displays the Open dialog box enabling you to specify a bitmap
file to be used as the background of the cells for the current sheet.
Sheet – Clear Background – Removes any bitmap specified for the background of the
current sheet.
http://oracleapps88.blogspot.com/
ORACLEAPPS88.BLOGSPOT.COM
Raju Ch
DISCOVERER MENU ITEMS
Tools Menu
The tools menu contains the functions you use to create and modify the query that populates the
data in the sheet. These functions include creating conditions, sorts, totals, percentages, and
calculations, applying parameters to the sheet, and setting query optimization options.
Menu Items:
Conditions – Displays the Conditions dialog box. Use this dialog box to refine the current
query using conditions, which are criteria used for filtering data displayed in the sheet.
Sort – Displays either the Sort Table dialog box or the Sort Crosstab dialog box (depending
on the layout of the current sheet). Use these dialog boxes to specify how data in the
current sheet should be ordered.
Totals – Displays the Totals dialog box. Use this dialog box to summarize data in the current
sheet.
http://oracleapps88.blogspot.com/
ORACLEAPPS88.BLOGSPOT.COM
Raju Ch
Percentages – Displays the Percentage dialog box. Use this dialog box to view and edit
percentages you have created in the current worksheet. To create a new percentage, select
this command and click New in the Percentage dialog box.
Calculations – Displays the Calculations dialog box. Use this dialog box to perform
mathmatical operations on selected items.
Parameters – Displays the Parameters dialog box. Use this dialog box to create and edit
parameters applied to the current sheet.
Options – Displays the Options dialog box. Use this dialog box to specify how queries should
be run, how sheets should look, default formatting, and other system preferences:
General – Specify which executables should be used to open files extension types;
specify how workbooks should be opened; specify wizard graphics.
Query Governor – Optimizes the performance of the query when retrieving data,
and specifies the use of summary data. The default setting for the Retrieve data
incrementally in groups of box is 100 rows; it is recommended that you change this
setting to 2500 for the current production environment.
Table/Crosstab – Sets default layout formats for tables and crosstab sheets in the
workbook, and sets a default title for the sheet.
Formats – Specifies the default formats for data, headings, sheet titles, totals, and
exceptions, and specifies formats for NULL values.
http://oracleapps88.blogspot.com/
ORACLEAPPS88.BLOGSPOT.COM
Raju Ch
Cache – Manages the data retrieved and stored in the client-side cache. Settings
include the size of the disk and memory cache, the cache location, and triggers to
clear the cache.
Advanced – Specifies settings for three advanced features of Discoverer’s querying
capabilities:
Automatic Querying – determines whether Discoverer refreshes data from the
database each time the report is modified. If the query is lengthy, users may
benefit from disabling this function, and manually refreshing the sheet after the
report has been modified.
Fan-Trap Detection – specifies if you are allowed to join more than two folders
together, in which detail data is related to a single master folder. The default
setting is to not disable the detection, however most of the reports require the
selection of items from multiple folders. If this box is unchecked (the default
setting), you will receive an error message when you try to run the report:
http://oracleapps88.blogspot.com/
ORACLEAPPS88.BLOGSPOT.COM
Raju Ch
Multiple Join Path Detection – when this function is not disabled, it allows
Discoverer to confirm queries in which certain items can be joined in more than
one way.
EUL – Sets the default End User Layer accessed by the user.
http://oracleapps88.blogspot.com/
ORACLEAPPS88.BLOGSPOT.COM
Raju Ch
DISCOVERER MENU ITEMS
Graph Menu
Most sheets can be represented graphically in Discoverer, using the Graph Wizard to initially
create the graph, and using the menu options to further modify the graph to a finished format.
Most of the following commands are available from a pop-up menu available when you click the
right mouse button over the graphical window.
Menu Items:
New Graph – Opens the New Graph Wizard which allows you to create and format a graph
of the currently displayed data.
Show – Displays the current sheet as a graph. This is a toggle command; to hide the current
sheet, chose Graph|Hide.
Print – Prints the currently displayed graph to the default printer.
Copy to Clipboard – Copies the currently displayed graph to the Windows clipboard. This
option is only available when a graph is displayed.
Legend – Displays the legend for the currently displayed graph. This is a toggle command.
http://oracleapps88.blogspot.com/
ORACLEAPPS88.BLOGSPOT.COM
Raju Ch
X Labels – Displays the labels for the currently displayed graph. This is a toggle command.
Toolbar – Displays the toolbar for the currently displayed graph. This is a toggle command.
Status Bar – Displays the status bar for the currently displayed graph. This is a toggle
command.
Scale – Displays the Scale and Numbers dialog box. Scale values are calculated by default,
however these values can be modified, as well as the scale unit and number of decimal
values displayed.
3D View – Displays the 3D View Properties dialog box. Use this dialog box to manipulate
the three-dimensional view of a graph.
http://oracleapps88.blogspot.com/
ORACLEAPPS88.BLOGSPOT.COM
Raju Ch
DISCOVERER MENU ITEMS
View Menu
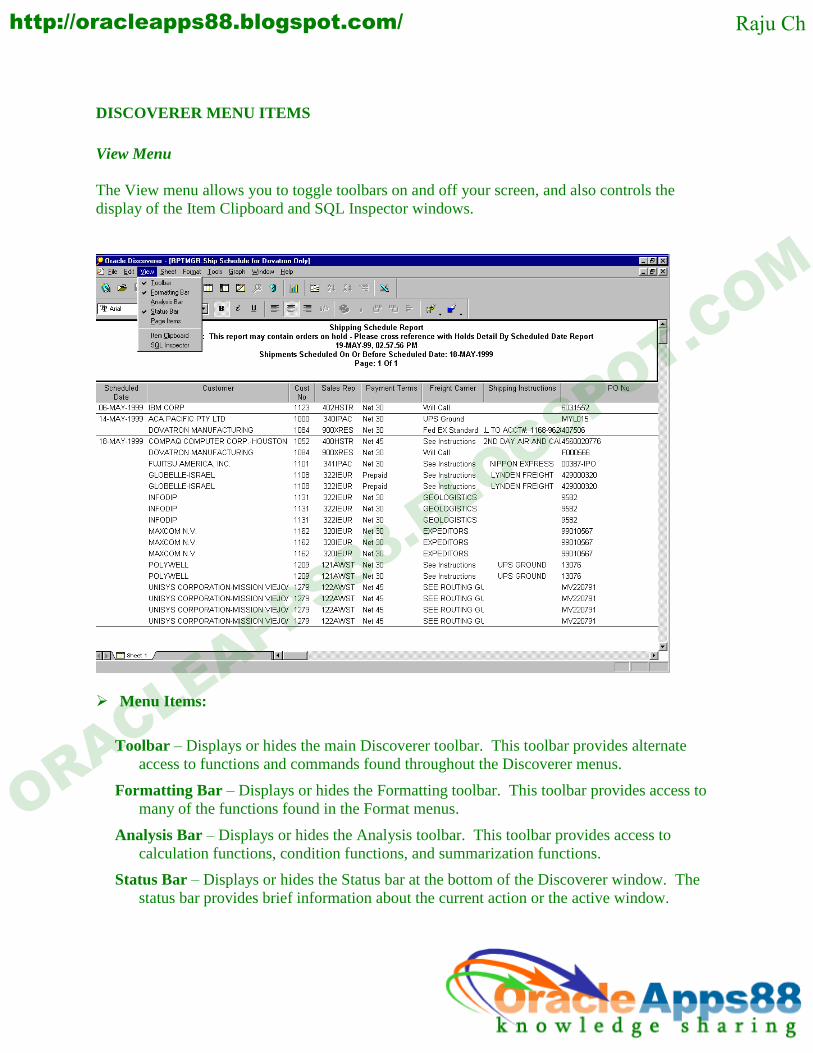
The View menu allows you to toggle toolbars on and off your screen, and also controls the
display of the Item Clipboard and SQL Inspector windows.
Menu Items:
Toolbar – Displays or hides the main Discoverer toolbar. This toolbar provides alternate
access to functions and commands found throughout the Discoverer menus.
Formatting Bar – Displays or hides the Formatting toolbar. This toolbar provides access to
many of the functions found in the Format menus.
Analysis Bar – Displays or hides the Analysis toolbar. This toolbar provides access to
calculation functions, condition functions, and summarization functions.
Status Bar – Displays or hides the Status bar at the bottom of the Discoverer window. The
status bar provides brief information about the current action or the active window.
http://oracleapps88.blogspot.com/
ORACLEAPPS88.BLOGSPOT.COM
Raju Ch
Page Items – Displays or hides the Page Items for the current sheet. The Page Items are
displayed at the top of the current worksheet. If the current worksheet has no Page Items,
this option is not available.
Item Clipboard – Displays the Item Clipboard, which displays any copied items. You can
drag items to and from the Item Clipboard and the current sheet.
SQL Inspector – Displays the SQL Inspector dialog box showing the most recent SQL
commands for the current sheet. Although you cannot modify any of the information in
the SQL Inspector dialog box you can copy the code to the clipboard and paste it into a
new sheet to form a new query. You can also export the SQL code to a file. Exporting
data is discussed in the next session.
http://oracleapps88.blogspot.com/
ORACLEAPPS88.BLOGSPOT.COM
Raju Ch
DISCOVERER MENU ITEMS
File Menu
The File menu contains common Windows functions, such as saving and printing, and also
contains several working session management commands.
Menu Items:
New – Opens the Workbook Wizard. Use this wizard to create a new workbook.
Open – Displays the Open Workbook dialog box. Use this dialog box to open an existing
workbook.
Close – Closes the current workbook. Discoverer prompts you to save changes to the
workbook.
Save – Saves the current workbook.
Save As – Displays the Save Workbook dialog box. Use this dialog box to save the current
workbook under a new name or location.
http://oracleapps88.blogspot.com/
ORACLEAPPS88.BLOGSPOT.COM
Raju Ch
Schedule – Opens the Schedule Workbooks Wizard. Use this wizard to schedule your
workbook (or individual sheets) to run at a later time.
Page Setup – Displays the Page Setup dialog box. Use this dialog box to format the current
workbook for printing.
Print Preview – Displays the current workbook in print preview form, showing how will
look when printed.
Print – Displays the Print dialog box enabling you to print all or part of a workbook.
Send – Opens the Prepare Mail dialog box where you can mail a workbook, worksheet, or
part of a worksheet as an attachment or in the message text.
Import SQL – Displays the Open dialog box, enabling you to open a .SQL file. Upon
opening, Discoverer runs the query and creates a new workbook.
Export – Displays the Export dialog box. Use this dialog box to save all or part of the data in
a workbook to a file. Several file types are available, including Excel spreadsheets, Word
documents, and Express databases.
http://oracleapps88.blogspot.com/
ORACLEAPPS88.BLOGSPOT.COM
Raju Ch
Manage Workbooks – Displays four possible commands:
Scheduling Manager – Opens the Scheduling Manager, where you can view and edit
scheduled workbooks.
Sharing – Displays the Share Workbooks dialog box. Use this dialog box to give
other users permission to use workbooks you create.
Delete – Displays the Delete Workbooks from Database dialog box. You can delete
multiple workbooks at one time.
Properties – Displays the File Properties dialog box showing the properties of the
current workbook.
Connect to Database – Displays the Connect to Oracle Discoverer dialog box. Use this
dialog box to open a connection to a different database account. Discoverer prompts you
to close any open workbooks before closing the current database connection.
Exit – Closes Discoverer and prompts you to save changes to any open workbooks.
http://oracleapps88.blogspot.com/
ORACLEAPPS88.BLOGSPOT.COM
Raju Ch
DISCOVERER MENU ITEMS
Help Menu
There are several functions available to you when you need help in using Discoverer. The
primary means available is the Help menu within Discoverer. This menu contains items that will
not only provide indexed help for specific topics, but also points to tutorials and documentation.
Menu Items:
Help Topics - Displays the Discoverer Help contents. All menus, commands, terminology,
and functionality is described briefly.
Using Help - Displays the Using Help window. This window will instruct you on using the
help menu.
http://oracleapps88.blogspot.com/
ORACLEAPPS88.BLOGSPOT.COM
Raju Ch
Quick Tour - Displays the Discoverer Quick Tour. This is a browser-based guided tour that
animates key functionality yet allows you to control the pace and navigation. You can
back up or go forward at any time, and you can print pages for future reference.
Cue Cards - Displays the Discoverer Cue Cards. These are pop-up windows that provide
step-by-step instructions for common tasks, such as creating conditions and totals.
Manuals - Displays the Oracle Information Navigator, showing available online manuals.
These are displayed in the browser and contain the same content as the bound user guide.
About Discoverer - Displays the About Discoverer window. This window displays useful
information about your current working environment, such as your available memory and
disk space, and also the Discoverer version and current user login ID.
http://oracleapps88.blogspot.com/
ORACLEAPPS88.BLOGSPOT.COM
Raju Ch