24
DevOps for Oracle Forms Using Developer Cloud Service Automating Application Deployment ORACLE WHITE PAPER | NOVEMBER 2018
DevOps for Oracle Forms Using Developer Cloud Service
Automating Application Deployment
O R A C L E W H I T E P A P E R | N O V E M B E R 2 0 1 8

DEVOPS FOR ORACLE FORMS USING DEVELOPER CLOUD SERVICE
Disclaimer
The following is intended to outline our general product direction. It is intended for information
purposes only, and may not be incorporated into any contract. It is not a commitment to deliver any
material, code, or functionality, and should not be relied upon in making purchasing decisions. The
development, release, and timing of any features or functionality described for Oracle’s products
remains at the sole discretion of Oracle.
0 | DEVOPS FOR ORACLE FORMS USING DEVELOPER CLOUD SERVICE
Table of Contents
Disclaimer 1
Introduction 1
Overview 2
Oracle Developer Cloud Service 3
Forms Application Deployment Services 4
Getting Set Up 5
The Environment and Setup 5
Initial Git and DCS Set Up 5
Creating a New Forms DCS Project 7
Setting Up the New Project before First Use 8
Connecting the Local Git Repository with the DCS Project Git Repository 10
Integrating a Forms Application with Git and DCS 12
Inserting a Forms Application into the New Repository 12
Putting Developer Cloud Service to Work 13
Running Jobs Manually 13
Running Jobs on a Schedule 14
Creating a Pipeline 14
Schedule a Time to Run a Pipeline 15
Setting Default Parameter Values 17
Running Jobs When Code Changes Are Detected 18
References 19
Conclusion 20
1 | DEVOPS FOR ORACLE FORMS USING DEVELOPER CLOUD SERVICE
Introduction
Oracle Forms is an application development technology that dates back to the 1980’s. Since that time,
the product has evolved from a tool to create character mode applications to one which creates
applications now being deployed in web architecture. Over time, applications developed with this
technology have grown significantly in size and complexity. Today, these complex enterprise
applications are deployed on servers around the world and to hundreds of thousands of end-users.
With applications of such complexity and importance, the need for easier, faster, and low risk
maintenance practices has become crucial to ensuring that these applications are stable, up to date,
and secure. This is where modern DevOps practices can help.
With trends in application development aggressively moving toward a more “agile” model of
development and deployment, the ability to manage Forms applications in this way will require modern
tooling. Developer Cloud Service offers such a solution.
This paper aims to illustrate how Oracle Developer Cloud Service and Oracle Cloud Infrastructure can
help to simplify version control and automate application deployment. Such automation can help to
reduce the level of effort and risk involved in maintaining Forms applications.
In short, this is an introduction to Oracle Forms in a modern DevOps environment.
2 | DEVOPS FOR ORACLE FORMS USING DEVELOPER CLOUD SERVICE
Overview
In any technical operation, the risk of introducing error or failure increases each time a step is executed by human
hands. Misinterpretation of instructions or standards, typographical errors, and numerous other factors often lead to
undesirable results. Such issues are not unique to Oracle Forms, but exist with any technology. By introducing
automation into a process the risk of error or failure is greatly reduced. This is because within the automated
process a fixed set of instructions and standards is included. In addition to gaining more predictable results,
increased efficiency is also attained.
Although the concept of “DevOps” primarily focuses on continuous development and continuous delivery as an effort
to roll out changes faster, it inherently will accomplish what is described above. If application changes can be
processed, tested, and delivered automatically not only can application updates be delivered more frequently, but
they can also be delivered with lower risk. Because a well established DevOps plan will also include a predictable
release cycle, even if issues are introduced fixes can be included in the next automated release cycle. Of course,
out of cycle updates are always possible.
In order to bring Oracle Forms into this automated style of application updating and/or maintenance, the use of
Developer Cloud Service (DCS) and Forms Application Deployment Services (FADS) will be necessary. An
overview of DCS and FADS is provided in the following sections. Refer the documentation list provided at the end
of this paper for more information.
.
3 | DEVOPS FOR ORACLE FORMS USING DEVELOPER CLOUD SERVICE
Oracle Developer Cloud Service
Oracle Developer Cloud Service (DCS) is an Oracle Cloud offering that provides many modern DevOps features in
a single interface.
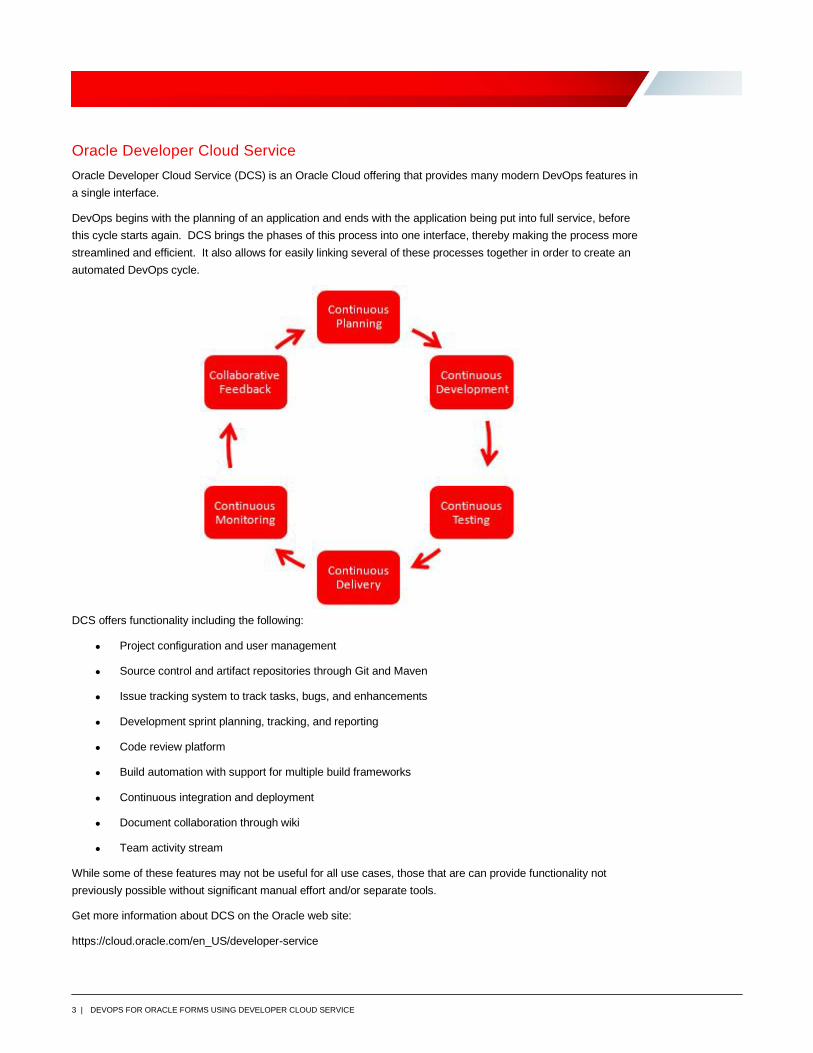
DevOps begins with the planning of an application and ends with the application being put into full service, before
this cycle starts again. DCS brings the phases of this process into one interface, thereby making the process more
streamlined and efficient. It also allows for easily linking several of these processes together in order to create an
automated DevOps cycle.
DCS offers functionality including the following:
Project configuration and user management
Source control and artifact repositories through Git and Maven
Issue tracking system to track tasks, bugs, and enhancements
Development sprint planning, tracking, and reporting
Code review platform
Build automation with support for multiple build frameworks
Continuous integration and deployment
Document collaboration through wiki
Team activity stream
While some of these features may not be useful for all use cases, those that are can provide functionality not
previously possible without significant manual effort and/or separate tools.
Get more information about DCS on the Oracle web site:
https://cloud.oracle.com/en_US/developer-service
4 | DEVOPS FOR ORACLE FORMS USING DEVELOPER CLOUD SERVICE
Forms Application Deployment Services
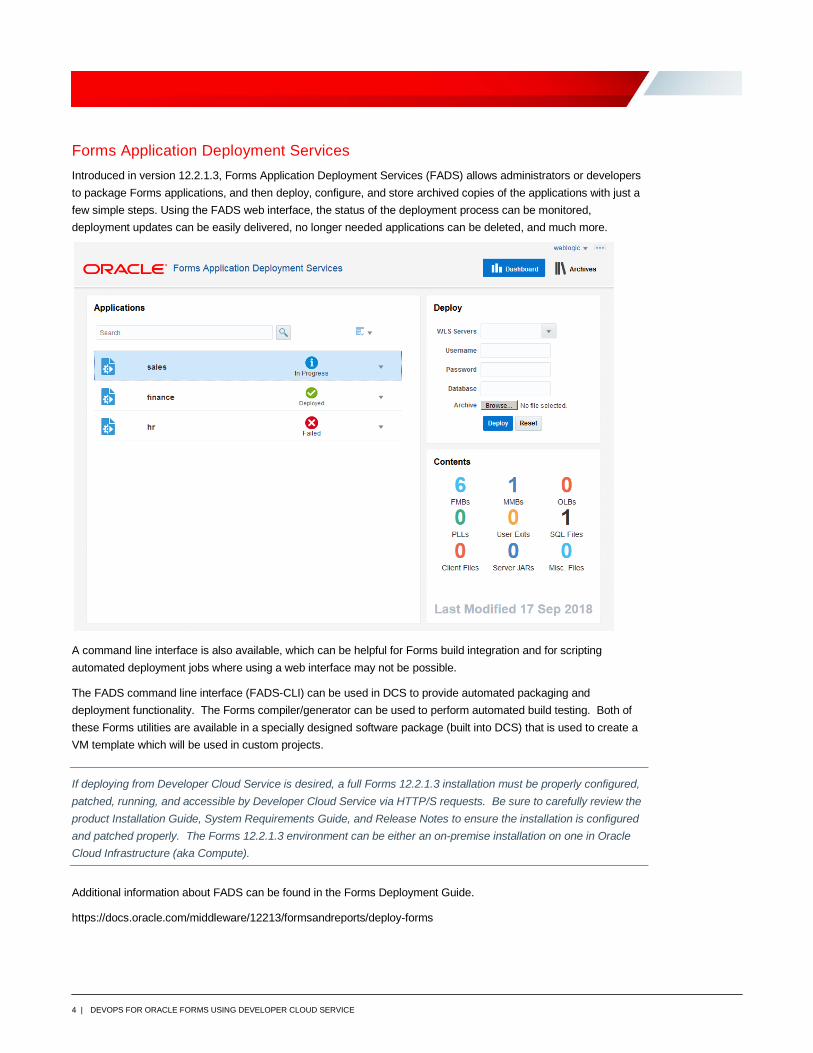
Introduced in version 12.2.1.3, Forms Application Deployment Services (FADS) allows administrators or developers
to package Forms applications, and then deploy, configure, and store archived copies of the applications with just a
few simple steps. Using the FADS web interface, the status of the deployment process can be monitored,
deployment updates can be easily delivered, no longer needed applications can be deleted, and much more.
A command line interface is also available, which can be helpful for Forms build integration and for scripting
automated deployment jobs where using a web interface may not be possible.
The FADS command line interface (FADS-CLI) can be used in DCS to provide automated packaging and
deployment functionality. The Forms compiler/generator can be used to perform automated build testing. Both of
these Forms utilities are available in a specially designed software package (built into DCS) that is used to create a
VM template which will be used in custom projects.
If deploying from Developer Cloud Service is desired, a full Forms 12.2.1.3 installation must be properly configured,
patched, running, and accessible by Developer Cloud Service via HTTP/S requests. Be sure to carefully review the
product Installation Guide, System Requirements Guide, and Release Notes to ensure the installation is configured
and patched properly. The Forms 12.2.1.3 environment can be either an on-premise installation on one in Oracle
Cloud Infrastructure (aka Compute).
Additional information about FADS can be found in the Forms Deployment Guide.
https://docs.oracle.com/middleware/12213/formsandreports/deploy-forms
5 | DEVOPS FOR ORACLE FORMS USING DEVELOPER CLOUD SERVICE
Getting Set Up
Detailed instructions for using DCS can be found in the DCS documentation. This document includes references to
Git, a third party version control technology. Please refer to the Git documentation for details on how to use it.
Because DCS is a Cloud service, it is often updated. Therefore, the screenshots and steps provided in this
document may differ from those needed to complete the tasks. This document should only be used as a general
guide for using Forms in DCS. Refer to the latest DCS documentation for the latest usage information.
The Environment and Setup
One factor in making DevOps successful is the ability to track application changes. To do this, the application’s source files must be included in a version control system. Git will be used for that purpose. Git will be the version control utility used in the developers’ environments to ensure that application changes made on their local systems are synchronized with those stored in DCS. This document will not go into detail on how to setup or use Git, but will include the basic steps associated with using Git with Forms and DCS in the context of its use with Forms. Details about Git, how to use it, and how to download it can be found on these pages:
» https://git-scm.com
» https://git-scm.com/book
On most Unix/Linux machines, Git will likely be pre-installed. If not, you will need to install it. For Microsoft environments, download and install Git for Windows. Refer to the Git site mentioned for download locations.
» https://git-scm.com/downloads
Initial Git and DCS Set Up
These are some of the basic steps for setting up a Git environment on Microsoft Windows. The steps will be the
similar on other platforms, however references to directories and their qualified paths will differ. These steps
assume you have already downloaded and installed Git.
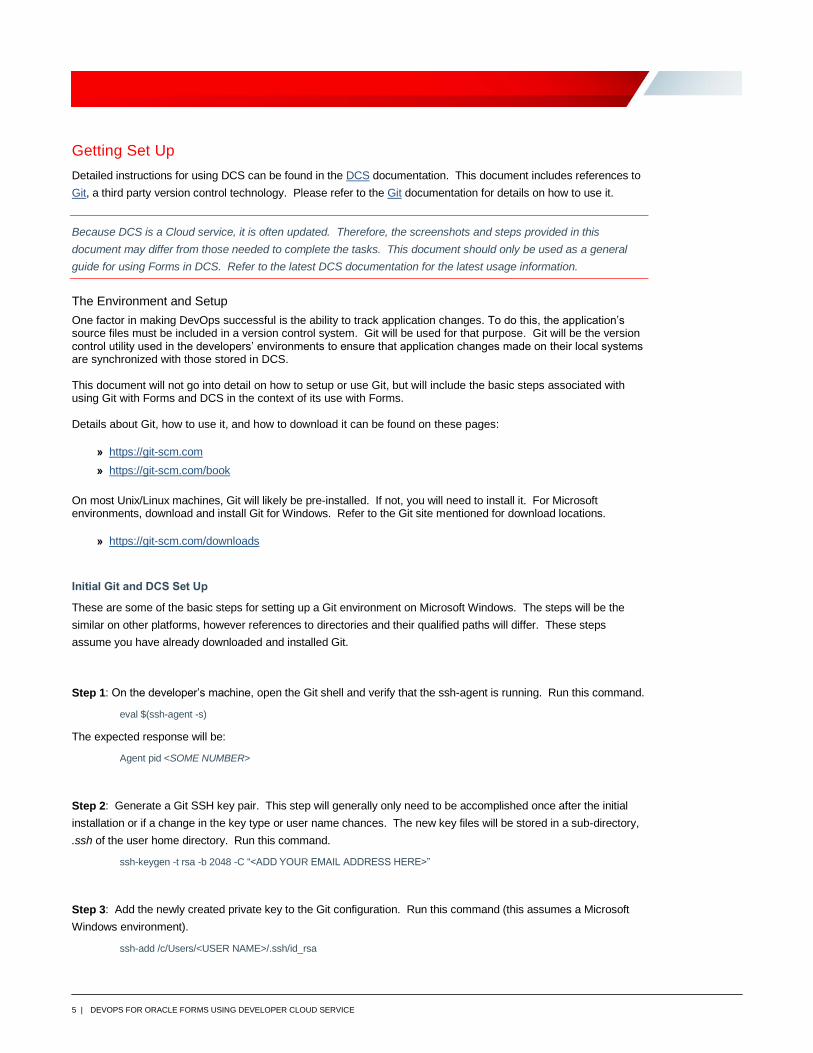
Step 1: On the developer’s machine, open the Git shell and verify that the ssh-agent is running. Run this command.
eval $(ssh-agent -s)
The expected response will be:
Agent pid <SOME NUMBER>
Step 2: Generate a Git SSH key pair. This step will generally only need to be accomplished once after the initial
installation or if a change in the key type or user name chances. The new key files will be stored in a sub-directory,
.ssh of the user home directory. Run this command.
ssh-keygen -t rsa -b 2048 -C “<ADD YOUR EMAIL ADDRESS HERE>”
Step 3: Add the newly created private key to the Git configuration. Run this command (this assumes a Microsoft
Windows environment).
ssh-add /c/Users/<USER NAME>/.ssh/id_rsa

6 | DEVOPS FOR ORACLE FORMS USING DEVELOPER CLOUD SERVICE
Step 4: Access the DCS environment and add the text from the newly created public key (e.g. id_rsa.pub) to the
user’s DCS profile. It will be used to allow the local Git to access the Cloud environment. In DCS, access User
Preferences then select the Authentication tab and click on “Add Key”. Provide a useful name for this public key and
paste the contents of the public key file into the Key field. Click “Create” to commit this addition.
Steps 5 through 8 require DCS Organization Administrative privileges.
Step 5: Access the Organization configuration screen by clicking on the bubble on the upper right side of the DCS
screen.
Step 6: Create a new VM Template. This VM Template will contain the Forms software needed to perform tasks
like generating Forms modules, converting Forms xml files to binary, deploying the application from DCS to a target
server, and so on. Enter a useful name and description and select the desired platform on which test builds will be
executed then click on “Create”. Because the Forms application generation process is essentially a validation of an
application’s PL/SQL and the same on all platforms, which platform you choose is irrelevant but should be one
certified for use with Oracle Forms.
7 | DEVOPS FOR ORACLE FORMS USING DEVELOPER CLOUD SERVICE
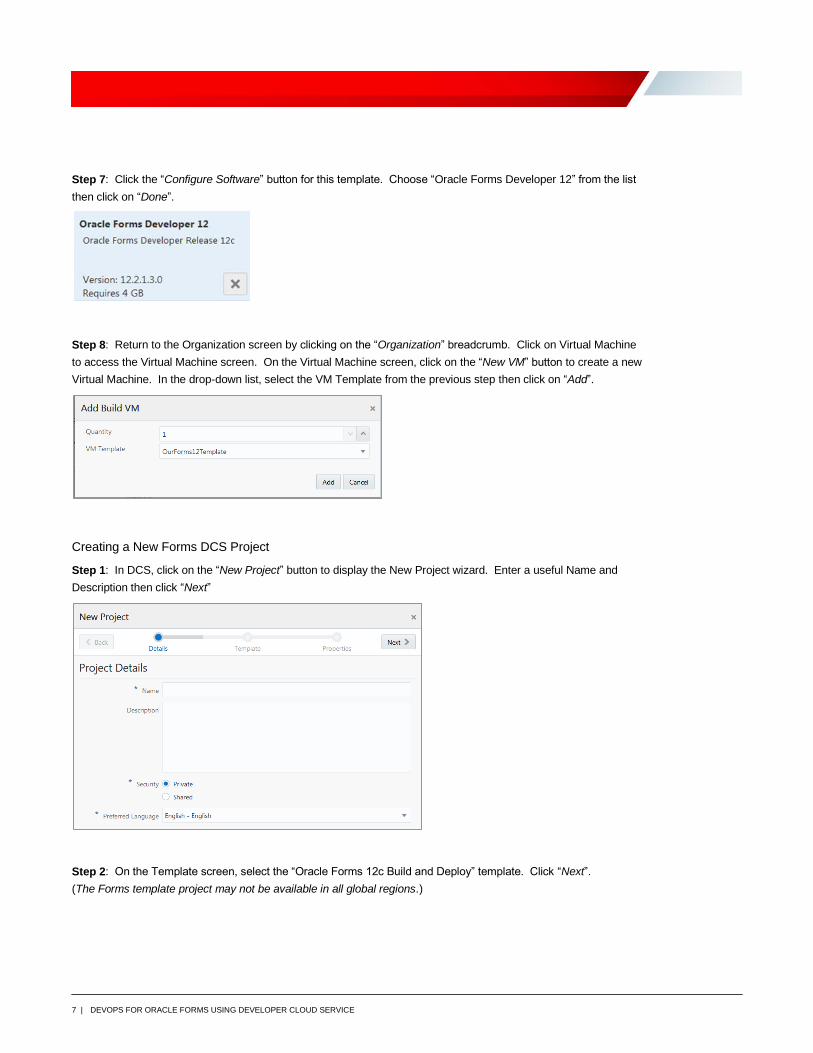
Step 7: Click the “Configure Software” button for this template. Choose “Oracle Forms Developer 12” from the list
then click on “Done”.
Step 8: Return to the Organization screen by clicking on the “Organization” breadcrumb. Click on Virtual Machine
to access the Virtual Machine screen. On the Virtual Machine screen, click on the “New VM” button to create a new
Virtual Machine. In the drop-down list, select the VM Template from the previous step then click on “Add”.
Creating a New Forms DCS Project
Step 1: In DCS, click on the “New Project” button to display the New Project wizard. Enter a useful Name and
Description then click “Next”
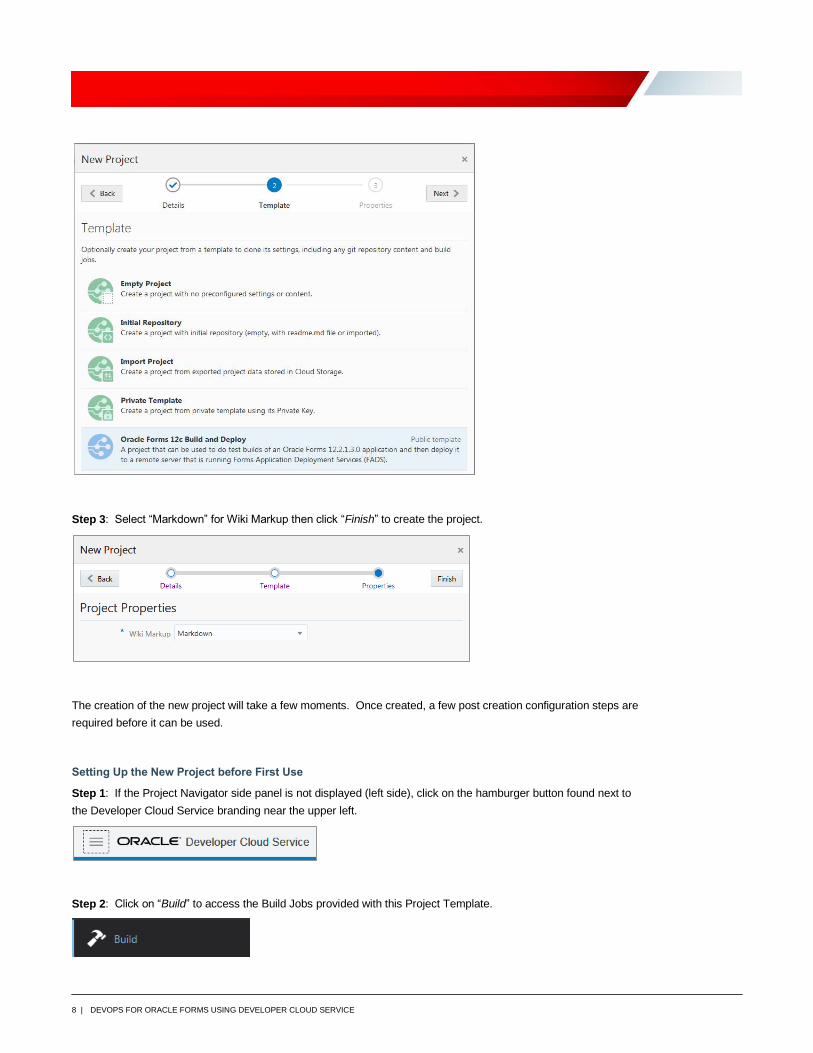
Step 2: On the Template screen, select the “Oracle Forms 12c Build and Deploy” template. Click “Next”.
(The Forms template project may not be available in all global regions.)
8 | DEVOPS FOR ORACLE FORMS USING DEVELOPER CLOUD SERVICE
Step 3: Select “Markdown” for Wiki Markup then click “Finish” to create the project.
The creation of the new project will take a few moments. Once created, a few post creation configuration steps are
required before it can be used.
Setting Up the New Project before First Use
Step 1: If the Project Navigator side panel is not displayed (left side), click on the hamburger button found next to
the Developer Cloud Service branding near the upper left.
Step 2: Click on “Build” to access the Build Jobs provided with this Project Template.

9 | DEVOPS FOR ORACLE FORMS USING DEVELOPER CLOUD SERVICE
Step 3: Click on the “Configure” button for the Compile_and_Package job.
Step 4: The first time entering the project, the Software Configuration tab may be automatically displayed. If not,
click the “Settings” gears icon/tab found on the left side vertical tab bar. Select the Software tab. In the “Software
Template” drop-down field, select the VM Template created in the initial setup steps.
Step 5: Click on the tools icon/tab found on the left side vertical tab bar. Select the Source Control tab. Click “Add
Source Control” and select Git. This will expose a Repository drop-down. From the drop-down, select the entry that
includes your project name and ends with .git. . Click on “Save”.
10 | DEVOPS FOR ORACLE FORMS USING DEVELOPER CLOUD SERVICE
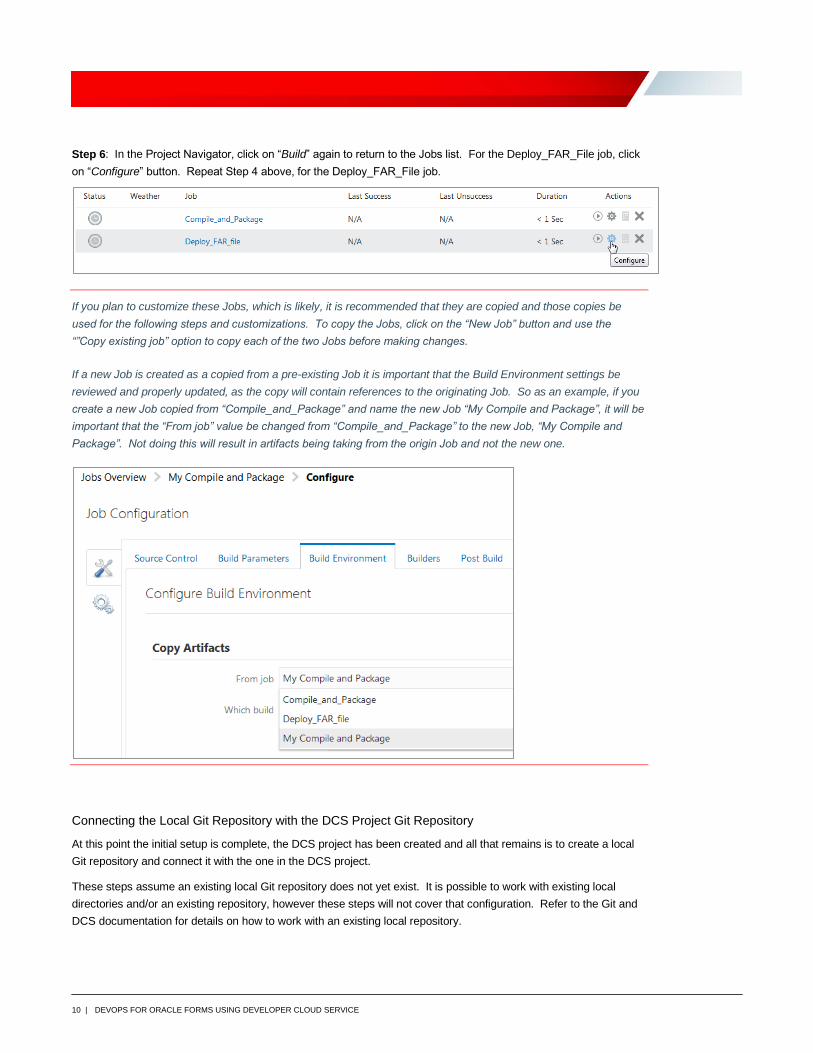
Step 6: In the Project Navigator, click on “Build” again to return to the Jobs list. For the Deploy_FAR_File job, click
on “Configure” button. Repeat Step 4 above, for the Deploy_FAR_File job.
If you plan to customize these Jobs, which is likely, it is recommended that they are copied and those copies be
used for the following steps and customizations. To copy the Jobs, click on the “New Job” button and use the
“”Copy existing job” option to copy each of the two Jobs before making changes.
If a new Job is created as a copied from a pre-existing Job it is important that the Build Environment settings be
reviewed and properly updated, as the copy will contain references to the originating Job. So as an example, if you
create a new Job copied from “Compile_and_Package” and name the new Job “My Compile and Package”, it will be
important that the “From job” value be changed from “Compile_and_Package” to the new Job, “My Compile and
Package”. Not doing this will result in artifacts being taking from the origin Job and not the new one.
Connecting the Local Git Repository with the DCS Project Git Repository
At this point the initial setup is complete, the DCS project has been created and all that remains is to create a local
Git repository and connect it with the one in the DCS project.
These steps assume an existing local Git repository does not yet exist. It is possible to work with existing local
directories and/or an existing repository, however these steps will not cover that configuration. Refer to the Git and
DCS documentation for details on how to work with an existing local repository.
11 | DEVOPS FOR ORACLE FORMS USING DEVELOPER CLOUD SERVICE
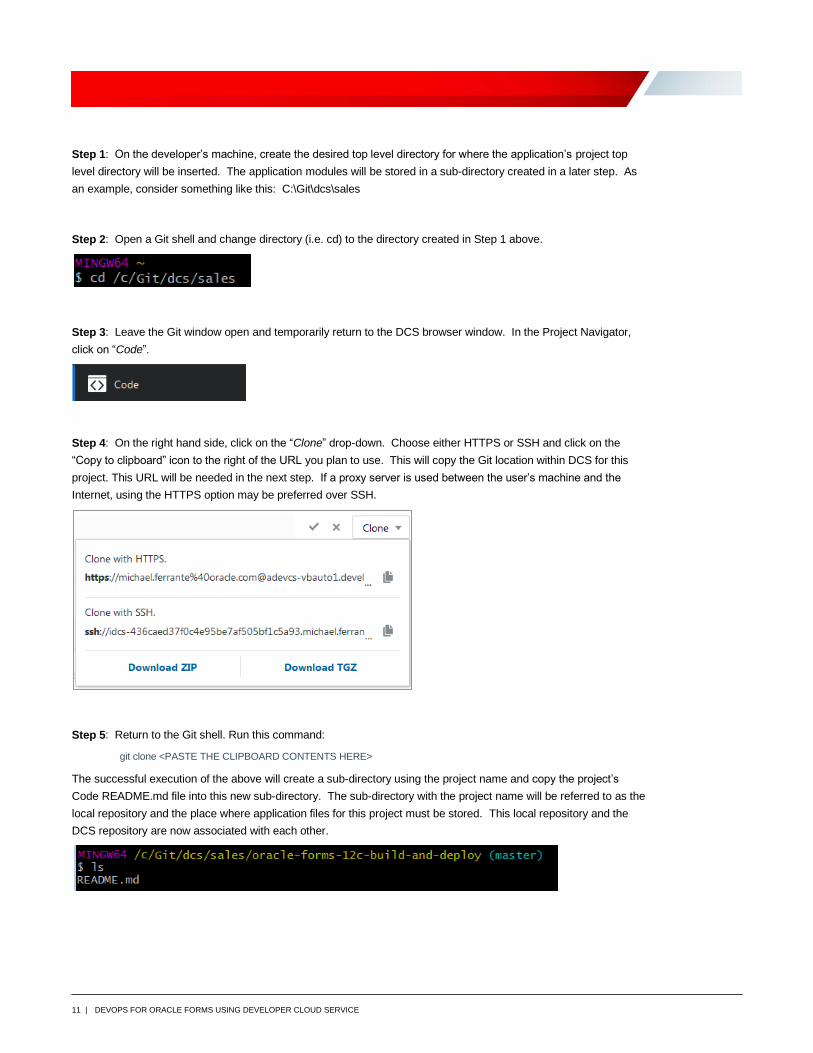
Step 1: On the developer’s machine, create the desired top level directory for where the application’s project top
level directory will be inserted. The application modules will be stored in a sub-directory created in a later step. As
an example, consider something like this: C:\Git\dcs\sales
Step 2: Open a Git shell and change directory (i.e. cd) to the directory created in Step 1 above.
Step 3: Leave the Git window open and temporarily return to the DCS browser window. In the Project Navigator,
click on “Code”.
Step 4: On the right hand side, click on the “Clone” drop-down. Choose either HTTPS or SSH and click on the
“Copy to clipboard” icon to the right of the URL you plan to use. This will copy the Git location within DCS for this
project. This URL will be needed in the next step. If a proxy server is used between the user’s machine and the
Internet, using the HTTPS option may be preferred over SSH.
Step 5: Return to the Git shell. Run this command:
git clone <PASTE THE CLIPBOARD CONTENTS HERE>
The successful execution of the above will create a sub-directory using the project name and copy the project’s
Code README.md file into this new sub-directory. The sub-directory with the project name will be referred to as the
local repository and the place where application files for this project must be stored. This local repository and the
DCS repository are now associated with each other.
12 | DEVOPS FOR ORACLE FORMS USING DEVELOPER CLOUD SERVICE
Integrating a Forms Application with Git and DCS
The above steps configured the local Git repository, created a new DCS project, and associated the local Git with
the remote (DCS) Git. The following steps will be used to update the local and remote repository as files are
changed. These steps represent an overview of how to add/update files in the repository. It will not go into rolling
back changes, deleting changes, or branching code. Refer to the Git documentation for details on using these more
advanced commands.
Inserting a Forms Application into the New Repository
In order to manage Forms application files through Git and eventually DCS, all files associated with the application
must be created or copied into the repository directory mentioned in an earlier step above.
Step 1: Copy all existing application files into the repository directory for this project.
Step 2: In order to update the local repository index, run the following command in the Git shell. Remember that
you must be in the repository directory before executing these command. This command simply notifies Git of
pending changes. The changes have not been committed yet. In this example a wildcard (*) is used, however
individual file names could be used instead. Using specific file names is helpful if additional changes to other files
are expected.
git add *
Step 3: Run the following command to commit the changes flagged for updating in the above steps. It is strongly
recommended that a comment be included with this command. Comments are included with the –m switch as
shown below.
git commit –m “Enter a description of the changes here”
Step 4: The above steps updated the local repository. In order to sync these changes with DCS, run the following
command. Note that “master” below is a reference to the master branch of the code. If the use of branching is
implemented, this reference to master would instead reference the current branch receiving the changes.
git push origin master
Each time files in this repository are updated/added, be sure to complete steps 2 through 4 above. Refer the Git
documentation for information on how to properly delete/remove a file. It may be best to delay executing any of the
Git commands until all expected changes have been completed.
13 | DEVOPS FOR ORACLE FORMS USING DEVELOPER CLOUD SERVICE
Putting Developer Cloud Service to Work
Now that the developer’s machine has been configured, DCS has a new Project for the Forms application(s), and
the two are tied together, it’s time to let DCS get to work. The sample Project provided is setup to have its Jobs
executed manually. However, forcing them to run automatically based on a schedule or detection of a code change
is also possible.
Running Jobs Manually
Because running any Build Job manually should be mostly self-explanatory, the level of detail provided here will be
limited. Refer to the Project’s Wiki, Readme for more information on the Job’s parameters and values needed to
execute either of the provided sample Jobs. Be sure to also review and understand the limitation of this sample
Project, also explained in the Wiki Readme.
This sample Project provides two Build Jobs. The second (“Deploy_FAR_File”) is dependent on the first
(“Compile_and_Package”). In other words, you must run the first before you can run the second. If you run the
second without having run the first, the application will be redeployed in its previous state the last time
“Compile_and_Package” was successfully run. If the first Job has never been run or never run successfully, the
second will fail.
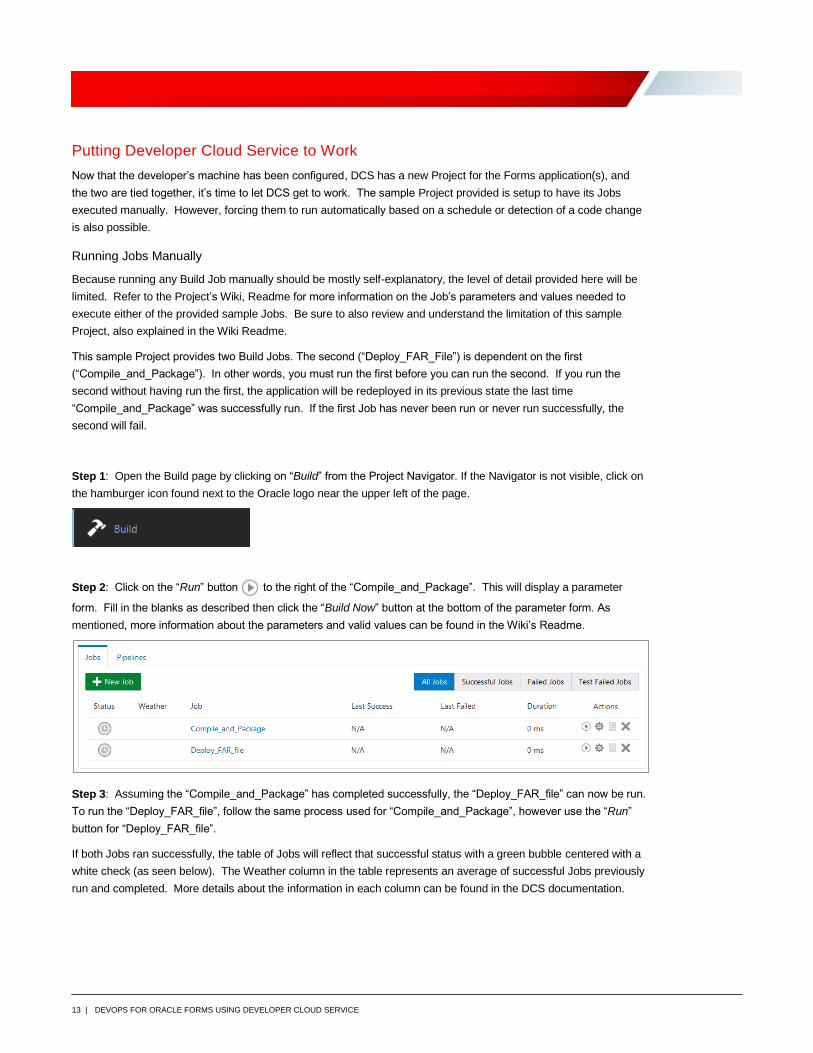
Step 1: Open the Build page by clicking on “Build” from the Project Navigator. If the Navigator is not visible, click on
the hamburger icon found next to the Oracle logo near the upper left of the page.
Step 2: Click on the “Run” button to the right of the “Compile_and_Package”. This will display a parameter
form. Fill in the blanks as described then click the “Build Now” button at the bottom of the parameter form. As
mentioned, more information about the parameters and valid values can be found in the Wiki’s Readme.
Step 3: Assuming the “Compile_and_Package” has completed successfully, the “Deploy_FAR_file” can now be run.
To run the “Deploy_FAR_file”, follow the same process used for “Compile_and_Package”, however use the “Run”
button for “Deploy_FAR_file”.
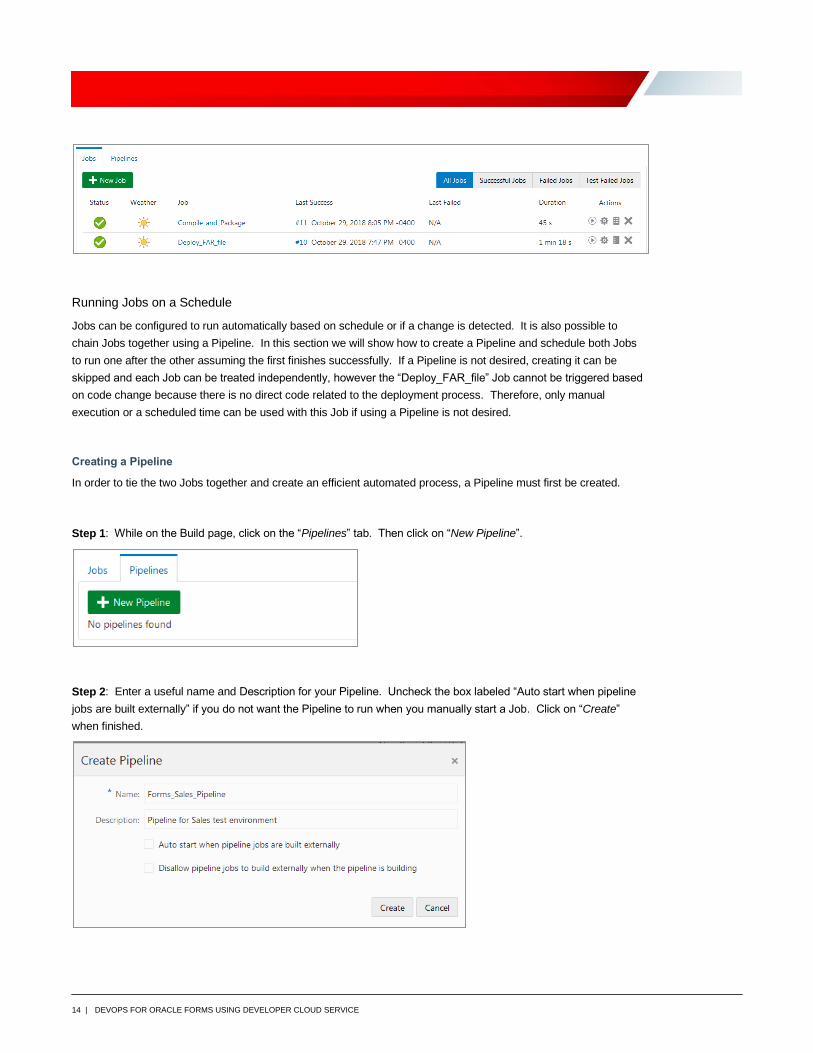
If both Jobs ran successfully, the table of Jobs will reflect that successful status with a green bubble centered with a
white check (as seen below). The Weather column in the table represents an average of successful Jobs previously
run and completed. More details about the information in each column can be found in the DCS documentation.
14 | DEVOPS FOR ORACLE FORMS USING DEVELOPER CLOUD SERVICE
Running Jobs on a Schedule
Jobs can be configured to run automatically based on schedule or if a change is detected. It is also possible to
chain Jobs together using a Pipeline. In this section we will show how to create a Pipeline and schedule both Jobs
to run one after the other assuming the first finishes successfully. If a Pipeline is not desired, creating it can be
skipped and each Job can be treated independently, however the “Deploy_FAR_file” Job cannot be triggered based
on code change because there is no direct code related to the deployment process. Therefore, only manual
execution or a scheduled time can be used with this Job if using a Pipeline is not desired.
Creating a Pipeline
In order to tie the two Jobs together and create an efficient automated process, a Pipeline must first be created.
Step 1: While on the Build page, click on the “Pipelines” tab. Then click on “New Pipeline”.
Step 2: Enter a useful name and Description for your Pipeline. Uncheck the box labeled “Auto start when pipeline
jobs are built externally” if you do not want the Pipeline to run when you manually start a Job. Click on “Create”
when finished.
15 | DEVOPS FOR ORACLE FORMS USING DEVELOPER CLOUD SERVICE
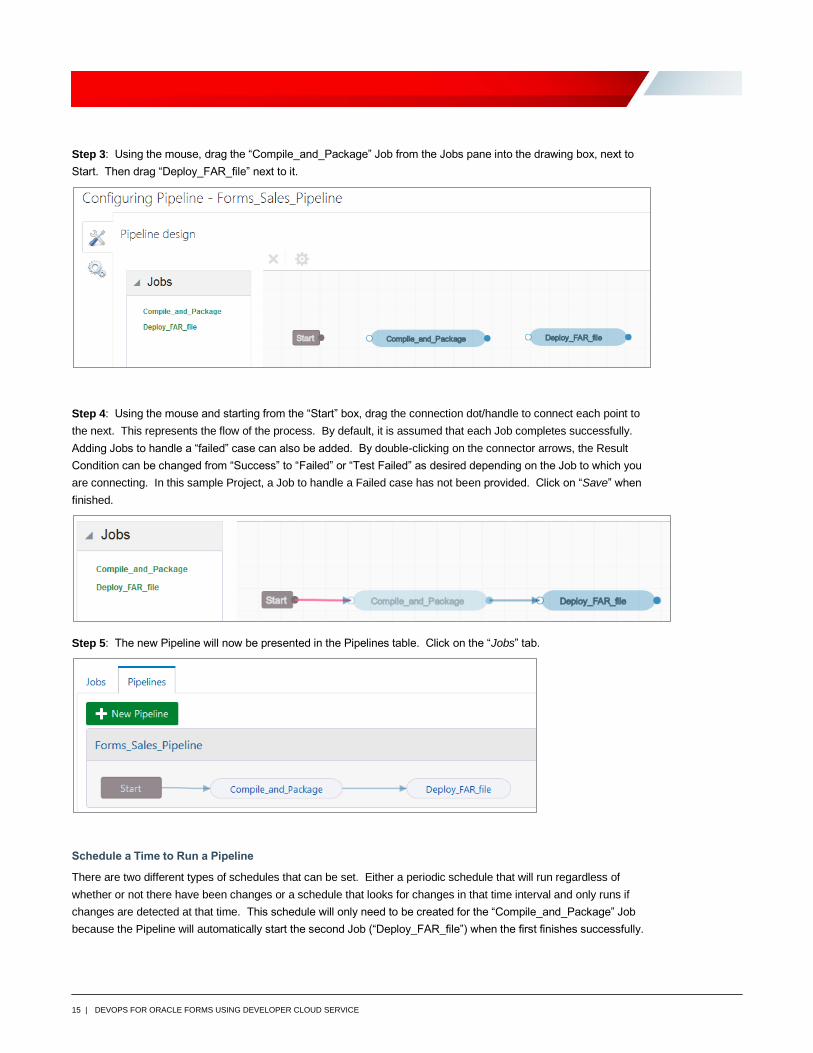
Step 3: Using the mouse, drag the “Compile_and_Package” Job from the Jobs pane into the drawing box, next to
Start. Then drag “Deploy_FAR_file” next to it.
Step 4: Using the mouse and starting from the “Start” box, drag the connection dot/handle to connect each point to
the next. This represents the flow of the process. By default, it is assumed that each Job completes successfully.
Adding Jobs to handle a “failed” case can also be added. By double-clicking on the connector arrows, the Result
Condition can be changed from “Success” to “Failed” or “Test Failed” as desired depending on the Job to which you
are connecting. In this sample Project, a Job to handle a Failed case has not been provided. Click on “Save” when
finished.
Step 5: The new Pipeline will now be presented in the Pipelines table. Click on the “Jobs” tab.
Schedule a Time to Run a Pipeline
There are two different types of schedules that can be set. Either a periodic schedule that will run regardless of
whether or not there have been changes or a schedule that looks for changes in that time interval and only runs if
changes are detected at that time. This schedule will only need to be created for the “Compile_and_Package” Job
because the Pipeline will automatically start the second Job (“Deploy_FAR_file”) when the first finishes successfully.
16 | DEVOPS FOR ORACLE FORMS USING DEVELOPER CLOUD SERVICE
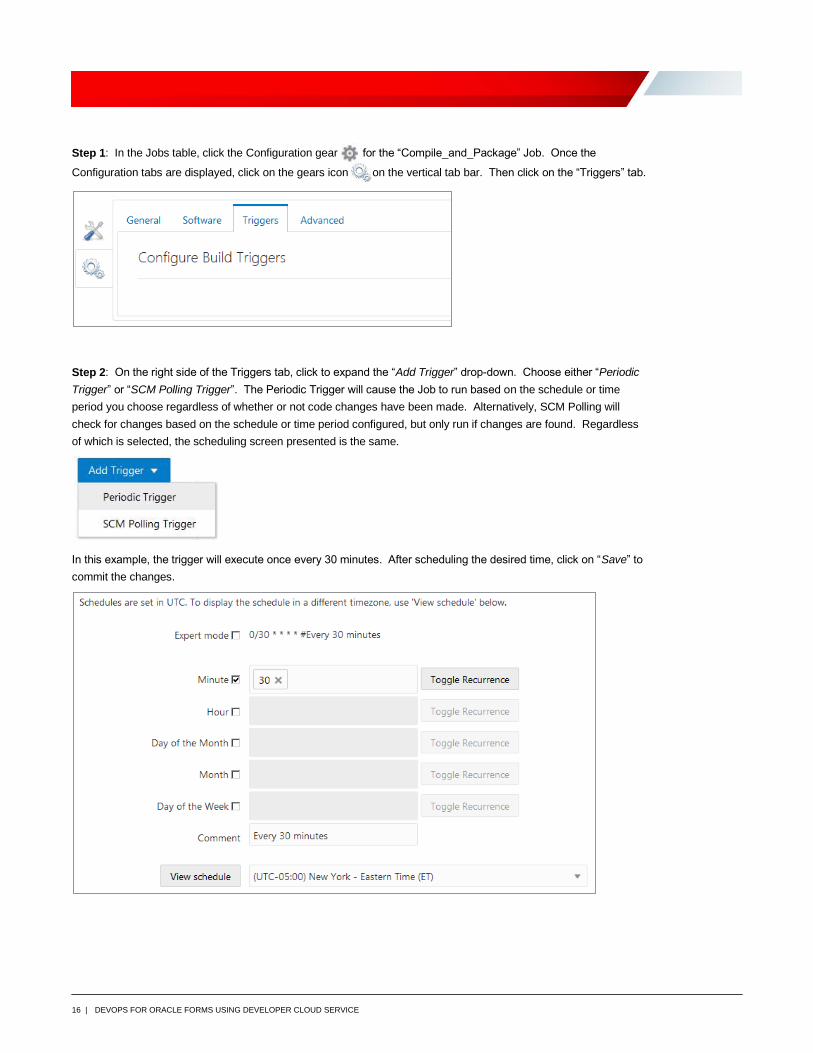
Step 1: In the Jobs table, click the Configuration gear for the “Compile_and_Package” Job. Once the
Configuration tabs are displayed, click on the gears icon on the vertical tab bar. Then click on the “Triggers” tab.
Step 2: On the right side of the Triggers tab, click to expand the “Add Trigger” drop-down. Choose either “Periodic
Trigger” or “SCM Polling Trigger”. The Periodic Trigger will cause the Job to run based on the schedule or time
period you choose regardless of whether or not code changes have been made. Alternatively, SCM Polling will
check for changes based on the schedule or time period configured, but only run if changes are found. Regardless
of which is selected, the scheduling screen presented is the same.
In this example, the trigger will execute once every 30 minutes. After scheduling the desired time, click on “Save” to
commit the changes.

17 | DEVOPS FOR ORACLE FORMS USING DEVELOPER CLOUD SERVICE
Setting Default Parameter Values
In order for a Pipeline of the provided sample Jobs to run without any user intervention, default values must be set
for all the Job parameters. Parameters with multiple fixed choices (drop-downs) will use the first value in the list as
the default value. Do the following for each of the two provided Jobs.
Step 1: Open the Job’s Configuration screen and navigate to the “Build Parameters” tab. Enter a Default Value for
each of the parameters on the page. Be sure to scroll down through all of them. When done, click on “Save”.
18 | DEVOPS FOR ORACLE FORMS USING DEVELOPER CLOUD SERVICE
Running Jobs When Code Changes Are Detected
Running Jobs or a Pipeline when code changes are detected is often desirable in a test environment, but can also
be used in any desired case. To run Jobs when code changes are detected, do the following.
If you created schedules using the previously mentioned steps, keep those in mind when introducing the following
steps. You may not want to run the Jobs for both scheduled triggers and upon change detection. If you do not want
both, be sure to delete the previously created schedules.
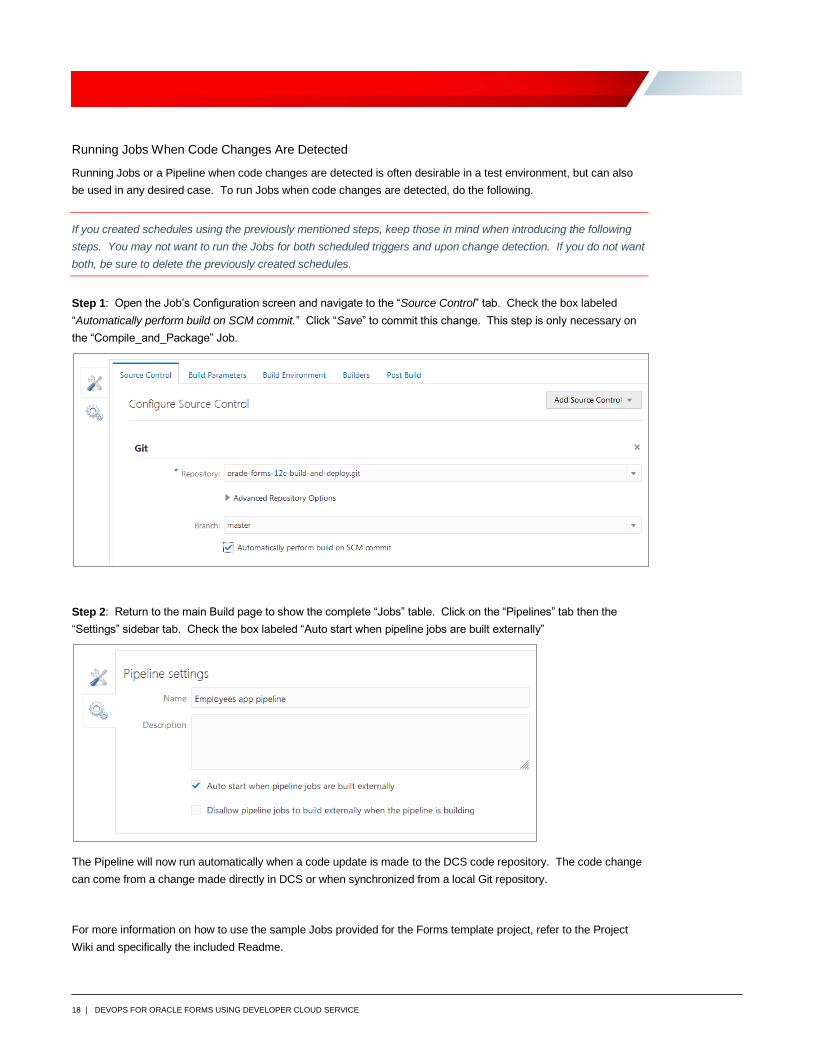
Step 1: Open the Job’s Configuration screen and navigate to the “Source Control” tab. Check the box labeled
“Automatically perform build on SCM commit.” Click “Save” to commit this change. This step is only necessary on
the “Compile_and_Package” Job.
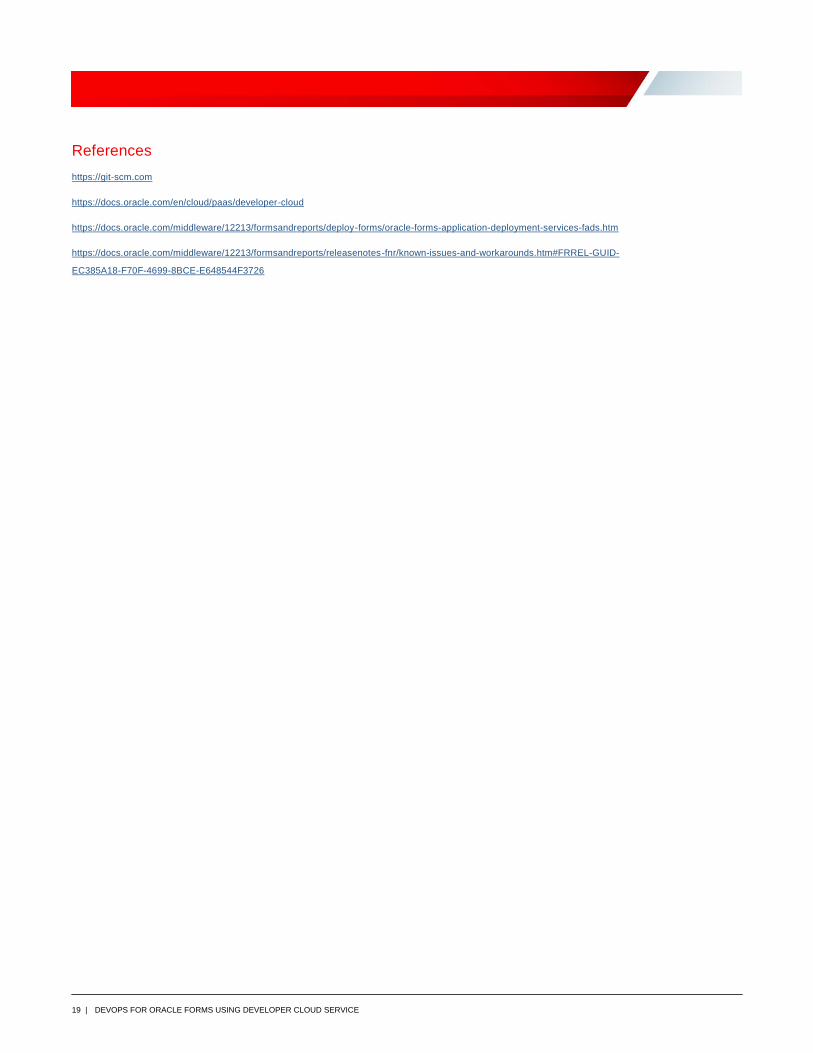
Step 2: Return to the main Build page to show the complete “Jobs” table. Click on the “Pipelines” tab then the
“Settings” sidebar tab. Check the box labeled “Auto start when pipeline jobs are built externally”
The Pipeline will now run automatically when a code update is made to the DCS code repository. The code change
can come from a change made directly in DCS or when synchronized from a local Git repository.
For more information on how to use the sample Jobs provided for the Forms template project, refer to the Project
Wiki and specifically the included Readme.
19 | DEVOPS FOR ORACLE FORMS USING DEVELOPER CLOUD SERVICE
References
https://git-scm.com
https://docs.oracle.com/en/cloud/paas/developer-cloud
https://docs.oracle.com/middleware/12213/formsandreports/deploy-forms/oracle-forms-application-deployment-services-fads.htm
https://docs.oracle.com/middleware/12213/formsandreports/releasenotes-fnr/known-issues-and-workarounds.htm#FRREL-GUID-
EC385A18-F70F-4699-8BCE-E648544F3726
20 | DEVOPS FOR ORACLE FORMS USING DEVELOPER CLOUD SERVICE
Conclusion
Modern DevOps allows organizations to more easily and quickly deliver application updates. Oracle Developer
Cloud Service with Oracle Forms support helps to bring modern DevOps to your legacy applications. With a well
thought out plan and powerful DevOps tools, applications can easily be updated, tested, and deployed faster than
ever before. Keeping your application up to date by regularly fixing bugs and delivering the latest features needed
by the organization’s user community is will help to ensure that users are able to work as effectively as possible and
ensure that accurate data is recorded.
Oracle Corporation, World Headquarters Worldwide Inquiries
500 Oracle Parkway Phone: +1.650.506.7000
Redwood Shores, CA 94065, USA Fax: +1.650.506.7200
Copyright © 2018, Oracle and/or its affiliates. All rights reserved. This document is provided for information purposes only, and the
contents hereof are subject to change without notice. This document is not warranted to be error-free, nor subject to any other warranties or conditions, whether expressed orally or implied in law, including implied warranties and conditions of merchantability or fitness for a particular purpose. We specifically disclaim any liability with respect to this document, and no contractual obligations are formed either directly or indirectly by this document. This document may not be reproduced or transmitted in any form or by any means, electronic or mechanical, for any purpose, without our prior written permission. Oracle and Java are registered trademarks of Oracle and/or its affiliates. Other names may be trademarks of their respective owners. Intel and Intel Xeon are trademarks or registered trademarks of Intel Corporation. All SPARC trademarks are used under license and are trademarks or registered trademarks of SPARC International, Inc. AMD, Opteron, the AMD logo, and the AMD Opteron logo are trademarks or registered trademarks of Advanced Micro Devices. UNIX is a registered trademark of The Open Group. 1118 ORACLE FORMS AND LIFECYCLE MANAGEMENT WITH DEVELOPER CLOUD SERVICE November 2018 Author: Michael Ferrante Contributing Authors: Phil Kuhn
C O N N E C T W I T H U S
blogs.oracle.com/oracle
facebook.com/oracle
twitter.com/oracle
oracle.com


