Oracle ® Fusion Middleware Installing and Configuring Oracle WebLogic Server and Coherence 12c (12.2.1.1) E73086-02 August 2016 Documentation for installers and system administrators that describes how to install and configure Oracle WebLogic Server and Coherence.
Transcript
Oracle® Fusion MiddlewareInstalling and Configuring Oracle WebLogic Server and Coherence
12c (12.2.1.1)
E73086-02
August 2016
Documentation for installers and system administrators thatdescribes how to install and configure Oracle WebLogic Serverand Coherence.
Oracle Fusion Middleware Installing and Configuring Oracle WebLogic Server and Coherence, 12c (12.2.1.1)
This software and related documentation are provided under a license agreement containing restrictions onuse and disclosure and are protected by intellectual property laws. Except as expressly permitted in yourlicense agreement or allowed by law, you may not use, copy, reproduce, translate, broadcast, modify, license,transmit, distribute, exhibit, perform, publish, or display any part, in any form, or by any means. Reverseengineering, disassembly, or decompilation of this software, unless required by law for interoperability, isprohibited.
The information contained herein is subject to change without notice and is not warranted to be error-free. Ifyou find any errors, please report them to us in writing.
If this is software or related documentation that is delivered to the U.S. Government or anyone licensing it onbehalf of the U.S. Government, then the following notice is applicable:
U.S. GOVERNMENT END USERS: Oracle programs, including any operating system, integrated software,any programs installed on the hardware, and/or documentation, delivered to U.S. Government end users are"commercial computer software" pursuant to the applicable Federal Acquisition Regulation and agency-specific supplemental regulations. As such, use, duplication, disclosure, modification, and adaptation of theprograms, including any operating system, integrated software, any programs installed on the hardware,and/or documentation, shall be subject to license terms and license restrictions applicable to the programs.No other rights are granted to the U.S. Government.
This software or hardware is developed for general use in a variety of information management applications.It is not developed or intended for use in any inherently dangerous applications, including applications thatmay create a risk of personal injury. If you use this software or hardware in dangerous applications, then youshall be responsible to take all appropriate fail-safe, backup, redundancy, and other measures to ensure itssafe use. Oracle Corporation and its affiliates disclaim any liability for any damages caused by use of thissoftware or hardware in dangerous applications.
Oracle and Java are registered trademarks of Oracle and/or its affiliates. Other names may be trademarks oftheir respective owners.
Intel and Intel Xeon are trademarks or registered trademarks of Intel Corporation. All SPARC trademarks areused under license and are trademarks or registered trademarks of SPARC International, Inc. AMD, Opteron,the AMD logo, and the AMD Opteron logo are trademarks or registered trademarks of Advanced MicroDevices. UNIX is a registered trademark of The Open Group.
This software or hardware and documentation may provide access to or information about content, products,and services from third parties. Oracle Corporation and its affiliates are not responsible for and expresslydisclaim all warranties of any kind with respect to third-party content, products, and services unlessotherwise set forth in an applicable agreement between you and Oracle. Oracle Corporation and its affiliateswill not be responsible for any loss, costs, or damages incurred due to your access to or use of third-partycontent, products, or services, except as set forth in an applicable agreement between you and Oracle.
Contents
Preface ............................................................................................................................................................... vii
Audience ...................................................................................................................................................... vii
Documentation Accessibility .................................................................................................................... vii
Related Documents..................................................................................................................................... vii
Conventions................................................................................................................................................ viii
1 Planning the Oracle WebLogic Server Installation
1.1 Using this Document....................................................................................................................... 1-1
1.1.1 Using the Standard Installation Topology as a Starting Point....................................... 1-2
1.1.2 Using this Document in an Upgrade Scenario................................................................. 1-2
1.1.3 Using this Document to Extend a Domain ....................................................................... 1-2
1.1.4 Using Installation Documents for Development Environments ................................... 1-2
1.2 About the WebLogic Server and Coherence Standard Installation Topology........................ 1-3
1.2.1 WebLogic Server and Coherence Standard Installation Topology Elements.............. 1-4
1.2.2 About Using the Standard Installation Topology for WebLogic Server MT............... 1-5
1.3 Running the Installer in Silent Mode ............................................................................................ 1-5
1.4 Roadmap for Installing and Configuring the Installation Topology ....................................... 1-5
1.5 Roadmap for Installing and Configuring the WebLogic Server MT Topology...................... 1-6
1.6 Roadmap for Verifying Your System Environment ................................................................... 1-7
1.7 Obtaining the Oracle WebLogic Server and Coherence Distribution...................................... 1-7
1.8 Obtaining the Oracle WebLogic Server MT Distribution .......................................................... 1-8
2 Installing the Oracle WebLogic Server and Coherence Software
2.1 Starting the Installation Program .................................................................................................. 2-1
2.2 Navigating the Installation Screens .............................................................................................. 2-2
2.3 About the Coherence Installation Type........................................................................................ 2-4
3 Installing Oracle WebLogic Server and Coherence for WebLogic Server MT
3.1 Starting WebLogic Server MT Installation................................................................................... 3-1
3.2 Navigating WebLogic Server MT Installation Screens............................................................... 3-1
iii
4 Creating and Configuring the WebLogic Domain
4.1 Configuring the WebLogic Domain.............................................................................................. 4-1
4.1.1 Starting the Configuration Wizard .................................................................................... 4-1
4.1.2 Navigating Configuration Wizard Screens to Configure the Domain ......................... 4-2
4.2 Starting the Servers.......................................................................................................................... 4-9
4.2.1 Starting the Node Manager............................................................................................... 4-10
4.2.2 Starting the Administration Server.................................................................................. 4-10
7.7.2 Scenario: Installing in an Existing, Non-Empty Oracle Home ...................................... 7-5
iv
A About the Oracle WebLogic Server and Coherence Distribution
B Installing WebLogic Server for Developers
B.1 Files Included with WebLogic Server Development ................................................................. B-1
B.2 Downloading the Installers............................................................................................................ B-2
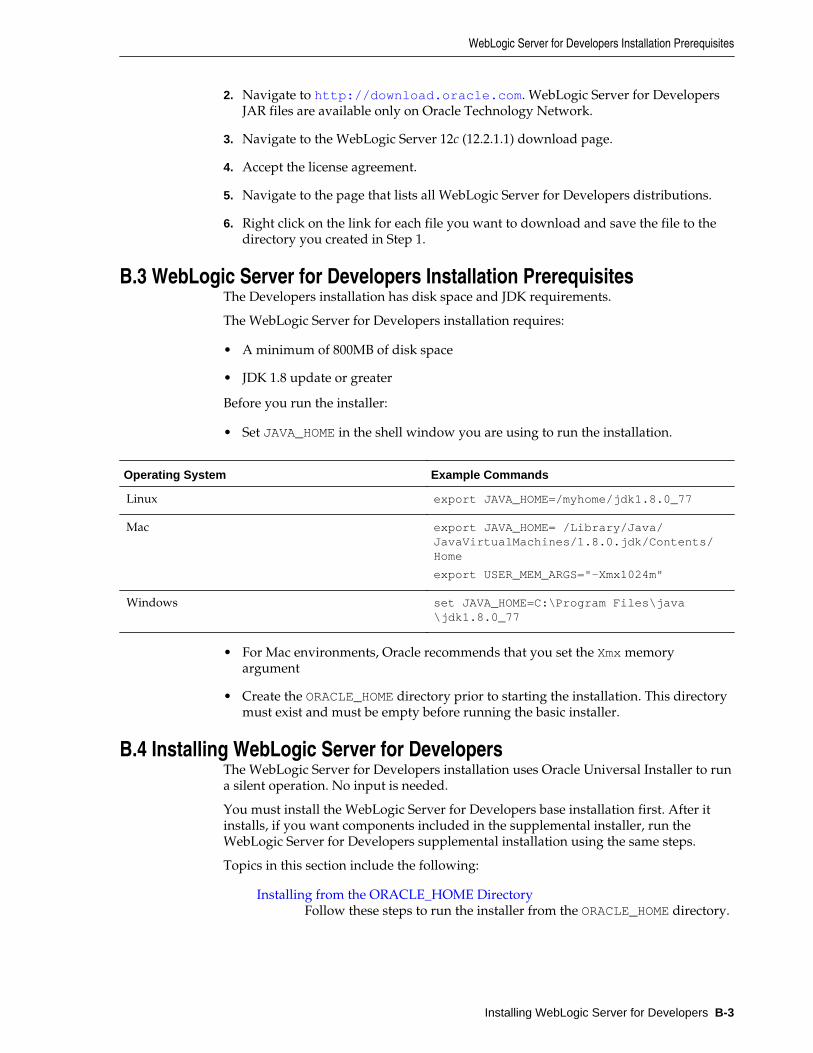
B.3 WebLogic Server for Developers Installation Prerequisites ..................................................... B-3
B.4 Installing WebLogic Server for Developers................................................................................. B-3
B.4.1 Installing from the ORACLE_HOME Directory ............................................................. B-4
B.4.2 Installing from a Directory Other Than ORACLE_HOME............................................ B-4
B.5 Creating a Development Domain ................................................................................................. B-4
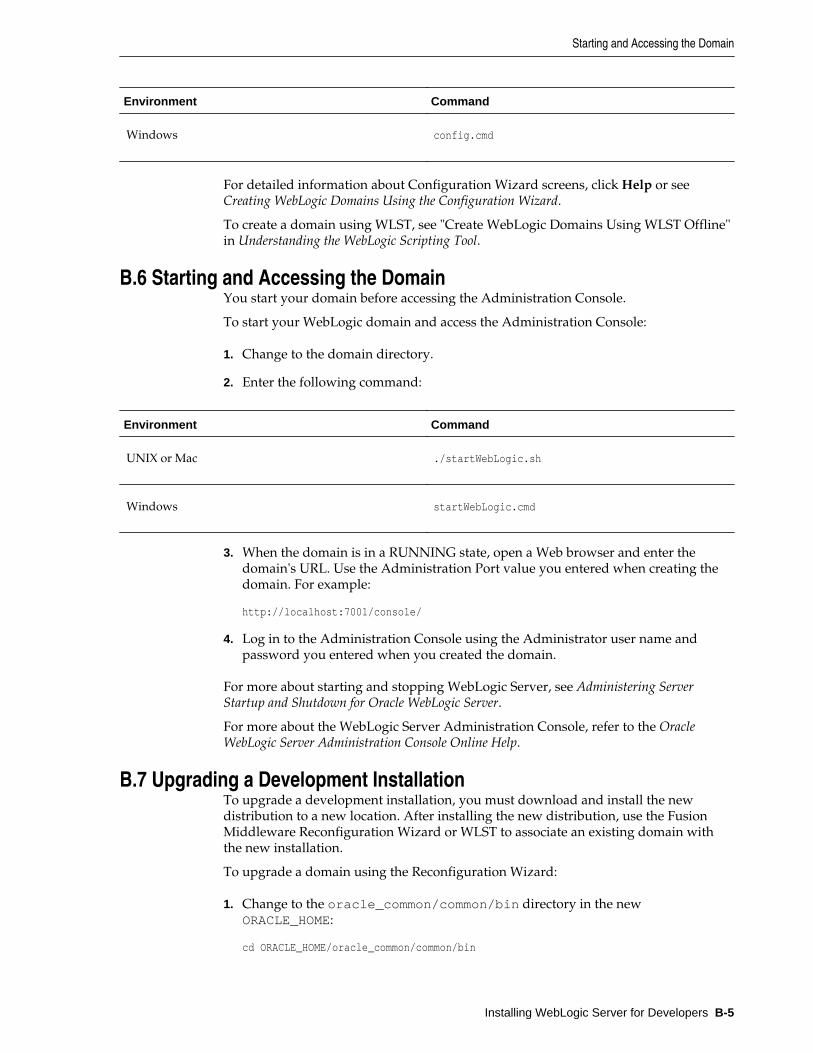
B.6 Starting and Accessing the Domain.............................................................................................. B-5
B.7 Upgrading a Development Installation ....................................................................................... B-5
B.8 Patching a Development Installation ........................................................................................... B-6
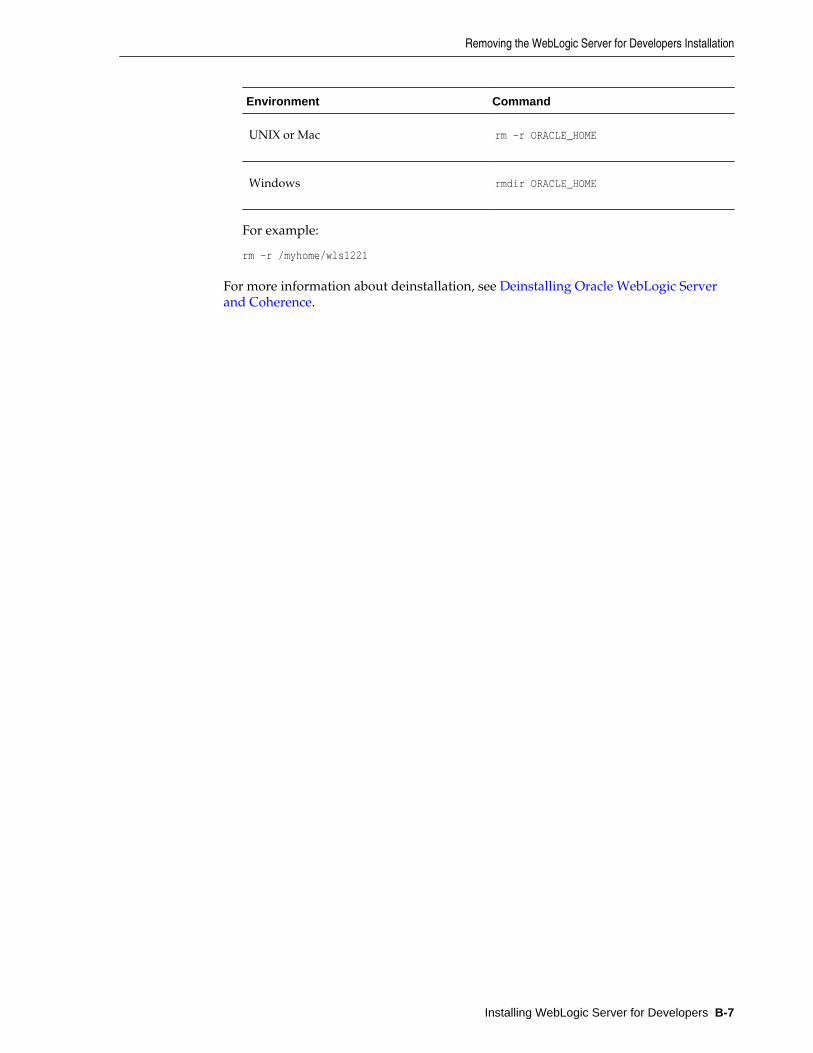
B.9 Removing the WebLogic Server for Developers Installation.................................................... B-6
v
vi
Preface
This document describes how to install and configure Oracle WebLogic Server andCoherence.
Audience
Documentation Accessibility
Related Documents
Conventions
AudienceThis document is intended for system administrators or application developers whoare installing WebLogic Server. It is assumed that readers are familiar with Webtechnologies and have a general understanding of Windows and UNIX platforms.
Documentation AccessibilityFor information about Oracle's commitment to accessibility, visit the OracleAccessibility Program website at http://www.oracle.com/pls/topic/lookup?ctx=acc&id=docacc.
Access to Oracle Support
Oracle customers that have purchased support have access to electronic supportthrough My Oracle Support. For information, visit http://www.oracle.com/pls/topic/lookup?ctx=acc&id=info or visit http://www.oracle.com/pls/topic/lookup?ctx=acc&id=trs if you are hearing impaired.
Related DocumentsFor more information, see the following documents in the 12c (12.2.1.1) documentationlibrary:
• Upgrading Oracle WebLogic Server
If you are upgrading your Oracle WebLogic Server installation from an earlierversion (for example from a 10.x release in 11g to a 12c release), this documentexplains how to upgrade the entire WebLogic Server environment, includingapplications, the WebLogic domains in which they are deployed, and anyapplication data associated with the domain. This may include external resources,such as database servers, firewalls, load balancers, and LDAP servers.
• Installing and Configuring the Oracle Fusion Middleware Infrastructure
Oracle WebLogic Server is also available as part of the Oracle Fusion MiddlewareInfrastructure distribution. Refer to this document if you want to install OracleWebLogic Server with Infrastructure capabilities.
ConventionsThe following text conventions are used in this document:
Convention Meaning
boldface Boldface type indicates graphical user interface elements associated with an action, orterms defined in text or the glossary.
italic Italic type indicates book titles, emphasis, or placeholder variables for which yousupply particular values.
monospace Monospace type indicates commands within a paragraph, URLs, code in examples,text that appears on the screen, or text that you enter.
viii
1Planning the Oracle WebLogic Server
Installation
This section prepares you to install Oracle WebLogic Server and Coherence. Reviewthis section thoroughly to ensure that you do not encounter any problems during orafter installation and domain configuration.
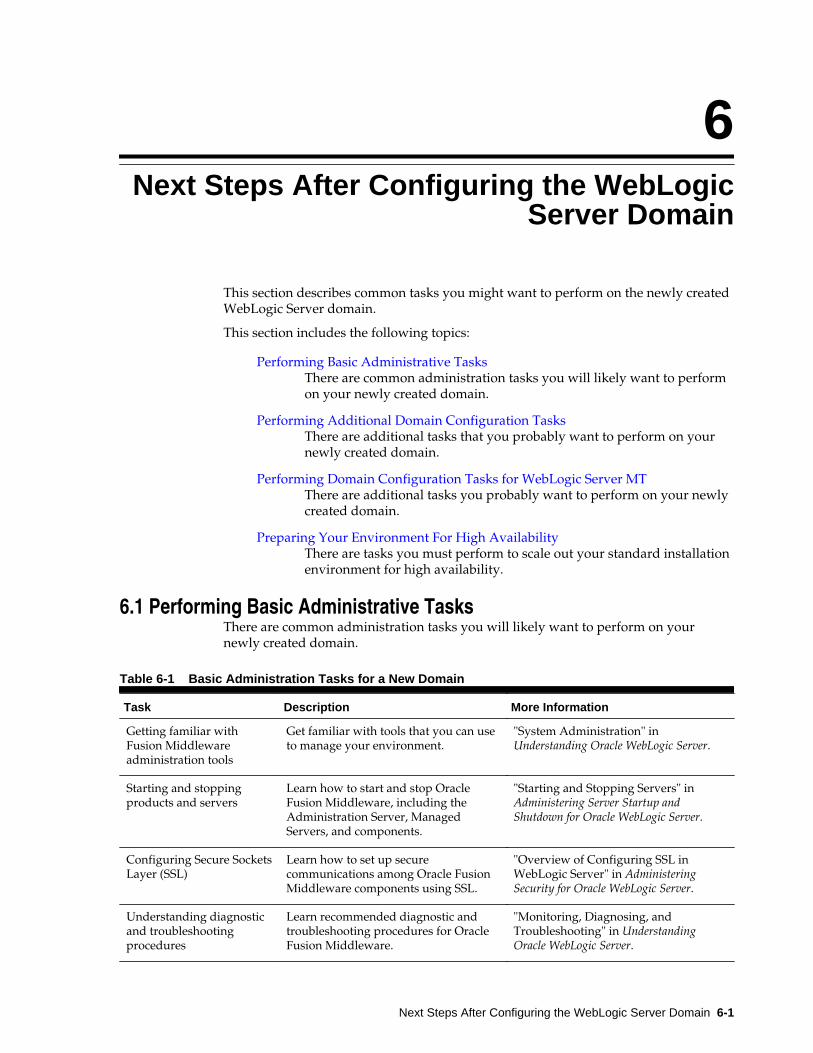
Using this DocumentThere are certain scenarios that you want to use this guide for, and othersources of information.
About the WebLogic Server and Coherence Standard Installation TopologyThe standard installation topology has a standard WebLogic Serverdomain.
Running the Installer in Silent ModeYou can install using the -silent flag on the command line when youstart the installer.
Roadmap for Installing and Configuring the Installation TopologyThis document has all the procedures you need to install and configureWebLogic Server. Within the procedures, this document refers toadditional information you can use if you want to create a modifiedversion of this topology.
Roadmap for Installing and Configuring the WebLogic Server MT TopologyFollow this roadmap to install and configure the WebLogic Server MTdistribution.
Roadmap for Verifying Your System EnvironmentThis topic has important information that you must read andunderstand before you begin installation and configuration steps. Itidentifies important tasks and checks that verify your environment isproperly prepared to install and configure Oracle Fusion MiddlewareWebLogic Server and Coherence.
Obtaining the Oracle WebLogic Server and Coherence DistributionYou download the software from the Oracle Technology Network(OTN).
Obtaining the Oracle WebLogic Server MT DistributionYou download the distribution from the Oracle Technology Network(OTN)
1.1 Using this DocumentThere are certain scenarios that you want to use this guide for, and other sources ofinformation.
Planning the Oracle WebLogic Server Installation 1-1
This section contains the following topics:
Using the Standard Installation Topology as a Starting PointThis guide helps you create the standard installation topology for OracleWebLogic Server and Coherence. You can extend this topology to makeit highly available and secure so that it is suitable for a productionsystem.
Using this Document in an Upgrade ScenarioIf you are installing Oracle WebLogic Server and Coherence as part of anupgrade procedure, follow procedures in this guide to install thesoftware, but do not run the Configuration Wizard to create a WebLogicdomain.
Using this Document to Extend a DomainProcedures in this document describe how to create a new domain; youcan use the same procedures to extend an existing domain.
Using Installation Documents for Development EnvironmentsThis guide describes how to use the Oracle WebLogic Server andCoherence distribution to install and configure a runtime, productionenvironment for Oracle WebLogic Server.
1.1.1 Using the Standard Installation Topology as a Starting PointThis guide helps you create the standard installation topology for Oracle WebLogicServer and Coherence. You can extend this topology to make it highly available andsecure so that it is suitable for a production system.
The standard installation topology represents a sample topology for this product; it isnot the only topology that Oracle supports. See "Understanding the StandardInstallation Topology" in Planning an Installation of Oracle Fusion Middleware.
1.1.2 Using this Document in an Upgrade ScenarioIf you are installing Oracle WebLogic Server and Coherence as part of an upgradeprocedure, follow procedures in this guide to install the software, but do not run theConfiguration Wizard to create a WebLogic domain.
After you install the software, go to Upgrading Oracle WebLogic Server.
1.1.3 Using this Document to Extend a DomainProcedures in this document describe how to create a new domain; you can use thesame procedures to extend an existing domain.
If you do this, be sure to read "Installing Multiple Products in the Same Domain" inPlanning an Installation of Oracle Fusion Middleware for important information.
If you are creating a new domain but your needs do not match the steps in aprocedure, be sure to make your selections accordingly and see the supportingdocumentation for more details.
1.1.4 Using Installation Documents for Development EnvironmentsThis guide describes how to use the Oracle WebLogic Server and Coherencedistribution to install and configure a runtime, production environment for OracleWebLogic Server.
Using this Document
1-2 Installing and Configuring Oracle WebLogic Server and Coherence
Oracle also has Oracle WebLogic Server development-only and supplemental installers:
• The quick installer is a a lightweight installer that contains all the necessary artifactsto develop and test Java applications. The quick installer is run directly from thecommand line. Installations performed with the quick installer can be patchedusing the standard Oracle patching tool, OPatch.
This version of Oracle WebLogic Server and the quick installer requires JDK 1.8version. Ensure that you have the proper JDK version installed and ready for usebefore starting.
The quick installer file name is fmw_12.2.1.1.0_wls_quick.jar
• The supplemental quick installer is a lightweight installer that contains all thenecessary artifacts to develop and test sample Java applications on OracleWebLogic Server.
The optional supplemental quick installer has components such as the sampleapplications, and Administration Console additional language help files.
The supplemental quick installer file name isfmw_12.2.1.1.0_wls_supplemental_quick.jar
To set up a development environment, see:
• Obtaining the Oracle WebLogic Server and Coherence Distribution to find thedevelopment installers. Word documents in the development kit includeinstructions to install and configure the development environment.
• "Overview of WebLogic Server Application Development" in DevelopingApplications for Oracle WebLogic Server for a complete list of what to keep in mindwhen you set up a development environment for Oracle WebLogic Server.
• "Oracle Fusion Middleware Installing JDeveloper" to install Oracle JDeveloper, anintegrated development environment (IDE) for building applications using thelatest Java, XML, Web services, and SQL standards.
1.2 About the WebLogic Server and Coherence Standard InstallationTopology
The standard installation topology has a standard WebLogic Server domain.
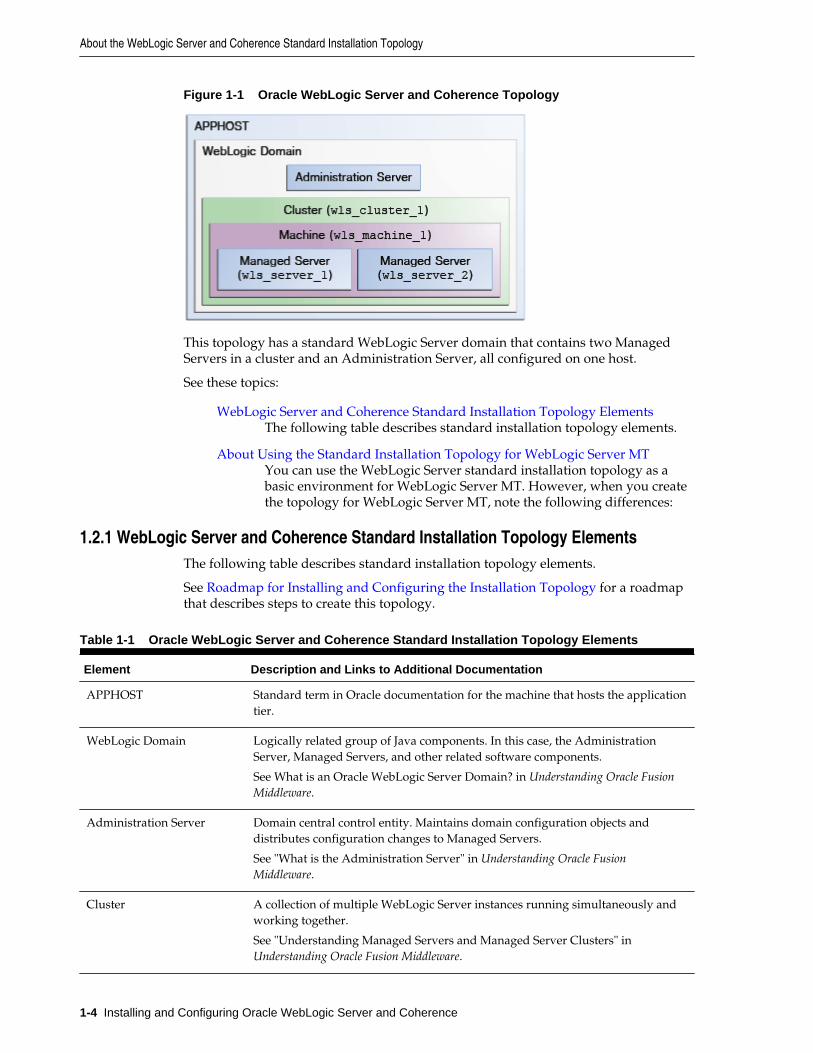
The following figure shows the standard installation topology for Oracle WebLogicServer and Coherence:
About the WebLogic Server and Coherence Standard Installation Topology
Planning the Oracle WebLogic Server Installation 1-3
Figure 1-1 Oracle WebLogic Server and Coherence Topology
This topology has a standard WebLogic Server domain that contains two ManagedServers in a cluster and an Administration Server, all configured on one host.
See these topics:
WebLogic Server and Coherence Standard Installation Topology ElementsThe following table describes standard installation topology elements.
About Using the Standard Installation Topology for WebLogic Server MTYou can use the WebLogic Server standard installation topology as abasic environment for WebLogic Server MT. However, when you createthe topology for WebLogic Server MT, note the following differences:
1.2.1 WebLogic Server and Coherence Standard Installation Topology ElementsThe following table describes standard installation topology elements.
See Roadmap for Installing and Configuring the Installation Topology for a roadmapthat describes steps to create this topology.
Table 1-1 Oracle WebLogic Server and Coherence Standard Installation Topology Elements
Element Description and Links to Additional Documentation
APPHOST Standard term in Oracle documentation for the machine that hosts the applicationtier.
WebLogic Domain Logically related group of Java components. In this case, the AdministrationServer, Managed Servers, and other related software components.
See What is an Oracle WebLogic Server Domain? in Understanding Oracle FusionMiddleware.
Administration Server Domain central control entity. Maintains domain configuration objects anddistributes configuration changes to Managed Servers.
See "What is the Administration Server" in Understanding Oracle FusionMiddleware.
Cluster A collection of multiple WebLogic Server instances running simultaneously andworking together.
See "Understanding Managed Servers and Managed Server Clusters" inUnderstanding Oracle Fusion Middleware.
About the WebLogic Server and Coherence Standard Installation Topology
1-4 Installing and Configuring Oracle WebLogic Server and Coherence
Table 1-1 (Cont.) Oracle WebLogic Server and Coherence Standard Installation Topology Elements
Element Description and Links to Additional Documentation
Machine Logical representation of the computer that hosts one or more WebLogic Serverinstances (servers). Machines are also the logical glue between Managed Serversand Node Manager; to start or stop a Managed Server with Node Manager, theManaged Server must be associated with a machine.
Managed Server Host for your applications, application components, Web services, and theirassociated resources.
See "Understanding Managed Servers and Managed Server Clusters" inUnderstanding Oracle Fusion Middleware.
1.2.2 About Using the Standard Installation Topology for WebLogic Server MTYou can use the WebLogic Server standard installation topology as a basicenvironment for WebLogic Server MT. However, when you create the topology forWebLogic Server MT, note the following differences:
• For WebLogic MT, you must use the Oracle Fusion Middleware Infrastructuredistribution instead of the WebLogic Server and Coherence distribution.
• When you configure a WebLogic MT domain, Oracle recommends that you selectthe Oracle Enterprise Manager Restricted JRF template instead of the Oracle JRFtemplate.
1.3 Running the Installer in Silent ModeYou can install using the -silent flag on the command line when you start theinstaller.
See the following topics in Installing Software with the Oracle Universal Installer fordetails on silent mode and the steps to run it.
• Understanding Silent Installation
• Understanding Response Files
• Running the Oracle Universal Installer in Silent Mode
• Running the Oracle Universal Installer for Silent Deinstallation
1.4 Roadmap for Installing and Configuring the Installation TopologyThis document has all the procedures you need to install and configure WebLogicServer. Within the procedures, this document refers to additional information you canuse if you want to create a modified version of this topology.
The following table shows steps required to install and configure Oracle WebLogicServer.
Running the Installer in Silent Mode
Planning the Oracle WebLogic Server Installation 1-5
Table 1-2 Oracle WebLogic Server and Coherence Installation Procedure
Task Description Documentation
Verify your system environment Before starting the installation,verify that your system meetsminimum system and networkrequirements.
Roadmap for Verifying YourSystem Environment
Obtain the appropriate distribution To create the topology this sectiondescribes, obtain the OracleWebLogic Server and Coherencedistribution.
Obtaining the Oracle WebLogicServer and Coherence Distribution.
Determine your installationdirectories
Verify that the installer can create oraccess installer directories that itneeds to create. Also, verify that thedirectories exist on systems thatmeet the minimum requirements.
What are the Key Oracle FusionMiddleware Directories? inUnderstanding Oracle FusionMiddleware.
Install the software Run the installation program toinstall the software.
Installing the Oracle WebLogicServer and Coherence Software
Create a WebLogic domain Use the Configuration Wizard tocreate a WebLogic domain.
Creating and Configuring theWebLogic Domain
Perform post-installation tasks Start to manage components in thedomain or continue to modify yourenvironment for high availability.
Next Steps After Configuring theWebLogic Server Domain
1.5 Roadmap for Installing and Configuring the WebLogic Server MTTopology
Follow this roadmap to install and configure the WebLogic Server MT distribution.
This document has all the procedures you need to install and configure WebLogicServer. Within the procedures, this document refers to additional information you canuse if you want to create a modified version of this topology.
The following table shows steps required to install and configure WebLogic Serve MT.
Table 1-3 WebLogic Server MT Installation Steps
Task Description Documentation
Verify your system environment Before starting the installation,verify that your system meetsminimum system and networkrequirements.
Roadmap for Verifying YourSystem Environment
Obtain the appropriate distribution To create the topology this sectiondescribes, obtain the WebLogicServer MT distribution.
Obtaining the Oracle WebLogicServer MT Distribution.
Roadmap for Installing and Configuring the WebLogic Server MT Topology
1-6 Installing and Configuring Oracle WebLogic Server and Coherence
Table 1-3 (Cont.) WebLogic Server MT Installation Steps
Task Description Documentation
Determine your installationdirectories
Verify that the installer can create oraccess installer directories that itneeds to create. Also, verify that thedirectories exist on systems thatmeet the minimum requirements.
What are the Key Oracle FusionMiddleware Directories? inUnderstanding Oracle FusionMiddleware.
Install the software Run the installation program toinstall the software.
Installing Oracle WebLogic Serverand Coherence for WebLogic ServerMT
Create a WebLogic domain Use the Configuration Wizard tocreate a WebLogic domain.
Creating a WebLogic Domain forWebLogic Server MT
Perform post-installation tasks Start to manage components in thedomain or continue to modify yourenvironment for high availability.
Next Steps After Configuring theWebLogic Server Domain
1.6 Roadmap for Verifying Your System EnvironmentThis topic has important information that you must read and understand before youbegin installation and configuration steps. It identifies important tasks and checks thatverify your environment is properly prepared to install and configure Oracle FusionMiddleware WebLogic Server and Coherence.
Table 1-4 Roadmap to Verify Your System Environment
Task Description Documentation
Verify certification andsystem requirements.
Verify that your operating system iscertified and properly configured forWebLogic Server and Coherence installationand configuration.
See "Verifying Certification, SystemRequirements and Interoperability"in Planning an Installation of OracleFusion Middleware.
Identify a properinstallation user.
Verify that the installation user has theproper permissions to install and configurethe software.
See "Selecting an Installation User"in Planning an Installation of OracleFusion Middleware.
Select the installation andconfiguration directories onyour system.
Verify that you can create the necessarydirectories for installation andconfiguration, according to therecommended directory structure.
See "Selecting Directories forInstallation and Configuration" inPlanning an Installation of OracleFusion Middleware.
Install a certified JDK. The installation program for the distributionrequires that your system have a certifiedJDK.
See "Installing a JDK" in Planning anInstallation of Oracle FusionMiddleware.
1.7 Obtaining the Oracle WebLogic Server and Coherence DistributionYou download the software from the Oracle Technology Network (OTN).
Roadmap for Verifying Your System Environment
Planning the Oracle WebLogic Server Installation 1-7
For complete information about how to obtain Oracle Fusion Middleware software,see "Understanding and Obtaining Product Distributions" in Planning an Installation ofOracle Fusion Middleware.
To download Oracle WebLogic Server and Coherence software for development orevaluation, go to the following location on OTN:
To obtain Oracle WebLogic Server and Coherence, go to OTN and follow these steps:
1. Find fmw_12.2.1.1.0_wls_Disk1_1of1.zip and download it to your system.
2. Extract the contents of this .zip file onto your system. The extracted filefmw_12.2.1.1.0_wls.jar runs the product installer and installs the softwareonto your system (Installing the Oracle WebLogic Server and Coherence Software).
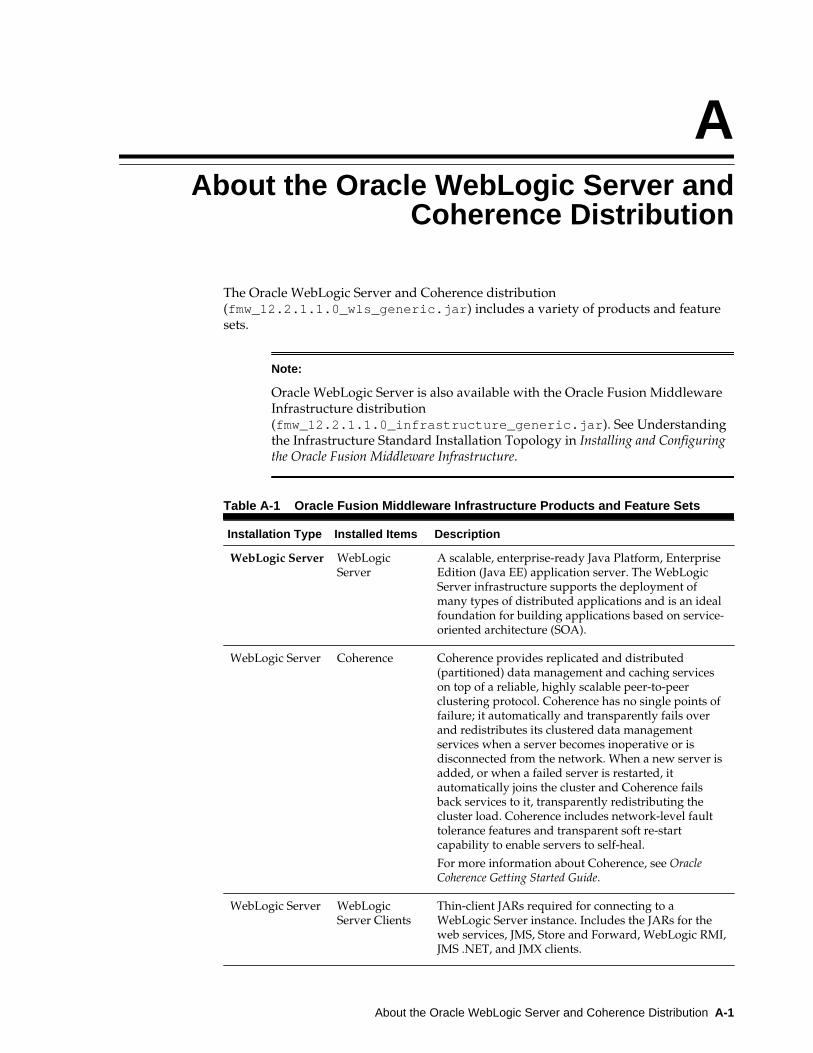
About the Oracle WebLogic Server and Coherence Distribution describes productsand feature sets in this distribution.
For more about obtaining Oracle Fusion Middleware products, see Oracle FusionMiddleware Download, Installation, and Configuration Readme Files on OTN.
1.8 Obtaining the Oracle WebLogic Server MT DistributionYou download the distribution from the Oracle Technology Network (OTN)
For complete information about how to obtain Oracle Fusion Middleware software,see "Understanding and Obtaining Product Distributions" in Planning an Installation ofOracle Fusion Middleware.
To download software for development or evaluation, go to the following OTNlocation :
To obtain WebLogic Server MT, go to OTN and follow these steps:
1. Find fmw_12.2.1.1.0_infrastructure_Disk1_1of1.zip and download itto your system.
2. Extract the .zip file contents onto your system. The extracted filefmw_12.2.1.1.0_infrastructure.jar runs the product installer and installsthe software onto your system (Installing the Oracle WebLogic Server andCoherence Software).
About the Oracle WebLogic Server and Coherence Distribution describes productsand feature sets in this distribution.
For more about locating and downloading Oracle Fusion Middleware products, see Oracle Fusion Middleware Download, Installation, and Configuration Readme Files on OTN.
Obtaining the Oracle WebLogic Server MT Distribution
1-8 Installing and Configuring Oracle WebLogic Server and Coherence
2Installing the Oracle WebLogic Server and
Coherence Software
This section describes how to start the Oracle WebLogic Server and Coherenceinstallation program in graphical mode and the sequence of screens during theinstallation process.
This section includes the following topics:
Starting the Installation ProgramYou launch the installation program from the JDK directory on yoursystem.
Navigating the Installation ScreensThe installation program shows a series of screens.
About the Coherence Installation TypeFor the WebLogic Server and Coherence standard installation topology,select the WebLogic Server installation type. When you select thisinstallation type and use instructions in this guide, the standardinstallation topology includes a Coherence cluster that contains storage-enabled Managed Coherence Servers.
2.1 Starting the Installation ProgramYou launch the installation program from the JDK directory on your system.
To start the installation program:
1. Log in to the target system.
2. Verify that a certified JDK already exists on your system; the installer requires acertified JDK. See Oracle Fusion Middleware Systems Requirements andSpecifications for more information. To download the JDK, see Understanding JDKRequirements for an Oracle Fusion Middleware Installation.
3. Go to the directory where you downloaded the installation program.
4. Launch the installation program by running java -jar from the JDK directory onyour system. See the following examples:
Installing the Oracle WebLogic Server and Coherence Software 2-1
Be sure to replace JDK location in these examples with the actual JDK location onyour system.
When the installation program opens, you are ready to begin the installation. Navigating the Installation Screens describes each screen.
2.2 Navigating the Installation ScreensThe installation program shows a series of screens.
The following table describes installation program screens in the order in which theyappear.
If you need more help with any installation screen, click the screen name.
Table 2-1 Oracle WebLogic Server and Coherence Installation Screens
Screen Description
Installation Inventory Setup On UNIX operating systems, this screen opens if thisis the first time you are installing any Oracle producton this host. Specify the location where you want tocreate your central inventory. Make sure that theoperating system group name selected on this screenhas write permissions to the central inventorylocation.
See "Understanding the Oracle Central Inventory" inInstalling Software with the Oracle Universal Installer.
This screen does not appear on Windows operatingsystems.
Auto Updates If you enable Auto Updates, the installer checks fornew versions of this software.
Keep the default setting Skip Auto Updates if youdo not want your system to check for softwareupdates at this time.
Select Select patches from directory to navigate to alocal directory if you downloaded patch files.
Select Search My Oracle Support for Updates toautomatically download software updates if youhave a My Oracle Support account. You must enterOracle Support credentials then click Search. Toconfigure a proxy server for the installer to accessMy Oracle Support, click Proxy Settings . Click TestConnection to test the connection.
Welcome This screen introduces you to the product installer.
Installation Location Use this screen to specify your Oracle homedirectory location.
For more on the directory structure, see "SelectingDirectories for Installation and Configuration" inPlanning an Installation of Oracle Fusion Middleware.
Navigating the Installation Screens
2-2 Installing and Configuring Oracle WebLogic Server and Coherence
Table 2-1 (Cont.) Oracle WebLogic Server and Coherence Installation Screens
Screen Description
Installation Type To create the standard installation topology forWebLogic Server and Coherence, select WebLogicServer.
NOTE: The topology in this document does notinclude server examples; Oracle stronglyrecommends that you do not install the examplesinto a production environment.
See About the Coherence Installation Type for moreon the Coherence installation type.
See About the Oracle WebLogic Server andCoherence Distribution for more on OracleWebLogic Server installation types.
Prerequisite Checks Verifies that your system meets the minimumnecessary requirements. If you see a warning orerror message, see one of the documents in Roadmap for Verifying Your System Environment.
Specify Security Updates If you already have an Oracle Support account, usethis screen to indicate how you would like to receivesecurity updates.
If you do not have one and are sure you want to skipthis step, clear the check box and verify yourselection in the follow-up dialog box.
Installation Summary Use this screen to verify the installation options youchose. Optional: To save these options to a responsefile, click Save Response File and enter the locationand file name. You can use response files later forsilent installations.
For more on silent or command line installation, see Running the Oracle Universal Installer in SilentMode in Installing Software with the Oracle UniversalInstaller.
Installation Progress Shows the installation progress.
Navigating the Installation Screens
Installing the Oracle WebLogic Server and Coherence Software 2-3
Table 2-1 (Cont.) Oracle WebLogic Server and Coherence Installation Screens
Screen Description
Installation Complete Opens when installation is complete. The next stepis launching the Configuration Wizard to create aWebLogic domain. There are two ways to do this:
• Select Automatically Launch the ConfigurationWizard. After you click Finish, theConfiguration Wizard starts and you configure adomain. To do this, see NavigatingConfiguration Wizard Screens to Configure theDomain.
• Do not select Automatically Launch theConfiguration Wizard on this screen. After youclick Finish, you must manually start theConfiguration Wizard to configure a domain. Todo this, see Starting the Configuration Wizard.
If you chose the Complete with Examplesinstallation type, you see an option to start the QuickStart Configuration Wizard, which you use to createsample domains. See "Quick Start ConfigurationWizard" in Creating WebLogic Domains Using theConfiguration Wizard.
2.3 About the Coherence Installation TypeFor the WebLogic Server and Coherence standard installation topology, select theWebLogic Server installation type. When you select this installation type and useinstructions in this guide, the standard installation topology includes a Coherencecluster that contains storage-enabled Managed Coherence Servers.
The Coherence Installation installation type is for users who want to deploy andmanage Coherence applications using the WebLogic Management Framework. Formore information, see the following:
• "Deploying Coherence Applications" in Administering Oracle Coherence.
• "What is the WebLogic Management Framework?" in Understanding Oracle FusionMiddleware.
About the Coherence Installation Type
2-4 Installing and Configuring Oracle WebLogic Server and Coherence
3Installing Oracle WebLogic Server and
Coherence for WebLogic Server MT
This section describes how to start the installation program in graphical mode and thesequence of screens during the installation process.
This section includes the following topics:
Starting WebLogic Server MT InstallationYou launch the installation program from the JDK directory on yoursystem.
Navigating WebLogic Server MT Installation ScreensThe installation program includes a series of screens.
3.1 Starting WebLogic Server MT InstallationYou launch the installation program from the JDK directory on your system.
To start the installation program, perform the following steps.
1. Log in to the target system.
2. Verify that a certified JDK already exists on your system. The installer requires acertified JDK. See the appropriate certification document for 12c (12.2.1.1) on the Oracle Fusion Middleware Supported System Configurations page.
3. Go to the directory where you downloaded the installation program.
4. Launch the installation program by running java -jar from the JDK directory onyour system. See the following examples:
Be sure to replace JDK location in these examples with the actual JDK location onyour system.
When the installation program opens, you are ready to begin the installation. Navigating the Installation Screens describes each screens.
3.2 Navigating WebLogic Server MT Installation ScreensThe installation program includes a series of screens.
Installing Oracle WebLogic Server and Coherence for WebLogic Server MT 3-1
The following table describes installation program screens in the order in which theyappear.
If you need more help with any installation screen, click the screen name.
Table 3-1 Oracle WebLogic Server MT Installation Screens
Screen Description
Installation Inventory Setup On UNIX operating systems, this screenopens if this is the first time you are installingany Oracle product on this host. Specify thelocation where you want to create yourcentral inventory. Make sure that theoperating system group name selected on thisscreen has write permissions to the centralinventory location.
See "Understanding the Oracle CentralInventory" in Installing Software with theOracle Universal Installer.
This screen does not appear on Windowsoperating systems.
Auto Updates If you enable Auto Updates, your systemperiodically checks for new versions of thissoftware. If your system finds a new version,the software prompts you for yourpermission to upgrade your installation.
Keep the default setting Skip Auto Updatesif you do not want your system to check forsoftware updates at this time.
Select Select patches from directory tonavigate to a local directory if youdownloaded patch files.
Select Search My Oracle Support forUpdates to automatically download softwareupdates if you have a My Oracle Supportaccount. You must enter Oracle Supportcredentials then click Search. To configure aproxy server for the installer to access MyOracle Support, click Proxy Settings . ClickTest Connection to test the connection.
Welcome This screen introduces you to the productinstaller.
Installation Location Use this screen to specify your Oracle homedirectory location.
For more on the directory structure, see "Selecting Directories for Installation andConfiguration" in Planning an Installation ofOracle Fusion Middleware.
Navigating WebLogic Server MT Installation Screens
3-2 Installing and Configuring Oracle WebLogic Server and Coherence
Table 3-1 (Cont.) Oracle WebLogic Server MT Installation Screens
Screen Description
Installation Type To create the standard installation topologyfor WebLogic Server and Coherence, selectWebLogic Server.
NOTE: The topology in this document doesnot include server examples; Oracle stronglyrecommends that you do not install theexamples into a production environment.
See About the Coherence Installation Typefor more on the Coherence installation type.
See About the Oracle WebLogic Server andCoherence Distribution for more on OracleWebLogic Server installation types.
Prerequisite Checks Verifies that your system meets the minimumnecessary requirements. If you see a warningor error message, see one of the documents in Roadmap for Verifying Your SystemEnvironment.
Specify Security Updates If you already have an Oracle Supportaccount, use this screen to indicate how youwould like to receive security updates.
If you do not have one and are sure you wantto skip this step, clear the check box andverify your selection in the follow-up dialogbox.
Installation Summary Use this screen to verify the installationoptions you chose. Optional: To save theseoptions to a response file, click SaveResponse File and enter the location and filename. You can use response files later forsilent installations.
For more on silent or command lineinstallation, see Using the Oracle UniversalInstaller in Silent Mode in Installing Softwarewith the Oracle Universal Installer.
Installation Progress Shows the installation progress.
Navigating WebLogic Server MT Installation Screens
Installing Oracle WebLogic Server and Coherence for WebLogic Server MT 3-3
Table 3-1 (Cont.) Oracle WebLogic Server MT Installation Screens
Screen Description
Installation Complete Opens when installation is complete. Thenext step is launching the ConfigurationWizard to create a WebLogic domain. Thereare two ways to do this:
• Select Automatically Launch theConfiguration Wizard. After you clickFinish, the Configuration Wizard startsand you configure a domain. To do this,see Navigating Configuration WizardScreens to Configure the Domain.
• Do not select Automatically Launch theConfiguration Wizard on this screen.After you click Finish, you mustmanually start the Configuration Wizardto configure a domain. To do this, see Starting the Configuration Wizard.
If you chose the Complete with Examplesinstallation type, you see an option to startthe Quick Start Configuration Wizard, whichyou use to create sample domains. See "QuickStart Configuration Wizard" in CreatingWebLogic Domains Using the ConfigurationWizard.
Navigating WebLogic Server MT Installation Screens
3-4 Installing and Configuring Oracle WebLogic Server and Coherence
4Creating and Configuring the WebLogic
Domain
This section describes how to create and configure the WebLogic Server domain afteryou successfully install WebLogic Server and Coherence software.
This section includes the following topics:
Configuring the WebLogic DomainUse the steps in this topic to create a WebLogic domain using theConfiguration Wizard.
Starting the ServersAfter you finish configuration, Oracle recommends that you take thefollowing steps to access tools that you use to manage your domain
Verifying the ConfigurationYou want to verify that your domain is configured properly.
4.1 Configuring the WebLogic DomainUse the steps in this topic to create a WebLogic domain using the ConfigurationWizard.
For other methods to create a domain, see "Additional Tools for Creating, Extending,and Managing WebLogic Domains" in Creating WebLogic Domains Using theConfiguration Wizard.
This section includes the following topics:
Starting the Configuration WizardTo begin domain configuration, navigate to the ORACLE_HOME/oracle_common/common/bin directory and start the ConfigurationWizard.
Navigating Configuration Wizard Screens to Configure the DomainFollow the sequence of topics this section to configure the domain withthe Configuration Wizard. You can also use this procedure to extend anexisting domain.
4.1.1 Starting the Configuration WizardTo begin domain configuration, navigate to the ORACLE_HOME/oracle_common/common/bin directory and start the Configuration Wizard.
On UNIX operating systems:
./config.sh
On Microsoft Windows operating systems:
Creating and Configuring the WebLogic Domain 4-1
.\config.cmd
4.1.2 Navigating Configuration Wizard Screens to Configure the DomainFollow the sequence of topics this section to configure the domain with theConfiguration Wizard. You can also use this procedure to extend an existing domain.
If your settings don't match those in the procedure, change your selections accordinglyor see supporting documentation for additional details.
To configure multiple products in a single domain, see "Installing Multiple Products inthe Same Domain" in Planning an Installation of Oracle Fusion Middleware.
Selecting the Domain Type and Domain Home LocationYou specify a Domain type and Domain home directory.
Selecting Configuration TemplatesYou select specific templates so that Managed Servers in the cluster willbe managed Coherence servers, and the cluster will be a managedCoherence cluster. This is a starting point to set up your Coherenceenvironment.
Configuring the Administrator AccountOn the Administrator Account screen, specify the user name andpassword for the default WebLogic Administrator account for thedomain.
Specifying the Domain Mode and JDKThere are differences between production mode and development mode.
Selecting Advanced ConfigurationTo complete domain configuration for the topology, select these optionson the Advanced Configuration screen:
Configuring the Administration Server Listen AddressOn the Administration Server screen, select the drop-down list next toListen Address and select the IP address on the host where theAdministration Server will reside.
Configuring Node ManagerUse the Node Manager screen to select the type of Node Manager youwant to configure, along with the Node Manager credentials.
Configuring Managed ServersUse the Managed Servers screen to create two new Managed Servers.
Configure a ClusterYou configure a cluster to group Managed Servers.
Assigning Managed Servers to the ClusterTo assign wls_server_1 and wls_server_2 to the new clusterwls_cluster_1, use the Assign Servers to Clusters screen.
Configuring Coherence ClustersUse the Coherence Clusters screen to configure the Coherence clusterthat is automatically added to the domain. Leave the default portnumber 0 as the Coherence cluster listen port.
Configuring the WebLogic Domain
4-2 Installing and Configuring Oracle WebLogic Server and Coherence
Creating a New MachineTo create a new machine in the domain, use the Machines screen. NodeManager requires a machine to be able to start and stop servers.
Assigning Servers to MachinesYou assign both Managed Servers to a machine.
Reviewing Your Configuration Specifications and Configuring the DomainThe Configuration Summary screen has detailed configurationinformation for the domain you are about to create. Review this screento verify that the information is correct.
Writing Down Your Domain Home and Administration Server URLThe Configuration Success screen shows two important items about thedomain you just configured.
4.1.2.1 Selecting the Domain Type and Domain Home LocationYou specify a Domain type and Domain home directory.
To specify the Domain type and Domain home directory:
1. On the Configuration Type screen, select Create a New Domain.
2. In the Domain Location field, specify your Domain home directory.
Oracle recommends that you locate your Domain home in accordance with thedirectory structure summarized in What are the Key Oracle Fusion MiddlewareDirectories? in Understanding Oracle Fusion Middleware, where the Domain home islocated outside the Oracle home directory. This directory structure helps you avoidissues when you upgrade or reinstall your software.
Tip:
For more information about the Domain home directory, see "Choosing aDomain Home" in Planning an Installation of Oracle Fusion Middleware.
For more information about reinstalling the software, see Reinstalling YourSoftware.
For more information about other options on this screen, see "ConfigurationType" in Creating WebLogic Domains Using the Configuration Wizard.
4.1.2.2 Selecting Configuration TemplatesYou select specific templates so that Managed Servers in the cluster will be managedCoherence servers, and the cluster will be a managed Coherence cluster. This is astarting point to set up your Coherence environment.
On the Templates screen select the following templates for configuration:
• Basic WebLogic Server Domain (selected by default)
• WebLogic Coherence Cluster Extension
For more detailed information and next steps, see Table 6-1.
Tip:
For more information about options on this screen, see Templates in CreatingWebLogic Domains Using the Configuration Wizard.
Configuring the WebLogic Domain
Creating and Configuring the WebLogic Domain 4-3
4.1.2.3 Configuring the Administrator AccountOn the Administrator Account screen, specify the user name and password for thedefault WebLogic Administrator account for the domain.
This account is used to boot and connect to the domain's Administration Server.
Tip:
You must make a note of the user name and password you choose to enterhere; you will need this in order to be able to start and access theAdministration Server.
4.1.2.4 Specifying the Domain Mode and JDKThere are differences between production mode and development mode.
On the Domain Mode and JDK screen:
• Select Production in the Domain Mode field.
• Select the Oracle Hotspot JDK in the JDK field.
Select Production Mode to give your environment a higher degree of security. Youneed to enter a user name and password to deploy applications and to start theAdministration Server.
Tip:
For details about options on this screen, including differences betweendevelopment mode and production mode, see Domain Mode and JDK inCreating WebLogic Domains Using the Configuration Wizard.
4.1.2.5 Selecting Advanced ConfigurationTo complete domain configuration for the topology, select these options on theAdvanced Configuration screen:
• Administration Server
Required to properly configure the Administration Server listen address.
• Node Manager
• Managed Servers, Clusters and Coherence
Required to configure the Managed Servers and cluster, and for configuring themachine and targeting Managed Servers to the machine.
Tip:
To configure dynamic clusters, see "Creating Dynamic Clusters" inAdministering Clusters for Oracle WebLogic Server.
4.1.2.6 Configuring the Administration Server Listen AddressOn the Administration Server screen, select the drop-down list next to Listen Addressand select the IP address on the host where the Administration Server will reside.
Do not use "All Local Addresses".
Configuring the WebLogic Domain
4-4 Installing and Configuring Oracle WebLogic Server and Coherence
4.1.2.7 Configuring Node ManagerUse the Node Manager screen to select the type of Node Manager you want toconfigure, along with the Node Manager credentials.
Select Per-Domain Default Location as the Node Manager type, then specify NodeManager credentials.
Tip:
See Node Manager in Creating WebLogic Domains Using the ConfigurationWizard for details about options on this screen.
See "Node Manager Overview" in Administering Node Manager for OracleWebLogic Server for details about the types of Node Manager.
4.1.2.8 Configuring Managed ServersUse the Managed Servers screen to create two new Managed Servers.
1. Click the Add button to create a new Managed Server.
2. Specify wls_server_1 in the Server name column.
3. In the Listen Address drop-down list, select the IP address of the host that theManaged Server will reside on. Do not use "All Local Addresses".
4. Repeat this process to create a second Managed Server named wls_server_2.
Configuring a second Managed Server is one of the steps needed to configure thestandard topology for high availability. If you are not creating a highly availableenvironment, then this step is optional.
For more on the high availability standard topology, see "Understanding theFusion Middleware Standard HA Topology" in the High Availability Guide.
For more on the next steps to prepare for high availability after your domain isconfigured, see Preparing Your Environment For High Availability.
The rest of this document uses the wls_server_1 and wls_server_2 server names;if you choose different names, be sure to substitute wls_server_1 andwls_server_2 with your server names.
Tip:
For more about options on this screen, see Managed Servers in CreatingWebLogic Domains Using the Configuration Wizard.
Configuring the WebLogic Domain
Creating and Configuring the WebLogic Domain 4-5
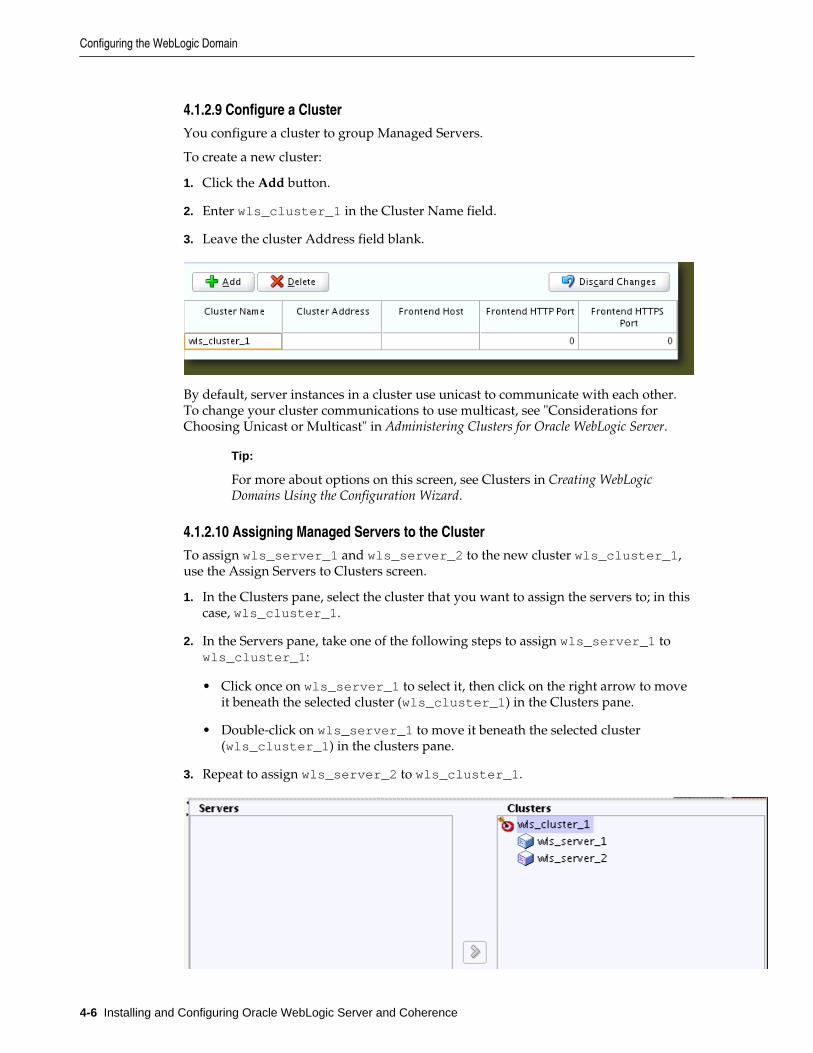
4.1.2.9 Configure a ClusterYou configure a cluster to group Managed Servers.
To create a new cluster:
1. Click the Add button.
2. Enter wls_cluster_1 in the Cluster Name field.
3. Leave the cluster Address field blank.
By default, server instances in a cluster use unicast to communicate with each other.To change your cluster communications to use multicast, see "Considerations forChoosing Unicast or Multicast" in Administering Clusters for Oracle WebLogic Server.
Tip:
For more about options on this screen, see Clusters in Creating WebLogicDomains Using the Configuration Wizard.
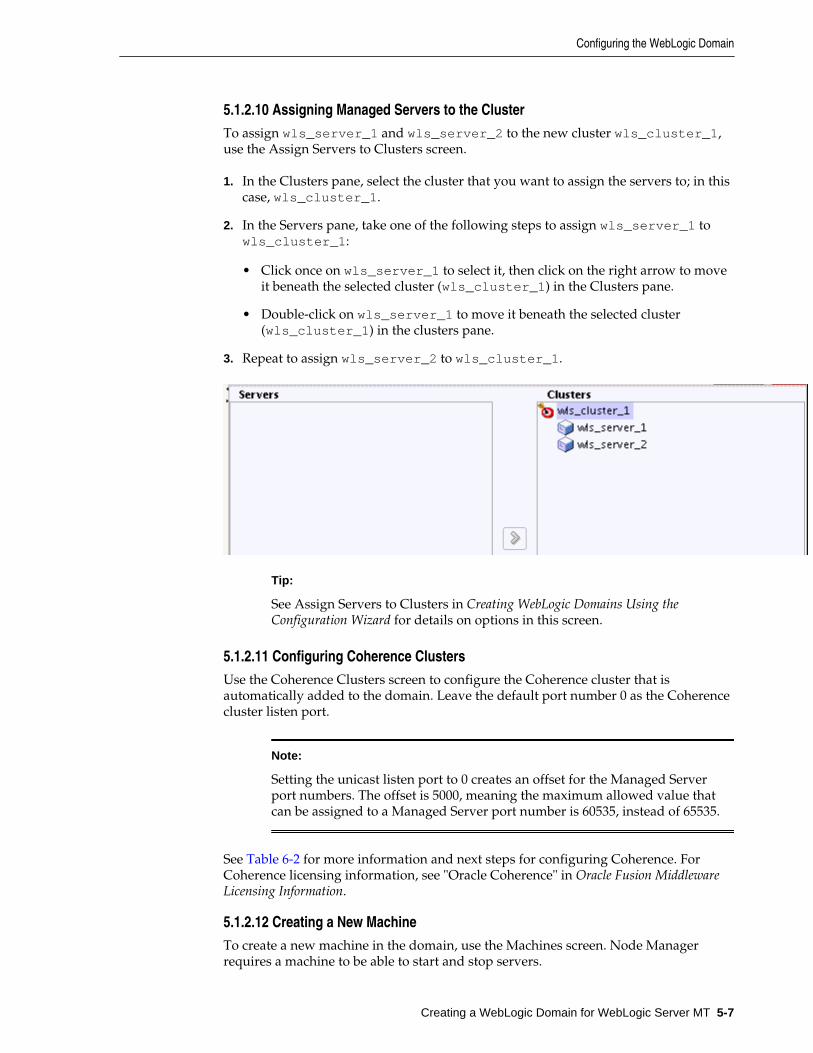
4.1.2.10 Assigning Managed Servers to the ClusterTo assign wls_server_1 and wls_server_2 to the new cluster wls_cluster_1,use the Assign Servers to Clusters screen.
1. In the Clusters pane, select the cluster that you want to assign the servers to; in thiscase, wls_cluster_1.
2. In the Servers pane, take one of the following steps to assign wls_server_1 towls_cluster_1:
• Click once on wls_server_1 to select it, then click on the right arrow to moveit beneath the selected cluster (wls_cluster_1) in the Clusters pane.
• Double-click on wls_server_1 to move it beneath the selected cluster(wls_cluster_1) in the clusters pane.
3. Repeat to assign wls_server_2 to wls_cluster_1.
Configuring the WebLogic Domain
4-6 Installing and Configuring Oracle WebLogic Server and Coherence
Tip:
See Assign Servers to Clusters in Creating WebLogic Domains Using theConfiguration Wizard for details on options in this screen.
4.1.2.11 Configuring Coherence ClustersUse the Coherence Clusters screen to configure the Coherence cluster that isautomatically added to the domain. Leave the default port number 0 as the Coherencecluster listen port.
Note:
Setting the unicast listen port to 0 creates an offset for the Managed Serverport numbers. The offset is 5000, meaning the maximum allowed value thatcan be assigned to a Managed Server port number is 60535, instead of 65535.
See Table 6-2 for more information and next steps for configuring Coherence. ForCoherence licensing information, see "Oracle Coherence" in Oracle Fusion MiddlewareLicensing Information.
4.1.2.12 Creating a New MachineTo create a new machine in the domain, use the Machines screen. Node Managerrequires a machine to be able to start and stop servers.
Tip:
If you plan to create a high availability environment and know the list ofmachines that your target topology requires, you can follow the steps in thistopic to create all machines at this time. For more information, see "OptionalScale Out Procedure" in High Availability Guide.
To create a new machine in the domain:
1. Click the Add button to create a new machine.
2. Specify wls_machine_1 in the Name field.
3. In the Node Manager Listen Address field, select the IP address of the machinewhere you are configuring Managed Servers.
You must select a specific interface and not "localhost." This allows Coherencecluster addresses to be dynamically calculated.
4. Verify the port in the Node Manager Listen Port field.
Other examples in the documentation may refer to the port number 5556. Replacethis port number with your own port number as needed.
Note:
If you extend an existing domain, you can assign servers to any existingmachine. It is not necessary to create a new machine unless your situationrequires it.
Configuring the WebLogic Domain
Creating and Configuring the WebLogic Domain 4-7
Tip:
See "Machines" in Creating WebLogic Domains Using the Configuration Wizard formore about this screen.
If you plan to create a high availability environment and know the list ofmachines required for your target topology, you can create all machines at thistime. For more information, see "Optional Scale Out Procedure" in HighAvailability Guide.
4.1.2.13 Assigning Servers to MachinesYou assign both Managed Servers to a machine.
To assign the Administration Server and Managed Servers to the new machine youjust created:
1. In the Machines pane, select the machine you want to assign the servers to; in thiscase, wls_machine_1.
2. In the Servers pane, assign AdminServer to wls_machine_1 by doing one ofthe following:
• Click once on AdminServer to select it, then click on the right arrow to moveit beneath the selected machine (wls_machine_1) in the Machines pane.
• Double-click on AdminServer to move it beneath the selected machine(wls_machine_1) in the Machines pane.
3. Repeat to assign both wls_server_1 and wls_server_2 to wls_machine_1.
Tip:
See Assign Servers to Machines in Creating WebLogic Domains Using theConfiguration Wizard for more on options on this screen.
Configuring the WebLogic Domain
4-8 Installing and Configuring Oracle WebLogic Server and Coherence
4.1.2.14 Reviewing Your Configuration Specifications and Configuring the DomainThe Configuration Summary screen has detailed configuration information for thedomain you are about to create. Review this screen to verify that the information iscorrect.
To make any changes, go back to a screen by using the Back button or selecting thescreen in the navigation pane.
Domain creation does not start until you click Create.
Tip:
See Configuration Summary in Creating WebLogic Domains Using theConfiguration Wizard for more on options in this screen.
4.1.2.15 Writing Down Your Domain Home and Administration Server URLThe Configuration Success screen shows two important items about the domain youjust configured.
The Configuration Success screen shows:
• Domain Location
• Administration Server URL
You must make a note of both items; you need them to start the servers and access theAdministration Server.
Click Finish to dismiss the Configuration Wizard.
4.2 Starting the ServersAfter you finish configuration, Oracle recommends that you take the following stepsto access tools that you use to manage your domain
Starting the Node ManagerTo start your per-domain Node Manager, go to the DOMAIN_HOME/bindirectory.
Starting the Administration ServerTo start the Administration Server, go the DOMAIN_HOME/bin directory.
Starting Managed ServersTo start Managed Servers, go the DOMAIN_HOME/bin directory and runthe command:
Starting the Servers
Creating and Configuring the WebLogic Domain 4-9
4.2.1 Starting the Node ManagerTo start your per-domain Node Manager, go to the DOMAIN_HOME/bin directory.
On UNIX operating systems, start Node Manager as shown below, using nohup andnm.out as an example output file:
nohup ./startNodeManager.sh > nm.out&
On Windows operating systems, run:
startNodeManager.cmd
Note:
If you use Windows, Oracle recommends that you install Node Manager torun as a startup service. This allows Node Manager to start up automaticallyeach time the system is restarted. (Node Manager is not required to startservers, Oracle recommends it over other methods.)
For more information, see "Running Node Manager as a Startup Service" inAdministering Node Manager for Oracle WebLogic Server.
4.2.2 Starting the Administration ServerTo start the Administration Server, go the DOMAIN_HOME/bin directory.
On UNIX operating systems, run:
./startWebLogic.sh
On Windows operating systems, run:
startWebLogic.cmd
If you selected Production Mode on the Domain Mode and JDK screen in Specifyingthe Domain Mode and JDK, you see a prompt for Administrator login credentials,shown on the Administrator Account screen in Configuring the AdministratorAccount.
Tip:
For more about starting the Administration Server, see "Starting and StoppingServers" in Administering Server Startup and Shutdown for Oracle WebLogicServer.
In production mode, you can create a boot identity file to bypass the need toprovide a user name and password when starting the Administration Server.For more information, see "Creating a Boot Identity File for an AdministrationServer" in Administering Server Startup and Shutdown for Oracle WebLogic Server.
4.2.3 Starting Managed ServersTo start Managed Servers, go the DOMAIN_HOME/bin directory and run thecommand:
Replace managed_server_name with the names of Managed Server you want tostart. For this topology, Managed Server names are wls_server_1 andwls_server_2 (defined on the Managed Server screen in Configuring ManagedServers). You must run this command twice, once for each Managed Server.
Replace admin_server_url with the Administration Server's full URL, as shown inthe Configuration Success screen in Reviewing Your Configuration Specifications andConfiguring the Domain.
The following examples show commands to start wls_server_1 andwls_server_2 on a UNIX operating system:
For more on starting Managed Servers, see "Starting and Stopping Servers" inAdministering Server Startup and Shutdown for Oracle WebLogic Server.
4.3 Verifying the ConfigurationYou want to verify that your domain is configured properly.
To verify configuration, see Performing Basic Administrative Tasks. Oraclerecommends that you familiarize yourself with the tasks that this section describesand perform them to verify that your domain is properly configured.
Verifying the Configuration
Creating and Configuring the WebLogic Domain 4-11
Verifying the Configuration
4-12 Installing and Configuring Oracle WebLogic Server and Coherence
5Creating a WebLogic Domain for WebLogic
Server MT
This section explains how to configure a domain for use with WebLogic Server MT.
This section includes the following topics:
Configuring the WebLogic DomainUse the steps in this topic to create a WebLogic domain using theConfiguration Wizard.
Starting the ServersAfter you finish configuration, Oracle recommends that you take thefollowing steps to access tools that you use to manage your domain
Verifying the ConfigurationYou want to verify that your domain is configured properly.
5.1 Configuring the WebLogic DomainUse the steps in this topic to create a WebLogic domain using the ConfigurationWizard.
For other methods to create a domain, see "Additional Tools for Creating, Extending,and Managing WebLogic Domains" in Creating WebLogic Domains Using theConfiguration Wizard.
This section includes the following topics:
Starting the Configuration WizardTo begin domain configuration, navigate to the ORACLE_HOME/oracle_common/common/bin directory and start the ConfigurationWizard.
Navigating Configuration Wizard Screens to Configure the DomainFollow the sequence of topics this section to configure the domain withthe Configuration Wizard. You can also use this procedure to extend anexisting domain.
5.1.1 Starting the Configuration WizardTo begin domain configuration, navigate to the ORACLE_HOME/oracle_common/common/bin directory and start the Configuration Wizard.
On UNIX operating systems:
./config.sh
On Microsoft Windows operating systems:
.\config.cmd
Creating a WebLogic Domain for WebLogic Server MT 5-1
5.1.2 Navigating Configuration Wizard Screens to Configure the DomainFollow the sequence of topics this section to configure the domain with theConfiguration Wizard. You can also use this procedure to extend an existing domain.
If your settings don't match those in the procedure, change your selections accordinglyor see supporting documentation for additional details.
To configure multiple products in a single domain, see "Installing Multiple Products inthe Same Domain" in Planning an Installation of Oracle Fusion Middleware.
Selecting the Domain Type and Domain Home LocationYou specify a Domain type and Domain home directory.
Selecting Configuration Templates for a WebLogic Server MT DomainOn the Templates screen, you select specific templates for a WebLogicServer MT domain.
Configuring the Administrator AccountOn the Administrator Account screen, specify the user name andpassword for the default WebLogic Administrator account for thedomain.
Specifying the Domain Mode and JDKThere are differences between production mode and development mode.
Selecting Advanced ConfigurationTo complete domain configuration for the topology, select these optionson the Advanced Configuration screen:
Configuring the Administration Server Listen AddressOn the Administration Server screen, select the drop-down list next toListen Address and select the IP address on the host where theAdministration Server will reside.
Configuring Node ManagerUse the Node Manager screen to select the type of Node Manager youwant to configure, along with the Node Manager credentials.
Configuring Managed ServersUse the Managed Servers screen to create two new Managed Servers.
Configure a ClusterYou configure a cluster to group Managed Servers.
Assigning Managed Servers to the ClusterTo assign wls_server_1 and wls_server_2 to the new clusterwls_cluster_1, use the Assign Servers to Clusters screen.
Configuring Coherence ClustersUse the Coherence Clusters screen to configure the Coherence clusterthat is automatically added to the domain. Leave the default portnumber 0 as the Coherence cluster listen port.
Creating a New MachineTo create a new machine in the domain, use the Machines screen. NodeManager requires a machine to be able to start and stop servers.
Configuring the WebLogic Domain
5-2 Installing and Configuring Oracle WebLogic Server and Coherence
Assigning Servers to MachinesYou assign both Managed Servers to a machine.
Virtual TargetsIf you have a WebLogic Server Multitenant (MT) environment, you usethe Virtual Targets screen to add or delete virtual targets. For thisinstallation (not a WebLogic Server MT environment), you do not enterany values; just select Next.
PartitionsThe Partitions screen is used to configure partitions for virtual targets inWebLogic Server Multitenant (MT) environments. Select Next withoutselecting any options.
Reviewing Your Configuration Specifications and Configuring the DomainThe Configuration Summary screen has detailed configurationinformation for the domain you are about to create. Review this screento verify that the information is correct.
Writing Down Your Domain Home and Administration Server URLThe Configuration Success screen shows two important items about thedomain you just configured.
5.1.2.1 Selecting the Domain Type and Domain Home LocationYou specify a Domain type and Domain home directory.
To specify the Domain type and Domain home directory:
1. On the Configuration Type screen, select Create a New Domain.
2. In the Domain Location field, specify your Domain home directory.
Oracle recommends that you locate your Domain home in accordance with thedirectory structure summarized in What are the Key Oracle Fusion MiddlewareDirectories? in Understanding Oracle Fusion Middleware, where the Domain home islocated outside the Oracle home directory. This directory structure helps you avoidissues when you upgrade or reinstall your software.
Tip:
For more information about the Domain home directory, see "Choosing aDomain Home" in Planning an Installation of Oracle Fusion Middleware.
For more information about reinstalling the software, see Reinstalling YourSoftware.
For more information about other options on this screen, see "ConfigurationType" in Creating WebLogic Domains Using the Configuration Wizard.
5.1.2.2 Selecting Configuration Templates for a WebLogic Server MT DomainOn the Templates screen, you select specific templates for a WebLogic Server MTdomain.
Select the following templates for a WebLogic Server MT domain:
• Basic WebLogic Server Domain (selected by default)
Configuring the WebLogic Domain
Creating a WebLogic Domain for WebLogic Server MT 5-3
• Oracle Enterprise Manager-Restricted JRF Oracle recommends that you select thistemplate for a WebLogic Server MT installation, instead of the Oracle JRF template.Selecting this template selects the Oracle Restricted JRF template automatically.
• Oracle Restricted JRF (Selected by default when you select the Oracle EnterpriseManager-Restricted JRF template.)
• WebLogic Coherence Cluster Extension
(Selected by default.) This template makes Managed Servers in the cluster managedCoherence servers, and makes the cluster a managed Coherence cluster. This is astarting point to set up a Coherence environment. For more information and nextsteps, see Next Steps After Configuring the WebLogic Server Domain.
Note:
This topic describes how to apply templates for WLS MT using theConfiguration Wizard. However, if you use WLST to create managed servers(configured or dynamic), the JRF template does not apply automatically. Whenyou use the Fusion Middleware Console to monitor the domain, monitoringdoes not work for the servers without the JRF template. See ConfiguringWebLogic Server MT: The Big Picture in Oracle Fusion Middleware UsingWebLogic Server MT.
Tip:
For more information about options on this screen, see Templates in CreatingWebLogic Domains Using the Configuration Wizard.
5.1.2.3 Configuring the Administrator AccountOn the Administrator Account screen, specify the user name and password for thedefault WebLogic Administrator account for the domain.
This account is used to boot and connect to the domain's Administration Server.
Tip:
You must make a note of the user name and password you choose to enterhere; you will need this in order to be able to start and access theAdministration Server.
5.1.2.4 Specifying the Domain Mode and JDKThere are differences between production mode and development mode.
On the Domain Mode and JDK screen:
• Select Production in the Domain Mode field.
• Select the Oracle Hotspot JDK in the JDK field.
Select Production Mode to give your environment a higher degree of security. Youneed to enter a user name and password to deploy applications and to start theAdministration Server.
Tip:
Configuring the WebLogic Domain
5-4 Installing and Configuring Oracle WebLogic Server and Coherence
For details about options on this screen, including differences betweendevelopment mode and production mode, see Domain Mode and JDK inCreating WebLogic Domains Using the Configuration Wizard.
5.1.2.5 Selecting Advanced ConfigurationTo complete domain configuration for the topology, select these options on theAdvanced Configuration screen:
• Administration Server
Required to properly configure the Administration Server listen address.
• Node Manager
• Managed Servers, Clusters and Coherence
Required to configure the Managed Servers and cluster, and for configuring themachine and targeting Managed Servers to the machine.
Tip:
To configure dynamic clusters, see "Creating Dynamic Clusters" inAdministering Clusters for Oracle WebLogic Server.
5.1.2.6 Configuring the Administration Server Listen AddressOn the Administration Server screen, select the drop-down list next to Listen Addressand select the IP address on the host where the Administration Server will reside.
Do not use "All Local Addresses".
5.1.2.7 Configuring Node ManagerUse the Node Manager screen to select the type of Node Manager you want toconfigure, along with the Node Manager credentials.
Select Per-Domain Default Location as the Node Manager type, then specify NodeManager credentials.
Tip:
See Node Manager in Creating WebLogic Domains Using the ConfigurationWizard for details about options on this screen.
See "Node Manager Overview" in Administering Node Manager for OracleWebLogic Server for details about the types of Node Manager.
5.1.2.8 Configuring Managed ServersUse the Managed Servers screen to create two new Managed Servers.
1. Click the Add button to create a new Managed Server.
2. Specify wls_server_1 in the Server name column.
3. In the Listen Address drop-down list, select the IP address of the host that theManaged Server will reside on. Do not use "All Local Addresses".
4. Repeat this process to create a second Managed Server named wls_server_2.
Configuring the WebLogic Domain
Creating a WebLogic Domain for WebLogic Server MT 5-5
Configuring a second Managed Server is one of the steps needed to configure thestandard topology for high availability. If you are not creating a highly availableenvironment, then this step is optional.
For more on the high availability standard topology, see "Understanding theFusion Middleware Standard HA Topology" in the High Availability Guide.
For more on the next steps to prepare for high availability after your domain isconfigured, see Preparing Your Environment For High Availability.
The rest of this document uses the wls_server_1 and wls_server_2 server names;if you choose different names, be sure to substitute wls_server_1 andwls_server_2 with your server names.
Tip:
For more about options on this screen, see Managed Servers in CreatingWebLogic Domains Using the Configuration Wizard.
5.1.2.9 Configure a ClusterYou configure a cluster to group Managed Servers.
To create a new cluster:
1. Click the Add button.
2. Enter wls_cluster_1 in the Cluster Name field.
3. Leave the cluster Address field blank.
By default, server instances in a cluster use unicast to communicate with each other.To change your cluster communications to use multicast, see "Considerations forChoosing Unicast or Multicast" in Administering Clusters for Oracle WebLogic Server.
Tip:
For more about options on this screen, see Clusters in Creating WebLogicDomains Using the Configuration Wizard.
Configuring the WebLogic Domain
5-6 Installing and Configuring Oracle WebLogic Server and Coherence
5.1.2.10 Assigning Managed Servers to the ClusterTo assign wls_server_1 and wls_server_2 to the new cluster wls_cluster_1,use the Assign Servers to Clusters screen.
1. In the Clusters pane, select the cluster that you want to assign the servers to; in thiscase, wls_cluster_1.
2. In the Servers pane, take one of the following steps to assign wls_server_1 towls_cluster_1:
• Click once on wls_server_1 to select it, then click on the right arrow to moveit beneath the selected cluster (wls_cluster_1) in the Clusters pane.
• Double-click on wls_server_1 to move it beneath the selected cluster(wls_cluster_1) in the clusters pane.
3. Repeat to assign wls_server_2 to wls_cluster_1.
Tip:
See Assign Servers to Clusters in Creating WebLogic Domains Using theConfiguration Wizard for details on options in this screen.
5.1.2.11 Configuring Coherence ClustersUse the Coherence Clusters screen to configure the Coherence cluster that isautomatically added to the domain. Leave the default port number 0 as the Coherencecluster listen port.
Note:
Setting the unicast listen port to 0 creates an offset for the Managed Serverport numbers. The offset is 5000, meaning the maximum allowed value thatcan be assigned to a Managed Server port number is 60535, instead of 65535.
See Table 6-2 for more information and next steps for configuring Coherence. ForCoherence licensing information, see "Oracle Coherence" in Oracle Fusion MiddlewareLicensing Information.
5.1.2.12 Creating a New MachineTo create a new machine in the domain, use the Machines screen. Node Managerrequires a machine to be able to start and stop servers.
Configuring the WebLogic Domain
Creating a WebLogic Domain for WebLogic Server MT 5-7
Tip:
If you plan to create a high availability environment and know the list ofmachines that your target topology requires, you can follow the steps in thistopic to create all machines at this time. For more information, see "OptionalScale Out Procedure" in High Availability Guide.
To create a new machine in the domain:
1. Click the Add button to create a new machine.
2. Specify wls_machine_1 in the Name field.
3. In the Node Manager Listen Address field, select the IP address of the machinewhere you are configuring Managed Servers.
You must select a specific interface and not "localhost." This allows Coherencecluster addresses to be dynamically calculated.
4. Verify the port in the Node Manager Listen Port field.
Other examples in the documentation may refer to the port number 5556. Replacethis port number with your own port number as needed.
Note:
If you extend an existing domain, you can assign servers to any existingmachine. It is not necessary to create a new machine unless your situationrequires it.
Tip:
See "Machines" in Creating WebLogic Domains Using the Configuration Wizard formore about this screen.
If you plan to create a high availability environment and know the list ofmachines required for your target topology, you can create all machines at thistime. For more information, see "Optional Scale Out Procedure" in HighAvailability Guide.
5.1.2.13 Assigning Servers to MachinesYou assign both Managed Servers to a machine.
To assign the Administration Server and Managed Servers to the new machine youjust created:
1. In the Machines pane, select the machine you want to assign the servers to; in thiscase, wls_machine_1.
Configuring the WebLogic Domain
5-8 Installing and Configuring Oracle WebLogic Server and Coherence
2. In the Servers pane, assign AdminServer to wls_machine_1 by doing one ofthe following:
• Click once on AdminServer to select it, then click on the right arrow to moveit beneath the selected machine (wls_machine_1) in the Machines pane.
• Double-click on AdminServer to move it beneath the selected machine(wls_machine_1) in the Machines pane.
3. Repeat to assign both wls_server_1 and wls_server_2 to wls_machine_1.
Tip:
See Assign Servers to Machines in Creating WebLogic Domains Using theConfiguration Wizard for more on options on this screen.
5.1.2.14 Virtual TargetsIf you have a WebLogic Server Multitenant (MT) environment, you use the VirtualTargets screen to add or delete virtual targets. For this installation (not a WebLogicServer MT environment), you do not enter any values; just select Next.
For more information on Virtual Targets, see Assign Virtual Targets to Partitions inCreating WebLogic Domains Using the Configuration Wizard.
5.1.2.15 PartitionsThe Partitions screen is used to configure partitions for virtual targets in WebLogicServer Multitenant (MT) environments. Select Next without selecting any options.
For more information on the Partitions screen, see Partitions in Creating WebLogicDomains Using the Configuration Wizard.
5.1.2.16 Reviewing Your Configuration Specifications and Configuring the DomainThe Configuration Summary screen has detailed configuration information for thedomain you are about to create. Review this screen to verify that the information iscorrect.
To make any changes, go back to a screen by using the Back button or selecting thescreen in the navigation pane.
Domain creation does not start until you click Create.
Tip:
See Configuration Summary in Creating WebLogic Domains Using theConfiguration Wizard for more on options in this screen.
Configuring the WebLogic Domain
Creating a WebLogic Domain for WebLogic Server MT 5-9
5.1.2.17 Writing Down Your Domain Home and Administration Server URLThe Configuration Success screen shows two important items about the domain youjust configured.
The Configuration Success screen shows:
• Domain Location
• Administration Server URL
You must make a note of both items; you need them to start the servers and access theAdministration Server.
Click Finish to dismiss the Configuration Wizard.
5.2 Starting the ServersAfter you finish configuration, Oracle recommends that you take the following stepsto access tools that you use to manage your domain
Starting the Node ManagerTo start your per-domain Node Manager, go to the DOMAIN_HOME/bindirectory.
Starting the Administration ServerTo start the Administration Server, go the DOMAIN_HOME/bin directory.
Starting Managed ServersTo start Managed Servers, go the DOMAIN_HOME/bin directory and runthe command:
5.2.1 Starting the Node ManagerTo start your per-domain Node Manager, go to the DOMAIN_HOME/bin directory.
On UNIX operating systems, start Node Manager as shown below, using nohup andnm.out as an example output file:
nohup ./startNodeManager.sh > nm.out&
On Windows operating systems, run:
startNodeManager.cmd
Note:
If you use Windows, Oracle recommends that you install Node Manager torun as a startup service. This allows Node Manager to start up automatically
Starting the Servers
5-10 Installing and Configuring Oracle WebLogic Server and Coherence
each time the system is restarted. (Node Manager is not required to startservers, Oracle recommends it over other methods.)
For more information, see "Running Node Manager as a Startup Service" inAdministering Node Manager for Oracle WebLogic Server.
5.2.2 Starting the Administration ServerTo start the Administration Server, go the DOMAIN_HOME/bin directory.
On UNIX operating systems, run:
./startWebLogic.sh
On Windows operating systems, run:
startWebLogic.cmd
If you selected Production Mode on the Domain Mode and JDK screen in Specifyingthe Domain Mode and JDK, you see a prompt for Administrator login credentials,shown on the Administrator Account screen in Configuring the AdministratorAccount.
Tip:
For more about starting the Administration Server, see "Starting and StoppingServers" in Administering Server Startup and Shutdown for Oracle WebLogicServer.
In production mode, you can create a boot identity file to bypass the need toprovide a user name and password when starting the Administration Server.For more information, see "Creating a Boot Identity File for an AdministrationServer" in Administering Server Startup and Shutdown for Oracle WebLogic Server.
5.2.3 Starting Managed ServersTo start Managed Servers, go the DOMAIN_HOME/bin directory and run thecommand:
Replace managed_server_name with the names of Managed Server you want tostart. For this topology, Managed Server names are wls_server_1 andwls_server_2 (defined on the Managed Server screen in Configuring ManagedServers). You must run this command twice, once for each Managed Server.
Replace admin_server_url with the Administration Server's full URL, as shown inthe Configuration Success screen in Reviewing Your Configuration Specifications andConfiguring the Domain.
The following examples show commands to start wls_server_1 andwls_server_2 on a UNIX operating system:
Creating a WebLogic Domain for WebLogic Server MT 5-11
Tip:
For more on starting Managed Servers, see "Starting and Stopping Servers" inAdministering Server Startup and Shutdown for Oracle WebLogic Server.
5.3 Verifying the ConfigurationYou want to verify that your domain is configured properly.
To verify configuration, see Performing Basic Administrative Tasks. Oraclerecommends that you familiarize yourself with the tasks that this section describesand perform them to verify that your domain is properly configured.
Verifying the Configuration
5-12 Installing and Configuring Oracle WebLogic Server and Coherence
6Next Steps After Configuring the WebLogic
Server Domain
This section describes common tasks you might want to perform on the newly createdWebLogic Server domain.
This section includes the following topics:
Performing Basic Administrative TasksThere are common administration tasks you will likely want to performon your newly created domain.
Performing Additional Domain Configuration TasksThere are additional tasks that you probably want to perform on yournewly created domain.
Performing Domain Configuration Tasks for WebLogic Server MTThere are additional tasks you probably want to perform on your newlycreated domain.
Preparing Your Environment For High AvailabilityThere are tasks you must perform to scale out your standard installationenvironment for high availability.
6.1 Performing Basic Administrative TasksThere are common administration tasks you will likely want to perform on yournewly created domain.
Table 6-1 Basic Administration Tasks for a New Domain
Learn recommended diagnostic andtroubleshooting procedures for OracleFusion Middleware.
"Monitoring, Diagnosing, andTroubleshooting" in UnderstandingOracle WebLogic Server.
Next Steps After Configuring the WebLogic Server Domain 6-1
6.2 Performing Additional Domain Configuration TasksThere are additional tasks that you probably want to perform on your newly createddomain.
Table 6-2 Additional Domain Configuration Tasks
Task Description More Information
Deploying applications Learn how to deploy your applications toWebLogic Server.
Deploying Applications inWebLogic Server in UnderstandingOracle WebLogic Server.
Adding a Web Tier front-endto your domain
Oracle Web Tier hosts Web pages (staticand dynamic), provides security and highperformance along with built-in clustering,load balancing, and failover features.
In particular, the Web Tier can containOracle HTTP Server instances.
If you are configuring Oracle WebLogicServer for multitenancy, install andconfigure Oracle Traffic Director in the Webtier.
See the steps to install andconfigure a standalone OracleHTTP Server in Installing andConfiguring Oracle HTTP Server.
Also see "Installing MultipleProducts in the Same Domain" inPlanning an Installation of OracleFusion Middleware for importantinformation.
Tuning and configuringCoherence for yourtopology.
A standard installation topology includes aCoherence cluster that contains storage-enabled Managed Coherence Servers. Thissetup is a good starting point to useCoherence, but depending upon yourspecific requirements, consider tuning andreconfiguring Coherence to improveperformance in a production environment.
For more on Coherence clusters,see "Configuring and ManagingCoherence Clusters" inAdministering Clusters for OracleWebLogic Server.
To tune Coherence, see Administering Oracle Coherence.
To store HTTP session data inCoherence, see "Using CoherenceWeb with WebLogic Server" inAdministering HTTP SessionManagement with OracleCoherence*Web.
To create and deploy Coherenceapplications, see Developing OracleCoherence Applications for OracleWebLogic Server.
6.3 Performing Domain Configuration Tasks for WebLogic Server MTThere are additional tasks you probably want to perform on your newly createddomain.
Table 6-3 Additional Domain Configuration Tasks
Task Description More Information
Deploying applications Learn how to deploy your applications toWebLogic Server.
Deploying Applications inWebLogic Server in UnderstandingOracle WebLogic Server.
Performing Additional Domain Configuration Tasks
6-2 Installing and Configuring Oracle WebLogic Server and Coherence
Oracle Web Tier hosts Web pages (staticand dynamic), provides security and highperformance along with built-in clustering,load balancing, and failover features.
If you are configuring WebLogic Server MT,install and configure Oracle Traffic Directorin the Web Tier.
Adding Oracle Traffic Director as aWebLogic Server MT FrontEndConfiguring Oracle TrafficDirector in WebLogic Server MTAlso see "Installing MultipleProducts in the Same Domain" inPlanning an Installation of OracleFusion Middleware for importantinformation.
Tuning and configuringCoherence for yourtopology.
A standard installation topology includes aCoherence cluster that contains storage-enabled Managed Coherence Servers. Thissetup is a good starting point to useCoherence, but depending upon yourspecific requirements, consider tuning andreconfiguring Coherence to improveperformance in a production environment.
For more on Coherence clusters,see "Configuring and ManagingCoherence Clusters" inAdministering Clusters for OracleWebLogic Server.
To tune Coherence, see Administering Oracle Coherence.
To store HTTP session data inCoherence, see "Using CoherenceWeb with WebLogic Server" inAdministering HTTP SessionManagement with OracleCoherence*Web.
To create and deploy Coherenceapplications, see Developing OracleCoherence Applications for OracleWebLogic Server.
Adding Oracle Traffic Director as a WebLogic Server MT Front EndIf you are configuring WebLogic Server MT, install and configure OracleTraffic Director in the Web tier. Oracle Traffic Director (OTD) is asoftware load balancer for load balancing HTTP/S and TCP traffic toservers in the back-end.
Configuring Oracle Traffic Director in WebLogic Server MTAfter you install Oracle Traffic Director as the front end to an OracleWebLogic Server MT domain, you want to connect the two elements.
6.3.1 Adding Oracle Traffic Director as a WebLogic Server MT Front EndIf you are configuring WebLogic Server MT, install and configure Oracle TrafficDirector in the Web tier. Oracle Traffic Director (OTD) is a software load balancer forload balancing HTTP/S and TCP traffic to servers in the back-end.
To add OTD as a front end to a WebLogic Server MT domain, see Oracle TrafficDirector Installation Guide
6.3.2 Configuring Oracle Traffic Director in WebLogic Server MTAfter you install Oracle Traffic Director as the front end to an Oracle WebLogic ServerMT domain, you want to connect the two elements.
Performing Domain Configuration Tasks for WebLogic Server MT
Next Steps After Configuring the WebLogic Server Domain 6-3
To configure Oracle Traffic Director in a WebLogic Server MT domain, see Configuring Oracle Traffic Director in Oracle Fusion Middleware Using WebLogicServer MT.
6.4 Preparing Your Environment For High AvailabilityThere are tasks you must perform to scale out your standard installation environmentfor high availability.
Table 6-4 Tasks Required to Prepare Your Environment for High Availability
Task Description More Information
Configuring NodeManager
Node Manager enables you to start,shut down, and restart theAdministration Server andManaged Server instances from aremote location, making this anessential utility for any highavailability environment.
To enable high availability, it isimportant to provide failovercapabilities to another hostcomputer. That way, if onecomputer goes down, yourenvironment can continue to servethe consumers of your deployedapplications.
"WebLogic ServerClustering" in theUnderstanding OracleWebLogic Server.
Configuring highavailability for yourWeb Tier components
If you have added a Web Tier front-end, then you must configure theWeb Tier for high availability, aswell as the WebLogic Serversoftware.
"Configuring HighAvailability for Web TierComponents" in HighAvailability Guide.
Setting up a front-endload balancer
You can use a load balancer todistribute requests across serversmore evenly.
"Load Balancing HTTPSessions with an ExternalLoad Balancer" in4Administering Clusters forOracle WebLogic Server.
Preparing Your Environment For High Availability
6-4 Installing and Configuring Oracle WebLogic Server and Coherence
7Deinstalling Oracle WebLogic Server and
Coherence
This section describes how to deinstall and reinstall Oracle WebLogic Server andCoherence. Oracle recommends that you always use the instructions in this section toremove the software. If you try to remove the software manually, you may encounterproblems when you try to reinstall the software again at a later time. Following theprocedures in this section ensures that the software is properly removed.
This section includes the following topics:
About Product DeinstallationThe deinstaller removes the software from the Oracle home directorythat you start it in.
Stopping Oracle Fusion MiddlewareBefore you run the deinstaller, Oracle recommends that you stop allservers and processes associated with the Oracle home you are going toremove.
Deinstalling the SoftwareFollow steps in this section to start the product deinstaller and removethe software.
Removing Oracle Home Directory ManuallyAfter deinstalling the software, you must manually remove your Oraclehome directory and any existing subdirectories that the deinstaller didnot remove.
Removing Program Shortcuts on Windows Operating SystemsOn Windows operating systems, you must also manually remove theprogram shortcuts; the deinstaller does not remove them for you.
Removing Your Domain and Application DataAfter deinstalling the software, you must remove the domain andapplication data if you don’t plan to use it or if you don’t plan toreconfigure a domain for a new WebLogic Server installation..
Reinstalling Your SoftwareYou can reinstall your software into the same Oracle home as a previousinstallation only if you deinstalled the software by followingdeinstallation instructions, including manually removing the Oraclehome directory.
7.1 About Product DeinstallationThe deinstaller removes the software from the Oracle home directory that you start itin.
Deinstalling Oracle WebLogic Server and Coherence 7-1
The deinstaller removes only components that the installation program installed; thedeinstaller does not remove:
• All files and directories in the Oracle home.
• The JDK or any user-created data, such as WebLogic domains or customapplication data.
The following table summarizes the procedure and has links to supportingdocuments.
Table 7-1 Roadmap for Deinstalling Oracle Fusion Middleware Infrastructure
Task Description and Documentation Documentation
Stop Oracle FusionMiddeware.
Oracle recommends that you stop all serversand processes in your domain before you runthe deinstaller
See StoppingOracle FusionMiddleware.
Remove the software. Run the product deinstaller to remove OracleWebLogic Server and Coherence.
See Deinstallingthe Software.
Remove the Oracle homedirectory.
The deinstaller does not remove all files andfolders from the Oracle home directory. Afterthe deinstaller finishes, you must manuallyremove the Oracle home to complete yourproduct removal.
The deinstaller does not remove the programshortcuts on your Windows operating system.
See RemovingProgramShortcuts onWindowsOperatingSystems
Remove your domain andapplication data.
The deinstaller does not remove data containedin your Domain home or Application homedirectories, even if they are located inside theOracle home. You must remove thesedirectories manually.
See RemovingYour DomainandApplicationData.
7.2 Stopping Oracle Fusion MiddlewareBefore you run the deinstaller, Oracle recommends that you stop all servers andprocesses associated with the Oracle home you are going to remove.
For more information, see "Starting and Stopping Servers" in Administering ServerStartup and Shutdown for Oracle WebLogic Server.
7.3 Deinstalling the SoftwareFollow steps in this section to start the product deinstaller and remove the software.
To run a silent (command-line) deinstallation, see "Running the Oracle UniversalInstaller for Silent Deinstallation" in Installing Software with the Oracle UniversalInstaller.
Stopping Oracle Fusion Middleware
7-2 Installing and Configuring Oracle WebLogic Server and Coherence
Starting the Deinstallation ProgramHow you start the deinstallation program depends on your operatingsystem: Windows or UNIX.
Navigating Deinstallation ScreensThe deinstallation program shows a series of screens, in the order thatthe following table lists.
7.3.1 Starting the Deinstallation ProgramHow you start the deinstallation program depends on your operating system:Windows or UNIX.
On UNIX operating systems, go to the ORACLE_HOME/oui/bin directory and enterthe command ./deinstall.sh
On Windows operating systems, choose one of the following options to startdeinstallation:
• From the command line, go to the ORACLE_HOME\oui\bin and enterdeinstall.cmd.
• From the Start menu, select All Programs, select Oracle, select OracleHome, thenselect Uninstall Oracle Middleware.
• Use a file manager window to go to the ORACLE_HOME\oui\bin directory anddouble click on deinstall.cmd
7.3.2 Navigating Deinstallation ScreensThe deinstallation program shows a series of screens, in the order that the followingtable lists.
If you need additional help with a deinstallation screen, click Help.
Table 7-2 Deinstallation Screens and Descriptions
Screen Description
Welcome Introduces you to the product deinstaller.
Deinstallation Summary Shows the Oracle home directory and its contents todeinstall. Verify that this is the correct directory.
Click Deinstall to begin removing the software.
Deinstallation Progress Shows the deinstallation progress.
Deinstallation Complete Opens when the deinstallation is complete. Review thisscreen then click Finish to dismiss the deinstaller.
7.4 Removing Oracle Home Directory ManuallyAfter deinstalling the software, you must manually remove your Oracle homedirectory and any existing subdirectories that the deinstaller did not remove.
For example, if your Oracle home directory is /home/Oracle/products/Oracle_Home on a UNIX operating system:
Removing Oracle Home Directory Manually
Deinstalling Oracle WebLogic Server and Coherence 7-3
cd /home/Oracle/productsrm -rf Oracle_Home
On a Windows operating system, if your Oracle home directory was C:\Oracle\Products\Oracle_Home, use a file manager window and navigate to the C:\Oracle\Products directory, then right-click on the Oracle_Home folder andselect Delete.
7.5 Removing Program Shortcuts on Windows Operating SystemsOn Windows operating systems, you must also manually remove the programshortcuts; the deinstaller does not remove them for you.
Go to the C:\Program Data\Microsoft\Windows\Start Menu\Programs\Oracle\Oracle Home\Product directory. If you only have one product installedin your Oracle home, you can remove the Oracle Home directory. If you havemultiple products installed in your Oracle home, you must remove all products beforeremoving the Oracle Home.
7.6 Removing Your Domain and Application DataAfter deinstalling the software, you must remove the domain and application data ifyou don’t plan to use it or if you don’t plan to reconfigure a domain for a newWebLogic Server installation..
To remove your domain and application data:
1. Manually remove your Domain home directory.
For example, if your Domain home directory was /home/Oracle/config/domains/infra_domain on a UNIX operating system:
cd /home/Oracle/config/domainsrm -rf infra_domain
On a Windows operating system, if your Domain home directory was C:\Oracle\Config\domains\infra_domain, use a file manager window and navigate tothe C:\Oracle\Config\domains directory, then right-click on theinfra_domain folder and select Delete.
2. Manually remove your Application home directory.
For example, if your Application home directory was /home/Oracle/config/applications/infra_domain on a UNIX operating system:
cd /home/Oracle/config/applicationsrm -rf infra_domain
On a Windows operating system, if your Application home directory was C:\Oracle\Config\applications\infra_domain, use a file manager windowand navigate to the C:\Oracle\Config\applications directory, then right-click on the infra_domain folder and select Delete.
3. Backup the domain_registry.xml file in your Oracle home, then edit the fileand remove the line associated with the domain you are removing. For example, toremove the infra_domain, find the following line and remove it:
Removing Program Shortcuts on Windows Operating Systems
7-4 Installing and Configuring Oracle WebLogic Server and Coherence
7.7 Reinstalling Your SoftwareYou can reinstall your software into the same Oracle home as a previous installationonly if you deinstalled the software by following deinstallation instructions, includingmanually removing the Oracle home directory.
When you reinstall, you can then specify the same Oracle home as your previousinstallation.
Consider the following cases where the Oracle home is not empty:
Scenario: Installing in an Existing Oracle Home that Contains the Same FeatureSets
The installer warns you that the Oracle home you specified duringinstallation already contains the software you're trying to install now.
Scenario: Installing in an Existing, Non-Empty Oracle HomeYou chose to create your Domain home or Application home somewhereinside your existing Oracle home. The deinstallation process does notremove this data, so if you try to reinstall into the same Oracle home, theinstaller does not allow it.
7.7.1 Scenario: Installing in an Existing Oracle Home that Contains the Same FeatureSets
The installer warns you that the Oracle home you specified during installation alreadycontains the software you're trying to install now.
Your options:
• Select a different installation type. In this case, only feature sets that do not alreadyexist in the Oracle home directory get installed.
• Select a different Oracle home directory.
7.7.2 Scenario: Installing in an Existing, Non-Empty Oracle HomeYou chose to create your Domain home or Application home somewhere inside yourexisting Oracle home. The deinstallation process does not remove this data, so if youtry to reinstall into the same Oracle home, the installer does not allow it.
Your options:
• Deinstall your software from the Oracle home then remove the Oracle homedirectory. You can then reinstall and reuse the same Oracle home location, usingthe instructions in Deinstalling Oracle WebLogic Server and Coherence. You mustre-create any domain or application data that was in the Oracle home.
• Select a different Oracle home directory.
Reinstalling Your Software
Deinstalling Oracle WebLogic Server and Coherence 7-5
Reinstalling Your Software
7-6 Installing and Configuring Oracle WebLogic Server and Coherence
AAbout the Oracle WebLogic Server and
Coherence Distribution
The Oracle WebLogic Server and Coherence distribution(fmw_12.2.1.1.0_wls_generic.jar) includes a variety of products and featuresets.
Note:
Oracle WebLogic Server is also available with the Oracle Fusion MiddlewareInfrastructure distribution(fmw_12.2.1.1.0_infrastructure_generic.jar). See Understandingthe Infrastructure Standard Installation Topology in Installing and Configuringthe Oracle Fusion Middleware Infrastructure.
Table A-1 Oracle Fusion Middleware Infrastructure Products and Feature Sets
Installation Type Installed Items Description
WebLogic Server WebLogicServer
A scalable, enterprise-ready Java Platform, EnterpriseEdition (Java EE) application server. The WebLogicServer infrastructure supports the deployment ofmany types of distributed applications and is an idealfoundation for building applications based on service-oriented architecture (SOA).
WebLogic Server Coherence Coherence provides replicated and distributed(partitioned) data management and caching serviceson top of a reliable, highly scalable peer-to-peerclustering protocol. Coherence has no single points offailure; it automatically and transparently fails overand redistributes its clustered data managementservices when a server becomes inoperative or isdisconnected from the network. When a new server isadded, or when a failed server is restarted, itautomatically joins the cluster and Coherence failsback services to it, transparently redistributing thecluster load. Coherence includes network-level faulttolerance features and transparent soft re-startcapability to enable servers to self-heal.
For more information about Coherence, see OracleCoherence Getting Started Guide.
WebLogic Server WebLogicServer Clients
Thin-client JARs required for connecting to aWebLogic Server instance. Includes the JARs for theweb services, JMS, Store and Forward, WebLogic RMI,JMS .NET, and JMX clients.
About the Oracle WebLogic Server and Coherence Distribution A-1
Table A-1 (Cont.) Oracle Fusion Middleware Infrastructure Products and FeatureSets
Installation Type Installed Items Description
WebLogic Server AdministrationConsole
A web application hosted by the AdministrationServer that is used for managing and monitoring anactive domain.
WebLogic Server CIE WLS Config Provides files used by the Oracle Fusion MiddlewareConfiguration Wizard.
WebLogic Server Third-PartyJDBC Drivers
Other JDBC drivers bundled with WebLogic Serverthat can be used to connect a WebLogic Serverenvironment to an external database.
For more information about this feature set, see "UsingJDBC Drivers with WebLogic Server" in AdministeringJDBC Data Sources for Oracle WebLogic Server.
WebLogic Server Third-PartyJackson
Third party open source software for processingJavaScript Object Notation (JSON) data formats.
WebLogic Server Third-PartyJersey
Third party open source software representing theofficial implementation of the Representational StateTransfer (REST) architecture.
For more information, see Developing and SecuringRESTful Web Services for Oracle WebLogic Server.
WebLogic Server Third-PartyMaven Apache
Maven is a build management tool that is central toproject build tasks such as compilation, packaging,and artifact management.
For more information, see Developing ApplicationsUsing Continuous Integration.
WebLogic Server OPatch The OPatch utility is a tool that allows the applicationand rollback of interim patches to Oracle products
Coherence WebLogicServer
A scalable, enterprise-ready Java Platform, EnterpriseEdition (Java EE) application server. The WebLogicServer infrastructure supports the deployment ofmany types of distributed applications and is an idealfoundation for building applications based on service-oriented architecture.
A-2 Installing and Configuring Oracle WebLogic Server and Coherence
Table A-1 (Cont.) Oracle Fusion Middleware Infrastructure Products and FeatureSets
Installation Type Installed Items Description
Coherence Coherence Coherence provides replicated and distributed(partitioned) data management and caching serviceson top of a reliable, highly scalable peer-to-peerclustering protocol. Coherence has no single points offailure; it automatically and transparently fails overand redistributes its clustered data managementservices when a server becomes inoperative or isdisconnected from the network. When a new server isadded, or when a failed server is restarted, itautomatically joins the cluster and Coherence failsback services to it, transparently redistributing thecluster load. Coherence includes network-level faulttolerance features and transparent soft re-startcapability to enable servers to self-heal.
For more information about Coherence, see OracleCoherence Getting Started Guide.
Coherence AdministrationConsole
A web application hosted by the AdministrationServer that is used for managing and monitoring anactive domain.
Coherence CIE WLS Config Provides files used by the Oracle Fusion MiddlewareConfiguration Wizard.
Coherence Third-PartyJDBC Drivers
Other JDBC drivers bundled with WebLogic Serverthat can be used to connect a WebLogic Serverenvironment to an external database.
For more information about this feature set, see "UsingJDBC Drivers with WebLogic Server" in AdministeringJDBC Data Sources for Oracle WebLogic Server.
Coherence Third-PartyJackson
Third party open source software for processingJavaScript Object Notation (JSON) data formats.
Coherence Third-PartyJersey
Third party open source software representing theofficial implementation of the Representational StateTransfer (REST) architecture.
For more information, see Developing and SecuringRESTful Web Services for Oracle WebLogic Server.
Coherence Third-PartyMaven Apache
Maven is a build management tool that is central toproject build tasks such as compilation, packaging,and artifact management.
For more information, see Developing ApplicationsUsing Continuous Integration.
Coherence OPatch The OPatch utility is a tool that allows the applicationand rollback of interim patches to Oracle products
About the Oracle WebLogic Server and Coherence Distribution A-3
Table A-1 (Cont.) Oracle Fusion Middleware Infrastructure Products and FeatureSets
Installation Type Installed Items Description
CompleteInstallation withExamples
WebLogicServer
A scalable, enterprise-ready Java Platform, EnterpriseEdition (Java EE) application server. The WebLogicServer infrastructure supports the deployment ofmany types of distributed applications and is an idealfoundation for building applications based on service-oriented architecture (SOA).
CompleteInstallation withExamples
Coherence Coherence provides replicated and distributed(partitioned) data management and caching serviceson top of a reliable, highly scalable peer-to-peerclustering protocol. Coherence has no single points offailure; it automatically and transparently fails overand redistributes its clustered data managementservices when a server becomes inoperative or isdisconnected from the network. When a new server isadded, or when a failed server is restarted, itautomatically joins the cluster and Coherence failsback services to it, transparently redistributing thecluster load. Coherence includes network-level faulttolerance features and transparent soft re-startcapability to enable servers to self-heal.
For more information about Coherence, see OracleCoherence Getting Started Guide.
CompleteInstallation withExamples
WebLogicServer Clients
Thin-client JARs required for connecting to aWebLogic Server instance. Includes the JARs for theweb services, JMS, Store and Forward, WebLogic RMI,JMS .NET, and JMX clients.
CompleteInstallation withExamples
AdministrationConsole
A web application hosted by the AdministrationServer that is used for managing and monitoring anactive domain.
CompleteInstallation withExamples
CIE WLS Config Provides files used by the Oracle Fusion MiddlewareConfiguration Wizard.
CompleteInstallation withExamples
Third-PartyJDBC Drivers
Other JDBC drivers bundled with WebLogic Serverthat can be used to connect a WebLogic Serverenvironment to an external database.
For more information about this feature set, see "UsingJDBC Drivers with WebLogic Server" in AdministeringJDBC Data Sources for Oracle WebLogic Server.
CompleteInstallation withExamples
Apache Derby Oracle's distribution of the open source Apache DerbyJava database, also called Java DB. Derby is a pureJava relational database management system (RDBMS)provided with Oracle WebLogic Server to allow you torun code examples with a functional database server.Derby is for demonstration (that is, non-production)use only
A-4 Installing and Configuring Oracle WebLogic Server and Coherence
Table A-1 (Cont.) Oracle Fusion Middleware Infrastructure Products and FeatureSets
Installation Type Installed Items Description
CompleteInstallation withExamples
Third-PartyJackson
Third party open source software for processingJavaScript Object Notation (JSON) data formats.
CompleteInstallation withExamples
Third-PartyJersey
Third party open source software representing theofficial implementation of the Representational StateTransfer (REST) architecture.
For more information, see Developing and SecuringRESTful Web Services for Oracle WebLogic Server.
CompleteInstallation withExamples
Third-PartyMaven Apache
Maven is a build management tool that is central toproject build tasks such as compilation, packaging,and artifact management.
For more information, see Developing ApplicationsUsing Continuous Integration.
CompleteInstallation withExamples
WebLogicServerExamples
Server Examples are example applications thatdemonstrate key features of WebLogic Server.
For more information, see "Sample Application andCode Examples" in Understanding Oracle WebLogicServer.
CompleteInstallation withExamples
CoherenceExamples
Coherence Examples demonstrate how to use thefeatures of Coherence in all supported languages(Java, .NET, and C++). The examples are organizedcollections of code that show how to use one or morefeatures, and provide a single common way (perlanguage) to build and run all examples. Source codefor the examples is included.
Note: Both Server Examples and Coherence Examplesare only installed if you select the Fusion MiddlewareInfrastructure with Examples install type.
CompleteInstallation withExamples
OPatch The OPatch utility is a tool that allows the applicationand rollback of interim patches to Oracle products.
About the Oracle WebLogic Server and Coherence Distribution A-5
A-6 Installing and Configuring Oracle WebLogic Server and Coherence
BInstalling WebLogic Server for Developers
The WebLogic Server development release includes all the necessary files to developand test applications on WebLogic Server, but uses less disk space than a completeWebLogic Server installation. The development installation is intended only fordevelopment. It is supported on Windows, Linux and Mac OS X systems.
This section includes the following topics:
Files Included with WebLogic Server DevelopmentThe development installation has two JAR files.
Downloading the InstallersYou download the installers from Oracle Technology Network.
WebLogic Server for Developers Installation PrerequisitesThe Developers installation has disk space and JDK requirements.
Installing WebLogic Server for DevelopersThe WebLogic Server for Developers installation uses Oracle UniversalInstaller to run a silent operation. No input is needed.
Creating a Development DomainYou create a development domain in the same way you normally do forWebLogic Server using either the Configuration Wizard or WebLogicScripting Tool (WLST).
Starting and Accessing the DomainYou start your domain before accessing the Administration Console.
Upgrading a Development InstallationTo upgrade a development installation, you must download and installthe new distribution to a new location. After installing the newdistribution, use the Fusion Middleware Reconfiguration Wizard orWLST to associate an existing domain with the new installation.
Patching a Development InstallationYou use the Oracle Patching tool (OPatch) to apply patches to aWebLogic Server development installation .
Removing the WebLogic Server for Developers InstallationUse the Oracle Universal Installer (OUI) deinstallation tool to remove aWebLogic Server for Developers installation.
B.1 Files Included with WebLogic Server DevelopmentThe development installation has two JAR files.
• Base development installer—Contains required WebLogic Server components:
Installing WebLogic Server for Developers B-1
– Essential development files, such as Core Application Server and Coherence
– WebLogic Server Administration Console
– WebLogic client JAR files
– TopLink
– Jackson (open-source Java JSON processor)
– Jersey (open-source RESTful Web Services framework)
– Maven (open-source repository manager)
– OPatch
– OUI installation and deinstallation files
The base installer does not include:
– Native JNI libraries for unsupported platforms
– Oracle Configuration Manager (OCM)
– Web services clients
– Server samples
– Coherence examples
– WebLogic Server Administration Console Language help files
– Derby evaluation database
• Supplement development installer—this JAR file adds the following optionalWebLogic Server components to an existing base development installation:
– Server examples
– Derby evaluation database
– WebLogic Server Administration Console Language help files
– Coherence examples
– Web services clients
Note:
For up-to-date information and known issues for WebLogic Server forDevelopers base and supplemental installers, see README files available foreach development installer on the Oracle download site.
B.2 Downloading the InstallersYou download the installers from Oracle Technology Network.
To download the files:
1. Create theORACLE_HOME directory in which to install WebLogic Server forDevelopers.
Downloading the Installers
B-2 Installing and Configuring Oracle WebLogic Server and Coherence
2. Navigate to http://download.oracle.com. WebLogic Server for DevelopersJAR files are available only on Oracle Technology Network.
3. Navigate to the WebLogic Server 12c (12.2.1.1) download page.
4. Accept the license agreement.
5. Navigate to the page that lists all WebLogic Server for Developers distributions.
6. Right click on the link for each file you want to download and save the file to thedirectory you created in Step 1.
B.3 WebLogic Server for Developers Installation PrerequisitesThe Developers installation has disk space and JDK requirements.
The WebLogic Server for Developers installation requires:
• A minimum of 800MB of disk space
• JDK 1.8 update or greater
Before you run the installer:
• Set JAVA_HOME in the shell window you are using to run the installation.
Operating System Example Commands
Linux export JAVA_HOME=/myhome/jdk1.8.0_77
Mac export JAVA_HOME= /Library/Java/JavaVirtualMachines/1.8.0.jdk/Contents/Home
export USER_MEM_ARGS="-Xmx1024m"
Windows set JAVA_HOME=C:\Program Files\java\jdk1.8.0_77
• For Mac environments, Oracle recommends that you set the Xmx memoryargument
• Create the ORACLE_HOME directory prior to starting the installation. This directorymust exist and must be empty before running the basic installer.
B.4 Installing WebLogic Server for DevelopersThe WebLogic Server for Developers installation uses Oracle Universal Installer to runa silent operation. No input is needed.
You must install the WebLogic Server for Developers base installation first. After itinstalls, if you want components included in the supplemental installer, run theWebLogic Server for Developers supplemental installation using the same steps.
Topics in this section include the following:
Installing from the ORACLE_HOME DirectoryFollow these steps to run the installer from the ORACLE_HOME directory.
WebLogic Server for Developers Installation Prerequisites
3. When installation completes, see Creating a Development Domain.
B.5 Creating a Development DomainYou create a development domain in the same way you normally do for WebLogicServer using either the Configuration Wizard or WebLogic Scripting Tool (WLST).
Oracle recommends that you create the domain outside the ORACLE_HOME directory.
To create a domain using the Configuration Wizard:
1. Change to the oracle_common/common/bin directory in your ORACLE_HOME:
cd ORACLE_HOME/oracle_common/common/bin
2. Start the Configuration Wizard:
Environment Command
UNIX or Mac ./config.sh
Creating a Development Domain
B-4 Installing and Configuring Oracle WebLogic Server and Coherence
Environment Command
Windows config.cmd
For detailed information about Configuration Wizard screens, click Help or see Creating WebLogic Domains Using the Configuration Wizard.
To create a domain using WLST, see "Create WebLogic Domains Using WLST Offline"in Understanding the WebLogic Scripting Tool.
B.6 Starting and Accessing the DomainYou start your domain before accessing the Administration Console.
To start your WebLogic domain and access the Administration Console:
1. Change to the domain directory.
2. Enter the following command:
Environment Command
UNIX or Mac ./startWebLogic.sh
Windows startWebLogic.cmd
3. When the domain is in a RUNNING state, open a Web browser and enter thedomain's URL. Use the Administration Port value you entered when creating thedomain. For example:
http://localhost:7001/console/
4. Log in to the Administration Console using the Administrator user name andpassword you entered when you created the domain.
For more about starting and stopping WebLogic Server, see Administering ServerStartup and Shutdown for Oracle WebLogic Server.
For more about the WebLogic Server Administration Console, refer to the OracleWebLogic Server Administration Console Online Help.
B.7 Upgrading a Development InstallationTo upgrade a development installation, you must download and install the newdistribution to a new location. After installing the new distribution, use the FusionMiddleware Reconfiguration Wizard or WLST to associate an existing domain withthe new installation.
To upgrade a domain using the Reconfiguration Wizard:
1. Change to the oracle_common/common/bin directory in the newORACLE_HOME:
cd ORACLE_HOME/oracle_common/common/bin
Starting and Accessing the Domain
Installing WebLogic Server for Developers B-5
2. Start the Reconfiguration Wizard:
Environment Command
UNIX or Mac ./reconfig.sh
Windows reconfig.cmd
For more information on the Reconfiguration Wizard, click the Help button or see Upgrading Oracle WebLogic Server.
To upgrade a domain using WLST, see "Reconfiguring a WebLogic Domain UsingWebLogic Scripting Tool" in Upgrading Oracle WebLogic Server.
B.8 Patching a Development InstallationYou use the Oracle Patching tool (OPatch) to apply patches to a WebLogic Serverdevelopment installation .
For information about upgrading WebLogic Server, see "About Rolling Updates" inUpgrading Oracle WebLogic Server.
For information about using OPatch, see Patching with OPatch.
B.9 Removing the WebLogic Server for Developers InstallationUse the Oracle Universal Installer (OUI) deinstallation tool to remove a WebLogicServer for Developers installation.
To remove a WebLogic Server for Developers installation:
1. Go to the oui/bin directory:
cd ORACLE_HOME/oui/bin
2. Run the deinstaller:
Environment Command
UNIX or Mac ./deinstall.sh
Windows deinstall.cmd
3. Click Next.
4. Click Deinstall. Wait for deinstallation to complete.
5. Click Finish
6. Navigate up three directory levels:
cd ../../..
7. Remove the ORACLE_HOME directory:
Patching a Development Installation
B-6 Installing and Configuring Oracle WebLogic Server and Coherence
Environment Command
UNIX or Mac rm -r ORACLE_HOME
Windows rmdir ORACLE_HOME
For example:
rm -r /myhome/wls1221
For more information about deinstallation, see Deinstalling Oracle WebLogic Serverand Coherence.
Removing the WebLogic Server for Developers Installation
Installing WebLogic Server for Developers B-7
Removing the WebLogic Server for Developers Installation
B-8 Installing and Configuring Oracle WebLogic Server and Coherence