Oracle ® Fusion Middleware Upgrading SOA Suite and Business Process Management 12c (12.2.1.1) E71493-01 June 2016 This guide provides instructions for upgrading and redeploying your Oracle SOA Suite 11g applications to Oracle SOA Suite 12c.
Transcript
Oracle® Fusion MiddlewareUpgrading SOA Suite and Business Process Management
12c (12.2.1.1)
E71493-01
June 2016
This guide provides instructions for upgrading andredeploying your Oracle SOA Suite 11g applications to OracleSOA Suite 12c.
Oracle Fusion Middleware Upgrading SOA Suite and Business Process Management, 12c (12.2.1.1)
Contributors: Jay Kasi, Robert Donat, Vamsee Goruganthu, Subramanian Hariharan, Suresh Krishnaswamy,William Norcott, Renga Rengarajan, Michael Rubino, Sitaraman Swaminathan
This software and related documentation are provided under a license agreement containing restrictions onuse and disclosure and are protected by intellectual property laws. Except as expressly permitted in yourlicense agreement or allowed by law, you may not use, copy, reproduce, translate, broadcast, modify, license,transmit, distribute, exhibit, perform, publish, or display any part, in any form, or by any means. Reverseengineering, disassembly, or decompilation of this software, unless required by law for interoperability, isprohibited.
The information contained herein is subject to change without notice and is not warranted to be error-free. Ifyou find any errors, please report them to us in writing.
If this is software or related documentation that is delivered to the U.S. Government or anyone licensing it onbehalf of the U.S. Government, then the following notice is applicable:
U.S. GOVERNMENT END USERS: Oracle programs, including any operating system, integrated software,any programs installed on the hardware, and/or documentation, delivered to U.S. Government end users are"commercial computer software" pursuant to the applicable Federal Acquisition Regulation and agency-specific supplemental regulations. As such, use, duplication, disclosure, modification, and adaptation of theprograms, including any operating system, integrated software, any programs installed on the hardware,and/or documentation, shall be subject to license terms and license restrictions applicable to the programs.No other rights are granted to the U.S. Government.
This software or hardware is developed for general use in a variety of information management applications.It is not developed or intended for use in any inherently dangerous applications, including applications thatmay create a risk of personal injury. If you use this software or hardware in dangerous applications, then youshall be responsible to take all appropriate fail-safe, backup, redundancy, and other measures to ensure itssafe use. Oracle Corporation and its affiliates disclaim any liability for any damages caused by use of thissoftware or hardware in dangerous applications.
Oracle and Java are registered trademarks of Oracle and/or its affiliates. Other names may be trademarks oftheir respective owners.
Intel and Intel Xeon are trademarks or registered trademarks of Intel Corporation. All SPARC trademarks areused under license and are trademarks or registered trademarks of SPARC International, Inc. AMD, Opteron,the AMD logo, and the AMD Opteron logo are trademarks or registered trademarks of Advanced MicroDevices. UNIX is a registered trademark of The Open Group.
This software or hardware and documentation may provide access to or information about content, products,and services from third parties. Oracle Corporation and its affiliates are not responsible for and expresslydisclaim all warranties of any kind with respect to third-party content, products, and services unlessotherwise set forth in an applicable agreement between you and Oracle. Oracle Corporation and its affiliateswill not be responsible for any loss, costs, or damages incurred due to your access to or use of third-partycontent, products, or services, except as set forth in an applicable agreement between you and Oracle.
Contents
Preface ................................................................................................................................................................ ix
Audience ....................................................................................................................................................... ix
Related Documents...................................................................................................................................... ix
Conventions.................................................................................................................................................. ix
1 Introduction to Oracle SOA Suite and Business Process Management Upgrade
1.1 Understanding the Oracle SOA Suite and Business Process Management Upgrade to 12c
9.11 Restarting a Failed Upgrade....................................................................................................... 9-29
A Troubleshooting the Upgrade
A.1 Reviewing the Release Notes ........................................................................................................ A-1
A.2 Resolving Server Start Errors........................................................................................................ A-2
A.3 Recovering From a Failed Upgrade ............................................................................................. A-2
A.4 OWSM Data Source Connection Failure During Upgrade (12.1.3 to 12.2.1) ......................... A-3
A.5 Troubleshooting a Failed BAM Upgrade.................................................................................... A-3
A.6 Reapplying an EDNTopic to SOA JMS Module After Upgrade.............................................. A-3
A.7 Troubleshooting Oracle Service Bus ........................................................................................... A-3
A.8 Troubleshooting Oracle Managed File Transfer (MFT) Upgrade Issues................................ A-4
A.9 Error Starting OWSM After Upgrading to 12c........................................................................... A-4
A.10 Encryption Issues During Upgrade ........................................................................................... A-5
A.11 Upgrading Unsupported Domains with the Upgrade Assistant ......................................... A-5
A.12 Business Rules Audit Trail Not Showing After Instance Upgrade ....................................... A-6
A.13 Resolving a Coherence Cache Exception .................................................................................. A-6
A.14 WSDL Generated Missing Elements for Custom Exception .................................................. A-6
A.15 Connecting to the ServerSocket through Remote Clients ...................................................... A-6
viii
Preface
The following topics describe the intended audience, typographical conventions andadditional resources that may be helpful during the upgrade process:
Audience
Related Documents
Conventions
AudienceThis document is intended for administrators who are familiar with Oracle FusionMiddleware installation, upgrade, and administration tasks.
Related DocumentsThe following documents provide important pre-upgrade information and should beused in conjunction with the information documented in this guide:
• Planning an Upgrade of Oracle Fusion Middleware
• Understanding Oracle Fusion Middleware
• Upgrading with the Upgrade Assistant
• Upgrading Oracle WebLogic Server
• Upgrading to the Oracle Fusion Middleware Infrastructure
• Administering Oracle User Messaging Service
ConventionsThe following text conventions are used in this document:
Convention Meaning
boldface Boldface type indicates graphical user interface elements associatedwith an action, or terms defined in text or the glossary.
italic Italic type indicates book titles, emphasis, or placeholder variables forwhich you supply particular values.
ix
Convention Meaning
monospace Monospace type indicates commands within a paragraph, URLs, codein examples, text that appears on the screen, or text that you enter.
x
1Introduction to Oracle SOA Suite and
Business Process Management Upgrade
Learn how the upgrade to Oracle Fusion Middleware SOA Suite and Business ProcessManagement 12c is performed. The procedures explain how to upgrade a productionversion of Oracle SOA Suite 11g or a previous 12c release, including the Oracle FusionMiddleware component configurations in that domain, to this release.
Understanding the Oracle SOA Suite and Business Process ManagementUpgrade to 12c (12.2.1.1)
Understanding the Starting Points for a SOA Suite 12c (12.2.1.1) Upgrade
Understanding the Interoperability and Compatibility Restrictions Before YouUpgrade
Understanding SOA Domain Upgrade Restrictions
Understanding the Standard SOA Upgrade Topologies
Understanding How to Use this Guide for Your UpgradeThere are different upgrade paths depending on what is in your pre-upgrade environment. This guide covers all of the supported upgradepaths, so it is important that you understand which procedures tofollow.
1.1 Understanding the Oracle SOA Suite and Business ProcessManagement Upgrade to 12c (12.2.1.1)
When upgrading your existing SOA Suite 11g or 12c environment to SOA Suite andBusiness Process Management 12c (12.2.1.1), you should understand how your pre-upgrade environment will be affected by the upgrade. For example, schemas anddomain directory upgrades are performed "in place" which updates the existing 11gfiles during the upgrade. The 12c (12.2.1.1) Oracle Home binaries are upgraded "out ofplace" as the binaries are installed in a new directory.
The upgrade to 12c (12.2.1.1) includes the midtier and the schemas. You cannotperform a midtier-only or schema-only upgrade.
The list below describes how the upgrade is performed for the followingInfrastructure and SOA Suite components:
• Oracle WebLogic Server, JRF and SOA Oracle Home Binaries - Upgraded Out ofPlace
You will install the Oracle Infrastructure 12c (12.2.1.1) (which includes WebLogicServer and JRF) and SOA Suite and Business Process Management 12c (12.2.1.1)
Introduction to Oracle SOA Suite and Business Process Management Upgrade 1-1
distribution binaries in a new Oracle home. The upgrade of binaries is considered"out of place" as the 11g binaries are not overwritten.
• Schemas - Upgraded In Place
The 11g schemas are upgraded to 12c "in place" which means that the UpgradeAssistant updates and overwrites the schemas during the upgrade process. Theservers must be down during this process.
• Instances - Migrated during the schema upgrade
The upgrade of active and closed instances from 11g to 12c happens automaticallyas part of the schema upgrade. You can manage the upgrade using administrationscripts.
• Domain Directory Reconfiguration - Upgraded In Place
The existing SOA domain is upgraded "in place". During the upgrade you willprovide the location of the 11g SOA domain and the 11g domain will bereconfigured to point to the new SOA 12c (12.2.1.1) home directory.
• Domain Component Configuration - Upgraded In Place
After the reconfiguration of the 11g SOA domain, the Upgrade Assistant is usedagain to upgrade any remaining domain component configurations that require anupgrade in the new SOA 12c (12.2.1.1) home directory.
Note:
Oracle recommends that you perform your domain upgrades in place.However, if an out-of-place domain upgrade is required, see "Performing anOut-of-Place Domain Directory Upgrade".
1.2 Understanding the Starting Points for a SOA Suite 12c (12.2.1.1)Upgrade
You can upgrade to Oracle SOA Suite and Business Process Management 12c (12.2.1.1)from the following production starting points:
• SOA Suite and Business Process Management 12c (12.1.3) and 12c (12.2.1.0)
• SOA Suite 11g (11.1.1.9, 11.1.1.7)
Note: If you are running SOA 11g (11.1.1.6) or earlier, you must first upgradeto SOA 11g (11.1.1.7 or 11.1.1.9) before you can upgrade. For moreinformation, see Oracle® Fusion Middleware Upgrade Guide for Oracle SOA Suite,WebCenter Portal, and ADF in the Oracle Fusion Middleware 11g (11.1.1.7)upgrade documentation library.
1.3 Understanding the Interoperability and Compatibility RestrictionsBefore You Upgrade
Before you begin the upgrade process from SOA Suite and BPM 11g to 12c, you mustread and understand how all of the components within your 11g domain will be
Understanding the Starting Points for a SOA Suite 12c (12.2.1.1) Upgrade
1-2 Upgrading SOA Suite and Business Process Management
impacted by the upgrade. Understanding Interoperability and Compatibility provides adetailed matrix of which components can and cannot be upgraded together. Ingeneral, you cannot upgrade a domain that contains components that are not yetavailable in Oracle Fusion Middleware 12c (12.2.1.1). There are other restrictions onthe components that can be upgraded to 12c (12.2.1.1) and you need to be sure thatyou have reviewed this information carefully before you proceed with the upgrade.
See Also:Understanding SOA Domain Upgrade Restrictions
1.4 Understanding SOA Domain Upgrade RestrictionsSome domains cannot be upgraded to 12c (12.2.1.1) because of known limitations andconfiguration changes from previous Fusion Middleware releases. Review thefollowing to ensure your domains are not impacted by these restrictions. Domains thatare impacted by these restrictions cannot be upgraded.
DO NOT ATTEMPT TO UPGRADE A DOMAIN THAT IS UNSUPPORTED.
The following list describes the known SOA domain upgrade restrictions.
• Domains that include SOA Core Extension cannot be upgraded in–place to12.2.1.1.
If your pre-upgrade environment contains SOA Core Extension, then you cannotupgrade to this release of Oracle Fusion Middleware. An upgrade of SOA CoreExtension is not supported in 12c (12.2.1.1). If you want to include SOA CoreExtension in your 12.2.1.1 domain, you will have to manually migrate the files.Contact Oracle Support for more information.
• Domains that include the Cloud Adapters Pack should not be upgraded to12.2.1.1
If your pre-upgrade domain includes the Cloud Adapters Pack, you cannotupgrade to 12.2.1.1.
• Domains that include Oracle Enterprise Repository cannot be upgraded to12.2.1.1
If your pre-upgrade domain includes Oracle Enterprise Repository (OER), youcannot upgrade to 12.2.1.1.
1.5 Understanding the Standard SOA Upgrade TopologiesThis upgrade documentation provides detailed instructions for upgrading two typicalSOA Suite configurations. These topologies are referred to as the Oracle FusionMiddleware 12c standard upgrade topologies. Specifically, for the purposes of thisguide, a standard installation topology consists of a WebLogic Server domain thatcontains an Administration Server and a cluster containing two Managed Servers or astandalone domain.
A standalone domain is a container for system components, such as Oracle HTTPServer. It has a directory structure similar to an Oracle WebLogic Server domain, but itdoes not contain an Administration Server or Managed Servers. It can contain one ormore instances of system components of the same type, such as Oracle HTTP Server,or a mix of system component types. For more information on the standalonetopology, see What Is a Standalone Domain?
Understanding SOA Domain Upgrade Restrictions
Introduction to Oracle SOA Suite and Business Process Management Upgrade 1-3
Your actual topology may vary, but the topologies described in this guide provide anexample that can be used as a guide to upgrade similar SOA Suite componenttopologies.
For more information on setting up the 12c SOA Suite topologies, see:
• Installing and Configuring Oracle SOA Suite and Business Process Management
• Enterprise Deployment Guide for Oracle SOA Suite
1.6 Understanding How to Use this Guide for Your UpgradeThere are different upgrade paths depending on what is in your pre-upgradeenvironment. This guide covers all of the supported upgrade paths, so it is importantthat you understand which procedures to follow.
The following table describes the procedures you will use based on your pre-upgradeenvironment. If your pre-upgrade environment includes other Oracle FusionMiddleware components, such as OracleWebCenter, you must refer to the component-specific upgrade guide for more information. For a complete list of upgrade guidesavailable for this release, see Oracle Fusion Middleware 12c Upgrade Documentation .
If your pre-upgrade environment includes... Refer to these upgrade procedures:
Oracle SOA Suite and Business ProcessManagement (BPM) 11g
Upgrading to SOA Suite and BusinessProcess Management 12c (12.2.1.1)
Oracle SOA Suite and Business ProcessManagement (BPM) 12c
Upgrading Oracle SOA Suite and BusinessProcess Management from a Previous 12cRelease
Clustered SOA and BPM Environment Upgrading a Clustered SOA Environment
Oracle SOA Suite with Oracle BusinessActivity Monitoring (BAM) 11g
Upgrading from Oracle SOA Suite withOracle Business Activity Monitoring 11g to12c
Oracle SOA Suite with Oracle BusinessActivity Monitoring (BAM) 12c
Upgrading to Oracle SOA Suite with BusinessActivity Monitoring (BAM) 12c (12.2.1.1)from a Previous 12c Release
Domain with Oracle Business ActivityMonitoring 11g Only
You cannot upgrade a BAM-only domain, butyou can Import/Export BAM objects to 12c.
Exporting All Oracle BAM 11g Artifacts fromthe Existing Domain
Oracle Service Bus (OSB) 11g with SOA Suite Upgrading Oracle Service Bus
Oracle Service Bus (OSB) 11g without SOASuite
Upgrading an OSB Domain (Without SOA)
Oracle User Messaging Service 11g or 12c Performing Pre-Upgrade Tasks for UserMessaging Service (UMS)
SOA Domain with AIAFP 11g or SOA CoreExtension 12c
Not Supported — You must uninstall AIAFP11g or SOA Core Extension to upgrade.
Understanding How to Use this Guide for Your Upgrade
1-4 Upgrading SOA Suite and Business Process Management
2Oracle Fusion Middleware Pre-Upgrade
Tasks
Before you start the upgrade process be sure to complete the required pre-upgradetasks for your components and environment.
The required pre-upgrade tasks must be completed before you start the upgrade.Failure to complete the required tasks may result in a failed upgrade or extendedsystem downtime. Complete only those tasks that apply to your deployment.
Note:
Depending on which Oracle SOA products are being upgraded, you may needto perform additional pre-upgrade tasks. Products such as Oracle Service Busand User Messaging Service may require additional pre- and post-upgradeconfiguration tasks.
Oracle Fusion Middleware Pre-Upgrade ChecklistThe Oracle Fusion Middleware Pre-Upgrade Checklist identifies tasksthat can be performed before you begin any upgrade to ensure you havea successful upgrade and limited downtime.
Creating a Complete BackupBefore you install the new 12c (12.2.1.1) distributions and beginupgrading your existing Oracle Fusion Middleware deployment, be sureyou have backed up all system-critical files; including all of thedatabases that host your Oracle Fusion Middleware schemas.
Cloning Your Production Environment for TestingOracle strongly recommends that you create a copy of your actualproduction environment, upgrade the cloned environment, verify thatthe upgraded components work as expected, and then (and only then)upgrade your production environment.
Verifying Certification and System RequirementsThe certification matrix and system requirements documents should beused in conjunction with each other to verify that your environmentmeets the necessary requirements for installation.
Updating Policy Files when Using Enhanced Encryption (AES 256)Optional step to perform if you plan to use enhanced encryption, such asAdvanced Encryption Standard (AES) 256, in your upgraded
Oracle Fusion Middleware Pre-Upgrade Tasks 2-1
environment. Oracle recommends that you apply the latest requiredpolicy files to the JDK before you upgrade.
Purging Unused DataPurging unused data and maintaining a purging methodology before anupgrade can optimize the upgrade process.
Creating an Edition on the Server for Edition-Based RedefinitionBefore upgrading an Edition-Based Redefinition (EBR) enabled schema,you must connect to the database server and create an edition on thedatabase server for 12c.
Creating a Non-SYSDBA User to Run Upgrade AssistantOracle recommends that you create a non-SYSDBA user called FMW torun the Upgrade Assistant. The FMW user has the privileges required tomodify schemas, but does not have full administrator privileges.
Performing SOA-Specific Pre-Upgrade TasksIn addition to the Oracle Fusion Middleware pre-upgrade requirements,you may also be required to complete additional SOA-specific upgradetasks depending on your pre-upgrade environment.
2.1 Oracle Fusion Middleware Pre-Upgrade ChecklistThe Oracle Fusion Middleware Pre-Upgrade Checklist identifies tasks that can beperformed before you begin any upgrade to ensure you have a successful upgrade andlimited downtime.
Upgrades are performed while the servers are down. This checklist is meant toidentify important — and often time-consuming — pre-upgrade tasks that you canperform before the upgrade to limit your downtime. The more preparation you can dobefore you begin the upgrade process, the less time you will spend offline.
Note: The pre-upgrade procedures you perform will depend on theconfiguration of your existing system, the components you are upgrading, andthe environment you want to create at the end of the upgrade andconfiguration process. Complete only those tasks that apply to yourconfigurations or use cases.
Table 2-1 Tasks to Perform Before You Upgrade to Oracle Fusion Middleware 12c
Task Description Documentation
Create a complete backup ofyour existing environment.
Required
Back up all system-critical files anddatabase(s) that contain any schemasthat are to be upgraded before youbegin your upgrade.
If the upgrade fails, you can restoreyour pre-upgrade environment andbegin the upgrade again.
Creating a Complete Backup.
If you modified any of the startupscripts in your existing domain, youwill need to copy them to temporarydirectory location (outside of theexisting domain) during the upgradeand redeploy them after the upgrade.
Maintaining Custom DomainEnvironment Settings
Oracle Fusion Middleware Pre-Upgrade Checklist
2-2 Upgrading SOA Suite and Business Process Management
Table 2-1 (Cont.) Tasks to Perform Before You Upgrade to Oracle Fusion Middleware 12c
Task Description Documentation
Clone your productionenvironment to use as anupgrade testing platform.
Optional
In addition to creating a completebackup of your system files, Oraclestrongly recommends that you cloneyour production environment. Thisenvironment can be used to test theupgrade.
Cloning Your ProductionEnvironment for Testing .
Verify that you are installingand upgrading your product ona supported hardware andsoftware configuration.
Do not attempt an upgrade ifyou are unable to use the latestsupported operating system. Aswith all supportedconfigurations, failure to complywith these requirements maycause your upgrade to fail.
Required
Verify that your hardware andsoftware configurations (includingoperating systems) are supported bythe latest certifications andrequirements documents.
Oracle recommends that you verifythis information right before you startthe upgrade as the certificationrequirements are frequently updated.
Make sure that you have applied thelatest patches to your componentsbefore you upgrade.
You must also make sure to use asupported JDK version before youinstall the 12c product distributions.
Verifying Certification and SystemRequirements.
If you are currently running a 32-bitoperating system, you will have tomigrate to a 64-bit operating systembefore you can upgrade.
Migrating from a 32-Bit to a 64-BitOperating System (Required only ifyou have a 32–Bit OS)
Update security policy files ifyou are using enhancedencryption (AES 256).
Some of the security algorithmsused in Fusion Middleware 12crequire additional policy files forthe JDK.
Optional
If you plan to use enhancedencryption, such as AES 256, Oraclerecommends that you apply the latestrequired policy files to the JDK beforeyou upgrade.
Updating Policy Files when UsingEnhanced Encryption (AES 256)
Purge any outdated or unuseddata before you upgrade.
Optional
To optimize performance, considerpurging data and objects that will notbe used in the upgradedenvironment.
Use the purge scripts before you startthe instance upgrade to purge theclosed 11g instances that you do notneed in the upgraded 12cenvironment.
Purging Unused Data
Oracle Database Users Only:Before upgrading an Edition-Based Redefinition (EBR)enabled schema, you mustconnect to the database serverand create an edition on thedatabase server for 12c (12.2.1.1).
Required if using an EBR database
If you are using an Edition-BasedRedefinition (EBR) database, youmust create the edition before startingthe upgrade.
Creating an Edition on the Server forEdition-Based Redefinition
Oracle Fusion Middleware Pre-Upgrade Checklist
Oracle Fusion Middleware Pre-Upgrade Tasks 2-3
Table 2-1 (Cont.) Tasks to Perform Before You Upgrade to Oracle Fusion Middleware 12c
Task Description Documentation
Create a Non-SYSDBA user torun the Upgrade Assistant.
OptionalOracle recommends that you createthe FMW user to run UpgradeAssistant. User FMW can run theUpgrade Assistant without systemadministration privileges.
Creating a Non-SYSDBA User to RunUpgrade Assistant
2.2 Creating a Complete BackupBefore you install the new 12c (12.2.1.1) distributions and begin upgrading yourexisting Oracle Fusion Middleware deployment, be sure you have backed up allsystem-critical files; including all of the databases that host your Oracle FusionMiddleware schemas.
Performing a complete database backup prior to performing a schema upgrade is aprerequisite for running Upgrade Assistant. In the Upgrade Assistant prerequisitesGUI screen, you will be required to acknowledge that backups have been performed,before proceeding with the actual upgrade.
For more information, see Backing Up Your Oracle Fusion Middleware Environmentand Upgrading and Preparing Your Oracle Databases for 12c .
Note: Your system backup must include theSYSTEM.SCHEMA_VERSION_REGISTRY$ table.
Backing Up the Schema Version Registry TableYour system backup must include theSYSTEM.SCHEMA_VERSION_REGISTRY$ table.
Maintaining Custom Domain Environment SettingsEvery domain includes dynamically generated domain and serverstartup scripts, such as setDomainEnv. Oracle recommends that you donot modify these startup scripts, as any changes made to them areoverwritten during subsequent domain upgrade and reconfigurationoperations.
2.2.1 Backing Up the Schema Version Registry TableYour system backup must include the SYSTEM.SCHEMA_VERSION_REGISTRY$ table.
Each Fusion Middleware schema has a row in theSYSTEM.SCHEMA_VERSION_REGISTRY$ table. If you run the Upgrade Assistant toupdate an existing schema and it does not succeed, you must restore the originalschema before you can try again. Make sure you back up your existing databaseschemas before you run the Upgrade Assistant.
Creating a Complete Backup
2-4 Upgrading SOA Suite and Business Process Management
Note: Performing these backups prior to performing a schema upgrade is aprerequisite for running Upgrade Assistant. In the Upgrade Assistantprerequisites GUI screen, you will be required to acknowledge that backupshave been performed, before proceeding with the actual upgrade.
2.2.2 Maintaining Custom Domain Environment SettingsEvery domain includes dynamically generated domain and server startup scripts, suchas setDomainEnv. Oracle recommends that you do not modify these startup scripts,as any changes made to them are overwritten during subsequent domain upgrade andreconfiguration operations.
To maintain your custom domain-level environment settings, creating a separate fileto store the custom domain information before you upgrade.
For example, if you want to customize server startup parameters that apply to allservers in a domain, you can create a file called setUserOverrides.cmd (Windows)or setUserOverrides.sh (UNIX) and configure it to add custom libraries to theWebLogic Server classpath, specify additional java command line options for runningthe servers, or specify additional environment variables, for instance. Any customsettings you add to this file are preserved during domain upgrade operation and arecarried over to the remote servers when using the pack and unpack commands.
Following is an example of startup customizations in a setUserOverrides file:
# add custom libraries to the WebLogic Server system claspath if [ "${POST_CLASSPATH}" != "" ] ; then POST_CLASSPATH="${POST_CLASSPATH}${CLASSPATHSEP}${HOME}/foo/fooBar.jar" export POST_CLASSPATH else POST_CLASSPATH="${HOME}/foo/fooBar.jar" export POST_CLASSPATH fi # specify additional java command line options for serversJAVA_OPTIONS="${JAVA_OPTIONS} -Dcustom.property.key=custom.value"
If the setUserOverrides file exists during a server startup, the file is included in thestartup sequence and any overrides contained within this file take effect. You muststore the setUserOverrides file in the domain_home/bin directory.
Note:
If you are unable to create the setUserOverrides script before an upgrade,you need to reapply your settings as described in Re-apply Customizations toStartup Scripts.
2.3 Cloning Your Production Environment for TestingOracle strongly recommends that you create a copy of your actual productionenvironment, upgrade the cloned environment, verify that the upgraded componentswork as expected, and then (and only then) upgrade your production environment.
Upgrades cannot be reversed. In most cases, if an error occurs, you must stop theupgrade and restore the entire environment from backup and begin the upgradeprocess from the beginning. Identifying potential upgrade issues in a developmentenvironment can eliminate unnecessary downtime.
Cloning Your Production Environment for Testing
Oracle Fusion Middleware Pre-Upgrade Tasks 2-5
Note: It is beyond the scope of this document to describe the cloningprocedures for all components and operating systems. Cloning procedures arecomponent and operating system-specific. At a high level, you install the pre-upgrade version of your component domain on a test machine, create therequired schemas using the Repository Creation Utility (RCU), and performthe upgrade.
Additional benefits of running an upgrade in a cloned production environmentinclude the following:
• Uncover and correct any upgrade issues.
• Practice completing an end-to-end upgrade.
• Understand the upgrade performance and how purge scripts can help.
• Understand the time required to complete the upgrade.
• Understand the database resource usage (such as temporary tablespace; PGA, etc).
Note: You can run the pre-upgrade Readiness Check on the clonedproduction environment to help identify potential upgrade issues with yourdata, but you must perform a complete test upgrade on a cloned environmentto ensure a successful upgrade.
2.4 Verifying Certification and System RequirementsThe certification matrix and system requirements documents should be used inconjunction with each other to verify that your environment meets the necessaryrequirements for installation.
Note: When checking the certification, system requirements, andinteroperability information, be sure to check specifically for any 32-bit or 64-bit system requirements. It is important for you to download softwarespecifically designed for the 32-bit or 64-bit environment, explicitly.
Warning: Make sure that your current environment has been patched to thelatest patch set BEFORE you begin the upgrade. Certifications are based onfully patched environments unless stated otherwise.
Verifying Certification and System Requirements
2-6 Upgrading SOA Suite and Business Process Management
Verify Your Environment Meets Certification RequirementsOracle has tested and verified the performance of your product on allcertified systems and environments. Make sure that you are installingyour product on a supported hardware or software configuration
Verify System Requirements and SpecificationsIt is important to verify that the system requirements such as disk space,available memory, specific platform packages and patches, and otheroperating system-specific items are met.
Verify that the Database Hosting Oracle Fusion Middleware Is SupportedYou must have a supported Oracle database configured with therequired schemas before you run Oracle Fusion Middleware 12c.
Verify that the JDK is Certified for This Release of Oracle Fusion MiddlewareBefore you can install any Oracle Fusion Middleware product using ageneric installer, you must download and install a supported JDK onyour system.
2.4.1 Verify Your Environment Meets Certification RequirementsOracle has tested and verified the performance of your product on all certified systemsand environments. Make sure that you are installing your product on a supportedhardware or software configuration
Whenever new certifications occur, they are added to the proper certificationdocument right away. New certifications can occur at any time, and for this reason thecertification documents are kept outside of the documentation libraries and areavailable on Oracle Technology Network. For more information, see CertificationMatrix for 12c (12.2.1.1).
2.4.2 Verify System Requirements and SpecificationsIt is important to verify that the system requirements such as disk space, availablememory, specific platform packages and patches, and other operating system-specificitems are met.
The Oracle Fusion Middleware System Requirements and Specifications documentshould be used to verify that the requirements of the certification are met. Forexample, if the certification document indicates that your product is certified forinstallation on 64-Bit Oracle Linux 7, this document should be used to verify that yourOracle Linux 7 system has met the required minimum specifications, like disk space,available memory, specific platform packages and patches, and other operatingsystem-specific items. This document is updated as needed and resides outside of thedocumentation libraries. The latest version is available on Oracle TechnologyNetwork.
For a complete description of the system requirements for installing and upgrading toOracle Fusion Middleware 12c, see Review System Requirements and Specifications.
Note: When you install the Oracle Fusion Middleware Release 12c software inpreparation for upgrade, you should use the same user account that you usedto install and configure the existing, pre-upgrade Oracle Fusion Middlewaresoftware. On UNIX operating systems, this will ensure that the proper ownerand group is applied to new Oracle Fusion Middleware 12c files anddirectories
Verifying Certification and System Requirements
Oracle Fusion Middleware Pre-Upgrade Tasks 2-7
Migrating from a 32-Bit to a 64-Bit Operating System (Required only if you havea 32–Bit OS)
This step is only required If you are running a 32-bit environment. If youhave a 32–bit OS, then you must migrate your 32-bit environment to a64-bit software environment before you upgrade.
2.4.2.1 Migrating from a 32-Bit to a 64-Bit Operating System (Required only if youhave a 32–Bit OS)This step is only required If you are running a 32-bit environment. If you have a 32–bitOS, then you must migrate your 32-bit environment to a 64-bit software environmentbefore you upgrade.
Make sure to validate the migration to ensure all your Oracle Fusion Middleware 11gsoftware is working properly on the 64-bit machine, and only then perform theupgrade to Oracle Fusion Middleware 12c.
In these tasks, host refers to the 32-bit source machine and target refers to the new 64-bit target machine.
Note: These steps assume that your database is located on a separate host andwill not be moved.
Upgrading an operating system typically involves the following:
Caution: These steps are provided as an example of the operating systemupgrade process and may or may not include all of the procedures you mustperform to update your specific operating system. Consult your operatingsystem's upgrade documentation for more information.
Procure the Hardware That Supports the Upgrade's 64-bit Software RequirementMake sure that you have supported target hardware in place before youbegin the upgrade process.
Stop All ProcessesBefore upgrading, you must stop all processes, including theAdministration Server, Managed Servers, and Node Manager, if they arestarted on the host.
Back Up All Files from the 32-bit Host MachineMake sure that you have created a complete backup of your entire 11gdeployment before you begin the upgrade process. These files can beused if there is an issue during the migration and you have to restart theprocess.
Set Up the Target 64-bit Machine with the 11g Host Name and IP AddressThe host name and IP address of the target machine must be madeidentical to the host. This require you to change the IP address and name
Verifying Certification and System Requirements
2-8 Upgrading SOA Suite and Business Process Management
of the source machine or decommission the source machine to avoidconflicts in the network.
Restore the 11g Backup from 32-bit Host to 64-bit HostRestore the files you backed from the 32-bit host using the samedirectory structure that was used in 11g. The directory structure on thetarget machine must be identical to the structure of the host machine.
Install the 12c Product Distribution(s) on the Target MachineOracle recommends an Out-of-Place approach for upgrade. Therefore,you must install the 12c product distributions in a new Oracle home onthe target machine.
Upgrade the Target 64-bit Environment Using the Standard Upgrade ProcedureAfter installing the product on the target machine, you must upgradeeach product component individually using an upgrade utility specifiedin the component-specific upgrade guide and complete any post-upgrade tasks.
2.4.2.1.1 Procure the Hardware That Supports the Upgrade's 64-bit Software Requirement
Make sure that you have supported target hardware in place before you begin theupgrade process.
2.4.2.1.2 Stop All Processes
Before upgrading, you must stop all processes, including the Administration Server,Managed Servers, and Node Manager, if they are started on the host.
For example, to stop the Administration Server, enter the following command:
2.4.2.1.3 Back Up All Files from the 32-bit Host Machine
Make sure that you have created a complete backup of your entire 11g deploymentbefore you begin the upgrade process. These files can be used if there is an issueduring the migration and you have to restart the process.
Note: If the upgrade from 32-bit to 64-bit takes place on the same machine,there is a risk of corrupting the source environment if the upgrade fails.
For more information on backing up your 11g files, see Backing Up Your Environmentin Oracle® Fusion Middleware Administrator's Guide.
During the upgrade you must have access to the contents of the following:
• 11g Domain Home
• 11g /nodemanager directory located in $ORACLE_HOME/wlserver/common/
Some of the backup and recovery procedures described in Backing Up YourEnvironment in Oracle® Fusion Middleware Administrator's Guide are product-specific.Do not proceed with the upgrade until you have a complete backup.
2.4.2.1.4 Set Up the Target 64-bit Machine with the 11g Host Name and IP Address
The host name and IP address of the target machine must be made identical to thehost. This require you to change the IP address and name of the source machine ordecommission the source machine to avoid conflicts in the network.
The process of changing an IP address and host name vary by operating system.Consult your operating system's administration documentation for more information.
2.4.2.1.5 Restore the 11g Backup from 32-bit Host to 64-bit Host
Restore the files you backed from the 32-bit host using the same directory structurethat was used in 11g. The directory structure on the target machine must be identicalto the structure of the host machine.
For detailed information about restoring your 11g files to the 64-bit target machine, see Recovering Your Environment in Oracle® Fusion Middleware Administrator's Guide.
2.4.2.1.6 Install the 12c Product Distribution(s) on the Target Machine
Oracle recommends an Out-of-Place approach for upgrade. Therefore, you mustinstall the 12c product distributions in a new Oracle home on the target machine.
For detailed instructions on how to obtain 12c distributions, see Understanding andObtaining Product Distributions. To identify an installation user see Selecting anInstallation User. To understand the directory structure for installation andconfiguration, see Understanding Directories for Installation and Configuration. Referto the component-specific installation guides for the component(s) you are installing.
2.4.2.1.7 Upgrade the Target 64-bit Environment Using the Standard Upgrade Procedure
After installing the product on the target machine, you must upgrade each productcomponent individually using an upgrade utility specified in the component-specificupgrade guide and complete any post-upgrade tasks.
For a complete upgrade procedure, see the component-specific upgrade guide for thecomponent(s) you are upgrading.
Note: The Node Manager upgrade procedure requires access to the originalNode Manager files. Use the 11g Node Manger files that you backed up fromthe 32-bit source machine as part of Back Up All Files from the 32-bit HostMachine.
2.4.3 Verify that the Database Hosting Oracle Fusion Middleware Is SupportedYou must have a supported Oracle database configured with the required schemasbefore you run Oracle Fusion Middleware 12c.
It is assumed that you understand the Oracle Database requirements when upgradingand ensure that the database hosting Oracle Fusion Middleware is supported and hassufficient space to perform an upgrade. For more information, see Certification Matrixfor 12c (12.2.1.1).
2.4.4 Verify that the JDK is Certified for This Release of Oracle Fusion MiddlewareBefore you can install any Oracle Fusion Middleware product using a generic installer,you must download and install a supported JDK on your system.
At the time this document was published, the certified JDK was 1.8.0_77.
Verifying Certification and System Requirements
2-10 Upgrading SOA Suite and Business Process Management
Make sure that the JDK is installed outside of the Oracle home. The Oracle UniversalInstaller validates that the designated Oracle home directory is empty, and the installdoes not progress until an empty directory is specified. If you install JDK under Oraclehome, you may experience issues in future operations. Therefore, Oracle recommendsthat you use install the JDK in the following directory: /home/oracle/products/jdk.
For more information on the difference between generic and platform-specificinstallers, see “Understanding the Difference Between Generic and Platform-SpecificDistributions” in the Oracle Fusion Middleware Download, Installation, and ConfigurationReadme Files.
2.5 Updating Policy Files when Using Enhanced Encryption (AES 256)Optional step to perform if you plan to use enhanced encryption, such as AdvancedEncryption Standard (AES) 256, in your upgraded environment. Oracle recommendsthat you apply the latest required policy files to the JDK before you upgrade.
The Java platform defines a set of APIs spanning major security areas, includingcryptography, public key infrastructure, authentication, secure communication, andaccess control. These APIs allow developers to easily integrate security mechanismsinto their application code.
Some of the security algorithms used in Fusion Middleware 12c require additionalpolicy files for the JDK. For more information, see Java Cryptography ArchitectureOracle Providers Documentation.
If you attempt to use enhanced encryption without applying these policy files to theJDK before you begin the upgrade, the upgrade can fail and you must restore theentire pre-upgrade environment and start the upgrade from the beginning.
2.6 Purging Unused DataPurging unused data and maintaining a purging methodology before an upgrade canoptimize the upgrade process.
Note: If a large amount of data needs to be purged, consider partitioningtables or employing other data optimization strategies. Using scripts toremove large amounts of data may impact performance. See Developing aPurging and Partitioning Methodology and Developing a Database GrowthManagement Strategy.
Some components have automated purge scripts. If you are using purge scripts, waituntil the purge is complete before starting the upgrade process. The upgrade may failif the purge scripts are running while using the Upgrade Assistant to upgrade yourschemas.
For SOA Suite Components:
If you are migrating closed 11g instance data, run the instance purge scripts beforerunning the upgrade. See Using Instance Data Purge Scripts.
Updating Policy Files when Using Enhanced Encryption (AES 256)
2.7 Creating an Edition on the Server for Edition-Based RedefinitionBefore upgrading an Edition-Based Redefinition (EBR) enabled schema, you mustconnect to the database server and create an edition on the database server for 12c.
Edition-based redefinition enables you to upgrade an application's database objectswhile the application is in use, thus minimizing or eliminating downtime. This isaccomplished by changing (redefining) database objects in a private environmentknown as an edition. Only when all changes have been made and tested do you makethe new version of the application available to users.
Note: This task must be completed by an Oracle Database user with DBAprivileges.
Before upgrading an Edition-Based Redefinition (EBR) enabled schema, you mustconnect to the database server and create an edition on the database server for 12c. Thenew edition for 12c must be a child of your existing 11g or 12c edition.
To create an edition on the database server, log in as an SYS user (or another Oracleuser that has DBA privileges) and enter the following command:
create edition Oracle_FMW_12_2_1 as child ofOracle_FMW_11_1_1_7_0;
Where, Oracle_FMW_11_1_1_7_0 is an example of the edition name you specifiedin RCU 11.1.1.7 when the 11.1.1.7 schemas were created. Be sure to provide the actualname used when creating the edition.
If the edition is created successfully, you get the following message:
Edition created.
During the upgrade, you are prompted to launch the Reconfiguration Wizard toreconfigure your existing domain. Before running the Reconfiguration Wizard, youmust specify the database default edition. Use the following SQL to manually setupthe default edition name for the database, for example:
ALTER DATABASE DEFAULT EDITION = Oracle_FMW_12_2_1;
2.8 Creating a Non-SYSDBA User to Run Upgrade AssistantOracle recommends that you create a non-SYSDBA user called FMW to run theUpgrade Assistant. The FMW user has the privileges required to modify schemas, butdoes not have full administrator privileges.
SYSDBA is an administrative privilege, required to perform high-level administrativeoperations such as creating, starting up, shutting down, backing up, or recovering thedatabase. The SYSDBA system privilege is for a fully empowered databaseadministrator. When you connect with the SYSDBA privilege, you connect with adefault schema and not with the schema that is generally associated with your username. For SYSDBA, this schema is SYS. Access to a default schema can be a verypowerful privilege. For example, when you connect as user SYS, you have unlimitedprivileges on data dictionary tables. Therefore, Oracle recommends that you create aNon-SYSDBA user to upgrade the schemas. The privileges listed in this topic must begranted before starting the Upgrade Assistant.
Creating an Edition on the Server for Edition-Based Redefinition
2-12 Upgrading SOA Suite and Business Process Management
Note: The v$xatrans$ table does not exist by default. You must runthe XAVIEW.SQL script to create this table before creating the user. Moreover,grant on v$xatrans$ table is required only for Oracle Identity Manager. Ifyou do not require Oracle Identity Manager for configuration or if you do nothave the v$xatrans$ table, then remove the following line from the script:
grant select on v$xatrans$ to FMW with grant option;
In the example below, welcome1 is the password. Make sure that you specify youractual password when granting privileges.
create user FMW identified by welcome1;grant dba to FMW;grant execute on DBMS_LOB to FMW with grant option;grant execute on DBMS_OUTPUT to FMW with grant option;grant execute on DBMS_STATS to FMW with grant option;grant execute on sys.dbms_aqadm to FMW with grant option;grant execute on sys.dbms_aqin to FMW with grant option;grant execute on sys.dbms_aqjms to FMW with grant option;grant execute on sys.dbms_aq to FMW with grant option;grant execute on utl_file to FMW with grant option;grant execute on dbms_lock to FMW with grant option;grant select on sys.V_$INSTANCE to FMW with grant option;grant select on sys.GV_$INSTANCE to FMW with grant option;grant select on sys.V_$SESSION to FMW with grant option;grant select on sys.GV_$SESSION to FMW with grant option;grant select on dba_scheduler_jobs to FMW with grant option;grant select on dba_scheduler_job_run_details to FMW with grant option;grant select on dba_scheduler_running_jobs to FMW with grant option;grant select on dba_aq_agents to FMW with grant option;grant execute on sys.DBMS_SHARED_POOL to FMW with grant option;grant select on dba_2pc_pending to FMW with grant option;grant select on dba_pending_transactions to FMW with grant option;grant execute on DBMS_FLASHBACK to FMW with grant option;grant execute on dbms_crypto to FMW with grant option;grant execute on DBMS_REPUTIL to FMW with grant option;grant execute on dbms_job to FMW with grant option;grant select on pending_trans$ to FMW with grant option;grant select on dba_scheduler_job_classes to fmw with grant option;grant select on SYS.DBA_DATA_FILES to FMW with grant option;grant select on SYS.V_$ASM_DISKGROUP to FMW with grant option;grant select on v$xatrans$ to FMW with grant option;grant execute on sys.dbms_system to FMW with grant option;grant execute on DBMS_SCHEDULER to FMW with grant option;grant select on dba_data_files to FMW with grant option;grant execute on UTL_RAW to FMW with grant option;grant execute on DBMS_XMLDOM to FMW with grant option;grant execute on DBMS_APPLICATION_INFO to FMW with grant option;grant execute on DBMS_UTILITY to FMW with grant option;grant execute on DBMS_SESSION to FMW with grant option;grant execute on DBMS_METADATA to FMW with grant option;grant execute on DBMS_XMLGEN to FMW with grant option;grant execute on DBMS_DATAPUMP to FMW with grant option;grant execute on DBMS_MVIEW to FMW with grant option;grant select on ALL_ENCRYPTED_COLUMNS to FMW with grant option;grant select on dba_queue_subscribers to FMW with grant option; grant execute on SYS.DBMS_ASSERT to FMW with grant option;
Creating a Non-SYSDBA User to Run Upgrade Assistant
Oracle Fusion Middleware Pre-Upgrade Tasks 2-13
Note:
Oracle Database 11.2.0.3 Database Users ONLY: You must apply OraclePatch 13036331 before you begin the upgrade. Go to My Oracle Support todownload the patch.
If you do not apply this patch, then you will have to grant additionalprivileges for some schemas.
2.9 Performing SOA-Specific Pre-Upgrade TasksIn addition to the Oracle Fusion Middleware pre-upgrade requirements, you may alsobe required to complete additional SOA-specific upgrade tasks depending on yourpre-upgrade environment.
This section includes pre-upgrade tasks that apply to any SOA, Business ProcessManagement, or integrated products being upgraded to 12c (12.2.1.1). Perform onlythose tasks that apply to your environment.
Caution:
Failure to properly prepare for an upgrade may lead to unrecoverable errorsand upgrade failures. Make sure that you have completed ALL applicable pre-upgrade tasks before beginning the upgrade.
Pre-Upgrade Task More Information
Required
Verify that your environment meets the OracleDatabase requirements for upgrading to Oracle SOASuite and BPM 12c (12.2.1.1)
Upgrading and Preparing the Fusion MiddlewareDatabase for a SOA Suite Upgrade
Required
Verify that your tablespaces are sized appropriately(insufficient sizing will result in a failed upgrade).
Adding Datafiles to the SOAINFRA and IAS_TEMPTablespaces
SOA Composer Users Only: Note that uncommittedchanges are not available after upgrade.
Committing SOA Composer Changes Before Upgrade
Required only if you are upgrading from a previous12c release.Delete the existing cloudsdk deployment from thedomain before upgrade.
Deleting the cloudsdk Application
Required only if upgrading User Messaging Service(UMS)
Complete the required pre-upgrade tasks for UserMessaging Service (UMS) if you are upgrading UMS aspart of your SOA Suite upgrade.
Performing Pre-Upgrade Tasks for User MessagingService (UMS)
Performing SOA-Specific Pre-Upgrade Tasks
2-14 Upgrading SOA Suite and Business Process Management
Pre-Upgrade Task More Information
Required only if upgrading Oracle Service Bus (OSB)
Complete the required pre-upgrade tasks for OracleService Bus (OSB) if you are upgrading OSB as part ofyour SOA Suite upgrade.
Performing Pre-Upgrade Tasks for Oracle Service Bus(OSB)
Optional
Upgrade your standalone Oracle HTTP Server. Thiscan be done before or after the upgrade.
Upgrading a Standalone Oracle HTTP Server
Upgrading and Preparing the Fusion Middleware Database for a SOA SuiteUpgrade
You must have a supported database configured with the requiredschemas before you can run Fusion Middleware 12c (12.2.1.1).
Committing SOA Composer Changes Before UpgradeIf you do not commit or rollback your changes to the SOA Composersandbox before you upgrade, your changes may not be propagated tothe new environment.
Upgrading Custom Applications Using Oracle JDeveloper 12cIf you have deployed custom applications to a SOA 11g domain, then theapplication deployments should function as they did in Oracle FusionMiddleware 11g after the upgrade procedure is complete.
Deleting the cloudsdk ApplicationIf you installed cloudsdk in your pre-upgrade environment, you mustdelete it before starting the upgrade.
Performing Pre-Upgrade Tasks for User Messaging Service (UMS)Complete the required pre-upgrade tasks for User Messaging Service(UMS) if you are upgrading UMS as part of your SOA Suite upgrade.
Performing Pre-Upgrade Tasks for Oracle Service Bus (OSB)You must complete the required pre-upgrade tasks for Oracle ServiceBus (OSB) if you are upgrading OSB as part of your SOA Suite upgrade.
Upgrading a Standalone Oracle HTTP ServerIf you are upgrading a standalone Oracle HTTP Server, then you shouldfollow the instructions in Upgrading Oracle HTTP Server.
2.9.1 Upgrading and Preparing the Fusion Middleware Database for a SOA SuiteUpgrade
You must have a supported database configured with the required schemas beforeyou can run Fusion Middleware 12c (12.2.1.1).
It is imperative that you understand the Oracle Database requirements for upgradingto Oracle SOA Suite and BPM 12c (12.2.1.1), and ensure that the database hostingOracle Fusion Middleware is supported and has sufficient space to perform anupgrade. You must have a supported database configured with the required schemasbefore you can run Fusion Middleware 12c (12.2.1.1). Always refer to the latest database certification matrix for the most current information.
Performing SOA-Specific Pre-Upgrade Tasks
Oracle Fusion Middleware Pre-Upgrade Tasks 2-15
As part of the Fusion Middleware pre-upgrade process, you verified that yourdatabase is supported. However it is important to note that when installing oridentifying a database to use with Oracle SOA Suite, there are additionalconsiderations, including the size and profile of the database and its ability to storedata for large numbers of Oracle SOA Suite composite applications. For moreinformation, see the following resources:
• "About the Database Profile Custom Variable" in Installing and Configuring OracleSOA Suite and Business Process Management
• "Introduction to SOA Composite Applications" in Administering Oracle SOA Suiteand Oracle Business Process Management Suite
• "Identifying the Profile or Size of the Database" in Administering Oracle SOA Suiteand Oracle Business Process Management Suite
Adding Datafiles to the SOAINFRA and IAS_TEMP TablespacesOracle recommends that you add more data files to the existing SOAdatabase tablespace to prevent a failed upgrade.
2.9.1.1 Adding Datafiles to the SOAINFRA and IAS_TEMP TablespacesOracle recommends that you add more data files to the existing SOA databasetablespace to prevent a failed upgrade.
While important for all tablespaces, it is especially important to make sure that the 11gSOAINFRA tablespace and IAS_TEMP tablespace are sized for a successful upgrade.
Note:
Once a database schema upgrade has failed due to a sizing error, you cannotsimply add more disk space and retry the upgrade. The schemas have beenleft in an inconsistent state and may have been marked "INVALID". Youcannot recover from this error without restoring the original, pre-upgradeenvironment from backups.
Two sample commands are provided below. Size the files according to your own usecase scenarios.
To add datafiles to SOAINFRA tablespace:
Connect to the database as sysdba and run the following command:
alter tablespace <PREFIX>_SOAINFRA add datafile '<DB_HOME>/oradata/orcl/<New_SoaInfra_DBF_FileName>' size 1000M autoextend on next 30M maxsize unlimited;commit;
To add tempfiles to IAS_TEMP tablespace:
Connect to the database as sysdba and run the following command:
alter tablespace PREFIX_IAS_TEMP add tempfile '<DB_HOME>/oradata/orcl/<New_iastemp_dbf_filename>' size 1000M autoextend on next 30M maxsize unlimited;commit;
For more information on sizing your tablespaces before upgrade, see CreatingDatafiles and Adding Datafiles to a Tablespace.
Performing SOA-Specific Pre-Upgrade Tasks
2-16 Upgrading SOA Suite and Business Process Management
2.9.2 Committing SOA Composer Changes Before UpgradeIf you do not commit or rollback your changes to the SOA Composer sandbox beforeyou upgrade, your changes may not be propagated to the new environment.
Before you start the upgrade, make sure that you have committed or rolled back anychanges that you do or do not want propagated to the upgraded environment.
2.9.3 Upgrading Custom Applications Using Oracle JDeveloper 12cIf you have deployed custom applications to a SOA 11g domain, then the applicationdeployments should function as they did in Oracle Fusion Middleware 11g after theupgrade procedure is complete.
If you want to take advantage of new Oracle 12c features, download and install theOracle SOA Suite or Oracle Business Process Management Quick Start for Developers.
The Quick Start for Developers distributions provide Oracle JDeveloper 12c users withthe required extensions for developing Oracle SOA Suite and Oracle Business ProcessManagement applications.
For more information, see Installing Oracle SOA Suite Quick Start for Developers.
Note: Oracle QuickStart is required if you want to use new Oracle SOA 12cfeatures.
2.9.4 Deleting the cloudsdk ApplicationIf you installed cloudsdk in your pre-upgrade environment, you must delete it beforestarting the upgrade.
This step is required only if cloudsdk was deployed in a previous 12c release.
The 12c (12.2.1.1.) version of cloudsdk is automatically deployed on the servers andcould conflict with the previously deployed application due to a change in the namingconventions.
1. Login into the Oracle WebLogic console.
Enter the URL in your Web browser. For example:
http://host1.example.com:7001/em
Enter the Oracle Fusion Middleware administrator user name and password andclick Login.
2. Click Deployments from the Domain Configuration panel of the console.
(Optional) Enter the result of the step only if necessary. Do not state the obviousresults. Tasks should be as concise as possible.
3. Click the Control tab.
4. Select cloudsdk and click Stop - Force stop now.
5. Click Configuration.
6. Select cloudsdk and click Delete.
Performing SOA-Specific Pre-Upgrade Tasks
Oracle Fusion Middleware Pre-Upgrade Tasks 2-17
7. Click on Release configuration.
2.9.5 Performing Pre-Upgrade Tasks for User Messaging Service (UMS)Complete the required pre-upgrade tasks for User Messaging Service (UMS) if you areupgrading UMS as part of your SOA Suite upgrade.
If you are Upgrading User Messaging Service from 11g to 12c, you may need toperform additional pre-upgrade tasks such as manually copying the configurationfiles from the managed server to the Admin server. If you are upgrading UMS from aprevious 12c release, then you will not have to perform this task again.
For more information, see Upgrading User Messaging Service.
2.9.6 Performing Pre-Upgrade Tasks for Oracle Service Bus (OSB)You must complete the required pre-upgrade tasks for Oracle Service Bus (OSB) if youare upgrading OSB as part of your SOA Suite upgrade.
If you are upgrading a SOA domain with Oracle Service Bus, you must preformseveral required pre-upgrade tasks. See Performing Pre-Upgrade Tasks for OracleService Bus (OSB).
2.9.7 Upgrading a Standalone Oracle HTTP ServerIf you are upgrading a standalone Oracle HTTP Server, then you should follow theinstructions in Upgrading Oracle HTTP Server.
This optional step can be performed before or after the upgrade.
To upgrade a standalone Oracle HTTP Server instance (one that is not associated withan 11g domain) or to upgrade the HTTP server at another time, refer to UpgradingOracle HTTP Server.
Note: Managed Oracle HTTP Servers, those that are associated with anexisting domain, are upgraded automatically during the Infrastructureupgrade process. You do not have to upgrade your managed HTTP Serverseparately.
Performing SOA-Specific Pre-Upgrade Tasks
2-18 Upgrading SOA Suite and Business Process Management
3Upgrading to SOA Suite and Business
Process Management 12c (12.2.1.1)
This section provides the end-to-end procedure for upgrading a single-node, SOASuite with Business Process Management 11g production installation to SOA Suitewith Business Process Management 12c (12.2.1.1).
Note:
Oracle strongly recommends that you create a copy of your actual productionenvironment, upgrade the cloned environment, verify that the upgradedcomponents work as expected, and then (and only then) upgrade yourproduction environment.
Identifying potential upgrade issues in a cloned environment can eliminateunnecessary downtime of your production environment.
Understanding the SOA Suite and BPM Upgrade Process FlowThis flowchart and the accompanying text describes the high-level stepsfor upgrading the Oracle Fusion Middleware SOA Suite 11g to 12c(12.2.1.1)
Installing Oracle SOA Suite and Business Process Management 12c (12.2.1.1)Before you can upgrade your existing SOA and Business ProcessManagement (BPM) components, you must first install the Oracle FusionMiddleware Infrastructure and the Oracle SOA Suite and BusinessProcess Management 12c (12.2.1.1) product distributions.
Creating the Required SOA Schemas Before You Upgrade from 11gIf you are upgrading from a supported 11g release, you may need tocreate the new 12c required schemas in a supported database before youcan upgrade.
Running a Pre-Upgrade Readiness CheckThe Upgrade Assistant can be run in -readiness mode to identifypotential upgrade issues before you perform an actual upgrade.
Stopping SOA Servers and ProcessesBefore running Upgrade Assistant, you must shut down ALL OracleFusion Middleware Managed Servers, Administration Servers, and
Upgrading to SOA Suite and Business Process Management 12c (12.2.1.1) 3-1
system components (such as OHS) that may be using the schemas orconfigurations you want to update.
Upgrading Schemas with the Upgrade AssistantFollow these tasks to upgrade your schemas with the Upgrade Assistant.
Reconfiguring the Domain Using the Reconfiguration WizardAfter upgrading the schemas, run the Reconfiguration Wizard toreconfigure your domain component configurations to 12c.
Upgrading the Domain Component Configurations Using the Upgrade AssistantUse the Upgrade Assistant to update any remaining WebLogiccomponent configurations within the domain.
Managing Your Upgraded Oracle Fusion Middleware 12c Software
3.1 Understanding the SOA Suite and BPM Upgrade Process FlowThis flowchart and the accompanying text describes the high-level steps for upgradingthe Oracle Fusion Middleware SOA Suite 11g to 12c (12.2.1.1)
The steps you take to upgrade your existing domain will vary depending on how yourdomain is configured and which components are being upgraded. Follow only thosesteps that are applicable to your deployment.
Understanding the SOA Suite and BPM Upgrade Process Flow
3-2 Upgrading SOA Suite and Business Process Management
Table 3-1 Task Descriptions for Upgrading Oracle SOA Suite
Description More Information
Required
If you have not done so already, perform all of therequired pre-upgrade tasks for the components you areupgrading.
For all required pre-upgrade tasks, see Oracle FusionMiddleware Pre-Upgrade Checklist
For SOA domains that include Oracle BAM, see Performing the Pre-Upgrade Tasks for Oracle BAM
When upgrading Oracle Service Bus (with or withoutOracle SOA), see Performing Pre-Upgrade Tasks forOracle Service Bus (OSB)
Understanding the SOA Suite and BPM Upgrade Process Flow
Upgrading to SOA Suite and Business Process Management 12c (12.2.1.1) 3-3
Table 3-1 (Cont.) Task Descriptions for Upgrading Oracle SOA Suite
Description More Information
Required
You must install Fusion Middleware Infrastructure 12c(12.2.1.1) in a NEW Oracle home on the same host asthe 11g production deployment before you begin theupgrade.
In 12c, Oracle home is used to describe the 11gMiddleware home.
See Installing the Infrastructure Software
This link will take you to the Installing and ConfiguringOracle Fusion Middleware Infrastructure guide.
NOTE: Install but do not use the Configuration Wizardto configure the newly installed domain domain. Youwill use the Reconfiguration Wizard during theupgrade to configure the existing 11g domain.
Required
Install SOA Suite and Business Process Management12c (12.2.1.1) and any integrated SOA-integrateddistributions (Oracle HTTP Server, Oracle Service Bus,etc) in your newly created Oracle home.
See Installing Oracle SOA Suite and Business ProcessManagement 12c (12.2.1.1)
NOTE: You must install the Fusion Middleware 12c(12.2.1.1) distributions for each SOA-integrated productyou are upgrading. For example, if you are upgradinga SOA 11g environment with Oracle Service Bus, youmust acquire the Oracle Service Bus 12c (12.2.1.1)distribution as well as the Oracle SOA Suite and BPM12c (12.2.1.1) distribution.
Required
Shut down the 11g Environment (stop allAdministration and Managed Servers).
WARNING: Failure to shut down your servers duringan upgrade may lead to data corruption.
See Stopping SOA Servers and Processes
Required
Launch the 12c (12.2.1.1) Repository Creation Utility(RCU) and create the new required 12c schemas.
See Creating the Required SOA Schemas Before YouUpgrade from 11g
Required
Run the Upgrade Assistant to upgrade the 11gdatabase schemas and to migrate all active (in flight)instance data.
See Upgrading Schemas Using the Upgrade Assistant
NOTE: The upgrade of active instance data is startedautomatically when running the Upgrade Assistant.Once the data is successfully upgraded to the new12.2.1 environment, you can close the UpgradeAssistant. The closed instances will continue toupgrade through a background process.
For more information, see Administering andMonitoring the Upgrade of SOA Instances .
Optional
SOA instances are automatically migrated during theupgrade. You can, however, actively manage andadminister the ongoing upgrade of closed instancesusing the administration SQL scripts or Oracle FusionMiddleware Enterprise Manager Control.
See Administering and Monitoring the Upgrade ofSOA Instances .
Required only if Oracle BAM is part of your upgrade.
If the 11g SOA domain that you are upgrading includesOracle Business Activity Monitoring (BAM), you mustcomplete all of the BAM-specific pre-upgrade tasksbefore you run the Reconfiguration Wizard. If you donot complete these steps before you attempt to run theReconfiguration Wizard, then the upgrade will fail.
See Upgrading from Oracle SOA Suite with OracleBusiness Activity Monitoring 11g to 12c
NOTE: Business Activity Monitoring (BAM) has beencompletely redesigned in 12c, and requires additionalsteps before reconfiguring the domain and after theupgrade.
Understanding the SOA Suite and BPM Upgrade Process Flow
3-4 Upgrading SOA Suite and Business Process Management
Table 3-1 (Cont.) Task Descriptions for Upgrading Oracle SOA Suite
Description More Information
Required
Run the Reconfiguration Wizard to reconfigure thedomain and node manager.
See Reconfiguring the Domain Using theReconfiguration Wizard
Required
Run the Upgrade Assistant (again) to upgrade domainconfigurations.
See Upgrading the Domain Component ConfigurationsUsing the Upgrade Assistant
Required only if there are tasks that apply to yourconfigurations.
Perform the required post-upgrade configuration tasks(if needed).
See Performing Post Upgrade Tasks
Required
As part of the upgrade verification process, Oraclerecommends that you start the new Administrationand Managed Servers and node manager to ensurethere are no issues.
See Starting and Stopping Servers
Required
As part of the upgrade verification process, Oraclerecommends that you ensure all of the upgradedcomponents are working as expected.
See Verifying the Domain Component ConfigurationsUpgrade
3.2 Installing Oracle SOA Suite and Business Process Management 12c(12.2.1.1)
Before you can upgrade your existing SOA and Business Process Management (BPM)components, you must first install the Oracle Fusion Middleware Infrastructure andthe Oracle SOA Suite and Business Process Management 12c (12.2.1.1) productdistributions.
You will install the 12c (12.2.1.1) product distributions into a new Oracle homedirectory. Do not use your existing Oracle home directory for the installation.
Verify that you have installed all prerequisite software. Oracle SOA Suite requires theOracle Fusion Middleware Infrastructure (Oracle WebLogic Server and JRF). For moreinformation, see Installing the Infrastructure Software
If your SOA domain has other SOA-integrated components, you must install thosedistributions, as well. See the Oracle Fusion Middleware documentation library for acomplete list of installation guides for each product distribution. Be sure to review anyof the component-specific chapters in this book to determine if additional pre-upgradesteps for your additional installations.
1. Log in to the target system.
2. Go to the directory where you downloaded the installation program.
3. Launch the installation program by running the java executable from the JDKdirectory on your system:
Installing Oracle SOA Suite and Business Process Management 12c (12.2.1.1)
Upgrading to SOA Suite and Business Process Management 12c (12.2.1.1) 3-5
• On UNIX operating systems: /home/Oracle/Java/jdk1.8.0_77/bin/java —jar fmw_12.2.1.0.0_PRODUCT.jar
• On Windows operating systems: C:\home\Oracle\Java\jdk1.8.0_77\bin\java -jar<component_name>.jarfmw_12.2.1.0.0_PRODUCT.jar
For example: cd /home/Oracle/Java/jdk1.8.0_77/bin/java —jarfmw_12.2.1.0.0_PRODUCT.jar
Be sure to replace the JDK location in these examples with the actual JDK locationon your system.
4. Follow the instructions described in Navigating the Installation Screens. This linkwill take you to the Oracle SOA Suite and Business Process Management InstallationGuide where you will find installation procedures for all of the supportedtopologies.
5. At the end of the installation you will be prompted to start the ConfigurationWizard to configure a new domain for 12c (12.2.1.1)
3.3 Creating the Required SOA Schemas Before You Upgrade from 11gIf you are upgrading from a supported 11g release, you may need to create the new12c required schemas in a supported database before you can upgrade.
Note:
OID-based Security Store Users Only: If you are using an OID-based securitystore in 11g, you must create the new 12c schema _STB and the _OPSS schemausing the Repository Creation Utility (RCU).
You do not need to reassociate an OID-based security store before upgrade.When upgrading schemas with the Upgrade Assistant, select the new OPSSschema and the Upgrade Assistant upgrades the OID-based security storeautomatically.
The 12c OPSS database schema is required so that you can reference the 12cschema during the reconfiguration of the domain. Your domain continues touse the OID-based security store after the upgrade is complete.
Table 3-2 Required Schemas for SOA and SOA integrated products
If you areupgrading...
Create these 12c schemas before you upgrade
SOA Suite (SOA) Service Table (_STB)
Audit Services (_IAU)
Business ProcessMonitoring (BPM)
Service Table (_STB)
Audit Services (_IAU)
Creating the Required SOA Schemas Before You Upgrade from 11g
3-6 Upgrading SOA Suite and Business Process Management
Table 3-2 (Cont.) Required Schemas for SOA and SOA integrated products
If you areupgrading...
Create these 12c schemas before you upgrade
Business ActivityMonitoring (BAM)
Schemas required for SOA Suite
And:
WebLogic Services (_WLS)
Managed FileTransfer (MFT)
Service Table (_STB)
Audit Services (_IAU)
Oracle Service Bus(OSB)
In Oracle FusionMiddleware 11greleases it waspossible to runOracle Service Bus(OSB) without adatabase, as theSOA schema wasnot required. In 12c,however, you musthave a supporteddatabase configuredwith the requiredSOA schemas beforeyou can run OracleService Bus 12c(12.2.1.1).
SOA Infrastructure (_SOAINFRA)
Service Table (_STB)
User Messaging (_UMS)
NOTE: It is possible to install Oracle Service Bus without runningOracle SOA, but you must create the _SOAINFRA and _STB schemas.
User MessagingService (UMS)
Service Table (_STB)
Audit Services (_IAU)
To create schemas using the RCU:
1. Set the JAVA_HOME environment variable and add $JAVA_HOME/bin to $PATH, ifyou have not done so already. The current supported JDK version is jdk1.8.0_77
2. Navigate to the 12c ORACLE_HOME/oracle_common/bin directory on yoursystem.
3. Start RCU:
On Unix operating systems:
./rcu
On Windows operating systems:
rcu.bat
Creating the Required SOA Schemas Before You Upgrade from 11g
Upgrading to SOA Suite and Business Process Management 12c (12.2.1.1) 3-7
4. Complete the schema creation by navigating the RCU screens. When creating newschemas for the upgrade, make sure to choose Select existing prefix and locate theprefix you used to create your existing schemas.
NOTE: The Common Infrastructure Services (prefix_STB) and Oracle PlatformSecurity Services (prefix_OPSS) schemas are selected by default if they have not yetbeen created.
.
For more information, see Navigating the RCU Screens to Create the Schemas inInstalling and Configuring the Oracle Fusion Middleware Infrastructure
Creating the Required SOA Schemas Before You Upgrade from 11g
3-8 Upgrading SOA Suite and Business Process Management
Creating the 12c OPSS Schema for an OID-based Security StoreThe only supported LDAP-based OPSS security store is Oracle InternetDirectory (OID). An LDAP-based policy store is typically used inproduction environments.
3.3.1 Creating the 12c OPSS Schema for an OID-based Security StoreThe only supported LDAP-based OPSS security store is Oracle Internet Directory(OID). An LDAP-based policy store is typically used in production environments.
If you are using an OID-based security store in 11g, you must create the new 12cschemas using the Repository Creation Utility (RCU).
You do not need to reassociate an OID-based security store before upgrade. While theUpgrade Assistant is running, select the OPSS schema. The Upgrade Assistantupgrades the OID-based security store automatically.
Note:
The 12c OPSS database schema is required so that you can reference the 12cschema during the reconfiguration of the domain. Your domain continues touse the OID-based security store after the upgrade is complete.
3.4 Running a Pre-Upgrade Readiness CheckThe Upgrade Assistant can be run in -readiness mode to identify potential upgradeissues before you perform an actual upgrade.
The readiness check is a read-only operation that scans your existing domain ordatabase schemas and produces a text file with the results of the scan. If your pre-upgrade environment has issues, you can correct those issues and then rerun thereadiness check before you upgrade.
By default, the Readiness Check Report file is located in the following Oracle 12cdirectory: ORACLE_HOME/oracle_common/upgrade/logs
Note: You can run the readiness check while the system is online. Dependingon the comprehensiveness of the checks, the readiness checks can take moretime to complete. Oracle recommends that you run the Readiness Checkduring slower usage periods to prevent performance degradation.
To perform a readiness check on your pre-upgrade environment, launch the UpgradeAssistant in -readiness mode:
1. Go to the bin directory:
On UNIX operating systems:
ORACLE_HOME/oracle_common/upgrade/bin
On Windows operating systems:
ORACLE_HOME\oracle_common\upgrade\bin
2. Enter the following command to start the Upgrade Assistant.
On UNIX operating systems:
Running a Pre-Upgrade Readiness Check
Upgrading to SOA Suite and Business Process Management 12c (12.2.1.1) 3-9
./ua -readiness
On Windows operating systems:
ua.bat -readiness
You can also launch the Upgrade Assistant with logging parameters as shown inthe UNIX example below:
When troubleshooting, consider setting the -logLevel to TRACE so that moreinformation will be logged. If additional information is not needed, change thelogLevel as the Upgrade Assistant's log files can become very large when -logLevel TRACE is used.
Note: If you have not created the Service Table schema, you might encounterthe error message UPGAST-00328 : The schema version registrytable does not exist on this database. If that happens itis necessary to create the service table schema in orderto run Upgrade Assistant.
If this occurs, you will need to create the required 12c schemas with theRepository Creation Utility (RCU).
Always. Readiness checks are onlyperformed on schemas orcomponent configurations that areat a supported upgrade startingpoint. There are two options tochoose from. These options aredescribed below:
• Use the Individually SelectedSchemas option to be able toselect the schemas you want toreview prior to upgrade.
• Use the Domain Based option tolet the Upgrade Assistantperform a readiness check perdomain.
Available Components When Individually SelectedSchemas option is selected.
This screen lists the availablecomponents for which the schemaswill be selected. If you selectsomething here, readiness checkwill be performed on thatcomponent's schema.
All Schemas Component List Any time a schema readiness checkis done.
This screen is shown any time aschema readiness check is done.This could be when you selectIndividually Selected Schemas orDomain Based with the Includechecks for all schemas option.
Schema Credentials Always. Use this screen to enter informationrequired to connect to the selectedschema and the database that hoststhe schema. If the schema that is tobe upgraded was created by RCU ina prior Fusion Middleware releasethen you will see a drop-downmenu listing the possible schemanames.
DBA User Name: Oraclerecommends that you run theUpgrade Assistant as FMW and notSYSDBA. If you have not yetcreated the FMW user, see Creatinga Non-SYSDBA User to RunUpgrade Assistant
Readiness Summary Always. This screen provides a high-leveloverview of the readiness checks tobe performed based on yourselections.
Click Save Response File if youplan to run the Upgrade Assistantagain in -response (or silent)mode.
Running a Pre-Upgrade Readiness Check
Upgrading to SOA Suite and Business Process Management 12c (12.2.1.1) 3-11
Readiness Check Always. This screen displays the currentstatus of the readiness check.Depending on what you haveselected to check, the process cantake several minutes.
For a detailed report, click ViewReadiness Report. This buttonappears only after all the readinesschecks are complete.
Readiness Success If the readiness check completessuccessfully.
You can now review the completereport.
If the readiness check encounters anissue or error, review the log file toidentify the issues, correct theissues, and then restart thereadiness check.
By default, the Readiness CheckReport file is located in thefollowing Oracle 12c directory:
ORACLE_HOME/oracle_common/upgrade/logs
3.5 Stopping SOA Servers and ProcessesBefore running Upgrade Assistant, you must shut down ALL Oracle FusionMiddleware Managed Servers, Administration Servers, and system components (suchas OHS) that may be using the schemas or configurations you want to update.
Note: Failure to shut down servers and processes may result in an incompleteor failed upgrade.
To stop a WebLogic Server Managed Server, use the following script:
1. Business Activity Monitoring (BAM) Managed Server
2. Oracle Service Bus (OSB) Managed Server
3. Service-Oriented Architecture (SOA) Managed Server
4. Oracle Web Services Manager (OWSM) Managed Server
5. Administration Servers
6. Node Managers
If you are running Node Manager, you should also stop the Node Manager. Youcan do this by closing the console window in which Node Manager is running, orby using the stopNodeManager WLST command.
7. Webtier (including the Oracle HTTP Server)
3.6 Upgrading Schemas with the Upgrade AssistantFollow these tasks to upgrade your schemas with the Upgrade Assistant.
Generating Log Files During SOAINFRA Schema Upgrade (Recommended)
Identifying Schemas that Can be Upgraded with the Upgrade AssistantReview the list of available schemas before you begin the upgrade byquerying the schema version registry.
Starting the Upgrade Assistant
Upgrading SOA Schemas with the Upgrade AssistantUse the Upgrade Assistant to upgrade your supported schemas to 12c(12.2.1.1)
Verifying the Schema Upgrade
Verifying the Instance Upgrade (if applicable)
Checking for Invalid Database Objects
Upgrading Partitioned Schema Tables from 11gIf you are upgrading an Oracle SOA 11g installation that includesschemas partitioned as described in the Oracle SOA Suite 11gAdministration Guide, and you want to continue with this specific tablepartitioning strategy in SOA 12c (12.2.1.1), then you must complete theserequired steps to upgrade your partitioned schema tables.
3.6.1 Generating Log Files During SOAINFRA Schema Upgrade (Recommended)To facilitate troubleshooting the upgrade, Oracle recommends that you generate logfiles when upgrading _SOAINFRA schema. Logging is disabled by default.
To enable logging:
Upgrading Schemas with the Upgrade Assistant
Upgrading to SOA Suite and Business Process Management 12c (12.2.1.1) 3-13
1. Create the soainfra user directory with the name UPGRADE_DIR
2. Enable debugging logs by calling function set_LogLevel(1) or ALTERPROCEDURE log_debug COMPILE PLSQL_CCFLAGS = 'debug_on:TRUE';
You can also launch the Upgrade Assistant with logging parameters as shown in theUNIX example below:
3.6.2 Identifying Schemas that Can be Upgraded with the Upgrade AssistantReview the list of available schemas before you begin the upgrade by querying theschema version registry.
This optional step can be used if you want to manually query theschema_version_registry table before you start the upgrade process. It isimportant to note that the Upgrade Assistant identifies all schemas that are availablefor an upgrade and allows you to select the individual schemas you want to upgradeor allow Upgrade Assistant to upgrade all of the schemas in the domain. In addition,when you run the Upgrade Assistant in —readiness mode, you will receive a reportwith all of the schemas and their current pre-upgrade versions.
If you are using an Oracle database, connect to the database as a user having OracleDBA privileges, and run the following from SQL*Plus to get the current versionnumbers:
SET LINE 120COLUMN MRC_NAME FORMAT A14COLUMN COMP_ID FORMAT A20COLUMN VERSION FORMAT A12COLUMN STATUS FORMAT A9COLUMN UPGRADED FORMAT A8SELECT MRC_NAME, COMP_ID, OWNER, VERSION, STATUS, UPGRADED FROM SCHEMA_VERSION_REGISTRY ORDER BY MRC_NAME, COMP_ID ;
The following report is generated when saved to a SQL script, for exampleversion.sql.
If the number in the "VERSION" is at 11.1.1.7.0 or higher, and the STATUS column is'VALID', then the schema is supported for upgrade.
If an upgrade is not needed for a schema, the schema_version_registry tableretains the schemas at their pre-upgrade version after the upgrade.
Tip:
Compare the information you collect from the schema version registry and thecorresponding schemas to determine whether there are schemas in yourdomain that are not available for an upgrade yet.
Notes about the schemas that need to be upgraded
• For most components, the only schema version starting points that are valid forupgrading are 11g Release 1 (1.1.1.7.0, 11.1.1.8.0, or 11.1.1.9.0) or 12c (12.1.2, 12.1.3,or 12.2.1.0). If your schemas are not at a supported version, then you must upgradethem before using the 12c (12.2.1.1) upgrade procedures.
Upgrading Schemas with the Upgrade Assistant
3-14 Upgrading SOA Suite and Business Process Management
Some components, such as Oracle Enterprise Data Quality and Oracle Golden GateVeridata, support an upgrade from versions other than the standard Oracle FusionMiddleware supported versions.
Refer to your component-specific installation and upgrade documentation foradditional information about the schemas that are required for your upgrade.
• If you used an OID-based policy store in 11g, make sure that you create a new 12c(12.2.1.1) OPSS schema before you perform the upgrade. After the upgrade, theOPSS schema will still remain LDAP-based store.
• You can only upgrade schemas for products that are available for upgrade in theOracle Fusion Middleware 12c (12.2.1.1) release. Do not attempt to upgrade adomain that includes components that are not yet available for upgrade to 12c(12.2.1.1).
3.6.3 Starting the Upgrade AssistantStart the Upgrade Assistant on the host where Administration Server is running, bydoing the following:
1. On UNIX operating systems:: change directory to ORACLE_HOME/oracle_common/upgrade/bin.
On Windows operating systems: change directory to ORACLE_HOME\oracle_common\upgrade\bin.
2. Enter the following command to start the Upgrade Assistant:
On UNIX operating systems:
./ua
On Windows operating systems:
ua.bat
You can also launch the Upgrade Assistant with logging parameters as shown inthe UNIX example below:
Note: When troubleshooting, consider setting the -logLevel to TRACE sothat more information will be logged. If additional information is not needed,change the logLevel as the Upgrade Assistant's log files can become very largewhen -logLevel TRACE is used.
Upgrading Schemas with the Upgrade Assistant
Upgrading to SOA Suite and Business Process Management 12c (12.2.1.1) 3-15
3.6.4 Upgrading SOA Schemas with the Upgrade AssistantUse the Upgrade Assistant to upgrade your supported schemas to 12c (12.2.1.1)
The Upgrade Assistant displays a sequence of screens listed when upgrading schemas.Perform the action(s) for each of the screen.
Welcome This screen provides an overview of the Upgrade Assistant and some information aboutimportant pre-upgrade tasks.
Schemas Select Individually Selected Schemas.
AvailableComponents
This screen provides a list of installed Oracle Fusion Middleware components that haveschemas that can be upgraded. When you select a component, the schemas and anydependencies are automatically selected.
For example, when Oracle SOA is selected, the Oracle SOA (_SOAINFRA), Audit Services(_IAU), Metadata Service (_MDS), Oracle Platform Security Services(_OPSS), and UserMessaging Services (_UMS) schemas will be included in the upgrade.
When Managed File Transfer is selected, Audit Services (_IAU), Enterprise Scheduler(_ESS) and Platform Security Services (OPSS) will be included in the upgrade.
Domain Directory This screen appears if you selected Oracle Platform Security Services or Oracle AuditServices on the Available Components screen.
Enter the absolute path to the existing WebLogic domain directory, or click Browse tonavigate to and select the domain directory you are upgrading.
Prerequisites Check that the prerequisites for schema upgrade are met. You must select eachprerequisite before you click Next.
CAUTION: Upgrade Assistant will NOT verify that these prerequisites have been met.
Upgrading Schemas with the Upgrade Assistant
3-16 Upgrading SOA Suite and Business Process Management
Schema Credentials Use this screen to enter database connection details for each of the schemas you areupgrading.
1. Select a the database type from the Database Type drop-down menu.
2. Enter the database connection details, and click Connect.
3. Select the schema you want to upgrade from the Schema User Name drop-downmenu, and then enter the password for the schema.
In some cases, such as _ORASDPM, you will need to manually enter the Schema UserName and password.
11g to 12c Upgrades Only: The UCSUMS schema is not auto-populated. Enterprefix_ORASDPM as the user. Upgrade environment uses _ORASDPM as the schemaname, whereas in the 12c environment it is referred to as the _UMS schema.
4. Click Next.
Notes:
• The title of Schema Credentials screen varies, depending upon the schemas you areupgrading. For example, if you are upgrading the _SOAINFRA schema, the screen titleappears as "SOAINFRA Schema".
• For information on the fields required to connect to the database, click Help.
Examine Review the status of the Upgrade Assistant as it examines each component, verifying thatthe component is ready for upgrade.
Verify that the Source Version displayed for each schema is listing the correct versionnumber for the schema to be upgraded.
Upgrade Summary Review the summary of the options that you have selected for schema upgrade. Verifythat the correct Source and Target versions are listed for each schema you intend toupgrade.
Click Upgrade to upgrade the schemas, or click Back if you wish to change theconfigurations.
Upgrade Progress Review the status of the current upgrade process.
NOTE: The progress bar on this screen displays the progress of the current upgradeprocedure. It does not indicate the time remaining for the upgrade.
Click Next when the upgrade is complete.
Upgrade Success Click Close if the Upgrade was successful.
If the upgrade failed or if you canceled the upgrade before it completed successfully, youshould review the log files, restore the backed up environment, and restart the UpgradeAssistant.
3.6.5 Verifying the Schema UpgradeUse the following SQL command to verify that the schema version inschema_version_registry has been properly updated.
Upgrading Schemas with the Upgrade Assistant
Upgrading to SOA Suite and Business Process Management 12c (12.2.1.1) 3-17
SET LINE 120COLUMN MRC_NAME FORMAT A14COLUMN COMP_ID FORMAT A20COLUMN VERSION FORMAT A12COLUMN STATUS FORMAT A9COLUMN UPGRADED FORMAT A8SELECT MRC_NAME, COMP_ID, OWNER, VERSION, STATUS, UPGRADED FROM SCHEMA_VERSION_REGISTRY ORDER BY MRC_NAME, COMP_ID ;
Check that the number in the VERSION column matches the latest version numberfor that schema. See Schemas That Require an Upgrade to verify that the updatedversion number is correct for your schema(s).
In the query result, the STATUS field will be either UPGRADING or UPGRADEDduring the schema patching operation, and will become VALID when the operation iscompleted.
If the status appears as INVALID, the schema update failed. You should examine thelogs files to determine the reason for the failure.
3.6.6 Verifying the Instance Upgrade (if applicable)If instances were upgraded as part of your schema upgrade, verify that there were noerrors with the instances.
• If the Upgrade Assistant reports that there are no additional instances to beupgraded, then simply close the Upgrade Assistant UI and continue with theremaining upgrade procedures (launching the Reconfiguration Wizard forexample).
• If the Upgrade Assistant reports that there was an error during the instanceupgrade, then correct the error(s) and resubmit the database job to complete theupgrade. You can also use the Report Upgrade Summary administration script(Option 1) to check the UPGRADE ERROR COUNT section of the report. For moreinformation, see Resolving Instance Upgrade Errors .
• If there are still closed instances to be upgraded, then you will be notified that theupgrade of the closed instances will continue in the background after you close theUpgrade Assistant. Do not close the Upgrade Assistant until UA reports it isfinished and you see the following:
Oracle SOA1. The Upgrade Assistant has successfully upgraded all active instances. You can now close the Upgrade Assistant.2. The automated upgrade of closed instances will continue in the background after the Upgrade Assistant is exited and until the SOA server is started,at which point the upgrade will stop. You can schedule the upgrade of any remaining closed instances for a time when the SOA server is less busy.Close the Upgrade Assistant and use the instance data administration scripts to administer and monitor the overall progress of this automated upgrade. For more information see "Administering and Monitoring the Upgrade of SOA Instance Data" in Upgrading SOA Suite and Business Process Management.
3.6.7 Checking for Invalid Database ObjectsIf you are using an Oracle database, you should recompile database objects afterrunning the Upgrade Assistant by connecting to the database as SYS and running thefollowing from SQL*Plus:
SQL>@?/rdbms/admin/utlrp.sql
Upgrading Schemas with the Upgrade Assistant
3-18 Upgrading SOA Suite and Business Process Management
This will compile the database objects that were upgraded by Upgrade Assistant.
Then issue the following query to ensure there are no longer any invalid databaseobjects:
SELECT owner, object_name FROM all_objects WHEREstatus='INVALID';
None of the database objects for the upgraded schema should be invalid at this point.If there are any, run the utlrp.sql command again and check again. If the problempersists, you should file a service request.
3.6.8 Upgrading Partitioned Schema Tables from 11gIf you are upgrading an Oracle SOA 11g installation that includes schemas partitionedas described in the Oracle SOA Suite 11g Administration Guide, and you want tocontinue with this specific table partitioning strategy in SOA 12c (12.2.1.1), then youmust complete these required steps to upgrade your partitioned schema tables.
Note: This procedure is required only if you plan to use the existing OracleSOA 11g table partitioning strategy in your upgraded 12c environment. If youare upgrading from a previous 12c release, you will not need to complete thisprocedure.
Understanding the Upgrade of Partitioned Schema Tables
Oracle SOA Suite 12c introduces a new set of Fabric tables on which the equi-partitioning strategy is based. The procedure described below enables you to align theexisting 11g strategy with the new 12c Fabric tables without rebuilding the dependentService Engine tables like BPEL, for example. The partition alignment will model thenew Fabric 12c table partitions against the now obsolete 11g COMPOSITE_INSTANCEpartitions (which all other/existing partitions should already be aligned). The new 12cFabric Table that will drive the equi-partitoning strategy is called"SCA_FLOW_INSTANCE".
Before You Begin
Review the following to understand how the upgrade may impact your deployment:
• To align the new SOA 12c Fabric tables, dummy/empty RANGE partitions will beadded which are modeled on the now obsolete 11g composite_instance table.This means that approximately 10 new Fabric tables will be recreated intopartitioned tables.
• You can convert RANGE partitioning to INTERVAL-RANGE partitioning duringthis process as Oracle Fusion Middleware SOA Suite 12c now supports both.
You can chose to continue with RANGE partitioning or convert to INTERVAL-RANGE partitioning as part of this process. An INTERVAL-RANGE table can houseboth RANGE and INTERVAL-RANGE partitions with the first partition always beinga RANGE partition (called a transition point). Note that when the tables areconverted to INTERVAL-RANGE , there will still be the existing RANGE partitionsuntil new INTERVAL-RANGE partitions are automatically allocated.
• The 11g SOA strategy did not provide any recommendations on the use of aMAXVALUE partitions. If you choose to convert to INTERVAL-RANGEpartitioning and the MAXVALUE partition is not empty, then the table will need to
Upgrading Schemas with the Upgrade Assistant
Upgrading to SOA Suite and Business Process Management 12c (12.2.1.1) 3-19
be rebuilt. However, if the MAXVALUE partition is empty then it will just bedropped as part of the conversion to INTERVAL-RANGE. However, if theMAXVALUE partition is empty, then it will be dropped as part of the conversion.( INTERVAL-RANGE partitioning does not allow a MAXVALUE partition aspartitions are automatically allocated.)
• The process involves the use of the TRS (Table Recreation Scripts) utility. You willbe required to edit some of the generated scripts. The editing is required to correctthe DDL syntax, as the generated DDL can vary between installations and RDBMSversions or may have been customized.
• The verification scripts in 12.2.1.1 are upgrade-aware and consider the instances inboth the 12c sca_flow_instance and 11g composite_instance tables.
Note: Oracle recommends that you create a complete backup of the schemasand database before starting this process. Oracle also recommends that youexecute this procedure in a test environment before attempting in production(including the verification scripts).
Process Overview
The upgrade of partitioned schema tables happens in two phases:
Phase 1: Generate the DDL script.
• Correct partition keys
• Honor any DDL changes
• Partition new 12c Fabric tables
Creates Dummy RANGE partitions modeled against “composite_instance”
5. Run trs_migrate_exec.sql to generate the DDL script.
Phase 2: Editing and Executing the DDL Script
Once the DDL script has been generated, you will need to edit the script beforeexecuting it.
Upgrading Schemas with the Upgrade Assistant
Upgrading to SOA Suite and Business Process Management 12c (12.2.1.1) 3-21
1. Open the generated DDL script and search for comments about theCOMPOSITE_INSTANCE partitions. You must update the DDL of each the newFabric table and add these partitions wherever these comments are found.
CREATE TABLE "PART_SOAINFRA"."SCA_FLOW_INSTANCE_M" ( "FLOW_ID" NUMBER(*,0), "FLOW_CORRELATION_ID" VARCHAR2(100), …. TABLESPACE "DEV12_SOAINFRA" ; <REMOVE SEMICOLON/* <REMOVE COMMENTS (if any) REM The RANGE partitions are based on COMPOSITE_INSTANCEREM INTERVAL(NUMTOYMINTERVAL(1, 'MONTH'))REM (PARTITION p0 VALUES LESS THAN (TO_DATE('2007-02-01', 'YYYY-MM-DD')),REM (PARTITION p1 VALUES LESS THAN (TO_DATE('2007-03-01', 'YYYY-MM-DD')));*/PARTITION BY RANGE (CREATED_TIME)INTERVAL(NUMTOYMINTERVAL(1, 'MONTH'))(PARTITION P0 VALUES LESS THAN (TO_DATE(TIMESTAMP' 2007-02-01 00:00:00' ,'YYYY-MM-DD')),, <REMOVE TIMESTAMP, 00:00:00 and LAST COMMA
The edited script should look like this:
CREATE TABLE "PART_SOAINFRA"."SCA_FLOW_INSTANCE_M" ( "FLOW_ID" NUMBER(*,0), "FLOW_CORRELATION_ID" VARCHAR2(100), …. TABLESPACE "DEV12_SOAINFRA" PARTITION BY RANGE (CREATED_TIME)INTERVAL(NUMTOYMINTERVAL(1, 'MONTH'))(PARTITION P0 VALUES LESS THAN (TO_DATE('2007-02-01' ,'YYYY-MM-DD')),PARTITION P1 VALUES LESS THAN (TO_DATE('2007-03-01' ,'YYYY-MM-DD')));
.
2. Run/test the edited DDL script in a test environment first.
3. Check the log in TRS_DIR for errors.
4. Test verification scripts.
3.7 Reconfiguring the Domain Using the Reconfiguration WizardAfter upgrading the schemas, run the Reconfiguration Wizard to reconfigure yourdomain component configurations to 12c.
When you use the Reconfiguration Wizard to reconfigure a WebLogic Server domain,the following items are automatically updated, depending on the applications in thedomain:
• WLS core infrastructure
• Domain version
Note: The Reconfiguration Wizard does not update any of your ownapplications that are included in the domain.
Reconfiguring the Domain Using the Reconfiguration Wizard
3-22 Upgrading SOA Suite and Business Process Management
Specifically, when you reconfigure a domain the following occurs:
• The domain version number in the config.xml file for the domain is updated tothe Administration Server's installed WebLogic Server version.
• Reconfiguration templates for all installed Oracle products are automaticallyselected and applied to the domain. These templates define any reconfigurationtasks that are required to make the WebLogic domain compatible with the currentWebLogic Server version.
• Start scripts are updated.
Note: Once the domain reconfiguration process starts, it is irreversible. Priorto running the Reconfiguration Wizard, ensure that you have backed up thedomain as described in Backing Up the Domain. If an error or otherinterruption occurs while running the Reconfiguration Wizard, you mustrestore the domain by copying the files and directories from the backuplocation to the original domain directory. This is the only way to ensure thatthe domain has been returned to its original state prior to reconfiguration.
Follow these instructions to reconfigure the existing domain using the ReconfigurationWizard. For general information about how the domain is reconfigured, see Reconfiguring WebLogic Domains.
Backing Up the Domain
Starting the Reconfiguration Wizard
Reconfiguring the Domain
3.7.1 Backing Up the DomainPrior to running the Reconfiguration Wizard, make a backup copy of the domaindirectory:
1. Copy the source domain to a separate location to preserve the contents.
For example, copy C:\domains\mydomain to C:\domains\mydomain_backup.
2. Prior to updating the domain on each remote Managed Server, make a backupcopy of the domain directory on each remote machine.
3. Verify that the backed up versions of the domain are complete.
If domain reconfiguration fails for any reason, you must copy all files and directoriesfrom the backup directory into the original domain directory to ensure that thedomain is returned entirely to its original state prior to reconfiguration.
3.7.2 Starting the Reconfiguration WizardStart the Reconfiguration Wizard in graphical mode by doing the following:
1. Log in to the system on which the domain resides.
2. Open the command shell (on UNIX operating systems) or open a commandprompt window (on Windows operating systems).
Reconfiguring the Domain Using the Reconfiguration Wizard
Upgrading to SOA Suite and Business Process Management 12c (12.2.1.1) 3-23
3. Edition Based Database Users Only: If your schemas are configured with EBRdatabase, a default edition name must be manually supplied before you run theReconfiguration Wizard.
Run the following SQL command to set the default edition:
ALTER DATABASE DEFAULT EDITION = edition_name;
where edition_name is the name of the child edition name.
where log_file is the absolute path of the log file you'd like to create for thedomain reconfiguration session. This can be helpful if you need to troubleshoot thereconfiguration process..
The parameter -log_priority=ALL ensures that logs are logged in fine mode.
Note:
When you run reconfig.cmd or reconfig.sh, the following error messagemight display to indicate that the default cache directory is not valid:
*sys-package-mgr*: can't create package cache dir
You can change the cache directory by setting the environment variableCONFIG_JVM_ARGS. For example:
CONFIG_JVM_ARGS=-Dpython.cachedir=valid_directory
3.7.3 Reconfiguring the DomainNote that you may not see every screen listed below. In addition, you may need tocomplete additional screens based on your environment setup. For more information,see Reconfiguring WebLogic Domains.
Table 3-5 Reconfiguration Wizard Screens
Reconfiguration Wizard Screen Description and Action Required
Select Domain Enter the absolute path to the existing domaindirectory, or click Browse to navigate to and select thedomain directory.
Reconfiguring the Domain Using the Reconfiguration Wizard
3-24 Upgrading SOA Suite and Business Process Management
Table 3-5 (Cont.) Reconfiguration Wizard Screens
Reconfiguration Wizard Screen Description and Action Required
Reconfiguration Setup Progress Shows the progress of applying the reconfigurationtemplates.
Domain Mode and JDK Domain mode cannot be changed.
Select the JDK to use in the domain or click Browse tonavigate to the JDK you want to use.
Note that Oracle Fusion Middleware 12c requires JavaSE 7. For more information, see Verifying Certificationand System Requirements.
Database Configuration Type Use the RCU Data option to connect to the Server Table(_STB) schema. The Repository Creation Utility (RCU)will automatically use service table schema to load theother 12c schema credentials automatically. Alwaysverify the data on the JDBC screens that follow.
NOTE: For any existing 11g datasource, thereconfiguration will preserve the existing values. Fornew datasources where the schema was created by 12cRCU, the default connection data will be retrieved fromthe _STB schema. If no connection data for a givenschema is found in the _STB schema, then the defaultconnection data is used.
JDBC Data Sources This screen is displayed if you created custom datasources for a database-based OPSS security store orAudit Data store in 11g.
Use this screen to configure the JDBC data sourcesdefined in your domain source.
JDBC Data Sources Test Test the data source connections you configured on theJDBC Data Sources screen.
JDBC Component Schema Specify the data source settings for each of the schemaslisted on the screen, by selecting the check box adjacentto each schema name.
You must specify the 11g schema details for theschemas that you just upgraded. For the others, specifythe 12.2.1.1 schema details.
JDBC Component Schema Test Test the configurations that you specified for the datasources in the previous screen. Select the check boxesadjacent to the names of the schemas to test, and clickTest Selected Connections.
The result of the test is indicated in the Status column.Click Next when the test is successful for all theschemas.
Reconfiguring the Domain Using the Reconfiguration Wizard
Upgrading to SOA Suite and Business Process Management 12c (12.2.1.1) 3-25
Table 3-5 (Cont.) Reconfiguration Wizard Screens
Reconfiguration Wizard Screen Description and Action Required
Node Manager This screen is displayed only if the domain you arereconfiguring is currently using a per-host NodeManager. Use this screen to select the Node Managerconfiguration to use for the reconfigured domain. Theresulting configuration depends on the combination ofoptions you select for Node Manager Type and NodeManager Configuration.
Advanced Configuration The categories that are listed on this screen depend onthe resources defined in the templates you selected forthe domain during domain configuration.
For example, when the SOA Suite and BPM template isbeing applied to the domain, select the ManagedServers, Clusters and Coherence if one or more of thefollowing applies:
• You have more than one managed server in a singledomain (soa_server1 and bam_server1, forexample)
• You need to modify cluster or coherence dataFor information on using the other advancedconfiguration options, such as Node Manager,Deployments and Services, Domain Front End HostCapture and JMS File Store, see the online help.
Managed Servers You must specify the actual hostname for the ListenAddress for each managed server in your domain.
Do not use the default localhost or All LocalAddresses option.
You must specify the actual hostname ashostname.company.com
When upgrading from 12.1.3 to 12.2.1.1, you mustassign the server to the appropriate Server Groups.See Targeting Server Groups Using theReconfiguration Wizard
Assign Servers to Machines If you have created servers as part of the upgradeprocess, then select the server name in the Servers listbox and target them to the correct Node ManagerMachine.
Otherwise, no action is required on this screen whenyou are upgrading or reconfiguring the domain.
Reconfiguring the Domain Using the Reconfiguration Wizard
3-26 Upgrading SOA Suite and Business Process Management
Table 3-5 (Cont.) Reconfiguration Wizard Screens
Reconfiguration Wizard Screen Description and Action Required
Assign Servers to Clusters Cluster Upgrades Only: If you are upgrading clusters,use this screen to assign Managed Servers to clusters.
Note that only Managed Servers are displayed in theServer list box. The Administration Server is not listedbecause it cannot be assigned to a cluster.
Note: SOA UPGRADESONLY: When OWSMPM isin its own cluster and notpart of SOA or OSB clusters,you should target onlySOA-MGD-SVRS-ONLYuser extensible server groupto the SOA cluster, targetonly OSB-MGD-SVRS-ONLY to the OSB clusterand target WSMPM-MAN-SVER server group toOWSM . When upgrading12.1.3 to 12.2.11, you alsoneed to target BAM-MGD-SVRS-ONLY to BAMcluster.
Configuration Summary Review the configuration summary.
Click Reconfig to reconfigure the domain, or click Backto change the configurations.
Reconfiguration Progress Review the reconfiguration progress. Click Next whenthe process is complete.
Reconfiguration Success Review the final status of the reconfiguration process.Click Finish to exit the Reconfiguration Wizard.
3.8 Upgrading the Domain Component Configurations Using the UpgradeAssistant
Use the Upgrade Assistant to update any remaining WebLogic componentconfigurations within the domain.
Follow the instructions in the following sections to upgrade any additional domaincomponent configurations using the Upgrade Assistant.
Note:
Do not start the Administration Server before launching the UpgradeAssistant.
Upgrading the Domain Component Configurations Using the Upgrade Assistant
Upgrading to SOA Suite and Business Process Management 12c (12.2.1.1) 3-27
Starting the Upgrade Assistant in Graphical User Interface (GUI) ModeThe Upgrade Assistant is used to upgrade schemas, componentconfigurations and standalone system components.
Upgrading SOA Component Configurations
3.8.1 Starting the Upgrade Assistant in Graphical User Interface (GUI) ModeThe Upgrade Assistant is used to upgrade schemas, component configurations andstandalone system components.
Oracle recommends that you successfully complete the upgrade of schemas andcomponent configurations for a single domain before beginning the upgrade ofanother domain.
Note: The Upgrade Assistant should be run by a non-SYSDBA userwhenever possible. The steps to create a user who has the privileges requiredto upgrade the schemas are described in Creating a Non-SYSDBA User.
To start the Upgrade Assistant:
1. On UNIX operating systems:: change directory to ORACLE_HOME/oracle_common/upgrade/bin.
On Windows operating systems: change directory to ORACLE_HOME\oracle_common\upgrade\bin.
2. Enter the following command to start the Upgrade Assistant:
On UNIX operating systems:
./ua
On Windows operating systems:
ua.bat
You can also launch the Upgrade Assistant with logging parameters as shown inthe UNIX example below:
Upgrading the Domain Component Configurations Using the Upgrade Assistant
3-28 Upgrading SOA Suite and Business Process Management
Note: When troubleshooting, consider setting the -logLevel to TRACE sothat more information will be logged. If additional information is not needed,change the logLevel as the Upgrade Assistant's log files can become very largewhen -logLevel TRACE is used.
3.8.2 Upgrading SOA Component ConfigurationsDescribes the screens of the Upgrade Assistant when upgrading WebLogicComponent Configurations.
NOTE: The screens you see are based on your environment. You may or may not seeall of the screens described below. For more information on using the UpgradeAssistant screens, see the online help.
Note:
Additional configuration tasks may be required.
After the Upgrade Assistant has successfully completes the upgrade of yourschemas and component configurations, you may need to perform the tasksdescribed in Performing Post Upgrade Tasks to ensure that your componentscontinue to function as expected.
Welcome This screen provides an overview of the Upgrade Assistant and some informationabout important pre-upgrade tasks.
Click Next to continue.
WebLogic Components Select the All Configurations Used by a Domain option to upgrade componentconfigurations for a managed WebLogic Server domain. You must enter the domaindirectory for the domain that you are upgrading now.
Click Next.
OWSM Policy Manager This screen is displayed if your 11g environment has multiple WebLogic Serverdomains, but the OWSM Policy Manager is only in one WLS domain and the OWSMagents are in other domains.
Provide the credentials for the WebLogic Administration Server domain where theOracle Web Services Manager (OWSM) Policy Manager is deployed.
For information about the fields on this page, click Help, or refer to OWSM PolicyManager.
Component List This screen provides a list of components that will be included in the domaincomponent configuration upgrade.
Prerequisites Check if the prerequisites for component configurations upgrade are met.
CAUTION: The Upgrade Assistant will not validate that these prerequisites have beenperformed.
Upgrading the Domain Component Configurations Using the Upgrade Assistant
Upgrading to SOA Suite and Business Process Management 12c (12.2.1.1) 3-29
UMS Configuration This screen is presented if there are remote managed servers hosting UMS 11gconfiguration files. You must provide the credentials to these servers so that theUpgrade Assistant can access the configuration files.
NOTE: You may be required to manually copy the UMS configuration files if theUpgrade Assistant is unable to locate them. See Upgrade Assistant: Copying UMSConfiguration Files.
Examine Review the status of the Upgrade Assistant as it examines each component, verifyingthat the component is ready for upgrade.
Upgrade Summary Review the summary of the options that you have selected for schema upgrade.
Click Upgrade to upgrade the schemas, or click Back if you wish to change theconfigurations.
Upgrade Progress Review the status of the upgrade process.
Click Next when the upgrade is complete.
Upgrade Success Click Close if the Upgrade was successful.
If the upgrade failed or if you canceled the upgrade before it completed successfully,you should review the log files, restore the backed up environment, and restart theUpgrade Assistant.
3.9 Managing Your Upgraded Oracle Fusion Middleware 12c SoftwareTable 3-7 lists some common administration tasks you will likely want to performafter upgrading. In addition, the component-specific administration guides mayprovide additional configuration tasks to perform after an upgrade.
Table 3-7 Basic Administration Tasks
Task Description More Information
Performing additional post-upgradeconfiguration steps for yourcomponent.
In addition to the post-upgradetasks described Performing PostUpgrade Tasks, you may also needto perform additional configurationtasks to ensure your newlyupgraded components function asexpected.
• Administering Oracle FusionMiddleware
• Administering Oracle SOA Suiteand Oracle Business ProcessManagement Suite
• Administering Oracle Service Bus
• Administering Oracle UserMessaging Service
Getting familiar with FusionMiddleware administration tools
Get familiar with the various toolsavailable which you can use tomanage your environment.
Overview of Oracle FusionMiddleware Administration Tools
Configuring Secure Sockets Layer(SSL)
Learn how to set up securecommunications among betweenOracle Fusion Middlewarecomponents using SSL.
Configuring SSL in Oracle FusionMiddleware
Managing Your Upgraded Oracle Fusion Middleware 12c Software
3-30 Upgrading SOA Suite and Business Process Management
Table 3-7 (Cont.) Basic Administration Tasks
Task Description More Information
Monitoring Oracle FusionMiddleware
Learn how to keep track of thestatus of Oracle Fusion Middlewarecomponents.
Monitoring Oracle FusionMiddleware
Managing Your Upgraded Oracle Fusion Middleware 12c Software
Upgrading to SOA Suite and Business Process Management 12c (12.2.1.1) 3-31
Managing Your Upgraded Oracle Fusion Middleware 12c Software
3-32 Upgrading SOA Suite and Business Process Management
4Upgrading Oracle SOA Suite and BusinessProcess Management from a Previous 12c
Release
The upgrade procedures vary depending on your starting point and the componentsin your existing domain. If you are upgrading from a previous 12c release, use thesesteps to upgrade to this release.
Select one of the following upgrade paths:.
Upgrading to SOA Suite and Business Process Management 12c (12.2.1.1) from aPrevious 12c Release
Follow these steps to upgrade your Oracle SOA Suite and BusinessProcess Management 12c deployment to this 12c release.
Upgrading to Oracle SOA Suite with Business Activity Monitoring (BAM) 12c(12.2.1.1) from a Previous 12c Release
If your existing 12c deployment includes SOA Suite with BusinessActivity Monitoring (BAM), you will need to complete the followingtasks to upgrade to the 12c (12.2.1.1) release.
Targeting Server Groups Using the Reconfiguration WizardWhen upgrading from a previous 12c release, you must manually targetyour servers to the appropriate server groups using the ReconfigurationWizard.
4.1 Upgrading to SOA Suite and Business Process Management 12c(12.2.1.1) from a Previous 12c Release
Follow these steps to upgrade your Oracle SOA Suite and Business ProcessManagement 12c deployment to this 12c release.
1. Make sure that you have completed all required pre-upgrade tasks.
You must complete the pre-upgrade tasks before you begin this process. Refer to Oracle Fusion Middleware Pre-Upgrade Checklist and any SOA-specific tasks thatmay be required for your deployed applications. Confirm that you have a completebackup version available in case you need to restore.
2. Install the 12c (12.2.1.1) product distributions in a new Oracle home. InstallingOracle SOA Suite and Business Process Management 12c (12.2.1.1)
3. Run a pre-upgrade readiness check using the Upgrade Assistant in -readinessmode.
Upgrading Oracle SOA Suite and Business Process Management from a Previous 12c Release 4-1
Launch the Upgrade Assistant in readiness mode from the12c (12.2.1.1) Oraclehome to review your 12.1.3 or 12.2.1 domain for any issues that could cause theupgrade to fail.
UNIX operating system users, navigate to oracle_common/upgrade/bin of the12c (12.2.1.1) Oracle home
Execute the following command: ./ua — readiness
Windows operating system users, navigate to oracle_common\upgrade\bin ofthe 12c (12.2.1.1) Oracle home
Execute the following command: ua.bat — readiness
4. Stop all administration and managed servers. Stopping SOA Servers andProcesses
5. Upgrade the 12.1.3 or 12.2.1.0 schemas to 12c (12.2.1.1) using the UpgradeAssistant 12c (12.2.1.1) .
Launch the Upgrade Assistant from the 12c (12.2.1.1) Oracle home to upgrade the12.1.3 or 12.2.1.0 schemas.
On UNIX operating systems:: change directory to ORACLE_HOME/oracle_common/upgrade/bin
Execute the following command: ./ua
On Windows operating systems: change directory to ORACLE_HOME\oracle_common\upgrade\bin
Execute the following command: ua.bat
Note: The default logging level is NOTIFICATION. Consider setting thelogging level to WARNING or ERROR to assist in troubleshooting (ifnecessary.) For example: ./ua -logLevel ERROR
6. Complete the Upgrade Assistant screens as described in the standard upgradeprocess: Upgrading SOA Schemas with the Upgrade Assistant
7. Upgrade the domain configurations using the Reconfiguration Wizard .
Start the Reconfiguration Wizard to reconfigure the domain.
On UNIX operating systems:
ORACLE_HOME/oracle_common/common/bin
On Windows operating systems:
ORACLE_HOME\oracle_common\common\bin
where ORACLE_HOME is your 12c (12.2.1.1) Oracle home directory.
On UNIX operating systems:
./reconfig.sh -log=<log_file> -log_priority=ALL
On Windows operating systems:
reconfig.cmd -log=<log_file> -log_priority=ALL
Launch the Reconfiguration Wizard from the 12c (12.2.1.1) Oracle home to upgradethe 12.1.3 or 12.2.1 domain.
Upgrading to SOA Suite and Business Process Management 12c (12.2.1.1) from a Previous 12c Release
4-2 Upgrading SOA Suite and Business Process Management
8. Complete the Reconfiguration Wizard screens as described in the standardreconfiguration process: Reconfiguring the Domain
During the reconfiguration process you will need to target your servers to thecorrect Server Groups, for more information see Targeting Server Groups Using theReconfiguration Wizard
Installing Oracle SOA Suite and Business Process Management 12c (12.2.1.1)Before you can upgrade your existing SOA and Business ProcessManagement (BPM) components, you must first install the Oracle FusionMiddleware Infrastructure and the Oracle SOA Suite and BusinessProcess Management 12c (12.2.1.1) product distributions.
Running a Pre-Upgrade Readiness CheckThe Upgrade Assistant can be run in -readiness mode to identifypotential upgrade issues before you perform an actual upgrade.
Stopping SOA Servers and ProcessesBefore running Upgrade Assistant, you must shut down ALL OracleFusion Middleware Managed Servers, Administration Servers, andsystem components (such as OHS) that may be using the schemas orconfigurations you want to update.
Starting the Upgrade Assistant
Upgrading SOA Schemas with the Upgrade AssistantUse the Upgrade Assistant to upgrade your supported schemas to 12c(12.2.1.1)
Reconfiguring the Domain Using the Reconfiguration WizardAfter upgrading the schemas, run the Reconfiguration Wizard toreconfigure your domain component configurations to 12c.
Upgrading SOA Component Configurations
4.1.1 Installing Oracle SOA Suite and Business Process Management 12c (12.2.1.1)Before you can upgrade your existing SOA and Business Process Management (BPM)components, you must first install the Oracle Fusion Middleware Infrastructure andthe Oracle SOA Suite and Business Process Management 12c (12.2.1.1) productdistributions.
You will install the 12c (12.2.1.1) product distributions into a new Oracle homedirectory. Do not use your existing Oracle home directory for the installation.
Verify that you have installed all prerequisite software. Oracle SOA Suite requires theOracle Fusion Middleware Infrastructure (Oracle WebLogic Server and JRF). For moreinformation, see Installing the Infrastructure Software
If your SOA domain has other SOA-integrated components, you must install thosedistributions, as well. See the Oracle Fusion Middleware documentation library for acomplete list of installation guides for each product distribution. Be sure to review anyof the component-specific chapters in this book to determine if additional pre-upgradesteps for your additional installations.
1. Log in to the target system.
2. Go to the directory where you downloaded the installation program.
Upgrading to SOA Suite and Business Process Management 12c (12.2.1.1) from a Previous 12c Release
Upgrading Oracle SOA Suite and Business Process Management from a Previous 12c Release 4-3
3. Launch the installation program by running the java executable from the JDKdirectory on your system:
• On UNIX operating systems: /home/Oracle/Java/jdk1.8.0_77/bin/java —jar fmw_12.2.1.0.0_PRODUCT.jar
• On Windows operating systems: C:\home\Oracle\Java\jdk1.8.0_77\bin\java -jar<component_name>.jarfmw_12.2.1.0.0_PRODUCT.jar
For example: cd /home/Oracle/Java/jdk1.8.0_77/bin/java —jarfmw_12.2.1.0.0_PRODUCT.jar
Be sure to replace the JDK location in these examples with the actual JDK locationon your system.
4. Follow the instructions described in Navigating the Installation Screens. This linkwill take you to the Oracle SOA Suite and Business Process Management InstallationGuide where you will find installation procedures for all of the supportedtopologies.
5. At the end of the installation you will be prompted to start the ConfigurationWizard to configure a new domain for 12c (12.2.1.1)
4.1.2 Running a Pre-Upgrade Readiness CheckThe Upgrade Assistant can be run in -readiness mode to identify potential upgradeissues before you perform an actual upgrade.
The readiness check is a read-only operation that scans your existing domain ordatabase schemas and produces a text file with the results of the scan. If your pre-upgrade environment has issues, you can correct those issues and then rerun thereadiness check before you upgrade.
By default, the Readiness Check Report file is located in the following Oracle 12cdirectory: ORACLE_HOME/oracle_common/upgrade/logs
Note: You can run the readiness check while the system is online. Dependingon the comprehensiveness of the checks, the readiness checks can take moretime to complete. Oracle recommends that you run the Readiness Checkduring slower usage periods to prevent performance degradation.
To perform a readiness check on your pre-upgrade environment, launch the UpgradeAssistant in -readiness mode:
1. Go to the bin directory:
On UNIX operating systems:
ORACLE_HOME/oracle_common/upgrade/bin
On Windows operating systems:
ORACLE_HOME\oracle_common\upgrade\bin
2. Enter the following command to start the Upgrade Assistant.
On UNIX operating systems:
./ua -readiness
Upgrading to SOA Suite and Business Process Management 12c (12.2.1.1) from a Previous 12c Release
4-4 Upgrading SOA Suite and Business Process Management
On Windows operating systems:
ua.bat -readiness
You can also launch the Upgrade Assistant with logging parameters as shown inthe UNIX example below:
When troubleshooting, consider setting the -logLevel to TRACE so that moreinformation will be logged. If additional information is not needed, change thelogLevel as the Upgrade Assistant's log files can become very large when -logLevel TRACE is used.
Note: If you have not created the Service Table schema, you might encounterthe error message UPGAST-00328 : The schema version registrytable does not exist on this database. If that happens itis necessary to create the service table schema in orderto run Upgrade Assistant.
If this occurs, you will need to create the required 12c schemas with theRepository Creation Utility (RCU).
Welcome Always. This screen provides an overview ofthe readiness check.
Readiness Check Type:
• Individually Selected Schemas• Domain Based
Always. Readiness checks are onlyperformed on schemas orcomponent configurations that areat a supported upgrade startingpoint. There are two options tochoose from. These options aredescribed below:
• Use the Individually SelectedSchemas option to be able toselect the schemas you want toreview prior to upgrade.
• Use the Domain Based option tolet the Upgrade Assistantperform a readiness check perdomain.
Upgrading to SOA Suite and Business Process Management 12c (12.2.1.1) from a Previous 12c Release
Upgrading Oracle SOA Suite and Business Process Management from a Previous 12c Release 4-5
Available Components When Individually SelectedSchemas option is selected.
This screen lists the availablecomponents for which the schemaswill be selected. If you selectsomething here, readiness checkwill be performed on thatcomponent's schema.
All Schemas Component List Any time a schema readiness checkis done.
This screen is shown any time aschema readiness check is done.This could be when you selectIndividually Selected Schemas orDomain Based with the Includechecks for all schemas option.
Schema Credentials Always. Use this screen to enter informationrequired to connect to the selectedschema and the database that hoststhe schema. If the schema that is tobe upgraded was created by RCU ina prior Fusion Middleware releasethen you will see a drop-downmenu listing the possible schemanames.
DBA User Name: Oraclerecommends that you run theUpgrade Assistant as FMW and notSYSDBA. If you have not yetcreated the FMW user, see Creatinga Non-SYSDBA User to RunUpgrade Assistant
Readiness Summary Always. This screen provides a high-leveloverview of the readiness checks tobe performed based on yourselections.
Click Save Response File if youplan to run the Upgrade Assistantagain in -response (or silent)mode.
Upgrading to SOA Suite and Business Process Management 12c (12.2.1.1) from a Previous 12c Release
4-6 Upgrading SOA Suite and Business Process Management
Readiness Check Always. This screen displays the currentstatus of the readiness check.Depending on what you haveselected to check, the process cantake several minutes.
For a detailed report, click ViewReadiness Report. This buttonappears only after all the readinesschecks are complete.
Readiness Success If the readiness check completessuccessfully.
You can now review the completereport.
If the readiness check encounters anissue or error, review the log file toidentify the issues, correct theissues, and then restart thereadiness check.
By default, the Readiness CheckReport file is located in thefollowing Oracle 12c directory:
ORACLE_HOME/oracle_common/upgrade/logs
4.1.3 Stopping SOA Servers and ProcessesBefore running Upgrade Assistant, you must shut down ALL Oracle FusionMiddleware Managed Servers, Administration Servers, and system components (suchas OHS) that may be using the schemas or configurations you want to update.
Note: Failure to shut down servers and processes may result in an incompleteor failed upgrade.
To stop a WebLogic Server Managed Server, use the following script:
Upgrading to SOA Suite and Business Process Management 12c (12.2.1.1) from a Previous 12c Release
Upgrading Oracle SOA Suite and Business Process Management from a Previous 12c Release 4-7
1. Business Activity Monitoring (BAM) Managed Server
2. Oracle Service Bus (OSB) Managed Server
3. Service-Oriented Architecture (SOA) Managed Server
4. Oracle Web Services Manager (OWSM) Managed Server
5. Administration Servers
6. Node Managers
If you are running Node Manager, you should also stop the Node Manager. Youcan do this by closing the console window in which Node Manager is running, orby using the stopNodeManager WLST command.
7. Webtier (including the Oracle HTTP Server)
4.1.4 Starting the Upgrade AssistantStart the Upgrade Assistant on the host where Administration Server is running, bydoing the following:
1. On UNIX operating systems:: change directory to ORACLE_HOME/oracle_common/upgrade/bin.
On Windows operating systems: change directory to ORACLE_HOME\oracle_common\upgrade\bin.
2. Enter the following command to start the Upgrade Assistant:
On UNIX operating systems:
./ua
On Windows operating systems:
ua.bat
You can also launch the Upgrade Assistant with logging parameters as shown inthe UNIX example below:
Upgrading to SOA Suite and Business Process Management 12c (12.2.1.1) from a Previous 12c Release
4-8 Upgrading SOA Suite and Business Process Management
• ERROR
• INCIDENT_ERROR
The default logging level is NOTIFICATION.
Note: When troubleshooting, consider setting the -logLevel to TRACE sothat more information will be logged. If additional information is not needed,change the logLevel as the Upgrade Assistant's log files can become very largewhen -logLevel TRACE is used.
4.1.5 Upgrading SOA Schemas with the Upgrade AssistantUse the Upgrade Assistant to upgrade your supported schemas to 12c (12.2.1.1)
The Upgrade Assistant displays a sequence of screens listed when upgrading schemas.Perform the action(s) for each of the screen.
Welcome This screen provides an overview of the Upgrade Assistant and some information aboutimportant pre-upgrade tasks.
Schemas Select Individually Selected Schemas.
AvailableComponents
This screen provides a list of installed Oracle Fusion Middleware components that haveschemas that can be upgraded. When you select a component, the schemas and anydependencies are automatically selected.
For example, when Oracle SOA is selected, the Oracle SOA (_SOAINFRA), Audit Services(_IAU), Metadata Service (_MDS), Oracle Platform Security Services(_OPSS), and UserMessaging Services (_UMS) schemas will be included in the upgrade.
When Managed File Transfer is selected, Audit Services (_IAU), Enterprise Scheduler(_ESS) and Platform Security Services (OPSS) will be included in the upgrade.
Domain Directory This screen appears if you selected Oracle Platform Security Services or Oracle AuditServices on the Available Components screen.
Enter the absolute path to the existing WebLogic domain directory, or click Browse tonavigate to and select the domain directory you are upgrading.
Upgrading to SOA Suite and Business Process Management 12c (12.2.1.1) from a Previous 12c Release
Upgrading Oracle SOA Suite and Business Process Management from a Previous 12c Release 4-9
Prerequisites Check that the prerequisites for schema upgrade are met. You must select eachprerequisite before you click Next.
CAUTION: Upgrade Assistant will NOT verify that these prerequisites have been met.
Schema Credentials Use this screen to enter database connection details for each of the schemas you areupgrading.
1. Select a the database type from the Database Type drop-down menu.
2. Enter the database connection details, and click Connect.
3. Select the schema you want to upgrade from the Schema User Name drop-downmenu, and then enter the password for the schema.
In some cases, such as _ORASDPM, you will need to manually enter the Schema UserName and password.
11g to 12c Upgrades Only: The UCSUMS schema is not auto-populated. Enterprefix_ORASDPM as the user. Upgrade environment uses _ORASDPM as the schemaname, whereas in the 12c environment it is referred to as the _UMS schema.
4. Click Next.
Notes:
• The title of Schema Credentials screen varies, depending upon the schemas you areupgrading. For example, if you are upgrading the _SOAINFRA schema, the screen titleappears as "SOAINFRA Schema".
• For information on the fields required to connect to the database, click Help.
Examine Review the status of the Upgrade Assistant as it examines each component, verifying thatthe component is ready for upgrade.
Verify that the Source Version displayed for each schema is listing the correct versionnumber for the schema to be upgraded.
Upgrade Summary Review the summary of the options that you have selected for schema upgrade. Verifythat the correct Source and Target versions are listed for each schema you intend toupgrade.
Click Upgrade to upgrade the schemas, or click Back if you wish to change theconfigurations.
Upgrade Progress Review the status of the current upgrade process.
NOTE: The progress bar on this screen displays the progress of the current upgradeprocedure. It does not indicate the time remaining for the upgrade.
Click Next when the upgrade is complete.
Upgrade Success Click Close if the Upgrade was successful.
If the upgrade failed or if you canceled the upgrade before it completed successfully, youshould review the log files, restore the backed up environment, and restart the UpgradeAssistant.
Upgrading to SOA Suite and Business Process Management 12c (12.2.1.1) from a Previous 12c Release
4-10 Upgrading SOA Suite and Business Process Management
4.1.6 Reconfiguring the Domain Using the Reconfiguration WizardAfter upgrading the schemas, run the Reconfiguration Wizard to reconfigure yourdomain component configurations to 12c.
When you use the Reconfiguration Wizard to reconfigure a WebLogic Server domain,the following items are automatically updated, depending on the applications in thedomain:
• WLS core infrastructure
• Domain version
Note: The Reconfiguration Wizard does not update any of your ownapplications that are included in the domain.
Specifically, when you reconfigure a domain the following occurs:
• The domain version number in the config.xml file for the domain is updated tothe Administration Server's installed WebLogic Server version.
• Reconfiguration templates for all installed Oracle products are automaticallyselected and applied to the domain. These templates define any reconfigurationtasks that are required to make the WebLogic domain compatible with the currentWebLogic Server version.
• Start scripts are updated.
Note: Once the domain reconfiguration process starts, it is irreversible. Priorto running the Reconfiguration Wizard, ensure that you have backed up thedomain as described in Backing Up the Domain. If an error or otherinterruption occurs while running the Reconfiguration Wizard, you mustrestore the domain by copying the files and directories from the backuplocation to the original domain directory. This is the only way to ensure thatthe domain has been returned to its original state prior to reconfiguration.
Follow these instructions to reconfigure the existing domain using the ReconfigurationWizard. For general information about how the domain is reconfigured, see Reconfiguring WebLogic Domains.
Backing Up the Domain
Starting the Reconfiguration Wizard
Reconfiguring the Domain
4.1.6.1 Backing Up the Domain
Prior to running the Reconfiguration Wizard, make a backup copy of the domaindirectory:
1. Copy the source domain to a separate location to preserve the contents.
Upgrading to SOA Suite and Business Process Management 12c (12.2.1.1) from a Previous 12c Release
Upgrading Oracle SOA Suite and Business Process Management from a Previous 12c Release 4-11
For example, copy C:\domains\mydomain to C:\domains\mydomain_backup.
2. Prior to updating the domain on each remote Managed Server, make a backupcopy of the domain directory on each remote machine.
3. Verify that the backed up versions of the domain are complete.
If domain reconfiguration fails for any reason, you must copy all files and directoriesfrom the backup directory into the original domain directory to ensure that thedomain is returned entirely to its original state prior to reconfiguration.
4.1.6.2 Starting the Reconfiguration Wizard
Start the Reconfiguration Wizard in graphical mode by doing the following:
1. Log in to the system on which the domain resides.
2. Open the command shell (on UNIX operating systems) or open a commandprompt window (on Windows operating systems).
3. Edition Based Database Users Only: If your schemas are configured with EBRdatabase, a default edition name must be manually supplied before you run theReconfiguration Wizard.
Run the following SQL command to set the default edition:
ALTER DATABASE DEFAULT EDITION = edition_name;
where edition_name is the name of the child edition name.
where log_file is the absolute path of the log file you'd like to create for thedomain reconfiguration session. This can be helpful if you need to troubleshoot thereconfiguration process..
The parameter -log_priority=ALL ensures that logs are logged in fine mode.
Upgrading to SOA Suite and Business Process Management 12c (12.2.1.1) from a Previous 12c Release
4-12 Upgrading SOA Suite and Business Process Management
Note:
When you run reconfig.cmd or reconfig.sh, the following error messagemight display to indicate that the default cache directory is not valid:
*sys-package-mgr*: can't create package cache dir
You can change the cache directory by setting the environment variableCONFIG_JVM_ARGS. For example:
CONFIG_JVM_ARGS=-Dpython.cachedir=valid_directory
4.1.6.3 Reconfiguring the Domain
Note that you may not see every screen listed below. In addition, you may need tocomplete additional screens based on your environment setup. For more information,see Reconfiguring WebLogic Domains.
Table 4-3 Reconfiguration Wizard Screens
Reconfiguration Wizard Screen Description and Action Required
Select Domain Enter the absolute path to the existing domaindirectory, or click Browse to navigate to and select thedomain directory.
Reconfiguration Setup Progress Shows the progress of applying the reconfigurationtemplates.
Domain Mode and JDK Domain mode cannot be changed.
Select the JDK to use in the domain or click Browse tonavigate to the JDK you want to use.
Note that Oracle Fusion Middleware 12c requires JavaSE 7. For more information, see Verifying Certificationand System Requirements.
Database Configuration Type Use the RCU Data option to connect to the Server Table(_STB) schema. The Repository Creation Utility (RCU)will automatically use service table schema to load theother 12c schema credentials automatically. Alwaysverify the data on the JDBC screens that follow.
NOTE: For any existing 11g datasource, thereconfiguration will preserve the existing values. Fornew datasources where the schema was created by 12cRCU, the default connection data will be retrieved fromthe _STB schema. If no connection data for a givenschema is found in the _STB schema, then the defaultconnection data is used.
JDBC Data Sources This screen is displayed if you created custom datasources for a database-based OPSS security store orAudit Data store in 11g.
Use this screen to configure the JDBC data sourcesdefined in your domain source.
Upgrading to SOA Suite and Business Process Management 12c (12.2.1.1) from a Previous 12c Release
Upgrading Oracle SOA Suite and Business Process Management from a Previous 12c Release 4-13
Table 4-3 (Cont.) Reconfiguration Wizard Screens
Reconfiguration Wizard Screen Description and Action Required
JDBC Data Sources Test Test the data source connections you configured on theJDBC Data Sources screen.
JDBC Component Schema Specify the data source settings for each of the schemaslisted on the screen, by selecting the check box adjacentto each schema name.
You must specify the 11g schema details for theschemas that you just upgraded. For the others, specifythe 12.2.1.1 schema details.
JDBC Component Schema Test Test the configurations that you specified for the datasources in the previous screen. Select the check boxesadjacent to the names of the schemas to test, and clickTest Selected Connections.
The result of the test is indicated in the Status column.Click Next when the test is successful for all theschemas.
Node Manager This screen is displayed only if the domain you arereconfiguring is currently using a per-host NodeManager. Use this screen to select the Node Managerconfiguration to use for the reconfigured domain. Theresulting configuration depends on the combination ofoptions you select for Node Manager Type and NodeManager Configuration.
Advanced Configuration The categories that are listed on this screen depend onthe resources defined in the templates you selected forthe domain during domain configuration.
For example, when the SOA Suite and BPM template isbeing applied to the domain, select the ManagedServers, Clusters and Coherence if one or more of thefollowing applies:
• You have more than one managed server in a singledomain (soa_server1 and bam_server1, forexample)
• You need to modify cluster or coherence dataFor information on using the other advancedconfiguration options, such as Node Manager,Deployments and Services, Domain Front End HostCapture and JMS File Store, see the online help.
Upgrading to SOA Suite and Business Process Management 12c (12.2.1.1) from a Previous 12c Release
4-14 Upgrading SOA Suite and Business Process Management
Table 4-3 (Cont.) Reconfiguration Wizard Screens
Reconfiguration Wizard Screen Description and Action Required
Managed Servers You must specify the actual hostname for the ListenAddress for each managed server in your domain.
Do not use the default localhost or All LocalAddresses option.
You must specify the actual hostname ashostname.company.com
When upgrading from 12.1.3 to 12.2.1.1, you mustassign the server to the appropriate Server Groups.See Targeting Server Groups Using theReconfiguration Wizard
Assign Servers to Machines If you have created servers as part of the upgradeprocess, then select the server name in the Servers listbox and target them to the correct Node ManagerMachine.
Otherwise, no action is required on this screen whenyou are upgrading or reconfiguring the domain.
Assign Servers to Clusters Cluster Upgrades Only: If you are upgrading clusters,use this screen to assign Managed Servers to clusters.
Note that only Managed Servers are displayed in theServer list box. The Administration Server is not listedbecause it cannot be assigned to a cluster.
Note: SOA UPGRADESONLY: When OWSMPM isin its own cluster and notpart of SOA or OSB clusters,you should target onlySOA-MGD-SVRS-ONLYuser extensible server groupto the SOA cluster, targetonly OSB-MGD-SVRS-ONLY to the OSB clusterand target WSMPM-MAN-SVER server group toOWSM . When upgrading12.1.3 to 12.2.11, you alsoneed to target BAM-MGD-SVRS-ONLY to BAMcluster.
Configuration Summary Review the configuration summary.
Click Reconfig to reconfigure the domain, or click Backto change the configurations.
Upgrading to SOA Suite and Business Process Management 12c (12.2.1.1) from a Previous 12c Release
Upgrading Oracle SOA Suite and Business Process Management from a Previous 12c Release 4-15
Table 4-3 (Cont.) Reconfiguration Wizard Screens
Reconfiguration Wizard Screen Description and Action Required
Reconfiguration Progress Review the reconfiguration progress. Click Next whenthe process is complete.
Reconfiguration Success Review the final status of the reconfiguration process.Click Finish to exit the Reconfiguration Wizard.
4.1.7 Upgrading SOA Component ConfigurationsDescribes the screens of the Upgrade Assistant when upgrading WebLogicComponent Configurations.
NOTE: The screens you see are based on your environment. You may or may not seeall of the screens described below. For more information on using the UpgradeAssistant screens, see the online help.
Note:
Additional configuration tasks may be required.
After the Upgrade Assistant has successfully completes the upgrade of yourschemas and component configurations, you may need to perform the tasksdescribed in Performing Post Upgrade Tasks to ensure that your componentscontinue to function as expected.
Welcome This screen provides an overview of the Upgrade Assistant and some informationabout important pre-upgrade tasks.
Click Next to continue.
WebLogic Components Select the All Configurations Used by a Domain option to upgrade componentconfigurations for a managed WebLogic Server domain. You must enter the domaindirectory for the domain that you are upgrading now.
Click Next.
OWSM Policy Manager This screen is displayed if your 11g environment has multiple WebLogic Serverdomains, but the OWSM Policy Manager is only in one WLS domain and the OWSMagents are in other domains.
Provide the credentials for the WebLogic Administration Server domain where theOracle Web Services Manager (OWSM) Policy Manager is deployed.
For information about the fields on this page, click Help, or refer to OWSM PolicyManager.
Component List This screen provides a list of components that will be included in the domaincomponent configuration upgrade.
Upgrading to SOA Suite and Business Process Management 12c (12.2.1.1) from a Previous 12c Release
4-16 Upgrading SOA Suite and Business Process Management
Prerequisites Check if the prerequisites for component configurations upgrade are met.
CAUTION: The Upgrade Assistant will not validate that these prerequisites have beenperformed.
UMS Configuration This screen is presented if there are remote managed servers hosting UMS 11gconfiguration files. You must provide the credentials to these servers so that theUpgrade Assistant can access the configuration files.
NOTE: You may be required to manually copy the UMS configuration files if theUpgrade Assistant is unable to locate them. See Upgrade Assistant: Copying UMSConfiguration Files.
Examine Review the status of the Upgrade Assistant as it examines each component, verifyingthat the component is ready for upgrade.
Upgrade Summary Review the summary of the options that you have selected for schema upgrade.
Click Upgrade to upgrade the schemas, or click Back if you wish to change theconfigurations.
Upgrade Progress Review the status of the upgrade process.
Click Next when the upgrade is complete.
Upgrade Success Click Close if the Upgrade was successful.
If the upgrade failed or if you canceled the upgrade before it completed successfully,you should review the log files, restore the backed up environment, and restart theUpgrade Assistant.
4.2 Upgrading to Oracle SOA Suite with Business Activity Monitoring(BAM) 12c (12.2.1.1) from a Previous 12c Release
If your existing 12c deployment includes SOA Suite with Business Activity Monitoring(BAM), you will need to complete the following tasks to upgrade to the 12c (12.2.1.1)release.
1. Complete all required pre-upgrade tasks.
You must complete the pre-upgrade tasks before you begin this process. Refer tothe Pre-Upgrade Checklist and any SOA-specific tasks that may be required foryour deployed applications. Confirm that you have a complete backup versionavailable in case you need to restore.
2. Run a pre-upgrade readiness check using the Upgrade Assistant in -readinessmode.
Launch the Upgrade Assistant from the 12.2.1.1 Oracle home to review your 12.1.3or 12.2.1 domain for upgrade readiness.
UNIX operating system users, navigate to oracle_common/upgrade/bin of the12.2.1.1 Oracle home
Execute the following command: ./ua — readiness
Upgrading to Oracle SOA Suite with Business Activity Monitoring (BAM) 12c (12.2.1.1) from a Previous 12c Release
Upgrading Oracle SOA Suite and Business Process Management from a Previous 12c Release 4-17
3. Upgrade the 12.1.3 or 12.2.1 schemas to 12.2.1.1 using the Upgrade Assistant 12c(12.2.1.1).
Launch the Upgrade Assistant from the 12.2.1 Oracle home to upgrade the 12.1.3 or12.2.1 schemas.
On UNIX operating systems:: change directory to ORACLE_HOME/oracle_common/upgrade/bin
Execute the following command: ./ua
On Windows operating systems: change directory to ORACLE_HOME\oracle_common\upgrade\bin
Execute the following command: ua.bat
4. Complete the Upgrade Assistant screens as described in the standard upgradeprocess: Upgrading Schemas Using the Upgrade Assistant
5. Upgrade the domain configurations using the Reconfiguration Wizard 12c(12.2.1).
Launch the Reconfiguration Wizard from the 12.2.1.1 Oracle home to upgrade the12.1.3 or 12.2.1 domain.
UNIX operating system users, navigate to:
oracle_common/common/bin of the 12.2.1.1 Oracle home
Execute the following command: ./reconfig.sh
Complete the Reconfiguration Wizard screens as described in the standardreconfiguration process: Reconfiguring the Domain Using the ReconfigurationWizard
IMPORTANT: You must complete these additional tasks while running theReconfiguration Wizard:
a. On the Component Datasources screen, change <prefix>_WLS_RUNTIME to<prefix>_WLS on the field of "Schema Owner" for "BAM Leasing Schema". Theschema owner name may incorrectly show DEV_WLS_RUNTIME.
b. Complete the Reconfiguration Wizard Managed Server screen as described in Targeting Server Groups Using the Reconfiguration Wizard
4.3 Targeting Server Groups Using the Reconfiguration WizardWhen upgrading from a previous 12c release, you must manually target your serversto the appropriate server groups using the Reconfiguration Wizard.
If you are upgrading a domain that was created in a previous 12c release (such as12.1.3), you MUST target your servers to the correct Server Groups during the domainreconfiguration phase of the upgrade. Failure to target these servers may result in afailed upgrade and excess downtime.
1. Launch the Reconfiguration Wizard.
(UNIX) ORACLE_HOME/oracle_common/common/bin
(Windows) ORACLE_HOME\oracle_common\common\bin
Targeting Server Groups Using the Reconfiguration Wizard
4-18 Upgrading SOA Suite and Business Process Management
2. Navigate to the Advanced Configuration screen and select Managed Servers,Clusters, and Coherence.
3. On the Managed Servers screen, target each server to the correct Server Group byselecting the correct group name from the Server Groups drop-down menu.
Targeting Server Groups Using the Reconfiguration Wizard
Upgrading Oracle SOA Suite and Business Process Management from a Previous 12c Release 4-19
Note: When OWSMPM is in its own cluster and not part of SOA or OSBclusters, you should target only SOA-MGD-SVRS-ONLY user extensibleserver group to the SOA cluster, target only OSB-MGD-SVRS-ONLY to theOSB cluster and target WSMPM-MAN-SVER server group to OWSM . Whenupgrading 12.1.3 to 12.2.1.1, you also need to target BAM-MGD-SVRS-ONLYto BAM cluster.
Component and Server Server Group
SOA (soa_server1) SOA-MGD-SVRS-ONLY
Oracle Service Bus — OSB (osb_server1) OSB-MGD-SVRS-ONLY
Business Activity Monitoring — BAM(bam_server1)
BAM-MGD-SVRS-ONLY
Managed File Transfer — MFT(mft_server1)
MFT-MGD-SVRS-ONLY
Each of the servers should now be targeted to the correct server group and should notshow as Unspecified.
Targeting Server Groups Using the Reconfiguration Wizard
4-20 Upgrading SOA Suite and Business Process Management
5Upgrading a Clustered SOA Environment
Describes the process of upgrading to a clustered SOA environment and performingpost-upgrade configuration tasks.
Understanding the SOA Cluster Upgrade Topology
Using Secured Task Forms in a Clustered TopologyThe task form is a Java Server Page XML (.jspx) file that you create in theOracle JDeveloper designer where you created the SOA compositecontaining the human task.
Upgrading a Clustered Topology
Propagating Domain Configuration on SOAHOST2Use these steps to propagate the newly upgraded files to another host.
Post-Upgrade Tasks for Cluster Upgrades
5.1 Understanding the SOA Cluster Upgrade TopologyFigure 5-1 shows a sample topology of a clustered Oracle SOA Suite deployment withSOA, Oracle Web Services Manager (OWSM), Oracle Service Bus (OSB) and OracleBusiness Activity Monitoring (Oracle BAM) in separate clusters across two applicationhosts, SOAHOST1 and SOAHOST2. The Oracle HTTP Server, Administration Server,Oracle Enterprise Manager Fusion Middleware Control and database are shared withboth hosts.
Specifically, this chapter describes the steps required to upgrade a WebLogic domainthat contains multiple WebLogic Server clusters that are scaled out to multiple hostcomputers. You can apply the concepts and procedures in this chapter to your ownspecific Oracle SOA Suite environment.
The steps required to upgrade this sample topology are described in the next sectionin Table 5-1.
Note:
If you are upgrading Oracle BAM with SOA, see Upgrading a SOA withOracle BAM Domain to 12c.
Upgrading a Clustered SOA Environment 5-1
Figure 5-1 Clustered SOA Topology
Understanding the SOA Cluster Upgrade Topology
5-2 Upgrading SOA Suite and Business Process Management
5.2 Using Secured Task Forms in a Clustered TopologyThe task form is a Java Server Page XML (.jspx) file that you create in the OracleJDeveloper designer where you created the SOA composite containing the humantask.
If your SOA composite includes a human task form, or if task forms are deployed onnon-SOA servers, then you must secure the task form after the upgrade.
5.3 Upgrading a Clustered TopologyTable 5-1 lists the steps required to upgrade the example clustered, multi-host OracleSOA Suite topology illustrated in Figure 5-1.
Table 5-1 Oracle SOA Suite and BPM Cluster Upgrade Roadmap
Task For More Information
Review the upgrade topology, and identify SOAHOST1 andSOAHOST2 on your setup.
See, Understanding the SOA Cluster UpgradeTopology
Shut down the Administration Server, all the ManagedServers, and the Node Managers running on SOAHOST1 orSOAHOST2.
See, Stopping SOA Servers and Processes
Install Infrastructure (WebLogic Server, OWSM, and JRF)and the Oracle SOA Suite products on SOAHOST1 in a newOracle home directory.
See, Installing Oracle SOA Suite and BusinessProcess Management 12c (12.2.1.1)
Perform a complete upgrade of your 11g deployment onSOAHOST1. Perform the post-upgrade configurations thatapply to your environment.
See, Upgrading to SOA Suite and BusinessProcess Management 12c (12.2.1.1)
See Also:
If BAM is part of your domain, see Upgrading aSOA with Oracle BAM Domain to 12c
If OSB is part of your domain, see UpgradingOracle Service Bus
Propagate the domain configuration of SOAHOST1 onSOAHOST2.
To do this, you must pack the domain on SOAHOST1, andunpack it on SOAHOST2.
See, Propagating Domain Configuration onSOAHOST2
Start the Administration Server and the Managed Servers onSOAHOST1 and SOAHOST2.
See, Starting and Stopping Servers
Perform the necessary post-upgrade tasks. See, Performing Post Upgrade Tasks
5.4 Propagating Domain Configuration on SOAHOST2Use these steps to propagate the newly upgraded files to another host.
After you have completed your single node upgrade on SOAHOST1, use these steps topropagate the newly upgraded files to another node (SOAHOST2).
Using Secured Task Forms in a Clustered Topology
Upgrading a Clustered SOA Environment 5-3
Executing the pack command on the server where the Admin Server and one ofthe Managed Servers is installed.
Copying the template file created in the previous step to SOAHOST2.
Executing the unpack command from the 12c Oracle Home on SOAHOST2.
Completing the following verification steps after the unpack.
5.4.1 Executing the pack command on the server where the Admin Server and one ofthe Managed Servers is installed.
In our sample topology, you would execute the following on SOAHOST1:
• 12c_ORACLE_HOME refers the actual path to the 12c Oracle Home directory (theinstallation directory for the 12c (12.2.1.1)bits).
• Replace 11g_DOMAIN_HOME with the actual path to the upgraded domaindirectory.
• domainupgradetemplate.jar is a sample name for the jar file you are creating,which will contain the domain configuration files.
• domainupgradetemplate is the name assigned to the domain template file.
• By default, the domainupgradetemplate is created in the current directorywhere you ran the pack command. In this example, it would be created in thefollowing directory, but you can specify a full path for the template jar file as partof the -template argument to the pack command:
ORACLE_COMMON_HOME/common/bin/
The pack command creates a template archive (.jar) file that contains a snapshot ofeither an entire domain or a subset of a domain. You can use a template that contains asubset of a domain to create a Managed Server domain directory hierarchy on aremote machine.
For more information on using the pack command, see "Overview of the Pack andUnpack Commands" in Creating Templates and Domains Using the Pack and UnpackCommands.
5.4.2 Copying the template file created in the previous step to SOAHOST2.Use the following command to copy domainupgradetemplate.jar file to SOAHOST2:
5.4.3 Executing the unpack command from the 12c Oracle Home on SOAHOST2.Make sure that the Admin and Managed Servers are still stopped and then execute thefollowing unpack command to create a full domain or a subset of a domain used for aManaged Server domain directory on the remote machine. You may use unpack onlywith a template compatible with your current installation.
Propagating Domain Configuration on SOAHOST2
5-4 Upgrading SOA Suite and Business Process Management
A sample unpack command code snippet is shown below. Use this as an exampleonly. Note that you must specify the "-overwrite_domain=true" flag on unpack.
• 12c_ORACLE_HOME refers the actual path to the 12c Oracle Home directory (theinstallation directory for the 12.2.1 bits).
• Replace 11g_DOMAIN_HOME with the actual path to the upgraded domaindirectory.
• domainupgradetemplate.jar is a sample name for the jar file you are creating,which will contain the domain configuration files.
• domainupgradetemplate is the name assigned to the domain template file.
5.4.4 Completing the following verification steps after the unpack.
1. Verify that WL_HOME, SOA_ORACLE_HOME, UMS_ORACLE_HOME insetDomainEnv.sh script from 11g domain are pointing to 12c.
See Reapplying Customizations to setDomainEnv.
2. Start the Node Manager, WebLogic Administration Server, and the ManagedServers on SOAHOST1 and SOAHOST2 in the following order:
a. On SOAHOST1 and SOAHOST2, start the Node Manager.
b. On SOAHOST1, start the WebLogic Administration Server.
c. On SOAHOST1 and SOAHOST2, start the Managed Servers.
For more information, see Starting and Stopping Servers. Carefully review the order inwhich Managed Servers should be started.
If you cannot start the servers or experience other technical issues, see Troubleshooting the Upgrade
Note:
During the upgrade, the Node Manager configuration files(nodermanager.properties, for example) are moved from11g_DOMAIN_HOME/wlserver_10.3/ location to the 11g_ORACLE_HOME/domains/DOMAIN_HOME/nodemanager location. Therefore, the nodemanager in 12c has to be started from the 11g_DOMAIN_HOME domaindirectory.
5.5 Post-Upgrade Tasks for Cluster UpgradesAfter a successful cluster upgrade, you may need to perform additional post-upgradeconfigurations tasks. Perform only those tasks that pertain to your clusteredenvironment.
Post-Upgrade Tasks for Cluster Upgrades
Upgrading a Clustered SOA Environment 5-5
Configuring Oracle HTTP Server for the WLS_OSB Managed Servers
Removing OWSM Targets from SOA and OSB Clusters
Updating OWSM Cross-Component Wiring
Reapplying an EDNTopic to SOA JMS Module After Cluster Upgrade
Preventing Duplicate Messages When Using JMS Transport Proxy Service
5.5.1 Configuring Oracle HTTP Server for the WLS_OSB Managed ServersTo enable Oracle HTTP Server to route to Oracle Service Bus console and OracleService Bus service, set the WebLogicCluster parameter to the list of nodes in thecluster.
For more information, see "Configuring Oracle HTTP Server for the Oracle ServiceBus" in the Enterprise Deployment Guide for Oracle SOA Suite.
5.5.2 Removing OWSM Targets from SOA and OSB ClustersIf your 12c domain includes an Oracle Web Services Manager (OWSM) in its owncluster and you have extended that domain with a SOA cluster and an OSB cluster,then post upgrade you must manually untarget the wsm-pm from the SOA and OSBclusters.
To remove the owsm-pm target from the SOA and OSB clusters:
1. Log in to the WebLogic Server Administration Console 12c.
Enter the following URL in a browser:
http://host name:port_number/console
The port number is the port number of the Administration Server. By default, theport number is 7001.
The login page is displayed.
2. Select Deployments from Domain Structure.
3. Select wsm-pm under Deployments.
4. In the settings for wsm-pm, select Targets.
5. Select wsm-pm component of type Enterprise Application and select ChangeTargets.
6. Uncheck SOA cluster and OSB cluster.
7. When prompted, click Yes to apply the changes.
8. REQUIRED: Once the wsm-pm is targeted only to the OWSM cluster, you mustrewire the components as described in "Updating OWSM Cross-ComponentWiring".
5.5.3 Updating OWSM Cross-Component WiringAfter you have removed OWSM targets from SOA and OSB clusters as described in Removing OWSM Targets from SOA and OSB Clusters, you must rewire the OWSMPolicy Manager components as described below:
Post-Upgrade Tasks for Cluster Upgrades
5-6 Upgrading SOA Suite and Business Process Management
1. Start the Administration (admin) server and one OWSM server.
2. Log in to the Oracle Enterprise Manager Fusion Middleware Control 12c consoleand navigate to the Cross Components Wiring > Components option.
3. Select OWSM Policy Manager from the list of available components:
Post-Upgrade Tasks for Cluster Upgrades
Upgrading a Clustered SOA Environment 5-7
4. From the Service End Points table, select the OWSM Policy Manager t3connection entry and click Publish. The status will change from Out of Sync toPublished.
5. Select OWSM Agent from the Component Type list. Select the t3 connection entryand click Bind.
6. Verify that the Service Type for the service end point is OWSM Policy Manager.
Post-Upgrade Tasks for Cluster Upgrades
5-8 Upgrading SOA Suite and Business Process Management
7. Repeat steps 5 and 6 to Bind the remaining component types. In this example, youwill select com.oracle.ess and Fusion Middleware Control.
5.5.4 Reapplying an EDNTopic to SOA JMS Module After Cluster UpgradeAfter upgrading a SOA Cluster domain to 12.2.1, the upgraded SOA JMS module maybe missing the EDNTopic. If the JMS module is missing the EDNTopic, you mustmanually add the topic or UDD for this topic using the Administration Console orWLST.
See the Administration Console online help for more information on reapplying theEDNTopic.
5.5.5 Preventing Duplicate Messages When Using JMS Transport Proxy ServiceIn a 12c cluster domain, jmsServers are targeted to migratable targets, which isdifferent from the default behavior in 11g where jmsServers were targeted to anindividual server.
When you configure a 12c proxy service based on the JMS transport, set the topicdistribution mode to One-Copy-Per-Application or One-Copy-Per-Server. To preventduplicate messages, do not use Compatibility mode in a clustered environment.
Post-Upgrade Tasks for Cluster Upgrades
Upgrading a Clustered SOA Environment 5-9
Post-Upgrade Tasks for Cluster Upgrades
5-10 Upgrading SOA Suite and Business Process Management
6Upgrading from Oracle SOA Suite with
Oracle Business Activity Monitoring 11g to12c
Describes the process of upgrading from a supported Oracle SOA Suite 11genvironment that includes Business Activity Monitoring (Oracle BAM) to a SOA 12c(12.2.1.1) environment with the newly redesigned Oracle BAM 12c.
Note: If you are upgrading from a previous Oracle SOA Suite with BAM 12crelease, seeUpgrading to Oracle SOA Suite with Business Activity Monitoring(BAM) 12c (12.2.1.1) from a Previous 12c Release
Understanding an Upgrade to Business Activity Monitoring in 12cUpgrading from Oracle BAM 11g to BAM 12c cannot be handled withthe standard upgrade procedures. You will need to perform severalmanual configuration tasks to complete the upgrade.
Understanding the SOA with Oracle BAM 11g Upgrade Process Flow
Performing the Pre-Upgrade Tasks for Oracle BAM
Upgrading a SOA with Oracle BAM Domain to 12cUse this procedure when upgrading a SOA domain that includes OracleBAM 11g.
Performing Post Upgrade Configuration Tasks for Oracle SOA with Oracle BAM12c
To run the SOA 12c domain that will eventually include Oracle BAM12c, you must perform additional configuration tasks after the upgrade.
Extending the SOA Domain with Oracle BAM 12cWhen you are ready to use Oracle BAM 12c with your upgraded SOA12c environment, you must extend the domain to include the BAM 12ctemplates.
Recovering from a Failed Oracle BAM Upgrade
6.1 Understanding an Upgrade to Business Activity Monitoring in 12cUpgrading from Oracle BAM 11g to BAM 12c cannot be handled with the standardupgrade procedures. You will need to perform several manual configuration tasks tocomplete the upgrade.
The procedures described in the following sections apply only to upgrades from 11g.If you are upgrading an upgraded 12c domain to this 12c release, you will follow the
Upgrading from Oracle SOA Suite with Oracle Business Activity Monitoring 11g to 12c 6-1
standard upgrade procedures described in Upgrading to SOA Suite and BusinessProcess Management 12c (12.2.1).
Oracle Business Activity Monitoring (BAM) 12c has been completely redesigned foruse with Oracle SOA Suite 12c, so there is no direct upgrade path. The schemas,binaries, and directory structure used in Oracle BAM 12c are different than those usedwith Oracle BAM 11g. Therefore, upgrading from Oracle BAM 11g to BAM 12c cannotbe handled with the standard upgrade procedures. You will need to perform severalmanual configuration tasks to complete the upgrade.
It is also important to understand that the only Oracle BAM 11g objects that can beused in your BAM 12c domain are data objects (DOs) and enterprise message sources(EMS). You will need to manually export these objects to an XML file and then importthem into the BAM 12c domain. The other Oracle BAM 11g artifacts, such asdashboards for example, will have to be manually recreated in Oracle BAM 12cdomain.
Oracle recommends that you continue to use your Oracle BAM 11g domain after theupgrade to allow time to create and test all of the necessary artifacts. Therefore, beforeyou begin the SOA with Oracle BAM upgrade process, it is strongly recommendedthat you reinstall the Oracle BAM 11g domain in a separate location so that the sourcefiles remain untouched during the domain reconfiguration. You will configure SOA12c to point to this new 11g domain after the upgrade as your existing 11g OracleBAM domain will be altered and will not function with SOA 12c.
Note:
There is no upgrade support for an Oracle BAM-only domain (a domainwithout SOA). If you have a BAM-only domain, and want to upgrade toOracle BAM 12c, then you must create a new Oracle BAM 12c domain andimport data objects and recreate all the dashboards and alerts.
6.2 Understanding the SOA with Oracle BAM 11g Upgrade Process FlowThe following flowchart shows a process overview of upgrading a SOA 11g domainwith Oracle BAM to a SOA 12c domain with Oracle BAM 12c.
Understanding the SOA with Oracle BAM 11g Upgrade Process Flow
6-2 Upgrading SOA Suite and Business Process Management
6.3 Performing the Pre-Upgrade Tasks for Oracle BAMThe tasks in this section should be performed when upgrading a SOA domain withOracle BAM 11g to 12c.
Creating a New Oracle BAM 11g Domain Before You Upgrade
Exporting All Oracle BAM 11g Artifacts from the Existing Domain
Importing Oracle BAM 11g Artifacts into the New Oracle BAM 11g Domain
Creating a Complete Backup of the Oracle BAM 11g Domain
Performing the Pre-Upgrade Tasks for Oracle BAM
Upgrading from Oracle SOA Suite with Oracle Business Activity Monitoring 11g to 12c 6-3
6.3.1 Creating a New Oracle BAM 11g Domain Before You UpgradeYou will continue to use your existing Oracle BAM 11g domain after the upgrade, soyou must install BAM 11g in a new domain home before you upgrade. If you do notcreate a new (separate) BAM 11g domain, you will not have a functioning BAMdomain after the upgrade and you will lose many of your artifacts and configurations.
Note:
If you do not create separate domain for Oracle BAM 11g, then you will loseBAM artifacts and BAM-related configurations only (SOA artifacts will not beimpacted).
In addition, any composites referring to BAM artifacts (such as adapters) ornew instances will be faulted during runtime.
Use the installation instructions in the 11g version of the Oracle Fusion MiddlewareInstallation Guide for Oracle SOA Suite and Oracle Business Process Management Suite.
To preserve your existing 11g BAM environment, use the 11g ICommand to exportALL of your Oracle BAM 11g artifacts (not just DOs and EMS), and then import theminto your new Oracle BAM 11g domain so you have a fully functional Oracle BAM 11gdomain after the upgrade.
• Exporting All Oracle BAM 11g Artifacts from the Existing Domain
• Importing Oracle BAM 11g Artifacts into the New Oracle BAM 11g Domain
After the upgrade, you can continue using the Oracle BAM 11g domain. Alternatively,you can extend the 12c SOA domain with Oracle BAM 12c and export the DOs andEMS artifacts from 11g domain and import them into extended Oracle BAM 12cdomain. For more information, see Extending the SOA Domain with Oracle BAM 12c.
6.3.2 Exporting All Oracle BAM 11g Artifacts from the Existing DomainAfter you install and configure your new Oracle BAM 11g domain in its new location,you will have to use 11g Oracle BAM ICommand utility to export the data from theexisting (old) Oracle BAM 11g domain and then import it into the new Oracle BAM11g domain before you upgrade.
For more information on using the 11g Oracle BAM ICommand command-line utilityto export data files, see the "Export" section of Monitoring Business Activity with OracleBAM.
6.3.3 Importing Oracle BAM 11g Artifacts into the New Oracle BAM 11g DomainAfter you have created a complete export XML of your Oracle BAM 11g artifacts (notjust the DOs and EMS), you must import the XML file into the newly created OracleBAM 11g domain. This will ensure that you continue to have a fully functioningOracle BAM domain after the upgrade and domain reconfiguration.
For more information on using the 11g Oracle BAM ICommand command-line utilityto export data files, see the "Import" section of Monitoring Business Activity with OracleBAM.
Performing the Pre-Upgrade Tasks for Oracle BAM
6-4 Upgrading SOA Suite and Business Process Management
6.3.4 Creating a Complete Backup of the Oracle BAM 11g DomainIn the event that the upgrade fails, you will need to restore the entire pre-upgradeenvironment using a backup version. Make sure that you have created a backupversion of the entire Oracle BAM 11g environment before you continue with theupgrade process. Note that the backup domain is separate from the new OracleBAM11g domain you created in Creating a New Oracle BAM 11g Domain Before YouUpgrade.
For more information, see "Backup and Recovery Strategies for Upgrade" in the OracleFusion Middleware Planning an Upgrade of Oracle Fusion Middleware.
6.4 Upgrading a SOA with Oracle BAM Domain to 12cUse this procedure when upgrading a SOA domain that includes Oracle BAM 11g.
This section describes the process of upgrading a SOA 11g domain that includesOracle BAM to a SOA 12c (12.2.1.1) domain that will also include Oracle BAM. Do notperform these tasks until you have created a complete backup of the Oracle BAM 11gdomain.
Stopping Servers and Processes
Installing Oracle SOA Suite and Business Process Management 12c (12.2.1.1)Before you can upgrade your existing SOA and Business ProcessManagement (BPM) components, you must first install the Oracle FusionMiddleware Infrastructure and the Oracle SOA Suite and BusinessProcess Management 12c (12.2.1.1) product distributions.
Creating New 12c Schemas with the Repository Creation Utility (RCU)If this is your first 12c upgrade, you may need to create new schemas forSOA and Oracle BAM 12c (12.2.1.1).
Renaming the Oracle BAM Templates Before Upgrading the 11g Schemas
Running the Upgrade Assistant to Upgrade Schemas
Reconfiguring the 11g Domain with the Reconfiguration Wizard
Running the Upgrade Assistant to Upgrade Component Configurations
6.4.1 Stopping Servers and ProcessesStop all of the servers and processes that are currently running before you begin theupgrade.
Instructions for stopping an Oracle Fusion Middleware environment are provided in "Stopping an Oracle Fusion Middleware Environment" in Administering Oracle FusionMiddleware.
6.4.2 Installing Oracle SOA Suite and Business Process Management 12c (12.2.1.1)Before you can upgrade your existing SOA and Business Process Management (BPM)components, you must first install the Oracle Fusion Middleware Infrastructure andthe Oracle SOA Suite and Business Process Management 12c (12.2.1.1) productdistributions.
You will install the 12c (12.2.1.1) product distributions into a new Oracle homedirectory. Do not use your existing Oracle home directory for the installation.
Upgrading a SOA with Oracle BAM Domain to 12c
Upgrading from Oracle SOA Suite with Oracle Business Activity Monitoring 11g to 12c 6-5
Verify that you have installed all prerequisite software. Oracle SOA Suite requires theOracle Fusion Middleware Infrastructure (Oracle WebLogic Server and JRF). For moreinformation, see Installing the Infrastructure Software
If your SOA domain has other SOA-integrated components, you must install thosedistributions, as well. See the Oracle Fusion Middleware documentation library for acomplete list of installation guides for each product distribution. Be sure to review anyof the component-specific chapters in this book to determine if additional pre-upgradesteps for your additional installations.
1. Log in to the target system.
2. Go to the directory where you downloaded the installation program.
3. Launch the installation program by running the java executable from the JDKdirectory on your system:
• On UNIX operating systems: /home/Oracle/Java/jdk1.8.0_77/bin/java —jar fmw_12.2.1.0.0_PRODUCT.jar
• On Windows operating systems: C:\home\Oracle\Java\jdk1.8.0_77\bin\java -jar<component_name>.jarfmw_12.2.1.0.0_PRODUCT.jar
For example: cd /home/Oracle/Java/jdk1.8.0_77/bin/java —jarfmw_12.2.1.0.0_PRODUCT.jar
Be sure to replace the JDK location in these examples with the actual JDK locationon your system.
4. Follow the instructions described in Navigating the Installation Screens. This linkwill take you to the Oracle SOA Suite and Business Process Management InstallationGuide where you will find installation procedures for all of the supportedtopologies.
5. At the end of the installation you will be prompted to start the ConfigurationWizard to configure a new domain for 12c (12.2.1.1)
6.4.3 Creating New 12c Schemas with the Repository Creation Utility (RCU)If this is your first 12c upgrade, you may need to create new schemas for SOA andOracle BAM 12c (12.2.1.1).
In Oracle Fusion Middleware 11g releases it was possible to run Oracle Service Bus(OSB) without a database, as the SOA schema was not required. In 12c, however, youmust have a supported database configured with the required SOA schemas beforeyou can run Oracle Service Bus 12c (12.2.1.1).
Note: You do not have to create new schemas if you are upgrading from aprevious 12c release unless you are extending your 12c domain to includecomponents for which you have not yet created the required schemas.
For the SOA with Oracle BAM upgrade you will need to create the following schemas(if you have not done so already):
• Service Table (_STB)
• Audit Services (_IAU)
Upgrading a SOA with Oracle BAM Domain to 12c
6-6 Upgrading SOA Suite and Business Process Management
• WebLogic Services (_WLS) - The Oracle WebLogic Services schema is required forOracle BAM - though Oracle BAM does not have its own separate schema in 11g.
• Managed File Transfer (_MFT) This schema was introduced in Release 12c (12.1.3)and is only needed if MFT is part of your domain.
• Oracle Platform Security Services (_OPSS)This schema is required if you are usingOracle Internet Directory (OID)-based security store in 11g.
To create schemas using the RCU:
1. Set the JAVA_HOME variable and add JAVA_HOME/bin to $PATH, if you have notdone so already..
2. Navigate to the 12c_ORACLE_HOME/oracle_common/bin directory on yoursystem.
3. Start RCU:
On Unix system, enter:
./rcu
On Windows system, enter:
.\rcu.bat
4. Complete the schema creation by navigating the RCU screens.
For more information, see Navigating the RCU Screens to Create the Schemas inInstalling and Configuring the Oracle Fusion Middleware Infrastructure.
6.4.4 Renaming the Oracle BAM Templates Before Upgrading the 11g SchemasBefore upgrading the 11g schemas with the Upgrade Assistant, you must change thenames of the following Oracle BAM reconfiguration templates upgrade will fail.
Make sure that you have exported your 11g Oracle BAM data before completing thisstep. If you are unsure, read Exporting All Oracle BAM 11g Artifacts from the ExistingDomain.
The templates can be found in the following 12c directory: $ORACLE_HOME/soa/common/templates/wls
6.4.5 Running the Upgrade Assistant to Upgrade SchemasFollow the standard procedure for upgrading schemas using the Upgrade Assistant.For more information, see Upgrading SOA Schemas with the Upgrade Assistant.
Upgrading a SOA with Oracle BAM Domain to 12c
Upgrading from Oracle SOA Suite with Oracle Business Activity Monitoring 11g to 12c 6-7
When upgrading SOA Suite and BPM with Oracle BAM 11g schemas, select thefollowing options on the Available Components screen (the schema names are listedfor each):
• Oracle Platform Security Services (_OPSS)
• Oracle SOA (_SOAINFRA)
• Oracle Managed File Transfer (_MFT)
When Oracle Platform Security Services and Oracle SOA are selected, the followingdependencies are also selected:
• Oracle Audit Services (_IAU)
• Oracle Metadata Services (_MDS)
• User Messaging Service (_ORASDPM)
NOTE: The 11g _ORASDPM schema has been renamed to _UMS in 12c. However,you must provide the 11g schema name prefix_ORASDPM when prompted in theUpgrade Assistant. The schema will continue to be <prefix>_ORASDPM forupgraded domains since schema names cannot be changed by Upgrade Assistant.
6.4.6 Reconfiguring the 11g Domain with the Reconfiguration WizardAfter you have renamed the Oracle BAM reconfiguration templates, start theReconfiguration Wizard and follow the steps as described Reconfiguring the DomainUsing the Reconfiguration Wizard.
The Reconfiguration Wizard will remove the Oracle BAM 11g application, library,BAMDataSource, BAMJMSSserver and BAMJmsSystemResource from the domain.
NOTE: You must manually remove the Oracle BAM server and cluster after theupgrade as described in Removing the Oracle BAM Servers and Clusters from theDomain.
6.4.7 Running the Upgrade Assistant to Upgrade Component ConfigurationsAfter the domain reconfiguration, run the Upgrade Assistant (again) to upgrade anyremaining component configurations.
For more information, see Upgrading the Domain Component Configurations Usingthe Upgrade Assistant.
6.5 Performing Post Upgrade Configuration Tasks for Oracle SOA withOracle BAM 12c
To run the SOA 12c domain that will eventually include Oracle BAM 12c, you mustperform additional configuration tasks after the upgrade.
After a successful upgrade, you must perform the following tasks to run the SOA 12cdomain that will eventually include Oracle BAM 12c.
Performing Post Upgrade Configuration Tasks for Oracle SOA with Oracle BAM 12c
6-8 Upgrading SOA Suite and Business Process Management
Note:
Oracle recommends that you first run the 12c SOA environment with OracleBAM 11g. Once you have verified that the environment is functioning asexpected, you can extend the domain with Oracle BAM 12c as described in Extending the SOA Domain with Oracle BAM 12c.
Starting the Admininstration (Admin) Server
Launching the WebLogic Server Administration 12c Console
Performing Post Upgrade Configuration Tasks for Oracle SOA with Oracle BAM 12c
Upgrading from Oracle SOA Suite with Oracle Business Activity Monitoring 11g to 12c 6-9
Deleting the UMS JMS Resources Running on the Oracle BAM Server or OracleBAM Cluster
These steps can be used to remove the UMS JMS resources forstandalone or clustered environments. Note the additional steps neededfor Oracle BAM cluster.
Deleting Subdeployment Resources Targeted to UMS JMS Server Targeted toOracle BAM
Delete the subdeployment resources targeted to UMS JMS servertargeted to Oracle BAM.
Removing the Oracle BAM Servers and Clusters from the DomainWhile the Admin Server is running, use Weblogic Console to completethe following tasks.
Removing Unnecessary Oracle BAM 11g Files from the Upgraded DomainUse the domainupdater script to remove any unnecessary 11g files fromthe upgraded domain.
For Cluster Upgrades Only: Stop the Admin and Managed ServersIf you are upgrading a cluster, you must stop the Admin and ManagedServers before you execute the pack and unpack commands.
For Cluster Upgrades Only: Run the Pack Command where the Admin Serverand Managed Servers are Installed
To get the reconfigured domain, including NodeManager, onto the othernode in the cluster, execute a managed pack from the Admin Servermachine, and then unpack on the remote nodes.
For Cluster Upgrades Only: Run the Unpack Command to Replicate the DomainConfiguration of SOAHOST1 on SOAHOST2.
Make sure that the Admin and Managed Servers are still stopped andthen execute the following unpack command to create a full domain or asubset of a domain
Restarting the Admin ServerYou must restart the 12c Administration Server before you execute theremaining configuration tasks.
Configuring 11g Oracle BAM Adapter to Work With SOA 12c DomainOnce the SOA 12c domain has been upgraded, you must configure theSOA 12c domain to use the Oracle BAM 11g domain.
Restarting the SOA Managed ServersYou must restart the SOA managed servers to complete the postconfiguration tasks.
Deleting the Existing UMS Email Driver from the SOA DomainDue to incompatibility issues with the mail patterns, you must delete theUMS driver in Oracle Enterprise Manager.
6.5.1 Starting the Admininstration (Admin) ServerTo start the Oracle WebLogic Administration Server, use the following script:
(UNIX) DOMAIN_HOME/bin/startWebLogic.sh
(Windows) DOMAIN_HOME\bin\startWebLogic.cmd
Performing Post Upgrade Configuration Tasks for Oracle SOA with Oracle BAM 12c
6-10 Upgrading SOA Suite and Business Process Management
6.5.2 Launching the WebLogic Server Administration 12c ConsoleTo display the Administration Console:
1. Enter the following URL in a browser:
http://hostname:port_number/console
The port number is the port number of the Administration Server. By default, theport number is 7001.
The login page is displayed.
2. Log in using the user name and password supplied during installation or anotheradministrative user that you created.
Alternatively, you can access the Administration Console from Fusion MiddlewareControl, from the home pages of targets such as the Administration Server orManaged Servers.
6.5.3 Deleting the UMS JMS Resources Running on the Oracle BAM Server or OracleBAM Cluster
These steps can be used to remove the UMS JMS resources for standalone or clusteredenvironments. Note the additional steps needed for Oracle BAM cluster.
1. Determine which JMS Server name is targeted to the Oracle BAM server or OracleBAM cluster. You may have multiple JMS servers, and it is important to note whichserver is targeted to the Oracle BAM server or cluster before you continue. If youhave only one UMS JMS Server, the default name is UMSJMSServer_auto_1.Always validate that the target of the selected UMS JMS Server is the Oracle BAMserver or Oracle BAM cluster.
Navigate to the Summary of JMS Servers screen (shown below). From the DomainStructure menu, expand Services, select Messaging and then select JMS Servers.Locate the UMSJMSServer that is targeted to the Oracle BAM server.
In the example below, UMSJMSServer_auto_3 is the server targeted to the OracleBAM server.
2. Delete the local queues for the UMS JMS Server targeted to Oracle BAM(UMSJMSServer_auto_3 in this example).
Performing Post Upgrade Configuration Tasks for Oracle SOA with Oracle BAM 12c
Upgrading from Oracle SOA Suite with Oracle Business Activity Monitoring 11g to 12c 6-11
Navigate to the Summary of JMS Modules screen (shown below). From theDomain Structure menu, expand Services, select JMS Modules. LocateUMSJMSSystemResource and click to display the local (and distributed) queuesin the Settings for UMSJMSSystemResource screen. You can filter the results toshow only those queues targeted to your UMS JMS Server.
3. Oracle BAM Cluster Only: Select all Uniform Distributed Queues targeted only tothe Oracle BAM server or cluster (UMSJMSServer_auto_3 in this example). (Youcan filter by type Uniform Distributed Queues). Click Delete.
CAUTION: Do not delete distributed queues that include server targets other thanOracle BAM. If there are other targeted servers, you must first remove (untarget)the Oracle BAM server from the distributed queue as shown in Step 4.
4. Untarget the Oracle BAM server from the distributed queue (if necessary).
To untarget the Oracle BAM server from the distributed queue, click the Targetstab from the Settings for UMSJMSSystemResource screen. Remove thecheckmark next to the Oracle BAM server and click Save. Now you can safelydelete the distributed queues as described in Step 3.
Performing Post Upgrade Configuration Tasks for Oracle SOA with Oracle BAM 12c
6-12 Upgrading SOA Suite and Business Process Management
5. Delete the local queues that are targeted to the UMS JMS Server.
Select all local queues that are targeted to the UMS JMS Server targeted to OracleBAM (UMSJMSServer_auto_3) from the Settings for UMSJMSSystemResourcescreen (as shown below):
Performing Post Upgrade Configuration Tasks for Oracle SOA with Oracle BAM 12c
Upgrading from Oracle SOA Suite with Oracle Business Activity Monitoring 11g to 12c 6-13
6. Click Delete.
6.5.4 Deleting Subdeployment Resources Targeted to UMS JMS Server Targeted toOracle BAM
Delete the subdeployment resources targeted to UMS JMS server targeted to OracleBAM.
1. Delete the subdeployment resources from the UMS JMS Server.
From the Settings for UMSJMSSystemResource screen, click the Subdeploymentstab.
2. Select the UMS JMS Server targeted to Oracle BAM (in the example below itsUMSJMSServer_auto_3).
3. Click Delete.
Performing Post Upgrade Configuration Tasks for Oracle SOA with Oracle BAM 12c
6-14 Upgrading SOA Suite and Business Process Management
6.5.5 Removing the Oracle BAM Servers and Clusters from the DomainWhile the Admin Server is running, use Weblogic Console to complete the followingtasks.
Note:
For more information on navigating through the Fusion Middleware ControlConsole, see Getting Started with Administering Oracle SOA Suite and OracleBPM Suite.
1. Navigate to the Summary of JMS Servers screen (shown below). From the DomainStructure menu, expand Services, select Messaging and then select JMS Servers.
2. Select the UMSJMSServer_auto_x from the list. Make sure the Current Target isthe Oracle BAM server.
3. Click Delete.
4. Navigate to the Summary of Persisted Stores screen (shown below).
5. Select UMSJMSFileStore_auto_x from the list. (Make sure the Target is theOracle BAM server.)
6. Click Delete.
7. Navigate to the Summary of Clusters screen (shown below). From the DomainStructure menu, expand Environment and select Clusters.
Performing Post Upgrade Configuration Tasks for Oracle SOA with Oracle BAM 12c
Upgrading from Oracle SOA Suite with Oracle Business Activity Monitoring 11g to 12c 6-15
8. Select bam_cluster from the list of clusters.
9. Click Delete.
10. Navigate to the Summary of Servers screen (shown below). From the DomainStructure menu, expand Environment and select Servers.
11. Select the Oracle BAM server(s) from the list.
12. Click Delete.
6.5.6 Removing Unnecessary Oracle BAM 11g Files from the Upgraded DomainUse the domainupdater script to remove any unnecessary 11g files from the upgradeddomain.
2. Run the domainupdater script from the SOA 12c home to remove anyunnecessary legacy 11g files from the upgraded domain.
(UNIX) cd ORACLE_HOME/soa/bam/bin./domainupdater.sh
Performing Post Upgrade Configuration Tasks for Oracle SOA with Oracle BAM 12c
6-16 Upgrading SOA Suite and Business Process Management
Enter the 11g domain path: (ex:)/soa11g/user_projects/domains/soa_domain
(Windows) cd ORACLE_HOME\soa\bam\bindomainupdater.cmdEnter the 11g domain path: (ex:)\soa11g\user_projects\domains\soa_domain
3. Restart the 12c Admin Server.
(UNIX) DOMAIN_HOME/bin/startWebLogic.sh
(Windows) DOMAIN_HOME\bin\startWebLogic.cmd
6.5.7 For Cluster Upgrades Only: Stop the Admin and Managed ServersIf you are upgrading a cluster, you must stop the Admin and Managed Servers beforeyou execute the pack and unpack commands.
See Starting and Stopping Servers for information on stopping servers in the correctorder.
6.5.8 For Cluster Upgrades Only: Run the Pack Command where the Admin Server andManaged Servers are Installed
To get the reconfigured domain, including NodeManager, onto the other node in thecluster, execute a managed pack from the Admin Server machine, and then unpack onthe remote nodes.
The pack command creates a template archive (.jar) file that contains a snapshot ofeither an entire domain or a subset of a domain. You can use a template that contains asubset of a domain to create a Managed Server domain directory hierarchy on aremote machine.
NOTE: The pack and unpack command utility must be run from 12c install directorypointing to the upgraded 11g domain.
Execute the pack command on the server where the Admin Server and one of theManaged Servers is installed.
In our example, you would execute the following on SOAHOST1:
• 12c_ORACLE_HOME refers the actual path to the 12c Oracle Home directory (theinstallation directory for the 12.2.1 bits).
Performing Post Upgrade Configuration Tasks for Oracle SOA with Oracle BAM 12c
Upgrading from Oracle SOA Suite with Oracle Business Activity Monitoring 11g to 12c 6-17
• Replace 11g_DOMAIN_HOME with the actual path to the upgraded domaindirectory.
• domainupgradetemplate.jar is a sample name for the jar file you are creating,which will contain the domain configuration files.
• domainupgradetemplate is the name assigned to the domain template file.
• By default, the domainupgradetemplate is created in the current directorywhere you ran the pack command. In this example, it would be created in thefollowing directory, but you can specify a full path for the template jar file as partof the -template argument to the pack command:
ORACLE_COMMON_HOME/common/bin/
The pack command creates a template archive (.jar) file that contains a snapshot ofeither an entire domain or a subset of a domain. You can use a template that contains asubset of a domain to create a Managed Server domain directory hierarchy on aremote machine.
For more information on using the pack command, see "Overview of the Pack andUnpack Commands" in Creating Templates and Domains Using the Pack and UnpackCommands.
6.5.9 For Cluster Upgrades Only: Run the Unpack Command to Replicate the DomainConfiguration of SOAHOST1 on SOAHOST2.
Make sure that the Admin and Managed Servers are still stopped and then execute thefollowing unpack command to create a full domain or a subset of a domain
You can create a full domain or a subset of a domain used for a Managed Serverdomain directory on the remote machine. You may use unpack only with a templatecompatible with your current installation.
A sample unpack command code snippet is shown below. Use this as an exampleonly. Note that you must specify the "-overwrite_domain=true" flag on unpack.
For more information on using the pack command, see "Overview of the Pack andUnpack Commands" in Creating Templates and Domains Using the Pack and UnpackCommands.
• 12c_ORACLE_HOME refers the actual path to the 12c Oracle Home directory (theinstallation directory for the 12.2.1 bits).
• Replace 11g_DOMAIN_HOME with the actual path to the upgraded domaindirectory.
• domainupgradetemplate.jar is a sample name for the jar file you are creating,which will contain the domain configuration files.
• domainupgradetemplate is the name assigned to the domain template file.
Performing Post Upgrade Configuration Tasks for Oracle SOA with Oracle BAM 12c
6-18 Upgrading SOA Suite and Business Process Management
6.5.10 Restarting the Admin ServerYou must restart the 12c Administration Server before you execute the remainingconfiguration tasks.
Procedures for starting and stopping Oracle Fusion Middleware, including theAdministration Server, Managed Servers, and components are provided in Startingand Stopping Oracle Fusion Middleware.
6.5.11 Configuring 11g Oracle BAM Adapter to Work With SOA 12c DomainOnce the SOA 12c domain has been upgraded, you must configure the SOA 12cdomain to use the Oracle BAM 11g domain.
Use the Oracle BAM 11g domain you created in Creating a New Oracle BAM 11gDomain Before You Upgrade.
For more information on how to configure this setup, see "Configuring Oracle BAMAdapter" in the 11g version of the Oracle Fusion Middleware Administrator's Guide forOracle SOA Suite and Oracle Business Process Management Suite.
6.5.12 Restarting the SOA Managed ServersYou must restart the SOA managed servers to complete the post configuration tasks.
See Starting and Stopping Servers for information on stopping servers in the correctorder.
6.5.13 Deleting the Existing UMS Email Driver from the SOA DomainDue to incompatibility issues with the mail patterns, you must delete the UMS driverin Oracle Enterprise Manager.
Note that you will create a new driver after you have extended the SOA 12c domainwith the Oracle BAM 12c templates.
1. While the Admin Server and all the managed servers are running in the SOAdomain, navigate to User Messaging Service, select the usermessagingdriver-mail service targeted to the soa_server.
From the User Messaging Email Driver drop-down menu, select Email DriverProperties as shown below.
Performing Post Upgrade Configuration Tasks for Oracle SOA with Oracle BAM 12c
Upgrading from Oracle SOA Suite with Oracle Business Activity Monitoring 11g to 12c 6-19
2. Select the User Messaging Service Email driver name from the Target Navigationpane.
3. Click Delete.
4. Repeat the process for any other cluster present in the domain.
6.6 Extending the SOA Domain with Oracle BAM 12cWhen you are ready to use Oracle BAM 12c with your upgraded SOA 12cenvironment, you must extend the domain to include the BAM 12c templates.
Complete the following tasks. Note that some tasks are optional.
Stop the Admin Server and SOA Managed Server(s)
Extend the SOA 12c Domain with Oracle BAM 12c Domain Template
Create the New UMS Email Driver for the Oracle BAM Server
Import the Oracle BAM 11g data objects and EMS data to the BAM 12c server.
Manually recreate the 11g BAM dashboards, alerts, and other artifacts for use inthe BAM 12c domain.
Migrate 11g Process Cubes to BAM 12c Process Star Schema (BPM Users Only).
Migrate the 11g Monitor Express data to BAM 12c Process Star schema.(Optional)
Generating 11g Compatible Process Star Schema Data Views in 12c (Optional)
Extending the SOA Domain with Oracle BAM 12c
6-20 Upgrading SOA Suite and Business Process Management
6.6.1 Stop the Admin Server and SOA Managed Server(s)Stop all of the 12c servers and processes that are currently running before you beginextending the domain.
3. Select the following templates on the Templates screen:
• Oracle WSM Policy Manager - 12.2.1.0
• Oracle User Messaging Service - 12.2.1.0
• Oracle BAM Client - 12.2.1.0
Extending the SOA Domain with Oracle BAM 12c
Upgrading from Oracle SOA Suite with Oracle Business Activity Monitoring 11g to 12c 6-21
• Oracle Enterprise Manager Plugin for BAM - 12.2.1.0
4. Complete the remaining Configuration Wizard screens as described in"Configuring the Oracle SOA Suite and Business Activity Monitoring (BAM)Topology" in Installing and Configuring Oracle SOA Suite and Business ProcessManagement.
Note:
Certain Fusing Middleware components such as SOA, OSB and BAM have adependency on UMS in 12c. If you configure more than one of thesecomponents within a single 12.2.1 domain, then each of these componentsmust run within its own cluster — even if there is only one server that runsthat component. See Figure 5-1 in Upgrading a Clustered SOA Environment .
When you reach the Advanced Configuration screen of the ConfigurationWizard, select Managed Servers, Clusters, and Coherence to create a BAMcluster as described in "Clusters" in Creating WebLogic Domains Using theConfiguration Wizard.
6.6.3 Create the New UMS Email Driver for the Oracle BAM ServerWhile the Oracle BAM server is running in the cluster, use Fusion Middleware ControlConsole to complete the following tasks:
1. Navigate to the Email Driver Properties screen.
From the Target Navigation pane, select User Messaging Service and from theUser Messaging Email Driver drop-down menu, select Email Driver Properties (asshown below).
2. Click Create to add a new UMS Email driver.
Extending the SOA Domain with Oracle BAM 12c
6-22 Upgrading SOA Suite and Business Process Management
3. Provide a unique name for the new Email driver in the Name field as shownbelow. Note that UMS needs to be configured on each cluster in a 12c domain.Therefore maintain the default selection for Configuration Level as Cluster asshown in the image.
4. Select Use Default Sender Address and enter EMAIL:[email protected] that the EMAIL: prefix is mandatory in this field.
5. Click OK to create the new driver with the given properties.
6.6.4 Import the Oracle BAM 11g data objects and EMS data to the BAM 12c server.Once you have extended the domain to include BAM 12c, you must export the dataobjects and EMS data from the BAM 11g environment you have been using with SOA12c. You will then import this data to the SOA with BAM 12c environment.
1. Export the data objects and EMS data from the 11g BAM domain using the 11gICommand command-line utility. (Note that the EMS definitions were upgraded aspart of the standard upgrade process and do not need to be imported.)
The following example shows how to use ICommand 11g to export informationabout one or more objects in the Oracle BAM server to a XML file:
NOTE: You may need to modify the ICommand configuration file before you runthe script. Specifically, verify that the correct usernames and passwords have beenentered. The BAMICommandConfig.xml file is located in WLS_HOME/user_projects/domains/base_domain/config/fmwconfig/servers/bam_server1/applications/oracle-bam_11.1.1/config/.
The following is an example configuration file.
Extending the SOA Domain with Oracle BAM 12c
Upgrading from Oracle SOA Suite with Oracle Business Activity Monitoring 11g to 12c 6-23
When you use the import command with the -upgrade parameter to bringOracle BAM 11g artifacts into Oracle BAM 12c, some information is modified.
6.6.5 Manually recreate the 11g BAM dashboards, alerts, and other artifacts for use inthe BAM 12c domain.
The dashboards, alerts, views, etc. you used in your BAM 11g domain must berecreated for the BAM 12c domain.
See the following sections of the BAM user guide, Monitoring Business Activity withOracle BAM:
• Creating Dashboards
• Creating Alerts
• Creating Parameters
• Creating and Using Business Views
6.6.6 Migrate 11g Process Cubes to BAM 12c Process Star Schema (BPM Users Only).Oracle strongly recommends that you perform the process cubes migration afterextending an upgraded BPM 12c domain with BAM 12c. This migration will ensurethat all of the necessary 12c data objects are created for BPM entities. This will alsoensure the BPM process analytics data has been migrated from the 11g Process cubes(applicable only if cube tables are populated with run-time data).
While exporting and importing each archive, you will be required to provide theserver admininstrator (admin) username and password, as well as the SOAINFRAschema username and password.
Extending the SOA Domain with Oracle BAM 12c
6-24 Upgrading SOA Suite and Business Process Management
Note:
The process cubes migration is a required prerequisite before proceeding withthe Monitor Express migration described in Migrate the 11g Monitor Expressdata to BAM 12c Process Star schema. (Optional).
This step is required even if you did not use Oracle BAM 11g Monitor Expresswith BPM 11g.
Task 1: Disable the Process Metrics.
Task 2: Determing the exportType to be used for the migration.
Task 3: (UNIX Only) Run migrateBPMProcessCubes script from the 12c SOAhome.
Task 4: (Windows Only) Export data object definitions and data from 11g BPMProcess Cubes and then import them to 12c.
Task 5: (Windows Only) Import dimension data (DimensionExport.zip) into theBAM server.
Task 6: (Windows Only) Import active fact data (ActiveFactDataExport.zip) intothe BAM server.
Task 7: (Windows Only - if exportType=ALL) Import completed fact data(CompletedFactDataExport.zip) into the BAM server.
Task 8: Restart the Oracle BAM server once the migration has completedsuccessfully.
Task 9: Enable the process metrics while the Oracle BAM server is running.
6.6.6.1 Task 1: Disable the Process Metrics.
1. Log in to the Fusion Middleware Control console.
2. In the Target Navigation pane, expand the Weblogic Domain node.
3. Select the domain in which Oracle SOA 12c server is installed.
For example, the domain might be soainfra or base_domain.
4. Right-click on the domain and select System MBean Browser.
The System MBean Browser page appears.
5. In the System MBean Browser, expand the Application Defined MBeans node.
6. Under Application Defined MBeans, expand the oracle.as.soainfra.config node.
7. Under oracle.as.soainfra.config, expand the Server: server_name node.
8. Under Server: server_name, expand the AnalyticsConfig node.
9. Under AnalyticsConfig, click analytics.
The analytics attributes are listed.
Extending the SOA Domain with Oracle BAM 12c
Upgrading from Oracle SOA Suite with Oracle Business Activity Monitoring 11g to 12c 6-25
10. If not already set to true, change the value of the DisableProcessMetricsattribute to true.
11. Click Apply.
6.6.6.2 Task 2: Determing the exportType to be used for the migration.
The exportType must be decided before migration because once the active instancemigration is complete, and process analytics are enabled, you will not be able to goback and migrate the Completed instance data.
The valid exportType values are:
• INFLIGHT_WITH_DIMENSION_AND_DEFINITION (default): Migrates only Activeinstance fact data archives
• ALL: Migrates all Active and Completed instance fact data archives
6.6.6.3 Task 3: (UNIX Only) Run migrateBPMProcessCubes script from the 12c SOAhome.
The migrateBPMProcessCubes shell script performs migration in two phases: exportand import. The first phase exports the following archives from BPM Process Cubes,and then the second phase imports them to BAM 12c.
• DefinitionExport.zip
• DimensionExport.zip
• ActiveFactDataExport.zip
• CompletedFactDataExport.zip (if running with -exportType = ALL option)
Before running the migrateBPMProcessCubes script, you must set the followingenvironment variables:
Environment Variable Description Sample Location
JAVA_HOME The location where youinstall the supported JavaDevelopment Kit (JDK).
/u01/oracle/products/jdk_version
ORACLE_HOME The Oracle home that iscreated for all the OracleFusion Middleware productson a host computer. Thisread-only directory containsbinary and library files, theOracle Common homedirectory, and the individualproduct directories for eachOracle Fusion Middlewareproduct you install.NOTE: This was known atthe Middleware Home in11g.
/install_location/Oracle_Home
Extending the SOA Domain with Oracle BAM 12c
6-26 Upgrading SOA Suite and Business Process Management
Environment Variable Description Sample Location
PROD_DIR The directory within theOracle home, which containsthe binary files associatedwith a logical product orfeature set. The name of eachproduct directory within theOracle home is predefined bythe installer and cannot bechanged.
install_location/Oracle_Home/SOA
On UNIX Operating Systems:
cd $ORACLE_HOME/bam/bin./migrateBPMProcessCubes.sh -serverUrl <BAM 12c server url> -serverPort <BAM 12c server port> -serverUserName <BAM 12c server user> -dbUrl <soa db jdbc url> -dbUserName <soainfra schema username> -exportDir <export dir> [-exportType ALL] [-importOnly]
Where:
serverUrl (mandatory) : BAM 12c Server URL serverPort (mandatory) : BAM 12c Server Port serverUserName (mandatory) : BAM 12c Server admin user dbUrl (mandatory) : SOA DB jdbc URL dbUserName (mandatory) : SOAINFRA schema username exportDir (mandatory) : A writable Directory where exported archives will be written exportType (optional ) : Export Type. Valid values are a)INFLIGHT_WITH_DIMENSION_AND_DEFINITION (default): Migrates only Active instance fact data archives b)ALL : Migrates all Active and Completed instance fact data archives importOnly (optional ) : If specified, data object definition and data archive export phase is skipped and only import is performed. It is assumed that archives are already present under "exportDir"
Note:
If there were errors during the migration, you may need to manually correctthe issues and start the script again. For more information, see Error Handling:11g Process Cubes to BAM 12c Star Schema Migration.
6.6.6.4 Task 4: (Windows Only) Export data object definitions and data from 11g BPMProcess Cubes and then import them to 12c.
The data object definitions migration is performed in two steps. Step one involvesexporting the data from 11g process cubes and step 2 imports the data into 12c.
The first phase exports the following archives from BPM Process Cubes, and then thesecond phase imports them to BAM 12c.The export command shown below willgenerate the following archive files under the <exportDir> directory:
• DefinitionExport.zip
Extending the SOA Domain with Oracle BAM 12c
Upgrading from Oracle SOA Suite with Oracle Business Activity Monitoring 11g to 12c 6-27
• DimensionExport.zip
• ActiveFactDataExport.zip
• CompletedFactDataExport.zip (if running with -exportType = ALL option)
1. Export the data objects and definitions using the following code example: (makesure that you provide your actual directory names)
oracle.bpm.metrics.dataobject.migration.application.Migrate11gProcessCubesto12cDO -url <soa db jdbc url> -userName <soa schema user name> -exportDir <export directory path> [-exportType ALL]
2. Import the data object definitions(DefinitionExport.zip) into the BAM server.
cd %ORACLE_HOME%\bam\bin\
bamcommand.cmd -host <bam server host> -protocol t3 -port <bam server port> -username <bam server admin user> -dburl <bam database jdbc url>-dbusername <bam database db user> -cmd import -file <Path to DefinitionExport.zip> -mode update
NOTE: After importing the archive for BAM 12c, review the bamcommand.log.*files under ORACLE_HOME/bam/bin directory to make sure no errors occurred.If error conditions do exist, see Error Handling: 11g Process Cubes to BAM 12c StarSchema Migration.
6.6.6.5 Task 5: (Windows Only) Import dimension data (DimensionExport.zip) into theBAM server.
This command uses -datamode and -migrate parameters.
Use the following code example to import the dimension data:
cd %ORACLE_HOME%\bam\bin\
bamcommand.cmd -host <bam server host> -protocol t3 -port <bam server port> -username <bam server admin user> -dburl <bam database jdbc url>-dbusername <bam database db user> -cmd import -file <Path to DimensionExport.zip> -datamode update -migrate 1
NOTE: After importing the archive for BAM 12c, review the bamcommand.log.* filesunder ORACLE_HOME/bam/bin directory to make sure no errors occurred. If errorconditions do exist, see Error Handling: 11g Process Cubes to BAM 12c Star SchemaMigration.
Extending the SOA Domain with Oracle BAM 12c
6-28 Upgrading SOA Suite and Business Process Management
6.6.6.6 Task 6: (Windows Only) Import active fact data (ActiveFactDataExport.zip) intothe BAM server.
This command uses -datamode and -migrate parameters.
cd %ORACLE_HOME%\bam\bin\
bamcommand.cmd -host <bam server host> -protocol t3 -port <bam server port> -username <bam server admin user> -dburl <bam database jdbc url>-dbusername <bam database db user> -cmd import -file <Path to ActiveFactDataExport.zip> -datamode update -migrate 1
6.6.6.7 Task 7: (Windows Only - if exportType=ALL) Import completed fact data(CompletedFactDataExport.zip) into the BAM server.
This command uses -datamode and -migrate parameters.
Use this command only if you used the exportType ALL when you migrated the dataobjects definitions for the BAM 11g process cubes.
cd %ORACLE_HOME%\bam\bin\
run the following commandbamcommand.cmd -host <bam server host> -protocol t3 -port <bam server port> -username <bam server admin user> -dburl <bam database jdbc url>-dbusername <bam database db user> -cmd import -file <Path to ActiveFactDataExport.zip> -datamode update -migrate 1
NOTE: After importing the archive for BAM 12c, review the bamcommand.log.* filesunder ORACLE_HOME/bam/bin directory to make sure no errors occurred. If errorconditions do exist, see Error Handling: 11g Process Cubes to BAM 12c Star SchemaMigration.
6.6.6.8 Task 8: Restart the Oracle BAM server once the migration has completedsuccessfully.
6.6.6.9 Task 9: Enable the process metrics while the Oracle BAM server is running.
1. Log in to the Fusion Middleware Control console.
2. In the Target Navigation pane, expand the Weblogic Domain node.
3. Select the domain in which the Oracle BAM server is installed.
For example, the domain might be soainfra or base_domain.
4. Right-click on the domain and select System MBean Browser.
The System MBean Browser page appears.
Extending the SOA Domain with Oracle BAM 12c
Upgrading from Oracle SOA Suite with Oracle Business Activity Monitoring 11g to 12c 6-29
5. In the System MBean Browser, expand the Application Defined MBeans node.
6. Under Application Defined MBeans, expand the oracle.as.soainfra.config node.
7. Under oracle.as.soainfra.config, expand the Server: server_name node.
8. Under Server: server_name, expand the AnalyticsConfig node.
9. Under AnalyticsConfig, click analytics.
The analytics attributes are listed.
10. Change the value of the DisableProcessMetrics attribute to false.
11. Click Apply.
6.6.7 Migrate the 11g Monitor Express data to BAM 12c Process Star schema. (Optional)Prerequisite: Perform the steps in Migrate 11g Process Cubes to BAM 12c Process StarSchema (BPM Users Only)..
Complete this optional task only if want to be able to analyze historical data fromBAM 11g through the BAM 12c process analytics dashboards. To do this, you mustmigrate the 11g process analytics data from BAM 11g the Monitor Express data objectsto the BAM 12c Process star schema data objects.
Before you can upgrade the 11g Monitor Express data to BAM 12c Process Starschema, you must migrate 11g process cubes to the BAM 12c star schema to ensurethat all of the necessary 12c data objects are created for BPM entities. This will alsoensure the BPM process analytics data has been migrated from the 11g Process cubes(applicable only if cube tables are populated with run-time data).
Note:
If there are any errors while importing the archive files, you can roll back all ofthe imported data in the BAM 12c process star schema data objects by runningthe rollback SQL file.
From a BAM 12c database SQL prompt, log in as the SOAINFRA schema user,navigate to the <PATH> directory and execute the following command:
sql> @rollbackMonitorExpressMigration.sql
For additional error handling procedures, see Error Handling: 11g ProcessCubes to BAM 12c Star Schema Migration.
Disable the Process Metrics.
Run the Oracle BAM migration utility to migrate the Monitor Express data.
Import the BPM data to Oracle BAM 12c.
Enable publishing to BAM 12c.
6.6.7.1 Disable the Process Metrics.
1. Log in to the Fusion Middleware Control console.
2. In the Target Navigation pane, expand the Weblogic Domain node.
Extending the SOA Domain with Oracle BAM 12c
6-30 Upgrading SOA Suite and Business Process Management
3. Select the domain in which the Oracle BAM server is installed.
For example, the domain might be soainfra or base_domain.
4. Right-click on the domain and select System MBean Browser.
The System MBean Browser page appears.
5. In the System MBean Browser, expand the Application Defined MBeans node.
6. Under Application Defined MBeans, expand the oracle.as.soainfra.config node.
7. Under oracle.as.soainfra.config, expand the Server: server_name node.
8. Under Server: server_name, expand the AnalyticsConfig node.
9. Under AnalyticsConfig, click analytics.
The analytics attributes are listed.
10. Change the value of the DisableProcessMetrics attribute to true.
11. Click Apply.
6.6.7.2 Run the Oracle BAM migration utility to migrate the Monitor Express data.
Data objects and data object definitions were migrated in Migrate 11g Process Cubesto BAM 12c Process Star Schema (BPM Users Only).
The following command will generate the data export for BPM data in zipped CSVfiles:
This command will generate "FactDataExport.zip" file under <PATH> directory.
NOTE: You can specify the composite name in the property file. If a composite nameis specified, then data for only those composites will be migrated. If a composite nameis not defined in the property file, then all the composite data will be migrated.
#*************************************#Mandatory Fields#*************************************#11g User NameBAM_11g_USER_NAME= <<11gUserName>>#12c User NameBAM_12c_SOURCE_NAME = <<12cUserName>> #11g URL
Extending the SOA Domain with Oracle BAM 12c
Upgrading from Oracle SOA Suite with Oracle Business Activity Monitoring 11g to 12c 6-31
BAM_11g_URL=jdbc:oracle:thin:@<<11gBAMSchemaDatabaseIP>>:<<Port>>:<<SID>>#12c URLBAM_12c_URL=jdbc:oracle:thin:@<<12cDatabaseIP>>:<<Port>>:<<SID>> #Path where data to be exportedPATH = <<Path where data need to be exported>>#*************************************#Optional Fields#************************************ COMPOSITE_LIST = <<List of Composite for which data needs to be exported. This is ':' separated>>#If above mention configurable is missing then all the composite data will be migrated.DATAOBJECT_FOLDER_PATH = <<DataObject Path If this field is absent then default path will taken as Samples/Monitor Express/BI_>>#************************************
6.6.7.3 Import the BPM data to Oracle BAM 12c.
This step will ensure that the previously exported BPM Monitor Express data isimported to BAM 12c.
cd $DOMAIN_HOME/bam/bin ./bamcommand -host <<host>> -protocol t3 -dbusername <<DbUserName>> -dburl jdbc:oracle:thin:@<<DBIP>>:<<Port>><<SID>> -username <<weblogicUserName>> -cmd import -file <<Path of BPM FactDataExport zip file >> -mode update -migrate 1
6.6.7.4 Enable publishing to BAM 12c.
Once the migration is complete, enable publishing to BAM 12c by setting theDisableProcessMetrics parameter to false.
1. Log in to the Fusion Middleware Control console.
2. In the Target Navigation pane, expand the Weblogic Domain node.
3. Select the domain in which the Oracle BAM server is installed.
For example, the domain might be soainfra or base_domain.
4. Right-click on the domain and select System MBean Browser.
The System MBean Browser page appears.
5. In the System MBean Browser, expand the Application Defined MBeans node.
6. Under Application Defined MBeans, expand the oracle.as.soainfra.config node.
7. Under oracle.as.soainfra.config, expand the Server: server_name node.
8. Under Server: server_name, expand the AnalyticsConfig node.
9. Under AnalyticsConfig, click analytics.
The analytics attributes are listed.
10. Change the value of the DisableProcessMetrics attribute to false.
11. Click Apply.
Extending the SOA Domain with Oracle BAM 12c
6-32 Upgrading SOA Suite and Business Process Management
Note:
If there are any errors while importing the archive files, you can roll back all ofthe imported data in the BAM 12c process star schema data objects by runningthe rollback SQL file.
From a BAM 12c database SQL prompt, log in as the SOAINFRA schema user,navigate to the <PATH> directory and execute the following command:
sql> @rollbackMonitorExpressMigration.sql
For additional error handling procedures, see Error Handling: 11g ProcessCubes to BAM 12c Star Schema Migration.
6.6.8 Generating 11g Compatible Process Star Schema Data Views in 12c (Optional)If you have an Oracle Fusion Middleware 11g application built on top of 11g processstar schema views, and you want to continue to use the application in 12c, then youwill need to recreate the views after the upgrade. The Star schema database views in12c are different from the 11g views and cannot be automatically upgraded.
Specifically, the star schema database views in 12c have different names, are based ontop of Oracle BAM data objects (and not on process cube tables), and are created at thecomposite level (instead of process level as in 11g). An automated utility is providedto assist you in recreating your views - both standard and process-specific - for use inyour Oracle 12c environment.
Task 1: Update the classpath to include the interface JAR file.
Task 2: Recreate Standard Views
Task 3: Recreate Process-Specific Views
6.6.8.1 Task 1: Update the classpath to include the interface JAR file.
You must updated the CLASSPATH to include the location of theoracle.bpm.analytics.interface.jar file located in the SOA Home.
• initialContextFactory is the JNDI Initial Context Factory such asweblogic.jndi.WLInitialContextFactory
• protocol is the RMI / JNDI protocol configured for the target server. Specify t3,IIOP, HTTP, T3s, IIOPS, or HTTPS.
• hostname is the full name of the host such as soa.mycompany.com
• soa-port is the SOA listening port such as 7001
• username is the server login name such as weblogic.
• composite-name (optional) is the name of a single composite you want to createviews
6.7 Recovering from a Failed Oracle BAM UpgradeThis section applies only when there are BAM servers in the domain. As part of BAMUpgrade, you can export BAM archives from 11g and import them into BAM 12c. Ifyou receive any errors during this process, use this section to try to resolve the issues.
Resolving the CFGFWK-60950 Error
Error Handling: 11g Process Cubes to BAM 12c Star Schema Migration
Recovering from a Failed Oracle BAM Upgrade
6-34 Upgrading SOA Suite and Business Process Management
Error Handling for UNIX Operating Systems
Error Handling for Windows Operating Systems
6.7.1 Resolving the CFGFWK-60950 ErrorIf you received the CFGFWK-60950 error, rename the BAM templates as described in“Renaming the Oracle BAM Templates Before Upgrading the 11g Schemas” andlaunch the Reconfiguration Wizard again.
If you received this error, you will need restore your entire pre-upgrade environment,perform the necessary pre-upgrade tasks and then perform the steps in the sectionlisted above before you can attempt the reconfiguration process again.
6.7.2 Error Handling: 11g Process Cubes to BAM 12c Star Schema MigrationYou may be able to resolve common errors by rolling back the data changes andrerunning the scripts with modified options.
Rollback All Data Changes:
1. Open a SQL session on the SOA database.
2. Log in as the SOAINFRA schema user and run the following script to roll back anydata changes:
Review the recommendations for your operating system:
• Error Handling for UNIX Operating Systems
• Error Handling for Windows Operating Systems
6.7.3 Error Handling for UNIX Operating SystemsIf any unexpected errors occurred during migration, you can try the following steps tocorrect the issues:
For Errors that Occurred During the Import Phase:
If the error occurred while importing archives to BAM 12c, rerun the shell script"migrateBPMProcessCubes.sh" as described in Migrate 11g Process Cubes to BAM 12cProcess Star Schema (BPM Users Only)., but add the "-importOnly" option. This cansave time by skipping the export step.
For example:
cd $ORACLE_HOME/bam/bin./migrateBPMProcessCubes.sh -serverUrl <BAM 12c server url> -serverPort <BAM 12c server port> -serverUserName <BAM 12c server user> -dbUrl <soa db jdbc url> -dbUserName <soainfra schema username> -exportDir <export dir> [-exportType ALL] [-importOnly]
For Errors that Occurred During the Export Phase:
If the error occurred while exporting archives from BPM Process cubes, perform thefollowing tasks:
1. Create a backup copy of the export directory defined as (<exportDir>)
Recovering from a Failed Oracle BAM Upgrade
Upgrading from Oracle SOA Suite with Oracle Business Activity Monitoring 11g to 12c 6-35
2. Delete the contents of the <exportDir>.
3. Rerun the shell script "migrateBPMProcessCubes.sh" as described in Migrate 11gProcess Cubes to BAM 12c Process Star Schema (BPM Users Only)., but remove the"-importOnly" option.
For example:
cd $ORACLE_HOME/bam/bin./migrateBPMProcessCubes.sh -serverUrl <BAM 12c server url> -serverPort <BAM 12c server port> -serverUserName <BAM 12c server user> -dbUrl <soa db jdbc url> -dbUserName <soainfra schema username> -exportDir <export dir> [-exportType ALL]
Additional Information:
You can also try the following to help resolve any issues:
• After importing each archive to BAM 12c, review the bamcommond.log.* fileslocated in the $ORACLE_HOME/bam/bin directory to make sure no errorsoccurred.
• Review the migration logs located in the <exportDir>/MigrationLogs.* :
6.7.4 Error Handling for Windows Operating SystemsRoll back all of the data changes as described above, and then try the following:
For Errors that Occurred During the Import Phase:
Reimport the archives as described in the following sections:
• Task 5: (Windows Only) Import dimension data (DimensionExport.zip) into theBAM server.
• Task 6: (Windows Only) Import active fact data (ActiveFactDataExport.zip) intothe BAM server.
• Task 7: (Windows Only - if exportType=ALL) Import completed fact data(CompletedFactDataExport.zip) into the BAM server.
For Errors that Occurred During the Export Phase:
If the error occurred while exporting archives from BPM Process cubes, perform thefollowing tasks:
1. Create a backup copy of the export directory defined as (<exportDir>)
2. Delete the contents of the <exportDir>.
3. Rerun the shell script "migrateBPMProcessCubes.sh" as described in Migrate 11gProcess Cubes to BAM 12c Process Star Schema (BPM Users Only)., but remove the"-importOnly" option.
oracle.bpm.metrics.dataobject.migration.application.Migrate11gProcessCubesto12cDO -url <soa db jdbc url> -userName <soa schema user name> -exportDir <export directory path> [-exportType ALL]
4. Repeat the remaining migration steps in Migrate the 11g Monitor Express data toBAM 12c Process Star schema. (Optional).
Recovering from a Failed Oracle BAM Upgrade
Upgrading from Oracle SOA Suite with Oracle Business Activity Monitoring 11g to 12c 6-37
Recovering from a Failed Oracle BAM Upgrade
6-38 Upgrading SOA Suite and Business Process Management
7Upgrading Oracle Service Bus
Describes the upgrade-specific tasks for upgrading Oracle Service Bus without OracleSOA Suite and Business Process Management.
When upgrading Oracle Service Bus 11g to Release 12c, you must perform the pre-and post-upgrade tasks described in this chapter. Failure to do so may result in a non-functioning post-upgrade environment.
Understanding the Oracle Service Bus Upgrade to 12cFollow this process flow to upgrade an Oracle Service Bus deploymentthat does not include SOA Suite.
Upgrading Multiple Components that use UMS in a Single OSB Domain (NotSupported)
If your Oracle Service Bus 11g topology is configured with more thanone component within a single domain, then you will not be able toupgrade to 12c (12.2.1.1)
Performing Pre-Upgrade Tasks for Oracle Service Bus (OSB)
Installing WebLogic Server and JRF InfrastructureBefore you can upgrade, you must first install Oracle WebLogic Serverand JRF using the 12c (12.2.1.1) Infrastructure distribution.
Installing the Oracle Service Bus
Creating Schemas for Oracle Service BusOracle Service Bus 12c requires the <prefix>_SOAINFRA, <prefix>_UMS,and <prefix>_STB schemas. You must create these schemas before youstart the Upgrade Assistant.
Upgrading an OSB Domain (Without SOA)
Reconfiguring an OSB Domain
Upgrading the WebLogic Component Configurations
Performing Post Upgrade Tasks for Oracle Service Bus
Troubleshooting Oracle Service Bus Upgrade
7.1 Understanding the Oracle Service Bus Upgrade to 12cFollow this process flow to upgrade an Oracle Service Bus deployment that does notinclude SOA Suite.
Oracle Service Bus (OSB) can be upgraded to 12c (12.2.1.1) with or without Oracle SOASuite and Business Process Management. The upgrade steps in this chapter describehow to upgrade Oracle Service Bus without SOA.
Upgrading Oracle Service Bus 7-1
If OSB is part of your SOA 11g or previous 12c domain, and you will be upgradingOSB as part of your SOA Suite upgrade to 12c (12.2.1.1), follow the standard upgradeprocess described in Upgrading to SOA Suite and Business Process Management 12c(12.2.1.1).
If you are upgrading Oracle Service Bus without SOA, use the upgrade proceduresdocumented in this chapter. Note that even though your domain does not includeSOA, you will still have to upgrade the _SOAINFRA schema to upgrade OSB data.OSB does not have a separate schema.
Note:
Be sure to review all of the Oracle Service Bus-specific pre- and post-upgradesteps. All Service Bus upgrades (with and without SOA) require theseadditional steps when upgrading to 12c (12.2.1.1).
Understanding the Oracle Service Bus Upgrade to 12c
7-2 Upgrading SOA Suite and Business Process Management
Step Description More Information
Upgrade the WebLogic server andJRF that will host your OSB domain.
You must install the 12cinfrastructure and then upgrade theinfrastructure domain beforeupgrading Oracle Service Bus.
Installing WebLogic Server and JRFInfrastructure
Install Oracle Service Bus. Obtain the Oracle Service Busdistribution and install the contentto a new Oracle Home.
Installing the Oracle Service Bus
Upgrade Oracle Service Bus. Upgrade your existing OracleService Bus domain.
Upgrading an OSB Domain(Without SOA)
Understanding the Oracle Service Bus Upgrade to 12c
Upgrading Oracle Service Bus 7-3
Step Description More Information
Perform all post-upgrade tasks. Perform the standard 12c post-upgrade tasks, as well as any post-upgrade OSB-specific tasks, thatapply to your deployment.
Performing Post Upgrade Tasks
Performing Post Upgrade Tasks forOracle Service Bus
Troubleshooting Oracle Service Bus
7.2 Upgrading Multiple Components that use UMS in a Single OSBDomain (Not Supported)
If your Oracle Service Bus 11g topology is configured with more than one componentwithin a single domain, then you will not be able to upgrade to 12c (12.2.1.1)
Certain Fusion Middleware components such as Oracle SOA, Oracle Service Bus (OSB)and Business Activity Monitoring (BAM) have a dependency on User MessagingService (UMS) in 12c. If you configure more than one of these components within asingle 12c (12.2.1.1) domain, then each of these components must run within its owncluster — even if there is only one server that runs that component.
In order to upgrade these components, you must create a separate cluster for eachcomponent during the domain reconfiguration as described in Clusters.
The supported upgrade topology for these components is described in Upgrading aClustered Topology .
7.3 Performing Pre-Upgrade Tasks for Oracle Service Bus (OSB)If you are upgrading Oracle Service Bus, you must perform the following tasks beforeyou begin the upgrade. Review your own use case scenarios and existing deploymentto determine if the following tasks apply to your environment.
Deploying Oracle Web Services Manager Policy Manager in Your 11gEnvironment
Exporting Services, Projects and Resources when Upgrading Oracle Service Bus
Deleting All Services, Projects and Resources
Migrating Oracle Service Bus Resources from Previous Releases
7.3.1 Deploying Oracle Web Services Manager Policy Manager in Your 11g EnvironmentIf Oracle Web Services Manager (OWSM) Policy Manager is not already deployed inyour Oracle Service Bus 11g environment, then you must manually deploy it beforeyou upgrade to 12c.
In 11g, both WebLogic security policies and OWSM policies were supported on OracleService Bus. As of 11g (11.1.1.7), WebLogic Security policies were deprecated, and arenot supported in 12c (12.1.3). Because WebLogic security policies were available in11g, deployment of the OWSM Policy Manager and use of the OWSM policies wasoptional. Since only OWSM policies are supported in 12c, OWSM Policy Managerdeployment is mandatory.
For information on manually deploying the OWSM Policy Manager in your 11genvironment, see "Installing OWSM with WebLogic Server" in Securing Web Servicesand Managing Policies with Oracle Web Services Manager.
Upgrading Multiple Components that use UMS in a Single OSB Domain (Not Supported)
7-4 Upgrading SOA Suite and Business Process Management
7.3.2 Exporting Services, Projects and Resources when Upgrading Oracle Service BusYou must export services, projects and resources into a configuration JAR file beforeyou can upgrade to Oracle Service Bus 12.2.1. After the upgrade, you will import theJAR file to the new 12c environment.
Note that you can manually export resources and services from older, supportedreleases. See Migrating Oracle Service Bus Resources from Previous Releases.
For more information, see "Importing and Exporting Resources and Configurations" inDeveloping Services with Oracle Service Bus.
7.3.3 Deleting All Services, Projects and ResourcesAfter the export, you must delete all user-created services, projects and resourcesbefore the upgrade.
For information on using the Oracle Service Bus Console to delete resources, see Howto Delete Projects, Folders, and Resources.
For information on using JDeveloper to delete resources, see How to Delete a Projector Resource.
7.3.4 Migrating Oracle Service Bus Resources from Previous ReleasesYou can manually export resources and services from the following releases and usethem with Oracle Service Bus 12c (12.2.1.1):
• Oracle Service Bus 12c Release 12.1.3 and 12.2.1.0
• Oracle Service Bus 11g Release: 11.1.1.7.0
• Oracle Service Bus 10.3 Releases: 10.3.1 and 10.3.0
• AquaLogic® Service Bus Releases 3.0 and later
For more information, see "Importing and Exporting Resources and Configurations" inDeveloping Services with Oracle Service Bus.
7.4 Installing WebLogic Server and JRF InfrastructureBefore you can upgrade, you must first install Oracle WebLogic Server and JRF usingthe 12c (12.2.1.1) Infrastructure distribution.
SOA Suite requires that Oracle WebLogic Server and JRF must be installed using the12c (12.2.1.1) Infrastructure distribution.
See Installing and Configuring the Oracle Fusion Middleware Infrastructure for detailedinstructions.
Caution:
When installing the Infrastructure distributions, do not use the ConfigurationWizard to configure the domain. You will use the new ReconfigurationWizard to configure the 11g domain during the upgrade process.
Installing WebLogic Server and JRF Infrastructure
Upgrading Oracle Service Bus 7-5
Note:
You must have the Infrastructure distribution installed before you canupgrade to SOA 12c (12.2.1.1). The only application server that Oracle FusionMiddleware 12c (12.2.1.1) supports is the Oracle WebLogic Server.
If you previously installed and configured the Infrastructure componentsusing a previous 12c release, then you must upgrade to Infrastructure 12c(12.2.1.1).
For more information, see Upgrading from a Previous Infrastructure 12cRelease.
7.5 Installing the Oracle Service BusTo install Oracle Service Bus, refer to Installing and Configuring Oracle Service Bus.
You can install and upgrade Oracle Service Bus without Oracle SOA Suite andBusiness Process Management, but you must still install the Oracle FusionMiddleware Infrastructure 12c (12.2.1) before upgrading Oracle Service Bus. For moreinformation, see Installing and Configuring the Oracle Fusion Middleware Infrastructure.
Note:
If you want to use Oracle Web Services Manager policies with Oracle ServieBus, then you must select the Oracle Web Services Manager extensiontemplate after selecting one of the Oracle Service Bus domain templates whenconfiguring the Oracle WebLogic domain.
7.6 Creating Schemas for Oracle Service BusOracle Service Bus 12c requires the <prefix>_SOAINFRA, <prefix>_UMS, and<prefix>_STB schemas. You must create these schemas before you start the UpgradeAssistant.
Oracle Service Bus does not have its own schema, as all database schema data forOracle Service Bus is incorporated in the SOAINFRA schema. So, while its possible torun Oracle Service Bus without running Oracle SOA, you must create the _SOAINFRA,_UMS and _STB schemas before you begin the upgrade.
Note: In Oracle Fusion Middleware 11g releases it was possible to run OracleService Bus (OSB) without a database, as the SOA schema was not required. In12c, however, you must have a supported database configured with therequired SOA schemas before you can run Oracle Service Bus 12c (12.2.1.1).
You will run the RCU from your new 12c Oracle Home directory.
1. Set the JAVA_HOME variable and add JAVA_HOME/bin to $PATH, if you have notdone so already..
2. Navigate to the 12c_ORACLE_HOME/oracle_common/bin directory on yoursystem.
3. Start RCU:
Installing the Oracle Service Bus
7-6 Upgrading SOA Suite and Business Process Management
On Unix system, enter:
./rcu
On Windows system, enter.
.\rcu.bat
4. Complete the schema creation by navigating the RCU screens. For moreinformation, see Navigating the RCU Screens to Create the Schemas in Installingand Configuring the Oracle Fusion Middleware Infrastructure
Creating the Required SOA Schemas Before You Upgrade from 11gIf you are upgrading from a supported 11g release, you may need tocreate the new 12c required schemas in a supported database before youcan upgrade.
7.6.1 Creating the Required SOA Schemas Before You Upgrade from 11gIf you are upgrading from a supported 11g release, you may need to create the new12c required schemas in a supported database before you can upgrade.
Note:
OID-based Security Store Users Only: If you are using an OID-based securitystore in 11g, you must create the new 12c schema _STB and the _OPSS schemausing the Repository Creation Utility (RCU).
You do not need to reassociate an OID-based security store before upgrade.When upgrading schemas with the Upgrade Assistant, select the new OPSSschema and the Upgrade Assistant upgrades the OID-based security storeautomatically.
The 12c OPSS database schema is required so that you can reference the 12cschema during the reconfiguration of the domain. Your domain continues touse the OID-based security store after the upgrade is complete.
Table 7-1 Required Schemas for SOA and SOA integrated products
If you areupgrading...
Create these 12c schemas before you upgrade
SOA Suite (SOA) Service Table (_STB)
Audit Services (_IAU)
Business ProcessMonitoring (BPM)
Service Table (_STB)
Audit Services (_IAU)
Business ActivityMonitoring (BAM)
Schemas required for SOA Suite
And:
WebLogic Services (_WLS)
Creating Schemas for Oracle Service Bus
Upgrading Oracle Service Bus 7-7
Table 7-1 (Cont.) Required Schemas for SOA and SOA integrated products
If you areupgrading...
Create these 12c schemas before you upgrade
Managed FileTransfer (MFT)
Service Table (_STB)
Audit Services (_IAU)
Oracle Service Bus(OSB)
In Oracle FusionMiddleware 11greleases it waspossible to runOracle Service Bus(OSB) without adatabase, as theSOA schema wasnot required. In 12c,however, you musthave a supporteddatabase configuredwith the requiredSOA schemas beforeyou can run OracleService Bus 12c(12.2.1.1).
SOA Infrastructure (_SOAINFRA)
Service Table (_STB)
User Messaging (_UMS)
NOTE: It is possible to install Oracle Service Bus without runningOracle SOA, but you must create the _SOAINFRA and _STB schemas.
User MessagingService (UMS)
Service Table (_STB)
Audit Services (_IAU)
To create schemas using the RCU:
1. Set the JAVA_HOME environment variable and add $JAVA_HOME/bin to $PATH, ifyou have not done so already. The current supported JDK version is jdk1.8.0_77
2. Navigate to the 12c ORACLE_HOME/oracle_common/bin directory on yoursystem.
3. Start RCU:
On Unix operating systems:
./rcu
On Windows operating systems:
rcu.bat
4. Complete the schema creation by navigating the RCU screens. When creating newschemas for the upgrade, make sure to choose Select existing prefix and locate theprefix you used to create your existing schemas.
Creating Schemas for Oracle Service Bus
7-8 Upgrading SOA Suite and Business Process Management
NOTE: The Common Infrastructure Services (prefix_STB) and Oracle PlatformSecurity Services (prefix_OPSS) schemas are selected by default if they have not yetbeen created.
.
For more information, see Navigating the RCU Screens to Create the Schemas inInstalling and Configuring the Oracle Fusion Middleware Infrastructure
7.7 Upgrading an OSB Domain (Without SOA)To upgrade Oracle Service Bus, you will follow the basic procedures described in Table 7-2.
Welcome This screen provides an overview of the UpgradeAssistant and some information about important pre-upgrade tasks.
Schemas Select Individually Selected Schemas.
NOTE: There is no OSB schema. All database schemadata for Oracle Service Bus is incorporated in theSOAINFRA schema.
Available Components This screen provides a list of installed Oracle FusionMiddleware components that have schemas that can beupgraded. When you select a component, the schemasand any dependencies are automatically selected.
When upgrading OSB, select Metadata Services, AuditServices and Oracle Platform Security Services.
Domain Directory This screen appears if you selected Oracle PlatformSecurity Services or Oracle Audit Services on theAvailable Components screen.
Enter the absolute path to the existing WebLogicdomain directory, or click Browse to navigate to andselect the 11g domain directory you are upgrading.
Prerequisites Check that the prerequisites for schema upgrade aremet. You must select each prerequisite before you clickNext.
CAUTION: Upgrade Assistant will NOT verify thatthese prerequisites have been met.
Schema Credentials Use this screen to enter database connection details foreach of the schemas you are upgrading.
Examine Review the status of the Upgrade Assistant as itexamines each component, verifying that thecomponent is ready for upgrade.
Verify that the Source Version displayed for eachschema is listing the correct version number for theschema to be upgraded.
Upgrading an OSB Domain (Without SOA)
7-10 Upgrading SOA Suite and Business Process Management
Upgrade Summary Review the summary of the options that you haveselected for schema upgrade. Verify that the correctSource and Target versions are listed for each schemayou intend to upgrade.
Click Upgrade to upgrade the schemas, or click Back ifyou wish to change the configurations.
Upgrade Progress Review the status of the current upgrade process.
NOTE: The progress bar on this screen displays theprogress of the current upgrade procedure. It does notindicate the time remaining for the upgrade.
Click Next when the upgrade is complete.
Upgrade Success Click Close if the Upgrade was successful.
If the upgrade failed or if you canceled the upgradebefore it completed successfully, you should review thelog files, restore the backed up environment, andrestart the Upgrade Assistant.
7.8 Reconfiguring an OSB DomainAfter the schema upgrade, you must reconfigure the 11g OSB domain using the OracleReconfiguration Wizard. This process is identical to the SOA domain reconfigurationprocedures described in Reconfiguring the Domain Using the Reconfiguration Wizard.
7.9 Upgrading the WebLogic Component ConfigurationsYou will run the Upgrade Assistant a second time, after the domain reconfiguration, toupgrade any component configurations in the 11g OSB domain.
This process is described in Upgrading the Domain Component Configurations Usingthe Upgrade Assistant.
7.10 Performing Post Upgrade Tasks for Oracle Service BusAfter a successful upgrade, you may need to perform one or more of the followingtasks. Review your own use case scenarios and existing deployment to determine ifthe following tasks apply to your environment.
Note:
If you experience any post-upgrade issues with Oracle Service Bus, refer to Troubleshooting Oracle Service Bus for a list of common solutions.
Importing Domain Configuration Data
Importing Security Configurations
Upgrading Your XQuery Resources
Reconfiguring an OSB Domain
Upgrading Oracle Service Bus 7-11
Understanding 12c Split-Joins
7.10.1 Importing Domain Configuration DataAfter the upgrade you will need to import the domain configuration data that youexported in Exporting Services, Projects and Resources when Upgrading OracleService Bus.
For more information, see How to Import Resources from a Configuration JAR File inthe Console and Executing a Configuration File.
7.10.2 Importing Security ConfigurationsUse the Oracle WebLogic Administration Console to import the security data that youexported pre-upgrade into the new Oracle Service Bus domain.
For more information, see the "Import data into a security provider" section of theOracle WebLogic Server Administration Console Online Help.
Note:
You must import the security information for each security providerseparately.
7.10.3 Upgrading Your XQuery ResourcesOracle Service Bus supports XQuery 1.0. The older XQuery 2004 is also supported.Any new XQuery resource created in Service Bus uses the XQuery 1.0 version, bydefault.
If you have upgraded from a pre-12c Service Bus project, all XQuery resources in theproject are configured to use the XQuery 2004 version.
For more information on upgrading XQuery Resources, see How to Upgrade YourXQuery Resources to use XQuery 1.0.
7.10.4 Understanding 12c Split-JoinsThe 11g split-join business service will no longer exist in 12c because in 12c there is adirect way to invoke a split-join component from a pipeline or a proxy service. Theupgrade process will automatically change all statically configured invoke referencesto a split-join business service as follows:
• The flow business service is removed. This means the Timeout propertyconfigured for the Flow business service is also removed.
• If the business service is located in the same project as the proxy service thatinvokes it, then the pipeline associated with that proxy service invokes the split-join directly.
• If the business service is located in a different project from the proxy service thatinvokes it, then a local proxy service is created to invoke the split-join. The localproxy service is invoked by the original proxy service.
Performing Post Upgrade Tasks for Oracle Service Bus
7-12 Upgrading SOA Suite and Business Process Management
7.11 Troubleshooting Oracle Service Bus UpgradeIf you experience post-upgrade issues with Oracle Service Bus, review the followingand apply any relevant solutions.
Resolving the HTTP 404 Error After OSB Upgrade with OHS as Cluster FrontendHost
Resolving the HTTP 404 Error When Accessing OSB Console
7.11.1 Resolving the HTTP 404 Error After OSB Upgrade with OHS as Cluster FrontendHost
If you configure Oracle HTTP Server (OHS) as a cluster domain frontend host, thenyou must add the following code to the OHS configuration file (ohs.confg):
7.11.2 Resolving the HTTP 404 Error When Accessing OSB ConsolePrior to 12c, the OSB console was accessed using the following URL: http://[HOST]:[PORT]/sbconsole
In 12c, the OSB Console URL has changed to: http://[HOST]:[PORT]/servicebus.
After the upgrade, if you enter http://[HOST]:[PORT]/sbconsole, it shouldredirect to http://[HOST]:[PORT]/servicebus.
If the redirect fails, and you receive a HTTP 404 error, try direclty entering the 12cURL: http://[HOST]:[PORT]/servicebus.
Troubleshooting Oracle Service Bus Upgrade
Upgrading Oracle Service Bus 7-13
Troubleshooting Oracle Service Bus Upgrade
7-14 Upgrading SOA Suite and Business Process Management
8Performing Post Upgrade Tasks
Summarizes the tasks you might have to perform after upgrading to Oracle SOA Suite12c.
Note:
There are additional component-specific post upgrade tasks for the following:
For Business Activity Monitoring (BAM), see Upgrading from Oracle SOASuite with Oracle Business Activity Monitoring 11g to 12c
For Oracle Service Bus (OSB), see Performing Post Upgrade Tasks for OracleService Bus
For User Messaging Service (UMS), see Upgrading User Messaging Service.
Performing Post Upgrade Tasks
Verifying that the Upgraded Components Work as Expected
8.1 Performing Post Upgrade TasksThe following tasks should be performed after an upgrade:
Reapplying Start Script Properties for JVM
Reapplying Customizations to setDomainEnv
Reapplying Customizations to XEngine Configuration Files
Copying Custom XPath Classes
Recreating Partition-Specific Roles for Application Roles and Policies
Starting and Stopping Servers
Upgrading Business Process Management (BPM) Metadata
Configuring an Oracle Fusion Middleware 12c Audit Data Store
Upgrading ServerSocket with Remote Clients
Reconfiguring Threads for SOA 12c
8.1.1 Reapplying Start Script Properties for JVMIf you used a start script to specify required startup properties, or to perform any otherwork required at start up in your 11g environment, then you will need to reapply theproperties post-upgrade.
Performing Post Upgrade Tasks 8-1
Specifically, if you have configured JRockit JVM arguments in your 11g environment,then these configurations must be reapplied post-upgrade. Oracle recommends thatyou use either startup-plan.xml or startscript.xml for configuring JVMstartup parameters.
Caution:
Failure to update the start script arguments may prevent you from starting theSOA and OSB servers after the upgrade.
To enable the scripts:
1. In the nodemanager.properties file, set the StartScriptEnabled propertyto true. (The default is false.) If your start script is namedstartWebLogic.sh or startWebLogic.cmd, Node Manager uses one of thosescripts as the default.
2. If you want to specify a custom start script, set the StartScriptName propertyto the name of your script in the nodemanager.properties file.
Node Manager sets the JAVA_VENDOR, JAVA_HOME, JAVA_OPTIONS,SECURITY_POLICY, CLASSPATH, and ADMIN_URL. It retrieves these values from theServerMBean, ServerStartMBean, and SSLMBean when you use theAdministration Console to start the server, or WLST connected to the AdministrationServer. When you use WLST connected directly to the Node Manager, you can specifythe values; otherwise, they are left empty.
Node Manager combines all of the command line startup options (-D flags) that arespecified in the ServerStartMBean Arguments attribute, as well as theSSLArguments into a single environmental variable called JAVA_OPTIONS.SSLArguments are retrieved from the values in the SSLMBean. The SSLMBean isinspected for ignoreHostnameVerification, HostnameVerifier, andReverseDNSAllowed values, then those values are appended to the -D flags. All ofthose flags comprise the SSLArguments parameter. All of the values forSSLArguments as well as Arguments in the ServerStartMBean comprise theJAVA_OPTIONS environment variable that is defined for the start script. In addition,the script will append any of its own defined values onto this environment variable.
8.1.2 Reapplying Customizations to setDomainEnvTo complete the upgrade of your SOA Suite and BPM environment to 12.2.1 it mightbe necessary to re-apply any customizations to startup scripts, such assetDomainEnv.
If servers do not start or start in AdminMode, the cause is most likely that thesetDomainEnv.sh changes from 11g were not reapplied to the 12c domain. ComparesetDomainEnv from 11g to 12c and then add any custom changes after the upgrade.
For more information, see "Re-apply Customizations to Startup Scripts".
Note:
To prevent losing your customizations in a future upgrade, see MaintainingCustom setDomainEnv Settings in Planning an Upgrade of Oracle FusionMiddleware.
Performing Post Upgrade Tasks
8-2 Upgrading SOA Suite and Business Process Management
8.1.3 Reapplying Customizations to XEngine Configuration FilesAny pre-upgrade changes made to the XEngine configuration files, such asSeverityConfig.xml, will be overwritten by new, regenerated configuration filesduring the domain reconfiguration process. Therefore, all customized settings used inthe pre-upgrade configuration files will need to be reapplied after the upgrade.
For example, if you added a section for SNIP in the pre-upgrade XEngineconfiguration file, SeverityConfig.xml, the same section will have to be added tothe new, post-upgrade SeverityConfig.xml file.
8.1.4 Copying Custom XPath ClassesAfter the upgrade you will need to copy any customized XPath classes to the new 12cOracle Home /classes directory as shown in the example below:
8.1.5 Recreating Partition-Specific Roles for Application Roles and PoliciesAfter the upgrade, you will have to recreate any partition-specific roles used in your11g environment.
Partition application roles for existing applications are not recreated by the 12cupgrade process. Instead, you must manually create these roles using the followingWLST script:
sca_createDefaultPartitionAppRoles partition
8.1.6 Starting and Stopping ServersAfter the upgrade of SOA Suite and BPM with integrated components, you shouldstart all of the Administration and Managed servers for your environment and makesure that they are functioning as expected.
You will continue to start the servers from the upgraded 11g domain home, as thedomain upgrade was performed in place.
The order in which you START and STOP the servers is important, and failure to startor stop them in the correct order can cause issues with the deployment.
Note:
Procedures for starting and stopping Oracle Fusion Middleware, including theAdministration Server, Managed Servers, and components are provided in Starting and Stopping Oracle Fusion Middleware
Start servers in this order:
1. Webtier (including the Oracle HTTP Server)
2. Node Managers
Performing Post Upgrade Tasks
Performing Post Upgrade Tasks 8-3
3. Administration Servers
4. Oracle Web Services Manager (OWSM) Managed Server
5. Service-Oriented Architecture (SOA) Managed Server
6. Oracle Service Bus (OSB) Managed Server
7. Business Activity Monitoring (BAM) Managed Server
Stop servers in this order:
1. Business Activity Monitoring (BAM) Managed Server
2. Oracle Service Bus (OSB) Managed Server
3. Service-Oriented Architecture (SOA) Managed Server
4. Oracle Web Services Manager (OWSM) Managed Server
5. Administration Servers
6. Node Managers
7. Webtier (including the Oracle HTTP Server)
8.1.7 Upgrading Business Process Management (BPM) MetadataThe BPM metadata upgrade begins once you log into Business Process Composer 12c(12.2.1) for the first time (after a successful upgrade).
For more information on using Business Process Composer, see Developing BusinessProcesses with Oracle Business Process Composer.
8.1.8 Configuring an Oracle Fusion Middleware 12c Audit Data StoreAs a part of the overall upgrade process, you should have created the IAU schema inthe database where your other Oracle Fusion Middleware schemas reside. For moreinformation about using the Audit Data Store, see Managing the Audit Data Store.
8.1.9 Upgrading ServerSocket with Remote ClientsThere is a change in behavior in which the ServerSocket is created when you upgradefrom Oracle Release 11g to Release 12g. Because of this, remote clients might not ableto connect to the ServerSocket when the hostname is configured as localhost. As aworkaround, the localhost should be changed to hostname.
8.1.10 Reconfiguring Threads for SOA 12cStarting in Oracle SOA Suite 12c (12.2.1), Work Managers handle most SOA-relatedwork threads. The thread configurations you specified for SOA 11g will not apply toyour upgraded SOA 12c environment. You will have to reconfigure the threads afterupgrading to SOA 12c.
For more information on using the new threading model, see "Tuning the SOAInfrastructure" in Tuning Performance.
Performing Post Upgrade Tasks
8-4 Upgrading SOA Suite and Business Process Management
8.2 Verifying that the Upgraded Components Work as ExpectedAfter a successful upgrade, you should perform the following tasks to make sure thatthe components are still working as expected and that there are no issues with the newdeployment.
Verifying the Domain Component Configurations Upgrade
Verifying the Database Schema Upgrade Succeeded
Understanding the Flow Trace Changes in 12c
8.2.1 Verifying the Domain Component Configurations UpgradeTo verify that the domain component configurations upgrade was successful, log in tothe Administration console and the Fusion Middleware Control using the followingURLs, and verify the upgraded version numbers for each component:
Fusion Middleware Control URL: http://administration_server_host:administration_server_port/em
Note:
After the upgrade, you must run all of your administration tools from the new12.2.1 Oracle home and not from the 11g Oracle home.
8.2.2 Verifying the Database Schema Upgrade SucceededIn addition to the Upgrade Assistant Upgrade Status screens, you can also manuallyvalidate that the database schema upgrade and instance upgrade was successful byusing SQL commands.
For more information, see Monitoring Upgrade Status with SQL Queries.
8.2.3 Understanding the Flow Trace Changes in 12cIn 12c SOA, instances are controlled using flowIDs instead of ECIDs. When theUpgrade Assistant upgrades instances from 11g SOA to 12c SOA, there are fewdifferences between the 11g upgraded flow instances and the newly created 12cinstances. These differences will not impact the functionality of the flow trace, but it isimportant to note the differences.
The flow trace XML examples below show the following differences:
• The attributes ActionType and ActionName are new in 12c and are not available in11g upgraded instances.
• Date and lastUpdatedDate are the same for 11g Upgraded instances.
• ElapsedTime for Entry Instance Id is 0 for 11g Upgraded instances.
Flow trace XML for 11g to 12c upgraded instances:
================================ <audit_trail
Verifying that the Upgraded Components Work as Expected
In addition, the Recovery status of the new instances created in 12c for a caught faultin BPEL shows the fault as recovered as shown in Figure 8-1:
Figure 8-1 New 12c Instance Flow Trace
However, the Recovery status of an upgraded 11g instance for a caught fault in BPELshows the fault as Nonrecoverable as shown in Figure 8-2:
Note: The information passed from the 11g faults is not enough to correctlyidentify the state of a fault. To handle this, all the actual faults retrieved from11g are initially identified as nonrecoverable. Dummy faults are then createdto set the proper state (BPEL_invoke_recovery, Bpel_activity_recovery).
Therefore, if you see a warning or notice that the 11g faults arenonrecoverable, you can ignore the warning.
Verifying that the Upgraded Components Work as Expected
8-6 Upgrading SOA Suite and Business Process Management
Figure 8-2 Upgraded 11g Instance Flow Trace
Verifying that the Upgraded Components Work as Expected
Performing Post Upgrade Tasks 8-7
Verifying that the Upgraded Components Work as Expected
8-8 Upgrading SOA Suite and Business Process Management
9Administering and Monitoring the Upgrade
of SOA Instances
Describes how open and closed SOA instances are upgraded to 12c (12.2.1) and theoptions a user has to administer and monitor the upgrade process.
The standard upgrade process for SOA Suite and BPM 12c provides an automatedsolution that will upgrade your open and closed instances. The upgrade of closedinstances can be monitored and configured with the administration scripts describedin the following sections:
Understanding the Instance Upgrade Process
Understanding Instance Upgrade Background Jobs
Using Purge Scripts Before You Upgrade
Using the Upgrade Administration Scripts
Configuring the Administration Scripts
Stopping Upgrade Sessions and Jobs
Restarting an Incomplete Upgrade
Monitoring Upgrade Status with SQL Queries
Monitoring Upgrade Status with Fusion Middleware Control
Resolving Instance Upgrade Errors
Restarting a Failed Upgrade
9.1 Understanding the Instance Upgrade ProcessThe Upgrade Assistant framework delegates the upgrade of schemas to respectivecomponent installations (MDS, ORASDPM, OPSS, SOA, etc.) During the 12c SOAupgrade, the Upgrade Assistant can also upgrade instances.
What is being upgraded?
The SOA installation will also upgrade various components as part of upgradeprocess, including _MDS schema and the _SOAINFRA schema. The _SOAINFRA schemacontains the following schema components:
• Schema definitions - such as tables and indexes
• Metadata - the data required to run the SOA server and SOA composites
Administering and Monitoring the Upgrade of SOA Instances 9-1
Note:
The BPM metadata upgrade begins once you log into Business ProcessComposer 12c (12.2.1) for the first time (after a successful upgrade).
For more information on using Business Process Composer, see DevelopingBusiness Processes with Oracle Business Process Composer.
• Instance Data - the data created by the various composites. Instances can be openor closed.
How are these components upgraded?
During the 12c schema upgrade process, it is important to understand the order inwhich UA performs the upgrade of these components.
The upgrade occurs in four distinct stages:
1. Upgrade Assistant will upgrade 11g schema definitions.
2. Upgrade Assistant will then upgrade 11g metadata and create background controljobs to upgrade open instances.
NOTE: This process may be time consuming as the jobs will continue to runwithin UA until the final database job finishes upgrading the open instances. It isimportant not to close the Upgrade Assistant until the final job is complete.
For example, the time required to upgrade instances depends on the following:
• Size of prefix_SOAINFRA schema (number of open and closed instances)
• System configuration (such as the number of CPI's (cores), memory usage, diskI/O configuration).
• Speed of the system and size of driver tables
3. Once all of the open instances have been upgraded, the background jobs beginupgrading the closed instances. Note that the upgrade of closed instancescontinues to run in the background even after you close the Upgrade Assistant.However, if the background job is stopped, and there are still closed instances tobe upgraded, then you must restart them with the administration scripts.
4. Finally, once the last job finishes upgrading the open instances, the UpgradeAssistant provides the upgrade status and lists the next steps to take in theupgrade process.
You should review the Upgrade Success screen of the Upgrade Assistant todetermine your next steps based on the information provided. NOTE: If you arerunning in -response (silent) mode, this information will be listed in the UAstdout file.
• If the Upgrade Assistant reports that there are no additional instances to beupgraded, then simply close the Upgrade Assistant UI and continue with theremaining upgrade procedures (launching the Reconfiguration Wizard forexample).
• If the Upgrade Assistant reports that there was an error during the instanceupgrade, then correct the error(s) and resubmit the database job to completethe upgrade. You can also use the Report Upgrade Summary administrationscript (Option 1) to check the UPGRADE ERROR COUNT section of the report.
Understanding the Instance Upgrade Process
9-2 Upgrading SOA Suite and Business Process Management
• You will be notified that the upgrade of the closed instances will continue inthe background after you close the Upgrade Assistant. Do not close theUpgrade Assistant until UA reports it is finished and you see the following:
Oracle SOA1. The Upgrade Assistant has successfully upgraded all open instances. You can now close the Upgrade Assistant.2. The automated upgrade of closed instances will continue in the background after the Upgrade Assistant is exited and until the SOA server is started,at which point the upgrade will stop. You can schedule the upgrade of any remaining closed instances for a time when the SOA server is less busy.Close the Upgrade Assistant and use the instance data administration scripts to administer and monitor the overall progress of this automated upgrade. For more information see "Administering and Monitoring the Upgrade of SOA Instance Data" in Upgrading SOA Suite and Business Process Management.
Note:
The upgrade of closed instances will continue until all instances have beenupgraded or the middle tier is started (such as the SOA managed server, forexample.)
If the middle tier is started before all closed instances are upgraded, then theupgrade job will stop. You will have to use the administration scripts tomanually restart the upgrade.
9.2 Understanding Instance Upgrade Background JobsThe background jobs are created by Upgrade Assistant during the _SOAINFRA schemaupgrade. These jobs run in the background and automate the upgrade of the open andclosed instance data. It is important to understand how these jobs operate within theupgrade process and how you can manage them. The list below describes someimportant information about these jobs:
• Jobs are created by Upgrade Assistant (UA), but they are managed throughadministration scripts. You can use the administration scripts to configure how andwhen these jobs will run, for example.
• Jobs are automatically started after the schema upgrade process.
• Jobs that are initiated through UA are automatically stopped when one of thefollowing occurs:
– The job is complete and all closed instances are migrated to 12c
– A middle tier application is started (a managed server, for example)
– The Stop Jobs script (Option 8) is started
• If closed instances have not yet been upgraded, then the background jobs willcontinue to run in the background - even after the Upgrade Assistant has beenclosed.
• If the job is stopped, and there are still instances to be upgraded, you can enableand schedule the jobs to run at another time using the administration scripts.
Understanding Instance Upgrade Background Jobs
Administering and Monitoring the Upgrade of SOA Instances 9-3
For more information on configuring the background jobs, see: Enabling andDisabling Background Control Job (Option 6), Stopping Upgrade Sessions andJobs, and Restarting an Incomplete Upgrade.
9.3 Using Purge Scripts Before You UpgradeUse the purge scripts before you start the instance upgrade to purge the closed 11ginstances that you do not need in the upgraded 12c environment. The 12c purgescripts will include non-migrated closed instances. This means that post upgrade, ifyou schedule to run 12c Purge scripts, the scripts will purge non-migrated closedinstances. Using the purge scripts to remove closed instances can help improve theoverall performance of the upgrade.
Note:
When upgrading open instances only, you may see an aborted status flow. Aflow will be in an aborted state if the child flow was aborted in 11g.
All composite instance associated with this ECID will remain in terminatedstate.
For more information on using Auto Purge or purge scripts, see Managing DatabaseGrowth.
Caution:
Do not schedule purge jobs to run while the Upgrade Assistant backgroundjobs are running. Running the scripts while Upgrade Assistant is running cancause the purge or upgrade to fail.
If you do configure purge scripts to run while Upgrade Assistant is running,you will see: "ORA-20099: ERROR The 11g to 12c Upgrade is in progress".
If you run UA while purge scripts are running, you will see: "SQLException:ORA-00054: resource busy and acquire with NOWAIT specified or timeoutexpired".
9.4 Using the Upgrade Administration ScriptsThe upgrade administration scripts are included as part of the Upgrade Assistantfunctions provided with the SOA Suite 12c (12.2.1) installation. These PL/SQL scriptsprovide additional administrative control over the upgrade of instances. Onceupgraded, the instances can be viewed from Oracle Enterprise Manager Console. Ifmore detailed information is needed about the upgrade progress, then use theadministration scripts for additional reporting and configuration options.
Using Purge Scripts Before You Upgrade
9-4 Upgrading SOA Suite and Business Process Management
Note:
The administration upgrade scripts provide detailed information about theupgrade. These scripts provide additional configuration, administration, andmonitoring functionality for your instance upgrade. You can configure thesescripts to run (or not run) based on your own requirements.
The Fusion Middleware Control Console can also be used to administer andmonitor the upgrade process, but you will have more administration optionsusing the administration scripts.
Oracle recommends that you run the Report Upgrade Summary (Option 1)script after using the Upgrade Assistant to monitor Upgrade of closedinstances.
For more information about using the Fusion Middleware Control Console tomonitor the progress of the upgrade, see Monitoring Upgrade Status withFusion Middleware Control.
Accessing the Upgrade Scripts Menu
Running the Administration Scripts
9.4.1 Accessing the Upgrade Scripts MenuThere are several scripts that can be used to configure, administer and monitor yourinstance upgrade. These scripts can be accessed using the soa_upgrade_menuPL/SQL script.
To access the upgrade scripts menu:
1. Locate the /admin directory of the 12.2.1 SOA home.
For example:
cd <ORACLE_HOME>/soa/common/sql/soainfra/sql/oracle/121300/upgrade/admin
2. Use SQL* Plus to access the _SOAINFRA schema using the schema owner nameand password.
For example:
sqlplus dev_soainfra/<welcome1>
where dev is the schema owner prefix you used when the SOAINFRA schemawas created, and welcome1 is the schema password.
Note:
If you attempt to access the administration scripts using a user other than<prefix>_SOAINFRA, you will encounter the following error message:
ERROR at line 24:ORA-06550: line 24, column 3:PLS-00201: identifier 'CONTROL_MIGRATION.UPGRADE_STATUS_INFO' must be declared
3. Run the soa_upgrade_menu.sql script to see the upgrade administration optionsmenu.
Using the Upgrade Administration Scripts
Administering and Monitoring the Upgrade of SOA Instances 9-5
SQL> @soa_upgrade_menu.sql==================================================1: Report upgrade summary.2: Report upgrade database sessions (Running sessions).3: Report upgrade database background jobs (Completed jobs).4: Report background control job parameters.5: Change background control job execution schedule.6: Enable/Disable background control job. .Advanced Options:. 7: Change background control job parameters. 8: Stop upgrade database background sessions and jobs. 9: Reset errored 11g instances.10: Report Current job run log (Oracle Internal Use). .11: EXIT. . . (NOTE: for error SP2-0309, please restart menu) .Enter option : ***********************************************************************************************
Table 9-1 describes the functionality of each script.
9.4.2 Running the Administration ScriptsThe Administration Scripts Main Menu displays all of the options you have to monitorand administer the background control jobs and other administration tasks such astroubleshooting.
Caution:
The Advanced Options should only be used to troubleshoot the upgrade or tomake changes to the upgrade process based on specific upgrade requirements.In most cases these scripts should only be executed by a designated systemadministrator or Oracle Support.
To run one of the administration scripts, enter an option number when prompted. Table 9-1 describes the functionality of each script.
Table 9-1 Menu Options for Upgrade Administration Scripts
Using the Upgrade Administration Scripts
9-6 Upgrading SOA Suite and Business Process Management
Table 9-1 (Cont.) Menu Options for Upgrade Administration Scripts
Option Number Scripts Name Use this option to... Description
1 Report Upgrade Summary View the overall status ofthe upgrade.
The report is divided intosub-sections and providesan overview of the overallupgrade and the currentrun.
The Report UpgradeSummary shows theupgrade summary forMETADATA, OPENECIDS (open instances)and ALL ECIDS (closedinstances). The upgradestatus is eitherCOMPLETE orOUTSTANDING (stillrunning).
In addition, it describesthe following:
• Last upgrade date forclosed 11g instances
The MaximumUpgrade Date forClosed 11gInstances sectiondisplays the closuredate of the lastupgraded flow. Theupgrade starts withthe most recentlyclosed instances andcontinues until theoldest completedinstance is upgraded.An instance flow thatclosed on January 1,2014 would beupgraded before aflow that closed onDecember 1, 2013. AMaximum UpgradeDate of June 1, 2013indicates that allclosed instances up toJune 1, 2013 have beenupgraded and anyinstances that wereclosed before June 1,2013 are still in theprocess of beingupgrade.
• Upgrade error count
The UPGRADE ERRORCOUNT displays thenumber of errors thathave occurred duringthe upgrade. You canuse theupgrade_error_logfile to determine thecause of the errors.
For more informationon handling upgradeerrors, see ResolvingInstance UpgradeErrors .
• Instance count sincestart of upgrade
The OverviewSince Start ofUpgrade shows thestart date and time ofthe upgrade, the totalnumber of instances tobe upgraded and thenumber of instancesremaining.
• Current Run Statistics
Upgrade data from thecurrent upgrade run.Each run is numbered.In the sample reportbelow, the data is fromthe first run (run:1). Adesignation of (run:2)would indicate thatthe upgrade was runfor the second timeand the statisticsdisplayed are forsecond run.
– START COUNT:Details how manyinstances areoutstanding as ofthe start of theRUN. Forsubsequentupgrade RUNs(run2, run3, etc.)the START COUNTtotal will detailwhat wasremaining at thecompletion of theprevious run.
– REMAININGCOUNT: During theupgrade run a sumof "currentinstances that havenot beenprocessed" iscollected every 5minutes during theRUN. The "currentinstances that havenot beenprocessed" are thensubtracted fromthe START COUNTto produce aREMAININGCOUNT.REMAININGCOUNT= STARTCOUNT - "currentinstances that havenot yet beenprocessed"
– PROCESSEDCOUNT:
PROCESSEDCOUNT= STARTCOUNT -REMAININGCOUNT
The report data is shownbelow:
=============================================Report Upgrade Summary(Please wait for report to generate)=============================================.. METADATA : COMPLETE. OPEN FLOWS : COMPLETE. ALL FLOWS : COMPLETE.. ------------------------------------------. Date of last upgraded and closed 11g Flows. ------------------------------------------. DATE : NOT AVAILABLE OR ALL DATA UPGRADED.. NOTE: Closed 11g flows prior to this date. may not be visible on the EM console. until they are upgraded... ---------------------. UPGRADE ERROR COUNT. ---------------------. COUNT : 0 PL/SQL procedure successfully completed. Enter to continue...---------------------------------------------Upgrade Start Date and Initial Instance Count---------------------------------------------. Upgrade Start Date : 06/MAY/2014:04/50. Initial Instance Count : 1881. Outstanding Instances Count : 0.------------------------------------CURRENT RUN STATISTICS (run#: 1)------------------------------------. Note: 1/ Statistics maybe from previous run. until new statistics are generated.. 2/ Statistics can take 10mins to refresh... STARTED: 06/MAY/2014:04/50. ENDED: 06/MAY/2014:04/52. START COUNT: 1881. PROCESSED COUNT: 1881. REMAINING COUNT: 0.========= End of Report =====================Upgrade Counter (Oracle Internal Use): < 300
Using the Upgrade Administration Scripts
Administering and Monitoring the Upgrade of SOA Instances 9-7
Table 9-1 (Cont.) Menu Options for Upgrade Administration Scripts
Option Number Scripts Name Use this option to... Description
The database sessions thatperform the instanceupgrades are executed asdatabase jobs. Once thejobs are complete, thestatus can be viewed withthis option. The user is notexpected to understandwhat each job does, onlyto ensure that the statusshows success withoutany errors.
The report displays thecontrol job parametervalues, the submittedupgrade job, currentstatus of the job(submitted, waiting,running) and the jobthread number (ifapplicable).
For example:
======================================================Report Upgrade Database Background Jobs (Completed)======================================================.. State of last 15 completed Jobs in descending order.Log_date Job_name Status ERROR---- ---- --- ----21-FEB-2014 03:07:36 UPGRADE_SOA_METADATA_JOB SUCCEEDED 0
Using the Upgrade Administration Scripts
Administering and Monitoring the Upgrade of SOA Instances 9-9
Table 9-1 (Cont.) Menu Options for Upgrade Administration Scripts
Option Number Scripts Name Use this option to... Description
4 Report backgroundcontrol job parameters.
View the currentbackground control jobparameters.
This option will report theparameters that arepassed to the control jobwhich coordinates theinstance upgrade.
9-10 Upgrading SOA Suite and Business Process Management
Table 9-1 (Cont.) Menu Options for Upgrade Administration Scripts
Option Number Scripts Name Use this option to... Description
5 Change backgroundcontrol job executionschedule.
Change the repeat intervaltime and duration of thebackground control job.
By default, thebackground control jobinterval will start at 3AM(local time) and run for 4hours (240 minutes) everyday until all of the closedinstances have beenupgraded (set in termsfreq=daily; byhour=3;byminute=0; bysecond=0).If you want this job to runat a different time, use thisoption to change therepeat interval.
Change Background Control Job Execution Schedule - Repeat Interval==================================================================The repeat interval determines when the control procedure isexecuted by the database scheduler.Examples of repeat intervals can be found in the Oracle DatabaseAdministors Guide.Enter REPEAT INTERVAL:
For more information, see Changing BackgroundControl Job ExecutionSchedule (Option 5)
NOTE: To change theduration of the run(default is 240 minutes),modify theJOB_MAX_RUNTIME usingthe Change BackgroundControl Job Parameters(Option 7).
Using the Upgrade Administration Scripts
Administering and Monitoring the Upgrade of SOA Instances 9-11
Table 9-1 (Cont.) Menu Options for Upgrade Administration Scripts
Option Number Scripts Name Use this option to... Description
6 Enable/Disablebackground control job.
Enable or disable thebackground job.
By default, the Enable/Disable backgroundcontrol job is disabled(ENABLE: FALSE). EnterY (Yes) to change thecurrent setting. Note thatdisabling the control jobwill prevent thebackground control jobfrom running at thespecified repeat interval.
The setting will appear inthe Summary Report asENABLE: TRUE orFALSE.
Enter N (No) to retain thecurrent setting.
ENABLE/DISABLE CONTROL JOB SCHEDULE===================================Disabling the Control Schedule will stop the Control jobfrom executing at the specified Repeat Interval.Change ENABLE Y/N:
For more information, see Enabling and DisablingBackground Control Job(Option 6)
Using the Upgrade Administration Scripts
9-12 Upgrading SOA Suite and Business Process Management
Table 9-1 (Cont.) Menu Options for Upgrade Administration Scripts
Option Number Scripts Name Use this option to... Description
7 Change backgroundcontrol job parameters.
Change the BATCH_SIZE,MAX_COUNT, JOB_MAX_RUNTIME or DOP(degree of parallel(options 1-4).
Do not change theAdvanced Options(options 5-14) unlessinstructed to do so byOracle Support totroubleshoot an upgrade.
For most upgrades, thedefault values for thebackground control jobparameters are sufficient.However, if you need tomake changes, review theparameter descriptions in Setting Control JobParameters (Option 7).
1: Set BATCH_SIZE2: Set MAX_COUNT3: Set JOB_MAX_RUNTIME4: Set DOP.Advanced Options:. (Options below for Oracle Internal Use). (Please contact Oracle Support).5: Set METADATA_JOB_COMPLETE6: Set DATA_JOB_COMPLETE7: Set OPEN_ECIDS_COMPLETE8: Set CTL_MAX_RUNTIME9: Set FIRST_TIME10: Set FIRST_CTL_MAX_RUNTIME11: Set FIRST_JOB_MAX_RUNTIME12: Set SQL_TRACE13: Set METRICS14: Set ASYNC.15: MAIN MENU.Enter option :
Using the Upgrade Administration Scripts
Administering and Monitoring the Upgrade of SOA Instances 9-13
Table 9-1 (Cont.) Menu Options for Upgrade Administration Scripts
Option Number Scripts Name Use this option to... Description
Stop the currentbackground databasesessions or jobs.
Use this option togracefully stop the currentbackground jobs orsessions as described in Stopping UpgradeSessions and Jobs
Stop Upgrade Database Background Sessions/Jobs==============================================All upgrade sessions and jobs should stop but this may require 5 minutes to take affect.
There will be a one minute wait before this procedure returns.Are you sure Y/N: YEnter for MENU
Using the Upgrade Administration Scripts
9-14 Upgrading SOA Suite and Business Process Management
Table 9-1 (Cont.) Menu Options for Upgrade Administration Scripts
Option Number Scripts Name Use this option to... Description
9
Reset errored 11ginstances.
Once an upgrade is run,check theupgrade_error_log andcorrect any reportederrors. Then, use thisoption to resubmit thoseinstances to process againin the next upgrade job.
This option will enable theinstances with errors to beprocessed again in thenext upgrade job. Use thisoption only after you havecorrected the errorsreported in theupgrade_error_log.
Reset errored 11g instances=======================The 11g instances which have encountered an error will have theirflow_id set to -1. This reset updates the flow_id back to nullso they can be processed in the next exection of the background job..The rows in the upgrade_error_log table will have their type columnset to zero. The rows in this table are not removed so that historyis not lost..NOTE: Ensure to schedule and enable the background job. Are you sure Y/N:
Using the Upgrade Administration Scripts
Administering and Monitoring the Upgrade of SOA Instances 9-15
Table 9-1 (Cont.) Menu Options for Upgrade Administration Scripts
Option Number Scripts Name Use this option to... Description
10
Report Current job run log(Oracle Internal Use).
Generate a report forOracle Support that showsthe parameters used in thecurrent run.
The output of this reportcan be sent to OracleSupport whentroubleshooting anupgrade.
You can also use thisreport to verify that anychanges made to theControl Job Parametersare correct.
Example:======================================================Report Current RUN log (Oracle Internal Use)======================================================.Module Type Comment--- --- -----CONTROL PARM batch_size => 10000CONTROL PARM max_count => 100000CONTROL PARM use_ctl_max_runtime => 0CONTROL PARM use_job_max_runtime => 0CONTROL PARM DOP => 4CONTROL PARM metadata_job_complete => FALSECONTROL PARM data_job_complete => FALSECONTROL PARM open_ecids_complete => FALSECONTROL PARM first_time => TRUECONTROL PARM sql_trace => FALSECONTROL PARM metrics => TRUECONTROL PARM async => TRUECONTROL PARM ctl_stoptime_d => NULLCONTROL PARM job_stoptime_d => NULLCONTROL INFO UPGRADE jobs submitted ASYNCRONOUSMETADATA INFO UPGRADE submitting: UPGRADE_SOA_METADATA_JOBCONTROL INFO CONTROL procedure waiting for (metadata and/or open ecids)METADATA INFO UPGRADE UPGRADE_SOA_JOB will wait for UPGRADE_SOA_METADATA_JDATA INFO UPGRADE submitting: UPGRADE_SOA_JOB0DATA INFO UPGRADE submitting: UPGRADE_SOA_JOB1DATA INFO UPGRADE submitting: UPGRADE_SOA_JOB2DATA INFO UPGRADE submitting: UPGRADE_SOA_JOB3DATA INFO UPGRADE will wait if UPGRADE_SOA_JOB running
Using the Upgrade Administration Scripts
9-16 Upgrading SOA Suite and Business Process Management
Table 9-1 (Cont.) Menu Options for Upgrade Administration Scripts
Option Number Scripts Name Use this option to... Description
11
Exit
Close the ScriptAdministration Menu.
This option will close themenu.
9.5 Configuring the Administration ScriptsThis section describes the steps needed to configure the upgrade administrationscripts.
Changing Background Control Job Execution Schedule (Option 5)
Enabling and Disabling Background Control Job (Option 6)
Setting Control Job Parameters (Option 7)
Resetting Errored 11g instances (Option 9)
9.5.1 Changing Background Control Job Execution Schedule (Option 5)Use Option 5 to change the execution schedule of the Background Control Job.
In the example below, the start time of the job was changed from 3AM to 4AM (localtime).
Change Background Control Job Execution Schedule - Repeat Interval==================================================================The repeat interval determines when the control procedure is executed by the database scheduler. Examples of repeat intervals can be found in the Oracle Database Administors Guide. Enter REPEAT INTERVAL: freq=daily; byhour=4; BEFORE Change : freq=daily; byhour=3;byminute=0; bysecond=0AFTER Change : freq=daily; byhour=4
9.5.2 Enabling and Disabling Background Control Job (Option 6)Use the Enable/Disable Background Control Job script (Option 6) to enable the start ofa background control job OR to prevent the start of a scheduled control job. T
Note:
The background control job is disabled by default (ENABLE: FALSE). If youmanually enable the job (ENABLE: TRUE), then you must also manuallydisable it.
ENABLE/DISABLE CONTROL JOB SCHEDULE===================================Disabling the Control Schedule will stop the Control job
Configuring the Administration Scripts
Administering and Monitoring the Upgrade of SOA Instances 9-17
from executing at the specified Repeat Interval.Change ENABLE Y/N:
9.5.3 Setting Control Job Parameters (Option 7)The Set Control Job Parameters script (option 7) can be used to configure theparameters described in Table 9-2.
Table 9-2 Background Control Job Parameters
Parameter Default Description
BATCH_SIZE 10000 Determines the number of updates(inserts, updates and deletes) thatare sent to the database at one timefor execution.
MAX_COUNT 100000 Determines the number ofinstances (ECIDs) that are fetchedto upgrade before anotherMAX_COUNT worth of instancesis fetched.
JOB_MAX_RUNTIME 240 minutes (4 hours) This is the maximum number ofminutes that a background controljob will run.
DOP 4 The number of parallel executionservers associated with a singleoperation is known as the degree ofparallelism (DOP). Parallelexecution is designed to effectivelyuse multiple CPUs.
CAUTION: Changing the degreeof parallel is an advanced option.Refer to your databaseadministration documentation formore information on setting theappropriate degree of parallelismfor your deployment.
SQL_TRACE FALSE NOTE: Setting SQL_TRACE toTRUE can be used to debug andtroubleshoot, but it may require theDBA to grant "alter session" to thesoainfra user as shown below:
$ sqlplus / as sysdbaSQL> grant alter session to <soainfra>;
To Change the Job Control Parameters:
1. Launch the SOA Upgrade Menu using the steps in Accessing the Upgrade ScriptsMenu.
Configuring the Administration Scripts
9-18 Upgrading SOA Suite and Business Process Management
Enter 7 in the Enter option field to run the Change Background Control JobParameters script.
The SOA Upgrade Menu is shown below:
==================================================1: Report upgrade summary.2: Report upgrade database sessions (Running sessions).3: Report upgrade database background jobs (Completed jobs).4: Report background control job parameters.5: Change background control job execution schedule.6: Enable/Disable background control job. .Advanced Options:. 7: Change background control job parameters. 8: Stop upgrade database background sessions and jobs. 9: Reset errored 11g instances.10: Report Current job run log (Oracle Internal Use). .11: EXIT. . . (NOTE: for error SP2-0309, please restart menu) .Enter option : ***********************************************************************************************
2. Enter the number of the parameter you want to change in the Enter Option field.
For example, to change the BATCH_SIZE, enter 1.
A complete list of control job parameters is listed as shown below:
1: Set BATCH_SIZE2: Set MAX_COUNT3: Set JOB_MAX_RUNTIME4: Set DOP.Advanced Options:. (Options below for Oracle Internal Use). (Please contact Oracle Support).5: Set METADATA_JOB_COMPLETE6: Set DATA_JOB_COMPLETE7: Set OPEN_ECIDS_COMPLETE8: Set CTL_MAX_RUNTIME9: Set FIRST_TIME10: Set FIRST_CTL_MAX_RUNTIME11: Set FIRST_JOB_MAX_RUNTIME12: Set SQL_TRACE13: Set METRICS14: Set ASYNC.15: MAIN MENU.Enter option :
3. Change the value of the parameter by entering a new value. Click Enter to committhe change. Repeat this process for each parameter you want to change.
Configuring the Administration Scripts
Administering and Monitoring the Upgrade of SOA Instances 9-19
You can verify that the change was accepted by looking at the values in the BeforeChange and After Change fields.
4. Return to the Main Menu by entering 15 in the Enter Option field.
You will return to the main Administration Script menu.
==================================================1: Report upgrade summary.2: Report upgrade database sessions (Running sessions).3: Report upgrade database background jobs (Completed jobs).4: Report background control job parameters.5: Change background control job execution schedule.6: Enable/Disable background control job. .Advanced Options:. 7: Change background control job parameters. 8: Stop upgrade database background sessions and jobs. 9: Reset errored 11g instances.10: Report Current job run log (Oracle Internal Use). .11: EXIT. . . (NOTE: for error SP2-0309, please restart menu) .Enter option : ***********************************************************************************************
5. Verify that your changes have been made using the Report Background Control JobParameters script (Option 4).
9.5.4 Resetting Errored 11g instances (Option 9)If the upgrade encountered errors during the run, resolve the issue(s) and thenresubmit the errored instances by resetting the error flow_id from (-1) to null. Theinstances will be processed in the next scheduled background control job run.
Configuring the Administration Scripts
9-20 Upgrading SOA Suite and Business Process Management
For more information, see Resolving Instance Upgrade Errors .
Reset errored 11g instances=======================The 11g instances which have encountered an error will have theirflow_id set to -1. This reset updates the flow_id back to nullso they can be processed in the next exection of the background job..The rows in the upgrade_error_log table will have their type columnset to zero. The rows in this table are not removed so that historyis not lost..NOTE: Ensure to schedule and enable the background job.Are you sure Y/N:
9.6 Stopping Upgrade Sessions and JobsYou can use the administration scripts to stop a running session or job.
Note:
If you stop a running upgrade job before it has completed, you will not be ableto query the remaining data or view it using Enterprise Manager Console.
The background jobs upgrade the newest instances first, so you can see howfar the upgrade has progressed by looking at the timestamp of the lastupgraded instance in the Upgrade Summary Report (Option 1) under theMaximum Upgrade Date for Closed 11g instances section.
There are two ways to stop the upgrade of read-only instances:
• Once the background database control job has started, use the Stop UpgradeDatabase Background Sessions and Job script (Option 8) to stop ALL of theupgrade sessions and jobs that are currently running. It can take a few minutesbefore all of the jobs have stopped.
Stop Upgrade Database Background Sessions/Jobs==============================================All upgrade sessions and jobs should stop but this may require 5 minutes to take affect.
There will be a one minute wait before this procedure returns.Are you sure Y/N: YEnter for MENU
Use the Report Upgrade Database Sessions (Option 2) to verify that there are nojobs running.You can restart the upgrade job, if needed, by scheduling a job to runat a user-defined time. This is the preferred method.
• Start a middle tier application, such as the SOA Managed Server.
Once a mid-tier application such as a managed server is started, the upgrade ofclosed instances is stopped automatically. You can use the administration scripts toschedule the upgrade job to run at another time.
Stopping Upgrade Sessions and Jobs
Administering and Monitoring the Upgrade of SOA Instances 9-21
9.7 Restarting an Incomplete UpgradeIf the instance upgrade is stopped, it must be manually restarted using theadministrations scripts as described below.
1. Enable the background control job using administration script option 6 - 'Enable/Disable background control job'.
See Enabling and Disabling Background Control Job (Option 6).
2. Schedule the background control job execution to run at specific time interval usingadministration script option 5 - 'Change background control job executionschedule'.
See Changing Background Control Job Execution Schedule (Option 5).
3. When the time interval specified in Step 2 is reached, the background control jobsstarts. Monitor the upgrade status using the administration script option 1 'ReportUpgrade Summary'.
See Option 1 in Table 9-1.
4. Once the upgrade is completed, log in to Oracle Enterprise Manager FusionMiddleware Control, expand SOA, click soa-infra (soa_server1) and verify that theData Migration Completed link is displayed under SOA Runtime Health section.
See Verifying Data Migration is Complete.
9.8 Monitoring Upgrade Status with SQL QueriesThis section provides SQL queries that can be used to monitor and validate upgrade inaddition to the Administration Scripts.
Restarting an Incomplete Upgrade
9-22 Upgrading SOA Suite and Business Process Management
To determine if... Use this query More Information
A flow instance has encountered anerror during upgrade (flowId is setto -1 or -2).
Select count (*) from composite_instance where flow_id=-1; select count(*) from composite_instance where flow_id = -1; select count(*) from cube_instance where flow_id = -2 select count(*) from dlv_message where flow_id = -2; select count(*) from mediator_instance where flow_id = -2;
Once Upgrade Assistant completesupgrading Open instances, Oraclerecommends that you check forrows in UPGRADE_ERROR_LOGtable within SOAINFRA schema.This table stores errored data thatwas not upgraded to 12c. Thecolumn ‘type' determines the typeof error encountered. The differenttype of error that can be reported inthe UPGRDAE_ERROR_LOG table:
• 0 : These errors were reported inthe previous upgrade run. Typewill be set to 0 while 'ResettingErrored 11g instances (Option9)' of the UpgradeAdministrative Script isexecuted.
• 1: Error occurred during theupgrade of instances.
• 2: Error occurred duringupgrade of EDN error eventstore or Adapter rejectedmessages.
• 9: Error occurred during theupgrade of Metadata
• 12: Generic error occurredduring the data upgradeprocess.
•It is important to ensure that noerrored records exist in these tables.
For more information, see ResettingErrored 11g instances (Option 9)
All Open instances are upgraded.select count (*) from cube_instance where state < 5 and flow_id = -1; select count (*) from dlv_message where state in (0,1,4) and flow_id = -1 select count (*) from mediator_instance where component_state between 4 and 15 and flow_id is null;
Run these queries post-upgrade toverify and they should return zerorows if all Open have beenmigrated.
9.9 Monitoring Upgrade Status with Fusion Middleware ControlIn addition to the administration scripts, you can also use the Oracle EnterpriseManager Fusion Middleware Control Console to view the general status of the
Monitoring Upgrade Status with Fusion Middleware Control
Administering and Monitoring the Upgrade of SOA Instances 9-23
upgrade. The administration scripts will provide you with more administrativecontrol of the upgrade jobs, but you can monitor the following with the FusionMiddleware Control Console:
Note:
If you need to perform advanced administration tasks for the upgrade, such asmodifying the schedule or interval time of the upgrade, for example, you mustuse the administration scripts as described in Using the UpgradeAdministration Scripts .
Verifying Data Migration is Complete
Managing an Incomplete (Stopped) Upgrade
Optimizing the Display of Instances in Enterprise Manager
Viewing Instances that Faulted During the Upgrade
Viewing Instances Created Prior to Composite Redeployment
9.9.1 Verifying Data Migration is CompleteIn the target navigation pane of Oracle Enterprise Manager Fusion MiddlewareControl, expand SOA, click soa-infra (soa_server1) and verify that the DataMigration Completed link is displayed under SOA Runtime Health section asshown below:
Figure 9-1 SOA Runtime Health: Data Migration Completed
Click Data Migration Complete and verify that the following message is displayed:
Monitoring Upgrade Status with Fusion Middleware Control
9-24 Upgrading SOA Suite and Business Process Management
Figure 9-2 Migration Completed
Click OK to close the Migration Completed dialog box. You will see the SOA RuntimeHealth migration status message (Figure 9-3).
Figure 9-3 SOA Runtime Health: Migration Status Message
Click Close this message. The following confirmation dialog appears:
Figure 9-4 Hide Data Confirmation
Click Yes to hide the data migration completed alert. The Close the message buttonwill disappear from the SOA Runtime Health section.
Click No to retain the alert in the SOA Runtime Health section.
9.9.2 Managing an Incomplete (Stopped) UpgradeYou can use Fusion Middleware Control to manage an incomplete upgrade, which canoccur in the following situations:
• None of the open or closed instances are upgraded.
• Some of the open instances have upgraded. For example, if you stop thebackground control job manually using administration script option 8 (Stopupgrade database background sessions and jobs) during the upgrade of openinstances.
• Only open instances have been upgraded.
• Some or none of the closed instances have been upgraded.
Note:
If you start the SOA managed servers before the instance upgrade is complete,Fusion Middleware Control will show the upgrade status as Data MigrationNot Complete and you will have to manually restart the upgrade as describedin Restarting an Incomplete Upgrade.
Monitoring Upgrade Status with Fusion Middleware Control
Administering and Monitoring the Upgrade of SOA Instances 9-25
If the upgrade is not yet complete, Fusion Middleware Control can provide themaximum creation date for all 11g instances that have not yet been upgraded. This isimportant because the maximum creation date can also help you determine why someinstances might not be visible in the 12c Enterprise Manager Console. For example, ifyou notice that some older 11g closed instances are not be visible in the FusionMiddleware Control console, you can check the maximum creation date for all non-upgraded instances to help you determine if its because the upgrade has not reachedthose instances yet.
To verify the status of an incomplete (stopped) upgrade using Middleware Control dothe following:
In the target navigation pane of Oracle Enterprise Manager Fusion MiddlewareControl, expand SOA, click soa-infra (soa_server1). In the SOA Runtime Healthsection of the screen you will see the current status of the upgrade. For an incompleteupgrade, the status will be Data Migration Not Complete. You can refresh this screenevery 5 minutes.
Figure 9-5 SOA Runtime Health: Data Migration Not Complete
Click Data Migration Not Complete and the following message is displayed:
Figure 9-6 SOA Runtime Health: Migration Not Complete Status Message
Data Migration Status:
• Active Instances: Shows the status of upgraded open instances. In the exampleabove, the open instances have already been upgraded (status will be Completed).
• Inactive Instances: Shows the status of upgraded closed instances. In the exampleabove, closed instances older than July 9, 2013 have not yet been upgraded. Theupgrade is performed newest to oldest. Any instances that have not yet beenupgraded will not appear in any Fusion Middleware Control reports or views. Youcan refresh the report every 5 minutes.
Note:
For a detailed report of the running upgrade, run the Report UpgradeSummary script (Option 1) as described in Running the AdministrationScripts.
Monitoring Upgrade Status with Fusion Middleware Control
9-26 Upgrading SOA Suite and Business Process Management
Once all the closed instances are upgraded, the link will change to Data MigrationCompleted as shown in Figure 9-2.
9.9.3 Optimizing the Display of Instances in Enterprise ManagerIf your upgrade includes migrating a large number of instances (closed and open), youmay experience performance issues when loading Enterprise Manager flow trace. Toprevent performance degradation, create an index as described in the following steps:
1. Stop the Administration Server and any running managed servers.
2. Connect to SOAINFRA schema from SQLPLUS and execute the followingcommand:
CREATE INDEX CI_FLOW_ID ON CUBE_INSTANCE(FLOW_ID);
3. Restart the Administration Server and managed servers.
9.9.4 Viewing Instances that Faulted During the UpgradeThe 11g instances that incur a fault and fail during the upgrade can be seen only at thecomposite level post-upgrade. These instances will not be displayed at the partitionlevel.
To view these instances, navigate to the Flow Instances tab of the deployed compositeas shown in Figure 9-7:
Figure 9-7 Using the composite level to view instances that faulted during upgrade
NOTE: Use Search Options to specify a specific instance creation time or date range.
Monitoring Upgrade Status with Fusion Middleware Control
Administering and Monitoring the Upgrade of SOA Instances 9-27
9.9.5 Viewing Instances Created Prior to Composite RedeploymentIf a composite is redeployed with the same pre-upgrade revision, then you mustnavigate to the partition level (instead of composite level) to view these instances asshown in Figure 9-8.
Instances created after the upgrade, however, can be viewed in the 12c compositelevel.
Figure 9-8 Using the partition level to see instances created prior to upgrade
9.10 Resolving Instance Upgrade ErrorsIf the upgrade fails or the UPGRADE ERROR COUNT section of the Report UpgradeSummary report (Option 1) shows that there were errors in the current run, you mustresolve the errors before resubmitting the instances to upgrade.
The upgrade_error_log can be used to diagnose the error situation and mayprovide guidance on how to resolve the issue. For more information on resolvingcommon upgrade errors, see Recovering From a Failed Upgrade.
The table below describes each of the errors and possible resolutions:
Error Type Description Error Message Resolution
0 These errors werereported in the previousupgrade run.
Type will be set to 0 afterresetting the erroredinstances as described in Resetting Errored 11ginstances (Option 9)).
Error message givingdetails about erroroccurred based onprevious error type.
Correct the errors fromthe previous run and resetusing AdministrativeScript.
Resolving Instance Upgrade Errors
9-28 Upgrading SOA Suite and Business Process Management
Error Type Description Error Message Resolution
1 Error occurred during theupgrade of instances.
The error message willhave actual error thrownfrom the Upgrade script.It will also show a stacktrace which will point outthe line in the UpgradePL/SQL script where theerror has occurred.
Debugging the root causecan be done by looking atthe actual error along withthe trace to get thelocation of the error.
ECID populated in theinfo column will behelpful in getting the datafor failed instance.
2 Error occurred duringupgrade of EDN errorevent store or Adapterrejected messages.
The error message willcontain the stringupgrade_rejected_message/upgrade_edn_messageto determine whichcomponent it failed
It will contain the reasonfor failure along with theid of the message whichfailed.
Debugging can be doneby analyzing the actualreason of the error. To getthe details of theadapter/edn messagewhich has failed the idlogged as part ofERROR_MSG can be used.
9 Error occurred during theupgrade of metadata.
It will have details of thecomposite_dn for whichthe metadata upgrade hasfailed
It will have the actualerror thrown fromUpgrade script also with astack trace which willpoint out the line in theUpgrade PL/SQL scriptwhere the error hasoccurred.
Debugging can be doneby looking at the actualerror along with the traceto get the location of theerror. Info column willgive the wholecomposite_dn for whichthe metadata upgrade hasfailed.
12 Generic error occurredduring the data upgradeprocess and not pertainingto any single instance.
Info will only contain thestring migrate_soa
It will have the actualerror thrown fromUpgrade script also with astack trace which willpoint out the line in theUpgrade PL/SQL scriptwhere the error hasoccurred.
This error type will bereported during upgraderun when the dataupgrade as a whole failsand not necessarilypertaining to anyparticular instance.
An example of this type oferror may be the TEMPtable space issue.
9.11 Restarting a Failed UpgradeOnce the errors have been resolved, use the following steps to restart the upgrade:
1. Fix the error condition(s) displayed in the upgrade_error_log.
2. Remove the error flags from the upgrade_error_log as described in ResettingErrored 11g instances (Option 9). This will allow the errored instances to beresubmitted in a subsequent run.
Restarting a Failed Upgrade
Administering and Monitoring the Upgrade of SOA Instances 9-29
3. Enable the background control job as described in Enabling and DisablingBackground Control Job (Option 6). You will have to trigger another upgrade run.
4. If necessary, change the repeat interval time and duration of the backgroundcontrol job as described in Changing Background Control Job Execution Schedule(Option 5).
5. Monitor the upgrade status using the Report Summary Upgrade script (Option 1).The UPGRADE ERROR COUNT section of the report should show 0 errors. If errorspersist, resolve the issue and repeat these steps.
Restarting a Failed Upgrade
9-30 Upgrading SOA Suite and Business Process Management
ATroubleshooting the Upgrade
This appendix describes some common procedures for troubleshooting a failedupgrade, domain reconfiguration or server start issues.
Reviewing the Release Notes
Resolving Server Start Errors
Recovering From a Failed Upgrade
OWSM Data Source Connection Failure During Upgrade (12.1.3 to 12.2.1)When you select All configurations used by the domain when runningthe Upgrade Assistant, the upgrade fails at the examination phase withthe WSMERROR-00015 error.
Troubleshooting a Failed BAM Upgrade
Reapplying an EDNTopic to SOA JMS Module After UpgradeEDN Topic is not found when starting SOA Server post upgrade. This isa known issue and the workaround is to re-create the EDN Topicmanually.
Troubleshooting Oracle Service Bus
Troubleshooting Oracle Managed File Transfer (MFT) Upgrade IssuesIf you encounter an upgrade error while upgrading Oracle Managed FileTransfer, refer to these troubleshooting tasks to correct the issue.
Error Starting OWSM After Upgrading to 12c
Encryption Issues During Upgrade
Upgrading Unsupported Domains with the Upgrade Assistant
Business Rules Audit Trail Not Showing After Instance Upgrade
Resolving a Coherence Cache Exception
WSDL Generated Missing Elements for Custom Exception
Connecting to the ServerSocket through Remote Clients
A.1 Reviewing the Release NotesMake sure that you review the release notes to determine if any known issues could beimpacting your upgrade. You can find the release notes in the Oracle FusionMiddleware 12c (12.2.1) library.
Troubleshooting the Upgrade A-1
A.2 Resolving Server Start ErrorsIf servers do not start, or they start in AdminMode, the cause is most likely that thesetDomainEnv.sh changes from the previous environment were not reapplied to the12c domain. Compare the setDomainEnv file from 11g to the new 12c setDomainEnvfile and then add any custom changes after the upgrade.
For more information, see "Re-apply Customizations to Startup Scripts".
A.3 Recovering From a Failed UpgradeRecovering from a failed upgrade depends on when the error(s) occurred. Review thefollowing to determine how to recover:
• If there are errors while running the Upgrade Assistant to upgrade _SOAINFRAschema, you must fix the errors in the schema and rerun batch jobs.
Note that this recovery method only applies when you are running the UpgradeAssistant for the first time and you selected the Schema option.
• If there are errors while running the Reconfiguration Wizard, you must restorefrom source environment and restart the upgrade from the beginning.
• If there are errors while running the Upgrade Assistant to upgrade WebLogicComponent Configurations option, then you can fix the errors and rerun theUpgrade Assistant. The second time you run the Upgrade Assistant there is noneed to restore from backup and restart the upgrade process from the beginning.This process is reentrant.
• If there are errors while running the Upgrade Assistant to upgrade schemas, andthe error occurs during the upgrade phase, you will have to restore from backup,correct the issues, and then restart the upgrade from the beginning. If the erroroccurs during the examine phase, however, you can correct the issues and restartthe Upgrade Assistant. Errors that occur prior to the upgrade phase are reentrant.
For more information on troubleshooting your upgrade, see "General TroubleshootingGuidelines" in the Upgrading with the Upgrade Assistant.
Note:
If you received the CFGFWK-60950 error, rename the BAM templates asdescribed in “Renaming the Oracle BAM Templates Before Upgrading the 11gSchemas” and launch the Reconfiguration Wizard again.
If you received this error, you will need restore your entire pre-upgradeenvironment, perform the necessary pre-upgrade tasks and then perform thesteps in the section listed above before you can attempt the reconfigurationprocess again.
For more information on resolving BAM-specific issues, see Recovering from aFailed Oracle BAM Upgrade.
Resolving Server Start Errors
A-2 Upgrading SOA Suite and Business Process Management
A.4 OWSM Data Source Connection Failure During Upgrade (12.1.3 to12.2.1)
When you select All configurations used by the domain when running the UpgradeAssistant, the upgrade fails at the examination phase with the WSMERROR-00015error.
Error Message:
[2015-09-22T10:46:54.552-07:00] [WSM] [INCIDENT_ERROR][upgrade.WSM.WSMPLUGIN]oracle.ias.update.exception.UpgradeException: WSMERROR-00015: Failed to read the Oracle WSM datasourceconnection details.atoracle.wsm.lifecycle.upgrade.impl.WSMUpgradePlugin.initializePluginData(WSMUpgradePlugin.java:396)
This error occurs because the 12.1.3 domain is created with Multi-DataSourceconnection. When upgrading to 12.2.1, the Upgrade Assistant expects a genericdatasource connection.
To perform the upgrade, complete the following steps:
1. Change the "mds-owsm" data source to be a generic data source.
2. Restart the Upgrade Assistant and, when prompted, select All configurations usedby the domain.
3. After a successful upgrade, you can change the "mds-owsm" data source back to amulti-DS.
A.5 Troubleshooting a Failed BAM UpgradeWhen upgrading a domain containing Oracle Business Activity Monitoring (BAM),note that there are additional BAM-specific troubleshooting procedures.
For more information, see Recovering from a Failed Oracle BAM Upgrade.
A.6 Reapplying an EDNTopic to SOA JMS Module After UpgradeEDN Topic is not found when starting SOA Server post upgrade. This is a knownissue and the workaround is to re-create the EDN Topic manually.
After upgrading to SOA 12.2.1, the upgraded SOA JMS module may be missing theEDNTopic. If the JMS module is missing the EDNTopic, you must manually add thetopic or UDD for this topic using the Administration Console or WLST.
This is a known issue and can occur in both clustered and unclustered environments.
See the Administration Console online help for more information on reapplying theEDNTopic or contact Oracle Support.
A.7 Troubleshooting Oracle Service BusIf you experience post-upgrade issues with Oracle Service Bus, review thetroubleshooting procedures described in Troubleshooting Oracle Service Bus Upgrade.
OWSM Data Source Connection Failure During Upgrade (12.1.3 to 12.2.1)
Troubleshooting the Upgrade A-3
A.8 Troubleshooting Oracle Managed File Transfer (MFT) Upgrade IssuesIf you encounter an upgrade error while upgrading Oracle Managed File Transfer,refer to these troubleshooting tasks to correct the issue.
Some common upgrade error messages for Managed File Transfer are listed below:
SQLException: ORA-04020: deadlock detected while trying to lock object
Resolution: Make sure that you selected Managed File Transfer on the AvailableComponents screen of the Upgrade Assistant. If you do not select Oracle Managed FileTransfer, the upgrade will not include MFT schema.
A.9 Error Starting OWSM After Upgrading to 12cIf there was a custom trust keystore configured in Enterprise Manager 11g prior to theupgrade, you may encounter issues with starting the OWSM.
Specifically, if after upgrading an 11g domain running OWSM to 12c, you receive thefollowing error in the OWSM server log (after the second startup), then you mustmanually correct this issue:
####<Dec 18, 2014 12:07:01 PM MST> <Error> <HTTP> <srvgdysoap01.nov.com> <wls_wsm1> <[STANDBY] ExecuteThread: '3' for queue: 'weblogic.kernel.Default (self-tuning)'> <<WLS Kernel>> <> <26c804bb-15a7-46de-a81e-82565fcd2f28-00000004> <1418929621034> <BEA-101216> <Servlet: "PolicyManagerValidator" failed to preload on startup in Web application: "/wsm-pm". Stack:java.lang.NullPointerExceptionat oracle.wsm.config.ConfigurationProcessor.isContextValid(ConfigurationProcessor.java:297)at weblogic.security.acl.internal.AuthenticatedSubject.doAs(AuthenticatedSubject.java:321)at weblogic.security.service.SecurityManager.runAs(SecurityManager.java:120)
If wsm-pm application will not start, you must perform the following steps:
1. Roll back the upgrade to 11g
Troubleshooting Oracle Managed File Transfer (MFT) Upgrade Issues
A-4 Upgrading SOA Suite and Business Process Management
2. Run through the upgrade steps again using the Upgrade Assistant.
3. Start the OWSM server
Note:
It is very important to only start the OWSM server once and leave it running.If you stop and restart it then the NPE will present itself and you will have toroll back again
4. Execute the following WLST command against the running OWSM server fromthe <domain_home>/oracle_common/common/bin location:
exportMetadata('wsm-pm','<wsm server>','location to write the zip') where <wsm_server> is the name of the WLS server running OWSM ('wsm_server1' for example)
5. Extract the MDS archive and go to /configuration/WLS/ and open the file there.The file name is the name of the domain.
6. Search for the property entries containing the string 'keystore.inst.0'. There areprobably several of them in a row and they look like
<orares:property ........</orares:property>
7. Delete these properties from the file.
8. Rebuild the archive and import it back to the running server with the command:
importMetadata('wsm-pm','<wsm server>','location of zip')
9. Restart the servers.
A.10 Encryption Issues During UpgradeIf you received the following error message during the reconfiguration, you may needto apply additional policy files to the JDK and restart the upgrade from your backup:
JPS-06513: Failed to save keystore. Reasonoracle.security.jps.service.keystore.KeyStoreServiceException:Failed to perform cryptographic operation
To prevent this error from reoccurring, apply the policy files before the subsequentupgrade using the information in Using Enhanced Encryption (AES 256).
A.11 Upgrading Unsupported Domains with the Upgrade AssistantIf you receive an error from the Upgrade Assistant stating that the specified domaincannot be upgraded, contact Oracle Support for more information. Supported domainconfigurations are described in Understanding SOA Domain Upgrade Restrictions.
Do not attempt to upgrade or schemas or domain configurations in an unsupporteddomain.
Encryption Issues During Upgrade
Troubleshooting the Upgrade A-5
A.12 Business Rules Audit Trail Not Showing After Instance UpgradeThe audit trail for upgraded 11g instances of the Decision Service Component will notbe available post-upgrade. The audit trail for new 12c instances will continue todisplay.
A.13 Resolving a Coherence Cache ExceptionIf you see the following WebLogic Cache Provider Coherence exception then it islikely that you are not following an enterprise deployment topology recommendationto specify a specific ListenAddress.
When you see this exception, you must set the ListenAddress for your managed serveras shown below:
Exception:
weblogic.cacheprovider.coherence.CoherenceException: at weblogic.cacheprovider.coherence.CoherenceClusterManager.ensureWKAAddresses(CoherenceClusterManager.java:510) at weblogic.cacheprovider.coherence.CoherenceClusterManager.configureClusterService(CoherenceClusterManager.java:236) at weblogic.cacheprovider.CacheProviderServerService.bootCoherenceFromWLSCluster(CacheProviderServerService.java:225) at weblogic.cacheprovider.CacheProviderServerService.initCoherence(CacheProviderServerService.java:94)
Resolution:
1. Log in to the WebLogic Server Console.
2. Navigate to Servers.
3. Locate the Managed Servers (SOA or OSB, for example).
4. Modify the Listen Address from localhost to 127.0.0.1 or provide the actualmachine name.
A.14 WSDL Generated Missing Elements for Custom ExceptionIf your EJBs contain custom exceptions, and you export the Web Service DescriptionLanguage (WSDL) file from your EJB business service, the generated WSDL file willnot have the custom exception properties in it. You will need to manually edit theWSDL file to include these custom exception properties after the upgrade.
The issue is limited only to the WSDL generation part of the file. During runtime, thecustom exception thrown from the EJB will be mapped to the respective elements inthe SOAP fault. The response payload will have the elements populatedcorresponding to the properties of the custom exception.
A.15 Connecting to the ServerSocket through Remote ClientsThere is a change in behavior in which the ServerSocket is created when you upgradefrom Oracle Release 11g to Release 12g. Because of this, remote clients might not able
Business Rules Audit Trail Not Showing After Instance Upgrade
A-6 Upgrading SOA Suite and Business Process Management
to connect to the ServerSocket when the hostname is configured as localhost. As aworkaround, the localhost should be changed to hostname.
For more information, see "Configuring Oracle Socket Adapter" UnderstandingTechnology Adapters.
Connecting to the ServerSocket through Remote Clients
Troubleshooting the Upgrade A-7
Connecting to the ServerSocket through Remote Clients
A-8 Upgrading SOA Suite and Business Process Management


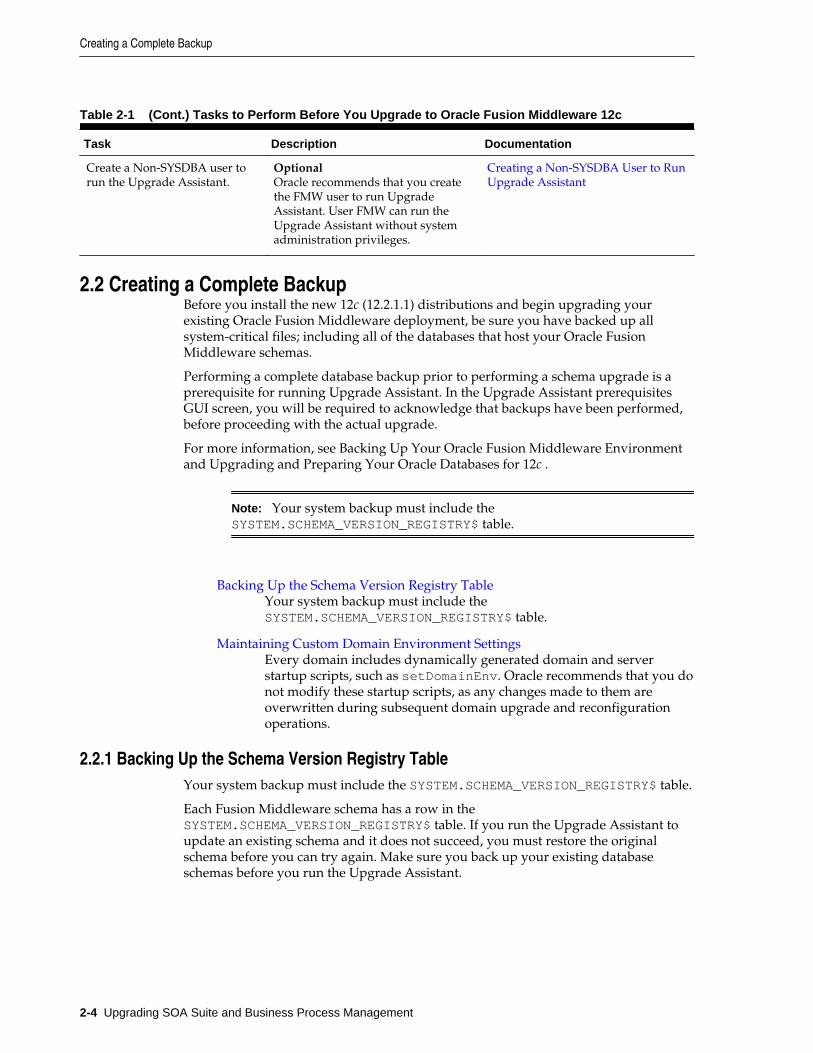


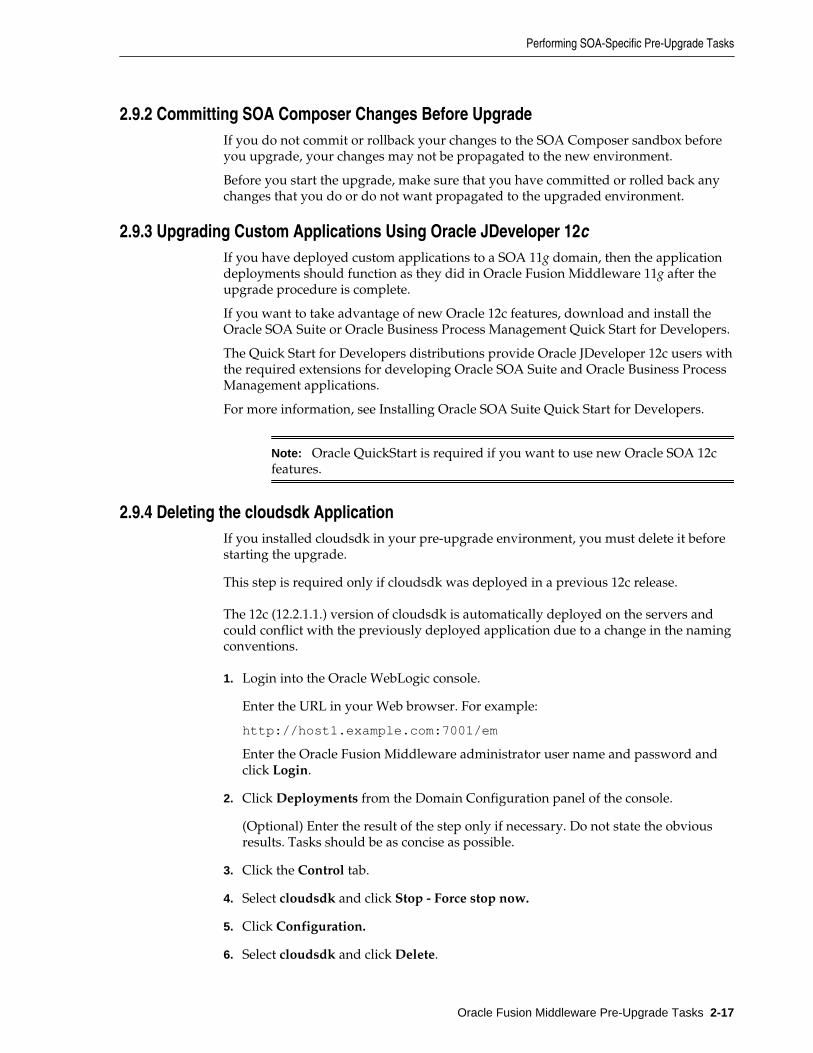


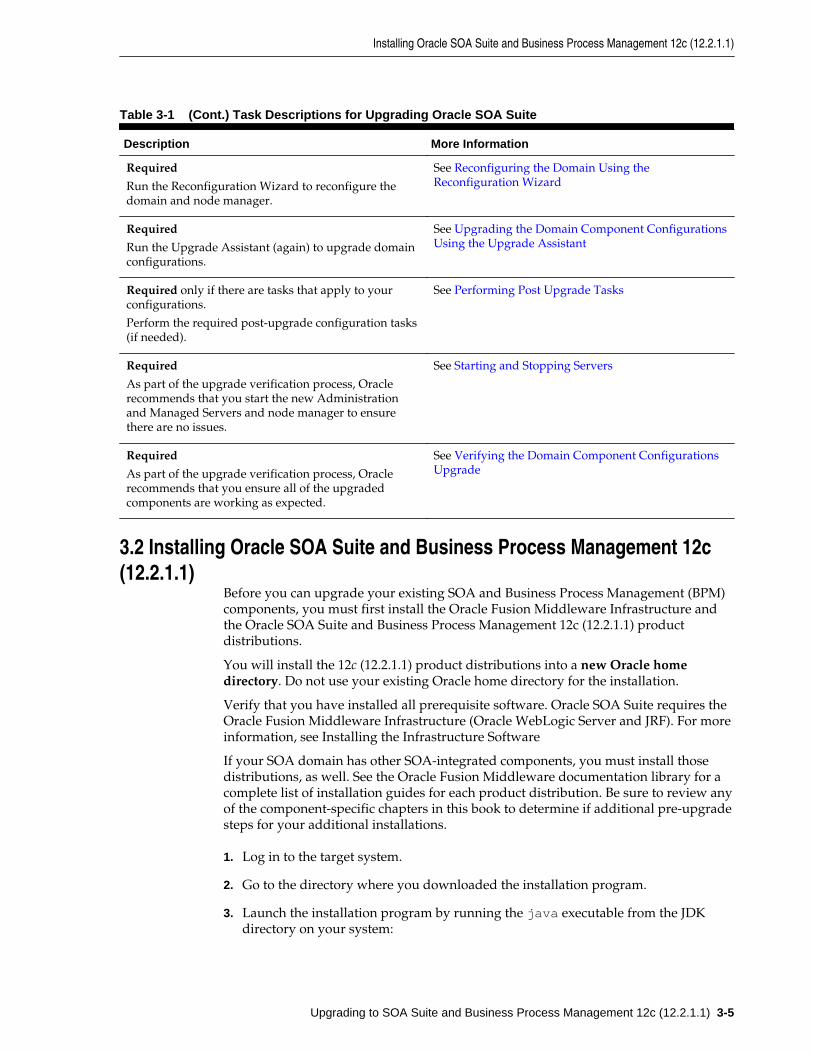


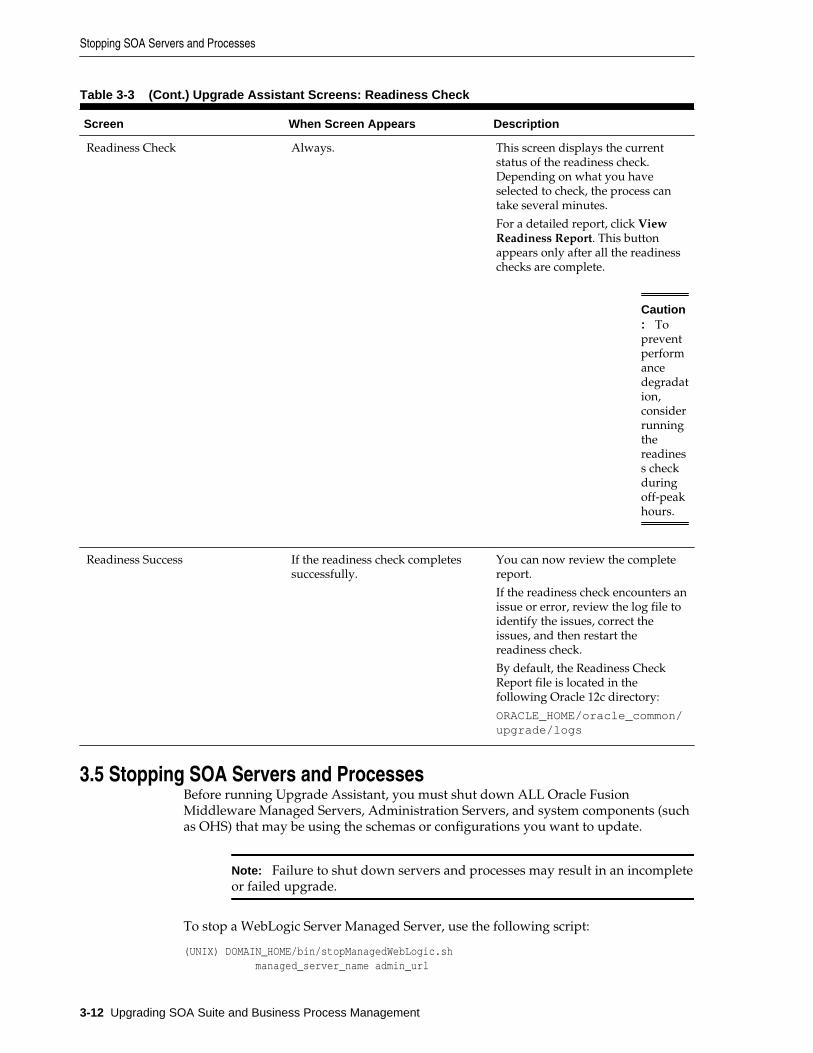


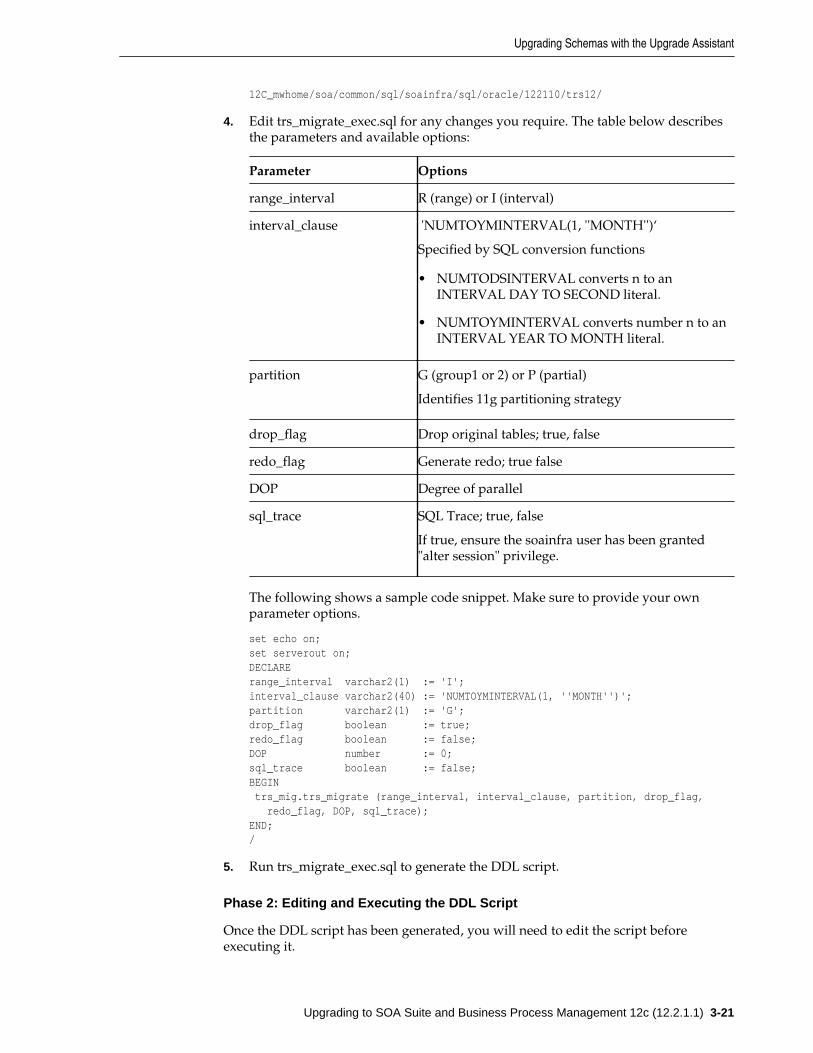
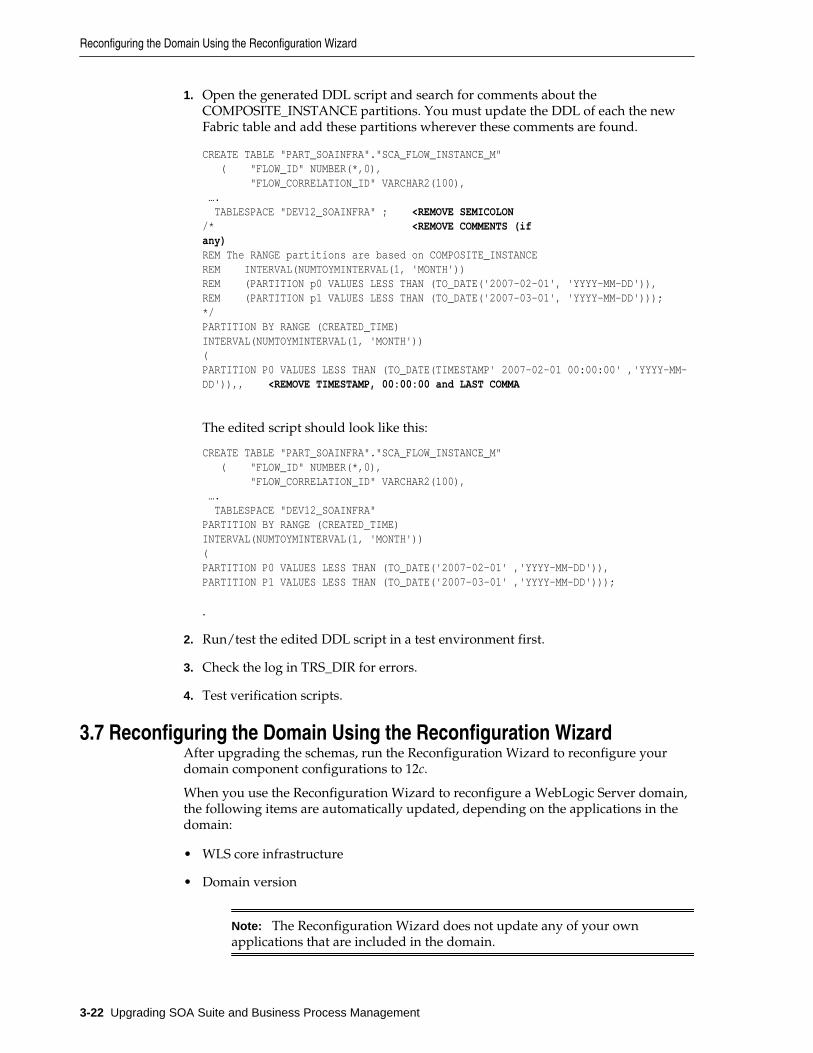


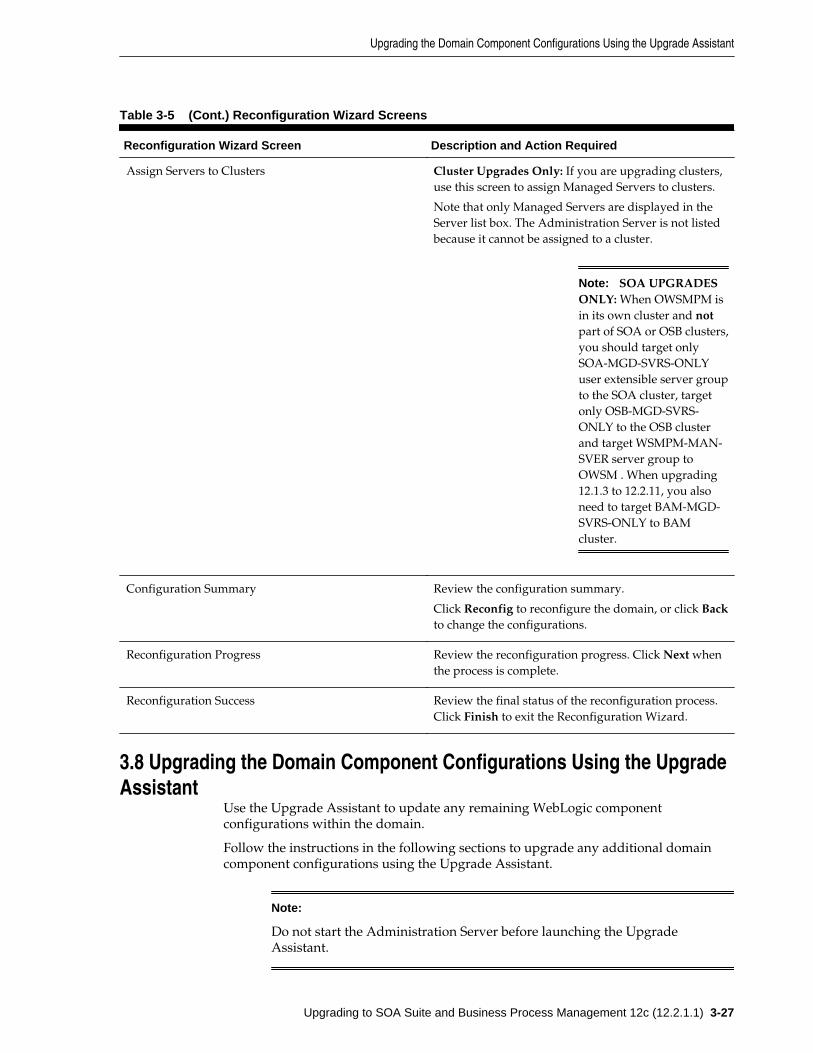


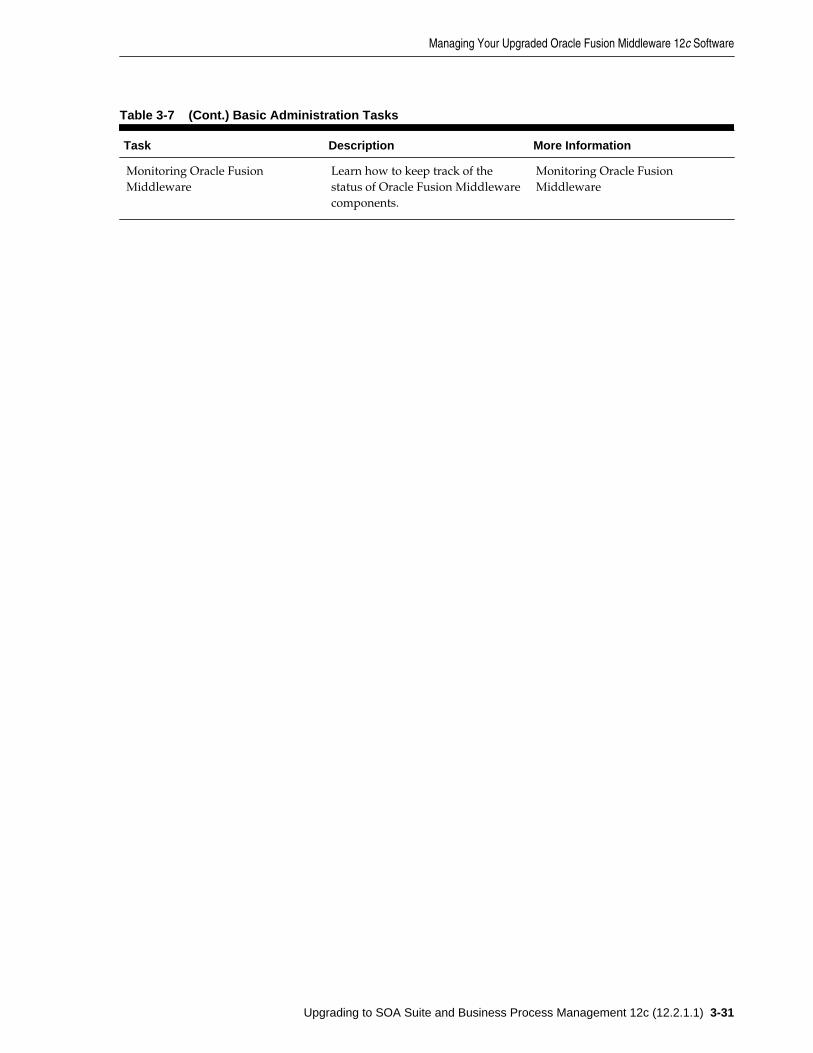


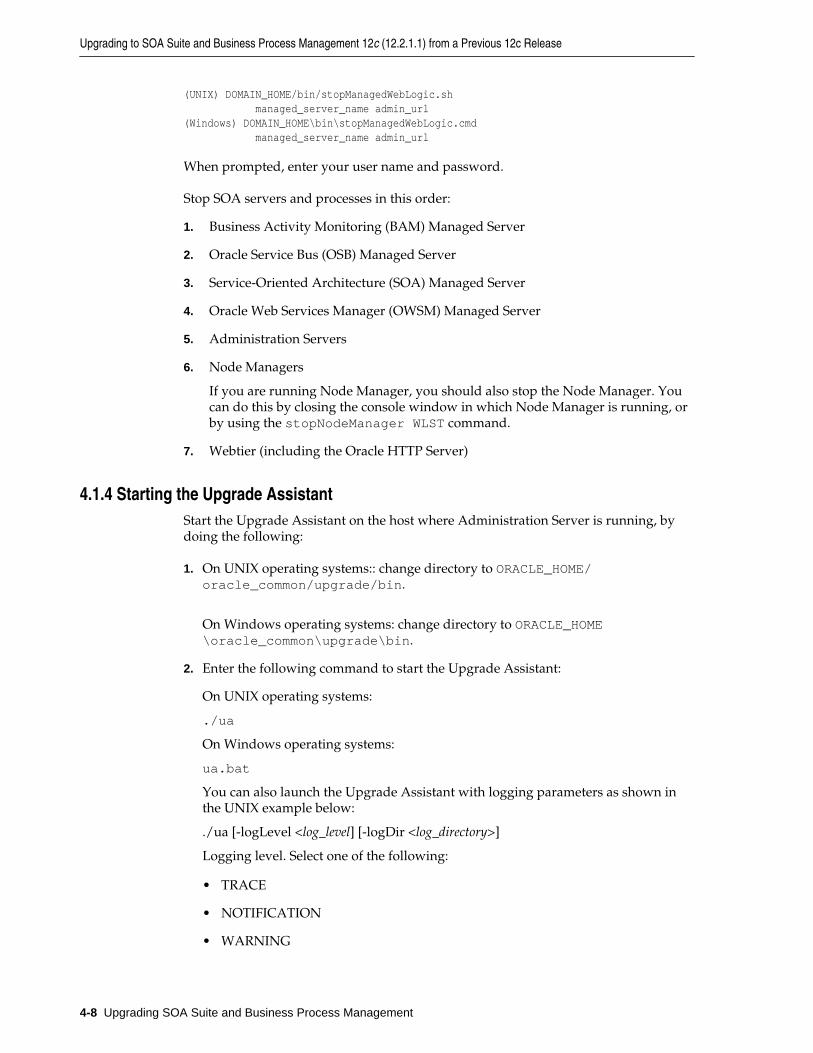


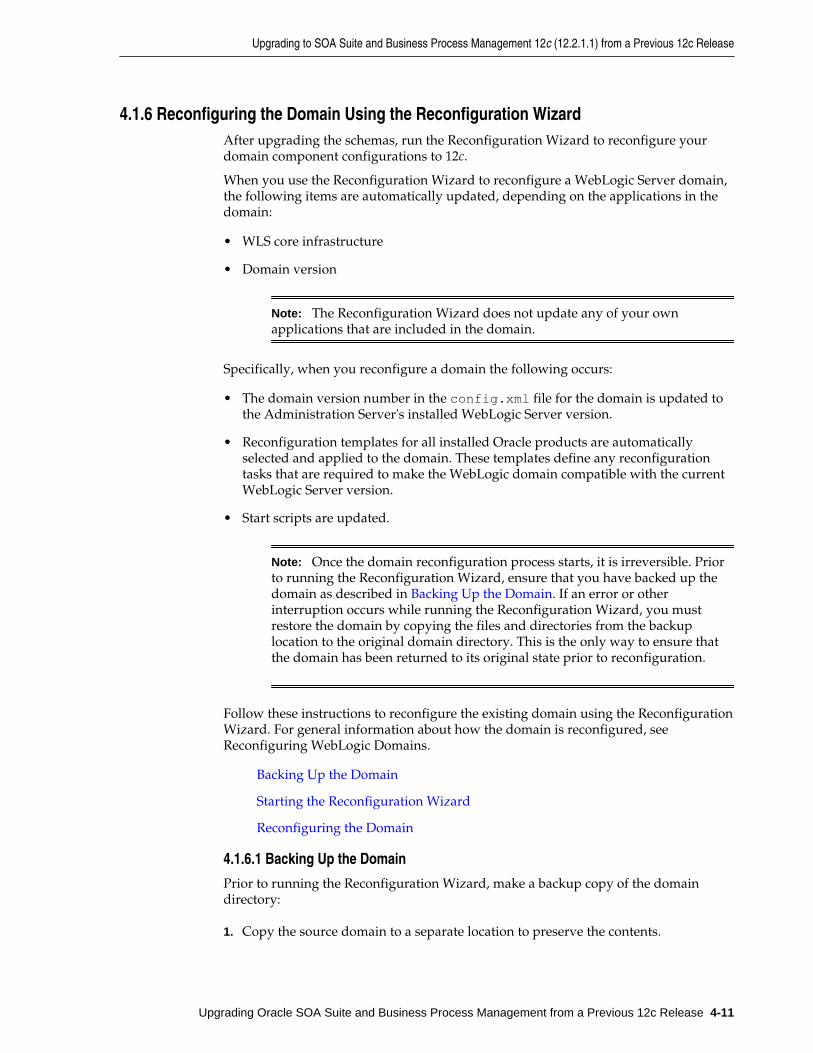

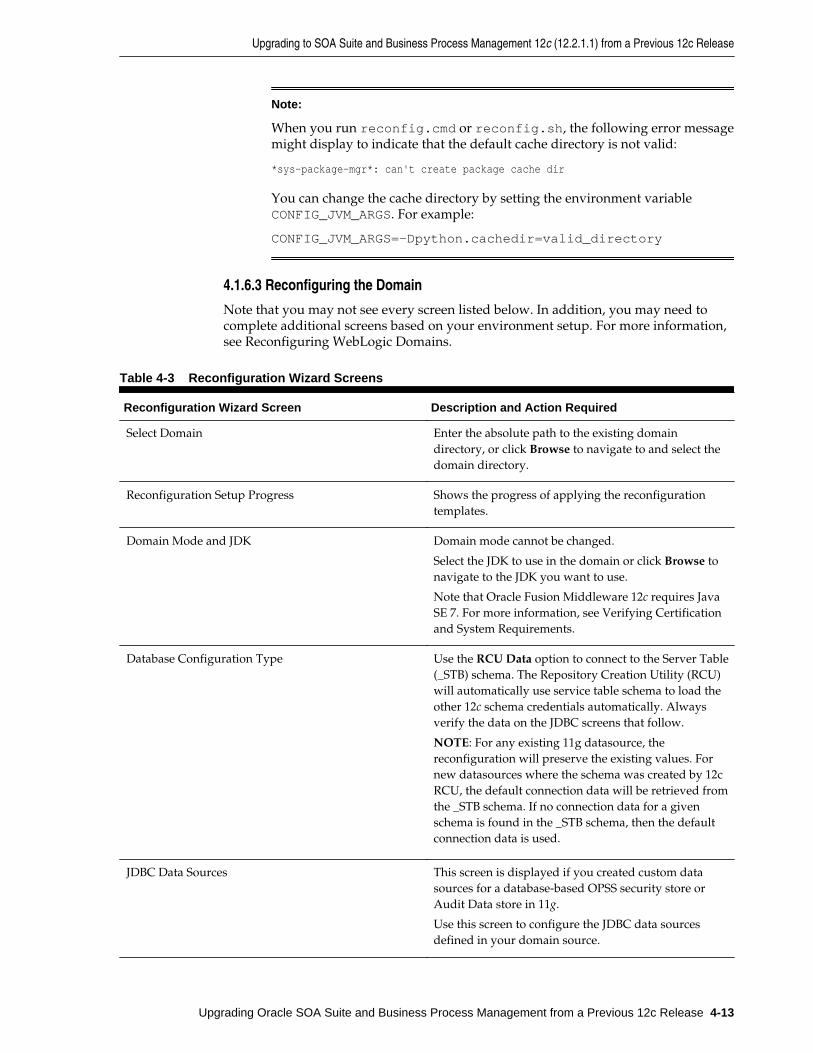


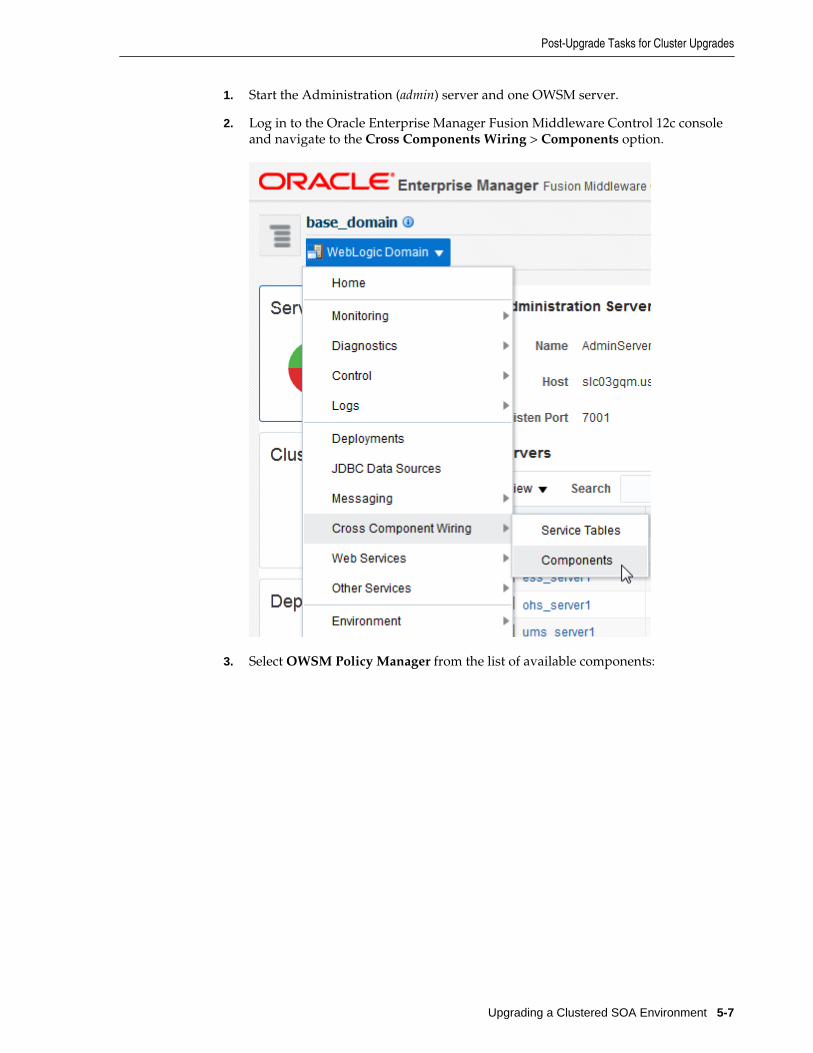
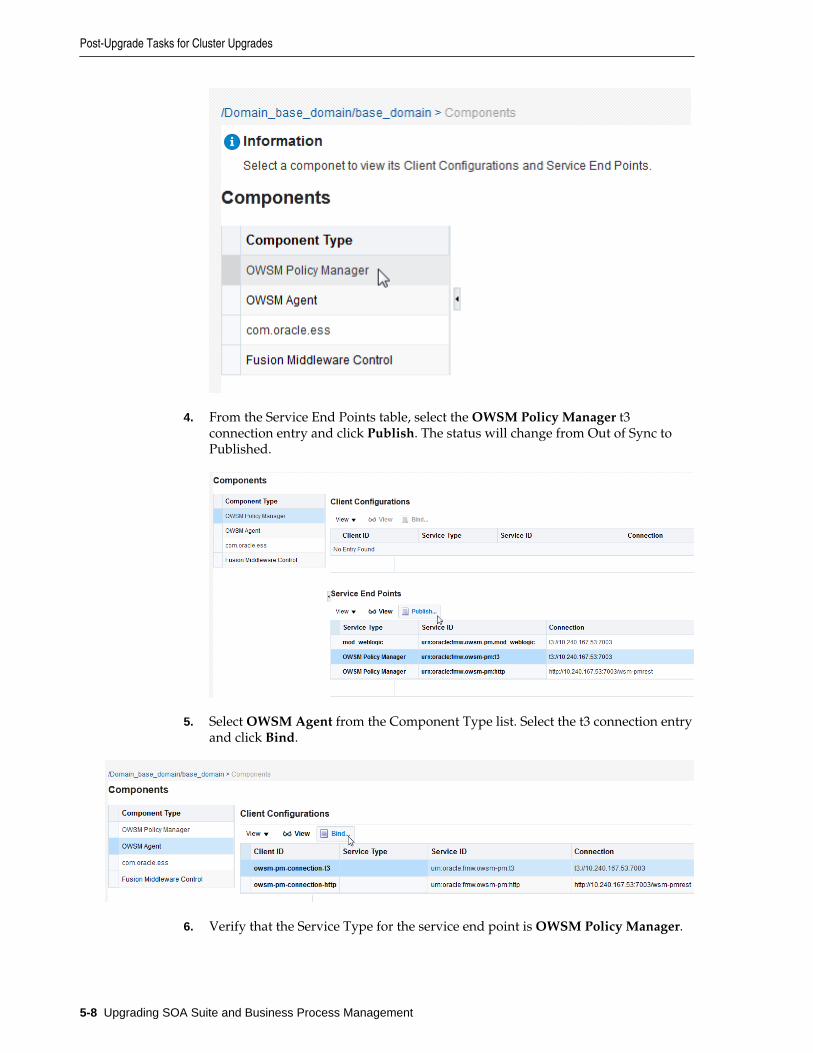


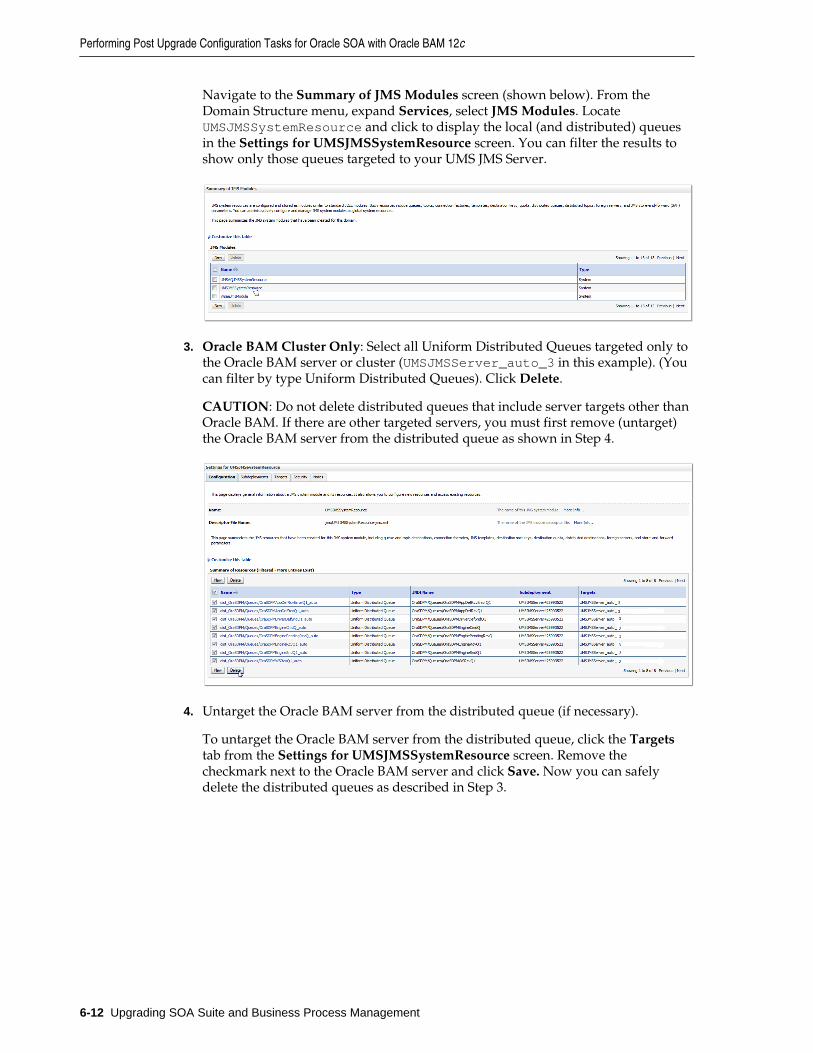


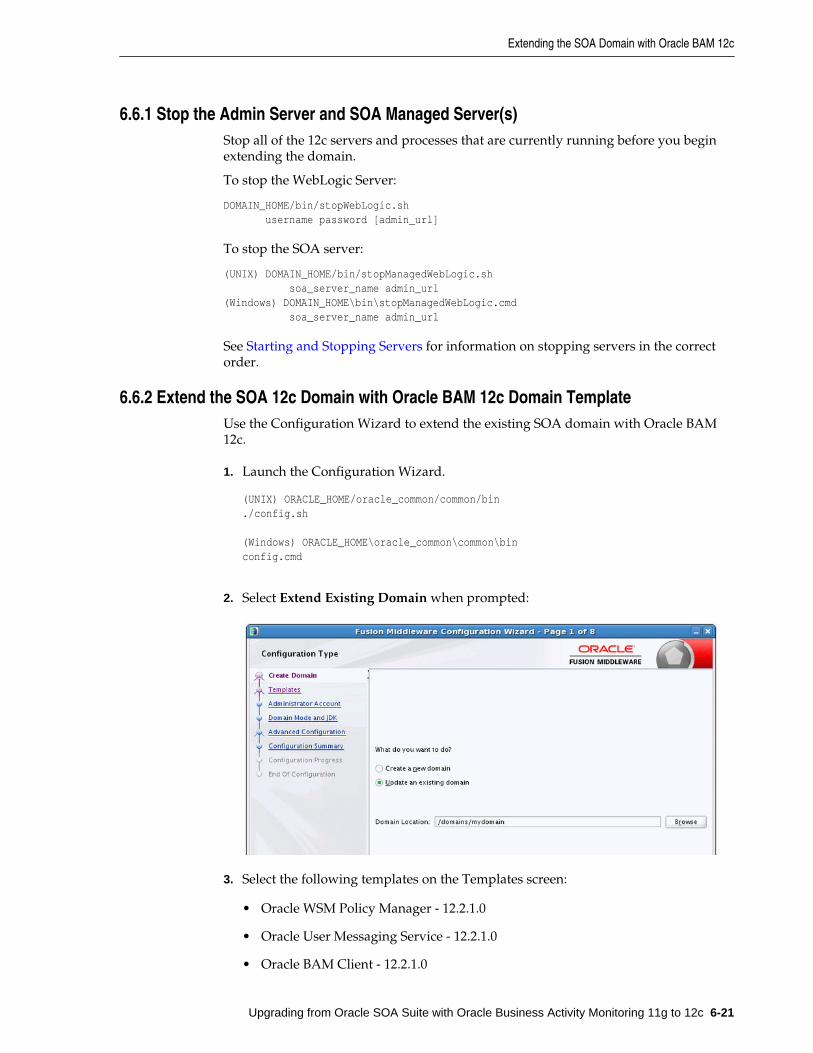

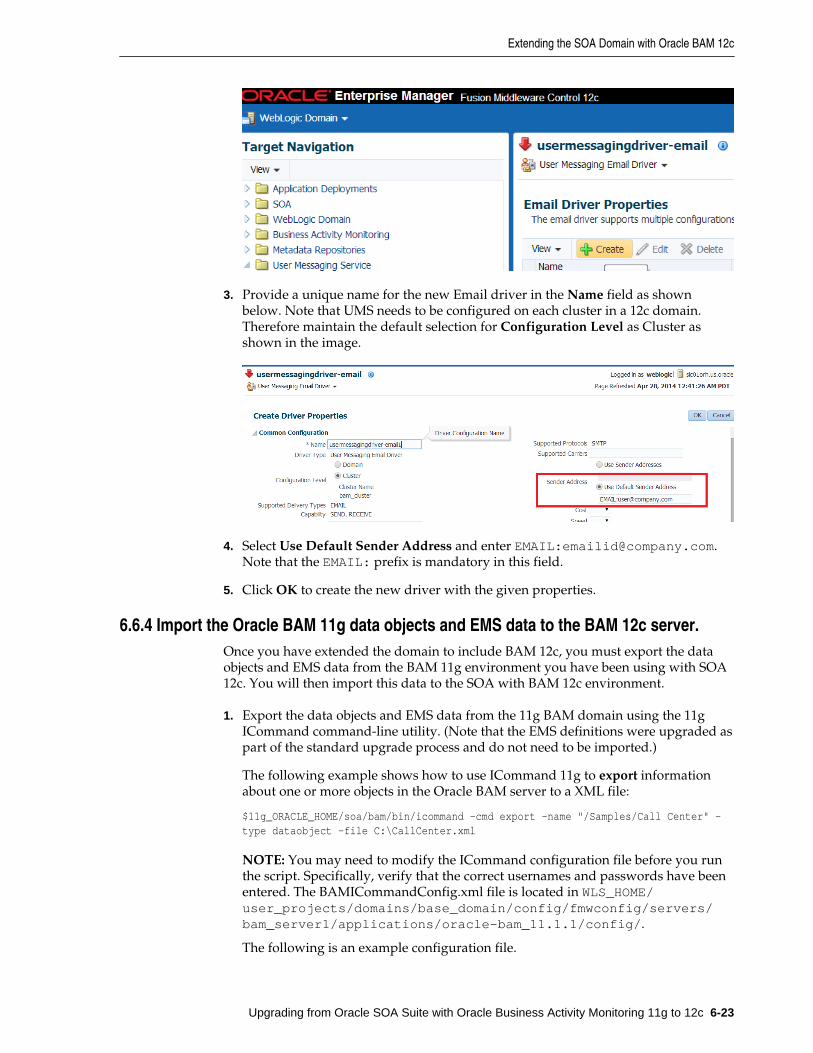


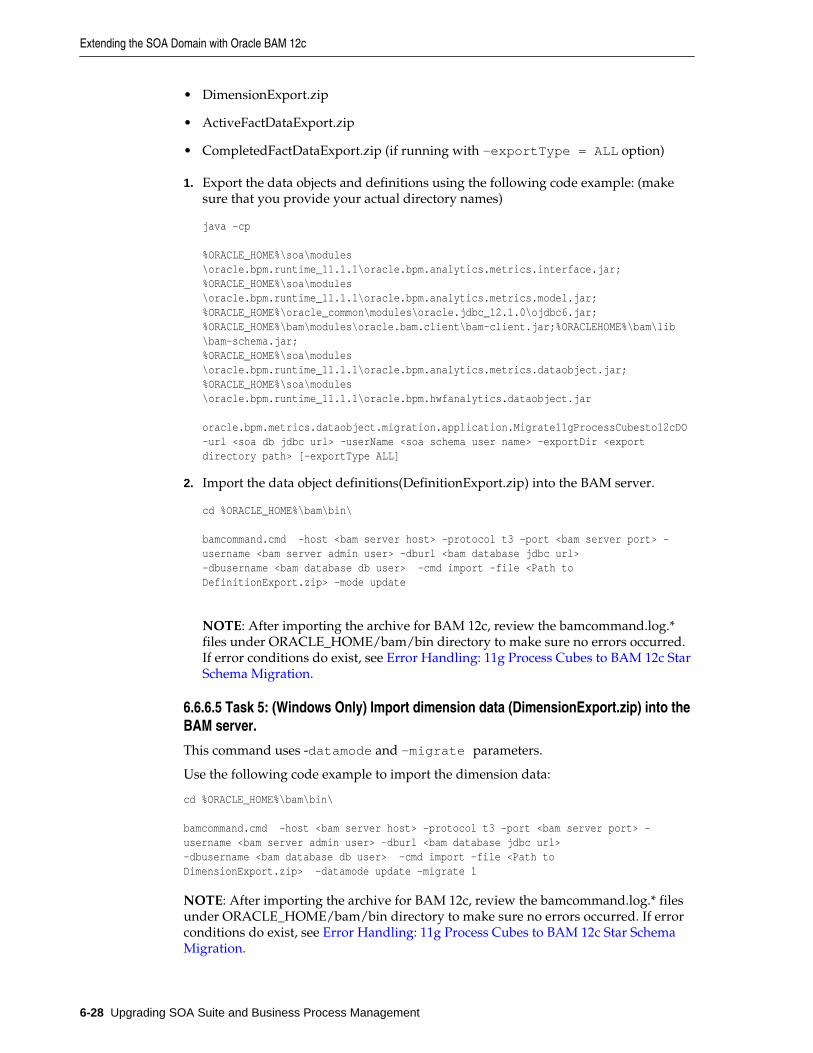


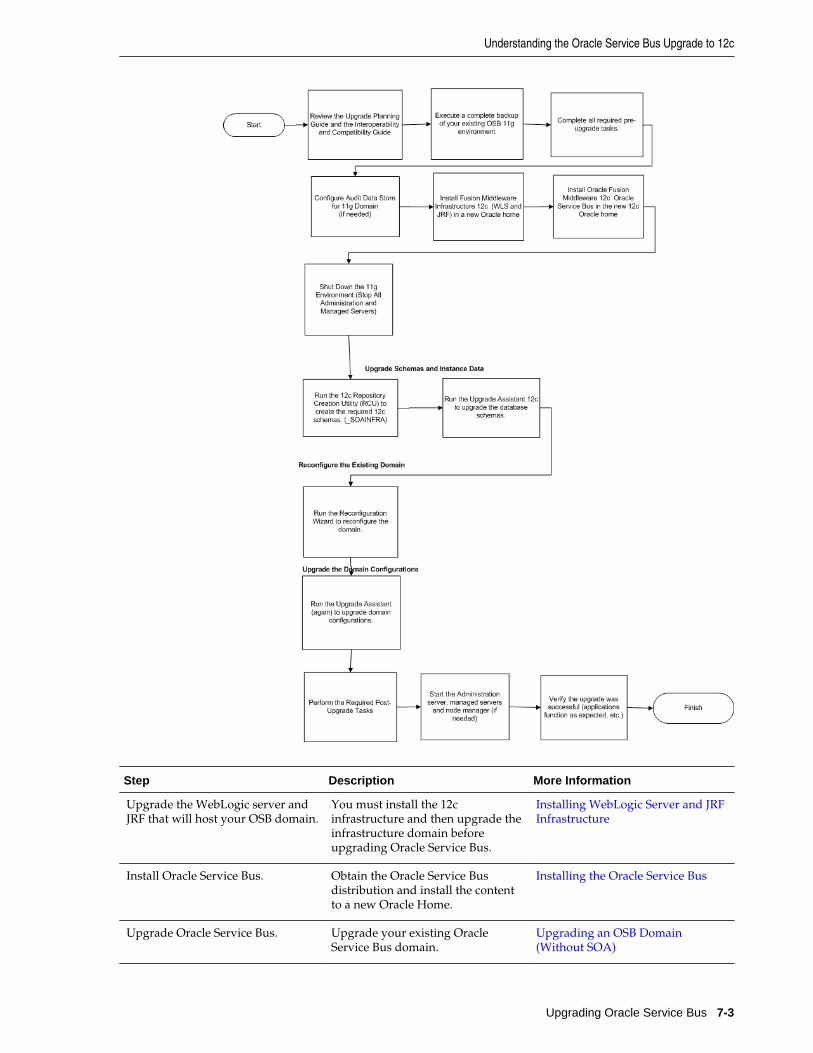


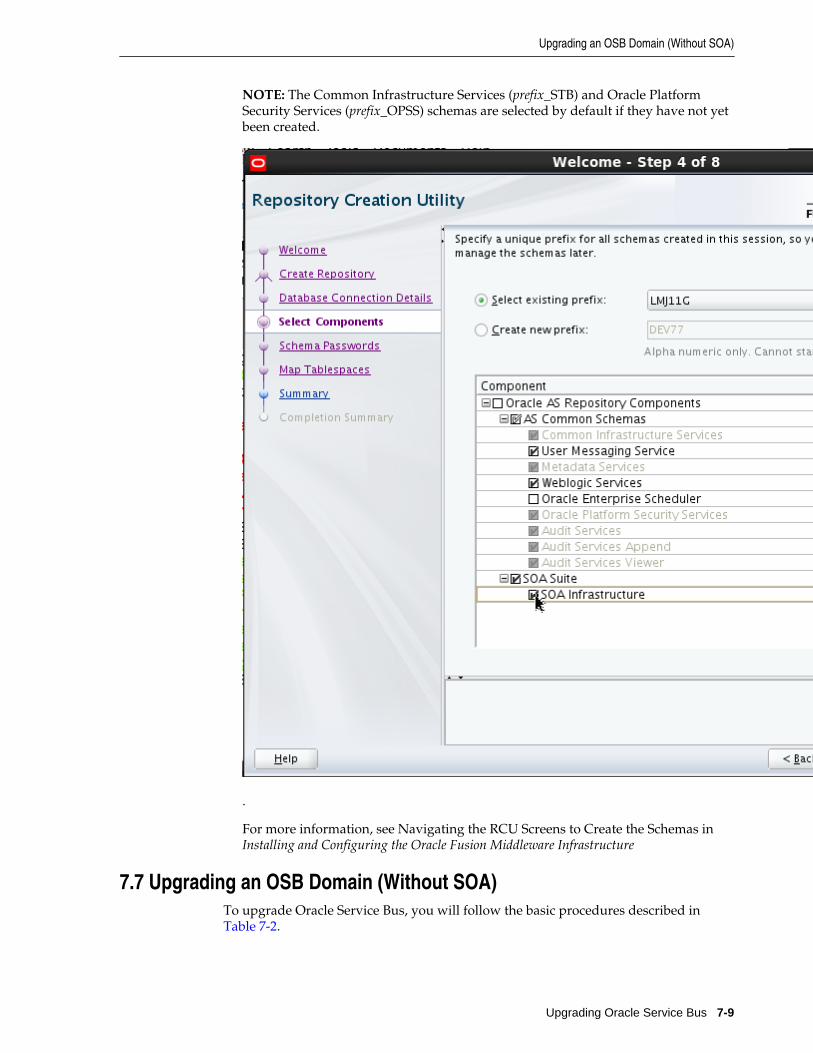


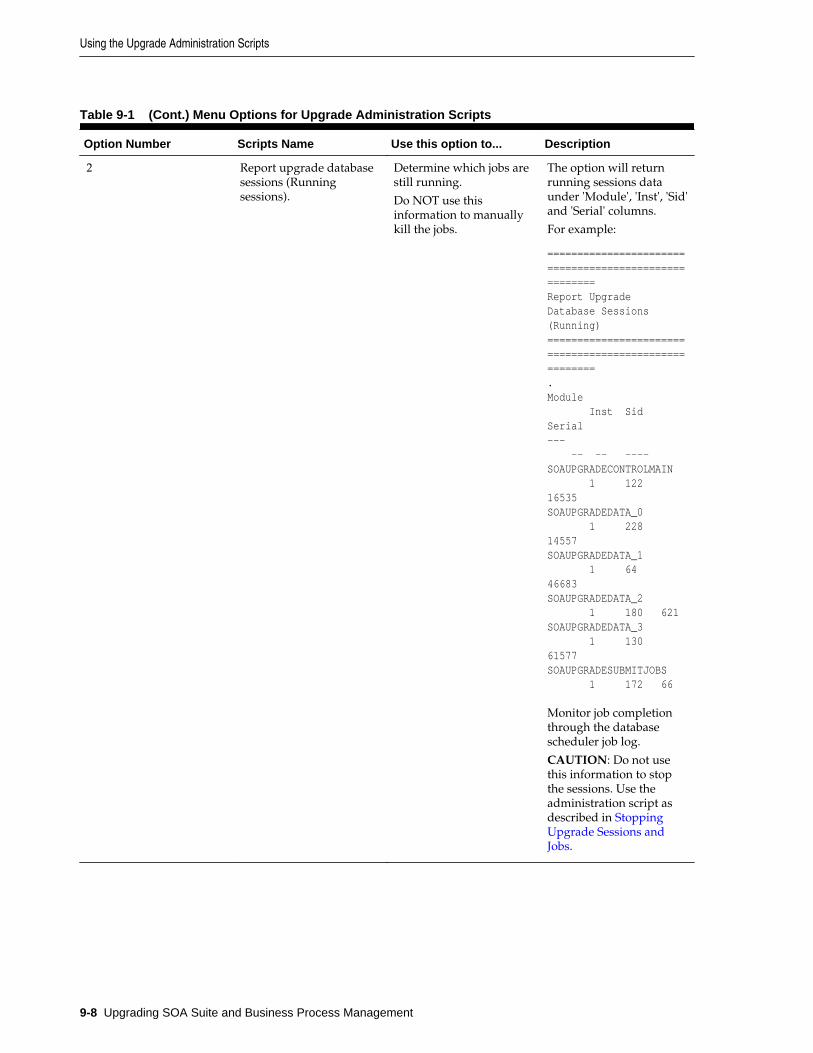
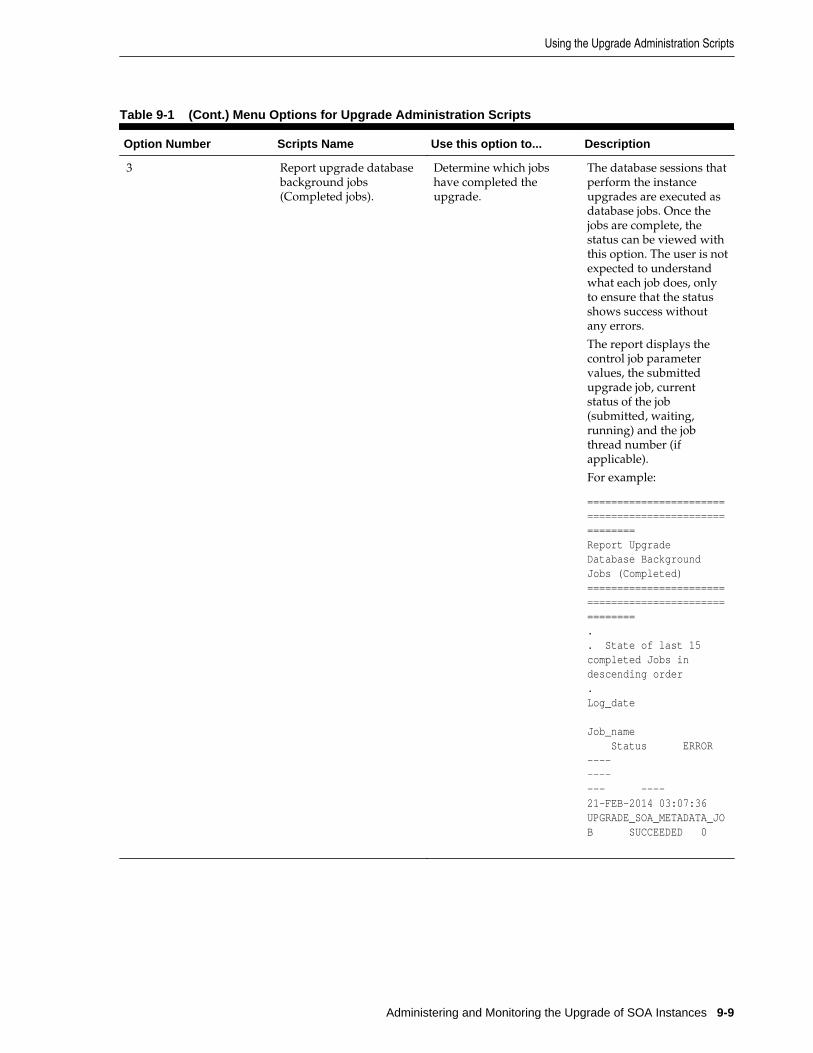


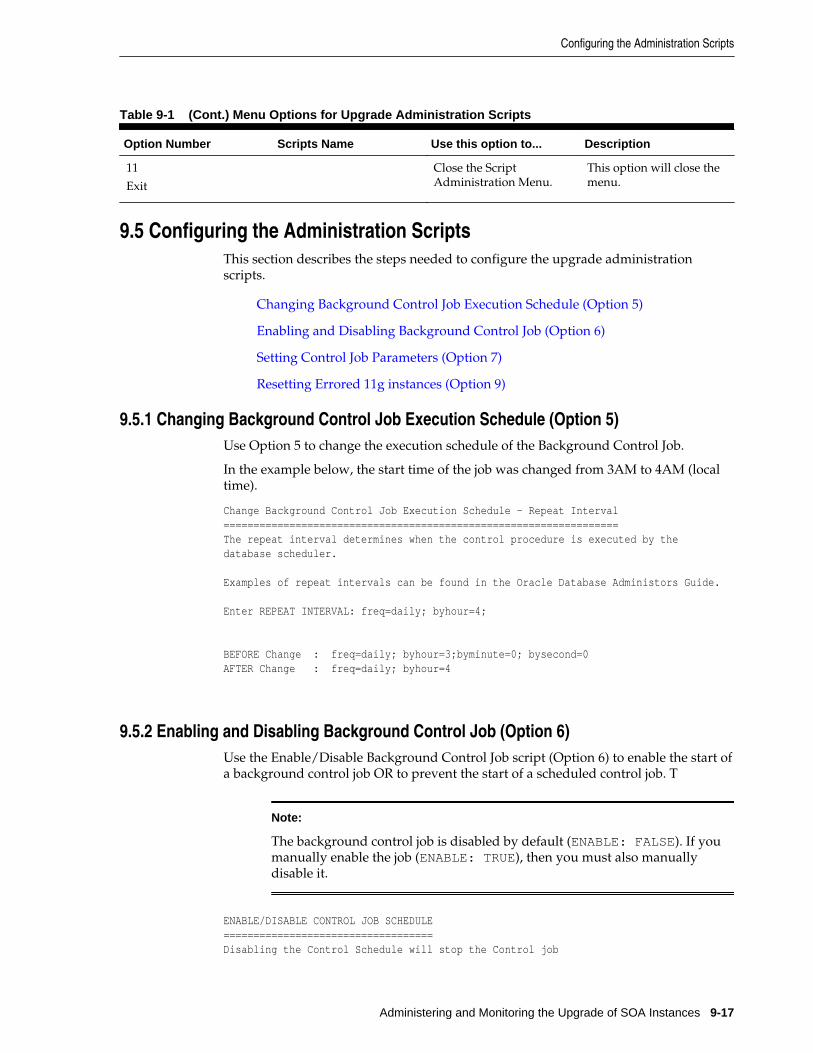

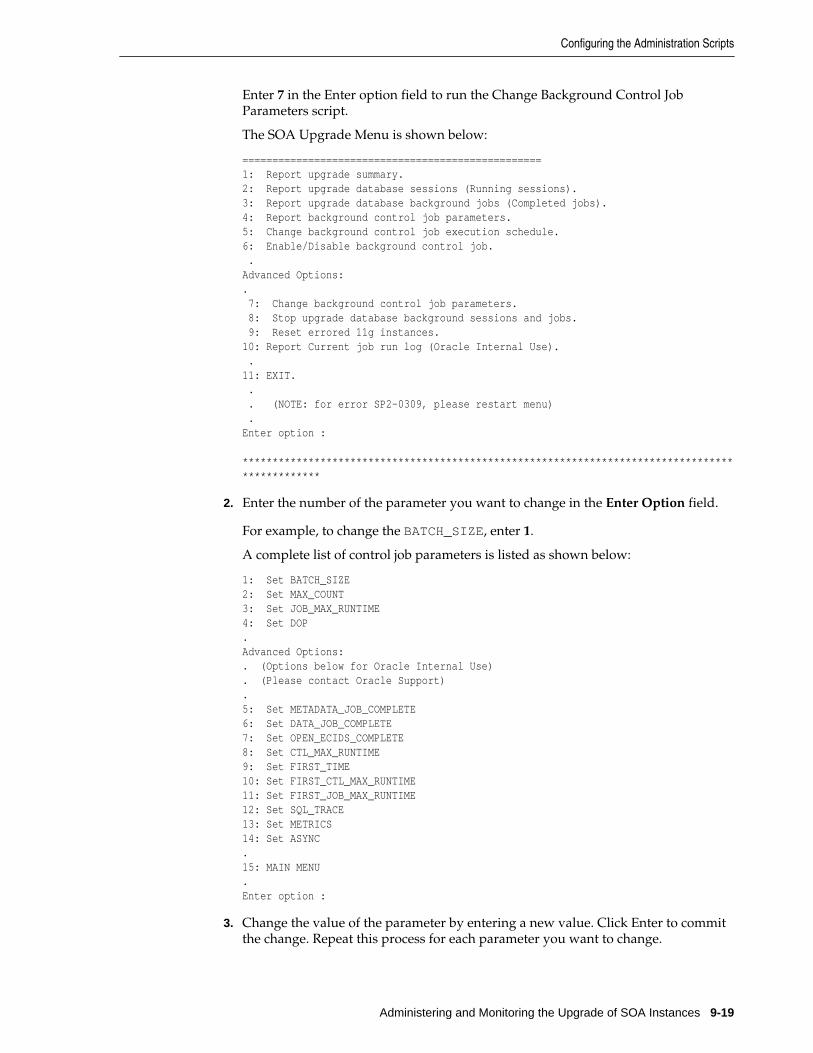
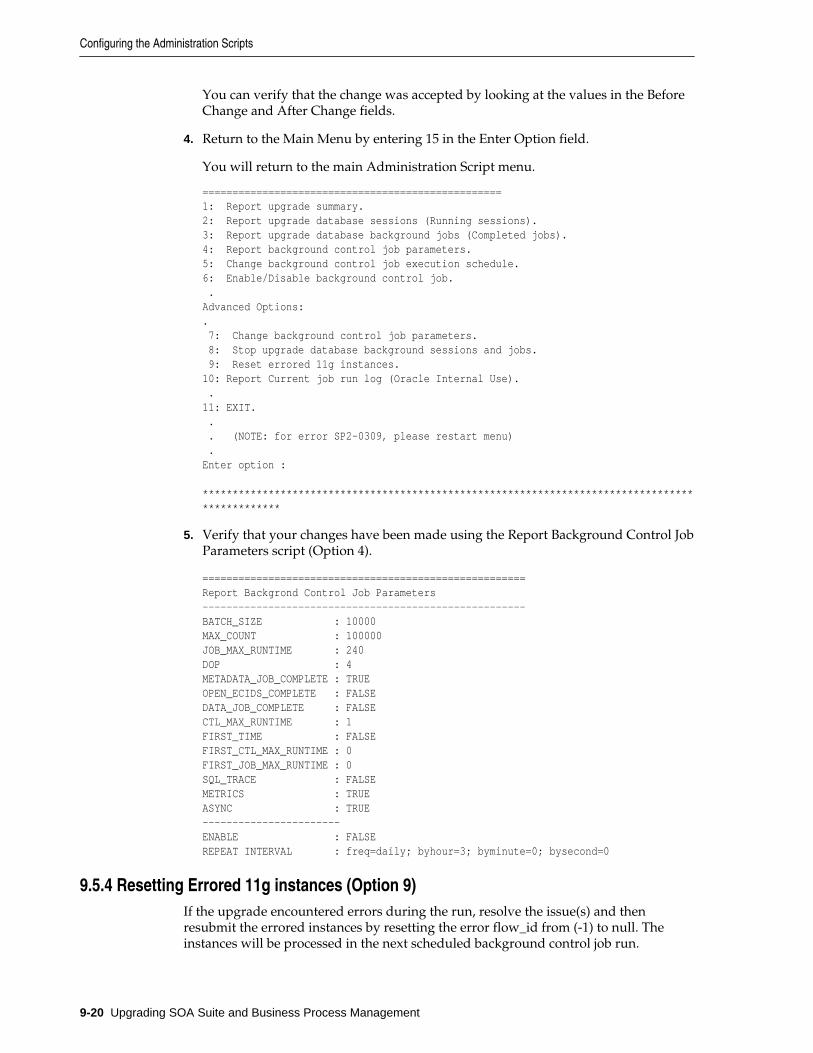


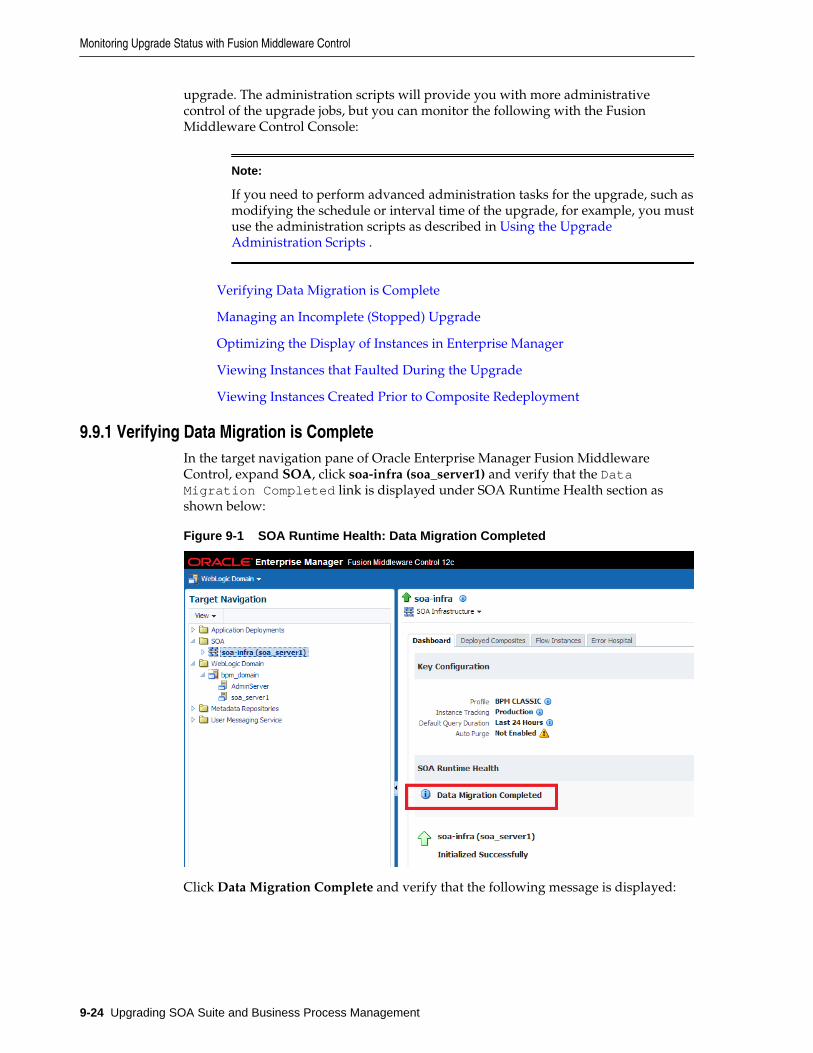

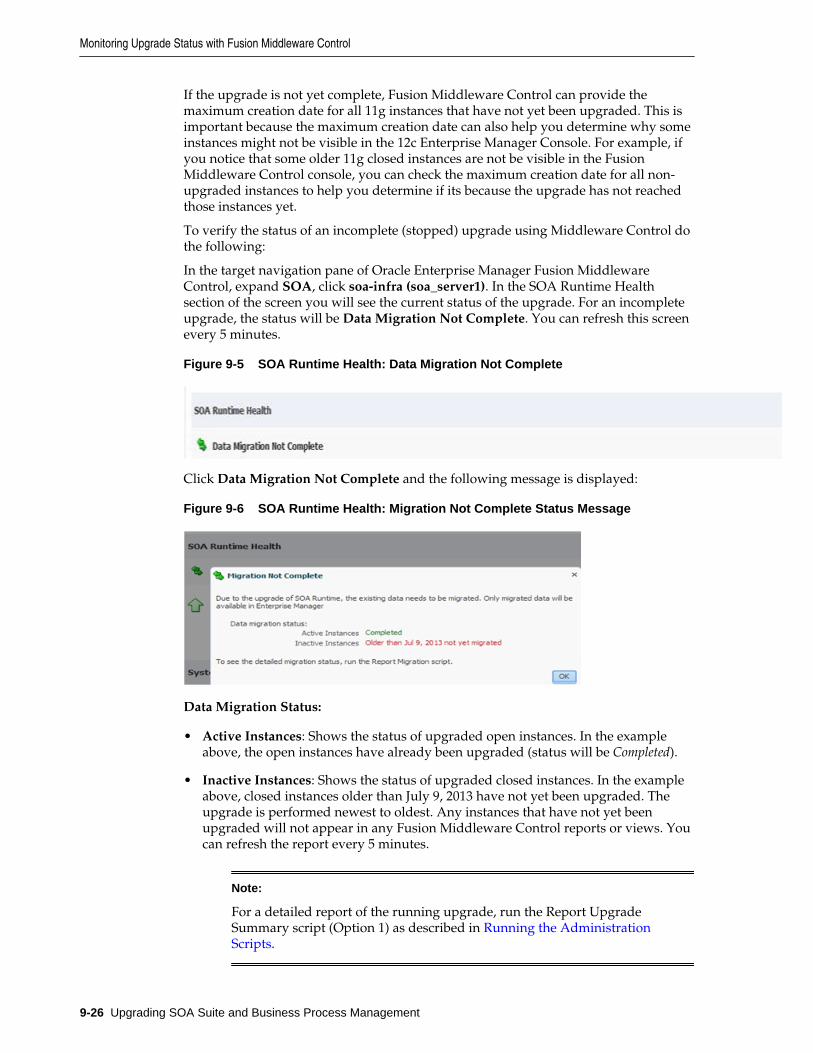
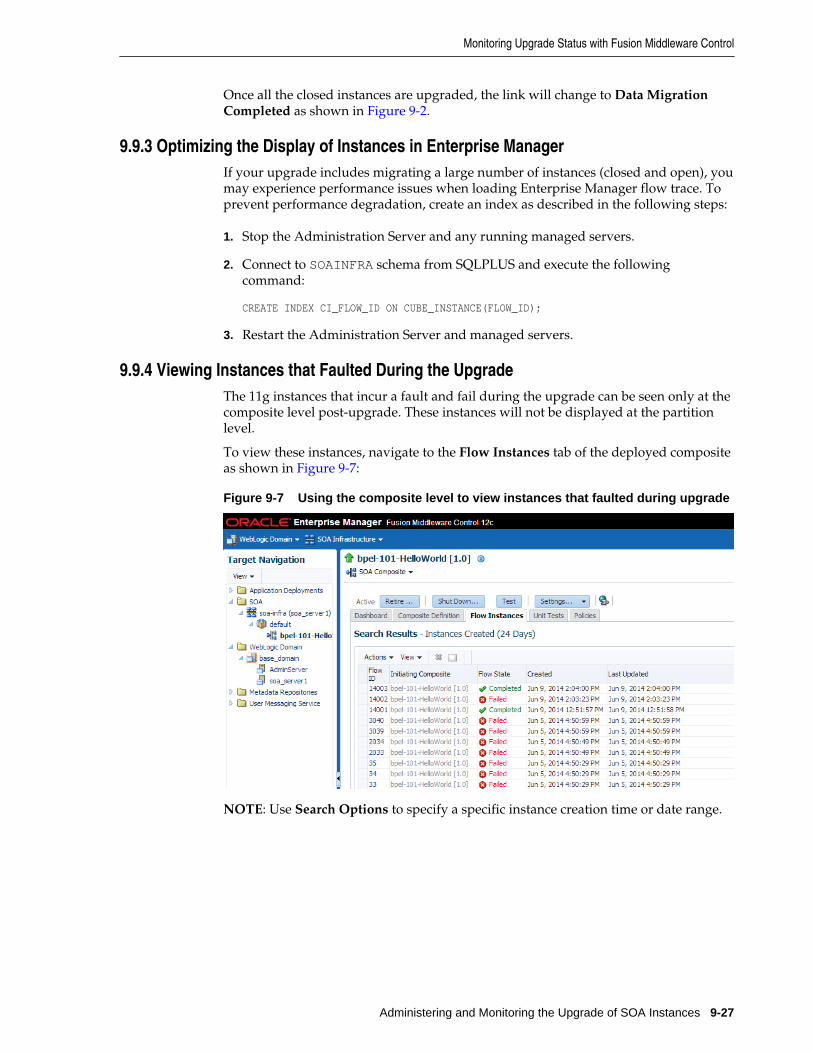


![Oracle Fusion Middleware Upgrading Forms 6i to Forms 11g · PDF file[1]Oracle® Forms Upgrading Oracle Forms 6i to Oracle Forms 12c 12c (12.2.1) E57481-01 October 2015](https://static.documents.pub/doc/80x56/5a8a08907f8b9a4a268bb11f/oracle-fusion-middleware-upgrading-forms-6i-to-forms-11g-1oracle-forms-upgrading.jpg)
![Developing Oracle ADF Mobile Browser Applications · 2018-05-08 · [1]Oracle® Fusion Middleware Developing Oracle ADF Mobile Browser Applications 12c (12.2.1.1) E67037-01 June 2016](https://static.documents.pub/doc/80x56/5f4ca47409b5fa18f7092f3b/developing-oracle-adf-mobile-browser-applications-2018-05-08-1oracle-fusion.jpg)
![Developing Help Systems with Oracle Help...[1]Oracle® Fusion Middleware Developing Help Systems with Oracle Help 12c (12.2.1.1) E67116-01 June 2016 Documentation for Oracle Help developers](https://static.documents.pub/doc/80x56/5f585fd1f22a543ddb086335/developing-help-systems-with-oracle-help-1oracle-fusion-middleware-developing.jpg)

![Oracle Fusion Middleware Knowledge Module Developer’s ... · [1]Oracle® Fusion Middleware Developing Knowledge Modules with Oracle Data Integrator 12c (12.2.1.1) E69420-01 May](https://static.documents.pub/doc/80x56/5fd917916d05a6310e7cb459/oracle-fusion-middleware-knowledge-module-developeras-1oracle-fusion-middleware.jpg)

![[]Oracle® Fusion Middleware Integrating Big Data with ...1[]Oracle® Fusion Middleware Integrating Big Data with Oracle Data Integrator 12c (12.2.1.1) E73982-01 May 2016](https://static.documents.pub/doc/80x56/5ec9dc0a0d137977432770be/oracle-fusion-middleware-integrating-big-data-with-1oracle-fusion-middleware.jpg)


