41
Oracle® Healthcare Analytics Data Integration Application Toolkit Secure Installation and Configuration Guide Release 3.0 for Oracle Data Integrator E52991-01 June 2014

Oracle® Healthcare Analytics Data Integration Application ToolkitSecure Installation and Configuration Guide
Release 3.0 for Oracle Data Integrator
E52991-01
June 2014
Oracle Healthcare Analytics Data Integration Application Toolkit Secure Installation and Configuration Guide, Release 3.0 for Oracle Data Integrator
E52991-01
Copyright © 2014, Oracle and/or its affiliates. All rights reserved.
This software and related documentation are provided under a license agreement containing restrictions on use and disclosure and are protected by intellectual property laws. Except as expressly permitted in your license agreement or allowed by law, you may not use, copy, reproduce, translate, broadcast, modify, license, transmit, distribute, exhibit, perform, publish, or display any part, in any form, or by any means. Reverse engineering, disassembly, or decompilation of this software, unless required by law for interoperability, is prohibited.
The information contained herein is subject to change without notice and is not warranted to be error-free. If you find any errors, please report them to us in writing.
If this is software or related documentation that is delivered to the U.S. Government or anyone licensing it on behalf of the U.S. Government, the following notice is applicable:
U.S. GOVERNMENT END USERS: Oracle programs, including any operating system, integrated software, any programs installed on the hardware, and/or documentation, delivered to U.S. Government end users are "commercial computer software" pursuant to the applicable Federal Acquisition Regulation and agency-specific supplemental regulations. As such, use, duplication, disclosure, modification, and adaptation of the programs, including any operating system, integrated software, any programs installed on the hardware, and/or documentation, shall be subject to license terms and license restrictions applicable to the programs. No other rights are granted to the U.S. Government.
This software or hardware is developed for general use in a variety of information management applications. It is not developed or intended for use in any inherently dangerous applications, including applications that may create a risk of personal injury. If you use this software or hardware in dangerous applications, then you shall be responsible to take all appropriate fail-safe, backup, redundancy, and other measures to ensure its safe use. Oracle Corporation and its affiliates disclaim any liability for any damages caused by use of this software or hardware in dangerous applications.
Oracle and Java are registered trademarks of Oracle and/or its affiliates. Other names may be trademarks of their respective owners.
Intel and Intel Xeon are trademarks or registered trademarks of Intel Corporation. All SPARC trademarks are used under license and are trademarks or registered trademarks of SPARC International, Inc. AMD, Opteron, the AMD logo, and the AMD Opteron logo are trademarks or registered trademarks of Advanced Micro Devices. UNIX is a registered trademark of The Open Group.
This software or hardware and documentation may provide access to or information on content, products, and services from third parties. Oracle Corporation and its affiliates are not responsible for and expressly disclaim all warranties of any kind with respect to third-party content, products, and services. Oracle Corporation and its affiliates will not be responsible for any loss, costs, or damages incurred due to your access to or use of third-party content, products, or services.

iii
Contents
Preface ................................................................................................................................................................. v
Audience....................................................................................................................................................... vDocumentation Accessibility ..................................................................................................................... vRelated Documents ..................................................................................................................................... vConventions ................................................................................................................................................. vi
1 Introduction
2 General Security Principles
2.1 Keeping Software Up to Date.................................................................................................... 2-12.2 Keeping Up to Date on the Latest Security Information Critical Patch Updates .............. 2-12.3 Configuring Strong Passwords on the Database.................................................................... 2-12.4 Following the Principle of Least Privilege .............................................................................. 2-22.5 Database Security Features........................................................................................................ 2-22.5.1 About Database Vault ......................................................................................................... 2-22.5.2 About Audit Vault............................................................................................................... 2-22.5.3 About Tablespace Encryption............................................................................................ 2-32.5.4 Secure SQL*Net.................................................................................................................... 2-32.6 Managing Default User Accounts ............................................................................................ 2-32.7 Closing All Open Ports Not in Use .......................................................................................... 2-32.8 Disabling the Telnet Service ...................................................................................................... 2-32.9 Disabling Other Unused Services............................................................................................. 2-42.10 Designing for Multiple Layers of Protection .......................................................................... 2-42.11 Configuring Secure SQL NET ................................................................................................... 2-4
3 Prerequisites
4 Secure Installation and Configuration
4.1 Application Toolkit Installation Overview ............................................................................. 4-14.1.1 Installing from Windows Operating System................................................................... 4-14.1.2 Installing from Linux Operating Systems........................................................................ 4-24.2 Installing OHADI 3.0 Application Toolkit .............................................................................. 4-24.2.1 Installing Application Toolkit Data Mart Component................................................... 4-24.2.2 Installing Application Toolkit ETL for Oracle Data Integrator Component............ 4-114.3 Reviewing the Installation Log Files ..................................................................................... 4-26

iv
v
Preface
This document describes secure configuration practices for the Oracle Healthcare Analytics Data Integration (OHADI) 3.0 Application Toolkit.
AudienceThis installation guide is intended for those who are responsible for installing OHADI Application Toolkit. You should be familiar with:
■ Oracle Database (DB)
■ Oracle Data Integrator (ODI)
■ Oracle Healthcare Data Warehouse Foundation (HWDF)
■ Unix or Windows operating system
Documentation AccessibilityFor information about Oracle's commitment to accessibility, visit the Oracle Accessibility Program website at http://www.oracle.com/pls/topic/lookup?ctx=acc&id=docacc.
Access to Oracle SupportOracle customers have access to electronic support through My Oracle Support. For information, visit http://www.oracle.com/pls/topic/lookup?ctx=acc&id=info or visit http://www.oracle.com/pls/topic/lookup?ctx=acc&id=trs if you are hearing impaired.
Related DocumentsFor more information, see the following documents:
Oracle Data Integrator■ Oracle Data Integrator Release Notes
■ Oracle Data Integrator Getting Started Guide
■ Oracle Data Integrator Installation Guide
■ Oracle Data Integrator Oracle Fusion Middleware Patching Guide
■ Oracle Data Integrator Upgrade Guide
■ Oracle Data Integrator Developer’s Guide

vi
■ Oracle Data Integrator Application Adapters Guide
■ Oracle Data Integrator Knowledge Module Developer's Guide
■ Oracle Data Integrator Connectivity and Knowledge Modules Guide:
Oracle Healthcare Data Warehouse Foundation■ Oracle Healthcare Data Warehouse Foundation Release Notes
■ Oracle Healthcare Data Warehouse Foundation Secure Installation and Configuration Guide
■ Oracle Healthcare Data Warehouse Foundation Programmer's Guide
■ Oracle Healthcare Data Warehouse Foundation Interface Table Programmer's Guide
Oracle Healthcare Analytics Data Integration■ Oracle Healthcare Analytics Data Integration Release Notes
■ Oracle Healthcare Analytics Data Integration Secure Installation and Configuration Guide
■ Oracle Healthcare Analytics Data Integration Administrator’s Guide
■ Oracle Healthcare Analytics Data Integration Programmer's Guide
■ Oracle Healthcare Analytics Data Integration Rules Catalog
■ Oracle Healthcare Analytics Data Integration Attribute Level Mappings
Oracle Healthcare Analytics Data Integration Application Toolkit■ Oracle Healthcare Analytics Data Integration Application Toolkit Secure Installation and
Configuration Guide [this document]
■ Oracle Healthcare Analytics Data Integration Application Toolkit Administrator’s Guide
■ Oracle Healthcare Analytics Data Integration Application Toolkit Programmer's Guide
ConventionsThe following text conventions are used in this document:
Convention Meaning
boldface Boldface type indicates graphical user interface elements associated with an action, or terms defined in text or the glossary.
italic Italic type indicates book titles, emphasis, or placeholder variables for which you supply particular values.
monospace Monospace type indicates commands within a paragraph, URLs, code in examples, text that appears on the screen, or text that you enter.
1
Introduction 1-1
1Introduction
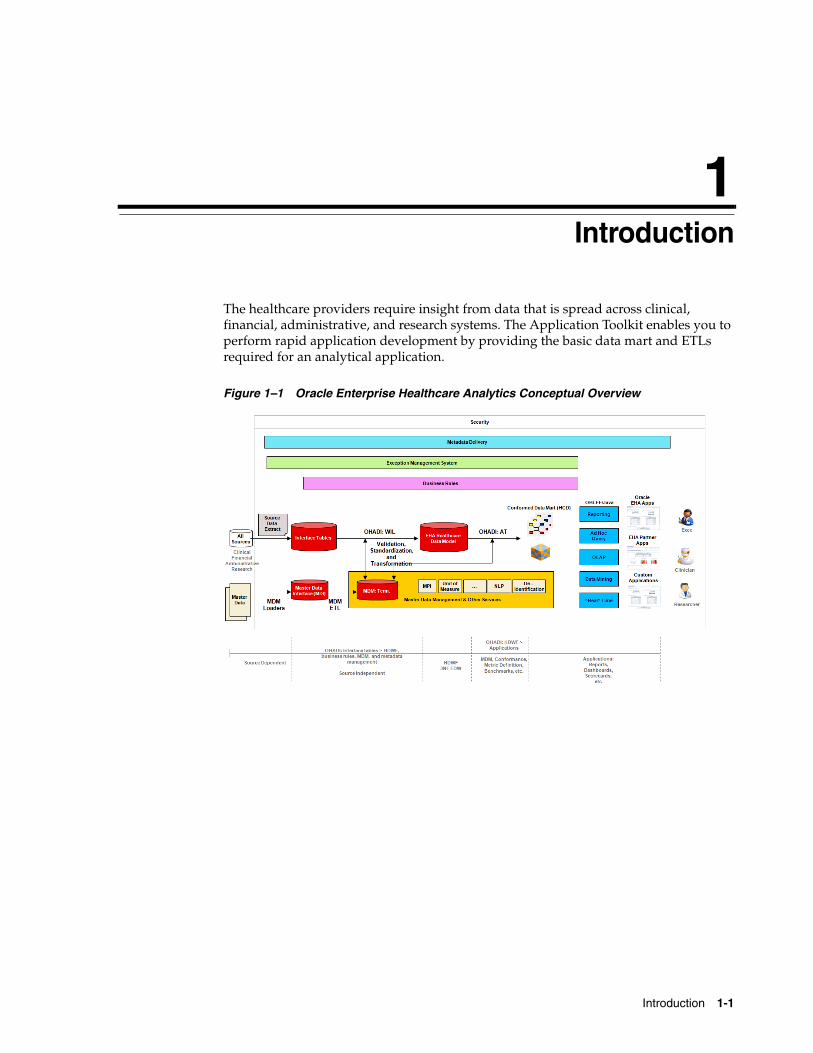
The healthcare providers require insight from data that is spread across clinical, financial, administrative, and research systems. The Application Toolkit enables you to perform rapid application development by providing the basic data mart and ETLs required for an analytical application.
Figure 1–1 Oracle Enterprise Healthcare Analytics Conceptual Overview

1-2 Oracle Healthcare Analytics Data Integration Application Toolkit Secure Installation and Configuration Guide

2
General Security Principles 2-1
2General Security Principles
The following principles are fundamental to using any application securely.
2.1 Keeping Software Up to DateOne of the principles of good security practice is to keep all software versions and patches up to date.
2.2 Keeping Up to Date on the Latest Security Information Critical Patch Updates
Oracle continually improves its software and documentation. Critical Patch Updates are the primary means of releasing security fixes for Oracle products to customers with valid support contracts. They are released on the Tuesday closest to the 17th day of January, April, July and October. We highly recommend customers to apply these patches as soon as they are released.
2.3 Configuring Strong Passwords on the DatabaseAlthough the importance of passwords is well known, the following basic rule of security management is worth repeating:
Ensure all your passwords are strong passwords.
You can strengthen passwords by creating and using password policies for your organization. For guidelines on securing passwords and for additional ways to protect passwords, refer to the Oracle Database Security Guide specific to the database release you are using.
You should modify the following passwords to use your policy-compliant strings:
■ Passwords for the database default accounts, such as SYS and SYSTEM.
■ Passwords for the database application-specific schema accounts, such as HDM, HDI, HCD, HMC and repository schemas.
■ You should not configure a password for the database listener as that will enable remote administration. For more information, see the section “Removing the Listener Password” of Oracle® Database Net Services Reference 11g Release 2 (11.2).
For more information, see Oracle® Database Security Guide 11g Release 2 (11.2).

Following the Principle of Least Privilege
2-2 Oracle Healthcare Analytics Data Integration Application Toolkit Secure Installation and Configuration Guide
2.4 Following the Principle of Least PrivilegeThe principle of least privilege states that users should be given the least amount of privilege to perform their jobs. Overly ambitious granting of responsibilities, roles, grants - especially early on in an organization's life cycle when people are few and work needs to be done quickly - often leaves a system wide open for abuse. User privileges should be reviewed periodically to determine relevance to current job responsibilities.
2.5 Database Security FeaturesThe following principles are fundamental to using any application securely.
2.5.1 About Database VaultOracle Database Vault restricts access to specific areas in an Oracle database from any user, including users who have administrative access. For example, you can restrict administrative access to employee salaries, customer medical records, or other sensitive information. This enables you to apply fine-grained access control to your sensitive data in a variety of ways. It hardens your Oracle Database instance and enforces industry standard best practices in terms of separating duties from traditionally powerful users. Most importantly, it protects your data from super-privileged users but still lets them to maintain your Oracle databases.
Oracle Database Vault is an integral component of your enterprise. With Oracle Database Vault, you can address the most difficult security problems remaining today, such as, protecting against insider threats, meeting regulatory compliance requirements, and enforcing separation of duty. You can configure the Oracle Database Vault to manage the security of an individual Oracle Database instance. You can install Oracle Database Vault on standalone Oracle Database installations, in multiple Oracle homes, and in Oracle Real Application Clusters (Oracle RAC) environments.
For frequently asked questions about Oracle Database Vault, visit http://www.oracle.com/technology/deploy/security/database-security/database-vault/dbv_faq.html.
For Oracle Technology Network (OTN) information specific to Oracle Database Vault, visit http://www.oracle.com/technology/deploy/security/database-security/database-vault/index.html.
2.5.2 About Audit VaultOracle Audit Vault automates the audit collection, monitoring, and reporting process. It turns audit data into a key security resource for detecting unauthorized activity. Consider using this feature to satisfy compliance regulations such as SOX, PCI, and HIPAA, and to mitigate security risks. Audit Vault is a separately licensed component.
To know more about Oracle Audit Vault, visit http://www.oracle.com/technetwork/database/audit-vault/overview/index.html.
Note: The Database Vault is a separately licensed feature of the database.

Disabling the Telnet Service
General Security Principles 2-3
2.5.3 About Tablespace EncryptionTransparent Data Encryption is one of the three components of the Oracle Advanced Security option for the Oracle Database 11g Release 2 Enterprise Edition. It provides transparent encryption of stored data to support your compliance efforts. Applications do not have to be modified and will continue to work seamlessly as before. Data is automatically encrypted when it is written to disk, and automatically decrypted when accessed by the application. Key management is built in to the Tablespace Encryption feature, eliminating the complex task of creating, managing, and securing encryption keys. The Advanced Security Option is a separately licensed component.
To know more about Oracle advance security options, visit http://www.oracle.com/technetwork/database/options/advanced-security/index.html.
2.5.4 Secure SQL*NetSQL*Net enables both client-server and server-server communications across any network. With SQL*Net, databases and their applications can reside on different computers and communicate as peer applications.
Advanced Security Option or Advanced Network Option can be used for encryption of SQL*Net traffic between the database and application servers. This certification and encrypting of SQL*Net traffic is only relevant for highly secure implementations that require encryption of all network traffic. The application servers and database should be solely contained in a secure data center. Performance should be tested before implementing encryption in a production environment. Organizations with stringent security requirements would benefit from a limited deployment of encryption of all direct SQL*Net traffic from outside the data center. The Advanced Security Option (ASO) is an optional component of the Oracle Database and is an extra cost.
To know more about SQL*NET, visit http://docs.oracle.com/cd/A57673_01/DOC/net/doc/NWUS233/ch1.htm
2.6 Managing Default User AccountsThe schema owner should not be the user for normal production; instead the account should be locked after the installation.
2.7 Closing All Open Ports Not in UseKeep only the minimum number of ports open and close all ports that are not in use.
2.8 Disabling the Telnet ServiceThe OHADI configuration does not use the Telnet service.
Telnet listens on port 23 by default.
If the Telnet service is available on any computer, Oracle recommends that you disable Telnet in favor of Secure Shell (SSH). Telnet, which sends clear-text passwords and user names through a log-in, is a security risk to your servers. Disabling Telnet tightens and protects your system security.

Disabling Other Unused Services
2-4 Oracle Healthcare Analytics Data Integration Application Toolkit Secure Installation and Configuration Guide
2.9 Disabling Other Unused ServicesIn addition to not using Telnet, the OHADI configuration does not use the following services or information for any functionality:
■ Simple Mail Transfer Protocol (SMTP). This protocol is an Internet standard for email transmission across Internet Protocol (IP) networks.
■ Identification Protocol (identd). This protocol is used to identify the owner of a TCP connection on UNIX.
■ Simple Network Management Protocol (SNMP). This protocol is a method for managing and reporting information about different systems.
Restricting these services or information does not affect the use of OHADI configuration. If you are not using these services for other applications, Oracle recommends that you disable these services to minimize your security exposure. If you need SMTP, identd, or SNMP for other applications, be sure to upgrade to the latest version of the protocol to provide the most up-to-date security for your system.
2.10 Designing for Multiple Layers of ProtectionWhen designing a secure deployment, design multiple layers of protection. If a hacker should gain access to one layer, such as the application server, that should not automatically give them easy access to other layers, such as the database server.
Providing multiple layers of protection may include:
■ Enable only those ports required for communication between different tiers, for example, only allowing communication to the database tier on the port used for SQL*NET communications (1521 by default).
■ Place firewalls between servers so that only expected traffic can move between servers.
2.11 Configuring Secure SQL NETIf the Application Toolkit Oracle Data Integrator (ODI) repository is installed in a database server other than the server having HDWF and Data Mart schema, the data transfer takes place between two different database servers over a network. As HDWF and Data Mart contains sensitive clinical and healthcare data, you must secure the communication between database servers. Use Oracle® Net Manager to configure encryption to secure communication between database servers. Oracle provides different encryption algorithms to secure communication. Select an appropriate encryption algorithm. For more information, see Oracle® Database Advanced Security Administrator's Guide 11g Release 2 (11.2).
3
Prerequisites 3-1
3Prerequisites
The following are the software requirements:
■ Oracle Database 11.2.0.4
■ Oracle Data Integrator (ODI) 11.1.1.7
■ Oracle Healthcare Data Warehouse (HDWF) 6.0
Before installation, ensure that the database instance is already created.
■ Create location for the Application Toolkit data mart data file. Verify the existence of the data file location.
■ Create a temporary tablespace for the Application Toolkit data mart schema or use the default temp tablespace based on your needs.
■ Install all schemas on a single database instance.
■ Use only lowercase for all folder names, for all platforms, to be created and used by the installer. Installation folder names must not have any spaces.
■ If the repository database is present in a remote server and you are installing from the Linux operating system (OS), mount the datapump (dpdump) directory of the remote database server to the installation server with appropriate read and write privileges. The Linux user of the remote server executing the Oracle process must have minimum privilege of 444 (read access to any users) to the files (logs), which are created by the IMPDP command.
If you are installing from Windows OS, share the datapump (dppump) directory of the remote database server to the installation server with appropriate read and write privileges. Also, ensure that the password is not prompted while accessing the shared directory from the installer machine.
■ If the repository database exists in the Exadata machine, you must add the repository database single node (the node which is mounted) TNS entry in the tnsnames.ora file in the installation server.
After installation, you must revert the TNS entry to multi-node.
■ Ensure the database TNS entry for HDWF database or repository database has a connection string, which is same as SID of the respective database.
■ Ensure that the System, HDWF, and HCD schema users do not display the Password expiry notification when you log in to the database.
■ Delete all the files in the directory <ORACLE_BASE>/oraInventory/ContentsXML/, before executing the installer.
Ensure the following when running the installer:

3-2 Oracle Healthcare Analytics Data Integration Application Toolkit Secure Installation and Configuration Guide
■ The database connection parameters such as host name, database port number, and service name to be specified in the installer are correct. You can verify it by executing the connect command on SQL*Plus using these parameters on the machine, where you are running the installer and connecting to the target database.
■ There are no trailing and leading spaces when entering parameters in the installer.
■ If you are running the initial install script after it failed the first time, ensure that you have deleted the HCD tablespace and/or users that are created as a part of the previous unsuccessful installation.
■ Ensure that the path of the data file mentioned while creating the tablespace is correct. The OHADI 3.0 Application Toolkit installer does not check the path.
■ If the installation fails, view the generated log files. For details about log files, see Section 4.3.
4
Secure Installation and Configuration 4-1
4Secure Installation and Configuration
This section describes how to install OHADI 3.0 Application Toolkit securely.
4.1 Application Toolkit Installation OverviewThe OHADI 3.0 Application Toolkit installer uses OUI, a user-interface driven installation tool to install the HDWF data warehouse. The product supports Windows 64-bit and Linux 64-bit operating systems (OS).
The Application Toolkit is delivered with the OHADI 3.0 product. The OHADI 3.0 media pack from eDelivery contains separate OHADI 3.0 Application Toolkit installer for all supported operating systems.
The following is the media pack folder structure:
MEDIA_PACK_LOCATION
/application_toolkit
/linux64
/win64
MEDIA_PACK_LOCATION refers to the location of the OHADI 3.0 media pack.
The installer acts in two phases as follows:
■ In the first phase, the installer collects information required for this installation. During this phase, you can move backward and forward through the screens, revising your entries. Follow the information on the screen (if any) before entering the values.
■ In the second phase, the installer runs the script to set up the OHADI 3.0 Application Toolkit data mart and ETL according to the information you provided in the first phase.
4.1.1 Installing from Windows Operating SystemTo install from Windows 64-bit OS, perform the following steps:
1. Unzip the OHADI 3.0 media pack zip on to your system.
2. Locate OHADI_V3_AT_ODI_Windows-x64.zip from the media pack files and extract the contents.
3. Navigate to the /install/directory and double-click setup.exe to start the OUI.

Installing OHADI 3.0 Application Toolkit
4-2 Oracle Healthcare Analytics Data Integration Application Toolkit Secure Installation and Configuration Guide
4.1.2 Installing from Linux Operating SystemsTo install from Linux 64-bit OS, perform the following steps:
1. Unzip the OHADI 3.0 media pack zip on to your Windows system.
2. Create a new directory in the Linux installation server to copy the Application Toolkit installation package files. For example, AT_INSTALL_DIR.
3. Locate and transfer the Application Toolkit installer file OHADI_V3_AT_ODI_Linux-x64.zip from the Windows OS to Linux OS installation directory <AT_INSTALL_DIR> in the Binary mode.
4. Unzip the Linux installer zip file on the installation Linux server (unzip -a OHADI_V3_AT_ODI_Linux-x64.zip).
5. Ensure that ORACLE_HOME, ORACLE_SID, and PATH environment variables are setup in your session.
6. Set the X Window display output to the IP address of your local computer. You can use the standard format for IP addresses and add :0 to the end of the address. For example, based on your shell, the format is as follows:
setenv DISPLAY 123.45.67.89:0
or export DISPLAY 123.45.67.89:0
7. Navigate to the <AT_INSTALL_DIR>/install/ directory.
8. Change protections on files to 755:
chmod 755 *
9. Convert the installer execution shell to SH shell since the installer script executes in the SH shell of Linux OS.
10. Start the following OUI from the <AT_INSTALL_DIR>/install/ directory:
./runInstaller
4.2 Installing OHADI 3.0 Application ToolkitThe Application Toolkit installer has two components, data mart and ETL. To install these components, follow the sections below:
4.2.1 Installing Application Toolkit Data Mart ComponentThis component installs the Application Toolkit data mart schema and the tables required for your analytical application. The data mart is also referred as HCD.
It creates the following directory structure on the system where it is run.
APPLICATIONTOOLKIT_HOME
/oracle
/ohadi30at
/install
/dmscripts -- Data Mart SQL scripts
/dmlog -- Installation log files
/dmrpt -- Installation report files
Installing OHADI 3.0 Application Toolkit
Secure Installation and Configuration 4-3
APPLICATIONTOOLKIT_HOME refers to the root installation directory of this product.
Follow the below sections to install this component.
PrerequisiteAll prerequisites from Chapter 3 are applicable for this component.
Deployment Details■ Install the data mart in the same HDWF database server.
■ The data mart tablespace and schema are created during the installation.
■ Determine the data mart tablespace initial size based on your environment. For production installation, a minimum of 4096 MB (4 GB) of disk space is recommended.
■ The data mart temporary tablespace is not created during the installation. It must be created as part of the prerequisites or you can use the default temp tablespace based on your needs.
The installer prompts you to enter the parameter values that are used during the installation. Oracle recommends you to gather the values for the installer parameters before starting the installation.
To install Application Toolkit data mart component, perform the following steps:
1. To run the installer, follow instructions in Section 4.1.1 or Section 4.1.2.
The Welcome screen appears on running the installer on the supported platform.
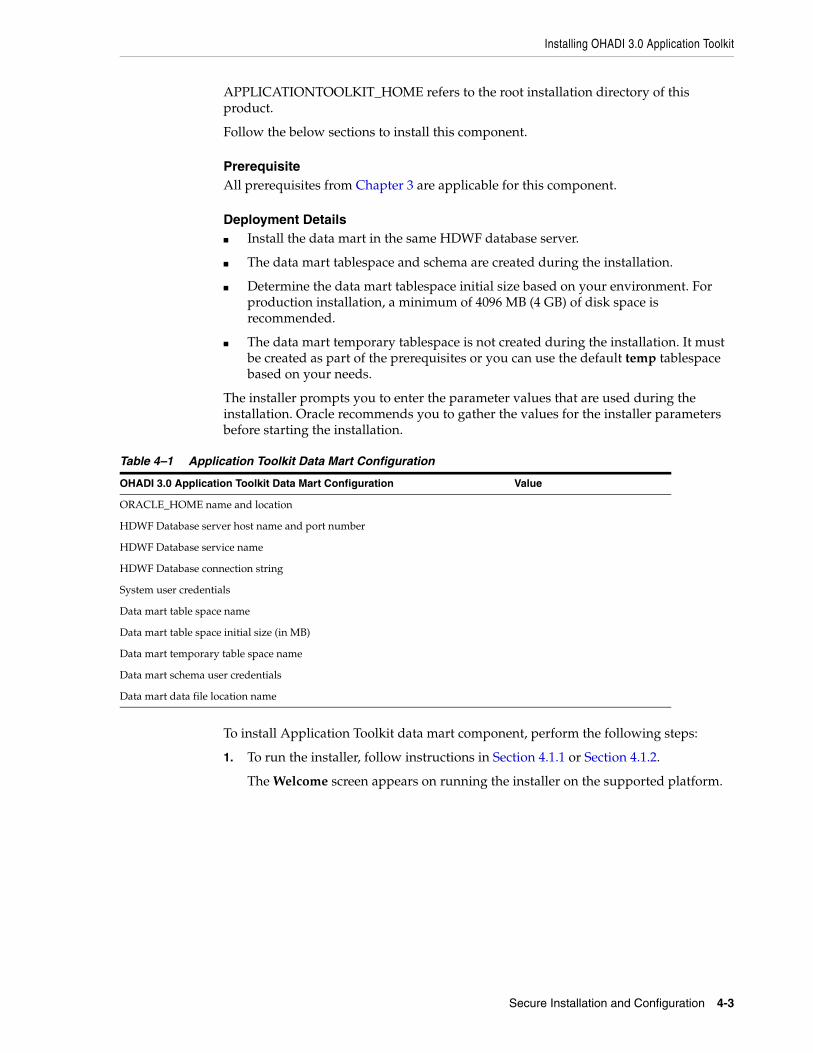
Table 4–1 Application Toolkit Data Mart Configuration
OHADI 3.0 Application Toolkit Data Mart Configuration Value
ORACLE_HOME name and location
HDWF Database server host name and port number
HDWF Database service name
HDWF Database connection string
System user credentials
Data mart table space name
Data mart table space initial size (in MB)
Data mart temporary table space name
Data mart schema user credentials
Data mart data file location name

Installing OHADI 3.0 Application Toolkit
4-4 Oracle Healthcare Analytics Data Integration Application Toolkit Secure Installation and Configuration Guide
Figure 4–1 Welcome Screen
Click Next to continue with the installation.
2. In the Select a Product to Install screen:
Figure 4–2 Select a Product to Install
a. Select Application Toolkit Data Mart 3.0.0.0.
b. Click Next.
3. In the Specify Home Details screen:

Installing OHADI 3.0 Application Toolkit
Secure Installation and Configuration 4-5
Figure 4–3 Specify Home Details
a. Enter the ORACLE_HOME location, which is the location of the Oracle Database on the machine where the installer is run.
b. Select ORACLE_HOME from the Name drop-down. This loads the Path drop-down.
c. Click Next.
4. In the Data Mart Home Configuration screen:
Figure 4–4 Data Mart Home Configuration
Note: Check the existence of the ORACLE_HOME location.

Installing OHADI 3.0 Application Toolkit
4-6 Oracle Healthcare Analytics Data Integration Application Toolkit Secure Installation and Configuration Guide
a. Specify the root installation directory of the OHADI 3.0 Application Toolkit product.
b. Click Next.
5. In the HDWF Database Configuration screen:
Figure 4–5 HDWF Database Configuration
a. Enter the database server host name where the HDWF schema is created.
b. Enter the database server port number.
c. Enter database system user password.
d. Enter the HDWF database service name (not SID).
e. Click Next.
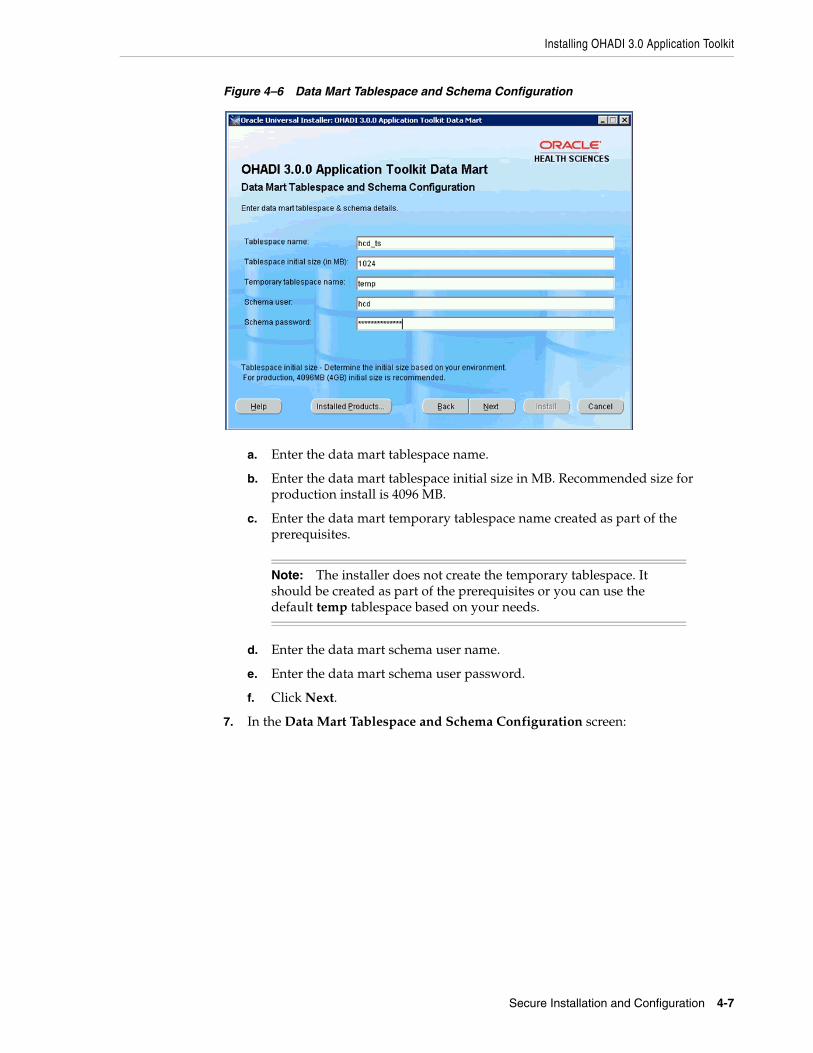
6. In the Data Mart Tablespace and Schema Configuration screen:
Note: Use lowercase for directory names, for all platforms, to be created and used by the installer.
Installing OHADI 3.0 Application Toolkit
Secure Installation and Configuration 4-7
Figure 4–6 Data Mart Tablespace and Schema Configuration
a. Enter the data mart tablespace name.
b. Enter the data mart tablespace initial size in MB. Recommended size for production install is 4096 MB.
c. Enter the data mart temporary tablespace name created as part of the prerequisites.
d. Enter the data mart schema user name.
e. Enter the data mart schema user password.
f. Click Next.
7. In the Data Mart Tablespace and Schema Configuration screen:
Note: The installer does not create the temporary tablespace. It should be created as part of the prerequisites or you can use the default temp tablespace based on your needs.

Installing OHADI 3.0 Application Toolkit
4-8 Oracle Healthcare Analytics Data Integration Application Toolkit Secure Installation and Configuration Guide
Figure 4–7 Data Mart Tablespace and Schema Configuration
a. Enter the location of the data mart data file in the machine or ASM specific syntax including the trailing slash.
This is the directory on the database server where the data files for the application are created during the installation.
This value is not validated and must be entered in the machine or ASM specific syntax including the trailing slash.
For example,
Unix: /u01/oradata/dbname/
Windows: drive:\oradata\dbname\
ASM: +DATA_EX02/hashas01/datafile/
b. Click Next.
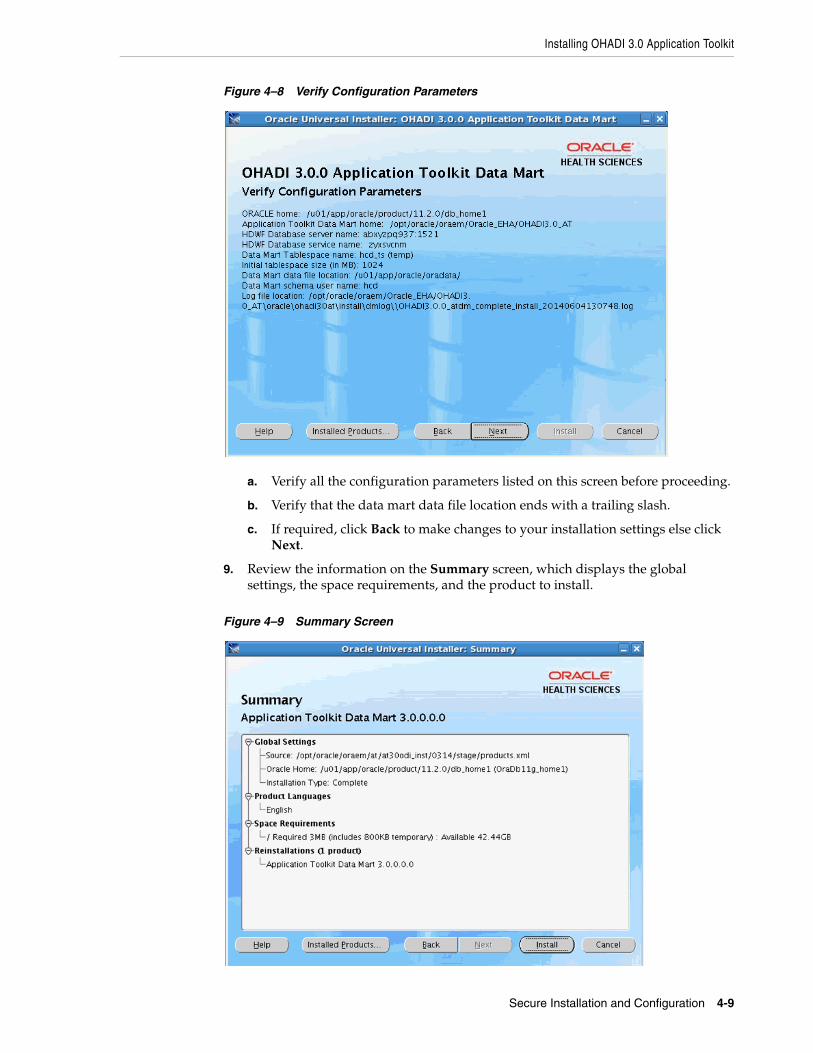
8. In the Verify Configuration Parameters screen:
Note:
■ ASM location must always start with + as shown above.
■ Failure to enter the trailing slash does not fail the installation but the data file name is prefixed with the folder name.
■ The HDWF data file name is the name of tablespace entered. For example, if the HDWF tablespace name is hdwf_ts, the data file created by the installer is hdwf_ts.dbf.
Installing OHADI 3.0 Application Toolkit
Secure Installation and Configuration 4-9
Figure 4–8 Verify Configuration Parameters
a. Verify all the configuration parameters listed on this screen before proceeding.
b. Verify that the data mart data file location ends with a trailing slash.
c. If required, click Back to make changes to your installation settings else click Next.
9. Review the information on the Summary screen, which displays the global settings, the space requirements, and the product to install.
Figure 4–9 Summary Screen

Installing OHADI 3.0 Application Toolkit
4-10 Oracle Healthcare Analytics Data Integration Application Toolkit Secure Installation and Configuration Guide
10. Click Install to continue.
The Application Toolkit data mart installation starts and the Install screen is displayed. OUI copies the files to the Application Toolkit data mart home location, and runs the data mart SQL scripts to create the database.
Figure 4–10 Install Screen
The install screen displays the location of the log file that records the result of the installation activities. Make a note of the log file location.
11. To review the progress of the installation, view the log file created at the location shown in the Install screen to monitor the current activity.
12. Once the installation is complete, the End of Installation screen is displayed.
This screen displays:
■ Application Toolkit Data Mart 3.0.0.0 post-install verification completed without errors if the installation is successful.
■ Location of the HDWF installer log file: <APPLICATIONTOOLKIT_Home>\oracle\ohadi30at\install\dmlog\ folder.
Note: The progress bar does not show the progress when the database is created using SQLPlus.
Note: If a different message is displayed on this screen other than the one mentioned above, perform the following:
■ Verify all the log files for any error.
■ Verify the installation report file for the installation status.
■ Connect to the data mart schema that you created using SQL*Plus or SQL Developer and verify few tables.

Installing OHADI 3.0 Application Toolkit
Secure Installation and Configuration 4-11
■ Location of the installation report: <APPLICATIONTOOLKIT_Home>\oracle\ohadi30at\install\dmrpt\ folder.
■ Location of OUI log files. For more details, see Section 4.3.
13. Review the installation report and save it in a secure location for future use.
14. Click Exit after reviewing the installation information. At the confirmation prompt, click Yes to exit the installer.
15. Review the generated installation log files for errors. For details, see Section 4.3.
16. Contact Oracle support, if necessary, to resolve any errors.
4.2.2 Installing Application Toolkit ETL for Oracle Data Integrator ComponentThis component installs the Application Toolkit ETL for ODI required for your analytical application. The source system for this ETL component is the HDWF schema (HDM) and the target system is Application Toolkit data mart (HCD).
It creates the following directory structure on the system where it is run.
APPLICATIONTOOLKIT_HOME
/oracle
/ohadi30at
/install
/etlscripts -- Application Toolkit repository install scripts
/etllogs -- Installation log files
/etlrpt -- Installation report files
/etlsql -- Application Toolkit repository schema creation scripts
/etlsrc -- Files used by Application Toolkit ETLs
/etlrep -- Application Toolkit repository data
APPLICATIONTOOLKIT_HOME refers to the root installation directory of this product.
PrerequisiteAll prerequisites from Chapter 3 are applicable for this component. In addition, the following must be installed:
■ OHADI 3.0 Application Toolkit data mart. To install the Application Toolkit data mart component, see Section 4.2.1.
■ Oracle Data Integrator (ODI) 11.1.1.7
■ Oracle Healthcare Analytics Data Integration 3.0 is required for production. This is optional if the Application Toolkit is installed for application development.
Deployment Details■ The installer lets you deploy the Application Toolkit ODI ETL repositories on the
ODI server, which uses its own database server and instance, or shares the HDWF database instance. You must select the deployment model based on your need.
■ The installer creates the Application Toolkit ODI master and work repository tablespace and schema during this installation based on your choice such as, HDWF database instance or ODI database instance.

Installing OHADI 3.0 Application Toolkit
4-12 Oracle Healthcare Analytics Data Integration Application Toolkit Secure Installation and Configuration Guide
■ Determine the ETL repository tablespace initial size based on your environment. For production installation, a minimum of 4096 MB (4 GB) is recommended.
■ The default temp tablespace is used by ETL repository schema.
■ Application Toolkit metadata configuration (HMC) schema is created in the HDWF database instance. The installer creates the schema if it does not exist and creates the Application Toolkit metadata configuration tables.
■ For production installation, use the OHADI HMC schema where, the OHADI 3.0 product is a required component. In this case, the installer creates the Application Toolkit metadata configuration tables in the OHADI 3.0 HMC schema.
The installer prompts you to enter the parameter values that are used during the installation. Oracle recommends you to gather the installer parameter values before starting the installation.
Perform the following steps:
1. To run the installer, follow the instructions in Section 4.1.1 or Section 4.1.2.
The Welcome screen appears on running the installer on the supported platform.
Table 4–2 Application Toolkit Data Mart Configuration
Application Toolkit ETL for ODI Value
ORACLE_HOME name and location
ODI agent installation location
Does ODI use HDWF database instance?
ODI database connection string
ODI database system user credentials
Mounted or shared directory of the repository database server
Mounted or shared directory of the installation server
HDWF Database server host name and port number
HDWF database system user credentials
HDWF database service name
HDWF database connection string
Repository table space name
Repository table space initial size (in MB)
Repository table space data file location
Master repository schema credentials
Work repository schema credentials
HDWF (HDM) tablespace name
HDWF (HDM) schema credentials (source)
Application Toolkit Data Mart (HCD) schema credentials (target)
Metadata configuration (HMC) schema credentials
Installing OHADI 3.0 Application Toolkit
Secure Installation and Configuration 4-13
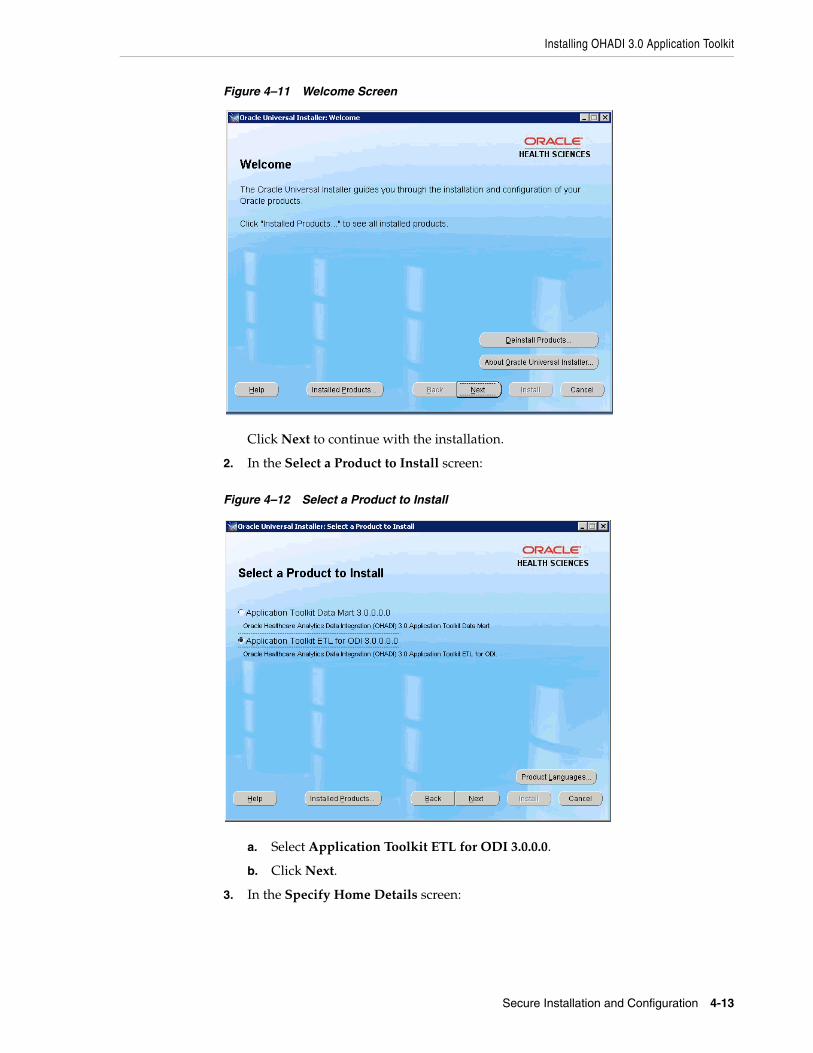
Figure 4–11 Welcome Screen
Click Next to continue with the installation.
2. In the Select a Product to Install screen:
Figure 4–12 Select a Product to Install
a. Select Application Toolkit ETL for ODI 3.0.0.0.
b. Click Next.
3. In the Specify Home Details screen:

Installing OHADI 3.0 Application Toolkit
4-14 Oracle Healthcare Analytics Data Integration Application Toolkit Secure Installation and Configuration Guide
Figure 4–13 Specify Home Details
a. Enter the ORACLE_HOME location, which is the location of the Oracle Database installation on the machine where the installer is run.
b. Select ORACLE_HOME from the Name drop-down. This loads the Path drop-down.
c. Click Next.
4. In the Application Toolkit ETL for ODI Home Configuration screen:
Figure 4–14 Application Toolkit ETL for ODI Home Configuration
Note: Check the existence of the ORACLE_HOME location.
Installing OHADI 3.0 Application Toolkit
Secure Installation and Configuration 4-15
a. Specify the root installation directory of the OHADI 3.0 Application Toolkit product.
b. Click Next.
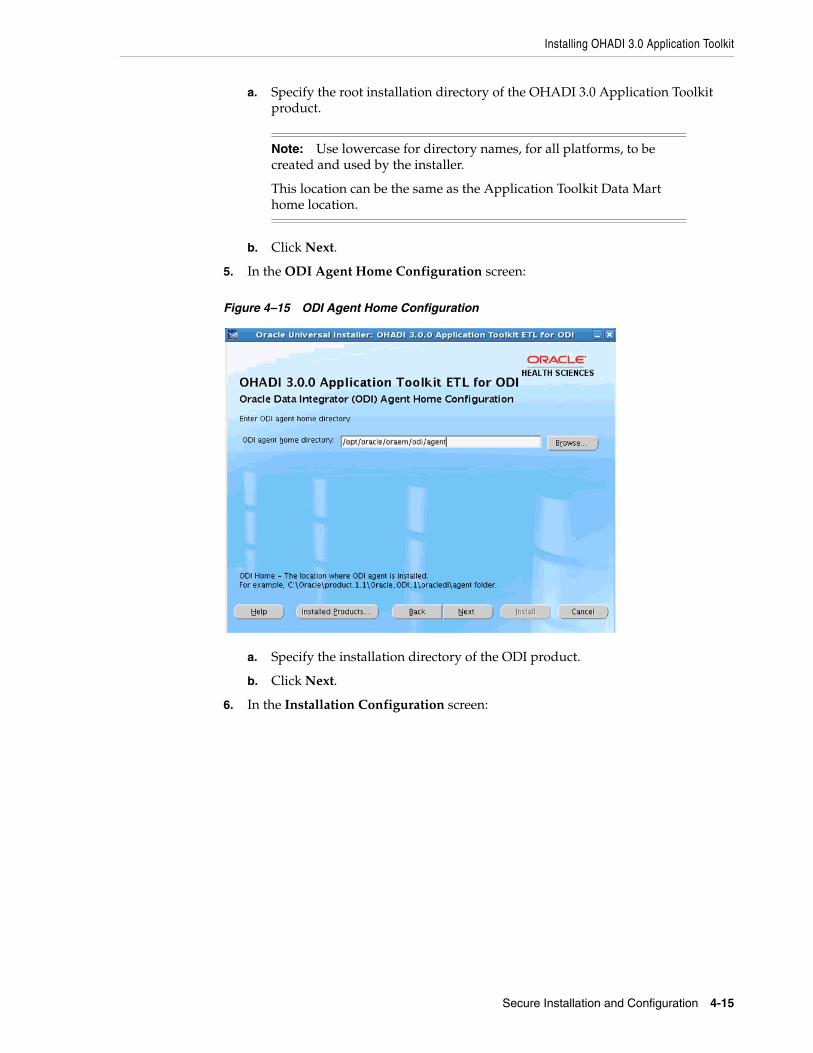
5. In the ODI Agent Home Configuration screen:
Figure 4–15 ODI Agent Home Configuration
a. Specify the installation directory of the ODI product.
b. Click Next.
6. In the Installation Configuration screen:
Note: Use lowercase for directory names, for all platforms, to be created and used by the installer.
This location can be the same as the Application Toolkit Data Mart home location.

Installing OHADI 3.0 Application Toolkit
4-16 Oracle Healthcare Analytics Data Integration Application Toolkit Secure Installation and Configuration Guide
Figure 4–16 Installation Configuration
a. Select Yes if you are installing ETL database components in a remote database server and go to step 7.
b. Otherwise, select No and go to step 8.
c. Click Next.
7. In the Mounted Directory Configuration screen:
Figure 4–17 Mounted Directory Configuration
Note: You have to set the prerequisites if you select Yes.

Installing OHADI 3.0 Application Toolkit
Secure Installation and Configuration 4-17
For Linux,
a. Mounted directory of repository database server - Enter the remote server path.
b. Mounted directory in installation server - Enter the path in the installation server where mounting is done.
c. Click Next.
For example, you can obtain all storage drives available in the OHADI Application Toolkit installation Linux machine by executing the df –h command. If the remote server directory is mounted on the installation server, the mounting is displayed as follows:
<Remote Server name>:<Remote server path> <total size> <used up space> < Available space> <use%> <Path in installation server where mounting was done>
For example,
abc:/scratch/dump 191G 138G 44G 76% /slc03jpg
For Windows, if the OHADI_AT_DUMP directory is shared from the remote repository server with the same name, then:
a. Shared directory of repository DB server - Enter the fully qualified path to the OHADI_AT_DUMP directory created in the repository database server. For example, d:\oui\odi\OHADI_AT_DUMP.
b. Shared directory of installation server - Enter the shared directory path created in the installation server to the OHADI_AT_DUMP directory (created in the repository DB server).
c. Click Next.
8. In the Database Instance Configuration screen:
Note: If the remote server mounted path is displayed as '/', you must provide the absolute mounted path of the remote server.
Note: This path is not validated by the installer.
Note: This path is not validated by the installer.
Note: Shared path must have full permissions to the user accessing from the installation server.
You must access the path before providing the values in the installer. If any credentials are prompted, enter the credentials, and save it so that it does not prompt while accessing from installer.
Installing OHADI 3.0 Application Toolkit
4-18 Oracle Healthcare Analytics Data Integration Application Toolkit Secure Installation and Configuration Guide
Figure 4–18 Database Instance Configuration
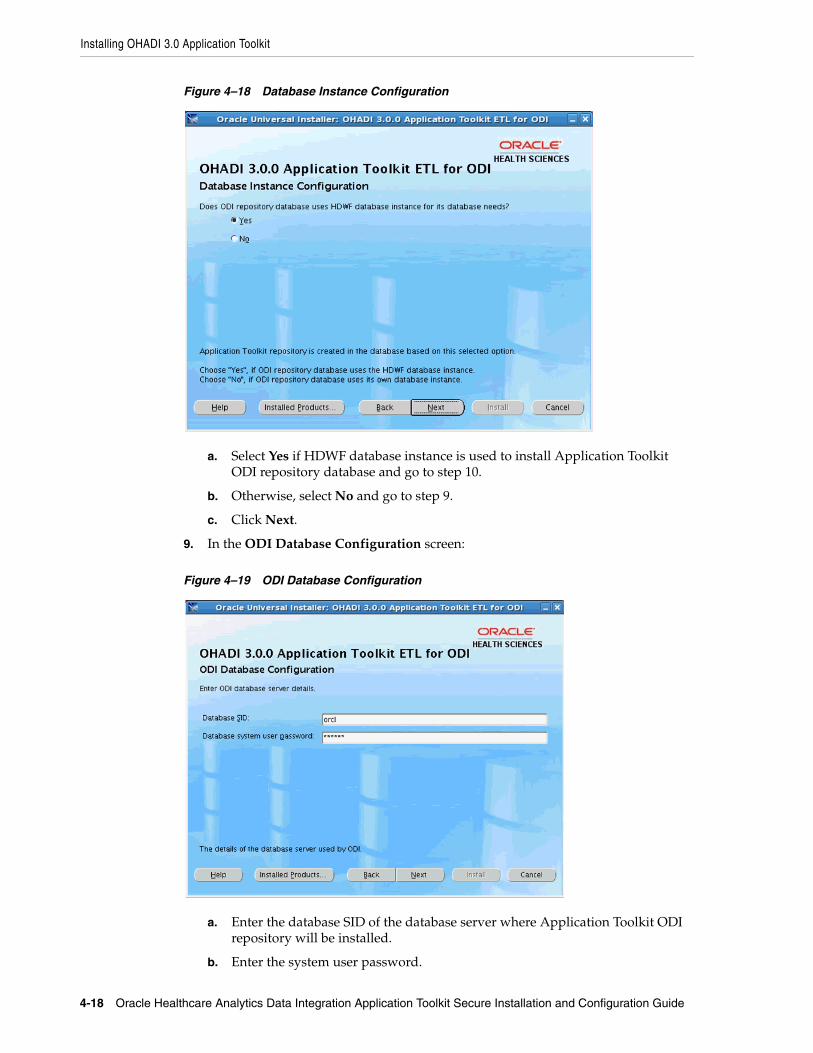
a. Select Yes if HDWF database instance is used to install Application Toolkit ODI repository database and go to step 10.
b. Otherwise, select No and go to step 9.
c. Click Next.
9. In the ODI Database Configuration screen:
Figure 4–19 ODI Database Configuration
a. Enter the database SID of the database server where Application Toolkit ODI repository will be installed.
b. Enter the system user password.

Installing OHADI 3.0 Application Toolkit
Secure Installation and Configuration 4-19
c. Click Next.
10. In the HDWF and Repository Database Configuration screen:
Figure 4–20 HDWF and Repository Database Configuration
a. Enter the database server host name where the HDWF schema is created.
b. Enter the database server port number.
c. Enter database system user password.
d. Enter the HDWF database service name (not SID).
e. Enter the HDWF database server SID.
f. Click Next.
11. In the Repository Tablespace and Schema Configuration screen:

Installing OHADI 3.0 Application Toolkit
4-20 Oracle Healthcare Analytics Data Integration Application Toolkit Secure Installation and Configuration Guide
Figure 4–21 Repository Tablespace and Schema Configuration
a. Enter the repository tablespace name.
b. Enter the repository tablespace initial size in MB. Recommended size for production install is 4096 MB.
c. Enter the master repository schema user name.
d. Enter the master repository schema password.
e. Enter the work repository schema user name.
f. Enter the work repository schema password.
g. Click Next.
12. In the Repository Tablespace Configuration screen:

Installing OHADI 3.0 Application Toolkit
Secure Installation and Configuration 4-21
Figure 4–22 Repository Tablespace Configuration
a. Enter the location of the Application Toolkit repository data file in the machine or ASM specific syntax including the trailing slash.
This is the directory on the database server where the data files for the application are created during the installation.
This value is not validated and must be entered in the machine or ASM specific syntax including the trailing slash.
For example,
Unix: /u01/oradata/dbname/
Windows: drive:\oradata\dbname\
ASM: +DATA_EX02/hashas01/datafile/
b. Click Next.
13. In the Source and Target Configuration screen:
Note:
■ ASM location must always start with + as shown above.
■ Failure to enter the trailing slash does not fail the installation but the data file name is prefixed with the folder name.
■ The HDWF data file name is the name of tablespace entered. For example, if the HDWF tablespace name is hdwf_ts, the data file created by the installer is hdwf_ts.dbf.

Installing OHADI 3.0 Application Toolkit
4-22 Oracle Healthcare Analytics Data Integration Application Toolkit Secure Installation and Configuration Guide
Figure 4–23 Source and Target Configuration
Source system is HDM schema of HDWF and target system is Application Toolkit data mart.
a. Enter the HDWF HDM schema tablespace name.
b. Enter the HDM schema user name.
c. Enter the HDM schema password.
d. Enter the Application Toolkit data mart schema user.
e. Enter the Application Toolkit data mart schema password.
f. Click Next.
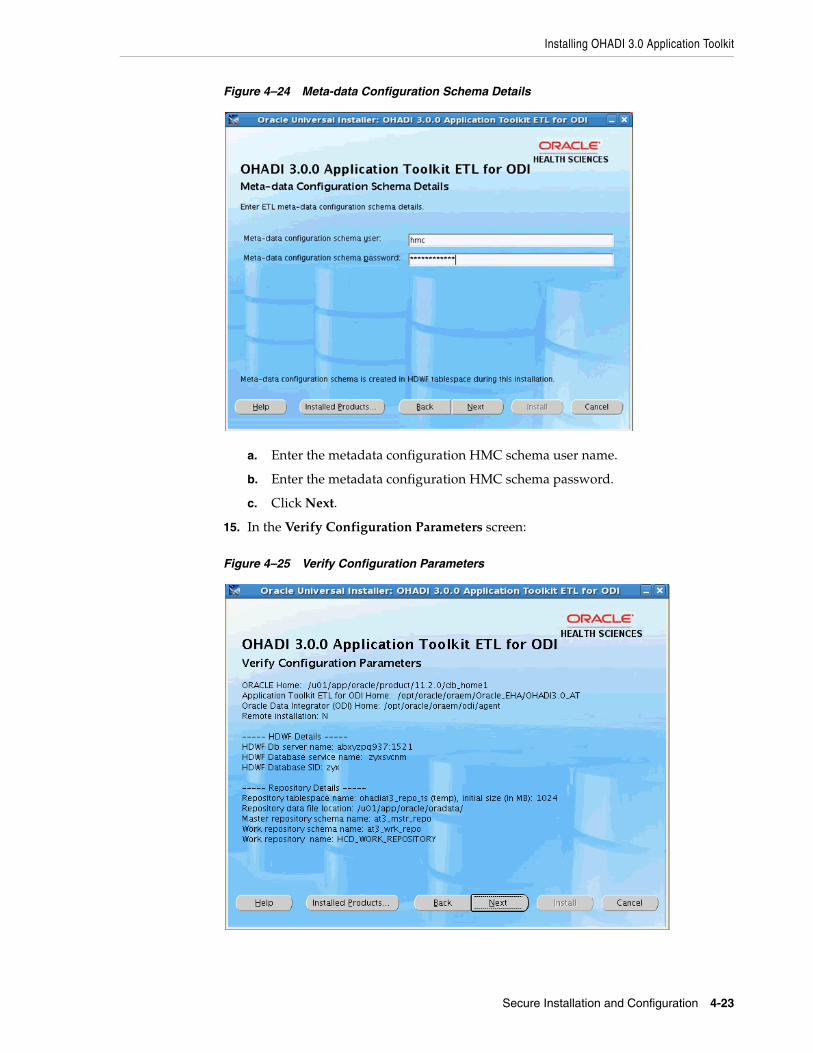
14. In the Meta-data Configuration Schema Details screen:
Note: The source and target schema are already installed through their respective product installations.
Installing OHADI 3.0 Application Toolkit
Secure Installation and Configuration 4-23
Figure 4–24 Meta-data Configuration Schema Details
a. Enter the metadata configuration HMC schema user name.
b. Enter the metadata configuration HMC schema password.
c. Click Next.
15. In the Verify Configuration Parameters screen:
Figure 4–25 Verify Configuration Parameters

Installing OHADI 3.0 Application Toolkit
4-24 Oracle Healthcare Analytics Data Integration Application Toolkit Secure Installation and Configuration Guide
a. Verify all the configuration parameters listed on this screen before proceeding.
b. Verify that the data file location ends with a trailing slash.
c. If required, click Back to make changes to your installation settings else click Next.
16. Review the information on the Summary screen, which displays the global settings, the space requirements, and the product to install.
Figure 4–26 Summary Screen
17. Click Install to continue.
18. The installation starts and the Install screen is displayed. OUI copies the files to the component Home location, and runs the scripts to install the ETL in ODI.

Installing OHADI 3.0 Application Toolkit
Secure Installation and Configuration 4-25
Figure 4–27 Install Screen
The install screen displays the location of the log file that records the result of the installation activities for this session. Make a note of the location of the log file.
19. To review the progress of the installation, view the log file created at the location shown in the Install screen to monitor the current activity of the install.
20. Once the installation is complete, the End of Installation screen is displayed.
This screen displays:
■ Application Toolkit ETL for ODI 3.0.0.0 post-install verification completed without errors, if the installation is successful.
■ Location of the installation log files: <APPLICATIONTOOLKIT_Home>\oracle\ohadi30at\install\etllogs\ folder.
■ Location of the installation report: <APPLICATIONTOOLKIT_Home>\oracle\ohadi30at\install\etlrpt\ folder.
■ Location of the OUI log files. For more information, see Section 4.3.
21. Review the installation report and save it in a secure location for your future use.
Note: The progress bar does not show the progress when the database is created using SQLPlus.
Note: If a different message is displayed on this screen other than the one mentioned above, perform the following:
■ Verify all the log files for any error.
■ Verify the installation report file for the installation status.
■ Connect to the Application Toolkit repositories in ODI to verify the ETLs are installed successfully.
Reviewing the Installation Log Files
4-26 Oracle Healthcare Analytics Data Integration Application Toolkit Secure Installation and Configuration Guide
22. Click Exit after reviewing the installation information. At the confirmation prompt, click Yes to exit the installer.
23. Review the generated installation log files for errors. For details, see Section 4.3.
24. Contact Oracle support, if necessary, to resolve any errors.
25. For the Exadata server database, perform the following steps once the installation is verified:
a. Revert the TNS entry to multi-node.
b. Update the multi-node Exadata server name in the ODI Repository connection and Topology connection (created during installation) manually before executing the ETL.
26. Delete the data dump directory created during installation. Connect to the repository DB system schema and execute the following command:
DROP DIRECTORY HCD_DUMP_DIR;
27. Unmount or unshare the mounted or shared directory for remote installation.
28. Revoke the privileges on the repository schema. Connect to the repository DB system schema and execute the following command:
REVOKE CREATE ANY SYNONYM FROM <master repository user>, <work repository user>;
Since Application Toolkit uses the same OHADI HMC schema where, the OHADI 3.0 product is a required component, it does not overwrite the existing values in the global parameter table HDI_ETL_GLBL_PARAM_G. You must ensure the values for following global parameters and update it if required:
■ HCD_SCHEMA_NAME
■ HMC_SCHEMA_NAME
■ HDWF_SCHEMA_NAME
4.3 Reviewing the Installation Log FilesDuring the installation of an OHADI 3.0 Application Toolkit, the OUI generates the following log files:
■ installActions<timestamp>.log - This log file records the action of the installer and helps in diagnosing problems with the installation.
■ oraInstall<timestamp>.out - This output file records all the output of SQL scripts that are run by the installer.
■ oraInstall<timestamp>.err - This error file records all the errors from the scripts run by the installer.
■ HCD_ODI_MASTER_INSTALL.log - This summary log file records the outcome of the import scripts run by the installer. This is applicable only for the ODI ETL component.
You must include the above log files if you report any problems that occur when installing the OHADI 3.0 Application Toolkit.
Note: Use the same values entered in Figure 4-21 for repository schema user.

Reviewing the Installation Log Files
Secure Installation and Configuration 4-27
The log files are time stamped and each installation session creates a new log file. On a Windows installation, the log files are located at \Oracle\Inventory\logs.
For example:
C:\Program Files\Oracle\Inventory\logs
On a Linux installation, the log files are located at $ORACLE_BASE/oraInventory/logs.
For example, /u01/app/oraInventory/logs


![Oracle Communications Data Model Adapters and Analytics ...[1]Oracle® Communications Data Model Adapters and Analytics User’s Guide Release 12.1 E64316-02 October 2015](https://static.documents.pub/doc/80x56/5e9395078fb7f636b14cf25c/oracle-communications-data-model-adapters-and-analytics-1oracle-communications.jpg)


