122
Oracle® Real Application Clusters Installation Guide 11g Release 1 (11.1) for Microsoft Windows B28251-06 July 2010

Oracle® Real Application ClustersInstallation Guide
11g Release 1 (11.1) for Microsoft Windows
B28251-06
July 2010

Oracle Real Application Clusters Installation Guide, 11g Release 1 (11.1) for Microsoft Windows
B28251-06
Copyright © 2007, 2010, Oracle and/or its affiliates. All rights reserved.
Primary Authors: Mark Bauer, Douglas Williams, Sanjay Sharma, Janet Stern
Contributing Authors: Jonathan Creighton, Pat Huey, Raj Kumar, Lyju Vadassery
Contributors: Chris Allison, Karin Brandauer, Robert Chang, Sudip Datta, Luann Ho, Rajiv Jayaraman, Roland Knapp, Diana Lorentz, Barb Lundhild, Vijay Lunawat, John Patrick McHugh, Anil Nair, Randy Neville, Philip Newlan, Michael Polaski, Dipak Saggi, Sudheendra Sampath, Janelle Simmons, Clive Simpkins, Khethavath P. Singh, Nitin Vengurlekar, Gary Young
This software and related documentation are provided under a license agreement containing restrictions on use and disclosure and are protected by intellectual property laws. Except as expressly permitted in your license agreement or allowed by law, you may not use, copy, reproduce, translate, broadcast, modify, license, transmit, distribute, exhibit, perform, publish, or display any part, in any form, or by any means. Reverse engineering, disassembly, or decompilation of this software, unless required by law for interoperability, is prohibited.
The information contained herein is subject to change without notice and is not warranted to be error-free. If you find any errors, please report them to us in writing.
If this software or related documentation is delivered to the U.S. Government or anyone licensing it on behalf of the U.S. Government, the following notice is applicable:
U.S. GOVERNMENT RIGHTS Programs, software, databases, and related documentation and technical data delivered to U.S. Government customers are "commercial computer software" or "commercial technical data" pursuant to the applicable Federal Acquisition Regulation and agency-specific supplemental regulations. As such, the use, duplication, disclosure, modification, and adaptation shall be subject to the restrictions and license terms set forth in the applicable Government contract, and, to the extent applicable by the terms of the Government contract, the additional rights set forth in FAR 52.227-19, Commercial Computer Software License (December 2007). Oracle USA, Inc., 500 Oracle Parkway, Redwood City, CA 94065.
This software is developed for general use in a variety of information management applications. It is not developed or intended for use in any inherently dangerous applications, including applications which may create a risk of personal injury. If you use this software in dangerous applications, then you shall be responsible to take all appropriate fail-safe, backup, redundancy, and other measures to ensure the safe use of this software. Oracle Corporation and its affiliates disclaim any liability for any damages caused by use of this software in dangerous applications.
Oracle is a registered trademark of Oracle Corporation and/or its affiliates. Other names may be trademarks of their respective owners.
This software and documentation may provide access to or information on content, products, and services from third parties. Oracle Corporation and its affiliates are not responsible for and expressly disclaim all warranties of any kind with respect to third-party content, products, and services. Oracle Corporation and its affiliates will not be responsible for any loss, costs, or damages incurred due to your access to or use of third-party content, products, or services.
iii
Contents
Preface ................................................................................................................................................................. ix
Intended Audience...................................................................................................................................... ixDocumentation Accessibility ..................................................................................................................... ixRelated Documents ..................................................................................................................................... xConventions ................................................................................................................................................. xi
What's New in Oracle Real Application Clusters Installation?....................................... xiii
Changes in Installation Documentation................................................................................................. xiiiChanges in the Install Options ................................................................................................................ xivNew Components Available for Installation......................................................................................... xivEnhancements and New Features for Installation................................................................................ xvDeprecated Components in Oracle Database 11g Release 1 (11.1)..................................................... xx
1 Preinstallation Checklist
Before You Start: Planning your Installation ...................................................................................... 1-1Check My Oracle Support................................................................................................................. 1-1Check Oracle Technical Network .................................................................................................... 1-2Review How to Use Cluster Verification Utility ........................................................................... 1-2Review and Back Up Existing Oracle Installations ....................................................................... 1-2Review Globalization Requirements............................................................................................... 1-3Review Documentation..................................................................................................................... 1-3
Server Hardware, Network and Operating System Overview........................................................ 1-4Review Server Hardware and Software Requirements................................................................ 1-4Network Connections Overview ..................................................................................................... 1-5Platform-Specific Server Configuration Overview ....................................................................... 1-7
Shared Storage Overview ....................................................................................................................... 1-7Additional Information to Prepare for Installation........................................................................... 1-7
Oracle Clusterware and Vendor Clusterware ............................................................................... 1-8Shared Components of Oracle Real Application Clusters Installations .................................... 1-8Oracle RAC 11g Release Compatibility........................................................................................... 1-8Preinstallation Requirements for Oracle Configuration Manager.............................................. 1-9
2 Installing Oracle Database with Oracle Real Application Clusters
Verifying System Readiness for Installing the Oracle Database with CVU ................................ 2-1Troubleshooting Installation Setup for Windows ......................................................................... 2-2

iv
Oracle Database Configuration Type Descriptions........................................................................... 2-3General Purpose, Transaction Processing, and Data Warehouse Configuration Types ......... 2-3Using the Advanced Configuration Type ...................................................................................... 2-3
Oracle Configuration Manager Option................................................................................................ 2-3Actions of OUI, DBCA, and Other Assistants During Installation ............................................... 2-4Database Security Options ..................................................................................................................... 2-5Installation of Oracle RAC Using Oracle Universal Installer ........................................................ 2-5Installation on Windows-Based Systems with the Minimum Memory Requirements ............. 2-6Deinstalling Oracle Real Application Clusters Software ................................................................ 2-7
Deinstalling Oracle Database with Oracle RAC Software ........................................................... 2-8Deinstalling Automatic Storage Management............................................................................ 2-10
3 Creating Oracle RAC Databases with the Database Configuration Assistant
Using Database Configuration Assistant with Oracle RAC ............................................................ 3-1Benefits of Using Database Configuration Assistant ....................................................................... 3-2Verifying DBCA Requirements............................................................................................................. 3-2Creating an Oracle RAC Database with DBCA ................................................................................. 3-3Automatic Listener Migration from Earlier Releases........................................................................ 3-6Deleting an Oracle Real Application Clusters Database with DBCA ........................................... 3-6
4 Oracle Real Application Clusters Post-Installation Procedures
Required Post-Installation Tasks .......................................................................................................... 4-1Back Up the Voting Disk after Installation..................................................................................... 4-1Download and Install Patches.......................................................................................................... 4-1Configure Oracle Products ............................................................................................................... 4-2Configure Storage for External Tables, Shared Files, or Directory Objects ............................... 4-2
Recommended Post-Installation Tasks ................................................................................................ 4-3Verifying Enterprise Manager Operations ..................................................................................... 4-3Logging in to Oracle Enterprise Manager Database Control ...................................................... 4-3Postinstallation Database Configuration for Oracle Configuration Manager .......................... 4-4
Additional Step for E-Business Suites...................................................................................... 4-5Additional Step for Oracle Enterprise Manager Grid Control............................................. 4-5
5 Parameter Management for Oracle Real Application Clusters Databases
Parameter Files and Oracle Real Application Clusters..................................................................... 5-1Using Server Parameter Files in Oracle Real Application Clusters ............................................... 5-1
Location of the Server Parameter File ............................................................................................. 5-2Parameter File Search Order in Oracle Real Application Clusters................................................. 5-3Server Parameter File Errors in Oracle Real Application Clusters................................................. 5-3
6 Understanding the Oracle Real Application Clusters Installed Configuration
Understanding the Configured Environment in Oracle Real Application Clusters................... 6-1The Oracle Cluster Registry in Oracle Real Application Clusters ................................................. 6-1Database Components Created Using Database Configuration Assistant................................... 6-2
Tablespaces and Data Files ............................................................................................................... 6-2Control Files ........................................................................................................................................ 6-3

v
Redo Log Files .................................................................................................................................... 6-3Managing Undo Tablespaces in Oracle Real Application Clusters .............................................. 6-3Initialization Parameter Files................................................................................................................. 6-4Configuring Service Registration-Related Parameters in Oracle Real Application Clusters ... 6-4Configuring the Listener File (listener.ora)......................................................................................... 6-5
Local Listeners .................................................................................................................................... 6-5Multiple Listeners .............................................................................................................................. 6-5How Oracle Uses the Listener (listener.ora File) ........................................................................... 6-5
Listener Registration and PMON Discovery .......................................................................... 6-6Net Service Names (tnsnames.ora File)................................................................................................ 6-6Net Services Profile (sqlnet.ora File) ................................................................................................. 6-11
7 Removing Oracle Database Software
Removing Oracle Configuration Manager.......................................................................................... 7-1Removing Oracle Cluster Synchronization Services ........................................................................ 7-2Deleting DB Control Configuration Files Using EMCA Scripts .................................................... 7-2Removing All Oracle Database Components ..................................................................................... 7-3
Stopping Oracle Services................................................................................................................... 7-3Removing Components with Oracle Universal Installer ............................................................. 7-3Manually Removing the Remaining Oracle Database Components .......................................... 7-4
Removing an Automatic Storage Management Instance...................................................... 7-4Updating the System Variable Path ......................................................................................... 7-5Removing Oracle from the Start Menu.................................................................................... 7-6Removing Oracle Directories .................................................................................................... 7-6
A Troubleshooting the Installation Process
Troubleshooting Oracle RAC Installations ........................................................................................ A-1General Installation Issues ............................................................................................................... A-1Oracle Real Application Clusters Installation Error Messages .................................................. A-2Performing Cluster Diagnostics During Oracle Real Application Clusters Installations ...... A-2
Verifying Requirements......................................................................................................................... A-2Encountering Installation Errors .......................................................................................................... A-3Reviewing the Log of an Installation Session ................................................................................... A-3Silent or Noninteractive Installation Response File Error Handling ........................................... A-3Troubleshooting Oracle Configuration Manager ............................................................................. A-4Troubleshooting Configuration Assistants ........................................................................................ A-5
Configuration Assistant Failures .................................................................................................... A-6Fatal Errors ......................................................................................................................................... A-6
Cleaning Up After a Failed Installation.............................................................................................. A-6Online Help Not Working ..................................................................................................................... A-6
B Stopping Processes in Oracle Real Application Clusters Databases
Back Up the Oracle Real Application Clusters Database................................................................ B-1Shut Down Oracle Real Application Clusters Databases ............................................................... B-1Stop All Oracle Processes ...................................................................................................................... B-1
Stopping Oracle Clusterware or Cluster Ready Services Processes .......................................... B-2
vi
Stopping Oracle Database 11g Processes Before Adding Products or Upgrading.................. B-3
C Managing Oracle Database Port Numbers
About Managing Ports ........................................................................................................................... C-1Viewing Port Numbers and Access URLS.......................................................................................... C-1Port Numbers and Protocols of Oracle Components ....................................................................... C-2Changing the Oracle Enterprise Management Agent Port.............................................................. C-4Changing the Oracle Enterprise Manager Database Console Ports .............................................. C-4Changing the Oracle XML DB Ports.................................................................................................... C-5
D Using Scripts to Create Oracle Real Application Clusters Databases
Creating a Database Using Scripts....................................................................................................... D-1
E Directory Structure for Oracle Real Application Clusters Environments
Understanding the Oracle Real Application Clusters Directory Structure ................................. E-1Directory Structures for Oracle Real Application Clusters ............................................................ E-1
F Converting to Oracle Real Application Clusters from Single-Instance Oracle Databases
Prerequisites for Conversion ................................................................................................................ F-1Single-Instance to Cluster-Enabled Conversion Administrative Issues ...................................... F-1Converting from Single-Instance to Oracle Real Application Clusters ....................................... F-2
Single Instance on a Non-Cluster computer to Oracle Database 11g with RAC ..................... F-2Back up the Original Single-Instance Database .................................................................... F-2Perform the Pre-Installation Steps........................................................................................... F-3Set up the Cluster ...................................................................................................................... F-3Validate the Cluster ................................................................................................................... F-3Copy the Preconfigured Database Image............................................................................... F-3Install Oracle Database 11g Software with Oracle Real Application Clusters.................. F-3
Single Instance on a Cluster to Oracle Database 11g RAC.......................................................... F-4Single Instance on a Cluster Running from a Cluster Enabled Oracle Home .................. F-4
Post-Conversion Steps............................................................................................................................ F-6
G Country Codes for Oracle Configuration Manager
Valid Country Codes............................................................................................................................... G-1
H Troubleshooting and Removing Oracle Configuration Manager Software
Troubleshooting Oracle Configuration Manager ............................................................................. H-1Removing Oracle Configuration Manager......................................................................................... H-2
Index

vii

viii
List of Tables
1–1 Overview of IP Address Requirements for Each Node with Oracle Clusterware ........... 1-66–1 Tablespace Names that Oracle Real Application Clusters Databases Use ....................... 6-26–2 Windows-Based Platforms Symbolic Link Names and Files ............................................. 6-26–3 Connections for Net Service Names....................................................................................... 6-7C–1 Ports Used in Oracle Components ......................................................................................... C-2E–1 Directory Structure for A Sample OFA-Compliant Windows Environment.................. E-1G–1 Country Codes for OCM.......................................................................................................... G-1
ix
Preface
This guide explains how to install and configure Oracle Real Application Clusters (Oracle RAC) on Microsoft Windows clusters. This preface contains the following topics:
■ Intended Audience
■ Documentation Accessibility
■ Related Documents
■ Conventions
Intended AudienceOracle Real Application Clusters Installation Guide for Microsoft Windows provides information for a database administrator who is installing Oracle RAC on a Windows cluster. The guide provides the network, cluster, and individual computer requirements for installing and configuring the software as well as the steps to complete an installation. In some cases, this book may help a network administrator or system administrator who is responsible for providing the required network and hardware configuration.
Documentation AccessibilityOur goal is to make Oracle products, services, and supporting documentation accessible to all users, including users that are disabled. To that end, our documentation includes features that make information available to users of assistive technology. This documentation is available in HTML format, and contains markup to facilitate access by the disabled community. Accessibility standards will continue to evolve over time, and Oracle is actively engaged with other market-leading technology vendors to address technical obstacles so that our documentation can be accessible to all of our customers. For more information, visit the Oracle Accessibility Program Web site at http://www.oracle.com/accessibility/.
Accessibility of Code Examples in DocumentationScreen readers may not always correctly read the code examples in this document. The conventions for writing code require that closing braces should appear on an otherwise empty line; however, some screen readers may not always read a line of text that consists solely of a bracket or brace.

x
Accessibility of Links to External Web Sites in DocumentationThis documentation may contain links to Web sites of other companies or organizations that Oracle does not own or control. Oracle neither evaluates nor makes any representations regarding the accessibility of these Web sites.
TTY Access to Oracle Support ServicesTo reach Oracle Support Services, use a telecommunications relay service (TRS) to call Oracle Support at 1.800.223.1711. Complete instructions for using the AT&T relay services are available at http://www.consumer.att.com/relay/tty/standard2.html. After the AT&T Customer Assistant contacts Oracle Support Services, an Oracle Support Services engineer will handle technical issues and provide customer support according to the Oracle service request process.
Related DocumentsFor more information, refer to the following Oracle resources:
Oracle Real Application Clusters Documentation■ Oracle Real Application Clusters Administration and Deployment Guide
■ Oracle Database 2 Day + Real Application Clusters Guide
Oracle Clusterware Documentation■ Oracle Clusterware Administration and Deployment Guide
Installation Guides■ Oracle Database Installation Guide for Microsoft Windows
■ Oracle Database Quick Installation Guide for Microsoft Windows (32-Bit)
■ Oracle Database Quick Installation Guide for Microsoft Windows x64
■ Oracle Diagnostics Pack Installation Guide
■ Oracle Universal Installer and OPatch User's Guide for Windows and UNIX
Operating System-Specific Administrative Guides■ Oracle Database Platform Guide for Microsoft Windows
Oracle Database 11g Real Application Clusters Management■ Oracle Real Application Clusters Administration and Deployment Guide
■ Oracle Database 2 Day + Real Application Clusters Guide
■ Oracle Database 2 Day DBA
■ Getting Started with the Oracle Diagnostics Pack
Generic Documentation■ Oracle Database New Features Guide
■ Oracle Database Net Services Administrator's Guide
■ Oracle Database Concepts
■ Oracle Database Reference

xi
Most Oracle error message documentation is in Oracle Database Error Messages. If you only have access to the Oracle Documentation media, then browse the error messages by range. Once you find a range, use your browser's find feature to locate a specific message. When connected to the Internet, you can search for a specific error message using the error message search feature of the Oracle online documentation. Additional error messages for Oracle Clusterware and Oracle RAC tools are included in the Oracle Real Application Clusters Administration and Deployment Guide.
ConventionsThe following text conventions are used in this document:
Convention Meaning
boldface Boldface type indicates graphical user interface elements associated with an action, or terms defined in text or the glossary.
italic Italic type indicates book titles, emphasis, or placeholder variables for which you supply particular values.
monospace Monospace type indicates commands within a paragraph, URLs, code in examples, text that appears on the screen, or text that you enter.

xii

xiii
What's New in Oracle Real ApplicationClusters Installation?
This section describes Oracle Database 11g release 1 (11.1) features as they pertain to the installation and configuration of Oracle Real Application Clusters (Oracle RAC) The topics in this section are:
■ Changes in Installation Documentation
■ Changes in the Install Options
■ New Components Available for Installation
■ Enhancements and New Features for Installation
■ Deprecated Components in Oracle Database 11g Release 1 (11.1)
Changes in Installation DocumentationWith Oracle Database 11g release 1 (11.1) , Oracle Clusterware can be installed or configured as an independent product. In addition, new documentation is provided for Oracle Database storage administration. For installation planning, note the following documentation:
Oracle Database 2 Day + Real Application Clusters GuideThis book provides an overview and examples of the procedures to install and configure a two-node Oracle Clusterware and Oracle RAC environment.
Oracle Clusterware Installation GuideThis book provides procedures either to install Oracle Clusterware as a standalone product, or to install Oracle Clusterware with either Oracle Database, or Oracle RAC. It contains system configuration instructions that require system administrator privileges.
Oracle Real Application Clusters Installation GuideThis book (the guide that you are reading) provides procedures to install Oracle RAC after you have completed successfully an Oracle Clusterware installation. It contains database configuration instructions for database administrators.
Oracle Database Storage Administrator’s GuideThis book provides information for database and storage administrators who administer and manage storage, or who configure and administer Automatic Storage Management (ASM).

xiv
Oracle Clusterware Administration and Deployment GuideThis is the administrator’s reference for Oracle Clusterware. It contains information about administrative tasks, including those that involve changes to operating system configurations.
Oracle Real Application Clusters Administration and Deployment GuideThis is the administrator’s reference for Oracle RAC. It contains information about administrative tasks. These tasks include database cloning, node addition and deletion, Oracle Cluster Registry (OCR) administration, use of Server Control Utility (SRVCTL) and other database administration utilities.
Changes in the Install OptionsThe following are installation option changes for Oracle Database 11g:
■ Oracle Application Express: This feature is installed with Oracle Database 11g. It was previously named HTML DB, and was available as a separate Companion CD component.
■ Oracle Configuration Manager: Oracle Configuration Manager (OCM) is integrated with Oracle Universal Installer. However, it is an optional component with database and client installations, and you must select Custom Installation to enable it. Oracle Configuration Manager, used in previous releases as Customer Configuration repository (CCR), is a tool that gathers and stores details relating to the configuration of the software stored in the ASM and database Oracle home directories.
Refer to Oracle Configuration Manager for Improved Support in New Components Available for Installation in this chapter for further information.
■ Oracle Data Mining: Enterprise Edition installation type selects Oracle Database Mining option by default.
■ Oracle Database Vault: This feature is offered during installation. It is an optional component for database installation, available through Custom installation.
■ Oracle SQL Developer: This feature is installed by default with template-based database installations, such as General Purpose, Transaction Processing, and Data Warehousing. It is also installed with database client Administrator, Runtime, and Custom installations.
■ Oracle Warehouse Builder: This information integration tool is now installed with both Standard and Enterprise Edition versions of the Oracle Database. With Enterprise Edition, you can purchase additional extension processes. Installing the Oracle Database also installs a pre-seeded repository, OWBSYS, necessary for using Oracle Warehouse Builder.
■ Oracle XML DB: Starting with Oracle Database 11g, Oracle XML DB is no longer an optional feature. It is installed and configured using Database Configuration Assistant for all database installations.
New Components Available for InstallationThe following are the new components available while installing Oracle Database 11g:
■ Oracle Application Express: Starting Oracle Database 11g, HTML DB is no longer available as a Companion CD component. Renamed as Oracle Application Express, this component is installed with Oracle Database 11g.
xv
With Oracle Database 11g, Oracle Application Express replaces iSQL*Plus.
■ Oracle Configuration Manager: This feature is offered during custom installation. It was previously named Customer Configuration repository (CCR). It is an optional component for database and client installations. Oracle Configuration Manager gathers and stores details relating to the configuration of the software stored in database Oracle home directories.
■ Oracle SQL Developer: This feature is installed by default with template-based database installations, such as General Purpose, Transaction Processing, and Data Warehousing. It is also installed with database client Administrator, Runtime, and Custom installations.
■ Oracle Warehouse Builder: This feature is now included as an option in the Database installation.
■ Oracle Real Application Testing: This feature is installed by default with the Enterprise Edition installation type of Oracle Database 11g.
Enhancements and New Features for InstallationThe following is a list of enhancements and new features for Oracle Database 11g release 1 (11.1):
Oracle HTTP Server UpdateTo install Oracle HTTP Server, use the "Oracle Fusion Middleware Web Tier Utilities 11g (11.1.1.2.0)" media or download.
Windows Server 2008 (32-Bit) and Windows Server 2008 x64Oracle Clusterware and Oracle RAC run on Microsoft Windows Server 2008 (32-bit) and Windows Server 2008 x64. Oracle Database 11g Release 1 (11.1.0.7 or later) is certified on Microsoft Windows Server 2008 (32-Bit) and Microsoft Windows Server 2008 x64 (all editions except HPC). The specific operating system components that are not supported in Windows Server 2008 (32-Bit) and Windows Server 2008 x64 are Hyper-V and Server Core.
Automatic Diagnostic RepositoryThe Automatic Diagnostic Repository is a feature added to Oracle Database 11g. The main objective of this feature is to reduce the time required to resolve bugs. Automatic Diagnostic Repository is the layer of the Diagnostic Framework implemented in Oracle Database 11g that stores diagnostic data and also provides service APIs to access data. The default directory that stores the diagnostic data is ORACLE_BASE\diag.
The Automatic Diagnostic Repository implements the following:
■ Diagnostic data for all Oracle products is written into an on-disk repository.
■ Interfaces that provide easy navigation of the repository, and the capability to read and write data
For Oracle RAC installations, if you use a shared Oracle Database home, then the Automatic Data Repository must be located on a shared storage location available to all the nodes.
See Also: Oracle Database Performance Tuning Guide for more information about Oracle Real Application Testing

xvi
Oracle Clusterware continues to place diagnostic data in the directory CRS_home\log, where CRS_home is the Oracle Clusterware home.
Automatic Storage Management Fast Mirror ResyncASM fast mirror resync quickly resynchronizes ASM disks within a disk group after transient disk path failures as long as the disk drive media is not corrupted. Any failures that render a failure group temporarily unavailable are considered transient failures. Disk path malfunctions, such as cable disconnections, host bus adapter or controller failures, or disk power supply interruptions, can cause transient failures. The duration of a fast mirror resync depends on the duration of the outage. The duration of a resynchronization is typically much shorter than the amount of time required to completely rebuild an entire ASM disk group.
ASM and Oracle RAC Deinstallation and Other Configuration Assistant EnhancementsDatabase Configuration Assistant (DBCA), Database Upgrade Assistant (DBUA), and Oracle Net Configuration Assistant (NETCA) have been improved. These improvements include the following:
DBCA■ Provides a command line feature, deleteASM, that removes ASM instances.
■ Provides the option to switch from a database configured for Oracle Enterprise Manager Database Control to Oracle Enterprise Manager Grid Control.
DBUA■ Includes an improved pre-upgrade script to provide space estimation,
initialization parameters, statistics gathering, and new warnings. DBUA also provides upgrades from Oracle Database releases 9.0, 9.2, 10.1, and 10.2.
■ Supports in-place patch set upgrades
■ Starts any services running prior to upgrades
New SYSASM Privilege for ASM AdministrationThis feature introduces a new SYSASM privilege that is specifically intended for performing ASM administration tasks. Using the SYSASM privilege instead of the SYSDBA privilege provides a clearer division of responsibility between ASM administration and database administration.
ASM Preferred Read Disk GroupsIn previous releases, ASM used the disk with the primary copy of a mirrored extent as the preferred disk for data reads. With this release, using the new initialization file parameter asm_preferred_read_failure_groups, you can specify disks located near a specific cluster node as the preferred disks from which that node obtains mirrored data. This option is presented in Database Configuration Assistant (DBCA), or you can configure it after installation. This change facilitates faster processing of data with widely distributed shared storage systems or with extended clusters (clusters whose nodes are geographically dispersed), and improves disaster recovery preparedness.
See Also: Oracle Database Storage Administrator's Guide

xvii
Automatic Storage Management Rolling MigrationRolling migration for ASM enables you to upgrade or patch ASM instances on clustered ASM nodes without affecting database availability. Rolling migration provides greater availability and more graceful migration of ASM software from one release to the next. This feature applies to ASM configurations that run on Oracle Database 11g release 1 (11.1) and later. In other words, you must already have Oracle Database 11g release 1 (11.1) installed before you can perform rolling migrations.
Conversion of Single-Instance ASM to clustered ASMUsing either Oracle Enterprise Manager Grid Control or rconfig, you can convert an existing ASM instance from a single-instance storage manager to a clustered storage manager. You can convert ASM release 11.1 instances directly, and convert releases previous to 11.1 by upgrading the instance to 11.1, and then performing the conversion.
Data Mining Schema Creation OptionIn Oracle Database 11g, the data mining schema is created when you run the SQL script catproc.sql as the SYS user. Therefore, the data mining option is removed from the Database Features screen of Database Configuration Assistant.
Oracle Disk Manager Network File System ManagementOracle Disk Manager (ODM) can manage network file systems (NFS) on its own, without using the operating system kernel NFS driver. This is referred to as Direct NFS. Direct NFS implements NFS version 3 protocol within the Oracle RDBMS kernel. This change enables monitoring of NFS status using the ODM interface. The Oracle RDBMS kernel driver tunes itself to obtain optimal use of available resources.
This feature provides the following:
■ Ease of tuning, and diagnosability, by providing the Oracle kernel control over the input-output paths to Network File Server, and avoiding the need to tune network performance at the operating system level.
■ A highly stable, highly optimized NFS client for database operations.
■ Use of the Oracle network file system layer for user tasks, reserving the operating system kernel network file system layer for network communication.
■ Use of the Oracle buffer cache, rather than the file system cache, for simpler tuning.
■ A common, consistent NFS interface, capable for use across Linux, UNIX and Windows platforms.
■ NFS on Oracle RAC. With operating system NFS drivers, even though NFS is a shared file system, NFS drives have to be mounted with the option noac (NO Attribute Caching) to prevent the operating system NFS driver from optimizing the file system cache by keeping file attributes locally. ODM NFS automatically recognizes Oracle RAC instances, and performs appropriate operations for data
Note: You cannot change the owner of the Oracle ASM or Oracle Database home during an upgrade. You must use the same Oracle software owner that owns the existing Oracle ASM or Oracle Database home.
See Also: Oracle Database Storage Administrator's Guide

xviii
files without requiring additional reconfiguration from users, system administrators, or DBAs. If you store the Oracle Clusterware voting disks or Oracle Cluster Registry (OCR) files on NFS, then they continue to require mounting with the noac option.
Optimal Flexible Architecture (OFA) SimplifiedWith the development of stripe and mirror everything architecture (SAME), and improved storage and throughput capacity for storage devices, the original OFA mission to enhance performance has shifted to its role of providing well-organized Oracle installations with separated software, configuration files and data. This separation enhances security, and simplifies upgrade, cloning, and other administrative tasks.
Oracle Database 11g release 1 (11.1) incorporates several changes to OFA to address this changed purpose.
As part of this change:
■ During Oracle RAC installation, you are prompted to accept the default, or select a location for the Oracle base directory, instead of the Oracle home directory. This change facilitates installation of more than one Oracle home directory in a common location, and separates software units for simplified administration. For this release, you are not required to use Oracle base, but this may become a requirement in a future release.
■ With this release, as part of the implementation of Automatic Diagnostic Repository (ADR), the following admin directories are changed:
– bdump (location set by the background_dump_dest initialization parameter; storage of Oracle background process trace files)
– cdump (location set by the core_dump_dest initialization parameter; storage of Oracle core dump files)
– udump (location set by the user_dump_dest initialization parameter; storage of Oracle user SQL trace files)
By default, the location of these trace and core files is in the \diag directory, which is in the path ORACLE_BASE\diag.
■ The initialization parameters BACKGROUND_DUMP_DEST and USER_DUMP_DEST are deprecated. They continue to be set, but you should not set these parameters manually.
■ A new initialization parameter is introduced. DIAGNOSTIC_DEST contains the location of "ADR base," which is the base directory under which one or more Automatic Database Repository homes are kept. Oracle documentation commonly refers to these homes as ADR homes. Each database instance has an ADR home, which is the root directory for a number of other directories that contain trace files, the alert log, health monitor reports, and dumps for critical errors. You can also view alert and trace files with the SQL statement select name, value from v$diag_info.
■ The default Flash Recovery area is moved from ORACLE_HOME\..\flash_recovery_area to ORACLE_BASE\flash_recovery_area.
■ The default data file location is moved from ORACLE_HOME\..\oradata to ORACLE_BASE\oradata.
■ A new utility, The ADR Command Interpreter (ADRCI), is introduced. The ADRCI facilitates reviewing alert log and trace files.

xix
For Oracle RAC installations, Oracle requires that the flash recovery area and the data file location are on a location shared among all the nodes. The Oracle Universal Installer confirms that this is the case during installation. This change does not affect the location of trace files for Oracle Clusterware.
Oracle Configuration Manager for Improved SupportDuring a custom installation, you are asked if you want to install Oracle Configuration Manager (OCM). OCM is an optional tool that enables you to associate your configuration information with your My Oracle Support (formerly OracleMetaLink) account. This can facilitate handling of service requests by ensuring that server system information is readily available.
Configuring the OCM tool requires that you have the following information from your service agreement:
■ Customer Identification Number (CSI)
■ My Oracle Support user account name
■ Country Code
In addition, you are prompted for server proxy information, if the host system does not have a direct connection to the Internet.
Support for Large Data FilesLarge data file support is an automated feature that enables Oracle to support larger files on ASM more efficiently and to increase the maximum file size.
Switching a Database from Database Control to Grid Control ConfigurationIn previous releases, Database Configuration Assistant contains the functionality to configure databases while creating them either with Database Control or with Grid Control, or to reconfigure databases after creation. However, if you want to change the configuration from Database to Grid control, this requires significant work. With Oracle Database 11g, Database Configuration Assistant enables you to switch configuration of a database from Database Control to Grid Control by running the Oracle Enterprise Manager Configuration Plug-in.
New Features in Oracle Data Provider for .NET Release 11.1 Oracle Data Provider for .NET release 11.1 includes the following:
■ ODP .NET Configuration
Developers can now configure ODP .NET using configuration files, including application config, web.config, or machine.config.
Settings in the machine.config override the registry settings and the settings in the application config or the web.config override the values in the machine.config.
■ Performance Enhancements
The following performance enhancements have been made:
See Also: Oracle Database Administrator's Guide for detailed information about these changes, and Oracle Database Utilities for information about viewing alert log and list trace files with ADRCI
See Also: Oracle Database Storage Administrator's Guide

xx
– Improved Parameter Context Caching
This release enhances the existing caching infrastructure to cache ODP .NET parameter contexts. This enhancement is independent of database version and it is available for all the supported database versions. This fea-ture provides significant performance improvement for the applications that execute the same statement repeatedly.
This enhancement is transparent to the developer. No code changes are needed to use this feature.
– Efficient LOB Retrieval
This release improves the performance of small-sized LOB retrieval by reducing the number of round-trips to the database. This enhancement is available only with Oracle 11g release 1.0 or higher database versions.
This enhancement is transparent to the developer. No code changes are needed to use this feature.
Deprecated Components in Oracle Database 11g Release 1 (11.1)The following components that were part of Oracle Database 10g release 2 (10.2) are not available for installation with Oracle Database 11g:
■ iSQL*Plus
■ Oracle Workflow
■ Data Mining Scoring Engine
■ Oracle Enterprise Manager Java console

1
Preinstallation Checklist 1-1
1 Preinstallation Checklist
Most errors that occur when installing Oracle Clusterware occur due to a failure to complete all of the required steps before starting the Oracle Universal Installer (OUI). Use the checklist in this chapter to ensure that you complete all of the required preinstallation tasks. Follow the links in this chapter to go directly to the relevant section or Web site where a task is described. The topics in this chapter include:
■ Before You Start: Planning your Installation
■ Server Hardware, Network and Operating System Overview
■ Shared Storage Overview
■ Additional Information to Prepare for Installation
1.1 Before You Start: Planning your InstallationThis section provides a list of tasks that Oracle recommends that you complete before you begin to install Oracle Clusterware. Whether your location is a Tier IV data center with a large system administration team, storage administrators, network administrators, database administrators, and third-party hardware and software vendors, or you are a project team of one, planning is important to ensure that your installation succeeds.
It is beyond the scope of this book to advise how to determine hardware sizing or capacity planning for your installation. Note that with Oracle Clusterware and Oracle Real Application Clusters (Oracle RAC), you can add nodes and instances as needed in response to increased workloads. Review and complete the following steps as part of your installation plan:
■ Check My Oracle Support
■ Check Oracle Technical Network
■ Review How to Use Cluster Verification Utility
■ Review and Back Up Existing Oracle Installations
■ Review Globalization Requirements
■ Review Documentation
1.1.1 Check My Oracle SupportBefore you decide whether you want to install Oracle 11g Release 1 (11.1) on existing hardware, or decide what server and storage hardware to purchase for an installation, log on to My Oracle Support (https://metalink.oracle.com), and click the Certify tab. Check the Certification Matrix for Oracle RAC for the operating system

Before You Start: Planning your Installation
1-2 Oracle Real Application Clusters Installation Guide
platform on which you intend to install, to ensure that your hardware configuration is supported for use with Oracle Clusterware, and, if you intend to install it, Oracle RAC. You can receive guidance about supported hardware options that can assist you with your purchasing decisions.
At the time of this release, you can also check the following URL for direct access to the Certification Matrix:
http://www.oracle.com/technology/support/metalink/index.html
In addition to specific certified hardware configurations, the Certify page provides support and patch information, and general advice about how to proceed with an Oracle Clusterware or Oracle Clusterware with Oracle RAC 11g Release 1 (11.1) installation, including important information about vendor clusterware and other configuration issues.
Also, you may want to refer to Oracle.com (http://www.oracle.com) for additional resources about planning for specific implementation scenarios, best practices, and other information that can help you with your installation plan. In particular, refer to the following Web site:
http://www.oracle.com/technology/products/database/clustering/index.html
1.1.2 Check Oracle Technical NetworkThe Oracle Technical Network (OTN) contains white papers about deployment options, such as capacity planning, best practices on various NFS platforms, and extended Oracle RAC deployments, which are not addressed in this guide. You can review papers at the following Web site:
http://www.oracle.com/technology/products/database/clustering/index.html
1.1.3 Review How to Use Cluster Verification UtilityOracle provides Cluster Verification Utility (CVU) to perform system checks in preparation for installation, patch updates, or other system changes. Learning how to use CVU can ensure that you have completed the required system configuration and preinstallation steps so that your installation, update, or patch operation completes successfully.
If you have a vendor performing system or preinstallation configuration steps for you, then ask the vendor to complete the relevant CVU check to ensure that your system is configured correctly.
1.1.4 Review and Back Up Existing Oracle InstallationsIf you have an existing Oracle installation, then document version numbers, patches, and other configuration information, and review upgrade procedures for your existing installation. Review the Oracle upgrade documentation before proceeding with your installation to decide how you want to proceed.
For most current information and best practices about preupgrade, post-upgrade, compatibility, and interoperability discussions, refer to "Oracle Upgrade
Note: Contact your Oracle sales representative if you do not have a My Oracle Support account.

Before You Start: Planning your Installation
Preinstallation Checklist 1-3
Companion." "Oracle Upgrade Companion" is available through Note 466181.1 on My Oracle Support:
https://metalink.oracle.com/
For upgrades, note the following:
■ You can only have one version of Oracle Clusterware running on a cluster at a time.
■ You can have multiple Oracle homes of Oracle 11g Release 1 (11.1) or later on your cluster. However, the Oracle Clusterware version must be greater than or equal to the Oracle Database or Automatic Storage Management software version. Oracle Clusterware supports databases or release Oracle Database 10g or later.
■ You can install earlier or later versions of Automatic Storage Manager (ASM). Both forward and backward compatibility is available with different versions of ASM. However, if you mix software versions, then ASM functionality reverts to the earliest software installation that it supports. For example, if you install Oracle Clusterware 11g with ASM, and you use it to support an existing Oracle Database release 10.2.0.3 installation, then ASM functionality is equivalent to that available only in the Oracle Database 10.2 release version.
■ Starting with release 10.1.0.6 and 10.2.0.3, you can use Database Upgrade Assistant (DBUA) for patch set upgrades with Oracle RAC. You can also use DBUA to upgrade between major point releases of Oracle RAC (for example, from 10.1 to 10.2, or 10.2 to 11g).
■ If you want to upgrade Oracle Clusterware Release 10.2 to Oracle Clusterware Release 11g, then you must first apply the 10.2.0.3 or later patchset.
■ If you intend to install Oracle Database, then it is faster to install all of the patches on the earlier database before creating a new database. For example, patch the Oracle Clusterware home, patch the database home, and then create the new database, instead of patching the Oracle Clusterware home, creating the database home, and then patching the database.
■ As with any system change, back up your existing database before attempting to install new software.
1.1.5 Review Globalization RequirementsReview the Oracle Database Globalization Support Guide to identify any additional steps that you may need to complete as part of your installation before you:
■ Upgrade an existing database with additional character sets or languages
■ Start an installation during which you want to add languages other than the default language, English
1.1.6 Review DocumentationReview this section, as well as the Preinstallation and Storage chapters that appear later in this book and in the Oracle Clusterware Installation Guide for Microsoft Windows, to ensure that you have completed all of the required steps for a successful installation. This information will also enable you to receive assistance with completing these steps. In addition, review the Release Notes and My Oracle Support (https://metalink.oracle.com) to ensure that you have the most current information about system requirements and other information that can affect your
See Also: Oracle Database Upgrade Guide
Server Hardware, Network and Operating System Overview
1-4 Oracle Real Application Clusters Installation Guide
installation. The short time that this review requires can prevent you from spending a lot more time when you later must research installation errors.
Oracle recommends that you install a Web browser on each of your cluster nodes. This enables you to use Oracle Enterprise Manager with Oracle RAC. It also enables you to access online documentation which is available in PDF and HTML formats.
1.2 Server Hardware, Network and Operating System OverviewYou must complete all of the required hardware, network, and operating system preinstallation steps for Oracle software. Failure to complete the required preinstallation steps is the most common reason for failed installations.
By the time you start performing the Oracle preinstallation steps described in this guide, you should have already completed installing CPUs, memory, local disks, network cards, host bus adaptors, interconnects, and any other networking or server hardware; and you should have installed the operating system, and any vendor clusterware. Review your vendor documentation to complete these tasks, and if relevant, work with your vendor to complete any Oracle preinstallation steps that are listed here to confirm that the vendor hardware and software is correctly configured.
Server and network preparation include the following tasks:
■ Review Server Hardware and Software Requirements
■ Network Connections Overview
■ Platform-Specific Server Configuration Overview
1.2.1 Review Server Hardware and Software RequirementsThis section contains a summary of server hardware and software configuration requirements and recommendations.
Oracle RequiresEach node in a cluster requires the following:
■ Supported server hardware, including processors and system configuration.
Review My Oracle Support before starting an installation on your existing hardware, and before purchasing new hardware, to ensure that the hardware is supported with Oracle Clusterware, and, if you install it, Oracle RAC 11g Release 1 (11.1).
Also review Chapter 2 and Chapter 4 in Oracle Clusterware Installation Guide for Microsoft Windows for more details on the supported configurations.
See Also: Oracle Database Concepts for an overview of Oracle Database, and Oracle Real Application Clusters Administration and Deployment Guide for additional information about Oracle Clusterware or Oracle RAC configuration and deployment. Also review the Oracle Database installation guide or Oracle Real Application Clusters installation guide for your platform, if you intend to install Oracle Database or Oracle RAC.

Server Hardware, Network and Operating System Overview
Preinstallation Checklist 1-5
■ External shared disks for storing the Oracle Clusterware files, such as the Oracle Cluster Registry (OCR) and the voting disks, as well as for the database files, as summarized in "Shared Storage Overview" on page 1-7.
■ If you install Oracle RAC, a supported interconnect software protocol on each node, to support Oracle Clusterware voting disk polling, and to support Cache Fusion. Your interconnect must be certified by Oracle for your platform.
Oracle RecommendsOracle recommends the following to simplify server installation and maintenance, and to prevent service issues
■ Enabling the Network Time Protocol feature of most operating systems, and ensuring that all nodes use the same reference Network Time Protocol server.
■ Configuring redundant switches, for all cluster sizes.
■ Using identical server hardware on each node, to simplify server maintenance.
■ To avoid resource contention issues, do not install Oracle RAC on a primary domain controller or backup domain controller.
Additional Options■ Though you do not need to use vendor clusterware with Oracle Clusterware,
Oracle Clusterware can interoperate with many vendor clusterware implementations. However, you must install Oracle Clusterware to use Oracle RAC. When you use vendor clusterware, Oracle Clusterware defers to the vendor clusterware for some tasks, such as node membership decisions.
■ You may require third-party vendor clusterware if you use a non-ethernet interconnect.
1.2.2 Network Connections OverviewBefore you begin to set up network configurations, ensure that your network administrator has created at least two network addresses on your DHCP server for each node. These addresses serve as the address for each node’s public and virtual IP addresses.
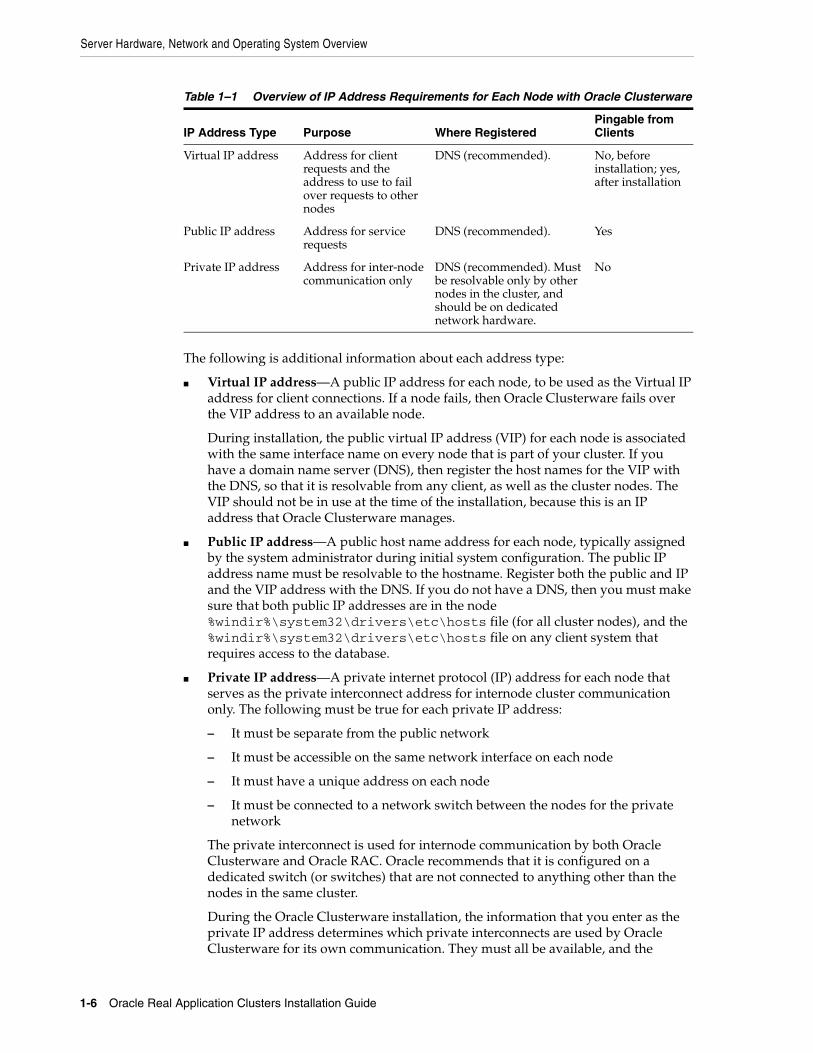
Table 1–1 and the content that follows it is an overview of IP address requirements:
Note: If you install Oracle RAC, then you must use the same operating system on each node in your cluster. Oracle strongly recommends that you use the same software configurations on each node of your cluster. Oracle Clusterware and Oracle Real Application Clusters do not support heterogeneous platforms (servers that have different chip architectures) in the same cluster.
Note: Oracle Clusterware software cannot be installed on Oracle Cluster File System (OCFS) or network-attached storage (NAS).
Server Hardware, Network and Operating System Overview
1-6 Oracle Real Application Clusters Installation Guide
The following is additional information about each address type:
■ Virtual IP address—A public IP address for each node, to be used as the Virtual IP address for client connections. If a node fails, then Oracle Clusterware fails over the VIP address to an available node.
During installation, the public virtual IP address (VIP) for each node is associated with the same interface name on every node that is part of your cluster. If you have a domain name server (DNS), then register the host names for the VIP with the DNS, so that it is resolvable from any client, as well as the cluster nodes. The VIP should not be in use at the time of the installation, because this is an IP address that Oracle Clusterware manages.
■ Public IP address—A public host name address for each node, typically assigned by the system administrator during initial system configuration. The public IP address name must be resolvable to the hostname. Register both the public and IP and the VIP address with the DNS. If you do not have a DNS, then you must make sure that both public IP addresses are in the node %windir%\system32\drivers\etc\hosts file (for all cluster nodes), and the %windir%\system32\drivers\etc\hosts file on any client system that requires access to the database.
■ Private IP address—A private internet protocol (IP) address for each node that serves as the private interconnect address for internode cluster communication only. The following must be true for each private IP address:
– It must be separate from the public network
– It must be accessible on the same network interface on each node
– It must have a unique address on each node
– It must be connected to a network switch between the nodes for the private network
The private interconnect is used for internode communication by both Oracle Clusterware and Oracle RAC. Oracle recommends that it is configured on a dedicated switch (or switches) that are not connected to anything other than the nodes in the same cluster.
During the Oracle Clusterware installation, the information that you enter as the private IP address determines which private interconnects are used by Oracle Clusterware for its own communication. They must all be available, and the
Table 1–1 Overview of IP Address Requirements for Each Node with Oracle Clusterware
IP Address Type Purpose Where RegisteredPingable from Clients
Virtual IP address Address for client requests and the address to use to fail over requests to other nodes
DNS (recommended). No, before installation; yes, after installation
Public IP address Address for service requests
DNS (recommended). Yes
Private IP address Address for inter-node communication only
DNS (recommended). Must be resolvable only by other nodes in the cluster, and should be on dedicated network hardware.
No
Additional Information to Prepare for Installation
Preinstallation Checklist 1-7
private interconnect interface for each node must be capable of responding to a ping command from another node in the cluster.
Oracle recommends that you use a logical Internet Protocol (IP) address that is available across all of the private networks, and that you take advantage of any available operating system-based failover mechanism by configuring it according to your third-party vendor's instructions for using their product to support failover.
1.2.3 Platform-Specific Server Configuration OverviewIn addition to the standard system requirements configuration, deployment on specific server hardware can include additional operating system configuration steps. Review the Preinstallation chapter, and check the My Oracle Support Certify page to ensure that you are aware of any additional requirements or recommendations for your specific hardware platform configuration.
1.3 Shared Storage OverviewOracle Clusterware requires two types of shared files: the Oracle Cluster Registry (OCR) and voting disk. These files must be located on one of two storage options:
■ A shared file system certified by Oracle for your platform
■ Shared raw disk partitions
If you intend to install Oracle RAC, then to store data and recovery files, you must select one of three shared storage options:
■ Automatic Storage Management
■ A shared file system certified by Oracle for your platform
■ Shared Raw disk partitions
Storage options can change over the lifetime of a release, as new storage vendors are certified. Therefore, be sure to review My Oracle Support to confirm that the storage option that you want to use is supported for your platform.
1.4 Additional Information to Prepare for InstallationThis section contains additional information about Oracle Clusterware, Oracle Automatic Storage Management, and Oracle RAC, that may be helpful for you to read to decide how you want to configure your installation. It contains the following sections:
■ Oracle Clusterware and Vendor Clusterware
■ Shared Components of Oracle Real Application Clusters Installations
Note: All host names must conform to the RFC 952 standard, which permits alphanumeric characters. Host names using underscores ("_") are not allowed.
Note: Shared raw disk partitions are only supported as un upgrade option, using DBCA.

Additional Information to Prepare for Installation
1-8 Oracle Real Application Clusters Installation Guide
■ Oracle RAC 11g Release Compatibility
1.4.1 Oracle Clusterware and Vendor ClusterwareOracle Clusterware provides clustering services. You do not require vendor clusterware when you use Oracle Clusterware. If you intend to install Oracle RAC, then you must install Oracle Clusterware.
1.4.2 Shared Components of Oracle Real Application Clusters InstallationsIf you intend to install Oracle Real Application Clusters (Oracle RAC) after installing Oracle Clusterware, note that all instances in Oracle RAC environments share the control file, server parameter file, redo log files, and all data files. These files must be placed on a shared cluster file system or on shared disks, and all the cluster database instances must have access to them. Each instance also has its own set of redo log files. During failures, shared access to redo log files enables surviving instances to perform recovery.
1.4.3 Oracle RAC 11g Release CompatibilityYou can install and operate different releases of Oracle Database software on the same computer:
■ If you have an existing Oracle home, then you can create a new Oracle home and install Oracle Database 11g into the new Oracle home. You should install Oracle Clusterware in a separate Oracle Clusterware home, and if you have an existing Oracle Clusterware installation, then you must use the older Oracle Clusterware software, or upgrade that Oracle Cluster software. Each node can have only one Oracle Clusterware home.
During installation, Oracle Universal Installer (OUI) prompts you to install additional Oracle Database 11g components if you have not already installed all of them.
■ If you intend to install Oracle RAC, then OUI lets you de-install and re-install Oracle RAC if needed.
■ If you are running the Oracle9i release of Oracle RAC, and you want to continue to use that release, then you must use Oracle9i Cluster Manager to support the Oracle9i RAC database server. Oracle Clusterware 11g is not compatible with Oracle9i database software.
■ If OUI detects a previous database release, then OUI asks you about your upgrade preferences. You have the option to upgrade one of the previous release databases with DBUA or to create a new database using DBCA. The information collected during this dialog is passed to DBUA or DBCA after the software is installed.
■ You can run different releases of Oracle Database and Automatic Storage Management (ASM). If the Oracle Database release and the ASM release are the same release, then they can both run out of the same Oracle home. If they are different releases, then the Oracle Database release and the ASM release must be in their separate release homes. For example, you can install an ASM release 11g Release 1 (11.1) instance and use it with Oracle Database 10g Release 2 (10.2)
Note: Do not move Oracle binaries from the Oracle home to another location. Doing so can cause dynamic link failures.

Additional Information to Prepare for Installation
Preinstallation Checklist 1-9
database, or you can install an Oracle 11g Release 1 (11.1) database and use it with an ASM 10g Release 2 (10.2) instance.
1.4.4 Preinstallation Requirements for Oracle Configuration ManagerBefore installing Oracle Configuration Manager (OCM), ensure that all the following preinstallation requirements are met:
■ You must have a Customer Support Identifier (CSI) and an My Oracle Support User Name available because this information is required when installing OCM.
■ You must specify a valid country code while installing OCM. Country codes are associated with the My Oracle Support User Name. Refer to the My Oracle Support site (http://metalink.oracle.com) if you encounter registration failures and are uncertain whether you have specified the correct country code. The country associated with the My Oracle Support User Name can be found in the Profile section under the Licenses link.
Note: When using different Oracle ASM and Oracle Database releases, the functionality of each is dependent on the functionality of the earlier software release. For example, an Oracle Database 10g instance using an Oracle ASM 11g instance will not be able to use new features available for Oracle ASM in release 11.1, but instead only Oracle ASM 10g features. Conversely, an Oracle Database 11g release using an Oracle ASM 10g instance will function like a release 11.1 database.
Note: OCM is only available when you perform a Custom installation.

Additional Information to Prepare for Installation
1-10 Oracle Real Application Clusters Installation Guide

2
Installing Oracle Database with Oracle Real Application Clusters 2-1
2 Installing Oracle Database with Oracle RealApplication Clusters
This chapter describes the installation procedures for installing Oracle Database 11g Release 1 (11.1) with Oracle Real Application Clusters (Oracle RAC). This chapter also describes some of the Oracle Universal Installer (OUI) features. This chapter contains the following topics:
■ Verifying System Readiness for Installing the Oracle Database with CVU
■ Oracle Database Configuration Type Descriptions
■ Oracle Configuration Manager Option
■ Actions of OUI, DBCA, and Other Assistants During Installation
■ Database Security Options
■ Installation of Oracle RAC Using Oracle Universal Installer
■ Installation on Windows-Based Systems with the Minimum Memory Requirements
■ Deinstalling Oracle Real Application Clusters Software
2.1 Verifying System Readiness for Installing the Oracle Database with CVU
To verify that your system is prepared to install Oracle Database with Oracle RAC successfully, run Cluster Verification Utility (CVU) from the CRS_home\bin directory, using the following command syntax:
cluvfy.bat stage -pre dbinst -n node_list [-r 11gR1 ] [-verbose]
In the preceding syntax example:
■ The variable node_list is the list of nodes in your cluster, separated by commas
For example, to perform a pre-installation check for an Oracle Database with Oracle RAC installation on a two-node cluster with nodes node1 and node2, enter the following command:
cluvfy.bat stage -pre dbinst -n node1,node2 -verbose
Note: To install Oracle RAC on Windows Server 2008, use the Oracle Database 11g Release 1 (11.1.0.7.0) for Microsoft Windows Server 2008 media.

Verifying System Readiness for Installing the Oracle Database with CVU
2-2 Oracle Real Application Clusters Installation Guide
Oracle recommends that you select the option -verbose to receive progress updates as CVU performs its system checks. The -verbose option provides detailed test reporting, which you can use to identify the cause of any checks that fail.
If the cluster verification check fails, then review and correct the relevant system configuration steps, and run the test again. Use the system configuration checks described in "Troubleshooting Installation Setup for Windows" to assist you.
2.1.1 Troubleshooting Installation Setup for WindowsIf you run CVU and your system fails system configuration checks, then review the CVU report, and use the output to resolve failed configuration checks.
User Equivalence Check FailedCause: Failure to establish user equivalency across all nodes.
Action: From the node where you intend to run OUI, verify that you have administrative privileges on the other nodes. To do this, enter the following command for each node that is a part of the cluster:
net use \\node_name\C$
where node_name is the node name.
If you find a node where you are not able to log on, then you must correct the user information on that node. You must use the same user name and password that has local administrative privileges on each node in a cluster, or use a domain user name. If you use a domain user name, then log on under a domain user that has administrative privileges on each node.
When you have corrected the path configuration information on the node, run the CVU check again.
Node Reachability Check FailedCause: Failure of one or more nodes to be properly connected for communication.
Action: Possible causes of this message include the following:
■ Improper network configuration
■ The node running CVU is unable to connect to one or more nodes in the cluster
Use the following command to check your current configuration on each node:
ipconfig /all
Node Connectivity Check FailedCause: One or more of the cluster nodes is not able to be connected from all nodes in the cluster
Action: Check for firewalls preventing the nodes from communicating on their private network interfaces.
System Requirements Check FailedCause: insufficient system resources, missing software packages, or other operating system or hardware problem.
Action: If you did not run the CVU command with the -verbose flag, then run the command again using -verbose, and review the report to determine which system requirement failed. Correct the problem.

Oracle Configuration Manager Option
Installing Oracle Database with Oracle Real Application Clusters 2-3
2.2 Oracle Database Configuration Type DescriptionsWhen you run OUI, you can select the General Purpose, Transaction Processing, Data Warehouse, or Advanced database configuration type.
For the first three configuration types, you can complete additional procedures that are described later in this chapter. If you select Advanced configuration, then you can use Database Configuration Assistant (DBCA) to create the database as described in Chapter 3, "Creating Oracle RAC Databases with the Database Configuration Assistant". Oracle recommends that you use DBCA to create your database.
2.2.1 General Purpose, Transaction Processing, and Data Warehouse Configuration Types
The General Purpose, Transaction Processing, and Data Warehouse configuration types use preconfigured database templates.
During installation, if you select one of the preconfigured database templates, then OUI starts Oracle Network Configuration Assistant (NETCA) and DBCA, and installs the preconfigured database without further input. During database installation, OUI displays a progress indicator.
DBCA processing for these three configuration types creates a starter database, and configures the Oracle network services. If you choose raw devices on the Specify Database File Storage Option page, then DBCA verifies that you configured the raw devices for each tablespace.
If you select Advanced configuration, then you must enter specific information as described in the next section.
2.2.2 Using the Advanced Configuration TypeIf you select the Advanced configuration type, then OUI runs DBCA, which displays General Purpose, Transaction Processing, Data Warehouse, and a fourth configuration type, Custom Database.
Use the Advanced Configuration type to address specific requirements, such as creating a database in a nondefault character set, or adding translation of product user interface into languages other than English. By default, the installation configures the character set of a new database based on the language of the operating system.
The first three templates are customizable versions of the preconfigured database types. The Custom Database type creates a database without using preconfigured options.
The following section provides more detail about OUI and DBCA processing when creating an Oracle RAC database.
2.3 Oracle Configuration Manager OptionDuring installation, you are prompted to provide information needed to enable Oracle Configuration Manager. This option enables you to associate information about your
See Also: Oracle Database Globalization Support Guide for detailed information on character sets and language configuration
See Also: Oracle Database Installation Guide for your platform for information about configuring globalization

Actions of OUI, DBCA, and Other Assistants During Installation
2-4 Oracle Real Application Clusters Installation Guide
Oracle RAC configuration with your My Oracle Support account. In the event that you need to place a service request with Oracle Support, that configuration information can help to provide a more rapid resolution to the service issue.
You can enable Oracle Configuration Manager during or after installation, or choose not to enable it. To enable it during installation, you must have the following information available:
■ Customer Support Identification Number (CSI) that identifies your organization
■ My Oracle Support user account name
■ Country code associated with your service agreement
Refer to My Oracle Support (https://metalink.oracle.com) if you encounter registration failures and are uncertain that the correct country code has been specified. You can find the country associated with your My Oracle Support account in the Profile section under the Licenses link.
2.4 Actions of OUI, DBCA, and Other Assistants During InstallationAfter installation, OUI starts the Network Configuration Assistant (NETCA). After NETCA completes its processing, OUI runs DBCA to create your database, in accordance with Optimal Flexible Architecture (OFA) guidelines. An installation created following OFA guidelines means that DBCA creates your database files, including the default server parameter file (SPFILE), using standard file naming and file placement practices.
The primary phases of DBCA processing are the following:
■ Create the database.
■ Configure the Oracle network services, if necessary.
■ Start the listeners and database instances.
You can also use DBCA in standalone mode to create or delete a database or ASM installation, or to switch database management from Oracle Enterprise Manager Database Control to Oracle Enterprise Manager Grid Control.
Note that with Oracle Database release 11.1, service management is no longer performed for Oracle RAC databases. Use Oracle Enterprise Manager DB Control or Grid Control for all administration and monitoring of services.
In Oracle Database 10g and later releases, some database language and territory definition files have been updated to better reflect locale conventions used in associated locales.
If the resulting changes in default NLS parameter values render your existing applications inoperative, then you can revert the changes by installing Oracle9i compatibility definition files. To install Oracle9i files in place of Oracle11g files, you must run OUI from a command line, as described in "Installation of Oracle RAC Using
See Also: Oracle Configuration Manager Installation and Administration Guide for further information
See Also: Oracle Database Net Services Administrator's Guide if you experience problems (for example, with the listener configuration), and for further information about Lightweight Directory Access Protocol (LDAP) support

Installation of Oracle RAC Using Oracle Universal Installer
Installing Oracle Database with Oracle Real Application Clusters 2-5
Oracle Universal Installer" on page 2-5, and use the following statement to set the b_cr9idata variable to true:
runInstaller oracle.rsf.nlsrtl_rsf:b_cr9idata=true
2.5 Database Security OptionsDuring installation, you are prompted to select database security configuration.The Secure Configuration option configures the database with database auditing options, and password policy and expiration settings.
For new database installations, the default configuration for Oracle Database 11g Release 1 (11.1) includes the Secure Configuration option. If you want to disable these enhanced security controls, then you can check the Disable security settings check box. Oracle Database is then installed with default options for Oracle Database 10g Release 2. After installation, you can change security settings by starting DBCA and modifying security settings. You can enable or disable auditing or password security settings, or revert to a previous security setting.
For database upgrades, the upgraded database retains your existing database security configuration, to ensure compatibility with existing applications. After installation, you can use DBCA to enable or disable the Secure Configuration auditing or password security settings for testing.
2.6 Installation of Oracle RAC Using Oracle Universal Installer Perform the following procedures to install Oracle Database 11g Release 1 (11.1) software with Oracle RAC.
1. Start the setup.exe command from the base directory of the Oracle Database 11g Release 1 (11.1) media, choose Oracle Database 11g, then click Next.
2. Provide information when prompted by OUI. If you need assistance during installation, click Help. If you encounter problems during installation, examine the OUI actions recorded in the installation log file. The log file is located in the Oracle Inventory directory with a name that includes the timestamp (date_time) of the install process, as shown in this example:
C:\Program Files\Oracle\Inventory\logs\installActionsdate_time.log
In the preceding syntax example, the variables date and time represents the date and the time of the log file.
See Also: Oracle Database Globalization Support Guide for additional information about updates to the Oracle Database language and territory definition files
Note: Oracle strongly recommends configuring your database with the Secure Configuration option either during installation, or after installation using DBCA.

Installation on Windows-Based Systems with the Minimum Memory Requirements
2-6 Oracle Real Application Clusters Installation Guide
The following is a list of additional information to note about installation:
■ If you select Automatic Storage Management (ASM) during installation, then the default partitions for ASM disk partition locations from which you must select ASM disks are marked as follows:
\\.\orcldisk*
If you are installing Oracle RAC from the Standard Edition, then you must use ASM for your database storage.
When have completed all steps for the second and final phase of the installation, proceed to Chapter 4, "Oracle Real Application Clusters Post-Installation Procedures" to perform the post-installation tasks.
2.7 Installation on Windows-Based Systems with the Minimum Memory Requirements
Installations of Oracle RAC on nodes in Windows-based systems with 512 MB of RAM and 500 MB of virtual memory have the following limitations:
■ 1 GB of RAM is recommended and 512 MB is the minimum allowable amount of RAM
■ Depending on how many applications are running on the computer, you may need to further increase the paging file size or reduce the size of the System Global Area (SGA) if you run out of virtual memory. Note that if temporary files and the paging file are both stored on the same physical drive, then a situation can occur where the space requirements for one can limit the size of another. If your system has limited free space, then first install the Oracle Database software. After the installation is finished, run NETCA to configure listeners and then DBCA to create a database.
On computer systems that barely meet the minimum memory and virtual memory requirements, 512 MB and 500 MB respectively, do not install the database. Instead, follow these guidelines:
■ Select Enterprise Edition Installation and deselect "Do not create a starter database"
■ Select Custom Installation, select "Do not create a starter database" from the Select Database Configuration page.
Note: The Oracle home name and path that you provide during database installation must be different from the home that you used during Oracle Clusterware installation. Do not install Oracle Database 11g with RAC software into the same home in which you installed Oracle Clusterware software.
Note: The only partitions that OUI displays for Windows systems are logical drives that are on drives that do not contain a primary partition, and have been stamped with asmtool. To stamp drives in Windows Server 2008 environments, run asmtoolg from an Administrative command prompt.

Deinstalling Oracle Real Application Clusters Software
Installing Oracle Database with Oracle Real Application Clusters 2-7
■ Select Advanced Installation, select the Custom installation type from the Select Installation Type page, and select No on the Create Database page when prompted to create the database.
■ Cancel DBCA from the Configuration Assistants page.
After installation, run the appropriate configuration assistant for your needs:
■ To create a new database, run DBCA from the Start Menu. Choose Start, then Programs, then Oracle - HOME_NAME, then Configuration and Migration Tools, and then Database Configuration Assistant.
■ To upgrade an existing database, run DBUA from the Start Menu. Choose Start, then Programs, then Oracle - HOME_NAME, then Configuration and Migration Tools, and then Database Upgrade Configuration Assistant.
To ensure that all nodes in your cluster use the new Oracle home, ensure that the path name for the new Oracle home is defined on each node in the cluster by completing the following procedure:
1. On each node, navigate to Start, then to Control Panel, then to System, then to Advanced and then to Environment Variables
2. In the "System variables" dialog, select the Path variable and ensure that the value for the Path variable contains oracle_home\bin, where oracle_home is your new Oracle home. If the variable does not contain this value, then click Edit and add this value to the start of the path variable definition in the Edit System Variable dialog and click OK.
3. Click OK in the Environment Variables page, then click OK in the System Properties page, and then close the Control Panel.
2.8 Deinstalling Oracle Real Application Clusters SoftwareIf you need to de-install Real Application Cluster software, then you must run OUI to de-install the software on the same node from which you performed the installation, and you must de-install Oracle database software first before de-installing Oracle Clusterware software. Perform the following procedures to deinstall Oracle Database 11g RAC and Oracle Clusterware software, as described in the following sections:
■ Deinstalling Oracle Database with Oracle RAC Software
■ Deinstalling Automatic Storage Management
Note: These sections describe a complete de-installation of the Oracle RAC, ASM, and Oracle Clusterware software where Oracle RAC and ASM share the Oracle home and no other Oracle home exists.
If you have multiple Oracle homes on your cluster, then check for any dependencies that might affect your other databases. Dependencies can include listeners, ASM instances, and so on, that run in the Oracle home that you want to delete. You can identify dependencies by using the Windows Services panel.

Deinstalling Oracle Real Application Clusters Software
2-8 Oracle Real Application Clusters Installation Guide
2.8.1 Deinstalling Oracle Database with Oracle RAC SoftwareThis section describes the procedure to deinstall Oracle Database 11g RAC software. Before you perform these steps, Oracle recommends that you make a backup of any databases that run from the Oracle home you are about to delete. You should then stop any instances and processes on all nodes, including services, that depend on the software that you are de-installing.
1. Drop all of the databases that are dependent on the Oracle home that you are deleting by using DBCA "Delete a database" option and selecting the correct database or databases to be dropped.
2. If an ASM instance runs in the Oracle home, then ensure that there are no other database dependencies on the ASM instance. Then remove the ASM configuration by logging on as an Administrative user and completing the following steps:
a. Connect to the ASM instance and run the following command to identify any database instances that are using this ASM instance:
SQL> select INSTANCE_NAME from GV$ASM_CLIENT;
b. For each instance listed in the output of the statement you ran in Step a, stop the respective databases.
c. Oracle recommends that you back up the database files for all of the databases that are currently using this ASM instance.
d. Using your connection to the ASM instance, run the following command:
Note: For Windows Server 2008, you must have administrator privileges and you must run commands from an Administrative command prompt to run executables that reside in the Oracle Clusterware home.
See Also: Oracle Real Application Clusters Administration and Deployment Guide for more information about using Oracle RAC scalability features of adding and deleting nodes and instances from Oracle RAC databases, and for information about viewing OCR content
Note: For Windows Server 2008, you must have administrator privileges and you must run commands from an Administrative command prompt to run executables that reside in the Oracle Clusterware home.
Note: This command only lists database instances that are running. It is possible that other instances are associated with the ASM instance, but they are not currently running. If you removed a database from this Oracle home but the output from the command shows that this ASM instance is supporting a database instance in another Oracle home, then do not remove the ASM instance or the Oracle home.
Deinstalling Oracle Real Application Clusters Software
Installing Oracle Database with Oracle Real Application Clusters 2-9
SQL> select * from V$ASM_DISKGROUP;
e. For each diskgroup listed in the output of the statement you ran in Step d, run the following command:
SQL> drop diskgroup diskgroup_name including contents;
where diskgroup_name is the name of the diskgroup.
f. Shut down ASM on all Oracle RAC nodes, and verify that all ASM instances are stopped.
g. To remove the ASM entry from the OCR, run the following command for all nodes on which this Oracle home exists:
srvctl remove asm -n nodename
where nodename is the name of a node from which you want to remove the ASM instance.
h. Run the following command on each node that has an ASM instance where node_number is the node identifier:
oradim -delete -asmsid +ASMnode_number
i. If you are using a shared cluster file system for your Oracle home, then run the following commands on the local node:
delete %ORACLE_HOME%\database\*ASM*delete %ORACLE_BASE%\admin\+ASM
You may need to remove subordinate files or directories before these commands complete successfully.
j. If you are not using a shared cluster file system for your Oracle home, then run the commands from the previous step, Step i, on each node on which the Oracle home exists.
k. Stop any other processes running in this Oracle home:
Stop Oracle Ultra Search: %ORACLE_HOME%\bin\searchctl stop
3. If the listener runs from this Oracle home, then use NETCA to remove the listener and its configuration.
4. Start OUI using the following command:
%ORACLE_HOME%\oui\bin\setup.exe
In the Welcome page, click Deinstall Products. The Inventory screen appears, listing all of the Oracle homes on the system. In the Inventory screen, select the Oracle home and the products that you want to remove, then click Remove.
Note: Always use OUI to remove Oracle software. Do not delete any Oracle home directories without first using OUI to remove the software. In addition, you cannot perform an Oracle RAC installation from the same OUI session in which you perform a de-installation of Oracle RAC. In other words, if you de-install Oracle RAC with OUI and want to perform another Oracle RAC installation, then you must start a new OUI session.

Deinstalling Oracle Real Application Clusters Software
2-10 Oracle Real Application Clusters Installation Guide
2.8.2 Deinstalling Automatic Storage ManagementTo remove the Automatic Storage Management (ASM) instances, complete the following tasks:
1. There is one listener for each node that Oracle Clusterware manages, and that is started and stopped with nodeapps. It is named nodename_LISTENER, and it is located in the Oracle home. Use NetCA to remove this listener and its Oracle Clusterware resources. If necessary, re-create this listener in another Oracle home.
2. If this is the Oracle home from which the ASM instance runs, then enter the following commands to remove the ASM configuration:
srvctl stop asm -n nodesrvctl remove asm -n node
3. If you are not using a cluster file system for your ASM Oracle home, then run the Server Control stop and remove commands listed in the previous step on each node on which the Oracle home exists.
4. If you are using a shared cluster file system for your ASM Oracle home, then run the following commands on the local node:
delete %ORACLE_HOME%\database\*ASM*delete %ORACLE_BASE%\admin\+ASM
You may need to remove subordinate files or directories before these commands complete successfully.
5. If you are not using a shared cluster file system for your ASM Oracle home, then run the commands from the previous step, step 4, on each node on which the Oracle home exists.
6. Run the following command on each node:
%ORACLE_HOME%\bin\oradim.exe -delete -asmsid +ASMnode_number
where node_number is the node identifier.

3
Creating Oracle RAC Databases with the Database Configuration Assistant 3-1
3 Creating Oracle RAC Databases with theDatabase Configuration Assistant
This chapter describes how to use the Database Configuration Assistant (DBCA) in standalone mode to create and delete Oracle Real Application Clusters (Oracle RAC) databases. The topics in this chapter include:
■ Using Database Configuration Assistant with Oracle RAC
■ Benefits of Using Database Configuration Assistant
■ Verifying DBCA Requirements
■ Creating an Oracle RAC Database with DBCA
■ Automatic Listener Migration from Earlier Releases
■ Deleting an Oracle Real Application Clusters Database with DBCA
3.1 Using Database Configuration Assistant with Oracle RACDBCA has the following primary database functions:
■ Create and delete the database
■ Add and delete database instances
■ Set up network configuration for the database and its instances
■ Register the database in Oracle Enterprise Manager Grid Control or configure Database Control
■ Start up the database and its instances
In addition DBCA has the following primary ASM functions:
■ Configure and delete Automatic Storage Management (ASM)
See Also: Oracle Real Application Clusters Administration and Deployment Guide for procedures on using Database Configuration Assistant (DBCA) to add and delete instances
Note: Cluster Managed Services are no longer managed through DBCA. Instead, use the cluster managed services page in Oracle Enterprise Manager DB Control (accessible from the Cluster Database Availability Page). For more information, refer to Oracle Real Application Clusters Administration and Deployment Guide.

Benefits of Using Database Configuration Assistant
3-2 Oracle Real Application Clusters Installation Guide
■ Provide an ASM instance for an Oracle Database node that is added to an existing Oracle RAC database that uses ASM, if ASM is not already configured on the node that is added to the Oracle RAC database
■ Automatically extend an ASM instance on any node where you attempt to perform any ASM configuration operations (such as mount) on a node where ASM is not already configured
3.2 Benefits of Using Database Configuration AssistantOracle recommends that you use DBCA to create your Oracle RAC database, because DBCA's preconfigured databases optimize your environment for features such as ASM, the server parameter file, and automatic undo management. DBCA also provides pages to create new ASM disk groups if they are needed; if you use ASM or cluster file system storage, then DBCA also configures recovery and backup disk space.
With DBCA, you can create site-specific tablespaces as part of database creation. If you have data file requirements that differ from those offered by DBCA templates, then create your database with DBCA and modify the data files later. You can also run user-specified scripts as part of your database creation process.
DBCA also configures your Oracle RAC environment for various Oracle high availability features, such as services and cluster administration tools. It also starts any database instances required to support your defined configuration.
3.3 Verifying DBCA RequirementsTo help to verify that your system is prepared to create the oracle database with Oracle RAC successfully, enter a cluster verification utility command using the following command syntax:
cluvfy.bat stage -pre dbcfg -n node_list -d oracle_home [-verbose]
In the preceding syntax example, the variable node_list is the list of nodes in your cluster, separated by commas, and the variable oracle_home is the path for the Oracle home under which the database is to be created or its configuration is to be modified.
For example, to perform a check to determine if your system is prepared for an Oracle database with Oracle RAC on a two-node cluster with nodes node1 and node2, and with the Oracle home path c:\oracle\product\11.1.0, enter the following command:
cluvfy.bat stage -pre dbcfg -n node1,node2 -d c:\oracle\product\11.1.0
You can select the option -verbose to receive progress updates as the CVU performs its system checks, and detailed reporting of the test results.
See Also:
■ "Creating an Oracle RAC Database with DBCA" on page 3-3 for more information about using DBCA in standalone mode
■ Oracle Database Net Services Administrator's Guide to resolve problems—for example, with the listener configuration—and for further information about Lightweight Directory Access Protocol (LDAP)-compliant directory support

Creating an Oracle RAC Database with DBCA
Creating Oracle RAC Databases with the Database Configuration Assistant 3-3
If the CVU summary indicates that the cluster verification check failed, then review and correct the relevant system configuration steps, and run the test again.
The command cluvfy stage -pre dbcfg verifies the following:
■ Node reachability: all the specified nodes are reachable from the local node
■ User equivalence: user equivalence exists on all the specified nodes
■ Node connectivity: the connectivity exists between all the specified nodes through the available public and private network interfaces
■ Administrative privileges: the current user has proper administrative privileges on the specified nodes for creating an Oracle RAC database
■ Oracle Clusterware integrity: all the components of the oracle clusterware stack are operational
3.4 Creating an Oracle RAC Database with DBCAOn Windows-based platforms, click Start, and select Programs, Oracle - Oracle_home name, Configuration and Migration Tools, and then Database Configuration Assistant
To create a database with DBCA in standalone mode without ASM or a cluster file system, you must have configured shared storage devices. In addition, you must have run the Oracle Net Configuration Assistant (NETCA) to configure your Oracle Net listener.ora file.
On Windows-based systems, if you plan to use ASM storage, then before you use DBCA to create a database, you must first create logical partitions without primary partitions on the same drive and delete the drive letters for these partitions on all nodes, or stamp these partitions with asmtool.
If you select DBCA templates that use preconfigured data files and if you do not use ASM or a cluster file system, then during database creation, DBCA first verifies that you created shared storage devices for each tablespace. If you have not configured the shared storage devices, then you must configure the devices and replace the default data file names that DBCA provides with the device names on the DBCA Storage page to continue database creation.
To start DBCA, connect as the Administrator to one of your nodes where Oracle RAC is installed and enter the command dbca command from the %ORACLE_HOME%\bin directory.
When you start DBCA, the first page it displays is the Welcome page for Oracle RAC, which includes the option to select an Oracle RAC database. DBCA displays this Oracle RAC Welcome page only if the Oracle home from which it is started was installed on a cluster.
If the Oracle RAC Welcome page opens, then provide information as prompted by DBCA. Click Help if you need assistance.
If DBCA does not display the Welcome page for Oracle RAC, then DBCA was unable to detect if the Oracle home is installed on a cluster. Perform clusterware diagnostics by using the following CVU command syntax:
Note: If the user who performed the Oracle RAC installation was not a Windows domain user, then you may need to add the software owner user to the ORA_DBA group on all nodes in the cluster except the one on which the installation was performed.

Creating an Oracle RAC Database with DBCA
3-4 Oracle Real Application Clusters Installation Guide
CRS_home\bin\cluvfy\runcluvfy.bat stage -post crsinst -n nodelist.
For example, if the Oracle Clusterware software is installed in D:\crs and the cluster consists of nodes node1 and node2, run the following command:
D:\crs\bin\cluvfy.bat stage -post crsinst -n node1,node2
Note the following important information when using DBCA:
■ If nodes that are part of your cluster installation do not appear on the Node Selection page, then run the opatch -lsinventory command to perform inventory diagnostics and clusterware diagnostics.
■ The Global Database Name is of the form database_name.network_domain. The global database name can contain no more than 30 characters (alphanumeric, underscore (_), dollar ($), and pound (#)), and must begin with an alphabetic character. The network domain portion of the global database name can contain no more than 128 characters (alphanumeric, underscore (_), and pound (#)), inclusive of all periods.
■ The SID prefix must begin with an alphabetic character.
■ The SID can have no more than 64 characters (alphanumeric, dollar ($), and pound (#)). DBCA uses the SID prefix to generate a unique value for the variable ORACLE_SID for each instance.
■ On the Management Options page, you are provided with selections for Oracle Enterprise Manager monitoring and management interfaces.
Database Control is always an option. If DBCA discovers Grid Control agents on the cluster, then it also provides you with the option Enterprise Manager with the Grid Control. Choose between Database Control and Grid Control interfaces.
You can set up e-mail notification and enable daily backup operations. For e-mail notifications, you provide the outgoing mail server and e-mail address. For daily backups, you enter the backup time and operating system credentials for the user that performs backup operations.
■ To use a flash recovery area, Oracle recommends that you create at least two separate ASM disk groups: one for the database area and one for the recovery area. Oracle recommends that you place the database area and the recovery area in separate failure groups.
A failure group is defined by shared hardware, such as a controller shared between two disks, or two disks that are on the same spindle. If two disks share hardware that could fail, making both disks unavailable, then these disks are said to be in the same failure group.
If you do not use ASM, then Oracle recommends that the data files and the Flash Recovery area are located outside of the Oracle home, in separate locations, as with separate ASM failure groups, so that a hardware failure does not affect availability.
■ If you do not see the disks that you want to add, then click Change Disk Discovery Path to alter the search path used by DBCA to find available disks, or
See Also: Oracle Database Concepts for more information about using a flash recovery area, and Oracle Database Storage Administrator's Guide for information about failure groups and best practices for high availability and recovery
Creating an Oracle RAC Database with DBCA
Creating Oracle RAC Databases with the Database Configuration Assistant 3-5
click Stamp Disks to start the asmtoolg GUI tool. (refer to Database IG for details).
■ If DBCA displays the following message:
The file oracle_home\bin\oracle does not exist on node node_name. Make sure that file exists on these nodes before proceeding.
This message means that the Oracle home from which the first ASM instance in the cluster runs is not installed on these cluster nodes. You must extend the ASM Oracle home to these nodes by performing the procedure documented in "Step 4: Adding Nodes at the Oracle RAC Database Layer" in the Oracle Real Application Clusters Administration and Deployment Guide. However, do not perform Step 5 in that section. OUI extends the ASM Oracle home to the selected nodes and performs any configuration required for running an ASM instance on these nodes.
■ If DBCA displays the following message:
Please run the DBCA from one of the nodes that has an existing ASM instance node_list.
This message means that you are attempting to create an Oracle RAC database using ASM storage, but the ASM instance does not exist on the node from which you ran DBCA. However, ASM instances do exist on the remote nodes that appear in the message node list. In this case, DBCA cannot clone the existing ASM instance from the remote node to the local node. To correct this, start DBCA from one of the nodes shown in the node list to create your Oracle RAC database using ASM storage. This copies the local node's ASM instance and modifies its parameters and attributes to create ASM instances on the nodes in your cluster that do not have ASM instances.
■ On the Recovery Configuration page, if you are using ASM or cluster file system storage, then you can also select the flash recovery area and size on the Recovery Configuration page. If you are using ASM, then the flash recovery area defaults to the ASM Disk Group. If you are using OCFS, then the flash recovery area defaults to %ORACLE_BASE%\flash_recovery_area.
■ If you intend to add more nodes in your cluster than you have during the current DBCA session, then click All Initialization Parameters, and change the parameter CLUSTER_DATABASE_INSTANCES to the number of nodes that you will add to the cluster.
In addition, if you click All Initialization Parameters, note that if your global database name is longer than 8 characters, then the database name value (in the DB_NAME parameter) is truncated to the first 8 characters, and the DB_UNIQUE_NAME parameter value is set to the global name.
After you respond to the DBCA prompts, review the Summary dialog information and click OK, DBCA does the following:
■ Creates an operative Oracle RAC database and its instances
■ Creates the Oracle RAC data dictionary views
See Also: Oracle Database Installation Guide for Microsoft Windows for more information about asmtoolg
See Also: Oracle Database Administrator's Reference for information about initialization parameters

Automatic Listener Migration from Earlier Releases
3-6 Oracle Real Application Clusters Installation Guide
■ Configures the network for the cluster database
■ Starts the Oracle services if you are on a Windows-based platform
■ Migrates previous release Oracle Database listeners and related files to the Oracle Database 11g Oracle home
■ Starts the listeners and database instances, and then starts the high availability services
■ Configures Oracle Enterprise Manager Database Control or Grid Control
3.5 Automatic Listener Migration from Earlier ReleasesIf your system has an Oracle Database 10g (10. 1) installation, and you install Oracle Database 11g release 1 (11.1) either to coexist with or to upgrade the Oracle Database 10.1 or 10.2 installation, then most installation types automatically migrate the Oracle Database 10.1 listener to the 11g release 1 (11.1) Oracle home. During migration, they configure and start a default Oracle Net listener using the same TCP/IP port as the existing listener, with the IPC key value EXTPROC. This process occurs through one of the following scenarios:
■ During a coexisting installation, DBCA automatically migrates the listener and related files from the Oracle Database 10.1 or 10.2 Oracle home to the Oracle Database 11g Oracle home.
■ During an upgrade, Oracle Database Upgrade Assistant (DBUA) automatically locates the Oracle 10g release 1 (10.1) or release 2 (10.2) listener, and migrates it to Oracle 11g release 1 (11.1).
The listener migration process stops the listener in the existing Oracle home, and restarts the listener from the new Oracle home. During migration, client applications may not be able to connect to any databases that are registered to the listener that is being migrated.
3.6 Deleting an Oracle Real Application Clusters Database with DBCAThis section explains how to delete an Oracle RAC database with DBCA. This process deletes a database and removes a database's initialization parameter files, instances, OFA structure, and Oracle network configuration. However, this process does not remove data files if you placed the files on raw devices or on raw partitions.
To delete a database with DBCA:
1. Start DBCA on one of the nodes:
On Windows-based platforms, click Start, and select Programs, Oracle - Oracle_home name, Configuration and Migration Tools, then Database Configuration Assistant
Caution: After you have created the database, if you decide that you want to install additional Oracle Database 10g products in the Oracle Database 11g database you have created, then you must stop all processes running in the Oracle home before you attempt to install the additional products. For the Oracle Universal Installer to relink certain executables and libraries, all database processes must be down. Refer to Appendix B, "Stopping Processes in Oracle Real Application Clusters Databases" for additional information.
Deleting an Oracle Real Application Clusters Database with DBCA
Creating Oracle RAC Databases with the Database Configuration Assistant 3-7
The DBCA Welcome page appears.
2. Select Oracle Real Application Clusters and click Next.
After you click Next, DBCA displays the Operations page.
3. Select Delete a database, click Next. DBCA displays the List of Cluster Databases page.
4. If your user ID and password are not operating-system authenticated, then the List of Cluster Databases page displays the user name and password fields. If these fields appear, then enter a user ID and password that has SYSDBA privileges.
5. Select the database to delete and click Finish.
After you click Finish, DBCA displays a dialog to confirm the database and instances that DBCA is going to delete.
6. Click OK to begin the deletion of the database and its associated files, services, and environment settings, or click Cancel to stop the operation.
When you click OK, DBCA continues the operation and deletes all of the associated instances for this database. DBCA also removes the parameter files and password files.
At this point, you have accomplished the following:
■ Deleted the selected database from the cluster
■ Deleted the selected database’s Oracle services for Windows-based platforms
■ Deleted high availability services that were assigned to the database
■ Deleted the Oracle Net configuration for the database
■ Deleted the OFA directory structure from the cluster
■ Deleted the data files if the data files were not on raw devices

Deleting an Oracle Real Application Clusters Database with DBCA
3-8 Oracle Real Application Clusters Installation Guide

4
Oracle Real Application Clusters Post-Installation Procedures 4-1
4 Oracle Real Application ClustersPost-Installation Procedures
This chapter describes how to complete the post-installation tasks after you have installed Oracle Database 11g with Oracle Real Application Clusters (Oracle RAC) software. It contains the following sections:
■ Required Post-Installation Tasks
■ Recommended Post-Installation Tasks
4.1 Required Post-Installation TasksYou must perform the following tasks after completing your installation:
■ Back Up the Voting Disk after Installation
■ Download and Install Patches
■ Configure Oracle Products
■ Configure Storage for External Tables, Shared Files, or Directory Objects
4.1.1 Back Up the Voting Disk after InstallationAfter your Oracle Database 11g with RAC installation is complete, and after you are sure that your system is functioning properly, make a backup of the contents of the voting disk using ocopy.exe which resides in the Oracle Database home.
Also make a backup of the voting disk contents after you complete any node additions or node deletions, and after running any deinstallation procedures.
4.1.2 Download and Install PatchesRefer to the My Oracle Support Web site for required patches for your installation. To download required patches:
1. Use a Web browser to view the My Oracle Support Web site:
https://metalink.oracle.com
2. Log in to My Oracle Support.
Note: This chapter only describes basic configurations. Refer to the Oracle Database Platform Guide for Microsoft Windows and the product administration and tuning guides for more detailed configuration and tuning information.
Required Post-Installation Tasks
4-2 Oracle Real Application Clusters Installation Guide
3. On the main My Oracle Support page click Patches.
4. On the Select a Patch Search Area page click New My Oracle Support Patch Search.
5. On the Simple Search page click Advanced.
6. On the Advanced Search page click the search icon next to the Product or Product Family field.
7. In the Search and Select: Product Family field, enter RDBMS Server in the For field and click Go.
8. Select RDBMS Server under the Results heading and click Select.
RDBMS Server appears in the Product or Product Family field and the current release appears in the Release field.
9. Select your platform from the list in the Platform field and click Go.
10. Any available patches appear under the Results heading.
11. Click the number of the patch that you want to download.
12. On the Patch Set page, click View README and read the page that appears. The README page contains information about the patch set and how to apply the patches to your installation.
13. Return to the Patch Set page, click Download, and save the file on your system.
14. Use the unzip utility provided with Oracle Database 11g to uncompress the Oracle patches that you downloaded from My Oracle Support. the unzip utility is located in the ORACLE_HOME\bin directory.
4.1.3 Configure Oracle ProductsMany Oracle products and options must be configured before you use them for the first time. Before using individual Oracle Database 11g database products or options, refer to the manual in the product documentation library which is available on the documentation media or on the OTN Web site.
4.1.4 Configure Storage for External Tables, Shared Files, or Directory ObjectsIf your Oracle RAC database uses files that are external to the database, then the external files should be located on shared storage that is accessible to all nodes. Each node should use the same mount point to access the file. Acceptable shared file systems include Database File System (DBFS), Oracle ASM Cluster File System (Oracle ACFS), Oracle Cluster File System (OCFS) for Windows, or a supported network file system (NFS).
The database Directory Object used to write and read files external to the database must point to a shared storage location, and each node must use the same mount point
Note: If you are not an My Oracle Support registered user, then click Register for My Oracle Support and register.
Note: If you find patches for your Oracle Clusterware and for your Oracle Database, you must apply the patches for your Oracle Clusterware home before you apply the patches for your Oracle home.

Recommended Post-Installation Tasks
Oracle Real Application Clusters Post-Installation Procedures 4-3
for the same shared storage location. For example, each node might have a Directory Object called DPUMP for the mount point C:\app\acfsmounts\dpump, which accesses Oracle ACFS shared storage.
4.2 Recommended Post-Installation TasksDepending on the options that you selected to install, Oracle recommends that you perform the following tasks after completing an installation:
■ Verifying Enterprise Manager Operations
■ Logging in to Oracle Enterprise Manager Database Control
■ Postinstallation Database Configuration for Oracle Configuration Manager
4.2.1 Verifying Enterprise Manager OperationsRun the following command to verify the Enterprise Manager configuration in your newly installed Oracle RAC environment:
srvctl config database -d db_name
SRVCTL displays the name of the node and the instance for the node. The following example for a database named orcl shows a node named iwinrac01 running an instance named orcl1. Run the following command:
C:\> srvctl config database -d orcl
The output should be similar to:
iwinrac01 orcl1 C:\oracle\product\11.1.0\db_1iwinrac02 orcl2 C:\oracle\product\11.1.0\db_1
4.2.2 Logging in to Oracle Enterprise Manager Database ControlIf you configure Oracle Enterprise Manager Database Control during installation, then you can use it to manage your database. Alternatively, you can use Oracle Enterprise Manager Grid Control to manage your database.
To use Database Control, you must access it on the node where you installed the database. If you want to log into Database Control from another cluster node, then you need to reconfigure Enterprise Manager to start the Database Control interface on that other node.
Use the following instructions to log in to Database Control:
1. On the node from which you installed the database, open a Web browser to access the Database Control URL, and use the following URL syntax:
Note: There is no checking of the contents of the external files or directory object specified as part of the external table to ensure that they are consistent on each node. To avoid unpredictable results, you must make sure the same file is accessed from all nodes, or make sure the same file is used on all nodes.
See Also: the emca command line help for instructions to perform reconfiguration

Recommended Post-Installation Tasks
4-4 Oracle Real Application Clusters Installation Guide
https://host:port/em
In the preceding example:
■ host is the name of the computer on which you installed Oracle Database
■ port is the port number reserved for the Database Control or Grid Control during installation
If you do not know the correct port number to use, then look for the following line in the file %ORACLE_HOME\install\portlist.ini, which lists the assigned port:
Enterprise Manager Console HTTP Port (db_name) = 1158
The installation reserves the first available port from the range 5500 to 5519.
For example, if you install Oracle Database on host mgmt42, and the Database Control uses port 1158, then use the following URL:
https://mgmt42:1158/em
Oracle Enterprise Manager displays the Database Control login page.
2. Log in to the database using the user name SYS and connect as SYSDBA.
Use the password that you specified for the SYS account during the installation.
4.2.3 Postinstallation Database Configuration for Oracle Configuration ManagerRun the following script to configure the database to enable Oracle Configuration Manager (OCM) to collect configuration information:
ORACLE_BASE\ORACLE_HOME\ccr\admin\scripts\installCCRSQL.exe collectconfig -s SID -r SYSDBA-USER
The installCCRSQL.exe script creates an Oracle Configuration Manager user and loads the PL/SQL procedure into the database defined by the ORACLE_SID. You can also specify the database SID by using the -s option in the command line as in the following example where the SID is orcl:
ORACLE_BASE\ORACLE_HOME\ccr\admin\scripts\installCCRSQL.exe collectconfig -s orcl
By default, the connection to the database is through operating system authentication, "/as sysdba." To specify a different user and password, you can use these options:
-r SYSDBA-USER: The login name for the user with a SYSDBA role
-p SYSDBA-PASSWORD: The password for the user with a SYSDBA role
Note: You can also log in to the Database Control using the SYSTEM or SYSMAN accounts, or you can grant login privileges to other database users.
Note:
■ If you specify the user without specifying the password, you will be prompted to enter the password.
■ If you specify only the password without specifying the user name, the user SYS is used by default.

Recommended Post-Installation Tasks
Oracle Real Application Clusters Post-Installation Procedures 4-5
4.2.3.1 Additional Step for E-Business SuitesIf the database is used as a repository for an Oracle E-Business Suite, then you must also run the following script from the ORACLE_HOME in which the E-Business database has been hosted:
ORACLE_BASE\ORACLE_HOME\ccr\admin\scripts\installCCRSQL.exe ebs_collectconfig -u Oracle_Applications_User
The -u parameter is mandatory. If you do not specify this parameter, then the application prompts you for the Oracle Applications User. If the -u parameter is specified, then you will be prompted for the Oracle Applications Password.
If you want to automate the install, then you can run the installCCRSQL.exe script with an additional -w option to specify the Oracle Applications Password. For example:
ORACLE_BASE\ORACLE_HOME\ccr\admin\scripts\installCCRSQL.exe ebs_collectconfig -u Oracle_Applications_User -w Oracle_Applications_Password
You can add the -s SID command to specify the SID of the Oracle Applications Database instance.
If you are not using operating system authentication to connect to the database, then you must use the -r parameter to specify the following:
-r SYSDBA-USER: The login name of the SYSDBA user
If only the -r parameter is specified, you are prompted to enter the password. The -p parameter for specifying the password is optional.
4.2.3.2 Additional Step for Oracle Enterprise Manager Grid ControlIf the database is used as a repository for Oracle Enterprise Manager Grid Control, then you must also run the following script:
ORACLE_BASE\ORACLE_HOME\ccr\admin\scripts\installCCRSQL.exe collectemrep
When you run this command, the application prompts you for the SYSMAN password. If you want to automate the install, then you can run the installCCRSQL.exe script to specify the SYSMAN password. For example:
ORACLE_BASE\ORACLE_HOME\ccr\admin\scripts\installCCRSQL.exe collectemrep -e SYSMAN PASSWORD
You can add the -s SID command to specify the SID of the Oracle Enterprise Manager Grid Control Database instance. You must run this script from the ORACLE_HOME in which the Oracle Enterprise Manager Grid Control database has been hosted.
If you are not using operating system authentication to connect to the database, then you must use the -r and -p parameters to specify the following:
-r SYSDBA-USER: The login name of the SYSDBA user
-p SYSDBA-PASSWORD: The password for the SYSDBA user
If the -r parameter is specified, the -p parameter is optional and will be prompted for.

Recommended Post-Installation Tasks
4-6 Oracle Real Application Clusters Installation Guide
5
Parameter Management for Oracle Real Application Clusters Databases 5-1
5Parameter Management for Oracle RealApplication Clusters Databases
This chapter describes server parameter file (SPFILE) placement and configuration in Oracle Real Application Clusters (Oracle RAC) environments. The topics in this chapter are:
■ Parameter Files and Oracle Real Application Clusters
■ Using Server Parameter Files in Oracle Real Application Clusters
■ Parameter File Search Order in Oracle Real Application Clusters
■ Server Parameter File Errors in Oracle Real Application Clusters
5.1 Parameter Files and Oracle Real Application ClustersOracle uses parameter settings in parameter files to determine how to control various database resources. You can use two types of files for parameter administration: the server parameter file (SPFILE) or one or more traditional client-side parameter files.
Oracle recommends that you manage parameters using an SPFILE. If you use client-side parameter files, then Oracle does not preserve parameter changes made for self-tuning after shutdown.
5.2 Using Server Parameter Files in Oracle Real Application ClustersBy default, Oracle creates the server parameter file based on one SPFILE. You can change parameter settings in the server parameter file only by using Oracle Enterprise Manager or ALTER SYSTEM SET SQL statements; the server parameter file is a binary file that you should not edit.
See Also: Oracle Real Application Clusters Administration and Deployment Guide for more information about parameters and Oracle Real Application Clusters Deployment and Performance Guide for a discussion of parallel execution-related parameters in Oracle RAC data warehouse environments
See Also: Oracle Real Application Clusters Administration and Deployment Guide for more information about using client-side parameter files

Using Server Parameter Files in Oracle Real Application Clusters
5-2 Oracle Real Application Clusters Installation Guide
If you are upgrading from a previous Oracle release, then create and configure the server parameter file for Oracle RAC using the procedures described in the following section.
5.2.1 Location of the Server Parameter FileThe default location of the server parameter file (SPFILE) is:
%ORACLE_HOME%\database\SPFILE%ORACLE_SID%.ORA
The default location of the server parameter file is inappropriate for Oracle RAC databases if you use ASM or raw devices because all instances must use the same server parameter file.
For Windows-based platforms Oracle recommends that you use a PFILE in this directory:
%ORACLE_HOME%\database\init%ORACLE_SID%.ora
This path is valid for each instance and it refers to a single, shared initialization parameter file. If you use raw storage, then the file must contain the following entry on a Windows-based platform:
SPFILE='\\.\dbname_SPFILE'
However, if you use a cluster file system, then use the following file location, where O is the OCFS drive:
SPFILE=O:\oradata\database_name\spfile.ora
If you use ASM, then the SPFILE value will be:
SPFILE='+disk_group_name/dbunique_name/spfiledbname.ora'
where dbunique_name is the unique database name and dbname is the database name.
You must use the same value of SPFILE so that all instances use the same server parameter file at startup.
To use DBCA to create your database and to use the server parameter file, on the Initialization Parameters page select Create server parameter file (SPFILE) under the File Locations tab which is visible only if you are using raw storage. Then enter either a shared file system filename or the raw device path name in the Server Parameters Filename field.
Note: Oracle recommends that you avoid modifying the values for self-tuning parameters; overriding these settings can adversely affect performance.
Note: The SPFILE for an ASM instance cannot be stored in ASM disks groups.

Server Parameter File Errors in Oracle Real Application Clusters
Parameter Management for Oracle Real Application Clusters Databases 5-3
5.3 Parameter File Search Order in Oracle Real Application ClustersOracle searches for your parameter file in the following order:
1. %ORACLE_HOME%\database\spfilesid.ora
2. %ORACLE_HOME%\database\spfile.ora
3. %ORACLE_HOME%\database\initsid.ora
See the previous section, "Location of the Server Parameter File", for information on how to configure you system to prevent your Oracle RAC instances using inappropriate parameter files.
5.4 Server Parameter File Errors in Oracle Real Application ClustersOracle reports errors that occur during server parameter file creation or while reading the file during startup. If an error occurs during a parameter update, then Oracle records the error in your ALERT.LOG file and ignores subsequent parameter updates to the file. If this happens, then do either of the following:
■ Shut down the instance, recover the server parameter file, and restart the instance.
■ Restart the instance using a PFILE instead of the SPFILE.
Oracle displays errors for parameter changes that you attempt when you incorrectly use the ALTER SYSTEM SET statement. Oracle does this when an error occurs while reading from or writing to the server parameter file.
Note: When you use DBCA to create the server parameter file, the default PFILE file name is:
%ORACLE_HOME%\database\init%ORACLE_SID%.ora
This is the default PFILE name.
See Also: Oracle Real Application Clusters Administration and Deployment Guide for more information about backing up the SPFILE

Server Parameter File Errors in Oracle Real Application Clusters
5-4 Oracle Real Application Clusters Installation Guide
6
Understanding the Oracle Real Application Clusters Installed Configuration 6-1
6 Understanding the Oracle Real ApplicationClusters Installed Configuration
This chapter describes the Oracle Real Application Clusters (Oracle RAC) installed configuration. The topics in this chapter include:
■ Understanding the Configured Environment in Oracle Real Application Clusters
■ The Oracle Cluster Registry in Oracle Real Application Clusters
■ Database Components Created Using Database Configuration Assistant
■ Managing Undo Tablespaces in Oracle Real Application Clusters
■ Initialization Parameter Files
■ Configuring Service Registration-Related Parameters in Oracle Real Application Clusters
■ Configuring the Listener File (listener.ora)
■ Net Service Names (tnsnames.ora File)
■ Net Services Profile (sqlnet.ora File)
6.1 Understanding the Configured Environment in Oracle Real Application Clusters
Oracle Net Configuration Assistant (NetCA) and Database Configuration Assistant (DBCA) configure your environment to meet the requirements for database creation and Enterprise Manager discovery of Real Application Cluster databases.
6.2 The Oracle Cluster Registry in Oracle Real Application ClustersDatabase Configuration Assistant uses the Oracle Cluster Registry (OCR) for storing the configurations for the cluster databases that it creates. The OCR is a shared file in a cluster file system environment. If you do not use a cluster file system, then you must make this file a shared raw device. Oracle Universal Installer (OUI) automatically initializes the OCR during the Oracle Clusterware installation.
Note: Configuration files are created on each node in your cluster database.

Database Components Created Using Database Configuration Assistant
6-2 Oracle Real Application Clusters Installation Guide
6.3 Database Components Created Using Database Configuration Assistant
This section describes the database components that DBCA creates, which include:
■ Tablespaces and Data Files
■ Control Files
■ Redo Log Files
6.3.1 Tablespaces and Data FilesAn Oracle database for both single-instance and cluster database environments is divided into smaller logical areas of space known as tablespaces. Each tablespace corresponds to one or more data files stored on a disk. Table 6–1 shows the tablespace names used by an Oracle RAC database and the types of data they contain:
You cannot alter these tablespace names when using the preconfigured database configuration options from Oracle Universal Installer. However, you can change the names of the tablespaces if you use the advanced database creation method.
As mentioned, each tablespace has one or more data files. The data file names created by the preconfigured database configuration options vary by storage type such as ASM, OFS, raw devices, and so on.
You can specify different symbolic names with the Advanced database configuration option.
Windows-based platforms use the symbolic link names for the data file and other database files shown in Table 6–2:
Table 6–1 Tablespace Names that Oracle Real Application Clusters Databases Use
Tablespace Name Contents
SYSTEM Consists of the data dictionary, including definitions of tables, views, and stored procedures needed by the database. Oracle automatically maintains information in this tablespace.
SYSAUX An auxiliary system tablespace that contains the DRSYS (contains data for OracleText), CWMLITE (contains the OLAP schemas), XDB (for XML features), ODM (for Oracle Data Mining), TOOLS (contains Enterprise Manager tables), INDEX, EXAMPLE, and OEM-REPO tablespaces.
USERS Consists of application data. As you create and enter data into tables, Oracle fills this space with your data.
TEMP Contains temporary tables and indexes created during SQL statement processing. You may need to expand this tablespace if you are running a SQL statement that involves significant sorting, such as ANALYZE COMPUTE STATISTICS on a very large table, or the constructs GROUP BY, ORDER BY, or DISTINCT.
UNDOTBSn These are the undo tablespaces for each instance that DBCA creates for automatic undo management.
RBS If you do not use automatic undo management, then Oracle uses the RBS tablespace for the rollback segments.
Table 6–2 Windows-Based Platforms Symbolic Link Names and Files
Windows-Based Platforms Symbolic Link Names Tablespace or Other Database Files
db_name_system SYSTEM

Managing Undo Tablespaces in Oracle Real Application Clusters
Understanding the Oracle Real Application Clusters Installed Configuration 6-3
6.3.2 Control FilesThe database is configured with two control files that are stored on shared storage.
6.3.3 Redo Log FilesEach instance is configured with at least two redo log files that are stored in the shared storage. If you chose cluster file system, then these files are shared file system files. If you do not have a cluster file system, then these files are raw devices. If you use ASM, then these files are stored on the ASM disk group.
The file names of the redo log files that are created with the preconfigured database configuration options vary by storage type. You must enter the raw device names unless you are using a cluster file system.
When using raw devices, to use the advanced database creation method, locate the redo log files in the Database Storage page and replace their default filenames with the correct raw device names or symbolic link names.
6.4 Managing Undo Tablespaces in Oracle Real Application Clusters Oracle stores rollback or undo information in undo tablespaces. To manage undo tablespaces, Oracle recommends that you use automatic undo management. Automatic undo management is an automated tablespace management mode that is easier to administer than manual undo management.
db_name_SYSAUX SYSAUX
db_name_users USERS
db_name_temp TEMP
db_name_undotbs1 UNDOTBS1
db_name_undotbs2 UNDOTBS2
db_name_rbs RBS (optional)
db_name_example EXAMPLE
db_name_indx INDX
db_name_spfile SPFILE
db_name_control1 Control File 1
db_name_control2 Control File 2
db_name_redo_instance_number log_number
Where instance_number is the number of the instance and log_number is the log number (1 or 2) for the instance.
Redo Log Files
Each instance must have at least two redo log files. If the database name is db, then the link names for the first instance are:
db_redo1_1
db_redo1_2
The link names for the second instance’s redo log files are:
db_redo2_1
db_redo2_2
Table 6–2 (Cont.) Windows-Based Platforms Symbolic Link Names and Files
Windows-Based Platforms Symbolic Link Names Tablespace or Other Database Files

Initialization Parameter Files
6-4 Oracle Real Application Clusters Installation Guide
6.5 Initialization Parameter FilesOracle recommends using the server parameter file (SPFILE). This file resides on the server on the shared disk; all instances in a cluster database can access this parameter file.
6.6 Configuring Service Registration-Related Parameters in Oracle Real Application Clusters
Two key benefits of Oracle RAC are connection load balancing and failover. Oracle RAC extends the ability of single-instance Oracle database load balancing, where connections are distributed among local dispatchers, to the balancing of connections among all instances in a cluster database. In addition, Oracle RAC provides failover by configuring multiple listeners on multiple nodes to manage client connection requests for the same database service. Connection load balancing and failover increase availability by taking advantage of the redundant resources within a cluster database. These features, however, require cross instance registration.
Cross instance registration in Oracle RAC occurs when an instance's PMON process registers with the local listener and with all other listeners. Thus, all instances in the cluster register with all listeners running on the cluster nodes. This enables all listeners to manage connections across all instances for both load balancing and failover.
Cross instance registration requires configuring the LOCAL_LISTENER and REMOTE_LISTENER initialization parameters. The LOCAL_LISTENER parameter identifies the local listener and the REMOTE_LISTENER parameter identifies the global list of listeners. The REMOTE_LISTENER parameter is dynamic. Oracle changes the setting for REMOTE_LISTENER dynamically when you reconfigure your cluster database, for example, when you add or delete instances.
By default, DBCA configures your environment with dedicated servers. However, if you select the shared server option on DBCA, then Oracle configures the shared server. In this case, Oracle uses both dedicated and shared server processing. When shared servers are configured, the DISPATCHERS parameter is specified as in the following example:
DISPATCHERS="(protocol=tcp)"
If the DISPATCHERS initialization parameter does not specify the LISTENER attribute as in the previous example, then the PMON process registers information for all dispatchers with the listeners specified by the LOCAL_LISTENER and REMOTE_LISTENER parameters.
However, when the LISTENER attribute is specified, the PMON process registers dispatcher information with the listeners specified by the LISTENER attribute. In this case, setting the LISTENER attribute overrides REMOTE_LISTENER settings for the specified dispatchers as in the following example:
DISPATCHERS="(protocol=tcp)(listener=listeners_db_name)"
See Also: Oracle Real Application Clusters Administration and Deployment Guide for more information about managing undo tablespaces
See Also: Chapter 5, "Parameter Management for Oracle Real Application Clusters Databases" for more information about the creation and use of parameter files

Configuring the Listener File (listener.ora)
Understanding the Oracle Real Application Clusters Installed Configuration 6-5
6.7 Configuring the Listener File (listener.ora)You can configure two types of listeners in the listener.ora file as described under the following headings:
■ Local Listeners
■ Multiple Listeners
■ How Oracle Uses the Listener (listener.ora File)
6.7.1 Local ListenersIf you configured dedicated server mode using the DBCA Connection Mode tab on the Initialization Parameters page, then DBCA automatically configures the LOCAL_LISTENER parameter when the listener uses a nondefault address port.
If you configured the dedicated server mode by setting the REMOTE_LISTENER initialization parameter, then you must also configure the instance-specific LOCAL_LISTENER initialization parameter.
For example, to configure the LOCAL_LISTENER parameter, add the following entry to the initialization parameter file, where listener_sid is resolved to a listener address through either a tnsnames.ora file or through Oracle Names Server:
sid.local_listener=listener_sid
The following entry should be in your tnsnames.ora file:
listener_sid=(address=(protocol=tcp)(host=node1-vip)(port=1522))
6.7.2 Multiple ListenersIf DBCA detects more than one listener on the node, it displays a list of the listeners. You can select one or all of these listeners with which to register your database.
6.7.3 How Oracle Uses the Listener (listener.ora File)Services coordinate their sessions using listener file entries by running a process on the server that receives connection requests on behalf of a client application. Listeners are configured to respond to connection requests sent to protocol addresses for a database service or non-database service.
Protocol addresses are configured in the listener configuration file, listener.ora, for a database service or a non-database service. Clients configured with the same addresses can connect to a service through the listener.
During a preconfigured database configuration installation, Oracle Net Configuration Assistant creates and starts a default listener called LISTENER_NODENAME. The listener is configured with a default protocol listening addresses for the database and external procedures. The advanced installation process prompts you to create at least one listener with Oracle Net Configuration Assistant. The listener is configured to respond to connection requests that are directed at one protocol address you specify, as well as an address for external procedures.
See Also: Oracle Database Net Services Administrator's Guide for further information about cross instance registration, shared and dedicated server configurations, and connection load balancing

Net Service Names (tnsnames.ora File)
6-6 Oracle Real Application Clusters Installation Guide
Both installation modes configure service information about the Oracle RAC database and external procedures. An Oracle Database 11g Release 1 (11.1) database service automatically registers its information with the listener, such as its service name, instance names, and load information.
This feature, called service registration, does not require configuration in the listener.ora file. After listener creation, Oracle Net Configuration Assistant starts the listener. A sample listener.ora file with an entry for an instance named node1 is:
listener_node1= (description= (address=(protocol=ipc)(key=extproc)) (address=(protocol=tcp)(host=node1-vip)(port=1521)(IP=FIRST)) (address=(protocol=tcp)(host=node1-ip)(port=1521)(IP=FIRST)))sid_list_listener_node1= (sid_list= (sid_desc= (sid_name=plsextproc) (oracle_home=C:\app\oracle\product\11.1.0\db_1) (program=extproc)))
6.7.3.1 Listener Registration and PMON DiscoveryWhen a listener starts after the Oracle instance starts, and the listener is listed for service registration, registration does not occur until the next time the PMON discovery routine starts. By default, PMON discovery occurs every 60 seconds.
To override the 60-second delay, use the SQL ALTER SYSTEM REGISTER statement. This statement forces PMON to register the service immediately.
Oracle recommends that you create a script to run this statement immediately after starting the listener. If you run this statement while the listener is up and the instance is already registered, or while the listener is down, then the statement has no effect.
6.8 Net Service Names (tnsnames.ora File)A tnsnames.ora file is created on each node with net service names. A connect identifier is an identifier that maps to a connect descriptor. A connect descriptor contains the following information:
■ The network route to the service, including the location of the listener through a protocol address
■ The SERVICE_NAME for an Oracle release 8.1 or later, or SID for pre-8.1 Oracle releases
DBCA creates net service names for connections as shown in Table 6–3:
See Also: Oracle Database Net Services Administrator's Guide for further information about the listener and the listener.ora file
Note: The SERVICE_NAME parameter you use in tnsnames.ora is singular because you can only specify one service name.
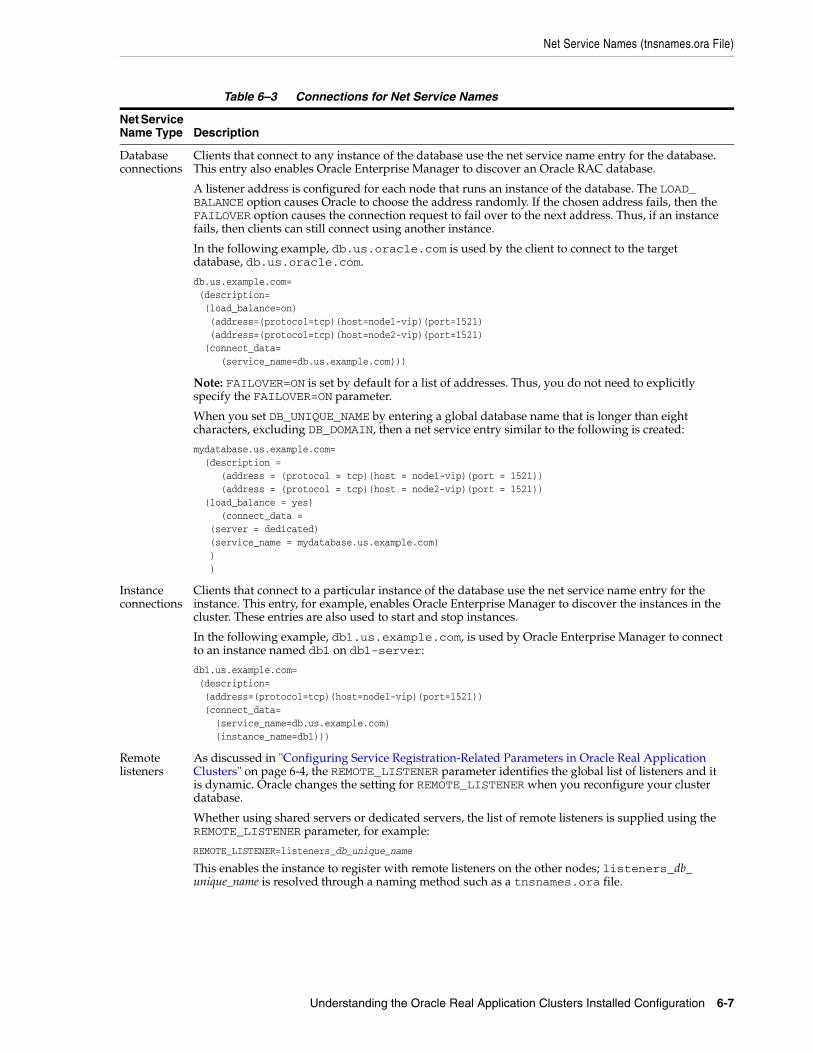
Net Service Names (tnsnames.ora File)
Understanding the Oracle Real Application Clusters Installed Configuration 6-7
Table 6–3 Connections for Net Service Names
Net Service Name Type Description
Database connections
Clients that connect to any instance of the database use the net service name entry for the database. This entry also enables Oracle Enterprise Manager to discover an Oracle RAC database.
A listener address is configured for each node that runs an instance of the database. The LOAD_BALANCE option causes Oracle to choose the address randomly. If the chosen address fails, then the FAILOVER option causes the connection request to fail over to the next address. Thus, if an instance fails, then clients can still connect using another instance.
In the following example, db.us.oracle.com is used by the client to connect to the target database, db.us.oracle.com.
db.us.example.com= (description= (load_balance=on) (address=(protocol=tcp)(host=node1-vip)(port=1521) (address=(protocol=tcp)(host=node2-vip)(port=1521) (connect_data= (service_name=db.us.example.com)))
Note: FAILOVER=ON is set by default for a list of addresses. Thus, you do not need to explicitly specify the FAILOVER=ON parameter.
When you set DB_UNIQUE_NAME by entering a global database name that is longer than eight characters, excluding DB_DOMAIN, then a net service entry similar to the following is created:
mydatabase.us.example.com= (description = (address = (protocol = tcp)(host = node1-vip)(port = 1521)) (address = (protocol = tcp)(host = node2-vip)(port = 1521)) (load_balance = yes) (connect_data = (server = dedicated) (service_name = mydatabase.us.example.com) ) )
Instance connections
Clients that connect to a particular instance of the database use the net service name entry for the instance. This entry, for example, enables Oracle Enterprise Manager to discover the instances in the cluster. These entries are also used to start and stop instances.
In the following example, db1.us.example.com, is used by Oracle Enterprise Manager to connect to an instance named db1 on db1-server:
db1.us.example.com= (description= (address=(protocol=tcp)(host=node1-vip)(port=1521)) (connect_data= (service_name=db.us.example.com) (instance_name=db1)))
Remote listeners
As discussed in "Configuring Service Registration-Related Parameters in Oracle Real Application Clusters" on page 6-4, the REMOTE_LISTENER parameter identifies the global list of listeners and it is dynamic. Oracle changes the setting for REMOTE_LISTENER when you reconfigure your cluster database.
Whether using shared servers or dedicated servers, the list of remote listeners is supplied using the REMOTE_LISTENER parameter, for example:
REMOTE_LISTENER=listeners_db_unique_name
This enables the instance to register with remote listeners on the other nodes; listeners_db_unique_name is resolved through a naming method such as a tnsnames.ora file.

Net Service Names (tnsnames.ora File)
6-8 Oracle Real Application Clusters Installation Guide
In the following example, listeners_db.us.example.com is resolved to a list of listeners available on the nodes on which the cluster database has instances:
listeners_db.us.example.com= (address_list= (address=(protocol=tcp)(host=node1-vip)(port=1521)) (address=(protocol=tcp)(host=node2-vip)(port=1521)))
The instance uses this list to determine the addresses of the remote listeners with which to register its information.
Nondefault listeners
As discussed in "Local Listeners" on page 6-5 and "Multiple Listeners" on page 6-5, the LOCAL_LISTENER parameter is set in the initsid.ora file if a nondefault listener is configured, for example:
sid.local_listener=listener_sid
Where listener_sid is resolved to a listener address through a naming method such as a tnsnames.ora file.
In the following sample, listener_db1.us.example.com is resolved to the nondefault listener address:
listener_db1.us.example.com= (address=(protocol=tcp)(host=node1-vip)(port=1522))
Table 6–3 (Cont.) Connections for Net Service Names
Net Service Name Type Description

Net Service Names (tnsnames.ora File)
Understanding the Oracle Real Application Clusters Installed Configuration 6-9
Services Entries
When you configure high availability services using the DBCA Services page, then DBCA creates net service entries similar to the following. The three services in the following examples, db_svc1, db_svc2, and db_svc3, have TAF policies of NONE, BASIC and PRECONNECT respectively.
db_svc1.us.example.com= (description = (address=(protocol=tcp)(host=node1-vip)(port=1521)) (address=(protocol=tcp)(host=node2-vip)(port=1521)) (load_balance=yes) (connect_data= (server = dedicated) (service_name = db_svc1.us.example.com) ) )
db_svc2.us.example.com= (description= (address=(protocol=tcp)(host=node1-vip)(port=1521)) (address=(protocol=tcp)(host=node2-vip)(port=1521)) (load_balance=yes) (connect_data = (server = dedicated) (service_name=db_svc2.us.example.com) (failover_mode = (type=select) (method=basic) (retries=180) (delay=5) ) ) )
db_svc3.us.example.com= (description= (address=(protocol=tcp)(host=node1-vip)(port=1521)) (address=(protocol=tcp)(host=node2-vip)(port=1521)) (load_balance=yes) (connect_data= (server=dedicated) (service_name=db_svc3.us.example.com) (failover_mode= (backup=db_svc3_preconnect.us.example.com) (type=select) (method=preconnect) (retries=180) (delay=5) ) ) )
Table 6–3 (Cont.) Connections for Net Service Names
Net Service Name Type Description

Net Service Names (tnsnames.ora File)
6-10 Oracle Real Application Clusters Installation Guide
Example 6–1 Example tnsnames.ora File
The following is a sample tnsnames.ora file that is created during a preconfigured database configuration installation:
db.us.example.com= (description= (load_balance=on) (address=(protocol=tcp)(host=node1-vip)(port=1521)) (address=(protocol=tcp)(host=node2-vip)(port=1521)) (connect_data= (service_name=db.us.example.com)))
db1.us.example.com= (description= (address=(protocol=tcp)(host=node1-vip)(port=1521)) (connect_data= (service_name=db.us.example.com) (instance_name=db1)))
db2.us.example.com= (description= (address=(protocol=tcp)(host=node2-vip)(port=1521)) (connect_data= (service_name=db.us.example.com) (instance_name=db2)))
listeners_db.us.example.com= (address_list=
Services Entries (continued)
When a service has a TAF policy of PRECONNECT, then a service_name_preconnect net service entry is also created, as in the following example:
db_svc3_preconnect.us.example.com = (description = (address = (protocol = tcp)(host = node1-vip)(port = 1521)) (address = (protocol = tcp)(host = node2-vip)(port = 1521)) (load_balance = yes) (connect_data = (server = dedicated) (service_name = db_svc3_preconnect.us.amce.com) (failover_mode = (backup = db_svc3.us.example.com) (type = select) (method = basic) (retries = 180) (delay = 5) ) ) )
External procedures
An entry for connections to external procedures. This enables an Oracle Database 11g database to connect to external procedures.
extproc_connection_data.us.example.com= (description= (address_list= (address=(protocol=ipc)(key=extproc0)) (connect_data= (sid=plsextproc)))
Table 6–3 (Cont.) Connections for Net Service Names
Net Service Name Type Description
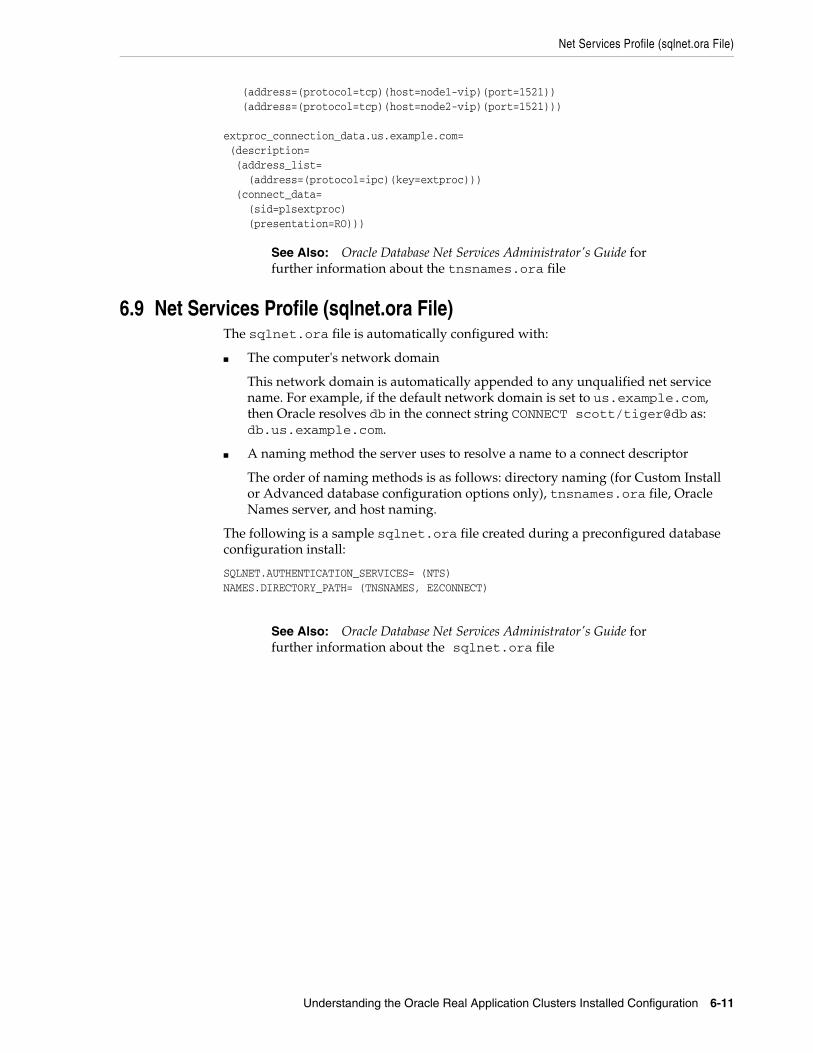
Net Services Profile (sqlnet.ora File)
Understanding the Oracle Real Application Clusters Installed Configuration 6-11
(address=(protocol=tcp)(host=node1-vip)(port=1521)) (address=(protocol=tcp)(host=node2-vip)(port=1521)))
extproc_connection_data.us.example.com= (description= (address_list= (address=(protocol=ipc)(key=extproc))) (connect_data= (sid=plsextproc) (presentation=RO)))
6.9 Net Services Profile (sqlnet.ora File)The sqlnet.ora file is automatically configured with:
■ The computer's network domain
This network domain is automatically appended to any unqualified net service name. For example, if the default network domain is set to us.example.com, then Oracle resolves db in the connect string CONNECT scott/tiger@db as: db.us.example.com.
■ A naming method the server uses to resolve a name to a connect descriptor
The order of naming methods is as follows: directory naming (for Custom Install or Advanced database configuration options only), tnsnames.ora file, Oracle Names server, and host naming.
The following is a sample sqlnet.ora file created during a preconfigured database configuration install:
SQLNET.AUTHENTICATION_SERVICES= (NTS)NAMES.DIRECTORY_PATH= (TNSNAMES, EZCONNECT)
See Also: Oracle Database Net Services Administrator's Guide for further information about the tnsnames.ora file
See Also: Oracle Database Net Services Administrator's Guide for further information about the sqlnet.ora file

Net Services Profile (sqlnet.ora File)
6-12 Oracle Real Application Clusters Installation Guide

7
Removing Oracle Database Software 7-1
7 Removing Oracle Database Software
This chapter describes how to remove Oracle databases, instances, and software:
■ Removing Oracle Configuration Manager
■ Removing Oracle Cluster Synchronization Services
■ Deleting DB Control Configuration Files Using EMCA Scripts
■ Removing All Oracle Database Components
7.1 Removing Oracle Configuration ManagerTo uninstall Oracle Configuration Manager, follow these steps:
1. If the ORACLE_BASE\ORACLE_HOME directory contains a database, remove the Oracle Configuration Manager user and the associated objects from the database by running the following script:
SQL> ORACLE_BASE\ORACLE_HOME\ccr\admin\scripts\dropocm.sql
2. If the database is a repository for the Oracle E-Business Suite, log in to the database as an SYSDBA user and remove the additional objects from the database by running the following script:
ORACLE_BASE\ORACLE_HOME\ccr\admin\scripts\ebs_dropccr.sql Oracle_Applications_User
Note: Always use Oracle Universal Installer to remove Oracle components. To avoid installation and configuration problems with new Oracle installations, follow the instructions in this chapter.
Note: When removing Oracle Software from Windows Server 2008 systems, you must run any commands from an administrator prompt.
See Also:
■ Oracle Real Application Clusters Installation and Configuration Guide for information about removing an Oracle Real Application Clusters installation
■ Component-specific documentation for individual requirements and restrictions

Removing Oracle Cluster Synchronization Services
7-2 Oracle Real Application Clusters Installation Guide
3. If the database is a repository for Oracle Grid Control, log in to the database as the SYSMAN user and remove the additional objects from the database by running the following script:
ORACLE_BASE\ORACLE_HOME\ccr\admin\scripts\dropemrep_collect.sql
4. To stop the Scheduler and remove the service or the crontab entry, enter the following command:
ORACLE_BASE\ORACLE_HOME\ccr\bin\deployPackages -d ORACLE_BASE\ORACLE_HOME\ccr\inventory\core.jar
5. Delete the ccr directory by entering the following command:
SYSTEM_DRIVE:\> rmdir /S ORACLE_BASE\ORACLE_HOME\ccr
Oracle Configuration Manager is successfully uninstalled.
7.2 Removing Oracle Cluster Synchronization ServicesThe first time you install Oracle Database, if you selected Automatic Storage Management as a storage and recovery option, Oracle Universal Installer configures and starts a single-instance version of the Oracle Cluster Synchronization Services (CSS) service.
If you did not choose Automatic Storage Management as a storage or recovery option, you can delete the OracleCSService service. To delete this service without deleting the Oracle home, perform the following:
1. Open a command prompt window.
2. Temporarily set the ORACLE_HOME environment variable. For example:
set ORACLE_HOME=c:\oracle\product\11.1.0\db_1
3. Run the localconfig batch file with the delete option to delete the OracleCSService service. For example:
SYSTEM_DRIVE:\oracle\product\11.1.0\db_1\bin\localconfig delete
7.3 Deleting DB Control Configuration Files Using EMCA ScriptsYou can use the emca command to remove the Database Control (DB Control) configuration files for all database instances in a cluster. Perform the following steps to delete these files:
1. Stop the nmcollector process on any node where the instance has Memory Access Mode enabled. You can stop the process by disabling Memory Access Mode.
2. Run the following command at the operating system prompt:
%ORACLE_HOME%\bin\emca -deconfig dbcontrol db -cluster
Note: You do not need to complete this step if you are removing the Oracle home.

Removing All Oracle Database Components
Removing Oracle Database Software 7-3
7.4 Removing All Oracle Database ComponentsUse Oracle Universal Installer to remove Oracle components from the inventory on the computer. Afterward, you need to manually remove the remaining components.
Do not delete Oracle home files or directories (for example, using Windows Explorer or the command prompt) without first using Oracle Universal Installer unless you exit Oracle Universal Installer during an installation. Otherwise, the components in the Oracle home remain registered in the Oracle Universal Installer inventory. If you manually delete Oracle home files and you attempt an installation in the same Oracle home, then some or all of the selected components may not be installed or properly configured.
Oracle Universal Installer does not register the installation in its inventory if the installation is unexpectedly interrupted. However, files may have been copied to your Oracle home. Remove these files manually and restart the installation.
This section contains these steps:
1. Stopping Oracle Services
2. Removing Components with Oracle Universal Installer
3. Manually Removing the Remaining Oracle Database Components
7.4.1 Stopping Oracle ServicesYou must first stop the Oracle services before removing Oracle components.
Follow these steps:
1. Open the Windows Services utility: From the Start menu, select Programs, then then Administrative Tools, and then Services.
2. If any Oracle services (names begin with Oracle or Ora) exist and have the status Started, then select each of the services, and click Stop.
3. Exit Services.
7.4.2 Removing Components with Oracle Universal InstallerTo remove components with Oracle Universal Installer in interactive mode:
1. Ensure that you first follow the instructions in the "Stopping Oracle Services" section on page 7-3.
2. Start Oracle Universal Installer: From the Start menu, select Programs, then Oracle - HOME_NAME, then Oracle Installation Products, and then Universal Installer.
The Select a Product page for Oracle Universal Installer appears.
3. Click the Deinstall Products button.
Note: You can use Oracle Database Configuration Assistant to remove an instance and related services. For information about Oracle Database Configuration Assistant, see "Installing Oracle Database and Building the Database" chapter of Oracle Database 2 Day DBA.
See Also: The Microsoft online Help for more information about stopping services
Removing All Oracle Database Components
7-4 Oracle Real Application Clusters Installation Guide
The Inventory window appears.
4. Expand the tree of installed components until you find the components to remove.
For example, if you installed a database with the Enterprise Edition option and later installed additional components with the Custom option, expand the Oracle home component to display all the components installed in the Oracle home.
5. Select the components to remove.
6. Click Remove.
The Confirmation window appears.
7. In the Confirmation dialog box, click Yes to remove the selected components.
After the components are removed from your computer, the Inventory window appears without the removed components.
8. Click Close to close the Inventory window.
9. Click Cancel to exit Oracle Universal Installer.
10. Click Yes to confirm that you want to exit.
7.4.3 Manually Removing the Remaining Oracle Database ComponentsOracle Universal Installer does not remove all Oracle components. After using Oracle Universal Installer to remove Oracle components, you need to manually remove remaining environment variables, Start menu options, and directories.
This section covers the following topics:
■ Removing an Automatic Storage Management Instance
■ Updating the System Variable Path
■ Removing Oracle from the Start Menu
■ Removing Oracle Directories
7.4.3.1 Removing an Automatic Storage Management InstanceTo remove an Automatic Storage Management instance running in the Oracle home after the database has been removed, perform the following steps:
1. At the Windows command prompt, set the ORACLE_SID environment variable to the SID for the Automatic Storage Management instance. For example:
SYSTEM_DRIVE:\set ORACLE_SID=+ASM
2. Start SQL*Plus and connect to the Automatic Storage Management instance as the SYS user:
Note: A message may appear indicating that removing some components may cause other components to not function properly.
Note: In rare situations, you may want to correct serious system problems by completely removing Oracle components manually from the computer without first deinstalling with Oracle Universal Installer. Do this only as a last resort, and only if you want to remove all Oracle components from your system.

Removing All Oracle Database Components
Removing Oracle Database Software 7-5
SYSTEM_DRIVE:\sqlplus /nologSQL> CONNECT sys/sys_password AS SYSDBA
3. Enter the following command to determine whether any Oracle database instances are using the Automatic Storage Management instance:
SQL> SELECT INSTANCE_NAME FROM V$ASM_CLIENT;
This command lists all of the database instances that are using this Automatic Storage Management instance. This command only lists database instances that are running. It is possible that other instances are associated with the Automatic Storage Management instance, but they are not currently running.
If you removed a database from this Oracle home but the output from the command shows that this Automatic Storage Management instance is supporting a database instance in another Oracle home, do not remove the Automatic Storage Management instance or the Oracle home.
4. If there are no database instances associated with this Automatic Storage Management instance, drop the disk group associated with this instance.
a. Identify the disk groups associated with the Automatic Storage Management instance:
SQL> SELECT NAME FROM V$ASM_DISKGROUP;
b. For each disk group that you want to delete, enter a command similar to the following:
SQL> DROP DISKGROUP disk_group_name INCLUDING CONTENTS;
5. Shut down the Automatic Storage Management instance and exit SQL*Plus:
SQL> SHUTDOWNSQL> EXIT
6. At the command prompt, enter the following command to remove the Automatic Storage Management service:
ORADIM -DELETE -ASMSID +ASM
7.4.3.2 Updating the System Variable PathCheck the Path environmental variable and remove any Oracle entries.
1. Open System from the Control Panel.
2. In the System Properties dialog box, click the Advanced tab, then click the Environment Variables button.
Note: Dropping the Automatic Storage Management disk group makes the disk device available for use with another Automatic Storage Management instance, if required. However, all data in the disk group is lost. Make sure that no other database instance requires any data from this disk group before you drop it.
See Also: Oracle Database Storage Administrator's Guide for more information about Automatic Storage Management and configuring Automatic Storage Management disk groups
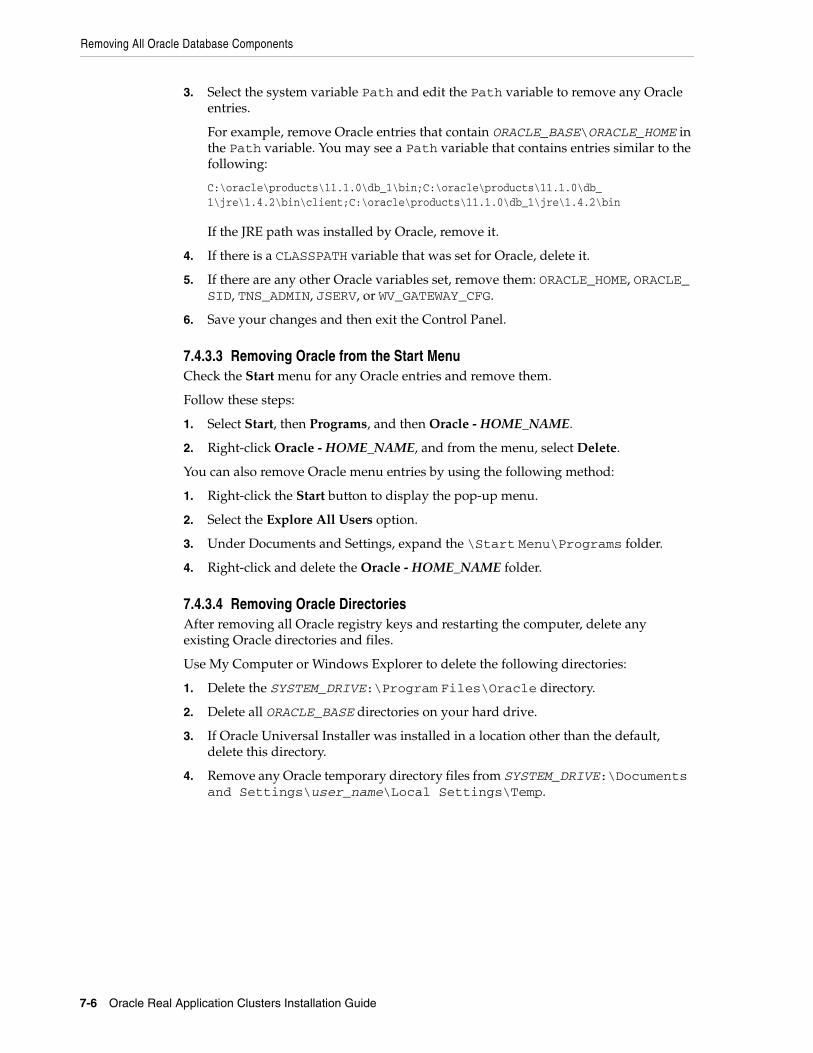
Removing All Oracle Database Components
7-6 Oracle Real Application Clusters Installation Guide
3. Select the system variable Path and edit the Path variable to remove any Oracle entries.
For example, remove Oracle entries that contain ORACLE_BASE\ORACLE_HOME in the Path variable. You may see a Path variable that contains entries similar to the following:
C:\oracle\products\11.1.0\db_1\bin;C:\oracle\products\11.1.0\db_1\jre\1.4.2\bin\client;C:\oracle\products\11.1.0\db_1\jre\1.4.2\bin
If the JRE path was installed by Oracle, remove it.
4. If there is a CLASSPATH variable that was set for Oracle, delete it.
5. If there are any other Oracle variables set, remove them: ORACLE_HOME, ORACLE_SID, TNS_ADMIN, JSERV, or WV_GATEWAY_CFG.
6. Save your changes and then exit the Control Panel.
7.4.3.3 Removing Oracle from the Start MenuCheck the Start menu for any Oracle entries and remove them.
Follow these steps:
1. Select Start, then Programs, and then Oracle - HOME_NAME.
2. Right-click Oracle - HOME_NAME, and from the menu, select Delete.
You can also remove Oracle menu entries by using the following method:
1. Right-click the Start button to display the pop-up menu.
2. Select the Explore All Users option.
3. Under Documents and Settings, expand the \Start Menu\Programs folder.
4. Right-click and delete the Oracle - HOME_NAME folder.
7.4.3.4 Removing Oracle DirectoriesAfter removing all Oracle registry keys and restarting the computer, delete any existing Oracle directories and files.
Use My Computer or Windows Explorer to delete the following directories:
1. Delete the SYSTEM_DRIVE:\Program Files\Oracle directory.
2. Delete all ORACLE_BASE directories on your hard drive.
3. If Oracle Universal Installer was installed in a location other than the default, delete this directory.
4. Remove any Oracle temporary directory files from SYSTEM_DRIVE:\Documents and Settings\user_name\Local Settings\Temp.

A
Troubleshooting the Installation Process A-1
A Troubleshooting the Installation Process
This appendix provides troubleshooting information for installing Oracle Real Application Clusters (Oracle RAC). The topics in this appendix are:
■ Troubleshooting Oracle RAC Installations
■ Verifying Requirements
■ Encountering Installation Errors
■ Reviewing the Log of an Installation Session
■ Silent or Noninteractive Installation Response File Error Handling
■ Troubleshooting Configuration Assistants
■ Cleaning Up After a Failed Installation
A.1 Troubleshooting Oracle RAC InstallationsThis section contains these topics:
■ General Installation Issues
■ Oracle Real Application Clusters Installation Error Messages
■ Performing Cluster Diagnostics During Oracle Real Application Clusters Installations
A.1.1 General Installation IssuesThe following is a list of examples of types of errors that can occur during installation:
Nodes unavailable for selection from the OUI Node Selection screenCause: Oracle Clusterware is either not installed, or the Oracle Clusterware services are not up and running.
Action: Install Oracle Clusterware, or review the status of your Oracle Clusterware. Consider restarting the nodes, as doing so may resolve the problem.
Node nodename is unreachableCause: Unavailable IP host
Action: Attempt the following:
See Also: Oracle Real Application Clusters Administration and Deployment Guide for additional information about Oracle RAC configuration and deployment

Verifying Requirements
A-2 Oracle Real Application Clusters Installation Guide
1. Run the command ipconfig /all. Compare the output of this command with the contents of the C:\WINNT\system32\drivers\etc\hosts file to ensure that the node IP is listed.
2. Run the command nslookup to see if the host is reachable.
Time stamp is in the futureCause: One or more nodes has a different clock time than the local node. If this is the case, then you may see output similar to the following:
time stamp 2005-04-04 14:49:49 is 106 s in the future
Action: Ensure that all member nodes of the cluster have the same clock time.
Administrative user unable to log in to SQL*Plus using the SYSDBA roleCause: When you install Oracle Database on Microsoft Windows, Oracle Universal Installer creates a Windows local group called ORA_DBA, and then adds the name of the user performing the software installation to this group. Members of the ORA_DBA group automatically receive the SYSDBA privilege. Oracle Universal Installer does not add the software owner user to ORA_DBA on other nodes under the following circumstances:
■ The installation user performed the installation remotely
■ The user performing the installation is a local user and not a Windows domain user
As a result, this user cannot log in to SQL*Plus using the SYSDBA role.
Action: Manually add remote users to ORA_DBA on the other nodes in the cluster.
A.1.2 Oracle Real Application Clusters Installation Error MessagesOracle RAC Management Tools Error Messages are in Oracle Real Application Clusters Administration and Deployment Guide.
A.1.3 Performing Cluster Diagnostics During Oracle Real Application Clusters Installations
If Oracle Universal Installer (OUI) does not display the Node Selection page, then perform clusterware diagnostics by running the olsnodes -v command from the binary directory in your Oracle Clusterware home, CRS_home\BIN, and analyzing its output. Refer to your clusterware documentation if the detailed output indicates that your clusterware is not running.
In addition, use the following command syntax to check the integrity of the Cluster Manager:
cluvfy comp clumgr -n node_list -verbose
In the preceding syntax example, the variable node_list is the list of nodes in your cluster, separated by commas.
A.2 Verifying RequirementsBefore you try any of the troubleshooting steps in this appendix, do the following:
■ Check Chapter 1, "Preinstallation Checklist" to make sure that your system meets the requirements and that you have completed all of the preinstallation tasks.

Silent or Noninteractive Installation Response File Error Handling
Troubleshooting the Installation Process A-3
■ Read the release notes for the product on your platform before installing it. The release notes are available on the Oracle Database installation media. You can find the latest version of the release notes on the Oracle Technology Network Web site:
http://www.oracle.com/technology/index.html
A.3 Encountering Installation ErrorsIf you encounter an error during installation:
■ Do not exit Oracle Universal Installer.
■ If you clicked Next after you entered incorrect information about one of the installation windows, click Back to return to the window and correct the information.
■ If you encounter an error while Oracle Universal Installer is copying or linking files, see "Reviewing the Log of an Installation Session" on page A-3 for interactive installations or "Silent or Noninteractive Installation Response File Error Handling" on page A-3 for more information.
■ If you encounter an error while a configuration assistant is running, see the "Troubleshooting Configuration Assistants" section on page A-5.
■ If you cannot resolve the problem, remove the failed installation by following the steps listed in the "Cleaning Up After a Failed Installation" section on page A-6.
A.4 Reviewing the Log of an Installation SessionDuring an installation, Oracle Universal Installer records all the actions that it performs in a log file. If you encounter problems during the installation, review the log file for information about possible causes of the problem. By default, the log files are located in the following directory:
SYSTEM_DRIVE:\> Program Files\Oracle\Inventory\logs
Log filenames from interactive installations take the form:
installActionsdate_time.log
For example, if an interactive installation occurred at 9:00:56 a.m. on October 14, 2005, the log file would be named:
installActions2006-10-14_09-00-56AM.log
A.5 Silent or Noninteractive Installation Response File Error HandlingTo determine whether a silent or noninteractive installation succeeds or fails, check the silentInstallActionsdate_time.log file, located in DRIVE_LETTER:\Program Files\Oracle\Inventory\logs.
Note: Do not delete or manually alter the Inventory directory or its contents. Doing so can prevent Oracle Universal Installer from locating products that you install on your system.
See Also: Silent or Noninteractive Installation Response File Error Handling on page A-3
Troubleshooting Oracle Configuration Manager
A-4 Oracle Real Application Clusters Installation Guide
If necessary, see the previous section for information about determining the location of the Inventory directory.
A silent or noninteractive installation fails if:
■ You do not specify a response file.
■ You specify an incorrect or incomplete response file.
For example, a common problem is that while all the product-specific data is filled out correctly, the staging area location may be incorrect. If this is the case, check the FROM_LOCATION variable and make sure that it points to the products.xml file in the installation media. In the installation media, this products.xml is in database\stage.
■ Oracle Universal Installer encounters an error, such as insufficient disk space.
Oracle Universal Installer or a configuration assistant validates the response file at runtime. If the validation fails, the silent or noninteractive installation or configuration process ends. Oracle Universal Installer treats values for parameters that are of the wrong context, format, or type as if no value was specified in the file.
A.6 Troubleshooting Oracle Configuration ManagerThis section lists some of the errors that may occur while using Oracle Configuration Manager and provides tips to troubleshoot these errors.
■ Insufficient Privileges While Running installCCRSQL collectconfig
When you run the installCCRSQL.exe script, it creates the ORACLE_OCM user and sets up a job to collect database configuration information. The ORACLE_OCM user requires EXECUTE privileges on UTL_FILE and DBMS_SCHEDULER for database versions 10g or later, and on the DBMS_JOB for pre-10g databases. If these privileges are granted to PUBLIC, the ORACLE_OCM user inherits these privileges, otherwise these privileges are explicitly granted when the installCCRSQL.exe script is executed. If the inherited privileges are revoked, the following errors indicating the lack of privileges will be logged in the alert_log:
ORA-12012: error on auto execute of job 52ORA-04068: existing state of packages has been discardedORA-04063: package body "ORACLE_OCM.package_name" has errorsORA-06508: PL/SQL: could not find program unit being called
To resolve these errors, you must grant the missing EXECUTE privilege to the ORACLE_OCM user.
– For database versions 10g and later, grant EXECUTE privileges on the UTL_FILE and DBMS_SCHEDULER packages to the ORACLE_OCM user by entering the following SQL*PLUS commands:
SQL> grant execute on UTL_FILE to oracle_ocm;SQL> grant execute on DBMS_SCHEDULER to oracle_ocm;SQL> ALTER PACKAGE oracle_ocm.MGMT_DB_LL_METRICS compile;SQL> ALTER PACKAGE oracle_ocm.mgmt_config compile;
– For pre-10g databases, grant EXECUTE privileges on the DBMS_JOB package to the ORACLE_OCM user by entering the following SQL*PLUS commands:
SQL> grant execute on UTL_FILE to oracle_ocm;
See Also: "Reviewing the Log of an Installation Session" on page A-3 for information about interactive installation log files

Troubleshooting Configuration Assistants
Troubleshooting the Installation Process A-5
SQL> grant execute on DBMS_JOB to oracle_ocm;SQL> ALTER PACKAGE oracle_ocm.MGMT_DB_LL_METRICS compile;SQL> ALTER PACKAGE oracle_ocm.mgmt_config compile;
■ ORA-04021 Error
There may be cases when the ORACLE_OCM user needs to be granted the required privileges during installation. While granting the privileges, the following error may occur in the ORACLE_BASE\ORACLE_HOME\ccr\log\collectconfigSID.log:
ORA-04021: timeout occurred while waiting to lock object SYS.<package like UTL_FILE>
This error may occur if another procedure is using the package for which the privileges are being granted. To resolve this error, retry the install when the package is not being used. This error may occur while granting privileges on UTL_FILE, DBMS_SCHEDULER, or DBMS_JOB.
■ ORA-01925 Error While Running installCCRSQL
This error may occur if the value of the MAX_ENABLED_ROLES initialization parameter has been exceeded. To resolve this error, you must increase the value of the MAX_ENABLED_ROLES parameter and restart the database as follows:
1. Edit the initsid.ora file where sid is the database system identifier and increase the value of MAX_ENABLED_ROLES . If a server parameter (spfile) has been used, alter the MAX_ENABLED_ROLES parameter by using the following SQL*PLus command:
SQL> alter system set MAX_ENABLED_ROLES=value scope=spfile
2. Restart the database.
Once the database has been restarted, re-run the installCCRSQL.exe script.
■ Incorrectly configured hostnames are displayed on My Oracle Support with only the short names.
To ensure that hostnames are displayed with their fully qualified names on My Oracle Support, the %windir%\system32\drivers\etc\hosts file must contain an entry that includes both the hostname and the network domain in the following format:
IP-Address Full-HostName Short-HostName
For example:
10.10.10.10 myhost.mydomain myhost
If the hosts file has not been correctly configured, only the short name is displayed on My Oracle Support.
A.7 Troubleshooting Configuration AssistantsTo troubleshoot an installation error that occurs when a configuration assistant is running:
■ Review the installation log files listed in the "Reviewing the Log of an Installation Session" section on page A-3.

Cleaning Up After a Failed Installation
A-6 Oracle Real Application Clusters Installation Guide
■ Review the specific configuration assistant log file located in the ORACLE_BASE\cfgtoollogs directory. Try to fix the issue that caused the error.
■ If you see the Fatal Error. Reinstall message, look for the cause of the problem by reviewing the log files. See "Fatal Errors" on page A-6 for more information.
A.7.1 Configuration Assistant FailuresOracle configuration assistant failures are noted at the bottom of the installation window. The configuration assistant interface displays additional information, if available. The configuration assistant execution status is stored in the installActionsdate_time.log file.
The execution status codes are listed in the following table:
A.7.2 Fatal ErrorsIf you receive a fatal error while a configuration assistant is running:
1. Remove the failed installation as described in the "Cleaning Up After a Failed Installation" section on page A-6.
2. Correct the cause of the fatal error.
3. Reinstall the Oracle software.
A.8 Cleaning Up After a Failed InstallationIf an installation fails, then you must remove files that Oracle Universal Installer created during the attempted installation and remove the Oracle home directory. Follow the instructions in Chapter 7, "Removing Oracle Database Software" to run Oracle Universal Installer to deinstall Oracle Database, manually remove the Oracle directory, and remove Oracle from the Registry Editor keys. Afterward, reinstall the software.
A.9 Online Help Not WorkingIf users are accessing Oracle Application Express through a Virtual Host, online Help will not work. Consider the following example:
■ The hostname of the Oracle HTTP Server where the Oracle Application Express DAD resides is internal.server.com and the port is 7777.
■ Users access Oracle Application Express through a Virtual Host. In their Web browsers, users see external.server.com and port 80.
In this example, Oracle Application Express online Help will not work if the users cannot access internal.server.com. To resolve this issue, add the following lines
Note: Make sure that there is no space in the path.
Status Result Code
Configuration assistant succeeded 0
Configuration assistant failed 1
Configuration assistant canceled -1

Online Help Not Working
Troubleshooting the Installation Process A-7
to the Oracle Application Express Database Access Descriptor (DAD) to override the CGI environment variables SERVER_NAME and SERVER_PORT:
PlsqlCGIEnvironmentList SERVER_NAME=external.server.comPlsqlCGIEnvironmentList SERVER_PORT=80
See Also: Oracle HTTP Server mod_plsql User's Guide for information on overriding the CGI environment variables

Online Help Not Working
A-8 Oracle Real Application Clusters Installation Guide

B
Stopping Processes in Oracle Real Application Clusters Databases B-1
B Stopping Processes in Oracle RealApplication Clusters Databases
This appendix describes how to stop processes in Oracle Real Application Clusters (Oracle RAC) databases in preparation for adding additional products to an existing database, or to prepare for applying patch updates. The topics in this appendix are:
■ Back Up the Oracle Real Application Clusters Database
■ Shut Down Oracle Real Application Clusters Databases
■ Stop All Oracle Processes
B.1 Back Up the Oracle Real Application Clusters DatabaseBefore you make any changes to the Oracle software, Oracle recommends that you create a backup of your current installation.
B.2 Shut Down Oracle Real Application Clusters DatabasesShut down any existing Oracle Database instances on each node, with normal or immediate priority.
If Automatic Storage Management (ASM) is running, shut down all databases that use ASM, and then shut down the ASM instance on each node of the cluster.
B.3 Stop All Oracle ProcessesStop all listener and other processes running in the Oracle home directories where you want to modify the database software.
Note: If you are using Oracle Clusterware or Cluster Ready Services, then you must shut down all Oracle Database instances on all cluster nodes before modifying the Oracle software. If you are performing a patch update, review the instructions in the Patch Set Notes for detailed instructions.
Note: If you shut down ASM instances, then you must first shut down all database instances that use ASM, even if these databases run from different Oracle homes.
Stop All Oracle Processes
B-2 Oracle Real Application Clusters Installation Guide
B.3.1 Stopping Oracle Clusterware or Cluster Ready Services ProcessesIf you stopping the processes to install a patch that supports rolling upgrades, then complete the following steps on the node where you will run the installer to perform the upgrade. To stop Oracle Clusterware and Cluster Ready Services on all of the nodes a non-rolling upgrade or for some other reason, perform these steps on each node:
1. Shut down any processes in the Oracle home that might be accessing a database; for example, Oracle Enterprise Manager Database Control.
2. Shut down all Oracle RAC instances on the node. To shut down all Oracle RAC instances for a database, enter the following command, where db_name is the name of the database:
Oracle_home\bin\srvctl stop database -d db_name
3. Shut down all ASM instances. To shut down an ASM instance, enter the following command, where node is the name of the node where the ASM instance is running:
Oracle_home\bin\srvctl stop asm -n node
4. Stop all node applications. To stop node applications running on a node, enter the following command, where node is the name of the node where the applications are running
Oracle_home\bin\srvctl stop nodeapps -n node
5. Shut down the Oracle Clusterware or CRS processes from the Services window. Access the Services window by clicking Start, selecting Control Panel, selecting Administrative Tools, then selecting Services. From the Services window, shut down the following services:
Oracle Object ServiceOracleClusterVolumeServiceOracleCRServiceOracleEVMServiceOracleCSService
Note: If you are stopping the processes on more than one node, then you must complete all of these steps, in the order listed, on one node before you perform any of these steps on another node.
Note: Before you shut down any processes that are monitored by Enterprise Manager Grid Control, set a blackout in Grid Control for the processes that you intend to shut down. This is necessary so that the availability records for these processes indicate that the shutdown was planned downtime, rather than an unplanned system outage.
Note: Depending on your configuration, your nodes may not be running all of the services listed.
Stop All Oracle Processes
Stopping Processes in Oracle Real Application Clusters Databases B-3
B.3.2 Stopping Oracle Database 11g Processes Before Adding Products or UpgradingThis section provides an overview of what needs to be done before adding additional products to Oracle Database 11g Release 1 (11.1). If you are performing a patch upgrade, then refer to the Database Patch Set Notes for the patch for additional instructions.
If node applications are running in the Oracle RAC Oracle home, then shut down the following Oracle Database 11g services before modifying the Oracle Database software:
1. Shut down any processes in the Oracle home on each node that can access a database; for example, Oracle Enterprise Manager Database Control.
2. Shut down all Oracle RAC instances on all nodes. To shut down all Oracle RAC instances for a database, enter the following command, where db_name is the name of the database:
Oracle_home\bin\srvctl stop database -d db_name
3. Shut down all ASM instances on all nodes. To shut down an ASM instance, enter the following command, where node is the name of the node where the ASM instance is running:
Oracle_home\bin\srvctl stop asm -n node
4. Stop all node applications on all nodes. To stop node applications running on a node, enter the following command, where node is the name of the node where the applications are running:
Oracle_home\bin\srvctl stop nodeapps -n node
Note: You must perform these steps in the order listed.
Note: Before you shut down any processes that are monitored by Enterprise Manager Grid Control, set a blackout in Grid Control for the processes that you intend to shut down. This is necessary so that the availability records for these processes indicate that the shutdown was planned downtime, rather than an unplanned system outage.

Stop All Oracle Processes
B-4 Oracle Real Application Clusters Installation Guide
C
Managing Oracle Database Port Numbers C-1
C Managing Oracle Database Port Numbers
This appendix lists the default port numbers and describes how to change the assigned port after installation:
■ About Managing Ports
■ Viewing Port Numbers and Access URLS
■ Port Numbers and Protocols of Oracle Components
■ Changing the Oracle Enterprise Management Agent Port
■ Changing the Oracle Enterprise Manager Database Console Ports
■ Changing the Oracle XML DB Ports
C.1 About Managing PortsDuring installation, Oracle Universal Installer assigns port numbers to components from a set of default port numbers. Many Oracle Database components and services use ports. As an administrator, it is important to know the port numbers that these services use, and to make sure that the same port number is not used by two services on your host.
Most port numbers are assigned during installation. Every component and service has an allotted port range, which is the set of port numbers Oracle Database attempts to use when assigning a port. Oracle Database starts with the lowest number in the range and performs the following checks:
■ Is the port used by another Oracle Database installation on the host?
The installation may be up or down at the time; Oracle Database can still detect if the port is used.
■ Is the port used by a process that is currently running?
This could be any process on the host, even a non-Oracle Database process.
If the answer to any of the preceding questions is yes, Oracle Database moves to the next highest port in the allotted port range, and continues checking until it finds a free port.
C.2 Viewing Port Numbers and Access URLSIn most cases, the port number of the Oracle Database component is listed in the tool used to configure the port. In addition, ports for some Oracle Database applications are listed in the portlist.ini file. This file is located in the ORACLE_BASE\ORACLE_HOME\install directory.

Port Numbers and Protocols of Oracle Components
C-2 Oracle Real Application Clusters Installation Guide
If you change a port number, it is not updated in the portlist.ini file, so you can only rely on this file immediately after installation. To find or change a port number, use the methods described in this appendix.
C.3 Port Numbers and Protocols of Oracle ComponentsTable C–1 lists the port numbers and protocols used by components that are configured during the installation. By default, the first port in the range is assigned to the component, if it is available.
Table C–1 Ports Used in Oracle Components
Component and Description Default Port Number Port Range Protocol
Oracle SQL*Net Listener
Allows Oracle client connections to the database over the Oracle SQL*Net protocol. You can configure this port number during installation. To reconfigure this port, use Net Configuration Assistant.
1521 1521 TCP
Oracle Data Guard
Shares the SQL*Net port and is configured during installation. To reconfigure this port, use Net Configuration Assistant to reconfigure the Oracle SQL*Net listener.
1521 (same value as the listener)
1521 TCP
Connection Manager
Listening port for Oracle client connections. You can configure Oracle Connection Manager during installation or after installation using Net Configuration Assistant (NETCA).
1630 1630 TCP
Oracle Management Agent
HTTP port for Oracle Management Agent, which is part of Oracle Enterprise Manager. It is configured during installation.
"Changing the Oracle Enterprise Management Agent Port" on page C-4 explains how to modify its port number
3938 1830–1849 HTTP
Oracle Enterprise Manager Database Control
HTTP port for Enterprise Manager Database Control. It is configured during installation. "Changing the Oracle Enterprise Manager Database Console Ports" on page C-4 explains how to modify its port number.
1158 5500–5519 TCP/HTTP
Oracle Enterprise Manager Database Console
RMI port for Enterprise Manager Database Control. It is configured during installation."Changing the Oracle Enterprise Manager Database Console Ports" on page C-4 explains how to modify its port number.
5520 5520–5539 TCP
Enterprise Manager Database Console
JMS port for Enterprise Manager Database Control. It is configured during installation. "Changing the Oracle Enterprise Manager Database Console Ports" on page C-4 explains how to modify its port number.
5540 5540–5559 TCP

Port Numbers and Protocols of Oracle Components
Managing Oracle Database Port Numbers C-3
Oracle XML DB
The Oracle XML DB HTTP port is used if Web-based applications need to access an Oracle database from an HTTP listener. It is configured during installation, but you cannot view it afterward. "Changing the Oracle XML DB Ports" on page C-5 explains how to change its port number.
Dynamic Dynamic HTTP
Oracle XML DB
The Oracle XML DB FTP is used when applications need to access an Oracle database from an FTP listener. It is configured during installation, but you cannot view it afterward. "Changing the Oracle XML DB Ports" on page C-5 explains how to change its port number.
Dynamic Dynamic FTP
Oracle Services for Microsoft Transaction Server
The port number for Microsoft Transaction Server is configured when you enter its value in Oracle Universal Installer during a Custom installation the first time you install it on a particular computer. If you install it in multiple Oracle homes on the same computer, Oracle Universal Installer uses the same port number that you specified during the first installation.
In most cases, you do not need to reconfigure the port number. If you need to, you can edit its value in the HKEY_LOCAL_MACHINE\SOFTWARE\ORACLE\OracleMTSRecoveryService\Protid_0 Registry Editor key.
2030 2030 TCP
Oracle Real Application Clusters (Local Host: Windows only)
The port number is assigned automatically during installation. You cannot view or modify it afterward.
61000 61000–61300 TCP
Oracle Real Application Clusters (Cluster Interconnect: Windows only)
The port number is assigned automatically during installation. You cannot view or modify it afterward.
11000 11000–26000 TCP
Oracle Real Application Clusters (UNIX)
The port number is assigned automatically during installation. You cannot view or modify it afterward.
Dynamic Dynamic UDP
Oracle Clusterware
Oracle Cluster Ready Services Daemon (CRS daemon) internode connection. The port number is assigned automatically during installation. You cannot view or modify it afterward.
49896 49896 TCP
Cluster Synchronization Service (CSS)
CSS daemon internode connection for the GM layer. The port number is assigned automatically during installation. You cannot view or modify it afterward.
49895 49895 TCP
Table C–1 (Cont.) Ports Used in Oracle Components
Component and Description Default Port Number Port Range Protocol

Changing the Oracle Enterprise Management Agent Port
C-4 Oracle Real Application Clusters Installation Guide
C.4 Changing the Oracle Enterprise Management Agent PortTo find the current setting for the Oracle Management Agent port, search for EMD_URL in the ORACLE_BASE\ORACLE_HOME\host_sid\sysman\config\emd.properties file.
To change the Oracle Management Agent HTTP port, use the emca -reconfig ports command:
emca -reconfig ports -AGENT_PORT 1831
C.5 Changing the Oracle Enterprise Manager Database Console PortsTo find the current HTTP, RMI, and JMS port settings, search in the following files:
■ HTTP port: Search for REPOSITORY_URL in the ORACLE_BASE\ORACLE_HOME\host_sid\sysman\config\emd.properties file.
■ RMI port: Search for the port attribute in the rmi-server tag in the ORACLE_BASE\ORACLE_HOME\oc4j\j2ee\OC4J_DBConsole_host_sid\config\rmi.xml file.
■ JMS port: Search for the port attribute in the jms-server tag in the ORACLE_BASE\ORACLE_HOME\oc4j\j2ee\OC4J_DBConsole_host_sid\config\jms.xml file.
To change the Oracle Enterprise Manager Database Console ports, use the emca -reconfig ports command:
ORACLE_BASE\ORACLE_HOME\bin> emca -reconfig ports option setting
where option can be:
■ DBCONTROL_HTTP_PORT: Sets the HTTP port, for example:
emca -reconfig ports -DBCONTROL_HTTP_PORT 1820
■ RMI_PORT: Sets the RMI port, for example:
emca -reconfig ports -RMI_PORT 5520
■ JMS_PORT: Sets the JMS port, for example:
emca -reconfig ports -JMS_PORT 5521
You can enter multiple -reconfig port settings in one line, for example:
Oracle Cluster Registry
The port number is assigned automatically during installation. You cannot view or modify it afterward.
Dynamic Dynamic TCP
Oracle Event Manager
The port number is assigned automatically during installation. You cannot view or modify it afterward.
49897 49897–49898 TCP
Cluster Manager
The port number is assigned automatically during installation. You cannot view or modify it afterward.
Dynamic Dynamic TCP
Table C–1 (Cont.) Ports Used in Oracle Components
Component and Description Default Port Number Port Range Protocol

Changing the Oracle XML DB Ports
Managing Oracle Database Port Numbers C-5
emca -reconfig ports -DBCONTROL_HTTP_PORT 1820 -AGENT_PORT 1821 -RMI_PORT 5520
C.6 Changing the Oracle XML DB PortsTo change the Oracle XML DB FTP and HTTP ports, you need to run the catxdbdbca.sql script, which in a default installation is located in ORACLE_BASE\ORACLE_HOME\rdbms\admin.
To change the Oracle XML DB ports:
1. Check that the Oracle listener is running. To do so, in the Windows Services utility, make sure that the Oracle TNS Listener service (for example, OracleOraDb11g_home1TNSListener) is set to Started.
If you cannot start the listener, refer to the Oracle Database Net Services Administrator's Guide.
2. Log in to SQL*Plus as SYS or XDB using the SYSDBA role.
For example, to log into SQL*Plus as SYS using the password welcome:
SYSTEM_DRIVE:\sqlplus /nologSQL> CONNECT sys/welcome AS SYSDBA
3. Run the catxdbdbca.sql script.
For example, to use 2200 for the FTP port and 8200 for the HTTP port, and assuming your Oracle home is in the following location, enter the following command:
SQL> @c:\oracle\product\11.1.0\db_1\rdbms\admin\catxdbdbca.sql 2200 8200
4. Exit SQL*Plus.

Changing the Oracle XML DB Ports
C-6 Oracle Real Application Clusters Installation Guide

D
Using Scripts to Create Oracle Real Application Clusters Databases D-1
DUsing Scripts to Create Oracle RealApplication Clusters Databases
This chapter describes the steps required to create an Oracle Real Application Clusters (Oracle RAC) database from scripts. The topic in this appendix is:
■ Creating a Database Using Scripts
D.1 Creating a Database Using ScriptsTo generate scripts to create an Oracle RAC database, create a database using the scripts, and prepare the database for use, complete the following steps:
1. Start Database Configuration Assistant (DBCA) and select your preferred options to build the Oracle RAC database. Note: you must select the Custom Database template on the Database Templates page for DBCA to provide the script generation option.
On the Creation Options page of your DBCA session, deselect Create Database and select Generate Database Creation Scripts before you click Finish. You can accept the default destination directory for the scripts, or browse for a different location. In either case, you should note the path name for use in the next step.
2. Navigate to the directory, which you noted in Step 1, where DBCA created the scripts, and review the SQL scripts to ensure that they contain the statements to build a database with the characteristics you require. If they do not, then Oracle recommends that you rerun DBCA to create scripts with the desired configuration rather than editing the scripts yourself.
3. On each cluster node you identified during your DBCA session, run the script or sid.bat on Windows, where sid is the sid prefix that you entered on the DBCA Database Name page.
4. Set the initialization parameter, cluster_database, to the value TRUE in your SPFILE by issuing an ALTER SYSTEM command, or by uncommenting it in your PFILE for each instance.
Note: The scripts generated by DBCA are for reference purposes only. Oracle strongly recommends that you use DBCA to create a database.
See Also: "Creating Oracle RAC Databases with the Database Configuration Assistant" for additional information about running a DBCA session.

Creating a Database Using Scripts
D-2 Oracle Real Application Clusters Installation Guide
5. Configure Net Services to support your new database and instances as described in Chapter 6, "Understanding the Oracle Real Application Clusters Installed Configuration".
6. Set the local_listener and remote_listener parameters in your SPFILE by issuing an ALTER SYSTEM command, or by uncommenting it in your PFILE for each instance.
7. Run SRVCTL to configure and start database and instance applications as described in Oracle Real Application Clusters Administration and Deployment Guide.
See Also: Oracle Universal Installer and OPatch User's Guide for Windows and UNIX for additional information about creating and using scripts to install Oracle software

E
Directory Structure for Oracle Real Application Clusters Environments E-1
E Directory Structure for Oracle RealApplication Clusters Environments
This appendix describes the directory structures for Oracle Real Application Clusters (Oracle RAC) software environments. The topics in this appendix are:
■ Understanding the Oracle Real Application Clusters Directory Structure
■ Directory Structures for Oracle Real Application Clusters
E.1 Understanding the Oracle Real Application Clusters Directory Structure
When you install Oracle Database with Oracle RAC, all subdirectories are under a top-level Oracle base directory, which is named by default ORACLE_BASE. The ORACLE_HOME and ADMIN directories are also located under the Oracle base directory.
E.2 Directory Structures for Oracle Real Application ClustersTable E–1 shows the hierarchical directory tree of a sample OFA-compliant database for Oracle RAC on Windows-based systems:
See Also: Oracle Real Application Clusters Administration and Deployment Guide for further information about the ORACLE_HOME and ADMIN directories
Table E–1 Directory Structure for A Sample OFA-Compliant Windows Environment
Root Second-Level Third-LevelFourth-Level Description
x:\oracle_base
c:\oracle
The default ORACLE_BASE directory.
\%ORACLE_HOME%
\ora11.1
The name of the Oracle home by default.
\%ORA_CRS_HOME%
\crs11.1
The name of the Oracle Clusterware home by default.
\bin Subtree for Oracle binaries.
\network Subtree for Oracle Net configuration files, including tnsnames.ora, listener.ora and sqlnet.ora.
\srvm \admin subdirectory.

Directory Structures for Oracle Real Application Clusters
E-2 Oracle Real Application Clusters Installation Guide
\admin The Oracle RAC script clustdb.sql and initialization parameter files for database creation
\database A directory from previous releases containing initialization files pointing to the new directory location for parameter files: ORACLE_BASE\admin\db_name\pfile.
\admin Subtree for Oracle RAC database administration files
\db_name db_name database administration files for the instance identified by sid.
\adhoc Ad hoc SQL scripts.
\adump Audit files.
\arch Archived redo log files.
\bdump Background process trace files.
\cdump Core dump files.
\create Programs used to create the database.
\exp Database export files
\pfile Initialization parameter files
\udump User SQL trace files
See Also: Oracle Database Platform Guide 11g Release 1 (11.1) for Microsoft Windows for further information about the ORACLE_HOME and ADMIN directories
Table E–1 (Cont.) Directory Structure for A Sample OFA-Compliant Windows
Root Second-Level Third-LevelFourth-Level Description
F
Converting to Oracle Real Application Clusters from Single-Instance Oracle Databases F-1
FConverting to Oracle Real ApplicationClusters from Single-Instance Oracle
Databases
This chapter describes the procedures for converting from Oracle Database 11g single-instance databases to Oracle Real Application Clusters (Oracle RAC) databases. The topics in this appendix are:
■ Prerequisites for Conversion
■ Single-Instance to Cluster-Enabled Conversion Administrative Issues
■ Converting from Single-Instance to Oracle Real Application Clusters
■ Post-Conversion Steps
If you are upgrading from Oracle Parallel Server to Oracle RAC or from an earlier version of Oracle RAC, then use the Database Upgrade Assistant (DBUA). In other words, the procedures in this chapter assume that your original single-instance database and the target Oracle RAC database are the same version of Oracle 11g, and that these installations are running on the same platform.
F.1 Prerequisites for ConversionYour system must meet the following hardware and software requirements to convert to Oracle RAC:
■ A supported hardware and operating system software configuration
■ Use OCFS or shared disks
■ Before converting your database, refer to the Oracle Database Licensing Information manual to understand the scope of your license.
F.2 Single-Instance to Cluster-Enabled Conversion Administrative IssuesNote the following administrative considerations before conversion:
■ Backup procedures should be available before converting from a single-instance Oracle database to Oracle RAC.
■ Additional archiving considerations apply in Oracle RAC environments. In particular, the archive file format requires a thread number. In addition, the
See Also: Database licensing information to understand the restrictions of your license. You must comply with the restrictions of the license that you have purchased.
Converting from Single-Instance to Oracle Real Application Clusters
F-2 Oracle Real Application Clusters Installation Guide
archived logs from all instances of an Oracle RAC database are required for media recovery. If you archive to a file and you do not use a cluster file system, then a method of accessing the archive logs from all nodes on which the cluster database has instances is required where file systems are not shared.
F.3 Converting from Single-Instance to Oracle Real Application ClustersTo convert from single-instance Oracle databases to Oracle RAC, Oracle strongly recommends that you use the Database Configuration Assistant (DBCA). This is because DBCA automates the configuration of the control file attributes, creates the undo tablespaces and the redo logs, and makes the initialization parameter file entries for cluster-enabled environments. It also configures the Oracle Net Services, Oracle Clusterware resources, and the configuration for Oracle RAC database management for use by Oracle Enterprise Manager or the SRVCTL utility. This section describes the following scenarios:
■ Single Instance on a Non-Cluster computer to Oracle Database 11g with RAC
■ Single Instance on a Cluster to Oracle Database 11g RAC
F.3.1 Single Instance on a Non-Cluster computer to Oracle Database 11g with RACTo convert from a single-instance Oracle database that is on a non-cluster computer to Oracle RAC, perform the procedures described under the following headings in the order shown:
■ Back up the Original Single-Instance Database
■ Perform the Pre-Installation Steps
■ Set up the Cluster
■ Copy the Preconfigured Database Image
■ Install Oracle Database 11g Software with Oracle Real Application Clusters
F.3.1.1 Back up the Original Single-Instance Database Use DBCA to create a preconfigured image of your single-instance database by using the following procedure:
1. Navigate to the bin directory in ORACLE_HOME, and start DBCA.
2. At the Welcome page, click Next.
3. On the Operations page, select Manage Templates, and click Next.
4. On the Template Management page, select Create a database template and From an existing database (structure as well as data), and click Next.
5. On the Source Database page, enter the SID prefix in the Database instance field, and click Next.
6. On the Template Properties page, enter a name for your template in the Name field. Oracle recommends that you use the database name.
By default, the template files are generated in the directory %ORACLE_HOME%\assistants\dbca\templates directory on Windows-based systems. If you choose to do so, you can enter a description of the file in the Description field, and change the template file location in the Template data file field.
When you have completed entries, click Next.

Converting from Single-Instance to Oracle Real Application Clusters
Converting to Oracle Real Application Clusters from Single-Instance Oracle Databases F-3
7. On the Location of Database Related Files page, select Maintain the file locations, so that you can restore the database to the current directory structure, and click Finish.
DBCA generates two files: a database structure file (template_name.dbc), and a database preconfigured image file (template_name.dfb).
F.3.1.2 Perform the Pre-Installation StepsPerform the pre-installation steps for Oracle Clusterware installation.
F.3.1.3 Set up the Cluster Form a cluster with the required number of nodes according to your hardware vendor's documentation. When you have configured all of the nodes in your cluster, either with or without vendor clusterware, then install Oracle Clusterware and validate cluster components.
F.3.1.4 Validate the ClusterValidate the cluster configuration using the Cluster Verification Utility, as described in Chapter 2, "Installing Oracle Database with Oracle Real Application Clusters".
F.3.1.5 Copy the Preconfigured Database ImageCopy the preconfigured database image. This includes copying the database structure *.dbc file and the database preconfigured image *.dfb file that DBCA created in the previous procedure "Back up the Original Single-Instance Database" on page F-2 to a temporary location on the node in the cluster from which you plan to run DBCA.
F.3.1.6 Install Oracle Database 11g Software with Oracle Real Application Clusters1. Run the Oracle Universal Installer (OUI) to perform an Oracle installation with the
Oracle 11g Database with RAC.
2. Select Cluster Installation Mode on the Specify Hardware Cluster Installation page of the Oracle Universal Installer (OUI) and select the nodes to include in your Oracle RAC database.
3. On the OUI Database Configuration Types page, select the Advanced install type.
After installing the Oracle software, the OUI runs post-installation configuration tools, such as the Network Configuration Assistant (NetCA), DBCA, and so on.
4. On the DBCA Template Selection page, use the template that you copied to a temporary location in the "Copy the Preconfigured Database Image" procedure. Use the browse option to select the template location.
5. If you selected raw storage on the OUI Storage Options page, then on the DBCA File Locations Tab on the Initialization Parameters page, replace the data files, control files, and log files, and so on, with the corresponding raw device files if you have not setup the DBCA_RAW_CONFIG environment variable. You must also replace default database files with raw devices on the Storage page.
See Also: Storage vendor-specific documentation for setting up the shared disk subsystem and for information about how to mirror and stripe disks
See Also: Chapter 3, "Creating Oracle RAC Databases with the Database Configuration Assistant" for more details about DBCA

Converting from Single-Instance to Oracle Real Application Clusters
F-4 Oracle Real Application Clusters Installation Guide
6. After creating the Oracle RAC database, DBCA displays the Password Management page on which you must change the passwords for database privileged users who have SYSDBA and SYSOPER roles. When DBCA exits, the conversion process is complete.
F.3.2 Single Instance on a Cluster to Oracle Database 11g RACUse the following procedures to convert your single-instance database on a cluster computer to Oracle RAC for all of these scenarios.
F.3.2.1 Single Instance on a Cluster Running from a Cluster Enabled Oracle HomePerform the following procedures to convert a single-instance database on a cluster running from a cluster-installed (Oracle Database 11g with RAC) Oracle home.
1. Use DBCA to create a preconfigured image of your single-instance database as described under the heading "Back up the Original Single-Instance Database" on page F-2. To perform the conversion manually, shut down the single-instance database.
2. To add nodes to your cluster, add and connect these nodes to the cluster as described under the heading "Perform the Pre-Installation Steps" on page F-3. Ensure that all of these nodes can access the shared storage. Also extend the Oracle Clusterware home to the new nodes using the procedures for "Extending Clusterware and Oracle Software to New Nodes" as described in Oracle Real Application Clusters Administration and Deployment Guide.
3. From the existing Oracle home, extend this home to the new nodes using the procedure "Adding Nodes at the Oracle RAC Database Layer" as described in Oracle Real Application Clusters Administration and Deployment Guide.
4. From one of the newly added nodes, configure the listeners on the additional nodes using the NetCA. Choose the same port number and protocol that you used on the existing node. If the NetCA displays the existing node in the node list page, then do not select this node, because the listener is already configured on it.
5. Convert the database using one of the following procedures:
■ Automated Conversion Procedure
■ Manual Conversion Procedure
F.3.2.1.1 Automated Conversion Procedure If you created the preconfigured image of the single instance database as described under the heading "Back up the Original Single-Instance Database" on page F-2, then use DBCA to complete the conversion to an Oracle RAC database by completing the following steps:
1. Start DBCA from the initial node. Select the names of the nodes that you want to include as part of your cluster database. On the Template Selection page, select the preconfigured template that you created previously. Enter the database name and respond to the remaining DBCA prompts.
2. To use raw devices for the cluster database files: When the Initialization Parameters page appears, enter the raw device name for the SPFILE on the File Locations tab. On the Storage page, replace the default database file names with the raw devices for the control files, redo logs, and data files to create the cluster database. Click Finish, and create the database.
After creating the Oracle RAC database, DBCA displays the Password Management page on which you must change the passwords for the database privileged users who

Converting from Single-Instance to Oracle Real Application Clusters
Converting to Oracle Real Application Clusters from Single-Instance Oracle Databases F-5
have SYSDBA and SYSOPER roles. When DBCA exits, the conversion process is complete.
F.3.2.1.2 Manual Conversion Procedure If you did not use DBCA to create a preconfigured image of your single-instance database as described in Step 1 in the section "Single Instance on a Cluster Running from a Cluster Enabled Oracle Home" on page F-4, then perform the following steps to complete the conversion:
1. Create the OFA directory structure on each of the nodes that you have added.
2. If you are converting single-instance database files on a file system to raw devices, then copy the database data files, control files, redo logs, and server parameter file to their corresponding raw devices using the OCOPY command from the Oracle Database home on Windows-based systems. Otherwise, continue to the next step.
3. Re-create the control files by running the CREATE CONTROLFILE SQL statement with the REUSE keyword and specify MAXINSTANCES and MAXLOGFILES, and so on, as needed for your Oracle RAC configuration. The MAXINSTANCES recommended default is 32.
4. Shut down the database instance.
5. If your single-instance database was using an SPFILE parameter file, then create a temporary PFILE from the SPFILE using the following SQL statement:
CREATE PFILE='pfile_name' from spfile='spfile_name'
6. Set the CLUSTER_DATABASE parameter to TRUE, set the INSTANCE_NUMBER parameter to a unique value for each instance, using a sid.parameter=value syntax.
If you optimized memory usage on your single-instance database, then adjust the size of the SGA to avoid swapping and paging when you convert to Oracle RAC. you should make this adjustment because Oracle RAC requires about 350 bytes for each buffer to accommodate the Global Cache Service (GCS). For example, if you have 10,000 buffers, then Oracle RAC requires about 350*10,000 bytes more memory. Therefore, adjust the size of the SGA by changing the DB_CACHE_SIZE and DB_nK_CACHE_SIZE parameters accordingly.
7. Start up the database instance using the PFILE created in Step 5.
8. If your single-instance database was using automatic undo management, then create an undo tablespace for each additional instance using the CREATE UNDO TABLESPACE SQL statement. If you are using raw devices, then ensure that the data file for the undo tablespace is on the raw device.
9. Create redo threads that have at least two redo logs for each additional instance. If you are using raw devices, then ensure that the redo log files are on raw devices. Enable the new redo threads by using an ALTER DATABASE SQL statement. Then shutdown the database instance.
10. Copy the Oracle password file from the initial node, or from the node from which you are working, to the corresponding location on the additional nodes on which the cluster database will have an instance. Make sure that you replace the ORACLE_SID name in each password file appropriately for each additional instance.
See Also: "Directory Structures for Oracle Real Application Clusters" on page E-1 for more information about OFA.

Post-Conversion Steps
F-6 Oracle Real Application Clusters Installation Guide
11. Add REMOTE_LISTENER=LISTENERS_DB_NAME and sid.LOCAL_LISTENER=LISTENER_SID parameters to the PFILE.
12. Configure the net service entries for the database and instances and address entries for the LOCAL_LISTENER for each instance and REMOTE_LISTENER in the tnsnames.ora file and copy it to all nodes.
13. Create the SPFILE from the PFILE. If you are not using a cluster file system, then ensure that the SPFILE is on a raw device.
14. Create the %ORACLE_HOME%\database\initSID.ora file on Windows-based systems that contains the following entry:
spfile='spfile_path_name'
where spfile_path_name is the complete path name of the SPFILE.
15. Add the configuration for the Oracle RAC database and its instance-to-node mapping using SRVCTL.
16. Start the Oracle RAC database using SRVCTL.
After starting the database with SRVCTL, your conversion process is complete and, for example, you can run the following SQL statement to see the statuses of all the instances in your Oracle RAC database:
select * from gv$active_instances
F.4 Post-Conversion StepsAfter completing the conversion, note the following recommendations for Oracle RAC environments:
■ Follow the recommendations for using load balancing and Transparent Application Failover as described in the Oracle Real Application Clusters Administration and Deployment Guide
■ Use locally managed tablespaces instead of dictionary managed tablespaces to reduce contention and manage sequences in Oracle RAC as described in the Oracle Real Application Clusters Deployment and Performance Guide
■ Follow the guidelines for configuring an interconnect, for using automatic segment space management, and for using SRVCTL to administer multiple instances, as described in the Oracle Real Application Clusters Administration and Deployment Guide
The buffer cache and shared pool capacity requirements in Oracle RAC are slightly greater than the requirements for single-instance Oracle databases. Therefore, you should increase the size of the buffer cache by about 10% and the size of the shared pool by about 15%.

G
Country Codes for Oracle Configuration Manager G-1
G Country Codes for Oracle ConfigurationManager
This appendix contains a list of country codes that you can use while installing Oracle Configuration Manager (OCM).
G.1 Valid Country CodesTable G–1 contains a list of countries and their short names (codes.)
Table G–1 Country Codes for OCM
Country Short Name (Code)
Afghanistan AS
African Other AA
Albania AL
Algeria DZ
American Samoa AS
Andorra AD
Angola AO
Anguilla AI
Antarctica AQ
Antigua and Barbuda AM
Argentina AR
Armenia AM
Aruba AW
Australia AU
Austria AT
Azerbaijan AZ
Bahamas BS
Bahrain BH
Bangladesh BD
Barbados BB
Belarus BY

Valid Country Codes
G-2 Oracle Real Application Clusters Installation Guide
Belgium BE
Belize BZ
Benin BJ
Bermuda BM
Bhutan BT
Bolivia BO
Bosnia-Herzegovina BA
Botswana BW
Bouvet Island BV
Brazil BR
British Indian Ocean Territory IO
Brunei Darussalam BN
Bulgaria BG
Burkina Faso BF
Burundi BI
Cambodia KH
Cameroon CM
Canada CA
Cape Verde CV
Cayman Islands KY
Central African Republic CF
Chad TD
Chile CL
China CN
Christmas Island CX
CIS-Comm. of Indep. States RU
Cocos (Keeling) Islands CC
Columbia CO
Comoros KM
Congo CG
Cook Islands CK
Costa Rica CR
Cote D’Ivoire CI
Croatia HR
Cuba CU
Cyprus CY
Czech Republic CZ
Table G–1 (Cont.) Country Codes for OCM
Country Short Name (Code)

Valid Country Codes
Country Codes for Oracle Configuration Manager G-3
Democratic People’s Republic of Korea KP
Denmark and Iceland DK
Djibouti DJ
Dominica DM
Dominican Republic DO
East Timor TP
Ecuador EC
Egypt EG
El Salvador SV
Equatorial Guinea GQ
Eritrea ER
Estonia EE
Ethiopia ET
Falkland Islands (Malvinas) FK
Faroe Islands FO
Fiji FJ
Finland FI
France FR
France - Overseas Territories FX
French Guiana GF
French Polynesia PF
French Southern Territories TF
Gabon GA
Gambia GM
Georgia GE
Germany DE
Ghana GH
Gibraltar GI
Greece GR
Greenland GL
Grenada GD
Guadeloupe GP
Guam GU
Guatemala GT
Guinea GN
Guinea - Bissau GW
Guyana GY
Table G–1 (Cont.) Country Codes for OCM
Country Short Name (Code)

Valid Country Codes
G-4 Oracle Real Application Clusters Installation Guide
Haiti HT
Heard Island and McDonald Islands HM
Honduras HN
Hong Kong HK
Hungary HU
Iceland IS
India IN
Indonesia ID
Iran (Islamic Republic of) IR
Iraq IQ
Ireland IE
Israel IL
Italy IT
Jamaica JM
Japan JP
Jordan JO
Kazakhstan KZ
Kenya KE
Kiribati KI
Kuwait KW
Kyrgyzstan KG
Lao People’s Democratic Republic LA
Latvia LV
Lebanon LB
Lesotho LS
Liberia LR
Libyan Arab Jamahiriya LY
Liechtenstein LI
Lithuania LT
Luxembourg LU
Macau MO
Macedonia MK
Madagascar MG
Malawi MW
Mali ML
Malta MT
Malyasia MY
Table G–1 (Cont.) Country Codes for OCM
Country Short Name (Code)

Valid Country Codes
Country Codes for Oracle Configuration Manager G-5
Marshall Islands MH
Martinique MQ
Mauritania MR
Mauritius MU
Mayotte YT
Mexico MX
Micronesia (Federated States Of) FM
Monaco MC
Mongolia MM
Montserrat MS
Morocco MA
Mozambique MZ
Myanmar MM
Namibia NA
Narau NR
Nepal NP
Netherlands NL
Netherlands Antilles AN
New Caledonia NC
New Zealand NZ
Nicaragua NI
Niger NE
Nigeria NG
Niue NU
Norfolk Island NF
Northern Mariana Islands MP
Norway NO
Oman OM
Pakistan PK
Palau PW
Panama PA
Papua New Guinea PG
Paraguay PY
Peru PE
Philippines PH
Pitcairn PN
Poland PL
Table G–1 (Cont.) Country Codes for OCM
Country Short Name (Code)

Valid Country Codes
G-6 Oracle Real Application Clusters Installation Guide
Portugal PT
Puerto Rico PR
Qatar QA
Republic of Korea KR
Republic of Moldova MD
Reunion RE
Romania RO
Rwanda RW
Saint Helena SH
Saint Kitts and Nevis KN
Saint Lucia LC
Saint Pierre and Miquelon PM
Saint Vincent and the Grenadines VC
Samoa WS
San Marino SM
Sao Tome and Principe ST
Saudi Arabia SA
Senegal SN
Serbia and Montenegro YU
Seychelles SC
Sierra Leone SL
Singapore SG
Slovakia SK
Slovenia SI
Solomon Islands SB
Somalia SO
South Africa ZA
South Asia Growth Economies SX
South Georgia and South Sandwich Island GS
Spain ES
Sri Lanka LK
Sudan SD
Suriname SR
Svalbard and Jan Mayen Islands SJ
Swaziland SZ
Sweden SE
Switzerland CH
Table G–1 (Cont.) Country Codes for OCM
Country Short Name (Code)

Valid Country Codes
Country Codes for Oracle Configuration Manager G-7
Syrian Arab Republic SY
Taiwan - Republic of China TW
Tajikistan TJ
Thailand TH
Togo TG
Tokelau TK
Tonga TO
Trinidad and Tobago TT
Tunisia TN
Turkey TR
Turkmenistan TM
Turks and Caicos Islands TC
Tuvalu TV
Uganda UG
Ukraine UA
United Arab Emirates AE
United Kingdom GB
United Republic of Tanzania TZ
United States US
United States Minor Outlying Islands UM
Uruguay UY
Uzbekistan UZ
Vanuatu VU
Vatican City State (Holy See) VA
Venezuala VE
Vietnam VN
Virgin Islands (British) VI
Wallis and Futuna Islands WF
Western Sahara EH
Yemen YE
Zaire ZR
Zambia ZM
Zimbabwe ZW
Table G–1 (Cont.) Country Codes for OCM
Country Short Name (Code)

Valid Country Codes
G-8 Oracle Real Application Clusters Installation Guide

H
Troubleshooting and Removing Oracle Configuration Manager Software H-1
H Troubleshooting and Removing OracleConfiguration Manager Software
This appendix describes how to troubleshoot and remove the Oracle Configuration Manager (OCM) software under the following topics:
■ Troubleshooting Oracle Configuration Manager
■ Removing Oracle Configuration Manager
H.1 Troubleshooting Oracle Configuration ManagerThis section lists some of the errors that may occur while using OCM and provides tips to troubleshoot these errors.
■ Insufficient Privileges While Running installCCRSQL collectconfig
When you run the installCCRSQL.exe script, it creates the ORACLE_OCM user and sets up a job to collect database configuration information. The ORACLE_OCM user requires EXECUTE privileges on UTL_FILE and DBMS_SCHEDULER for database versions 10g or later, and on the DBMS_JOB for pre-10g databases. If these privileges are granted to PUBLIC, the ORACLE_OCM user inherits these privileges, otherwise these privileges are explicitly granted when the installCCRSQL.exe script is executed. If the inherited privileges are revoked, the following errors indicating the lack of privileges will be logged in the alert_log:
ORA-12012: error on auto execute of job 52ORA-04068: existing state of packages has been discardedORA-04063: package body "ORACLE_OCM.package_name" has errorsORA-06508: PL/SQL: could not find program unit being called
To resolve these errors, you must grant the missing EXECUTE privilege to the ORACLE_OCM user.
– For database versions 10g and later, grant EXECUTE privileges on the UTL_FILE and DBMS_SCHEDULER packages to the ORACLE_OCM user by entering the following SQL*PLUS commands:
SQL> grant execute on UTL_FILE to oracle_ocm;SQL> grant execute on DBMS_SCHEDULER to oracle_ocm;SQL> ALTER PACKAGE oracle_ocm.MGMT_DB_LL_METRICS compile;SQL> ALTER PACKAGE oracle_ocm.mgmt_config compile;
– For versions prior to Oracle Database 10g, grant EXECUTE privileges on the DBMS_JOB package to the ORACLE_OCM user by entering the following SQL*PLUS commands:

Removing Oracle Configuration Manager
H-2 Oracle Real Application Clusters Installation Guide
SQL> grant execute on UTL_FILE to oracle_ocm;SQL> grant execute on DBMS_JOB to oracle_ocm;SQL> ALTER PACKAGE oracle_ocm.MGMT_DB_LL_METRICS compile;SQL> ALTER PACKAGE oracle_ocm.mgmt_config compile;
■ ORA-04021 Error
There may be cases when the ORACLE_OCM user needs to be granted the required privileges during installation. While granting the privileges, the following error may occur in the ORACLE_BASE\ORACLE_HOME\ccr\log\collectconfigSID.log:
ORA-04021: timeout occurred while waiting to lock object SYS.<package like UTL_FILE>
This error may occur if another procedure is using the package for which the privileges are being granted. To resolve this error, retry the install when the package is not being used. This error may occur while granting privileges on UTL_FILE, DBMS_SCHEDULER, or DBMS_JOB.
■ ORA-01925 Error While Running installCCRSQL
This error may occur if the value of the MAX_ENABLED_ROLES initialization parameter has been exceeded. To resolve this error, you must increase the value of the MAX_ENABLED_ROLES parameter and restart the database as follows:
1. Edit the initsid.ora file where sid is the database system identifier and increase the value of MAX_ENABLED_ROLES. If a server parameter (spfile) has been used, alter the MAX_ENABLED_ROLES parameter by using the following SQL*PLus command:
SQL> alter system set MAX_ENABLED_ROLES=value scope=spfile
2. Restart the database.
Once the database has been restarted, re-run the installCCRSQL.exe script.
■ Incorrectly configured hostnames are displayed on My Oracle Support with only the short names.
To ensure that hostnames are displayed with their fully qualified names on My Oracle Support, the %windir%\system32\drivers\etc\hosts file must contain an entry that includes both the hostname and the network domain in the following format:
IP-Address Full-HostName Short-HostName
For example:
10.10.10.10 myhost.mydomain myhost
If the hosts file has not been correctly configured, only the short name is displayed on My Oracle Support.
H.2 Removing Oracle Configuration ManagerTo uninstall OCM, follow these steps:
1. If the ORACLE_BASE\ORACLE_HOME directory contains a database, remove the Oracle Configuration Manager user and the associated objects from the database by running the following script:
SQL> ORACLE_BASE\ORACLE_HOME\ccr\admin\scripts\dropocm.sql

Removing Oracle Configuration Manager
Troubleshooting and Removing Oracle Configuration Manager Software H-3
2. If the database is a repository for the Oracle E-Business Suite, log in to the database as an SYSDBA user and remove the additional objects from the database by running the following script:
ORACLE_BASE\ORACLE_HOME\ccr\admin\scripts\ebs_dropccr.sql Oracle_Applications_User
3. If the database is a repository for Oracle Grid Control, log in to the database as the SYSMAN user and remove the additional objects from the database by running the following script:
ORACLE_BASE\ORACLE_HOME\ccr\admin\scripts\dropemrep_collect.sql
4. To stop the Scheduler and remove the service, enter the following command:
ORACLE_BASE\ORACLE_HOME\ccr\bin\deployPackages -d ORACLE_BASE\ORACLE_HOME\ccr\inventory\core.jar
5. Delete the ccr directory by entering the following command:
SYSTEM_DRIVE:\> rmdir /S ORACLE_BASE\ORACLE_HOME\ccr
OCM is successfully uninstalled.

Removing Oracle Configuration Manager
H-4 Oracle Real Application Clusters Installation Guide

Index-i
Index
AAdvanced
configuration type, 2-3architecture
Optimal Flexible Architecture (OFA), 2-4archive logs
destinations, converting to cluster database, F-1ASM
upgrades of, 1-3Automatic Storage Management (ASM)
removing an instance, 7-4automatic undo management, 6-3
Bbackups
and converting to cluster database, F-1
Ccluster database
installed configuration, 6-2Cluster Manager
ports, ranges and protocol, C-4Cluster Synchronization Services (CSS)
ports, ranges and protocol, C-3removing, 7-2
Cluster Verification UtilityDBCA database creation stage readiness
check, 3-2verifying readiness for database installation, 2-1
CLUSTER_DATABASE_INSTANCES, 3-5clusterware diagnostics, A-2commands
emca, 4-3components
created when using DBCA, 6-2configuration assistants
troubleshooting, A-5configuration types
Advanced, 2-3Data Warehouse, 2-3General Purpose, 2-3Transaction Processing, 2-3
connection load balancing, 6-4Connection Manager
ports, ranges and protocol, C-2
control fileinstalled configuration, 6-3
control files, 1-8described, 6-3
convert to cluster databaseadministrative considerations, F-1from non-cluster system, F-2from single-instance, F-4from single-instance to Oracle Real Application
Clusters, F-1post-conversion, F-6to Oracle Real Application Clusters from
single-instance Oracle databases, F-1converting
from single-instance to Real Application Clusters, D-1
to Oracle Real Application Clusters from single-instance Oracle databases, D-1
Country Code, 1-9country codes, G-1create database
using scripts, D-1creating
Oracle Real Application Clusters databasewith Database Configuration Assistant, 2-4,
3-1, 3-3cross-node registration, 6-4Customer Configuration Repository. See Oracle
Configuration Manager
Ddata files, 1-8
and DBCA, 6-2described, 6-2
Data Warehouseconfiguration type, 2-3
databasecomponents, created when using DBCA, 6-2
Database Configuration AssistantASM Disk Groups page, 3-5components created by, 6-2control files, 6-3creating Oracle Real Application Clusters database
after installation, 3-3during installation, 2-4, 3-1

Index-ii
data files, 6-2deleting databases with, 3-6deleting Real Application Clusters databases, 3-6initialization parameter files, 6-4List of Cluster Databases page, 3-7Operations page, 3-7Recovery Configuration page, 3-5redo log files, 6-3rollback segments, 6-3Summary dialog, 3-7tablespaces, 6-2using, 3-1Welcome page, 3-3
database configuration typeselecting, 2-3
database creation using scripts, D-1database directory, E-2DB_NAME, 3-5DB_UNIQUE_NAME, 3-5
initialization parameters, 3-5DBCA
delete database, 3-6dedicated servers, 6-4de-install Oracle Database software, 2-8delete database with DBCA, 3-6deprecated features
service management, 2-4diagnostics, A-2directory objects, 4-2directory structure, E-1
Windows, E-1domain user, 2-2, 3-3, A-2
EEnvironment Variables page
Windows, 2-7error messages
Real Application Clusters management tools, A-2errors
configuration assistants, A-5installation, A-3, A-6silent mode, A-3
external files, 4-2external tables, 4-2
Ffailover
and service registration, 6-4fatal errors, A-6features, new, 0-xiiifiles
Oracle Universal Installer log files, A-3
GGeneral Purpose
configuration type, 2-3globalization
support for, 2-3
Iinitialization parameter files, 6-4
for instances, 5-1listener parameters, 6-5
initialization parametersCLUSTER_DATABASE_INSTANCES, 3-5DB_NAME, 3-5DISPATCHERS, 6-4LOCAL_LISTENER, 6-4REMOTE_LISTENER, 6-4, 6-7
installActions.log file, A-3installation
and globalization, 2-3cannot select a node, A-1directory structure, E-1errors
log session, A-3while configuration assistant runs, A-6
listener.ora file, 6-5log files, A-3non-interactive, D-1noninteractive mode error handling, A-4of additional products after installation is
completed, 3-6Oracle Configuration Manager, 2-3response files
errors, A-3reviewing a log of an installation session, A-3silent mode error handling, A-4tnsnames.ora file, 6-6verifying shared storage devices, 3-3
installCCRSQL.exe, A-4installCCRSQL.sh, H-1instances
initialization parameter files, 5-1
Llanguage
choosing different languages, 2-3See globalization., 1-3
language support and installation, 2-3List of Cluster Databases page, 3-7listener
automatic migration from 10.1 to 10.2, 3-6local, 6-4registration, 6-6
listener.ora file, 6-5configuring, 6-5default configuration, 6-5
listenerslistener.ora file, 6-5
load balancingand service registration, 6-4
local administrative user, 2-2, A-2local listener, 6-4localization
and installation, 2-3log files, A-3
reviewing an installation session, A-3troubleshooting, A-3

Index-iii
MMy Oracle Support
check before installation, 1-1Oracle patches, 4-1
My Oracle Support User Name, 1-9
NNet Configuration Assistant (NetCA)
troubleshooting, A-5net service names, 6-6network configuration files
listener.ora, 6-5sqlnet.ora, 6-11tnsnames.ora, 6-6
network directory, E-1new features, 0-xiiinode
cannot select during installation, A-1unreachable, A-1
node timestamp, A-2noninteractive mode
error handling, A-3
OOCR
installed configuration, 6-1OCR contents, 6-1olsnodes command, A-2online help
not working, A-6Optimal Flexible Architecture (OFA), 2-4ora_dba group, A-2Oracle Cluster Registry port, C-4Oracle Clusterware
ports, ranges and protocol, C-3upgrades of, 1-3
Oracle Configuration Managerinformation needed to enable, 2-3installing, 0-xixoverview, 0-xiv, 0-xvtroubleshooting, H-1uninstalling, H-2
Oracle Data Guardports, ranges and protocol, C-2
Oracle Databaseupgrades of, 1-3
Oracle Database Configuration Assistant (DBCA)troubleshooting, A-5
Oracle Database Upgrade Assistant, 3-6Oracle E-Business Suite, 4-5, 7-1, H-3Oracle Enterprise Management Agent
portschanging, C-4ranges and protocol, C-2
Oracle Enterprise ManagerDatabase Control, 4-3post-installation configuration, 4-3
Oracle Enterprise Manager Database Consoleports
changing, C-4Oracle Enterprise Manager Database Control
portsranges and protocol, C-2
Oracle Event Managerports, ranges and protocol, C-4
Oracle Real Application Clusters (RAC)ports, ranges and protocol, C-3
Oracle Real Application Testing, 0-xvOracle Services for Microsoft Transaction Server
portsranges and protocol, C-3
Oracle services, stopping, 7-3Oracle SQL*Net Listener
portsranges and protocol, C-2
Oracle Universal InstallerWelcome page, 2-5
Oracle Universal Installer (OUI)log files, A-3removing components, 7-3removing components with, 7-3
Oracle XML DBports
changing, C-5ranges and protocol, C-3
OUInode not visible, A-1
Pparameter file search order, 5-3parameters
initialization, 5-1patches
download, 4-1install, 4-1My Oracle Support, 4-1
portlist.ini file, C-1ports
access URLs, C-1Cluster Manager, ranges and protocol, C-4Cluster Synchronization Services, ranges and
protocol, C-3configured for applications, C-1Connection Manager, ranges and protocol, C-2default ranges, C-1Oracle Cluster Registry, C-4Oracle Clusterware, ranges and protocol, C-3Oracle Data Guard, ranges and protocol, C-2Oracle Enterprise Management Agent
changing, C-4ranges and protocol, C-2
Oracle Enterprise Manager Database Consolechanging, C-4
Oracle Enterprise Manager Database Controlranges and protocol, C-2
Oracle Event Manager, ranges and protocol, C-4Oracle Real Application Clusters (RAC), ranges
and protocol, C-3Oracle Services for Microsoft Transaction Server,

Index-iv
ranges and protocol, C-3Oracle SQL*Net Listener
ranges and protocol, C-2Oracle XML DB
changing, C-5ranges and protocol, C-3
post-installationOracle Enterprise Manager configuration, 4-3patch download and install, 4-1product configuration, 4-2
preconfigured database installation types, 2-3pre-installation
raw device creation, 6-3
Rraw devices
identifying on Windowsdb_name_indx1 symbolic link, 6-3db_name_rbs1 symbolic link, 6-3db_name_redo thread_number symbolic
link, 6-3db_name_spfile1 symbolic link, 6-3db_name_system1 symbolic link, 6-2db_name_temp1 symbolic link, 6-3db_name_users1 symbolic link, 6-3
identifying on Windows, undotbs1 and undotbs2 symbolic links, 6-3
setting up, 6-3RBS tablespace
description, 6-2readme.txt file, C-1Real Application Clusters
databases, deleting, 3-6installed components of, 1-8management tools error messages, A-2overview, 3-1, 6-1raw device setup, 6-3
redo log fileinstalled configuration, 6-3
redo log files, 1-8described, 6-3
registrationcross-node, 6-4
removingAutomatic Storage Management instance, 7-4components manually, 7-4components with Oracle Universal Installer, 7-3
response fileserror handling, A-3
rollback segmentsdescribed, 6-3
Sscripts to create an Oracle Real Application Clusters
database, D-1server parameter files, 1-8, 5-1, 6-4
errors, 5-3service registration
configuring, 6-4shared configuration file, 6-1
shared server, 6-4shared storage devices
verification, 3-3silent mode
error handling, A-3errors, A-3
SPFILEdefault creation, 5-1default location, 5-2managing on ASM, 5-2managing on raw device, 5-2
sqlnet.ora file, 6-11default configuration, 6-11
srvm\admin directory, E-1Summary dialog, 3-7SYS, 4-4SYSDBA login, A-2SYSTEM tablespace
description, 6-2system variables dialog
Windows, 2-7
Ttablespaces
and DBCA, 6-2expanding for large sorts, 6-2RBS, 6-2SYSTEM, 6-2TEMP, 6-2undo tablespaces for automatic undo
management, 6-2USERS, 6-2
TEMP tablespacedescribed, 6-2
timestampon each node, A-2
tnsnames.ora file, 6-6default configuration, 6-6
Transaction Processingconfiguration type, 2-3
troubleshootingfatal errors, A-6Inventory log files, A-3online help not working, A-6
Uundo management, 6-3unreachable node, A-1upgrade
of existing Oracle Databases, 3-6of listener, 3-6
upgrades, 1-3USERS tablespace
described, 6-2
VVIP, 1-6virtual IP.See VIP

Index-v
WWelcome page
Oracle Universal Installer, 2-5Windows
minimum memory installation, 2-6system variables dialog, 2-7
Windows Environment Variables page, 2-7Windows Server 2008, 0-xv, 2-1, 2-8

Index-vi


