35
Oracle ® Retail Data Warehouse Database Installation Guide Release 13.0 April 2008
Oracle® Retail Data Warehouse
Database Installation Guide Release 13.0
April 2008

Oracle® Retail Data Warehouse Database Installation Guide, Release 13.0
Copyright © 2008, Oracle. All rights reserved.
Primary Author: Paul Kehler
The Programs (which include both the software and documentation) contain proprietary information; they are provided under a license agreement containing restrictions on use and disclosure and are also protected by copyright, patent, and other intellectual and industrial property laws. Reverse engineering, disassembly, or decompilation of the Programs, except to the extent required to obtain interoperability with other independently created software or as specified by law, is prohibited.
The information contained in this document is subject to change without notice. If you find any problems in the documentation, please report them to us in writing. This document is not warranted to be error-free. Except as may be expressly permitted in your license agreement for these Programs, no part of these Programs may be reproduced or transmitted in any form or by any means, electronic or mechanical, for any purpose.
If the Programs are delivered to the United States Government or anyone licensing or using the Programs on behalf of the United States Government, the following notice is applicable:
U.S. GOVERNMENT RIGHTS Programs, software, databases, and related documentation and technical data delivered to U.S. Government customers are "commercial computer software" or "commercial technical data" pursuant to the applicable Federal Acquisition Regulation and agency-specific supplemental regulations. As such, use, duplication, disclosure, modification, and adaptation of the Programs, including documentation and technical data, shall be subject to the licensing restrictions set forth in the applicable Oracle license agreement, and, to the extent applicable, the additional rights set forth in FAR 52.227-19, Commercial Computer Software—Restricted Rights (June 1987). Oracle Corporation, 500 Oracle Parkway, Redwood City, CA 94065
The Programs are not intended for use in any nuclear, aviation, mass transit, medical, or other inherently dangerous applications. It shall be the licensee's responsibility to take all appropriate fail-safe, backup, redundancy and other measures to ensure the safe use of such applications if the Programs are used for such purposes, and we disclaim liability for any damages caused by such use of the Programs.
Oracle, JD Edwards, PeopleSoft, and Siebel are registered trademarks of Oracle Corporation and/or its affiliates. Other names may be trademarks of their respective owners.
The Programs may provide links to Web sites and access to content, products, and services from third parties. Oracle is not responsible for the availability of, or any content provided on, third-party Web sites. You bear all risks associated with the use of such content. If you choose to purchase any products or services from a third party, the relationship is directly between you and the third party. Oracle is not responsible for: (a) the quality of third-party products or services; or (b) fulfilling any of the terms of the agreement with the third party, including delivery of products or services and warranty obligations related to purchased products or services. Oracle is not responsible for any loss or damage of any sort that you may incur from dealing with any third party.

Value-Added Reseller (VAR) Language (i) the software component known as ACUMATE developed and licensed by Lucent Technologies Inc. of Murray Hill, New Jersey, to Oracle and imbedded in the Oracle Retail Predictive Application Server – Enterprise Engine, Oracle Retail Category Management, Oracle Retail Item Planning, Oracle Retail Merchandise Financial Planning, Oracle Retail Advanced Inventory Planning and Oracle Retail Demand Forecasting applications.
(ii) the MicroStrategy Components developed and licensed by MicroStrategy Services Corporation (MicroStrategy) of McLean, Virginia to Oracle and imbedded in the MicroStrategy for Oracle Retail Data Warehouse and MicroStrategy for Oracle Retail Planning & Optimization applications.
(iii) the SeeBeyond component developed and licensed by Sun MicroSystems, Inc. (Sun) of Santa Clara, California, to Oracle and imbedded in the Oracle Retail Integration Bus application.
(iv) the Wavelink component developed and licensed by Wavelink Corporation (Wavelink) of Kirkland, Washington, to Oracle and imbedded in Oracle Retail Store Inventory Management.
(v) the software component known as Crystal Enterprise Professional and/or Crystal Reports Professional licensed by Business Objects Software Limited (“Business Objects”) and imbedded in Oracle Retail Store Inventory Management.
(vi) the software component known as Access Via™ licensed by Access Via of Seattle, Washington, and imbedded in Oracle Retail Signs and Oracle Retail Labels and Tags.
(vii) the software component known as Adobe Flex™ licensed by Adobe Systems Incorporated of San Jose, California, and imbedded in Oracle Retail Promotion Planning & Optimization application.
(viii) the software component known as Style Report™ developed and licensed by InetSoft Technology Corp. of Piscataway, New Jersey, to Oracle and imbedded in the Oracle Retail Value Chain Collaboration application.
(ix) the software component known as WebLogic™ developed and licensed by BEA Systems, Inc. of San Jose, California, to Oracle and imbedded in the Oracle Retail Value Chain Collaboration application.
(x) the software component known as DataBeacon™ developed and licensed by Cognos Incorporated of Ottawa, Ontario, Canada, to Oracle and imbedded in the Oracle Retail Value Chain Collaboration application.

v
Contents Preface ............................................................................................................................. vii
Audience ............................................................................................................................... vii Related Documents.............................................................................................................. vii Customer Support................................................................................................................ vii Review Patch Documentation ............................................................................................ vii Oracle Retail Documentation on the Oracle Technology Network............................... vii Conventions.........................................................................................................................viii
1 Preinstallation Tasks................................................................................................... 1 Implementation Capacity Planning......................................................................................2 Check Database Server Hardware Requirements ..............................................................2 Check Database Server Software Requirements.................................................................3 Other Software Requirements for the Data Warehouse ....................................................4 Check Client System Requirements .....................................................................................4 Create UNIX User Accounts..................................................................................................4 Create UNIX Directories ........................................................................................................4 Alter Directory Ownership and Privileges..........................................................................5 Copy Profiles for RDW User .................................................................................................6
2 Installation Tasks......................................................................................................... 7 Establish Data Warehouse Partitioning Strategy................................................................7 Create the RDW Database and Tablespaces........................................................................8
Create the Database as Follows......................................................................................8 Create RDW Tablespaces................................................................................................8
Load RDW Database ..............................................................................................................9 Create RDW Schema Owners.........................................................................................9 Create RDW Datamart-level tables ...............................................................................9 Set up RDW User Permissions .......................................................................................9
Configure RETL ....................................................................................................................10 Data Population ....................................................................................................................10
Populate Datamart Default Data .................................................................................11 Populate Time Dimension ............................................................................................12 Populate Static Dimension Data ..................................................................................14
Install Oracle Configuration Manager ...............................................................................15 A Appendix: Development Database Schema Implementation................................ 17 B Appendix: RDW Code Tree ....................................................................................... 19 C Appendix: Oracle 10g Database Creation Scripts.................................................. 21 D Appendix: Tablespace Creation Scripts.................................................................. 25 E Appendix: Installation Order .................................................................................... 27

vii
Preface Oracle Retail Installation Guides contain the requirements and procedures that are necessary for the retailer to install Oracle Retail products.
Audience This Installation Guide is written for the following audiences: Database administrators (DBA) System analysts and designers Integrators and implementation staff
Related Documents You can find more information about this product in these resources: Oracle Retail Data Warehouse Middle Tier Installation Guide Oracle Retail Data Warehouse Operations Guide Oracle Retail Data Warehouse Release Notes Oracle Retail Data Warehouse User Guide Oracle Retail Data Warehouse Data Model Oracle Business Intelligence Enterprise Edition (OBI EE) documentation
Customer Support https://metalink.oracle.com When contacting Customer Support, please provide the following: Product version and program/module name Functional and technical description of the problem (include business impact) Detailed step-by-step instructions to re-create Exact error message received Screen shots of each step you take
Review Patch Documentation For a base release (".0" release, such as 13.0), Oracle Retail strongly recommends that you read all patch documentation before you begin installation procedures. Patch documentation can contain critical information related to the base release, based on new information and code changes that have been made since the base release.
Oracle Retail Documentation on the Oracle Technology Network In addition to being packaged with each product release (on the base or patch level), all Oracle Retail documentation is available on the following Web site: http://www.oracle.com/technology/documentation/oracle_retail.html Documentation should be available on this Web site within a month after a product release. Note that documentation is always available with the packaged code on the release date.

viii
Conventions Navigate: This is a navigate statement. It tells you how to get to the start of the procedure and ends with a screen shot of the starting point and the statement “the Window Name window opens.”
Note: This is a note. It is used to call out information that is important, but not necessarily part of the procedure.
This is a code sample It is used to display examples of code A hyperlink appears like this.
Database Installation Guide 1
1 Preinstallation Tasks
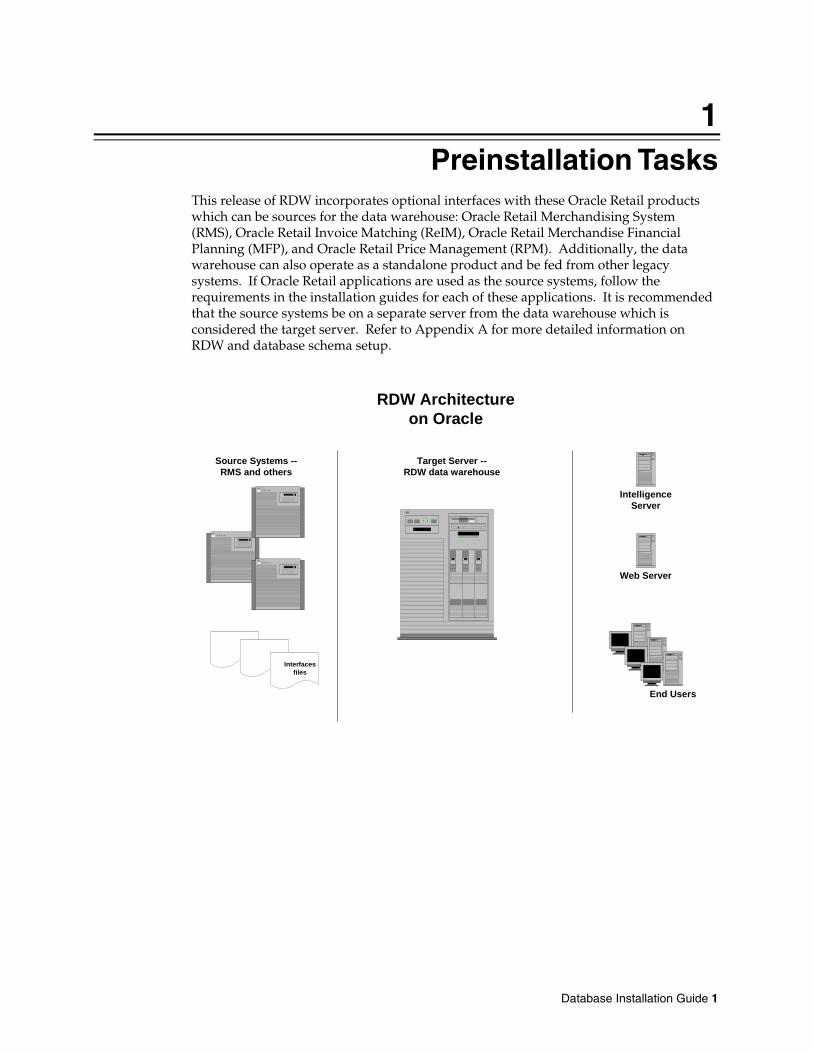
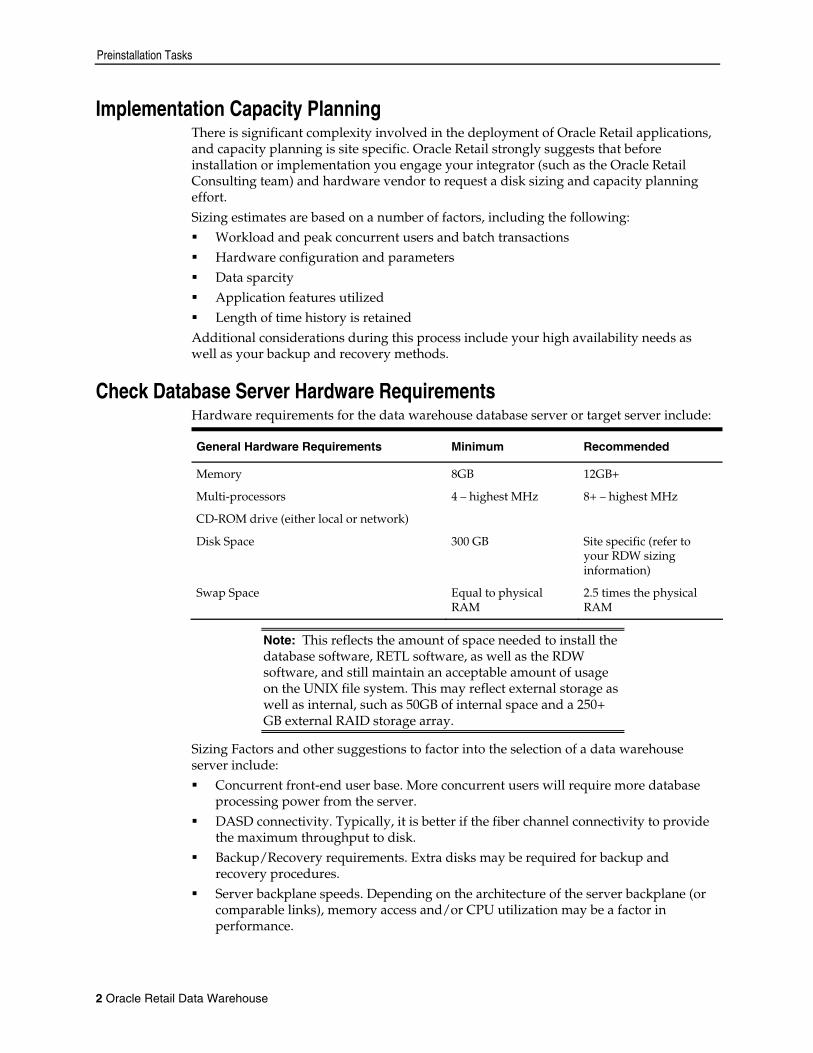
This release of RDW incorporates optional interfaces with these Oracle Retail products which can be sources for the data warehouse: Oracle Retail Merchandising System (RMS), Oracle Retail Invoice Matching (ReIM), Oracle Retail Merchandise Financial Planning (MFP), and Oracle Retail Price Management (RPM). Additionally, the data warehouse can also operate as a standalone product and be fed from other legacy systems. If Oracle Retail applications are used as the source systems, follow the requirements in the installation guides for each of these applications. It is recommended that the source systems be on a separate server from the data warehouse which is considered the target server. Refer to Appendix A for more detailed information on RDW and database schema setup.
RDW Architectureon Oracle
End Users
Target Server --RDW data warehouse
Source Systems --RMS and others
Interfacesfiles
IntelligenceServer
Web Server
Preinstallation Tasks
2 Oracle Retail Data Warehouse
Implementation Capacity Planning There is significant complexity involved in the deployment of Oracle Retail applications, and capacity planning is site specific. Oracle Retail strongly suggests that before installation or implementation you engage your integrator (such as the Oracle Retail Consulting team) and hardware vendor to request a disk sizing and capacity planning effort. Sizing estimates are based on a number of factors, including the following: Workload and peak concurrent users and batch transactions Hardware configuration and parameters Data sparcity Application features utilized Length of time history is retained
Additional considerations during this process include your high availability needs as well as your backup and recovery methods.
Check Database Server Hardware Requirements Hardware requirements for the data warehouse database server or target server include:
General Hardware Requirements Minimum Recommended
Memory 8GB 12GB+
Multi-processors 4 – highest MHz 8+ – highest MHz
CD-ROM drive (either local or network)
Disk Space 300 GB Site specific (refer to your RDW sizing information)
Swap Space Equal to physical RAM
2.5 times the physical RAM
Note: This reflects the amount of space needed to install the database software, RETL software, as well as the RDW software, and still maintain an acceptable amount of usage on the UNIX file system. This may reflect external storage as well as internal, such as 50GB of internal space and a 250+ GB external RAID storage array.
Sizing Factors and other suggestions to factor into the selection of a data warehouse server include: Concurrent front-end user base. More concurrent users will require more database
processing power from the server. DASD connectivity. Typically, it is better if the fiber channel connectivity to provide
the maximum throughput to disk. Backup/Recovery requirements. Extra disks may be required for backup and
recovery procedures. Server backplane speeds. Depending on the architecture of the server backplane (or
comparable links), memory access and/or CPU utilization may be a factor in performance.
Check Database Server Software Requirements
Database Installation Guide 3
Overall database size for the RDW. A capacity plan should be done for the database server and DASD requirements in general to assess how large the environment will need to be.
Note: These data warehouse server requirements should only be used as guidelines because they reflect the hardware used to run a small environment (approximately 200 gigabytes of data). Actual requirements can be somewhat smaller, or typically much larger, depending on the intended size of the RDW environment upon full implementation. Oracle can assist with making these determinations by providing information on database size estimates, server architecture, and so on.
Check Database Server Software Requirements General Requirements for a database server running RDW include:
Supported on: Versions Supported:
Database Server OS UNIX based OS certified with Oracle RDBMS 10g Enterprise Edition (Oracle Enterprise Linux 4 Patch 5)
Database Server Oracle RDBMS 10g Release 2 Enterprise Edition (minimum 10.2.0.3 patchset required) with the following patches and components:
Patches:
5397953 (ORA-07445: [KKPAPITGETALL()+2152] [SIGSEGV] [ADDRESS NOT MAPPED TO OBJECT] [0X34)
5648872 (SCHEDULER ORA-07445 [OPIDSA()+321] WHEN SETTING UP CHAIN TEST)
5921386 (WRONG RESULT WITH MERGE JOINT OUTER IN THE EXECUTION PLAN)
RAC Only
5721821 (ORA-7445[KGLOBCL] OCCURED AND INSTANCE WENT DOWN)
Components:
Oracle Database 10g
Oracle Partitioning
Oracle Net Services
Oracle Call Interface (OCI)
Oracle Programmer
Oracle XML Development Kit
ANSI compliant C compiler (certified with OS and database version)
x-Windows interface
Preinstallation Tasks
4 Oracle Retail Data Warehouse
Other Software Requirements for the Data Warehouse Please refer to the RDW 13.0 Middle Tier Installation Guide for the full installation instructions of the Oracle Business Intelligence Enterprise Edition components.
Requirement Version
Oracle Business Intelligence Enterprise Edition
10.1.3.3
Oracle Retail Extract Transform and Load (RETL)
13.0
Oracle Retail Merchandising System (RMS)/Oracle Retail Trade Management (RTM)/Oracle Retail Sales Audit (ReSA)
13.0
Oracle Retail Invoice Matching 13.0
Oracle Retail Price Management 13.0
Merchandise Financial Planning (MFP)
13.0
Check Client System Requirements General requirements for end-user client workstation software requirements include: See specific database platform documentation for client requirements. See the Oracle Retail Data Warehouse Middle Tier Installation Guide for other client
requirements.
Create UNIX User Accounts 1. Log in as the root user. 2. Create the following groups:
dba - admin group which controls RDW access dev - development group
3. Create the following user accounts, using ksh as the default shell: oretail - dba group rdw13dev - dev group
4. Typically the owner of the Oracle RDBMS software owns the RDW database software. This user is referred to as rdwdba.
Create UNIX Directories 1. Create UNIX directories for the RDW database structure and the code directory
structure.
Note: The database directories are used to provide scripts to aid in the creation of tablespaces and users. The code directory structure holds the source code, error and log directories. Refer to Appendix B: Code Tree for a more detailed description of the directory structure.
Alter Directory Ownership and Privileges
Database Installation Guide 5
2. Create RDW database directory structure: Log in to the database server as UNIX user rdwdba. This user owns the database
directory structure. Extract the files from the downloaded zip file. FTP (in binary mode) the tar file,
rdw13_db.zip, to <database_directory> on the UNIX server where the rdw13 database will be created. The <database_directory> directory is a working directory that should be designated at this time. As the rdwdba user, extract the rdw13_db.zip file by typing the following at the UNIX prompt: unzip rdw13_db.zip
3. Create RDW code directory structure: Log in to the database server as the UNIX user oretail. This user owns the code
directory structure. FTP (in binary mode) the file rdw13_code.zip to a base directory where you wish
to permanently store the RDW code directory. This base directory should be on the UNIX server where the RDW database will be created. The base directory is a working directory that you should designate at this time. As the oretail user, extract the rdw13_code.zip file in the base directory specified above by entering the following at the UNIX prompt: unzip rdw13_code.zip
Note: It is highly recommended that clients have a separate server for production installations. To set up a production environment; create a prd directory, then copy the dev directory structure to the production server, and use the <base_directory>/rdw13.0/prd as the code directory structure on that server. A prd group is needed and a separate prd user should be created as well.
Alter Directory Ownership and Privileges For added security, alter the directory ownership and privileges. 1. Log in as the root user (in the <base_directory>/rdw13.0 directory). 2. Change the following as indicated in the table below:
the ownership (chown –R <owner> <directory>) the group (chgrp –R <user group> <directory>) the privileges (chmod –R <privs> <directory>)
Directory Owner Group Privilege
retek oretail dba 775
dev rdw13dev dev 775
dbasql rdwdba – Oracle dba 774
For example: cd <base_directory>/rdw13.0 chown –R rdw13dev dev chgrp –R dev dev chmod –R 775 dev
Preinstallation Tasks
6 Oracle Retail Data Warehouse
Copy Profiles for RDW User 1. Login to UNIX as the rdw13dev user and change directories to
<base_directory>/rdw13.0/sample_profiles. 2. Copy the profile to the home directory of rdw13dev. Edit the .profile to correspond
with the server file system, RETL installation and UNIX environment.
Note: The sample profiles by default are set up for a development environment. Change the indicated variables as necessary for other environments. Any variables that may require modification are noted in the sample profile comments. Be sure to set up these UNIX accounts to automatically run the .profile within their home directory upon login.
Database Installation Guide 7
2 Installation Tasks
It is assumed that Oracle 10g release 2, with appropriate patches, has already been installed. If not, refer to “Check Database Server Software Requirements” in Chapter 1, “Preinstallation Tasks” before proceeding.
Note: Become familiar with the RDW application in a development environment before setting up a production system. The following instructions are recommended for development and test environments only. When implementing RDW for a production environment, refer to capacity planning information to determine size requirements for tablespaces, tables, and indexes. The installation scripts provided need to be modified accordingly.
If a database has already been created, it is necessary to review the contents of this section to determine if all database components have been installed and configured properly. Also refer to Appendices C and D.
Note: When running the scripts in this section, the following errors may be encountered “ORA-04043 object XXXX does not exist”, “ORA-01432 public synonym to be dropped does not exist”, “ORA-00942 table or view does not exist”, “ORA-29833 indextype does not exist”, “ORA-29807 specified operator does not exist”, “ORA-29931 specified association does not exist”, and “ORA-29816 object being disassociated is not present”. These errors can be ignored. The ORA errors are caused by dropping the objects the script is about to create.
Establish Data Warehouse Partitioning Strategy Establish a partitioning strategy before creating compressed datamart and historical tables in a production environment. In doing so, consider the database size and business requirements. For example, the amount of history to be held at various levels, and the various functional areas that might be used should be referenced when determining a partitioning strategy. Additionally, large non-compressed fact tables should be partitioned for ease of rolling off history. Refer to the RDW Operations Guide for more detailed information regarding the partitioning strategy for both compressed and non-compressed fact tables. Refer to “Oracle® Database Concepts 10g Release 2 (10.2) Chapter 18 “Partition Tables and Indexes” for further details regarding partitioning concepts.
Installation Tasks
8 Oracle Retail Data Warehouse
Create the RDW Database and Tablespaces
Create the Database as Follows 1. Login to the RDW database server as the rdwdba user. 2. Create the Oracle recommended OFA directory structure for the database (datafile
directories, adump, bdump, cdump, arch, create, exp, pfile, udump, utl_file_dir). 3. Place an entry in the oratab file for the database and execute oraenv to set the
ORACLE_SID and ORACLE_HOME environment variables. 4. Copy INSTALL_DIR/rdw13/create_db/init.ora to the $ORACLE_HOME/pfile
directory and rename it to init${ORACLE_SID}.ora. Modify the parameters according to guidelines specified in this file.
5. Create a symbolic link from $ORACLE_HOME/pfile/init${ORACLE_SID}.ora to $ORACLE_HOME/dbs/init${ORACLE_SID}.ora.
6. Modify the INSTALL_DIR/rdw13/create_db/crdb1.sql file. Refer to comments in this file regarding modifications that need to be made.
7. Login to SQL*Plus as SYSDBA and execute INSTALL_DIR/rdw13/create_db/crdb1.sql. Review crdb1.log for errors and correct as needed.
8. Login to SQL*Plus as SYSDBA and execute INSTALL_DIR/rdw13/create_db/crdb2.sql. Review crdb2.log for errors and correct as needed.
9. Login to SQL*Plus as SYSDBA and execute INSTALL_DIR/rdw13/create_db/crdb3.sql. Review JServer.log, context.log and xdb_protocol.log for errors and correct as needed.
10. Configure the database listener.
Create RDW Tablespaces 1. As the rdwdba user, change directories to INSTALL_DIR/rdw13/create_db. 2. Modify the create_rdw_tablespaces.sql script as appropriate. Refer to Appendix D. 3. Login to SQL*Plus as SYSDBA and execute: SQL>@create_rdw_tablespaces.sql.
4. Review create_rdw_tablespaces.log for errors and correct as needed.

Load RDW Database
Database Installation Guide 9
Load RDW Database
Create RDW Schema Owners 1. As the rdwdba user, change directories to INSTALL_DIR/rdw13/utility. 2. Review the crusers.sql file for the names and passwords of the rdw users that will be
created. Note these as they are used later in the installation. 3. Login to SQL*Plus as SYSDBA and execute the following script: SQL>@crusers..sql
4. To secure the passwords in the create users script, change the privileges on the script by entering: chmod 700 crusers.sql
Create RDW Datamart-level tables 1. As the rdwdba user, change directories to <database_directory>/rdw13/ddl/dm. 2. Log in to SQL*Plus as rdw13dm and execute the following script:
SQL>@rdw13.sql
3. This script creates the RDW datamart-level tables. It creates all default base non-partitioned tables. If you are implementing a partitioning strategy at this time, modify the DDL to reflect your partitioning.
4. Review the rdw13dm.log file to verify that the objects were all created successfully.
Set up RDW User Permissions 1. As the rdwdba user, change directories on the UNIX server to
<base_directory>/rdw13.0/dbasql. This directory contains scripts that set up all necessary synonyms and grants for
the RDW environment. The header of each file contains information regarding which user should execute the script, when to run them and additional details about the scripts.
The scripts spool to the /tmp directory. This directory should already exist, but verify that it does and can be written to before running.
The rdw_users.sql script has been set up to reference the default RDW usernames, so verify that they are correct and change to suit your environment if necessary.
When prompted by any of the scripts for an object name, press the [Enter] key to create permissions for all objects in the schema.
2. Login to SQL*Plus as the schema owner rdw13dm (created earlier) and execute the following scripts to setup permissions to the datamart objects: SQL>@gs_rdw13_dm_ora.sql SQL>@invalids.sql
Verify the scripts executed correctly by reviewing the following files: g_rdw13_dm.lst, s_rdw13_dm.lst
Note: Ignore any text that is generated similar to the following. SP2-0734: unknown command beginning "new 7: ..." - rest of line ignored
Ignore any text that is generated from invalids.sql if no objects need to be validated.

Installation Tasks
10 Oracle Retail Data Warehouse
SP2-0734: unknown command beginning "no rows se..." - rest of line ignored.
Note: These scripts are also used for maintenance. If you need to drop or add a table in the database, run these scripts again to give the appropriate privileges to your users. If a table has been dropped and recreated for maintenance, you also need to verify that all objects in the database are VALID. For a test or a production environment, you need to modify the rdw_users.sql script to alter the usernames for the environment you are creating.
Configure RETL This release of RDW incorporates RETL. Take this time now to install and configure this on the target server. See the RETL Programmers Guide to install and configure this tool. Once configured, populate the default data as described in the rest of this chapter. 1. Log in to the UNIX server with the rdw13dev account. 2. Change directories to <base_directory>/rdw13.0/rfx/etc. 3. Modify the rdw_config.env script to match your environment. For detail information
about each setting, refer to section ‘rdw_config.env settings’ within the RDW Operation Guide.
Data Population In order to successfully populate the database with datamart data, the rdw13dev profile must be modified for these values: $MMUSER, $PASSWORD, $PATH, $RFX_HOME and $MMHOME. 1. Log in to a UNIX session on the RDW database server as rdw13dev. Modify .profile
by setting MMUSER to the data mart owner, rdw13dm. Set PASSWORD to the appropriate password as determined when the crusers.sql script was run.
2. Set RFX_HOME to the location of the RETL installation and enter this value in the PATH.
3. Source the profile or exit and log back on as rdw13dev. 4. Verify the RETL executable is in the path of your UNIX session by typing the
following at the UNIX prompt: which retl
Data Population
Database Installation Guide 11
Populate Datamart Default Data 1. As the rdw13dev user, change directories to <base_directory>/rdw13.0/install. This
directory contains the code for all default data installation scripts. 2. At the UNIX prompt, enter: default_load.ksh
Note: Read the comments on every install script called within default_load.ksh, specifically load_maint_dim_key_dm.sql because the initial date for curr_load_dt might be different for every client.
This script executes the following SQL scripts: alter_dt_fmt.sql – alters the current session’s date format. load_program_control_dm.sql – populates the program status data for the RDW
modules. load_dummyrows.sql – populates necessary ‘dummy’ records for low level
dimensions. load_maint_dim_key_dm.sql – populates the dimension surrogate key
information and initial maintenance date. load_indicator_dm.sql – populates the default values for a dummy table for
front-end reporting. load_cde_dtl_dm.sql – populates the code abbreviation table for RDW batch
modules to reference. load_prod_diff_type_dm.sql – populates the diff type dimension with default
diff type values. load_rtl_type_dm.sql – populates the retail type dimension table with default
retail types. load_cde_dtl_com_dm.sql – populates the customer order code abbreviation
table for RDW batch modules to reference. load_tsf_type_dm.sql – populates the transfer type dimension table with default
transfer types. load_wf_cust_type_dm.sql – populates the wholesale franchise customer type
dimension table with default customer types. 3. On the UNIX server, change directories to <base_directory>/rdw13.0/log. 4. Review the log file that was created or modified. 5. On the UNIX server, change directories to <base_directory>/rdw13.0/error. Review
the error files that were created for default_load. 6. On the UNIX server, change directories to <base_directory>/rdw13.0/install. 7. Rerun the RDW profile and verify that the MMUSER and PASSWORD variables are
set to the batch user, rdw13dev and the appropriate password. At the UNIX prompt, enter: time_static_load.ksh time_static_load.ksh – populates the following tables with default values: time_minute_dm time_hour_dm time_half_hour_dm time_qtr_hour_dm
Installation Tasks
12 Oracle Retail Data Warehouse
8. On the UNIX server, cChange directories to <base_directory>/rdw13.0/log. 9. Review the log file that was created or modified. 10. On the UNIX server, change directories to <base_directory>/rdw13.0/error. 11. Review the error files that were created for time_static_load.
Note: Refer to the RDW Operations Guide for more information on the log files and error files.
12. Import the localization_dm.dmp file to the localization_dm table following the steps below: a. As the rdwdba user, change directories to
<database_directory>/rdw13_code/metadata. b. Set NLS_LANG environment variable to NLS_LANG
=AMERICAN_AMERICA.UTF8. c. Import the localization_dm.dmp file using the rdw13dm user. imp file=localization_dm.dmp
Populate Time Dimension This section describes the initial load and loading of additional time into RDW. The time dimension can be loaded with a 454 calendar, 13 period time calendar or a 454 with Gregorian calendar. Populate these tables according to business requirements. If RMS is implemented, the time dimension with 454-calendar time or 454 with Gregorian calendar the calendar information can be extracted from this system. Refer to the RMS Operations Guide volume 3 for details of how to extract time. After the calendar information has been extracted, proceed to section ‘Create Time in RDW’ to load it in RDW. To populate time for 454, 13 period or 454 with Gregorian calendar standalone, proceed to section ‘Create Standalone Time’. For information on the tables loaded for the Time dimension refer to the RDW Data Model documentation.
Create Standalone Time Modify the sample text files that serve as the data to populate the time calendar dimension with appropriate time for the environment. If a 454-time calendar or a 454-time calendar with Gregorian calendar will be used, modify the time_454*.txt. If implementing a 13 period time modify the time_13.txt file with the time calendar data. Modify the file, wkday*.txt, with the description of the first day of the fiscal week, for example ‘SUNDAY’. The entry in wkday.txt must be in all capital letters. A sample of these text files has been provided in <base_directory>/rdw13.0/dev/install. See the RDW Operations Guide Appendix A ‘API Flat File Specifications’ for instructions on how to modify the text files. Proceed to ‘Create Time in RDW’ to load time into the Data Warehouse.
Note: Sample text files can be used to get started in a development environment. These files need to be modified to match the fiscal calendar before creating time in a production environment
Data Population
Database Installation Guide 13
Create Time in RDW If more time data is needed, modify the parameters below for the new time period and run the module again. To minimize the load time for adding additional time, enter only the first year to be added as the response for the first year prompt in number 5. 1. If RMS is not being used as the source of the time calendar, move on to step 2. After
running time extraction in RMS (see RMS Operations Guide volume 3 for details), FTP time_454.txt, start_of_half_month.txt, and wkday.txt from RMS install directory to the RDW directory <base_directory>/rdw13.0/install.
2. Login to the RDW database server as the UNIX user rdw13dev. Verify the RETL executable is in the path of your UNIX session by typing which rfx at the UNIX prompt.
3. Change directories to <base_directory>/rdw13.0/install. 4. Verify the C compiler is in the path of your UNIX session and the C compiler is in
your UNIX library path. At the UNIX prompt, enter: which cc
5. Compile the module cr_time_454, cr_time_13 and cr_time_g with a standard ANSI C compiler. At the UNIX prompt, enter: cc –g –I. –o cr_time_454 c_utils.c cr_time_454.c cc –g –I. –o cr_time_13 c_utils.c cr_time_13.c cc –g –I. –o cr_time_g c_utils.c cr_time_g.c
6. Execute the cr_time.ksh module. At the UNIX prompt enter: cr_time.ksh
7. This script prompts for the calendar type. Choose 1 for 454 time, 2 for 13 period time and 3 for 454 with Gregorian time.
8. At the prompt enter the 4-digit year for the beginning and ending of the time calendar: Please enter first year to be loaded:
Please enter last year to be loaded:
Note: To determine the beginning and ending fiscal year, refer to the text file modified above. Verify all months or periods are included in the text file for the first year; no partial years are allowed.
One text file is generated in the install directory for each dimension table. 9. At the UNIX prompt, for 454 time calendar or 13 period time calendar enter:
time_load.ksh time_trnsfrm_load.ksh
10. At the UNIX prompt, for 454 time with Gregorian time calendar enter time_load.ksh g_time_load.ksh time_trnsfrm_load.ksh g_time_trnsfrm_load.ksh
11. Change directories on the UNIX server to <base_directory>/rdw13.0/log. Review the log file that was created or modified.
12. Change directories on the UNIX server to <base_directory>/rdw13.0/error. Review the error files that were created for time_load and time_trnsfrm_load. Review also
Installation Tasks
14 Oracle Retail Data Warehouse
the error files that were created for g_time_load and g_time_trnsfrm_load if 454 time with Gregorian calendar is used.
13. Refer to the RDW Operations Guide for more information on the log files and error files.
Note: DAY_IDNT serves as a surrogate key for day of the time. It can represent 454 time, 13 period time or Gregorian time. Since it is a surrogate key, it does not have meaning to it as long as it is unique across all the days of the time used in RDW.
Populate Static Dimension Data There are several dimension tables in RDW that must be loaded before loading Voucher Facts and executing some reports. In order to determine the information needed for these tables, refer to the RDW Operations Guide, Appendix A ‘API Flat File Specifications’. Sample flat files have been provided in the <base_directory>/rdw13.0/install directory, these tables must be populated according to business requirements. The tables to be populated are time_last_yr_by_day_lfl_dm, time_last_yr_by_wk_lfl_dm, vchr_age_band_dm. See the RDW Data Model documentation for more information on the tables and the column descriptions to be loaded. 1. Login to the RDW database server as the UNIX user rdw13dev. Verify the RETL
executable is in the path of your UNIX session by typing: which rfx
2. Change directories on the UNIX server to <base_directory>/rdw13.0/install. This directory contains the code for all default data install scripts.
3. The script timelfldm.ksh loads the following Time ‘Like for Like’ tables that are used exclusively by the reports: time_last_yr_by_day_lfl_dm time_last_yr_by_wk_lfl_dm
4. Load the Time ‘Like for Like’ tables by executing the script. At the UNIX prompt, enter: timelfldm.ksh
5. Change directories on the UNIX server to <base_directory>/rdw13.0/log. Review the log file that was created or modified.
6. On the UNIX server, change directories to <base_directory>/rdw13.0/error. Review the error files that were created.
7. On the UNIX server, change directories to <base_directory>/rdw13.0/install. The script, vchragedm.ksh, loads the table, vchr_age_band_dm, which is used by the voucher fact load batch module. At the UNIX prompt, enter:
vchragedm.ksh
8. On the UNIX server, change directories to <base_directory>/rdw13.0/log. Review the log file that was created or modified.
9. On the UNIX server, change directories to <base_directory>/rdw13.0/error. Review the error files that were created.
Refer to the RDW Operations Guide for more information on the log files and error files.
Install Oracle Configuration Manager
Database Installation Guide 15
Install Oracle Configuration Manager This Oracle Retail product has been instrumented for configuration discovery and collection by Oracle Configuration Manager (OCM). It is recommended that you take advantage of OCM in your environment. Please see MetaLink note 559539.1 for more information about OCM instrumentation in Oracle Retail products. Installing OCM for RDW: Determine your RDW_HOME directory path. This should be the <database_directory> referenced during the database installation for RDW. 1. Add this new RDW application to the retail inventory:
Create or modify the $RDW_HOME/retail_inventory/oracle_retail_RDW.properties file. Add the following lines to this file, substituting where appropriate: <RDW_name>+RDW_INSTALL_DATE=<yyyy-MM-dd HH:mm:ss> <RDW_name>+RDW_VERSION=13.0.0
Example:
rdw13inst1+RDW_INSTALL_DATE=2007-11-10 09:51:50
rdw13inst1+RDW_VERSION=13.0.0
<yyyy-MM-dd HH:mm:ss> refers to the date of RDW installation. See example value above. <RDW_name> refers to a unique name to identify this RDW installation. This is arbitrary and can be chosen at the time that this oracle_retail_RDW.properties file is created. This identifier must be unique across your entire customer support ID. The <RDW_name> string used in this file will become the OCM target name for this RDW installation.
2. The Retail OCM Installer should be used to install the OCM collector. Use the retail-OCM-withAnt.zip file included with the RDW release and follow the instructions in Metalink Note 559539.1 to run the Retail OCM Installer independently.

Database Installation Guide 17
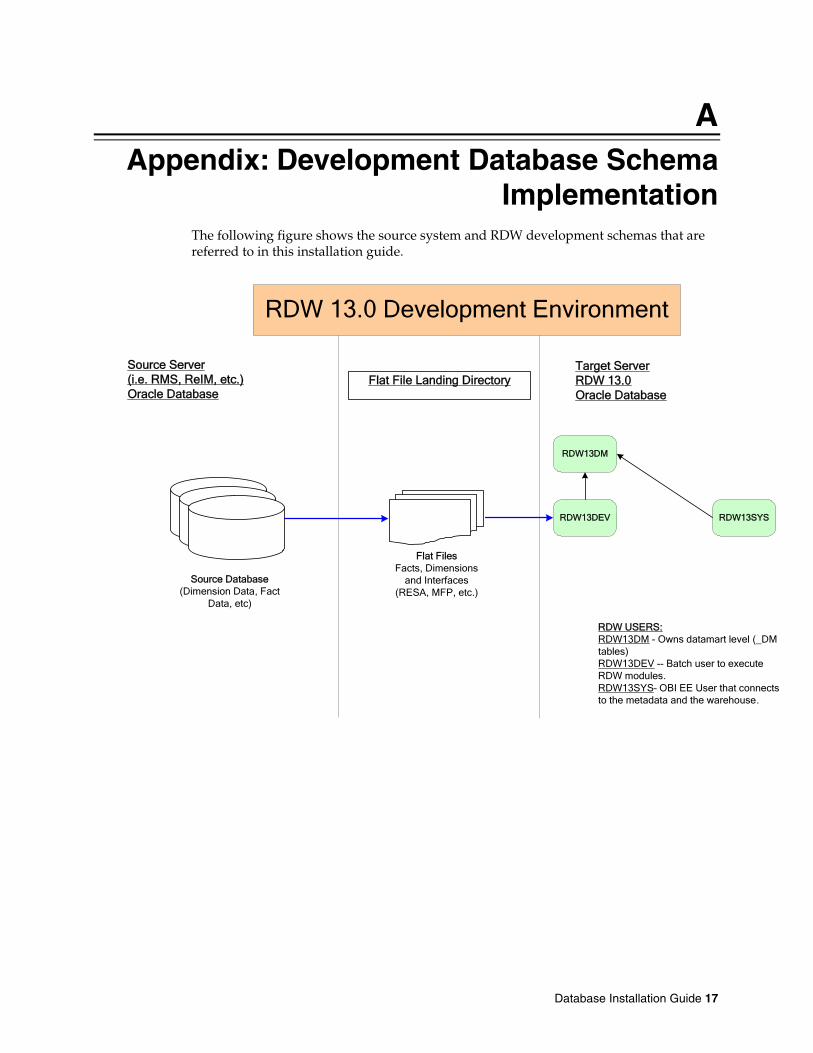
A Appendix: Development Database Schema
Implementation The following figure shows the source system and RDW development schemas that are referred to in this installation guide.
Source Database(Dimension Data, Fact
Data, etc)
Source Server(i.e. RMS, ReIM, etc.)Oracle Database
RDW 13.0 Development Environment
Target ServerRDW 13.0Oracle Database
Flat File Landing Directory
RDW USERS:RDW13DM - Owns datamart level (_DM tables)RDW13DEV -- Batch user to execute RDW modules.RDW13SYS– OBI EE User that connects to the metadata and the warehouse.
RDW13DM
RDW13DEV RDW13SYS
Flat FilesFacts, Dimensions
and Interfaces (RESA, MFP, etc.)

Database Installation Guide 19
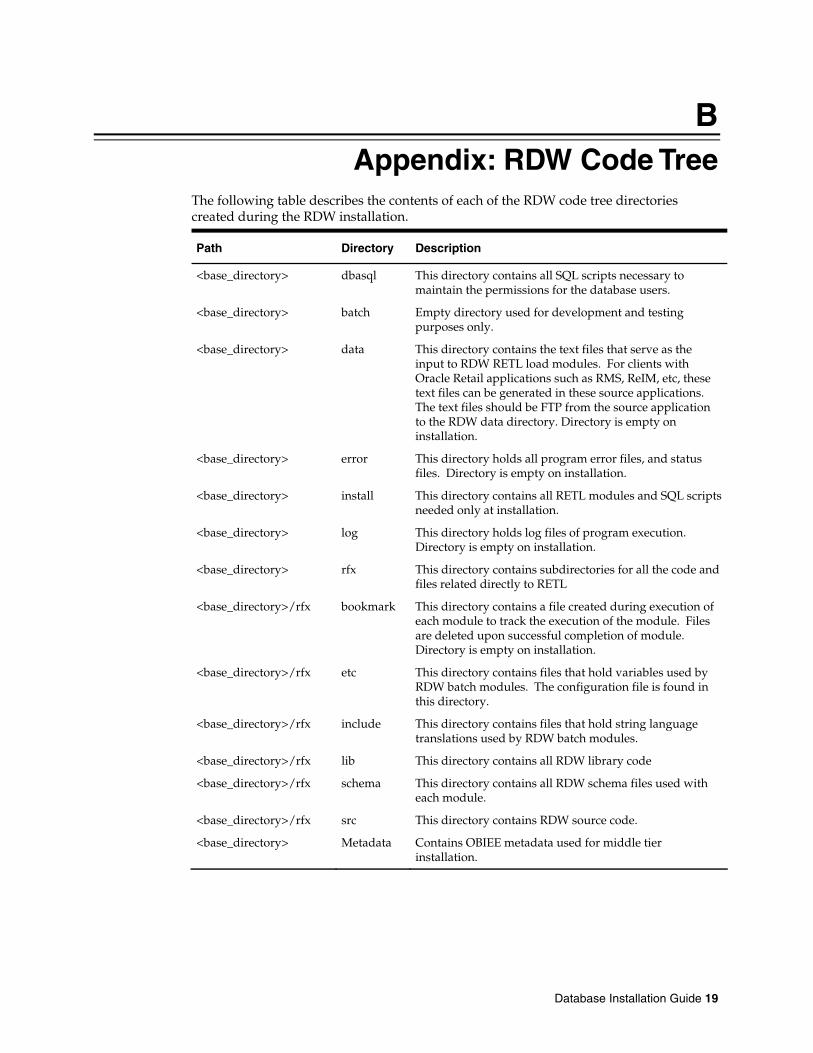
B Appendix: RDW Code Tree
The following table describes the contents of each of the RDW code tree directories created during the RDW installation.
Path Directory Description
<base_directory> dbasql This directory contains all SQL scripts necessary to maintain the permissions for the database users.
<base_directory> batch Empty directory used for development and testing purposes only.
<base_directory> data This directory contains the text files that serve as the input to RDW RETL load modules. For clients with Oracle Retail applications such as RMS, ReIM, etc, these text files can be generated in these source applications. The text files should be FTP from the source application to the RDW data directory. Directory is empty on installation.
<base_directory> error This directory holds all program error files, and status files. Directory is empty on installation.
<base_directory> install This directory contains all RETL modules and SQL scripts needed only at installation.
<base_directory> log This directory holds log files of program execution. Directory is empty on installation.
<base_directory> rfx This directory contains subdirectories for all the code and files related directly to RETL
<base_directory>/rfx bookmark This directory contains a file created during execution of each module to track the execution of the module. Files are deleted upon successful completion of module. Directory is empty on installation.
<base_directory>/rfx etc This directory contains files that hold variables used by RDW batch modules. The configuration file is found in this directory.
<base_directory>/rfx include This directory contains files that hold string language translations used by RDW batch modules.
<base_directory>/rfx lib This directory contains all RDW library code
<base_directory>/rfx schema This directory contains all RDW schema files used with each module.
<base_directory>/rfx src This directory contains RDW source code.
<base_directory> Metadata Contains OBIEE metadata used for middle tier installation.

Database Installation Guide 21
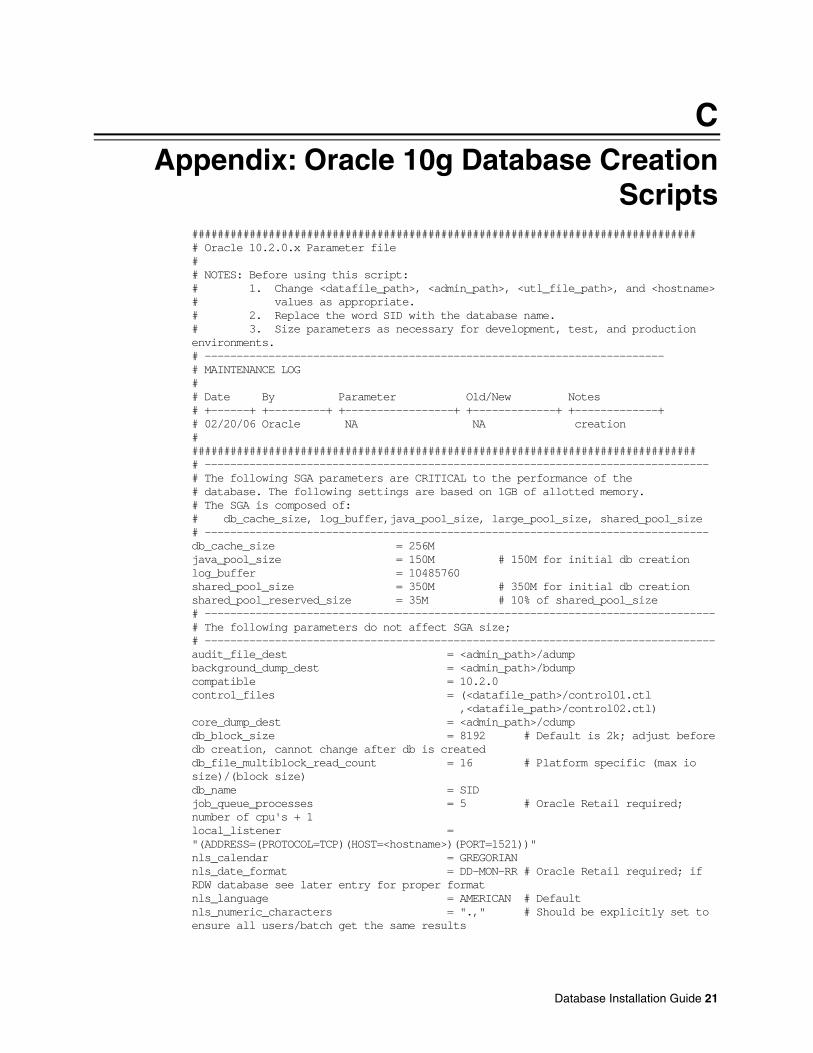
C Appendix: Oracle 10g Database Creation
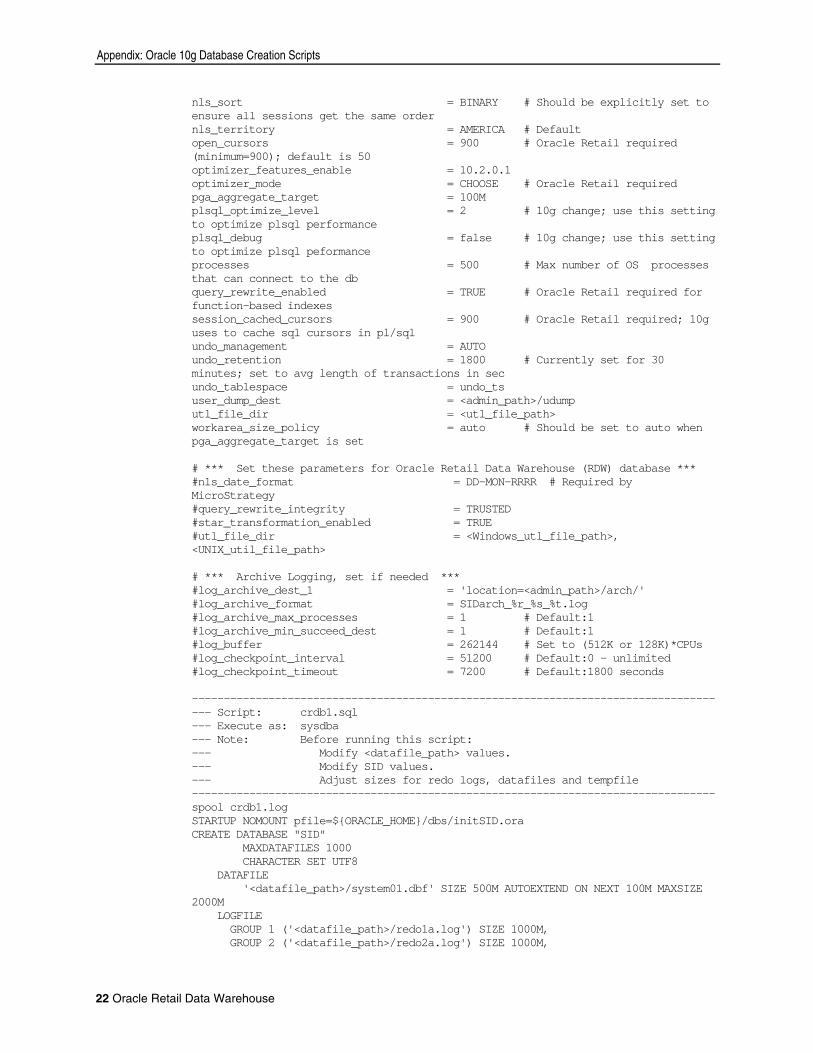
Scripts ############################################################################### # Oracle 10.2.0.x Parameter file # # NOTES: Before using this script: # 1. Change <datafile_path>, <admin_path>, <utl_file_path>, and <hostname> # values as appropriate. # 2. Replace the word SID with the database name. # 3. Size parameters as necessary for development, test, and production environments. # ------------------------------------------------------------------------ # MAINTENANCE LOG # # Date By Parameter Old/New Notes # +------+ +---------+ +-----------------+ +-------------+ +-------------+ # 02/20/06 Oracle NA NA creation # ############################################################################### # ------------------------------------------------------------------------------- # The following SGA parameters are CRITICAL to the performance of the # database. The following settings are based on 1GB of allotted memory. # The SGA is composed of: # db_cache_size, log_buffer,java_pool_size, large_pool_size, shared_pool_size # ------------------------------------------------------------------------------- db_cache_size = 256M java_pool_size = 150M # 150M for initial db creation log_buffer = 10485760 shared_pool_size = 350M # 350M for initial db creation shared_pool_reserved_size = 35M # 10% of shared_pool_size # -------------------------------------------------------------------------------- # The following parameters do not affect SGA size; # -------------------------------------------------------------------------------- audit_file_dest = <admin_path>/adump background_dump_dest = <admin_path>/bdump compatible = 10.2.0 control_files = (<datafile_path>/control01.ctl ,<datafile_path>/control02.ctl) core_dump_dest = <admin_path>/cdump db_block_size = 8192 # Default is 2k; adjust before db creation, cannot change after db is created db_file_multiblock_read_count = 16 # Platform specific (max io size)/(block size) db_name = SID job_queue_processes = 5 # Oracle Retail required; number of cpu's + 1 local_listener = "(ADDRESS=(PROTOCOL=TCP)(HOST=<hostname>)(PORT=1521))" nls_calendar = GREGORIAN nls_date_format = DD-MON-RR # Oracle Retail required; if RDW database see later entry for proper format nls_language = AMERICAN # Default nls_numeric_characters = ".," # Should be explicitly set to ensure all users/batch get the same results
Appendix: Oracle 10g Database Creation Scripts
22 Oracle Retail Data Warehouse
nls_sort = BINARY # Should be explicitly set to ensure all sessions get the same order nls_territory = AMERICA # Default open_cursors = 900 # Oracle Retail required (minimum=900); default is 50 optimizer_features_enable = 10.2.0.1 optimizer_mode = CHOOSE # Oracle Retail required pga_aggregate_target = 100M plsql_optimize_level = 2 # 10g change; use this setting to optimize plsql performance plsql_debug = false # 10g change; use this setting to optimize plsql peformance processes = 500 # Max number of OS processes that can connect to the db query_rewrite_enabled = TRUE # Oracle Retail required for function-based indexes session_cached_cursors = 900 # Oracle Retail required; 10g uses to cache sql cursors in pl/sql undo_management = AUTO undo_retention = 1800 # Currently set for 30 minutes; set to avg length of transactions in sec undo_tablespace = undo_ts user_dump_dest = <admin_path>/udump utl_file_dir = <utl_file_path> workarea_size_policy = auto # Should be set to auto when pga_aggregate_target is set # *** Set these parameters for Oracle Retail Data Warehouse (RDW) database *** #nls_date_format = DD-MON-RRRR # Required by MicroStrategy #query_rewrite_integrity = TRUSTED #star_transformation_enabled = TRUE #utl_file_dir = <Windows_utl_file_path>, <UNIX_util_file_path> # *** Archive Logging, set if needed *** #log_archive_dest_1 = 'location=<admin_path>/arch/' #log_archive_format = SIDarch_%r_%s_%t.log #log_archive_max_processes = 1 # Default:1 #log_archive_min_succeed_dest = 1 # Default:1 #log_buffer = 262144 # Set to (512K or 128K)*CPUs #log_checkpoint_interval = 51200 # Default:0 - unlimited #log_checkpoint_timeout = 7200 # Default:1800 seconds ------------------------------------------------------------------------------------- Script: crdb1.sql --- Execute as: sysdba --- Note: Before running this script: --- Modify <datafile_path> values. --- Modify SID values. --- Adjust sizes for redo logs, datafiles and tempfile ---------------------------------------------------------------------------------- spool crdb1.log STARTUP NOMOUNT pfile=${ORACLE_HOME}/dbs/initSID.ora CREATE DATABASE "SID" MAXDATAFILES 1000 CHARACTER SET UTF8 DATAFILE '<datafile_path>/system01.dbf' SIZE 500M AUTOEXTEND ON NEXT 100M MAXSIZE 2000M LOGFILE GROUP 1 ('<datafile_path>/redo1a.log') SIZE 1000M, GROUP 2 ('<datafile_path>/redo2a.log') SIZE 1000M,
Install Oracle Configuration Manager
Database Installation Guide 23
GROUP 3 ('<datafile_path>/redo3a.log') SIZE 1000M DEFAULT TEMPORARY TABLESPACE temp TEMPFILE '<datafile_path>/temp01.dbf' SIZE 5000M EXTENT MANAGEMENT LOCAL UNIFORM SIZE 1M UNDO TABLESPACE undo_ts DATAFILE '<datafile_path>/undo_ts01.dbf' SIZE 5000M SYSAUX DATAFILE '<datafile_path>/sysaux01.dbf' SIZE 500M AUTOEXTEND ON NEXT 100M MAXSIZE 2000M ; exit spool off ------------------------------------------------------------------------------------- --- Script: crdb2.sql --- Execute as: sysdba in 10.1.0.2 databases or higher --- Note: This script installs the data dictionary views in addition to --- granting necessary privileges to public. ------------------------------------------------------------------------------------- spool crdb2.log REM # install data dictionary views: PROMPT Running catalog.sql @$ORACLE_HOME/rdbms/admin/catalog.sql; PROMPT Running catblock.sql @$ORACLE_HOME/rdbms/admin/catblock.sql; PROMPT Running catproc.sql @$ORACLE_HOME/rdbms/admin/catproc.sql; PROMPT Running catoctk.sql @$ORACLE_HOME/rdbms/admin/catoctk.sql; PROMPT Running catrep.sql @$ORACLE_HOME/rdbms/admin/catrep.sql; PROMPT Running owminst.plb @$ORACLE_HOME/rdbms/admin/owminst.plb; REM * These privs needed for users to run proper grant code when creating users. grant select on dba_jobs to public with grant option; grant select on dba_roles to public with grant option; grant select on dba_role_privs to public with grant option; grant execute on dbms_rls to public with grant option; grant execute on dbms_alert to public; grant select_catalog_role to public; grant execute_catalog_role to public; grant execute on dbms_lock to public; grant execute on dbms_rls to public; grant execute on dbms_crypto to public; grant select on dba_sys_privs to public with grant option; REM * query rewrite privilege needed to create function-based indexes grant query rewrite to public; REM * dbms_system is needed for tracing grant execute on sys.dbms_system to public; PROMPT Creating PLAN table owned by SYSTEM @$ORACLE_HOME/rdbms/admin/utlxplan.sql PROMPT Creating public synonyn for the plan table create public synonym PLAN_TABLE for SYSTEM.PLAN_TABLE; connect SYSTEM/manager @$ORACLE_HOME/sqlplus/admin/pupbld.sql; @$ORACLE_HOME/sqlplus/admin/help/hlpbld.sql helpus.sql;
Appendix: Oracle 10g Database Creation Scripts
24 Oracle Retail Data Warehouse
spool off exit ------------------------------------------------------------------------------------- --- Script: crdb3.sql --- Execute as: sysdba in 10.1.0.2 databases or higher --- Note: This script installs java and xml components; --- Do not change the order of the statements below due to dependencies ------------------------------------------------------------------------------------- spool JServer.log @$ORACLE_HOME/javavm/install/initjvm.sql; @$ORACLE_HOME/xdk/admin/initxml.sql; @$ORACLE_HOME/xdk/admin/xmlja.sql; @$ORACLE_HOME/rdbms/admin/catjava.sql; @$ORACLE_HOME/rdbms/admin/catexf.sql; spool off spool context.log @$ORACLE_HOME/ctx/admin/catctx change_on_install SYSAUX TEMP NOLOCK; connect CTXSYS/change_on_install @$ORACLE_HOME/ctx/admin/defaults/dr0defin.sql AMERICAN; spool off spool xdb_protocol.log connect / as sysdba @$ORACLE_HOME/rdbms/admin/catqm.sql change_on_install SYSAUX TEMP; spool off @$ORACLE_HOME/rdbms/admin/utlrp.sql
Database Installation Guide 25
D Appendix: Tablespace Creation Scripts ------------------------------------------------------------------------------------- --- Script: create_rdw_tablespaces.sql --- Execute as: sysdba --- Note: Before running this script: --- Modify <datafile_path> values. --- Modify datafile storage parameters and sizes based on partitioning strategy. ---------------------------------------------------------------------------------- spool create_rdw_tablespaces.log CREATE TABLESPACE cache_data DATAFILE '<datafile_path>/cache_data01.dbf' SIZE 15M AUTOEXTEND ON NEXT 100M MAXSIZE 2000M EXTENT MANAGEMENT LOCAL SEGMENT SPACE MANAGEMENT AUTO ; CREATE TABLESPACE dm_dim_data DATAFILE '<datafile_path>/dm_dim_data01.dbf' SIZE 400M AUTOEXTEND ON NEXT 100M MAXSIZE 2000M EXTENT MANAGEMENT LOCAL SEGMENT SPACE MANAGEMENT AUTO ; CREATE TABLESPACE dm_dim_index DATAFILE '<datafile_path>/dm_dim_index01.dbf' SIZE 300M AUTOEXTEND ON NEXT 100M MAXSIZE 2000M EXTENT MANAGEMENT LOCAL SEGMENT SPACE MANAGEMENT AUTO ; CREATE TABLESPACE dm_fact_data DATAFILE '<datafile_path>/dm_fact_data01.dbf' SIZE 300M AUTOEXTEND ON NEXT 100M MAXSIZE 2000M EXTENT MANAGEMENT LOCAL SEGMENT SPACE MANAGEMENT AUTO ; CREATE TABLESPACE dm_fact_index DATAFILE '<datafile_path>/dm_fact_index01.dbf' SIZE 300M AUTOEXTEND ON NEXT 100M MAXSIZE 2000M EXTENT MANAGEMENT LOCAL SEGMENT SPACE MANAGEMENT AUTO ; CREATE TABLESPACE dim_mtx_data DATAFILE '<datafile_path>/dim_mtx_data01.dbf' SIZE 300M AUTOEXTEND ON NEXT 100M MAXSIZE 2000M EXTENT MANAGEMENT LOCAL SEGMENT SPACE MANAGEMENT AUTO ; CREATE TABLESPACE dim_mtx_index DATAFILE '<datafile_path>/dim_mtx_index01.dbf' SIZE 300M AUTOEXTEND ON NEXT 100M MAXSIZE 2000M EXTENT MANAGEMENT LOCAL SEGMENT SPACE MANAGEMENT AUTO ; CREATE TABLESPACE ms_meta_data DATAFILE '<datafile_path>/ms_meta_data01.dbf' SIZE 300M
Appendix: Tablespace Creation Scripts
26 Oracle Retail Data Warehouse
AUTOEXTEND ON NEXT 100M MAXSIZE 2000M EXTENT MANAGEMENT LOCAL SEGMENT SPACE MANAGEMENT AUTO ; CREATE TABLESPACE user_data DATAFILE '<datafile_path>/user_data01.dbf' SIZE 300M AUTOEXTEND ON NEXT 50M MAXSIZE 2000M EXTENT MANAGEMENT LOCAL SEGMENT SPACE MANAGEMENT AUTO ; spool off exit
Database Installation Guide 27
E Appendix: Installation Order
This section provides a guideline as to the order in which the Oracle Retail applications should be installed. If a retailer has chosen to use some, but not all, of the applications the order is still valid less the applications not being installed. 1. Oracle Retail Merchandising System (RMS), Oracle Retail Trade Management (RTM),
Oracle Retail Sales Audit (ReSA) 2. Oracle Retail Service Layer (RSL) 3. Oracle Retail Extract, Transform, Load (RETL) 4. Oracle Retail Active Retail Intelligence (ARI) 5. Oracle Retail Warehouse Management System (RWMS) 6. Oracle Retail Allocation 7. Oracle Retail Invoice Matching (ReIM) 8. Oracle Retail Price Management (RPM)
Note: During installation of RPM, you are asked for the RIBforRPM provider URL. Since RIB is installed after RPM, make a note of the URL you enter. If you need to change the RIBforRPM provider URL after you install RIB, you can do so by editing the jndi_provider.xml file.
9. Oracle Retail Central Office (ORCO) 10. Oracle Retail Back Office (ORBO) 11. Oracle Retail Store Inventory Management (SIM)
Note: During installation of SIM, you are asked for the AIP provider URL. Since AIP is installed after SIM, make a note of the URL you enter. If you need to change the AIP provider URL after you install AIP, you can do so by editing the jndi_providers_ribclient.xml file.
12. Oracle Retail Integration Bus (RIB) 13. Oracle Retail Point-of-Service (ORPOS) 14. Oracle Retail Analytics Applications 15. Oracle Retail Advanced Inventory Planning (AIP) 16. Oracle Retail Predictive Application Server (RPAS) 17. Oracle Retail Data Warehouse (RDW) 18. Oracle Retail Workspace (ORW)


