21
Oracle Taleo Cloud for Midsize (Taleo Business Edition) Release 17B2 What’s New
| Date post: | 25-Sep-2018 |
| Category: |
Documents |
| Upload: | truongkhanh |
| View: | 237 times |
| Download: | 0 times |
Oracle Taleo Cloud for Midsize (Taleo Business Edition) Release 17B2
What’s New
2
TABLE OF CONTENTS
REVISION HISTORY ................................................................................................................................................. 3
OVERVIEW ............................................................................................................................................................. 4
RELEASE FEATURE SUMMARY ................................................................................................................................ 4
TALENT CENTER ENHANCEMENTS ............................................................................................................................... 5 My Offer Approvals List View Widget ................................................................................................................................ 5 Offer Approval Page Layout ............................................................................................................................................... 6 My Approvals Widget ........................................................................................................................................................ 7 Working with Offer Approvals ........................................................................................................................................... 9 Talent Center Login for Recruit-Only Customers ............................................................................................................. 10
RECRUIT ENHANCEMENTS....................................................................................................................................... 11 Sequential Offer Approval Setting ................................................................................................................................... 11
PLATFORM ENHANCEMENTS ................................................................................................................................... 12 Employee Goal Status Trigger Notifications ..................................................................................................................... 12 Onboard Packet Status Trigger Notifications ................................................................................................................... 14 Change to Status Trigger Notifications for Users ............................................................................................................. 16 Streamlined User Record Creation................................................................................................................................... 16
ORACLE INTEGRATION CLOUD SERVICE (ICS) ADAPTER ................................................................................................. 20

3
REVISION HISTORY
This document will continue to evolve as existing sections change and new information is added. All
updates appear in the following table:
Date Feature Notes
06 OCT 2017 Created initial document.

4
OVERVIEW
This guide outlines the information you need to know about new or improved functionality in Oracle
Taleo Cloud for Midsize (Taleo Business Edition) Release 17B2. Each section includes a brief description
of the feature, the steps you need to take to enable or begin using the feature, and any tips or
considerations that you should keep in mind.
RELEASE FEATURE SUMMARY
Some of the new Release 17B2 features are automatically available to users after the upgrade and some
require action from the user, the system administrator, or Oracle.
The table below offers a quick view of the actions required to enable each of the Release 17B2 features.
Action Required to Enable Feature
Feature Automatically
Available
End User Action
Required
Administrator Action
Required
Oracle Service Request Required
Talent Center Enhancements
My Offer Approvals List View Widget
Offer Approval Page Layout
My Approvals Widget
Working with Offer Approvals
Talent Center Login for Recruit-Only Customers
Recruit Enhancements
Sequential Offer Approval Setting
Platform Enhancements
Employee Goal Status Trigger Notifications
Onboard Packet Status Trigger Notifications
Change to Status Trigger Notifications for Users
Streamlined User Record Creation
Oracle ICS Adapter
Oracle Integration Cloud Service (ICS) Adapter

5
TALENT CENTER ENHANCEMENTS
This release brings additional Hiring Manager features to the Talent Center, enhancing the features
added in the last release. Hiring Managers can now approve offers in addition to the 17B1 functionality
that enables users to view/approve requisitions and move candidates to the next step or reject
candidates. This gives users the ability to complete basic hiring actions across all parts of the recruiting
process, all from the modern, mobile responsive Talent Center.
MY OFFER APPROVALS LIST VIEW WIDGET
For Recruit customers, this widget displays any offers for which the user is listed as an approver or a
proxy approver. Hiring Managers can now easily approve offers on the go from the mobile-friendly
Talent Center using this widget.
The widget will not appear until an administrator adds it to the Talent Center home page.
STEPS TO ADD THE MY OFFER APPROVALS WIDGET TO THE HOME PAGE
You must be logged in as an administrator whose User record is linked to an Employee record (Recruit-
only customers do not need the Employee record). Select Administration, then select Customize Recruit
(you can also go to Customize Onboard or Customize Perform).
1. In the Manage Talent Centers section, click Edit Pages for the Talent Center for which you want
to set up. You will have one default Talent Center called ‘Talent Center’ but you may have
created additional Talent Centers as well.
2. On the Talent Center Home Page, click + Add new widget at the bottom of the page.
3. Click My Offer Approvals, and then click Add widget.
4. The widget is placed at the bottom, but you may move it to a new location by dragging and then
releasing when you see a blue area.
5. To rename the list view widget, click on the widget, enter a new name, and then click the Done
button at the top of the widget or click outside of the widget. You may also select another
language from the language drop down to change the title for your employees with different
preferred locales.
6. By default this list view widget will give users the ability to expand or collapse the widget. You
may disable this feature from the third menu.
7. You can re-order the columns of this list view by dragging. You can remove certain columns, or
click the + icon on the right to add more columns.
NOTE: If your users will be logging in on mobile devices it is not recommended to add too many columns
to this list view. Users will need to scroll to see all the data. Alternatively they can use the Card View.
8. Click the Done button when you have finished configuring the list view.
6
9. Click Save & Publish in the upper right-hand corner to make your changes available for this
Talent Center.
At this point, anyone logged into the Talent Center with a User record will see this widget on their home
page. You should continue configuring the page layout as described below.
OFFER APPROVAL PAGE LAYOUT
There is a single page layout for offer approvals on the Talent Center. You can configure the layout in a
drag and drop interface directly on the Talent Center. It is recommended that you have at least one
offer for which you are the approver when configuring the page layout. This is because data is
populated from offers associated with your User record so that you can see what your users will see
when they log into the Talent Center.
NOTE: Page layouts for the Talent Center are configured directly from the administrator’s interface on
the Talent Center. Any page layouts that you configure will be shared across Talent Centers. For
example, if you add static HTML to the Offer page layout, this will be visible for all Talent Centers.
On the other hand, list view widgets can vary between Talent Centers. You can display different columns
in the list view widget on one Talent Center than another. Because of this feature, you can only have
one administrator edit a Talent Center at a time. When a second administrator clicks the Edit Pages link,
he or she will receive an alert that another administrator is configuring the Talent Center.
STEPS TO CONFIGURE THE OFFER APPROVAL PAGE LAYOUT
If you are still logged into the Talent Center as the administrator, skip to step 3. If you are back in TBE,
you must be logged in as an administrator whose User record is linked to an Employee record (Recruit-
only customers do not need the Employee record). Select Administration, then select Customize
Recruit.
1. In the Manage Talent Centers section, click Edit Pages for any Talent Center (remember, the
page layouts are shared across Talent Centers).
2. Once on the Home Page, click the My Offer Approvals list view widget, which will change the list
view to Admin Mode.
3. Notice there is a Manage Layouts menu just below the buttons. From this menu, select the
Offer Approval Layout option.

7
4. The layout page appears and the data from one of the available offers will populate.
5. Click on any of the widgets to configure the fields for that specific section. You can remove
fields, add fields, and drag the fields to a different order.
NOTE: You cannot add the same field two times to the same widget but you can add it again in another
widget. All the fields on this layout are read-only by default and cannot be changed.
6. If you would like to add instructional text above any of the widgets, click + Add new widget at
the bottom of the page, select the Static HTML widget, enter your text, and then move the
widget to the desired location.
7. Each widget is saved by clicking the Done button, but remember to click Save & Publish at the
top of the page to save all the changes to your page layout across all Talent Centers.
NOTE: Changes to your page layouts immediately affect all offers on the Talent Center.
The default widgets on the page layout are as follows:
Offer Summary—this widget can hold up to 6 fields to give a quick overview. It also contains the offer letter icon, which cannot be removed.
Offer Details—this widget can hold any number of fields to provide more detailed information.
Approval Flow—this widget displays approvers for this offer. If you are using User profile pictures, you will see each user’s picture here. The order will match the order listed on the requisition. See Sequential Offer Approval Setting for information on enforcing sequential approvers.
Comments—this widget displays comments that are added to the offer.
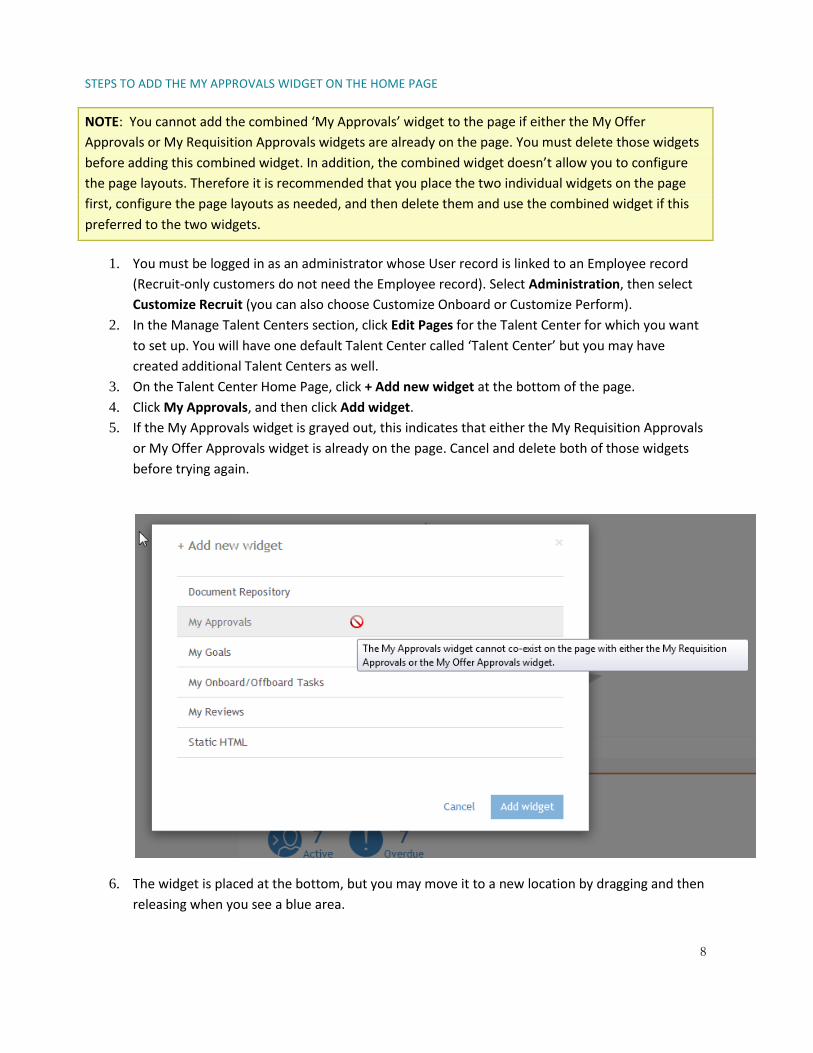
MY APPROVALS WIDGET
This widget displays both requisition and offer approvals in a single widget. This widget may be used in
place of the two separate approval widgets, saving space on the Talent Center. Administrators are able
to determine if the two separate widgets or the single widget would work better for their users. In this
combined widget there are fewer fields that can be added to the list view since the fields must be
common to both requisition and offer approvals.
The widget will not appear until an administrator adds it to the Talent Center home page.
8
STEPS TO ADD THE MY APPROVALS WIDGET ON THE HOME PAGE
NOTE: You cannot add the combined ‘My Approvals’ widget to the page if either the My Offer
Approvals or My Requisition Approvals widgets are already on the page. You must delete those widgets
before adding this combined widget. In addition, the combined widget doesn’t allow you to configure
the page layouts. Therefore it is recommended that you place the two individual widgets on the page
first, configure the page layouts as needed, and then delete them and use the combined widget if this
preferred to the two widgets.
1. You must be logged in as an administrator whose User record is linked to an Employee record
(Recruit-only customers do not need the Employee record). Select Administration, then select
Customize Recruit (you can also choose Customize Onboard or Customize Perform).
2. In the Manage Talent Centers section, click Edit Pages for the Talent Center for which you want
to set up. You will have one default Talent Center called ‘Talent Center’ but you may have
created additional Talent Centers as well.
3. On the Talent Center Home Page, click + Add new widget at the bottom of the page.
4. Click My Approvals, and then click Add widget.
5. If the My Approvals widget is grayed out, this indicates that either the My Requisition Approvals
or My Offer Approvals widget is already on the page. Cancel and delete both of those widgets
before trying again.
6. The widget is placed at the bottom, but you may move it to a new location by dragging and then
releasing when you see a blue area.

9
7. To rename the list view widget, click on the widget, enter a new name, and then click the Done
button at the top of the widget or click outside of the widget. You may also select another
language from the language drop down to change the title for your employees with different
preferred locales.
8. By default this list view widget will give users the ability to expand or collapse the widget. You
may disable this feature from the third menu.
9. You can re-order the columns of this list view by dragging. You can remove certain columns, or
click the + icon on the right to add more columns.
NOTE: If your users will be logging in on mobile devices it is not recommended to add too many columns
to this list view. Users will need to scroll to see all the data. Alternatively they can use the Card View.
10. Click the Done button when you have finished configuring the list view.
11. Click Save & Publish in the upper right-hand corner to make your changes available for this
Talent Center.
At this point, anyone logged into the Talent Center with a User record will see this widget on their home
page.
WORKING WITH OFFER APPROVALS
Once the administrator has added the new widgets, and users are logged into the Talent Center, they
will be able to approve any offers for which they are listed as a designated approver or a proxy approver
(users such as administrators who have override approval for all offers need to approve those offers
from within Taleo Business Edition; there is no override approval function via the Talent Center).
STEPS TO APPROVE OR REJECT OFFERS
1. Once logged into the Talent Center, locate the My Offer Approvals widget, or the combined My
Approvals widget.
2. If you are familiar with the contents and ready to approve or reject, you can click on the
appropriate button from the list view.
3. Enter a comment (optional), and then click either Submit or Cancel.
4. To view more details before accepting or rejecting, click the View button from the list view.
5. Review the contents of the offer, and then click the appropriate button at the top of the offer.
Once an offer has been approved or rejected, it will be removed from the widget.
If you are a proxy approver for an offer, when you click on Reject or Approve, you will see a drop down
next to ‘On behalf of’ that allows you to choose the person for which you are currently
approving/rejecting. If you are listed as a designated approver for the same offer, your own name will
also appear in the drop down. When you approve or reject, you can do so as yourself or on behalf of the
other person.

10
For example, in the image below, Julie Fox is logged into the Talent Center. Julie is the proxy approver
for Anna Cooper, but she is also a designated approver for this same offer. So when she goes to
approve, she will have the option of approving on behalf of Anna, or herself.
Talent Center User Can Approve on Behalf of Another User
There is a new setting in Taleo Business Edition which forces sequential approvals (see Sequential Offer
Approval Setting). When this setting is checked, you will only see the offers for which you are the
current approver or proxy for the current approver in the widget. If another approval is required before
you can approve it, the offer will not yet appear on the Talent Center. In the above example, if
sequential approvers were enabled, Julie would only see the option to approve on Anna’s behalf, and
then once she did this, she would become the current approver, and she would no longer see the ‘On
behalf of’ option once she had approved on behalf of Anna.
TALENT CENTER LOGIN FOR RECRUIT-ONLY CUSTOMERS
For Recruit-only customers, this release includes functionality that allows users who do not have
Employee records to log into the Talent Center directly. This enables a fully mobile experience for these
users. The same login credentials can now be used for both TBE and the Talent Center.
The users no longer have to log into TBE and then click on the icon introduced in the last release,
although this method still works as well:
Icon for Users with no Employee Record to Access the Talent Center

11
By logging directly into the Talent Center, your users who don’t need to access TBE frequently can spend
the majority of their time in the Talent Center, with its mobile-friendly, easy to use interface. Customers
can also update their email templates to direct users to the Talent Center instead of TBE.
RECRUIT ENHANCEMENTS
SEQUENTIAL OFFER APPROVAL SETTING
This release allows customers to enforce the order of approvers for offer approvals. When sequential
offers approvals are set, the offer will not appear in the My Offer Approvals or the My Approvals
widgets on the Talent Center until the user is the current approver, or proxy for the current approver.
However, when logged into TBE, the offers will still appear on the My View or My Dashboard pages, but
the Approve/Reject button will be grayed out, and if you hover over the button you will see a note that
the requisition is awaiting approval from the current approver.
Message That Appears When Sequential Approvals are Enforced and the User is not the Current Approver
If you do not turn on sequential approvers then the emails will continue to go out sequentially as they
have in the past, but the approvers can approve in any order.
NOTE: The last release introduced sequential approvers for requisitions, and this setting has now been
moved to a new location. Both the offer and requisition settings are in the same location. The value of
your requisition setting will remain the same after this release, but it is located in a new place.

12
STEPS TO TURN ON SEQUENTIAL OFFER APPROVALS
1. Select Administration, then select Customize Recruit.
2. In the Customize Processes section, click Approval Processes.
3. In the Approval Process Behavior section at the top of the page, check the option for Sequential
Offer Approval.
4. Click Save.
PLATFORM ENHANCEMENTS
EMPLOYEE GOAL STATUS TRIGGER NOTIFICATIONS
Perform customers can now set up email and system notifications triggered by the status change of an
employee goal. These emails or notifications can be sent to the employee, the employee’s manager or
review manager, or a designated user.
As with the status trigger notifications released previously for Recruit workflows, the Employee
workflow and the Reviews workflow, you must have an email template set up first in order to use this
feature. No new email templates have been added, so you must create one for each status for you wish
to send an email.
STEPS TO ENABLE STATUS TRIGGER NOTIFICATIONS/EMAILS FOR GOALS
1. Determine if you need to create a new email template, and do so if needed.
2. Select Administration, then select Customize Perform.
3. In the Customize Processes section, click Employee Goal Workflow.
4. From the Action menu, choose Assign Notifications for the status which should have the trigger.
5. Check the Email box for the parties which should be notified, and select the correct email
template as well.

13
6. Check the Notification checkbox for the parties which should receive a notification. Both can be
selected.
7. To select a specific user who is not one of the parties listed on the page, click the Add link and
then locate one or more users.
8. Click Save. Back in the workflow a small icon indicates that a status trigger has been set up.
In the above example, the employee’s manager and review manager will receive an email a few minutes
after the status of the goal has been changed to Completed, as well as see a small notification in the
upper right-hand corner new auto events icon.
By clicking on the small auto events icon, the notification for the goal appears.
Notification for Goal Status Change
The user Trina Lee will also receive an email, but not receive a notification.
A user or employee will only receive one copy of the email even if, for example, they are both a
designed user and the manager, assuming that the same email template is used.

14
ONBOARD PACKET STATUS TRIGGER NOTIFICATIONS
Onboard customers can now set up email and system notifications triggered by the completion of an
entire packet. Emails cannot be sent for individual activities. These emails or notifications can be sent to
the employee, the employee’s manager, the packet owner, or a designated user.
As with the other status trigger notifications, you must have an email template set up first in order to
use this feature. No new email templates have been added, so you must create one. New merge fields
have been added for this purpose. When setting up an email template, you can choose ‘Packet fields’
from the first drop down, and then select from several merge fields to create an email template to
indicate that the packet has been completed.
New Merge Fields for Onboard Packet Fields
Once the email has been has been created, notifications can be set up.
A new workflow for Onboard packets has been added as well to accommodate this feature. No custom
status can be created, although the names can be edited. However, as the behavior of these packet
statuses remains the name, it is recommended that if you do edit the names, choose one with a similar
meaning.

15
STEPS TO ENABLE STATUS TRIGGER NOTIFICATIONS/EMAILS FOR PACKETS
1. Create your email template as mentioned above.
2. Select Administration, then select Customize Onboard/Offboard.
3. In the Customize Processes section, click Activity Packet Workflow.
4. From the Action menu, choose Assign Notifications for the Completed status.
5. Check the Email box for the parties which should be notified, and select the correct email
template as well.
6. Check the Notification checkbox for the parties which should receive a notification. Both can be
selected.
7. To select a specific user who is not listed on the page, click the Add link and then locate one or
more users.
8. Click Save. Back in the workflow a small icon indicates that a status trigger has been set up.
In the above example, the packet owner will receive an email a few minutes after the status of the
packet has been changed to Completed, as well as see a small notification in the upper right-hand
corner new auto events icon.
Notification for Packet Completion
Trina Lee and Anna Cooper will also receive an email, but not receive a notification.

16
CHANGE TO STATUS TRIGGER NOTIFICATIONS FOR USERS
There has been a change to status trigger notifications of all types (Recruit, Perform, and Onboard)
when selecting specific users. In previous releases, users who didn’t have direct access to the
information were not sent the email, even though the email was just informative rather than a link to
document. For example, if you listed as user to receive a status trigger email for the status of a
requisition, but the user wasn’t an owner, then the email would not be sent. Instead the history log
would show permission errors such as these:
Permission Restriction Error From Previous Releases
This prevented customers from being able to use this feature to notify certain parties who don’t
typically log into the system of this important information. For example, if an employee status was
changed to Suspended, you might want to notify someone in HR. If a candidate is hired, you might want
to notify someone in IT to order a new laptop.
Due to customer feedback, status triggers will no longer have this check for specific users and will send
out the email to any user you have specified (except for users with the role No Access). It is the
responsibility of the customer to ensure that the email doesn’t contain any merge fields which would
result in sensitive information if they are including users who wouldn’t have access to this information,
such as salary information, etc.
Please review your existing status trigger notification email templates and ensure that the information
you are sending meets the security and privacy requirements for your organization.
STREAMLINED USER RECORD CREATION
The Talent Center provides employees with access to Recruit, Perform and Onboard transactions.
Having Employee records linked to their corresponding User records allows for displaying all
transactions to an Employee on the Talent Center.
This release introduces a setting which enables the automatic creation or linking of User records when
an Employee record in Active status is added or edited. Existing User records will be linked to the
Employee record based on the email address. If no existing User is found, by email address, a new User
record is created with basic information.
This feature saves times by setting up the link between the Employee and User record at the time of
creation (or edit). The email address must be included in the Employee record in order for this setting to

17
work. It also ensures that new Employees have corresponding User records for use in Taleo Business
Edition Recruit.
NOTE: This setting is not enabled by default. Please review how this works before enabling the setting.
This setting is most useful for Recruit customers who hire candidates, thereby creating employee
records, but some of these employees will also need access to Taleo Business Edition. The User records
can be created at the same time. If a small percentage of your employees will ever need to log into TBE,
then this setting may not be beneficial to you.
When this setting is enabled, any Employee record, in Active status, created or edited, will have a User record created or linked. The linking is done by matching the email address.
If a new User record is created, it will contain the same First Name, Last Name, username and email address as the Employee and will be assigned the role of Hiring Manager.
If an existing User record has the same email address as the Employee record being saved, the Employee record will be linked to the existing User record, rather than a new record being created.
If an Employee record is created by the Candidate to Employee conversion process, a User record is automatically created or linked in the same fashion if the Employee is created in an Active Status. The User record and the Employee record will be linked. The same username and email address will be used. Otherwise, the User creation/linking will take place when the Employee is subsequently set to an Active Status.
The same User creation/linking process applied for employees are added to the system manually, via an import, or via an API. As long as the status of the Employee is considered an active status according to your Employee Workflow, and the email address is included, the User record will also be created or linked.
If the status of several employees changes via an import or from the list view from an inactive to an active status, the User record will also be created or linked.
In all of these cases, the User records will have the role of “Hiring Manager” and the “Requisition Hiring Manager” property will be checked.
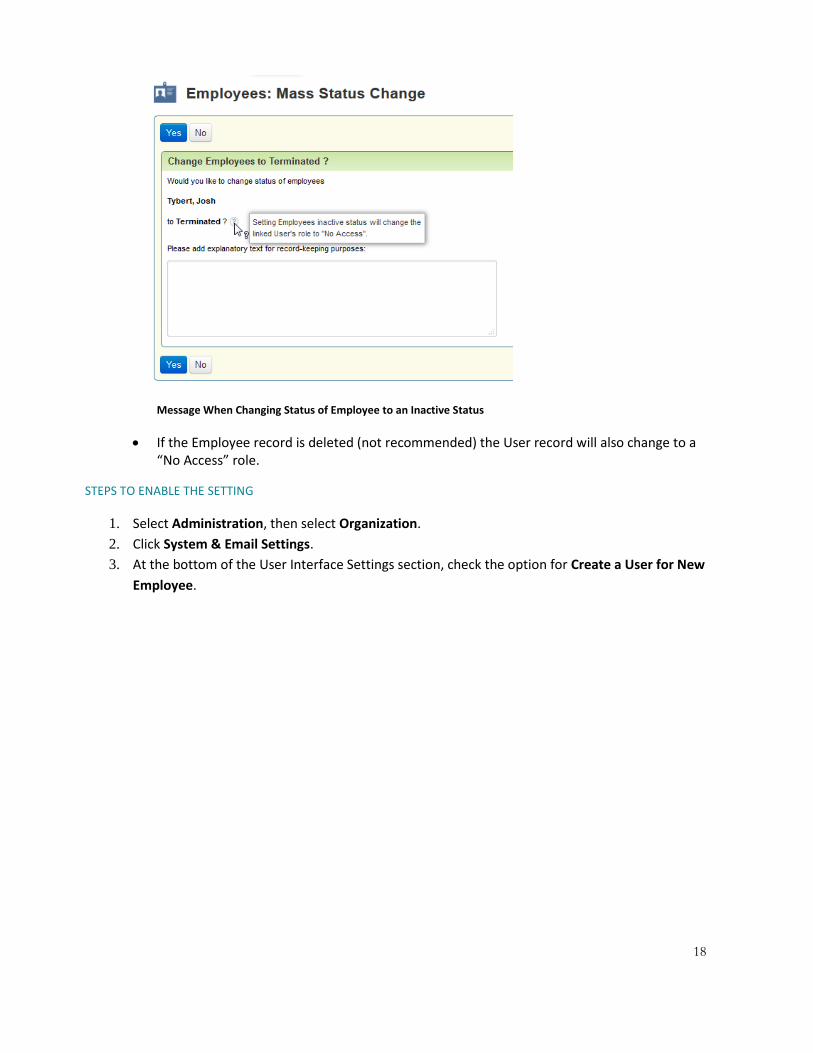
If the Employee record is then updated to an inactive status, either manually, from a list view, or via an import, then the User record will change to the “No Access” role. When you change the status of one or more Employee records to an inactive status from the list view, you will see an indication that the user’s role will be changed to No Access:
18
Message When Changing Status of Employee to an Inactive Status
If the Employee record is deleted (not recommended) the User record will also change to a “No Access” role.
STEPS TO ENABLE THE SETTING
1. Select Administration, then select Organization.
2. Click System & Email Settings.
3. At the bottom of the User Interface Settings section, check the option for Create a User for New
Employee.

19
4. Click Save.
5. Check your mappings when converting candidates by choosing Administration, then choosing
either Customize Perform or Customize Onboard.
6. In the Customize Processes section, click Candidate to Employee conversion process.
7. At the top of the page, check what the status for new employees will be. User records will only
be created if the employee is set to an active status (Employed is the only active status by
default).
8. In the list of Standard Fields, make sure that Email is checked to be mapped.
9. Click Save.
Now when an Employee record with an email address is in an active status, a User record will be created
as well.
NOTE: If your goal is to get your employees, such as hiring managers, to use the Talent Center most of
the time, you might want to turn off the automatic emails that are sent to new users in the system.
Then your employees can primarily use the Talent Center, and access Taleo Business Edition via the
‘Manager View’ link in the Talent Center as needed.

20
ORACLE INTEGRATION CLOUD SERVICE (ICS) ADAPTER
Oracle’s Integration Cloud Service (ICS) is a simple and powerful cloud-based platform that can be used
to orchestrate integrations between both on-premise and in the cloud applications. This release
includes a set of JSON hyperschemas for supporting a native TBE adapter in the ICS product. Using this
adapter, customers may seamlessly build data connections between TBE and other applications. ICS’s
intuitive point-and-click integration designer provides an easy to use interface for building integrations.
This TBE adapter will be available in an upcoming ICS release.
The TBE adapter in ICS will initially support building integrations using Candidate, Requisition, Employee,
and Offer entities. Support for additional entities will be available in future TBE releases. For more
information about Oracle’s Integration Cloud Service, visit the Oracle ICS website at
https://cloud.oracle.com/integration.
---

21
Copyright © 2017, Oracle and/or its affiliates. All rights reserved.
This document is provided for information purposes only, and the contents hereof are subject to change without notice. This document is not warranted to be error-free, nor subject
to any other warranties or conditions, whether expressed orally or implied in law, including implied warranties and conditions of merchantability or fitness for a particular purpose.
We specifically disclaim any liability with respect to this document, and no contractual obligations are formed either directly or indirectly by this document. This document may not
be reproduced or transmitted in any form or by any means, electronic or mechanical, for any purpose, without our prior written permission.
Oracle and Java are registered trademarks of Oracle and/or its affiliates. Other names may be trademarks of their respective owners.
Intel and Intel Xeon are trademarks or registered trademarks of Intel Corporation. All SPARC trademarks are used under license and are trademarks or registered trademarks of
SPARC International, Inc. AMD, Opteron, the AMD logo, and the AMD Opteron logo are trademarks or registered trademarks of Advanced Micro Devices. UNIX is a registered
trademark of The Open Group.


