216
Oracle® TimesTen In-Memory Database TimesTen to TimesTen Replication Guide Release 11.2.1 E13072-02 August 2009

Oracle® TimesTen In-Memory DatabaseTimesTen to TimesTen Replication Guide
Release 11.2.1
E13072-02
August 2009

Oracle TimesTen In-Memory Database TimesTen to TimesTen Replication Guide, Release 11.2.1
E13072-02
Copyright © 1996, 2009, Oracle and/or its affiliates. All rights reserved.
This software and related documentation are provided under a license agreement containing restrictions on use and disclosure and are protected by intellectual property laws. Except as expressly permitted in your license agreement or allowed by law, you may not use, copy, reproduce, translate, broadcast, modify, license, transmit, distribute, exhibit, perform, publish, or display any part, in any form, or by any means. Reverse engineering, disassembly, or decompilation of this software, unless required by law for interoperability, is prohibited.
The information contained herein is subject to change without notice and is not warranted to be error-free. If you find any errors, please report them to us in writing.
If this software or related documentation is delivered to the U.S. Government or anyone licensing it on behalf of the U.S. Government, the following notice is applicable:
U.S. GOVERNMENT RIGHTS Programs, software, databases, and related documentation and technical data delivered to U.S. Government customers are "commercial computer software" or "commercial technical data" pursuant to the applicable Federal Acquisition Regulation and agency-specific supplemental regulations. As such, the use, duplication, disclosure, modification, and adaptation shall be subject to the restrictions and license terms set forth in the applicable Government contract, and, to the extent applicable by the terms of the Government contract, the additional rights set forth in FAR 52.227-19, Commercial Computer Software License (December 2007). Oracle USA, Inc., 500 Oracle Parkway, Redwood City, CA 94065.
This software is developed for general use in a variety of information management applications. It is not developed or intended for use in any inherently dangerous applications, including applications which may create a risk of personal injury. If you use this software in dangerous applications, then you shall be responsible to take all appropriate fail-safe, backup, redundancy, and other measures to ensure the safe use of this software. Oracle Corporation and its affiliates disclaim any liability for any damages caused by use of this software in dangerous applications.
Oracle is a registered trademark of Oracle Corporation and/or its affiliates. Other names may be trademarks of their respective owners.
This software and documentation may provide access to or information on content, products, and services from third parties. Oracle Corporation and its affiliates are not responsible for and expressly disclaim all warranties of any kind with respect to third-party content, products, and services. Oracle Corporation and its affiliates will not be responsible for any loss, costs, or damages incurred due to your access to or use of third-party content, products, or services.

iii
Contents
Preface ................................................................................................................................................................. xi
Audience....................................................................................................................................................... xiRelated documents...................................................................................................................................... xiConventions ................................................................................................................................................. xiDocumentation Accessibility .................................................................................................................... xiiTechnical support ...................................................................................................................................... xiii
What’s New...................................................................................................................................................... xv
Oracle Clusterware integration ............................................................................................................... xvReplicating tables with different definitions ......................................................................................... xvIncreased column size............................................................................................................................... xvIncreased throughput for active standby pairs..................................................................................... xv
1 Overview of TimesTen Replication
What is replication? ................................................................................................................................. 1-1Requirements for replication compatibility ....................................................................................... 1-2Replication agents .................................................................................................................................... 1-2Copying updates between data stores.................................................................................................. 1-2
Default replication ............................................................................................................................. 1-3Return receipt replication ................................................................................................................. 1-4Return twosafe replication................................................................................................................ 1-5
Types of replication schemes ................................................................................................................. 1-7Active standby pair with read-only subscribers............................................................................ 1-7Full or selective replication............................................................................................................... 1-9Unidirectional or bidirectional replication..................................................................................... 1-9
Split workload configuration ................................................................................................. 1-10Hot standby configuration ..................................................................................................... 1-10Distributed workload .............................................................................................................. 1-11
Direct replication or propagation ................................................................................................. 1-12Cache groups and replication ............................................................................................................. 1-14
Replicating an AWT cache group ................................................................................................. 1-14Replicating an AWT cache group with a read-only subscriber propagating to an Oracle database 1-15Replicating a read-only cache group............................................................................................ 1-16
Sequences and replication ................................................................................................................... 1-16

iv
Foreign keys and replication............................................................................................................... 1-17Aging and replication ........................................................................................................................... 1-17
2 Getting Started
Configuring an active standby pair with one subscriber ................................................................. 2-1Step 1: Create the DSNs for the master and the subscriber data stores ..................................... 2-2Step 2: Create a table in one of the master data stores.................................................................. 2-2Step 3: Define the active standby pair ............................................................................................. 2-3Step 4: Start the replication agent on a master data store ............................................................ 2-3Step 5: Set the state of a master data store to 'ACTIVE'................................................................ 2-3Step 6. Create a user on the active master data store.................................................................... 2-3Step 7: Duplicate the active master data store to the standby master data store...................... 2-3Step 8: Start the replication agent on the standby master data store.......................................... 2-3Step 9. Duplicate the standby master data store to the subscriber ............................................. 2-4Step 10: Start the replication agent on the subscriber ................................................................... 2-4Step 11: Insert data into the table on the active master data store .............................................. 2-4Step 12: Drop the active standby pair and the table ..................................................................... 2-4
Configuring a replication scheme with one master and one subscriber ....................................... 2-5Step 1: Create the DSNs for the master and the subscriber ......................................................... 2-5Step 2: Create a table and replication scheme on the master data store .................................... 2-6Step 3: Create a table and replication scheme on the subscriber data store .............................. 2-6Step 4: Start the replication agent on each data store ................................................................... 2-6Step 4: Insert data into the table on the master data store ........................................................... 2-7Step 5: Drop the replication scheme and table............................................................................... 2-8
3 Defining an Active Standby Pair Replication Scheme
Restrictions on active standby pairs ..................................................................................................... 3-1Defining the DSNs for the data stores ................................................................................................. 3-2Defining an active standby pair replication scheme......................................................................... 3-2Identifying the data stores in the active standby pair....................................................................... 3-3Using a return service .............................................................................................................................. 3-3
RETURN RECEIPT ............................................................................................................................ 3-3RETURN RECEIPT BY REQUEST................................................................................................... 3-4RETURN TWOSAFE.......................................................................................................................... 3-4RETURN TWOSAFE BY REQUEST ................................................................................................ 3-5NO RETURN....................................................................................................................................... 3-5
Setting STORE attributes ....................................................................................................................... 3-5Setting the return service timeout period....................................................................................... 3-7Managing return service timeout errors......................................................................................... 3-7
Disabling return service blocking manually........................................................................... 3-8Establishing return service failure/recovery policies ........................................................... 3-8
RETURN SERVICES {ON | OFF} WHEN [REPLICATION] STOPPED ..................... 3-8DISABLE RETURN.............................................................................................................. 3-9RESUME RETURN .............................................................................................................. 3-9DURABLE COMMIT........................................................................................................... 3-9LOCAL COMMIT ACTION............................................................................................ 3-10
Compressing replicated traffic ...................................................................................................... 3-10

v
Port assignments ............................................................................................................................. 3-10Setting the log failure threshold.................................................................................................... 3-11
Configuring network operations........................................................................................................ 3-11Including or excluding data store objects from replication .......................................................... 3-12
4 Administering an Active Standby Pair Without Cache Groups
Overview of master data store states .................................................................................................... 4-1Duplicating a data store .......................................................................................................................... 4-2Setting up an active standby pair with no cache groups .................................................................. 4-3Recovering from a failure of the active master data store ................................................................ 4-3
Recovering when the standby master data store is ready............................................................ 4-3When replication is return receipt or asynchronous ............................................................. 4-3When replication is return twosafe .......................................................................................... 4-4
Recovering when the standby master data store is not ready..................................................... 4-5Recover the active master data store........................................................................................ 4-5Recover the standby master data store .................................................................................... 4-5
Failing back to the original nodes.................................................................................................... 4-6Recovering from a failure of the standby master data store ............................................................ 4-6Recovering from the failure of a subscriber data store..................................................................... 4-6Reversing the roles of the active and standby master data stores .................................................. 4-7Detection of dual active master data stores......................................................................................... 4-7Changing the configuration of an active standby pair ..................................................................... 4-8
5 Administering an Active Standby Pair with Cache Groups
Active standby pairs with cache groups .............................................................................................. 5-1Setting up an active standby pair with a read-only cache group .................................................... 5-2Setting up an active standby pair with an AWT cache group.......................................................... 5-3Recovering from a failure of the active master data store ................................................................ 5-3
Recovering when the standby master data store is ready............................................................ 5-4When replication is return receipt or asynchronous ............................................................. 5-4When replication is return twosafe .......................................................................................... 5-4
Recovering when the standby master data store is not ready..................................................... 5-5Recover the active master data store........................................................................................ 5-5Recover the standby master data store .................................................................................... 5-6
Failing back to the original nodes.................................................................................................... 5-7Recovering from a failure of the standby master data store ............................................................ 5-7Recovering from the failure of a subscriber data store..................................................................... 5-8Reversing the roles of the active and standby master data stores .................................................. 5-8Detection of dual active master data stores......................................................................................... 5-9Changing the configuration of an active standby pair with cache groups ................................... 5-9Using a disaster recovery subscriber in an active standby pair ................................................... 5-11
Requirements for using a disaster recovery subscriber with an active standby pair ........... 5-11Rolling out a disaster recovery subscriber .................................................................................. 5-11Switching over to the disaster recovery site................................................................................ 5-13
Creating a new active standby pair after switching to the disaster recovery site .......... 5-13Switching over to a single data store .................................................................................... 5-14

vi
Returning to the original configuration at the primary site...................................................... 5-15
6 Using Oracle Clusterware to Manage Active Standby Pairs
Overview .................................................................................................................................................... 6-1Active standby configurations ......................................................................................................... 6-2Required privileges............................................................................................................................ 6-3Hardware and software requirements............................................................................................ 6-3Restricted commands and SQL statements .................................................................................... 6-3
The cluster.oracle.ini file......................................................................................................................... 6-3Configuring basic availability .......................................................................................................... 6-4Configuring advanced availability.................................................................................................. 6-4Including cache groups in the active standby pair ....................................................................... 6-5Implementing application failover .................................................................................................. 6-5Recovering from failure of both master nodes .............................................................................. 6-7Using the RepDDL attribute............................................................................................................. 6-8
Creating and initializing a cluster......................................................................................................... 6-9Install Oracle Clusterware ................................................................................................................ 6-9Install TimesTen on each host .......................................................................................................... 6-9Start the TimesTen cluster agent................................................................................................... 6-10Create and populate a TimesTen data store on one host .......................................................... 6-10Create a cluster.oracle.ini file ........................................................................................................ 6-10Create the virtual IP addresses (optional) ................................................................................... 6-10Create an active standby pair replication scheme...................................................................... 6-10Start the active standby pair .......................................................................................................... 6-11Including more than one active standby pair in a cluster......................................................... 6-11
Recovering from failures ..................................................................................................................... 6-11When an active master data store or its host fails ...................................................................... 6-12When a standby master data store or its host fails..................................................................... 6-13When read-only subscribers or their hosts fail ........................................................................... 6-14When failures occur on both master nodes ................................................................................. 6-14
Automatic recovery ................................................................................................................. 6-14Manual recovery for advanced availability ......................................................................... 6-15Manual recovery for basic availability.................................................................................. 6-15
When more than two master hosts fail ........................................................................................ 6-15Planned maintenance ........................................................................................................................... 6-16
Changing the schema ..................................................................................................................... 6-16Performing a rolling upgrade of Oracle Clusterware software ............................................... 6-17Upgrading TimesTen...................................................................................................................... 6-17Adding a read-only subscriber to an active standby pair ......................................................... 6-17Removing a read-only subscriber from an active standby pair ............................................... 6-17Adding an active standby pair to a cluster.................................................................................. 6-18Removing an active standby pair from a cluster........................................................................ 6-19Adding a host to the cluster........................................................................................................... 6-19Removing a host from the cluster................................................................................................. 6-20Performing host or network maintenance................................................................................... 6-20Performing maintenance on the entire cluster............................................................................ 6-21

vii
7 Defining Replication Schemes
Designing a highly available system ................................................................................................... 7-1Failover and recovery ........................................................................................................................ 7-2Performance and recovery tradeoffs ............................................................................................... 7-3
Defining a replication scheme ............................................................................................................... 7-5Owner of the replication scheme and tables .................................................................................. 7-5Master, propagator and subscriber data store names................................................................... 7-6Defining replication elements .......................................................................................................... 7-6
Defining data store elements..................................................................................................... 7-7Defining table elements.............................................................................................................. 7-8Defining sequence elements ...................................................................................................... 7-8
Checking for replication conflicts on table elements .................................................................... 7-8Setting transmit durability on data store elements ....................................................................... 7-8
Using a return service .............................................................................................................................. 7-9RETURN RECEIPT ......................................................................................................................... 7-10RETURN RECEIPT BY REQUEST................................................................................................ 7-10RETURN TWOSAFE BY REQUEST ............................................................................................. 7-11RETURN TWOSAFE....................................................................................................................... 7-12NO RETURN.................................................................................................................................... 7-13
Setting STORE attributes .................................................................................................................... 7-13Setting the return service timeout period.................................................................................... 7-15Managing return service timeout errors and replication state changes.................................. 7-16
When to manually disable return service blocking ............................................................ 7-16Establishing return service failure/recovery policies ........................................................ 7-16
RETURN SERVICES { ON | OFF } WHEN REPLICATION STOPPED................... 7-17DISABLE RETURN........................................................................................................... 7-18RESUME RETURN ........................................................................................................... 7-19DURABLE COMMIT........................................................................................................ 7-19LOCAL COMMIT ACTION............................................................................................ 7-20
Compressing replicated traffic ...................................................................................................... 7-20Port assignments ............................................................................................................................. 7-21Replicating tables with different definitions............................................................................... 7-22
Configuring network operations........................................................................................................ 7-23Creating multiple replication schemes ............................................................................................. 7-24Replicating tables with foreign key relationships ......................................................................... 7-25Replicating materialized views .......................................................................................................... 7-25Replicating sequences .......................................................................................................................... 7-25Example replication schemes .............................................................................................................. 7-26
Single subscriber scheme ............................................................................................................... 7-27Multiple subscriber schemes ......................................................................................................... 7-28Selective replication scheme .......................................................................................................... 7-30Propagation scheme........................................................................................................................ 7-31Bidirectional split workload scheme ............................................................................................ 7-32Bidirectional general workload scheme....................................................................................... 7-33
Creating replication schemes with scripts........................................................................................ 7-34

viii
8 Setting Up a Replicated System
Configuring the network ........................................................................................................................ 8-1Network bandwidth requirements.................................................................................................. 8-2Replication in a WAN environment................................................................................................ 8-3Configuring host IP addresses ......................................................................................................... 8-3
Identifying data store hosts and network interfaces using the ROUTE clause ................. 8-3Identifying data store hosts on UNIX without using the ROUTE clause........................... 8-4Host name resolution on Windows.......................................................................................... 8-5User-specified addresses for TimesTen daemons and subdaemons................................... 8-6
Identifying the local host of a replicated data store ...................................................................... 8-6Setting up the replication environment............................................................................................... 8-6
Establishing the data stores .............................................................................................................. 8-7Data store attributes.................................................................................................................... 8-7Table requirements and restrictions......................................................................................... 8-7Copying a master data store to a subscriber ........................................................................... 8-8
On server1:............................................................................................................................ 8-9On server2:............................................................................................................................ 8-9
Managing the transaction log on a replicated data store ............................................................. 8-9About log buffer size and persistence...................................................................................... 8-9About transaction log growth on a master data store ........................................................ 8-10Setting the log failure threshold............................................................................................. 8-10Setting attributes for logging.................................................................................................. 8-11
Configuring a large number of subscribers................................................................................. 8-12Increasing replication throughput for active standby pairs ..................................................... 8-12
Replicating data stores across releases.............................................................................................. 8-12Applying a replication scheme to a data store................................................................................. 8-12Starting and stopping the replication agents................................................................................... 8-13
Controlling replication agents from the command line ............................................................ 8-13Controlling replication agents from a program.......................................................................... 8-15
Setting the replication state of subscribers ...................................................................................... 8-15
9 Monitoring Replication
Show state of replication agents............................................................................................................ 9-1From the command line: ttStatus..................................................................................................... 9-2From the command line: ttAdmin -query ...................................................................................... 9-2From a program: ttDataStoreStatus................................................................................................. 9-3
Show master data store information..................................................................................................... 9-3From the command line: ttRepAdmin -self -list ............................................................................ 9-4From a program: SQL SELECT statement ...................................................................................... 9-4
Show subscriber data store information.............................................................................................. 9-5From the command line: ttRepAdmin -receiver -list .................................................................... 9-5From a program: ttReplicationStatus procedure ........................................................................... 9-6From a program: SQL SELECT statement ...................................................................................... 9-7
Show configuration of replicated data stores ..................................................................................... 9-8From ttIsql: repschemes command.................................................................................................. 9-8From the command line: ttRepAdmin -showconfig ..................................................................... 9-9From a program: SQL SELECT statements ................................................................................. 9-10
ix
Show replicated log records ................................................................................................................ 9-11From the command line: ttRepAdmin -bookmark..................................................................... 9-11From a program: ttBookMark procedure .................................................................................... 9-12
Show replication status ........................................................................................................................ 9-12MAIN thread status fields ............................................................................................................. 9-14Replication peer status fields......................................................................................................... 9-14TRANSMITTER thread status fields ............................................................................................ 9-15RECEIVER thread status fields ..................................................................................................... 9-16
Checking the status of return service transactions ......................................................................... 9-16
10 Altering Replication
Altering a replication scheme ............................................................................................................. 10-1Adding a table or sequence to an existing replication scheme................................................. 10-2Adding a DATASTORE element to an existing replication scheme ....................................... 10-3
Including tables or sequences when you add a DATASTORE element .......................... 10-3Excluding a table or sequence when you add a DATASTORE element.......................... 10-3
Dropping a table or sequence from a replication scheme......................................................... 10-4Dropping a table or sequence that is replicated as part of a DATASTORE element..... 10-4Dropping a table or sequence that is replicated as a TABLE or SEQUENCE element.. 10-4
Creating and adding a subscriber data store .............................................................................. 10-5Dropping a subscriber data store.................................................................................................. 10-5Changing a TABLE or SEQUENCE element name.................................................................... 10-5Replacing a master data store........................................................................................................ 10-5Eliminating conflict detection ....................................................................................................... 10-6Eliminating the return receipt service.......................................................................................... 10-6Changing the port number ............................................................................................................ 10-6Changing the replication route ..................................................................................................... 10-6
Altering a replicated table ................................................................................................................... 10-7Truncating a replicated table ............................................................................................................... 10-7Dropping a replication scheme........................................................................................................... 10-8
11 Conflict Resolution and Failure Recovery
Replication conflict detection and resolution.................................................................................. 11-1Update and insert conflicts ............................................................................................................ 11-1Delete/update conflicts.................................................................................................................. 11-3Timestamp resolution..................................................................................................................... 11-3Configuring timestamp comparison ............................................................................................ 11-4
Establishing a timestamp column in replicated tables ....................................................... 11-5Configuring the CHECK CONFLICTS clause ..................................................................... 11-5
System timestamp column maintenance ..................................................................................... 11-6User timestamp column maintenance.......................................................................................... 11-6Local updates ................................................................................................................................... 11-7Conflict reporting............................................................................................................................ 11-7
Reporting conflicts to a text file ............................................................................................. 11-7Reporting conflicts to an XML file......................................................................................... 11-8Reporting uniqueness conflicts.............................................................................................. 11-8

x
Reporting update conflicts ..................................................................................................... 11-9Reporting DELETE/UPDATE conflicts.............................................................................. 11-11Suspending and resuming the reporting of conflicts ....................................................... 11-12
Managing data store failover and recovery .................................................................................... 11-13General failover and recovery procedures ................................................................................ 11-14
Subscriber failures.................................................................................................................. 11-14Master failures ........................................................................................................................ 11-15Automatic catch-up of a failed master data store ............................................................. 11-15Master/subscriber failures ................................................................................................... 11-16Network failures .................................................................................................................... 11-16Failures involving sequences ............................................................................................... 11-17
Recovering a failed data store ..................................................................................................... 11-17From the command line ........................................................................................................ 11-17From a program ..................................................................................................................... 11-18
Recovering NONDURABLE data stores ................................................................................... 11-19Writing a failure recovery script ................................................................................................. 11-19
12 XML Document Type Definition for the Conflict Report File
The conflict report XML Document Type Definition .................................................................... 12-1The main body of the document ........................................................................................................ 12-2The uniqueness conflict element ....................................................................................................... 12-2The update conflict element................................................................................................................ 12-4The delete/update conflict element ................................................................................................... 12-6
Index

xi
Preface
Oracle TimesTen In-Memory Database is a memory-optimized relational database. Deployed in the application tier, Oracle TimesTen In-Memory Database operates on databases that fit entirely in physical memory using standard SQL interfaces. High availability for the in-memory database is provided through real-time transactional replication.
AudienceThis document is intended for application developers and system administrators who use and administer TimesTen to TimesTen Replication.
To work with this guide, you should understand how database systems work. You should also have knowledge of SQL (Structured Query Language) and either ODBC (Open DataBase Connectivity) or JDBC (JavaDataBase Connectivity).
Related documentsTimesTen documentation is available on the product distribution media and on the Oracle Technology Network:
http://www.oracle.com/technology/documentation/timesten_doc.html
ConventionsTimesTen supports multiple platforms. Unless otherwise indicated, the information in this guide applies to all supported platforms. The term Windows refers to Windows 2000, Windows XP and Windows Server 2003. The term UNIX refers to Solaris, Linux, HP-UX and AIX.
This document uses the following text conventions:
Convention Meaning
boldface Boldface type indicates graphical user interface elements associated with an action, or terms defined in text or the glossary.
italic Italic type indicates book titles, emphasis, or placeholder variables for which you supply particular values.
monospace Monospace type indicates commands within a paragraph, URLs, code in examples, text that appears on the screen, or text that you enter.

xii
TimesTen documentation uses these variables to identify path, file and user names:
Documentation AccessibilityOur goal is to make Oracle products, services, and supporting documentation accessible to all users, including users that are disabled. To that end, our documentation includes features that make information available to users of assistive technology. This documentation is available in HTML format, and contains markup to facilitate access by the disabled community. Accessibility standards will continue to evolve over time, and Oracle is actively engaged with other market-leading technology vendors to address technical obstacles so that our documentation can be accessible to all of our customers. For more information, visit the Oracle Accessibility Program Web site at http://www.oracle.com/accessibility/.
Accessibility of Code Examples in DocumentationScreen readers may not always correctly read the code examples in this document. The conventions for writing code require that closing braces should appear on an otherwise empty line; however, some screen readers may not always read a line of text that consists solely of a bracket or brace.
italic monospace Italic monospace type indicates a variable in a code example that you must replace. For example:
Driver=install_dir/lib/libtten.sl
Replace install_dir with the path of your TimesTen installation directory.
[ ] Square brackets indicate that an item in a command line is optional.
{ } Curly braces indicated that you must choose one of the items separated by a vertical bar ( | ) in a command line.
| A vertical bar (or pipe) separates alternative arguments.
. . . An ellipsis (. . .) after an argument indicates that you may use more than one argument on a single command line.
% The percent sign indicates the UNIX shell prompt.
# The number (or pound) sign indicates the UNIX root prompt.
Convention Meaning
install_dir The path that represents the directory where the current release of TimesTen is installed.
TTinstance The instance name for your specific installation of TimesTen. Each installation of TimesTen must be identified at install time with a unique alphanumeric instance name. This name appears in the install path.
bits or bb Two digits, either 32 or 64, that represent either the 32-bit or 64-bit operating system.
release or rr Three numbers that represent the first three numbers of the current TimesTen release number, with or without a dot. For example, 1121 or 11.2.1 represents TimesTen Release 11.2.1.
jdk_version Two digits that represent the version number of the major JDK release. Specifically, 14 represent JDK 1.4; 5 represents JDK 5.
DSN The data source name.
Convention Meaning

xiii
Accessibility of Links to External Web Sites in DocumentationThis documentation may contain links to Web sites of other companies or organizations that Oracle does not own or control. Oracle neither evaluates nor makes any representations regarding the accessibility of these Web sites.
Deaf/Hard of Hearing Access to Oracle Support ServicesTo reach Oracle Support Services, use a telecommunications relay service (TRS) to call Oracle Support at 1.800.223.1711. An Oracle Support Services engineer will handle technical issues and provide customer support according to the Oracle service request process. Information about TRS is available at http://www.fcc.gov/cgb/consumerfacts/trs.html, and a list of phone numbers is available at http://www.fcc.gov/cgb/dro/trsphonebk.html.
Technical supportFor information about obtaining technical support for TimesTen products, go to the following Web address:
http://www.oracle.com/support/contact.html

xiv

xv
What’s New
This section summarizes the new features of Oracle TimesTen In-Memory Database release 11.2.1 that are documented in this guide. It provides links to more information.
Oracle Clusterware integrationTimesTen integrates with Oracle Clusterware to manage failure recovery for active standby replication schemes. See Chapter 6, "Using Oracle Clusterware to Manage Active Standby Pairs".
Replicating tables with different definitionsYou can replicate tables that have columns in different positions or tables that have a different number of partitions. See "Replicating tables with different definitions" on page 7-22.
Increased column sizeVARCHAR2, NVARCHAR2, VARBINARY and TT_VARCHAR columns in replicated tables can have a size of 4 megabytes. See "Table requirements and restrictions" on page 8-7.
Increased throughput for active standby pairsYou can configure increased throughput for active standby pairs. See "Increasing replication throughput for active standby pairs" on page 8-12.

xvi

1
Overview of TimesTen Replication 1-1
1Overview of TimesTen Replication
This chapter provides an overview of TimesTen replication. It includes these topics:
■ What is replication?
■ Requirements for replication compatibility
■ Replication agents
■ Copying updates between data stores
■ Types of replication schemes
■ Cache groups and replication
■ Sequences and replication
■ Foreign keys and replication
■ Aging and replication
What is replication?Replication is the process of maintaining copies of data in multiple data stores. The purpose of replication is to make data highly available to applications with minimal performance impact. TimesTen recommends the active standby pair configuration for highest availability. In an active standby pair replication scheme, the data is copied from the active master data store to the standby master data store before being copied to read-only subscribers.
In addition to providing recovery from failures, replication schemes can also distribute application workloads across multiple databases for maximum performance and facilitate online upgrades and maintenance.
Replication is the process of copying data from a master data store to a subscriber data store. Replication is controlled by replication agents for each data store. The replication agent on the master data store reads the records from the transaction log for the master data store. It forwards changes to replicated elements to the replication agent on the subscriber data store. The replication agent on the subscriber data store then applies the updates to its data store. If the subscriber replication agent is not running when the updates are forwarded by the master, the master retains the updates in its transaction log until they can be applied at the subscriber data store.
An entity that is replicated between data stores is called a replication element. TimesTen supports data stores, cache groups, tables and sequences as replication elements. An active standby pair is the only supported replication scheme for data stores with cache groups.

Requirements for replication compatibility
1-2 Oracle TimesTen In-Memory Database TimesTen to TimesTen Replication Guide
Requirements for replication compatibilityThe master and subscriber data stores must reside on machines that have the same operating system, CPU type, and word size. Although you can replicate between data stores that reside on the same machine, replication is generally used for copying updates into a data store that resides on another machine. This helps prevent data loss from node failure.
The data stores must have DSNs with identical DatabaseCharacterSet and TypeMode attributes.
Replication agentsReplication between data stores is controlled by a replication agent. Each data store is identified by:
■ A data store name derived from the file system's path name for the data store
■ A host name
The replication agent on the master data store reads the records from the transaction log and forwards any detected changes to replicated elements to the replication agent on the subscriber data store. The replication agent on the subscriber data store then applies the updates to its data store. If the subscriber agent is not running when the updates are forwarded by the master, the master retains the updates in the log until they can be transmitted.
The replication agents communicate through TCP/IP stream sockets. The replication agents obtain the TCP/IP address, host name, and other configuration information from the replication tables described in "System and Replication Tables" in Oracle TimesTen In-Memory Database SQL Reference.
Copying updates between data storesUpdates are copied between data stores in asynchronously by default. Asynchronous replication provides the best performance, but it does not provide the application with confirmation that the replicated updates have been committed on the subscriber data stores. For applications that need higher levels of confidence that the replicated data is consistent between the master and subscriber data stores, you can enable either return receipt or return twosafe service.
The return receipt service loosely synchronizes the application with the replication mechanism by blocking the application until replication confirms that the update has been received by the subscriber. The return twosafe service provides a fully
Note: If replication is configured between a data store from the current release of TimesTen and a data store from a TimesTen release previous to 7.0, then there are additional restrictions for replication compatibility. A data store may only replicate to a TimesTen release previous to 7.0 if it is configured with a DatabaseCharacterSet attribute of TIMESTEN8 and may only replicate tables with columns that use the original TimesTen data types (data types with the prefix TT_ or the data types BINARY_FLOAT and BINARY_DOUBLE). See "Types supported for backward compatibility in Oracle type mode" in Oracle TimesTen In-Memory Database SQL Reference for more information.

Copying updates between data stores
Overview of TimesTen Replication 1-3
synchronous option by blocking the application until replication confirms that the update has been both received and committed on the subscriber.
Return receipt replication has less performance impact than return twosafe at the expense of less synchronization. The operational details for asynchronous, return receipt, and return twosafe replication are discussed in these sections:
■ Default replication
■ Return receipt replication
■ Return twosafe replication
Default replicationWhen using default TimesTen replication, an application updates a master data store and continues working without waiting for the updates to be received and applied by the subscribers. The master and subscriber data stores have internal mechanisms to confirm that the updates have been successfully received and committed by the subscriber. These mechanisms ensure that updates are applied at a subscriber only once, but they are completely independent of the application.
Default TimesTen replication provides maximum performance, but the application is completely decoupled from the receipt process of the replicated elements on the subscriber.
Figure 1–1 Basic asynchronous replication cycle
The default TimesTen replication cycle is:
1. The application commits a local transaction to the master data store and is free to continue with other transactions.
2. During the commit, TimesTen Data Manager writes the transaction update records to the transaction log buffer.
3. The replication agent on the master data store directs the Data Manager to flush a batch of update records for the committed transactions from the log buffer to a transaction log file. This step ensures that, if the master fails and you need to recover the data store from the checkpoint and transaction log files, the recovered master contains all the data it replicated to the subscriber.
Application
Log FilesDSName1.log2
DSName1.log1DSName1.log0
3) Flush batch of update records to disk
Log FilesDSName2.log2
DSName2.log1DSName2.log0
TransactionLog Buffer
1) Commit transaction
2) Write update records to log
4) Send batch of update records to subscriber
5) Acknowledge receipt of batch
6) Write each received update record to log
7) In a separate thread, flush batch of updates to disk
Master Data Store Subscriber Data Store
TransactionLog Buffer

Copying updates between data stores
1-4 Oracle TimesTen In-Memory Database TimesTen to TimesTen Replication Guide
4. The master replication agent forwards the batch of transaction update records to the subscriber replication agent, which applies them to the subscriber data store. Update records are flushed to disk and forwarded to the subscriber in batches of 256K or less, depending on the master data store's transaction load. A batch is created when there is no more log data in the transaction log buffer or when the current batch is roughly 256K bytes.
5. The subscriber replication agent sends an acknowledgement back to the master replication agent that the batch of update records was received. The acknowledgement includes information on which batch of records the subscriber last flushed to disk. The master replication agent is now free to purge from the transaction log the update records that have been received, applied, and flushed to disk by all subscribers and to forward another batch of update records, while the subscriber replication agent asynchronously continues on to Step 6.
6. The replication agent at the subscriber updates the data store and directs its Data Manager to write the transaction update records to the transaction log buffer.
7. The replication agent at the subscriber data store uses a separate thread to direct the Data Manager to flush the update records to a transaction log file.
Return receipt replicationThe return receipt service provides a level of synchronization between the master and a subscriber data store by blocking the application after commit on the master until the updates of the committed transaction have been received by the subscriber.
An application requesting return receipt updates the master data store in the same manner as in the basic asynchronous case. However, when the application commits a transaction that updates a replicated element, the master data store blocks the application until it receives confirmation that the updates for the completed transaction have been received by the subscriber.
Return receipt replication trades some performance in order to provide applications with the ability to ensure higher levels of data integrity and consistency between the master and subscriber data stores. In the event of a master failure, the application has a high degree of confidence that a transaction committed at the master persists in the subscribing data store.

Copying updates between data stores
Overview of TimesTen Replication 1-5
Figure 1–2 Return receipt replication
Figure 1–2 shows that the return receipt replication cycle is the same as shown for the basic asynchronous cycle in Figure 1–1, only the master replication agent blocks the application thread after it commits a transaction (Step 1) and retains control of the thread until the subscriber acknowledges receipt of the update batch (Step 5). Upon receiving the return receipt acknowledgement from the subscriber, the master replication agent returns control of the thread to the application (Step 6), freeing it to continue executing transactions.
If the subscriber is unable to acknowledge receipt of the transaction within a configurable timeout period (default is 10 seconds), the master replication agent returns a warning stating that it did not receive acknowledgement of the update from the subscriber and returns control of the thread to the application. The application is then free to commit another transaction to the master, which continues replication to the subscriber as before. Return receipt transactions may time out for many reasons. The most likely causes for timeout are the network, a failed replication agent, or the master replication agent may be so far behind with respect to the transaction load that it cannot replicate the return receipt transaction before its timeout expires. For information on how to manage return-receipt timeouts, see "Managing return service timeout errors and replication state changes" on page 7-16.
See "RETURN RECEIPT" on page 7-10 for information on how to configure replication for return receipt.
Return twosafe replicationThe return twosafe service provides fully synchronous replication between the master and subscriber. Unlike the previously described replication modes, where transactions are transmitted to the subscriber after being committed on the master, transactions in twosafe mode are first committed on the subscriber before they are committed on the master.
Applications
Log FilesDSName.log2
DSName.log1DSName.log0
3) Flush batch of update records to disk
Log FilesDSName.log2
DSName.log1DSName.log0
TransactionLog Buffer
2) Write update records to log
4) Send batch of update records to subscriber
5) Acknowledge receipt of batch
7) Write each received update record to log
8) In a separate thread, flush batch of updates to disk
Master Data Store Subscriber Data Store
TransactionLog Buffer
6) Unblock thread
1) Commit transaction and block thread

Copying updates between data stores
1-6 Oracle TimesTen In-Memory Database TimesTen to TimesTen Replication Guide
Figure 1–3 Return twosafe replication
The following describes the replication behavior between a master and subscriber configured for return twosafe replication:
1. The application commits the transaction on the master data store.
2. The master replication agent writes the transaction records to the log and inserts a special precommit log record before the commit record. This precommit record acts as a place holder in the log until the master replication receives an acknowledgement that indicates the status of the commit on the subscriber.
3. The master replication agent transmits the batch of update records to the subscriber.
4. The subscriber replication agent commits the transaction on the subscriber data store.
5. The subscriber replication agent returns an acknowledgement back to the master replication agent with notification of whether the transaction was committed on the subscriber and whether the commit was successful.
6. If the commit on the subscriber was successful, the master replication agent commits the transaction on the master data store.
Note: The return twosafe service can be used only in a "hot standby" replication scheme where there is a single master and subscriber and the replication element is the entire data store. See "Hot standby configuration" on page 1-10.
Note: Transmission of return twosafe transactions are nondurable, so the master replication agent does not flush the log records to disk before sending them to the subscriber, as it does by default when replication is configured for asynchronous or return receipt replication.
Applications
3) Send batch of update records to subscriber
5) Acknowledge commit of transaction on the subscriber
Master Data Store Subscriber Data Store
TransactionLog Buffer
7) Unblock thread
1) Block thread
4) Commit transaction on the subscriber
6) Commit transaction on the master
2) Write update records to log

Types of replication schemes
Overview of TimesTen Replication 1-7
7. The master replication agent returns control to the application.
If the subscriber is unable to acknowledge commit of the transaction within a configurable timeout period (default is 10 seconds) or if the acknowledgement from the subscriber indicates the commit was unsuccessful, the replication agent returns control to the application without committing the transaction on the master data store. The application can then to decide whether to unconditionally commit or retry the commit. You can optionally configure your replication scheme to direct the master replication agent to commit all transactions that time out.
See "RETURN TWOSAFE" on page 7-12 for information on how to configure replication for return twosafe.
Types of replication schemesYou create a replication scheme to define a specific configuration of master and subscriber data stores. This section describes the possible relationships you can define between master and subscriber data stores when creating a replication scheme.
When defining a relationship between a master and subscriber, consider these replication schemes:
■ Active standby pair with read-only subscribers
■ Full or selective replication
■ Unidirectional or bidirectional replication
■ Direct replication or propagation
Active standby pair with read-only subscribersFigure 1–4 shows an active standby pair replication scheme with an active master data store, a standby master data store, and four read-only subscriber data stores.

Types of replication schemes
1-8 Oracle TimesTen In-Memory Database TimesTen to TimesTen Replication Guide
Figure 1–4 Active standby pair
The active standby pair can replicate a whole data store or select elements like tables and cache groups.
In an active standby pair, two data stores are defined as masters. One is an active master data store, and the other is a standby master data store. The application updates the active master data store directly. The standby master data store cannot be updated directly. It receives the updates from the active master data store and propagates the changes to as many as 127 read-only subscriber data stores. This arrangement ensures that the standby master data store is always ahead of the subscriber data stores and enables rapid failover to the standby data store if the active master data store fails.
Only one of the master data stores can function as an active master data store at a specific time. You can manage failover and recovery of an active standby pair with Oracle Clusterware. See Chapter 6, "Using Oracle Clusterware to Manage Active Standby Pairs". You can also manage failover and recovery manually. See Chapter 4, "Administering an Active Standby Pair Without Cache Groups".
If the standby master data store fails, the active master data store can replicate changes directly to the read-only subscribers. After the standby master data store has been recovered, it contacts the active standby data store to receive any updates that have been sent to the subscribers while the standby was down or was recovering. When the active and the standby master data stores have been synchronized, then the standby resumes propagating changes to the subscribers.
For details about setting up an active standby pair, see "Setting up an active standby pair with no cache groups" on page 4-3.
Applications
Read-only subscribers
Replication
Propagation
Standbymasterdata store
Activemasterdata store

Types of replication schemes
Overview of TimesTen Replication 1-9
Full or selective replicationFigure 1–5 illustrates a full replication scheme in which the entire master data store is replicated to the subscriber.
Figure 1–5 Replicating the entire master data store
You can also configure your master and subscriber data stores in various combinations to selectively replicate some table elements in a master data store to subscribers. Figure 1–6 shows some examples of selective replication. The left side shows a master data store that replicates the same selected elements to multiple subscribers, while the right side shows a master that replicates different elements to each subscriber.
Figure 1–6 Replicating selected elements to multiple subscribers
Unidirectional or bidirectional replicationSo far in this chapter, we have described unidirectional replication, where a master data store sends updates to one or more subscriber data stores. However, you can also configure data stores to operate bidirectionally, where each store is both a master and a subscriber.
These are basic ways to use bidirectional replication:
■ Split workload configuration
Master Data Store Subscriber Data Store
Applications
Updates
Update Records
Master Data Store
Subscriber Data Store
Applications
Subscriber Data Store
Subscriber Data Store
Master Data Store
Applications
Subscriber Data Store
Subscriber Data Store
Replicating same elementsto each subscriber
Replicating different elementsto each subscriber

Types of replication schemes
1-10 Oracle TimesTen In-Memory Database TimesTen to TimesTen Replication Guide
■ Hot standby configuration
■ Distributed workload
Split workload configurationIn a split workload configuration, each data store serves as a master for some table elements and a subscriber for others.
Consider the example shown in Figure 1–7, where the accounts for Chicago are processed on data store A while the accounts for New York are processed on data store B.
Figure 1–7 Split workload bidirectional replication
Hot standby configurationIn a hot standby configuration, users access a specific application/data store combination that replicates updates to a duplicate backup application/data store combination. In the event of a failure, the user load can be quickly shifted to the backup application/data store.
The hot standby configuration is shown in Figure 1–8. This configuration mimics the simplicity of unidirectional replication while allowing for simple and fast recovery in the event of a data store failure. Although there are two master data stores, applications update only one data store until it fails, at which time the applications are shifted to the other data store.
Users operate on data store A and updates are replicated to data store B, which assumes the role of subscriber. In the event data store A fails, users can be redirected to a copy of the application already configured on data store B. When data store A is restored, it can then assume the role of subscriber.
Note: It may be difficult to achieve a clean split of the workload. In Figure 1–7, imagine that there are rows that must be updated by transactions on both Chicago and New York applications. In that case, update conflicts are possible in the shared rows.
Data Store A Data Store B
Applicationsfor Chicago
Applicationsfor New York
Update

Types of replication schemes
Overview of TimesTen Replication 1-11
Figure 1–8 Hot standby configuration
Distributed workloadIn a distributed workload replication scheme, user access is distributed across duplicate application/data store combinations that replicate any update on any element to each other. In the event of a failure, the affected users can be quickly shifted to any application/data store combination.The distributed workload configuration is shown in Figure 1–9. Users access duplicate applications on each data store, which serves as both master and subscriber for the other data store.
Figure 1–9 Distributed workload configuration
When data stores are replicated in a distributed workload configuration, it is possible for separate users to concurrently update the same rows and replicate the updates to one another. Your application should ensure that such conflicts cannot occur, that they be acceptable if they do occur, or that they can be successfully resolved using the conflict resolution mechanism described in "Replication conflict detection and resolution" on page 11-1.
Note: Do not use a distributed workload configuration with the return twosafe return service.
Data Store A Data Store B
Applications Applications
Update
Users
Data Store A Data Store B
Applications Applications
Update
Users
Data Store A Data Store B
Applications Applications
Update
Users

Types of replication schemes
1-12 Oracle TimesTen In-Memory Database TimesTen to TimesTen Replication Guide
Direct replication or propagationYou can define a subscriber to serve as a propagator that receives replicated updates from a master and passes them on to subscribers of its own.
Propagators are useful for optimizing replication performance over lower-bandwidth network connections, such as those between servers in an intranet. For example, consider the direct replication configuration illustrated in Figure 1–10, where a master directly replicates to four subscribers over an intranet connection. Replicating to each subscriber over a network connection in this manner is an inefficient use of network bandwidth.
Figure 1–10 Master replicating to multiple subscribers over a network
For optimum performance, consider the configuration shown in Figure 1–11, where the master replicates to a single propagator over the network connection. The propagator in turn forwards the updates to each subscriber on its local area network.
Subscribers
Application
Master
Intranet

Types of replication schemes
Overview of TimesTen Replication 1-13
Figure 1–11 Master replicating to a single propagator over a network
Propagators are also useful for distributing replication loads in configurations that involve a master data store that must replicate to a large number of subscribers. For example, it is more efficient for the master to replicate to three propagators, rather than directly to the 12 subscribers as shown in Figure 1–12.
Figure 1–12 Using propagators to replicate to many subscribers
Propagator
Subscribers
Application
Master
Intranet
Applications
Master
Propagators
Subscribers
Cache groups and replication
1-14 Oracle TimesTen In-Memory Database TimesTen to TimesTen Replication Guide
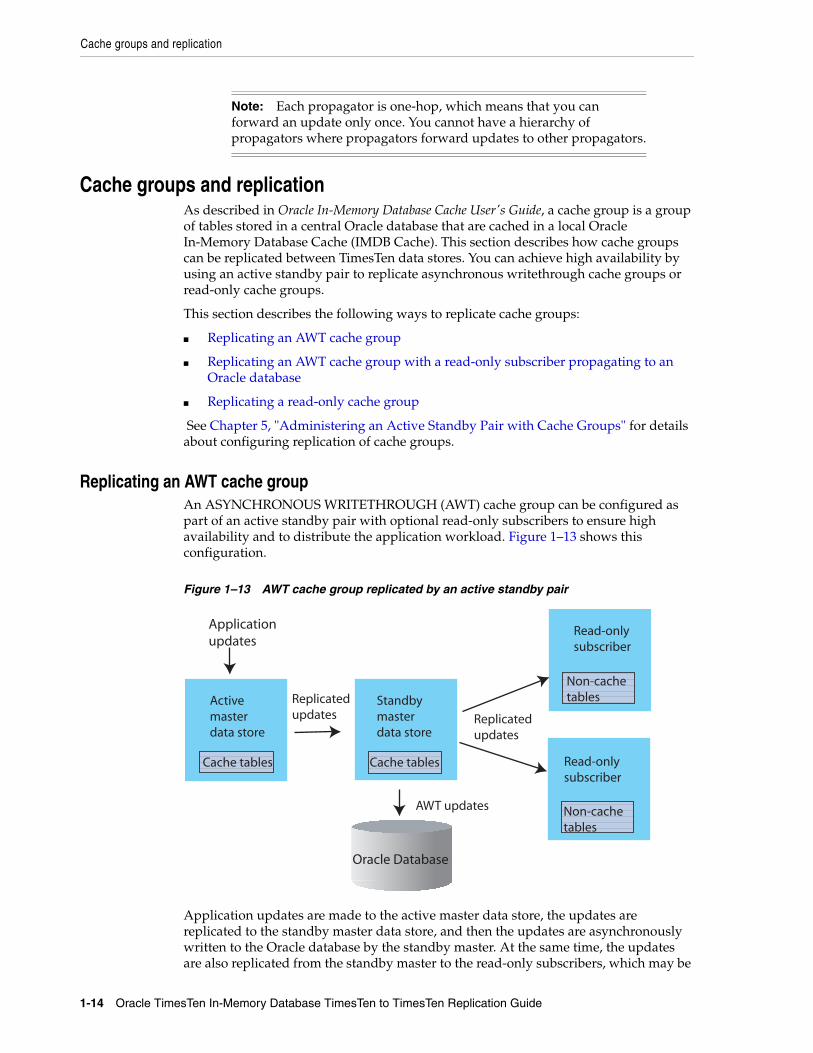
Cache groups and replicationAs described in Oracle In-Memory Database Cache User's Guide, a cache group is a group of tables stored in a central Oracle database that are cached in a local Oracle In-Memory Database Cache (IMDB Cache). This section describes how cache groups can be replicated between TimesTen data stores. You can achieve high availability by using an active standby pair to replicate asynchronous writethrough cache groups or read-only cache groups.
This section describes the following ways to replicate cache groups:
■ Replicating an AWT cache group
■ Replicating an AWT cache group with a read-only subscriber propagating to an Oracle database
■ Replicating a read-only cache group
See Chapter 5, "Administering an Active Standby Pair with Cache Groups" for details about configuring replication of cache groups.
Replicating an AWT cache groupAn ASYNCHRONOUS WRITETHROUGH (AWT) cache group can be configured as part of an active standby pair with optional read-only subscribers to ensure high availability and to distribute the application workload. Figure 1–13 shows this configuration.
Figure 1–13 AWT cache group replicated by an active standby pair
Application updates are made to the active master data store, the updates are replicated to the standby master data store, and then the updates are asynchronously written to the Oracle database by the standby master. At the same time, the updates are also replicated from the standby master to the read-only subscribers, which may be
Note: Each propagator is one-hop, which means that you can forward an update only once. You cannot have a hierarchy of propagators where propagators forward updates to other propagators.
Oracle Database
Applicationupdates
Activemasterdata store
Cache tables Cache tables
Standbymasterdata store
AWT updates
Replicatedupdates
Non-cachetables
Non-cachetables
Read-onlysubscriber
Read-onlysubscriber
Replicated updates

Cache groups and replication
Overview of TimesTen Replication 1-15
used to distribute the load from reading applications. The tables on the read-only subscribers are not in cache groups.
When there is no standby master data store, the active master both accepts application updates and writes the updates asynchronously to the Oracle database and the read-only subscribers. This situation can occur when the standby master has not yet been created, or when the active master fails and the standby master becomes the new active master. TimesTen reconfigures the AWT cache group when the standby master becomes the new active master.
If a failure occurs on the node where the active master data store resides, the standby node becomes the new active node. TimesTen automatically reconfigures the AWT cache group so that it can be updated directly by the application and continue to propagate the updates to Oracle asynchronously.
Replicating an AWT cache group with a read-only subscriber propagating to an Oracle database
You can recover from a complete failure of a site by creating a special disaster recovery read-only subscriber on a remote site as part of the active standby pair replication configuration. Figure 1–14 shows this configuration.
Figure 1–14 Disaster recovery configuration with active standby pair
The standby master data store sends updates to cache group tables on the read-only subscriber. This special subscriber is located at a remote disaster recovery site and can propagate updates to a second Oracle database, also located at the disaster recovery site. You can set up more than one disaster recovery site with read-only subscribers and Oracle databases. See "Using a disaster recovery subscriber in an active standby pair" on page 5-11.
Oracle Database
Applicationupdates
Activemasterdata store
Cache tables Cache tables
Standbymasterdata store
AWT updates
Replicatedupdates
Read-onlysubscriber
Replicated updates
Oracle Database
Cache tables
AWT updates
Local site Remote site

Sequences and replication
1-16 Oracle TimesTen In-Memory Database TimesTen to TimesTen Replication Guide
Replicating a read-only cache groupA read-only cache group enforces caching behavior in which committed updates on the Oracle tables are automatically refreshed to the corresponding TimesTen cache tables. Figure 1–15 shows a read-only cache group replicated by an active standby pair.
Figure 1–15 Read-only cache group replicated by an active standby pair
When the read-only cache group is replicated by an active standby pair, the cache group on the active master data store is autorefreshed from the Oracle database and replicates the updates to the standby master, where AUTOREFRESH is also configured on the cache group but is in the PAUSED state. In the event of a failure of the active master, TimesTen automatically reconfigures the standby master to be autorefreshed when it takes over for the failed master data store by setting the AUTOREFRESH STATE to ON.
TimesTen also tracks whether updates that have been autorefreshed from the Oracle database to the active master data store have been replicated to the standby master. This ensures that the autorefresh process picks up from the correct point after the active master fails, and no autorefreshed updates are lost.
This configuration may also include read-only subscriber data stores.This allows the read workload to be distributed across many data stores. The cache groups on the standby master data store replicate to regular (non-cache) tables on the subscribers.
Sequences and replicationIn some replication configurations, you may find a need to keep sequences synchronized between two or more data stores. For example, you may have a master data store containing a replicated table that uses a sequence to fill in the primary key value for each row. The subscriber data store is used as a hot backup for the master data store. If updates to the sequence's current value are not replicated, insertions of new rows on the subscriber after the master has failed could conflict with rows that were originally inserted on the master.
Oracle Database
Applicationupdates
Activemasterdata store
Cache tables Cache tables
Standbymasterdata store
Replicatedupdates
Non-cachetables
Non-cachetables
Read-onlysubscriber
Read-onlysubscriber
Replicated updates
Autorefresh updates

Aging and replication
Overview of TimesTen Replication 1-17
TimesTen replication allows the incremented sequence value to be replicated to subscriber data stores, ensuring that rows in this configuration inserted on either data store does not conflict. See "Replicating sequences" on page 7-25 for details on writing a replication scheme to replicate sequences.
Foreign keys and replicationIf a table with a foreign key configured with ON DELETE CASCADE is replicated, then the matching foreign key on the subscriber must also be configured with ON DELETE CASCADE. In addition, you must replicate any other table with a foreign key relationship to that table. This requirement prevents foreign key conflicts from occurring on subscriber tables when a cascade deletion occurs on the master data store.
TimesTen replicates a cascade deletion as a single operation, rather than replicating to the subscriber each individual row deletion which occurs on the child table when a row is deleted on the parent. As a result, any row on the child table on the subscriber data store, which contains the foreign key value that was deleted on the parent table, is also deleted, even if that row did not exist on the child table on the master data store.
Aging and replicationWhen a table or cache group is configured with least recently used (LRU) or time-based aging, the following rules apply to the interaction with replication:
■ The aging configuration on replicated tables and cache groups must be identical on every peer data store.
■ If the replication scheme is an active standby pair, then aging is performed only on the active master data store. Deletes that result from aging are then replicated to the standby master data store. The aging configuration must be set to ON on both the active and standby data stores. TimesTen automatically determines which data store is actually performing the aging based on its current role as active or standby.
■ In a replication scheme that is not an active standby pair, aging is performed individually in each data store. Deletes performed by aging are not replicated to other data stores.
■ When an asynchronous writethrough cache group is in a data store that is replicated by an active standby pair, delete operations that result from aging are not propagated to the Oracle database.

Aging and replication
1-18 Oracle TimesTen In-Memory Database TimesTen to TimesTen Replication Guide

2
Getting Started 2-1
2Getting Started
This chapter describes how to configure and start up sample replication schemes. It includes these topics:
■ Configuring an active standby pair with one subscriber
■ Configuring a replication scheme with one master and one subscriber
You must have the ADMIN privilege to complete the procedures in this chapter.
Configuring an active standby pair with one subscriberThis section describes how to create an active standby pair with one subscriber. The active master data store is master1. The standby master data store is master2. The subscriber data store is subscriber1. To keep the example simple, all data stores reside on the same computer, server1.
Figure 2–1 shows this configuration.
Figure 2–1 Active standby pair with one subscriber
This section includes the following topics:
Applications
Standbymasterdata store
Activemasterdata store
master1
master2
Read-onlysubscriber
subscriber1

Configuring an active standby pair with one subscriber
2-2 Oracle TimesTen In-Memory Database TimesTen to TimesTen Replication Guide
■ Step 1: Create the DSNs for the master and the subscriber data stores
■ Step 2: Create a table in one of the master data stores
■ Step 3: Define the active standby pair
■ Step 4: Start the replication agent on a master data store
■ Step 5: Set the state of a master data store to 'ACTIVE'
■ Step 6. Create a user on the active master data store
■ Step 7: Duplicate the active master data store to the standby master data store
■ Step 8: Start the replication agent on the standby master data store
■ Step 9. Duplicate the standby master data store to the subscriber
■ Step 10: Start the replication agent on the subscriber
■ Step 11: Insert data into the table on the active master data store
■ Step 12: Drop the active standby pair and the table
Step 1: Create the DSNs for the master and the subscriber data storesCreate DSNs named master1, master2 and subscriber1 as described in "Creating TimesTen Data Stores" in Oracle TimesTen In-Memory Database Operations Guide.
On UNIX and Linux systems, use a text editor to create the following odbc.ini file:
[master1]DRIVER=install_dir/lib/libtten.soDataStore=/tmp/master1DatabaseCharacterSet=AL32UTF8ConnectionCharacterSet=AL32UTF8[master2]DRIVER=install_dir/lib/libtten.soDataStore=/tmp/master2DatabaseCharacterSet=AL32UTF8ConnectionCharacterSet=AL32UTF8[subscriber1]DRIVER=install_dir/lib/libtten.soDataStore=/tmp/subscriber1DatabaseCharacterSet=AL32UTF8ConnectionCharacterSet=AL32UTF8
On Windows, use the ODBC Administrator to set the same attributes. Use defaults for all other settings.
Step 2: Create a table in one of the master data storesUse the ttIsql utility to connect to the master1 data store:
% ttIsql master1 Copyright (c) 1996-2009, Oracle. All rights reserved.Type ? or "help" for help, type "exit" to quit ttIsql. connect "DSN=master1";Connection successful: DSN=master1;UID=terry;DataStore=/tmp/master1;DatabaseCharacterSet=AL32UTF8;ConnectionCharacterSet=AL32UTF8;TypeMode=0;(Default setting AutoCommit=1)Command>

Configuring an active standby pair with one subscriber
Getting Started 2-3
Create a table called tab with columns a and b:
Command> CREATE TABLE tab (a NUMBER NOT NULL, > b CHAR(18), > PRIMARY KEY (a));
Step 3: Define the active standby pairDefine the active standby pair on master1:
Command> CREATE ACTIVE STANDBY PAIR master1, master2 > SUBSCRIBER subscriber1;
For more information about defining an active standby pair, see Chapter 3, "Defining an Active Standby Pair Replication Scheme".
Step 4: Start the replication agent on a master data storeStart the replication agent on master1:
Command> CALL ttRepStart;
Step 5: Set the state of a master data store to 'ACTIVE'The state of a new data store in an active standby pair is 'IDLE' until the active master data store has been set.
Use the ttRepStateSet built-in procedure to designate master1 as the active master data store:
Command> CALL ttRepStateSet('ACTIVE');
Verify the state of master1:
Command> CALL ttRepStateGet;< ACTIVE >1 row found.
Step 6. Create a user on the active master data storeCreate a user terry with a password of terry and grant terry the ADMIN privilege. Creating a user with the ADMIN privilege is required by Access Control for the next step.
Command> CREATE USER terry IDENTIFIED BY terry;User created.Command> GRANT admin TO terry;
Step 7: Duplicate the active master data store to the standby master data storeExit ttIsql and use the ttRepAdmin utility with the -duplicate option to duplicate the active master data store to the standby master data store:
% ttRepAdmin -duplicate -from master1 -host server1 -uid terry -pwd terry "dsn=master2"
Step 8: Start the replication agent on the standby master data storeUse ttIsql to connect to master2 and start the replication agent:
% ttIsql master2Copyright (c) 1996-2009, Oracle. All rights reserved.
Configuring an active standby pair with one subscriber
2-4 Oracle TimesTen In-Memory Database TimesTen to TimesTen Replication Guide
Type ? or "help" for help, type "exit" to quit ttIsql. connect "DSN=master2";Connection successful: DSN=master2;UID=terry;DataStore=/tmp/master2;DatabaseCharacterSet=AL32UTF8;ConnectionCharacterSet=AL32UTF8;TypeMode=0;(Default setting AutoCommit=1)Command> CALL ttRepStart;
Starting the replication agent for the standby data store automatically sets its state to 'STANDBY'. Verify the state of master2:
Command> CALL ttRepStateGet;< STANDBY >1 row found.
Step 9. Duplicate the standby master data store to the subscriberUse the ttRepAdmin utility to duplicate the standby master data store to the subscriber data store:
% ttRepAdmin -duplicate -from master2 -host server1 -uid terry -pwd terry "dsn=subscriber1"
Step 10: Start the replication agent on the subscriberUse ttIsql to connect to subscriber1 and start the replication agent. Verify the state of subscriber1.
% ttIsql subscriber1 Copyright (c) 1996-2009, Oracle. All rights reserved.Type ? or "help" for help, type "exit" to quit ttIsql. connect "DSN=subscriber1";Connection successful: DSN=subscriber1;UID=terry;DataStore=/stmp/subscriber1;DatabaseCharacterSet=AL32UTF8;ConnectionCharacterSet=AL32UTF8;TypeMode=0;(Default setting AutoCommit=1)Command> CALL ttRepStart;Command> call ttRepStateGet;< IDLE >1 row found.
Step 11: Insert data into the table on the active master data storeInsert a row into the tab table on master1.
Command> INSERT INTO tab VALUES (1,'Hello');1 row inserted.Command> SELECT * FROM tab;< 1, Hello >1 row found.
Verify that the insert is replicated to master2 and subscriber1.
Command> SELECT * FROM tab;< 1, Hello >1 row found.
Step 12: Drop the active standby pair and the tableStop the replication agents on each data store:

Configuring a replication scheme with one master and one subscriber
Getting Started 2-5
Command> CALL ttRepStop;
Drop the active standby pair on each data store. You can then drop the table tab on any data store in which you have dropped the active standby pair.
Command> DROP ACTIVE STANDBY PAIR;Command> DROP TABLE tab;
Configuring a replication scheme with one master and one subscriberThis section describes how to configure a replication scheme that replicates the contents of a single table in a master data store (masterds) to a table in a subscriber data store (subscriberds). To keep the example simple, both data stores reside on the same computer.
Figure 2–2 Simple replication scheme
This section includes the following topics:
■ Step 1: Create the DSNs for the master and the subscriber
■ Step 2: Create a table and replication scheme on the master data store
■ Step 4: Start the replication agent on each data store
■ Step 4: Insert data into the table on the master data store
■ Step 5: Drop the replication scheme and table
Step 1: Create the DSNs for the master and the subscriberCreate DSNs named masterds and subscriberds as described in "Creating TimesTen Data Stores" in Oracle TimesTen In-Memory Database Operations Guide.
On UNIX and Linux systems, use a text editor to create the following odbc.ini file on each data store:
[masterds]DataStore=/tmp/masterdsDatabaseCharacterSet=AL32UTF8ConnectionCharacterSet=AL32UTF8[subscriberds]DataStore=/tmp/subscriberdsDatabaseCharacterSet=AL32UTF8ConnectionCharacterSet=AL32UTF8
Application
masterdsdata store
subscriberdsdata store
tab tab

Configuring a replication scheme with one master and one subscriber
2-6 Oracle TimesTen In-Memory Database TimesTen to TimesTen Replication Guide
On Windows, use the ODBC Administrator to set the same attributes. Use defaults for all other settings.
Step 2: Create a table and replication scheme on the master data storeConnect to masterds with the ttIsql utility:
% ttIsql masterdsCopyright (c) 1996-2009, Oracle. All rights reserved.Type ? or "help" for help, type "exit" to quit ttIsql.
connect "DSN=masterds";Connection successful: DSN=masterds;UID=ttuser;DataStore=/tmp/masterds;DatabaseCharacterSet=AL32UTF8;ConnectionCharacterSet=AL32UTF8;TypeMode=0;(Default setting AutoCommit=1)Command>
Create a table named tab with columns named a, b and c:
Command> CREATE TABLE tab (a NUMBER NOT NULL, > b NUMBER, > c CHAR(8), > PRIMARY KEY (a));
Create a replication scheme called repscheme to replicate the tab table from masterds to subscriberds.
Command> CREATE REPLICATION repscheme > ELEMENT e TABLE tab > MASTER masterds > SUBSCRIBER subscriberds;
Step 3: Create a table and replication scheme on the subscriber data storeConnect to subscriberds and create the same table and replication scheme, using the same procedure described in Step 2.
Step 4: Start the replication agent on each data storeStart the replication agents on masterds and subscriberds:
Command> call ttRepStart;
Exit ttIsql. Use the ttStatus utility to verify that the replication agents are running for both data stores:
% ttStatusTimesTen status report as of Thu Jan 29 12:16:27 2009 Daemon pid 18373 port 4134 instance ttuserTimesTen server pid 18381 started on port 4136------------------------------------------------------------------------Data store /tmp/masterdsThere are 16 connections to the data storeShared Memory KEY 0x0201ab43 ID 5242889PL/SQL Memory KEY 0x0301ab43 ID 5275658 Address 0x10000000Type PID Context Connection Name ConnIDProcess 20564 0x081338c0 masterds 1Replication 20676 0x08996738 LOGFORCE 5Replication 20676 0x089b69a0 REPHOLD 2

Configuring a replication scheme with one master and one subscriber
Getting Started 2-7
Replication 20676 0x08a11a58 FAILOVER 3Replication 20676 0x08a7cd70 REPLISTENER 4Replication 20676 0x08ad7e28 TRANSMITTER 6Subdaemon 18379 0x080a11f0 Manager 2032Subdaemon 18379 0x080fe258 Rollback 2033Subdaemon 18379 0x081cb818 Checkpoint 2036Subdaemon 18379 0x081e6940 Log Marker 2035Subdaemon 18379 0x08261e70 Deadlock Detector 2038Subdaemon 18379 0xae100470 AsyncMV 2040Subdaemon 18379 0xae11b508 HistGC 2041Subdaemon 18379 0xae300470 Aging 2039Subdaemon 18379 0xae500470 Flusher 2034Subdaemon 18379 0xae55b738 Monitor 2037Replication policy : ManualReplication agent is running.Cache Agent policy : ManualPL/SQL enabled.------------------------------------------------------------------------Data store /tmp/subscriberdsThere are 16 connections to the data storeShared Memory KEY 0x0201ab41 ID 5177351PL/SQL Memory KEY 0x0301ab41 ID 5210120 Address 0x10000000Type PID Context Connection Name ConnIDProcess 20594 0x081338f8 subscriberds 1Replication 20691 0x0893c550 LOGFORCE 5Replication 20691 0x089b6978 REPHOLD 2Replication 20691 0x08a11a30 FAILOVER 3Replication 20691 0x08a6cae8 REPLISTENER 4Replication 20691 0x08ad7ba8 RECEIVER 6Subdaemon 18376 0x080b1450 Manager 2032Subdaemon 18376 0x0810e4a8 Rollback 2033Subdaemon 18376 0x081cb8b0 Flusher 2034Subdaemon 18376 0x08246de0 Monitor 2035Subdaemon 18376 0x082a20a8 Deadlock Detector 2036Subdaemon 18376 0x082fd370 Checkpoint 2037Subdaemon 18376 0x08358638 Aging 2038Subdaemon 18376 0x083b3900 Log Marker 2040Subdaemon 18376 0x083ce998 AsyncMV 2039Subdaemon 18376 0x08469e90 HistGC 2041Replication policy : ManualReplication agent is running.Cache Agent policy : ManualPL/SQL enabled.
Step 4: Insert data into the table on the master data storeUse ttIsql to connect to the master data store and insert some rows into the tab table:
% ttIsql masterdsCommand> INSERT INTO tab VALUES (1, 22, 'Hello');1 row inserted.Command> INSERT INTO tab VALUES (3, 86, 'World');1 row inserted.
Open a second command prompt window for the subscriber. Connect to the subscriber data store and check the contents of the tab table:
% ttIsql subscriberdsCommand> SELECT * FROM tab;< 1, 22, Hello>
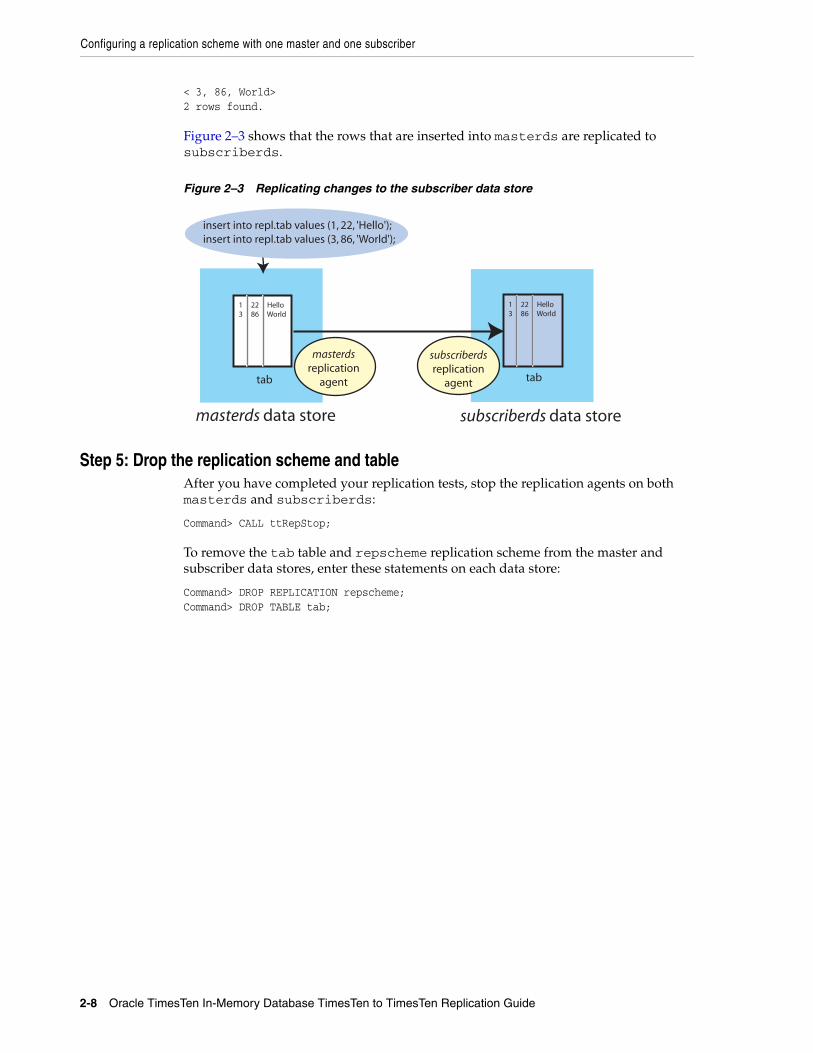
Configuring a replication scheme with one master and one subscriber
2-8 Oracle TimesTen In-Memory Database TimesTen to TimesTen Replication Guide
< 3, 86, World>2 rows found.
Figure 2–3 shows that the rows that are inserted into masterds are replicated to subscriberds.
Figure 2–3 Replicating changes to the subscriber data store
Step 5: Drop the replication scheme and tableAfter you have completed your replication tests, stop the replication agents on both masterds and subscriberds:
Command> CALL ttRepStop;
To remove the tab table and repscheme replication scheme from the master and subscriber data stores, enter these statements on each data store:
Command> DROP REPLICATION repscheme;Command> DROP TABLE tab;
masterds data store subscriberds data store
tab tab
masterdsreplication
agent
subscriberdsreplication
agent
Subscriber Data Store
insert into repl.tab values (1, 22, 'Hello');insert into repl.tab values (3, 86, 'World');
1 22 Hello3 86 World
1 22 Hello3 86 World

3
Defining an Active Standby Pair Replication Scheme 3-1
3Defining an Active Standby Pair ReplicationScheme
This chapter describes how to design a highly available system and define replication schemes. It includes the following topics:
■ Restrictions on active standby pairs
■ Defining the DSNs for the data stores
■ Defining an active standby pair replication scheme
■ Identifying the data stores in the active standby pair
■ Using a return service
■ Setting STORE attributes
■ Configuring network operations
■ Including or excluding data store objects from replication
Restrictions on active standby pairsWhen you are planning an active standby pair, keep in mind the following restrictions:
■ You can specify at most 127 subscriber data stores.
■ Each master and subscriber data store must be on a different node to ensure high availability.
■ The active master data store and the standby master data store should be on the same LAN.
■ The clock skew between the active node and the standby node cannot exceed 250 milliseconds.
■ For the initial set-up, you can create a standby master data store only by duplicating the active master data store with the ttRepAdmin -duplicate utility or the ttRepDuplicateEx C function.
■ Read-only subscribers can be created only by duplicating the standby master data store. If the standby master data store is unavailable, then the read-only subscribers can be created by duplicating the active master standby store. See "Duplicating a data store" on page 4-2.
■ After failover, the new standby master data store can only be recovered from the active master data store by duplicating the active master data store unless return twosafe replication is used between the active and the standby master data stores. If return twosafe replication is used, the automated master catch-up feature may

Defining the DSNs for the data stores
3-2 Oracle TimesTen In-Memory Database TimesTen to TimesTen Replication Guide
be used instead. See "Automatic catch-up of a failed master data store" on page 11-15.
■ Operations on replicated tables are not allowed on the standby master data store and the subscriber stores. However, operations on sequences and XLA bookmarks are allowed on the standby master data store and the subscriber stores.
■ Replication from the standby master data store to the read-only subscribers occurs asynchronously.
■ ALTER ACTIVE STANDBY PAIR statements can be executed only on the active master data store. If ALTER ACTIVE STANDBY PAIR is executed on the active master data store, then the standby master data store must be regenerated by duplicating the active master data store. All subscribers must also be regenerated from the standby master data store. See "Reversing the roles of the active and standby master data stores" on page 4-7.
Defining the DSNs for the data storesBefore you define the active standby pair, you need to define the DSNs for the active master, standby master and read-only subscriber data stores. On Linux or UNIX, create an odbc.ini file. On Windows, use the ODBC Administrator to name the data stores and set data store attributes. See "Step 1: Create the DSNs for the master and the subscriber data stores" on page 2-2 for an example.
Each data store "name" specified in a replication scheme must match the prefix of the data store file name without the path given for the DataStore attribute in the DSN definition for the data store. A replication scheme that uses the names specified in the Data Source Name attributes does not work. To avoid confusion, use the same name for both your DataStore and Data Source Name attributes in each DSN definition. For example, if the data store path is directory/subdirectory/foo.ds0, then foo is the data store name that you should use.
Defining an active standby pair replication schemeUse the CREATE ACTIVE STANDBY PAIR SQL statement to create an active standby pair replication scheme. The complete syntax for the CREATE ACTIVE STANDBY PAIR statement is provided in the Oracle TimesTen In-Memory Database SQL Reference.
You must have the ADMIN privilege to use the CREATE ACTIVE STANDBY PAIR statement and to perform other replication operations.
Table 3–1 shows the components of an active standby pair replication scheme and identifies the parameters associated with the topics in this chapter.
Table 3–1 Components of an active standby pair replication scheme
Component See...
CREATE ACTIVE STANDBY PAIR FullStoreName, FullStoreName
"Identifying the data stores in the active standby pair" on page 3-3
[ReturnServiceAttribute] "Using a return service" on page 3-3
[SUBSCRIBER FullStoreName [,...]] "Identifying the data stores in the active standby pair" on page 3-3
[STORE FullStoreName [StoreAttribute [...]]] "Setting STORE attributes" on page 3-5

Using a return service
Defining an Active Standby Pair Replication Scheme 3-3
Identifying the data stores in the active standby pairUse the full store name described in "Defining the DSNs for the data stores" on page 3-2. The first data store name designates the active master data store. The second data store name designates the standby master data store. Read-only subscriber data stores are indicated by the SUBSCRIBER clause.
You can also specify the hosts where the data stores reside by using an IP address or a literal host name surrounded by double quotes.
The active master data store and the standby master data store should be on separate hosts to achieve a highly available system. Read-only subscribers can be either local or remote. A remote subscriber provides protection from site-specific disasters.
You can provide an optional host ID as part of FullStoreName:
DataStoreName [ON Host]
Host can be either an IP address or a literal host name. It is good practice to surround a host name with double quotes.
Using a return serviceYou can configure your replication scheme with a return service to ensure a higher level of confidence that your replicated data is consistent on the active master and standby master data stores. See "Copying updates between data stores" on page 1-2. This section describes how to configure and manage the return receipt and return twosafe services. NO RETURN is the default setting.
The following sections describe the following return service clauses:
■ RETURN RECEIPT
■ RETURN RECEIPT BY REQUEST
■ RETURN TWOSAFE
■ RETURN TWOSAFE BY REQUEST
■ NO RETURN
RETURN RECEIPTTimesTen provides an optional return receipt service to loosely couple or synchronize your application with the replication mechanism.
[NetworkOperation [...]] "Configuring network operations" on page 3-11
[{INCLUDE|EXCLUDE}
{TABLE [[Owner.]TableName[,...]]|
CACHE GROUP [[Owner.]CacheGroupName[,...]|
SEQUENCE [[Owner.]SequenceName[,...]]}
[,...]]
"Including or excluding data store objects from replication" on page 3-12
Table 3–1 (Cont.) Components of an active standby pair replication scheme
Component See...

Using a return service
3-4 Oracle TimesTen In-Memory Database TimesTen to TimesTen Replication Guide
You can specify the RETURN RECEIPT clause to enable the return receipt service for the standby master data store. With return receipt enabled, when your application commits a transaction for an element on the active master data store, the application remains blocked until the standby acknowledges receipt of the transaction update.
If the standby is unable to acknowledge receipt of the transaction within a configurable timeout period, your application receives a tt_ErrRepReturnFailed (8170) warning on its commit request. See "Setting the return service timeout period" on page 3-7 for more information on the return service timeout period.
You can use the ttRepXactStatus procedure to check on the status of a return receipt transaction. See "Checking the status of return service transactions" on page 9-16 for details.
You can also configure the replication agent to disable the return receipt service after a specific number of timeouts. See "Managing return service timeout errors" on page 3-7 for details.
RETURN RECEIPT BY REQUESTRETURN RECEIPT enables notification of receipt for all transactions. You can use RETURN RECEIPT with the BY REQUEST clause to enable receipt notification only for specific transactions identified by your application.
If you specify RETURN RECEIPT BY REQUEST, you must use the ttRepSyncSet procedure to enable the return receipt service for a transaction. The call to enable the return receipt service must be part of the transaction (autocommit must be off).
If the standby master data store is unable to acknowledge receipt of the transaction update within a configurable timeout period, the application receives a tt_ErrRepReturnFailed (8170) warning on its commit request. See "Setting the return service timeout period" on page 3-7 for more information on the return service timeout period.
You can use ttRepSyncGet to check if a return service is enabled and obtain the timeout value. For example:
Command> CALL ttRepSyncGet();< 01, 45, 1>1 row found.
RETURN TWOSAFETimesTen provides a return twosafe service to fully synchronize your application with the replication mechanism. The return twosafe service ensures that each replicated transaction is committed on the standby master data store before it is committed on the active master data store. If replication is unable to verify the transaction has been committed on the standby, it returns notification of the error. Upon receiving an error, the application can either take a unique action or fall back on preconfigured actions, depending on the type of failure.
When replication is configured with RETURN TWOSAFE, you must disable the AutoCommit connection attribute.
If the standby is unable to acknowledge commit of the transaction update within a configurable timeout period, the application receives a tt_ErrRepReturnFailed (8170) warning on its commit request. See "Setting the return service timeout period" on page 3-7 for more information on the return service timeout period.

Setting STORE attributes
Defining an Active Standby Pair Replication Scheme 3-5
RETURN TWOSAFE BY REQUESTRETURN TWOSAFE enables notification of commit on the standby master data store for all transactions. You can use RETURN TWOSAFE with the BY REQUEST clause to enable notification of a commit on the standby only for specific transactions identified by your application.
If you specify RETURN TWOSAFE BY REQUEST for a standby master data store, you must use the ttRepSyncSet procedure to enable the return twosafe service for a transaction. The call to enable the return twosafe service must be part of the transaction (autocommit must be off).
If the standby is unable to acknowledge commit of the transaction within the timeout period, the application receives a tt_ErrRepReturnFailed (8170) warning on its commit request. The application can then chose how to handle the timeout, in the same manner as described for "RETURN TWOSAFE" on page 3-4.
The ALTER TABLE statement cannot be used to alter a replicated table that is part of a TWOSAFE BY REQUEST transaction. If DDLCommitBehavior=1, this operation results in error 8051. If DDLCommitBehavior=0, the operation succeeds because a commit is performed before the ALTER TABLE operation, resulting in the ALTER TABLE operation being in a new transaction which is not part of the TWOSAFE BY REQUEST transaction.
See "Setting the return service timeout period" on page 3-7 for more information on setting the return service timeout period.
You can use ttRepSyncGet to check if a return service is enabled and obtain the timeout value. For example:
Command> CALL ttRepSyncGet();< 01, 45, 1>1 row found.
NO RETURNYou can use the NO RETURN clause to explicitly disable either the return receipt or return twosafe service, depending on which one you have enabled. NO RETURN is the default condition.
Setting STORE attributesTable 3–2 lists the optional STORE attributes for the CREATE ACTIVE STANDBY PAIR statement.
Table 3–2 STORE attribute descriptions
Data store attribute Description
DISABLE RETURN {SUBSCRIBER|ALL} NumFailures
Set the return service policy so that return service blocking is disabled after the number of timeouts specified by NumFailures.
See "Establishing return service failure/recovery policies" on page 3-8.
RETURN SERVICES {ON|OFF} WHEN [REPLICATION] STOPPED
Set return services on or off when replication is disabled.
See "Establishing return service failure/recovery policies" on page 3-8.

Setting STORE attributes
3-6 Oracle TimesTen In-Memory Database TimesTen to TimesTen Replication Guide
RESUME RETURN Milliseconds
If DISABLE RETURN has disabled return service blocking, this attribute sets the policy for re-enabling the return service.
See "Establishing return service failure/recovery policies" on page 3-8.
RETURN WAIT TIME Seconds
Specifies the number of seconds to wait for return service acknowledgement. A value of 0 means that there is no waiting. The default value is 10 seconds.
The application can override this timeout setting by using the returnWait parameter in the ttRepSyncSet built-in procedure.
See "Setting the return service timeout period" on page 3-7.
DURABLE COMMIT {ON|OFF}
Overrides the DurableCommits attribute setting. Enables durable commit when return service blocking has been disabled by DISABLE RETURN.
See "DURABLE COMMIT" on page 3-9.
LOCAL COMMIT ACTION {NO ACTION|COMMIT}
Specifies the default action to be taken for a return service transaction in the event of a timeout. The options are:
NO ACTION - On timeout, the commit function returns to the application, leaving the transaction in the same state it was in when it entered the commit call, with the exception that the application is not able to update any replicated tables. The application can reissue the commit. This is the default.
COMMIT- On timeout, the commit function attempts to perform a commit to end the transaction locally.
This default setting can be overridden for specific transactions by using the localAction parameter in the ttRepSyncSet procedure.
See "LOCAL COMMIT ACTION" on page 3-10.
COMPRESS TRAFFIC {ON|OFF}
Compresses replicated traffic to reduce the amount of network bandwidth used.
See "Compressing replicated traffic" on page 3-10.
PORT PortNumber Sets the port number used by a data store to listen for updates from another data store.
In an active standby pair, the standby master data store listens for updates from the active master data store. Read-only subscribers listen for updates from the standby master data store.
If no PORT attribute is specified, the TimesTen daemon dynamically selects the port. While static port assignment is allowed by TimesTen, dynamic port allocation is recommended.
See "Port assignments" on page 3-10.
TIMEOUT Seconds Set the maximum number of seconds a data store waits before re-sending a message to an unresponsive data store.
In an active standby pair, the active master data store sends messages to the standby master data store. The standby master data store sends messages to the read-only subscribers.
See "Setting the return service timeout period" on page 3-7.
FAILTHRESHOLD Value Sets the log failure threshold.
See "Setting the log failure threshold" on page 3-11.
Table 3–2 (Cont.) STORE attribute descriptions
Data store attribute Description
Setting STORE attributes
Defining an Active Standby Pair Replication Scheme 3-7
The rest of this section includes these topics:
■ Setting the return service timeout period
■ Managing return service timeout errors
■ Compressing replicated traffic
■ Port assignments
■ Setting the log failure threshold
Setting the return service timeout periodIf a replication scheme is configured with one of the return services described in "Using a return service" on page 3-3, a timeout occurs if the standby master data store is unable to send an acknowledgement back to the active master within the time period specified by TIMEOUT.
The default return service timeout period is 10 seconds. You can specify a different return service timeout period by:
■ Specifying the RETURN WAIT TIME in the CREATE ACTIVE STANDBY PAIR statement or ALTER ACTIVE STANDBY PAIR statement. A RETURN WAIT TIME of '0' indicates no waiting.
■ Specifying a different return service timeout period programmatically by calling the ttRepSyncSet procedure with a new returnWait parameter.
Once set, the timeout period applies to all subsequent return service transactions until you either reset the timeout period or terminate the application session.
A return service may time out because of a replication failure or because replication is so far behind that the return service transaction times out before it is replicated. However, unless there is a simultaneous replication failure, failure to obtain a return service confirmation from the standby does not necessarily mean the transaction has not been or will not be replicated.
You can set other STORE attributes to establish policies that automatically disable return service blocking if there are excessive timeouts and re-enable return service blocking when conditions improve. See "Managing return service timeout errors" on page 3-7 for details.
Managing return service timeout errorsIf the standby master data store is unable to acknowledge the transaction update from the active master data store within the timeout period, the application receives an errRepReturnFailed warning on its commit request.
The default return service timeout period is 10 seconds. You can specify a different timeout period by:
■ Using the RETURN WAIT TIME clause in the STORE clause of the CREATE ACTIVE STANDBY PAIR statement
■ Calling the ttRepSyncSet procedure with a new returnWait parameter
A return service may time out or fail because of a replication failure or because replication is so far behind that the return service transaction times out before it is replicated. However, unless there is a simultaneous replication failure, failure to obtain a return service confirmation from the subscriber does not mean the transaction has not or will not be replicated.

Setting STORE attributes
3-8 Oracle TimesTen In-Memory Database TimesTen to TimesTen Replication Guide
You can respond to return service timeouts by:
■ Disabling return service blocking manually
■ Establishing return service failure/recovery policies
Disabling return service blocking manuallyYou may want respond in some manner if replication is stopped or return service timeout failures begin to adversely impact the performance of your replicated system. Your "tolerance threshold" for return service timeouts may depend on the historical frequency of timeouts and the performance/availability equation for your particular application, both of which should be factored into your response to the problem.
When using the return receipt service, you can manually respond by:
■ Using the ALTER ACTIVE STANDBY PAIR statement to disable return receipt blocking
■ Calling the ttDurableCommit procedure to durably commit transactions on the active master data storey that you can no longer verify as being received by the standby
If you decide to disable return receipt blocking, your decision to re-enable it depends on your confidence level that the return receipt transaction is no longer likely to time out.
Establishing return service failure/recovery policiesAn alternative to manually responding to return service timeout failures is to establish return service failure and recovery policies in the replication scheme. These policies direct the replication agents to detect changes to the replication state and to keep track of return service timeouts and then automatically respond in a predefined manner.
The following attributes in the CREATE ACTIVE STANDBY PAIR statement set the failure and recovery policies when using a RETURN RECEIPT or RETURN TWOSAFE service:
■ RETURN SERVICES {ON | OFF} WHEN [REPLICATION] STOPPED
■ DISABLE RETURN
■ RESUME RETURN
■ DURABLE COMMIT
■ LOCAL COMMIT ACTION
The policies set by these attributes are applicable for the life of the data store or until changed. The replication agent must be running to enforce these policies.
RETURN SERVICES {ON | OFF} WHEN [REPLICATION] STOPPED The RETURN SERVICES {ON | OFF} WHEN [REPLICATION] STOPPED attribute determines whether a return receipt or return twosafe service continues to be enabled or is disabled when replication is stopped. "Stopped" in this context means that either the active master replication agent is stopped (for example, by ttAdmin -repStop active) or the replication state of the standby master data store is set to Stop or Pause with respect to the active master data store (for example, by ttRepAdmin -state stop standby). A failed standby that has exceeded the specified FAILTHRESHOLD value is set to the Failed state, but is eventually set to the Stop state by the master replication agent.

Setting STORE attributes
Defining an Active Standby Pair Replication Scheme 3-9
RETURN SERVICES OFF WHEN REPLICATION STOPPED disables the return service when replication is stopped and is the default when using the RETURN RECEIPT service. RETURN SERVICES ON WHEN REPLICATION STOPPED allows the return service to continue to be enabled when replication is stopped and is the default when using the RETURN TWOSAFE service.
DISABLE RETURN When a DISABLE RETURN value is set, the data store keeps track of the number of return receipt or return twosafe transactions that have exceeded the timeout period set by RETURN WAIT TIME. If the number of timeouts exceeds the maximum value set by DISABLE RETURN, the application reverts to a default replication cycle in which it no longer waits for the standby to acknowledge the replicated updates.
Specifying SUBSCRIBER is the same as specifying ALL. Both settings refer to the standby master data store.
The DISABLE RETURN failure policy is only enabled when the replication agent is running. If DISABLE RETURN is specified but RESUME RETURN is not specified, the return services remain off until the replication agent for the data store has been restarted.You can cancel this failure policy by stopping the replication agent and specifying DISABLE RETURN with a zero value for NumFailures. The count of timeouts to trigger the failure policy is reset either when you restart the replication agent, when you set the DISABLE RETURN value to 0, or when return service blocking is re-enabled by RESUME RETURN.
RESUME RETURN When we say return service blocking is "disabled," we mean that the applications on the master data store no longer block execution while waiting to receive acknowledgements from the subscribers that they received or committed the replicated updates. Note, however, that the master still listens for an acknowledgement of each batch of replicated updates from the standby master data store.
You can establish a return service recovery policy by setting the RESUME RETURN attribute and specifying a resume latency value. When this attribute is set and return service blocking has been disabled for the standby master data store, the return receipt or return twosafe service is re-enabled when the commit-to-acknowledge time for a transaction falls below the value set by RESUME RETURN. The commit-to-acknowledge time is the latency between when the application issues a commit and when the master receives acknowledgement of the update from the subscriber.
The RESUME RETURN policy is enabled only when the replication agent is running. You can cancel a return receipt resume policy by stopping the replication agent and then using ALTER ACTIVE STANDBY PAIR to set RESUME RETURN to zero.
DURABLE COMMIT You can set the DURABLE COMMIT attribute to specify the durable commit policy for applications that have return service blocking disabled by DISABLE RETURN. When DURABLE COMMIT is set to ON, it overrides the DurableCommits attribute on the master data store and forces durable commits for those transactions that have had return service blocking disabled.
Note: A standby master data store may become unavailable for a period of time that exceeds the timeout period specified by RETURN WAIT TIME but still be considered by the master replication agent to be in the Start state. Failure policies related to timeouts are set by the DISABLE RETURN attribute.

Setting STORE attributes
3-10 Oracle TimesTen In-Memory Database TimesTen to TimesTen Replication Guide
If the replication scheme is configured with RETURN SERVICES ON WHEN REPLICATION STOPPED, the replication agent must be running to enforce the DURABLE COMMIT policy.
LOCAL COMMIT ACTION When you are using the return twosafe service, you can specify how the master replication agent responds to timeouts by setting LOCAL COMMIT ACTION. You can override the setting for specific transactions by calling the localAction parameter in the ttRepSyncSet procedure.
The possible actions upon receiving a timeout during replication of a twosafe transaction are:
■ COMMIT - Upon timeout, the replication agent on the active master data store commits the transaction and no more operations are allowed in the transaction.
■ NO ACTION - Upon timeout, the replication agent on the active master data store does not commit the transaction. The process recovery commits the transaction. This is equivalent to a forced commit.
Compressing replicated trafficIf you are replicating over a low-bandwidth network, or if you are replicating massive amounts of data, you can set the COMPRESS TRAFFIC attribute to reduce the amount of bandwidth required for replication. The COMPRESS TRAFFIC attribute compresses the replicated data from the data store specified by the STORE parameter in the CREATE ACTIVE STANDBY PAIR or ALTER ACTIVE STANDBY PAIR statement. TimesTen does not compress traffic from other data stores.
Though the compression algorithm is optimized for speed, enabling the COMPRESS TRAFFIC attribute has some impact on replication throughput and latency.
Example 3–1 Compressing traffic from active master data store
For example, to compress replicated traffic from active master data store dsn1 and leave the replicated traffic from standby master data store dsn2 uncompressed, the CREATE ACTIVE STANDBY PAIR statement looks like:
CREATE ACTIVE STANDBY PAIR dsn1 ON "machine1", dsn2 ON "machine2" SUBSCRIBER dsn3 ON "machine3" STORE dsn1 ON "machine1" COMPRESS TRAFFIC ON;
Example 3–2 Compressing traffic from both master data stores
To compress the replicated traffic from the dsn1 and dsn2 data stores, use:
CREATE ACTIVE STANDBY PAIR dsn1 ON "machine1", dsn2 ON "machine2" SUBSCRIBER dsn3 ON "machine3"STORE dsn1 ON "machine1" COMPRESS TRAFFIC ONSTORE dsn2 ON "machine2" COMPRESS TRAFFIC ON;
Port assignmentsIf you do not assign a PORT attribute, the TimesTen daemon dynamically selects the port. When ports are assigned dynamically in this manner for the replication agents, then the ports of the TimesTen daemons have to match as well.
When statically assigning ports, it is important to specify the full host name, DSN and PORT in the STORE attribute of the CREATE ACTIVE STANDBY PAIR statement.

Configuring network operations
Defining an Active Standby Pair Replication Scheme 3-11
Example 3–3 Assigning static ports
CREATE ACTIVE STANDBY PAIR dsn1 ON "machine1", dsn2 ON "machine2" SUBSCRIBER dsn3 ON "machine3"STORE dsn1 ON "machine1" PORT 16080STORE dsn2 ON "machine2" PORT 16083STORE dsn3 ON "machine3" PORT 16084;
Setting the log failure thresholdYou can establish a threshold value that, when exceeded, sets an unavailable standby master data store or a read-only subscriber to the Failed state before the available log space is exhausted.
You can set the log threshold by specifying a STORE clause with a FAILTHRESHOLD value in the CREATE ACTIVE STANDBY PAIR or ALTER ACTIVE STANDBY PAIR statement. The default threshold value is 0, which means "no limit."
If an active master data store sets the standby master data store or a read-only subscriber to the Failed state, it drops all of the data for the failed data store from its log and transmits a message to the failed data store. If the active master replication agent can communicate with the replication agent of the failed data store, then the message is transmitted immediately. Otherwise, the message is transmitted when the connection is reestablished.
Any application that connects to the failed data store receives a tt_ErrReplicationInvalid (8025) warning indicating that the data store has been marked Failed by a replication peer. Once the data store has been informed of its failed status, its state on the active master data store is changed from Failed to Stop.
An application can use the ODBC SQLGetInfo function to check if the data store the application is connected to has been set to the Failed state.
Configuring network operationsIf a replication host has more than one network interface, you may wish to configure replication to use an interface other than the default interface. Although you must specify the host name returned by the operating system's hostname command when you specify the data store name, you can configure replication to send or receive traffic over a different interface using the ROUTE clause.
The syntax of the ROUTE clause is:
ROUTE MASTER FullStoreName SUBSCRIBER FullStoreName {{MASTERIP MasterHost | SUBSCRIBERIP SubscriberHost} PRIORITY Priority} [...]
In the context of the ROUTE clause, each master data store is a subscriber of the other master data store and each read-only subscriber is a subscriber of both master data stores.
Example 3–4 Configuring multiple network interfaces
If host machine1 is configured with a second interface accessible by the host name machine1fast, and machine2 is configured with a second interface at IP address 192.168.1.100, you may specify that the secondary interfaces are used with the replication scheme.
CREATE ACTIVE STANDBY PAIR dns1, dsn2ROUTE MASTER dsn1 ON "machine1" SUBSCRIBER dsn2 ON "machine2" MASTERIP "machine1fast" PRIORITY 1

Including or excluding data store objects from replication
3-12 Oracle TimesTen In-Memory Database TimesTen to TimesTen Replication Guide
SUBSCRIBERIP "192.168.1.100" PRIORITY 1ROUTE MASTER dsn2 ON "machine2" SUBSCRIBER dsn1 ON "machine1" MASTERIP "192.168.1.100" PRIORITY 1 SUBSCRIBERIP "machine1fast" PRIORITY 1;
Alternately, on a replication host with more than one interface, you may wish to configure replication to use one or more interfaces as backups, in case the primary interface fails or the connection from it to the receiving host is broken. You can use the ROUTE clause to specify two or more interfaces for each master or subscriber that are used by replication in order of priority.
If replication on the master host is unable to bind to the MASTERIP with the highest priority, it will try to connect using subsequent MASTERIP addresses in order of priority immediately. However, if the connection to the subscriber fails for any other reason, replication will try to connect using each of the SUBSCRIBERIP addresses in order of priority before it tries the MASTERIP address with the next highest priority.
Example 3–5 Configuring network priority
If host machine1 is configured with two network interfaces at IP addresses 192.168.1.100 and 192.168.1.101, and host machine2 is configured with two interfaces at IP addresses 192.168.1.200 and 192.168.1.201, you may specify that replication use IP addresses 192.168.1.100 and 192.168.200 to transmit and receive traffic first, and to try IP addresses 192.168.1.101 or 192.168.1.201 if the first connection fails.
CREATE ACTIVE STANDBY PAIR dns1, dns2ROUTE MASTER dsn1 ON "machine1" SUBSCRIBER dsn2 ON "machine2" MASTERIP "192.168.1.100" PRIORITY 1 MASTERIP "192.168.1.101" PRIORITY 2 SUBSCRIBERIP "192.168.1.200" PRIORITY 1 SUBSCRIBERIP "192.168.1.201" PRIORITY 2;
Including or excluding data store objects from replicationAn active standby pair replicates an entire data store by default. Use the INCLUDE clause to replicate only the tables, cache groups and sequences that are listed in the INCLUDE clause. No other data store objects will be replicated in an active standby pair that is defined with an INCLUDE clause. For example, this INCLUDE clause specifies three tables to be replicated by the active standby pair:
INCLUDE TABLE employees, departments, jobs
You can choose to exclude specific tables, cache groups or sequences from replication by using the EXCLUDE clause of the CREATE ACTIVE STANDBY PAIR statement. Use one EXCLUDE clause for each object type. For example:
EXCLUDE TABLE ttuser.tab1, ttuser.tab2EXCLUDE CACHE GROUP ttuser.cg1, ttuser.cg2EXCLUDE SEQUENCE ttuser.seq1, ttuser.seq2

4
Administering an Active Standby Pair Without Cache Groups 4-1
4Administering an Active Standby PairWithout Cache Groups
This chapter describes how to administer an active standby pair that does not replicate cache groups.
For information about administering active standby pairs that replicate cache groups, see Chapter 5, "Administering an Active Standby Pair with Cache Groups".
For information about managing failover and recovery automatically, see Chapter 6, "Using Oracle Clusterware to Manage Active Standby Pairs".
This chapter includes the following topics:
■ Overview of master data store states
■ Duplicating a data store
■ Setting up an active standby pair with no cache groups
■ Recovering from a failure of the active master data store
■ Recovering from a failure of the standby master data store
■ Recovering from the failure of a subscriber data store
■ Reversing the roles of the active and standby master data stores
■ Detection of dual active master data stores
■ Changing the configuration of an active standby pair
Overview of master data store statesThis section summarizes the possible states of a master data store. These states are referenced in the tasks described in the rest of the chapter.
The master data stores can be in one of the following states:
■ ACTIVE - A store in this state is the active master data store. Applications can update its replicated tables.
■ STANDBY - A store in this state is the standby master data store. Applications can update only nonreplicated tables in the standby master data store. Nonreplicated tables are tables that have been excluded from the replication scheme by using the EXCLUDE TABLE or EXCLUDE CACHE GROUP clauses of the CREATE ACTIVE STANDBY PAIR statement.
■ FAILED - A data store in this state is a failed master data store. No updates can be replicated to it.

Duplicating a data store
4-2 Oracle TimesTen In-Memory Database TimesTen to TimesTen Replication Guide
■ IDLE - A store in this state has not yet had its role in the active standby pair assigned. It cannot be updated. Every store comes up in the IDLE state.
■ RECOVERING - When a previously failed master data store is synchronizing updates with the active master data store, it is in the RECOVERING state.
You can use the ttRepStateGet built-in procedure to discover the state of a master data store.
Duplicating a data storeWhen you set up an replication scheme or administer a recovery, a common task is duplicating a data store. You can use the ttRepAdmin -duplicate utility or the ttRepDuplicateEx C function to duplicate a data store.
To duplicate a data store, these conditions must be fulfilled:
■ The instance administrator performs the duplicate operation.
■ The instance administrator user name must be the same on both instances involved in the duplication.
■ You must provide the user name and password for a user with the ADMIN privilege on the source data store.
On the source data store, create a user and grant the ADMIN privilege to the user:
CREATE USER ttuser IDENTIFIED BY ttuser;User created.
GRANT admin TO ttuser;
Assume the user name of the instance administrator is timesten. Logged in as timesten, duplicate data store dsn1 on host1 to dsn2:
ttRepAdmin -duplicate -from dsn1 -host host1 -uid ttuser -pwd ttuser dsn2
If you are duplicating an active master data store that has cache groups, use the -keepCG option. You must also specify the cache administration user ID and password with the -cacheuid and -cachepwd options. If you do not provide the cache administration user password, ttRepAdmin prompts for a password. If the cache administration user ID is orauser and the password is orapwd, duplicate data store dsn1 on host1:
ttRepAdmin -duplicate -from dsn1 -host host1 -uid ttuser -pwd ttuser -keepCG -cacheuid orauser -cacheuid orapwd "DSN=dsn2;UID=;PWD="
The UID and PWD for dsn2 are specified as null values in the connection string so that the connection is made as the current OS user, which is the instance administrator. Only the instance administrator can run ttRepAdmin -duplicate. If dsn2 is configured with PWDCrypt instead of PWD, then the connection string should be "DSN=dsn2;UID=;PWDCrypt=".
When you duplicate a standby master data store with cache groups to a read-only subscriber, use the -nokeepCG option. In this example, dsn2 is the standby master data store and sub1 is the read-only subscriber:
ttRepAdmin -duplicate -from dsn2 -host host2 -uid ttuser -pwd ttuser -nokeepCG "DSN=sub1;UID=;PWD="
For more information about the ttRepAdmin utility, see "ttRepAdmin" in Oracle TimesTen In-Memory Database Reference. For more information about the

Recovering from a failure of the active master data store
Administering an Active Standby Pair Without Cache Groups 4-3
ttRepDuplicateEx C function, see "TimesTen Utility API" in Oracle TimesTen In-Memory Database C Developer's Guide.
Setting up an active standby pair with no cache groupsTo set up an active standby pair, complete the tasks in this section. See "Configuring an active standby pair with one subscriber" on page 2-1 for an example.
If you intend to replicate read-only cache groups or asynchronous writethrough (AWT) cache groups, see "Replicating cache tables" in Oracle In-Memory Database Cache User's Guide.
1. Create a data store.
2. Create the replication scheme using the CREATE ACTIVE STANDBY PAIR statement. See Chapter 3, "Defining an Active Standby Pair Replication Scheme".
3. Start the replication agent. See "Starting and stopping the replication agents" on page 8-13.
4. Call ttRepStateSet('ACTIVE') on the active master data store.
5. Create a user on the active master data store and grant the ADMIN privilege to the user.
6. Duplicate the active master data store to the standby master data store.
7. Start the replication agent on the standby master data store. See "Starting and stopping the replication agents" on page 8-13.
8. Wait for the standby master data store to enter the STANDBY state. Use the ttRepStateGet procedure to check the state of the standby master data store.
9. Duplicate all of the subscribers from the standby master data store. See "Copying a master data store to a subscriber" on page 8-8.
10. Set up the replication agent policy and start the replication agent on each of the subscriber stores. See "Starting and stopping the replication agents" on page 8-13.
Recovering from a failure of the active master data storeThis section includes the following topics:
■ Recovering when the standby master data store is ready
■ Recovering when the standby master data store is not ready
■ Failing back to the original nodes
Recovering when the standby master data store is readyThis section describes how to recover the active master data store when the standby master data store is available and synchronized with the active master data store. It includes the following topics:
■ When replication is return receipt or asynchronous
■ When replication is return twosafe
When replication is return receipt or asynchronousComplete the following tasks:

Recovering from a failure of the active master data store
4-4 Oracle TimesTen In-Memory Database TimesTen to TimesTen Replication Guide
1. Stop the replication agent on the failed data store if it has not already been stopped.
2. On the standby master data store, execute ttRepStateSet('ACTIVE'). This changes the role of the data store from STANDBY to ACTIVE.
3. On the new active master data store, execute ttRepStateSave('FAILED', 'failed_store','host_name'), where failed_store is the former active master data store that failed. This step is necessary for the new active master data store to replicate directly to the subscriber data stores.
4. Destroy the failed data store.
5. Duplicate the new active master data store to the new standby master data store.
6. Set up the replication agent policy and start the replication agent. See "Starting and stopping the replication agents" on page 8-13.
The standby master data store contacts the active master data store. The active master data store stops sending updates to the subscribers. When the standby master data store is fully synchronized with the active master data store, then the standby master data store enters the STANDBY state and starts sending updates to the subscribers. If you are replicating an AWT cache group, the new standby master data store takes over processing of the cache group automatically when it enters the STANDBY state.
When replication is return twosafeComplete the following tasks:
1. On the standby master data store, execute ttRepStateSet('ACTIVE'). This changes the role of the data store from STANDBY to ACTIVE.
2. On the new active master data store, execute ttRepStateSave('FAILED', 'failed_store','host_name'), where failed_store is the former active master data store that failed. This step is necessary for the new active master data store to replicate directly to the subscriber data stores.
3. Connect to the failed data store. This triggers recovery from the local transaction logs. If data store recovery fails, you must continue from Step 5 of the procedure for recovering when replication is return receipt or asynchronous. See "When replication is return receipt or asynchronous" on page 4-3.
4. Verify that the replication agent for the failed data store has restarted. If it has not restarted, then start the replication agent. See "Starting and stopping the replication agents" on page 8-13.
When the active master data store determines that it is fully synchronized with the standby master data store, then the standby master store enters the STANDBY state and starts sending updates to the subscribers. If you are replicating an AWT cache group, the new standby master data store takes over processing of the cache group automatically when it enters the STANDBY state.
Note: You can verify that the standby master data has entered the STANDBY state by using the ttRepStateGet built-in procedure.
Note: You can verify that the standby master data has entered the STANDBY state by using the ttRepStateSet built-in procedure.
Recovering from a failure of the active master data store
Administering an Active Standby Pair Without Cache Groups 4-5
Recovering when the standby master data store is not readyConsider the following scenarios:
■ The standby master data store fails. The active master data store fails before the standby comes back up or before the standby has been synchronized with the active master data store.
■ The active master data store fails. The standby master data store becomes ACTIVE, and the rest of the recovery process begins. (See "Recovering from a failure of the active master data store" on page 4-3.) The new active master data store fails before the new standby master data store is fully synchronized with it.
In both scenarios, the subscribers may have had more changes applied than the standby master data store.
When the active master data store fails and the standby master data store has not applied all of the changes that were last sent from the active master data store, there are two choices for recovery:
■ Recover the active master data store from the local transaction logs.
■ Recover the standby master data store from the local transaction logs.
The choice depends on which data store is available and which is more up to date.
Recover the active master data store1. Connect to the failed active data store. This triggers recovery from the local
transaction logs.
2. Verify that the replication agent for the failed active data store has restarted. If it has not restarted, then start the replication agent. See "Starting and stopping the replication agents" on page 8-13.
3. Execute ttRepStateSet('ACTIVE') on the newly recovered store.
4. Continue with Step 6 in "Setting up an active standby pair with no cache groups" on page 4-3.
Recover the standby master data store1. Connect to the failed standby data store. This triggers recovery from the local
transaction logs.
2. If the replication agent for the standby data store has automatically restarted, you must stop the replication agent. See "Starting and stopping the replication agents" on page 8-13.
3. Drop the replication configuration using the DROP ACTIVE STANDBY PAIR statement.
4. Re-create the replication configuration using the CREATE ACTIVE STANDBY PAIR statement.
5. Set up the replication agent policy and start the replication agent. See "Starting and stopping the replication agents" on page 8-13.
6. Execute ttRepStateSet('ACTIVE') on the master data store, giving it the ACTIVE role.
7. Continue from Step 6 in "Setting up an active standby pair with no cache groups" on page 4-3.

Recovering from a failure of the standby master data store
4-6 Oracle TimesTen In-Memory Database TimesTen to TimesTen Replication Guide
Failing back to the original nodesAfter a successful failover, you may wish to fail back so that the active master data store and the standby master data store are on their original nodes. See "Reversing the roles of the active and standby master data stores" on page 4-7 for instructions.
Recovering from a failure of the standby master data storeTo recover from a failure of the standby master data store, complete the following tasks:
1. Detect the standby master data store failure.
2. If return twosafe service is enabled, the failure of the standby master data store may prevent a transaction in progress from being committed on the active master data store, resulting in error 8170, "Receipt or commit acknowledgement not returned in the specified timeout interval". If so, then call the ttRepStateSet procedure with a localAction parameter of 2 (COMMIT) and commit the transaction again. For example:
call ttRepStateSet( null, null, 2);commit;
3. Execute ttRepStateSave('FAILED','standby_store','host_name') on the active master data store. After this, as long as the standby data store is unavailable, updates to the active data store are replicated directly to the subscriber data stores. Subscriber stores may also be duplicated directly from the active master.
4. If the replication agent for the standby data store has automatically restarted, stop the replication agent. See "Starting and stopping the replication agents" on page 8-13.
5. Recover the standby master data store in one of the following ways:
■ Connect to the standby master data store. This triggers recovery from the local transaction logs.
■ Duplicate the standby master data store from the active master data store.
The amount of time that the standby master data store has been down and the amount of transaction logs that need to be applied from the active master data store determine the method of recovery that you should use.
6. Set up the replication agent policy and start the replication agent. See "Starting and stopping the replication agents" on page 8-13.
The standby master data store enters the STANDBY state after the active master data store determines that the two master data stores have been synchronized.
Recovering from the failure of a subscriber data storeIf a subscriber data store fails, then you can recover it by one of the following methods:
■ Connect to the failed subscriber. This triggers recovery from the local transaction logs. Start the replication agent and let the subscriber catch up.
Note: You can verify that the standby master data has entered the STANDBY state by using the ttRepStateGet procedure

Detection of dual active master data stores
Administering an Active Standby Pair Without Cache Groups 4-7
■ Duplicate the subscriber from the standby master data store.
If the standby master data store is down or in recovery, then duplicate the subscriber from the active master data store.
After the subscriber data store has been recovered, then set up the replication agent policy and start the replication agent. See "Starting and stopping the replication agents" on page 8-13.
Reversing the roles of the active and standby master data storesTo change the active master data store's role to that of a standby master data store and vice versa:
1. Pause any applications that are generating updates on the current active master data store.
2. Execute ttRepSubscriberWait on the active master data store, with the DSN and host of the current standby data store as input parameters. This ensures that all updates have been transmitted to the current standby master data store.
3. Stop the replication agent on the current active master data store. See "Starting and stopping the replication agents" on page 8-13.
4. Execute ttRepDeactivate on the current active master data store. This puts the store in the IDLE state.
5. Execute ttRepStateSet('ACTIVE') on the current standby master data store. This store now acts as the active master data store in the active standby pair.
6. Set up the replication agent policy and start the replication agent on the old active master data store. Use the ttRepStateGet procedure to determine when the data store's state has changed from IDLE to STANDBY. The data store now acts as the standby master data store in the active standby pair.
7. Resume any applications that were paused in Step 1.
Detection of dual active master data storesOrdinarily, the designation of the active master and standby master data stores in an active standby pair is explicitly controlled by the user. However, in some circumstances the user may not have the ability to modify both the active and standby master data stores when changing the role of the standby master data store to active.
For example, if network communication to the site of an active master data store is interrupted, the user may need the standby master data store at a different site to take over the role of the active, but cannot stop replication on the current active master or change its role manually. Changing the standby master data store to active without first stopping replication on the active master leads to a situation where both masters are in the ACTIVE state and accepting transactions. In such a scenario, TimesTen can automatically negotiate the active/standby role of the master data stores when network communication between the stores is restored.
If, during the initial handshake between the data stores, TimesTen determines that the master data stores in an active standby pair replication scheme are both in the ACTIVE state, TimesTen performs the following operations automatically:
■ The data store which was set to the ACTIVE state most recently is left in the ACTIVE state and may continue to be connected to and updated by applications.

Changing the configuration of an active standby pair
4-8 Oracle TimesTen In-Memory Database TimesTen to TimesTen Replication Guide
■ The data store which was set to the ACTIVE state least recently is invalidated. All applications are disconnected.
■ When the invalidated data store comes back up, TimesTen determines whether any transactions have occurred on the data store that have not yet been replicated to the other master data store. If such transactions have occurred, they are now trapped, and the data store is left in the IDLE state. The data store needs to be duplicated from the active master in order to become a standby master. If there are no trapped transactions, the data store is safe to use as a standby master data store and is automatically set to the STANDBY state.
Changing the configuration of an active standby pairYou can change an active standby pair by:
■ Adding or dropping a read-only subscriber data store
■ Altering store attributes - Only the PORT and TIMEOUT attributes can be set for subscribers. The RELEASE clause cannot be set for any data store in an active standby pair.
■ Including tables or cache groups in the active standby pair
■ Excluding tables or cache groups from the active standby pair
If you are adding cache groups to the replication scheme, see Chapter 5, "Administering an Active Standby Pair with Cache Groups". The steps in this section apply to active standby pairs with no cache groups.
Make these changes on the active master data store. After you have changed the replication scheme on the active master data store, it no longer replicates updates to the standby master data store or to the subscribers. You must re-create the standby master data store and the subscribers and restart the replication agents.
Use the ALTER ACTIVE STANDBY PAIR statement to change the active standby pair.
To change an active standby pair, complete the following tasks:
1. Stop the replication agent on the active master data store. See "Starting and stopping the replication agents" on page 8-13.
2. Use the ALTER ACTIVE STANDBY PAIR statement to make changes to the replication scheme.
3. Start the replication agent on the active master data store. See "Starting and stopping the replication agents" on page 8-13.
4. Destroy the standby master data store and the subscribers.
5. Continue from Step 5 of "Setting up an active standby pair with no cache groups" on page 4-3.
Example 4–1 Adding a subscriber to an active standby pair
Add a subscriber data store to the active standby pair.
ALTER ACTIVE STANDBY PAIRADD SUBSCRIBER sub1;
Example 4–2 Dropping subscribers from an active standby pair
Drop subscriber data stores from the active standby pair.
ALTER ACTIVE STANDBY PAIR

Changing the configuration of an active standby pair
Administering an Active Standby Pair Without Cache Groups 4-9
DROP SUBSCRIBER sub1DROP SUBSCRIBER sub2;
Example 4–3 Changing the PORT and TIMEOUT settings for subscribers
Alter the PORT and TIMEOUT settings for subscribers rep3 and rep4.
ALTER ACTIVE STANDBY PAIRALTER STORE sub1 SET PORT 23000 TIMEOUT 180ALTER STORE sub2 SET PORT 23000 TIMEOUT 180;
Example 4–4 Adding tables to an active standby pair
Add two tables and a cache group to the active standby pair.
ALTER ACTIVE STANDBY PAIRINCLUDE TABLE tab1, tab2;

Changing the configuration of an active standby pair
4-10 Oracle TimesTen In-Memory Database TimesTen to TimesTen Replication Guide
5
Administering an Active Standby Pair with Cache Groups 5-1
5Administering an Active Standby Pair withCache Groups
This chapter describes how to administer an active standby pair that replicates cache groups.
For information about managing failover and recovery automatically, see Chapter 6, "Using Oracle Clusterware to Manage Active Standby Pairs".
This chapter includes the following topics:
■ Active standby pairs with cache groups
■ Setting up an active standby pair with a read-only cache group
■ Setting up an active standby pair with an AWT cache group
■ Recovering from a failure of the active master data store
■ Recovering from a failure of the standby master data store
■ Recovering from the failure of a subscriber data store
■ Reversing the roles of the active and standby master data stores
■ Detection of dual active master data stores
■ Changing the configuration of an active standby pair with cache groups
■ Using a disaster recovery subscriber in an active standby pair
Active standby pairs with cache groupsAn active standby pair that replicates a read-only cache group or an asynchronous writethrough (AWT) cache group can change the role of the cache group automatically as part of failover and recovery. This helps ensure high availability of cache instances with minimal data loss. See "Replicating an AWT cache group" on page 1-14 and "Replicating a read-only cache group" on page 1-16.
You can also create a special disaster recovery read-only subscriber when you set up active standby replication of an AWT cache group. This special subscriber, located at a remote disaster recovery site, can propagate updates to a second Oracle database, also located at the disaster recovery site. See "Using a disaster recovery subscriber in an active standby pair" on page 5-11.
You cannot use an active standby pair to replicate synchronous writethrough (SWT) cache groups. If you are using an active standby pair to replicated a data store with SWT cache groups, you must either drop or exclude the SWT cache groups.

Setting up an active standby pair with a read-only cache group
5-2 Oracle TimesTen In-Memory Database TimesTen to TimesTen Replication Guide
Setting up an active standby pair with a read-only cache groupThis section describes how to set up an active standby pair that replicates cache tables in a read-only cache group. The active standby pair used as an example in this section is not a cache grid member.
To set up an active standby pair that replicates a local read-only cache group, complete the following tasks:
1. Create a cache administration user in the Oracle database. See "Create users in the Oracle database" in Oracle In-Memory Database Cache User's Guide.
2. Create a data store. See "Create a DSN for a TimesTen database" in Oracle In-Memory Database Cache User's Guide.
3. Set the cache administration user ID and password by calling the ttCacheUidPwdSet built-in procedure. See "Set the cache administration user name and password in the TimesTen database" in Oracle In-Memory Database Cache User's Guide. For example:
Command> call ttCacheUidPwdSet('orauser','orapwd');
4. Start the cache agent on the data store. Use the ttCacheStart built-in procedure or the ttAdmin -cachestart utility.
Command> call ttCacheStart;
5. Use the CREATE CACHE GROUP statement to create the read-only cache group. For example:
Command> CREATE READONLY CACHE GROUP readcache > AUTOREFRESH INTERVAL 5 SECONDS > FROM oratt.readtab > (keyval NUMBER NOT NULL PRIMARY KEY, str VARCHAR2(32));
6. Ensure that the AUTOREFRESH STATE is set to PAUSED. The autorefresh state is PAUSED by default after cache group creation. You can verify the autorefresh state by executing the ttIsql cachegroups command:
Command> cachegroups;
7. Create the replication scheme using the CREATE ACTIVE STANDBY PAIR statement.
For example, suppose master1 and master2 are defined as the master data stores. sub1 and sub2 are defined as the subscriber data stores. The data stores reside on node1, node2, node3, and node4. The return service is RETURN RECEIPT. The replication scheme can be specified as follows:
Command> CREATE ACTIVE STANDBY PAIR master1 ON "node1", master2 ON "node2" > RETURN RECEIPT > SUBSCRIBER sub1 ON "node3", sub2 ON "node4" > STORE master1 ON "node1" PORT 21000 TIMEOUT 30 > STORE master2 ON "node2" PORT 20000 TIMEOUT 30;
8. Set up the replication agent policy for master1 and start the replication agent. See "Starting and stopping the replication agents" on page 8-13.
9. Set the replication state to ACTIVE by calling the ttRepStateSet built-in procedure on the active master data store (master1). For example:
Command> call ttRepStateSet('ACTIVE');

Recovering from a failure of the active master data store
Administering an Active Standby Pair with Cache Groups 5-3
10. Load the cache group by using the LOAD CACHE GROUP statement. This starts the autorefresh process. For example:
Command> LOAD CACHE GROUP readcache COMMIT EVERY 256 ROWS;
11. As the instance administrator, duplicate the active master data store (master1) to the standby master data store (master2). Use the ttRepAdmin -duplicate utility with the -keepCG option to preserve the cache group. Alternatively, you can use the ttRepDuplicateEx C function to duplicate the data store. See "Duplicating a data store" on page 4-2. In this example, cacheuser is a TimesTen user with ADMIN privilege.
ttRepAdmin -duplicate -from master1 -host node1 -uid cacheuser -pwd cachepwd -keepCG -cacheuid orauser -cacheuid orapwd "DSN=master2;UID=;PWD="
12. Set up the replication agent policy on master2 and start the replication agent. See "Starting and stopping the replication agents" on page 8-13.
13. The standby master database enters the STANDBY state automatically. Wait for master2 to enter the STANDBY state. Call the ttRepStateGet built-in procedure to check the state of master2. For example:
Command> call ttRepStateGet;
14. Start the cache agent for master2 using the ttCacheStart built-in procedure or the ttAdmin -cacheStart utility. For example:
Command> call ttCacheStart;
15. As the instance administrator, duplicate the subscribers (sub1 and sub2) from the standby master data store (master2). Use the -noKeepCG command line option with ttRepAdmin -duplicate to convert the cache tables to normal TimesTen tables on the subscribers. See "Duplicating a data store" on page 4-2. For example:
ttRepAdmin -duplicate -from master2 -host node2 -uid cacheuser -pwd cachepwd -nokeepCG "DSN=sub1;UID=;PWD="
16. Set up the replication agent policy on the subscribers and start the replication agent on each of the subscriber stores. See "Starting and stopping the replication agents" on page 8-13.
Setting up an active standby pair with an AWT cache groupFor detailed instructions for setting up an active standby pair with a global AWT cache group, see "Replicating cache tables" in Oracle In-Memory Database Cache User's Guide. The active standby pair in that section is a cache grid member.
Recovering from a failure of the active master data storeThis section includes the following topics:
■ Recovering when the standby master data store is ready
■ Recovering when the standby master data store is not ready
■ Failing back to the original nodes

Recovering from a failure of the active master data store
5-4 Oracle TimesTen In-Memory Database TimesTen to TimesTen Replication Guide
Recovering when the standby master data store is readyThis section describes how to recover the active master data store when the standby master data store is available and synchronized with the active master data store. It includes the following topics:
■ When replication is return receipt or asynchronous
■ When replication is return twosafe
When replication is return receipt or asynchronousComplete the following tasks:
1. Stop the replication agent on the failed data store if it has not already been stopped.
2. On the standby master data store, execute ttRepStateSet('ACTIVE'). This changes the role of the data store from STANDBY to ACTIVE. If you are replicating an read-only cache group or an AWT cache group with the AUTOREFRESH attribute, this action automatically causes the AUTOREFRESH state to change from PAUSED to ON for this data store.
3. On the new active master data store, execute ttRepStateSave('FAILED', 'failed_store','host_name'), where failed_store is the former active master data store that failed. This step is necessary for the new active master data store to replicate directly to the subscriber data stores.
4. Stop the cache agent on the failed data store if it is not already stopped.
5. Destroy the failed data store.
6. Duplicate the new active master data store to the new standby master data store. You can use either the ttRepAdmin -duplicate utility or the ttRepDuplicateEx C function to duplicate a data store. Use the -keepCG -recoveringNode command line options with ttRepAdmin in order to preserve the cache group. See "Duplicating a data store" on page 4-2.
7. Set up the replication agent policy on the new standby master data store and start the replication agent. See "Starting and stopping the replication agents" on page 8-13.
8. Start the cache agent on the new standby master data store.
The standby master data store contacts the active master data store. The active master data store stops sending updates to the subscribers. When the standby master data store is fully synchronized with the active master data store, then the standby master data store enters the STANDBY state and starts sending updates to the subscribers.The new standby master data store takes over processing of the cache group automatically when it enters the STANDBY state.
When replication is return twosafeComplete the following tasks:
1. On the standby master data store, execute ttRepStateSet('ACTIVE'). This changes the role of the data store from STANDBY to ACTIVE. If you are replicating a read-only cache group or an AWT cache group with the
Note: You can verify that the standby master data has entered the STANDBY state by using the ttRepStateGet built-in procedure.

Recovering from a failure of the active master data store
Administering an Active Standby Pair with Cache Groups 5-5
AUTOREFRESH attribute, this action automatically causes the AUTOREFRESH state to change from PAUSED to ON for this data store.
2. On the new active master data store, execute ttRepStateSave('FAILED', 'failed_store','host_name'), where failed_store is the former active master data store that failed. This step is necessary for the new active master data store to replicate directly to the subscriber data stores.
3. Connect to the failed data store. This triggers recovery from the local transaction logs. If data store recovery fails, you must continue from Step 5 of the procedure for recovering when replication is return receipt or asynchronous. See "When replication is return receipt or asynchronous" on page 5-4. If you are replicating a read-only cache group or an AWT cache group with the AUTOREFRESH attribute, the autorefresh state is automatically set to PAUSED.
4. Verify that the replication agent for the failed data store has restarted. If it has not restarted, then start the replication agent. See "Starting and stopping the replication agents" on page 8-13.
5. Verify that the cache agent for the failed data store has restarted. If it has not restarted, then start the cache agent.
When the active master data store determines that it is fully synchronized with the standby master data store, then the standby master store enters the STANDBY state and starts sending updates to the subscribers. The new standby master data store takes over processing of the cache group automatically when it enters the STANDBY state.
Recovering when the standby master data store is not readyConsider the following scenarios:
■ The standby master data store fails. The active master data store fails before the standby comes back up or before the standby has been synchronized with the active master data store.
■ The active master data store fails. The standby master data store becomes ACTIVE, and the rest of the recovery process begins. (See "Recovering from a failure of the active master data store" on page 5-3.) The new active master data store fails before the new standby master data store is fully synchronized with it.
In both scenarios, the subscribers may have had more changes applied than the standby master data store.
When the active master data store fails and the standby master data store has not applied all of the changes that were last sent from the active master data store, there are two choices for recovery:
■ Recover the active master data store from the local transaction logs.
■ Recover the standby master data store from the local transaction logs.
The choice depends on which data store is available and which is more up to date.
Recover the active master data store1. Connect to the failed active data store. This triggers recovery from the local
transaction logs. If you are replicating a read-only cache group or an AWT cache
Note: You can verify that the standby master data has entered the STANDBY state by using the ttRepStateSet built-in procedure.

Recovering from a failure of the active master data store
5-6 Oracle TimesTen In-Memory Database TimesTen to TimesTen Replication Guide
group with the AUTOREFRESH attribute, the autorefresh state is automatically set to PAUSED.
2. Verify that the replication agent for the failed active data store has restarted. If it has not restarted, then start the replication agent. See "Starting and stopping the replication agents" on page 8-13.
3. Execute ttRepStateSet('ACTIVE') on the newly recovered store. If you are replicating a read-only cache group or an AWT cache group with the AUTOREFRESH attribute, this action automatically causes the AUTOREFRESH state to change from PAUSED to ON for this data store.
4. Verify that the cache agent for the failed data store has restarted. If it has not restarted, then start the cache agent.
5. Duplicate the active master data store to the standby master data store. You can use either the ttRepAdmin -duplicate utility or the ttRepDuplicateEx C function to duplicate a data store. Use the -keepCG command line option with ttRepAdmin in order to preserve the cache group. "Duplicating a data store" on page 4-2.
6. Set up the replication agent policy on the standby master data store and start the replication agent. See "Starting and stopping the replication agents" on page 8-13.
7. Wait for the standby master data store to enter the STANDBY state. Use the ttRepStateGet procedure to check the state.
8. Start the cache agent for on the standby master data store using the ttCacheStart procedure or the ttAdmin -cacheStart utility.
9. Duplicate all of the subscribers from the standby master data store. See "Copying a master data store to a subscriber" on page 8-8. Use the -noKeepCG command line option with ttRepAdmin in order to convert the cache group to regular TimesTen tables on the subscribers.
10. Set up the replication agent policy on the subscribers and start the agent on each of the subscriber stores. See "Starting and stopping the replication agents" on page 8-13.
Recover the standby master data store1. Connect to the failed standby data store. This triggers recovery from the local
transaction logs. If you are replicating a read-only cache group or an AWT cache group with the AUTOREFRESH attribute, the autorefresh state is automatically set to PAUSED.
2. If the replication agent for the standby data store has automatically restarted, you must stop the replication agent. See "Starting and stopping the replication agents" on page 8-13.
3. If the cache agent has automatically restarted, stop the cache agent.
4. Drop the replication configuration using the DROP ACTIVE STANDBY PAIR statement.
5. Drop and re-create all cache groups using the DROP CACHE GROUP and CREATE CACHE GROUP statements.
6. Re-create the replication configuration using the CREATE ACTIVE STANDBY PAIR statement.
7. Set up the replication agent policy and start the replication agent. See "Starting and stopping the replication agents" on page 8-13.

Recovering from a failure of the standby master data store
Administering an Active Standby Pair with Cache Groups 5-7
8. Execute ttRepStateSet('ACTIVE') on the master data store, giving it the ACTIVE role. If you are replicating a read-only cache group or an AWT cache group with the AUTOREFRESH attribute, this action automatically causes the AUTOREFRESH state to change from PAUSED to ON for this data store.
9. Start the cache agent on the active master data store.
10. Duplicate the active master data store to the standby master data store. You can use either the ttRepAdmin -duplicate utility or the ttRepDuplicateEx C function to duplicate a data store. Use the -keepCG command line option with ttRepAdmin in order to preserve the cache group. "Duplicating a data store" on page 4-2.
11. Set up the replication agent policy on the standby master data store and start the replication agent. See "Starting and stopping the replication agents" on page 8-13.
12. Wait for the standby master data store to enter the STANDBY state. Use the ttRepStateGet procedure to check the state.
13. Start the cache agent for the standby master data store using the ttCacheStart procedure or the ttAdmin -cacheStart utility.
14. Duplicate all of the subscribers from the standby master data store. See "Copying a master data store to a subscriber" on page 8-8. Use the -noKeepCG command line option with ttRepAdmin in order to convert the cache group to regular TimesTen tables on the subscribers.
15. Set up the replication agent policy on the subscribers and start the agent on each of the subscriber stores. See "Starting and stopping the replication agents" on page 8-13.
Failing back to the original nodesAfter a successful failover, you may wish to fail back so that the active master data store and the standby master data store are on their original nodes. See "Reversing the roles of the active and standby master data stores" on page 5-8 for instructions.
Recovering from a failure of the standby master data storeTo recover from a failure of the standby master data store, complete the following tasks:
1. Detect the standby master data store failure.
2. If return twosafe service is enabled, the failure of the standby master data store may prevent a transaction in progress from being committed on the active master data store, resulting in error 8170, "Receipt or commit acknowledgement not returned in the specified timeout interval". If so, then call the ttRepStateSet procedure with a localAction parameter of 2 (COMMIT) and commit the transaction again. For example:
call ttRepStateSet( null, null, 2);commit;
3. Execute ttRepStateSave('FAILED','standby_store','host_name') on the active master data store. After this, as long as the standby data store is unavailable, updates to the active data store are replicated directly to the subscriber data stores. Subscriber stores may also be duplicated directly from the active master.

Recovering from the failure of a subscriber data store
5-8 Oracle TimesTen In-Memory Database TimesTen to TimesTen Replication Guide
4. If the replication agent for the standby data store has automatically restarted, stop the replication agent. See "Starting and stopping the replication agents" on page 8-13.
5. If the cache agent has automatically restarted, stop the cache agent.
6. Recover the standby master data store in one of the following ways:
■ Connect to the standby master data store. This triggers recovery from the local transaction logs.
■ Duplicate the standby master data store from the active master data store. You can use either the ttRepAdmin -duplicate utility or the ttRepDuplicateEx C function to duplicate a data store. Use the -keepCG -recoveringNode command line options with ttRepAdmin in order to preserve the cache group.See "Duplicating a data store" on page 4-2.
The amount of time that the standby master data store has been down and the amount of transaction logs that need to be applied from the active master data store determine the method of recovery that you should use.
7. Set up the replication agent policy and start the replication agent. See "Starting and stopping the replication agents" on page 8-13.
8. Start the cache agent.
The standby master data store enters the STANDBY state after the active master data store determines that the two master data stores have been synchronized.
Recovering from the failure of a subscriber data storeIf a subscriber data store fails, then you can recover it by one of the following methods:
■ Connect to the failed subscriber. This triggers recovery from the local transaction logs. Start the replication agent and let the subscriber catch up.
■ Duplicate the subscriber from the standby master data store. You can use either the ttRepAdmin -duplicate utility or the ttRepDuplicateEx C function to duplicate a data store. Use the -noKeepCG command line option with ttRepAdmin in order to convert the cache group to normal TimesTen tables on the subscriber.
If the standby master data store is down or in recovery, then duplicate the subscriber from the active master data store.
After the subscriber data store has been recovered, then set up the replication agent policy and start the replication agent. See "Starting and stopping the replication agents" on page 8-13.
Reversing the roles of the active and standby master data storesTo change the active master data store's role to that of a standby master data store and vice versa:
1. Pause any applications that are generating updates on the current active master data store.
Note: You can verify that the standby master data has entered the STANDBY state by using the ttRepStateGet procedure

Changing the configuration of an active standby pair with cache groups
Administering an Active Standby Pair with Cache Groups 5-9
2. Execute ttRepSubscriberWait on the active master data store, with the DSN and host of the current standby data store as input parameters. This ensures that all updates have been transmitted to the current standby master data store.
3. Stop the replication agent on the current active master data store. See "Starting and stopping the replication agents" on page 8-13.
4. Stop the cache agent on the active master data store.
5. Execute ttRepDeactivate on the current active master data store. This puts the store in the IDLE state. If you are replicating a read-only cache group or an AWT cache group with the AUTOREFRESH attribute, this action automatically causes the AUTOREFRESH state to change from ON to PAUSED for this data store.
6. Execute ttRepStateSet('ACTIVE') on the current standby master data store. This store now acts as the active master data store in the active standby pair. If you are replicating a read-only cache group or an AWT cache group with the AUTOREFRESH attribute, this automatically causes the AUTOREFRESH state to change from PAUSED to ON for this data store.
7. Configure the replication agent policy as needed and start the replication agent on the old active master data store. Use the ttRepStateGet procedure to determine when the data store's state has changed from IDLE to STANDBY. The data store now acts as the standby master data store in the active standby pair.
8. Start the cache agent on the old active master data store.
9. Resume any applications that were paused in Step 1.
Detection of dual active master data storesSee "Detection of dual active master data stores" on page 4-7. There is no difference for active standby pairs that replicate cache groups.
Changing the configuration of an active standby pair with cache groupsYou can change an active standby pair by:
■ Adding or dropping a subscriber data store
■ Altering store attributes - Only the PORT and TIMEOUT attributes can be set for subscribers. The RELEASE clause cannot be set for any data store in an active standby pair.
■ Including tables or cache groups in the active standby pair
■ Excluding tables or cache groups from the active standby pair
Make these changes on the active master data store. After you have changed the replication scheme on the active master data store, it no longer replicates updates to the standby master data store or to the subscribers. You must re-create the standby master data store and the subscribers and restart the replication agents.
Use the ALTER ACTIVE STANDBY PAIR statement to change the active standby pair.
To change an active standby pair, complete the following tasks:
1. Stop the replication agent on the active master data store. See "Starting and stopping the replication agents" on page 8-13.
2. Stop the cache agent on the active master data store.

Changing the configuration of an active standby pair with cache groups
5-10 Oracle TimesTen In-Memory Database TimesTen to TimesTen Replication Guide
3. Use the ALTER ACTIVE STANDBY PAIR statement to make changes to the replication scheme.
4. Start the replication agent on the active master data store. See "Starting and stopping the replication agents" on page 8-13.
5. Start the cache agent on the active master data store.
6. Destroy the standby master data store and the subscribers.
7. Duplicate the active master data store to the standby master data store. You can use either the ttRepAdmin -duplicate utility or the ttRepDuplicateEx C function to duplicate a data store. Use the -keepCG command line option with ttRepAdmin in order to preserve the cache group. See "Duplicating a data store" on page 4-2.
8. Set up the replication agent policy on the standby master data store and start the replication agent. See "Starting and stopping the replication agents" on page 8-13.
9. Wait for the standby master data store to enter the STANDBY state. Use the ttRepStateGet procedure to check the state.
10. Start the cache agent for the standby master data store using the ttCacheStart procedure or the ttAdmin -cacheStart utility.
11. Duplicate all of the subscribers from the standby master data store. See "Copying a master data store to a subscriber" on page 8-8. Use the -noKeepCG command line option with ttRepAdmin in order to convert the cache group to regular TimesTen tables on the subscribers. See "Duplicating a data store" on page 4-2.
12. Set up the replication agent policy on the subscribers and start the agent on each of the subscriber stores. See "Starting and stopping the replication agents" on page 8-13.
Example 5–1 Adding a subscriber to an active standby pair
Add a subscriber data store to the active standby pair.
ALTER ACTIVE STANDBY PAIRADD SUBSCRIBER sub1;
Example 5–2 Dropping subscribers from an active standby pair
Drop subscriber data stores from the active standby pair.
ALTER ACTIVE STANDBY PAIRDROP SUBSCRIBER sub1DROP SUBSCRIBER sub2;
Example 5–3 Changing the PORT and TIMEOUT settings for subscribers
Alter the PORT and TIMEOUT settings for subscribers rep3 and rep4.
ALTER ACTIVE STANDBY PAIRALTER STORE sub1 SET PORT 23000 TIMEOUT 180ALTER STORE sub2 SET PORT 23000 TIMEOUT 180;
Example 5–4 Adding tables and a cache group to an active standby pair
Add two tables and a cache group to the active standby pair.
ALTER ACTIVE STANDBY PAIRINCLUDE TABLE tab1, tab2INCLUDE CACHE GROUP cg0;

Using a disaster recovery subscriber in an active standby pair
Administering an Active Standby Pair with Cache Groups 5-11
Using a disaster recovery subscriber in an active standby pairTimesTen active standby pair replication provides high availability by allowing for fast switching between data stores within a data center. This includes the ability to automatically change which data store propagates changes to an Oracle database using AWT cache groups. However, for additional high availability across data centers, you may require the ability to recover from a failure of an entire site, which can include a failure of both TimesTen master data stores in the active standby pair as well as the Oracle database used for the cache groups.
You can recover from a complete site failure by creating a special disaster recovery read-only subscriber as part of the active standby pair replication scheme. The standby master data store sends updates to cache group tables on the read-only subscriber. This special subscriber is located at a remote disaster recovery site and can propagate updates to a second Oracle database, also located at the disaster recovery site. The disaster recovery subscriber can take over as the active master in a new active standby pair at the disaster recovery site if the primary site suffers a complete failure. Any applications may then connect to the disaster recovery site and continue operating, with minimal interruption of service.
Requirements for using a disaster recovery subscriber with an active standby pairTo use a disaster recovery subscriber, you must:
■ Be using an active standby pair configuration with AWT cache groups at the primary site.
■ Have a continuous WAN connection from the primary site to the disaster recovery site. This connection should have at least enough bandwidth to guarantee that the normal volume of transactions can be replicated to the disaster recovery subscriber at a reasonable pace.
■ Have an Oracle database configured at the disaster recovery site to include tables with the same schema as the database at the primary site. Note that this database is intended only for capturing the replicated updates from the primary site, and if any data exists in tables written to by the cache groups when the disaster recovery subscriber is created, that data is deleted.
■ Have the same cache group administrator user ID and password at both the primary and the disaster recovery site.
Though it is not absolutely required, you should have a second TimesTen data store configured at the disaster recovery site. This data store can take on the role of a standby master data store, in the event that the disaster recovery subscriber is promoted to an active master data store after the primary site fails.
Rolling out a disaster recovery subscriberTo create a disaster recovery subscriber, follow these steps:
1. Create an active standby pair with AWT cache groups at the primary site.
2. Create the disaster recovery subscriber at the disaster recovery site using the ttRepAdmin utility with the -duplicate and -cacheInitDR options. You must also specify the cache group administrator and password for the Oracle database at the disaster recovery site using the -cacheUid and -cachePwd options.
If your data store includes multiple cache groups, you may improve the efficiency of the duplicate operation by using the -nThreads option to specify the number

Using a disaster recovery subscriber in an active standby pair
5-12 Oracle TimesTen In-Memory Database TimesTen to TimesTen Replication Guide
of threads that are spawned to flush the cache groups in parallel. Each thread flushes an entire cache group to Oracle and then moves on to the next cache group, if any remain to be flushed. If a value is not specified for -nThreads, only one flushing thread is spawned.
For example, duplicate the standby master data store mast2, on the system with the host name primary and the cache user ID system and password manager, to the disaster recovery subscriber drsub, and using two cache group flushing threads. This example assumes that you have a user ttuser with password ttuser with the ADMIN privilege.
ttRepAdmin -duplicate -from mast2 -host primary -uid ttuser -pwd ttuser -cacheInitDR -nThreads 2 -cacheUid system -cachePwd manager drsub
If you use the ttRepDuplicateEx function in C, you must set the TT_REPDUPE_INITCACHEDR flag in ttRepDuplicateExArg.flags and may optionally specify a value for ttRepDuplicateExArg.nThreads4InitDR:
int rc;ttUtilHandle utilHandle;ttRepDuplicateExArg arg;memset( &arg, 0, sizeof( arg ) );arg.size = sizeof( ttRepDuplicateExArg );arg.flags = TT_REPDUPE_INITCACHEDR;arg.nThreads4InitDR = 2;arg.uid="ttuser"arg.pwd="ttuser"arg.cacheuid = "system";arg.cachepwd = "manager";arg.localHost = "disaster";rc = ttRepDuplicateEx( utilHandle, "DSN=drsub", "mast2", "primary", &arg );
After the subscriber is duplicated, TimesTen automatically configures the asynchronous writethrough replication scheme that propagates updates from the cache groups to the Oracle database, truncates the tables in the Oracle database that correspond to the cache groups in TimesTen, and then flushes all of the data in the cache groups to the Oracle database.
3. If you wish to set the failure threshold for the disaster recovery subscriber, call the ttCacheAWTThresholdSet built-in procedure and specify the number of transaction log files that can accumulate before the disaster recovery subscriber is considered either dead or too far behind to catch up.
If one or both master data stores had a failure threshold configured before the disaster recovery subscriber was created, then the disaster recovery subscriber inherits the failure threshold value when it is created with the ttRepAdmin -duplicate -initCacheDR command. If the master data stores have different failure thresholds, then the higher value is used for the disaster recovery subscriber.
For more information about the failure threshold, see "Setting the log failure threshold" on page 3-11.
4. Start the replication agent for the disaster recovery subscriber using the ttRepStart procedure or the ttAdmin command with the option -repstart. For example:
ttAdmin -repstart drsub

Using a disaster recovery subscriber in an active standby pair
Administering an Active Standby Pair with Cache Groups 5-13
Updates are now replicated from the standby master data store to the disaster recovery subscriber, which then propagates the updates to the Oracle database at the disaster recovery site.
Switching over to the disaster recovery siteWhen the primary site has failed, you can switch over to the disaster recovery site in one of two ways. If your goal is to minimize risk of data loss at the disaster recovery site, you may roll out a new active standby pair using the disaster recovery subscriber as the active master data store. If the goal is to absolutely minimize the downtime of your applications, at the risk of data loss if the disaster recovery data store later fails, you may instead choose to drop the replication scheme from the disaster recovery subscriber and use it as a single non-replicating data store. You may deploy an active standby pair at the disaster recovery site later.
Creating a new active standby pair after switching to the disaster recovery site1. Any read-only applications may be redirected to the disaster recovery subscriber
immediately. Redirecting applications that make updates to the data store must wait until Step 7.
2. Ensure that all of the recent updates to the cache groups have been propagated to the Oracle database using the ttRepSubscriberWait procedure or the ttRepAdmin command with the -wait option.
ttRepSubscriberWait( null, null, '_ORACLE', null, 600 );
If ttRepSubscriberWait returns 0x01, indicating a timeout, you may need to investigate to determine why the cache groups are not finished propagating before continuing to Step 3.
3. Stop the replication agent on the disaster recovery subscriber using the ttRepStop procedure or the ttAdmin command with the -repstop option. For example, to stop the replication agent for the subscriber drsub, use:
call ttRepStop;
4. Drop the active standby pair replication scheme on the subscriber using the DROP ACTIVE STANDBY PAIR statement. For example:
DROP ACTIVE STANDBY PAIR;
5. Create a new active standby pair replication scheme using the CREATE ACTIVE STANDBY PAIR statement, specifying the disaster recovery subscriber as the active master data store. For example, to create a new active standby pair with the former subscriber drsub as the active master and the new data store drstandby as the standby master, and using the return twosafe return service, use:
CREATE ACTIVE STANDBY PAIR drsub, drstandby RETURN TWOSAFE;
6. Set the new active standby master data store to the ACTIVE state using the ttRepStateSet procedure. For example, on the data store drsub in this example, execute:
call ttRepStateSet( 'ACTIVE' );
7. Any applications which must write to the TimesTen data store may now be redirected to the new active master data store.
8. If you are replicating a read-only cache group or an AWT cache group with the AUTOREFRESH attribute, load the cache group using the LOAD CACHE GROUP

Using a disaster recovery subscriber in an active standby pair
5-14 Oracle TimesTen In-Memory Database TimesTen to TimesTen Replication Guide
statement to begin the autorefresh process. You may also load the cache group if you are replicating an AWT cache group without the AUTOREFRESH attribute, although it is not required.
9. Duplicate the active master data store to the standby master data store. You can use either the ttRepAdmin -duplicate utility or the ttRepDuplicateEx C function to duplicate a data store. Use the -keepCG command line option with ttRepAdmin in order to preserve the cache group. See "Duplicating a data store" on page 4-2.
10. Set up the replication agent policy on the standby master data store and start the replication agent. See "Starting and stopping the replication agents" on page 8-13.
11. Wait for the standby master data store to enter the STANDBY state. Use the ttRepStateGet procedure to check the state.
12. Start the cache agent for the standby master data store using the ttCacheStart procedure or the ttAdmin -cacheStart utility.
13. Duplicate all of the subscribers from the standby master data store. See "Copying a master data store to a subscriber" on page 8-8. Use the -noKeepCG command line option with ttRepAdmin in order to convert the cache group to regular TimesTen tables on the subscribers.
14. Set up the replication agent policy on the subscribers and start the agent on each of the subscriber stores. See "Starting and stopping the replication agents" on page 8-13.
Switching over to a single data store1. Any read-only applications may be redirected to the disaster recovery subscriber
immediately. Redirecting applications that make updates to the data store must wait until Step 5.
2. Stop the replication agent on the disaster recovery subscriber using the ttRepStop procedure or the ttAdmin command with the -repstop option. For example, to stop the replication agent for the subscriber drsub, use:
call ttRepStop;
3. Drop the active standby pair replication scheme on the subscriber using the DROP ACTIVE STANDBY PAIR statement. For example:
DROP ACTIVE STANDBY PAIR;
4. Although there is no longer an active standby pair configured, AWT cache groups require the replication agent to be started. Start the replication agent on the data store using the ttRepStart procedure or the ttAdmin command with the -repstart option. For example, to start the replication agent for the data store drsub, use:
call ttRepStart;
5. Any applications which must write to a TimesTen data store may now be redirected to the this data store.

Using a disaster recovery subscriber in an active standby pair
Administering an Active Standby Pair with Cache Groups 5-15
Returning to the original configuration at the primary siteWhen the primary site is usable again, you may wish to move the working active standby pair from the disaster recovery site back to the primary site. You can do this with a minimal interruption of service by reversing the process that was used to create and switch over to the original disaster recovery site. Follow these steps:
1. Destroy original active master data store at the primary site, if necessary, using the ttDestroy utility. For example, to destroy a data store called mast1, use:
ttDestroy mast1
2. Create a disaster recovery subscriber at the primary site, following the steps detailed in "Rolling out a disaster recovery subscriber" on page 5-11. Use the original active master data store for the new disaster recovery subscriber.
3. Switch over to the new disaster recovery subscriber at primary site, as detailed in "Switching over to the disaster recovery site" on page 5-13. Roll out the standby master data store as well.
4. Roll out a new disaster recovery subscriber at the disaster recovery site, as detailed in "Rolling out a disaster recovery subscriber" on page 5-11.
Note: You may choose to roll out an active standby pair at the disaster recovery site at a later time. You may do this by following the steps in "Creating a new active standby pair after switching to the disaster recovery site" on page 5-13, starting at Step 2 and skipping Step 4.

Using a disaster recovery subscriber in an active standby pair
5-16 Oracle TimesTen In-Memory Database TimesTen to TimesTen Replication Guide

6
Using Oracle Clusterware to Manage Active Standby Pairs 6-1
6Using Oracle Clusterware to Manage ActiveStandby Pairs
Oracle Clusterware monitors and controls applications to provide high availability. This chapter describes how to use Oracle Clusterware to manage availability for a TimesTen active standby pair.
For more information about Oracle Clusterware, see Oracle Clusterware Administration and Deployment Guide in the Oracle Database documentation.
This chapter includes the following topics:
■ Overview
■ The cluster.oracle.ini file
■ Creating and initializing a cluster
■ Recovering from failures
■ Planned maintenance
OverviewFigure 6–1 shows an active standby pair with one read-only subscriber in the same local network. The active master data store, the standby master data store and the read-only subscriber are on different nodes. There are two nodes that are not part of the active standby pair that are also running TimesTen. An application updates the active master data store. An application also reads from the subscriber. All of the nodes are connected to shared storage.

Overview
6-2 Oracle TimesTen In-Memory Database TimesTen to TimesTen Replication Guide
Figure 6–1 Active standby pair with one subscriber
You can use Oracle Clusterware to start, monitor and automatically fail over TimesTen applications in response to node failures and other events. See "Planned maintenance" on page 6-16 and "Recovering from failures" on page 6-11 for details.
Oracle Clusterware can be implemented at two levels of availability for TimesTen. The basic level of availability manages two master nodes and up to 127 read-only subscriber nodes in the cluster. The active standby pair is defined with physical host names and IP addresses. If both master nodes fail, user intervention is necessary to migrate the active standby scheme to new hosts. When both master nodes fail, Oracle Clusterware notifies the user.
The advanced level of availability uses virtual IP addresses for the active, standby and read-only subscriber data stores. Extra nodes can be included in the cluster that are not part of the initial active standby pair. If a failure occurs, the use of virtual IP addresses allows one of the extra nodes to take on the role of a failed node automatically.
If your applications connect to TimesTen in a client/server configuration, automatic client failover enables the client to reconnect automatically to the master data store with the active role after a failure. See "Working with the TimesTen Client and Server" in Oracle TimesTen In-Memory Database Operations Guide and "TTC_FailoverPortRange" in Oracle TimesTen In-Memory Database Reference.
The ttCWAdmin utility is used to administer TimesTen active standby pairs in a cluster that is managed by Oracle Clusterware. The configuration for each active standby pair is stored in an initialization file called cluster.oracle.ini by default. The information in this file is used to create Oracle Clusterware resources. Resources are used to manage each TimesTen daemon, data store, TimesTen processes, user applications and virtual IP addresses. For more information about the ttCWAdmin utility, see "ttCWAdmin" in Oracle TimesTen In-Memory Database Reference. For more information about the cluster.oracle.ini file, see "The cluster.oracle.ini file" on page 6-3.
Active standby configurationsYou can use Oracle Clusterware to manage these configurations:
Activemasterdata store
Standbymasterdata store
Read-onlysubscriber
Applicationupdates
Sharedstorage
Extranode 1
Extranode 2
data store
Applicationreads

The cluster.oracle.ini file
Using Oracle Clusterware to Manage Active Standby Pairs 6-3
■ Active standby pair with or without read-only subscribers
■ Active standby pair (with or without read-only subscribers) with AWT cache groups
■ Active standby pair (with or without read-only subscribers) with read-only cache groups
■ Active standby pair (with or without read-only subscribers) with AWT cache groups and read-only cache groups
Required privilegesThe user must be the TimesTen instance administrator and must belong to the same operating system group as the Oracle Clusterware installation user.
On UNIX and Linux platforms, these ttCWAdmin commands must be executed by the root user:
ttCWAdmin -createVIPs
ttCWAdmin -dropVIPs
Hardware and software requirementsSee Oracle Clusterware Administration and Deployment Guide for network and storage requirements and information about Oracle Clusterware configuration files.
Oracle Clusterware and TimesTen should be installed in the same location on all nodes.
All machines should use Network Time Protocol (NTP) or a similar system to remain within 250 milliseconds of each other. This prevents Oracle Clusterware from unnecessarily restarting machines.
Restricted commands and SQL statementsWhen you use Oracle Clusterware to manage an active standby pair, do not use these commands and SQL statements:
■ CREATE ACTIVE STANDBY PAIR, ALTER ACTIVE STANDBY PAIR and DROP ACTIVE STANDBY PAIR SQL statements
■ ttAdmin and ttRepAdmin -duplicate utilities
■ ttRepStart and ttRepStop built-in procedures
In addition, do not call ttDaemonAdmin -stop before calling ttCWAdmin -shutdown.
For more information about the built-ins and utilities, see Oracle TimesTen In-Memory Database Reference. For more information about the SQL statements, see Oracle TimesTen In-Memory Database SQL Reference.
The cluster.oracle.ini fileThe configuration for each active standby pair is stored in an initialization file called cluster.oracle.ini. The information in this file is used to create Oracle Clusterware resources that manage TimesTen daemons, data stores, TimesTen processes, user applications and virtual IP addresses.

The cluster.oracle.ini file
6-4 Oracle TimesTen In-Memory Database TimesTen to TimesTen Replication Guide
The user creates the cluster.oracle.ini file as a text file and places it in the daemon home directory. By default this directory is:
■ The install_dir/info directory on Linux and UNIX
■ The c:\TimesTen\install_dir\srv\info directory on Windows
All of the attributes that can be used in the cluster.oracle.ini file are described in "Clusterware Attributes for TimesTen" in Oracle TimesTen In-Memory Database Reference.
The entry name in the cluster.oracle.ini file must be the same as an existing DSN:
■ In the sys.odbc.ini file on Linux or UNIX
■ In a system DSN on Windows
For example, [basicDSN] in the cluster.oracle.ini file described in "Configuring basic availability" on page 6-4 must exist in the sys.odbc.ini file.
This section includes sample cluster.oracle.ini files for these configurations:
■ Configuring basic availability
■ Configuring advanced availability
■ Including cache groups in the active standby pair
■ Implementing application failover
■ Recovering from failure of both master nodes
■ Using the RepDDL attribute
Configuring basic availabilityThis example shows an active standby pair with no subscribers. The hosts for the active master data store and the standby master data store are host1 and host2. The list of hosts is delimited by commas. You can include spaces for readability if desired.
When the ttCWAdmin utility creates a profile for the active standby pair, it creates scripts that are placed in the location specified by the ScriptInstallDir attribute.
[basicDSN]MasterHosts=host1,host2ScriptInstallDir=/mycluster/TTscripts
This is an example of a cluster.oracle.ini file for an active standby pair with one subscriber on host3:
[basicSubscriberDSN]MasterHosts=host1,host2SubscriberHosts=host3ScriptInstallDir=/mycluster/TTscripts
On Windows, the format of the ScriptInstallDir attribute is similar to this:
ScriptInstallDir=c:\mycluster\TTscripts
Configuring advanced availabilityThe hosts for the active master data store and the standby master data store are host1 and host2. host3 and host4 are extra nodes that can be used for failover. There are no subscriber nodes. MasterVIP specifies the virtual IP addresses defined for the

The cluster.oracle.ini file
Using Oracle Clusterware to Manage Active Standby Pairs 6-5
master data stores. VIPInterface is the name of the public network adaptor. VIPNetMask defines the netmask of the virtual IP addresses.
[advancedDSN]MasterHosts=host1,host2,host3,host4ScriptInstallDir=/mycluster/TTscriptsMasterVIP=192.168.1.1, 192.168.1.2VIPInterface=eth0VIPNetMask=255.255.255.0
This example has one subscriber on host4. There is one extra node that can be used for failing over the master data stores and one extra node that can be used for the subscriber data store. MasterVIP and SubscriberVIP specify the virtual IP addresses defined for the master and subscriber data stores. VIPInterface is the name of the public network adaptor. VIPNetMask defines the netmask of the virtual IP addresses.
[advancedSubscriberDSN]MasterHosts=host1,host2,host3SubscriberHosts=host4,host5ScriptInstallDir=/mycluster/TTscriptsMasterVIP=192.168.1.1, 192.168.1.2SubscriberVIP=192.168.1.3VIPInterface=eth0VIPNetMask=255.255.255.0
Ensure that the extra nodes:
■ Have TimesTen installed
■ Have the direct-linked application installed if this is part of the configuration. See "Implementing application failover" on page 6-5.
■ Have a copy of the cluster.oracle.ini file in the same location as the other hosts.
Including cache groups in the active standby pairIf the active standby pair replicates one or more AWT or read-only cache groups, set the CacheConnect attribute to y.
This example specifies an active standby pair with one subscriber in an advanced availability configuration. The active standby pair replicates one or more cache groups.
[advancedCacheDSN]MasterHosts=host1,host2,host3SubscriberHosts=host4, host5ScriptInstallDir=/mycluster/TTscriptsMasterVIP=192.168.1.1, 192.168.1.2SubscriberVIP=192.168.1.3VIPInterface=eth0VIPNetMask=255.255.255.0CacheConnect=y
Implementing application failoverTimesTen integration with Oracle Clusterware can facilitate the failover of an application that is linked to any of the data stores in the active standby pair. Both direct-linked and client/server applications that are on the same machine as Oracle Clusterware and TimesTen can be managed.
The cluster.oracle.ini file
6-6 Oracle TimesTen In-Memory Database TimesTen to TimesTen Replication Guide
The required attributes for failing over an application are:
■ AppName - Name of the application to be managed by Oracle Clusterware
■ AppStartCmd - Command line for starting the application
■ AppStopCmd - Command line for stopping the application
■ AppCheckCmd - Command line for executing an application that checks the status of the application specified by AppName
■ AppType - Determines the data store to which the application is linked. The possible values are Active, Standby, and Subscriber[index].
Optionally, you can also set AppFailureThreshold, AppFailoverDelay, and AppScriptTimeout. These attributes have default values.
Oracle Clusterware uses the user-supplied script or program specified by AppCheckCmd to monitor the application. The script that checks the status of the application must be written to return 0 for success and a nonzero number for failure. When Oracle Clusterware detects a nonzero value, it takes action to recover the failed application.
This example shows advanced availability configured for an active standby pair with with no subscribers. The reader application is an application that queries the data in the standby data store.
[appDSN]MasterHosts=host1,host2,host3,host4ScriptInstallDir=/mycluster/TTscriptsMasterVIP=192.168.1.1, 192.168.1.2VIPInterface=eth0VIPNetMask=255.255.255.0AppName=readerAppType=StandbyAppStartCmd=/mycluster/reader/app_start.shAppStopCmd=/clusterware/reader/app_stop.shAppCheckCmd=/clusterware/reader/app_check.sh
AppStartCmd, AppStopCmd and AppCheckCmd can include arguments. For example, consider a valid cluster.oracle.ini file on Windows. In this example the application is directly linked to the active master data store. The script for starting, stopping, and checking the application takes arguments for the DSN and the action to take (-start, -stop and -check).
Note the double quotes for the specified paths in AppStartCmd, AppStopCmd and AppCheckCmd. The quotes are needed because there are spaces in the path.
[appWinDSN]MasterHosts=host1,host2,host3,host4ScriptInstallDir=C:\Cluster Files\TTscriptsMasterVIP=192.168.1.1, 192.168.1.2VIPInterface=Local Area ConnectionVIPNetMask=255.255.255.0AppName=UpdateAppAppType=ActiveAppStartCmd="C:\Program Files\UserApps\UpdateApp.exe" -dsn myDSN -startAppStopCmd= "C:\Program Files\UserApps\UpdateApp.exe" -dsn myDSN -stopAppCheckCmd="C:\Program Files\UserApps\UpdateApp.exe" -dsn myDSN -check
You can configure failover for more than one application. Use AppName to name the application and provide values for AppType, AppStartCmd, AppStopCmd and

The cluster.oracle.ini file
Using Oracle Clusterware to Manage Active Standby Pairs 6-7
AppCheckCmd immediately following the AppName attribute. You can include blank lines for readability. For example:
[app2DSN]MasterHosts=host1,host2,host3,host4ScriptInstallDir=/mycluster/TTscriptsMasterVIP=192.168.1.1, 192.168.1.2VIPInterface=eth0VIPNetMask=255.255.255.0
AppName=readerAppType=StandbyAppStartCmd=/mycluster/reader/app_start.shAppStopCmd=/clusterware/reader/app_stop.shAppCheckCmd=/clusterware/reader/app_check.sh
AppName=updateAppType=ActiveAppStartCmd=/mycluster/update/app2_start.shAppStopCmd=/clusterware/update/app2_stop.shAppCheckCmd=/clusterware/update/app2_check.sh
Recovering from failure of both master nodesIf both master nodes fail, Oracle Clusterware can automatically recover the master data stores to two new nodes. Automatic recovery requires:
■ Advanced availability (virtual IP addresses and at least four hosts)
■ No cache groups on the active standby pair data stores
■ AutoRecover set to y
■ RepBackupDir specifies a directory on shared storage
■ RepBackupPeriod must be set to a value greater than 0
TimesTen first performs a full backup of the active master data store and then performs incremental backups. You can specify the optional attribute RepfullbackupCycle to manage when TimesTen performs subsequent full backup. By default, TimesTen performs a full backup after every five incremental backups.
If RepBackupDir and RepBackupPeriod are configured for backups, TimesTen performs backups for any master data store that becomes active. It does not delete backups that were performed for a data store that used to be active and has become the standby unless the data store becomes active again. Ensure that the shared storage has enough space for two complete data store backups. ttCWAdmin -restore automatically chooses the correct backup files.
TimesTen uses the ttBackup utility to perform backups. Incremental backups affect the amount of log records in the transaction log file. Ensure that the values of RepBackupPeriod and RepfullbackupCycle are small enough to prevent a large amount of log records in the transaction log file. For more information about the interaction between backups and log records, see "ttBackup" in Oracle TimesTen In-Memory Database Reference.
This example shows attribute settings for automatic recovery.
[autorecoveryDSN]MasterHosts=host1,host2,host3,host4ScriptInstallDir=/mycluster/TTscriptsMasterVIP=192.168.1.1, 192.168.1.2VIPInterface=eth0

The cluster.oracle.ini file
6-8 Oracle TimesTen In-Memory Database TimesTen to TimesTen Replication Guide
VIPNetMask=255.255.255.0AutoRecover=yRepBackupDir=/shared_drive/dsbackupRepBackupPeriod=3600
If you have cache groups in the active standby pair or prefer to recover manually from failure of both master hosts, ensure that AutoRecover is set to n (the default). Manual recovery requires:
■ RepBackupDir specifies a directory on shared storage
■ RepBackupPeriod must be set to a value greater than 0
This example shows attribute settings for manual recovery. The default value for AutoRecover is n, so it is not included in the file.
[manrecoveryDSN]MasterHosts=host1,host2,host3ScriptInstallDir=/mycluster/TTscriptsMasterVIP=192.168.1.1, 192.168.1.2VIPInterface=eth0VIPNetMask=255.255.255.0RepBackupDir=/shared_drive/dsbackupRepBackupPeriod=3600
Using the RepDDL attributeThe RepDDL attribute represents the SQL statement that creates the active standby pair. The RepDDL attribute is optional. You can use it to exclude tables, cache groups and sequences from the active standby pair.
If you include RepDDL in the cluster.oracle.ini file, you do not need to include ReturnServiceAttribute, MasterStoreAttribute and SubscriberStoreAttribute.
When you specify a value for RepDDL, use <DSN> for the data store file name prefix and placeholders for the host names, such as <MASTERHOST[1]> and <MASTERHOST[2]>.
Use the RepDDL attribute to exclude tables, cache groups and sequences from the active standby pair:
[excludeDSN]MasterHosts=host1,host2,host3,host4ScriptInstallDir=/mycluster/TTscriptsMasterVIP=192.168.1.1, 192.168.1.2VIPInterface=eth0VIPNetMask=255.255.255.0RepDDL=CREATE ACTIVE STANDBY PAIR \<DSN> ON <MASTERHOST[1]>, <DSN> ON <MASTERHOST[2]>,\EXCLUDE TABLE pat.salaries, \EXCLUDE CACHE GROUP terry.salupdate, \EXCLUDE SEQUENCE ttuser.empcount
Usually, Oracle Clusterware provides routing information to the TimesTen replication agent. If you are using network interfaces that Oracle Clusterware is not aware of, you can specify them in the ROUTE clause in RepDDL.
Note: Do not specify a ROUTE clause if you are configuring advanced availability.

Creating and initializing a cluster
Using Oracle Clusterware to Manage Active Standby Pairs 6-9
[routeDSN]MasterHosts=host1,host2,host3,host4ScriptInstallDir=/mycluster/TTscriptsRepDDL=CREATE ACTIVE STANDBY PAIR \<DSN> ON <MASTERHOST[1]>, <DSN> ON <MASTERHOST[2]>,\ROUTE MASTER <DSN> ON <MASTERHOST[1]> SUBSCRIBER <DSN> ON <MASTERHOST[2]>\MASTERIP "192.168.1.2" PRIORITY 1\SUBSCRIBERIP "192.168.1.3" PRIORITY 1\ MASTERIP "10.0.0.1" PRIORITY 2\SUBSCRIBERIP "10.0.0.2" PRIORITY 2\MASTERIP "140.87.11.203" PRIORITY 3\SUBSCRIBERIP "140.87.11.204" PRIORITY 3\ROUTE MASTER <DSN> ON <MASTERHOST[2]> SUBSCRIBER <DSN> ON <MASTERHOST[2]>\MASTERIP "192.168.1.3" PRIORITY 1\SUBSCRIBERIP "192.168.1.2" PRIORITY 1\ MASTERIP "10.0.0.2" PRIORITY 2\SUBSCRIBERIP "10.0.0.1" PRIORITY 2\MASTERIP "140.87.11.204" PRIORITY 3\SUBSCRIBERIP "140.87.11.203" PRIORITY 3\
Creating and initializing a clusterTo create and initialize a cluster, perform these tasks:
■ Install Oracle Clusterware
■ Install TimesTen on each host
■ Start the TimesTen cluster agent
■ Create and populate a TimesTen data store on one host
■ Create a cluster.oracle.ini file
■ Create the virtual IP addresses (optional)
■ Create an active standby pair replication scheme
■ Start the active standby pair
If you plan to have more than one active standby pair in the cluster, see "Including more than one active standby pair in a cluster" on page 6-11.
Install Oracle ClusterwareInstall Oracle Clusterware. By default the installation occurs on all hosts concurrently. See Oracle Clusterware Administration and Deployment Guide for details.
Oracle Clusterware starts automatically after successful installation.
Install TimesTen on each hostInstall TimesTen in the same location on each host in the cluster, including extra hosts.
On Linux and UNIX, the installer prompts you for values for:
■ The T CP/IP port number associated with the TimesTen cluster agent. If you do not provide a port number, TimesTen uses the default TimesTen port.
■ The Oracle Clusterware location.
■ The hosts included in the cluster, including spare hosts, with host names separated by commas

Creating and initializing a cluster
6-10 Oracle TimesTen In-Memory Database TimesTen to TimesTen Replication Guide
The installer uses these values to create the ttcrsagent.options file.
The ttcrsagent.options file must be the same on every host. On Linux, you can use the -record and -batch options for setup.sh to perform identical installations on additional hosts. See "TimesTen Installation" in Oracle TimesTen In-Memory Database Installation Guide for details.
On Windows, execute ttmodinstall -crs after installation to create the ttcrsagent.options file. You can also use the ttmodinstall utility to create the ttcrsagent.options file on existing installations on other platforms. For more information about ttmodinstall, see "ttmodinstall" in Oracle TimesTen In-Memory Database Reference.
Start the TimesTen cluster agentStart the TimesTen cluster agent by executing the ttCWAdmin -init command on one of the hosts. For example:
ttCWAdmin -init
When the TimesTen cluster agent has started, Oracle Clusterware begins monitoring the TimesTen daemon and will restart it if it fails.
Create and populate a TimesTen data store on one hostCreate a data store on the host where you intend the active master data store to reside. The DSN must be the same as the data store file name.
Create schema objects such as tables, AWT cache groups and read-only cache groups.
Create a cluster.oracle.ini fileCreate a cluster.oracle.ini file. See "The cluster.oracle.ini file" on page 6-3 for details about its contents and location.
Create the virtual IP addresses (optional)For advanced availability, execute the ttCWAdmin -createVIPs command on any host in the cluster. On UNIX, you must execute this command as the root user. For example:
ttCWAdmin -createVIPs -dsn myDSN
Create an active standby pair replication schemeCreate an active standby pair replication scheme by executing the ttCWAdmin -create command on any host. For example:
ttCWAdmin -create -dsn myDSN
This command prompts for an encryption pass phrase that the user will not need again. The command also prompts for the user ID and password for an internal user with the ADMIN privilege if it does not find this information in the sys.odbc.ini file. This internal user will be used to create the active standby pair.
If CacheConnect is enabled, the command prompts for the user password for the Oracle database. The Oracle password is used to set the autorefresh states for cache groups.
Recovering from failures
Using Oracle Clusterware to Manage Active Standby Pairs 6-11
Start the active standby pairStart the active standby pair replication scheme by executing the ttCWAdmin -start command on any host. For example:
ttCWAdmin -start -dsn myDSN
Including more than one active standby pair in a clusterIf you want to use Oracle Clusterware to manage more than one active standby pair in a cluster, include additional configurations in the cluster.oracle.ini file. For example, this cluster.oracle.ini file contains configuration information for two active standby pair replication schemes:
[advancedSubscriberDSN]MasterHosts=host1,host2,host3SubscriberHosts=host4, host5ScriptInstallDir=/mycluster/TTscriptsMasterVIP=192.168.1.1, 192.168.1.2SubscriberVIP=192.168.1.3VIPInterface=eth0VIPNetMask=255.255.255.0
[advSub2DSN]MasterHosts=host1,host2,host3SubscriberHosts=host4, host5ScriptInstallDir=/mycluster/TTscriptsMasterVIP=192.168.1.4, 192.168.1.5SubscriberVIP=192.168.1.6VIPInterface=eth0VIPNetMask=255.255.255.0
Perform these tasks for additional replication schemes:
1. Create and populate the data stores.
2. Create the virtual IP addresses. Use the ttCWAdmin -createVIPs command.
3. Create the active standby pair replication scheme. Use the ttCWAdmin -create command.
4. Start the active standby pair. Use the ttCWAdmin -start command.
Recovering from failuresOracle Clusterware can recover automatically from many kinds of failures. This section describes several failure scenarios and how Oracle Clusterware manages the failures.
This section includes these topics:
■ When an active master data store or its host fails
■ When a standby master data store or its host fails
■ When read-only subscribers or their hosts fail
■ When failures occur on both master nodes
■ When more than two master hosts fail

Recovering from failures
6-12 Oracle TimesTen In-Memory Database TimesTen to TimesTen Replication Guide
When an active master data store or its host failsIf there is a failure on the node where the active master data store resides, Oracle Clusterware automatically changes the state of the standby master data store to 'ACTIVE'. If application failover is configured, then the application begins updating the new active master data store.
Figure 6–2 shows that the state of the standby master data store has changed to 'ACTIVE' and that the application is updating the new active master data store.
Figure 6–2 Standby master data store becomes active
Oracle Clusterware tries to restart the data store or host where the failure occurred. If it is successful, then that data store becomes the standby master data store.
Figure 6–3 shows a cluster where the former active node becomes the standby node.
Activemasterdata store
Standbymasterdata store
Read-onlysubscriber
Sharedstorage
Extranode 1
Extranode 2
data store
Active
Applicationupdates
Applicationreads

Recovering from failures
Using Oracle Clusterware to Manage Active Standby Pairs 6-13
Figure 6–3 Standby master data store starts on former active host
If the failure of the former active node is permanent and advanced availability is configured, Oracle Clusterware starts a standby master data store on one of the extra nodes.
Figure 6–4 shows a cluster in which the standby master data store is started on one of the extra nodes.
Figure 6–4 Standby master data store starts on extra host
When a standby master data store or its host failsIf there is a failure on the standby node, Oracle Clusterware first tries to restart the data store or host. If it cannot restart the standby data store on the same host and advanced availability is configured, Oracle Clusterware starts the standby data store on an extra node.
Activemasterdata store
Standbymasterdata store
Read-onlysubscriber
Sharedstorage
Extranode 1
Extranode 2
data store
ActiveStandby
Applicationreads
Applicationupdates
Activemasterdata store
Standbymasterdata store
Read-onlysubscriber
Sharedstorage
Extranode 1
data store
Active
Standbymasterdata store
Applicationupdates
Applicationreads

Recovering from failures
6-14 Oracle TimesTen In-Memory Database TimesTen to TimesTen Replication Guide
Figure 6–5 shows the standby data store on a new host after a failure.
Figure 6–5 Standby master data store on new host
When read-only subscribers or their hosts failIf there is a failure on a subscriber node, Oracle Clusterware first tries to restart the data store or host. If it cannot restart the data store on the same host and advanced availability is configured, Oracle Clusterware starts the subscriber data store on an extra node.
When failures occur on both master nodesThis section includes these topics:
■ Automatic recovery
■ Manual recovery for advanced availability
■ Manual recovery for basic availability
Automatic recoveryOracle Clusterware can achieve automatic recovery from failure on both master nodes if:
■ Advanced availability is configured (virtual IP addresses and at least four hosts)
■ No cache groups are replicated by the active standby pair
■ AutoRecover is set to y
■ RepBackupDir specifies a directory on shared storage
■ RepBackupPeriod is set to a value greater than 0
See "Recovering from failure of both master nodes" on page 6-7 for examples of cluster.oracle.ini files.
Activemasterdata store
Standbymasterdata store
Read-onlysubscriber
Applicationupdates
Sharedstorage
Extranode 1
data store
Applicationreads
Standbymaster data store
Recovering from failures
Using Oracle Clusterware to Manage Active Standby Pairs 6-15
Manual recovery for advanced availabilityThis section assumes that the failed master nodes will be recovered to new hosts.
To perform manual recovery in an advanced availability configuration, perform these tasks:
1. If the new hosts are not already specified by MasterHosts and SubscriberHosts in the cluster.oracle.ini file, then modify the file to include the new hosts. This example uses manrecoveryDSN. This step is not necessary for manrecoveryDSN because extra hosts are already specified in the cluster.oracle.ini file.
2. Ensure that the TimesTen cluster agent is running on the local host.
ttCWAdmin -init -hosts localhost
3. Restore the backup data store. Ensure that there is not already a data store on the host with the same DSN as the data store you want to restore.
ttCWAdmin -restore -dsn manrecoveryDSN
4. If there are cache groups in the data store, drop and re-create the cache groups.
5. Re-create the active standby pair replication scheme.
ttCWAdmin -create -dsn manrecoveryDSN
6. Start the active standby pair replication scheme.
ttCWAdmin -start -dsn manrecoveryDSN
Manual recovery for basic availabilityThis section assumes that the failed master nodes will be recovered to new hosts.
To perform manual recovery in a basic availability configuration, perform these steps:
1. Acquire new hosts for the data stores in the active standby pair.
2. Update the MasterHosts and SubscriberHosts entries in the cluster.oracle.ini file. This example uses the basicDSN data store.
3. Ensure that the TimesTen cluster agent is running on the local host.
ttCWAdmin -init -hosts localhost
4. Restore the backup data store. Ensure that there is not already a data store on the host with the same DSN as the data store you want to restore.
ttCWADmin -restore -dsn basicDSN
5. If there are cache groups in the data store, drop and re-create the cache groups.
6. Re-create the active standby pair replication scheme.
ttCWAdmin -create -dsn basicDSN
7. Start the active standby pair replication scheme.
ttCWAdmin -start -dsn basicDSN
When more than two master hosts failApproach a failure of more than two master hosts as a more extreme case of dual host failure. Use these guidelines:

Planned maintenance
6-16 Oracle TimesTen In-Memory Database TimesTen to TimesTen Replication Guide
■ Address the root cause of the failure if it is something like a power outage or network failure.
■ Identify or obtain at least two healthy hosts for the active and standby master data stores.
■ Update the MasterHosts and SubscriberHosts entries in the cluster.oracle.ini file.
■ See "Manual recovery for advanced availability" on page 6-15 and "Manual recovery for basic availability" on page 6-15 for guidelines on subsequent actions to take.
Planned maintenanceThis section includes the following topics:
■ Changing the schema
■ Performing a rolling upgrade of Oracle Clusterware software
■ Upgrading TimesTen
■ Adding a read-only subscriber to an active standby pair
■ Removing a read-only subscriber from an active standby pair
■ Adding an active standby pair to a cluster
■ Removing an active standby pair from a cluster
■ Adding a host to the cluster
■ Removing a host from the cluster
■ Performing host or network maintenance
■ Performing maintenance on the entire cluster
Changing the schemaSchema changes like altering a table can be performed directly on the active master data store. The changes will be replicated to the other data stores in the active standby pair.
If you want to create or drop a table or cache group from an active standby pair in a cluster, perform the following tasks:
1. Stop the replication agents on the data stores in the active standby pair. These commands use the advancedCacheDSN as an example.
ttCWAdmin -stop -dsn advancedCacheDSN
2. Drop the active standby pair.
ttCWAdmin -drop -dsn advancedCacheDSN
3. Modify the schema as desired.
4. Re-create the active standby pair replication scheme.
ttCWAdmin -create -dsn advancedCacheDSN
5. Start the active standby pair replication scheme.
ttCWAdmin -start -dsn advancedCacheDSN

Planned maintenance
Using Oracle Clusterware to Manage Active Standby Pairs 6-17
Performing a rolling upgrade of Oracle Clusterware softwareSee Oracle Clusterware Administration and Deployment Guide.
Upgrading TimesTenTo upgrade TimesTen on one host, perform these tasks:
1. Stop the replication agents on the data stores in the active standby pair.
ttCWAdmin -stop -dsn advancedDSN
2. Stop the TimesTen cluster agent on the host. This removes the host from the cluster and stops the TimesTen daemon.
ttCWAdmin -shutdown -hosts localhost
3. Upgrade TimesTen on the host. If you are upgrading between major releases, use the ttMigrate utility. See "Data Store Upgrades" in Oracle TimesTen In-Memory Database Installation Guide.
4. Start the TimesTen cluster agent. This includes the host in the cluster and starts the TimesTen daemon.
ttCWAdmin -init
To perform a rolling upgrade of TimesTen across the cluster, perform the tasks on each host.
Adding a read-only subscriber to an active standby pairTo add a read-only subscriber to an active standby pair, perform these steps:
1. Stop the replication agents on all data stores. This example uses the advancedSubscriberDSN, which already has a subscriber and is configured for advanced availability.
ttCWAdmin -stop -dsn advancedSubscriberDSN
2. Drop the active standby pair.
ttCWAdmin -drop -dsn advancedSubscriberDSN
3. Modify the cluster.oracle.ini file.
■ Add the subscriber to the SubscriberHosts attribute.
■ If the cluster is configured for advanced availability, add a virtual IP address to the SubscriberVIP attribute.
See "Configuring advanced availability" on page 6-4 for an example using these attributes
4. Create the active standby pair replication scheme.
ttCWAdmin -create -dsn advancedSubscriberDSN
5. Start the active standby pair replication scheme.
ttCWAdmin -start -dsn advancedSubscriberDSN
Removing a read-only subscriber from an active standby pairTo remove a read-only subscriber to an active standby pair, perform these steps:
Planned maintenance
6-18 Oracle TimesTen In-Memory Database TimesTen to TimesTen Replication Guide
1. Stop the replication agents on all data stores. This example uses the advancedSubscriberDSN, which has a subscriber and is configured for advanced availability.
ttCWAdmin -stop -dsn advancedSubscriberDSN
2. Drop the active standby pair.
ttCWAdmin -drop -dsn advancedSubscriberDSN
3. Modify the cluster.oracle.ini file.
■ Remove the subscriber from the SubscriberHosts attribute or remove the attribute altogether if there are no subscribers left in the active standby pair.
■ Remove a virtual IP the SubscriberVIP attribute or remove the attribute altogether if there are no subscribers left in the active standby pair.
4. Create the active standby pair replication scheme.
ttCWAdmin -create -dsn advancedSubscriberDSN
5. Start the active standby pair replication scheme.
ttCWAdmin -start -dsn advancedSubscriberDSN
Adding an active standby pair to a clusterTo add an active standby pair (with or without subscribers) to a cluster that is already managing an active standby pair, perform these tasks:
1. Create and populate a data store on the host where you intend the active master data store to reside initially. See "Create and populate a TimesTen data store on one host" on page 6-10.
2. Modify the cluster.oracle.ini file. This example adds advSub2DSN to the cluster.oracle.ini file that already contains the configuration for advancedSubscriberDSN. The new active standby pair is on different hosts from the original active standby pair.
[advancedSubscriberDSN]MasterHosts=host1,host2,host3SubscriberHosts=host4, host5ScriptInstallDir=/mycluster/TTscriptsMasterVIP=192.168.1.1, 192.168.1.2SubscriberVIP=192.168.1.3VIPInterface=eth0VIPNetMask=255.255.255.0
[advSub2DSN]MasterHosts=host6,host7,host8SubscriberHosts=host9, host10ScriptInstallDir=/mycluster/TTscriptsMasterVIP=192.168.1.4, 192.168.1.5SubscriberVIP=192.168.1.6VIPInterface=eth0VIPNetMask=255.255.255.0
3. Create new virtual IP addresses. On Linux and UNIX, the user must be root to do this.
ttCWAdmin -createVIPs -dsn advSub2DSN

Planned maintenance
Using Oracle Clusterware to Manage Active Standby Pairs 6-19
4. Create the new active standby pair replication scheme.
ttCWAdmin -create -dsn advSub2DSN
5. Start the new active standby pair replication scheme.
ttCWAdmin -start -dsn advSub2DSN
Removing an active standby pair from a clusterTo remove an active standby pair (with or without subscribers) from a cluster, perform these tasks:
1. Stop the replication agents on all data stores in the active standby pair. This example uses advSub2DSN, which was added in "Adding an active standby pair to a cluster" on page 6-18.
ttCWAdmin -stop -dsn advSub2DSN
2. Drop the active standby replication scheme.
ttCWAdmin -drop -dsn advSub2DSN
3. Drop the virtual IP addresses for the active standby pair.
ttCWAdmin -dropVIPs -dsn advSub2DSN
4. Modify the cluster.oracle.ini file (optional). Remove the entries for advSub2DSN.
5. If you want to destroy the data stores, log onto each host that was included in the configuration for this active standby pair and use the ttDestroy utility.
ttDestroy advSub2DSN
For more information about ttDestroy, see "ttDestroy" in Oracle TimesTen In-Memory Database Reference.
Adding a host to the clusterAdding a host requires that the cluster be configured for advanced availability.
To add a host to the cluster, perform these tasks:
1. Stop the replication agents. This example uses the example DSN advancedDSN.
ttCWAdmin -stop -dsn advancedDSN
2. Drop the active standby pair.
ttCWAdmin -drop -dsn advancedDSN
3. Modify the cluster.oracle.ini file. In this example, host5 is added to the list of master hosts.
[advancedDSN]MasterHosts=host1, host2, host3, host4, host5ScriptInstallDir=/mycluster/TTscriptsMasterVIP=192.168.1.1, 192.168.1.2VIPInterface=eth0VIPNetMask=255.255.255.0
4. Ensure that the TimesTen cluster agent is running on host5.

Planned maintenance
6-20 Oracle TimesTen In-Memory Database TimesTen to TimesTen Replication Guide
ttCWAdmin -init -hosts host5
5. Re-create the active standby pair replication scheme.
ttCWAdmin -create -dsn advancedDSN
6. Start the active standby pair replication scheme.
ttCWAdmin -start -dsn advancedDSN
Removing a host from the clusterRemoving a host from the cluster requires that the cluster be configured for advanced availability. MasterHosts must list more than two hosts if one of the master hosts is to be removed. SubscriberHosts must list at least one more host than the number of subscriber data stores if one of the subscriber hosts is to be removed.
To remove a host from the cluster, perform these tasks:
1. Stop the replication agents. This example uses the example DSN advancedSubscriberDSN.
ttCWAdmin -stop -dsn advancedSubscriberDSN
2. Drop the active standby pair.
ttCWAdmin -drop -dsn advancedSubscriberDSN
3. Remove the host from the cluster. See "Adding and Deleting Oracle Clusterware Homes" in Oracle Clusterware Administration and Deployment Guide for details.
4. Modify the cluster.oracle.ini file by removing the host from the appropriate list of hosts. In this example, host5 has been removed from the list of subscriber hosts.
[advancedSubscriberDSN]MasterHosts=host1,host2,host3SubscriberHosts=host4ScriptInstallDir=/mycluster/TTscriptsMasterVIP=192.168.1.1, 192.168.1.2SubscriberVIP=192.168.1.3VIPInterface=eth0VIPNetMask=255.255.255.0
5. Re-create the active standby pair replication scheme.
ttCWAdmin -create -dsn advancedSubscriberDSN
6. Start the active standby pair replication scheme.
ttCWAdmin -start -dsn advancedSubscriberDSN
Performing host or network maintenanceIf you need to upgrade the operating system or hardware for a host or perform network maintenance, shut down Oracle Clusterware and disable automatic startup. Execute these Oracle Clusterware commands as root or OS administrator:
#crsctl stop crs
#crsctl disable crs
Planned maintenance
Using Oracle Clusterware to Manage Active Standby Pairs 6-21
Shut down TimesTen. See "Shutting down a TimesTen application" in Oracle TimesTen In-Memory Database Operations Guide.
Perform the host maintenance. Then enable automatic startup and start Oracle Clusterware:
#crsctl enable crs
#crsctl start crs
See Oracle Clusterware Administration and Deployment Guide for more information about these commands.
Performing maintenance on the entire clusterWhen all of the hosts in the cluster need to be brought down, stop Oracle Clusterware on each host individually. Execute these Oracle Clusterware commands as root or OS administrator:
# crsctl stop crs
#crsctl start crs
Shut down TimesTen. See "Shutting down a TimesTen application" in Oracle TimesTen In-Memory Database Operations Guide
Perform the maintenance. Then enable automatic startup and start Oracle Clusterware:
# crsctl enable crs
# crsctl start crs

Planned maintenance
6-22 Oracle TimesTen In-Memory Database TimesTen to TimesTen Replication Guide

7
Defining Replication Schemes 7-1
7Defining Replication Schemes
This chapter describes how to define replication schemes that are not active standby pairs. For information about defining active standby pair replication schemes, see Chapter 3, "Defining an Active Standby Pair Replication Scheme".
This chapter includes the following topics:
■ Designing a highly available system
■ Defining a replication scheme
■ Using a return service
■ Setting STORE attributes
■ Configuring network operations
■ Creating multiple replication schemes
■ Replicating tables with foreign key relationships
■ Replicating materialized views
■ Replicating sequences
■ Example replication schemes
■ Creating replication schemes with scripts
Designing a highly available systemThe primary objectives of any replication scheme are to:
■ Provide one or more backup data stores to ensure the data is always available to applications.
■ Provide a means to recover failed data stores from their backup stores.
■ Efficiently distribute workloads to provide applications with the quickest possible access to the data.
■ Enable software upgrades and maintenance without disrupting service to users.
When designing a highly available system, the subscriber data store must be able to survive failures that may affect the master. At a minimum, the master and subscriber need to be on separate machines. For some applications, you may want to place the subscriber in an environment that has a separate power supply. In certain cases, you may need to place a subscriber at an entirely separate site.
Configure your data stores to best distribute application workloads and make the best use of a limited number of server machines. For example, it might be more efficient

Designing a highly available system
7-2 Oracle TimesTen In-Memory Database TimesTen to TimesTen Replication Guide
and economical to configure your data stores bidirectionally in a distributed workload manner so that each serves as both master and subscriber, rather than as separate master and subscriber data stores in a "hot standby" configuration. However, a distributed workload scheme works best with applications that primarily read from the data stores. Implementing a distributed workload scheme for applications that frequently write to the same elements in a data store may diminish performance and require that you implement a solution to prevent or manage update conflicts, as described in "Replication conflict detection and resolution" on page 11-1.
Failover and recoveryAs you plan your replication scheme, consider every conceivable failover and recovery scenario. For example, subscriber failures generally have no impact on the applications connected to the master data stores and can be recovered from without disrupting user service. If a failure occur on a master data store, you should have a means to redirect the application load to a subscriber and continue service with no or minimal interruption. This process is typically handled by a cluster manager or custom software designed to detect failures, redirect users or applications from the failed data store to one of its subscribers, and manage recovery of the failed data store.
When planning your failover strategies, consider which subscribers are to take on the role of its master and for which users or applications. Also consider recovery factors. For example, a failed master must be able to recover its data store from its most up-to-date subscriber, and any subscriber must be able to recover from its master.
Consider the failure scenario for unidirectionally replicated data stores shown in Figure 7–1. In the case of a master failure, the application cannot access the data store until it is recovered from the subscriber. There is no way to switch the application connection or user load to the subscriber, unless you use an ALTER REPLICATION statement to redefine the subscriber data store as the master.
Figure 7–1 Recovering a master in a unidirectional scheme
Failover and recovery are more efficient when the data stores are configured in a bidirectional general workload scheme, such as the hot standby scheme shown in Figure 7–2. In the hot standby scheme, if the master data store fails, the cluster manager need only to shift the user load to the hot standby application on the subscriber data store. Upon recovering the failed data store, you can resume replication with the master/subscriber roles reversed with minimal interruption to service.
Data Store A Data Store B
Applications
Copy
Users
Data Store A Data Store B
ApplicationsApplications
Users
FAILED
Data Store A Data Store B
Applications
Copy
Users
Normal Operation Failure of Master Recovered Master

Designing a highly available system
Defining Replication Schemes 7-3
Figure 7–2 Recovering a master in a hot standby scheme
The failover procedure for data stores configured using a distributed workload scheme, such as the one shown in Figure 7–3, is similar to that used for the hot standby, but failover involves shifting the users affected by the failed data store to join the other users of an application on a surviving data store. Upon recovery, the workload can be redistributed to the application on the recovered data store.
Figure 7–3 Recovering a master in a distributed workload scheme
Performance and recovery tradeoffsWhen you design a replication scheme, you should weigh operational efficiencies against the complexities of failover and recovery. Factors that may complicate failover and recovery include the network topology that connects a master with its subscribers and the complexity of your replication scheme. For example, it is easier to recover a master that has been fully replicated to a single subscriber than recover a master that has selected elements replicated to different subscribers.
You can configure replication to work either asynchronously, "semi-synchronously" with the return receipt service, or fully synchronously with the return twosafe service. Select a return service for greater confidence that your data is consistent on both the master and subscriber data stores. Your decision to use either the default asynchronous, return receipt, or return twosafe mode depends on the degree of confidence you require and the performance tradeoff you are willing to make in exchange.
Table 7–1 summarizes the performance and recover tradeoffs of asynchronous (default) replication, return receipt service and return twosafe service.
Data Store A Data Store B
Applications Applications
Copy
Users
Data Store A Data Store B
Applications Applications
Users
FAILED
Data Store A Data Store B
Applications Applications
Copy
Users
Normal Operation Failure of Master Recovered Master
Data Store A Data Store B
Applications Applications
Copy
Users
Data Store A Data Store B
ApplicationsApplications Applications
Users
Data Store A Data Store B
Applications Applications
Copy
Users
FAILED
Normal Operation Failure of Master Recovered Master

Designing a highly available system
7-4 Oracle TimesTen In-Memory Database TimesTen to TimesTen Replication Guide
In addition to the performance and recovery tradeoffs between the two return services, you should also consider the following:
■ Return receipt can be used in more configurations, whereas return twosafe can only be used in a bidirectional hot standby configuration or an active standby pair.
■ Return twosafe allows you to specify a "local action" to be taken on the master data store in the event of a timeout or other error encountered when replicating a transaction to the subscriber data store.
A transaction is classified as return receipt or return twosafe when the application updates a table that is configured for either return receipt or return twosafe. Once a
Table 7–1 Performance and recovery tradeoffs
Type of behaviorAsynchronous (default) replication Return receipt Return twosafe
Commit sequence Each transaction is committed first on the master data store.
Each transaction is committed first on the master data store
Each transaction is committed first on the subscriber data store.
Performance on master Shortest response time and best throughput because there is no log wait between transactions or before the commit on the master.
Longer response time and less throughput than asynchronous.
The application is blocked for the duration of the network round-trip after commit. Replicated transactions are more serialized than with asynchronous replication, which results in less throughput.
Longest response time and least throughput.
The application is blocked for the duration of the network round-trip and remote commit on the subscriber before the commit on the master. Transactions are fully serialized, which results in the least throughput.
Effect of a runtime error Because the transaction is first committed on the master data store, errors that occur when committing on a subscriber require the subscriber to be either manually corrected or destroyed and then recovered from the master data store.
Because the transaction is first committed on the master data store, errors that occur when committing on a subscriber require the subscriber to be either manually corrected or destroyed and then recovered from the master data store.
Because the transaction is first committed on the subscriber data store, errors that occur when committing on the master require the master to be either manually corrected or destroyed and then recovered from the master data store. In twosafe mode, it is an error if a commit succeeds on the subscriber and fails on the master. In this event, the error is likely to be fatal, requiring the master to be destroyed and then recovered from the subscriber data store.
Failover after failure of master
If the master fails and the subscriber takes over, the subscriber may be behind the master and must reprocess data feeds and be able to remove duplicates
If the master fails and the subscriber takes over, the subscriber may be behind the master and must reprocess data feeds and be able to remove duplicates
If the master fails and the subscriber takes over, the subscriber is at least up to date with the master. It is also possible for the subscriber to be ahead of the master if the master fails before committing a transaction it had replicated to the subscriber.

Defining a replication scheme
Defining Replication Schemes 7-5
transaction is classified as either return receipt or return twosafe, it remains so, even if the replication scheme is altered before the transaction completes.
Defining a replication schemeAfter you have designed your replication scheme, use the CREATE REPLICATION SQL statement to apply the scheme to your data stores. You must have the ADMIN privilege to use the CREATE REPLICATION statement.
Table 7–2 shows the components of a replication scheme and identifies the clauses associated with the topics in this section. The complete syntax for the CREATE REPLICATION statement is provided in Oracle TimesTen In-Memory Database SQL Reference.
The replication scheme used by a data store is represented in its TTREP tables and persists across system reboots. You cannot directly modify the contents of the TTREP tables. Modifications can be made only by means of the CREATE REPLICATION or ALTER REPLICATION statements. See "System and Replication Tables" in Oracle TimesTen In-Memory Database SQL Reference for descriptions of the TTREP tables.
Owner of the replication scheme and tablesThe owner and name of the replication scheme and the replicated tables must be identical on both the master and subscriber data stores. To ensure that there is a
Table 7–2 Components of a replication scheme
Component See...
CREATE REPLICATION Owner.SchemeName "Owner of the replication scheme and tables" on page 7-5
ELEMENT ElementName ElementType "Defining replication elements" on page 7-6
[CheckConflicts] "Checking for replication conflicts on table elements" on page 7-8
{MASTER|PROPAGATOR} DataStoreName ON "HostName"
"Master, propagator and subscriber data store names" on page 7-6
[TRANSMIT {NONDURABLE|DURABLE}] "Setting transmit durability on data store elements" on page 7-8
SUBSCRIBER DataStoreName ON "HostName" "Master, propagator and subscriber data store names" on page 7-6
[ReturnServiceAttribute] "Using a return service" on page 7-9
INCLUDE|EXCLUDE "Defining data store elements" on page 7-7
STORE DataStoreName DataStoreAttributes "Setting STORE attributes" on page 7-13
[NetworkOperation] "Configuring network operations" on page 7-23
Note: Naming errors in your CREATE REPLICATION statement are often hard to troubleshoot, so take the time to check and double-check your element, data store, and host names for mistakes.

Defining a replication scheme
7-6 Oracle TimesTen In-Memory Database TimesTen to TimesTen Replication Guide
common owner across all data stores, you can explicitly specify an owner name with your replication scheme name in the CREATE REPLICATION statement.
For example, to assign an owner named repl to the replication scheme named repscheme, the first line of your CREATE REPLICATION statement would look like:
CREATE REPLICATION rep1.repscheme
If you omit the owner from the name of your replication scheme and the replicated tables, the default owner name, as specified by the login name of the requester or the name set by the UID attribute in the DSN, is used in its place. Your replication scheme does not work if owner names are different across its data stores.
Master, propagator and subscriber data store namesThese are the roles of the data stores in a replication scheme:
■ Master: Applications update the master data store. The master sends the updates to the propagator or to the subscribers directly.
■ Propagator: The propagator data store receives updates from the master data store and sends them to subscriber data stores.
■ Subscriber: Subscribers receive updates from the propagator or the master.
Before you define the replication scheme, you need to define the DSNs for the data stores in the replication scheme.On Linux or UNIX, create an odbc.ini file. On Windows, use the ODBC Administrator to name the data stores and set data store attributes. See "Step 1: Create the DSNs for the master and the subscriber" on page 2-5 for an example.
Each data store "name" specified in a replication scheme must match the prefix of the data store file name without the path given for the DataStore attribute in the DSN definition for the data store. A replication scheme that uses the names specified in the Data Source Name attributes does not work. To avoid confusion, use the same name for both your DataStore and Data Source Name attributes in each DSN definition. For example, if the data store path is directory/subdirectory/foo.ds0, then foo is the data store name that you should use.
Defining replication elementsA replication scheme consists of one or more ELEMENT descriptions that contain the name of the element, its type (DATASTORE, TABLE or SEQUENCE), the master data store on which it is updated, and the subscriber stores to which the updates are replicated.
These are restrictions on elements:
■ Do not include a specific object (table, sequence or data store) in more than one element description.
■ Do not define the same element in the role of both master and propagator.
■ An element must include the data store on the current host as either the master, subscriber or propagator.
■ Element names must be unique within a replication scheme.
The correct way to define elements in a multiple subscriber scheme is described in "Multiple subscriber schemes" on page 7-28. The correct way to propagate elements is described in "Propagation scheme" on page 7-31.

Defining a replication scheme
Defining Replication Schemes 7-7
The name of each element in a scheme can be used to identify the element if you decide later to drop or modify the element by using the ALTER REPLICATION statement.
You can add tables, sequences and data stores to an existing replication scheme. See "Altering a replication scheme" on page 10-1. You can drop a table or sequence from a data store that is part of an existing replication scheme. See "Dropping a table or sequence from a replication scheme" on page 10-4.
The rest of this section includes the following topics:
■ Defining data store elements
■ Defining table elements
■ Defining sequence elements
Defining data store elementsTo replicate the entire contents of the master data store (masterds) to the subscriber data store (subscriberds), the ELEMENT description (named ds1) might look like the following:
ELEMENT ds1 DATASTORE MASTER masterds ON "system1" SUBSCRIBER subscriberds ON "system2"
Identify a data store host using the host name returned by the hostname operating system command. Host names containing special characters must be surrounded by double quotes (").
You can choose to exclude certain tables and sequences from the data store element by using the EXCLUDE TABLE and EXCLUDE SEQUENCE clauses of the CREATE REPLICATION statement. When you use the EXCLUDE clauses, the entire data store is replicated to all subscribers in the element except for the objects that are specified in the EXCLUDE clauses. Use only one EXCLUDE TABLE and one EXCLUDE SEQUENCE clause in an element description. For example, this element description excludes two tables and one sequence:
ELEMENT ds1 DATASTORE MASTER masterds ON "system1" SUBSCRIBER subscriberds ON "system2" EXCLUDE TABLE tab1, tab2 EXCLUDE SEQUENCE seq1
You can choose to include only certain tables and sequences in the data store by using the INCLUDE TABLE and INCLUDE SEQUENCE clauses of the CREATE REPLICATION statement. When you use the INCLUDE clauses, only the objects that are specified in the INCLUDE clauses are replicated to each subscriber in the element. Use only one INCLUDE TABLE and one INCLUDE SEQUENCE clause in an element description. For example, this element description includes one table and two sequences:
ELEMENT ds1 DATASTORE MASTER masterds ON "system1" SUBSCRIBER subscriberds ON "system2" INCLUDE TABLE tab3 INCLUDE SEQUENCE seq2, seq3
Defining a replication scheme
7-8 Oracle TimesTen In-Memory Database TimesTen to TimesTen Replication Guide
Defining table elementsTo replicate the tab1 and tab2 tables from a master data store (named masterds and located on a host named system1) to a subscriber data store (named subscriberds on a host named system2), the ELEMENT descriptions (named a and b) might look like the following:
ELEMENT a TABLE tab1 MASTER masterds ON "system1" SUBSCRIBER subscriberds ON "system2"ELEMENT b TABLE tab2 MASTER masterds ON "system1" SUBSCRIBER subscriberds ON "system2"
Defining sequence elementsTo replicate updates to the current value of the seq sequence from a master data store (named masterds and located on a host named system1) to a subscriber data store (named subscriberds on a host named system2), the ELEMENT description (named a) might look like the following:
ELEMENT a SEQUENCE seq MASTER masterds ON "system1" SUBSCRIBER subscriberds ON "system2"
Checking for replication conflicts on table elementsWhen data stores are configured for bidirectional replication, there is a potential for replication conflicts to occur if the same table row in two or more data stores is independently updated at the same time.
Such conflicts can be detected and resolved on a table-by-table basis by including timestamps in your replicated tables and configuring the replication scheme with the optional CHECK CONFLICTS clause in each table's ELEMENT description.
See "Replication conflict detection and resolution" on page 11-1 for a complete discussion on replication conflicts and how to configure the CHECK CONFLICTS clause in the CREATE REPLICATION statement.
Setting transmit durability on data store elementsMaster data stores configured for asynchronous or return receipt replication are durable by default but can be set to nondurable using the TRANSMIT NONDURABLE clause. Master data stores configured for return twosafe replication are nondurable by default and cannot be made durable.
Transaction records in the master data store log buffer are, by default, flushed to disk before they are forwarded to subscribers. If the entire master data store is replicated (ELEMENT is of type DATASTORE), you can improve replication performance by eliminating the master's flush-log-to-disk operation from the replication cycle. This is done by including a TRANSMIT NONDURABLE clause in the ELEMENT description. The TRANSMIT setting has no effect on the subscriber. The transaction records on the subscriber data store are always flushed to disk.
Note: When using the return twosafe service, replication is TRANSMIT NONDURABLE. Setting TRANSMIT DURABLE has no effect on return twosafe transactions.

Using a return service
Defining Replication Schemes 7-9
Example 7–1 Replicating the entire master data store with TRANSMIT NONDURABLE
To replicate the entire contents of the master data store (masterds) to the subscriber data store (subscriberds) and to eliminate the flush-log-to-disk operation, your ELEMENT description (named a) might look like:
ELEMENT a DATASTORE MASTER masterds ON "system1" TRANSMIT NONDURABLE SUBSCRIBER subscriberds ON "system2"
In general, if a master data store fails, you have to initiate the ttRepAdmin -duplicate operation described in "Recovering a failed data store" on page 11-17 to recover the failed master from the subscriber data store. This is always true for a master data store configured with TRANSMIT DURABLE.
A data store configured as TRANSMIT NONDURABLE is recovered automatically by the subscriber replication agent if it is configured in the specific type of hot standby scheme described in "Automatic catch-up of a failed master data store" on page 11-15. Otherwise, you must follow the procedures described in "Recovering NONDURABLE data stores" on page 11-19 to recover a failed nondurable data store.
Using a return serviceYou can configure your replication scheme with a return service to ensure a higher level of confidence that replicated data is consistent on both the master and subscriber data stores. This section describes how to configure and manage the return receipt and return twosafe services.
You can specify a return service for table elements and data store elements for any subscriber defined in a CREATE REPLICATION or ALTER REPLICATION statement.
Example 7–2 shows separate SUBSCRIBER clauses that can define different return service attributes for SubDataStore1 and SubDataStore2.
Example 7–2 Different return services for each subscriber
CREATE REPLICATION Owner.SchemeName ELEMENT ElementNameElementType MASTER DataStoreName ON "HostName" SUBSCRIBER SubDataStore1 ON "HostName" ReturnServiceAttribute1 SUBSCRIBER SubDataStore2 ON "HostName" ReturnServiceAttribute2;
Alternatively, you can specify the same return service attribute for all of the subscribers defined in an element. Example 7–3 shows the use of a single SUBSCRIBER clause that defines the same return service attributes for both SubDataStore1 and SubDataStore2.
Example 7–3 Same return service for all subscribers
CREATE REPLICATION Owner.SchemeName ELEMENT ElementNameElementType MASTER DataStoreName ON "HostName" SUBSCRIBER SubDataStore1 ON "HostName", SubDataStore2 ON "HostName" ReturnServiceAttribute;
These sections describe the return service attributes:
■ RETURN RECEIPT

Using a return service
7-10 Oracle TimesTen In-Memory Database TimesTen to TimesTen Replication Guide
■ RETURN RECEIPT BY REQUEST
■ RETURN TWOSAFE
■ RETURN TWOSAFE BY REQUEST
■ NO RETURN
RETURN RECEIPTTimesTen provides an optional return receipt service to loosely couple or synchronize your application with the replication mechanism.
Specify the RETURN RECEIPT attribute to enable the return receipt service for the subscribers listed in the SUBSCRIBER clause of an ELEMENT description. With return receipt enabled, when the application commits a transaction for an element on the master data store, the application remains blocked until the subscriber acknowledges receipt of the transaction update. If the master is replicating the element to multiple subscribers, the application remains blocked until all of the subscribers have acknowledged receipt of the transaction update.
For example replication schemes that use return receipt services, see Example 7–24 and Example 7–25.
Example 7–4 RETURN RECEIPT
To confirm that all transactions committed on the tab table in the master store (masterds) are received by the subscriber (subscriberds), the ELEMENT description (e) might look like the following:
ELEMENT e TABLE tab MASTER masterds ON "system1" SUBSCRIBER subscriberds ON "system2" RETURN RECEIPT
If any of the subscribers are unable to acknowledge receipt of the transaction within a configurable timeout period, the application receives a tt_ErrRepReturnFailed (8170) warning on its commit request. You can use the ttRepXactStatus procedure to check on the status of a return receipt transaction. See "Checking the status of return service transactions" on page 9-16 for more information on the return service timeout period.
You can also configure the replication agent to disable the return receipt service after a specific number of timeouts. See "Managing return service timeout errors and replication state changes" on page 7-16 for details.
The return receipt service is disabled by default if replication is stopped. See "RETURN SERVICES { ON | OFF } WHEN REPLICATION STOPPED" on page 7-17 for details.
RETURN RECEIPT BY REQUESTRETURN RECEIPT enables notification of receipt for all transactions. You can use RETURN RECEIPT with the BY REQUEST option to enable receipt notification only for specific transactions identified by your application.
If you specify RETURN RECEIPT BY REQUEST for a subscriber, you must use the ttRepSyncSet procedure to enable the return receipt service for a transaction. The call to enable the return receipt service must be part of the transaction (autocommit must be off).

Using a return service
Defining Replication Schemes 7-11
Example 7–5 RETURN RECEIPT BY REQUEST
To enable confirmation that specific transactions committed on the tab table in the master store (masterds) are received by the subscriber (subscriberds), your ELEMENT description (e) might look like:
ELEMENT e TABLE tab MASTER masterds ON "system1" SUBSCRIBER subscriberds ON "system2" RETURN RECEIPT BY REQUEST
Prior to committing a transaction that requires receipt notification, we call ttRepSyncSet within a SQLExecDirect function to request the return services and to set the timeout period to 45 seconds:
rc = SQLExecDirect( hstmt, (SQLCHAR *) "CALL ttRepSyncSet(0x01, 45, NULL)", SQL_NTS )
If any of the subscribers are unable to acknowledge receipt of the transaction update within a configurable timeout period, the application receives a tt_ErrRepReturnFailed (8170) warning on its commit request. See "Setting the return service timeout period" on page 7-15.
You can use ttRepSyncGet to check if a return service is enabled and obtain the timeout value. For example:
Command> CALL ttRepSyncGet();< 01, 45, 1>1 row found.
RETURN TWOSAFE BY REQUESTRETURN TWOSAFE enables notification of commit on the subscriber for all transactions. You can use RETURN TWOSAFE with the BY REQUEST option to enable notification of subscriber commit only for specific transactions identified by the application.
If you specify RETURN TWOSAFE BY REQUEST for a subscriber, you must use the ttRepSyncSet procedure to enable the return twosafe service for a transaction. The call to enable the return twosafe service must be part of the transaction (autocommit must be off).
The ALTER TABLE statement cannot be used to alter a replicated table that is part of a TWOSAFE BY REQUEST transaction. If DDLCommitBehavior=1, this operation results in error 8051. If DDLCommitBehavior=0, the operation succeeds because a commit is performed before the ALTER TABLE operation, resulting in the ALTER TABLE operation being in a new transaction which is not part of the TWOSAFE BY REQUEST transaction.
Example 7–6 RETURN TWOSAFE BY REQUEST
To enable confirmation that specific transactions committed on the master store (datastoreA) are also committed by the subscriber (datastoreB), the ELEMENT description (a) might look like:
ELEMENT a DATASTORE MASTER datastoreA ON "system1" SUBSCRIBER datastoreB ON "system2" RETURN TWOSAFE BY REQUEST;

Using a return service
7-12 Oracle TimesTen In-Memory Database TimesTen to TimesTen Replication Guide
Before calling commit for a transaction that requires confirmation of commit on the subscriber, we call ttRepSyncSet within a SQLExecDirect function to request the return service, set the timeout period to 45 seconds, and specify no action (1) in the event of a timeout error:
rc = SQLExecDirect( hstmt, (SQLCHAR *) "CALL ttRepSyncSet(0x01, 45, 1)", SQL_NTS )
In this example, if the subscriber is unable to acknowledge commit of the transaction within the timeout period, the application receives a tt_ErrRepReturnFailed (8170) warning on its commit request. The application can then chose how to handle the timeout. See "Setting the return service timeout period" on page 7-15.
You can use ttRepSyncGet to check if a return service is enabled and obtain the timeout value. For example:
Command> CALL ttRepSyncGet();< 01, 45, 1>1 row found.
RETURN TWOSAFEThe return twosafe service ensures that each replicated transaction is committed on the subscriber data store before it is committed on the master data store. If replication is unable to verify the transaction has been committed on the subscriber, it returns notification of the error. Upon receiving an error, the application can either take a unique action or fall back on preconfigured actions, depending on the type of failure.
The return twosafe service is intended to be used in replication schemes where two data stores must stay synchronized. One data store has an active role, while the other data store has a standby role but must be ready to assume an active role at any moment. Use return twosafe with a bidirectional replication scheme with exactly two data stores.
To enable the return twosafe service for the subscriber, specify the RETURN TWOSAFE attribute in the SUBSCRIBER clause in the CREATE REPLICATION or ALTER REPLICATION statement.
Example 7–7 RETURN TWOSAFE
To confirm all transactions committed on the master store (datastoreA) are also committed by the subscriber (datastoreB), your ELEMENT description (a) might look like the following:
ELEMENT a DATASTORE MASTER datastoreA ON "system1" SUBSCRIBER datastoreB ON "system2" RETURN TWOSAFE
The entire CREATE REPLICATION statement that specifies both datastoreA and datastoreB in a bidirectional hot standby configuration with RETURN TWOSAFE might look like the following:
CREATE REPLICATION hotstandbyELEMENT a DATASTORE MASTER datastoreA ON "system1" SUBSCRIBER datastoreB ON "system2" RETURN TWOSAFEELEMENT b DATASTORE MASTER datastoreB ON "system2" SUBSCRIBER datastoreA ON "system1"

Setting STORE attributes
Defining Replication Schemes 7-13
RETURN TWOSAFE;
When replication is configured with RETURN TWOSAFE, you must disable the AutoCommit connection attribute.
When the application commits a transaction on the master data store, the application remains blocked until the subscriber acknowledges it has successfully committed the transaction. Initiating identical updates or deletes on both data stores can lead to deadlocks in commits that can be resolved only by stopping the processes.
If the subscriber is unable to acknowledge commit of the transaction update within a configurable timeout period, your application receives a tt_ErrRepReturnFailed (8170) warning on its commit request. See "Setting the return service timeout period" on page 7-15.
NO RETURNUse the NO RETURN attribute to explicitly disable the return receipt or return twosafe service. NO RETURN is the default condition. This attribute is typically set in ALTER REPLICATION statements. See Example 10–13.
Setting STORE attributesTable 7–3 lists the optional STORE parameters for the CREATE REPLICATION and ALTER REPLICATION statements.
Table 7–3 STORE attribute descriptions
STORE attribute Description
DISABLE RETURN {SUBSCRIBER|ALL} NumFailures
Set the return service policy so that return service blocking is disabled after the number of timeouts specified by NumFailures.
See "Establishing return service failure/recovery policies" on page 7-16.
RETURN SERVICES {ON|OFF} WHEN REPLICATION STOPPED
Set return services on or off when replication is disabled.
See "Establishing return service failure/recovery policies" on page 7-16.
RESUME RETURN Milliseconds
If DISABLE RETURN has disabled return service blocking, this attribute sets the policy for re-enabling the return service.
See "Establishing return service failure/recovery policies" on page 7-16.
RETURN WAIT TIME Seconds Specifies the number of seconds to wait for return service acknowledgement. A value of 0 means that there is no waiting. The default value is 10 seconds.
The application can override this timeout setting by using the returnWait parameter in the ttRepSyncSet built-in procedure.
See "Setting the return service timeout period" on page 7-15.
DURABLE COMMIT {ON|OFF} Overrides the DurableCommits attribute setting. Enables durable commit when return service blocking has been disabled by DISABLE RETURN.
See "DURABLE COMMIT" on page 7-19.

Setting STORE attributes
7-14 Oracle TimesTen In-Memory Database TimesTen to TimesTen Replication Guide
The FAILTHRESHOLD and TIMEOUT attributes can be unique to a specific replication scheme definition. This means these attribute settings can vary if you have applied different replication scheme definitions to your replicated data stores. This is not true for any of the other attributes, which must be the same across all replication scheme definitions. For example, setting the PORT attribute for one scheme sets it for all schemes.
LOCAL COMMIT ACTION {NO ACTION|ACTON}
Specify the default action to be taken for a return service transaction in the event of a timeout. The options are:
NO ACTION - On timeout, the commit function returns to the application, leaving the transaction in the same state it was in when it entered the commit call, with the exception that the application is not able to update any replicated tables. The application can reissue the commit. This is the default.
COMMIT- On timeout, the commit function attempts to perform a COMMIT to end the transaction locally.
This default setting can be overridden for specific transactions by using the localAction parameter in the ttRepSyncSet procedure.
See "LOCAL COMMIT ACTION" on page 7-20.
COMPRESS TRAFFIC {ON|OFF} Compress replicated traffic to reduce the amount of network bandwidth used.
See "Compressing replicated traffic" on page 7-20.
PORT PortNumber Set the port number used by subscriber data stores to listen for updates from a master.
If no PORT attribute is specified, the TimesTen daemon dynamically selects the port. While static port assignment is allowed by TimesTen, dynamic port allocation is recommended.
See "Port assignments" on page 7-21.
TIMEOUT Seconds Set the maximum number of seconds a data store waits for a response from another data store before resending the message.
"Setting the return service timeout period" on page 7-15
FAILTHRESHOLD Set the log failure threshold.
See "Setting the log failure threshold" on page 8-10.
CONFLICT REPORTING {SUSPEND|RESUME} AT Value
Specify the number of replication conflicts per second at which conflict reporting is suspended, and the number of conflicts per second at which conflict reporting resumes.
See "Replication conflict detection and resolution" on page 11-1.
TABLE DEFINITION CHECKING {EXACT|RELAXED}
Specify the type of table definition checking:
■ EXACT - The tables must be identical on master and subscriber. This is the default.
■ RELAXED - The tables must have the same key definition, number of columns and column data types.
See "Replicating tables with different definitions" on page 7-22.
Table 7–3 (Cont.) STORE attribute descriptions
STORE attribute Description

Setting STORE attributes
Defining Replication Schemes 7-15
For an example replication scheme that uses a STORE clause to set the FAILTHRESHOLD attribute, see Example 7–24.
Setting the return service timeout periodIf your replication scheme is configured with one of the return services described in "Using a return service" on page 7-9, a timeout occurs if any of the subscribers are unable to send an acknowledgement back to the master within the time period specified by TIMEOUT.
The default return service timeout period is 10 seconds. You can specify a different return service timeout period by:
■ Configuring RETURN WAIT TIME in the CREATE REPLICATION or ALTER REPLICATION statement. A RETURN WAIT TIME of '0' indicates no waiting.
■ Calling the ttRepSyncSet procedure with a new returnWait parameter
Once set, the timeout period applies to all subsequent return service transactions until you either reset the timeout period or terminate the application session. The timeout setting applies to all return services for all subscribers.
A return service may time out because of a replication failure or because replication is so far behind that the return service transaction times out before it is replicated. However, unless there is a simultaneous replication failure, failure to obtain a return service confirmation from the subscriber does not mean the transaction has not been or will not be replicated.
You can set other STORE attributes to establish policies that automatically disable return service blocking in the event of excessive timeouts and re-enable return service blocking when conditions improve. See "Managing return service timeout errors and replication state changes" on page 7-16.
Example 7–8 Setting the timeout period for both data store in bidirectional replication scheme
To set the timeout period to 30 seconds for both bidirectionally replicated data stores, datastoreA and datastoreB, in the hotstandby replication scheme, the CREATE REPLICATION statement might look like the following:
CREATE REPLICATION hotstandbyELEMENT a DATASTORE MASTER datastoreA ON "system1" SUBSCRIBER datastoreB ON "system2" RETURN TWOSAFEELEMENT b DATASTORE MASTER datastoreB ON "system2" SUBSCRIBER datastoreA ON "system1" RETURN TWOSAFESTORE datastoreA RETURN WAIT TIME 30STORE datastoreB RETURN WAIT TIME 30;
Example 7–9 Resetting the timeout period
To use the ttRepSyncSet procedure to reset the timeout period to 45 seconds, call ttRepSyncSet within a SQLExecDirect ODBC function. To avoid resetting the requestReturn and localAction values, specify NULL:
rc = SQLExecDirect( hstmt, (SQLCHAR *) "CALL ttRepSyncSet(NULL, 45, NULL)", SQL_NTS )
Setting STORE attributes
7-16 Oracle TimesTen In-Memory Database TimesTen to TimesTen Replication Guide
Managing return service timeout errors and replication state changesThe replication state can be reset to Stop by a user or by the master replication agent in the event of a subscriber failure. A subscriber may be unable to acknowledge a transaction that makes use of a return service and may time out with respect to the master. If any of the subscribers are unable to acknowledge the transaction update within the timeout period, the application receives an errRepReturnFailed warning on its commit request.
The default return service timeout period is 10 seconds. You can specify a different return service timeout period by:
■ Configuring the RETURN WAIT TIME attribute in the STORE clause of the CREATE REPLICATION or ALTER REPLICATION statement
■ Calling ttRepSyncSet procedure with a new returnWait parameter
A return service may time out or fail because of a replication failure or because replication is so far behind that the return service transaction times out before it is replicated. However, unless there is a simultaneous replication failure, failure to obtain a return service confirmation from the subscriber does not necessarily mean the transaction has not been or will not be replicated.
This section describes how to detect and respond to timeouts on return service transactions. The main topics are:
■ When to manually disable return service blocking
■ Establishing return service failure/recovery policies
When to manually disable return service blockingYou may want respond in some manner if replication is stopped or return service timeout failures begin to adversely impact the performance of the replicated system. Your "tolerance threshold" for return service timeouts may depend on the historical frequency of timeouts and the performance/availability equation for your particular application, both of which should be factored into your response to the problem.
When using the return receipt service, you can manually respond by:
■ Using ALTER REPLICATION to make changes to the replication scheme to disable return receipt blocking for a particular subscriber. If you decide to disable return receipt blocking, your decision to re-enable it depends on your confidence level that the return receipt transaction is no longer likely to time out.
■ Calling the ttDurableCommit procedure to durably commit transactions on the master that you can no longer verify as being received by the subscriber
An alternative to manually responding to return service timeout failures is to establish return service failure and recovery policies in your replication scheme. These policies direct the replication agents to detect changes to the replication state and to keep track of return service timeouts and then automatically respond in some predefined manner.
Establishing return service failure/recovery policiesAn alternative to manually responding to return service timeout failures is to establish return service failure and recovery policies in your replication scheme. These policies direct the replication agents to detect changes to the replication state and to keep track of return service timeouts and then automatically respond in some predefined manner.
The following attributes in the CREATE REPLICATION or ALTER REPLICATION statement set the failure/recovery policies when using a RETURN RECEIPT or RETURN TWOSAFE service:
Setting STORE attributes
Defining Replication Schemes 7-17
■ RETURN SERVICES { ON | OFF } WHEN REPLICATION STOPPED
■ DISABLE RETURN
■ RESUME RETURN
■ DURABLE COMMIT
■ LOCAL COMMIT ACTION
The policies set by these attributes are applicable for the life of the data store or until changed. However, the replication agent must be running to enforce these policies.
RETURN SERVICES { ON | OFF } WHEN REPLICATION STOPPED The RETURN SERVICES { ON | OFF } WHEN REPLICATION STOPPED attribute determines whether a return receipt or return twosafe service continues to be enabled or is disabled when replication is stopped. "Stopped" in this context means that either the master replication agent is stopped (for example, by ttAdmin -repStop master) or the replication state of the subscriber data store is set to Stop or Pause with respect to the master data store (for example, by ttRepAdmin -state stop subscriber). A failed subscriber that has exceeded the specified FAILTHRESHOLD value is set to the Failed state, but is eventually set to the Stop state by the master replication agent.
RETURN SERVICES OFF WHEN REPLICATION STOPPED disables the return service when replication is stopped and is the default when using the RETURN RECEIPT service. RETURN SERVICES ON WHEN REPLICATION STOPPED allows the return service to continue to be enabled when replication is stopped and is the default when using the RETURN TWOSAFE service.
Example 7–10 RETURN SERVICES ON WHEN REPLICATION STOPPED
Configure the CREATE REPLICATION statement to replicate updates from the masterds data store to the subscriber1 data store. The CREATE REPLICATION statement specifies the use of RETURN RECEIPT and RETURN SERVICES ON WHEN REPLICATION STOPPED.
CREATE REPLICATION myschemeELEMENT e TABLE tab MASTER masterds ON "server1" SUBSCRIBER subscriber1 ON "server2" RETURN RECEIPT STORE masterds ON "server1" RETURN SERVICES ON WHEN REPLICATION STOPPED;
While the application is committing updates to the master, ttRepAdmin is used to set subscriber1 to the Stop state:
ttRepAdmin -dsn masterds -receiver -name subscriber1 -state stop
The application continues to wait for return receipt acknowledgements from subscriber1 until the replication state is reset to Start and it receives the acknowledgment:
Note: A subscriber may become unavailable for a period of time that exceeds the timeout period specified by RETURN WAIT TIME but still be considered by the master replication agent to be in the Start state. Failure policies related to timeouts are set by the DISABLE RETURN attribute.
Setting STORE attributes
7-18 Oracle TimesTen In-Memory Database TimesTen to TimesTen Replication Guide
ttRepAdmin -dsn masterds -receiver -name subscriber1 -state start
DISABLE RETURN When a DISABLE RETURN value is set, the data store keeps track of the number of return receipt or return twosafe transactions that have exceeded the timeout period set by RETURN WAIT TIME. If the number of timeouts exceeds the maximum value set by DISABLE RETURN, the applications revert to a default replication cycle in which they no longer wait for subscribers to acknowledge the replicated updates.
You can set DISABLE RETURN SUBSCRIBER to establish a failure policy to disable return service blocking for only those subscribers that have timed out, or DISABLE RETURN ALL to establish a policy to disable return service blocking for all subscribers. You can use the ttRepSyncSubscriberStatus built-in procedure or the ttRepReturnTransitionTrap SNMP trap to determine whether a particular subscriber has been disabled by the DISABLE RETURN failure policy.
The DISABLE RETURN failure policy is enabled only when the replication agent is running. If DISABLE RETURN is specified but RESUME RETURN is not specified, the return services remain off until the replication agent for the data store has been restarted. You can cancel this failure policy by stopping the replication agent and specifying either DISABLE RETURN SUBSCRIBER or DISABLE RETURN ALL with a zero value for NumFailures. The count of timeouts to trigger the failure policy is reset either when you restart the replication agent, when you set the DISABLE RETURN value to 0, or when return service blocking is re-enabled by RESUME RETURN.
DISABLE RETURN maintains a cumulative timeout count for each subscriber. If there are multiple subscribers and you set DISABLE RETURN SUBSCRIBER, the replication agent disables return service blocking for the first subscriber that reaches the timeout threshold. If one of the other subscribers later reaches the timeout threshold, the replication agent disables return service blocking for that subscriber also.
Example 7–11 DISABLE RETURN SUBSCRIBER
Configure the CREATE REPLICATION statement to replicate updates from the masterds data store to the data stores, subscriber1 and subscriber2. The CREATE REPLICATION statement specifies the use of RETURN RECEIPT and DISABLE RETURN SUBSCRIBER with a NumFailures value of 5. The RETURN WAIT TIME is set to 30 seconds.
CREATE REPLICATION myschemeELEMENT e TABLE tab MASTER masterds ON "server1" SUBSCRIBER subscriber1 ON "server2", subscriber2 ON "server3"RETURN RECEIPTSTORE masterds ON "server1" DISABLE RETURN SUBSCRIBER 5 RETURN WAIT TIME 30;
While the application is committing updates to the master, subscriber1 experiences problems and fails to acknowledge a replicated transaction update. The application is blocked 30 seconds after which it commits its next update to the master. Over the course of the application session, this commit/timeout cycle repeats 4 more times until DISABLE RETURN disables return receipt blocking for subscriber1. The application continues to wait for return-receipt acknowledgements from subscriber2 but not from subscriber1.

Setting STORE attributes
Defining Replication Schemes 7-19
RETURN SERVICES OFF WHEN REPLICATION STOPPED is the default setting for the return receipt service. Therefore, return receipt is disabled under either one of the following conditions:
■ The subscriber is unable to acknowledge an update within the specified RETURN WAIT TIME, as described above.
■ Replication is stopped, as described in "RETURN SERVICES { ON | OFF } WHEN REPLICATION STOPPED" on page 7-17.
For another example that set the DISABLE RETURN attribute, see Example 7–12.
RESUME RETURN When we say return service blocking is "disabled," we mean that the applications on the master data store no longer block execution while waiting to receive acknowledgements from the subscribers that they received or committed the replicated updates. Note, however, that the master still listens for an acknowledgement of each batch of replicated updates from the subscribers.
You can establish a return service recovery policy by setting the RESUME RETURN attribute and specifying a resume latency value. When this attribute is set and return service blocking has been disabled for a subscriber, the return receipt or return twosafe service is re-enabled when the commit-to-acknowledge time for a transaction falls below the value set by RESUME RETURN. The commit-to-acknowledge time is the latency between when the application issues a commit and when the master receives acknowledgement of the update from the subscriber.
Example 7–12 RESUME RETURN
If return receipt blocking has been disabled for subscriber1 and if RESUME RETURN is set to 8 milliseconds, then return receipt blocking is re-enabled for subscriber1 the instant it acknowledges an update in less than 8 milliseconds from when it was committed by the application on the master.
CREATE REPLICATION myschemeELEMENT e TABLE tab MASTER masterds ON "server1" SUBSCRIBER subscriber1 ON "server2", subscriber2 ON "server3"RETURN RECEIPTSTORE masterds ON "server1" DISABLE RETURN SUBSCRIBER 5 RESUME RETURN 8;
The RESUME RETURN policy is enabled only when the replication agent is running. You can cancel a return receipt resume policy by stopping the replication agent and then using ALTER REPLICATION to set RESUME RETURN to zero.
DURABLE COMMIT Set the DURABLE COMMIT attribute to specify the durable commit policy for applications that have return service blocking disabled by DISABLE RETURN. When DURABLE COMMIT is set to ON, it overrides the DurableCommits attribute on the master data store and forces durable commits for those transactions that have had return service blocking disabled.
DURABLE COMMIT is useful if you have only one subscriber. However, if you are replicating the same data to two subscribers and you disable return service blocking to one subscriber, then you achieve better performance if you rely on the other subscriber than you would by enabling durable commits.

Setting STORE attributes
7-20 Oracle TimesTen In-Memory Database TimesTen to TimesTen Replication Guide
Example 7–13 DURABLE COMMIT
Set DURABLE COMMIT ON when establishing a DISABLE RETURN ALL policy to disable return-receipt blocking for all subscribers. If return-receipt blocking is disabled, commits are durably committed to disk to provide redundancy.
CREATE REPLICATION myschemeELEMENT e TABLE tab MASTER masterds ON "server1" SUBSCRIBER subscriber ON "server2", subscriber2 ON "server3"RETURN RECEIPTSTORE masterds ON "server1" DISABLE RETURN ALL 5 DURABLE COMMIT ON RESUME RETURN 8;
LOCAL COMMIT ACTION When using the return twosafe service, you can specify how the master replication agent responds to timeout errors by:
■ Setting the LOCAL COMMIT ACTION attribute in the STORE clause of the CREATE REPLICATION statement
■ Calling the ttRepSyncSet procedure with the localAction parameter
The possible actions upon receiving a timeout during replication of a twosafe transaction are:
■ COMMIT - Upon timeout, the replication agent on the master data store commits the transaction and no more operations are allowed in the transaction.
■ NO ACTION - Upon timeout, the replication agent on the master data store does not commit the transaction. The process recovery commits the transaction. This is equivalent to a forced commit.
If the call returns with an error, you can use the ttRepXactStatus procedure described in "Checking the status of return service transactions" on page 9-16 to check the status of the transaction. Depending on the error, your application can choose to:
■ Reissue the commit call - This repeats the entire return twosafe replication cycle, so that the commit call returns when the success or failure of the replicated commit on the subscriber is known or if the timeout period expires.
■ Roll back the transaction - If the call returns with an error related to applying the transaction on the subscriber, such as primary key lookup failure, you can roll back the transaction on the master.
Compressing replicated trafficIf you are replicating over a low-bandwidth network, or if you are replicating massive amounts of data, you can set the COMPRESS TRAFFIC attribute to reduce the amount of bandwidth required for replication. The COMPRESS TRAFFIC attribute compresses the replicated data from the data store specified by the STORE parameter in your CREATE REPLICATION or ALTER REPLICATION statement. TimesTen does not compress traffic from other data stores.
Note: If the replication scheme is configured with RETURN SERVICES ON WHEN REPLICATION STOPPED, the replication agent must be running to enforce the DURABLE COMMIT policy.

Setting STORE attributes
Defining Replication Schemes 7-21
Although the compression algorithm is optimized for speed, enabling the COMPRESS TRAFFIC attribute has some impact on replication throughput and latency.
Example 7–14 Compressing traffic from one data store
To compress replicated traffic from data store dsn1 and leave the replicated traffic from dsn2 uncompressed, the CREATE REPLICATION statement looks like:
CREATE REPLICATION repschemeELEMENT d1 DATASTORE MASTER dsn1 ON machine1 SUBSCRIBER dsn2 ON machine2ELEMENT d2 DATASTORE MASTER dsn2 ON machine2 SUBSCRIBER dsn1 ON machine1STORE dsn1 ON machine1 COMPRESS TRAFFIC ON;
Example 7–15 Compressing traffic between both data stores
To compress the replicated traffic between both the dsn1 and dsn2 data stores, use:
CREATE REPLICATION schemeELEMENT d1 DATASTORE MASTER dsn1 ON machine1 SUBSCRIBER dsn2 ON machine2ELEMENT d2 DATASTORE MASTER dsn2 ON machine2 SUBSCRIBER dsn1 ON machine1STORE dsn1 ON machine1 COMPRESS TRAFFIC ONSTORE dsn2 ON machine2 COMPRESS TRAFFIC ON;
Port assignmentsIf you do not assign a PORT attribute, the TimesTen daemon dynamically selects the port. When ports are assigned dynamically in this manner for the replication agents, then the ports of the TimesTen daemons have to match as well. Setting the PORT attribute for one scheme sets it for all schemes
If you use CREATE REPLICATION to establish different schemes on the same data store with different PORT attributes, TimesTen ignores the setting from the last CREATE REPLICATION statement. In this case, you must use ALTER REPLICATION to change the PORT setting.
When statically assigning ports, it is important to specify the full host name, DSN and PORT in the STORE attribute of the CREATE REPLICATION statement.
Example 7–16 Assigning static ports
CREATE REPLICATION repschemeELEMENT el1 TABLE tab MASTER dsn1 ON machine1 SUBSCRIBER dsn2 ON machine2ELEMENT el2 TABLE tab MASTER dsn2 ON machine2 SUBSCRIBER dsn1 ON machine1STORE dsn1 ON machine1 PORT 16080STORE dsn2 ON machine2 PORT 16083;

Setting STORE attributes
7-22 Oracle TimesTen In-Memory Database TimesTen to TimesTen Replication Guide
Replicating tables with different definitionsYou can use the TABLE DEFINITION CHECKING attribute to enable replication of tables that are not identical. Setting the TABLE DEFINITION CHECKING attribute to RELAXED requires that replicated tables have the same key definition, number of columns and column data types. Table definition checking occurs on the subscriber side. Setting this attribute to RELAXED for both master and subscriber has the same effect as setting it for only the subscriber.
The RELAXED setting usually results in slower performance. The change in performance depends on the workload and the number of columns in the tables. However, you can set it temporarily while consolidating tables with multiple partitions and then reset it to EXACT.
Example 7–17 Replicating tables with columns in different positions
Create table t1 in dsn1 data store:
CREATE TABLE t1 (a INT PRIMARY KEY, b INT, c INT);
Create table t1 in dsn2 data store with the columns in a different order than the columns in t1 in dsn1 data store. Note that the column names and data types are the same in both tables and a is the primary key in both tables.
CREATE TABLE t1 (c INT, a INT PRIMARY KEY, b INT);
Create replication scheme rep1. Set TABLE DEFINITION CHECKING to RELAXED for the subscriber, dsn2.
CREATE REPLICATION rep1 ELEMENT e1 TABLE t1 MASTER dsn1 SUBSCRIBER dsn2 STORE dsn2 TABLE DEFINITION CHECKING relaxed;
Start the replication agent for both data stores. Insert a row into t1 on dsn1.
Command> INSERT INTO t1 VALUES (4,5,6);1 row inserted.
Verify the results on t1 on dsn2.
Command> SELECT * FROM t1;< 5, 6, 4 >1 row found.
Example 7–18 Replicating tables with a different number of partitions
When you add columns to a table, it increases the number of partitions in the table, even if you subsequently drop the new columns. You can use the RELAXED setting for TABLE DEFINITION CHECKING to replicate tables that have different number of partitions.]
Create table t3 on dsn1 with two columns.
CREATE TABLE t3 (a INT PRIMARY KEY, b INT);
Create table t3 on dsn2 with one column that is the primary key.
CREATE TABLE t3 (a INT PRIMARY KEY);
Add a column to the table on dsn2. This increases the number of partitions to two, while the table on dsn1 has one partition.
Configuring network operations
Defining Replication Schemes 7-23
ALTER TABLE t3 ADD COLUMN b INT;
Create the replication scheme on both data stores.
CREATE REPLICATION reppart ELEMENT e2 TABLE t3 MASTER dsn1 SUBSCRIBER dsn2 STORE dsn2 TABLE DEFINITION CHECKING RELAXED;
Start the replication agent for both data stores. Insert a row into t3 on dsn1.
Command> INSERT INTO t3 VALUES (1,2);1 row inserted.
Verify the results in t3 on dsn2.
Command> SELECT * FROM t3;< 1, 2 >1 row found.
Configuring network operationsIf your replication host has more than one network interface, you may wish to configure replication to use an interface other than the default interface. Although you must specify the host name returned by the operating system's hostname command when you define a replication element, you may configure replication to send or receive traffic over a different interface using the ROUTE clause.
The syntax of the ROUTE clause is:
ROUTE MASTER FullStoreName SUBSCRIBER FullStoreName {{MASTERIP MasterHost | SUBSCRIBERIP SubscriberHost} PRIORITY Priority} [...]
Example 7–19 Configuring multiple network interfaces
If host machine1 is configured with a second interface accessible by the host name machine1fast, and machine2 is configured with a second interface at IP address 192.168.1.100, you may specify that the secondary interfaces are used with the replication scheme.
CREATE REPLICATION repschemeELEMENT e1 TABLE tab MASTER dsn1 ON machine1 SUBSCRIBER dsn2 ON machine2ELEMENT e2 TABLE tab MASTER dsn2 ON machine2 SUBSCRIBER dsn1 ON machine1ROUTE MASTER dsn1 ON machine1 SUBSCRIBER dsn2 ON machine2 MASTERIP machine1fast PRIORITY 1 SUBSCRIBERIP "192.168.1.100" PRIORITY 1ROUTE MASTER dsn2 ON machine2 SUBSCRIBER dsn1 ON machine1 MASTERIP "192.168.1.100" PRIORITY 1 SUBSCRIBERIP machine1fast PRIORITY 1;
Alternately, on a replication host with more than one interface, you may wish to configure replication to use one or more interfaces as backups, in case the primary interface fails or the connection from it to the receiving host is broken. You may use the ROUTE clause to specify two or more interfaces for each master or subscriber that are used by replication in order of priority.

Creating multiple replication schemes
7-24 Oracle TimesTen In-Memory Database TimesTen to TimesTen Replication Guide
Example 7–20 Configuring network priority
If host machine1 is configured with two network interfaces at IP addresses 192.168.1.100 and 192.168.1.101, and host machine2 is configured with two interfaces at IP addresses 192.168.1.200 and 192.168.1.201, you may specify that replication use IP addresses 192.168.1.100 and 192.168.200 to transmit and receive traffic first, and to try IP addresses 192.168.1.101 or 192.168.1.201 if the first connection fails.
CREATE REPLICATION repschemeELEMENT e TABLE tab MASTER dsn1 ON machine1 SUBSCRIBER dsn2 ON machine2ROUTE MASTER dsn1 ON machine1 SUBSCRIBER dsn2 ON machine2 MASTERIP "192.168.1.100" PRIORITY 1 MASTERIP "192.168.1.101" PRIORITY 2 SUBSCRIBERIP "192.168.1.200" PRIORITY 1 SUBSCRIBERIP "192.168.1.201" PRIORITY 2;
If replication on the master host is unable to bind to the MASTERIP with the highest priority, it will try to connect using subsequent MASTERIP addresses in order of priority immediately. However, if the connection to the subscriber fails for any other reason, replication will try to connect using each of the SUBSCRIBERIP addresses in order of priority before it tries the MASTERIP address with the next highest priority.
Creating multiple replication schemesThough it is often valid to assign more than one replication scheme to a data store, managing a replicated system is usually much easier if you contain the replication definition in a single scheme and apply that scheme to all of the replicated data stores.
However, there may be circumstances in which you want to define different replication schemes on different data stores. For example, in a large replicated system that is distributed across multiple sites, it might be more efficient for each site to autonomously manage a separate scheme. It might also be useful to create separate schemes with different SUBSCRIBER and STORE attributes to better accommodate the characteristics of the various hosts.
Note the following restrictions when creating multiple replication schemes:
■ There cannot be more than one replication scheme that describes replication from one data store to another data store. For example, you cannot have two separate replication schemes that replicate from the masterds data store to the subscriberds data store:
CREATE REPLICATION scheme1ELEMENT e TABLE tab1 MASTER masterds SUBSCRIBER subscriberds;
CREATE REPLICATION repscheme2ELEMENT e2 TABLE tab2 MASTER masterds SUBSCRIBER subscriberds;
■ A table for which a data store is the master in one replication scheme cannot have the same data store as a master for the same table in another replication scheme. For example, you cannot have two replication schemes that replicate the tab1 table from the masterds data store to the subscriber1ds and subscriber2ds data stores:

Replicating sequences
Defining Replication Schemes 7-25
CREATE REPLICATION repscheme1ELEMENT e TABLE tab1 MASTER masterds SUBSCRIBER subscriber1ds;
CREATE REPLICATION repscheme2ELEMENT e2 TABLE tab1 MASTER masterds SUBSCRIBER subscriber2ds;
Replicating tables with foreign key relationshipsOrdinarily, you may choose to replicate all or merely a subset of tables that have foreign key relationships with one another. However, if the foreign key relationships have been configured with ON DELETE CASCADE, then you must configure replication to replicate all of the tables, either by configuring the replication scheme with a DATASTORE element that does not EXCLUDE any of the tables, or by configuring the scheme with a TABLE element for every table that is involved in the relationship.
It is not possible to add a table with a foreign key relationship configured with ON DELETE CASCADE to a pre-existing replication scheme using ALTER REPLICATION. Instead, you must use DROP REPLICATION to drop the replication scheme, create the new table with the foreign key relationship, and then use CREATE REPLICATION to create a new replication scheme replicating all of the related tables.
Replicating materialized viewsA materialized view is a summary of data selected from one or more TimesTen tables, called detail tables. Though you cannot replicate materialized views directly, you can replicate their underlying detail tables in the same manner as you would replicate regular TimesTen tables.
The detail tables on the master and subscriber data stores can be referenced by materialized views. However, TimesTen replication verifies only that the replicated detail tables have the same structure on both the master and subscriber. It does not enforce that the materialized views are the same on each data store.
If you replicate an entire data store containing a materialized or non-materialized view as a DATASTORE element, only the detail tables associated with the view are replicated. The view itself is not replicated. A matching view can be defined on the subscriber data store, but is not required. If detail tables are replicated, TimesTen automatically updates the corresponding view.
Materialized views defined on replicated tables may result in replication failures or inconsistencies if the materialized view is specified so that overflow or underflow conditions occur when the materialized view is updated.
Replicating sequencesYou can use replication to ensure that the current value of a sequence on a subscriber data store is always in advance of the current value on the master data store, thereby preventing conflicts if the sequence is later used to make updates directly on the subscriber data store. For example, you may have an application that uses a sequence to determine primary key values in a replicated table, and a configuration that includes a hot standby data store that must assume the master role when the master

Example replication schemes
7-26 Oracle TimesTen In-Memory Database TimesTen to TimesTen Replication Guide
data store fails. By replicating your sequence, you can guarantee that the same sequence value is not used twice, regardless of which data store you update directly.
Sequence replication works by transmitting a new current value from the master data store to the subscriber every 20 references to the sequence's NEXTVAL, starting with the first reference. For example, consider a sequence my.seq with a MINVALUE of 1 and an INCREMENT of 2. The very first time that you use my.seq.NEXTVAL in a transaction, the current value of the sequence on the master data store is changed to three, and a new current value of 41 is replicated to the subscriber. The next 19 references to my.seq.NEXTVAL on the master data store result in no new current value being replicated, since the current value of 41 on the subscriber data store is still ahead of the current value on the master. Only on the twenty-first reference to my.seq.NEXTVAL is a new current value, 61, transmitted to the subscriber data store, as the subscriber's previous current value of 41 would now be behind the value of 43 on the master.
Sequence replication has these limitations:
■ Sequences with the CYCLE attribute cannot be replicated.
■ The definition of the replicated sequence on each peer data store must be identical.
■ No conflict checking is performed on sequences. If you make updates to sequences in both data stores in a bidirectional replication configuration without using the RETURN TWOSAFE service, it is possible for both sequences to return the identical NEXTVAL.
If you need to use sequences in a bidirectional replication scheme where updates may occur on either peer, you may instead use a non-replicated sequence with different MINVALUE and MAXVALUE attributes on each data store. For example, you may create sequence my.seq on datastore DS1 with a MINVALUE of 1 and a MAXVALUE of 100, and the same sequence on DS2 with a MINVALUE of 101 and a MAXVALUE of 200. Then, if you configure DS1 and DS2 with a bidirectional replication scheme, you may make updates to either data store using the sequence my.seq with the guarantee that the sequence values never conflict. Be aware that if you are planning on using ttRepAdmin -duplicate to recover from a failure in this configuration, you must drop and then re-create the sequence with a new MINVALUE and MAXVALUE after you have performed the duplicate.
Replicated sequences are intended to be used with replicated tables. Therefore, sequence updates are only replicated when they are followed by or used in updates to replicated tables. Operations on sequences such as SELECT my.seq.NEXTVAL FROM sys.dual, while incrementing the sequence value, are not replicated until they are followed by updates to tables that are replicated. A side effect of this behavior is that these sequence updates are not purged from the log until followed by updates to tables that are replicated. This causes ttRepSubscriberWait and ttRepAdmin -wait to fail when only these sequence updates are present at the end of the log.
See "Defining sequence elements" on page 7-8 for more information on configuring a replication scheme to include sequences.
Example replication schemesThe examples described in this section illustrate how to configure a variety of replication schemes. The examples have been kept simple for clarity. You can use these examples as a starting point from which to build more complex replication schemes.
The schemes described are:
■ Single subscriber scheme

Example replication schemes
Defining Replication Schemes 7-27
■ Multiple subscriber schemes
■ Selective replication scheme
■ Propagation scheme
■ Bidirectional split workload scheme
■ Bidirectional general workload scheme
Single subscriber schemeThe scheme shown in Example 7–3 is based on the single master and subscriber unidirectional replication scheme described in "Getting Started" on page 2-1. However, in this example, the two data stores are located on separate hosts, system1 and system2. We also use the RETURN RECEIPT service to confirm all transactions committed on the tab table in the master store are received by the subscriber.
Figure 7–4 Unidirectional replication (single table)
Example 7–21 Replicating one table
CREATE REPLICATION repschemeELEMENT e TABLE tab MASTER masterds ON "system1" SUBSCRIBER subscriberds ON "system2" RETURN RECEIPT;
The scheme shown in Example 7–22 establishes a master data store, named MASTERDS, that replicates its entire contents (tab1 through tab7) to the subscriber data store, named subscriberds, located on server2.
MASTERDS
Applications
SUBSCRIBERDS
REPL.TAB REPL.TAB
SYSTEM1 SYSTEM2

Example replication schemes
7-28 Oracle TimesTen In-Memory Database TimesTen to TimesTen Replication Guide
Figure 7–5 Unidirectional replication (entire data store)
Example 7–22 Replicating entire data store
CREATE REPLICATION repschemeELEMENT e DATASTORE MASTER masterds ON "server1" SUBSCRIBER subscriberds ON "server2";
Multiple subscriber schemesYou can create a replication scheme that includes up to 128 subscriber data stores.
Figure 7–6 shows a master data store with a table (tab) that is replicated to two subscriber data stores:
■ masterds master data store is on server1
■ subscriber1ds subscriber data store is on server2
■ subscriber2ds subscriber data store is on server3
Subscriber Data Store
MASTERDS
Applications
SERVER1 SERVER2
TAB1TAB2
SUBSCRIBERDS
TAB3TAB4
TAB5
TAB6
TAB7
TAB1TAB2
TAB3TAB4
TAB5
TAB6
TAB7

Example replication schemes
Defining Replication Schemes 7-29
Figure 7–6 Replicating to multiple subscribers
Example 7–23 Replicating to two subscribers
This example establishes a master data store, named masterds, that replicates the tab table to two subscriber data stores, subscriber1ds and subscriber2ds, located on server2 and server3, respectively. The name of the replication scheme is twosubscribers. The name of the replication element is e.
CREATE REPLICATION twosubscribersELEMENT e TABLE tab MASTER masterds ON "server1" SUBSCRIBER subscriber1ds ON "server2", subscriber2ds ON "server3";
Example 7–24 Replicating to two subscribers with RETURN RECEIPT
This example uses the basic example in Example 7–23 and adds a RETURN RECEIPT attribute and a STORE parameter. RETURN RECEIPT enables the return receipt service for both data stores. The STORE parameter sets a FAILTHRESHOLD value of 10 to establish the maximum number of transaction log files that can accumulate on masterds for a subscriber before it assumes the subscriber has failed.
CREATE REPLICATION twosubscribersELEMENT e TABLE rel.tab MASTER masterds ON "server1" SUBSCRIBER subscriber1ds ON "server2", subscriber2ds ON "server3" RETURN RECEIPTSTORE masterds FAILTHRESHOLD 10;
Example 7–25 Enabling RETURN RECEIPT for only one subscriber
This example shows how to enable RETURN RECEIPT for only subscriber2ds (no comma after the subscriber1ds definition).
MASTERDS
Applications
SUBSCRIBER1DS
REPL.TAB
REPL.TAB
SUBSCRIBER2DS
REPL.TABSERVER1
SERVER2
SERVER3

Example replication schemes
7-30 Oracle TimesTen In-Memory Database TimesTen to TimesTen Replication Guide
CREATE REPLICATION twosubscribersELEMENT e TABLE tab MASTER masterds ON "server1" SUBSCRIBER subscriber1ds ON "server2" SUBSCRIBER subscriber2ds ON "server3" RETURN RECEIPTSTORE masterds FAILTHRESHOLD 10;
Example 7–26 Enabling different return services for subscribers
This example shows how to apply RETURN RECEIPT BY REQUEST to subscriber1ds and RETURN RECEIPT to subscriber2ds. In this scheme, applications accessing subscriber1ds must use the ttRepSyncSet procedure to enable the return services for a transaction, while subscriber2ds unconditionally provides return services for all transactions.
CREATE REPLICATION twosubscribersELEMENT e TABLE tab MASTER masterds ON "server1" SUBSCRIBER subscriberds1 ON "server2" RETURN RECEIPT BY REQUEST SUBSCRIBER subscriber2ds ON "server3" RETURN RECEIPTSTORE masterds FAILTHRESHOLD 10;
Selective replication schemeThe selective replication scheme shown in Example 7–27 establishes a master data store, named centralds, that replicates four tables. tab1 and tab2 are replicated to the subscriber backup1ds. tab3 and tab4 are replicated to backup2ds. The master data store is located on the finance server.Both subscribers are located on the backupsystem server.
Figure 7–7 Selective replication
Example 7–27 Replicating tables to different subscribers
CREATE REPLICATION twobackupsELEMENT a TABLE tab1
Subscriber Data Store
CENTRALDS
Applications
BACKUP1DS
BACKUP2DS
FINANCE
BACKUPSYSTEM
TAB1
TAB1
TAB2
TAB2
TAB3
TAB3
TAB4
TAB4

Example replication schemes
Defining Replication Schemes 7-31
MASTER centralds ON "finance" SUBSCRIBER backup1ds ON "backupsystem"ELEMENT b TABLE tab2 MASTER centralds ON "finance" SUBSCRIBER backup1ds ON "backupsystem"ELEMENT d TABLE tab3 MASTER centralds ON "finance" SUBSCRIBER backup2ds ON "backupsystem"ELEMENT d TABLE tab4 MASTER centralds ON "finance" SUBSCRIBER backup2ds ON "backupsystem";
Propagation schemeExample 7–28 shows a one-way replication scheme from a master data store to a propagator that forwards the changes to two subscribers. For ELEMENT a, the tab table is updated at the centralds data store on the finance machine and replicated to the propds propagator data store on the nethandler machine. For ELEMENT b, the changes to the tab table received by propds are replicated to the two subscribers, backup1ds and backup2ds, on their respective machines, backupsystem1 and backupsystem2.
Example 7–29 provides a similar configuration, but it uses two replication schemes instead of one.
Note that replication for the tab table must be described with separate element names (a and b) in the same scheme, but can be described with the same element name (a) when using separate schemes.
Figure 7–8 Propagation
Example 7–28 One-way replication scheme
CREATE REPLICATION propagatorELEMENT a TABLE tab MASTER centralds ON "finance"
PROPDS
BACKUP1DS
BACKUP2DS
NETHANDLER
BACKUPSYSTEM2
Subscriber Data Store
CENTRALDS
Applications
FINANCE
REPL.TAB REPL.TAB
REPL.TAB
REPL.TAB
BACKUPSYSTEM1
Net
wo
rk (
WA
N)

Example replication schemes
7-32 Oracle TimesTen In-Memory Database TimesTen to TimesTen Replication Guide
SUBSCRIBER propds ON "nethandler"ELEMENT b TABLE tab PROPAGATOR propds ON "nethandler" SUBSCRIBER backup1ds ON "backupsystem1", backup2ds ON "backupsystem2";
Example 7–29 Two-way replication scheme
CREATE REPLICATION propagatorELEMENT a TABLE tab MASTER centralds ON "finance" SUBSCRIBER propds ON "nethandler";
CREATE REPLICATION propagator2ELEMENT a TABLE tab PROPAGATOR propds ON "nethandler" SUBSCRIBER backup1ds ON "backupsystem1", backup2ds ON "backupsystem2";
Bidirectional split workload schemeFigure 7–9 shows a split workload bidirectional replication scheme for two data stores, westds on the westcoast host and eastds on the eastcoast host. Customers are represented in two tables: waccounts contains data for customers in the Western region and eaccounts has data for customers from the Eastern region. The westds data store updates the waccounts table and replicates it to the eastds data store. The eaccounts table is owned by the eastds data store and is replicated to the westds data store. The RETURN RECEIPT attribute enables the return receipt service to guarantee that transactions on either master table are received by their subscriber.
Example 7–31 shows the same configuration using separate replication schemes, r1 and r2.
Figure 7–9 Split workload replication
Example 7–30 Split workload bidirectional replication scheme
CREATE REPLICATION r1ELEMENT elem_waccounts TABLE waccounts MASTER westds ON "westcoast" SUBSCRIBER eastds ON "eastcoast" RETURN RECEIPTELEMENT elem_eaccounts TABLE eaccounts
WESTDS
Applications
EASTDS
Applications
WACCOUNTS WACCOUNTS
EACCOUNTSEACCOUNTS
WESTCOAST EASTCOAST
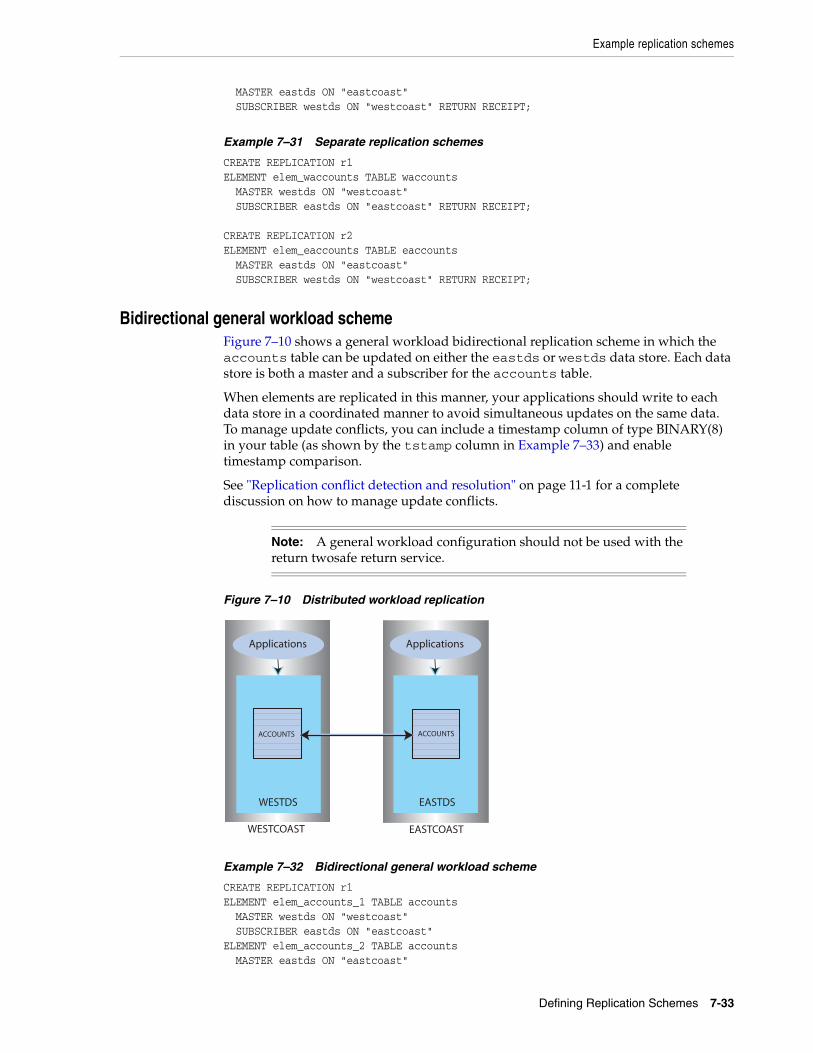
Example replication schemes
Defining Replication Schemes 7-33
MASTER eastds ON "eastcoast" SUBSCRIBER westds ON "westcoast" RETURN RECEIPT;
Example 7–31 Separate replication schemes
CREATE REPLICATION r1ELEMENT elem_waccounts TABLE waccounts MASTER westds ON "westcoast" SUBSCRIBER eastds ON "eastcoast" RETURN RECEIPT;
CREATE REPLICATION r2ELEMENT elem_eaccounts TABLE eaccounts MASTER eastds ON "eastcoast" SUBSCRIBER westds ON "westcoast" RETURN RECEIPT;
Bidirectional general workload schemeFigure 7–10 shows a general workload bidirectional replication scheme in which the accounts table can be updated on either the eastds or westds data store. Each data store is both a master and a subscriber for the accounts table.
When elements are replicated in this manner, your applications should write to each data store in a coordinated manner to avoid simultaneous updates on the same data. To manage update conflicts, you can include a timestamp column of type BINARY(8) in your table (as shown by the tstamp column in Example 7–33) and enable timestamp comparison.
See "Replication conflict detection and resolution" on page 11-1 for a complete discussion on how to manage update conflicts.
Figure 7–10 Distributed workload replication
Example 7–32 Bidirectional general workload scheme
CREATE REPLICATION r1ELEMENT elem_accounts_1 TABLE accounts MASTER westds ON "westcoast" SUBSCRIBER eastds ON "eastcoast"ELEMENT elem_accounts_2 TABLE accounts MASTER eastds ON "eastcoast"
Note: A general workload configuration should not be used with the return twosafe return service.
WESTDS
Applications
EASTDS
Applications
ACCOUNTS ACCOUNTS
WESTCOAST EASTCOAST

Creating replication schemes with scripts
7-34 Oracle TimesTen In-Memory Database TimesTen to TimesTen Replication Guide
SUBSCRIBER westds ON "westcoast";
Example 7–33 Include a timestamp column to manage update conflicts
CREATE TABLE accounts (custname VARCHAR2(30) NOT NULL, address VARCHAR2(80), curbalance DEC(15,2), tstamp BINARY(8), PRIMARY KEY (custname));
Creating replication schemes with scriptsCreating your replication schemes with scripts can save you time and help you avoid mistakes. This section provides some suggestions for automating the creation of replication schemes using Perl.
Consider the general workload bidirectional scheme shown in Example 7–34. Entering the ELEMENT description for the five tables, accounts, sales, orders, inventory, and customer, would be tedious and error-prone if done manually.
Example 7–34 General workload bidirectional replication scheme
CREATE REPLICATION bigschemeELEMENT elem_accounts_1 TABLE accounts MASTER westds ON "westcoast" SUBSCRIBER eastds ON "eastcoast"ELEMENT elem_accounts_2 TABLE accounts MASTER eastds ON "eastcoast" SUBSCRIBER westds ON "westcoast"ELEMENT elem_sales_1 TABLE sales MASTER westds ON "westcoast" SUBSCRIBER eastds ON "eastcoast"ELEMENT elem_sales_2 TABLE sales MASTER eastds ON "eastcoast" SUBSCRIBER westds ON "westcoast"ELEMENT elem_orders_1 TABLE orders MASTER westds ON "westcoast" SUBSCRIBER eastds ON "eastcoast"ELEMENT elem_orders_2 TABLE orders MASTER eastds ON "eastcoast" SUBSCRIBER westds ON "westcoast"ELEMENT elem_inventory_1 TABLE inventory MASTER westds ON "westcoast" SUBSCRIBER eastds ON "eastcoast"ELEMENT elem_inventory_2 TABLE inventory MASTER eastds ON "eastcoast" SUBSCRIBER westds ON "westcoast"ELEMENT elem_customers_1 TABLE customers MASTER westds ON "westcoast" SUBSCRIBER eastds ON "eastcoast"ELEMENT elem_customers_2 TABLE customers MASTER eastds ON "eastcoast" SUBSCRIBER westds ON "westcoast";
It is often more convenient to automate the process of writing a replication scheme with scripting. For example, the Perl script shown in Example 7–35 can be used to build the scheme shown in Example 7–34.

Creating replication schemes with scripts
Defining Replication Schemes 7-35
Example 7–35 Using a Perl script to create a replication scheme
@tables = qw( accounts sales orders inventory customers);
print "CREATE REPLICATION bigscheme";
foreach $table (@tables) { $element = $table; $element =~ s/repl\./elem\_/;
print "\n"; print " ELEMENT $element\_1 TABLE $table\n"; print " MASTER westds ON \"westcoast\"\n"; print " SUBSCRIBER eastds ON \"eastcoast\"\n"; print " ELEMENT $element\_2 TABLE $table\n"; print " MASTER eastds ON \"eastcoast\"\n"; print " SUBSCRIBER westds ON \"westcoast\""; }print ";\n";
The @tables array shown in Example 7–35 can be obtained from some other source, such as a data store. For example, you can use ttIsql and f in a Perl statement to generate a @tables array for all of the tables in the WestDSN data store with the owner name repl:
@tables = 'ttIsql -e "tables; quit" WestDSN | grep " REPL\."';
Example 7–36 shows a modified version of the script in Example 7–35 that creates a replication scheme for all of the repl tables in the WestDSN data store. (Note that some substitution may be necessary to remove extra spaces and line feeds from the grep output.)
Example 7–36 Perl script to create a replication scheme for all tables in WestDSN
@tables = 'ttIsql -e "tables; quit" WestDSN | grep " REPL\."';
print "CREATE REPLICATION bigscheme";
foreach $table (@tables) { $table =~ s/^\s*//; # Remove extra spaces $table =~ s/\n//; # Remove line feeds $element = $table; $element =~ s/repl\./elem\_/;
print "\n"; print " ELEMENT $element\_1 TABLE $table\n"; print " MASTER westds ON \"westcoast\"\n"; print " SUBSCRIBER eastds ON \"eastcoast\"\n"; print " ELEMENT $element\_2 TABLE $table\n"; print " MASTER eastds ON \"eastcoast\"\n"; print " SUBSCRIBER westds ON \"westcoast\""; }print ";\n";

Creating replication schemes with scripts
7-36 Oracle TimesTen In-Memory Database TimesTen to TimesTen Replication Guide

8
Setting Up a Replicated System 8-1
8Setting Up a Replicated System
This chapter describes how to set up and start replication. The typical tasks related to setting up and starting a replicated system are:
This chapter includes the following topics:
■ Configuring the network
■ Setting up the replication environment
■ Replicating data stores across releases
■ Applying a replication scheme to a data store
■ Starting and stopping the replication agents
■ Setting the replication state of subscribers
Configuring the networkThis section describes some of the issues to be considered when replicating TimesTen data over a network. The general topics are:
■ Network bandwidth requirements
■ Replication in a WAN environment
■ Configuring host IP addresses
Task See...
Configure the network "Configuring the network" on page 8-1.
Establish data stores and set up environment
"Setting up the replication environment" on page 8-6.
Define a replication scheme Chapter 7, "Defining Replication Schemes"
Apply replication scheme to the data stores
See "Applying a replication scheme to a data store" on page 8-12.
Start and stop the replication agent for each data store
See "Starting and stopping the replication agents" on page 8-13.
Set the replication state of subscribers See "Setting the replication state of subscribers" on page 8-15.
Note: To set up an active standby pair, see "Setting up an active standby pair with no cache groups" on page 4-3.
Configuring the network
8-2 Oracle TimesTen In-Memory Database TimesTen to TimesTen Replication Guide
■ Identifying the local host of a replicated data store
Network bandwidth requirementsThe network bandwidth required for TimesTen replication depends on the bulk and frequency of the data being replicated. This discussion explores the types of transactions that characterize the high and low ends of the data range and the network bandwidth required to replicate the data between TimesTen data stores.
The high end of the data range can be characterized by updates or inserts of small amounts of data, such as inserting 128 bytes into a row, which can result in approximately 1.5 - 1.6 MB per second of replicated data. The lower end might be characterized by a single char(10) column update running with return receipt, which can result in approximately 125 KB per second of replicated data.
The following table provides guidelines for calculating the size of replicated records.
Transactions are sent between replicated data stores in batches. A batch is created whenever there is no more data in the transaction log buffer in the master data store, or when the current batch is roughly 256K bytes. At the end of each batch, the master sends a 48-byte end-of-batch message and waits for a 48-byte acknowledgement from the subscriber when the batch is received. See "Copying updates between data stores" on page 1-2 for more information.
As shown in the table below, the 100 Base-T Ethernet typical in a LAN can sustain speeds of around 10 MB per second, which is more than enough sustained bandwidth for the most demanding replication rates. However, if servers are communicating in a WAN, the configuration of the replication scheme and transaction load must be carefully matched to the available bandwidth of the network.
Record Type Size
Begin transaction 48 bytes
Propagate 48 bytes
Update 116 bytes
+ 18 bytes per column updated
+ size of old column values
+ size of new column values
+ size of the primary key or unique key
Delete 104 bytes
+ size of the primary key or unique key
Insert 104 bytes
+ size of the primary key or unique key
+ size of inserted row
End transaction 48 bytes
Network Area Network Sustained Speed
LAN 100 Base-T Ethernet 10 MB per second
WAN T3 4.8 MB per second
WAN T2 780 KB per second

Configuring the network
Setting Up a Replicated System 8-3
As shown in the above table, with an available bandwidth of 4.8 MB per second, a T3 line should provide sufficient bandwidth to support 2 subscribers operating at the fastest possible transaction rates (totaling 3.2 MB/s) without loss of performance.
In contrast, a T1 line should provide sufficient bandwidth to accommodate return receipt replication for users inserting less than 1 KB into rows.
Replication in a WAN environmentTimesTen replication uses the TCP/IP protocol, which is not optimized for a WAN environment. You can improve replication performance over a WAN by installing a third-party "TCP stack" product. If replacing the TCP stack is not a feasible solution, you can reduce the amount of network traffic that the TCP/IP protocol has to deal with by setting the COMPRESS TRAFFIC attribute in your CREATE REPLICATION statement. See "Compressing replicated traffic" on page 7-20 for details.
See Oracle TimesTen In-Memory Database Installation Guide for information about changing TCP/IP kernel parameters for better performance.
Configuring host IP addressesIn a replication scheme, you need to identify the name of the host machine on which your data store resides. The operating system translates this host name to one or more IP addresses. This section describes how to configure replication so that it uses the correct host names and IP addresses each host machine.
This section includes these topics:
■ Identifying data store hosts and network interfaces using the ROUTE clause
■ Identifying data store hosts on UNIX without using the ROUTE clause
■ Host name resolution on Windows
■ User-specified addresses for TimesTen daemons and subdaemons
Identifying data store hosts and network interfaces using the ROUTE clauseWhen specifying the host for a data store in a replication element, you should always use the name returned by the hostname command, as replication uses the this same host name to verify that the current host is involved in the replication scheme. Replication schemes may not be created that do not include the current host.
If a host contains multiple network interfaces (with different IP addresses), you should specify which interfaces are to be used by replication using the ROUTE clause. You must specify a priority for each interface. Replication tries to first connect using the address with the highest priority, and if a connection cannot be established, it tries the remaining addresses in order of priority until a connection is established. If a connection to a host fails while using one IP address, replication attempts to re-connect (or fall back) to another IP address, if more than one address has been specified in the ROUTE clause.
WAN T1 197 KB per second
Network Area Network Sustained Speed

Configuring the network
8-4 Oracle TimesTen In-Memory Database TimesTen to TimesTen Replication Guide
See "Configuring network operations" on page 7-23 for more information.
Identifying data store hosts on UNIX without using the ROUTE clauseWhen possible, you should use the ROUTE clause of a replication scheme to identify data store hosts and the network interfaces to use for replication. However, if you have a legacy replication configuration that does not use the ROUTE clause, this section explains how to configure operating system and DNS files for a replication host with multiple network interfaces.
If a host contains multiple network interfaces (with different IP addresses) and replication is not configured with a ROUTE clause, TimesTen replication tries to connect to the IP addresses in the same order as returned by the gethostbyname call. It will try to connect using the first address; if a connection cannot be established, it tries the remaining addresses in order until a connection is established. TimesTen replication uses this same sequence each time it establishes a new connection to a host. If a connection to a host fails on one IP address, TimesTen replication attempts to re-connect (or fall back) to another IP address for the host in the same manner described above.
There are two basic ways you can configure a host to use multiple IP addresses on UNIX platforms: DNS or the /etc/hosts file.
For example, if your machine has two NICs, use the following syntax for your /etc/hosts file:
127.0.0.1 localhostIP_address_for_NIC_1 official_hostname optional_aliasIP_address_for_NIC_2 official_hostname optional_alias
The host name official_hostname is the name returned by the hostname command.
When editing the /etc/hosts file, keep in mind that:
■ You must log in as root to change the /etc/hosts file.
■ There should only be one line per IP address.
■ There can be multiple alias names on each line.
■ When there are multiple IP addresses for the same host name, they must be on consecutive lines.
■ The host name can be up to 30 characters long.
For example, the following entry in the /etc/hosts file on a UNIX platform describes a server named Machine1 with two IP addresses:
Note: Addresses for the ROUTE clause may be specified as either host names or IP addresses. However, if your host has more than one IP address configured for a given host name, you should only configure the ROUTE clause using the IP addresses, in order to ensure that replication uses only the IP addresses that you intend.
Note: If you have multiple network interface cards (NICs), be sure that “multi on” is specified in the /etc/host.conf file. Otherwise, gethostbyname will not return multiple addresses.

Configuring the network
Setting Up a Replicated System 8-5
127.0.0.1 localhost10.10.98.102 Machine1192.168.1.102 Machine1
To specify the same configuration for DNS, your entry in the domain zone file would look like:
Machine1 IN A 10.10.98.102 IN A 192.168.1.102
In either case, you only need to specify Machine1 as the host name in your replication scheme and replication will use the first available IP address when establishing a connection.
In an environment in which multiple IP addresses are used, you can also assign multiple host names to a single IP address in order to restrict a replication connection to a specific IP address. For example, you might have an entry in your /etc/hosts file that looks like:
127.0.0.1 localhost10.10.98.102 Machine1192.168.1.102 Machine1 RepMachine1
or a DNS zone file that looks like:
Machine1 IN A 10.10.98.102 IN A 192.168.1.102RepMachine1 IN A 192.168.1.102
If you want to restrict replication connections to IP address 192.168.1.102 for this host, you can specify RepMachine1 as the host name in your replication scheme. Another option is to simply specify the IP address as the host name in the CREATE REPLICATION statement used to configure your replication scheme.
Host name resolution on WindowsIf a replication configuration is specified using host names rather than IP addresses, replication must be able to translate host names of peers into IP addresses. For this to happen efficiently on Windows, make sure each Windows machine is set up to query either a valid WINS server or a valid DNS server that has correct information about the hosts on the network. In the absence of such servers, static HOST-to-IP entries can be entered in either:
%windir%\system32\drivers\etc\hosts
or
%windir%\system32\drivers\etc\lmhosts
Without any of these options, a Windows machine resorts to broadcasting, which is extremely slow, to detect peer nodes.
You may also encounter extremely slow host name resolution if the Windows machine cannot communicate with the defined WINS servers or DNS servers, or if the host name resolution set up is incorrect on those servers. Use the ping command to test whether a host can be efficiently located. The ping command responds immediately if host name resolution is set up properly.

Setting up the replication environment
8-6 Oracle TimesTen In-Memory Database TimesTen to TimesTen Replication Guide
User-specified addresses for TimesTen daemons and subdaemonsBy default, the TimesTen main daemon, all subdaemons and all agents use any available address to listen on a socket for requests. You can modify the ttendaemon.options file to specify an address for communication among the agents and daemons by including a -listenaddr option. See "Managing TimesTen daemon options" in Oracle TimesTen In-Memory Database Operations Guide for details.
Suppose that your machine has two NICs whose addresses are 10.10.10.100 and 10.10.11.200. The loopback address is 127.0.0.1. Then keep in mind the following as it applies to the replication agent:
■ If you do not set the -listenaddr option in the ttendaemon.options file, then any process can talk to the daemons and agents.
■ If you set -listenaddr to 10.10.10.100, then any process on the local host or the 10.10.10 net can talk to daemons and agents on 10.10.10.100. No processes on the 10.10.11 net can talk to the daemons and agents on 10.10.10.100.
■ If you set -listenaddr to 127.0.0.1, then only processes on the local host can talk to the daemons and agents. No processes on other hosts can talk the daemons and agents.
Identifying the local host of a replicated data storeOrdinarily, TimesTen replication is able to identify the hosts involved in a replication configuration using normal operating system host name resolution methods. However, in some rare instances, if the host has an unusual host name configuration, TimesTen is unable to determine that the local host matches the host name as specified in the replication scheme. When this occurs, you receive error 8191, "This store is not involved in a replication scheme," when attempting to start replication using ttRepStart or ttAdmin -repStart. The ttHostNameSet built-in procedure may be used in this instance to explicitly indicate to TimesTen that the current data store is in fact the data store specified in the replication scheme. See "ttHostNameSet" in Oracle TimesTen In-Memory Database Reference for more information.
Setting up the replication environmentThe topics related to setting up your replication environment include:
■ Establishing the data stores
■ Managing the transaction log on a replicated data store
■ Configuring a large number of subscribers
■ Increasing replication throughput for active standby pairs
You must have the ADMIN privilege to perform these operations.
Note: You must be consistent in identifying a data store host in a replication scheme. Do not identify a host using its IP address for one data store and then use its host name for the same or another data store.

Setting up the replication environment
Setting Up a Replicated System 8-7
Establishing the data storesYou can replicate one or more tables on any existing data store. If the data store you want to replicate does not yet exist, you must first create one, as described in "Creating TimesTen Data Stores" in Oracle TimesTen In-Memory Database Operations Guide.
After you have identified or created the master data store, create a DSN definition for the subscriber data store on the receiving machine. Set the DSN attributes for the master and subscriber data stores as described in "Data store attributes" on page 8-7.
After you have defined the DSN for your subscriber, you can populate the subscriber data store with the tables to be replicated from the master in one of two ways:
■ Connect to the data store and use SQL statements to create new tables in the subscriber data store that match those to be replicated from the master.
■ Use the ttRepAdmin -duplicate utility to copy the entire contents of the master data store to the subscriber, as described in "Copying a master data store to a subscriber" on page 8-8.
Data store attributesReplicated data stores must have the following attribute settings in their DSN definitions:
■ Logging
■ LogBufMB
■ LogFileSize
For more information about these attributes, see "Managing the transaction log on a replicated data store" on page 8-9.
In addition, data stores which replicate to each other must all have the same DatabaseCharacterSet attribute. TimesTen does not perform any character set conversion between replicated data stores.
Table requirements and restrictionsTables to be replicated in any type of replication scheme must have the following characteristics:
■ The name, owner, and column definitions of the tables participating in the replication scheme must be identical on both the master and subscriber data stores unless you specify a TABLE DEFINITION CHECKING value of RELAXED in the CREATE REPLICATION statement. If you specify RELAXED, then the tables must have the same key definition, number of columns and column data types. See "Setting STORE attributes" on page 7-13.
■ Tables to be replicated must have one of the following:
■ A primary key
■ A unique index over non-nullable columns
Note: It is possible to replicate between data stores with different settings for the TypeMode attribute. However, you must make sure that the underlying data type for each replicated column is the same on each node. See "TypeMode" in Oracle TimesTen In-Memory Database Reference for more information.

Setting up the replication environment
8-8 Oracle TimesTen In-Memory Database TimesTen to TimesTen Replication Guide
Replication uses the primary key or unique index to uniquely identify each row in the replicated table. Replication always selects the first usable index that turns up in a sequential check of the table's index array. If there is no primary key, replication selects the first unique index without NULL columns it encounters. The selected index on the replicated table in the master data store must also exist on its counterpart table in the subscriber.
■ VARCHAR2, NVARCHAR2, VARBINARY and TT_VARCHAR columns in replicated tables is limited to a size of 4 megabytes. For a VARCHAR2 column, the maximum length when using character length semantics depends on the number of bytes each character occupies when using a particular data store character set. For example, if the character set requires four bytes for each character, the maximum possible length is 64,000 characters. For an NVARCHAR2 column, which requires two bytes for each character, the maximum length when using character length semantics is 128,000 characters.
■ Temporary tables can be defined and used in a data store that has a replication scheme defined, but temporary tables themselves cannot be replicated.
If these requirements and restrictions present difficulties, you may want to consider using the Transaction Log API (XLA) as a replication mechanism. See "Using XLA as a replication mechanism" in Oracle TimesTen In-Memory Database C Developer's Guide.
Copying a master data store to a subscriberA short method for populating a subscriber data store that will fully replicate its master data store is to simply copy the contents of the master. Copying a data store in this manner is also essential when recovering a failed data store, as described in "Managing data store failover and recovery" on page 11-13.
You can use either the ttRepAdmin -duplicate utility or the ttRepDuplicateEx C function to duplicate a data store. See "Duplicating a data store" on page 4-2.
Before copying the contents of a master data store to populate a subscriber data store, you must:
1. Create a DSN for the new subscriber data store.
2. Create or alter a replication scheme to include the new subscriber data store and its host, as described in "Defining a replication scheme" on page 7-5.
3. Apply the replication scheme to the master data store, as described in "Applying a replication scheme to a data store" on page 8-12.
4. Start the replication agent for the master data store, as described in "Starting and stopping the replication agents" on page 8-13.
For example, on host server1, we have a DSN named masterDSN that describes the masterds data store. On host server2, we have a DSN named newstoreDSN that describes the newstore data store. The ttuser user on masterDSN has the ADMIN privilege.
To populate the newstore data store with the contents of masterds, perform the following tasks:
Note: The keys on replicated tables are transported in each update record to the subscribers. Smaller keys transport most efficiently.

Setting up the replication environment
Setting Up a Replicated System 8-9
On server1: Using a text editor, create a new SQL file, named newrepscheme.sql, that defines the replication scheme and calls the ttRepStart procedure to start replication:
CREATE REPLICATION repscheme ELEMENT e TABLE tab MASTER masterds ON "server1" SUBSCRIBER newstore ON "server2";
call ttRepStart;
From the command line, configure masterds with the replication scheme and start the replication agent:
> ttIsql -f newrepscheme.sql masterds
On server2: From the command line, copy the contents of the masterds data store into the newstore data store:
> ttRepAdmin -dsn newstore -duplicate -from masterds -host "server1" -uid ttuser
You will be prompted for the password of ttuser.
The newstore data store should now have the same contents as the masterds data store.
You can also do a duplication operation similar to that shown above from a C program by using the ttRepStart procedure and ttRepDuplicateEx C function. See "Starting and stopping the replication agents" on page 8-13 and "Recovering a failed data store" on page 11-17 for more information.
Managing the transaction log on a replicated data storeThis section includes these topics:
■ About log buffer size and persistence
■ About transaction log growth on a master data store
■ Setting the log failure threshold
■ Setting attributes for logging
About log buffer size and persistenceA common misconception among TimesTen users is that there is a relationship between the size of the log buffer and lost transactions. The size of the log buffer has no impact on persistence.
If your DSN is configured with DurableCommits=0, then transactions are written durably to disk only under the following circumstances:
■ When the log buffer fills up.
Note: The -host can be identified with either the name of the remote host or its TCP/IP address. If you identify hosts using TCP/IP addresses, you must identify the address of the local host (server2 in this example) by using the -localhost option. For details, see "ttRepAdmin" in Oracle TimesTen In-Memory Database Reference.

Setting up the replication environment
8-10 Oracle TimesTen In-Memory Database TimesTen to TimesTen Replication Guide
■ When the ttDurableCommit procedure is called or when a transaction on a connection with DurableCommits=1 is committed or rolled back.
■ When the replication agent sends a batch of transactions to a subscriber and the master has been configured for replication with the TRANSMIT DURABLE attribute (the default). (See "Default replication" on page 1-3.)
■ When the replication agent periodically executes a durable commit, whether the primary store is configured with TRANSMIT DURABLE or not.
■ When your DSN is configured with LogFlushMethod=2, writes are written to disk before control is returned to the application.
The size of the log buffer has no influence on the ability of TimesTen to write data to disk under any of the circumstances listed above.
About transaction log growth on a master data storeIn data stores that do not use replication, Transaction Log API (XLA), cache groups, or incremental backup, unneeded records in the log buffer and unneeded transaction log files are purged each time a checkpoint is initiated, either by the automatic background checkpointing thread or by an application’s call to the ttCkpt or ttCkptBlocking procedures. With a replicated data store, transactions remain in the log buffer and transaction log files until the master replication agent confirms they have been fully processed by the subscriber, as described in "Replication agents" on page 1-2. Only then can the master consider purging them from the log buffer and transaction log files.
A master data store transaction log can grow much larger than it would on an unreplicated data store if there are changes to its subscriber state. See "Setting the replication state of subscribers" on page 8-15 for information on the subscriber states. When the subscriber is in the Start state, the master can purge logged data after it receives confirmation it has been received by the subscriber. However, if a subscriber becomes unavailable or set to the Pause state, the log on the master data store cannot be flushed and the space used for logging can be exhausted. When the log space is exhausted, subsequent updates on the master data store are aborted.
Setting the log failure thresholdYou can establish a threshold value that, when exceeded, sets an unavailable subscriber to the Failed state before the available log space is exhausted.
You can set the log threshold by specifying a STORE parameter with a FAILTHRESHOLD value in your CREATE REPLICATION or ALTER REPLICATION statement. (See Example 7–24.)
The default threshold value is 0, which means "no limit." See "Setting attributes for logging" on page 8-11 for details.
If a master sets a subscriber data store to the Failed state, it drops all of the data for the failed subscriber from its log and transmits a message to the failed subscriber data store. (If the master replication agent can communicate with the subscriber replication agent, then the message is transmitted immediately. Otherwise, the message is
Note: If you use ALTER REPLICATION to reset the threshold value on an existing replication scheme, you must first stop the replication agents before using ALTER REPLICATION to define a new threshold value, and then restart the replication agents.

Setting up the replication environment
Setting Up a Replicated System 8-11
transmitted when the connection is reestablished.) After receiving the message from the master, if the subscriber is configured for bidirectional replication or to propagate updates to other subscribers, it does not transmit any further updates, because its state from a replication standpoint has been compromised.
Any application that connects to the failed subscriber receives a tt_ErrReplicationInvalid (8025) warning indicating that the data store has been marked Failed by a replication peer. Once the subscriber data store has been informed of its failed status, its state on the master data store is changed from Failed to Stop.
Applications can use the ODBC SQLGetInfo function to check if the data store it is connected to has been set to the Failed state, as described in"Subscriber failures" on page 11-14.
Setting attributes for loggingLogBufMB specifies the maximum size of your in-memory log buffer in megabytes. This buffer is flushed to a transaction log file on the disk when it becomes full. The minimum size for LogBufMB is 8 times the value of LogBufParallelism.
You need to establish enough disk space for the replication log files. There are two settings that control the amount of disk space used by your log:
■ The LogFileSize setting in your DSN specifies the maximum size of a transaction log file. If logging requirements exceed this value, additional transaction log files with the same maximum size are created. (If you set the LogFileSize to a smaller value than LogBufMB, TimesTen automatically increases the LogFileSize to match LogBufMB.)
■ The log threshold setting specifies the maximum number of transaction log files allowed to accumulate before the master assumes a subscriber has failed. The threshold value is the number of transaction log files between the most recently written to transaction log file and the earliest transaction log file being held for the subscriber. For example, if the last record successfully received by all subscribers was in Log File 1 and the last log record written to disk is at the beginning of Log File 4, then replication is at least 2 transaction log files behind (the contents of Log Files 2 and 3). If the threshold value is 2, then the master sets the subscriber to the Failed state after detecting the threshold value had been exceeded. This may take up to 10 seconds. See "Setting the log failure threshold" on page 8-10 for more information.
Because transactions are logged to disk, you can use bookmarks to detect the log record identifiers of the update records that have been replicated to subscribers and those that have been written to disk. To view the location of the bookmarks for the subscribers associated with masterDSN, use the C utility or ttBookmark procedure, as described in "Show replicated log records" on page 9-11.
If a subscriber goes down and then comes back up before the threshold is reached, then replication automatically "catches up" as the committed transactions in the transaction log files following the bookmark are automatically transmitted. However, if the threshold is exceeded, the master sets the subscriber to the Failed state. A failed subscriber must use ttRepAdmin -duplicate to copy the master data store and start over, as described in "Managing data store failover and recovery" on page 11-13.

Replicating data stores across releases
8-12 Oracle TimesTen In-Memory Database TimesTen to TimesTen Replication Guide
Configuring a large number of subscribersA replication scheme can include up to 128 subscribers. An active standby pair can include up to 127 read-only subscribers. If you are planning a replication scheme that includes a large number of subscribers, then ensure the following:
■ The log buffer size should result in the value of LOG_FS_READS in the SYS.MONITOR table being 0 or close to 0. This ensures that the replication agent does not have to read any log records from disk. If the value of LOG_FS_READS is increasing, then increase the log buffer size.
■ CPU resources are adequate. The replication agent on the master data store spawns a thread for every subscriber data store. Each thread reads and processes the log independently and needs adequate CPU resources to make progress.
Increasing replication throughput for active standby pairsUse the RecoveryThreads first connection attribute to increase the number of threads that apply changes from the active master data store to the standby master data store from 1 to 2. If you set RecoveryThreads to 2 on the standby, you should also set it to 2 on the active to maintain increased throughput if there is a failover.
You can also set RecoveryThreads to 2 on one or more read-only subscribers in an active standby pair to increase replication throughput from the standby master data store.
Data stores must be hosted on systems that are 2-way or larger to take advantage of setting this attribute to 2.
Replicating data stores across releasesReplication functions across releases only if the data store of the more recent version of TimesTen was upgraded using ttMigrate from a data store of the older version of TimesTen. A data store created in the more recent version of TimesTen is not guaranteed to replicate correctly with the older version.
For example, replication between a data store created in TimesTen release 5.1 and a data store created in TimesTen release 6.0 is not supported. However, if one data store was created in TimesTen release 5.1, and the peer data store was created in TimesTen release 5.1 and then upgraded to TimesTen release 6.0, replication between them is supported.
See "Data Store Upgrades" in Oracle TimesTen In-Memory Database Installation Guide.
Applying a replication scheme to a data storeDefine your replication scheme as described in Chapter 7, "Defining Replication Schemes". Save the CREATE REPLICATION statement in a SQL file.
After you have described your replication scheme in a SQL file, you can execute the SQL on the data store using the -f option to the ttIsql utility. The syntax is:
ttIsql -f schemefile.sql - connstr "dsn=DSN"
Example 8–1 Creating a replication scheme by executing a SQL file
If your replication scheme is described in a file called repscheme.sql, you can execute the file on a DSN, called masterDSN, by entering:
> ttIsql -f repscheme.sql -connstr "dsn=masterDSN"

Starting and stopping the replication agents
Setting Up a Replicated System 8-13
Under most circumstances, you should apply the same scheme to all of your replicated data stores. You must invoke a separate ttIsql command on each host to apply the replication scheme.
Example 8–2 Executing a SQL file on each host
If your scheme includes the data stores masterDSN on host S1, subscriber1DSN on host S2, and subscriber2DSN on host S3, do the following:
On host S1, enter:
> ttIsql -f repscheme.sql masterDSN
On host S2, enter:
> ttIsql -f repscheme.sql subscriber1DSN
On host S3, enter:
> ttIsql -f repscheme.sql subscriber2DSN
You can also execute the SQL file containing your replication scheme from the ttIsql command line. For example:
Command> run repscheme.sql;
Starting and stopping the replication agentsAfter you have defined a replication scheme, you can start the replication agents for each data store involved in the replication scheme. You must have the ADMIN privilege to start or stop a replication agent.
You can start and stop replication agents from either the command line or from your program, as described in the sections:
■ Controlling replication agents from the command line
■ Controlling replication agents from a program
Controlling replication agents from the command lineTo start and stop a replication agent from the command line, use the ttAdmin utility with the -repStart or -repStop option:
ttAdmin -repStart DSNttAdmin -repStop DSN
Note: If a data store does not participate in a replication scheme, attempts to start a replication agent for that data store fail.
Note: Replication DDL that is not permitted when the replication agent is running may be possible during the brief period of time between issuing ttAdmin -repStart command and the actual start of the replication agent. For example, it may be possible to drop a replication scheme during this time.

Starting and stopping the replication agents
8-14 Oracle TimesTen In-Memory Database TimesTen to TimesTen Replication Guide
Example 8–3 Starting and stopping the replication agent with ttAdmin
To start the replication agents for the DSNs named masterDSN and subscriberDSN, enter:
ttAdmin -repStart masterDSNttAdmin -repStart subscriberDSN
To stop the replication agents, enter:
ttAdmin -repStop masterDSNttAdmin -repStop subscriberDSN
You can also use the ttRepStart and ttRepStop procedures to start and stop a replication agent from the ttIsql command line.
Example 8–4 Starting and stopping the replication agent from the ttIsql command line
To start and stop the replication agent for the DSN named masterDSN, enter:
> ttIsql masterDSNCommand> call ttRepStart;Command> call ttRepStop;
You can also use the ttAdmin utility to set the replication restart policy. By default the policy is manual, which enables you to start and stop the replication agents as described above. Alternatively, you can set the replication restart policy for a data store to always or norestart.
When the restart policy is always, the replication agent is automatically started when the data store is loaded into memory. See "Specifying a RAM policy" in Oracle TimesTen In-Memory Database Operations Guide to determine when a data store is loaded into memory.
Example 8–5 Using ttAdmin to set the restart policy
To use ttAdmin to set the replication restart policy to always, enter:
ttAdmin -repPolicy always DSN
To reset the policy back to manual, enter:
ttAdmin -repPolicy manual DSN
Following an error or data store invalidation, both manual and always policies cause the replication agent to be automatically restarted. When the agent restarts automatically, it is often the first connection to the data store. This happens after a fatal error that, for example, requires all applications to disconnect. The first connection to a
Restart PolicyStart replication agent when the TimesTen daemon starts
Restart replication agent on errors or invalidation
always Yes Yes
manual No Yes
norestart No No
Note: The replication agents are managed by the TimesTen daemon, which must be started before starting any replication agents.

Setting the replication state of subscribers
Setting Up a Replicated System 8-15
data store usually has to load the most recent checkpoint file and often needs to do recovery. For a very large data store, this process may take several minutes. During this period, all activity on the data store is blocked so that new connections cannot take place and any old connections cannot finish disconnecting. This may also result in two copies of the data store existing at the same time because the old one stays around until all applications have disconnected. For very large data stores for which the first-connect time may be significant, you may want to wait for the old data store to become inactive first before starting up the new one. You can do this by setting the restart policy to norestart to specify that the replication agent is not to be automatically restarted.
Controlling replication agents from a programTo start and stop the replication agent for a data store from your program, connect to the replicated data store and use the ttRepStart and ttRepStop procedures.
Example 8–6 Starting and stopping the replication agent from a program
To start and stop the replication agent for the data store that is identified by the hdbc connection handle:
rc = SQLAllocStmt( hdbc, &hstmt );rc = SQLExecDirect( hstmt, (SQLCHAR *) "CALL ttRepStart()", SQL_NTS );rc = SQLExecDirect( hstmt, (SQLCHAR *) "CALL ttRepStop()", SQL_NTS );
Example 8–7 Setting the restart policy from a program
To set the replication policy to always for the data store identified by the hdbc connection handle:
rc = SQLAllocStmt( hdbc, &hstmt );rc = SQLExecDirect( hstmt, (SQLCHAR *) "CALL ttRepPolicy ('always')", SQL_NTS );
Setting the replication state of subscribersThe "state" of a subscriber replication agent is described by its master data store. When recovering a failed subscriber data store, you must reset the replication state of the subscriber data store with respect to the master data store it communicates with in a replication scheme. You can reset the state of a subscriber data store from either the command line or your program:
■ From the command line, use ttRepAdmin -state to direct a master data store to reset the replication state of one of its subscriber data stores.
■ From your program, invoke the ttRepSubscriberStateSet procedure to direct a master data store to reset the replication state of one or all of its subscriber data stores.
See "Monitoring Replication" on page 9-1 for information on how to query the state of a data store.
A master data store can set a subscriber data store to either the Start, Pause, or Stop states. The data store state appears as an integer value in the STATE column in the TTREP.REPNETWORK table, as shown below.

Setting the replication state of subscribers
8-16 Oracle TimesTen In-Memory Database TimesTen to TimesTen Replication Guide
When a master data store sets one of its subscribers to the Start state, updates for the subscriber are retained in the master's log. When a subscriber is in the Stop state, updates intended for it are discarded.
When a subscriber is in the Pause state, updates for it are retained in the master's log, but are not transmitted to the subscriber data store. When a master transitions a subscriber from Pause to Start, the backlog of updates stored in the master's log is transmitted to the subscriber. (There is an exception to this, which is described in "Managing data store failover and recovery" on page 11-13.) If a master data store is unable to establish a connection to a stated subscriber, the master periodically attempts to establish a connection until successful.
Example 8–8 Using ttRepAdmin to set the subscriber state
To use ttRepAdmin from the command line to direct the masterds master data store to set the state of the subscriberds subscriber data store to Stop:
ttRepAdmin -dsn masterds -receiver -name subscriberds -state stop
Example 8–9 Setting the subscriber state to Stop from a program
Assuming the replication scheme is named scheme, the following ttRepSubscriberStateSet procedure directs the master data store to set the state of the subscriber data store (subscriberds ON system1) to Stop:
rc = SQLAllocStmt( hdbc, &hstmt );rc = SQLExecDirect( hstmt, (SQLCHAR *) "CALL ttRepSubscriberStateSet('repscheme', 'repl', 'subscriberds', 'system1', 2)", SQL_NTS );
Example 8–10 Setting the subscriber state to Pause from a program
The following ttRepSubscriberStateSet procedure directs the master data store to set the state of all of its subscriber data stores to Pause:
rc = SQLAllocStmt( hdbc, &hstmt );rc = SQLExecDirect( hstmt, (SQLCHAR *)
State Description
Start
STATE value: 0
Replication updates are collected and transmitted to the subscriber data store as soon as possible. If replication for the subscriber data store is not operational, the updates are saved in the transaction log files until they can be sent.
Pause
STATE value: 1
Replication updates are retained in the log with no attempt to transmit them. Transmission begins when the state is changed to Start.
Stop
STATE value: 2
Replication updates are discarded without being sent to the subscriber data store. Placing a subscriber data store in the Stop state discards any pending updates from the master's transaction log.
Failed
STATE value: 4
Replication to a subscriber is considered failed because the threshold limit (log data) has been exceeded. This state is set by the system is a transitional state before the system sets the state to Stop.Applications that connect to a Failed data store receive a warning. See "General failover and recovery procedures" on page 11-14 for more information.
Note: If you have multiple subscribers with the same name on different hosts, use the ttRepAdmin -host parameter to identify the host for the subscriber.
Setting the replication state of subscribers
Setting Up a Replicated System 8-17
"CALL ttRepSubscriberStateSet( , , , , 1 )", SQL_NTS );
Only ttRepSubscriberStateSet can be used to set all of the subscribers of a master to a particular state.The ttRepAdmin utility does not have any equivalent functionality.

Setting the replication state of subscribers
8-18 Oracle TimesTen In-Memory Database TimesTen to TimesTen Replication Guide

9
Monitoring Replication 9-1
9Monitoring Replication
This chapter describes some of the TimesTen utilities and procedures you can use to monitor the replication status of your data stores.
You can monitor replication from both the command line and within your programs. The ttStatus and ttRepAdmin utilities described in this chapter are useful for command line queries. To monitor replication from your programs, you can use the TimesTen built-in procedures described in Oracle TimesTen In-Memory Database Reference or create your own SQL SELECT statements to query the replication tables described in "System and Replication Tables" in Oracle TimesTen In-Memory Database SQL Reference.
This chapter includes the following topics:
■ Show state of replication agents
■ Show master data store information
■ Show subscriber data store information
■ Show configuration of replicated data stores
■ Show replicated log records
■ Show replication status
■ Checking the status of return service transactions
Show state of replication agentsYou can display information about the current state of the replication agents:
■ From the command line: ttStatus
■ From the command line: ttAdmin -query
■ From a program: ttDataStoreStatus
You can also obtain the state of specific replicated data stores as described in "Show subscriber data store information" on page 9-5 and "Show configuration of replicated data stores" on page 9-8.
Note: You can only access the TimesTen SYS and TTREP tables for queries. You cannot directly alter the contents of these tables.
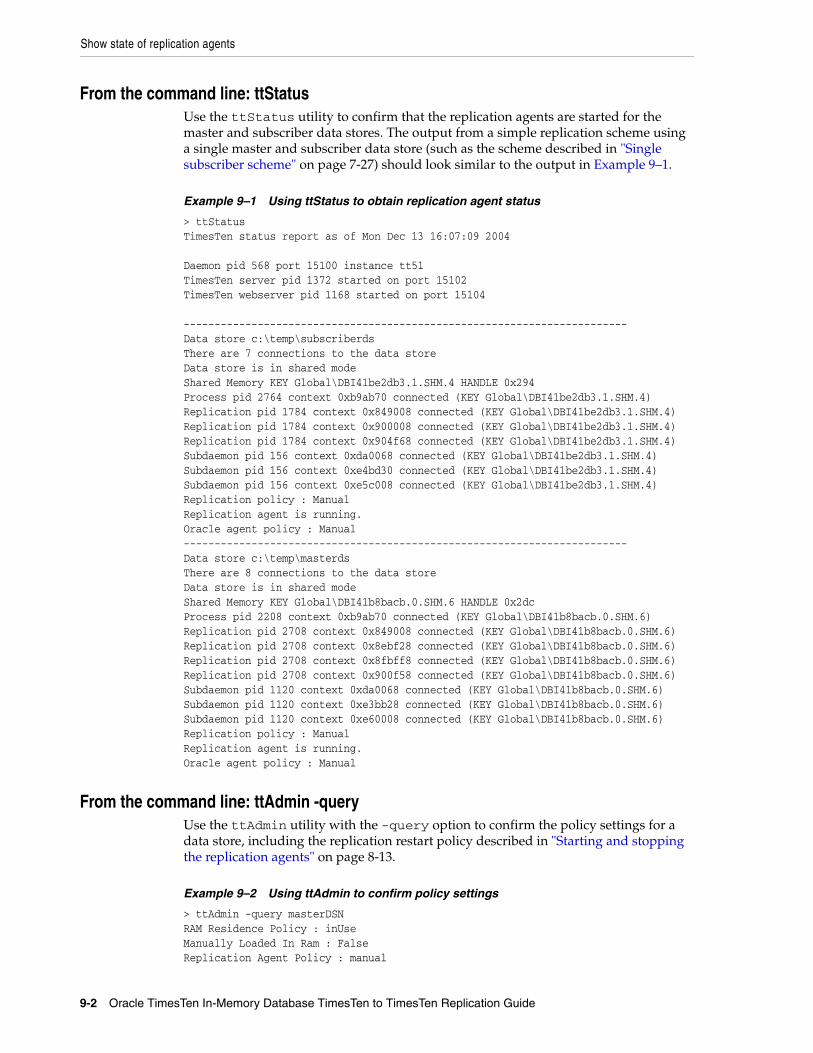
Show state of replication agents
9-2 Oracle TimesTen In-Memory Database TimesTen to TimesTen Replication Guide
From the command line: ttStatusUse the ttStatus utility to confirm that the replication agents are started for the master and subscriber data stores. The output from a simple replication scheme using a single master and subscriber data store (such as the scheme described in "Single subscriber scheme" on page 7-27) should look similar to the output in Example 9–1.
Example 9–1 Using ttStatus to obtain replication agent status
> ttStatusTimesTen status report as of Mon Dec 13 16:07:09 2004
Daemon pid 568 port 15100 instance tt51TimesTen server pid 1372 started on port 15102TimesTen webserver pid 1168 started on port 15104
------------------------------------------------------------------------Data store c:\temp\subscriberdsThere are 7 connections to the data storeData store is in shared modeShared Memory KEY Global\DBI41be2db3.1.SHM.4 HANDLE 0x294Process pid 2764 context 0xb9ab70 connected (KEY Global\DBI41be2db3.1.SHM.4)Replication pid 1784 context 0x849008 connected (KEY Global\DBI41be2db3.1.SHM.4)Replication pid 1784 context 0x900008 connected (KEY Global\DBI41be2db3.1.SHM.4)Replication pid 1784 context 0x904f68 connected (KEY Global\DBI41be2db3.1.SHM.4)Subdaemon pid 156 context 0xda0068 connected (KEY Global\DBI41be2db3.1.SHM.4)Subdaemon pid 156 context 0xe4bd30 connected (KEY Global\DBI41be2db3.1.SHM.4)Subdaemon pid 156 context 0xe5c008 connected (KEY Global\DBI41be2db3.1.SHM.4)Replication policy : ManualReplication agent is running.Oracle agent policy : Manual------------------------------------------------------------------------Data store c:\temp\masterdsThere are 8 connections to the data storeData store is in shared modeShared Memory KEY Global\DBI41b8bacb.0.SHM.6 HANDLE 0x2dcProcess pid 2208 context 0xb9ab70 connected (KEY Global\DBI41b8bacb.0.SHM.6)Replication pid 2708 context 0x849008 connected (KEY Global\DBI41b8bacb.0.SHM.6)Replication pid 2708 context 0x8ebf28 connected (KEY Global\DBI41b8bacb.0.SHM.6)Replication pid 2708 context 0x8fbff8 connected (KEY Global\DBI41b8bacb.0.SHM.6)Replication pid 2708 context 0x900f58 connected (KEY Global\DBI41b8bacb.0.SHM.6)Subdaemon pid 1120 context 0xda0068 connected (KEY Global\DBI41b8bacb.0.SHM.6)Subdaemon pid 1120 context 0xe3bb28 connected (KEY Global\DBI41b8bacb.0.SHM.6)Subdaemon pid 1120 context 0xe60008 connected (KEY Global\DBI41b8bacb.0.SHM.6)Replication policy : ManualReplication agent is running.Oracle agent policy : Manual
From the command line: ttAdmin -queryUse the ttAdmin utility with the -query option to confirm the policy settings for a data store, including the replication restart policy described in "Starting and stopping the replication agents" on page 8-13.
Example 9–2 Using ttAdmin to confirm policy settings
> ttAdmin -query masterDSNRAM Residence Policy : inUseManually Loaded In Ram : FalseReplication Agent Policy : manual
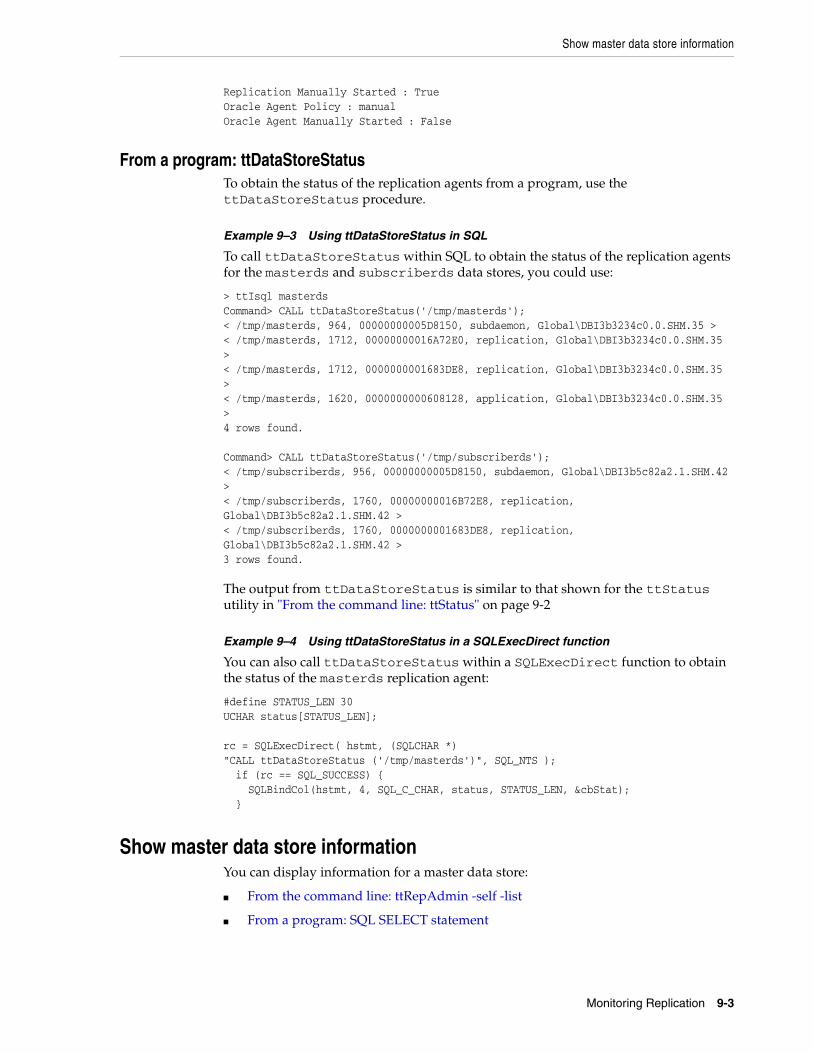
Show master data store information
Monitoring Replication 9-3
Replication Manually Started : TrueOracle Agent Policy : manualOracle Agent Manually Started : False
From a program: ttDataStoreStatusTo obtain the status of the replication agents from a program, use the ttDataStoreStatus procedure.
Example 9–3 Using ttDataStoreStatus in SQL
To call ttDataStoreStatus within SQL to obtain the status of the replication agents for the masterds and subscriberds data stores, you could use:
> ttIsql masterdsCommand> CALL ttDataStoreStatus('/tmp/masterds');< /tmp/masterds, 964, 00000000005D8150, subdaemon, Global\DBI3b3234c0.0.SHM.35 >< /tmp/masterds, 1712, 00000000016A72E0, replication, Global\DBI3b3234c0.0.SHM.35 >< /tmp/masterds, 1712, 0000000001683DE8, replication, Global\DBI3b3234c0.0.SHM.35 >< /tmp/masterds, 1620, 0000000000608128, application, Global\DBI3b3234c0.0.SHM.35 >4 rows found.
Command> CALL ttDataStoreStatus('/tmp/subscriberds');< /tmp/subscriberds, 956, 00000000005D8150, subdaemon, Global\DBI3b5c82a2.1.SHM.42 >< /tmp/subscriberds, 1760, 00000000016B72E8, replication, Global\DBI3b5c82a2.1.SHM.42 >< /tmp/subscriberds, 1760, 0000000001683DE8, replication, Global\DBI3b5c82a2.1.SHM.42 >3 rows found.
The output from ttDataStoreStatus is similar to that shown for the ttStatus utility in "From the command line: ttStatus" on page 9-2
Example 9–4 Using ttDataStoreStatus in a SQLExecDirect function
You can also call ttDataStoreStatus within a SQLExecDirect function to obtain the status of the masterds replication agent:
#define STATUS_LEN 30UCHAR status[STATUS_LEN];
rc = SQLExecDirect( hstmt, (SQLCHAR *)"CALL ttDataStoreStatus ('/tmp/masterds')", SQL_NTS ); if (rc == SQL_SUCCESS) { SQLBindCol(hstmt, 4, SQL_C_CHAR, status, STATUS_LEN, &cbStat); }
Show master data store informationYou can display information for a master data store:
■ From the command line: ttRepAdmin -self -list
■ From a program: SQL SELECT statement

Show master data store information
9-4 Oracle TimesTen In-Memory Database TimesTen to TimesTen Replication Guide
From the command line: ttRepAdmin -self -listTo display information for a master data store from the command line, use the ttRepAdmin utility with the -self -list options:
ttRepAdmin -dsn masterDSN -self -list
Example 9–5 Using ttRepAdmin to display information about a master data store
This example shows the output for the master data store described in "Multiple subscriber schemes" on page 7-28.
> ttRepAdmin -dsn masterds -self -listSelf host "server1", port auto, name "masterds", LSN 0/2114272
The following table describes the fields.
From a program: SQL SELECT statementTo obtain the information for a master data store from a program, use the following SQL SELECT statement to query the TTREP.TTSTORES and TTREP.REPSTORES tables:
SELECT t.host_name, t.rep_port_number, t.tt_store_name FROM ttrep.ttstores t, ttrep.repstores s WHERE t.is_local_store = 0x01 AND t.tt_store_id = s.tt_store_id;
Use the ttBookmark procedure to obtain the replication hold LSN, as described in "Show replicated log records" on page 9-11.
This is the output of the above SELECT statement for the master data store described in "Multiple subscriber schemes" on page 7-28. The fields are the host name, the replication port number, and the data store name.
< server1, 0, masterds>
Example 9–6 Using ttBookmark to obtain the replication hold LSN
Call the ttBookmark procedure to obtain the replication hold LSN.
> ttIsql masterdsCommand> call ttBookMark();< 10, 928908, 10, 280540, 10, 927692 >1 row found.
The output fields are defined as follows:
Field Description
host The name of the host machine for the data store.
port TCP/IP port used by a replication agent of another data store to receive updates from this data store. A value of 0 (zero) indicates replication has automatically assigned the port.
name Name of the data store
Log file / Replication hold LSN Indicates the oldest location in the transaction log that is held for possible transmission to the subscriber. A value of -1/-1 indicates replication is in the Stop state with respect to all subscribers.
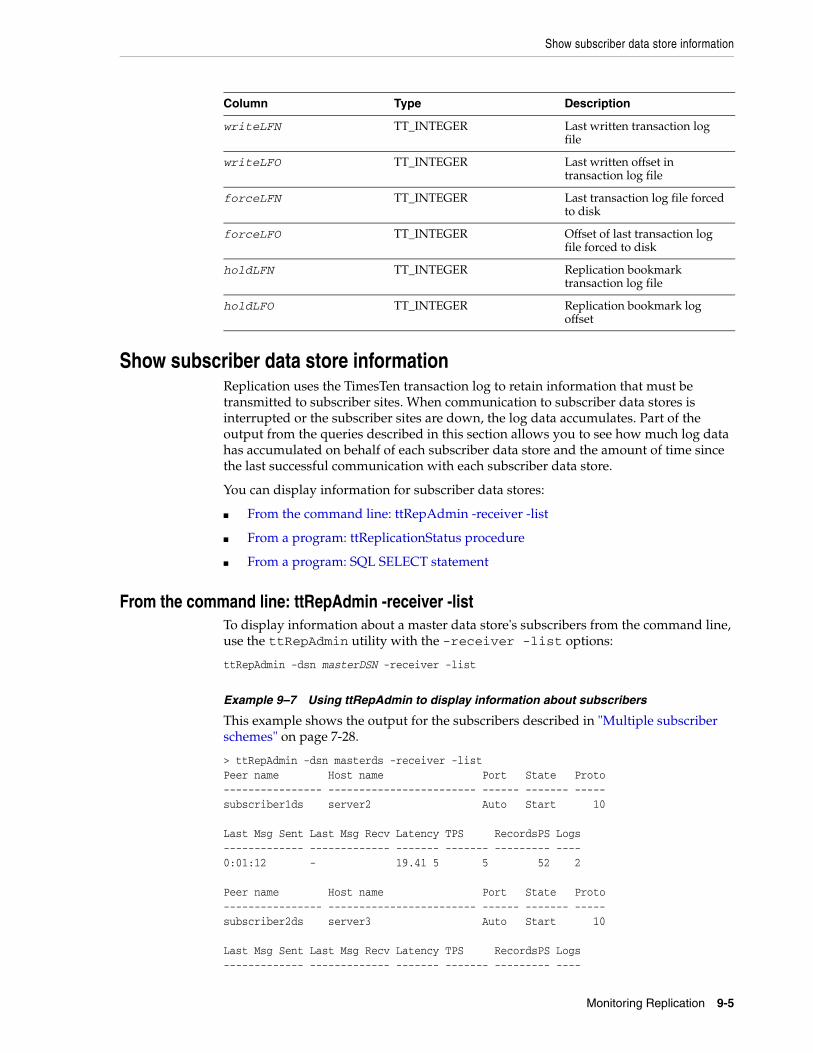
Show subscriber data store information
Monitoring Replication 9-5
Show subscriber data store informationReplication uses the TimesTen transaction log to retain information that must be transmitted to subscriber sites. When communication to subscriber data stores is interrupted or the subscriber sites are down, the log data accumulates. Part of the output from the queries described in this section allows you to see how much log data has accumulated on behalf of each subscriber data store and the amount of time since the last successful communication with each subscriber data store.
You can display information for subscriber data stores:
■ From the command line: ttRepAdmin -receiver -list
■ From a program: ttReplicationStatus procedure
■ From a program: SQL SELECT statement
From the command line: ttRepAdmin -receiver -listTo display information about a master data store's subscribers from the command line, use the ttRepAdmin utility with the -receiver -list options:
ttRepAdmin -dsn masterDSN -receiver -list
Example 9–7 Using ttRepAdmin to display information about subscribers
This example shows the output for the subscribers described in "Multiple subscriber schemes" on page 7-28.
> ttRepAdmin -dsn masterds -receiver -listPeer name Host name Port State Proto---------------- ------------------------ ------ ------- -----subscriber1ds server2 Auto Start 10
Last Msg Sent Last Msg Recv Latency TPS RecordsPS Logs------------- ------------- ------- ------- --------- ----0:01:12 - 19.41 5 5 52 2
Peer name Host name Port State Proto---------------- ------------------------ ------ ------- -----subscriber2ds server3 Auto Start 10
Last Msg Sent Last Msg Recv Latency TPS RecordsPS Logs------------- ------------- ------- ------- --------- ----
Column Type Description
writeLFN TT_INTEGER Last written transaction log file
writeLFO TT_INTEGER Last written offset in transaction log file
forceLFN TT_INTEGER Last transaction log file forced to disk
forceLFO TT_INTEGER Offset of last transaction log file forced to disk
holdLFN TT_INTEGER Replication bookmark transaction log file
holdLFO TT_INTEGER Replication bookmark log offset

Show subscriber data store information
9-6 Oracle TimesTen In-Memory Database TimesTen to TimesTen Replication Guide
0:01:04 - 20.94 4 48 2
The first line of the display contains the subscriber definition. The following row of the display contains latency and rate information, as well as the number of transaction log files being retained on behalf of this subscriber. See Example 9–9 for a description of each field.
If you have more than one scheme specified in your TTREP.REPLICATIONS table, you must use the -scheme option to specify which scheme you wish to list. Otherwise you receive the following error:
Must specify -scheme to identify which replication scheme to use
For the latest troubleshooting information, "Troubleshooting Replication" in Oracle TimesTen In-Memory Database Troubleshooting Procedures Guide.
From a program: ttReplicationStatus procedureYou can obtain more detailed status for a specific replicated data store from a program by using the ttReplicationStatus procedure.
Example 9–8 Using ttReplicationStatus from a program
You can use ttReplicationStatus to obtain the replication status of the subscriberds data store in relation to its master data store. From the master data store, enter:
> ttIsql masterdsCommand> CALL ttReplicationStatus ('subscriberds');< subscriberds, myhost, 0, start, 1, 152959, repscheme, repl>1 row found.
See Example 9–9 for an explanation of the output fields.
Example 9–9 Using ttReplicationStatus from a SQLExecDirect function
You can also call ttReplicationStatus within a SQLExecDirect function to obtain the replication status of the subscriberds data store:
#define STATUS_LEN 30UCHAR status[STATUS_LEN];
rc = SQLExecDirect( hstmt, (SQLCHAR *)"CALL ttReplicationStatus ('subscriberds')", SQL_NTS ); if (rc == SQL_SUCCESS) { SQLBindCol(hstmt, 4, SQL_C_CHAR, status, STATUS_LEN, &cbStat); }
The columns in the returned row are shown in the following table:
Column Description
Subscriber name Name of the subscriber data store.
Host name Name of the machine that hosts the subscriber.
Port TCP/IP port used by the subscriber agent to receive updates from the master. A value of 0 indicates replication has automatically assigned the port.

Show subscriber data store information
Monitoring Replication 9-7
From a program: SQL SELECT statementTo obtain information about a master's subscribers from a program, use the following SQL SELECT statement to query the TTREP.REPPEERS, TTREP.TTSTORES, and SYS.MONITOR tables:
SELECT t1.tt_store_name, t1.host_name, t1.rep_port_number,p.state, p.protocol, p.timesend, p.timerecv, p.latency,p.tps, p.recspersec, t3.last_log_file - p.sendlsnhigh + 1 FROM ttrep.reppeers p, ttrep.ttstores t1, ttrep.ttstores t2, sys.monitor t3 WHERE p.tt_store_id = t2.tt_store_id AND t2.is_local_store = 0X01 AND p.subscriber_id = t1.tt_store_id AND p.replication_name = 'repscheme' AND p.replication_owner = 'repl' AND (p.state = 0 OR p.state = 1);The following is sample output from the SELECT statement above:
< subscriber1ds, server2, 0, 0, 7, 1003941635, 0, -1.00000000000000, -1, -1, 1 >< subscriber2ds, server3, 0, 0, 7, 1003941635, 0, -1.00000000000000, -1, -1, 1 >
The output from either the ttRepAdmin utility or the SQL SELECT statement contains the following fields:
State Current state of the subscriber with respect to its master data store (see "Setting the replication state of subscribers" on page 8-15 for information).
Logs Number of transaction log files the master data store is retaining for this subscriber.
Last Msg Sent Time (in seconds) since the master sent the last message to the subscriber. This includes the "heartbeat" messages sent between the data stores.
Replication scheme name The name of the replication scheme used.
Owner name The name of the owner of the replication scheme.
Field Description
Peer name Name of the subscriber data store
Host name Name of the machine that hosts the subscriber
Port TCP/IP port used by the subscriber agent to receive updates from the master. A value of 0 indicates replication has automatically assigned the port.
State Current replication state of the subscriber with respect to its master data store (see "Show subscriber data store information" on page 9-5 for information).
Protocol Internal protocol used by replication to communicate between this master and its subscribers. You can ignore this value.
Last message sent Time (in seconds) since the master sent the last message to the subscriber. This includes the "heartbeat" messages sent between the data stores.
Last message received Time (in seconds) since this subscriber received the last message from the master.
Column Description

Show configuration of replicated data stores
9-8 Oracle TimesTen In-Memory Database TimesTen to TimesTen Replication Guide
Show configuration of replicated data storesYou can display the configuration of your replicated data stores:
■ From ttIsql: repschemes command
■ From the command line: ttRepAdmin -showconfig
■ From a program: SQL SELECT statements
From ttIsql: repschemes commandTo display the configuration of your replicated data stores from the ttIsql prompt, use the repschemes command:
Command> repschemes;
Example 9–10 shows the configuration output from the replication scheme shown in "Propagation scheme" on page 7-31.
Example 9–10 Output from ttIsql repschemes command
Replication Scheme PROPAGATOR:
Element: A Type: Table TAB Master Store: CENTRALDS on FINANCE Transmit Durable Subscriber Store: PROPDS on NETHANDLER
Element: B Type: Table TAB Propagator Store: PROPDS on NETHANDLER Transmit Durable Subscriber Store: BACKUP1DS on BACKUPSYSTEM1 Subscriber Store: BACKUP2DS on BACKUPSYSTEM2
Store: BACKUP1DS on BACKUPSYSTEM1 Port: (auto) Log Fail Threshold: (none) Retry Timeout: 120 seconds
Latency The average latency time (in seconds) between when the master sends a message and when it receives the final acknowledgement from the subscriber. (See note below.)
Transactions per second The average number of transactions per second that are committed on the master and processed by the subscriber. (See note below.)
Records per second The average number of transmitted records per second. (See note below.)
Logs Number of transaction log files the master data store is retaining for a subscriber.
Note: Latency, TPS, and RecordsPS report averages detected while replicating a batch of records. These values can be unstable if the workload is not relatively constant. A value of -1 indicates the master's replication agent has not yet established communication with its subscriber replication agents or sent data to them.
Field Description

Show configuration of replicated data stores
Monitoring Replication 9-9
Compress Traffic: Disabled
Store: BACKUP2DS on BACKUPSYSTEM2 Port: (auto) Log Fail Threshold: (none) Retry Timeout: 120 seconds Compress Traffic: Disabled
Store: CENTRALDS on FINANCE Port: (auto) Log Fail Threshold: (none) Retry Timeout: 120 seconds Compress Traffic: Disabled
Store: PROPDS on NETHANDLER Port: (auto) Log Fail Threshold: (none) Retry Timeout: 120 seconds Compress Traffic: Disabled
From the command line: ttRepAdmin -showconfigTo display the configuration of your replicated data stores from the command line, use the ttRepAdmin utility with the -showconfig option:
ttRepAdmin -showconfig -dsn masterDSN
Example 9–11 shows the configuration output from the propagated data stores configured by the replication scheme shown in "Propagation scheme" on page 7-31.
Example 9–11 ttRepAdmin output
> ttRepAdmin -showconfig -dsn centraldsSelf host "finance", port auto, name "centralds", LSN 0/155656, timeout 120, threshold 0
List of subscribers-----------------Peer name Host name Port State Proto---------------- ------------------------ ------ ------- -----propds nethandler Auto Start 10
Last Msg Sent Last Msg Recv Latency TPS RecordsPS Logs------------- ------------- ------- ------- --------- ----0:01:12 - 19.41 5 52 2
List of tables and subscriptions--------------------------------Table details-------------Table : tab Timestamp updates : -
Master Name Subscriber Name----------- -------------centralds propds
Table details-------------Table : tab Timestamp updates : -

Show configuration of replicated data stores
9-10 Oracle TimesTen In-Memory Database TimesTen to TimesTen Replication Guide
Master Name Subscriber name----------- -------------propds backup1dspropds backup2ds
See Example 9–9 for the meaning of the "List of subscribers" fields. The "Table details" fields list the table and the names of its master (Sender) and subscriber data stores.
From a program: SQL SELECT statementsTo display the configuration of your replicated data stores from a program, use the following SQL SELECT statements to query the TTREP.TTSTORES, TTREP.REPSTORES, TTREP.REPPEERS, SYS.MONITOR, TTREP.REPELEMENTS, and TTREP.REPSUBSCRIPTIONS tables:
SELECT t.host_name, t.rep_port_number, t.tt_store_name, s.peer_timeout, s.fail_threshold FROM ttrep.ttstores t, ttrep.repstores s WHERE t.is_local_store = 0X01 AND t.tt_store_id = s.tt_store_id;
SELECT t1.tt_store_name, t1.host_name, t1.rep_port_number, p.state, p.protocol, p.timesend, p.timerecv, p.latency, p.tps, p.recspersec, t3.last_log_file - p.sendlsnhigh + 1 FROM ttrep.reppeers p, ttrep.ttstores t1, ttrep.ttstores t2, sys.monitor t3 WHERE p.tt_store_id = t2.tt_store_id AND t2.is_local_store = 0X01 AND p.subscriber_id = t1.tt_store_id AND (p.state = 0 OR p.states = 1);
SELECT ds_obj_owner, DS_OBJ_NAME, t1.tt_store_name,t2.tt_store_name FROM ttrep.repelements e, ttrep.repsubscriptions s, ttrep.ttstores t1, ttrep.ttstores t2 WHERE s.element_name = e.element_name AND e.master_id = t1.tt_store_id AND s.subscriber_id = t2.tt_store_id ORDER BY ds_obj_owner, ds_obj_name;
Use the ttBookmark procedure to obtain the replication hold LSN, as described in "From a program: ttBookMark procedure" on page 9-12.
Example 9–12 Output from SELECT queries
The output from the above queries for the data stores configured by the replication scheme shown in "Propagation scheme" on page 7-31 might look like the following:
< finance, 0, centralds, 120, 0 >< propds, nethandler, 0, 0, 7, 1004378953, 0, -1.00000000000000, -1, -1, 1 >< repl, tab, centralds, propds >< repl, tab, propds, backup1ds >< repl, tab, propds, backup2ds >
See Example 9–6 for descriptions for the first three columns in the first row. The fourth column is the TIMEOUT value that defines the amount of time a data store waits for a response from another data store before resending a message. The last column is the log failure threshold value described in "Setting the log failure threshold" on page 8-10.
See Example 9–9 for a description of the second row. The last three rows show the replicated table and the names of its master (sender) and subscriber (receiver) data stores.

Show replicated log records
Monitoring Replication 9-11
Show replicated log recordsTransactions are stored in the log in the form of log records. You can use bookmarks to detect which log records have or have not been replicated by a master data store.
A bookmark consists of log sequence numbers (LSNs) that identify the location of particular records in the transaction log that you can use to gauge replication performance. The LSNs associated with a bookmark are: hold LSN, last written LSN, and last LSN forced to disk. The hold LSN describes the location of the lowest (or oldest) record held in the log for possible transmission to a subscriber. You can compare the hold LSN with the last written LSN to determine the amount of data in the transaction log that have not yet been transmitted to the subscribers. The last LSN forced to disk describes the last records saved in a transaction log file on disk.
A more accurate way to monitor replication to a particular subscriber is to look at the send LSN for the subscriber, which consists of the SENDLSNHIGH and SENDLSNLOW fields in the TTREP.REPPEERS table. In contrast to the send LSN value, the hold LSN returned in a bookmark is computed every 10 seconds to describe the minimum send LSN for all the subscribers, so it provides a more general view of replication progress that does not account for the progress of replication to the individual subscribers. Because replication acknowledgements are asynchronous for better performance, the send LSN can also be some distance behind. Nonetheless, the send LSN for a subscriber is the most accurate value available and is always ahead of the hold LSN.
You can display replicated log records:
■ From the command line: ttRepAdmin -bookmark
■ From a program: ttBookMark procedure
From the command line: ttRepAdmin -bookmarkTo display the location of the bookmarks from the command line, use the ttRepAdmin utility with the -bookmark option:
> ttRepAdmin -dsn masterds -bookmarkReplication hold LSN ...... 10/927692Last written LSN .......... 10/928908Last LSN forced to disk ... 10/280540Each LSN is defined by two values:Log file number / Offset in log file
The LSNs output from ttRepAdmin -bookmark are:
Line Description
Replication hold LSN The location of the lowest (or oldest) record held in the log for possible transmission to a subscriber. A value of -1/-1 indicates replication is in the Stop state with respect to all subscribers (or the queried data store is not a master data store).
Last written LSN The location of the most recently generated transaction log record for the data store.
Last LSN forced to disk The location of the most recent transaction log record written to the disk.

Show replication status
9-12 Oracle TimesTen In-Memory Database TimesTen to TimesTen Replication Guide
From a program: ttBookMark procedureTo display the location of the bookmarks from a program, use the ttBookmark procedure.
Example 9–13 Using ttBookmark to display bookmark location
> ttIsql masterds
Command> call ttBookMark();< 10, 928908, 10, 280540, 10, 927692 >1 row found.
The first two columns in the returned row define the "Last written LSN," the next two columns define the "Last LSN forced to disk," and the last two columns define the "Replication hold LSN."
Show replication statusYou can use the ttRepAdmin utility with the -showstatus option to display the current status of the replication agent. The status output includes the bookmark locations, port numbers, and communication protocols used by the replication agent for the queried data store.
The output from ttRepAdmin -showstatus includes the status of the MAIN thread and the TRANSMITTER and RECEIVER threads used by the replication agent. A master data store has a TRANSMITTER thread and a subscriber data store has a RECEIVER thread. A data store that serves a master/subscriber role in a bidirectional replication scheme has both a TRANSMITTER and a RECEIVER thread.
Each replication agent has a single REPLISTENER thread that listens on a port for peer connections. On a master data store, the REPLISTENER thread starts a separate TRANSMITTER thread for each subscriber data store. On a subscriber data store, the REPLISTENER thread starts a separate RECEIVER thread for each connection from a master.
If the TimesTen daemon requests that the replication agent stop or if a fatal error occurs in any of the other threads used by the replication agent, the MAIN thread waits for the other threads to gracefully terminate. The TimesTen daemon may or may not restart the replication agent, depending upon certain fatal errors. The REPLISTENER thread never terminates during the lifetime of the replication agent. A TRANSMITTER or RECEIVER thread may stop but the replication agent may restart it. The RECEIVER thread terminates on errors from which it cannot recover or when the master disconnects.
Example 9–13 shows ttRepAdmin -showstatus output for a unidirectional replication scheme in which the rep1 data store is the master and rep2 data store is the subscriber. The first ttRepAdmin -showstatus output shows the status of the rep1 data store and its TRANSMITTER thread. The second output shows the status of the rep2 data store and its RECEIVER thread.
Following the example are sections that describe the meaning of each field in the ttRepAdmin -showstatus output:
■ MAIN thread status fields
■ Replication peer status fields
■ TRANSMITTER thread status fields
■ RECEIVER thread status fields

Show replication status
Monitoring Replication 9-13
Example 9–14 Unidirectional replication scheme
Consider the unidirectional replication scheme from the rep1 data store to the rep2 data store:
CREATE REPLICATION rELEMENT e1 TABLE t MASTER rep1 SUBSCRIBER rep2;
The replication status for the rep1 data store should look similar to the following:
> ttRepAdmin -showstatus rep1
DSN : rep1Process ID : 1980Replication Agent Policy : MANUALHost : MYHOSTRepListener Port : 1113 (AUTO)Last write LSN : 0.1487928Last LSN forced to disk : 0.1487928Replication hold LSN : 0.1486640
Replication Peers: Name : rep2 Host : MYHOST Port : 1154 (AUTO) Replication State : STARTED Communication Protocol : 12
TRANSMITTER thread(s): For : rep2 Start/Restart count : 2 Send LSN : 0.1485960 Transactions sent : 3 Total packets sent : 10 Tick packets sent : 3 MIN sent packet size : 48 MAX sent packet size : 460 AVG sent packet size : 167 Last packet sent at : 17:41:05 Total Packets received: 9 MIN rcvd packet size : 48 MAX rcvd packet size : 68 AVG rcvd packet size : 59 Last packet rcvd'd at : 17:41:05 Earlier errors (max 5): TT16060 in transmitter.c (line 3590) at 17:40:41 on 08-25-2004 TT16122 in transmitter.c (line 2424) at 17:40:41 on 08-25-2004
The replication status for the rep2 data store should look similar to the following:
> ttRepAdmin -showstatus rep2
DSN : rep2Process ID : 2192Replication Agent Policy : MANUALHost : MYHOSTRepListener Port : 1154 (AUTO)Last write LSN : 0.416464Last LSN forced to disk : 0.416464Replication hold LSN : -1.-1

Show replication status
9-14 Oracle TimesTen In-Memory Database TimesTen to TimesTen Replication Guide
Replication Peers: Name : rep1 Host : MYHOST Port : 0 (AUTO) Replication State : STARTED Communication Protocol : 12
RECEIVER thread(s): For : rep1 Start/Restart count : 1 Transactions received : 0 Total packets sent : 20 Tick packets sent : 0 MIN sent packet size : 48 MAX sent packet size : 68 AVG sent packet size : 66 Last packet sent at : 17:49:51 Total Packets received: 20 MIN rcvd packet size : 48 MAX rcvd packet size : 125 AVG rcvd packet size : 52 Last packet rcvd'd at : 17:49:51
MAIN thread status fieldsThe following fields are output for the MAIN thread in the replication agent for the queried data store.
Replication peer status fieldsThe following fields are output for each replication peer that participates in the replication scheme with the queried data store. A "peer" could play the role of master,
MAIN Thread Description
DSN Name of the data store to be queried.
Process ID Process Id of the replication agent.
Replication Agent Policy The restart policy, as described in "Starting and stopping the replication agents" on page 8-13
Host Name of the machine that hosts this data store.
RepListener Port TCP/IP port used by the replication agent to listen for connections from the TRANSMITTER threads of remote replication agents. A value of 0 indicates that this port has been assigned automatically to the replication agent (the default), rather than being specified as part of a replication scheme.
Last write LSN The location of the most recently generated transaction log record for the data store. See "Show replicated log records" on page 9-11 for more information.
Last LSN forced to disk The location of the most recent transaction log record written to the disk. See "Show replicated log records" on page 9-11 for more information.
Replication hold LSN The location of the lowest (or oldest) record held in the log for possible transmission to a subscriber. A value of -1/-1 indicates replication is in the Stop state with respect to all subscribers. See "Show replicated log records" on page 9-11 for more information.

Show replication status
Monitoring Replication 9-15
subscriber, propagator or both master and subscriber in a bidirectional replication scheme.
TRANSMITTER thread status fieldsThe following fields are output for each TRANSMITTER thread used by a master replication agent to send transaction updates to a subscriber. A master with multiple subscribers has multiple TRANSMITTER threads.
Replication Peers Description
Name Name of a data store that is a replication peer to this data store.
Host Host machine of peer data store.
Port TCP/IP port used by the replication agent for the peer data store. A value of 0 indicates this port has been assigned automatically to the replication agent (the default), rather than being specified as part of a replication scheme.
Replication State Current replication state of the replication peer with respect to the queried data store (see "Show subscriber data store information" on page 9-5 for information).
Communication Protocol Internal protocol used by replication to communicate between the peers. (For internal use only.)
Note: The counts in the TRANSMITTER output begin to accumulate when the replication agent is started. These counters are reset to 0 only when the replication agent is started or restarted.
TRANSMITTER Thread Description
For Name of the subscriber data store that is receiving replicated data from this data store.
Start/Restart count Number of times this TRANSMITTER thread was started or restarted by the replication agent due to a temporary error, such as operation timeout, network failure, and so on.
Send LSN The last LSN transmitted to this peer. See "Show replicated log records" on page 9-11 for more information.
Transactions sent Total number of transactions sent to the subscriber.
Total packets sent Total number of packets sent to the subscriber (including tick packets)
Tick packets sent Total number of tick packets sent. Tick packets are used to maintain a "heartbeat" between the master and subscriber. You can use this value to determine how many of the 'Total packets sent' packets are not related to replicated data.
MIN sent packet size Size of the smallest packet sent to the subscriber.
MAX sent packet size Size of the largest packet sent to the subscriber.
AVG sent packet size Average size of the packets sent to the subscriber.
Last packet sent at Time of day last packet was sent (24-hour clock time)
Total packets received Total packets received from the subscriber (tick packets and acknowledgement data)

Checking the status of return service transactions
9-16 Oracle TimesTen In-Memory Database TimesTen to TimesTen Replication Guide
RECEIVER thread status fieldsThe following fields are output for each RECEIVER thread used by a subscriber replication agent to receive transaction updates from a master. A subscriber that is updated by multiple masters has multiple RECEIVER threads.
Checking the status of return service transactionsYou can determine whether the return service for a particular subscriber has been disabled by the DISABLE RETURN failure policy by calling the
MIN rcvd packet size Size of the smallest packet received
MAX rcvd packet size Size of the largest packet received
AVG rcvd packet size Average size of the packets received
Last packet rcvd at Time of day last packet was received (24-hour clock time)
Earlier errors (max 5) Last five errors generated by this thread
Note: The counts in the RECEIVER output begin to accumulate when the replication agent is started. These counters are reset to 0 only when the replication agent is started or restarted.
RECEIVER Thread Description
For Name of the master data store that is sending replicated data from this data store
Start/Restart count Number of times this RECEIVER thread was started or restarted by the replication agent due to a temporary error, such as operation timeout, network failure, and so on.
Transactions received Total number of transactions received from the master
Total packets sent Total number of packets sent to the master (tick packets and acknowledgement data)
Tick packets sent Total number of tick packets sent to the master. Tick packets are used to maintain a "heartbeat" between the master and subscriber. You can use this value to determine how many of the 'Total packets sent' packets are not related to acknowledgement data.
MIN sent packet size Size of the smallest packet sent to the master
MAX sent packet size Size of the largest packet sent to the master
AVG sent packet size Average size of the packets sent to the master
Last packet sent at Time of day last packet was sent to the master (24-hour clock time)
Total packets received Total packets of acknowledgement data received from the master
MIN rcvd packet size Size of the smallest packet received
MAX rcvd packet size Size of the largest packet received
AVG rcvd packet size Average size of the packets received
Last packet rcvd at Time of day last packet was received (24-hour clock time)
TRANSMITTER Thread Description

Checking the status of return service transactions
Monitoring Replication 9-17
ttRepSyncSubscriberStatus built-in procedure or by means of the SNMP trap, ttRepReturnTransitionTrap. The ttRepSyncSubscriberStatus procedure returns a value of '1' to indicate the return service has been disabled for the subscriber, or a value of '0' to indicate that the return service is still enabled.
Example 9–15 Using ttRepSyncSubscriberStatus to obtain return receipt status
To use ttRepSyncSubscriberStatus to obtain the return receipt status of the subscriberds data store with respect to its master data store, masterDSN, enter:
> ttIsql masterDSN
Command> CALL ttRepSyncSubscriberStatus ('subscriberds');< 0 >1 row found.
This result indicates that the return service is still enabled.
See "DISABLE RETURN" on page 7-18 for more information.
You can check the status of the last return receipt or return twosafe transaction executed on the connection handle by calling the ttRepXactTokenGet and ttRepXactStatus procedures.
First, call ttRepXactTokenGet to get a unique token for the last return service transaction. If you are using return receipt, the token identifies the last return receipt transaction committed on the master data store. If you are using return twosafe, the token identifies the last twosafe transaction on the master that, in the event of a successful commit on the subscriber, is committed by the replication agent on the master. However, in the event of a timeout or other error, the twosafe transaction identified by the token is not committed by the replication agent on the master.
Next, pass the token returned by ttRepXactTokenGet to the ttRepXactStatus procedure to obtain the return service status. The output of the ttRepXactStatus procedure reports which subscriber or subscribers are configured to receive the replicated data and the current status of the transaction (not sent, received, committed) with respect to each subscriber. If the subscriber replication agent encountered a problem applying the transaction to the subscriber data store, the ttRepXactStatus procedure also includes the error string. If you are using return twosafe and receive a timeout or other error, you can then decide whether to unconditionally commit or retry the commit, as described in "RETURN TWOSAFE" on page 7-12.
The ttRepXactStatus procedure returns the return service status for each subscriber as a set of rows formatted as:
subscriberName, status, error
Example 9–16 Reporting the status of each subscriber
For example, you can use ttRepXactTokenGet and ttRepXactStatus in a GetRSXactStatus function to report the status of each subscriber in your replicated system:
SQLRETURN GetRSXactStatus (HDBC hdbc)
Note: If ttRepXactStatus is called without a token from ttRepXactTokenGet, it returns the status of the most recent transaction on the connection which was committed with the return receipt or return twosafe replication service.
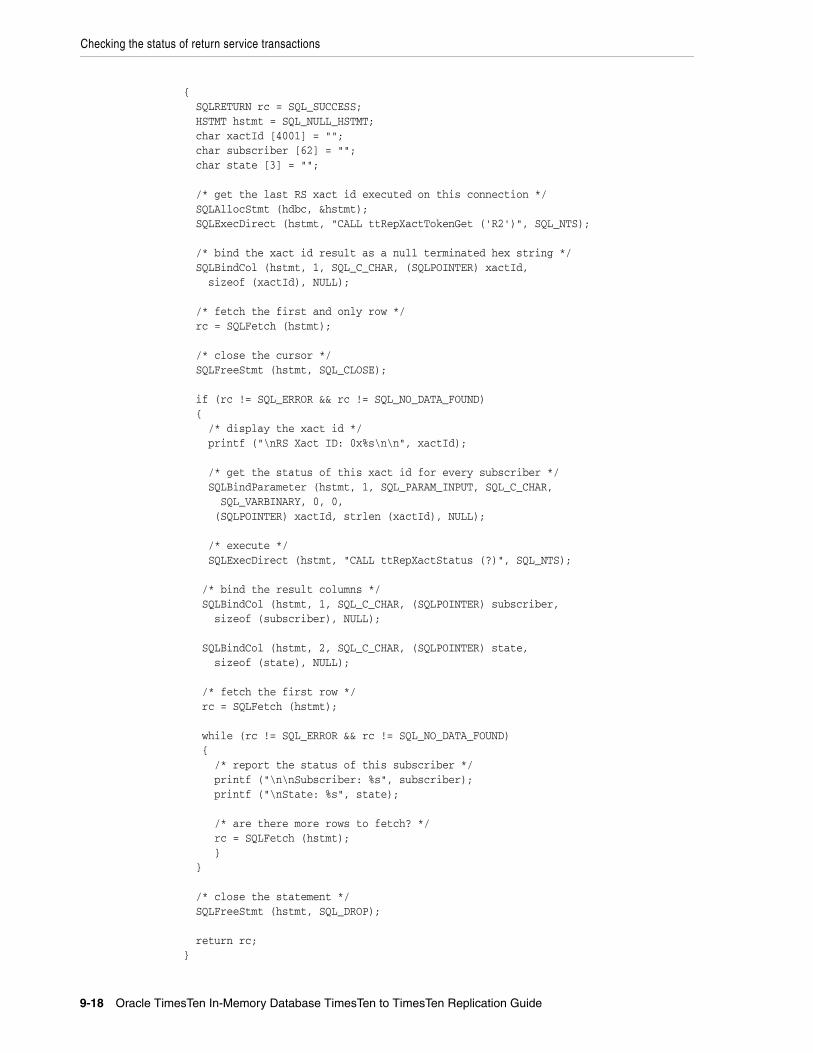
Checking the status of return service transactions
9-18 Oracle TimesTen In-Memory Database TimesTen to TimesTen Replication Guide
{ SQLRETURN rc = SQL_SUCCESS; HSTMT hstmt = SQL_NULL_HSTMT; char xactId [4001] = ""; char subscriber [62] = ""; char state [3] = "";
/* get the last RS xact id executed on this connection */ SQLAllocStmt (hdbc, &hstmt); SQLExecDirect (hstmt, "CALL ttRepXactTokenGet ('R2')", SQL_NTS);
/* bind the xact id result as a null terminated hex string */ SQLBindCol (hstmt, 1, SQL_C_CHAR, (SQLPOINTER) xactId, sizeof (xactId), NULL);
/* fetch the first and only row */ rc = SQLFetch (hstmt);
/* close the cursor */ SQLFreeStmt (hstmt, SQL_CLOSE);
if (rc != SQL_ERROR && rc != SQL_NO_DATA_FOUND) { /* display the xact id */ printf ("\nRS Xact ID: 0x%s\n\n", xactId);
/* get the status of this xact id for every subscriber */ SQLBindParameter (hstmt, 1, SQL_PARAM_INPUT, SQL_C_CHAR, SQL_VARBINARY, 0, 0, (SQLPOINTER) xactId, strlen (xactId), NULL);
/* execute */ SQLExecDirect (hstmt, "CALL ttRepXactStatus (?)", SQL_NTS);
/* bind the result columns */ SQLBindCol (hstmt, 1, SQL_C_CHAR, (SQLPOINTER) subscriber, sizeof (subscriber), NULL);
SQLBindCol (hstmt, 2, SQL_C_CHAR, (SQLPOINTER) state, sizeof (state), NULL);
/* fetch the first row */ rc = SQLFetch (hstmt);
while (rc != SQL_ERROR && rc != SQL_NO_DATA_FOUND) { /* report the status of this subscriber */ printf ("\n\nSubscriber: %s", subscriber); printf ("\nState: %s", state);
/* are there more rows to fetch? */ rc = SQLFetch (hstmt); } }
/* close the statement */ SQLFreeStmt (hstmt, SQL_DROP);
return rc;}

10
Altering Replication 10-1
10Altering Replication
This chapter describes how to alter an existing replication system. Table 10–1 lists the tasks often performed on an existing replicated system.
Altering a replication schemeYou can use ALTER REPLICATION to alter your replication scheme on the master and subscriber data stores. Any alterations on the master store must also be made on its subscribers.
If you use ALTER REPLICATION to change a replication scheme that specifies a DATASTORE element, then:
■ You cannot use SET NAME to change the name of the DATASTORE element
■ You cannot use SET CHECK CONFLICTS to enable conflict resolution
Most ALTER REPLICATION operations are supported only when the replication agent is stopped (ttAdmin -repStop). However, it is possible to dynamically add a data
Table 10–1 Tasks performed on an existing replicated system
Task What to do
Alter or drop a replication scheme See"Altering a replication scheme" on page 10-1 and "Dropping a replication scheme" on page 10-8.
Alter a table used in a replication scheme
See "Altering a replicated table" on page 10-7.
Truncate a table used in a replication scheme
See "Truncating a replicated table" on page 10-7.
Change the replication state of a subscriber data store
See "Setting the replication state of subscribers" on page 8-15.
Resolve update conflicts See "Replication conflict detection and resolution" on page 11-1.
Recover from failures See "Managing data store failover and recovery" on page 11-13.
Upgrade data store Use the ttMigrate and ttRepAdmin utilities, as described in "Data Store Upgrades" in Oracle TimesTen In-Memory Database Installation Guide.
Note: You must have the ADMIN privilege to use the ALTER REPLICATION statement.

Altering a replication scheme
10-2 Oracle TimesTen In-Memory Database TimesTen to TimesTen Replication Guide
store to a replication scheme while the replication agent is running, as described in "Creating and adding a subscriber data store" on page 10-5.
The procedure for ALTER REPLICATION operations that require the replication agents to be stopped is:
1. Use the ttRepStop procedure or ttAdmin -repStop to stop the replication agent for the master and subscriber data stores. While the replication agents are stopped, changes to the master data store are stored in the log.
2. Issue the same ALTER REPLICATION statement on both master and subscriber data stores.
3. Use the ttRepStart procedure or ttAdmin -repStart to restart the replication agent for the master and subscriber data stores. The changes stored in the master data store log are sent to the subscriber data store.
This section includes the following topics:
■ Adding a table or sequence to an existing replication scheme
■ Adding a DATASTORE element to an existing replication scheme
■ Dropping a table or sequence from a replication scheme
■ Creating and adding a subscriber data store
■ Dropping a subscriber data store
■ Changing a TABLE or SEQUENCE element name
■ Replacing a master data store
■ Eliminating conflict detection
■ Eliminating the return receipt service
■ Changing the port number
■ Changing the replication route
Adding a table or sequence to an existing replication schemeThere are two ways to add a table or sequence to an existing replication scheme:
■ When the element level of the replication scheme is TABLE or SEQUENCE, use the ALTER REPLICATION statement with the ADD ELEMENT clause to add a table or sequence. See Example 10–1.
■ When the element level of the replication scheme is DATASTORE, use the ALTER REPLICATION statement with the ALTER ELEMENT clause to include a table or sequence. See Example 10–2.
Example 10–1 Adding a sequence and a table to a replication scheme
This example uses the replication scheme r1, which was defined in Example 7–30. It alters replication scheme r1 to add sequence seq and table westleads, which will be updated on data store westds and replicated to data store eastds.
ALTER REPLICATION r1 ADD ELEMENT elem_seq SEQUENCE seq MASTER westds ON "westcoast" SUBSCRIBER eastds ON "eastcoast" ADD ELEMENT elem_westleads TABLE westleads MASTER westds ON "westcoast" SUBSCRIBER eastds ON "eastcoast";
Altering a replication scheme
Altering Replication 10-3
Example 10–2 Adding a sequence and a table to a DATASTORE element
Add the sequence my.seq and the table my.tab1 to the ds1 DATASTORE element in my.rep1 replication scheme.
ALTER REPLICATION my.rep1 ALTER ELEMENT ds1 DATASTORE INCLUDE SEQUENCE my.seq ALTER ELEMENT ds1 DATASTORE INCLUDE TABLE my.tab1;
Adding a DATASTORE element to an existing replication schemeYou can add a DATASTORE element to an existing replication scheme by using the ALTER REPLICATION statement with the ADD ELEMENT clause. All tables except temporary tables, materialized view, and nonmaterialized views are included in the data store if you do not use the INCLUDE or EXCLUDE clauses. Se"Including tables or sequences when you add a DATASTORE element" on page 10-3 and "Excluding a table or sequence when you add a DATASTORE element" on page 10-3.
Example 10–3 Adding a DATASTORE element to a replication scheme
Add a DATASTORE element to an existing replication scheme.
ALTER REPLICATION my.rep1 ADD ELEMENT ds1 DATASTORE MASTER rep2 SUBSCRIBER rep1, rep3;
Including tables or sequences when you add a DATASTORE elementYou can restrict replication to specific tables or sequences when you add a data store to an existing replication scheme. Use the ALTER REPLICATION statement with the ADD ELEMENT clause and the INCLUDE TABLE clause or INCLUDE SEQUENCE clause. You can have one INCLUDE clause for each table or sequence in the same ALTER REPLICATION statement.
Example 10–4 Including a table and sequence in a DATASTORE element
Add the ds1 DATASTORE element to my.rep1 replication scheme. Include the table my.tab2 and the sequence my.seq in the DATASTORE element.
ALTER REPLICATION my.rep1ADD ELEMENT ds1 DATASTOREMASTER rep2SUBSCRIBER rep1, rep3INCLUDE TABLE my.tab2INCLUDE SEQUENCE my.seq;
Excluding a table or sequence when you add a DATASTORE elementYou can exclude tables or sequences when you add a DATASTORE element to an existing replication scheme. Use the ALTER REPLICATION statement with the ADD ELEMENT clause and the EXCLUDE TABLE clause or EXCLUDE SEQUENCE clause. You can have one EXCLUDE clause for each table or sequence in the same ALTER REPLICATION statement.
Example 10–5 Excluding a table or sequence from a DATASTORE element
Add the ds2 DATASTORE element to a replication scheme, but exclude the table my.tab1 and the sequence my.seq.

Altering a replication scheme
10-4 Oracle TimesTen In-Memory Database TimesTen to TimesTen Replication Guide
ALTER REPLICATION my.rep1ADD ELEMENT ds2 DATASTOREMASTER rep2SUBSCRIBER rep1EXCLUDE TABLE my.tab1EXCLUDE SEQUENCE my.seq;
Dropping a table or sequence from a replication schemeThis section includes the following topics:
■ Dropping a table or sequence that is replicated as part of a DATASTORE element
■ Dropping a table or sequence that is replicated as a TABLE or SEQUENCE element
Dropping a table or sequence that is replicated as part of a DATASTORE elementTo drop a table or sequence that is part of a replication scheme at the DATASTORE level, complete the following tasks:
1. Stop the replication agent.
2. Exclude the table or sequence from the DATASTORE element in the replication scheme.
3. Drop the table or sequence.
If you have more than one DATASTORE element that contains the table or sequence, then you must exclude the table or sequence from each element before you drop it.
Example 10–6 Excluding a table from a DATASTORE element and then dropping the table
Exclude the table my.tab1 from the ds1 DATASTORE element in the my.rep1 replication scheme. Then drop the table.
ALTER REPLICATION my.rep1 ALTER ELEMENT ds1 DATASTORE EXCLUDE TABLE my.tab1;DROP TABLE my.tab1;
Dropping a table or sequence that is replicated as a TABLE or SEQUENCE elementTo drop a table that is part of a replication scheme at the TABLE or SEQUENCE level, complete the following tasks:
1. Stop the replication agent.
2. Drop the element from the replication scheme.
3. Drop the table or sequence.
Example 10–7 Dropping an element from a replication scheme and then dropping the sequence
Drop the SEQUENCE element elem_seq from the replication scheme r1. Then drop the sequence seq.
ALTER REPLICATION r1 DROP ELEMENT elem_seq;DROP SEQUENCE seq;

Altering a replication scheme
Altering Replication 10-5
Creating and adding a subscriber data storeYou can add a new subscriber data store while the replication agents are running. To add a data store to a replication scheme, do the following:
1. Make sure the new data store does not exist.
2. Apply the appropriate statements to all participating data stores:
ALTER REPLICATION ... ALTER ELEMENT ... ADD SUBSCRIBER ...
3. Run the ttRepAdmin -duplicate command to copy the contents of the master data store to the newly created subscriber. You can use the -setMasterRepStart option to ensure that any updates made to the master after the duplicate operation has started are also copied to the subscriber.
4. Start the replication agent on the newly created data store (ttAdmin -repStart).
Example 10–8 Adding a subscriber to a replicated table
This example alters the r1 replication scheme to add a subscriber (backup3) to the westleads table (step 2 above):
ALTER REPLICATION r1 ALTER ELEMENT elem_westleads ADD SUBSCRIBER backup3 ON "backupserver";
Dropping a subscriber data storeStop the replication agent before you drop a subscriber data store.
This example alters the r1 replication scheme to drop the backup3 subscriber for the westleads table:
Example 10–9 Dropping a subscriber for a replicated table
ALTER REPLICATION r1 ALTER ELEMENT elem_westleads DROP SUBSCRIBER backup3 ON "backupserver";
Changing a TABLE or SEQUENCE element nameStop the replication agent before you change a TABLE or SEQUENCE element name.
Change the element name of the westleads table from elem_westleads to newelname:
Example 10–10 Changing a table name
ALTER REPLICATION r1 ALTER ELEMENT Eelem_westleads SET NAME newelname;
Replacing a master data storeStop the replication agent before you replace a master data store.
Note: You cannot use the SET NAME clause to change the name of a DATASTORE element.

Altering a replication scheme
10-6 Oracle TimesTen In-Memory Database TimesTen to TimesTen Replication Guide
In this example, newwestds is made the new master for all elements currently configured for the master, westds:
Example 10–11 Replacing a master data store
ALTER REPLICATION r1 ALTER ELEMENT * IN westds SET MASTER newwestds;
Eliminating conflict detectionIn this example, conflict detection configured by the CHECK CONFLICTS clause in the scheme shown in Example 11–2 is eliminated for the elem_accounts_1 table:
Example 10–12 Eliminating conflict detection for a table
ALTER REPLICATION r1 ALTER ELEMENT elem_accounts_1 SET NO CHECK;
See "Replication conflict detection and resolution" on page 11-1 for a detailed discussion on conflict checking.
Eliminating the return receipt serviceIn this example, the return receipt service is eliminated for the first subscriber in the scheme shown in Example 7–30:
Example 10–13 Eliminating return receipt service for a subscriber
ALTER REPLICATION r1 ALTER ELEMENT elem_waccounts ALTER SUBSCRIBER eastds ON "eastcoast" SET NO RETURN;
Changing the port numberThe port number is the TCP/IP port number on which a subscribing data store's replication agent accepts connection requests from its master replication agent. See "Port assignments" on page 7-21 for details on how to assign port to the replication agents.
In this example, the r1 replication scheme is altered to change the eastds data store's port number to 22251:
Example 10–14 Changing a port number for a data store
ALTER REPLICATION r1 ALTER STORE eastds ON "eastcoast" SET PORT 22251;
Changing the replication routeIf a replication host has multiple network interfaces, you may specify which interfaces are used for replication traffic using the ROUTE clause. If you need to change which interfaces are used by replication, you may do so by dropping and adding IP addresses from or to a ROUTE clause.

Truncating a replicated table
Altering Replication 10-7
Example 10–15 Changing the replication route
In this example, the rep.r1 replication scheme is altered to change the priority 2 IP address for the master data store from 192.168.1.100 to 192.168.1.101:
ALTER REPLICATION r1 DROP ROUTE MASTER eastds ON "eastcoast" SUBSCRIBER westds ON "westcoast" MASTERIP "192.168.1.100" ADD ROUTE MASTER eastds ON "eastcoast" SUBSCRIBER westds ON "westcoast" MASTERIP "192.168.1.101" PRIORITY 2;
Altering a replicated tableYou can use ALTER TABLE to add or drop columns on the master data store. The ALTER TABLE operation is replicated to alter the subscriber data stores.
If you use ALTER TABLE on a data store configured for bidirectional replication, first stop updates to the table on all of the replicated data stores and confirm all replicated updates to the table have been received by the data stores before issuing the ALTER TABLE statement. Do not resume updates until the ALTER TABLE operation has been replicated to all data stores. This is necessary to ensure there will be no write operations in the pre-altered format after the table is altered on all data stores.
Also, if you are executing a number of successive ALTER TABLE operations on a data store, you should only proceed with the next ALTER TABLE after you have confirmed the previous ALTER TABLE has reached all of the subscribers.
Truncating a replicated tableYou can use TRUNCATE TABLE to delete all of the rows of a table without dropping the table itself. Truncating a table is faster than using a DELETE FROM table statement.
Truncate operations on replicated tables are replicated and result in truncating the table on the subscriber data store. Unlike delete operations, however, the individual rows are not deleted. Even if the contents of the tables do not match at the time of the truncate operation, the rows on the subscriber data store are deleted anyway.
The TRUNCATE statement replicates to the subscriber, even when no rows are operated upon.
When tables are being replicated with timestamp conflict checking enabled, conflicts are not reported.
Note: You can use the ttRepSubscriberWait procedure or monitoring tools described in "Monitoring Replication" on page 117 to confirm the updates have been received and committed on the data stores.
Note: You can use the ALTER TABLE statement to change default column values, but the ALTER TABLE statement is not replicated. Thus default column values need not be identical on all nodes.

Dropping a replication scheme
10-8 Oracle TimesTen In-Memory Database TimesTen to TimesTen Replication Guide
Dropping a replication schemeYou can use the DROP REPLICATION statement to remove a replication scheme from a data store. You cannot drop a replication scheme when master catchup is required unless it is the only replication scheme in the data store.
You must stop the replication agent before you drop a replication scheme.
Example 10–16 Dropping a replication scheme
To remove the repscheme replication scheme from a data store, enter the following:
DROP REPLICATION repscheme;
If you are dropping replicated tables, you must drop the replication scheme before dropping the replicated tables. Otherwise, you receive an error indicating that you have attempted to drop a replicated table or index.
Example 10–17 Removing a table and a replication from a data store
To remove the tab table and repscheme replication scheme from a data store, enter the following:
DROP REPLICATION repscheme;DROP TABLE tab;
Note: You must have the ADMIN privilege to use the DROP REPLICATION statement.

11
Conflict Resolution and Failure Recovery 11-1
11Conflict Resolution and Failure Recovery
This chapter describes:
■ Replication conflict detection and resolution
■ Managing data store failover and recovery
Replication conflict detection and resolutionTables in data stores configured in a bidirectional replication scheme, as described in "Hot standby configuration" on page 1-10, may be subject to replication conflicts. A replication conflict occurs when applications on bidirectionally replicated data stores initiate an UPDATE, INSERT or DELETE operation on the same data item at the same time. If no special steps are taken, each data store can end up in disagreement with the last update made by the other data store.
Three different types of replication conflicts can occur:
■ Update conflicts: This type of conflict occurs when concurrently running transactions at different stores make simultaneous UPDATE requests on the same row in the same table, and install different values for one or more columns.
■ Uniqueness conflicts: This type of conflict occurs when concurrently running transactions at different stores make simultaneous INSERT requests for a row in the same table that has the same primary or unique key, but different values for one or more other columns.
■ Delete conflicts: This type of conflict occurs when a transaction at one store deletes a row while a concurrent transaction at another store simultaneously updates or inserts the same row. Currently, TimesTen can detect delete/update conflicts, but cannot detect delete/insert conflicts. TimesTen cannot resolve either type of delete conflict.
See "Conflict reporting" on page 11-7 for example reports generated by TimesTen upon detecting update, uniqueness, and delete conflicts.
Update and insert conflictsFigure 11–1 shows the results from an update conflict, which would occur for the value X under the following circumstances:
Note: TimesTen does not detect conflicts involving TRUNCATE TABLE statements.

Replication conflict detection and resolution
11-2 Oracle TimesTen In-Memory Database TimesTen to TimesTen Replication Guide
Figure 11–1 Update conflict
If update or insert conflicts remain unchecked, the master and subscriber data stores fall out of synchronization with each other. It may be difficult or even impossible to determine which data store is correct.
With update conflicts, it is possible for a transaction to update many data items but have a conflict on a few of them. Most of the transaction's effects survive the conflict, with only a few being overwritten by replication. If you decide to ignore such conflicts, the transactional consistency of the application data is compromised.
If an update conflict occurs, and if the updated columns for each version of the row are different, then the non-primary key fields for the row may diverge between the replicated tables.
TimesTen replication includes timestamp-based conflict resolution to cope with simultaneous updates or inserts. Through the use of timestamp-based conflict
Steps On data store A On data store B
Initial condition X is 1 X is 1
The application on each data store updates X simultaneously
Set X=2 Set X=100
The replication agent on each data store sends its update to the other
Replicate X to data store B
Replicate X to data store A
Each data store now has the other's update Replication says to set X=100
Replication says to set X=2
Note: Uniqueness conflicts resulting from conflicting inserts follow a similar pattern as update conflicts, only the conflict involves the whole row.
Note: Within a single data store, update conflicts are prevented by the locking protocol: only one transaction at a time can update a specific row in the data store. However, update conflicts can occur in replicated systems due to the ability of each data store to operate independently.
Data Store A
Application
Data Store B
Application
X = 100 X = 2
X = 100 X = 2

Replication conflict detection and resolution
Conflict Resolution and Failure Recovery 11-3
resolution, you may be able to keep the replicated data stores synchronized and transactionally consistent.
Delete/update conflictsFigure 11–2 shows the results from a delete/update conflict, which would occur for Row 4 under the following circumstances:
Figure 11–2 Update/delete conflict
Though TimesTen can detect and report delete/update conflicts, it cannot resolve them. Under these circumstances, the master and subscriber data stores fall out of synchronization with each other.
Though TimesTen cannot ensure synchronization between data stores following such a conflict, it does ensure that the most recent transaction is applied to each data store. If the timestamp for the delete is more recent than that for the update, the row is deleted on each data store. If the timestamp for the update is more recent than that for the delete, the row is updated on the local data store. However, because the row was deleted on the other data store, the replicated update is discarded. See "Reporting DELETE/UPDATE conflicts" on page 11-11 for example reports.
Timestamp resolutionFor replicated tables that are subject to conflicts, create the table with a special column of type BINARY(8) to hold a timestamp value that indicates the time the row was
Steps On data store A On data store B
Initial condition Row 4 exists Row 4 exists
The applications issue a conflicting update and delete on Row 4 simultaneously
Update Row 4 Delete Row 4
The replication agent on each data store sends the delete or update to the other
Replicate update to data store B
Replicate delete to data store A
Each data store now has the delete or update from the other data store
Replication says to delete Row 4
Replication says to update Row 4
Note: There is an exception to this behavior when timestamp comparison is enabled on a table using UPDATE BY USER. See "User timestamp column maintenance" on page 11-6 for details.
Data Store A
Application
Data Store B
Application
Delete Row Update Row
Delete Row 4Update Row 4

Replication conflict detection and resolution
11-4 Oracle TimesTen In-Memory Database TimesTen to TimesTen Replication Guide
inserted or last updated. You can then configure TimesTen to automatically insert a timestamp value into this column each time a particular row is changed, as described in "Configuring timestamp comparison" on page 11-4.
How replication computes the timestamp column depends on your system:
■ On UNIX systems, the timestamp value is derived from the timeval structure returned by the gettimeofday system call. This structure reports the time of day in a pair of 4-byte words to a resolution of 1 microsecond. The actual resolution of the value is system-dependent.
■ On Windows systems, the timestamp value is derived from the GetSystemTimeAsFileTime Win32 call. The Windows file time is reported in units of 0.1 microseconds, but effective granularity can be as coarse as 10 milliseconds.
TimesTen uses the time value returned by the system at the time the transaction performs each update as the record's INSERT or UPDATE time. Therefore, rows that are inserted or updated by a single transaction may receive different timestamp values.
When applying an update received from a master, the replication agent at the subscriber data store performs timestamp resolution in the following manner:
■ If the timestamp of the update record is newer than the timestamp of the stored record, TimesTen updates the row. The same rule applies to inserts. If a replicated insert is newer than an existing row, the existing row is overwritten.
■ If the timestamp of the update and of the stored record are equal, the update is allowed. The same rule applies to inserts.
■ If the timestamp of the update is older than the timestamp of the stored record, the update is discarded. The same rule applies to inserts.
■ If a row is deleted, no timestamp is available for comparison. Any update operations on the deleted row are discarded. However, if a row is deleted on one system, then replicated to another system that has more recently updated the row, then the replicated delete is rejected. A replicated insert operation on a deleted row is applied as an insert.
■ An update that cannot find the updated row is considered a delete conflict, which is reported but cannot be resolved.
Configuring timestamp comparisonTo configure timestamp comparison:
Note: TimesTen does not support conflict resolution between cached tables in a cache group and Oracle.
Note: If the ON EXCEPTION NO ACTION option is specified for a table, then the update, insert, or delete that fails a timestamp comparison is rejected. This may result in transactional inconsistencies should replication apply some, but not all, the actions of a transaction. If the ON EXCEPTION ROLLBACK WORK option is specified for a table, an update that fails timestamp comparison causes the entire transaction to be skipped.

Replication conflict detection and resolution
Conflict Resolution and Failure Recovery 11-5
■ Define a column in your replicated tables to hold the timestamp value.
■ Include a CHECK CONFLICTS clause for each TABLE element in your CREATE REPLICATION statement to identify the timestamp column, how timestamps are to be generated, what to do in the event of a conflict, and how to report conflicts.
Establishing a timestamp column in replicated tablesTo use timestamp comparison on replicated tables, you must specify a nullable column of type BINARY(8) to hold the timestamp value. The timestamp column must be created along with the table as part of a CREATE TABLE statement - it cannot be added later as part of an ALTER TABLE statement. In addition, the timestamp column cannot be part of a primary key or index. Example 11–1 shows the rep.tab table contains a column named tstamp of type BINARY(8) to hold the timestamp value.
Example 11–1 Including a timestamp column when creating a table
CREATE TABLE rep.tab (col1 NUMBER NOT NULL, col2 NUMBER NOT NULL, tstamp BINARY(8), PRIMARY KEY (col1));
If no timestamp column is defined in the replicated table, timestamp comparison cannot be performed to detect conflicts. Instead, at each site, the value of a row in the database reflects the most recent update applied to the row, either by local applications or by replication.
Configuring the CHECK CONFLICTS clauseWhen configuring your replication scheme, you can set up timestamp comparison for a TABLE element by including a CHECK CONFLICTS clause in the table's ELEMENT description in the CREATE REPLICATION statement.
The syntax of the CREATE REPLICATION statement is described in Oracle TimesTen In-Memory Database SQL Reference. Below are some examples of how CHECK CONFLICTS might be used when configuring your replication scheme.
Example 11–2 Automatic timestamp comparison
In this example, we establish automatic timestamp comparison for the bidirectional replication scheme shown in Example 7–30. The DSNs, west_dsn and east_dsn, define the westds and eastds data stores that replicate the table, repl.accounts, containing the timestamp column, tstamp. In the event of a comparison failure, discard the transaction that includes an update with the older timestamp.
CREATE REPLICATION r1ELEMENT elem_accounts_1 TABLE accounts CHECK CONFLICTS BY ROW TIMESTAMP COLUMN tstamp UPDATE BY SYSTEM ON EXCEPTION ROLLBACK WORK MASTER westds ON "westcoast" SUBSCRIBER eastds ON "eastcoast"ELEMENT elem_accounts_2 TABLE accounts CHECK CONFLICTS BY ROW TIMESTAMP
Note: A CHECK CONFLICT clause cannot be specified for DATASTORE elements.

Replication conflict detection and resolution
11-6 Oracle TimesTen In-Memory Database TimesTen to TimesTen Replication Guide
COLUMN tstamp UPDATE BY SYSTEM ON EXCEPTION ROLLBACK WORK MASTER eastds ON "EASTCOAST" SUBSCRIBER westds ON "WESTCOAST";
When bidirectionally replicating data stores with conflict resolution, the replicated tables on each data store must be set with the same CHECK CONFLICTS attributes. If you need to disable or change the CHECK CONFLICTS settings for the replicated tables, use the ALTER REPLICATION statement described in "Eliminating conflict detection" on page 10-6 and apply to each replicated data store.
System timestamp column maintenanceWhen timestamp comparison is enabled using:
CHECK CONFLICTS BY ROW TIMESTAMP COLUMN ColumnName UPDATE BY SYSTEMTimesTen automatically maintains the value of the timestamp column using the current time returned by the underlying operating system. This is the default setting.
When you specify UPDATE BY SYSTEM, TimesTen:
■ Initializes the timestamp column to the current time when a new record is inserted into the table.
■ Updates the timestamp column to the current time when an existing record is modified.
During initial load, the timestamp column values should be left NULL, and applications should not give a value for the timestamp column when inserting or updating a row.
When you use the ttBulkCp or ttMigrate utility to save TimesTen tables, the saved rows maintain their current timestamp values. When the table is subsequently copied or migrated back into TimesTen, the timestamp column retains the values it had when the copy or migration file was created.
User timestamp column maintenanceWhen timestamp comparison is enabled on a table using:
CHECK CONFLICTS BY ROW TIMESTAMP COLUMN ColumnName UPDATE BY USER
your application is responsible for maintaining timestamp values. The timestamp values used by your application can be arbitrary, but the time values cannot decrease. In cases where the user explicitly sets or updates the timestamp column, the application-provided value is used instead of the current time.
Note: If you configure TimesTen for timestamp comparison after using the ttBulkCp or ttMigrate to copy or migrate your tables, the initial values of the timestamp columns remain NULL, which is considered by replication to be the earliest possible time.

Replication conflict detection and resolution
Conflict Resolution and Failure Recovery 11-7
Local updatesTo maintain synchronization of tables between replicated sites, TimesTen also performs timestamp comparisons for updates performed by local transactions. If an updated table is declared to have automatic timestamp maintenance, then updates to records that have timestamps exceeding the current system time are prohibited.
Normally, clocks on replicated systems are synchronized sufficiently to ensure that a locally updated record is given a later timestamp than that in the same record stored on the other systems. Perfect synchronization may not be possible or affordable, however. But, by protecting record timestamps from "going backwards," replication can do what is possible to ensure that the tables on replicated systems stay synchronized.
Conflict reportingTimesTen conflict checking may be configured to report conflicts to a human-readable plain text file, or to an XML file for use by user applications. This section includes the topics:
■ Reporting conflicts to a text file
■ Reporting conflicts to an XML file
■ Reporting uniqueness conflicts
■ Reporting update conflicts
■ Reporting DELETE/UPDATE conflicts
■ Suspending and resuming the reporting of conflicts
Reporting conflicts to a text fileTo configure replication to report conflicts to a human-readable text file (the default), use:
CHECK CONFLICTS BY ROW TIMESTAMP COLUMN ColumnName ... REPORT TO 'FileName' FORMAT STANDARD
An entry is added to the report file FileName that describes each conflict. The phrase FORMAT STANDARD is optional and may be omitted, as the standard report format is the default.
Each failed operation logged in the report consists of an entry that starts with a header, followed by information specific to the conflicting operation. Each entry is separated by a number of blank lines in the report.
The header contains:
Note: Replicated delete operations always carry a system-generated timestamp. If replication has been configured with UPDATE BY USER and an update/delete conflict occurs, the conflict is resolved by comparing the two timestamp values and the operation with the larger timestamp wins. If the basis for the user timestamp varies from that of the system-generated timestamp, the results may not be as expected. Therefore, if you expect delete conflicts to occur, use system-generated timestamps.

Replication conflict detection and resolution
11-8 Oracle TimesTen In-Memory Database TimesTen to TimesTen Replication Guide
■ The time the conflict was discovered.
■ The data stores that sent and received the conflicting update.
■ The table in which the conflict occurred.
The header has the following format:
Conflict detected at time on dateDatastore : subscriber_datastoreTransmitting name : master_datastoreTable : username.tablename
For example:
Conflict detected at 20:08:37 on 05-17-2004Datastore : /tmp/subscriberdsTransmitting name : MASTERDSTable : USER1.T1
Following the header is the information specific to the conflict. Data values are shown in ASCII format. Binary data is translated into hexadecimal before display, and floating-point values are shown with appropriate precision and scale.
For further description of the conflict report file, see "Reporting uniqueness conflicts" on page 11-8, "Reporting update conflicts" on page 11-9 and "Reporting DELETE/UPDATE conflicts" on page 11-11.
Reporting conflicts to an XML fileTo configure replication to report conflicts to an XML file, use:
CHECK CONFLICTS BY ROW TIMESTAMP COLUMN ColumnName ... REPORT TO 'FileName' FORMAT XML
Replication uses the base file name FileName to create two files. FileName.xml is a header file that contains the XML Document Type Definition for the conflict report structure, as well as the root element, defined as <ttrepconflictreport>. Inside the root element is an XML directive to include the file FileName.include, and it is to this file that all conflicts are written. Each conflict is written as a single element of type <conflict>.
For further description of the conflict report file XML elements, see Chapter 12, "XML Document Type Definition for the Conflict Report File".
Reporting uniqueness conflictsA uniqueness conflict record is issued when a replicated INSERT fails because of a conflict.
A uniqueness conflict record in the report file contains:
■ The timestamp and values for the existing tuple, which is the tuple that the conflicting tuple is in conflict with.
Note: When performing log maintenance on an XML conflict report file, only the file FileName.include should be truncated or moved. For conflict reporting to continue to function correctly, the file FileName.xml should be left untouched.

Replication conflict detection and resolution
Conflict Resolution and Failure Recovery 11-9
■ The timestamp and values for the conflicting insert tuple, which is the tuple of the insert that failed.
■ The key column values used to identify the record.
■ The action that was taken when the conflict was detected (discard the single row insert or the entire transaction)
The format of a uniqueness conflict record is:
Conflicting insert tuple timestamp : <timestamp in binary format>Existing tuple timestamp : <timestamp in binary format>The existing tuple :<<column value> [,<column value>. ..]>The conflicting tuple :<<column value> [,<column value> ...]>The key columns for the tuple:<<key column name> : <key column value>>Transaction containing this insert skippedFailed transaction:Insert into table <user>.<table> <<columnvalue> [,<columnvalue>...]>End of failed transaction
Example 11–3 shows the output from a uniqueness conflict on the row identified by the primary key value, '2'. The older insert replicated from subscriberds conflicts with the newer insert in masterds, so the replicated insert is discarded.
Example 11–3
Conflict detected at 13:36:00 on 03-25-2002Datastore : /tmp/masterdsTransmitting name : SUBSCRIBERDSTable : TABConflicting insert tuple timestamp : 3C9F983D00031128Existing tuple timestamp : 3C9F983E000251C0The existing tuple :< 2, 2, 3C9F983E000251C0>The conflicting tuple :< 2, 100, 3C9F983D00031128>The key columns for the tuple:<COL1 : 2>Transaction containing this insert skippedFailed transaction:Insert into table TAB < 2, 100, 3C9F983D00031128>End of failed transaction
Reporting update conflictsAn update conflict record is issued when a replicated UPDATE fails because of a conflict. This record reports:
■ The timestamp and values for the existing tuple, which is the tuple that the conflicting tuple is in conflict with.
■ The timestamp and values for the conflicting update tuple, which is the tuple of the update that failed.
Note: If the transaction was discarded, the contents of the entire transaction are logged in the report file.

Replication conflict detection and resolution
11-10 Oracle TimesTen In-Memory Database TimesTen to TimesTen Replication Guide
■ The old values, which are the original values of the conflicting tuple before the failed update.
■ The key column values used to identify the record.
■ The action that was taken when the conflict was detected (discard the single row update or the entire transaction).
The format of an update conflict record is:
Conflicting update tuple timestamp : <timestamp in binary format>Existing tuple timestamp : <timestamp in binary format>The existing tuple :<<column value> [,<column value>. ..]>The conflicting update tuple :TSTAMP :<timestamp> :<<column value> [,<column value>. ..]>The old values in the conflicting update:TSTAMP :<timestamp> :<<column value> [,<column value>. ..]>The key columns for the tuple:<<key column name> : <key column value>>Transaction containing this update skippedFailed transaction:Update table <user>.<table> with keys:<<key column name> : <key column value>>New tuple value:<TSTAMP :<timestamp> :<<column value> [,<column value>. ..]>End of failed transaction
Example 11–4 shows the output from an update conflict on the col2 value in the row identified by the primary key value, '6'. The older update replicated from the masterds data store conflicts with the newer update in subscriberds, so the replicated update is discarded.
Example 11–4 Output from an update conflict
Conflict detected at 15:03:18 on 03-25-2002Datastore : /tmp/subscriberdsTransmitting name : MASTERDSTable : TABConflicting update tuple timestamp : 3C9FACB6000612B0Existing tuple timestamp : 3C9FACB600085CA0The existing tuple :< 6, 99, 3C9FACB600085CA0>The conflicting update tuple :<TSTAMP :3C9FACB6000612B0, COL2 : 50>The old values in the conflicting update:<TSTAMP :3C9FAC85000E01F0, COL2 : 2>The key columns for the tuple:<COL1 : 6>Transaction containing this update skippedFailed transaction:Update table TAB with keys:<COL1 : 6>New tuple value: <TSTAMP :3C9FACB6000612B0, COL2 : 50>End of failed transaction
Note: If the transaction was discarded, the contents of the entire transaction are logged in the report file.
Replication conflict detection and resolution
Conflict Resolution and Failure Recovery 11-11
Reporting DELETE/UPDATE conflictsA delete/update conflict record is issued when an update is attempted on a row that has more recently been deleted. This record reports:
■ The timestamp and values for the conflicting update tuple or conflicting delete tuple, whichever tuple failed.
■ If the delete tuple failed, the report also includes the timestamp and values for the existing tuple, which is the surviving update tuple with which the delete tuple was in conflict.
■ The key column values used to identify the record.
■ The action that was taken when the conflict was detected (discard the single row update or the entire transaction).
The format of a record that indicates a delete conflict with a failed update is:
Conflicting update tuple timestamp : <timestamp in binary format>The conflicting update tuple :TSTAMP :<timestamp> :<<column value> [,<column value>. ..]>This transaction skippedThe tuple does not existTransaction containing this update skippedUpdate table <user>.<table> with keys:<<key column name> : <key column value>>New tuple value:<TSTAMP :<timestamp> :<<column value> [,<column value>. ..]>End of failed transaction
Example 11–5 shows the output from a delete/update conflict caused by an update on a row that has more recently been deleted. Because there is no row to update, the update from SUBSCRIBERDS is discarded.
Example 11–5 Output from a delete/update conflict: delete is more recent
Conflict detected at 15:27:05 on 03-25-2002Datastore : /tmp/masterdsTransmitting name : SUBSCRIBERDSTable : TABConflicting update tuple timestamp : 3C9FB2460000AFC8The conflicting update tuple :<TSTAMP :3C9FB2460000AFC8, COL2 : 99>The tuple does not existTransaction containing this update skippedFailed transaction:Update table TAB with keys:<COL1 : 2>New tuple value: <TSTAMP :3C9FB2460000AFC8,COL2 : 99>End of failed transaction
The format of a record that indicates an update conflict with a failed delete is:
Conflicting binary delete tuple timestamp : <timestamp in binary format>
Note: If the transaction was discarded, the contents of the entire transaction are logged in the report file. TimesTen cannot detect DELETE/INSERT conflicts.

Replication conflict detection and resolution
11-12 Oracle TimesTen In-Memory Database TimesTen to TimesTen Replication Guide
Existing binary tuple timestamp : <timestamp in binary format>The existing tuple :<<column value> [,<column value>. ..]>The key columns for the tuple:<<key column name> : <key column value>>Transaction containing this delete skippedFailed transaction:Delete table <user>.<table> with keys:<<key column name> : <key column value>>End of failed transaction
Example 11–6 shows the output from a delete/update conflict caused by a delete on a row that has more recently been updated. Because the row was updated more recently than the delete, the delete from masterds is discarded.
Example 11–6 Output from a delete/update conflict: update is more recent
Conflict detected at 15:27:20 on 03-25-2002Datastore : /tmp/subscriberdsTransmitting name : MASTERDSTable : TABConflicting binary delete tuple timestamp : 3C9FB258000708C8Existing binary tuple timestamp : 3C9FB25800086858The existing tuple :< 147, 99, 3C9FB25800086858>The key columns for the tuple:<COL1 : 147>Transaction containing this delete skippedFailed transaction:Delete table TAB with keys:<COL1 : 147>
Suspending and resuming the reporting of conflictsProvided your applications are well-behaved, replication usually encounters and reports only sporadic conflicts. However, it is sometimes possible under heavy load to trigger a flurry of conflicts in a short amount of time, particularly when applications are in development and such errors are expected. This can potentially have a negative impact on the performance of the host machine because of excessive writes to the conflict report file and the large number of SNMP traps that can be generated.
To avoid overwhelming a host with replication conflicts, you may configure replication to suspend conflict reporting when the number of conflicts per second has exceeded a user-specified threshold. Conflict reporting may also be configured to resume once the conflicts per second have fallen below a user-specified threshold.
Conflict reporting suspension and resumption can be detected by an application by catching the SNMP traps ttRepConflictReportStoppingTrap and ttRepConflictReportStartingTrap, respectively. See "Diagnostics through SNMP Traps" in Oracle TimesTen In-Memory Database Error Messages and SNMP Traps for more information.
To configure conflict reporting to be suspended and resumed based on the number of conflicts per second, use the CONFLICT REPORTING SUSPEND AT and CONFLICT REPORTING RESUME AT attributes for the STORE clause of a replication scheme. Example 11–7 demonstrates the configuration of a replication schemes where conflict reporting ceases when the number of conflicts exceeds 20 per second, and conflict reporting resumes when the number of conflicts drops below 10 per second.

Managing data store failover and recovery
Conflict Resolution and Failure Recovery 11-13
Example 11–7 Configuring conflict reporting thresholds
CREATE REPLICATION r1ELEMENT elem_accounts_1 TABLE accounts CHECK CONFLICTS BY ROW TIMESTAMP COLUMN tstamp UPDATE BY SYSTEM ON EXCEPTION ROLLBACK WORK REPORT TO 'conflicts' FORMAT XML MASTER westds ON "westcoast" SUBSCRIBER eastds ON "eastcoast"ELEMENT elem_accounts_2 TABLE accounts CHECK CONFLICTS BY ROW TIMESTAMP COLUMN tstamp UPDATE BY SYSTEM ON EXCEPTION ROLLBACK WORK REPORT TO 'conflicts' FORMAT XML MASTER eastds ON "eastcoast" SUBSCRIBER westds ON "westcoast"STORE westds ON "westcoast" CONFLICT REPORTING SUSPEND AT 20 CONFLICT REPORTING RESUME AT 10STORE eastds ON "eastcoast" CONFLICT REPORTING SUSPEND AT 20 CONFLICT REPORTING RESUME AT 10;
Managing data store failover and recoveryAs discussed in "Designing a highly available system" on page 7-1, a fundamental element in the design of a highly available system is the ability to quickly recover from a failure. Failures may be related to:
Hardware problems:
■ System failure
■ Network failure
Software problems:
■ Operating system failure
■ Application failure
■ Data store failure
■ Operator error
Your replicated system must employ a "cluster manager" or custom software to detect such failures and, in the event of a failure involving a master data store, redirect the user load to one of its subscribers. TimesTen does not provide a cluster manager or make any assumptions about how they operate, so the focus of this discussion is on
Note: If the replication agent is stopped while conflict reporting is suspended, conflict reporting is enabled when the replication agent is restarted. The SNMP trap ttRepConflictReportingStartingTrap is not sent if this occurs. This means that an application that monitors the conflict report suspension traps must also monitor the traps for replication agent stopping and starting.

Managing data store failover and recovery
11-14 Oracle TimesTen In-Memory Database TimesTen to TimesTen Replication Guide
the TimesTen mechanisms that an application or cluster manager can use to recover from failures.
Unless the replication scheme is configured to use the return twosafe service, TimesTen replicates updates only after the original transaction commits to the master data store. If a subscriber data store is inoperable or communication to a subscriber data store fails, updates at the master are not impeded. During outages at subscriber systems, updates intended for the subscriber are saved in the TimesTen transaction log.
General failover and recovery proceduresThe procedures for managing failover and recovery depend primarily on:
■ Your replication scheme.
■ Whether the failure occurred on a master or subscriber data store.
■ Whether the threshold for the transaction log on the master is exhausted before the problem is resolved and the data stores reconnected.
Subscriber failuresIf your replication scheme is configured for default asynchronous replication, should a subscriber data store become inoperable or communication to a subscriber data store fail, updates at the master are not impeded and the cluster manager does not have to take any immediate action.
During outages at subscriber systems, updates intended for the subscriber are saved in the transaction log on the master. If the subscriber agent reestablishes communication with its master before the master reaches its FAILTHRESHOLD, the updates held in the log are automatically transferred to the subscriber and no further action is required. (See "Setting the log failure threshold" on page 8-10 for details on how to establish the FAILTHRESHOLD value for the master data store.)
If the FAILTHRESHOLD is exceeded, the master sets the subscriber to the Failed state and it must be recovered, as described in "Recovering a failed data store" on page 11-17. Any application that connects to the failed subscriber receives a tt_ErrReplicationInvalid (8025) warning indicating that the data store has been marked Failed by a replication peer.
Applications can use the ODBC SQLGetInfo function to check if the subscriber data store it is connected to has been set to the Failed state. The SQLGetInfo function includes a TimesTen-specific infotype, TT_REPLICATION_INVALID, that returns a 32-bit integer value of '1' if the data store is failed, or '0' if not failed. Since the infotype TT_REPLICATION_INVALID is specific to TimesTen, all applications using it need to include the timesten.h file in addition to the other ODBC include files.
Note: The procedures described in this section require that you have the ADMIN privilege.
Note: If the failed subscriber is configured to use a return service, you must first disable return service blocking, as described in "Managing return service timeout errors and replication state changes" on page 7-166.

Managing data store failover and recovery
Conflict Resolution and Failure Recovery 11-15
Example 11–8 Checking whether a data store has been set to the Failed state
Check if the data store identified by the hdbc handle has been set to the Failed state.
SQLINTEGER retStatus;
SQLGetInfo(hdbc, TT_REPLICATION_INVALID, (PTR)&retStatus, NULL, NULL);
Master failuresThe cluster manager plays a more central role if a failure involves the master data store. Should a master data store fail, the cluster manager must detect this event and redirect the user load to one of its surviving data stores. This surviving subscriber then becomes the master, which continues to accept transactions and replicates them to the other surviving subscriber data stores. If the failed master and surviving subscriber are configured in a bidirectional manner, transferring the user load from a failed master to a subscriber does not require that you make any changes to your replication scheme. However, when using unidirectional replication or complex schemes, such as those involving propagators, you may have to issue one or more ALTER REPLICATION statements to reconfigure the surviving subscriber as the "new master" in your scheme. See "Replacing a master data store" on page 10-5 for an example.
When the problem is resolved, if you are not using the hot-standby configuration or the active standby pair described in "Automatic catch-up of a failed master data store" on page 11-15, you must recover the master data store as described in "Recovering a failed data store" on page 11-17.
After the data store is back online, the cluster manager can either transfer the user load back to the original master or reestablish it as a subscriber for the "acting master." See "Failover and recovery" on page 40 for more information.
Automatic catch-up of a failed master data storeThe master catch-up feature automatically restores a failed master data store from a subscriber data store without the need to invoke the ttRepAdmin -duplicate operation described in "Recovering a failed data store" on page 11-17.
The master catch-up feature needs no configuration, but it can be used only in the following types of configurations:
■ A single master replicated in a bidirectional, hot-standby manner to a single subscriber
■ An active standby pair in which the active master data store is replicated to the standby data store which then propagates changes to up to 127 read-only subscribers
In addition, the following must be true:
■ The ELEMENT type is DATASTORE.
■ TRANSMIT NONDURABLE or RETURN TWOSAFE must be enabled. TRANSMIT NONDURABLE is optional for asynchronous and return receipt transactions.
■ All replicated transactions must be committed non-durably (they must be transmitted to the other master data store before they are committed on the local one). For example, if the replication scheme is configured with RETURN TWOSAFE BY REQUEST and any transaction is committed without first enabling RETURN TWOSAFE, master catch-up may not occur after a failure of the master.

Managing data store failover and recovery
11-16 Oracle TimesTen In-Memory Database TimesTen to TimesTen Replication Guide
When the master replication agent is restarted after a crash or invalidation, any lost transactions that originated on the master are automatically reapplied from the subscriber to the master. No connections are allowed to the master store until it has completely caught up with the subscriber. Applications attempting to connect to a data store during the catch-up phase receive an error that indicates a catch-up is in progress. The only exception is if you connect to a data store with the ForceConnect attribute set in the DSN.
When the catch-up phase is complete, your application can connect to the data store. An SNMP trap and message to the system log indicate the completion of the catch-up phase.
If one of the stores is invalidated or crashes during the catch-up process, the catch-up phase is resumed when the store comes back up.
Master/subscriber failuresYou can distribute the workload over multiple bidirectionally replicated data stores, each of which serves as both master and subscriber. When recovering a master/subscriber data store, the log on the failed data store may present problems when you restart replication. See "Bidirectional general workload scheme" on page 7-33.
If a data store in a distributed workload scheme fails and work is shifted to a surviving data store, the information in the surviving data store becomes more current than that in the failed data store. If replication is restarted at the failed system before the FAILTHRESHOLD has been reached on the surviving data store, then both data stores attempt to update one another with the contents of their transaction logs. In this case, the older updates in the transaction log on the failed data store may overwrite more recent data on the surviving system.
There are two ways to recover in such a situation:
■ If the timestamp conflict resolution rules described in "Replication conflict detection and resolution" on page 11-1 are sufficient to guarantee consistency for your application, then you can restart the failed system and allow the updates from the failed data store to propagate to the surviving data store. The conflict resolution rules prevent more recent updates from being overwritten.
■ Re-create the failed data store, as described in "Recovering a failed data store" on page 11-17.
Network failuresIn the event of a temporary network failure, you need not perform any specific action to continue replication. The replication agents that were in communication attempt to
Note: If the data store must be re-created, the updates in the log on the failed data store that were not received by the surviving data store cannot be identified or restored. In the case of several surviving data stores, you must select which of the surviving data stores is to be used to re-create the failed data store. It is possible that at the time the failed data store is re-created, that the selected surviving data store may not have received all updates from the other surviving data stores. This results in diverging data stores. The only way to prevent this situation is to re-create the other surviving data stores from the selected surviving data store.

Managing data store failover and recovery
Conflict Resolution and Failure Recovery 11-17
reconnect every few seconds. Should the agents reconnect before the master data store runs out of log space, the replication protocol makes sure they neither miss nor repeat any replication updates. If the network is unavailable for a longer period and the FAILTHRESHOLD has been exceeded for the master log, you need to recover the subscriber as described in "Recovering a failed data store" on page 11-17.
Failures involving sequencesAfter a link failure, if replication is allowed to recover by replaying queued logs, you do not need to take any action.
However, if the failed node was down for a significant amount of time, you must use the ttRepAdmin -duplicate command to repopulate the data store on the failed node with transactions from the surviving node, as sequences are not rolled back during failure recovery. In this case, the ttRepAdmin -duplicate command copies the sequence definitions from one node to the other.
Recovering a failed data storeIf a restarted data store cannot be recovered from its master's transaction log so that it is consistent with the other data stores in the replicated system, you must re-create the data store from one of its replication peers. If your data stores are configured in a hot-standby replication scheme, as described in "Automatic catch-up of a failed master data store" on page 11-15, a failed master data store is automatically brought up to date from the subscriber. Data stores configured with other types of replication schemes must be restored using command line utilities or programmatically using the TimesTen Utility C functions, as described below.
In the event of a subscriber failure, if any tables are configured with a return service, commits on those tables in the master data store are blocked until the return service timeout period expires. To avoid this, you can establish a return service failure and recovery policy in your replication scheme, as described in"Managing return service timeout errors and replication state changes" on page 7-16. If you are using the RETURN RECEIPT service, an alternative is to use ALTER REPLICATION and set the NO RETURN attribute to disable return receipt until the subscriber is restored and caught up. Then, you can submit another ALTER REPLICATION to re-establish RETURN RECEIPT.
From the command lineIf the data stores are fully replicated, you can use ttDestroy to remove the failed data store from memory and ttRepAdmin -duplicate to re-create it from a surviving data store. If the data store contains any cache groups, you must also use the -keepCG option of ttRepAdmin. See "Duplicating a data store" on page 4-2.
Example 11–9 Recovering a failed data store
To recover a failed data store, subscriberds, from a master, named masterds on host system1, enter:
> ttDestroy /tmp/subscriberds
> ttRepAdmin -dsn subscriberds -duplicate -from masterds -host "system1" -uid ttuser
Note: It is not necessary to re-create the DSN for the failed data store.

Managing data store failover and recovery
11-18 Oracle TimesTen In-Memory Database TimesTen to TimesTen Replication Guide
You will be prompted for the password of ttuser.
After re-creating the data store with ttRepAdmin -duplicate, the first connection to the data store reloads it into memory. To improve performance when duplicating large data stores, you can avoid the reload step by using the ttRepAdmin -ramLoad option to keep the data store in memory after the duplicate operation.
Example 11–10 Keeping a data store in memory when recovering it
To recover a failed data store, subscriberds, from a master, named masterds on host system1, and to keep the data store in memory and restart replication after the duplicate operation, enter:
> ttDestroy /tmp/subscriberds
> ttRepAdmin -dsn subscriberds -duplicate -ramLoad -from masterds -host "system1" -uid ttuser -setMasterRepStart
You will be prompted for the password of ttuser.
From a programYou can use the C functions provided in the TimesTen Utility library to programmatically recover a failed data store.
If the data stores are fully replicated, you can use ttDestroyDataStore function to remove the failed data store and the ttRepDuplicateEx function to re-create it from a surviving data store.
Example 11–11 Recovering and starting a failed data store
To recover and start a failed data store, named subscriberds on host system2, from a master, named masterds on host system1, enter:
int rc;ttUtilHandle utilHandle;ttRepDuplicateExArg arg;memset( &arg, 0, sizeof( arg ) );arg.size = sizeof( ttRepDuplicateExArg );arg.flags = TT_REPDUP_REPSTART | TT_REPDUP_RAMLOAD;arg.uid=ttuser;arg.pwd=ttuser;arg.localHost = "system2";rc = ttDestroyDataStore( utilHandle, "subscriberds", 30 );rc = ttRepDuplicateEx( utilHandle, "DSN=subscriberds", "masterds", "system1", &arg );
Note: ttRepAdmin -duplicate is only supported between identical and patch TimesTen releases (the major and minor release numbers must be the same).
Note: After duplicating a data store with the ttRepAdmin -duplicate -ramLoad options, the RAM Policy for the data store is manual until explicitly reset by ttAdmin -ramPolicy or the ttRamPolicy function.

Managing data store failover and recovery
Conflict Resolution and Failure Recovery 11-19
In this example, the timeout for the ttDestroyDataStore operation is 30 seconds. The last parameter of the ttRepDuplicateEx function is an argument structure containing two flags: TT_REPDUP_RESTART to set the subscriberds data store to the Start state after the duplicate operation is completed, and TT_REPDUP_RAMLOAD to set the RAM Policy to manual and keep the data store in memory.
See "TimesTen Utility API" in Oracle TimesTen In-Memory Database C Developer's Guide for the complete list of the functions provided in the TimesTen C Language Utility Library.
Recovering NONDURABLE data storesIf your data store is configured with the TRANSMIT NONDURABLE option in a hot-standby configuration, as described in "Automatic catch-up of a failed master data store" on page 11-15, you do not need to take any action to recover a failed master data store.
For other types of configurations, if the master data store configured with the TRANSMIT NONDURABLE option fails, you must use ttRepAdmin-duplicate or ttRepDuplicateEx to re-create the master data store from the most current subscriber data store. If your application attempts to reconnect to the master store without first performing the duplicate operation, the replication agent recovers the data store, but any attempt to connect results in an error that advises you to perform the 'duplicate'. To avoid this error, your application must reconnect with the connection attribute, ForceConnect set to 1.
Writing a failure recovery scriptUpon detecting a failure, the cluster manager should invoke a script that effectively executes the procedure shown by the pseudocode in Example 11–12.
Example 11–12 Failure recovery pseudocode
Detect problem { if (Master == unavailable) { FailedDataStore = Master FailedDSN = Master_DSN SurvivorDataStore = Subscriber switch users to SurvivorDataStore }else { FailedDataStore = Subscriber FailedDSN = Subscriber_DSN SurvivorDataStore = Master }}Fix problem....If (Problem resolved) { Get state for FailedDataStore if (state == "failed") { ttDestroy FailedDataStore ttRepAdmin -dsn FailedDSN -duplicate
Note: When the TT_REPDUP_RAMLOAD flags is used with ttRepDuplicateEx, the RAM policy for the duplicate data store is manual until explicitly reset by the ttRamPolicy function or ttAdmin -ramPolicy.

Managing data store failover and recovery
11-20 Oracle TimesTen In-Memory Database TimesTen to TimesTen Replication Guide
-from SurvivorDataStore -host SurvivorHost -setMasterRepStart -uid ttuser -pwd ttuser } else { ttAdmin -repStart FailedDSN } while (backlog != 0) { wait }}
Switch users back to Master.
This applies to either the master or subscriber data stores. If the master fails, you may lose some transactions.

12
XML Document Type Definition for the Conflict Report File 12-1
12XML Document Type Definition for theConflict Report File
This chapter describes the Document Type Definition (DTD) and structure of an XML format replication conflict report file. The TimesTen XML format conflict report is are based on the XML 1.0 specification (http://www.w3.org/TR/REC-xml). For information on configuring replication to report conflicts, see "Replication conflict detection and resolution" on page 11-1.
This chapter includes:
■ The conflict report XML Document Type Definition
■ The main body of the document
■ The uniqueness conflict element
■ The update conflict element
■ The delete/update conflict element
The conflict report XML Document Type DefinitionThe XML Document Type Definition (DTD) for the replication conflict report is a set of markup declarations that describes the elements and structure of a valid XML file containing a log of replication conflicts. This DTD can be found in the XML header file-the file with the suffix ".xml"-that is created when replication is configured to report conflicts to an XML file. User applications which understand XML use the DTD to parse the rest of the XML replication conflict report. For more information on reading and understanding XML Document Type Definitions, see http://www.w3.org/TR/REC-xml.
<?xml version="1.0"?><!DOCTYPE ttreperrorlog [ <!ELEMENT ttrepconflictreport(conflict*) > <!ELEMENT repconflict header, conflict) > <!ELEMENT header (time, datastore, transmitter, table) > <!ELEMENT time (hour, min, sec, year, month, day) > <!ELEMENT hour (#PCDATA) > <!ELEMENT min (#PCDATA) > <!ELEMENT sec (#PCDATA) > <!ELEMENT year (#PCDATA) > <!ELEMENT month (#PCDATA) > <!ELEMENT day (#PCDATA) > <!ELEMENT datastore (#PCDATA) > <!ELEMENT transmitter (#PCDATA) > <!ELEMENT table (tableowner, tablename) >

The main body of the document
12-2 Oracle TimesTen In-Memory Database TimesTen to TimesTen Replication Guide
<!ELEMENT tableowner (#PCDATA) > <!ELEMENT tablename (#PCDATA) > <!ELEMENT scope (#PCDATA) > <!ELEMENT failedtransaction ((insert | update | delete)+) > <!ELEMENT insert (sql) > <!ELEMENT update (sql, keyinfo, newtuple) > <!ELEMENT delete (sql, keyinfo) > <!ELEMENT sql (#PCDATA) > <!ELEMENT keyinfo (column+) > <!ELEMENT newtuple (column+) > <!ELEMENT column (columnname, columntype, columnvalue) > <!ATTLIST column pos CDATA #REQUIRED > <!ELEMENT columnname (#PCDATA) > <!ELEMENT columnvalue (#PCDATA) > <!ATTLIST columnvalue isnull (true | false) "false"> <!ELEMENT existingtuple (column+) > <!ELEMENT conflictingtuple (column+) > <!ELEMENT conflictingtimestamp(#PCDATA) > <!ELEMENT existingtimestamp (#PCDATA) > <!ELEMENT oldtuple (column+) > <!ELEMENT conflict (conflictingtimestamp, existingtimestamp*, existingtuple*, existingtimestamp*, conflictingtuple*, oldtuple*, keyinfo*) ><!ATTLIST conflict type (insert | update | deletedupdate | updatedeleted) #REQUIRED><!ENTITY logFile SYSTEM "Filename.include">]><ttrepconflictreport> &logFile;</ttrepconflictreport>
The main body of the documentThe .xml file for the XML replication conflict report is merely a header, containing the XML Document Type Definition describing the report format as well as a link to a file with the suffix ".include". This include file is the main body of the report, containing each replication conflict as a separate element. There are three possible types of elements: insert, update and delete/update conflicts. Each conflict type requires a slightly different element structure.
The uniqueness conflict elementA uniqueness conflict occurs when a replicated insertion fails because a row with an identical key column was inserted more recently. See "Reporting uniqueness conflicts" on page 11-8 for a description of the information that is written to the conflict report for a uniqueness conflict.
Example 12–1 illustrates the format of a uniqueness conflict XML element, using the values from Example 11–3.
Example 12–1 Uniqueness conflict element
<repconflict> <header> <time> <hour>13</hour> <min>36</min>

The uniqueness conflict element
XML Document Type Definition for the Conflict Report File 12-3
<sec>00</sec> <year>2002</year> <month>03</month> <day>25</day> </time> <datastore>/tmp/masterds</datastore> <transmitter>SUBSCRIBERDS</transmitter> <table> <tableowner>REPL</tableowner> <tablename>TAB</tablename> </table> </header> <conflict type="insert"> <conflictingtimestamp>3C9F983D00031128</conflictingtimestamp> <existingtimestamp>3C9F983E000251C0</existingtimestamp> <existingtuple> <column pos="1"> <columnname>COL1</columnname> <columntype>NUMBER(38)</columntype> <columnvalue>2</columnvalue> </column> <column pos="2"> <columnname>COL2</columnname> <columntype>NUMBER(38)</columntype> <columnvalue>2</columnvalue> </column> <columnname>TSTAMP</columnname> <columntype>BINARY(8)</columntype> <columnvalue>3C9F983E000251C0</columnvalue> </column> </existingtuple> <conflictingtuple> <column pos="1"> <columnname>COL1</columnname> <columntype>NUMBER(38)</columntype> <columnvalue>2</columnvalue> </column> <column pos="2"> <columnname>COL2</columnname> <columntype>NUMBER(38)</columntype> <columnvalue>100</columnvalue> </column> <column pos="3"> <columname>TSTAMP</columnname> <columntype>BINARY(8)</columntype> <columnvalue>3C9F983D00031128</columnvalue> </column> </conflictingtuple> <keyinfo> <column pos="1"> <columnname>COL1</columnname> <columntype>NUMBER(38)</columntype> <columnvalue>2</columnvalue> </column> </keyinfo> </conflict> <scope>TRANSACTION</scope> <failedtransaction> <insert> <sql>Insert into table TAB </sql> <column pos="1">

The update conflict element
12-4 Oracle TimesTen In-Memory Database TimesTen to TimesTen Replication Guide
<columnname>COL1</columnname> <columntype>NUMBER(38)</columntype> <columnvalue>2</columnvalue> </column> <column pos="2"> <columnname>COL2</columnname> <columntype>NUMBER(38)</columntype> <columnvalue>100</columnvalue> </column> <column pos="3"> <columnname>TSTAMP</columnname> <columntype>NUMBER(38)</columntype> <columnvalue>3C9F983D00031128</columnvalue> </column> </insert> </failedtransaction></repconflict>
The update conflict elementAn update conflict occurs when a replicated update fails because the row was updated more recently. See "Reporting update conflicts" on page 11-9 for a description of the information that is written to the conflict report for an update conflict.
Example 12–2 illustrates the format of an update conflict XML element, using the values from Example 11–4.
Example 12–2 Update conflict element
<repconflict> <header> <time> <hour>15</hour> <min>03</min> <sec>18</sec> <year>2002</year> <month>03</month> <day>25</day> </time> <datastore>/tmp/subscriberds</datastore> <transmitter>MASTERDS</transmitter> <table> <tableowner>REPL</tableowner> <tablename>TAB</tablename> </table> </header> <conflict type="update"> <conflictingtimestamp> 3C9FACB6000612B0 </conflictingtimestamp> <existingtimestamp>3C9FACB600085CA0</existingtimestamp> <existingtuple> <column pos="1"> <columnname>COL1</columnname> <columntype>NUMBER(38)</columntype> <columnvalue>6</columnvalue> </column> <column pos="2"> <columnname>COL2</columname> <columntype>NUMBER(38)</columntype>
The update conflict element
XML Document Type Definition for the Conflict Report File 12-5
<columnvalue>99</columnvalue> </column> <column pos="3"> <columnname>TSTAMP</columnname> <columntype>BINARY(8)</columntype> <columnvalue>3C9FACB600085CA0></columnvalue> </column> </existingtuple> <conflictingtuple> <column pos="3"> <columnname>TSTAMP</columnname> <columntype>BINARY(8)</columntype> <columnvalue>3C9FACB6000612B0</columnvalue> </column> <column pos="2"> <columnname>COL2</columnname> <columntype>NUMBER(38)</columntype> <columnvalue>50</columnvalue> </column> </conflictingtuple> <oldtuple> <column pos="3"> <columnname>TSTAMP</columnname> <columntype>BINARY(8)</columntype> <columnvalue>3C9FAC85000E01F0</columnvalue> </column> <column pos="2"> <columnname>COL2</columnname> <columntype>NUMBER(38)</columntype> <columnvalue>2</columnvalue> </column> </oldtuple> <keyinfo> <column pos="1"> <columnname>COL1</columnname> <columntype>NUMBER(38)</columntype> <columnvalue>6</columnvalue> </column> </keyinfo></conflict><scope>TRANSACTION</scope><failedtransaction> <update> <<sql>Update table TAB</sql> <<keyinfo> <column pos="1"> <columnname>COL1</columnname> <columntype>NUMBER(38)</columntype> <columnvalue>6</columnvalue> </column> </keyinfo> <column pos="3"> <columnname>TSTAMP</columnname> <columntype>BINARY(8)</columntype> <columnvalue>3C9FACB6000612B0</columnvalue> </column> <column pos="2"> <columnname>COL2</columnname> <columntype>NUMBER(38)</columntype> <columnvalue>50</columnvalue>

The delete/update conflict element
12-6 Oracle TimesTen In-Memory Database TimesTen to TimesTen Replication Guide
</column> </update> </failedtransaction></repconflict>
The delete/update conflict elementA delete/update conflict occurs when a replicated update fails because the row to be updated has already been deleted on the data store receiving the update, or when a replicated deletion fails because the row has been updated more recently. See "Reporting DELETE/UPDATE conflicts" on page 11-11 for a description of the information that is written to the conflict report for a delete/update conflict.
Example 12–3 illustrates the format of a delete/update conflict XML element in which an update fails because the row has been deleted more recently, using the values from Example 11–5.
Example 12–3 Delete/update conflict element: delete is more recent
<repconflict> <header> <time> <hour>15</hour> <min>27</min> <sec>05</sec> <year>2002</year> <month>03</month> <day>25</day> </time> <datastore>/tmp/masterds</datastore> <transmitter>SUBSCRIBERDS</transmitter> <table> <tableowner>REPL</tableowner> <tablename>TAB</tablename> </table> </header> <conflict type="update"> <conflictingtimestamp> 3C9FB2460000AFC8 </conflictingtimestamp> <conflictingtuple> <column pos="3"> <columnname>TSTAMP</columnname> <columntype>BINARY(8)</columntype> <columnvalue>3C9FB2460000AFC8</columnvalue> </column> <column pos="2"> <columnname>COL2</columnname> <columntype>NUMBER(38)</columntype> <columnvalue>99/columnvalue> </column> </conflictingtuple> <keyinfo> <column pos="1"> <columnname>COL1</columnname> <columntype>NUMBER(38)</columntype> <columnvalue>2</columnvalue> </column> </keyinfo> </conflict>

The delete/update conflict element
XML Document Type Definition for the Conflict Report File 12-7
<scope>TRANSACTION</scope> <failedtransaction> <update> <sql>Update table TAB</sql> <keyinfo> <column pos="1"> <columnname>COL1</columnname> <columntype>NUMBER(38)</columntype> <columnvalue>2</columnvalue> </column> </keyinfo> <column pos="3"> <columnname>TSTAMP</columnname> <columntype>BINARY(8)</columntype> <columnvalue>3C9FB2460000AFC8</columnvalue> </column> <column pos="2"> <columnname>COL2</columnname> <columntype>NUMBER(38)</columntype> <columnvalue>99</columnvalue> </column> </update> </failedtransaction></repconflict>
Example 12–4 illustrates the format of a delete/update conflict XML element in which a deletion fails because the row has been updated more recently, using the values from Example 11–6.
Example 12–4 Delete/update conflict element: update is more recent
<repconflict> <header> <time> <hour>15</hour> <min>27</min> <sec>20</sec> <year>2002</year> <month>03</month> <day>25</day> </time> <datastore>/tmp/masterds</datastore> <transmitter>MASTERDS</transmitter> <table> <tableowner>REPL</tableowner> <tablename>TAB</tablename> </table> </header> <conflict type="delete"> <conflictingtimestamp> 3C9FB258000708C8 </conflictingtimestamp> <existingtimestamp>3C9FB25800086858</existingtimestamp> <existingtuple> <column pos="1"> <columnname>COL1</columnname> <columntype>NUMBER(38)</columntype> <columnvalue>147</columnvalue> </column> <column pos="2">
The delete/update conflict element
12-8 Oracle TimesTen In-Memory Database TimesTen to TimesTen Replication Guide
<columnname>COL2</columnname> <columntype>NUMBER(38)</columntype> <columnvalue>99</columnvalue> </column> <column pos="3"> <columnname>TSTAMP</columnname> <columntype>BINARY(8)</columntype> <columnvalue>3C9FB25800086858</columnvalue> </column> </existingtuple> <keyinfo> <column pos="1"> <columnname>COL1</columnname> <columntype>NUMBER(38)</columntype> <columnvalue>147</columnvalue> </column> </keyinfo> </conflict> <scope>TRANSACTION</scope> <failedtransaction> <delete> <sql>Delete from table TAB</sql> <keyinfo> <column pos="1"> <columnname>COL1</columnname> <columntype>NUMBER(38)</columntype> <columnvalue>147</columnvalue> </column> </keyinfo> </delete> </failedtransaction></repconflict>

Index-1
Index
Aactive master data store
detecting dual active masters, 4-7active standby pair
adding host to cluster, 6-19adding or dropping a subscriber, 5-9adding or dropping subscriber, 4-8, 5-9adding tables or cache groups, 4-8, 5-9altering, 4-8altering STORE attributes, 5-9altering store attributes, 4-8, 5-9configuring network interfaces, 3-11detecting dual active masters, 4-7disaster recovery, 5-11dropping tables or cache groups, 4-8, 5-9DSN, 3-2excluding tables or cache groups, 5-9failback, 4-6, 5-7overview, 1-7recover active when standby not ready, 4-5recovering active master data store, 4-3replicating a global AWT cache group, 5-3replicating local read-only cache group, 5-2restrictions, 3-1return service, 3-3return twosafe service, 7-12setting up, 4-3states, 4-1SUBSCRIBER clause, 3-3subscriber failure, 4-6
active standby pair with cache groupsaltering, 5-9recover active when standby not ready, 5-5recovering active master data store, 5-3subscriber failure, 5-8
ADD ELEMENT clausedata store, 10-3
ADMIN privilege, 3-2, 7-5, 8-6aging, 1-17ALTER ELEMENT clause, 10-2ALTER REPLICATION, use of, 10-1ALTER TABLE
and replication, 10-7application failover
Oracle Clusterware, 6-5
asynchronous writethrough cache grouppropagating to Oracle database, 1-15replication, 1-14
attributesForceConnect, 11-16
autocommit, 7-10, 7-11RETURN RECEIPT BY REQUEST, 3-4RETURN TWOSAFE BY REQUEST, 3-5
AutoCommit connection attributeRETURN TWOSAFE, 3-4
automatic catch-up, 11-15automatic client failover, 6-2AWT cache group
propagating to Oracle Database, 1-15replicating, 5-3replication, 1-14
Bbidirectional replication, 1-9bookmarks in log, 8-11, 9-11
Ccache grid
active standby pairs, 5-3cache group
excluding from data store, 10-3including in data store, 10-3
cache groupsreplicating a global AWT cache group, 5-3replicating a read-only cache group, 5-2
cache groups, replicating, 1-14catch-up feature, 11-15CHECK CONFLICTS clause, 7-8, 11-5client failover, 6-2cluster
virtual IP addresses, 6-2cluster agent, 6-9cluster manager, role of, 7-2cluster.oracle.ini
advanced availability, 6-4advanced availability, one subscriber, 6-5application failover, 6-5, 6-6automatic recovery from failure of both master
nodes, 6-7

Index-2
basic availability, 6-4basic availability, one subscriber, 6-4cache groups, 6-5excluding tables, cache groups and
sequences, 6-8location, 6-4manual recovery from failure of both master
nodes, 6-8Windows example, 6-4, 6-6
cluster.oracle.ini file, 6-2examples, 6-3specify route, 6-8
Clusterwarerequired privileges, 6-3
COMPRESS TRAFFICactive standby pair, 3-10STORE attribute in CREATE REPLICATION
statement, 7-20configuring replication, 7-1configuring the network, 8-1configuring timestamp comparison, 11-4conflict reporting, 11-7CONFLICT REPORTING attributes, 7-14conflict resolution, 11-1, 11-3conflict types, 11-1controlling replication, 8-15copying a data store
privileges, 4-2, 8-8copying a master data store, 8-8CREATE ACTIVE STANDBY PAIR, 5-2
syntax, 3-2using, 3-2
CREATE ACTIVE STANDBY PAIR statement, 4-3CREATE REPLICATION
defining data store element, 7-7defining table element, 7-8use of, 7-5
Ddata store
ForceConnect attribute, 11-16data store element, 7-7data store file name
defined, 3-2, 7-6data store name, 7-6data store objects
excluding from active standby pair, 3-12data stores
attributes of, 8-7duplicating, 8-8establishing, 8-7failed, 3-11, 8-11, 11-13managing logs, 8-9recovering, 7-2, 11-13setting state, 8-15
data types, size limits on, 8-8DATASTORE element, 7-6
adding to replication scheme, 10-3and materialized views, 7-25
and nonmaterialized views, 7-25default column values, 10-7DISABLE RETURN attribute, 7-13DISABLE RETURN policy, 7-18, 7-19
active standby pair, 3-9disaster recovery
active standby pair with AWT cache group, 5-11disk-based logs
setting size of, 8-11distributed workload configuration, 1-11
recovery issues, 7-3DNS server, 8-5DROP REPLICATION, 2-8, 10-8dropping replication scheme, 2-8, 10-8DSN
define for active standby pair, 3-2defining, 7-6
DSNscreating, 2-5, 8-7
duplicating a data storeprivileges, 4-2, 8-8with cache groups, 4-2
duplicating a master data store, 8-8DURABLE COMMIT attribute, 7-13
Eelement
defined, 1-1ELEMENT descriptions, 7-6EXCLUDE
active standby pair, 3-12EXCLUDE SEQUENCE
in CREATE REPLICATION statement, 7-7EXCLUDE SEQUENCE clause, 10-3EXCLUDE TABLE
in CREATE REPLICATION statement, 7-7EXCLUDE TABLE clause, 10-3
Ffailback, 4-6, 5-7failed data store, 11-13
connecting to, 3-11, 8-11Failed state, 8-10, 8-15, 11-13
log threshold, 3-11failover and recovery, 11-13
issues, 7-2FAILTHRESHOLD, 3-8, 7-17FAILTHRESHOLD attribute, 7-14, 8-10, 11-14
active standby pair, 3-11report setting, 9-8
failure recovery script, 11-19ForceConnect attribute, 11-16, 11-19foreign keys, 1-17
replication, 7-25full replication, 1-9full store name
active standby pair, 3-3

Index-3
Hhost name
identifying, 7-7hostname command, 7-7hostnames, 8-3hot standby configuration, 1-6, 1-10hot-standby configuration
recovery issues, 7-2
IINCLUDE
active standby pair, 3-12INCLUDE CACHE GROUP
in CREATE REPLICATION statement, 7-7INCLUDE SEQUENCE
in CREATE REPLICATION statement, 7-7INCLUDE SEQUENCE clause, 10-3INCLUDE TABLE, 4-9, 5-10
in CREATE REPLICATION statement, 7-7INCLUDE TABLE clause, 10-3IP addresses, 8-3
LLOCAL COMMIT ACTION
active standby pair, 3-10LOCAL COMMIT ACTION attribute, 7-14log
locating bookmarks, 8-11, 9-11management, 8-9size and persistence, 8-9threshold value, 8-10, 8-11
log sequence number, 9-11log threshold value
active standby pair, 3-11LogBufMB attribute, 8-7, 8-11LogFileSize attribute, 8-7, 8-11logging, 8-11Logging attribute, 8-7LSN, 9-11
Mmaster catch-up, 11-15master data store
defined, 7-6materialized views, replicating, 7-25monitoring replication, 9-1
Nnetwork requirements, 8-3NO RETURN attribute, 7-13NO RETURN clause
active standby pair, 3-5NVARCHAR columns, size limit, 8-8
OON DELETE CASCADE, 1-17Oracle Clusterware, 6-1
adding active standby pair to cluster, 6-18adding subscriber to active standby pair, 6-17altering tables and cache groups, 6-16automatic recovery from dual failure, 6-14creating or dropping tables and cache
groups, 6-16failure of more than two master hosts, 6-15host maintenance, 6-20machine room maintenance, 6-21manual recovery for advanced availability, 6-15manual recovery for basic availability, 6-15network maintenance, 6-20removing active standby pair from cluster, 6-19removing host from cluster, 6-20removing subscriber from active standby
pair, 6-17required privileges, 6-3restricted commands, 6-3rolling upgrade, 6-17routing, 6-8storage for backups, 6-7TimesTen advanced level, 6-2TimesTen basic level, 6-2upgrading TimesTen, 6-17virtual IP addresses, 6-2
owner name, 7-5
PPause state, 8-15PORT assignment
active standby pair, 3-10PORT attribute, 7-14privilege
create an active standby pair, 3-2required, 8-6to create a replication scheme, 7-5
propagation, 1-12propagator data store, 1-12
defined, 7-6
Rread-only cache group
replicating, 1-16recovering failed data stores, 7-2, 11-13RepDDL attribute, 6-8replicated tables, requirements for, 8-7replicating over a network, 1-12, 8-1replication
across releases, 8-12and ttAdmin, 8-13bidirectional, 1-9configuration issues, 7-1configuring timestamp comparison, 11-4conflict reporting, 11-7conflict resolution, 11-1

Index-4
controlling, 8-15described, 1-1element, 1-1, 7-6FAILTHRESHOLD, 3-8, 7-17foreign keys, 7-25gauging performance, 9-11monitoring, 9-1of materialized views, 7-25restart policy, 8-13, 8-14, 8-15return receipt, 1-4starting, 8-13state of, 8-15stopping, 8-13timestamp column maintenance, 11-6unidirectional, 1-9
replication agentdefined, 1-2starting, 2-6, 8-13stopping, 2-6, 8-13
replication conflicts, types of, 11-1replication daemon, see "replication agent"replication scheme
active standby pair, 1-7applying to DSNs, 8-12configuring, 7-1defining, 7-5dropping, 2-8examples of, 7-26for cache groups, 1-14multiple, 7-24naming, 7-5
replication schemestypes, 1-7
repschemes command, 9-8resource
defined, 6-2restart policy, 8-14RESUME RETURN attribute, 7-13RESUME RETURN policy, 3-9, 7-19return receipt
definition, 1-2RETURN RECEIPT attribute, 7-10
example use of, 7-27RETURN RECEIPT BY REQUEST attribute, 7-10
example use of, 7-30RETURN RECEIPT BY REQUEST clause
active standby pair, 3-4RETURN RECEIPT clause
active standby pair, 3-3RETURN RECEIPT failure policy
report settings, 9-8return receipt replication, 1-4RETURN RECEPT timeout errors, 1-5, 7-14return service
active standby pair, 3-3performance and recovery tradeoffs, 7-3
return service blockingdisabling, 3-8, 7-16
return service failure policy, 7-16active standby pair, 3-7
return service timeout errors, 3-7, 7-16RETURN SERVICES WHEN REPLICATION
STOPPED attribute, 7-13return twosafe
active standby pair, 7-12definition, 1-2
RETURN TWOSAFE attribute, 7-12RETURN TWOSAFE BY REQUEST attribute, 7-11RETURN TWOSAFE BY REQUEST clause
active standby pair, 3-5RETURN TWOSAFE clause
active standby pair, 3-4RETURN WAIT TIME attribute, 7-13ROUTE clause
active standby pair, 3-11
Sselective replication, 1-9sequences
replicating, 1-16split workload, 1-10SQLGetInfo function, 3-11, 8-11, 11-14standby master data store
recover from failure, 4-6, 5-7Start state, 8-15starting the replication agent, 2-6, 8-13Stop state, 8-15stopping the replication agent, 2-8, 8-13STORE attributes, 7-13
active standby pair, 3-5SUBSCRIBER attributes, 7-9SUBSCRIBER clause, 3-3subscriber data store
defined, 7-6subscriber failure, 4-6, 5-8subscribers
number allowed, 7-28
Ttable
dropping from replication scheme, 10-4excluding from data store, 10-3including in data store, 10-3
TABLE DEFINITION CHECKING attribute, 7-14examples, 7-22
TABLE element, 7-6table element, 7-8table requirements, 8-7tables
altering and replication, 10-7threshold log setting, 8-10, 8-11
active standby pair, 3-11timeout
return service for an active standby pair, 3-7TIMEOUT attribute, 7-14timestamp column maintenance, 11-6timestamp-based conflict resolution, 11-1TimesTen cluster agent, 6-9

Index-5
TRANSMIT DURABLE attribute, 7-8TRANSMIT NONDURABLE
and recovery, 11-19TRANSMIT NONDURABLE attribute, 7-8TRUNCATE TABLE, 10-7truncating a replicated table, 10-7ttAdmin -ramPolicy, use of, 11-18, 11-19ttAdmin -repPolicy, use of, 8-14ttAdmin -repStart, use of, 8-13ttAdmin -repStop, use of, 8-14ttCkpt procedure, 8-10ttCkptBlocking procedure, 8-10ttcrsagent.options file, 6-10ttCWAdmin
required privileges, 6-3ttCWAdmin utility, 6-2ttDestroy, use of, 11-17ttDestroyDataStore procedure, use of, 11-18ttDurableCommit built-in procedure, 3-8, 7-16ttIsql -f, use of, 8-12ttRepAdmin -bookmark, use of, 9-11ttRepAdmin -duplicate
privileges, 4-2, 8-8ttRepAdmin -duplicate, use of, 7-9, 8-8, 11-15, 11-17,
11-18, 11-19ttRepAdmin -ramLoad, use of, 11-18ttRepAdmin -receiver -list, use of, 9-5ttRepAdmin -self -list, use of, 9-4ttRepAdmin -showconfig, use of, 9-9ttRepAdmin -state, use of, 8-15ttRepDuplicate procedure, use of, 11-18ttRepDuplicateEx
privileges, 4-2, 8-8ttReplicationStatus procedure, 9-6ttRepReturnTransitionTrap SNMP trap, 7-18ttRepStart procedure, 8-14, 8-15, 10-2ttRepStop procedure, 8-14, 8-15, 10-2ttRepSubscriberStateSet procedure, 8-15ttRepSubscriberWait built-in procedure, 7-26ttRepSyncGet built-in procedure, 3-4, 3-5ttRepSyncGet procedure, 7-11, 7-12ttRepSyncSet built-in procedure, 3-4, 3-5, 3-6, 3-7,
7-10, 7-12, 7-13, 7-14, 7-30ttRepSyncSet procedure, 3-10, 7-11, 7-15, 7-16, 7-20ttRepSyncSubscriberStatus procedure, 7-18, 9-17ttRepXactStatus built-in procedure, 3-4, 9-17ttRepXactStatus procedure, 7-10, 7-20ttRepXactTokenGet built-in procedure, 9-17
Uunidirectional replication, 1-9update conflicts, managing, 7-33
VVARBINARY columns, size limit, 8-8VARCHAR2 columns, size limit, 8-8virtual IP address
Oracle Clusterware, 6-2
WWINS server, 8-5

Index-6


![[1]Oracle® Enterprise Manager for Oracle TimesTen In ... · [1]Oracle® Enterprise Manager for Oracle TimesTen In-Memory Database User's Guide Release 13.3.1.0.0 F16795-01 March](https://static.documents.pub/doc/80x56/5faa8008348eb504e1009b4f/1oracle-enterprise-manager-for-oracle-timesten-in-1oracle-enterprise.jpg)


