24
Page 1 of 24 Oracle WebCenter Portal 11g Developer Workshop Lab 02 – Creating the OraHealth Page Template and Skin

Page 1 of 24
Oracle WebCenter Portal 11g Developer Workshop
Lab 02 – Creating the OraHealth Page Template and Skin

Page 2 of 24
Overview
WebCenter Portal uses page templates and skins to control the look-and-feel of the portals. These page templates are ADF Faces pages (*.jspx) that are created with JDeveloper. Since these pages are based on Java Server Faces, any layout can be achieved with WebCenter Portal. The goal of this lab is to create a new look-and-feel to match the one defined by the customer. For this, we will use an existing template called Skyros as the base, since both have similar layouts. At the end of this exercise, you will be able to: 1. Create a new Page Template by copying an existing one
2. Create a new Skin by copying an existing one
3. Export the Page Template and Skin to the desktop
4. Customize the Page Template and Skin in JDeveloper
5. Export the customized Page Template and Skin to the desktop
6. Import the customized Page Template and Skin into the Portal
7. Set the default Page Template and Skin for the OraHealth Portal
Page 3 of 24
Instructions
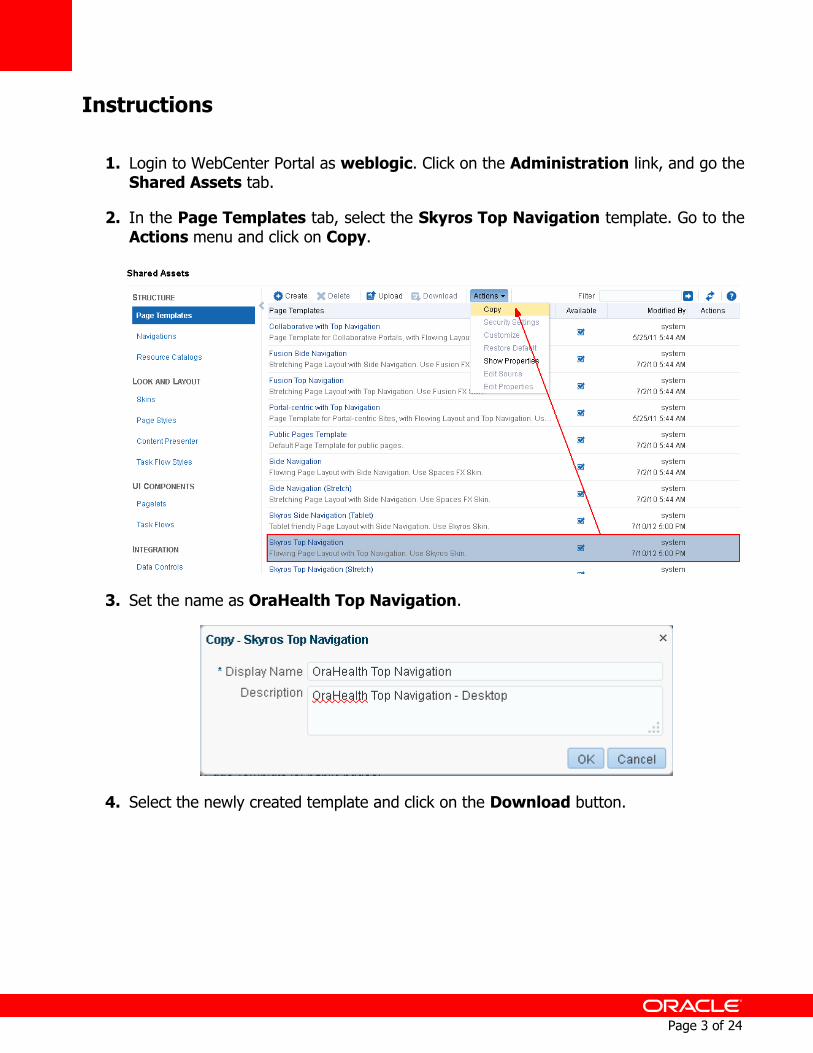
1. Login to WebCenter Portal as weblogic. Click on the Administration link, and go the Shared Assets tab.
2. In the Page Templates tab, select the Skyros Top Navigation template. Go to the Actions menu and click on Copy.
3. Set the name as OraHealth Top Navigation.
4. Select the newly created template and click on the Download button.

Page 4 of 24
5. Select Save to My Computer and click Download. Save the EAR file to your desktop.
6. Open JDeveloper and load the DesignWebCenterSpaces application (if you have not configured your JDeveloper yet, please see the Preparing the Environment document for more information).
7. Right-click the WebCenterSpacesResources project and select Import Portal Resource....

Page 5 of 24
8. Select the EAR file that was downloaded from the Portal and click OK.
9. Click OK in the confirmation message.
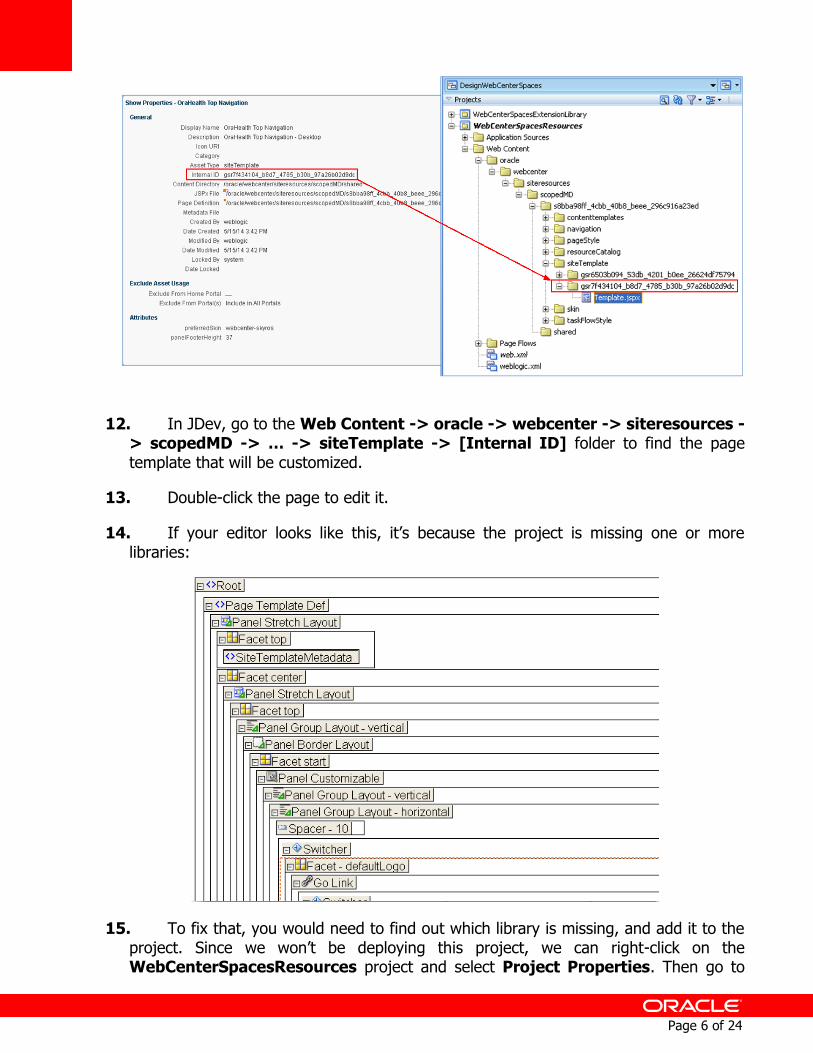
10. To find out which portal template is the one we want to customize, go back to the Portal page, select the OraHealth Top Navigation template and go to the Actions -> Show Properties menu.
11. The Internal ID is the information we need, because it will be the name of the folder in the JDev project that contains the page template.
Page 6 of 24
12. In JDev, go to the Web Content -> oracle -> webcenter -> siteresources -> scopedMD -> … -> siteTemplate -> [Internal ID] folder to find the page template that will be customized.
13. Double-click the page to edit it.
14. If your editor looks like this, it’s because the project is missing one or more libraries:
15. To fix that, you would need to find out which library is missing, and add it to the project. Since we won’t be deploying this project, we can right-click on the WebCenterSpacesResources project and select Project Properties. Then go to

Page 7 of 24
the Libraries and Classpath tab, click the Add Library button, select all libraries under the Extension folder and click OK. Click OK to close the Project Properties window. In the Associate to Data Control windows, you can click Cancel.
16. The page will open in Design mode. Unfortunately a perfect preview is impossible, because there are several components evaluated at runtime. For that reason, it is much easier to work on the Structure panel, in the lower left side. Make sure to leave plenty of space for the Structure panel.
17. This template will also require a new Skin (css). Go back to the Portal -> Shared Assets page and browse to the Skins tab, select the Skyros skin and go to the Actions -> Copy menu.

Page 8 of 24
18. Set the name as OraHealth and click OK.
19. Download this skin and import it into JDeveloper. Check the Internal ID to make sure you are editing the right file. Open the skin.css file under the folder with the Internal ID you´ve just checked.
20. To make your life easier, the skin was already created prior to the workshop. Replace the contents of the Skin.css file from the JDev project with the contents from the lab_assets/Lab2_TemplateSkin/Skin.css file. Save and close the file.
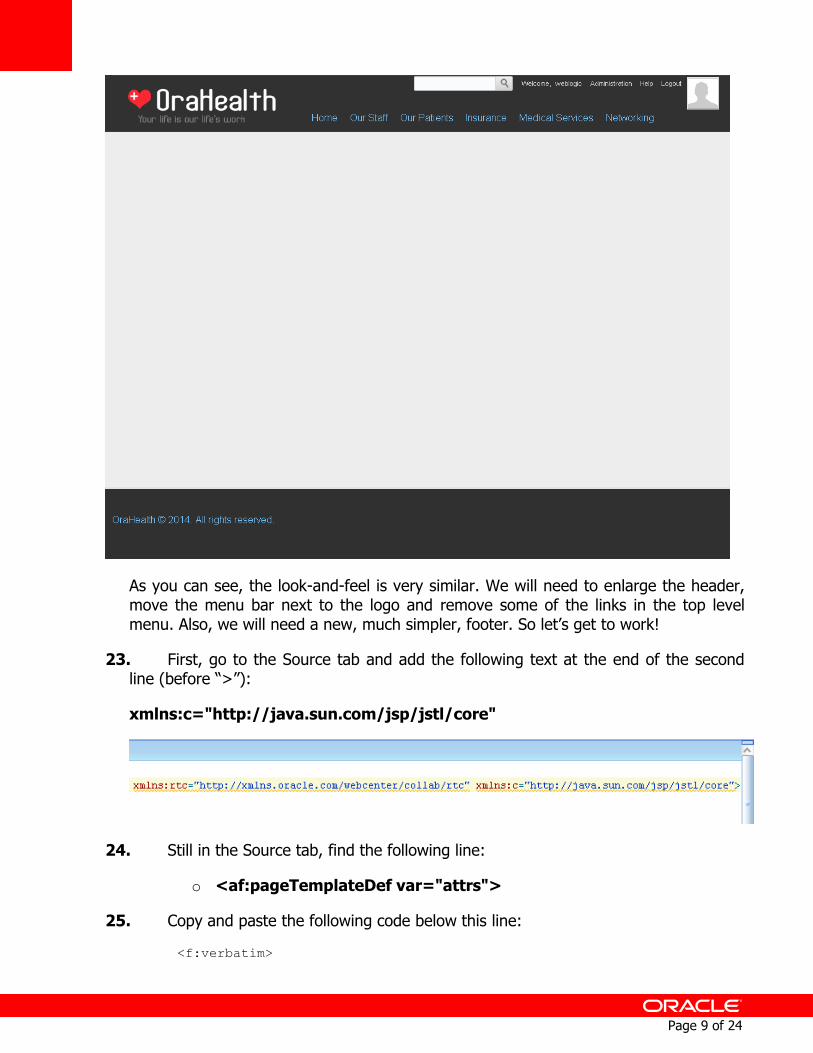
21. Now that we have the skin ready, we can customize the template to match our customer’s look and feel. This is what the current template (Skyros) looks like:
22. This is what the customized template will look like:
Page 9 of 24
As you can see, the look-and-feel is very similar. We will need to enlarge the header, move the menu bar next to the logo and remove some of the links in the top level menu. Also, we will need a new, much simpler, footer. So let’s get to work!
23. First, go to the Source tab and add the following text at the end of the second line (before “>”):
xmlns:c="http://java.sun.com/jsp/jstl/core"
24. Still in the Source tab, find the following line:
o <af:pageTemplateDef var="attrs">
25. Copy and paste the following code below this line:
<f:verbatim>
Page 10 of 24
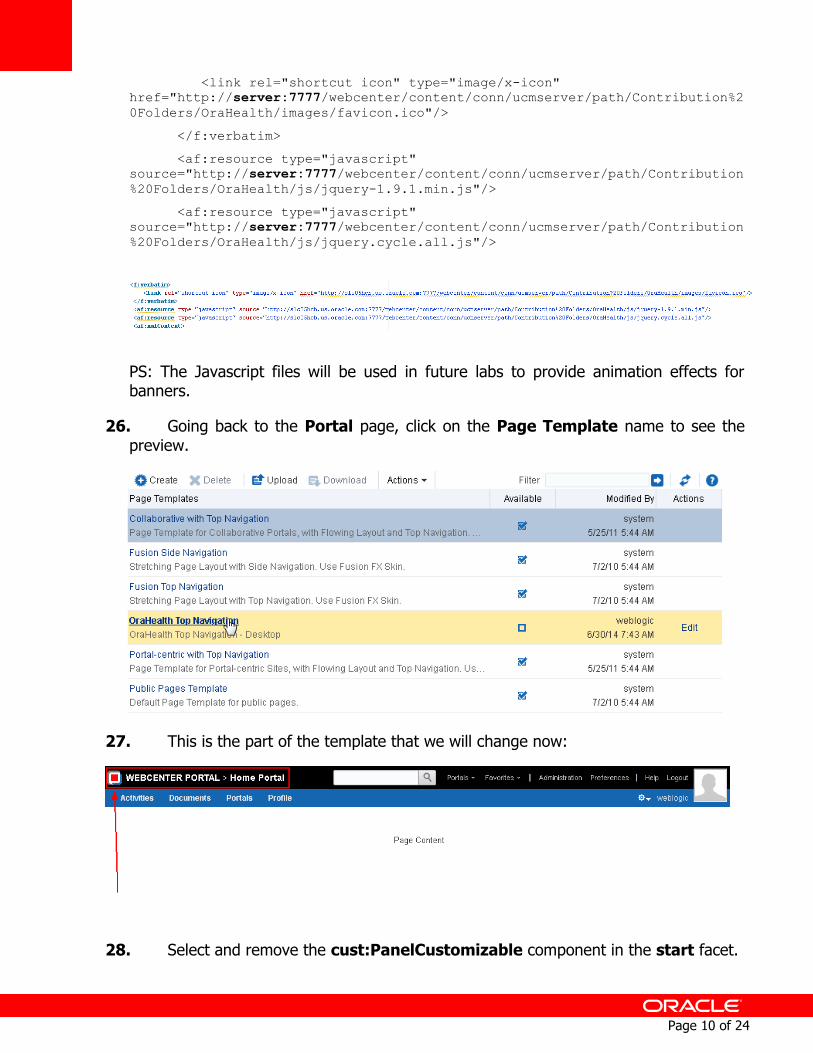
<link rel="shortcut icon" type="image/x-icon"
href="http://server:7777/webcenter/content/conn/ucmserver/path/Contribution%2
0Folders/OraHealth/images/favicon.ico"/>
</f:verbatim>
<af:resource type="javascript"
source="http://server:7777/webcenter/content/conn/ucmserver/path/Contribution
%20Folders/OraHealth/js/jquery-1.9.1.min.js"/>
<af:resource type="javascript"
source="http://server:7777/webcenter/content/conn/ucmserver/path/Contribution
%20Folders/OraHealth/js/jquery.cycle.all.js"/>
PS: The Javascript files will be used in future labs to provide animation effects for banners.
26. Going back to the Portal page, click on the Page Template name to see the preview.
27. This is the part of the template that we will change now:
28. Select and remove the cust:PanelCustomizable component in the start facet.

Page 11 of 24
29. From the Component Pallete, drag a Panel Group Layout from the Layout tab and drop it into the start facet:
30. In the Property Inspector, set the StyleClass property as OraHealthLogo.

Page 12 of 24
31. From the Component Pallete, drag a Go Image Link component from the Common Components tab into the Panel Group Layout we just created. Set the following properties for this component:
o Icon: /content/conn/ucmserver/path/Contribution%20Folders/OraHealth/images/OraHealth_logo.jpg
o Destination: #{boilerBean.globalLogoURIInSpace}
o Text: [leave blank]
32. Going back to the Portal page, click on the Page Template name to see the preview. This is the part of the template that we will change now:
Page 13 of 24
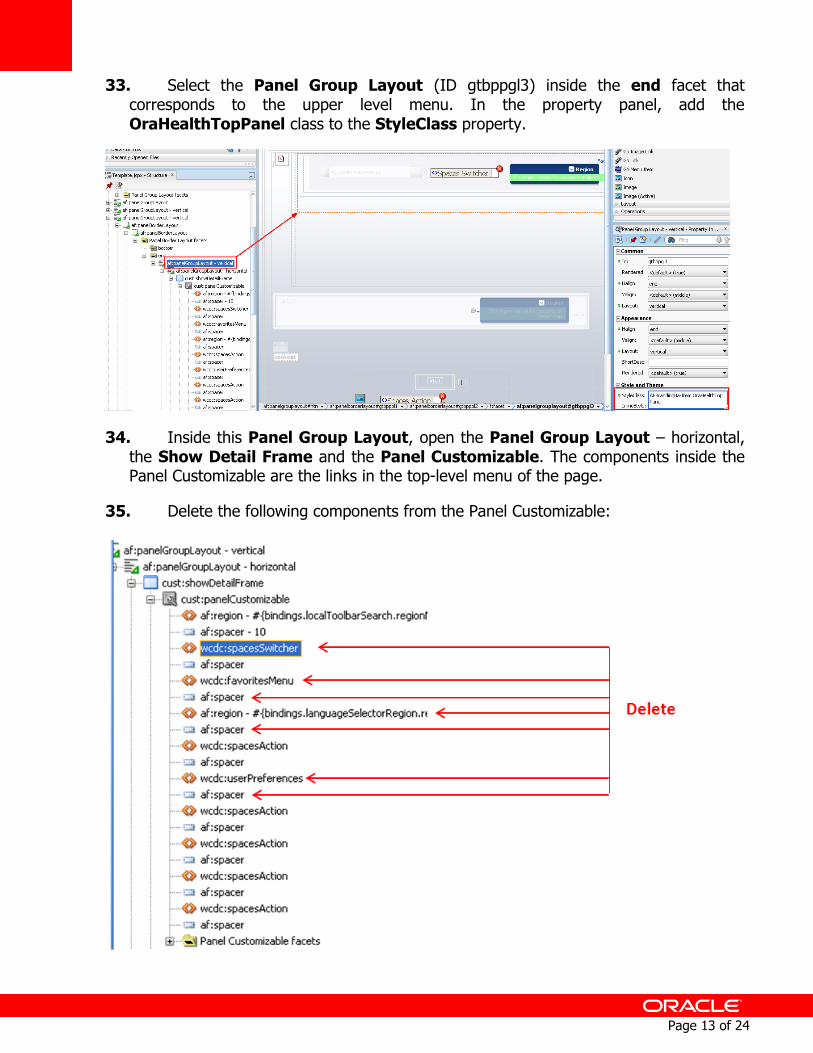
33. Select the Panel Group Layout (ID gtbppgl3) inside the end facet that corresponds to the upper level menu. In the property panel, add the OraHealthTopPanel class to the StyleClass property.
34. Inside this Panel Group Layout, open the Panel Group Layout – horizontal, the Show Detail Frame and the Panel Customizable. The components inside the Panel Customizable are the links in the top-level menu of the page.
35. Delete the following components from the Panel Customizable:
Page 14 of 24
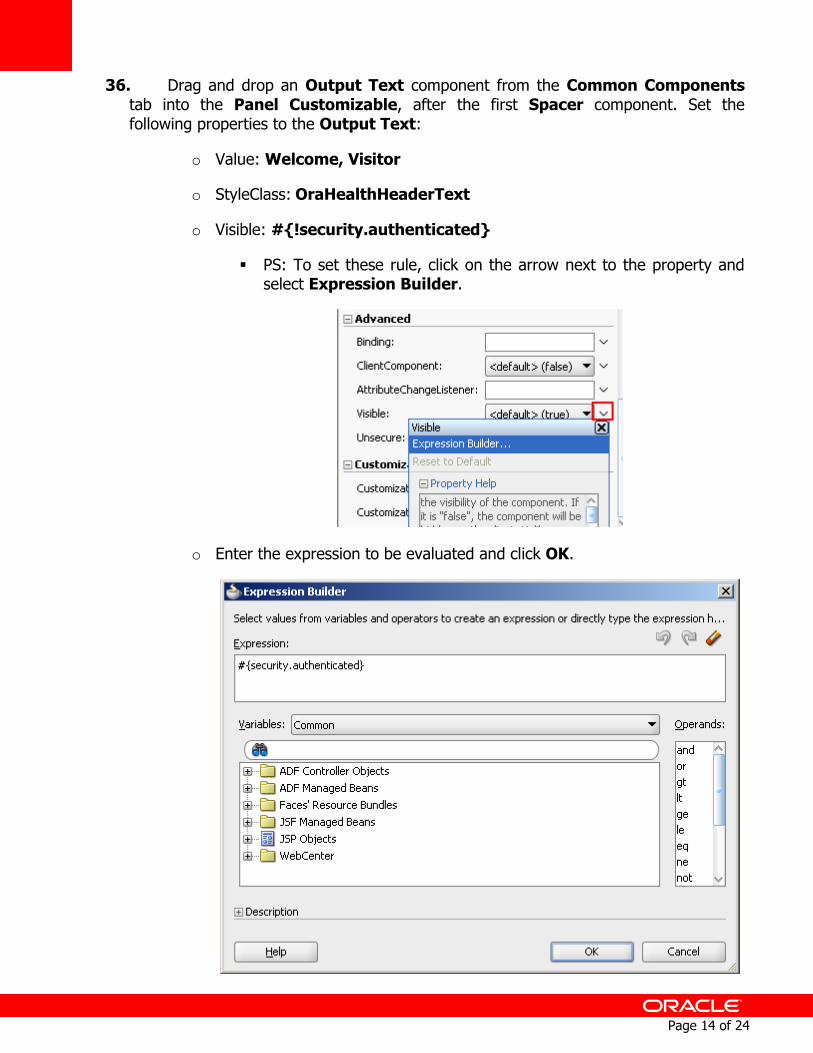
36. Drag and drop an Output Text component from the Common Components tab into the Panel Customizable, after the first Spacer component. Set the following properties to the Output Text:
o Value: Welcome, Visitor
o StyleClass: OraHealthHeaderText
o Visible: #{!security.authenticated}
PS: To set these rule, click on the arrow next to the property and select Expression Builder.
o Enter the expression to be evaluated and click OK.

Page 15 of 24
This means it will only appear if the user is not logged in.
37. Add an Output Text component below this text, with the following properties:
o Value: Welcome,
o StyleClass: OraHealthHeaderText
o Visible: #{security.authenticated}
o This means it will only appear if the user is logged in.
38. Select the Spacer component located beneath the OutputText and set the width property to 3 and the visible property to #{security.authenticated}.
39. In the Component Palette, select SpacesDeclarativeComponents in the option list and drag & drop an User Profile component after the spacer. Set the following properties:
o Text: #{security.userDisplayName}
o ShortDesc: #{security.userDisplayName}
o StyleClass: OraHealthHeaderText
Page 16 of 24
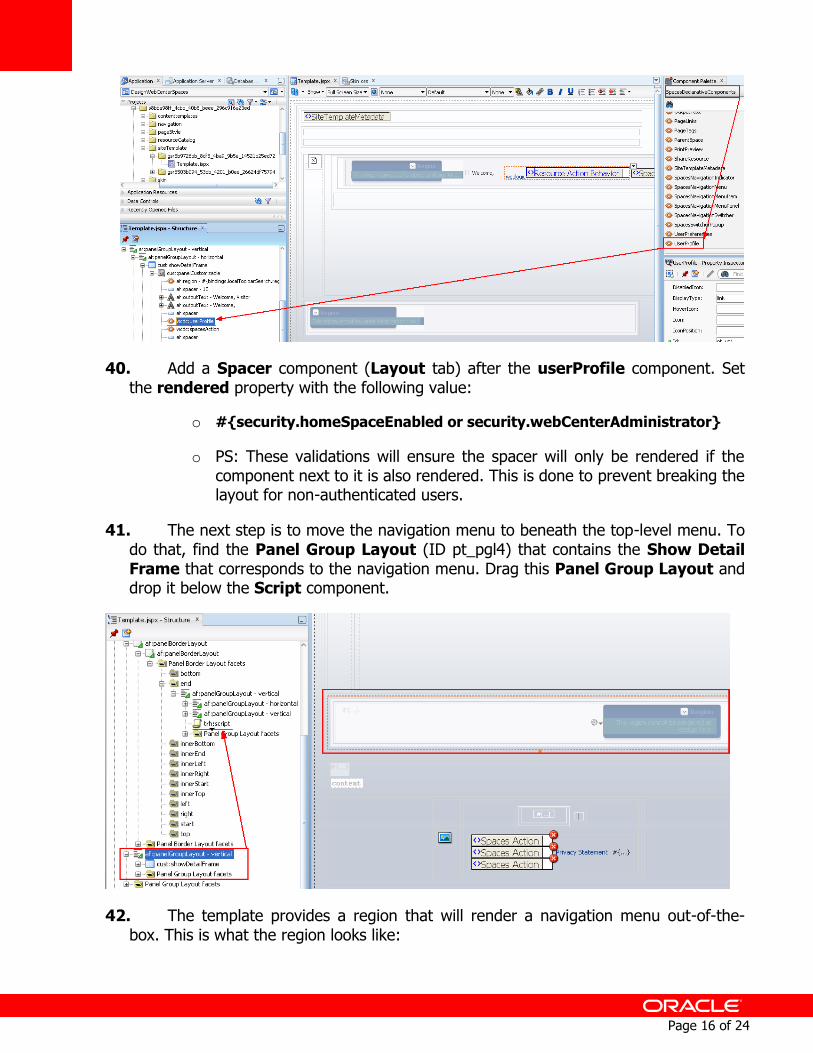
40. Add a Spacer component (Layout tab) after the userProfile component. Set the rendered property with the following value:
o #{security.homeSpaceEnabled or security.webCenterAdministrator}
o PS: These validations will ensure the spacer will only be rendered if the component next to it is also rendered. This is done to prevent breaking the layout for non-authenticated users.
41. The next step is to move the navigation menu to beneath the top-level menu. To do that, find the Panel Group Layout (ID pt_pgl4) that contains the Show Detail Frame that corresponds to the navigation menu. Drag this Panel Group Layout and drop it below the Script component.
42. The template provides a region that will render a navigation menu out-of-the-box. This is what the region looks like:

Page 17 of 24
43. However, because of our customer’s look-and-feel requirements, we need to develop our own navigation, to match the one in their current site. Expand the Panel Group Layout that was just moved and select the Panel Customizable component inside.
44. Go to the Source tab and find the selected lines.
45. Remove the <af:region… tag and copy & paste the code from the lab_assets/Lab02_TemplateSkin/navigation_menu.txt file. Your code should look like this:

Page 18 of 24
46. Now we will work on the template footer. Find the Panel Group Layout (ID pt_pg20) and delete the Panel Customizable and Panel Group Layout components that are located inside it.
47. Add an Output Text to this Panel Group Layout, with the text OraHealth © 2014. All rights reserved.
48. Save the File.
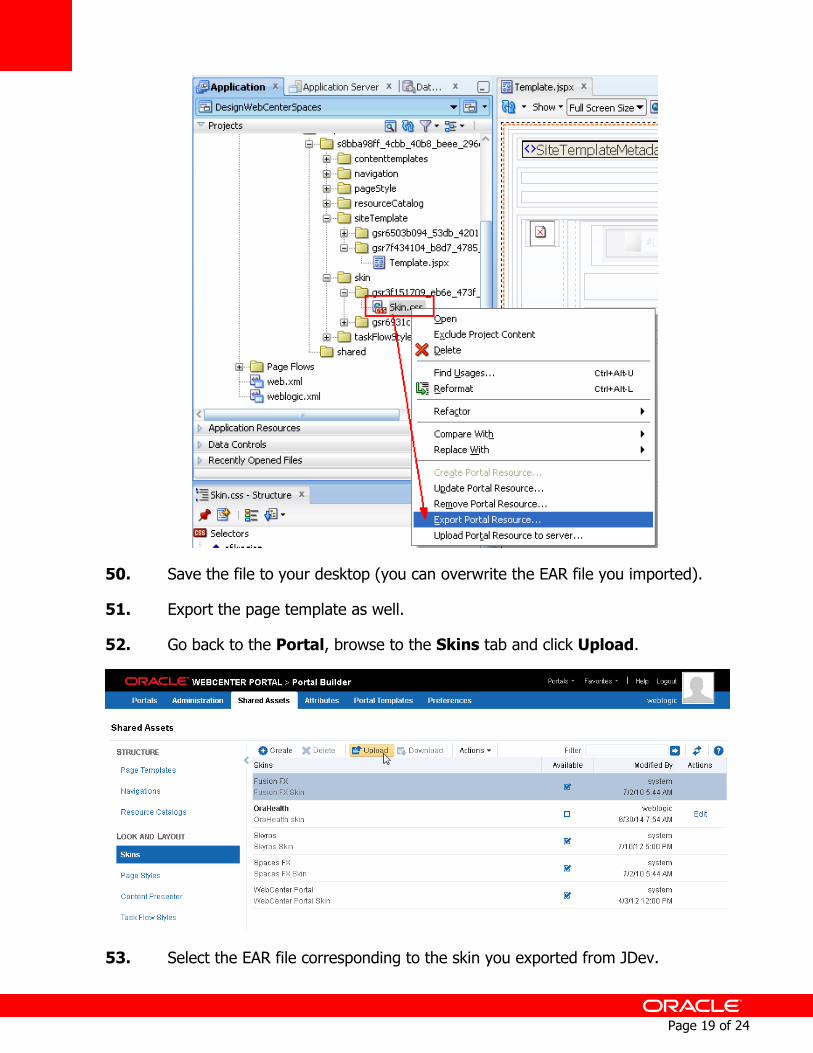
49. Right-click the Skin.css file and select Export Portal Resource.
Page 19 of 24
50. Save the file to your desktop (you can overwrite the EAR file you imported).
51. Export the page template as well.
52. Go back to the Portal, browse to the Skins tab and click Upload.
53. Select the EAR file corresponding to the skin you exported from JDev.
Page 20 of 24
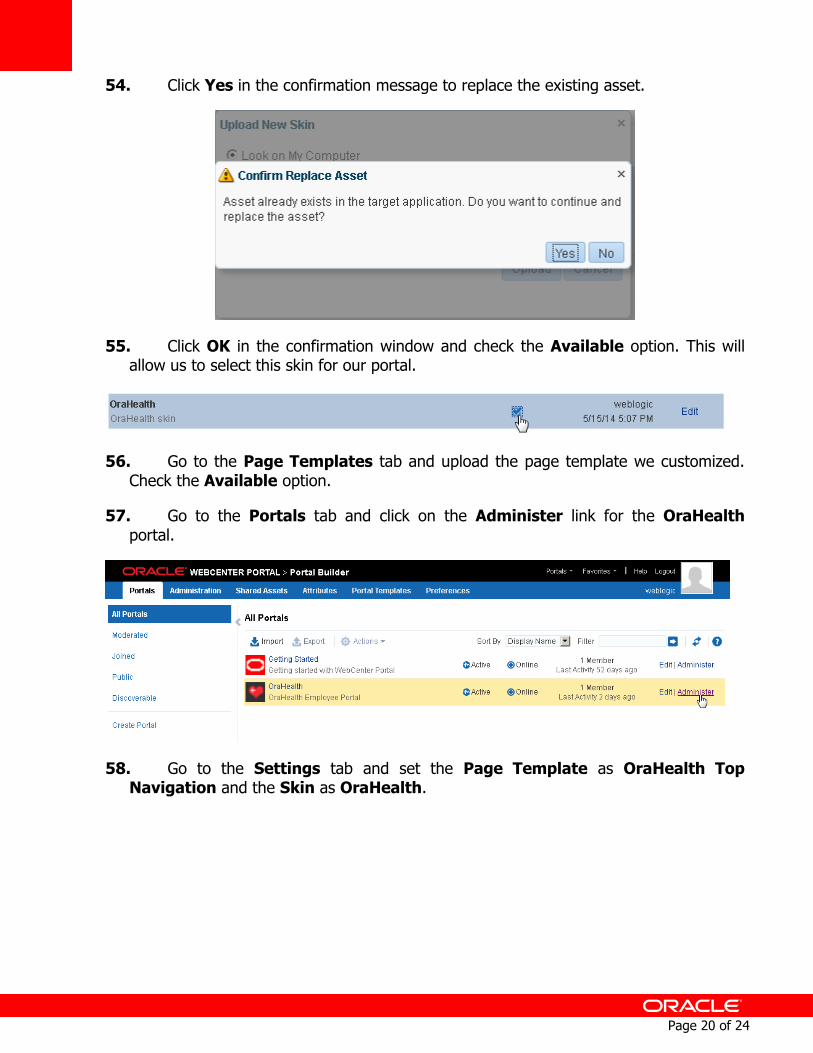
54. Click Yes in the confirmation message to replace the existing asset.
55. Click OK in the confirmation window and check the Available option. This will allow us to select this skin for our portal.
56. Go to the Page Templates tab and upload the page template we customized. Check the Available option.
57. Go to the Portals tab and click on the Administer link for the OraHealth portal.
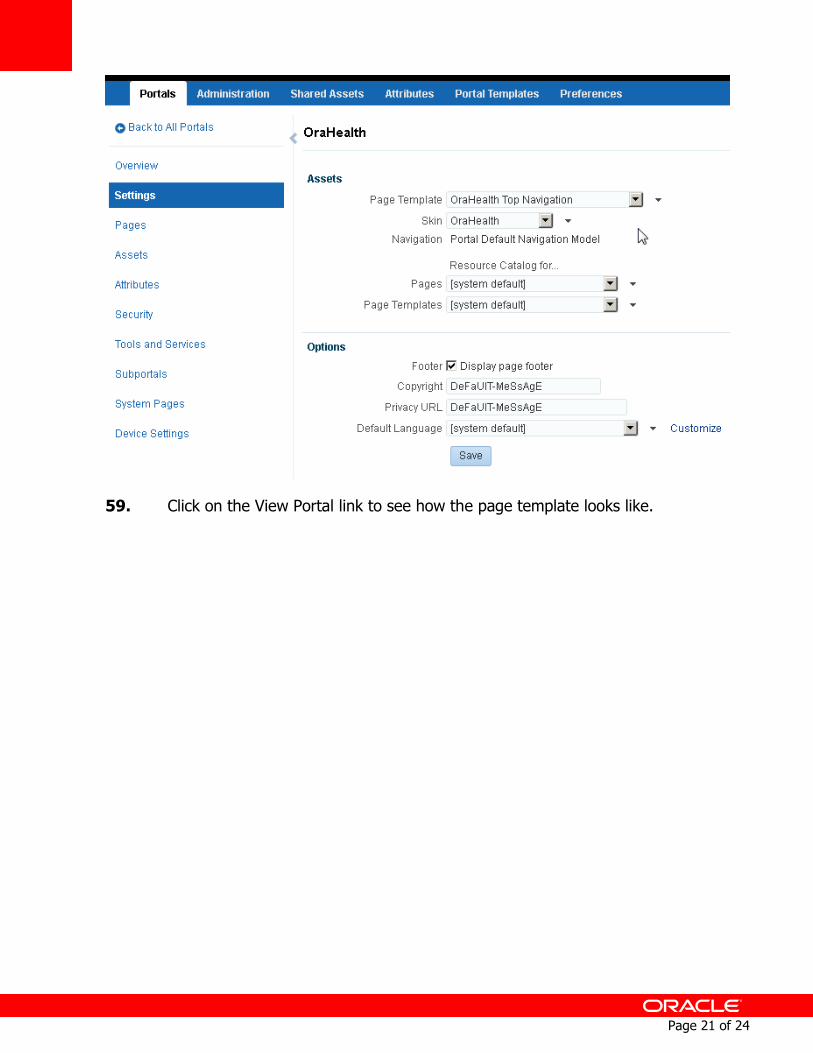
58. Go to the Settings tab and set the Page Template as OraHealth Top Navigation and the Skin as OraHealth.
Page 21 of 24
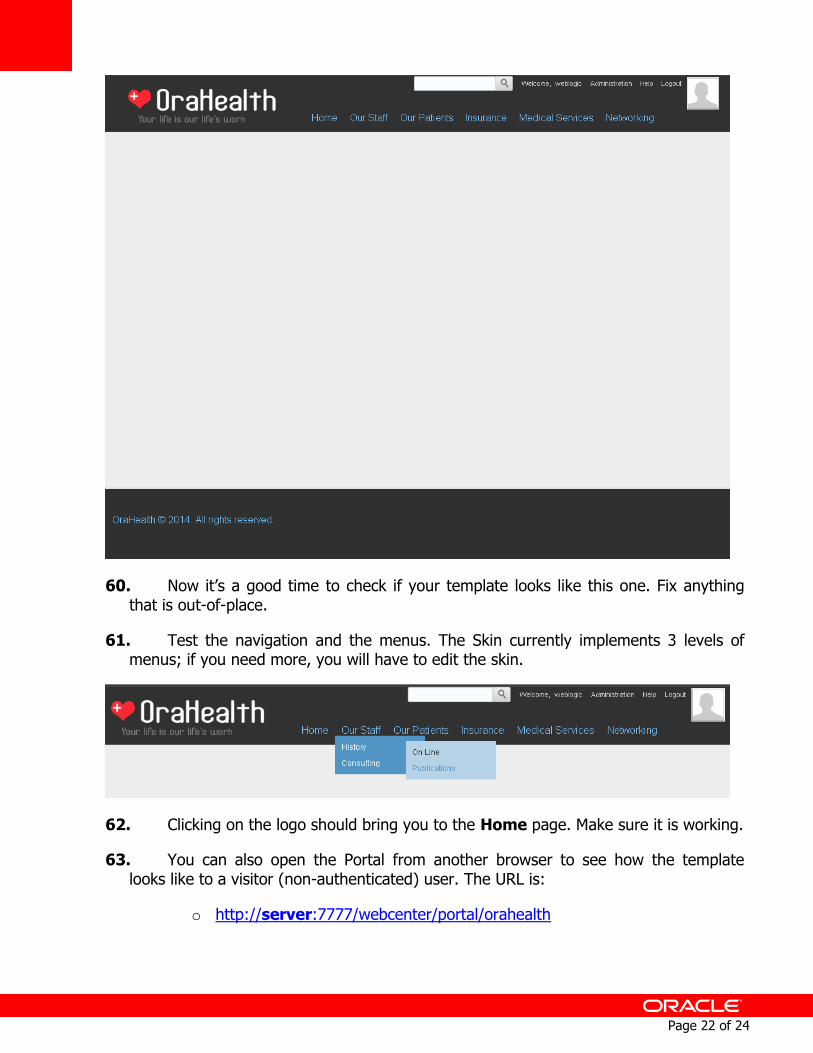
59. Click on the View Portal link to see how the page template looks like.
Page 22 of 24
60. Now it’s a good time to check if your template looks like this one. Fix anything that is out-of-place.
61. Test the navigation and the menus. The Skin currently implements 3 levels of menus; if you need more, you will have to edit the skin.
62. Clicking on the logo should bring you to the Home page. Make sure it is working.
63. You can also open the Portal from another browser to see how the template looks like to a visitor (non-authenticated) user. The URL is:
o http://server:7777/webcenter/portal/orahealth

Page 23 of 24
64. Notice how the authenticated user sees the Administration, Help and Logout links, while the visitor sees Help and Login. This is due to the expression language validations that are in the page template.
65. Save the project and close JDeveloper.
Page 24 of 24
Oracle WebCenter Portal 11g Developer Workshop – LAB 02 Creating OraHealth Page Template and Skin
September, 2014
Author: Denis Abrantes
Oracle Corporation
World Headquarters
500 Oracle Parkway
Redwood Shores, CA 94065
U.S.A.
Worldwide Inquiries:
Phone: +1.650.506.7000
Fax: +1.650.506.7200
oracle.com
Copyright © 2014, Oracle. All rights reserved.
This document is provided for information purposes only and the
contents hereof are subject to change without notice.
This document is not warranted to be error-free, nor subject to any
other warranties or conditions, whether expressed orally or implied
in law, including implied warranties and conditions of merchantability
or fitness for a particular purpose. We specifically disclaim any
liability with respect to this document and no contractual obligations
are formed either directly or indirectly by this document. This document
may not be reproduced or transmitted in any form or by any means,
electronic or mechanical, for any purpose, without our prior written permission.
Oracle, JD Edwards, PeopleSoft, Fatwire and Siebel are registered trademarks of Oracle
Corporation and/or its affiliates. Other names may be trademarks
of their respective owners.


