340
Oracle9i DBA Fundamentals II Student Guide • Volume 1 D11297GC10 Production 1.0 May 2001 D32714

Oracle9i DBA Fundamentals II
Student Guide • Volume 1
D11297GC10Production 1.0May 2001D32714

Copyright © Oracle Corporation, 2000, 2001. All rights reserved.
This documentation contains proprietary information of Oracle Corporation. It is provided under a license agreement containing restrictions on use and disclosure and is also protected by copyright law. Reverse engineering of the software is prohibited. If this documentation is delivered to a U.S. Government Agency of the Department of Defense, then it is delivered with Restricted Rights and the following legend is applicable:
Restricted Rights Legend
Use, duplication or disclosure by the Government is subject to restrictions for commercial computer software and shall be deemed to be Restricted Rights software under Federal law, as set forth in subparagraph (c)(1)(ii) of DFARS 252.227-7013, Rights in Technical Data and Computer Software (October 1988).
This material or any portion of it may not be copied in any form or by any means without the express prior written permission of Oracle Corporation. Any other copying is a violation of copyright law and may result in civil and/or criminal penalties.
If this documentation is delivered to a U.S. Government Agency not within the Department of Defense, then it is delivered with “Restricted Rights,” as defined in FAR 52.227-14, Rights in Data-General, including Alternate III (June 1987).
The information in this document is subject to change without notice. If you find any problems in the documentation, please report them in writing to Education Products, Oracle Corporation, 500 Oracle Parkway, Box SB-6, Redwood Shores, CA 94065. Oracle Corporation does not warrant that this document is error-free.
Oracle and all references to Oracle products are trademarks or registered trademarks of Oracle Corporation.
All other products or company names are used for identification purposes only, and may be trademarks of their respective owners.
Authors
Donna KeeslingJames Womack
Technical Contributorsand Reviewers
Lance AshdownTammy BednarLouise BeijerHoward BradleySenad DizdarJoel GoodmanScott GossettStefan LindbladHoward OstrowRadhanes PetronillaMaria Jesus Senise GarciaPeter SharmanRanbir SinghHarald Van BreederodeJohn WatsonSteven WertheimerJunichi Yamazaki
Publisher
John B Dawson
1 Networking OverviewObjectives 1-2Network Environment Challenges 1-3Simple Network: Two-Tier 1-5Simple to Complex Network: N-Tier 1-6Complex Network 1-7Oracle9i Networking Solutions 1-8Connectivity: Oracle Net Services 1-9Connectivity: Database Connectivity With IIOP and HTTP 1-11Directory Naming 1-12Directory Services: Oracle Internet Directory 1-13Scalability: Oracle Shared Server 1-14Scalability: Connection Manager 1-15Security: Advanced Security 1-17Advanced Security Encryption 1-18Security: Oracle Net and Firewalls 1-19Accessibility: Heterogeneous Services 1-20Accessibility: External Procedures 1-21Summary 1-22
2 Basic Oracle Net ArchitectureObjectives 2-2Oracle Net Connections 2-3Client-Server Application Connection: No Middle-Tier 2-4Web Client Application Connections 2-6Web Client Application Connection: Java Application Client 2-7Web Client Application Connection: Java Applet Client 2-8Web Client Application Connection: Web Server Middle-Tier 2-9Web Client Application Connection: No Middle-Tier 2-10Summary 2-12
3 Basic Oracle Net Server-Side ConfigurationObjectives 3-2Overview: The Listener Process 3-3The Listener Responses 3-4Configuring the Listener 3-5Bequeath Session 3-7Redirect Session 3-9Static Service Registration: The listener.ora File 3-10Static Service Registration: Create a Listener 3-14Configure Services 3-15Logging and Tracing 3-16Dynamic Service Registration: Configure Registration 3-17Dynamic Service Registration: Configure PMON 3-18Configure the Listener for Oracle9i JVM: IIOP and HTTP 3-19
Contents
iii

Listener Control Utility (LSNRCTL) 3-21LSNRCTL Commands 3-22LSNRCTL SET and SHOW Modifiers 3-24Summary 3-26Practice 3 Overview 3-27
4 Basic Oracle Net Services Client-Side Configuration Objectives 4-2Host Naming 4-3Host Naming Client Side 4-4Host Naming Server Side 4-5Select Host Name Method 4-6Host Naming Method 4-7Local Naming 4-8Oracle Net Configuration Assistant 4-9Choosing Local Naming 4-10Configuring Local Net Service Names 4-11Working with Net Service Names 4-12Specify the Oracle Database Version 4-13Database Service Name 4-14Network Protocol 4-15Host Name and Listener Port 4-16Testing the Connection 4-17Connection Test Result 4-18Net Service Name 4-19Save the Net Service Name 4-20tnsnames.ora 4-21sqlnet.ora 4-22Troubleshooting the Client Side 4-23Summary 4-25Practice 4 Overview 4-26
5 Usage and Configuration of the Oracle Shared Server Objectives 5-2Server Configurations 5-3Dedicated Server Processes 5-4Oracle Shared Server 5-5Benefits of Oracle Shared Server 5-7Connecting 5-9Processing a Request 5-10The SGA and PGA 5-12Configuring Oracle Shared Server 5-13DISPATCHERS 5-14SHARED_SERVERS 5-16MAX_DISPATCHERS 5-18
iv

MAX_SHARED_SERVERS 5-20CIRCUITS 5-21SHARED_SERVER_SESSIONS 5-22Related Parameters 5-23Verifying Setup 5-24Data Dictionary Views 5-26Summary 5-27Practice 5 Overview 5-28
6 Backup and Recovery OverviewObjectives 6-2Backup and Recovery Issues 6-3Categories of Failures 6-4Causes of Statement Failures 6-5Resolutions for Statement Failures 6-6Causes of User Process Failures 6-7Resolution of User Process Failures 6-8Possible User Errors 6-9Resolution of User Errors 6-10Causes of Instance Failure 6-11Recovery from Instance Failure 6-12Causes of Media Failures 6-14Resolutions for Media Failures 6-15Defining a Backup and Recovery Strategy 6-16Business Requirements 6-17Operational Requirements 6-18Technical Considerations 6-20Disaster Recovery Issues 6-22Summary 6-24
7 Instance and Media Recovery Structures Objectives 7-2Overview 7-3Large Pool 7-6Database Buffer Cache, DBWn, and Datafiles 7-8Redo Log Buffer, LGWR, and Redo Log Files 7-10Multiplexed Redo Log Files 7-13CKPT Process 7-15Multiplexed Control Files 7-17ARCn Process and Archived Log Files 7-19Database Synchronization 7-21Phases for Instance Recovery 7-22Tuning Instance Recovery Performance 7-24Tuning the Duration of Instance and Crash Recovery 7-25
v

Initialization Parameters Influencing Checkpoints 7-26Tuning the Phases of Instance Recovery 7-28Tuning the Rolling Forward Phase 7-29Tuning the Rolling Back Phase 7-30Fast-Start On-Demand Rollback 7-31Fast-Start Parallel Rollback 7-32Controlling Fast-Start Parallel Rollback 7-33Monitoring Parallel Rollback 7-34Summary 7-35Practice 7 Overview 7-36
8 Configuring the Database Archiving ModeObjectives 8-2Redo Log History 8-3Noarchivelog Mode 8-4Archivelog Mode 8-6Changing the Archiving Mode 8-8Automatic and Manual Archiving 8-10Specifying Multiple ARCn Processes 8-12Stop or Start Additional Archive Processes 8-13Enabling Automatic Archiving at Instance Startup 8-14Enabling Automatic Archiving After Instance Startup 8-15Disabling Automatic Archiving 8-16Manually Archiving Online Redo Log Files 8-17Specifying the Archive Log Destination 8-19Specifying Multiple Archive Log Destinations 8-20LOG_ARCHIVE_DEST_n Options 8-21Specifying a Minimum Number of Local Destinations 8-22Controlling Archiving to a Destination 8-24Specifying the File Name Format 8-25Obtaining Archive Log Information 8-26Summary 8-29Practice 8 Overview 8-30
9 Oracle Recovery Manager Overview and Configuration Objectives 9-2Recovery Manager Features 9-3Recovery Manager Components 9-5RMAN Repository: Using the Control File 9-7Channel Allocation 9-8Manual Channel Allocation 9-10Automatic Channel Allocation 9-12Media Management 9-13Types of Connections with RMAN 9-15Connecting Without a Recovery Catalog 9-16
vi

Recovery Manager Modes 9-18RMAN Commands 9-20RMAN Configuration Settings 9-22The CONFIGURE Command 9-23The SHOW Command 9-25LIST Command Operations 9-26The LIST Command 9-27The REPORT Command 9-28The REPORT NEED BACKUP Command 9-29Recovery Manager Packages 9-30RMAN Usage Considerations 9-31Summary 9-33Practice 9 Overview 9-34
10 User-Managed BackupsObjectives 10-2Terminology 10-3User-Managed Backup and Recovery 10-5Querying Views to Obtain Database File Information 10-6Backup Methods 10-8Consistent Whole Database Backup (Closed Database Backup) 10-9Advantages of Making Consistent Whole Database Backups 10-10Making a Consistent Whole Database Backup 10-12Open Database Backup 10-14Advantages of Making Open Database Backups 10-15Open Database Backup Requirements 10-16Open Database Backup Options 10-17Making a Backup of an Online Tablespace 10-18Ending the Online Tablespace Backup 10-19Backup Status Information 10-20Failure During Online Tablespace Backup 10-22Read-Only Tablespace Backup 10-24Read-Only Tablespace Backup Issues 10-25Backup Issues with Logging and Nologging Options 10-26Manual Control File Backups 10-27Backing Up the Initialization Parameter File 10-29Verifying Backups Using the DBVERIFY Utility 10-30DBVERIFY Command-Line Interface 10-31Summary 10-33Practice 10 Overview 10-34
11 RMAN BackupsObjectives 11-2RMAN Backup Concepts 11-3Recovery Manager Backups 11-4
vii

Backup Sets 11-5Characteristics of Backup Sets 11-6Backup Piece 11-7The BACKUP Command 11-8Backup Piece Size 11-11Parallelization of Backup Sets 11-12Multiplexed Backup Sets 11-15Duplexed Backup Sets 11-16Backups of Backup Sets 11-17Archived Redo Log File Backups 11-18Archived Redo Log Backup Sets 11-19Datafile Backup Set Processing 11-20Backup Constraints 11-21Image Copies 11-22Characteristics of an Image Copy 11-23Image Copies 11-24The COPY Command 11-25Image Copy Parallelization 11-26Copying the Whole Database 11-27Making Incremental Backups 11-28Differential Incremental Backup Example 11-29Cumulative Incremental Backup Example 11-31Backup in Noarchivelog Mode 11-32RMAN Control File Autobackups 11-33Tags for Backups and Image Copies 11-34RMAN Dynamic Views 11-35Monitoring RMAN Backups 11-36Miscellaneous RMAN Issues 11-38Summary 11-40Practice 11 Overview 11-41
12 User-Managed Complete RecoveryObjectives 12-2Media Recovery 12-3Recovery Steps 12-4Restoration and Datafile Media Recovery with User-Managed Procedures 12-5Archivelog and Noarchivelog Modes 12-6Recovery in Noarchivelog Mode 12-7Recovery in Noarchivelog Mode With Redo Log File Backups 12-9Recovery in Noarchivelog Mode Without Redo Log File Backups 12-10Recovery in Archivelog Mode 12-11Complete Recovery 12-12Complete Recovery in Archivelog Mode 12-13Determining Which Files Need Recovery 12-14
viii

User-Managed Recovery Procedures: RECOVER Command 12-16Using Archived Redo Log Files During Recovery 12-17Restoring Datafiles to a New Location with User-Managed Procedures 12-19Complete Recovery Methods 12-20Complete Recovery of a Closed Database 12-22Closed Database Recovery Example 12-23Open Database Recovery When the Database Is Initially Open 12-25Open Database Recovery Example 12-26Open Database Recovery When the Database Is Initially Closed 12-28Open Database Recovery Example 12-29Recovery of a Datafile Without a Backup 12-32Recovery Without a Backup Example 12-33Read-Only Tablespace Recovery 12-35Read-Only Tablespace Recovery Issues 12-36Loss of Control Files 12-37Recovering Control Files 12-38Summary 12-39Practices 12-1 and 12-2 Overview 12-40
13 RMAN Complete RecoveryObjectives 13-2Restoration and Datafile Media Recovery Using RMAN 13-3Using RMAN to Recover a Database in Noarchivelog Mode 13-4Using RMAN to Recover a Database in Archivelog Mode 13-6Using RMAN to Restore Datafiles to a New Location 13-7Using RMAN to Recover a Tablespace 13-8Using RMAN to Relocate a Tablespace 13-9Summary 13-11Practices 13-1 and 13-2 Overview 13-12
14 User-Managed Incomplete RecoveryObjectives 14-2Incomplete Recovery Overview 14-3Reasons for Performing Incomplete Recovery 14-4Types of Incomplete Recovery 14-5Incomplete Recovery Guidelines 14-7Incomplete Recovery and the Alert Log 14-9User-Managed Procedures for Incomplete Recovery 14-10RECOVER Command Overview 14-11Time-Based Recovery Example 14-12UNTIL TIME Recovery 14-13Cancel-Based Recovery Example 14-15Using a Backup Control File During Recovery 14-18Loss of Current Redo Log Files 14-21Summary 14-23Practices 14-1 and 14-2 Overview 14-24
ix

15 RMAN Incomplete RecoveryObjectives 15-2Incomplete Recovery of a Database Using RMAN 15-3RMAN Incomplete Recovery UNTIL TIME Example 15-4RMAN Incomplete Recovery UNTIL SEQUENCE Example 15-6Summary 15-7Practice 15 Overview 15-8
16 RMAN MaintenanceObjectives 16-2Cross Checking Backups and Copies 16-3The CROSSCHECK Command 16-4Deleting Backups and Copies 16-5The DELETE Command 16-6Deleting Backups and Copies 16-7Changing the Availability of RMAN Backups and Copies 16-8Changing the Status to Unavailable 16-9Exempting a Backup or Copy from the Retention Policy 16-10The CHANGE … KEEP Command 16-11Cataloging Archived Redo Log Files and User-Managed Backups 16-12The CATALOG Command 16-13Uncataloging RMAN Records 16-14The CHANGE … UNCATALOG Command 16-15Summary 16-16Practice 16 Overview 16-17
17 Recovery Catalog Creation and MaintenanceObjectives 17-2Overview 17-4Recovery Catalog Contents 17-5Benefits of Using a Recovery Catalog 17-7Additional Features Which Require the Recovery Catalog 17-8Create Recovery Catalog 17-9Connecting Using a Recovery Catalog 17-12Recovery Catalog Maintenance 17-13Resynchronization of the Recovery Catalog 17-14Using RESYNC CATALOG for Resynchronization 17-15Resetting a Database Incarnation 17-16Recovery Catalog Reporting 17-18Viewing the Recovery Catalog 17-19Stored Scripts 17-21Script Examples 17-22Managing Scripts 17-23Backup of Recovery Catalog 17-24
x

Recovering the Recovery Catalog 17-25Summary 17-26Practice 17 Overview 17-27
18 Transporting Data Between DatabasesObjectives 18-2Oracle Export and Import Utility Overview 18-3Methods to Run the Export Utility 18-5Export Modes 18-6Command-Line Export 18-7Direct-Path Export Concepts 18-9Specifying Direct-Path Export 18-10Direct-Path Export Features 18-11Direct-Path Export Restrictions 18-12Uses of the Import Utility for Recovery 18-13Import Modes 18-14Command-Line Import 18-15Invoking Import as SYSDBA 18-17Import Process Sequence 18-18National Language Support Considerations 18-19Summary 18-20Practice 18 Overview 18-21
19 Loading Data Into a DatabaseObjectives 19-2Data Loading Methods 19-3Direct-Load INSERT 19-4Serial Direct-Load Inserts 19-5Parallel Direct-Load Insert 19-7SQL*Loader 19-8Using SQL*Loader 19-9Conventional and Direct Path Loads 19-10Comparing Direct and Conventional Path Loads 19-11Parallel Direct-Path Load 19-12SQL*Loader Control File 19-13Control File Syntax Considerations 19-16Input Data and Datafiles 19-17Logical Records 19-20Data Conversion 19-21Discarded or Rejected Records 19-22Log File Contents 19-23SQL*Loader Guidelines 19-25Summary 19-26Practice 19 Overview 19-27
xi

20 WorkshopObjectives 20-2Workshop Methodology 20-4Workshop Approach 20-6Business Requirements 20-7Resolving a Database Failure 20-8Troubleshooting Methods 20-10Enable Tracing 20-11Using Trace Files 20-12Resolving a Network Failure 20-14Summary 20-16
Appendix A: Practice Solutions
Appendix B: Workshop Scenarios
Appendix C: Worldwide Support Bulletins
xii

1Copyright © Oracle Corporation, 2001. All rights reserved.
Networking Overview

Oracle9i DBA Fundamentals II 1-2
1-2 Copyright © Oracle Corporation, 2001. All rights reserved.
Objectives
After completing this lesson, you should be able to do the following:
• Explain solutions included with Oracle9i for managing complex networks
• Describe Oracle networking add-on solutions
Oracle9i DBA Fundamentals II 1-3
1-3 Copyright © Oracle Corporation, 2001. All rights reserved.
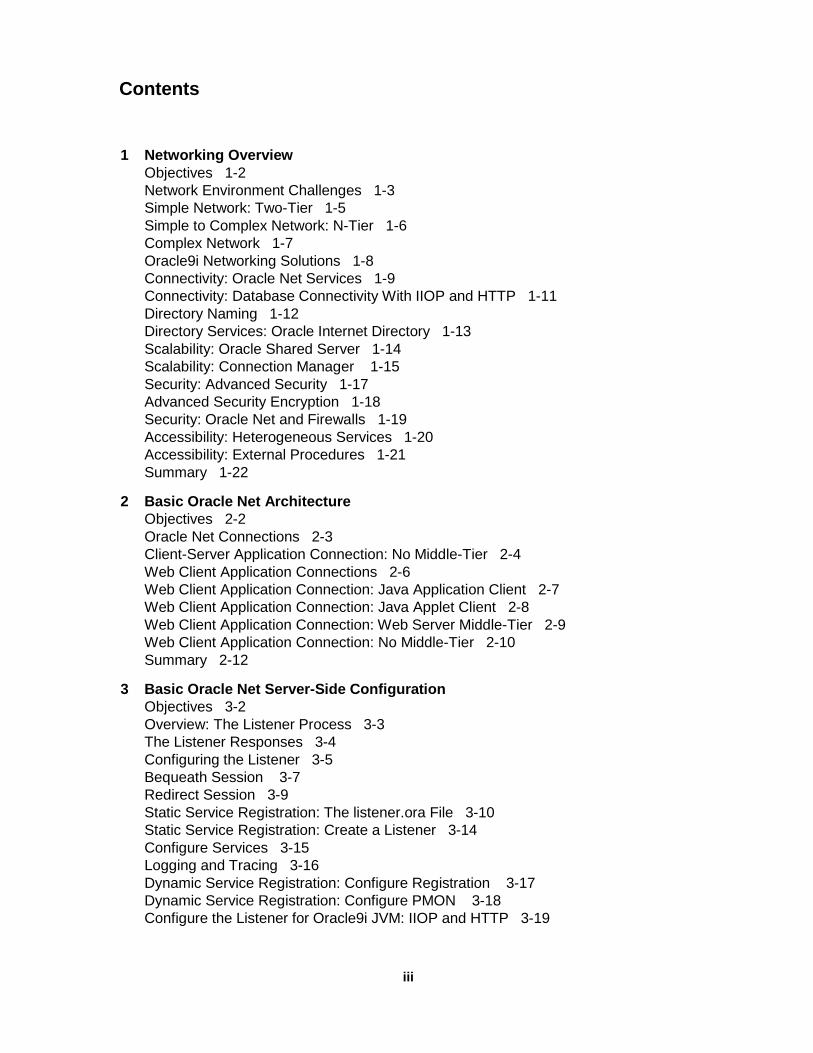
Network Environment Challenges
• Configuring the network environment
• Maintaining the network
• Tuning, troubleshooting, and monitoring the network
• Implementing security in the network
• Integrating legacy systems
Configuring the Network Environment
To implement a successful networking environment consider the following questions:
• What type of network are you configuring? Is it a small network with a few clients, or a large network with many clients and many servers?
• Are you using a single protocol or multiple protocols?
• Is the network static or expanding?
• What configuration options do you have?
• Are there user-friendly tools available to configure the network?
• Is your network strictly client/server or is it multi-tiered?
Maintaining the Network
• How much network maintenance is required for your enterprise?
• Will you add clients and servers to your network?
• Do you anticipate frequent upgrades?

Oracle9i DBA Fundamentals II 1-4
Tuning, Troubleshooting, and Monitoring the Network
• Does your network include the needed tools?
• How large a workload do you anticipate?
– Number of users
– Number of transactions
– Number of nodes
– Location of nodes
Implementing Security in the Network
• Do you need to secure your network environment?
• Is secure and sensitive information being transmitted over the network?
• What tools are available for implementing security?
• Do you anticipate Internet access to your servers?
Integrating Legacy Systems
How will your legacy systems interact with your networking environment?
Note: Performing an up-front analysis that answers questions like these helps you choose the appropriate network strategy from the beginning.

Oracle9i DBA Fundamentals II 1-5
Two-Tier Networks
In a two-tier network, a client communicates directly with a server. This is also known as a client-server architecture. A client-server network is an architecture that involves client processes that request services from server processes.The client and server communicate over a network using a given protocol, which must be installed on both the client and the server.
A common error in client-server network development is to prototype an application in a small, two-tier environment and then scale up by simply adding more users to the server. This approach can result in an ineffective system, as the server becomes overburdened. To properly scale to hundreds or thousands of users, it may be necessary to implement an N-tier architecture, which introduces one or more servers or agents between the client and server.
1-5 Copyright © Oracle Corporation, 2001. All rights reserved.
Simple Network: Two-Tier
Network
Client
Server
• Network connects client and server
• Client and server speak the same “language” or protocol

Oracle9i DBA Fundamentals II 1-6
N-Tier Networks
In an N-tier architecture, the role of the middle-tier agent can be manifold. It can provide:
• Translation services (as in adapting a legacy application on a mainframe to a client-server environment or acting as a bridge between protocols)
• Scalability services (as in acting as a transaction-processing monitor to balance the load of requests between servers)
• Network agent services (as in mapping a request to a number of different servers, collating the results, and returning a single response to the client)
1-6 Copyright © Oracle Corporation, 2001. All rights reserved.
Simple to Complex Network: N-Tier
Network
Middle tier
Network
• Client can be a thin client or a PC
• Middle tier can contain applications and services
• Server holds actual data
Client
Server

Oracle9i DBA Fundamentals II 1-7
Complex Network Issues
Networks should improve communication rather than impede distributed operations. In a more complex network environment, several issues must be addressed:
• Different hardware platforms that run different operating systems
• Multiple protocols used on these platforms
• Different syntax between different but connected applications
• Different geographical locations in which the connected applications reside
A well-designed complex network can support a large-scale distributed system.
1-7 Copyright © Oracle Corporation, 2001. All rights reserved.
Complex Network
TCP/IP
TCP/IP
DECnet
TCP/IP
DECnet
APPC/LU6.2
Oracle9i DBA Fundamentals II 1-8
1-8 Copyright © Oracle Corporation, 2001. All rights reserved.
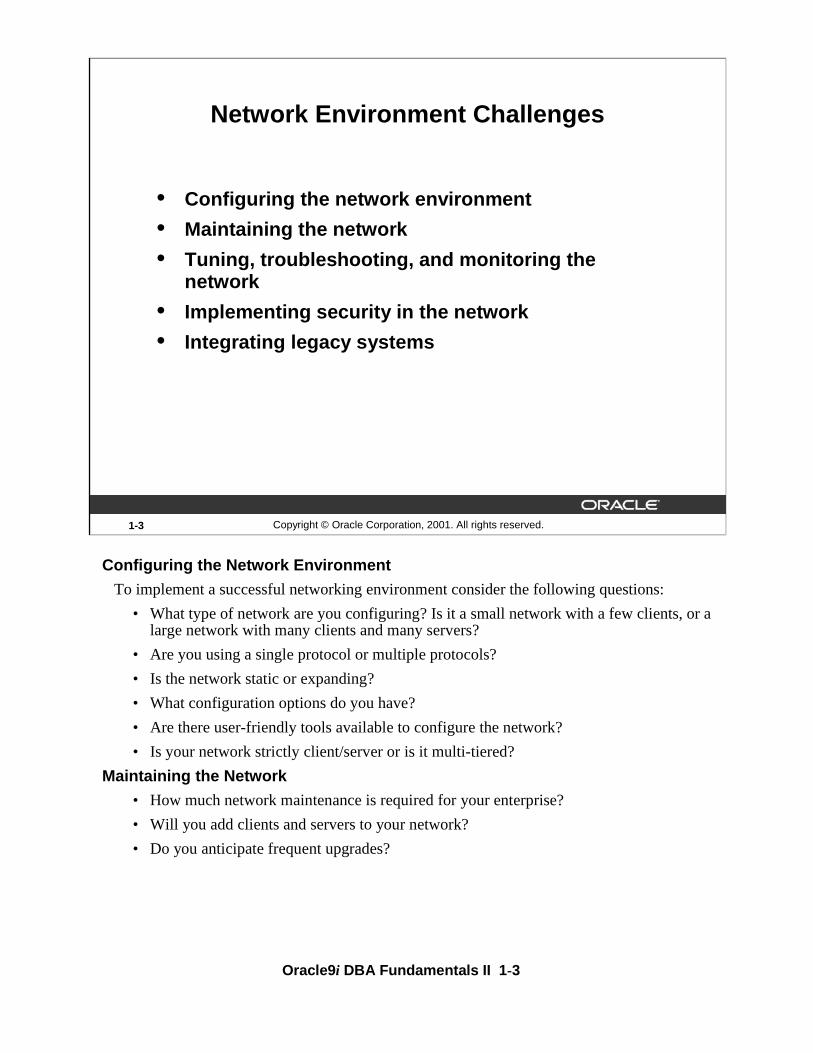
Oracle9i Networking Solutions
• Connectivity
• Directory Services
• Scalability
• Security
• Accessibility
Oracle Network Solutions
Oracle provides a full suite of products and tools to address most any networking need. Connectivity issues are addressed by the wide range of protocols supported by Oracle Net Services. Oracle Internet Directory (OID) is tightly integrated with Oracle9i. OID is an LDAP Version 3 compliant directory service and fulfills requests for everything from net service names to user credentials to policies. Oracle can scale up to support huge user demands through the use of Connection Manager and Oracle Shared Server. Security needs are addressed by Oracle’s support of third-party encryption and data integrity products and authentication adapters. Oracle supports industry or de-facto standard security products rather than proprietary products. Oracle even supports the integration of non-Oracle databases through Oracle Heterogeneous Services.
Oracle9i DBA Fundamentals II 1-9
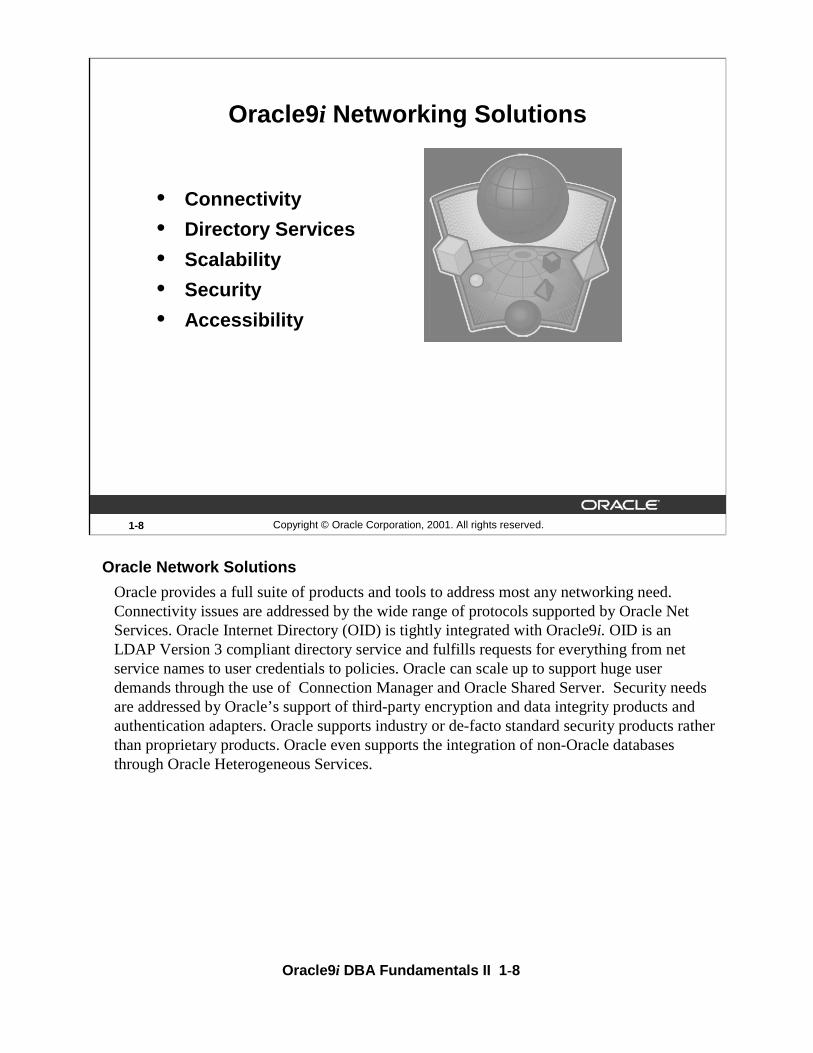
Oracle Net Services Key Features
Oracle Net Services introduces key new features to address the changes occurring from the growth in distributed environments. These changes include increasing user access to data stores, creating more easily configured and administered environments, and enhancing user authentication to securely identify users.
1-9 Copyright © Oracle Corporation, 2001. All rights reserved.
Connectivity: Oracle Net Services
• Protocol independence
• Comprehensive platform support
• Integrated GUI administration tools
• Multiple configuration options
• Tracing and diagnostic toolset
• Basic security

Oracle9i DBA Fundamentals II 1-10
Oracle Net Services
Oracle Net Services provides the industry’s broadest support for network transport protocols, including TCP/IP, IBM LU6.2, and DECnet. All data conversion using Oracle Net Services is invisible to the user and the application. This enables Oracle9i to operate across different types of computers, operating systems, and networks to transparently connect any combination of PC, UNIX, legacy, and other systems without expensive changes to the existing infrastructure.
Oracle Net Services contains configuration and administration mechanisms and eliminates the need for a centralized configuration utility. For simple environments, Oracle Net Services’ default settings provide a transparent name resolution adapter. This eliminates the need for generating configuration files. For more complicated environments, Oracle Internet Directory stores connection information in a database, in addition to other services.
Oracle Net Services addresses Internet connectivity through integration of standard solutions such as Remote Authentication Dial-In User Service (RADIUS) and Lightweight Directory Access Protocol (LDAP) with legacy systems.
Note: Novell IPX/SPX is no longer a supported protocol under Oracle9i.
1-10 Copyright © Oracle Corporation, 2001. All rights reserved.
Connectivity: Oracle Net Services
Protocol
Oracle Net
Client
ServerAny platform Any platform
Administration and configuration
Protocol
Oracle Net

Oracle9i DBA Fundamentals II 1-11
IIOP and HTTP Connectivity
Connections to the database are not limited to Oracle Net Services alone; clients can establish connections to the database using Internet protocols such as Internet Inter-ORB Protocol (IIOP) and Hypertext Transfer Protocol (HTTP). Using these Internet protocols, users can run applications from within a Web browser to connect directly to an Oracle9i database. Internet technologies such as Internet File System, Enterprise JavaBeans (EJB), and the Internet standard Secure Sockets Layer (SSL) protocol provide added security to network connections.
Note: Oracle Net supports a presentation layer called General Inter-ORB Protocol (GIOP) that is used for clients that connect to the Java option. IIOP is an implementation of GIOP over TCP/IP or TCP/IP with SSL. Oracle provides the GIOP service implementation.
1-11 Copyright © Oracle Corporation, 2001. All rights reserved.
Connectivity: Database Connectivity With IIOP and HTTP
Web browser Oracle9iIIOP, HTTP
Database connectivity can be achieved using the following additional protocols:
• Internet Inter-ORB Protocol (IIOP)
• Hypertext Transfer Protocol (HTTP)
Oracle9i DBA Fundamentals II 1-12
1-12 Copyright © Oracle Corporation, 2001. All rights reserved.
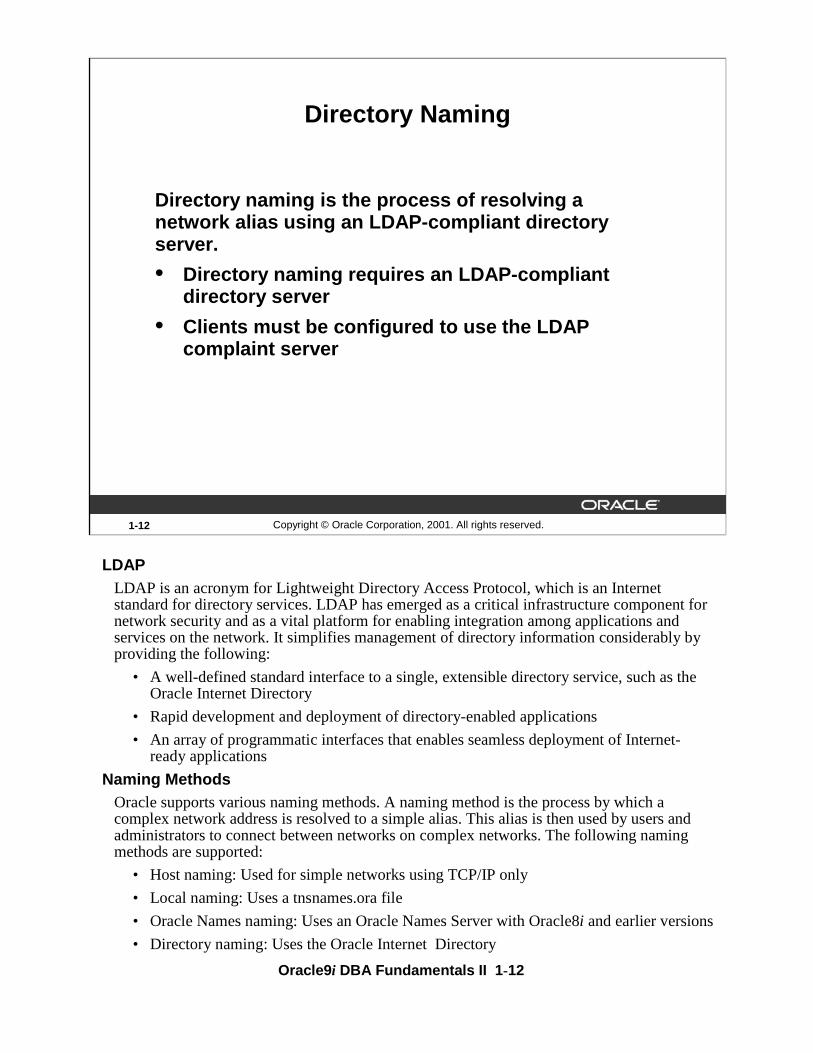
Directory Naming
Directory naming is the process of resolving a network alias using an LDAP-compliant directory server.
• Directory naming requires an LDAP-compliant directory server
• Clients must be configured to use the LDAP complaint server
LDAPLDAP is an acronym for Lightweight Directory Access Protocol, which is an Internet standard for directory services. LDAP has emerged as a critical infrastructure component for network security and as a vital platform for enabling integration among applications and services on the network. It simplifies management of directory information considerably by providing the following:
• A well-defined standard interface to a single, extensible directory service, such as the Oracle Internet Directory
• Rapid development and deployment of directory-enabled applications
• An array of programmatic interfaces that enables seamless deployment of Internet-ready applications
Naming MethodsOracle supports various naming methods. A naming method is the process by which a complex network address is resolved to a simple alias. This alias is then used by users and administrators to connect between networks on complex networks. The following naming methods are supported:
• Host naming: Used for simple networks using TCP/IP only
• Local naming: Uses a tnsnames.ora file
• Oracle Names naming: Uses an Oracle Names Server with Oracle8i and earlier versions
• Directory naming: Uses the Oracle Internet Directory

Oracle9i DBA Fundamentals II 1-13
Oracle Internet Directory (OID)
The Oracle Internet Directory (OID) complies with the LDAP Version 3. It provides the following features:
• Integrates with Oracle8i and Oracle9i databases, making it easy for Oracle customers to administer their users and systems
• Provides a scaleable, cross-platform directory structure for reliable, secure Internet computing
• Enables OID-based directories to stay synchronized even when distributed
• Integrates existing public key certificates, e-wallets, and access privileges
• Maintains routing policies, system management objects, and quality of service issues
• Enables service resellers that lease lines from carrier-class providers to segregate directories with customer information from their providers while sharing the infrastructure information required to provide quality service
Note: Configuration of Oracle Internet Directory is not covered in this class.
1-13 Copyright © Oracle Corporation, 2001. All rights reserved.
Directory Services: Oracle Internet Directory
Oracle Internet Directory is Oracle’s LDAP compliant directory service. It provides the following features:• Integrates tightly with Oracle9i
• Simplifies network administration
• Provides a secure and reliable directory structure

Oracle9i DBA Fundamentals II 1-14
1-14 Copyright © Oracle Corporation, 2001. All rights reserved.
The Oracle Shared Server enables a large number of users to connect to a database simultaneously.
• Database resources are shared resulting in efficient memory and processing usage
• Connections are routed via a dispatcher
• Server processes are not dedicated to each client
• Server processes serve client processes as needed
Scalability: Oracle Shared Server
Oracle Shared Server
The Oracle Shared Server architecture has been designed for user scalability. By enabling efficient server side resource sharing, the Oracle Shared Server allows a large number of users to connect simultaneously to a database server.
Dispatcher
The dispatcher is a process that handles the management of the connections to the valuable server processes. A dispatcher can support multiple client connections concurrently.
Server Processes
Shared servers handle the retrieving and saving of data to the database and any other CPU processing that the application needs.
The Result
This task distribution in the Oracle Shared Server is very efficient and enables large user scalability. It also leads to very good connection time and throughput.
Note: Oracle Shared Server used to be known as Oracle Multithreaded Server or MTS in versions earlier than Oracle9i.

Oracle9i DBA Fundamentals II 1-15
Connection Manager
Connection Manager is a gateway process and control program configured and installed on a middle tier. The Connection Manager can be configured for the following features:
Multiplexing
Connection Manager can handle several incoming connections and transmit them simultaneously over a single outgoing connection. Multiplexing gives larger numbers of users access to a server. The configuration is offered only in a TCP/IP environment.
Cross-Protocol Connectivity
Using this feature, a client and a server can communicate with different network protocols.
Network Access Control
Using Connection Manager, designated clients can connect to certain servers in a network based on the TCP/IP protocol.
Benefits of Connection Manager
• Supports more users on the end tier if you use a middle tier to deploy Connection Manager and provides for better use of resources and scalability
• Enables cross-protocol communication
• Can act as an access control mechanism
• Can act as a proxy server if your firewall doesn’t interact with sqlnet
1-15 Copyright © Oracle Corporation, 2001. All rights reserved.
Scalability: Connection Manager
Connection Manager offers:
• Multiplexing of connections
• Cross-protocol connectivity
• Network access control

Oracle9i DBA Fundamentals II 1-16
1-16 Copyright © Oracle Corporation, 2001. All rights reserved.
Scalability: Connection Manager
Server
ConnectionManager
1 2
3
Connection Multiplexing
This example shows how Connection Manager acts as a multiplexer to funnel data frommany clients to one server.
1. The initial connection from a client to a server is established by connecting to Connection Manager.
2. Connection Manager establishes the connection to the server.
3. When additional clients request connections to the server through Connection Manager, they use the same connection that Connection Manager used for the initial connection.

Oracle9i DBA Fundamentals II 1-17
1-17 Copyright © Oracle Corporation, 2001. All rights reserved.
• Encryption– Encodes between network nodes
– DES, RSA, 3DES
• Authentication– Authenticates users through third-party services
and Secure Sockets Layer (SSL)
– Kerberos, Radius, CyberSafe
• Data Integrity– Ensures data integrity during transmission
– MD5, SHA
Security: Advanced Security
Oracle Advanced Security
Oracle Advanced Security provides data privacy, integrity, authentication, and single sign-on.
• Encryption ensures that the data transmitted between nodes remains private
• Authentication ensures that users are authenticated appropriately
• Data Integrity ensures that data is not modified or tampered with during transmission
• Single Sign-On enables users to authenticate to multiple servers using a single username/password combination
Oracle9i DBA Fundamentals II 1-18
1-18 Copyright © Oracle Corporation, 2001. All rights reserved.
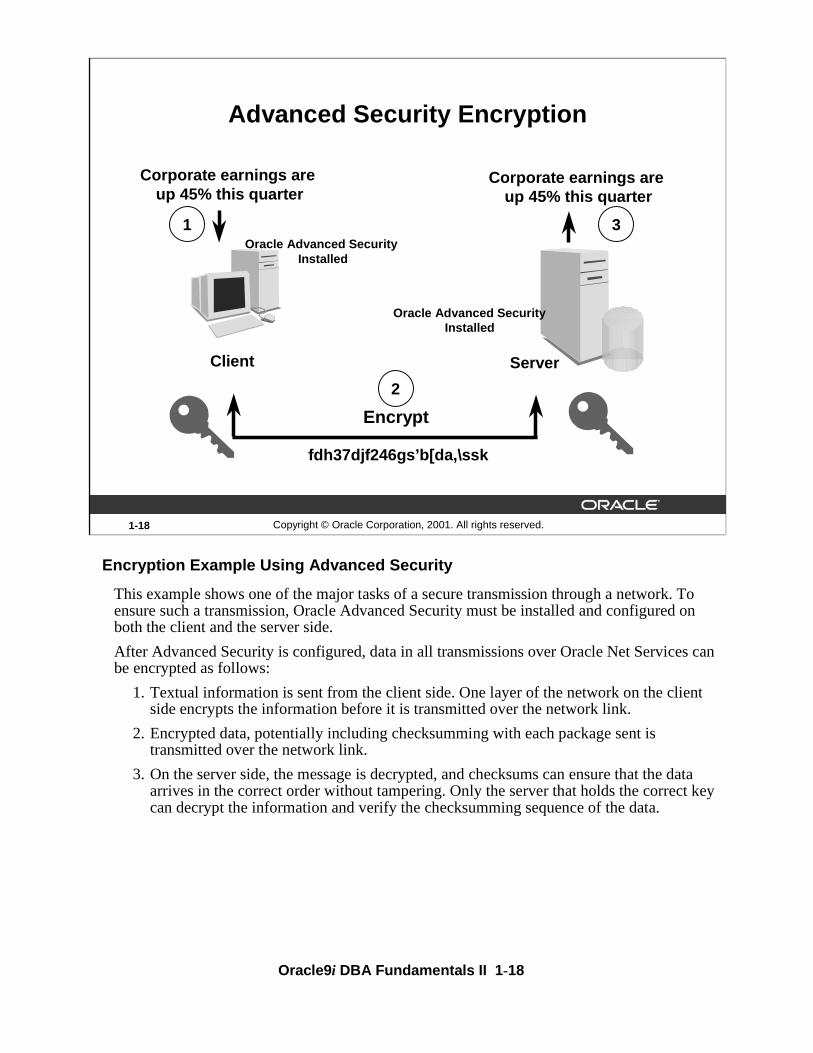
Advanced Security Encryption
Client
Corporate earnings are up 45% this quarter
1
Decrypt
Server
2
Encrypt
fdh37djf246gs’b[da,\ssk
3
Corporate earnings are up 45% this quarter
Oracle Advanced SecurityInstalled
Oracle Advanced Security Installed
Encryption Example Using Advanced Security
This example shows one of the major tasks of a secure transmission through a network. To ensure such a transmission, Oracle Advanced Security must be installed and configured on both the client and the server side.
After Advanced Security is configured, data in all transmissions over Oracle Net Services can be encrypted as follows:
1. Textual information is sent from the client side. One layer of the network on the client side encrypts the information before it is transmitted over the network link.
2. Encrypted data, potentially including checksumming with each package sent is transmitted over the network link.
3. On the server side, the message is decrypted, and checksums can ensure that the data arrives in the correct order without tampering. Only the server that holds the correct key can decrypt the information and verify the checksumming sequence of the data.
Oracle9i DBA Fundamentals II 1-19
1-19 Copyright © Oracle Corporation, 2001. All rights reserved.
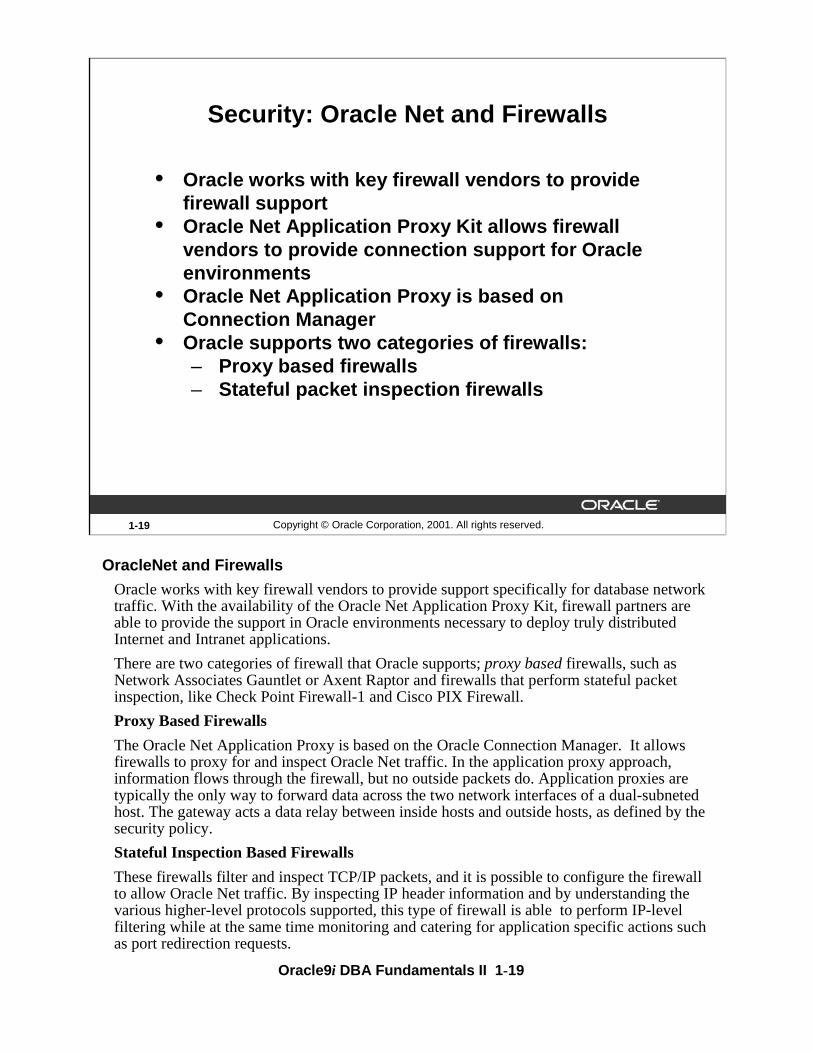
Security: Oracle Net and Firewalls
• Oracle works with key firewall vendors to provide firewall support
• Oracle Net Application Proxy Kit allows firewall vendors to provide connection support for Oracle environments
• Oracle Net Application Proxy is based on Connection Manager
• Oracle supports two categories of firewalls:– Proxy based firewalls– Stateful packet inspection firewalls
OracleNet and Firewalls
Oracle works with key firewall vendors to provide support specifically for database network traffic. With the availability of the Oracle Net Application Proxy Kit, firewall partners are able to provide the support in Oracle environments necessary to deploy truly distributed Internet and Intranet applications.
There are two categories of firewall that Oracle supports; proxy based firewalls, such as Network Associates Gauntlet or Axent Raptor and firewalls that perform stateful packet inspection, like Check Point Firewall-1 and Cisco PIX Firewall.
Proxy Based Firewalls
The Oracle Net Application Proxy is based on the Oracle Connection Manager. It allows firewalls to proxy for and inspect Oracle Net traffic. In the application proxy approach, information flows through the firewall, but no outside packets do. Application proxies are typically the only way to forward data across the two network interfaces of a dual-subneted host. The gateway acts a data relay between inside hosts and outside hosts, as defined by the security policy.
Stateful Inspection Based Firewalls
These firewalls filter and inspect TCP/IP packets, and it is possible to configure the firewall to allow Oracle Net traffic. By inspecting IP header information and by understanding the various higher-level protocols supported, this type of firewall is able to perform IP-level filtering while at the same time monitoring and catering for application specific actions such as port redirection requests.

Oracle9i DBA Fundamentals II 1-20
Heterogeneous Services
Heterogeneous Services provide seamless integration between the Oracle server and environments other than Oracle. Heterogeneous Services enable you to do the following:
• Use Oracle SQL to transparently access data stored in non-Oracle data-stores like Informix, DB2, SQL Server and Sybase
• Use Oracle procedure calls to transparently access non-Oracle systems, services, or application programming interfaces (APIs), from your Oracle distributed environment
A Heterogeneous Service agent is required to access a particular non-Oracle system.
Benefit
Heterogeneous Services enable integration with foreign data sources.
Note: Configuration of Heterogeneous Services is not covered in this class.
1-20 Copyright © Oracle Corporation, 2001. All rights reserved.
Accessibility: Heterogeneous Services
• Enables access of legacy data as if it resides in a single, local relational database
• Enables Oracle procedure calls to access non-Oracle systems, services, or APIs

Oracle9i DBA Fundamentals II 1-21
1-21 Copyright © Oracle Corporation, 2001. All rights reserved.
Accessibility: External Procedures
• External procedures are functions written in a 3GL language that can be called from PL/SQL– Support of external procedures allows the
developer more flexibility than SQL or PL/SQL provide
• The Oracle listener can listen for external procedure calls
• Connections to external procedure can be configured during or after server installation
External Procedures
Oracle support of external procedures allows the developer more development choices than standard SQL or PL/SQL provide. The listener can be configured to listen for external procedure calls. When a PL/SQL or SQL application calls an external procedure, the listener launches a network session-specific process called extproc. Through the listener service, PL/SQL passes the following information to extproc:
• Shared library name
• External procedure name
• Parameters (if necessary)
The extproc program then loads the shared library and invokes the external procedure.

Oracle9i DBA Fundamentals II 1-22
1-22 Copyright © Oracle Corporation, 2001. All rights reserved.
Summary
In this lesson, you should have learned how to:
• Explain Oracle’s solutions for managing complex networks:
– Oracle Net Services
– IIOP and HTTP Connectivity
– Oracle Internet Directory
– Oracle Shared Server
– Connection Manager
• Describe Oracle’s add-on solutions:– Oracle Advanced Security
– Heterogeneous Services

2Copyright © Oracle Corporation, 2001. All rights reserved.
Basic Oracle Net Architecture

Oracle9i DBA Fundamentals II 2-2
2-2 Copyright © Oracle Corporation, 2001. All rights reserved.
Objectives
After completing this lesson, you should be able to do the following:
• Explain the key components of the Oracle Net layered architecture
• Explain Oracle Net Services role in client server connections
• Describe how web client connections are established through Oracle networking products

Oracle9i DBA Fundamentals II 2-3
2-3 Copyright © Oracle Corporation, 2001. All rights reserved.
Oracle Net Connections
• Oracle Net is used to establish connections between applications on a network depending on the following: – The network configuration
– The location of the nodes
– The application
– The network protocol
• The connections types can be:– Client-Server Application
– Web Application Connection

Oracle9i DBA Fundamentals II 2-4
2-4 Copyright © Oracle Corporation, 2001. All rights reserved.
Client-Server Application Connection: No Middle-Tier
ServerClient
TTC
Forms/SQL*Plus
Oracle Net
OPS
Protocol
TTC
Oracle Database
Oracle Net
OPS
Protocol
Client-Server Application Connection
Oracle Net enables a network connection between a client and a database server. Oracle Net is a software component that resides on both the client and on the database server. It is layered on top of the network protocol.
Client-Server Connection Components
When a connection is initiated from a client to the RDBMS server, data is passed down a stack on the client, over the network, and up a similar stack to the RDBMS server. The Oracle Net architecture uses a stack similar to the Open System Interconnect (OSI) Network Model.
The following explains a high-level structure of each essential component of the Oracle Net network architecture and how they relate to the OSI model:
Oracle Application
The client application such as SQL*Plus or Forms uses Oracle Call Interface (OCI) to communicate with the server. OCI is a software component that provides an interface between the client application and the SQL language the server understands.
Two-Task Common
Two-Task Common (TTC) provides character set and data type conversion between different character sets or formats on the client and server. TTC falls within the OSI Presentation layer.

Oracle9i DBA Fundamentals II 2-5
Client-Server Application Connection (continued)
Oracle Net
Oracle Net is responsible for establishing and maintaining the connection between the client application and the server. Oracle Net must reside on both the client and the server for peer-to-peer communication to occur. On the client side, Oracle Net is responsible for the following connectivity issues:
• The location of the server
• Whether one or more protocol is involved in the connection
• How to handle exceptions and interrupts
On the server side, Oracle Net performs the same tasks as the client except that it works with the listener to receive incoming connection requests.
Note: The listener will be covered in more detail in later sections.
Oracle Net also communicates with naming services and Oracle Advanced Security to ensure secure connections. Oracle Net maps to the Session layer of the OSI model.
Oracle Protocol Support
Oracle Protocol Support (OPS) is responsible for mapping Oracle Net functionality to the industry standard protocols used in the connection between the client and server. This layer supports the following protocols:
• TCP/IP
• TCP/IP with SSL
• Names Pipes
• LU6.2
• Virtual Interface (VI)
Oracle9i DBA Fundamentals II 2-6
Web Application Connection
Connections from client Web browsers over the Internet to an Oracle database server are similar to client-server applications, except for the architecture. Typically, a browser on the client can communicate using HTTP to a Web Application Server to make a connection request. The Web server can send the request to an application to process the request. The application uses Oracle Net to communicate with an Oracle database server that also is configured with Oracle Net.
The JDBC OCI driver is used to connect an Oracle client and the JDBC Thin driver is used for clients without an Oracle installation, particularly with applets.
2-6 Copyright © Oracle Corporation, 2001. All rights reserved.
Web Client Application Connections
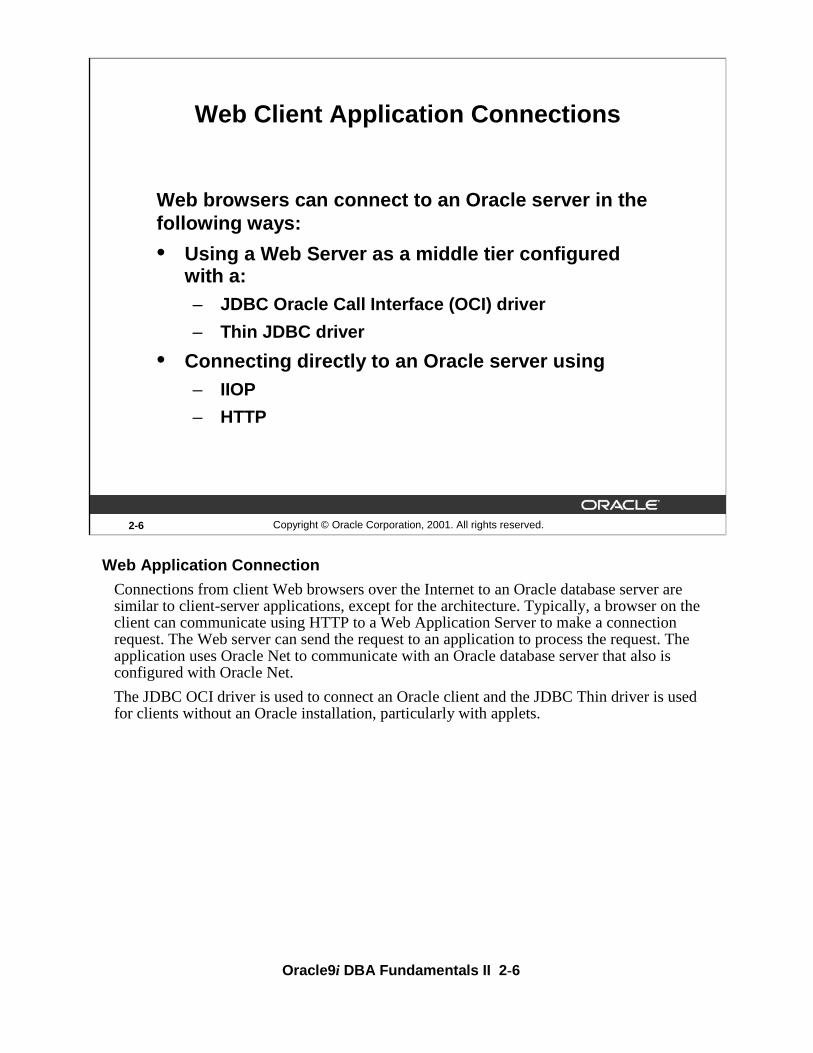
Web browsers can connect to an Oracle server in the following ways:
• Using a Web Server as a middle tier configured with a:– JDBC Oracle Call Interface (OCI) driver
– Thin JDBC driver
• Connecting directly to an Oracle server using– IIOP
– HTTP
Oracle9i DBA Fundamentals II 2-7
2-7 Copyright © Oracle Corporation, 2001. All rights reserved.
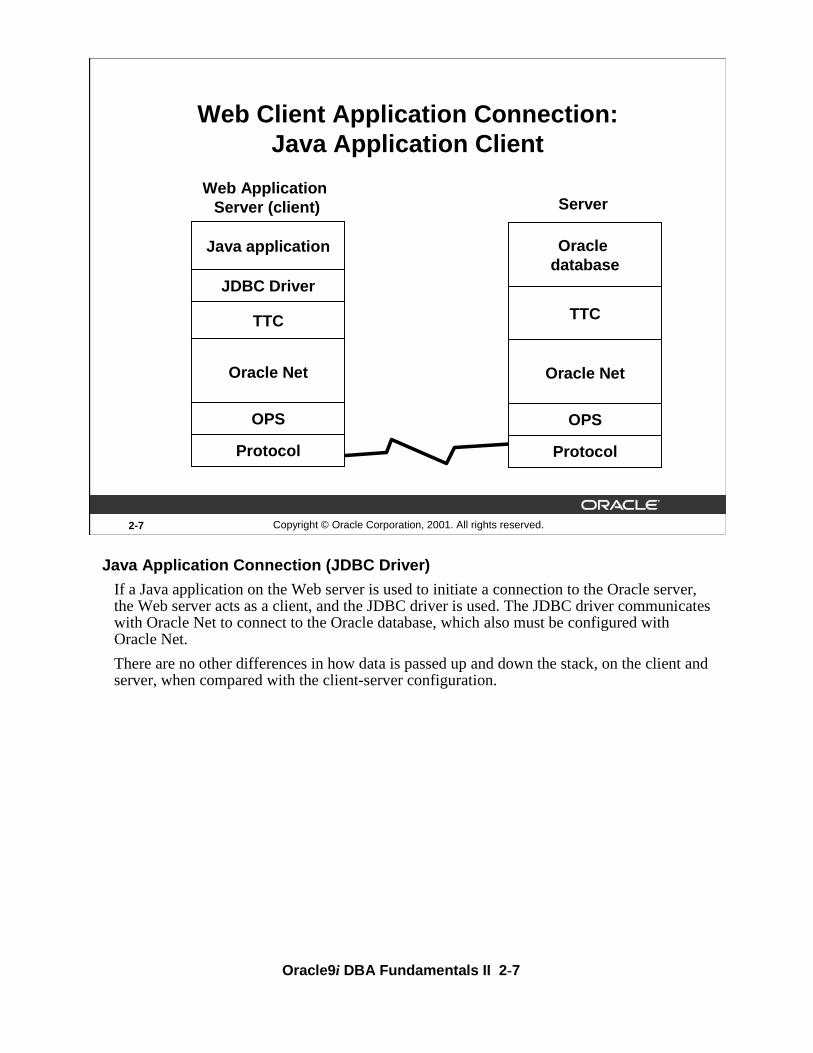
Web Client Application Connection: Java Application Client
ServerWeb Application
Server (client)
TTC
Java application
Oracle Net
OPS
Protocol
TTC
Oracle database
Oracle Net
OPS
Protocol
JDBC Driver
Java Application Connection (JDBC Driver)
If a Java application on the Web server is used to initiate a connection to the Oracle server, the Web server acts as a client, and the JDBC driver is used. The JDBC driver communicates with Oracle Net to connect to the Oracle database, which also must be configured with Oracle Net.
There are no other differences in how data is passed up and down the stack, on the client and server, when compared with the client-server configuration.

Oracle9i DBA Fundamentals II 2-8
2-8 Copyright © Oracle Corporation, 2001. All rights reserved.
Web Client Application Connection: Java Applet Client
ServerWeb Application
Server (client)
JavaTTC
Java applet
Java Net
TCP/IP
TTC
Oracle database
Oracle Net
OPS
TCP/IP
JDBC Thin driver
Java Applet Connection (JDBC Thin Driver)
If a Java applet is invoked on the Web server to initiate a connection to the Oracle server, the Web server acts as a client, and the JDBC Thin driver is used. The JDBC Thin driver communicates with Java Net to communicate with the Oracle database that must be configured with Oracle Net. JavaTTC and Java Net are lightweight implementations of TTC and Oracle Net respectively, that assist Java applets in connecting to the Oracle server.
There are no other differences in how data is passed up and down the stack, on the client and server, when compared with the client-server configuration.

Oracle9i DBA Fundamentals II 2-9
Web Server Middle-Tier Connection
In this network configuration, a Web browser, using the HTTP protocol, on the Internet may invoke a Java applet or Java application on an Oracle Web Application Server. The web server, acting as a client with Oracle Net or Java Net installed, connects to an Oracle server running Oracle Net.
Oracle Net or JavaNet must be installed on the web server client and the Oracle server for a connection to be possible. The underlying protocol connection is assumed.
2-9 Copyright © Oracle Corporation, 2001. All rights reserved.
Web Client Application Connection: Web Server Middle-Tier
Web browser
Oracleserver
User
Server
Web application
server
Client Server
HTTP TCP/IP
Java application or applet
Oracle9i DBA Fundamentals II 2-10
2-10 Copyright © Oracle Corporation, 2001. All rights reserved.
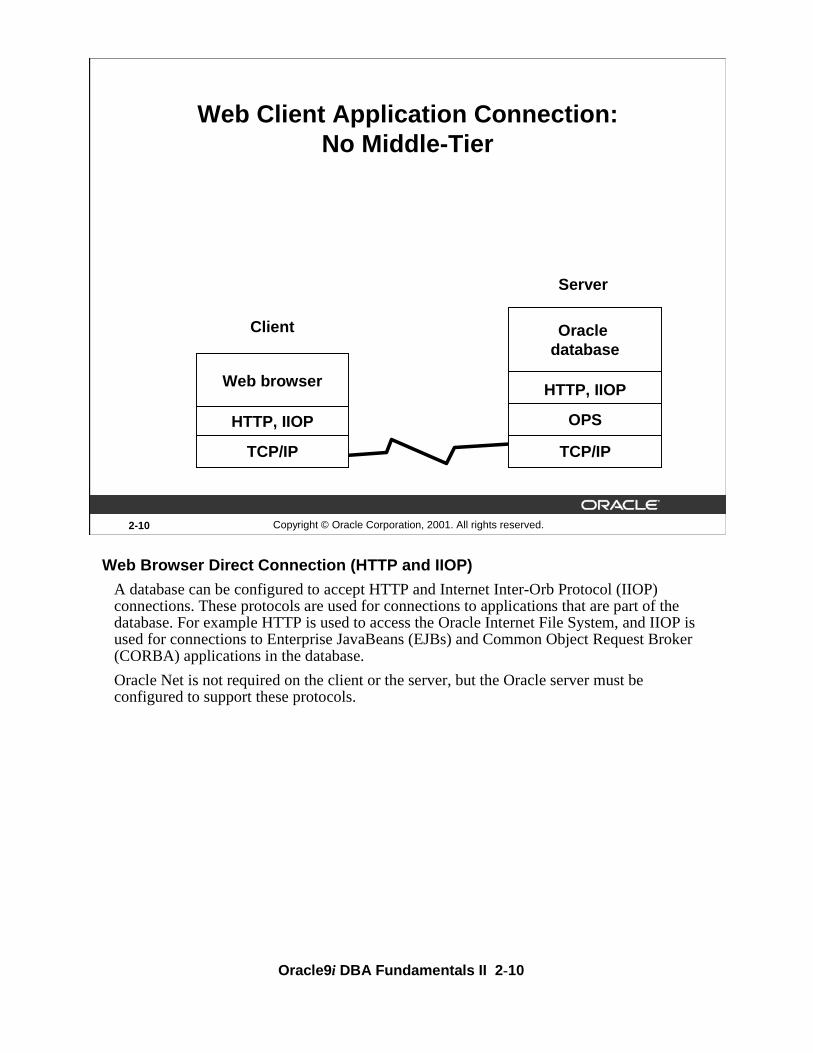
Web Client Application Connection: No Middle-Tier
Server
Client
HTTP, IIOP
Web browser
TCP/IP
HTTP, IIOP
Oracle database
OPS
TCP/IP
Web Browser Direct Connection (HTTP and IIOP)
A database can be configured to accept HTTP and Internet Inter-Orb Protocol (IIOP) connections. These protocols are used for connections to applications that are part of the database. For example HTTP is used to access the Oracle Internet File System, and IIOP is used for connections to Enterprise JavaBeans (EJBs) and Common Object Request Broker (CORBA) applications in the database.
Oracle Net is not required on the client or the server, but the Oracle server must be configured to support these protocols.

Oracle9i DBA Fundamentals II 2-11
Web Connections Using HTTP and IIOP
Oracle Net is not required on the client or on the server, but the Oracle server must be configured to support these protocol. The Web application server is not required in this type of connection.
2-11 Copyright © Oracle Corporation, 2001. All rights reserved.
Web Client Application Connection: No Middle Tier
OracleServer
supportingHTTP and IIOP
Server
IIOP
ClientServer
Client
Web browser
Web browser
HTTP

Oracle9i DBA Fundamentals II 2-12
2-12 Copyright © Oracle Corporation, 2001. All rights reserved.
Summary
In this lesson, you should have learned how to:
• Explain the key components of the Oracle Net layered architecture
• Explain Oracle Net Services role in client server connections
• Describe how web client connections are established through Oracle networking products
3Copyright © Oracle Corporation, 2001. All rights reserved.
Basic Oracle Net Server-Side Configuration
Oracle9i DBA Fundamentals II 3-2
3-2 Copyright © Oracle Corporation, 2001. All rights reserved.
Objectives
After completing this lesson, you should be able to do the following:
• Identify how the listener responds to incoming connections
• Configure the listener using Oracle Net Manager
• Control the listener using the Listener Control Utility (lsnrctl)Describe Dynamic Service Registration
• Configure the listener for IIOP and HTTP connections

Oracle9i DBA Fundamentals II 3-3
Characteristics of the Listener Process
The listener is a process running on a node that listens for incoming connections on behalf of a database or a number of databases. The following are the characteristics of a listener:
• A listener process can listen for more than one database
• Multiple listeners can listen on behalf of a single database to perform load balancing
• The listener can listen for multiple protocols
• The default name of the listener in Oracle Net is LISTENER
• The name of the listener must be unique per listener.ora file
Note: Oracle9i databases requires a release 9.0 listener. Previous versions of the listener are not supported. However, it is possible to use a release 9.0 listener with previous versions of the Oracle database.
3-3 Copyright © Oracle Corporation, 2001. All rights reserved.
Overview: The Listener Process
listener.ora
Listener
Client Server
tnsnames.ora
sqlnet.ora

Oracle9i DBA Fundamentals II 3-4
Listener Responses
Spawn and Bequeath Connection
The listener passes or bequeaths the connection to a spawned process. This method is used in dedicated servers only.
Direct Hand Off Connection
The listener will hand off a connection to a dispatcher when an Oracle Shared Server is used. This method is not possible with dedicated server processes.
Redirected Connection
A connection may be redirected by the listener to a dispatcher if a Shared Server is used
Note: Each of the connection types is covered in more detail later in the lesson.
Transparency of Direct Hand Off and Redirect
Whether a connection session is bequeathed, handed off, or redirected to an existing process, the session is transparent to the user. It can be detected only by turning on tracing and analyzing the resulting trace file.
3-4 Copyright © Oracle Corporation, 2001. All rights reserved.
The Listener Responses
When a connection request is made by a client to a server, the listener performs one of the following:
• Spawns a server process and passes the connection to it
• Hands off the connection to a dispatcher or server process in an Oracle Shared Server configuration
• Redirects the connection to a dispatcher or server process

Oracle9i DBA Fundamentals II 3-5
3-5 Copyright © Oracle Corporation, 2001. All rights reserved.
Configuring the Listener
The listener can be configured in two ways:
• Static service configuration– Used for Oracle8 and earlier releases– Requires LISTENER.ORA configuration
– Required for Oracle Enterprise Manager and other services
• Dynamic service registration– Does not require a LISTENER.ORA file
– The listener relies on the PMON process
– Oracle9i uses service registration
Configuring the Listener
Static Service Registration
In order for a listener to accept client requests from an Oracle8 or earlier release, the listener.ora file must be configured. The static configuration is also required for Oracle Enterprise Manager (OEM) and other services such as external procedures and Heterogeneous Services.
Dynamic Service Registration
An Oracle9i instance uses service registration to inform the listener about its database services. Service registration relies on the PMON process to register instance information with the listener. PMON also informs the listener about the current state and load of the instance and Shared Server dispatchers.
If Oracl9i JVM is installed, HTTP and IIOP listening endpoints can be registered dynamically with the listener.
When an instance is started, initialization parameters about the listener are read from the init.ora file by which PMON registers information with the listener. If a listener is not up when the instance starts, PMON will not register information with the listener. PMON will continue attempting to contact the listener. The listener will reject any connections made to an unregistered service.

Oracle9i DBA Fundamentals II 3-6
Configuring the Listener (continued)
Benefits of Dynamic Service Registration
• The listener.ora file does not require the SID_LIST_LISTENER_NAME parameter that specifies information on the databases served by the listener. This parameter is still required if the management tool you are using requires it.
• Connect-time failover is enabled.
• Connection load balancing is enabled for shared servers.
Oracle9i DBA Fundamentals II 3-7
3-7 Copyright © Oracle Corporation, 2001. All rights reserved.
Bequeath Session
1
3
listener
ClientServer
2
4
Spawned server process5
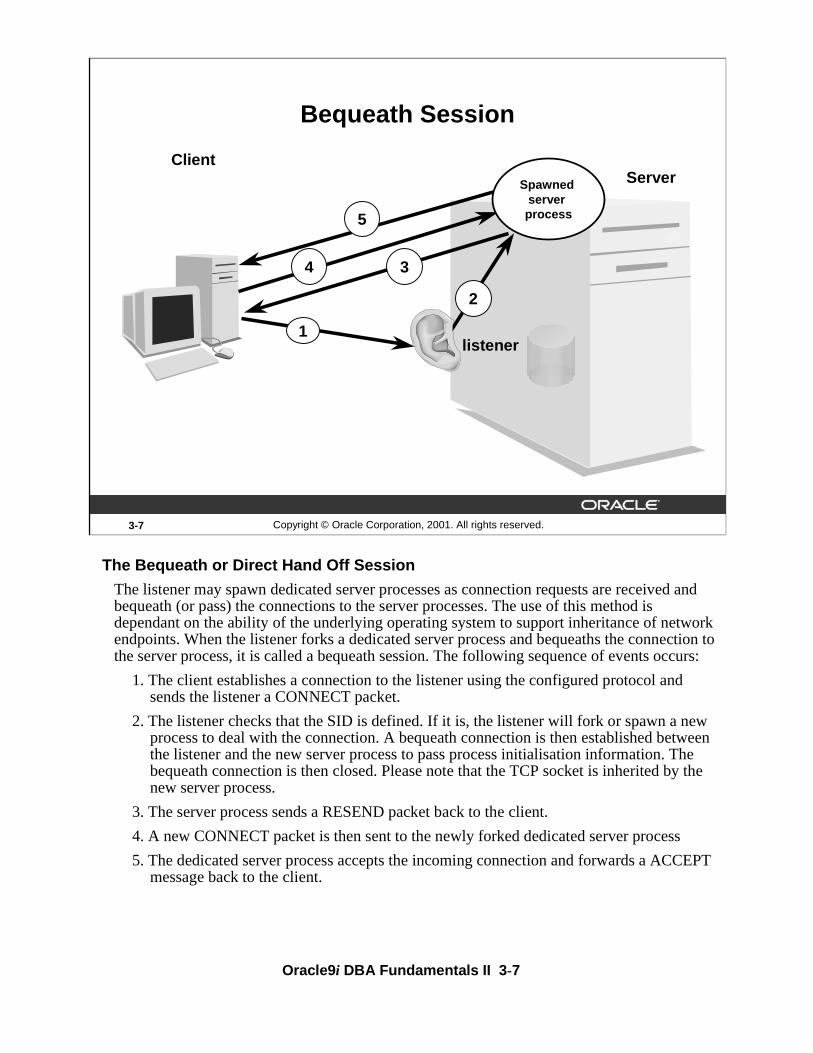
The Bequeath or Direct Hand Off Session
The listener may spawn dedicated server processes as connection requests are received and bequeath (or pass) the connections to the server processes. The use of this method is dependant on the ability of the underlying operating system to support inheritance of network endpoints. When the listener forks a dedicated server process and bequeaths the connection to the server process, it is called a bequeath session. The following sequence of events occurs:
1. The client establishes a connection to the listener using the configured protocol and sends the listener a CONNECT packet.
2. The listener checks that the SID is defined. If it is, the listener will fork or spawn a new process to deal with the connection. A bequeath connection is then established between the listener and the new server process to pass process initialisation information. The bequeath connection is then closed. Please note that the TCP socket is inherited by the new server process.
3. The server process sends a RESEND packet back to the client.
4. A new CONNECT packet is then sent to the newly forked dedicated server process
5. The dedicated server process accepts the incoming connection and forwards a ACCEPT message back to the client.

Oracle9i DBA Fundamentals II 3-8
The Bequeath or Direct Hand Off Session (continued)
If, because of the operating system or protocol, a connection cannot be passed between two different processes on the same machine, a redirect must take place instead.
Note: When a client disconnects, the clients’ dedicated server process closes.
Oracle Shared Server
When the operating system handles a shared server connection in the fashion described above, it is said to be a direct hand off connection. The only difference between the two is that the listener does not spawn the dispatcher processes. The connection mechanics however, are identical.
Windows Platform Considerations
NT does not implicitly support inheritance of network endpoints. To do this, the registry entry USE_SHARED_SOCKET must be set to TRUE to allow multiple connections to use a single socket. When the value is FALSE (default), bequeath connections are not possible so a redirect session is initiated instead..
If theUSE_SHARED_SOCKET entry is set to true, NT can initiate bequeath connections but there are some caveats to consider. If a number of connections are initiated and for some reason the listener is stopped, the listener will not be able to be restarted until the connections are cleared. This is because the existing connections are using the same port number that the listener needs to listen on. This is a limitation with Microsoft’s implementation of TCP/IP using Widows Sockets API (WINSOCK2).

Oracle9i DBA Fundamentals II 3-9
3-9 Copyright © Oracle Corporation, 2001. All rights reserved.
Redirect Session
1
port
4
Listener
Client Server
3
port
5
Server ordispatcher
process6
2
The Redirect SessionWhen conditions do not support the establishment of a bequeath or direct hand off connection, a redirect session will be established. The steps below outline the mechanics of this type of connection:
1. The client establishes a connection to the listener using the configured protocol and sends the listener a CONNECT packet.
2. The listener checks that the SID is defined. If it is, the listener will spawn a new thread or process to service the new connection An IPC connection is then established between the listener and the new process/thread.
3. The new process/thread selects a new TCP/IP port from the list of free user defined ports and passes this information back to the listener.
4. The listener inserts this new port into a REDIRECT packet and sends it back to the client and the original TCP socket between the client and the listener is then reset.
5. A new TCP connection is established to the redirect address specified in the REDIRECT packet and a CONNECT packet is then forwarded to the dedicated server process.
6. The dedicated server process can now finally accept the incoming connection and forwards an ACCEPT message back to the client.
If a redirect session is established with shared servers, a new process may not necessarily be spawned as stated in step 2 if there is capacity remaining on the shared servers that are running.
Oracle9i DBA Fundamentals II 3-10
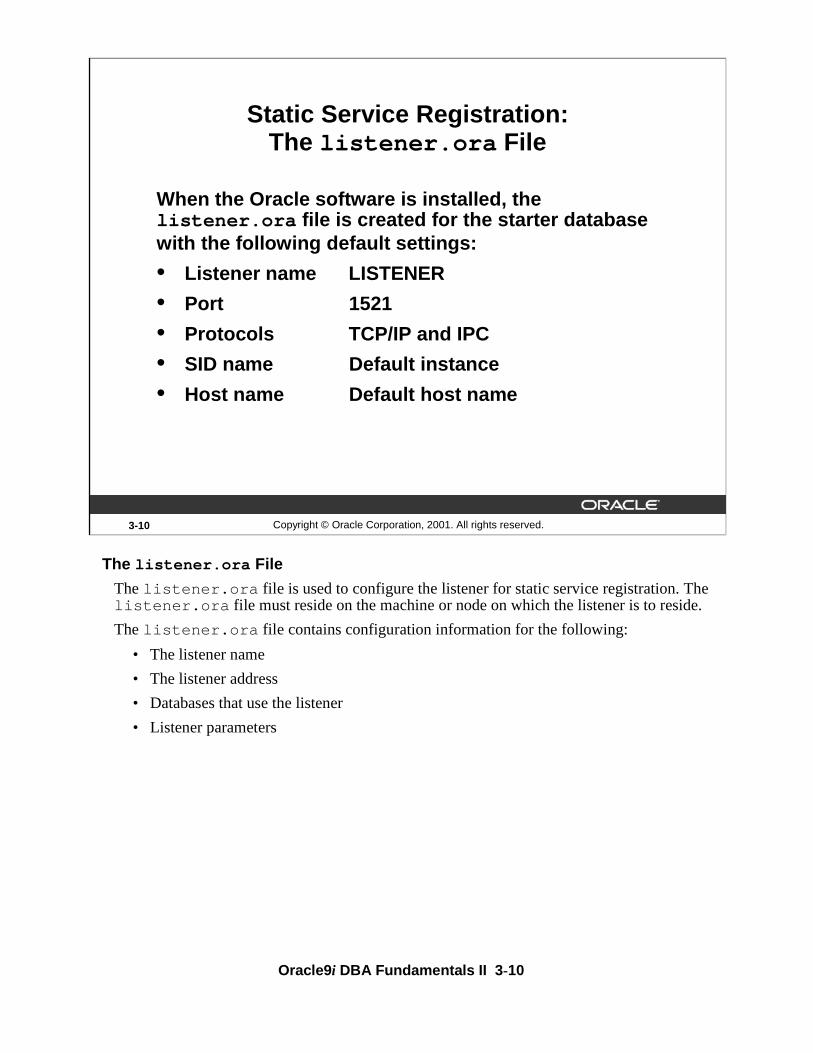
The listener.ora File
The listener.ora file is used to configure the listener for static service registration. The listener.ora file must reside on the machine or node on which the listener is to reside.
The listener.ora file contains configuration information for the following:
• The listener name
• The listener address
• Databases that use the listener
• Listener parameters
3-10 Copyright © Oracle Corporation, 2001. All rights reserved.
Static Service Registration:The listener.ora File
When the Oracle software is installed, thelistener.ora file is created for the starter databasewith the following default settings:
• Listener name LISTENER
• Port 1521
• Protocols TCP/IP and IPC
• SID name Default instance
• Host name Default host name

Oracle9i DBA Fundamentals II 3-11
3-11 Copyright © Oracle Corporation, 2001. All rights reserved.
Static Service Registration: The listener.ora File
1. LISTENER =2. (ADDRESS_LIST =3. (ADDRESS= (PROTOCOL= TCP)(Host= stc-sun02)(Port= 1521))
)4. SID_LIST_LISTENER =5. (SID_LIST =6. (SID_DESC =7. (ORACLE_HOME= /home/oracle)8. (GLOBAL_DBNAME = ORCL.us.oracle.com)9. (SID_NAME = ORCL)
)
10. ...sample additional SID description ...)
listener.ora File Contents
The default listener.ora file contains the following parameters:
1. The name of the listener. The default name is LISTENER.
2. The ADDRESS_LIST parameter contains a block of addresses at which the listener listens for incoming connections. Each of the addresses defined in this block represents a different way by which a listener receives a connection.
3. The TCP address identifies incoming TCP connections from clients on the network attempting to connect to port 1521. The clients use the port defined in theirtnsnames.ora file to connect to this listener. Based on the SID_LIST defined for this listener, the listener specifies the database to which to connect. Please note that is possible to configure multiple listeners here as long as they have unique names and unique ports on the node where they are configured. Each listener configured will have its own SID_LIST but a single database can be serviced by multiple listeners.
4. A listener can listen for more than one database on a machine. The SID_LIST_LISTENER_NAME block or parameter is where these SIDs are defined.
5. The SID_LIST parameter is defined if more than one SID is defined.

Oracle9i DBA Fundamentals II 3-12
listener.ora File Contents (continued)
6. The SID_DESC parameter must exist for each defined SID.
7. The ORACLE_HOME is where the home directory of the database is defined. This enables the listener to identify the location of a database executable file.
8. The parameter GLOBAL_DBNAME identifies the global database name of the database, a name comprised of the database name and database domain. The global database name is of the form database_name.database_domain. Consider, for example, orcl.us.acme.com where the database name portion, orcl, is a simple name you wish to call your database. The database domain portion, us.oracle.com, specifies the database domain in which the database is located, making the global database name unique You can obtain the GLOBAL_DBNAME value from the SERVICE_NAMES parameter in the initialization parameter file. This parameter must be embedded under SID_DESC and should match the value of the SERVICE_NAMESparameter.
9. The SID_NAME parameter defines the name of the SID on behalf of which the listener accepts connections.
10.By default, an example SID is defined here.

Oracle9i DBA Fundamentals II 3-13
LISTENER.ORA Parameters
Parameter Description CONNECT_TIMEOUT_listener_name Sets the number of seconds that the
listener waits for the server process to get a valid database query after the session has started.
LISTENER_address Defines the listening addresses for the listener.
LOG_DIRECTORY_listener_name Controls the directory in which the log file is written.
LOG_FILE_listener_name Specifies the filename to which the log information is written.
LOGGING_listener_name By default, logging is always on unless you provide this parameter and turn logging off.
PASSWORDS_listener_name Sets a nonencrypted password for authentication to the Listener Control utility (LSNRCTL).
SAVE_CONFIG_ON_STOP_listener_name
Any changes made by the LSNRCTL SET command are made permanent if the parameter is set to TRUE.
SERVICE_LIST_listener_name Defines the service served by the listener. This is the same as the SID_LIST, made more generic for nondatabase servers.
SID_LIST_listener_name Defines the SID of the databases served by the listener.
STARTUP_WAIT_TIME_listener_name
Sets the number of seconds that the listener sleeps before responding to the first LSNRCTL STATUS command. This assures that a listener with a slow protocol has time to start up before responding to a status request.
TRACE_DIRECTORY_listener_name Controls the directory in which the trace file is written.
TRACE_FILE_listener_name Sets the name of the trace file.
TRACE_LEVEL_listener_name Turns tracing off or to a specified level.
Oracle9i DBA Fundamentals II 3-14
3-14 Copyright © Oracle Corporation, 2001. All rights reserved.
Static Service Registration: Create a Listener
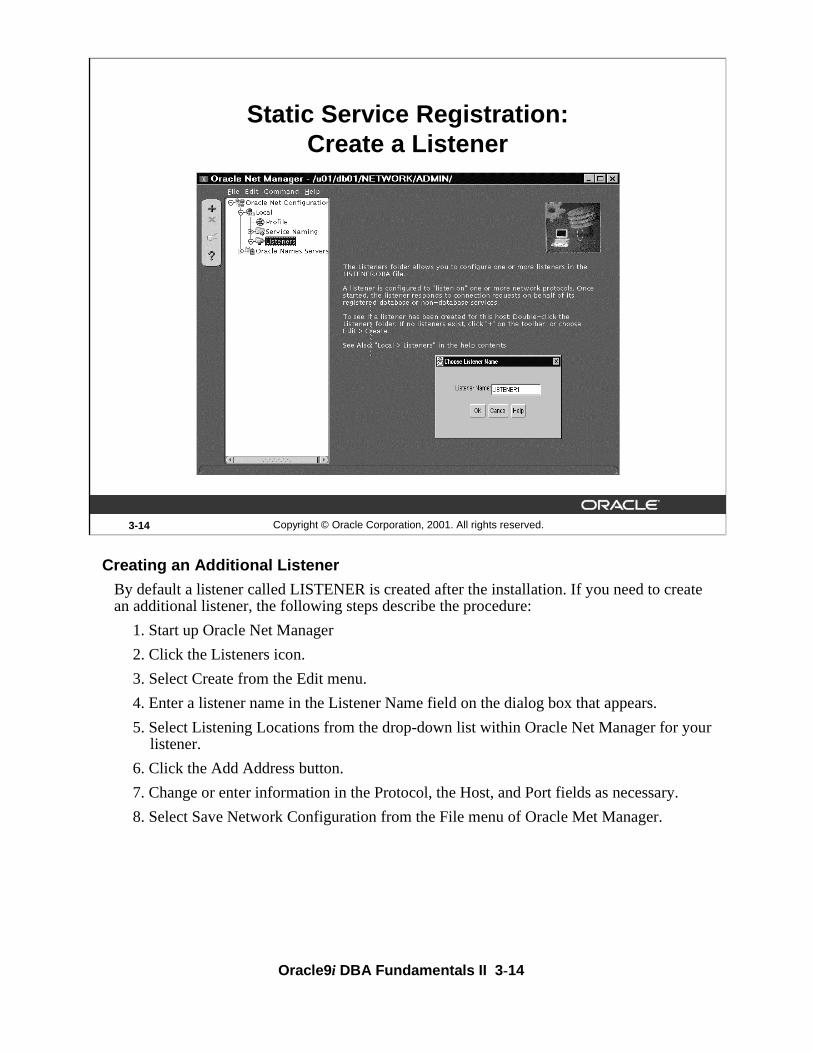
Creating an Additional Listener
By default a listener called LISTENER is created after the installation. If you need to create an additional listener, the following steps describe the procedure:
1. Start up Oracle Net Manager
2. Click the Listeners icon.
3. Select Create from the Edit menu.
4. Enter a listener name in the Listener Name field on the dialog box that appears.
5. Select Listening Locations from the drop-down list within Oracle Net Manager for your listener.
6. Click the Add Address button.
7. Change or enter information in the Protocol, the Host, and Port fields as necessary.
8. Select Save Network Configuration from the File menu of Oracle Met Manager.
Oracle9i DBA Fundamentals II 3-15
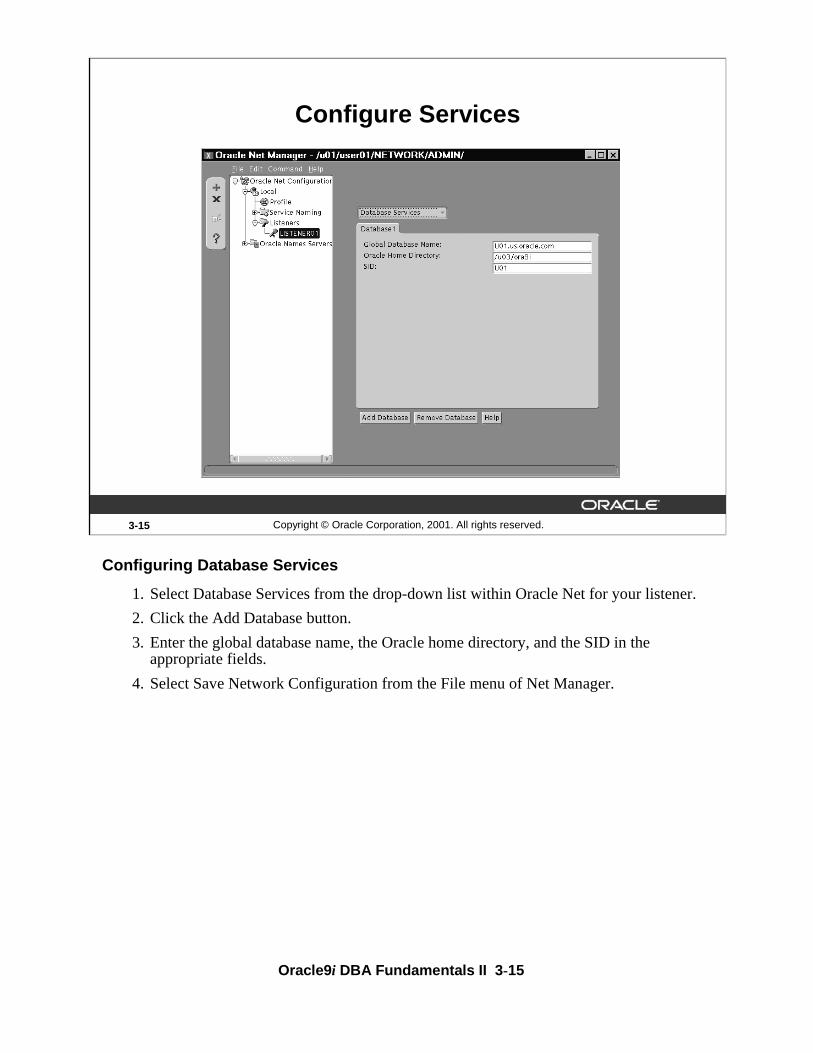
Configuring Database Services
1. Select Database Services from the drop-down list within Oracle Net for your listener.
2. Click the Add Database button.
3. Enter the global database name, the Oracle home directory, and the SID in the appropriate fields.
4. Select Save Network Configuration from the File menu of Net Manager.
3-15 Copyright © Oracle Corporation, 2001. All rights reserved.
Configure Services

Oracle9i DBA Fundamentals II 3-16
3-16 Copyright © Oracle Corporation, 2001. All rights reserved.
Logging and Tracing
Configuring Listener Logging and Tracing
1. Select General Parameters from the pull-down menu within Net Manager for your listener.
2. Click the Logging & Tracing tab.
3. Enable logging by selecting the Logging Enabled option button.
4. Enter the path and filename for a log file.
5. Select Save Network Configuration from the File menu of Oracle Net.
6. Repeat above steps for tracing (if needed). Be aware that logging and especially tracing can use large amounts of disk space and should be monitored. Tracing should only be used if needed.
Oracle9i DBA Fundamentals II 3-17
3-17 Copyright © Oracle Corporation, 2001. All rights reserved.
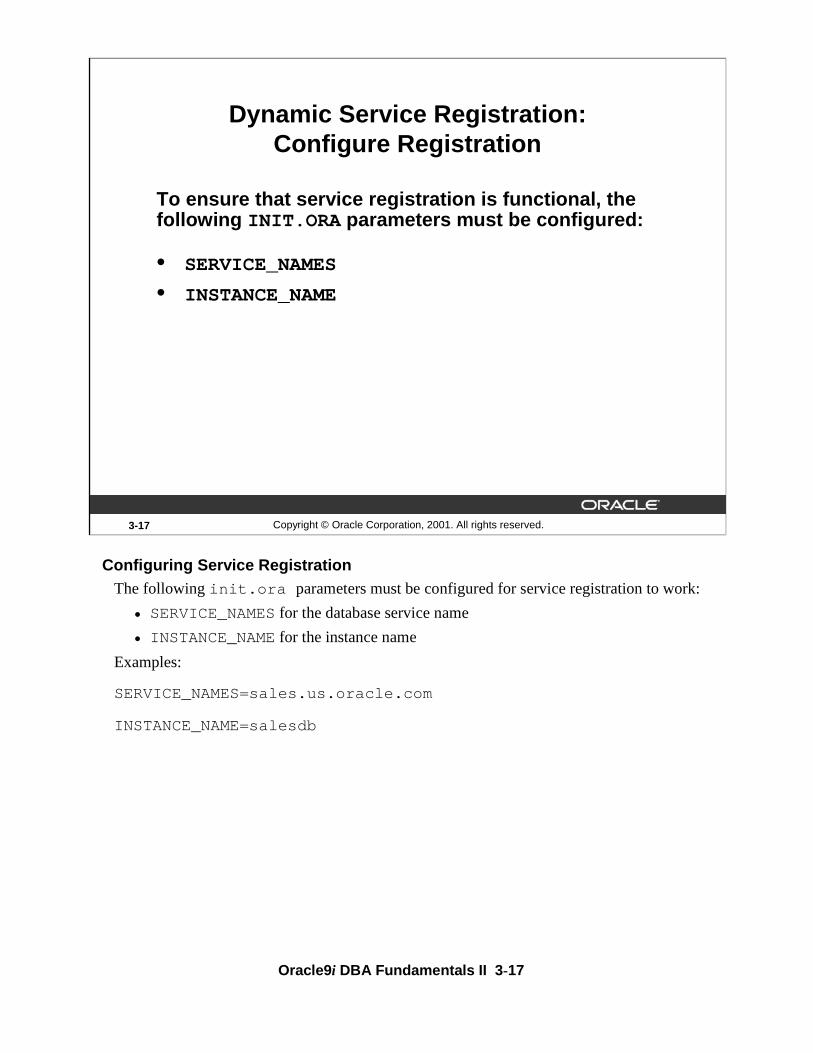
Dynamic Service Registration:Configure Registration
To ensure that service registration is functional, the following INIT.ORA parameters must be configured:
• SERVICE_NAMES
• INSTANCE_NAME
Configuring Service RegistrationThe following init.ora parameters must be configured for service registration to work:
• SERVICE_NAMESfor the database service name
• INSTANCE_NAMEfor the instance name
Examples:
SERVICE_NAMES=sales.us.oracle.com
INSTANCE_NAME=salesdb

Oracle9i DBA Fundamentals II 3-18
Service Registration
Using a Non-default Listener
You can force PMON to register with a local listener on the server that does not use TCP/IP or use port 1521 by configuring the LOCAL_LISTENER parameter in the init.ora file as follows:
LOCAL_LISTENER=listener_alias
listener_alias must be resolved to the listener protocol address through a naming method such as tnsnames.ora. An example entry in the tnsnames.ora follows:
listener_name=
(DESCRIPTION=
(ADDRESS=(PROTOCOL=tcp)(HOST=sales-server)(PORT=1421)))
3-18 Copyright © Oracle Corporation, 2001. All rights reserved.
Dynamic Service Registration:Configure PMON
• By default, PMON registers with a local listener on the server with the following settings:– Listener name LISTENER
– Port 1521
– Protocols TCP/IP
– SID name Default instance
– Host name Default host name
• PMON can register with a non default listener if:– LOCAL_LISTENER parameter is defined in INIT.ORA – DISPATCHERS parameter (For Shared Server) is
defined in INIT.ORA
Oracle9i DBA Fundamentals II 3-19
3-19 Copyright © Oracle Corporation, 2001. All rights reserved.
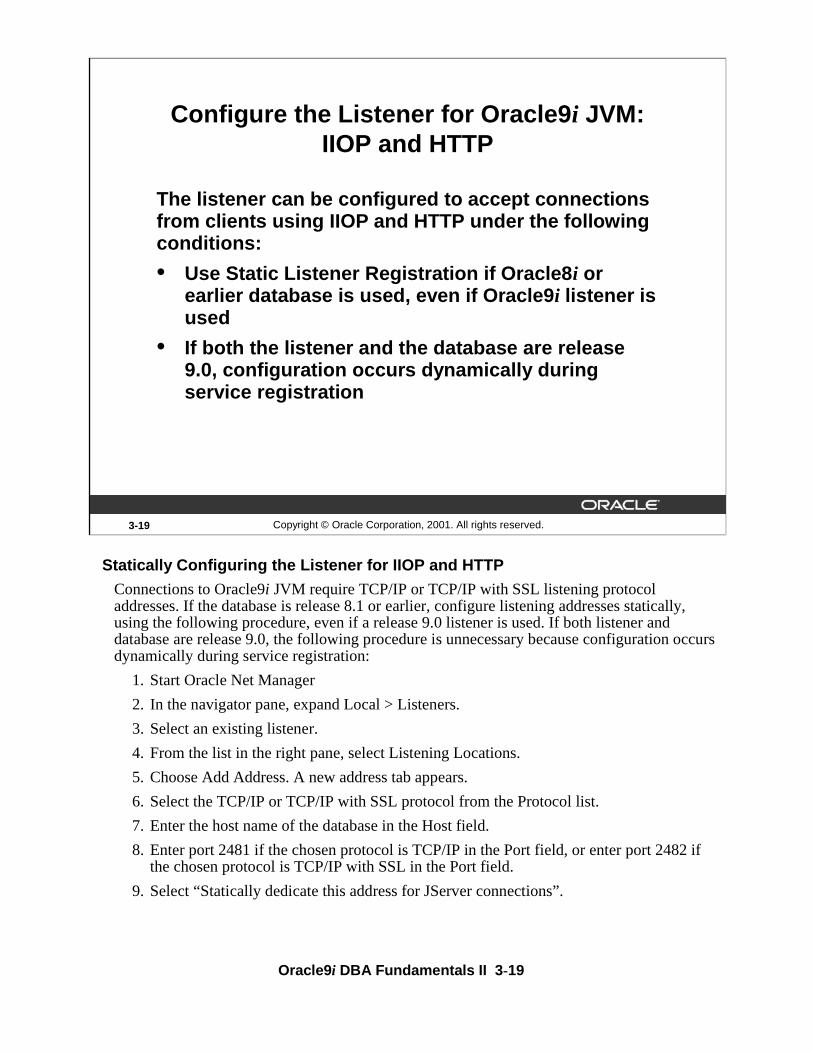
Configure the Listener for Oracle9i JVM: IIOP and HTTP
The listener can be configured to accept connections from clients using IIOP and HTTP under the following conditions:
• Use Static Listener Registration if Oracle8i or earlier database is used, even if Oracle9i listener is used
• If both the listener and the database are release 9.0, configuration occurs dynamically during service registration
Statically Configuring the Listener for IIOP and HTTP
Connections to Oracle9i JVM require TCP/IP or TCP/IP with SSL listening protocol addresses. If the database is release 8.1 or earlier, configure listening addresses statically, using the following procedure, even if a release 9.0 listener is used. If both listener and database are release 9.0, the following procedure is unnecessary because configuration occurs dynamically during service registration:
1. Start Oracle Net Manager
2. In the navigator pane, expand Local > Listeners.
3. Select an existing listener.
4. From the list in the right pane, select Listening Locations.
5. Choose Add Address. A new address tab appears.
6. Select the TCP/IP or TCP/IP with SSL protocol from the Protocol list.
7. Enter the host name of the database in the Host field.
8. Enter port 2481 if the chosen protocol is TCP/IP in the Port field, or enter port 2482 if the chosen protocol is TCP/IP with SSL in the Port field.
9. Select “Statically dedicate this address for JServer connections”.

Oracle9i DBA Fundamentals II 3-20
Statically Configuring the Listener for IIOP and HTTP (continued)
10.Select File > Save Network Configuration.
The listener.ora is updated with the following:
listener=
(DESCRIPTION_LIST=
(DESCRIPTION=
(ADDRESS=(PROTOCOL=tcp)(HOST=server1)(PORT=2481))
(PROTOCOL_STACK=
(PRESENTATION=giop)
(SESSION=raw))))
Oracle9i DBA Fundamentals II 3-21
3-21 Copyright © Oracle Corporation, 2001. All rights reserved.
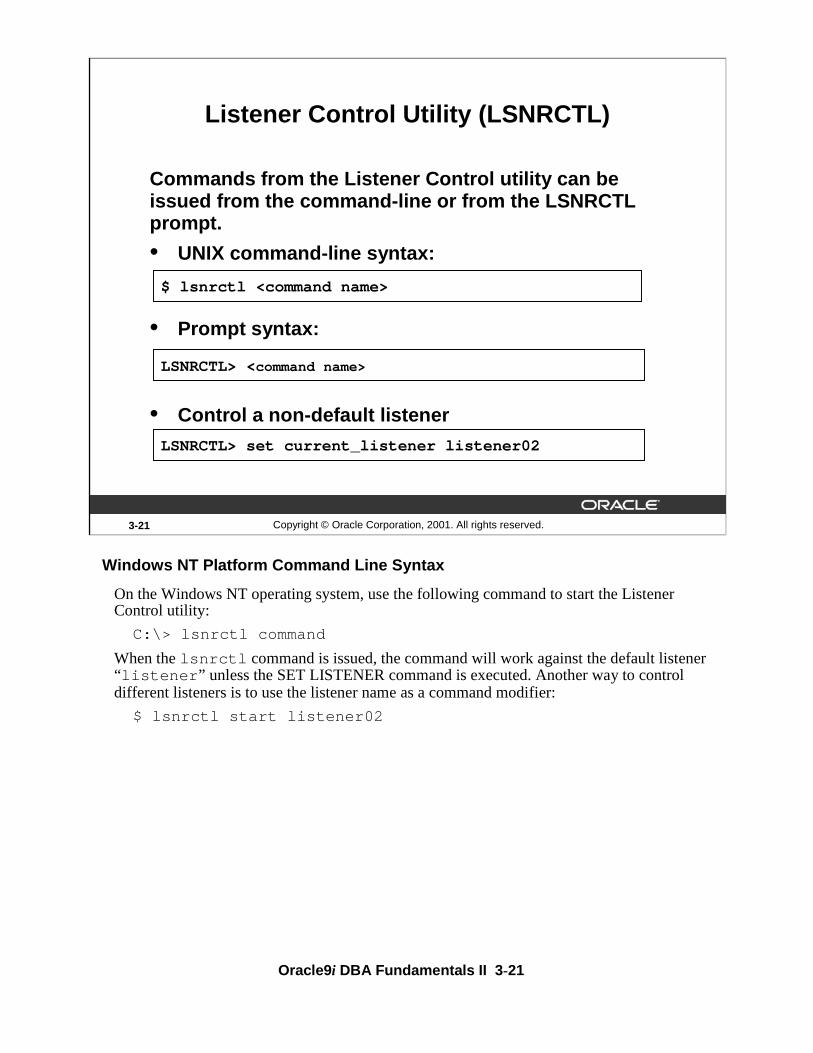
Listener Control Utility (LSNRCTL)
Commands from the Listener Control utility can be issued from the command-line or from the LSNRCTLprompt.
• UNIX command-line syntax:
• Prompt syntax:
• Control a non-default listener
$ lsnrctl <command name>
LSNRCTL> <command name>
LSNRCTL> set current_listener listener02
Windows NT Platform Command Line Syntax
On the Windows NT operating system, use the following command to start the Listener Control utility:
C:\> lsnrctl command
When the lsnrctl command is issued, the command will work against the default listener “listener” unless the SET LISTENER command is executed. Another way to control different listeners is to use the listener name as a command modifier:
$ lsnrctl start listener02

Oracle9i DBA Fundamentals II 3-22
3-22 Copyright © Oracle Corporation, 2001. All rights reserved.
LSNRCTL Commands
Use the following commands to control the listener:• START [listener_name]
• STOP [listener_name]
LSNRCTL Commands
Starting the Listener
You can use the START command to start the listener from the Listener Control utility. Any manual changes to the listener.ora file must be made when the listener is shut down. The argument for the START command is the name of the listener, and if no argument is specified, the current listener is started. If a current listener is not defined, LISTENER is started.
LSNRCTL> START [listener_name]
or
$ lsnrctl start [listener_name]
Stopping the ListenerThe STOP command stops the listener. The listener must be running to stop it properly. If a password is configured, the SET PASSWORD command must be used before the STOP command can be used. The password must be set from within the LSNRCTL prompt; it cannot be set from the operating system command line. It is good practice to send a warning message to all network users before stopping a listener.
LSNRCTL> STOP [listener_name]
or
$ lsnrctl stop [listener_name]

Oracle9i DBA Fundamentals II 3-23
LSNRCTL Commands (continued)
Command Description
CHANGE_PASSWORD Dynamically changes the encrypted password of a listener.
EXIT Quits the LSNRCTL utility.
HELP Provides the list of all available LSNRCTL commands. QUIT Provides the functionality of the EXIT command. RELOAD Shuts down everything except listener addresses and
rereads the listener.ora file. You use this command to add or change services without actually stopping the listener.
SAVE_CONFIG Creates a backup of your listener configuration file (called listener.bak) and updates the listener.ora file itself to reflect any changes
SERVICES Provides detailed information about the services the listener listens for.
SET parameter This command sets a listener parameter.
SHOW parameter This command lists the value of a listener parameter.

Oracle9i DBA Fundamentals II 3-24
3-24 Copyright © Oracle Corporation, 2001. All rights reserved.
LSNRCTL SET and SHOW Modifiers
The SET modifier is used to change listener parameters in the Listener Control utility environment.
The SHOW modifier is used to display the values of the parameters set for the listener.
LSNRCTL> SET trc_level ADMIN
LSNRCTL> SHOW connect_timeout

Oracle9i DBA Fundamentals II 3-25
SET and SHOW Modifiers
Note: The SHOW command has the corresponding parameters of the SET command except SET PASSWORD.
Command Description SET CONNECT_TIMEOUT Determines the amount of time the listener
waits for a valid connection request after a connection has been started.
SET CURRENT_LISTENER Sets or shows parameters when multiple listeners are used.
SET LOG_DIRECTORY Sets a nondefault location for the log file or to return the location to the default.
SET LOG_FILE Sets a nondefault name for the log file.
SET LOG_STATUS Turns listener logging on or off.
SET PASSWORD Changes the password sent from the LSNRCTL utility to the listener process for authentication purposes only.
SET SAVE_CONFIG_ON_STOP Saves any changes made by the LSNRCTL SET command permanently if the parameter is on. All parameters are saved right before the listener exits.
SET STARTUP_WAITTIME Sets the amount of time the listener sleeps before responding to a START command.
SET TRC_DIRECTORY Sets a nondefault location for the trace file or to return the location to the default.
SET TRC_FILE Sets a nondefault name for the trace file. SET TRC_LEVEL Turns on tracing for the listener.
Oracle9i DBA Fundamentals II 3-26
3-26 Copyright © Oracle Corporation, 2001. All rights reserved.
Summary
In this lesson, you should have learned how to:
• Describe how the listener handles client connection requests
• What role the listener.ora file plays in configuring the listener
• Use the lsnrctl utility to control the functions of the listener
• Configure the listener for IIOP and HTTP connections

Oracle9i DBA Fundamentals II 3-27
3-27 Copyright © Oracle Corporation, 2001. All rights reserved.
Practice 3 Overview
This practice covers the following topics:
• Configuring a non-default LISTENER
• Starting and stopping your listener
• Viewing the LISTENER log file

Oracle9i DBA Fundamentals II 3-28
Practice 3
1. Create a listener listenernn (nn will be a two digit number assigned to you by your instructor) using Oracle Net Manager. The listener must be configured for the server as provided by the instructor; this server contains an Oracle database Unn. The listener must be configured for the TCP/IP protocol only and must listen for incoming connections on the port provided by the instructor.
Note: If Oracle9i Oracle Net software is loaded on the student PC’s, the listener configuration file will be created on the client PC using Oracle Net Manager and, in later steps, transferred through FTP or similar file transfer application on the server.
For this practice and successive network practices, the TNS_ADMIN environment variable must point to $HOME/NETWORK/ADMIN on the host where your Unix account resides. Look in your .profile (located in your home directory) and search for an entry like this:TNS_ADMIN=$HOME/NETWORK/ADMIN
export TNS_ADMIN
Edit the file and add the lines above if they don’t already exist. Log out and log back in again for the changes to take effect.
If Oracle9i client software is not available on your workstation, the listener.ora must be edited by hand. Sample networking files can be found in your $HOME/network/admin directory. The sample files will all have .sam extensions. Copy listener.sam to listener.ora and edit by hand using vi.$ cd $TNS_ADMIN$ cp listener.sam listener.ora
2. View the contents of the listener.ora file to verify the configuration details.
3. If you have created the listener.ora file on your pc, then use FTP (ASCII mode) to transfer it to your $TNS_ADMIN directory on the Unix server.
4. When the listener.ora file is properly placed, start your listener by issuing lsnrctlstart listenernn from your prompt. If you encounter difficulties, use the lsnrctlcommand output and the listener log file to troubleshoot.
5. Stop, then restart your database instance.
6. View the contents of the listener log file. Is the instance registered? Why not?

4Copyright © Oracle Corporation, 2001. All rights reserved.
4Basic Oracle Net Services Client-Side Configuration

Oracle9i DBA Fundamentals II 4-2
4-2 Copyright © Oracle Corporation, 2001. All rights reserved.
Objectives
After completing this lesson, you should be able to do the following:
• Describe the difference between host naming and local service name resolution
• Use Oracle Net Configuration Assistant to configure:– Host Naming method
– Local naming method
– Net service names
• Perform simple connection troubleshooting

Oracle9i DBA Fundamentals II 4-3
4-3 Copyright © Oracle Corporation, 2001. All rights reserved.
Host Naming
Clients can connect to a server using a host name if:
• You are connecting to an Oracle database service using Oracle Net Services Client software
• Your client and server are connecting over a TCP/IP protocol
• Host names are resolved through an IP address translation mechanism such as DNS or a local /etc/hosts file
• No advanced features like Connection Manager or security options are used
Host Naming Method
• Requires minimal user configuration. The user need only provide the name of the host to establish a connection.
• Eliminates the need to create and maintain a local names configuration file (tnsnames.ora).
• Eliminates the need to understand Oracle Names or Oracle Internet Directory administration procedures.
• Host Naming can only be used to identify one sid per node although other sid’s can be identified using other naming methods.
• Multiple global names can be aliased to the same IP address in the hosts file and host naming can be used to connect to any of these databases even if they are on the same node.
Oracle9i DBA Fundamentals II 4-4
4-4 Copyright © Oracle Corporation, 2001. All rights reserved.
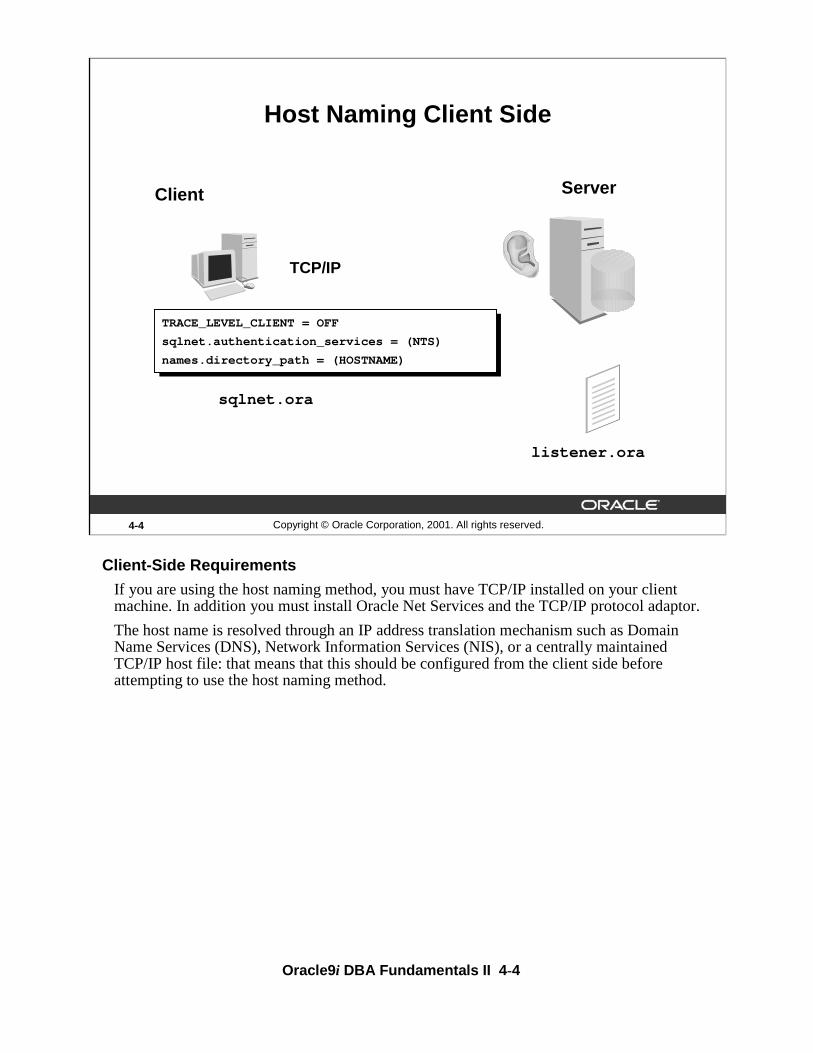
Host Naming Client Side
sqlnet.ora
listener.ora
Server
TRACE_LEVEL_CLIENT = OFF
sqlnet.authentication_services = (NTS)
names.directory_path = (HOSTNAME)
TCP/IP
Client
Client-Side Requirements
If you are using the host naming method, you must have TCP/IP installed on your client machine. In addition you must install Oracle Net Services and the TCP/IP protocol adaptor.
The host name is resolved through an IP address translation mechanism such as Domain Name Services (DNS), Network Information Services (NIS), or a centrally maintained TCP/IP host file: that means that this should be configured from the client side before attempting to use the host naming method.
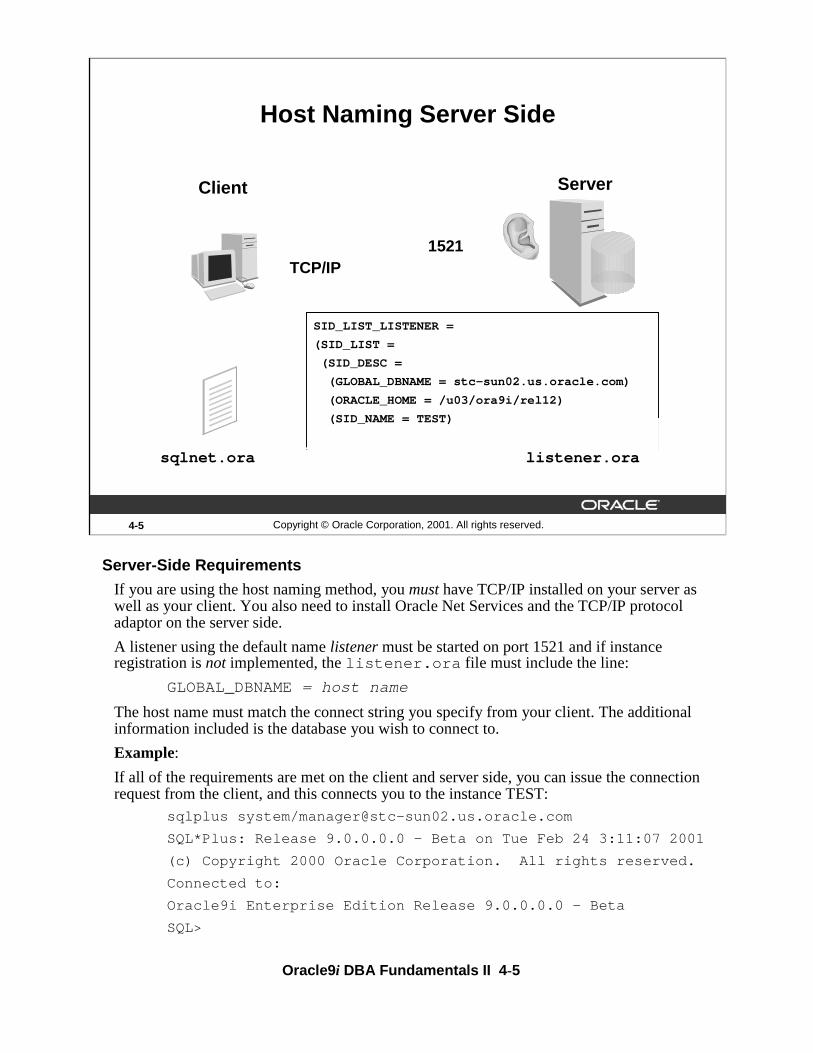
Oracle9i DBA Fundamentals II 4-5
4-5 Copyright © Oracle Corporation, 2001. All rights reserved.
Host Naming Server Side
Client
sqlnet.ora listener.ora
Server
SID_LIST_LISTENER =
(SID_LIST =
(SID_DESC =
(GLOBAL_DBNAME = stc-sun02.us.oracle.com)
(ORACLE_HOME = /u03/ora9i/rel12)
(SID_NAME = TEST)
1521TCP/IP
Server-Side Requirements
If you are using the host naming method, you must have TCP/IP installed on your server as well as your client. You also need to install Oracle Net Services and the TCP/IP protocol adaptor on the server side.
A listener using the default name listener must be started on port 1521 and if instance registration is not implemented, the listener.ora file must include the line:
GLOBAL_DBNAME = host name
The host name must match the connect string you specify from your client. The additional information included is the database you wish to connect to.
Example:
If all of the requirements are met on the client and server side, you can issue the connection request from the client, and this connects you to the instance TEST:
sqlplus system/[email protected]
SQL*Plus: Release 9.0.0.0.0 - Beta on Tue Feb 24 3:11:07 2001
(c) Copyright 2000 Oracle Corporation. All rights reserved.
Connected to:
Oracle9i Enterprise Edition Release 9.0.0.0.0 - Beta
SQL>

Oracle9i DBA Fundamentals II 4-6
4-6 Copyright © Oracle Corporation, 2001. All rights reserved.
Select Host Name Method
Selecting the Host Name Method
The Oracle Net Configuration Assistant can be used to select the naming method. From a command prompt, enter netca and select Naming Methods Configuration option button. Click Next to continue.

Oracle9i DBA Fundamentals II 4-7
4-7 Copyright © Oracle Corporation, 2001. All rights reserved.
Host Naming Method
Selecting the Host Name Method (continued)
Make sure that Host Name is listed in the Selected Naming Methods window. If other methods are also chosen, make sure Host Name appears first. Click Next to finish. Your changes will be written to the sqlnet.ora file:
# SQLNET.ORA Network Configuration File: /u03/ora9i/rel12/network/admin/sqlnet.ora
# Generated by Oracle configuration tools.
NAMES.DEFAULT_DOMAIN = us.oracle.com
NAMES.DIRECTORY_PATH= (HOSTNAME)

Oracle9i DBA Fundamentals II 4-8
4-8 Copyright © Oracle Corporation, 2001. All rights reserved.
Local Naming
listener.ora
ServerClient
tnsnames.ora
sqlnet.ora
Local Naming Method
Advantages of local naming:
• Provides a relatively straightforward method for resolving service name addresses.
• Resolves service names across networks running different protocols.
• Can easily be configured using a graphical configuration tool
The local naming method requires net service names be stored in the tnsnames.ora file. It is not recommended that this file be edited by hand. However, adding net service names is easy using the Oracle Net Configuration Assistant.

Oracle9i DBA Fundamentals II 4-9
4-9 Copyright © Oracle Corporation, 2001. All rights reserved.
Oracle Net Configuration Assistant
Oracle Net Configuration Assistant
You can use Oracle Net Configuration Assistant or Oracle Net Manager to configure local naming. Oracle Net Configuration Assistant is used in these examples.
Because Oracle Net Configuration Assistant is implemented in Java and is packaged with the Java Runtime Environment, you can run it on any platform where Oracle Net Services is installed.
Starting Oracle Net Configuration Assistant
From a command prompt enter:
$ netca
Select the Naming Methods Configuration option button and click Next.
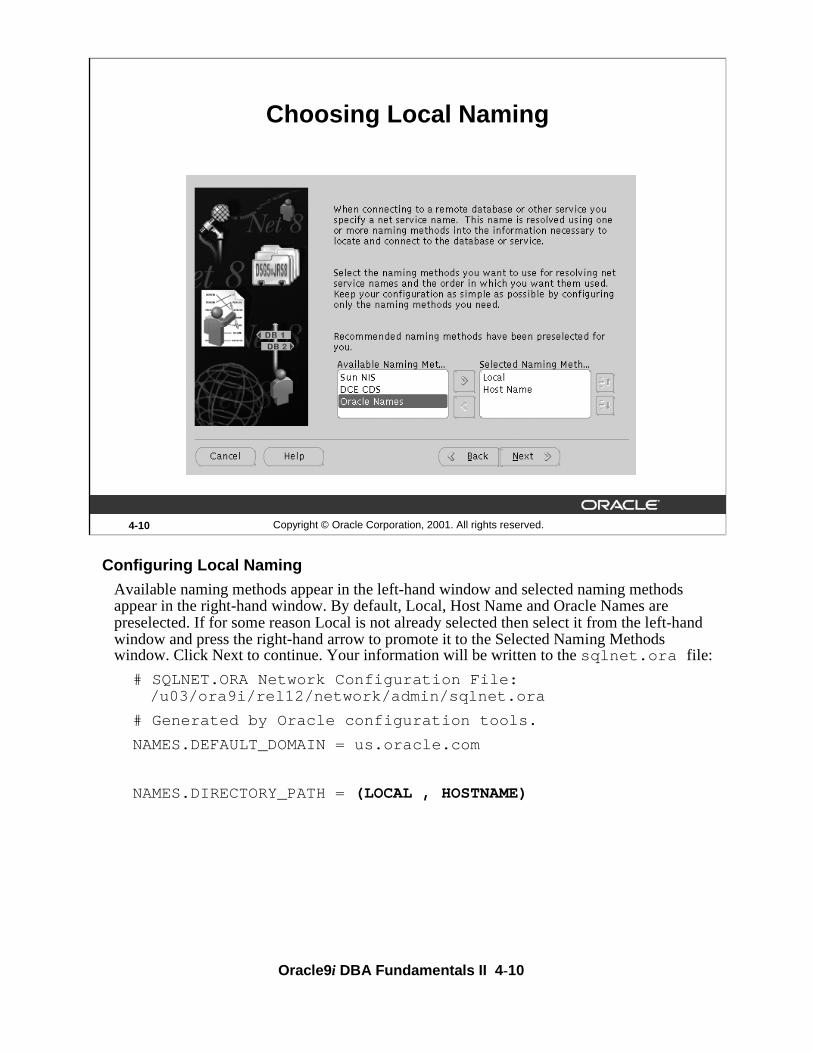
Oracle9i DBA Fundamentals II 4-10
4-10 Copyright © Oracle Corporation, 2001. All rights reserved.
Choosing Local Naming
Configuring Local Naming
Available naming methods appear in the left-hand window and selected naming methods appear in the right-hand window. By default, Local, Host Name and Oracle Names arepreselected. If for some reason Local is not already selected then select it from the left-hand window and press the right-hand arrow to promote it to the Selected Naming Methods window. Click Next to continue. Your information will be written to the sqlnet.ora file:
# SQLNET.ORA Network Configuration File: /u03/ora9i/rel12/network/admin/sqlnet.ora
# Generated by Oracle configuration tools.
NAMES.DEFAULT_DOMAIN = us.oracle.com
NAMES.DIRECTORY_PATH = (LOCAL , HOSTNAME)

Oracle9i DBA Fundamentals II 4-11
4-11 Copyright © Oracle Corporation, 2001. All rights reserved.
Configuring Local Net Service Names
Net Service Name Configuration
After selecting Local as the Naming Method, service names can now be configured by selecting the Local Net Service Name Configuration option button from the Oracle Net Services Configuration Assistant.

Oracle9i DBA Fundamentals II 4-12
4-12 Copyright © Oracle Corporation, 2001. All rights reserved.
Working with Net Service Names
Add a Net Service Name
You use the next window to create, reconfigure, delete, rename, or test a net service name. In this example, the Add option button is chosen.

Oracle9i DBA Fundamentals II 4-13
4-13 Copyright © Oracle Corporation, 2001. All rights reserved.
Specify the Oracle Database Version
Specifying the Database Version
Specify whether the database or service is Oracle8i or later. Earlier Oracle versions require extra configuration on the listener side while Oracle8i or 9i databases and services do not.

Oracle9i DBA Fundamentals II 4-14
4-14 Copyright © Oracle Corporation, 2001. All rights reserved.
Database Service Name
Specify the Service NameFor your Oracle8i or Oracle9i database, you must next enter the database service name.

Oracle9i DBA Fundamentals II 4-15
4-15 Copyright © Oracle Corporation, 2001. All rights reserved.
Network Protocol
Select the Network Protocol
The network protocol to be used by the connection must now be specified. The protocols available in the configuration assistant reflect only those protocols that have been previously installed. Uninstalled protocols are not present in the protocol list presented by the Oracle Net Service Configuration Assistant.
Note: With the introduction of Oracle9i, SPX is no longer a supported protocol.

Oracle9i DBA Fundamentals II 4-16
4-16 Copyright © Oracle Corporation, 2001. All rights reserved.
Host Name and Listener Port
Configuring the Host Name and Port Number
Enter the host name and the port number, and click Next.
Host Name
Enter the fully qualified name of the machine on which the database you want to connect to and communicate with resides.
Port Number
Enter the number of the port on which the Oracle Net listener monitors connection requests to the server (host). By default, the Configuration Assistant sets the listener port to 1521. If required, an alternative port number can be specified.

Oracle9i DBA Fundamentals II 4-17
4-17 Copyright © Oracle Corporation, 2001. All rights reserved.
Testing the Connection
Test the Service Information
The connection information can now be tested. Click Yes, perform a test then click on Finish to proceed.
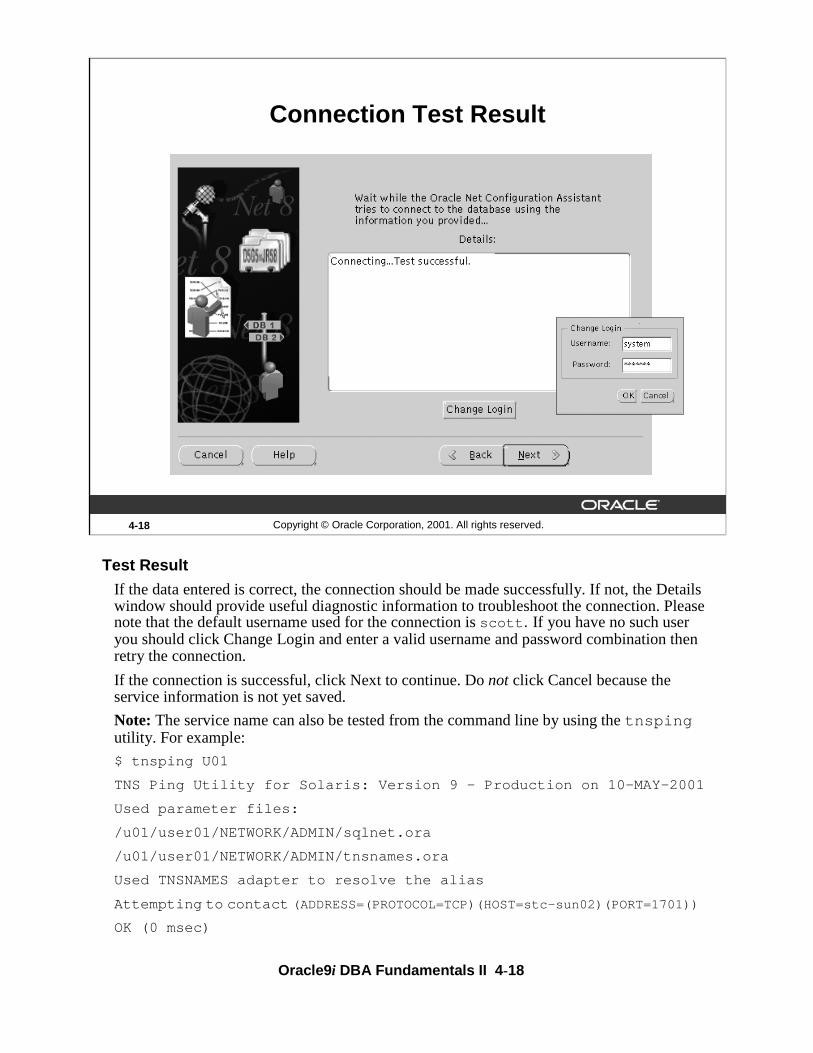
Oracle9i DBA Fundamentals II 4-18
4-18 Copyright © Oracle Corporation, 2001. All rights reserved.
Connection Test Result
Test Result
If the data entered is correct, the connection should be made successfully. If not, the Details window should provide useful diagnostic information to troubleshoot the connection. Please note that the default username used for the connection is scott. If you have no such user you should click Change Login and enter a valid username and password combination then retry the connection.
If the connection is successful, click Next to continue. Do not click Cancel because the service information is not yet saved.
Note: The service name can also be tested from the command line by using the tnspingutility. For example:
$ tnsping U01
TNS Ping Utility for Solaris: Version 9 - Production on 10-MAY-2001
Used parameter files:
/u01/user01/NETWORK/ADMIN/sqlnet.ora
/u01/user01/NETWORK/ADMIN/tnsnames.ora
Used TNSNAMES adapter to resolve the alias
Attempting to contact (ADDRESS=(PROTOCOL=TCP)(HOST=stc-sun02)(PORT=1701))
OK (0 msec)

Oracle9i DBA Fundamentals II 4-19
4-19 Copyright © Oracle Corporation, 2001. All rights reserved.
Net Service Name
Choosing the Net Service Name
Enter a name for the net service name next. The Configuration Assistant defaults the name to the database service name that was entered initially. A more meaningful or descriptive name can be entered if you want. Click Next to continue.

Oracle9i DBA Fundamentals II 4-20
4-20 Copyright © Oracle Corporation, 2001. All rights reserved.
Save the Net Service Name
Saving the Net Service Name
When you select the No option button and click on Next, the service name is saved by default to the tnsnames.ora file located in the $ORACLE_HOME/network/admin directory.

Oracle9i DBA Fundamentals II 4-21
4-21 Copyright © Oracle Corporation, 2001. All rights reserved.
tnsnames.ora
# TNSNAMES.ORA Network Configuration File:/u03/ora9i/rel12/network/admin/tnsnames.ora
# Generated by Oracle configuration tools.
MY_SERVICE.US.ORACLE.COM =
(DESCRIPTION =
(ADDRESS_LIST =
(ADDRESS = (PROTOCOL = TCP)(HOST = stc-sun02.us.oracle.com)(PORT = 1521))
)
(CONNECT_DATA =
(SERVICE_NAME = TEST.us.oracle.com)
)
)
The tnsnames.ora File
The tnsnames.ora file is used to store net service names. The default location is $ORACLE_HOME/network/admin on UNIX and %ORACLE_HOME%\network\admin on NT. The content of the tnsnames.ora is as follows:
Parameter Description
MY_SERVICE.US. … Net service name and domain name.
DESCRIPTION Keyword for describing the connect descriptor. Descriptions are always specified the same way.
ADDRESS Keyword for the address specification. If multiple addresses are specified, use the keyword ADDRESS_LIST prior to the ADDRESS
PROTOCOL Specifies the protocol used.
HOST Protocol-specific information for TCP/IP-Specifies the host name of the server or IP address. Can differ for another protocol.
PORT Protocol specific information for TCP/IP-Specifies the port number on which the server side listener is listening.
CONNECT_DATA Specifies the database service to which to connect.
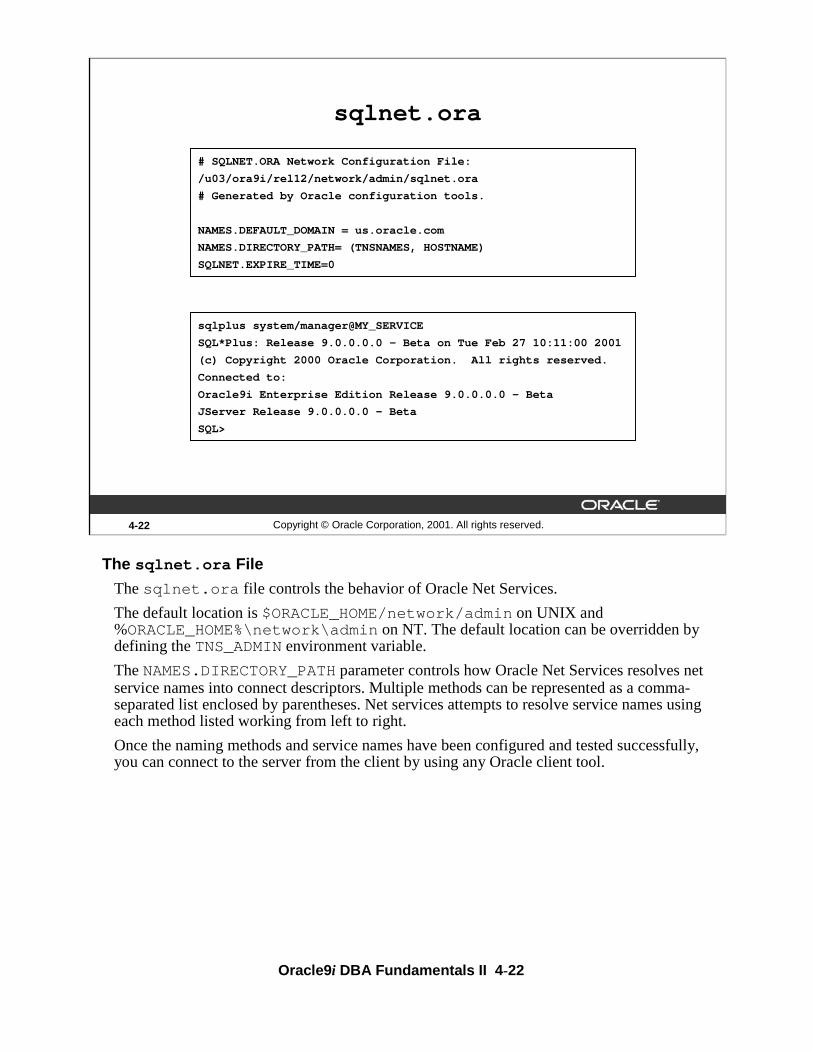
Oracle9i DBA Fundamentals II 4-22
4-22 Copyright © Oracle Corporation, 2001. All rights reserved.
sqlnet.ora
# SQLNET.ORA Network Configuration File:
/u03/ora9i/rel12/network/admin/sqlnet.ora
# Generated by Oracle configuration tools.
NAMES.DEFAULT_DOMAIN = us.oracle.com
NAMES.DIRECTORY_PATH= (TNSNAMES, HOSTNAME)
SQLNET.EXPIRE_TIME=0
sqlplus system/manager@MY_SERVICE
SQL*Plus: Release 9.0.0.0.0 - Beta on Tue Feb 27 10:11:00 2001
(c) Copyright 2000 Oracle Corporation. All rights reserved.
Connected to:
Oracle9i Enterprise Edition Release 9.0.0.0.0 - Beta
JServer Release 9.0.0.0.0 - Beta
SQL>
The sqlnet.ora File
The sqlnet.ora file controls the behavior of Oracle Net Services.
The default location is $ORACLE_HOME/network/admin on UNIX and %ORACLE_HOME%\network\admin on NT. The default location can be overridden by defining the TNS_ADMIN environment variable.
The NAMES.DIRECTORY_PATH parameter controls how Oracle Net Services resolves net service names into connect descriptors. Multiple methods can be represented as a comma-separated list enclosed by parentheses. Net services attempts to resolve service names using each method listed working from left to right.
Once the naming methods and service names have been configured and tested successfully, you can connect to the server from the client by using any Oracle client tool.

Oracle9i DBA Fundamentals II 4-23
4-23 Copyright © Oracle Corporation, 2001. All rights reserved.
Troubleshooting the Client Side
ORA-12154 “TNS:could not resolve service
name”
ORA-12198 “TNS:could not find path to
destination”
ORA-12203 “TNS:unable to connect to
destination”
ORA-12533 “TNS:illegal ADDRESS parameters”
ORA-12541 “TNS:no listener”
The following error codes are related to problems onthe client side:
Troubleshooting
The following describes common errors and how they can be resolved.
ORA-12154: “TNS:could not resolve service name”
Cause Oracle Net Services cannot locate the connect descriptor specified in thetnsnames.ora configuration file.
Actions
1. Verify that a tnsnames.ora file exists and that it is accessible.
2. Verify that the tnsnames.ora file is in the location specified by the TNS_ADMINenvironment variable.
3. In your tnsnames.ora file, verify that the service name specified in your connectionstring is mapped to a connect descriptor in the tnsnames.ora file. Also, verify that there are no syntax errors in the file.
4. Verify that there are no duplicate copies of the sqlnet.ora file.
5. If you are connecting from a login dialog box, verify that you are not placing an at symbol (@) before your connection service name.

Oracle9i DBA Fundamentals II 4-24
Troubleshooting (continued)ORA-12198: “TNS:could not find path to destination” and ORA-12203: “TNS:unable to connect to destination”
Cause The client cannot find the desired database.
Actions
1. Verify that you have correctly entered the service name of the database that you want to reach.
2. Verify that the service name ADDRESSparameters in the connect descriptor of your TNSNAMES.ORAfile are correct.
3. Verify that your TNSNAMES.ORAfile is stored in the directory defined in the TNS_ADMIN environment variable.
4. Verify that the listener on the remote node has started and is running. If not, start the listener by using the Listener Control utility.
5. If you are connecting from a login dialog box, verify that you are not placing an at symbol (@) before your connection service name.
ORA-12533: “TNS:illegal ADDRESS parameters”
Cause The protocol-specific parameters in the ADDRESSsection of the designated connect descriptor in your tnsnames.ora file are incorrect.
Action For more information about protocol-specific keywords, refer to the Oracle operating system documentation for your platform.
ORA-12541: TNS:no listener
Cause The listener on the remote node cannot be contacted.
Actions Verify that the listener on the remote node has been started. You can check its status with the STATUScommand of the Listener Control utility and start it with the STARTcommand if necessary.
Oracle9i DBA Fundamentals II 4-25
4-25 Copyright © Oracle Corporation, 2001. All rights reserved.
Summary
In this lesson, you should have learned how to:
• Describe the difference between host naming and local service name resolution
• Use Oracle Net Configuration Assistant to configure:– Local naming method
– Net service names
• Perform simple connection troubleshooting

Oracle9i DBA Fundamentals II 4-26
4-26 Copyright © Oracle Corporation, 2001. All rights reserved.
Practice 4 Overview
This practice covers the following topics:
• Configuration of Local Naming
• Configuration net service names
• Testing the configuration

Oracle9i DBA Fundamentals II 4-27
Practice 4
If you are unsure of the name of your client, please ask the instructor how to obtain the name.
1. Use the Oracle Net Manager to configure your client to use the local naming method. Select TNSNAMES as the only naming method. If you are unsure of the name of your client, please ask the instructor how to obtain the name.
Manual Configuration
If Oracle9i is not available on your client, manually configure and test the client connection from the Unix host. Change directories to $TNS_ADMIN and copysqlnet.sam and tnsnames.sam to sqlnet.ora and tnsnames.orarespectively. Edit them manually with vi.
2. Test that the service is reachable using tnsping.
3. Investigate the contents of the sqlnet.ora and tnsnames.ora file. How is the information you provided recorded in these files?
4. Connect to the server as system/manager using SQL*Plus and verify that you are connected to the correct instance by querying the V$INSTANCE view.

Oracle9i DBA Fundamentals II 4-28

5Copyright © Oracle Corporation, 2001. All rights reserved.
5Usage and Configuration of the Oracle Shared Server

Oracle9i DBA Fundamentals II 5-2
5-2 Copyright © Oracle Corporation, 2001. All rights reserved.
Objectives
After completing this lesson, you should be able to do the following:
• Identify the components of the Oracle Shared Server
• Describe the Oracle Shared Server architecture
• Configure the Oracle Shared Server
• Identify and explain usefulness of related data dictionary views

Oracle9i DBA Fundamentals II 5-3
5-3 Copyright © Oracle Corporation, 2001. All rights reserved.
Server Configurations
• Dedicated server process
• Shared server process
Oracle Server Configuration Options
Oracle creates server processes to handle the requests of user processes connected to an instance. A server process can be either a dedicated server process, where one server process services only one user process, or it can be a shared server process, where a server process can service multiple user processes. Shared server processes are a part of Oracle Shared Server architecture.

Oracle9i DBA Fundamentals II 5-4
5-4 Copyright © Oracle Corporation, 2001. All rights reserved.
Dedicated Server Processes
Client Server
Userprocess
Serverprocess
PMONDBWnSMON LGWRCKPT ARCn
InstanceSGA
Dedicated Server Processes
• The user process and server process are separate.
• Each user process has its own server process.
• The user and server processes can run on different machines to take advantage of distributed processing.
• There is a one-to-one ratio between the user and server processes.
• Even when the user process is not making a database request, the dedicated server exists but remains idle.
The program interface in use here depends on whether the user and the dedicated server processes are on the same machine. If they are, the host operating system’s interprocesscommunication (IPC) mechanism is used for the program interface between processes.

Oracle9i DBA Fundamentals II 5-5
5-5 Copyright © Oracle Corporation, 2001. All rights reserved.
Oracle Shared Server
Shared serverprocesses
Database serverclient
Snnn
Snnn
Userprocess
Userprocess
Snnn
InstanceSGA
DispatcherD003
DispatcherD001
DispatcherD002
The Oracle Shared Server
The Oracle Shared Server configuration enables shared servers, dedicated servers, and combined users and servers to exist within the same instance.
• In an online transaction processing environment for example, order entry applications, in which users enter data through an application interface, the server process could be idle 90 percent or more of the connected time.
• Oracle Shared Server improves server efficiency, because any server can process an incoming request, rather than wait for a specific server to process work on a request.
• With Oracle Shared Server, you can support many more users than you can in the dedicated server configuration with the same number of servers, because users in the Oracle Shared Server architecture share the server processes, and thus, fewer server processes can be configured.
Under the Oracle Shared Server architecture, client-user processes ultimately connect to a dispatcher. The PMON process registers the location and load of the dispatchers with the listener, enabling the listener to forward requests to the least utilized dispatcher. Service registration does not require configuration in the listener.ora file.
A dispatcher can support multiple client connections concurrently. Each client connection is bound to a virtual circuit. A virtual circuit is a piece of shared memory used by the dispatcher for client database connection requests and replies.
Oracle9i DBA Fundamentals II 5-6
The Oracle Shared Server (continued)
The dispatcher places a virtual circuit on a common queue when a request arrives. A shared server picks up the virtual circuit from the common queue, services the request, and relinquishes the virtual circuit before attempting to retrieve another virtual circuit from the common queue. This approach enables a small pool of server processes to serve a large number of clients.
Technical Note
If configuring Oracle Shared Server on Windows NT, dispatchers can use only the TCP/IP protocol.
Oracle9i DBA Fundamentals II 5-7
5-7 Copyright © Oracle Corporation, 2001. All rights reserved.
Benefits of Oracle Shared Server
• Reduces the number of processes against an instance
• Increases the number of possible users
• Achieves load balancing
• Reduces the number of idle server processes
• Reduces memory usage and system overhead
Using Oracle Shared Server
The Oracle Shared Server architecture reduces memory usage by reducing the number of server processes required. For example, for 100 users using dedicated servers, 100 server processes are required. With Oracle Shared Server, you may need only 10 shared server processes for the 100 users, significantly reducing system resource usage.
The Oracle Shared Server architecture requires Oracle Net Services. User processes targeting the Oracle Shared Servers must connect through Oracle Net Services, even if the user processes exist on the same machine as the Oracle instance.
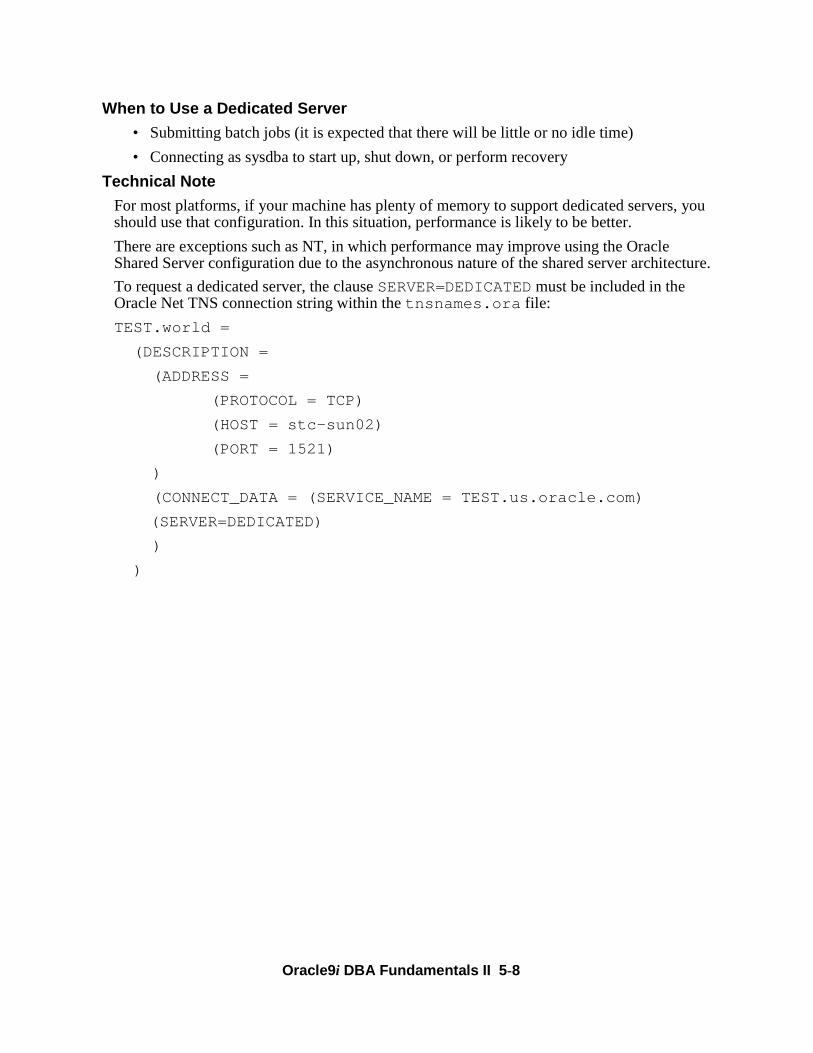
Oracle9i DBA Fundamentals II 5-8
When to Use a Dedicated Server
• Submitting batch jobs (it is expected that there will be little or no idle time)
• Connecting as sysdba to start up, shut down, or perform recovery
Technical Note
For most platforms, if your machine has plenty of memory to support dedicated servers, you should use that configuration. In this situation, performance is likely to be better.
There are exceptions such as NT, in which performance may improve using the Oracle Shared Server configuration due to the asynchronous nature of the shared server architecture.
To request a dedicated server, the clause SERVER=DEDICATED must be included in the Oracle Net TNS connection string within thetnsnames.ora file:
TEST.world =
(DESCRIPTION =
(ADDRESS =
(PROTOCOL = TCP)
(HOST = stc-sun02)
(PORT = 1521)
)
(CONNECT_DATA = (SERVICE_NAME = TEST.us.oracle.com)
(SERVER=DEDICATED)
)
)

Oracle9i DBA Fundamentals II 5-9
5-9 Copyright © Oracle Corporation, 2001. All rights reserved.
2
1
Database serverclient
Connecting
Userprocess
Userprocess
Listener
Dispatcherprocess
D001
Dispatcherprocess
D002
3
Connecting to an Oracle Shared Server
1. The listener process waits for any connection requests from a user process. When a process requests a connection, the listener determines whether to connect the user process to a dispatcher (depending on the load of the dispatcher) or assign it a dedicated server process.
2. If the configuration allows the user process to connect to a dispatcher, the listener gives the user process the address of a dispatcher process. If the user process requests a dedicated server, the listener creates a dedicated server process and connects the user process to it.
3. Once the connection has been established, either through a dispatcher or a dedicated server process, the connection is maintained for the duration of the session.
Technical Note
If the user call is from across a network, the dispatcher process chosen by the listener mustmatch the protocol of the network being used.

Oracle9i DBA Fundamentals II 5-10
5-10 Copyright © Oracle Corporation, 2001. All rights reserved.
PMONDBWnSMON LGWRCKPT ARCn
Request Queuefor all
DispatchersResponse queue
for (D002)Response queue
for (D003)
InstanceSGA
6
Processing a Request
1
Shared serverprocesses
Database server
client
Snnn
Snnn
Userprocess
Userprocess
Listener
DispatcherD002
DispatcherD003
Snnn
DispatcherD001
23
4
5
Response queue for (D001)
How a Request is Processed
1. A user sends a request to its dispatcher.
2. The dispatcher places the request into the request queue in the System Global Area (SGA).
3. A shared server picks up the request from the request queue and processes the request.
4. The shared server places the response on the calling dispatcher’s response queue.
5. The response is handed off to the dispatcher.
6. The dispatcher returns the response to the user.
Once the user call has been completed, the shared server process is released and is available to service another user call in the request queue.
Request Queue
• One request queue is shared by all dispatchers.
• Shared servers monitor the request queue for new requests.
• Requests are processed on a first-in, first-out (FIFO) basis.

Oracle9i DBA Fundamentals II 5-11
Request Queue (continued)
• Shared servers place all completed requests on the calling dispatcher’s response queue.
• Each dispatcher has its own response queue in the SGA.
• Each dispatcher is responsible for sending completed requests back to the appropriate user process.
• Users are connected to the same dispatcher for the duration of a session.
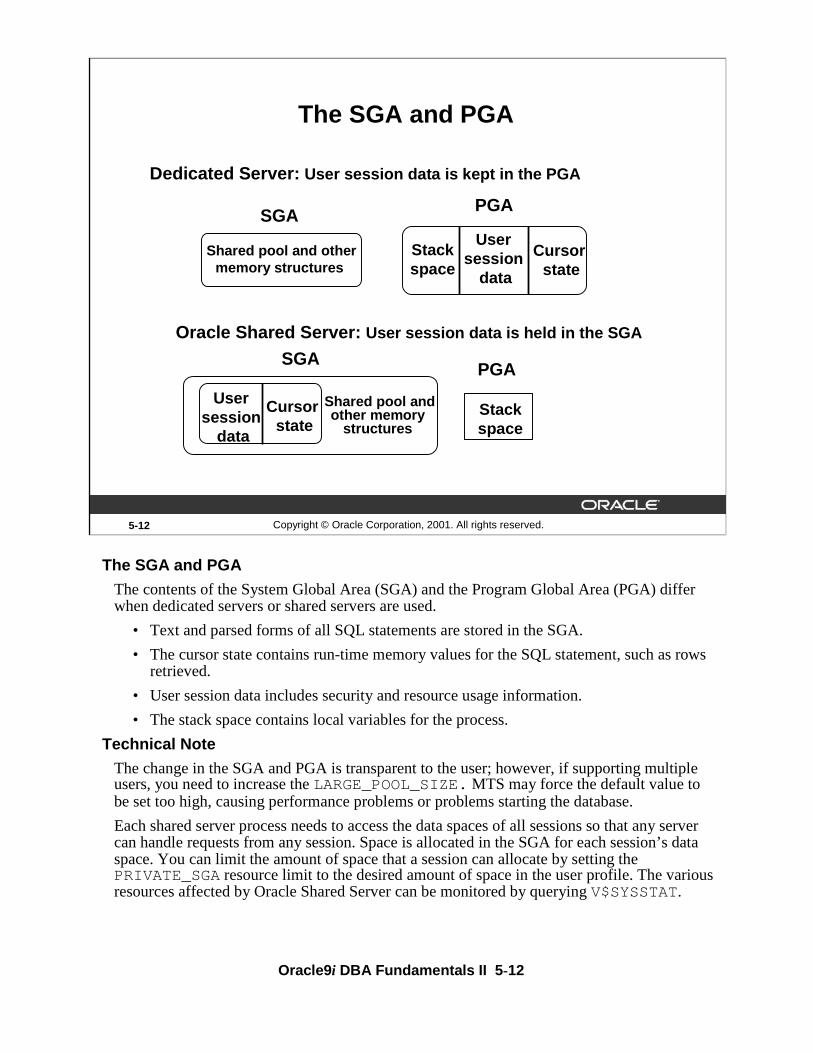
Oracle9i DBA Fundamentals II 5-12
5-12 Copyright © Oracle Corporation, 2001. All rights reserved.
SGA
Oracle Shared Server: User session data is held in the SGA
SGA
Shared pool and other memory structures
User session
data
Cursor state
Shared pool and other memory
structuresStackspace
PGA
Dedicated Server: User session data is kept in the PGA
The SGA and PGA
Stackspace
User session
data
Cursor state
PGA
The SGA and PGA
The contents of the System Global Area (SGA) and the Program Global Area (PGA) differ when dedicated servers or shared servers are used.
• Text and parsed forms of all SQL statements are stored in the SGA.
• The cursor state contains run-time memory values for the SQL statement, such as rows retrieved.
• User session data includes security and resource usage information.
• The stack space contains local variables for the process.
Technical Note
The change in the SGA and PGA is transparent to the user; however, if supporting multiple users, you need to increase the LARGE_POOL_SIZE. MTS may force the default value to be set too high, causing performance problems or problems starting the database.
Each shared server process needs to access the data spaces of all sessions so that any server can handle requests from any session. Space is allocated in the SGA for each session’s data space. You can limit the amount of space that a session can allocate by setting the PRIVATE_SGA resource limit to the desired amount of space in the user profile. The various resources affected by Oracle Shared Server can be monitored by querying V$SYSSTAT.

Oracle9i DBA Fundamentals II 5-13
5-13 Copyright © Oracle Corporation, 2001. All rights reserved.
Configuring Oracle Shared Server
initSID.oraparameters
• Required Parameters– DISPATCHERS
– SHARED_SERVERS
• Optional Parameters– MAX_DISPATCHERS
– MAX_SHARED_SERVERS
– CIRCUITS
– SHARED_SERVER_SESSIONS
Configuring Oracle Shared Server
To configure Oracle Shared Server, you must edit the initialization parameter file for your instance. After setting these initialization parameters, restart the instance, which will then use the shared server configuration. Oracle Shared Server architecture requires Oracle Net Services even if the client and shared server processes reside on the same machine as the Oracle instance.
Most of the optional parameters have sensible defaults. On many systems, the only parameter that should be configured is DISPATCHERS.

Oracle9i DBA Fundamentals II 5-14
5-14 Copyright © Oracle Corporation, 2001. All rights reserved.
DISPATCHERS
dispatchers = “(PROTOCOL=TCP)(DISPATCHERS=2)\
(PROTOCOL=IPC)(DISPATCHERS=1)”
DispatcherD002
TCP/IP
Init.ora file
DispatcherD003
IPC
DispatcherD001
TCP/IP
Specifies the number of dispatchers initially started for a given protocol
The DISPATCHERS Parameter
The database administrator uses the DISPATCHERS parameter to enable various attributes for each dispatcher.
Oracle9i supports a name-value syntax (similar to the syntax used by Oracle Net Services) to enable the specification of existing and additional attributes in a position-independent, case-insensitive manner.
For example:
DISPATCHERS = “(PROTOCOL=TCP)(DISPATCHERS=3)”
Parameter Type
Parameter class:
Default value:
String (Specify as a quoted string)
Dynamic (can use ALTER SYSTEMto modify)
NULL
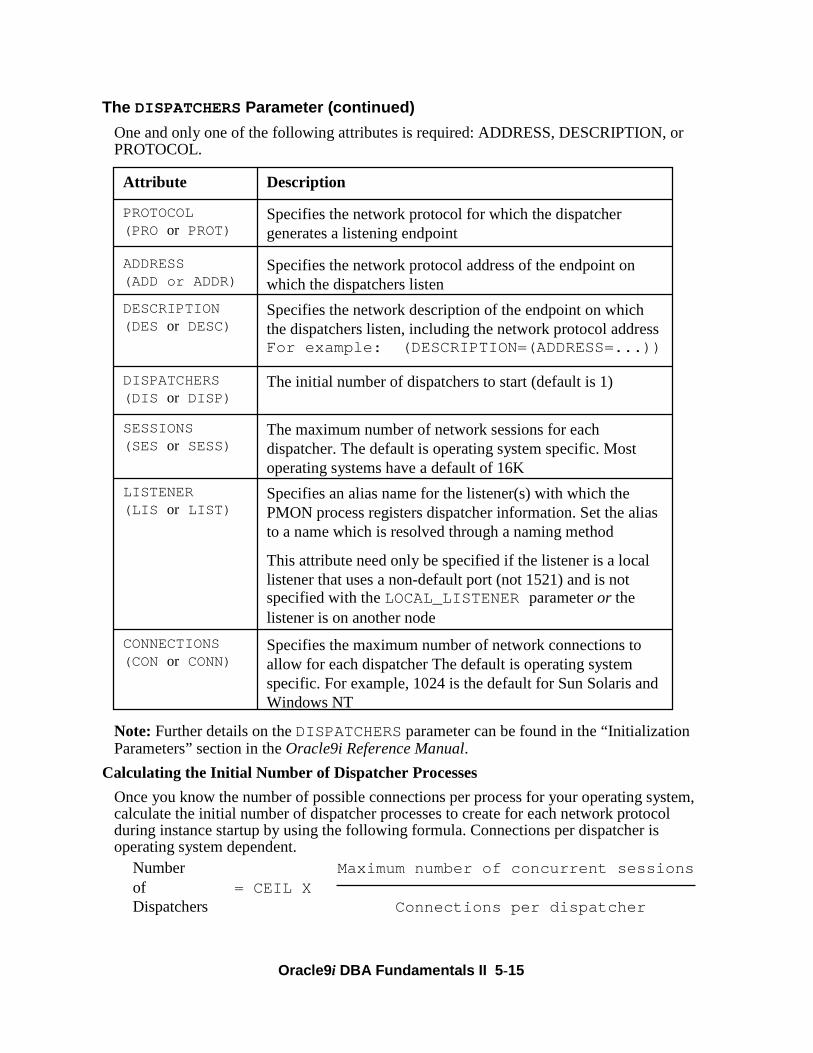
Oracle9i DBA Fundamentals II 5-15
The DISPATCHERS Parameter (continued)
One and only one of the following attributes is required: ADDRESS, DESCRIPTION, or PROTOCOL.
Note: Further details on the DISPATCHERS parameter can be found in the “Initialization Parameters” section in the Oracle9i Reference Manual.
Calculating the Initial Number of Dispatcher Processes
Once you know the number of possible connections per process for your operating system, calculate the initial number of dispatcher processes to create for each network protocol during instance startup by using the following formula. Connections per dispatcher is operating system dependent.
Number Maximum number of concurrent sessionsof = CEIL X Dispatchers Connections per dispatcher
Attribute
PROTOCOL (PRO or PROT)
ADDRESS(ADD or ADDR)
Description
Specifies the network protocol for which the dispatcher generates a listening endpoint
Specifies the network protocol address of the endpoint on which the dispatchers listen
DISPATCHERS(DIS or DISP)
The initial number of dispatchers to start (default is 1)
DESCRIPTION(DES or DESC)
Specifies the network description of the endpoint on which the dispatchers listen, including the network protocol address For example: (DESCRIPTION=(ADDRESS=...))
SESSIONS(SES or SESS)
LISTENER(LIS or LIST)
The maximum number of network sessions for each dispatcher. The default is operating system specific. Most operating systems have a default of 16K
Specifies an alias name for the listener(s) with which the PMON process registers dispatcher information. Set the alias to a name which is resolved through a naming method
This attribute need only be specified if the listener is a locallistener that uses a non-default port (not 1521) and is not specified with the LOCAL_LISTENER parameter or thelistener is on another node
CONNECTIONS (CON or CONN)
Specifies the maximum number of network connections to allow for each dispatcher The default is operating system specific. For example, 1024 is the default for Sun Solaris and Windows NT

Oracle9i DBA Fundamentals II 5-16
5-16 Copyright © Oracle Corporation, 2001. All rights reserved.
SHARED_SERVERS
shared_servers = 6
Init.ora file
S001
S002
S003
S004
S005
S006
Specifies the number of server processes createdwhen an instance is started up
The SHARED_SERVERS Parameter
SHARED_SERVERS specifies the number of server processes that you want to create when an instance is started up.
Parameter Type
Parameter class:
Default value:
Integer
Dynamic (can use ALTER SYSTEM to modify)
0
Range of values: Operating system dependent

Oracle9i DBA Fundamentals II 5-17
Setting the Initial Number of Shared Server Processes
The appropriate number of initial shared server processes for a database system depends on how many users typically connect to it and how much processing each user requires.
• If each user makes relatively few requests over a period of time, then each associated user process is idle for a large percentage of time. In that case, one shared server process can serve 10 to 20 users.
• If each user requires a significant amount of processing, a higher ratio of server processes to user processes is needed to handle requests.
If you want the Oracle database to use shared servers, you must set the SHARED_SERVERSparameter to at least 1. If you omit the parameter or set it to 0, the Oracle database does not start any shared servers at all.
You can subsequently set SHARED_SERVERS to a number greater than 0 while the instance is running.
It is best to estimate fewer initial shared server processes. Additional shared servers start automatically when needed and are deallocated automatically if they remain idle for too long.
• Note that the initial servers always remain allocated, even if they are idle.
• If you set the initial number of servers too high, your system might incur unnecessary overhead.
• Experiment with the number of initial shared server processes, and monitor shared servers until you find the ideal system performance for typical database activity.
Modifying the Minimum Number of Shared Server Processes
After starting an instance, you can change the minimum number of shared server processes by using the ALTER SYSTEM command.
• Oracle will eventually terminate servers that are idle when there are more shared servers than the minimum limit you specify.
• If you set SHARED_SERVERS to 0, Oracle terminates all current servers when they become idle and does not start any new servers until you increase SHARED_SERVERS.
• Setting SHARED_SERVERS to 0 effectively disables the shared server temporarily.
To control the minimum number of shared server processes, you must have the ALTER SYSTEM privilege.
The following statement sets the number of shared server processes to two:
ALTER SYSTEM SET SHARED_SERVERS = 2

Oracle9i DBA Fundamentals II 5-18
5-18 Copyright © Oracle Corporation, 2001. All rights reserved.
MAX_DISPATCHERS
max_dispatchers = 5
Init.ora file
DispatcherD002
TCP/IP
DispatcherD003
IPC
DispatcherD001
TCP/IP
DispatcherD004
DispatcherD005
• Specifies the maximum number of dispatcher processes that can run simultaneously
• Issue ALTER SYSTEM command to add more dispatchers than initially started
The MAX_DISPATCHERS Parameter
MAX_DISPATCHERS specifies the maximum number of dispatcher processes that can run simultaneously. After instance startup, you can start more dispatcher processes if needed; however, you can only start dispatchers that use protocols mentioned in the parameter file of the database.
For example, if the parameter file starts dispatchers for TCP and IPC, you cannot later start dispatchers for protocol DECnet without changing the parameter file and restarting the instance.
Parameter Type
Parameter class:
Default value:
Integer
Static
If dispatchers are configured, then defaults to whichever is greater: 5 or the number of dispatchers configured
Range of values: Operating system dependent

Oracle9i DBA Fundamentals II 5-19
Estimating the Maximum Number of Dispatches
To estimate the maximum number of dispatcher processes an instance requires, use the following formula:
Maximum number of concurrent sessionsMAX_DISPATCHERS =
Connections per dispatcher
For example, assume that your system typically has 900 users concurrently connected by way of TCP/IP and supports 255 connections per process. In this case, the DISPATCHERS parameter should be set as follows:
DISPATCHERS = "(PROTOCOL=TCP) (DISPATCHERS=4)"
Adding or Removing Dispatchers
• If the load on the dispatcher processes is consistently high, start additional dispatcher processes to route user requests without waiting. You may start new dispatchers until the number of dispatchers equals MAX_DISPATCHER.
• The load on the dispatchers can be monitored using the data dictionary views V$CIRCUIT and V$DISPATCHER.
• In contrast, if the load on dispatchers is consistently low, reduce the number of dispatchers.
The following example adds a dispatcher process where the number of dispatchers was previously two:
ALTER SYSTEM SETDISPATCHERS=’(PROTOCOL=TCP)(DISPATCHERS=3)’;
You can also use the ALTER SYSTEMcommand to remove dispatchers to the number specified in DISPATCHERS. If you want to have fewer than that, edit the init.ora file, then stop and restart the database.

Oracle9i DBA Fundamentals II 5-20
5-20 Copyright © Oracle Corporation, 2001. All rights reserved.
MAX_SHARED_SERVERS
max_shared_servers = 10
Init.ora file
S001
S002
S003
S004
S005
S006
S007
S008
S009
S010
• Specifies the maximum number of shared servers that can be started
• Allows shared servers to be allocated dynamically based on the length of the request queue
The MAX_SHARED_SERVERS Parameter
MAX_SHARED_SERVERS specifies the maximum number of shared server processes that will be allowed to run simultaneously.
Estimating the Maximum Number of Shared Servers
In general, set this parameter for an appropriate number of shared server processes at times of highest activity. Experiment with this limit, and monitor shared servers to determine an ideal setting for this parameter.
To get the maximum numbers of servers started, query the data dictionary view V$SHARED_SERVER_MONITOR.
Note: On Windows NT, take care when setting MAX_SHARED_SERVERS to a high value because each server is a thread in a common process.
Parameter Type
Parameter class:
Default value:
Integer
Static
Defaults to whichever is greater: 20 or 2 times the value of MAX_SERVERS
Range of values: Operating system dependent

Oracle9i DBA Fundamentals II 5-21
5-21 Copyright © Oracle Corporation, 2001. All rights reserved.
Instance: TST8i
CIRCUITS
CIRCUITS = 100
Init.ora file
• Specifies the total number of virtual circuits that are available for inbound and outbound network sessions
• Contributes to total SGA size
The CIRCUITS Parameter
Virtual circuits are user connections to the database through dispatchers and servers.TheCIRCUITS parameter specifies the total number of virtual circuits that are available for inbound and outbound network sessions. This parameter is of interest because it is one of several parameters that contribute to the total SGA requirements of an instance.
.
Parameter Type
Parameter class:
Default value:
String
Static (cannot use ALTER SYSTEM to modify)
If Oracle Shared Server is configured, then the value of CIRCUITS will match that of SESSIONS otherwise, the value is 0
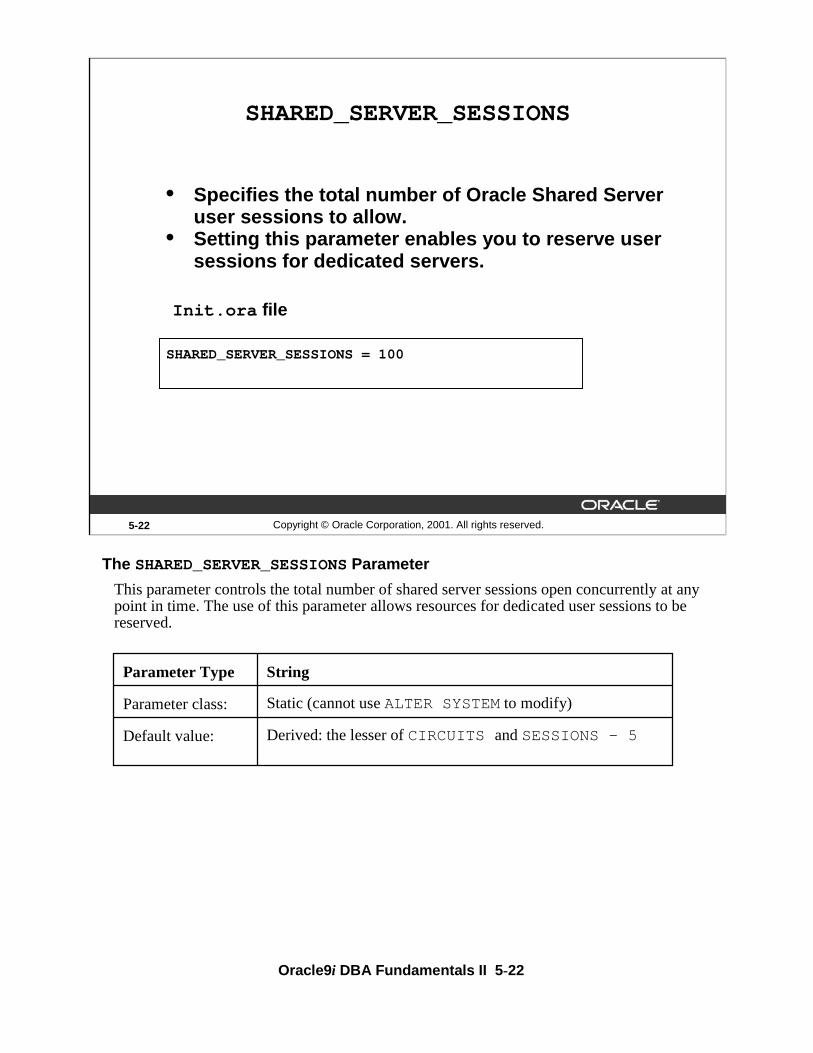
Oracle9i DBA Fundamentals II 5-22
5-22 Copyright © Oracle Corporation, 2001. All rights reserved.
SHARED_SERVER_SESSIONS
SHARED_SERVER_SESSIONS = 100
Init.ora file
• Specifies the total number of Oracle Shared Server user sessions to allow.
• Setting this parameter enables you to reserve user sessions for dedicated servers.
The SHARED_SERVER_SESSIONS Parameter
This parameter controls the total number of shared server sessions open concurrently at any point in time. The use of this parameter allows resources for dedicated user sessions to be reserved.
Parameter Type
Parameter class:
Default value:
String
Static (cannot use ALTER SYSTEM to modify)
Derived: the lesser of CIRCUITS and SESSIONS - 5

Oracle9i DBA Fundamentals II 5-23
5-23 Copyright © Oracle Corporation, 2001. All rights reserved.
Related Parameters
Other initialization parameters affected by OracleShared Server that may require adjustment:• LARGE_POOL_SIZE
• SESSIONS
Related Parameters
Other parameters affected by Oracle Shared Server that may require adjustment:
• LARGE_POOL_SIZEspecifies the size in bytes of the large pool allocation heap. Oracle Shared Server may force the default value to be set too high, causing performance problems or problems starting the database.
• SESSIONS specifies the maximum number of sessions that can be created in the system. May need to be adjusted for Oracle Shared server.
Use the large pool to allocate shared server-related UGA (User Global Area), not the shared pool. This is because Oracle uses the shared pool to allocate SGA (Shared Global Area) memory for other purposes, such as shared SQL and PL/SQL procedures. Using the large pool instead of the shared pool decreases fragmentation of the shared pool.
To store shared server-related UGA in the large pool, specify a value for the initialization parameter LARGE_POOL_SIZE. To see in which pool (shared pool or large pool) the memory for an object resides, see the POOLcolumn in V$SGASTAT. LARGE_POOL_SIZEdoes not have a default value, but its minimal value is 300K. If you do not set a value for LARGE_POOL_SIZE, then Oracle uses the shared pool for Oracle Shared Server usersession memory.
Oracle allocates some fixed amount of memory (about 10K) per configured session from the shared pool, even if you have configured the large pool. The CIRCUITS initialization parameter specifies the maximum number of concurrent shared server connections that the database allows.

Oracle9i DBA Fundamentals II 5-24
5-24 Copyright © Oracle Corporation, 2001. All rights reserved.
Verifying Setup
$ lsnrctl services
• Verify that you are connected using shared servers by making a single connection then query V$CIRCUIT view to show one entry per shared server connection
• Verify that the dispatcher has registered with the listener when the database was started by issuing:
Verifying Oracle Shared Server Setup
When using Oracle Shared Server, you should first start the listener, then the database, so that the dispatchers can immediately register with the listener. To verify that registration has taken place issue the following command:$ lsnrctl services listener01
Service "TEST" has 1 instance(s).
Instance "TEST", status READY, has 4 handler(s) for this service...
Handler(s):
"DISPATCHER" established:1 refused:0 current:1 max:1022 state:ready
D002 <machine: stc-sun02.us.oracle.com, pid: 8707>
(ADDRESS=(PROTOCOL=tcp)(HOST=stc-sun02.us.oracle.com)(PORT=35231))
"DISPATCHER" established:1 refused:0 current:0 max:1022 state:ready
D001 <machine: stc-sun02.us.oracle.com, pid: 8705>
(ADDRESS=(PROTOCOL=tcp)(HOST=stc-sun02.us.oracle.com)(PORT=35230))
"DISPATCHER" established:1 refused:0 current:0 max:1022 state:ready
D000 <machine: stc-sun02.us.oracle.com, pid: 8703>
(ADDRESS=(PROTOCOL=tcp)(HOST=stc-sun02.us.oracle.com)(PORT=35229))
"DEDICATED" established:0 refused:0

Oracle9i DBA Fundamentals II 5-25
Verifying Oracle Shared Server Setup (continued)
Verify your connections are using shared servers by making several connections then query the V$CIRCUIT view to show one entry per shared server connection. This also verifies that the listener is performing load balancing for incoming connections.
SQL>select dispatcher, circuit, server, status from v$circuit;
DISPATCH CIRCUIT SERVER STATUS
-------- -------- -------- ----------------
82890064 8257BA64 8288F6A4 NORMAL
8288F9E4 8257BBB0 00 NORMAL
8288FD24 8257BCFC 00 NORMAL

Oracle9i DBA Fundamentals II 5-26
5-26 Copyright © Oracle Corporation, 2001. All rights reserved.
Data Dictionary Views
• V$CIRCUIT
• V$SHARED_SERVER
• V$DISPATCHER
• V$SHARED_SERVER_MONITOR
• V$QUEUE
• V$SESSION
Useful Dictionary Views Summarized
V$CIRCUIT This view contains information about virtual circuits, which areuser connections to the database through dispatchers and servers.
V$SHARED_SERVER This view contains information on the shared server processes.
V$DISPATCHER This view provides information on the dispatcher processes.
V$SHARED_SERVER_ MONITOR
This view contains information for tuning the shared server processes.
V$QUEUE
V$SESSION
This view contains information on request and response queues.
This view lists session information for each current session.
Oracle9i DBA Fundamentals II 5-27
5-27 Copyright © Oracle Corporation, 2001. All rights reserved.
Summary
In this lesson, you should have learned how to:
• Identify the components of the Oracle Shared Server
• Describe the Oracle Shared Server architecture
• Configure the Oracle Shared Server
• Identify and explain usefulness of related data dictionary views

Oracle9i DBA Fundamentals II 5-28
5-28 Copyright © Oracle Corporation, 2001. All rights reserved.
Practice 5 Overview
This practice covers the following topics:
• Configuring Oracle Shared Server• Defining LOCAL_LISTENER for instance
registration
• Using LSNRCTL utility to verify services
• Verifying shared server configuration and performance using V$ views
• Verifying instance registration

Oracle9i DBA Fundamentals II 5-29
Practice 5
1. Start a Telnet session connecting to the server where your database resides Configure and start up Oracle Shared Server for your database so that you have one dispatcher listening for TCP/IP connections and one shared server to serve requests. Specify the maximum dispatchers as two and maximum shared servers as six.
Note: Since the listener you are using is not listening on the default port of 1521, you must define the local_listener parameter in your init.ora and include a listener alias and address in your tnsnames.ora file. If this parameter is not properly defined, the instance will not start since the dispatcher processes will not know how to register with the listener.
2. To verify that a dispatcher is associated with your listener, use the lsnrctl utility.
3. Before making a network connection, query the view V$CIRCUIT from SQL*Plus connecting as system/manager in your telnet session to see if it contains data. This view has an entry for each connection session currently using shared servers.
4. Make a connection using SQL*Plus, connecting as system/manager from your client to the server, and query V$CIRCUIT view again. After you have verified the connection, exit SQL*Plus.
5. Query the V$SHARED_SERVER view to see how many shared servers have been started.
6. Query the V$DISPATCHER view to see how many dispatchers have been started.
7. Make two connections using SQL*Plus, connecting as system/manager from your client to the server using shared servers. Has the number of shared servers increased? Why or why not?
8. Add one more dispatcher to handle TCP requests and verify that the additional dispatcher has been added.

Oracle9i DBA Fundamentals II 5-30

6Copyright © Oracle Corporation, 2001. All rights reserved.
Backup and Recovery Overview
Oracle9i DBA Fundamentals II 6-2
6-2 Copyright © Oracle Corporation, 2001. All rights reserved.
Objectives
After completing this lesson, you should be able todo the following:
• Describe the basics of database backup, restore, and recovery
• List the types of failure that may occur in an Oracle environment
• Define a backup and recovery strategy
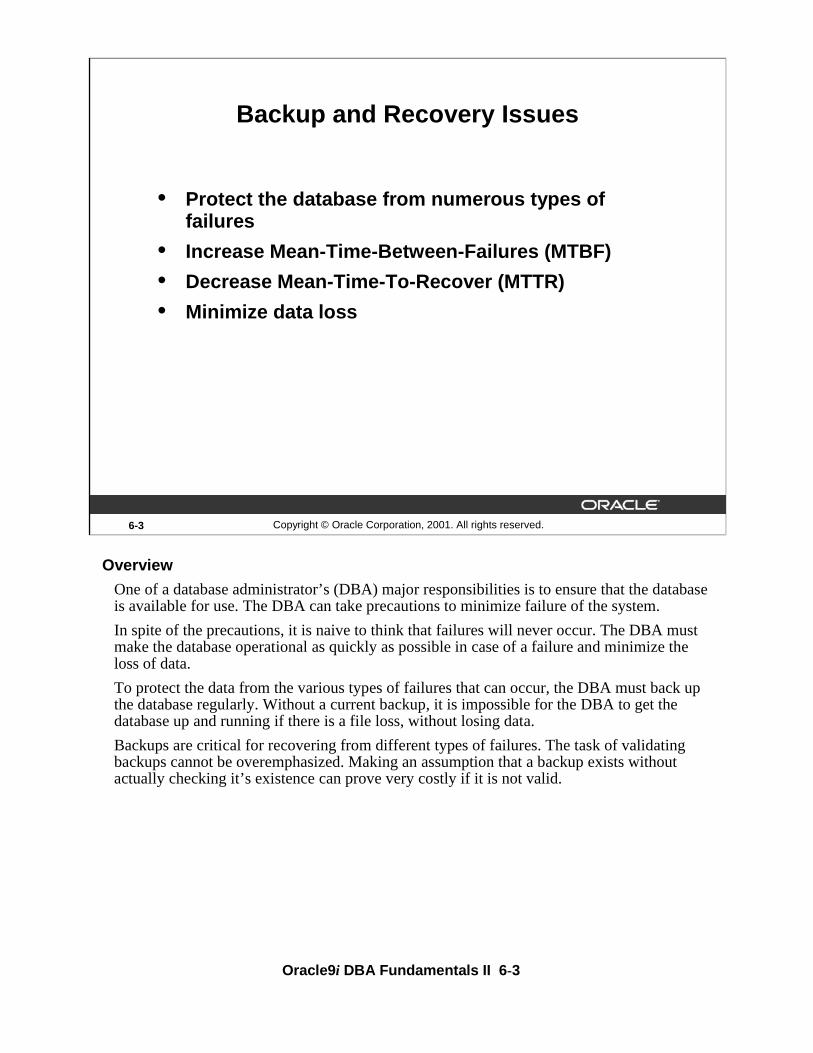
Oracle9i DBA Fundamentals II 6-3
Overview
One of a database administrator’s (DBA) major responsibilities is to ensure that the database is available for use. The DBA can take precautions to minimize failure of the system.
In spite of the precautions, it is naive to think that failures will never occur. The DBA must make the database operational as quickly as possible in case of a failure and minimize the loss of data.
To protect the data from the various types of failures that can occur, the DBA must back up the database regularly. Without a current backup, it is impossible for the DBA to get the database up and running if there is a file loss, without losing data.
Backups are critical for recovering from different types of failures. The task of validating backups cannot be overemphasized. Making an assumption that a backup exists without actually checking it’s existence can prove very costly if it is not valid.
6-3 Copyright © Oracle Corporation, 2001. All rights reserved.
Backup and Recovery Issues
• Protect the database from numerous types of failures
• Increase Mean-Time-Between-Failures (MTBF)
• Decrease Mean-Time-To-Recover (MTTR)
• Minimize data loss

Oracle9i DBA Fundamentals II 6-4
Categories of Failures
Different types of failures may occur in an Oracle database environment. These include:
• Statement failure
• User process failure
• User error
• Instance failure
• Media failure
• Network failure
Each type of failure requires a varying level of involvement by the DBA to recover effectively from the situation. In some cases, recovery depends on the type of backup strategy that has been implemented. For example, a statement failure requires little DBA intervention, whereas a media failure requires the DBA to employ a tested recovery strategy.
6-4 Copyright © Oracle Corporation, 2001. All rights reserved.
Categories of Failures
• Statement failure
• User process failure
• User error
• Instance failure
• Media failure
• Network failure
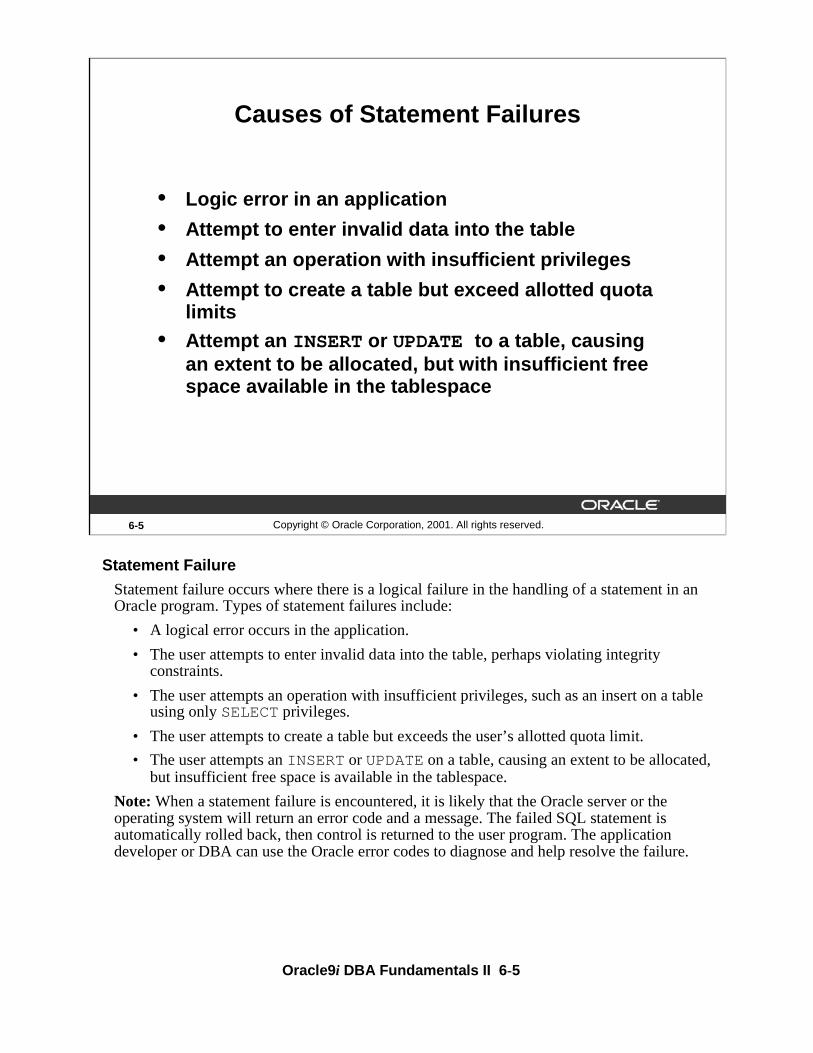
Oracle9i DBA Fundamentals II 6-5
Statement Failure
Statement failure occurs where there is a logical failure in the handling of a statement in an Oracle program. Types of statement failures include:
• A logical error occurs in the application.
• The user attempts to enter invalid data into the table, perhaps violating integrity constraints.
• The user attempts an operation with insufficient privileges, such as an insert on a table using only SELECT privileges.
• The user attempts to create a table but exceeds the user’s allotted quota limit.
• The user attempts an INSERT or UPDATE on a table, causing an extent to be allocated, but insufficient free space is available in the tablespace.
Note: When a statement failure is encountered, it is likely that the Oracle server or the operating system will return an error code and a message. The failed SQL statement is automatically rolled back, then control is returned to the user program. The application developer or DBA can use the Oracle error codes to diagnose and help resolve the failure.
6-5 Copyright © Oracle Corporation, 2001. All rights reserved.
Causes of Statement Failures
• Logic error in an application
• Attempt to enter invalid data into the table
• Attempt an operation with insufficient privileges
• Attempt to create a table but exceed allotted quota limits
• Attempt an INSERT or UPDATE to a table, causing an extent to be allocated, but with insufficient free space available in the tablespace
Oracle9i DBA Fundamentals II 6-6
Statement Failure Resolution
DBA intervention after statement failures will vary in degree, depending on the type of failure, and may include the following:
• Fix the application so that logical flow is correct. Depending on your environment this may be an application developer task rather than a DBA task.
• Modify the SQL statement and reissue it. This may also be an application developer task rather than a DBA task.
• Provide the necessary database privileges for the user to complete the statement successfully.
• Issue the ALTER USER command to change the quota limit.
• Add file space to the tablespace. Technically, the DBA should make sure this does not happen; however, in some cases it may be necessary to add file space. A DBA can also use the RESIZE and AUTOEXTEND options for data files.
• Oracle9i provides a means for suspending, and later resuming, the execution of large database operations in the event of space allocation failures. This enables an administrator to take corrective action, instead of the Oracle database server returning an error to the user. After the error condition is corrected, the suspended operation automatically resumes. This feature is called resumable space allocation and the statements that are affected are called resumable statements.
6-6 Copyright © Oracle Corporation, 2001. All rights reserved.
Resolutions for Statement Failures
• Correct the logical flow of the program.
• Modify and reissue the SQL statement.
• Provide the necessary database privileges.• Change the user’s quota limit by using the ALTER
USER command.
• Add file space to the tablespace.
• Enable resumable space allocation.

Oracle9i DBA Fundamentals II 6-7
Causes of User Process Failures
A user’s process may fail for a number of reasons; however, the more common causes include:
• The user performed an abnormal disconnect in the session. For example, a user issues a [Ctrl] + [Break] in SQL*Plus while connected to a database in a client-server configuration.
• The user’s session was abnormally terminated. One possible scenario is the user rebooted the client while connected to a database in a client-server configuration.
• The user’s program raised an address exception which terminated the session. This is common if the application does not properly handle exceptions when they are raised.
6-7 Copyright © Oracle Corporation, 2001. All rights reserved.
Causes of User Process Failures
• The user performed an abnormal disconnect in the session.
• The user’s session was abnormally terminated.
• The user’s program raised an address exception, which terminated the session.

Oracle9i DBA Fundamentals II 6-8
User Process Failure and DBA Action
The DBA will rarely need to take action to resolve user process errors. The user process cannot continue to work, although the Oracle server and other user processes will continue to function.
PMON Background Process
The PMON background process is usually sufficient for cleaning up after an abnormally terminated user process.
When the PMON process detects an abnormally terminated server process, it rolls back the transaction of the abnormally terminated process, and releases any resources and locks it has acquired.
6-8 Copyright © Oracle Corporation, 2001. All rights reserved.
Resolution of User Process Failures
• The PMON process detects an abnormally terminated user process.
• PMON rolls back the transaction and releases any resources and locks being held by it.

Oracle9i DBA Fundamentals II 6-9
User Errors
DBA intervention is usually required to recover from user errors.
Common Types of User Errors
• The user accidentally drops or truncates a table.
• The user deletes all rows in a table.
• The user commits data, but discovers an error in the committed data.
6-9 Copyright © Oracle Corporation, 2001. All rights reserved.
Possible User Errors
SQL> DROP TABLE employees;
SQL> TRUNCATE TABLE employees;
SQL> UPDATE employees
2 SET salary = salary * 1.5;
SQL> COMMIT;
SQL> DELETE FROM employees;
SQL> COMMIT;
Oracle9i DBA Fundamentals II 6-10
Minimizing User Errors
A key issue in any database and application environment is to make sure that users are properly trained and are aware of database availability and integrity implications.
A DBA should understand the types of applications and business operations that may result in loss of data from user errors and how to implement recovery measures for those situations.
Some recovery situations may be quite extensive, such as restoring the database to a point-in-time just prior to the error, exporting the lost data, and then importing that data back into the database from which it was lost.
Oracle9i provides a new feature called FlashBack, which lets you view and repair historical data. FlashBack offers the ability to perform queries on the database as of a certain wall clock time or user-specified system commit number (SCN).
6-10 Copyright © Oracle Corporation, 2001. All rights reserved.
Resolution of User Errors
• Train the database users.
• Recover from a valid backup.
• Import the table from an export file.
• Use LogMiner to determine the time of error.
• Recover with a point-in-time recovery.
• Use LogMiner to perform object-level recovery.
• Use FlashBack to view and repair historical data.

Oracle9i DBA Fundamentals II 6-11
Instance Failure
An instance failure may occur for numerous reasons:
• A power outage occurs that causes the server to become unavailable.
• The server becomes unavailable due to hardware problems such as a CPU failure, memory corruption, or an operating system crash.
• One of the Oracle server background processes (DBWn, LGWR, PMON, SMON, CKPT) experiences a failure.
To recover from instance failure, the DBA:
• Starts the instance by using the “startup” command. The Oracle server will automatically recover, performing both the roll forward and rollback phases.
• Investigates the cause of failure by reading the instance alert.log file and any other trace files that were generated during the instance failure.
6-11 Copyright © Oracle Corporation, 2001. All rights reserved.
Database
Datafile 1
Datafile 2
Datafile 3
Controlfiles
Redo log file 1
Redo log file 2
145
Causes of Instance FailureInstance
SGA
Redo logbuffer
Data buffer
Large PoolLocks
Shared pool
Data dict.cache
Shared SQLand PL/SQL
PMONDBWnSMON LGWRCKPT ARCnUser
processServer
processPGA
Userprocess
Serverprocess
PGA
146146
146
146
146
Parameterfile
Passwordfile

Oracle9i DBA Fundamentals II 6-12
Instance Recovery
Instance recovery restores a database to its transaction-consistent state just prior to instance failure. The Oracle server automatically performs instance recovery when the database is opened if it is necessary.
No recovery action needs to be performed by you. All required redo information is read by SMON. To recover from this type of failure, start the database:
SQL> CONNECT / AS sysdba;
Connected.
SQL> STARTUP;
. . .
Database opened.
After the database has opened, notify users that any data that they did not commit must be re-entered.
6-12 Copyright © Oracle Corporation, 2001. All rights reserved.
Recovery from Instance Failure
• No special recovery action is needed from DBA.
• Start the instance.
• Wait for the “database opened” notification.
• Notify users.
• Check alert file to determine the reason for the failure.

Oracle9i DBA Fundamentals II 6-13
Instance Recovery (continued)
Note:
• There may be a time delay between starting the database and the “Database opened” notification—this is the roll forward phase that takes place while the database is mounted.
– SMON performs the roll forward process by applying changes recorded in the online redo log files from the last checkpoint.
– Rolling forward recovers data that has not been recorded in the database files, but has been recorded in the online redo log, including the contents of rollback segments.
• Rollback can occur while the database is open, because either SMON or a server process can perform the rollback operation. This allows the database to be available for users more quickly.

Oracle9i DBA Fundamentals II 6-14
Media Failure
Media failure involves a physical problem when reading from or writing to a file that is necessary for the database to operate. Media failure is the most serious type of failure because it usually requires DBA intervention.
Common Types of Media Related Problems
• The disk drive that held one of the database files experienced a head crash.
• There is a physical problem reading from or writing to the files needed for normal database operation.
• A file was accidentally erased.
6-14 Copyright © Oracle Corporation, 2001. All rights reserved.
Causes of Media Failures
• Head crash on a disk drive
• Physical problem in reading from or writing to database files
• File was accidentally erased

Oracle9i DBA Fundamentals II 6-15
Media Failure Resolution
A tested recovery strategy is the key component to resolving media failure problems. The ability of the DBA to minimize down time and data loss as a result of media failure depends on the type of backups that are available. A recovery strategy, therefore, depends on the following:
• The backup method you choose and which files are affected.
• The Archivelog mode of operation of the database. If archiving is used, you can apply archived redo log files to recover committed data since the last backup.
6-15 Copyright © Oracle Corporation, 2001. All rights reserved.
Resolutions for Media Failures
• The recovery strategy depends on which backup method was chosen and which files are affected.
• If available, apply archived redo log files to recover data committed since the last backup.
Oracle9i DBA Fundamentals II 6-16
Questions for the DBA
Whatever backup strategy you choose, it is important to obtain agreement from all appropriate levels of management. For example, if your company wants to avoid taking physical image copies of the files to minimize the usage of disk space, management must be aware of the ramifications of this decision.
Here are some questions to consider when selecting a backup strategy:
• Given the expectation of system availability, does management understand the tradeoffs of the backup strategy that is chosen?
• Are there dedicated resources available which will be needed to ensure a successful backup and recovery strategy?
• Is the importance of taking backups and preparing recovery procedures clearly understood?
Performing a thorough analysis of the business, operational, and technical requirements provides management with the information needed to support an effective backup and recovery strategy.
6-16 Copyright © Oracle Corporation, 2001. All rights reserved.
Defining a Backup and Recovery Strategy
• Business requirements
• Operational requirements
• Technical considerations
• Management concurrence
Oracle9i DBA Fundamentals II 6-17
Business Impact
You should understand the impact that down time has on the business. Management must quantify the cost of down time and the loss of data and compare this with the cost of reducing down time and minimizing data loss.
MTTR Database availability is a key issue for a DBA. In the event of a failure the DBA should strive to reduce the Mean-Time-To-Recover (MTTR). This strategy ensures that the database is unavailable for the shortest possible amount of time. Anticipating the types of failures that can occur and using effective recovery strategies, the DBA can ultimately reduce the MTTR.
MTBF Protecting the database against various types of failures is also a key DBA task. To do this, a DBA must increase the Mean-Time-Between-Failures (MTBF). The DBA must understand the backup and recovery structures within an Oracle database environment and configure the database so that failures do not often occur.
Evolutionary Process A backup and recovery strategy evolves as business, operational, and technical requirements change. It is important that both the DBA and appropriate management review the validity of a backup and recovery strategy on a regular basis.
6-17 Copyright © Oracle Corporation, 2001. All rights reserved.
Business Requirements
• Mean-Time-To-Recover
• Mean-Time-Between-Failure
• Evolutionary process
Oracle9i DBA Fundamentals II 6-18
24-Hour Operations
Backups and recoveries are always affected by the type of business operation that you provide, particularly in a situation where a database must be available 24 hours a day, 7 days a week for continuous operation. Proper database configuration is necessary to support these operational requirements because they directly affect the technical aspects of the database environment.
Testing Backups
DBAs can ensure that they have a strategy that enables them to decrease the MTTR and increase the MTBF by having a plan in place to test the validity of backups regularly. A recovery is only as good as the backups that are available. Here are some questions to consider when selecting a backup strategy:
• Can you depend on system administrators, vendors, backup DBAs, and other critical personnel when you need help?
• Can you test your backup and recovery strategies at frequently scheduled intervals?
• Are backup copies stored at an off-site location?
• Is a plan well documented and maintained?
6-18 Copyright © Oracle Corporation, 2001. All rights reserved.
Operational Requirements
• 24-hour operations
• Testing and validating backups
• Database volatility

Oracle9i DBA Fundamentals II 6-19
Database Volatility
Other issues that impact operational requirements include the volatility of the data and structure of the database. Here are some questions to consider when selecting a backup strategy:
• Are tables frequently updated?
• Is data highly volatile? If so, you must perform backups more frequently than a business where data is relatively static.
• Does the structure of the database change often?
• How often do you add data files?

Oracle9i DBA Fundamentals II 6-20
Physical Image Copies
Certain technical requirements are dictated by the types of backups that are required. For example, if physical image copies of data files are required, this may significantly impact available storage space.
Logical Copies
Creating logical copies of objects in the database may not have as significant storage requirements as physical image copies; however, system resources may be affected because logical copies are performed while the database is being accessed by users.
Database Configuration
Database configuration affects how backups are performed and the availability of the database. Depending on the database configuration, system resources, such as disk space required to support a backup and recovery strategy, may be limited.
6-20 Copyright © Oracle Corporation, 2001. All rights reserved.
Technical Considerations
• Resources: hardware, software, manpower, and time
• Physical image copies of the operating system files
• Logical copies of the objects in the database
• Database configuration
• Transaction volume which affects desired frequency of backups

Oracle9i DBA Fundamentals II 6-21
Transaction Volume
Transaction volume also affect system resources. If 24-hour operations require regular backups, the load on system resources is increased.
Technical Requirements
Here are some questions to consider when selecting a backup strategy:
• How much data do you have?
• Do you have the machine power and capacity to support backups?
• Is the data easily recreated?
• Can you reload the data into the database from a flat file?
• Does the database configuration support resiliency to different types of failures?
Oracle9i DBA Fundamentals II 6-22
Natural Disaster
Perhaps your data is so important that you must ensure resiliency even in the event of a complete system failure. Natural disasters and other issues can affect the availability of your data and must be considered when creating a disaster recovery plan. Here are some questions to consider when selecting a backup and recovery strategy:
• What will happen to your business in the event of a serious disaster such as:
– Flood, fire, earthquake, or hurricane
– Malfunction of storage hardware or software
• If your database server fails, will your business be able to operate during the hours, days, or even weeks it might take to get a new hardware system?
• Do you store backups at an off-site location?
6-22 Copyright © Oracle Corporation, 2001. All rights reserved.
Disaster Recovery Issues
• How will your business be affected in the event of a major disaster?– Earthquake, flood, or fire
– Complete loss of machine
– Malfunction of storage hardware or software
– Loss of key personnel, such as the database administrator
• Do you have a plan for testing your strategy periodically?

Oracle9i DBA Fundamentals II 6-23
Solutions
• Off-site backups
• Oracle9i Data Guard which protects critical data by automating the creation, management, and monitoring aspects of a standby database environment.
• Geomirroring
• Messaging
• TP monitors
Loss of Key Personnel
In terms of key personnel, consider the following questions:
• How will a loss of personnel affect your business?
• If your DBA leaves the company or is unable to work, will you be able to continue to run the database system?
• Who will handle a recovery situation if the DBA is unavailable?
Oracle9i DBA Fundamentals II 6-24
6-24 Copyright © Oracle Corporation, 2001. All rights reserved.
Summary
In this lesson, you should have learned how to:
• Evaluate potential failures in your environment
• Develop a strategy dictated by business, operational, and technical requirements
• Consider a test plan for a backup and recovery strategy

7Copyright © Oracle Corporation, 2001. All rights reserved.
Instance and Media Recovery Structures

Oracle9i DBA Fundamentals II 7-2
7-2 Copyright © Oracle Corporation, 2001. All rights reserved.
Objectives
After completing this lesson, you should be able todo the following:
• Describe the Oracle processes, memory structures, and files relating to recovery
• Identify the importance of checkpoints, redo log files, and archived log files
• Describe ways to tune instance recovery
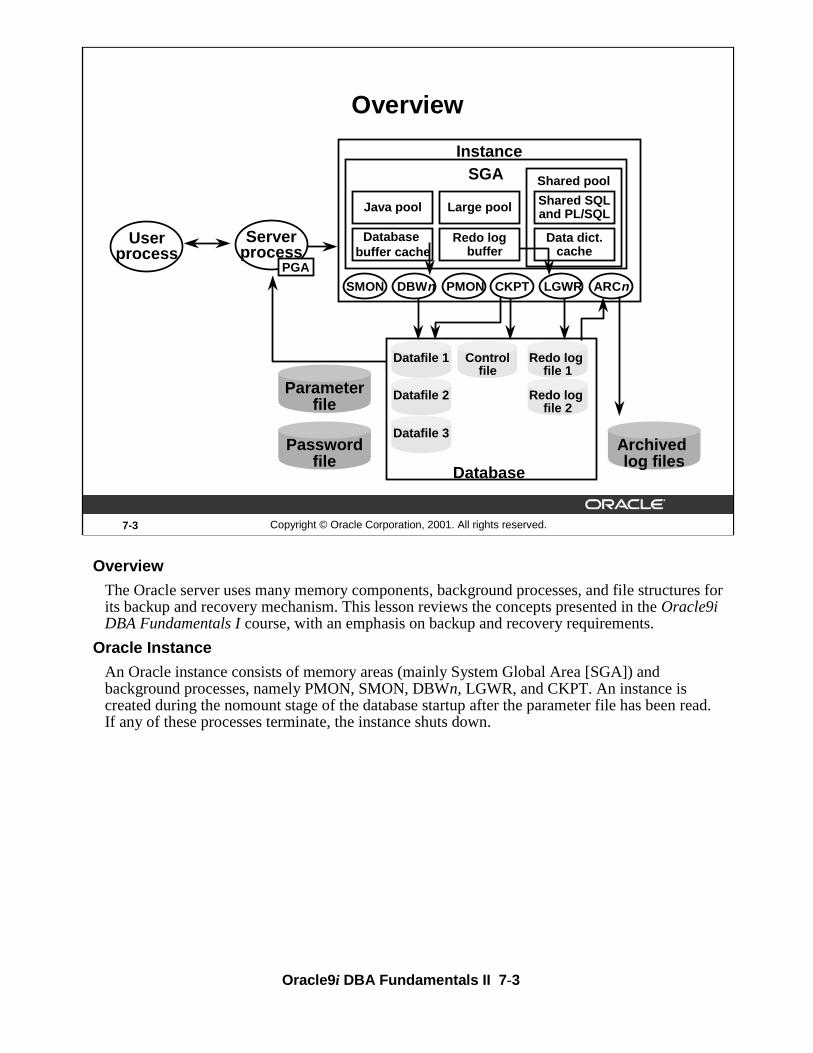
Oracle9i DBA Fundamentals II 7-3
Overview
The Oracle server uses many memory components, background processes, and file structures for its backup and recovery mechanism. This lesson reviews the concepts presented in the Oracle9i DBA Fundamentals I course, with an emphasis on backup and recovery requirements.
Oracle Instance
An Oracle instance consists of memory areas (mainly System Global Area [SGA]) and background processes, namely PMON, SMON, DBWn, LGWR, and CKPT. An instance is created during the nomount stage of the database startup after the parameter file has been read. If any of these processes terminate, the instance shuts down.
7-3 Copyright © Oracle Corporation, 2001. All rights reserved.
Overview
InstanceSGA
Database buffer cache
Large poolJava pool
Shared pool
Data dict.cache
Shared SQLand PL/SQL
ARCn
Userprocess
Serverprocess
PGA
Database
Datafile 1
Datafile 2
Datafile 3
Controlfile
Redo log file 1
Redo log file 2
Parameterfile
Passwordfile
Archived log files
PMONDBWnSMON LGWRCKPT
Redo logbuffer

Oracle9i DBA Fundamentals II 7-4
Memory Structures
Background Processes
The User Process
The user process is created when a user starts a tool such as SQL*Plus, Oracle Forms Developer, Oracle Reports Developer, Oracle Enterprise Manager, and so on. This process might be on the client or server, and provides an interface for the user to enter commands that interact with the database.
Type Description
Database buffer cache
Memory area used to store blocks read from data files. Data is read into the blocks by server processes and written out by DBWn asynchronously.
Log buffer Memory containing before and after image copies of changed data to be written to the redo logs
Large pool An optional area in the SGA that provides large memory allocations for backup and restore operations, I/O server processes, and session memory for the shared server and Oracle XA.
Shared pool Stores parsed versions of SQL statements, PL/SQL procedures, and data dictionary information
Type Description Database writer (DBWn)
Writes dirty buffers from the data buffer cache to the data files. This activity is asynchronous.
Log writer (LGWR) Writes data from the redo log buffer to the redo log files
System monitor (SMON)
Performs automatic instance recovery. Recovers space in temporary segments when they are no longer in use. Merges contiguous areas of free space depending on parameters that are set.
Process monitor (PMON)
Cleans up the connection/server process dedicated to an abnormally terminated user process. Performs rollback and releases the resources held by the failed process.
Checkpoint (CKPT) Synchronizes the headers of the data files and control files with the current redo log and checkpoint numbers.
Archiver (ARCn) (optional)
A process that automatically copies redo logs that have been marked for archiving.
Oracle9i DBA Fundamentals II 7-5
The Server Process
The server process accepts commands from the user process and performs steps to complete user requests. If the database is not in a shared server configuration, a server process is created on the machine containing the instance when a valid connection is established.
Oracle Database
An Oracle database consists of the following physical files:
Dynamic Views
The Oracle server provides a number of standard views to obtain information on the database and instance. These views include:
• V$SGA: Queries the size of the instance for the shared pool, log buffer, data buffer cache, and fixed memory sizes (operating system-dependent)
• V$INSTANCE: Queries the status of the instance, such as the instance mode, instance name, startup time, and host name
• V$PROCESS: Queries the background and server processes created for the instance
• V$BGPROCESS: Queries the background processes created for the instance
• V$DATABASE: Lists status and recovery information about the database. It includes information on the database name, the unique database identifier, the creation date, the control file creation date and time, the last database checkpoint, and other information.
• V$DATAFILE : Lists the location and names of the data files that are contained in the database. It includes information relating to the file number and name, creation date, status (online or offline), enabled (read-only, read-write), last data file checkpoint, size, and other information.
File Type Description Type
Datafiles Physical storage of data. At least one file is required per database. This file stores the system tablespace.
Binary
Redo logs Contain before and after image copies of changed data, for recovery purposes. At least two groups are required.
Binary
Control files Record the status of the database, physical structure, and RMAN meta data
Binary
Parameter file Store parameters required for instance startup Text
Server parameter file
Store persistent parameters required for instance startup
Binary
Password file (optional)
Store information on users who can start, stop, and recover the database
Binary
Archive logs (optional)
Physical copies of the online redo log files. Created when the database is set in Archivelog mode. Used in recovery.
Binary

Oracle9i DBA Fundamentals II 7-6
The Large Pool
The large pool is used to allocate sequential I/O buffers from shared memory. For I/O slaves and Oracle backup and restore, the RDBMS allocates buffers that are a few hundred kilobytes in size.
Recovery Manager (RMAN) uses the large pool for backup and restore when you set the DBWR_IO_SLAVES or BACKUP_TAPE_IO_SLAVES parameters to simulate asynchronous I/O.
Sizing the Large Pool
If LARGE_POOL_SIZE is set, then Oracle attempts to get memory from the large pool. If this value is not large enough, then Oracle does not try to get buffers from the shared pool.
If the LARGE_POOL_SIZE initialization parameter is not set, then the Oracle server attempts to allocate shared memory buffers from the shared pool in the SGA.
If Oracle cannot get enough memory, then it obtains I/O buffer memory from local process memory and writes a message to the alert.log file indicating that synchronous I/O is used for the backup.
7-6 Copyright © Oracle Corporation, 2001. All rights reserved.
Large Pool
• Can be configured as a separate memory area in the SGA to be used for:– Oracle backup and restore operations
– I/O server processes
– Session memory for the shared servers
• Is sized by the LARGE_POOL_SIZE parameter

Oracle9i DBA Fundamentals II 7-7
Large Pool Parameters• LARGE_POOL_SIZE: If this parameter is not set, then there is no large pool. The
specified size of memory is allocated from the SGA.
– Description: Size of the large pool, in bytes (can specify values in K or M)
– Minimum: 300 K
– Maximum: At least 2 GB (the maximum is operating system-specific)
– To determine how the large pool is being used, query V$SGASTAT:
SQL> SELECT *
2 FROM v$sgastat
3 WHERE pool = ’large pool’;
POOL NAME BYTES
----------- --------------- --------
large pool free memory 4194304*
• DBWR_IO_SLAVES: This parameter specifies the number of I/O slaves used by the DBWn process. The DBWn process and its slaves always write to disk. By default, the value is 0 and I/O slaves are not used.
– If DBWR_IO_SLAVES is set to a nonzero value, the numbers of I/O slaves used by the ARCn process, LGWR process, and Recovery Manager are set to 4.
– Typically, I/O slaves are used to simulate asynchronous I/O on platforms that do not support or implement it inefficiently. However, I/O slaves can be used even when asynchronous I/O is being used. In that case, the I/O slaves use asynchronous I/O.
• BACKUP_TAPE_IO_SLAVES: It specifies whether I/O slaves are used by the Recovery Manager to backup, copy, or restore data to tape.
– When BACKUP_TAPE_IO_SLAVES is set to TRUE, an I/O slave process is used to write to or read from a tape device.
– If this parameter is set to FALSE (the default), then I/O slaves are not used for backups; instead, the shadow process engaged in the backup accesses the tape device.
Note: Because a tape device can be accessed only by one process at any given time, this parameter is a Boolean, which allows or does not allow the deployment of an I/O slave process to access a tape device.
– In order to perform duplex backups, this parameter must be enabled, otherwise an error will be signaled. Recovery Manager configures as many slaves as needed for the number of backup copies requested when this parameter is enabled.

Oracle9i DBA Fundamentals II 7-8
Function of the Database Buffer Cache
• The database buffer cache is an area in the SGA that is used to store the most recently used data blocks.
• The server process reads tables, indexes, and rollback segments from the data files into the buffer cache where it makes changes to data blocks when required.
• The Oracle server uses a least recently used (LRU) algorithm to determine which buffers can be overwritten to accommodate new blocks in the buffer cache.
Function of the DBWn Background Process
• The database writer process (DBWn) writes the dirty buffers from the database buffer cache to the data files. It ensures that sufficient numbers of free buffers— buffers that can be overwritten when server processes need to read in blocks from the data files—are available in the database buffer cache.
• The database writer regularly synchronizes the database buffer cache and the data files: this is the checkpoint event triggered in various situations.
• Although one database writer process is adequate for most systems, you can configure additional processes (DBW1 through DBW9) to improve write performance if your system modifies data heavily. These additional database writer processes are not useful on uniprocessor systems.
7-8 Copyright © Oracle Corporation, 2001. All rights reserved.
Database Buffer Cache, DBWn, and Datafiles
InstanceSGA
Database buffer cache
Large poolJava pool
Shared pool
Data dict.cache
Shared SQLand PL/SQL
ARCn
Userprocess
Serverprocess
PGA
Database
Datafile 1
Datafile 2
Datafile 3
Controlfile
Redo log file 1
Redo log file 2
Parameterfile
Passwordfile
Archived log files
PMONDBW0SMON LGWRCKPTDBW1
Redo logbuffer
Oracle9i DBA Fundamentals II 7-9
Function of the DBWn Background Process (continued)
Data Files
Data files store both system and user data on a disk. This data may be committed or uncommitted.
Data Files Containing Only Committed Data
This is normal for a closed database, except when failure has occurred or the “shutdown abort” option has been used. If the instance is shutdown using the normal, immediate or transactional option, the data files contain only committed data. This is because all uncommitted data is rolled back, and a checkpoint is issued to force all committed data to a disk.
Data Files Containing Uncommitted Data
While an instance is started, datafiles can contain uncommitted data. This happens when data has been changed but not committed (the changed data is now in the cache), and more space is needed in the cache, forcing the uncommitted data off to disk. Only when all users eventually commit will the data files contain only committed data. In the event of failure, during subsequent recovery, the redo logs and rollback segments are used to synchronize the datafiles.
Configuring Tablespaces
Tablespaces contain one or more datafiles. It is important that tablespaces are created carefully to provide a flexible and manageable backup and recovery strategy. Here is a typical configuration of tablespaces, taking into account requirements for backup and recovery operations:
• System: Backup and recovery is more flexible if system and user data is contained in different tablespaces.
• Temporary: If the tablespace containing temporary segments (used in sort, and so on) is lost, it can be re-created, rather than recovered.
• Undo: The procedures for backing up undo tablespaces are exactly the same as for backing up any other read/write tablespace. Because the automatic undo tablespace is so important for recovery and for read consistency, you should back it up frequently.
• Read-only data: Backup time can be reduced because a tablespace must be backed up only when the tablespace is made read-only.
• Highly volatile data: This tablespace should be backed up more frequently, also reducing recovery time.
• Index data: Tablespaces to store only index segments should be created. These tablespaces can often be re-created instead of recovered.

Oracle9i DBA Fundamentals II 7-10
Function of the Redo Log Buffer
• The redo log buffer is a circular buffer that holds information about changes made to the database. This information is stored in redo entries.
• Redo entries contain the information necessary to reconstruct, or redo, changes made to the database by INSERT, UPDATE, DELETE, CREATE, ALTER, or DROP operations. Redo entries are used for database recovery, if necessary.
• Redo entries are copied by Oracle server processes from the user’s memory space to the redo log buffer.
7-10 Copyright © Oracle Corporation, 2001. All rights reserved.
Redo Log Buffer, LGWR, and Redo Log Files
InstanceSGA
Database buffer cache
Large poolJava pool
Shared pool
Data dict.cache
Shared SQLand PL/SQL
ARCn
Userprocess
Serverprocess
PGA
Database
Datafile 1
Datafile 2
Datafile 3
Controlfile
Redo log file 1
Redo log file 2
Parameterfile
Passwordfile
Archived log files
PMONSMON LGWRCKPT
Redo logbuffer
DBWn

Oracle9i DBA Fundamentals II 7-11
Function of the LGWR Background Process
The log writer (LGWR) writes redo entries from the redo log buffer to the redo log files as follows:
• When the redo log buffer is one-third full
• When a timeout occurs (every three seconds)
• When there is 1 MB of redo
• Before DBWn writes modified blocks in the database buffer cache to the data files
• When a transaction commits
Redo Log Files
Redo log files store all changes made to the database. If the database is to be recovered to a point in time when it was operational, redo logs are used to ensure that all committed transactions are committed to disk, and all uncommitted transactions are rolled back. The important points relating to redo log files are as follows:
• LGWR writes to redo log files in a circular fashion. This behavior results in all members of a log file group being overwritten.
• Although it is mandatory to have at least two log groups to support the cyclic nature, in most cases, you would need more than two redo log groups.
– You can create additional log file groups using the following SQL command:
ALTER DATABASE [database]
ADD LOGFILE [GROUP integer] filespec
[, [GROUP integer] filespec]...]
– To drop an entire online redo log group, use the following SQL command:
ALTER DATABASE [database]
DROP LOGFILE
{GROUP integer|(’filename’[,’filename’]...)}
[,{GROUP integer|(’filename’[,’filename’]...)}]...
• To avoid a single-point media failure, it is recommended that you multiplex redo logs.

Oracle9i DBA Fundamentals II 7-12
Redo Log Switches
At a log switch, the current redo log group is assigned a log sequence number that identifies the information stored in that redo log group and is also used for synchronization.
• A log switch occurs when LGWR stops writing to one redo log group and begins writing to another.
• A log switch occurs when LGWR has filled one log file group.
• A DBA can force a log switch by using the ALTER SYSTEM SWITCH LOGFILEcommand.
• A checkpoint occurs automatically at a log switch.
• Processing can continue as long as at least one member of a group is available. If a member is damaged or unavailable, messages are written to the LGWR trace file and to the alert log.
Dynamic Views
• V$LOG: Lists the number of members in each group. It contains:
– The group number
– The current log sequence number
– The size of the group
– The number of members
– Status (CURRENT or INACTIVE)
– The checkpoint change numbers
• V$LOGFILE : Lists the names, status (STALEor INVALID ), and group of each log file member.
• V$LOG_HISTORY: Contains information on log history from the control file.

Oracle9i DBA Fundamentals II 7-13
7-13 Copyright © Oracle Corporation, 2001. All rights reserved.
Group 1
Log1a.rdo
Log1b.rdo
Group 2
Log2a.rdo
Log2b.rdo
Group 3
Multiplexed Redo Log Files
Disk 1(Member a)
Disk 2(Member b)
Log3a.rdo
Log3b.rdo
Guidelines for Multiplexing
The redo log file configuration requires at least two redo log members per group, with each member on a different disk to guard against failure.
Keep the following points in mind:
• All members of a group contain identical information and are of the same size.
• Group members are updated simultaneously.
• Each group should contain the same number of members of the same size.
The locations of the online redo log files can be changed by renaming the online redo log files. Before renaming the online redo log files, make sure that the new online redo log file exists. The Oracle server changes only the pointers in the control files, but does not physically rename or create any operating system files. If the old file is an Oracle-managed file and it exists, then it is deleted.

Oracle9i DBA Fundamentals II 7-14
Guidelines for Multiplexing (continued)
How to Relocate a Redo Log File
1. If the log file is current, perform a log switch by using:
ALTER SYSTEM SWITCH LOG FILE;
2. Copy the redo log file from the previous location to the new location by using the operating system copy utility (cp in UNIX or COPY in NT)
3. Use the ALTER DATABASE RENAME FILE command to make the change in control files:
ALTER DATABASE [database]
RENAME FILE ’filename’[, ’filename’]...
TO ’filename’[, ’filename’]...
How to Add a Member to a Group
You can add new members to existing redo log file groups by using the following SQL command:
ALTER DATABASE [database]
ADD LOGFILE MEMBER
[ ’filename’ [REUSE]
[, ’filename’ [REUSE]]...
TO {GROUP integer
|(’filename’[, ’filename’]...)
}
]...
How to Drop a Member from a Group
You may want to drop an online redo log member if it becomes INVALID. Use the following command:
ALTER DATABASE [database]
DROP LOGFILE MEMBER ’filename’[, ’filename’]...
Note: You cannot drop a member from the current or active redo log file group.

Oracle9i DBA Fundamentals II 7-15
Database Checkpoints
Database checkpoints ensure that all modified database buffers are written to the database files. The database header files are then marked current, and the checkpoint sequence number is recorded in the control file. Checkpoints synchronize the buffer cache by writing all buffers to disk whose corresponding redo entries were part of the log file being checkpointed.
Incremental checkpoints are continuous, low overhead checkpoints that write buffers as a background activity.
Checkpoint Process (CKPT) Features
• The CKPT process is always enabled.
• The CKPT process updates file headers at checkpoint completion.
• More frequent checkpoints reduce the time needed for recovering from instance failure at the possible expense of performance.
7-15 Copyright © Oracle Corporation, 2001. All rights reserved.
CKPT Process
InstanceSGA
Database buffer cache
Large poolJava pool
Shared pool
Data dict.cache
Shared SQLand PL/SQL
ARCn
Userprocess
Serverprocess
PGA
Database
Datafile 1
Datafile 2
Datafile 3
Controlfile
Redo log file 1
Redo log file 2
Parameterfile
Passwordfile
Archived log files
PMONSMON LGWRCKPT
Redo logbuffer
DBWn
Oracle9i DBA Fundamentals II 7-16
When Does Checkpointing Occur?
• At every log switch (cannot be suppressed)
• When fast-start checkpointing is set to force DBWn to write buffers in advance in order to shorten the instance recovery
• At a frequency defined by the LOG_CHECKPOINT_INTERVAL initialization parameter. It specifies the frequency of checkpoints in terms of the number of redo log file blocks that can exist between an incremental checkpoint and the last block written to the redo log.
• When the elapsed time since writing the redo block at the current checkpoint position exceeds the number of seconds specified by the LOG_CHECKPOINT_TIMEOUTinitialization parameter. LOG_CHECKPOINT_TIMEOUT specifies the amount of time, in seconds, that has passed since the incremental checkpoint at the position where the last write to the redo log (sometimes called the tail of the log) occurred. This parameter also signifies that no buffer will remain dirty (in the cache) for more than integer seconds.
• At instance shutdown, unless the instance is aborted
• When forced by a database administrator (ALTER SYSTEM CHECKPOINT command)
• When a tablespace is taken offline or an online backup is started
Note: Read-only data files are an exception: Their checkpoint numbers are frozen and do not correspond with the number in the control file.
Synchronization
• At each checkpoint, the checkpoint number is updated in every database file header and in the control file.
• The checkpoint number acts as a synchronization marker for redo, control, and data files. If they have the same checkpoint number, the database is considered to be in a consistent state.
• Information in the control file is used to confirm that all files are at the same checkpoint number during database startup. Any inconsistency between the checkpoint numbers in the various file headers results in a failure, and the database cannot be opened. Recovery is required.
Instance Recovery
Checkpoints expedite instance recovery because at every checkpoint all changed data is written to a disk. After data resides in datafiles, redo log entries before the last checkpoint need not be applied again during the roll forward phase of instance recovery.
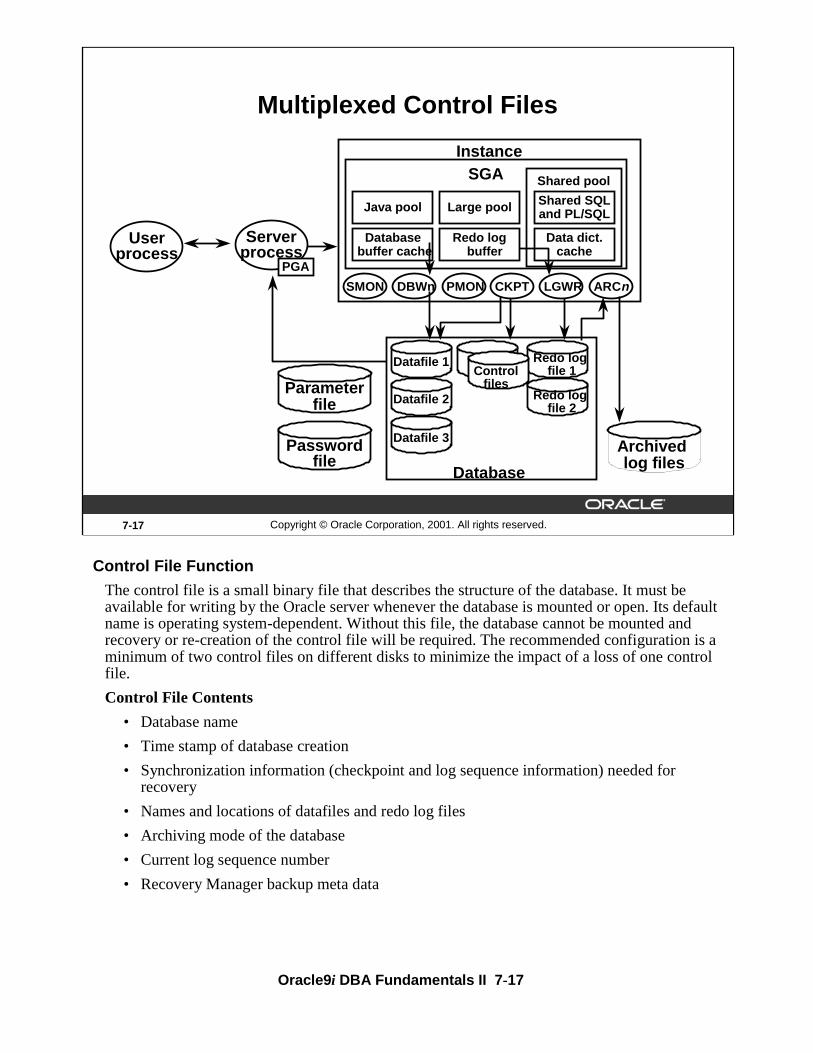
Oracle9i DBA Fundamentals II 7-17
Control File Function
The control file is a small binary file that describes the structure of the database. It must be available for writing by the Oracle server whenever the database is mounted or open. Its default name is operating system-dependent. Without this file, the database cannot be mounted andrecovery or re-creation of the control file will be required. The recommended configuration is a minimum of two control files on different disks to minimize the impact of a loss of one control file.
Control File Contents
• Database name
• Time stamp of database creation
• Synchronization information (checkpoint and log sequence information) needed for recovery
• Names and locations of datafiles and redo log files
• Archiving mode of the database
• Current log sequence number
• Recovery Manager backup meta data
7-17 Copyright © Oracle Corporation, 2001. All rights reserved.
Multiplexed Control Files
InstanceSGA
Databasebuffer cache
Large poolJava pool
Shared pool
Data dict.cache
Shared SQLand PL/SQL
ARCn
Userprocess
Serverprocess
PGA
Database
Datafile 1
Datafile 2
Datafile 3
Redo log file 1
Redo log file 2
Parameterfile
Passwordfile
Archived log files
PMONDBWnSMON LGWRCKPT
Controlfiles
Redo logbuffer

Oracle9i DBA Fundamentals II 7-18
Dynamic View
To obtain the location and names of the control files, use either the dynamic performance view V$PARAMETER or the dynamic performance view V$CONTROLFILE.
SQL> SELECT name
2> FROM v$controlfile;
NAME
-----------------------/ORADATA/u01/ctrl01.ctl
/ORADATA/u02/ctrl02.ctl
2 rows selected.
How to Multiplex the Control File
To add a new control file or change the number or location of the control file, follow these steps:
1. Shut down the database.
2. Make a copy of the existing control file to a different device by using operating system commands.
3. Edit or add the CONTROL_FILES parameter and specify names for all the control files.
4. Start the database.

Oracle9i DBA Fundamentals II 7-19
Function of the Archive Background Process
The ARCn process is an optional process. When enabled, it archives the redo log files to designated storage areas. This process has a great significance in backup, restoration, and recovery of a database set to Archivelog mode, where databases are operational 24 hours a day and 7 days a week.
The ARCn process initiates when a log switch occurs and copies one member of the last (unarchived) redo log group to at least one of the destinations specified by one or more init.ora parameters.
Archived Log Files
When the database is set to Archivelog mode, the LGWR process waits for the online redo log files to be archived (either manually or through the ARCn process) before they can be reused.
If an online redo log file is corrupt, another member from the same group is used. Archived logs are beneficial to the backup and recovery process because:
• A database backup, combined with archived redo log files, guarantees that all committed data can be recovered to the point of failure.
• Valid database backups can be taken while the database is online.
7-19 Copyright © Oracle Corporation, 2001. All rights reserved.
ARCn Process and Archived Log Files
InstanceSGA
Database buffer cache
Large poolJava pool
Shared pool
Data dict.cache
Shared SQLand PL/SQL
ARC0
Userprocess
Serverprocess
PGA
Database
Datafile 1
Datafile 2
Datafile 3
Controlfile
Redo log file 1
Redo log file 2
Passwordfile
Archived log filesdest 1
PMONDBWnSMON LGWRCKPT
Parameterfile
Passwordfile
Archived log filesdest 2
ARC1
Redo logbuffer

Oracle9i DBA Fundamentals II 7-20
Function of the Archive Background Process (continued)
Archiving Considerations
The choice of whether to enable archiving depends on the availability and reliability requirements of each database. Archived logs can be stored in more than one location (duplexing or multiple destinations), because they are vital for recovery. For production databases, it is recommended that you use the archive log feature with multiple destinations.
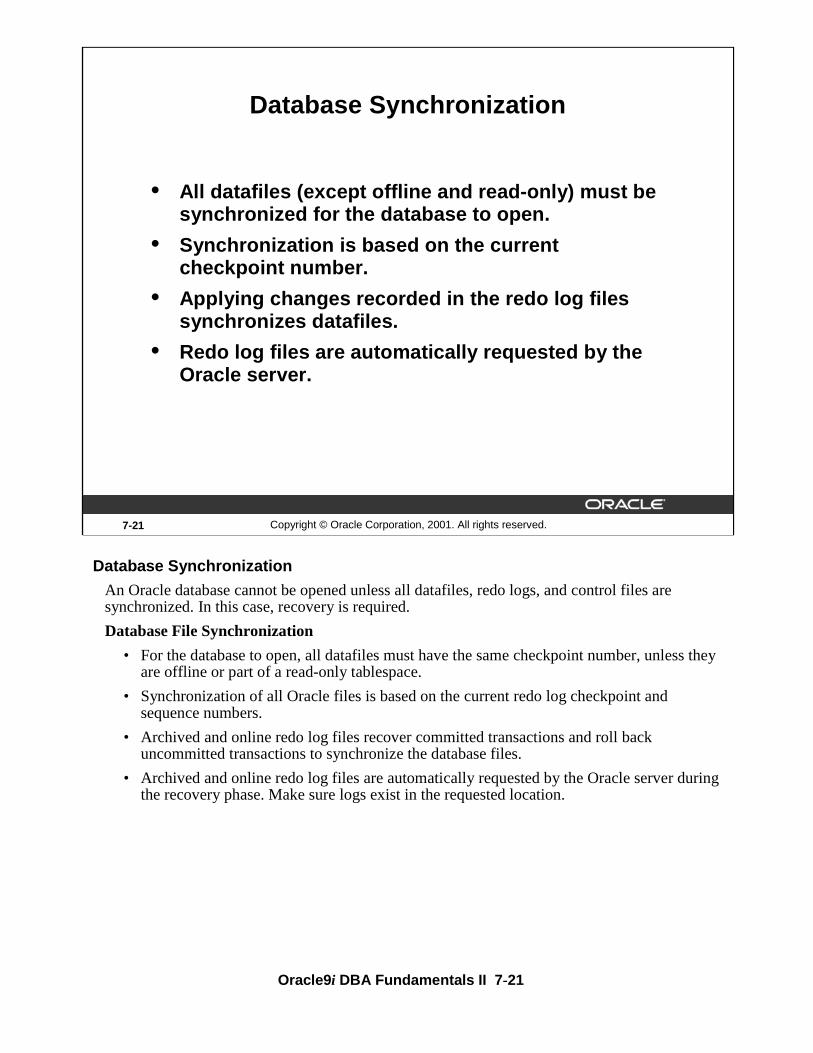
Oracle9i DBA Fundamentals II 7-21
Database Synchronization
An Oracle database cannot be opened unless all datafiles, redo logs, and control files are synchronized. In this case, recovery is required.
Database File Synchronization
• For the database to open, all datafiles must have the same checkpoint number, unless they are offline or part of a read-only tablespace.
• Synchronization of all Oracle files is based on the current redo log checkpoint and sequence numbers.
• Archived and online redo log files recover committed transactions and roll back uncommitted transactions to synchronize the database files.
• Archived and online redo log files are automatically requested by the Oracle server during the recovery phase. Make sure logs exist in the requested location.
7-21 Copyright © Oracle Corporation, 2001. All rights reserved.
Database Synchronization
• All datafiles (except offline and read-only) must be synchronized for the database to open.
• Synchronization is based on the current checkpoint number.
• Applying changes recorded in the redo log files synchronizes datafiles.
• Redo log files are automatically requested by the Oracle server.

Oracle9i DBA Fundamentals II 7-22
7-22 Copyright © Oracle Corporation, 2001. All rights reserved.
Database
Datafile 1
UndoDatafile
Datafile 3
Controlfile
Redo log file 1
Redo log file 2
146.5146.5
146.5
146.5
146.5
145
Phases for Instance Recovery
1. Datafiles out-of-synch2. Roll forward (redo)3. Committed and non-
committed data in files
SQL*Plus Serverprocess
PGA
Undo
Checkpoint
4. Roll back (undo)5. Committed data in files
InstanceSGA
Redo logbuffer
Databasebuffer cache
Large poolJava pool
Shared pool
Data dict.cache
Shared SQLand PL/SQL
ARCnPMONDBWnSMON LGWRCKPT
Instance Recovery Phases
1. The datafiles are not synchronized.
2. During the cache recovery or roll forward phase, all of the changes recorded in the redo log files since the last checkpoint are reapplied to the datafiles. This phase also regenerates undo or rollback data.
3. The datafiles now contain committed and perhaps uncommitted changes. The database is opened.
4. During the transaction recovery or rollback phase, any changes that were not actually committed are rolled back.
5. The datafiles now contain only committed changes to the database.

Oracle9i DBA Fundamentals II 7-23
Instance Recovery Phases
Phase Explanation 1 Unsynchronized files: The Oracle server determines whether a database
needs recovery when unsynchronized files are found. Instance failure can cause this to happen, such as a shutdown abort. This situation causes loss of uncommitted data because memory is not written to disk and files are not synchronized before shutdown.
2 Roll forward phase: DBWR writes both committed and uncommitted data to the data files. The purpose of the roll forward phase is to apply all changes recorded in the log file to the data blocks.
Note: - Undo segments are populated during the roll forward phase. Because redo logs store both before and after data images, an undo segment entry is added if an uncommitted block is found in the datafile and no rollback entry exists.
- Redo logs are applied using log buffers. The buffers used are marked for recovery and do not participate in normal transactions until they are relinquished by the recovery process.
- Redo logs are applied to a read-only datafile if a status conflict occurs (that is, the file header states the file is read-only, yet the control file recognizes it as read-write, or vice versa).
3 Committed and uncommitted data in datafiles: Once the roll forward phase has successfully completed, all committed data resides in the datafiles, although uncommitted data still might exist.
4 Roll back phase: To remove the uncommitted data from the files, undo segments populated during the roll forward phase or prior to the crash are used. Blocks are rolled back when requested by either the Oracle server or a user, depending on who requests the block first.
The database is therefore available even while roll back is running. Only those data blocks participating in roll back are not available.
5 Committed data in datafiles: When both the roll forward and rollback phases have completed, only committed data resides on disk.
6 Synchronized data files: All datafiles are now synchronized.
Oracle9i DBA Fundamentals II 7-24
Tuning Instance Recovery Performance
Instance and crash recovery are the automatic application of redo log records to Oracle data blocks after an instance failure.
The principal means of balancing the duration of instance recovery and daily performance is by influencing how aggressively Oracle advances the checkpoint. You can minimize the number of blocks processed during recovery by keeping the checkpoint only a few blocks behind the most recent redo log record. However, there will be increased performance overhead for normal operations due to frequent checkpointing
7-24 Copyright © Oracle Corporation, 2001. All rights reserved.
Tuning Instance Recovery Performance
• Tuning the duration of instance and crash recovery
• Tuning the phases of instance recovery
Oracle9i DBA Fundamentals II 7-25
Tuning Instance Recovery Performance (continued)
There are several methods you can use to keep the duration of instance and crash recovery within user-specified bounds.
Fast-start fault recovery functionality can be used to control instance recovery. This reduces the roll forward time by making it bounded and predictable, and also eliminates the time required to perform rollback. The foundation of fast-start fault recovery is the fast-start checkpointing architecture. A target time to complete the roll forward phase of recovery is specified by means of an initialization parameter.
The size of the redo log file directly influences checkpointing. The smaller the size of the smallest log, the more aggressively Oracle writes dirty buffers to disk to ensure that the position of the checkpoint has advanced to the current log, before that log completely fills, so that it can be reused.
7-25 Copyright © Oracle Corporation, 2001. All rights reserved.
Tuning the Duration of Instance and Crash Recovery
Methods to keep the duration of instance and crashrecovery within user-specified bounds:
• Set initialization parameters to influence the number of redo log records and data blocks involved in recovery.
• Size the redo log file to influence checkpointing frequency.
• Issue SQL statements to initiate checkpoints.
• Parallelize instance recovery operations.

Oracle9i DBA Fundamentals II 7-26
Using Initialization Parameters to Affect Recovery
You can use three initialization parameters to influence how aggressively Oracle advances the checkpoint.
Fast-start checkpointing occurs continuously, advancing the checkpoint time as blocks are written. A target (bounded) time to complete the roll forward phase of recovery is specified by means of the parameter FAST_START_MTTR_TARGET, and Oracle automatically varies the checkpoint writes to meet that target.
It is recommended that you use only the FAST_START_MTTR_TARGET parameter, instead of a combination of FAST_START_IO_TARGET, LOG_CHECKPOINT_INTERVAL, and LOG_CHECKPOINT_TIMEOUT as in previous releases. FAST_START_MTTR_TARGETprovides the most precise control over the duration of recovery and eliminates the need to manually set values for LOG_CHECKPOINT_INTERVAL and LOG_CHECKPOINT_TIMEOUT.
The dynamic view V$INSTANCE_RECOVERY provides the current recovery parameter settings.
7-26 Copyright © Oracle Corporation, 2001. All rights reserved.
Initialization Parameters Influencing Checkpoints
Parameter
FAST_START_MTTR_TARGET
LOG_CHECKPOINT_TIMEOUT
LOG_CHECKPOINT_INTERVAL
Definition
Expected MTTR specified in seconds
Amount of time that has passed
since the incremental checkpoint at
the position where the last write to
the redo log occurred
Number of redo log file blocks that
can exist between an incremental
checkpoint and the last block written
to the redo log

Oracle9i DBA Fundamentals II 7-27
V$INSTANCE_RECOVERY
Column Description RECOVERY_ESTIMATED_IOS Contains the number of dirty buffers in the
buffer cache. (In Standard Edition, the value of this field is always NULL).
ACTUAL_REDO_BLKS Current number of redo blocks required to be read for recovery.
TARGET_REDO_BLKS Goal for the maximum number of redo blocks to be processed during recovery. This value is the minimum of the next three columns (LOG_FILE_SIZE_REDO_BLKS, LOG_CHKPT_TIMEOUT_REDO_BLKS, LOG_CHKPT_INTERVAL_REDO_BLKS).
LOG_FILE_SIZE_REDO_BLKS Number of redo blocks to be processed during recovery corresponding to 90% of the size of the smallest log file.
LOG_CHKPT_TIMEOUT_REDO_BLKS
Number of redo blocks that must be processed during recovery to satisfy LOG_CHECKPOINT_TIMEOUT.
LOG_CHKPT_INTERVAL_REDO_BLKS
Number of redo blocks that must be processed during recovery to satisfy LOG_CHECKPOINT_INTERVAL.
FAST_START_IO_TARGET_REDO_BLKS
This field is obsolete. It is retained for backward compatibility. The value of this field is always NULL.
TARGET_MTTR Effective mean time to recover (MTTR) target in seconds. Usually, it should be equal to the value of the FAST_START_MTTR_TARGET parameter. If FAST_START_MTTR_TARGET is set to such a small value that it is impossible to do a recovery within its time frame, then the TARGET_MTTR field contains the effective MTTR target, which is larger than FAST_START_MTTR_TARGET. If FAST_START_MTTR_TARGET is set to such a high value that even in the worst-case (the whole buffer cache is dirty) recovery would not take that long, then the TARGET_MTTR field contains the estimated MTTR in the worst-case scenario. This field is 0 if FAST_START_MTTR_TARGET is not specified.
ESTIMATED_MTTR The current estimated mean time to recover (MTTR) in the number of seconds based on the number of dirty buffers and log blocks (gives the current estimated MTTR even if FAST_START_MTTR_TARGET is not specified).

Oracle9i DBA Fundamentals II 7-28
Tuning the Phases of Instance Recovery
You can use parameters to control the rolling forward and rolling back phases of instance recovery to increase the efficiency of the recovery. The total recovery time required is the sum of the time required to roll forward and roll back.
7-28 Copyright © Oracle Corporation, 2001. All rights reserved.
Tuning the Phases of Instance Recovery
• Tuning the roll forward phase
• Tuning the rollback phase
Oracle9i DBA Fundamentals II 7-29
Tuning the Rolling Forward Phase The RECOVERY_PARALLELISM initialization parameter is used to specify the number of concurrent process for instance or crash recovery operations. Using multiple processes in effect provides parallel block recovery. Different processes are allocated to different blocks during the roll forward phase.
7-29 Copyright © Oracle Corporation, 2001. All rights reserved.
Tuning the Rolling Forward Phase
• Parallel block recovery
• RECOVERY_PARALLELISM specifies the number of concurrent recovery processes

Oracle9i DBA Fundamentals II 7-30
Tuning the Rolling Back Phase
Fast-start on-demand rollback is an automatic feature which allows new transactions to begin immediately after the roll forward phase of recovery completes. If a user attempts to access a row that is locked by a dead transaction, only the changes needed to complete the transaction are rolled back. The rollback is on-demand.
7-30 Copyright © Oracle Corporation, 2001. All rights reserved.
Tuning the Rolling Back Phase
• Fast-start on-demand rollback
• Fast-start parallel rollback

Oracle9i DBA Fundamentals II 7-31
Fast-Start On-Demand Rollback
A user transaction initiates rollback on only the block the transaction is attempting to access. The remainder of the blocks are recovered in the background by SMON, potentially in parallel. The advantage is that a transaction does not have to wait until all work of a long transaction is rolled back.
7-31 Copyright © Oracle Corporation, 2001. All rights reserved.
Fast-Start On-Demand Rollback
Server process encountering data to be rolled backperforms the following:
• Rolls back the block containing the required row
• Hands off further recovery, which may be in parallel, to SMON
Improvedresponse
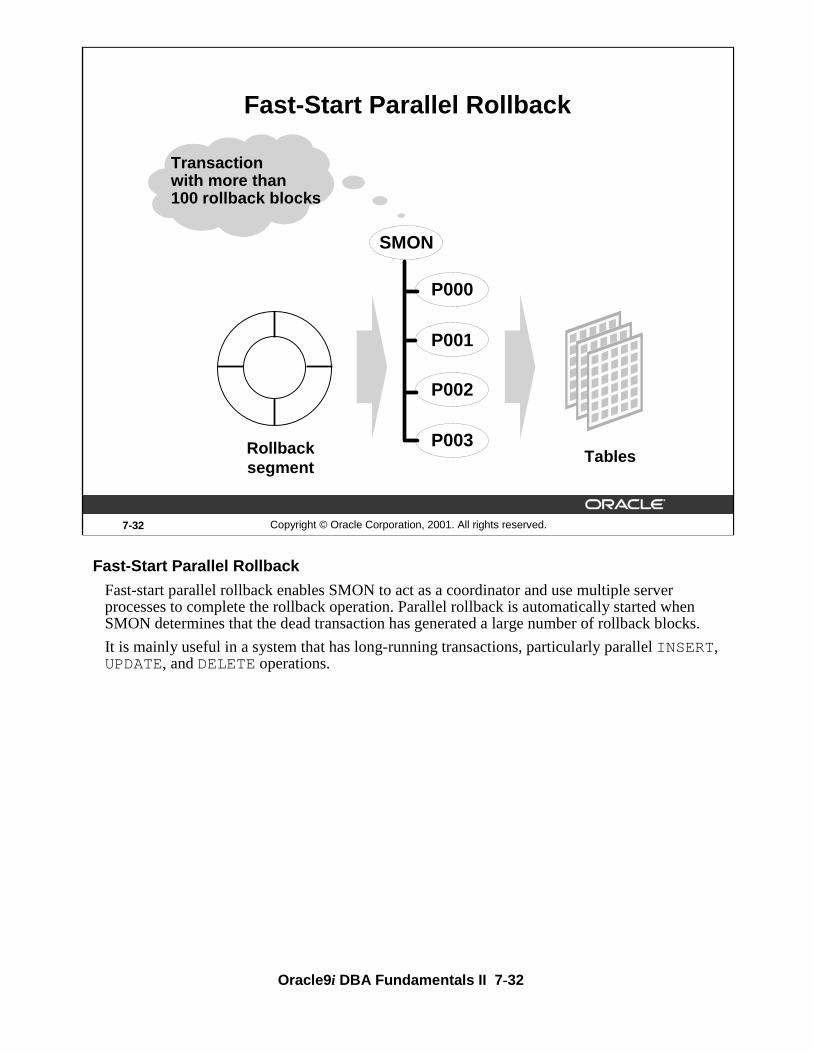
Oracle9i DBA Fundamentals II 7-32
Fast-Start Parallel Rollback
Fast-start parallel rollback enables SMON to act as a coordinator and use multiple server processes to complete the rollback operation. Parallel rollback is automatically started when SMON determines that the dead transaction has generated a large number of rollback blocks.
It is mainly useful in a system that has long-running transactions, particularly parallel INSERT, UPDATE, and DELETE operations.
7-32 Copyright © Oracle Corporation, 2001. All rights reserved.
Fast-Start Parallel Rollback
SMON
Rollbacksegment
Tables
Transaction with more than 100 rollback blocks
P001
P000
P002
P003

Oracle9i DBA Fundamentals II 7-33
Controlling Fast-Start Parallel Rollback
The number of processes involved in transaction recovery is set through the dynamic initialization parameter FAST_START_PARALLEL_ROLLBACK. The valid values for this parameter and its impact on fast-start parallel rollback are shown in the table.
7-33 Copyright © Oracle Corporation, 2001. All rights reserved.
Controlling Fast-Start Parallel Rollback
FAST_START_PARALLEL_ROLLBACK parameter
Value
FALSE
LOW
HIGH
Maximum Parallel Recovery Servers
None
2 * CPU_COUNT
4 * CPU_COUNT
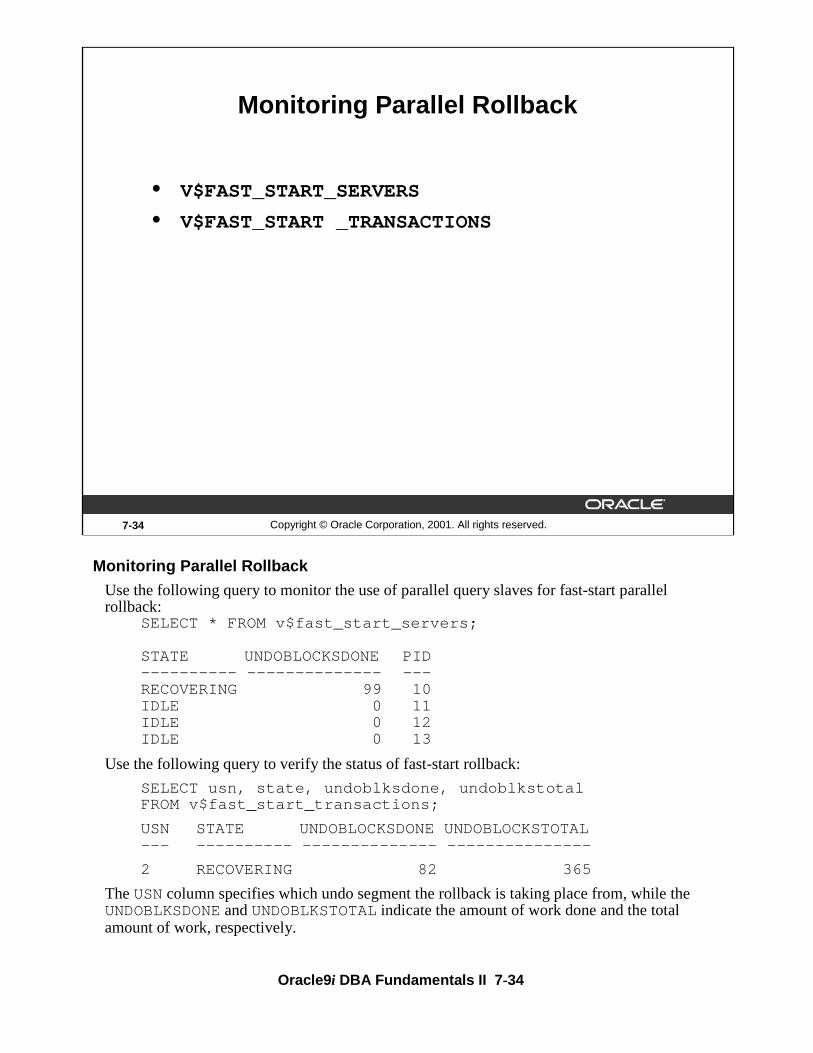
Oracle9i DBA Fundamentals II 7-34
Monitoring Parallel Rollback
Use the following query to monitor the use of parallel query slaves for fast-start parallel rollback:
SELECT * FROM v$fast_start_servers;
STATE UNDOBLOCKSDONE PID---------- -------------- ---RECOVERING 99 10IDLE 0 11IDLE 0 12IDLE 0 13
Use the following query to verify the status of fast-start rollback:
SELECT usn, state, undoblksdone, undoblkstotalFROM v$fast_start_transactions;
USN STATE UNDOBLOCKSDONE UNDOBLOCKSTOTAL--- ---------- -------------- ---------------
2 RECOVERING 82 365
The USN column specifies which undo segment the rollback is taking place from, while the UNDOBLKSDONE and UNDOBLKSTOTAL indicate the amount of work done and the total amount of work, respectively.
7-34 Copyright © Oracle Corporation, 2001. All rights reserved.
Monitoring Parallel Rollback
• V$FAST_START_SERVERS
• V$FAST_START _TRANSACTIONS
Oracle9i DBA Fundamentals II 7-35
7-35 Copyright © Oracle Corporation, 2001. All rights reserved.
Summary
In this lesson, you should have learned how to:
• Identify components of the instance and database that are significant to recovery
• Tune instance recovery
Oracle9i DBA Fundamentals II 7-36
7-36 Copyright © Oracle Corporation, 2001. All rights reserved.
Practice 7 Overview
This practice covers the following topics:
• Querying dynamic performance views to determine the current state and structure of the database
• Explaining the use of specific initialization parameters
• Mirroring of the control files and redo log files

Oracle9i DBA Fundamentals II 7-37
Practice 7
1. Query the V$ view that you use to find the names of all datafiles in the database.
2. Query the V$ views that you use to find the current online redo log and names of all redo logs in the database.
3. Query the V$ view that you use to find the names of all control files in the database.
4. Query the V$ view that you use to find the name of the database.
5. Query the V$ view that you use to locate processes still connected to the instance before shutting down the database.
6. Which initialization parameter configures the memory area in the SGA that buffers recovery information before being written to disk?
7. What is the large pool, when is it used, and what initialization parameter configures it?
8. Describe the significance of the parameter FAST_START_MTTR_TARGET during instance recovery.
9. Set up mirroring of the control files so that you have two control files. Place your second control file in the $HOME/ORADATA/u02 directory.
10. Set up mirroring of the online redo log files so that you have two members per group. Place the second member of each group in the $HOME/ORADATA/u04 directory.

Oracle9i DBA Fundamentals II 7-38

8Copyright © Oracle Corporation, 2001. All rights reserved.
Configuring the Database Archiving Mode

Oracle9i DBA Fundamentals II 8-2
8-2 Copyright © Oracle Corporation, 2001. All rights reserved.
Objectives
After completing this lesson, you should be able todo the following:
• Describe the differences between Archivelog and Noarchivelog modes
• Configure a database for Archivelog mode
• Enable automatic archiving
• Perform manual archiving of logs
• Configure multiple archive processes
• Configure multiple destinations, including remote destinations

Oracle9i DBA Fundamentals II 8-3
Redo Log History
All transactions are recorded in the online redo log files. This allows for automatic recovery of transactions in the event of a database failure.
If the database is configured for Noarchivelog mode, no redo history is saved to archived log files, and recovery operations are limited and a loss of transaction work may occur. This is the result of the automatic recycling of log files, where older log files needed for recovery are overwritten and only the most recent part of the transaction history is available.
You can configure a database in Archivelog mode, so that a history of redo information is maintained in archived files. The archived redo log files can be used for media recovery.
The database can be initially created in Archivelog mode, but it is configured for Noarchivelog mode by default.
8-3 Copyright © Oracle Corporation, 2001. All rights reserved.
Online redo log files
No redo historyLGWR
Redo history054 053
052
051
052
Redo Log History
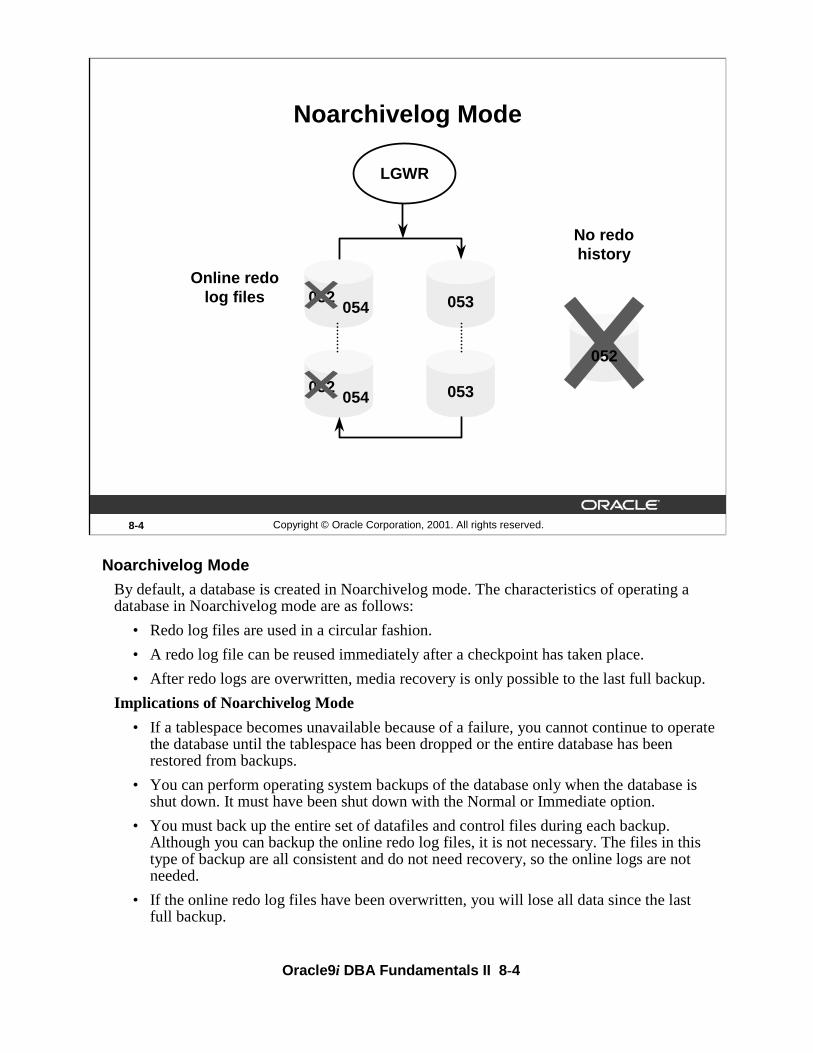
Oracle9i DBA Fundamentals II 8-4
Noarchivelog Mode
By default, a database is created in Noarchivelog mode. The characteristics of operating a database in Noarchivelog mode are as follows:
• Redo log files are used in a circular fashion.
• A redo log file can be reused immediately after a checkpoint has taken place.
• After redo logs are overwritten, media recovery is only possible to the last full backup.
Implications of Noarchivelog Mode
• If a tablespace becomes unavailable because of a failure, you cannot continue to operate the database until the tablespace has been dropped or the entire database has been restored from backups.
• You can perform operating system backups of the database only when the database is shut down. It must have been shut down with the Normal or Immediate option.
• You must back up the entire set of datafiles and control files during each backup. Although you can backup the online redo log files, it is not necessary. The files in this type of backup are all consistent and do not need recovery, so the online logs are not needed.
• If the online redo log files have been overwritten, you will lose all data since the last full backup.
8-4 Copyright © Oracle Corporation, 2001. All rights reserved.
Online redo log files
No redo history
053
LGWR
054 053052
053054 053052
052
Noarchivelog Mode

Oracle9i DBA Fundamentals II 8-5
Noarchivelog Mode (continued)
Media Recovery Options in Noarchivelog Mode
You must restore the datafiles and control files from a full database backup.
If you used the Export utility to back up the database, you can use the Import utility torestore lost data. However, this results in an incomplete recovery and transactions maybe lost.
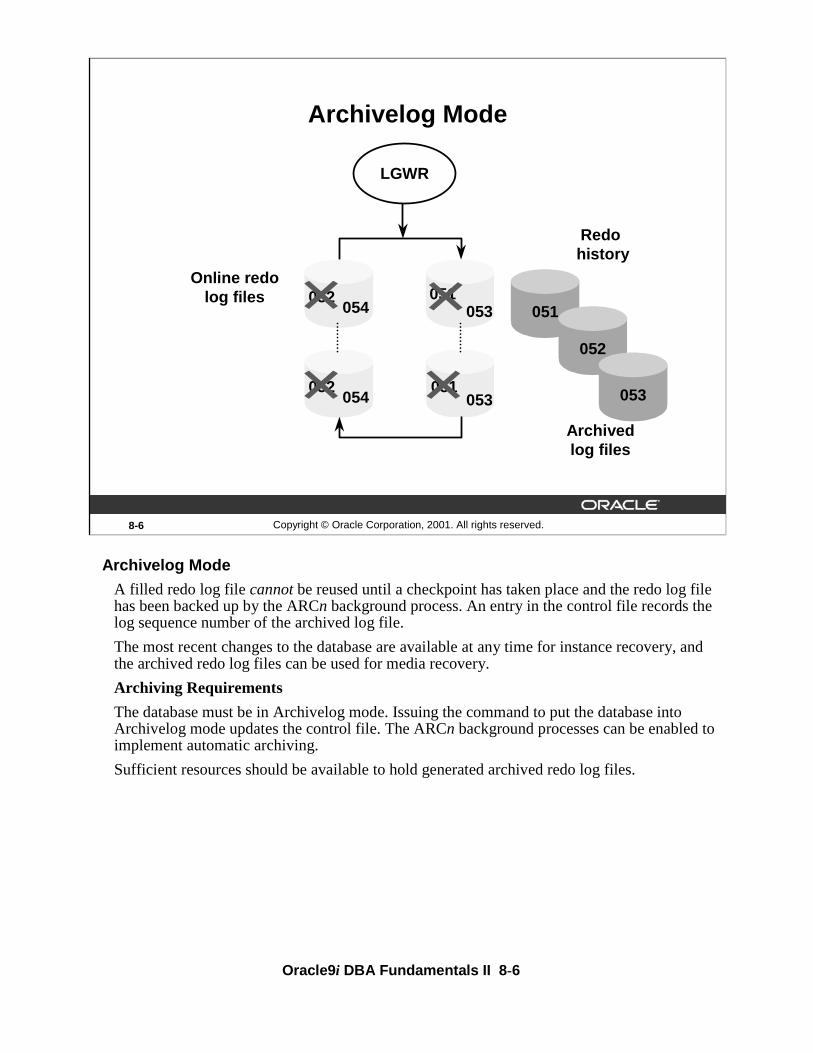
Oracle9i DBA Fundamentals II 8-6
Archivelog Mode
A filled redo log file cannot be reused until a checkpoint has taken place and the redo log file has been backed up by the ARCn background process. An entry in the control file records the log sequence number of the archived log file.
The most recent changes to the database are available at any time for instance recovery, and the archived redo log files can be used for media recovery.
Archiving Requirements
The database must be in Archivelog mode. Issuing the command to put the database into Archivelog mode updates the control file. The ARCn background processes can be enabled to implement automatic archiving.
Sufficient resources should be available to hold generated archived redo log files.
8-6 Copyright © Oracle Corporation, 2001. All rights reserved.
Archivelog Mode
053053
053
051
053051
051
052
053
Archivedlog files
Online redo log files
LGWR
054052
054052
Redohistory

Oracle9i DBA Fundamentals II 8-7
Archivelog Mode (continued)
Implications of Setting the Database in Archivelog Mode
• The database is protected from loss of data when media failure occurs.
• You can back up the database while it is online.
• When a tablespace other than SYSTEM goes offline as a result of media failure, the remainder of the database remains available because tablespaces (other than SYSTEM) can be recovered while the database is open.
Media Recovery Options
• You can restore a backup copy of the damaged files and use archived log files to bring the datafiles up-to-date while the database is online or offline.
• You can recover the database to a specific point in time.
• You can recover the database to the end of a specified archived log file.
• You can recover the database to a specific system change number (SCN).

Oracle9i DBA Fundamentals II 8-8
Changing the Archiving ModeThe initial archiving mode is set in the CREATE DATABASE statement. The default is Noarchivelog mode, which eliminates the archiving of redo information generated during the creation of the database.
You change the Archivelog mode by using the ALTER DATABASE command while the database is in the Mount state.
SQL> ALTER DATABASE [ archivelog | noarchivelog ]
where: archivelog establishes Archivelog mode for redo log file groups
noarchivelog establishes Noarchivelog mode for redo log file groups
8-8 Copyright © Oracle Corporation, 2001. All rights reserved.
Changing the Archiving Mode
SHUTDOWN NORMAL/IMMEDIATE1
STARTUP MOUNT
ALTER DATABASE ARCHIVELOG 3
ALTER DATABASE OPEN4
5
2
init.oraControl
file
Full database backup

Oracle9i DBA Fundamentals II 8-9
Changing the Archiving Mode (continued)A user must have the ALTER SYSTEM privilege to alter the Archivelog mode of the database.
Note: After the mode has been changed from Noarchivelog mode to Archivelog, you must back up all the datafiles and the control file. Your previous backup is not usable anymore because it was taken while the database was in Noarchivelog mode.
The new backup that is taken after putting the database into Archivelog mode is the back up against which all your future archived redo log files will apply.
Setting the database in Archivelog mode does not enable the Archiver (ARCn) processes.
Step Explanation
1 Shutdown the database: SQL> SHUTDOWN IMMEDIATE
2 Start the database in Mount state so that you can alter the Archivelog mode of database: SQL> STARTUP MOUNT
3 Set the database in Archivelog mode by using the ALTER DATABASE command: SQL> ALTER DATABASE ARCHIVELOG;
4 Open the database: SQL> ALTER DATABASE OPEN;
5 Take a full backup of the database.

Oracle9i DBA Fundamentals II 8-10
Automatic and Manual Archiving
The Archive Process
After a database is set in Archivelog mode, you must decide whether online redo log files are to be archived automatically or manually. This is the second step in creating archived redo log files to use for recovery.
Automatic Versus Manual Archiving
• In automatic archiving, the ARCn background processes are enabled and they copy redo log files as they are filled.
• In manual archiving, you must use SQL*Plus or Oracle Enterprise Manager to copy the files.
• It is recommended that you enable automatic archiving of log files.
8-10 Copyright © Oracle Corporation, 2001. All rights reserved.
Automatic and Manual Archiving
• Automatic archiving: LOG_ARCHIVE_START=TRUE
• Manual archiving: LOG_ARCHIVE_START=FALSE
DBA
ARC0
ARC1 053053
053053

Oracle9i DBA Fundamentals II 8-11
Automatic and Manual Archiving (continued)
Guidelines
• Before deciding on the archive mode (automatic or manual), you must set the database in Archivelog mode.
• Failure to switch to Archivelog mode will prevent ARCn from copying redo log files.
• The database should be shut down cleanly (by using the normal, immediate, or transactional option) before enabling the archive process.
Note: If the archive processes (ARCn) fail for any reason, after transaction activity has filled up all the redo logs, the Oracle server hangs. This is a legitimate hang, because setting the database in Archivelog mode tells the Oracle server not to overwrite the online redo log unless it is archived. Thus archiving online redo logs must keep pace with the transaction activity on the system (generation of redo logs).

Oracle9i DBA Fundamentals II 8-12
LOG_ARCHIVE_MAX_PROCESSES Parameter
Parallel Data Definition Language (DDL) and parallel Data Manipulation Language (DML) operations may generate a large number of redo log files. A single ARC0 process to archive these redo log files might not be able to keep up. Oracle starts additional processes as needed. However if you wish to avoid the run time overhead of invoking the additional processes, you can specify the number of processes to be started at instance startup.
You can specify up to ten ARCn processes by using the LOG_ARCHIVE_MAX_PROCESSESparameter.
When LOG_ARCHIVE_START is set to TRUE, an Oracle instance starts up with as many archiver processes as defined by LOG_ARCHIVE_MAX_PROCESSES.
You can always spawn additional archive processes, up to the limit set by LOG_ARCHIVE_MAX_PROCESSES, or kill archive processes at any time during the instance life.
8-12 Copyright © Oracle Corporation, 2001. All rights reserved.
Specifying Multiple ARCn Processes
• The dynamic parameter LOG_ARCHIVE_MAX_PROCESSES controls the number of archive processes started at instance startup.
• A maximum of ten ARCn processes can be specified.
• The number of ARCn processes can be changed with ALTER SYSTEM.

Oracle9i DBA Fundamentals II 8-13
Dynamic Number of ARCn Processes
During a period of heavy transaction load or activity, you can temporarily start additional archive processes to eliminate archiving bottlenecks. After the transaction activity returns to a normal level, you can stop some of the ARCn processes.
For example, every day of the month you start the instance with two archive processes. During the last day of each month, the activity always increases, so you start additional processes:
SQL> ALTER SYSTEM SET LOG_ARCHIVE_MAX_PROCESSES=3;
The day after, if the instance is not shut down, you can issue the following SQL command to stop the additional archive process:
SQL> ALTER SYSTEM SET LOG_ARCHIVE_MAX_PROCESSES=2;
Note: If the instance is shut down at night, the next day it would start again with only two archive processes as specified in the initialization parameter file.
8-13 Copyright © Oracle Corporation, 2001. All rights reserved.
Stop or Start Additional Archive Processes
LOG_ARCHIVE_MAX_PROCESSES=2
Archived redo logs
053
Online redo logs
ARC0ARC1
ALTER SYSTEM SET
LOG_ARCHIVE_MAX_PROCESSES = 3;
ARC2
053053
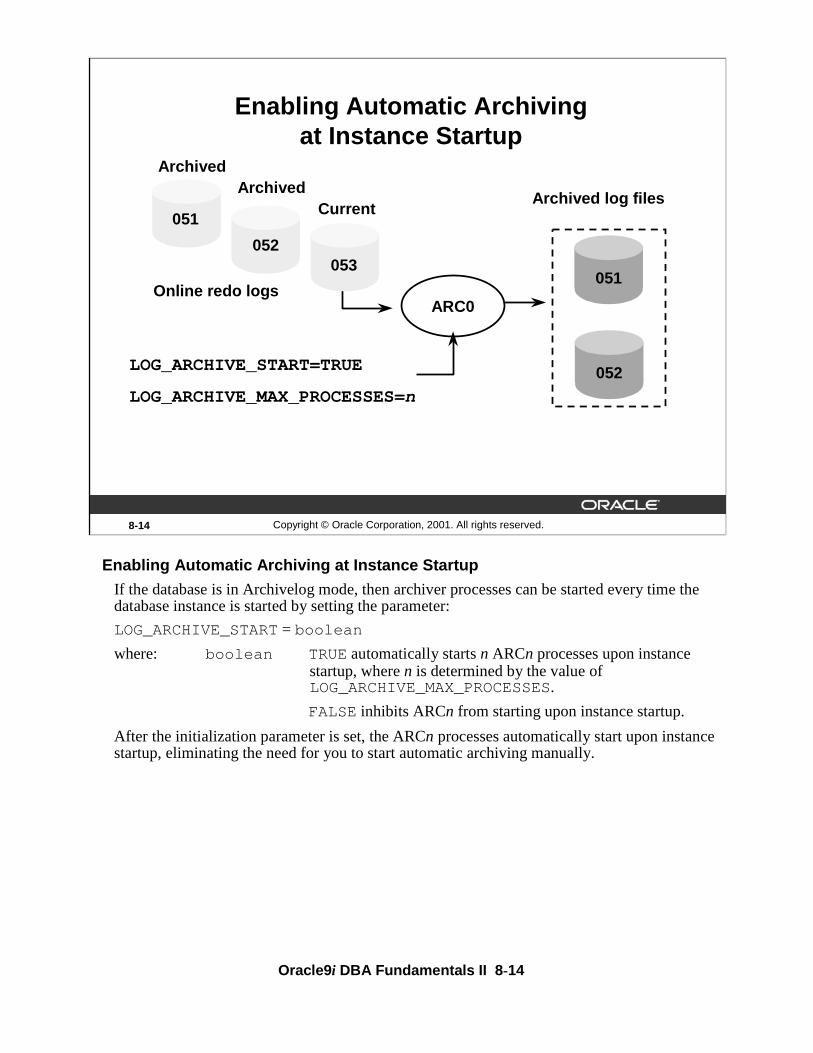
Oracle9i DBA Fundamentals II 8-14
Enabling Automatic Archiving at Instance Startup
If the database is in Archivelog mode, then archiver processes can be started every time the database instance is started by setting the parameter:
LOG_ARCHIVE_START = boolean
where: boolean TRUE automatically starts n ARCn processes upon instance startup, where n is determined by the value of LOG_ARCHIVE_MAX_PROCESSES.
FALSE inhibits ARCn from starting upon instance startup.
After the initialization parameter is set, the ARCn processes automatically start upon instance startup, eliminating the need for you to start automatic archiving manually.
8-14 Copyright © Oracle Corporation, 2001. All rights reserved.
Enabling Automatic Archiving at Instance Startup
ARC0
051Archived log files
051
052
ArchivedArchived
Current
LOG_ARCHIVE_START=TRUE
LOG_ARCHIVE_MAX_PROCESSES=n
Online redo logs051
052
052053
051
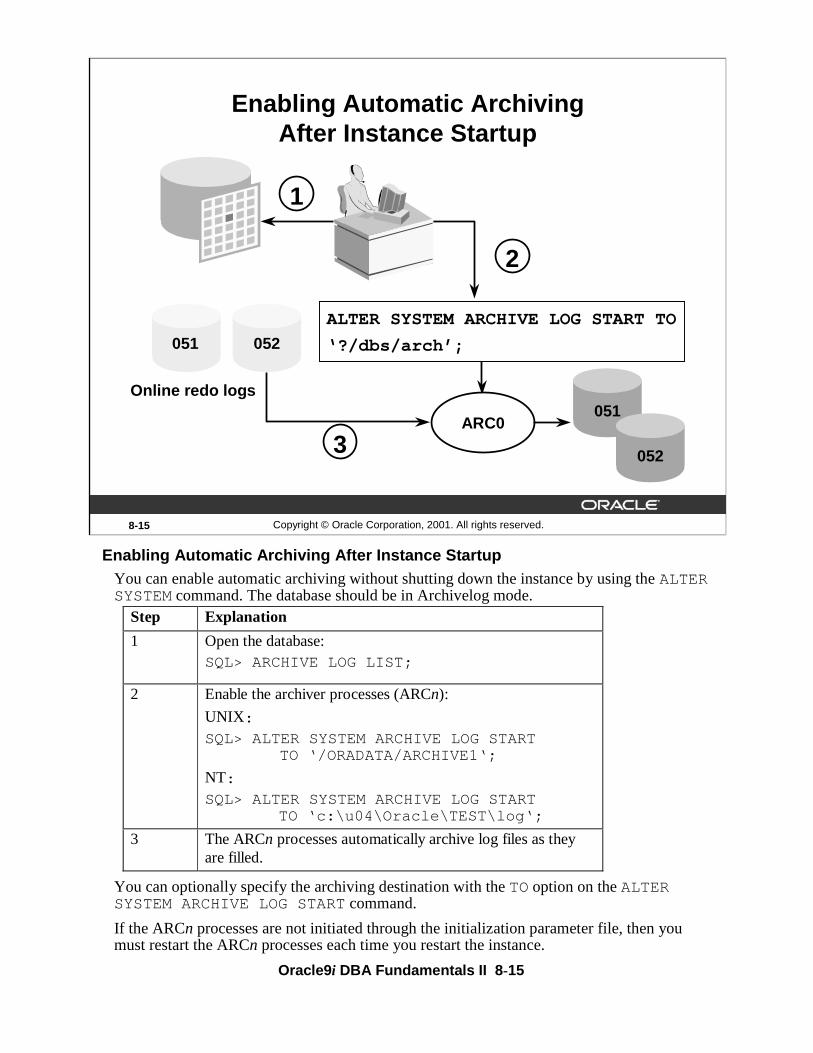
Oracle9i DBA Fundamentals II 8-15
Enabling Automatic Archiving After Instance StartupYou can enable automatic archiving without shutting down the instance by using the ALTER SYSTEM command. The database should be in Archivelog mode.
You can optionally specify the archiving destination with the TO option on the ALTER SYSTEM ARCHIVE LOG START command.
If the ARCn processes are not initiated through the initialization parameter file, then you must restart the ARCn processes each time you restart the instance.
8-15 Copyright © Oracle Corporation, 2001. All rights reserved.
ARC0
Enabling Automatic Archiving After Instance Startup
ALTER SYSTEM ARCHIVE LOG START TO
‘?/dbs/arch’;
2
051 052
Online redo logs
052051
1
3051
052
Step Explanation
1 Open the database: SQL> ARCHIVE LOG LIST;
2 Enable the archiver processes (ARCn):
UNIX: SQL> ALTER SYSTEM ARCHIVE LOG START
TO ‘/ORADATA/ARCHIVE1‘;
NT:
SQL> ALTER SYSTEM ARCHIVE LOG START TO ‘c:\u04\Oracle\TEST\log‘;
3 The ARCn processes automatically archive log files as they are filled.
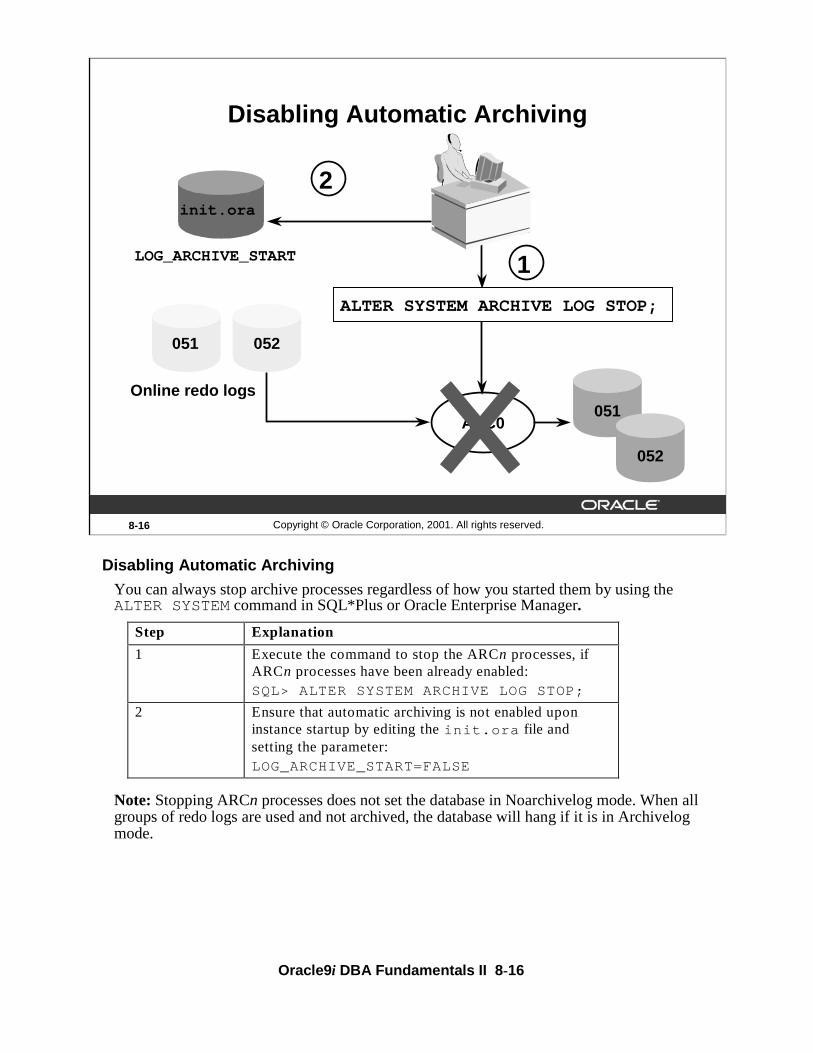
Oracle9i DBA Fundamentals II 8-16
Disabling Automatic Archiving
You can always stop archive processes regardless of how you started them by using the ALTER SYSTEM command in SQL*Plus or Oracle Enterprise Manager.
Note: Stopping ARCn processes does not set the database in Noarchivelog mode. When all groups of redo logs are used and not archived, the database will hang if it is in Archivelog mode.
Step Explanation
1 Execute the command to stop the ARCn processes, if ARCn processes have been already enabled: SQL> ALTER SYSTEM ARCHIVE LOG STOP;
2 Ensure that automatic archiving is not enabled upon instance startup by editing the init.ora file and setting the parameter: LOG_ARCHIVE_START=FALSE
8-16 Copyright © Oracle Corporation, 2001. All rights reserved.
ARC0
Disabling Automatic Archiving
1
2
ALTER SYSTEM ARCHIVE LOG STOP;
LOG_ARCHIVE_START
052
051051
052
Online redo logs
052051
init.ora
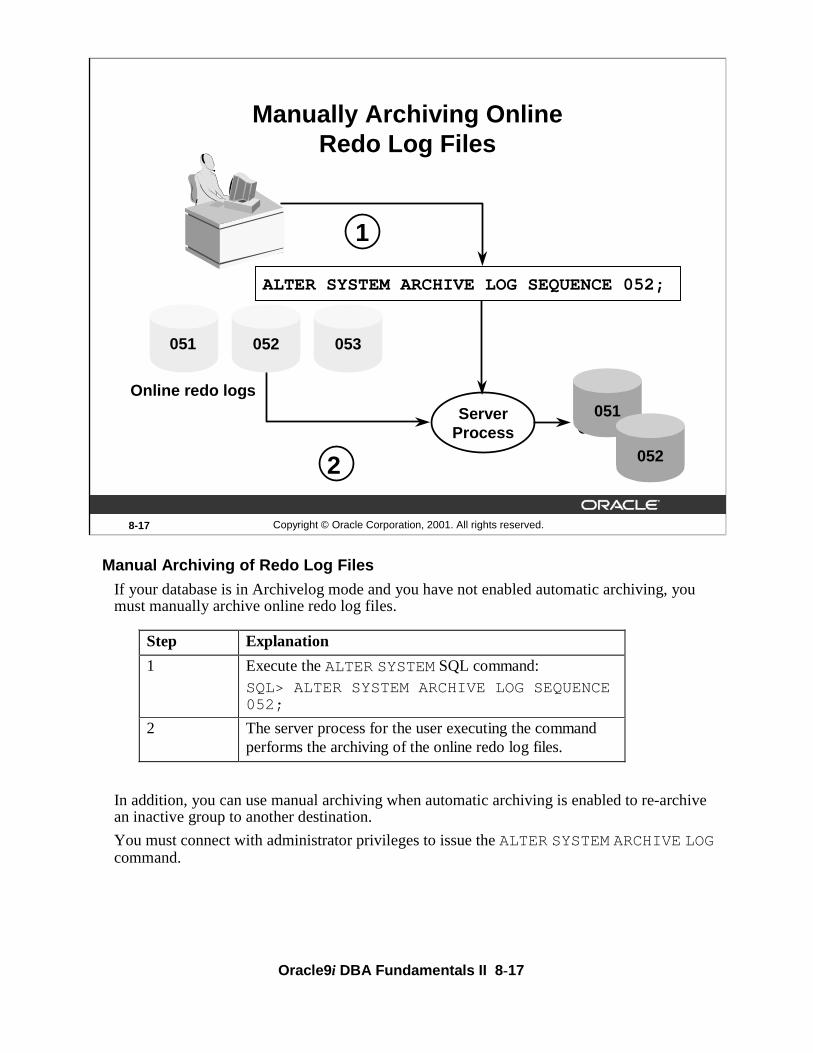
Oracle9i DBA Fundamentals II 8-17
Manual Archiving of Redo Log Files
If your database is in Archivelog mode and you have not enabled automatic archiving, you must manually archive online redo log files.
In addition, you can use manual archiving when automatic archiving is enabled to re-archive an inactive group to another destination.
You must connect with administrator privileges to issue the ALTER SYSTEM ARCHIVE LOGcommand.
8-17 Copyright © Oracle Corporation, 2001. All rights reserved.
Manually Archiving Online Redo Log Files
1
ALTER SYSTEM ARCHIVE LOG SEQUENCE 052;
2 052
051
052051 053
Online redo logsServer
Process051
052
Step Explanation
1 Execute the ALTER SYSTEM SQL command: SQL> ALTER SYSTEM ARCHIVE LOG SEQUENCE 052;
2 The server process for the user executing the command performs the archiving of the online redo log files.

Oracle9i DBA Fundamentals II 8-18
Manual Archiving of Redo Log Files (continued)
When you manually archive online redo log files you can use the following options with the ALTER SYSTEM ARCHIVE LOG command:
Option Description
THREAD Specifies thread containing the redo log file group to be archived (for Oracle Parallel Server)
SEQUENCE Archives the online redo log file group identified by the log sequence number
CHANGE Archives based upon the SCN
GROUP Archives the online redo log file group
CURRENT Archives the current redo log file group of the specified thread
LOGFILE Archives the redo log file group with members identified by filename
NEXT Archives the oldest online redo log file group that has not been archived
ALL Archives all online redo log file groups
START Enables automatic archiving of redo log file groups
TO Specifies the location to which the redo log file group is archived
STOP Disables automatic archiving of redo log file groups
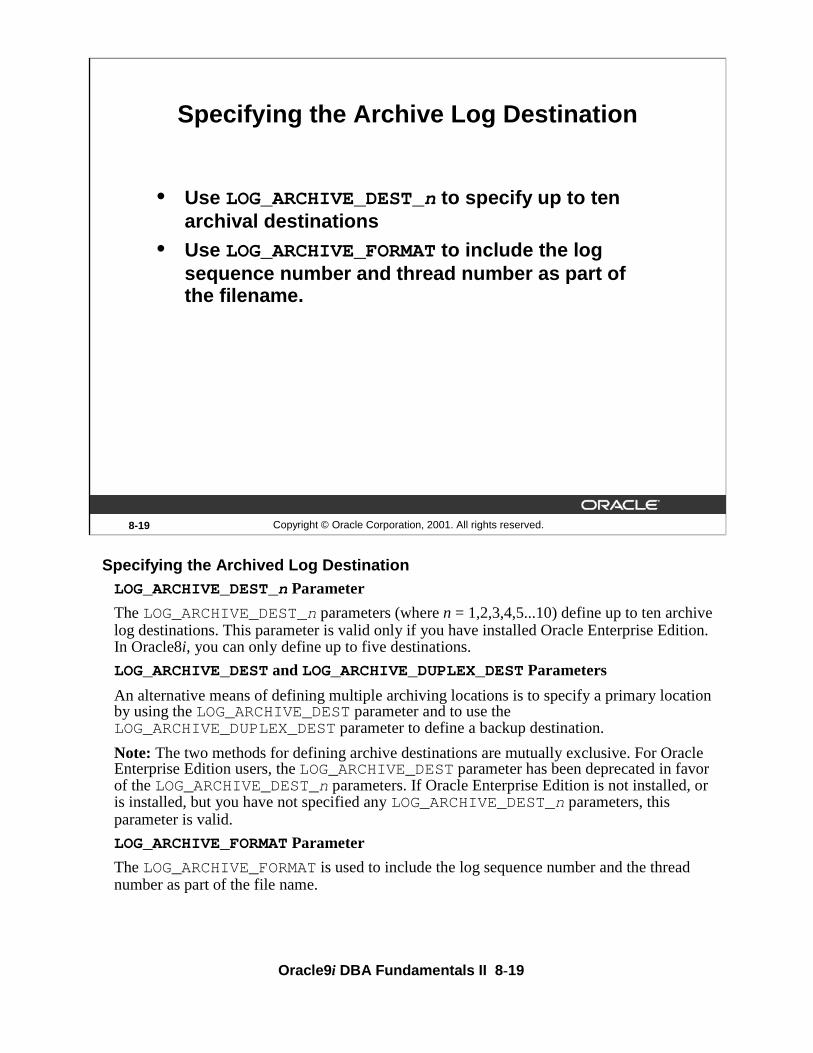
Oracle9i DBA Fundamentals II 8-19
Specifying the Archived Log DestinationLOG_ARCHIVE_DEST_n Parameter
The LOG_ARCHIVE_DEST_n parameters (where n = 1,2,3,4,5...10) define up to ten archive log destinations. This parameter is valid only if you have installed Oracle Enterprise Edition. In Oracle8i, you can only define up to five destinations.
LOG_ARCHIVE_DEST and LOG_ARCHIVE_DUPLEX_DEST Parameters
An alternative means of defining multiple archiving locations is to specify a primary location by using the LOG_ARCHIVE_DEST parameter and to use the LOG_ARCHIVE_DUPLEX_DEST parameter to define a backup destination.
Note: The two methods for defining archive destinations are mutually exclusive. For Oracle Enterprise Edition users, the LOG_ARCHIVE_DEST parameter has been deprecated in favor of the LOG_ARCHIVE_DEST_n parameters. If Oracle Enterprise Edition is not installed, or is installed, but you have not specified any LOG_ARCHIVE_DEST_n parameters, this parameter is valid.
LOG_ARCHIVE_FORMAT Parameter
The LOG_ARCHIVE_FORMAT is used to include the log sequence number and the thread number as part of the file name.
8-19 Copyright © Oracle Corporation, 2001. All rights reserved.
Specifying the Archive Log Destination
• Use LOG_ARCHIVE_DEST_n to specify up to ten archival destinations
• Use LOG_ARCHIVE_FORMAT to include the log sequence number and thread number as part of the filename.

Oracle9i DBA Fundamentals II 8-20
Specifying Multiple Archive LocationsThe LOG_ARCHIVE_DEST_n parameters are dynamic parameters that can be modified at the system or session level. A maximum of ten destinations can be specified by using a suffix ranging from 1 to 10.
The destination can be either:
• A local file system location, defined by using the keyword LOCATION. The location specified must be valid and cannot be an NFS-mounted directory.
• An Oracle Net alias for a remote destination, specified by using the SERVICEkeyword. The service name specified is resolved by using the local TNSNAMES.ORAfile to identify the remote database. Oracle9i supports shipping of archive log files to aremote node with IPC or TCP/IP. Only one archive destination per remote database can be specified.
Notes: When configuring archive log destinations, make sure that the path names are set according to the operating system environment.
You must specify the LOCATION parameter for at least one destination.
8-20 Copyright © Oracle Corporation, 2001. All rights reserved.
Specifying Multiple Archive Log Destinations
Use LOG_ARCHIVE_DEST_n to specify up to ten archival destinations which can be on a:
• Local disk
• Remote standby database
log_archive_dest_1 = "LOCATION=/archive1"
log_archive_dest_2 = "SERVICE=standby_db1"

Oracle9i DBA Fundamentals II 8-21
Additional Options with LOG_ARCHIVE_DEST_n
MANDATORY Versus OPTIONAL
When using the LOG_ARCHIVE_DEST_n parameters, a destination can be designated as either mandatory or optional as shown below:
• MANDATORYimplies that archiving to this destination must complete successfully before an online redo log file can be overwritten.
• OPTIONAL implies that an online redo log file can be reused even if it has not been successfully archived to this destination. This is the default.
REOPEN Attribute
• The REOPEN attribute defines whether archiving to a destination must be re-attempted in case of failure. If a number is specified along with the keyword REOPEN, as in REOPEN=600, the archiver attempts to write to this destination after the specified number of seconds following a failure. The default is 300 seconds. There is no limit on the number of attempts made to archive to a destination. Any errors in archiving are reported in the alert file at the primary site.
• If REOPEN is not specified, errors at optional destinations are recorded and ignored. No further redo logs will be sent to these destinations. Errors at mandatory destinations will prevent reuse of the online redo log until the archiving is successful. The status of an archive destination is set to ERROR whenever archiving is unsuccessful.
8-21 Copyright © Oracle Corporation, 2001. All rights reserved.
LOG_ARCHIVE_DEST_n Options
• Set archive location as MANDATORY or OPTIONAL.
• Define time before retry in case of failures.
log_archive_dest_1="LOCATION=/archive
MANDATORY REOPEN"
log_archive_dest_2="SERVICE=standby_db1
MANDATORY REOPEN=600"
log_archive_dest_3="LOCATION=/archive2
OPTIONAL"

Oracle9i DBA Fundamentals II 8-22
Specifying the Minimum Number of Successful Archive Locations
The number of destinations that need to be archived successfully before an online redo log file can be used is determined based on the following settings:
• The number of destinations defined as MANDATORY
• The value of the LOG_ARCHIVE_MIN_SUCCEED_DEST parameter. The value specifies a lower bound on the number of local destinations that need to be archived. If this number is less than the number of mandatory local destinations, it has no effect on the archiving behavior. If this number exceeds the number of mandatory local destinations, the number of local destinations archived must be at least equal to this value before an online redo log file can be reused.
8-22 Copyright © Oracle Corporation, 2001. All rights reserved.
Specifying a Minimum Number of Local Destinations
• LOG_ARCHIVE_MIN_SUCCEED_DEST parameter
• An online redo log group can be reused only if:– Archiving has been done to all mandatory locations
– The number of local locations archived is greater than or equal to the value of the LOG_ARCHIVE_MIN_SUCCEED_DEST parameter
LOG_ARCHIVE_MIN_SUCCEED_DEST = 2

Oracle9i DBA Fundamentals II 8-23
Specifying the Minimum Number of Successful Archive Locations (continued)Example: Consider a case where LOG_ARCHIVE_MIN_SUCCEED_DEST is set to 2. If the number of mandatory local destinations is 3, then these three locations must be archived before an online redo log file can be reused. On the other hand, if the number of mandatory local archive destinations is 1, then at least one optional local archive destination must be archived before an online redo log file can be reused. In other words, the LOG_ARCHIVE_MIN_SUCCEED_DEST can be used to make archiving to one or more optional destinations mandatory, but not vice versa.
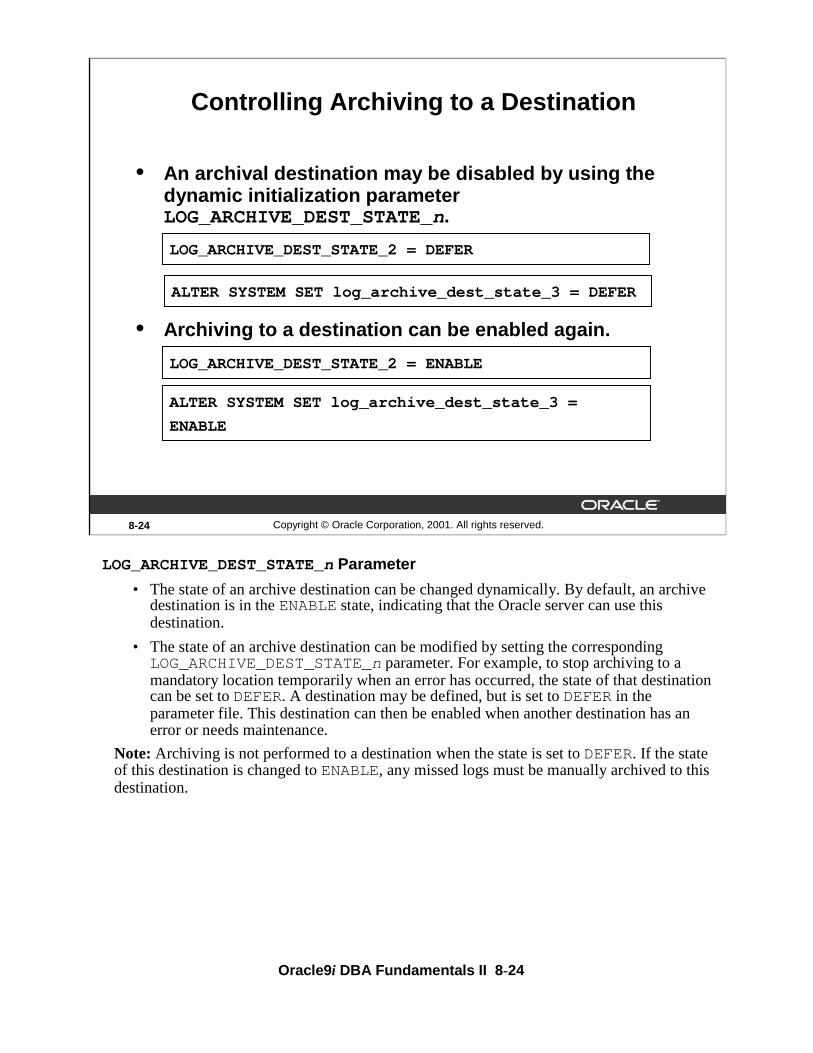
Oracle9i DBA Fundamentals II 8-24
LOG_ARCHIVE_DEST_STATE_n Parameter
• The state of an archive destination can be changed dynamically. By default, an archive destination is in the ENABLE state, indicating that the Oracle server can use this destination.
• The state of an archive destination can be modified by setting the corresponding LOG_ARCHIVE_DEST_STATE_n parameter. For example, to stop archiving to a mandatory location temporarily when an error has occurred, the state of that destination can be set to DEFER. A destination may be defined, but is set to DEFER in the parameter file. This destination can then be enabled when another destination has an error or needs maintenance.
Note: Archiving is not performed to a destination when the state is set to DEFER. If the state of this destination is changed to ENABLE, any missed logs must be manually archived to this destination.
8-24 Copyright © Oracle Corporation, 2001. All rights reserved.
Controlling Archiving to a Destination
• An archival destination may be disabled by using the dynamic initialization parameter LOG_ARCHIVE_DEST_STATE_n.
• Archiving to a destination can be enabled again.
LOG_ARCHIVE_DEST_STATE_2 = DEFER
LOG_ARCHIVE_DEST_STATE_2 = ENABLE
ALTER SYSTEM SET log_archive_dest_state_3 =
ENABLE
ALTER SYSTEM SET log_archive_dest_state_3 = DEFER

Oracle9i DBA Fundamentals II 8-25
Specifying LOG_ARCHIVE_FORMAT
LOG_ARCHIVE_FORMAT = extension
where: extension should include the variables %s or %S forlog sequence number. The default value is operating system-specific.
Example on UNIX and NT: LOG_ARCHIVE_FORMAT=arch%s.arc
Filename Options
• %s or %S: Includes the log sequence number as part of the filename.
• %t or %T: Includes the thread number as part of the filename.
• Using %S causes the value to be a fixed length padded to the left with zeros.
8-25 Copyright © Oracle Corporation, 2001. All rights reserved.
Specifying the File Name Format
ARC0
LOG_ARCHIVE_DEST_n
LOG_ARCHIVE_FORMAT
/ORADATA/archive/
Archived log file
052
arch%s.arc
052053
053
Group 1
053052
053052053
053
ARC0 052
Online redo log files
Group 2
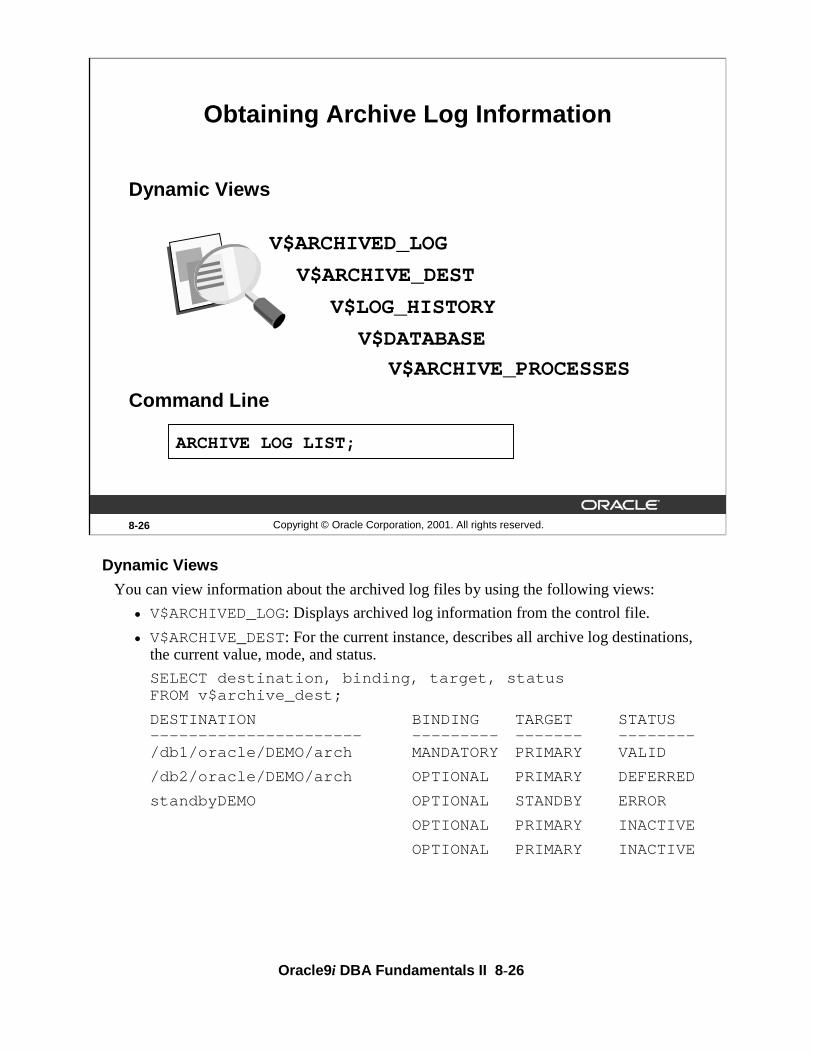
Oracle9i DBA Fundamentals II 8-26
Dynamic Views
You can view information about the archived log files by using the following views:
• V$ARCHIVED_LOG: Displays archived log information from the control file.
• V$ARCHIVE_DEST: For the current instance, describes all archive log destinations, the current value, mode, and status.
SELECT destination, binding, target, statusFROM v$archive_dest;
DESTINATION BINDING TARGET STATUS---------------------- --------- ------- --------/db1/oracle/DEMO/arch MANDATORY PRIMARY VALID
/db2/oracle/DEMO/arch OPTIONAL PRIMARY DEFERRED
standbyDEMO OPTIONAL STANDBY ERROR
OPTIONAL PRIMARY INACTIVE
OPTIONAL PRIMARY INACTIVE
8-26 Copyright © Oracle Corporation, 2001. All rights reserved.
Obtaining Archive Log Information
V$ARCHIVE_DEST
V$ARCHIVED_LOG
V$LOG_HISTORY
Dynamic Views
Command Line
ARCHIVE LOG LIST;
V$DATABASE
V$ARCHIVE_PROCESSES

Oracle9i DBA Fundamentals II 8-27
Dynamic Views (continued)
Note: The query displays five rows, each representing information for a possible destination. A status of INACTIVE indicates that this destination is not defined. A status of VALID indicates the destination is enabled and error-free.
To check for errors and the log sequence number at which the error occurred for each destination, use the following query:
SELECT destination,fail_sequence,errorFROM v$archive_destWHERE status=’ERROR’;
DESTINATION FAIL_SEQ ERROR------------ -------- -------------------------------standbyDEMO 2010 ORA-12154: TNS:could not
resolve service name
1 row selected.
• V$LOG_HISTORY: Contains log file information from the control file.
• V$DATABASE: Current state of archiving.
• V$ARCHIVE_PROCESSES: Provides information about the state of the various ARCH processes for the instance.
SELECT * FROM v$archive_processes;
PROCESS STATUS LOG_SEQUENCE STAT------------- ---------- ------------- -----
0 ACTIVE 2014 BUSY
1 ACTIVE 0 IDLE
2 ACTIVE 0 IDLE
3 STOPPED 0 IDLE
4 STOPPED 0 IDLE
5 STOPPED 0 IDLE
6 STOPPED 0 IDLE
7 STOPPED 0 IDLE
8 STOPPED 0 IDLE
9 STOPPED 0 IDLE
10 rows selected.
One row for each of the 10 possible archiver processes is displayed. A status of ACTIVE indicates that the process is up and running. A process that is currently archiving has a state of BUSY. The LOG_SEQUENCEcolumn for a busy process shows the current log sequence number it is archiving.

Oracle9i DBA Fundamentals II 8-28
Archive Log Information
The ARCHIVE LOG LIST command provides the DBA with information about the log mode and status of archiving for the database:
SQL> ARCHIVE LOG LIST;
Database log mode Archive mode
Automatic archival Enabled
Archive destination /ORADATA/ARCHIVE1/
Oldest online log sequence 1304
Next log sequence to archive 1305
Current log sequence 1305
Archive List Display Description
Database log mode Current mode of archiving
Automatic archival Status of the optional Archiver processes
Archive destination Destination to which log files will be copied (either by manual instruction or the detached process); shows one of the destinations, even if they are all mandatory
Oldest online log sequence Sequence number of oldest online log
Next log sequence to archive Next redo log to archive (only displayed in Archivelog mode)
Current log sequence Sequence number of current log file

Oracle9i DBA Fundamentals II 8-29
8-29 Copyright © Oracle Corporation, 2001. All rights reserved.
Summary
In this lesson, you should have learned how to:
• Configure a database for Archivelog mode
• Enable automatic archiving
• Perform manual archiving of logs
• Configure multiple archive processes
• Configure multiple destinations, including remote destinations

Oracle9i DBA Fundamentals II 8-30
8-30 Copyright © Oracle Corporation, 2001. All rights reserved.
Practice 8 Overview
This practice covers the following topics:
• Enabling and disabling automatic archiving
• Configuring multiple archiver processes
• Configuring multiple archiving destinations
• Performing manual archiving of redo log files

Oracle9i DBA Fundamentals II 8-31
Practice 81. Invoke SQL*Plus, connect as sysdba,and shut down the instance with the
Immediate option.
2. Edit the init.ora file to:
– Enable archiving
– Archive log files to two destinations: $HOME/ORADATA/ARCHIVE1 and $HOME/ORADATA/ ARCHIVE2 directories. $HOME/ORADATA/ARCHIVE1 is mandatory and $HOME/ORADATA/ARCHIVE2 is optional.
– Use the archiving format of arch_%s.arc
– Spawn two archive processes at instance start
3. Start up the database in Mount mode.
4. List the parameters LOG_ARCHIVE_DEST, LOG_ARCHIVE_START, and LOG_ARCHIVE_FORMAT, and note the values.
5. Execute the ARCHIVE LOG LIST command. Note the archivelog mode of the database and whether automatic archiving is enabled.
6. Set the database in Archivelog mode.
7. Open the database.
8. Execute the ARCHIVE LOG LIST command. Verify that two archiver processes are running.
9. Execute the ALTER SYSTEM SWITCH LOGFILE command twice, then show the values of the ARCHIVE parameters. Do you see any archived log files? What is the format of the filename?
10. Stop automatic archiving by executing the ALTER SYSTEM ARCHIVE LOG STOPcommand.
11. Execute the ALTER SYSTEM SWITCH LOGFILE command enough times to cycle through all the online redo log groups. What happens and why?
12. Establish a second telnet session and invoke SQL*Plus. Connect as sysdba.
13. Enable automatic archiving by using the ALTER SYSTEM ARCHIVE LOG STARTcommand.
14. Return to your first session. What happens and why?

Oracle9i DBA Fundamentals II 8-32

9Copyright © Oracle Corporation, 2001. All rights reserved.
Oracle Recovery Manager Overviewand Configuration

Oracle9i DBA Fundamentals II 9-2
9-2 Copyright © Oracle Corporation, 2001. All rights reserved.
Objectives
After completing this lesson, you should be able todo the following:
• Identify the features and components of RMAN
• Describe the RMAN repository and control file usage
• Describe channel allocation
• Describe the Media Management Library interface
• Connect to RMAN without the recovery catalog
• Configure the RMAN environment
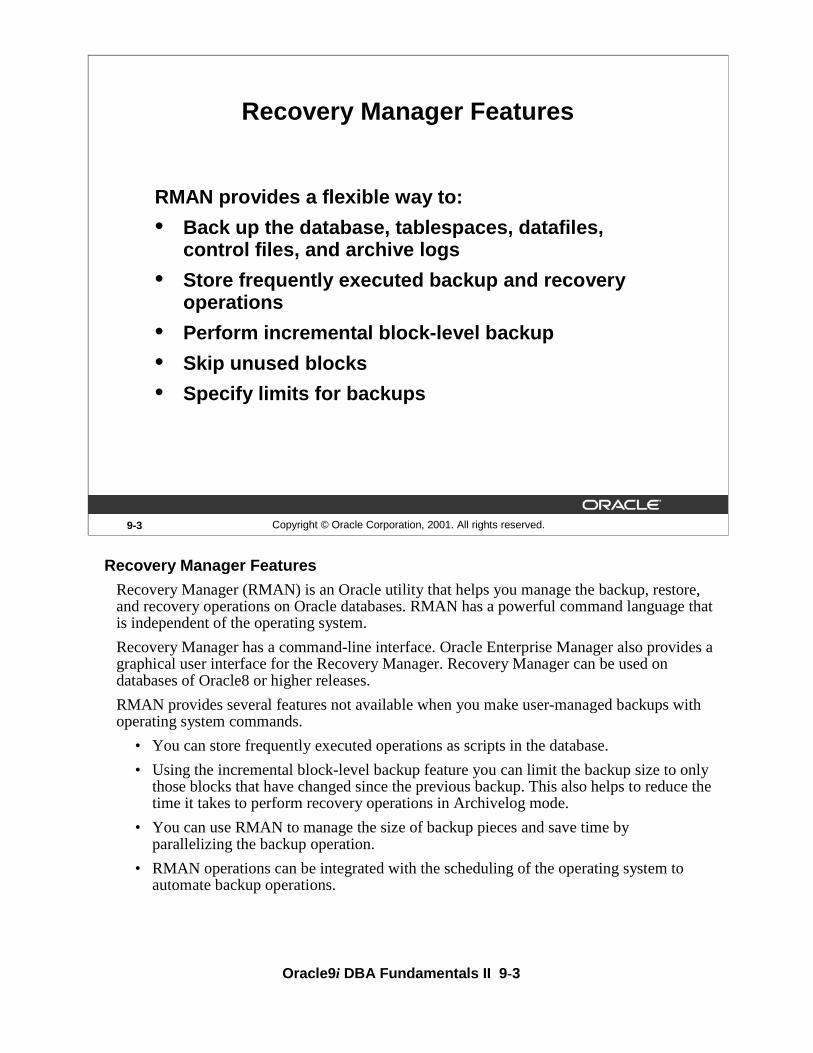
Oracle9i DBA Fundamentals II 9-3
9-3 Copyright © Oracle Corporation, 2001. All rights reserved.
Recovery Manager Features
RMAN provides a flexible way to:
• Back up the database, tablespaces, datafiles, control files, and archive logs
• Store frequently executed backup and recovery operations
• Perform incremental block-level backup
• Skip unused blocks
• Specify limits for backups
Recovery Manager Features
Recovery Manager (RMAN) is an Oracle utility that helps you manage the backup, restore, and recovery operations on Oracle databases. RMAN has a powerful command language that is independent of the operating system.
Recovery Manager has a command-line interface. Oracle Enterprise Manager also provides a graphical user interface for the Recovery Manager. Recovery Manager can be used on databases of Oracle8 or higher releases.
RMAN provides several features not available when you make user-managed backups with operating system commands.
• You can store frequently executed operations as scripts in the database.
• Using the incremental block-level backup feature you can limit the backup size to only those blocks that have changed since the previous backup. This also helps to reduce the time it takes to perform recovery operations in Archivelog mode.
• You can use RMAN to manage the size of backup pieces and save time by parallelizing the backup operation.
• RMAN operations can be integrated with the scheduling of the operating system to automate backup operations.

Oracle9i DBA Fundamentals II 9-4
9-4 Copyright © Oracle Corporation, 2001. All rights reserved.
Recovery Manager Features
RMAN provides a flexible way to:
• Detect corrupted blocks during backup
• Increase performance through:– Automatic parallelization
– Generation of less redo
– Restricting I/O for backups
– Tape streaming
Recovery Manager Features (continued)
• You can detect block corruption. The information relating to the block corruption that is detected during backup can be obtained by using the dynamic views V$BACKUP_CORRUPTION and V$COPY_CORRUPTION.
• RMAN provides performance enhancements such as:
– Automatic parallelization of backup, restore, and recovery operations
– No generation of extra redo during online database backups
– Backups that are restricted to limit reads per file, per second to avoid interfering with OLTP work
– Prevention of flooding of any one file with reads and writes while still keeping a tape drive streaming, using multiplexing
• RMAN has a media management API to work seamlessly with third-party media management tools interfacing with storage devices providing increased speed and reliability.

Oracle9i DBA Fundamentals II 9-5
9-5 Copyright © Oracle Corporation, 2001. All rights reserved.
RecoveryManager(RMAN)
Serversession(default)
Serversession(polling)
Serversession
(channel)MML
Serversession
(channel)
Serversession
(channel)
Targetdatabase
Serversession(rcvcat)
Recoverycatalog DB
Enterprise Manager
Recovery Manager Components
Disk Disk
Recovery Manager Components
Recovery Manager Executable The Recovery Manager command-line interface is invoked through the executable RMAN. RMAN interprets user commands and appropriately invokes server sessions to perform the desired tasks.
Server Sessions The server processes (Unix) or services (Windows NT) invoked by RMAN connect to the target database to perform the backup, restore, and recovery functions through a PL/SQL interface.
Target Database The database for which backup and recovery operations are being performed using RMAN is called the target database. The control file of the target database contains information about its physical structure, such as the size and location of datafiles, online and archived redo log files, and control files. This information is used by the server sessions invoked by RMAN in backup and recovery operations.
RMAN Repository The data used by RMAN for backup, restore, and recovery operations is referred to as RMAN metadata. It is stored in the control file of the target database and in an optional recovery catalog database.
Although it is not mandatory to create a recovery catalog to use RMAN, it is beneficial to use a recovery catalog. The recovery catalog should be located in a database different from the target database. The creation and maintenance of the recovery catalog is discussed in another lesson.

Oracle9i DBA Fundamentals II 9-6
Recovery Manager Components (continued)
Channel To perform and record backup and recovery operations, RMAN requires a link to the target database. This link is referred to as a channel. You can allocate channels manually or preconfigure channels using automatic channel allocation.
Media Management Library The media management library (MML) is used by RMAN when writing to or reading from tapes. The additional media management software required for using the tape medium is provided by media and storage system vendors.
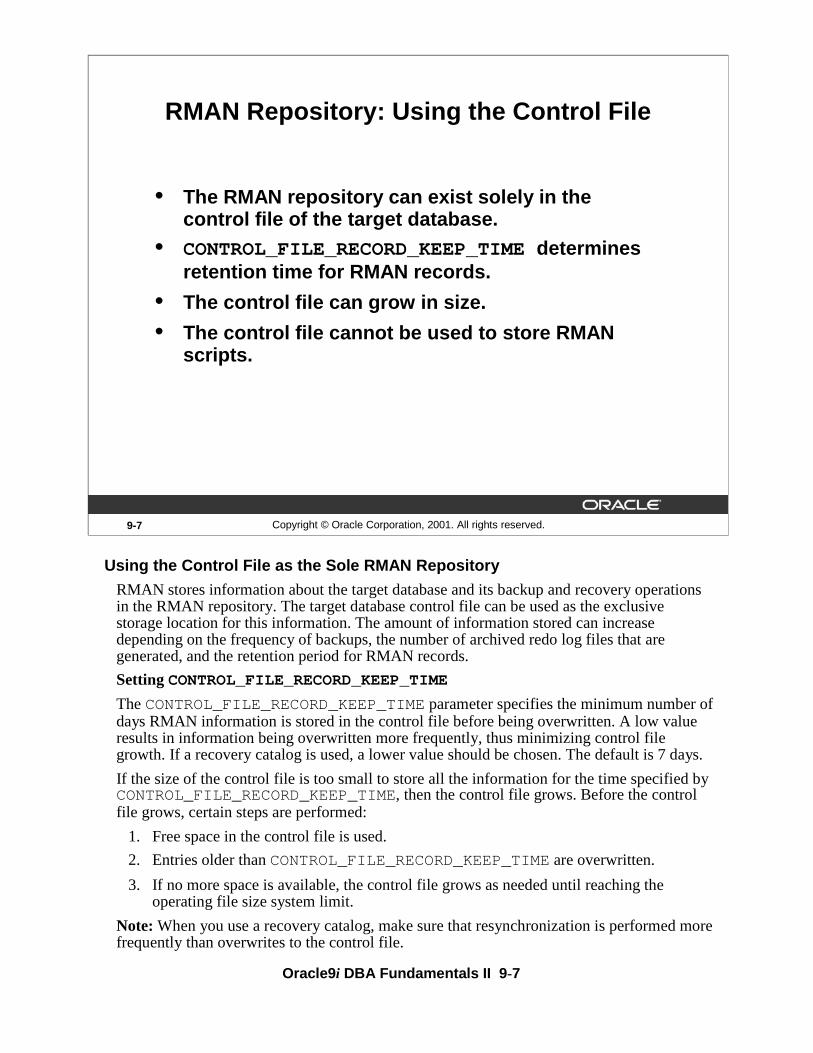
Oracle9i DBA Fundamentals II 9-7
9-7 Copyright © Oracle Corporation, 2001. All rights reserved.
RMAN Repository: Using the Control File
• The RMAN repository can exist solely in the control file of the target database.
• CONTROL_FILE_RECORD_KEEP_TIME determines retention time for RMAN records.
• The control file can grow in size.
• The control file cannot be used to store RMAN scripts.
Using the Control File as the Sole RMAN Repository
RMAN stores information about the target database and its backup and recovery operations in the RMAN repository. The target database control file can be used as the exclusive storage location for this information. The amount of information stored can increase depending on the frequency of backups, the number of archived redo log files that are generated, and the retention period for RMAN records.
Setting CONTROL_FILE_RECORD_KEEP_TIME
The CONTROL_FILE_RECORD_KEEP_TIME parameter specifies the minimum number of days RMAN information is stored in the control file before being overwritten. A low value results in information being overwritten more frequently, thus minimizing control file growth. If a recovery catalog is used, a lower value should be chosen. The default is 7 days.
If the size of the control file is too small to store all the information for the time specified by CONTROL_FILE_RECORD_KEEP_TIME, then the control file grows. Before the control file grows, certain steps are performed:
1. Free space in the control file is used.
2. Entries older than CONTROL_FILE_RECORD_KEEP_TIME are overwritten.
3. If no more space is available, the control file grows as needed until reaching the operating file size system limit.
Note: When you use a recovery catalog, make sure that resynchronization is performed more frequently than overwrites to the control file.

Oracle9i DBA Fundamentals II 9-8
9-8 Copyright © Oracle Corporation, 2001. All rights reserved.
Channel Allocation
Server
RMAN
Channel (disk)
Channel (sbt_tape)MML
Disk
Targetdatabase
Server
Channel Allocation
A channel represents one stream of data to a device type. A channel must be allocated before you execute backup and recovery commands. Each allocated channel establishes a connection from the RMAN executable to a target or auxiliary database instance (either a database created with the duplicate command or a temporary database used in TSPITR) by starting a server session on the instance. This server session performs the backup and recovery operations. Only one RMAN session communicates with the allocated server sessions.
Each channel usually corresponds to one output device, unless your MML is capable of hardware multiplexing.
You can allocate channels manually or preconfigure channels for use in all RMAN sessions using automatic channel allocation.
Manual Channel Allocation
The ALLOCATE CHANNEL command with a RUN command and the ALLOCATECHANNEL FOR MAINTENANCE command issued at the RMAN prompt are used to allocate a channel manually. Manual channel allocation overrides automatic allocation.

Oracle9i DBA Fundamentals II 9-9
Channel Allocation (continued)
Automatic Channel Allocation
In Oracle9i, you can preconfigure channels for use in all RMAN sessions using automatic channel allocation.
RMAN provides a preconfigured DISK channel that you can use for backups and copies to disk.
In addition, you can configure a set of persistent, automatic channels.You specify automatic channels to disk or tape by using the CONFIGURE CHANNEL command.

Oracle9i DBA Fundamentals II 9-10
9-10 Copyright © Oracle Corporation, 2001. All rights reserved.
Manual Channel Allocation
• BACKUP, COPY, RESTORE, and RECOVER commands require at least one channel.
• Allocating a channel starts a server process on the target database.
• Channels affect the degree of parallelism.
• Channels write to different media types.
• Channels can be used to impose limits.
RMAN> RUN {
2> ALLOCATE CHANNEL c1 TYPE disk
3> FORMAT = ’/db01/BACKUP/usr0520.bak’;
4> BACKUP DATAFILE ’/db01/ORADATA/users01.dbf’;}
Manually Allocating a Channel
Recovery Manager uses the channel processes to communicate between the Oracle server and the operating system.
• An Oracle server process for the target database is created for every channel allocated. Every BACKUP, COPY, RESTORE, or RECOVER command issued in Recovery Manager requires at least one channel.
• The number of channels allocated will be the maximum degree of parallelization that is used during backup, restore, or recovery.
• The type of media desired determines the type of channel allocated. Query the V$BACKUP_DEVICE view to determine supported device types.
• You can impose limits for the COPY and BACKUP commands by specifying parameters in the ALLOCATE CHANNEL command:
– Read rate: Limits number of buffers read per second, per file to reduce online performance through excessive disk I/O.
allocate channel … rate = integer
– Kbytes: Limits backup piece file size created by a channel. This is useful when there are maximum file sizes for an operating system or device type.
allocate channel … maxpiecesize = integer

Oracle9i DBA Fundamentals II 9-11
Manually Allocating a Channel (continued)
• Maxopenfiles: Limits the number of concurrently open files for a large backup (default 16). This prevents too many files from being open.
ALLOCATE CHANNEL … MAXOPENFILE = integer
Examples of Allocating a Channel
• ALLOCATE CHANNEL FOR MAINTENANCE DEVICE TYPE disk;
This command allocates a channel for the DELETEcommand, because a file will be removed from the disk. Maintenance channels cannot be used for any other I/O operation, such as backup or copy.
• RMAN> RUN {
2> ALLOCATE CHANNEL d1 DEVICE TYPE disk
3> FORMAT = ’/db01/BACKUP/%U’;
4> BACKUP DATAFILE ’/ …/u03/users01.dbf’;}
The second example allocates a channel named d1, where all files created by this channel will have the format ’/db01/BACKUP/%U’ . The channel backs up one datafile, /db01/ORADATA/u03/users01.dbf .

Oracle9i DBA Fundamentals II 9-12
9-12 Copyright © Oracle Corporation, 2001. All rights reserved.
Automatic Channel Allocation
Change the default device type:
Configure parallelism for automatic channels:
RMAN> CONFIGURE DEVICE TYPE DISK PARALLELISM 3;
RMAN> CONFIGURE DEFAULT DEVICE TYPE TO sbt;
Configure automatic channel options:RMAN> CONFIGURE CHANNEL DEVICE TYPE DISK
2> FORMAT = ‘/BACKUP/RMAN/%U';
RMAN> CONFIGURE CHANNEL DEVICE TYPE DISK 2> MAXPIECESIZE 2G;
Configuring Automatic Channels
You can save persistent configuration information such as channel parameters, parallelism, and the default device type in the RMAN repository. You can configure automatic channels for use in backup, restore, recovery, and maintenance jobs.
When a channel is automatically allocated by RMAN, its name is in the format ora_devicetype_n (ora_sbt_tape_n or ora_disk_n).
You can override automatic channels by using the ALLOCATE CHANNEL command to allocate channels manually. The automatic channel feature is mutually exclusive with the manual channel feature: RMAN uses one or the other for every job.
By default, RMAN has preconfigured a disk channel so that you can back up to disk without doing any manual configuration. Hence, if you are backing up to disk rather than to a media manager, you can immediately begin backing up to disk.

Oracle9i DBA Fundamentals II 9-13
9-13 Copyright © Oracle Corporation, 2001. All rights reserved.
Media Management
Recovery Manager
Oracle server session
Media management
server software
Tape library or single tape
Media management
library
Media Management
To use tape storage for your database backups, RMAN requires a media manager. A media manager is a utility that loads, labels, and unloads sequential media, such as tape drives for the purpose of backing up, restoring, and recovering data. The Oracle server calls MML software routines to back up and restore data files to and from media that is controlled by the media manager.
Some media management products can manage the entire data movement between Oracle data files and the backup devices. Some products that use high-speed connections between storage and media subsystems can reduce much of the backup load from the primary database server.
Note that the Oracle server does not need to connect to the media management library (MML) software when it backs up to disk.
The Oracle Backup Solutions Program (BSP) provides a range of media management products that are compliant with Oracle’s MML specification. Software that is compliant with the MML interface enables an Oracle server session to back up to a media manager and request the media manager to restore backups. Check with your media vendor to determine whether it is a member of the Oracle BSP.

Oracle9i DBA Fundamentals II 9-14
Media Management (continued)
Before you can begin using RMAN with a media manager, you must install it and make sure that RMAN can communicate with it.Instructions for this procedure should be available in the media manager vendor’s software documentation.
Depending on the product that you are installing, the following basic steps apply:
1. Install and configure the media management software on the target host or production network. No RMAN integration is required at this stage.
2. Ensure that you can make non-RMAN backups of operating system files on the target database host. This step makes later troubleshooting much easier. Refer to your media management documentation to learn how to back up files to the media manager.
3. Obtain and install the third-party media management module for integration with the Oracle server. This module must contain the library that Oracle loads when accessing the media manager.
After you install the media management software, the media management library should already be integrated with the Oracle server.
Backup and Restore Operations Using a Media Manager
The following Recovery Manager script performs a data file backup to a tape drive controlled by a media manager:
run {
# Allocating a channel of type ’sbt_tape’ for serial device
ALLOCATE CHANNEL ch1 DEVICE TYPE ’sbt_tape’;
BACKUP DATAFILE 3;
}
When Recovery Manager executes this command, it sends the backup request to the Oracle server session performing the backup. The Oracle server session identifies the output channel as a media management device and requests the media manager to load a tape and write the output.
The media manager labels and keeps track of the tape and names of files on each tape.
The media manager handles restore as well as backup operations. When you restore a file, the following steps occur:
1. The Oracle server requests the restore of a particular file.
2. The media manager identifies the tape containing the file and reads the tape.
3. The media manager passes the information back to the Oracle server session.
4. The Oracle session writes the file to disk.

Oracle9i DBA Fundamentals II 9-15
9-15 Copyright © Oracle Corporation, 2001. All rights reserved.
Types of Connections with RMAN
• Target database
• Recovery catalog database
• Auxiliary database– Standby database
– Duplicate database
– TSPITR instance
Types of Database Connections with RMAN
With Recovery Manager you can connect to the following types of databases:
• Target database You are connected to the target database with the SYSDBA privilege. You must have this privilege for the connection to succeed.
• Recovery catalog database This is an optional database which is configured for the RMAN repository.
• Auxiliary database An auxiliary database is a database created using the RMAN DUPLICATE command. Or it may be a temporary database used during tablespace point-in-time recovery (TSPITR). A standby database is a copy of your production database that can be used for disaster recovery.

Oracle9i DBA Fundamentals II 9-16
9-16 Copyright © Oracle Corporation, 2001. All rights reserved.
Connecting Without a Recovery Catalog
Serverprocess(default)
Serverprocess(polling)
UNIX: $ ORACLE_SID=DB01; export ORACLE_SID$ rman target sys/change_on_install
NT: C:\> set ORACLE_SID=DB01
C:\> rman target sys/change_on_install
rman target sys/change_on_install@DB01
Starting RMAN locally
Starting RMAN remotely
Targetdatabase
Recoverymanager(RMAN)
Connecting to the Target Database Without a Catalog
Local Connection
For a local RMAN connection, at an operating system prompt, enter the following:
UNIX:$ ORACLE_SID=DB01; export ORACLE_SID
$ rman target sys/change_on_install
NT: C:\> SET ORACLE_SID=DB01
C:\> rman target sys/change_on_install
Optionally, you can specify the keyword NOCATALOG as follows:
rman target sys/change_on_install nocatalog
NOCATALOG is the default mode.
Remote Connection
To connect from another server, use the net service name for the target database:
rman target sys/change_on_install@DB01

Oracle9i DBA Fundamentals II 9-17
Connecting to the Target Database Without a Catalog (continued)
Connection Process
After you type the RMAN connection command, the following events occur:
• A user process is created for Recovery Manager.
• The user process creates two Oracle server processes:
– One default process connected to the target database for executing SQL commands, resynchronizing the control file, and recovery roll forward
– One polling process connected to the target database to locate Remote Procedure Call (RPC) completions (only one per instance)
• Backup and recovery information is retrieved from the control file.

Oracle9i DBA Fundamentals II 9-18
9-18 Copyright © Oracle Corporation, 2001. All rights reserved.
Recovery Manager Modes
• Interactive mode– Use it when doing analysis
– Minimize regular usage
– Avoid using with log option
• Batch mode– Meant for automated jobs
– Minimize operator errors
– Set the log file to obtain information
Recovery Manager
Recovery Manager acts as a command-line interpreter (CLI) with its own command language. There are two modes of operation with the RMAN— interactive and batch.
Interactive Mode To run RMAN commands interactively, start RMAN and then type commands into the command-line interface. For example, you can start RMAN from the UNIX command shell and then execute interactive commands as follows:
$ rman target sys/sys_pwd@db1
RMAN> BACKUP DATABASE;
Batch Mode You can type RMAN commands into a file, and then run the command file by specifying its name on the command line. The contents of the command file should be identical to commands entered at the command line.
When running in batch mode, RMAN reads input from a command file and writes output messages to a log file (if specified).

Oracle9i DBA Fundamentals II 9-19
Recovery Manager (continued)
RMAN parses the command file in its entirety before compiling or executing any commands. There is no need to place an exit command in the file because RMAN will terminate when the end of the file is reached.
Batch mode is most suitable for performing regularly scheduled backups by means of an operating system job-control facility.
$ rman target / @tbsbk.rcv log tbs.log
In this example, the user has created a file tbsbk.rcv, which contains the commands the user would have used interactively. RMAN would output the messages to the file tbs.log.

Oracle9i DBA Fundamentals II 9-20
9-20 Copyright © Oracle Corporation, 2001. All rights reserved.
RMAN Commands
RMAN commands are of the following types:
• Stand-alone – Executed only at the RMAN prompt
– Executed individually
– Cannot appear as subcommands within RUN
• Job– Must be within the brackets of RUN
– Executed as a group
• Stand-alone or job
RMAN Commands
RMAN has two basic types of commands: stand-alone and job commands.
Stand-alone commands are executed at the RMAN prompt and are generally self-contained. Following are some of the stand-alone commands:
• CHANGE
• CONNECT
• CREATE CATALOG, RESYNC CATALOG
• CREATE SCRIPT, DELETE SCRIPT, REPLACE SCRIPT
The job commands are usually grouped and RMAN executes the job commands inside of a RUNcommand block sequentially. If any command within the block fails, RMAN ceases processing—no further commands within the block are executed.
There are some commands that can be issued either at the prompt or within RUN. Executing stand-alone commands at the RMAN prompt allows you to take advantage of the automatic channel functionality.
You can execute the commands in interactive mode or batch mode.

Oracle9i DBA Fundamentals II 9-21
Some Command Examples
To Mount the Target Database Issue the startup command as follows:
RMAN> STARTUP MOUNT
To Shut Down the Target Database Issue the shutdown command as follows:
RMAN> SHUTDOWN IMMEDIATE
To List the Current Configuration of the Target Database Use the REPORT command to obtain the configuration of the database as follows:
RMAN> REPORT SCHEMA;
RMAN-03022: compiling command: report
Report of database schema
File K-bytes Tablespace RB Name
---- -------- ---------- --- -----------------
1 117760 SYSTEM *** …/ORADATA/u01/system_01.dbf
2 30720 UNDO1 *** …/ORADATA/u02/undotbs.dbf
3 5120 USERS *** …/ORADATA/u04/users_01.dbf
4 5120 INDX *** …/ORADATA/u03/indx_01.dbf
5 5120 SAMPLE *** …/ORADATA/u02/sample_01.dbf
6 1024 QUERY_DATA *** …/ORADATA/u01/query_01.dbf
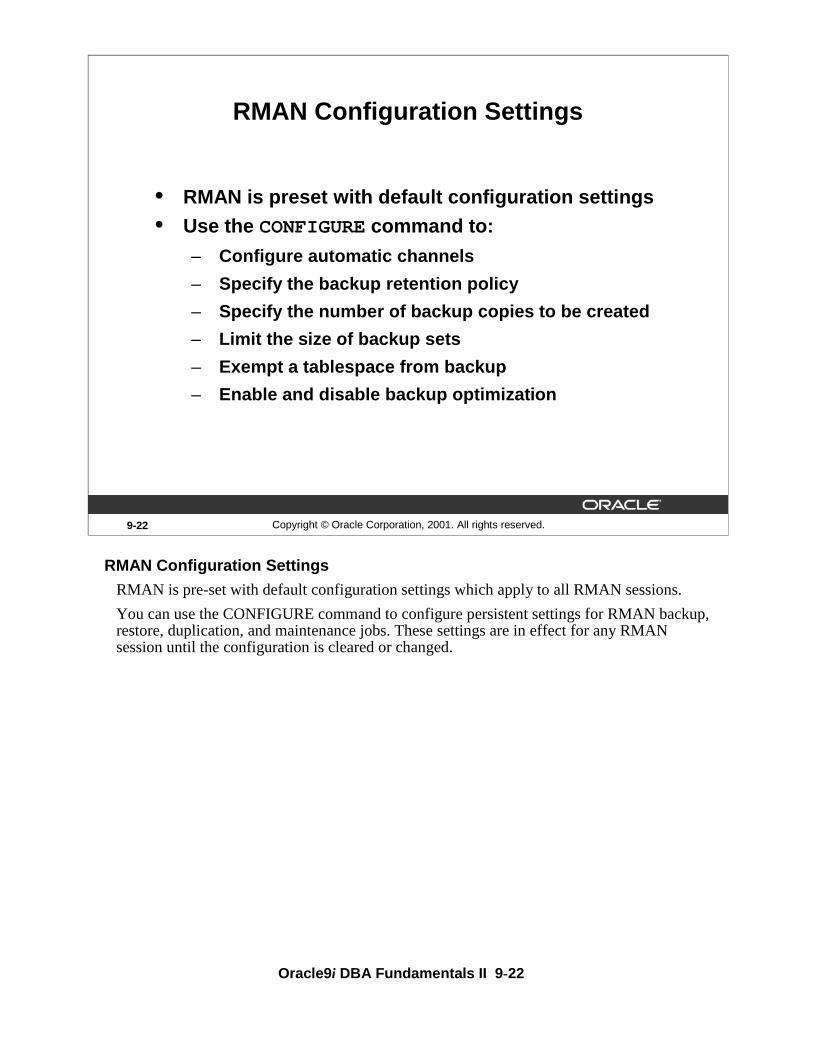
Oracle9i DBA Fundamentals II 9-22
9-22 Copyright © Oracle Corporation, 2001. All rights reserved.
RMAN Configuration Settings
• RMAN is preset with default configuration settings• Use the CONFIGURE command to:
– Configure automatic channels
– Specify the backup retention policy
– Specify the number of backup copies to be created
– Limit the size of backup sets
– Exempt a tablespace from backup
– Enable and disable backup optimization
RMAN Configuration Settings
RMAN is pre-set with default configuration settings which apply to all RMAN sessions.
You can use the CONFIGURE command to configure persistent settings for RMAN backup, restore, duplication, and maintenance jobs. These settings are in effect for any RMAN session until the configuration is cleared or changed.

Oracle9i DBA Fundamentals II 9-23
9-23 Copyright © Oracle Corporation, 2001. All rights reserved.
The CONFIGURE Command
Configure automatic channels:
Implement retention policy by specifying a recovery window: RMAN> CONFIGURE RETENTION POLICY TO RECOVERY
2> WINDOW OF 7 days;
RMAN> CONFIGURE CHANNEL DEVICE TYPE DISK FORMAT
’/db01/BACKUP/%U’;
Implement retention policy by specifying redundancy:RMAN> CONFIGURE RETENTION POLICY TO REDUNDANCY 2;
Using the CONFIGURE Command
Configure Automatic Channels
You can specify the default backup location and file naming convention with the CONFIGURE CHANNEL command.
Configure Backup Retention Policies
You can use the CONFIGURE RETENTION POLICY command to create a persistent and automatic backup retention policy. Based on the criteria that you specify in the CONFIGUREcommand, RMAN determines when backups and copies of datafiles and control files are obsolete; that is, when they are no longer needed for media recovery. You can issue the REPORT OBSOLETE command to view obsolete files and DELETE OBSOLETE to delete them. You can issue the CONFIGURE RETENTION POLICY CLEAR command to return the setting to the default value.
You can implement a retention policy in one of the following mutually exclusive ways:
• Specify a recovery window, which is a period of time that begins with the current time and extends backward in time to the point of recoverability. In the example, the CONFIGURE command ensures that for each datafile, one backup that is older than the point of recoverability (7 days) must be retained.
• Specify a redundancy value, which indicates that any number of backups or copies beyond a specified number need not be retained. The default value is 1 day.

Oracle9i DBA Fundamentals II 9-24
9-24 Copyright © Oracle Corporation, 2001. All rights reserved.
The CONFIGURE Command
Configure duplexed backup sets:
Use the CLEAR option to return to the default value:
RMAN> CONFIGURE RETENTION POLICY CLEAR;RMAN> CONFIGURE CHANNEL DEVICE TYPE sbt CLEAR;
RMAN> CONFIGURE DATAFILE BACKUP COPIES FOR
2> DEVICE TYPE disk TO 2;
Configure backup optimization: RMAN> CONFIGURE BACKUP OPTIMIZATION ON;
Using the CONFIGURE Command (continued)
Configure Duplexed Backup Sets
You can create up to four copies of each backup piece in a backup set for all backup commands that use automatic channels. This applies only for datafiles and archived redo log files.
Configure Backup Optimization
You set backup optimization on so that the BACKUP command does not back up files to a device type if the identical file has already been backed up to the device type. For two files to be identical, their content must be exactly the same. The default value for backup optimization is OFF.
You can override backup optimization by using the FORCE option of the BACKUPcommand.

Oracle9i DBA Fundamentals II 9-25
9-25 Copyright © Oracle Corporation, 2001. All rights reserved.
The SHOW Command
• Displays persistent configuration settings• Use the SHOW command to display:
– Automatic channel configuration settings
– Backup retention policy settings
– Number of backup copies to be created
– Backup set size limit
– Tablespace excluded from backups
– Backup optimization status
• Use SHOW ALL to display all settings:
RMAN> SHOW ALL;
The SHOW Command
The SHOW command is used to to display persistent configuration settings specified with the CONFIGURE command. These settings are configured for use with any RMAN session.
You can use the SHOW command to display the following:• Automatic channel configuration settings
SHOW CHANNEL;SHOW DEVICE TYPE;SHOW DEFAULT DEVICE TYPE;
• RMAN retention policy configuration settingsSHOW RETENTION POLICY;
• Number of backup copiesSHOW DATAFILE BACKUP COPIES;
• Maximum size for backup setsSHOW MAXSETSIZE;
• Tablespaces excluded from whole database backupsSHOW EXCLUDE;
• Status of backup optimizationSHOW BACKUP OPTIMIZATION;

Oracle9i DBA Fundamentals II 9-26
9-26 Copyright © Oracle Corporation, 2001. All rights reserved.
LIST Command Operations
• Lists backup sets and copies of data files
• Lists backup sets and copies of any data file for a specified tablespace
• Lists backup sets and copies containing archive logs for a specified range
• Lists incarnations for the database
The LIST Command
The LIST command is used to produce a detailed report listing all information for the following:
• Backup sets that contain a backup of a specified list of data files
• Copies of a specified list of data files
• Backup sets that contain a backup of any data file that is a member of a specified list of tablespaces
• Copies of any data file that is a member of a specified list of tablespaces
• Backup sets that contain a backup of any archived logs with a specified name or range
• Copies of any archived logs with a specified name or range
• Incarnations of a specified database

Oracle9i DBA Fundamentals II 9-27
9-27 Copyright © Oracle Corporation, 2001. All rights reserved.
The LIST Command
List backups of all files in the database:
List all backup sets containing the users01.dbfdatafile: RMAN> LIST BACKUP OF DATAFILE
2> “/db01/ORADATA/u03/users01.dbf”;
RMAN> LIST BACKUP OF DATABASE;
List all copies of datafiles in the SYSTEM tablespace:RMAN> LIST COPY OF TABLESPACE “SYSTEM”;
Using the LIST Command
You must be connected to the target database. If you are connected in the Nocatalog mode, then the database must be mounted. If you connect using a recovery catalog, then the target instance must be started (but does not need to be mounted).
List Database Backup
You can use this command to generate a list of backups of all files in the database.
List Data File Copies
The example uses the LIST command to list data file copies for the SYSTEM tablespace.
LIST Backup Set
The example uses the LIST command to list all known backups of the data file“/db01/ORADATA/u03/users01.dbf” .

Oracle9i DBA Fundamentals II 9-28
9-28 Copyright © Oracle Corporation, 2001. All rights reserved.
The REPORT Command
• Produces a detailed analysis of therecovery catalog
• Produces reports to answer:– Which files need a backup?
– Which backups can be deleted?
– Which files are unrecoverable?
The REPORT Command
This command helps you analyze information in the RMAN repository in more detail.
Reports can be produced for a variety of questions, such as:
• What is the structure of the database?
RMAN> REPORT SCHEMA;
• Which files need to be backed up?
RMAN> REPORT NEED BACKUP ...;
• Which backups can be deleted (that is, are obsolete)?
RMAN> REPORT OBSOLETE;
• Which files are not recoverable because of unrecoverable operations?
RMAN> REPORT UNRECOVERABLE ...;

Oracle9i DBA Fundamentals II 9-29
9-29 Copyright © Oracle Corporation, 2001. All rights reserved.
The REPORT NEED BACKUP Command
• Lists all data files requiring a backup
• Assumes the most recent backup is used during a restore
• Provides three options:– Incremental
– Days
– Redundancy
• Without options, takes into account the configured retention policy
REPORT NEED BACKUP days 3;
REPORT NEED BACKUP incremental 3;
REPORT NEED BACKUP redundancy 3;
The REPORT NEED BACKUP Command
The REPORT NEED BACKUP command is used to identify all data files that need a backup. The report assumes that the most recent backup would be used in the event of a restore.
There are three options:
• Incremental: An integer specifies the maximum number of incremental backups that should be restored during recovery. If this number, or more, is required, then the data file needs a new full backup.For example, to report files needing three or more incremental backups for recovery:
RMAN > REPORT NEED BACKUP incremental 3 database;
• Days: An integer specifies the maximum number of days since the last full or incremental backup of a file. The file needs a backup if the most recent backup is equal to or greater than this number.For example, to report what system files have not been backed up for three days:
RMAN > REPORT NEED BACKUP days 3 tablespace system;
• Redundancy: An integer specifies the minimum level of redundancy considered necessary. For example, redundancy level two requires a backup if there are not two or more backups.

Oracle9i DBA Fundamentals II 9-30
9-30 Copyright © Oracle Corporation, 2001. All rights reserved.
Recovery Manager Packages
Recovery Manager uses PL/SQL packages as itsinterface to:
• Target databases
• The recovery catalog
RecoveryManager
PL/SQL
Recoverycatalog
dbms_rcvcatdbms_rcvman dbms_rcvman
dbms_rcvcat
dbms_rcvman
Targetdatabase
Targetcontrol file
dbms_backup_restore
Recovery Manager PackagesDBMS_RCVCAT and DBMS_RCVMAN
Two packages, DBMS_RCVCAT and DBMS_RCVMAN, are used by RMAN to perform its tasks. These are internal, undocumented packages created by the CREATE CATALOGcommand. DBMS_RCVMAN is created in the target database by the scripts dbmsrman.sqland prvtrmns.plb which are called by catproc.sql.
DBMS_RCVCAT is used by Recovery Manager to maintain information in the recovery catalog, and DBMS_RCVMAN queries the control file or recovery catalog.
DBMS_BACKUP_RESTORE Package
This package is created by the dbmsbkrs.sql and prvtbkrs.plb scripts called by catproc.sql. It is used to interface with Oracle and the operating system to create, restore, and recover backups of datafiles and archived redo log files.

Oracle9i DBA Fundamentals II 9-31
9-31 Copyright © Oracle Corporation, 2001. All rights reserved.
RMAN Usage Considerations
• Resources: Shared memory, more processes• Privileges given to users
– Database: SYSDBA– Operating System: Access to devices
• Remote operations – Set up the password file– Ensure that the password file is backed up
• Globalization environment variables • Format used for the time parameters in RMAN
commands
RMAN Usage Considerations
Before Recovery Manager is used, consider the following points:
• Shared Resources on the System Most of RMAN’s work is performed through Oracle server processes. The operations can also be performed in parallel to increase throughput. This implies that the PROCESSES parameter must be sufficiently high. From the OS standpoint, this means that shared memory and semaphores are adequately set.
• Set of Users Performing Privileged Operations You must decide on the set of users who perform privileged operations. Accordingly, you can set the users’ accounts with the necessary privileges at the operating system and at the Oracle database.
To start up and shut down a database, the user should have the SYSDBA privilege.

Oracle9i DBA Fundamentals II 9-32
RMAN Usage Considerations (continued)
• Remote Operations You need to use a password file to connect to the target database over Oracle Net to perform privileged operations, such as shutdown, startup, backup, and recovery from a remote machine. You may have to set up a password file. You should ensure that there is a strategy to backup the password file as well.
• Globalization Environment Variables Before invoking RMAN, set the NLS_DATE_FORMAT and NLS_LANG environment variables. These variables determine the format used for the time parameters in RMAN commands, such as RESTORE, RECOVER, and REPORT.
• Use of the Recovery Catalog When you use a recovery catalog, RMAN can perform a wider variety of automated backup and recovery functions. Use of the recovery catalog involves storage space and maintenance efforts.
You should also decide whether to have a database dedicated to maintain the recovery catalog of many target databases. Also consider the strategy to back up the recovery catalog.

Oracle9i DBA Fundamentals II 9-33
9-33 Copyright © Oracle Corporation, 2001. All rights reserved.
Summary
In this lesson, you should have learned how to:
• Configure the RMAN environment
• Use automatic channel allocation
• Manually allocate channels
• Connect to RMAN without the recovery catalog
• Retrieve information from the RMAN repository
Oracle9i DBA Fundamentals II 9-34
9-34 Copyright © Oracle Corporation, 2001. All rights reserved.
Practice 9 Overview
This practice covers the following topics:
• Using Recovery Manager to connect to a target database in default NOCATALOG mode.
• Obtaining information from the target database control file.
• Configuring a retention policy• Using the SHOW command to display RMAN
environment settings

Oracle9i DBA Fundamentals II 9-35
Practice 9
1. List some of the benefits of using RMAN rather than user-managed backup and recovery procedures.
____________________________________________________________________
____________________________________________________________________
____________________________________________________________________
____________________________________________________________________
____________________________________________________________________
2. Describe some of the ways that RMAN uses the control file of the target database.
____________________________________________________________________
____________________________________________________________________
____________________________________________________________________
____________________________________________________________________
____________________________________________________________________
3. Connect to your database as the target database in the default Nocatalog mode.
4. Use the RMAN REPORT command to generate a listing of your database structure.
5. Use the RMAN SHOW command to generate a listing of the RMAN configuration settings.
6. Use the RMAN CONFIGURE command to set the backup retention policy to a recovery window of 14 days.
7. Verify the setting for the backup retention policy.
8. Set the backup retention policy back to the default value.

Oracle9i DBA Fundamentals II 9-36

10Copyright © Oracle Corporation, 2001. All rights reserved.
User-Managed Backups

Oracle9i DBA Fundamentals II 10-2
10-2 Copyright © Oracle Corporation, 2001. All rights reserved.
Objectives
After completing this lesson, you should be able todo the following:
• Describe user-managed backup and recovery operations
• Discuss backup issues associated with read-only tablespaces
• Perform closed database backups
• Perform open database backups
• Back up the control file
• Perform cleanup after a failed online backup
• Use the DBVERIFY utility to detect corruption
Oracle9i DBA Fundamentals II 10-3
10-3 Copyright © Oracle Corporation, 2001. All rights reserved.
Terminology
• Whole database backup – Target database may be open or closed
– Backup of all datafiles and the control file
• Partial database backups– Tablespace
– Datafile
– Control file
• Consistent backups
• Inconsistent backups
Backup Terminology
Whole Database Backup
Whole database backup (also known as whole backup) refers to a backup of all datafiles and the control file of the database. Whole backups can be performed when the database is closed or open. This is the most common method of backup.
The whole backup that is taken when the database is closed (after the database is shut down using the NORMAL, IMMEDIATE, or TRANSACTIONAL options) is called a consistentbackup. In such a backup, all the database file headers are consistent with the control file, and when restored completely, the database can be opened without any recovery. When the database is operated in Noarchivelog mode, only a consistent whole database backup is valid for restore and recovery.
When the database is open and operational, the datafile headers are not consistent with the control file unless the database is open in read-only mode. When the database is shut down with the ABORT option this inconsistency persists. Backups of the database in such a state are termed as an inconsistent backup. Inconsistent backups need recovery to bring the database into a consistent state. When databases need to be available 7 days a week, 24 hours a day, you have no option but to use an inconsistent backup, and this can be performed only on databases running in Archivelog mode.

Oracle9i DBA Fundamentals II 10-4
Backup Terminology (continued)
Tablespace Backup
A tablespace backup is a backup of the datafiles that make up a tablespace. Tablespace backups are valid only if the database is in Archivelog mode because redo entries will be required to make the datafiles consistent with the rest of the database. You can make tablespace backups when the tablespace is read-only or offline-normal in Noarchivelog mode.
Datafile Backups
You can make backups of a single datafile if your database is in Archivelog mode. You can make backups of read-only or offline-normal datafiles in Noarchivelog mode.
Control File Backups
You can configure RMAN for automatic backups of the control file after a BACKUP or COPYcommand is issued. The control file can also be backed up through SQL commands.

Oracle9i DBA Fundamentals II 10-5
10-5 Copyright © Oracle Corporation, 2001. All rights reserved.
User-Managed Backup and Recovery
• Files are backed up with operating system commands
• Backups are restored with operating system commands
• Recovery is accomplished using SQL and SQL*Plus commands
User-Managed Backup and Recovery
User-managed backup and recovery does not use Recovery Manager. Operating system commands are used to make backups of the database files and to restore them in a recovery situation. The recovery commands are issued in a SQL*Plus session.
Oracle recommends using RMAN for all backup and recovery operations, but supports user-managed backup and recovery methods.
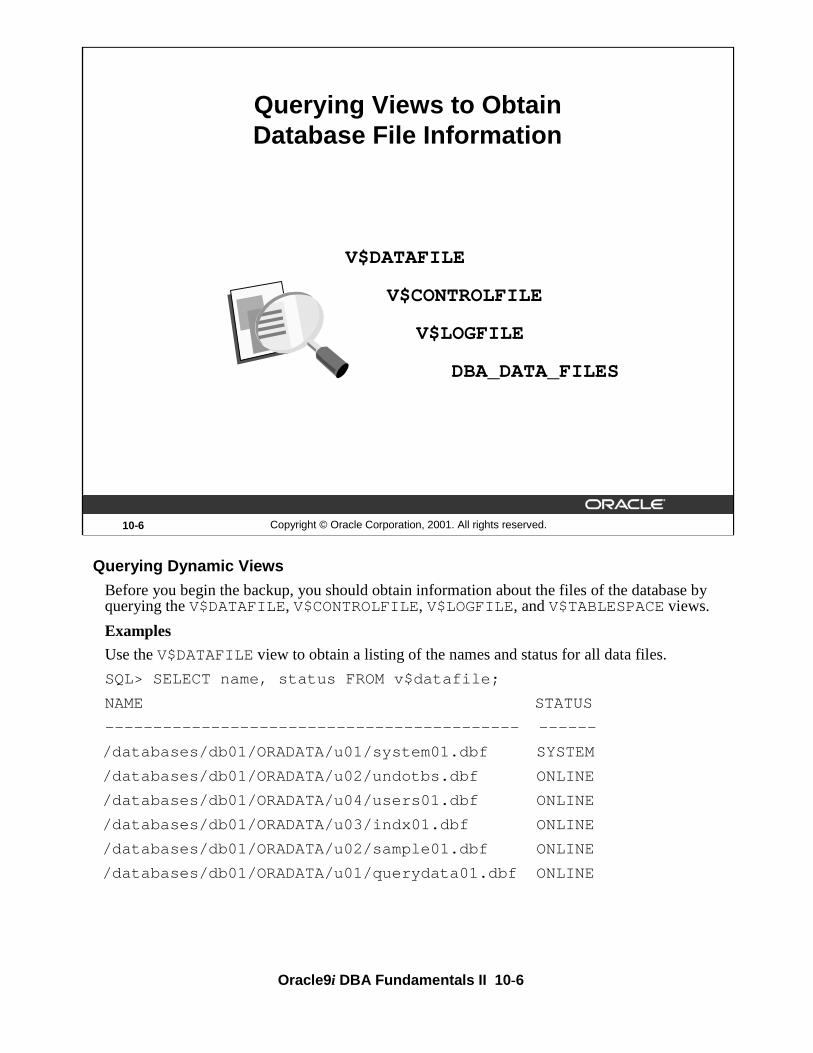
Oracle9i DBA Fundamentals II 10-6
Querying Dynamic Views
Before you begin the backup, you should obtain information about the files of the database by querying the V$DATAFILE, V$CONTROLFILE, V$LOGFILE, and V$TABLESPACE views.
Examples
Use the V$DATAFILE view to obtain a listing of the names and status for all data files.
SQL> SELECT name, status FROM v$datafile;
NAME STATUS
------------------------------------------- ------
/databases/db01/ORADATA/u01/system01.dbf SYSTEM
/databases/db01/ORADATA/u02/undotbs.dbf ONLINE
/databases/db01/ORADATA/u04/users01.dbf ONLINE
/databases/db01/ORADATA/u03/indx01.dbf ONLINE
/databases/db01/ORADATA/u02/sample01.dbf ONLINE
/databases/db01/ORADATA/u01/querydata01.dbf ONLINE
10-6 Copyright © Oracle Corporation, 2001. All rights reserved.
Querying Views to Obtain Database File Information
V$DATAFILE
V$CONTROLFILE
V$LOGFILE
DBA_DATA_FILES

Oracle9i DBA Fundamentals II 10-7
Querying Dynamic Views (continued)Use the V$CONTROLFILE view to display the names of all control files.
SQL> SELECT name FROM v$controlfile;
NAME
--------------------------------------------
/databases/db01/ORADATA/u01/ctrl01.ctl
/databases/db01/ORADATA/u01/ctrl02.ctl
Use the V$LOGFILE view to display the names of all redo log files.
SQL> SELECT member FROM v$logfile;
MEMBER
----------------------------------------------
/databases/db01/ORADATA/u03/log01a.rdo
/databases/db01/ORADATA/u03/log02a.rdo
/databases/db01/ORADATA/u04/log01b.rdo
/databases/db01/ORADATA/u04/log02b.rdo
Use the V$TABLESPACE and V$DATAFILE data dictionary views to obtain a list of all data files and their respective tablespaces. This is very useful when setting up scripts to perform open database backups, so you can ensure that you copy all files at the operating system level.
SQL> SELECT t.name tablespace, f.name datafile
2> FROM v$tablespace t, v$datafile f
3> WHERE t.ts# = f.ts#
4> ORDER BY t.name;
TABLESPACE DATAFILE
---------- --------------------------------------------------
INDX /databases/db01/ORADATA/u03/indx01.dbf
QUERY_DATA /databases/db01/ORADATA/u01/querydata01.dbf
SAMPLE /databases/db01/ORADATA/u02/sample01.dbf
SYSTEM /databases/db01/ORADATA/u01/system01.dbf
UNDOTBS /databases/db01/ORADATA/u02/undotbs.dbf
USERS /databases/db01/ORADATA/u04/users01.dbf

Oracle9i DBA Fundamentals II 10-8
Evaluating Backup Methods
You can safeguard against loss of data that results from media failures by choosing the most appropriate backup method for maximum data recovery. A user-managed database backup is an operating system backup of database files while the database is open or closed.
Physical Backup Methods
• Operating system backup without archiving is used to recover to the point of the last backup after a media failure.
• Operating system backup with archiving is used to recover to the point of failure after a media failure.
10-8 Copyright © Oracle Corporation, 2001. All rights reserved.
Backup Methods
Physical backup
Closed database
Noarchivelog mode
Closed or open database
Archivelog mode

Oracle9i DBA Fundamentals II 10-9
Consistent Whole Database Backup
A consistent whole database backup, also known as a closed database backup, is a backup that is taken of all the datafiles and control files that constitute an Oracle database while the database is closed. It can also include the online redo log files, parameter file, and the password file
When using user-managed backup operations, you should define an operating system backup procedure that will always back up the Oracle datafiles, control files, parameter file, and the password file as part of a strategy to safeguard against potential media failures that can damage these files.
Ensure that the complete pathnames of the files are noted and used appropriately in the backup. In a multiple database environment, care must be taken to associate these files with the corresponding database through a naming convention, because the names of the parameter files and password files are not recorded in the dictionary.
Note: It is not necessary to include the online redo log files as part of a whole database backup, if the database has been shut down cleanly, by using a normal, transactional, or immediate option. However, in cases where it is necessary to restore the entire database, the process is simplified if they have been backed up.
10-9 Copyright © Oracle Corporation, 2001. All rights reserved.
Consistent Whole Database Backup(Closed Database Backup)
Datafiles Control files
Passwordfile
Online or offline storage
Parameterfile
Redo logfiles

Oracle9i DBA Fundamentals II 10-10
Advantages of Making Consistent Whole Database Backups
• A consistent whole database backup is conceptually simple because all you need to do is:
– Shut down the database
– Copy all required files to the backup location
– Open the database
• A minimal number of commands is required to perform a closed database backup.
• You can automate the closed database backup process by executing a simple script that requires minimal operator interaction and does the following:
– Shuts down the database
– Copies the control file and datafiles
– Opens the database
• All files copied during a closed database backup are consistent to a point in time. No transactions occur while the backup is taking place because the database is unavailable for use.
10-10 Copyright © Oracle Corporation, 2001. All rights reserved.
Advantages of Making Consistent Whole Database Backups
• Conceptually simple
• Easy to perform
• Require little operator interaction

Oracle9i DBA Fundamentals II 10-11
Disadvantages of Making Consistent Whole Database Backups
• For business operations where the database must be continuously available, a consistent whole database backup is unacceptable because the database is shutdown and unavailable during the backup.
• The amount of time that the database is unavailable is affected by the size of the database, the number of datafiles, and the speed with which the copy operations on the data files can be performed. If this amount of time exceeds the allowable down time, you must choose another type of backup.
• The recovery point is only to the last full consistent whole database backup, and lost transactions may have to be entered manually following a recovery operation.

Oracle9i DBA Fundamentals II 10-12
Performing a Consistent Whole Database Backup
Perform a consistent whole database backup while the Oracle server instance is shut down.
1. Compile an up-to-date listing of all relevant files to back up.
2. Shut down the Oracle instance with the SHUTDOWN NORMAL, SHUTDOWN IMMEDIATE, or SHUTDOWN TRANSACTIONAL command.
3. Back up all datafiles and control files by using an operating system backup utility. You can also include the redo log files although it is not required. You should also backup the parameter file and the password file
4. Restart the Oracle instance.
10-12 Copyright © Oracle Corporation, 2001. All rights reserved.
2
Making a Consistent Whole Database Backup
3
4
SHUTDOWN IMMEDIATE;
HOST cp <files> /backup/
STARTUP OPEN;
1
Control files
Passwordfile
Parameter file
Datafiles Redo log files

Oracle9i DBA Fundamentals II 10-13
Guidelines
• The default option for the shutdown command is normal. Use transactional or immediate if there is any chance that transactions or processes are still accessing the database.
• Consider a reliable, automated procedure for this operation to ensure that every file is correctly backed up.
• Back up the parameter file and the password file when performing full closed backups.
• You do not need to include files associated with read-only tablespaces in full backups.
• If the database is opened while the offline or cold backup is performed, the backup is invalid and cannot be guaranteed usable in a recovery situation.

Oracle9i DBA Fundamentals II 10-14
Open Database Backup
If business requirements do not permit you to shut down the database to perform backups, then you can use the following methods to perform backups of the database while it is in use:
• Perform backups of all the tablespaces or individual datafiles while they are online or offline.
• Back up the control file to a binary file or create a script to re-create the control file.
The online redo log files do not need to be backed up.
10-14 Copyright © Oracle Corporation, 2001. All rights reserved.
Open Database Backup
DatafilesControl files
Parameter file
Archived redolog filesPassword file
Online redolog files
Oracle9i DBA Fundamentals II 10-15
Advantages of Making an Open Database Backup
• The database is available for normal use during the backup.
• A backup can be done at a tablespace or datafile level.
• Supports businesses that operate all day every day.
Considerations When Making an Open Database Backup
• More training is required for the DBA.
• Tested and automated scripts are recommended for performing open database backups.
10-15 Copyright © Oracle Corporation, 2001. All rights reserved.
Advantages of MakingOpen Database Backups
• Maintains high database availability
• Can be done at a tablespace or datafile level
• Supports nonstop business operations

Oracle9i DBA Fundamentals II 10-16
Open Database Backup Requirements
You can perform backups of tablespaces or individual datafiles while the database is in use, provided two criteria are met:
• The database is set to Archivelog mode.
• You ensure that the online redo logs are archived, either by enabling the Oracle automatic archiving (ARCn) processes or by manually archiving the redo log files.
10-16 Copyright © Oracle Corporation, 2001. All rights reserved.
Archivelog mode
Online redo log files
Archived redo log files
ARC0
052
051
053
051052
053
053
LGWR
054 053052
053052
051
054 053051
Open Database Backup Requirements

Oracle9i DBA Fundamentals II 10-17
Open Database Backup Options
The Oracle server enables you to back up all datafiles for a specific tablespace, or an individual datafile for a tablespace. Regardless of the option you choose, the database remains available for normal (transaction) use during the backup process.
When a datafile is placed in backup mode, more redo log entries may be generated because the log writer writes block images of changed blocks of the datafile in backup mode to the redo log instead of just the row information.
This could have a significant impact on the size of redo logs and the performance of the log writer.
10-17 Copyright © Oracle Corporation, 2001. All rights reserved.
Open Database Backup Options
Tablespace backup
Tablespace USERS
users02.dbfusers01.dbf
Datafile backup
users02.dbf
Tablespace USERS
users01.dbf

Oracle9i DBA Fundamentals II 10-18
How to Perform an Online Tablespace Backup1. Set the datafile or tablespace in backup mode by issuing the ALTER TABLESPACE...BEGIN BACKUP command. This prevents the sequence number in the datafile header from changing, so that logs are applied in recovery from backup start time. Even if the datafile is in backup mode, it is available for normal transaction.
SQL> ALTER TABLESPACE users BEGIN BACKUP;
2. Use an operating system backup utility to copy all datafiles in the tablespace to backup storage. The log sequence numbers in the backup files may be different when eachtablespace is backed up sequentially.
UNIX:
cp /ORADATA/u03/users01.dbf /BACKUP/users01.dbf
NT:
ocopy c:\users\disk1\user01.ora e:\users\backup\user01.ora
10-18 Copyright © Oracle Corporation, 2001. All rights reserved.
Database Backup
Datafile 2144
Datafile 1143
Making a Backup of an Online Tablespace
SQL> ALTER TABLESPACE users
2> BEGIN BACKUP;
$cp /…/users01.dbf
/BACKUP/users01.dbf Database
Datafile 1
Datafile 2
Datafile 3
Controlfiles
Redo logfile 1
Redo logfile 2
145
144
145
145 144
145

Oracle9i DBA Fundamentals II 10-19
How to Perform an Online Tablespace Backup (continued)
3. After the datafiles of the tablespace have been backed up, set them into normal mode by issuing the following command: SQL> ALTER TABLESPACE users END BACKUP;
4. Archive the unarchived redo logs so that the redo required to recover the tablespacebackup is archived as follows:
SQL> ALTER SYSTEM ARCHIVE LOG CURRENT;
Repeat these steps for all tablespaces, including SYSTEM and undo segment tablespaces.
The time between the ALTER TABLESPACE BEGIN BACKUP and ALTER TABLESPACE END BACKUP commands should be minimized, because more redoinformation is generated as a result of modified blocks being written to the redo log files. It istherefore recommended that you perform online backup of one tablespace at a time.
10-19 Copyright © Oracle Corporation, 2001. All rights reserved.
Database
Datafile 1
Datafile 2
Datafile 3
Controlfiles
Redo logfile 1
Redo logfile 2
145
145
145
145 144
145
Ending the Online Tablespace Backup
SQL> ALTER TABLESPACE users
2> BEGIN BACKUP;
$cp /…/users01.dbf
/BACKUP/users01.dbf
SQL> ALTER TABLESPACE users
2> END BACKUP;
Database Backup
Datafile 2144
Datafile 1143
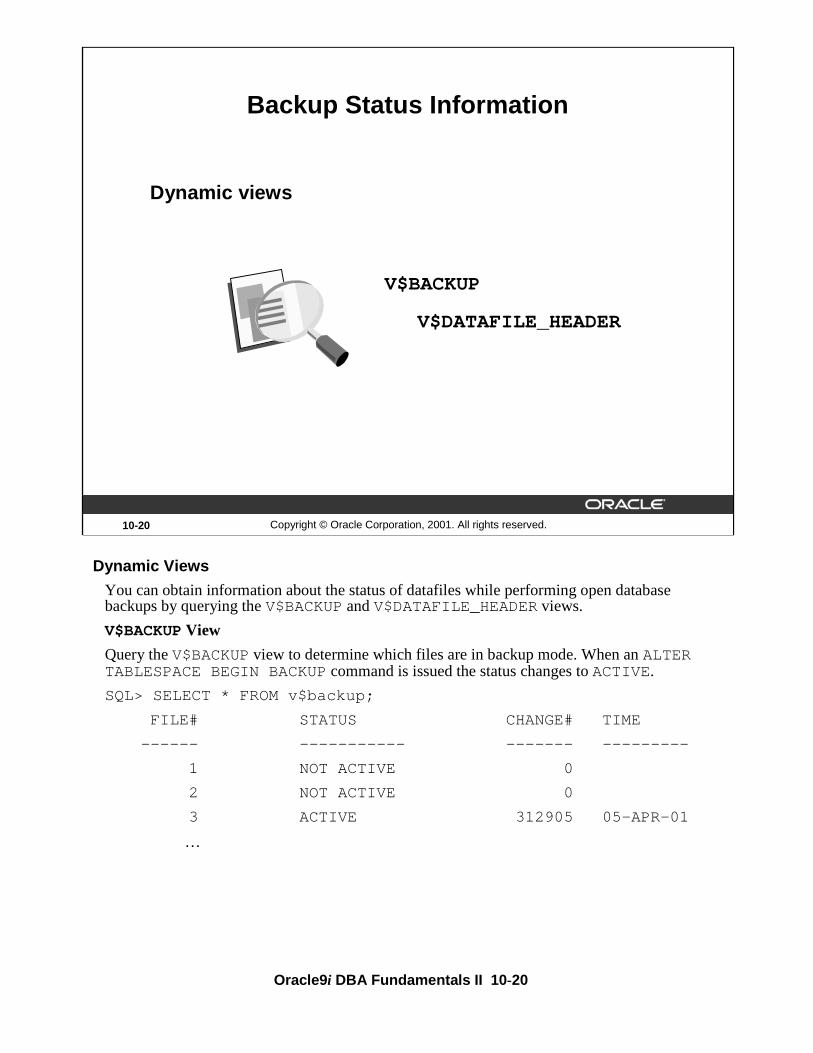
Oracle9i DBA Fundamentals II 10-20
Dynamic Views
You can obtain information about the status of datafiles while performing open database backups by querying the V$BACKUP and V$DATAFILE_HEADER views.
V$BACKUP View
Query the V$BACKUP view to determine which files are in backup mode. When an ALTERTABLESPACE BEGIN BACKUP command is issued the status changes to ACTIVE.
SQL> SELECT * FROM v$backup;
FILE# STATUS CHANGE# TIME
------ ----------- ------- ---------
1 NOT ACTIVE 0
2 NOT ACTIVE 0
3 ACTIVE 312905 05-APR-01
…
10-20 Copyright © Oracle Corporation, 2001. All rights reserved.
Backup Status Information
V$BACKUP
Dynamic views
V$DATAFILE_HEADER

Oracle9i DBA Fundamentals II 10-21
Dynamic Views (continued)The status column value changes to NOT ACTIVE after the file is backed up.
SQL> SELECT * FROM v$backup;
FILE# STATUS CHANGE# TIME
------ ----------- ------- ---------
1 NOT ACTIVE 0
2 NOT ACTIVE 0
3 NOT ACTIVE 312905 05-APR-01
…
V$DATAFILE_HEADER View
Information about datafiles that are in backup mode can also be derived by querying the V$DATAFILE_HEADER view. When an ALTER TABLESPACE BEGIN BACKUP command is issued, the value in the FUZZY column for the tablespace’s data files changes to YES to indicate that the corresponding files are in backup mode.
SQL> SELECT name, status, fuzzy FROM v$datafile_header;
NAME STATUS FUZ
-------------------------------- ------ ---
/…/u01/system01.dbf ONLINE
/…/u02/undotbs.dbf ONLINE
/…/u03/users01.dbf ONLINE YES
…
The value of the FUZZY column changes to NULL when the ALTER TABLESPACE ENDBACKUP command is issued.
SQL> SELECT name, status, fuzzy FROM v$datafile_header;
NAME STATUS FUZ
-------------------------------- ------ ---
/…/u01/system01.dbf ONLINE
/…/u02/undotbs.dbf ONLINE
/…/u03/users01.dbf ONLINE
…

Oracle9i DBA Fundamentals II 10-22
Failure During an Online Tablespace Backup
During an online tablespace backup, the system may crash, a power failure may occur, the database may be shut down, and so on. If any of these occurs:
• The backup files will be unusable if the operating system did not complete the backup. You will need to back up the files again.
• The database files in online backup mode will not be synchronized with the database, because the header is frozen when the backup starts.
• The database will not open because the Oracle server assumes that the files have been restored from a backup.
You can use the ALTER DATABASE …END BACKUPcommand to take the datafiles out of backup mode. You should use this only when you are sure that the files were put in backup mode, not restored from a backup.
10-22 Copyright © Oracle Corporation, 2001. All rights reserved.
Failure During Online Tablespace Backup
ALTER TABLESPACE users
BEGIN BACKUP;
copy /…/users01.dbf
/BACKUP/users01.dbf
Datafile 3
Redo logfile 2
Control files
Redo logfile 1
Datafile 1
Database
144
145
144
144
144
Datafile 2144
Datafile 3
Redo logfile 2
Control files
Redo logfile 1
Datafile 1
Database
146
145
146
146
146
Datafile 2144

Oracle9i DBA Fundamentals II 10-23
Failure During an Online Tablespace Backup (continued)
If you are unsure whether a file needs to be recovered, or if it was left in online backup mode, query the V$BACKUP view:
SQL> SELECT * FROM v$backup;
FILE# STATUS CHANGE# TIME
------- ------------------ ------- --------
1 NOT ACTIVE 0
2 ACTIVE 228596 30-NOV-01
3 NOT ACTIVE 0
4 NOT ACTIVE 0
This output indicates that file number 2 is currently in online backup mode. To unfreeze the header, issue the command:
SQL> ALTER DATABASE datafile 2 END BACKUP;
Database altered.
Alternatively, with Oracle9i you can issue the following command:
SQL> ALTER DATABASE END BACKUP;
Database altered.
This command takes all of the datafiles that were in backup mode out of the mode simultaneously.
You can then query V$BACKUP to check the status again as follows:
SQL> SELECT * FROM v$backup;
FILE# STATUS CHANGE# TIME
-------- ------------------ ------- -------
1 NOT ACTIVE 0
2 NOT ACTIVE 228596 30-NOV-01
...
Now you can open the database for users:
SQL> ALTER DATABASE OPEN;
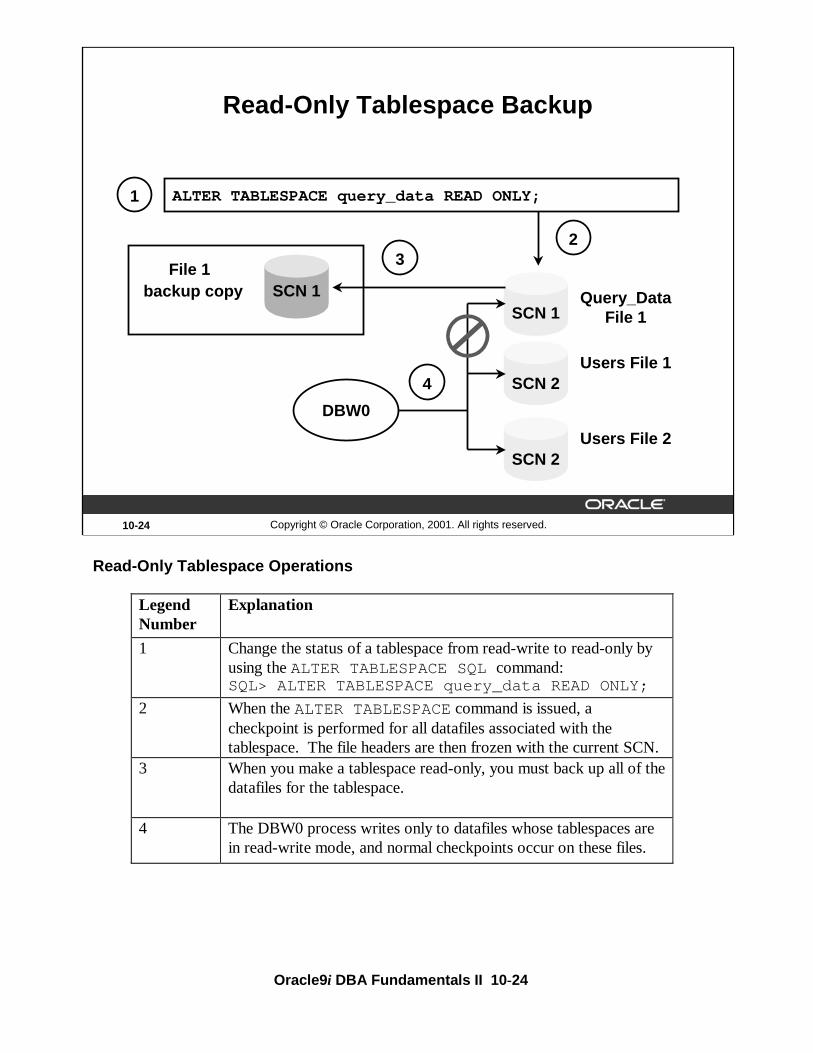
Oracle9i DBA Fundamentals II 10-24
Read-Only Tablespace Operations
10-24 Copyright © Oracle Corporation, 2001. All rights reserved.
Read-Only Tablespace Backup
ALTER TABLESPACE query_data READ ONLY;
SCN 1
SCN 2
SCN 1backup copy
1
2
SCN 2
3
4Users File 1
File 1
Users File 2
Query_Data File 1
DBW0
Legend Number
Explanation
1 Change the status of a tablespace from read-write to read-only by using the ALTER TABLESPACE SQL command: SQL> ALTER TABLESPACE query_data READ ONLY;
2 When the ALTER TABLESPACE command is issued, a checkpoint is performed for all datafiles associated with the tablespace. The file headers are then frozen with the current SCN.
3 When you make a tablespace read-only, you must back up all of the datafiles for the tablespace.
4 The DBW0 process writes only to datafiles whose tablespaces are in read-write mode, and normal checkpoints occur on these files.

Oracle9i DBA Fundamentals II 10-25
Notes on Read-Only Tablespaces
• Because no writes are performed on datafiles for a read-only tablespace, the only time the files must be recovered is when they are damaged.
• Changing the status of a tablespace from read-only to read-write results in DBW0 writing to the tablespace files and checkpoints occur as they usually would. From this point, you must resume a normal backup schedule for all datafiles associated with the tablespace.
• The ALTER TABLESPACE command to change a tablespace to read-only updates the control file. When performing a recovery operation, the control file must correctly identify read-only tablespaces; otherwise you must recover the tablespace.
10-25 Copyright © Oracle Corporation, 2001. All rights reserved.
Read-Only Tablespace Backup Issues
• Only one backup is needed after altering the tablespace to read-only.
• Resume a normal backup schedule for that tablespace after making it read-write.
• The control file must correctly identify the tablespace in read-only mode, otherwise you must recover it.

Oracle9i DBA Fundamentals II 10-26
Backup Issues With Logging and Nologging Options
Tablespaces, tables, indexes, or partitions may be set to Nologging mode for faster load of data when using direct-load operations. When the Nologging option is set for a direct-load operation, insert statements are not logged in the redo log files.
Because the redo logs do not contain the values that were inserted when the table was in Nologging mode, the data file pertaining to the table or partition should be backed up immediately upon completion of the direct-load operation.
10-26 Copyright © Oracle Corporation, 2001. All rights reserved.
Backup Issues with Logging and Nologging Options
NologgingLogging
All changes recorded to redo
Minimal redo recorded
Fully recoverable from last backup
Not recoverable from last backup
No additional backup May require additional backup

Oracle9i DBA Fundamentals II 10-27
Backing Up the Control File Manually
If you are not using RMAN for backups, you must manually back up the control file. You must protect against loss of the control file because information in the control file is required at instance startup time.
Certain status information in the control file, such as the current online redo log file and the names of the database files, is used by the Oracle server during instance or media recovery. You need to maintain a recent copy of the control file after every change to the database configuration.
Guidelines
• Multiplex the control files and name them in the init.ora file by using the CONTROL_FILES parameter.
• The ALTER DATABASE BACKUP CONTROLFILE TO TRACE command creates a script to re-create the control file. The file is located in the directory specified in the initialization parameter USER_DUMP_DEST. This script does not contain RMAN meta data.
• In addition, the individual control files should also be backed-up by using the ALTER DATABASE BACKUP CONTROLFILE to filename command. This provides a binary copy of the control file at that time.
• During a full backup, shut down the instance normally and use an operating system backup utility to copy the control file to backup storage.
10-27 Copyright © Oracle Corporation, 2001. All rights reserved.
Manual Control File Backups
Creating a binary image
ALTER DATABASE BACKUP CONTROLFILE TO
‘control1.bkp`;
Creating a text trace file
ALTER DATABASE BACKUP CONTROLFILE TO TRACE;

Oracle9i DBA Fundamentals II 10-28
Backing Up the Control File Manually (continued)
The following commands change the database configuration and result in changes to the control file:
• ALTER DATABASE [ADD | DROP] LOGFILE
• ALTER DATABASE [ADD | DROP] LOGFILE MEMBER
• ALTER DATABASE [ADD | DROP ] LOGFILE GROUP
• ALTER DATABASE [ NOARCHIVELOG | ARCHIVELOG ]
• ALTER DATABASE RENAME FILE
• CREATE TABLESPACE
• ALTER TABLESPACE [ADD | RENAME ] DATAFILE
• ALTER TABLESPACE [READ WRITE | READ ONLY ]
• DROP TABLESPACE
Note: It is necessary to back up the control file after any of the above commands is issued.
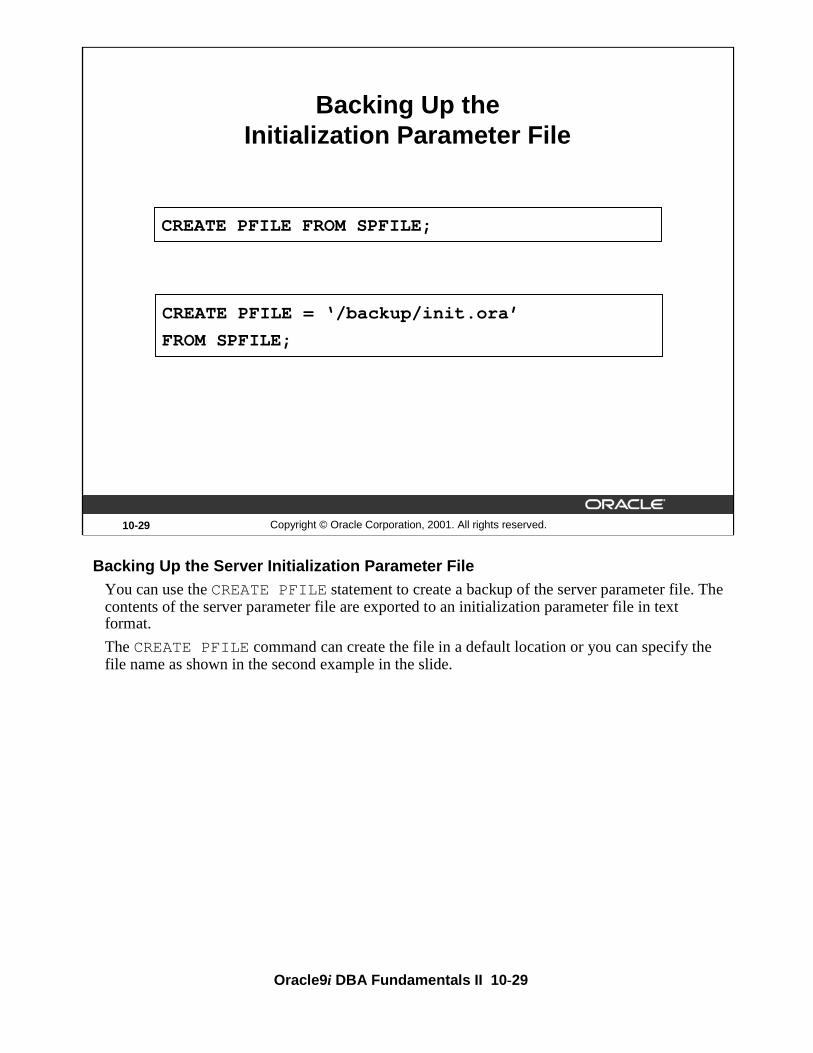
Oracle9i DBA Fundamentals II 10-29
Backing Up the Server Initialization Parameter FileYou can use the CREATE PFILE statement to create a backup of the server parameter file. The contents of the server parameter file are exported to an initialization parameter file in text format.
The CREATE PFILE command can create the file in a default location or you can specify the file name as shown in the second example in the slide.
10-29 Copyright © Oracle Corporation, 2001. All rights reserved.
Backing Up the Initialization Parameter File
CREATE PFILE FROM SPFILE;
CREATE PFILE = ‘/backup/init.ora’
FROM SPFILE;
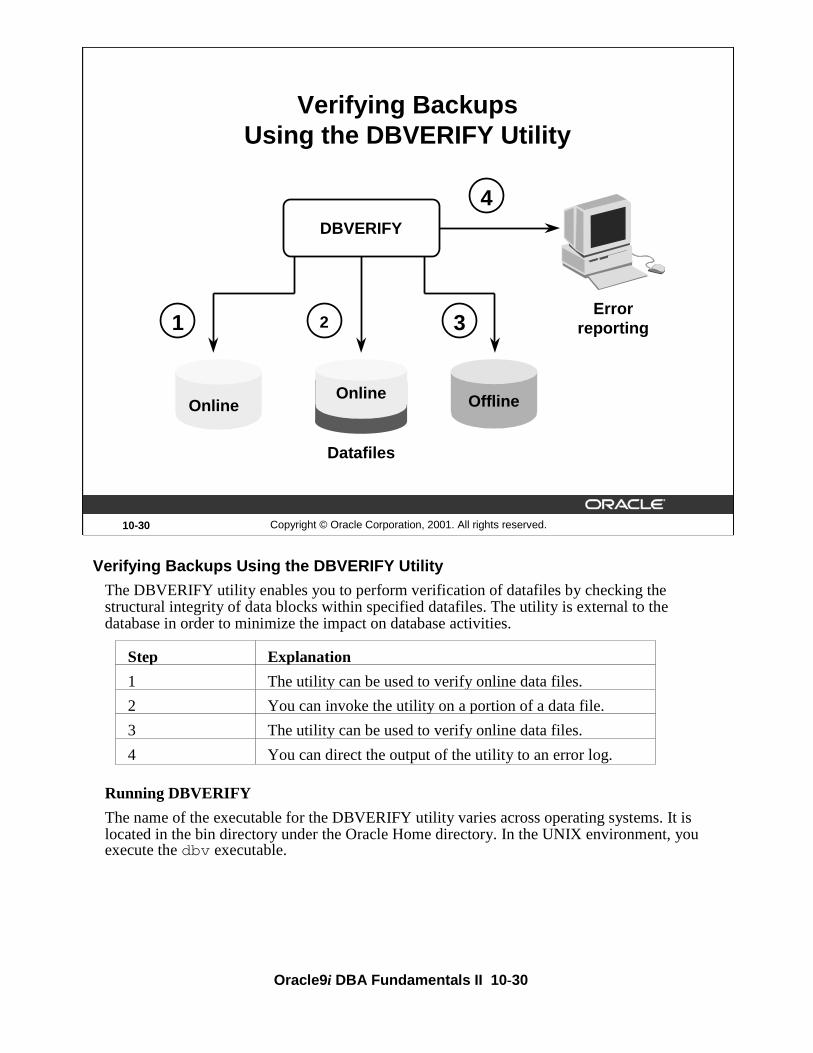
Oracle9i DBA Fundamentals II 10-30
10-30 Copyright © Oracle Corporation, 2001. All rights reserved.
1 2
Verifying Backups Using the DBVERIFY Utility
DBVERIFY
Datafiles
Online
Errorreporting
Offline
3
4
Online
Verifying Backups Using the DBVERIFY Utility
The DBVERIFY utility enables you to perform verification of datafiles by checking the structural integrity of data blocks within specified datafiles. The utility is external to the database in order to minimize the impact on database activities.
Running DBVERIFY
The name of the executable for the DBVERIFY utility varies across operating systems. It is located in the bin directory under the Oracle Home directory. In the UNIX environment, you execute the dbv executable.
Step Explanation
1 The utility can be used to verify online data files.
2 You can invoke the utility on a portion of a data file.
3 The utility can be used to verify online data files.
4 You can direct the output of the utility to an error log.

Oracle9i DBA Fundamentals II 10-31
10-31 Copyright © Oracle Corporation, 2001. All rights reserved.
DBVERIFY Command-Line Interface
• External command line utility
• Used to ensure that a backup database or data file is valid before a restore
• May be a helpful diagnostic aid when data-corruption problems are encountered
%dbv file=/ORADATA/u03/users01.dbf logfile=dbv.log
DBVERIFY Command Line Interface
You invoke the DBVERIFY utility using a command-line interface. You use this utility primarily to ensure that a backup database (or datafile) is valid before it is restored or as a diagnostic aid when you have encountered data-corruption problems.
Example
To verify the integrity of the users01.dbf data file, starting with block 1 and ending with block 500, you execute the following command:
UNIX
$ dbv /ORADATA/u03/users01.dbf start=1 end=500
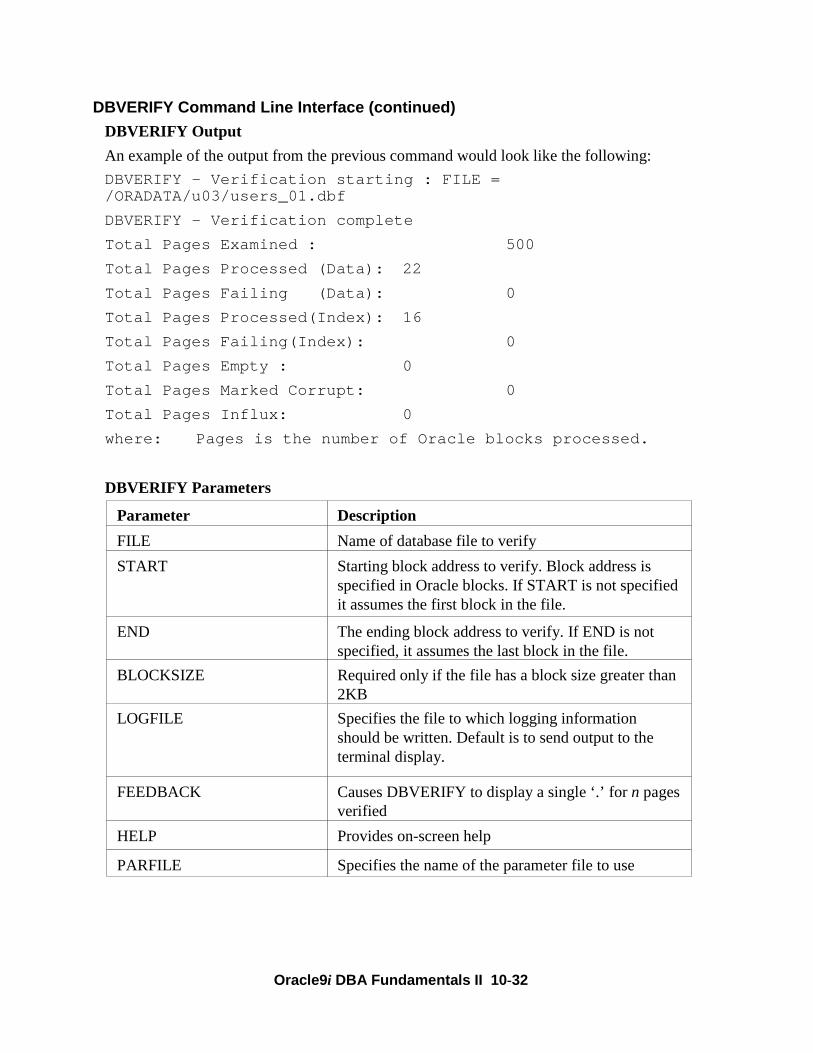
Oracle9i DBA Fundamentals II 10-32
DBVERIFY Command Line Interface (continued)
DBVERIFY Output
An example of the output from the previous command would look like the following:
DBVERIFY - Verification starting : FILE = /ORADATA/u03/users_01.dbf
DBVERIFY - Verification complete
Total Pages Examined : 500
Total Pages Processed (Data): 22
Total Pages Failing (Data): 0
Total Pages Processed(Index): 16
Total Pages Failing(Index): 0
Total Pages Empty : 0
Total Pages Marked Corrupt: 0
Total Pages Influx: 0
where: Pages is the number of Oracle blocks processed.
DBVERIFY Parameters
Parameter Description
FILE Name of database file to verify
START Starting block address to verify. Block address is specified in Oracle blocks. If START is not specified it assumes the first block in the file.
END The ending block address to verify. If END is not specified, it assumes the last block in the file.
BLOCKSIZE Required only if the file has a block size greater than 2KB
LOGFILE Specifies the file to which logging information should be written. Default is to send output to the terminal display.
FEEDBACK Causes DBVERIFY to display a single ‘.’ for n pages verified
HELP Provides on-screen help
PARFILE Specifies the name of the parameter file to use

Oracle9i DBA Fundamentals II 10-33
10-33 Copyright © Oracle Corporation, 2001. All rights reserved.
Summary
In this lesson, you should have learned how to:
• Determine which files require backup and when they should be backed up
• Make user-managed backups
• Backup the control file
• Backup the server initialization parameter file
• End an online backup that did not complete due to instance failure
• Use dynamic views to determine the status of backup operations
• Use DBVERIFY to verify the backup

Oracle9i DBA Fundamentals II 10-34
10-34 Copyright © Oracle Corporation, 2001. All rights reserved.
Practice 10 Overview
This practice covers the following topics:
• Performing a full offline database backup.
• Performing an online backup of a tablespace datafile.
• Creating a trace file of the control file.

Oracle9i DBA Fundamentals II 10-35
Practice 10 User-Managed Backups1. While the database is open, connect to the database as sys or system and using
V$ and data dictionary views, make a list of all of the files that must be backed up for a whole offline database backup.
Note: Copy the redo logs for ease of restore and recovery in Noarchivelog mode.
2. Shut down the database with the IMMEDIATE option. Make a whole offline database backup into the $HOME/DONTTOUCH directory using the operating system commands.
Note: Do not place any additional files in the DONTTOUCH directory or remove any files from this directory. This copy will be used for the workshop.
3. Start the instance, mount and open the database.
4. Connect as system/manager and make an open backup of the SAMPLE tablespace. Copy the file to the $HOME/BACKUP/UMAN directory. Make sure that you do not overwrite another copy.
5. Use the ALTER DATABASE command to back up the control file to trace. Execute the $HOME/STUDENT/LABS/spid.sql script to identify the trace file. Exit to the operating system and copy the trace file to $HOME/BACKUP/UMAN/cntrl.sql. Using an editor, remove the comment lines from the trace file.
6. Create a binary copy of the control file and put it in the $HOME/BACKUP/UMANdirectory. Name the backup copy cntrl1.bkp.

Oracle9i DBA Fundamentals II 10-36

11Copyright © Oracle Corporation, 2001. All rights reserved.
RMAN Backups

Oracle9i DBA Fundamentals II 11-2
11-2 Copyright © Oracle Corporation, 2001. All rights reserved.
Objectives
After completing this lesson, you should be able todo the following:
• Identify types of RMAN specific backups• Use the RMAN BACKUP command to create backup
sets
• Back up the control file
• Back up the the archived redo log files• Use the RMAN COPY command to create image
copies

Oracle9i DBA Fundamentals II 11-3
11-3 Copyright © Oracle Corporation, 2001. All rights reserved.
RMAN Backup Concepts
• Recovery Manager backup is a server-managed backup– Recovery Manager uses Oracle server sessions for
backup operations– Includes database, tablespaces, datafiles, control
files, archived redo log files
• Closed database backup– Target database must be mounted (not open)– Includes datafiles, control files, archived redo log
files
• Open database backup– Tablespaces should not be put in backup mode– Includes datafiles, control files, archived redo log
files
Types of Recovery Manager Backups
Recovery Manager provides functionality to back up:
• The entire database, every datafile in a tablespace, or a single datafile
• The control file
• All or selected archived logs
Note: The online redo log files are not backed up when using Recovery Manager.
Closed Database Backups
A closed database backup is defined as a backup of the database while it is closed (offline). This is the same as the consistent database backup. If you are performing a closed backup, the target database must not be open. If you are using a recovery catalog, the recovery catalog database must be open.
Open Database Backups
An open database backup is defined as a backup of any portion of the database while it is open (online). Recovery Manager uses server processes to make copies of datafiles, control files, or archive logs. When using Recovery Manager, do not put tablespaces in backup mode using the ALTER TABLESPACE ... BEGIN BACKUP command. RMAN reads a block until a consistent read is obtained.
Oracle9i DBA Fundamentals II 11-4
11-4 Copyright © Oracle Corporation, 2001. All rights reserved.
ArchivedLog file
Datafile 3
Recovery Manager Backups
Copy of datafile 3
Copy of archived log
Image copy
Backup set
Backup set 1
Backup set 2
Backup set 3
Datafile 1
Datafile 2
Datafile 3
Datafile 4
Controlfile
Datafile 4
Controlfile
Datafile 1
Datafile 2
Datafile 3
Datafile 3
ArchivedLog file
Control file
Control file
Copy of control file
Recovery Manager Backups
You can make the following types of backups with Recovery Manager:
• Image copies are copies of a datafile, control file, or archived redo log file. A copy can be made using Recovery Manager or an operating system utility. The image copy of a datafile consists of all the blocks of the datafile, including the unused blocks. The image copy can include only one file and a single operation of copy cannot be multiplexed.
• Backup sets can include one or more datafiles, the control file or archived redo log files. The backup set can contain one or more files. You can make a backup set in two distinct ways:
– Full backup: In a full backup, you back up one or more files. In a full backup, all blocks containing data for the files specified are backed up.
– Incremental backup: An incremental backup is a backup of datafiles that include only the blocks that have changed since the last incremental backup. Incremental backups require a base-level (or incremental level 0) backup, which backs up all blocks containing data for the files specified. Incremental level 0 and full backups copy all blocks in datafiles, but full backups cannot be used in an incremental backup strategy.
Note: You can configure automatic control file backup so that the control file is backed up when you issue a BACKUP or COPY command.
Oracle9i DBA Fundamentals II 11-5
11-5 Copyright © Oracle Corporation, 2001. All rights reserved.
Backup Sets
Backup set 1
Backup set 2
Backup set 3
Datafile 1
Datafile 2
Datafile 3
Datafile 4
Controlfile
Datafile 4
Controlfile
Datafile 1
Datafile 2
Datafile 3
Backup Sets
A backup set consists of one or more physical files stored in an RMAN-specific format, on either disk or tape. You can make a backup set containing datafiles, control files, and archived redo log files. You can also back up a backup set. Backup sets can be of two types:
• Datafile: Can contain datafiles and control files, but not archived logs
• Archived log: Contains archived logs, not datafiles or control files
Note: Backup sets may need to be restored by Recovery Manager before recovery can be performed, unlike image copies which generally are available on disks.
Control Files in Datafile Backup Sets
Each file in a backup set must have the same Oracle block size (control files and datafiles have the same block size, whereas archived log block sizes are machine dependent). When a control file is included, it is written in the last datafile backup set. A control file can be included in a backup set either:
• Explicitly using the INCLUDE CONTROL FILE syntax
• Implicitly by backing up file 1 (the system datafile)
The RMAN BACKUP command is used to back up datafiles, archived redo log files, and control files. The BACKUP command backs up the files into one or more backup sets on diskor tape. You can make the backups when the database is open or closed. Backups can be full or incremental backups.

Oracle9i DBA Fundamentals II 11-6
11-6 Copyright © Oracle Corporation, 2001. All rights reserved.
Characteristics of Backup Sets
• The BACKUP command creates backup sets.
• Backup sets usually contain more than one file.
• Backup sets can be written to a disk or tape.
• A restore operation is required to extract files from a backup set.
• Data file backup sets can be incremental or full.
• Backup sets do not include never-used blocks.
Characteristics of Backup Sets
A backup set is a logical structure that has the following characteristics:
• A backup set contains one or more physical files called backup pieces.
• A backup set is created by the BACKUP command. The FILESPERSET parameter controls the number of datafiles contained in a backup set.
• A backup set can be written to disk or tape. Oracle provides one tape output by default for most platforms, known as SBT_TAPE (System Backup to Tape), which writes to a tape device when you are using a media manager.
• A restore operation must extract files from a backup set before recovery.
• Archived redo log file backup sets cannot be incremental (they are full by default).
• A backup set does not include data blocks that have never been used.

Oracle9i DBA Fundamentals II 11-7
11-7 Copyright © Oracle Corporation, 2001. All rights reserved.
Backup Piece
Backup set 1 (Logical)Piece 2 (file)Piece 1 (file)
Datafile 1 Datafile 4 Datafile 5
Piece 1 (file)
Datafile 2 Datafile 3 Datafile 9
Backup set 2 (Logical)
• A backup piece is a file in a backup set.
• A backup piece can contain blocks from more than one datafile.
Tape 1
Tape 2
Serverprocess
(channel)
MML
Serverprocess
(channel)
MML
Backup Piece
A logical backup set usually only has one backup piece. A backup piece is a single physical file that can contain one or more Oracle datafiles or archived logs.
For a large database, a backup set might exceed the maximum size for a single tape reel, physical disk, or operating system file. The size of each backup set piece can therefore be limited by using MAXPIECESIZE with the CONFIGURE CHANNEL or ALLOCATE CHANNEL commands.
Oracle9i DBA Fundamentals II 11-8
11-8 Copyright © Oracle Corporation, 2001. All rights reserved.
The BACKUP Command
RMAN> BACKUP 2> FORMAT ’/BACKUP/df_%d_%s_%p.bus’3> DATABASE filesperset = 2;
Backup set 1
Backup set 2
Backup set 3
Datafile 1
Datafile 2
Datafile 3
Datafile 4
Controlfile
Datafile 4
Controlfile
Datafile 1
Datafile 2
Datafile 3
The BACKUP Command
You can control the number of backup sets that Oracle produces as well as the number of input files that Recovery Manager places into a single backup set. If any I/O errors are received when reading files or writing backup pieces, the job is aborted.
When using the BACKUP command, you must do the following:
• Mount or open the target database. Recovery Manager allows you to make an inconsistent backup if the database is in Archivelog mode, but you must apply redo logs to make the backups consistent for use in recovery operations.
• Manually allocate a channel for execution of the BACKUP command if you are not using automatic channel allocation.
Optionally, you can do the following:
• Specify naming convention for backup pieces. If you do not specify the FORMATparameter, RMAN stores the backup pieces in a port-specific directory ($ORACLE_HOME/dbs on UNIX). If you do not specify a file name format, RMAN uses %U by default.
• Include the control file in the backup set by using the INCLUDE CURRENTCONTROLFILE option.
You cannot combine archived redo log files and datafiles into a single backup. Also, when performing backups using scripts, you cannot generate unique tag names.

Oracle9i DBA Fundamentals II 11-9
BACKUP Command Options
Option Significance
full The server session copies all blocks into the backup set, skipping only datafile blocks that have never been used. The server session does not skip blocks when backing up archived redo logs or control files. Full backup is not considered an incremental backup.
incrementallevel integer
The server session copies data blocks that have changed since the last incremental n backup, where n is any integer from 1 to 4.
When attempting an incremental backup of a level greater than 0, server process checks that a level 0 backup or level 0 copy exists for each datafile in the BACKUP command.
If you specify incremental, then in the backup spec you must set one of the following parameters: DATA FILE, DATA FILECOPY, TABLESPACE, or DATABASE. Recovery Manager does not support incremental backups of control files, archived redo logs, or backup sets.
filespersetinteger
When you specify the FILESPERSET parameter, Recovery Manager compares the FILESPERSET value to a calculated value (number of files backed up per number of channels) and takes the lower of the two, thereby ensuring that all channels are used. If you do not specify FILESPERSET, then Recovery Manager compares the calculated value (number of files per allocated channels) to the default value of 64 and takes the lower of the two.
When there are more channels than files to back up, channels remain idle. Input files cannot be split across channels.
skip Specify this parameter to exclude some datafiles or archived redo logs from the backup set. You have the following options within the parameter:offline: Exclude offline datafiles from backup set.
readonly: Exclude datafiles belonging to read-only tablespaces.
inaccessible: Exclude datafiles or archived redo logs that cannot be read because of I/O errors.
maxsetsizeinteger
Specifies a maximum size for a backup set in bytes (default), kilobytes (K), megabytes (M), and gigabytes (G). Recovery Manager attempts to limit all backup sets to this size.
diskratiointeger
Directs Recovery Manager to assign only datafiles to backup sets spread across the specified number of drives.Useful for datafile backups when datafiles are striped or reside on separate disk spindles.
delete input
Deletes the input files upon successful creation of the backup set. Specify this option only when backing up archived redo logs, datafile copies or backup sets. It is equivalent to issuing a CHANGE . . . DELETE command for all of the input files.

Oracle9i DBA Fundamentals II 11-10
BACKUP Command Options (continued)
Option Significance
includecurrentcontrolfile
Creates a snapshot of the current control file and places it into each backup set produced by this clause.
Format Format of the name of output. The format parameters can be used either individually or in combination.
%c Specifies the copy number of the backup piece within a set of duplexed backup pieces.
%p Specifies the backup piece number within the backup set. This value starts at 1 for each backup set and is increased by 1 as each backup piece is created.
%s Specifies the backup set number. This number is a counter in the control file that is increased for each backup set.
%d Specifies the database name.
%n Specifies the database name, padded on the right with x characters to a total length of 8 characters.
%t Specifies the backup set time stamp, which is a 4-byte value derived as the number of seconds elapsed since a fixed reference time. The combination of %s and %t can be used to form a unique name for the backup set.
%u Specifies an 8-character name constituted by compressed representations of the backup set number and the time that the backup set was created
%U Specifies a convenient shorthand for %u_%p_%c that guarantees uniqueness in generated backup filenames. If you do not specify a format, Recovery Manager uses %U by default.

Oracle9i DBA Fundamentals II 11-11
11-11 Copyright © Oracle Corporation, 2001. All rights reserved.
Backup Piece Size
Backup piece size can be limited as follows:
RMAN> RUN {
2> ALLOCATE CHANNEL t1 TYPE ’SBT_TAPE’
3> MAXPIECESIZE = 4G;
4> BACKUP
5> FORMAT ’df_%t_%s_%p’ FILESPERSET 3
6> (tablespace users); }
Backup Piece Size
You can use the following commands to restrict the size of a backup piece and generate more than one piece per set when required:
ALLOCATE CHANNEL … MAXPIECESIZE = integer
CONFIGURE CHANNEL … MAXPIECESIZE = integer
Specify the size in bytes, kilobytes (K), megabytes (M), or gigabytes (G).
Example (from slide)
• Scenario: The USER_DATA tablespace needs to be backed up to one tape drive. The maximum file size for the tape drive is 4 GB.
• Result: If the output file is less than 4 GB, only one backup piece will be written for the backup set. If the output size is greater than 4 GB, more than one backup piece will be written for the backup set. Each backup piece will have blocks from three files interspersed.
Note: In Oracle8i, the following command would be used:
SET LIMIT CHANNEL t1 KBYTES 4194304;
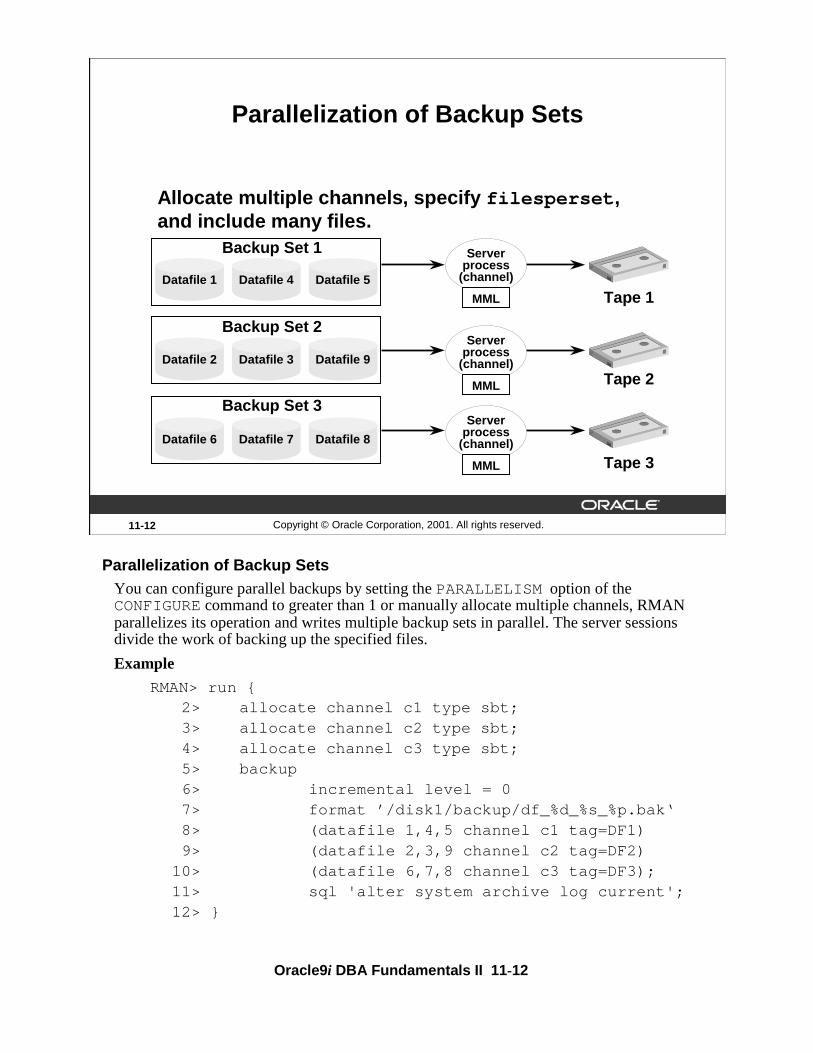
Oracle9i DBA Fundamentals II 11-12
11-12 Copyright © Oracle Corporation, 2001. All rights reserved.
Parallelization of Backup Sets
Allocate multiple channels, specify filesperset, and include many files.
Serverprocess
(channel)
MML
Serverprocess
(channel)
MML
Serverprocess
(channel)
MML
Backup Set 1
Backup Set 2
Backup Set 3
Tape 1
Tape 2
Tape 3
Datafile 4Datafile 1 Datafile 5
Datafile 3Datafile 2 Datafile 9
Datafile 7Datafile 6 Datafile 8
Parallelization of Backup SetsYou can configure parallel backups by setting the PARALLELISM option of the CONFIGURE command to greater than 1 or manually allocate multiple channels, RMAN parallelizes its operation and writes multiple backup sets in parallel. The server sessions divide the work of backing up the specified files.
Example
RMAN> run {2> allocate channel c1 type sbt;3> allocate channel c2 type sbt;4> allocate channel c3 type sbt;5> backup6> incremental level = 07> format ’/disk1/backup/df_%d_%s_%p.bak‘8> (datafile 1,4,5 channel c1 tag=DF1)9> (datafile 2,3,9 channel c2 tag=DF2)
10> (datafile 6,7,8 channel c3 tag=DF3);11> sql 'alter system archive log current';12> }
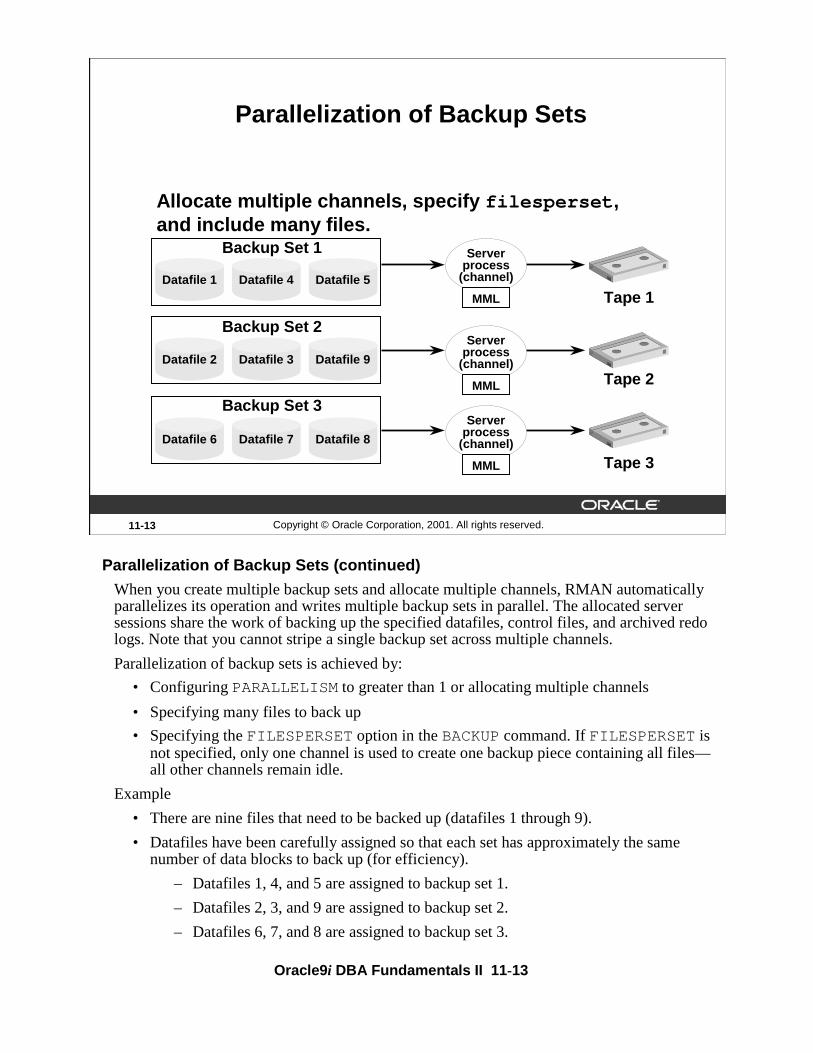
Oracle9i DBA Fundamentals II 11-13
11-13 Copyright © Oracle Corporation, 2001. All rights reserved.
Parallelization of Backup Sets
Allocate multiple channels, specify filesperset, and include many files.
Serverprocess
(channel)
MML
Serverprocess
(channel)
MML
Serverprocess
(channel)
MML
Backup Set 1
Backup Set 2
Backup Set 3
Tape 1
Tape 2
Tape 3
Datafile 4Datafile 1 Datafile 5
Datafile 3Datafile 2 Datafile 9
Datafile 7Datafile 6 Datafile 8
Parallelization of Backup Sets (continued)
When you create multiple backup sets and allocate multiple channels, RMAN automatically parallelizes its operation and writes multiple backup sets in parallel. The allocated server sessions share the work of backing up the specified datafiles, control files, and archived redo logs. Note that you cannot stripe a single backup set across multiple channels.
Parallelization of backup sets is achieved by:
• Configuring PARALLELISM to greater than 1 or allocating multiple channels
• Specifying many files to back up
• Specifying the FILESPERSET option in the BACKUP command. If FILESPERSET is not specified, only one channel is used to create one backup piece containing all files—all other channels remain idle.
Example
• There are nine files that need to be backed up (datafiles 1 through 9).
• Datafiles have been carefully assigned so that each set has approximately the same number of data blocks to back up (for efficiency).
– Datafiles 1, 4, and 5 are assigned to backup set 1.
– Datafiles 2, 3, and 9 are assigned to backup set 2.
– Datafiles 6, 7, and 8 are assigned to backup set 3.

Oracle9i DBA Fundamentals II 11-14
Parallelization of Backup Sets (continued)• Because there are three files per set, there is no need to use the FILESPERSET
parameter. Three backup sets will be written each of which would contain blocks from three datafiles. Three channels are used to write in parallel.

Oracle9i DBA Fundamentals II 11-15
11-15 Copyright © Oracle Corporation, 2001. All rights reserved.
Datafile 1
Datafile 2
Datafile 3
Serverprocess
(channel)
MML
Multiplexed Backup Sets
Multiplex two or more datafiles into a backup setfor tape streaming.
Backup set
Tape
filesperset = 3
Datafile 1,2,3,1,2,3…
RMAN Multiplexed Backup Sets
The technique of RMAN multiplexing is to simultaneously read files on disks and and then write them into the same backup piece. When more than one file is written to the same backup file or piece, Recovery Manager automatically performs the allocation of files to channels, multiplexes the files, and skips any unused blocks. With a sufficient number of files to back up concurrently, high-performance sequential output devices (for example, fast tape drives) can be streamed. This is important for backups that must compete with other online system resources. It is the responsibility of the operator or storage subsystem to change the tape on the target database where the tape drive is located.
This process was designed for writing to tape but it can also be used to write to disk.
Multiplexing is controlled by the following:
• The FILESPERSET parameter on the BACKUP command
• The MAXOPENFILES parameter of the ALLOCATE CHANNEL and CONFIGURECHANNEL commands
Example
The database contains three data files that will be multiplexed together into one physical file (set) and stored on tape. The datafiles are multiplexed by writing n number of blocks from datafile 1, then datafile 2, then datafile 3, then datafile 1, and so on until all files are backed up.
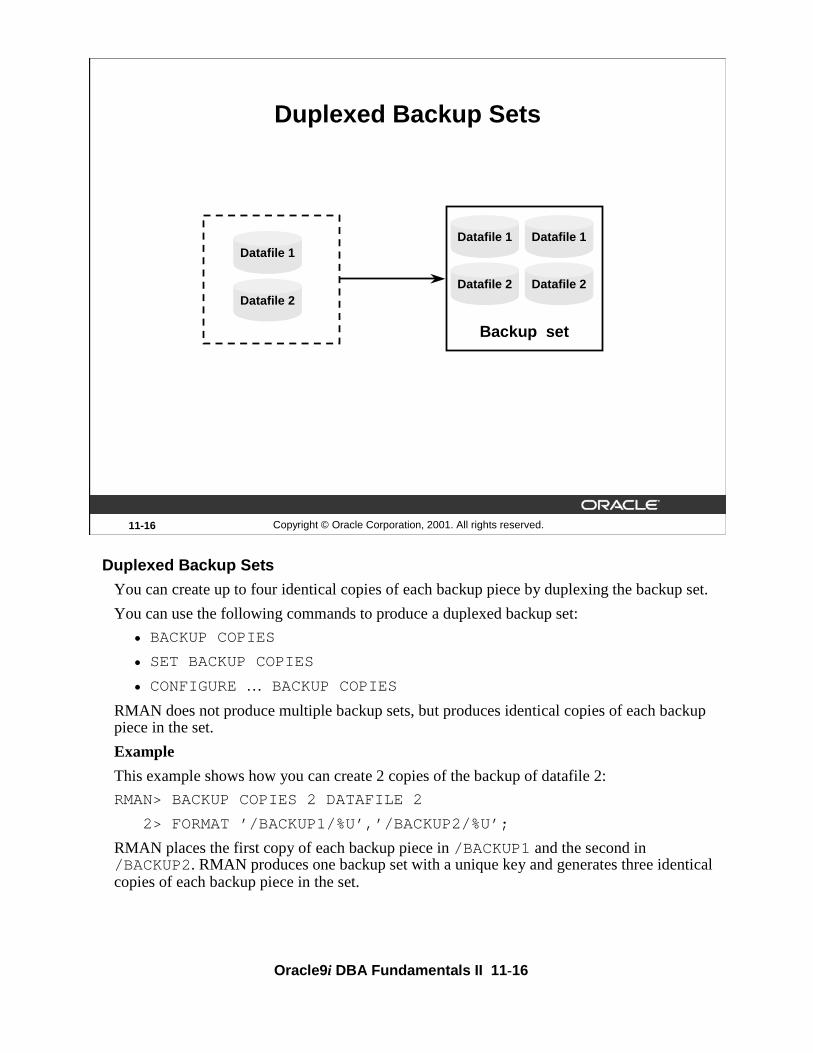
Oracle9i DBA Fundamentals II 11-16
11-16 Copyright © Oracle Corporation, 2001. All rights reserved.
Backup set
Datafile 1
Datafile 2
Duplexed Backup Sets
Datafile 1
Datafile 2
Datafile 1
Datafile 2
Duplexed Backup Sets
You can create up to four identical copies of each backup piece by duplexing the backup set.
You can use the following commands to produce a duplexed backup set:
• BACKUP COPIES
• SET BACKUP COPIES
• CONFIGURE … BACKUP COPIES
RMAN does not produce multiple backup sets, but produces identical copies of each backup piece in the set.
Example
This example shows how you can create 2 copies of the backup of datafile 2:
RMAN> BACKUP COPIES 2 DATAFILE 2
2> FORMAT ’/BACKUP1/%U’,’/BACKUP2/%U’;
RMAN places the first copy of each backup piece in /BACKUP1 and the second in /BACKUP2. RMAN produces one backup set with a unique key and generates three identical copies of each backup piece in the set.
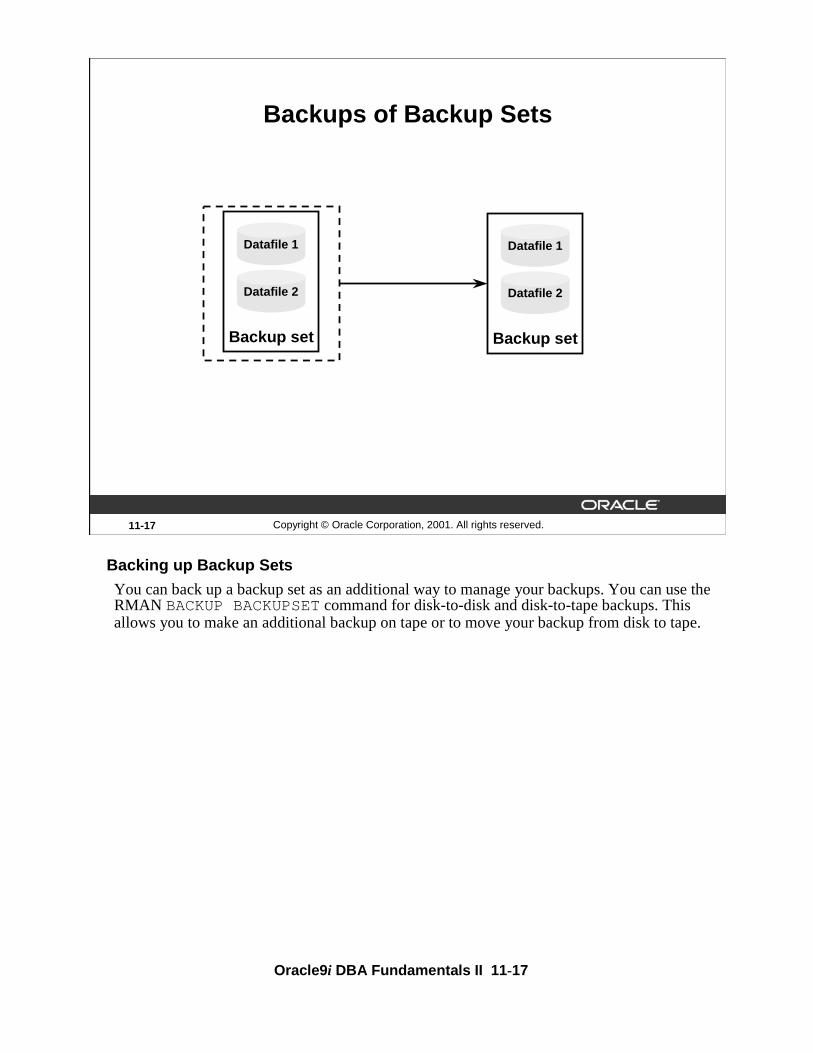
Oracle9i DBA Fundamentals II 11-17
11-17 Copyright © Oracle Corporation, 2001. All rights reserved.
Backups of Backup Sets
Datafile 1
Datafile 2
Backup set
Datafile 1
Datafile 2
Backup set
Backing up Backup Sets
You can back up a backup set as an additional way to manage your backups. You can use the RMAN BACKUP BACKUPSET command for disk-to-disk and disk-to-tape backups. This allows you to make an additional backup on tape or to move your backup from disk to tape.

Oracle9i DBA Fundamentals II 11-18
11-18 Copyright © Oracle Corporation, 2001. All rights reserved.
Archived Redo Log File Backups
• Online redo log file switch is automatic.
• Archived log failover is performed.
Archived Redo Log File BackupsAt the beginning of every BACKUP ... ARCHIVELOG command that does not include an UNTIL clause or SEQUENCE parameter, RMAN attempts to automatically switch out of and archive the current online redo log.
In Oracle9i, RMAN performs archived log failover. If any corrupt blocks are detected in an archived redo log file, RMAN searches other archiving destinations for a file without corrupt blocks.

Oracle9i DBA Fundamentals II 11-19
11-19 Copyright © Oracle Corporation, 2001. All rights reserved.
Archived Redo Log Backup Sets
• Include only archived redo log files
• Are always full backups
RMAN> BACKUP
2> FORMAT ’/disk1/backup/ar_%t_%s_%p’
3> ARCHIVELOG ALL DELETE ALL INPUT;
Archived Redo Log File Backup Sets
A common problem experienced by DBAs is not knowing whether an archived log has been completely copied out to the archive log destination before attempting to back it up. Recovery Manager has access to control file or recovery catalog information, so it knows which logs have been archived and can be restored during recovery.
You can back up archived redo log files with the BACKUP ARCHIVELOG command or include them when backing up datafiles and control files with the BACKUP … PLUS ARCHIVELOG command.
Characteristics of Archived Log Backup Sets
• Can include only archived logs, not datafiles or control files.
• Are always full backups. (There is no logic in performing incremental backups because you can specify the range of archived logs to backup.)
Example (from slide)
This example backs up all archived redo logs to a backup set, where each backup piece contains three archived logs. After the archived logs are copied, they are deleted from disk and marked as deleted in the V$ARCHIVED_LOG view.

Oracle9i DBA Fundamentals II 11-20
11-20 Copyright © Oracle Corporation, 2001. All rights reserved.
Datafile Backup Set Processing
• Memory buffers are allocated for each file.
• Files are sorted in channel by descending size.
• Files are checkpointed and the header block is copied.
• Files are multiplexed together.
• Blocks to include are determined.
• Corrupt blocks are checked and checksum is calculated.
• Buffers are sent to the output device.
Datafile Backup Set Processing
Recovery Manager performs backup of datafiles in the following steps:
1. Memory buffers are allocated for each file in the set. Each buffer is sized by (db_block_size*db_file_direct_io_count).
2. The files to be backed up are in descending order by their size in a channel.
3. The files in the set are checkpointed and each file header block is copied.
4. Each block is checked before inclusion in the backup as follows:
– If incremental, the SCN in the block is checked to see if it qualifies for inclusion.
– If full or level 0, the block is checked to see if it has ever contained data.
5. If corrupt blocks are found, this information is stored in the control file and can be queried using V$BACKUP_CORRUPTION after backup completion.
6. The checksum is calculated.
7. When the output buffer is filled, it is sent to the output device.
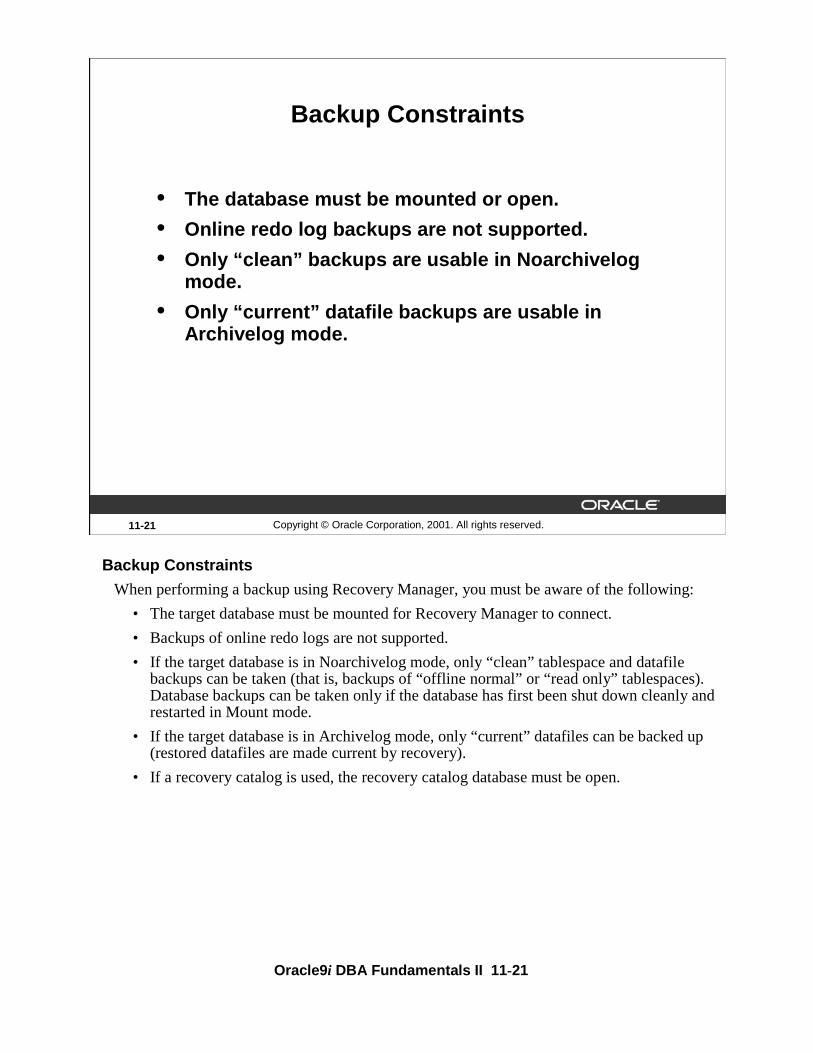
Oracle9i DBA Fundamentals II 11-21
11-21 Copyright © Oracle Corporation, 2001. All rights reserved.
Backup Constraints
• The database must be mounted or open.
• Online redo log backups are not supported.
• Only “clean” backups are usable in Noarchivelog mode.
• Only “current” datafile backups are usable in Archivelog mode.
Backup Constraints
When performing a backup using Recovery Manager, you must be aware of the following:
• The target database must be mounted for Recovery Manager to connect.
• Backups of online redo logs are not supported.
• If the target database is in Noarchivelog mode, only “clean” tablespace and datafile backups can be taken (that is, backups of “offline normal” or “read only” tablespaces). Database backups can be taken only if the database has first been shut down cleanly and restarted in Mount mode.
• If the target database is in Archivelog mode, only “current” datafiles can be backed up (restored datafiles are made current by recovery).
• If a recovery catalog is used, the recovery catalog database must be open.

Oracle9i DBA Fundamentals II 11-22
11-22 Copyright © Oracle Corporation, 2001. All rights reserved.
Image Copies
ArchivedLog file
Datafile 3 Copy of datafile 3
Copy of archived log
Datafile 3
ArchivedLog file
Image Copies
An image copy contains a single datafile, archived redo log file, or control file. An image copy can be created with the RMAN COPY command or an operating system command.
When you create the image copy with the RMAN COPY command, the server session validates the blocks in the file and records the copy in the control file.

Oracle9i DBA Fundamentals II 11-23
11-23 Copyright © Oracle Corporation, 2001. All rights reserved.
Characteristics of an Image Copy
• Can be written only to a disk
• Can be used immediately; does not need to be restored
• Is a physical copy of a single data file, archived log, or control file
• Is most like an operating system backup (contains all blocks)
• Can be part of an incremental strategy
Characteristics of an Image Copy
An image copy has the following characteristics:
• An image copy can be written only to disk. Hence additional disk space may be required to retain the copy on the disk. When large files are being considered, copying may take a long time, but restoration time is reduced considerably because the copy is available on the disk.
• If files are stored on disk, they can be used immediately (that is, they do not need to be restored from other media). This provides a fast method for recovery using the SWITCHcommand in Recovery Manager, which is equivalent to the ALTER DATABASERENAME FILE SQL statement.
• In an image copy all blocks are copied, whether they contain data or not, because an Oracle server process copies the file and performs additional actions such as checking for corrupt blocks and registering the copy in the control file. To speed up the process of copying, you can use the NOCHECKSUM parameter.
• Image copy can be part of a full or incremental level 0 backup, because a file copy always includes all blocks. Use the level 0 option if the copy will be used in conjunction with an incremental backup set.
• Image copy can be designated as a level 0 backup in incremental backup strategy, but no other levels are possible with image copy.

Oracle9i DBA Fundamentals II 11-24
11-24 Copyright © Oracle Corporation, 2001. All rights reserved.
Image Copies
RMAN> COPY
2> DATAFILE ’/ORADATA/users_01_db01.dbf’ TO
3> ’/BACKUP/users01.dbf’ tag=DF3,
4> ARCHIVELOG ’arch_1060.arc’ TO
5> ’arch_1060.bak’;
Datafile 3
Archivedlog file
Datafile 3
Archivedlog file
Copy of datafile 3
Copy of archived log
Image Copies
The RMAN COPY command creates an image copy of a file. The output file is always written to disk. You can copy datafiles, archived redo log files, or control files. In many cases, copying datafiles is more beneficial than backing them up, because the output is suitable for use without any additional processing.
If you want to make a whole database backup with the COPY command, you must copy each datafile with a separate COPY statement. You can also make a copy of the control file and archived redo log files.
The example in the slide assumes that you are using automatic channel allocation. If you are manually allocating channels, include the COPY command within the RUN statement as follows: RMAN> RUN {
2> ALLOCATE CHANNEL c1 type disk;3> COPY4> DATAFILE ’/ORADATA/users_01_db01.dbf’ to 5> ’/BACKUP/users01.dbf’ tag=DF3,6> ARCHIVELOG ’arch_1060.arc’ to7> ’arch_1060.bak’;}

Oracle9i DBA Fundamentals II 11-25
11-25 Copyright © Oracle Corporation, 2001. All rights reserved.
RMAN > COPY2> DATAFILE 3 TO ’/BACKUP/file3.dbf’,3> DATAFILE 1 TO ’/BACKUP/file1.dbf’;
Database
The COPY Command
Image copy
Image copy
Datafile 1
Datafile 3
Datafile 1
Datafile 2
Datafile 3
Controlfiles
Redo logfile 1
Redo logfile 2
The COPY Command
During the copy operation, an Oracle server process computes a checksum for each block to detect corruption. RMAN verifies the checksum when restoring the copy. This is referred to as physical corruption detection. You can use the NOCHECKSUM option to suppress the checksum operation and speed up the copy process. If the database is already maintaining block checksums, then this option has no effect.
You can use the CHECK LOGICAL option to test data and index blocks that pass physical corruption checks for logical corruption—for example, corruption of a row piece or index entry. If logical corruption is detected, the block is logged in the alert log and trace file of the server process.
You can set a threshold for logical and physical corruption with the MAXCORRUPT parameter. As long as the sum of physical and logical corruptions that is detected for a file remain below this value, the RMAN command completes and Oracle populates the view V$COPY_CORRUPTION with corrupt block ranges. If MAXCORRUPT is exceeded, then the command terminates without populating the views.

Oracle9i DBA Fundamentals II 11-26
11-26 Copyright © Oracle Corporation, 2001. All rights reserved.
Image Copy Parallelization
One COPY command with many channels
RMAN> CONFIGURE DEVICE TYPE disk parallelism 4;
2> COPY # 3 files copied in parallel
3> datafile 1 TO ’/BACKUP/df1.dbf’,
4> datafile 2 TO ’/BACKUP/df2.dbf’,
5> datafile 3 TO ’/BACKUP/df3.dbf’;
RMAN> COPY # Second copy command
2> datafile 4 TO ’/BACKUP/df4.dbf’;
Image Copy ParallelizationBy default, Recovery Manager executes each COPY command serially. However, you can parallelize the copy operation by:
• Using the CONFIGURE DEVICE TYPE … PARALLELISM
• Or allocating multiple channels ( required in Oracle8i)
• Specifying one COPY command for multiple files
You can allocate the channels manually as shown in the slide or by automatic channel configuration.
In the example, four channels are created, but only three will be used. This is how the command is executed:
1. Four channels are configured for writing to disk.
2. The first COPY command uses three channels (server processes)—one for writing each data file to disk.
3. The second COPY command does not execute until the previous COPY command has finished execution. It will use only one channel.
Note: When you use a high degree of parallelism, more machine resources are used, but the backup operation can be completed faster.
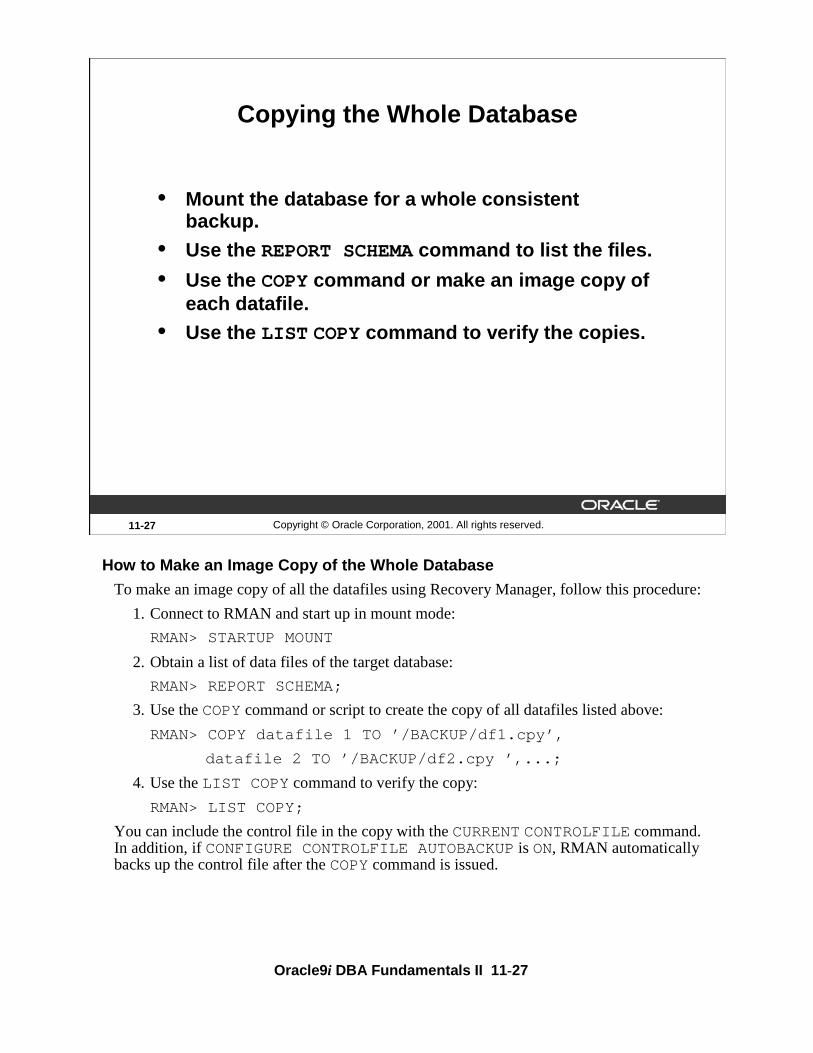
Oracle9i DBA Fundamentals II 11-27
11-27 Copyright © Oracle Corporation, 2001. All rights reserved.
Copying the Whole Database
• Mount the database for a whole consistent backup.
• Use the REPORT SCHEMA command to list the files.
• Use the COPY command or make an image copy of each datafile.
• Use the LIST COPY command to verify the copies.
How to Make an Image Copy of the Whole Database
To make an image copy of all the datafiles using Recovery Manager, follow this procedure:
1. Connect to RMAN and start up in mount mode:
RMAN> STARTUP MOUNT
2. Obtain a list of data files of the target database:
RMAN> REPORT SCHEMA;
3. Use the COPY command or script to create the copy of all datafiles listed above:
RMAN> COPY datafile 1 TO ’/BACKUP/df1.cpy’,
datafile 2 TO ’/BACKUP/df2.cpy ’,...;
4. Use the LIST COPY command to verify the copy:
RMAN> LIST COPY;
You can include the control file in the copy with the CURRENT CONTROLFILEcommand. In addition, if CONFIGURE CONTROLFILE AUTOBACKUPis ON, RMAN automatically backs up the control file after the COPYcommand is issued.

Oracle9i DBA Fundamentals II 11-28
11-28 Copyright © Oracle Corporation, 2001. All rights reserved.
Making Incremental Backups
Full backup • Full backups contain all datafile blocks
• Differential Incremental backups contain only modified blocks fromlevel n or lower
• Cumulative incrementalbackups contain only modified blocks from level n-1 or lower
Differentialincremental backup
Cumulativeincremental backup
RMAN Backup TypesFull BackupsA full backup differs from a whole database backup. A whole backup is comprised of all of the datafiles and control file of the target database, whereas a full backup may contain one or more of the datafiles, the control file or archived redo log files.When performing a full backup, an Oracle server process reads the entire file and copies all blocks into the backup set, skipping only datafile blocks that have never been used. The server session does not skip blocks when backing up archived redo logs or control files. A full backup is not a part of the incremental backup strategy. You can create and restore full backups of datafiles, datafile copies, tablespaces, database, control files, archive logs and archive log copies. Note that backup sets containing archived redo logs are always full backups.Incremental BackupsAn incremental backup is a backup that includes only the blocks that have changed since a previous incremental backup. RMAN can create multi-level incremental backups as follows:
• Differential backup – the default type of incremental backup which backs up all blocks changed after the most recent backup at level n or lower
• Cumulative backup – backs up all blocks changed after the most recent backup at level n-1 or lower

Oracle9i DBA Fundamentals II 11-29
11-29 Copyright © Oracle Corporation, 2001. All rights reserved.
Differential Incremental Backup Example
Backup of all blocks that have changed since themost recent backup at level n or lower.
LvlDay Sun Mon Tue Wed Thu Fri Sat Sun
Level 0
0 2 2 1 2 2 2
Level 0
0
Differential Incremental Backup Example
You are maintaining a 100 GB database, which is continuously growing. Based on existing hardware, you determine that open backups of the entire database take 4 hours. The database is online 24 hours a day, 7 days a week and the backups are consuming too much of the system resources during this period of time. Level 0 backups cannot be performed more than once a week, but fast recovery in case of failure is required. You therefore decide on the following backup and recovery strategy:
A level 0 backup will be performed each week on the day with the least activity. You determine this day to be Sunday.
RMAN> BACKUP INCREMENTAL level 0 database;
Incremental level 2 backups will be performed every other day, except Wednesday. In this way, backups will be fast because only changed blocks from the previous day will be copied:
RMAN> BACKUP INCREMENTAL level 2 database;

Oracle9i DBA Fundamentals II 11-30
Differential Incremental Backup Example (continued)
• Wednesday is a day with less database activity, so all blocks changed since Sunday are copied to assist with speed of recovery. For example, if a failure occurs on Friday, then only Sunday, Wednesday, and Thursday backups need to be restored (Monday and Tuesday are not required):
RMAN> BACKUP INCREMENTAL level 1 database;
• On Thursday, the incremental backup was replaced by a full backup. Because this does not change the backup base level, Friday’s backup copy changes since Wednesday. The backup therefore can be discarded before the next level 0. If by mistake the backup on Thursday was a level 0, then the backup on Friday copies all changed blocks since Thursday, which is the new base level. This backup must now be kept until the next level 0.

Oracle9i DBA Fundamentals II 11-31
11-31 Copyright © Oracle Corporation, 2001. All rights reserved.
Cumulative Incremental Backup Example
Contains all blocks changed since the previousbackup at a level less than n – 1 or lower
LvlDay Sun Mon Tue Wed Thu Fri Sat Sun
Level 0
0 2 2C 1 2C 2C
Level 0
02
Cumulative Incremental Backups Example
Cumulative incremental backups have the following characteristics:
• A cumulative incremental level n backup (where n > 0) copies all changed blocks since the previous backup at level n-1 or lower.
• A cumulative incremental backup backs up blocks previously backed up at the same level. Therefore, they may take longer, write out more blocks, and produce larger backup files than noncumulative backups.
• Cumulative incremental backups are provided for recovery speed, because fewer backups must be applied at each level when recovering.
Example
Cumulative incremental backups duplicate changes already copied by the previous incremental backup at the same level. Therefore, if an incremental level 2 backup is taken, then the following cumulative level 2 backs up all newly modified blocks plus those backed up by the incremental level 2. This means that only one incremental backup of the same level is needed to completely recover.
RMAN> BACKUP INCREMENTAL level 2 cumulative database;

Oracle9i DBA Fundamentals II 11-32
11-32 Copyright © Oracle Corporation, 2001. All rights reserved.
Backup in Noarchivelog Mode
RMAN> BACKUP DATABASE FILESPERSET 3;
1. Ensure sufficient space for the backup. 2. Shut down using the NORMAL or IMMEDIATE clause. 3. Mount the database.4. Allocate multiple channels if not using automatic.5. Run the BACKUP command. 6. Verify that the backup is finished and cataloged.7. Open the database for normal use.
How to Perform a Multiplexed Backup in Noarchivelog Mode
1. Ensure that the destination directory where you want to store the backup is available and has sufficient space.
2. Shut down the database cleanly using the NORMAL, IMMEDIATE, or TRANSACTIONAL clause.
3. Mount the database.
4. If you are not using automatic channel allocation, allocate multiple channels and use a format string to multiplex channels to different disks.
5. Run the BACKUP command. Because the database is in Noarchivelog mode, the incremental backups are not applicable, so use the full backup option.
6. Verify that the backup is finished and cataloged.
7. Open the database for normal use.
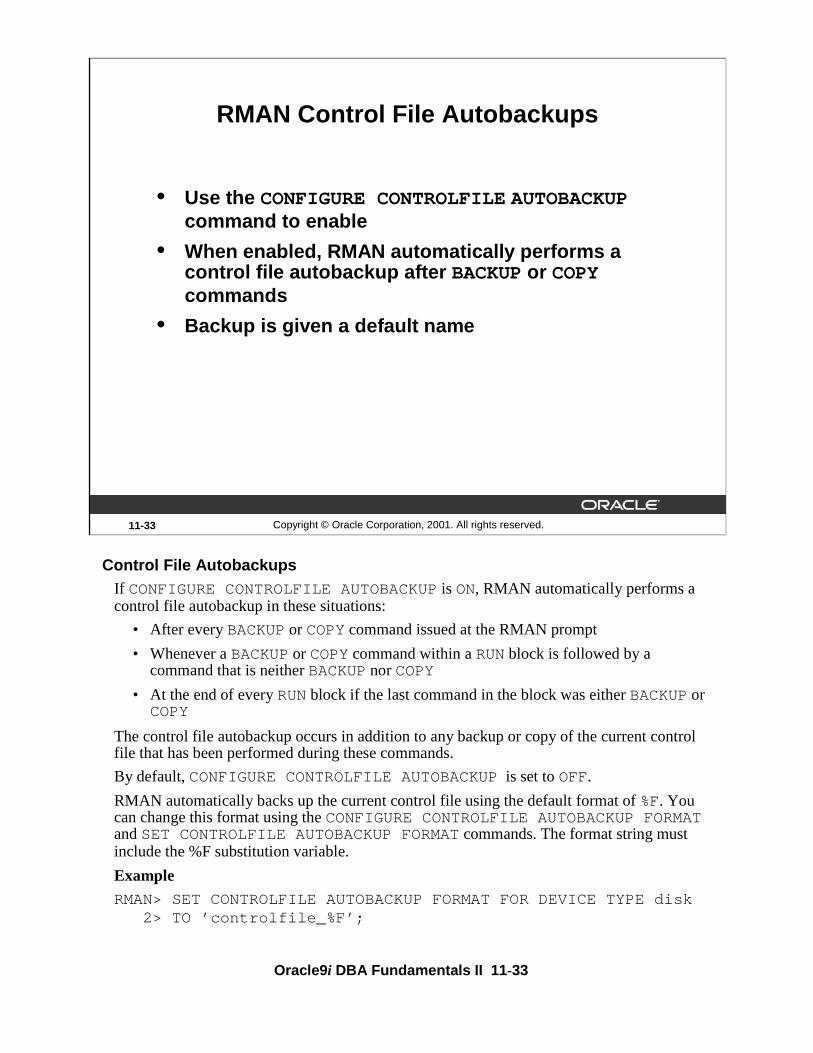
Oracle9i DBA Fundamentals II 11-33
11-33 Copyright © Oracle Corporation, 2001. All rights reserved.
RMAN Control File Autobackups
• Use the CONFIGURE CONTROLFILE AUTOBACKUPcommand to enable
• When enabled, RMAN automatically performs a control file autobackup after BACKUP or COPY commands
• Backup is given a default name
Control File AutobackupsIf CONFIGURE CONTROLFILE AUTOBACKUP is ON, RMAN automatically performs a control file autobackup in these situations:
• After every BACKUP or COPY command issued at the RMAN prompt
• Whenever a BACKUP or COPY command within a RUN block is followed by a command that is neither BACKUP nor COPY
• At the end of every RUN block if the last command in the block was either BACKUP or COPY
The control file autobackup occurs in addition to any backup or copy of the current control file that has been performed during these commands.
By default, CONFIGURE CONTROLFILE AUTOBACKUP is set to OFF.
RMAN automatically backs up the current control file using the default format of %F. You can change this format using the CONFIGURE CONTROLFILE AUTOBACKUP FORMATand SET CONTROLFILE AUTOBACKUP FORMAT commands. The format string must include the %F substitution variable.
Example
RMAN> SET CONTROLFILE AUTOBACKUP FORMAT FOR DEVICE TYPE disk 2> TO ’controlfile_%F’;

Oracle9i DBA Fundamentals II 11-34
11-34 Copyright © Oracle Corporation, 2001. All rights reserved.
Tags for Backups and Image Copies
Logical name assigned to a backup set or image copy
month_full_backup week_full_backup Wednesday_1_backup
Datafile 3
Datafile 4
Backup set
Datafiles 1,3
Datafile s 2,4
Backup set
Datafile 1
Backup set
Tags for Backups and Image Copies
A tag is a meaningful name that you can assign to a backup set or image copy. The advantages of user tags are as follows:
• Tags provide a useful reference to a collection of file copies or a backup set.
• Tags can be used in the LIST command to locate backed up files easily.
• Tags can be used in the RESTORE and SWITCH commands.
• The same tag can be used for multiple backup sets or file copies.
If a nonunique tag references more than one datafile, then Recovery Manager chooses the most current available file.
Example
• Each month, a full backup of datafiles 1, 2, 3, and 4 is performed. The tag in the control file for this backup is month_full_backup, even though the physical filename generated is df_DB00_863_1.dbf.
• Each week, a full backup of datafiles 3 and 4 is performed. The tag name for this backup is week_full_backup.

Oracle9i DBA Fundamentals II 11-35
11-35 Copyright © Oracle Corporation, 2001. All rights reserved.
RMAN Dynamic Views
V$ARCHIVED_LOG
V$BACKUP_CORRUPTION
V$COPY_CORRUPTION
V$BACKUP_DATAFILE
V$BACKUP_REDOLOG
V$BACKUP_SET
V$BACKUP_PIECE
RMAN Dynamic Views
You can use the following views to obtain RMAN information stored in the control file:
• V$ARCHIVED_LOGshows which archives have been created, backed up, and cleared in the database.
• V$BACKUP_CORRUPTIONshows which blocks have been found corrupt during a backup of a backup set.
• V$COPY_CORRUPTIONshows which blocks have been found corrupt during an image copy.
• V$BACKUP_DATAFILEis useful for creating equal-sized backup sets by determining the number of blocks in each data file. It can also find the number of corrupt blocks for the data file.
• V$BACKUP_REDOLOGshows archived logs stored in backup sets.
• V$BACKUP_SET shows backup sets that have been created.
• V$BACKUP_PIECEshows backup pieces created for backup sets.
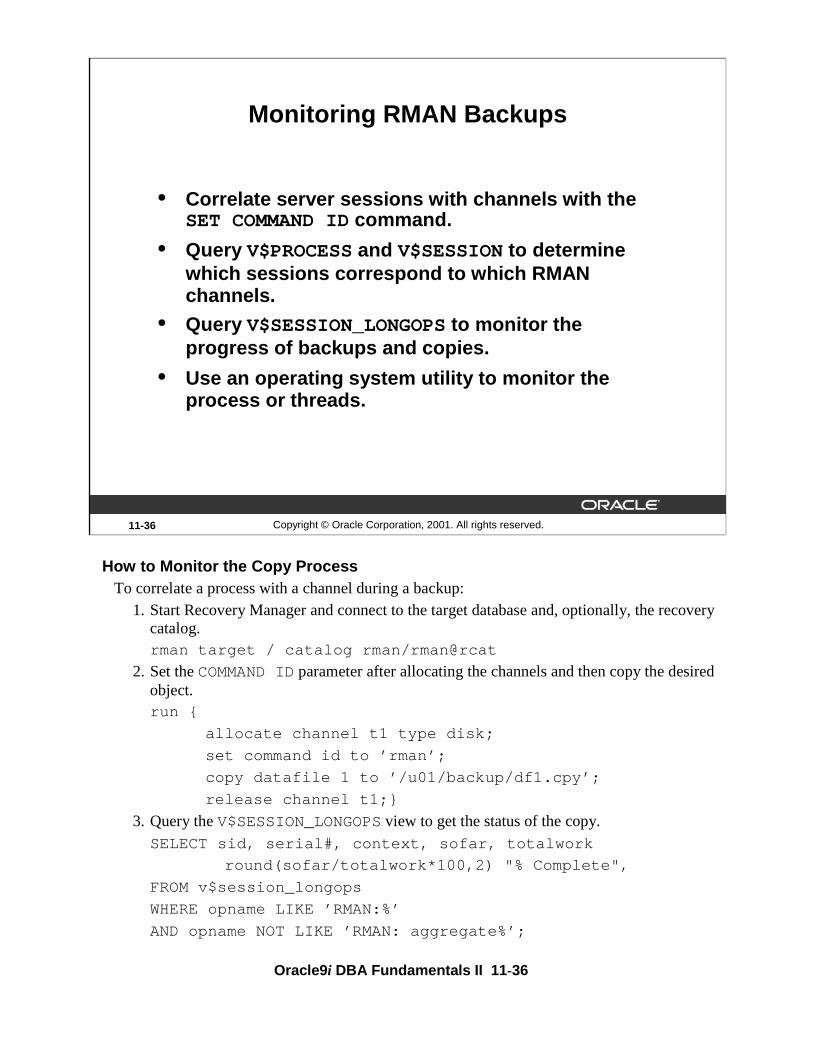
Oracle9i DBA Fundamentals II 11-36
11-36 Copyright © Oracle Corporation, 2001. All rights reserved.
Monitoring RMAN Backups
• Correlate server sessions with channels with the SET COMMAND ID command.
• Query V$PROCESS and V$SESSION to determine which sessions correspond to which RMAN channels.
• Query V$SESSION_LONGOPS to monitor the progress of backups and copies.
• Use an operating system utility to monitor the process or threads.
How to Monitor the Copy ProcessTo correlate a process with a channel during a backup:
1. Start Recovery Manager and connect to the target database and, optionally, the recovery catalog.rman target / catalog rman/rman@rcat
2. Set the COMMAND ID parameter after allocating the channels and then copy the desired object. run {
allocate channel t1 type disk;
set command id to ’rman’;
copy datafile 1 to ’/u01/backup/df1.cpy’;
release channel t1;}
3. Query the V$SESSION_LONGOPS view to get the status of the copy.SELECT sid, serial#, context, sofar, totalwork
round(sofar/totalwork*100,2) "% Complete",
FROM v$session_longops
WHERE opname LIKE ’RMAN:%’
AND opname NOT LIKE ’RMAN: aggregate%’;

Oracle9i DBA Fundamentals II 11-37
How to Monitor the Copy Process (continued)4. Using SQL*Plus and query V$PROCESS and V$SESSION to get the SID and SPID.
Then use an operating system utility to monitor the process or threads.
SELECT sid, spid, client_info
FROM v$process p, v$session s
WHERE p.addr = s.paddr
AND client_info LIKE ’%id=rman%’;
Note: For monitoring the copy process, you must query the target database, and hence, the target database should be in Open or Mount state.
Oracle9i DBA Fundamentals II 11-38
11-38 Copyright © Oracle Corporation, 2001. All rights reserved.
Miscellaneous RMAN Issues
• Abnormal termination of a Recovery Manager job
• Detecting physical and logical block corruption
• Detecting a fractured block during open backups
Miscellaneous RMAN Issues
Abnormal Termination of Recovery Manager
Recovery Manager records only backup sets that have finished successfully in the control file. If a Recovery Manager job terminates abnormally, incomplete files might exist in the operating system. Recovery Manager will not use them, but you will need to remove them.
Detecting Corruption
Recovery Manager detects and can prohibit any attempt to perform operations that would result in unusable backup files or corrupt restored data files.
By default, error checking for physical corruption is enabled. Information about corrupt data file blocks encountered during a backup are recorded in the control file and the alert log. The server identifies corrupt data file blocks, but they are still included in the backup. The Oracle server records the address of the corrupt block and the type of corruption in the control file. To view corrupt blocks from the control file, view either V$BACKUP_CORRUPTION for backup sets or V$COPY_CORRUPTION for image copies.
RMAN tests data and index blocks for logical corruption and logs any errors in the alert.log and server session trace file. By default, error checking for logical corruption is disabled.

Oracle9i DBA Fundamentals II 11-39
Miscellaneous RMAN Issues (continued)
Detecting a Fractured Block
RMAN reads whole database blocks and determines whether the block is fractured by comparing the header and footer of each block. If it detects a fractured block, then it re-reads the block until it gets a consistent block. This is one of the reasons why it is not necessary to put a tablespace in online backup mode when using RMAN for tablespace or datafile backups.
This mechanism also reduces the amount of redo generated during the backup because the entire block does not have to be written to the redo log file.
Oracle9i DBA Fundamentals II 11-40
11-40 Copyright © Oracle Corporation, 2001. All rights reserved.
Summary
In this lesson, you should have learned how to:
• Determine what type of RMAN backups should be taken
• Make backups with the RMAN COPY and BACKUPcommands
• Backup the control file
• Backup the archived redo log files

Oracle9i DBA Fundamentals II 11-41
11-41 Copyright © Oracle Corporation, 2001. All rights reserved.
Practice 11 Overview
This practice covers the following topics:
• Using Recovery Manager to backup one tablespace datafile and a controlfile.
• Using Recovery Manager to backup archived log files.
• Using the RMAN COPY command to create an image copy of a database file.

Oracle9i DBA Fundamentals II 11-42
Practice 11 RMAN Backups
1. What are the two supported backup types for Recovery Manager? List some of the differences between the two backup types.
2. Use RMAN to back up the datafiles belonging to the tablespace. Be sure you also make a copy of the current control file. Your backups should be placed in the $HOME/BACKUP/RMAN directory and should use the format df_%d_%s_%p.bus for the file names.
3. Create an image copy of the datafiles belonging to the SYSTEM tablespace. The copy should be placed in the $HOME/BACKUP/RMAN directory with the name of sys0101.cpy. The tag should be SYSTEM01.
4. Using RMAN, back up the archived redo log files generated today to the $HOME/BACKUP/RMAN directory.
5. Obtain a listing of all data files that have not been backed up.


