358
Oracle9i DBA Fundamentals I Volume 2 • Student Guide D11321GC10 Production 1.0 May 2001 D32644
| Date post: | 22-Apr-2018 |
| Category: |
Documents |
| Upload: | truonghanh |
| View: | 237 times |
| Download: | 4 times |

Oracle9 i DBA Fundam entals I
Volume 2 • Student Guide
D11321GC10Production 1.0May 2001D32644

Authors
Sarath Chandran
Marie St. Gelais
S Matt Taylor Jr
Technical Reviewers
Howard Bradley
Ruth Baylis
Paul Cartwright
Trevor Davis
Joel Goodman
Scott Gossett
Tomoki Ishii
Peter Kilpatrick
Stefan Lindblad
Howard Ostrow
Ashesh Parekh
Radhanes Petronilla
Venceslava Pretlova
Andreas Reinhardt
Ranbir Singh
Peter Sharman
Barry Trute
Ric VanDyke
Karla Villasenor
John Watson
Teppei Yagihashi
Publisher
Shane Mattimoe
Copyright © Oracle Corporation, 2001. All rights reserved.
This documentation contains proprietary information of Oracle Corporation. It is provided under a license agreement containing restrictions on use and disclosure and is also protected by copyright law. Reverse engineering of the software is prohibited. If this documentation is delivered to a U.S. Government Agency of the Department of Defense, then it is delivered with Restricted Rights and the following legend is applicable:
Restricted Rights Legend
Use, duplication or disclosure by the Government is subject to restrictions for commercial computer software and shall be deemed to be Restricted Rights software under Federal law, as set forth in subparagraph (c)(1)(ii) of DFARS 252.227-7013, Rights in Technical Data and Computer Software (October 1988).
This material or any portion of it may not be copied in any form or by any means without the express prior written permission of Oracle Corporation. Any other copying is a violation of copyright law and may result in civil and/or criminal penalties.
If this documentation is delivered to a U.S. Government Agency not within the Department of Defense, then it is delivered with “Restricted Rights,” as defined in FAR 52.227-14, Rights in Data-General, including Alternate III (June 1987).
The information in this document is subject to change without notice. If you find any problems in the documentation, please report them in writing to Education Products, Oracle Corporation, 500 Oracle Parkway, Box SB-6, Redwood Shores, CA 94065. Oracle Corporation does not warrant that this document is error-free.
SQL*Loader, SQL*Net, SQL*Plus, Net8, Oracle Call Interface, Oracle7, Oracle8, Oracle 8i, Developer/2000, Developer/2000 Forms, Designer/2000, Oracle Enterprise Manager, Oracle Parallel Server, PL/SQL, Pro*C, Pro*C/C++, and Trusted Oracle are trademarks or registered trademarks of Oracle Corporation.
All other products or company names are used for identification purposes only, and may be trademarks of their respective owners.

Introduction Course Objectives I-2Oracle 9i Enterprise Edition I-3Database Administrator Tasks I-4
1 Oracle Architectural Components Objectives 1-2Overview of Primary Componenets 1-3Oracle Server 1-5Oracle Instance 1-6Establishing a Connection and Creating a Session 1-7Oracle Database 1-9Physical Structure 1-10Memory Structure 1-11System Global Area (SGA) 1-12Shared Pool 1-15Library Cache 1-16Data Dictionary Cache 1-17Database Buffer Cache 1-18Redo Log Buffer Cache 1-21Large Pool 1-22Java Pool 1-23Program Global Area (PGA) 1-24Process Structure 1-25User Process 1-26Sever Process 1-27Background Processes 1-28Database Writer (DBWn) 1-29Log Writer (LGWR) 1-30System Monitor (SMON) 1-31Process Monitor (PMON) 1-32Checkpoint (CKPT) 1-33Archiver (ARCn) 1-35Logical Structure 1-37Processing a SQL Statement 1-38Summary 1-40Practice 1 Overview 1-41
2 Getting Started With the Oracle ServerObjectives 2-2Database Administration Tools 2-3
Contents
iii

Oracle Universal Installer 2-4Interactive Installation 2-5Non-Interactive Installation Using Response Files 2-6Oracle Database Configuration Assistant 2-9Optimal Flexible Architecture (OFA) 2-10Oracle Software and File Locations 2-11Database Administrator Users 2-12Authentication Methods for Database Administrators 2-13Using Password File Authentication 2-14SQL* Plus 2-16Oracle Enterprise Manager 2-17Oracle Enterprise Manager Architecture: Java-Based Console and Applications 2-18Oracle Enterprise Manager Architecture: Managed Nodes 2-19Oracle Enterprise Manager Console 2-20DBA Tools 2-22Summary 2-24Practice 2 Overview 2-25
3 Managing an Oracle InstanceObjectives 3-2Initialization Parameter Files 3-3PFILE initSID.ora 3-5PFILE Example 3-6SPFILE spfileSID.ora 3-7Creating an SPFILE 3-8SPFILE Example 3-10Oracle Managed Files 3-12Oracle Managed File Example 3-14Starting UP a Database 3-15STARTUPCommand 3-18The ALTER DATABASEComand 3-20Opening a Database in Restricted Mode 3-21Opening a Database in Read-Only Mode 3-23Shutting Down the Database 3-24Shutdown Options 3-25Managing an Instance by Monitoring Diagnostic Files 3-29Alert Log File 3-30Background Trace Files 3-32User Trace File 3-33
iv
Enabling or Disabling User Tracing 3-34Summary 3-35Practice 3 Overview 3-38
4 Creating a DatabaseObjectives 4-2Managing and Organizing a Database 4-3Creation Prerequisites 4-4Planning Database Files Locations 4-5Creating a Database 4-7Operating System Environment 4-8Using the Database Configuration Assistant 4-9Create a Database 4-11Database Information 4-12Typical or Custom Install 4-13Other Parameters 4-15Complete Database Creation 4-16Creating a Database Manually 4-17Preparing the Parameter File 4-18Creating SPFILE 4-19Starting the Instance 4-20Creating the Database 4-21Creating a Database Using OMF 4-24Troubleshooting 4-25After Database Creation 4-26Summary 4-27
5 Data Dictionary Contents and UsageObjectives 5-2Data Dictionary 5-3Data Dictionary Contents 5-5How the Data Dictionary Is Used 5-6Data Dictionary View Categories 5-7Dynamic Performance Tables 5-9Querying the Data Dictionary and Dynamic Performance Views 5-10Data Dictionary Examples 5-11Summary 5-12Practice 5 Overview 5-13
6 Maintaining the Control FileObjectives 6-2Control File 6-3
v

Control File Contents 6-5Multiplexing the Control File Using SPFI LE 6-7Multiplexing the Control File Using in i t . or a 6-8Managing Control Files with OMF 6-9Obtaining Control File Information 6-10Summary 6-13Practice 6 Overview 6-14
7 Maintaining Redo Log F ilesObjectives 7-2Using Redo Log Files 7-3Structure of Redo Log Files 7-4How Redo Logs Work 7-6Forcing Log Switches and Checkpoints 7-8Adding Online Redo Log Groups 7-9Adding Online Redo Log Members 7-10Dropping Online Redo Log Groups 7-12Dropping Online Redo Log Members 7-13Clearing, Relocating, or Renaming Online Redo Log Files 7-15Online Redo Log Configuration 7-17Managing Online Redo Logs with OMF 7-19Obtaining Group and Member Information 7-20Archived Redo Log Files 7-22Summary 7-26Practice 7 Overview 7-28
8 Managing Tablespaces and Data filesObjectives 8-2Overview 8-3Database Storage Hierarchy 8-4SYSTEMand Non-SYSTEMTablespaces 8-7Creating Tablespaces 8-8Space Management in Tablespaces 8-11Locally Managed Tablespaces 8-12Dictionary Managed Tablespaces 8-14Changing the Storage Settings 8-15Undo Tablespace 8-17Temporary Tablespace 8-18Default Temporary Tablespace 8-21Restrictions on Default Temporary Tablespace 8-22Offline Status 8-23Read-Only Tablespaces 8-26Dropping Tablespaces 8-29
vi

Resizing a Tablespace 8-32Enabling Automatic Extension of Data Files 8-33Changing the Size of Data Files Manually 8-36Adding Data files to a Tablespace 8-37Moving Data Files: ALTER TABLESPACE 8-39Configuring Oracle Managed Files for Tablespace Creation 8-42Creating Tablespaces with OMF 8-43Obtaining Tablespaces Information 8-44Summary 8-45Practice 8 Overview 8-47
9 Stor age Stru cture and RelationshipsObjectives 9-2Overview 9-3Types of Segments 9-4Storage Clause Precedence 9-8Extent Allocation and Deallocation 9-9Used and Free Extents 9-10Database Block 9-11Database Block Contents 9-12Block Space Utilization Parameters 9-13Data Block Management 9-15Automatic Segment-Space Management 9-16Configuring Automatic Segment-Space Management 9-18Manual Data Block Management 9-19Block Space Usage 9-20Data Dictionary Views 9-21Obtaining Storage Information 9-22Summary 9-24Practice 9 Overview 9-26
10 Managing Undo DataObjectives 10-2Managing Undo Data Overview 10-3Undo Segment 10-4Undo Segments: Purpose 10-5Read Consistency 10-6Types of Undo Segments 10-7Automatic Undo Management: Concepts 10-9Automatic Undo Management: Configuration 10-10Automatic Undo Management: Initialization Parameters 10-11Automatic Undo Management: UNDOTablespace 10-12
vii

Automatic Undo Management: Altering and UNDOTablespace 10-14Automatic Undo Management: Switching UNDOTablespaces 10-16Automatic Undo Management: Dropping an UNDOTablespace 10-18Automatic Undo Management: Other Parameters 10-21Undo Data Statistics 10-23Automatic Undo Management: Sizing an UNDOTablespaces 10-24Automatic Undo Management Undo Quota 10-26Obtaining Undo Segments Information 10-27Summary 10-29Practice 10 Overview 10-31
11 Managing TablesObjectives 11-2Storing User Data 11-3Oracle Data Types 11-6ROWID Format 11-10Structure of a Row 11-12Creating a Table 11-13Creating Temporary Tables 11-17Creating a Table: Guidelines 11-18Changing Storage Parameters 11-19Manually Allocating Extents 11-22Nonpartitioned Table Reorganization 11-23Truncating a Table 11-24Dropping a Table 11-26Dropping a Column 11-27Using the UNUSED Option 11-28Obtaining Table Information 11-30Summary 11-33Practice 11 Overview 11-34
12 Managing Indexes Objectives 12-2Classification of Indexes 12-3B-Tree Index 12-5Bitmap Index 12-7Comparing B-Tree and Bitmap Indexes 12-9Creating Normal B-Tree Indexes 12-10Creating Indexes: Guidelines 12-14Creating Bitmap Indexes 12-16Changing Storage Parameters for Indexes 12-19Allocating and Deallocating Index Space 12-21
viii

Rebuilding Indexes 12-22Online Rebuild of Indexes 12-24Coalescing Indexes 12-25Checking Index Validity 12-26Dropping Indexes 12-28Identifying Unused Indexes 12-30Obtaining Index Information 12-31Summary 12-32Practice 12 Overview 12-34
13 Maintaining Data IntegrityObjectives 13-2Data Integrity 13-3Types of Constraints 13-5Constraint States 13-6Constraint Checking 13-8Defining Constraints as Immediate or Deferred 13-9Primary and Unique Key Enforcement 13-10Foreign Key Considerations 13-11Defining Constraints While Creating a Table 13-13Guidelines for Defining Constraints 13-18Enabling Constraints 13-19Using the EXCEPTIO NS Table 13-24Obtaining Constraint Information 13-27Summary 13-30Practice 13 Overview 13-32
14 Managing Password S ecur ity and Resour cesObjectives 14-2Profiles 14-3Password Management 14-5Enabling Password Management 14-6Password Account Locking 14-7Password Expiration and Aging 14-8Password History 14-9Password Verification 14-10User-Provided Password Function 14-11Password Verification Function VERI FY_FUNCTI ON 14-12Creating a Profile: Password Settings 14-13Altering a Profile: Password Setting 14-17Dropping a Profile: Password Setting 14-19Resource Management 14-21
ix

Enabling Resource Limits 14-22Setting Resource Limits at Session Level 14-23Setting Resource Limits at Call Level 14-24Creating a Profile: Resource Limit 14-25Managing Resource Using the Database Resource Manager 14-28Resource Plan Directives 14-30Obtaining Password and Resource Limits Information 14-32Summary 14-34Practice Overview 14-36
15 Managing UsersObjectives 15-2Users and Security 15-3Database Schema 15-5Checklist for Creating Users 15-6Creating a New User: Database Authentication 15-7Creating a New User: Operating System Authentication 15-10Changing User Quota on Tablespace 15-12Dropping a User 15-14Obtaining User Information 15-15Summary 15-16Practice 15 Overview 15-17
16 Managing Pr ivilegesObjectives 16-2Managing Privileges 16-3System Privileges 16-4System Privileges: Examples 16-5Granting System Privileges 16-6SYSDBA and SYSOPER Privileges 16-9System Privilege Restrictions 16-10Revoking System Privileges 16-11Revoking System Privileges WIT H ADMI N OPTI ON 16-12Object Privileges 16-13Granting Object Privileges 16-14Revoking Object Privileges 16-17Revoking Object Privileges WI TH GRANT OPTI ON 16-20Obtaining Privileges Information 16-21Auditing 16-22Auditing Guidelines 16-23Auditing Categories 16-25
x

Database Auditing 16-27Auditing Options 16-29Viewing Auditing Options 16-31Obtaining Audit Records 16-32Summary 16-33Practice 16 Overview 16-35
17 Managing RolesObjectives 17-2Roles 17-3Benefits of Roles 17-4Creating Roles 17-5Predefined Roles 17-8Modifying Roles 17-9Assigning Roles 17-11Establishing Default Roles 17-13Application Roles 17-16Enabling and Disabling Roles 17-17Removing Roles from Users 17-21Removing Roles 17-23Guidelines for Creating Roles 17-25Guidelines for Using Passwords and Default Roles 17-26Displaying Role Information 17-27Summary 17-28Practice 17 Overview 17-30
18 Using Globalization SupportObjectives 18-2Globalization Support Features 18-3Different Types of Encoding Schemes 18-5Database Character Sets and National Character Sets 18-8Guidelines for Choosing an Oracle Database Character Set 18-9Guidelines for Choosing an Oracle National Character Set 18-11Choosing a Unicode Solution Unicode Database 18-12Choosing a Unicode Solution Unicode Datatype 18-13Specifying Language-Dependent Behavior 18-14Specifying Language-Dependent Behavior for the Server 18-15Dependent Language and Territory Default Values 18-16Specifying Language-Dependent Behavior for the Session 18-18Character Sets in Client-Server Architecture 18-19Specifying Language-Dependent Behavior for the Session 18-21
xi

Linguistic Sorting 18-22NLS Sorting 18-23Using NLS Parameters in SQL Functions 18-26Linguistic Index Support 18-30Import and Loading Data Using NLS 18-31Obtaining Information About Character Sets 18-32Obtaining Information About NLS Settings 18-33Globalization Support Utilities 18-37Summary 18-39Practice 18 Overview 18-40
Append ix A: How to Create an Oracle9i Database in an Unix Environment
Appendix B: Managing Rollback Segments
Appendix C: Practice for SQL*Plus
xi i
DBA Fundamentals I 12 -1
12Copyright © Oracle Corporation, 2001. All rights reserved.
Managing Indexes

DBA Fundamentals I 12 -2
12-2 Copyright © Oracle Corporation, 2001. All rights reserved.
Objectives
After completing this lesson, you should be able todo the following:
• List the different types of indexes and their uses
• Create various types of indexes
• Reorganize indexes
• Drop indexes
• Get index information from the data dictionary
• Monitor the usage of an index
DBA Fundamentals I 12 -3
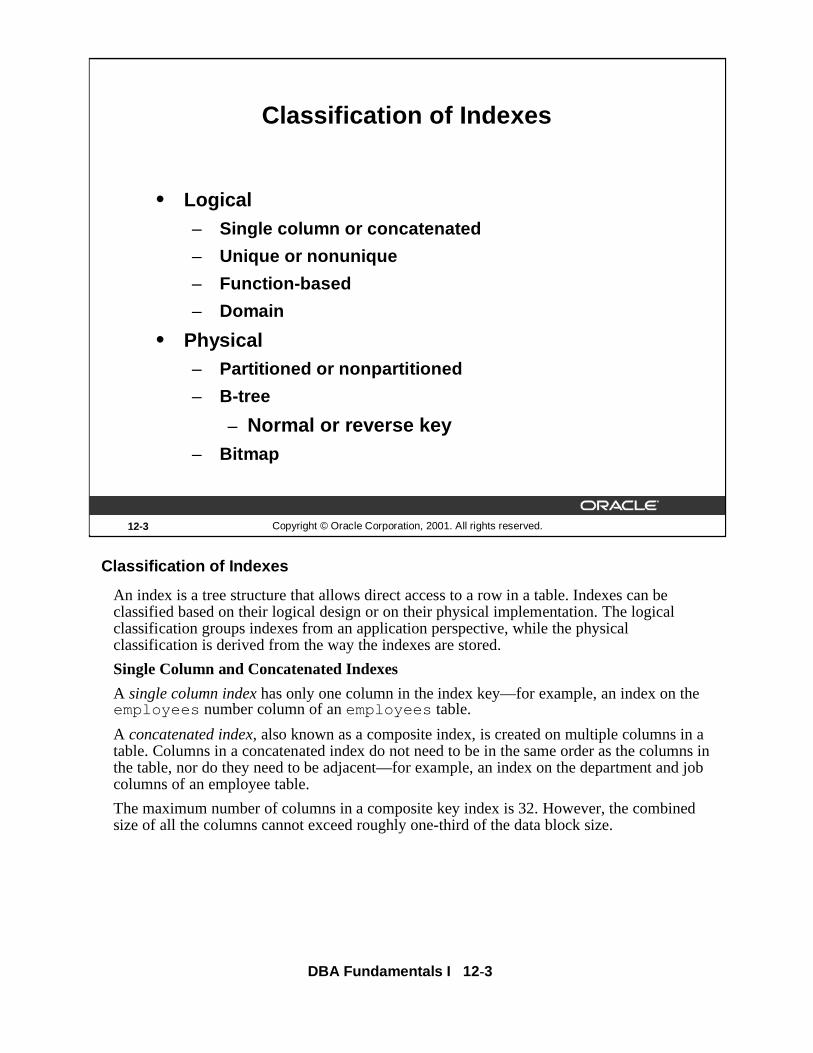
Classification of Indexes
An index is a tree structure that allows direct access to a row in a table. Indexes can be classified based on their logical design or on their physical implementation. The logical classification groups indexes from an application perspective, while the physical classification is derived from the way the indexes are stored.
Single Column and Concatenated Indexes
A single column indexhas only one column in the index key—for example, an index on the employees number column of an employees table.
A concatenated index, also known as a composite index, is created on multiple columns in a table. Columns in a concatenated index do not need to be in the same order as the columns in the table, nor do they need to be adjacent—for example, an index on the department and job columns of an employee table.
The maximum number of columns in a composite key index is 32. However, the combined size of all the columns cannot exceed roughly one-third of the data block size.
12-3 Copyright © Oracle Corporation, 2001. All rights reserved.
Classification of Indexes
• Logical– Single column or concatenated
– Unique or nonunique
– Function-based
– Domain
• Physical– Partitioned or nonpartitioned
– B-tree
– Normal or reverse key– Bitmap

DBA Fundamentals I 12 -4
Classification of Indexes (continued)
Unique and Nonunique Indexes
A unique index guarantees that no two rows of a table have duplicate values in the column that defines the index. An index key in a unique index can point to only one row in the table.
In a nonunique index, a single key can have multiple rows associated with it, and can be used to enforce uniqueness.
Function-Based Indexes
A function-based index is created when using functions or expressions that involve one or more columns in the table being indexed. A function-based index precomputes the value of the function or expression and stores it in the index. Function-based indexes can be created as either a B-tree or a bitmap index.
Domain Indexes
A domain index is an application-specific (Text, Spatial) index that is created, managed, and accessed by routines supplied by an indextype. It is called a domain index because it indexes data in application-specific domains.
Only single-column domain indexes are supported. You can build single-column domain indexes on columns having scalar, object, or LOB datatypes.
Partitioned and Nonpartitioned Indexes
Partitioned indexes are used for large tables to store index entries corresponding to an index in several segments. Partitioning allows an index to be spread across many tablespaces, decreasing contention for index lookup, and increasing manageability. Partitioned indexes are often used with partitioned tables to improve scalability and manageability. An index partition can be created for each table partition.
This lesson discusses the creation and maintenance of nonpartitioned B-tree and bitmap indexes.

DBA Fundamentals I 12 -5
How Indexes Are Stored
Although all the indexes use a B-tree structure, the term B-tree index is usually associated with an index that stores a list of ROWIDS for each key.
Structure of a B-Tree Index
At the top of the index is the root, which contains entries that point to the next level in the index. At the next level are branch blocks, which in turn point to blocks at the next level in the index. At the lowest level are the leaf nodes, which contain the index entries that point to rows in the table. The leaf blocks are doubly linked to facilitate scanning the index in an ascending as well as descending order of key values.
Format of Index Leaf Entries
An index entry is made up of the following components:
• An entry header, which stores number of columns and locking information
• Key column length-value pairs, which define the size of a column in the key followed by the value for the column (The number of such pairs is a maximum of the number of columns in the index.)
• ROWID of a row, which contains the key values
12-5 Copyright © Oracle Corporation, 2001. All rights reserved.
B-Tree Index
Index entry header
Key column length
Key column value
ROWID
Root
Branch
Leaf
Index entry

DBA Fundamentals I 12 -6
Index Leaf Entry Characteristics
In a B-tree index on a nonpartitioned table:
• Key values are repeated if there are multiple rows that have the same key value.
• There is no index entry corresponding to a row that has all key columns that are NULL. Therefore a WHEREclause specifying NULLwill always result in a full table scan.
• Restricted ROWID is used to point to the rows of the table, since all rows belong to the same segment.
Effect of DML Operations on an Index
The Oracle server maintains all the indexes when DML operations are carried out on the table. Here is an explanation of the effect of a DML command on an index:
• Insert operations result in the insertion of an index entry in the appropriate block.
• Deleting a row results only in a logical deletion of the index entry. The space used by the deleted row is not available for new entries until all the entries in the block are deleted.
• Updates to the key columns result in a logical delete and an insert to the index. The PCTFREEsetting has no effect on the index except at the time of creation. A new entry may be added to an index block even if it has less space than that specified by PCTFREE.

DBA Fundamentals I 12 -7
8
Bitmap Indexes
Bitmap indexes are more advantageous than B-tree indexes in certain situations:
• When a table has millions of rows and the key columns have low cardinality—that is, there are very few distinct values for the column. For example, bitmap indexes may be preferable to B-tree indexes for the gender and marital status columns of a table containing passport records.
• When queries often use a combination of multiple WHEREconditions involving the ORoperator.
• When there is read-only or low update activity on the key columns.
Structure of a Bitmap Index
A bitmap index is also organized as a B-tree, but the leaf node stores a bitmap for each key value instead of a list of ROWIDs. Each bit in the bitmap corresponds to a possible ROWID, and if the bit is set, it means that the row with the corresponding ROWID contains the key value.
As shown in the diagram, the leaf node of a bitmap index contains the following:
• An entry header, containing the number of columns and lock information
• Key values consisting of length and value pairs for each key column (In the example, the key consists of only one column, and the first entry has a key value of Blue.)
12-7 Copyright © Oracle Corporation, 2001. All rights reserved.
Bitmap Index
<Blue, 10.0.3, 12.8.3, 1000100100010010100>
<Green, 10.0.3, 12.8.3, 0001010000100100000>
<Red, 10.0.3, 12.8.3, 0100000011000001001>
<Yellow, 10.0.3, 12.8.3, 0010001000001000010>
keystartROWID
endROWID bitmap
Table
Index
Block 10
Block 11
Block 12
File 3

DBA Fundamentals I 12 -8
Structure of a Bitmap Index (continued)
• Start ROWID, which in the example contains a file number 3, a block number 10, and a row number 0
• End ROWID, which in the example includes a block number 12 and a row number 8
• A bitmap segment consisting of a string of bits (The bit is set when the corresponding row contains the key value and is unset when the row does not contain the key value. The Oracle server uses a patented compression technique to store bitmap segments.)
The start ROWID is the ROWID of the first row pointed to by the bitmap segment of the bitmap—that is, the first bit of the bitmap corresponds to that ROWID, the second bit of the bitmap corresponds to the next row in the block, and the end ROWID is a pointer to the last row in the table covered by the bitmap segment. Bitmap indexes use restricted ROWIDs.
Using a Bitmap Index
The B-tree is used to locate the leaf nodes that contain bitmap segments for a given value of the key. Start ROWID and the bitmap segments are used to locate the rows that contain the key value.
When changes are made to the key column in the table, bitmaps must be modified. This results in locking of the relevant bitmap segments. Because locks are acquired on the whole bitmap segment, a row that is covered by the bitmap cannot be updated by other transactions until the first transaction ends.

DBA Fundamentals I 12 -9
Comparing B-Tree and Bitmap Indexes
Bitmap indexes are more compact than B-tree indexes when used with low-cardinality columns.
Updates to key columns in a bitmap index are more expensive because bitmaps use bitmap-segment-level locking, whereas in a B-tree index, locks are on entries corresponding to individual rows of the table.
Bitmap indexes can be used to perform operations such as Bitmap Boolean. The Oracle server can use two bitmap segments to perform a bitwise boolean and get a resulting bitmap. This allows efficient use of bitmaps in queries that use the boolean predicate.
In summary, B-tree indexes may be more suitable in an OLTP environment for indexing dynamic tables, whereas bitmap indexes may be useful in data warehouse environments where complex queries are used on large, static tables.
12-9 Copyright © Oracle Corporation, 2001. All rights reserved.
Comparing B-Tree and Bitmap Indexes
B-tree
Suitable for high-cardinality columns
Updates on keys relativelyinexpensive
Inefficient for queries using OR predicates
Useful for OLTP
Bitmap
Suitable for low-cardinality columns
Updates to key columns veryexpensive
Efficient for queries using OR predicates
Useful for data warehousing

DBA Fundamentals I 12 -10
Creating Normal B-Tree Indexes
An index can be created either in the account of the user who owns the table or in a different account, although it is generally created in the same account as the table.
The syntax above creates an index on the EMPLOYEES table using the LAST_NAME column.
12-10 Copyright © Oracle Corporation, 2001. All rights reserved.
Creating Normal B-Tree Indexes
CREATE INDEX hr.employees_last_name_idx
ON hr.employees(last_name)
PCTFREE 30
STORAGE(INITIAL 200K NEXT 200K
PCTINCREASE 0 MAXEXTENTS 50)
TABLESPACE indx;

DBA Fundamentals I 12 -11
Syntax (continued)where: UNIQUE is used to specify a unique index
(Nonunique is the default.)
schema is the owner of the index/table
index is the name of the index
table is the name of the table
column is the name of the column
ASC/ DESC indicates whether the index should be created in ascending or decending order.
TABLESPACE identifies the tablespace where the index will be created
PCTFREE is the amount of space reserved in each block (in percentage of total space minus the block header) at the time of creation for accommodating new index entries
INITRANS specifies the number of transaction entries preallocated in each block(The default and the minimum value is 2.)
MAXTRANS limits the number of transaction entries that can be allocated to each block(The default is 255.)
STORAGE clause identifies the storage clause that determineshow extents are allocated to the index
LOGGING specifies that the creation of the index and subsequent operations on the index are logged in the redo log file(This is the default.)
NOLOGGING specifies that the creation and certain types of data loads are not logged in the redo log file
NOSORT specifies that the rows are stored in the database in ascending order, and therefore, the Oracle server does not have to sort the rows while creating the index

DBA Fundamentals I 12 -12
Syntax (continued)
Note
• If MINIMUM EXTENThas been defined for the tablespace, the extent sizes for the index are rounded up to the next higher multiple of the MINIMUM EXTENTvalue.
• If the [NO]LOGGINGclause is omitted, the logging attribute of the index defaults to the logging attribute of the tablespace in which it resides.
• PCTUSEDcannot be specified for an index. Because index entries must be stored in the correct order, the user cannot control when an index block is used for inserts.
• If the NOSORT keyword is used when the data is not sorted on the key, the statement terminates with an error. This option is likely to fail if the table has had several DML operations on it.
• The Oracle server uses existing indexes to create a new index, if possible. This happens when the key for the new index corresponds to the leading part of the key of an existing index.
DBA Fundamentals I 12 -13
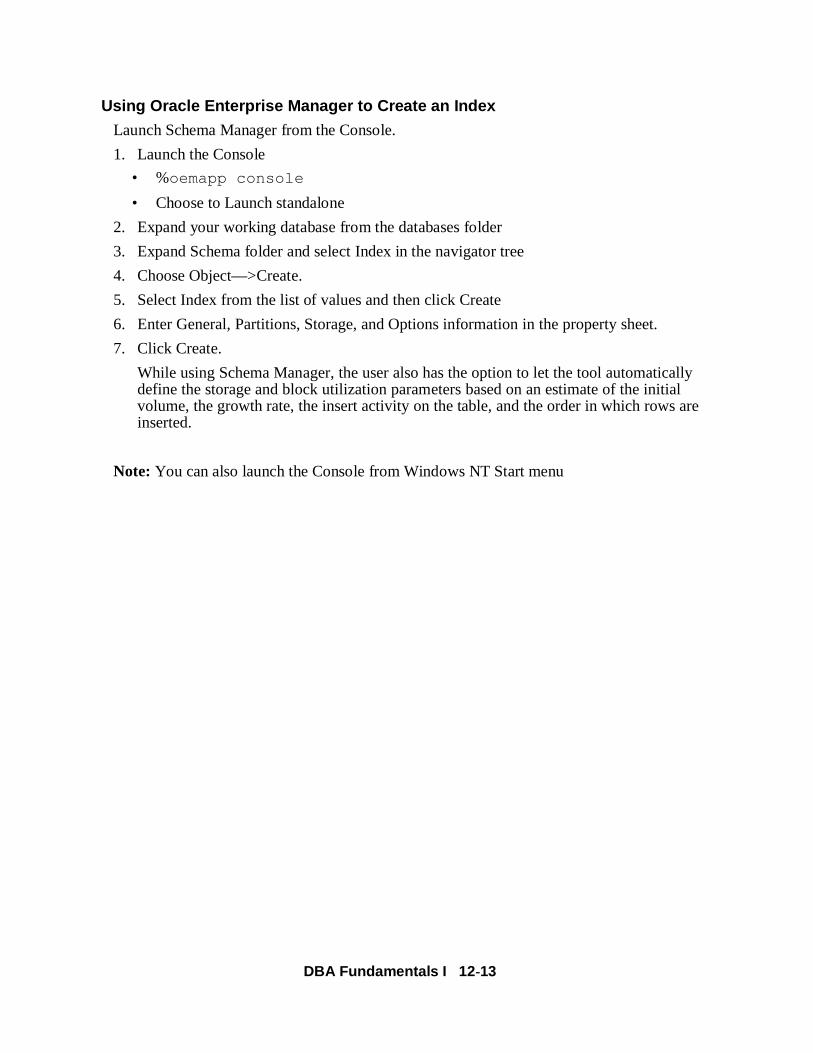
Using Oracle Enterprise Manager to Create an Index
Launch Schema Manager from the Console.
1. Launch the Console
• %oemapp console
• Choose to Launch standalone
2. Expand your working database from the databases folder
3. Expand Schema folder and select Index in the navigator tree
4. Choose Object—>Create.
5. Select Index from the list of values and then click Create
6. Enter General, Partitions, Storage, and Options information in the property sheet.
7. Click Create.
While using Schema Manager, the user also has the option to let the tool automatically define the storage and block utilization parameters based on an estimate of the initial volume, the growth rate, the insert activity on the table, and the order in which rows are inserted.
Note: You can also launch the Console from Windows NT Start menu

DBA Fundamentals I 12 -14
Guidelines When Creating Indexes
Consider the following while creating an index:
• Indexes speed up query performance and slow down DML operations. Always minimize the number of indexes needed on volatile tables.
• Place indexes in a separate tablespace, not in a tablespace that has rollback segments, temporary segments, and tables.
• There could be significant performance gain for large indexes by avoiding redo generation. Consider using theNOLOGGING clause for creating large indexes.
• Because index entries are smaller compared to the rows they index, index blocks tend to have more entries per block. For this reason, INITRANS should generally be higher on indexes than on the corresponding tables.
Indexes and PCTFREE
The PCTFREEparameter for an index works differently from that of a table. This parameter is used only during creation of the index to reserve space for index entries that may need to be inserted into the same index block. Index entries are not updated. When a key column is updated, this involves a logical delete of the index entry and an insert.
12-14 Copyright © Oracle Corporation, 2001. All rights reserved.
Creating Indexes: Guidelines
• Balance query and DML needs
• Place in separate tablespace
• Use uniform extent sizes: Multiples of five blocks or MINIMUM EXTENTsize for tablespace
• Consider NOLOGGINGfor large indexes
• INITRANS should generally be higher on indexes than on the corresponding tables.

DBA Fundamentals I 12 -15
Indexes and PCTFREE (continued)
Use a low PCTFREE for indexes on columns that are monotonically increasing, such as a system-generated invoice number. In these cases, new index entries are always appended to the existing entries and there is no need to insert a new entry between two existing index entries.
Where the value for an indexed column of an inserted row can take on any value, that is, the new value can fall within the current range of values—you should provide for a higher PCTFREE.An example of an index requiring a high PCTFREEis an index on the customer code column of an invoice table. In this case, it is useful to specify a value of PCTFREEas indicated by the following equation:
Maximum number of rows – Initial number of rowsX 100
Maximum number of rows
The maximum value can cater to a specific time period, such as a year.

DBA Fundamentals I 12 -16
Syntax
Use the following command to create a bitmap index:
CREATE BITMAP INDEX [schema.] index
ON [schema.] table
(column [ ASC | DESC ] [ , column [ASC | DESC ] ] ...)
[ TABLESPACE tablespace ]
[ PCTFREE integer ]
[ INITRANS integer ]
[ MAXTRANS integer ]
[ storage-clause ]
[ LOGGING| NOLOGGING ]
[ NOSORT ]
Notice that a bitmap index cannot be unique.
12-16 Copyright © Oracle Corporation, 2001. All rights reserved.
Creating Bitmap Indexes
Use the parameter CREATE_BITMAP_AREA_SIZE to
specify the amount of memory allocated for bitmap
creation.
CREATE BITMAP INDEX orders_region_id_idx
ON orders(region_id)
PCTFREE 30
STORAGE(INITIAL 200K NEXT 200K
PCTINCREASE 0 MAXEXTENTS 50)
TABLESPACE indx;

DBA Fundamentals I 12 -17
CREATE_BITMAP_AREA_SIZEThe initialization parameter CREATE_BITMAP_AREA_SIZEdetermines the amount of space that will be used for storing bitmap segments in memory. The default value is 8 MB. A larger value may lead to a faster index creation. If cardinality is very small, this value can be set to a small value. For example, if cardinality is only 2, then the value can be in the order of kilobytes rather than megabytes. As a general rule, for a higher cardinality, more memory is needed for optimal performance.

DBA Fundamentals I 12 -18
Using Oracle Enterprise Manager to Create a Bitmap Index
Launch Schema Manager from the Console.
1. Launch the Console
• %oemapp console
• Choose to Launch standalone
2. Expand your working database from the databases folder
3. Expand Schema folder and select Index in the navigator tree
4. Select Object—>Create from the menu
5. Select Index from the list of values and then click Create.
6. Enter General, Partitions, Storage, and Options information in the property sheet, and make sure that the Bitmap option is selected in the General page.
7. Click Create.

DBA Fundamentals I 12 -19
Changing Storage Parameters for Indexes
Some of the storage parameters and block utilization parameters can be modified by using the ALTER INDEX command.
Syntax
ALTER INDEX [schema.]index
[ storage-clause ]
[ INITRANS integer ]
[ MAXTRANS integer ]
The implications of changing the storage parameters for an index are the same as the implications of changing them for a table. A common use of this change is to increase the MAXEXTENTS for an index.
Block utilization parameters may be changed to guarantee higher levels of concurrency on an index block.
12-19 Copyright © Oracle Corporation, 2001. All rights reserved.
Changing Storage Parameters for Indexes
ALTER INDEX employees_last_name_idx
STORAGE(NEXT 400K
MAXEXTENTS 100);

DBA Fundamentals I 12 -20
Using Oracle Enterprise Manager to Change Storage Parameters
Launch Schema Manager from the Console.
1. Launch the Console
• %oemapp console
• Choose to Launch standalone
2. Expand your working database from the databases folder
3. Expand Schema folder and expand on Index folder in the navigator tree
4. Expand the user name (or schema).
5. Select the index.
6. Modify the values in the Storage tab of the property sheet.
7. Click Apply.
Note: You can also launch the Console from Windows NT Start menu
DBA Fundamentals I 12 -21
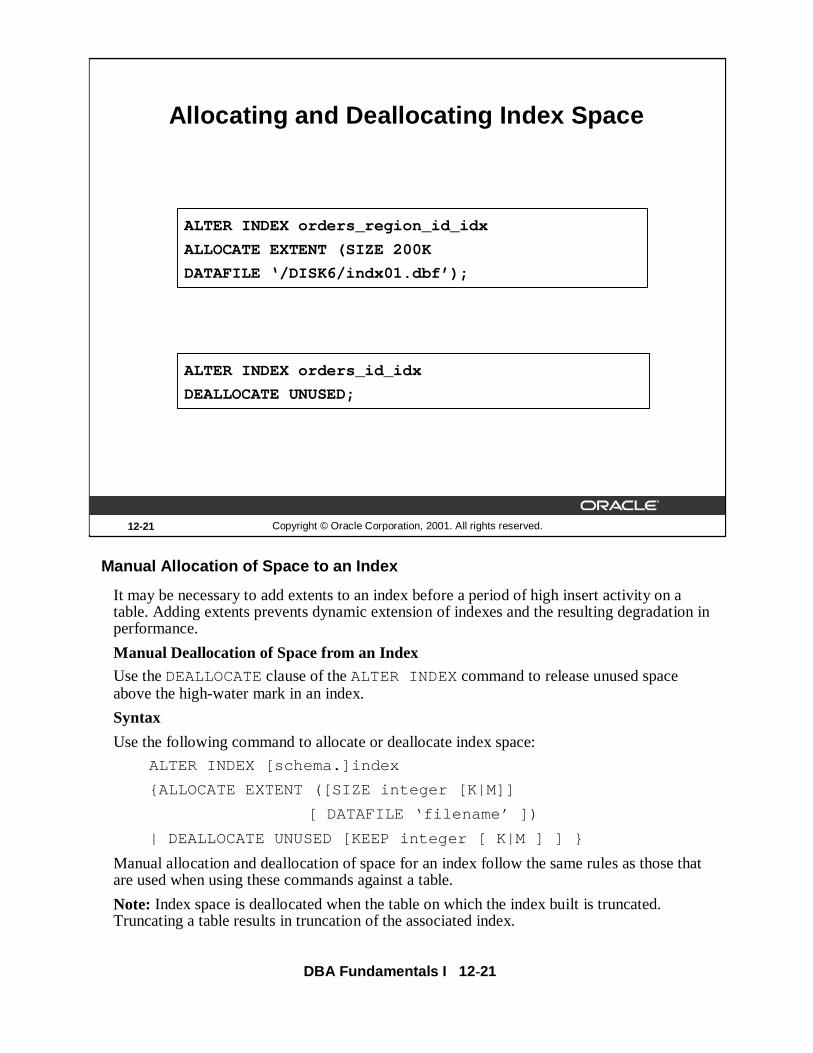
Manual Allocation of Space to an Index
It may be necessary to add extents to an index before a period of high insert activity on a table. Adding extents prevents dynamic extension of indexes and the resulting degradation in performance.
Manual Deallocation of Space from an Index
Use the DEALLOCATEclause of the ALTER INDEX command to release unused space above the high-water mark in an index.
Syntax
Use the following command to allocate or deallocate index space:
ALTER INDEX [schema.]index
{ALLOCATE EXTENT ([SIZE integer [K|M]]
[ DATAFILE ‘filename’ ])
| DEALLOCATE UNUSED [KEEP integer [ K|M ] ] }
Manual allocation and deallocation of space for an index follow the same rules as those that are used when using these commands against a table.
Note: Index space is deallocated when the table on which the index built is truncated. Truncating a table results in truncation of the associated index.
12-21 Copyright © Oracle Corporation, 2001. All rights reserved.
Allocating and Deallocating Index Space
ALTER INDEX orders_region_id_idx
ALLOCATE EXTENT (SIZE 200K
DATAFILE ‘/DISK6/indx01.dbf’);
ALTER INDEX orders_id_idx
DEALLOCATE UNUSED;

DBA Fundamentals I 12 -22
Rebuilding Indexes
Index rebuilds have the following characteristics:
• A new index is built using an existing index as the data source.
• Sorts are not needed when an index is built using an existing index, resulting in better performance.
• The old index is deleted after the new index is built. During the rebuild, sufficient space is needed to accommodate both the old and the new index in their respective tablespaces.
• The resulting index does not contain any deleted entries. Therefore, this index uses space more efficiently.
• Queries can continue to use the existing index while the new index is being built.
Possible Rebuild Situations
Rebuild an index in the following situations:
• The existing index needs to be moved to a different tablespace. This may be necessary if the index is in the same tablespace as the table or if objects need to be redistributed across disks.
12-22 Copyright © Oracle Corporation, 2001. All rights reserved.
Rebuilding Indexes
Use the ALTER INDEX command to:
• Move an index to a different tablespace
• Improve space utilization by removing deleted entries
• Change a reverse key index to a normal B-tree index and vice versa
ALTER INDEX orders_region_id_idx REBUILD
TABLESPACE indx02;

DBA Fundamentals I 12 -23
Possible Rebuild Situations (continued)
• An index contains many deleted entries. This is a typical problem with sliding indexes, such as an index on the order number of an orders table, where completed orders are deleted and new orders with higher numbers are added to the table. If a few old orders are outstanding, there may be several index leaf blocks with all but a few deleted entries.
• An existing normal index needs to be converted into a reverse key index. This may be the case when migrating applications from an earlier release of the Oracle server.
• The table of the index has been moved to another tablespace using the ALTER TABLE ... MOVE TABLESPACE command.
Syntax
Use the following command to rebuild an index:
ALTER INDEX [schema.] index REBUILD
[ TABLESPACE tablespace ]
[ PCTFREE integer ]
[ INITRANS integer ]
[ MAXTRANS integer ]
[ storage-clause ]
[ LOGGING| NOLOGGING ]
[ REVERSE | NOREVERSE ]
The ALTER INDEX ... REBUILD command cannot be used to change a bitmap index to B-tree and vice versa. The REVERSEor NOREVERSE keyword, can only be specified for B-tree indexes.
DBA Fundamentals I 12 -24
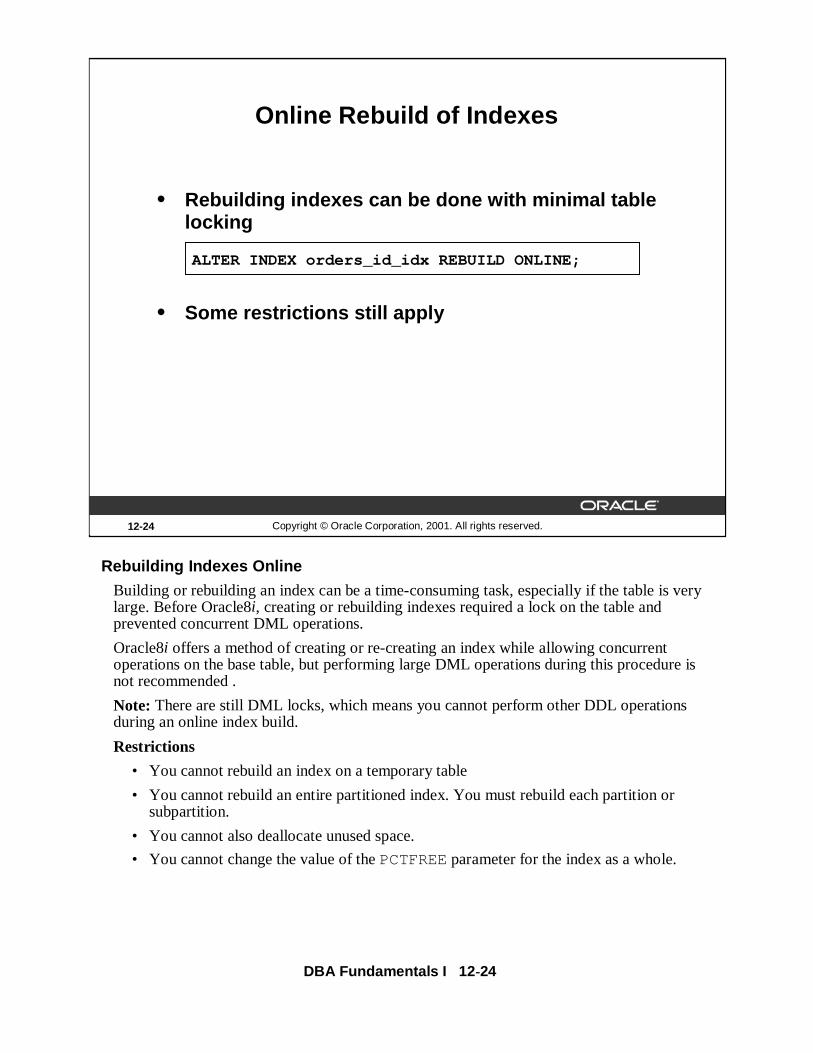
Rebuilding Indexes Online
Building or rebuilding an index can be a time-consuming task, especially if the table is very large. Before Oracle8i, creating or rebuilding indexes required a lock on the table and prevented concurrent DML operations.
Oracle8i offers a method of creating or re-creating an index while allowing concurrent operations on the base table, but performing large DML operations during this procedure is not recommended .
Note: There are still DML locks, which means you cannot perform other DDL operations during an online index build.
Restrictions
• You cannot rebuild an index on a temporary table
• You cannot rebuild an entire partitioned index. You must rebuild each partition or subpartition.
• You cannot also deallocate unused space.
• You cannot change the value of the PCTFREEparameter for the index as a whole.
12-24 Copyright © Oracle Corporation, 2001. All rights reserved.
Online Rebuild of Indexes
• Rebuilding indexes can be done with minimal table locking
• Some restrictions still apply
ALTER INDEX orders_id_idx REBUILD ONLINE;

DBA Fundamentals I 12 -25
Coalescing Indexes
When you encounter index fragmentation, you can rebuild or coalesce the index. Before you perform either task, you should consider the cost and benefits of each option and choose the one that works best for your situation. Coalesce on an index is a block rebuild that is done online.
In situations where you have B-tree index leaf blocks that can be freed up for reuse, you can merge those leaf blocks using the following SQL statement:
ALTER INDEX hr.employees_idx COALESCE;
The figure above shows the effect ofALTER INDEX … COALESCE on the index hr.employees_idx. Before performing theCOALESCE operation, the first two leaf blocks are 50% full. This means the index is fragmented and can be coalesced to completely filling the first block, reducing fragmentation.
12-25 Copyright © Oracle Corporation, 2001. All rights reserved.
Coalescing Indexes
Before coalescing After coalescing
ALTER INDEX orders_id_idx COALESCE;

DBA Fundamentals I 12 -26
Analyzing an Index
Analyze the index to perform the following:
• Check all the index blocks for block corruption. Note that this command does not verify whether index entries correspond to data in the table.
• Populate the INDEX_STATSview with information about the index.
Syntax
ANALYZE INDEX [ schema.]index VALIDATE STRUCTURE
After running this command, query INDEX_STATSto obtain information about the index as shown in the following example:
12-26 Copyright © Oracle Corporation, 2001. All rights reserved.
Checking Index Validity
ANALYZE INDEX orders_region_id_idx
VALIDATE STRUCTURE;
INDEX_STATS
DBA Fundamentals I 12 -27
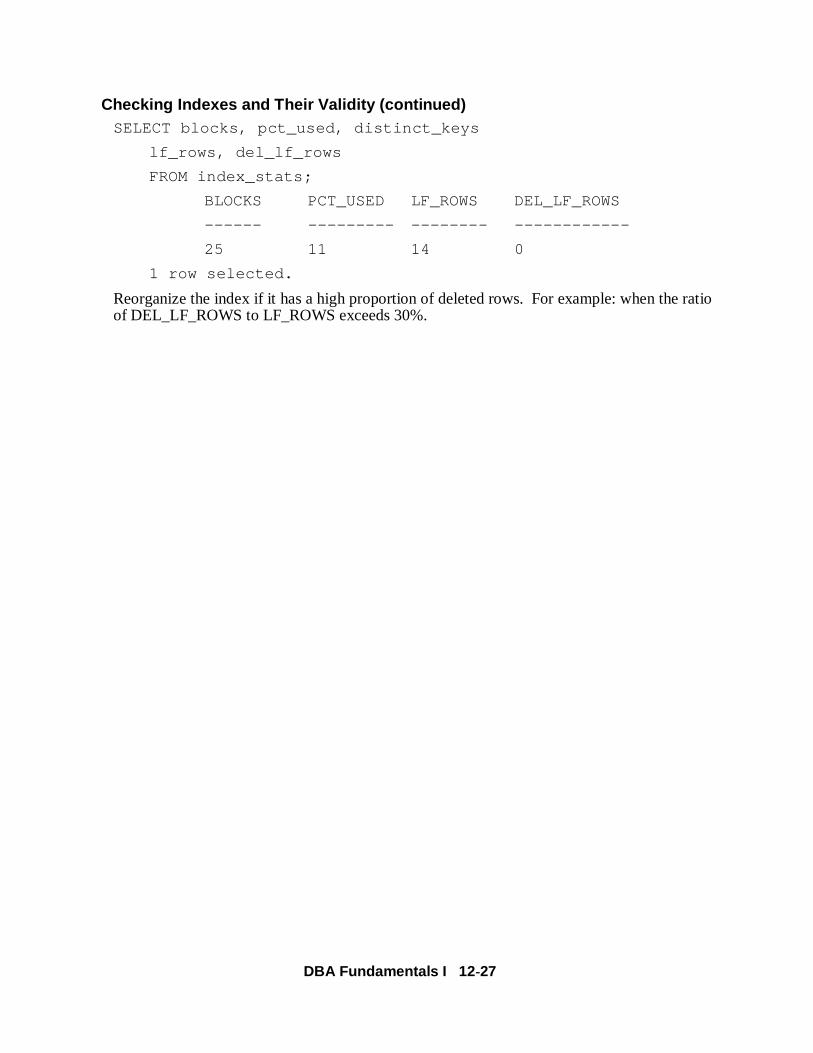
Checking Indexes and Their Validity (continued)SELECT blocks, pct_used, distinct_keys
lf_rows, del_lf_rows
FROM index_stats;
BLOCKS PCT_USED LF_ROWS DEL_LF_ROWS
------ --------- -------- ------------
25 11 14 0
1 row selected.
Reorganize the index if it has a high proportion of deleted rows. For example: when the ratio of DEL_LF_ROWS to LF_ROWS exceeds 30%.
DBA Fundamentals I 12 -28
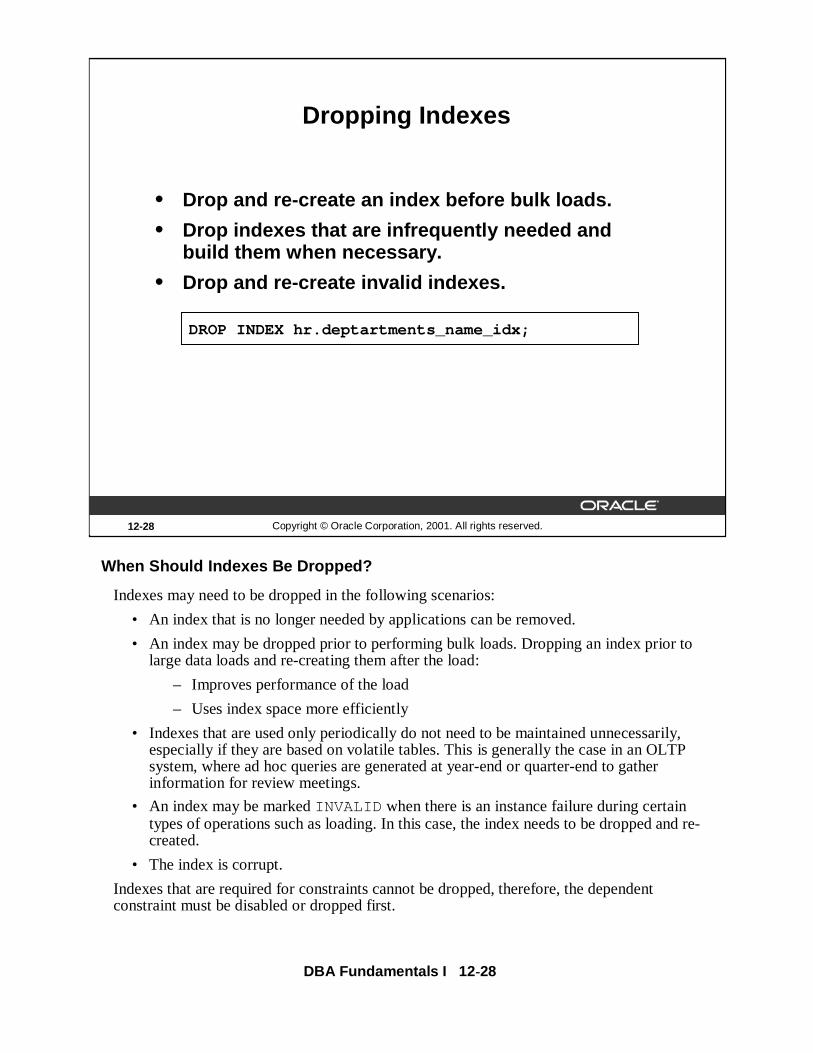
When Should Indexes Be Dropped?
Indexes may need to be dropped in the following scenarios:
• An index that is no longer needed by applications can be removed.
• An index may be dropped prior to performing bulk loads. Dropping an index prior to large data loads and re-creating them after the load:
– Improves performance of the load
– Uses index space more efficiently
• Indexes that are used only periodically do not need to be maintained unnecessarily, especially if they are based on volatile tables. This is generally the case in an OLTP system, where ad hoc queries are generated at year-end or quarter-end to gather information for review meetings.
• An index may be marked INVALID when there is an instance failure during certain types of operations such as loading. In this case, the index needs to be dropped and re-created.
• The index is corrupt.
Indexes that are required for constraints cannot be dropped, therefore, the dependent constraint must be disabled or dropped first.
12-28 Copyright © Oracle Corporation, 2001. All rights reserved.
Dropping Indexes
• Drop and re-create an index before bulk loads.
• Drop indexes that are infrequently needed and build them when necessary.
• Drop and re-create invalid indexes.
DROP INDEX hr.deptartments_name_idx;

DBA Fundamentals I 12 -29
Using Oracle Enterprise Manager to Drop an Index
Launch Schema Manager from the Console.
1. Launch the Console
• %oemapp console
• Choose to Launch standalone
You can also launch the Console from Windows NT Start menu
2. Expand your working database from the databases folder
3. Expand Schema folder and expand the Index folder in the navigator tree
4. Expand the user name (or schema).
5. Select the index.
6. Select Object—>Remove.
7. Select Yes in the dialog box.
Note: An index cannot be dropped if it is used to implement an integrity constraint that is
enabled. Constraints are discussed in the lesson “Maintaining Data Integrity.”

DBA Fundamentals I 12 -30
Identifying Unused Indexes
Beginning with Oracle9i, statistics about the usage of an index can be gathered and displayed in V$OBJECT_USAGE. If the information gathered indicates that an index is never used, the index can be dropped. In addition, eliminating unused indexes cuts down on overhead that the Oracle server has to do for DML, thus performance is improved. Each time the MONITORING USAGEclause is specified, V$OBJECT_USAGEwill be reset for the specified index. The previous information is cleared or reset, and a new start time is recorded.
V$OBJECT_USAGEColumns
INDEX_NAME: The index name.
TABLE_NAME: The corresponding table.
MONITORING: Indicates whether monitoring is ONor OFF.
USED: Indicates YESor NOwhether index has been used during the monitoring time.
START_MONITORING: Time monitoring began on index.
END_MONITORING: Time monitoring stopped on index.
12-30 Copyright © Oracle Corporation, 2001. All rights reserved.
Identifying Unused Indexes
• To start monitoring the usage of an index
• To stop monitoring the usage of an index
ALTER INDEX summit.orders_id_idx
MONITORING USAGE
ALTER INDEX summit.orders_id_idx
NOMONITORING USAGE

DBA Fundamentals I 12 -31
12-31 Copyright © Oracle Corporation, 2001. All rights reserved.
Obtaining Index Information
Information about indexes can be obtained by querying the data dictionary.
• DBA_INDEXES: Provides information on the indexes
• DBA_IND_COLUMNS: Provides information on the columns indexed
• DBA_IND_EXPRESSIONS: Provides information on function based indexes
• V$OBJECT_USAGE: Provides information on the usage of an index

DBA Fundamentals I 12 -32
12-32 Copyright © Oracle Corporation, 2001. All rights reserved.
Summary
In this lesson, you should have learned how to:
• Create different types of indexes
• Reorganize indexes
• Drop indexes
• Get index information from the data dictionary
• Begin and end monitoring usage of indexes

DBA Fundamentals I 12 -33
Quick Reference
Context Reference
Initialization parameters CREATE_BITMAP_AREA_SIZE
Dynamic performance views None
Data dictionary tables/views DBA_INDEXES
DBA_IND_COLUMNS
DBA_OBJECTS
IND$
INDEX_STATS
Commands CREATE INDEX
CREATE UNIQUE INDEX
CREATE BITMAP INDEX
CREATE INDEX ... REVERSE
ALTER INDEX ... STORAGE
ALTER INDEX ... INITRANS ... MAXTRANS
ALTER INDEX ... ALLOCATE EXTENT
ALTER INDEX ... DEALLOCATE UNUSED
ALTER INDEX .... REBUILD
ALTER INDEX .... REBUILD ... REVERSE
ALTER INDEX .... REBUILD ... NOREVERSE
ANALYZE INDEX ... VALIDATE STRUCTURE
DROP INDEX
Packaged procedures andfunctions
None

DBA Fundamentals I 12 -34
12-34 Copyright © Oracle Corporation, 2001. All rights reserved.
Practice 12 Overview
This practice covers the following topics:
• Creating an index on columns of a table
• Moving the index to another tablespace
• Dropping an index
• Obtain index information

DBA Fundamentals I 12 -35
Practice 12: Managing Indexes1 You are considering creating indexes on the NAMEand REGIONcolumns of the
CUSTOMERStable. What types of index are appropriate for the two columns? Createthe indexes, naming them CUST_NAME_IDXand CUST_REGION_IDX, respectively,and placing them in the appropriate tablespaces.
Hint: A B-tree index is suitable for a column with many distinct values, and a bitmap index is suitable for columns with only a few distinct values.
2 Move the CUST_REGION_IDXindex to another tablespace.
Hint: The index can be rebuilt specifying a different tablespace.
3 Note the files and blocks used by the extents by CUST_REGION_IDXindex.
Hint: Use the view DBA_EXTENTSto get this information.
4 Re-create the CUST_REGION_IDXindex without dropping and re-creating it, andretain it in the same tablespace as before. Does the new index use the same blocks thatwere used earlier?
Hint: Rebuild the index.
The new index does not reuse the same space as seen from the location of the extentafter rebuild. This is because Oracle server builds a temporary index, drops the old one,and renames the temporary index.
5 a As user SYSTEM, run the script lab12_05a.sql to create and populatethe NUMBERStable.
b Query the table NUMBERSto find the number of distinct values in the twocolumns in the table.
c Create B-tree indexes NUMB_OE_IDXand NUMB_NO_IDXon the ODD_EVENand NOcolumns of the NUMBERStable, respectively, and check the total sizesof the indexes. Put the indexes in tablespace INDX01 .
Hint: Check the total blocks allocated to the extents from DBA_SEGMENTS.
d Create bitmap indexes NUMB_OE_IDXand NUMB_NO_IDXon the ODD_EVENand NOcolumns of the NUMBERStable, respectively, and check the total sizesof the indexes. Put the indexes in tablespace INDX01.What can you conclude about the relationship between cardinality and sizes of thetwo types of indexes?
Hint: The existing indexes need to be dropped before creating the new indexes.Now re-execute the query to check the sizes of the indexes.

DBA Fundamentals I 12 -36
DBA Fundamentals I 13 -1
13Copyright © Oracle Corporation, 2001. All rights reserved.
Maintaining Data Integrity

DBA Fundamentals I 13 -2
13-2 Copyright © Oracle Corporation, 2001. All rights reserved.
Objectives
After completing this lesson, you should be able todo the following:
• Implement data integrity constraints
• Maintain integrity constraints
• Obtain constraint information from the data dictionary

DBA Fundamentals I 13 -3
Methods to Guarantee Data Integrity
Data integrity means that data in a database adheres to business rules. There are three primary ways in which data integrity can be maintained:
• Application code
• Database triggers
• Declarative integrity constraints
Mapping the business rules using one of the three methods is a design decision made by the designer. The database administrator is primarily concerned with implementing the methods chosen by the designer and balancing the performance needs against integrity requirements.
Application code can be implemented either as stored procedures within the database or as applications running on the client. This lesson focuses on the use of integrity constraints.
13-3 Copyright © Oracle Corporation, 2001. All rights reserved.
Data Integrity
Applicationcode
Table
Data
Integrityconstraint
Databasetrigger

DBA Fundamentals I 13 -4
Methods to Guarantee Data Integrity (continued)
Database Triggers
Database triggers are PL/SQL programs that are executed when a certain event such as an insert or an update of a column occurs on a table. Triggers can be enabled or disabled—that is, they can be set to execute when the event occurs, or they can be set not to execute even though they are defined. Database triggers are usually created only to enforce a complex business rule that cannot be defined as an integrity constraint.
Note: Database triggers are covered in other Oracle courses.
Integrity Constraints
Integrity constraints are the preferred mechanism for enforcing business rules because they:
• Provide improved performance
• Are easy to declare and modify—they do not require extensive coding
• Centralize rules
• Are flexible (enabled or disabled)
• Are fully documented in the data dictionary
The following sections explain the behavior of integrity constraints and discuss how they are implemented by the Oracle server.

DBA Fundamentals I 13 -5
Types of ConstraintsBy default, all columns in a table allow nulls. Null means absence of a value. A NOT NULLconstraint requires a column of a table to contain values.
A UNIQUEkey constraint requires that every value in a column or set of columns (key) be unique. No two rows of a table can have duplicate values in a specified column or set of columns.
Each table in the database can have at most one PRIMARY KEYconstraint. A PRIMARY KEYconstraint ensures that both of the following are true:
• No two rows of a table have duplicate values in the specified column.
• Primary key columns do not contain nulls.
A CHECKintegrity constraint on a column or a set of columns requires that a specified condition be true or unknown for every row of the table.
Although the NOT NULLand CHECKconstraints do not directly require DBA attention, the primary key, unique, and foreign key constraints must be managed to ensure high availability and acceptable performance levels.
13-5 Copyright © Oracle Corporation, 2001. All rights reserved.
Types of Constraints
Constraint
NOT NULL
UNIQUE
PRIMARY KEY
FOREIGN KEY
CHECK
Description
Specifies that a column cannot contain null values
Designates a column or combination of columns as unique
Designates a column or combination of columns as the table’s primary key
Designates a column or combination of columns as the foreign key in a referential integrity constraint
Specifies a condition that each row of the table must satisfy
DBA Fundamentals I 13 -6
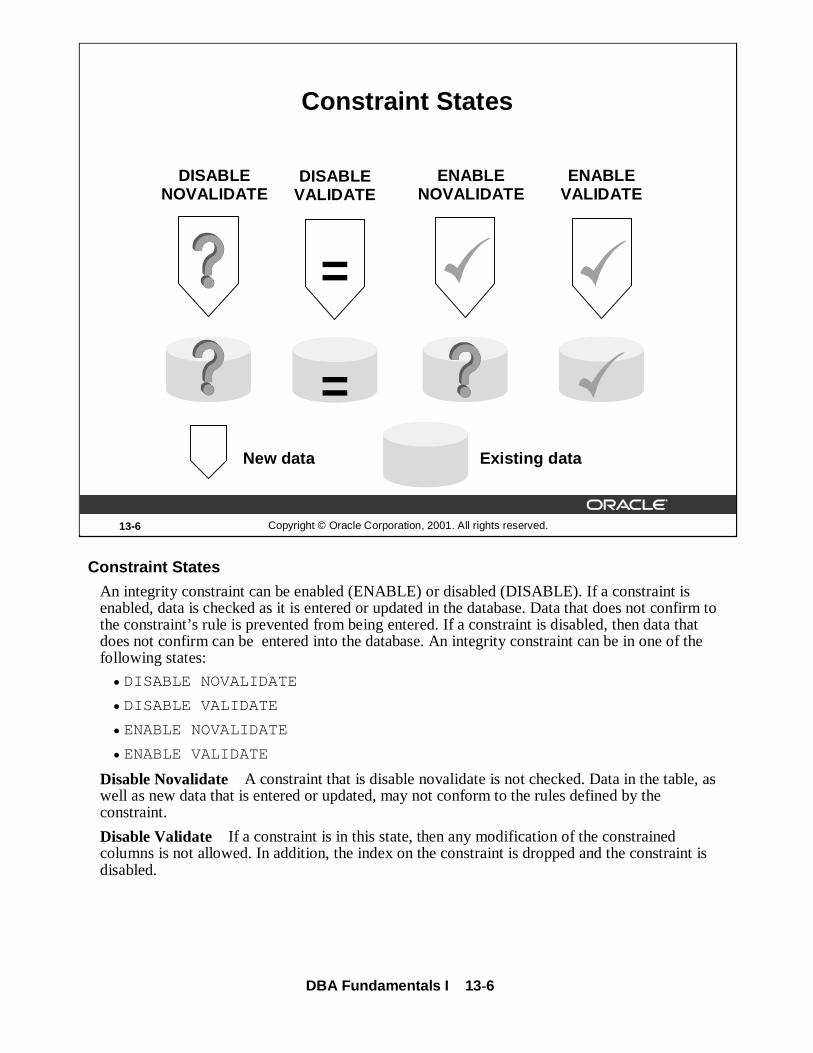
Constraint States
An integrity constraint can be enabled (ENABLE) or disabled (DISABLE). If a constraint is enabled, data is checked as it is entered or updated in the database. Data that does not confirm to the constraint’s rule is prevented from being entered. If a constraint is disabled, then data that does not confirm can be entered into the database. An integrity constraint can be in one of the following states:
• DISABLE NOVALIDATE
• DISABLE VALIDATE
• ENABLE NOVALIDATE
• ENABLE VALIDATE
Disable Novalidate A constraint that is disable novalidate is not checked. Data in the table, as well as new data that is entered or updated, may not conform to the rules defined by the constraint.
Disable Validate If a constraint is in this state, then any modification of the constrained columns is not allowed. In addition, the index on the constraint is dropped and the constraint is disabled.
13-6 Copyright © Oracle Corporation, 2001. All rights reserved.
Constraint States
ENABLENOVALIDATE
ENABLEVALIDATE
Existing dataNew data
DISABLENOVALIDATE
DISABLEVALIDATE
=
=

DBA Fundamentals I 13 -7
Constraint States (continued)
Enable Novalidate If a constraint is in this state, new data that violates the constraint cannot be entered. However, the table may contain data that is invalid—that is, data that violates the constraint. Enabling constraints in the novalidated state is most useful in data warehouse configurations that are uploading valid OLTP data.
Enable Validate If a constraint is in this state, no row violating the constraint can be inserted into the table. However, while the constraint is disabled such a row can be inserted. This row is known as an exception to the constraint. If the constraint is in the enable novalidate state, violations resulting from data entered while the constraint was disabled remain. The rows that violate the constraint must be either updated or deleted in order for the constraint to be put in the validated state.
When a constraint changes to enable validate from a disabled state, the table is locked and all data in the table is checked for conformity. This may cause DML operations such as a data load to wait, so it is advisable to move first from a disabled state to enable novalidate, and then to enable validate.
Transitions between these states are governed by the following rules:
• ENABLE implies VALIDATE, unless NOVALIDATEis specified.
• DISABLE implies NOVALIDATE, unless VALIDATE is specified.
• VALIDATE and NOVALIDATEdo not have default implications for the ENABLEand DISABLE states.
• When a unique or primary key moves from the DISABLE state to the ENABLEstate and there is no existing index, a unique index is created automatically. Similarly, when a unique or primary key moves from ENABLEto DISABLE and it is enabled with a unique index, the unique index is dropped.
• When any constraint is moved from the NOVALIDATEstate to the VALIDATE state, all data must be checked. However, moving from VALIDATE to NOVALIDATEsimply forgets that the data was ever checked.
• Moving a single constraint from the ENABLE NOVALIDATEstate to the ENABLE VALIDATE state does not block reads, writes, or other DDL statements.
DBA Fundamentals I 13 -8
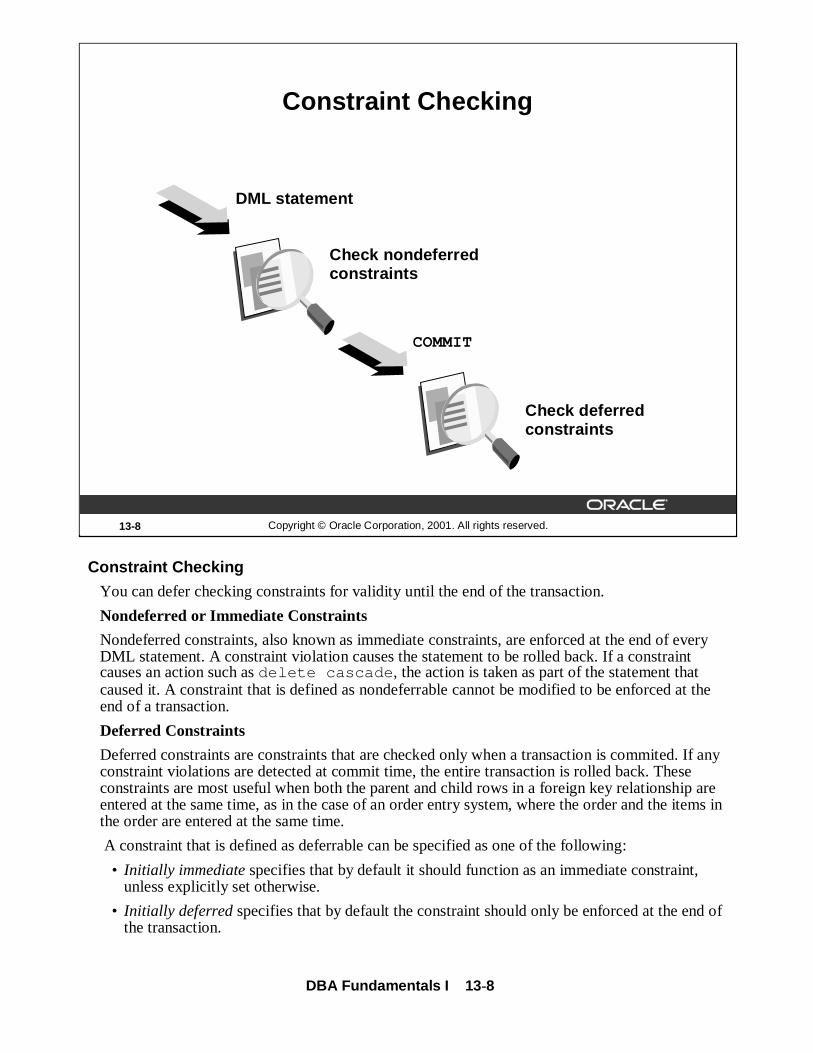
Constraint Checking
You can defer checking constraints for validity until the end of the transaction.
Nondeferred or Immediate Constraints
Nondeferred constraints, also known as immediate constraints, are enforced at the end of every DML statement. A constraint violation causes the statement to be rolled back. If a constraint causes an action such as delete cascade , the action is taken as part of the statement that caused it. A constraint that is defined as nondeferrable cannot be modified to be enforced at the end of a transaction.
Deferred Constraints
Deferred constraints are constraints that are checked only when a transaction is commited. If any constraint violations are detected at commit time, the entire transaction is rolled back. These constraints are most useful when both the parent and child rows in a foreign key relationship are entered at the same time, as in the case of an order entry system, where the order and the items in the order are entered at the same time.
A constraint that is defined as deferrable can be specified as one of the following:
• Initially immediatespecifies that by default it should function as an immediate constraint, unless explicitly set otherwise.
• Initially deferredspecifies that by default the constraint should only be enforced at the end of the transaction.
13-8 Copyright © Oracle Corporation, 2001. All rights reserved.
Constraint Checking
DML statement
Check nondeferred constraints
COMMIT
Check deferred constraints

DBA Fundamentals I 13 -9
Changing the Enforcement of ConstraintsThe SET CONSTRAINTSstatement makes constraints either DEFERREDor IMMEDIATE for a particular transaction. You can use this statement to set the mode for a list of constraint names or for constraints. The SET CONSTRAINTSmode lasts for the duration of the transaction or until another SET CONSTRAINTSstatement resets the mode. The SET CONSTRAINTSstatement is disallowed inside triggers.
The ALTER SESSIONstatement also has clauses to SET CONSTRAINTSto IMMEDIATEor DEFERRED. These clauses imply setting ALL deferrable constraints (list of constraint names cannot be specified). The ALTER SESSION SET CONSTRAINTSstatement applies to a current session only.
ALTER SESSIONSET CONSTRAINT[S] ={IMMEDIATE|DEFERRED|DEFAULT}
SET CONSTRAINT | CONSTRAINTS {constraint |ALL }{IMMEDIATE|DEFERRED}
13-9 Copyright © Oracle Corporation, 2001. All rights reserved.
Defining Constraints asImmediate or Deferred
• Use the SET CONSTRAINTSstatement to make constraints either DEFERREDor IMMEDIATE
• The ALTER SESSION statement also has clauses to SET CONSTRAINTSto DEFERREDor IMMEDATE

DBA Fundamentals I 13 -10
13-10 Copyright © Oracle Corporation, 2001. All rights reserved.
Primary and Unique Key Enforcement
Is an index available for use?
Yes
No
No
Yes
Yes
No
Create nonuniqueindex
Create uniqueindex
Do not use index
Use existing index
Key enabled?
Constraintdeferrable?
No
YesConstraintDeferrable?
Is the indexnon-unique?
No
How to Enforce Primary and Unique Key Constraints
Primary and unique keys are enforced using indexes. You can control the location and type of index that is used for enforcing these constraints.
The Oracle server uses the following procedure to implement unique and primary key constraints:
• If the constraint is disabled, no indexes are needed.
• If the constraint is enabled and the columns in the constraint form the leading part of an index, the index is used to enforce the constraint whether the index itself was created as unique or non-unique.
• If the constraint is enabled and there is no index that uses the constraint columns as a leading part of the index, then an index with the same name as the constraint is created using the following rules:
– If the key is deferrable, a non-unique index on the key column is created.
– If the key is non-deferrable, a unique index is created.
• If an index is available for use and constraint is non-deferrable, use existing index. If the constraint is deferrable and the index is non-unique, use existing index.

DBA Fundamentals I 13 -11
Foreign Key Considerations
You need to consider several factors in maintaining tables that are in a foreign key relationship.
DDL Involving Parent Table
The foreign key must be dropped before dropping the parent table. Use the following command to perform both actions using a single statement:
DROP TABLE table CASCADE CONSTRAINTS
The parent table cannot be truncated without dropping or disabling the foreign key.
The foreign key must be dropped before the tablespace containing the parent is dropped. The following command can be used to achieve this:
DROP TABLESPACE tablespace INCLUDING CONTENTS CASCADE CONSTRAINTS
13-11 Copyright © Oracle Corporation, 2001. All rights reserved.
Foreign Key Considerations
Ensure the tablespace containing the parent key key is online
Perform DML on child table
Use the CASCADE CONSTRAINTSclause
Drop tablespace containing parent table
Disable or drop foreign keyTruncate parent table
Cascade constraintsDrop parent table
Appropriate SolutionDesired Action

DBA Fundamentals I 13 -12
Foreign Key Considerations (continued)If the DELETE CASCADEoption is not used when rows are deleted from the parent table, the Oracle server needs to ensure that there are no rows in the child table with the corresponding foreign key. Similarly, an update to the parent key is permitted only when there are no child rows with the old key value. If there is no index on the foreign key on the child table, the Oracle server locks the child table and prevents changes to ensure referential integrity. If there is an index on the table, the referential integrity is maintained by locking the index entries and avoiding more restrictive locks on the child table. If both tables need to be updated concurrently from different transactions, create an index on the foreign key columns.
When data is inserted into or the foreign key column is updated in the child table, the Oracle server checks the index on the parent table that is used for enforcing the referenced key. Therefore, the operation succeeds only if the tablespace containing the index is online. Note that the tablespace containing the parent table does not need to be online to perform DML operations on the child table.
Oracle9i no longer requires a share lock on unindexed foreign keys when doing an update or delete on the primary key. It still obtains the table-level share lock, but then releases it immediately after obtaining it. If multiple primary keys are update or deleted, the lock is obtained and released once per row.

DBA Fundamentals I 13 -13
Defining Constraints While Creating a Table
A constraint can be defined either when a table is created or when a table is altered. Use the constraint_clause clause in a CREATE TABLEor ALTER TABLE statement to define a constraint. You must have the requisite privileges to define an integrity constraint. To create a referential integrity constraint, the parent table must be in your own schema, or you must have the REFERENCESprivilege on the columns of the referenced key in the parent table.
13-13 Copyright © Oracle Corporation, 2001. All rights reserved.
Defining Constraints WhileCreating a Table
CREATE TABLE hr.employee(id NUMBER(7)
CONSTRAINT employee_id_pk PRIMARY KEYDEFERRABLE USING INDEX
STORAGE(INITIAL 100K NEXT 100K)TABLESPACE indx,
last_name VARCHAR2(25) CONSTRAINT employee_last_name_nn NOT NULL,
dept_id NUMBER(7))TABLESPACE users;

DBA Fundamentals I 13 -14
Defining Constraints While Creating a Table (continued)The column_constraint syntax is part of the table definition. At the time the table is created, the constraint can be defined using the following syntax:
column datatype [CONSTRAINT constraint]
{[NOT] NULL
|UNIQUE [USING INDEX index_clause]
|PRIMARY KEY [USING INDEX index_clause]
|REFERENCES [schema.]table [(column)]
[ON DELETE CASCADE]
|CHECK (condition)
}
constraint_state :==
[NOT DEFERRABLE|DEFERRABLE [INITIALLY {IMMEDIATE|DEFERRED}]
]
[DISABLE|ENABLE [VALIDATE |NOVALIDATE]]
where: CONSTRAINT identifies the integrity constraint by the nameconstraint stored in data dictionary
USING INDEX specifies that the parameters defined in the index-clause should be used for the indexthe Oracle server uses to enforce a unique orprimary key constraint (The name of the indexis the same as the name of the constraint.)
DEFERRABLE indicates that constraint checking can bedeferred until the end of the transaction byusing the SET CONSTRAINTcommand
NOT DEFERRABLEindicates that this constraint is checked at theend of each DML statement(A NOT DEFERRABLEconstraint cannot bedeferred by sessions or transactions. NOTDEFERRABLEis the default.)

DBA Fundamentals I 13 -15
Defining Constraints While Creating a Table (continued)INITIALLY IMMEDIATE indicates that at the start of every transaction, the
default is to check this constraint at the end of everyDML statement (If no INITIALLY clause is specified,INITIALLY IMMEDIATE is the default.)
INITIALLY DEFERRED implies that this constraint is DEFERRABLEandspecifies that, by default, the constraint is checked onlyat the end of each transaction
DISABLE disables the integrity constraint(If an integrity constraint is disabled, the Oracle serverdoes not enforce it.)
DBA Fundamentals I 13 -16
Defining Constraints While Creating a Table (continued)
Using Enterprise Manager to define Constraints
1. Launch the Console:%oemapp console
2. Choose to Launch the Console standalone.
3. Expand your working database from the databases folder
4. Right-click on the your working database and click Connect.
5. Supply the username, password and service name for your working database and click OK.
6. Expand the Schema folder.
7. Select the Table folder and select Create from the Object menu
8. Select Table from the list and click Create
9. Supply values for the table name, schema owner, tablespace and define the columns for the table
10. Click the Constraints tab and define integrity constraints and click Create
DBA Fundamentals I 13 -17
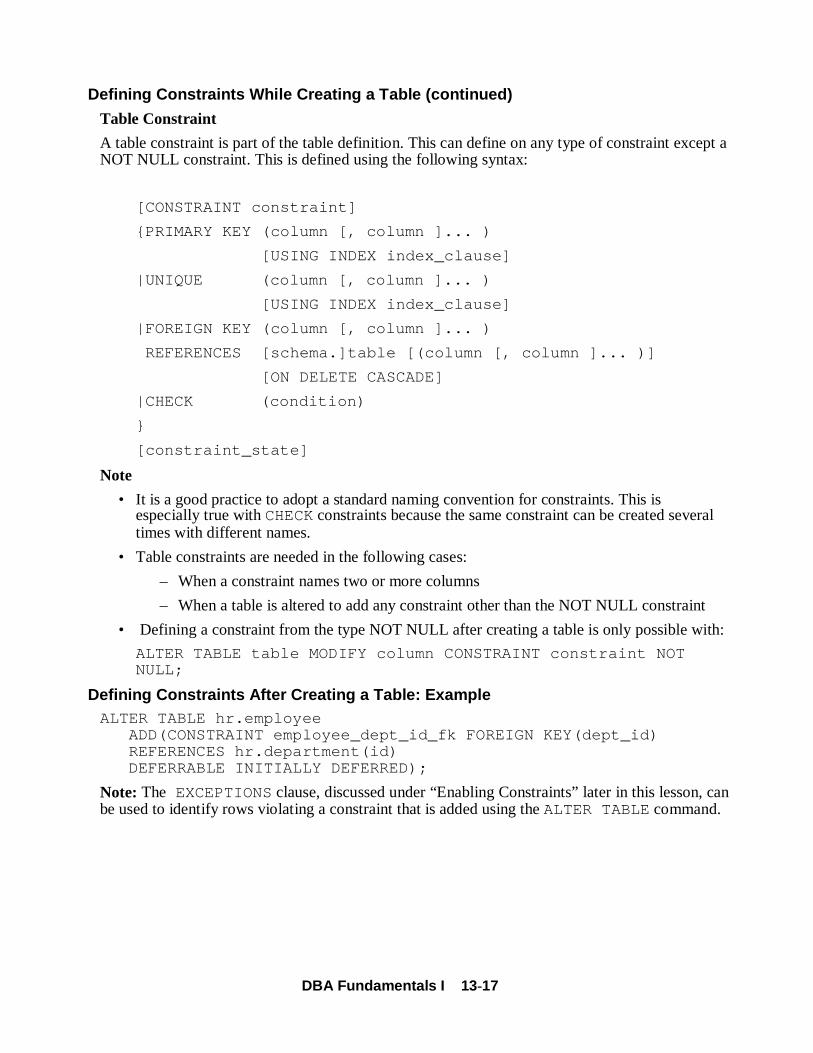
Defining Constraints While Creating a Table (continued)
Table Constraint
A table constraint is part of the table definition. This can define on any type of constraint except a NOT NULL constraint. This is defined using the following syntax:
[CONSTRAINT constraint]
{PRIMARY KEY (column [, column ]... )
[USING INDEX index_clause]
|UNIQUE (column [, column ]... )
[USING INDEX index_clause]
|FOREIGN KEY (column [, column ]... )
REFERENCES [schema.]table [(column [, column ]... )]
[ON DELETE CASCADE]
|CHECK (condition)
}
[constraint_state]
Note
• It is a good practice to adopt a standard naming convention for constraints. This is especially true with CHECKconstraints because the same constraint can be created several times with different names.
• Table constraints are needed in the following cases:
– When a constraint names two or more columns
– When a table is altered to add any constraint other than the NOT NULL constraint
• Defining a constraint from the type NOT NULL after creating a table is only possible with:
ALTER TABLE table MODIFY column CONSTRAINT constraint NOT NULL;
Defining Constraints After Creating a Table: ExampleALTER TABLE hr.employee
ADD(CONSTRAINT employee_dept_id_fk FOREIGN KEY(dept_id) REFERENCES hr.department(id) DEFERRABLE INITIALLY DEFERRED);
Note: The EXCEPTIONSclause, discussed under “Enabling Constraints” later in this lesson, can be used to identify rows violating a constraint that is added using the ALTER TABLE command.

DBA Fundamentals I 13 -18
Guidelines for Defining Constraints
The following guidelines are useful when defining constraints:
• Place indexes used for enforcing primary key and unique constraints in a tablespace different from that of the table. This can be done either by specifying the USING INDEXclause or by creating the table, creating the index, and altering the table to add or enable the constraint.
• If data is frequently loaded in bulk into a table, it is preferable to disable the constraints, perform the load, and then enable the constraints. If a unique index is used for enforcing a primary key or unique constraint, this index needs to be dropped when the constraint is disabled. Performance can be enhanced by using a nonunique index for enforcement of primary key or unique constraints in such situations: either create the key as deferrable or create the index before defining or enabling the key.
• If a table contains a self-referencing foreign key, use one of the following methods to load data:
– Define or enable the foreign key after the initial load
– Define the constraint as a deferrable constraint
The second method is useful if data loads are performed frequently.
13-18 Copyright © Oracle Corporation, 2001. All rights reserved.
Guidelines for Defining Constraints
• Primary and unique constraints:
– Place indexes in a separate tablespace
– Use nonunique indexes if bulk loads are frequent
• Self-referencing foreign keys:
– Define or enable foreign keys after initial load
– Defer constraint checking

DBA Fundamentals I 13 -19
Enabling ConstraintsA constraint that is currently disabled can be enabled in one of the two ways: ENABLE NOVALIDATEor ENABLE VALIDATE
Enable NOVALIDATE
For PRIMARY KEYand UNIQUEconstraints which have an existing index, enabling a constraintNOVALIDATEis much faster than enabling a constraint VALIDATE because existing data is not checked for constraint violation if the constraint is deferrable. If this option is used for enabling a constraint, no locks are required on the table. This method is appropriate where there is a lot of DML activity on a table, as in the case of an OLTP environment.
The following command can be used to enable a constraint ENABLE NOVALIDATE:
ALTER TABLE [ schema. ] table
ENABLE NOVALIDATE {CONSTRAINT constraint
| PRIMARY KEY
| UNIQUE ( column [, column ] ... ) }
[ USING INDEX index_clause ]
13-19 Copyright © Oracle Corporation, 2001. All rights reserved.
Enabling Constraints
ENABLE NOVALIDATE
ALTER TABLE hr.departmentsENABLE NOVALIDATE CONSTRAINT dept_pk;
• No locks on table
• Primary and unique keys must use nonunique indexes

DBA Fundamentals I 13 -20
Enabling Constraints (continued)
Restrictions
The USING INDEX clause is applicable only for primary key or unique constraints that were created as deferrable, and when one of the following is true:
• The constraints were created disabled
• The constraints were disabled and the index was dropped.
However, if the index needs to be created, using this method of enabling a constraint does not offer any significant benefit over ENABLE VALIDATE because the Oracle server locks the table to build the index.
Note: Disabling constraints is covered in the course Introduction to SQL and PL/SQL.

DBA Fundamentals I 13 -21
Enabling Constraints (continued)
Using Enterprise Manager to modify Constraints
1. Launch the Console:%oemapp console
2. Choose to Launch the Console standalone.
3. Expand your working database from the databases folder
4. Right-click on the your working database and click Connect.
5. Supply the username, password and service name for your working database and click OK.
6. Expand the Schema folder.
7. Expand the Table folder and select the Table in which Constraints are to be modified
8. Click the Constraints tab, make the requisite modifications
9. Click Apply
Note: You can also launch the Console from Windows NT Start menu

DBA Fundamentals I 13 -22
Enabling ConstraintsEnabling a constraint VALIDATE checks existing data for constraint violation. This is the default when a constraint is enabled. If executed when the constraint is disabled, it has the following effects:
• The table is locked and changes to the table are prevented until validation of existing data is complete.
• The Oracle server creates an index if one does not exist on the index columns. It creates a unique index while enabling a primary key or unique constraint that is nondeferrable. A nonunique index is built for a deferrable primary key or a unique constraint.
If this command is executed when a constraint is enforced, it does not require any table locks during validation. The enforced constraint guarantees that no violations are introduced during validation. This has the following advantages:
• All constraints are enabled concurrently.
• Each constraint is internally parallelized.
• Concurrent activity on the table is permitted.
13-22 Copyright © Oracle Corporation, 2001. All rights reserved.
Enabling Constraints
ENABLE VALIDATE
ALTER TABLE hr.employeesENABLE VALIDATE CONSTRAINT emp_dept_fk;
• Locks table
• Can use unique or nonunique indexes
• Needs valid table data

DBA Fundamentals I 13 -23
Enabling Constraints (continued)The following command is used to enable a constraint ENABLE VALIDATE:
ALTER TABLE [ schema. ] table
ENABLE [ VALIDATE ]{CONSTRAINT constraint
| PRIMARY KEY
| UNIQUE ( column [, column ] ... ) }
[ USING INDEX index_clause ]
[ EXCEPTIONS INTO [ schema. ] table ]
Note
• The VALIDATE option is the default and does not need to be specified when enabling a constraint that is disabled.
• If data in the table violates the constraint, then the statement is rolled back and the constraint remains disabled.
• The use of the EXCEPTIONSclause is discussed in the following section.

DBA Fundamentals I 13 -24
How to Identify Row ViolationThe EXCEPTIONSclause helps to identify any row that violates an enabled constraint. Use the following procedure to detect constraint violations, rectify them, and reenable a constraint:
1. If the EXCEPTIONSis not already created, run the utlexcpt1.sql script:
SQL> @?/rdbms/admin/utlexcpt1
Statement processed.
SQL> DESCRIBE exceptions
Name Null? Type
-------------------------- ------- ----------------
ROW_ID ROWID
OWNER VARCHAR2(30)
TABLE_NAME VARCHAR2(30)
CONSTRAINT VARCHAR2(30)
Note: The exact name and location of the utlexcpt1.sql script is specific to the operating system. For more information, see your operating system specific Oracle documentation.
13-24 Copyright © Oracle Corporation, 2001. All rights reserved.
Using the EXCEPTIONSTable
• Create the EXCEPTIONStable by running the utlexcpt1.sql script
• Execute the ALTER TABLE statement with EXCEPTIONSoption
• Use subquery on EXCEPTIONSto locate rows with invalid data
• Rectify the errors
• Reexecute ALTER TABLE to enable the constraint.
DBA Fundamentals I 13 -25
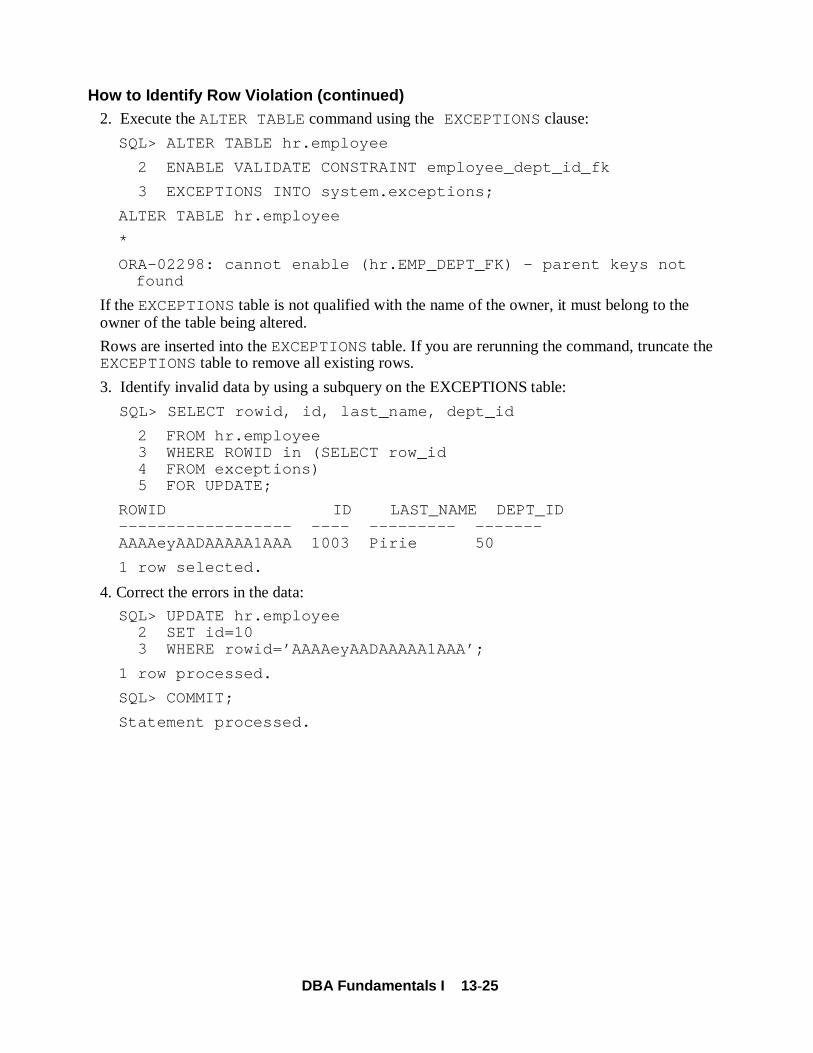
How to Identify Row Violation (continued)2. Execute the ALTER TABLE command using theEXCEPTIONSclause:
SQL> ALTER TABLE hr.employee
2 ENABLE VALIDATE CONSTRAINT employee_dept_id_fk
3 EXCEPTIONS INTO system.exceptions;
ALTER TABLE hr.employee
*
ORA-02298: cannot enable (hr.EMP_DEPT_FK) - parent keys not found
If the EXCEPTIONStable is not qualified with the name of the owner, it must belong to the owner of the table being altered.
Rows are inserted into the EXCEPTIONStable. If you are rerunning the command, truncate the EXCEPTIONStable to remove all existing rows.
3. Identify invalid data by using a subquery on the EXCEPTIONS table:
SQL> SELECT rowid, id, last_name, dept_id
2 FROM hr.employee3 WHERE ROWID in (SELECT row_id4 FROM exceptions)5 FOR UPDATE;
ROWID ID LAST_NAME DEPT_ID ------------------ ---- --------- -------AAAAeyAADAAAAA1AAA 1003 Pirie 50
1 row selected.
4. Correct the errors in the data:
SQL> UPDATE hr.employee2 SET id=103 WHERE rowid=’AAAAeyAADAAAAA1AAA’;
1 row processed.
SQL> COMMIT;
Statement processed.

DBA Fundamentals I 13 -26
How to Identify Row Violation (continued)5. Truncate theEXCEPTIONStable and reenable the constraint:
SQL> TRUNCATE TABLE exceptions;
Statement processed.
SQL> ALTER TABLE hr.employee 2 ENABLE VALIDATE CONSTRAINT employee_dept_id_fk3 EXCEPTIONS INTO system.exceptions;
Statement processed.

DBA Fundamentals I 13 -27
Obtaining Constraint InformationUse the following query to obtain the names, types, and status of all constraints on HR’s EMPLOYEEtable:
SQL> SELECT constraint_name, constraint_type, deferrable,2 deferred, validated3 FROM dba_constraints4 WHERE owner='HR'5 AND table_name='EMPLOYEE';
CONSTRAINT_NAME C DEFERRABLE DEFERRED VALIDATED ---------------- - --------------- ----------- ----------EMPLOYEE_DEPT.. R DEFERRABLE DEFERRED VALIDATED EMPLOYEE_ID_PK P DEFERRABLE IMMEDIATE VALIDATED SYS_C00565 C NOT DEFERRABLE IMMEDIATE VALIDATED
3 rows selected.
13-27 Copyright © Oracle Corporation, 2001. All rights reserved.
Obtaining Constraint Information
Data Dictionary Views
• DBA_CONSTRAINTS
• DBA_CONS_COLUMNS

DBA Fundamentals I 13 -28
Obtaining Constraint Information (continued)The following table shows the columns in the DBA_CONSTRAINTSview that are not self-evident:
Columns in Constraints
To get the columns in the constraints on HR’s EMPLOYEES table, use the following query:
SQL> SELECT c.constraint_name, c.constraint_type, 2 cc.column_name3 FROM dba_constraints c, dba_cons_columns cc4 WHERE c.owner='HR'5 AND c.table_name='EMPLOYEE'6 AND c.owner = cc.owner7 AND c.constraint_name = cc.constraint_name8 ORDER BY cc.position;
CONSTRAINT_NAME C COLUMN_NAME ---------------- - ---------------EMPLOYEE_DEPT... R DEPT_ID EMPLOYEE_ID_PK P IDSYS_C00565 C LAST_NAME
3 rows selected.
If set, this flag will be used in the optimizerRELY
The date when the constraint was last enabled or disabledLAST_CHANGE
Indicates that the constraint is to be rewritten to avoid such situations as Year 2000 problems.
BAD
Indicates whether the constraint name is system-generated (Valid values are ‘USERNAME’ and ‘GENERATED NAME.’)
GENERATED
Defines the owner and name of the referenced constraint for foreign keys
R_OWNERR_CONSTRAINT_NAME
Show the condition specified for a check constraintSEARCH_CONDITION
The type of constraint is P if Primary Key, U if Unique, R if foreign key, or C if Check constraint. NOT NULL constraints are stored as check constraints.
CONSTRAINT_TYPE
DescriptionName

DBA Fundamentals I 13 -29
Obtaining Constraint Information (continued)
Finding Primary Key–Foreign Key Relationships
To find foreign keys on hr’s EMPLOYEE table and the parent constraints, use the following query:
SQL> SELECT c.constraint_name AS "Foreign Key", 2 p.constraint_name AS "Referenced Key", 3 p.constraint_type, 4 p.owner,5 p.table_name6 FROM dba_constraints c, dba_constraints p7 WHERE c.owner='HR'8 AND c.table_name='EMPLOYEE'9 AND c.constraint_type='R'10 AND c.r_owner=p.owner11 AND c.r_constraint_name = p.constraint_name;
Foreign Key Referenced Key C OWNER TABLE_NAME ------------ -------------- - ---------- ----------EMPLOYEES_DEPT.. DEPT_PK P HR DEPARTMENT
1 row selected.

DBA Fundamentals I 13 -30
13-30 Copyright © Oracle Corporation, 2001. All rights reserved.
Summary
In this lesson, you should have learned how to:
• Implement data integrity
• Use an appropriate strategy for creating and maintaining constraints
• Obtain information from the data dictionary

DBA Fundamentals I 13 -31
Quick Reference
NonePackages, procedures, and functions
ALTER TABLE…ENABLE VALIDATE CONSTRAINT…EXCEPTIONS INTO
ALTER TABLE…ENABLE NOVALIDATE CONSTRAINT
ALTER TABLE…DISABLE CONSTRAINT
ALTER TABLE ADD CONSTRAINT…EXCEPTIONS INTO
CREATE TABLE…CONSTRAINTCOMMANDS
DBA_CONS_COLUMNS
DBA_CONSTRAINTSData dictionary views
NoneDynamic performance views
NoneInitialization parameters
ReferenceContext

DBA Fundamentals I 13 -32
13-32 Copyright © Oracle Corporation, 2001. All rights reserved.
Practice 13 Overview
This practice covers the following topics:
• Creating constraints
• Enabling unique constraints
• Creating an Exceptions table
• Identifying existing constraint violations in a table, correcting the errors and re-enabling the constraints

DBA Fundamentals I 13 -33
Practice 13: Maintaining Data Integrity 1 Examine the script lab13_01.sql . Run the script to create the constraints.
2 Query the data dictionary to:
a Check for constraints, whether they are deferrable, and their status.
Hint: Use the DBA_CONSTRAINTSview to get this information
b Check the names and types of indexes created to validate the constraints.
Hint: The indexes are only created for primary key and unique constraints andhave the same name as the constraints
3 Insert two records with the following values into the PRODUCTStable:
4 Enable the unique constraint on the PRODUCTtable. Was it successful? Why or why not?
5 a Ensure that new rows added to the table do not violate the constraint on thePRODUCTtable.
Hint: This can be done by enabling the constraint NOVALIDATE.
b Query the data dictionary to verify the effect of the change.
c Test that the constraint disables inserts that violate the change by adding arow with the following values:
6 Take the necessary steps to identify existing constraint violations in the PRODUCTStable, modify product codes as needed, and guarantee that all existing as well as newdata do not violate the constraint. (Assume that the table has several thousands ofrows and it is too time-consuming to verify each row manually.)
Hint: Use the following steps:
a Create the EXCEPTIONStable.
b Run the command to enable the constraint and trap the exceptions.
c Use the ROWIDs in the EXCEPTIONStable to list the rows in thePRODUCTStable that violate the constraint. (Do not list LOB columns.)
d Rectify the errors.
e Enable the constraint.
2400NT Monitor4000
3620UNIX Monitor4000
LIST_PRICEPRODUCT_DESCRIPTIONPRODUCT_ID
3000Monitor4000
LIST_PRICEPRODUCT_DESCRIPTIONPRODUCT_ID
DBA Fundamentals I 13 -34
Practice 13: Maintaining Data Integrity 7 Run the script lab13_07.sql to insert rows into the table. Were the inserts
successful? Roll back the changes.
8 Now examine the script lab13_08 . Notice that this script also performs theinserts in the same sequence. Run the script and check if it executes successfully.
9 Truncate the CUSTOMERStable. Was it successful? Why or why not?

DBA Fundamentals I 14-1
14Copyright © Oracle Corporation, 2001. All rights reserved.
Managing Password Security and Resources

DBA Fundamentals I 14-2
14-2 Copyright © Oracle Corporation, 2001. All rights reserved.
Objectives
After completing this lesson, you should be able todo the following:
• Manage passwords using profiles
• Administer profiles
• Control use of resources using profiles
• Obtain information about profiles, password management, and resources
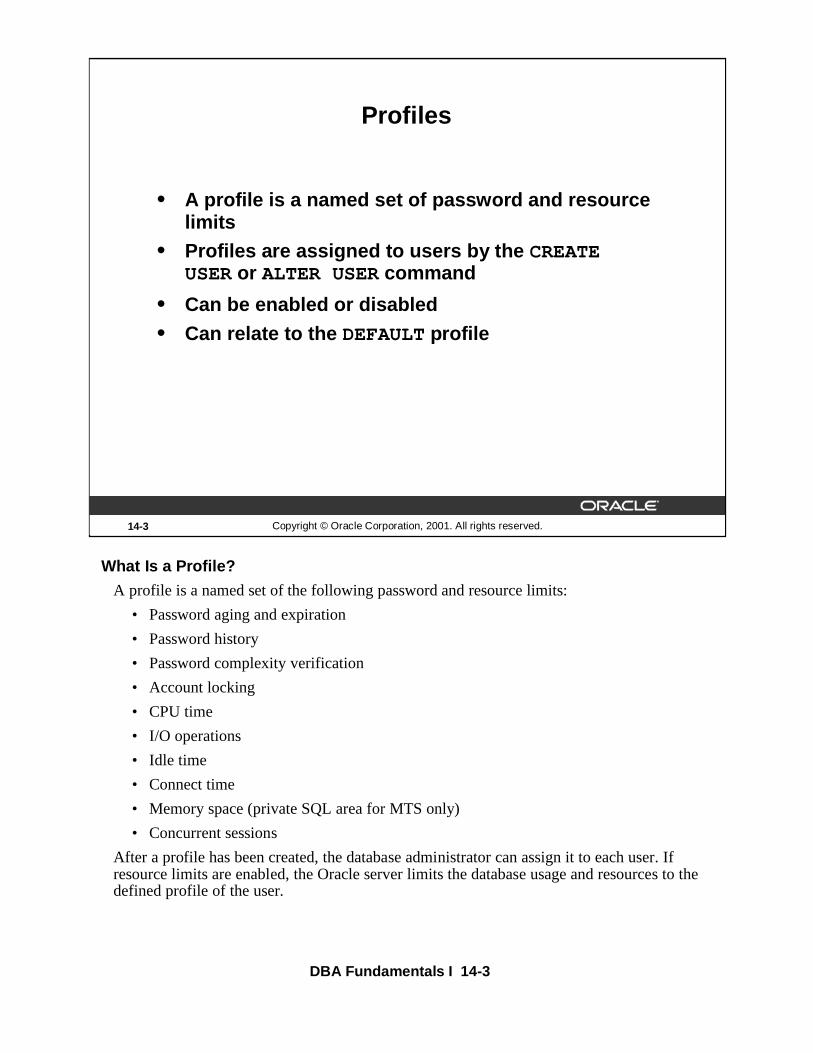
DBA Fundamentals I 14-3
14-3 Copyright © Oracle Corporation, 2001. All rights reserved.
Profiles
• A profile is a named set of password and resource limits
• Profiles are assigned to users by the CREATE USERor ALTER USERcommand
• Can be enabled or disabled
• Can relate to the DEFAULTprofile
What Is a Profile?
A profile is a named set of the following password and resource limits:
• Password aging and expiration
• Password history
• Password complexity verification
• Account locking
• CPU time
• I/O operations
• Idle time
• Connect time
• Memory space (private SQL area for MTS only)
• Concurrent sessions
After a profile has been created, the database administrator can assign it to each user. If resource limits are enabled, the Oracle server limits the database usage and resources to the defined profile of the user.

DBA Fundamentals I 14-4
DEFAULT ProfileThe Oracle server automatically creates a DEFAULTprofile when the database is created.
The users who have not been explicitly assigned a specific profile conform to all the limits of the DEFAULTprofile. All limits of the DEFAULT profile are initially unlimited. However, the database administrator can change the values so that limits are applied to all users by default.
Profile Usage
• Restrict users from performing some operations that require heavy use of resources
• Ensure that users log off the database when they have left their session idle for some time
• Enable group resource limits for similar users
• Easily assign resource limits to users
• Manage resource usage in large, complex multiuser database systems
• Control the use of passwords
Profile Characteristics
• Profile assignments do not affect current sessions.
• Profiles can be assigned only to users and not to roles or other profiles.
• If you do not assign a profile when creating a user, the user is automatically assigned the DEFAULTprofile.

DBA Fundamentals I 14-5
14-5 Copyright © Oracle Corporation, 2001. All rights reserved.
Password Management
User
Password expiration and aging
Password verification
Password history
Account locking
Setting up profiles
Password Management Features
For greater control over database security, Oracle password management is controlled by database administrators with profiles.
This lesson describes the available password management features:
• Account locking: Enables automatic locking of an account when a user fails to log into the system in the specified number of attempts
• Password aging and expiration: Enables the password to have a lifetime, after which it expires and must be changed
• Password history: Checks the new password to ensure that the password is not reused for a specified amount of time or a specified number of password changes
• Password complexity verification: Makes a complexity check on the password to verify that it is complex enough to provide protection against intruders who might try to break into the system by guessing the password
DBA Fundamentals I 14-6
14-6 Copyright © Oracle Corporation, 2001. All rights reserved.
Enabling Password Management
• Set up password management by using profiles and assign them to users.
• Lock, unlock, and expire accounts using the CREATE USERor ALTER USERcommand.
• Password limits are always enforced.
How to Enable Password Management
Create the profile to limit the password settings, and assign the profile to the user by using the CREATE USER or ALTER USER command.
Password limit settings in profiles are always enforced.
When password management is enabled, the user account can be locked or unlocked by using the CREATE USER or ALTER USER command.
Note: Refer to the Managing Users lesson for details regarding the CREATE USER command.

DBA Fundamentals I 14-7
14-7 Copyright © Oracle Corporation, 2001. All rights reserved.
Password Account Locking
Parameter
FAILED_LOGIN_ATTEMPTS
PASSWORD_LOCK_TIME
Description
Number of failed login attempts before lockout of the account
Number of days the account is locked after the specified number of failed login attempts
PASSWORD_LOCK_TIME
Account Locking
The Oracle server automatically locks an account after the FAILED_LOGIN_ATTEMPTS value is reached. The account is either automatically unlocked after a specified time PASSWORD_LOCK_TIME or it must be unlocked by the database administrator using the ALTER USER command.
The database account can be explicitly locked with the ALTER USER command. When this happens, the account is not automatically unlocked.
Note: The ALTER USER command will be demonstrated later in this lesson.

DBA Fundamentals I 14-8
14-8 Copyright © Oracle Corporation, 2001. All rights reserved.
Password Expiration and Aging
Parameter
Lifetime of the password in days after which the password expires
Grace period in days for changing the password after the first successful login after the password has expired
PASSWORD_LIFE_TIME
PASSWORD_GRACE_TIME
Parameter
Password Aging and Expiration
The PASSWORD_LIFE_TIME parameter sets the maximum lifetime after which the password must be changed.
The database administrator can specify a grace period PASSWORD_GRACE_TIME, which begins after the first attempt to log in to the database after password expiration. A warning message is generated every time the user tries to log in until the grace period is over. The user is expected to change the password within the grace period.
If the password is not changed, the account is locked.
The user’s account status is changed to EXPIRED by explicitly setting the password to be expired.
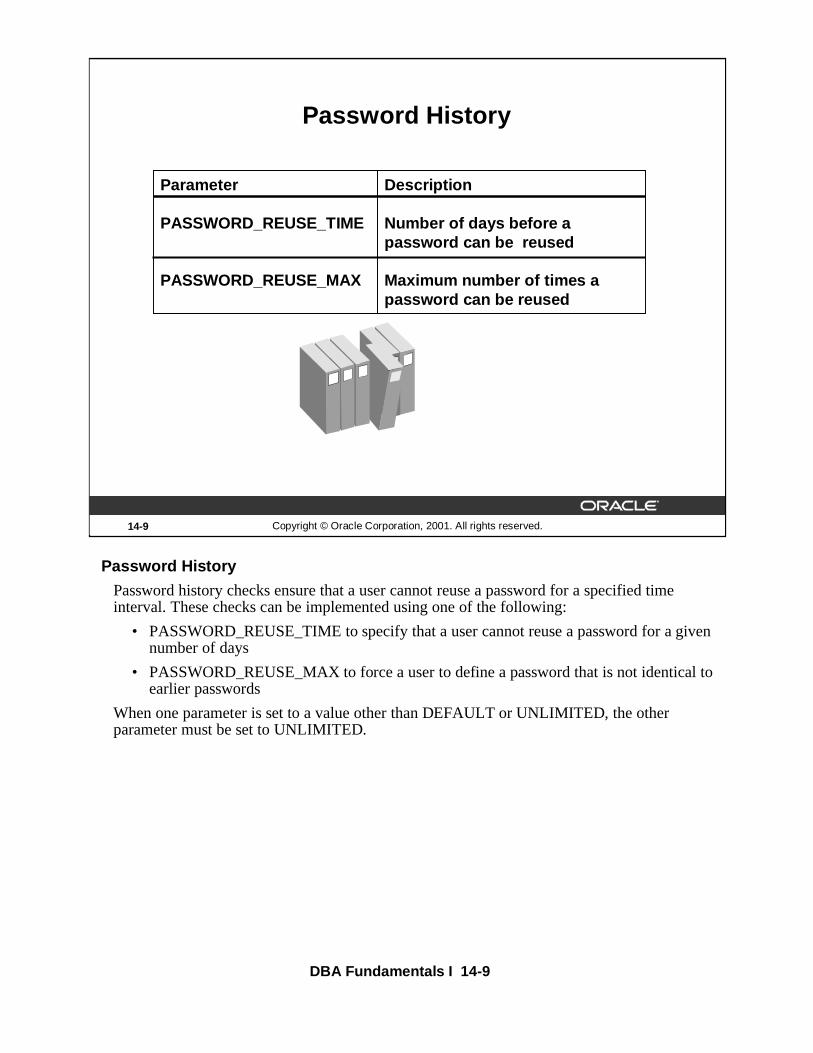
DBA Fundamentals I 14-9
14-9 Copyright © Oracle Corporation, 2001. All rights reserved.
Password History
Parameter
PASSWORD_REUSE_TIME
PASSWORD_REUSE_MAX
Description
Number of days before a password can be reused
Maximum number of times apassword can be reused
Password History
Password history checks ensure that a user cannot reuse a password for a specified time interval. These checks can be implemented using one of the following:
• PASSWORD_REUSE_TIME to specify that a user cannot reuse a password for a given number of days
• PASSWORD_REUSE_MAX to force a user to define a password that is not identical to earlier passwords
When one parameter is set to a value other than DEFAULT or UNLIMITED, the other parameter must be set to UNLIMITED.

DBA Fundamentals I 14-10
14-10 Copyright © Oracle Corporation, 2001. All rights reserved.
Password Verification
Parameter
PASSWORD_VERIFY_FUNCTION
Description
PL/SQL function that makes a password complexity check before a password is assigned
Password Verification
Before assigning a new password to a user, a PL/SQL function can be invoked to verify the validity of the password.
The Oracle server provides a default verification routine or the database administrator can write a PL/SQL function.
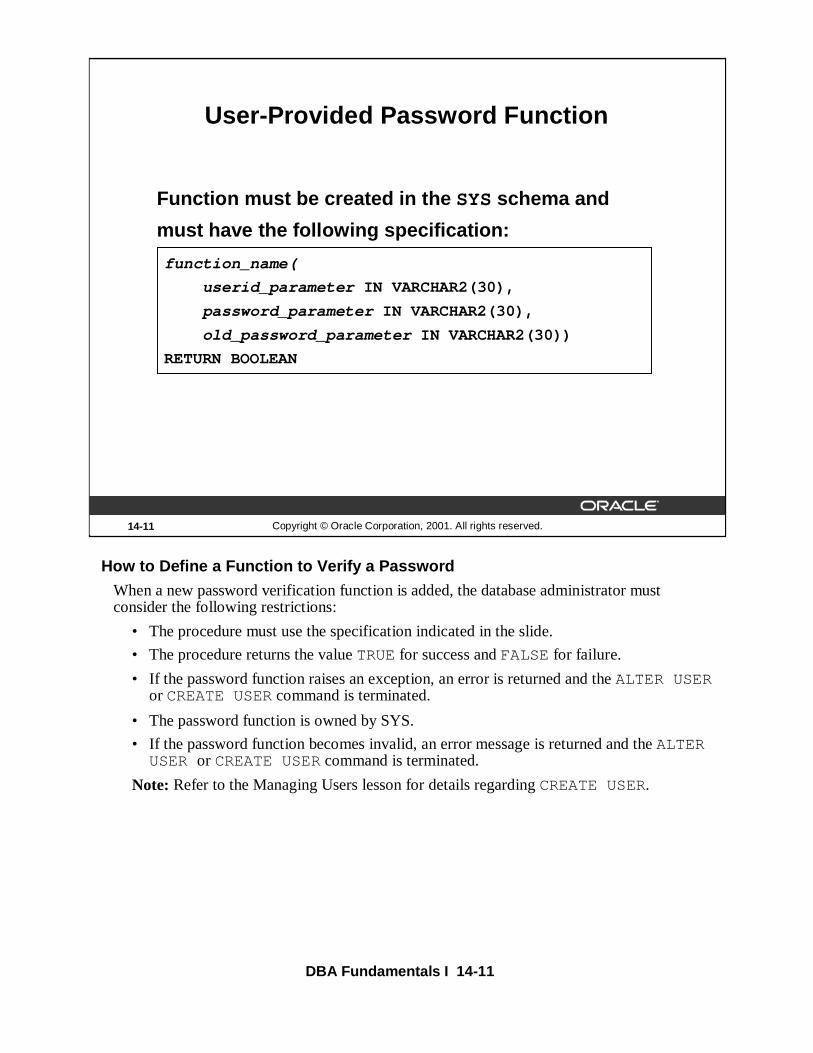
DBA Fundamentals I 14-11
14-11 Copyright © Oracle Corporation, 2001. All rights reserved.
User-Provided Password Function
Function must be created in the SYSschema and
must have the following specification:
function_name(
userid_parameter IN VARCHAR2(30),
password_parameter IN VARCHAR2(30),
old_password_parameter IN VARCHAR2(30))
RETURN BOOLEAN
How to Define a Function to Verify a Password
When a new password verification function is added, the database administrator must consider the following restrictions:
• The procedure must use the specification indicated in the slide.
• The procedure returns the value TRUEfor success and FALSE for failure.
• If the password function raises an exception, an error is returned and the ALTER USERor CREATE USERcommand is terminated.
• The password function is owned by SYS.
• If the password function becomes invalid, an error message is returned and the ALTER USER or CREATE USERcommand is terminated.
Note: Refer to the Managing Users lesson for details regarding CREATE USER.

DBA Fundamentals I 14-12
14-12 Copyright © Oracle Corporation, 2001. All rights reserved.
Password Verification Function VERIFY_FUNCTION
• Minimum length is four characters.
• Password should not be equal to username.
• Password should have at least one alphabetic, one numeric, and one special character.
• Password should differ from the previous password by at least three letters.
The Default Verification Function
The Oracle server provides a complexity verification function, in the form of a default PL/SQL function called VERIFY_FUNCTIONof the script utlpwdmg.sql, which must be run in the SYSschema.
During the execution of the script utlpwdmg.sql, the Oracle server creates VERIFY_FUNCTIONand changes the DEFAULTprofile with the following ALTER PROFILE command:
ALTER PROFILE DEFAULT LIMIT
PASSWORD_LIFE_TIME 60
PASSWORD_GRACE_TIME 10
PASSWORD_REUSE_TIME 1800
PASSWORD_REUSE_MAX UNLIMITED
FAILED_LOGIN_ATTEMPTS 3
PASSWORD_LOCK_TIME 1/1440
PASSWORD_VERIFY_FUNCTION verify_function;

DBA Fundamentals I 14-13
14-13 Copyright © Oracle Corporation, 2001. All rights reserved.
Creating a Profile:Password Settings
CREATE PROFILE grace_5 LIMIT
FAILED_LOGIN_ATTEMPTS 3
PASSWORD_LOCK_TIME UNLIMITED
PASSWORD_LIFE_TIME 30
PASSWORD_REUSE_TIME 30
PASSWORD_VERIFY_FUNCTION verify_function
PASSWORD_GRACE_TIME 5;
How to Create a Profile
Use the following CREATE PROFILEcommand to administer passwords:
CREATE PROFILE profile LIMIT
[FAILED_LOGIN_ATTEMPTS max_value]
[PASSWORD_LIFE_TIME max_value]
[ {PASSWORD_REUSE_TIME
|PASSWORD_REUSE_MAX} max_value]
[PASSWORD_LOCK_TIME max_value]
[PASSWORD_GRACE_TIME max_value]
[PASSWORD_VERIFY_FUNCTION
{function|NULL|DEFAULT } ]

DBA Fundamentals I 14-14
How to Create a Profile (continued)
Where
PROFILE: is the name of the profile to be created
FAILED_LOGIN_ATTEMPTS: specifies the number of failed attempts to log in to the user account before the account locked
PASSWORD_LIFE_TIME: limits the number of days the same password can be used for authentication. The password expires if it is not changed within this period, and further connections are rejected.
PASSWORD_REUSE_TIME: specifies the number of days before a password can be reused. If you set PASSWORD_REUSE_TIMEto an integer value, then you must set PASSWORD_REUSE_MAXto UNLIMITED.
PASSWORD_REUSE_MAX: specifies the number of password changes required before the current password can be reused. If you set PASSWORD_REUSE_MAXto an integer value, then you must set PASSWORD_REUSE_TIMEto UNLIMITED.
PASSWORD_LOCK_TIME: specifies the number of days an account will be locked after the specified number of consecutive failed login attempts
PASSWORD_GRACE_TIME:specifies the number of days after the grace period begins during which a warning is issued and login is allowed. If the password is not changed during the grace period, the password expires.
PASSWORD_VERIFY_FUNCTION: allows a PL/SQL password complexity verification script to be passed as an argument to the CREATE PROFILEstatement
DBA Fundamentals I 14-15
How to Use Oracle Enterprise Manager to Create a Profile
Launch Security Manager from the Console.
1. Launch the Console
• %oemapp console
• Choose to Launch standalone
You can also launch the Console from Windows NT Start menu
2. Expand your working database from the databases folder
3. Expand Security folder and select the Profiles folder
4. Select Create from the Object menu
5. Select Profile in the list and click Create.
6. Enter a name for the Profile and complete other fields or accept the default values
7. Select the Password tab and enter the account password parameters
8. Click Create.
Assigning a Profile
With the CREATE USERcommand or the ALTER USERcommand, a profile can be assigned. Each user can be assigned only one profile at a time.
Note: Refer to the Managing Users lesson for details regarding CREATE USER.

DBA Fundamentals I 14-16
How to Use Oracle Enterprise Manager to Assign a Profile to a User
To generate the ALTER USER command with Oracle Enterprise Manager use the following steps:
Launch Security Manager from the Console.
1. Launch the Console
• %oemapp console
• Choose to Launch standalone
2. Expand your working database from the databases folder
3. Expand the Security folder
4. From the Profiles folder, select Object—>Assign a Profile to User(s).
5. In the Assign Profile dialog box select the user(s)
6. Click OK
Note: You can also launch the Console from Windows NT Start menu
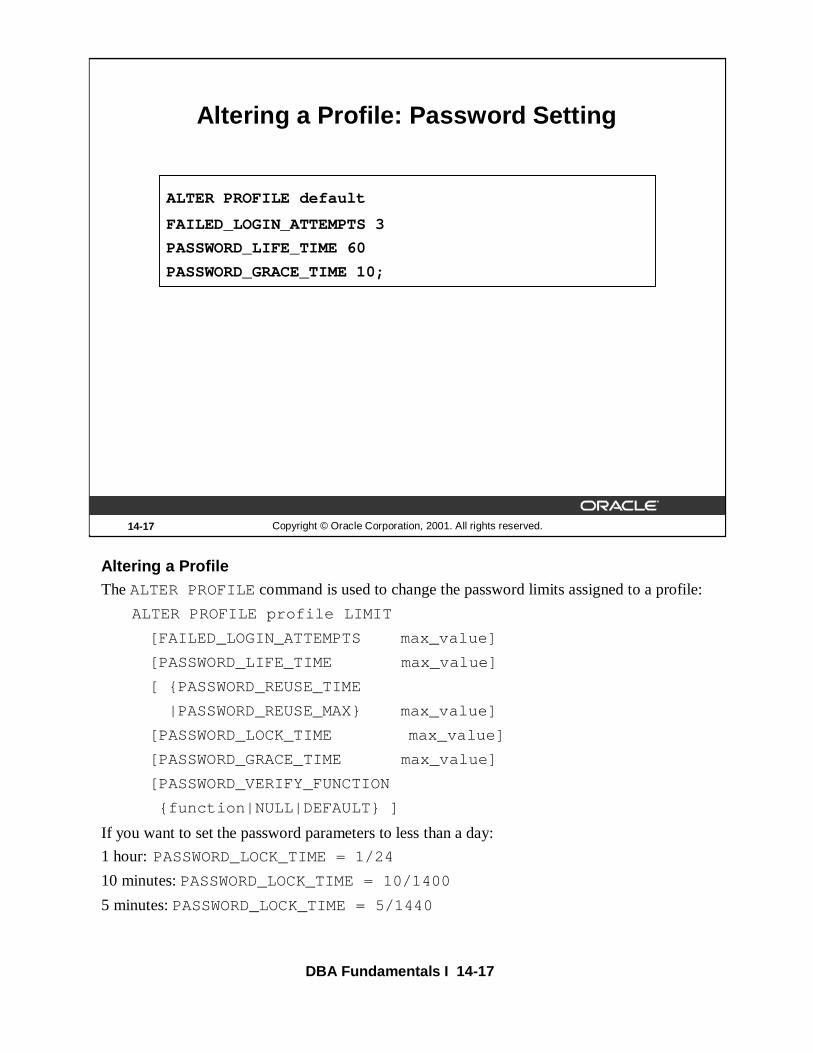
DBA Fundamentals I 14-17
14-17 Copyright © Oracle Corporation, 2001. All rights reserved.
Altering a Profile: Password Setting
ALTER PROFILE default
FAILED_LOGIN_ATTEMPTS 3
PASSWORD_LIFE_TIME 60
PASSWORD_GRACE_TIME 10;
Altering a ProfileThe ALTER PROFILE command is used to change the password limits assigned to a profile:
ALTER PROFILE profile LIMIT
[FAILED_LOGIN_ATTEMPTS max_value]
[PASSWORD_LIFE_TIME max_value]
[ {PASSWORD_REUSE_TIME
|PASSWORD_REUSE_MAX} max_value]
[PASSWORD_LOCK_TIME max_value]
[PASSWORD_GRACE_TIME max_value]
[PASSWORD_VERIFY_FUNCTION
{function|NULL|DEFAULT} ]
If you want to set the password parameters to less than a day:
1 hour:PASSWORD_LOCK_TIME = 1/24
10 minutes: PASSWORD_LOCK_TIME = 10/1400
5 minutes: PASSWORD_LOCK_TIME = 5/1440
DBA Fundamentals I 14-18
How to Use Oracle Enterprise Manager to Alter a Profile
Launch Security Manager from the Console.
1. Launch the Console
• %oemapp console
• Choose to Launch standalone
2. Expand your working database from the databases folder
3. Expand the Security folder
4. Expand the Profiles folder.
5. Select the profile.
6. Click the Password tab in the detail side of the Console and change the details on the password parameters
7. Click Apply.
Guidelines
Changes to a profile do not affect current sessions. Changes are used in subsequent sessions
only.
Note: You can also launch the Console from Windows NT Start menu

DBA Fundamentals I 14-19
14-19 Copyright © Oracle Corporation, 2001. All rights reserved.
Dropping a Profile: Password Setting
DROP PROFILE developer_prof;
DROP PROFILE developer_prof CASCADE;
Dropping a ProfileDrop a profile using the DROP PROFILEcommand:
DROP PROFILE profile [CASCADE]
where:
profile: is the name of the profile to be dropped
CASCADE: revokes the profile from users to whom it is assigned (The Oracle server automatically assigns the DEFAULT profile to such users. Specify this option to drop a profile that is currently assigned to users.)
Guidelines
• The DEFAULTprofile cannot be dropped.
• When a profile is dropped, this change applies to subsequently created sessions only and not to the current sessions.

DBA Fundamentals I 14-20
How to Use Oracle Enterprise Manager to Drop a Profile
1. Launch the Console
• %oemapp console
• Choose to Launch standalone
2. Expand your working database from the databases folder
3. Expand the Security folder
4. Expand the Profiles folder.
5. Select the profile.
6. Select Object—>Remove
Note: You can also launch the Console from Windows NT Start menu
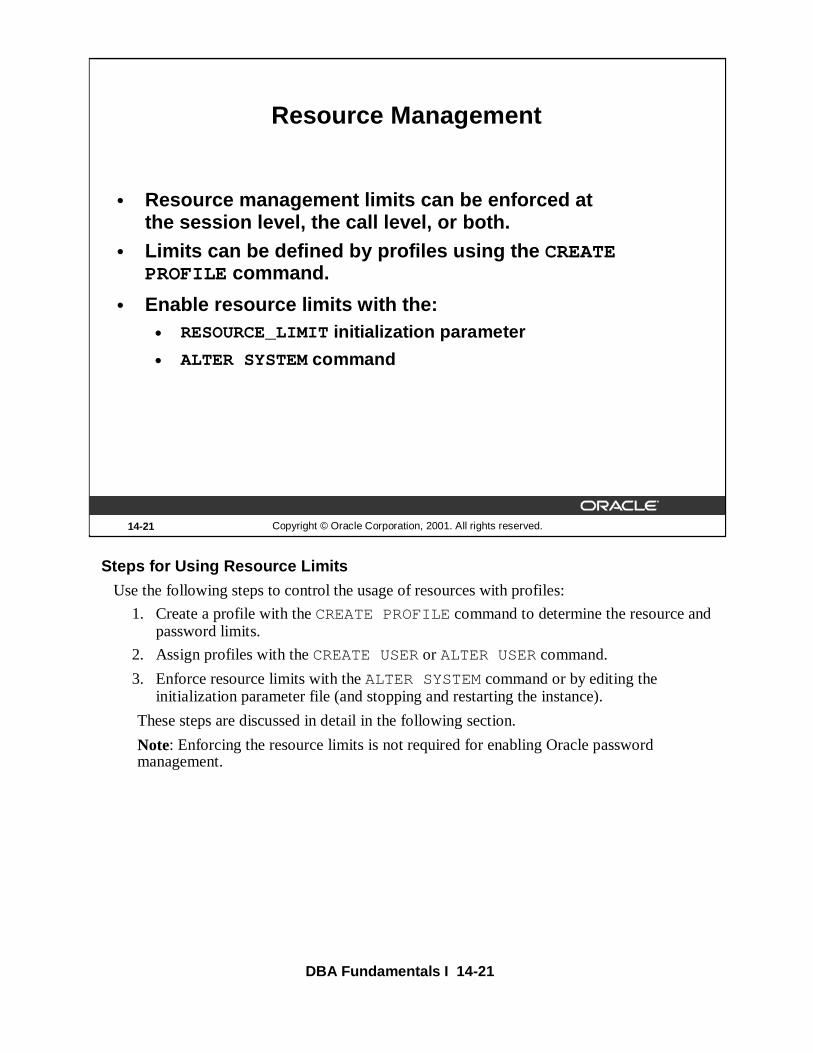
DBA Fundamentals I 14-21
14-21 Copyright © Oracle Corporation, 2001. All rights reserved.
Resource Management
• Resource management limits can be enforced at the session level, the call level, or both.
• Limits can be defined by profiles using the CREATE PROFILE command.
• Enable resource limits with the:• RESOURCE_LIMITinitialization parameter
• ALTER SYSTEMcommand
Steps for Using Resource Limits
Use the following steps to control the usage of resources with profiles:
1. Create a profile with the CREATE PROFILEcommand to determine the resource and password limits.
2. Assign profiles with the CREATE USERor ALTER USERcommand.
3. Enforce resource limits with the ALTER SYSTEMcommand or by editing the initialization parameter file (and stopping and restarting the instance).
These steps are discussed in detail in the following section.
Note: Enforcing the resource limits is not required for enabling Oracle password management.

DBA Fundamentals I 14-22
14-22 Copyright © Oracle Corporation, 2001. All rights reserved.
Enabling Resource Limits
• Set the initialization parameter RESOURCE_LIMITto TRUE
• Enforce the resource limits by enabling the parameter with the ALTER SYSTEMcommand
ALTER SYSTEM SET RESOURCE_LIMIT=TRUE;
Controlling Enforcement of Resource LimitsEnable or disable the enforcement of resource limits by altering the RESOURCE_LIMITinitialization parameter or by using the ALTER SYSTEMcommand.
RESOURCE_LIMITInitialization Parameter
• To enable or disable enforcement of resource limits, alter this parameter in the initialization file and restart the instance.
• A value of TRUE enables enforcement.
• A value of FALSEdisables enforcement (default).
• Use this parameter to enable enforcement when the database can be shut down.
ALTER SYSTEMCommand
• To enable or disable enforcement of resource limits for an instance, use the ALTER SYSTEMcommand.
• The setting specified using the ALTER SYSTEMcommand remains in effect until altered again or until the database is shut down.
• Use this command to enable or to disable enforcement when the database cannot be shut down.

DBA Fundamentals I 14-23
14-23 Copyright © Oracle Corporation, 2001. All rights reserved.
Resource
CPU_PER_SESSION
SESSIONS_PER_USER
CONNECT_TIME
IDLE_TIME
LOGICAL_READS_PER _SESSION
PRIVATE_SGA
Description
Total CPU time measured in hundredths of seconds
Number of concurrent sessions allowed for each username
Elapsed connect time measured in minutes
Periods of inactive time measured in minutes
Number of data blocks (physical and logical reads)
Private space in the SGA measured in bytes (for Shared Server only)
Setting Resource Limits at Session Level
Guidelines
Profile limits can be enforced at the session level, the call level, or both. Session-level limits are enforced for each connection.
When a session-level limit is exceeded:
• An error message returns; for example:ORA-02391: exceeded simultaneous SESSION_PER_USER limit.
• The Oracle server disconnects the user.
Guidelines
• IDLE_TIME is calculated for the server process only. It does not take into account application activity. The IDLE_TIME limit is not affected by long-running queries and other operations.
• LOGICAL_READS_PER_SESSIONis a limitation on the total number of reads from both memory and disk. This might be done to ensure that no I/O intensive statements can hoard memory and tie up the disk.
• PRIVATE_SGA applies only when running the shared server architecture and can be specified in M or K.
Note: The shared server architecture is covered in detail in the DBA Fundamentals IIcourse.

DBA Fundamentals I 14-24
14-24 Copyright © Oracle Corporation, 2001. All rights reserved.
Resource
CPU_PER_CALL
LOGICAL_READS_PER _CALL
Description
CPU time per call in hundredths of seconds
Number of data blocks that can be read per call
Setting Resource Limitsat Call Level
Call-Level and Session-Level Limits
Call-level limits are enforced for each call made while executing a SQL statement.
When a call-level limit is exceeded:
• The processing of the statement is halted.
• The statement is rolled back.
• All previous statements remain intact.
• The user’s session remains connected.

DBA Fundamentals I 14-25
14-25 Copyright © Oracle Corporation, 2001. All rights reserved.
Creating a Profile:Resource Limit
CREATE PROFILE developer_prof LIMIT
SESSIONS_PER_USER 2
CPU_PER_SESSION 10000
IDLE_TIME 60
CONNECT_TIME 480;
The CREATE PROFILECommand Syntax
Create a profile using the following CREATE PROFILEcommand:
CREATE PROFILE profile LIMIT
[SESSIONS_PER_USER max_value]
[CPU_PER_SESSION max_value]
[CPU_PER_CALL max_value]
[CONNECT_TIME max_value]
[IDLE_TIME max_value]
[LOGICAL_READS_PER_SESSION max_value]
[LOGICAL_READS_PER_CALL max_value]
[COMPOSITE_LIMIT max_value]
[PRIVATE_SGA max_bytes]
where:
profile is the name of the profile
max_value is an integer, UNLIMITED, or DEFAULT
max_bytes is an integer optionally followed by K or M UNLIMITED, or DEFAULT

DBA Fundamentals I 14-26
The CREATE PROFILE Command Syntax (continued)UNLIMITED: indicates that a user assigned this profile can use an unlimited amount of this resource
DEFAULT: indicates this profile is subject to the limit for this resource, as specified in the DEFAULTprofile
COMPOSITE_LIMIT: limits the total resource cost for a session expressed in service units; Oracle calculates the resource cost as a sum of:
– CPU_PER_SESSION
– CONNECT_TIME
– LOGICAL_READS_PER_SESSION
– PRIVATE_SGA
The data dictionary view RESOURCE_COSTprovides resource limits assigned to different resources.
Note: Refer to the Oracle9i SQL Referencedocument for information on how to specify the weight for each session resource, ALTER RESOURCE COSTcommand.

DBA Fundamentals I 14-27
How to Use Oracle Enterprise Manger to Set Resource Limits
1. Launch the Console
• %oemapp console
• Choose to Launch standalone
2. Expand your working database from the databases folder
3. Expand the Security folder
4. Select the Profiles folder.
5. Select Create from the Object menu
6. Select Profile in the list and click Create.
7. Enter the resource parameters
8. Click Create

DBA Fundamentals I 14-28
14-28 Copyright © Oracle Corporation, 2001. All rights reserved.
Managing Resources Using the Database Resource Manager
• Provides the Oracle server with more control over resource management decisions
• Elements of the Database Resource Manager– Resource consumer group
– Resource plan
– Resource allocation method
– Resource plan directives
• DBMS_RESOURCE_MANAGERpackage is used to create and maintain elements
• Requires ADMINISTER_RESOURCE_MANAGERprivilege
Managing Resources Using Database Resource Manager
The goal of the Database Resource Manager is to give the Oracle server more control over resource management decisions, thus circumventing problems resulting from inefficient operating system management.
Elements of the Database Resource Manager
Resource consumer group: Groups of users, or sessions, grouped together based on resource processing requirements.
Resource plan: Contains directives that specify how resources are allocated to resource consumer groups.
Resource allocation method: The method or policy used by the Database Resource Manager when allocating for a particular resource.
Resource plan directive: Used by administrators to associate resource consumer groups with particular plans and allocate resources among resource consumer groups.
Administering the Database Resource Manager
You must have the system privilege ADMINISTER_RESOURCE_MANAGERto administer the Database Resource Manager (DBMS_RESOURCE_MANAGER).Typically, DBAs will have this privilege with the ADMIN option as part of the DBA role.

DBA Fundamentals I 14-29
14-29 Copyright © Oracle Corporation, 2001. All rights reserved.
Managing Resources Using the Database Resource Manager
• Resource plans specify the resource consumer groups belonging to the plan.
• Resource plans contain directives for how resources are to be allocated among consumer groups.
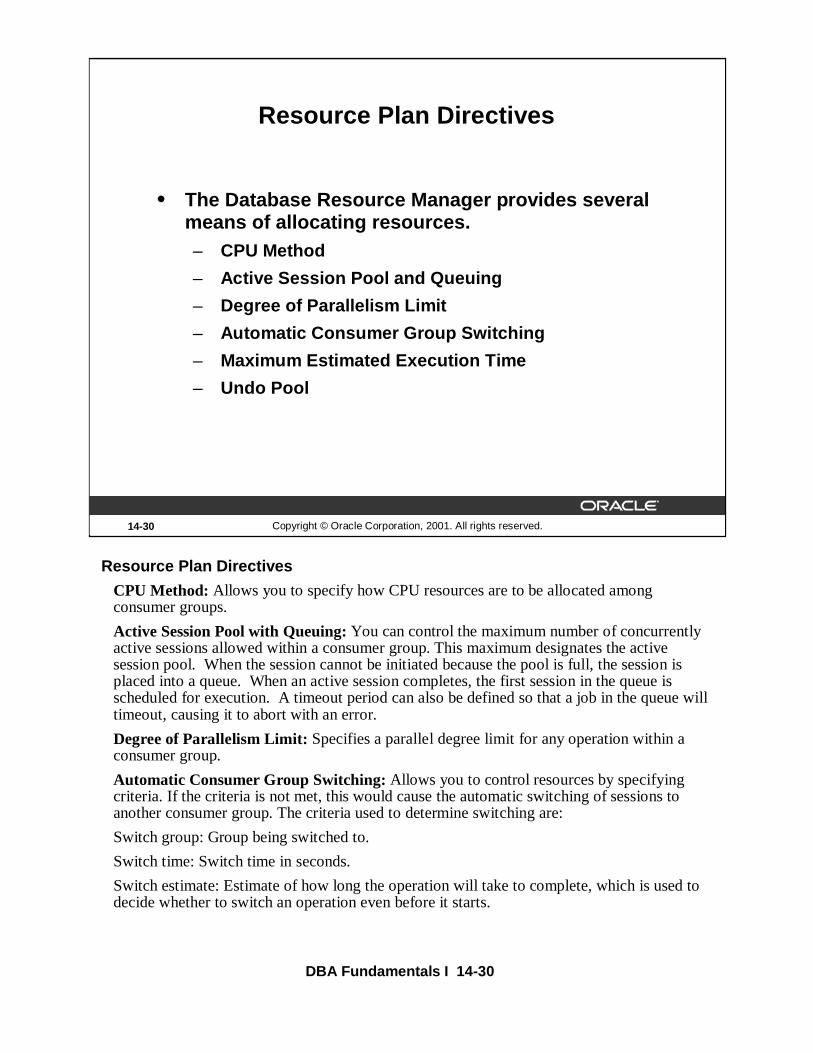
DBA Fundamentals I 14-30
14-30 Copyright © Oracle Corporation, 2001. All rights reserved.
Resource Plan Directives
• The Database Resource Manager provides several means of allocating resources.– CPU Method
– Active Session Pool and Queuing
– Degree of Parallelism Limit
– Automatic Consumer Group Switching
– Maximum Estimated Execution Time
– Undo Pool
Resource Plan Directives
CPU Method: Allows you to specify how CPU resources are to be allocated among consumer groups.
Active Session Pool with Queuing: You can control the maximum number of concurrently active sessions allowed within a consumer group. This maximum designates the active session pool. When the session cannot be initiated because the pool is full, the session is placed into a queue. When an active session completes, the first session in the queue is scheduled for execution. A timeout period can also be defined so that a job in the queue will timeout, causing it to abort with an error.
Degree of Parallelism Limit: Specifies a parallel degree limit for any operation within a consumer group.
Automatic Consumer Group Switching: Allows you to control resources by specifying criteria. If the criteria is not met, this would cause the automatic switching of sessions to another consumer group. The criteria used to determine switching are:
Switch group: Group being switched to.
Switch time: Switch time in seconds.
Switch estimate: Estimate of how long the operation will take to complete, which is used to decide whether to switch an operation even before it starts.

DBA Fundamentals I 14-31
Resource Plan Directives (continued)
Maximum Estimated Execution Time: Estimates the execution time of an operation proactively. A DBA can define the maximum estimated execution time any operation can take at any given time by setting the resource plan directive parameter MAX_ESTIMATED_EXEC_TIME. If the operation's estimate is more than the MAX_ESTIMATED_EXEC_TIME defined, the operation will not start, therefore, eliminating the exceptionally large job that would utilize too much of the system resources.
Undo Pool: An undo pool for each consumer group can be specified to control the amount of total undo that can be generated by a consumer group. When a consumer group exceeds its limit, the current DML statement generating the redo is terminated. The undo pool is defined by the resource plan directive parameter called UNDO_POOL.
Note: The Database Resource Manager is covered further in the Oracle9i Performance Tuningcourse.

DBA Fundamentals I 14-32
14-32 Copyright © Oracle Corporation, 2001. All rights reserved.
Obtaining Password and Resource Limits Information
Information about password and resource limits canbe obtained by querying the data dictionary.
• DBA_USERS
• DBA_PROFILES
Viewing User Information
Use DBA_USERS to obtain information about account status.
SELECT username, password, account_status,
FROM dba_users;
USERNAME PASSWORD ACCOUNT_STATUS
------- -------- --------------
SYS 8A8F025737A9097A OPEN
SYSTEM D4DF7931AB130E37 OPEN
OUTLN 4A3BA55E08595C81 OPEN
DBSNMP E066D214D5421CCC OPEN
HR BB69FBB77CFA6B9A OPEN
OE 957C7EF29CC223FC LOCKED

DBA Fundamentals I 14-33
Viewing Profile InformationQuery the DBA_PROFILESview to display password profile information:
SELECT * FROM dba_profiles
WHERE resource_type='PASSWORD'
AND profile=’GRACE_5’;
PROFILE RESOURCE_NAM RESOURCE LIMIT
-------------------- --------- -------
GRACE_5 FAILED_LOGIN_ATTEMPTS PASSWORD 3
GRACE_5 PASSWORD_LIFE_TIME PASSWORD 30
GRACE_5 PASSWORD_REUSE_TIME PASSWORD 30
GRACE_5 PASSWORD_REUSE_MAX PASSWORD UNLIMITED
GRACE_5 PASSWORD_VERIFY_FUNCTION PASSWORD DEFAULT
GRACE_5 PASSWORD_LOCK_TIME PASSWORD UNLIMITED
GRACE_5 PASSWORD_GRACE_TIME PASSWORD 5

DBA Fundamentals I 14-34
14-34 Copyright © Oracle Corporation, 2001. All rights reserved.
Summary
In this lesson, you should have learned how to:
• Administer passwords
• Administer profiles

DBA Fundamentals I 14-35
Quick Reference
Context Reference Initialization parameters RESOURCE_LIMIT Dynamic performance views None Data dictionary view DBA_PROFILES
DBA_USERS Commands CREATE PROFILE
ALTER PROFILE
DROP PROFILE
ALTER USER Stored procedures and functions
VERIFY_FUNCTION

DBA Fundamentals I 14-36
14-36 Copyright © Oracle Corporation, 2001. All rights reserved.
Practice Overview
This practice covers the following topics:
• Enabling password management
• Defining profiles and assigning to users
• Disabling password management

DBA Fundamentals I 14-37
Practice 14: Managing Password Security and Resources1 Run the lab14_01.sql script to create user Jeff. Enable password management
by running script @$ORACLE_HOME/rdbms/admin/utlpwdmg.sql .
2 Try to change the password of user Jeff to Jeff . What happens?
3 Try changing the password for Jeff to follow the password management format.
Hint: Password should contain at least one digit, one character, and one punctuation.
4 Alter the DEFAULTprofile to ensure the following applies to users assigned the
DEFAULTprofile:
- After two login attempts, the account should be locked.
- The password should expire after 30 days.
- The same password should not be reused for at least one minute.
- The account should have a grace period of five days to change an expiredpassword.
- Ensure that the requirements given have been implemented.
Hints:
Use the ALTER PROFILE command to change the default profile limits.
Query the data dictionary view DBA_PROFILESto verify the result.
5 Log in to user Jeff supplying an invalid password. Try this twice, then log in again, this time supplying the correct password. What happens? Why?
6 Using data dictionary view DBA_USERS verify user Jeff is locked. Unlock the accountfor the user Jeff. After unlocking user Jeff connect as Jeff.
Hint: Execute the ALTER USERcommand to unlock the account.
7 Disable password checks for the DEFAULTprofile.
Hint: Execute the ALTER PROFILE command to disable the password checks.
8 Log in to user Jeff supplying an invalid password. Try this twice, then log in again, this time supplying the correct password. What happens? Why?

DBA Fundamentals I 14-38

DBA Fundamentals I 15-1
15Copyright © Oracle Corporation, 2001. All rights reserved.
Managing Users
DBA Fundamentals I 15-2
15-2 Copyright © Oracle Corporation, 2001. All rights reserved.
Objectives
After completing this lesson, you should be able todo the following:
• Create new database users
• Alter and drop existing database users
• Monitor information about existing users

DBA Fundamentals I 15-3
Security Domain
The database administrator defines the names of the users allowed to access a database. A security domain defines the settings that apply to the user.
Authentication Mechanism
A user who needs access to the database can be authenticated by one of the following:
• Data Dictionary
• Operating system
• Network
The means of authentication is specified at the time the user is defined in the database and can be altered later. This lesson covers authentication by database and by operating system only.
Note: Refer to Getting Started with Oracle lesson for details regarding operating system authentication using roles.
Authentication through the network is covered in the course DBA Fundamentals II.
15-3 Copyright © Oracle Corporation, 2001. All rights reserved.
Accountlocking
Tablespacequotas
Temporarytablespace
Defaulttablespace
Roleprivileges
Resourcelimits
Securitydomain
Directprivileges
Authenticationmechanism
Users and Security

DBA Fundamentals I 15-4
Tablespace Quotas
Tablespace quotas control the amount of physical storage space allocated to a user in the tablespaces in the database.
Default Tablespace
The default tablespace defines the location where segments created by a user are stored if the user does not explicitly specify a tablespace at the time the segment is created.
Temporary Tablespace
Temporary tablespace defines where extents will be allocated by the Oracle server if the user performs an operation that requires writing sort data to the disk.
Account Locking
Accounts can be locked to prevent a user from logging on to the database. This can be set to occur automatically, or the database administrator can lock or unlock accounts manually.
Resource Limits
Limits can be placed on the use of resources such as CPU time, logical I/O, and the number of sessions opened by a user.
Direct Privileges
Privileges are used to control the actions a user can perform in a database.
Role Privileges
A user can be granted privileges indirectly through the use of roles.
Note: Refer to the Managing Privilegesand Managing Roleslessons for information regarding role privileges.
This lesson covers defining a user with the appropriate authentication mechanism, limiting the use of space by the users in the system, and manually controlling account locking.

DBA Fundamentals I 15-5
What Is a Schema?
A schema is a named collection of objects such as tables, views, clusters, procedures, and packages associated with a particular user. When a database user is created, a corresponding schema with the same name is created for that user. A user can be associated only with a schema of the same name, and therefore username andschema are often used interchangeably.
The slide shows some of the objects that users can own in an Oracle database.
15-5 Copyright © Oracle Corporation, 2001. All rights reserved.
Schema Objects
Tables
Triggers
Constraints
Indexes
Views
Sequences
Stored program units
Synonyms
User-defined data types
Database links
Database Schema
• A schema is a named collection of objects
• A user is created, and a corresponding schema is created
• User can be associated only with one schema
• Username and schema are often used interchangeably

DBA Fundamentals I 15-6
15-6 Copyright © Oracle Corporation, 2001. All rights reserved.
Checklist for Creating Users
• Identify tablespaces in which the user needs to store objects.
• Decide on quotas for each tablespace.
• Assign a default tablespace and temporary tablespace.
• Create a user.
• Grant privileges and roles to the user.

DBA Fundamentals I 15-7
Syntax
Use the following command to create a new user:
CREATE USER user
IDENTIFIED {BY password | EXTERNALLY}
[ DEFAULT TABLESPACE tablespace ]
[ TEMPORARY TABLESPACE tablespace ]
[ QUOTA {integer [K | M ] | UNLIMITED } ON tablespace
[ QUOTA {integer [K | M ] | UNLIMITED } ON tablespace ]...]
[ PASSWORD EXPIRE ]
[ ACCOUNT { LOCK | UNLOCK }]
[ PROFILE { profile | DEFAULT }]
15-7 Copyright © Oracle Corporation, 2001. All rights reserved.
Creating a New User: Database Authentication
Set the initial password:
CREATE USER aaron
IDENTIFIED BY soccer
DEFAULT TABLESPACE data
TEMPORARY TABLESPACE temp
QUOTA 15m ON data
PASSWORD EXPIRE;

DBA Fundamentals I 15-8
Syntax (continued)
where:
user: is the name of the user
BY password: specifies user authenticated by the database and needs to supply password while logging on
EXTERNALLY:specifies that the user is authenticated by the operating system
GLOBALLY AS: specifies that the user is authenticated globally
DEFAULT TEMPORARY TABLESPACE:identifies the default or temporary tablespace for the user if a temporary tablespace has not been assigned to the user.
QUOTA:defines the maximum space allowed for objects owned by the user in the tablespace tablespace (Quota can be defined as integerbytes or kilobytes and megabytes. The keyword UNLIMITED is used to specify that the objects owned by the user can use as much space as is available in the tablespace. By default, no user has any quota on any tablespace.)
PASSWORD EXPIRE:forces the user to reset the password when the user logs on to the database using SQL Plus (This option is valid only if the user is authenticated by the database.)
ACCOUNT LOCK/UNLOCK:can be used to lock or unlock the user’s account explicitly (UNLOCKis the default.)
PROFILE: is used to control resource usage and to specify the password control mechanism to be used for the user
Note: Refer to theManaging Profiles lesson for information on creating profiles.
A password authentication method is mandatory. If a password is specified, it is maintained by the Oracle server in the data dictionary. Password control mechanisms provided by the Oracle server are available when users are authenticated by the server.
Once the password expiry is set, when the user logs on using SQL Plus, the user receives the following message at logon, and is prompted to enter a new password:
ERROR:
ORA-28001: the account has expired
Changing password for PETER
Old password:
New password:
Retype new password:
Password changed

DBA Fundamentals I 15-9
How to Use Oracle Enterprise Manager to Create a New User
1. Launch the Console
• %oemapp console
• Choose to Launch standalone
You can also launch the Console from Windows NT Start menu.
2. Expand your working database from the databases folder
3. Expand the Security folder
4. Select the Users folder and select Create from the right mouse menu.
5. Enter user information in the General page of the property sheet.
6. Specify quotas using the Quotas page.
7. Click Create.
You can also select a user and then select Object—>Create Like from the menu bar to create a user with the same quotas and privileges as an existing database user.
Oracle Security Manager automatically grants the CONNECTrole to any user who is created using the tool.
Note: Refer to the Managing Roleslesson for information on the CONNECTrole.
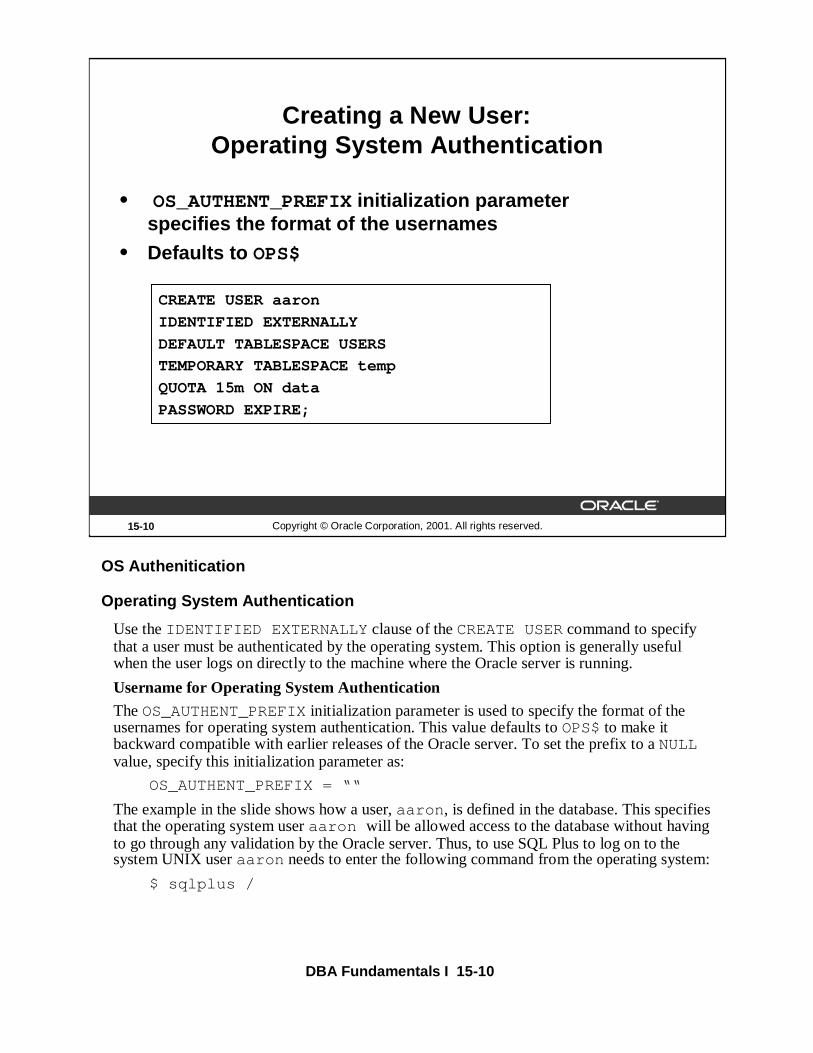
DBA Fundamentals I 15-10
OS Authenitication
Operating System Authentication
Use the IDENTIFIED EXTERNALLY clause of the CREATE USERcommand to specify that a user must be authenticated by the operating system. This option is generally useful when the user logs on directly to the machine where the Oracle server is running.
Username for Operating System Authentication
The OS_AUTHENT_PREFIXinitialization parameter is used to specify the format of the usernames for operating system authentication. This value defaults to OPS$to make it backward compatible with earlier releases of the Oracle server. To set the prefix to a NULL value, specify this initialization parameter as:
OS_AUTHENT_PREFIX = ““
The example in the slide shows how a user, aaron , is defined in the database. This specifies that the operating system user aaron will be allowed access to the database without having to go through any validation by the Oracle server. Thus, to use SQL Plus to log on to the system UNIX user aaron needs to enter the following command from the operating system:
$ sqlplus /
15-10 Copyright © Oracle Corporation, 2001. All rights reserved.
Creating a New User: Operating System Authentication
CREATE USER aaron
IDENTIFIED EXTERNALLY
DEFAULT TABLESPACE USERS
TEMPORARY TABLESPACE temp
QUOTA 15m ON data
PASSWORD EXPIRE;
• OS_AUTHENT_PREFIXinitialization parameter specifies the format of the usernames
• Defaults to OPS$

DBA Fundamentals I 15-11
Username for Operating System Authentication (continued)
Note
• Using OS_AUTHENT_PREFIX=OPS$gives the flexibility of having a user authenticated by either the operating system or the Oracle server. In this case, the DBA can create the user by entering a command of the form:
CREATE USER ops$user
IDENTIFIED BY password ...
• A user who logs on to the machine running the Oracle server need not supply a password. If the user connects from a remote client, he or she can connect by supplying the password.
• Setting another initialization parameter, REMOTE_OS_AUTHENT=TRUE, specifies that a user can be authenticated by a remote operating system. The default value of FALSEindicates that a user can be authenticated only by the machine running the Oracle server. Use this parameter with care because there is a potential security problem.
• If there are users in the database who are authenticated by the operating system, changing OS_AUTHENT_PREFIXmay prevent these users from logging on to the database.

DBA Fundamentals I 15-12
Modifying Tablespace Quotas
You may need to modify tablespace quotas in the following situations:
• When tables owned by a user exhibit unanticipated growth
• When an application is enhanced and requires additional tables or indexes
• When objects are reorganized and placed in different tablespaces
Use the following command to modify tablespace quotas or to reassign tablespaces:
ALTER USER user
[ DEFAULT TABLESPACE tablespace]
[ TEMPORARY TABLESPACE tablespace]
[ QUOTA {integer [K | M] | UNLIMITED } ON tablespace
[ QUOTA {integer [K | M] | UNLIMITED } ON tablespace ] ...]
Once a quota of 0 is assigned, the objects owned by the user remain in the revoked tablespace, but they cannot be allocated any new space. For example, if a table that is 10 MB exists in tablespace USERS, and the tablespace USERSquota is altered to 0, no more new extents can be allocated for that table.
Any unchanged options remain unchanged.
15-12 Copyright © Oracle Corporation, 2001. All rights reserved.
Changing User Quota on Tablespace
ALTER USER aaron
QUOTA 0 ON USERS;

DBA Fundamentals I 15-13
Manager to Modify Tablespace Quota
1. Launch the Console
• %oemapp console
• Choose to Launch standalone
You can also launch the Console from Windows NT Start menu
2. Expand your working database from the databases folder
3. Expand the Security folder
4. Expand the Users folder.
5. Select the username.
6. Enter the quota size in the Quota page of the property sheet
7. Click Apply.

DBA Fundamentals I 15-14
Syntax
DROP USER user [CASCADE]
Guidelines
• The CASCADEoption drops all objects in the schema before dropping the user. This must be specified if the schema contains any objects.
• A user who is currently connected to the Oracle server cannot be dropped.
15-14 Copyright © Oracle Corporation, 2001. All rights reserved.
Dropping a User
• Use the CASCADEclause to drop all objects in the schema if the schema contains objects.
• Users currently connected to the Oracle server cannot be dropped
DROP USER aaron;
DROP USER aaron CASCADE;

DBA Fundamentals I 15-15
Tablespace Quotas
Use the following query to find the default_tablespace for all users.
SELECT username, default_tablespace
FROM dba_users;
USERNAME DEFAULT_TABLESPACE
----------- ------------------
SYS SYSTEM
SYSTEM SYSTEM
OUTLN SYSTEM
DBSNMP SYSTEM
HR EXAMPLE
OE EXAMPLE
15-15 Copyright © Oracle Corporation, 2001. All rights reserved.
Obtaining User Information
Information about users can be obtained by queryingthe data dictionary.
• DBA_USERS
• DBA_TS_QUOTAS

DBA Fundamentals I 15-16
Quick Reference
15-16 Copyright © Oracle Corporation, 2001. All rights reserved.
Summary
In this lesson, you should have learned how to:
• Create users specifying the appropriate password mechanism
• Control usage of space by users
Context Reference
Initialization parameters OS_AUTHENT_PREFIX
REMOTE_OS_AUTHENT
Data dictionary views DBA_USERS
DBA_TS_QUOTA
Commands CREATE USER
ALTER USER
DROP USER

DBA Fundamentals I 15-17
15-17 Copyright © Oracle Corporation, 2001. All rights reserved.
Practice 15 Overview
This practice covers the following topics:
• Creating users
• Displaying data dictionary information about users
• Removing user quotas

DBA Fundamentals I 15-18
Practice 15: Managing Users1 Create user Bob with a password of CRUSADER. Make sure that any objects and
temporary segments created by Bob are not created in the system tablespace. Also,ensure that Bob can log in and create objects up to one megabyte in size in USERSand INDX tablespaces.
Hint: Ensure that the temporary tablespace temp is assigned. Use thelab15_01.sql script to grant Bob the ability to create sessions.
2 Create a user Emi with a password of MARY. Make sure that any objects and sortsegments created by Emi are not created in the system tablespace.
3 Display the information on Bob and Emi from the data dictionary.
Hint: This can be obtained by querying DBA_USERS.
4 From the data dictionary, display the information on the amount of space that Bobcan use in tablespaces.
Hint: This can be obtained by querying DBA_TS_QUOTAS.
5 a As user BOBchange his temporary tablespace. What happens? Why?
b As Bob, change his password to SAM.
6 As SYSTEM, remove Bob’s quota on his default tablespace.
7 Remove Emi ’s account from the database.
Hint: Because Emi owns tables, you need to use the CASCADEoption.
8 Bob has forgotten his password. Assign him a password of OLINK and requirethat Bob change his password the next time he logs on.

DBA Fundamentals I 16 -1
16Copyright © Oracle Corporation, 2001. All rights reserved.
Managing Privileges

DBA Fundamentals I 16 -2
16-2 Copyright © Oracle Corporation, 2001. All rights reserved.
Objectives
After completing this lesson, you should be able todo the following:
• Identify system and object privileges
• Grant and revoke privileges
• Identify auditing capabilities

DBA Fundamentals I 16 -3
16-3 Copyright © Oracle Corporation, 2001. All rights reserved.
Managing Privileges
Two types of Oracle user privileges:
• System: Enables users to perform particular actions in the database
• Object: Enables users to access and manipulate a specific object
Privileges
A privilege is a right to execute a particular type of SQL statement or to access another user’s object. These include the right to:
• Connect to a database
• Create a table
• Select rows from another user’s table
• Execute another user’s stored procedure
System Privileges
Each system privilege allows a user to perform a particular database operation or class of database operations. For example, the privilege to create tablespaces is a system privilege.
Object Privileges
Each object privilege allows a user to perform a particular action on a specific object, such as a table, view, sequence, procedure, function, or package.
A DBA’s control of privileges includes:
• Providing a user the right to perform a type of operation
• Granting and revoking access to perform system functions
• Granting privileges directly to users or to roles
• Granting privileges to all users (PUBLIC)

DBA Fundamentals I 16 -4
16-4 Copyright © Oracle Corporation, 2001. All rights reserved.
System Privileges
• There are over 100 distinct system privileges
• The ANYkeyword in the privileges signifies that users have the privilege in any schema
• The GRANTcommand adds a privilege to a user or a group of users
• The REVOKEcommand deletes the privileges
System Privileges
The privileges can be classified as follows:
• Privileges enabling system wide operations; for example, CREATE SESSION, CREATE TABLESPACE
• Privileges enabling management of objects in a user’s own schema; for example, CREATE TABLE
• Privileges enabling management of objects in any schema; for example, CREATE ANY TABLE
Privileges can be controlled with the DDL commands GRANTand REVOKE, which add and revoke system privileges to the user or to a role (for Roles, see the lesson Managing Roles)

DBA Fundamentals I 16 -5
16-5 Copyright © Oracle Corporation, 2001. All rights reserved.
System Privileges: ExamplesCategory Examples
INDEX CREATE ANY INDEXALTER ANY INDEXDROP ANY INDEX
TABLE CREATE TABLECREATE ANY TABLEALTER ANY TABLEDROP ANY TABLESELECT ANY TABLEUPDATE ANY TABLEDELETE ANY TABLE
SESSION CREATE SESSIONALTER SESSIONRESTRICTED SESSION
TABLESPACE CREATE TABLESPACEALTER TABLESPACEDROP TABLESPACEUNLIMITED TABLESPACE
System Privileges: Examples• There is no CREATE INDEXprivilege.
• CREATE TABLE includes the CREATE INDEXand the ANALYZEcommands. The user must have a quota for the tablespace or must have been granted UNLIMITED TABLESPACE.
• Privileges such as CREATE TABLE, CREATE PROCEDURE, or CREATE CLUSTERinclude the dropping of these objects.
• UNLIMITED TABLESPACE cannot be granted to a role.
• For truncating a table in another schema, the DROP ANY TABLEprivilege is necessary.

DBA Fundamentals I 16 -6
16-6 Copyright © Oracle Corporation, 2001. All rights reserved.
Granting System Privileges
GRANT CREATE SESSION TO emi;
GRANT CREATE SESSION TO emi WITH ADMIN OPTION;
Granting System Privileges Use the SQL statement GRANTto grant system privileges to users.
The grantee can further grant the system privilege to other users with the ADMINoption. Exercise caution when granting system privileges with the ADMINoption. Such privileges are usually reserved for security administrator and rarely granted to other users.
GRANT {system_privilege|role}
[, {system_privilege|role} ]...
TO {user|role|PUBLIC}
[, {user|role|PUBLIC} ]...
[WITH ADMIN OPTION]

DBA Fundamentals I 16 -7
Granting System Privileges (continued)
where:
system_privilege specifies the system privilege to be granted role specifiesthe role name to be granted
PUBLIC grants system privilege to all users
WITH ADMIN OPTION enables the grantee to further grant the privilege or roleto other users or roles

DBA Fundamentals I 16 -8
Granting System Privileges (continued)
Using Enterprise Manager to grant System Privileges
1. Launch the Console:%oemapp console
2. Choose to Launch the Console standalone.
3. Expand your working database from the databases folder
4. Right-click on the your working database and click Connect.
5. Supply the username, password and service name for your working database and click OK.
6. Expand the Security folder.
7. Expand the Users folder and select the user who needs the privilege.
8. Click the System Privileges tab on the detail side of the console.
9. Select the system privileges that you want to grant. Optionally, check the Admin Option box and click Apply.
Note: You can also launch the Console from the Windows NT Start menu.
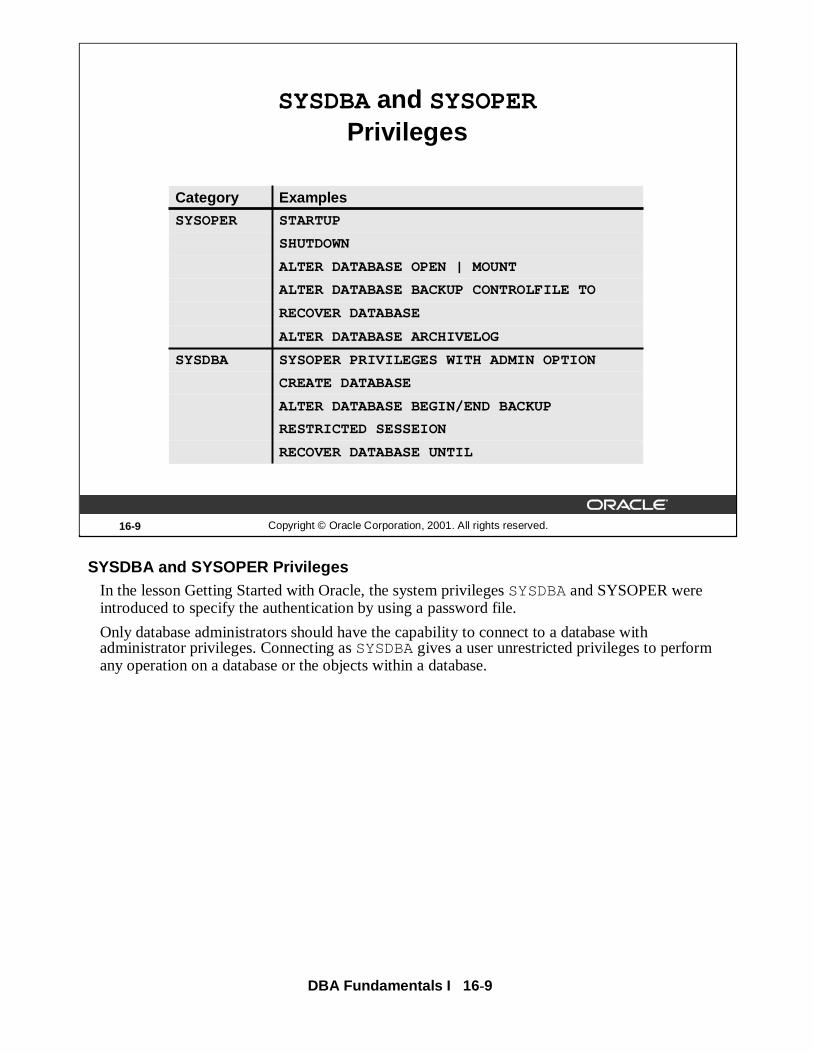
DBA Fundamentals I 16 -9
16-9 Copyright © Oracle Corporation, 2001. All rights reserved.
SYSDBAand SYSOPERPrivileges
ALTER DATABASE BEGIN/END BACKUP
RESTRICTED SESSEION
RECOVER DATABASE UNTIL
CREATE DATABASE
SYSOPER PRIVILEGES WITH ADMIN OPTIONSYSDBA
ALTER DATABASE ARCHIVELOG
RECOVER DATABASE
ALTER DATABASE BACKUP CONTROLFILE TO
ALTER DATABASE OPEN | MOUNT
SHUTDOWN
STARTUPSYSOPER
ExamplesCategory
SYSDBA and SYSOPER PrivilegesIn the lesson Getting Started with Oracle, the system privilegesSYSDBAand SYSOPER were introduced to specify the authentication by using a password file.
Only database administrators should have the capability to connect to a database with administrator privileges. Connecting as SYSDBAgives a user unrestricted privileges to perform any operation on a database or the objects within a database.

DBA Fundamentals I 16 -10
16-10 Copyright © Oracle Corporation, 2001. All rights reserved.
System Privilege Restrictions
O7_DICTIONARY_ACCESSIBILITY parameter
• Controls restrictions on SYSTEM privileges
• If set to TRUE, access to objects in SYS schema is allowed
• Default is FALSE
– Ensures that system privileges that allow access to any schema do not allow access to SYS schema
System Privilege Restrictions
The dictionary protection mechanism in Oracle9i prevents unauthorized users from accessing dictionary objects.
Access to dictionary objects is restricted to the roles SYSDBAand SYSOPER. System privileges providing access to objects in other schemas do not give you access to dictionary objects. For example, the SELECT ANY TABLE privilege allows you to access views and tables in other schemas, but does not enable you to select dictionary objects (base tables, views, packages, and synonyms).
If the parameter is set to TRUE, access to objects in SYSschema is allowed (Oracle7 behavior). If this parameter is set to FALSE, SYSTEMprivileges that allow access to objects in other schemas do not allow access to objects in the dictionary schema.
For example, if O7_DICTIONARY_ACCESSIBILITY=FALSE, then the SELECT ANY TABLEstatement will allow access to views or tables in any schema except SYSschema (for example, dictionaries could not be accessed). The system privilege, EXECUTE ANY PROCEDUREwill allow access on the procedures in any other schema except in SYSschema.

DBA Fundamentals I 16 -11
16-11 Copyright © Oracle Corporation, 2001. All rights reserved.
Revoking System Privileges
REVOKE CREATE TABLE FROM emi;
Revoking System PrivilegesSystem privileges can be revoked using the SQL statement REVOKE. Any user with the ADMIN OPTIONfor a system privilege can revoke the privilege from any other database user. The revoker does not have to be the user that originally granted the privilege.
REVOKE {system_privilege|role}
[, {system_privilege|role} ]...
FROM {user|role|PUBLIC}
[, {user|role|PUBLIC} ]...
Note:
• The REVOKEcommand can only revoke privileges that have been granted directly with a GRANTcommand.
• Revoking system privileges may have an effect on some dependent objects. For example, if SELECT ANY TABLE is granted to a user, and that user has created any procedures or views that use a table in some other schema, revoking the privilege invalidates the procedures or views.

DBA Fundamentals I 16 -12
16-12 Copyright © Oracle Corporation, 2001. All rights reserved.
Revoking System PrivilegesWITH ADMIN OPTION
DBA
GRANT
REVOKE
Jeff Emi
Jeff EmiDBA
Revoking System Privileges (continued)
There are no cascading effects when a system privilege is revoked, regardless of whether it was given WITH ADMIN OPTION.
To illustrate this, read through the following steps.
Scenario:
1. The DBA grants the CREATE TABLEsystem privilege to Jeff with the ADMIN OPTION.
2. Jeff creates a table.
3. Jeff grants the CREATE TABLEsystem privilege to Emi.
4. Emi creates a table.
5.The DBA revokes the CREATE TABLEsystem privilege from Jeff.
The result:
Jeff’s table still exists, but no new tables can be created.
Emi’s table still exists and she still has the CREATE TABLEsystem privilege.

DBA Fundamentals I 16 -13
16-13 Copyright © Oracle Corporation, 2001. All rights reserved.
Object Privileges
Object priv. Table View Sequence Procedure
ALTER √√√√ √ √ √ √ √√√√
DELETE √√√√ √√√√
EXECUTE √√√√
INDEX √√√√ √√√√
INSERT √√√√ √√√√
REFERENCES √√√√
SELECT √√√√ √√√√ √√√√
UPDATE √√√√ √√√√
Object Privileges
An object privilege is a privilege or right to perform a particular action on a specific table, view, sequence, procedure, function, or package. Each object has a particular set of grantable privileges. The table above lists the privileges for various objects. Note that the only privileges that apply to a sequence are SELECTand ALTER. UPDATE, REFERENCES, and INSERT can be restricted by specifying a subset of updateable columns. A SELECTcan be restricted by creating a view with a subset of columns and granting SELECTprivilege on the view. A grant on a synonym is converted to a grant upon the base table referenced by the synonym.
Note: This slide does not provide an exhaustive list of object privileges.

DBA Fundamentals I 16 -14
16-14 Copyright © Oracle Corporation, 2001. All rights reserved.
Granting Object Privileges
GRANT EXECUTE ON dbms_output TO jeff;
GRANT UPDATE ON emi.customers TO jeff WITH GRANT OPTION;
Granting Object PrivilegesGRANT { object_privilege [(column_list)]
[, object_privilege [(column_list)] ]...
|ALL [PRIVILEGES]}
ON [schema.]object
TO {user|role|PUBLIC}[, {user|role|PUBLIC} ]...
[WITH GRANT OPTION]
where:
object_privilege specifies the object privilege to be granted
column_list specifies a table or view column (This can be specified onlywhen granting the INSERT, REFERENCES, or UPDATEprivileges.)
ALL grants all privileges for the object that have been grantedWITH GRANT OPTION
ON object identifies the object on which the privileges are tobe granted
WITH GRANT OPTION enables the grantee to grant the object privilegesto other users or roles
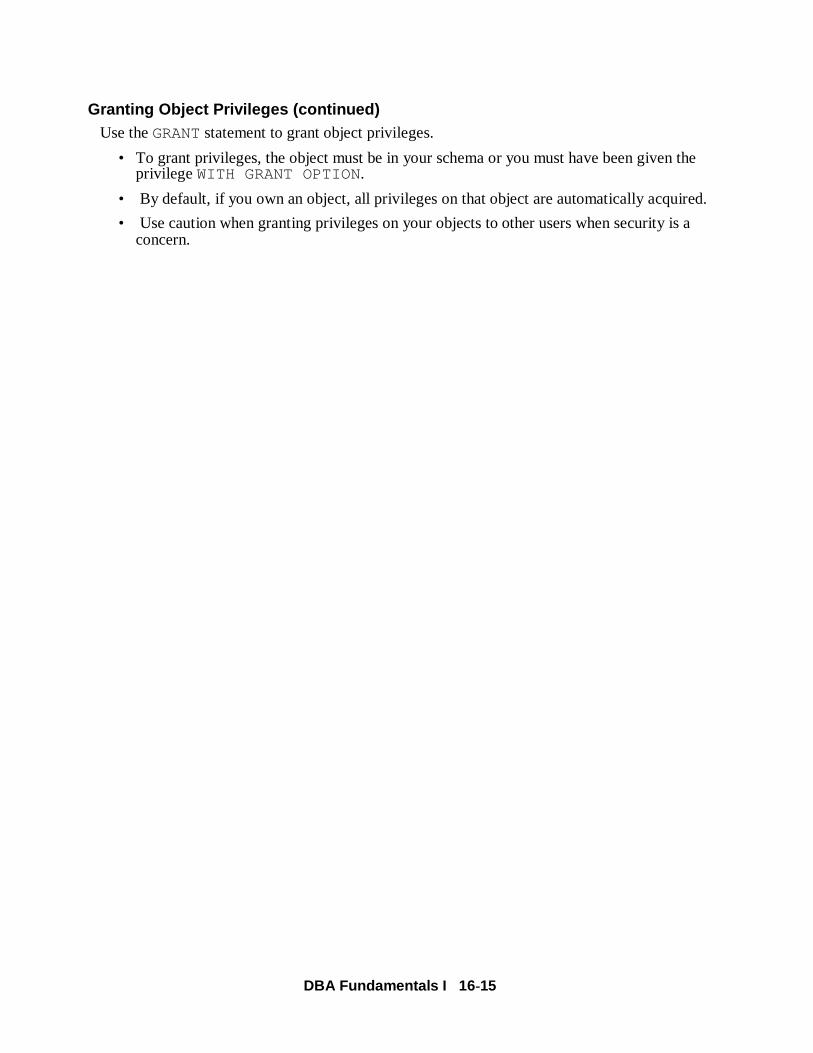
DBA Fundamentals I 16 -15
Granting Object Privileges (continued)Use the GRANTstatement to grant object privileges.
• To grant privileges, the object must be in your schema or you must have been given the privilege WITH GRANT OPTION.
• By default, if you own an object, all privileges on that object are automatically acquired.
• Use caution when granting privileges on your objects to other users when security is a concern.
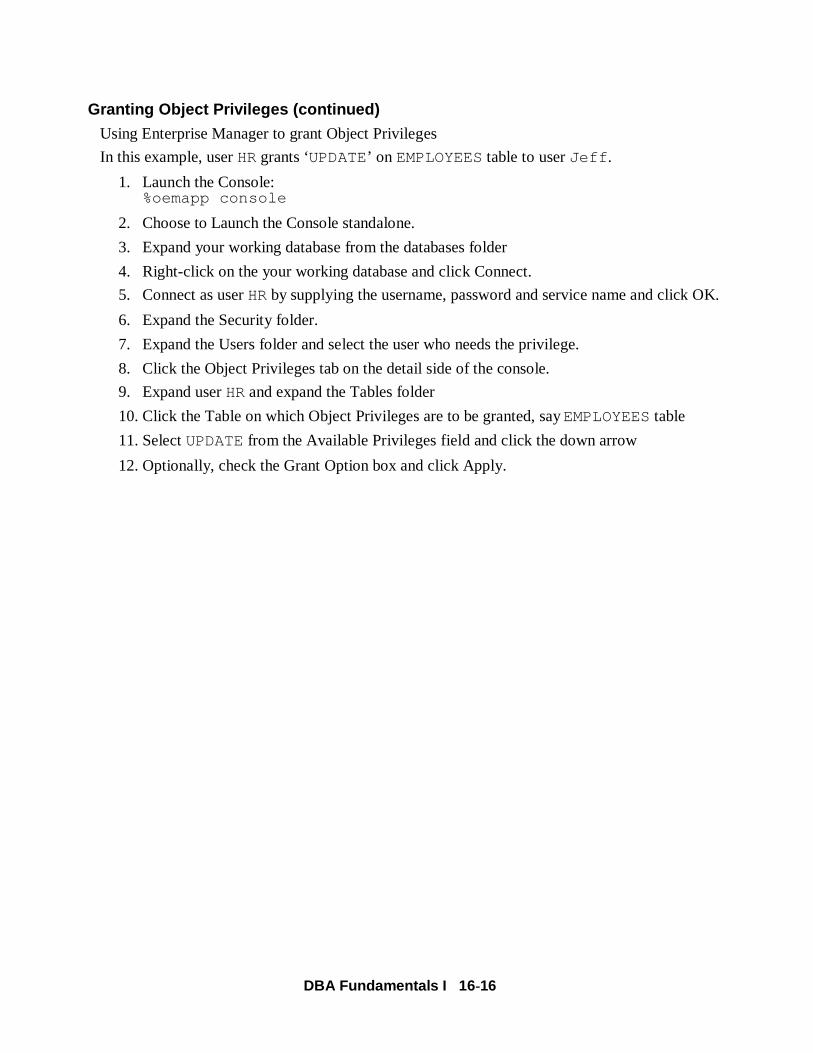
DBA Fundamentals I 16 -16
Granting Object Privileges (continued)
Using Enterprise Manager to grant Object Privileges
In this example, user HRgrants ‘UPDATE’ on EMPLOYEEStable to user Jeff .
1. Launch the Console:%oemapp console
2. Choose to Launch the Console standalone.
3. Expand your working database from the databases folder
4. Right-click on the your working database and click Connect.
5. Connect as user HRby supplying the username, password and service name and click OK.
6. Expand the Security folder.
7. Expand the Users folder and select the user who needs the privilege.
8. Click the Object Privileges tab on the detail side of the console.
9. Expand user HRand expand the Tables folder
10. Click the Table on which Object Privileges are to be granted, say EMPLOYEEStable
11. Select UPDATEfrom the Available Privileges field and click the down arrow
12. Optionally, check the Grant Option box and click Apply.

DBA Fundamentals I 16 -17
16-17 Copyright © Oracle Corporation, 2001. All rights reserved.
Revoking Object Privileges
REVOKE SELECT ON emi.orders FROM jeff;
Revoking Object PrivilegesThe REVOKEstatement is used to revoke object privileges. To revoke an object privilege, the revoker must be the original grantor of the object privilege being revoked.
Use the following command to revoke an object privilege:
REVOKE { object_privilege
[, object_privilege ]...
| ALL [PRIVILEGES] }
ON [schema.]object
FROM {user|role|PUBLIC}
[, {user|role|PUBLIC} ]...
[CASCADE CONSTRAINTS]

DBA Fundamentals I 16 -18
Revoking Object Privileges (continued)
where:
object_privilege specifies the object privilege to be granted
ALL revokes all object privileges that are granted to the user
ON identifies the object on which the object privileges arerevoked
FROM identifies users or roles from which the object privilegesare revoked
CASCADE CONSTRAINTS
drops any referential integrity constraints that therevoke has defined using REFERENCESor ALLprivileges
Restriction
Grantors can revoke privileges from only those users to whom they have granted privileges.

DBA Fundamentals I 16 -19
Revoking Object Privileges (continued)
Using Enterprise Manager to Revoke Object Privileges
In this example, user HRis revoking the Object Privilege.
1. Launch the Console:%oemapp console
2. Choose to Launch the Console standalone.
3. Expand your working database from the databases folder
4. Right-click on the your working database and click Connect.
5. Connect as user HR by supplying the username, password and service name and click OK.
6. Expand the Security folder.
7. Expand the Users folder and select the user from whom the privilege is to be revoked
8. Click the Object Privileges tab on the detail side of the console.
9. Select the object privilege that is to be revoked and click the Up arrow
10. Click Apply.

DBA Fundamentals I 16 -20
16-20 Copyright © Oracle Corporation, 2001. All rights reserved.
GRANT
REVOKE
Revoking Object PrivilegesWITH GRANT OPTION
Bob Jeff Emi
EmiJeffBob
Revoking Object Privileges (continued)
Cascading effects can be observed when revoking a system privilege related to a DML operation. For example, if SELECT ANY TABLE is granted to a user, and that user has created any procedures that use the table, all procedures contained in the user's schema must be recompiled before they can be used again.
Revoking object privileges will also cascade when given WITH GRANT OPTION.
To illustrate this, read through the following steps.
Scenario• Jeff is granted the SELECTobject privilege on EMPLOYEESwith the GRANT OPTION.
• Jeff grants the SELECT privilege on EMPLOYEESto Emi.
• Later, the SELECTprivilege is revoked from Jeff. This revoke is cascaded to Emi as well.
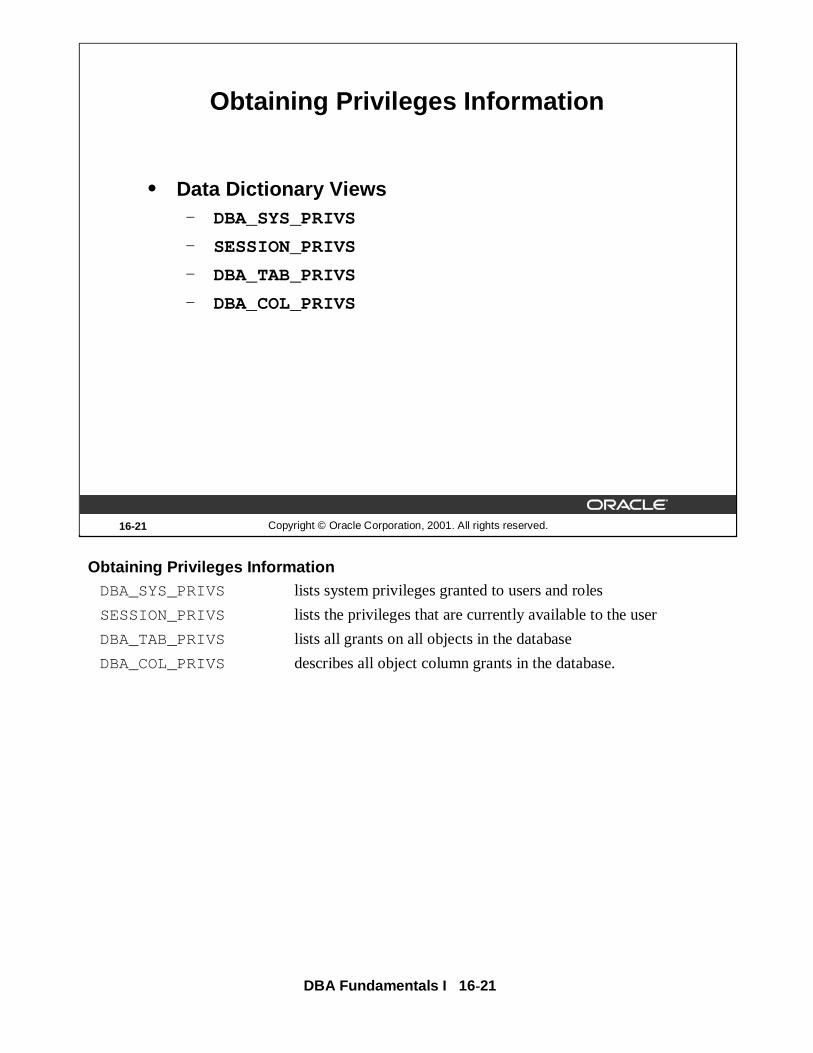
DBA Fundamentals I 16 -21
Obtaining Privileges InformationDBA_SYS_PRIVS lists system privileges granted to users and roles
SESSION_PRIVS lists the privileges that are currently available to the user
DBA_TAB_PRIVS lists all grants on all objects in the database
DBA_COL_PRIVS describes all object column grants in the database.
16-21 Copyright © Oracle Corporation, 2001. All rights reserved.
Obtaining Privileges Information
• Data Dictionary Views– DBA_SYS_PRIVS
– SESSION_PRIVS
– DBA_TAB_PRIVS
– DBA_COL_PRIVS

DBA Fundamentals I 16 -22
16-22 Copyright © Oracle Corporation, 2001. All rights reserved.
Auditing
• Auditing is the monitoring of selected user database actions
• Used to
– Investigate suspicious database activity
– Gather information about specific database activities
Auditing
If an unauthorized user is deleting data, the DBA might decide to audit all connections to the database and all successful and unsuccessful deletions from all tables in the database. The DBA can gather statistics about which tables are being updated, how many logical I/Os are performed, and how many concurrent users connect at peak times.

DBA Fundamentals I 16 -23
16-23 Copyright © Oracle Corporation, 2001. All rights reserved.
Auditing Guidelines
• Define what you want to audit
– Audit users, statements, or objects
– Statement executions
– Successful statement executions, unsuccessful statement executions or both
• Manage your audit trail
– Monitor the growth of the audit trail
– Protect the audit trail from unauthorized access
Auditing Guidelines
Restrict auditing by first identifying the auditing requirements, and setting minimal auditing options that will cater to the requirements. Object auditing must be used where possible to reduce the number of entries generated. If statement or privilege auditing needs to be used, the following settings can minimize audit generation:
• Specifying users to audit
• Auditing by session, and not by access
• Auditing either successes or failures, but not both
• Audit records may be written to either SYS.AUD$or the operating system’s audit trail. The ability to use the operating system’s audit trail is operating system dependent.
Monitoring the Growth of the Audit Trail
If the audit trail becomes full, no more audit records can be inserted, and audited statements will not execute successfully. Errors are returned to all users that issue an audited statement. You must free some space in the audit trail before these statements can be executed.

DBA Fundamentals I 16 -24
Monitoring the Growth of the Audit Trail (continued)
To ensure the audit trail does not grow too rapidly:
• Enable auditing only when necessary.
• Be selective about which audit options are specified.
• Tightly control schema object auditing. Users can turn on auditing for the objects that they own.
• The AUDIT ANY privilege also enables a user to turn on auditing, so grant it sparingly.
Periodically remove audit records from the audit trail with the DELETEor TRUNCATEcommand. Audit files are located in $ORACLE_HOME/rdbms/audit directory.
Protecting the Audit Trail
You should protect the audit trail so that audit information cannot be added, modified, or deleted. Issue the command:
AUDIT delete ON sys.aud$ BY ACCESS;
To protect the audit trail from unauthorized deletions, only the DBA should have the DELETE_CATALOG_ROLErole.
Moving the Audit Trail out of the System Tablespace
As new records get inserted into the database audit trail, the AUD$table can grow without bound. Although you should not drop the AUD$table, you can delete or truncate from it because the rows are for information only and are not necessary for the Oracle instance to run. Because the AUD$table grows and then shrinks, it should be stored outside of the system tablespace.
To move AUD$to the AUDIT_TAB tablespace:
• Ensure that auditing is currently disabled.
• Enter the following command:
ALTER TABLE aud$ MOVE TABLESPACE AUDIT_TAB;
• Enter the following command:
CREATE INDEX i_aud1 ON aud$(sessionid, ses$tid)TABLESPACE AUDIT_IDX;
• Enable auditing for the instance.

DBA Fundamentals I 16 -25
16-25 Copyright © Oracle Corporation, 2001. All rights reserved.
Auditing Categories
• Audited by default
– Instance startup and Instance shutdown
– Administrator privileges
• Database auditing
– Enabled by DBA
– Cannot record column values
• Value-based or application auditing
– Implemented through code
– Can record column values
– Used to track changes to tables
Auditing categories
Regardless of whether database auditing is enabled, Oracle always records some database operations into the operating system audit trail. These are:
• Instance startup: The audit record details the operating system user starting the instance, the users terminal identifier, the date and time stamp and whether database auditing was enabled or disabled.
• Instance shutdown: This details the operating system user shutting down the instance, the user’s terminal identifier, the date and time stamp.
• Administrator privileges: This details the operating system user connecting to Oracle with administrator privileges.
Database Auditing
Database auditing is the monitoring and recording of selected user database actions. Information about the event is stored in the audit trail.
The audit trail can be used to investigate suspicious activity. For example, if an unauthorized user is deleting data from tables, the database administrator may decide to audit all connections to the database in conjunction with successful and unsuccessful deletions of rows from tables in the database.

DBA Fundamentals I 16 -26
Database Auditing (continued)
Auditing might also be used to monitor and gather data about specific database activities. For example, the database administrator can gather statistics about which tables are being updated, how many logical I/Os are performed, and how many concurrent users connect at peak times.
Value-Based Auditing
Database auditing cannot record column values. If the changes to database columns need to be tracked and column values need to be stored for each change, use application auditing. Application auditing can be done either through client code, stored procedures, or database triggers.

DBA Fundamentals I 16 -27
16-27 Copyright © Oracle Corporation, 2001. All rights reserved.
Database Auditing
Parameter file
Specify audit options
DatabaseAudit trail
Audit options
Enable database auditing
DBA User
Execute command
Generate audit trail
Review audit information
Serverprocess
OS audit trail
Enabling and Disabling Database AuditingOnce you have decided what to audit, you set the AUDIT_TRAIL initialization parameter to enable auditing for the instance. This parameter indicates whether the audit trail is written to a database table or the operating system audit trail.
AUDIT_TRAIL = value
where value can be one of the following:
DB enables auditing and directs all audit records to the databaseaudit trail (SYS.AUD$)
OS enables auditing and directs all audit records to the operatingsystem audit trail (if permitted on the operating system)
NONE disables auditing (this is the default value)

DBA Fundamentals I 16 -28
Enabling Database Auditing (continued)Audit records will not be written to the audit trail unless the DBA has set the AUDIT_TRAILparameter to DBor OS. Although the SQL statements AUDIT and NOAUDITcan be used at any time, records will only be written to the audit trail if the DBA has set the AUDIT_TRAILparameter in the initialization file.
Note: The Installation and Configuration Guide for your operating system provides information on writing audit records to the OS audit trail.
Specifying Audit Options
Next, you set specific auditing options using the AUDIT command. With the AUDIT command, you indicate which commands, users, objects, or privileges to audit. You can also indicate whether an audit record should be generated for each occurrence or once per session. If an auditing option is no longer required, you can turn off the option with the NOAUDITcommand.
Execution of Statements
When users execute PL/SQL and SQL statements, the server process examines the auditing options to determine if the statement being executed should generate an audit record. SQL statements inside PL/SQL program units are individually audited, as necessary, when the program unit is executed. Because views and procedures may refer to other database objects, several audit records may be generated as the result of executing a single statement.
Generating Audit Data
The generation and insertion of an audit trail record is independent of a user’s transaction; therefore, if a user’s transaction is rolled back, the audit trail record remains intact. Since the audit record is generated during the execute phase, a syntax error, which occurs during the parse phase, will not cause an audit trail record to be generated.
Reviewing Audit Information
Examine the information generated during auditing by selecting from the audit trail data dictionary views or by using an operating system utility to view the operating system audit trail. This information is used to investigate suspicious activity and to monitor database activity.

DBA Fundamentals I 16 -29
16-29 Copyright © Oracle Corporation, 2001. All rights reserved.
Auditing Options
• Statement auditing
• Privilege auditing
• Schema object auditing
AUDIT create any trigger;
AUDIT TABLE;
AUDIT SELECT ON emi.orders;
Audit Options
Statement auditing: This is the selective auditing of SQL statements, not the specific schema objects on which it operates. For example, AUDIT TABLE tracks several DDL statements regardless of the table on which they are issued. You can set statement auditing to audit selected users or every user in the database.
Privilege auditing: This is the selective auditing of system privileges to perform corresponding actions, such as AUDIT CREATE ANY TRIGGER. You can set privilege auditing to audit a selected user or every user in the database.
Schema object auditing: This is the selective auditing of specific statements on a particular schema object, such as AUDIT SELECT ON HR.EMPLOYEES. Schema object auditing always applies to all users of the database.
You can specify any auditing option, and specify the following conditions:
• WHENEVER SUCCESSFUL/ WHENEVER NOT SUCCESSFUL
• BY SESSION / BY ACCESS
For specific users or for all users in the database (statement and privilege auditing only).
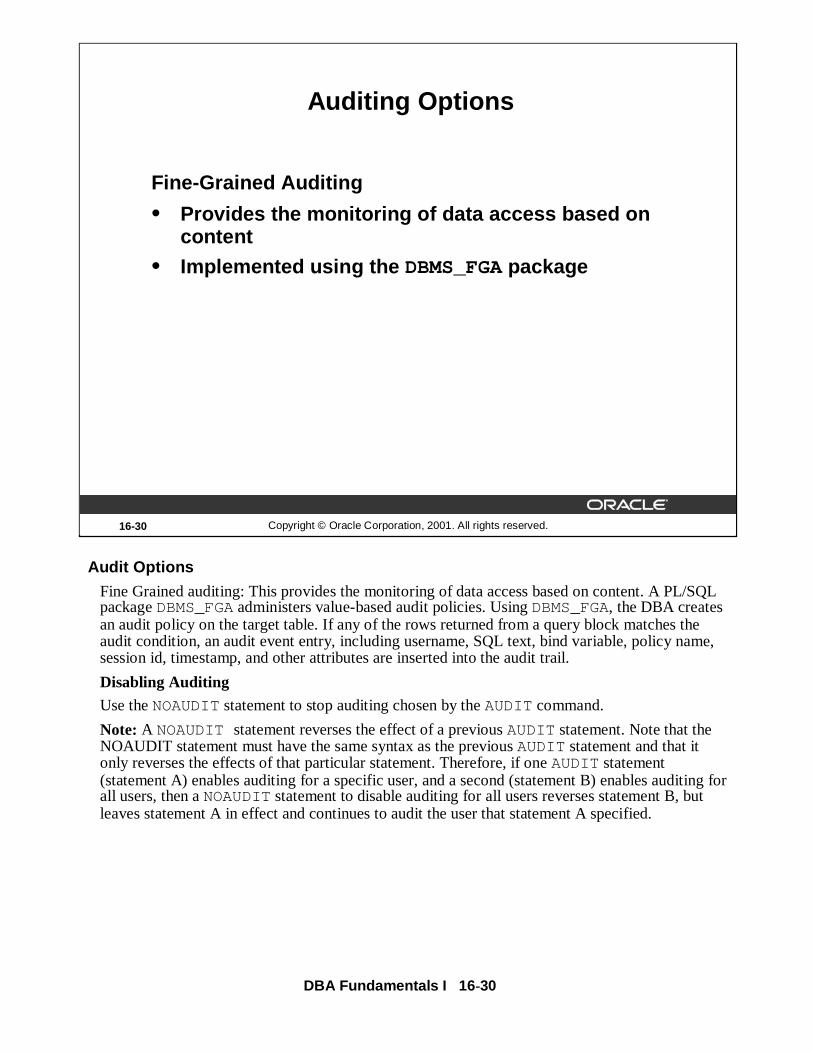
DBA Fundamentals I 16 -30
16-30 Copyright © Oracle Corporation, 2001. All rights reserved.
Auditing Options
Fine-Grained Auditing
• Provides the monitoring of data access based on content
• Implemented using the DBMS_FGApackage
Audit Options
Fine Grained auditing: This provides the monitoring of data access based on content. A PL/SQL package DBMS_FGAadministers value-based audit policies. Using DBMS_FGA, the DBA creates an audit policy on the target table. If any of the rows returned from a query block matches the audit condition, an audit event entry, including username, SQL text, bind variable, policy name, session id, timestamp, and other attributes are inserted into the audit trail.
Disabling Auditing
Use the NOAUDITstatement to stop auditing chosen by the AUDIT command.
Note: A NOAUDIT statement reverses the effect of a previous AUDIT statement. Note that the NOAUDIT statement must have the same syntax as the previous AUDIT statement and that it only reverses the effects of that particular statement. Therefore, if one AUDIT statement (statement A) enables auditing for a specific user, and a second (statement B) enables auditing for all users, then a NOAUDITstatement to disable auditing for all users reverses statement B, but leaves statement A in effect and continues to audit the user that statement A specified.
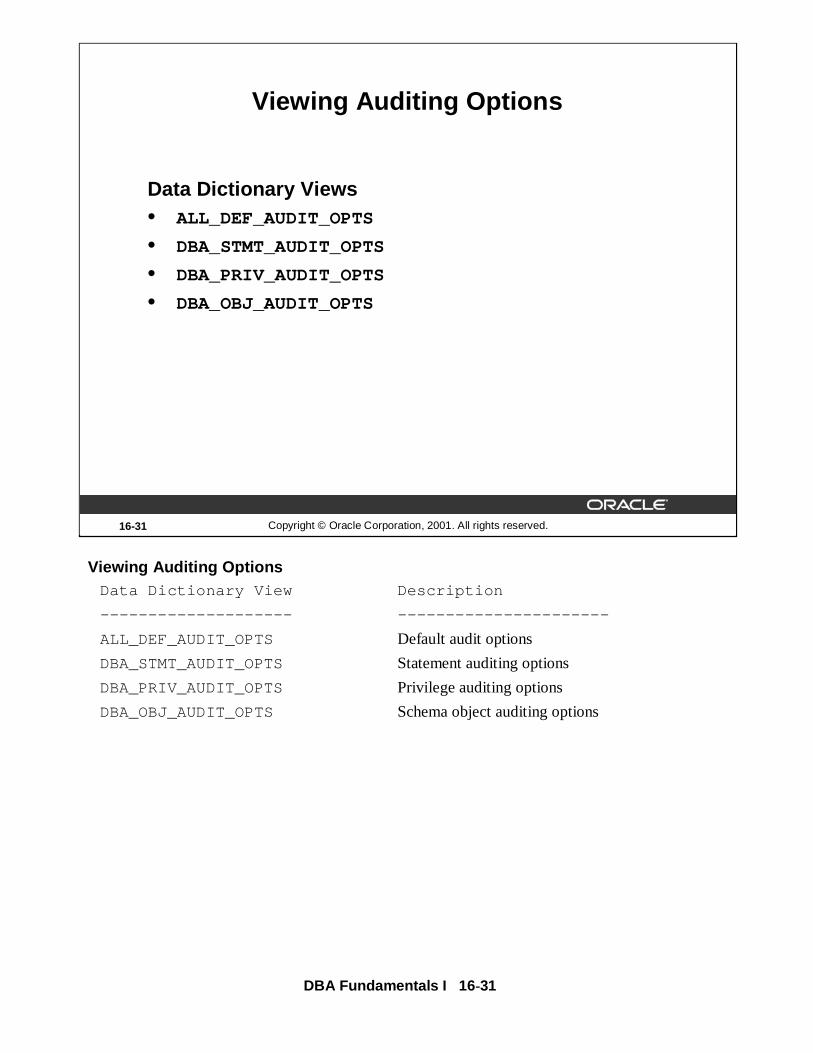
DBA Fundamentals I 16 -31
16-31 Copyright © Oracle Corporation, 2001. All rights reserved.
Viewing Auditing Options
Data Dictionary Views• ALL_DEF_AUDIT_OPTS
• DBA_STMT_AUDIT_OPTS
• DBA_PRIV_AUDIT_OPTS
• DBA_OBJ_AUDIT_OPTS
Viewing Auditing OptionsData Dictionary View Description
-------------------- ----------------------
ALL_DEF_AUDIT_OPTS Default audit options
DBA_STMT_AUDIT_OPTS Statement auditing options
DBA_PRIV_AUDIT_OPTS Privilege auditing options
DBA_OBJ_AUDIT_OPTS Schema object auditing options
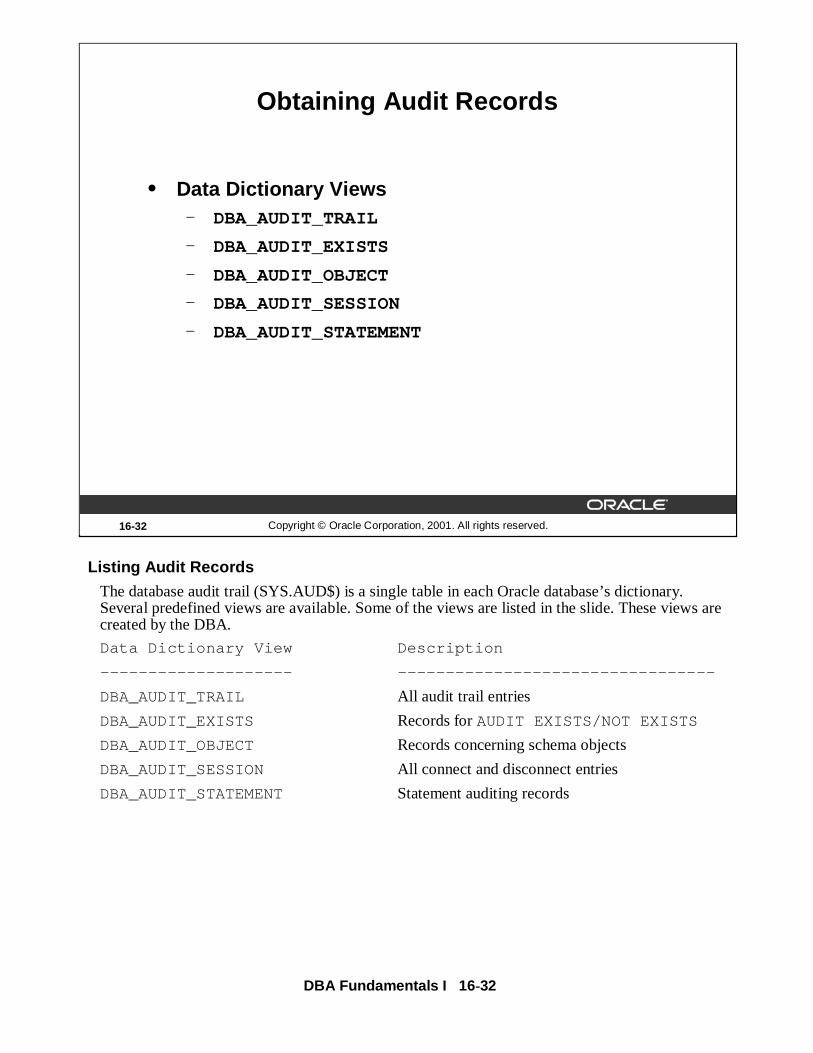
DBA Fundamentals I 16 -32
Listing Audit Records
The database audit trail (SYS.AUD$) is a single table in each Oracle database’s dictionary. Several predefined views are available. Some of the views are listed in the slide. These views are created by the DBA.
Data Dictionary View Description
-------------------- ---------------------------------
DBA_AUDIT_TRAIL All audit trail entries
DBA_AUDIT_EXISTS Records for AUDIT EXISTS/NOT EXISTS
DBA_AUDIT_OBJECT Records concerning schema objects
DBA_AUDIT_SESSION All connect and disconnect entries
DBA_AUDIT_STATEMENT Statement auditing records
16-32 Copyright © Oracle Corporation, 2001. All rights reserved.
Obtaining Audit Records
• Data Dictionary Views– DBA_AUDIT_TRAIL
– DBA_AUDIT_EXISTS
– DBA_AUDIT_OBJECT
– DBA_AUDIT_SESSION
– DBA_AUDIT_STATEMENT

DBA Fundamentals I 16 -33
16-33 Copyright © Oracle Corporation, 2001. All rights reserved.
Summary
In this lesson, you should have learned how to:
• Control system and object privileges
• Use database auditing
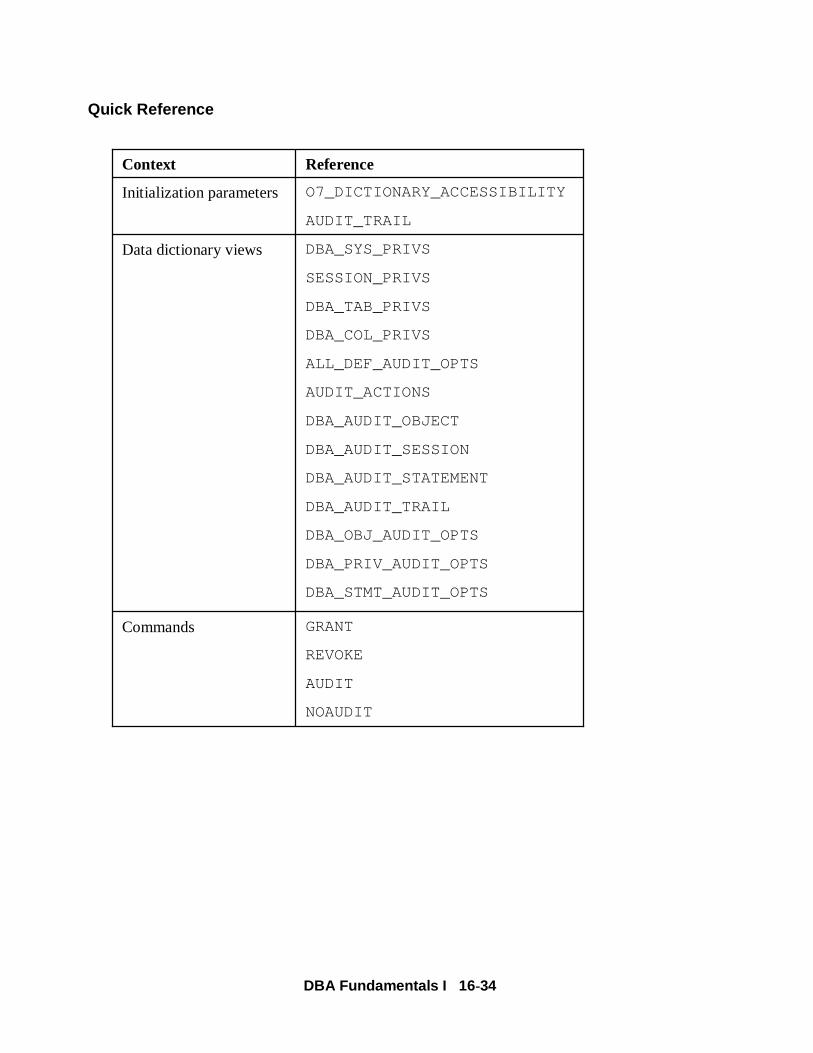
DBA Fundamentals I 16 -34
Quick Reference
NOAUDIT
AUDIT
REVOKE
GRANTCommands
DBA_STMT_AUDIT_OPTS
DBA_PRIV_AUDIT_OPTS
DBA_OBJ_AUDIT_OPTS
DBA_AUDIT_TRAIL
DBA_AUDIT_STATEMENT
DBA_AUDIT_SESSION
DBA_AUDIT_OBJECT
AUDIT_ACTIONS
ALL_DEF_AUDIT_OPTS
DBA_COL_PRIVS
DBA_TAB_PRIVS
SESSION_PRIVS
DBA_SYS_PRIVSData dictionary views
AUDIT_TRAIL
O7_DICTIONARY_ACCESSIBILITYInitialization parameters
ReferenceContext

DBA Fundamentals I 16 -35
16-35 Copyright © Oracle Corporation, 2001. All rights reserved.
Practice 16 Overview
This practice covers the following topics:
• Creating user and granting system privileges
• Granting Object privileges to users
• Enabling Auditing

DBA Fundamentals I 16 -36
Practice 16: Managing Privileges1 As SYSTEM, create user Emi and give her the capability to log on to the database and
create objects in her schema.
2 a Connect as Emi, and create tables using the script lab16_02a.sql to create thetables CUSTOMERSand ORDERS.
b Connect as SYSTEMand copy the data from SYSTEM.CUSTOMERSto Emi ’sCUSOMTERStable. Verify that records have been inserted.
c As SYSTEMgive Bob the ability to select from Emi 's CUSTOMERStable. Whathappens and why?
3 Reconnect as Emi and give Bob the ability to select from Emi 's CUSTOMERStable.Also, enable Bob to give the select capability to other users. Examine the datadictionary views that record these actions.
4 Create user Trevor with the capability to log on to the database
5 a As Bob, enable Trevor to access Emi ’s CUSTOMERStable. Give Bob the newpassword sam.
b As Emi, remove Bob’s privilege to read Emi ’s CUSTOMERStable.
c As Trevor , query Emi ’s CUSTOEMRStable. What happens and why?
6 a Enable Emi to create tables in any schema. As Emi, create the table ORDERSinBob’s schema as a copy of EMI.ORDERS. What happened and why?
b As SYSTEM, examine the data dictionary view DBA_TABLEStocheck the result.
7 Enable Emi to start up and shut down the database without the ability to create anew database.

DBA Fundamentals I 17 -1
17Copyright © Oracle Corporation, 2001. All rights reserved.
Managing Roles

DBA Fundamentals I 17 -2
17-2 Copyright © Oracle Corporation, 2001. All rights reserved.
Objectives
After completing this lesson, you should be able todo the following:
• Create and modify roles
• Control availability of roles
• Remove roles
• Use predefined roles
• Display role information from the data dictionary
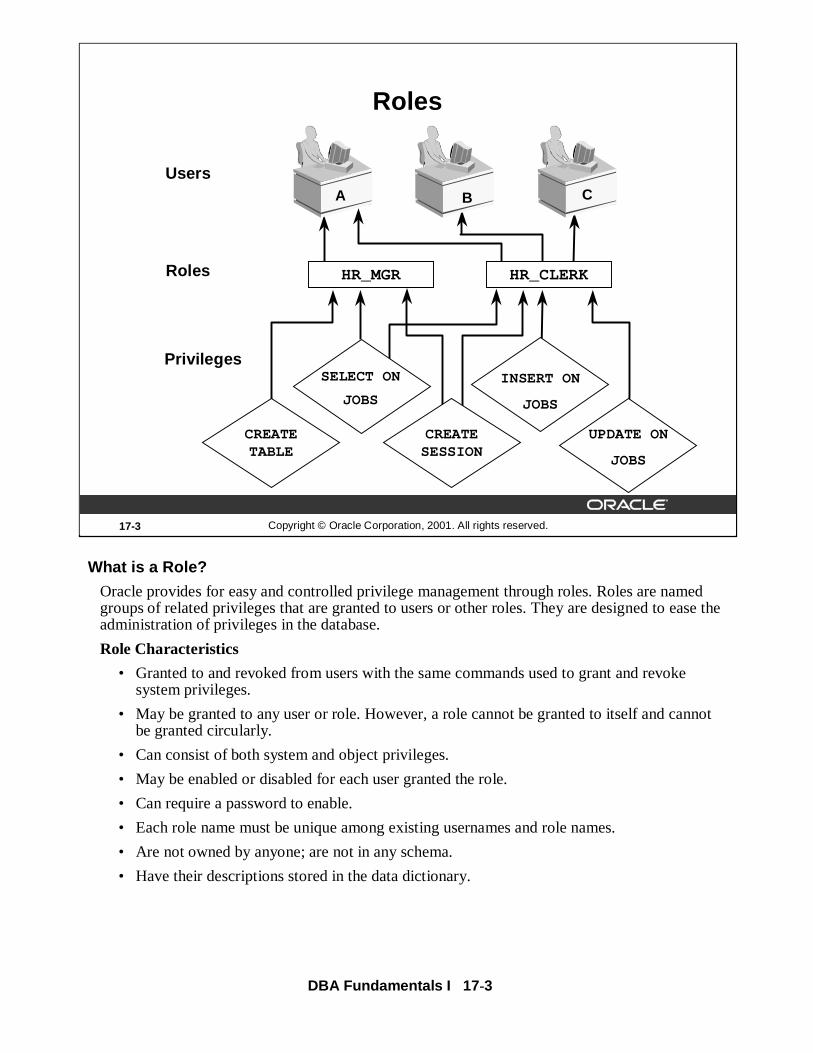
DBA Fundamentals I 17 -3
17-3 Copyright © Oracle Corporation, 2001. All rights reserved.
Roles
Users
Privileges
Roles
UPDATE ON
JOBS
INSERT ON
JOBS
SELECT ON
JOBS
CREATE TABLE
CREATE SESSION
HR_CLERKHR_MGR
A B C
What is a Role?
Oracle provides for easy and controlled privilege management through roles. Roles are named groups of related privileges that are granted to users or other roles. They are designed to ease the administration of privileges in the database.
Role Characteristics
• Granted to and revoked from users with the same commands used to grant and revoke system privileges.
• May be granted to any user or role. However, a role cannot be granted to itself and cannot be granted circularly.
• Can consist of both system and object privileges.
• May be enabled or disabled for each user granted the role.
• Can require a password to enable.
• Each role name must be unique among existing usernames and role names.
• Are not owned by anyone; are not in any schema.
• Have their descriptions stored in the data dictionary.

DBA Fundamentals I 17 -4
17-4 Copyright © Oracle Corporation, 2001. All rights reserved.
Benefits of Roles
• Easier privilege management
• Dynamic privilege management
• Selective availability of privileges
• Can be granted through the operating system
• Improved performance
Benefits of Roles
Easier Privilege Management
Use roles to simplify privilege management. Rather than granting the same set of privileges to several users, you can grant the privileges to a role, and then grant that role to each user.
Dynamic Privilege Management
If the privileges associated with a role are modified, all the users who are granted the role automatically and immediately acquire the modified privileges.
Selective Availability of Privileges
Roles can be enabled and disabled to turn privileges on and off temporarily. Enabling a role can also be used to verify that a user has been granted that role.
Can be granted Through the Operating System
Operating system commands or utilities can be used to assign roles to users in the database.
Improved Performance
By disabling roles, there are fewer privileges to verify during statement execution. Using roles reduces the number of grants stored in the data dictionary.

DBA Fundamentals I 17 -5
17-5 Copyright © Oracle Corporation, 2001. All rights reserved.
Creating Roles
CREATE ROLE oe_clerk;
CREATE ROLE hr_clerkIDENTIFIED BY bonus;
CREATE ROLE hr_managerIDENTIFIED EXTERNALLY;
Creating Roles
Use the CREATE ROLE statement to create roles. CREATE ROLE system privilege is required. When you create a role that is NOT IDENTIFIED or is IDENTIFIED EXTERNALLY or BY Password, Oracle grants the role with ADMIN option.
Use the following command to create a role:
CREATE ROLE role [NOT IDENTIFIED | IDENTIFIED
{BY password | EXTERNALLY | GLOBALLY | USING package}]
where:
role is the name of the role
NOT IDENTIFIED indicates that no verification is required when enablingthe role
IDENTIFIED indicates that verification is required when enabling therow
BY password provides the password that the user must specify when enabling the role
USING package creates an application role, which is a role that can be enabledonly by applications using an authorized package

DBA Fundamentals I 17 -6
Creating Roles (continued)
EXTERNALLY indicates that a user must be authorized by an external service(such as the operating system or a third-party service) beforeenabling the role)
GLOBALLY indicates that a user must be authorized to use the role by theenterprise directory service before the role is enabled with theSET ROLE statement, or at login

DBA Fundamentals I 17 -7
Creating Roles (continued)
Using Enterprise Manager to Create a Role
1. Launch the Console:%oemapp console
2. Choose to Launch the Console standalone.
3. Expand your working database from the databases folder
4. Right-click on the your working database and click Connect.
5. Supply the username, password and service name for your working database and click OK.
6. Expand the Security folder.
7. Right-click on Roles folder and click Create.
8. Enter a name for the role.
9. Optionally, GRANT roles and privileges to the new role.
10. Click Create.
Note: You can also launch the Console from Windows NT Start menu.

DBA Fundamentals I 17 -8
17-8 Copyright © Oracle Corporation, 2001. All rights reserved.
Predefined Roles Role Name Description
CONNECT, These roles are providedRESOURCE, DBA for backward compatibility
EXP_FULL_DATABASE Privileges to export thedatabase
IMP_FULL_DATABASE Privileges to import thedatabase
DELETE_CATALOG_ROLE DELETEprivileges ondata dictionary tables
EXECUTE_CATALOG_ROLE EXECUTEprivilege ondata dictionary packages
SELECT_CATALOG_ROLE SELECTprivilege on datadictionary tables
Predefined Roles
The roles listed are defined automatically for Oracle databases when you run database creation scripts. CONNECT, RESOURCE, and DBAroles are provided for backward compatibility to earlier versions of the Oracle server.
The EXP_FULL_DATABASEand IMP_FULL_DATABASEroles are provided for convenience in using the Import and Export utilities.
The roles DELETE_CATALOG_ROLE, EXECUTE_CATALOG_ROLE, and SELECT_CATALOG_ROLEare provided for accessing data dictionary views and packages. These roles can be granted to users who do not have the DBArole but who require access to the views and tables in the data dictionary.
Other Special Roles
The Oracle server also creates other roles that authorize you to administer the database. On many operating systems, these roles are called OSOPERand OSDBA. Their names may be different on your operating system.
Other roles are defined by SQL scripts provided with the database. For example, AQ_ADMINISTRATOR_ROLEprovides privileges to administer Advanced Queuing. AQ_USER_ROLEis obsoleted but mainly kept for release 8.0 compatibility.
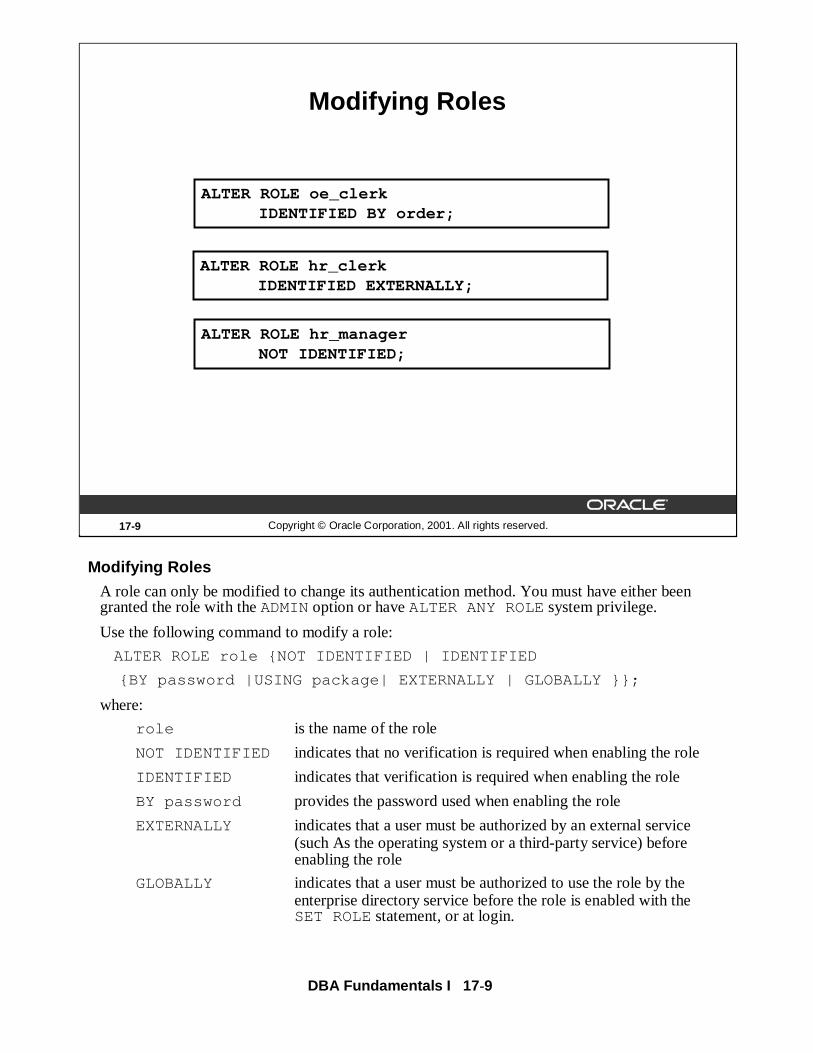
DBA Fundamentals I 17 -9
17-9 Copyright © Oracle Corporation, 2001. All rights reserved.
Modifying Roles
ALTER ROLE hr_clerkIDENTIFIED EXTERNALLY;
ALTER ROLE hr_managerNOT IDENTIFIED;
ALTER ROLE oe_clerkIDENTIFIED BY order;
Modifying Roles
A role can only be modified to change its authentication method. You must have either been granted the role with the ADMINoption or have ALTER ANY ROLEsystem privilege.
Use the following command to modify a role:
ALTER ROLE role {NOT IDENTIFIED | IDENTIFIED
{BY password |USING package| EXTERNALLY | GLOBALLY }};
where:
role is the name of the role
NOT IDENTIFIED indicates that no verification is required when enabling the role
IDENTIFIED indicates that verification is required when enabling the role
BY password provides the password used when enabling the role
EXTERNALLY indicates that a user must be authorized by an external service(such As the operating system or a third-party service) beforeenabling the role
GLOBALLY indicates that a user must be authorized to use the role by theenterprise directory service before the role is enabled with theSET ROLEstatement, or at login.

DBA Fundamentals I 17 -10
Modifying Roles (continued)
Using Enterprise Manager to Modify Roles
1. Launch the Console:%oemapp console
2. Choose to Launch the Console standalone.
3. Expand your working database from the databases folder
4. Right-click on the your working database and click Connect .
5. Supply the username, password and service name for your working database and click OK.
6. Expand the Security folder.
7. Expand theRoles folder and select the role to be modified.
8. Make the requisite modifications and click Apply .
Note: You can also launch the Console from the Windows NT Start menu.

DBA Fundamentals I 17 -11
17-11 Copyright © Oracle Corporation, 2001. All rights reserved.
Assigning Roles
GRANT hr_clerk TO hr_manager;
GRANT oe_clerk TO scott;
GRANT hr_manager TO scott WITH ADMIN OPTION;
Assigning Roles
To grant a role to a user, use the same syntax command that was used to grant a system privilege to a user:
GRANT role [, role ]...
TO {user|role|PUBLIC}
[, {user|role|PUBLIC} ]...
[WITH ADMIN OPTION]
where:
role is a role to be granted or a role receiving the role granted
user is a user receiving a role
PUBLIC grants the role to all users
WITH ADMIN OPTION
enables the grantee to grant the role to other users or roles. (If you grant a role with this option, the grantee can grant andrevoke the role from other users and alter or drop the role.)

DBA Fundamentals I 17 -12
Assigning Roles (continued)The user who creates a role is implicitly assigned the role withADMIN OPTION. A user who has not been granted a role with ADMIN OPTION requires the GRANT ANY ROLEsystem privilege to grant and revoke roles to and from others.
Note: The maximum number of database roles that users can enable is set by the initialization parameter MAX_ENABLED_ROLES.

DBA Fundamentals I 17 -13
17-13 Copyright © Oracle Corporation, 2001. All rights reserved.
Establishing Default Roles
ALTER USER scottDEFAULT ROLE hr_clerk, oe_clerk;
ALTER USER scott DEFAULT ROLE ALL;
ALTER USER scott DEFAULT ROLE ALL EXCEPT hr_clerk;
ALTER USER scott DEFAULT ROLE NONE;
Default Roles
A user may have many roles assigned. A default role is a subset of these roles that is automatically enabled when the user logs on. By default, all the roles assigned to a user are enabled at logon without the need of a password. Limit the default roles for a user with the ALTER USERcommand.
The DEFAULT ROLEclause applies only to roles that have been granted directly to the user with a GRANTstatement. The DEFAULT ROLEclause cannot be used to enable:
• Roles not granted to the user
• Roles granted through other roles
• Roles managed by an external service (such as the operating system)
Use the following syntax to assign default roles to a user:
ALTER USER user DEFAULT ROLE
{role [,role]... | ALL [EXCEPT role [,role]... ] | NONE}
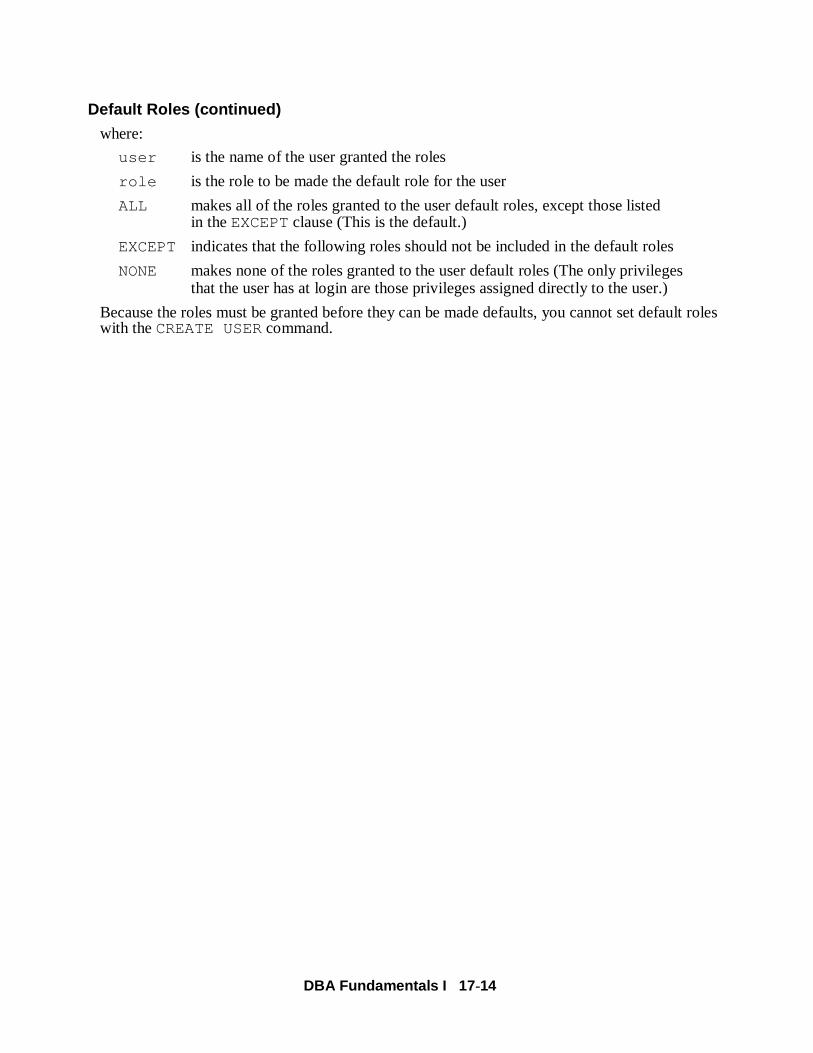
DBA Fundamentals I 17 -14
Default Roles (continued)
where:
user is the name of the user granted the roles
role is the role to be made the default role for the user
ALL makes all of the roles granted to the user default roles, except those listedin the EXCEPTclause (This is the default.)
EXCEPT indicates that the following roles should not be included in the default roles
NONE makes none of the roles granted to the user default roles (The only privilegesthat the user has at login are those privileges assigned directly to the user.)
Because the roles must be granted before they can be made defaults, you cannot set default roles with the CREATE USERcommand.
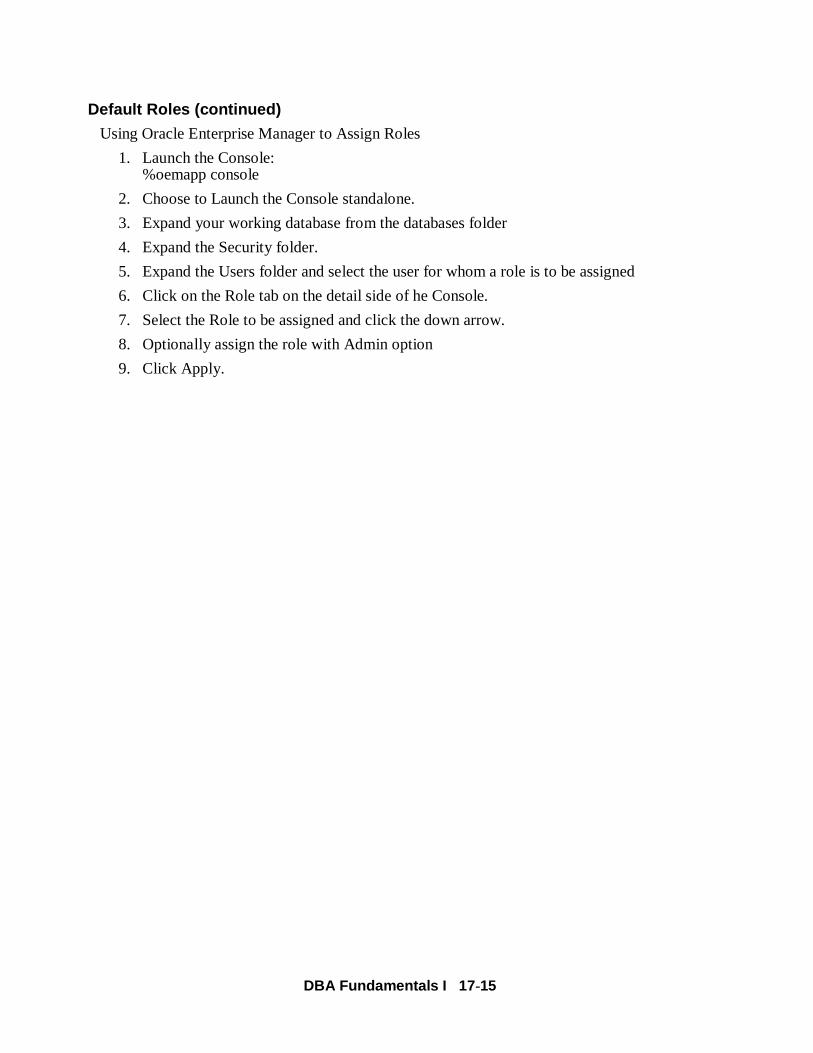
DBA Fundamentals I 17 -15
Default Roles (continued)
Using Oracle Enterprise Manager to Assign Roles
1. Launch the Console:%oemapp console
2. Choose to Launch the Console standalone.
3. Expand your working database from the databases folder
4. Expand the Security folder.
5. Expand the Users folder and select the user for whom a role is to be assigned
6. Click on the Role tab on the detail side of he Console.
7. Select the Role to be assigned and click the down arrow.
8. Optionally assign the role with Admin option
9. Click Apply.

DBA Fundamentals I 17 -16
17-16 Copyright © Oracle Corporation, 2001. All rights reserved.
Application Roles
• Application roles can be enabled only by authorized PL/SQL packages
• The USING package clause creates an Application Role
CREATE ROLE admin_roleIDENTIFIED USING hr.employee;
Application RolesThe USINGpackage clause in the CREATE ROLEstatement creates an application role. Application role can be enabled only by applications using an authorized PL/SQL package. Application developers do not need to secure a role by embedding passwords inside applications. Instead, they can create an application role and specify which PL/SQL package is authorized to enable the role.
CREATE ROLE admin_role IDENTIFIED USING hr.employee;
In this example, admin_role is an application role and the role can be enabled only by modules defined inside the PL/SQL package hr.employee .

DBA Fundamentals I 17 -17
17-17 Copyright © Oracle Corporation, 2001. All rights reserved.
Enabling and Disabling Roles
• Disable a role to revoke the role from a user temporarily
• Enable a role to grant it temporarily
• The SET ROLE command enables anddisables roles
• Default roles are enabled for a user at login.
• A password may be required to enable a role.
Enabling and Disabling Roles
Enable or disable roles to activate and deactivate temporarily the privileges associated with the roles. To enable a role, the role must first be granted to the user.
When a role is enabled, the user can use the privileges granted to that role. If a role is disabled, the user cannot use the privileges associated with that role unless those privileges are granted directly to the user or to another role enabled for that user. Roles are enabled for a session. At the next session, the user’s active roles will revert to default roles.
Specifying Roles to Be Enabled
The SET ROLEcommand and the DBMS_SESSION.SET_ROLEprocedure enable all of the roles included in the command and disable all other roles. Roles can be enabled from any tool or program that allows PL/SQL commands; however, a role cannot be enabled in a stored procedure.
You can use the ALTER USER...DEFAULT ROLE command to indicate which roles will be enabled for a user at login. All other roles are disabled.
A password may be required to enable a role. The password must be included in the SET ROLEcommand to enable the role. Default roles assigned to a user do not require a password; they are enabled at login, the same as a role without a password.

DBA Fundamentals I 17 -18
Enabling and Disabling Roles (continued)
Restrictions
A role cannot be enabled from a stored procedure, because this action may change the security domain (set of privileges) that allowed the procedure to be called in the first place. So, in PL/SQL, roles can be enabled and disabled in anonymous blocks and application procedures (for example, Oracle Forms procedures), but not in stored procedures.
If a stored procedure contains the command SET ROLE, the following error is generated at run time:
ORA-06565: cannot execute SET ROLE from within stored procedure

DBA Fundamentals I 17 -19
17-19 Copyright © Oracle Corporation, 2001. All rights reserved.
Enabling and Disabling Roles
SET ROLE hr_clerk;
SET ROLE oe_clerk IDENTIFIED BY order;
SET ROLE ALL EXCEPT oe_clerk;
Enabling and Disabling RolesThe SET ROLEcommand turns off any other roles granted to the user.
SET ROLE {role [ IDENTIFIED BY password ]
[, role [ IDENTIFIED BY password ]]...
| ALL [ EXCEPT role [, role ] ...]
| NONE }
where:
role is the name of the role
IDENTIFIED BY password provides the password required when enablingthe role
ALL enables all roles granted to the current user,except those listed in the EXCEPTclause (Youcannot use this option to enable roles withpasswords.)
EXCEPT role does not enable these rolesNONE disables all roles for the current session (Only
privileges granted directly to the user areactive.)

DBA Fundamentals I 17 -20
Enabling and Disabling Roles (continued)The ALL option without the EXCEPTclause works only when every role that is enabled does not have a password.

DBA Fundamentals I 17 -21
17-21 Copyright © Oracle Corporation, 2001. All rights reserved.
Removing Roles from Users
REVOKE hr_manager FROM PUBLIC;
REVOKE oe_clerk FROM scott;
Removing Roles from UsersTo revoke a role from a user, use the SQL statement REVOKE. Any user with the ADMINoption for a role can revoke the role from any other database user or role. Also users with the GRANT ANY ROLEcan revoke any role.
REVOKE role [, role ]...
FROM {user|role|PUBLIC}
[, {user|role|PUBLIC} ]...
where:
role is the role to be revoked or the role from which roles arerevoked
user is the user from which the system privileges or roles arerevoked
PUBLIC revokes the privilege or role from all users

DBA Fundamentals I 17 -22
Removing Roles from Users (continued)
How to use Oracle Enterprise Manager to Revoke a Role
1. Launch the Console:%oemapp console
2. Choose to Launch the Console standalone.
3. Expand your working database from the databases folder
4. Expand the Security folder.
5. Expand the Users folder and select the user for whom a Role is to be revoked.
6. Click on the Role tab on the detail side of the Console.
7. Select the role to be revoked from the ‘Granted’ box and click on the up arrow. Click Apply.
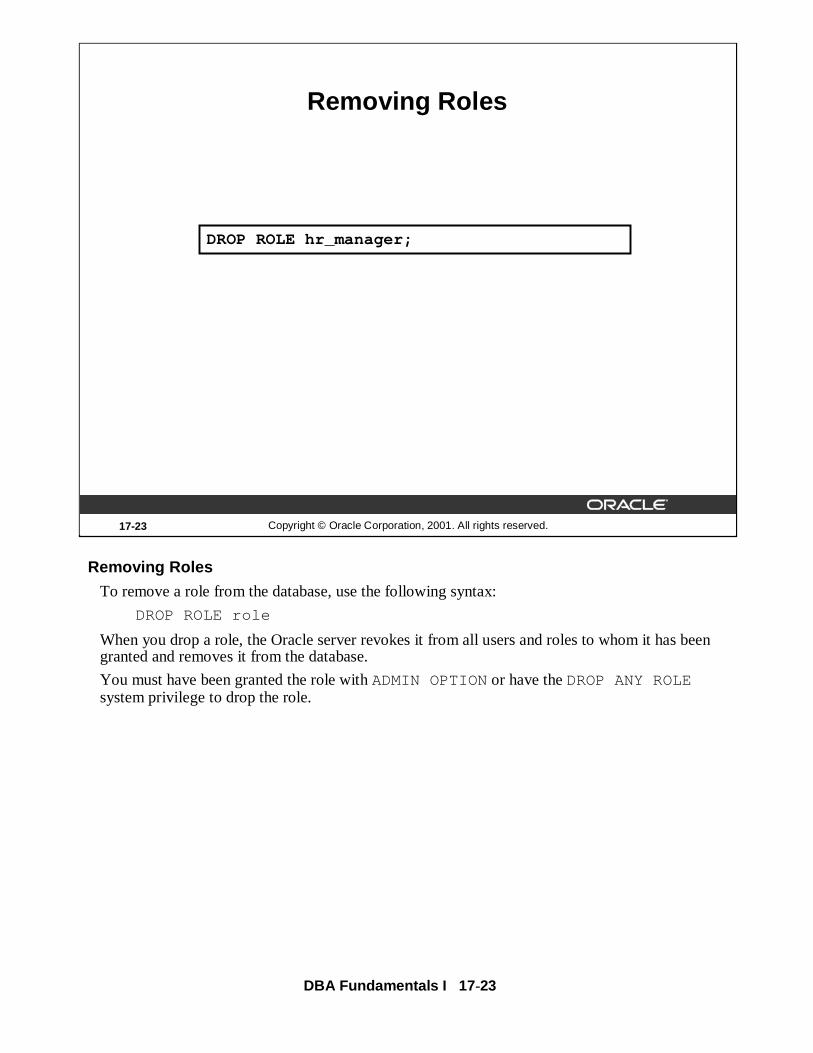
DBA Fundamentals I 17 -23
17-23 Copyright © Oracle Corporation, 2001. All rights reserved.
Removing Roles
DROP ROLE hr_manager;
Removing Roles
To remove a role from the database, use the following syntax:
DROP ROLE role
When you drop a role, the Oracle server revokes it from all users and roles to whom it has been granted and removes it from the database.
You must have been granted the role with ADMIN OPTIONor have the DROP ANY ROLEsystem privilege to drop the role.

DBA Fundamentals I 17 -24
Removing Roles (continued)
How to use Oracle Enterprise Manager to Remove a Role
1. Launch the Console:%oemapp console
2. Choose to Launch the Console standalone.
3. Expand your working database from the databases folder
4. Expand the Security folder.
5. Expand the Roles folder.
6. Right-click on the role to be removed and select Remove. Or, select the role to be removed and select Remove from the Object menu.

DBA Fundamentals I 17 -25
17-25 Copyright © Oracle Corporation, 2001. All rights reserved.
BENEFITS PAYROLL
HR_MANAGERHR_CLERK PAY_CLERK
Userroles
Applicationroles
Applicationprivileges
Guidelines for Creating Roles
Users
Payroll privilegesBenefits privileges
Guidelines for Creating Roles
Because a role includes the privileges necessary to perform a task, the role name is usually an application task or a job title. The example above uses both application tasks and job titles for role names.
1. Create a role for each application task. The name of the application role corresponds to a task in the application, such as PAYROLL
2. Assign the privileges necessary to perform the task to the application role.
3. Create a role for each type of user. The name of the user role corresponds to a job title, such as PAY_CLERK.
4. Grant application roles to user’s roles.
5. Grant user’s roles to users.
If a modification to the application requires that new privileges are needed to perform the payroll task, then the DBA only needs to assign the new privileges to the application role, PAYROLL. All of the users that are currently performing this task will receive the new privileges.

DBA Fundamentals I 17 -26
17-26 Copyright © Oracle Corporation, 2001. All rights reserved.
Guidelines for Using Passwords and Default Roles
Default rolePassword protected(not default)
Select privilegesINSERT, UPDATE, DELETE,and SELECTprivileges
PAY_CLERK PAY_CLERK_RO
Using Passwords
Passwords provide an additional level of security when enabling a role. For example, the application might require a user to enter a password when enabling the PAY_CLERKrole, because this role can be used to issue checks
Passwords allow a role to be enabled only through an application. This technique is shown in the example above
• The DBAhas granted the user two roles, PAY_CLERKand PAY_CLERK_RO.
• The PAY_CLERKhas been granted all of the privileges needed to perform the payroll clerk function.
• The PAY_CLERK_RO(RO for read only) has been granted only SELECTprivileges on the tables required to perform the payroll clerk function.
• The user can log in to SQL*Plus to perform queries, but cannot modify any of the data, because the PAY_CLERKis not a default role, and the user does not know the password for PAY_CLERK.
• When the user logs on to the payroll application, it enables thePAY_CLERKby providing the password. It is coded in the program; the user is not prompted for it.
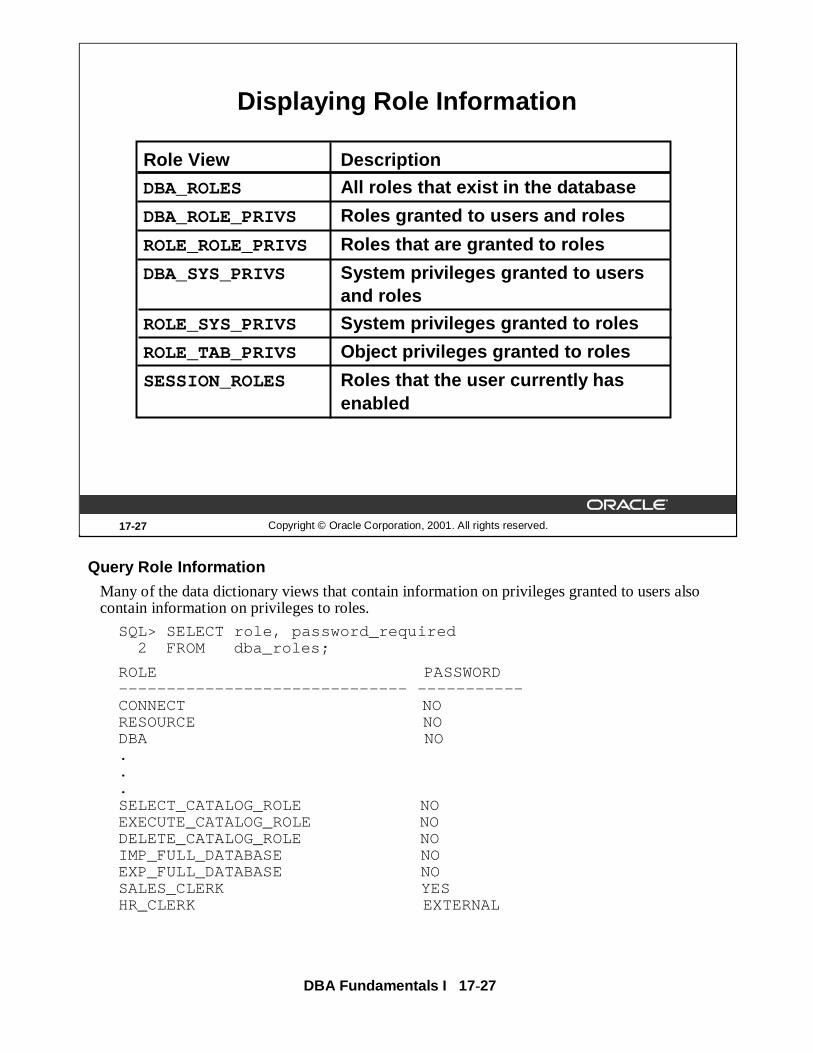
DBA Fundamentals I 17 -27
17-27 Copyright © Oracle Corporation, 2001. All rights reserved.
Displaying Role Information
Role View Description
DBA_ROLES All roles that exist in the database
DBA_ROLE_PRIVS Roles granted to users and roles
ROLE_ROLE_PRIVS Roles that are granted to roles
DBA_SYS_PRIVS System privileges granted to users and roles
ROLE_SYS_PRIVS System privileges granted to roles
ROLE_TAB_PRIVS Object privileges granted to roles
SESSION_ROLES Roles that the user currently has enabled
Query Role Information
Many of the data dictionary views that contain information on privileges granted to users also contain information on privileges to roles.
SQL> SELECT role, password_required 2 FROM dba_roles;
ROLE PASSWORD------------------------------ -----------CONNECT NO RESOURCE NO DBA NO ... SELECT_CATALOG_ROLE NO EXECUTE_CATALOG_ROLE NO DELETE_CATALOG_ROLE NO IMP_FULL_DATABASE NO EXP_FULL_DATABASE NO SALES_CLERK YES HR_CLERK EXTERNAL

DBA Fundamentals I 17 -28
17-28 Copyright © Oracle Corporation, 2001. All rights reserved.
Summary
In this lesson, you should have learned how to:
• Create roles
• Assign privileges to roles
• Assign roles to users or roles
• Establish default roles

DBA Fundamentals I 17 -29
Quick Reference
REVOKE
GRANT
ALTER USER…DEFAULT ROLES
SET ROLE
DROP ROLE
ALTER ROLE
CREATE ROLECommands
SESSION_ROLES
ROLE_TAB_PRIVS
ROLE_SYS_PRIVS
ROLE_ROLE_PRIVS
DBA_SYS_PRIVS
DBA_ROLE_PRIVS
DBA_ROLESData dictionary views
MAX_ENABLED_ROLESInitialization parameters
ReferenceContext

DBA Fundamentals I 17 -30
17-30 Copyright © Oracle Corporation, 2001. All rights reserved.
Practice 17 Overview
This practice covers the following topics:
• Listing system privileges for a role
• Creating, assigning and dropping roles
• Creating Application roles

DBA Fundamentals I 17 -31
Practice 17: Managing Roles
1 Examine the data dictionary view and list the system privileges of the RESOURCErole.
2 Create a role called DEV, which enables a user to create a table, create a view andselect from Kay ’s CUSTOMERStable.
3 a Assign the RESOURCEand DEVroles to Bob, but make only theRESOURCErole to be automatically enabled when he logs on.
b Give Bob the ability to read all the data dictionary information.
4 Bob needs to check the undo segments that are currently used by the instance.Connect as Bob and list the undo segments used.
5 As SYSTEM, try to create a view CUST_VIEWon Kay ’s CUSTOMERStable. Whathappens and why?
6 As user Emi grant select on customers to SYSTEM. As SYSTEMtry to create viewCUST_VIEWon Emi ’s CUSTOMERStable. What happens and why?

DBA Fundamentals I 17 -32

18Copyright © Oracle Corporation, 2001. All rights reserved.
Using Globalization Support

DBA Fundamentals I 18 -2
18-2 Copyright © Oracle Corporation, 2001. All rights reserved.
Objectives
After completing this lesson, you should be able todo the following:
• Choose database character set and national character set for a database
• Specify the language-dependent behavior using initialization parameters, environment variables, and the ALTER SESSIONcommand
• Use the different types of National Language Support (NLS) parameters
• Explain the influence on language-dependent application behavior
• Obtain information about Globalization Support usage

DBA Fundamentals I 18 -3
18-3 Copyright © Oracle Corporation, 2001. All rights reserved.
Globalization Support Features
• Language support
• Territory support
• Character set support
• Linguistic sorting
• Message support
• Date and time formats
• Numeric formats
• Monetary formats
Database
Globalization Support
Globalization Support ensures that database utilities and error messages, sort order, date, time, monetary, numeric, and calendar conventions automatically adapt to the native language.
Oracle currently supports 57 languages, 88 territories, 84 linguistic sorts (71 monolingual and 13 multilingual), and 235 encoded character sets.
The language-dependent operations are controlled by a number of parameters and environment variables on both the client and the server sides.
Server and client may run in the same or different locations. When client and server use different character sets, the Oracle server handles character set conversion automatically.

DBA Fundamentals I 18 -4
Globalization Support (continued)
• Users can interact, store, process, and retrieve data in their native language, including Western European, Eastern European, Middle Eastern, East Asian, and Southeast Asian languages.
• Different countries and geographies dictate different cultural conventions that directly affect data formats.
• Many different character encoding schemes, including single-byte, multibyte, and fixed-width encoded character sets are supported.
• The Oracle server provides many different linguistic sorts for linguistically accurate sorting.
• Database utilities and error messages appear in the supported native language. The Oracle products are translated into 30 different languages.
• Date and time formats can be expressed according to ISO conventions for fractional seconds, second, minute, hour, day, month, and year. Time zone regions can be used to support Daylight Savings Time.
• National calendars such as Gregorian, Japanese, Imperial, and Thai Buddha are supported.
• Numeric data is represented in the appropriate local formats.
• Currency symbols reflect the local economy and the ISO conventions. Credit and debit symbols also differ from location to location.

DBA Fundamentals I 18 -5
18-5 Copyright © Oracle Corporation, 2001. All rights reserved.
Different Types of Encoding Schemes
Oracle supports different classes of character encoding schemes:
• Single-byte character sets– 7-bit
– 8-bit
• Varying-width multibyte character sets
• Fixed-width multibyte character sets
• Unicode (AL32UFT8, AL16UTF16, UTF8)
Character Encoding Schemes
A character encoding scheme specifies numeric codes corresponding to characters that a computer or terminal can display and receive.
Character encoding schemes are used to interpret data into meaningful symbols from a terminal to a host machine.
Oracle provides different classes of encoding schemes:
• Single-byte
• Varying-width
• Fixed-width
• Unicode
Single-Byte Character Sets
In a single-byte character set, each character occupies one byte. Single-byte 7-bit encoding schemes can define up to 128 (27) characters; single-byte 8-bit encoding schemes can define up to 256 (28) characters.

DBA Fundamentals I 18 -6
Examples of Single-Byte Schemes
7-bit character set: ASCII 7-bit American (US7ASCII)
8-bit character set:
• ISO 8859-1 West European (WE8ISO8859P1)
• EBCDIC Code Page 500 8-bit West European (WE8EBCDIC500)
• DEC 8-bit West European (WE8DEC)
Varying-Width Multibyte Character Sets
A varying-width multibyte character set is represented by one or more bytes per character. Multibyte character sets are commonly used for Asian language support. Some multibyte encoding schemes use the value of the most significant bit to indicate if a byte represents a single byte or is part of a series of bytes representing a character. However, other character encoding schemes differentiate single-byte from multibyte characters. A shift-out control code, sent by a device, indicates that the following bytes are double-byte characters, until a shift-in code is encountered.
Examples of Varying-Width Multibyte Schemes
• Japanese Extended UNIX Code (JEUC)
• Chinese GB2312-80 (CGB2312-80)
• AL32UTF8 (UTF-8)
Fixed-Width Multibyte Character Sets
Fixed-width multibyte character sets provide support similar to multibyte character sets, except that the format is a fixed number of bytes for each character.
This provides the benefits of having a uniform byte size representation for each character.
Only one fixed-width multibyte character set is supported and it is only in the National Character Set, AL16UTF16.
Example of Fixed-Width Multibyte Character Sets
AL16UTF16, 16-bit Unicode (fixed width 2-byte Unicode)

DBA Fundamentals I 18 -7
Unicode Character Set
Unicode is a worldwide character-encoding standard that can represent all characters for computer usage, including technical symbols and characters used in publishing. Unicode Standard, version 3.0 contains 49,149 characters, with a capacity for over one million characters.
The Unicode character repertoire can be represented in a number of different encoding formats. UTF-16 (Universal Character Set Transformation Format) is a two-byte, fixed-width format; UTF-8 is a multibyte, varying-width format.
Oracle provides AL32UTF8, UTF8, and UTFE as database character sets and AL16UTF16 and UTF8 as national character sets. The advantage of UTF-8 based character sets is that they include ASCII using the same single-byte encoding. UTF8 is a superset of ASCII, hence this makes database character set migration easier when upgrading ASCII based characters sets to Unicode.
Note: Notice above UTF-16 and UTF-8, with hyphens, refer to the Unicode Standard encodings; UTF8, AL32UTF8, and AL16UTF16, without hyphens, refer to Oracle character sets based on the Unicode Standard.

DBA Fundamentals I 18 -8
18-8 Copyright © Oracle Corporation, 2001. All rights reserved.
Database Character Sets and National Character Sets
Can store Unicode using either AL16UTF16 or UTF8
Can store varying-width character sets
Store data columns of type NCHAR, NVARCHAR2, NCLOB
Store data columns of type CHAR, VARCHAR2, CLOB, LONG
May not be changed without re-creation, few exceptions
May not be change without re-creation, few exceptions
Defined at creation timeDefined at creation time
National Character SetsDatabase Character Sets
Character Set TypesThe CREATE DATABASEstatement has the CHARACTER SETclause and the additional optional clause NATIONAL CHARACTER SETto declare the character set to be used as the database character set and the national character set. If no NATIONAL CHARACTER SETclause is present, the national character set defaults to AL16UTF16.
Because the database character set is used to identify and to hold SQL and PL/SQL source code, it must have either EBCDIC or 7-bit ASCII as a subset, whichever is native to the platform. Therefore, it is not possible to use a fixed-width, multibyte character set as the database character set, only as the national character set.
The National Character set is for Unicode storage only and the SQL NCHARdatatypes (NCHAR, NVARCHAR2, and NCLOB) are Unicode Datatypes in Oracle9i.

DBA Fundamentals I 18 -9
18-9 Copyright © Oracle Corporation, 2001. All rights reserved.
Guidelines for Choosing an Oracle Database Character Set
Considerations
• What language does the database need to support?
• What are interoperability concerns with system resources and applications?
• What are the performance implications?
• What are the restrictions?
What language does the database need to support?
Several character sets may meet your current language requirements, but you should consider future requirements as well. If you know that you will need to expand support in the future for different languages, picking a character set with a wider range now will eliminate the need for migration later.
What are interoperability concerns with system resources and applications?
While the database maintains and processes the actual character data, there are other resources that you must depend on from the operating system. For instance, the operating system supplies fonts that correspond to the character set you have chosen. Input methods that support the language(s) desired and application software must also be compatible with a particular character set.
If you choose a character set that is different from what is available on the operating system, Oracle can convert the operating system character set to the database character set. However, there is some character set conversion overhead, and you need to make sure that the operating system character set has an equivalent character repertoire to avoid any possible data loss.
DBA Fundamentals I 18 -10
What are the performance implications?
There can be different performance overheads in handling different encoding schemes, depending on the character set chosen. For best performance, you should try to choose a character set that avoids character set conversion and uses the most efficient encoding for the languages desired. Single-byte character sets are more optimal for performance than multibyte character sets, and they also are the most efficient in terms of space requirements. However, single-byte character sets limit how many languages you can use.
What are the restrictions?
You cannot choose a database character set that is fixed-width multibyte.

DBA Fundamentals I 18 -11
18-11 Copyright © Oracle Corporation, 2001. All rights reserved.
Guidelines for Choosing an Oracle National Character Set
• Two choices– AL16UTF16
– UTF8
• Is space an issue?
• Is performance an issue?
Choosing a National Character Set
Two choices are available for the National Character Set, AL16UTF16 and UTF8. AL16UFT16 is a fixed width 2-byte Unicode character set. UTF8 is a variable width 1 to 3 byte Unicode character set.
European characters, in UTF8, are stored in 1 to 2 bytes and thus save space over AL16UTF16 which stores characters in 2 bytes. Asian characters, in UTF8, are stored in 3 bytes and require more space than AL16UTF16.
Because AL16UTF16 is a fixed width encoding, it performs faster than the variable width UTF8.

DBA Fundamentals I 18 -12
18-12 Copyright © Oracle Corporation, 2001. All rights reserved.
Choosing a Unicode SolutionUnicode Database
When Should You Use a Unicode Database?
• Easy code migration for Java or PL/SQL
• Easy data migration from ASCII based data
• Evenly distributed multilingual data
• InterMedia Text Search
Easy Code Migration for Java or PL/SQL
A Unicode Database minimizes code changes when implementing multiple languages by storing multilingual data in existing SQL CHARdatatypes (CHAR, VARCHAR2, CLOB, and LONG). It is not necessary to recode for the SQL NCHARdatatypes.
Easy Data Migration from ASCII based dataIf the current database character set and data are strict US7ASCII , the database can be migrated with a simple ALTER DATABASEstatement.
Evenly Distributed Multilingual data
If multilingual data is distributed throughout the database, choose a Unicode database solution because it does not require you to identify which columns store multilingual data.
Oracle TextTo use multilingual BLOBs with Oracle Text, a Unicode database solution is required.
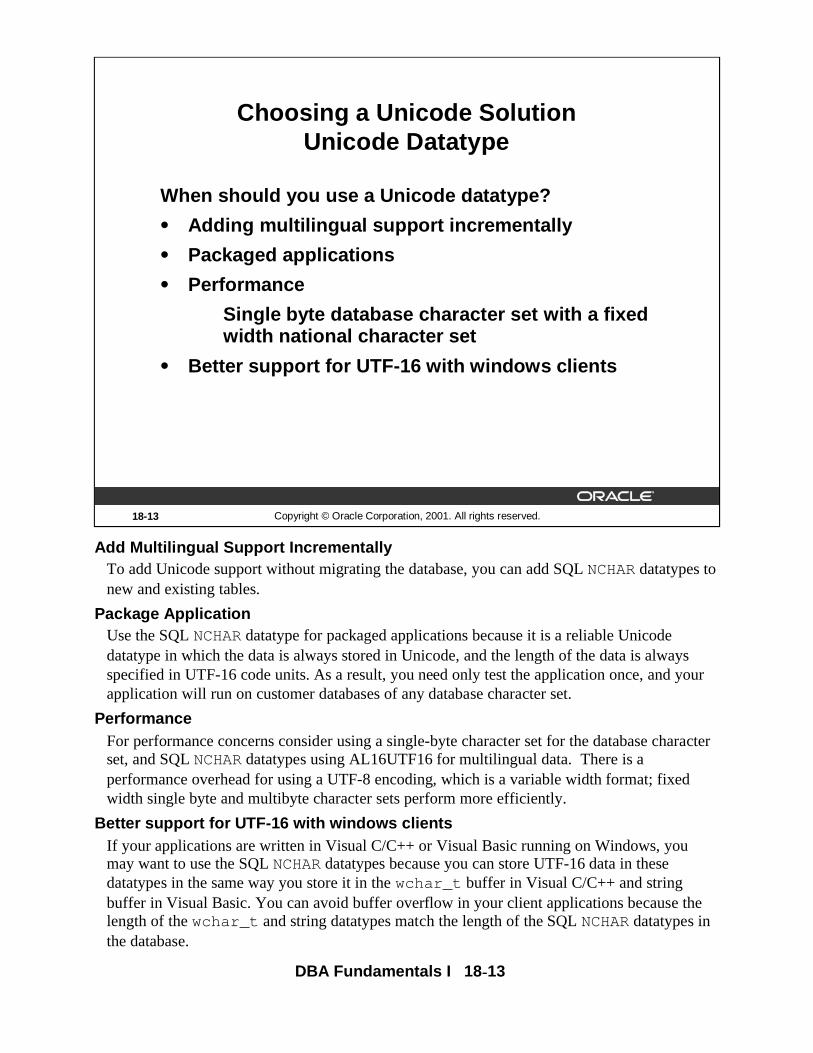
DBA Fundamentals I 18 -13
18-13 Copyright © Oracle Corporation, 2001. All rights reserved.
Choosing a Unicode SolutionUnicode Datatype
When should you use a Unicode datatype?
• Adding multilingual support incrementally
• Packaged applications
• Performance
Single byte database character set with a fixed width national character set
• Better support for UTF-16 with wi ndows clients
Add Multilingual Support IncrementallyTo add Unicode support without migrating the database, you can add SQL NCHARdatatypes to new and existing tables.
Package ApplicationUse the SQL NCHARdatatype for packaged applications because it is a reliable Unicode datatype in which the data is always stored in Unicode, and the length of the data is always specified in UTF-16 code units. As a result, you need only test the application once, and your application will run on customer databases of any database character set.
PerformanceFor performance concerns consider using a single-byte character set for the database character set, and SQL NCHARdatatypes using AL16UTF16 for multilingual data. There is a performance overhead for using a UTF-8 encoding, which is a variable width format; fixed width single byte and multibyte character sets perform more efficiently.
Better support for UTF-16 with windows clientsIf your applications are written in Visual C/C++ or Visual Basic running on Windows, you may want to use the SQL NCHARdatatypes because you can store UTF-16 data in these datatypes in the same way you store it in the wchar_t buffer in Visual C/C++ and string buffer in Visual Basic. You can avoid buffer overflow in your client applications because the length of the wchar_t and string datatypes match the length of the SQL NCHARdatatypes in the database.

DBA Fundamentals I 18 -14
18-14 Copyright © Oracle Corporation, 2001. All rights reserved.
Specifying Language-Dependent Behavior
Initialization parameter
Environment variable
ALTER SESSION command
Specifying Language-Dependent Behavior
There are three ways to specify National Language Support (NLS) parameters:
• As initialization parameters on the server side to specify the default server environment (These default settings have no effect on the client side.)
• As environment variables for the client to specify locale-dependent behavior overriding the defaults set for the server
• As the ALTER SESSIONparameter to override the default set for the session or the server

DBA Fundamentals I 18 -15
18-15 Copyright © Oracle Corporation, 2001. All rights reserved.
Specifying Language-Dependent Behavior for the Server
NLS_LANGUAGEspecifies:
• The language for messages
• Day and month names
• Symbols for A.D, B.C, A.M, P.M.
• The default sorting mechanism
NLS_TERRITORYspecifies:
• Day and week numbering
• Default date format, decimal character, group separator, and the default ISO and local currency symbols
NLS Initialization ParametersThe initialization parameter NLS_LANGUAGEdefines the value for language-dependent conventions, such as:
• Language used for Oracle messages
• Language used for day and month names and their abbreviations
• Symbols used for language-equivalents of a.m, p.m, A.D., and B.C.
• Default sorting sequence of character data
The initialization parameter NLS_TERRITORYdefines values for territory-dependent conventions, which include:
• Default date format
• Decimal character and group separator
• Local currency symbol
• ISO currency symbol
• ISO week number calculation
• Week start day
Note: When the territory name contains a space, as in The Netherlands, the territory name should be enclosed in double quotes, for example “The Netherlands.”

DBA Fundamentals I 18 -16
18-16 Copyright © Oracle Corporation, 2001. All rights reserved.
Dependent Language and Territory Default Values
AMERICA$
AMERICA
DD-MON-RR
,.
NLS_TERRITORYNLS_CURRENCY
NLS_ISO_CURRENCY
NLS_DATE_FORMAT
NLS_NUMERIC_CHARACTERS
AMERICANAMERICAN
BINARY
NLS_LANGUAGE
NLS_DATE_LANGUAGE
NLS_SORT
VALUESPARAMETER
NLS Initialization ParametersThe initialization parameter NLS_LANGUAGEdetermines the default values of the following parameters:
Changes the linguistic sort sequence that the Oracle server uses to sort character values (The sort value must be the name of a linguistic sort sequence.)
NLS_SORT
Explicitly changes the language for day and month names and abbreviations and spelled values of other date format elements
NLS_DATE_LANGUAGE
DescriptionColumn

DBA Fundamentals I 18 -17
NLS Initialization Parameters (continued)NLS_TERRITORYdetermines the default values for the following parameters:
Dual Currency Support for the Euro
On January 1, 1999, the new currency of the European union, the euro, made its debut. In order to support the new European Union currency, dual currency support has been added for given territories. An initialization parameter NLS_DUAL_CURRENCYsets an alternate currency symbol for the user session.
The following territories have the euro symbol added for dual currency support:
Austria Italy
Belgium Luxembourg
Denmark Netherlands
Finland Portugal
France Spain
Germany Sweden
Greece United Kingdom
Ireland
The ISO character sets, such as WE8ISO8859P15 and MS Code Page WE8MSWIN1525, have specified code points for the euro symbol.
Explicitly specifies a new default date format (The value must be a date format model.)
NLS_DATE_FORMAT
Explicitly specifies the territory whose ISO currency symbol should be used
NLS_ISO_CURRENCY
Explicitly specifies a new decimal character and group separator
NLS_NUMERIC_CHARACTERS
Explicitly specifies a new local currency symbol
NLS_CURRENCY
DescriptionColumn

DBA Fundamentals I 18 -18
18-18 Copyright © Oracle Corporation, 2001. All rights reserved.
Specifying Language-Dependent Behavior for the Session
• Environment variable: NLS_LANG=French_France.UTF8
• Additional environment variables:– NLS_DATE_FORMAT
– NLS_DATE_LANGUAGE
– NLS_SORT
– NLS_NUMERIC_CHARACTERS
– NLS_CURRENCY
– NLS_ISO_CURRENCY
– NLS_CALENDAR
The Environment Variable NLS_LANG
Specify the desired cultural convention for an individual user with the NLS_LANG environment. The value of NLS_LANGoverrides any values of the NLS initialization parameters.
Each component controls a subset of NLS features:
NLS_LANG=<language>_<territory>.<charset>
Where: language overrides the value of NLS_LANGUAGEand controlsthe same features as NLS_LANGUAGE
territory overrides the value of NLS_TERRITORYand controlsthe same features as NLS_TERRITORY
characterset specifies the character encoding scheme used by clientapplication (normally that of the user’s terminal)

DBA Fundamentals I 18 -19
18-19 Copyright © Oracle Corporation, 2001. All rights reserved.
Character Sets in Client-Server Architecture
CREATE DATABASE ...CHARACTER SET <charset>NATIONAL CHARACTER SET<ncharset>...
NLS_LANG=<language>_<territory>.<charset>NLS_NCHAR=<ncharset>
The Environment Variable NLS_LANG(continued)
NLS_LANGdefines a client terminal’s character encoding scheme. Different clients can use different encoding schemes. Data passed between client and server is converted automatically between the two encoding schemes. The database encoding scheme should be a superset, or equivalent of, all the client encoding schemes. The conversion is transparent to the client application.
When the database character set and the client character set are the same, Oracle assumes that the data being sent or received is of the same character set, so no validations or conversions are performed. The benefit in this scenario is better performance, but if misused it can lead to possible data inconsistency problems, such as storing data from another character set different then the database character set.
For example your database character set is US7ASCII and you are using Simplified Chinese Windows as your client terminal, by setting NLS_LANGto SIMPLIFIED CHINESE_HONGKONG.US7ASCIIas the client character set, it is possible for you to store multibyte Simplified Chinese characters inside a single byte database. This means that Oracle will treat these characters as single-byte US7ASCII characters, hence all SQL string manipulation functions such as SUBSTRor LENGTHwill be based on bytes rather than characters. And all your non-ASCII characters could be lost following an export and import into another database.
DBA Fundamentals I 18 -20
Additional Environment Variables
All NLS initialization parameters are available as environment variables, making it possible to specify individual NLS characteristics for each client.
In addition NLS_CALENDARcan be used to specify which calendar system the Oracle server uses; for example, Gregorian, Persian, or Thai Buddha.
The following variables can be set only in the client environment:
• NLS_CREDIT
• NLS_DEBIT
• NLS_DISPLAY
• NLS_LANG
• NLS_LIST_SEPARATOR
• NLS_MONETARY
Note
The description of these parameters can be found in the Oracle9i GlobalizationSupport Manual.
If the environment variable ORA_NLS33 is set to an invalid directory, it is possible tocreate the database only with the default character set US7ASCII . ORA_NLS33shouldbe set on UNIX as follows:
$ORACLE_HOME/ocommon/nls/admin/data
This is also the default setting if ORA_NLS33is not set.

DBA Fundamentals I 18 -21
18-21 Copyright © Oracle Corporation, 2001. All rights reserved.
Specifying Language-Dependent Behavior for the Session
ALTER SESSION SET NLS_DATE_FORMAT=‘DD.MM.YYYY’;
DBMS_SESSION.SET_NLS(‘NLS_DATE_FORMAT’,’’’DD.MM.YYYY’’’) ;
Changing NLS ParametersChange individual NLS characteristics for a session with the ALTER SESSIONcommand. All environment variables that can be set on both the client and server sides can also be modified by issuing the ALTER SESSIONcommand.
In the above example the date format is changed for the session.
Also, tools such as SQL*Plus reads the environment variables and issue the corresponding ALTER SESSIONcommand.
In addition to explicitly issuing ALTER SESSIONcommands, there is a database package DBMS_SESSION.SET_NLSthat takes the name and the value of the parameter.

DBA Fundamentals I 18 -22
18-22 Copyright © Oracle Corporation, 2001. All rights reserved.
Linguistic Sorting
Oracle provides three types of sorting
• Binary sorting, sorted according to the binary values of the encoded characters
• Monolingual sorting– Sorts in two passes
– Based on a character's assigned major and minor values
• Multilingual sorting– Based on the new ISO 14651 and,
– Unicode 3.0 Standard for multilingual collation
Linguistic Sorting
A binary sort is a conventional sorting mechanism by which letters are sorted according to the binary values used to encode the characters. The alphabetic position of a character may vary for different languages.
With monolingual sorting Oracle makes two passes when comparing strings in monolingual sorts. The first pass is to compare the major value of entire string from the major table and the second pass is to compare the minor value from the minor table. Usually, letters with the same appearance will have the same major value. Oracle defines letters with diacritic and case differences for the same major value but different minor values. This provides better sorting than binary but is still limited.
For multilingual sorting, Oracle provides a sorting mechanism based on an ISO standard (ISO14651) and the Unicode 3.0 standard. This allow each language to properly sort each encoded character.
Oracle currently support 84 linguistic sorts (68 monolingual and 13 multilingual). For a complete list please refer to the Oracle9i Globalization Support Manual.
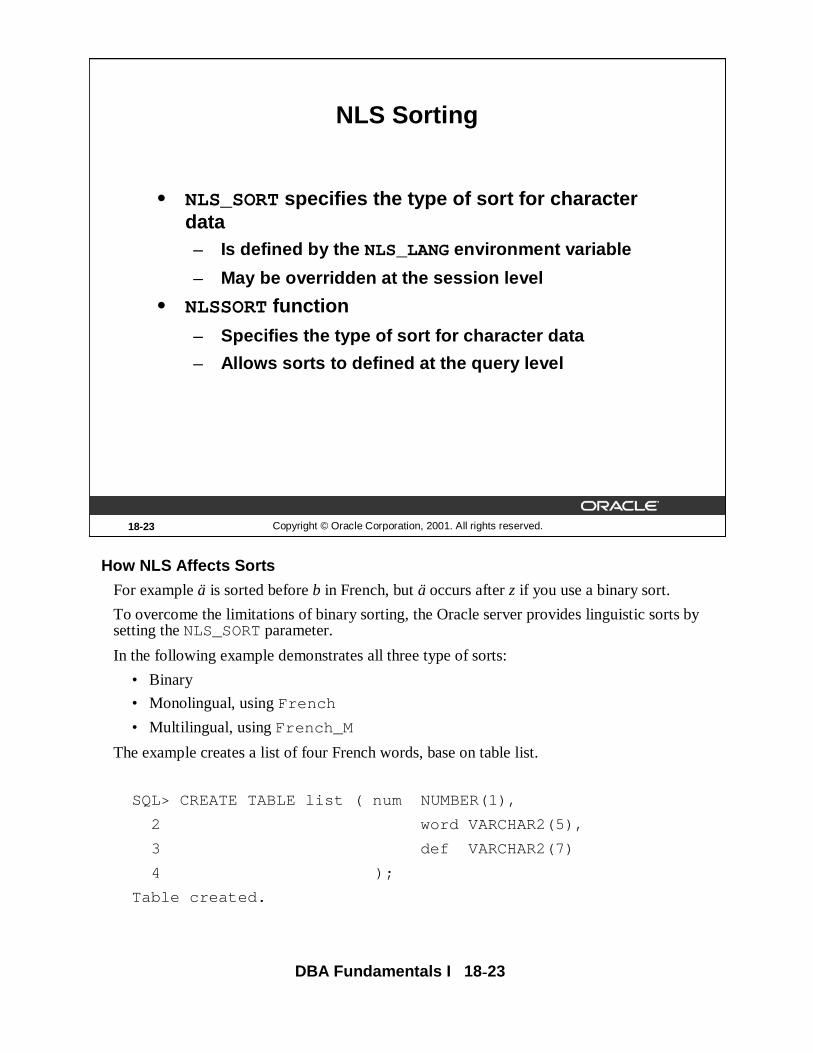
DBA Fundamentals I 18 -23
18-23 Copyright © Oracle Corporation, 2001. All rights reserved.
NLS Sorting
• NLS_SORTspecifies the type of sort for character data– Is defined by the NLS_LANGenvironment variable
– May be overridden at the session level
• NLSSORTfunction
– Specifies the type of sort for character data
– Allows sorts to defined at the query level
How NLS Affects Sorts
For example ä is sorted before b in French, but ä occurs after z if you use a binary sort.
To overcome the limitations of binary sorting, the Oracle server provides linguistic sorts by setting the NLS_SORTparameter.
In the following example demonstrates all three type of sorts:
• Binary
• Monolingual, using French
• Multilingual, using French_M
The example creates a list of four French words, base on table list.
SQL> CREATE TABLE list ( num NUMBER(1),
2 word VARCHAR2(5),
3 def VARCHAR2(7)
4 );
Table created.
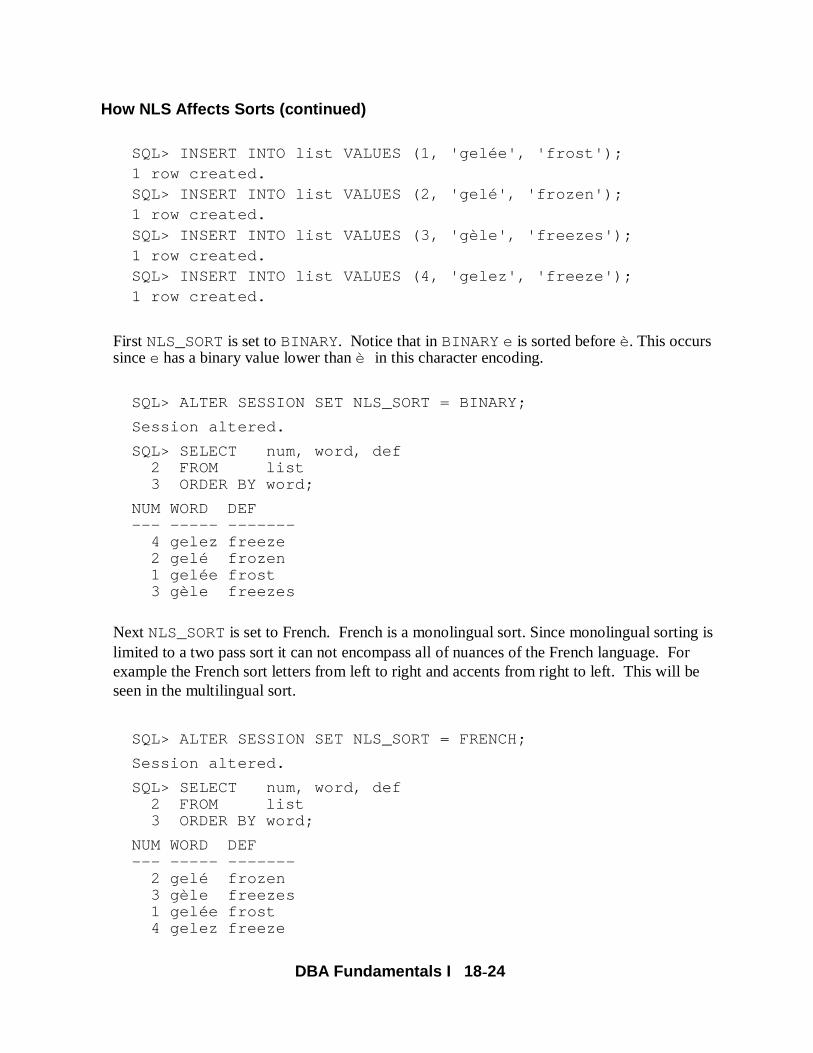
DBA Fundamentals I 18 -24
How NLS Affects Sorts (continued)
SQL> INSERT INTO list VALUES (1, 'gelée', 'frost');1 row created.SQL> INSERT INTO list VALUES (2, 'gelé', 'frozen');1 row created.SQL> INSERT INTO list VALUES (3, 'gèle', 'freezes');1 row created.SQL> INSERT INTO list VALUES (4, 'gelez', 'freeze');1 row created.
First NLS_SORTis set to BINARY. Notice that in BINARY e is sorted before è. This occurs since e has a binary value lower than è in this character encoding.
SQL> ALTER SESSION SET NLS_SORT = BINARY;
Session altered.
SQL> SELECT num, word, def2 FROM list3 ORDER BY word;
NUM WORD DEF--- ----- -------
4 gelez freeze2 gelé frozen1 gelée frost3 gèle freezes
Next NLS_SORTis set to French. French is a monolingual sort. Since monolingual sorting is limited to a two pass sort it can not encompass all of nuances of the French language. For example the French sort letters from left to right and accents from right to left. This will be seen in the multilingual sort.
SQL> ALTER SESSION SET NLS_SORT = FRENCH;
Session altered.
SQL> SELECT num, word, def2 FROM list3 ORDER BY word;
NUM WORD DEF--- ----- -------
2 gelé frozen3 gèle freezes1 gelée frost4 gelez freeze

DBA Fundamentals I 18 -25
How NLS Affects Sorts (continued)
Finally the multilingual sort, French_M . Notice the differences between this sort and the previous sort.
SQL> ALTER SESSION SET NLS_SORT = FRENCH_M;
Session altered.
SQL> SELECT num, word, def2 FROM list3 ORDER BY word;
NUM WORD DEF--- ----- -------
3 gèle freezes2 gelé frozen1 gelée frost4 gelez freeze
NLSSORTallows sorting to be defined at the query level. The following example sets NLS_SORTto BINARYat the session level but changes the sort at the query level. Notice the results are the same as the above example.
SQL> ALTER SESSION SET NLS_SORT=BINARY;
Session altered.
SQL> SELECT num, word, def2 FROM list3 ORDER BY NLSSORT(word,'NLS_SORT=FRENCH_M');
NUM WORD DEF--- ----- -------
3 gèle freezes2 gelé frozen1 gelée frost4 gelez freeze

DBA Fundamentals I 18 -26
18-26 Copyright © Oracle Corporation, 2001. All rights reserved.
Using NLS Parameters in SQL Functions
SELECT TO_CHAR(hire_date,’DD.Mon.YYYY’,‘NLS_DATE_LANGUAGE=FRENCH’)
FROM employees;
SELECT ename, TO_CHAR(sal,’9G999D99’,‘NLS_NUMERIC_CHARACTERS=‘‘,.’’’)
FROM emp;
SQL Functions with NLS Parameters
SQL character functions support single-byte and multibyte characters.
Some SQL functions require NLS parameters to be specified explicitly as part of their parameter list. Therefore SQL functions can override the behavior specified by the environment.

DBA Fundamentals I 18 -27
Examples Using NLS Parameters in SQL FunctionsSQL> SELECT TO_CHAR(hire_date, 'DD.Mon.YYYY',
2 'NLS_DATE_LANGUAGE=FRENCH') AS "Hire Date"
3 FROM employees;
Hire Date
-----------
15.Dec.1997
03.Nov.1998
11.Nov.1997
19.Mar.1999
24.Jan.2000
23.Fev.2000
24.Mar.2000
21.Avr.2000
11.Mar.1997
23.Mar.1998
24.Jan.1998
23.Fev.1999
24.Mar.1999
21.Avr.2000
11.Mai.1996
19.Mar.1997
24.Mar.1998
23.Avr.1998
24.Mai.1999
04.Jan.2000

DBA Fundamentals I 18 -28
Examples Using NLS Parameters in SQL Functions (continued)
SQL> SELECT last_name,
2 TO_CHAR(salary,'99G999D99','NLS_NUMERIC_CHARACTERS='',.''')
3 FROM employees;
LAST_NAME TO_CHAR(SA
------------------------- ----------
Doran 7.500,00
Sewall 7.000,00
Vishney 10.500,00
Greene 9.500,00
Marvins 7.200,00
Lee 6.800,00
Ande 6.400,00
Banda 6.200,00
Ozer 11.500,00
Bloom 10.000,00
Fox 9.600,00
Smith 7.400,00
Bates 7.300,00
Kumar 6.100,00
Abel 11.000,00
Hutton 8.800,00
Taylor 8.600,00
Livingston 8.400,00
Grant 7.000,00
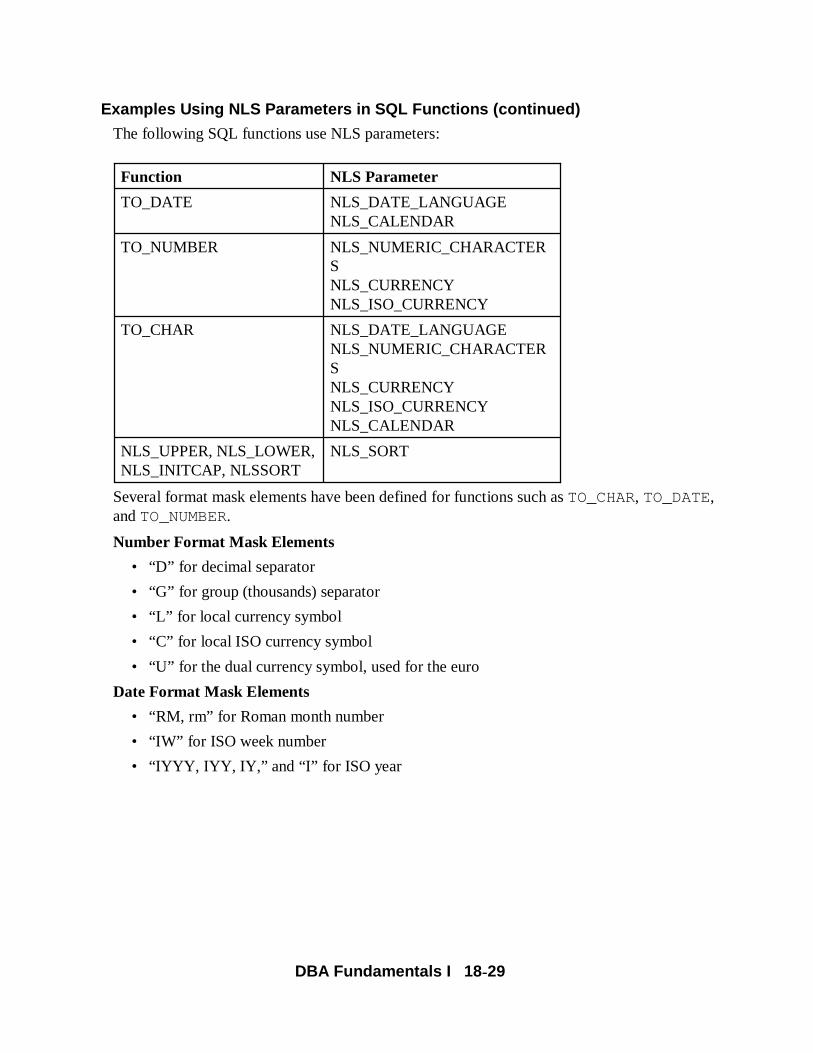
DBA Fundamentals I 18 -29
Examples Using NLS Parameters in SQL Functions (continued)
The following SQL functions use NLS parameters:
Several format mask elements have been defined for functions such as TO_CHAR, TO_DATE, and TO_NUMBER.
Number Format Mask Elements
• “D” for decimal separator
• “G” for group (thousands) separator
• “L” for local currency symbol
• “C” for local ISO currency symbol
• “U” for the dual currency symbol, used for the euro
Date Format Mask Elements
• “RM, rm” for Roman month number
• “IW” for ISO week number
• “IYYY, IYY, IY,” and “I” for ISO year
NLS_SORTNLS_UPPER, NLS_LOWER,NLS_INITCAP, NLSSORT
NLS_DATE_LANGUAGENLS_NUMERIC_CHARACTERSNLS_CURRENCYNLS_ISO_CURRENCYNLS_CALENDAR
TO_CHAR
NLS_NUMERIC_CHARACTERSNLS_CURRENCYNLS_ISO_CURRENCY
TO_NUMBER
NLS_DATE_LANGUAGENLS_CALENDAR
TO_DATE
NLS Parameter Function

DBA Fundamentals I 18 -30
18-30 Copyright © Oracle Corporation, 2001. All rights reserved.
Linguistic Index Support
• Linguistic indexing
• High performance with local sorting
• NLS_COMPparameter for linguistic comparisons
CREATE INDEX list_word ONlist (NLSSORT(word, ‘NLS_SORT = French_M’));
Linguistic Indexing
Functional indexes, described in the lesson Indexes and Index-Organized Tables, can be specialized to create linguistically sorted indexes. The SQL function NLSSORTreturns the string of bytes used to sort the first parameter in the given linguistic sorting sequence. In this example, an index is created on WORD that is sorted according to French_M sorting order. This allows you to perform index-based queries on data sorted according to each languages rules.
Linguistic Behavior of Comparison OperatorsNLS_COMPis a dynamic initialization parameter that controls how comparison operators such as <, >, and = handle linguistic ordering. When set to BINARY (the default), comparison is based on the binary value of the string. When set to ANSI, comparison operators use linguistic sorting sequences to determine the outcome of the operation according to the NLS_SORTsession parameter.

DBA Fundamentals I 18 -31
18-31 Copyright © Oracle Corporation, 2001. All rights reserved.
Import and Loading Data Using NLS
• Data will be converted from export file character set to the database character set during the import.
• LOADER:– Conventional: Data is converted into the session
character set specified by NLS_LANG.
– DIRECT: Data is converted directly into the database character set.
NLS with Import and SQL*Loader
The export file is exported with the source database character set. During import, the data is automatically converted from the character set of the export file to the target database character set.
SQL*Loader also has the capability to convert data from the data file character set to the database character set.
When using conventional path, data is converted into the session character set specified by the NLS_LANGparameter for that session.
On the direct path, data is converted directly into the database character set.
The control file of the SQL*Loader shows how to interpret the data file.
The parameter character set tells what character set is used in each data file.
Example: $sqlldr control=utl1case.ctl characterset=WE8ISO9959P1

DBA Fundamentals I 18 -32
18-32 Copyright © Oracle Corporation, 2001. All rights reserved.
Obtaining Information About Character Sets
NLS_DATABASE_PARAMETERS:
• PARAMETER(NLS_CHARACTERSET,
NLS_NCHAR_CHARACTERSET)
• VALUE
Querying the Data Dictionary for NLS Information
View the database and the national character set with the following query:
SQL> SELECT parameter, value 2 FROM nls_database_parameters 3 WHERE parameter LIKE '%CHARACTERSET%';
PARAMETER VALUE
----------------------- ------------------------------
NLS_CHARACTERSET WE8ISO8859P1
NLS_NCHAR_CHARACTERSET AL16UTF16
2 rows selected.

DBA Fundamentals I 18 -33
18-33 Copyright © Oracle Corporation, 2001. All rights reserved.
Obtaining Information About NLS Settings
NLS_INSTANCE_PARAMETERS:
• PARAMETER(initialization parameters that have been explicitly set)
• VALUE
NLS_SESSION_PARAMETERS:
• PARAMETER(session parameters)
• VALUE
Querying the Data Dictionary for NLS Information
This view displays only values for parameters that have been explicitly set in the init <SID>. ora file.
SQL> SELECT * FROM nls_instance_parameters;
PARAMETER VALUE
------------------------------ ----------------------------
NLS_LANGUAGE AMERICAN
NLS_TERRITORY AMERICA
NLS_SORT
NLS_DATE_LANGUAGE
NLS_DATE_FORMAT
NLS_CURRENCY
NLS_NUMERIC_CHARACTERS
NLS_ISO_CURRENCYNLS_CALENDAR
NLS_TIME_FORMAT
NLS_TIMESTAMP_FORMAT

DBA Fundamentals I 18 -34
Querying the Data Dictionary for NLS Information (continued)
NLS_TIME_TZ_FORMAT
NLS_TIMESTAMP_TZ_FORMAT
NLS_DUAL_CURRENCY
NLS_COMP
NLS_LENGTH_SEMANTICS BYTE
NLS_NCHAR_CONV_EXCP FALSE
17 rows selected.
The following view shows session parameters.
SQL> SELECT * FROM nls_session_parameters;
PARAMETER VALUE
------------------------------ ----------------------------
NLS_LANGUAGE AMERICAN
NLS_TERRITORY AMERICA
NLS_CURRENCY $
NLS_ISO_CURRENCY AMERICA
NLS_NUMERIC_CHARACTERS .,
NLS_CALENDAR GREGORIAN
NLS_DATE_FORMAT DD-MON-RR
NLS_DATE_LANGUAGE AMERICAN
NLS_SORT BINARY
NLS_TIME_FORMAT HH.MI.SSXFF AM
NLS_TIMESTAMP_FORMAT DD-MON-RR HH.MI.SSXFF AM
NLS_TIME_TZ_FORMAT HH.MI.SSXFF AM TZR
NLS_TIMESTAMP_TZ_FORMAT DD-MON-RR HH.MI.SSXFF AM TZR
NLS_DUAL_CURRENCY $
NLS_COMP BINARY
NLS_LENGTH_SEMANTICS BYTE
NLS_NCHAR_CONV_EXCP FALSE
17 rows selected.

DBA Fundamentals I 18 -35
18-35 Copyright © Oracle Corporation, 2001. All rights reserved.
Obtaining Information About NLS Settings
V$NLS_VALID_VALUES:
• PARAMETER (LANGUAGE, SORT, TERRITORY, CHARACTERSET)
• VALUE
V$NLS_PARAMETERS:
• PARAMETER (NLS session parameters,NLS_CHARACTERSET)
• VALUE
Querying the Data Dictionary for NLS Information
List all valid values for NLS parameters.
SQL> SELECT * FROM v$nls_valid_values
2 WHERE parameter='LANGUAGE';
PARAMETER VALUE
--------- --------------
LANGUAGE AMERICAN
LANGUAGE GERMAN
LANGUAGE FRENCH
LANGUAGE CANADIAN FRENCH
LANGUAGE SPANISH
LANGUAGE ITALIAN
LANGUAGE DUTCH
LANGUAGE SWEDISH
LANGUAGE NORWEGIAN
...
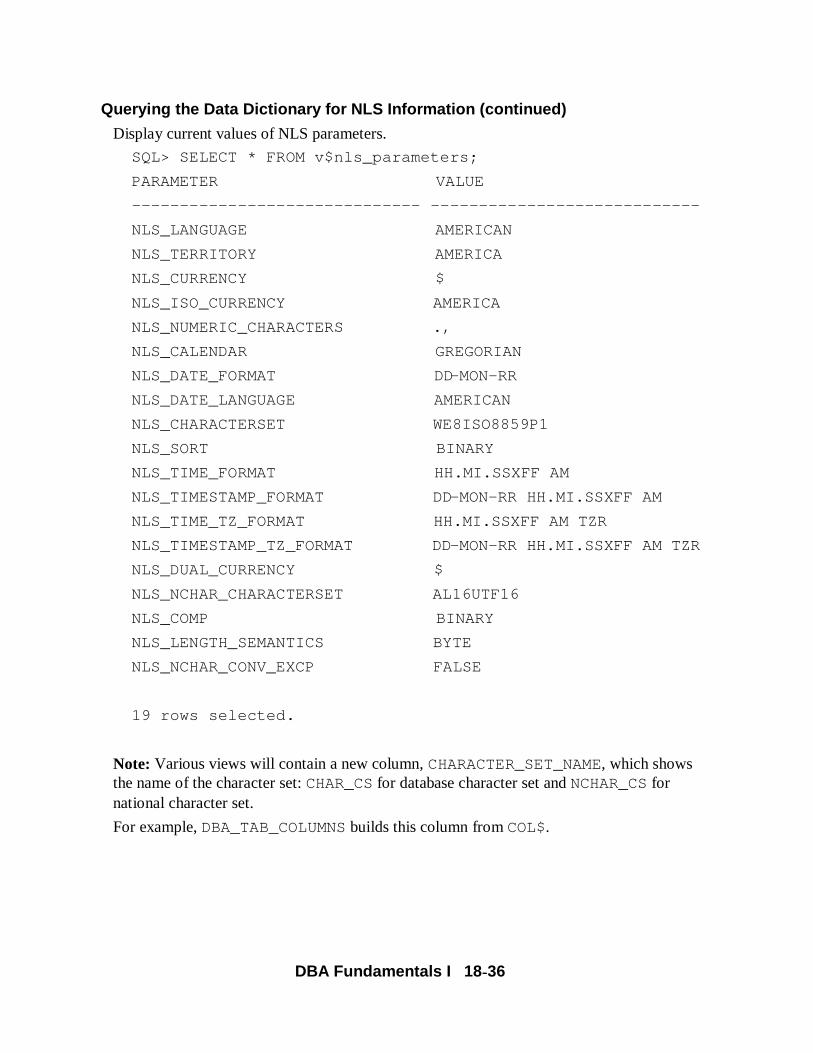
DBA Fundamentals I 18 -36
Querying the Data Dictionary for NLS Information (continued)
Display current values of NLS parameters.
SQL> SELECT * FROM v$nls_parameters;
PARAMETER VALUE
------------------------------ ----------------------------
NLS_LANGUAGE AMERICAN
NLS_TERRITORY AMERICA
NLS_CURRENCY $
NLS_ISO_CURRENCY AMERICA
NLS_NUMERIC_CHARACTERS .,
NLS_CALENDAR GREGORIAN
NLS_DATE_FORMAT DD-MON-RR
NLS_DATE_LANGUAGE AMERICAN
NLS_CHARACTERSET WE8ISO8859P1
NLS_SORT BINARY
NLS_TIME_FORMAT HH.MI.SSXFF AM
NLS_TIMESTAMP_FORMAT DD-MON-RR HH.MI.SSXFF AM
NLS_TIME_TZ_FORMAT HH.MI.SSXFF AM TZR
NLS_TIMESTAMP_TZ_FORMAT DD-MON-RR HH.MI.SSXFF AM TZR
NLS_DUAL_CURRENCY $
NLS_NCHAR_CHARACTERSET AL16UTF16
NLS_COMP BINARY
NLS_LENGTH_SEMANTICS BYTE
NLS_NCHAR_CONV_EXCP FALSE
19 rows selected.
Note: Various views will contain a new column, CHARACTER_SET_NAME, which shows the name of the character set: CHAR_CSfor database character set and NCHAR_CSfor national character set.
For example, DBA_TAB_COLUMNSbuilds this column from COL$.

DBA Fundamentals I 18 -37
18-37 Copyright © Oracle Corporation, 2001. All rights reserved.
Globalization SupportUtilities
• Character Set Scanner
– Scans the database to determine if the character set can be changed
– Reports are provided detailing possible problems and fixes
• Oracle Locale Builder
– Easy to use graphical interface
– For viewing, modifying, and creating locale definitions
Character Set Scanner
The character set scanner is a command line utility which assists in character set conversion. The scanner identifies area of possible character set conversion and truncation of data, the amount of effort required, and column widths which should be expanded. It provides assessment of feasibility, reports potential migration issues, checks all character data, and generates a summary of database scan. Prior to any character set conversion the character set scanner should be used.
Oracle Locale Builder
The Oracle9i server provides an extensive set of locale definitions including languages, territories, character sets and linguistic sorts. If you need to customize any of these existing locale definition, or create a new one, the new Oracle Locale Builder provides an easy-to-use graphical user interface through which one easily view, customize and define the various locale.

DBA Fundamentals I 18 -38
18-38 Copyright © Oracle Corporation, 2001. All rights reserved.
Summary
In this lesson, you should have learned how to:
• Choose a database character set and a national character set for the database
• Use the various types of National Language Support parameters for the server, or the session

DBA Fundamentals I 18 -39
Quick Reference
DBMS_SESSION.SET_NLSPackaged procedures and functions
ALTER SESSION SETCommands
NLS_DATABASE_PARAMETERSNLS_INSTANCE_PARAMETERSNLS_SESSION_PARAMETERS
Data dictionary views
V$NLS_VALID_VALUESV$NLS_PARAMETERS
Dynamic performance views
NLS_LANGUAGENLS_TERRITORYNLS_DATE_FORMATNLS_DATE_LANGUAGENLS_CURRENCYNLS_ISO_CURRENCYNLS_SORTNLS_NUMERIC_CHARACTERSNLS_CALENDAR
Initialization parameters
ReferenceContext

DBA Fundamentals I 18 -40
18-40 Copyright © Oracle Corporation, 2001. All rights reserved.
Practice 18 Overview
This practice covers the following topics:
• Checking the database and national character set
• Identifying valid NLS values
• Setting NLS parameters

DBA Fundamentals I 18 -41
Practice 18: Using National Language Support
1 Check the database and the national character set.
2 Which are valid values for the database character set.
3 Make sure that all dates in this session are displayed using a 4-digit year. ChangeNLS_LANGUAGEto FRENCH. Selectsysdate from DUAL.

DBA Fundamentals I 18 -42

DBA Fundamentals I A -1
ACopyright © Oracle Corporation, 2001. All rights reserved.
How to Create an Oracle9 i Database in an Unix Environment

DBA Fundamentals I A -2
Introduction
Steps to Create a Database
There are six steps to creating a useable database: three steps to create a database and three additional steps to make it usable.
1. Set the operating system environment variables ORACLE_HOME, ORACLE_SID, PATH, and LD_LIBRARY_PATH.
2. Edit/Create aninit sid .ora parameter file.
3. Execute the CREATE DATABASEcommand in SQL*Plus.
4. Run the required scripts catalog.sql andcatproc.sql .
5. Run the scriptpupbld.sql .
6. Create a tablespace for user data and any other tablespaces that might be required to meet the needs of the database.
Note: This paper makes the assumption that the Oracle9i Server has been installed in an ORACLE_HOME. Installation of the Oracle9i Server does not fall into the scope of this paper.
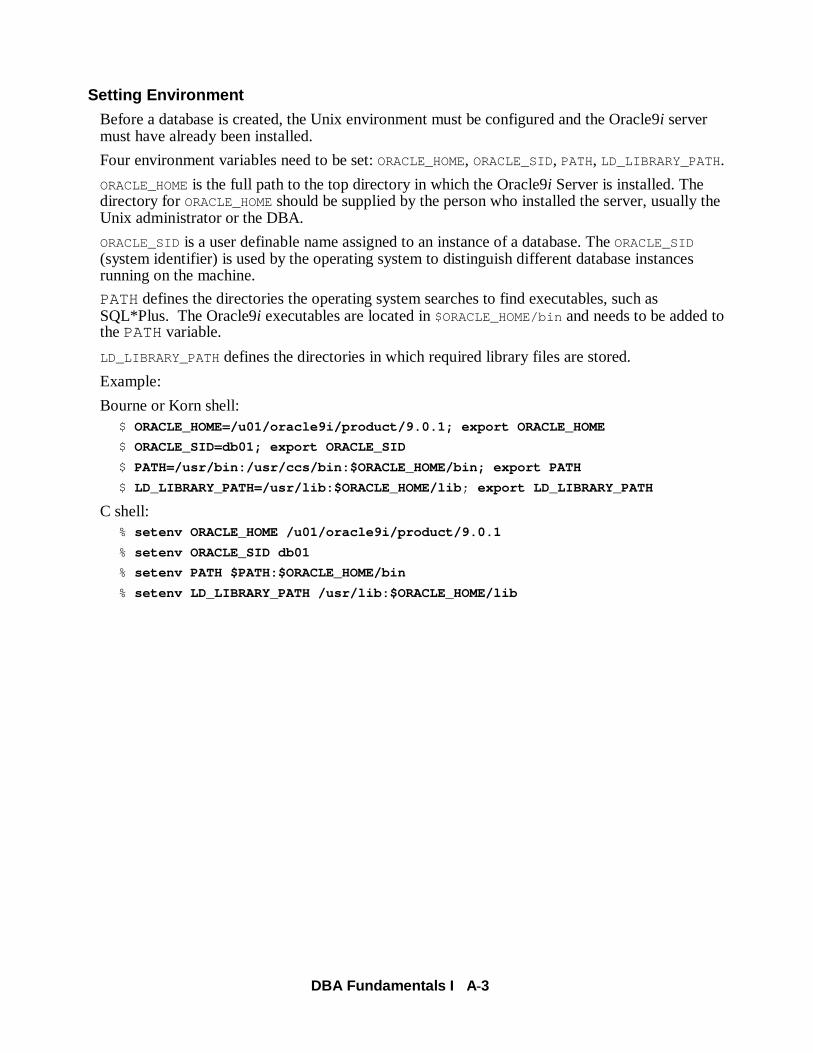
DBA Fundamentals I A -3
Setting Environment
Before a database is created, the Unix environment must be configured and the Oracle9i server must have already been installed.
Four environment variables need to be set: ORACLE_HOME, ORACLE_SID, PATH, LD_LIBRARY_PATH.
ORACLE_HOMEis the full path to the top directory in which the Oracle9i Server is installed. The directory for ORACLE_HOMEshould be supplied by the person who installed the server, usually the Unix administrator or the DBA.
ORACLE_SIDis a user definable name assigned to an instance of a database. The ORACLE_SID(system identifier) is used by the operating system to distinguish different database instances running on the machine.
PATHdefines the directories the operating system searches to find executables, such as SQL*Plus. The Oracle9i executables are located in $ORACLE_HOME/binand needs to be added to the PATHvariable.
LD_LIBRARY_PATHdefines the directories in which required library files are stored.
Example:
Bourne or Korn shell:$ ORACLE_HOME=/u01/oracle9i/product/9.0.1; export ORACLE_HOME
$ ORACLE_SID=db01; export ORACLE_SID
$ PATH=/usr/bin:/usr/ccs/bin:$ORACLE_HOME/bin; export PATH
$ LD_LIBRARY_PATH=/usr/lib:$ORACLE_HOME/lib ; export LD_LIBRARY_PATH
C shell:% setenv ORACLE_HOME /u01/oracle9i/product/9.0.1
% setenv ORACLE_SID db01
% setenv PATH $PATH:$ORACLE_HOME/bin
% setenv LD_LIBRARY_PATH /usr/lib:$ORACLE_HOME/lib

DBA Fundamentals I A -4
Editing initsid.ora
Edit/Create initsid.ora
The initsid.ora file, a user configured text file, is read each time the database starts. The parameters in the file initialize the database settings. The parameter settings in theinitsid.orafile affect not only the database at startup but also how the database is created. Prior to creating the database theinitsid.ora file must be configured.
When the Oracle9i server is installed a sample init.ora file is placed in $ORACLE_HOME/dbs. Keep this file as a backup and do not modify it, create a copy of the file containing the name of the ORACLE_SID.
Example:$ cd $ORACLE_HOME/dbs
$ cp init.ora initdb01.ora
The sample init.ora file has many comments containing suggestions for parameter settings.
The parameters in theinitsid.ora do not have to be in any order but if a parameter is listed more than once the last setting is the one used. Oracle9i Reference suggests placing the parameters in alphabetical order to prevent duplication.
There are a few parameters that should be configured; these include db_name, control_files , background_dump_dest , user_dump_dest , core_dump_dest , and undo_management .
The parameters background_dump_dest , user_dump_dest , and core_dump_dest are set to the full path locations where trace files are to be placed:
• core_dump_dest contains core dumps generated by the database
• user_dump_dest contains user trace files
• background_dump_dest contains trace files for the backgroundprocesses and the alert.log.
The db_name is the name of the database, which is used for a different purpose than ORACLE_SID. The ORACLE_SIDis the name used to designate an instance of the database. Many times the db_name and ORACLE_SIDare the same but it is not required. The db_name in the initsid.oramust be identical (case sensitive) to the name of the database used in the CREATE DATABASEcommand when the database is created.
The control_files initialization parameter designates the full path and filename of eachcontrolfile for the database. For the creation of the database, it identifies the controlfiles that need to be created.
The undo_management initialization parameter determines whether the Oracle server automatically or the DBA manually handles undo data. Set undo_management to AUTOin the initialization file.
At the end of Appendix A is an example initdb01.ora file.

DBA Fundamentals I A -5
Creating the DatabaseAfter setting the environment and configuring theinitsid.ora the database can be created. An Oracle database is created by executing a CREATE DATABASEcommand. The CREATE DATABASE command, specifies the number and location of the logfiles, the location and size of the SYSTEMtablespace, UNDOtablespace, and TEMPtablespace, and the character set for the database (this is not an exhaustive list).
The Oracle utility SQL*Plus is used when creating the database. The Unix executable for SQL*Plus issqlplus .
When creating a database the Oracle9i server is only aware of the SYSuser and the SYSDBA role. To create a database you must connect to SQL*Plus as the user SYSand the role SYSDBA. This can be accomplished in one of two methods.
1. If the Unix user used to connect to SQL*Plus is part of the administrator’s group, defined during the installation of the Oracle9i server, then the following syntax may be used:
$ sqlplus '/ as sysdba '
or
$ sqlplus /nolog
SQL> connect / as sysdba
2. If the Unix user being used to connect to SQL*Plus is not part of the administrator’s group then a password file must be created for the database by an administrator and the password assigned to SYS in the password file will need to be used. The syntax below assumes the password assigned to SYS in the password file is oracle .
$ sqlplus 'sys/oracle as sysdba'
or
$ sqlplus /nolog
SQL> connect sys/oracle as sysbda
The steps for creating and executing the SQL statement are:
1. Create a SQL script that contains the CREATE DATABASEcommand. (At the end of Appendix A is a sample create database script.)
2. Connect to SQL*Plus as SYS AS SYSDBA in one of the two methods shown above.
3. Startup the database in NOMOUNTmode.
4. Execute the SQL script.

DBA Fundamentals I A -6
Creating the Database (continued)
Example:% sqlplus 'sys/oracle as sysdba'
SQL> startup nomount
ORACLE instance started.
Total System Global Area 21790532 bytes
Fixed Size 278340 bytes
Variable Size 16777216 bytes
Database Buffers 4194304 bytes
Redo Buffers 540672 bytes
SQL> @crdbdb01.sql
SQL> CREATE DATABASE db01
2 LOGFILE
3 GROUP 1 ('$HOME/ORADATA/u03/log_01_01_db01.rdo') SIZE 10M,
4 GROUP 2 ('$HOME/ORADATA/u03/log_02_01_db01.rdo') SIZE 10M
5 DATAFILE '$HOME/ORADATA/u01/system_01_db01.dbf' SIZE 100M
6 AUTOEXTEND ON NEXT 5M MAXSIZE 150M
7 DEFAULT TEMPORARY TABLESPACE temp
8 TEMPFILE '$HOME/ORADATA/u02/temp_01_db01.dbf' SIZE 15M
9 AUTOEXTEND ON NEXT 5M MAXSIZE 30M
10 CHARACTER SET WE8ISO8859P1
11 NATIONAL CHARACTER SET AL16UTF16
12 ;
Statement processed.

DBA Fundamentals I A -7
Running ScriptsThe scripts catalog.sql andcatproc.sql , located in $ORACLE_HOME/rdbms/admin , must be run after the database is created. The script catalog.sql creates the data dictionary views andcatproc.sql creates the packages and procedures required to use PL/SQL.
Both scripts must be run as SYS. Before executing the scripts, make sure the database is open.
Example:% sqlplus /nolog
SQL> CONNECT / AS SYSDBA
SQL> @$ORACLE_HOME/rdbms/admin/catalog.sql
SQL> @$ORACLE_HOME/rdbms/admin/catproc.sql
On a system that is not busy, the total time for both scripts to complete is between 35 and 65 minutes.
After these scripts have run, verify the objects are valid. The following query returns any invalid objects.
SQL> SELECT owner,object_name,object_type
2 FROM dba_objects
3 WHERE status = 'INVALID'
4 ORDER BY owner,object_type,object_name;
Running pupbld.sqlThe scriptpupbld.sql , located in directory $ORACLE_HOME/sqlplus/admin , creates the Product User Profile table and related procedures. Running this script among other purposes, prevents a warning message each time a user connects to SQL*Plus. The script must be run as user SYSTEM.
$ sqlplus system/manager
SQL> @$ORACLE_HOME/sqlplus/admin/pupbld.sql

DBA Fundamentals I A -8
Creating Tablespaces
Create other tablespaces needed for the installation.
In a database installation the following tablespaces are normally created:
• users user data
• tools objects created by the user SYSTEM (optional)
These should be created.
Example:SQL> create tablespace USERS
2 datafile '$HOME/ORADATA/u03/users_01_db01.dbf' SIZE 25M
3 PERMANENT
4 EXTENT MANAGEMENT LOCAL UNIFORM SIZE 128K
5 SEGMENT SPACE MANAGEMENT auto;
Summary• Set ORACLE_HOME, ORACLE_SID, PATH, and LD_LIBRARY_PATH
• Edit theinitsid.ora .
• Execute the CREATE DATABASEcommand.
• Run the scripts catalog.sql andcatproc.sql .
• Run the scriptpupbld.sql .
• Create the tablespaces needed for the database.

DBA Fundamentals I A -9
Sample initdb01.ora:
background_dump_dest=$HOME/ADMIN/BDUMP
compatible=9.0.0
control_files=$HOME/ORADATA/u01/ctrl_01_sid.ctl
core_dump_dest=$HOME/ADMIN/CDUMP
db_block_size=4096
db_cache_size=4M
db_domain=world
db_name=db01
global_names=TRUE
instance_name=db01
max_dump_file_size=10240
remote_login_passwordfile=exclusive
service_names=db01
shared_pool_size=8M
undo_management=AUTO
user_dump_dest=$HOME/ADMIN/UDUMP
Sample script to a create database:
CREATE DATABASE db01
LOGFILE
GROUP 1 ('$HOME/ORADATA/u03/log_01_01_db01.rdo') SIZE 10M,
GROUP 2 ('$HOME/ORADATA/u03/log_02_01_db01.rdo') SIZE 10M
DATAFILE '$HOME/ORADATA/u01/system_01_db01.dbf' SIZE 100M
AUTOEXTEND ON NEXT 5M MAXSIZE 150M
DEFAULT TEMPORARY TABLESPACE temp
TEMPFILE '$HOME/ORADATA/u02/temp_01_db01.dbf' SIZE 15M
AUTOEXTEND ON NEXT 5M MAXSIZE 30M
CHARACTER SET WE8ISO8859P1
NATIONAL CHARACTER SET AL16UTF16
;

DBA Fundamentals I A -10

DBA Fundamentals I B -1
B-1 Copyright © Oracle Corporation, 2001. All rights reserved.
BManaging Rollback Segments

DBA Fundamentals I B -2
B-2 Copyright © Oracle Corporation, 2001. All rights reserved.
Objectives
After completing this lesson, you should be able to do the following:
• Create rollback segments using appropriate storage settings
• Maintain rollback segments
• Plan the number and size of rollback segments
• Troubleshoot common rollback segment problems
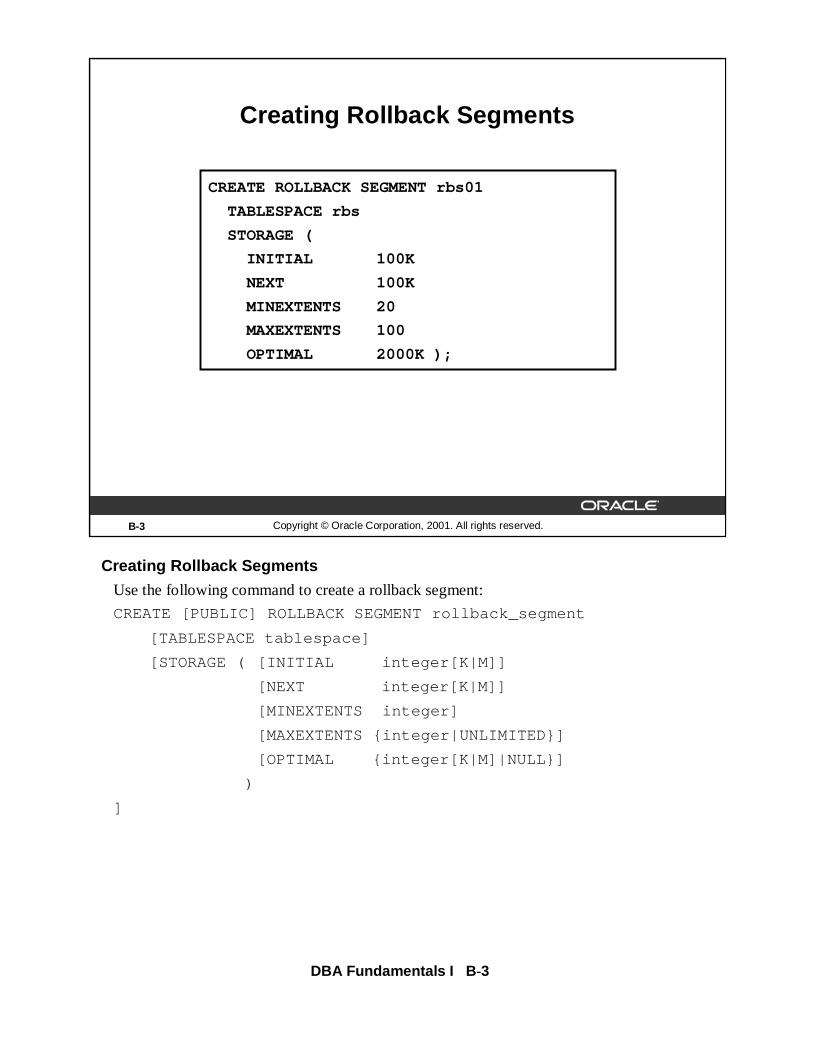
DBA Fundamentals I B -3
Creating Rollback Segments
Use the following command to create a rollback segment:
CREATE [PUBLIC] ROLLBACK SEGMENT rollback_segment
[TABLESPACE tablespace]
[STORAGE ( [INITIAL integer[K|M]]
[NEXT integer[K|M]]
[MINEXTENTS integer]
[MAXEXTENTS {integer|UNLIMITED}]
[OPTIMAL {integer[K|M]|NULL}]
)
]
B-3 Copyright © Oracle Corporation, 2001. All rights reserved.
Creating Rollback Segments
CREATE ROLLBACK SEGMENT rbs01
TABLESPACE rbs
STORAGE (
INITIAL 100K
NEXT 100K
MINEXTENTS 20
MAXEXTENTS 100
OPTIMAL 2000K );

DBA Fundamentals I B -4
Creating Rollback Segments (continued)
Restrictions
• A rollback segment can be specified as either public or private (the default) at the time of creation and cannot be changed.
• For a rollback segment, MINEXENTSmust be at least two.
• PCTINCREASEcannot be specified for a rollback segment and is always set to 0.
• OPTIMAL, if specified, must be at least equal to the initial size of the rollback segment, which is the space used by the number of extents defined by MINEXTENTS.
Guidelines
• Always use INITIAL = NEXT for rollback segments to ensure that all extents are of the same size.
• Set the OPTIMALvalue to minimize the allocation and deallocation of rollback segment extents.
• Avoid setting MAXEXTENTSto UNLIMITED. This could cause unnecessary extension of a rollback segment and possibly of data files due to a program error.
• Always place rollback segments in a separate, exclusive tablespace to minimize contention and fragmentation.

DBA Fundamentals I B -5
Allocation of a Rollback Segment
When a transaction begins, a rollback segment needs to be assigned to this transaction. A transaction can request a specific rollback segment using the following command:
SET TRANSACTION USE ROLLBACK SEGMENT rollback_segment
If no such request is made, the Oracle server chooses the rollback segment with the fewest transactions and assigns it to the transaction.
Using Extents
Transactions use extents of a rollback segment in a sequential, circular fashion, moving from one to the next after the current extent is full. A transaction writes an entry to its current location in the rollback segment and advances the current pointer by the size of the entry.
More than one transaction can write to the same extent of a rollback segment; however, each rollback segment block contains information from one and only one transaction.
B-5 Copyright © Oracle Corporation, 2001. All rights reserved.
Transactions and Rollback Segments
Transaction 1
Active extent Inactive extent
4 3
1 2
Transaction 2
DBA Fundamentals I B -6
Allocation of a Rollback Segment (continued)
Example
In the example in the slide, two transactions have been assigned to a rollback segment, which has four extents.
1. When the transactions commence, they begin writing to Extent 3 of the rollback segment.
2. As the two transactions generate more rollback information, they continue to write into Extent 3.
3. When Extent 3 is full, the transactions write to the next extent in the ring, which is Extent 4. When transactions start writing to a new extent as in this step, it is called a wrap.
4. When the last extent for the rollback segment (Extent 4) is full, the transactions can use the first in the ring (Extent 1) if it is free or inactive. An extent is free or inactive only if there are currently no active transactions using the extent—that is, all transactions that wrote to the extent have completed.

DBA Fundamentals I B -7
Growth of Rollback Segments
The pointer or the head of the rollback segment moves to the next extent when all blocks of the current extent are used and a transaction needs another block for more space. When the last extent is full, the pointer moves to the front of the first extent.
The pointer can move to the next extent only if that extent has no active transactions. The pointer cannot skip over an extent. If the next extent is being used, the transaction allocates an additional extent for the rollback segment. This is called an extend.
A rollback segment can grow in this manner until it reaches the maximum number of extents specified by the MAXEXTENTSparameter.
B-7 Copyright © Oracle Corporation, 2001. All rights reserved.
Growth of Rollback Segments
Active extent
Inactive extent
1 2
4 3
1 2
3
4
5
New extent

DBA Fundamentals I B -8
OPTIMAL ParameterThe OPTIMALparameter specifies the size in bytes that a rollback segment must shrink to, if possible. Specifying OPTIMALminimizes the waste of space in a rollback segment. If the OPTIMALparameter is specified, a rollback segment can release space on completion of transactions that caused the growth.
The deallocation of extents is not done as soon as transactions are completed. The process ofdeallocating extents is performed only when the head moves from one extent to the next. Extents are deallocated if both of these conditions are true:
• The current size of the rollback segment exceeds OPTIMAL.
• There are contiguous inactive extents.
The Oracle server tries to deallocate the size of the rollback segment until it is equal to OPTIMAL, but may have to stop short if the next extent to be deallocated is in use.
The Oracle server always deallocates the oldest inactive extents, as they are least likely to be used for read consistency.
B-8 Copyright © Oracle Corporation, 2001. All rights reserved.
Shrinkage of Rollback Segments
Active extent
Inactive extent
1 2
6 3
1
2
34
5
6
OPTIMAL

DBA Fundamentals I B -9
The ALTER ROLLBACK SEGMENT Command
When a rollback segment is created, it is offline and cannot be used. To make the rollback segment available for use by transactions, use the ALTER ROLLBACK SEGMENTcommand and bring it online.
Syntax
Use the following command to make a rollback segment available:
ALTER ROLLBACK SEGMENT rollback_segment ONLINE;
The number of rollback segments that can be brought online by an instance is limited by the MAX_ROLLBACK_SEGMENTSparameter. Set this value to one more than the number of non-SYSTEM rollback segments required for the instance.
A rollback segment is online only until the instance is shut down. To ensure that a rollback segment is always brought online by an instance, specify the name of the rollback segment in the parameter file as shown in the following example:
ROLLBACK_SEGMENTS=(rbs01, rbs02)
B-9 Copyright © Oracle Corporation, 2001. All rights reserved.
Bringing Rollback Segments Online
• Use the following command to make a rollback segment available:
• Specify the following initialization parameter to ensure that rollback segments are brought online at startup:
ROLLBACK_SEGMENTS=(rbs01, rbs02)
ALTER ROLLBACK SEGMENT rbs01 ONLINE;
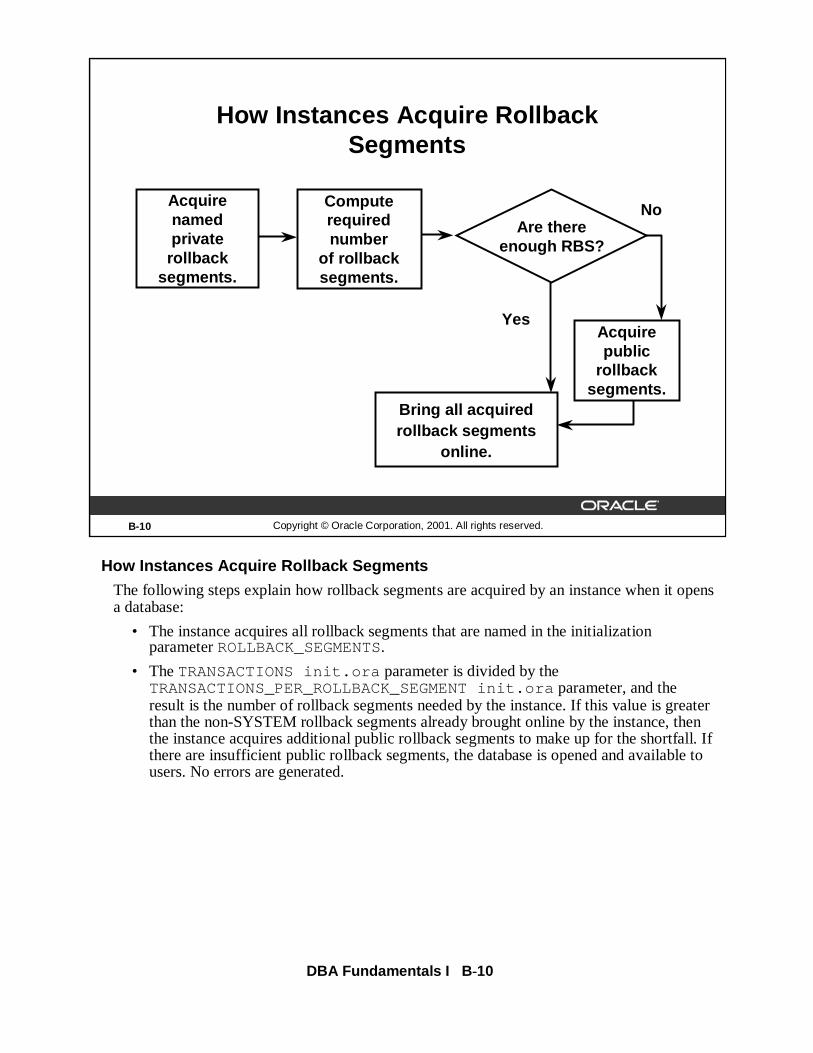
DBA Fundamentals I B -10
How Instances Acquire Rollback Segments
The following steps explain how rollback segments are acquired by an instance when it opens a database:
• The instance acquires all rollback segments that are named in the initialization parameter ROLLBACK_SEGMENTS.
• The TRANSACTIONS init.ora parameter is divided by the TRANSACTIONS_PER_ROLLBACK_SEGMENT init.ora parameter, and the result is the number of rollback segments needed by the instance. If this value is greater than the non-SYSTEM rollback segments already brought online by the instance, then the instance acquires additional public rollback segments to make up for the shortfall. If there are insufficient public rollback segments, the database is opened and available to users. No errors are generated.
B-10 Copyright © Oracle Corporation, 2001. All rights reserved.
How Instances Acquire Rollback Segments
Bring all acquired rollback segments
online.
Acquire named private
rollback segments.
Are thereenough RBS?
Acquire public
rollback segments.
Computerequired number
of rollback segments.
Yes
No
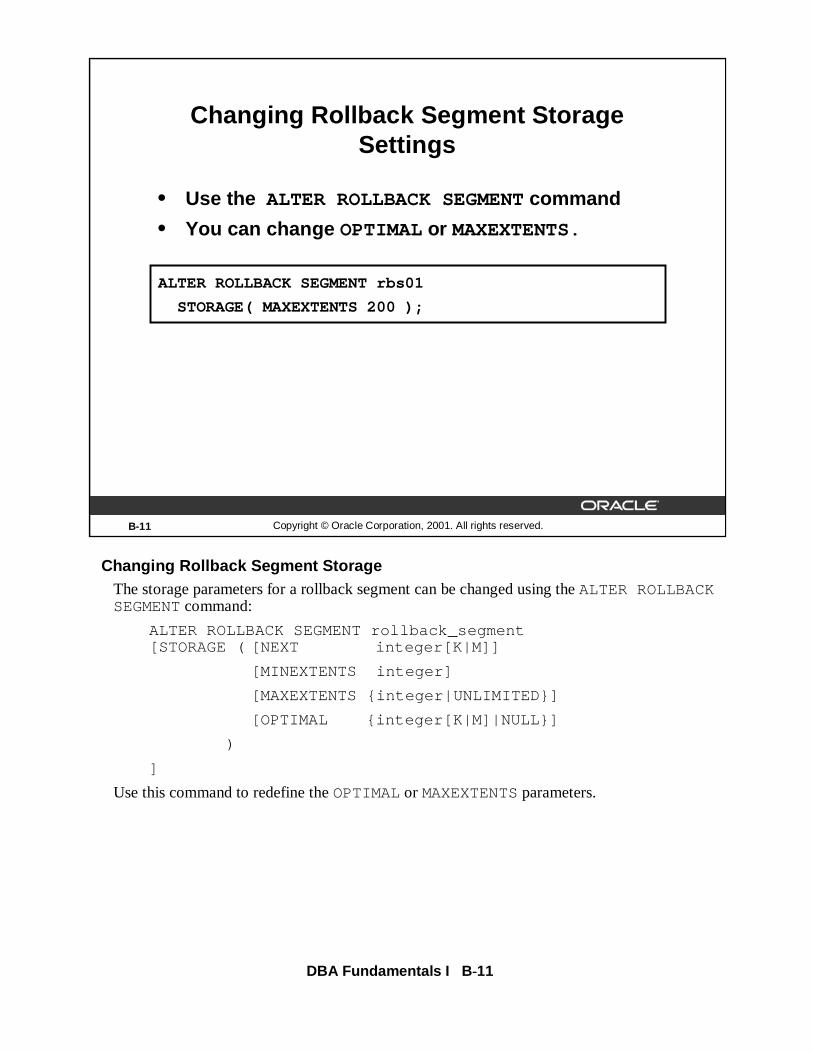
DBA Fundamentals I B -11
Changing Rollback Segment StorageThe storage parameters for a rollback segment can be changed using the ALTER ROLLBACK SEGMENTcommand:
ALTER ROLLBACK SEGMENT rollback_segment [STORAGE ( [NEXT integer[K|M]]
[MINEXTENTS integer]
[MAXEXTENTS {integer|UNLIMITED}]
[OPTIMAL {integer[K|M]|NULL}]
)
]
Use this command to redefine the OPTIMALor MAXEXTENTSparameters.
B-11 Copyright © Oracle Corporation, 2001. All rights reserved.
Changing Rollback Segment Storage Settings
• Use the ALTER ROLLBACK SEGMENTcommand
• You can change OPTIMALor MAXEXTENTS.
ALTER ROLLBACK SEGMENT rbs01
STORAGE( MAXEXTENTS 200 );

DBA Fundamentals I B -12
Deallocating Space from Rollback SegmentsIf OPTIMALhas been specified for a rollback segment, the Oracle server attempts todeallocate extents to release space above the optimal size.
Manual Deallocation
To manually deallocate space from a rollback segment, use the following command:
ALTER ROLLBACK SEGMENT rollback_segment
SHRINK [ TO integer [ K|M ]];
This command attempts to reduce the size of the rollback segment to the specified size but stops short if an extent cannot be deallocated because it is active.
If integer is not specified, the Oracle server attempts to deallocate extents until the size of the rollback segment is equal to OPTIMAL.
If the integer specified is larger than the current size of the rollback segment, this command is ignored.
B-12 Copyright © Oracle Corporation, 2001. All rights reserved.
Deallocating Space from Rollback Segments
• Use the ALTER ROLLBACK SEGMENTcommand.
• If extents are active, they may not shrink to the requested size.ALTER ROLLBACK SEGMENT rbs01
SHRINK TO 4M;

DBA Fundamentals I B -13
Taking a Rollback Segment Offline
Take a rollback segment offline:
• To prevent new transactions from using a rollback segment
• If the rollback segment needs to be dropped
Syntax
Use the following command to take a rollback segment offline:
ALTER ROLLBACK SEGMENT rollback_segment OFFLINE;
If there are transactions using the rollback segment at the time this statement is executed, the status of the rollback segment is set to PENDING OFFLINE, as seen from the dynamic performance view, V$ROLLSTAT. As soon as all existing transactions complete, the segment is taken offline.
B-13 Copyright © Oracle Corporation, 2001. All rights reserved.
Taking Rollback Segment Offline
• Take a rollback segment offline to make it unavailable
• If transactions are using the rollback segment, the status is temporarily change to PENDING OFFLINE
ALTER ROLLBACK SEGMENT rbs01
OFFLINE;

DBA Fundamentals I B -14
Dropping Rollback Segments
Use the following command to drop a rollback segment:
DROP ROLLBACK SEGMENT rollback_segment;
A rollback segment may need to be dropped if it is no longer needed or if it needs to be re-created with different storage settings for INITIAL , NEXT, or MINEXTENTS.
A rollback segment must be offline before it can be dropped.
B-14 Copyright © Oracle Corporation, 2001. All rights reserved.
Dropping Rollback Segments
A rollback segment must be offline before it can be dropped.
DROP ROLLBACK SEGMENT rbs01;

DBA Fundamentals I B -15
Number of Rollback Segments
The header block of a rollback segment contains transaction table entries that define the state of each transaction. Every transaction that uses a rollback segment needs to update the transaction table frequently. This could cause contention on the header, especially in an OLTP environment. Because OLTP environments typically use short transactions, many small rollback segments are recommended in this environment. If possible, create one rollback segment for every four concurrent transactions.
Batch environments generally run fewer jobs that may need to carry out several changes. These jobs require large rollback segments. Hence, in a batch environment, allow for the growth of the rollback segments by creating them in large tablespaces.
B-15 Copyright © Oracle Corporation, 2001. All rights reserved.
Planning Rollback Segments: Number
• OLTP– Many small rollback segments
– Four transactions per rollback segment
– Up to ten transactions per rollback segment
• Batch– Few large rollback segments
– One per transaction
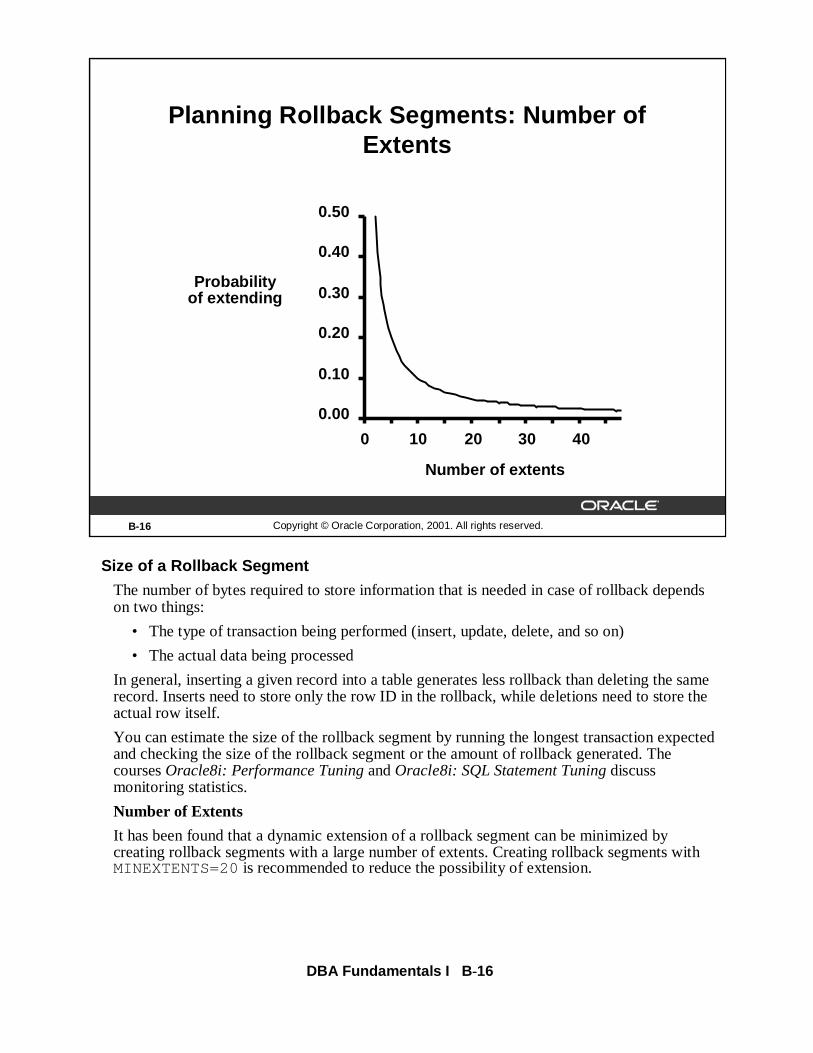
DBA Fundamentals I B -16
Size of a Rollback Segment
The number of bytes required to store information that is needed in case of rollback depends on two things:
• The type of transaction being performed (insert, update, delete, and so on)
• The actual data being processed
In general, inserting a given record into a table generates less rollback than deleting the same record. Inserts need to store only the row ID in the rollback, while deletions need to store the actual row itself.
You can estimate the size of the rollback segment by running the longest transaction expected and checking the size of the rollback segment or the amount of rollback generated. The courses Oracle8i: Performance Tuningand Oracle8i: SQL Statement Tuningdiscuss monitoring statistics.
Number of Extents
It has been found that a dynamic extension of a rollback segment can be minimized by creating rollback segments with a large number of extents. Creating rollback segments with MINEXTENTS=20is recommended to reduce the possibility of extension.
B-16 Copyright © Oracle Corporation, 2001. All rights reserved.
Planning Rollback Segments: Number of Extents
0.00
0.10
0.20
0.30
0.40
0.50
0 10 20 30 40
Number of extents
Probabilityof extending

DBA Fundamentals I B -17
B-17 Copyright © Oracle Corporation, 2001. All rights reserved.
Rollback Segment Problems
• Insufficient space for transactions
• Read-consistency error
• Blocking session
• Error in taking tablespace offline

DBA Fundamentals I B -18
Possible Causes
A transaction uses a single rollback segment and may fail if there is insufficient space in the rollback segment (ORA-01562). This could be caused by one of the following:
• There is insufficient space in the tablespace for the rollback segments to extend (ORA-01560).
• The number of extents in the rollback segment has reached MAXEXTENTS,and additional extents cannot be allocated (ORA-01628).
Solution
If the tablespace does not have free space, increase the space available by:
• Setting OPTIMALto ensure that a single rollback segment does not use all of the free space in the tablespace
• Shrinking rollback segments back to their optimal size
• Increasing the size of the tablespace
If a rollback segment cannot allocate more extents because the limit imposed by MAXEXTENTShas been reached:
• Increase MAXEXTENTSfor the rollback segment.
• Drop and re-create the rollback segment with larger extent sizes to avoid a recurrence of the problem.
B-18 Copyright © Oracle Corporation, 2001. All rights reserved.
Insufficient Space for Transactions
• No space in tablespace:– Extend data files
– Enables automatic extension of data files
– Add data files
• MAXEXTENTSreached for segment– Increase MAXEXTENTS
– Re-create segments with larger extent sizes

DBA Fundamentals I B -19
Possible Causes
To provide read consistency, the Oracle server guarantees that changes made by other users that are not committed when the statement begins or are made after the statement begins execution are not seen by the statement. If the Oracle server cannot construct a read-consistent image of data, the user will receive an ORA-01555 SNAPSHOT TOO OLDerror. This error can occur when the transaction that made the change has already committed and:
• The transaction slot in the rollback header has been reused.
• The before image in the rollback segment has been overwritten by another transaction.
Solution
Read-consistency errors can be minimized by ensuring that rollback segments are created with:
• A higher MINEXTENTS value
• Larger extent sizes
• A higher OPTIMALvalue
Note that these errors cannot be avoided by increasing MAXEXTENTS.
B-19 Copyright © Oracle Corporation, 2001. All rights reserved.
Image at statement commencement
New image
TableSELECT *
FROM table
Read-Consistency Error
Reused block

DBA Fundamentals I B -20
Possible Causes
When an extent in a rollback segment is full, the Oracle server attempts to reuse the next extent in the segment. If this new extent contains one active entry—that is, an entry by a transaction that is still active—it cannot be used. In these cases, a rollback segment allocates an additional extent. The transaction cannot skip an extent in the ring and continue writing to a subsequent extent. A transaction that has made only a few changes, but has been idle for a long time could cause rollback segments to grow even though there are many free extents. In this situation, a lot of space is wasted and a database administrator may need to intervene to avoid excessive rollback segment growth.
B-20 Copyright © Oracle Corporation, 2001. All rights reserved.
Blocking Session
Extent 3
Existing extent
New extent
4 1
3 2
1 2
3
4
5
Blocking session

DBA Fundamentals I B -21
Possible Causes (continued)
Solution
Query V$ROLLSTAT, V$SESSION, and V$TRANSACTIONviews to find any blocking transactions.
ExampleSQL> SELECT s.sid, s.serial#, t.start_time, t.xidusn, s.username
2 FROM v$session s, v$transaction t, v$rollstat r
3 WHERE s.saddr = t.ses_addr
4 AND t.xidusn = r.usn
5 AND ((r.curext = t.start_uext-1) OR
6 ((r.curext = r.extents-1) AND t.start_uext=0));
SID SERIAL# START_TIME XIDUSN USERNAME
--- ------- ------------------ ------- ------
9 27 10/30/97 21:10:41 2 SYSTEM
1 row selected.
Check whether the transaction can be ended by the user. If not, it may be necessary to kill the session.

DBA Fundamentals I B -22
Problem Diagnosis and Resolution
If a tablespace contains one or more active rollback segments, it cannot be taken offline. The session executing the statement receives an ORA-01546 error message.
Solution
Perform the following steps:
1. Query DBA_ROLLBACK_SEGSto find which rollback segments are in the tablespace.
2. Take all rollback segments in the tablespace offline.
3. Check V$TRANSACTIONto find which transactions are currently using these rollback segments.
4. Use V$SESSIONto obtain the user name and session information.
5. Kill the session or have the user end the transaction.
6. Take the tablespace offline.
B-22 Copyright © Oracle Corporation, 2001. All rights reserved.
Error in Taking a Tablespace Offline
You cannot take a tablespace containing an active rollback segment offline.
1. Determine which rollback segments are in the tablespace.
2. Take all of these rollback segments offline.
3. Find active transactions using these rollback segments.
4. Find the session ID and serial number.
5. Terminate the session, if necessary.
6. Take the tablespace offline.
DBA Fundamentals I B -23
B-23 Copyright © Oracle Corporation, 2001. All rights reserved.
Summary
In this lesson, you should have learned how to:
• Create adequate rollback segments
• Troubleshoot rollback segment problems

DBA Fundamentals I B -24

DBA Fundamentals I C -1
CCopyright © Oracle Corporation, 2001. All rights reserved.
CPractice Solutions for SQL*Plus

DBA Fundamentals I C -2
Practice 1: Solutions
1 Which one of the following statements is true?a An Oracle server is a collection of data consisting of three file types.b A user establishes a connection with the database by starting an Oracle instance.c A connection is a communication pathway between the Oracle Server and the
Oracle Instance.d A session starts when a user is validated by the Oracle server.
Answer: D
2 Which one of the following memory areas is not part of the SGA?a Database buffer cacheb PGAc Redo log buffer cached Shared Pool
Answer: B
3 Which two of the following statements are true about the Shared Pool?a The shared Pool consists of the Library Cache, Data Dictionary Cache, Shared SQL
area, Java Pool, and Large Pool.b The Shared Pool is used to store the most recently executed SQL statements and the
most recently used data.c The Shared Pool is used for object that can be shared globally.d The Library Cache consist of the Shared SQL and Shared PL/SQL areas.
Answer: B D
4 Which one of the following memory areas is used to cache the data dictionaryinformation? a Database Buffer Cacheb PGAc Redo log buffer cached Shared Pool
Answer: D
5 The primary purpose of the Redo Log Buffer Cache is to record all changes to thedatabase data blocks.a Trueb False
Answer: True
6 The PGA is a memory region that contains data and control information for multipleserver processes or multiple background processes. a Trueb False
Answer: False, A PGA is a memory region that contains data and controlinformation for a single server process or a single background process.

DBA Fundamentals I C -3
Practice 1: Solutions (continued)
7 Which one of the following processes is available when an Oracle instance is started.a User processb Background processc Server processd System process
Answer: B
8 Identify five mandatory background processes.________________________________________________________________________________________________________________________________________________________________________________________________________
Answer: DBWR, LGWR, PMON, SMON, CKPT
9 Which one of the following memory areas is used to cache the data dictionaryinformation?a Database Buffer Cacheb PGAc Redo log buffer cached Shared Pool
Answer: D
10 Match the process with its task.a Database Writer ___ Assists with writing to the data file headersb Log Writer ___ Responsible for instance recoveryc System Monitor ___ Cleans up after failed processesd Process Monitor ___ Can call on the Database Writer to writee Checkpoint ___ Writes dirty buffers to the data files
Answer: E,C,D,B,A
11 The physical structure of an Oracle database consists of control files, data files, andredo log files.a Trueb False
Answer: True
12 Place the following structures in order of hierarchy beginning with database.a Tablespacesb Extentc Segmentd databasee blockAnswer: D,A,C,B,E
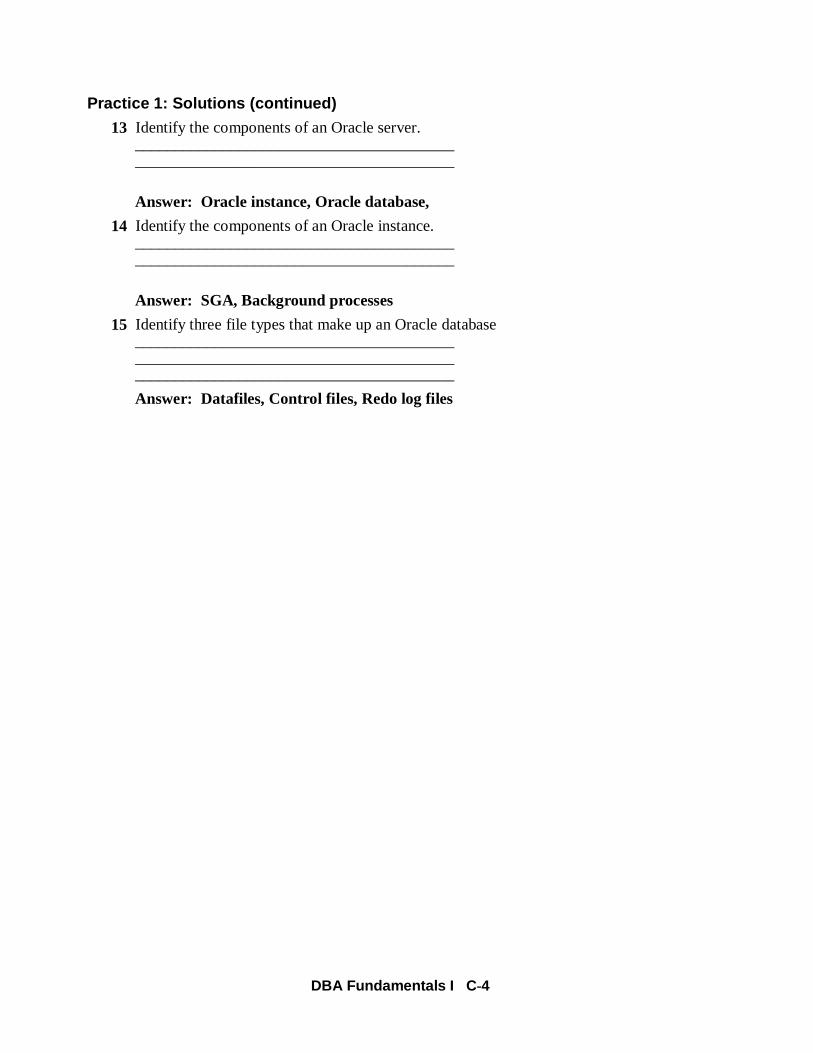
DBA Fundamentals I C -4
Practice 1: Solutions (continued)
13 Identify the components of an Oracle server.________________________________________________________________________________
Answer: Oracle instance, Oracle database,
14 Identify the components of an Oracle instance.________________________________________________________________________________
Answer: SGA, Background processes
15 Identify three file types that make up an Oracle database________________________________________________________________________________________________________________________
Answer: Datafiles, Control files, Redo log files
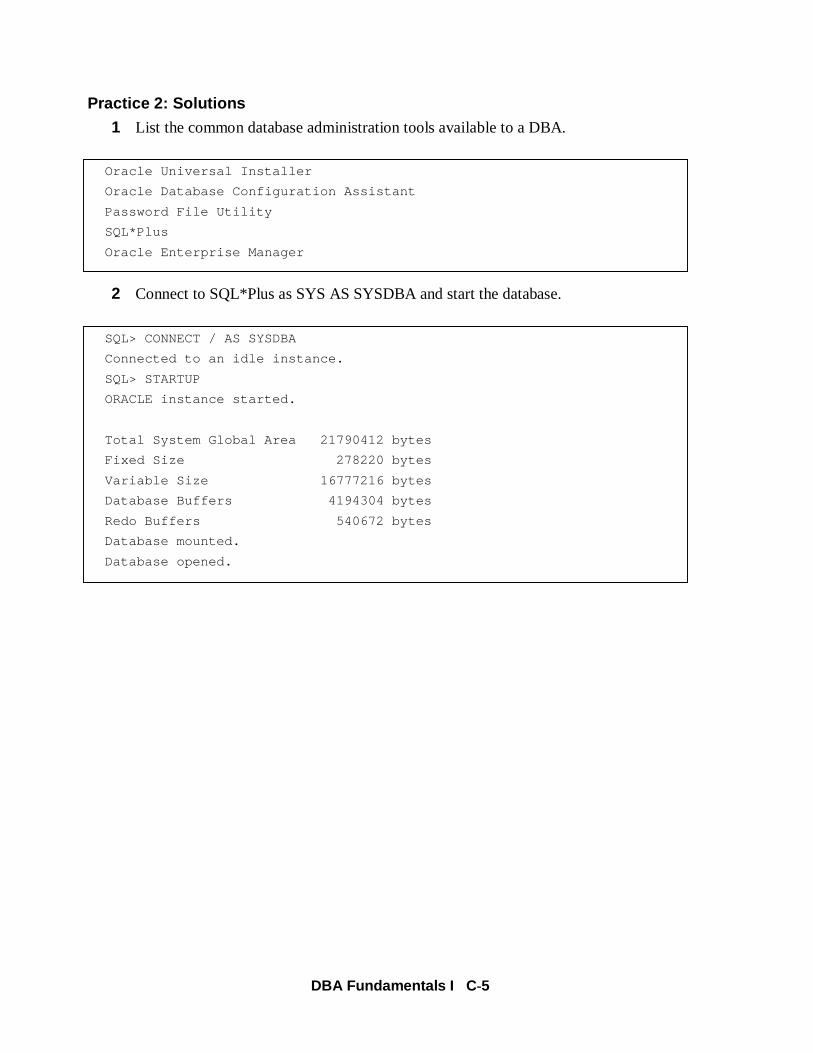
DBA Fundamentals I C -5
Practice 2: Solutions
1 List the common database administration tools available to a DBA.
2 Connect to SQL*Plus as SYS AS SYSDBA and start the database.
Oracle Universal Installer
Oracle Database Configuration Assistant
Password File Utility
SQL*Plus
Oracle Enterprise Manager
SQL> CONNECT / AS SYSDBA
Connected to an idle instance.
SQL> STARTUP
ORACLE instance started.
Total System Global Area 21790412 bytes
Fixed Size 278220 bytes
Variable Size 16777216 bytes
Database Buffers 4194304 bytes
Redo Buffers 540672 bytes
Database mounted.
Database opened.

DBA Fundamentals I C -6
Practice 2: Solutions (continued)3 Select columns OWNER, TABLE_NAME, and TABLESPACE_NAMEfrom data
dictionary view DBA_TABLES, and format the output. (The display of the first tenrows is sufficient.)Exit SQL*Plus.
SQL> COLUMN owner FORMAT a5;
SQL> COLUMN table_name FORMAT a20;
SQL> COLUMN tablespace_name FORMAT a15;
SQL> SELECT owner,table_name,tablespace_name2 FROM dba_tables3 WHERE rownum < 10;
OWNER TABLE_NAME TABLESPACE_NAME
----- -------------------- ---------------
SYS FILE$ SYSTEM
SYS BOOTSTRAP$ SYSTEM
SYS SEG$ SYSTEM
SYS ICOL$ SYSTEM
SYS PROXY_ROLE_DATA$ SYSTEM
SYS IND$ SYSTEM
SYS CDEF$ SYSTEM
SYS OBJ$ SYSTEM
SYS CCOL$ SYSTEM
9 rows selected.
SQL> EXIT

DBA Fundamentals I C -7
Practice 2: Solutions (continued)4 Start SQL*Plus and run a script named lab02_03.sql , which spools all initialization
parameters to the output filepara.lst .
5 Remove the current password file located in $HOME/ADMIN/PFILE .Create a new password file using the following information:
- Password for sys: oracle
- Enable five privileged users
- Location $HOME/ADMIN/PFILE
Ensure that Oracle can write to this file by changing permissions on the file:
chmod 660 $HOME/ADMIN/PFILE/orapw$ORACLE_SID
Hint: Use theorapwd utility to create the password file.
Note: The password file is normally created in $ORACLE_HOME/dbs, owned bythe owner of $ORACLE_HOME, and the permissions are not changed.
SQL> @$HOME/STUDENT/LABS/lab02_03.sql
SQL> CONNECT / AS SYSDBA
Connected.
SQL> SET PAGESIZE 999
SQL> SPOOL para.lst;
SQL> SHOW parameter
NAME TYPE VALUE
------------------------------------ ----------- ----------------------
O7_DICTIONARY_ACCESSIBILITY boolean FALSE
active_instance_count integer
aq_tm_processes integer 0
archive_lag_target integer 0...
SQL> !rm $HOME/ADMIN/PFILE/orapw$ORACLE_SID
SQL> !orapwd file=$HOME/ADMIN/PFILE/orapw$ORACLE_SID password=oracle entries=5
SQL> !chmod 660 $HOME/ADMIN/PFILE/orapw$ORACLE_SID
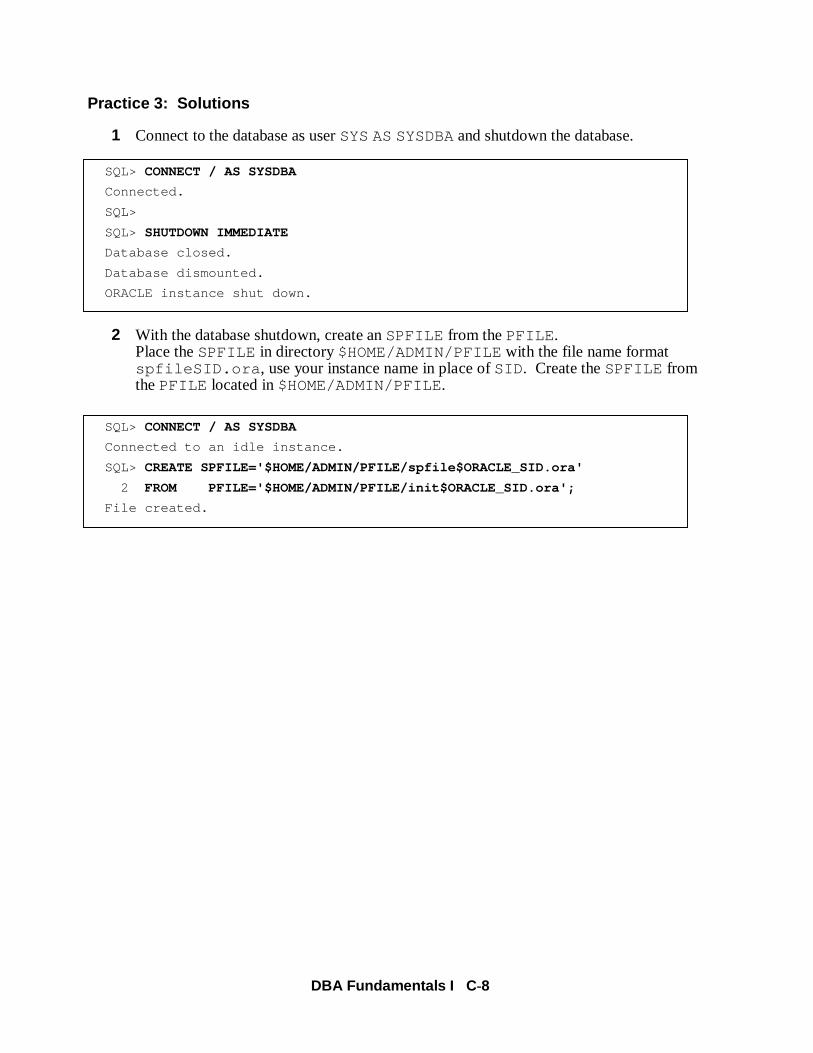
DBA Fundamentals I C -8
Practice 3: Solutions
1 Connect to the database as user SYS AS SYSDBAand shutdown the database.
2 With the database shutdown, create an SPFILE from the PFILE .Place the SPFILE in directory $HOME/ADMIN/PFILE with the file name format spfileSID.ora , use your instance name in place of SID . Create the SPFILE fromthe PFILE located in $HOME/ADMIN/PFILE .
SQL> CONNECT / AS SYSDBA
Connected.
SQL>
SQL> SHUTDOWN IMMEDIATE
Database closed.
Database dismounted.
ORACLE instance shut down.
SQL> CONNECT / AS SYSDBA
Connected to an idle instance.
SQL> CREATE SPFILE='$HOME/ADMIN/PFILE/spfile$ORACLE_SID.ora'
2 FROM PFILE='$HOME/ADMIN/PFILE/init$ORACLE_SID.ora';
File created.

DBA Fundamentals I C -9
Practice 3: Solutions (continued)3 From the operating system, view the SPFILE .
4 Connect as user SYS AS SYSDBA, and start the database using the SPFILE .
SQL> !more $HOME/ADMIN/PFILE/spfile$ORACLE_SID.ora
*.background_dump_dest='/u01/home/db01/ADMIN/BDUMP'
*.compatible='9.0.0'
*.control_files='/u01/home/db01/ORADATA/u01/ctrl01.ctl'
*.core_dump_dest='/u01/home/db01/ADMIN/CDUMP'
*.db_block_size=4096
*.db_cache_size=4M
*.db_domain='world'
*.db_name='db01'
*.global_names=TRUE
*.instance_name='db01'
*.java_pool_size='0'
*.max_dump_file_size='10240'
*.remote_login_passwordfile='exclusive'
*.service_names='db01'
*.shared_pool_size=8M
*.undo_management='AUTO'
*.undo_tablespace='UNDOTBS'
*.user_dump_dest='/u01/home/db01/ADMIN/UDUMP'
SQL> CONNECT / AS SYSDBA
Connected to an idle instance.
SQL> STARTUP
ORACLE instance started.
Total System Global Area 21790412 bytes
Fixed Size 278220 bytes
Variable Size 16777216 bytes
Database Buffers 4194304 bytes
Redo Buffers 540672 bytes
Database mounted.
Database opened.

DBA Fundamentals I C -10
Practice 3: Solutions (continued)5 Shutdown the database and open it in read-only mode. Connect as user HR
password HRand and insert the following into the REGIONStable.
INSERT INTO regions VALUES ( 5, ‘Mars’ );
What happens? Put the database back in read-write mode.
SQL> CONNECT / AS SYSDBA
Connected.
SQL> SHUTDOWN IMMEDIATE
Database closed.
Database dismounted.
ORACLE instance shut down.
SQL> STARTUP MOUNT
ORACLE instance started.
Total System Global Area 21790412 bytes
Fixed Size 278220 bytes
Variable Size 16777216 bytes
Database Buffers 4194304 bytes
Redo Buffers 540672 bytes
Database mounted.
SQL> ALTER DATABASE OPEN READ ONLY;
Database altered.
SQL> CONNECT hr/hr
Connected.
SQL> INSERT INTO regions VALUES ( 5, 'Mars');
INSERT INTO regions VALUES ( 5, 'Mars')
*
ERROR at line 1:
ORA-01552: cannot use system rollback segment for non-system tablespace
‘SAMPLE'
SQL> CONNECT / AS SYSDBA
Connected.
SQL> SHUTDOWN IMMEDIATE
Database closed.
Database dismounted.
ORACLE instance shut down.
SQL> STARTUP
ORACLE instance started.

DBA Fundamentals I C -11
Practice 3: Solutions (continued)6 Connect as user HRpassword HRand insert the following row into the table REGIONS;
do not commit or exit.
INSERT INTO regions VALUES ( 5, ‘Mars’ );
In a new telnet session start SQL*Plus. Connect as SYS AS SYSDBAand performa shut down transactional.
What happens? Rollback the insert in the HRsession and exit, what happens?
Note: Parameter UNDO_RETENTION, which will be discussed in Managing Undo Data, is set to 15 minutes by default. Because of this parameter it could be15 minutes before the database shuts down after the ROLLBACKcommand is executed. Connect to another session as SYS AS SYSDBAand execute thefollowing command to speed up the process.
ALTER SYSTEM SET undo_retention=0 SCOPE=MEMORY;
HR SESSIONSQL> CONNECT hr/hr
Connected.
SQL> INSERT INTO regions VALUES (5, 'Mars');
1 row created.
SYS SESSIONSQL> CONNECT / AS SYSDBA
Connected.
SQL> SHUTDOWN TRANSACTIONAL
HR SESSIONSQL> ROLLBACK;
Rollback complete.
SQL> EXIT;
ERROR:
ORA-01089: immediate shutdown in progress - no operations are permitted
Disconnected from Oracle9i Enterprise Edition Release 9.0.0.0.0 - Beta
With the Partitioning option
JServer Release 9.0.0.0.0 - Beta (with complications)
SYS SESSIONDatabase closed.
Database dismounted.
ORACLE instance shut down.

DBA Fundamentals I C -12
Practice 3: Solutions (continued)
7 Make sure the database is started. Keep the two SQL*Plus sessions open, onesession as user SYS AS SYSDBAand one as user HR. As user SYS AS SYSDBAenable restricted session. As user HRselect from the regions table. Isthe select successful? In the HR session exit SQL*Plus then reconnect as HR. What happens? Disable restricted session.
SYS SESSIONSQL> CONNECT / AS SYSDBA
Connected to an idle instance.
SQL> STARTUP
ORACLE instance started.
HR SESSIONSQL> CONNECT hr/hr
Connected.
SYS SESSIONSQL> ALTER SYSTEM ENABLE RESTRICTED SESSION;
System altered.
HR SESSIONSQL> SELECT *
2 FROM regions;
REGION_ID REGION_NAME
---------- -------------------------
1 Europe
2 Americas
3 Asia
4 Middle East and Africa
SQL> CONNECT hr/hr
ERROR:
ORA-01035: ORACLE only available to users with RESTRICTED SESSION privilege
Warning: You are no longer connected to ORACLE.
SYS SESSIONSQL> ALTER SYSTEM DISABLE RESTRICTED SESSION;
System altered.

DBA Fundamentals I C -13
Practice 5: Solutions
1 Which of the following statements are true about the data dictionary?a The data dictionary describes the database and its objects.b The data dictionary includes two types of objects: base tables, data dictionary views.c The data dictionary is a set of tables.d The data dictionary records and verifies information about its associated database.
Answer: All of the Above
2 Base tables are created using the catalog.sql script.a Trueb False
Answer: False, sql.bsq script
3 Which three of the following statements are true about how the data dictionary is used?a The Oracle server modifies it when a DML statement is executed.b It is used to find information about users, schema objects, and storage structures.c Used by users and DBAs as a reference.d The data dictionary is a necessary ingredient for the database to function.
Answer: B,C,D
4 Data dictionary views are static views.a Trueb False
Answer: True
5 The information for a Dynamic Performance table is gathered from the control fileand memory. a Trueb False
Answer: True
6 Which of the following questions might a dynamic performance view answer?a Is the object online and available?b What locks are being held?c Who owns the object?d What privileges do users have?e Is the session active?
Answer: A,B,E

DBA Fundamentals I C -14
Practice 5: Solutions (continued)
7 Find a list of the data dictionary views.
SQL> CONNECT / AS SYSDBA
Connected.
SQL> SELECT table_name
2 FROM dictionary;
TABLE_NAME
------------------------------
ALL_ALL_TABLES
ALL_ARGUMENTS
ALL_ASSOCIATIONS
ALL_AUDIT_POLICIES
ALL_BASE_TABLE_MVIEWS
ALL_CATALOG
ALL_CLUSTERS
ALL_CLUSTER_HASH_EXPRESSIONS
ALL_COLL_TYPES
.
.
.

DBA Fundamentals I C -15
Practice 5: Solutions (continued)
8 Identify the database name, instance name, and size of the database blocks.
Hint: Query the Dynamic Views V$DATABASE, V$THREAD, andV$PARAMETER.
9 List the name and size of the data files, online redo log files, and the name of thecontrol files.
Hint: Query the Dynamic Views V$DATAFILE, V$LOGFILE, and V$CONTROLFILE.
SQL> SELECT name
2 FROM v$database;
NAME
---------
DB01
SQL> SELECT instance
2 FROM v$thread;
INSTANCE
----------------
db01
SQL> SELECT value
2 FROM v$parameter
3 WHERE name ='db_block_size';
VALUE
--------------------------------
4096
SQL> SELECT name
2 FROM v$datafile;
NAME
------------------------------------------------------------------
/u01/home/db01/ORADATA/u01/system01.dbf
/u01/home/db01/ORADATA/u02/undotbs.dbf
/u01/home/db01/ORADATA/u03/users01.dbf
/u01/home/db01/ORADATA/u03/indx01.dbf
/u01/home/db01/ORADATA/u02/sample01.dbf
/u01/home/db01/ORADATA/u01/querydata01.dbf
6 rows selected.

DBA Fundamentals I C -16
Practice 5: Solutions (continued)10 Identify the data file that makes up the SYSTEMtablespace.
Hint: Query the data dictionary view DBA_DATA_FILESto identify the data filesthat make up SYSTEMtablespace.
11 How much free space is available in the database and how much is already used?
Hints:
- Query the data dictionary view DBA_FREE_SPACEto show how much freespace is available in the database.
- Query the data dictionary view DBA_SEGMENTSto display how much spaceis already used.
SQL> SELECT file_name
2 FROM dba_data_files
3 WHERE tablespace_name = 'SYSTEM';
FILE_NAME
---------------------------------------
/u01/home/db01/ORADATA/u01/system01.dbf
SQL> SELECT sum(bytes)/1024 "free space in KB"
2 FROM dba_free_space;
free space in KB
----------------
42700
SQL> SELECT sum(bytes)/1024 "used space in KB"
2 FROM dba_segments;
used space in KB
----------------
131992

DBA Fundamentals I C -17
Practice 5: Solutions (continued)
12 List the name and creation date of the database users.
Hint: Query the data dictionary view DBA_USERSto list the name and the creationof the database users.
SQL> SELECT username, created
2 FROM dba_users;
USERNAME CREATED
------------------------------ ---------
SYS 16-APR-01
SYSTEM 16-APR-01
OUTLN 16-APR-01
DBSNMP 16-APR-01
ORDSYS 16-APR-01
ORDPLUGINS 16-APR-01
MDSYS 16-APR-01
HR 16-APR-01
OE 16-APR-01
9 rows selected.

DBA Fundamentals I C -18
Practice 6: Solutions
1 Where is the existing control file located and what is the name?
Hint: Query the dynamic performance view V$CONTROLFILEorV$PARAMETER, or execute the SHOW PARAMETERcommand todisplay the name and the location of the control file.
2 Try to start the database without any control files. (Simulate this by changing thename of the control file in the parameter file or changing the control file name.)What happens?
SQL> COL name FORMAT a50
SQL> SELECT *
2 FROM v$controlfile;
STATUS NAME
------- --------------------------------------
/u01/home/db01/ORADATA/u01/ctrl01.ctl
SQL> CONNECT / AS SYSDBA
Connected.
SQL> SHUTDOWN IMMEDIATE
Database closed.
Database dismounted.
ORACLE instance shut down.
SQL> !cp $HOME/ORADATA/u01/ctrl01.ctl $HOME/ORADATA/u01/ctrl01.bak
SQL> !rm $HOME/ORADATA/u01/ctrl01.ctl
SQL> STARTUP
ORACLE instance started.
Total System Global Area 21790412 bytes
Fixed Size 278220 bytes
Variable Size 16777216 bytes
Database Buffers 4194304 bytes
Redo Buffers 540672 bytes
ORA-00205: error in identifying controlfile, check alert log for more info
SQL> SHUTDOWN IMMEDIATE
ORA-01507: database not mounted
ORACLE instance shut down.
SQL> !cp $HOME/ORADATA/u01/ctrl01.bak $HOME/ORADATA/u01/ctrl01.ctl
SQL> STARTUP
ORACLE instance started.

DBA Fundamentals I C -19
Practice 6: Solutions (continued)3 Multiplex the existing control file, using the directory u02 , and name the new control
file ctrl02.ctl . Make sure that the Oracle Server is able to write to the newcontrol file. For example, on Unix use the command chmod 660 . Confirm that bothcontrol files are being used.
Hints:
- Before shutting down the database alter the SPFILE (SCOPE=SPILE) to addthe new control file to the initialization file.
- Shut down the database, and copy the existing control file to a new filewith the name ctrl02.ctl in the directory u02 . Use the commandchmod 660 on Unix. Normally the permissions on the file would notbe changed, this is for the classroom environment.
- Start up the database.
- Query the Dynamic View V$CONTROLFILEor V$PARAMETER, or usethe SHOW PARAMETERcommand to confirm that both control files arebeing used.
SQL> CONNECT / AS SYSDBA
Connected.
SQL> ALTER SYSTEM SET control_files = '$HOME/ORADATA/u01/ctrl01.ctl',
'$HOME/ORADATA/u02/ctrl02.ctl' SCOPE=SPFILE;
System altered.
SQL> SHUTDOWN IMMEDIATE;
Database closed.
Database dismounted.
ORACLE instance shut down.
SQL> !cp $HOME/ORADATA/u01/ctrl01.ctl $HOME/ORADATA/u02/ctrl02.ctl
SQL> !chmod 660 $HOME/ORADATA/u02/ctrl02.ctl
SQL> STARTUP
ORACLE instance started.
Database mounted.
Database opened.
SQL> SELECT name
2 FROM v$controlfile;
NAME
--------------------------------------
/u01/home/db01/ORADATA/u01/ctrl01.ctl
/u01/home/db01/ORADATA/u02/ctrl02.ctl

DBA Fundamentals I C -20
Practice 6: Solutions (continued)
4 What is the initial sizing of the data file section in your control file?
Hint: Query the Dynamic ViewV$CONTROLFILE_RECORD_SECTION.
SQL> SELECT records_total
2 FROM v$controlfile_record_section
3 WHERE type = 'DATAFILE';
RECORDS_TOTAL
-------------
40

DBA Fundamentals I C -21
Practice 7: Solutions
1 List the number and location of existing log files and display the number of redolog file groups and members your database has.
Hints:
- Query the dynamic view V$LOGFILE.
- Use the dynamic view V$LOG.
2 In which database mode is your database configured? Is archiving enabled?
Hints:
- Query the dynamic view V$DATABASE.
- Query the dynamic view V$INSTANCE.
SQL> SELECT member
2 FROM v$logfile;
MEMBER
-------------------------------------/u01/home/db01/ORADATA/u03/log02a.rdo
/u01/home/db01/ORADATA/u03/log01a.rdo
SQL> SELECT group#, members
2 FROM v$log;
GROUP# MEMBERS
---------- ----------
1 1
2 1
SQL> SELECT log_mode
2 FROM v$database;
LOG_MODE
------------
NOARCHIVELOG
SQL> SELECT archiver
2 FROM v$instance;
ARCHIVE
-------
STOPPED

DBA Fundamentals I C -22
Practice 7: Solutions (continued)3 Add a redo log member to each group in your database located on u04 , using the
following naming conventions:
Add member to Group 1: log01b.rdoAdd member to Group 2: log02b.rdo
Verify the result.
Hints:
- Execute the ALTER DATABASE ADD LOGFILE MEMBERcommandto add a redo log member to each group.
- Query the dynamic performance view V$LOGFILE to verify the result.
SQL> ALTER DATABASE ADD LOGFILE MEMBER
2 '$HOME/ORADATA/u04/log01b.rdo' to Group 1,
3 '$HOME/ORADATA/u04/log02b.rdo' to Group 2;
Database altered.
SQL> COLUMN GROUP# FORMAT 99
SQL> COLUMN MEMBER FORMAT a40
SQL> SELECT *
2 FROM v$logfile;
GROUP# STATUS TYPE MEMBER
------ ------- ------- -------------------------------------
2 ONLINE /u01/home/db01/ORADATA/u03/log02a.rdo
1 STALE ONLINE /u01/home/db01/ORADATA/u03/log01a.rdo
1 INVALID ONLINE /u01/home/db01/ORADATA/u04/log01b.rdo
2 INVALID ONLINE /u01/home/db01/ORADATA/u04/log02b.rdo

DBA Fundamentals I C -23
Practice 7: Solutions (continued)4 Add a redo log group in your database with two members located on u03 and
u04 using the following naming conventions:
Add Group 3: log03a.rdo and log03b.rdo
Verify the result.
Hints:
- Execute the ALTER DATABASE ADD LOGFILEcommand to create a new group.
- Query the Dynamic View V$LOGFILE to display the nameof the new members of the new group.
- Query the Dynamic View V$LOGto display the number ofredo log file groups and members.
SQL> ALTER DATABASE ADD
2 LOGFILE GROUP 3(
3 '$HOME/ORADATA/u03/log03a.rdo',
4 '$HOME/ORADATA/u04/log03b.rdo'
5 ) SIZE 1024K;
Database altered.
SQL> COLUMN GROUP# FORMAT 99
SQL> COLUMN MEMBER FORMAT a40
SQL> SELECT *
2 FROM v$logfile;
GROUP# STATUS TYPE MEMBER
------ ------- ------- ----------------------------------------
2 ONLINE /u01/home/db01/ORADATA/u03/log02a.rdo
1 STALE ONLINE /u01/home/db01/ORADATA/u03/log01a.rdo
1 INVALID ONLINE /u01/home/db01/ORADATA/u04/log01b.rdo
2 INVALID ONLINE /u01/home/db01/ORADATA/u04/log02b.rdo
3 ONLINE /u01/home/db01/ORADATA/u03/log03a.rdo
3 ONLINE /u01/home/db01/ORADATA/u04/log03b.rdo
6 rows selected.
SQL> SELECT group#, members
2 FROM v$log;
GROUP# MEMBERS
------ ----------
1 2
2 2
3 2

DBA Fundamentals I C -24
Practice 7: Solutions (continued)
5 Remove the redo log group created in step 4.
Hints:
- Execute the ALTER DATABASE DROP LOGFILE GROUPcommand toremove the log group.
- Query the Dynamic View V$LOGto verify the result.
- Remove the operating system files for the group
SQL> ALTER SYSTEM SWITCH LOGFILE;
System altered.
SQL> ALTER SYSTEM SWITCH LOGFILE;
System altered.
SQL> ALTER SYSTEM SWITCH LOGFILE;
System altered.
SQL> SELECT group#, members
2 FROM v$log;
GROUP# MEMBERS
------ ----------
1 2
2 2
3 2
SQL> ALTER DATABASE DROP LOGFILE GROUP 3;
Database altered.
SQL> !rm $HOME/ORADATA/u03/log03a.rdo
SQL> !rm $HOME/ORADATA/u04/log03b.rdo

DBA Fundamentals I C -25
Practice 7: Solutions (continued)
6 Resize all online redo log files to 1024 KB. (Because we cannot resize log files, we have to add new logs and drop the old.)
Hints:
- Execute the ALTER DATABASE ADD LOGFILE GROUPcommandto add two new groups with the size 1024 KB.
- Query the Dynamic View V$LOGto check the active group.
- Execute the ALTER SYSTEM SWITCH LOGFILEcommand to force logswitches and change the group stage to inactive. The number of log switchesrequired will vary.
- Execute the ALTER DATABASE DROP LOGFILEcommand to removethe inactive groups.
- Query the Dynamic View V$LOGto verify the result.
SQL> ALTER DATABASE ADD LOGFILE
2 GROUP 3( '$HOME/ORADATA/u03/log03a.rdo',
3 '$HOME/ORADATA/u04/log03b.rdo'
4 ) SIZE 1024K,
5 GROUP 4( '$HOME/ORADATA/u03/log04a.rdo',
6 '$HOME/ORADATA/u04/log04b.rdo'
7 ) SIZE 1024K
8 ;
Database altered.
SQL> SELECT group#, status
2 FROM v$log;
GROUP# STATUS
------ ----------------
1 ACTIVE
2 CURRENT
3 UNUSED
4 UNUSED
SQL> ALTER SYSTEM SWITCH LOGFILE;
System altered.
SQL> ALTER SYSTEM SWITCH LOGFILE;
System altered.
SQL> ALTER SYSTEM SWITCH LOGFILE;
System altered.
SQL> ALTER SYSTEM SWITCH LOGFILE;
System altered.

DBA Fundamentals I C -26
Practice 7: Solutions (continued)
SQL> ALTER DATABASE DROP LOGFILE GROUP 1, GROUP 2;
Database altered.
SQL> SELECT group#, bytes
2 FROM v$log;
GROUP# BYTES
------ ----------
3 1048576
4 1048576

DBA Fundamentals I C -27
Practice 8: Solutions
1 Create permanent tablespaces with the following names and storage:
a DATA01data dictionary managed.
b DATA02 locally managed with uniform sized extents (Ensure that every used extentsize in the tablespace is a multiple of 100 KB.)
c INDX01 locally managed with uniform sized extents of 4K ( Enable automatic extension of 500 KB when more extents are required with amaximum size of 2 MB. )
d RONLYfor read-only tables with the default storage. DO NOT make the tablespaceread only at this time.
Display the information from the data dictionary.
SQL> CREATE TABLESPACE data01
2 DATAFILE '$HOME/ORADATA/u04/data01.dbf' SIZE 2M
3 EXTENT MANAGEMENT DICTIONARY;
Tablespace created.
SQL> CREATE TABLESPACE data02
2 DATAFILE '$HOME/ORADATA/u03/data02.dbf' SIZE 1M
3 EXTENT MANAGEMENT LOCAL UNIFORM SIZE 100K;
Tablespace created.
SQL> CREATE TABLESPACE indx01
2 DATAFILE '$HOME/ORADATA/u02/indx01.dbf' SIZE 1M
3 AUTOEXTEND ON NEXT 500K MAXSIZE 2M
4 EXTENT MANAGEMENT LOCAL UNIFORM SIZE 4K;
Tablespace created.
SQL> CREATE TABLESPACE ronly
2 DATAFILE '$HOME/ORADATA/u01/ronly01.dbf' SIZE 1M;
Tablespace created.

DBA Fundamentals I C -28
Practice 8: Solutions (continued)
2 Allocate 500K more disk space to tablespace DATA02. V erify the result.
SQL> COLUMN name FORMAT a50
SQL> SET LINESIZE 80
SQL> SET PAGESIZE 999
SQL> SELECT name, bytes, create_bytes
2 FROM v$datafile;
NAME BYTES CREATE_BYTES
-------------------------------------------- --------- ------------
/u01/home/db01/ORADATA/u01/system01.dbf 131072000 0
/u01/home/db01/ORADATA/u02/undotbs.dbf 31457280 0
/u01/home/db01/ORADATA/u03/users01.dbf 5242880 0
/u01/home/db01/ORADATA/u03/indx01.dbf 5242880 0
/u01/home/db01/ORADATA/u02/example01.dbf 5242880 0
/u01/home/db01/ORADATA/u01/querydata01.dbf 1048576 0
/u01/home/db01/ORADATA/u04/data01.dbf 2097152 2097152
/u01/home/db01/ORADATA/u03/data02.dbf 1048576 1048576
/u01/home/db01/ORADATA/u02/indx01.dbf 1048576 1048576
/u01/home/db01/ORADATA/u01/ronly01.dbf 1048576 1048576
10 rows selected.
SQL> ALTER DATABASE
2 DATAFILE '$HOME/ORADATA/u03/data02.dbf' RESIZE 1500K;
Database altered.
SQL> COLUMN name FORMAT a40
SQL> SELECT name, bytes, create_bytes
2 FROM v$datafile
3 WHERE name LIKE '%data02%‘;
NAME BYTES CREATE_BYTES
---------------------------------------- ---------- ------------
/u01/home/db02/ORADATA/u03/data02.dbf 1536000 1048576
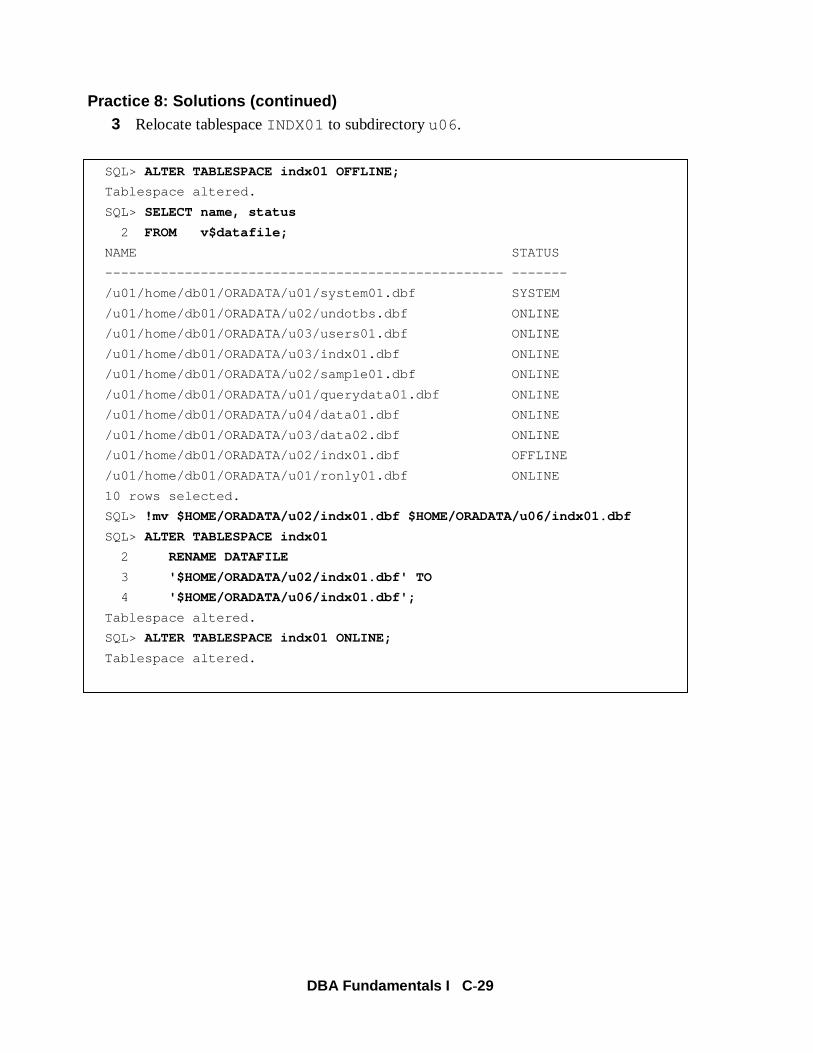
DBA Fundamentals I C -29
Practice 8: Solutions (continued)3 Relocate tablespace INDX01 to subdirectory u06 .
SQL> ALTER TABLESPACE indx01 OFFLINE;
Tablespace altered.
SQL> SELECT name, status
2 FROM v$datafile;
NAME STATUS
-------------------------------------------------- -------
/u01/home/db01/ORADATA/u01/system01.dbf SYSTEM
/u01/home/db01/ORADATA/u02/undotbs.dbf ONLINE
/u01/home/db01/ORADATA/u03/users01.dbf ONLINE
/u01/home/db01/ORADATA/u03/indx01.dbf ONLINE
/u01/home/db01/ORADATA/u02/sample01.dbf ONLINE
/u01/home/db01/ORADATA/u01/querydata01.dbf ONLINE
/u01/home/db01/ORADATA/u04/data01.dbf ONLINE
/u01/home/db01/ORADATA/u03/data02.dbf ONLINE
/u01/home/db01/ORADATA/u02/indx01.dbf OFFLINE
/u01/home/db01/ORADATA/u01/ronly01.dbf ONLINE
10 rows selected.
SQL> !mv $HOME/ORADATA/u02/indx01.dbf $HOME/ORADATA/u06/indx01.dbf
SQL> ALTER TABLESPACE indx01
2 RENAME DATAFILE
3 '$HOME/ORADATA/u02/indx01.dbf' TO
4 '$HOME/ORADATA/u06/indx01.dbf';
Tablespace altered.
SQL> ALTER TABLESPACE indx01 ONLINE;
Tablespace altered.

DBA Fundamentals I C -30
Practice 8: Solutions (continued)
SQL> SELECT name, status
2 FROM v$datafile;
NAME STATUS
-------------------------------------------------- -------
/u01/home/db01/ORADATA/u01/system01.dbf SYSTEM
/u01/home/db01/ORADATA/u02/undotbs.dbf ONLINE
/u01/home/db01/ORADATA/u03/users01.dbf ONLINE
/u01/home/db01/ORADATA/u03/indx01.dbf ONLINE
/u01/home/db01/ORADATA/u02/sample01.dbf ONLINE
/u01/home/db01/ORADATA/u01/querydata01.dbf ONLINE
/u01/home/db01/ORADATA/u04/data01.dbf ONLINE
/u01/home/db01/ORADATA/u03/data02.dbf ONLINE
/u01/home/db01/ORADATA/u06/indx01.dbf ONLINE
/u01/home/db01/ORADATA/u01/ronly01.dbf ONLINE
10 rows selected.
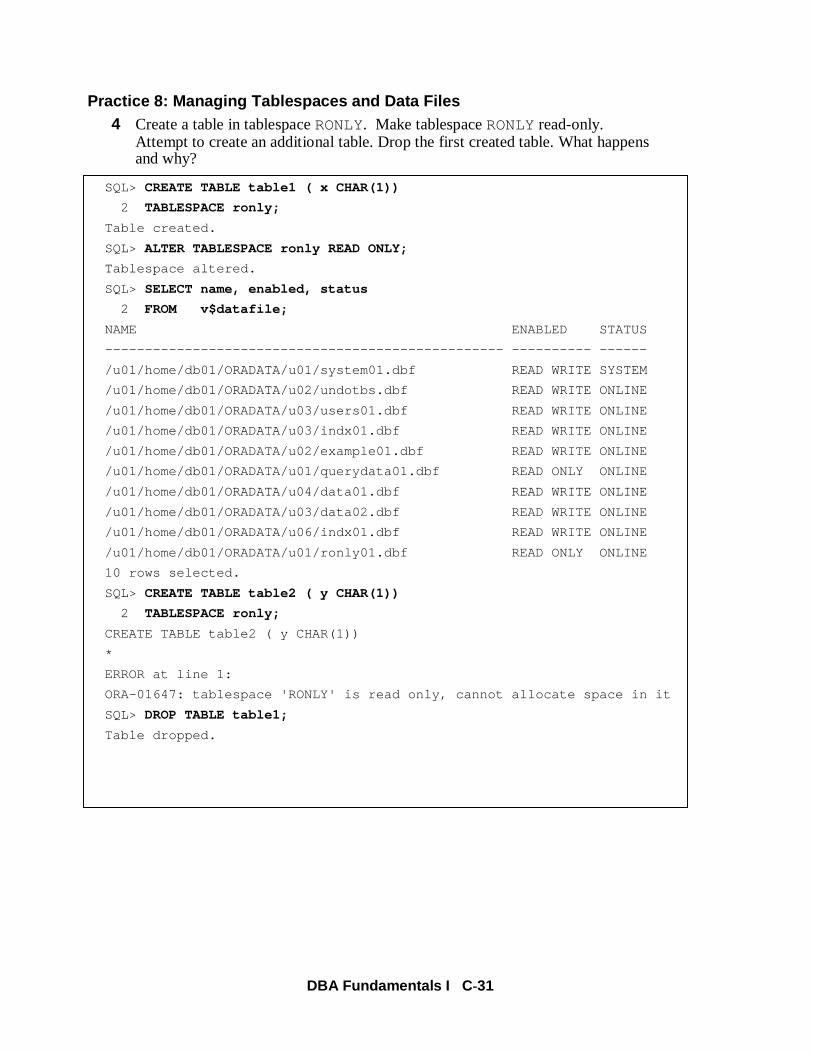
DBA Fundamentals I C -31
Practice 8: Managing Tablespaces and Data Files4 Create a table in tablespace RONLY. Make tablespace RONLYread-only.
Attempt to create an additional table. Drop the first created table. What happensand why?
SQL> CREATE TABLE table1 ( x CHAR(1))
2 TABLESPACE ronly;
Table created.
SQL> ALTER TABLESPACE ronly READ ONLY;
Tablespace altered.
SQL> SELECT name, enabled, status
2 FROM v$datafile;
NAME ENABLED STATUS
-------------------------------------------------- ---------- ------
/u01/home/db01/ORADATA/u01/system01.dbf READ WRITE SYSTEM
/u01/home/db01/ORADATA/u02/undotbs.dbf READ WRITE ONLINE
/u01/home/db01/ORADATA/u03/users01.dbf READ WRITE ONLINE
/u01/home/db01/ORADATA/u03/indx01.dbf READ WRITE ONLINE
/u01/home/db01/ORADATA/u02/example01.dbf READ WRITE ONLINE
/u01/home/db01/ORADATA/u01/querydata01.dbf READ ONLY ONLINE
/u01/home/db01/ORADATA/u04/data01.dbf READ WRITE ONLINE
/u01/home/db01/ORADATA/u03/data02.dbf READ WRITE ONLINE
/u01/home/db01/ORADATA/u06/indx01.dbf READ WRITE ONLINE
/u01/home/db01/ORADATA/u01/ronly01.dbf READ ONLY ONLINE
10 rows selected.
SQL> CREATE TABLE table2 ( y CHAR(1))
2 TABLESPACE ronly;
CREATE TABLE table2 ( y CHAR(1))
*
ERROR at line 1:
ORA-01647: tablespace 'RONLY' is read only, cannot allocate space in it
SQL> DROP TABLE table1;
Table dropped.

DBA Fundamentals I C -32
Practice 8: Solutions (continued)5 Drop tablespace RONLYand the associated datafile. Verify it.
SQL> DROP TABLESPACE ronly INCLUDING CONTENTS AND DATAFILES;
Tablespace dropped.
SQL> SELECT *
2 FROM v$tablespace;
TS# NAME INC
------- ------------- ---
0 SYSTEM YES
1 UNDOTBS YES
3 USERS YES
4 INDX YES
5 SAMPLE YES
2 TEMP YES
6 QUERY_DATA YES
7 DATA01 YES
8 DATA02 YES
9 INDX01 YES
10 rows selected.
SQL> !ls $HOME/ORADATA/u01/*
/u01/home/db01/ORADATA/u01/ctrl01.bak
/u01/home/db01/ORADATA/u01/querydata01.dbf
/u01/home/db01/ORADATA/u01/ctrl01.ctl
/u01/home/db01/ORADATA/u01/system01.dbf

DBA Fundamentals I C -33
Practice 8: Solutions (continued)6 Set DB_CREATE_FILE_DESTto $HOME/ORADATA/u05in memory only. Create
tablespace DATA03size 5M. Do not specify a file location. Verify the creation of thedata file.
SQL> ALTER SYSTEM SET DB_CREATE_FILE_DEST='$HOME/ORADATA/u05' SCOPE=MEMORY;
System altered.
SQL> CREATE TABLESPACE data03
2 DATAFILE SIZE 5M;
Tablespace created.
SQL> SELECT *
2 FROM v$tablespace;
TS# NAME INC
------- ------------- ---
0 SYSTEM YES
1 UNDOTBS YES
3 USERS YES
4 INDX YES
5 SAMPLE YES
2 TEMP YES
6 QUERY_DATA YES
7 DATA01 YES
8 DATA02 YES
9 INDX01 YES
11 DATA03 YES
11 rows selected.
SQL> !ls $HOME/ORADATA/u05
ora_data03_xg17n9nd.dbf

DBA Fundamentals I C -34
Practice 9: Solutions 1 As user SYSTEM, run the lab09_01.sql script to create tables and indexes.
SQL> @$HOME/STUDENT/LABS/lab09_01.sql
SQL> CONNECT system/manager
Connected.
SQL> CREATE TABLE emp ( empno NUMBER(4),
2 ename VARCHAR2(30),
3 job VARCHAR2(9),
4 mgr NUMBER(4),
5 hiredate DATE,
6 sal NUMBER(7,2),
7 comm NUMBER(7,2),
8 deptno NUMBER(2) )
9 TABLESPACE data01
10 STORAGE ( INITIAL 100K
11 NEXT 100K
12 PCTINCREASE 0
13 MINEXTENTS 8
14 MAXEXTENTS 10 );
Table created.
SQL> CREATE TABLE fragment1( a NUMBER )
2 TABLESPACE data01
3 STORAGE( INITIAL 10K );
Table created.
SQL> CREATE TABLE dept ( deptno NUMBER,
2 dname VARCHAR2(15),
3 loc VARCHAR2(20) )
4 TABLESPACE data01
5 STORAGE( INITIAL 50K
6 NEXT 50K );
Table created.
SQL> CREATE TABLE fragment2( a NUMBER )
2 TABLESPACE data01
3 STORAGE ( INITIAL 8K );
Table created.

DBA Fundamentals I C -35
Practice 9: Solutions (continued)
SQL> CREATE TABLE big_emp ( empno NUMBER(4),
2 ename VARCHAR2(30) )
3 TABLESPACE data01
4 STORAGE ( INITIAL 1M
5 NEXT 1M
6 MAXEXTENTS 10 );
Table created.
SQL> CREATE INDEX i_e_empno
2 ON emp(ename)
3 TABLESPACE indx01
4 STORAGE ( INITIAL 50K
5 NEXT 50K );
Index created.
SQL> DROP TABLE fragment1;
Table dropped.
SQL> DROP TABLE fragment2;
Table dropped.

DBA Fundamentals I C -36
Practice 9: Solutions (continued)
2 Identify the different types of segments in the database.
SQL> CONNECT system/manager
Connected.
SQL> SELECT DISTINCT segment_type
2 FROM dba_segments;
SEGMENT_TYPE
------------------
CACHE
CLUSTER
INDEX
INDEX PARTITION
LOBINDEX
LOBSEGMENT
NESTED TABLE
ROLLBACK
TABLE
TABLE PARTITION
TYPE2 UNDO
11 rows selected.

DBA Fundamentals I C -37
Practice 9: Solutions (continued)
3 Write a query to check which segments are within five extents short of the maximumextents. Ignore the bootstrap segment. This query is useful in identifying any segmentsthat are likely to generate errors during future data load.
4 Which files have space allocated for the EMPtable?
SQL> CONNECT system/manager
Connected.
SQL> COLUMN segment_name FORMAT a20
SQL> COLUMN segment_type FORMAT a15
SQL> SELECT segment_name,segment_type,
2 max_extents, extents
3 FROM dba_segments
4 WHERE extents+5 > max_extents
5 AND segment_type<>'CACHE';
SEGMENT_NAME SEGMENT_TYPE MAX_EXTENTS EXTENTS
-------------------- --------------- ----------- ----------
EMP TABLE 10 8
SQL> CONNECT system/manager
Connected.
SQL> SELECT DISTINCT f.file_name
2 FROM dba_extents e,dba_data_files f
3 WHERE e.segment_name='EMP'
4 AND e.file_id=f.file_id;
FILE_NAME
-------------------------------------
/u01/home/db01/ORADATA/u04/data01.dbf

DBA Fundamentals I C -38
Practice 9: Solutions (continued)5 Run the lab09_05.sql script.
6 List the free space available by tablespace. The query should display the number offragments, the total free space, and the largest free extent in each tablespace.
SQL> @$HOME/STUDENT/LABS/lab09_05.sql
SQL> CONNECT / AS SYSDBA;
Connected.
SQL> SELECT tablespace_name,COUNT(*) AS fragments,
2 SUM(bytes) AS total,
3 MAX(bytes) AS largest
4 FROM dba_free_space
5 GROUP BY tablespace_name;
TABLESPACE_NAME FRAGMENTS TOTAL LARGEST
------------------------------ ---------- ---------- ----------
DATA01 3 147456 126976
DATA02 1 1433600 1433600
DATA03 1 5177344 5177344
SAMPLE 1 2555904 2555904
INDX 1 5120000 5120000
INDX01 1 917504 917504
QUERY_DATA 1 983040 983040
SYSTEM 1 4943872 4943872
UNDOTBS 15 24903680 6750208
USERS 1 5177344 5177344
10 rows selected.
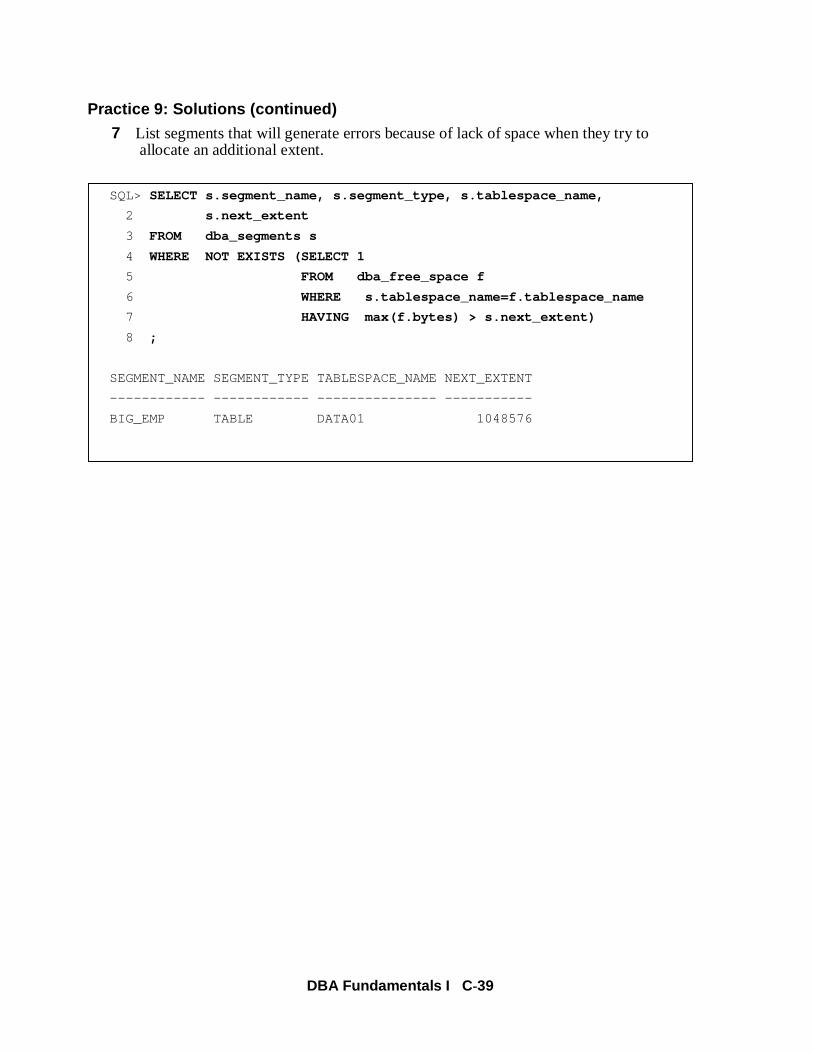
DBA Fundamentals I C -39
Practice 9: Solutions (continued)
7 List segments that will generate errors because of lack of space when they try toallocate an additional extent.
SQL> SELECT s.segment_name, s.segment_type, s.tablespace_name,
2 s.next_extent
3 FROM dba_segments s
4 WHERE NOT EXISTS (SELECT 1
5 FROM dba_free_space f
6 WHERE s.tablespace_name=f.tablespace_name
7 HAVING max(f.bytes) > s.next_extent)
8 ;
SEGMENT_NAME SEGMENT_TYPE TABLESPACE_NAME NEXT_EXTENT
------------ ------------ --------------- -----------
BIG_EMP TABLE DATA01 1048576

DBA Fundamentals I C -40
Practice 10: Solutions 1 Connect as user SYS, and list the undo segments in tablespace UNDOTBS.
2 Create undo tablespace UNDO2, size 15M, in $HOME/oradata/u03 . List therollback segments in tablespace UNDO2.
SQL> CONNECT / AS SYSDBA
Connected.
SQL> SELECT segment_name
2 FROM dba_rollback_segs
3 WHERE tablespace_name = 'UNDOTBS';
SEGMENT_NAME
--------------------
_SYSSMU1$
_SYSSMU2$
_SYSSMU3$
_SYSSMU4$
_SYSSMU5$
_SYSSMU6$
_SYSSMU7$
_SYSSMU8$
8 rows selected.
SQL> CREATE UNDO TABLESPACE undo2
2 DATAFILE '$HOME/ORADATA/u03/undo2.dbf' size 15M;
Tablespace created.
SQL> SELECT segment_name
2 FROM dba_rollback_segs
3 WHERE tablespace_name = 'UNDO2';
SEGMENT_NAME
--------------------
_SYSSMU9$
_SYSSMU10$
_SYSSMU11$
_SYSSMU12$
_SYSSMU13$
_SYSSMU14$
_SYSSMU15$
_SYSSMU16$
8 rows selected.

DBA Fundamentals I C -41
Practice 10: Solutions (continued)3 In a new telnet session start SQL*Plus and connect as user HRand run script
lab10_03.sql to insert a row into table DEPARTMENTS.Do not commit, roll back, or exit the session.
4 In the session in which you are connected as SYS, using the ALTER SYSTEMcommand, switch the UNDOtablespace from UNDOTBSto UNDO2for the instance.
5 As SYSdrop tablespace UNDOTBS. What happened? Why?
SQL> @$HOME/STUDENT/LABS/lab10_03.sql
SQL> CONNECT hr/hr
Connected.
SQL> INSERT INTO departments (department_id, department_name)
2 VALUES (9999,'x');
1 row created.
SQL> ALTER SYSTEM SET undo_tablespace='UNDO2' SCOPE=BOTH;
System altered.
SQL> DROP TABLESPACE undotbs INCLUDING CONTENTS AND DATAFILES;
DROP TABLESPACE undotbs INCLUDING CONTENTS AND DATAFILES
*
ERROR at line 1:
ORA-30013: undo tablespace 'UNDOTBS' is currently in use

DBA Fundamentals I C -42
Practice 10: Solutions (continued)6 List the undo segments in tablespace UNDOTBSand their status. Compare this
list to the list in step 1.
SQL> SELECT segment_name
2 FROM dba_rollback_segs
3 WHERE tablespace_name = 'UNDOTBS';
SEGMENT_NAME
--------------------
_SYSSMU1$
_SYSSMU2$
_SYSSMU3$
_SYSSMU4$
_SYSSMU5$
_SYSSMU6$
_SYSSMU7$
_SYSSMU8$
8 rows selected.
SQL> SELECT a.usn,a.name,b.status
2 FROM v$rollname a, v$rollstat b
3 WHERE a.name IN ( SELECT segment_name
4 FROM dba_segments
5 WHERE tablespace_name = 'UNDOTBS'
6 )
7 AND a.usn = b.usn;
USN NAME STATUS
----- -------------------------------------- ---------------
2 _SYSSMU2$ PENDING OFFLINE

DBA Fundamentals I C -43
Practice 10: Solutions (continued)7 In the session connected as HR, roll back the transaction and exit the session.
8 In the session connected as SYSdrop tablespace UNDOTBS. What happened? Why?
9 As SYS issue the following command:
ALTER SYSTEM SET undo_retention=0 SCOPE=memory;
Now drop tablespace UNDOTBS. What happened? Why?
Note: There still may be a delay before the tablespace is drop.
SQL> ROLLBACK;
Rollback complete.
SQL> EXIT;
SQL> DROP TABLESPACE undotbs;
DROP TABLESPACE undotbs
*
ERROR at line 1:
ORA-30013: undo tablespace 'UNDOTBS' is currently in use
SQL> ALTER SYSTEM SET undo_retention=0 SCOPE=MEMORY;
System altered.
SQL> DROP TABLESPACE undotbs INCLUDING CONTENTS AND DATAFILES;
Tablespace dropped.

DBA Fundamentals I C -44
Practice 11: Solutions 1 Create the following tables as user SYSTEMfor an order entry system that you are
implementing now. The tables and the columns are shown below:
You have been informed that in the table ORDERS, rows will be inserted without avalue for DATE_OF_DELY, and it will be updated when the order is fulfilled. Usetablespace USERS. You can use the default storage settings.
DATEDATE_OF_DELY
VARCHAR2(3)CUST_CODE
DATEORD_DATE
NUMBER(3)ORD_IDORDERS
VARCHAR2(5)REGION
VARCHAR2(50)NAME
VARCHAR2(3)CUST_CODECUSTOMERS
Data Type and SizeColumnTable
SQL> CONNECT system/manager
Connected.
SQL> CREATE TABLE customers ( cust_code VARCHAR2(3),
2 name VARCHAR2(50),
3 region VARCHAR2(5) )
4 TABLESPACE users;
Table created.
SQL> CREATE TABLE orders ( ord_id NUMBER(3),
2 ord_date DATE,
3 cust_code VARCHAR2(3),
4 date_of_dely DATE )
5 TABLESPACE users;
Table created.

DBA Fundamentals I C -45
Practice 11: Solutions (continued)2 Run the script lab11_02.sql to insert rows into the tables.
3 Find which files and blocks contain the rows for the orders table.
Hint: Query data dictionary view DBA_EXTENTS.
4 Check the number of extents used by the table ORDERS.
SQL> @$HOME/STUDENT/LABS/lab11_02.sql
SQL> CONNECT system/manager
Connected.
SQL> SELECT file_id, block_id, blocks
2 FROM dba_extents
3 WHERE owner = 'SYSTEM'
4 AND segment_name = 'ORDERS'
5 AND segment_type = 'TABLE';
FILE_ID BLOCK_ID BLOCKS
---------- ---------- ----------
3 25 8
SQL> SELECT count(*)
2 FROM dba_extents
3 WHERE segment_name='ORDERS'
4 AND owner='SYSTEM';
COUNT(*)
----------
1

DBA Fundamentals I C -46
Practice 11: Solutions (continued)5 Allocate an extent manually, with default size, for the table ORDERSand confirm
that the extent has been added as specified.
6 Create another table, ORDERS2as copy of the ORDERStable, but withMINEXTENTS=10. Verify that the table has been createdwith the specified number of extents.
SQL> ALTER TABLE orders ALLOCATE EXTENT;
Table altered.
SQL> SELECT count(*)
2 FROM dba_extents
3 WHERE segment_name='ORDERS'
4 AND owner='SYSTEM';
COUNT(*)
----------
2
SQL> CREATE TABLE orders2
2 TABLESPACE users
3 STORAGE(MINEXTENTS 10)
4 AS
5 SELECT * FROM orders;
Table created.
SQL> SELECT count(*)
2 FROM dba_extents
3 WHERE segment_name='ORDERS2'
4 AND owner='SYSTEM';
COUNT(*)
----------
10

DBA Fundamentals I C -47
Practice 11: Solutions (continued)7 Truncate table ORDERSwithout releasing space and check the number of extents to
verify extents have not been deallocated.
8 Truncate the ORDERS2table, releasing space. How many extents does the table havenow?
9 Run the script lab11_09.sql to insert some rows into the ORDERS2table.
SQL> TRUNCATE TABLE orders REUSE STORAGE;
Table truncated.
SQL> SELECT count(*)
2 FROM dba_extents
3 WHERE segment_name='ORDERS'
4 AND owner='SYSTEM';
COUNT(*)
----------
2
SQL> TRUNCATE TABLE orders2;
Table truncated.
SQL> SELECT count(*)
2 FROM dba_extents
3 WHERE segment_name='ORDERS2'
4 AND owner='SYSTEM';
COUNT(*)
----------
10
SQL> @$HOME/STUDENT/LABS/lab11_09.sql

DBA Fundamentals I C -48
Practice 11: Solutions (continued)10 View the columns for the ORDERS2table. Then mark the DATE_OF_DELYcolumn
as UNUSED. View the columns for the ORDERS2table again. What happens?
11 Drop the unused column DATE_OF_DELY.
12 Drop the ORDERS2table.
SQL> DESCRIBE orders2 ;
Name Null? Type
-------------------------- -------- ------------------
ORD_ID NUMBER(3)
ORD_DATE DATE
CUST_CODE VARCHAR2(3)
DATE_OF_DELY DATE
SQL> ALTER TABLE orders2
2 SET UNUSED COLUMN date_of_dely
3 CASCADE CONSTRAINTS;
Table altered.
SQL> DESCRIBE orders2;
Name Null? Type
-------------------------- -------- ------------------
ORD_ID NUMBER(3)
ORD_DATE DATE
CUST_CODE VARCHAR2(3)
SQL> ALTER TABLE orders2
2 DROP UNUSED COLUMNS CHECKPOINT 1000;
Table altered.
SQL> DROP TABLE orders2;
Table dropped.

DBA Fundamentals I C -49
Practice 12: Solutions 1 You are considering creating indexes on the NAMEand REGIONcolumns of the
CUSTOMERStable. What types of index are appropriate for the two columns? Createthe indexes, naming them CUST_NAME_IDXand CUST_REGION_IDX, respectively,and placing them in the appropriate tablespaces.
Hint: A B-tree index is suitable for a column with many distinct values, and a bitmap index is suitable for columns with only a few distinct values.
2 Move the CUST_REGION_IDXindex to another tablespace.
Hint: The index can be rebuilt specifying a different tablespace.
3 Note the files and blocks used by the extents by CUST_REGION_IDXindex.
Hint: Use the view DBA_EXTENTSto get this information.
SQL> CONNECT system/manager
Connected.
SQL> CREATE INDEX cust_name_idx
2 ON customers(name)
3 TABLESPACE indx01;
Index created.
SQL> CREATE BITMAP INDEX cust_region_idx
2 ON system.customers(region)
3 TABLESPACE indx01;
Index created.
SQL> ALTER INDEX cust_region_idx REBUILD
2 TABLESPACE indx;
Index altered.
SQL> SELECT file_id, block_id, blocks
2 FROM dba_extents
3 WHERE segment_name='CUST_REGION_IDX'
4 AND owner='SYSTEM';
FILE_ID BLOCK_ID BLOCKS
---------- ---------- ----------
4 17 125

DBA Fundamentals I C -50
Practice 12: Solutions (continued)4 Re-create the CUST_REGION_IDXindex without dropping and re-creating it, and
retain it in the same tablespace as before. Does the new index use the same blocks thatwere used earlier?
Hint: Rebuild the index.
The new index does not reuse the same space as seen from the location of the extentafter rebuild. This is because Oracle server builds a temporary index, drops the old one,and renames the temporary index.
5 a As user SYSTEM, run the script lab12_05a.sql to create and populatethe NUMBERStable.
b Query the table NUMBERSto find the number of distinct values in the twocolumns in the table.
SQL> ALTER INDEX cust_region_idx REBUILD;
Index altered.
SQL> SELECT file_id, block_id, blocks
2 FROM dba_extents
3 WHERE segment_name='CUST_REGION_IDX'
4 AND owner='SYSTEM';
FILE_ID BLOCK_ID BLOCKS
---------- ---------- ----------
4 142 125
SQL> @$HOME/STUDENT/LABS/lab12_05a.sql
SQL> SELECT count(DISTINCT no) NO,
2 count(DISTINCT odd_even) OE
3 FROM numbers;
NO OE
---------- ----------
10000 2

DBA Fundamentals I C -51
Practice 12: Solutions (continued)5 c Create B-tree indexes NUMB_OE_IDXand NUMB_NO_IDXon the ODD_EVEN
and NOcolumns of the NUMBERStable, respectively, and check the total sizesof the indexes. Put the indexes in tablespace INDX01 .
Hint: Check the total blocks allocated to the extents from DBA_SEGMENTS.
SQL> CREATE INDEX numb_oe_idx
2 ON numbers(odd_even)
3 TABLESPACE indx01;
Index created.
SQL> CREATE INDEX numb_no_idx
2 ON numbers(no)
3 TABLESPACE indx01;
Index created.
SQL> COLUMN segment_name FORMAT a15
SQL> SELECT segment_name, blocks
2 FROM dba_segments
3 WHERE segment_name LIKE 'NUMB%'
4 AND segment_type='INDEX';
SEGMENT_NAME BLOCKS
--------------- ----------
NUMB_OE_IDX 40
NUMB_NO_IDX 46

DBA Fundamentals I C -52
Practice 12: Solutions (continued)5 d Create bitmap indexes NUMB_OE_IDXand NUMB_NO_IDXon the ODD_EVEN
and NOcolumns of the NUMBERStable, respectively, and check the total sizesof the indexes. Put the indexes in tablespace INDX01.What can you conclude about the relationship between cardinality and sizes of thetwo types of indexes?
Hint: The existing indexes need to be dropped before creating the new indexes.Now re-execute the query to check the sizes of the indexes.
It can be seen from the results that a bitmap index is compact for a low-cardinalitycolumn, while a B-tree index is compact for a high-cardinality column.
SQL> DROP INDEX numb_oe_idx;
Index dropped.
SQL> DROP INDEX numb_no_idx;
Index dropped.
SQL> CREATE BITMAP INDEX numb_oe_idx
2 ON numbers(odd_even)
3 TABLESPACE indx01;
Index created.
SQL> CREATE BITMAP INDEX numb_no_idx
2 ON numbers(no)
3 TABLESPACE indx01;
Index created.
SQL> SELECT segment_name, blocks
2 FROM dba_segments
3 WHERE segment_name LIKE 'NUMB%'
4 AND segment_type='INDEX';
SEGMENT_NAME BLOCKS
--------------- ----------
NUMB_OE_IDX 2
NUMB_NO_IDX 72
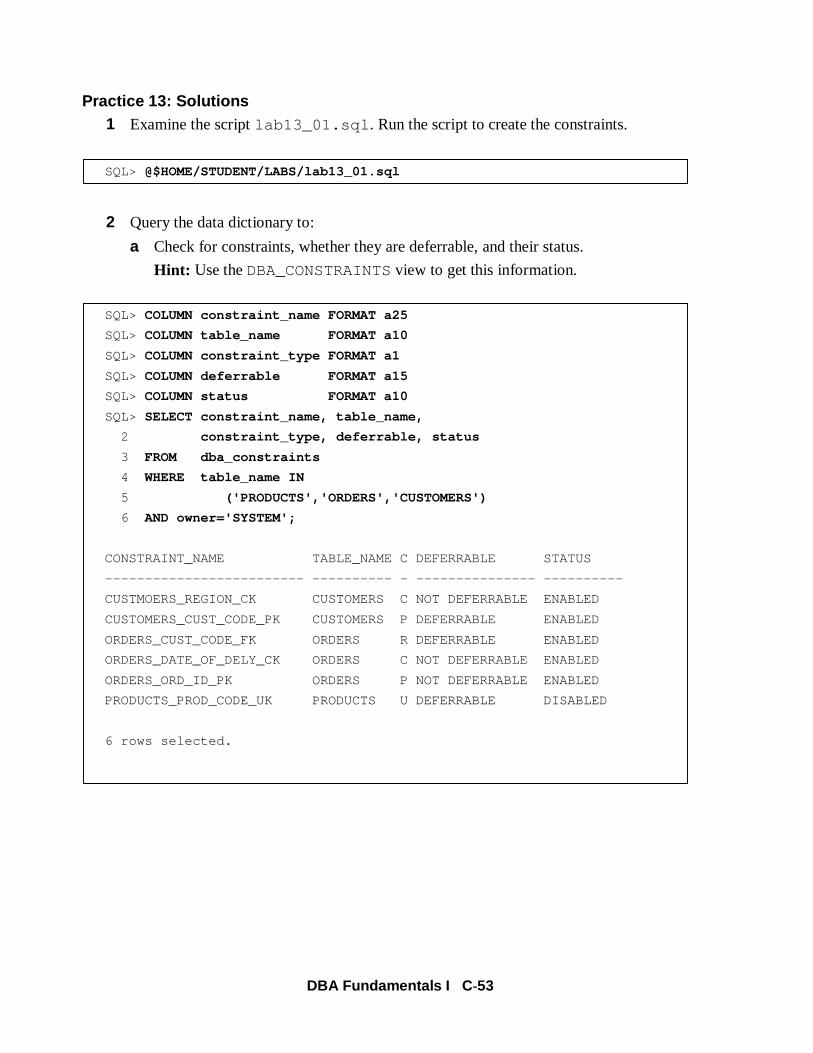
DBA Fundamentals I C -53
SQL> COLUMN constraint_name FORMAT a25
SQL> COLUMN table_name FORMAT a10
SQL> COLUMN constraint_type FORMAT a1
SQL> COLUMN deferrable FORMAT a15
SQL> COLUMN status FORMAT a10
SQL> SELECT constraint_name, table_name,
2 constraint_type, deferrable, status
3 FROM dba_constraints
4 WHERE table_name IN
5 ('PRODUCTS','ORDERS','CUSTOMERS')
6 AND owner='SYSTEM';
CONSTRAINT_NAME TABLE_NAME C DEFERRABLE STATUS
------------------------- ---------- - --------------- ----------
CUSTMOERS_REGION_CK CUSTOMERS C NOT DEFERRABLE ENABLED
CUSTOMERS_CUST_CODE_PK CUSTOMERS P DEFERRABLE ENABLED
ORDERS_CUST_CODE_FK ORDERS R DEFERRABLE ENABLED
ORDERS_DATE_OF_DELY_CK ORDERS C NOT DEFERRABLE ENABLED
ORDERS_ORD_ID_PK ORDERS P NOT DEFERRABLE ENABLED
PRODUCTS_PROD_CODE_UK PRODUCTS U DEFERRABLE DISABLED
6 rows selected.
Practice 13: Solutions 1 Examine the script lab13_01.sql . Run the script to create the constraints.
2 Query the data dictionary to:
a Check for constraints, whether they are deferrable, and their status.
Hint: Use the DBA_CONSTRAINTSview to get this information.
SQL> @$HOME/STUDENT/LABS/lab13_01.sql

DBA Fundamentals I C -54
Practice 13: Solutions (continued)
2 b Check the names and types of indexes created to validate the constraints.
Hint: The indexes are only created for primary key and unique constraints andhave the same name as the constraints
3 Insert two records with the following values into the PRODUCTStable:
2400NT Monitor4000
3620Unix Monitor4000
LIST_PRICEPRODUCT_DESCRIPTIONPRODUCT_ID
SQL> SELECT index_name,table_name,uniqueness
2 FROM dba_indexes
3 WHERE index_name in
4 ( SELECT constraint_name
5 FROM dba_constraints
6 WHERE table_name IN ('PRODUCTS', 'ORDERS', 'CUSTOMERS')
7 AND owner='SYSTEM'
8 AND constraint_type in ('P','U')
9 )
10 ;
INDEX_NAME TABLE_NAME UNIQUENES
------------------------------ ---------- ---------
CUSTOMERS_CUST_CODE_PK CUSTOMERS NONUNIQUE
ORDERS_ORD_ID_PK ORDERS UNIQUE
SQL> INSERT INTO system.products
2 VALUES(4000,'UNIX Monitor',3620);
1 row created.
SQL> INSERT INTO system.products
2 VALUES(4000,'NT Monitor', 2400);
1 row created.
SQL> COMMIT;
Commit complete.

DBA Fundamentals I C -55
Practice 13: Solutions (continued)4 Enable the unique constraint on the PRODUCTtable. Was it successful?
Why or why not?
5 a Ensure that new rows added to the table do not violate the constraint on thePRODUCTtable.
Hint: This can be done by enabling the constraint NOVALIDATE.
b Query the data dictionary to verify the effect of the change.
SQL> ALTER TABLE system.products
2 ENABLE CONSTRAINT products_prod_code_uk;
ALTER TABLE system.products
*
ERROR at line 1:
ORA-02299: cannot validate (SYSTEM.PRODUCTS_PROD_CODE_UK) - duplicate keys found
SQL> ALTER TABLE system.products
2 ENABLE NOVALIDATE CONSTRAINT products_prod_code_uk;
Table altered.
SQL> SELECT constraint_name, table_name,
2 constraint_type, validated, status
3 FROM dba_constraints
4 WHERE table_name = 'PRODUCTS'
5 AND owner='SYSTEM';
CONSTRAINT_NAME TABLE_NAME C VALIDATED STATUS
------------------------- ---------- - ------------- ----------
PRODUCTS_PROD_CODE_UK PRODUCTS U NOT VALIDATED ENABLED

DBA Fundamentals I C -56
Practice 13: Solutions (continued)
5 c Test that the constraint disables inserts that violate the change by adding arow with the following values:
3000Monitor4000
LIST_PRICEPRODUCT_DESCRIPTIONPRODUCT_ID
SQL> INSERT INTO system.products
2 VALUES(4000,'Monitor',3000);
INSERT INTO system.products
*
ERROR at line 1:
ORA-00001: unique constraint (SYSTEM.PRODUCTS_PROD_CODE_UK) violated

DBA Fundamentals I C -57
Practice 13: Solutions (continued)6 Take the necessary steps to identify existing constraint violations in the PRODUCTS
table, modify product codes as needed, and guarantee that all existing as well as newdata do not violate the constraint. (Assume that the table has several thousands ofrows and it is too time-consuming to verify each row manually.)
Hint: Use the following steps:
a Create the EXCEPTIONStable.
b Run the command to enable the constraint and trap the exceptions.
c Use theROWIDs in the EXCEPTIONStable to list the rows in thePRODUCTStable that violate the constraint. (Do not list LOB columns.)
SQL> CONNECT system/manager
Connected.
SQL> @?/rdbms/admin/utlexcpt
SQL> ALTER TABLE system.products
2 ENABLE CONSTRAINT products_prod_code_uk
3 EXCEPTIONS INTO system.exceptions;
ALTER TABLE system.products
*
ERROR at line 1:
ORA-02299: cannot validate (SYSTEM.PRODUCTS_PROD_CODE_UK) - duplicate keys found
SQL> SELECT rowid, prod_code, description
2 FROM system.products
3 WHERE rowid IN ( SELECT row_id
4 FROM exceptions
5 WHERE table_name='PRODUCTS'
6 )
7 ;
ROWID PROD_CODE DESCRIPTION
------------------ ---------- ------------------------------
AAABSgAAIAAAAASAAA 4000 UNIX Monitor
AAABSgAAIAAAAASAAB 4000 NT Monitor

DBA Fundamentals I C -58
Practice 13: Solutions (continued)
6 d Rectify the errors.
e Enable the constraint.
SQL> UPDATE system.products
2 SET prod_code='4001'
3 WHERE rowid = ( SELECT max(row_id)
4 FROM exceptions
5 WHERE table_name='PRODUCTS'
6 )
7 ;
1 row updated.
SQL> ALTER TABLE system.products
2 ENABLE CONSTRAINT products_prod_code_uk
3 EXCEPTIONS INTO system.exceptions;
Table altered.

DBA Fundamentals I C -59
Practice 13: Solutions (continued) 7 Run the script lab13_07.sql to insert rows into the table. Were the inserts
successful? Roll back the changes.
8 Now examine the script lab13_08 . Notice that this script also performs theinserts in the same sequence. Run the script and check if it executes successfully.
9 Truncate the CUSTOMERStable. Was it successful? Why or why not?
SQL> @$HOME/STUDENT/LABS/lab13_07.sql
SQL> INSERT INTO system.orders
2 VALUES (800,'01-JAN-98','J01',NULL);
INSERT INTO system.orders
*
ERROR at line 1:
ORA-02291: integrity constraint (SYSTEM.ORDERS_CUST_CODE_FK) violated -parent key not found
SQL> INSERT INTO system.customers
2 VALUES ('J01','Sports Store', 'East');
1 row created.
SQL> ROLLBACK;
Rollback complete.
SQL> @$HOME/STUDENT/LABS/lab13_08.sql
SQL> ALTER SESSION SET CONSTRAINTS=deferred;
Session altered.
SQL> INSERT INTO system.orders
2 VALUES (800,'01-JAN-98','J01',NULL);
1 row created.
SQL> INSERT INTO system.customers
2 VALUES ('J01','Sports Store', 'East');
1 row created.
SQL> COMMIT;
Commit complete.
SQL> TRUNCATE TABLE system.customers;
TRUNCATE TABLE system.customers
*
ERROR at line 1:
ORA-02266: unique/primary keys in table referenced by enabled foreign keys

DBA Fundamentals I C -60
Practice 14: Solutions 1 Run the lab14_01.sql script to create user Jeff. Enable password management
by running script @$ORACLE_HOME/rdbms/admin/utlpwdmg.sql .
2 Try to change the password of user Jeff to JEFF. What happens?
3 Try changing the password for Jeff to follow the password management format.
Hint: Password should contain at least one digit, one character, and one punctuation.
SQL> @$HOME/STUDENT/LABS/lab14_01.sql
SQL> @$ORACLE_HOME/rdbms/admin/utlpwdmg.sql
SQL> ALTER USER jeff IDENTIFIED BY jeff;
ALTER USER jeff IDENTIFIED BY jeff
*
ERROR at line 1:
ORA-28003: password verification for the specified password failed
ORA-20001: Password same as or similar to user
SQL> ALTER USER jeff
2 IDENTIFIED BY super1$;
User altered.
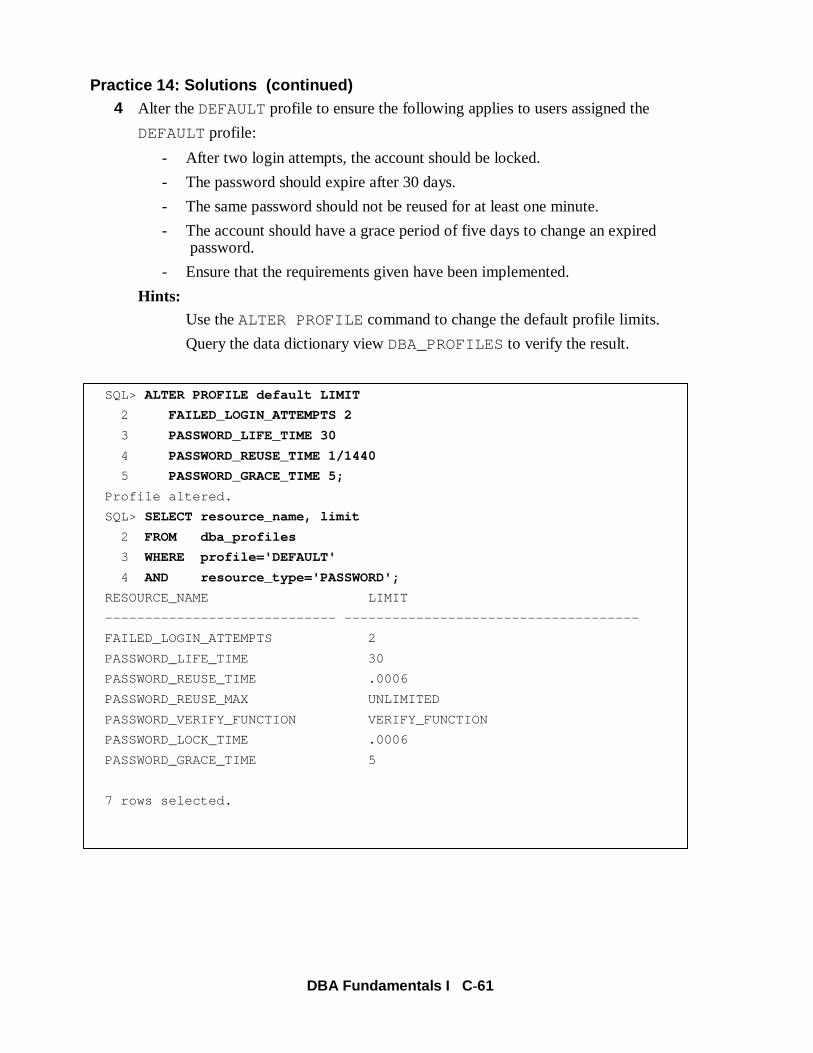
DBA Fundamentals I C -61
Practice 14: Solutions (continued)4 Alter the DEFAULTprofile to ensure the following applies to users assigned the
DEFAULTprofile:
- After two login attempts, the account should be locked.
- The password should expire after 30 days.
- The same password should not be reused for at least one minute.
- The account should have a grace period of five days to change an expiredpassword.
- Ensure that the requirements given have been implemented.
Hints:
Use the ALTER PROFILE command to change the default profile limits.
Query the data dictionary view DBA_PROFILESto verify the result.
SQL> ALTER PROFILE default LIMIT
2 FAILED_LOGIN_ATTEMPTS 2
3 PASSWORD_LIFE_TIME 30
4 PASSWORD_REUSE_TIME 1/1440
5 PASSWORD_GRACE_TIME 5;
Profile altered.
SQL> SELECT resource_name, limit
2 FROM dba_profiles
3 WHERE profile='DEFAULT'
4 AND resource_type='PASSWORD';
RESOURCE_NAME LIMIT
----------------------------- -------------------------------------
FAILED_LOGIN_ATTEMPTS 2
PASSWORD_LIFE_TIME 30
PASSWORD_REUSE_TIME .0006
PASSWORD_REUSE_MAX UNLIMITED
PASSWORD_VERIFY_FUNCTION VERIFY_FUNCTION
PASSWORD_LOCK_TIME .0006
PASSWORD_GRACE_TIME 5
7 rows selected.

DBA Fundamentals I C -62
Practice 14: Solutions (continued)5 Log in to user Jeff supplying an invalid password. Try this twice, then log in again,
this time supplying the correct password. What happens? Why?
6 Using data dictionary view DBA_USERS verify user Jeff is locked. Unlock the accountfor the user Jeff. After unlocking user Jeff connect as Jeff.
Hint: Execute the ALTER USERcommand to unlock the account.
SQL> CONNECT jeff/superman
ERROR:
ORA-01017: invalid username/password; logon denied
Warning: You are no longer connected to ORACLE.
SQL> CONNECT jeff/super
ERROR:
ORA-01017: invalid username/password; logon denied
SQL> CONNECT jeff/super1$
ERROR:
ORA-28000: the account is locked
SQL> CONNECT / AS SYSDBA
Connected.
SQL> SELECT username, account_status
2 FROM dba_users;
USERNAME ACCOUNT_STATUS
--------------- ---------------
SYS OPEN
SYSTEM OPEN
OUTLN OPEN
ORDSYS OPEN
MDSYS OPEN
OE OPEN
HR OPEN
ORDPLUGINS OPEN
DBSNMP OPEN
JEFF LOCKED(TIMED)
10 rows selected.
SQL> ALTER USER jeff
2 ACCOUNT UNLOCK;
User altered.
SQL> CONNECT jeff/super1$
Connected.

DBA Fundamentals I C -63
Practice 14: Solutions (continued)7 Disable password checks for the DEFAULTprofile.
Hint: Execute the ALTER PROFILE command to disable the password checks.
8 Log in to user Jeff supplying an invalid password. Try this twice, then log in again, this time supplying the correct password. What happens? Why?
SQL> CONNECT jeff/superman
ERROR:
ORA-01017: invalid username/password; logon denied
Warning: You are no longer connected to ORACLE.
SQL> CONNECT jeff/super
ERROR:
ORA-01017: invalid username/password; logon denied
SQL> CONNECT jeff/super1$
Connected.
SQL> ALTER PROFILE default LIMIT
2 FAILED_LOGIN_ATTEMPTS UNLIMITED
3 PASSWORD_LIFE_TIME UNLIMITED
4 PASSWORD_REUSE_TIME UNLIMITED
5 PASSWORD_REUSE_MAX UNLIMITED
6 PASSWORD_VERIFY_FUNCTION NULL
7 PASSWORD_LOCK_TIME UNLIMITED
8 PASSWORD_GRACE_TIME UNLIMITED;
Profile altered.

DBA Fundamentals I C -64
Practice 15: Solutions 1 Create user Bob with a password of CRUSADER. Make sure that any objects and
temporary segments created by Bob are not created in the system tablespace. Also,ensure that Bob can log in and create objects up to one megabyte in size in USERSand INDX tablespaces.
Hint: Ensure that the temporary tablespace temp is assigned. Use thelab15_01.sql script to grant Bob the ability to create sessions.
2 Create a user Emi with a password of MARY. Make sure that any objects and sortsegments created by Emi are not created in the system tablespace.
3 Display the information on Bob and Emi from the data dictionary.
Hint: This can be obtained by querying DBA_USERS.
SQL> CONNECT system/manager
Connected.
SQL> CREATE USER bob
2 IDENTIFIED BY crusader
3 DEFAULT TABLESPACE USERS
4 TEMPORARY TABLESPACE temp
5 QUOTA 1M ON USERS
6 QUOTA 1M ON INDX;
User created.
SQL> @$HOME/STUDENT/LABS/lab15_01.sql
SQL> GRANT CREATE SESSION TO bob;
Grant succeeded.
SQL> CREATE USER emi
2 IDENTIFIED BY mary
3 DEFAULT TABLESPACE users
4 TEMPORARY TABLESPACE temp;
User created.
SQL> SELECT username, default_tablespace,
2 temporary_tablespace
3 FROM dba_users
4 WHERE username IN ('BOB', 'EMI');
USERNAME DEFAULT_TABLESPACE TEMPORARY_TABLE
---------- -------------------- ---------------
EMI USERS TEMP
BOB USERS TEMP

DBA Fundamentals I C -65
Practice 15: Solutions (continued)
4 From the data dictionary, display the information on the amount of space that Bobcan use in tablespaces.
Hint: This can be obtained by querying DBA_TS_QUOTAS.
5 a As user BOBchange his temporary tablespace. What happens? Why?
b As Bob, change his password to SAM.
SQL> COLUMN tablespace_name FORMAT a15
SQL> COLUMN user FORMAT a10
SQL> SELECT *
2 FROM dba_ts_quotas
3 WHERE username = 'BOB';
TABLESPACE_NAME USERNAME BYTES MAX_BYTES BLOCKS MAX_BLOCKS
--------------- -------- -------- ---------- ---------- ----------
INDX BOB 0 1048576 0 256
USERS BOB 0 1048576 0 256
SQL> connect bob/crusader;
Connected.
SQL> ALTER USER bob
2 TEMPORARY TABLESPACE users;
ALTER USER bob
*
ERROR at line 1:
ORA-01031: insufficient privileges
SQL> connect bob/crusader;
Connected.
SQL> ALTER USER bob
2 IDENTIFIED BY sam;
User altered.

DBA Fundamentals I C -66
Practice 15: Solutions (continued)6 As SYSTEM, remove Bob’s quota on his default tablespace.
7 Remove Emi ’s account from the database.
Hint: Because Emi owns tables, you need to use the CASCADEoption.
8 Bob has forgotten his password. Assign him a password of OLINK and requirethat Bob change his password the next time he logs on.
SQL> CONNECT system/manager
Connected.
SQL> ALTER USER bob QUOTA 0 ON users;
User altered.
SQL> DROP USER emi;
User dropped.
SQL> ALTER USER bob
2 IDENTIFIED BY olink
3 PASSWORD EXPIRE;
User altered.

DBA Fundamentals I C -67
Practice 16: Solutions 1 As SYSTEM, create user Emi and give her the capability to log on to the database and
create objects in her schema.
2 a Connect as Emi, and create tables using the script lab16_02a.sql to create thetables CUSTOMERSand ORDERS.
SQL> CONNECT system/manager
Connected.
SQL> CREATE USER emi
2 IDENTIFIED BY "abcd12"
3 DEFAULT TABLESPACE data01
4 TEMPORARY TABLESPACE temp
5 QUOTA 1M ON data01;
User created.
SQL> GRANT create session, create table TO emi;
Grant succeeded.
SQL> CONNECT emi/abcd12;
Connected.
SQL> @$HOME/STUDENT/LABS/lab16_02a.sql;

DBA Fundamentals I C -68
Practice 16: Solutions (continued)2 b Connect as SYSTEMand copy the data from SYSTEM.CUSTOMERSto Emi ’s
CUSOMTERStable. Verify that records have been inserted.
c As SYSTEMgive Bob the ability to select from Emi 's CUSTOMERStable. Whathappens and why?
SQL> CONNECT system/manager;
Connected.
SQL> INSERT INTO emi.customers
2 SELECT *
3 FROM system.customers;
9 rows created.
SQL> SELECT * FROM emi.customers;
CUS NAME REGIO
--- -------------------------------------------------- -----
A01 TKB SPORT SHOP West
A02 VOLLYRITE North
A03 JUST TENNIS North
A04 EVERY MOUNTAIN South
A05 SHAPE UP South
A06 SHAPE UP West
A07 WOMENS SPORTS South
A08 NORTH WOODS HEALTH AND FITNESS SUPPLY CENTER East
J01 Sports Store East
9 rows selected.
SQL> CONNECT system/manager
Connected.
SQL> GRANT select ON emi.customers TO bob;
GRANT select ON emi.customers TO bob
*
ERROR at line 1:
ORA-01031: insufficient privileges
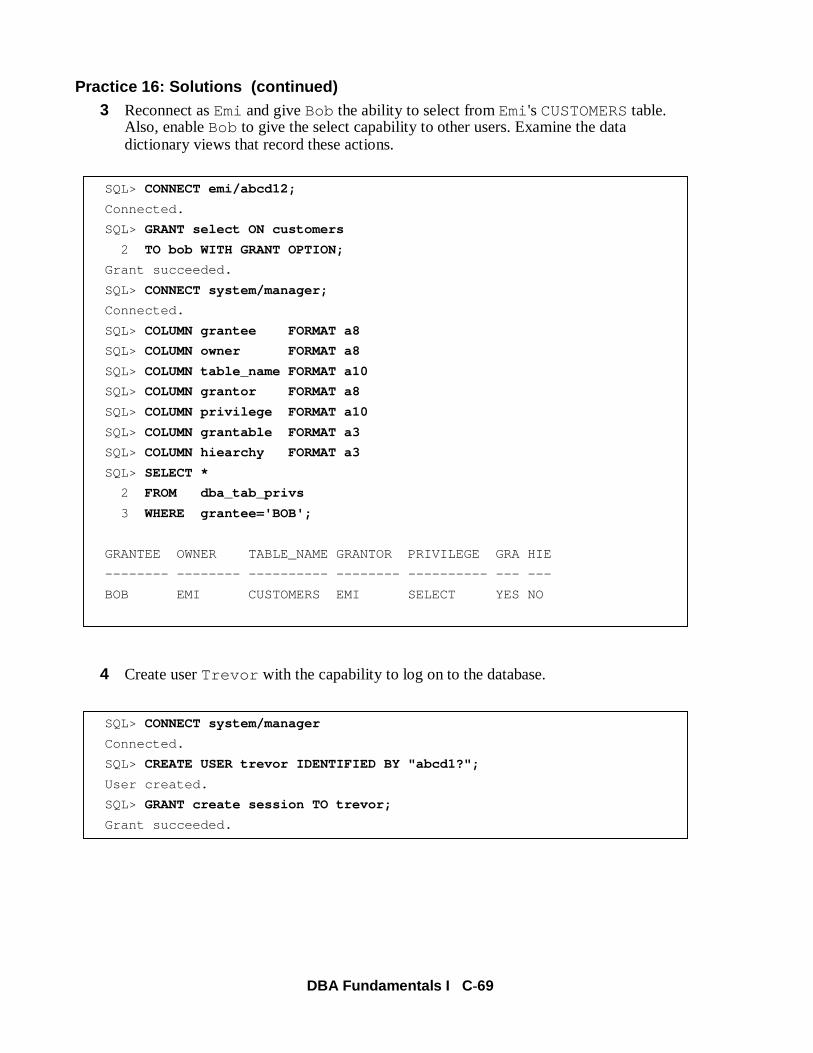
DBA Fundamentals I C -69
Practice 16: Solutions (continued)3 Reconnect as Emi and give Bob the ability to select from Emi 's CUSTOMERStable.
Also, enable Bob to give the select capability to other users. Examine the datadictionary views that record these actions.
4 Create user Trevor with the capability to log on to the database.
SQL> CONNECT emi/abcd12;
Connected.
SQL> GRANT select ON customers
2 TO bob WITH GRANT OPTION;
Grant succeeded.
SQL> CONNECT system/manager;
Connected.
SQL> COLUMN grantee FORMAT a8
SQL> COLUMN owner FORMAT a8
SQL> COLUMN table_name FORMAT a10
SQL> COLUMN grantor FORMAT a8
SQL> COLUMN privilege FORMAT a10
SQL> COLUMN grantable FORMAT a3
SQL> COLUMN hiearchy FORMAT a3
SQL> SELECT *
2 FROM dba_tab_privs
3 WHERE grantee='BOB';
GRANTEE OWNER TABLE_NAME GRANTOR PRIVILEGE GRA HIE
-------- -------- ---------- -------- ---------- --- ---
BOB EMI CUSTOMERS EMI SELECT YES NO
SQL> CONNECT system/manager
Connected.
SQL> CREATE USER trevor IDENTIFIED BY "abcd1?";
User created.
SQL> GRANT create session TO trevor;
Grant succeeded.

DBA Fundamentals I C -70
Practice 16: Solutions (continued)5 a As Bob, enable Trevor to access Emi ’s CUSTOMERStable. Give Bob the new
password sam.
b As Emi, remove Bob’s privilege to read Emi ’s CUSTOMERStable.
c As Trevor , query Emi ’s CUSTOEMRStable. What happens and why?
SQL> CONNECT bob/olink
ERROR:
ORA-28001: the password has expired
Changing password for bob
New password:
Retype new password:
Password changed
Connected.
SQL> GRANT select ON emi.customers TO trevor;
Grant succeeded.
SQL> CONNECT emi/abcd12;
Connected.
SQL> REVOKE select ON customers FROM bob;
Revoke succeeded.
SQL> CONNECT trevor/abcd1?;
Connected.
SQL> SELECT *
2 FROM emi.customers;
FROM emi.customers
*
ERROR at line 2:
ORA-00942: table or view does not exist

DBA Fundamentals I C -71
Practice 16: Solutions (continued)6 a Enable Emi to create tables in any schema. As Emi, create the table ORDERSin
Bob’s schema as a copy of EMI.ORDERS. What happened and why?
b As SYSTEM, examine the data dictionary view DBA_TABLEStocheck the result.
7 Enable Emi to start up and shut down the database without the ability to create anew database.
SQL> CONNECT system/manager
Connected.
SQL> GRANT create any table TO emi;
Grant succeeded.
SQL> CONNECT emi/abcd12
Connected.
SQL> CREATE TABLE bob.orders
2 AS
3 SELECT *
4 FROM orders;
FROM orders
*
ERROR at line 4:
ORA-01536: space quota exceeded for tablespace 'USERS'
SQL> CONNECT system/manager
Connected.
SQL> SELECT owner, table_name
2 FROM dba_tables
3 WHERE table_name IN ('CUSMTERS', 'ORDERS');
OWNER TABLE_NAME
-------- ----------
OE ORDERS
SYSTEM ORDERS
EMI ORDERS
SQL> CONNECT sys/oracle AS SYSDBA
Connected.
SQL> GRANT sysoper TO emi;
Grant succeeded.

DBA Fundamentals I C -72
Practice 17: Solutions
1 Examine the data dictionary view and list the system privileges of the RESOURCErole.
2 Create a role called DEV, which enables a user to create a table, create a view andselect from Emi ’s CUSTOMERStable.
SQL> CONNECT system/manager
Connected.
SQL> COLUMN privilege FORMAT a20
SQL> COLUMN grantee FORMAT a10
SQL> SELECT *
2 FROM dba_sys_privs
3 WHERE grantee = 'RESOURCE';
GRANTEE PRIVILEGE ADM
---------- -------------------- ---
RESOURCE CREATE CLUSTER NO
RESOURCE CREATE INDEXTYPE NO
RESOURCE CREATE OPERATOR NO
RESOURCE CREATE PROCEDURE NO
RESOURCE CREATE SEQUENCE NO
RESOURCE CREATE TABLE NO
RESOURCE CREATE TRIGGER NO
RESOURCE CREATE TYPE NO
8 rows selected.
SQL> CREATE ROLE dev;
Role created.
SQL> GRANT create table, create view TO dev;
Grant succeeded.
SQL> CONNECT emi/abcd12
Connected.
SQL> GRANT select ON customers TO dev;
Grant succeeded.
SQL> CONNECT system/manager
Connected.
SQL> GRANT dev TO bob;
Grant succeeded.
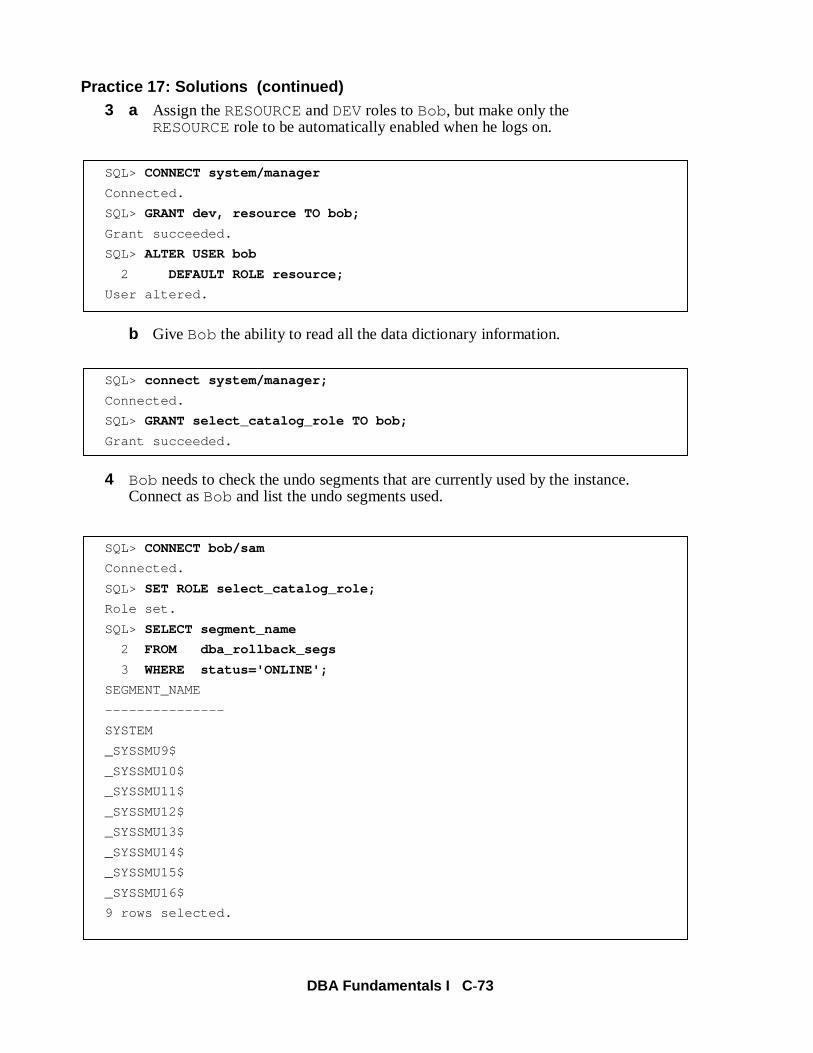
DBA Fundamentals I C -73
Practice 17: Solutions (continued) 3 a Assign the RESOURCEand DEVroles to Bob, but make only the
RESOURCErole to be automatically enabled when he logs on.
b Give Bob the ability to read all the data dictionary information.
4 Bob needs to check the undo segments that are currently used by the instance.Connect as Bob and list the undo segments used.
SQL> CONNECT system/manager
Connected.
SQL> GRANT dev, resource TO bob;
Grant succeeded.
SQL> ALTER USER bob
2 DEFAULT ROLE resource;
User altered.
SQL> connect system/manager;
Connected.
SQL> GRANT select_catalog_role TO bob;
Grant succeeded.
SQL> CONNECT bob/sam
Connected.
SQL> SET ROLE select_catalog_role;
Role set.
SQL> SELECT segment_name
2 FROM dba_rollback_segs
3 WHERE status='ONLINE';
SEGMENT_NAME
---------------
SYSTEM
_SYSSMU9$
_SYSSMU10$
_SYSSMU11$
_SYSSMU12$
_SYSSMU13$
_SYSSMU14$
_SYSSMU15$
_SYSSMU16$
9 rows selected.

DBA Fundamentals I C -74
Practice 17: Solutions (continued) 5 As SYSTEM, try to create a view CUST_VIEWon Emi ’s CUSTOMERStable. What
happens and why?
6 As user Emi grant select on customers to SYSTEM. As SYSTEMtry to create viewCUST_VIEWon Emi ’s CUSTOMERStable. What happens and why?
SQL> connect system/manager
Connected.
SQL> CREATE VIEW cust_view AS
2 SELECT *
3 FROM emi.customers;
FROM emi.customers
*
ERROR at line 3:
ORA-01031: insufficient privileges
SQL> CONNECT emi/abcd12
Connected.
SQL> GRANT select ON customers TO system;
Grant succeeded.
SQL> CONNECT system/manager
Connected.
SQL> CREATE VIEW cust_view AS
2 SELECT *
3 FROM emi.customers;
View created.

DBA Fundamentals I C -75
Practice 18: Solutions
1 Check the database and the national character set.
2 Which are valid values for the database character set.
SQL> CONNECT sys/oracle AS SYSDBA
Connected.
SQL> SELECT parameter, value
2 FROM nls_database_parameters
3 WHERE parameter LIKE '%CHARACTERSET%';
PARAMETER VALUE
------------------------------ ----------------------------------------
NLS_CHARACTERSET WE8ISO8859P1
NLS_NCHAR_CHARACTERSET AL16UTF16
SQL> SELECT value
2 FROM v$nls_valid_values
3 WHERE parameter = 'CHARACTERSET'
4 ORDER BY value;
VALUE
----------------------------------------------------------------
AL16UTF16
AL24UTFFSS
AL32UTF8
AR8ADOS710
AR8ADOS710T
AR8ADOS720
AR8ADOS720T...
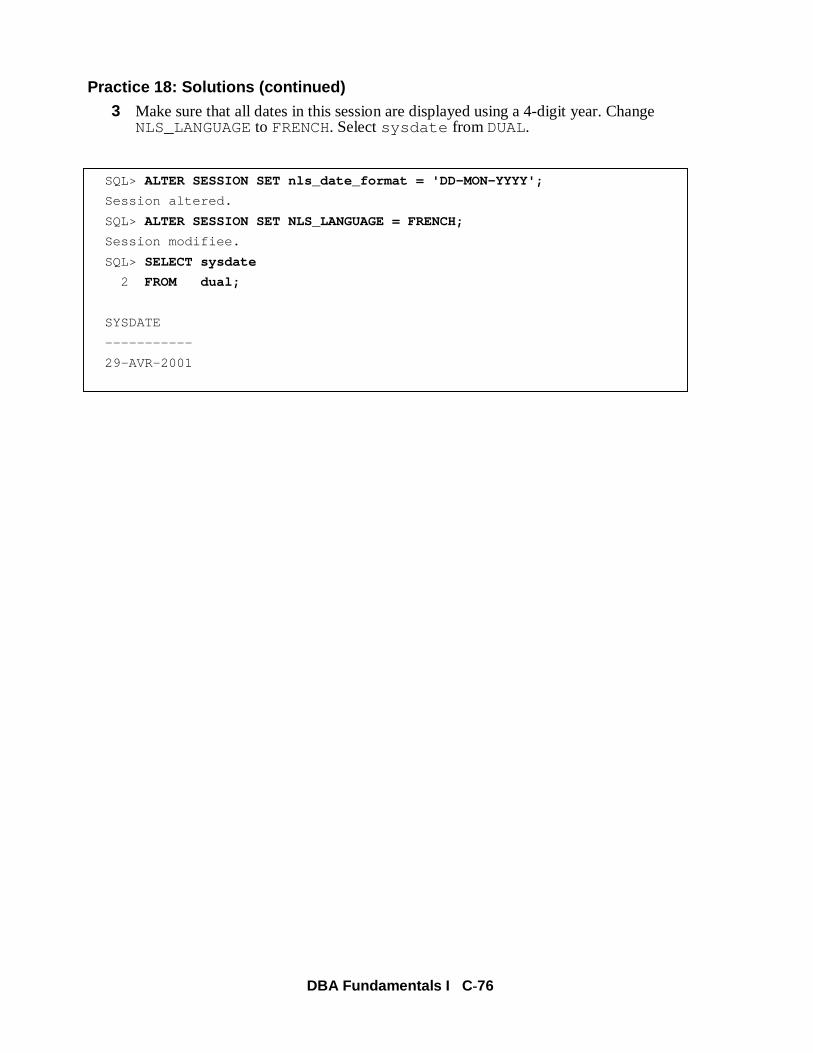
DBA Fundamentals I C -76
Practice 18: Solutions (continued)
3 Make sure that all dates in this session are displayed using a 4-digit year. ChangeNLS_LANGUAGEto FRENCH. Select sysdate from DUAL.
SQL> ALTER SESSION SET nls_date_format = 'DD-MON-YYYY';
Session altered.
SQL> ALTER SESSION SET NLS_LANGUAGE = FRENCH;
Session modifiee.
SQL> SELECT sysdate
2 FROM dual;
SYSDATE
-----------
29-AVR-2001


