16
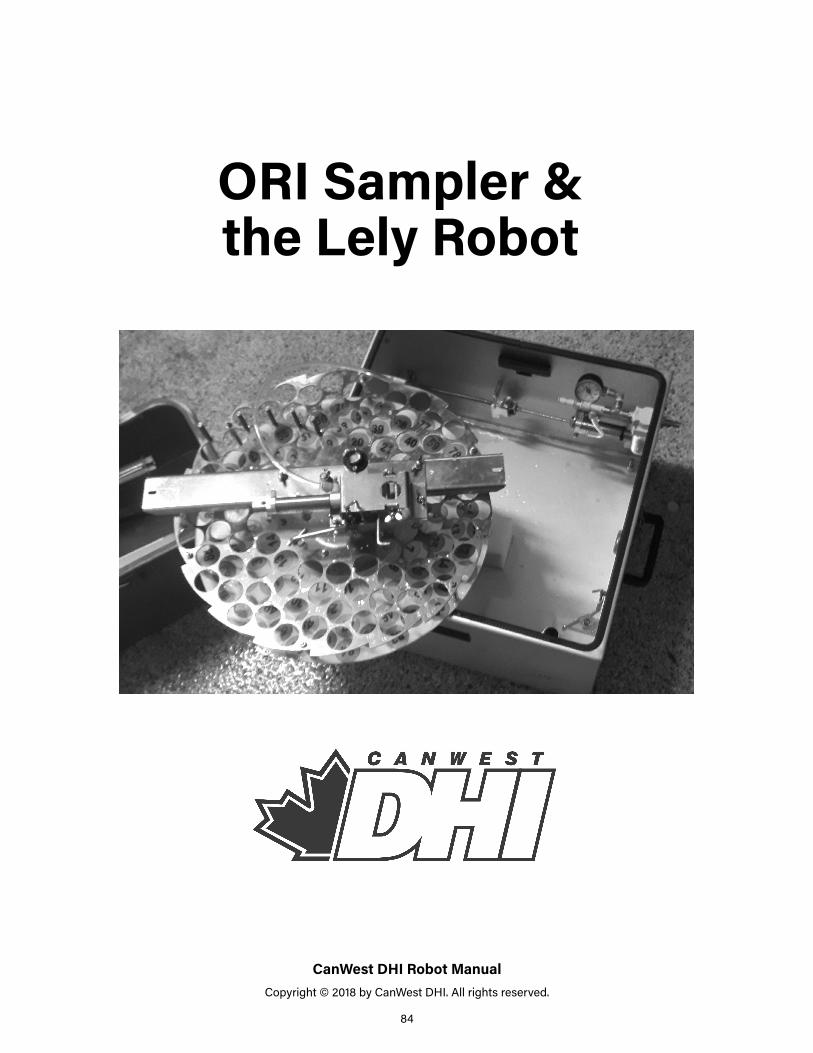
CanWest DHI Robot Manual Copyright © 2018 by CanWest DHI. All rights reserved. 84 ORI Sampler & the Lely Robot
CanWest DHI Robot Manual Copyright © 2018 by CanWest DHI. All rights reserved.
84
ORI Sampler & the Lely Robot
CanWest DHI Robot Manual Copyright © 2018 by CanWest DHI. All rights reserved.
85
67
1
2
4
53
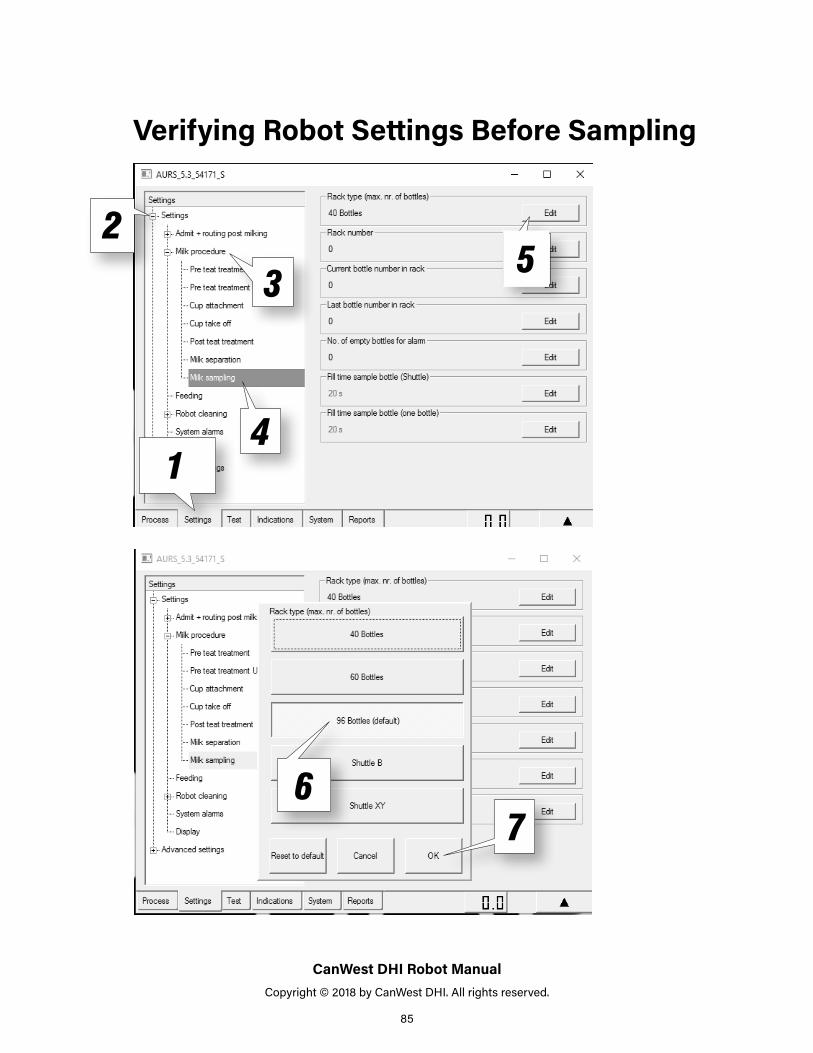
Verifying Robot Settings Before Sampling

CanWest DHI Robot Manual Copyright © 2018 by CanWest DHI. All rights reserved.
86
1
How to Start Sampling
2
3
Adjust feet on ORI to make sampler level
CanWest DHI Robot Manual Copyright © 2018 by CanWest DHI. All rights reserved.
87
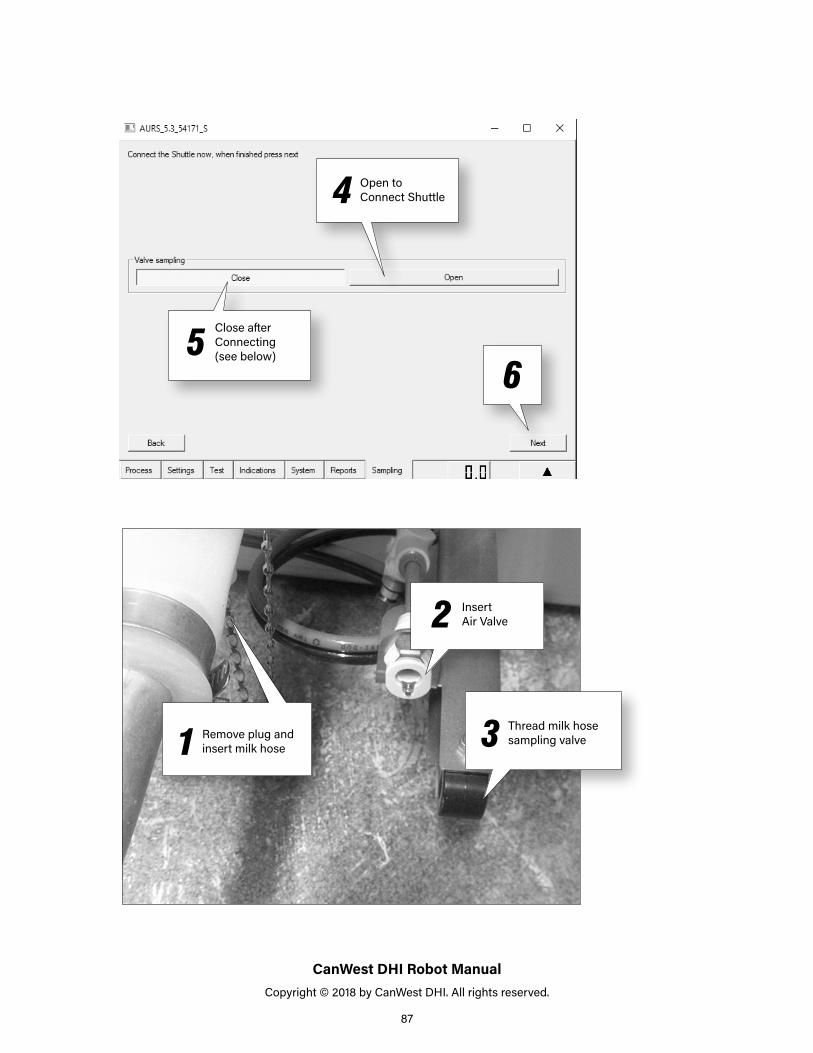
4
56
Open to Connect Shuttle
Close after Connecting (see below)
Remove plug and insert milk hose1
Insert Air Valve2
Thread milk hose sampling valve3
CanWest DHI Robot Manual Copyright © 2018 by CanWest DHI. All rights reserved.
88
See Reference Number Chart
Rack Report
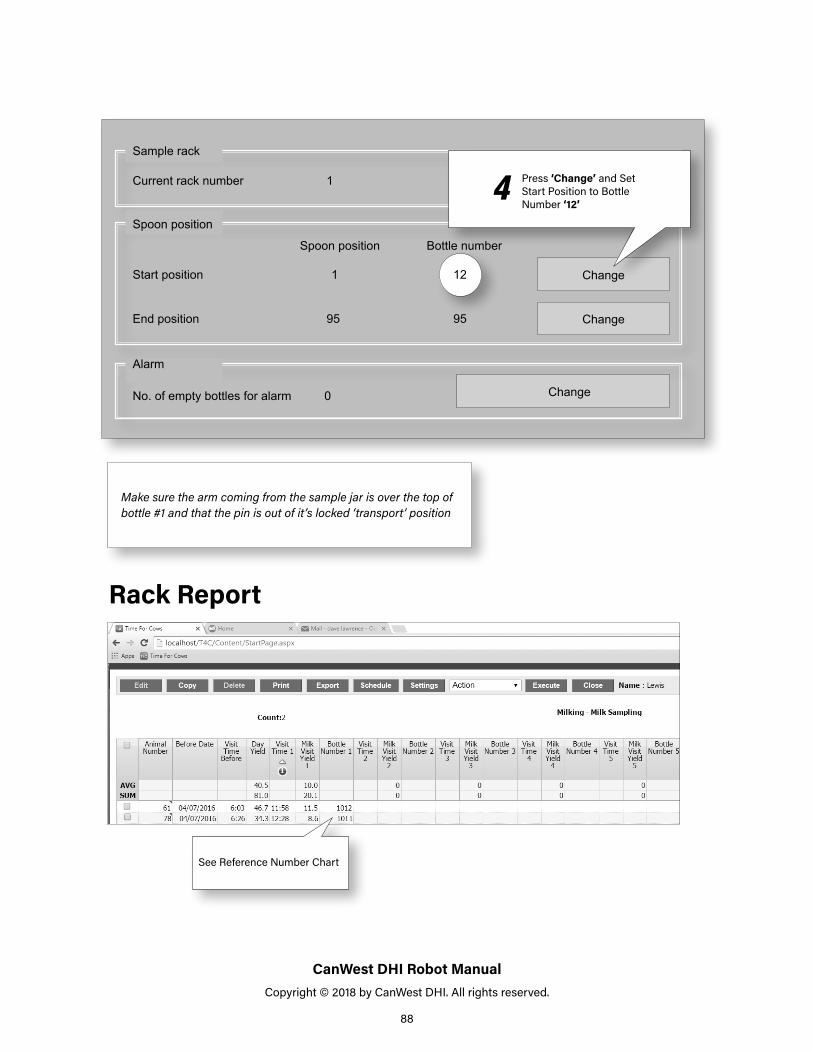
Current rack number 1
Spoon position Bottle number
95
0
95
Start position
End position
No. of empty bottles for alarm
Sample rack
Spoon position
Alarm
Change
Change
Change
Change
4 Press ‘Change’ and Set Start Position to Bottle Number ‘12’
1 12
Make sure the arm coming from the sample jar is over the top of bottle #1 and that the pin is out of it’s locked ‘transport’ position

CanWest DHI Robot Manual Copyright © 2018 by CanWest DHI. All rights reserved.
89
Sam
pler
Sta
rt
Posi
tion
on R
obot
Scre
en
1212
136
2514
6049
3884
7362
112
3526
1559
5039
8374
6310
334
2716
5851
4082
7564
94
3328
1757
5241
8176
658
532
2918
5653
4280
7766
76
3130
1955
5443
7978
676
730
3120
5455
4478
7968
58
2932
2153
5645
7780
694
928
3322
5257
4676
8170
310
2734
2351
5847
7582
712
1126
3524
5059
4874
8372
11
121
2536
2549
6049
7384
7313
132
3737
2661
6150
8585
7414
143
3838
2762
6251
8686
7515
154
3939
2863
6352
8787
7616
165
4040
2964
6453
8888
7717
176
4141
3065
6554
8989
7818
187
4242
3166
6655
9090
7919
198
4343
3267
6756
9180
2020
944
4433
6868
5792
8121
2110
4545
3469
6958
9382
2222
1146
4635
7070
5994
8323
2312
4747
3671
7160
9584
2424
1348
4837
7272
6196
85
T4C
Rack
Re
port
N
umbe
r
T4C
Rack
Re
port
N
umbe
r
Bot
tle
Posi
tion
inO
riSa
mpl
er
T4C
Rack
Re
port
N
umbe
r
T4C
Rack
Re
port
N
umbe
r
Ren
umbe
ring
the
vial
s to
the
Lely
Rob
ot w
ith O
ri C
olle
ctor
Bot
tle
Posi
tion
inO
riSa
mpl
er
Bot
tle
Posi
tion
inO
riSa
mpl
er
Bot
tle
Posi
tion
inO
riSa
mpl
er
Renu
mbe
ring
the
vial
s to
the
Lely
Rob
ot w
ith th
e O
RI c
olle
ctor
CanWest DHI Robot Manual Copyright © 2018 by CanWest DHI. All rights reserved.
90
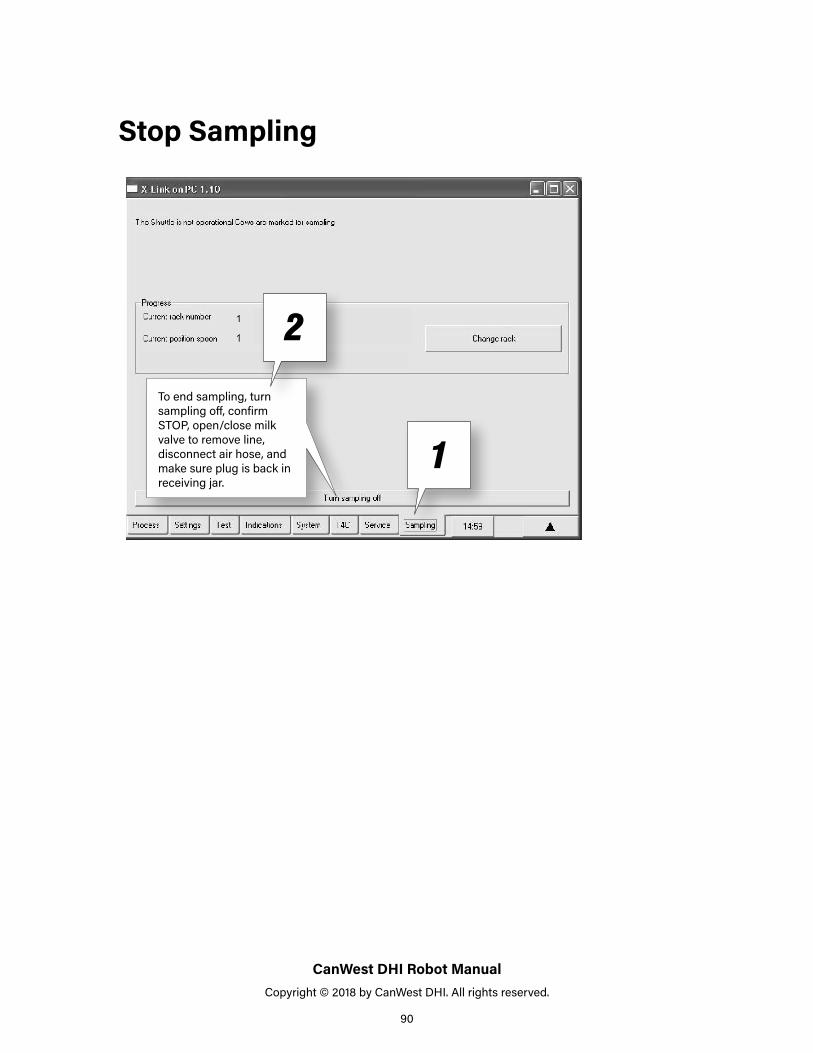
To end sampling, turn sampling off, confirm STOP, open/close milk valve to remove line, disconnect air hose, and make sure plug is back in receiving jar.
Stop Sampling
1
2
CanWest DHI Robot Manual Copyright © 2018 by CanWest DHI. All rights reserved.
91
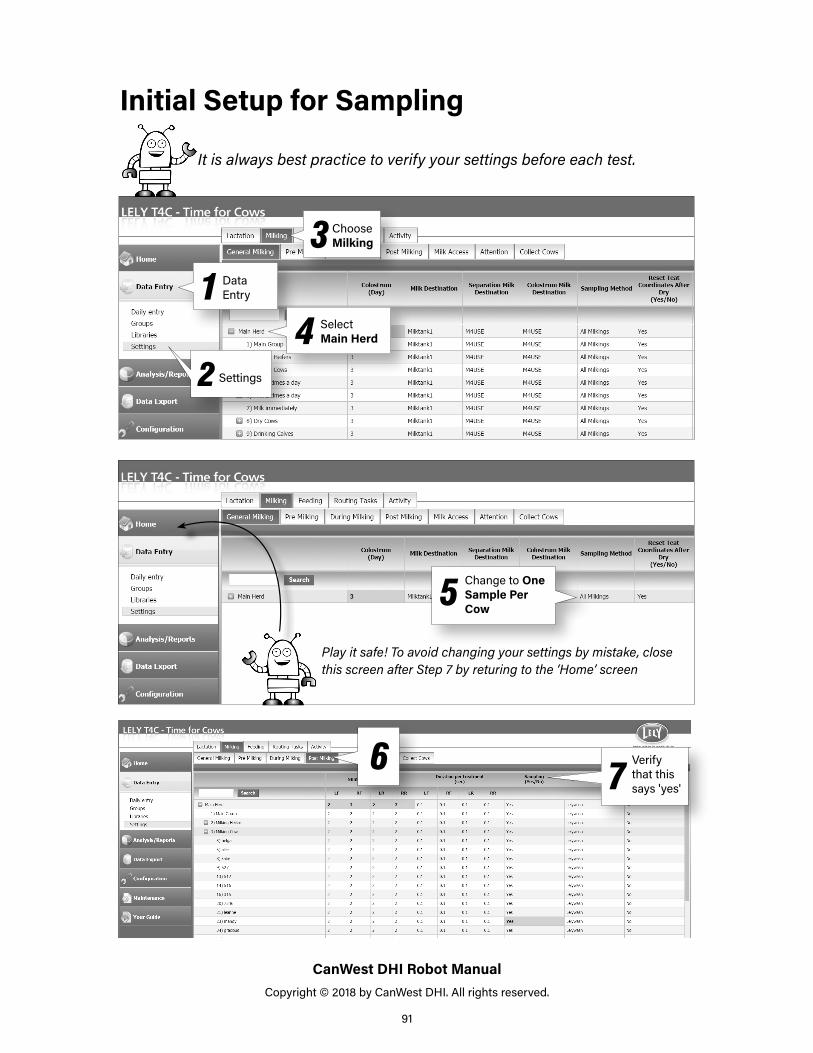
Initial Setup for Sampling
1
2
3
4
5 Change to One Sample Per Cow
It is always best practice to verify your settings before each test.
Play it safe! To avoid changing your settings by mistake, close this screen after Step 7 by returing to the ‘Home’ screen
Choose Milking
Select Main Herd
Settings
Data Entry
6 7Verify that this says 'yes'
CanWest DHI Robot Manual Copyright © 2018 by CanWest DHI. All rights reserved.
92
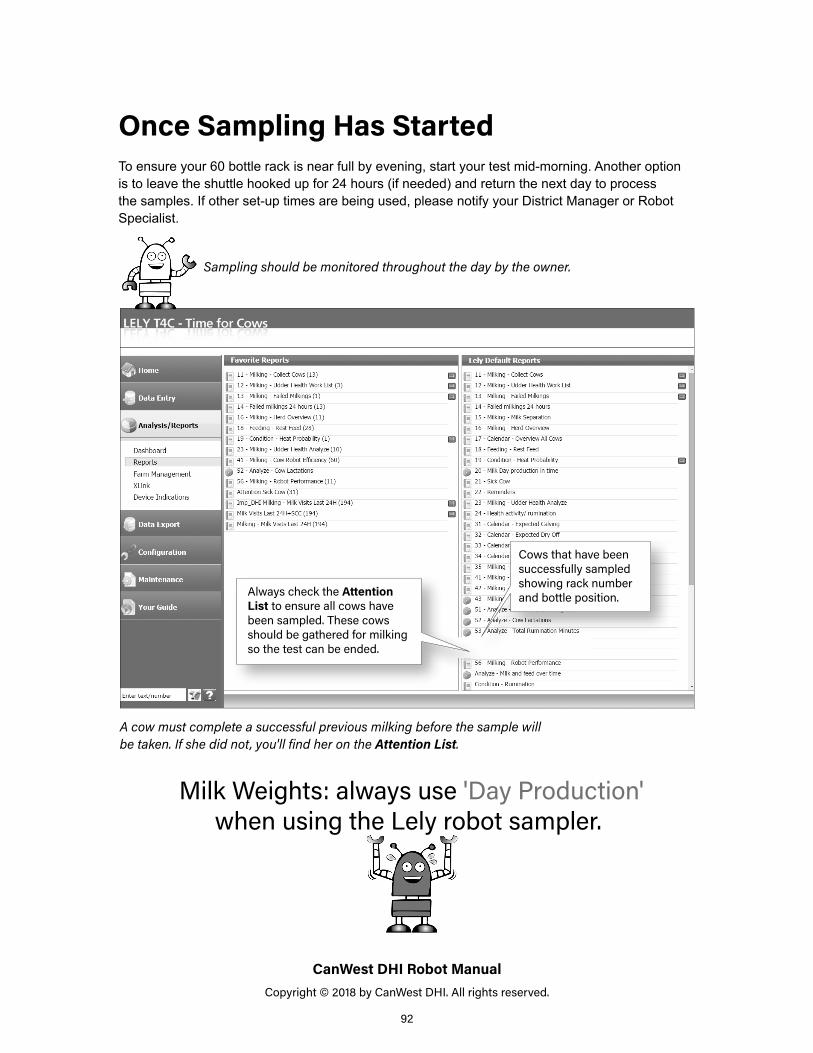
Once Sampling Has StartedTo ensure your 60 bottle rack is near full by evening, start your test mid-morning. Another option is to leave the shuttle hooked up for 24 hours (if needed) and return the next day to process the samples. If other set-up times are being used, please notify your District Manager or Robot Specialist.
Always check the Attention List to ensure all cows have been sampled. These cows should be gathered for milking so the test can be ended.
A cow must complete a successful previous milking before the sample will be taken. If she did not, you'll find her on the Attention List.
Sampling should be monitored throughout the day by the owner.
Cows that have been successfully sampled showing rack number and bottle position.
Milk Weights: always use 'Day Production' when using the Lely robot sampler.
CanWest DHI Robot Manual Copyright © 2018 by CanWest DHI. All rights reserved.
93
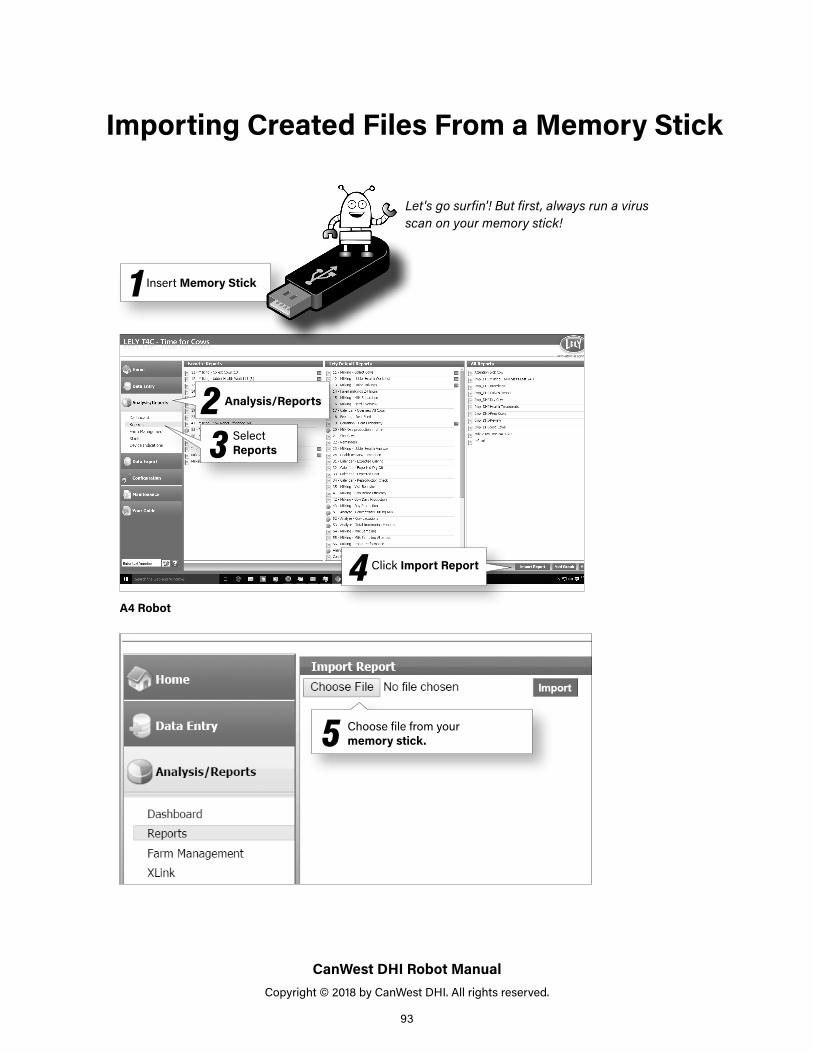
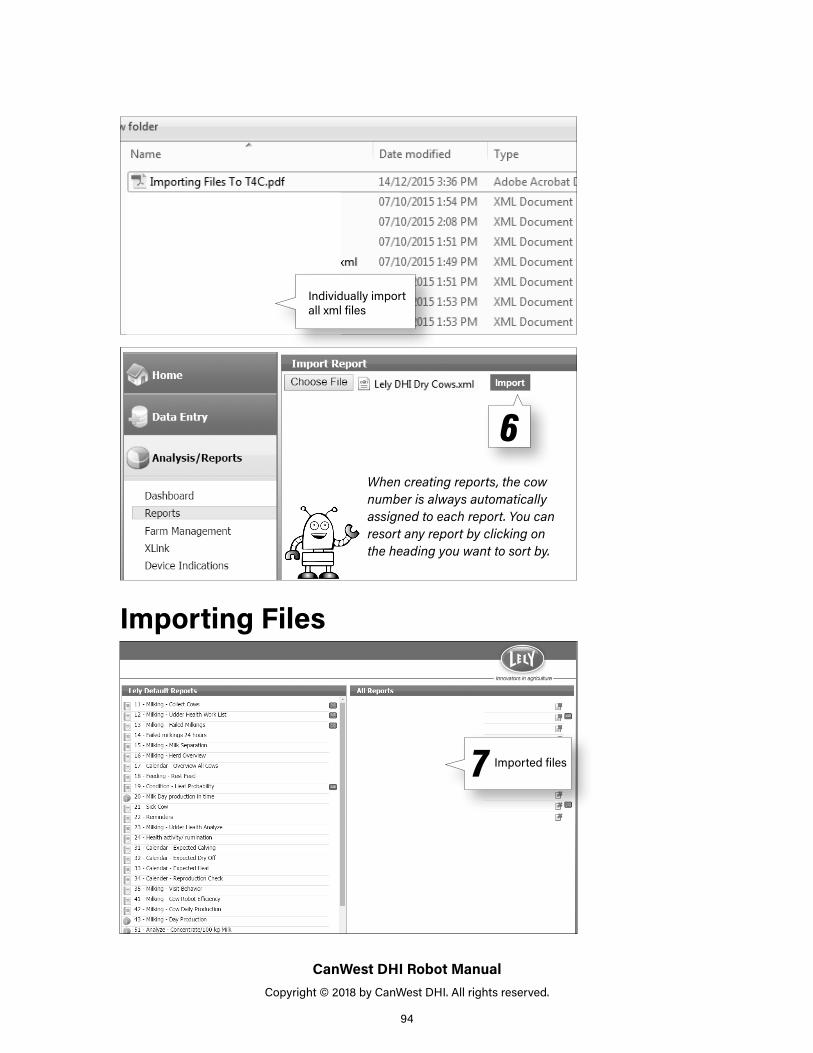
23 Select
Reports
A4 Robot
1Insert Memory Stick
Importing Created Files From a Memory Stick
4
Let's go surfin'! But first, always run a virus scan on your memory stick!
Analysis/Reports
Click Import Report
5 Choose file from your memory stick.
CanWest DHI Robot Manual Copyright © 2018 by CanWest DHI. All rights reserved.
94
Individually import all xml files
6When creating reports, the cow number is always automatically assigned to each report. You can resort any report by clicking on the heading you want to sort by.
7 Imported files
Importing Files
CanWest DHI Robot Manual Copyright © 2018 by CanWest DHI. All rights reserved.
95
1
2
34
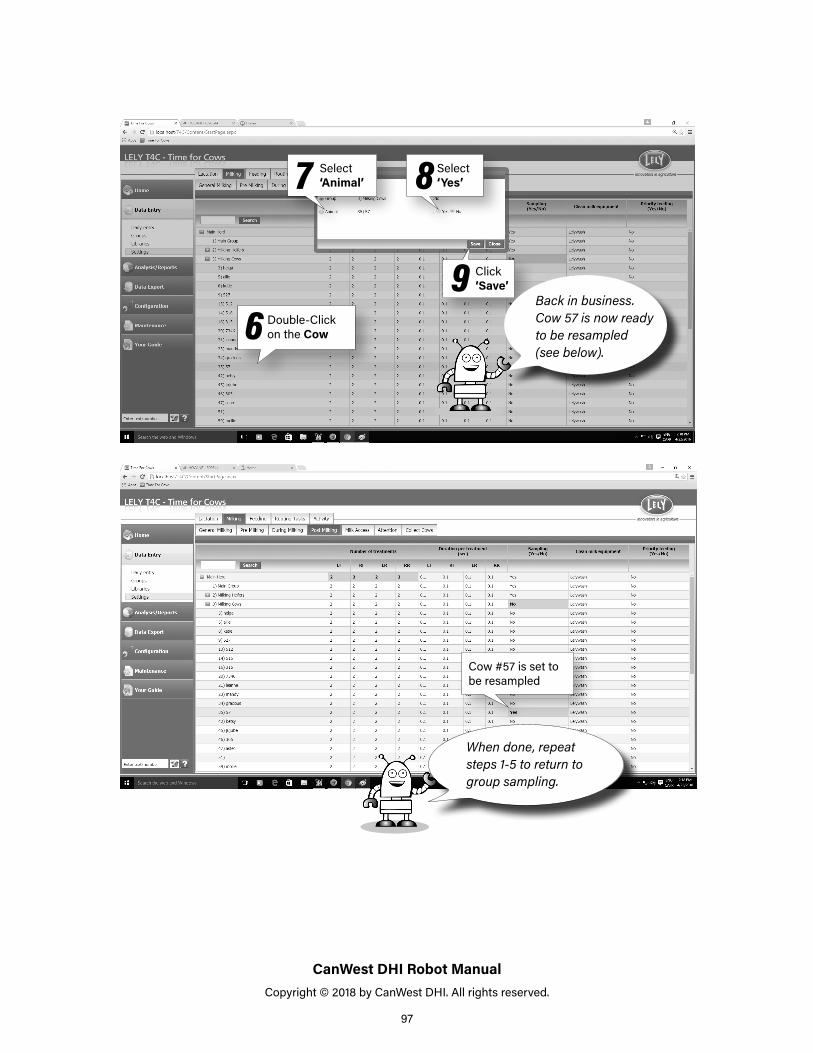
If you know what group the cow is in, select that group and change sampling method to ‘All Milkings’ and have the cow reenter the robot to be resampled.
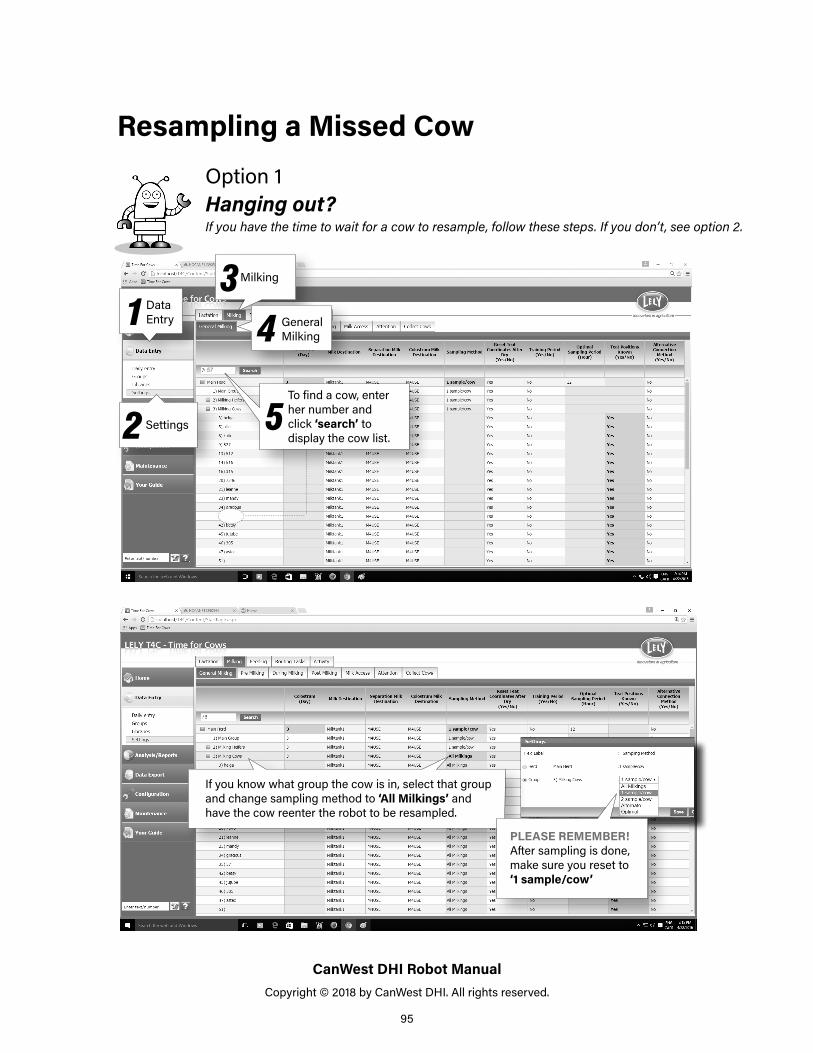
Resampling a Missed Cow
5
PLEASE REMEMBER! After sampling is done, make sure you reset to ‘1 sample/cow’
57
To find a cow, enter her number and click ‘search’ to display the cow list.
Option 1Hanging out? If you have the time to wait for a cow to resample, follow these steps. If you don’t, see option 2.
Data Entry
Settings
Milking
General Milking
CanWest DHI Robot Manual Copyright © 2018 by CanWest DHI. All rights reserved.
96
3 4
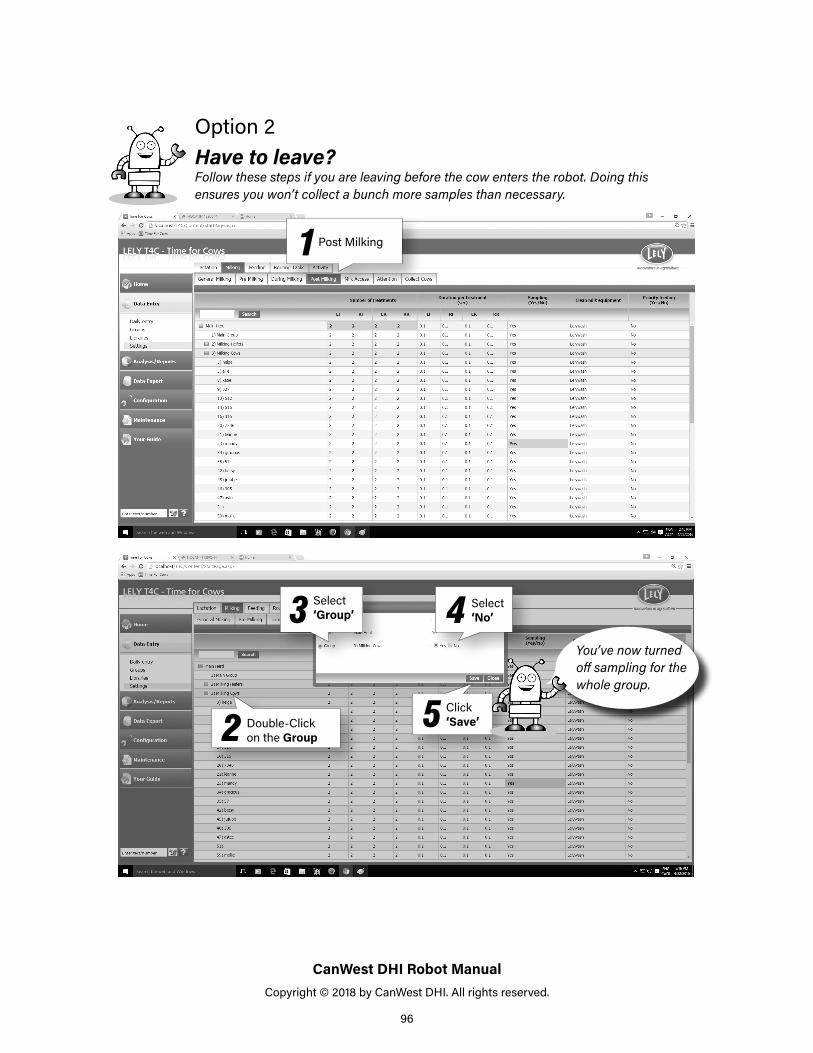
Post Milking
Option 2Have to leave? Follow these steps if you are leaving before the cow enters the robot. Doing this ensures you won’t collect a bunch more samples than necessary.
Select ‘Group’
Select ‘No’
Click ‘Save’Double-Click
on the Group52
1
You’ve now turned off sampling for the whole group.
CanWest DHI Robot Manual Copyright © 2018 by CanWest DHI. All rights reserved.
97
9
7 8Select ‘Animal’
Select ‘Yes’
Double-Click on the Cow6
Click ‘Save’
When done, repeat steps 1-5 to return to group sampling.
Back in business. Cow 57 is now ready to be resampled (see below).
Cow #57 is set to be resampled
CanWest DHI Robot Manual Copyright © 2018 by CanWest DHI. All rights reserved.
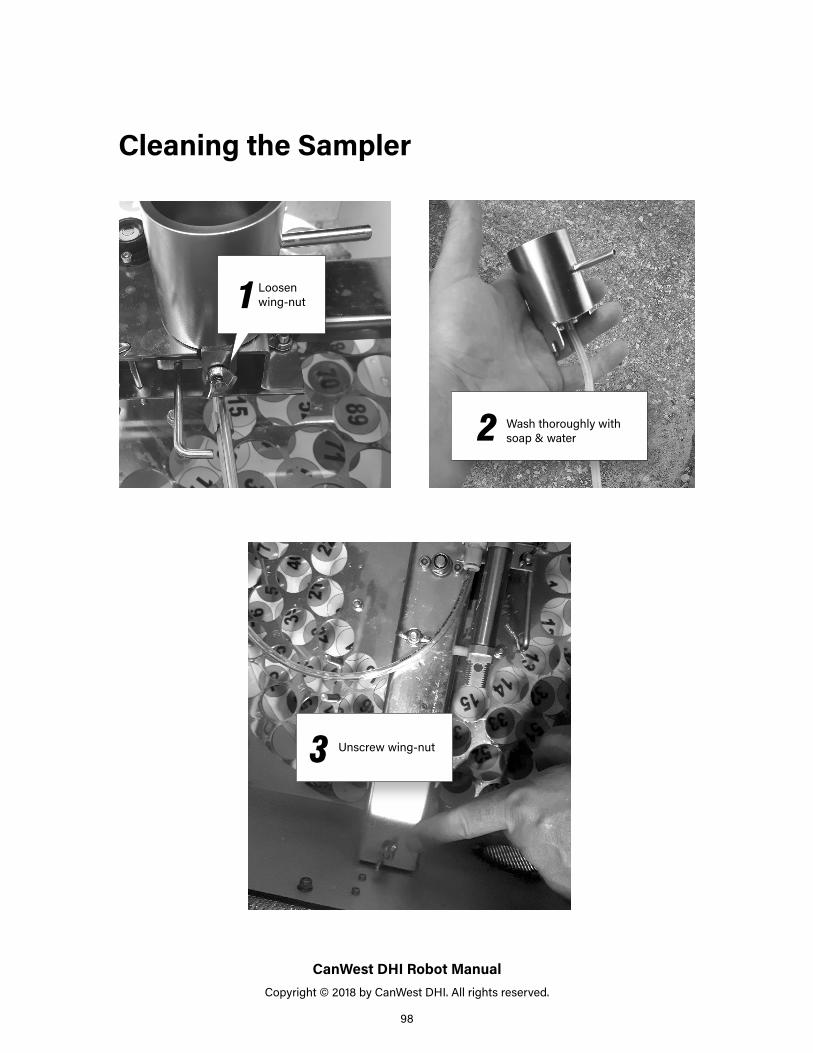
98
Loosen wing-nut1
Wash thoroughly with soap & water2
Cleaning the Sampler
Unscrew wing-nut3

CanWest DHI Robot Manual Copyright © 2018 by CanWest DHI. All rights reserved.
99
After sampling/before transport, slide pin into the lock postion to relieve pressure on the milk line.
After sampling, wash exterior and interior of sampler. Let air dry.4
5
To pull out tray, make sure to put these in lock position


