18
Outboard Pilot Hydraulic Setup

Outboard Pilot Hydraulic Setup

Perform These Steps Before Commissioning
Initial Setup

Getting Started
IMPORTANT
Before starting
Make sure all HDS units, the NMEA 2000 network, and ALL devices connected to the network are
completely powered up and ready for use.
3

Initial Setup After installing the HDS Gen2 Touch - 4.5 software/HDS Gen3 - 2.0 software, do a Restore Default for the Autopilot. Put a check mark in the Autopilots box only and then select OK. The Restore Defaults dialogue box will go away when the restore is complete.
4

Engine Data Sources • Press the Pages Key at the top right of the HDS unit. • Select Settings and then Network from the right side of the screen. • Press Data Sources. • Then Select Engine
– Center • Pilot Present
• You want to make sure you have the NAC-1_Autopilot with a checkmark in the box. (Without a checkmark in this box, the Pilot will not commission properly)
5

Auto Pilot Setup • Press the Pages Key • Select Settings • Choose Autopilot • Select Autopilot Data
Sources
• The Autopilot Data Sources menu will appear on the screen
6
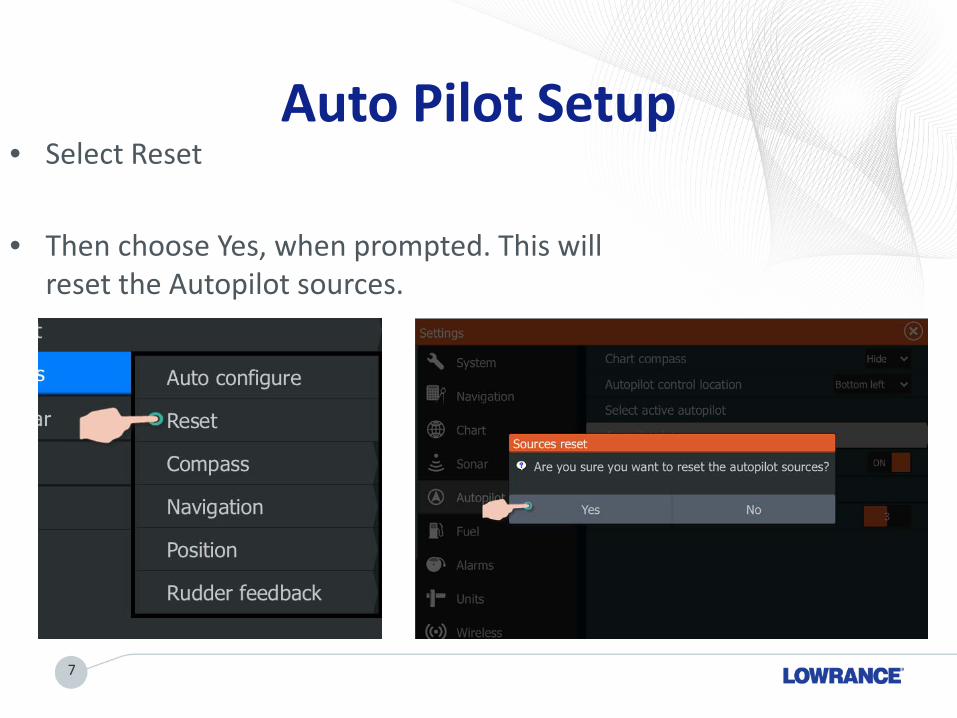
Auto Pilot Setup • Select Reset
• Then choose Yes, when prompted. This will
reset the Autopilot sources.
7

Auto Pilot Setup • Next Select Auto Configure
• Then choose Start when prompted, to Auto Configure the Autopilot
sources (By doing this, the Autopilot computer will select the best sources on the network to receive the data it needs)
8

Auto Pilot Setup • Compass – Choose
between: – Point-1 AP (Good)
– RC42 (Better) *If an RC42 is not connected, this option will not appear.
• Navigation – Multiple units can show up here. It is best to select the HDS unit mounted at the driver’s console of the boat.
9

Auto Pilot Setup • Position – Choose one of
the following: – Point-1 (This is the best
option) – Point-1 AP (Choose if you only
have a Point-1 AP on the boat)
• Rudder Feedback – Hydraulic Steering = Virtual
Rudder Feedback – Cable Steering = Rudder
Feedback
10

Point-1 vs Point-1AP • The Point-1 AP has been configured to use Raw unfiltered
data, that the Autopilot requires to function properly.
• The Point-1 has filters and buffers in place to allow the HDS to compile the proper data to use with charts and radars.
11

Your Outboard Pilot should now be ready to commission. If you are still having issues, Please use the
following information to verify your data source settings.

Verify Data Sources if Having Trouble Commissioning
Network Data Sources

Setting up Network Data Sources • Press the Pages Key – (Upper right corner of the HDS unit)
• Select Settings – (Bottom left corner of the screen)
• Choose Network – (Left side of the screen)
• Select Data Sources
14

Data Sources – Point-1 AP Only
15
Data Source Select NAC-1
Vessel Rate of Turn Order
Engine Center/Pilot Present
Rudder 1/Rudder Angle (VRF)
Pilot Command Rudder Angle
Rudder Limit
Pilot Drift
Command Rudder Direction
Set Heading
Data Source Select Point-1 AP
GPS All Data
Vessel Heading
Rate of Turn
Attitude Pitch
Attitude Roll

Data Sources – Point-1 AP & Point-1
16 © Navico Company Confidential
Data Source Select NAC-1
Vessel Rate of Turn Order
Engine Center/Pilot Present
Rudder 1/Rudder Angle (VRF)
Pilot Command Rudder Angle
Rudder Limit
Pilot Drift
Command Rudder Direction
Set Heading
Data Source Select Point-1 AP
GPS All Data
Vessel Rate of Turn
Attitude Pitch
Attitude Roll
Data Source Select Point-1
Vessel Heading

Troubleshooting/Tips/FAQ
Tip #1 – You will not be able to carry out the Rudder Feedback Test seen below the calibration button. Tip #2 – If you find your AP being totally unresponsive, go to your data sources and ensure that Virtual Rudder Feedback is selected. Tip #3 – Ensure that your Point-1 AP is correctly installed BEFORE engaging your new Autopilot. Tip #4 – Remove any “slack or play” in your steering linkage connected to the motor. Tip #5 – If you find the AP is taking a bit long to correct heading when idling/trolling, change the AP Sensitivity from 3 (default) to 5. Tip #6 – If you find the AP over correcting while travelling at speed, change the AP Sensitivity to 1.
17


