13
EN 2CSYD0202B Outdoor bi-directional dual IR perimeter detector Installation manual
EN
2CSYD0202B
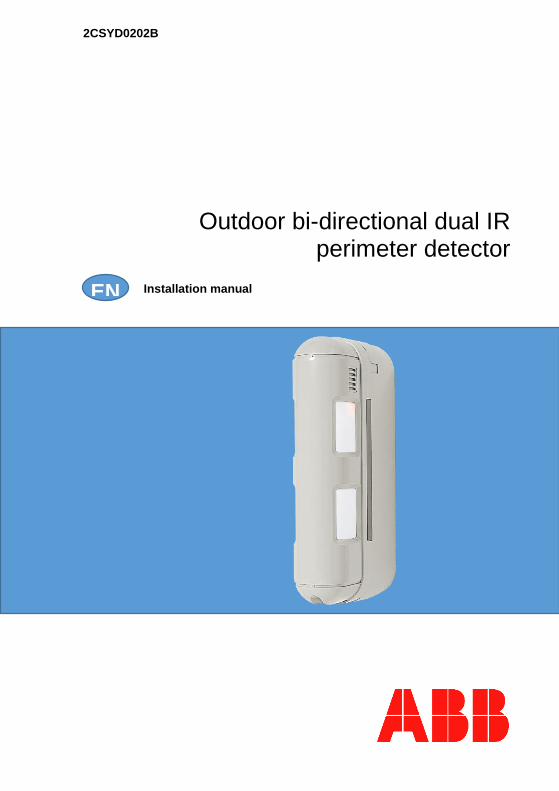
Outdoor bi-directional dual IR perimeter detector
Installation manual

IT
2
2CSYD0202B
1 GENERAL INFORMATION
1.1 Disclaimer
All information in this document has been carefully selected and checked however ABB S.p.A. is not liable for any printing errors or technical inaccuracy. ABB S.p.A. reserves the right to improve or change the products described in this user manual at any time and without any advanced notice. Moreover, it is possible that this user manual encompasses references or information about products and services not sold yet. Such references or information do not mean in any way that ABB S.p.A. intends to sell such products or services.
WARNING! Installation must be carried out only by a qualified electrician. 1.2 EC Declaration of Conformity
ABB S.p.A., with registered office in Milan - via Vittor Pisani 16, declares under its own responsibility that the device with product code 2CSYD0202B meets the essential electromagnetic compatibility and security requirements contained in the Directive R&TTE 1999/5/EC and in the EC Low Voltage Directive 2006/95/EC, as it was designed and manufactured in compliance with the following harmonized standards: EN 300 220, EN 50131-1, EN 50131-2-2, EN 50131-5-3. 1.3 Package contents
no. 1 Outdoor bi-directional dual IR perimeter detector no. 1 Lithium battery 3 V – 5 Ah (not connected) no. 2 Self-tapping cross-recessed screws 2.9 x 27 mm no. 2 Screw anchors Ø 5 mm no. 1 Manual 1.4 Trademarks and copyright
DomusTech Free is a trademark of ABB S.p.A. All trademarks in the document belong to the relevant owners. © Copyright ABB S.p.A. 2015 – All rights reserved.

IT
3
2CSYD0202B
2 GENERAL DESCRIPTION
The outdoor bi-directional dual IR perimeter detector enables to control the buildings from outside and it can be installed both on a wall and on a pole. It is particularly suitable to protect doors and windows from outside. Thanks to two IR sensors on each side, of which one can be adjusted, it is possible to detect people and to avoid false alarms caused by little animals or cars passing by. The bundle adjustment is independent for the right and the left side.
IT
4
2CSYD0202B
3 INSTALLATION
The installation procedure encompasses the following steps: 1) Device fixing. 2) Programming 3) Adjustment. 4) Completion and test.
3.1 Device fixing
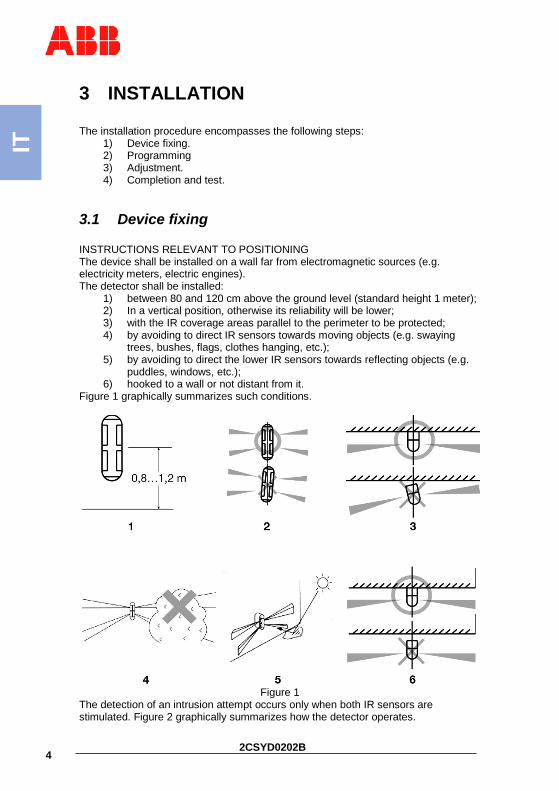
INSTRUCTIONS RELEVANT TO POSITIONING The device shall be installed on a wall far from electromagnetic sources (e.g. electricity meters, electric engines). The detector shall be installed:
1) between 80 and 120 cm above the ground level (standard height 1 meter); 2) In a vertical position, otherwise its reliability will be lower; 3) with the IR coverage areas parallel to the perimeter to be protected; 4) by avoiding to direct IR sensors towards moving objects (e.g. swaying
trees, bushes, flags, clothes hanging, etc.); 5) by avoiding to direct the lower IR sensors towards reflecting objects (e.g.
puddles, windows, etc.); 6) hooked to a wall or not distant from it.
Figure 1 graphically summarizes such conditions.
Figure 1
The detection of an intrusion attempt occurs only when both IR sensors are stimulated. Figure 2 graphically summarizes how the detector operates.

IT
5
2CSYD0202B
Figure 2 Sensors can be horizontally adjusted to 0 or 3 degrees. Both sensors of a side shall have the same adjustment (0 or 3 degrees), but the left side or the right side can be adjusted in a different way. Vertically it is possible to adjust the coverage area of the lower sensors regardless of the left side and the right side; while the one of the upper sensors is fix. Figure 3 shows the IR coverage diagram (upper view and vertical coverage for 4 positions of the lens of the lower IR sensor) when the detector is positioned at 1 meter height.
WARNING! The coverage distance of the detector is defined by the coverage provided by the lower IR sensor.
Detection distance (detection height: 1 m)
Lens position
Standard (m)
Actual, according to the thermal conditions of the environment (m)
A 12,0 10,0 … 15,0 B 8,0 6,0 … 10,0 C 5,0 4,0 … 6,0 D 2,0 1,5,0 … 3,0
It detects
It does not detect

IT
6
2CSYD0202B
Figure 3 To fix the detector (figure 4):
1) loosen the screw and remove the front cover. WARNING: do not touch the lens surface.
2) loosen the rear screws. WARNING: do not touch the mirrors. 3) remove the rear cover by letting it slide downwards and then move it away
from the detector. 4) To fix the detector to the wall, mark the position corresponding to the fixing
holes. Make two 5-mm holes in the wall for the screw anchors and fix the rear cover of the detector with the screws.
5) If you want to fix the detector to a supporting pole, open the prearranged holes on the back of rear cover. Let two metal bands pass (max 20 mm width, max 0.5 thickness, not included in the package) and tighten as much as possible the rear cover of the detector to the support.

IT
7
2CSYD0202B
Figure 4
3.2 Programming
The device programming is carried out through the DIP switch and the acquisition of the detector by the control unit. To program the detector:
1) Power the detector. The LED flashes. 2) Fix the detector to the rear cover. 3) Prepare the control unit to acquire the detector and select the required
area and memory location. 4) Stimulate the detector by passing the hand in front of the sensors (the LED
will flash). The detector will transmit its code that will be acquired by the control unit (for further information, refer to the control unit installation manual).
3.3 Adjustment
It is possible to adjust the detection direction horizontally, the detection distance and the detection sensitivity.
WARNING! Never touch mirrors or IR sensors with fingers!

IT
8
2CSYD0202B
To execute the adjustments (figure 5): 1) Unhook the three bands of the lens holder frame with a screwdriver and
remove it from the front cover. 2) Move the lens to select the angle (0 and 3 grades) of the detection area.
For the coverage diagram, please refer to figure 3. WARNING! The left and right sides can have a different angular position but it is mandatory that in the vertical area the upper and the lower lens have the same angular position. With the angular position of 3 degrees, the detector sensitivity (see below) shall be set to “alta” (High).
3) Adjust the detection distance by gently letting the lower lens slide to the required position A, B, C or D (for the coverage diagrams, please refer to figure 3). The lower lens can be independently adjusted for the left side and the right side.
4) Insert the lens holder frame again into the front cover and align the three bands A, B and C of each frame side with the holes (A’, B’ and C’) of the cover.
Figure 5

IT
9
2CSYD0202B
3.4 Completion and test
Complete the installation and test the detector (figure 6):
Figure 6
1) Set the detector sensitivity (L = low, M = medium, H = high) by using the proper selector. Use H when the horizontal detection angles have been changed (3 degrees) or when a higher sensitivity towards the end (12 m) of the detection area is required.
2) Set the DIP switch of the detector.
Switch Function
1 ON Test mode. OFF * Standard operation.
2 ON Suppression: only one alarm every 5 seconds is generated even if multiple detections occurred (the battery duration is reduced).
OFF * Idem, but every 120 seconds.
3 ON Active LED (it turns on for each detection during the standard operation).
OFF * Inactive LED. * factory configuration
3) Set the DIP switch 1 of the detector to ON (test mode). Lay the front cover back on the device and check if the detector signals possible intrusion attempts by walking in the area to be protected (the front, left or right LEDs turn on according to the involved side). If no signal is issued, try to adjust the detection area again or increase the sensitivity. Check the operation

IT
10
2CSYD0202B
with the control unit (read the installation and user manuals of the control unit for details about the detector test procedure).
4) Remove the front cover of the detector, set the DIP switch 1 to OFF (standard operation), lay the cover back and fix it with the screw.
4 MAINTENANCE
4.1 Cleaning
To clean the device externally, use a slightly wet cloth. Regularly check that the lens of the IR sensors are clean and that there are no obstacles. 4.2 Test
Execute the detector test at least once a year. For the test procedure, please refer to the manual related to the intrusion alarm system of the control unit. 4.3 Battery replacement
The battery in the detector shall not be disposed as urban waste (Directive, 2006/66/EC), as it is subject to separate waste collection in order to avoid environmental damages. Battery shall be replaced by qualified personnel. To replace the battery:
1) Put the control unit into maintenance status (please refer to the control unit installation manual).
2) Disassemble the detector (please refer to the installation steps). 3) Remove the exhausted battery and insert the new one. 4) Assemble the detector again. 5) Execute the detector test to be sure that it works. 6) Exit the maintenance status if required.
4.4 Device reset
To delete the acquisition address and to restore the factory configuration of the sensor, press the tamper for 5 times with an interval of at least one second between each single pressing. The activity must be completed within 16 seconds. The reset shall be carried out if you want that the device is acquired by another control unit. To re-acquire the device on the same control unit, it is not necessary to previously execute the reset procedure.

IT
11
2CSYD0202B

IT
12
2CSYD0202B
5 TECHNICAL SPECIFIATIONS
APPLICATION SCOPE Security COMMUNICATION TECHNOLOGY Transmission in FM 868.3 MHz RANGE IN FREE AIR 300 m POWER SUPPLY no. 1 Lithium battery 3 V – 1.4 Ah lasting
4 years (with 120-s. suppression). Operation is guaranteed for 30 days from the low battery notification
DETECTION ELEMENTS 4 IR sensors PROGRAMMING ELEMENTS 1 3-way DIP switch
1 sensitivity selector SIGNAL ELEMENTS 2 LED
Low battery in the control unit ANTI-TAMPERING PROTECTION Tamper Additional data provided by the manufacturer USAGE TEMPERATURE -20 … + 50 °C USAGE RELATIVE HUMIDITY Max 95% max (non-condensing) USAGE ENVIRONMENT Indoor/outdoor (sheltered and dry
places) INSTALLATION Free PROTECTION LEVEL IP55 SIZES (L x H x W) 56 x 235 x 128 mm WEIGHT 520 gr

Manual code: 2CSM600506D0201 rev. 00
ABB S.p.A. – ABB SACE Division Viale dell’Industria, 18 20010 Vittuone (MI)
For further information and assistance:
from Monday to Saturday from 8:00 a.m. to 7:00 p.m.
Printed in Italy
Power and productivity for a better world TM


