15
03/08/2007 An introduction to Outlook 2007| Craig Goacher COMPUTING SERVICES DEPARTMENT MOVING FROM OUTLOOK 2003 TO OUTLOOK 2007
03/08/2007
An introduction to Outlook 2007| Craig Goacher
COMPUTING
SERVICES
DEPARTMENT
MOVING FROM OUTLOOK 2003 TO
OUTLOOK 2007

Ch
apte
r: E
rro
r! N
o t
ext
of
spec
ifie
d s
tyle
in d
ocu
me
nt.
2
Ch
apte
r: E
rro
r! N
o t
ext
of
spec
ifie
d s
tyle
in d
ocu
me
nt.
3
Contents
Microsoft Outlook 2007 ................................................................................................................... 4
The Ribbon and the Office Button .................................................................................................... 4
The Office Button (and the Quick Access Toolbar) .................................................................. 4
The Ribbon ................................................................................................................................ 4
Email ................................................................................................................................................. 6
To-Do Bar ............................................................................................................................. 6
Tasks .................................................................................................................................... 6
New look for the Calendar ............................................................................................................... 7
Calendar overlay mode .................................................................................................................... 8
New look for Contacts ...................................................................................................................... 9
Printing ........................................................................................................................................... 10
Commands ...................................................................................................................................... 11
Keyboard shortcuts ........................................................................................................................ 13
Email Merge.................................................................................................................................... 14
Ch
apte
r: E
rro
r! N
o t
ext
of
spec
ifie
d s
tyle
in d
ocu
me
nt.
4
Microsoft Outlook 2007 So you are trying to send an email in Outlook 2007 for the first time and you’re not sure where to start. Don’t worry - you'll still be able to do the things you've always done. The new look to Outlook 2007 is designed to make those things even easier. Let’s quickly run through the new interface of Outlook 2007 so you can get up to speed and be productive in no time!
The Ribbon and the Office Button
In Outlook 2007, the first time you create a new message (or open one you receive) you will see the Ribbon across the top of the message window.
The Ribbon gives Outlook a new look. As you get up to speed, you will see that it is there to help you get things done more easily and with fewer steps.
The Ribbon is only one part of the new user interface though… There's a lot more that is new to help you work faster and more efficiently. To name just a few of these things, there's the To-Do Bar, new navigation in the calendar, and a new format for contacts.
Before we look at all the new features of Outlook 2007, let’s spend some more time looking at the Office Button and the Ribbon.
The Office Button (and the Quick Access Toolbar)
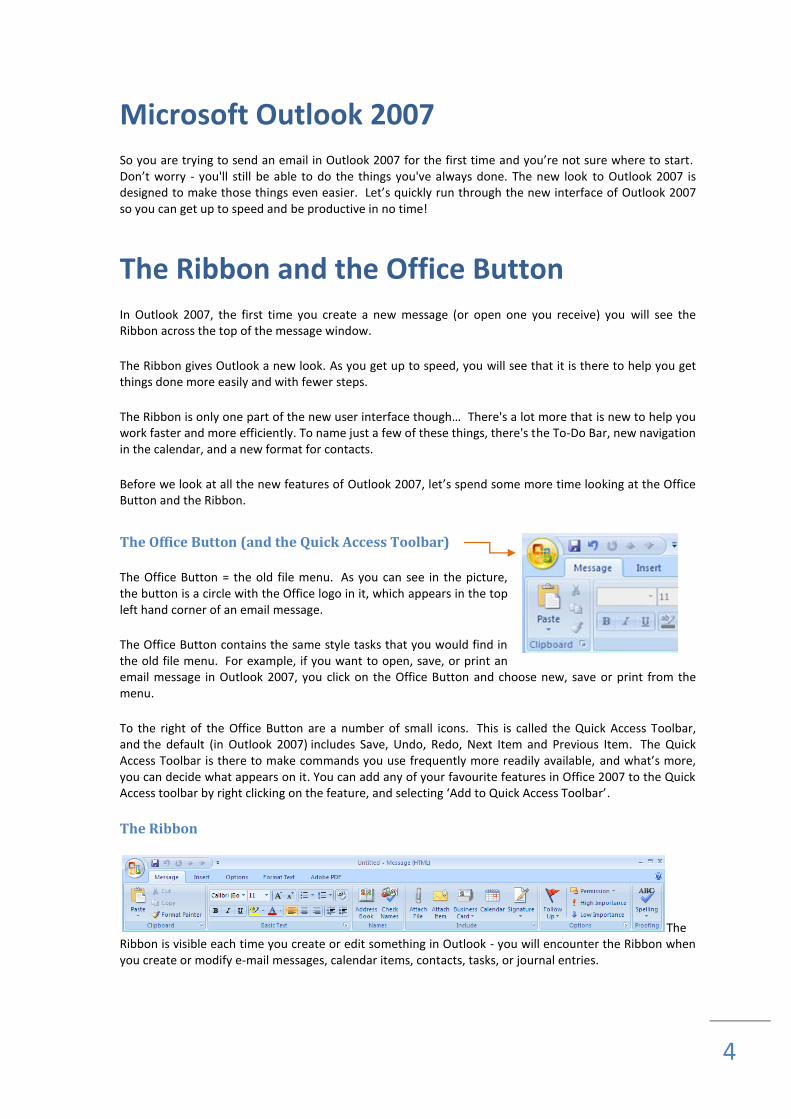
The Office Button = the old file menu. As you can see in the picture, the button is a circle with the Office logo in it, which appears in the top left hand corner of an email message.
The Office Button contains the same style tasks that you would find in the old file menu. For example, if you want to open, save, or print an email message in Outlook 2007, you click on the Office Button and choose new, save or print from the menu.
To the right of the Office Button are a number of small icons. This is called the Quick Access Toolbar, and the default (in Outlook 2007) includes Save, Undo, Redo, Next Item and Previous Item. The Quick Access Toolbar is there to make commands you use frequently more readily available, and what’s more, you can decide what appears on it. You can add any of your favourite features in Office 2007 to the Quick Access toolbar by right clicking on the feature, and selecting ‘Add to Quick Access Toolbar’.
The Ribbon
The Ribbon is visible each time you create or edit something in Outlook - you will encounter the Ribbon when you create or modify e-mail messages, calendar items, contacts, tasks, or journal entries.
Ch
apte
r: E
rro
r! N
o t
ext
of
spec
ifie
d s
tyle
in d
ocu
me
nt.
5
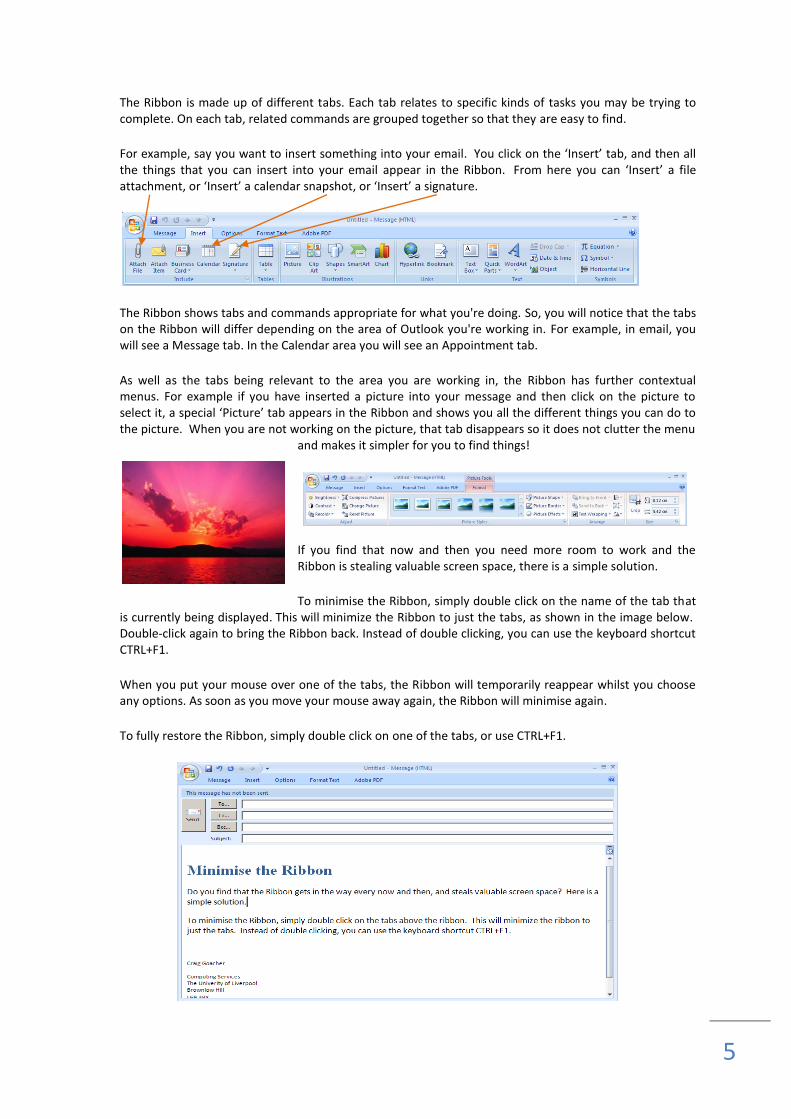
The Ribbon is made up of different tabs. Each tab relates to specific kinds of tasks you may be trying to complete. On each tab, related commands are grouped together so that they are easy to find.
For example, say you want to insert something into your email. You click on the ‘Insert’ tab, and then all the things that you can insert into your email appear in the Ribbon. From here you can ‘Insert’ a file attachment, or ‘Insert’ a calendar snapshot, or ‘Insert’ a signature.
The Ribbon shows tabs and commands appropriate for what you're doing. So, you will notice that the tabs on the Ribbon will differ depending on the area of Outlook you're working in. For example, in email, you will see a Message tab. In the Calendar area you will see an Appointment tab.
As well as the tabs being relevant to the area you are working in, the Ribbon has further contextual menus. For example if you have inserted a picture into your message and then click on the picture to select it, a special ‘Picture’ tab appears in the Ribbon and shows you all the different things you can do to the picture. When you are not working on the picture, that tab disappears so it does not clutter the menu
and makes it simpler for you to find things!
If you find that now and then you need more room to work and the Ribbon is stealing valuable screen space, there is a simple solution.
To minimise the Ribbon, simply double click on the name of the tab that is currently being displayed. This will minimize the Ribbon to just the tabs, as shown in the image below. Double-click again to bring the Ribbon back. Instead of double clicking, you can use the keyboard shortcut CTRL+F1.
When you put your mouse over one of the tabs, the Ribbon will temporarily reappear whilst you choose any options. As soon as you move your mouse away again, the Ribbon will minimise again.
To fully restore the Ribbon, simply double click on one of the tabs, or use CTRL+F1.

Email In the email view of Outlook 2007, many things will look similar to Outlook 2003. For example, you will see the navigation bar on the left hand side, showing all of your mail folders, and the reading pane, displaying your messages will look familiar too.
In Outlook 2007 there is an additional panel to the right hand side, called the To-Do Bar.
To-Do Bar
The To-Do bar is new to Outlook 2007. It is designed to help you keep your calendar organised and easily plan and assign time for your upcoming tasks. You will see the To-Do bar down the right hand side of your Outlook window.
The To-Do bar displays a simple calendar at the top, in which the current month is highlighted in bold and today’s date surrounded by a square.
Below the calendar your upcoming appointments and meetings are listed. For ease of access, you can right click on one of these meetings to quickly open it and accept, decline, propose new time, etc.
At the bottom of the To-Do bar is a list of your upcoming tasks and flagged emails. Right click a task in the To-Do bar to quickly open it.
Tasks
You can change how Tasks appear in your To-Do bar if you want to. For example, instead of displaying your tasks by Due Date, you may wish to display them by Category. To do this, right click Arranged By: Due Date and select Category from the list of options.
If you now receive an email which requires further action on your part, you could flag the email, categorise it, and then rename the task created in the To-Do bar to something more appropriate.
When the task has been completed, you can just click the flag for that task in the To-Do bar to mark it as completed. It will then be removed from the To-Do bar. You can also right click the task and choose other options such as adding reminders, specifying a due date, or assign the task to someone else.

Ch
apte
r: E
rro
r! N
o t
ext
of
spec
ifie
d s
tyle
in d
ocu
me
nt.
7
New look for the Calendar The new design for the Calendar in Outlook 2007 makes it easier to see what’s what. Moving around is easier too. Here are some examples:
1. Clearer buttons make it easier to quickly switch between daily, weekly, and monthly calendar views.
2. Back and Forward buttons let you quickly go to the next day, week, or month in the calendar. 3. A new Tasks area. You can use this area to track your tasks. Completed items on this list appear
crossed out and "stick" to the day; tasks not marked as complete will automatically be carried over to the next day, until you complete them.
1
2
3
Ch
apte
r: E
rro
r! N
o t
ext
of
spec
ifie
d s
tyle
in d
ocu
me
nt.
8
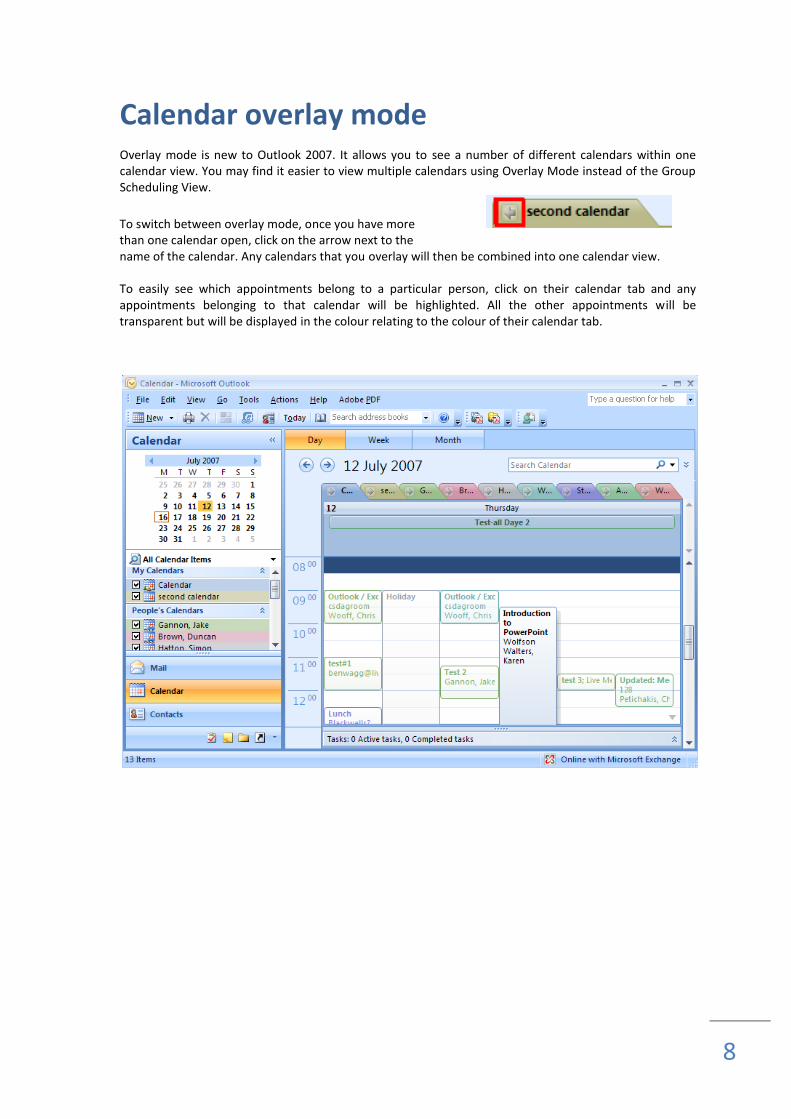
Calendar overlay mode Overlay mode is new to Outlook 2007. It allows you to see a number of different calendars within one calendar view. You may find it easier to view multiple calendars using Overlay Mode instead of the Group Scheduling View.
To switch between overlay mode, once you have more than one calendar open, click on the arrow next to the name of the calendar. Any calendars that you overlay will then be combined into one calendar view. To easily see which appointments belong to a particular person, click on their calendar tab and any appointments belonging to that calendar will be highlighted. All the other appointments will be transparent but will be displayed in the colour relating to the colour of their calendar tab.

Ch
apte
r: E
rro
r! N
o t
ext
of
spec
ifie
d s
tyle
in d
ocu
me
nt.
9
New look for Contacts In Outlook 2007, the Business Cards view makes contacts easy to see and easy to share. You will first notice the new look for contacts when you click Contacts to switch to that area of Outlook.
Other traditional views, as used in Outlook 2003, are still available.
Ch
apte
r: E
rro
r! N
o t
ext
of
spec
ifie
d s
tyle
in d
ocu
me
nt.
10
Printing Printing in Outlook 2007 is even easier than in previous versions of Outlook.
Where do I find the button to Print when composing an email in Outlook 2007?
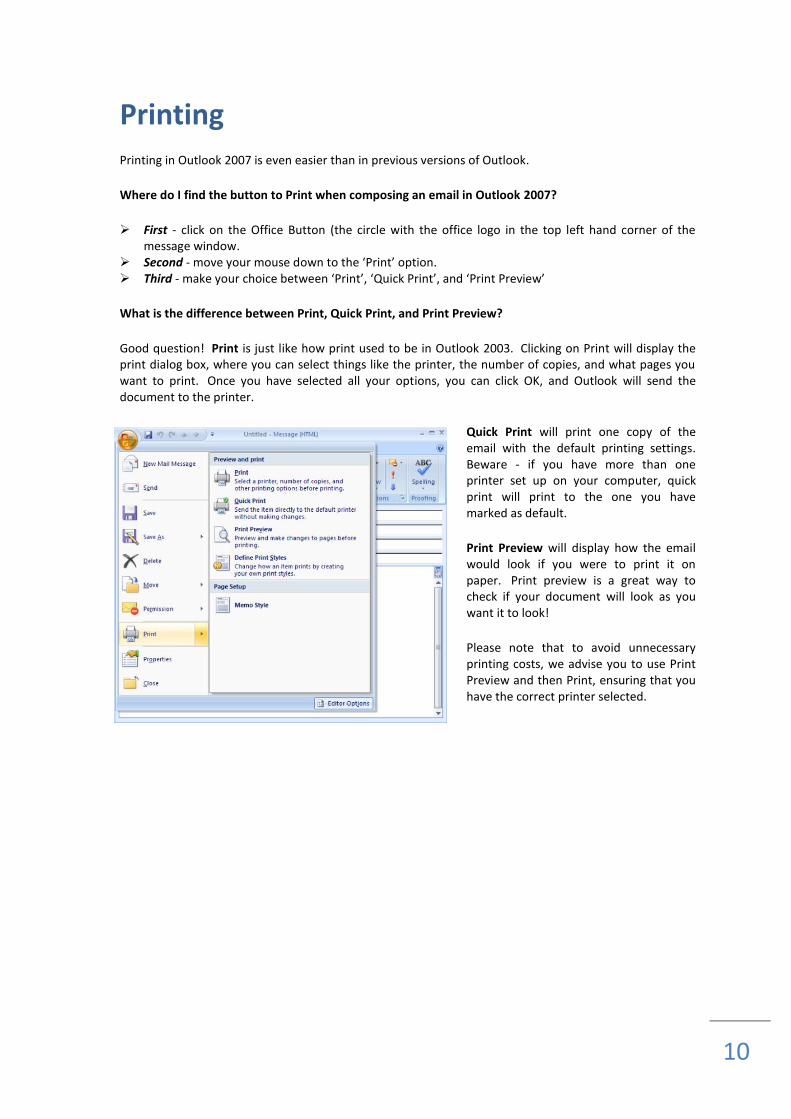
First - click on the Office Button (the circle with the office logo in the top left hand corner of the message window.
Second - move your mouse down to the ‘Print’ option. Third - make your choice between ‘Print’, ‘Quick Print’, and ‘Print Preview’
What is the difference between Print, Quick Print, and Print Preview?
Good question! Print is just like how print used to be in Outlook 2003. Clicking on Print will display the print dialog box, where you can select things like the printer, the number of copies, and what pages you want to print. Once you have selected all your options, you can click OK, and Outlook will send the document to the printer.
Quick Print will print one copy of the email with the default printing settings. Beware - if you have more than one printer set up on your computer, quick print will print to the one you have marked as default.
Print Preview will display how the email would look if you were to print it on paper. Print preview is a great way to check if your document will look as you want it to look!
Please note that to avoid unnecessary printing costs, we advise you to use Print Preview and then Print, ensuring that you have the correct printer selected.

Ch
apte
r: E
rro
r! N
o t
ext
of
spec
ifie
d s
tyle
in d
ocu
me
nt.
11
Commands Where are my usual commands?
“Undo Command”
The Undo command has moved a little from previous versions of Outlook. You can now find Undo (as well as Redo and Repeat) in the Quick Access Toolbar when inside an email or appointment window. The Quick Access Toolbar lives in the top left hand corner of the screen. Have a look at the image below; I have circled Undo so you know where it is.
Note: that you will also find Undo in the same spot (in the Quick Access Toolbar) in Word 2007, PowerPoint 2007, and Excel 2007.
“Bcc Field”
In order to use the Blind Carbon Copy feature when sending an email, you must first enable the Bcc field. This is now found on the Options tab.
“Request a Delivery Receipt” Request a delivery receipt if you would like to be informed when your email has successfully been delivered. You will now find this on the Options tab. Place a tick in the box to select this option.
“Attach File”
To send an attachment with your email you can choose Attach file on the Message tab. This option is also included on the Insert tab.
“Paste”
Use the Paste function to insert text that you have copied. This can now be found on the Clipboard section of the Message tab or the Format Text tab.

Ch
apte
r: E
rro
r! N
o t
ext
of
spec
ifie
d s
tyle
in d
ocu
me
nt.
12
“Private” – Calendar only
Mark a calendar item as private in order to hide the details of that item from anyone that may have
shared access to your calendar. This can now be found on the Event tab. Click on the padlock to make an appointment private.
“Appointment/Scheduling views” – Calendar only In Outlook 2003, you could switch between the appointment and scheduling views by selecting the appointment or scheduling tab. This has changed slightly for Outlook 2007. Now you must select either scheduling or appointment from the Show grouping on the Event tab.
Ch
apte
r: E
rro
r! N
o t
ext
of
spec
ifie
d s
tyle
in d
ocu
me
nt.
13
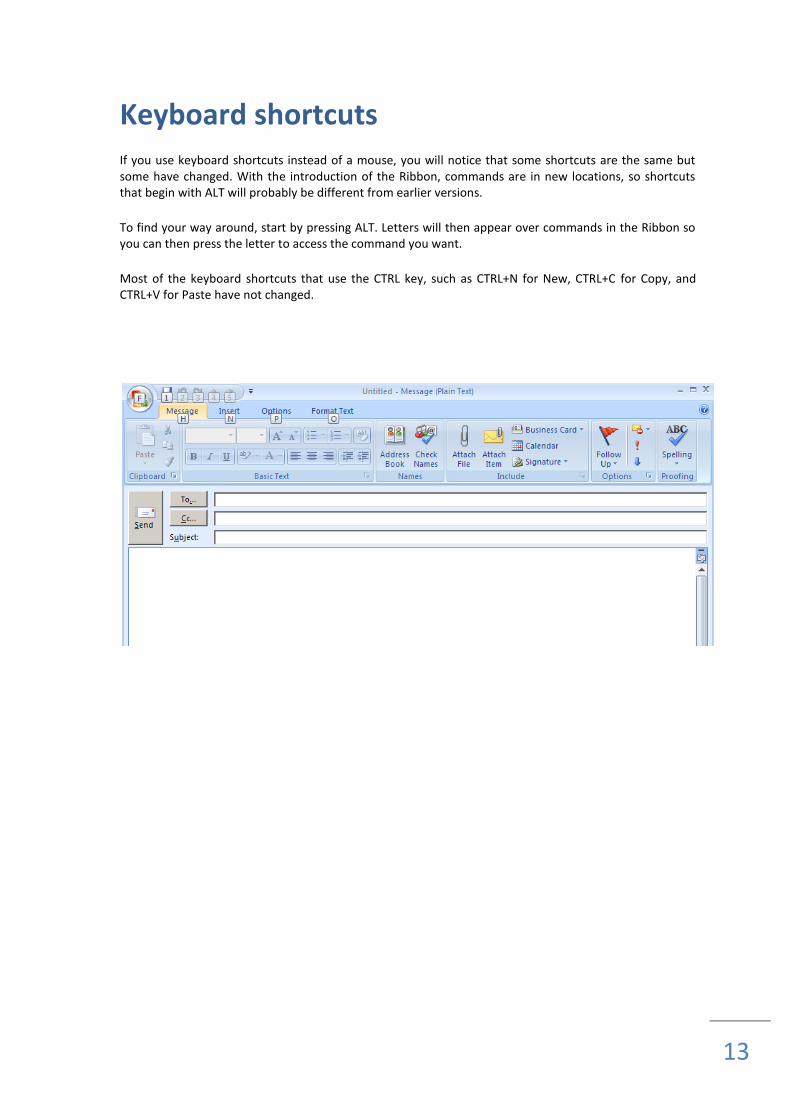
Keyboard shortcuts If you use keyboard shortcuts instead of a mouse, you will notice that some shortcuts are the same but some have changed. With the introduction of the Ribbon, commands are in new locations, so shortcuts that begin with ALT will probably be different from earlier versions.
To find your way around, start by pressing ALT. Letters will then appear over commands in the Ribbon so you can then press the letter to access the command you want.
Most of the keyboard shortcuts that use the CTRL key, such as CTRL+N for New, CTRL+C for Copy, and CTRL+V for Paste have not changed.
Ch
apte
r: E
rro
r! N
o t
ext
of
spec
ifie
d s
tyle
in d
ocu
me
nt.
14
Email Merge Do you have a message that you want to send to multiple contacts and better yet… would you like to personalise the message for each recipient?
Instead of “Hi all”, what about “Hi Jill”, “Hi Jake” etc?
You can, with email merge in Word 2007.
Email merge works exactly the same as a standard mail merge… except for one big difference. Instead of printing individual letters or envelopes or labels, Word 2007 will generate individual emails, send them to your Outlook 2007 outbox, and then when you are next online in Outlook, Outlook will send your personalised emails to each addressee.
Starting an email merge in Word 2007 is easy.
1. Open up Word 2007
2. Type your email in Word 2007
3. Click on the “Mailings” tab in the ribbon
4. In the “Start Mail Merge” grouping, click on the “Start Mail Merge” button. It will show a list of mail
merge options available. You can choose Letters, E-Mail Messages, Envelopes, Labels or Directory. In this case as we want to send an email… click on “E-Mail Messages”
5. Next you need to select the recipients of your email merge. These names could come from any
number or sources… maybe an Excel 2007 spreadsheet? Maybe your Outlook 2007 Contacts… or you could just type them yourself. To do that, click on the “Select Recipients” box in the “Start Mail Merge” group. Either find your data source, your outlook contacts, or create a new list.
6. If you want to edit any of the recipients in the list, now is the time to click on “Edit Recipient List” in the “Start Mail Merge” group.
7. The next step is to add the appropriate fields to personalise the greeting, the recipient’s name, or to add any other piece of data you might have on the contact anywhere throughout your recipient list. You can find the appropriate fields in the “Write & Insert Fields” group (still on the “Mailings” tab). More than likely you will want to add at least a greeting line (Dear Bill… or something like that). To do that, click on the “Greeting Line” button in the “Write & Insert Fields” group. The following dialog box appears:

Ch
apte
r: E
rro
r! N
o t
ext
of
spec
ifie
d s
tyle
in d
ocu
me
nt.
15
8. Once you are happy with your greeting line format, click “OK”. Word 2007 will now drop the field into your document.
9. Now you can preview your results to ensure that everyone’s name is coming up correctly. Click the “Preview Results” button in the “Preview Results” group… then use the forward and back arrows beside it to run through your recipient list.
10. If you are happy with the preview, now is the time to finish things off and complete the merge. In the
“Finish” group on the “Mailings tab” you will see a button called “Finish & Merge”. Click on it, and then click “Send E-mail Messages…”
11. Now Word 2007 automatically generates all the individual emails, and sends them to your Outlook
2007 outbox (or your default email client).
12. Open up Outlook or your email client, and watch all your emails being sent!
Good Luck with using Outlook 2007


