131
Outlook on the web User Manual Version 1.0 August 2018

Outlook on the web
User Manual
Version 1.0
August 2018
Outlook on the web User Manual
1
Contents
Introduction .................................................................................................................................................................... 4
1. Overview of Outlook on the web ...................................................................................................... 4
2. Types of Emails ............................................................................................................................................. 5
2.1 Personal Email ........................................................................................................................................... 5
Mailbox Size ....................................................................................................................................... 5
Size Limit per Single Email ..................................................................................................... 6
Limits on Number of Recipients (Destinations) ....................................................... 6
Limits on Number of Emails Sent during Certain Period .................................. 6
2.2 Shared Email .............................................................................................................................................. 7
3. Using Email ....................................................................................................................................................... 8
3.1 Sign-in ............................................................................................................................................................. 8
3.2 Basic Operation ....................................................................................................................................... 10
Basic Screen and Function Buttons ................................................................................ 10
Customizing Reading Pane ................................................................................................... 12
Folders Initially Provided ........................................................................................................ 12
Favorites ............................................................................................................................................ 13
Conversation Display ................................................................................................................ 14
Sorting Emails ................................................................................................................................ 17
Redirect Setting for Personal Email ................................................................................ 19
3.2.7.1 Using the Forwarding Feature ............................................................ 20
3.2.7.2 Using Inbox and Sweep Rules ............................................................ 23
Redirect Setting for Shared Email ................................................................................... 28
3.2.8.1 Using the Forwarding Feature ............................................................ 29
3.2.8.2 Using Inbox and Sweep Rules ............................................................ 34
Automatic Reply ........................................................................................................................... 41
3.3 Creating Email Message ................................................................................................................... 43
Creating New Message as Personal Email ................................................................. 43
Creating New Message as Shared Email .................................................................... 45
Creating Signature for Personal Email ......................................................................... 49
Creating Signature for Shared Email............................................................................. 51
Message Options .......................................................................................................................... 54
Message Flag ............................................................................................................................... 56
Message Format ........................................................................................................................... 57
Outlook on the web User Manual
2
Email Error Prevention Functions: Email Tips, Spell Check, Input Error
Check 59
3.4 Attaching or Inserting Files ............................................................................................................ 60
3.5 Putting Emails In Order .................................................................................................................... 63
Quick Search ................................................................................................................................... 63
Creating a subfolder .................................................................................................................. 63
Filtering Rules ................................................................................................................................ 64
[Deleted Items] Folder ............................................................................................................ 67
3.6 Email Security .......................................................................................................................................... 70
How Junk Email Filter Works .............................................................................................. 70
Changing Download Settings of Images .................................................................... 76
Blocking Suspicious Attachment ....................................................................................... 77
3.7 Sign Out ....................................................................................................................................................... 78
4. Setting Up and Managing Shared Email .................................................................................... 79
4.1 Setting Up Shared Email .................................................................................................................. 79
Initial Setup for Shared Emails (for Initial Login Only).................................... 79
Opening Shared Email ............................................................................................................. 82
4.2 Managing Users (Members and Administrators) ............................................................ 85
Adding Member ............................................................................................................................. 85
Adding Administrator ................................................................................................................ 88
Deleting Member.......................................................................................................................... 91
Deleting Administrator ............................................................................................................. 93
5. People(Contacts) ........................................................................................................................................ 96
5.1 Functions in Contacts View ...................................................................................................... 100
5.2 Managing Contacts ............................................................................................................................ 101
Creating Contacts ..................................................................................................................... 101
Creating Contacts List ........................................................................................................... 103
5.3 Contacts for Shared Email ........................................................................................................... 104
Using Outlook on the web Contacts ........................................................................... 104
6. Calendar ......................................................................................................................................................... 108
6.1 Functions of Calendar ..................................................................................................................... 109
6.2 Calendar Display ................................................................................................................................. 110
Changing Calendar Display Method ............................................................................ 110
Calendar Navigator ................................................................................................................. 111
Changing Timezone ................................................................................................................ 111
Changing Work Week ............................................................................................................ 112
Outlook on the web User Manual
3
Time Scale (Time Unit) ........................................................................................................ 113
6.3 Creating Calendar .............................................................................................................................. 114
Calendar Items ........................................................................................................................... 115
Creating Schedule .................................................................................................................... 116
Creating Schedule from Timetable .............................................................................. 120
Creating Event ............................................................................................................................ 122
7. Task................................................................................................................................................................... 123
7.1 Task Functions ..................................................................................................................................... 123
7.2 Managing Tasks ................................................................................................................................... 124
Creating Task .............................................................................................................................. 124
Finishing Task ............................................................................................................................. 126
8. Contact Us .................................................................................................................................................... 127
Appendix ...................................................................................................................................................................... 128
Supported Browsers ....................................................................................................................................... 128
Outlook on the web User Manual
4
Introduction
This manual provides basic information on how to use our email system (Office
365).
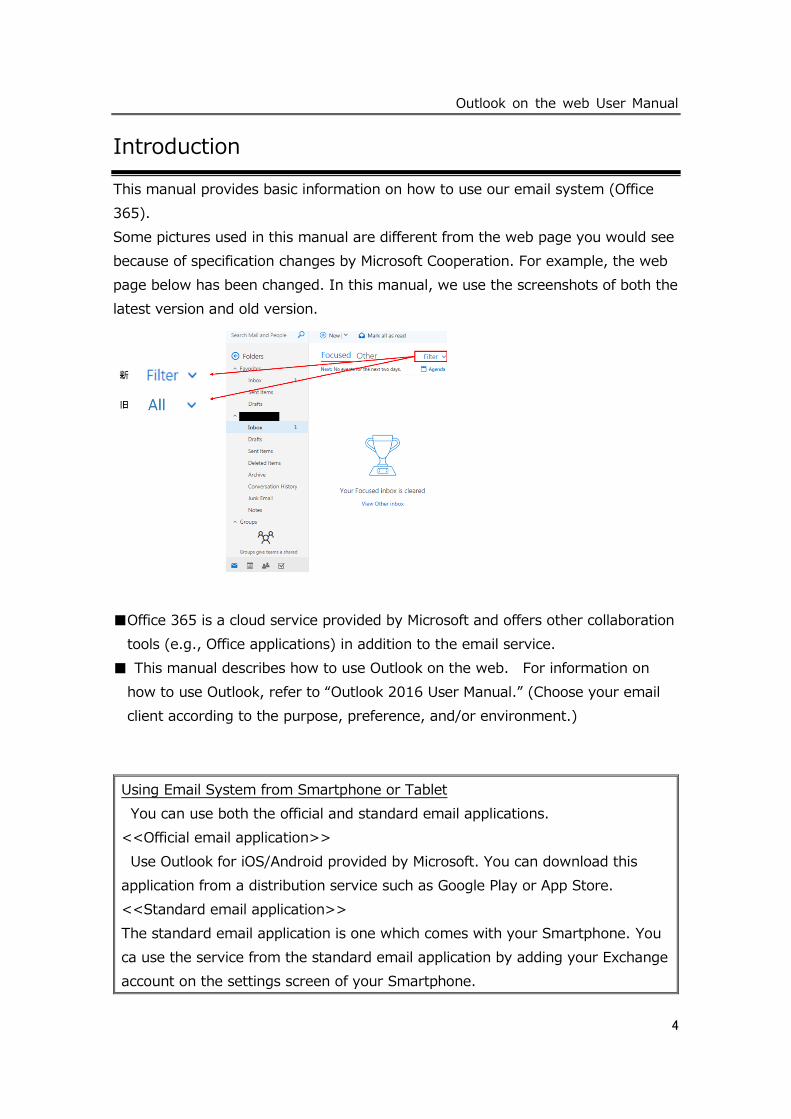
Some pictures used in this manual are different from the web page you would see
because of specification changes by Microsoft Cooperation. For example, the web
page below has been changed. In this manual, we use the screenshots of both the
latest version and old version.
■Office 365 is a cloud service provided by Microsoft and offers other collaboration
tools (e.g., Office applications) in addition to the email service.
■ This manual describes how to use Outlook on the web. For information on
how to use Outlook, refer to “Outlook 2016 User Manual.” (Choose your email
client according to the purpose, preference, and/or environment.)
Using Email System from Smartphone or Tablet
You can use both the official and standard email applications.
<<Official email application>>
Use Outlook for iOS/Android provided by Microsoft. You can download this
application from a distribution service such as Google Play or App Store.
<<Standard email application>>
The standard email application is one which comes with your Smartphone. You
ca use the service from the standard email application by adding your Exchange
account on the settings screen of your Smartphone.
Outlook on the web User Manual
5
[Caution] (Particularly for Staff)
* Since you are handling business emails, pay attention to security when using
the email service from outside the organization (e.g., lock the screen or enable
the remote wipe function).
Outlook on the web User Manual
4
1. Overview of Outlook on the web
Outlook on the web is a web-based application used to access the Office 365
mailbox from a web browser, and provides almost the same functions as Outlook,
including sending and receiving emails as well as managing address book,
contacts, and schedule. You can use Outlook on the web in any environment
where you can use a web browser, whether you are inside or outside the
university.
* Refer to “Appendix” at the end of the manual for the supported
browsers._%E8%A3%9C%E8%B6%B3%E8%B3%87%E6%96%99
<<Note>>
Since Outlook on the web is a part of the cloud service, its screens and
functions may be added or deleted due to system updates by Microsoft. We will
inform you of such updates on the Office 365 Special Website.
<<Reference>> Overview of Outlook
Outlook is the email client included in Microsoft Office and provides functions for
sending and receiving emails as well as managing address book, contacts, and
schedule. You need to install Outlook on your PC to use it.
⇒For information on how to use Outlook, refer to “Outlook 2013 User Manual.”
Outlook on the web User Manual
5
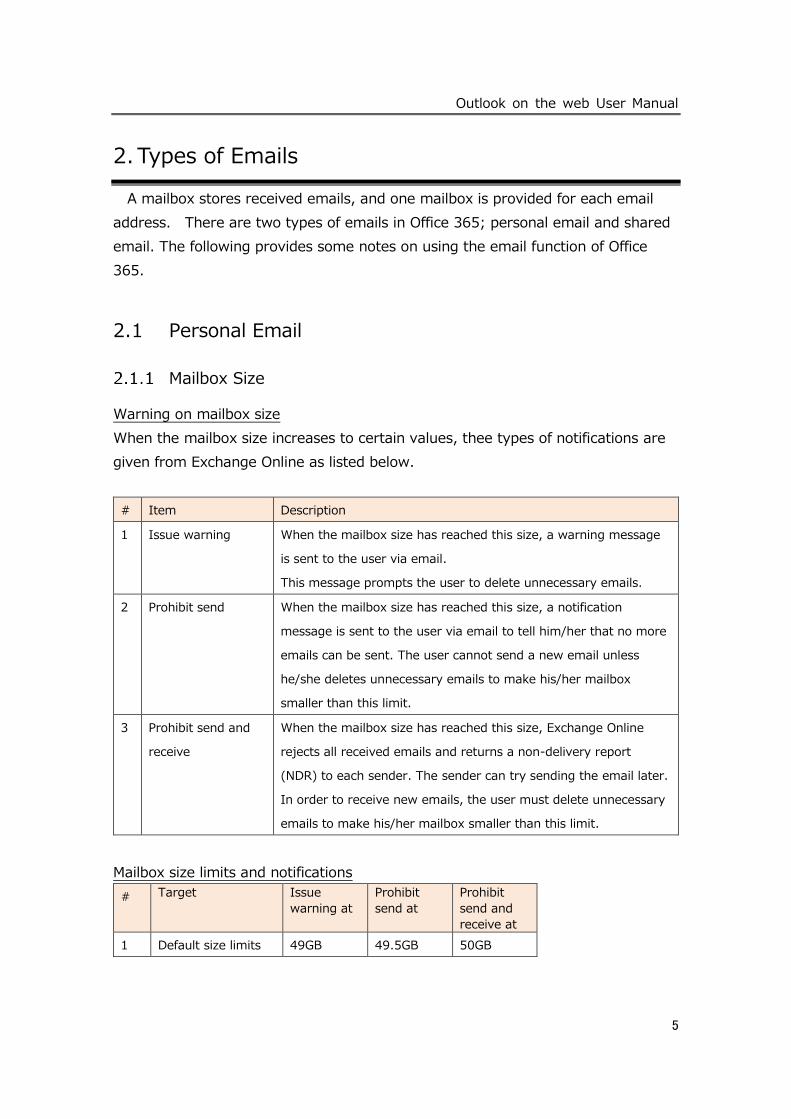
2. Types of Emails
A mailbox stores received emails, and one mailbox is provided for each email
address. There are two types of emails in Office 365; personal email and shared
email. The following provides some notes on using the email function of Office
365.
2.1 Personal Email
Mailbox Size
Warning on mailbox size
When the mailbox size increases to certain values, thee types of notifications are
given from Exchange Online as listed below.
# Item Description
1 Issue warning When the mailbox size has reached this size, a warning message
is sent to the user via email.
This message prompts the user to delete unnecessary emails.
2 Prohibit send When the mailbox size has reached this size, a notification
message is sent to the user via email to tell him/her that no more
emails can be sent. The user cannot send a new email unless
he/she deletes unnecessary emails to make his/her mailbox
smaller than this limit.
3 Prohibit send and
receive
When the mailbox size has reached this size, Exchange Online
rejects all received emails and returns a non-delivery report
(NDR) to each sender. The sender can try sending the email later.
In order to receive new emails, the user must delete unnecessary
emails to make his/her mailbox smaller than this limit.
Mailbox size limits and notifications
# Target Issue
warning at
Prohibit
send at
Prohibit
send and
receive at
1 Default size limits 49GB 49.5GB 50GB
Outlook on the web User Manual
6
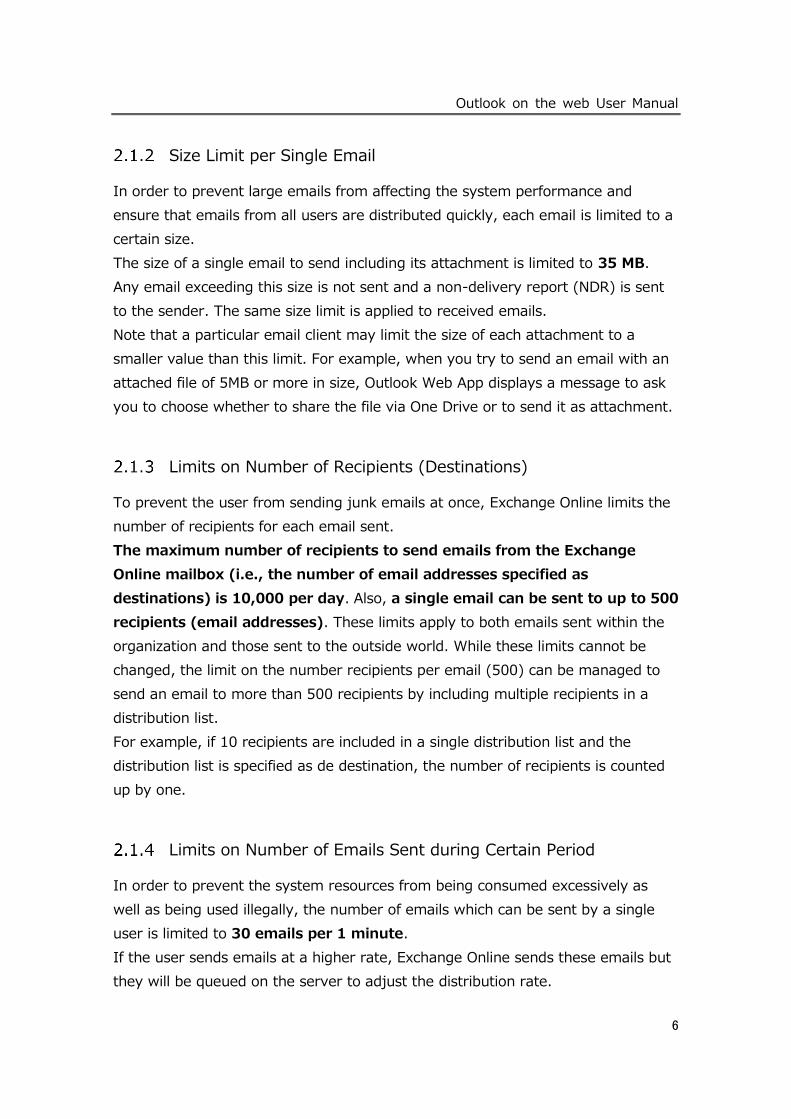
Size Limit per Single Email
In order to prevent large emails from affecting the system performance and
ensure that emails from all users are distributed quickly, each email is limited to a
certain size.
The size of a single email to send including its attachment is limited to 35 MB.
Any email exceeding this size is not sent and a non-delivery report (NDR) is sent
to the sender. The same size limit is applied to received emails.
Note that a particular email client may limit the size of each attachment to a
smaller value than this limit. For example, when you try to send an email with an
attached file of 5MB or more in size, Outlook Web App displays a message to ask
you to choose whether to share the file via One Drive or to send it as attachment.
Limits on Number of Recipients (Destinations)
To prevent the user from sending junk emails at once, Exchange Online limits the
number of recipients for each email sent.
The maximum number of recipients to send emails from the Exchange
Online mailbox (i.e., the number of email addresses specified as
destinations) is 10,000 per day. Also, a single email can be sent to up to 500
recipients (email addresses). These limits apply to both emails sent within the
organization and those sent to the outside world. While these limits cannot be
changed, the limit on the number recipients per email (500) can be managed to
send an email to more than 500 recipients by including multiple recipients in a
distribution list.
For example, if 10 recipients are included in a single distribution list and the
distribution list is specified as de destination, the number of recipients is counted
up by one.
Limits on Number of Emails Sent during Certain Period
In order to prevent the system resources from being consumed excessively as
well as being used illegally, the number of emails which can be sent by a single
user is limited to 30 emails per 1 minute.
If the user sends emails at a higher rate, Exchange Online sends these emails but
they will be queued on the server to adjust the distribution rate.
Outlook on the web User Manual
7
2.2 Shared Email
The shared email is a mailbox where multiple users can read and send emails. By
using the shared email, a shared calendar is provided so that multiple users can adjust
their holiday and work shift schedules.
About shared email
Using the shared email service, users of the same distribution group can send emails
from a common account, like a public email address (e.g., [email protected],
[email protected]) and easily manage these emails. When a user replies to an
email which was sent to the shared email account, the reply message will be shown as
an email sent from the shared account (but not the personal account).
The shared email is most suitable to process inquiries from users via email since
multiple responsible persons within the organization can manage and reply to the
inquiries. The users can obtain answers to their inquiries quickly and related emails
are saved in a single mailbox.
There is no user name or password dedicated to the shared email. You cannot directly
sign in to the shared mailbox using the Outlook, Outlook Web App, Exchange
ActiveSync, Exchange Web Services (EWS), and other Exchange protocols. You need
to be granted permission to access the shared mailbox first, and access to it using
Outlook or Outlook Web App.
Notes on Shared Email
• Determine who are responsible for replying to received emails as well as
sending new emails and make sure that everyone in the group knows it. This is
important to avoid accidents such as sending the same email twice.
• Since the mailbox is shared by all members, if someone deletes an email, other
members can no longer view it.
• If one of the group members changes the state of an email from “Unread” to
“Read,” other members will see it as “Read.”
Limits on shared mailbox
The size of the shared mailbox is limited to 50 GB. When the shared mailbox size
reaches 50GB, it will be locked in one month. Be careful so that the shared mailbox
does not exceed this limit by archiving it regularly.
Outlook on the web User Manual
8
3. Using Email
This chapter describes the basic operation for using the email service in Outlook
on the web.
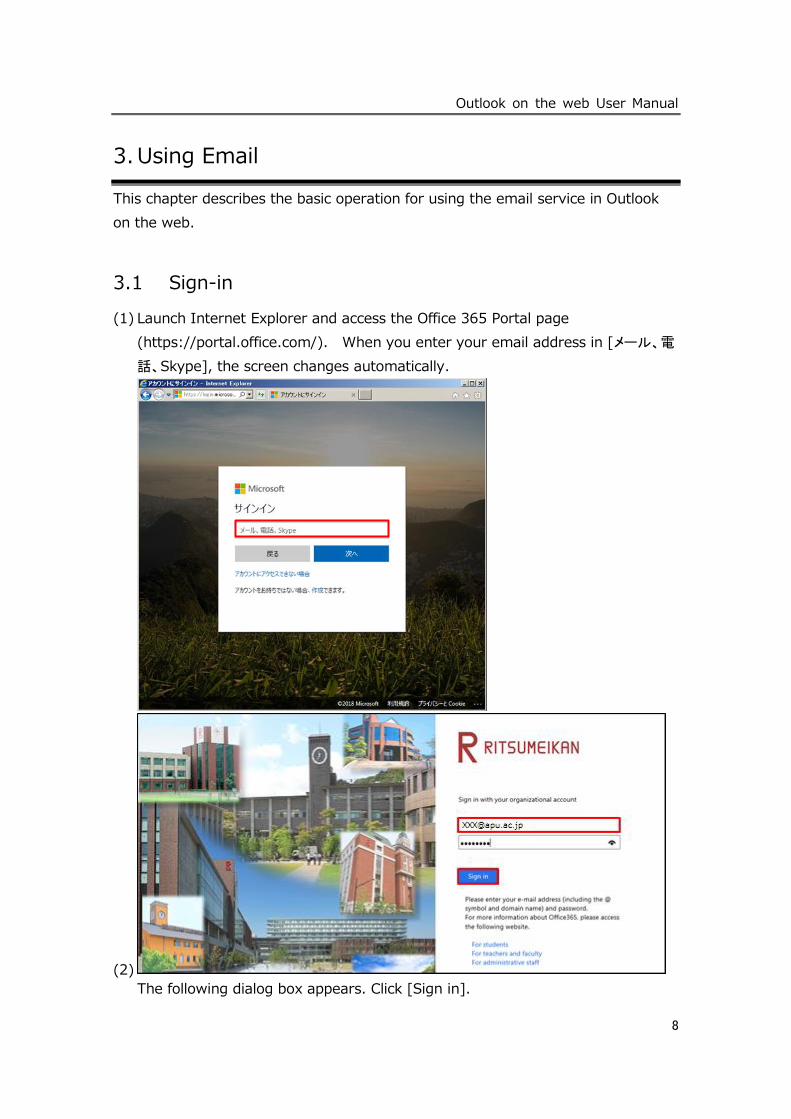
3.1 Sign-in
(1) Launch Internet Explorer and access the Office 365 Portal page
(https://portal.office.com/). When you enter your email address in [メール、電
話、Skype], the screen changes automatically.
(2)
The following dialog box appears. Click [Sign in].
Outlook on the web User Manual
9
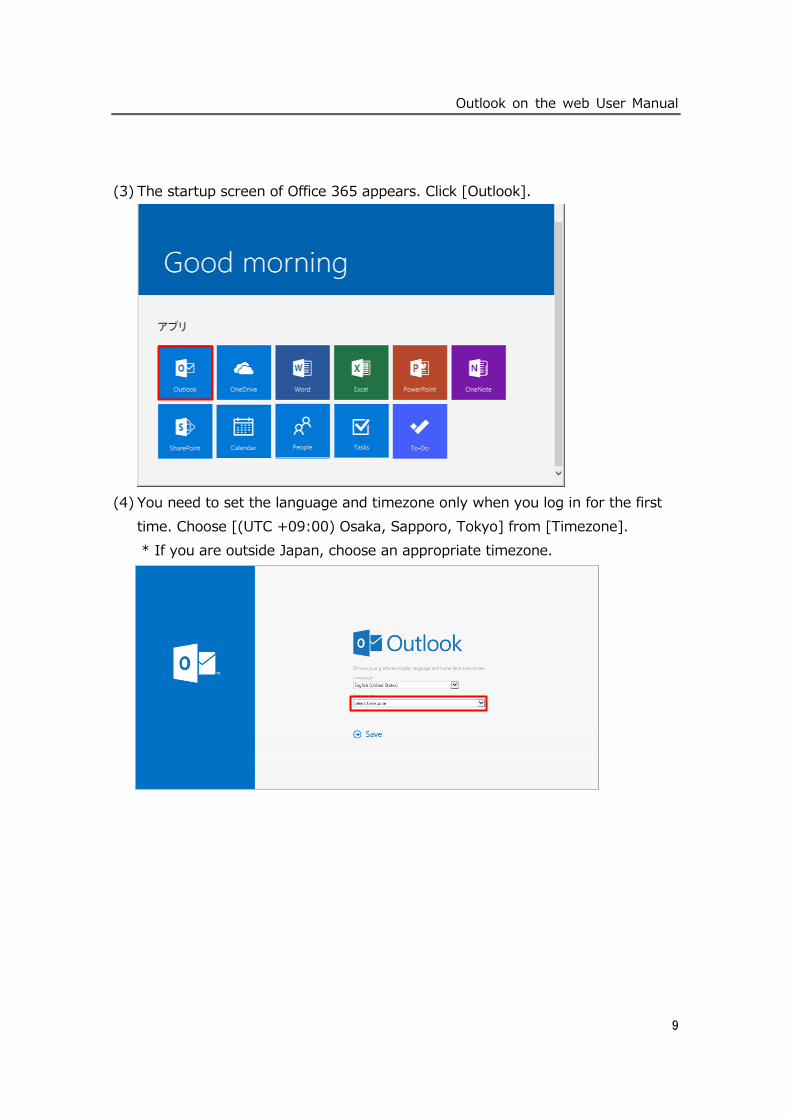
(3) The startup screen of Office 365 appears. Click [Outlook].
(4) You need to set the language and timezone only when you log in for the first
time. Choose [(UTC +09:00) Osaka, Sapporo, Tokyo] from [Timezone].
* If you are outside Japan, choose an appropriate timezone.
Outlook on the web User Manual
10
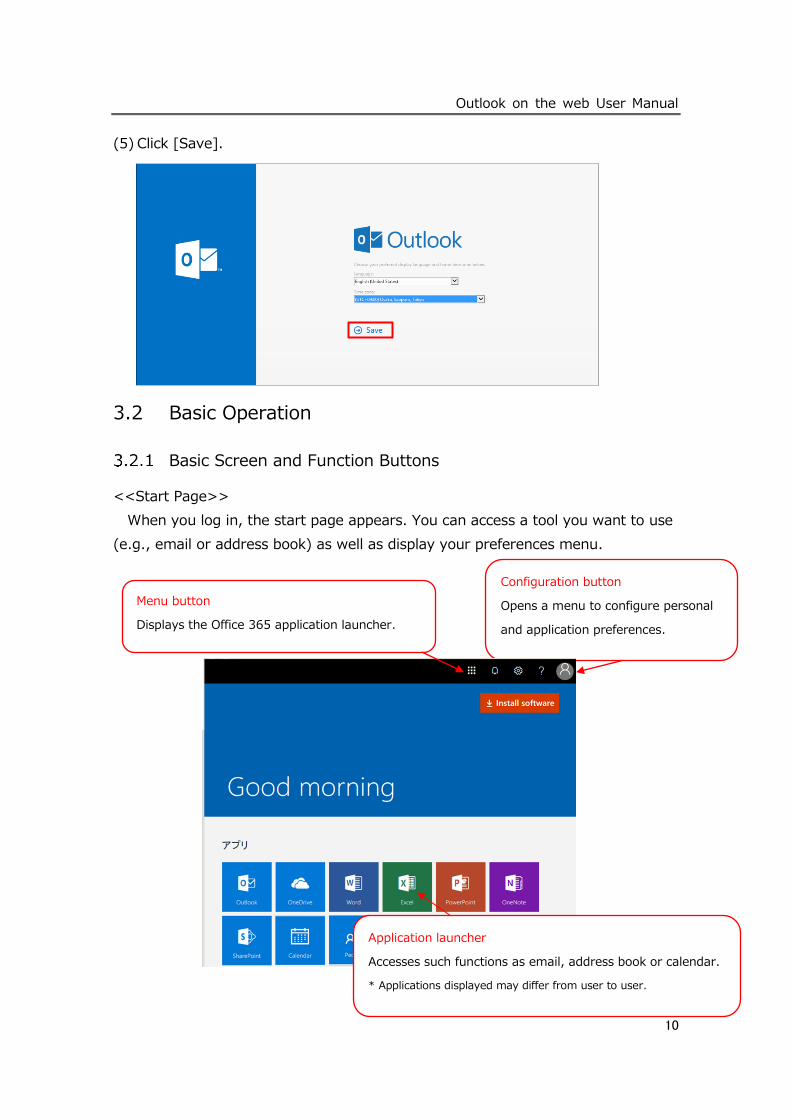
(5) Click [Save].
3.2 Basic Operation
Basic Screen and Function Buttons
<<Start Page>>
When you log in, the start page appears. You can access a tool you want to use
(e.g., email or address book) as well as display your preferences menu.
Menu button
Displays the Office 365 application launcher.
Configuration button
Opens a menu to configure personal
and application preferences.
Application launcher
Accesses such functions as email, address book or calendar.
* Applications displayed may differ from user to user.
Outlook on the web User Manual
11
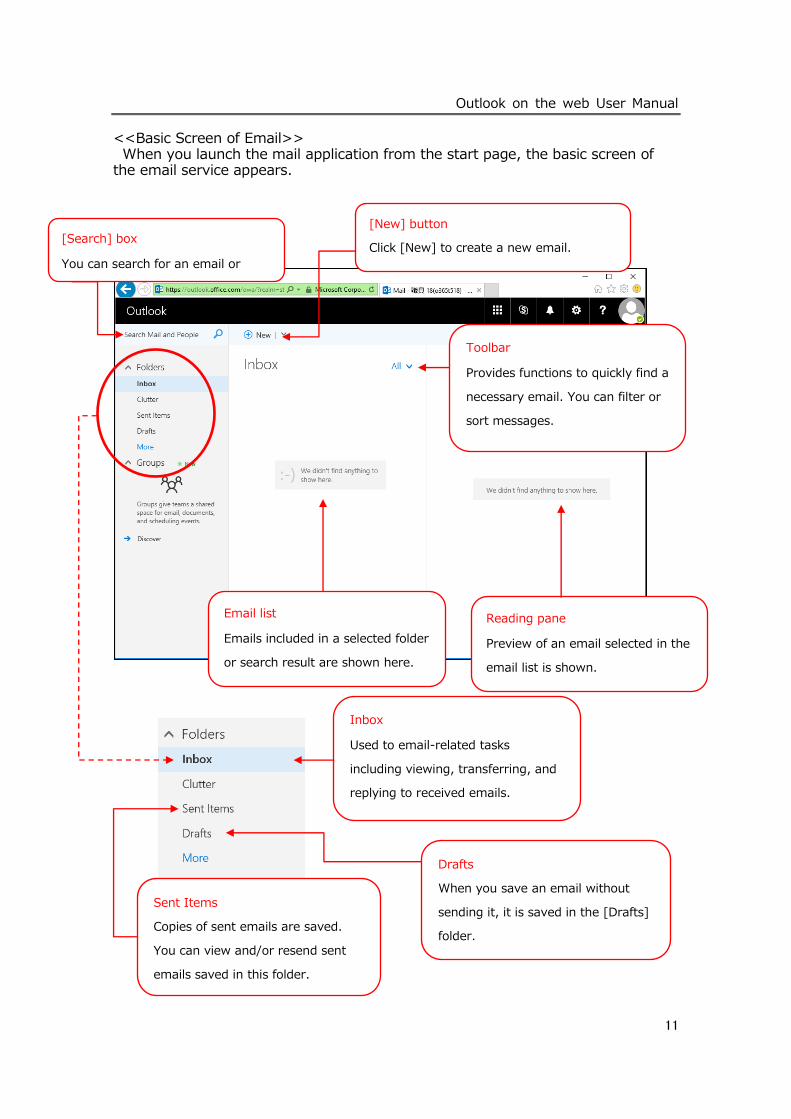
<<Basic Screen of Email>> When you launch the mail application from the start page, the basic screen of the email service appears.
[New] button
Click [New] to create a new email.
Email list
Emails included in a selected folder
or search result are shown here.
Reading pane
Preview of an email selected in the
email list is shown.
Toolbar
Provides functions to quickly find a
necessary email. You can filter or
sort messages.
[Search] box
You can search for an email or
Inbox
Used to email-related tasks
including viewing, transferring, and
replying to received emails.
Sent Items
Copies of sent emails are saved.
You can view and/or resend sent
emails saved in this folder.
Drafts
When you save an email without
sending it, it is saved in the [Drafts]
folder.

Outlook on the web User Manual
12
Customizing Reading Pane
You can use the reading pane options to configure various settings including
where to display the reading pane, and what to do when an item is moved or
deleted.
Customize the reading pane in the following procedure:
(1) Click at the upper right of the screen and choose [Mail].
(2) Choose [Mail], [Layout], and [Reading Pane].
(3) Under [Reading Pane], check desired options and click [Save].
Folders Initially Provided
In Outlook on the web, emails are managed in folders. You can create new folders
in addition to the folders initially provided.
Folders initially provided
Folder Description
Inbox Received emails are store in this folder. This folder stores unread and
read emails which have not been deleted or moved to another folder.
Used to email-related tasks including viewing, transferring, and
replying to received emails.
Drafts When you save an email without sending it, it is saved in the [Drafts]
folder. You can open an email in this folder anytime and edit or send
it.
Sent Items Copies of sent emails are saved. You can view and/or resend sent
emails saved in this folder.
Outlook on the web User Manual
13
Folder Description
Deleted Items Items deleted in other folders are moved to the [Deleted Items]
folder. Items moved to the [Deleted Items] folder can be returned to
the original folder before this folder is emptied by choosing [Empty
Folder].
Notes Notes created in Outlook 2013 are stored in this folder. You can only
display notes in Outlook on the web.
Junk Email Received junk emails are automatically moved to this folder. You can
add junk emails anytime to the junk list. If you find that an email
moved to this folder is not a junk, you can move it to the Inbox.
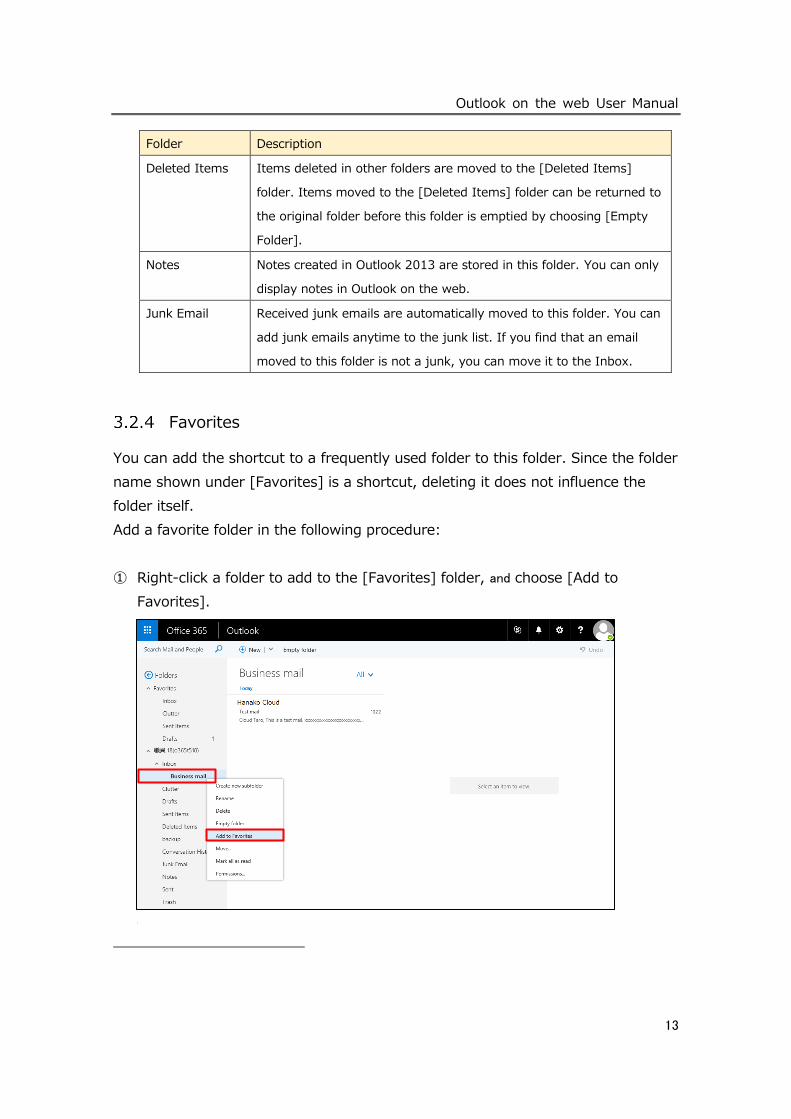
Favorites
You can add the shortcut to a frequently used folder to this folder. Since the folder
name shown under [Favorites] is a shortcut, deleting it does not influence the
folder itself.
Add a favorite folder in the following procedure:
① Right-click a folder to add to the [Favorites] folder, and choose [Add to
Favorites].
Outlook on the web User Manual
14
Conversation Display
Outlook on the web can show emails by conversation by organizing emails and
their replies in a hierarchical manner.
Each email in a conversation is indicated by a multi-item icon in the email list.
When a new email in a conversation is received, the entire conversation is moved
to the top of the email list. Clicking the header of a conversation in the email list
displays the conversation in the reading pane. When multiple messages are
replied to a single email, the conversation is further divided into multiple threads.
A conversation with unread message(s) is colored. By expanding the conversation,
the sender of the unread message is colored. In the expanded conversation, you
can visually check replies and emails from other members.
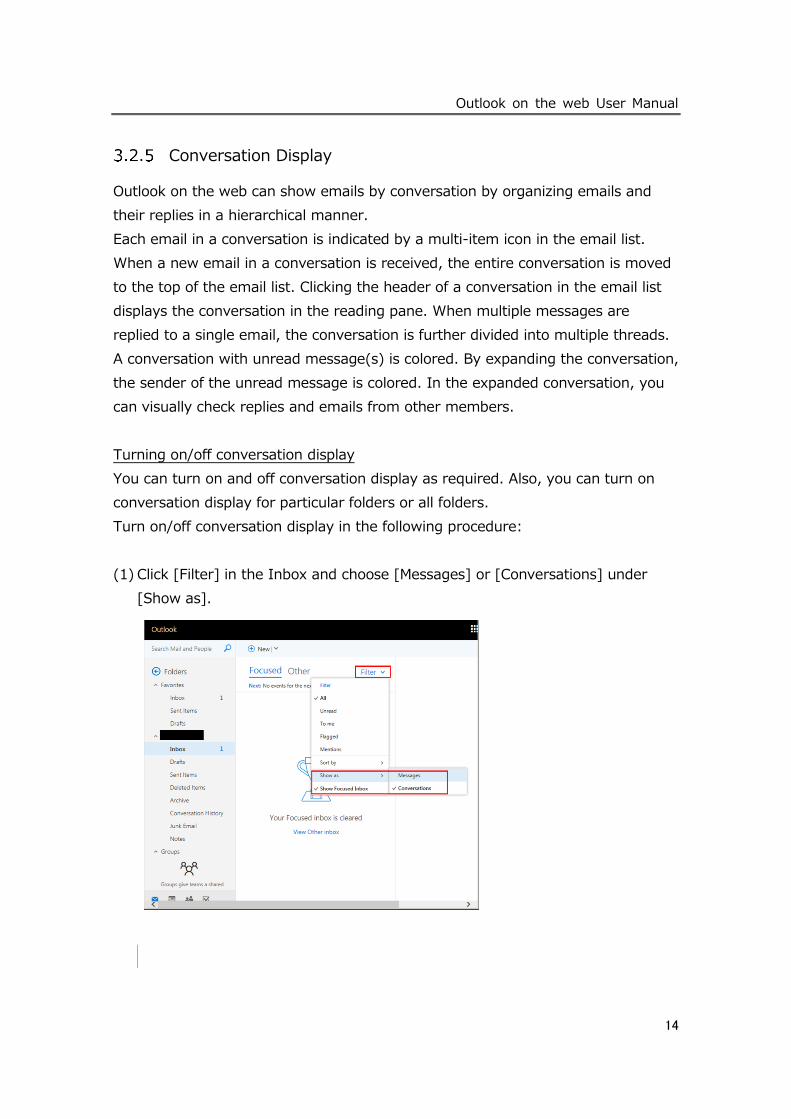
Turning on/off conversation display
You can turn on and off conversation display as required. Also, you can turn on
conversation display for particular folders or all folders.
Turn on/off conversation display in the following procedure:
(1) Click [Filter] in the Inbox and choose [Messages] or [Conversations] under
[Show as].
Outlook on the web User Manual
15
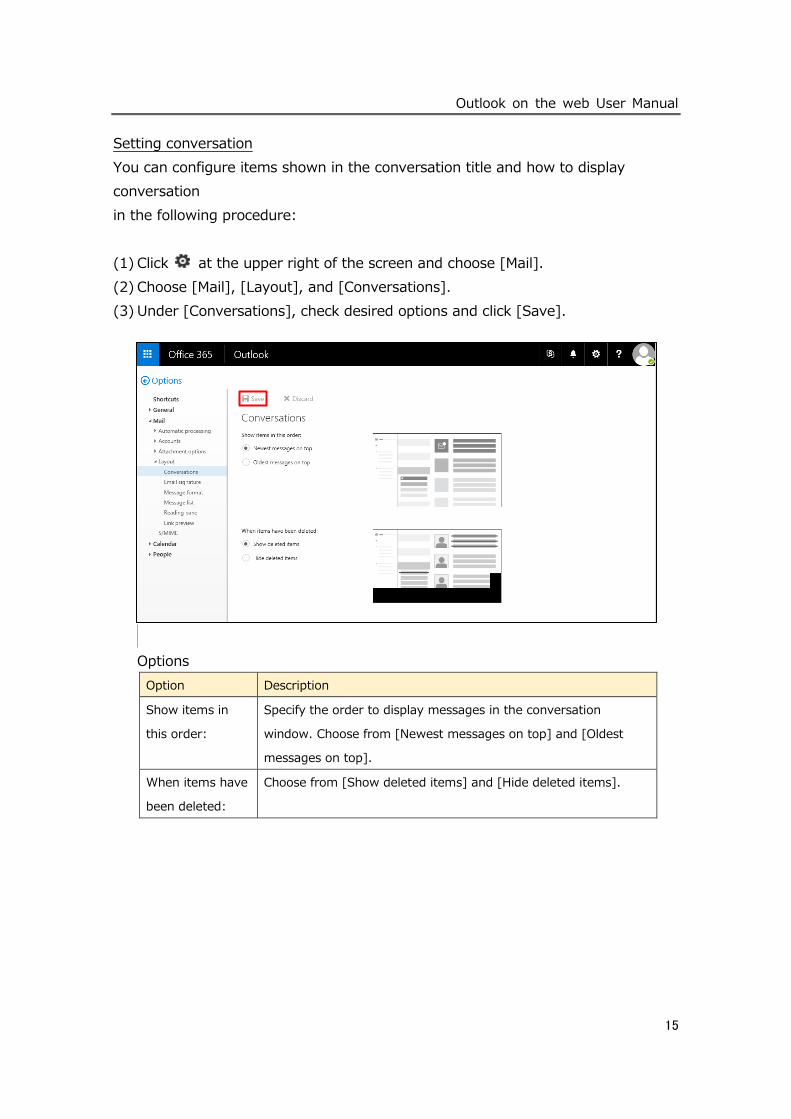
Setting conversation
You can configure items shown in the conversation title and how to display
conversation
in the following procedure:
(1) Click at the upper right of the screen and choose [Mail].
(2) Choose [Mail], [Layout], and [Conversations].
(3) Under [Conversations], check desired options and click [Save].
Options
Option Description
Show items in
this order:
Specify the order to display messages in the conversation
window. Choose from [Newest messages on top] and [Oldest
messages on top].
When items have
been deleted:
Choose from [Show deleted items] and [Hide deleted items].
Outlook on the web User Manual
16
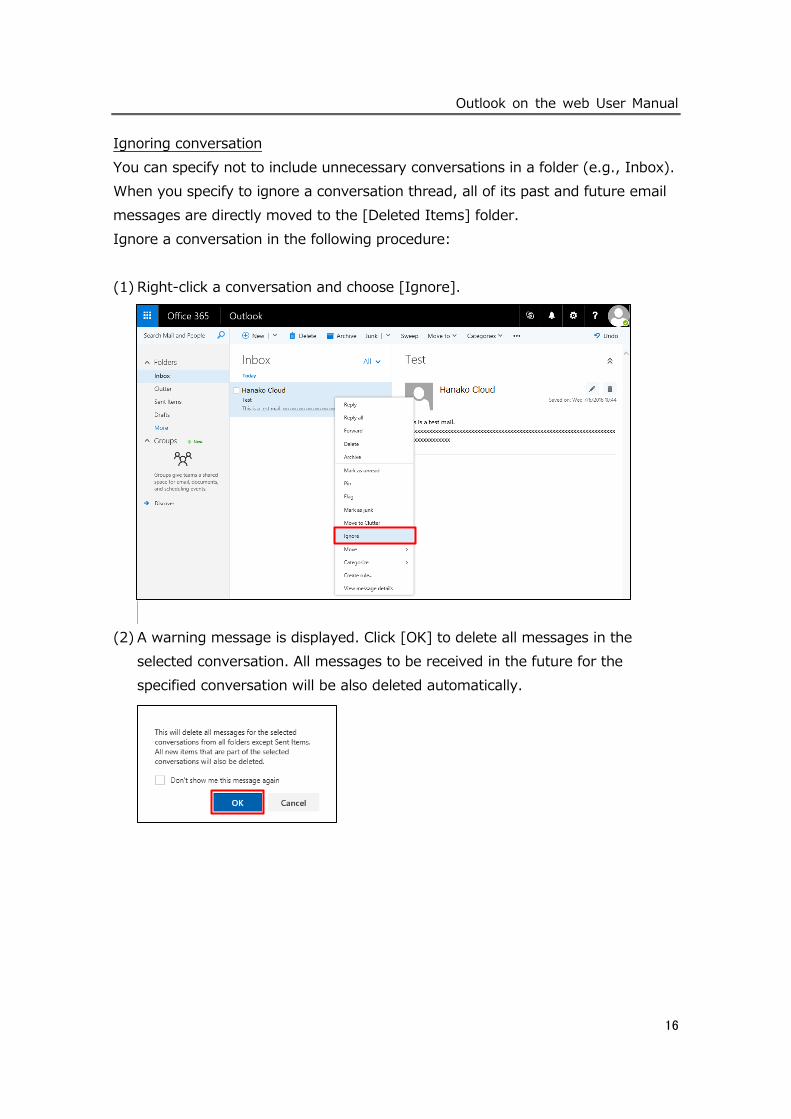
Ignoring conversation
You can specify not to include unnecessary conversations in a folder (e.g., Inbox).
When you specify to ignore a conversation thread, all of its past and future email
messages are directly moved to the [Deleted Items] folder.
Ignore a conversation in the following procedure:
(1) Right-click a conversation and choose [Ignore].
(2) A warning message is displayed. Click [OK] to delete all messages in the
selected conversation. All messages to be received in the future for the
specified conversation will be also deleted automatically.
Outlook on the web User Manual
17
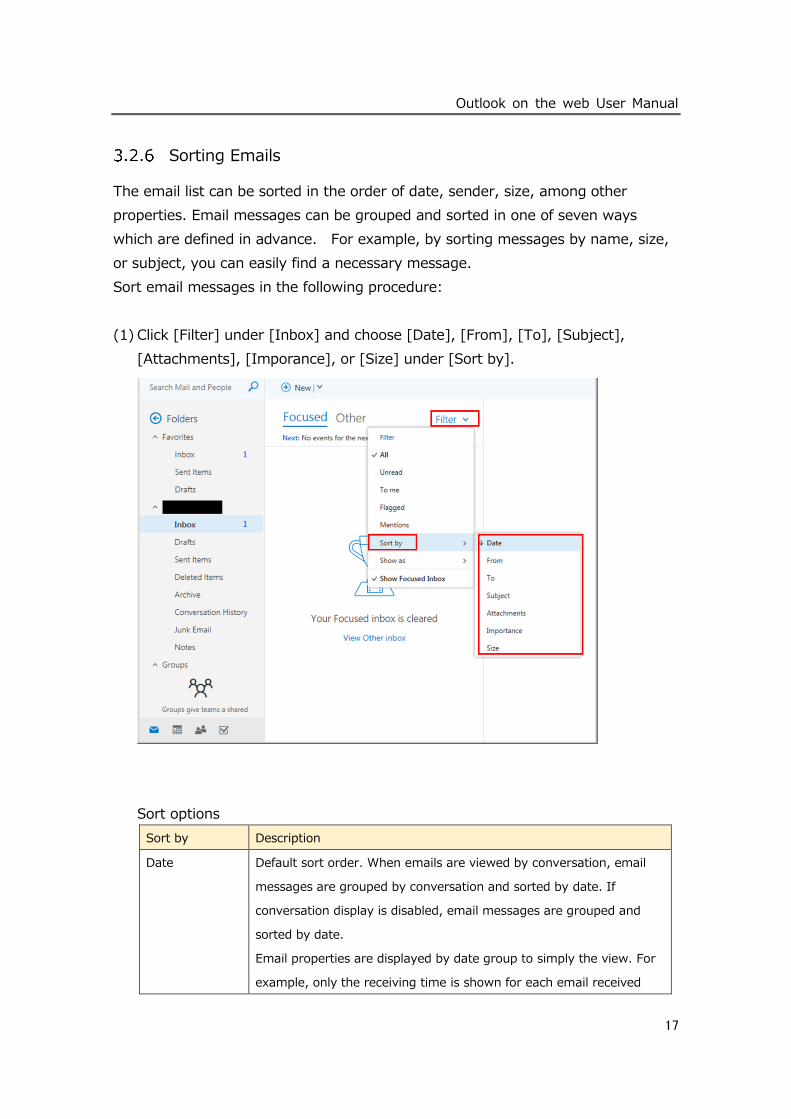
Sorting Emails
The email list can be sorted in the order of date, sender, size, among other
properties. Email messages can be grouped and sorted in one of seven ways
which are defined in advance. For example, by sorting messages by name, size,
or subject, you can easily find a necessary message.
Sort email messages in the following procedure:
(1) Click [Filter] under [Inbox] and choose [Date], [From], [To], [Subject],
[Attachments], [Imporance], or [Size] under [Sort by].
Sort options
Sort by Description
Date Default sort order. When emails are viewed by conversation, email
messages are grouped by conversation and sorted by date. If
conversation display is disabled, email messages are grouped and
sorted by date.
Email properties are displayed by date group to simply the view. For
example, only the receiving time is shown for each email received
Outlook on the web User Manual
18
Sort by Description
today, the day of the week and receiving time are shown for each
email received within the past week, and more detailed information is
shown for the older emails.
From Email messages are grouped by the [From] field and sorted by date.
To Email messages are grouped by the [To] field and sorted by date.
Size Email messages are grouped into one of seven size categories; Huge
(larger than 5MB), Ultra Large (1 to 5MB), Extra Large (500KB to
1MB), Large (100 to 500KB), Medium (25 to 100KB), Small (10 to
25KB), Extremely Small (smaller than 10KB), and sorted by size.
Subject Email messages are grouped by subject (in alphabetical order) and
sorted by size. Messages are grouped correctly if the subject is
prefixed with "RE:” or "FW:".
Attachments Email messages are grouped by presence of attachment and sorted
by date.
Importance Email messages are grouped by importance and sorted by date.
Outlook on the web User Manual
19
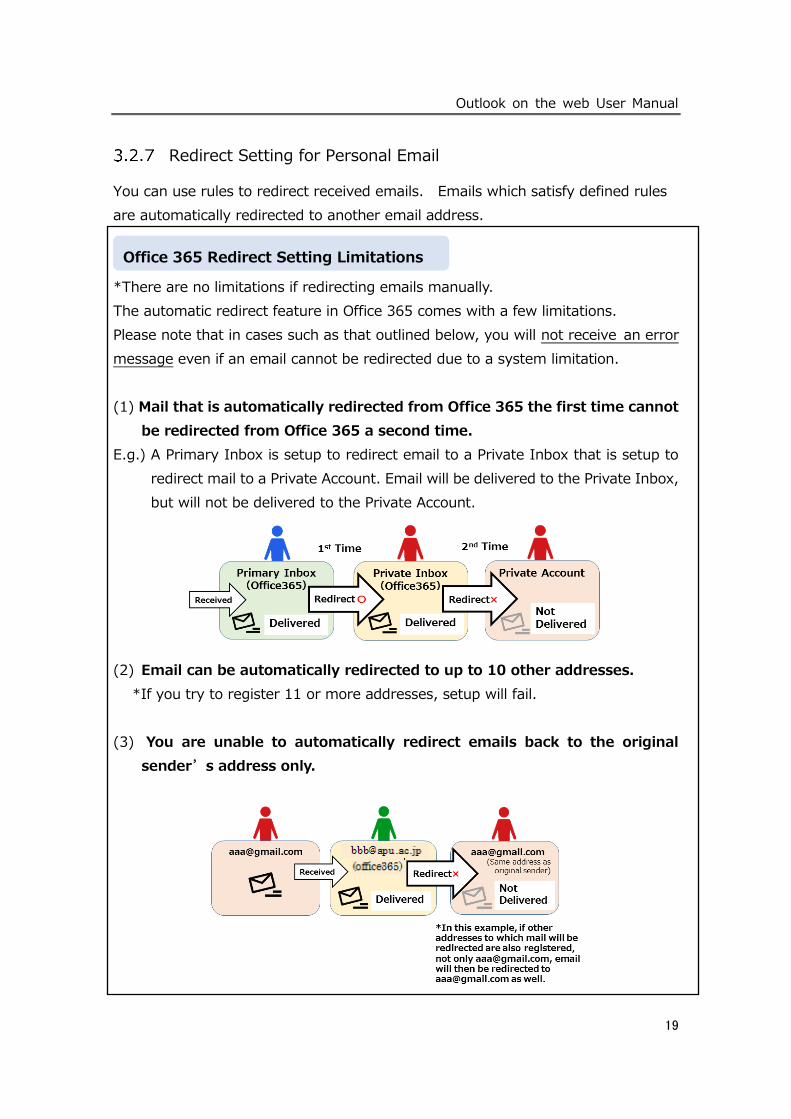
Redirect Setting for Personal Email
You can use rules to redirect received emails. Emails which satisfy defined rules
are automatically redirected to another email address.
*There are no limitations if redirecting emails manually.
The automatic redirect feature in Office 365 comes with a few limitations.
Please note that in cases such as that outlined below, you will not receive an error
message even if an email cannot be redirected due to a system limitation.
(1) Mail that is automatically redirected from Office 365 the first time cannot
be redirected from Office 365 a second time.
E.g.) A Primary Inbox is setup to redirect email to a Private Inbox that is setup to
redirect mail to a Private Account. Email will be delivered to the Private Inbox,
but will not be delivered to the Private Account.
(2) Email can be automatically redirected to up to 10 other addresses.
*If you try to register 11 or more addresses, setup will fail.
(3) You are unable to automatically redirect emails back to the original
sender’s address only.
Office 365 Redirect Setting Limitations
Outlook on the web User Manual
20
For more details, please see the Office365+R website regarding Office 365 Redirect
Settings Limitations. Links provided below. (In Japanese. Machine translation
function available.)
[For students]
https://secure.ritsumei.ac.jp/students/office365/column/detail/?category=メールシステム&id=44
[For faculty]
https://secure.ritsumei.ac.jp/staff-all/office365/column/detail/?category=メールシステム&id=44
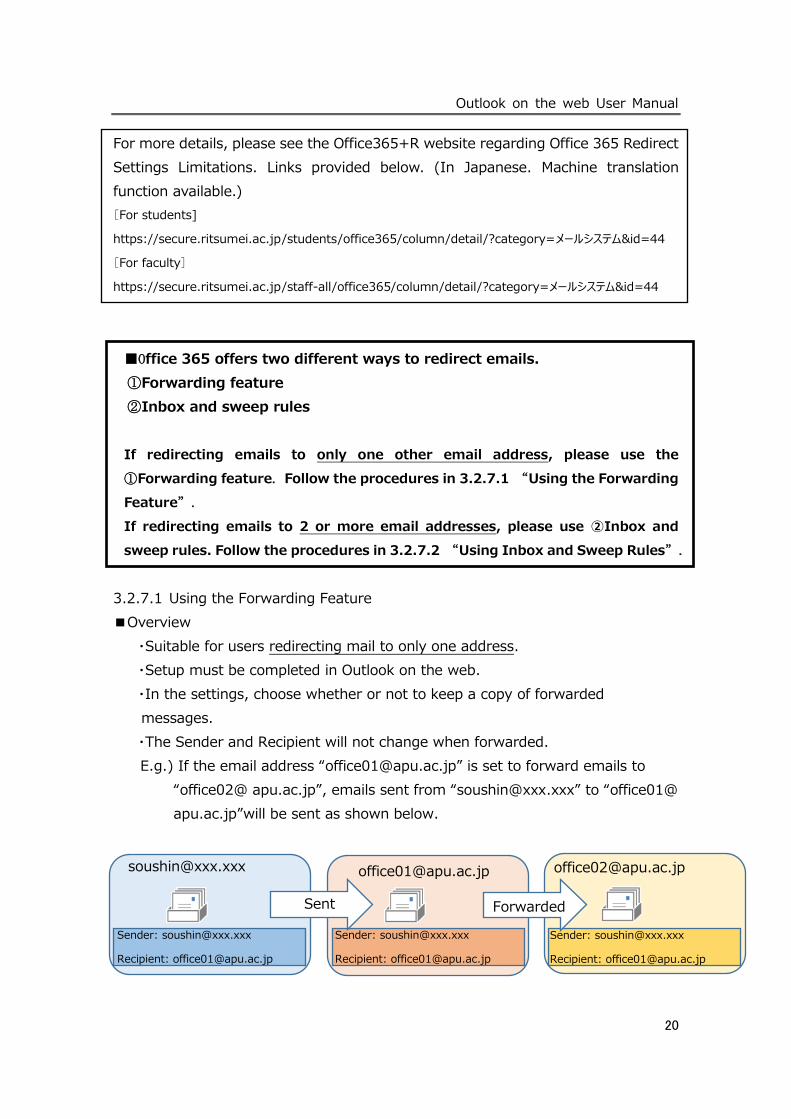
■Office 365 offers two different ways to redirect emails.
①Forwarding feature
②Inbox and sweep rules
If redirecting emails to only one other email address, please use the
①Forwarding feature. Follow the procedures in 3.2.7.1 “Using the Forwarding
Feature”.
If redirecting emails to 2 or more email addresses, please use ②Inbox and
sweep rules. Follow the procedures in 3.2.7.2 “Using Inbox and Sweep Rules”.
3.2.7.1 Using the Forwarding Feature
■Overview
・Suitable for users redirecting mail to only one address.
・Setup must be completed in Outlook on the web.
・In the settings, choose whether or not to keep a copy of forwarded
messages.
・The Sender and Recipient will not change when forwarded.
E.g.) If the email address “[email protected]” is set to forward emails to
“office02@ apu.ac.jp”, emails sent from “[email protected]” to “office01@
apu.ac.jp”will be sent as shown below.
Sender: [email protected]
Recipient: [email protected]
Sender: [email protected]
Recipient: [email protected]
Sender: [email protected]
Recipient: [email protected]
Sent Forwarded
Outlook on the web User Manual
21
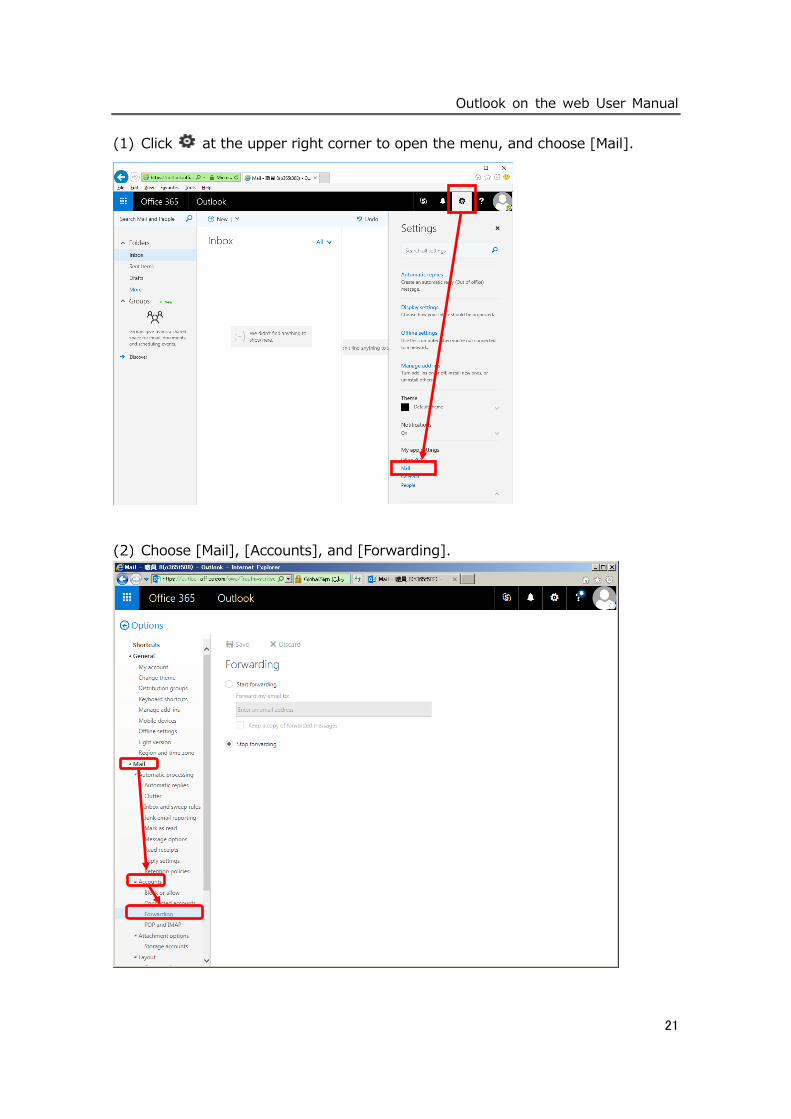
(1) Click at the upper right corner to open the menu, and choose [Mail].
Choose [Mail], [Accounts], and [Forwarding].
Outlook on the web User Manual
22
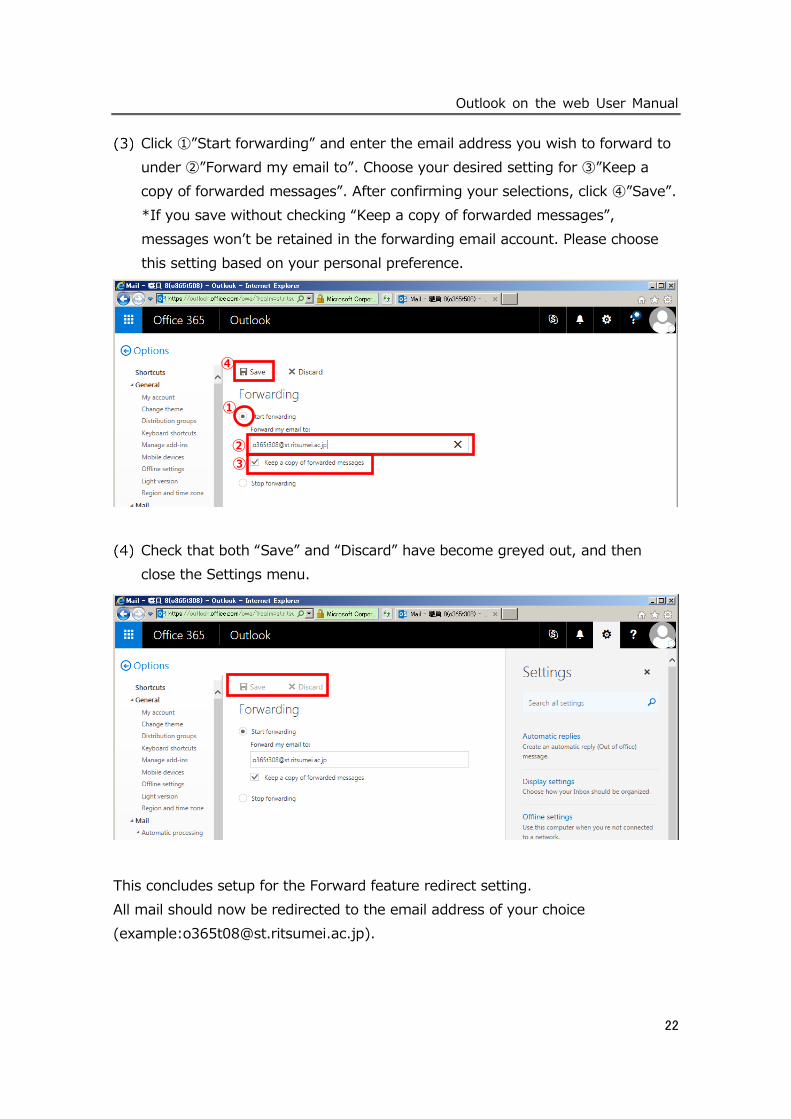
Click ①”Start forwarding” and enter the email address you wish to forward to
under ②”Forward my email to”. Choose your desired setting for ③”Keep a
copy of forwarded messages”. After confirming your selections, click ④”Save”.
*If you save without checking “Keep a copy of forwarded messages”,
messages won’t be retained in the forwarding email account. Please choose
this setting based on your personal preference.
Check that both “Save” and “Discard” have become greyed out, and then
close the Settings menu.
This concludes setup for the Forward feature redirect setting.
All mail should now be redirected to the email address of your choice
(example:[email protected]).
①
②
③
④

Outlook on the web User Manual
23
3.2.7.2 Using Inbox and Sweep Rules
■Overview
・Suitable for users redirecting mail to two or more addresses (Max. 10
addresses).
・Setup must be completed in Outlook on the web or Outlook (PC ver.).
・Emails will be retained in the forwarding email account.
・Depending on the redirect method, the sender of the email may change.
a) If “Redirecting” Mail
Email received at the forwarding destination address will show the original
sender and recipient.
E.g.) If “[email protected]” is set to forward email to
“[email protected]”, mail sent from “[email protected]” to
“[email protected]” will be redirected as follows.
b) If “Forwarding” Mail
Email received at the forwarding destination address will appear to be sent
from the address that forwarded the email and not the original sender.
E.g.) If “[email protected]” is set to forward email to
“[email protected]”, mail sent from “[email protected]” to
“[email protected]” will be forwarded as follows.
Sender: [email protected]
Recipient: [email protected]
Sender: [email protected]
Recipient: [email protected]
Sender: [email protected]
Recipient: [email protected]
Sent Forwarded
Sender: [email protected]
Recipient: [email protected]
Sender: [email protected]
Recipient: [email protected]
Sender: [email protected]
Recipient: [email protected]
Sent
Forwarded
Outlook on the web User Manual
24
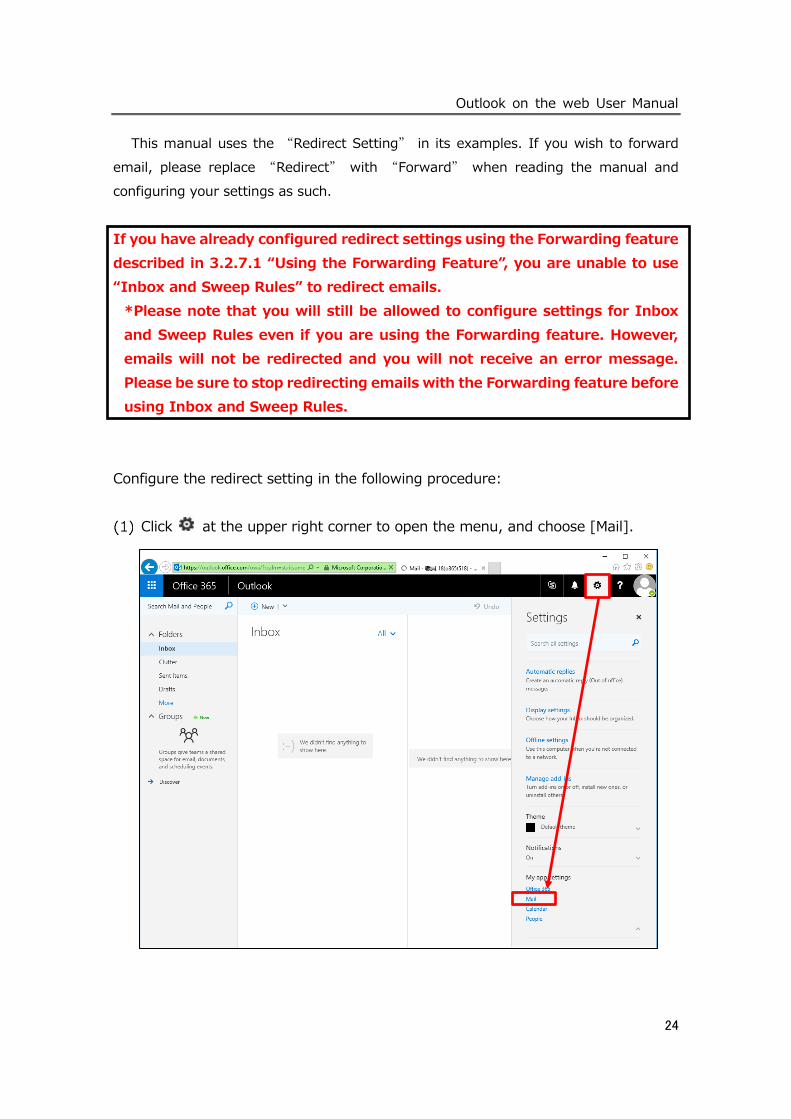
This manual uses the “Redirect Setting” in its examples. If you wish to forward
email, please replace “Redirect” with “Forward” when reading the manual and
configuring your settings as such.
If you have already configured redirect settings using the Forwarding feature
described in 3.2.7.1 “Using the Forwarding Feature”, you are unable to use
“Inbox and Sweep Rules” to redirect emails.
*Please note that you will still be allowed to configure settings for Inbox
and Sweep Rules even if you are using the Forwarding feature. However,
emails will not be redirected and you will not receive an error message.
Please be sure to stop redirecting emails with the Forwarding feature before
using Inbox and Sweep Rules.
Configure the redirect setting in the following procedure:
Click at the upper right corner to open the menu, and choose [Mail].

Outlook on the web User Manual
25
Choose [Mail], [Automatic processing], and [Inbox and sweep rules].
Click [+] and add a rule.
Outlook on the web User Manual
26
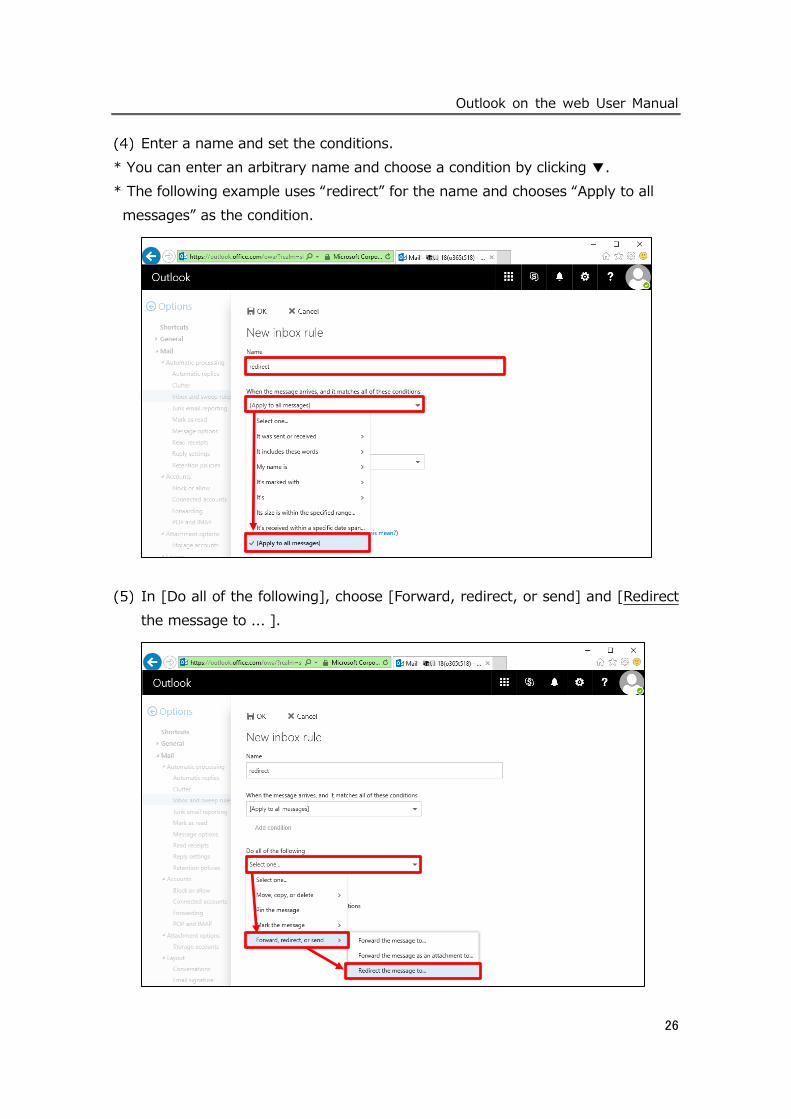
Enter a name and set the conditions.
* You can enter an arbitrary name and choose a condition by clicking ▼.
* The following example uses “redirect” for the name and chooses “Apply to all
messages” as the condition.
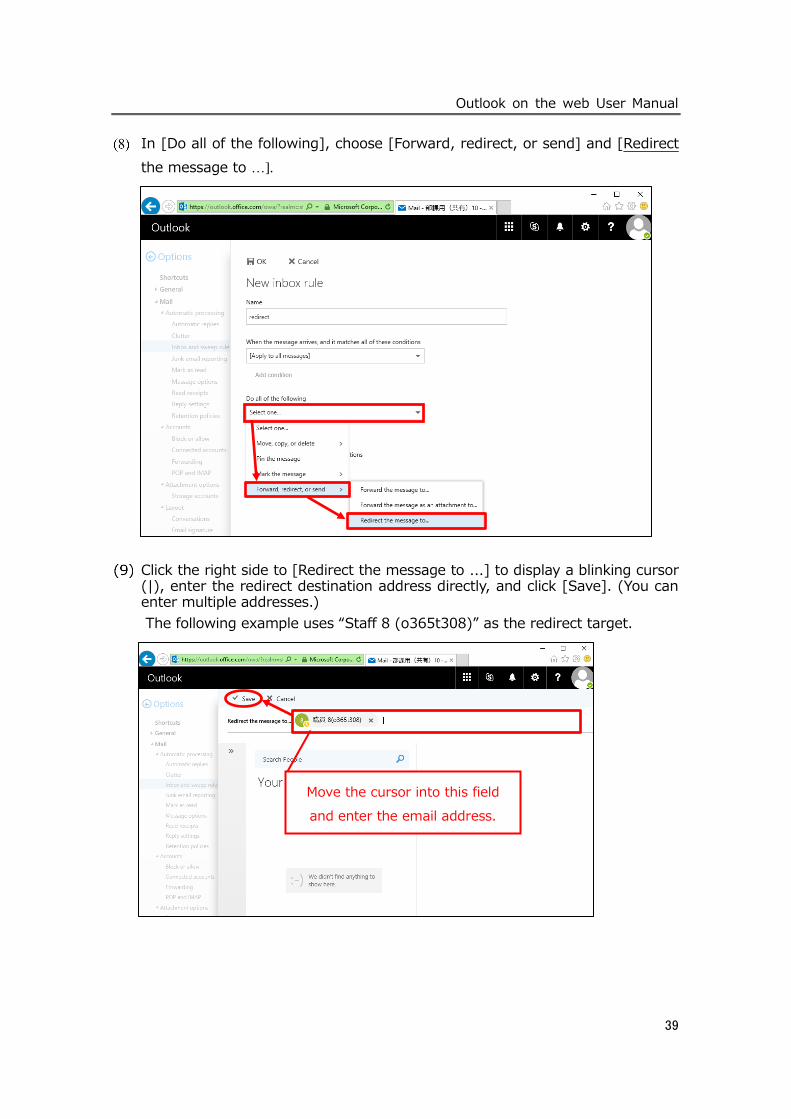
In [Do all of the following], choose [Forward, redirect, or send] and [Redirect
the message to … ].

Outlook on the web User Manual
27
Click the right side to [Redirect the message to … ] to display a blinking cursor (|), enter the redirect destination address directly, and click [Save]. (You can enter multiple addresses.)
* The following example uses “Staff 8 (o365t308)” as the redirect target.
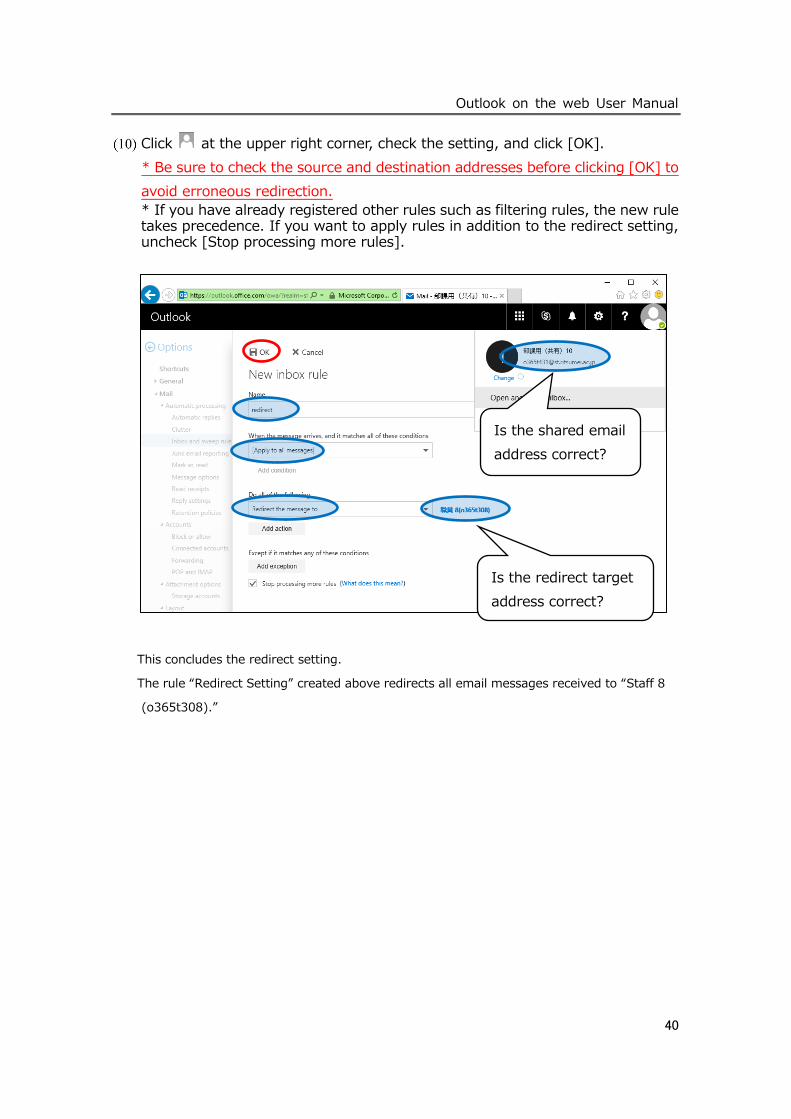
Check the setting and click [OK]. If the setting is correct, close the setup screen. If you have already registered other rules such as filtering rules, the new rule takes precedence. If you want to apply rules in addition to the redirect setting, uncheck [Stop processing more rules].
This concludes the redirect setting.
The rule “Redirect Setting” created above redirects all email messages received to “Staff 8
(o365t308).”
Redirect setting
Outlook on the web User Manual
28
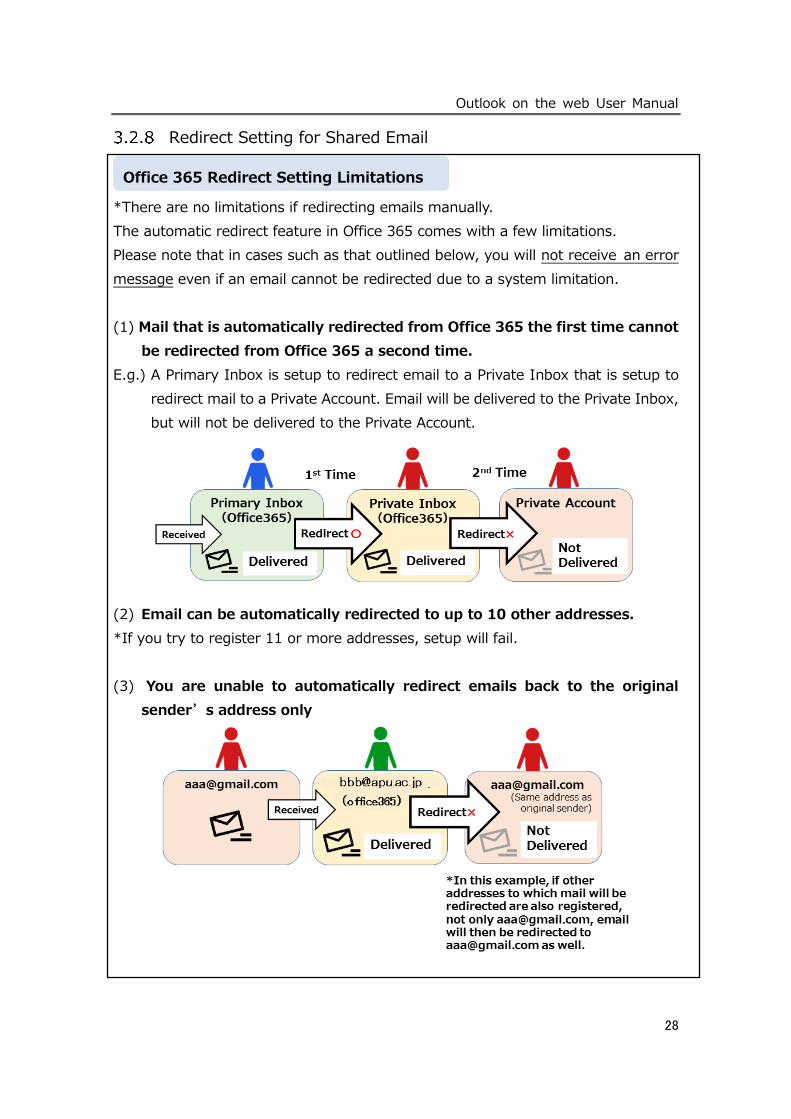
Redirect Setting for Shared Email
*There are no limitations if redirecting emails manually.
The automatic redirect feature in Office 365 comes with a few limitations.
Please note that in cases such as that outlined below, you will not receive an error
message even if an email cannot be redirected due to a system limitation.
(1) Mail that is automatically redirected from Office 365 the first time cannot
be redirected from Office 365 a second time.
E.g.) A Primary Inbox is setup to redirect email to a Private Inbox that is setup to
redirect mail to a Private Account. Email will be delivered to the Private Inbox,
but will not be delivered to the Private Account.
(2) Email can be automatically redirected to up to 10 other addresses.
*If you try to register 11 or more addresses, setup will fail.
(3) You are unable to automatically redirect emails back to the original
sender’s address only
Office 365 Redirect Setting Limitations
Outlook on the web User Manual
29
For more details, please see the Office365+R website regarding Office 365 Redirect
Settings Limitations. Links provided below. (In Japanese. Machine translation
function available.)
[For students]
https://secure.ritsumei.ac.jp/students/office365/column/detail/?category=メールシステム&id=44
[For faculty]
https://secure.ritsumei.ac.jp/staff-all/office365/column/detail/?category=メールシステム&id=44
[Precautions]
Be sure to observe the following precautions to avoid erroneous redirection:
• Only the administrator or a single member entrusted by the administrator must configure redirect setting. * If more than one person do it, erroneous operation or redirection (e.g., duplicate setting) can occur.
Ensure that only one person takes charge of this setting. • Be sure to use Outlook on the web to configure the setting. You cannot use Outlook for this purpose.
■Office 365 offers two different ways to redirect emails.
①Forwarding feature
②Inbox and sweep rules
If redirecting emails to only one other email address, please use the
①Forwarding feature. Follow the procedures in 3.2.8.1 “Using the Forwarding
Feature”.
If redirecting emails to 2 or more email addresses, please use ②Inbox and sweep
rules. Follow the procedures in 3.2.8.2 “Using Inbox and Sweep Rules”.
3.2.8.1 Using the Forwarding Feature
■Overview
・Suitable for users redirecting mail to only one address.
・Setup must be completed in Outlook on the web.
・In the settings, choose whether or not to keep a copy of forwarded
messages.
・The Sender and Recipient will not change when forwarded.
Outlook on the web User Manual
30
E.g.) If the email address “[email protected]” is set to forward emails to
“[email protected]”, emails sent from “[email protected]” to
“[email protected]”will be sent as shown below.
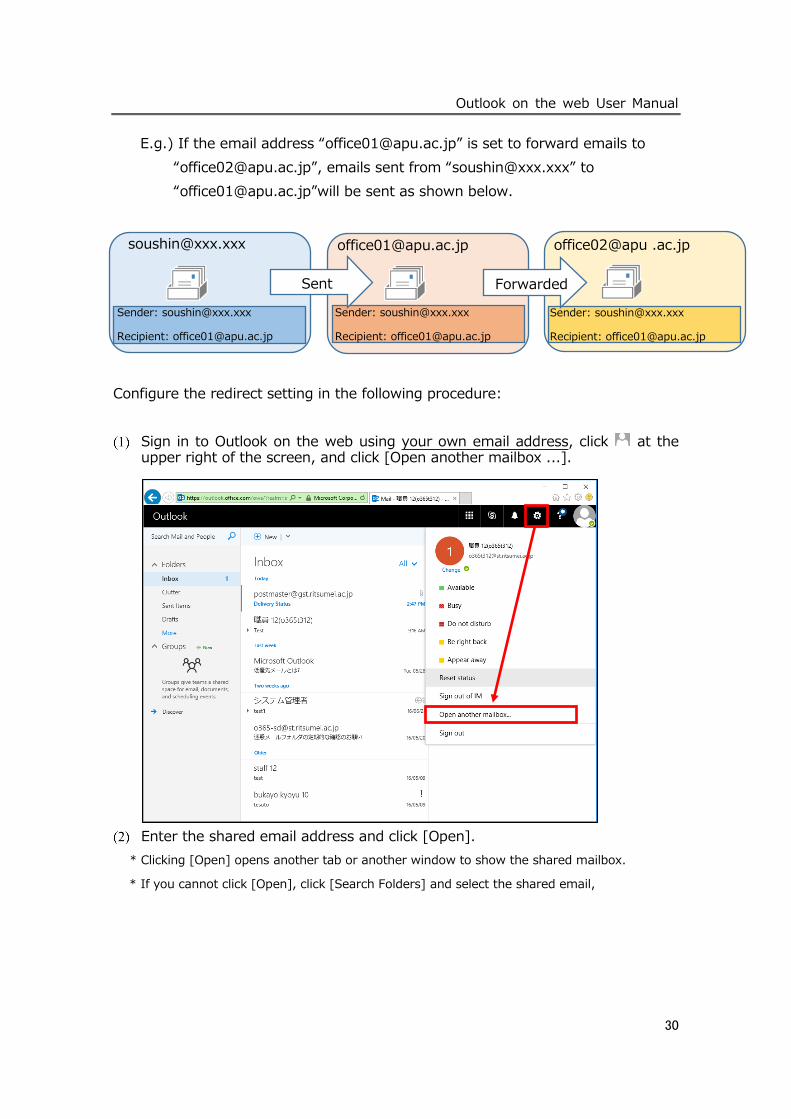
Configure the redirect setting in the following procedure:
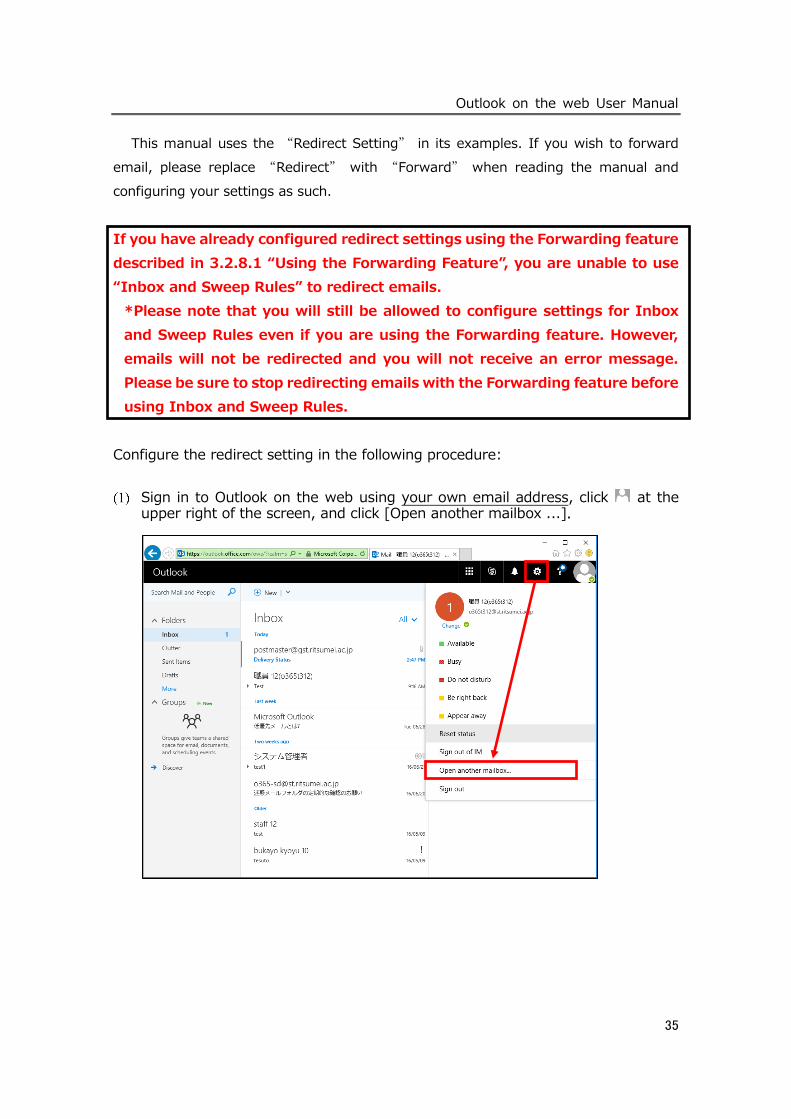
Sign in to Outlook on the web using your own email address, click at the
upper right of the screen, and click [Open another mailbox ...].
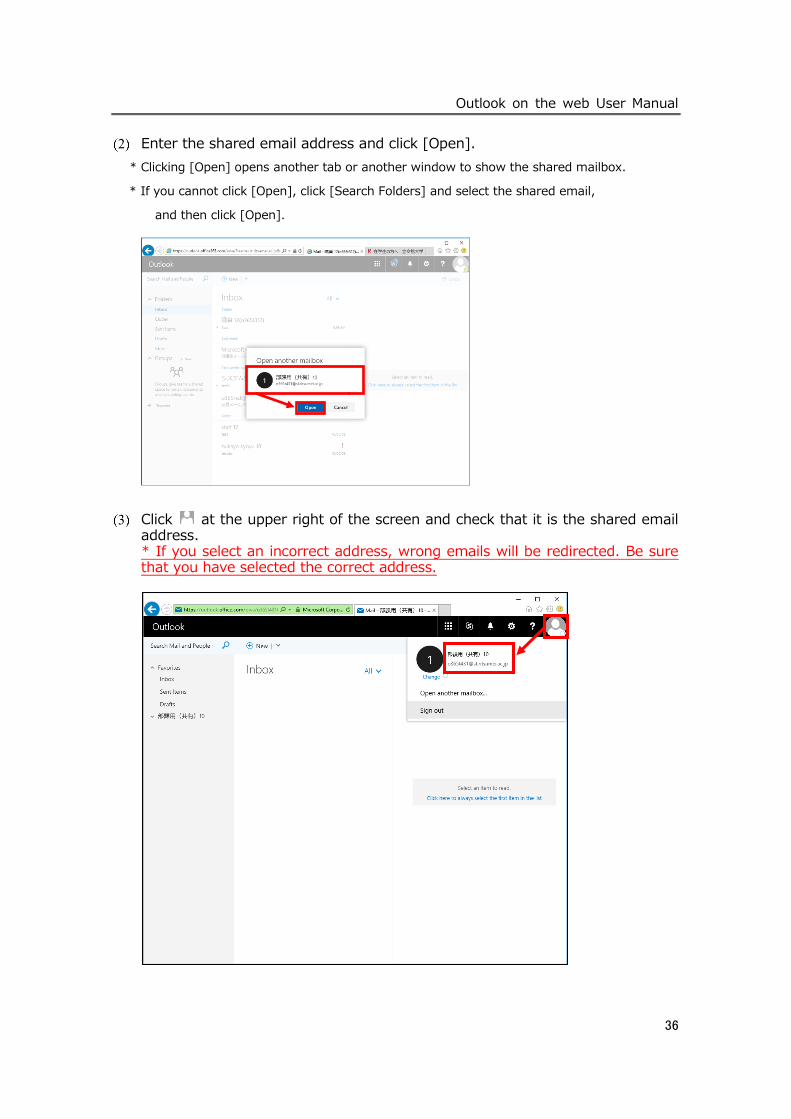
Enter the shared email address and click [Open].
* Clicking [Open] opens another tab or another window to show the shared mailbox.
* If you cannot click [Open], click [Search Folders] and select the shared email,
Sender: [email protected]
Recipient: [email protected]
Sender: [email protected]
Recipient: [email protected]
office02@apu .ac.jp
Sender: [email protected]
Recipient: [email protected]
Sent Forwarded
Outlook on the web User Manual
31
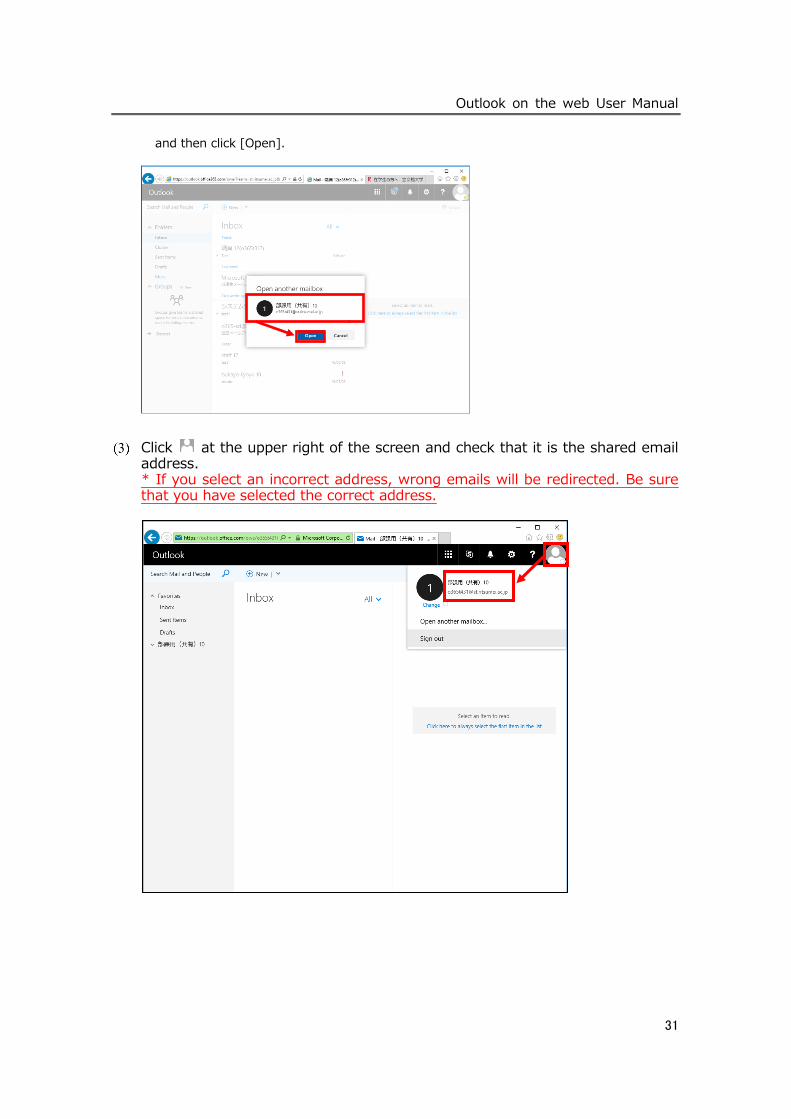
and then click [Open].
Click at the upper right of the screen and check that it is the shared email address. * If you select an incorrect address, wrong emails will be redirected. Be sure that you have selected the correct address.
Outlook on the web User Manual
32
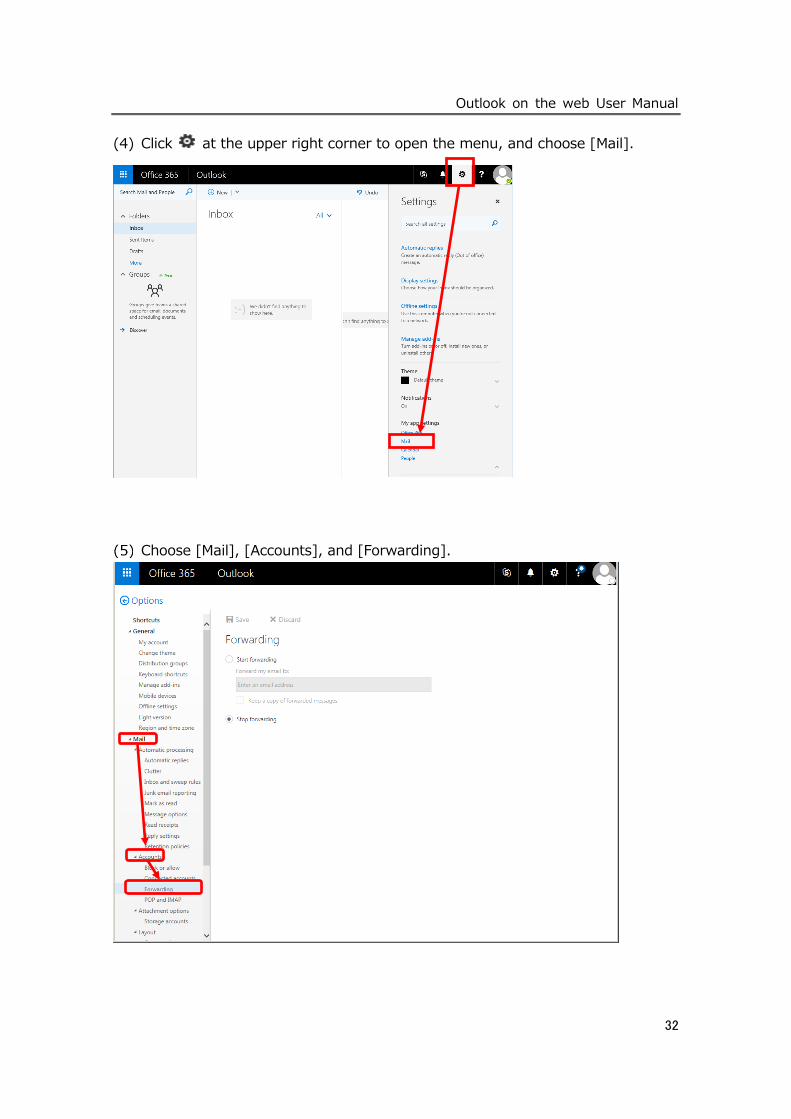
(4) Click at the upper right corner to open the menu, and choose [Mail].
Choose [Mail], [Accounts], and [Forwarding].
Outlook on the web User Manual
33
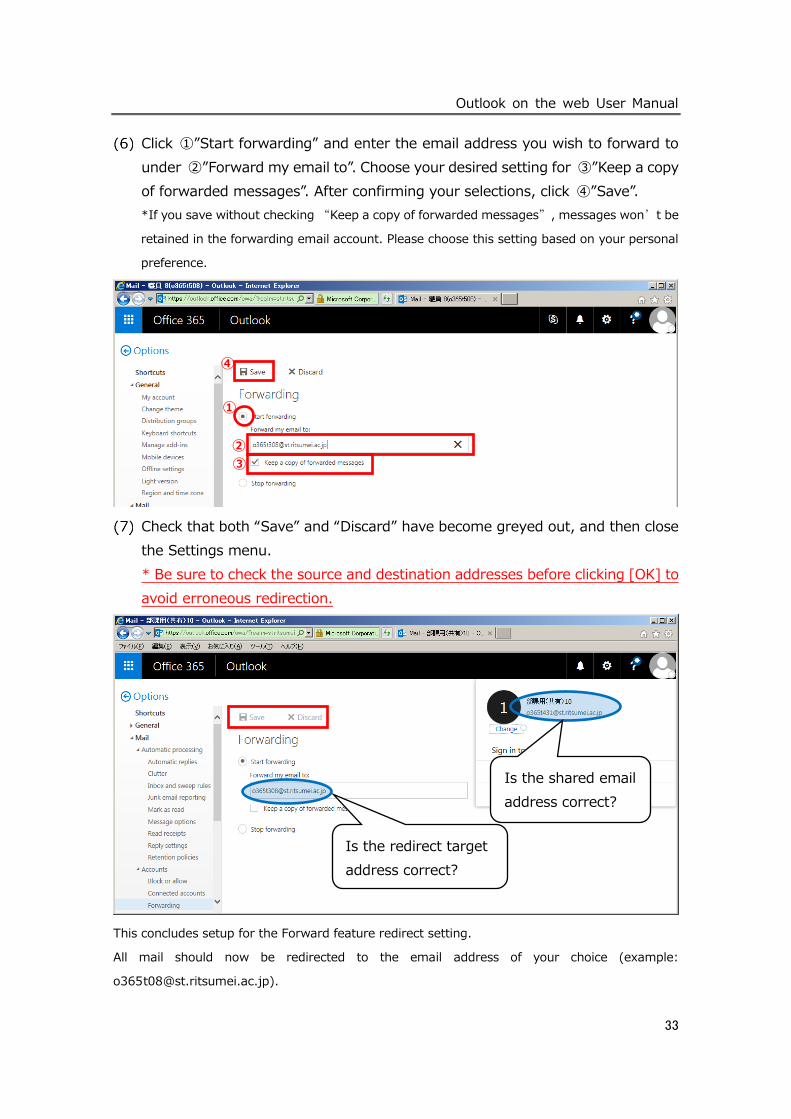
Click ①”Start forwarding” and enter the email address you wish to forward to
under ②”Forward my email to”. Choose your desired setting for ③”Keep a copy
of forwarded messages”. After confirming your selections, click ④”Save”.
*If you save without checking “Keep a copy of forwarded messages”, messages won’t be
retained in the forwarding email account. Please choose this setting based on your personal
preference.
Check that both “Save” and “Discard” have become greyed out, and then close
the Settings menu.
* Be sure to check the source and destination addresses before clicking [OK] to
avoid erroneous redirection.
This concludes setup for the Forward feature redirect setting.
All mail should now be redirected to the email address of your choice (example:
①
②
③
④
Is the shared email
address correct?
Is the redirect target
address correct?
Outlook on the web User Manual
34
3.2.8.2 Using Inbox and Sweep Rules
■Overview
・ Suitable for users redirecting mail to two or more addresses (Max. 10
addresses).
・Setup must be completed in Outlook on the web or Outlook (PC ver.).
・Emails will be retained in the forwarding email account.
・Depending on the redirect method, the sender of the email may change.
a) If “Redirecting” Mail
Email received at the forwarding destination address will show the original
sender and recipient.
E.g.) If “[email protected]” isset to forward email to
“[email protected]”, mail sent from “[email protected]” to
“[email protected]” will be redirected as follows.
b) If “Forwarding” Mail
Email received at the forwarding destination address will appear to be sent
from the address that forwarded the email and not the original sender.
E.g.) If “[email protected]” is set to forward email to
“[email protected]”, mail sent from “[email protected]” to
“[email protected]” will be forwarded as follows.
Sender: [email protected]
Recipient: [email protected]
Sender: [email protected]
Recipient: [email protected]
Sender: [email protected]
Recipient: [email protected]
Sent Forwarded
Sender: [email protected]
Recipient: [email protected]
Sender: [email protected]
Recipient: [email protected]
Sender: [email protected]
Recipient: [email protected]
Sent
Forwarded
Outlook on the web User Manual
35
This manual uses the “Redirect Setting” in its examples. If you wish to forward
email, please replace “Redirect” with “Forward” when reading the manual and
configuring your settings as such.
If you have already configured redirect settings using the Forwarding feature
described in 3.2.8.1 “Using the Forwarding Feature”, you are unable to use
“Inbox and Sweep Rules” to redirect emails.
*Please note that you will still be allowed to configure settings for Inbox
and Sweep Rules even if you are using the Forwarding feature. However,
emails will not be redirected and you will not receive an error message.
Please be sure to stop redirecting emails with the Forwarding feature before
using Inbox and Sweep Rules.
Configure the redirect setting in the following procedure:
Sign in to Outlook on the web using your own email address, click at the upper right of the screen, and click [Open another mailbox ...].
Outlook on the web User Manual
36
Enter the shared email address and click [Open].
* Clicking [Open] opens another tab or another window to show the shared mailbox.
* If you cannot click [Open], click [Search Folders] and select the shared email,
and then click [Open].
Click at the upper right of the screen and check that it is the shared email address. * If you select an incorrect address, wrong emails will be redirected. Be sure that you have selected the correct address.

Outlook on the web User Manual
37
(4) Click at the upper right corner to open the menu, and choose [Mail].
Choose [Mail], [Automatic processing], and [Inbox and sweep rules].

Outlook on the web User Manual
38
Click [+] and add a rule.
Enter a name and set the conditions.
* You can enter an arbitrary name and choose a condition by clicking ▼.
* The following example uses “redirect” for the name and chooses “Apply to all
messages” as the condition.
Outlook on the web User Manual
39
In [Do all of the following], choose [Forward, redirect, or send] and [Redirect
the message to …].
Click the right side to [Redirect the message to …] to display a blinking cursor (|), enter the redirect destination address directly, and click [Save]. (You can enter multiple addresses.)
The following example uses “Staff 8 (o365t308)” as the redirect target.
Move the cursor into this field
and enter the email address.
Outlook on the web User Manual
40
Click at the upper right corner, check the setting, and click [OK].
* Be sure to check the source and destination addresses before clicking [OK] to
avoid erroneous redirection.
* If you have already registered other rules such as filtering rules, the new rule takes precedence. If you want to apply rules in addition to the redirect setting, uncheck [Stop processing more rules].
This concludes the redirect setting.
The rule “Redirect Setting” created above redirects all email messages received to “Staff 8
(o365t308).”
Is the shared email
address correct?
Is the redirect target
address correct?
Outlook on the web User Manual
41
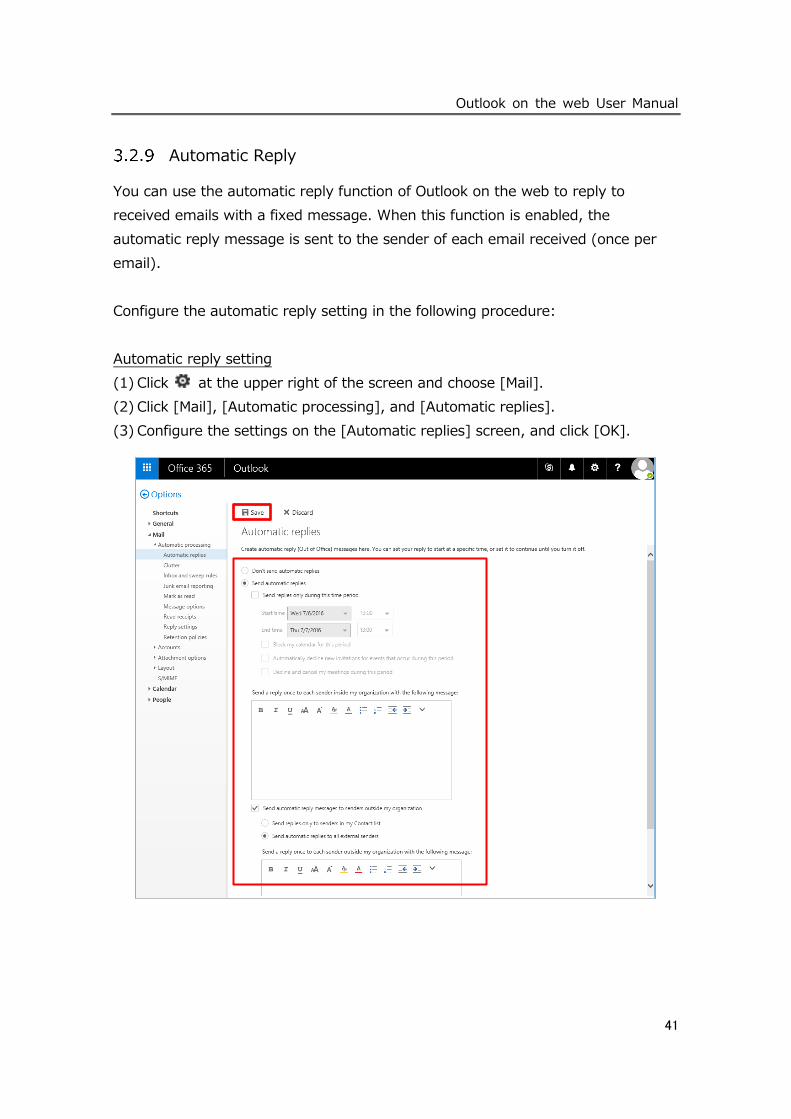
Automatic Reply
You can use the automatic reply function of Outlook on the web to reply to
received emails with a fixed message. When this function is enabled, the
automatic reply message is sent to the sender of each email received (once per
email).
Configure the automatic reply setting in the following procedure:
Automatic reply setting
(1) Click at the upper right of the screen and choose [Mail].
(2) Click [Mail], [Automatic processing], and [Automatic replies].
(3) Configure the settings on the [Automatic replies] screen, and click [OK].

Outlook on the web User Manual
42
Settings
Setting Description
Don’t send automatic replies Choose this radio button to disable automatic reply.
Send automatic replies Choose this radio button to enable automatic reply.
Send replies only during this
time period
To control when to send automatic replies, check this box
and specify the start time and end time. If you do not
specify the period, automatic replies are sent until this
function is disabled, and a message which tells that
automatic reply is enabled appears each time you sign in
to the mailbox.
Send a reply once to each
sender inside my organization
with the following message:
Use this text box to create a message which is sent only
to senders within your organization. Note that this option
may be unavailable.
Send automatic reply
messages to senders outside
my organization
Check this box to send automatic replies to senders
outside your organization.
If you check [Send automatic reply messages to senders
outside my organization], you need more setting.
Choose one of the following options:
■ Send replies only to senders in my Contacts list
Automatic replies are sent only to senders who are
listed in the [People] folder. Those not listed will
not receive automatic replies.
■ Send automatic replies to all external senders
Automatic replies are sent to all senders outside
your organization.
Send a reply once to each
sender outside my
organization with the following
message:
If you choose [Send Automatic replies to all external
senders], enter the reply message in the text box.
Outlook on the web User Manual
43
3.3 Creating Email Message
Outlook on the web supports sending and receiving simple text and the Internet
standard HTML email messages.
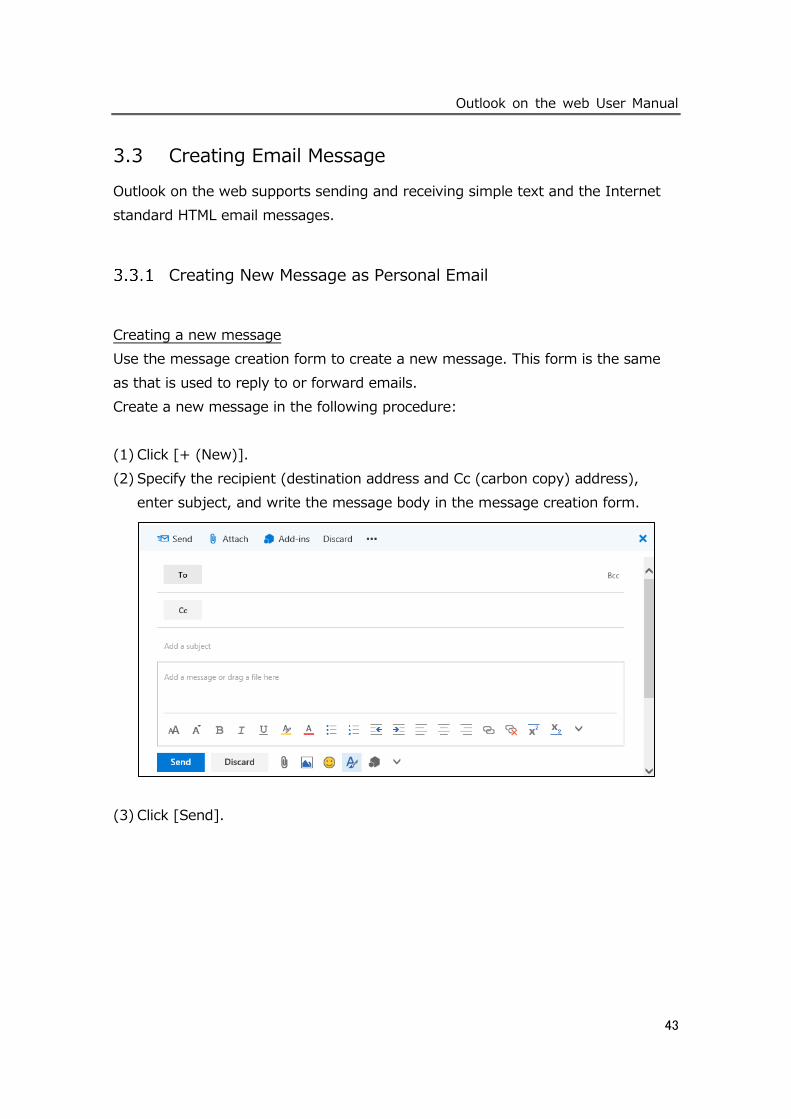
Creating New Message as Personal Email
Creating a new message
Use the message creation form to create a new message. This form is the same
as that is used to reply to or forward emails.
Create a new message in the following procedure:
(1) Click [+ (New)].
(2) Specify the recipient (destination address and Cc (carbon copy) address),
enter subject, and write the message body in the message creation form.
(3) Click [Send].

Outlook on the web User Manual
44
Specifying the recipient
To specify the recipient of the message, enter the name or email address. You
can enter multiple recipients by separating them with a semicolon (;).
You can enter an email address by clicking [To] or [Cc]. The address book opens.
Personal contacts are displayed by default, and you can search for an address in
the [Search] box. You can also search the Global Address List. Double-click a
name in the address book to add his or her email address to the message as the
recipient.
You can also specify [Bcc] (blind carbon copy) recipient
in the following procedure:
(1) Click [Bcc] in the message creation form.
(2) The [Bcc] field appears.
You can also keep the [Bcc] field displayed in the following procedure:
(1) Click at the upper right of the screen and choose [Mail].
(2) Choose [Mail], [Layout], and [Message format].
Outlook on the web User Manual
45
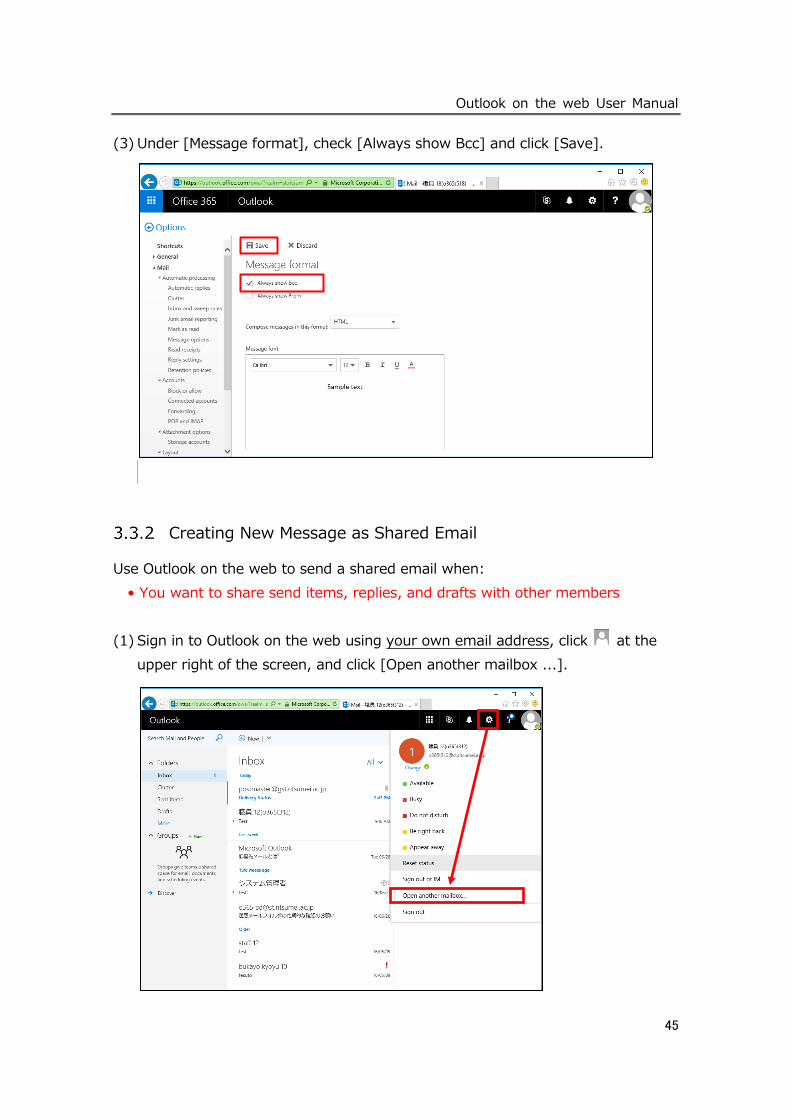
(3) Under [Message format], check [Always show Bcc] and click [Save].
Creating New Message as Shared Email
Use Outlook on the web to send a shared email when:
• You want to share send items, replies, and drafts with other members
(1) Sign in to Outlook on the web using your own email address, click at the
upper right of the screen, and click [Open another mailbox ...].
Outlook on the web User Manual
46
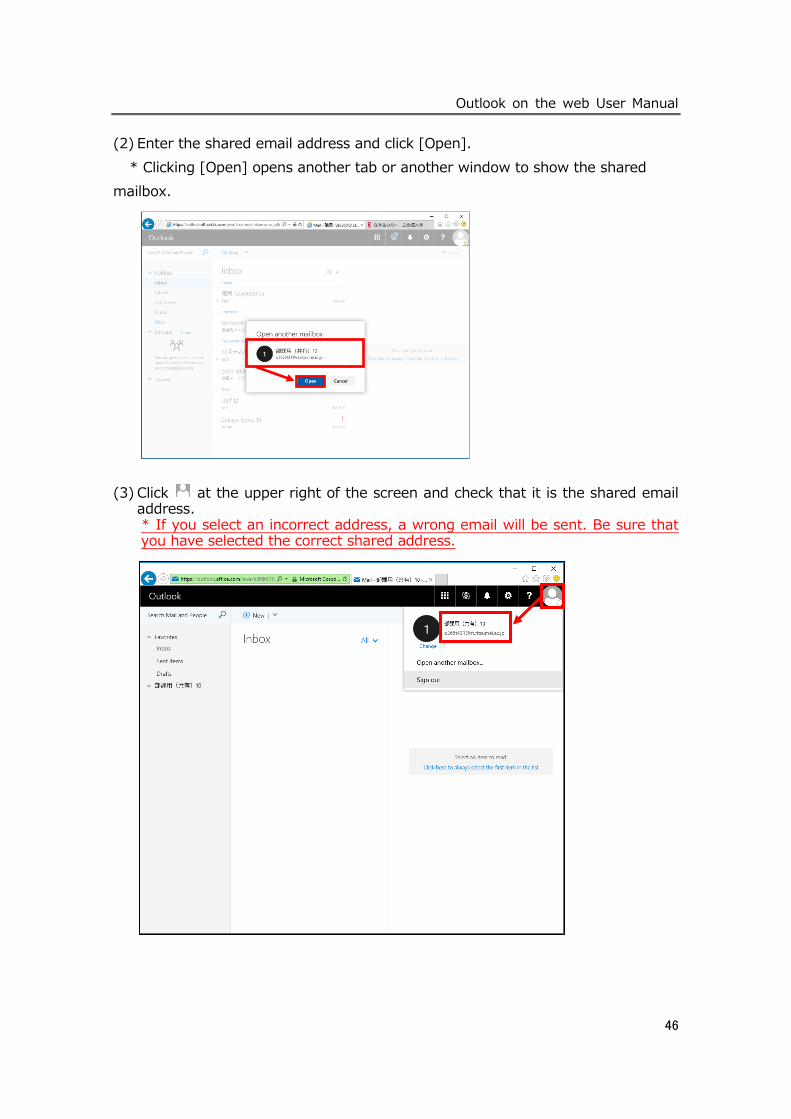
(2) Enter the shared email address and click [Open].
* Clicking [Open] opens another tab or another window to show the shared
mailbox.
(3) Click at the upper right of the screen and check that it is the shared email address. * If you select an incorrect address, a wrong email will be sent. Be sure that you have selected the correct shared address.
Outlook on the web User Manual
47
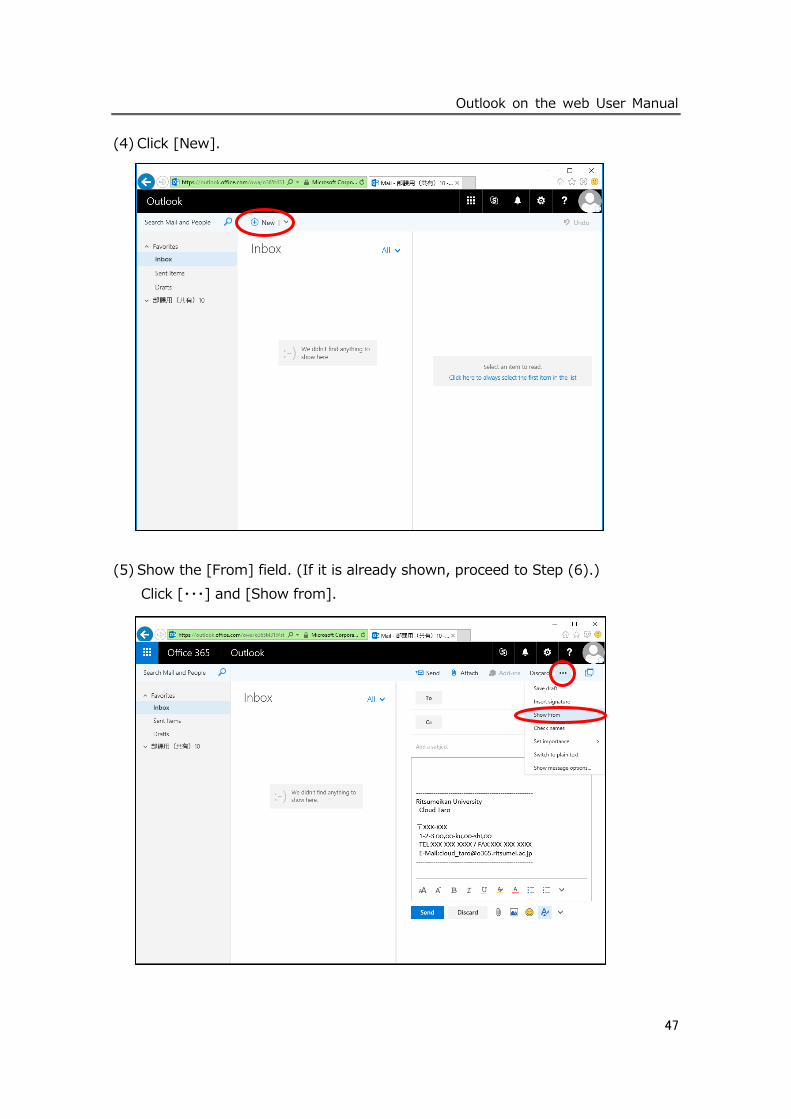
(4) Click [New].
(5) Show the [From] field. (If it is already shown, proceed to Step (6).)
Click [・・・] and [Show from].
Outlook on the web User Manual
48
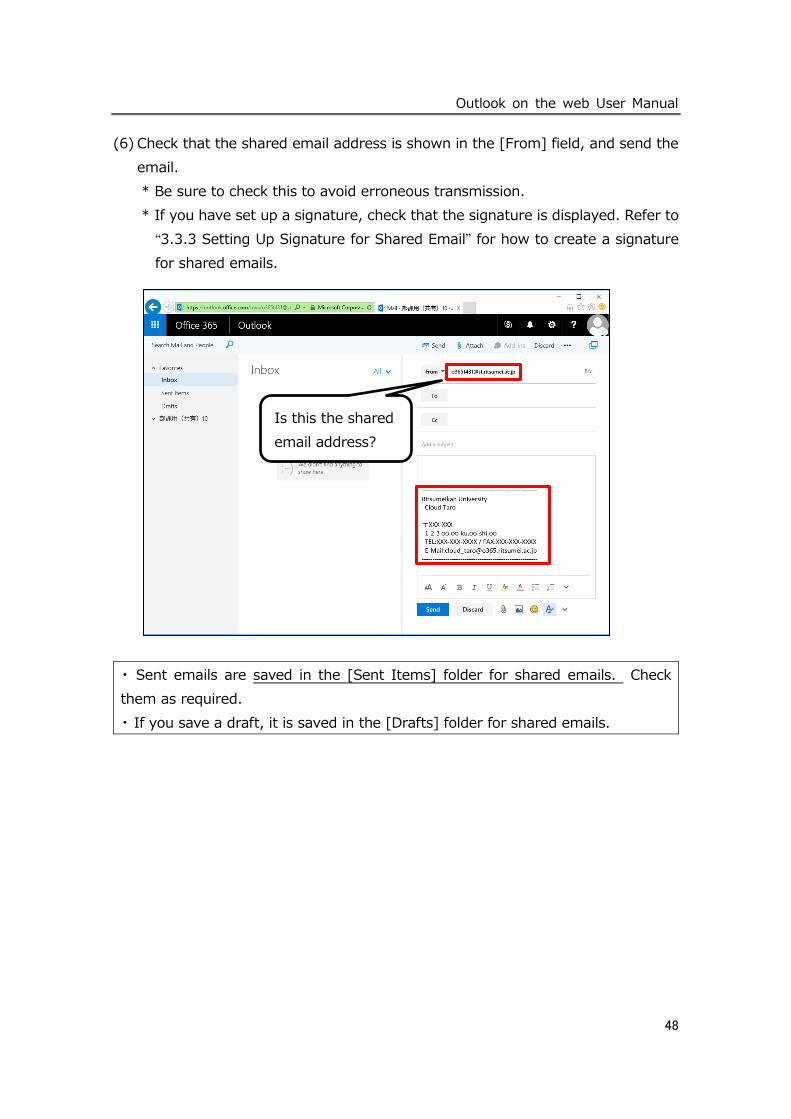
(6) Check that the shared email address is shown in the [From] field, and send the
email.
* Be sure to check this to avoid erroneous transmission.
* If you have set up a signature, check that the signature is displayed. Refer to
“3.3.3 Setting Up Signature for Shared Email” for how to create a signature
for shared emails.
• Sent emails are saved in the [Sent Items] folder for shared emails. Check
them as required.
• If you save a draft, it is saved in the [Drafts] folder for shared emails.
Is this the shared
email address?
Outlook on the web User Manual
49
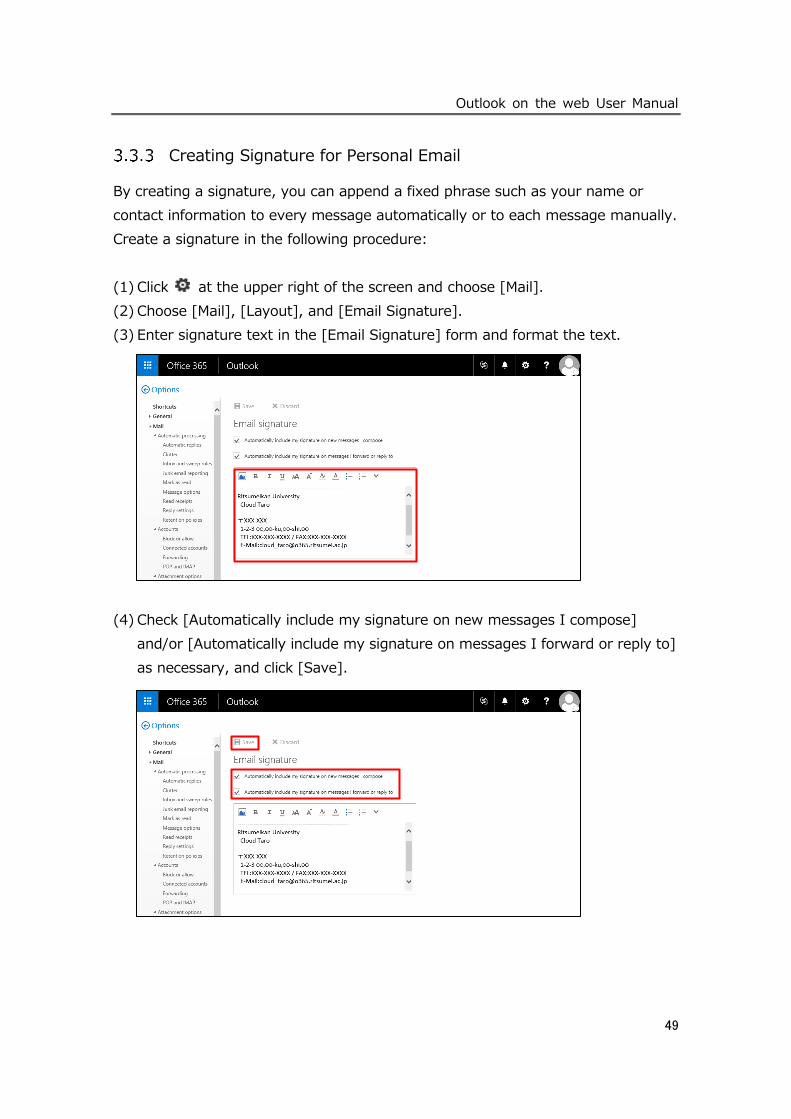
Creating Signature for Personal Email
By creating a signature, you can append a fixed phrase such as your name or
contact information to every message automatically or to each message manually.
Create a signature in the following procedure:
(1) Click at the upper right of the screen and choose [Mail].
(2) Choose [Mail], [Layout], and [Email Signature].
(3) Enter signature text in the [Email Signature] form and format the text.
(4) Check [Automatically include my signature on new messages I compose]
and/or [Automatically include my signature on messages I forward or reply to]
as necessary, and click [Save].
Outlook on the web User Manual
50
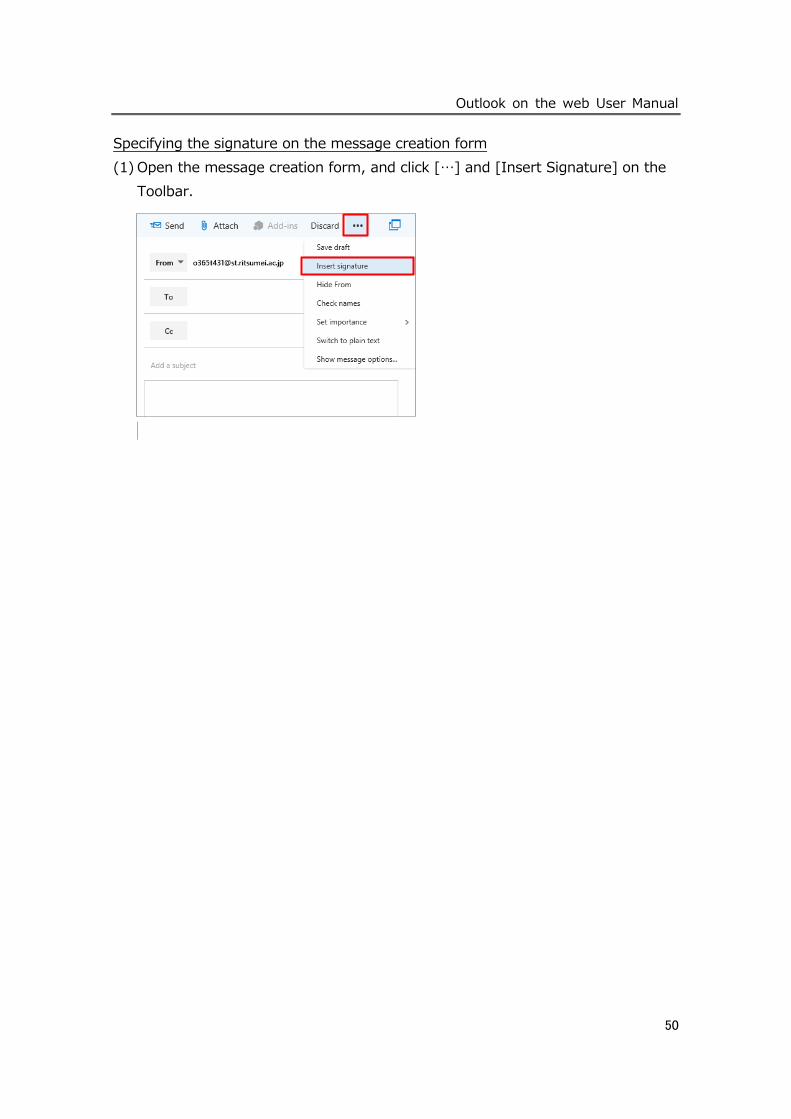
Specifying the signature on the message creation form
(1) Open the message creation form, and click […] and [Insert Signature] on the
Toolbar.
v
Outlook on the web User Manual
51
Creating Signature for Shared Email
In Outlook on the web, you can only register one signature per account. To
create a signature for the shared email, perform the following procedure for
each shared email.
A signature created in Outlook on the web will not be reflected on Outlook. If
you use both Outlook on the web and Outlook, set up the signature in each
application.
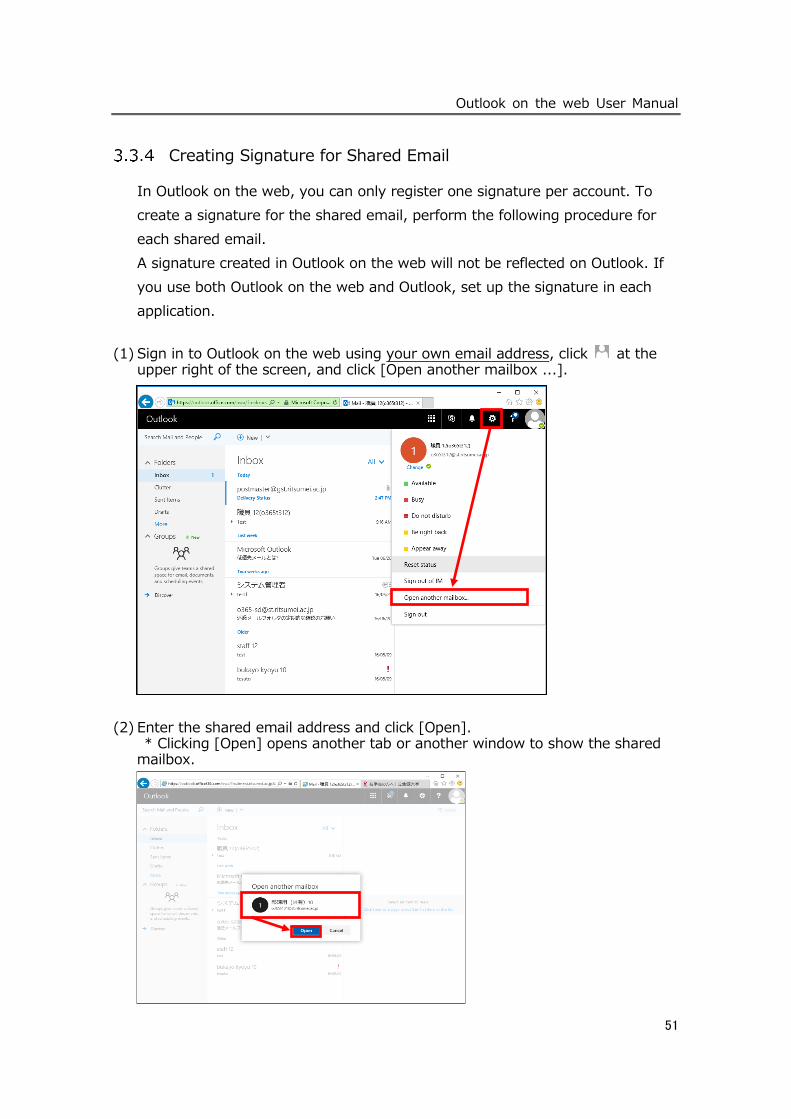
(1) Sign in to Outlook on the web using your own email address, click at the upper right of the screen, and click [Open another mailbox ...].
(2) Enter the shared email address and click [Open]. * Clicking [Open] opens another tab or another window to show the shared mailbox.
Outlook on the web User Manual
52
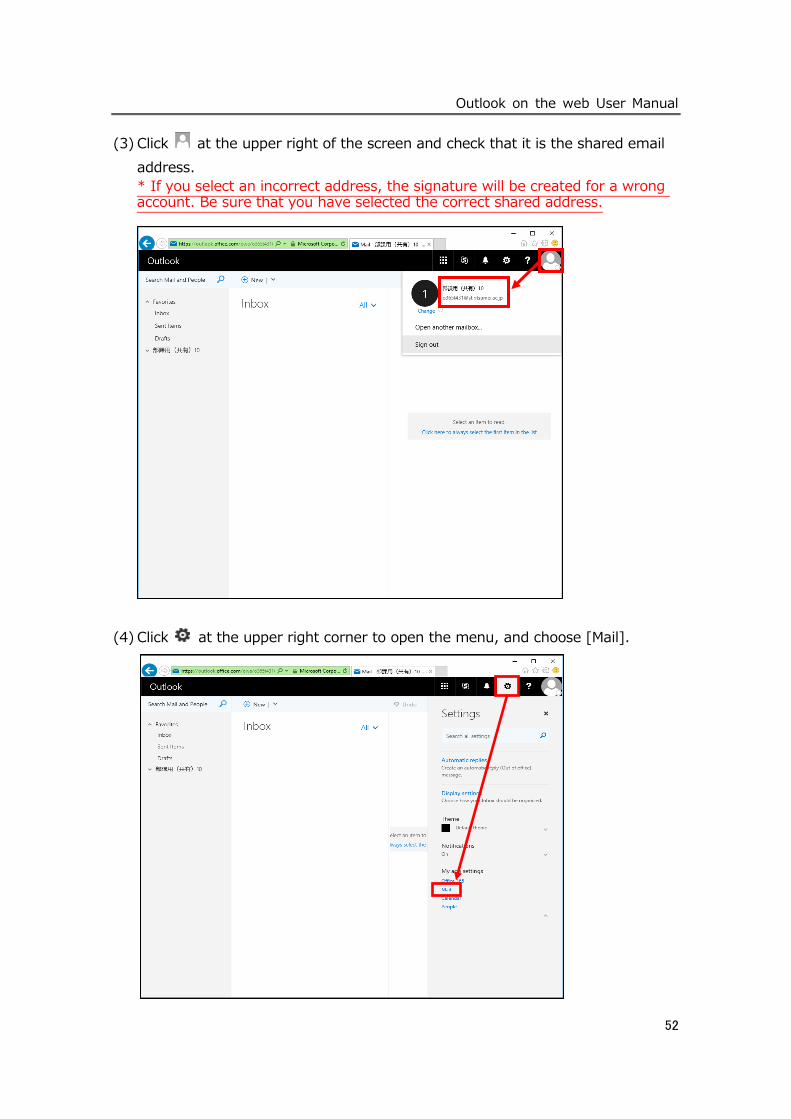
(3) Click at the upper right of the screen and check that it is the shared email
address.
* If you select an incorrect address, the signature will be created for a wrong account. Be sure that you have selected the correct shared address.
(4) Click at the upper right corner to open the menu, and choose [Mail].
Outlook on the web User Manual
53
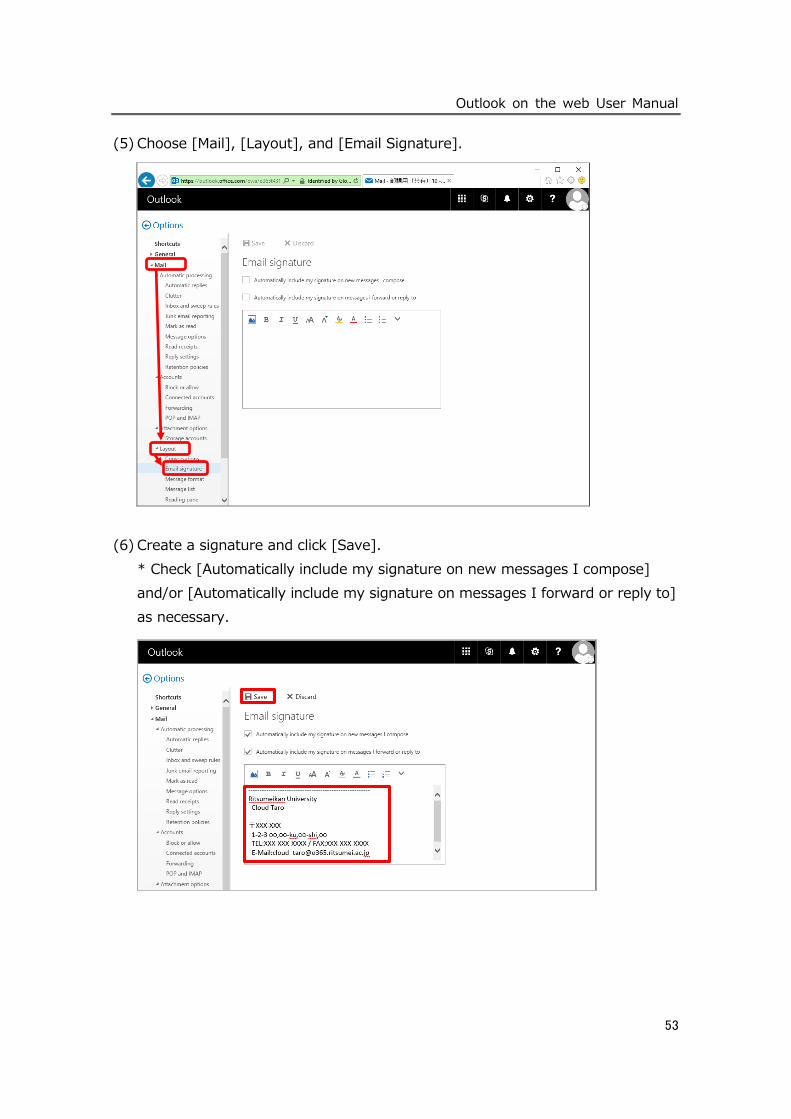
(5) Choose [Mail], [Layout], and [Email Signature].
(6) Create a signature and click [Save].
* Check [Automatically include my signature on new messages I compose]
and/or [Automatically include my signature on messages I forward or reply to]
as necessary.
Outlook on the web User Manual
54
Message Options
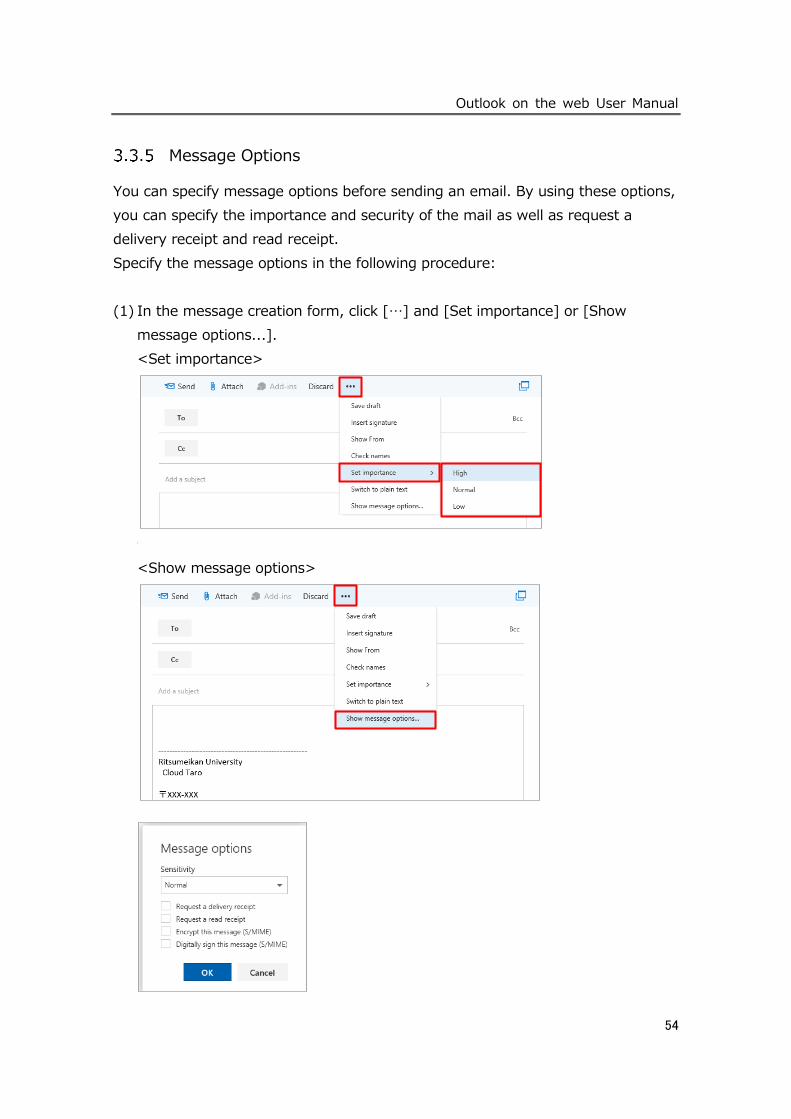
You can specify message options before sending an email. By using these options,
you can specify the importance and security of the mail as well as request a
delivery receipt and read receipt.
Specify the message options in the following procedure:
(1) In the message creation form, click […] and [Set importance] or [Show
message options...].
<Set importance>
<Show message options>
v
vv
v
Outlook on the web User Manual
55
Options
Option Description
Importance By setting importance, the recipient can see how important the
received email is by just viewing the email list. Available importance
levels are [High], [Normal], and [Low], and [Normal] is used by
default.
Sensitivity By setting security, the recipient can see which security level is
required for the received email by just viewing the email list.
Available security levels are [Normal] (with no security setting),
[Personal], [Private], and [Confidential], and you can choose one of
them as necessary. For a message with a security level set, related
information is shown in the Information Bar of the reading pane.
Tracking options By checking [Request a delivery receipt] and/or [Request a read
receipt], you can check if the message is delivered and/or read.
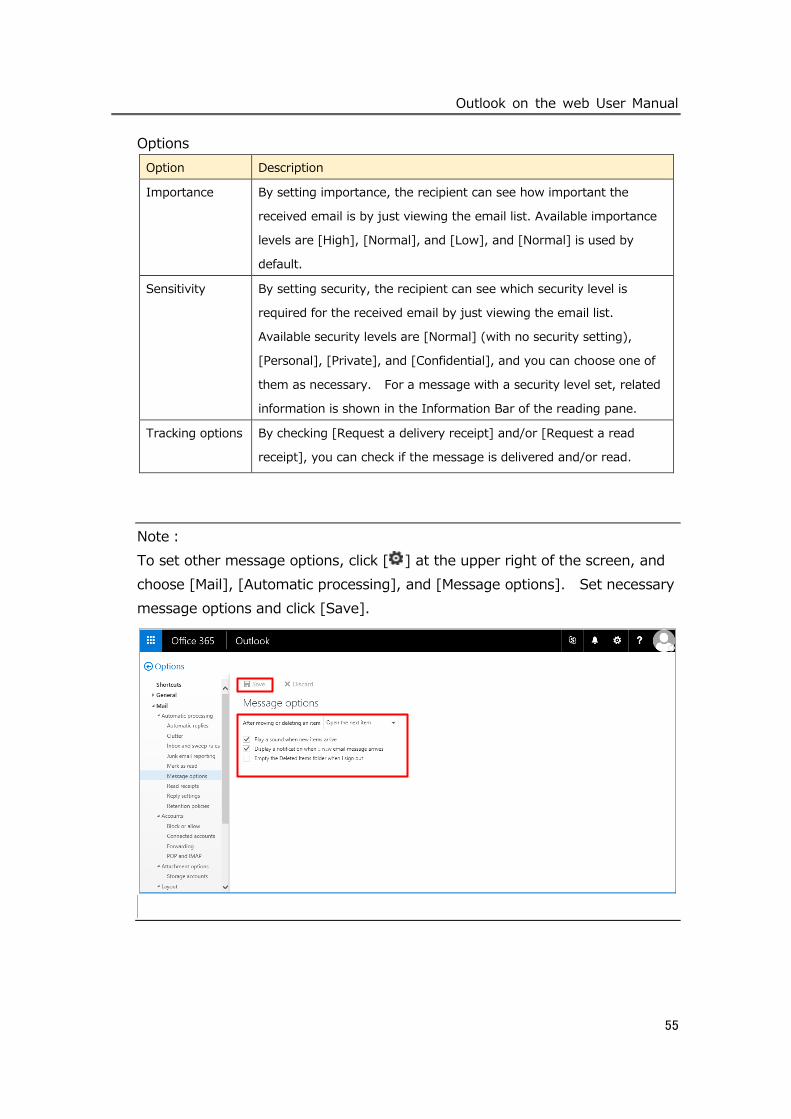
Note:
To set other message options, click [ ] at the upper right of the screen, and
choose [Mail], [Automatic processing], and [Message options]. Set necessary
message options and click [Save].
v
vv
Outlook on the web User Manual
56
Message Flag
Attaching a flag to an email message helps to check necessary tasks or attract
attention of the recipient. The [ ] (flag) column of the email list indicates the
flag status as listed below.
Flag list
Flag Description
Blank No flag
With flag
Flag completed
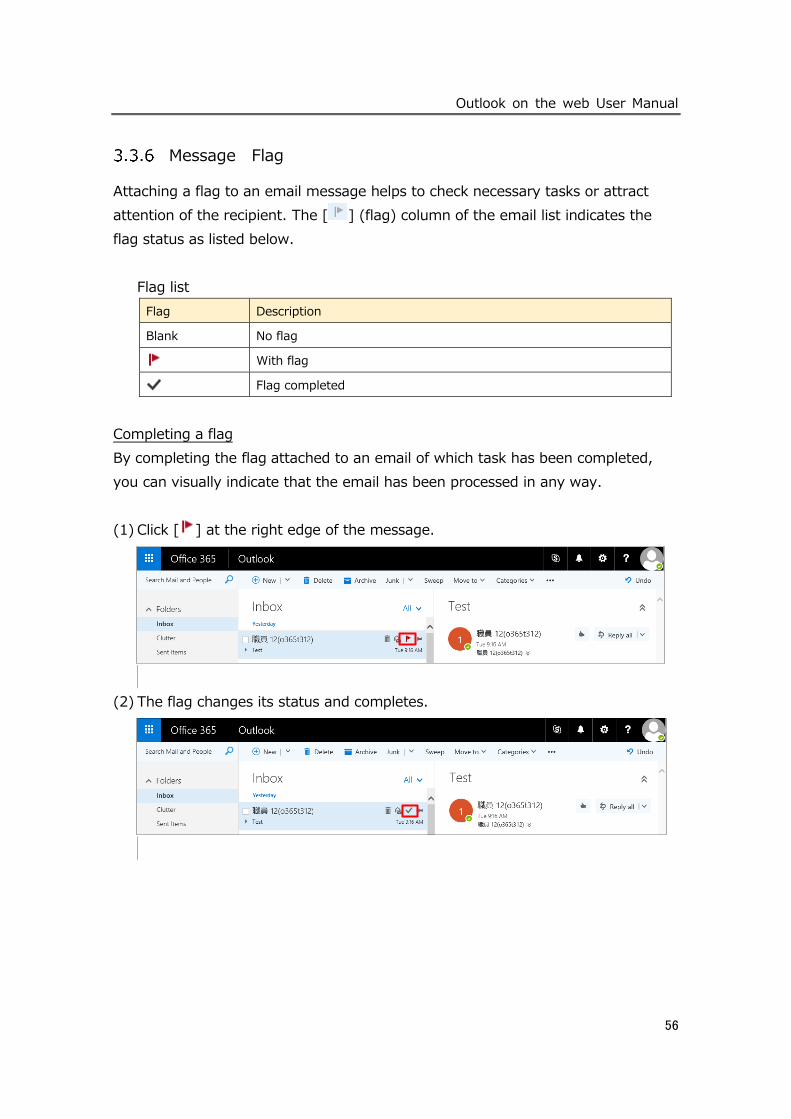
Completing a flag
By completing the flag attached to an email of which task has been completed,
you can visually indicate that the email has been processed in any way.
(1) Click [ ] at the right edge of the message.
(2) The flag changes its status and completes.
Outlook on the web User Manual
57
Message Format
Outlook on the web can send and receive messages in both HTML and plain text
formats.
Message types
Message Format Description
HTML format
(default)
Outlook on the web uses the HTML format to create a new email
message by default. Using the HTML format, you can specify the
font, bullets and numbering, text alignment, ruled lines, figure
(background), HTML style, prototype, signature, and Web-related
properties. Since popular email application uses HTML, it is
recommended to use the HTML format if you often send email
messages over the Internet. It is also recommended to use the
HTML format if you often send internal messages using Exchange
Online.
Plain text format The plain text format can be used by all email applications. Also,
an email in this format is smaller than the HTML format. However,
you cannot specify the font, including bold, italic, and colored text.
While you cannot show an image directly within the message body,
you can attach an image file to the email.
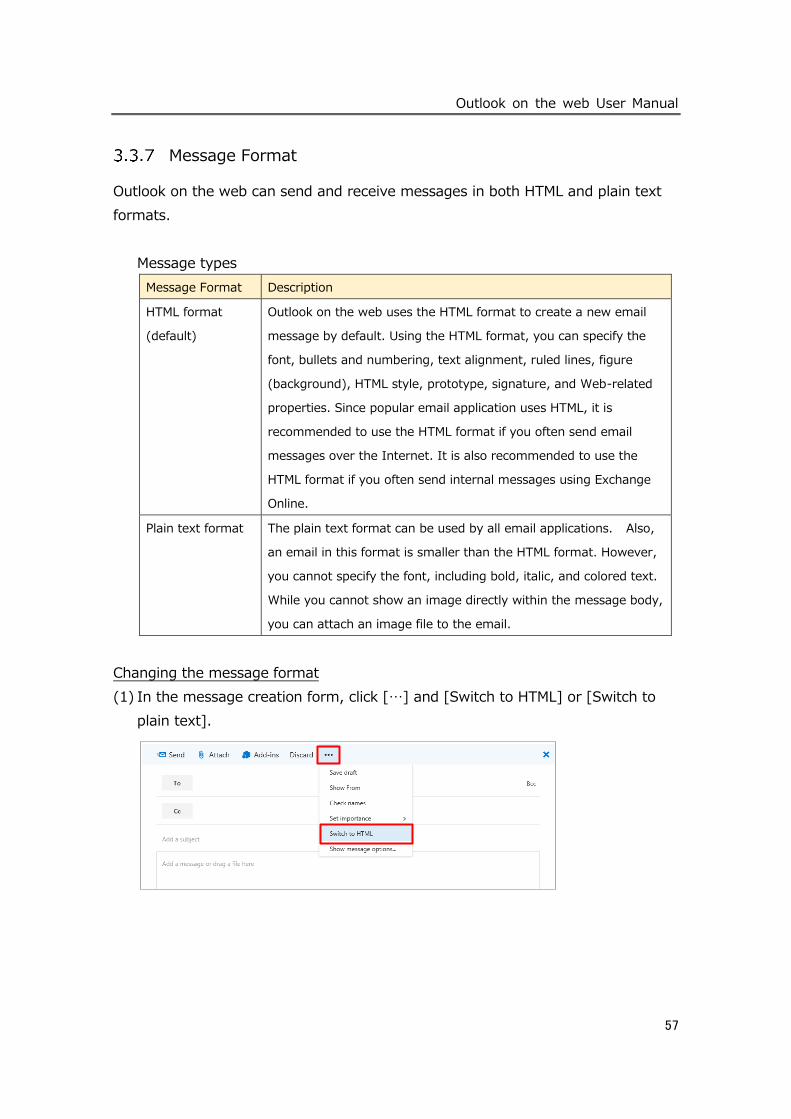
Changing the message format
(1) In the message creation form, click […] and [Switch to HTML] or [Switch to
plain text].
v
vv
Outlook on the web User Manual
58
* A warning message is displayed when you try to switch to the plain text
format. Click [OK].
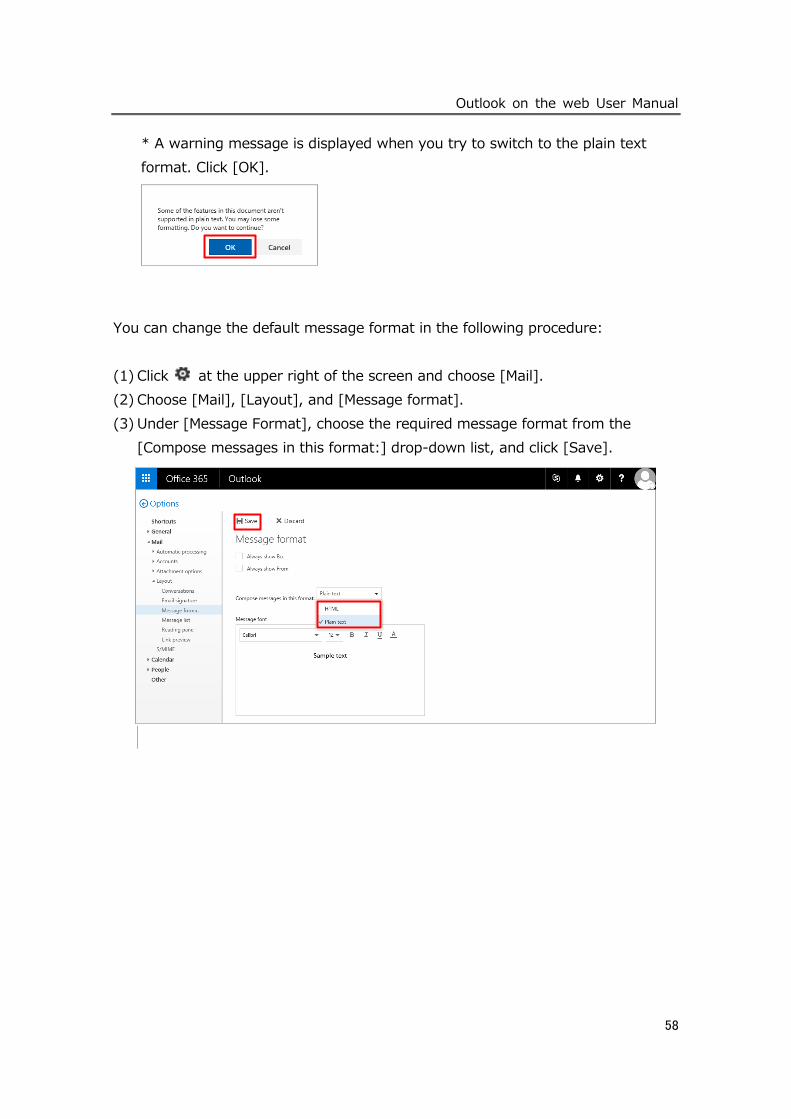
You can change the default message format in the following procedure:
(1) Click at the upper right of the screen and choose [Mail].
(2) Choose [Mail], [Layout], and [Message format].
(3) Under [Message Format], choose the required message format from the
[Compose messages in this format:] drop-down list, and click [Save].
v
Outlook on the web User Manual
59
Email Error Prevention Functions: Email Tips, Spell Check, Input
Error Check
Checking the email tips
Similarly to Outlook 2013, you can view email tips in Outlook on the web.
* In Outlook on the web, you cannot configure the email tip options which can be
configured in Outlook 2013.
Spell check
Spell check in Outlook on the web depends on the spell check function of the web
browser. The spell check function is available in Internet Explorer 10 or later and
the latest versions of Firefox, Chrome, and Safari. Refer to the Help page of your
web browser for how to use the spell check function.
Using the auto check function when sending emails
* In Outlook on the web, you cannot configure the email tip options which can be
configured in Outlook 2013.
Outlook on the web User Manual
60
3.4 Attaching or Inserting Files
You can attach a file or shortcut to an email. You can also insert an image into it.
Attaching a file
You can attach a file saved on your PC or accessible via the network to an item
created in the mailbox.
Attach a file to an email in the following procedure.
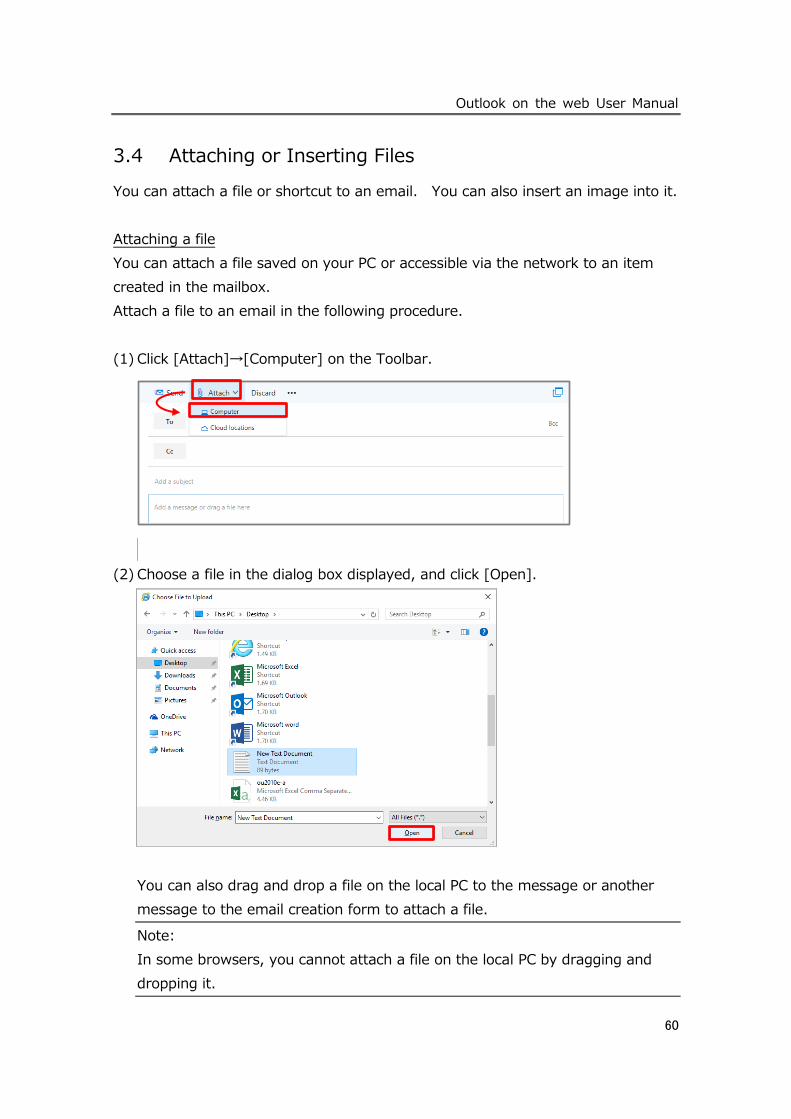
(1) Click [Attach]→[Computer] on the Toolbar.
(2) Choose a file in the dialog box displayed, and click [Open].
You can also drag and drop a file on the local PC to the message or another
message to the email creation form to attach a file.
Note:
In some browsers, you cannot attach a file on the local PC by dragging and
dropping it.
Outlook on the web User Manual
61
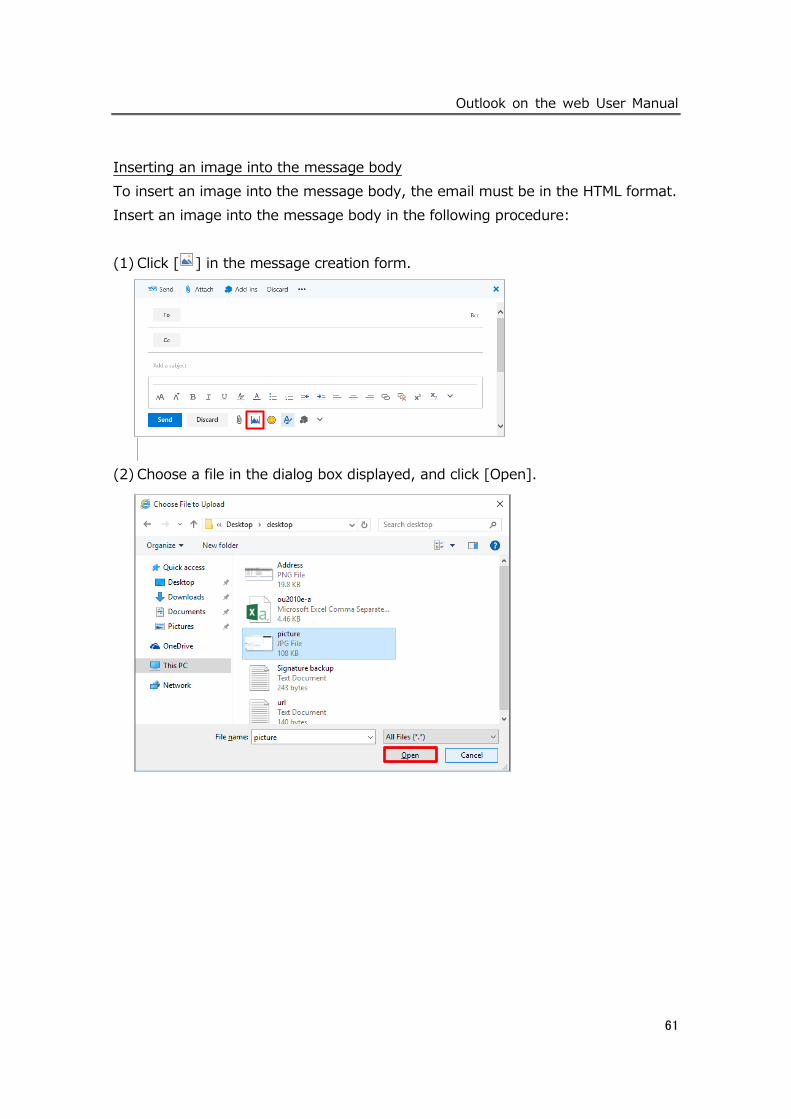
Inserting an image into the message body
To insert an image into the message body, the email must be in the HTML format.
Insert an image into the message body in the following procedure:
(1) Click [ ] in the message creation form.
(2) Choose a file in the dialog box displayed, and click [Open].
Outlook on the web User Manual
62
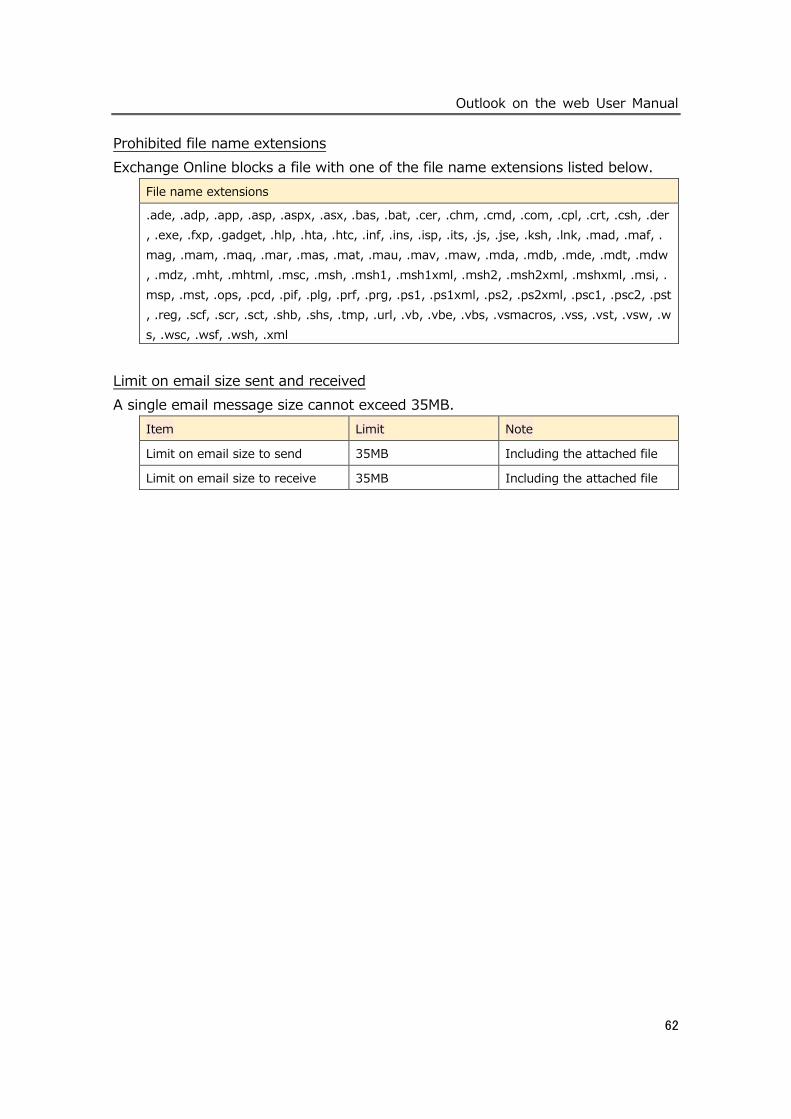
Prohibited file name extensions
Exchange Online blocks a file with one of the file name extensions listed below.
File name extensions
.ade, .adp, .app, .asp, .aspx, .asx, .bas, .bat, .cer, .chm, .cmd, .com, .cpl, .crt, .csh, .der
, .exe, .fxp, .gadget, .hlp, .hta, .htc, .inf, .ins, .isp, .its, .js, .jse, .ksh, .lnk, .mad, .maf, .
mag, .mam, .maq, .mar, .mas, .mat, .mau, .mav, .maw, .mda, .mdb, .mde, .mdt, .mdw
, .mdz, .mht, .mhtml, .msc, .msh, .msh1, .msh1xml, .msh2, .msh2xml, .mshxml, .msi, .
msp, .mst, .ops, .pcd, .pif, .plg, .prf, .prg, .ps1, .ps1xml, .ps2, .ps2xml, .psc1, .psc2, .pst
, .reg, .scf, .scr, .sct, .shb, .shs, .tmp, .url, .vb, .vbe, .vbs, .vsmacros, .vss, .vst, .vsw, .w
s, .wsc, .wsf, .wsh, .xml
Limit on email size sent and received
A single email message size cannot exceed 35MB.
Item Limit Note
Limit on email size to send 35MB Including the attached file
Limit on email size to receive 35MB Including the attached file
Outlook on the web User Manual
63
3.5 Putting Emails In Order
Quick Search
Outlook on the web provides a series of filters to quickly search for particular
items using keywords and search conditions.
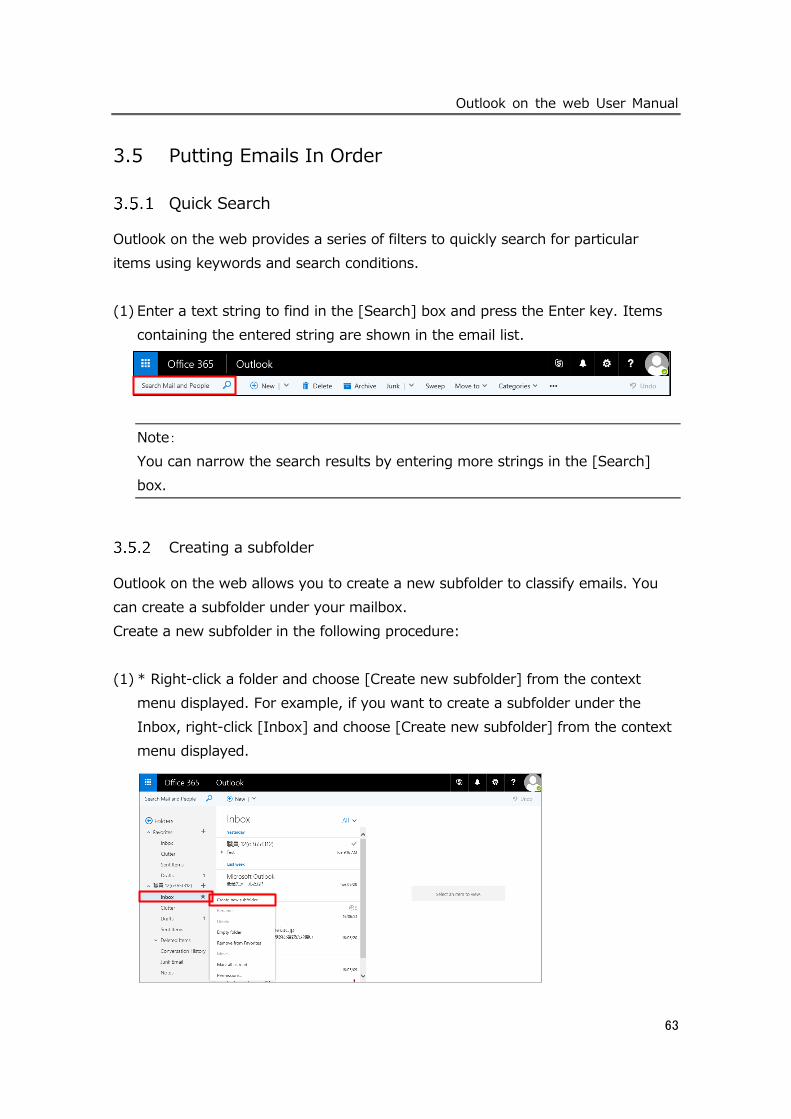
(1) Enter a text string to find in the [Search] box and press the Enter key. Items
containing the entered string are shown in the email list.
Note:
You can narrow the search results by entering more strings in the [Search]
box.
Creating a subfolder
Outlook on the web allows you to create a new subfolder to classify emails. You
can create a subfolder under your mailbox.
Create a new subfolder in the following procedure:
(1) * Right-click a folder and choose [Create new subfolder] from the context
menu displayed. For example, if you want to create a subfolder under the
Inbox, right-click [Inbox] and choose [Create new subfolder] from the context
menu displayed.
Outlook on the web User Manual
64
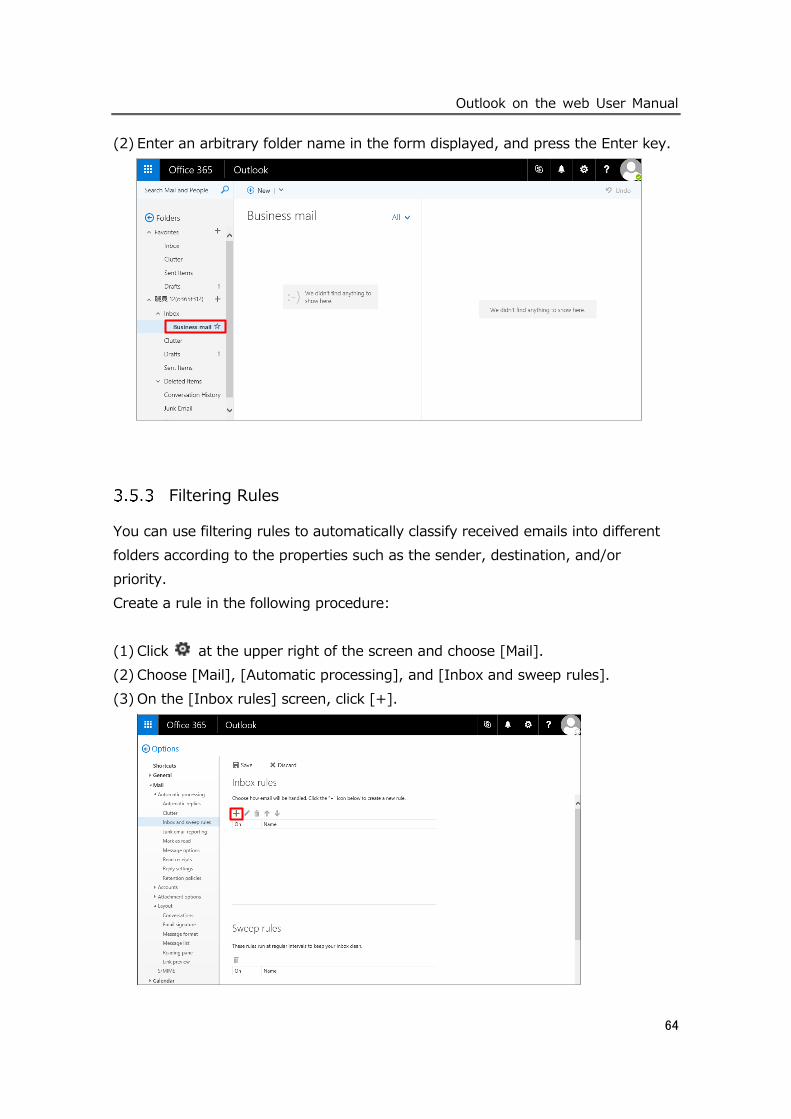
(2) Enter an arbitrary folder name in the form displayed, and press the Enter key.
Filtering Rules
You can use filtering rules to automatically classify received emails into different
folders according to the properties such as the sender, destination, and/or
priority.
Create a rule in the following procedure:
(1) Click at the upper right of the screen and choose [Mail].
(2) Choose [Mail], [Automatic processing], and [Inbox and sweep rules].
(3) On the [Inbox rules] screen, click [+].
Outlook on the web User Manual
65
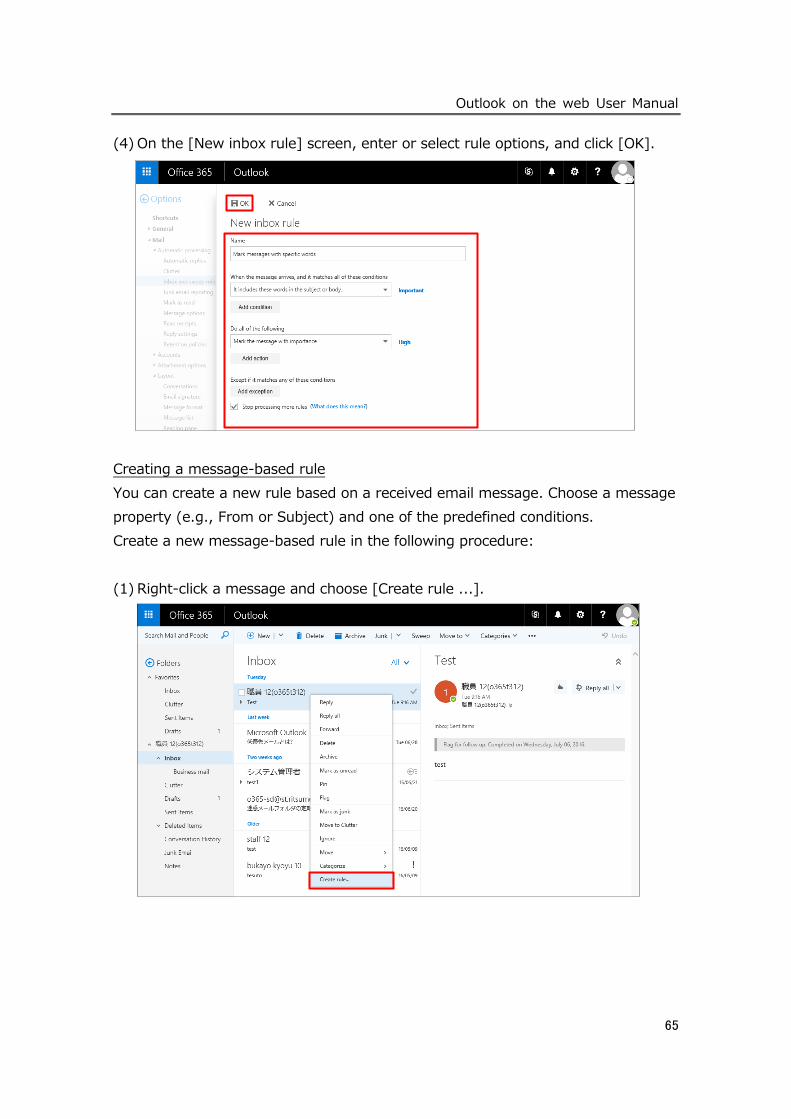
(4) On the [New inbox rule] screen, enter or select rule options, and click [OK].
Creating a message-based rule
You can create a new rule based on a received email message. Choose a message
property (e.g., From or Subject) and one of the predefined conditions.
Create a new message-based rule in the following procedure:
(1) Right-click a message and choose [Create rule ...].

Outlook on the web User Manual
66
(2) Enter or select rule options, and click [OK].
Outlook on the web User Manual
67
[Deleted Items] Folder
Deleted items are moved to the [Deleted Items] folder. The [Deleted Items] folder
keeps items until the folder is emptied. The contents of this folder grow over time
and can consume a large part of the storage for data files and email account.
Automatically emptying the [Deleted Items] folder
You can set to automatically empty the [Deleted Items] folder. When you specify
to empty the [Deleted Items] folder when you sign out, a confirmation message
will be displayed before emptying the folder.
Specify to empty the [Deleted Items] folder automatically in the following
procedure:
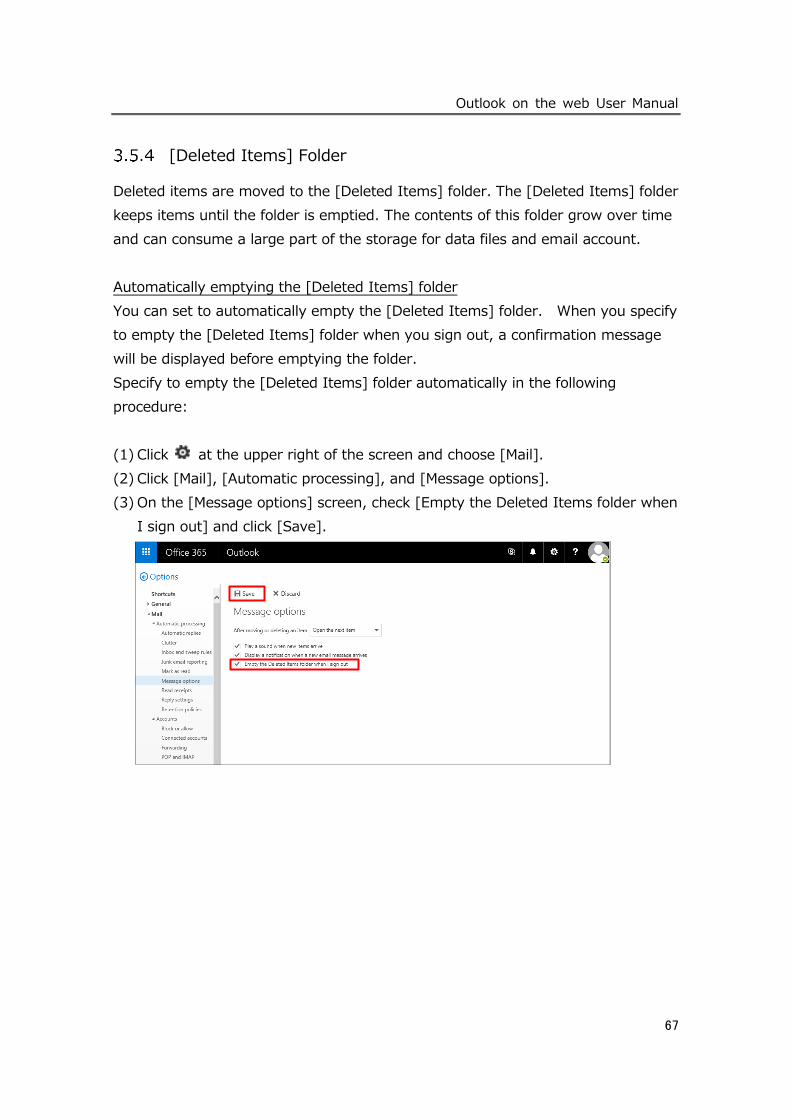
(1) Click at the upper right of the screen and choose [Mail].
(2) Click [Mail], [Automatic processing], and [Message options].
(3) On the [Message options] screen, check [Empty the Deleted Items folder when
I sign out] and click [Save].
Outlook on the web User Manual
68
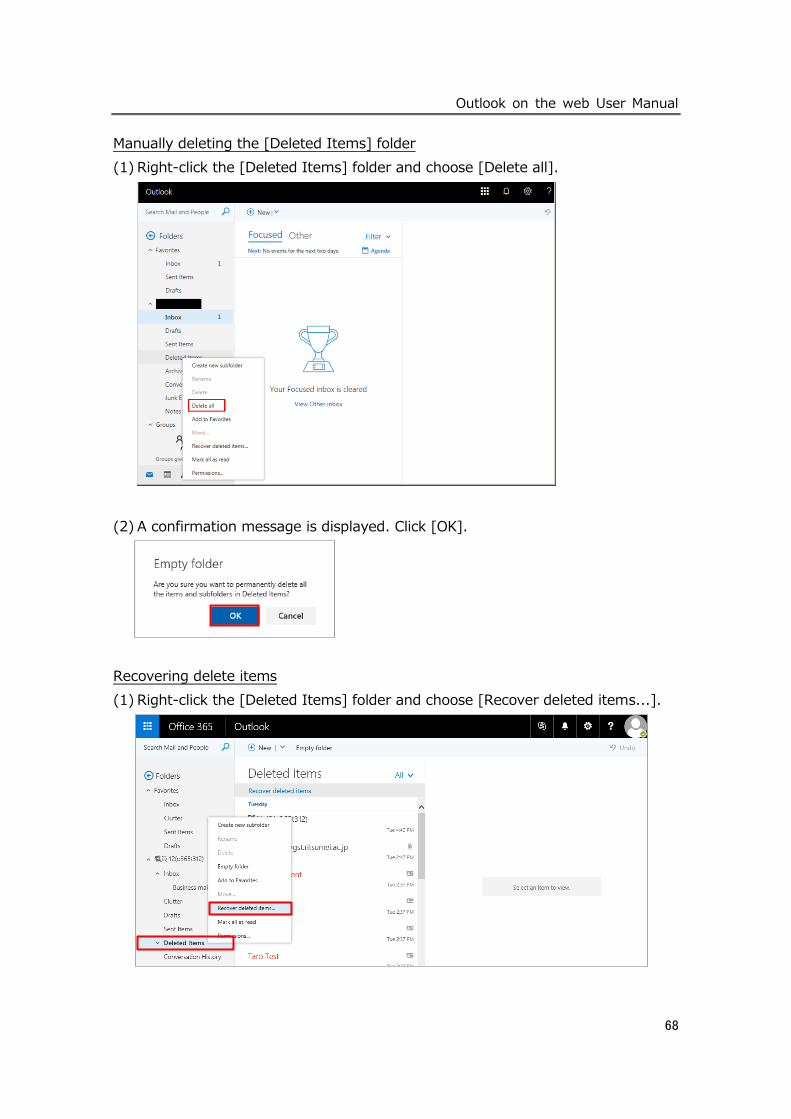
Manually deleting the [Deleted Items] folder
(1) Right-click the [Deleted Items] folder and choose [Delete all].
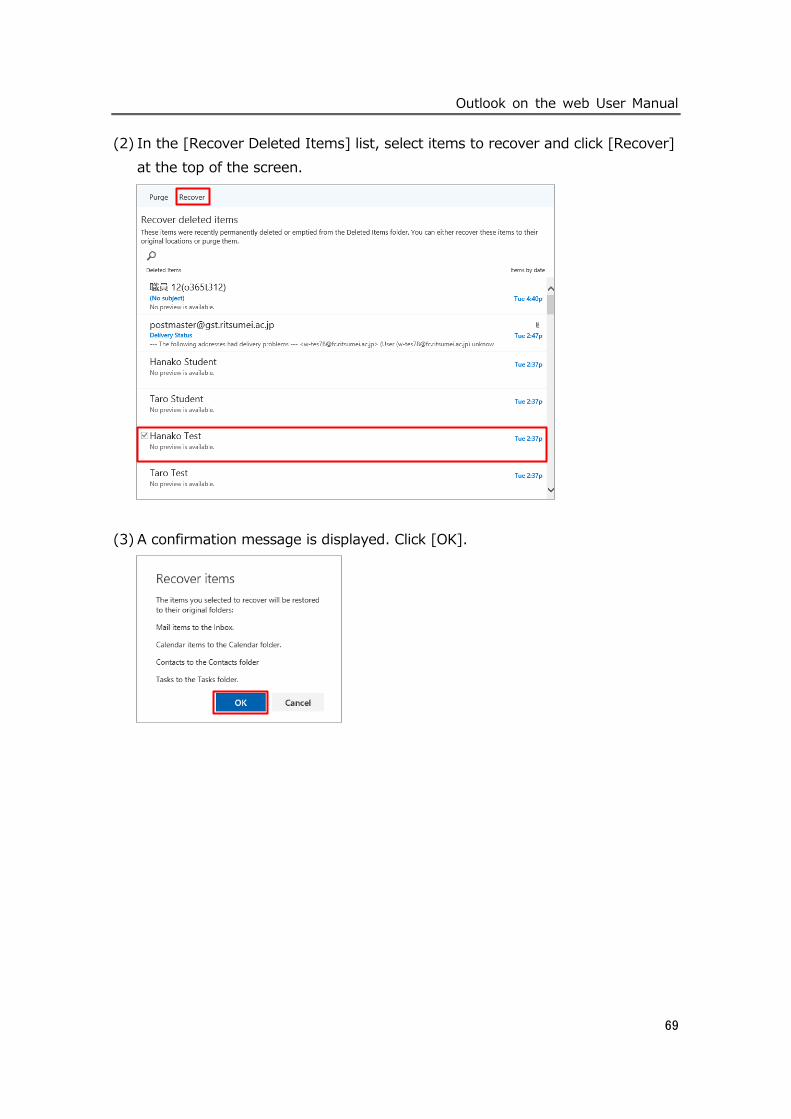
(2) A confirmation message is displayed. Click [OK].
Recovering delete items
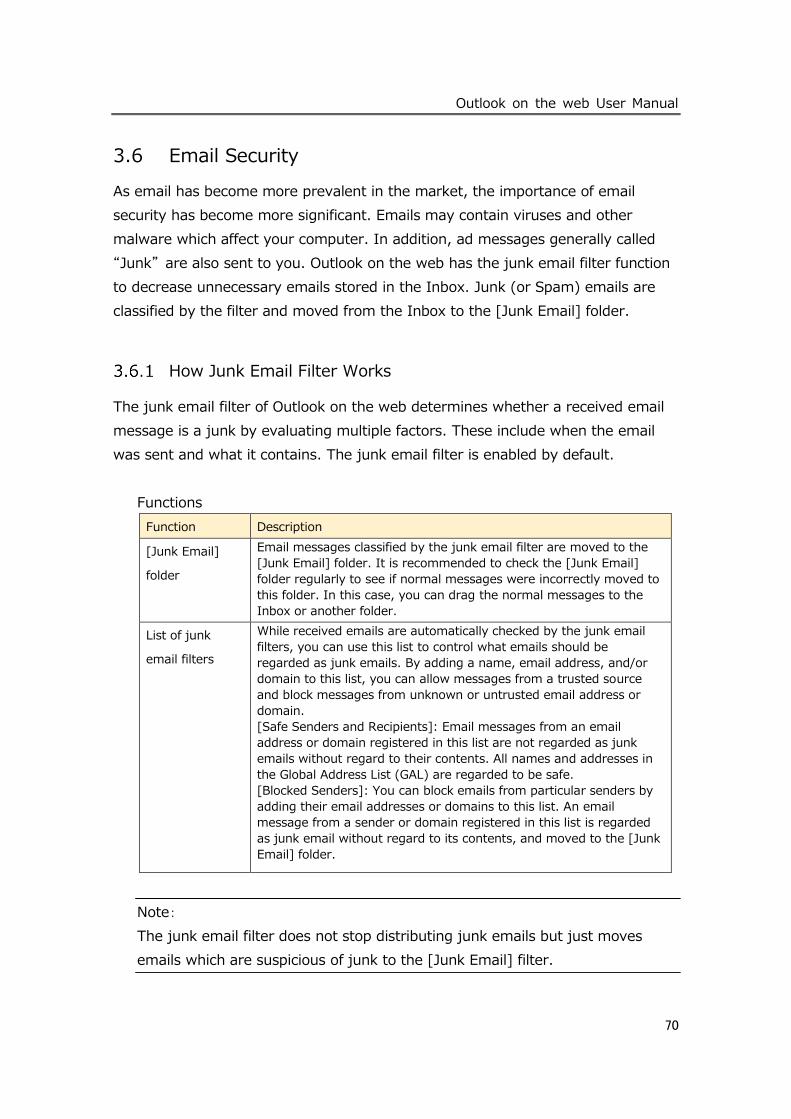
(1) Right-click the [Deleted Items] folder and choose [Recover deleted items...].
Outlook on the web User Manual
69
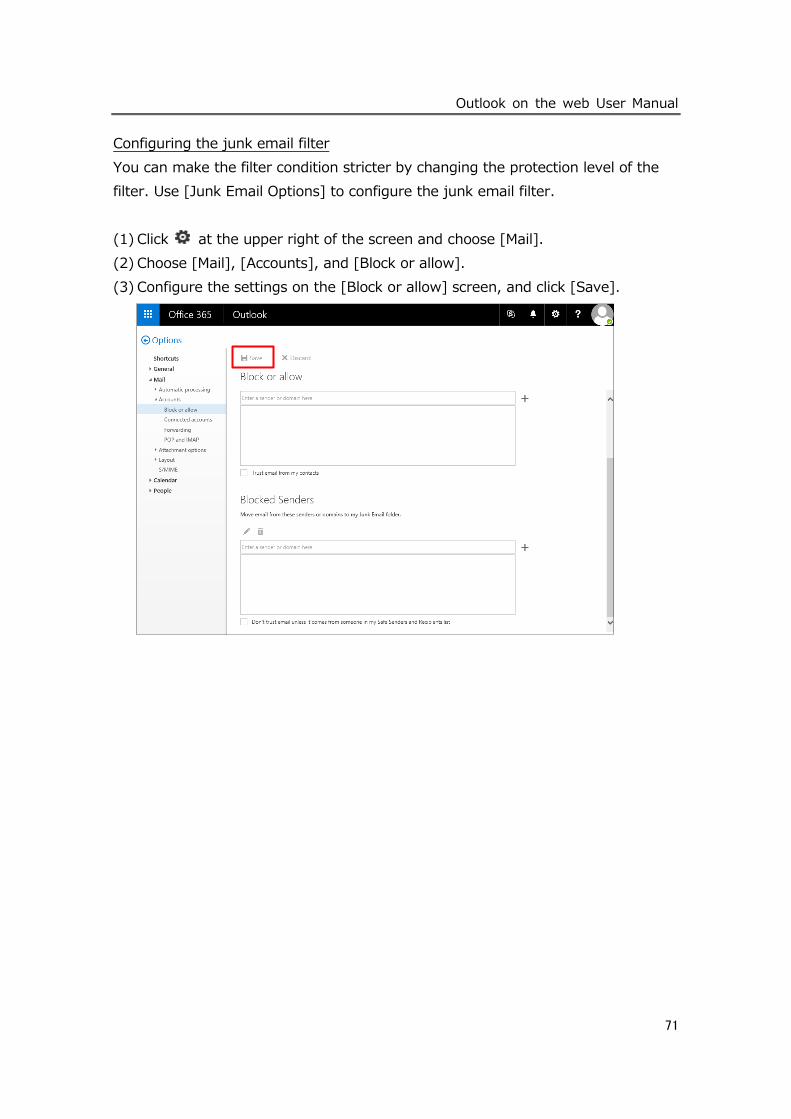
(2) In the [Recover Deleted Items] list, select items to recover and click [Recover]
at the top of the screen.
(3) A confirmation message is displayed. Click [OK].
Outlook on the web User Manual
70
3.6 Email Security
As email has become more prevalent in the market, the importance of email
security has become more significant. Emails may contain viruses and other
malware which affect your computer. In addition, ad messages generally called
“Junk” are also sent to you. Outlook on the web has the junk email filter function
to decrease unnecessary emails stored in the Inbox. Junk (or Spam) emails are
classified by the filter and moved from the Inbox to the [Junk Email] folder.
How Junk Email Filter Works
The junk email filter of Outlook on the web determines whether a received email
message is a junk by evaluating multiple factors. These include when the email
was sent and what it contains. The junk email filter is enabled by default.
Functions
Function Description
[Junk Email]
folder
Email messages classified by the junk email filter are moved to the
[Junk Email] folder. It is recommended to check the [Junk Email]
folder regularly to see if normal messages were incorrectly moved to
this folder. In this case, you can drag the normal messages to the
Inbox or another folder.
List of junk
email filters
While received emails are automatically checked by the junk email
filters, you can use this list to control what emails should be
regarded as junk emails. By adding a name, email address, and/or
domain to this list, you can allow messages from a trusted source
and block messages from unknown or untrusted email address or
domain.
[Safe Senders and Recipients]: Email messages from an email
address or domain registered in this list are not regarded as junk
emails without regard to their contents. All names and addresses in
the Global Address List (GAL) are regarded to be safe.
[Blocked Senders]: You can block emails from particular senders by
adding their email addresses or domains to this list. An email
message from a sender or domain registered in this list is regarded
as junk email without regard to its contents, and moved to the [Junk
Email] folder.
Note:
The junk email filter does not stop distributing junk emails but just moves
emails which are suspicious of junk to the [Junk Email] filter.
Outlook on the web User Manual
71
Configuring the junk email filter
You can make the filter condition stricter by changing the protection level of the
filter. Use [Junk Email Options] to configure the junk email filter.
(1) Click at the upper right of the screen and choose [Mail].
(2) Choose [Mail], [Accounts], and [Block or allow].
(3) Configure the settings on the [Block or allow] screen, and click [Save].
Outlook on the web User Manual
72
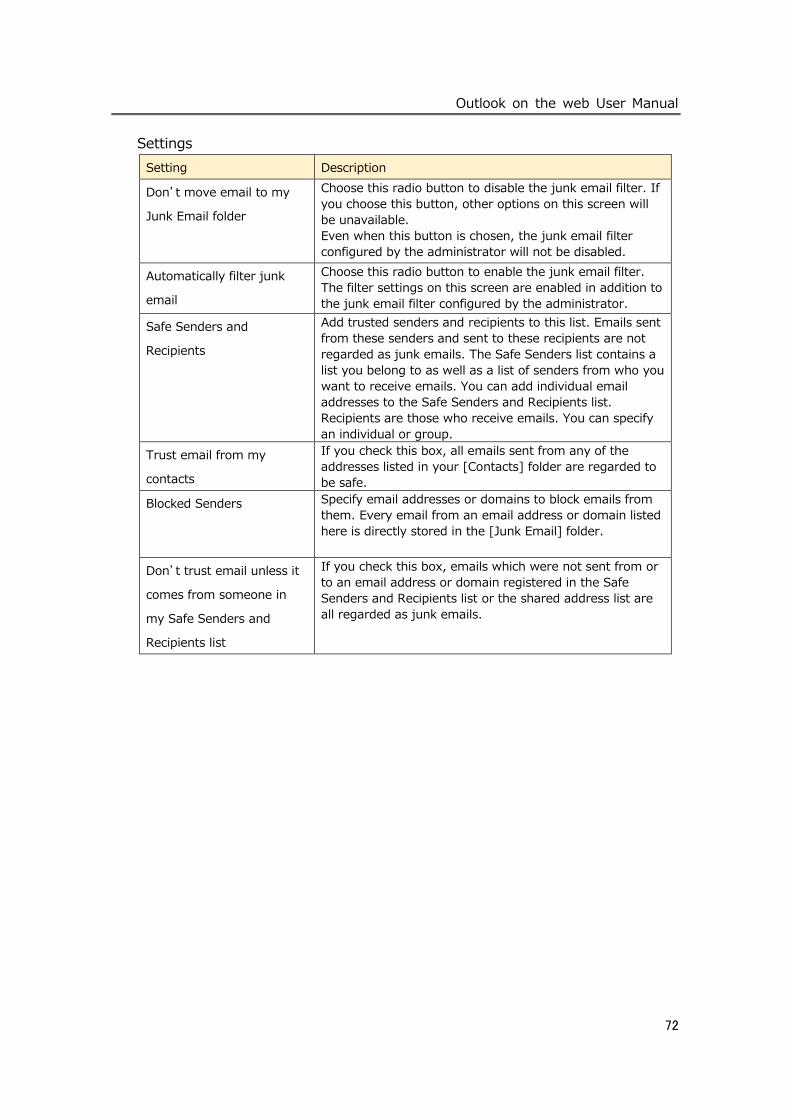
Settings
Setting Description
Don’t move email to my
Junk Email folder
Choose this radio button to disable the junk email filter. If
you choose this button, other options on this screen will
be unavailable.
Even when this button is chosen, the junk email filter
configured by the administrator will not be disabled.
Automatically filter junk
Choose this radio button to enable the junk email filter.
The filter settings on this screen are enabled in addition to
the junk email filter configured by the administrator.
Safe Senders and
Recipients
Add trusted senders and recipients to this list. Emails sent
from these senders and sent to these recipients are not
regarded as junk emails. The Safe Senders list contains a
list you belong to as well as a list of senders from who you
want to receive emails. You can add individual email
addresses to the Safe Senders and Recipients list.
Recipients are those who receive emails. You can specify
an individual or group.
Trust email from my
contacts
If you check this box, all emails sent from any of the
addresses listed in your [Contacts] folder are regarded to
be safe.
Blocked Senders Specify email addresses or domains to block emails from
them. Every email from an email address or domain listed
here is directly stored in the [Junk Email] folder.
Don’t trust email unless it
comes from someone in
my Safe Senders and
Recipients list
If you check this box, emails which were not sent from or
to an email address or domain registered in the Safe
Senders and Recipients list or the shared address list are
all regarded as junk emails.
Outlook on the web User Manual
73
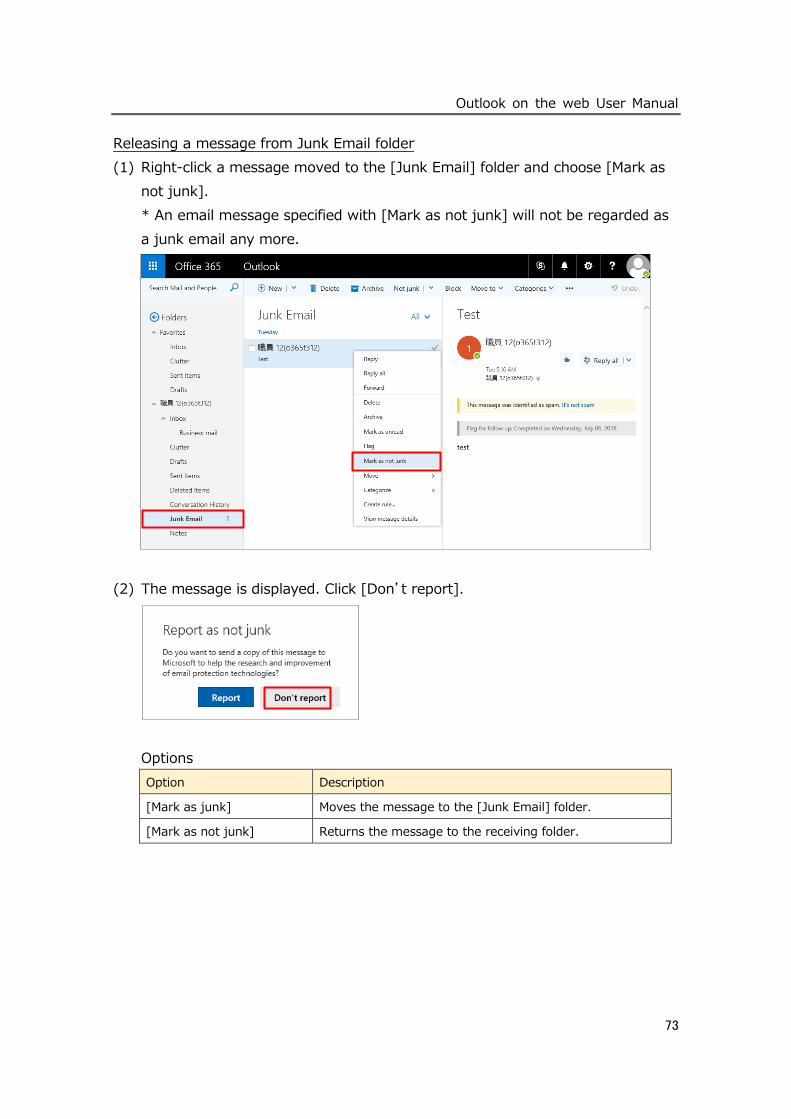
Releasing a message from Junk Email folder
(1) Right-click a message moved to the [Junk Email] folder and choose [Mark as
not junk].
* An email message specified with [Mark as not junk] will not be regarded as
a junk email any more.
(2) The message is displayed. Click [Don’t report].
Options
Option Description
[Mark as junk] Moves the message to the [Junk Email] folder.
[Mark as not junk] Returns the message to the receiving folder.
Outlook on the web User Manual
74
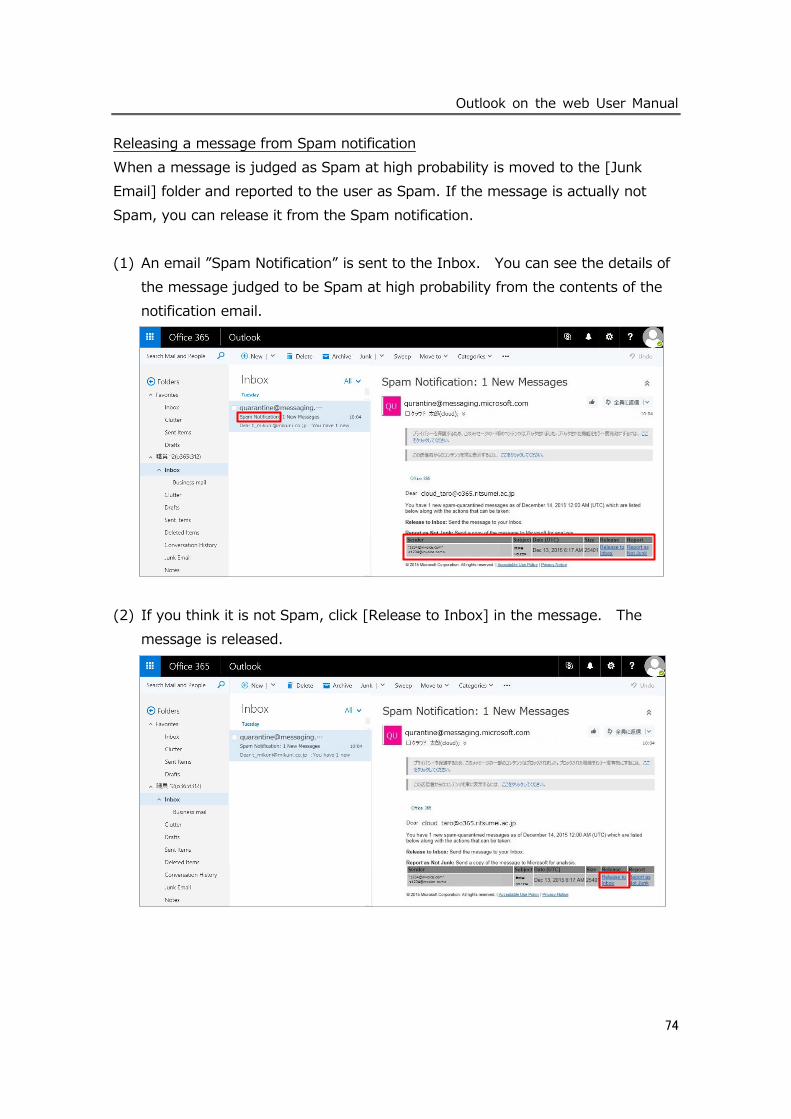
Releasing a message from Spam notification
When a message is judged as Spam at high probability is moved to the [Junk
Email] folder and reported to the user as Spam. If the message is actually not
Spam, you can release it from the Spam notification.
(1) An email ”Spam Notification” is sent to the Inbox. You can see the details of
the message judged to be Spam at high probability from the contents of the
notification email.
(2) If you think it is not Spam, click [Release to Inbox] in the message. The
message is released.
Outlook on the web User Manual
75
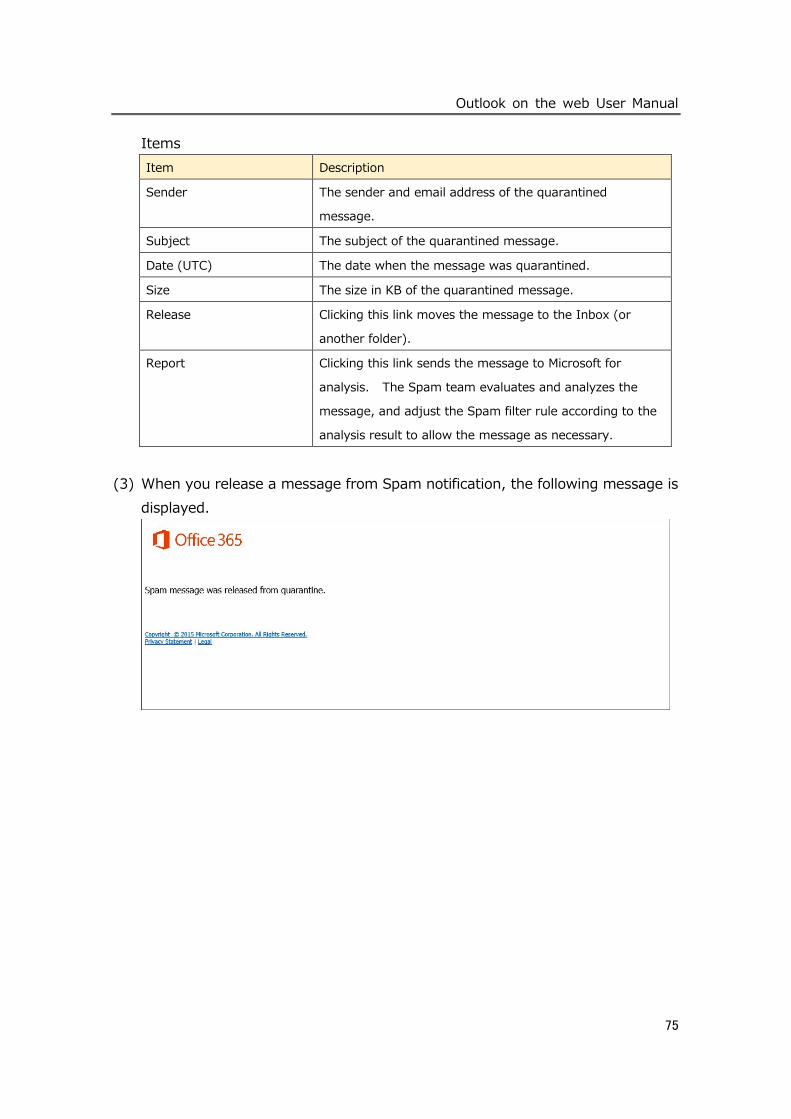
Items
Item Description
Sender The sender and email address of the quarantined
message.
Subject The subject of the quarantined message.
Date (UTC) The date when the message was quarantined.
Size The size in KB of the quarantined message.
Release Clicking this link moves the message to the Inbox (or
another folder).
Report Clicking this link sends the message to Microsoft for
analysis. The Spam team evaluates and analyzes the
message, and adjust the Spam filter rule according to the
analysis result to allow the message as necessary.
(3) When you release a message from Spam notification, the following message is
displayed.
Outlook on the web User Manual
76
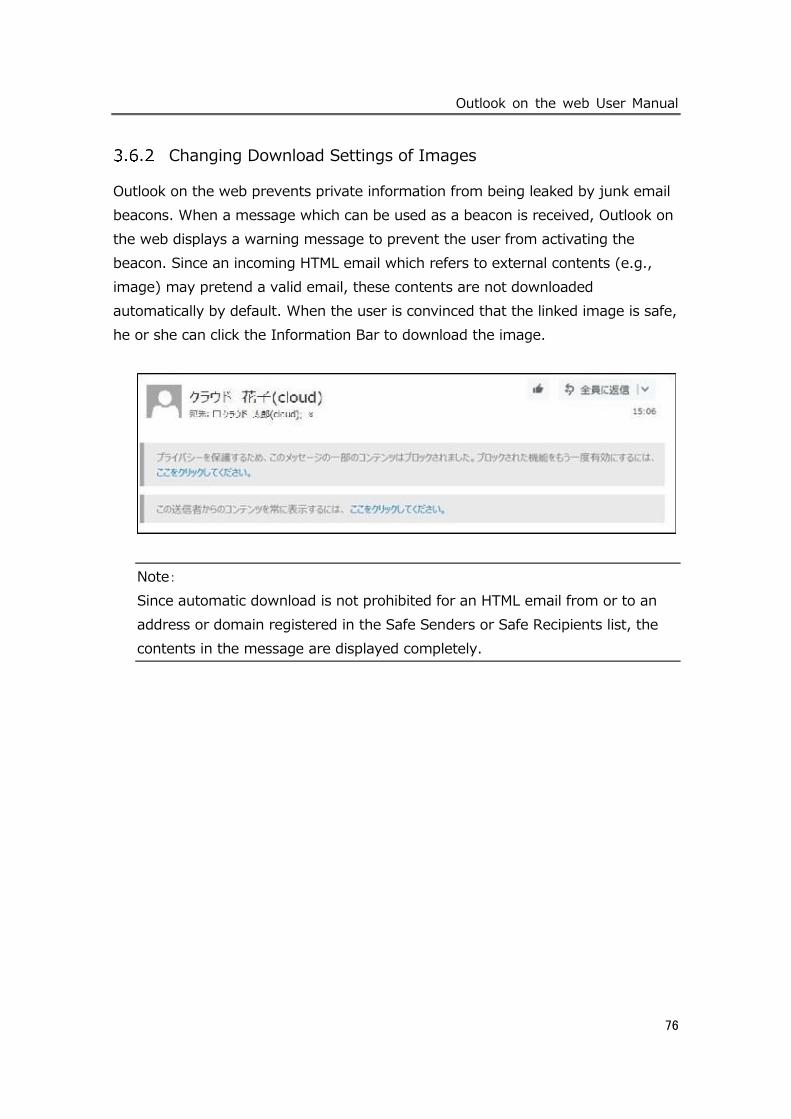
Changing Download Settings of Images
Outlook on the web prevents private information from being leaked by junk email
beacons. When a message which can be used as a beacon is received, Outlook on
the web displays a warning message to prevent the user from activating the
beacon. Since an incoming HTML email which refers to external contents (e.g.,
image) may pretend a valid email, these contents are not downloaded
automatically by default. When the user is convinced that the linked image is safe,
he or she can click the Information Bar to download the image.
Note:
Since automatic download is not prohibited for an HTML email from or to an
address or domain registered in the Safe Senders or Safe Recipients list, the
contents in the message are displayed completely.

Outlook on the web User Manual
77
Blocking Suspicious Attachment
A file attached to an email may contain malware (e.g., virus) which affects your
PC. To prevent damages to the network by such malware, Exchange Online blocks
attached files with particular filename extensions (e.g., .bat, .exe, .vbs, .js, .lnk)
and an attached file with one of these extensions will become unavailable after
sending or receiving the email.
Sending suspicious attachment
When a file with a particular filename extension (e.g., .bat, .exe, .vbs, .js, .lnk) is
attached to a sent or received email, you cannot open this file.
If you should need to send such a file via email, try the following methods:
Change the filename extension to an allowed one. For example, if you attach
Picture.exe file to your email, it will be blocked. However, if you rename it to
MyFile.exe_EXTRA and attach it to your email, it will not be blocked. In the
email message, direct the recipient to change the file name extension to the
original one.
Compress (e.g., zip) the file and attach the compressed file to your email.
Save the file in a shared network folder which is secured, and include the link
to the file in the message.

Outlook on the web User Manual
78
3.7 Sign Out
Sign out from Outlook on the web in the following procedure:
(1) Click at the upper right of the screen and choose [Sign out].
(2) The sign out screen appears.
Outlook on the web User Manual
79
4. Setting Up and Managing Shared Email
4.1 Setting Up Shared Email
Initial Setup for Shared Emails (for Initial Login Only)
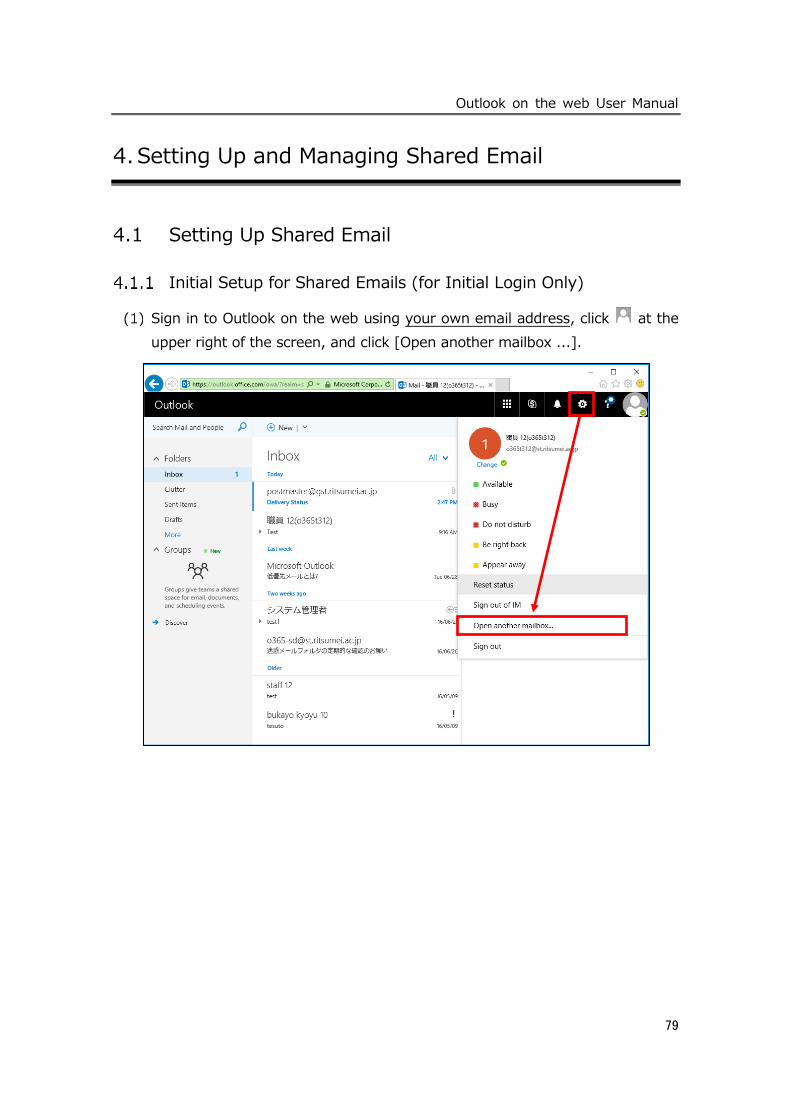
Sign in to Outlook on the web using your own email address, click at the
upper right of the screen, and click [Open another mailbox ...].
Outlook on the web User Manual
80
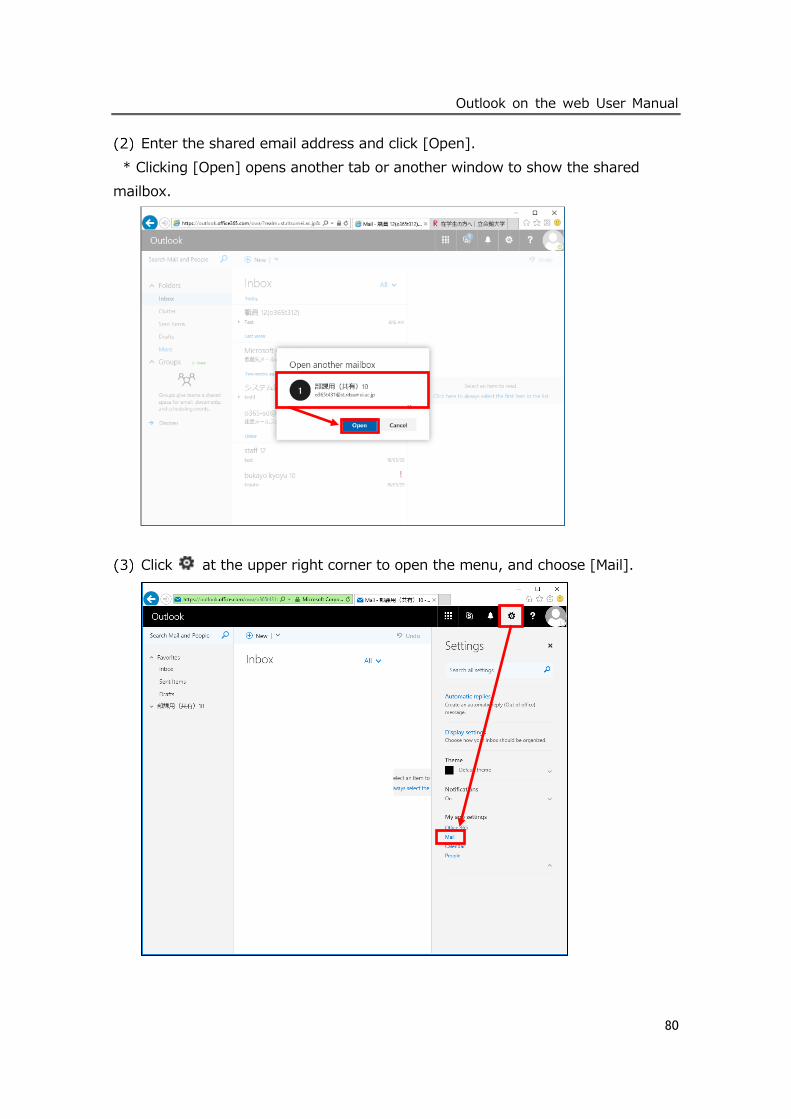
Enter the shared email address and click [Open].
* Clicking [Open] opens another tab or another window to show the shared
mailbox.
Click at the upper right corner to open the menu, and choose [Mail].
Outlook on the web User Manual
81
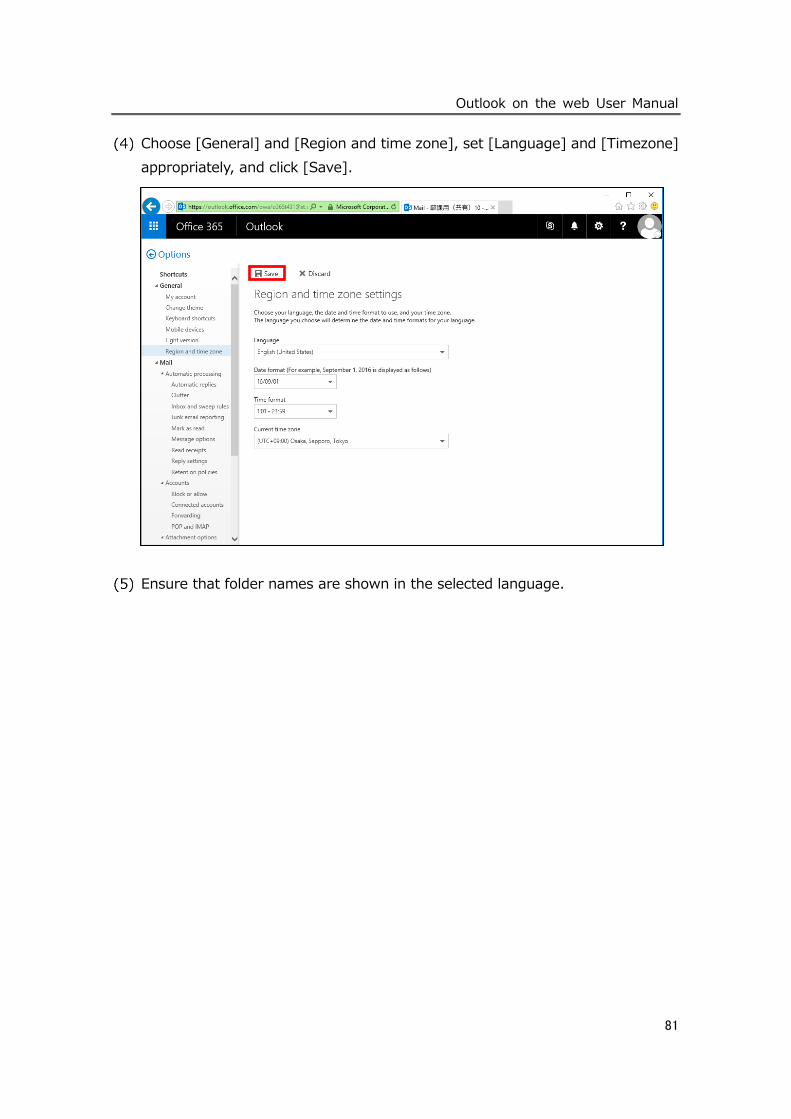
Choose [General] and [Region and time zone], set [Language] and [Timezone]
appropriately, and click [Save].
Ensure that folder names are shown in the selected language.
Outlook on the web User Manual
82
Opening Shared Email
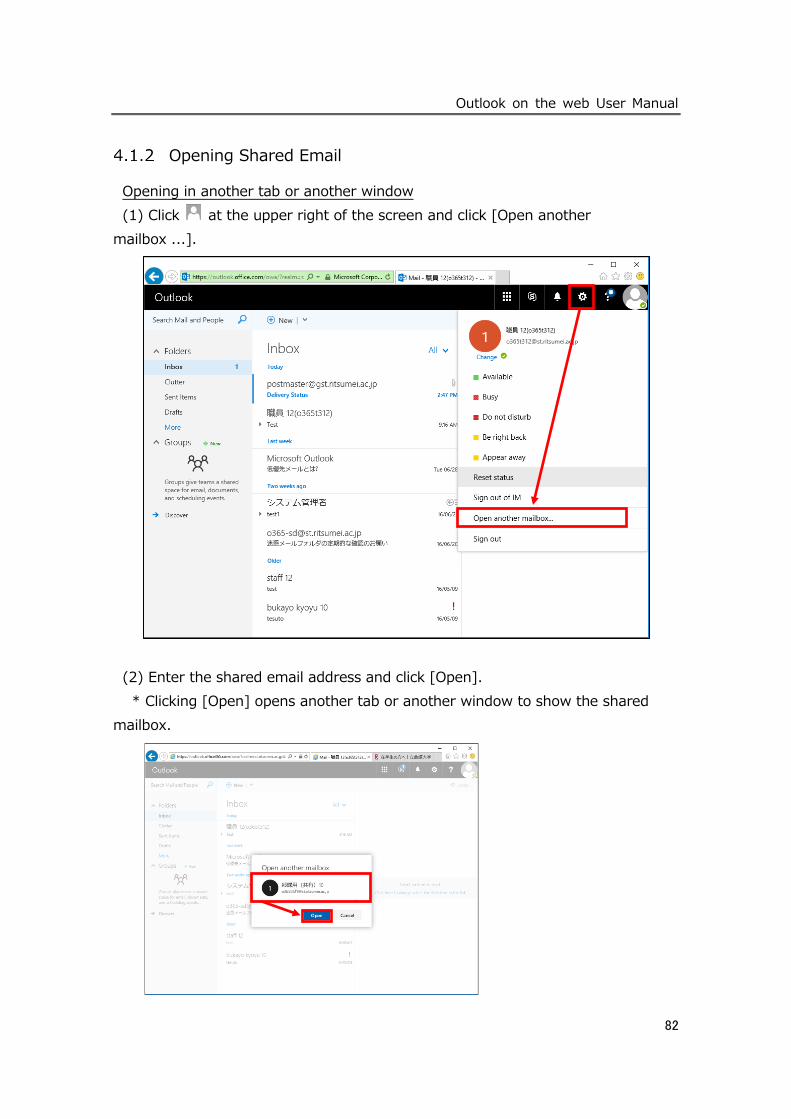
Opening in another tab or another window
(1) Click at the upper right of the screen and click [Open another
mailbox ...].
(2) Enter the shared email address and click [Open].
* Clicking [Open] opens another tab or another window to show the shared
mailbox.
Outlook on the web User Manual
83
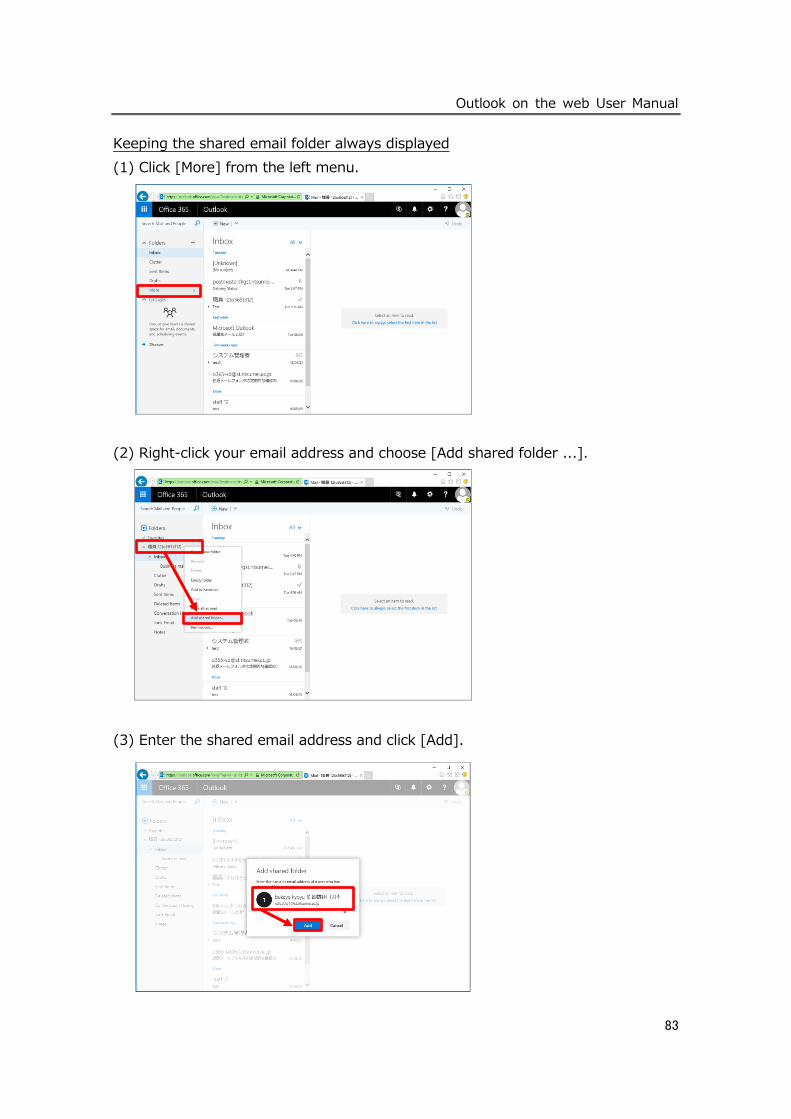
Keeping the shared email folder always displayed
(1) Click [More] from the left menu.
(2) Right-click your email address and choose [Add shared folder ...].
(3) Enter the shared email address and click [Add].
Outlook on the web User Manual
84
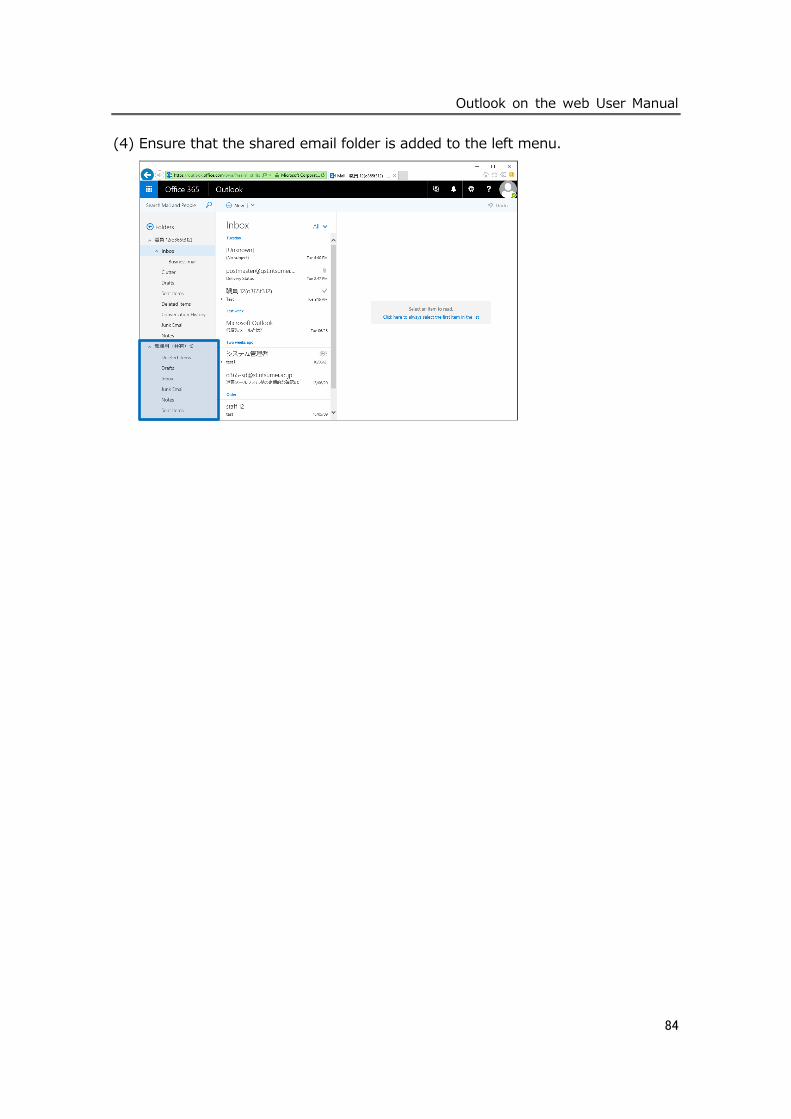
(4) Ensure that the shared email folder is added to the left menu.
Outlook on the web User Manual
85
4.2 Managing Users (Members and Administrators)
You can add, change, or delete email addresses of members who use shared
emails on Outlook on the web.
■Description
• The shared email administrator can be add or changed by an administrator himself/herself. It is not necessary to apply to the Information System Department. Each department can manage the administrator. • Be sure to perform this procedure when the administrator is changed due to personnel changes. • Perform this procedure in Outlook on the web. You cannot use Outlook for this purpose. • Multiple shared email administrator can be assigned. • If the administrator should be deleted by mistake, it will not be possible to manage shared email users. Be very careful when deleting the administrator. • An email address outside the organization cannot be registered. • If it is not possible to change the administrator (e.g., when the administrator left the office), contact the Information System Department. • A “system administrator” managed by the Information System Department is included in the administrators. NEVER DELETE the system administrator.
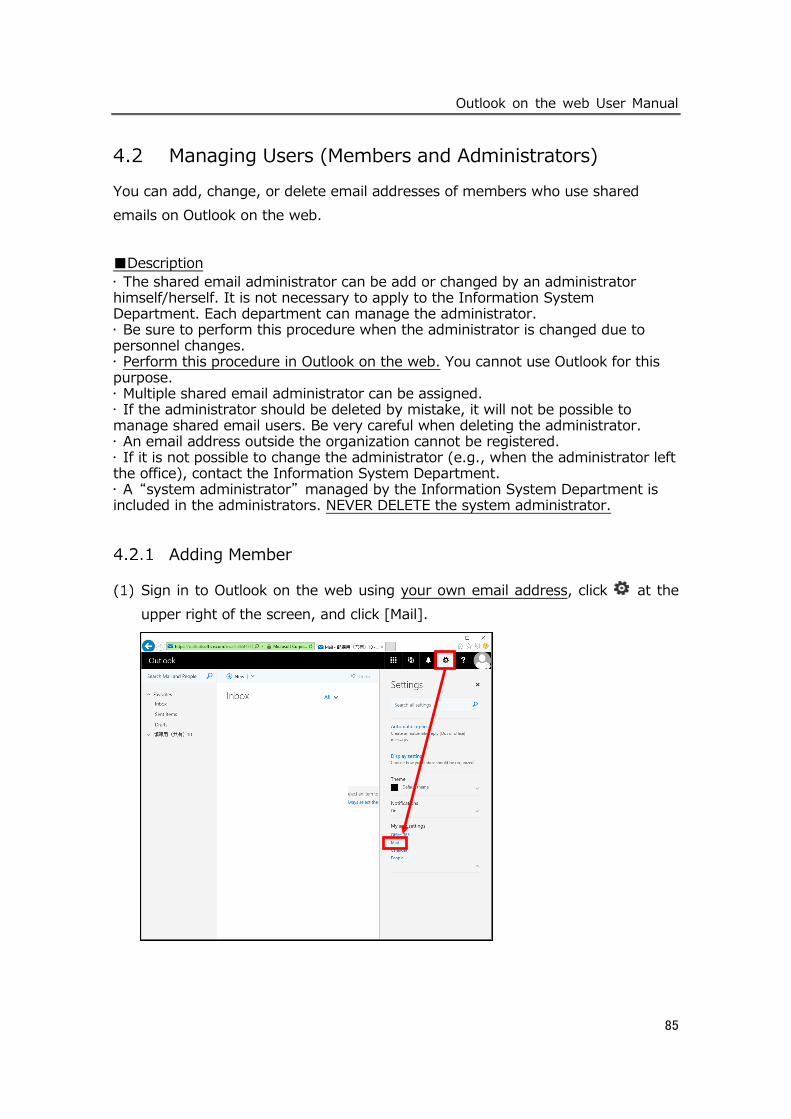
Adding Member
Sign in to Outlook on the web using your own email address, click at the
upper right of the screen, and click [Mail].
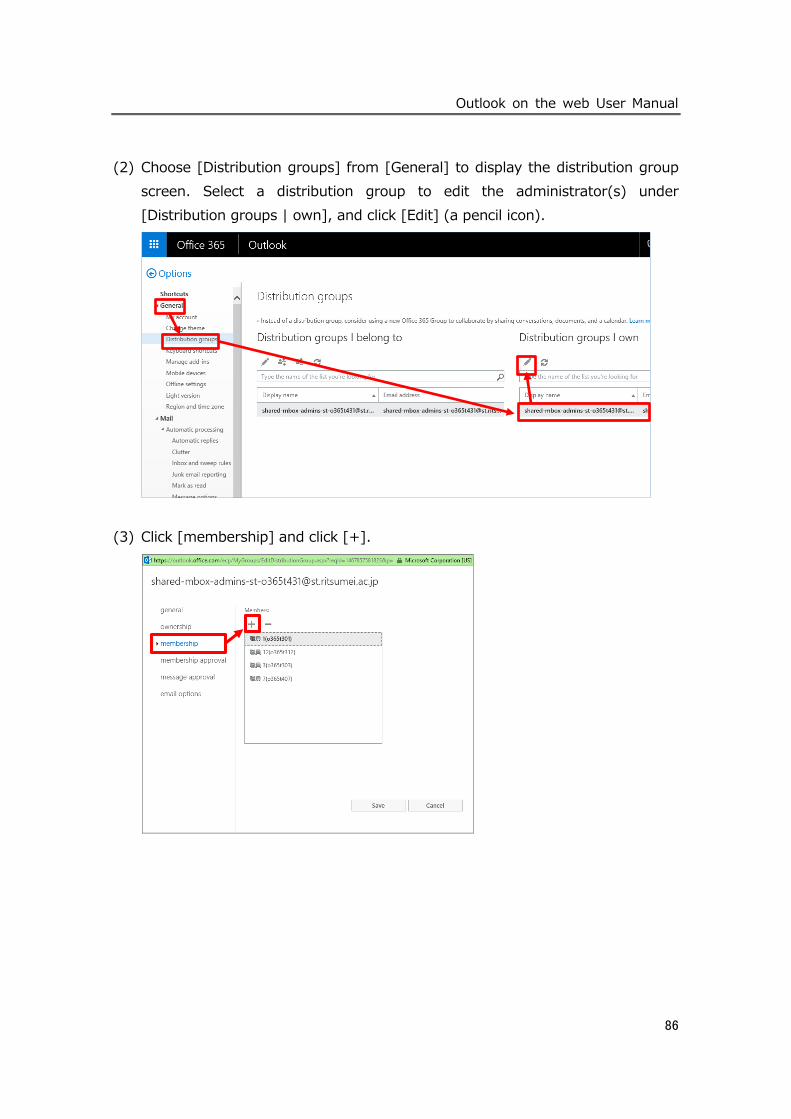
Outlook on the web User Manual
86
(2) Choose [Distribution groups] from [General] to display the distribution group
screen. Select a distribution group to edit the administrator(s) under
[Distribution groups | own], and click [Edit] (a pencil icon).
(3) Click [membership] and click [+].
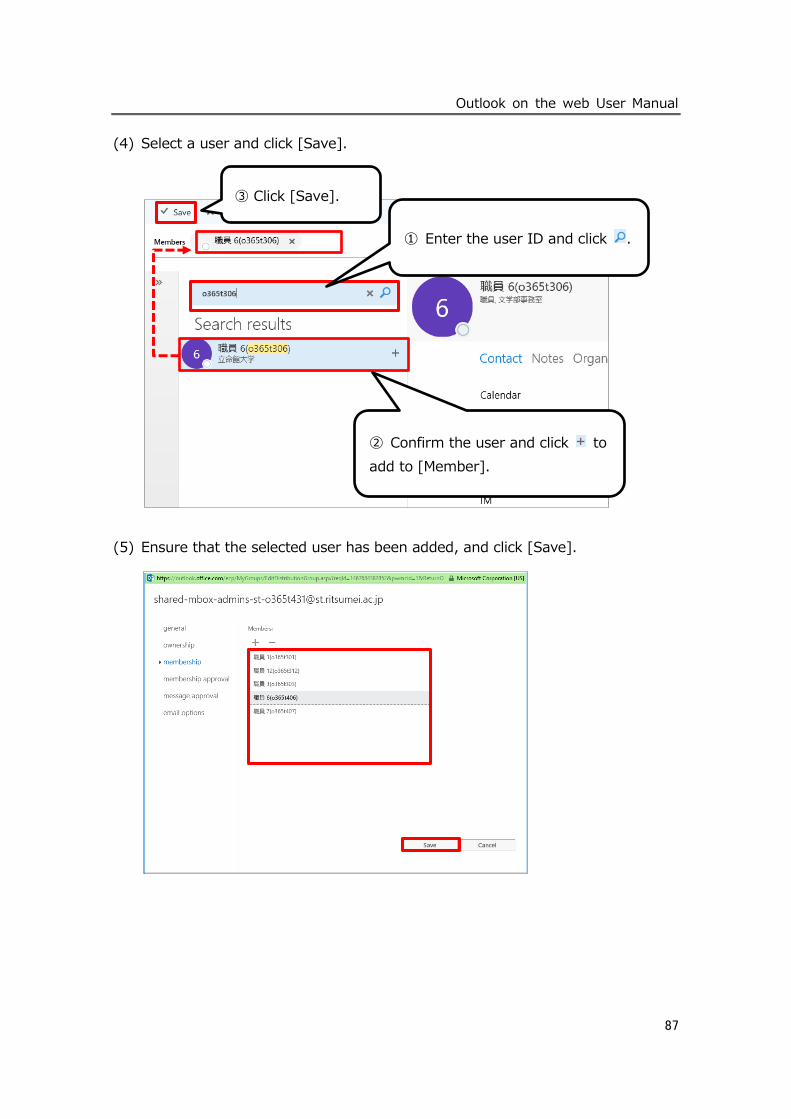
Outlook on the web User Manual
87
(4) Select a user and click [Save].
(5) Ensure that the selected user has been added, and click [Save].
① Enter the user ID and click .
② Confirm the user and click to
add to [Member].
③ Click [Save].
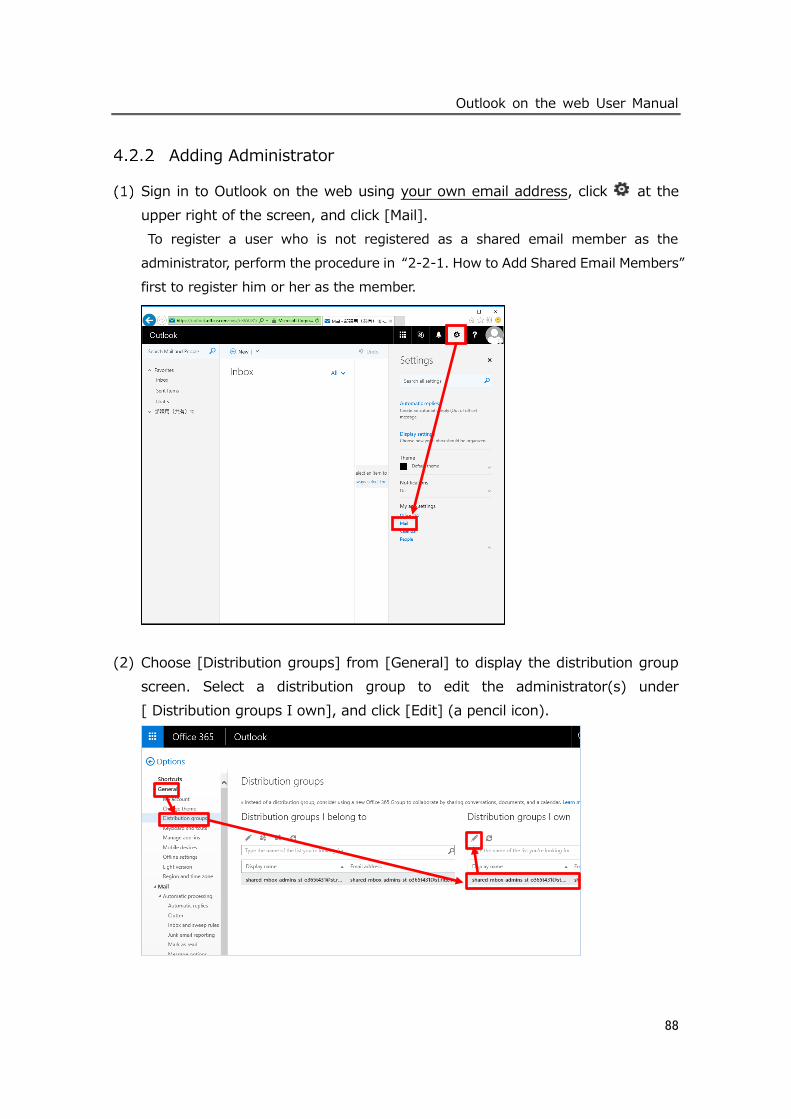
Outlook on the web User Manual
88
Adding Administrator
Sign in to Outlook on the web using your own email address, click at the
upper right of the screen, and click [Mail].
To register a user who is not registered as a shared email member as the
administrator, perform the procedure in “2-2-1. How to Add Shared Email Members”
first to register him or her as the member.
(2) Choose [Distribution groups] from [General] to display the distribution group
screen. Select a distribution group to edit the administrator(s) under
[ Distribution groups I own], and click [Edit] (a pencil icon).
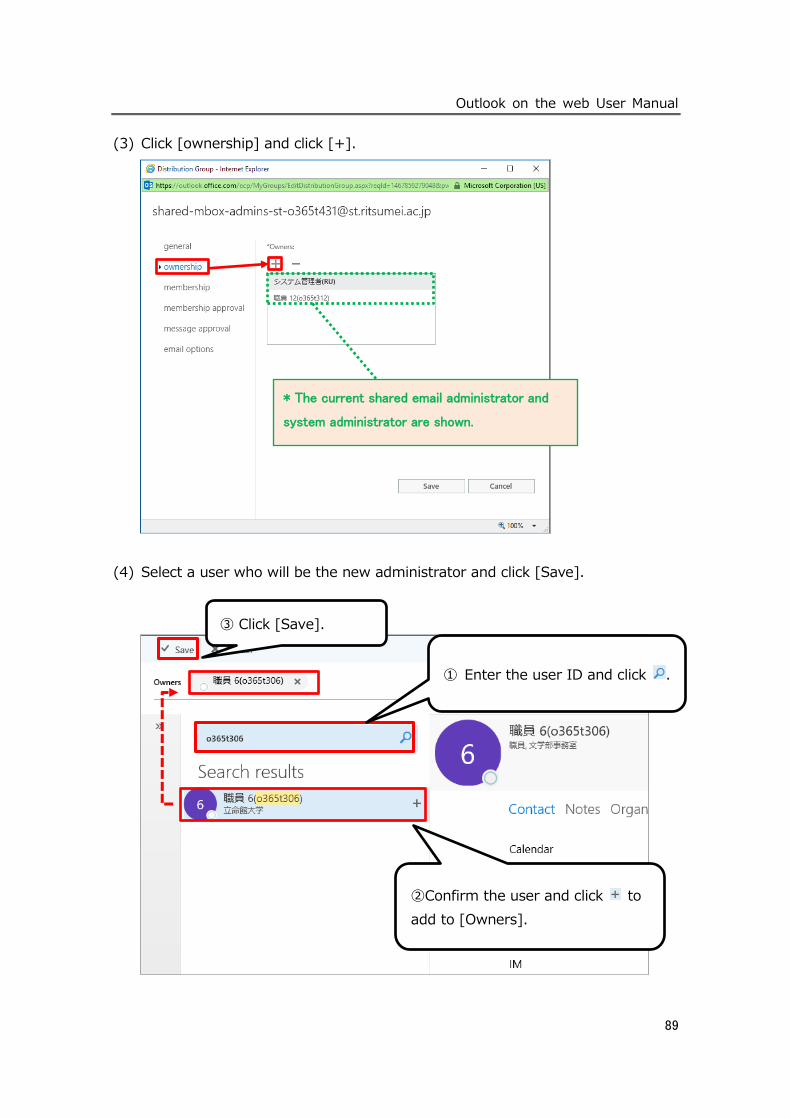
Outlook on the web User Manual
89
(3) Click [ownership] and click [+].
(4) Select a user who will be the new administrator and click [Save].
* The current shared email administrator and
system administrator are shown.
① Enter the user ID and click .
②Confirm the user and click to
add to [Owners].
③ Click [Save].
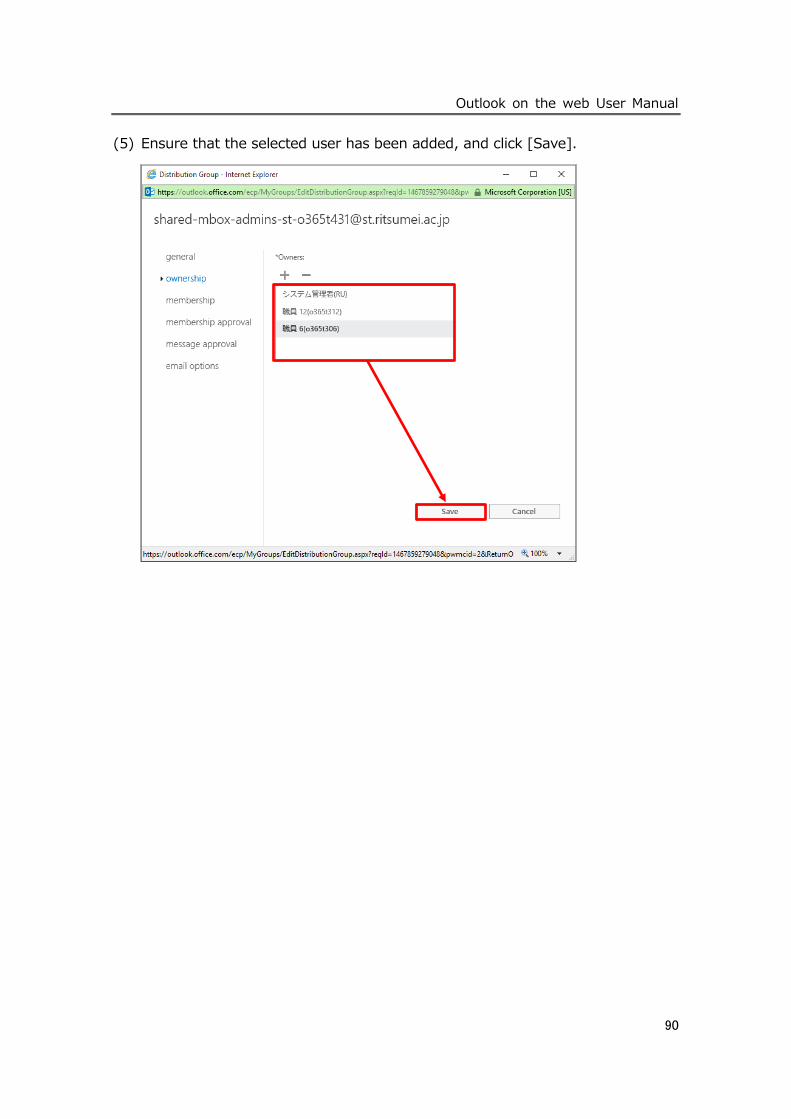
Outlook on the web User Manual
90
(5) Ensure that the selected user has been added, and click [Save].
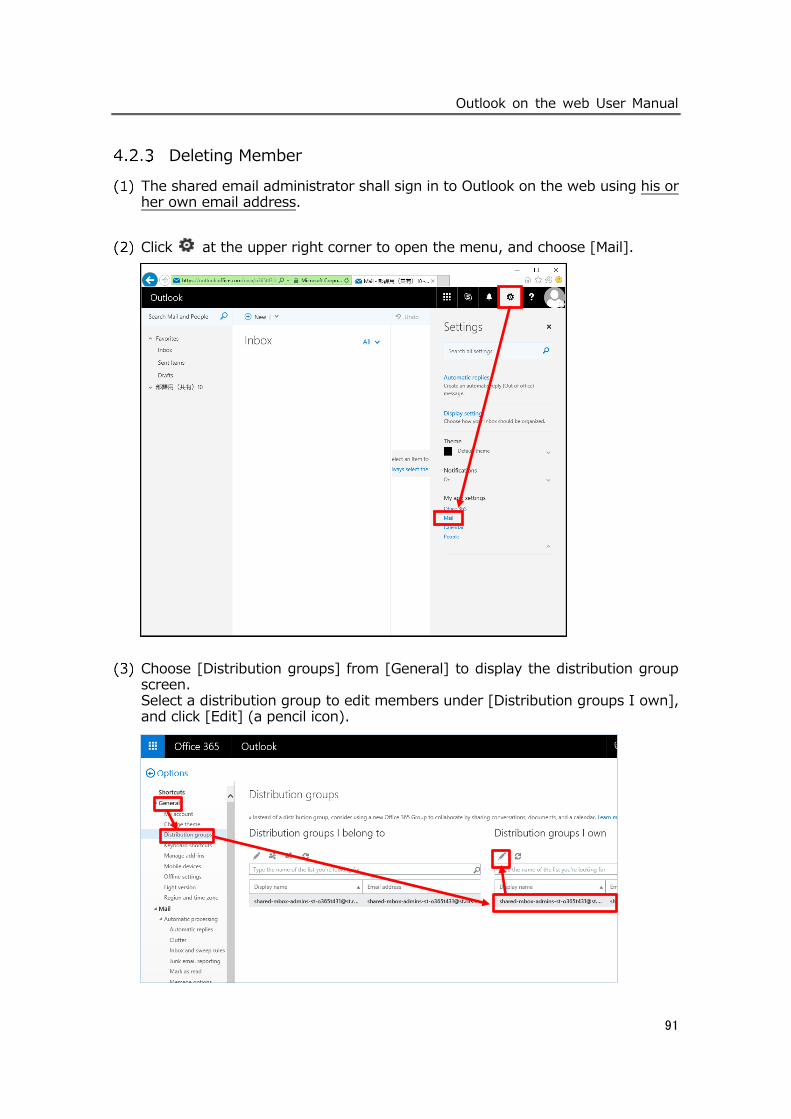
Outlook on the web User Manual
91
Deleting Member
The shared email administrator shall sign in to Outlook on the web using his or her own email address.
Click at the upper right corner to open the menu, and choose [Mail].
Choose [Distribution groups] from [General] to display the distribution group screen. Select a distribution group to edit members under [Distribution groups I own], and click [Edit] (a pencil icon).
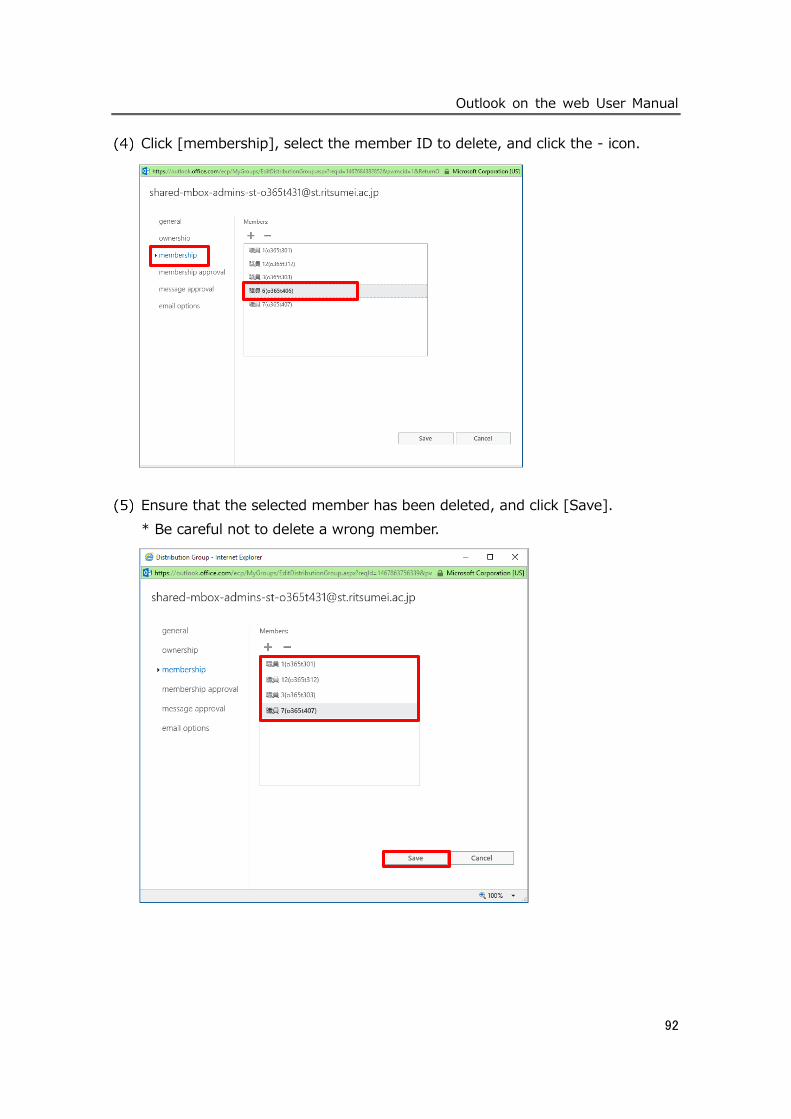
Outlook on the web User Manual
92
Click [membership], select the member ID to delete, and click the - icon.
Ensure that the selected member has been deleted, and click [Save].
* Be careful not to delete a wrong member.
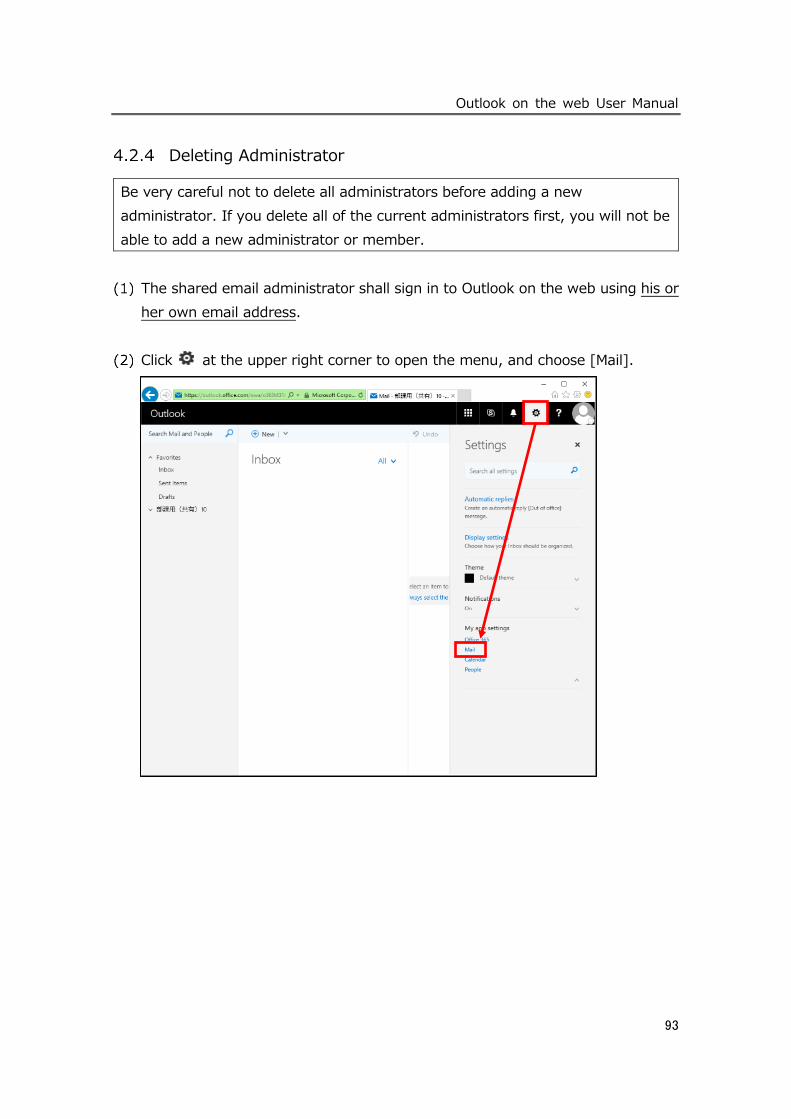
Outlook on the web User Manual
93
Deleting Administrator
Be very careful not to delete all administrators before adding a new
administrator. If you delete all of the current administrators first, you will not be
able to add a new administrator or member.
The shared email administrator shall sign in to Outlook on the web using his or
her own email address.
Click at the upper right corner to open the menu, and choose [Mail].
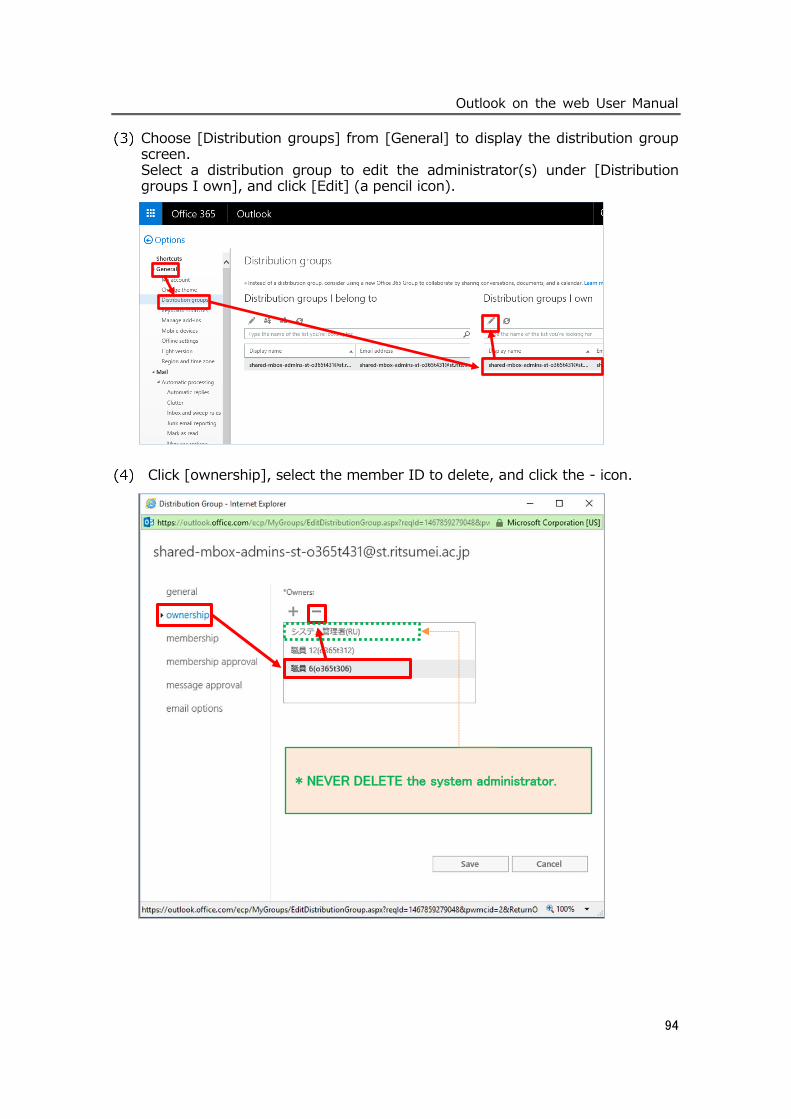
Outlook on the web User Manual
94
Choose [Distribution groups] from [General] to display the distribution group screen. Select a distribution group to edit the administrator(s) under [Distribution groups I own], and click [Edit] (a pencil icon).
Click [ownership], select the member ID to delete, and click the - icon.
* NEVER DELETE the system administrator.
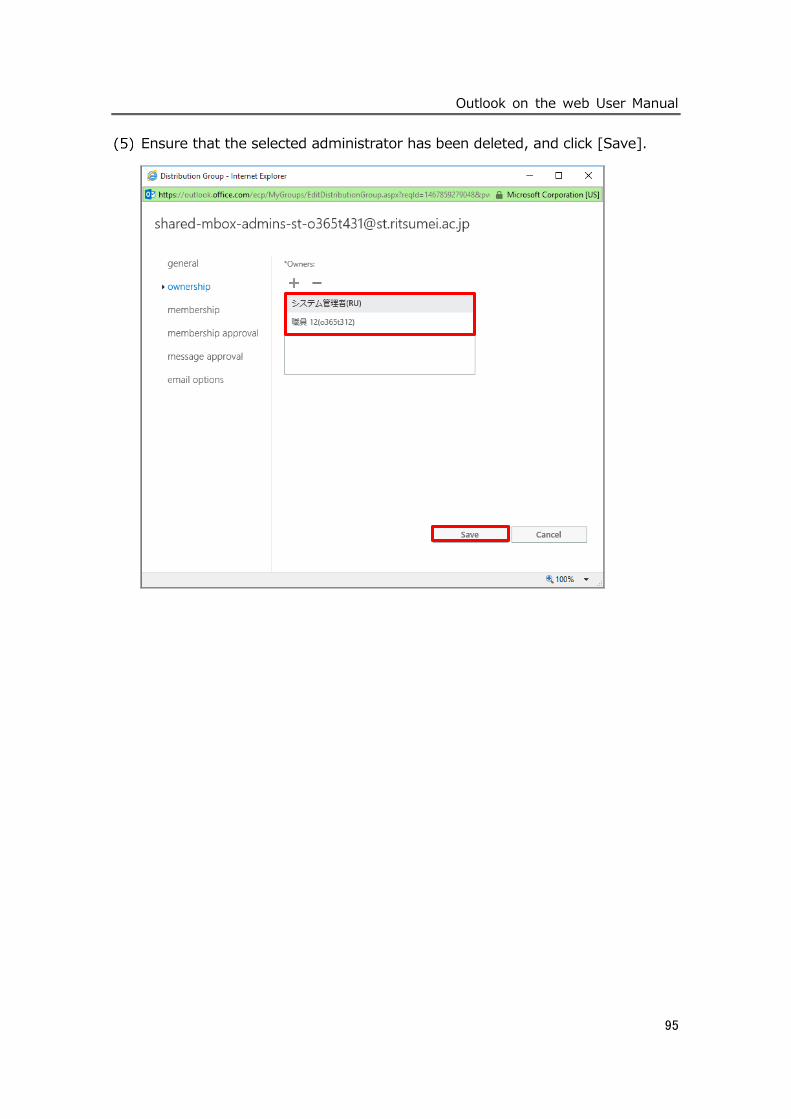
Outlook on the web User Manual
95
Ensure that the selected administrator has been deleted, and click [Save].
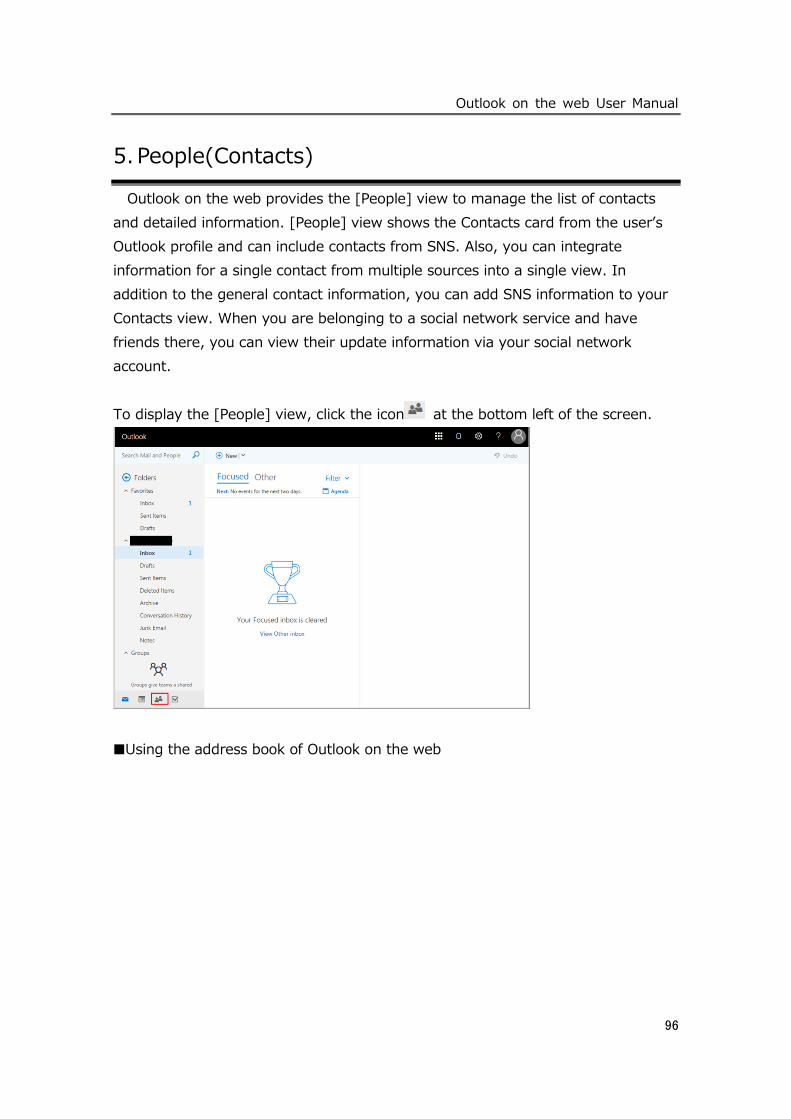
Outlook on the web User Manual
96
5. People(Contacts)
Outlook on the web provides the [People] view to manage the list of contacts
and detailed information. [People] view shows the Contacts card from the user’s
Outlook profile and can include contacts from SNS. Also, you can integrate
information for a single contact from multiple sources into a single view. In
addition to the general contact information, you can add SNS information to your
Contacts view. When you are belonging to a social network service and have
friends there, you can view their update information via your social network
account.
To display the [People] view, click the icon at the bottom left of the screen.
■Using the address book of Outlook on the web
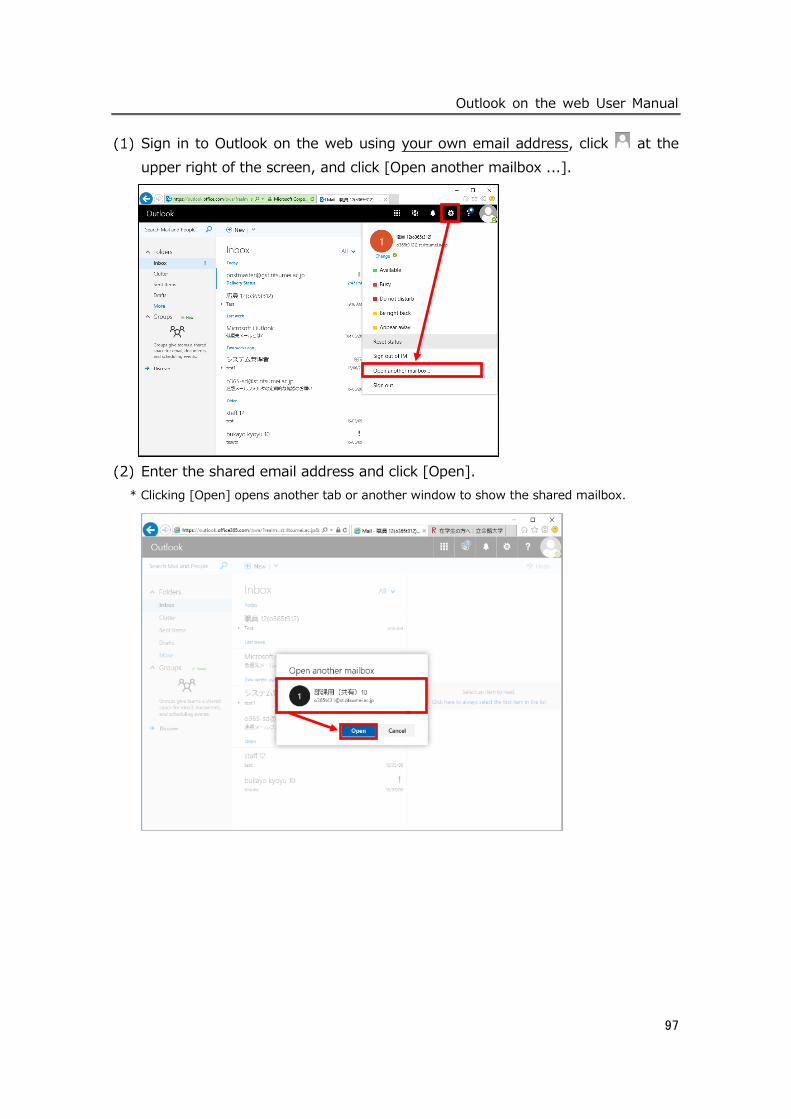
Outlook on the web User Manual
97
Sign in to Outlook on the web using your own email address, click at the
upper right of the screen, and click [Open another mailbox ...].
Enter the shared email address and click [Open].
* Clicking [Open] opens another tab or another window to show the shared mailbox.
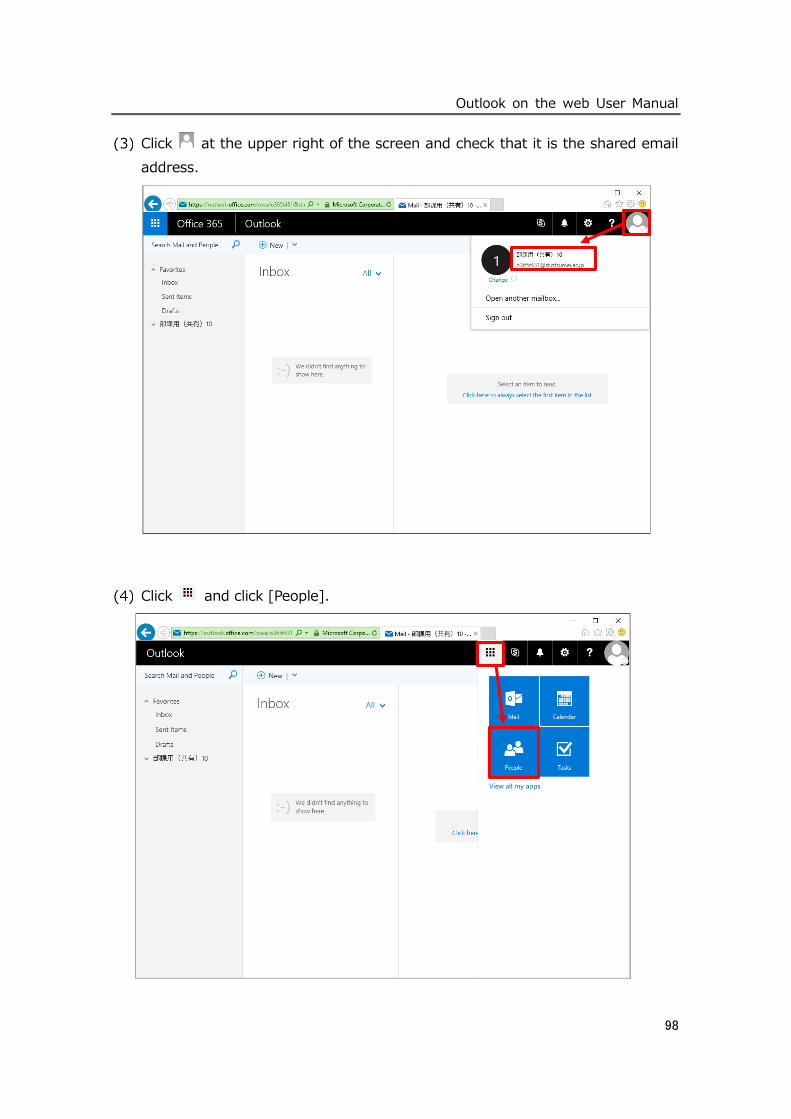
Outlook on the web User Manual
98
Click at the upper right of the screen and check that it is the shared email
address.
Click and click [People].
Outlook on the web User Manual
99
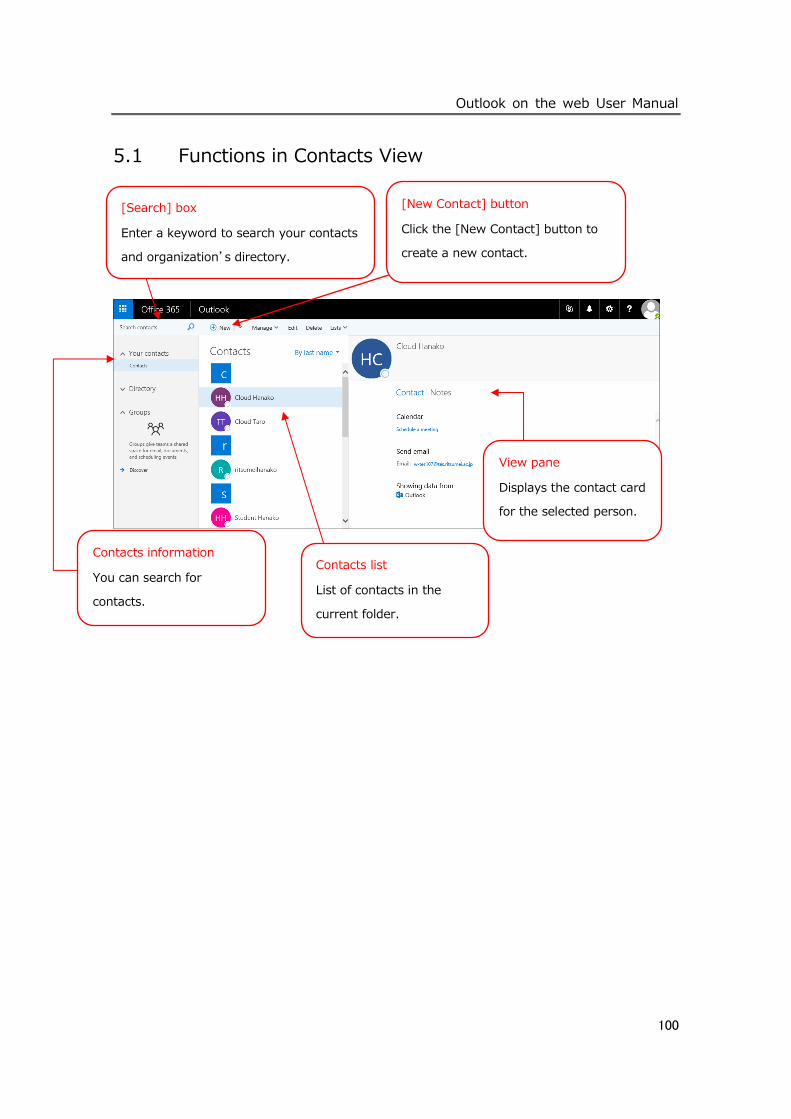
Outlook on the web User Manual
100
5.1 Functions in Contacts View
[New Contact] button
Click the [New Contact] button to
create a new contact.
[Search] box
Enter a keyword to search your contacts
and organization’s directory.
Contacts information
You can search for
contacts.
Contacts list
List of contacts in the
current folder.
View pane
Displays the contact card
for the selected person.
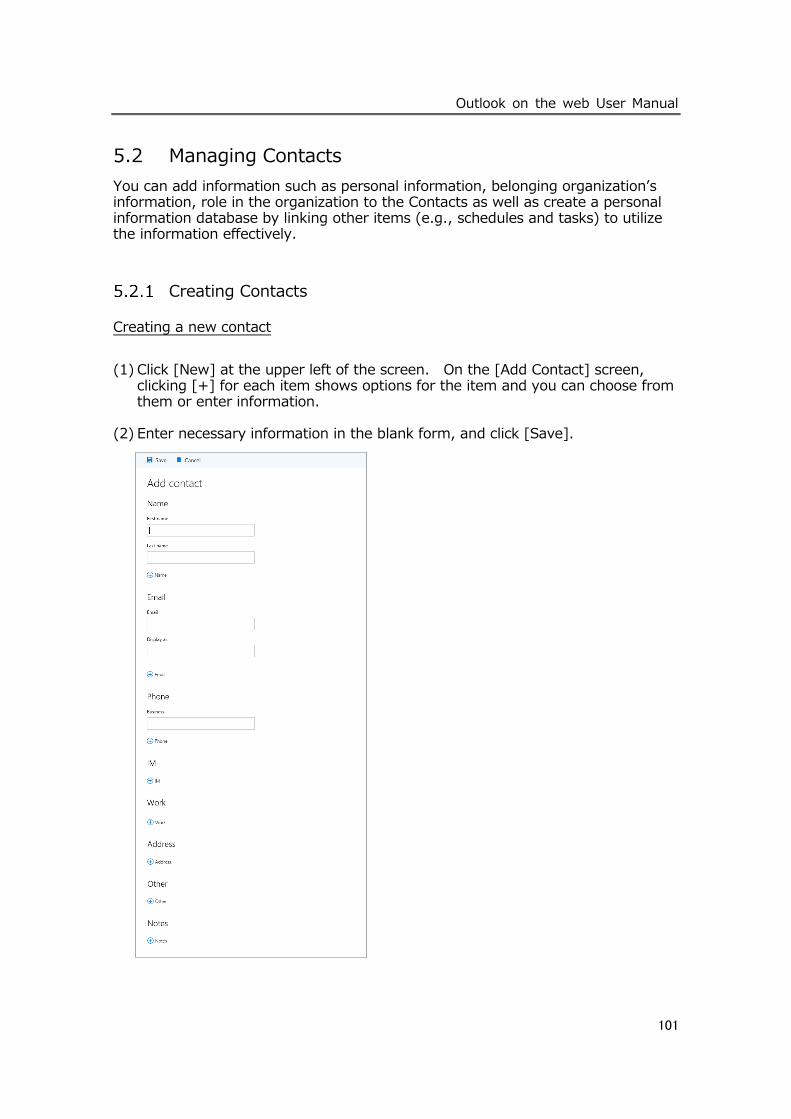
Outlook on the web User Manual
101
5.2 Managing Contacts
You can add information such as personal information, belonging organization’s information, role in the organization to the Contacts as well as create a personal information database by linking other items (e.g., schedules and tasks) to utilize the information effectively.
Creating Contacts
Creating a new contact
(1) Click [New] at the upper left of the screen. On the [Add Contact] screen, clicking [+] for each item shows options for the item and you can choose from them or enter information.
(2) Enter necessary information in the blank form, and click [Save].
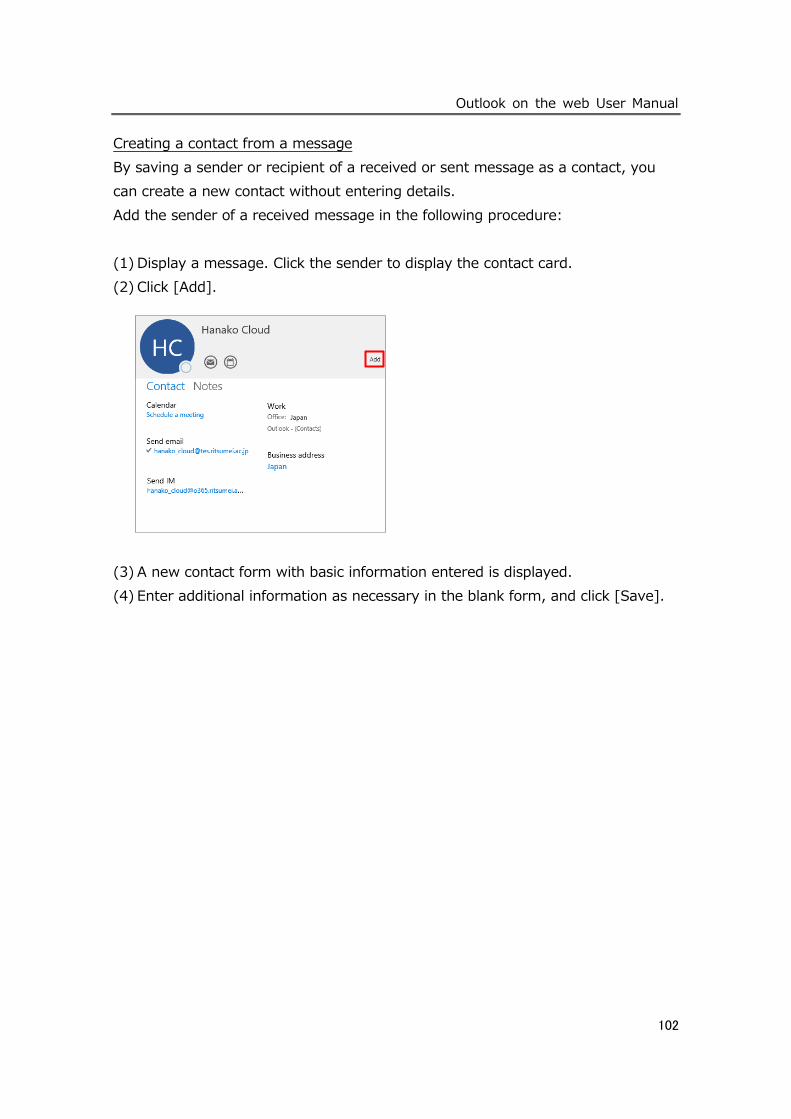
Outlook on the web User Manual
102
Creating a contact from a message
By saving a sender or recipient of a received or sent message as a contact, you
can create a new contact without entering details.
Add the sender of a received message in the following procedure:
(1) Display a message. Click the sender to display the contact card.
(2) Click [Add].
(3) A new contact form with basic information entered is displayed.
(4) Enter additional information as necessary in the blank form, and click [Save].
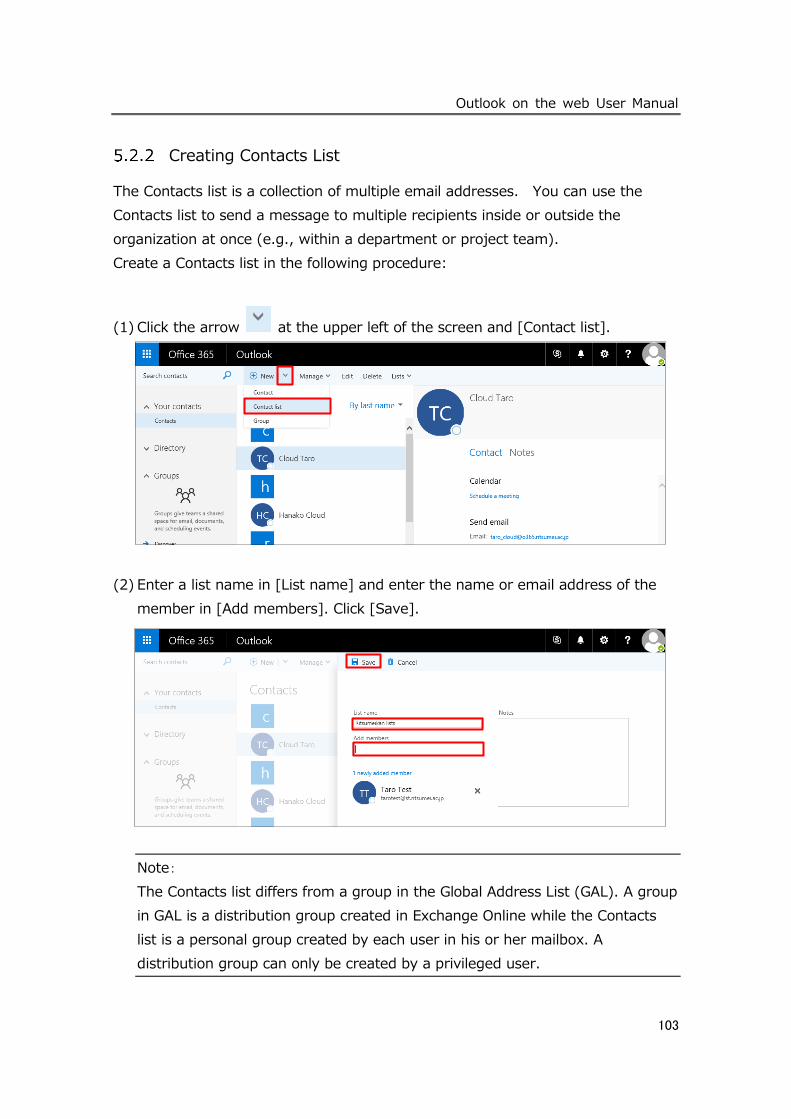
Outlook on the web User Manual
103
Creating Contacts List
The Contacts list is a collection of multiple email addresses. You can use the
Contacts list to send a message to multiple recipients inside or outside the
organization at once (e.g., within a department or project team).
Create a Contacts list in the following procedure:
(1) Click the arrow at the upper left of the screen and [Contact list].
(2) Enter a list name in [List name] and enter the name or email address of the
member in [Add members]. Click [Save].
Note:
The Contacts list differs from a group in the Global Address List (GAL). A group
in GAL is a distribution group created in Exchange Online while the Contacts
list is a personal group created by each user in his or her mailbox. A
distribution group can only be created by a privileged user.
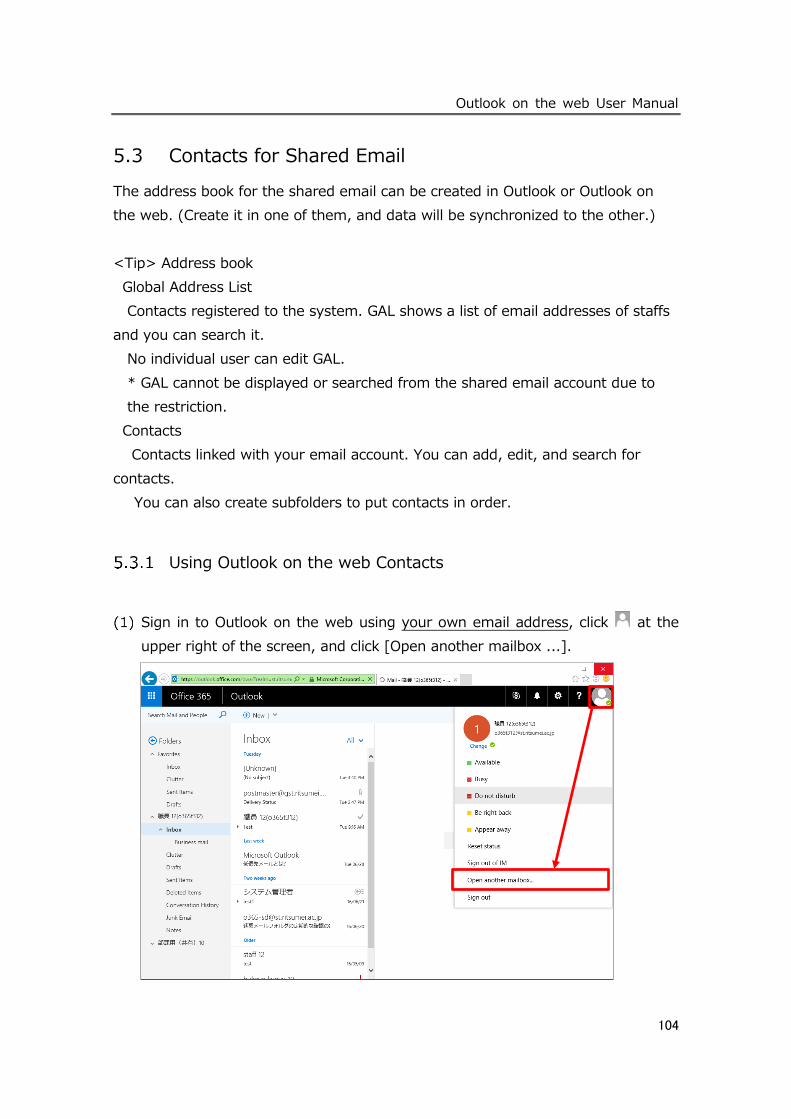
Outlook on the web User Manual
104
5.3 Contacts for Shared Email
The address book for the shared email can be created in Outlook or Outlook on
the web. (Create it in one of them, and data will be synchronized to the other.)
<Tip> Address book
Global Address List
Contacts registered to the system. GAL shows a list of email addresses of staffs
and you can search it.
No individual user can edit GAL.
* GAL cannot be displayed or searched from the shared email account due to
the restriction.
Contacts
Contacts linked with your email account. You can add, edit, and search for
contacts.
You can also create subfolders to put contacts in order.
Using Outlook on the web Contacts
Sign in to Outlook on the web using your own email address, click at the
upper right of the screen, and click [Open another mailbox ...].
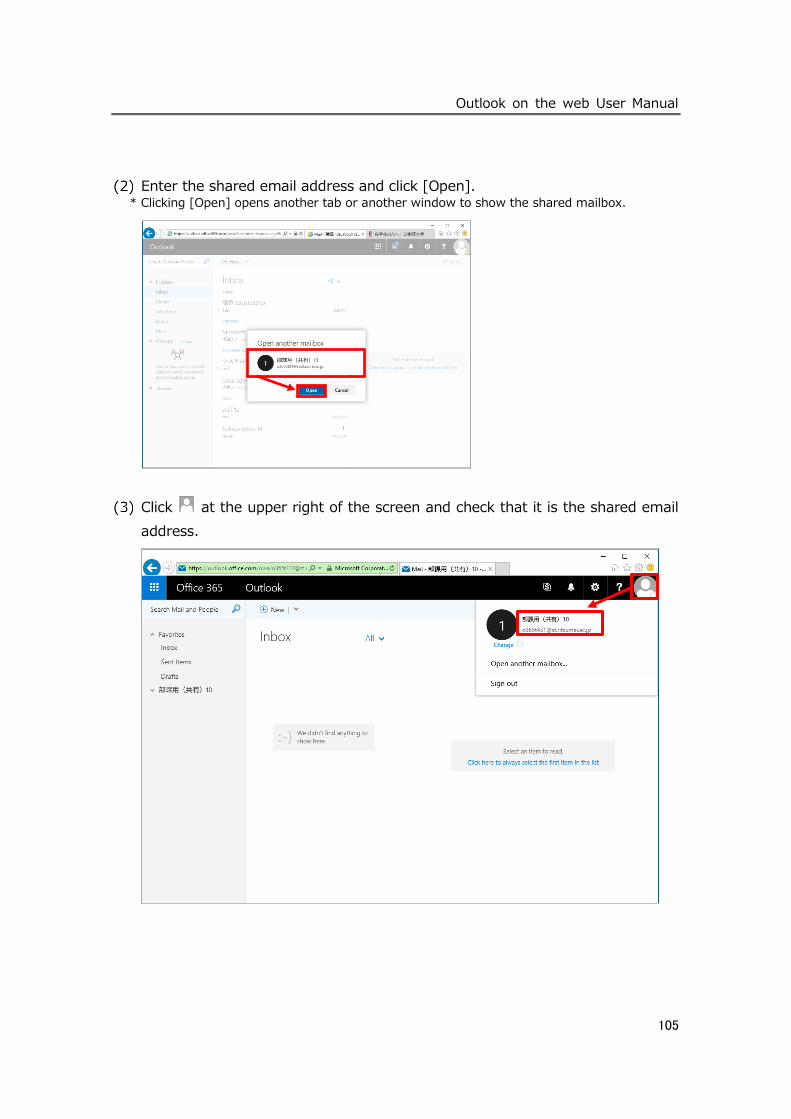
Outlook on the web User Manual
105
Enter the shared email address and click [Open]. * Clicking [Open] opens another tab or another window to show the shared mailbox.
Click at the upper right of the screen and check that it is the shared email
address.
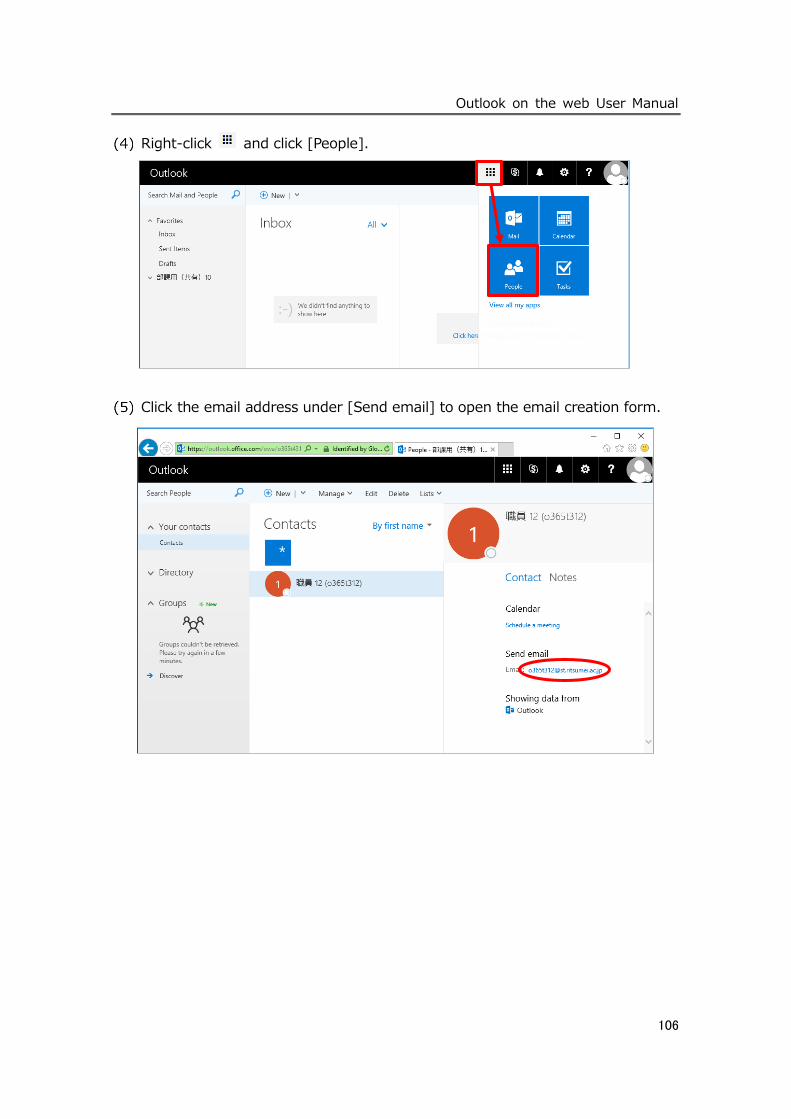
Outlook on the web User Manual
106
Right-click and click [People].
Click the email address under [Send email] to open the email creation form.
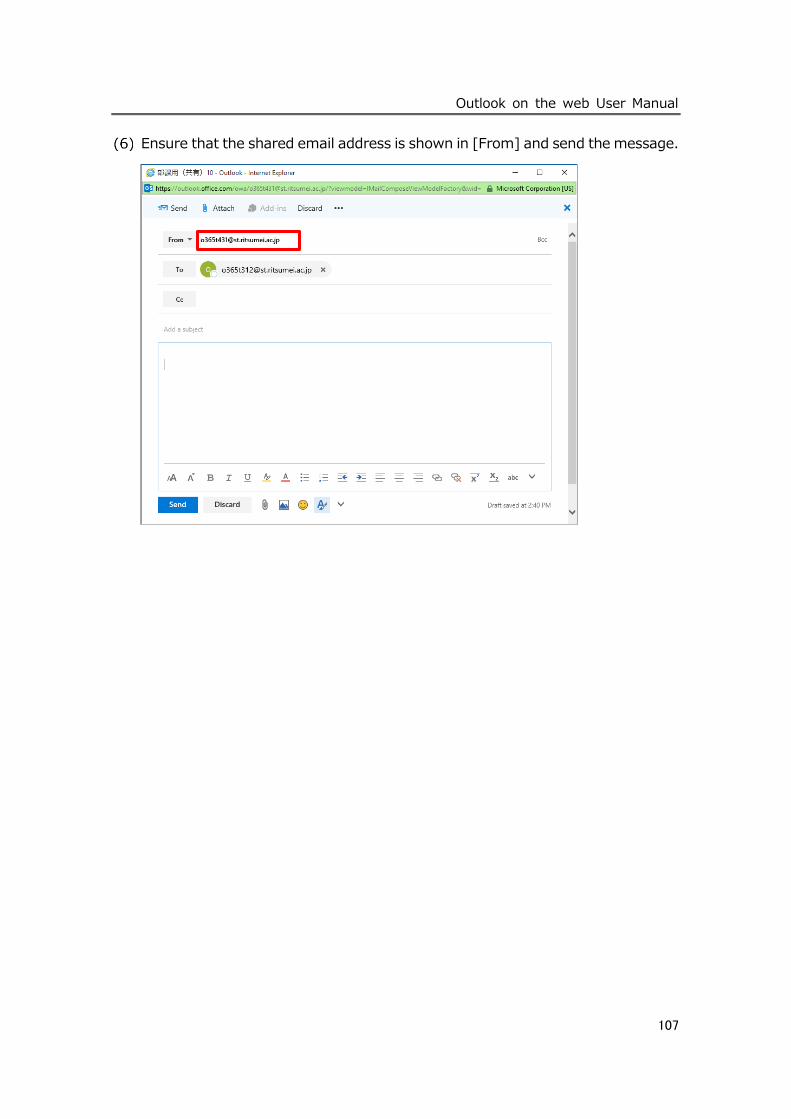
Outlook on the web User Manual
107
Ensure that the shared email address is shown in [From] and send the message.
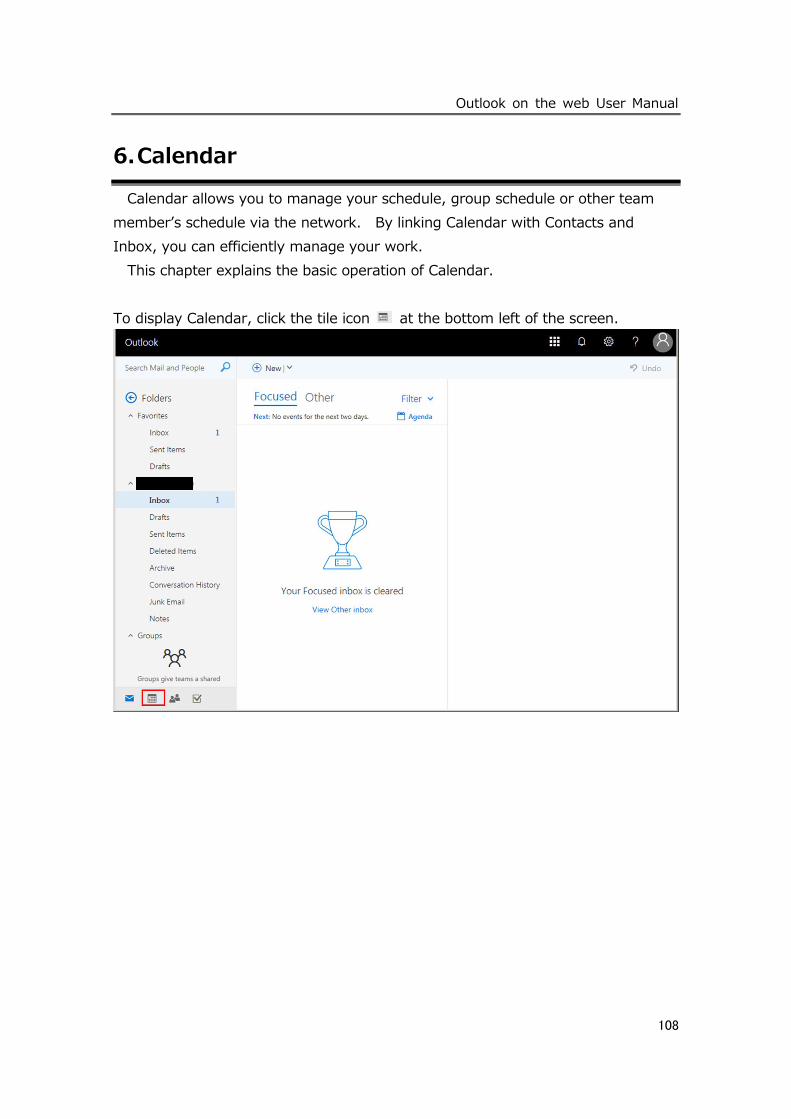
Outlook on the web User Manual
108
6. Calendar
Calendar allows you to manage your schedule, group schedule or other team
member’s schedule via the network. By linking Calendar with Contacts and
Inbox, you can efficiently manage your work.
This chapter explains the basic operation of Calendar.
To display Calendar, click the tile icon at the bottom left of the screen.
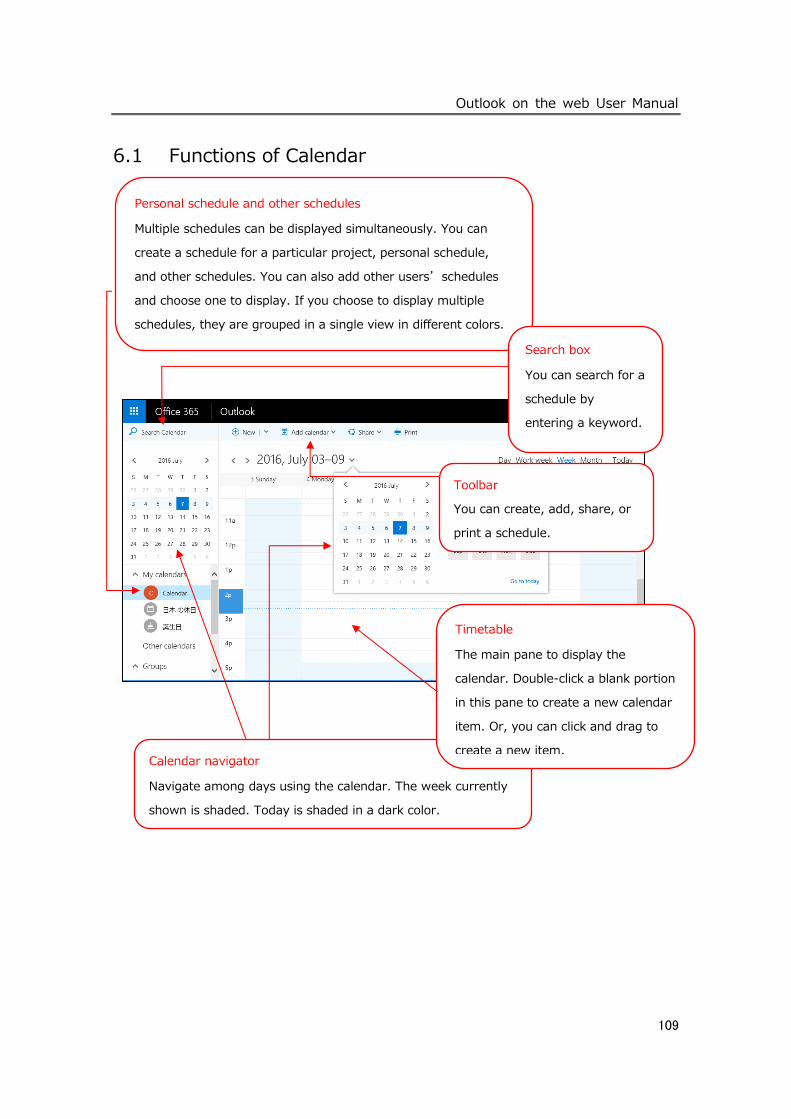
Outlook on the web User Manual
109
6.1 Functions of Calendar
Toolbar
You can create, add, share, or
print a schedule.
Calendar navigator
Navigate among days using the calendar. The week currently
shown is shaded. Today is shaded in a dark color.
Timetable
The main pane to display the
calendar. Double-click a blank portion
in this pane to create a new calendar
item. Or, you can click and drag to
create a new item.
Personal schedule and other schedules
Multiple schedules can be displayed simultaneously. You can
create a schedule for a particular project, personal schedule,
and other schedules. You can also add other users’ schedules
and choose one to display. If you choose to display multiple
schedules, they are grouped in a single view in different colors.
Search box
You can search for a
schedule by
entering a keyword.
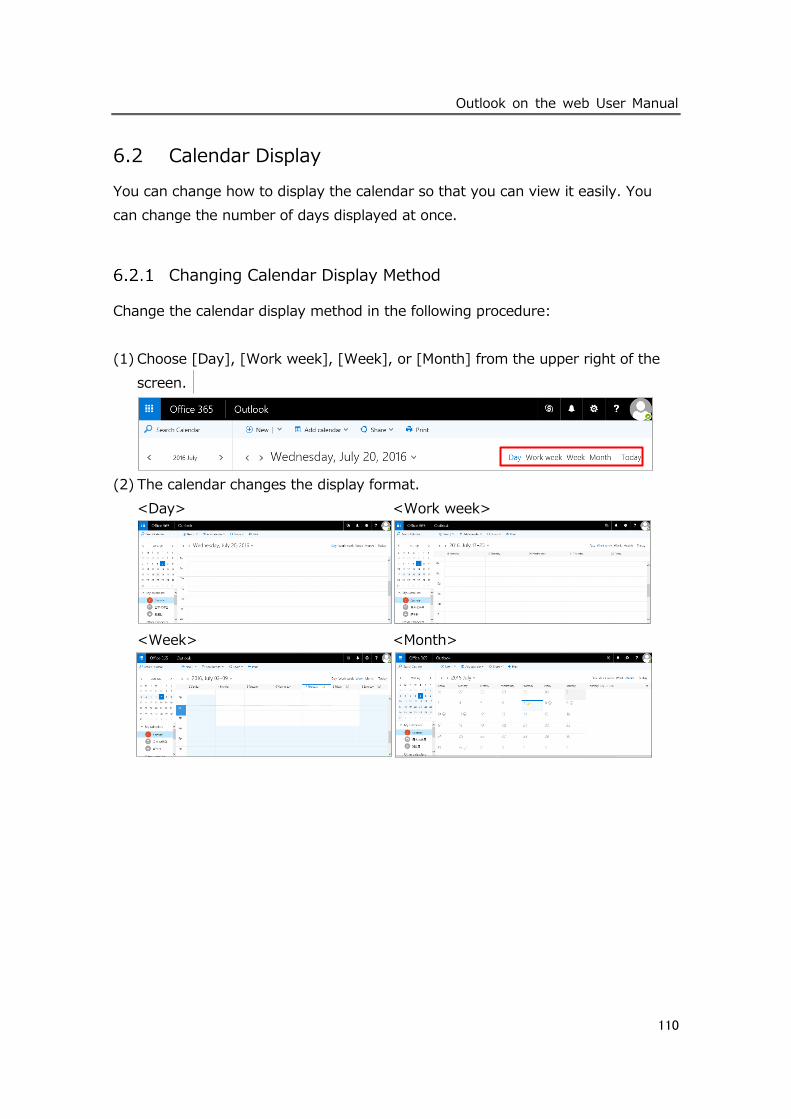
Outlook on the web User Manual
110
6.2 Calendar Display
You can change how to display the calendar so that you can view it easily. You
can change the number of days displayed at once.
Changing Calendar Display Method
Change the calendar display method in the following procedure:
(1) Choose [Day], [Work week], [Week], or [Month] from the upper right of the
screen.
(2) The calendar changes the display format.
<Day> <Work week>
<Week> <Month>
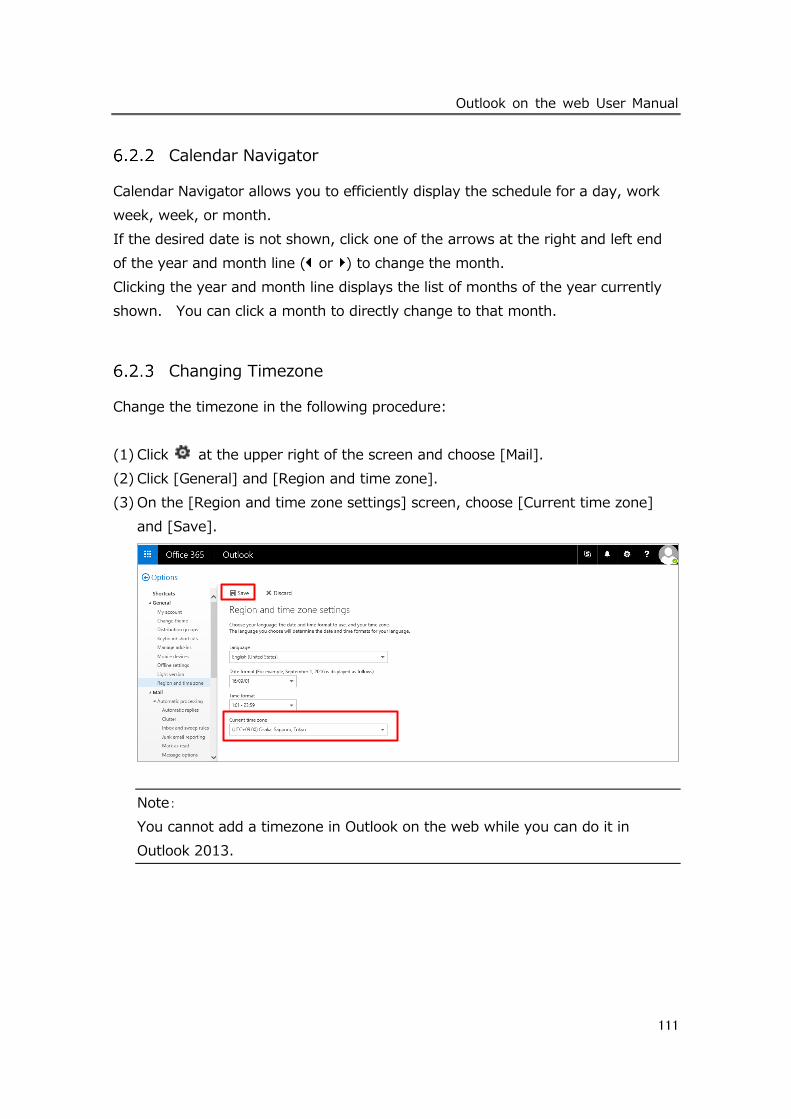
Outlook on the web User Manual
111
Calendar Navigator
Calendar Navigator allows you to efficiently display the schedule for a day, work
week, week, or month.
If the desired date is not shown, click one of the arrows at the right and left end
of the year and month line ( or ) to change the month.
Clicking the year and month line displays the list of months of the year currently
shown. You can click a month to directly change to that month.
Changing Timezone
Change the timezone in the following procedure:
(1) Click at the upper right of the screen and choose [Mail].
(2) Click [General] and [Region and time zone].
(3) On the [Region and time zone settings] screen, choose [Current time zone]
and [Save].
Note:
You cannot add a timezone in Outlook on the web while you can do it in
Outlook 2013.
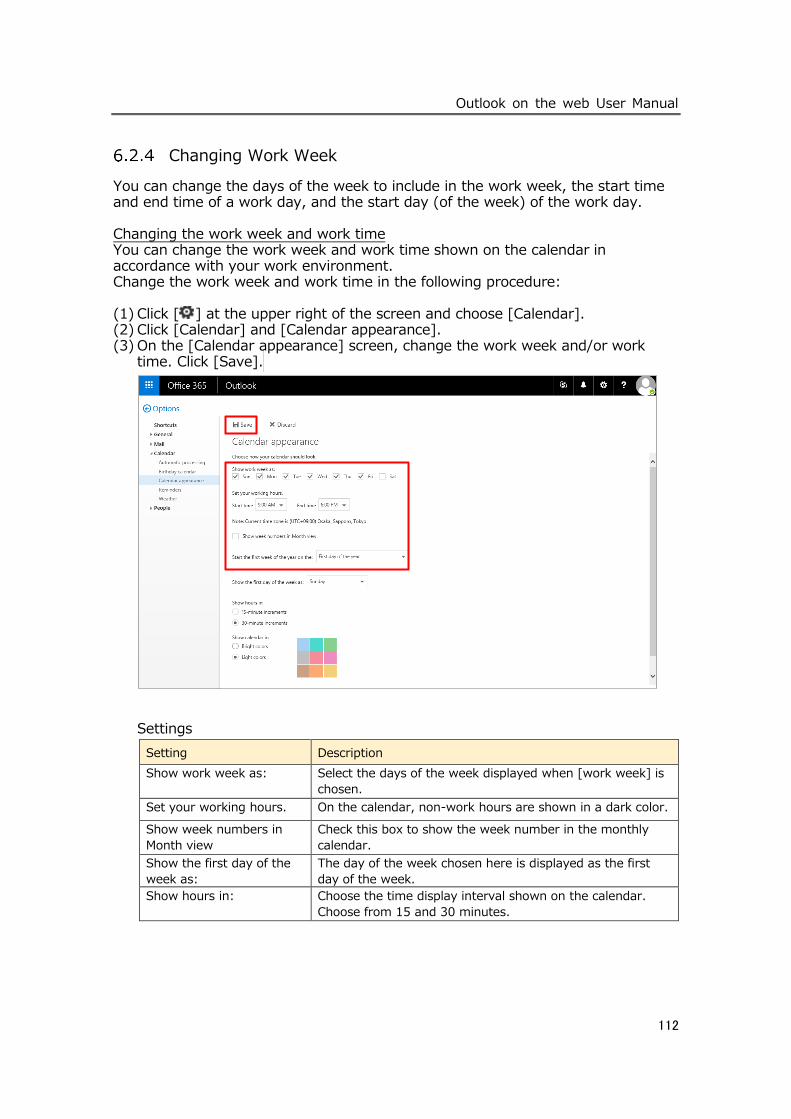
Outlook on the web User Manual
112
Changing Work Week
You can change the days of the week to include in the work week, the start time and end time of a work day, and the start day (of the week) of the work day. Changing the work week and work time You can change the work week and work time shown on the calendar in accordance with your work environment. Change the work week and work time in the following procedure: (1) Click [ ] at the upper right of the screen and choose [Calendar]. (2) Click [Calendar] and [Calendar appearance]. (3) On the [Calendar appearance] screen, change the work week and/or work
time. Click [Save].
Settings
Setting Description
Show work week as: Select the days of the week displayed when [work week] is
chosen.
Set your working hours. On the calendar, non-work hours are shown in a dark color.
Show week numbers in
Month view
Check this box to show the week number in the monthly
calendar.
Show the first day of the
week as:
The day of the week chosen here is displayed as the first
day of the week.
Show hours in: Choose the time display interval shown on the calendar.
Choose from 15 and 30 minutes.
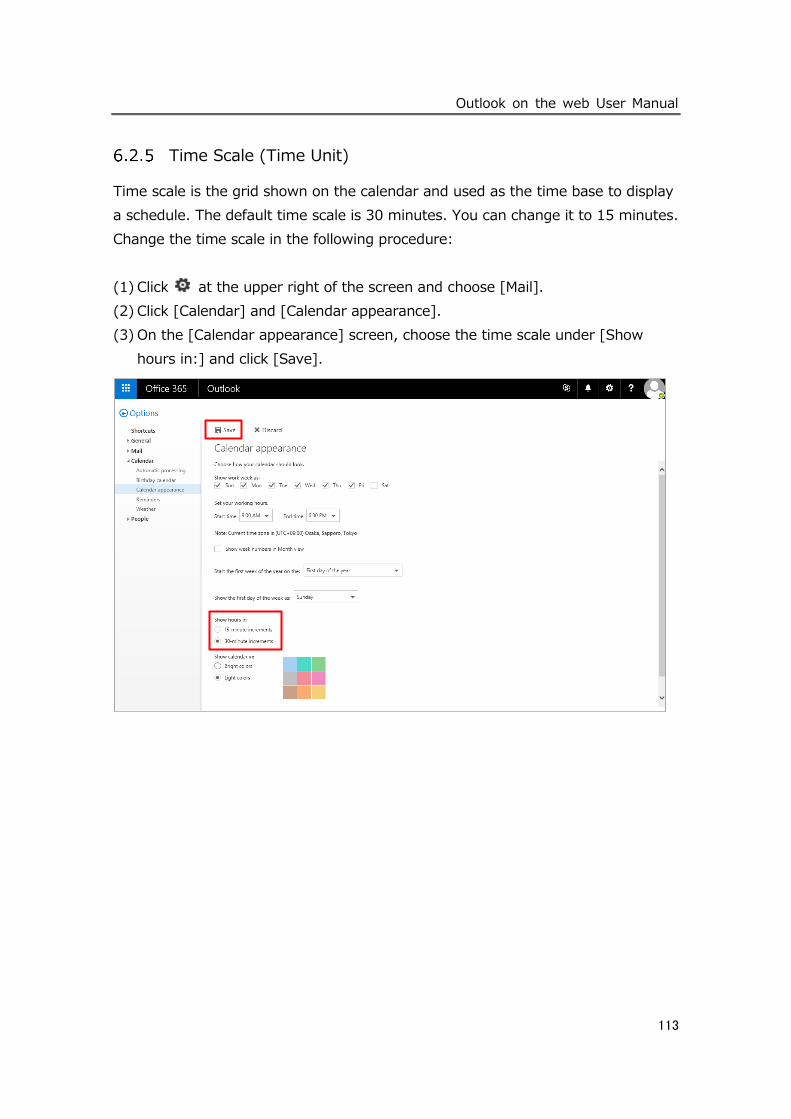
Outlook on the web User Manual
113
Time Scale (Time Unit)
Time scale is the grid shown on the calendar and used as the time base to display
a schedule. The default time scale is 30 minutes. You can change it to 15 minutes.
Change the time scale in the following procedure:
(1) Click at the upper right of the screen and choose [Mail].
(2) Click [Calendar] and [Calendar appearance].
(3) On the [Calendar appearance] screen, choose the time scale under [Show
hours in:] and click [Save].
Outlook on the web User Manual
114
6.3 Creating Calendar
You can perform tasks listed below using the calendar.
Task list
Task Description
Create
schedules and
events
Just like writing a schedule in your notebook, click the Calendar of
Outlook on the web and enter a schedule. You can set up an alarm
or message to remind you of a schedule, meeting, or event, or
display different items in different colors for clarification.
Hold a meeting Choose the time, create a schedule, and invite attendees. In Outlook
on the web, you can easily find the earliest time when all of the
attendees can attend. When you send an email for invitation to the
meeting, it will be shown under the Inbox of each attendee. When
the invited user opens the invitation email, Outlook on the web tells
the user if the meeting schedule conflicts with an existing item in his
or her item. The user can choose to accept, temporarily accept, or
reject the invitation by clicking an appropriate button. You can open
the meeting event to see who accepted, rejected, has not yet replied
to the invitation or requested for another date.
Display a group
schedule
You can create a schedule to display schedules of multiple persons or
resources. For example, you can display schedules of
all members of your department or meeting rooms of your company
to quickly plan a meeting.
Outlook on the web User Manual
115
Calendar Items
The calendar displays three items; schedule, meeting, and event.
Items
Item Description
Schedule A schedule is an activity which does not involve other members. You
can set an alarm to display a message to remind you of a schedule.
Also, you can publish your schedules such as [Busy], [Available],
[Temporarily busy], or [Out of Office] to others and control how
these schedules are published. Manage a schedule repeated weekly
or monthly as a regular schedule. Schedules are displayed daily,
weekly, or monthly.
Create schedules in your calendar. When you obtain the access
privilege to other users’ calendars, you can create and change
schedules in their calendars. You can hide your schedule.
Meeting A meeting is an activity which involves other staffs and/or resources.
You can set up an online meeting if such a service is provided in your
organization or over the Internet.
To set up a meeting, specify attendees, resources to reserve, and the
start time and end time. Replies to invitation to the meeting are
shown under the Inbox. A user who received the invitation to the
meeting can check other attendees’ schedules and request for a
different time. You can add attendees to the meeting already set up
and change the settings of the meeting.
Event An event is an activity lasting for longer than 24 hours. For example,
an exhibition, holiday, seminar are all events. An event is not shown
in the time frame of the calendar, but shown in the header. When
another user views your calendar, a schedule which lasts for more
than a day is shown as [Busy], but an event is shown as [Available].
A normal event is done just once and continues for one or more
days.

Outlook on the web User Manual
116
Creating Schedule
A schedule is one of the items managed on the calendar which does not require
inviting other members or reserving a resource and finishes within a day.
Create a schedule in the following procedure:
(1) Click [New] at the top of the screen.
(2) In the [Add a title for the event] form, enter the schedule name and choose
the time for each of [Start] and [End]. Click [Save].
Outlook on the web User Manual
117
Items
Item Description
Event Enter the title of the schedule. A descriptive name is preferred.
Location Enter the location where the event takes place.
Start Choose or enter the start day of the schedule.
Start time Choose or enter the start time of the schedule. For an event which
lasts for the whole day, check [Whole day].
End Choose or enter the end day of the schedule.
Outlook on the web User Manual
118
Item Description
End time Choose or enter the end time of the schedule.
Show as When you are sharing the calendar with other members, you can
specify how to publish your calendar. Note that details of your
schedules are not published.
Alarm You can specify how many minutes prior to the schedule to trigger an
alarm. Click [None] if you do not want the alarm.
Save to If you have multiple calendars, choose one to save the schedule. If
you have only one calendar, this option is grayed out.
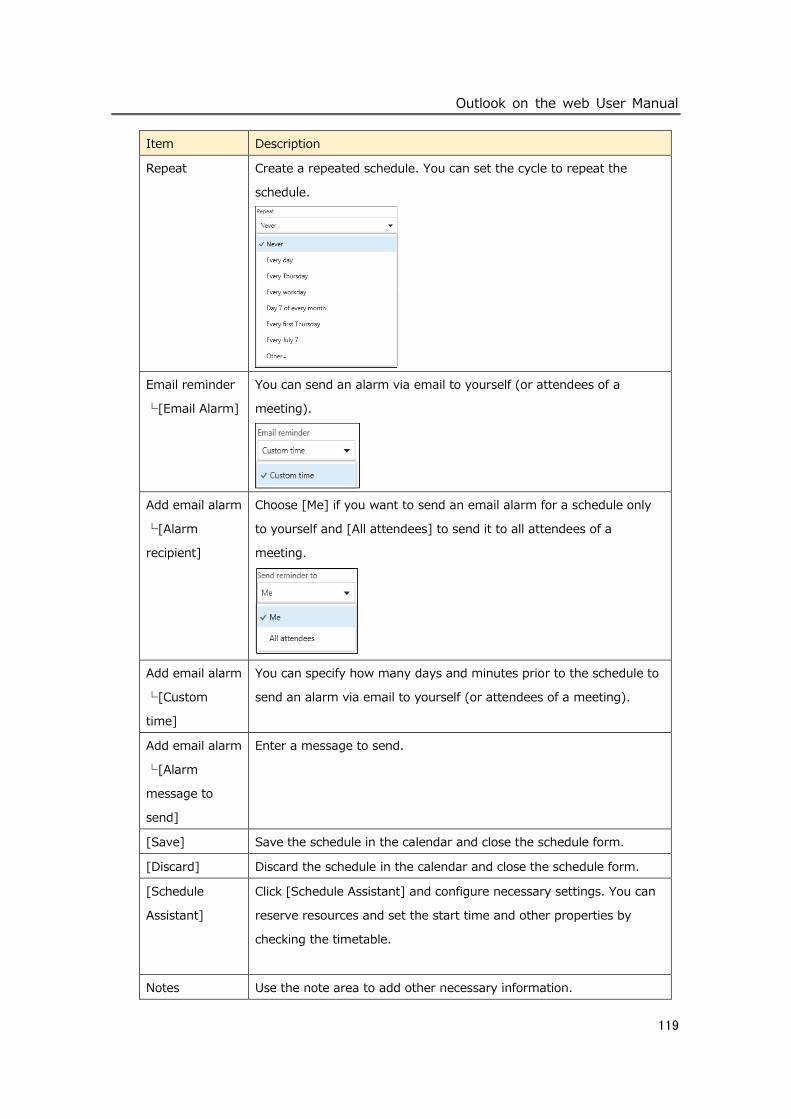
Outlook on the web User Manual
119
Item Description
Repeat Create a repeated schedule. You can set the cycle to repeat the
schedule.
Email reminder
└[Email Alarm]
You can send an alarm via email to yourself (or attendees of a
meeting).
Add email alarm
└[Alarm
recipient]
Choose [Me] if you want to send an email alarm for a schedule only
to yourself and [All attendees] to send it to all attendees of a
meeting.
Add email alarm
└[Custom
time]
You can specify how many days and minutes prior to the schedule to
send an alarm via email to yourself (or attendees of a meeting).
Add email alarm
└[Alarm
message to
send]
Enter a message to send.
[Save] Save the schedule in the calendar and close the schedule form.
[Discard] Discard the schedule in the calendar and close the schedule form.
[Schedule
Assistant]
Click [Schedule Assistant] and configure necessary settings. You can
reserve resources and set the start time and other properties by
checking the timetable.
Notes Use the note area to add other necessary information.
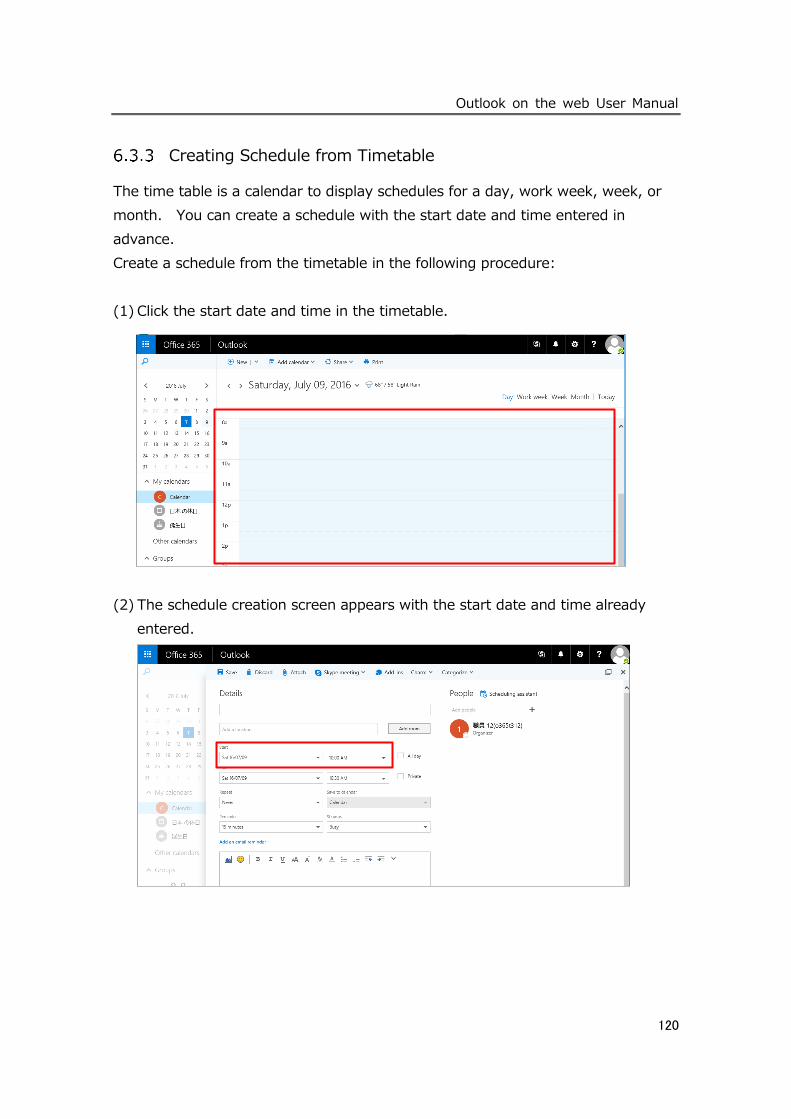
Outlook on the web User Manual
120
Creating Schedule from Timetable
The time table is a calendar to display schedules for a day, work week, week, or
month. You can create a schedule with the start date and time entered in
advance.
Create a schedule from the timetable in the following procedure:
(1) Click the start date and time in the timetable.
(2) The schedule creation screen appears with the start date and time already
entered.
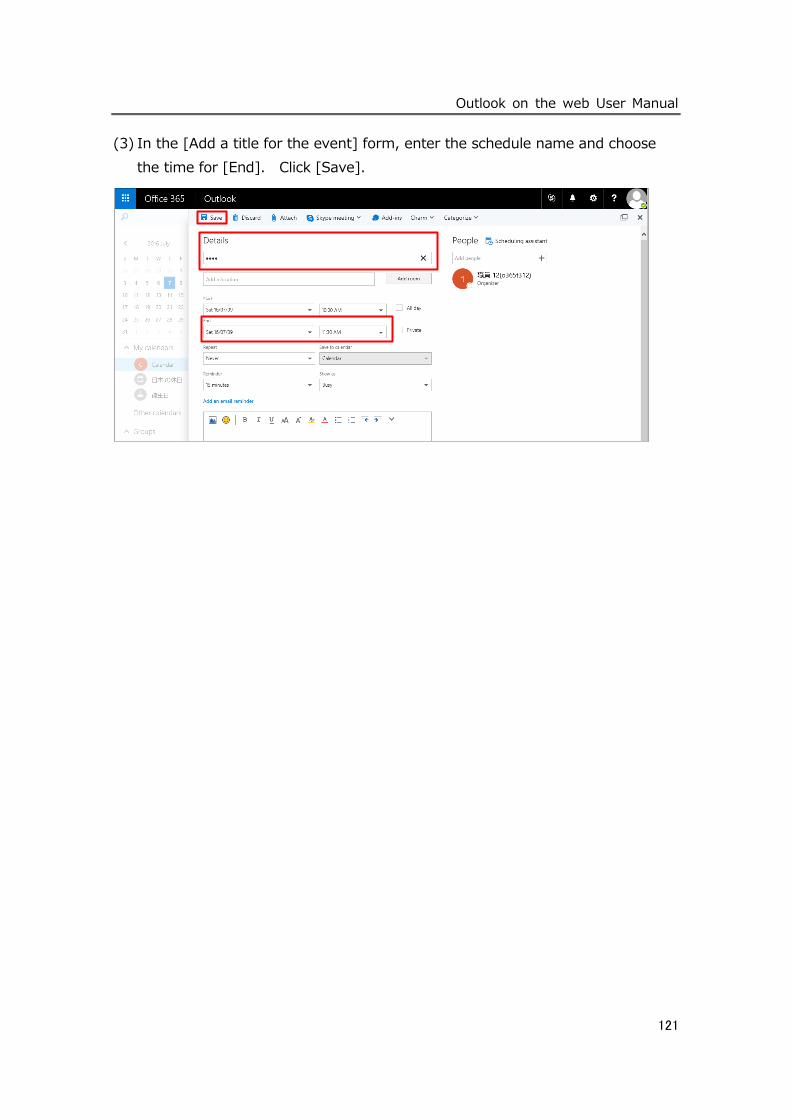
Outlook on the web User Manual
121
(3) In the [Add a title for the event] form, enter the schedule name and choose
the time for [End]. Click [Save].
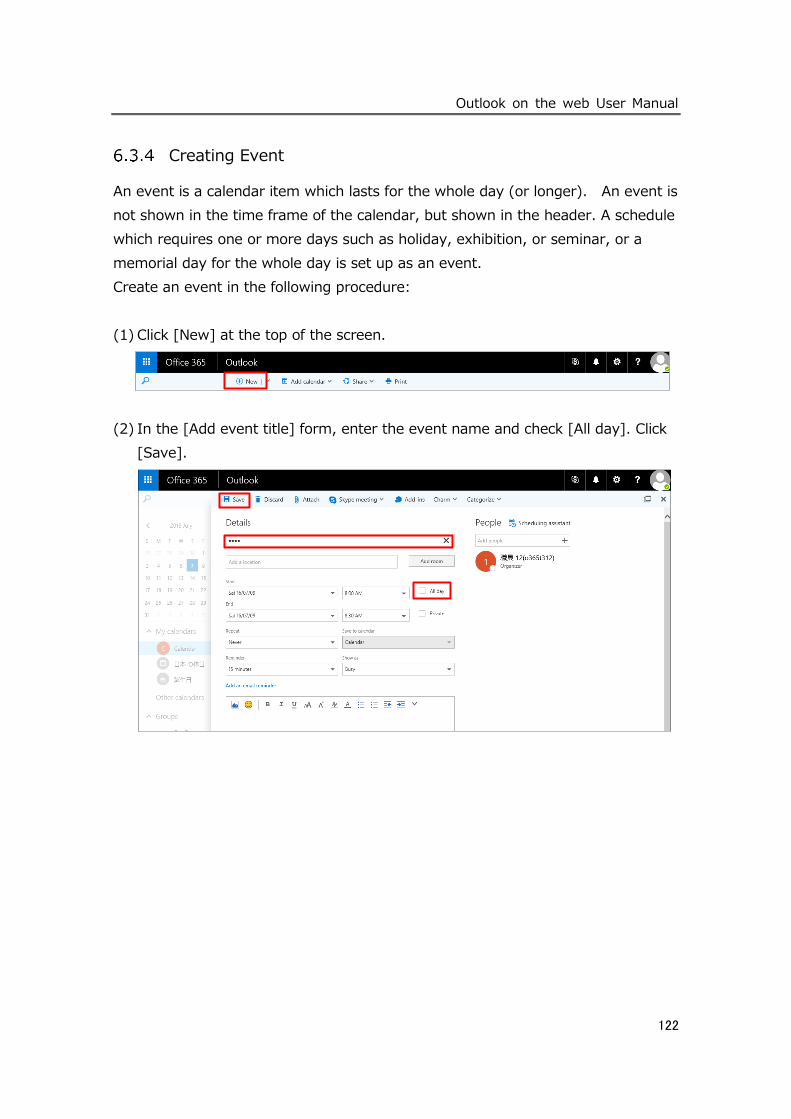
Outlook on the web User Manual
122
Creating Event
An event is a calendar item which lasts for the whole day (or longer). An event is
not shown in the time frame of the calendar, but shown in the header. A schedule
which requires one or more days such as holiday, exhibition, or seminar, or a
memorial day for the whole day is set up as an event.
Create an event in the following procedure:
(1) Click [New] at the top of the screen.
(2) In the [Add event title] form, enter the event name and check [All day]. Click
[Save].
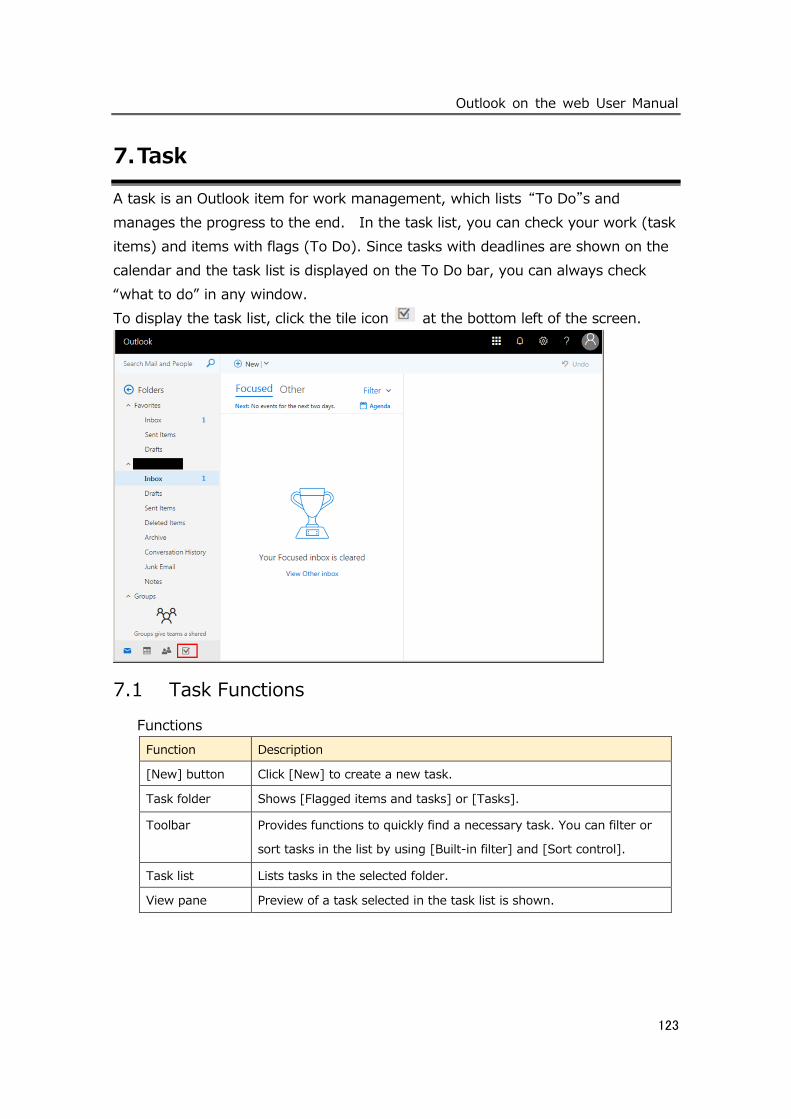
Outlook on the web User Manual
123
7. Task
A task is an Outlook item for work management, which lists “To Do”s and
manages the progress to the end. In the task list, you can check your work (task
items) and items with flags (To Do). Since tasks with deadlines are shown on the
calendar and the task list is displayed on the To Do bar, you can always check
“what to do” in any window.
To display the task list, click the tile icon at the bottom left of the screen.
7.1 Task Functions
Functions
Function Description
[New] button Click [New] to create a new task.
Task folder Shows [Flagged items and tasks] or [Tasks].
Toolbar Provides functions to quickly find a necessary task. You can filter or
sort tasks in the list by using [Built-in filter] and [Sort control].
Task list Lists tasks in the selected folder.
View pane Preview of a task selected in the task list is shown.
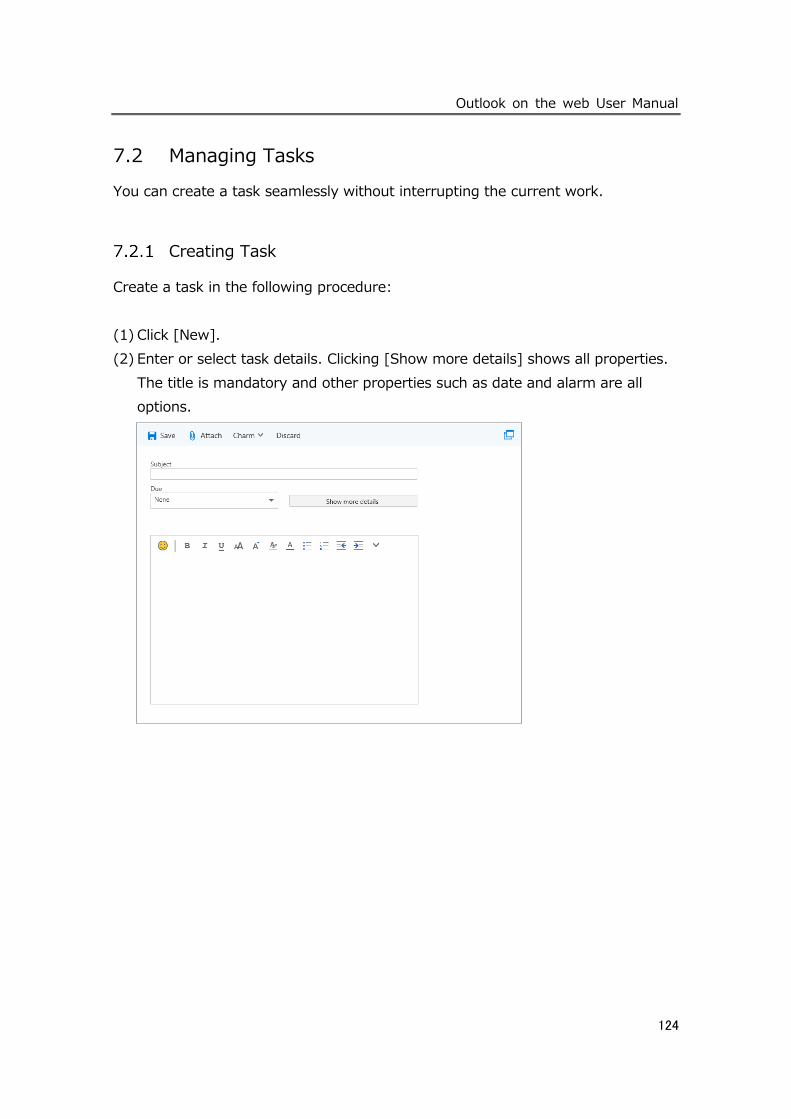
Outlook on the web User Manual
124
7.2 Managing Tasks
You can create a task seamlessly without interrupting the current work.
Creating Task
Create a task in the following procedure:
(1) Click [New].
(2) Enter or select task details. Clicking [Show more details] shows all properties.
The title is mandatory and other properties such as date and alarm are all
options.
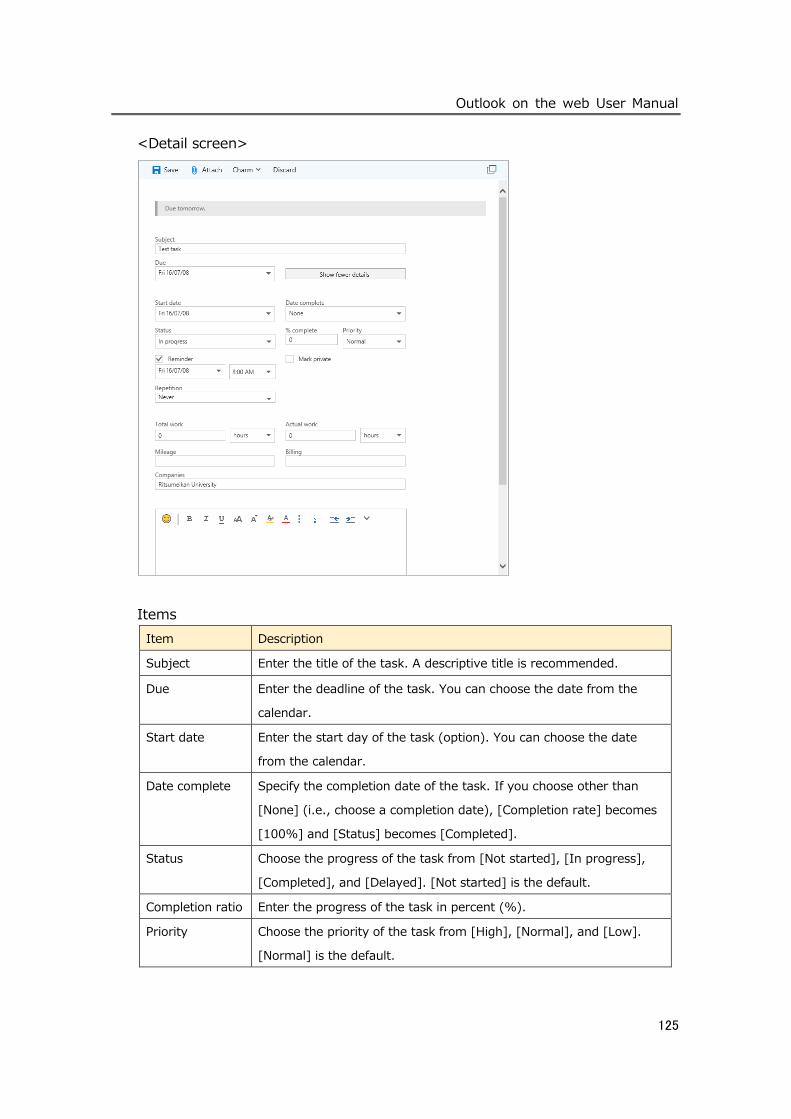
Outlook on the web User Manual
125
<Detail screen>
Items
Item Description
Subject Enter the title of the task. A descriptive title is recommended.
Due Enter the deadline of the task. You can choose the date from the
calendar.
Start date Enter the start day of the task (option). You can choose the date
from the calendar.
Date complete Specify the completion date of the task. If you choose other than
[None] (i.e., choose a completion date), [Completion rate] becomes
[100%] and [Status] becomes [Completed].
Status Choose the progress of the task from [Not started], [In progress],
[Completed], and [Delayed]. [Not started] is the default.
Completion ratio Enter the progress of the task in percent (%).
Priority Choose the priority of the task from [High], [Normal], and [Low].
[Normal] is the default.
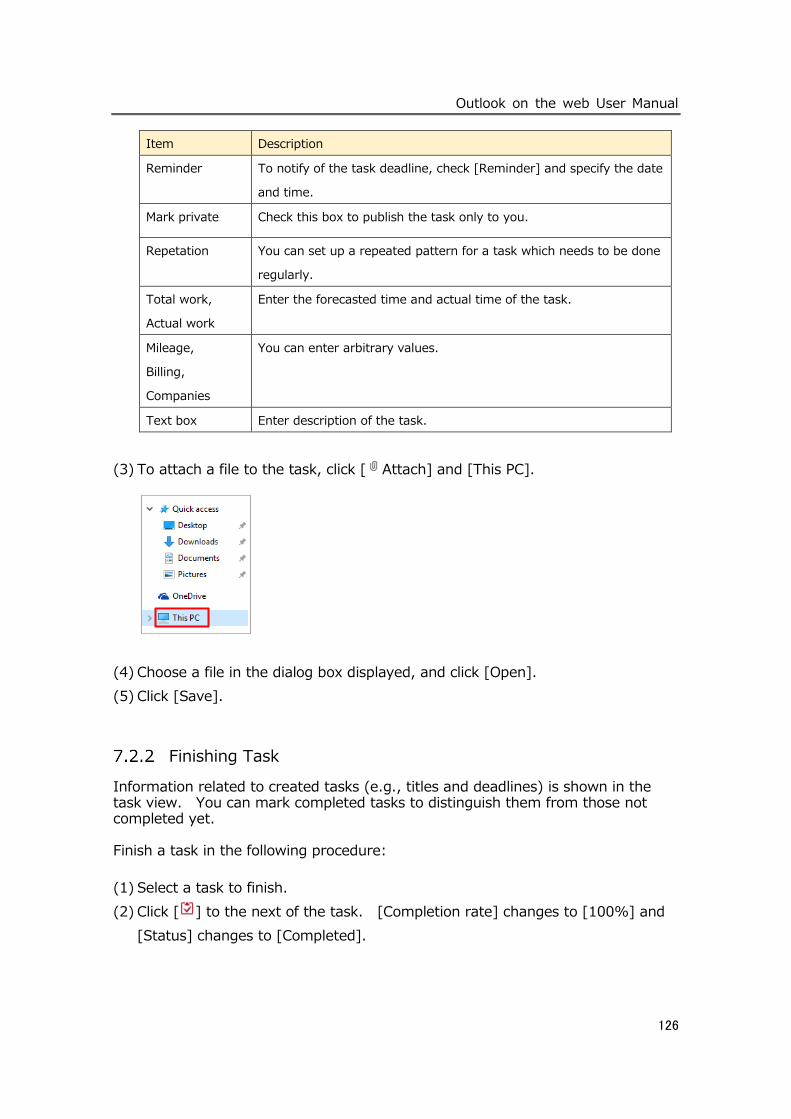
Outlook on the web User Manual
126
Item Description
Reminder To notify of the task deadline, check [Reminder] and specify the date
and time.
Mark private Check this box to publish the task only to you.
Repetation You can set up a repeated pattern for a task which needs to be done
regularly.
Total work,
Actual work
Enter the forecasted time and actual time of the task.
Mileage,
Billing,
Companies
You can enter arbitrary values.
Text box Enter description of the task.
(3) To attach a file to the task, click [ Attach] and [This PC].
(4) Choose a file in the dialog box displayed, and click [Open].
(5) Click [Save].
Finishing Task
Information related to created tasks (e.g., titles and deadlines) is shown in the task view. You can mark completed tasks to distinguish them from those not completed yet. Finish a task in the following procedure:
(1) Select a task to finish.
(2) Click [ ] to the next of the task. [Completion rate] changes to [100%] and
[Status] changes to [Completed].
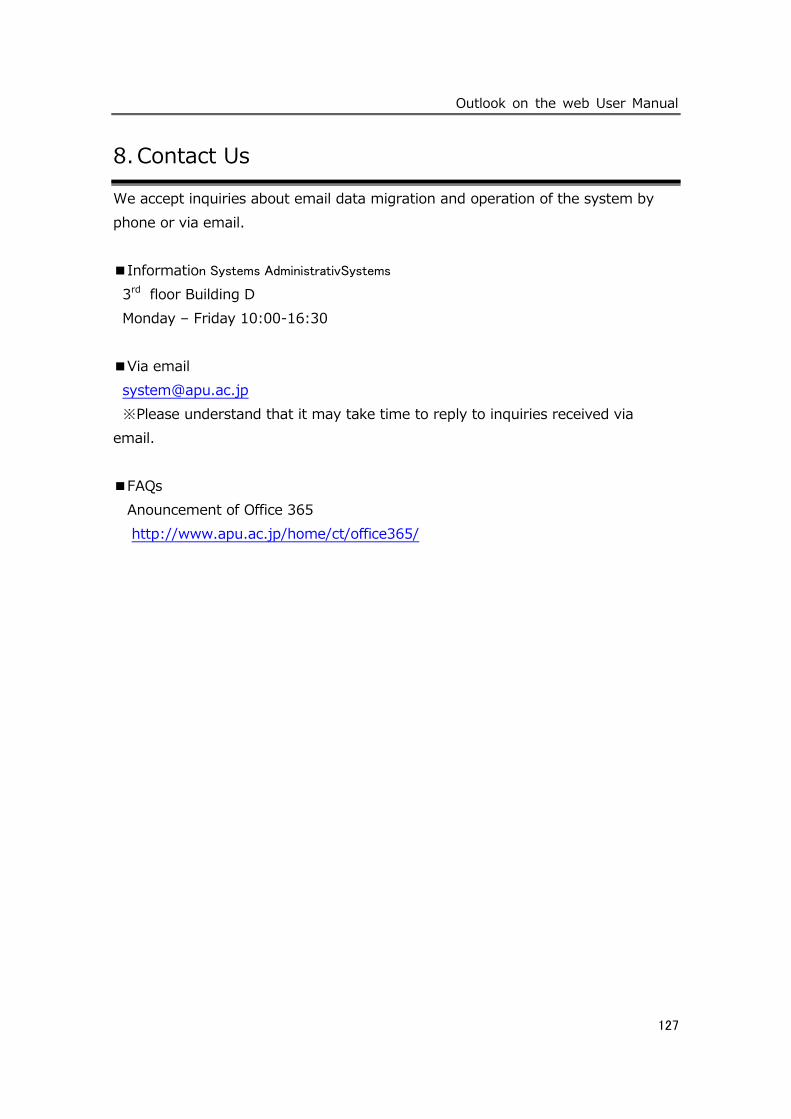
Outlook on the web User Manual
127
8. Contact Us
We accept inquiries about email data migration and operation of the system by
phone or via email.
■Information Systems AdministrativSystems
3rd floor Building D
Monday – Friday 10:00-16:30
■Via email
※Please understand that it may take time to reply to inquiries received via
email.
■FAQs
Anouncement of Office 365
http://www.apu.ac.jp/home/ct/office365/

Outlook on the web User Manual
128
Appendix
Supported Browsers
Outlook on the web can be used using a web browser in various environments
including Windows OS and Mac OS X.
You can use the following browsers on a PC running Windows 10:
Latest version of Microsoft Edge (offline access available)
Latest version of Internet Explorer (offline access available)
Latest version of Firefox (offline access available)
Latest version of Chrome (offline access available)
You can use the following browsers on a PC running Windows 8:
Internet Explorer 10 or later (offline access available)
Latest version of Firefox (offline access available)
Latest version of Chrome (offline access available)
You can use the following browsers on a PC running Windows 7 Service Pack 1:
Internet Explorer 8 or later (Internet Explorer 10 or later is recommended)
Latest version of Firefox (offline access available)
Latest version of Chrome (offline access available)
You can use the following browsers on a PC running Mac OS X V10:
Latest version of Firefox (offline access available)
Safari 6 or later (offline access available)
Latest version of Chrome (offline access available)


