Component Suite in JSF Overview @author R.L. Martinez, Ph.D. In the previous tutorial we used the JSF framework along with the Facelets view definition language to create a template and a client page that utilized the template structure and settings. By using NetBeans, the CSS files that define the style settings for the pages were automatically created. In this tutorial, we will copy the TemplateDemo project and name it ComponentSuite. Using the PrimeFaces Component Suite with JSF In this tutorial, we add the PrimeFaces component suite to the TemplateDemo project. PrimeFaces includes a number of user interface controls that can be used in conjunction with JSF to produce rich user interface functionality for web applications. PrimeFaces relies upon the popular jQuery library to accomplish much of its user interface enhancement. We will add lightbox and password controls to the project to demonstrate use of the suite. Begin by R-clicking TemplateDemo in the Project group and selecting copy. Name the new project ComponentSuite and save to your projects folder. Disregard the warning since we are not using a version control system. Page 1 of 27
Transcript
Component Suite in JSF
Overview @author R.L. Martinez, Ph.D.
In the previous tutorial we used the JSF framework along with the Facelets view definition language to create a template and a client page that utilized the template structure and settings. By using NetBeans, the CSS files that define the style settings for the pages were automatically created. In this tutorial, we will copy the TemplateDemo project and name it ComponentSuite.
Using the PrimeFaces Component Suite with JSF
In this tutorial, we add the PrimeFaces component suite to the TemplateDemo project. PrimeFaces includes a number of user interface controls that can be used in conjunction with JSF to produce rich user interface functionality for web applications. PrimeFaces relies upon the popular jQuery library to accomplish much of its user interface enhancement. We will add lightbox and password controls to the project to demonstrate use of the suite.
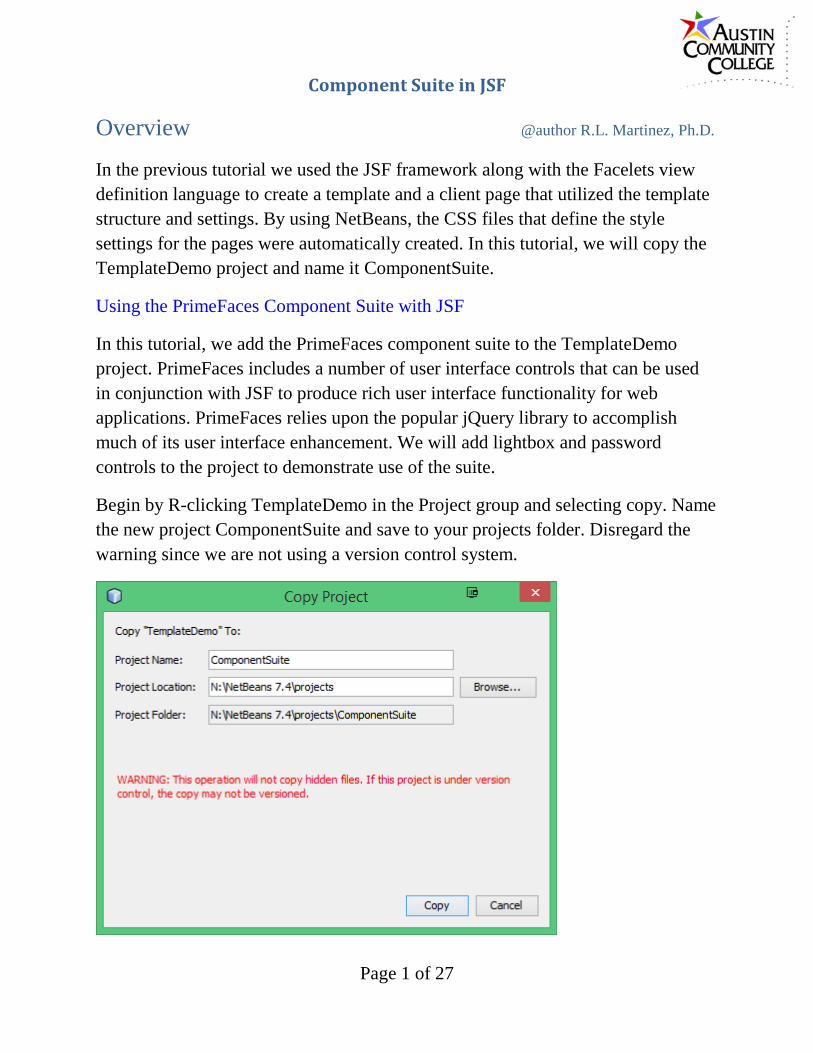
Begin by R-clicking TemplateDemo in the Project group and selecting copy. Name the new project ComponentSuite and save to your projects folder. Disregard the warning since we are not using a version control system.
Page 1 of 27
Component Suite in JSF
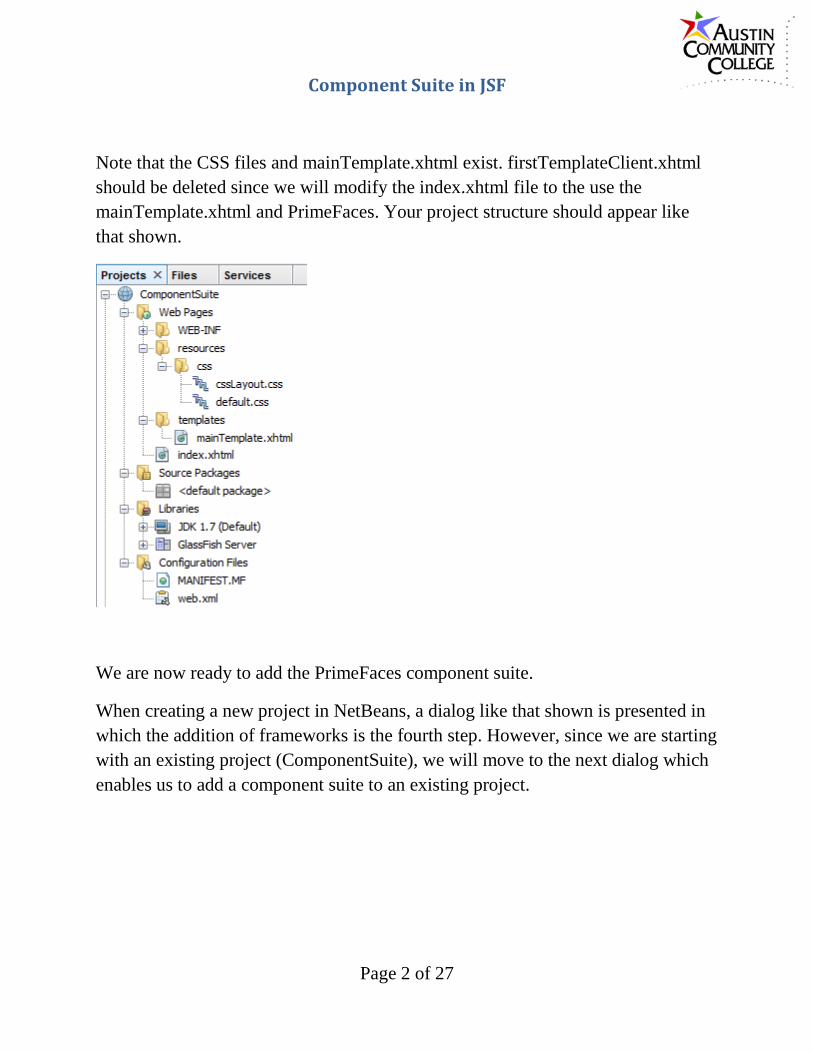
Note that the CSS files and mainTemplate.xhtml exist. firstTemplateClient.xhtml should be deleted since we will modify the index.xhtml file to the use the mainTemplate.xhtml and PrimeFaces. Your project structure should appear like that shown.
We are now ready to add the PrimeFaces component suite.
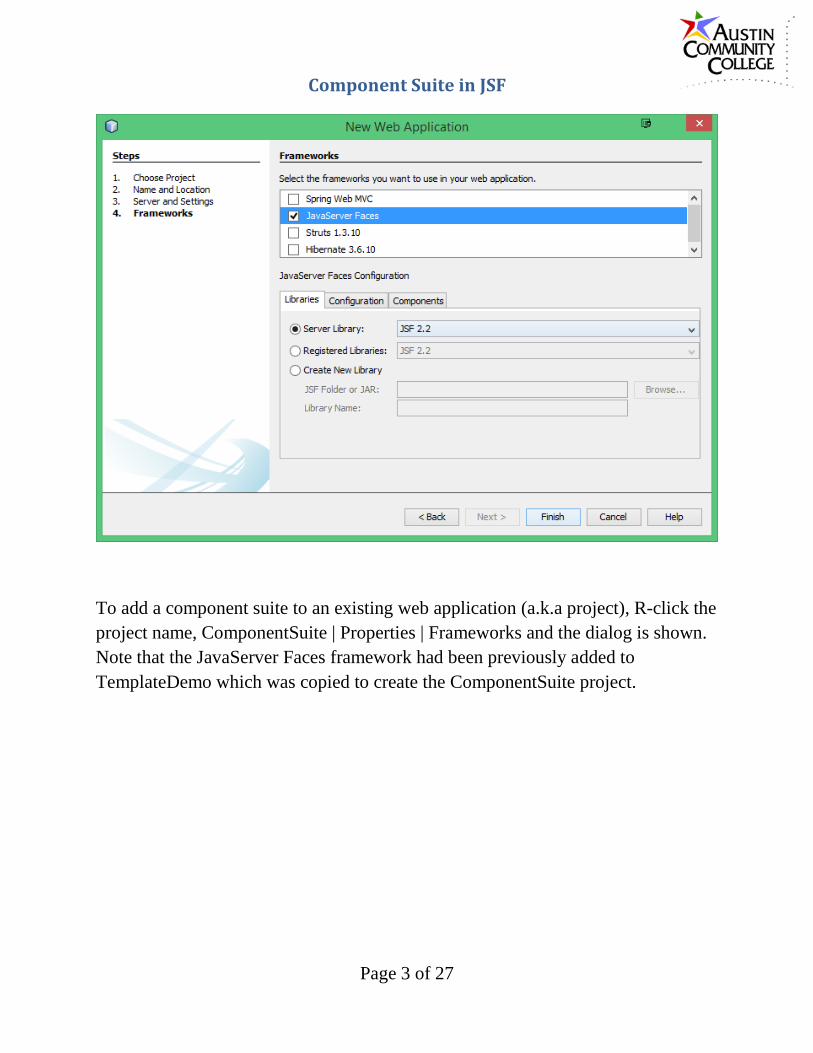
When creating a new project in NetBeans, a dialog like that shown is presented in which the addition of frameworks is the fourth step. However, since we are starting with an existing project (ComponentSuite), we will move to the next dialog which enables us to add a component suite to an existing project.
Page 2 of 27
Component Suite in JSF
To add a component suite to an existing web application (a.k.a project), R-click the project name, ComponentSuite | Properties | Frameworks and the dialog is shown. Note that the JavaServer Faces framework had been previously added to TemplateDemo which was copied to create the ComponentSuite project.
Page 3 of 27
Component Suite in JSF
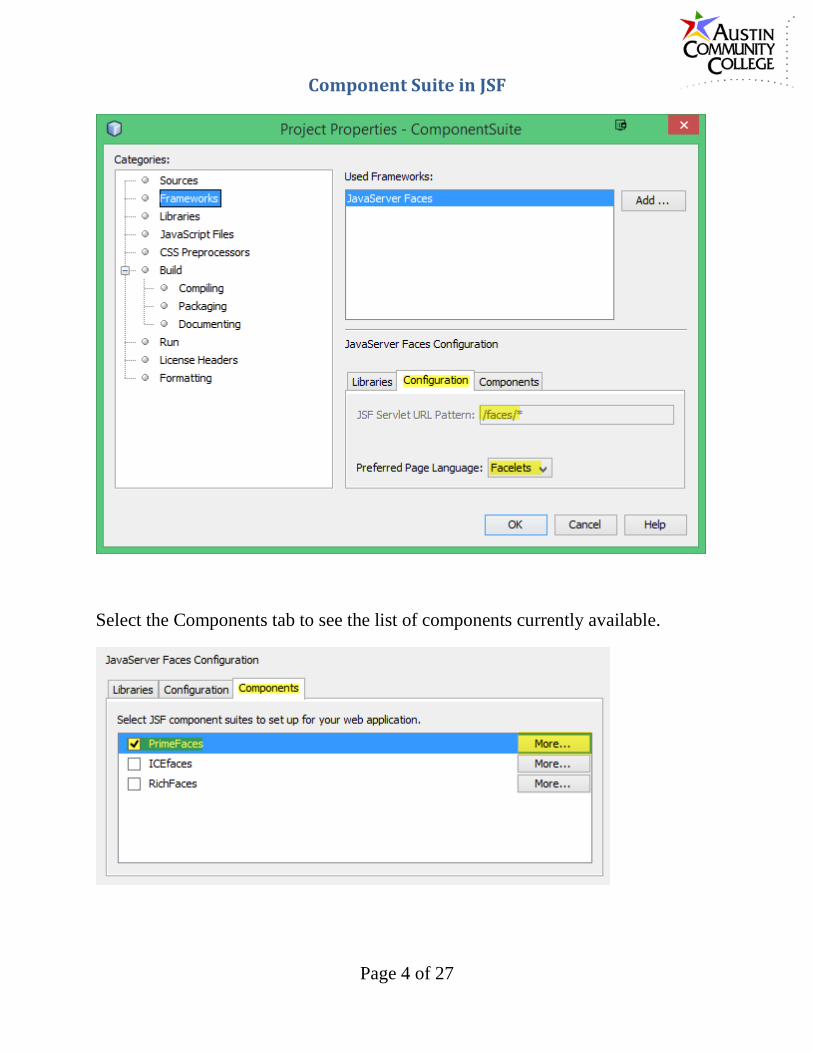
Select the Components tab to see the list of components currently available.
Page 4 of 27
Component Suite in JSF
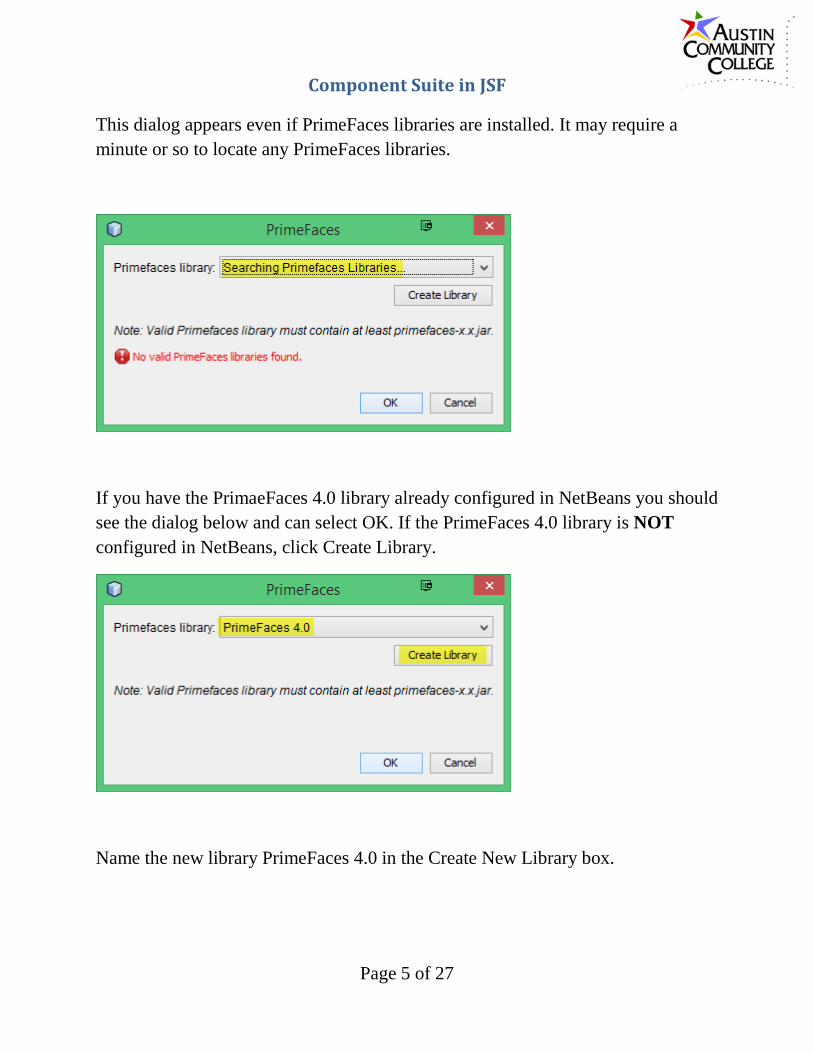
This dialog appears even if PrimeFaces libraries are installed. It may require a minute or so to locate any PrimeFaces libraries.
If you have the PrimaeFaces 4.0 library already configured in NetBeans you should see the dialog below and can select OK. If the PrimeFaces 4.0 library is NOT configured in NetBeans, click Create Library.
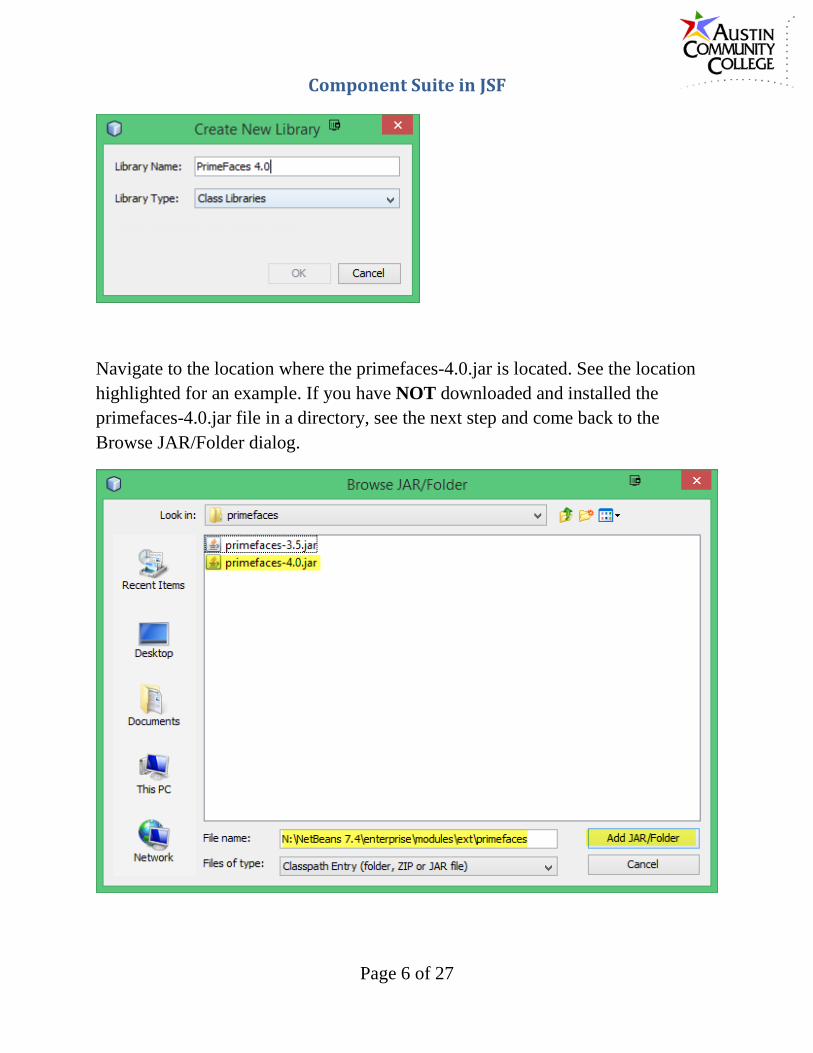
Name the new library PrimeFaces 4.0 in the Create New Library box.
Page 5 of 27
Component Suite in JSF
Navigate to the location where the primefaces-4.0.jar is located. See the location highlighted for an example. If you have NOT downloaded and installed the primefaces-4.0.jar file in a directory, see the next step and come back to the Browse JAR/Folder dialog.
Page 6 of 27
Component Suite in JSF
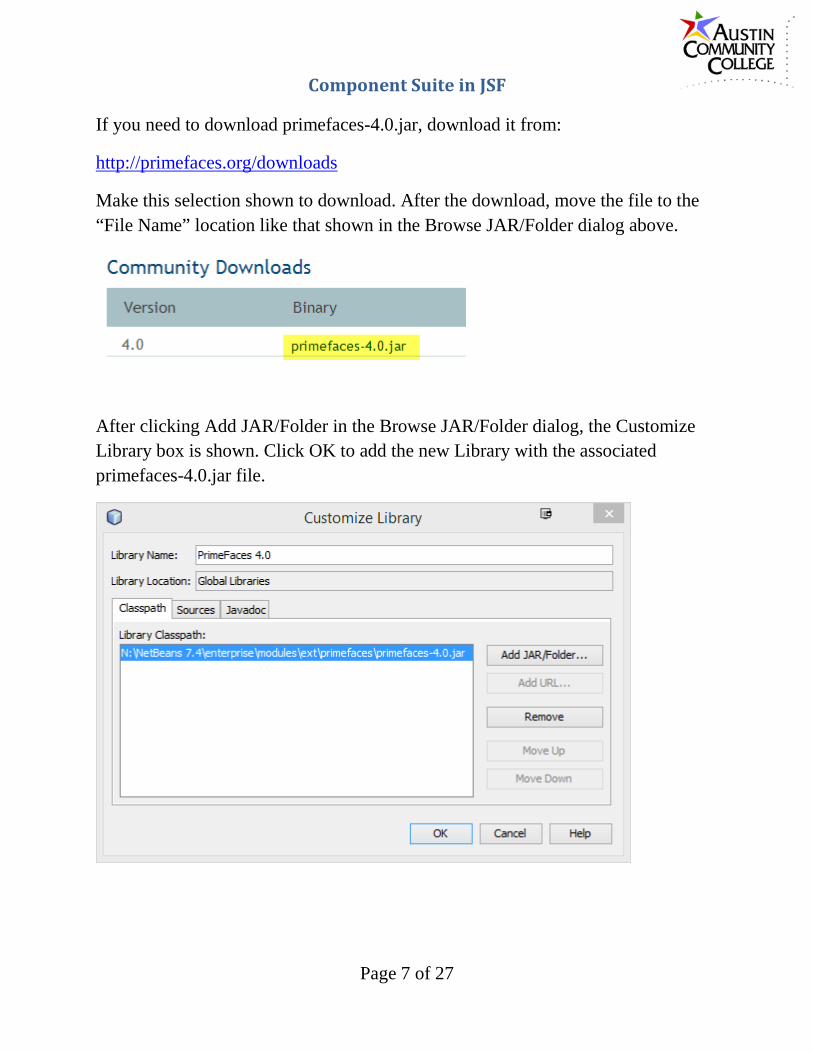
If you need to download primefaces-4.0.jar, download it from:
http://primefaces.org/downloads
Make this selection shown to download. After the download, move the file to the “File Name” location like that shown in the Browse JAR/Folder dialog above.
After clicking Add JAR/Folder in the Browse JAR/Folder dialog, the Customize Library box is shown. Click OK to add the new Library with the associated primefaces-4.0.jar file.
Now click OK to complete the addition of the component suite.
Additions to the ComponentSuite project are highlighted. The PrimeFaces 4.0 library contains packages and classes that will be used in this tutorial and subsequent sections. The welcomePrimefaces.xhtml was automatically added to the project and is accessed from a link added to index.xhtml.
Page 8 of 27
Component Suite in JSF
Open the index.xhtml and notice that line 12 was added when the component suite was included.
It is a link to the welcomePrimefaces.xhtml file.
Page 9 of 27
Component Suite in JSF
Run the index.xhtml file by R-clicking the file and selecting Run. The output is shown.
Click the link PrimeFaces welcome page on the index.xhtml page to access the page shown.
Page 10 of 27
Component Suite in JSF
Click the Demo menu item to access the PrimeFaces demo page, some of which is shown.
Notice the component Lightbox in the Overlay section as shown. Click on Lightbox to see an example implementation and the sample code provided. We will implement our own version of a lightbox by modifying index.xhtml.
Page 11 of 27
Component Suite in JSF
This is the resulting output of the index.xhtml page containing the lightbox which we will employ below.
To implement the lightbox, we will need to have four standard size images (600 x 450-500), four smaller versions of the images (200 x 150-160), apply minor modifications to a CSS file, and modify index.xhtml. A web/images folder was created for this exercise and 8 images were added to the folder.
Page 12 of 27
Component Suite in JSF
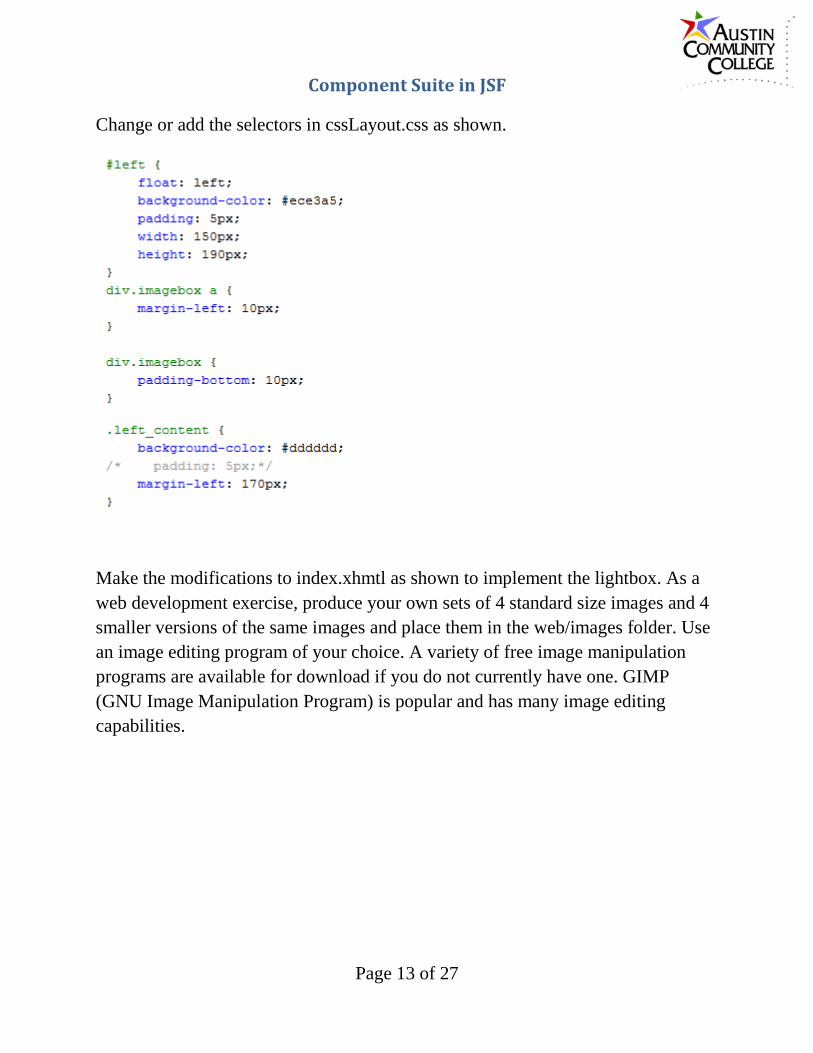
Change or add the selectors in cssLayout.css as shown.
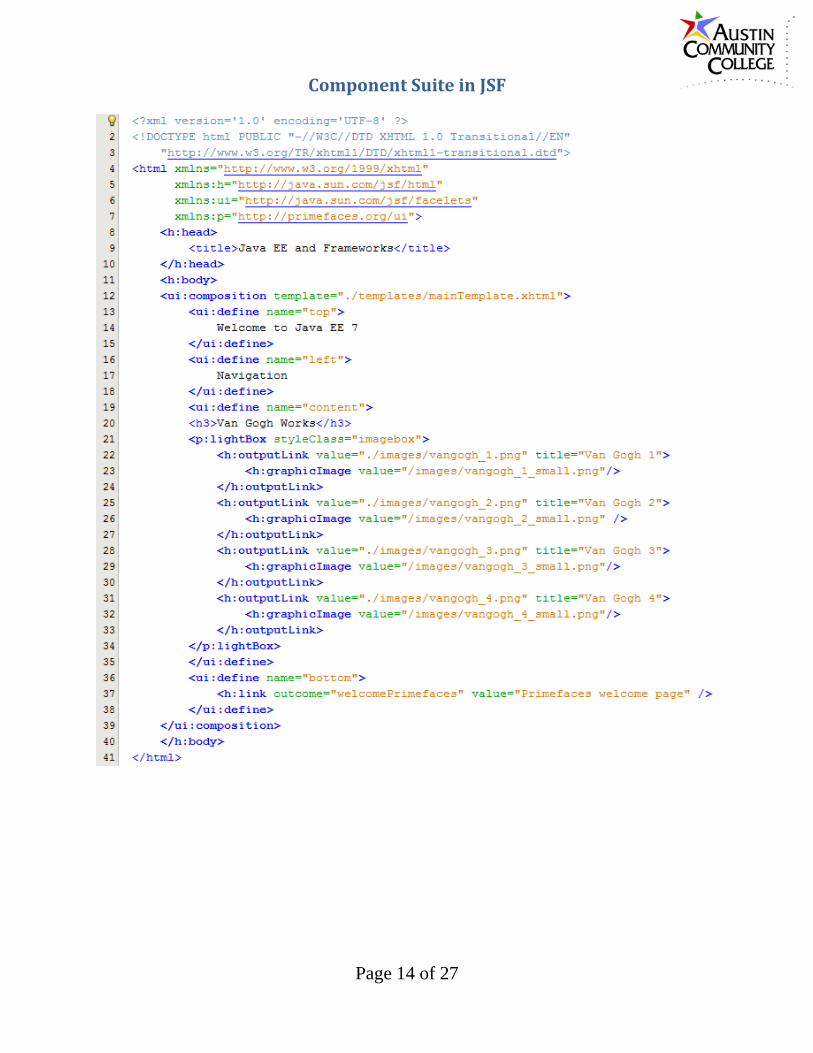
Make the modifications to index.xhmtl as shown to implement the lightbox. As a web development exercise, produce your own sets of 4 standard size images and 4 smaller versions of the same images and place them in the web/images folder. Use an image editing program of your choice. A variety of free image manipulation programs are available for download if you do not currently have one. GIMP (GNU Image Manipulation Program) is popular and has many image editing capabilities.
Page 13 of 27
Component Suite in JSF
Page 14 of 27
Component Suite in JSF
To see the lightbox in action, run the file by R-clicking the file and selection Run. After the page opens click on any of the images to see the larger images displayed in the lightbox. The output below is the result of clicking the third image. The arrows can be used to navigate to different images in the series. The lightbox can be closed by either clicking the x in the lower right corner or clicking off of the image.
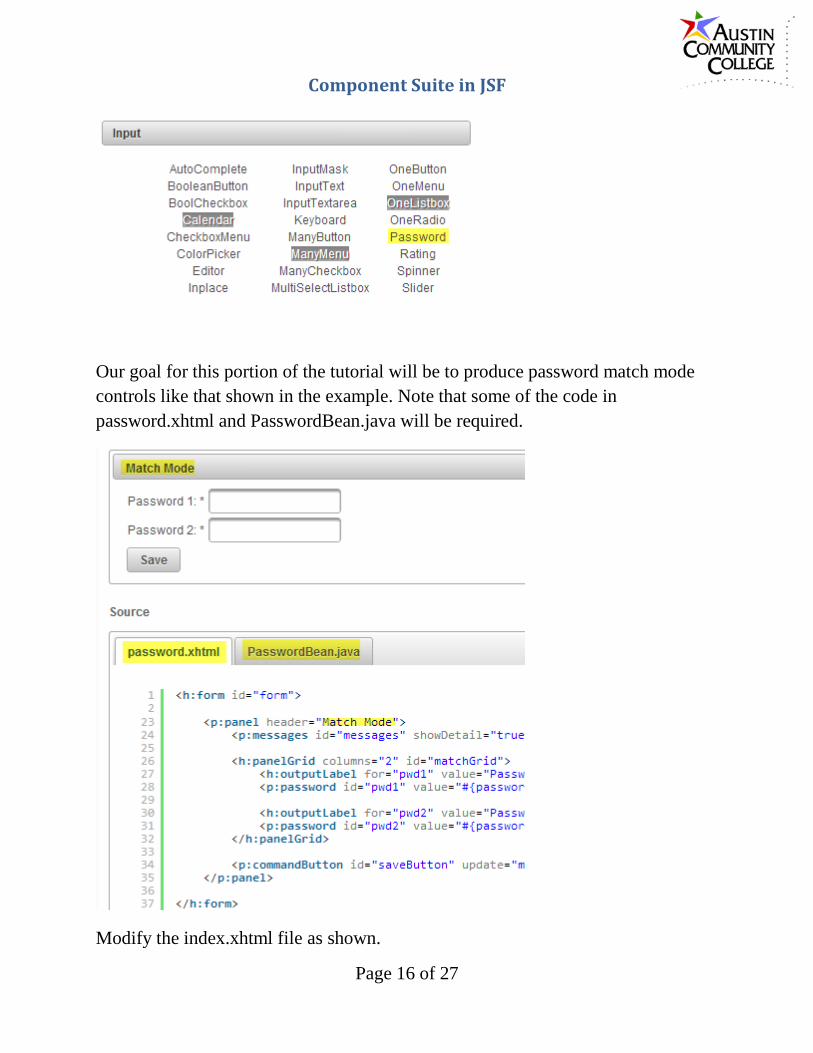
Let’s add one more PrimeFaces component to the page. Select the password control located in the input section of the PrimeFaces Demo page (accessed above).
Page 15 of 27
Component Suite in JSF
Our goal for this portion of the tutorial will be to produce password match mode controls like that shown in the example. Note that some of the code in password.xhtml and PasswordBean.java will be required.
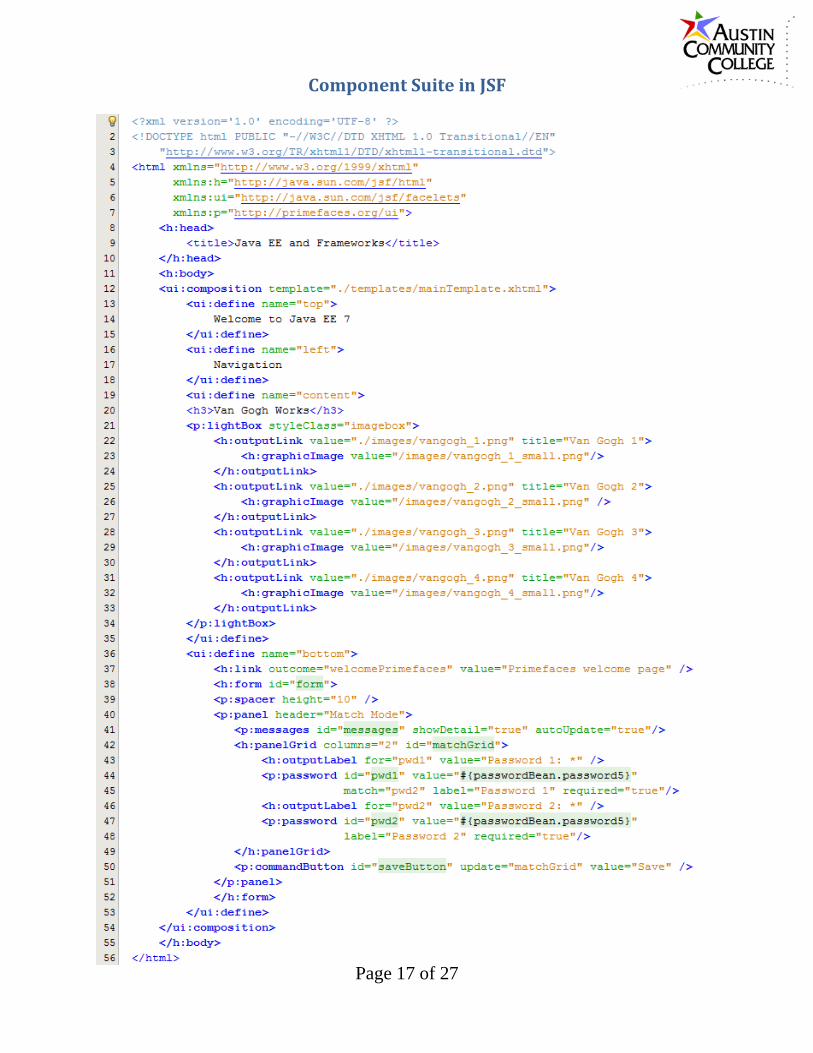
Modify the index.xhtml file as shown.
Page 16 of 27
Component Suite in JSF
Page 17 of 27
Component Suite in JSF
This is the output of index.xhtml which now includes both the lightbox and the password controls.
Using a Managed Bean
Now we will add the password bean to the project to enable the password matching functionality. The password bean will be managed by JSF (via the servlet container). Beans can be registered by xml files or by annotations. Annotations are used in this example due to the benefit of collocating registration with the bean.
R-click Source Packages | New | Java Class.
Page 18 of 27
Component Suite in JSF
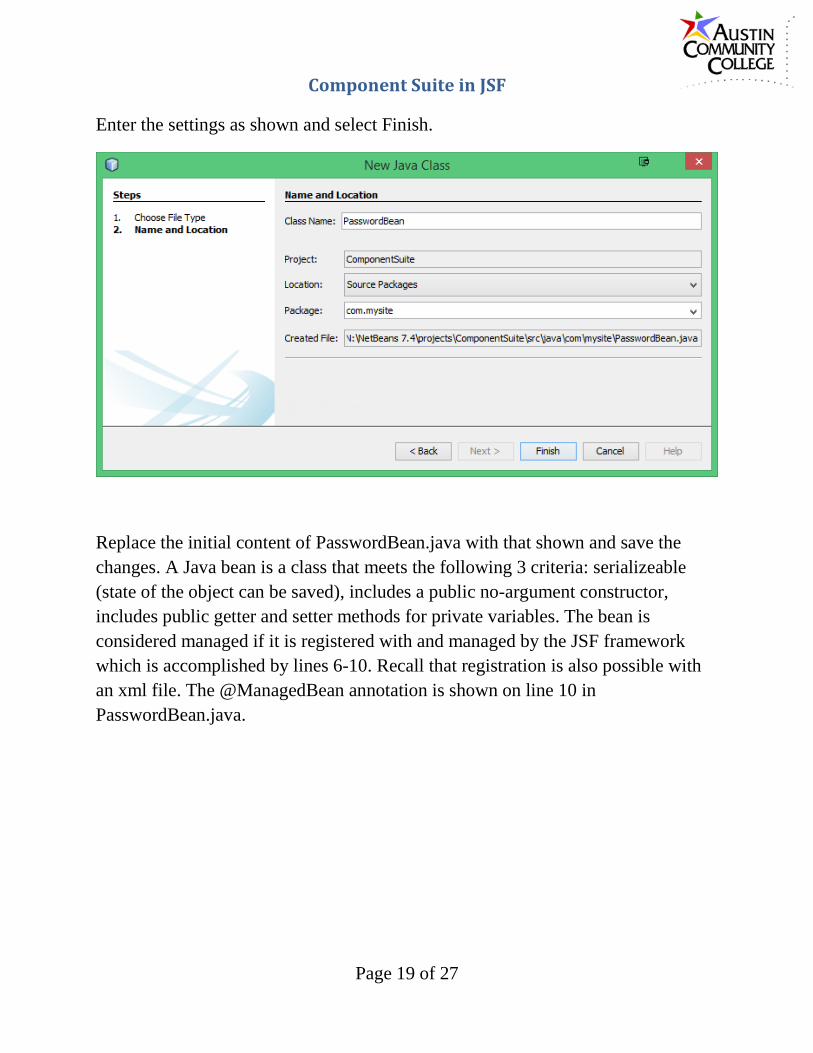
Enter the settings as shown and select Finish.
Replace the initial content of PasswordBean.java with that shown and save the changes. A Java bean is a class that meets the following 3 criteria: serializeable (state of the object can be saved), includes a public no-argument constructor, includes public getter and setter methods for private variables. The bean is considered managed if it is registered with and managed by the JSF framework which is accomplished by lines 6-10. Recall that registration is also possible with an xml file. The @ManagedBean annotation is shown on line 10 in PasswordBean.java.
Page 19 of 27
Component Suite in JSF
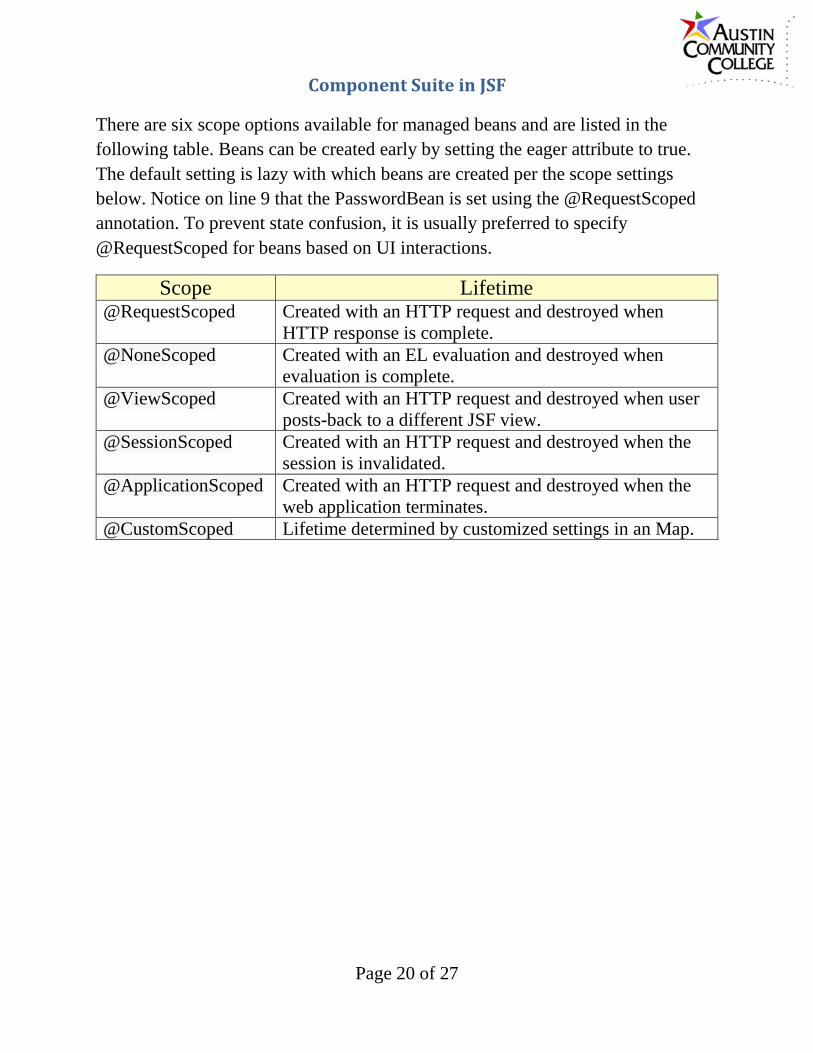
There are six scope options available for managed beans and are listed in the following table. Beans can be created early by setting the eager attribute to true. The default setting is lazy with which beans are created per the scope settings below. Notice on line 9 that the PasswordBean is set using the @RequestScoped annotation. To prevent state confusion, it is usually preferred to specify @RequestScoped for beans based on UI interactions.
Scope Lifetime @RequestScoped Created with an HTTP request and destroyed when
HTTP response is complete. @NoneScoped Created with an EL evaluation and destroyed when
evaluation is complete. @ViewScoped Created with an HTTP request and destroyed when user
posts-back to a different JSF view. @SessionScoped Created with an HTTP request and destroyed when the
session is invalidated. @ApplicationScoped Created with an HTTP request and destroyed when the
web application terminates. @CustomScoped Lifetime determined by customized settings in an Map.
Page 20 of 27
Component Suite in JSF
Page 21 of 27
Component Suite in JSF
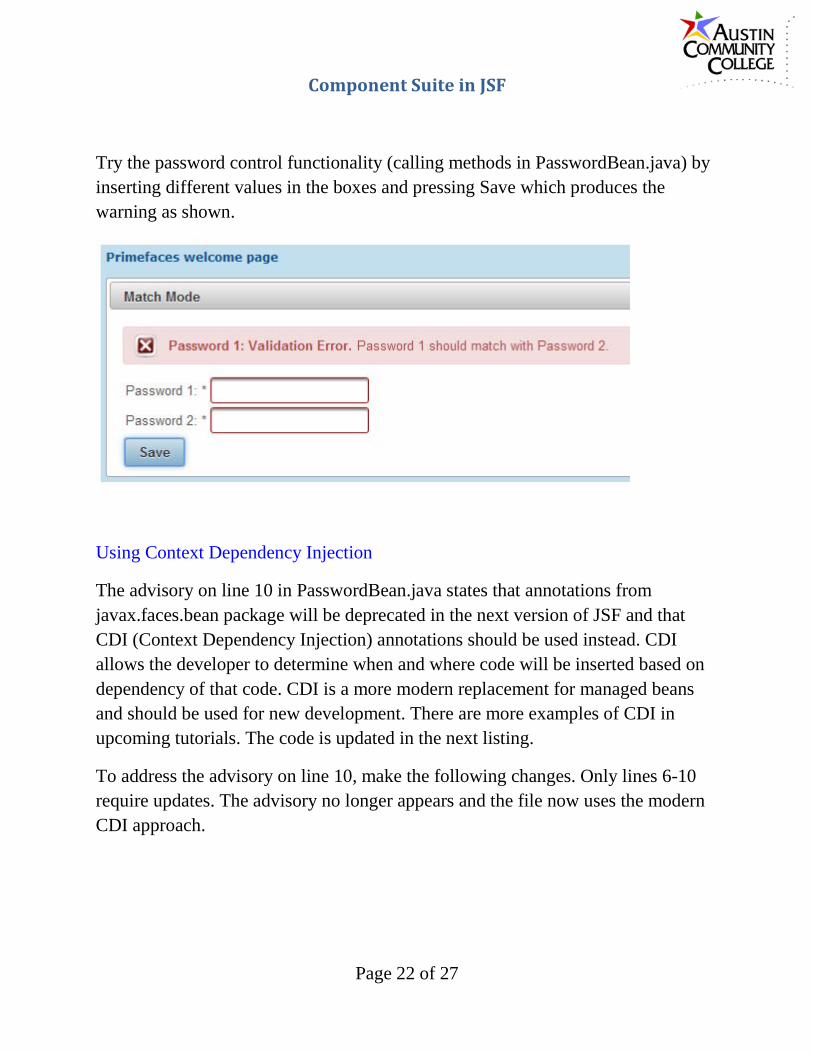
Try the password control functionality (calling methods in PasswordBean.java) by inserting different values in the boxes and pressing Save which produces the warning as shown.
Using Context Dependency Injection
The advisory on line 10 in PasswordBean.java states that annotations from javax.faces.bean package will be deprecated in the next version of JSF and that CDI (Context Dependency Injection) annotations should be used instead. CDI allows the developer to determine when and where code will be inserted based on dependency of that code. CDI is a more modern replacement for managed beans and should be used for new development. There are more examples of CDI in upcoming tutorials. The code is updated in the next listing.
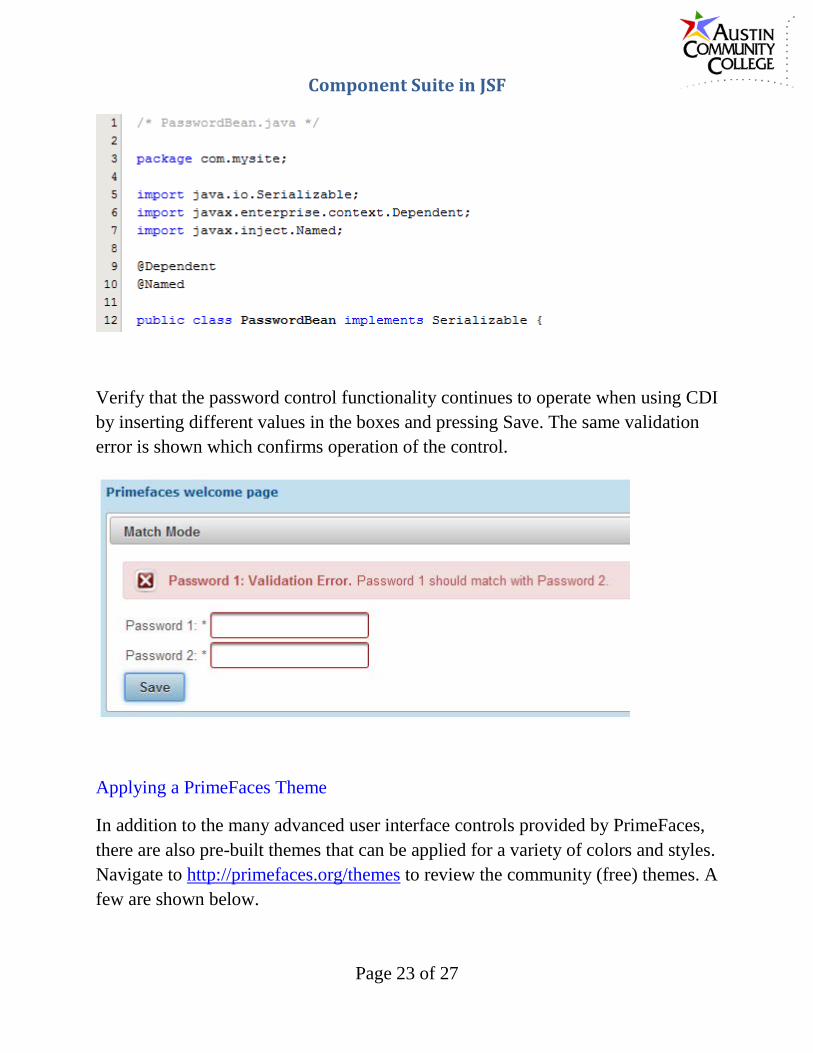
To address the advisory on line 10, make the following changes. Only lines 6-10 require updates. The advisory no longer appears and the file now uses the modern CDI approach.
Page 22 of 27
Component Suite in JSF
Verify that the password control functionality continues to operate when using CDI by inserting different values in the boxes and pressing Save. The same validation error is shown which confirms operation of the control.
Applying a PrimeFaces Theme
In addition to the many advanced user interface controls provided by PrimeFaces, there are also pre-built themes that can be applied for a variety of colors and styles. Navigate to http://primefaces.org/themes to review the community (free) themes. A few are shown below.
Adding a theme to a project involves just three steps: modify web.xml, download the theme .jar file, add the .jar file to the project libraries. The addition to web.xml is shown below for the redmond theme. Set the param-value to correspond to the theme which you want to apply.
Download the theme of your choice from the PrimeFaces repository (redmond-1.0.10.jar file was used for this tutorial but any theme is fine):
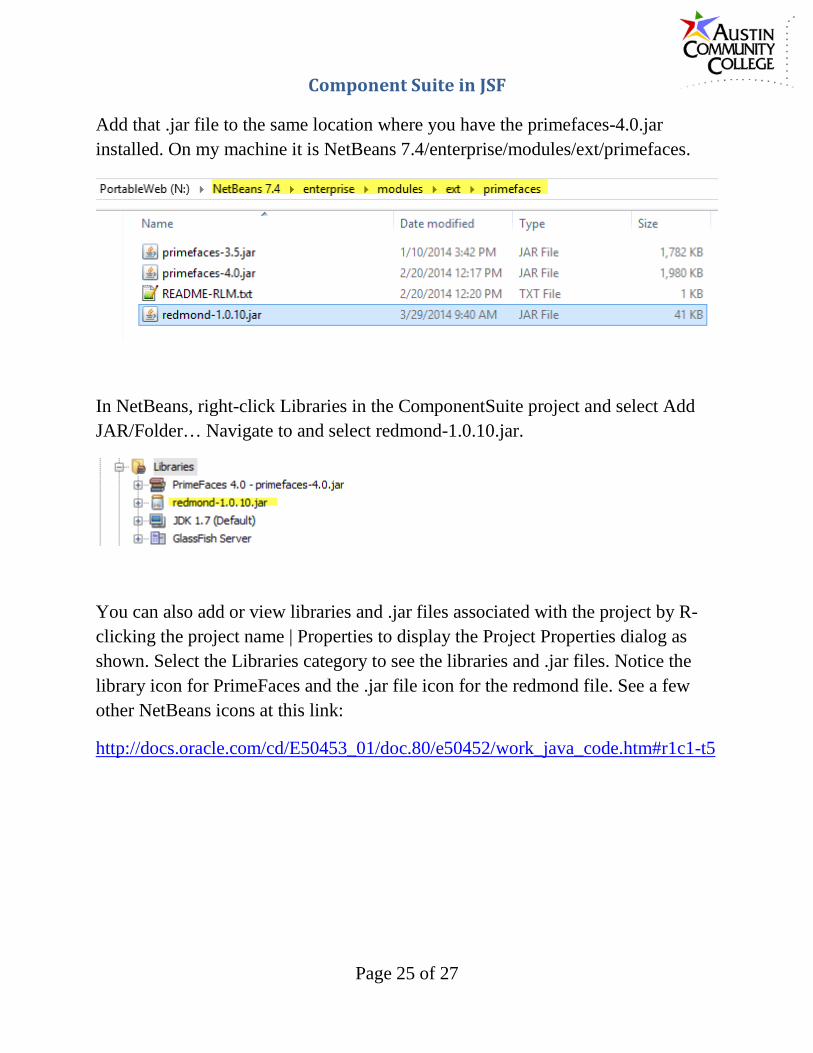
Add that .jar file to the same location where you have the primefaces-4.0.jar installed. On my machine it is NetBeans 7.4/enterprise/modules/ext/primefaces.
In NetBeans, right-click Libraries in the ComponentSuite project and select Add JAR/Folder… Navigate to and select redmond-1.0.10.jar.
You can also add or view libraries and .jar files associated with the project by R-clicking the project name | Properties to display the Project Properties dialog as shown. Select the Libraries category to see the libraries and .jar files. Notice the library icon for PrimeFaces and the .jar file icon for the redmond file. See a few other NetBeans icons at this link:
Also note that the dialog below is shown after the project was upgraded to NetBeans v8.0.
Run the project and notice that the redmond theme is applied to the password control (Match Mode is blue).
Page 26 of 27
Component Suite in JSF
In this tutorial we started by creating a copy of the TemplateDemo project and naming the new project ComponentSuite. Then the PrimeFaces component suite was added to the project. The lightbox control from PrimeFaces was implemented in index.xhtml. Then the password matching control was included which supplies a warning if passwords do not agree. Finally, we applied a PrimeFaces theme to present a new user perspective.


![Software aspects of the Geant4 validation repository · the PrimeFaces [12] open source JSF (Java Server Faces) component suite. The database is accessed using the classes provided](https://static.documents.pub/doc/80x56/5e9b9f1d93729e07552bb7af/software-aspects-of-the-geant4-validation-repository-the-primefaces-12-open-source.jpg)


