Overview of PDF Bookmarks Quick Tips: -PDF Bookmarks: Bookmarks are used in Adobe Acrobat to link a particular page or section of a PDF file. They allow you to quickly jump to that portion of the document by clicking on the linked phrase. -Adobe Reader does NOT create Bookmarks! Reader will only view PDF files. You can NOT edit or create a PDF using Reader. -You can get download a full version as a 30 Day Free Trial of Adobe Acrobat XI Pro - Adobe Acrobat XI Standard and Pro are available for download on the web or purchase at the store. Always check the system requirements and your computer before downloading and installing software to make sure that it is compatible with your system. -There is variance in the fee structure due to the difference in the versions of the software and options to purchase to use it monthly or purchase the entire program. The cost is anywhere from $9.99/month to $298-$499 for the entire program. -Be sure to check our website, http://www.nursecredentialing.org/Accreditation/Primary for templates and guidelines on the self-study and activity files. -You can use Links instead of Bookmarks, if you know how to use them. -If you are creating a PDF file from a SCANNED document, it will be an OCR Text document, instructions for that are not provided. -Renaming a Bookmark: Click on the Bookmark on the left menu to highlight the words and type in the new name. -Double check the content to make sure everything is included before submitting your documents to us! -These directions may vary with other versions of Adobe Acrobat!
Transcript
Overview of PDF Bookmarks
Quick Tips:
-PDF Bookmarks: Bookmarks are used in Adobe Acrobat to link a particular page or section of a PDF file. They allow you to quickly jump to that portion of the document by clicking on the linked phrase.
-Adobe Reader does NOT create Bookmarks! Reader will only view PDF files. You can NOT edit or create a PDF using Reader.
-You can get download a full version as a 30 Day Free Trial of Adobe Acrobat XI Pro - Adobe Acrobat XI Standard and Pro are available for download on the web or purchase at the store. Always check the system requirements and your computer before downloading and installing software to make sure that it is compatible with your system.
-There is variance in the fee structure due to the difference in the versions of the software and options to purchase to use it monthly or purchase the entire program. The cost is anywhere from $9.99/month to $298-$499 for the entire program.
-Be sure to check our website, http://www.nursecredentialing.org/Accreditation/Primary for templates and guidelines on the self-study and activity files.
-You can use Links instead of Bookmarks, if you know how to use them. -If you are creating a PDF file from a SCANNED document, it will be an OCR Text document, instructions for that are not provided.
-Renaming a Bookmark: Click on the Bookmark on the left menu to highlight the words and type in the new name.
-Double check the content to make sure everything is included before submitting your documents to us!
-These directions may vary with other versions of Adobe Acrobat!
Step 1: Create Word Document. Create your file in Word. Use our pre-formatted Table of Contents for your file to start with and then add the remainder of your content. Save your document in Word, move on to the next step when you have finished editing all text and checked spelling, grammar, etc. You cannot edit the text once you have imported the document into Adobe.
Step 2: Open your Word version in Adobe Acrobat Pro. Open Adobe Acrobat. Below is a screen shot of the Home Page. On the left is a list of documents that you have previously opened or created (recent files). On the right are your task options. You will need to click on “Create a PDF” (top right) to start a document.
Shot 1:
Step 3: After you select “Create a PDF,” it will have you select which document that you will be using. Select the file and “Open.”
Shot 2:
Adobe will take you back to the home page but a black bar will appear at the bottom and show you that it is processing the files.
Shot 3:
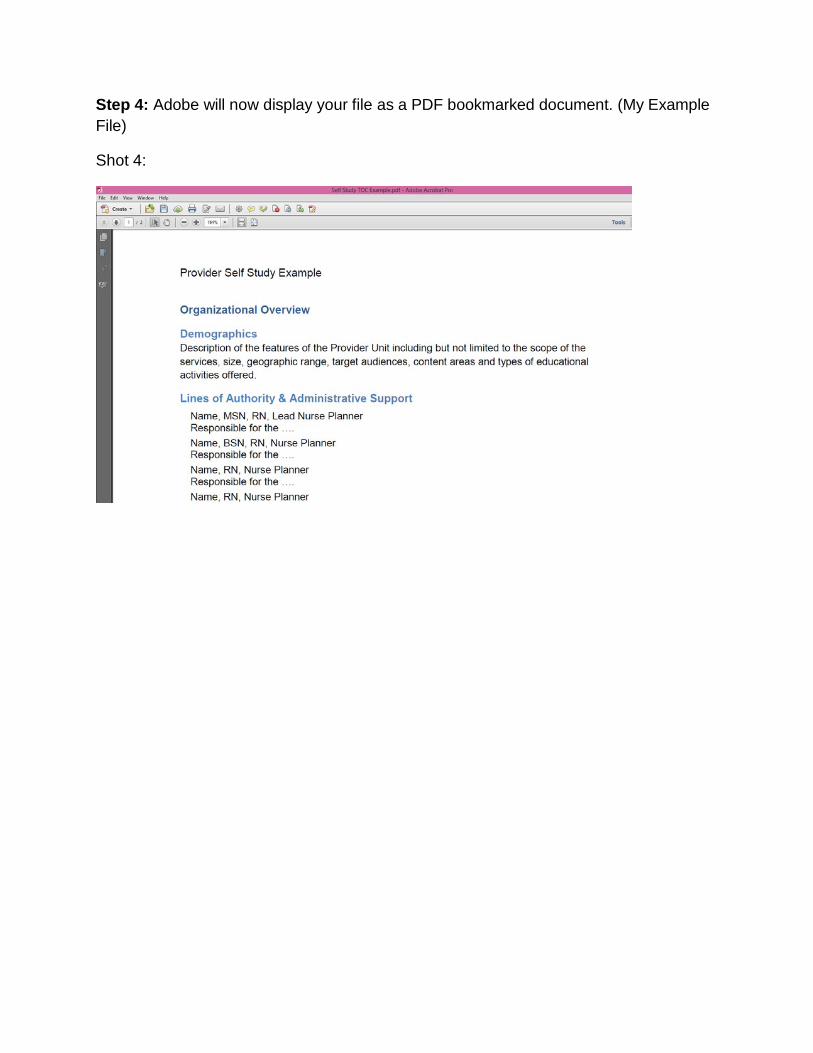
Step 4: Adobe will now display your file as a PDF bookmarked document. (My Example File)
Shot 4:
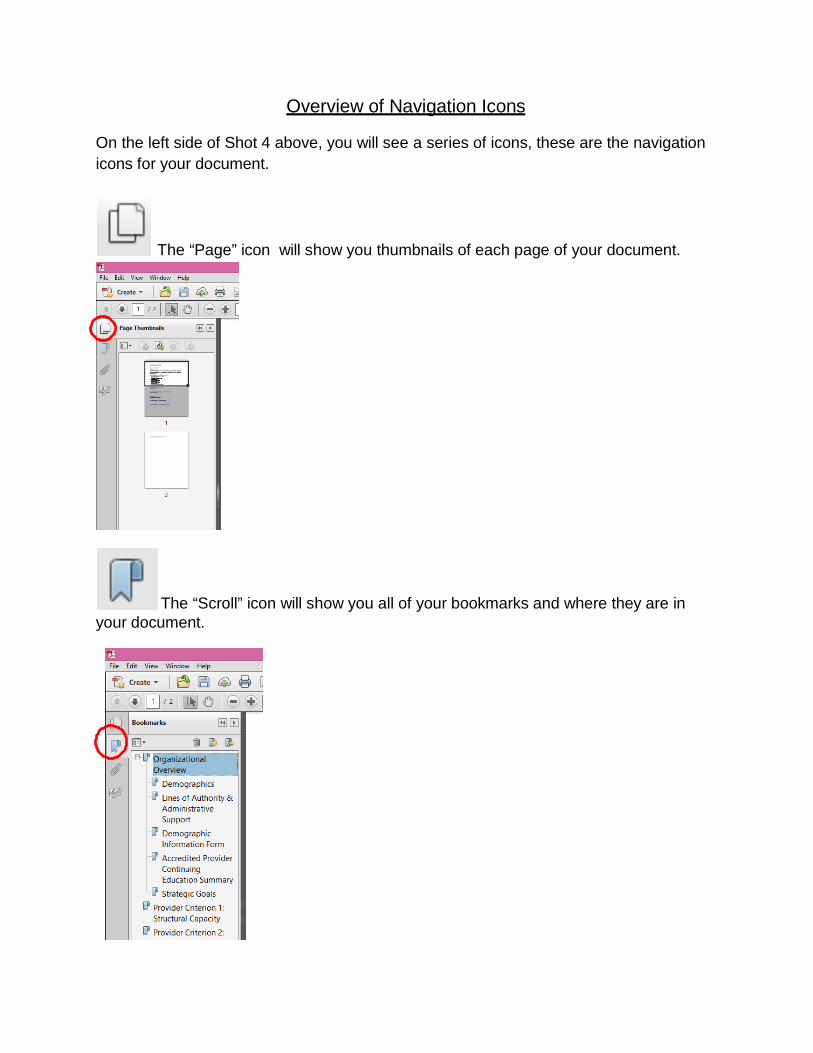
Overview of Navigation Icons
On the left side of Shot 4 above, you will see a series of icons, these are the navigation icons for your document.
The “Page” icon will show you thumbnails of each page of your document.
The “Scroll” icon will show you all of your bookmarks and where they are in your document.
The “Paper Clip” icon is the attachment menu and will allow you to attach supporting documents.
The “Pen” icon is to verify signatures on the document.
How to Create a New Bookmark
If you find that you would like to add in another bookmark that was not already created, these are the steps for that.
Step 1: On the left, Click on the “Scroll” Icon, which open the Bookmarks Navigation pane.
Shot 1: Bookmarks Navigation Pane.
Step 2: Find the text in the document that you wish to make a bookmark.
Step 3: Using the Text Select Tool from the Acrobat toolbar (The arrow above and to the right of the bookmarks toolbar), highlight/select the text with your mouse that you wish to use for the bookmark label. The highlighted text currently selected in the document is used as the Bookmark’s label. If no text has been highlighted, type the text for the bookmark label, and press Enter. (Bookmark labels can be up to 128 characters long.)
Shot 2: Use the Selection Text Tool to highlight text to create the next bookmark. Select New Bookmark from the drop down of options. Repeat until all Bookmarks are created.
Shot 3: All of my Bookmarks, including the newly created ones.
Nesting Bookmarks
You can nest/indent a list of bookmarks to show a relationship between topics. Nesting creates a parent/child relationship. You can expand and collapse this hierarchical list as desired. Remember: The nested pages must be bookmarks first to do this!
Here is what the final product will look like:
When you are finished, you should be able to jump from page to page throughout the document still with the document in order. Follow the steps below to nest one or more bookmarks under another bookmark:
Step 1: First, I made all of my soon to be nested pages Bookmarks, as you can see in the Navigation pane on the left.
Step 2: Select/highlight the bookmark or range of bookmarks you want to nest (click the first bookmark, hold down the shift key or Ctrl key and click the last bookmarks in the series). Below, I have highlighted all of the bookmarks that I will be moving to be sub- headed under “Organizational Overview.”
Step 3: Drag the highlighted bookmarks underneath what will become the parent bookmark or chapter heading. A line with a black triangle on the left will appear that shows where the bookmarks are being moved to. See the Navigation pane in the picture below.
Step 4: Release your mouse and the bookmarks will be moved. Note: The actual pages will remain in their original location in the document.
How to Insert an Attachment into your PDF
Step 1: Open your File in Adobe Acrobat.
Step 2: On the left, click on the “Paper Clip” icon to display the attachment menu.
Step 3: Click on the box icon to display the attachment drop down menu.
Select Add Attachment.
Step 4: Find your attachment in your files, select Open.
Step 5: Your attachment will be listed on the left hand display pane when it is attached. You can continue to upload using steps 1-4 or click on the paperclip with the starburst for a quicklink to upload attachments.
*When referencing an attachment in your document, make sure to reference the file name. For example, see attachment “How to Create a TOC.”
You can sort by name using the arrow above the “name” of the files, this will alphabetize the files to make it easier to locate them by name.
How to Page Number your PDF
Our documents are required to be paginated. These steps explain the process to insert page numbers.
Step 1: On the right side of the screen in Acrobat, under Tools, click on Pages.
Step 2: The Pages menu will drop down new options. Choose Header & Footer. Click add Header & Footer.
Step 3: A Menu will pop up with options for you to choose from. Here you can choose a font, insert any header or footer, preview what you are inserting, etc. Simply choose where you want the page number in the document (left, center or right footer text) then click your mouse in the box. Then click the button to Insert a Page Number, it will show the page number in the box that you picked. You can use this to insert a date as well.
Step 4: Click Ok and you are done.
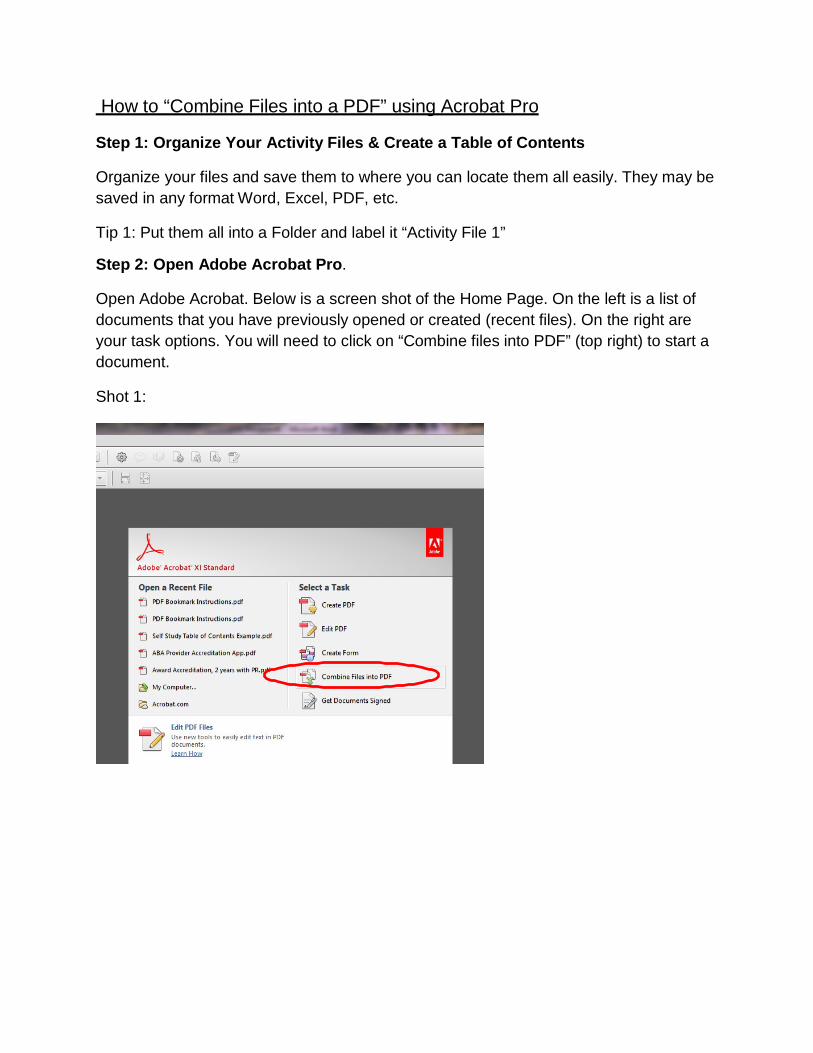
How to “Combine Files into a PDF” using Acrobat Pro
Step 1: Organize Your Activity Files & Create a Table of Contents Organize your files and save them to where you can locate them all easily. They may be saved in any format Word, Excel, PDF, etc.
Tip 1: Put them all into a Folder and label it “Activity File 1”
Step 2: Open Adobe Acrobat Pro. Open Adobe Acrobat. Below is a screen shot of the Home Page. On the left is a list of documents that you have previously opened or created (recent files). On the right are your task options. You will need to click on “Combine files into PDF” (top right) to start a document.
Shot 1:
After you select Combine files into a PDF, this screen will open.
Shot 2:
Step 3: Add Files
Go to Add Files in the top left. In the drop down menu, select Add Files. This will take you to the document library on your computer.
Shot 3:
Choose all the files from your document library that you wish to have in your final document. (Refer to your written list.)
Shot 4:
As you add files to your document list, they will show here. You can go to your document library as many times as you want BEFORE you Combine Files.
Shot 5:
Step 4: Arrange Files in Final Order You can re-arrange the order of the files by clicking on the file icon and dragging them around the screen. The order that you place them, will be the FINAL order of how they are in your document. Again, refer to your list & make sure that your files are in the same order!
Shot 6:
Step 5: Combine Files to Finalize the Document
When your files are in order and ready, click Combine Files in the bottom right to finalize the document and create the PDF with Bookmarks.
Shot 7:
Adobe will begin creating your file, this process will take 3-5 minutes depending on the size. You will see a green bar across the bottom, that says “Converting.”
Shot 8:
When Adobe is done, your new completed PDF file will open with Bookmarks created. The bookmarks will be of a few things:
1) Titles of every document 2) Table of Contents
You may need to re-name some of your Bookmarks. Click on the Bookmark on the left menu to highlight the words (bookmark link) and type in the new name