Overview of PowerChute Network Shutdown Installation The PowerChute Network Shutdown software works with the UPS Network Management Card to provide safe, unattended shutdowns of computer servers receiving power through a UPS. The software can be installed on supported operating systems like Windows, UNIX, Linux, Mac, and on virtualization software, see Operating System and Compatibility Chart. You can install PowerChute Network Shutdown (PCNS) with Single-, Redundant-, and Parallel- UPS configurations. For a description of possible configuration modes — Single, Redundant, Parallel — and the UPS devices that support these modes, see Configuration Wizard: UPS Electrical Configuration. See also: • Software and Hardware Requirements • Installing and Configuring PowerChute Network Shutdown • Further Information on Operating Systems • INI files in PowerChute Network Shutdown Notes: For ESXi installations, see the separate manual ESXi Installation. PCNS v3.x does not support Multiple-instances configurations. Product Center The PCNS Product Center page, Product Center page has many links to useful up-to-date information. This includes background information on vMA virtualization, loss of communications, and application notes which discuss varied subject matter including possible UPS configurations.
Transcript
Overview of PowerChute Network Shutdown Installation
The PowerChute Network Shutdown software works with the UPS Network Management Card to provide safe, unattended shutdowns of computer servers receiving power through a UPS.The software can be installed on supported operating systems like Windows, UNIX, Linux, Mac, and on virtualization software, see Operating System and Compatibility Chart.You can install PowerChute Network Shutdown (PCNS) with Single-, Redundant-, and Parallel-UPS configurations.For a description of possible configuration modes — Single, Redundant, Parallel — and the UPS devices that support these modes, see Configuration Wizard: UPS Electrical Configuration.See also:
• Software and Hardware Requirements• Installing and Configuring PowerChute Network Shutdown• Further Information on Operating Systems• INI files in PowerChute Network Shutdown
Notes: For ESXi installations, see the separate manual ESXi Installation.PCNS v3.x does not support Multiple-instances configurations.
Product CenterThe PCNS Product Center page, Product Center page has many links to useful up-to-date information. This includes background information on vMA virtualization, loss of communications, and application notes which discuss varied subject matter including possible UPS configurations.
Software and Hardware RequirementsNote: All references to UNIX® in this help include the Solaris™, HP-UX®, and AIX™ operating systems. (For ESXi, see the separate manual ESXi Installation).To install PowerChute Network Shutdown (PCNS), you must have the following:
• A supported operating system and web browser, as listed on the website, Operating System and Compatibility Chart .
• Disk space100 MB of free space on your hard drive for the actual installation process.A PCNS installation takes up about 6 MB of space if you have already installed a public JRE. A PCNS installation takes up about 100 MB of space when you accept the option of installing the private JRE with PCNS.Important Note: A private JRE means that it is specifically for the PCNS application. If you plan to use the public JRE, then you have to manually install it before you install PCNS.
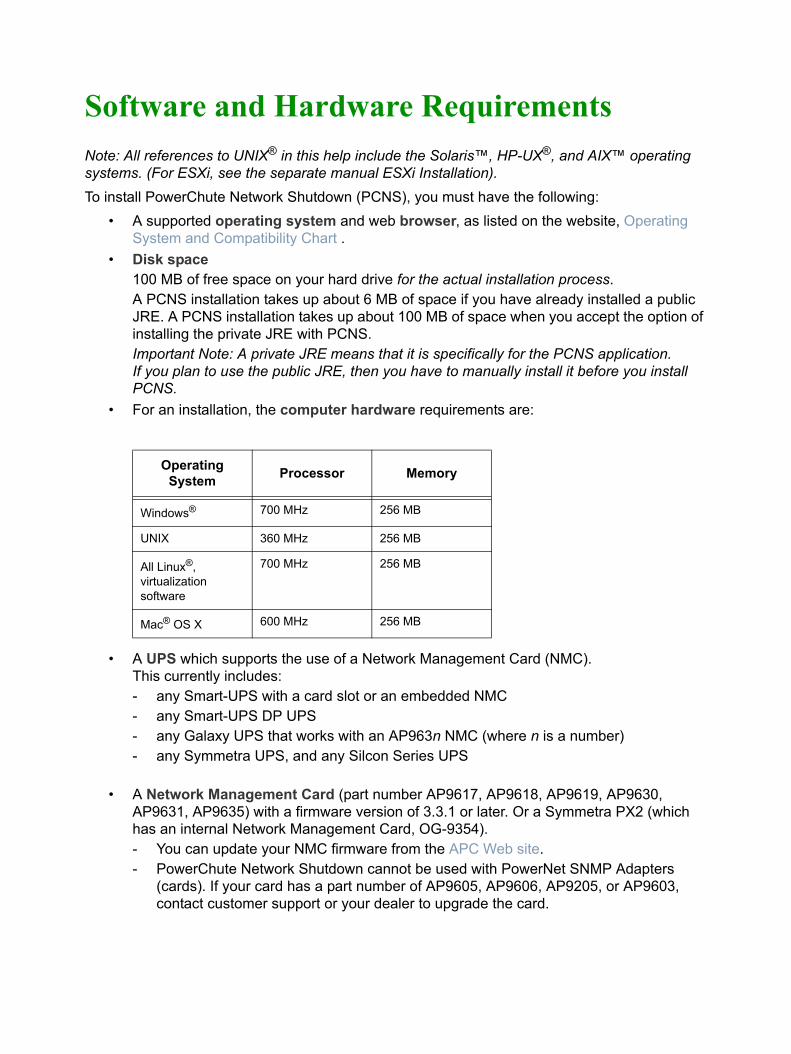
• For an installation, the computer hardware requirements are:
• A UPS which supports the use of a Network Management Card (NMC). This currently includes:- any Smart-UPS with a card slot or an embedded NMC- any Smart-UPS DP UPS- any Galaxy UPS that works with an AP963n NMC (where n is a number)- any Symmetra UPS, and any Silcon Series UPS
x• A Network Management Card (part number AP9617, AP9618, AP9619, AP9630,
AP9631, AP9635) with a firmware version of 3.3.1 or later. Or a Symmetra PX2 (which has an internal Network Management Card, OG-9354). - You can update your NMC firmware from the APC Web site.- PowerChute Network Shutdown cannot be used with PowerNet SNMP Adapters
(cards). If your card has a part number of AP9605, AP9606, AP9205, or AP9603, contact customer support or your dealer to upgrade the card.x
Note: PCNS can only use IPv4 addresses to communicate with an NMC. It cannot use IPv6 addresses.
• FirewallIf you are using a firewall, PCNS needs to be able to connect to the NMC Web Access port (default: TCP port 80) and receive data inbound to UDP port 3052 on the PCNS server machine. On Windows, when the Windows Firewall is enabled, you can allow the PCNS installation to configure the firewall automatically. That is, the NMC communication port (UDP 3052) is registered as an exception in the firewall and enabled. Also, exceptions are created for TCP ports 3052 (HTTP) and 6547 (HTTPS) but are left disabled for security reasons. If you want to enable remote access to a particular Web user interface, you can enable the appropriate exception.
• JRE
You must have a supported Java™ Runtime Environment (JRE), as seen for the different operating systems . With all supported operating systems — except HP-UX, AIX, and Mac OS X — PCNS gives you the option of installing a “private” JRE during an installation of PCNS v3.0.1. See Disk space.
For most operating systems, you can download a Java Runtime Environment from http://java.com.
• For the PCNS computer server: A monitor with a minimum resolution of 800 x 600; however, 1024 x 768 or greater is recommended.
• You must have administrator privileges for the server (the host computer).
• For ESX: You must have an installation of VMware Tools for each guest operating system on VMware.
• You must remove PowerChute plus, PowerChute Business Edition, PowerChute Personal Edition, and PowerChute Server before installing PCNS.The installation process will perform an upgrade rather than a complete installation if you have v2.2.4 or higher of PCNS already installed. For earlier versions of PCNS and for Multiple-instances configurations, you must uninstall the software before installing v3.0.1.
Installing and Configuring PowerChute Network ShutdownSetting up the operation of PowerChute Network Shutdown (PCNS) is divided into placing the executable files onto your drive and your actual configuration. You can subsequently use the configuration wizard to re-configure your setup at any time.
Installing PowerChute Network ShutdownInstallations of PCNS can be standard, silent, an upgrade, or a silent upgrade. See these sections:
• Upgrading the software• Silently upgrading the software• Installing the software• Silently installing the software• Installing on Netgear ReadyNAS
Upgrading the softwareIf you have v2.2.4 or higher of PCNS already installed, the installation process tells you it’s going to perform an upgrade rather than a complete installation. Upgrading enables you to retain your existing configuration settings.The main steps are the same for an upgrade and a standard installation, go to Installing PCNS: and perform steps 3 and 4. The configuration wizard does not run after an upgrade.Note: You can’t upgrade from a 32-bit version to a 64-bit version of PCNS, you must do a full installation. Also, you must manually uninstall the old version first.
Silently upgrading the softwareIf you have v2.2.4 or higher of PCNS already installed, the installation process tells you it’s going to perform an upgrade rather than a complete installation. Upgrading enables you to retain your existing configuration settings. See also Silently installing the software.
Installing the softwareTo install and operate the PowerChute Network Shutdown software, perform the following steps. (If you are upgrading from PCNS v2.4 or higher, refer to Upgrading the software).You can also use silent, non-interactive installation modes to set up your computer servers to have the same PowerChute Network Shutdown configuration (see Silently installing the software).
1. Install the Network Management Card (NMC) in your UPS. For installation instructions, see the Network Management Card installation guide that was shipped with your card.If you are using a Redundant-UPS or a Parallel-UPS configuration, you use one Network Management Card in each UPS in the system.Install the NMC in your UPS and configure it with an IP address before beginning the PCNS installation. If you install PowerChute Network Shutdown first, additional steps will be required when installing the NMC.
2. Using the NMC user interface, configure the UPS and the Network Management Card. At a minimum, perform these tasks: ba. Under the UPS tab, on the Configuration - shutdown page, set the Low Battery
Duration field value to at least five minutes.x
b. On the same page, you can set the authentication phrase for the administrator. Under the Administration tab, on the Local Users - administrator page, you can set the user name and password (these must be the same on all NMCs in a Redundant- or Parallel-UPS configuration).In the NMC, the default administrator user name and password are both apc, while the default setting for the authentication phrase is admin user phrase.
3. Installing PCNS:The installation program must be run on the server to be protected.On VMware, the installation program must be run on the ESX Console Operating System (COS). On Hyper-V, the installation program must be run on the server console.Note: Multiple-byte characters (Chinese for example) and some single byte high-ASCII characters e.g. ß, é, ä, are not allowed in the installation path.To start the PowerChute Network Shutdown installation, choose from the sections directly below which specify different OS systems and hardware.
Installing on Windows Server 2008 Server Core and Windows Hyper-V Server 2008a. Manually install the appropriate JRE version.b. Locate the installation file or files on the CD and copy them to a temporary directory
on your server. If necessary, unzip the installation file.c. Go to the temporary directory, and type cscript install.vbs at the command
prompt, as an administrator.d. When prompted for the installation directory, press Enter to accept the default or type
your custom directory path.e. If the directory you specified already exists, you need to confirm that the installation
should go there by typing y and pressing Enter.f. Type the full directory location of your Java software, or search for the default by
pressing Enter. You will be prompted if it’s not found. An example path is:C:\Program Files\java\jre1.6.0_16 Confirm the directory by typing y and pressing Enter.
g. When asked whether you want to install PCNS, type y and press Enter.
Installing on WindowsDouble-click setup.exe - either the downloaded file or on the CD.When the Windows Firewall is enabled, you can allow the PCNS installation to configure the firewall automatically by choosing Yes when prompted: PowerChute Network Shutdown ports must be opened in the Windows Firewall to enable communication with the Network Management
Card(s). Would you like this configuration to be performed automatically?
See Firewall for more information.
Installing on Linux and UNIXYou should have root privileges to perform the installation.
a. If you are installing from the CD, locate your installation files in one of the following directories on the CD: Aix, Hpux, Linux, Solaris_Sparc, Solaris_x86, ESX. Copy them to a temporary directory on your server.
b. If you are installing from the Web site, locate the filepcnsVersion_OS name.tar.gz (where Version is the PCNS version no, e.g. pcns301_linux.tar.gz) on the APC Web site and copy it to a temporary directory on your server.
Change your working directory to the temporary directory. Then type the following commands: gunzip pcnsVersion_OS name.tar.gz tar -xf pcnsVersion_OS name.tar
c. To install in a conversational mode, log on as a root user, type the following command at the root. (Alternatively you could use the sudo or su commands).If you are not logged on as the root user you need to run the installer using sudo, or switch to root user context using the su command and then run the installer.
./install.sh
Note: After a web download you might need to grant execute permissions:chmod +x install.sh
d. You cannot specify a directory name that contains a space, either for the installation or the Java directory.
If you do not specify an installation directory, it will be installed to /opt/APC (the default).See JRE before proceeding.
Installing on Mac OS XPerform the following steps.a. Download from the web. Or if the software is on a CD, copy the installation files from
the Mac OS X folder to a folder on the Mac. b. Go to the folder on the Mac where you put the installation files. c. Double-click on the file install.commandd. A terminal window opens, prompting you for your password. e. Enter your password.
x4. Complete the software installation.
x
The PowerChute Network Shutdown service (on Windows) and the daemon (on Linux, VMware, UNIX, and Mac OS X) all start automatically when the installation is completed. You can then delete the installation files.
5. On Windows Server 2008 Server Core, Windows Hyper-V Server, and virtualization software, go to a computer that has a browser and open the PCNS user interface with the URL: https://server_ip_address:6547. The wizard runs automatically.On Linux and UNIX, you must open the browser and enter the PCNS URL.When the Configuration Wizard displays, specify your configuration through its screen pages.
Silently installing the softwareInstalling silently means the installation is unattended or non-interactive. The requirements for a silent installation are the same as for any other installation (see Software and Hardware Requirements).If you want the same settings on all servers, you install silently using the edited silentInstall.INI or the silentInstall.sample file, and roll this out to the rest of the servers.Note: It is not possible to roll out your event configurations or shutdown settings using a silent installation. You can however, use pcnsconfig.ini to do this. See INI files in PowerChute Network Shutdown.See the following:
• Silent Install on Windows and Mac• Silent Install on Linux and UNIX• Silent Install on Windows Server 2008 Server Core and Hyper-V Server• Editing your silent installations file• Error codes for silent installations
Note: The situation regarding a silent installation with Hyper-V is summarized below:- For the standalone Hyper-V Server 2008, and the Core edition of Windows Server
2008 R2 (Enterprise, Datacenter, and Standard) with Hyper-V functionality enabled, use the steps in Silent Install on Windows Server 2008 Server Core and Hyper-V Server.x
- For the Full edition of Windows Server 2008 R2 (Enterprise, Datacenter, and Standard) with Hyper-V functionality enabled, use the steps in Silent Install on Windows and Mac.
Silent Install on Windows and MacYou can install PowerChute Network Shutdown (PCNS) by performing the following steps.Locate the installation file or files on the CD and copy them to a temporary directory on your server. If necessary, unzip the installation file(s).After you complete the installation, check the pcnsinst.log and errors.log files for error conditions. They are created in the folder where setup.exe is run from.
Edit the silentInstall.ini file to set new parameters, if required; see Editing your silent installations file.
• For an installation on Windows, navigate to the temporary directory on the server, and type the following on one line at the Windows command line:setup.exe –s silentInstall.ini
• For an installation on Mac OS X, navigate to the temporary folder on the new server, and type the following command on one line:Install.command –s silentinstall.ini
Note: Using sudo will always prompt the user to enter a password. To do this completely silently, you could use this command: Echo password | sudo –S ./install.command –sOn the Mac, applicationDirectory should be the first line in the INI file or you might get an error, see Editing your silent installations file.
Silent Install on Linux and UNIXEdit the silentInstall.sample file to set new parameters, if required; see Editing your silent installations file. Type the following command to start the installation, as an administrator:./install.sh –f silentInstall.sample
Silent Install on Windows Server 2008 Server Core and Hyper-V ServerFollow these steps:
1. Manually install the appropriate JRE version.2. Locate the installation file or files on the CD and copy them to a temporary directory on
your server. If necessary, unzip the installation file.Edit the silentInstall.sample file to set new parameters, if required; see Editing your silent installations file.
3. Type cscript install.vbs /f silentInstall.sample (as an administrator).The installation starts and completes without user inputs.
Editing your silent installations fileOn Windows Server Core and UNIX operating systems, the file that guides silent installations is named silentInstall.sample.On all other Windows operating systems and on a MAC, the file is named silentInstall.INI.
These are plain text files and can be edited with an available text editor. Each field or line has a value that the installer needs to carry out the installation. The tables below explain the fields available; this can vary between operating systems.
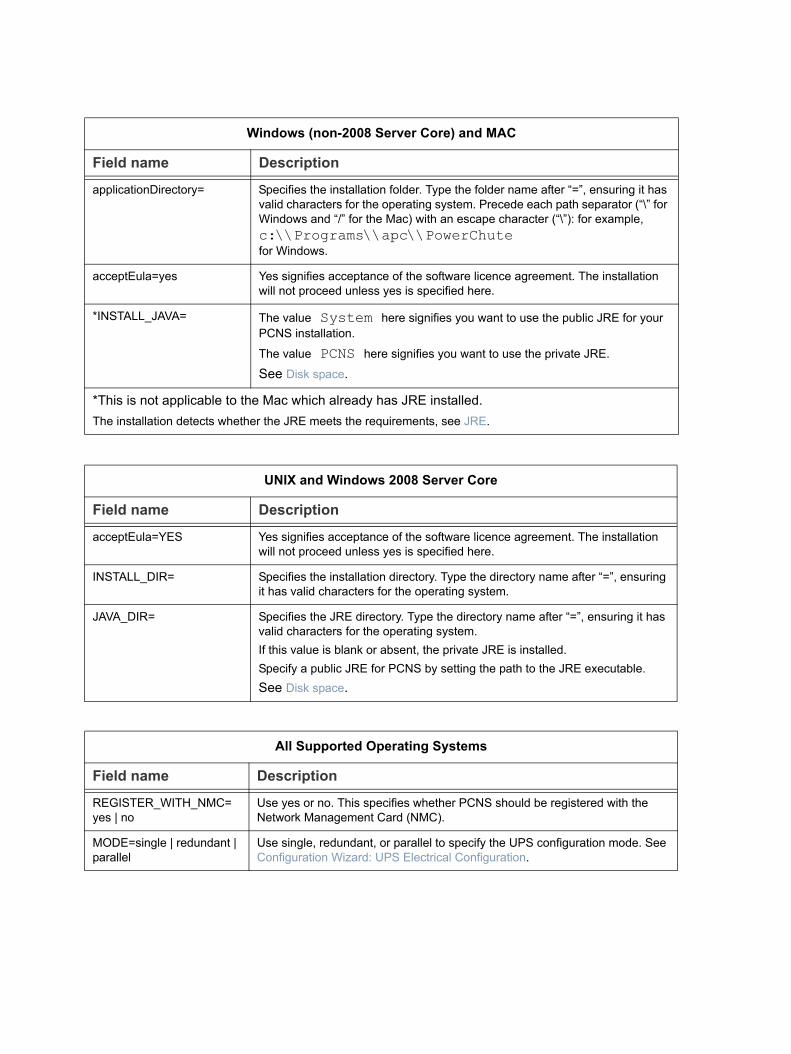
Windows (non-2008 Server Core) and MAC
Field name Description
applicationDirectory= Specifies the installation folder. Type the folder name after “=”, ensuring it has valid characters for the operating system. Precede each path separator (“\” for Windows and “/” for the Mac) with an escape character (“\”): for example,c:\\Programs\\apc\\PowerChute for Windows.
acceptEula=yes Yes signifies acceptance of the software licence agreement. The installation will not proceed unless yes is specified here.
*INSTALL_JAVA= The value System here signifies you want to use the public JRE for your PCNS installation.
The value PCNS here signifies you want to use the private JRE.
See Disk space.
*This is not applicable to the Mac which already has JRE installed.The installation detects whether the JRE meets the requirements, see JRE.
UNIX and Windows 2008 Server Core
Field name Description
acceptEula=YES Yes signifies acceptance of the software licence agreement. The installation will not proceed unless yes is specified here.
INSTALL_DIR= Specifies the installation directory. Type the directory name after “=”, ensuring it has valid characters for the operating system.
JAVA_DIR= Specifies the JRE directory. Type the directory name after “=”, ensuring it has valid characters for the operating system.If this value is blank or absent, the private JRE is installed.Specify a public JRE for PCNS by setting the path to the JRE executable.See Disk space.
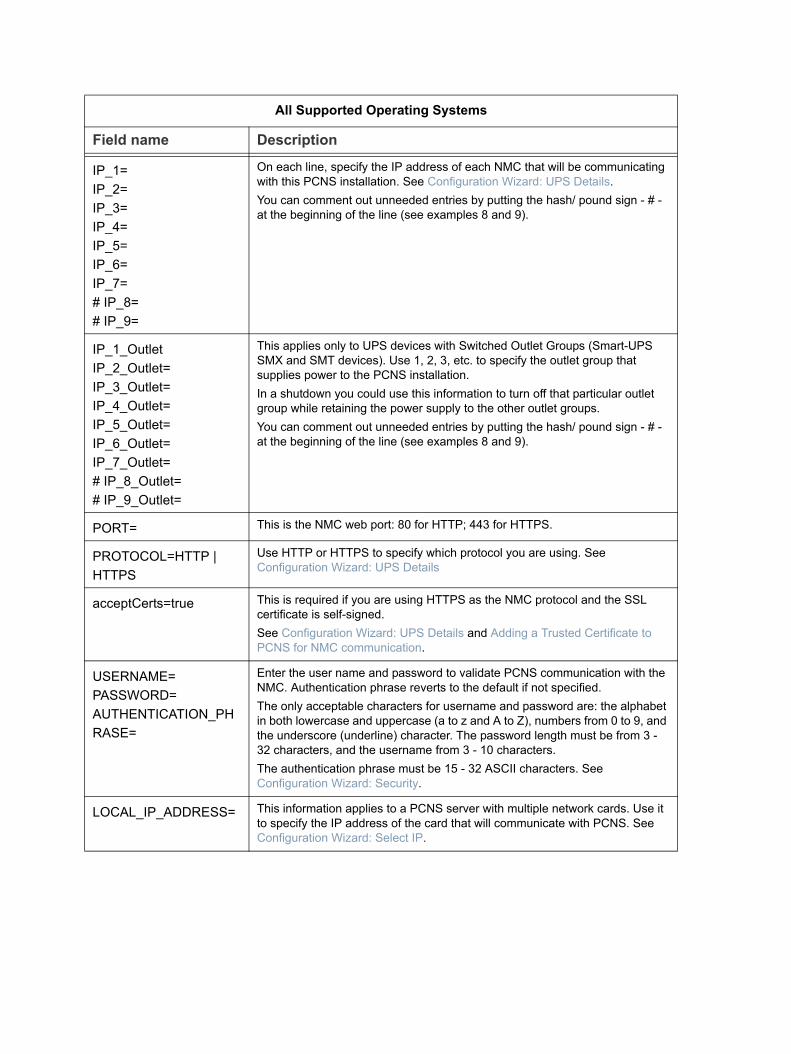
All Supported Operating Systems
Field name Description
REGISTER_WITH_NMC=yes | no
Use yes or no. This specifies whether PCNS should be registered with the Network Management Card (NMC).
MODE=single | redundant | parallel
Use single, redundant, or parallel to specify the UPS configuration mode. See Configuration Wizard: UPS Electrical Configuration.
IP_1=IP_2=IP_3=IP_4=IP_5=IP_6=IP_7=# IP_8=# IP_9=
On each line, specify the IP address of each NMC that will be communicating with this PCNS installation. See Configuration Wizard: UPS Details.You can comment out unneeded entries by putting the hash/ pound sign - # - at the beginning of the line (see examples 8 and 9).
This applies only to UPS devices with Switched Outlet Groups (Smart-UPS SMX and SMT devices). Use 1, 2, 3, etc. to specify the outlet group that supplies power to the PCNS installation.In a shutdown you could use this information to turn off that particular outlet group while retaining the power supply to the other outlet groups.You can comment out unneeded entries by putting the hash/ pound sign - # - at the beginning of the line (see examples 8 and 9).
PORT= This is the NMC web port: 80 for HTTP; 443 for HTTPS.
PROTOCOL=HTTP | HTTPS
Use HTTP or HTTPS to specify which protocol you are using. See Configuration Wizard: UPS Details
acceptCerts=true This is required if you are using HTTPS as the NMC protocol and the SSL certificate is self-signed. See Configuration Wizard: UPS Details and Adding a Trusted Certificate to PCNS for NMC communication.
USERNAME=PASSWORD=AUTHENTICATION_PHRASE=
Enter the user name and password to validate PCNS communication with the NMC. Authentication phrase reverts to the default if not specified.The only acceptable characters for username and password are: the alphabet in both lowercase and uppercase (a to z and A to Z), numbers from 0 to 9, and the underscore (underline) character. The password length must be from 3 - 32 characters, and the username from 3 - 10 characters. The authentication phrase must be 15 - 32 ASCII characters. See Configuration Wizard: Security.
LOCAL_IP_ADDRESS= This information applies to a PCNS server with multiple network cards. Use it to specify the IP address of the card that will communicate with PCNS. See Configuration Wizard: Select IP.
All Supported Operating Systems
Field name Description
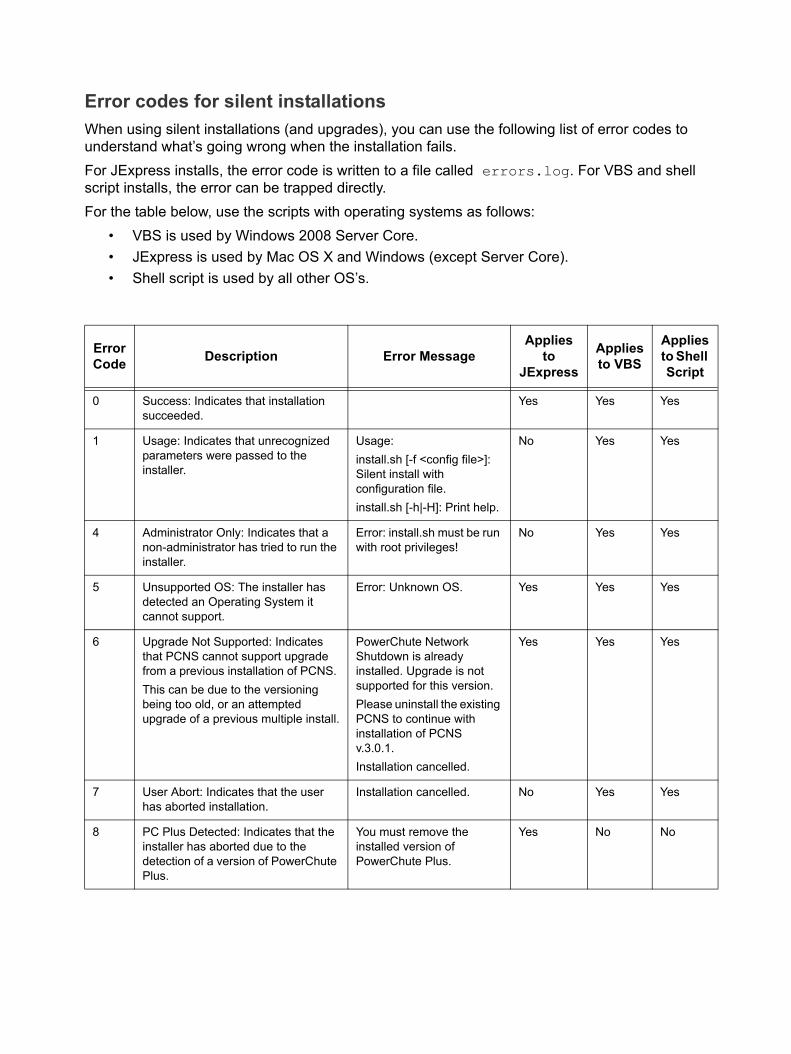
Error codes for silent installationsWhen using silent installations (and upgrades), you can use the following list of error codes to understand what’s going wrong when the installation fails. For JExpress installs, the error code is written to a file called errors.log. For VBS and shell script installs, the error can be trapped directly.For the table below, use the scripts with operating systems as follows:
• VBS is used by Windows 2008 Server Core.• JExpress is used by Mac OS X and Windows (except Server Core).• Shell script is used by all other OS’s.
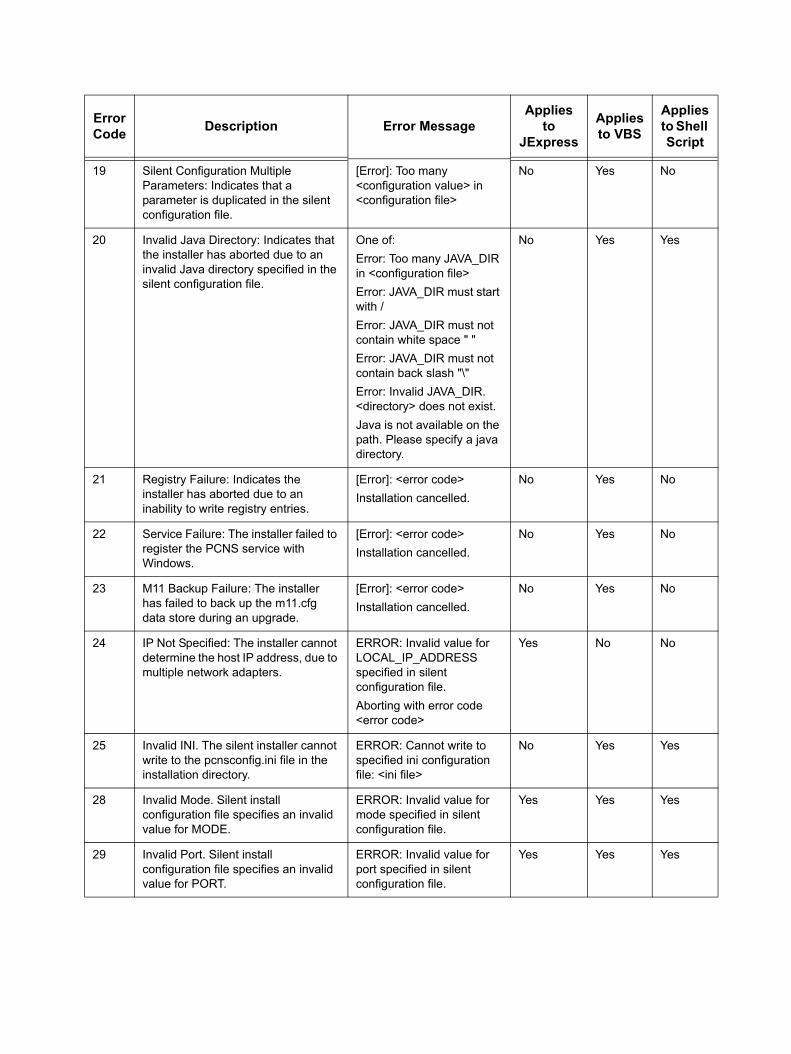
Error Code Description Error Message
Applies to
JExpress
Applies to VBS
Applies to Shell Script
0 Success: Indicates that installation succeeded.
Yes Yes Yes
1 Usage: Indicates that unrecognized parameters were passed to the installer.
4 Administrator Only: Indicates that a non-administrator has tried to run the installer.
Error: install.sh must be run with root privileges!
No Yes Yes
5 Unsupported OS: The installer has detected an Operating System it cannot support.
Error: Unknown OS. Yes Yes Yes
6 Upgrade Not Supported: Indicates that PCNS cannot support upgrade from a previous installation of PCNS. This can be due to the versioning being too old, or an attempted upgrade of a previous multiple install.
PowerChute Network Shutdown is already installed. Upgrade is not supported for this version.Please uninstall the existing PCNS to continue with installation of PCNS v.3.0.1.Installation cancelled.
Yes Yes Yes
7 User Abort: Indicates that the user has aborted installation.
Installation cancelled. No Yes Yes
8 PC Plus Detected: Indicates that the installer has aborted due to the detection of a version of PowerChute Plus.
You must remove the installed version of PowerChute Plus.
Yes No No
9 PCBE Detected: Indicates that the installer has aborted due to the detection a version of PowerChute Business Edition.
You must remove the installed version of PowerChute Business Edition Server.
Yes Yes No
10 PowerChute Server Detected: Indicates that the installer has aborted due to the detection of a version of PowerChute Server.
You must remove the installed version of PowerChute Server.
Yes No No
11 HyperV or VMware Detected: Indicates that the installer has aborted due to the detection of HyperV or VMware.
VMware [Server|Workstation|Player] has been detected on your system. This version of PowerChute Network Shutdown does not support VMware. Please uninstall VMware Server, or consult www.apc.com for the required version of PowerChute Network Shutdown.Microsoft Windows Hyper-V has been detected on your system. This version of PowerChute Network Shutdown does not support Hyper-V. Please disable Hyper-V, or consult www.apc.com for the required version of PowerChute Network Shutdown.
Yes Yes Yes
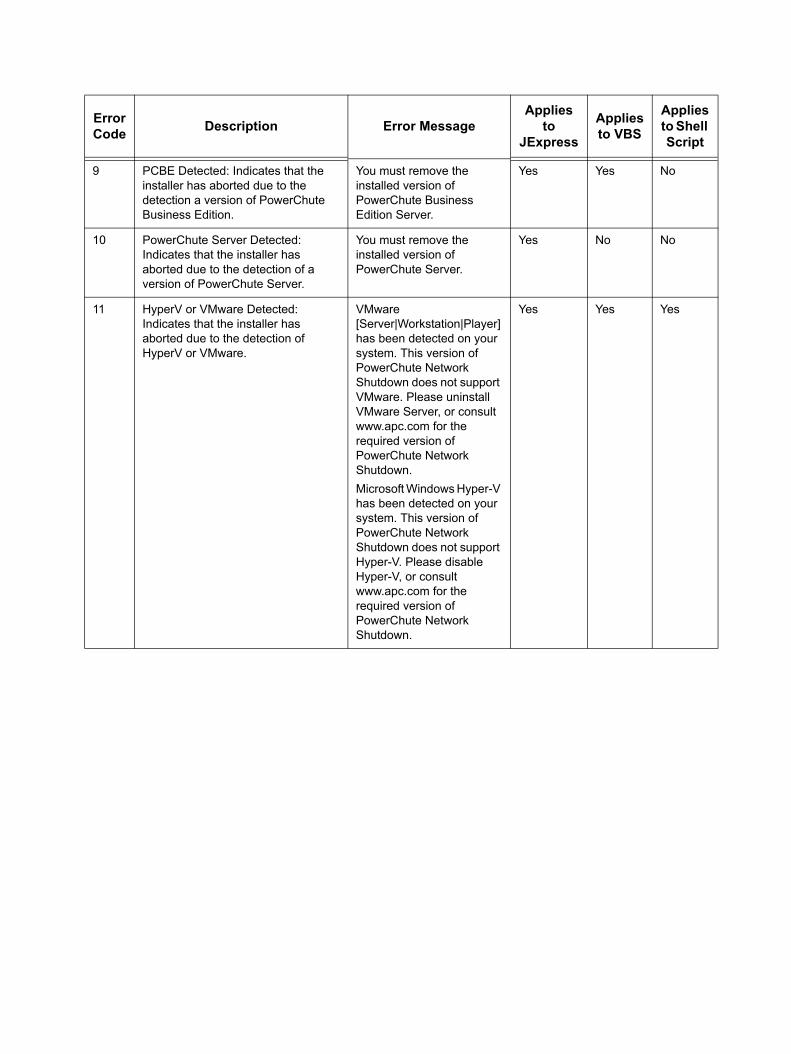
Error Code Description Error Message
Applies to
JExpress
Applies to VBS
Applies to Shell Script
12 Invalid Install Directory: Indicates that the installer has aborted due to an invalid target directory.
One of:Error: Too many INSTALL_DIR in silentConfiguration.iniError: INSTALL_DIR must start with '/'Error: INSTALL_DIR must not contain white space.Error: INSTALL_DIR must not contain back slash '\'Error: INSTALL_DIR is not configured.Installation directory must start with "/"Installation directory must not contain white space " "Installation directory must not contain back slash "\"Failed to create directory <install directory>.
Yes Yes Yes
13 Invalid Java Version: Invalid version of Java specified in configuration file.
Installation cancelled. No No Yes
14 Unsupported Locale: The installer has detected an attempt to install an English build on a Japanese system.
This version of PowerChute Network Shutdown does not support the Japanese language. Please consult www.apc.com for the required version of PowerChute Network Shutdown.
Yes No Yes
15 Zipfile Missing: Indicates that the installer cannot find the zipfile, from which to extract the PCNS install.
Can't find <zip filename> No Yes Yes
16 Silent Configuration Missing: Indicates that the installer has aborted because the specified silent configuration file could not be read.
Error: Invalid file <filename>
Yes Yes Yes
17 EULA Not Accepted: Indicates that the installer has aborted because the End User Licence Agreement was not accepted.
Error: EULA must be accepted by setting ACCEPT_EULA=YES in config file
Yes Yes Yes
18 Silent Configuration Missing Parameter: Indicates that required parameters are missing from the silent configuration file.
[Error]: <configuration value> is not defined in <configuration file>
No Yes No
Error Code Description Error Message
Applies to
JExpress
Applies to VBS
Applies to Shell Script
19 Silent Configuration Multiple Parameters: Indicates that a parameter is duplicated in the silent configuration file.
[Error]: Too many <configuration value> in <configuration file>
No Yes No
20 Invalid Java Directory: Indicates that the installer has aborted due to an invalid Java directory specified in the silent configuration file.
One of:Error: Too many JAVA_DIR in <configuration file>Error: JAVA_DIR must start with /Error: JAVA_DIR must not contain white space " "Error: JAVA_DIR must not contain back slash "\"Error: Invalid JAVA_DIR. <directory> does not exist.Java is not available on the path. Please specify a java directory.
No Yes Yes
21 Registry Failure: Indicates the installer has aborted due to an inability to write registry entries.
[Error]: <error code>Installation cancelled.
No Yes No
22 Service Failure: The installer failed to register the PCNS service with Windows.
[Error]: <error code>Installation cancelled.
No Yes No
23 M11 Backup Failure: The installer has failed to back up the m11.cfg data store during an upgrade.
[Error]: <error code>Installation cancelled.
No Yes No
24 IP Not Specified: The installer cannot determine the host IP address, due to multiple network adapters.
ERROR: Invalid value for LOCAL_IP_ADDRESS specified in silent configuration file.Aborting with error code <error code>
Yes No No
25 Invalid INI. The silent installer cannot write to the pcnsconfig.ini file in the installation directory.
ERROR: Cannot write to specified ini configuration file: <ini file>
No Yes Yes
28 Invalid Mode. Silent install configuration file specifies an invalid value for MODE.
ERROR: Invalid value for mode specified in silent configuration file.
Yes Yes Yes
29 Invalid Port. Silent install configuration file specifies an invalid value for PORT.
ERROR: Invalid value for port specified in silent configuration file.
Yes Yes Yes
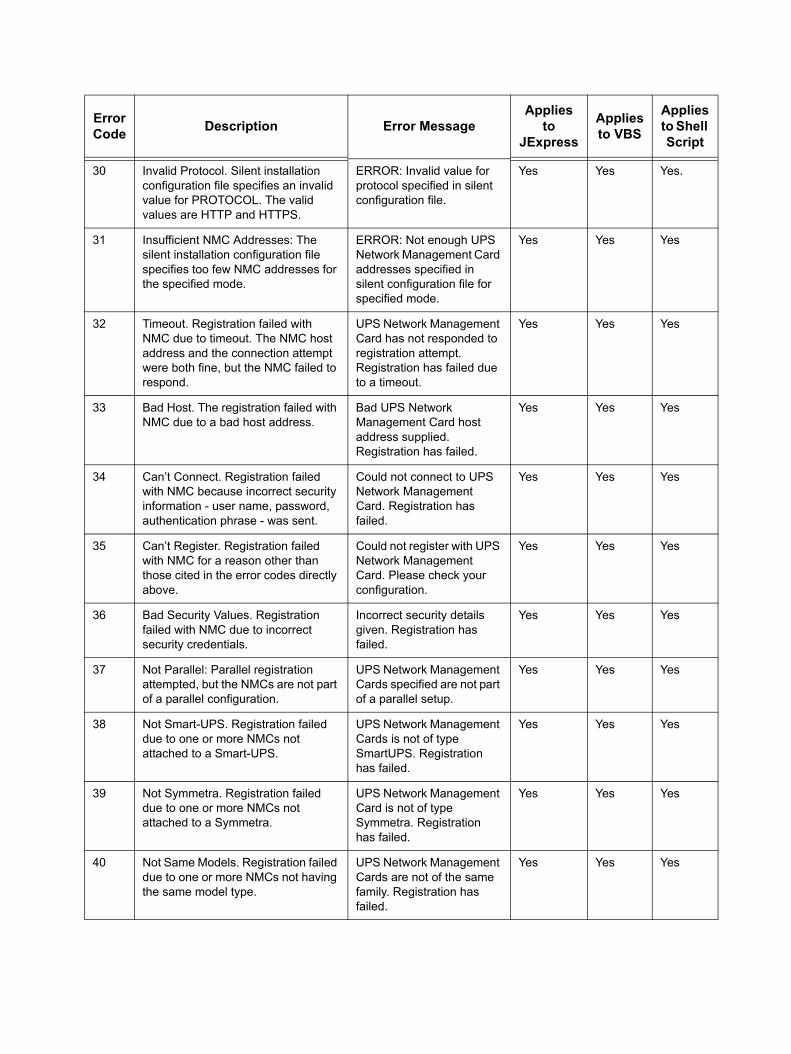
Error Code Description Error Message
Applies to
JExpress
Applies to VBS
Applies to Shell Script
30 Invalid Protocol. Silent installation configuration file specifies an invalid value for PROTOCOL. The valid values are HTTP and HTTPS.
ERROR: Invalid value for protocol specified in silent configuration file.
Yes Yes Yes.
31 Insufficient NMC Addresses: The silent installation configuration file specifies too few NMC addresses for the specified mode.
ERROR: Not enough UPS Network Management Card addresses specified in silent configuration file for specified mode.
Yes Yes Yes
32 Timeout. Registration failed with NMC due to timeout. The NMC host address and the connection attempt were both fine, but the NMC failed to respond.
UPS Network Management Card has not responded to registration attempt. Registration has failed due to a timeout.
Yes Yes Yes
33 Bad Host. The registration failed with NMC due to a bad host address.
Bad UPS Network Management Card host address supplied. Registration has failed.
Yes Yes Yes
34 Can’t Connect. Registration failed with NMC because incorrect security information - user name, password, authentication phrase - was sent.
Could not connect to UPS Network Management Card. Registration has failed.
Yes Yes Yes
35 Can’t Register. Registration failed with NMC for a reason other than those cited in the error codes directly above.
Could not register with UPS Network Management Card. Please check your configuration.
Yes Yes Yes
36 Bad Security Values. Registration failed with NMC due to incorrect security credentials.
Incorrect security details given. Registration has failed.
Yes Yes Yes
37 Not Parallel: Parallel registration attempted, but the NMCs are not part of a parallel configuration.
UPS Network Management Cards specified are not part of a parallel setup.
Yes Yes Yes
38 Not Smart-UPS. Registration failed due to one or more NMCs not attached to a Smart-UPS.
UPS Network Management Cards is not of type SmartUPS. Registration has failed.
Yes Yes Yes
39 Not Symmetra. Registration failed due to one or more NMCs not attached to a Symmetra.
UPS Network Management Card is not of type Symmetra. Registration has failed.
Yes Yes Yes
40 Not Same Models. Registration failed due to one or more NMCs not having the same model type.
UPS Network Management Cards are not of the same family. Registration has failed.
Yes Yes Yes
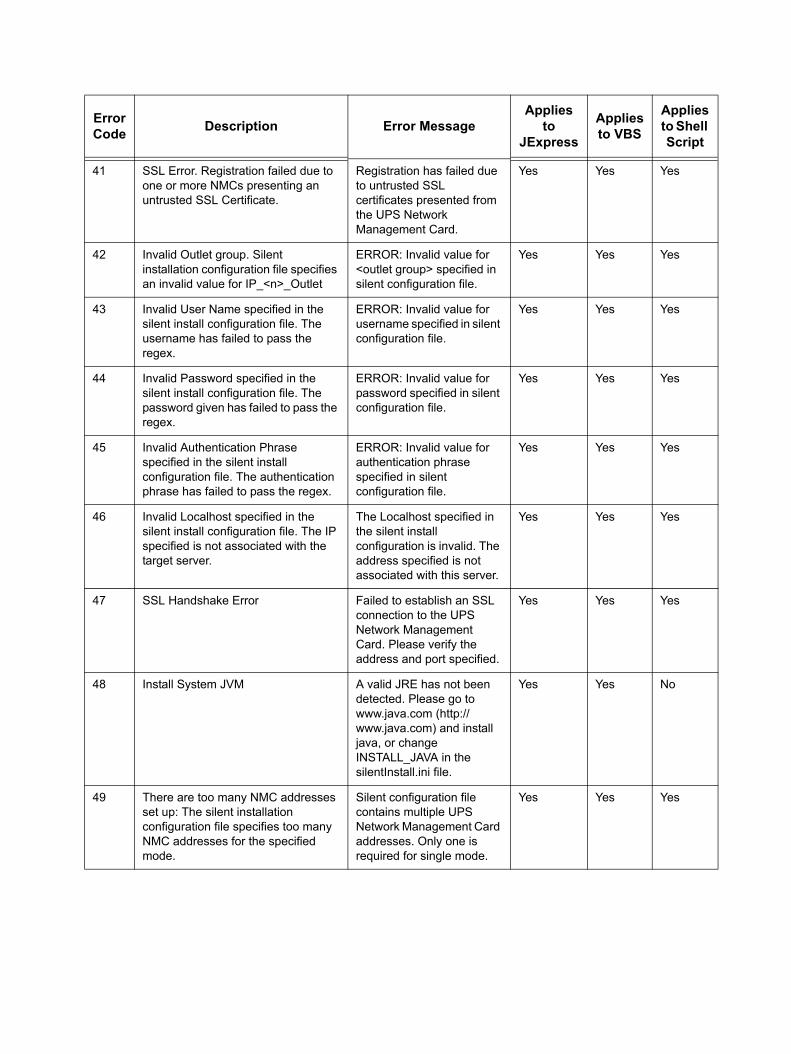
Error Code Description Error Message
Applies to
JExpress
Applies to VBS
Applies to Shell Script
41 SSL Error. Registration failed due to one or more NMCs presenting an untrusted SSL Certificate.
Registration has failed due to untrusted SSL certificates presented from the UPS Network Management Card.
Yes Yes Yes
42 Invalid Outlet group. Silent installation configuration file specifies an invalid value for IP_<n>_Outlet
ERROR: Invalid value for <outlet group> specified in silent configuration file.
Yes Yes Yes
43 Invalid User Name specified in the silent install configuration file. The username has failed to pass the regex.
ERROR: Invalid value for username specified in silent configuration file.
Yes Yes Yes
44 Invalid Password specified in the silent install configuration file. The password given has failed to pass the regex.
ERROR: Invalid value for password specified in silent configuration file.
Yes Yes Yes
45 Invalid Authentication Phrase specified in the silent install configuration file. The authentication phrase has failed to pass the regex.
ERROR: Invalid value for authentication phrase specified in silent configuration file.
Yes Yes Yes
46 Invalid Localhost specified in the silent install configuration file. The IP specified is not associated with the target server.
The Localhost specified in the silent install configuration is invalid. The address specified is not associated with this server.
Yes Yes Yes
47 SSL Handshake Error Failed to establish an SSL connection to the UPS Network Management Card. Please verify the address and port specified.
Yes Yes Yes
48 Install System JVM A valid JRE has not been detected. Please go to www.java.com (http://www.java.com) and install java, or change INSTALL_JAVA in the silentInstall.ini file.
Yes Yes No
49 There are too many NMC addresses set up: The silent installation configuration file specifies too many NMC addresses for the specified mode.
Silent configuration file contains multiple UPS Network Management Card addresses. Only one is required for single mode.
Yes Yes Yes
Error Code Description Error Message
Applies to
JExpress
Applies to VBS
Applies to Shell Script
Installing on Netgear ReadyNASPowerChute Network Shutdown (PCNS) works on Intel-based ReadyNAS devices from Netgear. It does not work on SPARC-based systems. See the list of supported devices at Operating System and Compatibility Chart.PCNS installs directly on to the supported ReadyNAS device, and works with your UPS to provide safe shutdowns in case of power problems.Install PCNS as follows.
1. Log on to your Netgear ReadyNAS UI using the URL https://<NAS_IP_Address>/admin: Your Netgear help documentation will have information on how to obtain the IP address. In some cases, it will display on the front of the device.
2. On the left pane of the ReadyNAS screen under Home, click on the Add-ons option and then on Add New.The installation file (.bin) is available on the PCNS CD and as a download from the Netgear website. At this point, the Netgear URL for any “add-ons” should display on the ReadyNAS screen.
3. Locate the file below on the CD or download and extract it from the website package:PowerChuteNetworkShutdown_n.n.n.bin. where n.n.n represents the PCNS version you are installing.
4. On the ReadyNAS screen, click the Choose File button and enter the path to PowerChuteNetworkShutdown_n.n.n.bin. Click Open.
5. Click Upload and verify image.6. At the dialog presented, click OK to commence the upload and verification process.7. When the upload and verification is confirmed, click the Install button on the ReadyNAS
screen.8. A confirmation displays saying that the add-on has been successfully installed. Click OK.9. On the left-pane of the screen, click on Add-ons and Installed.10. The URL for PCNS displays in the main pane of the screen. Click on the URL to launch
PCNS in your browser window in order to configure it.
Your NAS is not protected until you complete the PCNS configuration wizard.The PCNS username and password is completely independant of the users accounts configured on the NAS Server.
Further Information on Operating SystemsSee the following:
• Running on Linux and UNIX• Running on Mac OS X• Running on VMware ESX• Running on Windows Hyper-V Server• Uninstalling on Windows Server 2008 Server Core
Running on Linux and UNIXTo stop PowerChute Network Shutdown, type the following at the command line:
• On Linux use the command/etc/rc.d/init.d/PowerChute stop
• On Solaris, use the command /etc/rc2.d/S99PowerChute stop• On AIX, use the command /etc/rc.APCpcns stop• On HP-UX, use the command /sbin/init.d/pcns stop
To start PowerChute Network Shutdown manually, type the following at the command line:• On Linux, use the command
/etc/rc.d/init.d/PowerChute start
• On Solaris, use the command /etc/rc2.d/S99PowerChute start • On AIX, use the command /etc/rc.APCpcns start • On HP-UX, use the command /sbin/init.d/pcns start
To uninstall in a conversational mode, run the uninstall script located in the PowerChute directory. For example, type the following command: /opt/APC/PowerChute/uninstallTo uninstall in a silent mode, run the uninstall script located in the PowerChute directory, with the -q option (don’t use –Q, /q, /Q). For example, type the following command:/opt/APC/PowerChute/uninstall -q
Running on Mac OS XTo stop PowerChute Network Shutdown, type the following at the command line: sudo /Library/StartupItems/comapcpcns/comapcpcns stop
To start PowerChute Network Shutdown manually, type the following at the command line: sudo /Library/StartupItems/comapcpcns/comapcpcns start
To remove PowerChute Network Shutdown, run the uninstall script.
Running on VMware ESX
For ESXi installations, see the separate manual ESXi Installation.
To stop PowerChute Network Shutdown, type the following at the command line:/etc/rc.d/init.d/PowerChute stop
To start PowerChute Network Shutdown manually, type the following at the command line:/etc/rc.d/init.d/PowerChute start
Important: In order to be able to shut down the virtual machines (VM) on VMware ESX, you need to configure a Guest Shutdown on each VM.
Consult your ESX documentation on how to do this, or look it up on the APC by Schneider KBase (answer ID is 10380).To uninstall in a conversational mode, run the uninstall script located in the PowerChute directory. For example, type the following command:
/opt/APC/PowerChute/uninstall
To uninstall in a silent mode, run the uninstall script located in the PowerChute directory, with the -q option (don’t use –Q, /q, /Q). For example, type the following command:Type in a password when prompted.
/opt/APC/PowerChute/uninstall -q
It is possible to change the version of Java used by PCNS by editing the java.cfg file found in the PCNS installation directory (for example /opt/APC/PowerChute/group1). In the file, type the directory path of the Java location you want to use and save the file. Then stop and restart the daemon.
Running on Windows Hyper-V ServerIn order to be able to shut down the virtual machines (VM) on Windows Hyper-V, you need to configure a guest operating shutdown on each VM.
Consult your Hyper-V documentation on how to do this, or look it up on the APC by Schneider KBase (answer ID is 10381).To uninstall PCNS on Hyper-V Server, please see Uninstalling on Windows Server 2008 Server Core.
Uninstalling on Windows Server 2008 Server CoreFollow these steps to uninstall PowerChute Network Shutdown (PCNS) on a Server Core platform.
1. Close any command prompt windows that are accessing PCNS.2. Go to the PowerChute directory, e.g. C:\Program Files\APC\PowerChute.3. Type cscript uninstall.vbs and press Enter.4. When asked, confirm that you want to uninstall PCNS by typing y and pressing Enter.
INI files in PowerChute Network ShutdownThere are two INI files in PowerChute Network Shutdown (PCNS): silentInstall.INI — also known as silentInstall.sample — and pcnsconfig.ini.They can be used to automate the installation and configuration, respectively, of PCNS in another location after your initial installation.When you:
• make configuration changes through the user interface, like configuring events to take actions or changing a delay for a shutdown command file, or
• run the Configuration Wizard (see Configuring PowerChute Network Shutdown), the settings in the default pcnsconfig.ini file are updated with your new settings. The file is then ready to be rolled out in order to use the same configurations with other PCNS installations (though certain information like IP addresses might need to be changed).To use pcnsconfig.ini, you must create a script to stop the PCNS service (daemon), replace the existing copy of pcnsconfig.ini, and re-start the service. See the link to Using pcnsconfig.ini at Product Center .See also Silently installing the software and Re-setting the PCNS password.
Re-setting the PCNS passwordIf you forget or lose your password, you can set a new one and also change the user name and authentication phrase by editing the pcnsconfig.ini file. In the [NetworkManagementCard] section of the INI file, set the following lines with your new values:
username= new user namepassword= new passwordauthenticationPhrase= new authentication phrase
The PowerChute Network Shutdown (PCNS) configuration wizard functionality enables you to specify the following PCNS settings:
• the user name and password, and the authentication phrase• the PCNS IP address• the UPS configuration• the IP address and port of the Network Management Card to monitor• if relevant, the outlet group that supplies power to the PCNS server
The configuration of PCNS is done through several dialog screens. Your configuration changes are not applied until you click the Apply button on the Configuration Wizard: Confirm screen page.If you are re-configuring, as distinct from doing a first-time configuration, you can choose Cancel to exit and return to the PCNS user interface before clicking the Apply button on the Configuration Wizard: Confirm screen page; your configuration will remain as it was before you choose Configuration Wizard on the menu.
After configuring your settings, you can roll them out to other PCNS installations using an INI file, see INI files in PowerChute Network Shutdown.
Configuration Wizard: SecurityThe user name and authentication phrase validate the communication between PowerChute Network Shutdown (PCNS) and the NMC. Because of this, you must set values in PCNS to be the same as those for the Network Management Card (NMC). The NMC user name on the NMC Web user interface is found at Administration - Local Users - administrator. The NMC authentication phrase on the NMC user interface is found at UPS - Configuration - shutdown (UPS - PowerChute - Configuration on older firmware). In the NMC, the default administrator user name and password are both apc, while the default setting for the authentication phrase is admin user phrase. The authentication phrase must be 15 to 32 characters of any type.The password specified here is the only information that is unique to PCNS. You should record and share the password you use to make sure the information is not lost. (If you do lose it, see INI files in PowerChute Network Shutdown).
The PowerChute Network Shutdown (PCNS) password allows any ASCII characters. The password length must be from 3 to 32 characters.Note: If you are using a Redundant-UPS or a Parallel-UPS configuration, ALL of the Network Management Cards in the UPS system must use the same administrator user name and authentication phrase.
Configuration Wizard: Select IPThis screen only displays when your computer server has more than one IP address.The Internet Protocol (IP) address you specify here for the PCNS server is the network communication link between PCNS and the Network Management Card (NMC). Each PCNS installation has one, unique IP address set up with the NMC and displayed in the NMC user interface under UPS - Configuration - PowerChute clients (or UPS - PowerChute - clients).
Configuration Wizard: UPS Electrical ConfigurationYou can configure PowerChute Network Shutdown (PCNS) to operate in several different modes or configurations, listed below.
Not all of these configurations are supported by all the UPS devices that work with PCNS. See also Product Center.
Single-UPS ConfigurationIn a Single-UPS configuration, each computer server or group of servers is protected by a single UPS. That is, each server has one PCNS agent communicating with a single NMC installed on a UPS.
Redundant-UPS ConfigurationWith a Redundant-UPS configuration, PCNS recognizes a group of either two or three UPS devices as a single UPS. One supplies the power and the others are available to support the load if there is an electrical problem. (Typically, this is a server with multiple power cords).In this configuration, you have one PCNS agent on a server communicating with two or three Network Management Cards (NMC) installed on UPS devices.The UPS devices have to be the same model type and firmware version and each must have enough battery power to keep the system going in an outage.
Parallel-UPS ConfigurationIn a Parallel UPS configuration you can synchronize several UPS Devices to provide greater capacity or redundancy. In a Parallel-UPS configuration, PCNS recognizes an entire parallel system of UPS devices as a single UPS.The power outputs of the UPS devices are combined to share the load.
In this configuration, you have one PCNS agent on a server communicating with several Network Management Cards (NMC) installed on UPS devices which have already been configured to operate in parallel mode.Each UPS in a Parallel-UPS configuration must be of the same model type and firmware version.
Recommended background information on configurationsSee Product Center.
Configuration Wizard: UPS DetailsThe Network Management Card (NMC) has HTTP enabled by default but it can be changed to HTTPS through the NMC user interface. Specify which protocol is already being used by the NMC here. For a Redundant-UPS or a Parallel-UPS configuration, all of the NMCs must use the same protocol.If you choose HTTPS, then you see the Accept Untrusted SSL Certificates? check box field.If the SSL certificate used by the NMC is self-signed or if it is not signed by a Trusted Authority, you must select this option. (By default, the NMC uses a self-signed SSL certificate, but it provides the option of installing a valid public key certificate if a high level of security is required. See Adding a Trusted Certificate to PCNS for NMC communication).What port does the NMC use? The default is 80 for HTTP, and 443 for HTTPS. Do not change this number unless you changed the port being used by your NMC. For a Redundant-UPS or a Parallel-UPS configuration, all of the Network Management Cards must use the same port.
Caution: For the last field, NMC IP address, you must choose the address of the NMC in the UPS supplying power to the PCNS computer server (that is, the present server). Otherwise, your server is not protected during a power outage. The wizard does not report an error if you specify the wrong NMC.
Adding a Trusted Certificate to PCNS for NMC communicationAs seen above, when using the HTTPS protocol to communicate with the NMC, you must select the Accept Untrusted SSL Certificates? check box. However, it is possible to create a Trusted Certificate file and add it to the PCNS trusted store. PCNS can then stop automatically accepting untrusted certificates (which might be invalid).Your NMC user’s guide has details on the Security Wizard used to create the Trusted Certificate file with an extension .CRT. This file is then used to create components that can be uploaded to the NMC to replace the default self-signed certificate.In order to facilitate the trusted SSL communication of PCNS with the NMC, this Trusted Certificate file must then be added to the system Java cacerts keystore or to the PowerChute-keystore file. (You can do this using the Java keytool.exe; for details see the Java help documentation). Adding it to the cacerts keystore means it is available to all your applications as distinct from just PCNS.By default the PowerChute-keystore file is located in APC\PowerChute\group1. Its password is "password”.If you add the Trusted Certificate and you subsequently get a connection error with the NMC, then it could be because a) the certificate has expired, b) it is not yet valid, or c) it has been
revoked. In any of these case, you need to add a new Trusted Certificate to the PCNS server or to upload a new valid SSL certificate to the NMC.Notes:The PowerChute-keystore file only exists after the first attempt is made to communicate with the NMC using HTTPS (by using the configuration wizard for example).For this reason, for a silent installation you must add the Trusted Certificate to the Java cacerts keystore.PCNS only checks the keystore when its service starts. After you add the Trusted Certificate, you will need to re-start the PCNS service if it’s already running.
Configuration Wizard: MiscellaneousThe Automatically check for updates to PCNS feature informs you when a new software update is available. It allows you to decide whether to update or not.You can select the Turn off Power Source when PCNS shuts down the server field if you want the actual UPS to turn off when the PCNS server shuts down. (This does not apply to certain UPS devices: Parallel Silcon and Parallel-UPS configurations, Smart-UPS VT or Galaxy UPS devices).If the shutdown is due to a power failure, the default behavior (as determined by the Network Management Card settings) is that the UPS will turn on again when power returns. You can check your settings for On-Battery Shutdown Behavior in the NMC at UPS-Configuration-shutdown OR UPS-PowerChute-configuration.
Configuration Wizard: ConfirmWhen running this wizard for the first time, the Cancel button is disabled; however you can use the Previous button.In your second or later use of this wizard, you can use Cancel to return to the main PCNS page without applying any of the settings you have changed.
Configuration Wizard: Applying ChangesCheck your specifications and apply them on this screen page. This page then informs you whether the configuration has been successfully applied. If not, it specifies the problem. If there is an error, you can choose Fix it now, which takes you to the page most likely to contain the problem. Alternatively, you can choose Continue anyway, which accepts the current settings, even though PCNS is not configured correctly.If the configuration cannot communicate with the Network Management Card, you can manually set up the IP address of the PCNS server with the NMC, see the steps below.In some cases, this configuration wizard sets up the IP address, but is unable to verify it. When this happens, you must subsequently check to ensure that the IP address is registered. To check or to manually add the IP address:
1. Access the Network Management Card’s user interface by using the NMC IP address as the URL.
2. Click on the UPS tab.3. Find the list of PowerChute clients with the IP addresses which are registered with this
Network Management Card. (The menu options vary between NMC user interfaces).4. To add a new IP address, click the Add Client button, and type the IP address of the
server on which PowerChute Network Shutdown is installed in the Add IP Address field, and click Apply.If you are using a Redundant-UPS or a Parallel-UPS configuration, you need to go to the user interface for each separate NMC and enter the PCNS IP address there.
Error Message “PCNS is NOT receiving data from the NMC.”If you get this message, check whether the IP address of the Agent is listed on the NMC user interface under UPS - Configuration - PowerChute clients (or UPS - PowerChute - clients).If the IP address is not listed then you can try to add it manually as mentioned in the section directly above.If the IP address is listed there:
• Make sure that the UDP port 3052 is NOT being blocked by a firewall.• Check the IP settings on the PCNS machine and on the NMC user interface to verify that
the default gateway and subnet mask are correct.
Configuration Wizard: Select Outlet GroupWhen your UPS has Switched Outlet Group functionality, you must use this screen page to specify the outlet group that supplies power to the server that has PCNS installed. This is important in order to ensure a safe shutdown of the server.
Warning: PCNS can’t distinguish between outlet groups. Be sure to select the correct outlet group.