How to integrate QueueMetrics-Live to MyPBX Overview QueueMetrics Live is a cloud-based call center suite for Asterisk telephony system. It create a cloud space for telephony system uploading their queue_log, according to the log, QueueMetrics can easily generate the report of the queue daily, weekly and monthly. What is more, QueueMetrics Live is also a call center control platform, including the features like hot-desking, agent log in and log out, real-time monitor the queue, and spy the call. This guide refers to the following links: QueueMetrics User Manual: http://manuals.loway.ch/QM_UserManual-chunked/index.html Tutorial Video: http://queuemetrics.com/video.jsp Running QueueMetrics-Live for Asterisk on a Yeastar U PBX This document guides you to achieve the following features: 1.Upload the queue_log to QueueMetrics Live cloud server, then QueueMetrics report the queue statistics detail according to the log. 2.Create Agent in QueueMetrics cloud side, and remotely log in and log out for MyPBX queue. 3.Monitor the queue real time and control the incoming and outgoing call of queue. 4.Other feature like hot-desking, spy the line. Configuring MyPBX 1.Create a queue in MyPBX. Log in MyPBX with the User name: admin, and create a queue in the page: PBX -> Inbound Call Control -> Queues.
Transcript
How to integrate QueueMetrics-Live to MyPBX
OverviewQueueMetrics Live is a cloud-based call center suite for Asterisk telephony system. It create a cloud space for telephony system uploading their queue_log, according to the log, QueueMetrics can easily generate the report of the queue daily, weekly and monthly. What is more, QueueMetrics Live is also a call center control platform, including the features like hot-desking, agent log in and log out, real-time monitor the queue, and spy the call.
This guide refers to the following links:
QueueMetrics User Manual:http://manuals.loway.ch/QM_UserManual-chunked/index.htmlTutorial Video:http://queuemetrics.com/video.jsp
Running QueueMetrics-Live for Asterisk on a Yeastar U PBX
This document guides you to achieve the following features:1.Upload the queue_log to QueueMetrics Live cloud server, then QueueMetrics report the queue statistics detail according to the log.2.Create Agent in QueueMetrics cloud side, and remotely log in and log out for MyPBX queue.3.Monitor the queue real time and control the incoming and outgoing call of queue.4.Other feature like hot-desking, spy the line.
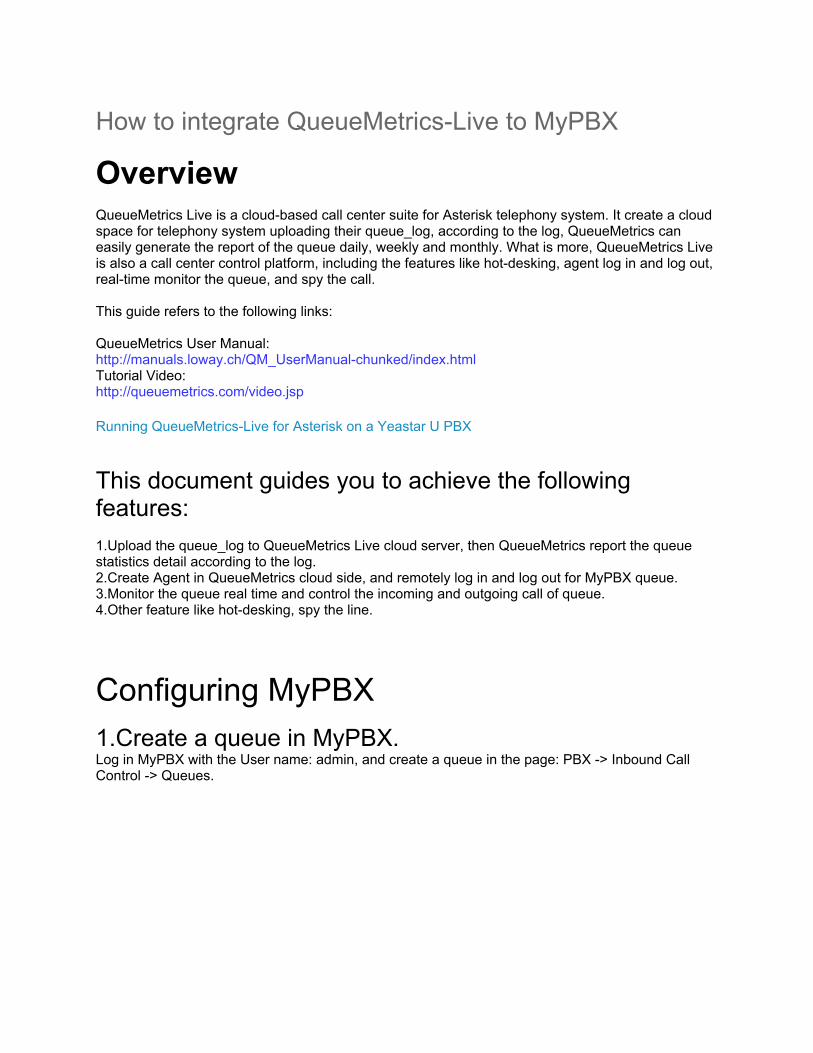
Configuring MyPBX1.Create a queue in MyPBX.Log in MyPBX with the User name: admin, and create a queue in the page: PBX -> Inbound Call Control -> Queues.
Note: leave the agent list empty, the agent will be logged on in QueueMetrics side.
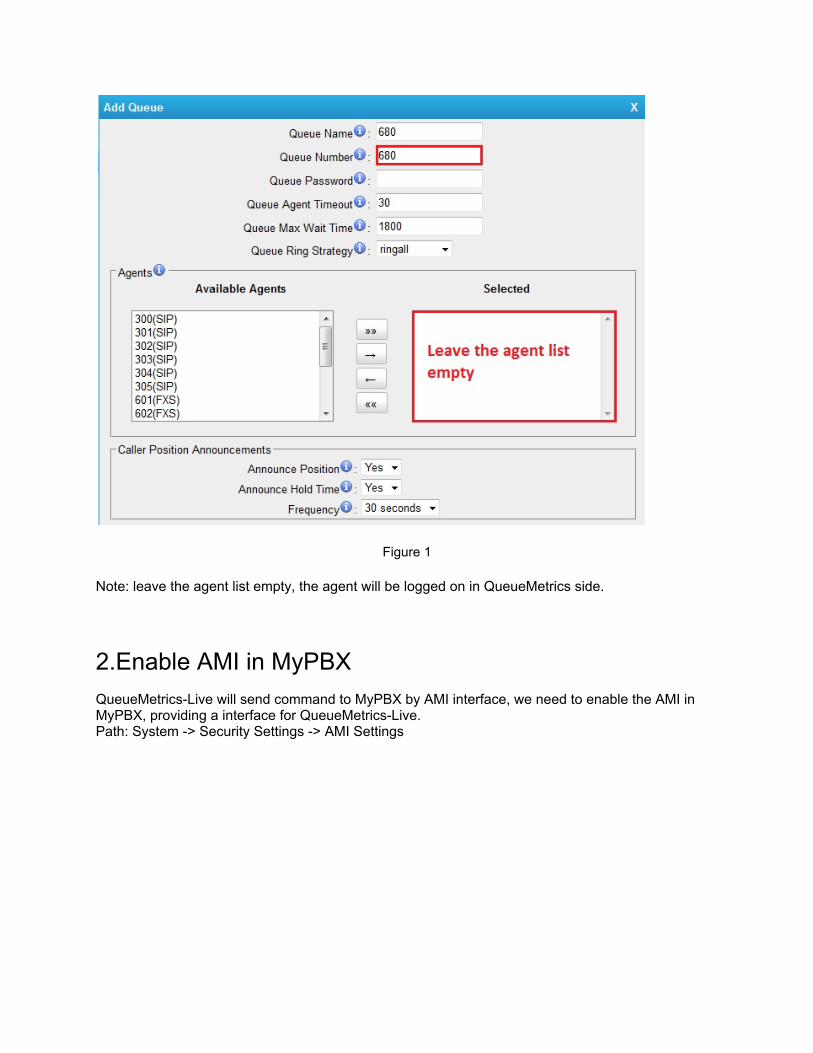
2.Enable AMI in MyPBXQueueMetrics-Live will send command to MyPBX by AMI interface, we need to enable the AMI in MyPBX, providing a interface for QueueMetrics-Live.Path: System -> Security Settings -> AMI Settings
Figure 2
Check Enable AMIUser Name: adminPassword: passwordPermitted ‘IP address/Subnet mask’: 127.0.0.1/255.255.255.0 (add to IP Restriction list).
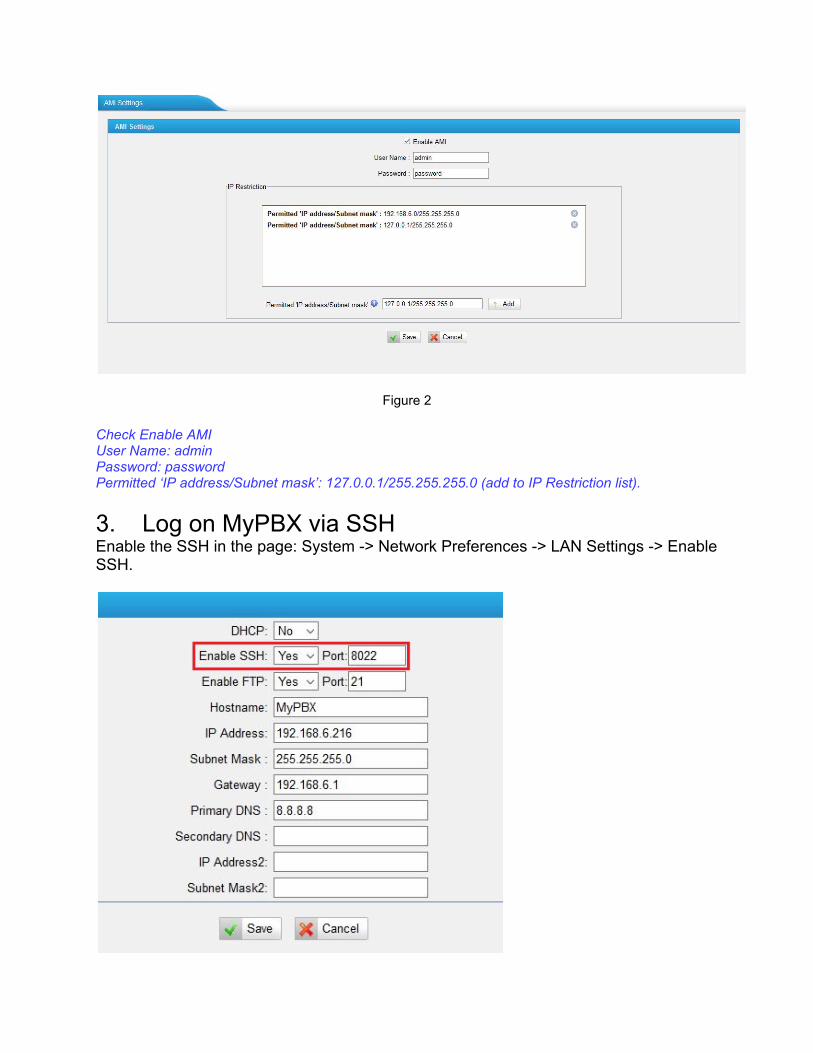
3. Log on MyPBX via SSHEnable the SSH in the page: System -> Network Preferences -> LAN Settings -> Enable SSH.
Figure 3
Enable SSH: YesPort:8022
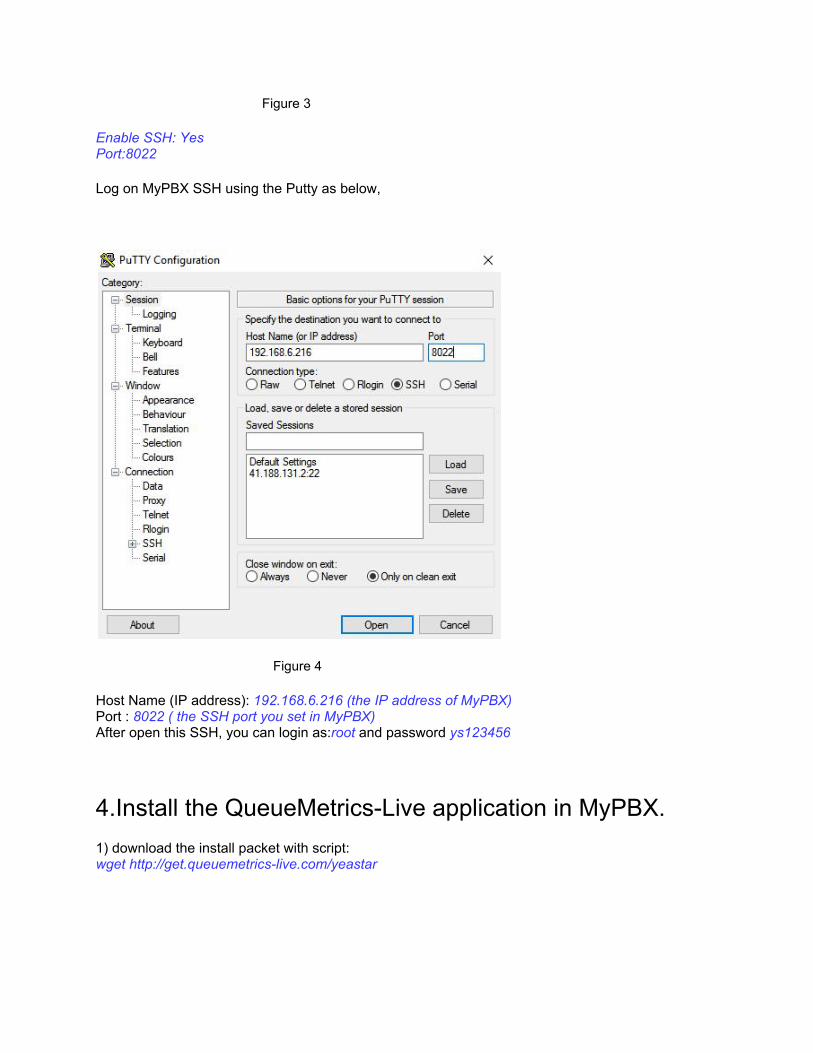
Log on MyPBX SSH using the Putty as below,
Figure 4
Host Name (IP address): 192.168.6.216 (the IP address of MyPBX)Port : 8022 ( the SSH port you set in MyPBX)After open this SSH, you can login as:root and password ys123456
4.Install the QueueMetrics-Live application in MyPBX.1) download the install packet with script:wget http://get.queuemetrics-live.com/yeastar
Figure 5
2) run the scriptsh yeastarThen MyPBX will checking the connectivity.
Figure 6
3) fill in the requested data of your Queuemetrics-live instant.
Figure 7
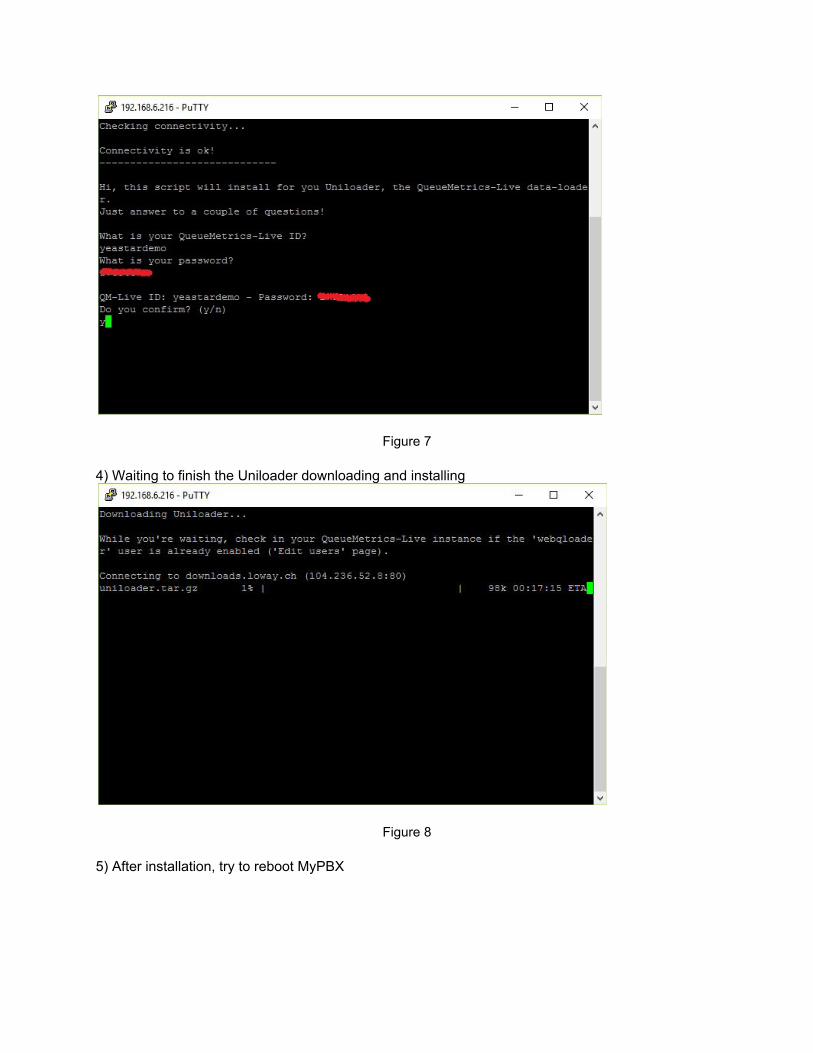
4) Waiting to finish the Uniloader downloading and installing
Figure 8
5) After installation, try to reboot MyPBX
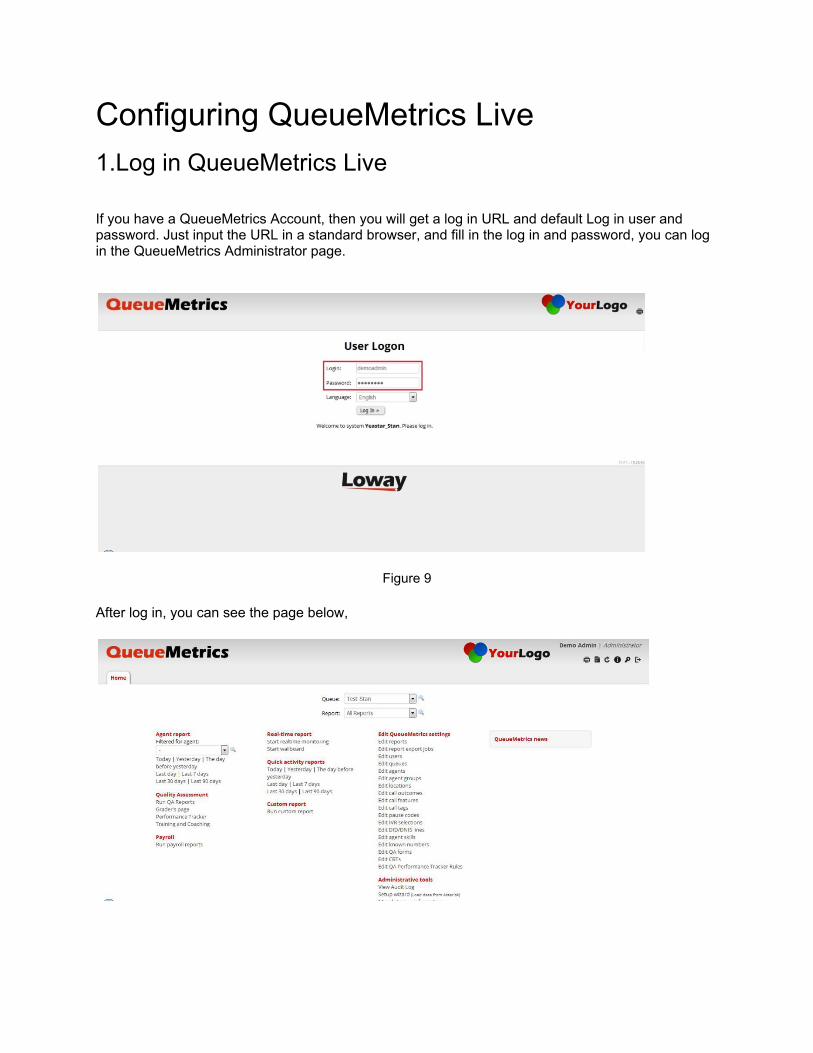
Configuring QueueMetrics Live1.Log in QueueMetrics Live
If you have a QueueMetrics Account, then you will get a log in URL and default Log in user and password. Just input the URL in a standard browser, and fill in the log in and password, you can log in the QueueMetrics Administrator page.
Figure 9
After log in, you can see the page below,
Figure 10
2.Setting System Parameters For full integration with MyPBX, we need to modify some system parameters in QueueMetrics-Live.After log on to QueueMetrics-Live home page, we enter the page ‘Edit system parameters’ in the right bottom of the page.Then modify two parameter as below:
default.hotdesking=86400callfile.dir=tcp:admin:[email protected] (this is according to your /etc/asterisk/manager.conf)
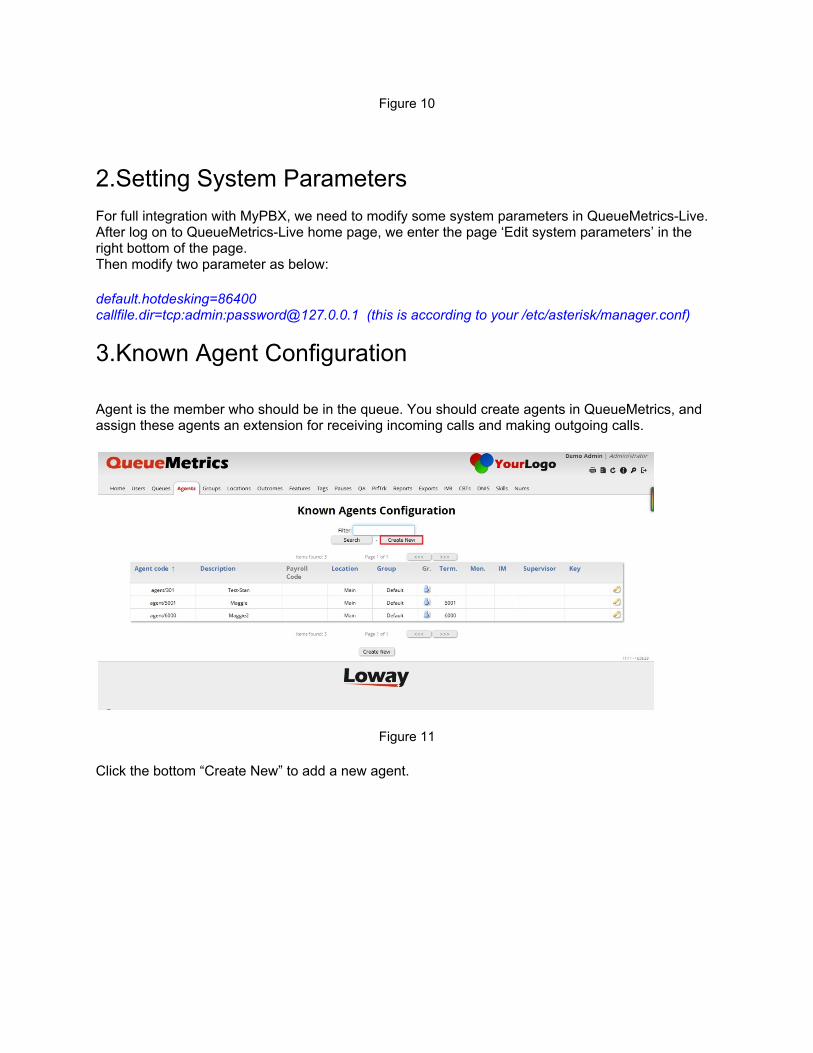
3.Known Agent Configuration
Agent is the member who should be in the queue. You should create agents in QueueMetrics, and assign these agents an extension for receiving incoming calls and making outgoing calls.
Figure 11
Click the bottom “Create New” to add a new agent.
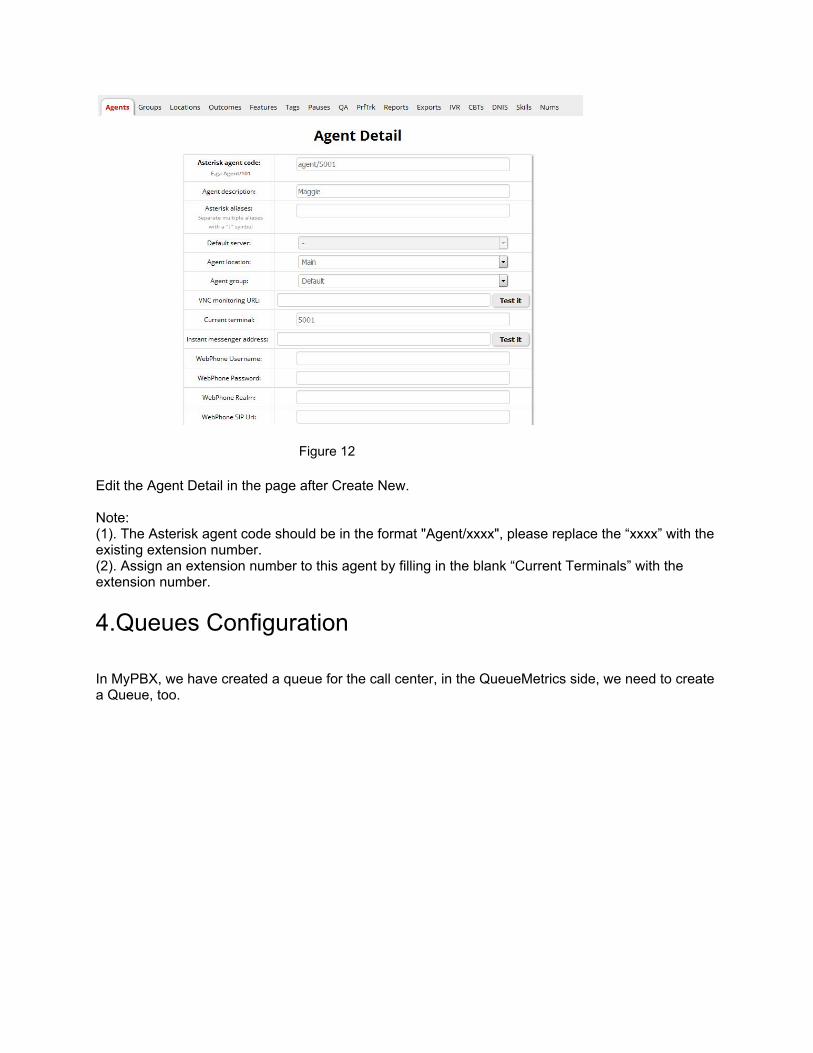
Figure 12
Edit the Agent Detail in the page after Create New.
Note:(1). The Asterisk agent code should be in the format "Agent/xxxx", please replace the “xxxx” with the existing extension number.(2). Assign an extension number to this agent by filling in the blank “Current Terminals” with the extension number.
4.Queues Configuration
In MyPBX, we have created a queue for the call center, in the QueueMetrics side, we need to create a Queue, too.
Figure 13
Then edit the queue detail.
Figure 14
Note: if the queue number in MyPBX is 680, then the Queue(s) name in QueueMetrics should be "queue-680".
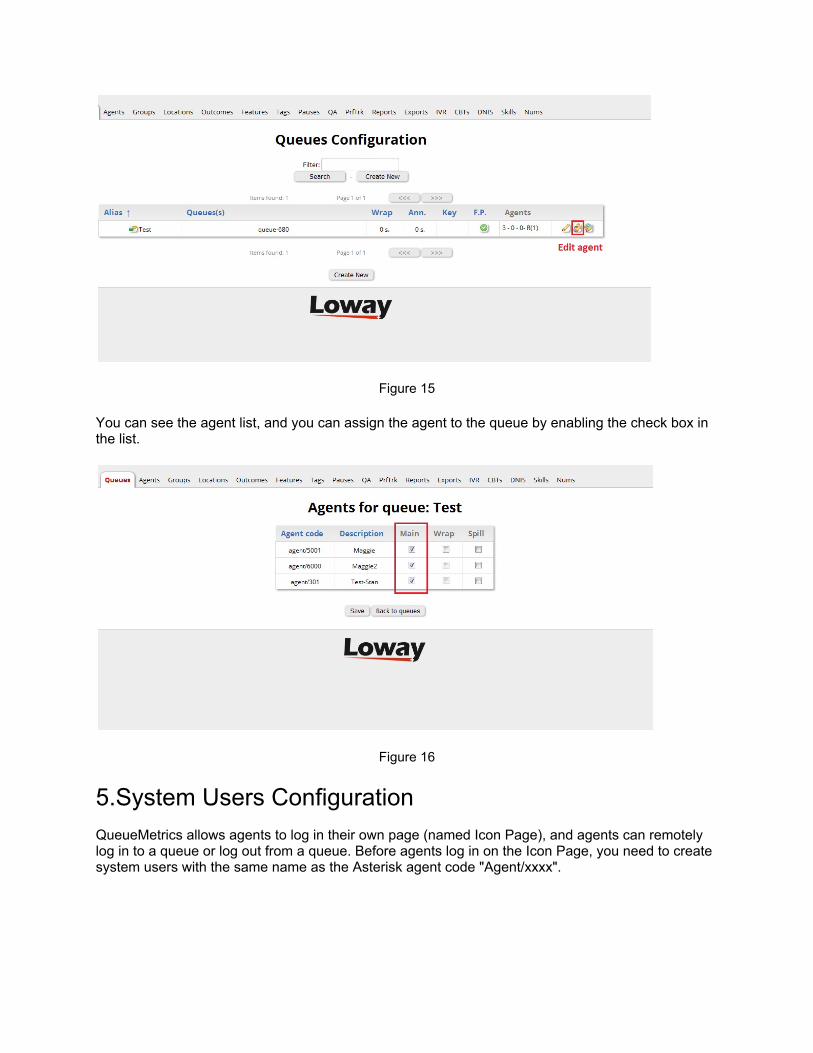
You can assign some agents to the queue by click the agent edit as below.
Figure 15
You can see the agent list, and you can assign the agent to the queue by enabling the check box in the list.
Figure 16
5.System Users ConfigurationQueueMetrics allows agents to log in their own page (named Icon Page), and agents can remotely log in to a queue or log out from a queue. Before agents log in on the Icon Page, you need to create system users with the same name as the Asterisk agent code "Agent/xxxx".
Figure 17
Create a new user and edit the detail in the page below
Figure 18
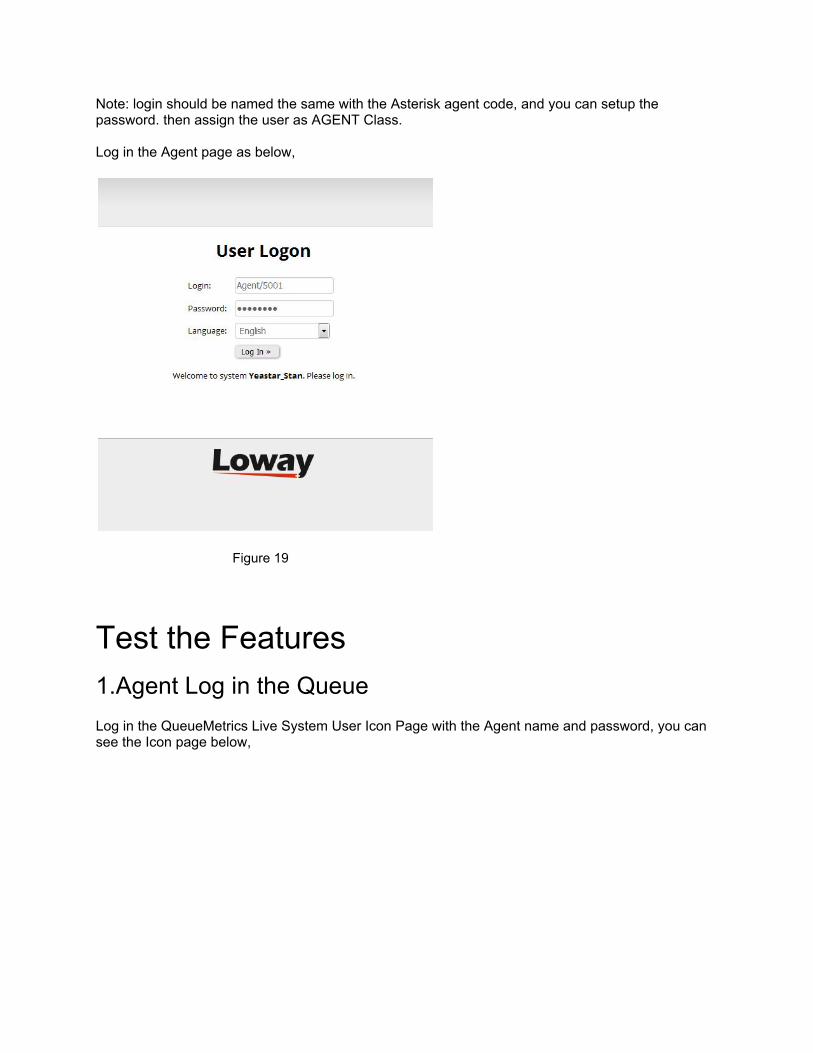
Note: login should be named the same with the Asterisk agent code, and you can setup the password. then assign the user as AGENT Class.
Log in the Agent page as below,
Figure 19
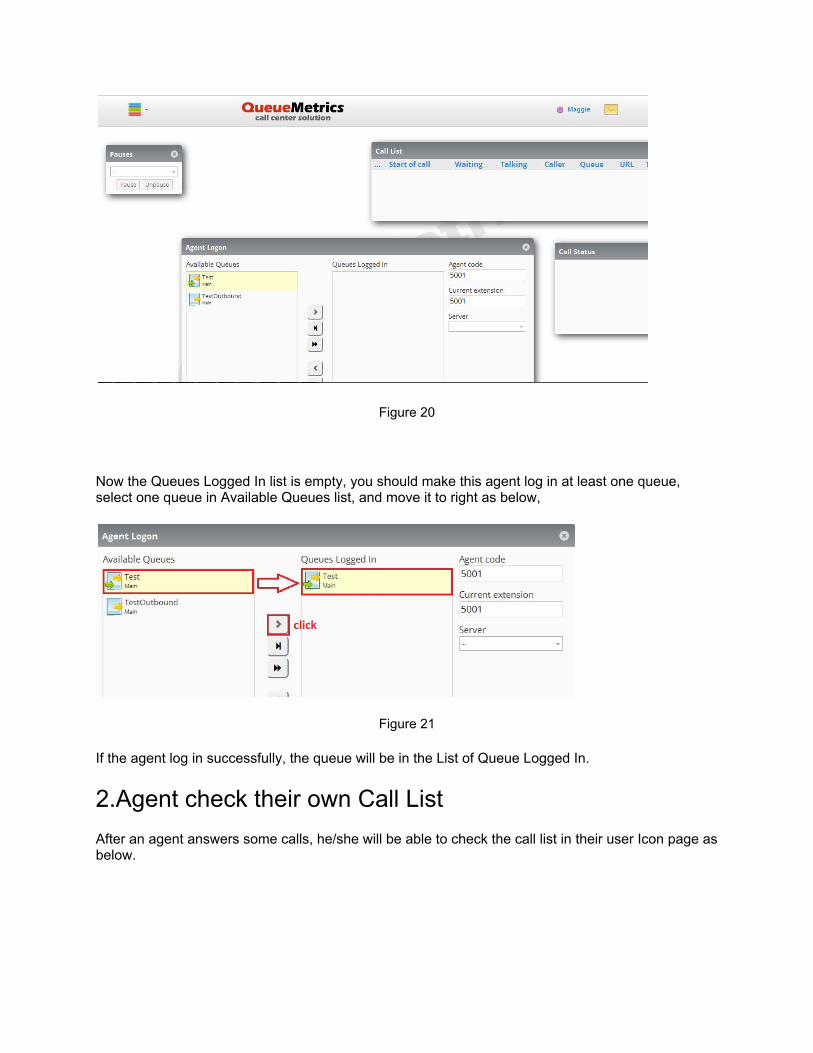
Test the Features1.Agent Log in the QueueLog in the QueueMetrics Live System User Icon Page with the Agent name and password, you can see the Icon page below,
Figure 20
Now the Queues Logged In list is empty, you should make this agent log in at least one queue, select one queue in Available Queues list, and move it to right as below,
Figure 21
If the agent log in successfully, the queue will be in the List of Queue Logged In.
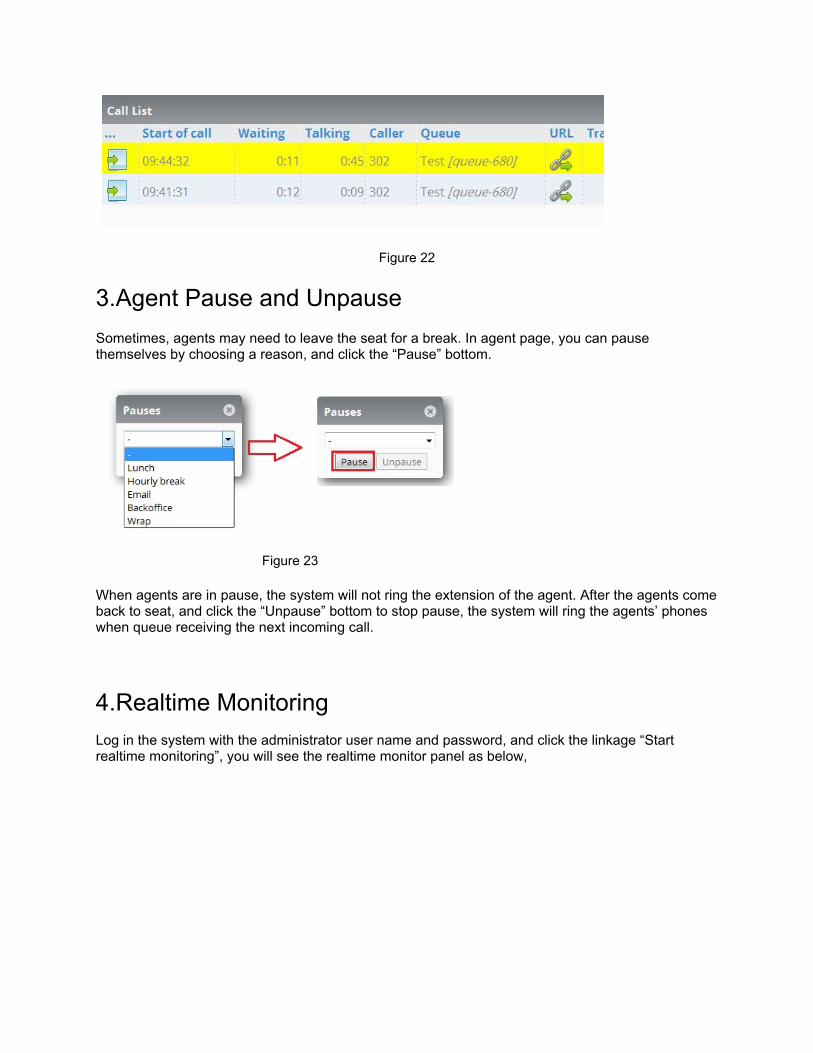
2.Agent check their own Call ListAfter an agent answers some calls, he/she will be able to check the call list in their user Icon page as below.
Figure 22
3.Agent Pause and UnpauseSometimes, agents may need to leave the seat for a break. In agent page, you can pause themselves by choosing a reason, and click the “Pause” bottom.
Figure 23
When agents are in pause, the system will not ring the extension of the agent. After the agents come back to seat, and click the “Unpause” bottom to stop pause, the system will ring the agents’ phones when queue receiving the next incoming call.
4.Realtime MonitoringLog in the system with the administrator user name and password, and click the linkage “Start realtime monitoring”, you will see the realtime monitor panel as below,
Figure 24
In the real-time monitoring panel, you will be able to monitor the status of Queues, processing calls and agents.
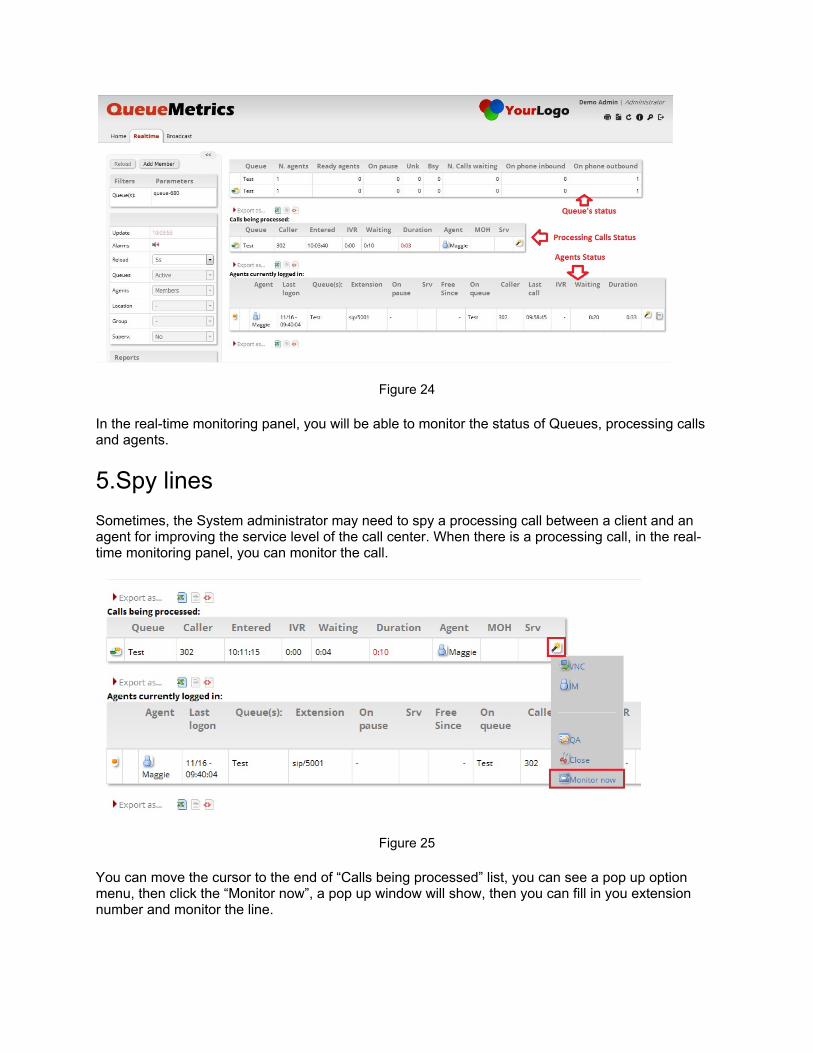
5.Spy linesSometimes, the System administrator may need to spy a processing call between a client and an agent for improving the service level of the call center. When there is a processing call, in the real-time monitoring panel, you can monitor the call.
Figure 25
You can move the cursor to the end of “Calls being processed” list, you can see a pop up option menu, then click the “Monitor now”, a pop up window will show, then you can fill in you extension number and monitor the line.
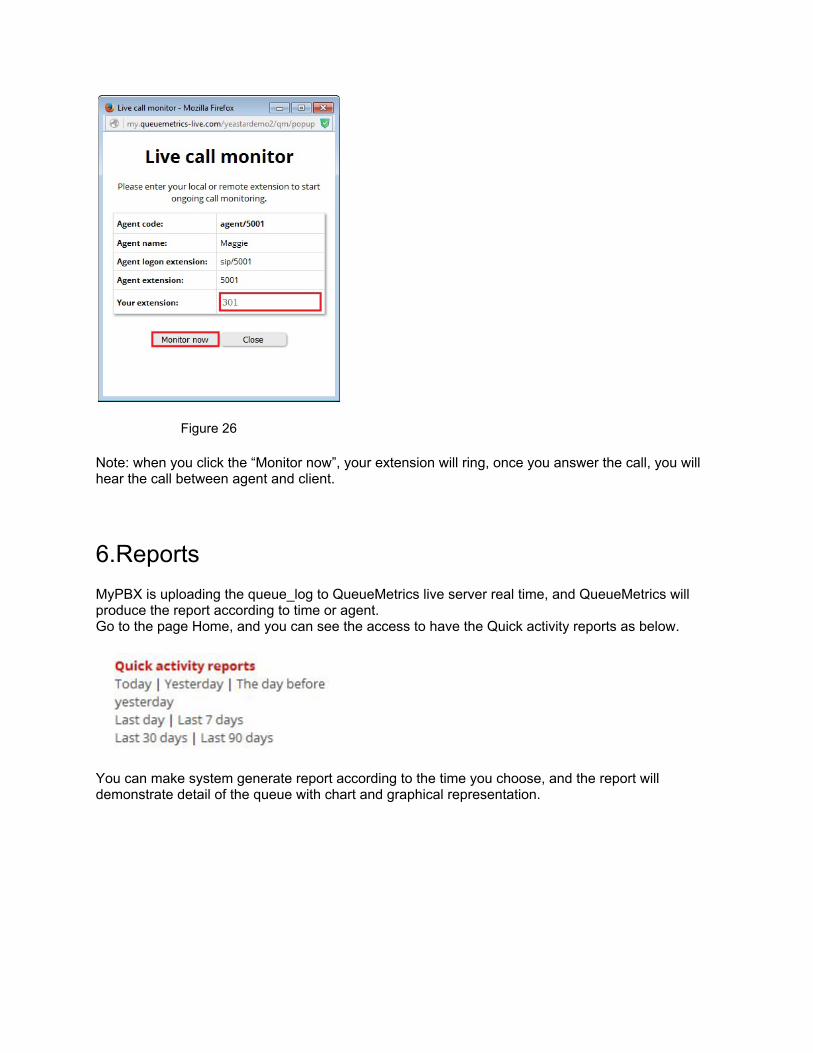
Figure 26
Note: when you click the “Monitor now”, your extension will ring, once you answer the call, you will hear the call between agent and client.
6.ReportsMyPBX is uploading the queue_log to QueueMetrics live server real time, and QueueMetrics will produce the report according to time or agent.Go to the page Home, and you can see the access to have the Quick activity reports as below.
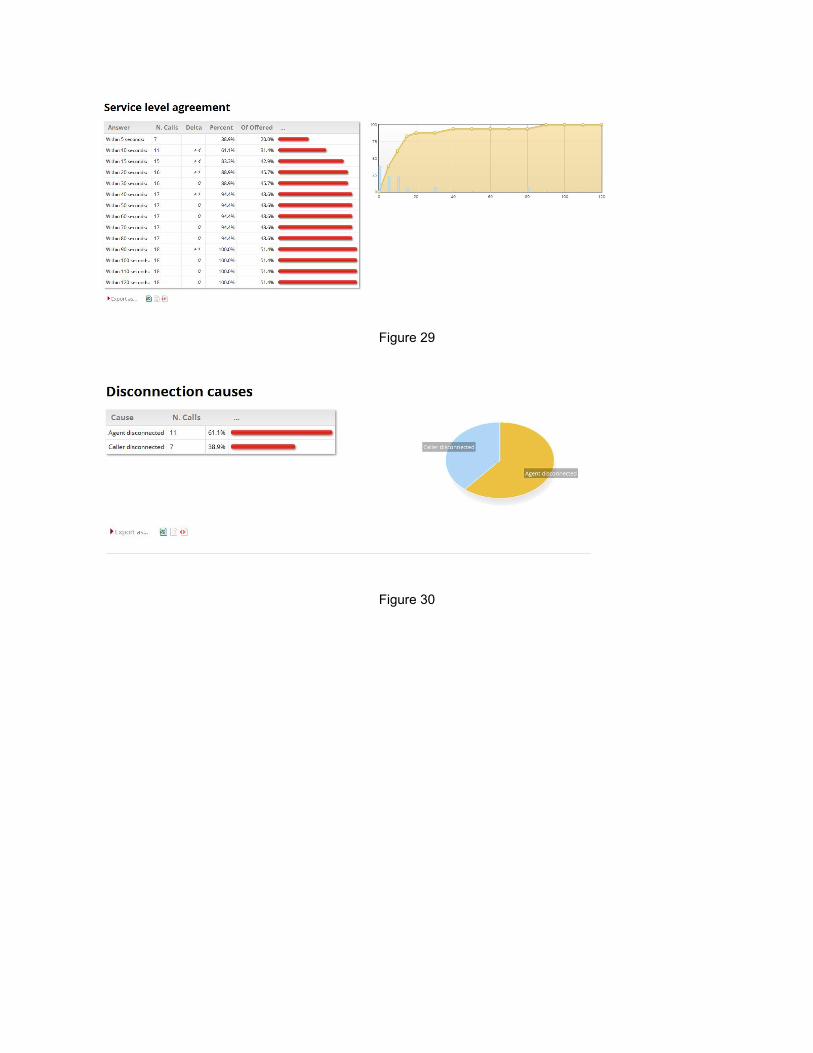
You can make system generate report according to the time you choose, and the report will demonstrate detail of the queue with chart and graphical representation.