14
OWNER’S MANUAL SDA100 SDA200 STREAMER DAC AMPLIFIER

1
OWNER’S MANUAL
SDA100 SDA200
STREAMER DAC
AMPLIFIER

2
You have just bought a product with exceptional audiophile performances. We really thank you for your confidence in our products. To get the best part of your streamer, please read carefully this manual.
INDEX : • Index, cautions & advises ............................................................................. p2 • 1 – General information and technical specs ................................................ p3 • Rear connecting, front panel functions ......................................................... p4 • Remote control functions, Wi-fi antenna connecting ..................................... p5 • 2 – Bi-amp connecting ; Trigger function ...................................................... p6 • 3 – uses: I – Preferences: start; network settings ......................................... p7 • Other preferences ......................................................................................... p8 • II –Favorite menu ......................................................................................... p9 • III – USB REAR / USB FRONT ..................................................................... p9 • IV – Media server .......................................................................................... p9 • V - Internet radio ........................................................................................... p9 • 4 – By-Pass function ..................................................................................... p10 • 5 – Bluetooth function ................................................................................... p10 • 6 – Apps ........................................................................................................ p10 • Help for Network settings ............................................................................. p11 • Troubles & solutions ..................................................................................... p12 • Warranty Certificate ...................................................................................... p12
SAFETY INSTRUCTIONS:
- Install your device in a dry, properly ventilated and away from any source of heat. - Make sure that you do not place never anything on your Streamer. - Do not make any connection when your device is powered ON. - Avoid short cuts.
CONSEILS D’UTILISATION : It is recommended to choose good quality chords to connect this appliance to the other devices. Feel free to take advices from your specialist dealer. The following parts are included:
- a SDA; -a power chord; - a remote control; - an antenna; - this manual with the certificate of guarantee.
3
1 – GENERAL INFORMATIONS
GENERAL INFORMATION’S AND ADVISES: Your ATOLL SDA is DLNA and UPnP compatible, it can run in a network with other devices. Take the time to read carefully the section « getting started » of this manual (page 7) before putting your unit under voltage. The display shows the selected radio station logo and has information about the files on the network and USB type sockets. It indicates the level of the volume from 0 to 100. On the other hand, it indicates no information from other sources connected to the different inputs (USB-B, line inputs, digital inputs). ACCEPTED FILES: MP3 (8-48 kHz 16 bit) AAC (24-96 kHz 16 bit) ALAC, AAC+ v1/HE-AAC FLAC (44.1-96 kHz 16/24 bits) FLAC, WAV, AIFF up to 192 kHz/16-24 bits; available on USB-A and with RJ45 link. CLEANING: Before any cleaning, switch off your appliance. Use a soft and dry rag to clean up the appliance. Never use acetone, white-spirit, ammoniac, or any kind of product containing abrasive agent. Never try to clean up inside the appliance. WARRANTEE: The guarantee is two years long from date of purchase. We recommend you to ask your dealer to fill the guarantee and to conserve it with your invoice. The guarantee is only available for appliance which have been use correctly regarding this owner’s manual.
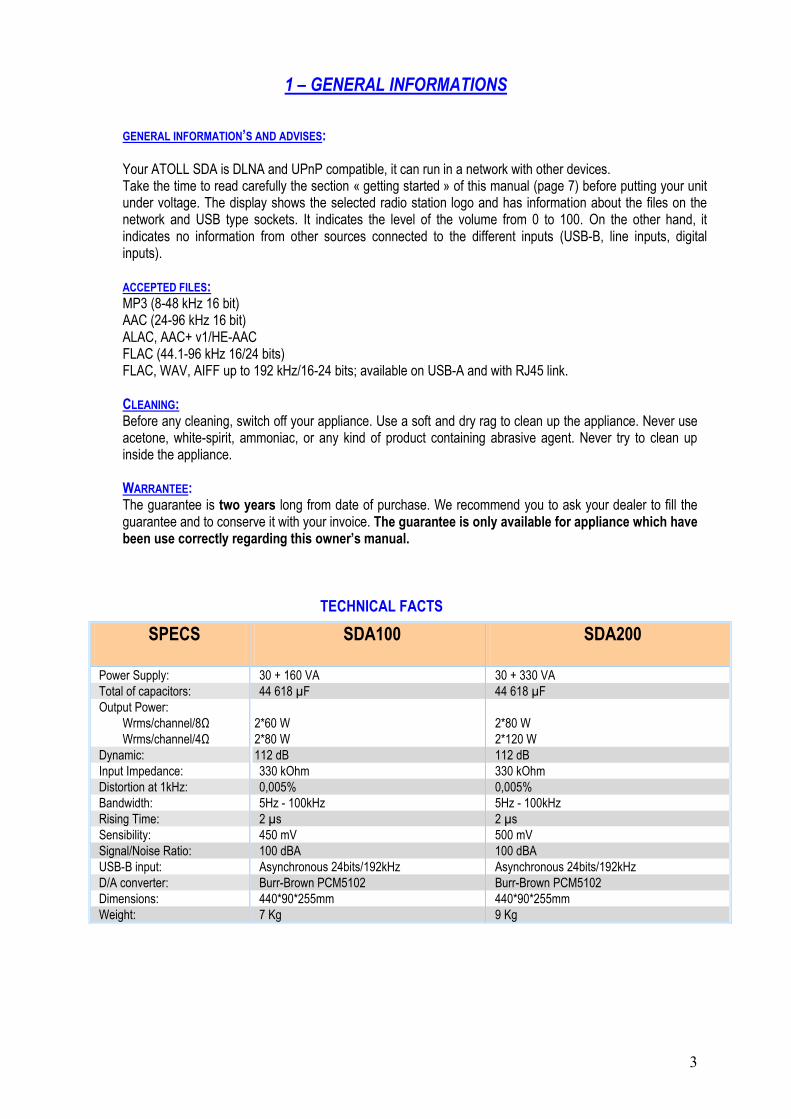
TECHNICAL FACTS
SPECS SDA100 SDA200
Power Supply:
Total of capacitors:
Output Power:
Wrms/channel/8Ω
Wrms/channel/4Ω
Dynamic:
Input Impedance:
Distortion at 1kHz:
Bandwidth:
Rising Time:
Sensibility:
Signal/Noise Ratio:
USB-B input:
D/A converter:
Dimensions:
Weight:
30 + 160 VA
44 618 µF
2*60 W
2*80 W
112 dB
330 kOhm
0,005%
5Hz - 100kHz
2 µs
450 mV
100 dBA
Asynchronous 24bits/192kHz
Burr-Brown PCM5102
440*90*255mm
7 Kg
30 + 330 VA
44 618 µF
2*80 W
2*120 W
112 dB
330 kOhm
0,005%
5Hz - 100kHz
2 µs
500 mV
100 dBA
Asynchronous 24bits/192kHz
Burr-Brown PCM5102
440*90*255mm
9 Kg

4
CONNECTING: Rear view of Appliance: 1- Right channel Output 7- Trigger Output 2- Left channel Output 8- Optical digital Input 3- USB-B type Input (computer) (*) 9- Coaxial digital Input 4-Bluetooth receiver 10- Ethernet link Input (RJ45) 5- Analog Outputs 11- USB-A type Input (Hard disk, USB key) 6- Analog Inputs (x2) 12- Wifi Antenna 13- On/Off switch (*) Your appliance is equipped with a High-Res. asynchronous USB Input (B type). It will be possible to use it only when you’ll have downloaded the appropriate driver on your computer (see separated flyer). Download this driver at:
http://www.atoll-electronique.com/convertisseur-dac.php To avoid any troubles in the transfer of High Resolution files (24bits/192kHz), we recommend to use a USB interconnect with ferrite.
FUNCTIONS: Front view of Appliance: 14- Volume control +&- keys and selection 17- USB-A type Input of By-pass mode. 18- Remote control receiver 15- Inputs selections keys 19- Menus control keys 16- Inputs led selection (1) 20- Headphones Outputs (jack 3.5) (2) 21- On/Off key & stand-by led indicator (3) (1) By default, when all selection led are off, the listening source is the Streamer.
(2) Plugging the Headphones in the jack cuts the speakers Outputs. (3) 2 stand-by mode are possible: Short Stand-by: with a short press on key 21, allows to switch off the display and all inputs. When you’ll put you’re the streamer ON, you’ll conserve the selected source and the same volume level. It is also possible to get over this stand-by directly from the iOS or Android apps by pressing the volume control key. Long Stand-by: with a longer press on key 21 (3 sec.), the stand-by cuts all functions. When you’ll put the SDA ON the volume will start at 0 (time of re-starting is longer).
1 2 3 4
5 6 7 8 9 10 11 12 13
14 15 16
17 18 19 20 21

5
REMOTE CONTROL:
Reminder of these keys on the front panel: 14- Volume control + & - 15- Inputs selections + & - 19- Navigation in the menu keys 21- Stand-by key 5 (2 modes: see previous chapter) 22- Alphanumeric keys Used to select track, or input numbers, letters and characters (from 0 to 9 and from A to Z) By quick successive press on keys 2 for example, allows to scroll: a, b, c, 2, A, B, C
23- Home: to return to the playing source 24- Play / Pause & Enter key 25- Fast forwards key 26- Next track keys 27- Stop key 28- ADD FAV: Key to put the selection in the "Favorites" menu. Press OK to validate and return to normal playback. 29- REM FAV : key to remove the 'Favorites' menu selection. 30- Input selection button: USB-B ; Coaxial ; Optical ; By-Pass (press during 2 seconds) ; Line1 ; Line2 ; Streamer. 31- CD players keys: keys allowing to control the CD players and Drive from Atoll. 32- BACK: Key return back in menus. 33- Backwards through track 34- OK: Validation key in menu’s choices. 35- Previous track selection key 36- SHUF: plays current list on random order 37- REP: repeat key 38- DISP: changes of display appearance 39- MUTE: sound muting 40- USB-B/Bluetooth: A short press selects the USB-B input (red led); a long press (2-3 sec.) selects the Bluetooth input (see p.10)
WIFI ANTENNA CONNECTING: Make sure the good implementation of the Wi-Fi antenna prior to connection and any use. The antenna is packed with the remote control. Please use the supplied antenna or a similar Wifi antenna with male connector.
21
22
23
24
25
19
26
27
28
29
15
30
31
32
33
34
35
36
37
38
14
39
40
6
2 – CONNECTING SETUP
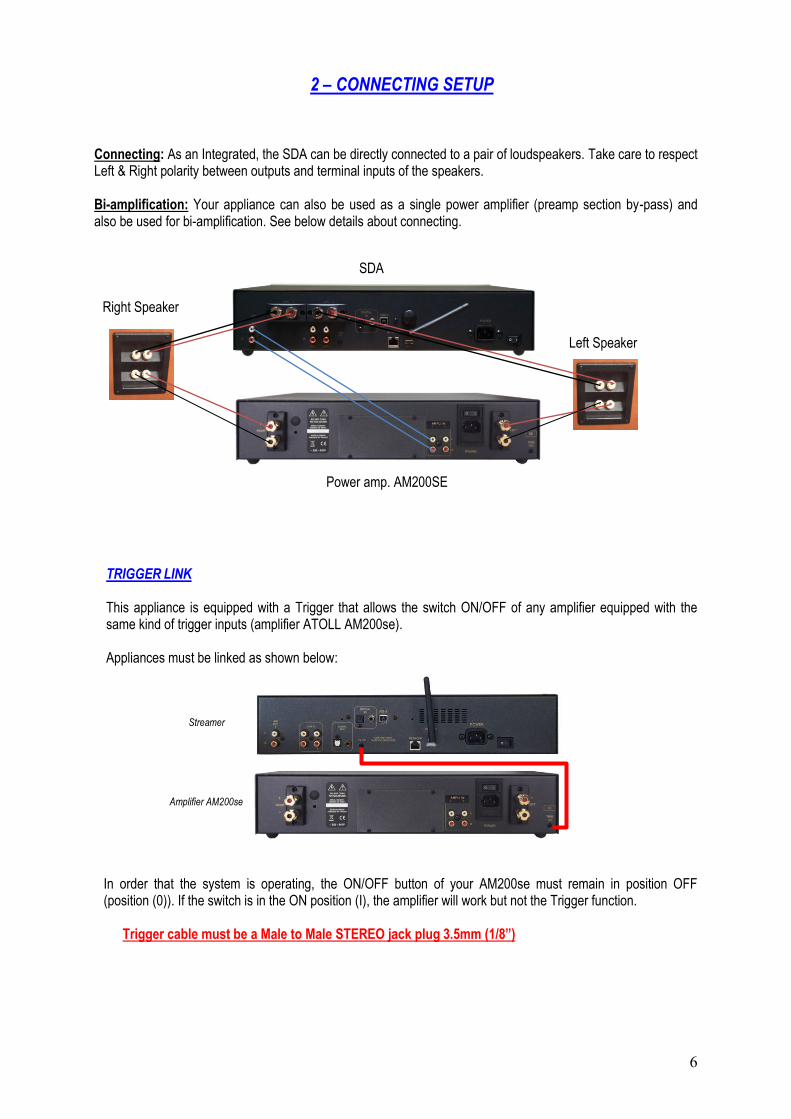
Connecting: As an Integrated, the SDA can be directly connected to a pair of loudspeakers. Take care to respect Left & Right polarity between outputs and terminal inputs of the speakers. Bi-amplification: Your appliance can also be used as a single power amplifier (preamp section by-pass) and also be used for bi-amplification. See below details about connecting.
TRIGGER LINK This appliance is equipped with a Trigger that allows the switch ON/OFF of any amplifier equipped with the same kind of trigger inputs (amplifier ATOLL AM200se). Appliances must be linked as shown below:
Streamer
Amplifier AM200se
In order that the system is operating, the ON/OFF button of your AM200se must remain in position OFF (position (0)). If the switch is in the ON position (I), the amplifier will work but not the Trigger function.
Trigger cable must be a Male to Male STEREO jack plug 3.5mm (1/8”)
Right Speaker
Left Speaker
SDA
Power amp. AM200SE

7
3 - USES
I - SETTINGS Starting: Before switching on your device, connect the cable network (type RJ45) to the connector (10). For reasons of stability of the network, the wired connection is preferred to Wifi binding when possible. Press the standby key: the led (21) flashes about 8 seconds before the display appears. Wait for the first page on display before handling. You can then use the buttons (19) forward navigation on your remote control or the front panel to access the menus. When first plugging in your device (or in the case of changing network configurations), you must set up the connection between your Streamer and your network. Without this configuration, the operation of internet radios, or playback of the files present on your network will be inoperative. Network settings: Go in the 'Settings' menu and then on 'network '. Select the menu « Network setup ». Then you’ll have to choose between « wired » or « wireless ». 1/ In the case of a wired connection, the display shows that the system will restart in cable mode. If it is not already, connect the network cable and then press OK. The unit will restart (wait several seconds). You can pass to automatic (DHCP) or even enter a static IP address. 2/ In the case of a "wireless" connection, the device will help you find available wireless networks. To do this, press "scan". All of the wireless networks available in your environment will be shown, Select the one corresponding to your.
RQ: in some environments (buildings), several networks can be visible. Make sure you choose yours.
WPS key: Enter, in accordance with the capital letters and no spaces the security key WIFI which appears at the bottom of your internet emitter. In some cases it is required to set your emitter in association mode to secure the connection. In the seconds that follow press 'Play' on your remote control or press and hold 2 seconds the Centre key on the keypad of the front panel of your Streamer The connection to the network only takes a few seconds and it remains in memory even when the Streamer or the emitter have been disconnected.
This symbol indicates the link wireless as well as the strength of the signal.

8
Network Information: In the "network" menu, some information’s are also available:
1/ Network info : gives you the name of the device, the connection SSID (name of the wireless LAN), DHCP status, corresponds to the network IP address and MAC address (ID physics of the streamer)
2/ Default UPnP Server: You can select or a default server. If the selection is 'no defect' chosen, all of the files on the network will be available. If one of the networks is selected, only the files on this server will be able to be read.
3/ Friendly Name: allows to give a name to the device (select Edit in the menu). OTHER « SETTINGS » In the 'Settings' menu you have access to several menus: Time: This menu allows you to set the time according to your geographic location. You can select :
1/ Time Zone: Select your time zone according to your region 2/ Daylight Saving: allows to select daylight saving time (On or Off). 3/ Show Clock: This menu displays the date and time User Interface:
This menu allows you to determine: 1/ Language: this device allows to choose between French, English or German. 2/ Theme: the theme matches the background image of the screen. You can choose the theme 1 (choice
of the Atoll blue background) theme 2 (white writes black), or theme 3 (zoom effect). 3/ Display Timeout: Select the time after which the display will switch off. By default, the delay is off but
you can select a period of 10, 30 sec. 1mn, 5mn, 15mn, 1h.
RQ: this choice allows only the switch off of the display. The functions of your device will be still active. To refresh the display, press one of the remote or the front panel navigation keys.
Playback: - This menu determines the playback settings of all tracks you will read. - Repeat: during the reading of a selection, you can choose: OFF (no repeat), ALL (symbol ) or ONE
(symbol ). - Shuffle: during the reading of a selection, you can choose: OFF, Songs or Albums (symbol ) - Slideshow: during the reading of a selection of photos, you can choose the speed of scrolling of
thumbnails: OFF (the scroll will be made by pressing the keys back or next), 5-10-15 sec… (determines the time between each picture).
General
In this menu, you can have access to different information and settings including:
- Reset Settings: to find all the original settings. A reset setting causes a reboot of your machine. RQ: if you choose to re-start, all menus will be in English.
- Software Update: use to update your device software. - Info: gives general information about your device. - Legal: gives an internet address where to find legal data about your device.
9
II - FAVORITES: This device allows you to select your favorite music or internet radio of your choice. Select a track (present on the network or on any support connected to the front or rear USB inputs) or internet radio. Press the key on the remote control ADD FAV (28) to add it to the list of favorites. RQ: If the network is not connected or if the source support is no longer connected, the track will not be able to be read. To remove a track or radio to favorites, select it and then press the FAV REM (29). III - USB REAR / USB FRONT: Select one of these Inputs in order to be able to read the files on the connected media (USB keys, hard disk, MP3 player…). You can navigate within these brackets with buttons Right & Left (19) of the front panel or of the remote control.
IV – MEDIA SERVER: This menu provides access to all of the files on the network. By selecting this menu, the list of the various sources of data appears. For all of them you can choose: music / photos / playlists Music: You can select music according to different criteria (according to the data indicated on the original files). The selection can be done according to: All music / genre / all artists / artist collaboration / album artists / composers / albums / classification / music selection / folders Photos: You can select the photos according to different criteria (according to the data indicated on the original files). The selection can be done according to: All photos / date of photos / albums / key words / classification / selection of images / files. Selections: This menu provides access to the selections. In the media library menu, you can also find all the tracks played in chronological order by going to the "Recently played" menu.
V – INTERNET RADIO: This menu allows you to access the menu of vTuner, or approximately 15000 internet radio stations. In this menu you can set a selection of radio according to different criteria: Country / recently read / search stations / location / genre / search podcasts / podcasts by location / podcasts by genre / new stations / most popular / get access code / reset Favourites Search Menu: Two menus allows to search directly by name (stations, podcasts). You can directly enter the name of a station or a podcast using the alphanumeric keys on the remote control (22) or the navigation keys of the front panel(19). When the name is shown, press the button (24) PLAY/PAUSE on the remote control or on the central navigation key of the front panel (19) for 2 seconds to validate and launch the search.
This symbol means that the device is in playback mode.

10
4 – BY-PASS
Warning: read this paragraph attentively in order not to activate this mode by error. The BY-PASS function allows to use your SDA as a power amplifier (By-pass the preamp section). It can be used with an analog signal coming from an AV preamplifier or a converter DAC. The selection of BY-PASS function is possible only on analog inputs LINE1 and LINE2. In this case, the functions of management of volume and selection of the sources are inoperative. To enter By-pass : select Input LINE1 or LINE2 then press on key (30) BY-PASS of the remote control during 2 seconds or press on the same time keys VOL + & - (14) of the front panel. When one of those input is selected in BY-PASS mode, it will remain memorized in this mode even if you change the source or if the appliance is switch off. To disable By-pass mode, press 2-3 seconds on By-pass key of the remote or on keys VOL + & - (14) of the front panel.
5 - BLUETOOTH Your SDA allows the reception of audio signals sent since any devices having a Bluetooth transmitter (smartphone, tab, computer…). First time association: - Activate the Bluetooth connectivity of your emitter device ; - Select your SDA on the list of possible receiver (by default named ATOLL SDA); - With key (40) of the remote or with keys SEL +/- (15) of the front panel, select the Bluetooth input of your SDA (led 16 lighting in blue). The whole audio signals which will be read on your device source will then be transmitted towards your SDA. Your emitter device will remain associated until you switch off your SDA but he will remain visible for your emitter. Association of another emitter: Once associated to an emitter, you’ll need to switch completely your SDA off in order to make it visible from another emitter. The quality of reception of the signal can be dependent on the power of the Bluetooth emitter and the distance between the 2 devices. Avoid being up to more than 5 meters of your SDA for a correct reception without any risks of signal cuts.
5 - APP: A free application for iPod Touch, iPad, iPhone, and Android is available to drive your SDA named ATOLL HD. You can download it freely on line on Apple or Googleplay stores. As a first step, make sure that your Smartphone or Tab. is well connected in WIFI on the same network as your SDA. If so, your device will appear on the screen of your device just after starting the application, just select it. The application will resume the data displayed on the screen the SDA: logo of the radio station, audio, volume, etc. with the exception of the covers of albums and images. You can navigate through the menus and adjust the analog volume level. You can set a maximum volume level by tapping twice on the 'volume' of the application area. It is also possible to turn on your SDA when it is on simple Stand-by mode by pressing Volume + of the app. In the event the application does not work, simply start it to reset control.
Blue led for Bluetooth

11
Additional Apps:
There are other apps that can be run in association with your SDA. For example Apple MusicFlow (not free)
allows to play the all the music you read from your Smart phone directly on your appliance.
Broadcast media content using Windows Media Player streaming
You can stream the music streaming on the streamer from your computer, using Windows Media Player.
Step 1: connect the SDA to your network
Connect your streamer to your home network using a wired connection or wireless.
Step 2: Windows Media settings Windows Media Player 12 (Windows 7)
1. In Windows Media Player, click the menu flow continuously, and then select Enable streaming media. 2. On the page that appears, click Enable streaming media.
Write a name for your library of media files, and then click OK.
RQ : You can download the Windows Media Player on windows.microsoft.com/windows/downloads/windows-media-player.
Windows Media Player 11 (Windows Vista & XP)
1. In Windows Media Player, right-click on the library, and then click sharing of media files.
Click share my media files, and then click OK.
2. Windows Media Player looks for devices on your network. ATOLL STREAMER should appear with a green check mark.
3. If you want more options, click settings.
When you are finished, click OK.
Step 3 : read or display multimedia content
1. In the media streamer library menu, select the name of your computer.
2. Select the item you want to read or view.
Broadcast media content using MAC
In order to be able to share your files under MAC computer, it is advisable to download a compatible software DLNA allowing the sharing in network. We advise you software like ASSET UPnP for OSX or JRiver Média Center.
12
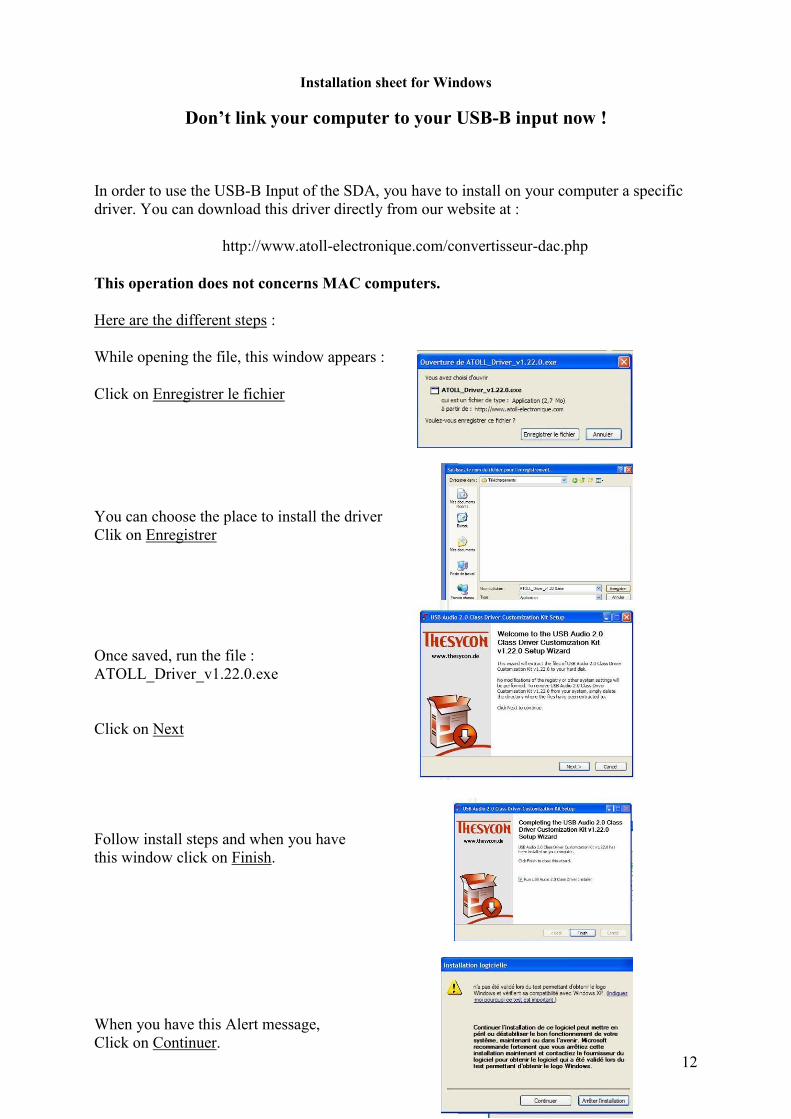
Installation sheet for Windows
Don’t link your computer to your USB-B input now !
In order to use the USB-B Input of the SDA, you have to install on your computer a specific
driver. You can download this driver directly from our website at :
http://www.atoll-electronique.com/convertisseur-dac.php
This operation does not concerns MAC computers.
Here are the different steps :
While opening the file, this window appears :
Click on Enregistrer le fichier
You can choose the place to install the driver
Clik on Enregistrer
Once saved, run the file :
ATOLL_Driver_v1.22.0.exe
Click on Next
Follow install steps and when you have
this window click on Finish.
When you have this Alert message,
Click on Continuer.

13
During install, you’ll get this message :
Click on OK
At the end of Install, click on Finish.
The Driver is installed.
It is recommended to re-start the computer to complete the install.
You can now connect the SDA to a USB output of your computer.
After re-start, check that the Driver is
correctly installed by looking at the
configuration of the Volume control panel.
Speakers Menu :
Shows the name of the Driver
14
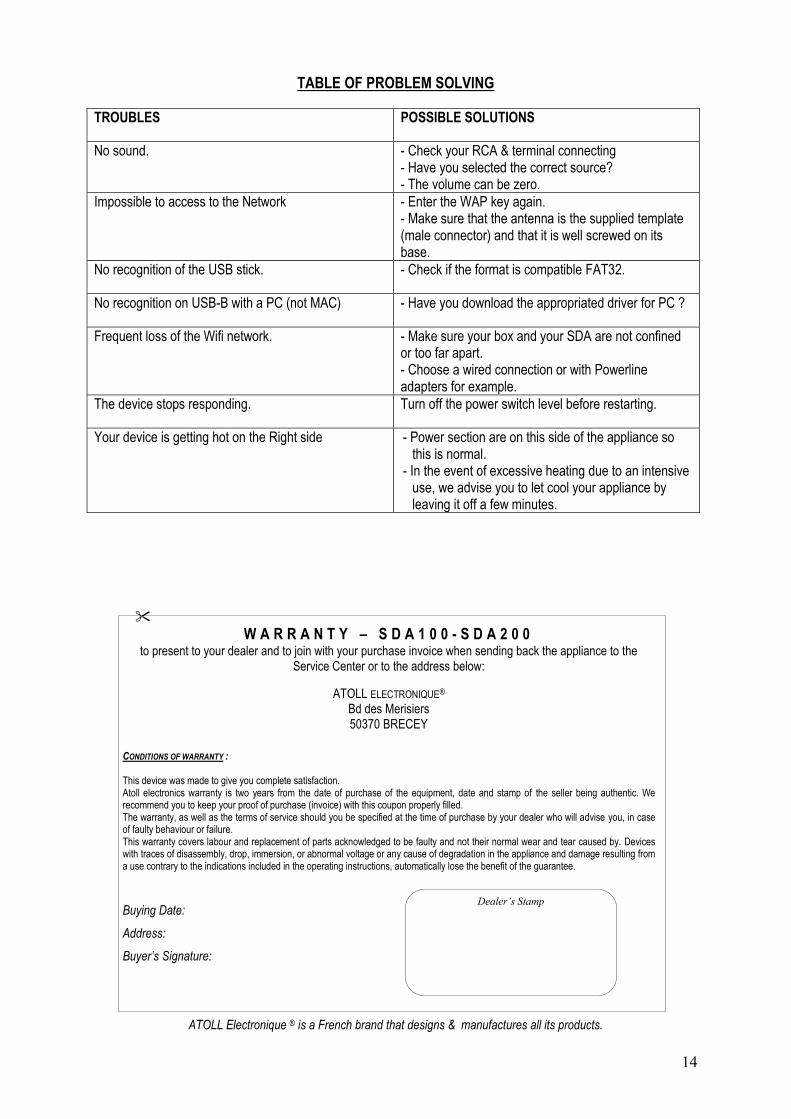
TABLE OF PROBLEM SOLVING
TROUBLES POSSIBLE SOLUTIONS
No sound. - Check your RCA & terminal connecting - Have you selected the correct source? - The volume can be zero.
Impossible to access to the Network - Enter the WAP key again. - Make sure that the antenna is the supplied template (male connector) and that it is well screwed on its base.
No recognition of the USB stick. - Check if the format is compatible FAT32.
No recognition on USB-B with a PC (not MAC) - Have you download the appropriated driver for PC ?
Frequent loss of the Wifi network. - Make sure your box and your SDA are not confined or too far apart. - Choose a wired connection or with Powerline adapters for example.
The device stops responding. Turn off the power switch level before restarting.
Your device is getting hot on the Right side - Power section are on this side of the appliance so this is normal.
- In the event of excessive heating due to an intensive use, we advise you to let cool your appliance by leaving it off a few minutes.
W A R R A N T Y – S D A 1 0 0 - S D A 2 0 0 to present to your dealer and to join with your purchase invoice when sending back the appliance to the
Service Center or to the address below:
ATOLL ELECTRONIQUE® Bd des Merisiers 50370 BRECEY
CONDITIONS OF WARRANTY : This device was made to give you complete satisfaction. Atoll electronics warranty is two years from the date of purchase of the equipment, date and stamp of the seller being authentic. We recommend you to keep your proof of purchase (invoice) with this coupon properly filled. The warranty, as well as the terms of service should you be specified at the time of purchase by your dealer who will advise you, in case of faulty behaviour or failure. This warranty covers labour and replacement of parts acknowledged to be faulty and not their normal wear and tear caused by. Devices with traces of disassembly, drop, immersion, or abnormal voltage or any cause of degradation in the appliance and damage resulting from a use contrary to the indications included in the operating instructions, automatically lose the benefit of the guarantee.
Buying Date:
Address:
Buyer’s Signature:
ATOLL Electronique ® is a French brand that designs & manufactures all its products.
Dealer’s Stamp
![Protocol Specification · 2015-01-09 · 8th January 2015 SAT>IP Protocol Specification Page 5 of 70 SES S.A. References . UPnP Forum [1] UPnP Device Architecture 1.1 . DLNA [2] DLNA](https://static.documents.pub/doc/80x56/5f4bcb00c73ffb6385247baf/protocol-specification-2015-01-09-8th-january-2015-satip-protocol-specification.jpg)


