MC09D1MG COLOR TV WITH BUILT-IN VCR OWNER’S MANUAL READ THIS MANUAL FIRST! CONGRATULATIONS ON PURCHASING THIS PRODUCT .WE’VE INCLUDED EVERYTHING YOU NEED TO GET STARTED.IF YOU HAVE ANY PROBLEMS, OUR REPRESENTATIVES CAN HELP YOU GET THE MOST FROM YOUR NEW PRODUCT BY EXPLAINING: • HOOKUPS • FIRST TIME SETUP • FEATURE OPERATION DO NOT ATTEMPT TO RETURN THIS PRODUCT TO THE STORE. FOR FAST HELP , CALL US FIRST! 1-800-705-2000 THANK YOU FOR MAKING US A PART OF YOUR HOME! IMPORTANT! RETURN YOUR WARRANTY REGISTRATION CARD WITHIN 10 DAYS. SEE WHY INSIDE. MC09D1MG 3/22/02 1:15 PM Page 1
Transcript
MC09D1MGCOLOR TV WITH BUILT-IN VCR
OWNER’S MANUAL
READ THIS MANUAL FIRST!CONGRATULATIONS ON PURCHASING THIS PRODUCT.WE’VE INCLUDED
EVERYTHING YOU NEED TO GET STARTED. IF YOU HAVE ANY PROBLEMS,OUR REPRESENTATIVES CAN HELP YOU GET THE MOST FROM YOUR
NEW PRODUCT BY EXPLAINING:• HOOKUPS • FIRST TIME SETUP • FEATURE OPERATION
DO NOT ATTEMPT TO RETURN THIS PRODUCT TO THE STORE.FOR FAST HELP, CALL US FIRST!
1-800-705-2000THANK YOU FOR MAKING US A PART OF YOUR HOME!
IMPORTANT! RETURN YOUR WARRANTY REGISTRATION CARD WITHIN 10 DAYS.
SEE WHY INSIDE.
MC09D1MG 3/22/02 1:15 PM Page 1
Once your MAGNAVOX purchase is registered, you’re eligible to receive all the privileges of own-ing a MAGNAVOX product. So complete and return the Warranty Registration Card enclosedwith your purchase at once. And take advantage of these important benefits.
Return your Warranty Registration card today toensure you receive all the benefits you’re entitled to.
For Customer UseEnter below the Serial No.which is located on the rear ofthe cabinet. Retain this infor-mation for future reference.Model No.________________Serial No. ________________
Congratulations on your purchase, and welcome to the “family!”
Dear MAGNAVOX product owner:Thank you for your confidence in MAGNAVOX. You’ve selectedone of the best-built, best-backed products available today. Andwe’ll do everything in our power to keep you happy with yourpurchase for many years to come. As a member of the MAGNAVOX “family,” you’re entitled to protection by one of the most comprehensive warranties andoutstanding service networks in the industry.What’s more, your purchase guarantees you’ll receive all theinformation and special offers for which you qualify, plus easyaccess to accessories from our convenient home shopping network.And most importantly you can count on our uncompromisingcommitment to your total satisfaction.All of this is our way of saying welcome-and thanks for investingin a MAGNAVOX product.
P.S. Remember, to get the most from your MAGNAVOX product, you must return yourWarranty Registration Card within 10 days. Soplease mail it to us right now!
Know thesesafetysymbols
This “bolt of lightning” indi-cates uninsulated material
within your unit may cause anelectrical shock. For the safetyof everyone in your household,please do not remove productcovering.
The “exclamation point”calls attention to features
for which you should read theenclosed literature closely toprevent operating and mainte-nance problems.WARNING: TO PREVENTFIRE OR SHOCK HAZARD,DO NOT EXPOSE THISEQUIPMENT TO RAIN ORMOISTURE.CAUTION: To prevent elec-tric shock, match wide blade ofplug to wide slot, fully insert.ATTENTION: Pour éviter leschoc électriques, introduire lalame la plus large de la fichedans la borne correspondantede la prise et pousser jusqu’aufond.
CAUTIONRISK OF ELECTRIC SHOCK
DO NOT OPEN
CAUTION: TO REDUCE THE RISK OF ELECTRIC SHOCK, DO NOTREMOVE COVER (OR BACK). NO USER-SERVICEABLE PARTS
INSIDE. REFER SERVICING TO QUALIFIED SERVICE PERSONNEL.
RE
G
I ST R A T I O N
NE
ED
ED
WITHIN10
DA
YS Hurry!
WarrantyVerificationRegistering your product within10 days confirms your right to maximum protection under theterms and conditions of your MAGNAVOX warranty.
OwnerConfirmationYour completed WarrantyRegistration Card serves asverification of ownership in theevent of product theft or loss.
ModelRegistrationReturning your WarrantyRegistration Card right away guarantees you’ll receive allthe information and specialoffers which you qualify for asthe owner of your model.
Visit our World Wide Web Site at http://www.magnavox.com
MC09D1MG 3/22/02 1:15 PM Page 2
Introduction 3
Features• Automatic Channel Setup• Automatic Head Cleaner• Automatic Tracking Adjustment• Daylight-Savings Time• English or Spanish displays• High Quality (HQ) System• One-Touch Recording
• Real-Time Tape Counter• Remote Control or Front Panel
menu access• Rental Playback• Repeat Play• ShowGuardTM - Indefinite Timer
Recording memory
• Sleep Timer• Special Effects: Forward and
Reverse Searching; Still• Timer Recording• Timer Search• Wake Up Timer• Zero Return
Safety PrecautionsWarning: To prevent fire or shock hazard, do not expose this equipment to rain or moisture.Federal Communications Commission (FCC) Warning: Any unauthorized changes or modifications to this equipment void the user’sauthority to operate it.This equipment has been tested and found to comply with the limits for aClass B digital device, pursuant to Part 15 of the FCC Rules. These limitsare designed to provide reasonable protection against harmful interferencein a residential installation. This equipment generates, uses, and can radiateradio frequency energy and, if not installed and used in accordance with theinstructions, may cause harmful interference to radio communications. However, there is no guarantee that interference will not occur in a partic-ular installation. If this equipment does cause harmful interference to radioor television reception, which can be determined by turning the equipmentoff and on, the user is encouraged to try to correct the interference by oneor more of the following measures:1. Reorient or relocate the receiving antenna.2. Increase the separation between the equipment and receiver.3. Connect the equipment into an outlet on a circuit different from that to
which the receiver is connected. 4. Consult the dealer or an experienced radio/TV technician for help.
Magnavox recommends you use only video cassette tapes that have the mark. Other tapes may cause poor picture quality and excessive
deposits on the video heads that the warranty may not cover if damageoccurs.This TV/VCR has a High Quality (HQ) system and is compatible with exist-ing Video Home System (VHS) equipment.Note to the Cable TV System Installer: This reminder calls the CableTV system installer’s attention to Article 820-40 of the National ElectricalCode, which provides guidelines for proper grounding – in particular, speci-fying that the cable ground shall be connected to the grounding system ofthe building, as close to the point of cable entry as possible.
Welcome to your TV/VCR owner’s manual.This manual describes the MC09D1MG TV/VCR and explains how to use all the features listed below.
As an ENERGY STAR® Partner, Magnavox has determined that this product meets the ENERGY STAR®
guidelines for energy efficiency. ENERGY STAR® is a U.S. registered mark. Using products with theENERGY STAR® label can save energy. Saving energy reduces air pollution and lowers utility bills.
SmartClockTM, SmartLockTM, and ShowGuardTM are trademarks of Philips Consumer Electronics. Copyright 2002 Magnavox. All rights reserved.
Using the Remote Control● Point the remote control at the TV/VCR’s remote sensor.● Do not put objects between the remote control and the
TV/VCR.
TV/VCR Maintenance● In this TV/VCR, use only tapes with the mark.● Remove any light adhesive stick-on notes from the video cas-
sette tape before putting the tape in the TV/VCR. Removablelabels can jam the TV/VCR.
● The TV/VCR requires periodic maintenance to maintain itsexcellent performance. This TV/VCR has an automatic headcleaning system. However, the video heads will eventuallyrequire cleaning or replacement. Only an authorized servicecenter should perform this service.
1
2
1
2
3
Putting Batteries in the Remote Control
1 Remove the battery compartment lid on the bot-tom of the remote control by sliding the lid down andoff, following the direction of the arrow on the lid.
2 Place two AA batteries inside the battery com-partment with their + and – ends aligned as indicated.
3 Replace the battery compartment lid.
Battery Safety● Battery Usage CAUTION - To prevent battery leakage that
may result in bodily injury or damage to the unit:Install ALL batteries correctly, with the + and - markings onthe battery aligned as indicated on the unit;Do not mix batteries, for example, old with new or carbonwith alkaline; andRemove batteries when the unit will not be used for a longtime.
Recording PreventionVideo cassette tapes have record tabs to ensure you do noterase recordings accidentally.
1 To prevent accidental recording, break off thetab with a screwdriver.
2 To record again, cover the hole with cellophanetape.
• Your new product, its packaging,and this manual contain materialsthat can be recycled and reused.Specialized companies can recycleyour product to increase theamount of reusable materials andto minimize the amount thatneeds to be properly disposed.Your product uses batteries thatshould not be thrown away whendepleted but should be disposedof as small chemical waste.Please find out about the localregulations on disposal of your oldproduct, batteries, manual, andpackaging when you replace exist-ing equipment.
Helpful Hint
MC09D1MG 3/22/02 1:15 PM Page 5
• Before connecting an antenna or cable signal to the ANT(enna) Jack, make sure the pin is not bent. If the pin isbent, straighten it as illustrated, then connect the antenna or cable signal to the ANT(enna) Jack.
Helpful Hint
Crooked Pin Straight PinBent pin
Cable
6 Hooking Up the TV/VCR
ANT
DC 13.2V
AC 120V
ANT
ANT
DC 13.2V
AC 120V
ANT
INOUT
Connect an RF coaxial cable (75-ohm, not supplied) to the OUT Jackon the Cable Box and to theANT(enna) Jack on the TV/VCR.
Connect a Cable signalor an antenna to theANT(enna) Jack.
1 Hook up your TV/VCR using one of the connections shown.
ANT
DC 13.2V
AC 120V
ANT
Rod Antenna (supplied)
Connect the Cable signal tothe IN Jack on the Cable Box.
RF coaxial cable(not supplied)
AHooking Up Your TV/VCR With aCable Signal or Outdoor Antenna
B Hooking Up Your TV/VCR With aCable BoxTo view any channel, set the TV/VCR to theCable Box output channel (channel 03 or 04).Then, select channels at the Cable Box.
CHooking Up Your TV/VCR With theSupplied Rod AntennaTo install the supplied rod antenna, push thestem of the antenna into the antenna hole on theback of the TV/VCR. Connect the antenna wireto the ANT(enna) Jack on the back of theTV/VCR as shown. Extend the antenna and adjustits length, direction, and angle for the clearestpicture.
3 Before you turn on the TV/VCR, go topage eight.
2 Connect the AC power cord to the AC 120V jack on the back of theTV/VCR. Plug the AC power cord into an AC power outlet. Use only thesupplied AC power cord.
ANT
DC 13.2V
AC 120V
Plug
MC09D1MG 3/22/02 1:15 PM Page 6
Hooking Up the TV/VCR (cont’d) 7
• Do not watch TV while driving.• Make sure the cigarette lighter jack is
free of ashes and other debris.• Always unplug the car battery cord
from the cigarette lighter before youunplug it from the TV/VCR.
• You must disconnect the car batterycord from the TV/VCR before you canuse standard electrical (AC) power.
• If you use the TV/VCR with the vehi-cle’s engine off, recharge the vehicle’sbattery often. Unplug the car batterycord from the cigarette lighter whenyou finish using the TV/VCR.
• When you use the TV/VCR with a carbattery cord, noise may appear onthe TV/VCR screen.
• Do not use this TV/VCR in high tem-perature conditions. Details are onpage 41.
Helpful Hints
Mobile ConnectionsUsually, the supplied rod antenna provides adequate reception.But when you want to watch TV outdoors or in a vehicle, try amobile antenna (not supplied) or an indoor dipole antenna (notsupplied) for better reception.
1Connect an antenna to the ANT(enna) jack. If you do notuse the supplied rod antenna, refer to the instructions with yourother antenna to make a connection.
2Make sure your vehicle has a 13.2-volt, negative groundelectrical system. Connect one end of the car batterycord to the DC 13.2V jack on the back of the TV/VCR.Then connect the other end of the car battery cord to thecigarette lighter in your vehicle.Use only the supplied car battery cord. Using another cord coulddamage the TV/VCR. Make sure you push the car battery cord’splug completely into the cigarette lighter.
ANT
DC 13.2V
AC 120V
DC 13.2V
To CigaretteLighter
car battery cord
Fuse ReplacementIf the TV/VCR does not have power when connected properly inyour vehicle, replace the fuse in the car battery cord.Use only a 5-amp, 250-volt, fast blow fuse, which is availableat an electronics retailer.
1To remove the old fuse, unscrew the red cap from the end of thecord. Place your fingers on the grooved part of the cap and turnthe cap counter-clockwise.
2When the cap is removed, the red cap and the silver tip will beloose. The fuse will be loose inside the end of the cord.
3Remove the old fuse and insert a new fuse.
4Replace the red cap and the silver tip. The fuse will tighten intoplace as you screw on the cap, turning the cap clockwise. (Theend of the fuse will fit into the silver tip, which is in the center ofthe red cap when tightened.)
ANT
DC 13.2V
AC 120V
ANT
Rod Antenna (supplied)
MC09D1MG 3/22/02 1:15 PM Page 7
8 Setting TV Channels for the First TimeThe TV/VCR can memorize the channels you receive in yourarea. If you are using a Cable Box or Satellite Box, you donot need to set channels at the TV/VCR. Set the TV/VCR tothe output channel of the Cable Box or Satellite Box (chan-nel 03 or 04). Then select the channel to be viewed on theCable Box or Satellite Box.If you do not see these menus when you turn on theTV/VCR, set TV channels as instructed on page 10 instead.
1 Press POWER to turn on the TV/VCR.
2 Press F.FWD/B or REW/s to select ENG-LISH or ESPAÑOL (Spanish). The selected lan-guage will appear inside the [ ].
– SET UP –
B LANGUAGE[ENGLISH] ESPAÑOL
AUTO PRESET
• The TV/VCR distinguishesbetween standard TV channelsand cable channels.
• To play or record a video tapebefore setting TV channels, pressthe MENU button on the remotecontrol. To set up channels later,see Resetting TV Channels onpage 10.
• To select cable channels higherthan 99, press the +100 button,then press the Number buttonsfor the last two digits. For exam-ple, to select channel 125, press+100, 2, 5. Precede single-digitchannel numbers with a zero(for example, 01 ... 09).
Helpful Hints
3 Press PLAY/▲ or STOP/▼ to select AUTOPRESET. Then press F.FWD/B. The TV/VCRscans and memorizes all active channels in your area.When scanning is complete, the TV/VCR will go tothe lowest available channel automatically.Use the CH(annel) o/p buttons to select memo-rized channels. Use the Number buttons to selectnon-memorized channels.
– SET UP –
LANGUAGE[ENGLISH] ESPAÑOL
B AUTO PRESET
TIME SEARCH MUTERECORD
SPEED RESET
0
8 97
5 64
2 31
PAUSE/STILL
+100
STOP
F.FWD
PLAY
REW
VOL.
DISPLAYMENU
POWER SLEEP/WAKE UP
CH.
ALT.CH12-3
MC09D1MG 3/22/02 1:15 PM Page 8
Selecting a Menu Language 9
• If the menu is in Spanish butyou prefer English, press MENU,then press PLAY/▲ or STOP/▼to select IDIOMA [ESPAÑOL],then press F.FWD/B to select[ENGLISH]. Press MENU toremove the menu.
Helpful Hint
This function affects only the language of the TV/VCR’smenu, not the audio of TV programming or video tapes.
1 Press MENU. Press PLAY/▲ or STOP/▼ toselect LANGUAGE.
– M E N U –
TIMER PROGRAMMINGPICTURE CONTROLSETTING CLOCKCHANNEL SET UPUSER’S SET UP
B LANGUAGE [ENGLISH]ZERO RETURNTIME SEARCH
2 Press F.FWD/B or REW/s to select ENG-LISH or ESPAÑOL (Spanish). The selected lan-guage will appear inside the [ ].
3 Press MENU to remove the menu.
TIME SEARCH MUTERECORD
SPEED RESET
0
8 97
5 64
2 31
PAUSE/STILL
+100
STOP
F.FWD
PLAY
REW
VOL.
DISPLAYMENU
POWER SLEEP/WAKE UP
CH.
ALT.CH
1,3
1-2
MC09D1MG 3/22/02 1:15 PM Page 9
• The TV/VCR cannot control orchange the channels of theCable Box or Satellite Box.
Helpful Hint
10 Resetting TV ChannelsAlthough the TV/VCR may automatically memorize thechannels you receive when you turn it on for the first time,you may set up channels again by following the steps below.
1 Press MENU. Press PLAY/▲ or STOP/▼ toselect CHANNEL SET UP. Then, pressF.FWD/B.
– M E N U –
TIMER PROGRAMMINGPICTURE CONTROLSETTING CLOCK
B CHANNEL SET UPUSER’S SET UPLANGUAGE [ENGLISH]ZERO RETURNTIME SEARCH
2 Press PLAY/▲ or STOP/▼ to select AUTOPRESET. Then, press F.FWD/B.The TV/VCR scans and memorizes all the activechannels in your area. When scanning is complete, the TV/VCR will go tothe lowest available channel automatically.Use the CH(annel) o/p buttons to select memo-rized channels. Use the Number buttons to selectnon-memorized channels.
– CHANNEL SET UP –
ADD / DELETE CH (TV)
B AUTO PRESET
TIME SEARCH MUTERECORD
SPEED RESET
0
8 97
5 64
2 31
PAUSE/STILL
+100
STOP
F.FWD
PLAY
REW
VOL.
DISPLAYMENU
POWER SLEEP/WAKE UP
CH.
ALT.CH
1
1,2
MC09D1MG 3/22/02 1:15 PM Page 10
Adding/Deleting Channels 11The channels you no longer receive or seldom watch can bedeleted from the memory. (Of course, you can add deletedchannels into the memory again.)
1 Press MENU. Press PLAY/▲ or STOP/▼ toselect CHANNEL SET UP. Then, pressF.FWD/B.
– M E N U –
TIMER PROGRAMMINGPICTURE CONTROLSETTING CLOCK
B CHANNEL SET UPUSER’S SET UPLANGUAGE [ENGLISH]ZERO RETURNTIME SEARCH
2 Press PLAY/▲ or STOP/▼ to selectADD/DELETE CH. Then, press F.FWD/B.
– CHANNEL SET UP –
B ADD / DELETE CH (TV)
AUTO PRESET
3 Press PLAY/▲ or STOP/▼ until the channelnumber you wish to add or delete appears.You also can use the Number buttons or theCH(annel) ▲/▼ button to enter it.
0 8
ADD / DELETE
4 Press F.FWD/B or REW/s to add or deletethe channel. Deleted channels will appear in lightred. Added channels will appear in light blue. Todelete another channel, repeat steps 3-4.
5 Press MENU to remove the menu.
• To confirm that a channel hasbeen added or deleted, press theCH(annel) ▲/▼ button to see ifyou can or cannot select thechannel. Only memorized oradded channels can be selectedwith CH(annel) ▲/▼.
Helpful Hint
TIME SEARCH MUTERECORD
SPEED RESET
0
8 97
5 64
2 31
PAUSE/STILL
+100
STOP
F.FWD
PLAY
REW
VOL.
DISPLAYMENU
POWER SLEEP/WAKE UP
CH.
ALT.CH
1-4
1,5
MC09D1MG 3/22/02 1:15 PM Page 11
12 Setting the Clock
1 Press MENU. Press PLAY/▲ or STOP/▼ toselect SETTING CLOCK, then pressF.FWD/B.
– M E N U –
TIMER PROGRAMMINGPICTURE CONTROL
B SETTING CLOCKCHANNEL SET UPUSER’S SET UPLANGUAGE [ENGLISH]ZERO RETURNTIME SEARCH
2 With AUTO CLOCK selected, pressF.FWD/B or REW/s repeatedly until [ON]appears beside AUTO CLOCK.
– SETTING CLOCK –
B AUTO CLOCK [ON]
AUTO CLOCK CH [AUTO]
MANUAL CLOCK SET
D.S.T. [OFF]
• If the TV/VCR is connecteddirectly to a Cable Box orSatellite Box, select the local PBSstation on the Cable Box. Set theTV/VCR to the output channel ofthe Cable Box or Satellite Box(usually channel 3 or 4), to setthe clock automatically.
• The TV/VCR cannot control orchange the channels of theCable Box or Satellite Box.
• If you use the mobile connec-tions described on page seven,you cannot use the AUTOCLOCK function.
Helpful Hints
Set the clock accurately for proper timer recording. If aPublic Broadcasting Station (PBS) is available in your area,follow Auto Clock Setting below. If not, follow ManualClock Setting on pages 14-15.
Auto Clock SettingYou can have the TV/VCR set the clock automatically byusing the PBS channel in your area. Once you have set theclock, the TV/VCR will automatically monitor the correcttime and date being broadcast by the PBS station.
Before you begin, make sure ...● The TV/VCR power is on.● The antenna/Cable TV connections are correct.● The Cable Box is on (if applicable). (See Helpful Hints.)● Channels are set. Details are on pages eight and 10.
TIME SEARCH MUTERECORD
SPEED RESET
0
8 97
5 64
2 31
PAUSE/STILL
+100
STOP
F.FWD
PLAY
REW
VOL.
DISPLAYMENU
POWER SLEEP/WAKE UP
CH.
ALT.CH
1-2
1
MC09D1MG 3/22/02 1:15 PM Page 12
Setting the Clock (cont’d) 13
3 Press PLAY/▲ or STOP/▼ to select AUTOCLOCK CH. Then press F.FWD/B or REW/s
until the channel number of your local PBSstation appears.If you do not know the PBS channel number, leave itset to [AUTO], which is located before [2]. TheTV/VCR will automatically search all available chan-nels for the local PBS station and will select thatchannel.
– SETTING CLOCK –
AUTO CLOCK [ON]
B AUTO CLOCK CH [AUTO]
MANUAL CLOCK SET
D.S.T. [OFF]
4 Press MENU to remove the menu.
5 Press POWER to turn off the TV/VCR.
• If the TV/VCR sets the timeincorrectly, it may have takenthe time from a PBS station in adifferent time zone. Enter thecorrect local PBS station manual-ly at step 3 or follow the stepsfor Manual Clock Setting onpages 14-15.
Helpful Hint
TIME SEARCH MUTERECORD
SPEED RESET
0
8 97
5 64
2 31
PAUSE/STILL
+100
STOP
F.FWD
PLAY
REW
VOL.
DISPLAYMENU
POWER SLEEP/WAKE UP
CH.
ALT.CH5
43
MC09D1MG 3/22/02 1:16 PM Page 13
14 Setting the Clock (cont’d)
• If you unplug the AC power cordor if the power fails for morethan three seconds, you mayhave to reset the clock.
• If there is no PBS station in yourarea or on your cable system,select AUTO CLOCK and pressF.FWD/B or REW/s to turn[OFF] this function. Then youcan set the clock manually.
B SETTING CLOCKCHANNEL SET UPUSER’S SET UPLANGUAGE [ENGLISH]ZERO RETURNTIME SEARCH
2 Press PLAY/▲ or STOP/▼ to select MANUALCLOCK SET. Then, press F.FWD/B.
– SETTING CLOCK –
AUTO CLOCK [ON]
AUTO CLOCK CH [AUTO]
B MANUAL CLOCK SET
D.S.T. [OFF]
3 Press PLAY/▲ or STOP/▼ until your desiredmonth appears. (Example: May →05) Then, pressF.FWD/B.
– MANUAL CLOCK SET–
MONTH DAY YEAR
0 5 / – – – – – – – – –
HOUR MINUTE
– – : – – – –
4 Press PLAY/▲ or STOP/▼ until your desiredday appears. (Example: 7th →07) Then, pressF.FWD/B.
– MANUAL CLOCK SET–
MONTH DAY YEAR
0 5 / 0 7 – – – – – – –
HOUR MINUTE
– – : – – – –
TIME SEARCH MUTERECORD
SPEED RESET
0
8 97
5 64
2 31
PAUSE/STILL
+100
STOP
F.FWD
PLAY
REW
VOL.
DISPLAYMENU
POWER SLEEP/WAKE UP
CH.
ALT.CH
1-4
1
MC09D1MG 3/22/02 1:16 PM Page 14
Setting the Clock (cont’d) 15
5 Press PLAY/▲ or STOP/▼ until your desiredyear appears. (Example: 2002) Then, pressF.FWD/B.
– MANUAL CLOCK SET–
MONTH DAY YEAR
0 5 / 0 7 TUE 2 0 0 2
HOUR MINUTE
– – : – – – –
6 Press PLAY/▲ or STOP/▼ until your desiredhour appears. (Example: 05 PM) Then, pressF.FWD/B.
– MANUAL CLOCK SET–
MONTH DAY YEAR
0 5 / 0 7 TUE 2 0 0 2
HOUR MINUTE
0 5 : – – P M
7 Press PLAY/▲ or STOP/▼ until your desiredminute appears. (Example: 40)
– MANUAL CLOCK SET–
MONTH DAY YEAR
0 5 / 0 7 TUE 2 0 0 2
HOUR MINUTE
0 5 : 4 0 P M
8 Press MENU. Although seconds are not displayed,they begin counting from 00 when you press MENUon the remote control. Use this feature to synchro-nize the clock with the correct time.
5:40 PM
• To adjust the clock later, followsteps 1-2 on page 14. Then,press F.FWD/B or REW/s toselect the item you want tochange. Enter the correct infor-mation by pressing PLAY/▲ orSTOP/▼. Press MENU when youare finished.
Helpful Hint
TIME SEARCH MUTERECORD
SPEED RESET
0
8 97
5 64
2 31
PAUSE/STILL
+100
STOP
F.FWD
PLAY
REW
VOL.
DISPLAYMENU
POWER SLEEP/WAKE UP
CH.
ALT.CH
5-7
8
MC09D1MG 3/22/02 1:16 PM Page 15
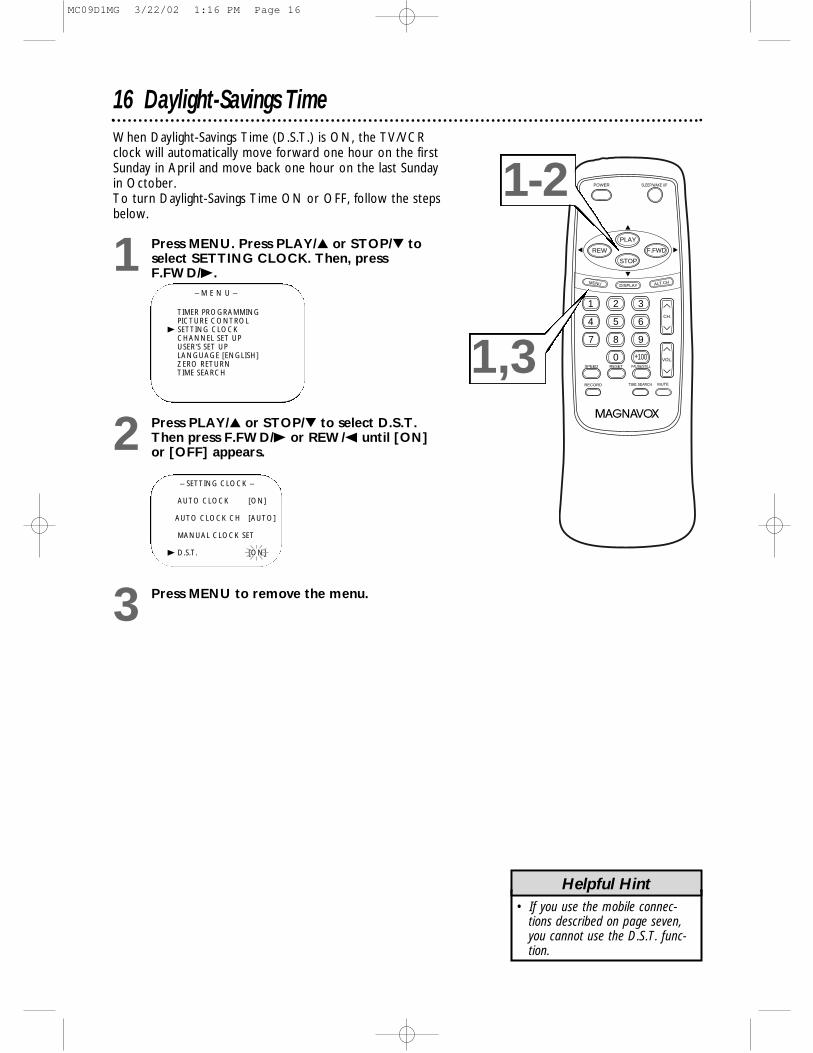
16 Daylight-Savings TimeWhen Daylight-Savings Time (D.S.T.) is ON, the TV/VCRclock will automatically move forward one hour on the firstSunday in April and move back one hour on the last Sundayin October. To turn Daylight-Savings Time ON or OFF, follow the stepsbelow.
B SETTING CLOCKCHANNEL SET UPUSER’S SET UPLANGUAGE [ENGLISH]ZERO RETURNTIME SEARCH
2 Press PLAY/▲ or STOP/▼ to select D.S.T.Then press F.FWD/B or REW/s until [ON]or [OFF] appears.
– SETTING CLOCK –
AUTO CLOCK [ON]
AUTO CLOCK CH [AUTO]
MANUAL CLOCK SET
B D.S.T. [ON]
3 Press MENU to remove the menu.
TIME SEARCH MUTERECORD
SPEED RESET
0
8 97
5 64
2 31
PAUSE/STILL
+100
STOP
F.FWD
PLAY
REW
VOL.
DISPLAYMENU
POWER SLEEP/WAKE UP
CH.
ALT.CH
1-2
1,3
• If you use the mobile connec-tions described on page seven,you cannot use the D.S.T. func-tion.
Helpful Hint
MC09D1MG 3/22/02 1:16 PM Page 16
TIME SEARCH MUTERECORD
SPEED RESET
0
8 97
5 64
2 31
PAUSE/STILL
+100
STOP
F.FWD
PLAY
REW
VOL.
DISPLAYMENU
POWER SLEEP/WAKE UP
CH.
ALT.CH
F.FWD/B (fast forward)ButtonWhen tape playback is stopped,press to fast forward the tape athigh speed. During tape playback,press to fast forward the tapewhile the picture stays on thescreen. Details are on page 23.When setting the clock or a timerrecording, press to confirm infor-mation and proceed to the nextstep. Press to select a menu item.
CH(annel) o/p ButtonPress to scan through theTV/VCR’s available channels.
MENU ButtonPress to display the main menu.
PLAY/▲ ButtonPress to play a tape. Details are onpage 22. Press to select a menuitem. Press to enter digits whensetting a timer recording or theclock.
SLEEP/WAKE UP ButtonPress to set the Sleep Timer.Details are on page 35. Press toset the Wake Up Timer. Detailsare on page 36.
SPEED ButtonPress to select the recording tape speed(SP or SLP). Details are on page 24.
Remote Control Buttons 17
VOL(ume) o/p ButtonPress to adjust the sound level.Pressing VOL(ume) o/p whenthe sound is muted will restorethe sound.
POWER ButtonPress to turn on or off theTV/VCR.
REW/{ (rewind) ButtonWhen tape playback is stopped,press to rewind the tape at highspeed. During tape playback, pressto rewind the tape while the pic-ture stays on the screen. Details areon page 23. Press to select a menuitem.
RECORD ButtonPress once to start a recording.Details are on page 24.
Number ButtonsUse to select channels for viewingor recording. Details are on page 8.
TIME SEARCH ButtonPress to activate a Time Search.Details are on page 34.
RESET ButtonPress to reset the counter to0:00:00. Details are on page 33.
DISPLAY ButtonPress to display the counter orthe current channel number andcurrent time on the TV screen.Details are on page 20.
STOP/▼ ButtonPress to stop the tape. Press toselect a menu item. Press toenter digits when setting theclock or a timer recording.
PAUSE/STILL ButtonPress to pause recording. Pressagain to resume recording.Details are on page 24.During tape playback, press tofreeze the picture (still). Details are on page 23.
MUTE ButtonPress to eliminate the TV/VCR’ssound. Press again to return tothe previous volume level.
ALT. CH (AlternateChannel) ButtonPress to return to the TV chan-nel you were viewing previously.
MC09D1MG 3/22/02 1:16 PM Page 17
18 Front Panel
AUDIO VIDEO
REC
POWER REW PLAY F.FWD REC/OTR VOLUME CHANNELEARPHONE
STOPEJECT
Screen CoverThe TV/VCR screen is pro-tected by a removablescreen cover. If you wantto remove the screencover, slide in the two tabsthat hold the cover inplace, then pull off thecover.
Cassette CompartmentInsert a video cassette tape here.
POWER ButtonPress to turn the TV/VCR on or off. Turn off the TV/VCR to activate a timerrecording.
CHANNEL ▲/▼ButtonsPress to select a TV chan-nel for viewing or record-ing. To access theTV/VCR’s menu, pressCHANNEL ▲ while inline input (AUX) mode.Press again to remove themenu.Press to adjust the track-ing during tape playback.Details are on page 37.
STOP/EJECT ButtonPress once to stop the tape. When play-back is stopped, press to eject the tape.Press to select an item in the menu.
PLAY ButtonPress to play a tape. Details are on page 22.
REC/OTR (record/one-touch recording)Button Press once to start a recording. Details are onpage 24. Press repeatedly to start a One-TouchRecording (an immediate timed recording, 30minutes to eight hours long) of the channel youare watching. Details are on page 25.
REW (rewind) ButtonWhen tape playback is stopped, press to rewindthe tape at high speed. During playback, press torewind the tape while the picture stays on thescreen. Press to change a setting of a menu item(for example, to adjust the BRIGHTNESS) or toreturn to a previous menu.
F.FWD (Fast Forward) ButtonWhen tape playback is stopped, press to fast for-ward the tape at high speed. During playback,press to fast forward the tape while the picturestays on the screen. Press to change a setting ofa menu item (for example, to adjust theBRIGHTNESS) or to advance to the next menu.
REC(ord) LightThis light flashes during a recording. Itlights up when the TV/VCR power is offfor a timer recording. It blinks rapidlywhen a recording is paused.
Remote SensorReceives a signal from your remote so youcan operate the TV/VCR from a distance.
VOLUME o/pButtonsPress to adjust the soundlevel.
EARPHONE JackConnect earphones(not supplied) here forpersonal listening.
AUDIO In JackConnect this jack to the audio out jack ofa camcorder or another VCR. Details areon page 30.
VIDEO In JackConnect this jack to the video out jack ofa camcorder or another VCR. Details areon page 30.
MC09D1MG 3/22/02 1:16 PM Page 18
Rear Panel 19
ANT
DC 13.2V
AC 120V
ANT(enna) JackConnect your antenna or cable here.Details are on page six.
Antenna HoleConnect the base stem of the suppliedrod antenna here. Details are on page six.
AC 120V JackConnect the AC power cord here.Details are on page six.
DC 13.2V JackConnect the car battery cord here.Details are on page seven.
MC09D1MG 3/22/02 1:16 PM Page 19
To check the Counter, Clock, and Channel number on the TV screen, press DISPLAY on the remote control.Each time you press DISPLAY, the TV screen will change as described below.
● Counter mode: After five seconds, only the counter remains. To clear it, press DISPLAY.● Clock mode: After five seconds, only the clock and channel number remain. To clear them, press DISPLAY.
20 On-Screen Status Displays
COUNT 0:12:34
5:40PMCH2
<Off mode> <Counter mode> <Clock mode>
PressDISPLAY once
PressDISPLAY once
Press DISPLAY once
MC09D1MG 3/22/02 1:16 PM Page 20
decreasedbrightnessBRIGHT increased
brightness
REW/s F.FWD/B
decreasedcontrastCONTRAST increased
contrast
palerCOLOR more brilliant
more purpleTINT more green
softerSHARPNESS more clear
Adjusting the Picture Controls 21 Follow these steps to adjust the TV/VCR’s brightness, pic-ture, color, tint, and sharpness.
SETTING CLOCKCHANNEL SET UPUSER’S SET UPLANGUAGE [ENGLISH]ZERO RETURNTIME SEARCH
2 Press PLAY/▲ or STOP/▼ until the desiredcontrol is displayed. You can select BRIGHT,CONTRAST, COLOR, TINT, or SHARPNESS.
3 Press F.FWD/B or REW/s to adjust the con-trol.
BRIGHT– PPPPPPPCPPPPPPP +
• If you do not begin changing anadjustment within five seconds ofselecting a control, the PictureControl menu will disappear.
• The original settings will probablygive you the best picture quality.
• The TV/VCR will retain thePicture Control settings even ifthe power fails.
Helpful Hints
TIME SEARCH MUTERECORD
SPEED RESET
0
8 97
5 64
2 31
PAUSE/STILL
+100
STOP
F.FWD
PLAY
REW
VOL.
DISPLAYMENU
POWER SLEEP/WAKE UP
CH.
ALT.CH
1-3
1
MC09D1MG 3/22/02 1:16 PM Page 21
22 Playing
• If the tape you want to play isalready in the TV/VCR, turn onthe TV/VCR power, then pressPLAY/▲ .
• Playback features and optionsare on pages 23 and 31-34.
• When you play an S-VHS formattape, you cannot get the highresolution that would be avail-able on an S-VHS VCR. Noiselines (black and white streaks)may appear in the picture.
Helpful Hints
Follow the steps below to play a tape.
1 Insert a tape in the TV/VCR.The power will come on. If the tape’s record tab ismissing, playback should start automatically.
2 If playback does not start automatically, pressPLAY/▲ to start playback.
3 Press STOP/▼ to stop playback.
4 Press REW(ind)/{ to rewind the tape.
5 When the tape finishes rewinding, pressSTOP/EJECT on the TV/VCR to remove thetape.
TIME SEARCH MUTERECORD
SPEED RESET
0
8 97
5 64
2 31
PAUSE/STILL
+100
STOP
F.FWD
PLAY
REW
VOL.
DISPLAYMENU
POWER SLEEP/WAKE UP
CH.
ALT.CH
3
4 2
MC09D1MG 3/22/02 1:16 PM Page 22
Playback Options 23
• Still mode will automaticallyswitch to Stop mode after fiveminutes to protect the TV/VCRand the tape from damage.
• SP/LP/SLP means this feature willwork with tapes recorded inStandard Play, Long Play, orSuper Long Play. For detailsabout tape speed, see page 24.
• LP/SLP means this feature willwork with tapes recorded inLong Play and Super Long Play.For details on tape speed, seepage 24.
• During forward and reversesearching, horizontal noise barswill appear on the TV/VCRscreen.
• Tapes recorded in SLP speed willhave the clearest picture duringforward and reverse searchingand Still mode.
• This TV/VCR will only recordtapes in SP or SLP. It will playtapes that were recorded in LPon a different device (anotherVCR, for example).
Helpful Hints
Forward and Reverse Searching(SP/LP/SLP)
1 During tape playback, press and releaseF.FWD/B or REW(ind)/{.A fast forward or reverse picture search will begin.
2 To return to normal playback, press PLAY/▲.
Super High Speed Searching (LP/SLP)
1 During tape playback, press F.FWD/B orREW(ind)/{, then press again.The TV/VCR will now search in super high speed. Press F.FWD/B or REW(ind)/{ repeatedly toswitch between regular and super high speed search-ing.
2 To return to normal playback, press PLAY/▲.
Viewing a Still Picture
1 During tape playback, press PAUSE/STILL.A still picture will appear on the screen. The noiselines will move each time you press PAUSE/STILL.
2 To release the still picture and return to nor-mal playback, press PLAY/▲.
TIME SEARCH MUTERECORD
SPEED RESET
0
8 97
5 64
2 31
PAUSE/STILL
+100
STOP
F.FWD
PLAY
REW
VOL.
DISPLAYMENU
POWER SLEEP/WAKE UP
CH.
ALT.CH
MC09D1MG 3/22/02 1:16 PM Page 23
24 Recording
• You cannot record one channelwhile watching another.
• Recording options are on pages 25-30.
• If you pause a recording for morethan five minutes, the TV/VCR willswitch to Stop mode automaticallyto protect the video cassette tapefrom damage.
• You can change the tape speedwith the SPEED button while arecording is in progress, but somedistortion may appear on thetape.
Helpful Hints
Read and follow the steps below to record a TV program.
1 Place a tape with its record tab intact (see pagefive) in the TV/VCR. The power will come on. Or, ifthe tape is already in the TV/VCR, pressPOWER to turn on the TV/VCR, if necessary.
2 Press SPEED until the desired tape speedappears on the TV/VCR screen. See tape speeddetails below.
3 Use CH(annel) o/p or the Number buttons toselect the channel you want to record.You cannot change channels during recording.
4 Press RECORD once to start recording. TheREC(ord) light will glow. If the tape does not have arecord tab the TV/VCR will eject the tape. Insertanother tape.
5 To pause the recording (for example, duringcommercials), press PAUSE/STILL. TheREC(ord) light will flash. To resume recording,press PAUSE/STILL again or press RECORD.The REC(ord) light will glow.
4 hrs. 2 hrs.(playback only) 20 mins.SLP(Super Long Play)
8 hrs. 6 hrs. 3 hrs.
Tape SpeedsThis chart shows the recording/playback time for three typesof video cassettes (T160, T120, and T60). There are threeplayback speeds: SP, LP, and SLP. A tape will play only in thespeed in which it was recorded. When recording, you canchange the tape speed using the SPEED button. You cannotrecord in LP speed. The slower the speed, the more programming you can fit onthe tape. SLP is the slowest speed.
TIME SEARCH MUTERECORD
SPEED RESET
0
8 97
5 64
2 31
PAUSE/STILL
+100
STOP
F.FWD
PLAY
REW
VOL.
DISPLAYMENU
POWER SLEEP/WAKE UP
CH.
ALT.CH
63
53
1
24-5
MC09D1MG 3/22/02 1:16 PM Page 24
One-Touch Recording 25A One-Touch Recording (OTR) is an immediate timedrecording from 30 minutes to eight hours long.● This function cannot be done from the remote control.● Recording starts immediately when you press REC/OTR.
Before you begin, make sure ...● The TV/VCR power is on.● Insert a cassette tape with its erase prevention tab in
place. (If necessary, rewind or fast forward the tape to thepoint at which you want to begin recording.)
1 Press the Number buttons or CH(annel) o/pto select the channel you want to record. Remember, if the TV/VCR is connected to a CableBox or Satellite Box, the TV/VCR must be on channel3 or 4. Select the channel you want to record at theCable Box/Satellite Box.
2 Press SPEED to select a tape speed (SP/ SLP).Details are on page 24.
3 Press REC/OTR repeatedly to select a record-ing length. The recording length will be determinedby the number of times you press REC/OTR. Eachpress of REC/OTR will increase the recording timeby 30 minutes. It may be set up to a maximumrecording length of eight hours.
OTR (2:30)
SP
• If you press REC/OTR 18 times,normal recording resumes.
• To stop an OTR, press STOP/p.• To show the remaining time,
press DISPLAY. OTR will appearbriefly on the TV screen.
• Recording stops when 0:00 isreached.
• The maximum recording time ofa T-160 tape in SLP speed is 8hours (assuming you start at thebeginning of the tape). A T-120tape has a maximum of 6 hoursrecording time in SLP speed.
• If the tape ends before therecording’s end time, the TV/VCRwill stop recording, eject thetape, and turn itself off.
4 For a one-time recording, press PLAY/▲ until thedesired date appears.Or, to record a TV program at the same time onthe same channel every day, press STOP/▼ untilEVRY DAY appears.Or, to record a TV program at the same time onthe same channel every week, for example everyMonday, press STOP/▼ until EVRY and yourdesired day of the week appear together.Finally, press F.FWD/B.
26 Timer RecordingFollow the steps below to program the TV/VCR to record TV pro-grams while you’re away from home. The TV/VCR will turn itselfon, record, and turn itself off automatically.Before you begin, make sure ...● The clock is set. If the clock is not set, MANUAL CLOCK SET
appears. See page 14 to set the clock, then set the recording.● Channels are set. Details are on pages eight and 10.● A tape is in the TV/VCR.
1 Press MENU. Press PLAY/▲ or STOP/▼ to selectTIMER PROGRAMMING. Press F.FWD/B.
2 Press PLAY/▲ or STOP/▼ to select a program posi-tion. Then, press F.FWD/B.
3 Press PLAY/▲ or STOP/▼ until the desired channelnumber appears. (Example: CH61) Then pressF.FWD/B. If the TV/VCR is connected to a Cable Box orSatellite Box, the TV/VCR must be on CH3 or CH4. Set CHas 03 or 04 in the Timer Programming menu. Select thechannel to be recorded on the Cable Box/Satellite Box.
• If you are using Timer recording,you may not operate the unitmanually.
• The erase-prevention tab on thecassette must be in place (or youmust put tape over the hole).
• If the erase-prevention tab isremoved, the cassette will ejectwhen you press POWER to turnoff the TV/VCR.
• If the tape ends before therecording is complete, the TV/VCRwill stop recording immediatelyand eject the tape.
6 Press PLAY/▲ or STOP/▼ until the desiredbeginning minute appears. (Example: 7:30 PM)Then, press F.FWD/B.
5 Press PLAY/▲ or STOP/▼ until the desiredbeginning hour appears. (Example: 7:12 PM)Then, press F.FWD/B.
• To correct information while set-ting the Timer Recording, pressREW/s to go back one stepand select the incorrect informa-tion. Press PLAY/o or STOP/pto enter the correct information.
Helpful Hint
7 Press PLAY/▲ or STOP/▼ until the desired endhour appears. (Example: 8:30PM) Then, pressF.FWD/B.
9 Press PLAY/▲ or STOP/▼ until the desiredtape speed appears. (Example: SP)
10 Press F.FWD/B or REW/s. To set another pro-gram, repeat steps 2-10. Or, press MENU to removethe menu.
11 Press POWER to set the timer recording. TheREC(ord) light will appear. You must turn off theTV/VCR to activate automatic timer recording. If thepower is not off and you continue watching TV, TIMERREC STANDBY starts flashing on the TV screen twominutes before the programmed start time.
28 Timer Recording (cont’d)Extending a Timer RecordingTo make a Timer Recording start and end later than originally sched-uled, follow these steps.1 Press POWER to turn on the TV/VCR.2 Press MENU. Press PLAY/▲ or STOP/▼ to select TIMER PRO-
GRAMMING. Press F.FWD/B. 3 Press RECORD, then press PLAY/▲ or STOP/▼ to select the
desired program.4 Press RECORD again. Each press of RECORD will shift forward the
beginning/end time by 10 minutes. If the recording is in progress,each press will shift forward the end time only. If you adjust the times during recording, the recording speed auto-matically changes to SLP.To restore the original recording times, press PAUSE/STILL.
5 Press F.FWD/B or REW/s , then press MENU to remove themenu.
6 If the timer recording is scheduled to start later, press POWER toturn off the TV/VCR for the recording.
Correcting a Timer Recording1 To correct information in a Timer Recording after you have finished
setting it, press POWER to turn on the TV/VCR.2 Press MENU. Press PLAY/▲ or STOP/▼ to select TIMER PRO-
GRAMMING. Press F.FWD/B.3 Press PLAY/▲ or STOP/▼ to select a timer recording, then press
F.FWD/B.4 Press F.FWD/B repeatedly to select the information you want to
change. Press REW/s to go back if necessary. Press PLAY/▲ orSTOP/▼ to enter the correct information.
5 Press POWER to turn off the TV/VCR again to set the recording.
Cancelling Timer RecordingsTo cancel a timer recording that is in progress:1 Press POWER to turn on the TV/VCR, then press STOP/EJECT on
the TV/VCR.To cancel a timer recording that has not started:1 Press POWER to turn on the TV/VCR.2 Press MENU. Press PLAY/▲ or STOP/▼ to select TIMER PRO-
GRAMMING. Press F.FWD/B.3 Press PLAY/▲ or STOP/▼ to select a timer recording, then press
F.FWD/B.4 Press RESET.5 Press MENU to remove the menu.
Checking Scheduled Timer Recordings1 Press POWER to turn on the TV/VCR. The REC(ord) light will turn
off.2 Press MENU. Press PLAY/▲ or STOP/▼ to select TIMER PRO-
GRAMMING if necessary. 3 Press F.FWD/B. The program details will appear on the screen.4 Press MENU to remove the menu.
MC09D1MG 3/22/02 1:16 PM Page 28
Timer Recording Auto Return 29With this feature, after timer recording is finished, thebeginning of the recorded program(s) can be searched forautomatically.
1 Press MENU. Press PLAY/▲ or STOP/▼ toselect USER’S SET UP. Then, press F.FWD/B.
– M E N U –
TIMER PROGRAMMINGPICTURE CONTROLSETTING CLOCKCHANNEL SET UP
B USER’S SET UPLANGUAGE [ENGLISH]ZERO RETURNTIME SEARCH
2 Press PLAY/▲ or STOP/▼ to select AUTORETURN. Press F.FWD/B or REW/s until[ON] appears.
– USER’S SET UP –
RENTAL [OFF]REPEAT PLAY [OFF]
B AUTO RETURN [ON]
• If you press POWER while thetape is rewinding, Auto Returnwill stop.
• If there is a power failure, theTV/VCR will retain its memoryfor this feature.
Helpful Hints
3 Press MENU. When all the timer recordings arecompleted, the TV/VCR will rewind to the beginningof the recorded program(s). Press PLAY/▲ to playthe tape from the beginning of the timer recordings.
To Cancel Auto ReturnRepeat steps 1-2, but select [OFF] at step 2 using F.FWD/B
or REW/s.
TIME SEARCH MUTERECORD
SPEED RESET
0
8 97
5 64
2 31
PAUSE/STILL
+100
STOP
F.FWD
PLAY
REW
VOL.
DISPLAYMENU
POWER SLEEP/WAKE UP
CH.
ALT.CH
1-2
1,3
MC09D1MG 3/22/02 1:16 PM Page 29
30 Rerecording (Tape Duplication)
• Unauthorized recording of copy-righted television programs, videotapes, or other materials mayinfringe on the rights of copyrightowners and violate copyright laws.
• Different brands of equipmentmay operate differently.
• Make sure all connections aresecure. Otherwise, you may notrecord both picture and sound.
• Programs that are copyright protected may not record clearly.
Helpful Hints
VIDEOOUT
AUDIO
AUDIO VIDEO
REC
POWERSTOPEJECT
AUDIO and VIDEO OUT Jacks on source unit(VCR or Camcorder)
AUDIO and VIDEO InJacks on TV/VCR
Audio Cable from AUDIO OUT to AUDIO In
Video Cable from VIDEO OUT to VIDEO In
1 Make the connections shown above, using audioand video cables (not supplied). Connect thesource unit (VCR or camcorder) to a powersource after connections are made.
2 The VCR or camcorder will play your tape. Insert aprerecorded tape in the source unit. If playbackbegins, press STOP on the unit.
3 The TV/VCR will record your tape. Insert a blanktape in the TV/VCR. Make sure the tape’s recordtab is intact. The TV/VCR power will turn on automati-cally.
4 Point the TV/VCR remote control at theTV/VCR. Press Number buttons 0, 0 so thatAUX appears on the screen.The TV/VCR is now in Line Input or Auxiliary mode.
5 Point the TV/VCR remote control at theTV/VCR. Press SPEED until the desired tapespeed (SP or SLP) appears on the screen.
6 Press PLAY on the source unit andREC(ord)/OTR on your TV/VCR at the sametime. Copying will begin.
7 To stop copying, press STOP/EJECT on theTV/VCR, then stop the tape on the VCR orcamcorder.
MC09D1MG 3/22/02 1:16 PM Page 30
Repeat Play 31
• Once you set Repeat Play, itstays in effect even after youturn off the TV/VCR.
• If RENTAL is set to [ON], theRENTAL PLAY B display has pri-ority. Details are on page 32.
• The TV/VCR will retain theRepeat Play setting even if thepower fails.
Helpful Hints
Repeat Play allows you to repeat a tape indefinitely withoutusing PLAY/▲. ALL REPEAT will repeatedly play the tapefrom the beginning to the end. BLANK REPEAT will repeat-edly play the tape from its beginning to the first part that isblank for more than 10 seconds.
1 Press MENU. Press PLAY/▲ or STOP/▼ toselect USER’S SET UP. Then, press F.FWD/B.
– M E N U –
TIMER PROGRAMMINGPICTURE CONTROLSETTING CLOCKCHANNEL SET UP
B USER’S SET UPLANGUAGE [ENGLISH]ZERO RETURNTIME SEARCH
– USER’S SET UP –
RENTAL [OFF]B REPEAT PLAY [ALL]
AUTO RETURN [OFF]
2 Press PLAY/▲ or STOP/▼ to select REPEATPLAY.Press F.FWD/B or REW/s repeatedly until[ALL] or [BLANK] appears.
3 Press MENU to remove the menu.
4 Press PLAY/▲ to start Repeat Play. REPEATPLAY B appears.
To Cancel Repeat PlayRepeat steps 1-2, but select [OFF] at step 2 using F.FWD/B
or REW/s. Press MENU to remove the menu.
TIME SEARCH MUTERECORD
SPEED RESET
0
8 97
5 64
2 31
PAUSE/STILL
+100
STOP
F.FWD
PLAY
REW
VOL.
DISPLAYMENU
POWER SLEEP/WAKE UP
CH.
ALT.CH
1,2,4
1,3
MC09D1MG 3/22/02 1:16 PM Page 31
32 Rental PlaybackThis function enables you to improve picture quality whenplaying worn cassettes such as rented tapes.
1 Press MENU. Press PLAY/▲ or STOP/▼ toselect USER’S SET UP. Then, press F.FWD/B.
– M E N U –
TIMER PROGRAMMINGPICTURE CONTROLSETTING CLOCKCHANNEL SET UP
B USER’S SET UPLANGUAGE [ENGLISH]ZERO RETURNTIME SEARCH
– USER’S SET UP –
B RENTAL [ON]REPEAT PLAY [OFF]AUTO RETURN [OFF]
2 Press PLAY/▲ or STOP/▼ to select RENTAL.Press F.FWD/B or REW/s until [ON]appears.
3 Press MENU to remove the menu.
4 Press PLAY to start playback. RENTAL PLAY Bappears.
To Cancel Rental PlaybackRepeat steps 1-2, but select [OFF] at step 2 using F.FWD/Bor REW/s. Press MENU to remove the menu.
• Once you select Rental Playback,it stays in effect even after youturn off the TV/VCR.
• The TV/VCR will retain theRental setting even if the powerfails.
Helpful Hints
TIME SEARCH MUTERECORD
SPEED RESET
0
8 97
5 64
2 31
PAUSE/STILL
+100
STOP
F.FWD
PLAY
REW
VOL.
DISPLAYMENU
POWER SLEEP/WAKE UP
CH.
ALT.CH
1,3
1,2,4
MC09D1MG 3/22/02 1:16 PM Page 32
Zero Return 33Follow the steps below to reset the counter to zero at atape location you want to refer to later.
1 Play, rewind, or fast forward the tape to thelocation you would like to refer to later. Stopthe tape.
2 Press RESET to set the counter to 0:00:00.
3 Press RECORD (for recording) or PLAY/▲ (forplayback). Press STOP/▼ when recording orplayback is completed.
4 Press MENU. Press PLAY/▲ or STOP/▼ toselect ZERO RETURN. Then, press F.FWD/B.The counter will appear on the screen. When thetape reaches the point at which you set the counterto zero, the tape will stop. Press PLAY/▲ to watchthe tape.
– M E N U –
TIMER PROGRAMMINGPICTURE CONTROLSETTING CLOCKCHANNEL SET UPUSER’S SET UPLANGUAGE [ENGLISH]
B ZERO RETURNTIME SEARCH
TIME SEARCH MUTERECORD
SPEED RESET
0
8 97
5 64
2 31
PAUSE/STILL
+100
STOP
F.FWD
PLAY
REW
VOL.
DISPLAYMENU
POWER SLEEP/WAKE UP
CH.
ALT.CH
1,3,4
3 2
4
MC09D1MG 3/22/02 1:16 PM Page 33
34 Time SearchTime Search lets you quickly advance the tape to a positionsimply by entering the amount of playback time you want toskip.In the example below, Time Search is set to 2 hours, 50 min-utes from the present position.
1 Insert a tape.
2 Press TIME SEARCH.
3 Press PLAY/▲ or STOP/▼ until your desiredtime appears (for example, 2:50 for 2 hours 50 min-utes). Each press increases the time by 10 minutes.To cancel the Time Search at this point, press MENU.
4 Press REW/s or F.FWD/B. The TV/VCR willrewind or fast forward the specified amount of time.The time counts down as the search progresses.When 0:00 is reached, the tape will start playbackautomatically.Or, to cancel the time search before it finishes, pressSTOP/EJECT.
TIME SEARCH2 : 50
• Time Search can be set up to amaximum of 9 hours 50 minutes(9:50), 10 minutes at a time.
• This function will not operate dur-ing recording.
Helpful Hints
TIME SEARCH MUTERECORD
SPEED RESET
0
8 97
5 64
2 31
PAUSE/STILL
+100
STOP
F.FWD
PLAY
REW
VOL.
DISPLAYMENU
POWER SLEEP/WAKE UP
CH.
ALT.CH
3-4
2
MC09D1MG 3/22/02 1:16 PM Page 34
Sleep Timer 35Use the Sleep Timer to program the TV/VCR to shut off ina certain amount of time.
1 Press SLEEP/WAKE UP until SLEEP TIMERappears.
2 Press PLAY/▲, STOP/▼, F.FWD/B or REW/suntil your desired sleep time appears.Each button press will increase the time by 30 min-utes up to 120 minutes.
SLEEP TIMER [2:00]
3 Press MENU to exit the Sleep Timer setting.
• To cancel the Sleep Timer, pressSLEEP/WAKE UP until SLEEPTIMER appears. Press PLAY/▲,STOP/▼, F.FWD/B, or REW/sto select OFF.
• To see how much time remainsbefore the TV/VCR turns itself off,press SLEEP/WAKE UP twice,then press MENU to exit theSleep Timer setting.
Helpful Hints
TIME SEARCH MUTERECORD
SPEED RESET
0
8 97
5 64
2 31
PAUSE/STILL
+100
STOP
F.FWD
PLAY
REW
VOL.
DISPLAYMENU
POWER SLEEP/WAKE UP
CH.
ALT.CH
3
2
1
MC09D1MG 3/22/02 1:16 PM Page 35
36 Wake Up TimerThe Wake Up Timer turns on the TV/VCR automatically ata specified time within the next 24 hours. You may set theTV/VCR to turn on at a TV channel or with VCR playback.To set the Wake Up Timer, follow the steps below.Before you begin:● Set the clock. Details are on pages 12-15. If the clock is not
set, you will not be able to set the Wake Up Timer.● Put a tape in the TV/VCR if you want the TV/VCR to start
tape playback at the specified time.
1 Press SLEEP/WAKE UP until WAKE UPTIMER appears. Press F.FWD/B or REW/suntil [ON] appears.
WAKE UP B ON/OFF [ON]TIMER TV/TAPE [TV]
TIME [12:OOAM]
4 Press MENU to remove the menu, then pressPOWER to turn off the TV/VCR. The TV/VCRwill turn on at the specified time.
WAKE UP ON/OFF [ON]TIMER B TV/TAPE [TV]
TIME [12:OOAM]
2 Press PLAY/▲ or STOP/▼to select TV/TAPE.Press F.FWD/B or REW/s to select [TV] or[TAPE]. If you select TV, the current TV channelwill be on when the TV/VCR turns on. Select TAPEto start tape playback when the TV/VCR turns on.
WAKE UP ON/OFF [ON]TIMER TV/TAPE [TV]
B TIME [12:OOAM]
3 Press PLAY/▲ or STOP/▼ to select TIME.Press F.FWD/B or REW/s to select yourdesired wake up time.Each button press will increase (or decrease) thetime by 10 minutes.
• To cancel the Wake Up Timer,press SLEEP/WAKE UP untilWAKE UP TIMER appears, thenpress F.FWD/B or REW/s until[OFF] appears.
Helpful Hint
TIME SEARCH MUTERECORD
SPEED RESET
0
8 97
5 64
2 31
PAUSE/STILL
+100
STOP
F.FWD
PLAY
REW
VOL.
DISPLAYMENU
POWER SLEEP/WAKE UP
CH.
ALT.CH1
1-3
4
4
MC09D1MG 3/22/02 1:16 PM Page 36
Automatic Operation Features 37The following playback features will always operate.
Automatic PlaybackWhen you put a tape in the TV/VCR, the power will comeon automatically. If the tape’s record tab is missing, playbackwill begin. If a timer recording is set, the power will notcome on automatically when you insert a tape with therecord tab intact. If a timer recording is set and the TV/VCRpower is off, the TV/VCR will eject the tape if the recordtab is missing.
Automatic Rewind, Eject, OffWhen you play, fast forward, or record a tape to its end,the TV/VCR will rewind the tape, stop, turn itself off, andeject the tape.
Tape EjectA tape can be ejected with the TV/VCR power on or off(but the TV/VCR must be plugged in). If a timer recording isprogrammed, a tape cannot be ejected when the power isoff. Turn on the TV/VCR power, then eject the tape. Besure to insert a tape and turn off the TV/VCR power for thetimer recording.
Automatic Tracking AdjustmentThe TV/VCR automatically adjusts the tracking to give youthe best possible picture quality. With some recordings,however, you may get a better picture using the manualtracking controls (see below).
Manual TrackingTo adjust the tracking manually, press the CHANNEL ▲/▼buttons on the TV/VCR or the CH(annel) ▲/▼ button onthe remote control during playback.Tracking returns to Automatic Tracking Adjustment when atape is inserted or when the STOP/▼ button is pressed.
BeforeTracking
Adjustment
AfterTracking
Adjustment
MC09D1MG 3/22/02 1:16 PM Page 37
38 Helpful Hints
LocationFor safe operation and satisfactory performance of your TV/VCR, remember the following:• Shield it from direct sunlight and keep it away from sources of intense heat. • Avoid dusty or humid places.• Avoid places with insufficient ventilation. Do not block the ventilation openings at the top and bottom of the
TV/VCR. Do not place the TV/VCR on a carpet, as this will block the ventilation openings.• Avoid locations subject to strong vibrations.• Do not place the TV/VCR near strong magnetic fields.• Do not move the TV/VCR from a cold place to a hot place, or vice versa.• Do not use this TV/VCR under high temperature conditions (maximum operating temperature: 104˚F).
Electrical Shock and Fire Hazards• Do not handle the power cord with wet hands.• Do not pull the power cord when disconnecting the TV/VCR from the AC (alternating current) wall outlet.
Grasp it by the plug.• If you spill water on the TV/VCR, unplug the power cord immediately and take the TV/VCR to an authorized
service center.• Do not put your fingers or objects into the TV/VCR cassette compartment.• Do not place anything on top of the TV/VCR.
Dew Warning (Moisture Condensation)• Moisture may condense inside the unit when you move it from a cold place to a warm place, after heating a
cold room, or when the humidity is high. There is no warning that moisture is in your TV/VCR. Playing a tapein a TV/VCR in which moisture has accumulated could damage the tape and the TV/VCR. If you suspect mois-ture inside the TV/VCR, keep the TV/VCR power on (but do not play a tape) for at least two hours. This willallow the TV/VCR to dry.
TV/VCR will not perform a timer recording.• Set the recording start and stop times correctly. Details are on pages 26-28. Midnight is 12 a.m. Noon is 12
p.m.• Make sure the TV/VCR power is off.• Set the clock. Details are on pages 12-15.• Put a tape in the TV/VCR. The tape must have a record tab.• With ShowGuard, you don’t have to worry about losing your timer recordings. If the power fails, timer
recordings will be restored when the clock is reset. (The clock will reset itself automatically if you are usingAUTO CLOCK. Details are on pages 12-13. If you are not using AUTO CLOCK, reset the clock manually.Details are on pages 14-15.) The timer recording will not occur only if it was scheduled to take place duringthe power failure.
TV/VCR will not record.• Make sure the tape has a record tab. Details are on page five.• Plug the power cord into an active AC outlet. Details are on page six. Or, plug the car battery cord into your
vehicle’s cigarette lighter. Details are on page seven.• Check your hookups. Details are on pages six-seven.• Set up the channels. Details are on pages eight and 10.
Channel reception is poor.• Check connections, then set up the channels again. Details are on pages eight and 10.
TV/VCR power shuts off after 15 minutes.• To save energy, the TV/VCR will shut itself off after 15 minutes when it is on a channel that is not receiving a
broadcast signal (for example, a station that has gone off the air for the night). This is normal.
If you are having problems with your product, check this list of problems and possible solutions beforerequesting service. You may be able to solve the problem yourself.If you need to call a customer service representative, please know the model number and serial number ofyour product before you call. This information is on the back of the product. Also, please take a moment toidentify the problem you are having, and be prepared to explain this to the representative. If the representa-tive will need to help you with operations, please stay near the product. Our representatives will be happy toassist you.
MC09D1MG 3/22/02 1:16 PM Page 38
Helpful Hints (cont’d) 39The remote control is not available, or the remote control will not access the menu.• Use the buttons on the front of the TV/VCR to access the menu. You cannot enter numbers (for example, to
program a timer recording) using the front panel buttons. Details are on page 18.
TV/VCR has no power.• Connect the power plug to an AC (alternating current) outlet completely. Or, plug the car battery cord into
your vehicle’s cigarette lighter.
TV/VCR does not have a picture.• Adjust the antenna. Details are on pages six-seven.• Adjust the TV/VCR picture controls. Details are on page 21.• Select an active channel.
TV/VCR has poor sound or no sound.• Adjust the volume or press the MUTE button to restore the volume.
Tape playback is poor or tape is destroyed.• Adjust the tracking. Details are on page 37.• Use the Rental feature. Details are on page 32.• If moisture has accumulated in your TV/VCR, keep the power on for at least two hours, but do not try to play
a tape. Details are on page 38.
Remote control does not operate TV/VCR.• Aim the remote control directly at the TV/VCR’s remote sensor. Details are on pages five and 18.• Remove all obstacles between the remote control and the TV/VCR.• Inspect and replace the batteries in the remote control. Details are on page five.
Number buttons will not select channels above 69.• Enter channel numbers as a two-digit number. If you want to select channels 100 and above, press the +100
button, then the Number buttons for the last two digits. Details are on page eight.• If you are using an antenna and do not have Cable TV service, only channels 2-69 will be available. Details are on
pages eight and 10-11.
You cannot insert a tape into the TV/VCR.• Insert the tape window side up, with the record tab facing you.• Make sure a tape isn’t already in the TV/VCR by pressing the STOP/EJECT button on the TV/VCR.• Gently push on the center of the tape. Never force a tape into the TV/VCR.• If you have set a timer recording and the TV/VCR power is off, the TV/VCR will eject the tape if the record tab
is missing.
You cannot remove the tape from the TV/VCR.• Make sure the power plug is completely connected to an AC (alternating current) outlet. Or, make sure the
car battery cord is completely connected to your vehicle’s cigarette lighter.• If a timer recording is programmed, turn on the TV/VCR power, then eject the tape. Be sure to insert a tape
and turn off the TV/VCR power for the timer recording.• Unplug the TV/VCR power cord for five minutes. Then, plug in the power cord again, then press the POWER
button on the TV/VCR. If the tape does not eject, press the STOP/EJECT button on the TV/VCR three to fivetimes. If the tape still does not eject, you may need an authorized servicer to remove the tape.
TV/VCR ejects the tape when you try to start a recording.• Make sure the tape has a record tab. Details are on page five.
The cylinder rotates when tape playback is stopped.• To enable the quick play mechanism, the cylinder will rotate for about five minutes. This is normal. The quick
play mechanism switches the tape mechanism from Stop to Play in just one second.
Automatic clock setting won’t work.• Disconnect the car battery cord from the DC 13.2V jack. Instead, connect the AC power cord to the AC
120V jack on the TV/VCR and to an AC power outlet to supply standard electrical power. Details are on pagessix-seven.
• Make sure channels are set and you have connected an antenna or Cable TV signal. Details are on pages eightand 10.
MC09D1MG 3/22/02 1:16 PM Page 39
AUDIO In Jack: jack on the front of the TV/VCR which is used to recordaudio from another source.Automatic Channel Setup: process in which the TV/VCR memorizes allavailable channels. Then, when you push the CH(annel) ▲/▼ button, you onlyscan through channels you receive.Auxiliary (AUX): The channel to which you set your TV/VCR during dub-bing or when viewing material that is playing on another device that is con-nected to the TV/VCR (for example, a camcorder or VCR). The auxiliary (orline input) channel is always channel 00 (AUX).Bands: settings that allow you to tune channels.• Antenna – VHF (very high frequency; channels
2-13) and UHF (ultra high frequency; channels14-69).
• Cable – all standard channels can be received without a Cable Box.Brightness: adjusting increases or decreases the brightness of the color onthe screen.Color: adjusting pales or brightens the TV/VCR color.Dubbing: copying a tape using a VCR.HQ: high quality; a feature in the TV/VCR circuitry which provides enhancedpicture detail.Mode: a TV/VCR operation.OTR: One-Touch Recording; a timed recording that starts immediately andrecords for 30 minutes to eight hours, whichever you specify.Picture: adjusting increases or decreases the contrast of the picture on thescreen.Sharpness: adjusting softens or clarifies the picture on the screen.Tape Speeds: how fast the tape travels during playback or recording.• SP (standard play) – fastest tape speed (recording time for a T120 tape is
approximately two hours); best picture quality.• LP (long play) – average tape speed; playback only.• SLP (super long play) – slowest tape speed (recording time for a T120
tape is approximately six hours).Tint: adjusting changes the tints of the picture on the TV/VCR from purple togreen.VIDEO In Jack: jack on the front of the TV/VCR which is used to recordvideo from another source.
40 Glossary
MC09D1MG 3/22/02 1:16 PM Page 40
GeneralCRT: 9-inch in line gunTelevision system: NTSCVideo Heads: Two headsTape width: 1/2 inch (12.65 mm)Tape speed
As an ENERGY STAR® Partner, Magnavox has determined thatthis product meets the ENERGY STAR® guidelines for energyefficiency. ENERGY STAR® is a U.S. registered mark.
This owner’s manual is made of recycled paper.
The following items are supplied with your TV/VCR; theyare provided to help you use or set up your TV/VCR.
TIME SEARCHMUTE
RECORD
SPEED
RESET
08
9
7 56
4 23
1
PAUSE/STILL
+100
STOP F.FWD
PLAY
REW
VOL.
DISPLAY
MENU
POWER
SLEEP/WAKE UP
CH.
ALT.CH
Remote Control 4835 218 37336Two AA Batteries 4835 138 17012