83
FAX 560 ® OWNER’S MANUAL

T7BASE-US-FM5.5
FAX 560®OW
NER’
S MA
NUAL
T7BASE-US-FM5.5
If You Need to Call Customer Service
Please complete the following information for future reference:
Model: FAX560
Serial Number:*
Date of Purchase:
Place of Purchase:
* The serial number is on the underside of the unit. Retain this Quick-Start Manual with your sales receipt as a permanent record of your purchase, in the event of a theft, fire or warranty service.
Year 2000 Compliant
Brother is addressing the Year 2000 related issues for all Brother fax machines and multi-function centers. Our focus is to ensure that our bundled third party software will continue to properly process date/time data after January 1, 2000.
Brother fax machines and multi-function centers will function properly after January 1, 2000, provided that all non-Brother hardware, software and firmware used by our customers in connection or combination with Brother fax machines, and bundled software, accurately exchange date data with the Brother products.
Please continue to check our Web page for updates at http://www.brother.com. All remedies will be provided to individual customers via software patches through software download or from Brother Customer Service.
©1996-2000 Brother Industries, Ltd.

an get ther the lling.
ut
ne
om e.
Brother Numbers
Brother fax-back systemBrother Customer Service has installed an easy-to-use fax-back system, so you cinstant answers to common technical questions and product information for all Broproducts. This system is available 24 hours a day, 7 days a week. You can use system to send faxes to any fax machine, not just the one from which you are ca
If you can’t resolve difficulty with your fax machine using this manual, call our fax-back system, and follow the voice prompts to receive faxed instructions abousing the system, and an index of fax-back subjects.
The Brother fax-back system number (USA only) has been preprogrammed on OTouch key 1.
Frequently Asked Questions (FAQs)You can find more information about Brother products on the World Wide Web. Frproduct specification sheets to Frequently Asked Questions (FAQs), it is all therVisit us at:
http://www.brother.com
Brother Bulletin BoardBrother’s Bulletin Board Numbers are
For Customer Service
USA: 1-800-521-2846
From within Canada: 1-800-681-9838
USA: 1-888-298-3616
From within Canada: 1-514-685-2040
USA: 1-800-284-4329 (voice)1-908-575-8790 (fax)
From within Canada: 1-800-853-6660 (voice)1-514-685-4898 (fax)
From within Montreal: 1-514-685-6464 (voice)
i
T7BASE-US-FM5.5
B R O T H E R N U M B E R S

ost ,
ies
l
el
el
Ordering Accessories and Supplies
For the best quality results use only genuine Brother accessories, available at mBrother retailers. If you cannot find the accessory you need and you have a VisaMasterCard, Discover or American Express credit card, you can order accessordirectly from Brother.
USA: 1-888-879-3232 (voice)1-800-947-1445 (fax)
From within Canada: 1-800-668-2768 (voice)
DESCRIPTION ITEM
Thermal Print Cartridge PC401
2-PK Refill Ribbon Rolls PC402RF
Telephone Line Cord Tell the Brother Representative your Modenumber so you get the appropriate color.
Telephone Handset Tell the Brother Representative your Modnumber so you get the appropriate color.
Handset Curled Cord Tell the Brother Representative your Modnumber so you get the appropriate color.
Paper Wire Extension UF9869001
Output Paper Extension LE4129001
Paper Tray LE4126001
Owner’s Manual LE4131001
Surge Protection Device with Telephone Line Protection (2 outlets)
QPD 120
Surge Protection Device with TelephoneLine Protection (8 outlets)
FX 120
ii
T7BASE-US-FM5.5
O R D E R I N G A C C E S S O R I E S A N D S U P P L I E S

Notice – Disclaimer of Warranties(For USA and Canada)
BROTHER’S LICENSOR(S), AND THEIR DIRECTORS, OFFICERS, EMPLOYEES ORAGENTS (COLLECTIVELY BROTHER’S LICENSOR) MAKES NO WARRANTIES,EXPRESS OR IMPLIED, INCLUDING WITHOUT LIMITATION THE IMPLIED WARRANTIESOF MERCHANTABILITY AND FITNESS FOR A PARTICULAR PURPOSE, REGARDINGTHE SOFTWARE. BROTHER’S LICENSOR(S) DOES NOT WARRANT, GUARANTEE ORMAKE ANY REPRESENTATIONS REGARDING THE USE OR THE RESULTS OF THE USEOF THE SOFTWARE IN TERMS OF ITS CORRECTNESS, ACCURACY, RELIABILITY,CURRENTNESS OR OTHERWISE. THE ENTIRE RISK AS TO THE RESULTS ANDPERFORMANCE OF THE SOFTWARE IS ASSUMED BY YOU. THE EXCLUSION OFIMPLIED WARRANTIES IS NOT PERMITTED BY SOME STATES IN THE USA AND SOMEPROVINCES IN CANADA. THE ABOVE EXCLUSION MAY NOT APPLY TO YOU.IN NO EVENT WILL BROTHER’S LICENSOR(S) BE LIABLE TO YOU FOR ANYCONSEQUENTIAL, INCIDENTAL OR INDIRECT DAMAGES (INCLUDING DAMAGES FORLOSS OF BUSINESS PROFITS, BUSINESS INTERRUPTION, LOSS OF BUSINESSINFORMATION, AND THE LIKE) ARISING OUT OF THE USE OR INABILITY TO USE THESOFTWARE EVEN IF BROTHER’S LICENSOR HAS BEEN ADVISED OF THE POSSIBILITYOF SUCH DAMAGES. BECAUSE SOME STATES IN THE USA AND SOME PROVINCES INCANADA DO NOT ALLOW THE EXCLUSION OR LIMITATION OF LIABILITY FORCONSEQUENTIAL OR INCIDENTAL DAMAGES, THE ABOVE LIMITATIONS MAY NOTAPPLY TO YOU. IN ANY EVENT BROTHER’S LICENSOR’S LIABILITY TO YOU FORACTUAL DAMAGES FROM ANY CAUSE WHATSOEVER, AND REGARDLESS OF THEFORM OF THE ACTION (WHETHER IN CONTRACT, TORT (INCLUDING NEGLIGENCE),PRODUCT LIABILITY OR OTHERWISE), WILL BE LIMITED TO $50.
Compilation and Publication NoticeUnder the supervision of Brother Industries, Ltd., this manual has been compiledand published, covering the latest product descriptions and specifications.The contents of this manual and the specifications of this product are subject tochange without notice.Brother reserves the right to make changes without notice in the specifications andmaterials contained herein and shall not be responsible for any damages (includingconsequential) caused by reliance on the materials presented, including but notlimited to typographical and other errors relating to the publication.
TrademarksThe Brother logo is a registered trademark of Brother Industries, Ltd.Brother is a registered trademark of Brother Industries, Ltd.IBM, IBM PC, MWAVE and IBM Aptiva are registered trademarks of InternationalBusiness Machines Corporation.ScanSoft PaperPort is a registered trademark of ScanSoft, Inc.Microsoft and MS-DOS are registered trademarks of Microsoft Corporation.Windows and Windows NT are registered trademarks of Microsoft in the U.S. andother countries.All other terms and brand and product names mentioned in this manual areregistered trademarks of their respective companies.
iii
T7BASE-US-FM5.5
N O T I C E – D I S C L A I M E R O F W A R R A N T I E S

BROTHER ONE YEAR LIMITED WARRANTY and EXCHANGE SERVICE(For USA Only)
This warranty gives you certain rightsand you may also have other rights thatmay vary from state to state. This warranty is given only to the firstend-use purchaser of theaccompanying product (referred to inthis warranty as “his Product”).What is covered: Brother warrants toyou for the Warranty Period that thereare no defects in the materials,workmanship or Year 2000 complianceof this Product. The ìWarranty Period”is 90 days from the date you purchasedthis product. The ìWarranty Period” forconsumable items, such as Toner,Drums, Ribbons, etc. is 90 days fromthe date of purchase, or the rated life ofthe Consumable item, whichever isshorter.What is NOT covered: This warranty isVOID -- that is, this Product has nowarranty -- if: (1) you did not purchasethis Product from an authorized Brotherreseller within the United States, (2) thisProduct has been serviced, modified ortampered with by anyone other than anAuthorized Service Representative ofBrother, (3) the serial number has beenmodified, defaced or removed from thisProduct, (4) this Product has beenabused or damaged, (5) non BrotherÆ-brand or non Brother approved parts,supplies, power supplies or otheraccessories have been used with thisProduct, or (6) this Product has beentransported without the properpreparation and packaging.What to do if you think your Productis defective: Call our Customer Service Hotline at 1-800-284-4329, or if you suspect adefect in materials or workmanship inthis Product, you can report it to aBrother Authorized Service Center.During the Warranty Period, supplyBrother’s representative with a copy ofyour dated bill of sale showing that thisProduct was purchased within theUnited States. For the name of yourBrother Authorized Service Center, call1-800-521-2846. After contacting theBrother Authorized Service Center, youmay be required to deliver or send the
iv
T7BASE-US-FM5.5
F A X L I M I T E D W A R R A N T Y
Product properly packaged, freightprepaid, to the Authorized ServiceCenter together with a photocopy ofyour bill of sale.What Brother will do: Brother (or itsAuthorized Service Center) willevaluate your report of a possibledefect to determine whether a defectexists, and if it does exist, Brother (or itsAuthorized Service Center) will repair or(at Brother’s option) replace theProduct with a product that performsthe same functions and performs aswell as the original Product. Brotherreserves the right to supply refurbishedor remanufactured replacement partsprovided that the replacement partsconform to the manufacturer’sspecifications for new products. Therepaired or replacement product will bereturned to you at no cost.Exchange Service: When an exchange is authorized,Brother will exchange your non-workingproduct with a refurbished orremanufactured product that conformsto the manufacturer’s specifications fornew products. The refurbished orremanufactured Product you receivewill be covered by the balance of thelimited warranty period remaining onthe original Product, plus an additionalthirty (30) days. You will keep thereplacement Product that is sent to youand must return (or be billed up to thecost of a new product) your originalnon- working product, which shallbecome the property of Brother. Youmust call Brother Customer Service andif the representative cannot correct theproduct’s malfunction over thetelephone and you elect the exchangeservice, you must provide informationpertaining to this Product and you mustalso provide a valid major credit cardnumber. Your credit card will becharged up to the cost of a new Productif: (i) you do not return your originalProduct to Brother within five (5)business days; (ii) the malfunctions ofyour original Product are not covered bythe limited warranty; (iii) the properpackaging instructions are not followedand has caused damage to the product;

BROTHER ONE YEAR LIMITED WARRANTY and EXCHANGE SERVICE(For USA Only)
or (iv) the warranty period on youroriginal Product has expired or has notbeen sufficiently validated with a copyof the proof of purchase (bill of sale).The Brother Customer ServiceRepresentative will ship the exchangeProduct via next business day deliverycourier service, with return instructionsand prepaid return airbill. Follow thereturn instructions. You must return theoriginal Product in the same shippingcarton in which the exchanged Productwas received and include a copy ofproof of purchase (bill of sale). Retainyour original accessory items and acopy of the return airbill, signed by thecourier.Limitations:Repair or replacement as describedabove is your sole and exclusive (thatis, your only) remedy if this Product isdefective. Brother is not responsible fordamage to or loss of any equipment,media, programs or data related to theuse of this Product. Except for thatrepair or replacement, Brother shall notbe liable for any direct, indirect,incidental or consequential damages orspecific relief. Because some states donot allow the exclusion or limitation ofconsequential or incidental damages,the above limitation may not apply toyou.THIS WARRANTY IS GIVEN IN LIEUOF ALL OTHER WARRANTIES,WRITTEN OR ORAL, WHETHEREXPRESSED BY AFFIRMATION,PROMISE, DESCRIPTION,DRAWING, MODEL OR SAMPLE.ANY AND ALL WARRANTIES OTHERTHAN THIS ONE, WHETHEREXPRESS OR IMPLIED, INCLUDINGIMPLIED WARRANTIES OFMERCHANTABILITY AND FITNESSFOR A PARTICULAR PURPOSE, AREHEREBY DISCLAIMED.This Limited Warranty is the onlywarranty that Brother is giving for thisProduct. It is the final expression andthe exclusive and only statement ofBrother’s obligations to you. It replacesall other agreements and under-standings that you may have withBrother or its representatives.
T7BASE-US-FM5.5
F
This Limited Warranty (and Brother’sobligation to you) may not be changedin any way unless you and Brother signthe same piece of paper in which we (1)refer to this Product and your bill of saledate, (2) describe the change to thiswarranty and (3) agree to make thatchange.Product Support: Toll-free customerservice and technical support isavailable for hardware operationalassistance at 1-800-284-4329. At anytime, free technical support in the formof Frequently Asked Questions,troubleshooting tips and service centerlocator is available through our fax-backsystem at 1-800-521-2846 or Brother’sInternet Web Site (www.brother.com).Now you can visit us on-line (www.brothermall.com) , your completesource for genuine Brother Accessoriesand Supplies.Brother International Corporation100 Somerset CorporateBlvd.Bridgewater, New Jersey08807-0911Please record your model and serialnumbers and your date and location ofPurchase below for your records. Keepthis information with your proof ofpurchase (bill of sale) in case yourProduct is lost, stolen or requiresservice.Model # _______________________Serial #________________________Date of purchase: _______________Store where purchased:___________Location of store: ________________Important: We recommend that youkeep all original packing materials, inthe event that you ship this product.
vA X L I M I T E D W A R R A N T Y
T
BROTHER MULTIFUNCTION CENTER/FACSIMILE MACHINE LIMITED WARRANTY
(For Canada Only)Pursuant to this limited warranty of 1 year from the date of purchase for labour and parts,Brother International Corporation (Canada) Ltd. (“Brother”), or its Authorized ServiceCenters, will repair this MFC/Facsimile machine free of charge if defective in material orworkmanship. This Limited Warranty does not include cleaning, consumables(including, without limitation, print cartridges, print head, toner and drum) or damagecaused by accident, neglect, misuse or improper installation or operation, any damagecaused from service, maintenance, modifications, or tampering by anyone other than aBrother Authorized Service Representative, or from the use of supplies or consumableitems that are non-Brother products. Operation of the MFC/Facsimile machine in excessof the specifications or with the Serial Number or Rating Label removed shall be deemedabuse and all repairs thereafter shall be the sole liability of the end-user/purchaser. Inorder to obtain warranty service, the MFC/Facsimile machine must be delivered orshipped freight prepaid by the end user/purchaser to a “Brother” Authorized ServiceCenter, together with your Proof of Purchase in the form of a Sales Receipt.
For laser products: Failure to remove the Toner Cartridge (and Toner Drum Unit onapplicable models) during shipping will cause severe damage to the MFC/Facsimile andwill VOID the Warranty. (Refer to your Operation Manual for proper packaging.)
For ink-jet products: Do not remove the ink cartridges during shipping. Damage to yourprint head resulting from packing without the ink cartridges will VOID your warranty.(Refer to your Operation Manual for proper packaging.)
BROTHER DISCLAIMS ALL OTHER WARRANTIES EXPRESSED OR IMPLIEDINCLUDING, WITHOUT LIMITATION, ANY IMPLIED WARRANTIES OFMERCHANTABILITY OR FITNESS FOR A PARTICULAR PURPOSE, EXCEPT TOTHE EXTENT THAT ANY WARRANTIES IMPLIED BY LAW CANNOT BE VALIDLYWAIVED.
No oral or written information, advice or representation provided by Brother, itsAuthorized Service Centers, Distributors, Dealers, Agents or employees, shall createanother warranty or modify this warranty. This warranty states Brother’s entire liabilityand your exclusive remedy against Brother for any failure of the MFC/Facsimile machineto operate properly.
Neither Brother nor anyone else involved in the development, production, or delivery ofthis MFC/Facsimile machine shall be liable for any indirect, incidental, special,consequential, exemplary, or punitive damages, including lost profits, arising from theuse of or inability to use the product, even if advised by the end user/purchaser of thepossibility of such damages. Since some Provinces do not allow the above limitation ofliability, such limitation may not apply to you.
This Limited Warranty gives you specific legal rights and you may also have other rightswhich vary from Providence to Providence.
Warranty Service is available at Brother Authorized Service Centers throughoutCanada. For Technical Support or for the name and location of your nearestAuthorized Service Center call 1-800-853-6660. Within Montreal, please call 685-6464.Internet support: [email protected] or browse Brother’s Web Site: www.brother.com
Brother International Corporation (Canada) Ltd.1 Rue Hôtel de VilleDollard-Des-Ormeaux, QC H9B 3H6
®
We’re at your side.
7BASE-US-FM5.5
vi

-1
1-1-11-1. 1-2-2-3
-1
2-12-12-22-22-22-22-32-3
. 2-42-42-52-52-5-5
-6-7
-72-7
-82-82-9-92-9
Table of Contents
1 Introduction..................................................................................... 1Using This Manual .....................................................................
Finding Information............................................................. 1About Fax Machines ..................................................................
Fax Tones and Handshake..................................................ECM (Error Correction Mode)............................................ 1
FAX-560 Control Panel Overview............................................. 1
2 Location and Connections .............................................................. 2Caution .......................................................................................Choosing a Location...................................................................Assembly....................................................................................
Attach the paper wire extension ..........................................Attach the paper tray ...........................................................Attach the output paper support ..........................................Loading the Paper................................................................Acceptable Paper .................................................................
Connections...............................................................................Connecting the Machine......................................................Special Line Considerations ................................................
Roll Over Phone Lines....................................................Two-Line Phone System.................................................Converting Telephone Wall Outlets ............................... 2Installing Brother Machine, External Two-Line TAD, and
Two-Line Telephone .................................................... 2Multi-Line Connections (PBX) ........................................... 2
If you are installing the fax machine to work with a PBX: ............................................................................. 2
Custom Features on Your Phone Line.................................Connecting an External Telephone Answering Device
(TAD)................................................................................ 2Sequence .........................................................................Connections.....................................................................Outgoing Message (OGM) ............................................. 2
Connecting an External Telephone .....................................
vii
T7BASE-US-FM5.5

-1
3-13-1-1
3-2
4-1
. 4-14-14-1-2-24-2-24-34-3-34-44-4-54-54-54-5
. 5-1
5-15-15-25-25-35-3-45-4
. 5-45-5
5-555-55-5-6
3 On-Screen Programming................................................................ 3User-Friendly Programming.......................................................
Function Mode.....................................................................Alternating Displays............................................................ 3Function Selection Table.....................................................
4 Initial Setup......................................................................................Getting Started...........................................................................
Setting Date and Time .........................................................Choosing Station ID ............................................................
Setting Tone/Pulse Dialing Mode (For Canada Only).... 4Details for Entering Text................................................. 4Inserting spaces...............................................................Making corrections ......................................................... 4Repeating letters..............................................................Special characters and symbols.......................................
Setting Up Your Area Code (For USA Only) ..................... 4Setting Beeper Volume........................................................Choosing the Handset Volume............................................
Setting Volume Amplify................................................. 4Setting the Speaker Volume ................................................Setting the Ring Volume .....................................................Memory Storage ..................................................................
5 Setup Receive..................................................................................Basic Receiving Operations .......................................................
Select Answer Mode............................................................To select or change your Answer Mode .........................
Setting Ring Delay ..............................................................Setting F/T Ring Time.........................................................Easy Receive .......................................................................Printing a Reduced Incoming original................................. 5
Recommended Reductions..............................................Setting Paper Size...............................................................
Advanced Receiving Operations ................................................Operation from External or Extension Telephone...............
For FAX/TEL Mode Only .............................................. 5-Changing Remote Codes.................................................To change Remote Codes ...............................................
Printing a Fax in Memory.................................................... 5
viii
T7B
ASE-US-FM5.5

5-6
. 6-1
6-16-26-2-2
6-3. 6-36-36-4. 6-46-4
6-4-5
. 6-56-5
-6
7-17-17-27-37-37-4-4
7-47-57-57-67-67-6. 7-77-77-7
Polling..................................................................................
6 Setup Send ......................................................................................Automatic Document Feeder (ADF)..........................................
Manual Transmission ..........................................................Automatic Transmission......................................................Manual and Automatic Fax Redial...................................... 6Memory Transmission.........................................................
Basic Sending Operations .........................................................Contrast................................................................................Resolution............................................................................
Advanced Sending Operations ..................................................Overseas Mode ....................................................................Delayed FAX.......................................................................Setting Up for Polled Transmit............................................ 6Canceling a Scheduled Job.................................................Interrupting Delayed Fax and Polled Transmit Jobs ...........More Advanced Features
(Call Brother fax-back system) ......................................... 6
7 Auto Dial Numbers and Dialing Options...................................... 7-1Storing Numbers for Easy Dialing .............................................
Storing One Touch Dial Numbers.......................................Storing Speed Dial Numbers ...............................................Changing One Touch and Speed Dial Numbers..................Setting Up Groups for Broadcasting ...................................
Dialing Options ..........................................................................Manual Dialing.................................................................... 7One Touch Dialing ..............................................................Speed Dialing ......................................................................Dialing Access Codes and Credit Card Numbers................Search ..................................................................................Redial...................................................................................Broadcasting ........................................................................Pause...................................................................................Hold .....................................................................................Tone/Pulse (For Canada Only)............................................
ix
T7BASE-US-FM5.5

. 8-1
. 8-1-1-1
8-2-2-3-3-3-4-48-5-58-58-68-6
9-1
9-19-1
9-1
-1
0-10-1-2-2
1
11-1
1-11-2
1-2e-2-3
8 Telephone Services .........................................................................Custom Features........................................................................
Distinctive Ring................................................................... 8Registering the Distinctive Ring Pattern......................... 8
Caller ID ..............................................................................Caller ID Log .................................................................. 8Printing the Caller ID Log .............................................. 8Viewing the Caller ID Log.............................................. 8Returning a Call from the Log ........................................ 8Registering a Caller ID Number ..................................... 8
Call Waiting Caller ID......................................................... 8CallManage (For USA Only) .....................................................
Registration with CallManage............................................. 8Sending a Fax Using CallManage .......................................Placing a Telephone Call Using CallManage......................Customer Support ................................................................
9 Making Copies.................................................................................Copy Functions...........................................................................
Making a Single Copy .........................................................Copy Options: Single or Multiple Copies,
Reduce/Enlarge, Sort/Stack...............................................
10 Printing Reports ............................................................................ 10Fax Machine Settings and Activity .......................................... 1
To Print a Report ............................................................... 1Transmission Verification (Xmit) Report.......................... 10Activity Report Interval..................................................... 10
11 Important Information ................................................................. 11-Standard Telephone and FCC Notices .....................................
These notices are in effect on models sold and used in the United States only. .................................................... 1
International Energy Star Compliance Statement......... 1Industry Canada Compliance Statement
(For Canada Only) ...................................................... 1Federal Communications Commission Compliance Notic
(For USA Only) .......................................................... 11Important Safety Instructions........................................ 11
x
T7B
ASE-US-FM5.5

1
2-12-1
2-42-52-5-62-72-72-72-8
S-1
.I-1
-1
.R-1R-1
-2R-2R-2.R-3
-3-3R-3R-4-4
12 Troubleshooting and Routine Maintenance ............................... 12-Troubleshooting ....................................................................... 1
Error Messages .................................................................. 1If You Are Having Difficulty with Your Fax Machine..... 12-4
Printing or Receiving Faxes.......................................... 1Phone Line or Connections........................................... 1Sending Faxes ............................................................... 1Handling Incoming Calls .............................................. 12
Routine Maintenance................................................................ 1Cleaning the Scanner......................................................... 1Cleaning the Print Head..................................................... 1Replacing the Print Cartridge ............................................ 1
Specifications ...................................................................................
Index.................................................................................................
Remote Fax Options....................................................................... RSetting Up Fax Storage .............................................................
Programming Paging Number.............................................Programming a Fax Forwarding Number............................RTurning On Fax Storage ......................................................Changing Remote Access Code ..........................................
Using Remote Retrieval Aceess Code ......................................Calling for Messages.......................................................RRetrieving Memory Status List .......................................RRemote Retrieval Access Card .......................................Retrieving Fax Messages ................................................Changing Fax Forwarding Number ................................R
xi
T7BASE-US-FM5.5

een
g a
ill be x at s s of
us. send
1 Introduction
Using This Manual
Thank you for purchasing a Brother fax machine (FAX). This fax machine has bdesigned to be simple to use, with LCD screen prompts to guide you through functions. However, you can use your fax machine to its fullest potential by takinfew minutes to read this manual.
Finding Information All chapter headings and subheadings are listed in the Table of Contents. You wable to find information about a specific feature or function by checking the Indethe back of this manual. Also, throughout this manual, you’ll see special symbolalerting you to important information, cross-references, and warnings. Illustrationsome screen displays also help you choose the correct key-presses.
About Fax Machines
If you’re a first-time fax machine user, fax operation might seem a little mysterioYou’ll soon get used to the unusual fax tones on your phone line, and be able toand receive faxes easily.
Additionally, your fax machine has a Help Key. Press Copy/Help and then press Start to print a list of basic operational steps and functions.
1 - 1 I N T R O D U C T I O N
T7BASE-US-FM5.5

dial
e, ach er the a
plays y fax tinues
NG
the the shake hine
rity y d
.
our fax
Fax Tones and HandshakeWhen someone is sending a fax, the fax machine sends fax calling tones (CNGtones)—soft, intermittent beeps at 4-second intervals. You’ll hear them when youand press Start , and they continue for about 40 seconds after dialing. During that timthe sending machine must begin the “handshake” with the receiving machine. Etime you use automatic procedures to send a fax, you are sending CNG tones ovphone line. You’ll soon learn to listen for these soft beeps each time you answerphone on your fax line, so you know if you are receiving a fax message.
The receiving fax responds with fax receiving tones—loud, chirping sounds. A receiving fax chirps for about 40 seconds over the phone line, and the screen disRECEIVE. If your fax machine is set to the FAX ONLY Mode, it will answer evercall automatically with fax receiving tones. Even if the other party hangs up, yourmachine continues to send the “chirps” for about 40 seconds, and the screen conto display “RECEIVE.” To cancel the receiving mode, press Stop .
When your fax machine answers in FAX/TEL Mode, the fax machine listens for Ctones and then responds with receiving tones.
The fax “handshake” is the time in which the sending machine’s CNG tones andreceiving machines “chirps” overlap. This must be for at least 2 to 4 seconds, somachines can understand how each is sending and receiving the fax. The handcannot begin until the call is answered, and the CNG tones only last for about 40seconds after the number is dialed. Therefore, it’s important for the receiving macto answer the call in as few rings as possible.
ECM (Error Correction Mode)The Error Correction Mode (ECM) is a way for the fax machine to check the integof a fax transmission while it is in progress. ECM transmissions are possible onlbetween machines that both have the ECM feature. If they do, you may send anreceive fax messages that are continuously checked for their integrity.
Sufficient memory must be available in your fax machine for this feature to work
When you have an external telephone answering device (TAD) on your fax line, yTAD will determine the number of rings before the call is answered. Pay specialattention to the directions in the Installation chapter for connecting a TAD to your machine.
I N T R O D U C T I O N 1 - 2
T7BASE-US-FM5.5
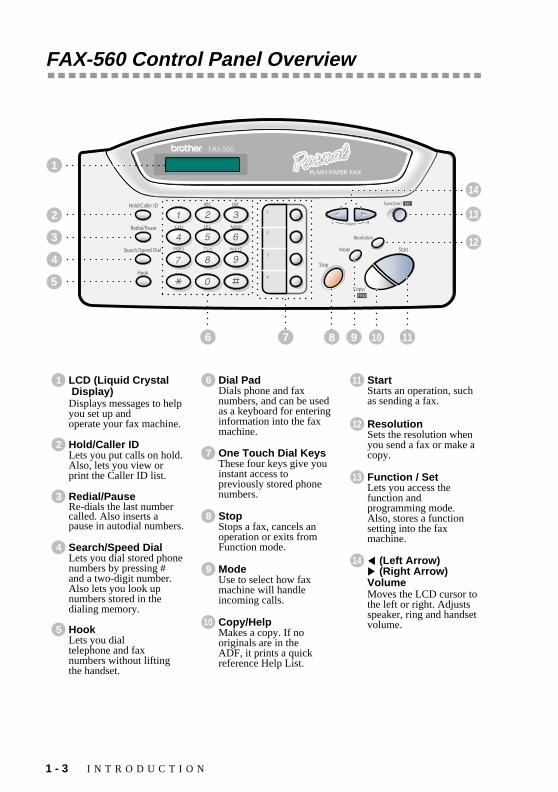
FAX-560 Control Panel Overview
6
3
4
5
2
1
1
7 10 118 9
12
LCD (Liquid Crystal Display)Displays messages to help you set up and operate your fax machine.
5 HookLets you dial telephone and fax numbers without lifting the handset.
4 Search/Speed DialLets you dial stored phone numbers by pressing # and a two-digit number. Also lets you look up numbers stored in the dialing memory.
3 Redial/PauseRe-dials the last number called. Also inserts a pause in autodial numbers.
2 Hold/Caller IDLets you put calls on hold. Also, lets you view or print the Caller ID list.
6 Dial PadDials phone and fax numbers, and can be used as a keyboard for entering information into the fax machine.
10 Copy/HelpMakes a copy. If no originals are in the ADF, it prints a quick reference Help List.
9 ModeUse to select how fax machine will handle incoming calls.
8 StopStops a fax, cancels an operation or exits from Function mode.
7 One Touch Dial KeysThese four keys give you instant access to previously stored phone numbers.
11 StartStarts an operation, such as sending a fax.
14 (Left Arrow) (Right Arrow) VolumeMoves the LCD cursor to the left or right. Adjusts speaker, ring and handset volume.
13 Function / SetLets you access the function and programming mode.Also, stores a function setting into the fax machine.
12 ResolutionSets the resolution when you send a fax or make a copy.
13
14
1 - 3 I N T R O D U C T I O N
T7BASE-US-FM5.5

ct the
ned
hone
here
that is a
o o
ine hat r the
2 Location and Connections
Caution
1 Never install telephone wiring during a lightning storm.
2 We recommend that this product be used with a surge protection device to proteproduct against lightning storms.
3 Never install a telephone jack in a wet location unless the jack is specifically desigfor a wet location.
4 Never touch telephone wires or terminals that are not insulated unless the telepline has been disconnected at the network interface.
5 Use caution when installing or modifying telephone lines.
6 Avoid using a telephone (other than a cordless type) during an electrical storm. Tmay be a remote risk of electric shock from lightning.
7 Do not use the telephone to report a gas leak in the vicinity of the leak.
8 For PLUGGABLE EQUIPMENT, the socket-outlet should be installed near the equipment and should be easily accessible.
Choosing a Location
Place your fax machine on a flat, stable surface, such as a desk. Select a placefree of vibration and shocks. Locate the fax machine near a telephone jack and standard, grounded power outlet.
Avoid placing your machine in a high-traffic area. Do not place near heaters, airconditioners, water, chemicals or refrigerators. Do not expose the fax machine tdirect sunlight, excessive heat, moisture or dust. Do not connect your machine telectrical outlets controlled by wall switches or automatic timers. Disruption of power can wipe out information in the unit’s memory. Do not connect your machto electrical outlets on the same circuit as large appliances or other equipment tmight disrupt the power supply. Avoid interference sources, such as speakers obase units of cordless phones.
L O C A T I O N A N D C O N N E C T I O N S 2 - 1
T7BASE-US-FM5.5

Assembly
Attach the paper wire extensionAttach the paper wire extension as shown in the illustration below.
Attach the paper trayAttach the paper tray. Make sure the wide pins on the paper tray inserted firmly into the pockets on the top edge of the machine.
Attach the output paper supportAttach the output paper support.
Paper WireExtension
Paper Tray
OutputPaper
Support
2 - 2 L O C A T I O N A N D C O N N E C T I O N S
T7BASE-US-FM5.5

either
ips,
Loading the PaperThe maximum number of 20 lb. sheets you can load depends on the paper size,50 Letter or 30 Legal.
1 Place paper in the paper tray.
Acceptable Paper
Temperature: 68˚F (20˚C)
Humidity 60%
Size: Letter and Legal
Weight: 17 lb. – 24 lb.
Thickness: .0031 inches – .0039 inches
Do not use curled, wrinkled, folded or ripped paper, or paper with staples, paper clpaste or tape attached. DO NOT use cardboard, newspaper or fabric.
Tap the stack of paper so theedges are even.
L O C A T I O N A N D C O N N E C T I O N S 2 - 3
T7BASE-US-FM5.5
e
from ower ove the
use a line,
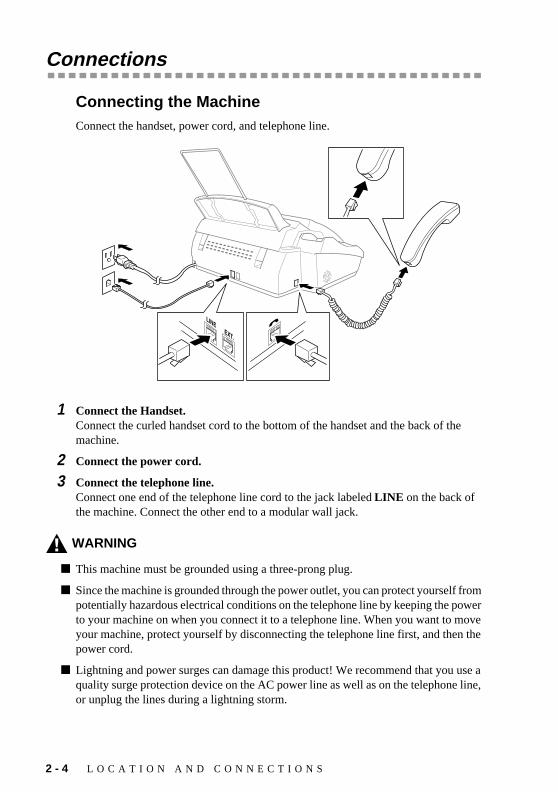
Connections
Connecting the MachineConnect the handset, power cord, and telephone line.
1 Connect the Handset.Connect the curled handset cord to the bottom of the handset and the back of thmachine.
2 Connect the power cord.
3 Connect the telephone line.Connect one end of the telephone line cord to the jack labeled LINE on the back of the machine. Connect the other end to a modular wall jack.
WARNING
■ This machine must be grounded using a three-prong plug.
■ Since the machine is grounded through the power outlet, you can protect yourselfpotentially hazardous electrical conditions on the telephone line by keeping the pto your machine on when you connect it to a telephone line. When you want to myour machine, protect yourself by disconnecting the telephone line first, and thenpower cord.
■ Lightning and power surges can damage this product! We recommend that you quality surge protection device on the AC power line as well as on the telephoneor unplug the lines during a lightning storm.
2 - 4 L O C A T I O N A N D C O N N E C T I O N S
T7BASE-US-FM5.5
pass or
the other x call ork
the bined
RJ14 k, red, cess
quire ne
slave
into ) and
of
Special Line Considerations
Roll Over Phone Lines
A roll over phone system is a group of two or more separate telephone lines thatincoming calls to each other if they are busy. The calls are usually passed down“rolled over” to the next available phone line in a preset order.
Your fax machine can work in a roll over system as long as it is the last number insequence, so the call cannot roll away. Do not put the fax machine on any of the numbers; when the other lines are busy and a second fax call is received, the fais transferred to a line that does not have a fax machine. Your fax machine will wbest on a dedicated line.
Two-Line Phone System
A two-line phone system is nothing more than two separate phone numbers on same wall outlet. The two phone numbers can be on separate jacks (RJ11) or cominto one jack (RJ14). Your machine must be plugged into an RJ11 jack. RJ11 andjacks may be equal in size and appearance and both may contain four wires (blacgreen, yellow). To test the type of jack, plug in a two-line phone and see if it can acboth lines. If it can, you must separate the line for your machine.
Converting Telephone Wall Outlets
There are three ways to convert to an RJ11 receptacle. The first two ways may reassistance from the telephone company. You can change the wall outlets from oRJ14 jack to two RJ11 jacks. Or, you can have an RJ11 wall outlet installed and or jump one of the phone numbers to it.
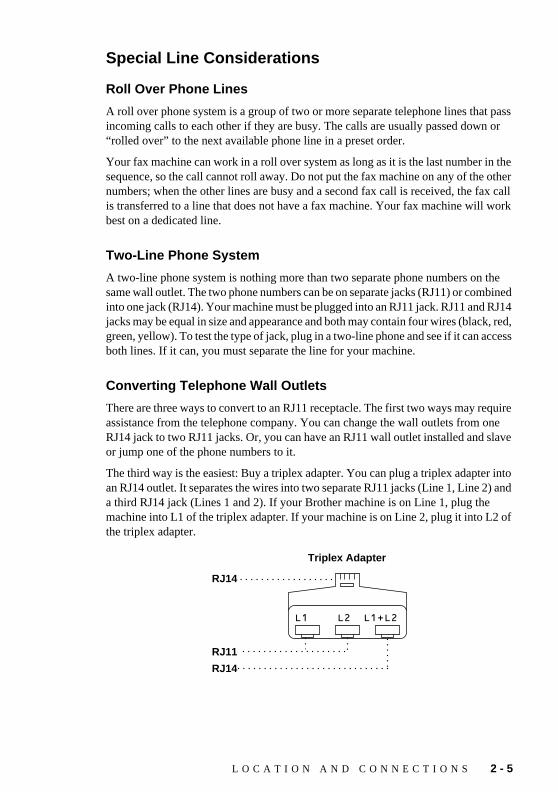
The third way is the easiest: Buy a triplex adapter. You can plug a triplex adapteran RJ14 outlet. It separates the wires into two separate RJ11 jacks (Line 1, Line 2a third RJ14 jack (Lines 1 and 2). If your Brother machine is on Line 1, plug the machine into L1 of the triplex adapter. If your machine is on Line 2, plug it into L2the triplex adapter.
RJ14
RJ11
Triplex Adapter
RJ14
L O C A T I O N A N D C O N N E C T I O N S 2 - 5
T7BASE-US-FM5.5

jack ine
will d two e
plex
the
ways
e
Installing Brother Machine, External Two-Line TAD, and Two-Line Telephone
When you are installing an external two-line telephone answering device (TAD) anda two-line telephone, your machine must be isolated on one line at both the walland at the TAD. The most common connection is to put the Brother machine on L2, which is our assumption in the following steps. The back of the two-line TAD must have two telephone jacks: one labeled L1 or L1/L2, and the other labeled L2. Youneed at least three telephone line cords, the one that came with your machine anfor your external two-line TAD. You will need a fourth line cord if you add a two-lintelephone.
1 Place the two-line TAD and two-line telephone next to your Brother machine.
2 Plug one end of the telephone line cord for your machine into the L2 jack of the triadapter. Plug the other end into the LINE jack on the back of the machine.
3 Plug one end of the first telephone line cord for your TAD into the L1 jack of thetriplex adapter. Plug the other end into the L1 or L1/L2 jack of the two-line TAD.
4 Plug one end of the second telephone line cord for your TAD into the L2 jack of two-line TAD. Plug the other end into the EXT. jack on the back of the machine.
You can keep two-line telephones on other wall outlets as always. There are two to add a two-line telephone to the fax machine’s wall outlet. You can plug the telephone line cord from the two-line telephone into the L1+L2 jack of the triplexadapter. Or, you can plug the two-line telephone into the TEL jack of the two-linTAD.
Triplex AdapterTwo Line Phone
Two Line External TAD Brother Machine
2 - 6 L O C A T I O N A N D C O N N E C T I O N S
T7BASE-US-FM5.5

we ask r the
ith a our
ed
ur ade.
Multi-Line Connections (PBX)Most offices use a central telephone system. While it is often relatively simple toconnect the fax machine to a key system or a PBX (Private Branch Exchange), suggest that you contact the company that installed your telephone system and them to connect the fax machine for you. It is advisable to have a separate line fofax machine. You can then leave the fax machine in FAX ONLY Mode to receivefaxes any time of day or night.
If the fax machine is to be connected to a multi-line system, ask your installer toconnect the unit to the last line on the system. This prevents the unit from beingactivated each time a telephone call is received. (See Easy Receive, page 5-3.)
If you are installing the fax machine to work with a PBX:
1 It is not guaranteed that the unit will operate correctly under all circumstances wPBX. Any cases of difficulty should be reported first to the company that handles yPBX.
2 If all incoming calls will be answered by a switchboard operator, it is recommendthat the Answer Mode be set to MANUAL. All incoming calls should initially be regarded as telephone calls.
3 The unit may be used with either pulse or tone dialing telephone service.
Custom Features on Your Phone LineTo learn how custom features may affect your faxing operations, please see Troubleshooting and Routine Maintenance, Chapter 12.
As with all fax units, this machine must be connected to a two wire system. If yoline has more than two wires, proper connection of the fax machine cannot be m
L O C A T I O N A N D C O N N E C T I O N S 2 - 7
T7BASE-US-FM5.5

an all fax e fax n
The ith .” ing
d
Connecting an External Telephone Answering Device (TAD)
Sequence
You might choose to connect an additional answering system. When you have external TAD on the same telephone line as the fax machine, the TAD answerscalls. The fax machine “listens” for fax calling (CNG) tones. If it hears them, the machine takes over the call and receives the fax. If it doesn’t hear CNG tones, thmachine lets the TAD continue playing your outgoing message so your caller caleave you a voice message.
The TAD must answer within four rings (the recommended setting is two rings). fax machine cannot hear CNG tones until the TAD has answered the call, and wfour rings there are only 8–10 seconds of CNG tones left for the fax “handshakeMake sure you carefully follow instructions in this manual for recording your outgomessage. We do not recommend using the toll saver feature on your external answering machine if it exceeds 4 rings.
Do not connect a TAD elsewhere on the same phone line—your fax machine anTAD will both try to control the line.
2 - 8 L O C A T I O N A N D C O N N E C T I O N S
T7BASE-US-FM5.5
k all
the
the
g
andle
r fax they
ing
e. evice)
n the
nd, witch
Connections
The external TAD must be plugged into the back of the fax machine, into the jaclabeled EXT. Your fax machine cannot work properly if you plug the TAD into a wjack.
1 Plug the telephone line cord from the wall jack into the back of the fax machine, injack labeled LINE.
2 Plug the telephone line cord from your TAD into the back of the fax machine, in jack labeled EXT. (Make sure this cord is connected to the TAD at the TAD’s telephone line jack (not to telephone set jack).)
3 Set your external TAD to four rings or less. (The fax machine’s Ring Delay settindoes not apply.)
4 Record the outgoing message (see below).
5 Set the TAD to answer calls.
6 Set the Answer Mode to TAD:ANSWER MACH.
Outgoing Message (OGM)
Timing is important in recording this message. The message sets up the ways to hboth manual and automatic fax reception.
1 Record 5 seconds of silence at the beginning of your message. (This allows youmachine time to listen for the fax CNG tones of automatic transmissions before stop.)
2 Limit your speaking to 20 seconds.
3 End your 20-second message by giving your Fax Receive Code for people sendmanual faxes. For example: “After the beep, leave a message or send a fax by pressing 5 1 and Start.”
Connecting an External TelephoneYour fax machine is equipped with a handset that you can use as a regular phonHowever, you can also connect a separate telephone (or telephone answering ddirectly to your fax machine.
Connect the modular plug on the telephone’s line cord to the jack labeled EXT. oback of the fax machine.
Whenever this phone (or TAD) is in use, the screen displays EXT. TEL IN USE, aif the fax machine handset is lifted, an alarm sounds. To disconnect the call and sto the fax machine, press Hook .
L O C A T I O N A N D C O N N E C T I O N S 2 - 9
T7BASE-US-FM5.5

ey. fax
reen ing
you option
n
the
rrect
w to ou, x, or
3 On-Screen Programming
User-Friendly Programming
We have designed your fax machine with on-screen programming and a Help kUser-friendly programming helps you take full advantage of all the functions yourmachine has to offer. (See Using This Manual, page 1-1.)
Since your fax programming is done on the LCD, we created step-by-step on-scprompts to help you program your fax machine. All you need to do is follow theprompts as they guide you through the function menu selections and programmoptions and settings.
Function ModeYou can access the function mode by pressing Function/Set . When you enter the function mode, your fax machine displays a list of main menu options from which can choose. These options appear one after the other on the display. Select anby pressing Function/Set when the option appears on the screen.
You can “scroll” more quickly through options by pressing . When the screedisplays your selection, press Function/Set . (Press to scroll backward if you passed your choice or to save key strokes. Both arrow keys show all options, inopposite order.)
Before you press Function/Set after entering information in a field using the dial pad, you can correct a mistake. Use to back up and then type over the incocharacters.
Alternating DisplaysWhen you see alternating displays, the LCD sometimes alternates between the currently selected option, and a help message giving brief instructions about hoproceed. The display you’ll probably see most often is shown below, showing ywhen you place an original in the ADF, that you can dial a number and send a fayou can make a copy.
When you finish a function, the screen displays ACCEPTED.If you want to exit the Function mode, press Stop .
FAX: NO. & START
COPY: PRESS COPY
3 - 1 O N - S C R E E N P R O G R A M M I N G
T7BASE-US-FM5.5

you ax
Function Selection TableIf you have a basic understanding of how to program your fax machine, you canperform most of the programming settings without the Owner’s Manual. To help understand the function selections, options, and settings that are found in your fprograms, use the Function Selection Table below.
1. INITIAL SETUP
Function Description Factory Set More Info
1. DATE/TIME Enter date and time for LCD display and to print on transmissions.
— 4-1
2. STATION ID Program name, fax number and telephone number to appear on each transmitted page.
— 4-1
3. BEEPER Adjust volume level of beeper. LOW 4-4
4. VOLUME AMPLIFY For the hearing-impaired, you can set the volume to the VOL AMPLIFY:ON setting on a permanent or temporary basis.
OFF 4-5
5. TONE/PULSE(For Canada Only)
Selects dialing mode. TONE 4-2
6. LOCAL LANGUAGE(For Canada Only)
Allows you to change the LCD Language to French.
ENGLISH See French manual
2. SETUP RECEIVE
Function Description Factory Set More Info
1. RING DELAY Number of rings before fax machine answers in FAX/TEL or FAX mode.
04 5-2
2. F/T RING TIME Sets the time for “double ring” in FAX/TEL mode.
20 5-3
3. EASY RECEIVE Receive fax messages without pressing the Start key.
ON 5-3
4. REMOTE CODE Enter code to activate or deactivate machine from a remote location.
ON ( 51, #51)
5-5
5. REDUCTION Reduces size of image. AUTO 5-4
6. PAPER Selects size of paper for fax receiving.
LETTER 5-4
7. POLLING RX Sets up your fax machine to poll another fax machine.
OFF 5-6
O N - S C R E E N P R O G R A M M I N G 3 - 2
T7BASE-US-FM5.5
3. SETUP SEND
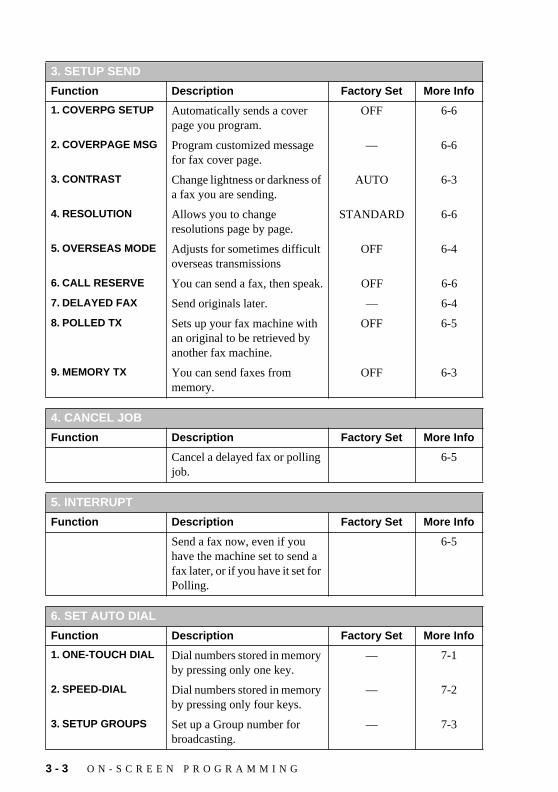
Function Description Factory Set More Info
1. COVERPG SETUP Automatically sends a cover page you program.
OFF 6-6
2. COVERPAGE MSG Program customized message for fax cover page.
— 6-6
3. CONTRAST Change lightness or darkness of a fax you are sending.
AUTO 6-3
4. RESOLUTION Allows you to change resolutions page by page.
STANDARD 6-6
5. OVERSEAS MODE Adjusts for sometimes difficult overseas transmissions
OFF 6-4
6. CALL RESERVE You can send a fax, then speak. OFF 6-6
7. DELAYED FAX Send originals later. — 6-4
8. POLLED TX Sets up your fax machine with an original to be retrieved by another fax machine.
OFF 6-5
9. MEMORY TX You can send faxes from memory.
OFF 6-3
4. CANCEL JOB
Function Description Factory Set More Info
Cancel a delayed fax or polling job.
6-5
5. INTERRUPT
Function Description Factory Set More Info
Send a fax now, even if you have the machine set to send a fax later, or if you have it set for Polling.
6-5
6. SET AUTO DIAL
Function Description Factory Set More Info
1. ONE-TOUCH DIAL Dial numbers stored in memory by pressing only one key.
— 7-1
2. SPEED-DIAL Dial numbers stored in memory by pressing only four keys.
— 7-2
3. SETUP GROUPS Set up a Group number for broadcasting.
— 7-3
3 - 3 O N - S C R E E N P R O G R A M M I N G
T7BASE-US-FM5.5
7. PRINT REPORTS
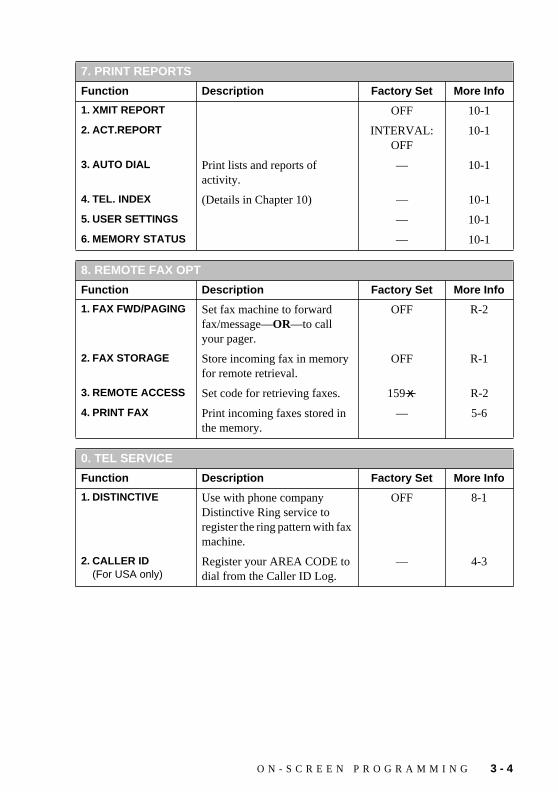
Function Description Factory Set More Info
1. XMIT REPORT OFF 10-1
2. ACT.REPORT INTERVAL: OFF
10-1
3. AUTO DIAL Print lists and reports of activity.
— 10-1
4. TEL. INDEX (Details in Chapter 10) — 10-1
5. USER SETTINGS — 10-1
6. MEMORY STATUS — 10-1
8. REMOTE FAX OPT
Function Description Factory Set More Info
1. FAX FWD/PAGING Set fax machine to forward fax/message––OR––to call your pager.
OFF R-2
2. FAX STORAGE Store incoming fax in memory for remote retrieval.
OFF R-1
3. REMOTE ACCESS Set code for retrieving faxes. 159 R-2
4. PRINT FAX Print incoming faxes stored in the memory.
— 5-6
0. TEL SERVICE
Function Description Factory Set More Info
1. DISTINCTIVE Use with phone company Distinctive Ring service to register the ring pattern with fax machine.
OFF 8-1
2. CALLER ID(For USA only)
Register your AREA CODE to dial from the Caller ID Log.
— 4-3
O N - S C R E E N P R O G R A M M I N G 3 - 4
T7BASE-US-FM5.5
he
.
tion
ll fax
4 Initial Setup
Getting Started
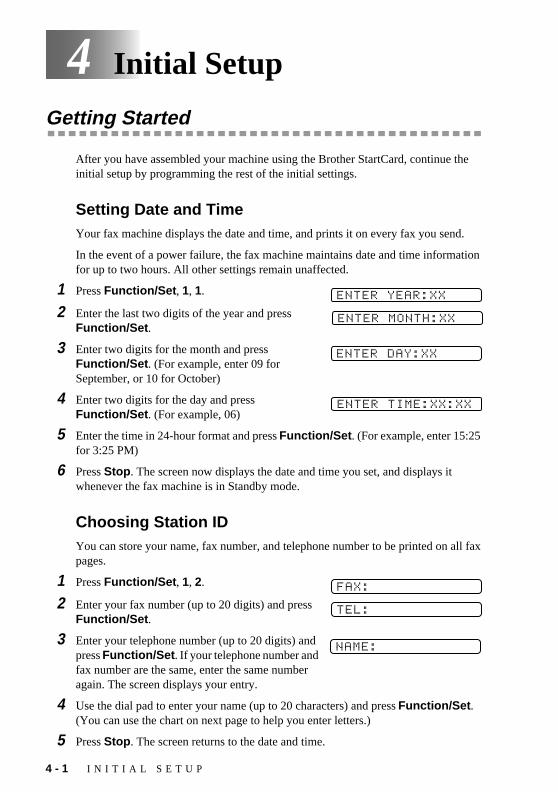
After you have assembled your machine using the Brother StartCard, continue tinitial setup by programming the rest of the initial settings.
Setting Date and TimeYour fax machine displays the date and time, and prints it on every fax you send
In the event of a power failure, the fax machine maintains date and time informafor up to two hours. All other settings remain unaffected.
1 Press Function/Set , 1, 1.
2 Enter the last two digits of the year and press Function/Set .
3 Enter two digits for the month and press Function/Set . (For example, enter 09 for September, or 10 for October)
4 Enter two digits for the day and press Function/Set . (For example, 06)
5 Enter the time in 24-hour format and press Function/Set . (For example, enter 15:25 for 3:25 PM)
6 Press Stop . The screen now displays the date and time you set, and displays it whenever the fax machine is in Standby mode.
Choosing Station IDYou can store your name, fax number, and telephone number to be printed on apages.
1 Press Function/Set , 1, 2.
2 Enter your fax number (up to 20 digits) and press Function/Set .
3 Enter your telephone number (up to 20 digits) and press Function/Set . If your telephone number and fax number are the same, enter the same number again. The screen displays your entry.
4 Use the dial pad to enter your name (up to 20 characters) and press Function/Set . (You can use the chart on next page to help you enter letters.)
5 Press Stop . The screen returns to the date and time.
ENTER YEAR:XX
ENTER MONTH:XX
ENTER DAY:XX
ENTER TIME:XX:XX
FAX:
TEL:
NAME:
4 - 1 I N I T I A L S E T U P
T7BASE-US-FM5.5

vice.
enter nted used
, you
rsor and
Setting Tone/Pulse Dialing Mode (For Canada Only)
Your fax machine comes set to accommodate tone (multi-frequency) dialing serIf you have pulse (rotary) dialing service, you need to change the dialing mode.
1 Press Function/Set , 1, 5.
2 Press or to select TONE or PULSE and press Function/Set .
3 Press Stop to exit.
Details for Entering Text
When you are setting certain functions, such as the Station ID, you may need to text into the fax machine. Most keys on the dial pad have three or four letters priabove them. The keys for 0, # and don’t have printed letters because they arefor special characters or operations.
By pressing the appropriate number on the dial pad the correct number of timescan access the character you want.
Inserting spaces
If you want to enter a blank space, press twice.
Making corrections
If you entered a letter incorrectly and want to change it, press to move the cuafter the last correct letter. Then press Stop ; the letters above and to the right of thecursor are deleted. Re-enter the correct text and/or digits. You can also back uptype over incorrect letters.
Press Key one time two times three times four times
2 A B C 2
3 D E F 3
4 G H I 4
5 J K L 5
6 M N O 6
7 P Q R S
8 T U V 8
9 W X Y Z
DIALING:PULSE?
DIALING:TONE?
I N I T I A L S E T U P 4 - 2
T7BASE-US-FM5.5

cter,
ver
acters.ake
Repeating letters
If you need to enter a character assigned to the same key as the previous charapress to move the cursor to the right.
Special characters and symbols
Setting Up Your Area Code (For USA Only)You must set up your area code in Caller ID.
1 Press Function/Set , 0, 2.
2 Use the dial pad to enter your area code and press Function/Set .
3 Press Stop to exit.
Press repeatedly for (space) ! “ # $ % & ’ ( ) * + , - . /
Press # repeatedly for : ; < = > ? @ [ ] ^ _
Press Ø repeatedly for É À È Ê Î Ç Ë Ö 0
■ The telephone number you enter is used only for Call Back Message and CoPage features.
■ If you do not enter a fax number, no additional information can be entered.■ To enter a space, press once between numbers and twice between char■ If your Station ID has already been programmed, the screen prompts “1” to m
a change, or “2” to exit without changing.
NOTICE
The Telephone Consumer Protection Act of 1991 makes it unlawful for any person to use a computer or electronic device to send any message via a telephone fax machine unless such messages clearly contain, in a margin at the top or bottom of each transmitted page, or on the first page of the transmission, the date and time it is sent and an identification of the business or other entity or other individual sending the message and the telephone number of the sending machines or such business, other entity or individual.
In order to program this information into your fax machine, you should complete the steps described on page 4-1.
AREA CODE:000
AREA CODE:908
4 - 3 I N I T I A L S E T U P
T7BASE-US-FM5.5

ey or
Y
ing a ume. ain.
ume will
d. t the
lay next
Setting Beeper VolumeYou can set the beeper to LOW, HIGH or OFF. The default setting is LOW . When the beeper is set to LOW or HIGH, the fax machine beeps every time you press a kmake an error, and at the end of fax sending or receiving.
1 Press Function/Set , 1, 3.
2 Press or to select your setting and press Function/Set .
3 Press Stop to exit.
Choosing the Handset VolumeBefore you begin to use the fax machine, you must decide if you need to set thehandset volume to AMPLIFY:ON for a user who is hearing-impaired. The AMPLIFvolume level complies with FCC standards.
VOLUME AMPLIFY: OFF
This default setting is appropriate if none of the users are hearing-impaired. Durconversation, users can press or on the control panel to adjust the volWhen the handset is replaced, the handset volume remain until you change it ag
VOLUME AMPLIFY: ON–TEMPORARY
This setting is appropriate if some of the users are hearing-impaired. During a conversation, users can press or on the control panel to adjust the volto LOW, HIGH or AMPLIFY. When the handset is replaced, the handset volume returns to the default setting of LOW.
VOL AMPLIFY:ON–PERMANENT
Choose VOL AMPLIFY:ON–PERMANENT if all of the users are hearing-impaireDuring a conversation, users can press or on the control panel to adjusvolume to LOW, HIGH or AMPLIFY. When the handset is replaced, the handsetvolume returns to the default setting of AMPLIFY.
WARNING
It is important that you do not choose PERMANENT unless all users are hearing-impaired. Otherwise, the default setting of AMPLIFY may damage the hearing of some users.
When you press or on the control panel to adjust the volume, the dispshows the setting you are choosing. Each key press changes the volume to the setting.
I N I T I A L S E T U P 4 - 4
T7BASE-US-FM5.5
teps:
are g will
ring
ine are g will
E,
u
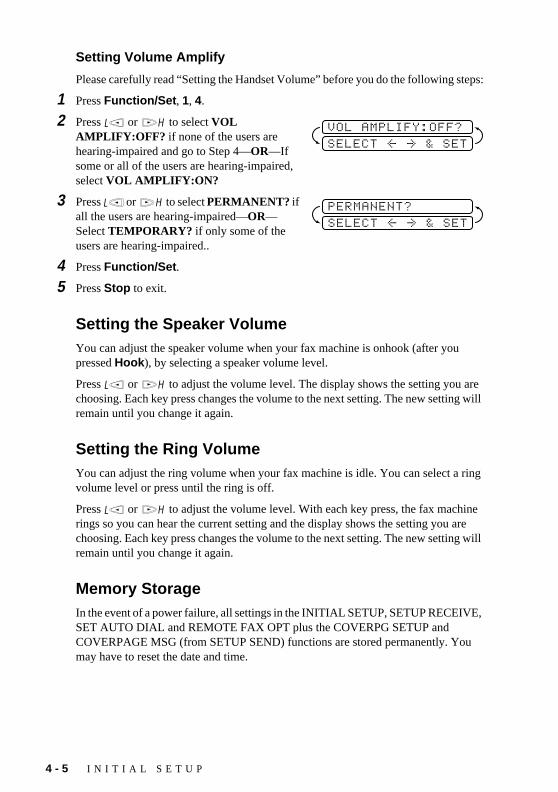
Setting Volume Amplify
Please carefully read “Setting the Handset Volume” before you do the following s
1 Press Function/Set , 1, 4.
2 Press or to select VOL AMPLIFY:OFF? if none of the users are hearing-impaired and go to Step 4—OR—If some or all of the users are hearing-impaired, select VOL AMPLIFY:ON?
3 Press or to select PERMANENT? if all the users are hearing-impaired—OR—Select TEMPORARY? if only some of the users are hearing-impaired..
4 Press Function/Set .
5 Press Stop to exit.
Setting the Speaker VolumeYou can adjust the speaker volume when your fax machine is onhook (after youpressed Hook ), by selecting a speaker volume level.
Press or to adjust the volume level. The display shows the setting youchoosing. Each key press changes the volume to the next setting. The new settinremain until you change it again.
Setting the Ring VolumeYou can adjust the ring volume when your fax machine is idle. You can select avolume level or press until the ring is off.
Press or to adjust the volume level. With each key press, the fax machrings so you can hear the current setting and the display shows the setting you choosing. Each key press changes the volume to the next setting. The new settinremain until you change it again.
Memory StorageIn the event of a power failure, all settings in the INITIAL SETUP, SETUP RECEIVSET AUTO DIAL and REMOTE FAX OPT plus the COVERPG SETUP and COVERPAGE MSG (from SETUP SEND) functions are stored permanently. Yomay have to reset the date and time.
SELECT <- -> & SET
VOL AMPLIFY:OFF?
SELECT <- -> & SET
PERMANENT?
4 - 5 I N I T I A L S E T U P
T7BASE-US-FM5.5

ing.
u
, it
lect
hine,
ine. call. ints
; it e
5 Setup Receive
Basic Receiving Operations
Select Answer ModeMANUAL —You must answer all calls yourself. If you hear fax tones, press Start to begin receiving the fax, then hang up. You can use this mode with Distinctive Ring(See Distinctive Ring, page 8-1.)
FAX ONLY —The fax machine automatically answers every call as a fax call. Yocannot receive a voice call, but you can dial out and make a voice call.
FAX/TEL —The fax machine automatically answers every call. If the call is a faxprints the fax. If the call is not a fax, it signals you with a double ring (ring-ring), different from the phone company ringing, to alert you to pick up the call. If you sethis setting, you’ll need to set the Ring Delay and F/T Ring Time features (on thefollowing pages). If you have extension phones on the same line as the fax macset Ring Delay to 4. (See For FAX/TEL Mode Only, page 5-5.)
TAD—This is the only setting in which you can use an external answering machYour telephone answering device is connected to your FAX, and answers every Once the TAD answers, the FAX listens for fax tones. If it detects fax tones, it prthe fax.
The TAD setting works only with an external telephone answering device (TAD)does not work with telephone company voice mail. Ring Delay and F/T Ring Timdo not work in this setting.
09/06 15:25 FAX
Current Answer Mode
S E T U P R E C E I V E 5 - 1
T7BASE-US-FM5.5

en
fore keep
e
the
To select or change your Answer Mode
1 Press Mode . The screen displays your current selection.
2 Continue to press Mode until your new selection appears. After 2 seconds, the screreturns to the date and time display, along with your new Answer Mode setting.
Setting Ring DelayThe Ring Delay setting determines the number of times the fax machine rings beit answers. If you have extension phones on the same line as the fax machine, the Ring Delay default setting of 4. (See Easy Receive, page 5-3 and Operation from External or Extension Telephone, page 5-5 and For FAX/TEL Mode Only, page 5-5.)
1 Press Function/Set , 2, 1.
2 Press or to select how many times the line rings before the fax machinanswers (00 – 04) and press Function/Set . If you select 00, the line doesn’t ring atall.
3 Press Stop to exit.
If you’re changing Answer Mode while in another operation, the screen returns tocurrent operation display.
FAX/TEL
FAX ONLY
TAD:ANSWER MACH.
MANUAL
5 - 2 S E T U P R E C E I V E
T7BASE-US-FM5.5

ing nds; n
on
x
u see n our
cting ine. g
a eive
for
Setting F/T Ring TimeYou need to determine how long the fax machine will notify you with its special double ring when you have a voice call. This ringing happens after the initial ringfrom the phone company. Only the fax machine rings, for 20, 30, 40 or 70 secono other phones on the same line ring the special double ring. However, you caanswer the call on any phone on the same line as the fax machine.
1 Press Function/Set , 2, 2.
2 Press or to select how long the fax machine will ring to alert you that you have a voice call and press Function/Set .
3 Press Stop to exit.
Now, when a call comes in and the machine is set to FAX/TEL Mode, all phonesthis line will ring the number of times you selected in Ring Delay.
You can let the fax machine pick up and detect if it’s a fax or voice call. If it’s a facall, the machine prints the fax. If it’s a voice call, the machine signals you with adouble ring for the length of time you selected in F/T Ring Time.
Easy ReceiveWhen you use this feature, you don’t have to press Start when you answer a fax call and hear calling beeps. Just hold the handset and wait a few seconds. When yoRECEIVE on the fax screen or when you hear “chirps” through the handset of aextension phone connected to another wall jack, just replace the handset, and ymachine does the rest. Selecting ON allows the fax machine to receive fax calls automatically, even if you lift the handset of an extension or external phone. SeleSEMI lets the machine receive the call only if you’ve answered it at the fax machSelecting OFF means you’ll have to activate the fax machine yourself, by pressinStart or by pressing 5 1 if you are not at your machine. (See Operation from External or Extension Telephone and For FAX/TEL Mode Only, page 5-5.)
If you’ve set the feature to ON, but your fax machine doesn’t automatically connectfax call when you lift an external or extension phone handset, press the Fax Reccode 5 1. At the fax machine, lift the handset and press Start .
1 Press Function/Set , 2, 3.
2 Press or to select ON, SEMI or OFF and press Function/Set .
3 Press Stop to exit.
Even if the caller hangs up during the double ringing, the fax machine continuesthe set time.
RING TIME:20 SEC
S E T U P R E C E I V E 5 - 3
T7BASE-US-FM5.5

less our
%)
hen to ing er in
Printing a Reduced Incoming originalYou can always reduce the size of an incoming fax to a fixed percentage, regardof the size of the paper (up to legal) in your fax machine. If you choose AUTO, ymachine chooses the level of reduction for you.
1 Press Function/Set , 2, 5.
2 Press or to select the reduction ratio you want (AUTO, 93%, 87% or 75and press Function/Set . Choose 100% if you don't want a reduction.
3 Press Stop to exit.
Recommended Reductions
If your paper is letter size (8.5" x 11"), and the incoming fax is letter size, select 93%A4, select 87%legal size, select 75%.
If your paper is A4 (8.2" x 11.6"), and the incoming fax is letter size, select 100%A4, select 93%
If your paper is legal size (8.5" x 14"), and the incoming fax isletter size, select 100%A4, select 100%legal size, select 93%.
Setting Paper SizeYou can use three sizes of paper for printing your faxes—letter, legal and A4. Wyou change the kind of paper you have loaded in the fax machine, you will needchange the setting for paper size, so your machine will know how to fit the incomfax on the page. You can also select the level of page reduction to fit on the papyour machine.
1 Press Function/Set , 2, 6.
2 Press or to select LETTER, LEGAL or A4 and press Function/Set .
3 Press 1 if you want to change the reduction setting—OR—Press 2 to go to Step 5.
4 Press or to select AUTO , 100%, 93%, 87% or 75% and press Function/Set .
5 Press Stop to exit.
5.REDUCTION
6.PAPER
1.YES 2.NO
CHANGE REDUCTION
5 - 4 S E T U P R E C E I V E
T7BASE-US-FM5.5

XT. hen
e
e the
the
)
e
g ne
ceive
Advanced Receiving Operations
Operation from External or Extension TelephoneIf you answer a fax call on an extension phone or on an external phone in the Ejack, you can make your fax machine take over by using the Fax Receive Code. Wyou press the Fax Receive Code 5 1, the fax machine starts to receive a fax. (SeEasy Receive, page 5-3.)
If the fax machine answers a voice call and double-rings for you to take over, usTelephone Answer Code # 5 1 to take the call at an extension phone. (See Setting F/T Ring Time, page 5-3.)
If you answer a call, and no one is on the line, assume you’re receiving a fax. Atfax machine phone, press Start , then hang up. At an extension phone, press 5 1, wait for fax receiving tones (chirps), then hang up. At an external phone, press
5 1 and wait for the phone to be disconnected (the screen displays RECEIVEbefore you hang up. (Your caller will have to press Start to send the fax.)
For FAX/TEL Mode Only
When the fax machine is in FAX/TEL mode, it will use the F/T Ring Time (doublringing) to alert you to a voice call. If you’re at the fax machine, you can lift the handset to answer.
If you’re at an extension phone, you’ll need to lift the handset during the F/T RinTime and press # 5 1 between the double rings. If no one is on the line, or if someowants to send you a fax, send the call back to the fax machine by pressing 5 1.
Changing Remote Codes
Remote Codes might not work with some telephone systems. The preset Fax ReCode is 5 1. The preset Telephone Answer Code is # 5 1.
To change Remote Codes
1 Press Function/Set , 2, 4.
2 Press or to select ON (or OFF) and press Function/Set .
3 If you want to, enter a new Fax Receive Code, then press Function/Set .
4 If you want to, enter a new Telephone Answer Code, then press Function/Set .
5 Press Stop to exit.
If you are always disconnected when accessing your external TAD remotely, trychanging the Fax Receive Code from 5 1 to # # # and the Telephone Answer Codefrom # 5 1 to 9 9 9.
REMOTE ACT.:ON?
FAX RECEIVE:*51
TEL ANSWER:#51
S E T U P R E C E I V E 5 - 5
T7BASE-US-FM5.5
A),
our ne. l; if
Printing a Fax in MemoryIf you have Fax Storage ON for remote retrieval, you can still print a fax in the memory when you are at your machine:
1 Press Function/Set , 8, 4.
2 Press Start .
3 Press Stop .(See Turning On Fax Storage, page R-2.)
Polling
For details about the Polling function, our fax-back system 1-800-521-2846 (US1-800-681-9838 (From within Canada) and request Document #: 20918.
Polling is the process of retrieving faxes from another fax machine. You can use yfax machine to “poll” other machines, or you can have someone poll your machiAll parties involved in polling need to set up their fax machines to accommodatepolling. When someone polls your machine to receive a fax, they pay for the calyou poll someone’s fax machine to receive a fax, you pay for the call. (See Canceling a Scheduled Job, page 6-5.)
Some fax machines do not respond to the polling function.
5 - 6 S E T U P R E C E I V E
T7BASE-US-FM5.5

. Your paper
ne g the r
er
e
6 Setup Send
Automatic Document Feeder (ADF)
■ originals must be between 5.8 and 8.5 inches wide, and 5.9 and 23.7 inches longfax machine can only scan an image 8.2 inches wide, regardless of how wide the is.
■ Make sure you place the original face down, top edge first.
■ Adjust the paper guides to fit the width of your original.
■ The automatic document feeder (ADF) can hold up to 10 pages, feeding each oindividually through the fax machine. Use standard (17 lb–24 lb) paper when usinADF; if you’re using heavier paper, feed each sheet individually to prevent papejams.
■ Make sure originals written with ink are completely dry.
DO NOT use curled, wrinkled, folded or ripped paper, or paper with staples, papclips, paste or tape attached. DO NOT use cardboard, newspaper or fabric.
You must press Resolution (before you send the fax) to select the resolution for thtype of original you’re sending. (See Resolution, page 6-4.)
Paper Guides
S E T U P S E N D 6 - 1
T7BASE-US-FM5.5
efore
d, or
e
l
Manual TransmissionManual transmission lets you hear the dial tone, ringing and fax receiving tones bsending the fax.
1 Place the original face down in the ADF.
2 Pick up the handset and listen for a dial tone—OR—press Hook and listen for a dial tone.
3 Enter the fax number you want to call. (You can enter the digits using the dial payou can enter a One Touch or Speed Dial number or you can call using Search/Speed Dial .) (See One Touch Dialing, page 7-4 and Search, page 7-6.)
4 When you hear the fax tone, press Start .
5 If you’re using the handset, hang up.
Automatic TransmissionThis is the easiest way to send a fax. IMPORTANT: Do not pick up the handset, or press Hook .
1 Place the original face down in the ADF.
2 Enter the fax number using One Touch, Speed Dial, Search or the dial pad. (SeOne Touch Dialing, Speed Dialing and Search, page 7-4 to 7-6.)
3 Press Start .
Manual and Automatic Fax RedialIf you’re sending a fax manually and the line is busy, press Redial/Pause to retry the number.
If you’re sending a fax automatically and the line is busy, the fax machine will rediaautomatically up to three times at 5 minute intervals.
6 - 2 S E T U P S E N D
T7BASE-US-FM5.5
on as
nu
ery
ss n a
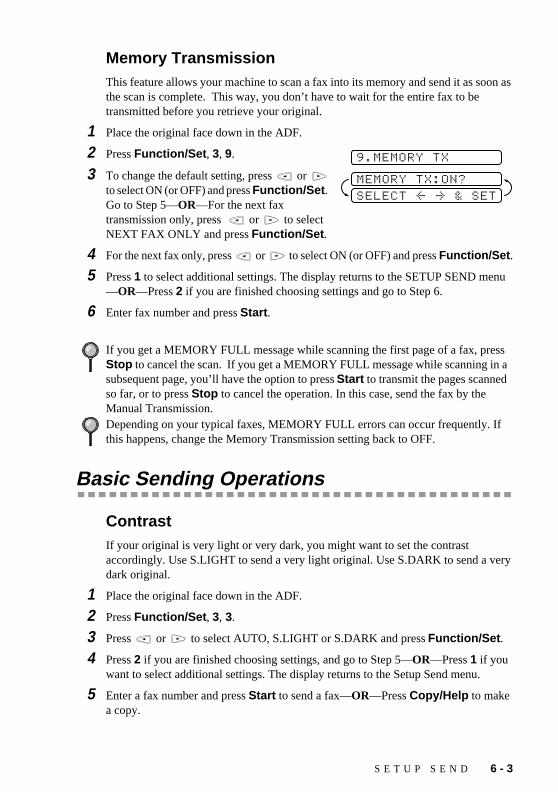
Memory TransmissionThis feature allows your machine to scan a fax into its memory and send it as sothe scan is complete. This way, you don’t have to wait for the entire fax to be transmitted before you retrieve your original.
1 Place the original face down in the ADF.
2 Press Function/Set , 3, 9.
3 To change the default setting, press or to select ON (or OFF) and press Function/Set . Go to Step 5—OR—For the next fax transmission only, press or to select NEXT FAX ONLY and press Function/Set .
4 For the next fax only, press or to select ON (or OFF) and press Function/Set .
5 Press 1 to select additional settings. The display returns to the SETUP SEND me—OR—Press 2 if you are finished choosing settings and go to Step 6.
6 Enter fax number and press Start .
Basic Sending Operations
ContrastIf your original is very light or very dark, you might want to set the contrast accordingly. Use S.LIGHT to send a very light original. Use S.DARK to send a vdark original.
1 Place the original face down in the ADF.
2 Press Function/Set , 3, 3.
3 Press or to select AUTO, S.LIGHT or S.DARK and press Function/Set .
4 Press 2 if you are finished choosing settings, and go to Step 5—OR—Press 1 if you want to select additional settings. The display returns to the Setup Send menu.
5 Enter a fax number and press Start to send a fax—OR—Press Copy/Help to make a copy.
If you get a MEMORY FULL message while scanning the first page of a fax, preStop to cancel the scan. If you get a MEMORY FULL message while scanning isubsequent page, you’ll have the option to press Start to transmit the pages scannedso far, or to press Stop to cancel the operation. In this case, send the fax by the Manual Transmission.Depending on your typical faxes, MEMORY FULL errors can occur frequently. Ifthis happens, change the Memory Transmission setting back to OFF.
9.MEMORY TX
SELECT <- -> & SET
MEMORY TX:ON?
S E T U P S E N D 6 - 3
T7BASE-US-FM5.5
.
.
end
enu
ResolutionWhen you have an original in the ADF, you can use the Resolution key. Press Resolution continuously until you see your selection on the screen.
Standard—suitable for most typed originals.
Fine—good for small print; transmits a little slower than standard resolution.
Super Fine—good for small print or artwork; transmits slower than fine resolution
Photo—use when original has varying shades of gray; slowest transmission time
Advanced Sending Operations
Overseas ModeIf you have difficulty sending a fax overseas, use the Overseas mode.
After you send a fax using this feature, the feature turns itself off.
1 Place the original face down in the ADF.
2 Press Function/Set , 3, 5.
3 Press or to select ON (or OFF) and press Function/Set .
4 Press 1 if you want to select additional settings. The display returns to the Setup Smenu—OR—Press 2 if you are finished choosing settings and go to Step 5.
5 Enter the fax number you’re calling.
6 Press Start .
Delayed FAXYou can use this function to send a fax up to 24 hours later.
1 Place the original face down in the ADF.
2 Press Function/Set , 3, 7.
3 Enter the time you want the fax to be sent, in 24-hour format and press Function/Set . (For example, enter 19:45 for 7:45 PM)
4 Press 1 to leave the originals waiting in the ADF—OR—Press 2 to scan the original into memory.(See Interrupting Delayed Fax and Polled Transmit Jobs, page 6-5.)
5 Press 1 to select additional settings. The display returns to the SETUP SEND m—OR—Press 2 if you are finished choosing settings and go to Step 6.
5.OVERSEAS MODE
1.DOC 2.MEMORY
6 - 4 S E T U P S E N D
T7BASE-US-FM5.5

81-
it.
t to
send edial
ve
6 Enter the fax number.
7 Press Start . The machine will wait to send the fax at the time you set up.
Setting Up for Polled TransmitPolled Transmit is when you set up your fax machine to wait with an original so another fax machine can retrieve it.
For more information call our fax-back system at 1-800-521-2846 (USA), 1-800-69838 (from within Canada) and request Document #: 21707.
Canceling a Scheduled JobYou can cancel tasks you’ve scheduled, such as Delayed Fax or Polling Transm
1 Press Function/Set , 4. Any waiting jobs appear on the display. If there are no jobs waiting, the screen displays NO JOB WAITING.
2 If you have more than two jobs waiting, press or to select the job you wancancel and press Function/Set .—OR—If you have only one job waiting, go to Step 3.
3 Press 1 to cancel—OR—Press 2 to exit without canceling.
4 Press Stop to exit.
Interrupting Delayed Fax and Polled Transmit JobsYou can send a fax or make a copy now, even if you have the fax machine set toa fax later, or if you have it set to be polled. However, you cannot use automatic ror the function mode.
1 Press Function/Set , 5.
2 Wait 2 seconds, then remove the original that is waiting in the ADF.
3 Place the original you want to send now in the ADF.
4 Enter the number for the fax you want to send now.
5 Press Start .
6 After the transmission is finished, return the first original to the ADF.
7 Press Function/Set , 5 to restore the Delayed Fax and/or Polling.
If you have set up a Delayed Fax or Polled Transmit job in memory, you don’t hato interrupt it to send a fax or make a copy.
PRESS START KEY
ENTER FAX NO.
4.CANCEL JOB
INSERT ORIGINAL
S E T U P S E N D 6 - 5
T7BASE-US-FM5.5
ed in back ripts:
an
More Advanced Features (Call Brother fax-back system)Your machine has additional advanced features and functions that are not includthis manual. To receive faxed instructions, please call our automated Brother fax-system at 1-800-521-2846 and enter the Document Numbers for the following sc
• Polling (Doc #: 21707)
• Cover Page (Doc #: 20918)
• Call Reservation (Doc #: 21708)
• Print Sample Call Back Message (Doc #: 21709)
• Next Fax Reservation (Doc #: 21710)
• Multiple Resolution Transmission (Doc #: 21711)
• Glossary (Doc #: 21712)
If you have set up a Delayed Fax or Polled Transmit job, the machine will send original without storing it in memory.
6 - 6 S E T U P S E N D
T7BASE-US-FM5.5

d ouch
)
for
he
7 Auto Dial Numbers and Dialing Options
Storing Numbers for Easy Dialing
You can set up your fax machine to do three types of easy dialing: One Touch, Speed Dial, and Groups for Broadcasting of faxes.
Storing One Touch Dial NumbersYou can store four fax/phone numbers that you can dial by pressing one key (anStart ). You also can store names with these numbers. When you press a One Tdial location, the screen displays the name or number as the call is dialed. (SeeOne Touch Dialing, page 7-4.)
One Touch keys are not the dial pad keys. They are the four keys (numbers 1–4located in the middle of the control panel.
1 Press Function/Set , 6, 1.
2 Press the One Touch key where you want to store a number.
3 Enter a number (up to 20 digits) and press Function/Set .
4 Use the dial pad to enter the name or company (up to 15 characters) and press Function/Set . You can use the chart on page 17 to help you enter letters—OR—To store the number without a name, press Function/Set . (See Details for Entering Text, page 4-2.)
5 Press or to select the type of number and press Function/Set .
If you lose electrical power, auto dial numbers in memory will not be lost.
(One Touch key 1 is pre-programmed for Brother fax-back system, USA only. Youcan override it if you wish.) The screen displays the location you selected.
If you want to enter a pause in the dialing sequence (to wait for an “outside line,”example), press Redial/Pause as you’re entering digits. Pressing Redial/Pause enters a 3.5-second pause when the number is dialed, and a dash appears on tscreen.
FAX a fax only number
TEL a telephone (voice) number
FAX/TEL both a fax and telephone (voice) number
CHAIN a number (usually an access code) for chain dialing.
NAME:
A U T O D I A L N U M B E R S A N D D I A L I N G O P T I O N S 7 - 1
T7BASE-US-FM5.5

red,
a te).
ing
here
a
6 Press to Step 2 to store another One Touch number—OR—Press Stop to exit.
When you dial an AUTO DIAL number, the screen displays the name you’ve stoor, if you haven’t stored a name, the number you’ve stored.
You can use chain dialing to store long dialing sequences. For example, to store9 1 201 555 1234 987 65 4321, divide the number into two parts. Store the first part asChain type number (this tells the system that the dialing sequence is not comple
CHAIN—9 1 201 555 1234
The last part of the One Touch number must be stored as any of the other followthree types.
FAX or FAX/TEL or TEL—987 65 4321
Now, when you dial, just press the two keys (one after the other, in order) whereyou’ve stored the two parts of the number.
Storing Speed Dial NumbersYou can store Speed Dial numbers, when you dial by pressing only four keys. Tare 50 Speed Dial locations.
1 Press Function/Set , 6, 2.
2 Use the dial pad to enter a two-digit location (01–50) and press Function/Set .
3 Enter the number (up to 20 digits) and press Function/Set .
4 Use the dial pad to enter the name or company (up to 15 characters) and pressFunction/Set —OR—Press Function/Set to store the number without a name. (See Details for Entering Text, page 4-2.)
5 Press or to select the type of number and press Function/Set .
6 Return to Step 2 to store another Speed Dial number—OR—Press Stop to exit.
If you must wait for another dial tone at any point in the dialing sequence, store pause at that place in the number by pressing Redial/Pause . Each key press adds a 3.5 second pause.
FAX a fax only number
TEL a telephone (voice) number
FAX/TEL both a fax and telephone (voice) number
CHAIN a number (usually an access code) for chain dialing.
SPEED-DIAL? #
#05:
ENTER & SET
NAME:
7 - 2 A U T O D I A L N U M B E R S A N D D I A L I N G O P T I O N S
T7BASE-US-FM5.5

er is you to
e
ed
only e
Changing One Touch and Speed Dial NumbersIf you try to store a One Touch or Speed Dial number in a location where a numbalready stored, the screen displays the current name stored there, then promptseither 1. CHANGE—OR—2. EXIT.
1 Press 1 to change the number stored, or press 2 to exit without making a change.
2 Enter a new number.
• If you want to erase the whole number, press Stop when the cursor is to the left of the digits. The letters above and to the right of the cursor are deleted.
• If you want to change a digit, use or to position the cursor under thdigit you want to change, then type over it.
3 Follow the directions from Step 3 in Storing One Touch Numbers or Storing SpeDial Numbers.
Setting Up Groups for BroadcastingGroups allow you to send the same fax message to many fax numbers by pressingone One Touch key (Broadcasting). First , you’ll need to store each fax number as a OnTouch or Speed Dial number. Then, you can combine them into a Group. Each Group uses up a One Touch key. Finally , you can have up to four small Groups, or you canassign up to 53 numbers to one large Group. (See Storing One Touch Dial Numbers, page 7-1, Storing Speed Dial Numbers, page 7-2 and Broadcasting, page 7-6.)
1 Press Function/Set , 6, 3.
2 Select a One Touch key where you wish to store the number. (For example, press One Touch key 2 to store a Group.)
3 Use the dial pad to identify the Group with a number and press Function/Set . (For example, press 1 for Group 1.)
4 To include One Touch or Speed Dial numbers in the Group, enter them as if you were dialing. For example, for One Touch key 3, press One Touch key 3. For Speed Dial location 09, press Search/Speed Dial , then press 0, 9 on the dial pad. The LCD shows 03, #09.
5 Press Function/Set to accept the numbers for this group.
6 Use the dial pad to enter a name for the group and press Function/Set . (For example, NEW CLIENTS) (See Details for Entering Text, page 4-2.)
7 Press Stop to exit.
You can print a list of all One Touch and Speed Dial numbers. See Printing Reports, Chapter 10.
SELECT ONE-TOUCH
SETUP GROUP:GO
ENTER & SET
G01:*O3#O9
NAME:
ENTER & SET
A U T O D I A L N U M B E R S A N D D I A L I N G O P T I O N S 7 - 3
T7BASE-US-FM5.5

y, or make
or, if
ers. s you
call.
ers. s you
ing fter
s.
Dialing Options
You can use your fax machine to make voice telephone calls, by dialing manuallby using Search, One Touch or Speed Dial memory. You can use the handset toand receive calls.
When you dial an auto dial number, the screen displays the name you’ve stored,you have’nt stored a name, the fax number you’ve stored.
Manual DialingManual dialing is simply pressing all of the digits of the phone number.
1 Pick up the handset—OR—Press Hook .
2 When you hear a dial tone, dial the call using the dial pad.
3 If you pressed Hook to dial the call, pick up the handset when the other party answ(The speaker works only one way; the other party won’t be able to hear you unlespick up the handset.)
4 To hang up, replace the handset.
One Touch Dialing1 Pick up the handset—OR—Press Hook . (See Storing One Touch Dial Numbers, page 7-1.)
2 When you hear a dial tone, press the One Touch key of the location you want to
3 If you pressed Hook to dial the call, pick up the handset when the other party answ(The speaker works only one way; the other party won’t be able to hear you unlespickup the handset.)
4 To hang up a voice call, replace the handset.
If you try to use a One Touch location with no number stored in it, you hear a warnsound, and screen displays NOT REGISTERED. The display returns to normal a2 seconds.
If you are sending a fax, press Start after pressing the One Touch key. If you pickedup the handset, press Start when the receiving fax machine answers with fax tone
7 - 4 A U T O D I A L N U M B E R S A N D D I A L I N G O P T I O N S
T7BASE-US-FM5.5

ers. s you
when ake as One the
e
pad.
tails,
enter
Speed Dialing1 Pick up the handset—OR—Press Hook . (See Storing Speed Dial Numbers, page 7-2.)
2 When you hear a dial tone, press Search/Speed Dial , press #, then press the two-digit Speed Dial number.
3 If you pressed Hook to dial the call, pick up the handset when the other party answ(The speaker works only one way; the other party won’t be able to hear you unlespickup the handset.)
4 To hang up a voice call, replace the handset.
Dialing Access Codes and Credit Card NumbersSometimes you may want to choose from among several long distance carriers you make a call. Rates may vary depending upon the time and destination. To tadvantage of low rates, you can store the access codes or long-distance carriers Touch and Speed Dial numbers. You can store these long dialing sequences bydividing them and setting them up separately in any combination. You can eveninclude manual dialing using the dial pad. The combined number will be dialed inorder you entered it, as soon as you press Start . Make sure you selected CHAIN as the type of the number when you store it into the One Touch or Speed Dial. (SeStoring One Touch Dial Numbers and Storing Speed Dial Numbers, page 7-1 to 7-2.)
For example:
You store “555”on One Touch key 03 and “7000”on One Touch key 02. If you press One Touch 03, 02 and Start you will dial “555-7000”. To temporarily change a number, you can substitute part of the number with manual dialing using the dial For example, to change the number to 555-7001 you can press One Touch 03 and press 7, 0, 0, 1 using the dial pad.
If you are sending a fax, press Start after entering the Speed Dial number. If you picked up the handset, press Start when the receiving fax machine answers with faxtones.
The CallManage access code can save you money on long distance calls (for desee CallManage, page 8-5). (For USA Only)
Pause after dialing Speed Dial numbers for the name to be displayed before you the next portion of the dialing sequence.
A U T O D I A L N U M B E R S A N D D I A L I N G O P T I O N S 7 - 5
T7BASE-US-FM5.5

ries.
r.
oice
ers. s you
ory, in a
ly to
mber
ll lly
SearchYou can search for names you have stored in One Touch and Speed Dial memoNames are shown alphabetically. (See Storing One Touch Dial Numbers, page 7-1 and Storing Speed Dial Numbers, page 7-2.)
1 Press Search/Speed Dial , then enter the first letter of the name you’re looking fo
2 Press or to search the memory.
3 When the screen displays the name you want to call, pick up the handset for a vcall.
4 Press Start to begin dialing.
5 If you pressed Hook to dial the call, pick up the handset when the other party answ(The speaker works only one way; the other party won’t be able to hear you unlespickup the handset.)
6 When the call is over, hang up to cancel the call.
RedialIf the last number you dialed was busy, press Redial/Pause for easy dialing.
BroadcastingUsing the numbers you have stored in Groups, One Touch and Speed Dial memyou can “broadcast” faxes automatically to a maximum of 54 different locations few simple steps. (See Setting Up Groups for Broadcasting, page 7-3.) To Broadcast,you must set MEMORY TX to either ON or NEXT FAX ONLY.
After the Broadcast is completed, a Broadcast Report will be printed automaticallet you know the results.
1 Place the original face down in the ADF.
2 Press Function/Set , 3, 9 to select ON or NEXT FAX ONLY and press Function/Set .
3 Enter the One Touch and Speed Dial numbers (one after the other) or a Group Nuyou have stored.
4 Press Start . The fax machine stores the original in memory, then transmits it to athe numbers you entered. If the line is busy, your machine will redial automaticaup to three times at 5 minutes intervals.
Press Stop during transmission to cancel the current fax broadcast.
7 - 6 A U T O D I A L N U M B E R S A N D D I A L I N G O P T I O N S
T7BASE-US-FM5.5
3.5
nsion
king, not
PausePress Redial/Pause to insert a pause between numbers. Each key press adds asecond delay.
Hold1 Press Hold/Caller ID to put a call on Hold.
2 You can put down the handset without disconnecting the call.
3 Pick up the fax machine handset to release the call from Hold. Picking up an extehandset will not release the call from Hold.
Tone/Pulse (For Canada Only)If you have pulse dialing service, but need to send tone signals (for telephone banfor example), follow the directions below. If you have touch tone service, you doneed this feature to send tone signals.
1 Lift the handset.
2 Press #. Any digits dialed after this send tone signals.
3 When you hang up, the fax machine returns to pulse dialing service.
A U T O D I A L N U M B E R S A N D D I A L I N G O P T I O N S 7 - 7
T7BASE-US-FM5.5
ered bers
you hone
one
nual
e
rm the
h it you
8 Telephone Services
Custom Features
Your fax machine supports the Distinctive Ring and Caller ID telephone servicesoffered by some telephone companies.
Distinctive RingThis fax machine feature lets you use the Distinctive Ring subscriber service offby some telephone companies, which allows you to have several telephone numon one phone line. Each phone number has its own Distinctive Ring pattern, so know which phone number is ringing. This is one way you can have a separate pnumber for your fax machine.
Your fax machine has a Distinctive Ring function, allowing you to dedicate one phnumber just for receiving faxes. You’ll need to follow the directions below to “register” the new Distinctive Ring pattern, that was assigned by the Telephone Company, so your fax machine can recognize its incoming calls.
■ The fax machine will answer only calls to its registered number.
■ To have your TAD answer only the main number, the fax machine must be in MaMode.
■ In FAX/TEL or FAX ONLY mode, the fax machine will answer all numbers on thphone line.
Registering the Distinctive Ring Pattern
1 Set the fax machine to MANUAL mode.
2 Press Function/Set , 0, 1.
3 Press or to select DISTINCTIVE:SET? and press Function/Set .
If you have Call Waiting, Ring Master, Voice Mail, an answering service or an alasystem or other custom feature on your telephone line, it may create a problem inoperation of your fax machine.
You can change or cancel the Distinctive Ring pattern at any time. You can switcoff temporarily, then turn it back on. When you get a new fax number, make sure reset this function.
You can register only one Distinctive Ring pattern with the fax machine. Some ringing patterns cannot be registered.
8 - 1 T E L E P H O N E S E R V I C E S
T7BASE-US-FM5.5

ss s.)
vice
, if rom
s
rea.
of
y to
ine’s ut ion
4 Press or to select the prestored ring pattern you want to assign and preFunction/Set . (You will hear each pattern as you scroll through the four patternBe sure to choose the pattern assigned by the Telephone Company.
5 Press Stop to exit.
Caller IDThe Caller ID feature of this fax machine lets you use the Caller ID subscriber seroffered by many local telephone companies. After at least two rings, the screen displays the telephone number of your caller (or up to 16 characters of the nameavailable). Once you pick up the handset, the Caller ID information disappears fthe screen, but the call information remains stored in the Caller ID memory.
• CALL PICKUP display remains on the screen when no Caller ID information watransmitted.
• OUT-OF-AREA display means the call originates outside your Caller ID service a
• PRIVATE CALL display means the caller has intentionally blocked transmissioninformation.
Caller ID service varies with different carriers. Call your local telephone compandetermine the kind of service available in your area.
Caller ID Log
Your fax machine stores up to 30 of the last Caller IDs received into the fax machmemory in the Caller ID Log. When the thirty-first call comes in, information abothe first call is erased. You can print the report or scroll through Caller ID informatto review those calls made to your fax machine.
Ring Pattern
Rings
1 long - long
2 short - long - short
3 short - short - long
4 very long (normal pattern)
T E L E P H O N E S E R V I C E S 8 - 2
T7BASE-US-FM5.5

(See
in ot
Printing the Caller ID Log
1 Press Hold/Caller ID .
2 To print the Caller ID Log, press Start .
Viewing the Caller ID Log
1 Press Hold/Caller ID .
2 After 2 seconds, press or to scroll through the Caller ID Log.
3 When you want to see more detailed information for a displayed ID (phone number and date and time call was received) press Function/Set .
4 To continue viewing the Caller ID Log (Step 2), press or .—OR—To exit the Caller ID Log, press Stop .
Returning a Call from the Log
You can scroll through the Caller ID Log and select a call to return automatically. page 8-2)You must set up your AREA CODE in advance. (USA only)
1 Press Hold/Caller ID .
2 Press or to scroll through the Caller ID Log and when you see a call you want to return immediately, press Function/Set .
3 To begin dialing, press Start .
4 Begin speaking when the other party answers.
This feature may not be available in certain area of USA and Canada.If your dialing plan does not follow the standard 1 + area code + 7-digit number dialing system for calling outside your area code, you may experience problemsreturning calls automatically from the Caller ID Log. Your fax machine will automatically dial “1” plus the area code for any number that does not originate your area code. If this is not the procedure followed by your dialing plan you will nbe able to return calls automatically.
CALLER ID LOG
PRINTING
SELECT <- -> & SET
PRESS START KEY
CALLER ID LOG
01)MARY HENDERSON
02)TOM HENDERSON
03)ABC COMPANY
03)ABC COMPANY
03)02/01 12:00
03)9087772837
DIAL:PRESS START
SELECT <- -> & SET
PRESS START KEY
CALLER ID LOG
01)MARY HENDERSON
DIAL:PRESS START
01)9082438436
01)02/01 12:00
8 - 3 T E L E P H O N E S E R V I C E S
T7BASE-US-FM5.5

er.
en.
arty r ID.
ct
Registering a Caller ID Number
You can set up a caller in the Caller ID Log as a One Touch or Speed Dial numb
1 Press Hold/Caller ID .
2 After 2 seconds, press or to scroll through the Log and when you see a caller you want to register, press Function/Set .
3 To register the caller as a One Touch number, press the One Touch key where you want the number to be stored.—OR—To register the caller as a Speed Dial number, press Search/Speed Dial and use the dial pad to press the two-digit location code (01–50), and press Function/Set .
4 Enter the caller’s name and press Function/Set .
5 Press or to select the type of number and press Function/Set :
6 Return to Step 2 to store another auto dial number—OR—Press Stop to exit.
Call Waiting Caller IDThe Call Waiting Caller ID feature lets you use the Call Waiting Caller ID serviceoffered by many local telephone companies. This feature displays the telephonenumber (or name, if available) of Call Waiting callers on your fax machine’s scre
1 To answer a Call Waiting signal while you’re talking on the phone, ask the other pif you can put them on Hold to catch the other call. The screen displays the Calle
2 Press Search/Speed Dial to switch to the second call.
3 To switch back to the first call, press Search/Speed Dial again.
If the LCD shows REGISTERED, the auto dial location already has a number.
FAX A fax number
TEL A telephone (voice) number
FAX/TEL Both a fax and telephone number
CHAIN A number, usually an access code, for chain dialing
Either caller can hang up at any time. However, if you hang up you will disconneboth callers.
SELECT <- -> & SET
PRESS START KEY
CALLER ID LOG
03)ABC COMPANY
03)02/01 12:00
03)9087772837
DIAL:PRESS START
NAME:
ENTER & SET
T E L E P H O N E S E R V I C E S 8 - 4
T7BASE-US-FM5.5

ance one cted
on y
the key made g
for
e er, etc. ction onth
uch
uch,
CallManage (For USA Only)
This Brother fax machine provides convenient, “One-Touch” access to a long distplan that provides best average long distance rates*. Once registered, fax or phcalls made using the CallManage feature will access a long distance carrier seleby CallManage, Inc., that offers a plan with best average domestic rates based standard long distance plans of major carriers within the United States. This maresult in significant savings, depending on your current long distance carrier andcalling patterns.
Trying the CallManage feature requires no commitment on your part. Just followsteps below to register with CallManage, Inc. Once registered, your One-Touch4 can be used to access the CallManage feature for any calls you choose. Callswithout using the CallManage feature will be processed through your normal londistance carrier.
If you prefer not to activate the CallManage feature you can use One Touch key4 to store a number of your own choosing.
Registration with CallManageBefore using the CallManage feature, you must register for this service with CallManage Inc.:
1 Pick up the fax handset.
2 Press One Touch 4.
(Your machine will automatically dial the pre-stored toll free registration number CallManage, Inc. or you may directly dial 1-888-387-9680.)
3 A CallManage Customer Service Representative will ask you a number of simplquestions required to set up your account (such as name, address, phone numbfor billing purposes). There are no sign-up fees, monthly service charges or connefees for the CallManage feature. You will receive a separate itemized bill each mfrom CallManage, Inc. for only those calls made using the CallManage feature*.
4 After registering, the Representative will explain how to reprogram your One Tokey 4 for CallManage dialing.
Sending a Fax Using CallManage1 Place the original face down in the ADF.
2 Press One Touch 4.
3 Dial the complete long distance or international fax number as usual, using One ToSpeed Dial, Search or the dial pad. (See One Touch Dialing, Speed Dialing and Search, page 7-4 to 7-6.)
4 Press Start .
8 - 5 T E L E P H O N E S E R V I C E S
T7BASE-US-FM5.5

ch,
-way
s with
s. rier e
that plans
he ocal
hes
er ls.
Placing a Telephone Call Using CallManage
1 Press One Touch 4.
2 Dial the complete long distance or international number as usual, using One TouSpeed Dial, Search or the dial pad. (See One Touch Dialing, Speed Dialing and Search, page 7-4 to 7-6.)
3 Press Start .
4 Pick up the handset when you hear the other party through the fax machine’s onespeaker.
Customer SupportIf you have questions or want more information*, call CallManage at 1-877-622-5457.
You must dial the number and wait to hear the other party answer before you pick up the handset to speak.
Percent savings and comparisons based on standard rate plans of major carriertariffs in effect as of January 2000. Long distance savings will depend upon the customer’s current carrier for long distance service and his or her calling patternRates updated periodically. Call 1-877-622-5457for latest rate and underlying carinformation. In order to use the CallManage feature you must register for servicthrough CallManage, Inc (toll free) at 1-888-387-9680. Once registered, the OneTouch 4 button will access a long distance provider selected by CallManage, Inc.offers a plan with best average domestic rates based on standard long distanceof major carriers within the United States. Using the CallManage feature after registering will result in your receiving a long distance telephone bill from CallManage, Inc. Without proper registration, calls made using the One Touch 4button may not be connected or may default to a standard rate plan offered by tunderlying carrier and charges for such calls will appear either on the customer’s ltelephone bill as the underlying carrier’s service or on a direct bill from the underlying carrier. The One Touch 4 button should not be used if the customer wisto use his or her existing primary or dial around carrier for long distance service.Brother International, Corp. is not responsible for long distance service or custombilling. Subject to service availability. All applications are subject to credit approvaDO NOT USE THE ONE TOUCH 4 BUTTON TO DIAL 911 – IT WILL NOT ACCESS EMERGENCY SERVICES.CallManage is a trademark of CallManage, Inc.
T E L E P H O N E S E R V I C E S 8 - 6
T7BASE-US-FM5.5

press n to r than
s. e 1, you
9 Making Copies
Copy Functions
To make a single copy that is not reduced, enlarged or sorted, you only have to one key. The default resolution for a single copy is Super Fine. Set the resolutioPHOTO for photographs. Remember, your machine cannot scan anything closeone-eighth inch from the edge of the paper.
Making a Single Copy1 Place the original face down in the ADF.
2 Press Copy/Help twice.
To cancel, press Stop .
Do NOT pull on the paper while copying is in progress.
Copy Options: Single or Multiple Copies, Reduce/Enlarge, Sort/StackYou can choose additional copy options. First, you can select the number of copieNext, you can choose whether multiple copies will be STACKED (all copies of pagthen all copies of page 2, etc.) or SORTED (collated). Finally, you can choose anenlargement or reduction ratio. To automatically reduce the copy to the paper sizehave set for the paper tray, select AUTO . To reduce the copy by a fixed percentage, choose 93%, 87%, 75% or 50%. Or, to enlarge the copy, select 150%, 125% or 120%. To copy a document at its original size, select 100%.
1 Place the original face down in the ADF.
2 Press Copy/Help .
3 Enter the number of copies you want (1-99) and press Function/Set . For example, press 9 for nine copies.
To start copying now, press Copy/Help .
If you would like to select additional copy options, like SORT, ENLARGE or REDUCE, press Function/Set .
FAX:NO.& START
COPY:PRESS COPY
NO.OF COPIES:01
THEN COPY OR SET
NO.OF COPIES:09
STACK P.01 FNE
MULTI COPY:STACK
THEN COPY OR SET
9 - 1 M A K I N G C O P I E S
T7BASE-US-FM5.5

f
4 Press or to select SORT. For example, select SORT.
To start copying now without enlarging or reducing, press Copy/Help .
To reduce or enlarge the image, press Function/Set .
5 Press or to select an enlargement or reduction ratio.
For example, 75 %.
6 Press Copy/Help .
If you are making multiple copies and get a MEMORY FULL message while you are scanning the first page, press Stop to cancel the job. Then make a single copy. Iyou selected SORT and the MEMORY FULL message appears while scanning subsequent pages, you can press Copy/Help to copy the portion that is in memory, or press Stop to cancel. To restart the copy job using less memory, press Copy/Help for stacked copies.
MULTI COPY:SORT
SORT P.01 FNE
ELG/RDC:100% ?
THEN COPY OR SET
ELG/RDC:100% ?
ELG/RDC:120% ? • •
ELG/RDC: 93% ?
ELG/RDC: 75% ?
SORT P.01 FNE
M A K I N G C O P I E S 9 - 2
T7BASE-US-FM5.5
nd
10Printing Reports
Fax Machine Settings and Activity
You can print the following lists and reports:
Choose to print a Transmission Verification Report after all faxes you send.
Activity Report lists information about the last 30incoming and outgoing faxes. TX means Transmit; RX means Receive.
Lists names and numbers stored in One Touch aSpeed Dial memory, in numerical order.
AUTO DIAL list (above), alphabetically.
Lists settings for INITIAL SETUP, SETUP RECEIVE, SETUP SEND, PRINT REPORTS, REMOTE FAX OPT and TEL SERVICE.
Lists summary information and amount of occupied memory.
To Print a Report1 Press Function/Set , 7.
2 Enter the number of the report you want to print. For example, press 4 to print the TEL-INDEX.
3 Press Start .
4 Press Stop to exit.
For the Activity Report , also press or to select PRINT REPORT?.
1.XMIT REPORT
2.ACT.REPORT
3.AUTO DIAL
4.TEL.INDEX
5.USER SETTINGS
6.MEMORY STATUS
10 - 1 P R I N T I N G R E P O R T S
T7BASE-US-FM5.5

ame e
or port .
4
down.
Transmission Verification (Xmit) ReportYou can use the Xmit Report as proof that you sent a fax. This report lists the nor fax number of the receiving party, the time and date of transmission, and if thtransmission was successful.
When the feature is OFF, the report is printed automatically only if there’s an errduring transmission. If the report indicates NG, send the original again. If the reindicates you should check the readability of certain pages, resend those pages
When the feature is ON, the report is printed with every fax you send.
1 Press Function/Set , 7, 1.
2 Press or to select ON (or OFF) and press Function/Set .
3 Press Stop to exit.
Activity Report IntervalYou can set the fax machine to print activity reports at specific intervals (6, 12, 2hours, 2, 4 or 7 days). If you set the interval to OFF, you can print the report byfollowing the steps in the previous section.
1 Press Function/Set , 7, 2.
2 Press or to display:
and press Function/Set .
3 Press or to choose your setting and press Function/Set . If you choose 7 days, the screen prompts you to choose a day at which to begin the 7-day count
4 Enter the time to begin printing, in 24-hour format and press Function/Set . (For example, enter 19:45 for 7:45 PM)
5 Press Stop to exit.
INTERVAL?
P R I N T I N G R E P O R T S 10 - 2
T7BASE-US-FM5.5

:
ing.
on pon
dard
the
alled. line ct to
ges arily. ou
ns or you
ized pany been
11 Important Information
Standard Telephone and FCC Notices
These notices are in effect on models sold and used in the United States only.This equipment is hearing aid and volume control compatible.
When programming emergency numbers and/or making test calls to emergency numbers
■ Before you hang up, briefly explain to the dispatcher the reason for the call.
■ Perform such activities in the off-peak hours, such as early morning or late even
This equipment complies with Part 68 of FCC Rules. On the rear panel of this equipment is a label that contains, among other information, the FCC RegistratiNumber and Ringer Equivalence Number (REN) for this equipment. You must, urequest, provide this information to your telephone company.
You may safely connect this equipment to the telephone line by means of a stanmodular jack, USOC RJ11C.
An FCC compliant telephone cord with a modular plug is provided with this equipment. This equipment is designed to be connected to the telephone line orpremise’s wiring using a compatible modular jack that is Part 68 compliant. SeeInstallation section of this manual for details.
The REN is useful to determine the quantity of devices you may connect to yourtelephone line and still have those devices ring when your telephone number is cIn most, but not all areas, the sum of the RENs of all devices connected to one should not exceed five (5). To be certain of the number of devices you may conneyour line, as determined by the REN, you should contact your local telephone company to determine the maximum REN for your calling area. If your fax damathe telephone line, the telephone company may discontinue your service temporIf possible, they will notify you in advance. But if advance notice is not practical, ywill be notified as soon as possible. You will be informed of your right to file a complaint with the FCC.
Your telephone company may make changes to its facilities, equipment, operatioprocedures that could affect the proper functioning of your equipment. If they do,will be notified in advance to give you an opportunity to maintain uninterrupted telephone service.
If you experience trouble with this fax machine, please contact a Brother AuthorService Center for information on obtaining service or repair. The telephone commay ask that you disconnect this equipment from the line until the problem has corrected or until you are sure that the equipment is not malfunctioning.
If you are not able to solve a problem with your fax machine, contact Brother Customer Service. (See Brother Numbers, page i.)
11 - 1 I M P O R T A N T I N F O R M A T I O N
T7BASE-US-FM5.5
ment rs,
ce-
ent sur
B o tion. not rence ot e to off of the
om
lt of
International Energy Star Compliance Statement
The purpose of the International Energy Star Program is to promote the developand popularization of energy-efficient office equipment, which includes computemonitors, printers, facsimile receivers and copy machines world-wide. As an International Energy Star partner, Brother Industries, Ltd. has decided that this product meets the guideline of the program.
Industry Canada Compliance Statement (For Canada Only)
This Class B digital apparatus meets all requirements of the Canadian InterferenCausing Equipment Regulations.
Cet appareil numérique de la classe B respecte toutes les exigences du Règlemla matériel brouilleur du Canada.
Federal Communications Commission Compliance Notice(For USA Only)
This equipment has been tested and found to comply with the limits for a Class digital device, pursuant to Part 15 of the FCC Rules. These limits are designed tprovide reasonable protection against harmful interference in a residential installaThis equipment generates, uses, and can radiate radio frequency energy and, ifinstalled and used in accordance with the instructions, may cause harmful interfeto radio communications. However, there is no guarantee that interference will noccur in a particular installation. If this equipment does cause harmful interferencradio or television reception, which can be determined by turning the equipmentand on, the user is encouraged to try to correct the interference by one or more following measures:
■ Reorient or relocate the receiving antenna.■ Increase the separation between the fax equipment and the receiver.■ Connect the fax equipment on a separate circuit.■ Consult the dealer or an experienced radio/TV technician for help.
WARNING
For protection against the risk of electrical shock, always disconnect all cables frthe wall outlet before servicing, modifying or installing the equipment.
This equipment may not be used on coin service lines provided by the telephonecompany or connected to party lines.
Brother cannot accept any financial or other responsibilities that may be the resuyour use of this information, including direct, special or consequential damages.There are no warranties extended or granted by this document.
I M P O R T A N T I N F O R M A T I O N 11 - 2
T7BASE-US-FM5.5

ers.
g
ure t be , sofa, eater. ided.
u are
g) are utlet.
walk
he Also, peres
nts,
touch spill
e you icing een
e
d.
ork
e.
on
Important Safety Instructions1 Read all of these instructions.
2 Save them for later reference.
3 Follow all warnings and instructions marked on the product.
4 Unplug this product from the wall outlet before cleaning. Do not use liquid or aerosol cleanUse a damp cloth for cleaning.
5 Do not use this product near water.
6 Do not place this product on an unstable cart, stand, or table. The product may fall, causinserious damage to the product.
7 Slots and openings in the cabinet and the back or bottom are provided for ventilation; to ensreliable operation of the product and to protect it from overheating, these openings must noblocked or covered. The openings should never be blocked by placing the product on a bedrug, or other similar surface. This product should never be placed near or over a radiator or hThis product should never be placed in a built-in installation unless proper ventilation is prov
8 This product should be operated from the type of power source indicated on the label. If yonot sure of the type of power available, consult with your dealer or local power company.
9 This product is equipped with a 3-wire grounding type plug, a plug having a third (groundinpin. This plug will fit into only a grounding-type power outlet. This is a safety feature. If you unable to insert the plug into the outlet, contact your electrician to replace your obsolete oDo not defeat the purpose of the grounding-type plug.
10 Do not allow anything to rest on the power cord. Do not place this product where people canon the cord.
11 If an extension cord is used with this product, make sure that the total ampere ratings on tproducts plugged into the extension cord do not exceed the extension cord ampere rating.make sure that the total of all products plugged into the wall outlet does not exceed 15 am(USA only).
12 Do not place anything in front of the fax machine that will block the exit-path of sent documeoriginals and received faxes.
13 Do not touch an original during printing.
14 Never push objects of any kind into this product through cabinet slots, because they may dangerous voltage points or short out parts resulting in a risk of fire or electric shock. Neverliquid of any kind on the product.
15 Do not attempt to service this product yourself, as opening or removing covers may exposto dangerous voltage points and/or other risks, and may void your warranty. Refer all servto a Brother Authorized Service Center. A list of Brother Authorized Service Centers has bincluded for your convenience, or you may contact the Brother Customer Service for yournearest Brother Authorized Service Center. (See Brother Numbers, page i.)
16 Unplug this product from the wall outlet and refer servicing to a Brother Authorized ServicCenter under the following conditions:
A When the power cord is damaged or frayed.
B If liquid has been spilled into the product.
C If the product has been exposed to rain or water.
D If the product does not operate normally when the operating instructions are followeAdjust only those controls that are covered by the operating instructions. Improper adjustment of other controls may result in damage and will often require extensive wby a qualified technician to restore the product to normal operation.
E If the product has been dropped or the cabinet has been damaged.
F If the product exhibits a distinct change in performance, indicating a need for servic
17 To protect your product against power surges, we recommend the use of a power protectidevice (Surge Protector).
11 - 3 I M P O R T A N T I N F O R M A T I O N
T7BASE-US-FM5.5
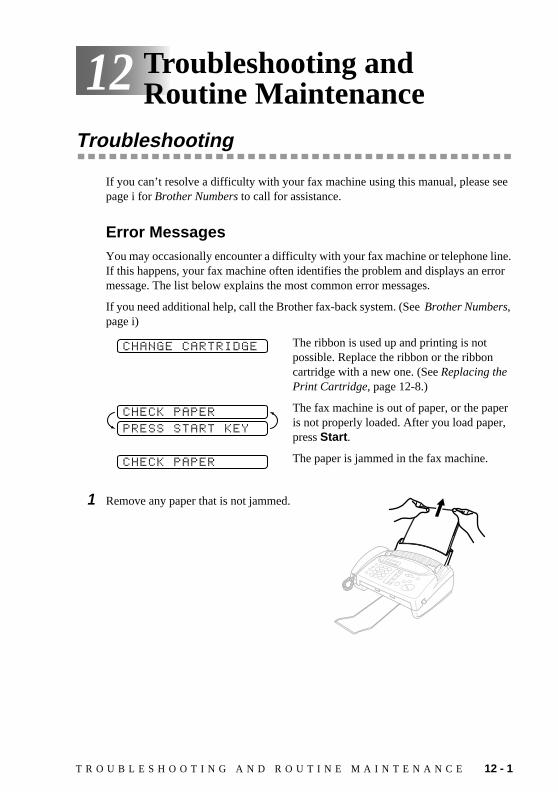
ee
ne. ror
r
12Troubleshooting and Routine Maintenance
Troubleshooting
If you can’t resolve a difficulty with your fax machine using this manual, please spage i for Brother Numbers to call for assistance.
Error MessagesYou may occasionally encounter a difficulty with your fax machine or telephone liIf this happens, your fax machine often identifies the problem and displays an ermessage. The list below explains the most common error messages.
If you need additional help, call the Brother fax-back system. (See Brother Numbers, page i)
The ribbon is used up and printing is not possible. Replace the ribbon or the ribbon cartridge with a new one. (See Replacing the Print Cartridge, page 12-8.)
The fax machine is out of paper, or the papeis not properly loaded. After you load paper, press Start .
The paper is jammed in the fax machine.
1 Remove any paper that is not jammed.
CHANGE CARTRIDGE
PRESS START KEY
CHECK PAPER
CHECK PAPER
T R O U B L E S H O O T I N G A N D R O U T I N E M A I N T E N A N C E 12 - 1
T7BASE-US-FM5.5

2 Open the top cover by lifting the gray lever on the right side of the top cover.
3 Pull the jammed paper gently from the paper tray toward the front of the machine. If the paper is jammed under the rollers, then pull it toward the back of the machine.
Top Cover
YES!
NO!
12 - 2 T R O U B L E S H O O T I N G A N D R O U T I N E M A I N T E N A N C E
T7BASE-US-FM5.5

ry
y,
4 Remove the print cartridge and turn the spool to tighten the ribbon.
5 Install the cartridge. (See Replacing the Print Cartridge, page 12-8)
6 Close the top cover.
7 Load the paper.
A poor quality phone line resulted in a communications error. Try the call again.
You have requested a polling call from another party, but the other fax machine is not in Poll Waiting mode.
The other party has disconnected during a fax. Tcalling the other party.
The documents were not inserted or fed properlor were too long or too short.
1 Remove any paper that is not jammed from the ADF.
2 Open the top cover.
3 Pull the document toward the front of the machine.
4 Close the cover and press Stop .
Contact Brother Customer Service at
USA: 1-800-284-4329 (voice)
From within Canada: 1-800-853-6660 (voice)
From within Montreal: 1-514-685-6464 (voice)
COMM.ERROR
CONNECTION FAIL
DISCONNECTED
DOCUMENT JAM
MACHINE ERROR XX
PRESS STOP KEY
T R O U B L E S H O O T I N G A N D R O U T I N E M A I N T E N A N C E 12 - 3
T7BASE-US-FM5.5

y.
al
e
r r
if the ine. in
The number you called does not answer or is busYou may also have reached a number not connected to a fax. Check the number and call again.
You’ve tried accessing a One Touch or Speed Dilocation with no number assigned to it. See pages 7-1 to 7-2 for information about storing OnTouch or Speed Dial numbers.
The print head has overheated. Unplug the fax machine and wait 30 minutes for it to cool.
The top cover is not closed completely.
If You Are Having Difficulty with Your Fax MachineIf you think there is a problem with your fax machine, make a copy first. If the copy looks good, the problem is probably not your fax machine. Check the difficultiesbelow and follow the troubleshooting tips.
Printing or Receiving Faxes
Condensed Print and Horizontal Streaks; Top and Bottom of Sentences Cut OffIf your copy looks good, you probably had a bad connection, with static orinterference on the phone line. If the copy looks bad, call Brother CustomeService at 1-800-284-4329 (USA), 1-800-853-6660 (from within Canada) o 1-514-685-6464 (from within Montreal).
Vertical Black Lines When ReceivingThe sender’s scanner may be dirty. Ask the sender to make a copy to seeproblem is with the sending machine. Try receiving from another fax machIf the problem continues, call Brother Customer Service at 1-800-284-4329(USA), 1-800-853-6660 (from within Canada) or 1-514-685-6464 (from withMontreal).
NO RESPONSE/BUSY
NOT REGISTERED
PRINTER FAULT
TOP COVER OPEN
12 - 4 T R O U B L E S H O O T I N G A N D R O U T I N E M A I N T E N A N C E
T7BASE-US-FM5.5

ine
our
ine,
t the with our
the see
ot in
, the the ohol
Phone Line or Connections
Fax Machine Does Not Answer When CalledMake sure the fax machine is in the correct receiving mode for your setup (either FAX, FAX/TEL or TAD). Check for dial tone. If possible, call your faxmachine to hear it answer. If there is still no answer, check the telephone lcord connection. (See Connecting the Machine, page 2-4 and Connect the telephone line.) Connect a standard telephone handset to the fax machine telephone jack. If there is no ringing when you call your fax machine, call yTelephone Company to check the line.
Telephone Answering Device (TAD) Does Not Answer When CalledConnect the telephone line cord from your TAD to the back of the fax machin the jack labeled EXT. Make sure the TAD is set to answer calls. (See Connecting an External Telephone Answering Device (TAD), page 2-8.)
No Dial Tone on the HandsetPress Hook —OR—Lift the handset. If you don’t hear a dial tone, check telephone line cord connections at the fax machine and wall jack. Check thahandset is connected to the fax machine’s handset jack. Test the wall jackanother single line telephone. If there is no dial tone at the wall outlet, call yTelephone Company.
The Caller ID does not display after the Call Waiting SignalThe Caller ID signal is sent ten seconds after the Call Waiting Signal and speaking may interfere with it. When you hear the Call Waiting signal, ask other party to hold while you answer the call. Then stop speaking until youthe Caller ID on the LCD.
Sending Faxes
Poor Transmitting QualityTry changing your resolution to FINE or SUPERFINE. (See Resolution, page 6-4.) Make a copy to verify the fax machine’s scanner operation.
Dialing Does Not WorkCheck all line cord connections, and make sure the curled handset cord is nthe EXT jack.Check power cord connection.Send a manual fax by pressing Hook —OR—Lifting the handset, and dialing the number. Wait to hear fax receiving tones before pressing Start .
Vertical Black Lines When SendingUse your fax machine to make a copy. If the copy shows the same problemscanner area is dirty. Lift the top cover and check the original path. Clean scanner’s white tape and the glass strip under the tape using isopropyl alcand a lint-free cloth. (See page 12-7.)
T R O U B L E S H O O T I N G A N D R O U T I N E M A I N T E N A N C E 12 - 5
T7BASE-US-FM5.5

to an
fault
Code
by
the our
e a or
on line.
ller nal re
nd
ne
Handling Incoming Calls
Double Ring in FAX/TEL ModeThe fax machine knows the incoming call is not a fax so it is signaling youanswer the telephone call. Pick up the fax machine handset or answer fromextension phone and press your fax machine’s Telephone Answer Code (desetting is #51). (See For FAX/TEL Mode Only, page 5-5.)
Transferring a Call to the Fax MachineIf you have answered the fax machine handset, press Start , and hang up immediately. If you answered at an extension phone, press your three-digit Fax Receive (the factory setting is 51). When your fax machine answers, hang up.
Fax Machine “Hears” Voice as CNG ToneIf your fax machine is set to Easy Receive ON, and it answers voice calls trying to receive a fax, try turning Easy Receive to OFF. (See Easy Receive, page 5-3.)
Transmission Verification Report Prints “Result: NG”There is probably temporary noise or static on the phone line. Try sendingfax again. If the problem continues, call the Telephone Company to check yphone line.
Custom Features on a Single LineIf you have Call Waiting, Caller ID, Call Waiting/Caller ID, Ring Master, VoicMail, an answering machine, alarm system or any other custom feature onsingle phone line with your fax machine, it may create a problem sending receiving fax data.
Example #1:If you are having a telephone conversation and a fax communicationsignal comes through on your Call Waiting Caller ID feature, you canverify that the second call is a fax by switching to it. You have the optito receive the fax call, by asking the first caller to hang up to clear the
Example #2:If you are sending or receiving a fax message while a Call Waiting CaID (or other custom feature) signal comes through on the line, the sigcan temporarily interrupt or disrupt the fax data. Brother’s ECM featushould help overcome this problem. This condition is related to the telephone system industry, and is common to all devices that send areceive information on a single, shared line with custom features. If avoiding a slight interruption is crucial to your business, a separate liwith no custom features is recommended.
12 - 6 T R O U B L E S H O O T I N G A N D R O U T I N E M A I N T E N A N C E
T7BASE-US-FM5.5
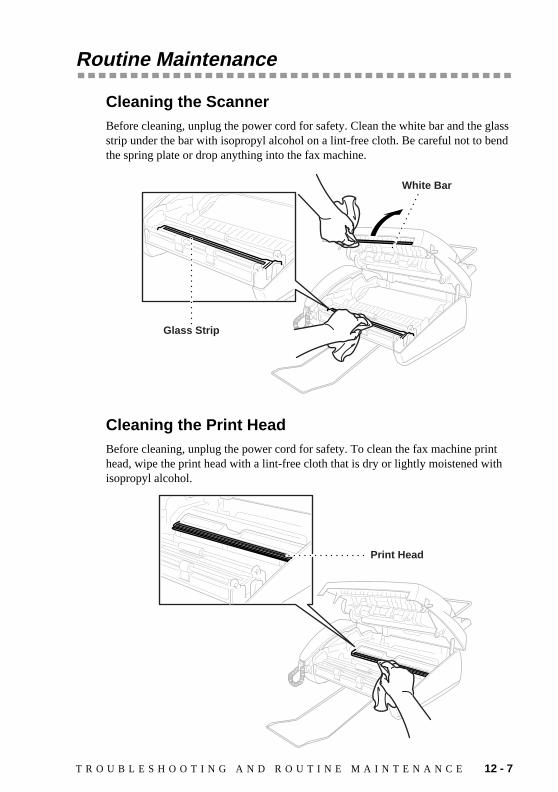
lass nd
t h
Routine Maintenance
Cleaning the ScannerBefore cleaning, unplug the power cord for safety. Clean the white bar and the gstrip under the bar with isopropyl alcohol on a lint-free cloth. Be careful not to bethe spring plate or drop anything into the fax machine.
Cleaning the Print HeadBefore cleaning, unplug the power cord for safety. To clean the fax machine prinhead, wipe the print head with a lint-free cloth that is dry or lightly moistened witisopropyl alcohol.
Glass Strip
White Bar
Print Head
T R O U B L E S H O O T I N G A N D R O U T I N E M A I N T E N A N C E 12 - 7
T7BASE-US-FM5.5

WARNING
Just after you have used the machine, the print head is extremely HOT !
Replacing the Print Cartridge1 Open the top cover by lifting the gray lever on the right side. (See page12-2)
2 Remove the print cartridge containing the used ribbon and set it down.
3 Install the new print cartridge, by inserting the recessed first and placing the cartridge into its four holders.
4 Press down on both sides of the top cover to close it securely.
You can save money by purchasing the 2-PK Refill Ribbon Rolls (PC402RF). Installation instructions will be included. If you handle the print cartridge (frame) carefully, you can reuse it until it breaks.
Gray Lever
12 - 8 T R O U B L E S H O O T I N G A N D R O U T I N E M A I N T E N A N C E
T7BASE-US-FM5.5

S P E C I F I C A T I O N S S - 1
T7BASE-US-FM5.5
Specifications
* “Pages” refers to the ITU-T #1 chart (in Out of Paper Reception in ECM mode). Specifications are subject to change without prior notice.
Type Desktop facsimile transceiver
Compatibility ITU-T Group 3
Coding System Modified Huffman (MH)
Modem Speed 9600/7200/4800/2400; Automatic Fallback
original Input Width 5.8 inches to 8.5 inches (148 mm to 216 mm)
Scanning/Printing Width 8.2 inches (208 mm)
Paper Tray Letter: 50 Sheets; Legal: 30 Sheets
Printer Type Line Thermal with Ribbon
Gray Scale 64 levels (Dithered)
Display LCD, 16 characters
Polling Types Standard, Sequential
Contrast Control Automatic/Super Light/Super Dark (manual setting)
Resolution • Horizontal 203 dot/inch (8 dot/mm) • Vertical Standard—98 line/inch (3.85 line/mm)
Fine, Photo—196 line/inch (7.7 line/mm) Superfine, Photo (copy)—392 line/inch (15.4 line/mm)
Memory Capacity 512 KB (up to 25 pages*)
One Touch Dial 4
Speed Dial 50 stations
Automatic Redial 3 times at 5 minute intervals
Speaker Type Monitor
Auto Answer 0, 1, 2, 3 or 4 rings
Communication Source Public switched telephone network
Operating Environment 41 - 95° F
Power Source 120V AC 50/60Hz (U.S.A., Canadian Version Only)
Power Consumption Standby: under 5 watts — Peak: under 170 watts
Dimensions 13.1 x 11.9 x 11.1 (inches)/ 334 x 301 x 281 (mm)
Weight 7.5 lb / 3.4 kg

Index
. i1
4
4
i
1
-3
2
9
3
-5
-6
-2
. i
4
i
1
2
-1
AAccessories .............................................
ACTIVITY REPORT .........................10-2
Alternating Displays .............................3-1
Answer Mode ................................ 5-1, 5-
Answering Machine ..............................2-
AUTO DIAL REPORT ......................10-1
Automatic Transmission .......................6-
BBeeper Volume .....................................4-
Broadcasting .........................................7
Broadcasting (Set Up Groups) ..............7-
Brother Numbers .....................................
CCALL PICKUP .....................................8-2
Call Waiting Caller ID ..........................8-4
Caller ID ...............................................8-
Caller ID (Printing Log) .......................8-3
Caller ID (Viewing Log) ......................8-3
CallManage ...........................................8-
Canceling Job ........................................6
Chain Dialing ........................................7-
CHECK PAPER .................................12-
COMM. ERROR ................................12-3
Connect (External Telephone Answering Device) ..............................................2-
Connect (External Telephone) ..............2-
Connect (Power Cord) ..........................2-
Connect (Telephone Line) ....................2-
CONNECTION FAIL ........................12-3
Contrast .................................................6
Control Panel ........................................1-
Corrections (Entering Text) ..................4-
T7BASE-US-FM5.5
I - 1 I N D E X
. ii
2
8
2
4
-6
3
. i
2
5
-5
2
1
8
9
4
4
-3
3
2
Customer Service .....................................
DDate and Time .......................................4-
Delayed FAX ........................................6-
Dialing Mode ........................................4-2
Dialing Options .....................................7-
Disclaimer & Warranties ........................ii
DISCONNECTED ..............................12-3
Distinctive Ring ....................................8-1
DOCUMENT JAM .............................12-3
Documents (Size) ..................................6-
EEasy Receive .........................................5
ECM (Error Correction Mode) .............1-2
Entering Text ........................................4-
External Telephone ...............................2-
External Telephone Answering Device 2-8
FF/T (FAX/TEL) Mode ..........................5-1
F/T Ring Time ......................................5-
FAX ONLY Mode ................................5-1
Fax Receive Code .................................5
Fax Storage ...........................................5
Fax Tones and Handshake ....................1
fax-back system .......................................
Fine (Resolution) ..................................6-
Frequently Asked Questions (FAQs) ........
Function Mode ......................................3-
Function Selection Table ......................3-
GGray Scale ............................................ S

1
7
2
2
4
-5
4
2
5
5
3
7
1
-6
5
-3
3
2
5
4
1
1
4
8
5
-1
2
HHandset Volume ...................................4-
Help ......................................................1-
Hold .............................................. 1-3, 7-
IInserting Spaces ....................................4
International Calls .................................6-
Interrupting ...........................................6-
MMaintenance (Routine) .......................12-
Manual Dialing .....................................7-4
MANUAL Mode ..................................5-1
Manual Transmission ...........................6-
MEMORY STATUS REPORT ..........10-1
Memory Storage ...................................4-
Memory Transmission ..........................6-
Multi-Line Connections ........................2-7
OOne Touch Dial (Changing) .................7-3
One Touch Dial (Storing) .....................7-1
One Touch Dialing ...............................7-
On-Screen Programming ......................3-
Outgoing Message (External TAD) ......2-9
Overseas Mode .....................................6
PPaper Size .............................................5
Pause .....................................................7
PBX ......................................................2-
Photo (Resolution) ................................6-
Polled Transmit .....................................6-
Polling (Receive) ..................................5-
Power Consumption .............................S-
Print (a Fax in Memory) .......................5-6
Print (Caller ID Log) ............................8-3
T7BASE-US-FM5.5
4
1
7
-2
4
5
7
2
5
3
4
1
-4
-4
-7
7
4
5
6
1
Print (Report) ......................................10-
Print Head (Cleaning) .........................12-
PRINTER FAULT ..............................12-4
Pulse (For Canada Only) ......................4-
RRedial (Automatic) ...............................6-2
Redial (Manual) ....................................6-
Reduction (Printing) .............................5-4
Reduction (Recommended Ratios) .......5-
Remote Codes (Changing) ....................5
Resolution .............................................6-
Ring Delay ............................................5-
Ring Volume .........................................4-
Roll Over Phone Lines ..........................2-
SSafety Instructions ..............................11-
Scanner (Cleaning) .............................12-
Scroll .....................................................3-
Search ...................................................7
Speaker Volume ....................................4-
Special characters .................................4
Speed Dial (Changing) .........................7-
Speed Dial (Storing) .............................7-
Speed Dialing ........................................7-
Standard (Resolution) ...........................6-
Station ID ..............................................4-
Storing Telephone Numbers .................7-
Super Fine (Resolution) ........................6-
TTAD ......................................................2-
TAD (Mode) .........................................5-1
TEL.INDEX REPORT .......................10-1
Telephone Answer Code .......................5-
Telephone Numbers ..............................7
Tone ......................................................4-
I N D E X I - 2

Tone (Send Signals) ..............................7
TOP COVER OPEN ...........................12-
TRANSMISSION VERIFICATION (XMIT) REPORT ...........................10-2
Troubleshooting ..................................12-
Two-Line Phone System .......................2-
UUSER SETTINGS REPORT ..............10-1
VVERIFICATION (XMIT) REPORT ..10-1
Volume Amplify ...................................4-5
WWARNING .........................................11-2
I - 3 I N D E X
T7BASE-US-FM5.5
-7
4
1
5

ted, .
Remote Fax Options
Setting Up Fax Storage
Programming Paging NumberWhen Paging is selected, your fax machine dials the pager number you’ve programmed, and dials your Personal Identification Number (PIN) when connecto activate your pager and let you know you have a fax message in the memory
1 Press Function/Set , 8, 1.
2 Press or until the screen displays
and press Function/Set .
3 Enter your pager phone number (up to 20 digits) followed by # # and press Function/Set . Do not include the area code if it is the same as that of your fax machine. For example, 1 8 0 0 5 5 5 1 2 3 4 # #.
4 If your pager requires a PIN, enter the PIN, press #, press Redial/Pause , enter your fax number, then press # # and press Function/Set . For example, 1 2 3 4 5 # Redial/Pause 1 8 0 0 5 2 1 2 8 4 6 # # .—OR—If you do not need a PIN, press Redial/Pause , enter your fax number, then press # # and press Function/Set . For example, Redial/Pause 1 8 0 0 5 2 1 2 8 4 6 # # .
5 Press Stop to exit.
You cannot use Paging and Fax Forwarding at the same time. You cannot use Paging and Fax Forwarding when Fax Storage is set to OFF. (See Turning On Fax Storage, page R-2.)
You cannot change a Paging number or PIN remotely.
PAGING?
PAG#:
ENTER & SET
R E M O T E F A X O P T I O N S R - 1
T7BASE-US-FM5.5

ards
ther en
u can
er
Programming a Fax Forwarding NumberWhen Fax Forwarding is set to ON, your fax machine stores the received fax in memory, then dials the fax machine phone number you’ve programmed, and forwthe fax message.
1 Press Function/Set , 8, 1.
2 Press or until the screen displays FAX FORWARD? and press Function/Set .
3 Enter the number of the fax machine where faxes will be forwarded (up to 20 digits) and press Function/Set .
4 Press Stop to exit.
Turning On Fax StorageIf you set Fax Storage to ON, you will be able to retrieve fax messages from anolocation, using Fax Forwarding, Paging, or Remote Retrieval functions. The screwill indicate when you have a fax stored in memory.
1 Press Function/Set , 8, 2.
2 Press or to select ON (or OFF) and press Function/Set .
3 Press Stop to exit.
If you press 1, all fax data is erased and Fax Storage is turned off. If you press 2, data is not erased, and Fax Storage remains on. (See Printing a Fax in Memory, page 5-6.)
Changing Remote Access CodeEnter your Remote Access Code when the fax machine picks up your call, so yoaccess features remotely. The access code is preset to 1 5 9 , but you can change this.
1 Press Function/Set , 8, 3. (See Operation from External or Extension Telephone, page 5-5)
2 Enter a three-digit number from 000 to 999. The “ ” cannot be changed.Do not use the same digits that appear in your Fax Receive or Telephone AnswCode.
3 Press Function/Set .
4 Press Stop to exit.
If there are faxes in memory when you turn the Fax Storage OFF, the screens prompts you to erase any faxes in memory.
FWD#:
ENTER & SET
FAX STORAGE:OFF?
SELECT & SET
ERASE ALL FAX?
1.YES 2.NO
R - 2 R E M O T E F A X O P T I O N S
T7BASE-US-FM5.5

Using Remote Retrieval Aceess Code
r ss es
n gs
.
e
to
d
s
d Fold
Calling for MessagesYou can call your FAX from any touch tone phone (oremote Group 3 fax machine) and use a Remote AcceCode and other button presses to retrieve fax messag
1 Dial your fax number from a touch tone phone.
2 When your fax machine answers, immediately enter your Remote Access Code (1 5 9 ).
3 The fax machine signals the kinds of messages received:
1 long beep — Fax message(s)No beeps — No messages
4 The fax machine then prompts you with two shortbeeps to enter a command. If you wait longer tha30 seconds to enter a command, the machine hanup. If you enter an invalid command, the machinebeeps three times.
5 Press 9 0 to reset the fax machine when you finish
6 Hang up.
Retrieving Memory Status ListYou can retrieve the Memory Status List from a remotfax machine to see if you have any fax messages.
1 Dial your fax number.
2 When your machine answers, immediately enter your Remote Access Code (1 5 9 ).
3 When you hear two short beeps, use the dial pad press 9 6 1.
4 Using the dial pad, enter the number (up to 20 digits) of the remote fax machine where you wantthe Memory Status List forwarded, and then press# #.
5 After you hear your fax machine beep, hang up anwait.
Your fax machine calls the remote fax machine. The remote fax machine prints the Memory StatuList.
If your fax machine is set to MANUAL mode, you can access your machine by waiting about 2 minutes, then entering the Remote Access Code within 30 seconds.
You cannot use and # as dial numbers. However, if you want to store a pause, press #.
Fol
R E M
T7BASE-US-FM5.5
.
Remote Retrieval Access Card
If you plan to receive fax messages while away from your machine, carrying the Remote Retrieval AccessCard printed below will serve as a convenient reminder of the retrieval procedures. Simply cut out the card and fold it to fit your wallet or organizer. Keeping it handy will help you derive the full benefit of your machine’s forwarding, paging and remote retrieval features.
Usi
ng
Rem
ote
Ret
riev
al A
cces
s C
od
e
1Di
al yo
ur fa
x num
ber f
rom
a fa
x mac
hine
usin
g tou
ch to
ne ph
one.
2W
hen
your
mac
hine
ans
wer
s, im
med
iate
ly e
nter
your
Rem
ote
Retri
eval
Acc
ess C
ode
(159
).
3Y
our m
achi
ne si
gnal
s the
kin
ds o
f mes
sage
s rec
eive
d:1
long
bee
p —
Fax
mes
sage
(s)
3 sh
ort —
No
mes
sage
s.4
Afte
r 2 sh
ort b
eeps
, ent
er a
rem
ote c
omm
and
and
follo
w th
e ste
ps.
5Pr
ess
t
o re
set y
our m
achi
ne w
hen
you
finish
.9
0
6H
ang
up.
14
Pres
s 9
71
1 lo
ng b
eep
— F
ax m
essa
ge(s
)3
shor
t bee
ps —
No
mes
sage
s
CHAN
GE A
NSW
ER M
ODE
Pres
s 9
8th
en fo
r TA
D, p
ress
1FA
X/T
EL (F
ax/T
elep
hone
), pr
ess
2FA
X, p
ress
.3
EXIT
REM
OTE
OPE
RATI
ON
Pres
s 9
0
CHEC
K RE
CEIV
ING
STA
TUS
RE
MO
TER
ETR
IEV
AL
AC
CE
SS
CA
RD
O T E F A X O P T I O N S R - 3
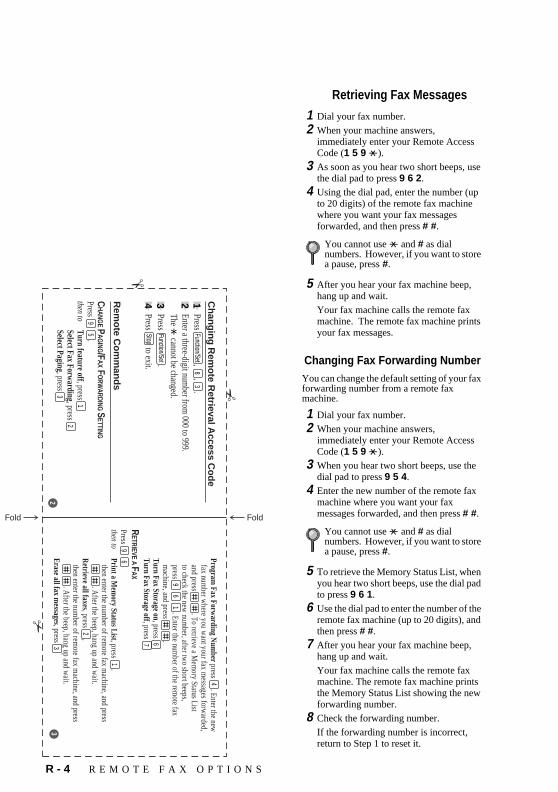
Fold
R - 4 R E M O T E F A X O P T I O N S
T7BASE-US-FM5.5
e
d
e
Retrieving Fax Messages
1 Dial your fax number.
2 When your machine answers, immediately enter your Remote Access Code (1 5 9 ).
3 As soon as you hear two short beeps, usthe dial pad to press 9 6 2.
4 Using the dial pad, enter the number (upto 20 digits) of the remote fax machine where you want your fax messages forwarded, and then press # #.
5 After you hear your fax machine beep, hang up and wait.
Your fax machine calls the remote fax machine. The remote fax machine printsyour fax messages.
Changing Fax Forwarding NumberYou can change the default setting of your faxforwarding number from a remote fax machine.
1 Dial your fax number.
2 When your machine answers, immediately enter your Remote Access Code (1 5 9 ).
3 When you hear two short beeps, use thedial pad to press 9 5 4.
4 Enter the new number of the remote fax machine where you want your fax messages forwarded, and then press # #.
5 To retrieve the Memory Status List, whenyou hear two short beeps, use the dial pato press 9 6 1.
6 Use the dial pad to enter the number of thremote fax machine (up to 20 digits), andthen press # #.
7 After you hear your fax machine beep, hang up and wait.
Your fax machine calls the remote fax machine. The remote fax machine printsthe Memory Status List showing the newforwarding number.
8 Check the forwarding number.
If the forwarding number is incorrect, return to Step 1 to reset it.
You cannot use and # as dial numbers. However, if you want to storea pause, press #.
You cannot use and # as dial numbers. However, if you want to storea pause, press #.
fax number w
here you want your fax m
essages forwarded,
and press . To retrieve a Mem
ory Status Listto check the new
number, after tw
o short beeps,press . Enter the num
ber of the remote fax
machine, and press .
Program Fax Forw
arding Num
ber press . Enter the new4
9
6
1
Turn Fax Storage on, press6
Turn Fax Storage off, press7
RETRIEVE A F
AX
Press 9
6then to
Print a Mem
ory Status List, press .1
then enter the number of rem
ote fax machine, and press
. After the beep, hang up and w
ait.R
etrieve all faxes, press ,2
then enter the number of rem
ote fax machine, and press
. After the beep, hang up and w
ait.Erase all fax m
essages, press3
3
Press , , .
Ch
ang
ing
Rem
ote R
etrieval Access C
od
e
1Function/Set
83
2Enter a three-digit num
ber from 000 to 999.
The cannot be changed.
3Press .
Function/Set
4Press to exit.
Stop
Rem
ote C
om
man
ds
CHANG
E PAG
ING/FAX F
ORW
ARDING S
ETTINGPress .
9
5then to
Turn feature off, press1
Select Fax Forwarding, press
2Select Paging, press
32
Fold

T7BASE-US-FM5.5
LE4131001Printed in Malaysia
®
Brother International Corporation100 Somerset Corporate Boulevard
P.O. Box 6911Bridgewater, NJ 08807-0911 USA
Brother International Corporation (Canada) Ltd.1 rue Hôtel de Ville,
Dollard-des-Ormeaux, QC, CANADA H9B 3H6
Visit us on the World Wide Webhttp://www.brother.com
These machines are made for use in the USA or CANADA only. We can notrecommend using them overseas because it may violate theTelecommunications Regulations of that country and the power requirementsof your fax machine may not be compatible with the power available in foreigncountries.
Using USA or CANADA models overseas is at your own riskand will void your warranty
.


