Owner’s Manual & Technical Information AZSA3001 Crusader II PTF US AZSA3001EU Crusader II PTF EU AZSA3001UK Crusader II PTF UK AZSA3001AU Crusader II PTF AU AZSA3000 Crusader II RTF US AZSA3000EU Crusader II RTF EU AZSA3000UK Crusader II RTF UK AZSA3000M1 Crusader II RTF AU (Mode 1) AZSA3000AU Crusader II RTF AU (Mode 2)
Transcript
Owner’s Manual & Technical Information
AZSA3001 Crusader II PTF USAZSA3001EU Crusader II PTF EUAZSA3001UK Crusader II PTF UKAZSA3001AU Crusader II PTF AU
AZSA3000 Crusader II RTF USAZSA3000EU Crusader II RTF EUAZSA3000UK Crusader II RTF UKAZSA3000M1 Crusader II RTF AU (Mode 1)AZSA3000AU Crusader II RTF AU (Mode 2)
Replacement Parts ..................................................................21
Warranty, Support and Service USA .......................................22
Warranty & Conformity UK .......................................................23
Warranty, Support & Service AU ..............................................24
IMPORTANT! This radio control model is not a toy. It must be operated and flown according to these instructions and may cause serious injury to persons or damage to property if not used responsibly or if operated without due caution. Unsuitable for children under 14 years of age.
4
IntroductionThank you for purchasing an Ares Crusader II. If you’re new to R/C model flying we’d like to welcome you to one of the most far-reaching, absorbing and rewarding hobbies that the aviation world has to offer. You’ve chosen the right product. Eye-catching in its bright semi-scale color scheme, the Ares Crusader II not only looks right, it’s been designed to fly right. Perfectly placed to take the complete beginner from tentative first hops to basic aerobatics and beyond, a close look at the airframe and the well-appointed powertrain will have experienced pilots raising a wry smile in approval.
From its classic Clark-Y high-lift wing and fully symmetrical stabilizer section, through the stable, high ground clearance, trike undercarriage layout, to the roomy fuselage and resilient EPO foam construction, this is an airplane that puts function and form on an equal footing, as a look inside will confirm. Here, the powerful 750kV brushless outrunner and 40A Electronic Speed Controller – coupled to a stock 3S 2200mAh Li-Po – are perfectly suited to the ample 12 x 8” propeller, resulting in enough power to tackle that crucial training function, yet perform aerobatics with ease. As a beginner, you’ll immediately appreciate the Crusader’s docile and forgiving flight envelope, while those with experience will delight in its versatility and outstanding performance. The Ares Crusader II is, quite simply, the perfect one-stop solution to grass-roots training and progression to basic aerobatics.
FCC InformationThis device complies with part 15 of the FCC rules. Operation is subject to the following two conditions:
1.) This device may not cause harmful interference
2.) This device must accept any interference received, including interference that may cause undesired operation.
Caution: Changes or modifications not expressly approved by the party responsible for compliance could void the user’s authority to operate the equipment.
This product contains a radio transmitter with wireless technology which has been tested and found to be compliant with the applicable regulations governing a radio transmitter in the 2.400GHz to 2.4835GHz frequency range.
The associated regulatory agencies of the following countries recognize the noted certifications for this product as authorized for sale and use: USA.
Safety PrecautionsUnsuitable for children under 14 years of age. Failure to use this product in the intended manner as described in the following instructions can result in damage and / or personal injury. A Radio Controlled (RC) airplane is not a toy. If misused it can cause serious bodily harm and damage to property.
5
Keep items that could become entangled in the propeller away from the propeller, including loose clothing, tools, etc. Be especially sure to keep your hands, face and other parts of your body away from the propeller.
As the user of this product you are solely and wholly responsible for operating it in a manner that does not endanger yourself and others or result in damage to the product or the property of others.
This model is controlled by a radio signal that is subject to possible interference from a variety of sources outside your control. This interference can cause momentary loss of control. As a result it’s advisable to always keep a safe distance from objects and people in all directions around your model as this will help to avoid collisions and / or injury.
• Never operate your model if the voltage of the batteries in the transmitter is too low.
• Always operate your model in an open area away from obstacles, people, vehicles, buildings, etc.
• Carefully follow the directions and warnings for this and any optional support equipment (chargers, rechargeable batteries, etc.).
• Keep all chemicals, small parts and all electronic components out of the reach of children.
• Moisture causes damage to electronic components. Avoid exposing to water any electronic components, parts, etc. that are not specifically designed and protected for use in water.
LiPo Battery WarningsIMPORTANT NOTE: Lithium Polymer batteries are significantly more volatile than the alkaline, NiCd or NiMH batteries also used in RC applications. All instructions and warnings must be followed exactly to prevent property damage and / or personal injury as the mishandling of LiPo batteries can result in fire. By handling, charging or using the included LiPo battery you assume all risks associated with LiPo batteries. If you do not agree with these conditions please return the complete product in new, unused condition to the place of purchase immediately.
• You MUST charge the LiPo battery in a safe area away from flammable materials.
• NEVER, at any time, leave the LiPo battery unattended when it’s being charged.
• When charging the battery you should ALWAYS remain in constant observation to monitor the charging process and react immediately to any potential problems that may occur.
• After flying / discharging the battery you must allow it to cool to ambient/room temperature before recharging.
6
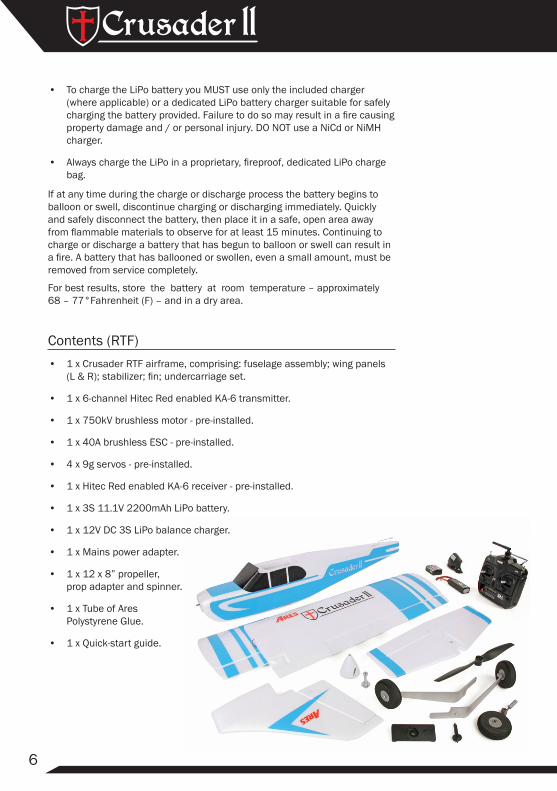
• To charge the LiPo battery you MUST use only the included charger (where applicable) or a dedicated LiPo battery charger suitable for safely charging the battery provided. Failure to do so may result in a fire causing property damage and / or personal injury. DO NOT use a NiCd or NiMH charger.
• Always charge the LiPo in a proprietary, fireproof, dedicated LiPo charge bag.
If at any time during the charge or discharge process the battery begins to balloon or swell, discontinue charging or discharging immediately. Quickly and safely disconnect the battery, then place it in a safe, open area away from flammable materials to observe for at least 15 minutes. Continuing to charge or discharge a battery that has begun to balloon or swell can result in a fire. A battery that has ballooned or swollen, even a small amount, must be removed from service completely.
For best results, store the battery at room temperature – approximately 68 – 77°Fahrenheit (F) – and in a dry area.
• 1 x Hitec Red enabled KA-6 receiver - pre-installed.
• 1 x 3S 11.1V 2200mAh LiPo battery.
• 1 x 12V DC 3S LiPo balance charger.
• 1 x Mains power adapter.
• 1 x 12 x 8” propeller, prop adapter and spinner.
• 1 x Tube of Ares Polystyrene Glue.
• 1 x Quick-start guide.
Required to Complete (RTF)• 4 x AA batteries
Required to Complete (PTF)• 1 x 5-channel Hitec or Hitec Red-enabled transmitter.
8
KA-6 Transmitter Details (Mode 2)
Throttle/Rudder stick
Digital Rudder trim
ON/OFF switch
Digital Aileron trim
Elevator/Aileron stick
Digital Elevator Trim
Digital throttle trim
LED Power indicator
Mode 1/Mode 2 switch
Channel 5 switch
Channel 6 Switch
Servo reversing switches Delta/Elevon
Mix switch
9
KA-6 Transmitter Details (Mode 1)
Elevator/Rudder stick
Digital Rudder trim
ON/OFF switch
Digital Aileron trim
Throttle/Aileron stick
Digital Throttle Trim
Digital elevator trim
LED Power indicator
Mode 1/Mode 2 switch
Channel 5 switch
Channel 6 Switch
Servo reversing switches Delta/Elevon
Mix switch
10
KA-6 Transmitter FunctionalityFor a full description of your KA-6 transmitter’s features and functions refer to the online KA-6 instruction manual located here: http://ikonnik-rc.com/KA6/support.asp
1. Digital trims: Your KA-6 transmitter has digital trims on all for primary controls – aileron; elevator; rudder; throttle. Each movement of the trim button is audibly highlighted by a single short beep, whilst trim center is highlighted by a single longer beep.
2. Servo reverse: The rotation direction of the servos can be individually reversed using the Servo Reversing Switches located on the front facia.
3. Fail Safe: In the event of signal loss the KA-6 is equipped with a fail-safe function which operates across all 6 channels and must be set independent of the pairing process.
4. Delta Mix: Whilst the KA-6 can be used to control delta aircraft (or a flying wing) for Crusader II operation the Delta Mix switch must be set to FIXED WING.
Charging the Supplied LiPo BatteryRead and fully understand the section headed LI-PO BATTERY WARNINGS and never leave LiPo batteries unattended whilst charging.
• Plug the mains power adaptor into a wall socket and connect the charger to the power adaptor using the circular DC socket. Note that the green LED ‘Power’ indicator on the charger will light.
• Place the charger on a flat, heat resistant surface (not carpet) with a good airflow all around. Ensure the vent openings on the bottom and sides of the charger are not blocked. Connect the supplied 3S 2200mAh LiPo battery to the charger using the white three pin balance plug, ensuring the correct orientation of the plug. The red ‘Charger’ LED will light indicating that the battery is charging. When fully charged the red LED will stop glowing, whereupon the battery can be disconnected.
UP
11
Final Assembly1. Apply a generous but even spread of glue (in the area indicated by the cross
hatched lines) to the top and bottom surface of the horizontal stabilizer.
2. Slide the horizontal stabilizer into its slot at the rear of the fuselage and push it fully home.
3. Apply a generous but even spread of glue on either side of the vertical stabilizer (as indicated by the cross hatched lines).
4. Slide the vertical stabilizer into its slot at the rear of the fuselage and push it fully home.
5. Check the orientation of the main undercarriage then slot each leg into the mount making sure to align the rectangular hole in the leg with the matching hole in the mount.
12
6. Insert the undercarriage nose leg into the joiner tube, position the flat section of the leg directly behind the Allen screw, then securely tighten the screw to clamp the leg in place.
7. Join the two wing panels using the main spar, noting that these do not need to be glued together.
8. Connect the aileron leads to the Y-lead extensions that are plugged into Channel 1 of the KA-6 receiver.
9. To attach the wing to the fuselage, locate the dowels at the leading edge then insert the wing bolt plate at the trailing edge to lock the two halves together.
Main Spar
13
10. Insert the wing bolt and push it firmly down to lock it in position. A firm twist in either direction will release it.
11. Open the battery hatch on the underside of the fuselage, insert the fully charged LiPo and slide it as far forward as it will go.
12. Remove the KA-6 transmitter battery cover and insert four AA alkaline cells (not included) taking care to observe the correct polarity.
13. Switch ON your transmitter, ensure the LED is lit solid red and move the throttle stick to its low position.
14
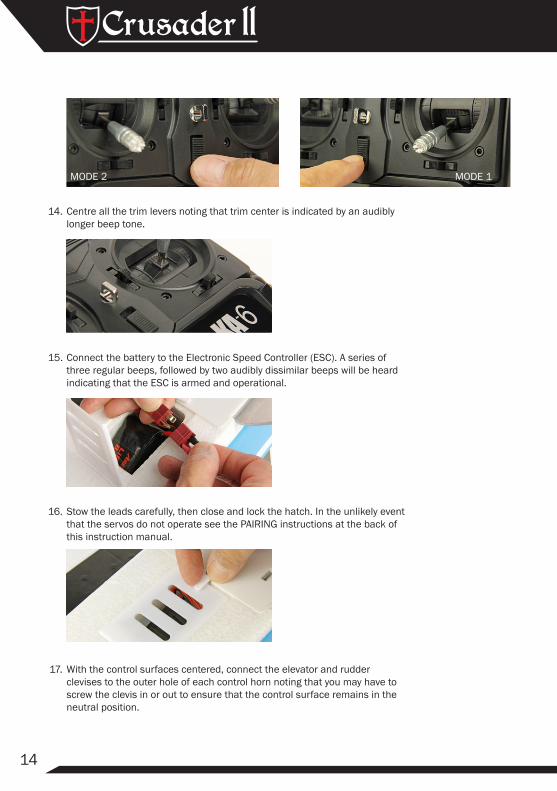
14. Centre all the trim levers noting that trim center is indicated by an audibly longer beep tone.
15. Connect the battery to the Electronic Speed Controller (ESC). A series of three regular beeps, followed by two audibly dissimilar beeps will be heard indicating that the ESC is armed and operational.
16. Stow the leads carefully, then close and lock the hatch. In the unlikely event that the servos do not operate see the PAIRING instructions at the back of this instruction manual.
17. With the control surfaces centered, connect the elevator and rudder clevises to the outer hole of each control horn noting that you may have to screw the clevis in or out to ensure that the control surface remains in the neutral position.
MODE 2 MODE 1
15
18. Check that the ailerons are centered and, if not, adjust the clevises to suit.
19. Make sure the control surfaces operate in the correct direction. With the model in front of you, facing away, move the rudder stick to the left and check that the rudder moves left in response. Right rudder stick will move the rudder to the right.
20. Check the alignment of the nose wheel. With the rudder in the neutral position this will need to be straight. If it’s slightly off center, adjust it in the following manner:
• Lift the wing, disconnect the aileron leads, and stow it carefully to one side.
• Locate the nose wheel steering pushrod on top of the rudder servo.
• Undo the pushrod’s screw-lock connector with a crosshead screwdriver.
• Adjust the pushrod to bring the wheel into alignment.
• Tighten the screw-lock connector, reconnect the aileron leads and reattach the wing.
UP
MODE 2 MODE 1
16
21. Pull the elevator stick back and check that the elevator moves in an upward direction. Push the elevator stick forward and check that the elevator moves in a downward direction.
22. Moving the aileron stick to the left should cause the right-hand aileron to move in a downward direction whilst the left-hand aileron moves upward. Moving the aileron stick to the left will have an opposite effect.
23. Open the throttle slowly and check that the motor shaft turns in an anticlockwise direction (when viewed from the front).
MODE 2 MODE 1
MODE 2 MODE 1
MODE 1MODE 2
17
24. Open the battery hatch, unplug the Li-Po battery and switch OFF the transmitter. Assemble the propeller and spinner in the following sequence:a. Pass the circular propeller driver over the propeller shaft, noting its
orientation.
b. Add the spinner backplate.
c. Fit the propeller over the shaft and seat it comfortably against the upstands of the backplate.
d. Add the washer then loosely fit the prop nut.
e. Add the prop shaft to the motor shaft, push it back as far as it will go, then securely tighten the prop nut, noting that a loose propeller can cause considerable damage and serious injury.
18
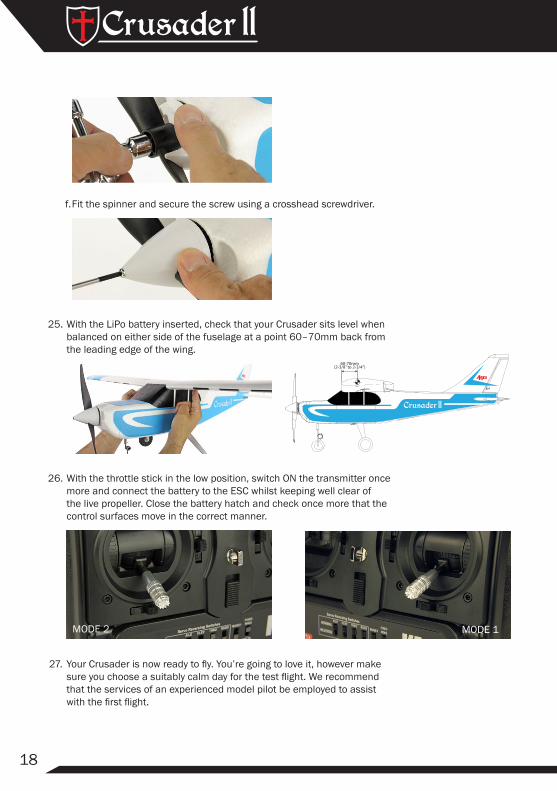
f. Fit the spinner and secure the screw using a crosshead screwdriver.
25. With the LiPo battery inserted, check that your Crusader sits level when balanced on either side of the fuselage at a point 60–70mm back from the leading edge of the wing.
26. With the throttle stick in the low position, switch ON the transmitter once more and connect the battery to the ESC whilst keeping well clear of the live propeller. Close the battery hatch and check once more that the control surfaces move in the correct manner.
27. Your Crusader is now ready to fly. You’re going to love it, however make sure you choose a suitably calm day for the test flight. We recommend that the services of an experienced model pilot be employed to assist with the first flight.
MODE 2 MODE 1
60-70mm(2-3/8” to 2-3/4”)
19
Flying Your Crusader IIWhere model flying is concerned, it’s not possible to have too much space.So, we recommend flying your Crusader in a large enough area to ensure that control is relaxed and that you have time to think. The area required will be free of obstructions and at least the size of a ball field. We suggest that early flights be carried out when the wind conditions are light, however once you’re familiar with your Crusader you will easily be able to fly in less favorable conditions. If you’re new to model flying we strongly recommend that the services of an experienced model pilot be employed to assist with your first flight.
The Crusader has plenty of power and will not struggle to get airborne. With this in mind, and whilst our recommended method is to take-off from a tarmac or short grass strip, it is possible to hand-launch the model. If you adopt this method:
• Always launch your Crusader DIRECTLY INTO WIND
• Smoothly APPLY FULL POWER immediately before launching
• Always launch the model with the WINGS STRAIGHT AND LEVEL
• Launch the model with the NOSE POINTING SLIGHTLY UPWARD, never downward
• Make your launch positive and GIVE THE MODEL FLYING SPEED
Performing an ROG (Rise Off Ground) take-off is entirely conventional. Always take-off with the model facing directly into wind. Open the throttle smoothly and progressively to full power and, as the Crusader gathers speed, correct with rudder to counter any natural tendency that the model may have to pull to the left (this is a perfectly normal reaction to motor / propeller torque). Allow the Crusader to roll for 15 to 20ft then ease the elevator back to lift her clear of the ground.
Climb away smoothly and when good altitude has been achieved initiate a gentle aileron turn whist continuing to climb. At cruising height you can reduce the throttle and perform some relaxed familiarisation circuits whilst keeping the model well within visual range. The Crusader has an abundance of power so note that cruising throttle will be somewhat lower (about ¼ stick)
20
than similar trainers of this type. This is a good thing and allows ample power for any number of regular aerobatic maneuvers, including loops, rolls, inverted flight, Cuban Eights, stall turns and, in experienced hands, even knife-edge.
Landing can be intimidating for novice pilots, however the Crusader’s light wing loading and gentle slow speed characteristics make it easy. Even so, when you turn onto final approach mke sure you position the nose of the airplane directly into wind. Ease the power back to reduce altitude and keep the wings straight and level all the way down. As the ground approaches, a final application of elevator to flair will ensure a gentle touchdown and the culmination of a perfect flight.
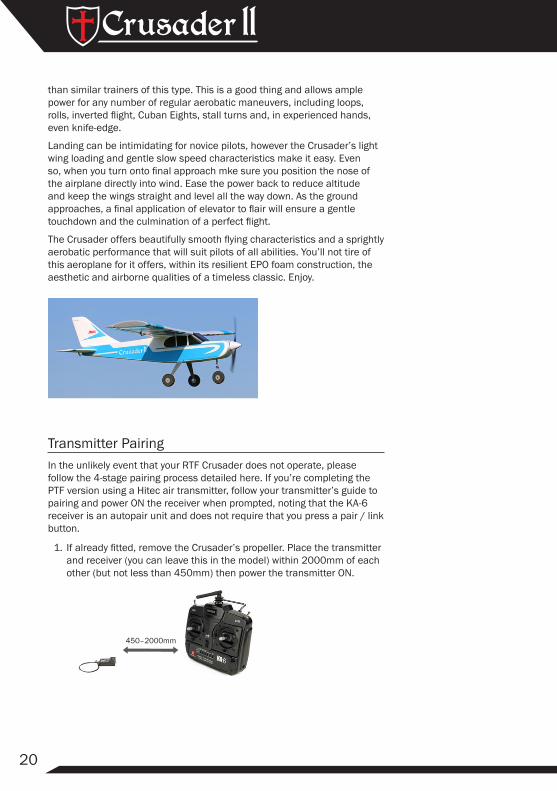
The Crusader offers beautifully smooth flying characteristics and a sprightly aerobatic performance that will suit pilots of all abilities. You’ll not tire of this aeroplane for it offers, within its resilient EPO foam construction, the aesthetic and airborne qualities of a timeless classic. Enjoy.
Transmitter PairingIn the unlikely event that your RTF Crusader does not operate, please follow the 4-stage pairing process detailed here. If you’re completing the PTF version using a Hitec air transmitter, follow your transmitter’s guide to pairing and power ON the receiver when prompted, noting that the KA-6 receiver is an autopair unit and does not require that you press a pair / link button.
1. If already fitted, remove the Crusader’s propeller. Place the transmitter and receiver (you can leave this in the model) within 2000mm of each other (but not less than 450mm) then power the transmitter ON.
450–2000mm
21
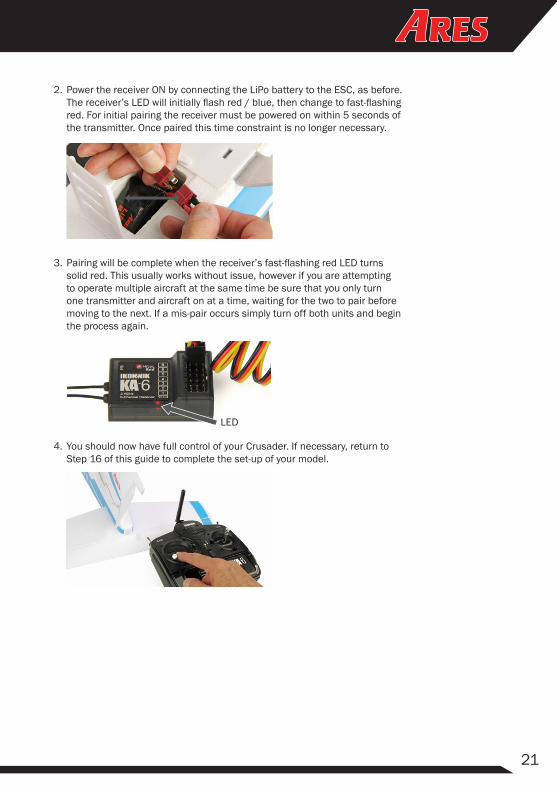
2. Power the receiver ON by connecting the LiPo battery to the ESC, as before. The receiver’s LED will initially flash red / blue, then change to fast-flashing red. For initial pairing the receiver must be powered on within 5 seconds of the transmitter. Once paired this time constraint is no longer necessary.
3. Pairing will be complete when the receiver’s fast-flashing red LED turns solid red. This usually works without issue, however if you are attempting to operate multiple aircraft at the same time be sure that you only turn one transmitter and aircraft on at a time, waiting for the two to pair before moving to the next. If a mis-pair occurs simply turn off both units and begin the process again.
4. You should now have full control of your Crusader. If necessary, return to Step 16 of this guide to complete the set-up of your model.
45–200cm
LED
22
Recommended AccessoriesTo minimise your waiting time and maximise the enjoyment of your Crusader II we recommend the following accessories:
Limited Warranty Ares products are covered by the currently valid statutory warranty regulations. If you wish to make a claim under the limited warranty, please contact the model shop where you originally purchased the unit.
The limited warranty does not cover:
• Damage due to commercial use, negligence, misuse, abuse, accident, or acts of God
• Damage due to improper installation, operation or maintenance
• Normal wear and tear
• Cosmetic damage
• Modifications or repairs not carried out by Ares or by an authorised Ares Service Centre
• Product not purchased from an authorized Ares dealer
• The use of accessories other than original Ares items
• Use of the unit outside the stated specification
Ares and its authorised representatives accept no liability for loss, damage or costs which are caused by the incorrect or incompetent use of the product.
UK Distribution - Ares is distributed in the UK by: J Perkins Distribution Ltd. Lenham, Kent, ME17 2DL. www.jperkins.com
CE Conformity DeclarationJ Perkins (Distribution) confirms this product is in compliance with the relevant harmonised European directives relating to its safe operation.
To see a copy of the relevant Declaration of Conformity visit: http://www.ares-rc.com/support
DisposalThis appliance is labelled in accordance with European Directive 2012/19/EU concerning Waste Electrical and Electronic Equipment (WEEE). The WEEE Directive came into force to reduce the disposal of domestic waste and promote recycling. Any electrical item that carries the crossed out wheelie bin logo must not be disposed of in domestic waste but should be taken to a designated collection facility. J Perkins (Distribution) are a member of an approved compliance scheme to encourage consumers to recycle unwanted items. Your local authority will be able to provide details of your nearest approved waste disposal site.