16
Owner’s Manual York B500 Bench Item #45068 June 30,2013 www.yorkfitness.com
Owner’s Manual
York B500 Bench Item #45068
June 30,2013
www.yorkfitness.com

www.yorkfitness.com2
Table of contentsCongratulations on purchasing your exercise equipment from
You have chosen a high quality, safe and innovative piece of equipment as your training partner and we are certain it will keep you motivated on the way to achieving your personal fitness goals.Please take the time to read this owner’s manual as it will help you to get the most out of your new exercise equipment. For more information visit www.yorkfitness.com
CONTENTS
Safety information 03
Customer support 04
Assembly instructions 05
Important information 14
Exploded drawing 15
Part list 15
Protect the environment by not disposing of this product or batteries with household waste. Check your local authority for recycling advice and facilities.

www.yorkfitness.com 3
Safety informationPlease read this instruction manual before you begin assembly. Great care has been taken to design these instructions and following them will help you with quicker assembly and minimize the risk of injury.
It is important that you keep these instructions for future reference.
This list is not exhaustive - You are responsible for your own safety!
• Assemble the product on a level surface
• You will need at least one person to help you assemble this unit.
• Always use the product on a level surface, ensure that the product is stable before use.
• Always ensure that the equipment has adequate space on each side and front (the back can be near to a wall).
• Replace defective components immediately, and/or keep the equipment out of use until it is repaired.
• Use only the adjustment settings as described in the instructions. Always use the correct adjustment pin and/or locking devices.
• secure before use and / or after adjustment.
• Never leave any adjustment devices projecting from the product.
• Always consult your doctor before undertaking any exercise program.
• Always wear suitable clothing and footwear e.g. tracksuit / shorts / training shoes
• Remove all personal jewelry before exercising.
• Ensure you warm-up well before using the equipment as this will help to prevent muscle strain.
• After eating, allow 1-2 hours before exercising as this will help to prevent muscle strain.
• Injuries to health may result from incorrect or excessive training.
• Never overload the equipment - the maximum user load is displayed in these instructions and on the product label.
• We recommend that you do not lift weights alone.
• There should be somebody there to assist you.
• Never use the equipment in any other manner other than the ways explained in these instructions and/or any wall-chart supplied.
• Parents and others in charge of children should be aware of their responsibility, because the natural play instinct and the fondness of experimenting of children can lead to situations and behavior for which the training equipment is not intended
• If children are allowed to use the equipment, their mental and physical development and above all their temperament should be taken into account. They should be controlled and instructed in the correct use of the equipment.
• The equipment is under no circumstances suitable as a children’s toy.
• Children should not be allowed on, or around the equipment - especially when it is not in use.
• This product has been tested for use in a home environment and is warranted for In Home, personal, family or household use.
• Due to our continuous policy of product development, York Fitness reserves the right to
CAUTION! The instructions must be followed carefully in the assembly, use and maintenance of your equipment. The warranty does not cover damage due to negligence of the assembly, adjustment and maintenance instructions described herein.
100kg User, 100kg Training
Safety StandardsThis bench meets the requirements of British and EU safety standards EN957 parts 1 and 4, Class H.
Tools and consumables• 2 x 10 & 13 & 17mm spanner• Slotted Screwdriver

www.yorkfitness.com4
Customer supportShould you require any assistance regarding this product please gather the following information and then contact us using the details below:
• Serial No. - This can be found on the sticker below, located as indicated. • Original purchase date• Place of purchase• Information about the place and conditions of use• Precise description of the issue / defect
Use only on a level surfaceNot suitable for therapeutic purpose
Manufacturer: YORK BARBELLContact: York Way, Daventry, England, NN11 4YBProduct Name: York B500 Folding BenchMax User Weight: 100KG USER, 100KG TRAININGSafety Standards: EN957 Part 1 & 4 - Class H
SERIAL NO: 45068-
Product’s Name
Serial Number
This product label is an example only, it is not the realserial number of the item you have bought.
IMPORTANT!! - Please retain your sales receipt, York Fitness Customer Care may request proof of purchase to validate eligibility for warranty service. Warranty cover starts from the date shown on the proof of purchase.
ENGLAND - York Barbell UK Ltd.
York Way, Daventry, England, NN11 4YB Tel: 0844 225 3112 Website:
AUSTRALIA - York Fitness Australia
1/2 Swaffham Rd, Minto, PO Box 5130, NSW 2566 Tel: 1800 730 149 Website:
USA - York Barbell USA Inc.
3300 Board Road, York, PA 17406 Tel: 1 (717) 767-6481 Toll Free: 1 (800) 358-9675 Website: www.yorkbarbell.com
Canada - York Barbell Co. Ltd. Canada
1450 South Service Rd. West, Oakville (Toronto), ON, L6L 5T7 Tel: 1 (905) 827-6362 Toll Free: 1 (800) 361-0448

www.yorkfitness.comwww.yorkfitness.com 5
Assembly instructionsCare & Maintenance• This equipment should not be placed outdoors, in a garage or an outbuilding. Keep the equipment in a dry
place with as little temperature variation as possible. • We recommend placing a mat beneath the equipment to protect both the equipment and your flooring. • Always place the equipment in a dry environment.• Use a warm, damp cloth to keep the product clean.• No wet cleaning of electrical components. Unplug before any care and maintenance.• The safety level of the equipment can be maintained only if it is regularly examined for damage and wear. This
includes any ropes, pulleys, nuts, bolts, moving parts, bushes, chains, wheels, bearings & connection points etc.• Ensure that you inspect the product regularly - at least once a week is recommended.• Ensure that all fixings are tight before use.• Always replace damaged / worn components with original parts from the manufacturer.
PREPARE YoUR woRK AREA - It is important you assemble the product in a clean and uncluttered space.woRK wITh A FRIEND - We recommend you have someone assist you with the assembly as some of the components are quite heavy.UNPACK ThE CARToN - Remove all the parts and lay them out on the floor.

www.yorkfitness.com6
(MM)
45068KH-30300
21 M10x55L 7pcs
32 M
10 1
5pcs
24 M10x95L 1pcs
20 M10x90L 2pcs
22 M
10x5
5L 2
pcs
29 M
10x1
10L
1pc
s
31 M
10x6
0L 3
pcs25 M10x70L 1pcs
30 11x20 22pcs
26 M
8x40
L 4
pcs
28 M8x20L 2pcs
27 8.5x18 6pcs
34 M8 2pcs23 M6x45 1pcs
33 M6 1pcs
17 D8 1pcs
Assembly instructionsBlister Pack:
www.yorkfitness.comwww.yorkfitness.com 7
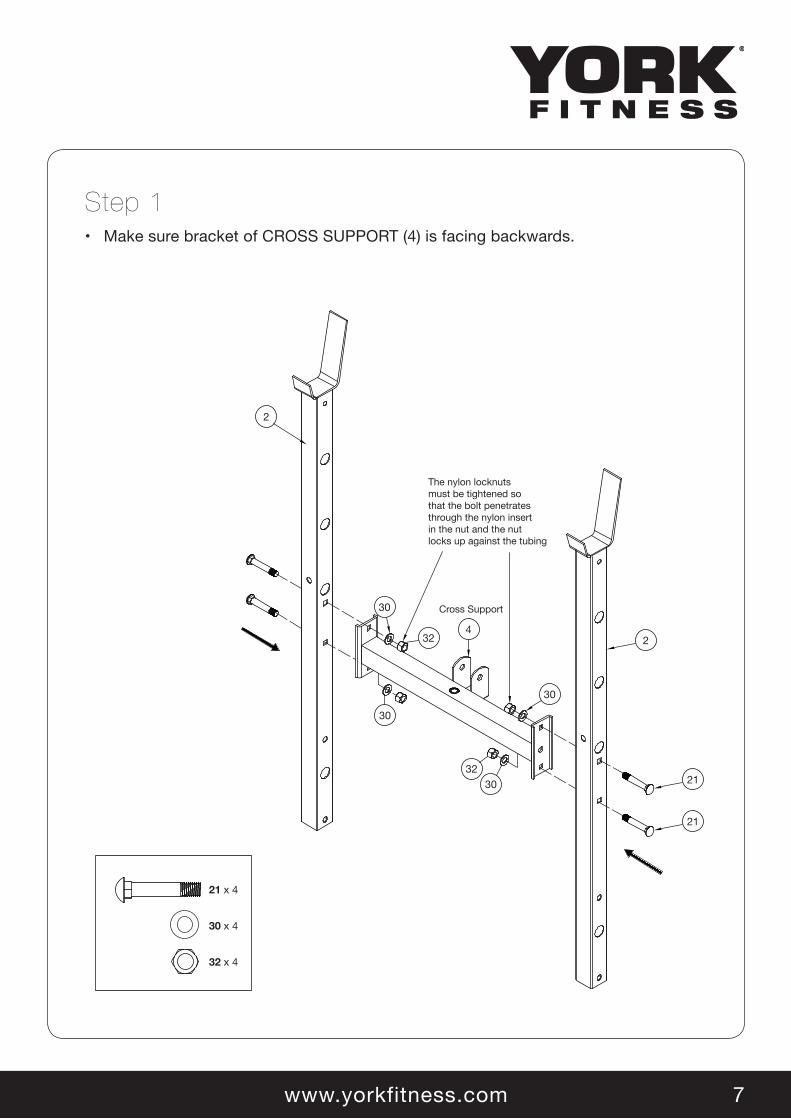
The nylon locknutsmust be tightened sothat the bolt penetratesthrough the nylon insertin the nut and the nutlocks up against the tubing
Cross Support
2
30
30
3032
30
2
21
324
32 x 4
30 x 4
21 x 4
21
Step 1• Make sure bracket of CROSS SUPPORT (4) is facing backwards.

www.yorkfitness.com8
Step 2
Assembly instructions
121
20
15
22
30
3032
20
3022
15
IMPORTANTN.B. Make sure this hexhead bolt is in the thirdhole from the bottomof u-bend basement.
32 x 6
30 x 8
20 x 2
22 x 2
21 x 2

www.yorkfitness.comwww.yorkfitness.com 9
30
5
24
40
3130
3230
3121
16
16
6
30
32
IMPORTANTH.B. The off entre holeshould be towards the top.
Fit the carriage boltin the square holeeither side.
The nylon lock nutsmust be tightened sothat the bolt penetratesthrough the nyloninsert in the nut andthe nut locks upagainst the tubing
32 x 2
30 x 4
21 x 1
31 x 2
24 x 1
Step 3

www.yorkfitness.com10
Assembly instructions
18
27
26
10
27 x 4
26 x 4
Step 4• N.B. First Fasten Backrest Supports (Part #10) to the Upholstery (Part #18). Do not
tighten until the supports are fastened to the bench.

www.yorkfitness.comwww.yorkfitness.com 11
9
32
3029
32 x 1
30 x 2
29 x 1
H.B. The offentre hole should be towards the top.
Step 5

www.yorkfitness.com12
Assembly instructions
19
34
8
2728
32
13
30
31
These hooks should be inposition when unloading or
loading weights. Large weightsshould be only loaded
or unloaded with bar on floor.
HOOKS IN LOCKED POSITION
32 x 1
30 x 2
31 x 1
27 x 2
28 x 2
Step 6

www.yorkfitness.comwww.yorkfitness.com 13
Step 7
36
12
7
39
36
12
3630
3239
36
36
14
11
2344
4217
33
2530
Make sure you fit,the carraige bolt (23)in the square holeof leg unit (7).
32 x 1
30 x 2
25 x 1
39 x 2
44 x 1
33 x 1
17 x 1
23 x 1

www.yorkfitness.com14
IMPORTANT INSTRUCTION
Before using your bench check the following:1. The bench has been set up correctly as shown.
2. The carriage bolts are in place 6 secure.
3. The Tri-knob is fastened securely.
4. The backrest adjustable post is correctly in position.
5. All the nuts and bolts arc secured. 24
40
How to fold up your bench:1. Remove the Tri-Knob
2. Remove the carriage bolts.
3. Lift the front leg and fold up your bench. NOTE: T
4. When the bench is upright put the backrest adjustable post in the top hole to stop bench folding down.
5. Replace the Tri-Knob and carriage bolt, so you do not lose them.
6. Store the bench safety e.g. away from children.
www.yorkfitness.comwww.yorkfitness.com 15
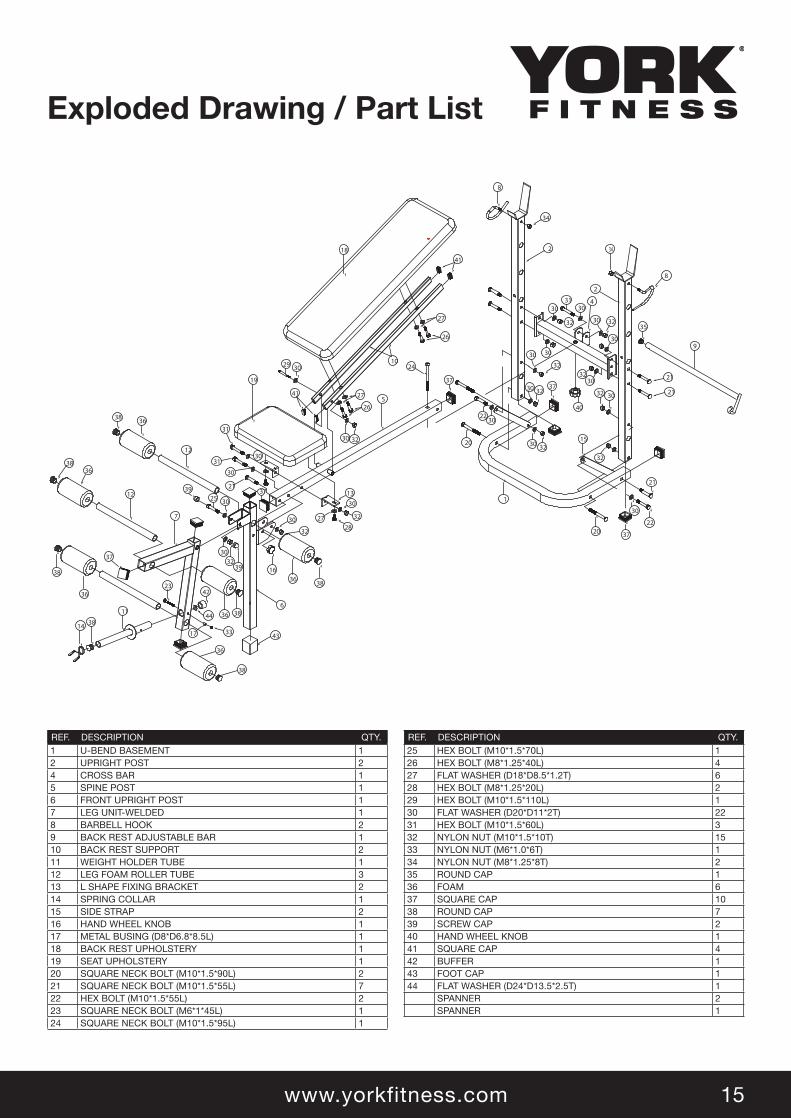
Exploded Drawing / Part List
37
8
34
2 34
8
2
35
9
21
21
3230
3230
30
30
32
3031
37
40
3022
20
37
12
3638
30
30
32
32 3030 32
1
21
22
30
3720
32
24
5
3031
30
3115
3230
27
26
27
26
41
41
3029
19
30 32
1330
32
2827
21
30
32
3836
1632
39
30
6
43
3836
42
302539
17 33
36
38
11
3814
2336
38
37
12
7
3638
4
10
R
18
44
REF. DESCRIPTION QTY.1 U-BEND BASEMENT 12 UPRIGHT POST 24 CROSS BAR 15 SPINE POST 16 FRONT UPRIGHT POST 17 LEG UNIT-WELDED 18 BARBELL HOOK 29 BACK REST ADJUSTABLE BAR 110 BACK REST SUPPORT 211 WEIGHT HOLDER TUBE 112 LEG FOAM ROLLER TUBE 313 L SHAPE FIXING BRACKET 214 SPRING COLLAR 115 SIDE STRAP 216 HAND WHEEL KNOB 117 METAL BUSING (D8*D6.8*8.5L) 118 BACK REST UPHOLSTERY 119 SEAT UPHOLSTERY 120 SQUARE NECK BOLT (M10*1.5*90L) 221 SQUARE NECK BOLT (M10*1.5*55L) 722 HEX BOLT (M10*1.5*55L) 223 SQUARE NECK BOLT (M6*1*45L) 124 SQUARE NECK BOLT (M10*1.5*95L) 1
REF. DESCRIPTION QTY.25 HEX BOLT (M10*1.5*70L) 126 HEX BOLT (M8*1.25*40L) 427 FLAT WASHER (D18*D8.5*1.2T) 628 HEX BOLT (M8*1.25*20L) 229 HEX BOLT (M10*1.5*110L) 130 FLAT WASHER (D20*D11*2T) 2231 HEX BOLT (M10*1.5*60L) 332 NYLON NUT (M10*1.5*10T) 1533 NYLON NUT (M6*1.0*6T) 134 NYLON NUT (M8*1.25*8T) 235 ROUND CAP 136 FOAM 637 SQUARE CAP 1038 ROUND CAP 739 SCREW CAP 240 HAND WHEEL KNOB 141 SQUARE CAP 442 BUFFER 143 FOOT CAP 144 FLAT WASHER (D24*D13.5*2.5T) 1
SPANNER 2SPANNER 1

www.yorkfitness.com


