35
OWNER’S MANUAL MANUEL D’UTILISATION BEDIENUNGSANLEITUNG
| Date post: | 16-Mar-2018 |
| Category: |
Documents |
| Upload: | doankhuong |
| View: | 218 times |
| Download: | 1 times |

OWNER’S MANUALMANUEL D’UTILISATION
BEDIENUNGSANLEITUNG

PrecautionsLocationUsing the unit in the following locations can result in amalfunction.
• In direct sunlight• Locations of extreme temperature or humidity• Excessively dusty or dirty locations• Locations of excessive vibration• Close to magnetic fields
Power supplyPlease connect the designated AC adapter to an AC out-let of the correct voltage. Do not connect it to an AC out-let of voltage other than that for which your unit is in-tended.Interference with other electrical devicesRadios and televisions placed nearby may experience re-ception interference. Operate this unit at a suitable dis-tance from radios and televisions.
HandlingTo avoid breakage, do not apply excessive force to theswitches or controls.
CareIf the exterior becomes dirty, wipe it with a clean, drycloth. Do not use liquid cleaners such as benzene or thin-ner, or cleaning compounds or flammable polishes.
Keep this manualAfter reading this manual, please keep it for later refer-ence.
Keeping foreign matter out of yourequipmentNever set any container with liquid in it near this equip-ment. If liquid gets into the equipment, it could cause abreakdown, fire, or electrical shock.Be careful not to let metal objects get into the equipment.If something does slip into the equipment, unplug theAC adapter from the wall outlet. Then contact yournearest Korg dealer or the store where the equipmentwas purchased.
THE FCC REGULATION WARNING (forU.S.A.)
This equipment has been tested and found to complywith the limits for a Class B digital device, pursuant toPart 15 of the FCC Rules. These limits are designed toprovide reasonable protection against harmful interfer-ence in a residential installation. This equipment gener-ates, uses, and can radiate radio frequency energy and, ifnot installed and used in accordance with the instruc-tions, may cause harmful interference to radio commu-nications. However, there is no guarantee that interfer-ence will not occur in a particular installation. If thisequipment does cause harmful interference to radio ortelevision reception, which can be determined by turn-ing the equipment off and on, the user is encouraged totry to correct the interference by one or more of the fol-lowing measures:Reorient or relocate the receiving antenna.Increase the separation between the equipment and re-ceiver.Connect the equipment into an outlet on a circuit differ-ent from that to which the receiver is connected.Consult the dealer or an experienced radio/TV techni-cian for help.Unauthorized changes or modification to this systemcan void the user’s authority to operate this equipment.
CE mark for European Harmonized StandardsCE mark which is attached to our company’s products ofAC mains operated apparatus until December 31, 1996means it conforms to EMC Directive (89/336/EEC) andCE mark Directive (93/68/EEC).And, CE mark which is attached after January 1, 1997means it conforms to EMC Directive (89/336/EEC), CEmark Directive (93/68/EEC) and Low Voltage Directive(73/23/EEC).Also, CE mark which is attached to our company’s prod-ucts of Battery operated apparatus means it conforms toEMC Directive (89/336/EEC) and CE mark Directive(93/68/EEC).
IMPORTANT NOTICE TO CONSUMERSThis product has been manufactured according to strictspecifications and voltage requirements that are appli-cable in the country in which it is intended that thisproduct should be used. If you have purchased thisproduct via the internet, through mail order, and/or viaa telephone sale, you must verify that this product is in-tended to be used in the country in which you reside.WARNING: Use of this product in any country otherthan that for which it is intended could be dangerousand could invalidate the manufacturer’s or distributor'swarranty.Please also retain your receipt as proof of purchase oth-erwise your product may be disqualified from themanufacturer’s or distributor's warranty.

1
2
1
3
4
12
13
5
6
78
910
11
IntroductionThank you for purchasing the KP2 KAOSS PAD dynamic effect/controller. For trouble-free en-joyment of the KP2’s fullest potential, please read this manual carefully and use the productcorrectly.
Top panel1. [INPUT SELECT] switch2. [PEAK] indicator3. [INPUT VOLUME] knob4. [FX DEPTH] knob5. [PROGRAM/BPM] display6. [PROGRAM/BPM] knob7. [PROGRAM MEMORY 1–8] keys8. [TAP/BPM] key9. Touch pad10. [PAD MOTION/MUTE] lever11. [REC/STOP] key12. [SAMPLE 1, 2] keys13. [HOLD] key
Front panel1. [PHONES VOLUME] knob2. [PHONES] output jack3. [MIC TRIM] knob4. [MIC] input jack
Rear panel1. [GROUND] connector2. [PHONO IN] jacks3. [LINE IN] jacks4. [LINE OUT] jacks5. [CONNECTION] switch6. [MIDI IN], [MIDI OUT] connectors7. DC 12V jack8. [POWER] switch
Parts of the KP2 and their functions
2
1 34
4321
5
7
8
6

2
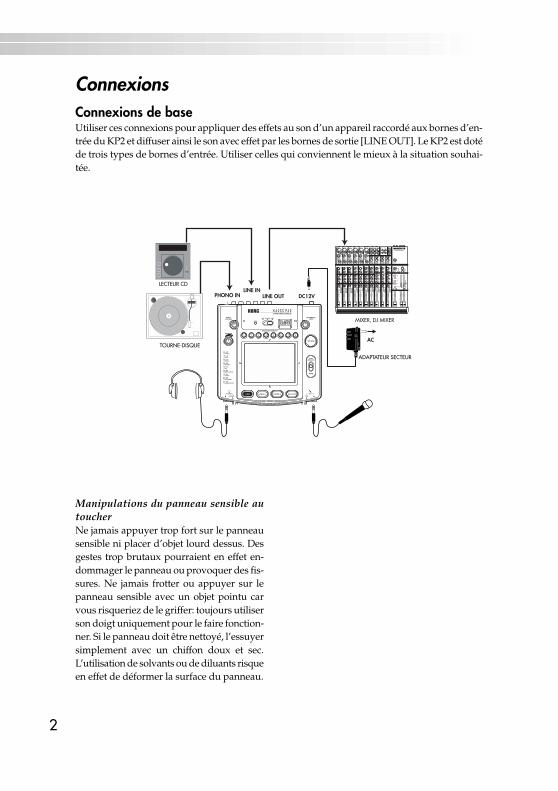
ConnectionsBasic connectionsUse these connections when you want to apply effects to the sound from a device connected tothe KP2’s input jacks, and output the processed sound from the Line Out jacks. The KP2 hasthree types of input jacks. Use the jacks that are appropriate for your situation.
PHONO INLINE IN
LINE OUT DC12V
MIXER, DJ MIXER
AC
MIC1
BAL�OR�
UNBAL
LINE IN 1LOW CUT�
75Hz�18dB/OCT
�TRIM+10dB -40dB
10 �60
U
-10dBV
MIC GAIN
LINE IN 7-8
L
R
BAL�OR�
UNBAL
MONO��
+4�-10
LEVEL��
LINE IN 9-10
L
R
BAL�OR�
UNBAL
MONO��
+4�-10
LEVEL��
LINE IN 11-12
L
R
BAL�OR�
UNBAL
MONO��
+4�-10
LEVEL��
LINE IN 13-14
L
R
BAL�OR�
UNBAL
MONO��
+4�-10
LEVEL��
STEREO AUX RETURNS1
2
1
2
AUX SEND
LEFT(1/MONO) RIGHT ALL BAL/UNBAL
L
R
TAPE�INPUT
TAPE�OUTPUT
MAIN OUTSL
R
BAL/UNBAL
PHONES
MICRO SERIES 1402-VLZ14-CHANNEL MIC/LINE MIXER
MIC2
BAL�OR�
UNBAL
LINE IN 2LOW CUT�
75Hz�18dB/OCT
�TRIM+10dB -40dB
10 �60
U
-10dBV
MIC GAIN
MIC3
BAL�OR�
UNBAL
LINE IN 3LOW CUT�
75Hz�18dB/OCT
�TRIM+10dB -40dB
10 �60
U
-10dBV
MIC GAIN
MIC4
BAL�OR�
UNBAL
LINE IN 4LOW CUT�
75Hz�18dB/OCT
�TRIM+10dB -40dB
10 �60
U
-10dBV
MIC GAIN
MIC5
BAL�OR�
UNBAL
LINE IN 5LOW CUT�
75Hz�18dB/OCT
�TRIM+10dB -40dB
10 �60
U
-10dBV
MIC GAIN
MIC6
BAL�OR�
UNBAL
LINE IN 6LOW CUT�
75Hz�18dB/OCT
�TRIM+10dB -40dB
10 �60
U
-10dBV
MIC GAIN
60
U
+15
U
+15
AUX1�
MON/�EFX
2�EFX
U
+15
U
+12
-15
-12
U
+15-15
PAN
SOLO
1�MUTE�A LT 3 – 4
EQHI�
12kHz
MID�2.5kHz
LOW�80Hz
L R
dB10
5
U
5
10
20
30
4050
60
U
+15
U
+15
AUX1�
MON/�EFX
2�EFX
U
+15
U
+12
-15
-12
U
+15-15
PAN
SOLO
2�MUTE�A LT 3 – 4
EQHI�
12kHz
MID�2.5kHz
LOW�80Hz
L R
dB10
5
U
5
10
20
30
4050
60
U
+15
U
+15
AUX1�
MON/�EFX
2�EFX
U
+15
U
+12
-15
-12
U
+15-15
PAN
SOLO
3�MUTE�A LT 3 – 4
EQHI�
12kHz
MID�2.5kHz
LOW�80Hz
L R
dB10
5
U
5
10
20
30
4050
60
U
+15
U
+15
AUX1�
MON/�EFX
2�EFX
U
+15
U
+12
-15
-12
U
+15-15
PAN
SOLO
4�MUTE�A LT 3 – 4
EQHI�
12kHz
MID�2.5kHz
LOW�80Hz
L R
dB10
5
U
5
10
20
30
4050
60
U
+15
U
+15
AUX1�
MON/�EFX
2�EFX
U
+15
U
+12
-15
-12
U
+15-15
PAN
SOLO
5�MUTE�A LT 3 – 4
EQHI�
12kHz
MID�2.5kHz
LOW�80Hz
L R
dB10
5
U
5
10
20
30
4050
60
U
+15
U
+15
AUX1�
MON/�EFX
2�EFX
U
+15
U
+12
-15
-12
U
+15-15
PAN
SOLO
6�MUTE�A LT 3 – 4
EQHI�
12kHz
MID�2.5kHz
LOW�80Hz
L R
dB10
5
U
5
10
20
30
4050
60
U
+15
U
+15
AUX1�
MON/�EFX
2�EFX
U
+15
U
+12
-15
-12
U
+15-15
PAN
SOLO
7–8�MUTE�A LT 3 – 4
EQHI�
12kHz
MID�2.5kHz
LOW�80Hz
L R
dB10
5
U
5
10
20
30
4050
60
U
+15
U
+15
AUX1�
MON/�EFX
2�EFX
U
+15
U
+12
-15
-12
U
+15-15
PAN
SOLO
9–10�MUTE�A LT 3 – 4
EQHI�
12kHz
MID�2.5kHz
LOW�80Hz
L R
dB10
5
U
5
10
20
30
4050
60
U
+15
U
+15
AUX1�
MON/�EFX
2�EFX
U
+15
U
+12
-15
-12
U
+15-15
PAN
SOLO
11–12�MUTE�A LT 3 – 4
EQHI�
12kHz
MID�2.5kHz
LOW�80Hz
L R
dB10
5
U
5
10
20
30
4050
60
U
+15
U
+15
AUX1�
MON/�EFX
2�EFX
U
+15
U
+12
-15
-12
U
+15-15
PAN
SOLO
13–14�MUTE�A LT 3 – 4
EQHI�
12kHz
MID�2.5kHz
LOW�80Hz
L R
dB10
5
U
5
10
20
30
4050
60
dB10
5
U
5
10
20
30
4050
60
dB10
5
U
5
10
20
30
4050
U
+10
U
+20
U
+20
1
2AUX 1 MASTER
PRE�POST
NORMALLED
AUX 1�SELECT
EFX TO�MONITOR
AUX �RETURNS
SOURCE
MAIN�MIX
LEFT RIGHT
CLIP+28
+10
+7
+4
+2
0
-2
-4
-7
-10
-20
-30
0dB=0dBu
RUDE SOLO LIGHT
ALT�3-4
TAPE
ASSIGN�TO MAIN MIX
NORMAL(AFL)LEVEL SET(PFL)
SOLO�MODE
PHANTOM POWER
CONTROL�ROOM / PHONES MAIN MIX
TURNTABLE
CD PLAYER
AC ADAPTER
Care of the touch padNever press the touch pad with excessiveforce, or place heavy objects on it. It maycrack or break if handled roughly. Press thetouch pad only with your finger, since rub-bing or pressing the touch pad with a sharpobject will scratch it. To clean the touch pad,wipe it lightly with a soft dry cloth. Do notuse solvents such as thinner, since this maycause deformation.

3
DJ mixer connectionsTo use the KP2 as an external effect processor, connect the effect send jack of your DJ mixer etc.to the Line In jacks of the KP2, and connect the Line Out jacks of the KP2 to the effect returnjacks of your mixer.
When using a connection via the effect send/return jacksSet theKP2’s Connection switch to FX LOOP. With this setting, the output signal from the KP2’sLine Out jacks will consist only of the sound processed by the KP2, and will not include theoriginal sound that is being input to the KP2.If you want to use the KP2’s FX/Depth knob to adjust the effect depth during use, set thisswitch to the DIRECT position.
LINE IN
LINE OUT
CONNECTION LINE OUT
DIRECTFX LOOP
TURNTABLE TURNTABLEDJ MIXER
SEND
RETURN
MIDI connectionsUse these connections when you want to connect MIDI devices to the KP2 and use it along withsequence data.
LINE IN MIDI INMIDI OUTOUTPUT
KORG EM-1

4
Operation1. Turning on the power(1) Connect the KP2 to your other equip-ment as shown in the diagram, and connectthe AC adapter to an electrical outlet.(2) Press the Power switch to turn it on. TheProgram/BPM display will light.To turn off the power, press the Powerswitch once again to turn it off.
2. Inputting audio(1) Use the Input Select switch to select theinput jacks of the connected device to whichyou want to apply an effect.
MIC: The effect will be applied to the micinput.PHONO: The effect will be applied to thephono inputs.LINE: The effect will be applied to the lineinputs.
3. Adjusting the volume(1) Adjust the input level.While outputting audio from the connecteddevice, use the Input Volume knob to adjustthe input level so that the peak indicatordoes not light red.If you are using the mic jack, adjust theMIC Trim knob as appropriate for the sensi-tivity of the mic, so that the sound is not dis-torted.(2) If you are using headphones, use thePhones Volume knob to adjust the level.
4. Selecting a program(1) The Program/BPM display will indicatethe number of the currently selected pro-gram.Use the Program/BPM knob to select a pro-gram (00–99).(2) Use the FX/Depth knob to adjust thedepth of the effect.No effect will be applied if the knob is
turned to the far left, and the maximum ef-fect will be applied if the knob is turned tothe far right.
About the Program/BPM displayThis display shows the number of the cur-rently selected program, the specified BPM,and the point (position) at which you aretouching the touch pad.While you are operating the touch pad:The display will indicate the position atwhich you are touching the pad (1.1–9.9; 5.5is the center).
Horizontal position (1–9)Vertical position (1–9)
When selecting programs: The display willshow the program number (00–99).When setting the BPM: When you arepressing the Tap/BPM key to set the BPM,the display will indicate the BPM value. InAuto BPM mode, three dots will light.MIDI Edit mode: The display will show theMIDI channel or control number, etc.
5. Operating the touch pad(1) Control the sound by rubbing your fin-ger across the touch pad or tapping it.
Use the included protective sheet.(2) If you turn on the Hold key while oper-ating the touch pad, the KP2 will hold theeffect sound as it was the moment beforeyou took your finger away from the pad.
6. The Mute functionIf you move the Pad Motion/Mute lever toMUTE (toward yourself), the input signal,sample sound, or synth/drum sound willbe silenced. When using delay or reverb,this lets you output only the effect sound(i.e., the delayed sound or reverberation).
transformerBy using the Pad Motion/Mute lever to rapidlyswitch MUTE on/off, you can create rhythmsusing a sustained input sound. This is a DJ tech-nique known as “transformer.”
5
7. Pad motionThe KP2 lets you record your touch pad op-erations, and move the the Pad Motion/Mute lever to the PAD MOTION position toplay back these operations.
RecordingRecording will begin when you hold the thePad Motion/Mute lever in the PAD MO-TION position and touch the touch pad.Even when you take your finger away fromthe touch pad, this state will continue to berecorded as part of your operation. Thismeans that you can also record operationsthat include tapping on the touch pad. Re-cording will end when you move thethePad Motion/Mute lever back to its originalposition. Recording will also end when youreach the maximum recording time (ap-proximately 3.2 seconds).
PlaybackIf you have recorded a pad motion, movethe the Pad Motion/Mute lever to the PADMOTION position, and the recorded mo-tion will play back. As long as you leave thethe Pad Motion/Mute lever in the PADMOTION position, the same motion will beplayed back repeatedly as long as you donot touch the touch pad.
If you touch the touch pad during playback,recording will begin. Recording will be reset ifyou change programs.
The Hold key on/off state is not recorded aspart of the pad motion. Also, if you turn on theHold key and play back a pad motion, the motionwill be held at the point where you stopped play-back.
8. Specifying the BPMIf you specify the BPM, you will be able toapply effects in synchronization to the BPMwhen an effect program from the “BPM FX/PTN” group is selected. For details on theeffect parameter to which this effect will beapplied, refer to the effect program list(☞ separate sheet).
What is BPM?BPM (Beats Per Minute) is the tempo of thesong expressed as the number of beats (quarternotes) that occur in one minute. A higher BPMvalue means a faster tempo.
To set the BPMIf you know the BPM, press the Tap/BPMkey and use the Program/BPM knob to setthe value. The normal display will reappearif ten seconds pass without any operationbeing performed.
Tap Tempo functionIf you do not know the BPM, press the Tap/BPM key twice or more in rhythm with thebeat of the song. The beat will be detected,and the BPM will appear in the Program/BPM display.
Auto BPM functionIf you press and hold down the Tap/BPMkey for an extended time, three dots will ap-pear in the Program/BPM display, and thebeat of the audio input will be detected au-tomatically. (Auto BPM mode)While the Program/BPM display is blink-ing, the BPM is being detected.Press the Tap/BPM key once again to endautomatic detection.
You can set the BPM in a range of 80–160.
MIDI Sync functionThe BPM of the KP2 can be specified byMIDI Timing Clock messages from an exter-nal MIDI device. Connect the [MIDI IN]connector of the KP2 to the [MIDI OUT]connector of the external MIDI device (suchas a sequencer) that is transmitting the tim-ing clock messages.
This function does not synchronize se-quence data with the KP2's rhythm pattern pro-grams. If you want to synchronize to sequencedata, you will either have to insert a Touch PadOn message into the beginning of each measureof your sequence data, or touch the touch pad atthe beginning of each KP2 phrase to start thepattern.
If you want the KP2 to receive TimingClock and Touch Pad On messages, go to MIDI

6
Edit mode (☞ p.8), and make “MIDI messagetransmission/reception settings” (☞ p.8) so thatthese messages will be received.
You can not use the Tap Tempo or AutoBPM functions while the KP2 is receiving Tim-ing Clock from an external MIDI device
9. Storing settings in the ProgramMemory keyThe current state of the KAOSS PAD can bestored in one of the Program Memory 1–8keys, so that it can be instantly recalledwhenever you want.
Stored contents— Effect program— On/off state of the Hold key and the heldposition (coordinates)— FX/Depth knob setting— For the “BPM FX/PTN” group, the speci-fied BPM value— For the “SAMPLE/PLAY” group, theSample 1, 2 key used
Effect programs 60 and 90–99 do not storethe state of the Hold key.
To store settings(1) Press the Program Memory 1–8 key thatyou want to assign.(2) Use the Program/BPM knob to selectthe effect program that you want to assign.
If you want to store the setting of the Holdkey, select the program and then turn on theHold key and touch the touch pad to specify theposition. If you want to store other settings,make them at this time.(3) Press and hold down the ProgramMemory 1–8 key you selected in step (1) forapproximately two seconds, and the set-tings will be stored.When the settings have been stored, theProgram/BPM display will stop blinking.
To recall settings(1) Press a Program Memory 1–8 key, andthe settings stored in that key will be re-called.
10. Sampling and playing backa phraseA phrase from the audio input can be re-corded into one of the Sample 1, 2 keys.Then when you have selected a programfrom the “SAMPLE/PLAY” group (pro-grams 90–99), you can play back the samplewhile using the touch pad to control theplayback speed or reverse-playback. If youhave selected a program from other than the“SAMPLE/PLAY” group, pressing theSample 1, 2 keys will play back the phrasethat was recorded in that key.You can record for approximately six sec-onds in each of the two keys.
The recorded phrases will be lost when thepower is turned off. It is not possible to save therecorded phrases.
Recording(1) Press the Rec/Stop key, and the Rec/Stop key LED will blink to indicate that youare in record-ready mode.(2) Press the Sample 1, 2 key into which youwant to record. At this time, you will nothear the playback sound.(3) When you press the Rec/Stop key, theRec/Stop key LED will light, and recordingwill begin. Recording will stop when youpress the Rec/Stop key once again.
Recording will stop automatically whenyou reach the maximum recording time.
For programs of other than the “SAMPLE/PLAY” group, you can operate the touch padwhile you record, and the sound processed by theeffect will be recorded.
Auto recording (AUTO REC)You can cause recording to begin automati-cally when audio is input. This is conve-nient when recording voice from a mic.(1) In step (2) of the Recording procedure,hold down the Sample 1, 2 key to which youwant to record, and press the Rec/Stop key.The Rec/Stop key and Sample 1, 2 keyLEDs will blink simultaneously, indicatingthat you are in record-ready mode.(2) Recording will begin automatically

7
when audio is input. Recording will stopwhen you press the Rec/Stop key onceagain.
PlaybackThe playback method will differ dependingon the effect program that you have se-lected.
For a program from the “SAMPLE/PLAY” group(1) Select a program from the “SAMPLE/PLAY” group (90–99).(2) Press the Sample 1, 2 key that you wantto play. The playback will not yet be outputat this time.(3) When you touch the touch pad, thesound will play back according to the posi-tion that you touch.The way in which the phrase plays will de-pend on the program. (☞ separate sheet: Ef-fect program list)(4) Use the FX Depth knob to adjust theplayback volume.When the FX Depth knob is positioned inthe center, the playback sound and the in-put sound will be output in a 1:1 propor-tion. When the knob is at the maximum po-sition, only the sample sound will be outputduring playback, and you will not hear theinput sound.
For a program from other than the“SAMPLE/PLAY” group(1) Select a program from other than the“SAMPLE/PLAY” group.(2) Press a Sample 1, 2 key, and the recordedphrase will play at normal speed. If youcontinue pressing the key, the phrase willplay back as a loop.To adjust the volume, continue pressing theSample 1, 2 key and use the FX Depth knobto make adjustments.
You can apply effects to the playback by op-erating the touch pad while the sound playsback.
If you press the Hold key while pressing theSample 1, 2 key, the playback will be held. Holdwill be cancelled when you press the Sample 1, 2key once again.
MIDI functionsWhat is MIDI?MIDI stands for Musical Instrument DigitalInterface, and is a world-wide standard for ex-changing a variety of performance-related infor-mation between electronic musical instrumentsand computers.
MIDI connectionsCommercially available MIDI cables are usedto transmit and receive MIDI messages. Con-nect these cables between the MIDI connec-tors of the KP2 and the MIDI connectors ofthe external MIDI device with which youwant to transfer data.MIDI IN connector: This connector re-ceives MIDI messages from another MIDIdevice. Connect it to the MIDI OUT connec-tor of the external device.MIDI OUT connector: This connectortransmits messages from the KP2. Connectit to the MIDI IN connector of the externaldevice.
Using MIDIIn addition to using the KP2 as an effect pro-cessor, you can transmit MIDI messagesfrom the KP2 to use it as a realtime control-ler for a synthesizer or other external MIDIdevice.You can also connect the KP2 to a MIDI se-quencer, and record the MIDI messages thatare transmitted when you operate the touchpad. By playing back the recorded MIDImessages you can reproduce your touchpad operations.
About MIDI channelsIn order to independently transmit informa-tion to multiple MIDI devices over a singleMIDI cable, MIDI uses sixteen channels (1–16). If the transmitting device is set to MIDIchannel “1,” the MIDI messages will not bereceived unless the receiving device is alsoset to MIDI channel “1.”

8
About the MIDI implementation chartThe owner’s manual of each MIDI device in-cludes a “MIDI implementation chart.” Thischart lets you check the types of MIDI mes-sage that can be transmitted or received.When you use two (or more) MIDI devices to-gether, compare their MIDI implementationcharts to see which types of MIDI messagethey are able to transmit and receive betweenthemselves.* Details on the MIDI functionality are providedin the separate MIDI implementation. To obtainthe MIDI implementation, please contact Korgdistributor.
MIDI Edit modeHold down the Tap/BPM key and press theRec/Stop key. After approximately one sec-ond, you will enter MIDI Edit mode, andthe MIDI channel will be displayed blinkingin the Program/BPM display.
Setting the MIDI channelIn MIDI Edit mode, the Program/BPM dis-play will show the MIDI channel. At thistime you can use the Program/BPM knob tochange the MIDI channel.
MIDI message transmission/reception settingsTransmission and reception of each type ofMIDI message can be turned on/off bypressing one of the keys listed below. Trans-mission and reception are enabled when thecorresponding LED is lit. Transmission andreception are disabled when the LED isdark.(☞ p.9: Messages that can be transmittedand received)
Some parameters can only be transmitted,and others can only be received.
Changing the control numberBy holding down one of the ProgramMemory 3–8 keys and turning the Pro-gram/BPM knob, you can change the con-trol number setting. Although it is possibleto select a control number that is already inuse, it is not possible to simultaneously turnon transmission and reception for MIDI
messages of the same control number.The MIDI messages transmitted and received
by the KP2 can be changed in the range of CC#1–CC#31 and CC#64–CC#95.
To store the settings you modifiedIn MIDI Edit mode, press and hold the Rec/Stop key for one second or longer, and theMIDI settings you modified will be stored.If you turn off the power without storingthe modified settings, they will revert totheir previous state.
To exit MIDI Edit modeYou will return to the normal state if youtouch the touch pad or leave the KP2 for tenseconds without performing any operation.
Saving your settingsYou can save the contents of programmemory and the control number settings ofMIDI edit mode by transmitting them as ex-clusive messages, and saving them on anexternal MIDI device.For details on the exclusive messages thatthe KP2 can transmit and receive, refer tothe separate MIDI implementation.
9
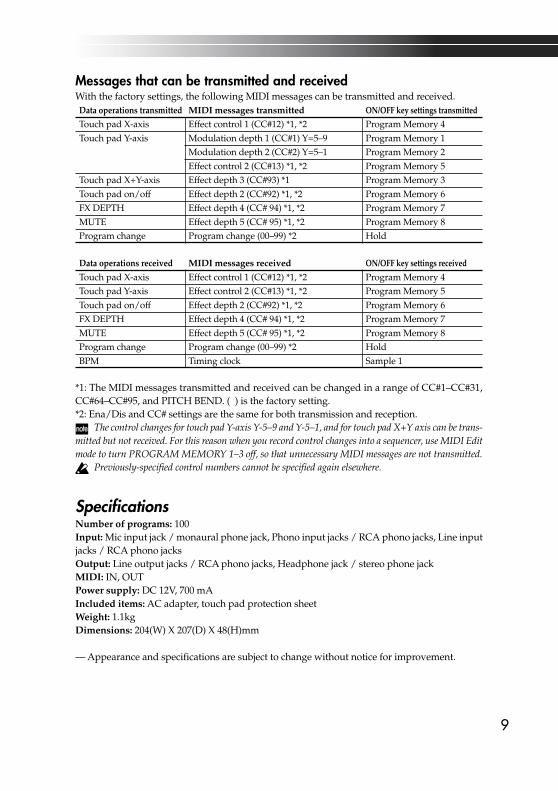
Messages that can be transmitted and receivedWith the factory settings, the following MIDI messages can be transmitted and received.Data operations transmitted MIDI messages transmitted ON/OFF key settings transmitted
Touch pad X-axis Effect control 1 (CC#12) *1, *2 Program Memory 4Touch pad Y-axis Modulation depth 1 (CC#1) Y=5–9 Program Memory 1
Modulation depth 2 (CC#2) Y=5–1 Program Memory 2Effect control 2 (CC#13) *1, *2 Program Memory 5
Touch pad X+Y-axis Effect depth 3 (CC#93) *1 Program Memory 3Touch pad on/off Effect depth 2 (CC#92) *1, *2 Program Memory 6FX DEPTH Effect depth 4 (CC# 94) *1, *2 Program Memory 7MUTE Effect depth 5 (CC# 95) *1, *2 Program Memory 8Program change Program change (00–99) *2 Hold
Data operations received MIDI messages received ON/OFF key settings received
Touch pad X-axis Effect control 1 (CC#12) *1, *2 Program Memory 4Touch pad Y-axis Effect control 2 (CC#13) *1, *2 Program Memory 5Touch pad on/off Effect depth 2 (CC#92) *1, *2 Program Memory 6FX DEPTH Effect depth 4 (CC# 94) *1, *2 Program Memory 7MUTE Effect depth 5 (CC# 95) *1, *2 Program Memory 8Program change Program change (00–99) *2 HoldBPM Timing clock Sample 1
*1: The MIDI messages transmitted and received can be changed in a range of CC#1–CC#31,CC#64–CC#95, and PITCH BEND. ( ) is the factory setting.*2: Ena/Dis and CC# settings are the same for both transmission and reception.
The control changes for touch pad Y-axis Y-5–9 and Y-5–1, and for touch pad X+Y axis can be trans-mitted but not received. For this reason when you record control changes into a sequencer, use MIDI Editmode to turn PROGRAM MEMORY 1–3 off, so that unnecessary MIDI messages are not transmitted.
Previously-specified control numbers cannot be specified again elsewhere.
SpecificationsNumber of programs: 100Input: Mic input jack / monaural phone jack, Phono input jacks / RCA phono jacks, Line inputjacks / RCA phono jacksOutput: Line output jacks / RCA phono jacks, Headphone jack / stereo phone jackMIDI: IN, OUTPower supply: DC 12V, 700 mAIncluded items: AC adapter, touch pad protection sheetWeight: 1.1kgDimensions: 204(W) X 207(D) X 48(H)mm
— Appearance and specifications are subject to change without notice for improvement.

Marque CE pour les normes européennesharmonisées
La marque CE apposée sur tous les produits de notrefirme fonctionnant sur secteur jusqu'au 31 décembre1996 signifie que ces appareils répondent à la DirectiveEMC (89/336/EEC) et à la Directive concernant la mar-que CE (93/68/EEC).La marque CE apposée après le 1 janvier 1997 signifieque ces appareils sont conformes à la Directive EMC(89/336/EEC), à la Directive concernant la marque CE(93/68/EEC) ainsi qu'à la Directive Basse Tension (73/23/EEC).La marque CE apposée sur tous les produits de notrefirme fonctionnant sur piles signifie que ces appareils ré-pondent à la Directive EMC (89/336/EEC) et à la Direc-tive concernant la marque CE (93/68/EEC).
PrécautionsEmplacementL’utilisation de cet instrument dans les endroits suivantspeut en entraîner le mauvais fonctionnement.
• En plein soleil• Endroits très chauds ou très humides• Endroits sales ou fort poussiéreux• Endroits soumis à de fortes vibrations• A proximité de champs magnétiques
AlimentationBranchez l’adaptateur secteur fourni à une prise secteurde tension appropriée. Evitez de brancher l’adaptateur àune prise de courant dont la tension ne correspond pas àcelle pour laquelle l'appareil est conçu.
Interférences avec d’autres appareilsélectriquesLes postes de radio et de télévision situés à proximitépeuvent par conséquent souffrir d’interférences à la ré-ception. Veuillez dès lors faire fonctionner cet appareil àune distance raisonnable de postes de radio et de télévi-sion.
ManiementPour éviter de les endommager, manipulez les comman-des et les boutons de cet instrument avec soin.
EntretienLorsque l’instrument se salit, nettoyez-le avec un chiffonpropre et sec. Ne vous servez pas d’agents de nettoyageliquides tels que du benzène ou du diluant, voire desproduits inflammables.
Conservez ce manuelAprès avoir lu ce manuel, veuillez le conserver soigneu-sement pour toute référence ultérieure.
Evitez toute intrusion d’objets ou de li-quideNe placez jamais de récipient contenant du liquide prèsde l’instrument. Si le liquide se renverse ou coule, il ris-que de provoquer des dommages, un court-circuit ouune électrocution.Veillez à ne pas laisser tomber des objets métalliquesdans le boîtier (trombones, par ex.). Si cela se produit,débranchez l’alimentation de la prise de courant et con-tactez votre revendeur korg le plus proche ou la surfaceoù vous avez acheté l’instrument.
REMARQUE IMPORTANTE POUR LESCLIENTS
Ce produit a été fabriqué suivant des spécifications sévè-res et des besoins en tension applicables dans le pays oùce produit doit être utilisé. Si vous avez acheté ce produitvia l’internet, par vente par correspondance ou/et ventepar téléphone, vous devez vérifier que ce produit estbien utilisable dans le pays où vous résidez.ATTENTION: L’utilisation de ce produit dans un paysautre que celui pour lequel il a été conçu peut être dan-gereuse et annulera la garantie du fabricant ou du distri-buteur. Conservez bien votre récépissé qui est la preuvede votre achat, faute de quoi votre produit ne risque dene plus être couvert par la garantie du fabricant ou dudistributeur.

1
2
1
3
4
12
13
5
6
78
910
11
IntroductionMerci d’avoir fait l’acquisition du CONTRÔLEUR D’EFFETS DYNAMIQUE KP2 KAOSS PAD.Afin de pouvoir en profiter longtemps sans problèmes et de tirer le meilleur parti de toutes sespossibilités, nous vous conseillons de lire attentivement la présente notice et de toujours utiliserle KP2 correctement.
2
1 34
4321
5
7
8
6
Eléments du KP2 et leurs fonctionsPanneau supérieur1. Interrupteur [INPUT SELECT](Sélecteur d’entrée)2. Témoin [PEAK] (Crête)3. Bouton [INPUT VOLUME](volume entrant)4. Bouton [FX DEPTH](Intensité de l’effet)5. Affichage [PROGRAM/BPM]6. Bouton [PROGRAM/BPM]7. Touches [PROGRAM MEMORY 1 ~ 8](mémoires de programmes)8. Touche [TAP/BPM]9. Panneau sensible au toucher10. Levier [PAD MOTION/MUTE](déplacement sur le panneau/assourdissement)11. Touche [REC/STOP](Enregistrement/arrêt)12. Touches [SAMPLE 1, 2](Echantillons)13. Touche [HOLD]
Face avant1. Bouton [PHONES VOLUME](volume du casque d’écoute)2. Prise de sortie [PHONES](prise pour casque d’écoute)3. Bouton [MIC TRIM](épuration des sons)4. Prise d’entrée [MIC](prise pour micro)
Face arrière1. Borne [GROUND] (terre)2. Bornes [PHONO IN](entrée pour tourne-disque)3. Bornes [LINE IN](entrée de ligne)4. Bornes [LINE OUT] (sortie de ligne)5. Interrupteur [CONNECTION]6. Bornes [MIDI IN], [MIDI OUT]7. Prise DC 12V8. Interrupteur d’alimentation [POWER]
2
ConnexionsConnexions de baseUtiliser ces connexions pour appliquer des effets au son d’un appareil raccordé aux bornes d’en-trée du KP2 et diffuser ainsi le son avec effet par les bornes de sortie [LINE OUT]. Le KP2 est dotéde trois types de bornes d’entrée. Utiliser celles qui conviennent le mieux à la situation souhai-tée.
PHONO INLINE IN
LINE OUT DC12V
MIXER, DJ MIXER
AC
MIC1
BAL�OR�
UNBAL
LINE IN 1LOW CUT�
75Hz�18dB/OCT
�TRIM+10dB -40dB
10 �60
U
-10dBV
MIC GAIN
LINE IN 7-8
L
R
BAL�OR�
UNBAL
MONO��
+4�-10
LEVEL��
LINE IN 9-10
L
R
BAL�OR�
UNBAL
MONO��
+4�-10
LEVEL��
LINE IN 11-12
L
R
BAL�OR�
UNBAL
MONO��
+4�-10
LEVEL��
LINE IN 13-14
L
R
BAL�OR�
UNBAL
MONO��
+4�-10
LEVEL��
STEREO AUX RETURNS1
2
1
2
AUX SEND
LEFT(1/MONO) RIGHT ALL BAL/UNBAL
L
R
TAPE�INPUT
TAPE�OUTPUT
MAIN OUTSL
R
BAL/UNBAL
PHONES
MICRO SERIES 1402-VLZ14-CHANNEL MIC/LINE MIXER
MIC2
BAL�OR�
UNBAL
LINE IN 2LOW CUT�
75Hz�18dB/OCT
�TRIM+10dB -40dB
10 �60
U
-10dBV
MIC GAIN
MIC3
BAL�OR�
UNBAL
LINE IN 3LOW CUT�
75Hz�18dB/OCT
�TRIM+10dB -40dB
10 �60
U
-10dBV
MIC GAIN
MIC4
BAL�OR�
UNBAL
LINE IN 4LOW CUT�
75Hz�18dB/OCT
�TRIM+10dB -40dB
10 �60
U
-10dBV
MIC GAIN
MIC5
BAL�OR�
UNBAL
LINE IN 5LOW CUT�
75Hz�18dB/OCT
�TRIM+10dB -40dB
10 �60
U
-10dBV
MIC GAIN
MIC6
BAL�OR�
UNBAL
LINE IN 6LOW CUT�
75Hz�18dB/OCT
�TRIM+10dB -40dB
10 �60
U
-10dBV
MIC GAIN
60
U
+15
U
+15
AUX1�
MON/�EFX
2�EFX
U
+15
U
+12
-15
-12
U
+15-15
PAN
SOLO
1�MUTE�A LT 3 – 4
EQHI�
12kHz
MID�2.5kHz
LOW�80Hz
L R
dB10
5
U
5
10
20
30
4050
60
U
+15
U
+15
AUX1�
MON/�EFX
2�EFX
U
+15
U
+12
-15
-12
U
+15-15
PAN
SOLO
2�MUTE�A LT 3 – 4
EQHI�
12kHz
MID�2.5kHz
LOW�80Hz
L R
dB10
5
U
5
10
20
30
4050
60
U
+15
U
+15
AUX1�
MON/�EFX
2�EFX
U
+15
U
+12
-15
-12
U
+15-15
PAN
SOLO
3�MUTE�A LT 3 – 4
EQHI�
12kHz
MID�2.5kHz
LOW�80Hz
L R
dB10
5
U
5
10
20
30
4050
60
U
+15
U
+15
AUX1�
MON/�EFX
2�EFX
U
+15
U
+12
-15
-12
U
+15-15
PAN
SOLO
4�MUTE�A LT 3 – 4
EQHI�
12kHz
MID�2.5kHz
LOW�80Hz
L R
dB10
5
U
5
10
20
30
4050
60
U
+15
U
+15
AUX1�
MON/�EFX
2�EFX
U
+15
U
+12
-15
-12
U
+15-15
PAN
SOLO
5�MUTE�A LT 3 – 4
EQHI�
12kHz
MID�2.5kHz
LOW�80Hz
L R
dB10
5
U
5
10
20
30
4050
60
U
+15
U
+15
AUX1�
MON/�EFX
2�EFX
U
+15
U
+12
-15
-12
U
+15-15
PAN
SOLO
6�MUTE�A LT 3 – 4
EQHI�
12kHz
MID�2.5kHz
LOW�80Hz
L R
dB10
5
U
5
10
20
30
4050
60
U
+15
U
+15
AUX1�
MON/�EFX
2�EFX
U
+15
U
+12
-15
-12
U
+15-15
PAN
SOLO
7–8�MUTE�A LT 3 – 4
EQHI�
12kHz
MID�2.5kHz
LOW�80Hz
L R
dB10
5
U
5
10
20
30
4050
60
U
+15
U
+15
AUX1�
MON/�EFX
2�EFX
U
+15
U
+12
-15
-12
U
+15-15
PAN
SOLO
9–10�MUTE�A LT 3 – 4
EQHI�
12kHz
MID�2.5kHz
LOW�80Hz
L R
dB10
5
U
5
10
20
30
4050
60
U
+15
U
+15
AUX1�
MON/�EFX
2�EFX
U
+15
U
+12
-15
-12
U
+15-15
PAN
SOLO
11–12�MUTE�A LT 3 – 4
EQHI�
12kHz
MID�2.5kHz
LOW�80Hz
L R
dB10
5
U
5
10
20
30
4050
60
U
+15
U
+15
AUX1�
MON/�EFX
2�EFX
U
+15
U
+12
-15
-12
U
+15-15
PAN
SOLO
13–14�MUTE�A LT 3 – 4
EQHI�
12kHz
MID�2.5kHz
LOW�80Hz
L R
dB10
5
U
5
10
20
30
4050
60
dB10
5
U
5
10
20
30
4050
60
dB10
5
U
5
10
20
30
4050
U
+10
U
+20
U
+20
1
2AUX 1 MASTER
PRE�POST
NORMALLED
AUX 1�SELECT
EFX TO�MONITOR
AUX �RETURNS
SOURCE
MAIN�MIX
LEFT RIGHT
CLIP+28
+10
+7
+4
+2
0
-2
-4
-7
-10
-20
-30
0dB=0dBu
RUDE SOLO LIGHT
ALT�3-4
TAPE
ASSIGN�TO MAIN MIX
NORMAL(AFL)LEVEL SET(PFL)
SOLO�MODE
PHANTOM POWER
CONTROL�ROOM / PHONES MAIN MIX
TOURNE-DISQUE
LECTEUR CD
ADAPTATEUR SECTEUR
Manipulations du panneau sensible autoucherNe jamais appuyer trop fort sur le panneausensible ni placer d’objet lourd dessus. Desgestes trop brutaux pourraient en effet en-dommager le panneau ou provoquer des fis-sures. Ne jamais frotter ou appuyer sur lepanneau sensible avec un objet pointu carvous risqueriez de le griffer: toujours utiliserson doigt uniquement pour le faire fonction-ner. Si le panneau doit être nettoyé, l’essuyersimplement avec un chiffon doux et sec.L’utilisation de solvants ou de diluants risqueen effet de déformer la surface du panneau.

3
Connexions d’un mélangeur pour DJ Connexions d’un mélangeurpour DJPour utiliser le KP2 comme processeur d’effets externe, raccorder la borne d’envoi d’effets dumélangeur pour DJ, etc. aux bornes d’entrée de ligne du KP2 et raccorder les bornes de sortie deligne du KP2 aux bornes de retour d’effets du mélangeur.
Lors de l’utilisation d’une connexion passant par les bornes d’envoi/de retour d’effetsRégler l’interrupteur Connection du KP2 sur FX LOOP. Avec ce réglage, le signal diffusé par lesbornes de sortie de ligne du KP2 ne comprendra que le son traité par le KP2 (et non le son origi-nal qui lui a été envoyé).Pour pouvoir utiliser le bouton FX/Depth du KP2 en vue de régler l’intensité de l’effet pendantle jeu, cet interrupteur doit se trouver sur la position DIRECT.
Connexions MIDIUtiliser ces connexions pour raccorder des dispositifs MIDI au KP2 et le faire fonctionner avecdes séquences de données.
LINE IN MIDI INMIDI OUTOUTPUT
KORG EM-1
LINE IN
LINE OUT
CONNECTION LINE OUT
DIRECTFX LOOP
TOURNE-DISQUE TOURNE-DISQUEMELANGEUR POUR DJ
ENVOI
RETOUR
4
4. Sélection d’un programme(1) L’affichage Program/BPM indique le nu-méro du programme sélectionné.Utilisez le bouton Program/BPM pour sélec-tionner un autre programme (00~99).(2) Utilisez le bouton FX/Depth pour réglerl’intensité de l’effet.Aucun effet n’est appliqué lorsque le boutonest tourné à fond vers la gauche; par contre,le niveau maximum de l’effet est appliquélorsque le bouton est tourné à fond vers ladroite.
A propos de l’affichage Program/BPMCet affichage indique le numéro du pro-gramme actuellement sélectionné, le nombrede battements par minute (BPM) spécifié et lepoint (emplacement) du panneau sensibletouché.Lors de l’utilisation du panneau sensible autoucher: L’affichage indique l’emplacementtouché (1.1 à 9.9 avec 5.5 qui correspond aucentre).
Position horizontale (1~9)Position verticale (1~9)
Lors de la sélection de programmes: L’affi-chage indique le numéro du programme(00~99).Lors du réglage du tempo (BPM): Lorsquevous appuyez sur la touche Tap/BPM pourrégler le tempo, l’affichage indique la valeurdes battements par minute (BPM). En modeAuto BPM, trois points apparaissent sur l'af-fichage.Mode d’édition MIDI: L’affichage indique lenuméro du canal MIDI ou de commandeMIDI, etc.
5. Utilisation du panneausensible au toucher(1) Permet de contrôler le son en frottant sondoigt sur le panneau ou en le tapotant.RemarqueUtiliser la feuille de protection fournie.
Fonctionnement1. Mise sous tension(1) Raccordez le KP2 à vos autres équipe-ments comme illustré sur le schéma puisbranchez l’adaptateur secteur dans une prisede courant.(2) Appuyez sur l’interrupteur d’alimenta-tion pour mettre la KP2 sous tension.L’affichage Program/BPM s’allume.Pour mettre l’appareil hors tension,réappuyez sur l’interrupteur d’alimentation.
2. Entrée de données audio(1) Utilisez l’interrupteur Input Select poursélectionner les bornes d’entrée de l’appareilraccordé auxquelles vous souhaitez appli-quer un effet.
MIC: L’effet est appliqué à l’entrée du micro.PHONO: L’effet est appliqué aux entréespour tourne-disque PHONO.LINE: L’effet est appliqué aux entrées de li-gne.
3. Réglage du volume(1) Réglez le niveau d’entrée.Lors de la diffusion de données audio prove-nant de l’appareil connecté, utilisez le boutonInput Volume pour régler le niveau d’entréede sorte que le témoin de crête rouge ne s’al-lume pas.En cas d’utilisation de la borne pour micro,réglez le bouton MIC Trim en fonction de lasensibilité de votre micro, afin d’éviter toutedistorsion sonore.(2) En cas d’utilisation d’un casque d’écoute,utilisez le bouton Phones Volume pour réglerle niveau.

5
(2) Si vous activez la touche Hold pendantl’utilisation du panneau sensible au toucher,le KP2 conservera le son de l’effet tel qu’ilétait juste avant que vous ne retiriez votredoigt du panneau.
6. Fonction d’assourdissement(Mute)Si vous déplacez le levier Pad Motion/Mutevers la fonction MUTE (vers vous), le signald’entrée, le son de l'échantillon ou le son desynthé/de batterie sera assourdi (coupé).Lors de l‘utilisation du retard ou de la réver-bération, cela permet de ne diffuser que leson de l’effet (c’est-à-dire le son retardé ou laréverbération).
TransformerEn utilisant le levier Pad Motion/Mute pouractiver/désactiver rapidement l’interrupteurMUTE, vous pouvez créer des rythmes quifont appel à un son d’entrée soutenu. Il s’agitlà d’une technique de DJ connue sous le nomde “transformer.”
7. Dé-placements sur lepanneau sensibleLe KP2 permet d’enregistrer les opérationseffectuées sur le panneau sensible au toucherpuis de déplacer le levier Pad Motion/Mutevers la position PAD MOTION pour repro-duire ces opérations.
EnregistrementL’enregistrement commence lorsque vousmaintenez le levier Pad Motion/Mute sur laposition PAD MOTION et que vous touchezle panneau sensible.Même lorsque vous retirez votre doigt dupanneau sensible, l’enregistrement continueet fait partie de l’opération.Cela signifie que vous pouvez égalementenregistrer des opérations qui comprennentdes tapotements du panneau sensible. L’en-registrement s’arrête lorsque vous remettezle levier Pad Motion/Mute sur sa positiond’origine ou lorsque vous atteignez le tempsd’enregistrement maximum (environ 3,2 se-condes).
ReproductionSi vous avez enregistré un mouvement sur lepanneau sensible, déplacez le levier PadMotion/Mute sur la position PAD MOTIONpour reproduire le mouvement enregistré. Sivous laissez le levier Pad Motion/Mute surla position PAD MOTION, le même mouve-ment jouera de manière répétitive jusqu’à ceque vous touchiez le panneau sensible.
Si vous touchez le panneau sensible pen-dant la reproduction, l’enregistrement démarre.L’enregistrement s’efface en cas de changementde programme.
L’état activé/désactivé de la touche Holdn’est pas enregistré comme faisant partie dumouvement sur le panneau. De même, si vousactivez la touche Hold et que vous reproduisezun mouvement sur le panneau, le mouvementsera conservé au point où vous avez arrêté la re-production.
8. Spécification des BPM(battements par minute)La définition des BPM vous permet d’appli-quer des effets synchronisés sur les BPM lorsde la sélection d’un programme d’effets dugroupe “BPM FX/PTN”. Pour plus de détailssur le paramètre d’effet auquel cet effet s’ap-plique, voir la liste des programmes d’effets(feuillet séparé).
Qu’est-ce que les BPM?Les BPM (Battements Par Minute) représen-tent le tempo d’un morceau exprimé en nom-bre de battements (noires) produits en uneminute. Une valeur de BPM plus élevée si-gnifie un tempo plus rapide.
Réglage des BPMSi vous connaissez le nombre de BPM, ap-puyez sur la touche Tap/BPM et utilisez lebouton Program/BPM pour définir la valeur.L’affichage normal réapparaîtra dix secondesplus tard si vous n’effectuez aucune opéra-tion.

6
Fonction Tap TempoSi vous ne connaissez pas le nombre de BPM,appuyez deux fois ou plus en rythme autemps du morceau sur la touche Tap/BPM.Le KP2 identifiera le nombre de battementset les BPM apparaîtront sur l’affichageProgram/BPM.
Fonction Auto BPMSi vous appuyez sur la touche Tap/BPM etque vous la maintenez enfoncée pendant uncertain temps, trois points apparaîtront surl’affichage Program/BPM et l’appareil détec-tera automatiquement le rythme (battement)de l’entrée audio. (Mode Auto BPM)La détection des BPM a lieu tant que l’affi-chage Program/BPM clignote.Réappuyez sur la touche Tap/BPM pourmettre fin à la détection automatique.
Il est possible de régler les BPM sur uneplage allant de 80 à 160.
Fonction de synchronisation MIDI(MIDI Sync)Il est possible de spécifier les BPM du KP2par l’envoi de messages d’horloge de syn-chronisation MIDI provenant d’un dispositifMIDI externe. Branchez la borne [MIDI IN]du KP2 dans la borne [MIDI OUT] du dispo-sitif MIDI externe (comme un séquenceur)qui transmet des messages d'horloge pour lasynchronisation.
Cette fonction ne synchronise pas des sé-quences de données avec les programmes de mo-tifs rythmiques du KP2. Pour une synchronisa-tion sur des séquences de données, vous devrezsoit insérer un message d’activation du panneausensible au toucher (Touch Pad On) au début dechacune des mesures de vos séquences de don-nées, soit toucher le panneau sensible au débutde chacune des phrases du KP2 pour démarrer lemotif.
Pour que le KP2 puisse recevoir des messa-ges de synchronisation et d’activation du pan-neau sensible au toucher, accédez au mode d’édi-tion MIDI (☞ p.9) et effectuez les “Réglages detransmission/réception de messages MIDI”(☞ p.9) de sorte qu’il puisse recevoir ces messa-ges.
Vous ne pouvez pas utiliser les fonctionsTap Tempo ou Auto BPM lorsque le KP2 reçoitdes messages de synchronisation d'un appareilMIDI externe.
9. Sauvegarde des réglagesdans le programme ToucheMémoireIl est possible de sauvegarder l’état actuel duKP2 sous une des touches Program Memory(mémoires de programmes) 1 à 8 afin de pou-voir les rappeler instantanément chaque foisque vous le souhaitez.
Contenus mémorisés— Programme d’effet— Etat activé/désactivé de la touche Hold etla position conservée (coordonnées)— Réglage du bouton FX/Depth— Pour le groupe “BPM FX/PTN”, la valeurBPM spécifiée— Pour le groupe “SAMPLE/PLAY” , la tou-che utilisée pour l’échantillon 1, 2
Les programmes d’effets 60 et 90~99 ne mé-morisent pas l'état de la touche [HOLD].
Pour mémoriser les réglages(1) Appuyez sur la touche Program Memory1–8 à laquelle vous voulez attribuer les don-nées.(2) Utilisez le bouton Program/BPM poursélectionner le programme d’effets à attri-buer.
Pour mémoriser le réglage de la toucheHold, sélectionnez le programme puis activez latouche Hold et touchez le panneau sensible pourpréciser la position. Si vous souhaitez mémoriserd’autres réglages, vous devez les définir à cestade.(3) Appuyez sur la touche Program Memory1–8 sélectionnée au point (1) et maintenez-laenfoncée pendant environ deux secondespour mémoriser les réglages.Lorsque les réglages sont sauvegardés, l’affi-chage Program/BPM arrête de clignoter.
7
Pour rappeler les réglages(1) Appuyez sur une touche ProgramMemory 1~8 pour rappeler les réglages mé-morisés sous cette touche.
10. Echantillonnage etreproduction d’une phraseIl est possible d’enregistrer une phrase del’entrée audio sous une des touches Sample1, 2.Ensuite, lorsque vous aurez sélectionné unprogramme dans le groupe “SAMPLE/PLAY” (programmes 90~99), vous pourrezreproduire l’échantillon en utilisant le pan-neau sensible au toucher pour contrôler lavitesse de reproduction ou la reproductioninversée.Si vous avez sélectionné un programme d'unautre groupe que “SAMPLE/PLAY”, le faitd’appuyer sur les touches Sample 1, 2 per-mettra de reproduire la phrase enregistréesous cette touche.Vous pouvez ainsi enregistrer des phrasesd’environ six secondes sous chacune desdeux touches.
Les phrases enregistrées s’effacent à la misehors tension et il n’est pas possible de les sauve-garder.
Enregistrement(1) Appuyez sur la touche Rec/Stop. Le té-moin de la touche clignote afin d’indiquerque vous avez accédé au mode d'attented’enregistrement.(2) Appuyez sur la touche Sample 1, 2 souslaquelle vous souhaitez enregistrer les don-nées. A ce stade, vous n’entendrez pas le sonreproduit.(3) Lorsque vous appuyez sur la touche Rec/Stop, le témoin de la touche s’allume et l’en-registrement commence. L’enregistrements’arrête lorsque vous réappuyez sur la toucheRec/Stop.
L’enregistrement s’arrête automatiquementlorsque vous atteignez le temps d'enregistre-ment maximum.
Pour les programmes ne faisant pas partiedu groupe “SAMPLE/PLAY”, vous pouvez uti-liser le panneau sensible au toucher pendantl’enregistrement; le son traité avec l’effet sera en-registré.
Enregistrement automatique (AUTOREC)Vous pouvez programmer le démarrage del’enregistrement dès l’entrée de donnéesaudio. Cette fonction s’avère particulière-ment pratique en cas d’enregistrement devoix provenant d’un micro.(1) Au point (2) de la procédure d’enregistre-ment, maintenez enfoncée la touche Sample1, 2 sous laquelle vous souhaitez enregistrerpuis appuyez sur la touche Rec/Stop.Les témoins des touches Rec/Stop et Sample1, 2 clignoteront simultanément pour indi-quer que vous avez accédé au mode d'attented'enregistrement.(2) L’enregistrement commencera automati-quement dès l’entrée de données audio. Ils’arrêtera lorsque vous réappuierez sur latouche Rec/Stop.
ReproductionLa méthode de reproduction diffère en fonc-tion du programme d'effets sélectionné.
Pour un programme du groupe“SAMPLE/PLAY”(1) Sélectionnez un programme du groupe“SAMPLE/PLAY” (90~99).(2) Appuyez sur la touche Sample 1, 2 dontvous voulez lire les données. La reproductionne commencera pas encore.(3) Lorsque vous toucherez le panneau sen-sible, le son sera reproduit en fonction de laposition touchée.La manière de jouer de la phrase dépendradu programme. (feuillet séparé: Liste desprogrammes d’effets)(4) Utilisez le bouton FX Depth pour régler levolume de reproduction.Lorsque ce bouton FX Depth est positionnéau centre, le son de la reproduction et le sonentrant sont diffusés selon un rapport 1:1.Lorsque le bouton est placé sur la position
8
maximum, seul le son de l’échantillon estaudible pendant la reproduction et vousn’entendez pas le son entrant.
Pour un programme n’appartenant pasau groupe“SAMPLE/PLAY”(1) Sélectionnez un programme d’un groupeautre que “SAMPLE/PLAY”.(2) Appuyez sur une des touches Sample 1,2 pour que la phrase enregistrée soit repro-duite à la vitesse normale.Si vous continuez d’appuyer sur la touche, laphrase est reproduite en boucle.Pour régler le volume, continuez d’appuyersur la touche Sample 1, 2 et utilisez le boutonFX Depth pour effectuer les réglages.
Vous pouvez appliquer des effets à la repro-duction en touchant le panneau sensible pendantla reproduction du son.
Si vous appuyez sur la touche Hold pen-dant que vous appuyez sur la touche Sample 1,2, la reproduction sera conservée. La fonctionHold s'annule lorsque vous appuyez à nouveausur la touche Sample 1, 2.
Fonctions MIDIQu’est-ce que le système MIDI?Le terme MIDI vient de l’anglais Musical Ins-trument Digital Interface (interface numéri-que pour instruments de musique) et il s'agitd’une norme internationale permettantl’échange d’informations liées aux interpré-tations entre des instruments de musiqueélectroniques et des ordinateurs.
Connexions MIDIDes câbles MIDI disponibles dans le com-merce sont utilisés pour transmettre et rece-voir des messages MIDI Raccordez ces câblesentre les bornes MIDI du KP2 et les bornesMIDI du dispositif MIDI externe avec lequelvous souhaitez échanger des données.Borne MIDI IN : Cette borne permet de re-cevoir des messages MIDI provenant d'unautre dispositif MIDI. Pour ce faire, raccor-dez-la à la borne MIDI OUT du dispositifexterne.Borne MIDI OUT : Cette borne permet de
transmettre des messages provenant du KP2.Pour ce faire, raccordez-la à la borne MIDI INdu dispositif externe.
Utilisation du système MIDILe KP2 n’est pas qu’un simple processeurd’effets: il permet également de transmettredes messages MIDI pour l’utiliser commecontrôleur en temps réel d’un synthétiseurou d’un autre appareil MIDI externe.Vous pouvez également raccorder le KP2 àun séquenceur MIDI et enregistrer les messa-ges MIDI transmis lors du toucher du pan-neau sensible. La reproduction des messagesMIDI enregistrés permet ainsi de reproduireles opérations effectuées sur le panneau sen-sible.
A propos des canaux MIDIAfin de pouvoir transmettre indépendam-ment des informations aux différents appa-reils MIDI, par le biais d'un seul câble MIDI,le système MIDI utilise seize canaux (1~16).Si l'appareil de transmission est réglé sur lecanal MIDI “1,” les messages MIDI ne serontreçus que si l’appareil récepteur est égale-ment réglé sur le canal MIDI “1.”
A propos du tableau d'implémentationMIDILe manuel d’utilisation de chaque appareilMIDI comprend un “Tableau d’implémenta-tion MIDI.”Ce tableau permet de vérifier les types demessages MIDI pouvant être transmis oureçus.Lorsque vous raccordez deux ou davantaged’appareils MIDI, comparez leurs tableauxd’implémentation MIDI pour voir quels ty-pes de messages MIDI ils peuvent transmet-tre et recevoir entre eux.* Vous trouverez de plus amples détails surles fonctions MIDI dans la brochure d'implé-mentation MIDI. Pour obtenir ce document,veuillez prendre contact avec votre reven-deur Korg.

9
Mode d’édition MIDIMaintenez la touche Tap/BPM enfoncée etappuyez sur la touche Rec/Stop. Après envi-ron une seconde, vous accéderez au moded’édition MIDI et le canal MIDI apparaîtra enclignotant sur l’affichage Program/BPM.
Configuration du canal MIDIDans le mode d’édition MIDI, l’affichageProgram/BPM indique le canal MIDI. A cestade, vous pouvez utiliser le boutonProgram/BPM pour changer de canal MIDI.
Réglages de transmission/réception de messages MIDIIl est possible d’activer/de désactiver latransmission et la réception de chaque typede message MIDI en appuyant sur une destouches indiquées ci-dessous.La transmission et la réception sont activéeslorsque le témoin correspondant est allumé.La transmission et la réception sont désacti-vées lorsque le témoin correspondant estéteint. (☞ p.11: Messages transmis et reçus)
Certains paramètres peuvent uniquementêtre transmis, d'autres peuvent uniquement êtrereçus.
Changement de numéro de commandeEn maintenant enfoncée une des touchesProgram Memory 3~8 et en tournant le bou-ton Program/BPM, vous pouvez modifier leréglage du numéro de commande. Même s'ilest possible de sélectionner un numéro decommande déjà utilisé, il n’est pas possibled’activer simultanément la transmission et laréception pour les messages MIDI correspon-dants à un même numéro de commande.
Il est possible de changer les messagesMIDI transmis et reçus par le KP2 sur une plageallant du numéro CC#1 à CC#31et du numéroCC#64 à CC#95.
Sauvegarde des réglages modifiésDans le mode d’édition MIDI, appuyez sur latouche Rec/Stop et maintenez-la enfoncéependant au moins une seconde pour sauve-garder les réglages MIDI modifiés. Si vous
mettez le KP2 hors tension sans avoir sauve-gardé les réglages, ceux-ci seront remplacéspar les réglages d’origine.
Pour quitter le mode d’éditionMIDILe KP2 revient à son état normal si vous tou-chez le panneau sensible ou si vous n’effec-tuez aucune opération pendant dix secondes.
Sauvegarde de vos réglagesVous pouvez sauvegarder le contenu de lamémoire de programmes et les réglages denuméros de commandes du mode d’éditionMIDI en les transmettant sous forme de mes-sages exclusifs pour les enregistrer sur undispositif MIDI externe.Pour plus de détails sur les messages exclu-sifs que le KP2 peut transmettre et recevoir,consultez les informations d’implémentationMIDI séparées.

10
Messages pouvant être transmis ou reçusLes réglages d’usine permettent de transmettre ou de recevoir les messages MIDI suivants.
Opérations de données transmises Messages MIDI transmis Réglages de touches ON/OFF transmis
Panneau sensible au toucher Axe X Commande d’effet 1 (CC#12) *1, *2 Mémoire de programme 4Panneau sensible au toucher Axe Y Intensité de la modulation 1 (CC#1) Y=5~9 Mémoire de programmes 1
Intensité de la modulation 2 (CC#2) Y=5~1 Mémoire de programmes 2Commande de l’effet 2 (CC#13) *1, *2 Mémoire de programmes 5
Panneau sensible au toucher Intensité de l’effet 3 (CC#93) *1 Mémoire de programmes 3Axe X+YActivation/désactivation Intensité de l’effet 2 (CC#92) *1, *2 Mémoire de programmes 6du panneau sensible au toucherFX DEPTH Intensité de l’effet 4 (CC# 94) *1, *2 Mémoire de programmes 7MUTE Intensité de l’effet 5 (CC# 95) *1, *2 Mémoire de programmes 8Changement de programme Changement de programme (00~99) *2 Hold
Opérations de données reçues Messages MIDI reçus Réglages de touches ON/OFF reçus
Panneau sensible au toucher axe X Commande de l’effet 1 (CC#12) *1, *2 Mémoire de programmes 4Panneau sensible au toucher axe Y Commande de l’effet 2 (CC#13) *1, *2 Mémoire de programmes 5Activation/désactivation Intensité de l’effet 2 (CC#92) *1, *2 Mémoire de programmes 6du panneau sensible au toucherFX DEPTH Intensité de l’effet 4 (CC# 94) *1, *2 Mémoire de programmes 7MUTE Intensité de l’effet 5 (CC# 95) *1, *2 Mémoire de programmes 8Changement de programme Changement de programme (00~99) *2 HoldBPM Horloge de synchronisation Echantillon 1
*1: Il est possible de modifier les messages MIDI transmis et reçus pour les CC#1à CC#31, CC#64à CC#95 et pour le PITCH BEND. Les données entre parenthèses correspondent au réglaged’usine.*2: Les réglages d’activation/désactivation et de numéro de CC# sont les mêmes pour la trans-mission et la réception.
Les changements de commande pour les emplacements Y-5~9 et Y-5~1 de l’axe Y ainsi que pour l’axe X+Y dupanneau sensible au toucher peuvent être transmis mais non reçus. Pour cette raison, lors de l’enregistrement dechangements de commandes sur un séquenceur, utilisez le mode d’édition MIDI pour désactiver les touchesPROGRAM MEMORY 1~3 afin de ne pas transmettre de messages MIDI inutiles.
Les numéros de commandes spécifiés antérieurement ne peuvent pas être spécifiés à nouveau à un autre endroit.
Spécifications techniquesNombre de programmes: 100Entrées: Entrée Mic / borne phone mono, Entrées Phono / Bornes phono RCA , Entrées Line /Bornes phono RCASorties: Sorties Line / Bornes phono RCA , prise pour casque d’écoute / borne phone stéréoMIDI: IN, OUTAlimentation: DC 12V, 700 mAAccessoires inclus: Adaptateur secteur, feuillet de protection pour panneau sensible au toucherPoids: 1.1kgDimensions: 204(L) X 207(P) X 48(H) mm— La finition et les spécifications techniques peuvent être sujettes à modifications sans avis préalable,dans un but d’amélioration du produit.

11

VorsichtsmaßnahmenAufstellungsortVermeiden Sie das Aufstellen des Geräts an Orten, andenen
• es direkter Sonneneinstrahlung ausgesetzt ist;• hohe Feuchtigkeit oder Extremtemperaturen auftre-
ten können;• Staub oder Schmutz in großen Mengen vorhanden
sind;• das Gerät Erschütterungen ausgesetzt sein kann.• in der Nähe eines Magnetfeldes.
StromversorgungSchließen Sie das beiliegende Netzteil nur an eine geeig-nete Steckdose an. Verbinden Sie es niemals mit einerSteckdose einer anderen Spannung.
Störeinflüsse auf andere ElektrogeräteDieser kann bei in der Nähe aufgestellten Rund-funkempfängern oder Fernsehgeräten Empfangsstörun-gen hervorrufen. Betreiben Sie solche Geräte nur in ei-nem geeigneten Abstand von diesem Erzeugnis.
BedienungVermeiden Sie bei der Bedienung von Schaltern undReglern unangemessenen Kraftaufwand.
ReinigungBei auftretender Verschmutzung können Sie das Gehäu-se mit einem trockenen, sauberen Tuch abwischen. Ver-wenden Sie keinerlei Flüssigreiniger wie beispielsweiseReinigungsbenzin, Verdünnungs- oder Spülmittel. Ver-wenden Sie niemals brennbare Reiniger.
BedienungsanleitungBewahren Sie diese Bedienungsanleitung gut auf, fallsSie sie später noch einmal benötigen.
Flüssigkeiten und FremdkörperStellen Sie niemals Behältnisse mit Flüssigkeiten in derNähe des Geräts auf. Wenn Flüssigkeit in das Gerät ge-langt, können Beschädigung des Geräts, Feuer oder einelek-trischer Schlag die Folge sein.Beachten Sie, daß keinerlei Fremdkörper in das Gerätgelangen. Sollte ein Fremdkörper in das Gerät gelangtsein, so trennen Sie es sofort vom Netz. Wenden Sie sichdann an Ihren KORG-Fachhändler.
Das CE-ZeichenVor dem 31.12.1996 vergebene CE-Zeichen auf unserennetzgespeisten Geräten zeigen an, daß diese Geräte ge-mäß der EMC-Richtlinie (89/336/EWG) und der CE-Richtlinie (93/68/EWG) der EU arbeiten.Nach dem 01.01.1997 vergebene CE-Zeichen auf unse-ren netzgespeisten Geräten zeigen an, daß diese Gerätegemäß der EMC-Richtlinie (89/336/EWG), der CE-Richtlinie (93/68/EWG) und der Niederspannungs-stromrichtlinie (73/23/EWG) der EU arbeiten.Die CE-Zeichen auf unseren batteriegespeisten Gerätenzeigen an, daß diese Geräte gemäß der EMC-Richtlinie(89/336/EWG) und der CE-Richtlinie (93/68/EWG) derEU arbeiten.
WICHTIGER HINWEIS FÜR KUNDENDieses Produkt wurde unter strenger Beachtung vonSpezifikationen und Spannungsanforderungen herge-stellt, die im Bestimmungsland gelten. Wenn Sie diesesProdukt über das Internet, per Postversand und/odermit telefonischer Bestellung gekauft haben, müssen Siebestätigen, dass dieses Produkt für Ihr Wohngebiet aus-gelegt ist.WARNUNG: Verwendung dieses Produkts in einem an-deren Land als dem, für das es bestimmt ist, verwendetwird, kann gefährlich sein und die Garantie des Herstel-lers oder Importeurs hinfällig lassen werden. Bitte be-wahren Sie diese Quittung als Kaufbeleg auf, da andern-falls das Produkt von der Garantie des Herstellers oderImporteurs ausgeschlossen werden kann.

1
2
1
3
4
12
13
5
6
78
910
11
EinleitungVielen Dank für den Erwerb des dynamischen Effektgerätes und Controllers KP2 KAOSSPAD. Für den störungsfreien Betrieb des KP2 und zur Ausnutzung aller Möglichkeiten lesenSie bitte diese Anleitung sorgfältig durch und bedienen Sie das Gerät in der gefordertenWeise.
2
1 34
4321
5
7
8
6
Bedienungselemente und Anschlüsse des KP2 und derenFunktionen
Oberes Bedienfeld1. Eingangswahlschalter [INPUT
SELECT]2. Spitzenpegelanzeige [PEAK]3. Eingangsregler [INPUT VOLUME]4. Effektregler [FX DEPTH]5. Programm-/Tempoanzeige [PRO-
GRAM/BPM]6. Programm-/Temporegler [PRO-
GRAM/BPM]7. Programmspeichertasten [PROGRAM
MEMORY 1–8]8. Taste [TAP/BPM]9. Touch Pad10. Hebel [PAD MOTION/MUTE]11. Aufnahme-/Stopptaste [REC/STOP]12. Sample-Tasten [SAMPLE 1, 2]13. [HOLD]-Taste
Vorderes Bedienfeld1. Kopfhörerregler [PHONES VOLUME]2. Kopfhörerbuchse [PHONES]3. Mikrofonregler [MIC TRIM]4. Mikrofoneingangsbuchse [MIC]
Rückseite1. Masseanschluss [GROUND]2. Plattenspieler-Eingangsbuchsen
[PHONO IN]3. Line-Eingangsbuchsen [LINE IN]4. Line-Ausgangsbuchsen [LINE OUT]5. Verbindungsschalter [CONNECTION]6. Anschlüsse [MIDI IN], [MIDI OUT]7. Stromversorgungsbuchse DC 12 V8. Netzschalter [POWER]

2
AnschlüsseWichtigste AnschlüsseStellen Sie diese Verbindungen her, wenn Sie das Tonsignal eines an den Eingangsbuchsendes KP2 angeschlossenen Gerätes mit Effekten versehen und das bearbeitete Signal an denLine-Ausgangsbuchsen [LINE OUT] ausgeben möchten. Das KP2 hat drei verschiedene Artenvon Eingängen. Benutzen Sie die Eingangsbuchsen, die in Ihrer Situation am besten geeignetsind.
Behandlung und Pflege desTouch PadDrücken oder schlagen Sie niemals mitübermäßiger Kraft auf das Touch Pad, undstellen Sie keine schweren Gegenständedarauf ab. Das Pad kann zerbrechen, wennzu hart darauf geschlagen wird. BetätigenSie das Touch Pad nur mit Ihren Fingern,wenn Sie mit einem harten Gegenstanddarauf drücken oder darüber fahren, kanndas Pad Kratzer bekommen. Benutzen Siezur Reinigung des Touch Pads ein weiches,trockenes Tuch. Benutzen Sie keineLösungsmittel wie Nitroverdünnung oderBenzin, da sich das Pad dadurch verfor-men könnte.
PHONO INLINE IN
LINE OUT DC12V
MIXER, DJ MIXER
AC
MIC1
BAL�OR�
UNBAL
LINE IN 1LOW CUT�
75Hz�18dB/OCT
�TRIM+10dB -40dB
10 �60
U
-10dBV
MIC GAIN
LINE IN 7-8
L
R
BAL�OR�
UNBAL
MONO��
+4�-10
LEVEL��
LINE IN 9-10
L
R
BAL�OR�
UNBAL
MONO��
+4�-10
LEVEL��
LINE IN 11-12
L
R
BAL�OR�
UNBAL
MONO��
+4�-10
LEVEL��
LINE IN 13-14
L
R
BAL�OR�
UNBAL
MONO��
+4�-10
LEVEL��
STEREO AUX RETURNS1
2
1
2
AUX SEND
LEFT(1/MONO) RIGHT ALL BAL/UNBAL
L
R
TAPE�INPUT
TAPE�OUTPUT
MAIN OUTSL
R
BAL/UNBAL
PHONES
MICRO SERIES 1402-VLZ14-CHANNEL MIC/LINE MIXER
MIC2
BAL�OR�
UNBAL
LINE IN 2LOW CUT�
75Hz�18dB/OCT
�TRIM+10dB -40dB
10 �60
U
-10dBV
MIC GAIN
MIC3
BAL�OR�
UNBAL
LINE IN 3LOW CUT�
75Hz�18dB/OCT
�TRIM+10dB -40dB
10 �60
U
-10dBV
MIC GAIN
MIC4
BAL�OR�
UNBAL
LINE IN 4LOW CUT�
75Hz�18dB/OCT
�TRIM+10dB -40dB
10 �60
U
-10dBV
MIC GAIN
MIC5
BAL�OR�
UNBAL
LINE IN 5LOW CUT�
75Hz�18dB/OCT
�TRIM+10dB -40dB
10 �60
U
-10dBV
MIC GAIN
MIC6
BAL�OR�
UNBAL
LINE IN 6LOW CUT�
75Hz�18dB/OCT
�TRIM+10dB -40dB
10 �60
U
-10dBV
MIC GAIN
60
U
+15
U
+15
AUX1�
MON/�EFX
2�EFX
U
+15
U
+12
-15
-12
U
+15-15
PAN
SOLO
1�MUTE�A LT 3 – 4
EQHI�
12kHz
MID�2.5kHz
LOW�80Hz
L R
dB10
5
U
5
10
20
30
4050
60
U
+15
U
+15
AUX1�
MON/�EFX
2�EFX
U
+15
U
+12
-15
-12
U
+15-15
PAN
SOLO
2�MUTE�A LT 3 – 4
EQHI�
12kHz
MID�2.5kHz
LOW�80Hz
L R
dB10
5
U
5
10
20
30
4050
60
U
+15
U
+15
AUX1�
MON/�EFX
2�EFX
U
+15
U
+12
-15
-12
U
+15-15
PAN
SOLO
3�MUTE�A LT 3 – 4
EQHI�
12kHz
MID�2.5kHz
LOW�80Hz
L R
dB10
5
U
5
10
20
30
4050
60
U
+15
U
+15
AUX1�
MON/�EFX
2�EFX
U
+15
U
+12
-15
-12
U
+15-15
PAN
SOLO
4�MUTE�A LT 3 – 4
EQHI�
12kHz
MID�2.5kHz
LOW�80Hz
L R
dB10
5
U
5
10
20
30
4050
60
U
+15
U
+15
AUX1�
MON/�EFX
2�EFX
U
+15
U
+12
-15
-12
U
+15-15
PAN
SOLO
5�MUTE�A LT 3 – 4
EQHI�
12kHz
MID�2.5kHz
LOW�80Hz
L R
dB10
5
U
5
10
20
30
4050
60
U
+15
U
+15
AUX1�
MON/�EFX
2�EFX
U
+15
U
+12
-15
-12
U
+15-15
PAN
SOLO
6�MUTE�A LT 3 – 4
EQHI�
12kHz
MID�2.5kHz
LOW�80Hz
L R
dB10
5
U
5
10
20
30
4050
60
U
+15
U
+15
AUX1�
MON/�EFX
2�EFX
U
+15
U
+12
-15
-12
U
+15-15
PAN
SOLO
7–8�MUTE�A LT 3 – 4
EQHI�
12kHz
MID�2.5kHz
LOW�80Hz
L R
dB10
5
U
5
10
20
30
4050
60
U
+15
U
+15
AUX1�
MON/�EFX
2�EFX
U
+15
U
+12
-15
-12
U
+15-15
PAN
SOLO
9–10�MUTE�A LT 3 – 4
EQHI�
12kHz
MID�2.5kHz
LOW�80Hz
L R
dB10
5
U
5
10
20
30
4050
60
U
+15
U
+15
AUX1�
MON/�EFX
2�EFX
U
+15
U
+12
-15
-12
U
+15-15
PAN
SOLO
11–12�MUTE�A LT 3 – 4
EQHI�
12kHz
MID�2.5kHz
LOW�80Hz
L R
dB10
5
U
5
10
20
30
4050
60
U
+15
U
+15
AUX1�
MON/�EFX
2�EFX
U
+15
U
+12
-15
-12
U
+15-15
PAN
SOLO
13–14�MUTE�A LT 3 – 4
EQHI�
12kHz
MID�2.5kHz
LOW�80Hz
L R
dB10
5
U
5
10
20
30
4050
60
dB10
5
U
5
10
20
30
4050
60
dB10
5
U
5
10
20
30
4050
U
+10
U
+20
U
+20
1
2AUX 1 MASTER
PRE�POST
NORMALLED
AUX 1�SELECT
EFX TO�MONITOR
AUX �RETURNS
SOURCE
MAIN�MIX
LEFT RIGHT
CLIP+28
+10
+7
+4
+2
0
-2
-4
-7
-10
-20
-30
0dB=0dBu
RUDE SOLO LIGHT
ALT�3-4
TAPE
ASSIGN�TO MAIN MIX
NORMAL(AFL)LEVEL SET(PFL)
SOLO�MODE
PHANTOM POWER
CONTROL�ROOM / PHONES MAIN MIX
PLATTENSPIELER
CD-SPIELER
STECKERNETZTEIL

3
Anschluss an ein DJ-MischpultWenn Sie das KP2 als externes Effektgerät verwenden möchten, verbinden Sie die Effect-Send-Buchse Ihres DJ-Mischpults (o. ä.) mit den Line-Eingangsbuchsen des KP2, undverbinden Sie die Line-Ausgangsbuchsen des KP2s mit den Effect-Return-Buchsen (o. ä.)Ihres Mischpults.
Bei Anschluss über die Buchsen Effect Send/ReturnStellen Sie den Verbindungsschalter [CONNECTION] des KP2 auf „FX LOOP“. In dieserEinstellung besteht das Ausgangssignal von den Line-Ausgangsbuchsen des KP2 nur ausdem bearbeiteten Effektsignal des KP2s; ohne jeglichen Anteil vom Originalsignal, das zumKP2 geschickt wurde.Wenn Sie den Effektregler [FX DEPTH] des KP2s zum Einstellen des Effektanteils verwendenmöchten, stellen Sie diesen Schalter in die Stellung „DIRECT“.
MIDI-VerbindungenStellen Sie diese Verbindungen her, wenn Sie MIDI-Geräte am KP2 anschließen möchten, umz. B. Sequenzerprogramme usw. zu nutzen.
LINE IN MIDI INMIDI OUTOUTPUT
KORG EM-1
PLATTENSPIELER PLATTENSPIELERDJ-MISCHPULT
LINE INSEND
LINE OUTRETURN
CONNECTION LINE OUT
DIRECTFX LOOP

4
4. Auswählen eines Programms(1) Auf der Programm-/Tempoanzeige[PROGRAM/BPM] wird die Nummer desmomentan ausgewählten Programmesangezeigt.Benutzen Sie den Programm-/Temporegler[PROGRAM/BPM] zur Auswahl einesProgramms (00–99).(2) Mit dem Effektregler [FX DEPTH]können Sie den Effektanteil einstellen.Es wird kein Effekt angewendet, wenn derRegler ganz nach links gedreht wird, undes wird der maximaleEffektanteil zugemischt, wenn der Regleran den Rechtsanschlag gedreht wird.
Informationen zur Programm-/Tempoanzeige [PROGRAM/BPM]Hier wird die Nummer des momentanausgewählten Programmes angezeigt, dereingestellte BPM-Wert sowie die Position,an der Sie das Touch Pad berühren.Bei Betätigung des Touch Pads:Die Anzeige zeigt die Position an, an derSie das Pad berühren (1.1–9.9; 5.5 bedeutet„Mitte“).
Horizontale Position (1–9)Vertikale Position (1–9)
Bei der Programmwahl: Die Anzeige zeigtdie Programmnummer an (00–99).Beim Einstellen des BPM-Wertes: WennSie die Taste [TAP/BPM] drücken, um denBPM-Wert einzustellen, zeigt die Anzeigeden BPM-Wert an. Im Auto-BPM-Modusleuchten drei Punkte auf.Bei der MIDI-Bearbeitung: Die Anzeigezeigt den MIDI-Kanal, die Controller-Nummer oder andere Datenwerte an.
5. Bedienung des Touch Pad(1) Steuern Sie den Sound, indem Sie mitdem Finger über das Touch Pad gleitenoder es antippen.
Bedienung1. Einschalten(1) Schließen Sie das KP2 an die anderenGeräte an, wie in der Abbildung gezeigt,und stecken Sie den Netzadapter in eineWandsteckdose.(2) Schalten Sie das Gerät am Netzschalter[POWER] ein.Die Programm-/Tempoanzeige [PRO-GRAM/BPM] leuchtet auf.Zum Ausschalten drücken Sie denNetzschalter [POWER] nochmals.
2. Eingabe eines Audiosignals(1) Benutzen Sie den Eingangswahlschalter[INPUT SELECT] zur Auswahl derEingangsbuchsen an denen das Gerätangeschlossen ist, dem Sie einen Effektzumischen möchten.
MIC: Der Effekt wird auf den Mikrofonein-gang angewendet.PHONO: Der Effekt wird auf denPlattenspielereingang angewendet.LINE: Der Effekt wird auf die Line-Eingangsbuchsen angewendet.
3. Einstellen der Lautstärke(1) Stellen Sie den Eingangspegel ein.Während ein Audiosignal am angeschlos-senen Gerät wiedergegeben wird, stellenSie am Eingangsregler [INPUT VOLUME]den Eingangspegel so ein, dass dieSpitzenpegelanzeige nicht rot aufleuchtet.Wenn Sie den Mikrofoneingang verwen-den, stellen Sie den Mikrofonregler [MICTRIM] auf die Empfindlichkeit desMikrofons ein, so dass das Signal nichtverzerrt ist.(2) Wenn Sie Kopfhörer benutzen, stellenSie die gewünschte Hörlautstärke amKopfhörerregler [PHONES VOLUME] ein.

5
Benutzen Sie die mitgelieferte Schutzfolie.(2) Wenn Sie während Sie der Betätigungdes Touch Pad die [HOLD]-Taste drücken,hält das KP2 den Effekt-Sound, der in demMoment aktiv ist, in dem Sie das TouchPad loslassen .
6. Stummschaltung (MUTE)Wenn Sie den Hebel [PAD MOTION/MUTE] zu sich hin ziehen (Stellung„MUTE“), wird das Eingangssignal, derSample oder der Synth-/Schlagzeug-Sound stummgeschaltet. Wenn Sie einenDelay- oder Halleffekt benutzen, wird abdiesem Moment nur der Effektklangausgegeben (d. h. das Echo oder der Hall).
TransformerDurch schnelle Bewegungen mit demHebel [PAD MOTION/MUTE] können Siedie Stummschaltung schnell ein- undausschalten und so aus einem dauerhaftanliegenden Eingangssignal Rhythmenerzeugen. Diese DJ-Technik wird z. T. als„Transformer“ bezeichnet.
7. Pad-Bewegungen (PadMotion)Mit dem KP2 könne Sie Ihre Touch-Pad-Bewegungen aufzeichnen, und indem Sieden Hebel [PAD MOTION/MUTE] in dieStellung „PAD MOTION“ stellen, könnenSie die Bewegungen abspielen.
Aufnahme von Pad-BewegungenDie Aufnahme beginnt, sobald Sie denHebel [PAD MOTION/MUTE] in derStellung „PAD MOTION” festhalten unddabei das Touch Pad berühren.Auch dann, wenn Sie den Finger vomTouch Pad abheben, wird der nachfolgendeZustand weiterhin als Teil Ihrer Bedienunginterpretiert und aufgezeichnet.Daher können Sie auch Aktionen auf demTouch Pad aufnehmen, bei denen Sie inAbständen darauf tippen. Die Aufnahmeendet, wenn Sie den Hebel [PAD MOTI-ON/MUTE] in die Grundstellung (MUTE)bewegen.
Die Aufnahme endet ebenfalls, sobald diemaximale Aufnahmedauer (etwa 3,3Sekunden) erreicht ist.
Wiedergabe von Pad-BewegungenWenn Sie eine Pad-Bewegung aufgenom-men haben, schieben Sie den Hebel [PADMOTION/MUTE] in die Stellung „PADMOTION“ (ohne das Touch Pad zuberühren), und die aufgenommenenBewegungen werden abgespielt. SolangeSie den Hebel [PAD MOTION/MUTE] inder Stellung „PAD MOTION“ lassen unddas Touch Pad nicht berühren, wirdwiederholt die gleiche Bewegungabgespielt.
Wenn Sie das T ouch Pad während der W ie-dergabe berühren, beginnt eine neue Aufnahme.Die Aufnahme wird ausgesetzt, wenn Sie aufein anderes Programm umschalten.
Der Ein-/Ausschaltzustand der [HOLD]-Taste wird nicht als T eil der Pad-Bewegungenaufgezeichnet. W enn Sie die [HOLD]-T astedrücken und eine Pad-Bewegung abspielen,wird die Bewegung ab der Stelle angehalten, ander Sie die W iedergabe gestoppt hatten.
8. Eingabe des BPM-WertesWenn Sie einen BPM-Wert angeben,können Sie die Effekte mit dem Temposynchronisieren, wenn ein Effektprogrammder Gruppe „BPM FX/PTN“ ausgewähltist. Einzelheiten zu dem jeweiligenEffektparameter, für den der BPM-Wertgilt, erfahren Sie aud der Liste derEffektprogramme (Tabelle auf separatemBlatt).
Was ist der BPM-Wert?BPM (Beats Per Minute = Schläge proMinute) ist das Tempo des Titels, angege-ben in der Anzahl von Schlägen (Viertelno-ten), die in einer Minute gezählt werden.Ein höherer BPM-Wert bezeichnet einschnelleres Tempo.
Einstellen des BPM-WertesWenn Sie die BPM kennen, drücken Sie dieTaste [TAP/BPM] und stellen Sie den Wertmit dem Programm-/Temporegler

6
[PROGRAM/BPM] ein. Nach zehnSekunden ohne weitere Änderungenerscheint wieder die normale Anzeige.
Tap-Tempo-FunktionWenn Sie den BPM-Wert nicht kennen,drücken Sie die Taste [TAP/BPM] zwei-oder mehrmals im Rhythmus deslaufenden Titels. Ihr „getipptes“ Tempowird erkannt, und der BPM-Wert erscheintin der Programm-/Tempoanzeige[PROGRAM/BPM].
Auto-BPM-FunktionWenn Sie die Taste [TAP/BPM] für längereZeit drücken, erscheinen drei Punkte in derProgramm-/Tempoanzeige, und derRhythmus des ankommendenAudiosignals wird automatisch erkannt(Auto-BPM-Modus).Während die Programm-/Tempoanzeige[PROGRAM/BPM] blinkt, läuft dieErkennung des BPM-Wertes. Drücken Siedie Taste [TAP/BPM] erneut, um dieautomatische Erkennung auszuschalten.
Sie können BPM auf einen W ert zwischen80 und 160 einstellen.
MIDI-Sync-FunktionDer BPM-Wert des KP2 kann auch aus derMIDI Clock eines externen MIDI-Gerätesgewonnen werden. Verbinden Sie dieBuchse [MIDI IN] des KP2 mit der MIDI-Ausgangsbuchse des externen MIDI-Gerätes (wie einem Sequenzer), das dieMIDI Clock senden kann.Diese Funktion erlaubt keine Synchronisa-tion der Sequenzdaten mit den Rhythmendes KP2. Wenn Sie zu Sequenzdatensynchronisieren möchten, müssen Sieentweder eine Touch-Pad-On-Meldung anden Anfang jedes Taktes Ihrer Sequenz-daten einfügen, oder das Touch Pad amAnfang jeder Phrase des KP2 antippen, umdas Pattern zu starten.
Wenn Sie möchten, dass der KP2 die MIDIClock und T ouch-Pad-On-Meldungen empfan-gen soll, schalten Sie in den MIDI-Bearbeitungsmodus ( ☞ Seite 9) ein, und sorgenSie in den „Einstellungen für Übertragung und
Empfang von MIDI-Meldungen“ ( ☞ Seite 9)dafür , dass diese Meldungen empfangen werden.
Sie können die Funktionen „T ap Tempo“oder „Auto BPM“ nicht benutzen, während derKP2 MIDI-Clock-Daten von einem externenMIDI-Gerät empfängt.
9. Speichern von Einstellungenmit denProgrammspeichertastenDer momentane Einstellungszustand desKP2 kann unter einer der Programm-speichertasten [PROGRAM MEMORY 1–8]abgelegt werden, so dass dieser Zustandjederzeit abrufbar ist.
Gespeicherte Daten— Effektprogramm— Ein-/Ausschaltzustand der [HOLD]-Taste sowie die Halteposition (Koordina-ten)— Einstellung des Effektreglers FX/DEPTH— In der Gruppe „BPM FX/PTN“: dereingestellte BPM-Wert— In der Gruppe „SAMPLE/PLAY“: dieverwendeten Sample-Tasten 1 und 2
Die Ef fektprogramme 60 und 90–99 spei-chern nicht den Zustand der [HOLD]-T aste.
Speichern der Daten(1) Drücken Sie die Programmspeichertaste[PROGRAM MEMORY 1–8], der Sie diemomentane Einstellung zuweisenmöchten.(2) Mit dem Programm-/Temporegler[PROGRAM/BPM] können Sie dasEffektprogramm auswählen, das beimDrücken der Taste aktiviert werden soll.
Wenn Sie den Zustand der [HOLD]-T astespeichern möchten, wählen Sie das Programm,schalten Sie die [HOLD]-T aste ein, und berüh-ren Sie das T ouch Pad, um die Position anzuge-ben. W enn Sie weitere Einstellungen vorneh-men möchten, tun Sie dieses jetzt.(3) Drücken und halten Sie die in Schritt (1)gewählte Programmspeichertaste etwa 2Sekunden lang – die Einstellungen wurdengespeichert.
7
Sobald die Einstellungen gespeichert sind,hört die Programm-/Tempoanzeige[PROGRAM/BPM] auf zu blinken.
Abruf gespeicherter Einstellungen(1) Drücken Sie eine der Programm-speichertasten 1-8 – die unter dieser Tastegespeicherten Einstellungen werdenabgerufen.
10. Sampeln und Wiedergebeneiner PhraseEine Phrase des eingehenden Audiosignalskann unter einer der beiden Sample-Tasten[SAMPLE 1, 2] aufgenommen werden.Wenn Sie daraufhin ein Programm derGruppe „SAMPLE/PLAY“ auswählen(Programme Nrn. 90–99), können Sie denSample abspielen und mit dem Touch Paddie Wiedergabegeschwindigkeit oder dieRückwärtswiedergabe steuern.Wenn Sie ein Programm aus der Gruppe„SAMPLE/PLAY“ gewählt haben, wirddurch Drücken einer der beiden Sample-Tasten die unter dieser Taste aufgenomme-ne Phrase abgespielt.Für jede Taste können Sie etwa sechsSekunden lang aufnehmen.
Die aufgenommenen Phrasen gehen verlo-ren, wenn das Gerät ausgeschaltet wird. Dieaufgenommenen Phrasen können nicht gespei-chert werden.
Aufnahme (Sampeln)(1) Drücken Sie die Aufnahme-/Stopptaste[REC/STOP], und die LED dieser Tastezeigt durch Blinken an, dass das Gerätaufnahmebereit ist.(2) Drücken Sie die Sample-Taste 1 oder 2,für die Sie einen Sample aufnehmenmöchten. Dabei wird nicht der dortgespeicherte Sample abgespielt.(3) Wenn Sie die Aufnahme-/Stopptaste[REC/STOP] drücken, leuchtet deren LED,und die Aufnahme beginnt. Die Aufnahmestoppt, wenn Sie die gleiche Tastenochmals drücken.
Die Aufnahme stoppt automatisch, sobalddie maximale Aufnahmezeit erreicht ist.
Bei Programmen, die nicht aus der Gruppe„SAMPLE/PLA Y“ stammen, können Sie wäh-rend der Aufnahme das T ouch Pad betätigen,und der durch den Ef fekt bearbeitete Sound wirdaufgenommen.
Automatische Aufnahme (AUTO REC)Sie können das Gerät so einstellen, dass dieAufnahme automatisch beginnt, sobald einAudiosignal empfangen wird. Dies istdann praktisch, wenn Sie eine Stimme perMikrofon aufnehmen.(1) Halten Sie in Schritt (2) des Aufnahme-vorgangs (s. o.) die gewünschte Sample-Taste 1 oder 2 gedrückt, und drücken Siedie Aufnahme-/Stopptaste [REC/STOP].Die LEDs dieser und der entsprechendenSample-Taste 1 oder 2 blinken gleichzeitig,um die Aufnahmebereitschaft anzuzeigen.(2) Die Aufnahme beginnt automatisch,sobald ein Audiosignal erkannt wird. DieAufnahme stoppt, wenn Sie die Aufnah-me-/Stopptaste nochmals drücken.Wiedergabe (Sample abspielen)Die Art der Wiedergabe hängt ganz davonab, welches Effektprogramm Sie ausge-wählt haben.
Bei einem Programm aus der Gruppe„SAMPLE/PLAY“:(1) Wählen Sie ein Programm aus derGruppe „SAMPLE/PLAY“ (Nrn. 90–99).(2) Drücken Sie die Sample-Taste 1 oder 2,deren Sample Sie spielen möchten. Eserfolgt noch keine Wiedergabe.(3) Wenn Sie das Touch Pad berühren, wirdder Sample entsprechend der angetipptenPosition abgespielt.Die Art und Weise, wie die Phrase gespieltwird, hängt vom Programm ab (separatesBlatt: Liste der Effektprogramme).(4) Mit dem Effektregler [FX DEPTH]bestimmen Sie die Wiedergabelautstärkedes Samples.In der Mittelstellung dieses Reglers wirdder Sample genauso laut ausgegeben, wieer aufgenommen wurde (1:1).In Maximalstellung ist während der

8
Sample-Wiedergabe nur das Sample-Signalzu hören (kein Eingangssignal).
Bei einem Programm aus anderenGruppen (nicht „SAMPLE/PLAY“):(1) Wählen Sie ein Programm aus eineranderen Gruppe als „SAMPLE/PLAY“.(2) Drücken Sie eine der Sample-Tasten 1oder 2, und die aufgenommene Phraseläuft mit normalem Tempo.Wenn Sie die Taste weiterhin gedrückthalten, läuft die Phrase als Loop (im Kreis).Um die Lautstärke einzustellen, halten Siedie jeweilige Sample-Taste 1 oder 2gedrückt und drehen Sie am EffektreglerFX DEPTH.
Während der Sample-W iedergabe könnenSie mit dem T ouch Pad Ef fekte erzeugen.
Wenn Sie bei gehaltener Sample-T aste die[HOLD]-T aste drücken, wird die W iedergabefortgesetzt, so als ob Sie die Sample-T aste weiter -hin gedrückt hielten.Die Haltefunktion (HOLD) wird ausgeschaltet,indem Sie die entsprechende Sample-T aste 1 oder2 nochmals drücken.
MIDI-FunktionenWas ist MIDI?MIDI steht für Musical Instrument DigitalInterface und ist ein weltweiter Standardfür die Übertragung einer Vielzahlverschiedener Spielinformationen undanderer Daten zwischen elektronischMusikinstrumenten und Computern.
MIDI-VerbindungenFür die Übertragung und den Empfangvon MIDI-Meldungen werden spezielleMIDI-Kabel verwendet. Verbinden Sie dieMIDI-Buchsen am KP2 mit den MIDI-Anschlüssen des externen MIDI-Gerätes,mit dem Sie MIDI-Daten austauschenmöchten.Buchse MIDI IN: An dieser Buchsewerden MIDI-Meldungen von anderenMIDI-Geräten empfangen. Verbinden Siediese Buchse mit dem MIDI OUT-Anschluss des externen Gerätes.
Buchse MIDI OUT: An dieser Buchsewerden MIDI-Meldungen vom KP2gesendet. Verbinden Sie diese Buchse mitdem MIDI IN-Anschluss des externenGerätes.
Benutzung von MIDINeben dem Einsatz des KP2 als Effektgerätkönnen Sie MIDI-Befehle vom KP2 aussenden und es als „Realtime Controller“(Steuergerät) für einen Synthesizer oderandere externe MIDI-Geräte verwenden.Sie können das KP2 auch an einen MIDI-Sequenzer anschließen und die beiBetätigung des Touch Pad gesendetenMIDI-Befehle aufzeichnen. Wenn Sie dieaufgenommenen MIDI-Meldungen dortwieder abspielen, werden Ihre Bedienungs-vorgänge am Touch Pad wiedergegeben.
Informationen zu MIDI-KanälenUm Informationen unabhängig voneinan-der an mehrere MIDI-Geräte über eineinziges Kabel übertragen zu können,besitzen MIDI-Datenpakete einen von 16Kanälen (1–16). Wenn das sendende Gerätauf MIDI-Kanal „1“ eingestellt ist, werdendie MIDI-Meldungen empfangsseitigignoriert, wenn das empfangende Gerätnicht ebenfalls auf MIDI-Kanal “1” steht.
Informationen zur MIDI-ImplementationstabelleDie Bedienungsanleitungen vieler MIDI-Geräte enhalten eine so genannte „MIDI-Implementationstabelle“.In dieser Tabelle sind alle Arten von MIDI-Befehlen aufgeführt, die von diesem Gerätgesendet oder empfangen werden können.Wenn Sie zwei (oder mehrere) MIDI-Gerätebenutzen, vergleichen Sie deren MIDI-Implementationstabellen, um zu erfahren,welche MIDI-Meldungen diese Geräteuntereinander austauschen können.* Einzelheiten über alle MIDI-Funktionen erhal-ten Sie in der separaten MIDI-Implementations-tabelle.Wenden Sie sich diesbezüglich an Ihren Korg-Händler .

9
Bearbeitung von MIDI-Daten (MIDIEdit)Halten Sie die Taste [TAP/BPM] gedrücktund drücken Sie die Aufnahme-/Stopptaste [REC/STOP]. Nach etwa einerSekunde gelangen Sie in den MIDI-Bearbeitungsmodus, und der MIDI-Kanalblinkt in der Programm-/Tempoanzeige[PROGRAM/BPM].
Einstellen des MIDI-KanalsIm MIDI-Bearbeitungsmodus zeigt dieProgramm-/Tempoanzeige [PROGRAM/BPM] den MIDI-Kanal an. Sie können denProgramm-/Temporegler [PROGRAM/BPM] benutzen, um den MIDI-Kanaleinzustellen.
Einstellungen für Übertragung undEmpfang von MIDI-MeldungenÜbertragung und Empfang jeder Art vonMIDI-Nachricht kann mit einer der untenaufgeführten Tasten ein- und ausgeschaltetwerden (MIDI-Filterfunktion).Übertragung und Empfang sind aktiviert,wenn die entsprechende LED leuchtet.Übertragung und Empfang sinddeaktiviert, wenn die LED nicht leuchtet.(Seite 10: Meldungen, die gesendet undempfangen werden können)
Einige Parameter können nur gesendet, an-dere nur empfangen werden.
Ändern von Controller-NummernWenn Sie eine der Programmspeichertasten[PROGRAM MEMORY 3–8] gedrückthalten und den Programm-/Temporegler[PROGRAM/BPM] drehen, können SieController-Nummern ändern. Obwohl Siehier eine bereits verwendete Controller-Nummer auswählen können, ist dergleichzeitige Empfang und die Übertra-gung von MIDI-Meldungen mit gleicherController-Nummer nicht möglich.
Die vom KP2 gesendeten und empfangenenMIDI-Meldungen können auf die Controller -Nummern 1–31 und 64–95 eingestellt werden.
Speichern der verändertenEinstellungenDrücken und halten Sie im MIDI-Bearbeitungsmodus die Aufnahme-/Stopptaste [REC/STOP] für mindestenseine Sekunde — die geänderten MIDI-Einstellungen wurden gespeichert. WennSie das Gerät ausschalten, ohne zuspeichern, bleiben alle Einstellungen imursprünglichen Zustand.
Verlassen des MIDI-BearbeitungsmodusSie kehren in den normalen Bedienungs-status zurück, sobald Sie das Touch Padberühren oder indem Sie einfach zehnSekunden lang nichts ändern.
Speichern Ihrer EinstellungenSie können die Inhalte Ihrer Programmeund die Einstellungen der Controller-Nummern des MIDI-Bearbeitungsmodus’speichern, indem Sie diese als so genannte„SysEx”-Meldungen (systemexklusiveMeldungen) an ein externes MIDI-Gerätsenden und diese dort speichern. Näheresüber die SysEx-Meldungen, die das KP2sendet und empfängt, erfahren Sie in derseparaten MIDI-Implementationstabelle.

10
Meldungen, die gesendet und empfangen werden könnenMit den Werkseinstellungen können die folgenden MIDI-Meldungen übertragen undempfangen werden.
Durch Bedienungsvorgänge Gesendete Tastenzuständegesendete Daten Gesendete MIDI-Befehle (EIN/AUS)Touch Pad X-Achse Effektparameter 1 (Controller-Nr. 12) *1, *2 Programmspeicher 4Touch Pad Y-Achse Modulationstiefe 1 (Controller-Nr. 1) Y=5–9 Programmspeicher 1
Modulationstiefe 2 (Controller-Nr. 2) Y=5–1 Programmspeicher 2Effektparameter 2 (Controller-Nr. 13) *1, *2 Programmspeicher 5
Touch Pad X+Y-Achse Effektanteil 3 (Controller-Nr. 93) *1 Programmspeicher 3Touch Pad ein/aus Effektanteil 2 (Controller-Nr. 92) *1, *2 Programmspeicher 6FX DEPTH Effektanteil 4 (Controller-Nr. 94) *1, *2 Programmspeicher 7MUTE Effektanteil 5 (Controller-Nr. 95) *1, *2 Programmspeicher 8Programmwechsel Programmwechsel (00–99) *2 HOLD (Halten)
Für Bedienungsvorgänge Empfangene Tastenzuständeempfangene Daten Empfangene MIDI-Befehle (EIN/AUS)Touch pad X-Achse Effektparameter 1 (Controller-Nr. 12) *1, *2 Programmspeicher 4Touch pad Y-Achse Effektparameter 2 (Controller-Nr. 13) *1, *2 Programmspeicher 5Touch Pad ein/aus Effektanteil 2 (Controller-Nr. 92) *1, *2 Programmspeicher 6FX DEPTH Effektanteil 4 (Controller-Nr. 94) *1, *2 Programmspeicher 7MUTE Effektanteil 5 (Controller-Nr. 95) *1, *2 Programmspeicher 8Programmwechsel Programmwechsel (00–99) *2 HOLD (Halten)BPM-Wert MIDI Clock Sample 1
*1: Die gesendeten und empfangenen MIDI-Meldungen können auf die Controller -Nummern 1–31 und64–95 sowie PITCH BEND eingestellt werden. ( ) ist werksseitig so eingestellt.*2: Die Einstellungen „Ena“/„Dis“ (Aktivieren/Deakt.) und „CC#“ (Controller -Nummer) sind fürÜbertragung und Empfang immer gleich.
Die Controller -Änderungen fürdie T ouch-Pad-Y -Achse Y -5–9 und Y-5–1 sowie für die T ouch-Pad-X+Y Achse können gesendet, jedoch nicht empfangen werden. Schalten Sie daher bei der Aufnahme vonController -Änderungen in einem Sequenzer die Programmspeichertasten 1–3 aus, so dass keine überflüs-sigen MIDI-Meldungen übertragen werden.
Einmal eingestellte Controller -Nummern lassen sich nicht an anderer Stelle ändern.
Technische DatenAnzahl der Programme: 100Eingänge: Mikrofoneingang/Klinkenbuchse (mono), Plattenspielereingang/Cinch-Buchsen,Line-Eingang/Cinch-BuchsenAusgänge: Line-Ausgang/Cinch-Buchsen, Kopfhörerausgang/Klinkenbuchse (stereo)MIDI: IN, OUTStromversorgung: 12 V Gleichspannung, 700 mAMitgeliefertes Zubehör: Netzadapter, Schutzfolie für das Touch PadGewicht: 1,1 kgAbmessungen: 204(B) X 207(T) X 48(H) mm— Die Technischen Daten sowie das äußere Erscheinungsbild können sich im Zuge der Fortentwick-lung jederzeit ändern.

11


