103
www.lgecommercial.com SuperSign Lite/W OWNER’S MANUAL Please read this manual carefully before operating your set and retain it for future reference.

www.lgecommercial.com
SuperSign Lite/W
OWNER’S MANUAL
Please read this manual carefully before operating your set and retain it for future reference.

iEN
GLIS
H
CopyrightContent and programs in this software user guide are subject to the Copyright law, the Computer Programs Protection Act, and applicable international treaties. The user guide's content and programs may be used only under a License Agreement with LG Electronics, and may only be used or copied in accordance with the License Agreement. All or part of this user guide may not be transmitted, copied, distributed, utilized for derivative works using electronic, mechanical, or recording devices without the prior written consent of LG Electronics. Copyright © 2011 LG Electronics. All rights reserved. Twin Tower, Yeouido-dong 20, Yeongdeungpo-gu, Seoul
Registered Trademarks SuperSign is a registered trademark of LG Electronics. All other names of products and compa-nies are trademarks of the respective owners, and are used as references only.
About the User Guide Please read through this user guide before using the SuperSign solution. Make it available at all times by keeping a copy close by for reference.
Notational Convention • Keyboard input required to perform functions is in bold.
Example: <Esc> key
• Keyboard input with more than one key is combined with + and in bold. Example: <Ctrl+C> keys
Program UI Notation • Button controls shown on the program screen are in bold.
Example: [OK], [Save]
• Names of options shown on the program screen are in bold. Example: Start, All Programs
ENG
LISH
ii
TABLE OF CONTENTS1 OVERVIEW1 Introduction to SuperSign1 Components of SuperSign1 - Display1 - SuperSign Player1 - SuperSign Server2 Functions Available in
SuperSign Versions
4 SUPERSIGN SERVER4 System Requirements4 - Server4 - Client5 Creating the User Account6 Log in/Log out6 - Logging In7 - Logging Out8 Home8 - Home Window Layout and
Functions9 - Dashboard Settings10 - Software Update Notification
Function11 Workgroup11 - Changing a Workgroup11 - Editing a Workgroup14 Content14 - Content Window Layout and
Functions
16 - Loading Content16 - Setting an Expiration Date for
Media17 - Content Management19 Schedule19 - Schedule Window Layout and
Functions21 - Creating New Schedules27 - Schedule Management31 - AutoPlaying schedule files32 Player32 - Player Window Layout and
Functions34 - Player Search35 - Player Control41 - Player Screen History
Management42 - Creating Tiles43 - Player Management45 User45 - User Window Layout and
Functions47 - User Account Registration47 - Editing User’s Workgroup48 - User Account View49 - User Account Management50 Distribution50 - Distribution Window Layout and
Functions

iiiEN
GLIS
H
51 - Creating Content Distribution Files
55 - Creating Schedule Distribution Files
58 - Creating VideoWall Distribution File
74 - Distribution Details Management78 Urgent Message81 Log report82 Setup82 - Profile83 - Role87 - Server88 - System89 - Trouble Notice90 - SuperSign N92 - About SuperSign93 New features for SuperSign
94 APPENDIX94 SuperSign Network Connection94 - LAN Connection95 - Internet Connection96 - Wireless Connection96 - Available Ports 97 Frequently Asked Questions

1EN
GLIS
H
OverviewThe brief introduction and components of the SuperSign Lite/W are described below.
Introduction to SuperSignThe SuperSign is a network-based solution for digital advertising communications developed by LG Electronics. It is a program for integrated management of the SuperSign solution, providing support for digital media creation and management, content deployment, video play, and remote control. The SuperSign solution includes the Display, SuperSign Player (hardware and software), and SuperSign Server as its components.
Components of SuperSign
DisplayThe Display is connected to the SuperSign Player (media player) to display advertising content, and supports most LCD monitors/TV displays using the LG RS232C protocol. You can control monitor/TV functions (e.g. brightness, resolution, and sound) of the monitors/TVs supporting LG RS232C protocol by using the SuperSign Server.
SuperSign PlayerThe SuperSign Player consists of a media player (hardware), and the SuperSign Player software which is installed on the media player. The media player comes in two types, box type and a built-in type.
SuperSign ServerThe SuperSign solution provides the SuperSign Server, an all-in-one management program that allows you to manage the display and media player, and create and distribute media.

Menu Detailed functions SuperSign Lite SuperSign W
Home
System Summary
O O
Approval Status
Error Status list
Last updated Content
Last edited schedule
Last edited player
Last edited user X O
Notice Board X O
Content Content-related functions O O
Schedule Schedule-related functions O O
Player
Player-related functions O O
Supported players 50 1000
Urgent Message O O
Distribution
Distribute Content O O
Distribute Schedule O O
Distribute Videowall - Basic X O
Distribute Videowall - Advanced (Media Editor)
X O
User User-related functions X O
Log Report Log Report related functions O O
ENG
LISH
2
Functions Available in SuperSign Versions
Some functions may not be available depending upon the SuperSign version.Please refer to the table below.
The SuperSign Lite is a package distributed free of charge for content authoring and basic controls. You can use a wider range of functions by purchasing SuperSign W.

3EN
GLIS
H
Menu Detailed functions SuperSign Lite SuperSign W
Setting
Profile O O
Role X O
Server X O
Systems X O
Trouble Notice O O
SuperSign N X O
Information O O
ENG
LISH
4
SuperSign ServerSuperSign Server is an integrated management program supporting the network-based creation and management of digital media, content distribution, video play, or remote control etc. Super-Sign Server is embedded with a client-side PC Editor which is capable of creating and editing content, and a server-side Web Editor.
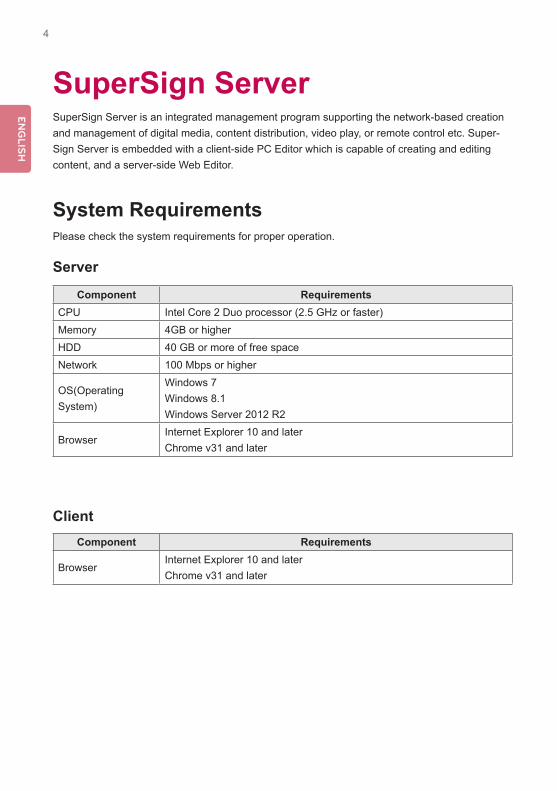
System RequirementsPlease check the system requirements for proper operation.
Server
Client
Component RequirementsCPU Intel Core 2 Duo processor (2.5 GHz or faster)Memory 4GB or higherHDD 40 GB or more of free spaceNetwork 100 Mbps or higher
OS(Operating System)
Windows 7 Windows 8.1 Windows Server 2012 R2
BrowserInternet Explorer 10 and laterChrome v31 and later
Component Requirements
BrowserInternet Explorer 10 and laterChrome v31 and later

5EN
GLIS
H
Creating the User AccountYou can make a request for an account via the server.
1 Go to Start > All Programs > SuperSign Lite/W.• The User Login window will appear.
2 Click Create an account now to make an account request.
3 Enter all required information.
4 Click the [Save] button in the top right corner of the screen to save the information.
5 Click the [OK] button when the account creation complete message appears.
• Theaccountcreatedbytheusermustfirstbeapprovedbytheserveradministrator.Formore information on approving accounts, see 49 Page, "Approving User Accounts".
NOTE

ENG
LISH
6
Log in/Log outYoucanfindouthowtologintousetheprogram,andhowtologouttoexittheprogram.
Logging In1 Entertheserveraddressintheaddressfieldofthewebbrowser.
• The program login screen will appear.
2 Enter the user ID and password, and then click the [Login] button.• ID and Password are initialized to admin/000000.

7EN
GLIS
H
Logging Out1 Click in the top right corner of the screen.
• The Login screen is displayed.

ENG
LISH
8
HomeOn the main screen of the SuperSign, you can monitor the general system through the dashboard.
Home Window Layout and FunctionsThe following shows the layout and functions of the Home window.
No. Name Function① Menu tab Menu tabs for key functions
②Personal details and monitoring area
•Displays the user’s personal information. - Including name, role, and most recent login.
③
Dashboard area •Dashboard information - Goes to the details page when the linked information is clicked.
•Moves the category location.• : Export Dash Board
①
②
③

9EN
GLIS
H
Dashboard Settings
Item FunctionServer storage Displays used and available space compared to the total space.Player Network Status
Display the status of a connected player, disconnected player or player with errors.
Pending Approval Shows a list of items pending approval (User, content, schedule, and distribution).
System Summary Displays the system summaryDevice Information (Error)
•Displays a list of errors.•Goes to the details page when the user clicks the information.
Total Workgroup Displays the total number of workgroups and the number of users.Content Type Displays the number by content type.Schedule Type Displays the number by schedule type.Distribution Information
Displays distribution information (Approved/Non-Approved/Rejected).
Last updated Content •Displays a list of schedules recently updated.•Goes to the details page when the user clicks the information.
Notice board •Display the list of notices•An administrator can write/edit/delete a notice•Anyone can write a notice regardless of privilege•A user can edit/delete his/her own notice
Last edited player •Displays a list of players recently updated.•Goes to the details page when the user clicks on the information.
Last edited schedule •Displays a list of schedules recently updated.•Goes to the details page when the user clicks on the information.
Last edited user •Displays a list of user accounts recently updated.•Goes to the details page when the user clicks on the information.

ENG
LISH
10
Software Update Notification FunctionWhenanadminuseraccesstheHomescreen,thenotificationwindowpopsoutifthereisthelatest version of the software.
1 Displays the current version and the update version available.
2 Click the update version to download a new version of the software. Then, save it on your PC to upgrade the SuperSign server.
3 Click Change log to check the update history.
4 Click the [Don't show up today] checkbox and select [Close].Then,theupdatenotificationwindow will not appear during the day.

11EN
GLIS
H
Workgroup
• Workgroup functions are available on SuperSign W only. To use these additional functions, please purchase SuperSign W.
Changing a WorkgroupYou can change your workgroup by selecting another workgroup on your list of workgroups. You can manage content, schedule, and players for the changed workgroup.
Editing a Workgroup
You can create workgroups and manage content, schedule, and players for each workgroup. Select the Edit Workgroup button ( ) at the top left of the Home screen to create or delete a workgroup.
NOTE
• Only users with administrator privileges are allowed to edit workgroups.
NOTE

ENG
LISH
12
Creating a Workgroup
On the Edit Workgroup screen, select New to create a new workgroup.
Deleting a Workgroup
On the Edit Workgroup screen, select a workgroup to delete and click the [Delete] button to delete the workgroup. When a workgroup is deleted, all the items in the workgroup are deleted. However, the users and players that were in the workgroup will be moved to the default workgroup.
Renaming a Workgroup
On the Edit Workgroup screen, select a workgroup and select the [Modify] button to rename the workgroup.

13EN
GLIS
H
Workgroup Users
On the Edit Workgroup screen, select a workgroup to view the list of users belonging to the workgroup.
Adding Users to a Workgroup
On the Workgroup Members Screen, select New to view the list of users that can be added and their roles. When you select a user and add them to the selected workgroup, the user will be able to manage the content, schedule and players of the workgroup.

ENG
LISH
14
ContentYou can create advertising content using various templates and layouts. To edit content, refer to the user manual of SuperSign Editor.
Content Window Layout and FunctionsThe following shows the layout and functions of the Content window.
No. Name Function① Action buttons •[Create New]: Create content.
•[Import]: Imports content and media (video, music, Flash, image,PDF/Office)filesorplaylists.
•[Delete]: Delete content.•[Approve]: Approves content. •[Reject]: Rejects content.•[Copy]: Copies or moves multiple content
① ②
③ ④ ⑤
15EN
GLIS
H
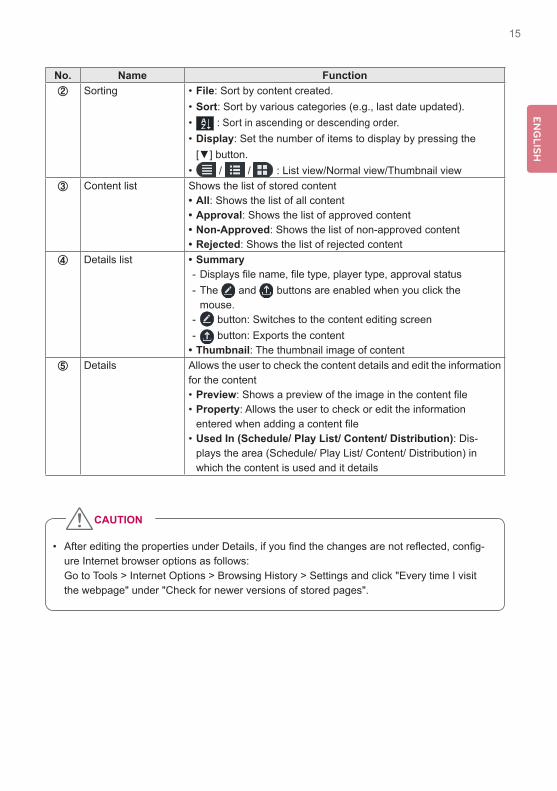
No. Name Function② Sorting •File: Sort by content created.
•Sort: Sort by various categories (e.g., last date updated).• : Sort in ascending or descending order.•Display: Set the number of items to display by pressing the [▼]button.
• / / : List view/Normal view/Thumbnail view③ Content list Shows the list of stored content
• All: Shows the list of all content• Approval: Shows the list of approved content• Non-Approved: Shows the list of non-approved content• Rejected: Shows the list of rejected content
④ Details list • Summary - Displaysfilename,filetype,playertype,approvalstatus - The and buttons are enabled when you click the mouse.
- button: Switches to the content editing screen - button: Exports the content
• Thumbnail: The thumbnail image of content⑤ Details Allows the user to check the content details and edit the information
for the content•Preview:Showsapreviewoftheimageinthecontentfile•Property: Allows the user to check or edit the information enteredwhenaddingacontentfile
•Used In (Schedule/ Play List/ Content/ Distribution): Dis-plays the area (Schedule/ Play List/ Content/ Distribution) in which the content is used and it details
• AftereditingthepropertiesunderDetails,ifyoufindthechangesarenotreflected,config-ure Internet browser options as follows: Go to Tools > Internet Options > Browsing History > Settings and click "Every time I visit the webpage" under "Check for newer versions of stored pages".
CAUTION

ENG
LISH
16
Loading Content1 Click Content on the Menu tab at the top of the program.
2 In the content list, select the folder from which you will import content and then click [Import].
3 Whenthefileimportpop-upwindowappears,clickthe[Browse]buttonandselectafiletoimport.
4 Afterselectingafilepath,clickthe[Save] button.• Oncethefileisopen,theEditorswitchestotheContentwindow,displayingthefilestatus
with the icon.
Setting an Expiration Date for Media1 Select the media in the content list that you want to set an expiration date for.
2 Check the Expiration Date box under the Properties tab in the Details pane.• To delete the existing expiration date, uncheck the Expiration Date box and click the
[Save] button.3 Specify your desired expiration date by clicking the button.
4 Click the [Save] button.
5 Content, Play List, and Schedule that refer to the media will have the same expiration date as the media.• On the Content List screen, expired content is shown marked with an .

17EN
GLIS
H
Content Management
Approving Content
1 Click the Non-Approved category in the content list.• The content not been approved appears in the item list.• Alternatively, select a content item with shown in the item list.
2 Select the content you want to approve in the content details list.• The selected content is shown with a check mark.
3 Click the [Approved] button to approve the selected content.• Once the approval is complete, changes to .
Rejecting Content
1 Select the content you want to reject in the content details list.• The selected content is shown with a check mark.
2 Click the [Rejected] button to reject the selected content.• Once the rejection is complete, or changes to .
Deleting Content
1 Select the content you want to delete in the content details list.• The selected content is shown with a check mark.
2 Click the [Delete] button to delete the selected content.
3 WhentheConfirmDeletewindowappears,clickthe[OK] button.
4 Whenthedeletionconfirmationwindowappears,clickthe[OK] button.• Once the deletion is complete, the deleted content will disappear from the details list.

ENG
LISH
18
Copying or Moving Multiple Content
1 On the content details list, select content to copy or move.2 Click the [Copy] button to copy or move the selected content.3 When moving content, select the Delete the original option at the bottom of the Copy or Move
screen.4 Select a workgroup and a folder to copy or move and click the [Apply] button.
• When moving, content can only be moved to another folder within the same workgroup.
• Copying and moving multiple content is available on SuperSign W only. To use these additional functions, please purchase SuperSign W.
NOTE

19EN
GLIS
H
No. Name Function① Action buttons •[Create New]: Creates a schedule.
•[Import]: Loads a schedule. - Supports.Zipfileformat - WhenimportingtheexportedZIPfile,alloftheincludedcontentwill be registered on the same server.
•[Delete]: Deletes a schedule.•[Approve]: Approves a schedule not approved. •[Reject]: Rejects a schedule not approved.•[Copy]: Copies or moves multiple schedules.
ScheduleYou can create or modify a schedule to deploy the content.
Schedule Window Layout and FunctionsThe following shows the layout and functions of the Content window.
③ ④
① ②
⑤

ENG
LISH
20
No. Name Function② Sorting •Sort: Sort by various categories (e.g., last date updated).
• : Sort in ascending or descending order.•Display:Setthenumberofitemstodisplaybypressingthe[▼]button.• / : List view/Normal view
③ Schedule list Displays the list of saved schedules.•All: View the list of all schedules.•Approved: View the list of approved schedules.•Non-Approved: View the list of unapproved schedules.•Rejected: View the list of rejected schedules.
④ Details list •Summary - Displayfilename,scheduledate,playertype, scheduled player, and approved status
- The , and buttons will be enabled when you click the mouse.
- button: Switches to schedule editing screen - button: Exports the schedule - button: Copy schedule (However, you can only copy schedules for the videowall schedule.)
•Thumbnail:Displaysthethumbnailimageandfilenameofacon-tentfileinaschedule
⑤ Details Provides the details of the selected schedule. •Preview: Thumbnailimageandfilenameofthecontentincludedin
the schedule.•Property: Schedule properties (Title, Player Type, Schedule date,
Editor, Create Date, Creator, Approval status, Expiration Date, Ap-prover, Description, and Tag)
•Available (Distribution): Provides distribution information that uses the applicable schedule.
* The administrator can edit the information.
• AftereditingthepropertiesunderDetails,ifyoufindthechangesarenotreflected,config-ure Internet browser options as follows: Go to Tools > Internet Options > Browsing History > Settings and click "Every time I visit the webpage" under "Check for newer versions of stored pages".
CAUTION

21EN
GLIS
H
Creating New Schedules1 Click Schedule on the Menu tab at the top of the program.
2 In the schedule list screen, click [Create New] button at the top left corner.
3 When creating a normal schedule, select the player type you want from Player type. When creating a videowall schedule, select Videowall.
• The new schedule edit area page appears. By default, the schedules are sorted per week.
NOTE
• Videowall schedule registration is available on SuperSign W only. To use this function, please purchase SuperSign W.
• For synchronizing the videowall when registering the videowall schedule, you can only add content, and video.
No. Name Function① List button Moves to the content list② File name display
area Displaysthecurrentfile'sname.
③ Action buttons •[New]: Creates a schedule.•[Save]: Saves a schedule.•[Save as]: Saves the schedule with a new name.
③
④ ⑤
①
⑥
②
ENG
LISH
22
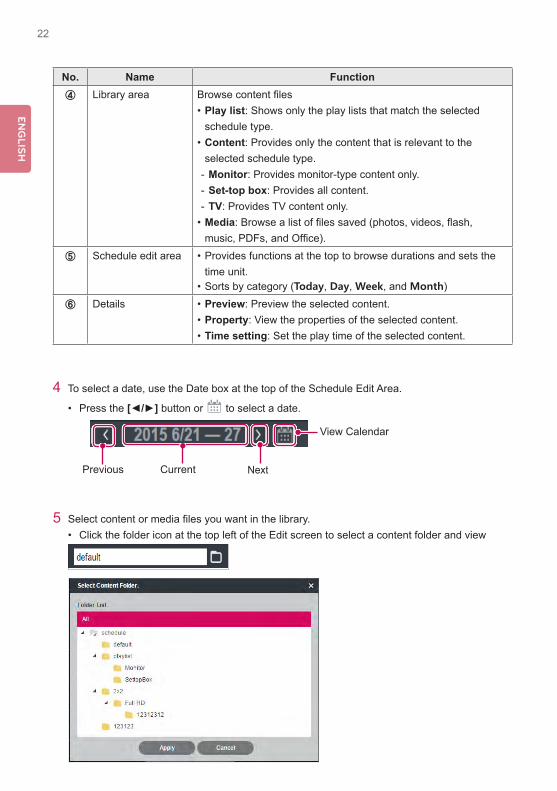
4 To select a date, use the Date box at the top of the Schedule Edit Area.
• Press the [◄/►] button or to select a date.
5 Selectcontentormediafilesyouwantinthelibrary.• Click the folder icon at the top left of the Edit screen to select a content folder and view
the content in that folder.
Previous Current Next
View Calendar
No. Name Function④ Library area Browsecontentfiles
•Play list: Shows only the play lists that match the selected schedule type.
•Content: Provides only the content that is relevant to the selected schedule type. - Monitor: Provides monitor-type content only. - Set-top box: Provides all content. - TV: Provides TV content only.
•Media:Browsealistoffilessaved(photos,videos,flash,music,PDFs,andOffice).
⑤ Schedule edit area •Provides functions at the top to browse durations and sets the time unit.
•Sorts by category (Today, Day, Week, and Month) ⑥ Details •Preview: Preview the selected content.
•Property: View the properties of the selected content. •Time setting: Set the play time of the selected content.

23EN
GLIS
H
Player Type Availablemediafiletype
Monitor Content, photo, video, and music
Set Top Box Content,photo,video,flash,music,andPDF/Office
TV Type Content, photo, video, and music
• PPT/PDF/ODPfilesaddedtotheserverusingthePCEditorcanbeselectedfrommonitor/TV type.
NOTE
6 Drag-and-drop the selected item onto a desired date in the schedule edit area.• TheselecteditemisshownincellformatintheScheduleEditArea.Ifthefilehasatimeproperty,anareaisassignedwhichisproportionatetothetimeoftheoriginalfile.Oth-erwise(i.e.,imageanddocumentfileswithoutthetimeproperty,)aminimumamountoftime is assigned, depending upon the view type.
7 Set the item’s play duration in the Time setting.
No. Name Function① Time Settings •All day: Displays the schedule cell throughout the day.
•Start at/End at: Displays or edits the start/end time of the schedule cell.
② Repeat •Click Repeat to repeat the schedule cell. - A check mark is shown, and the repeat details are enabled. - Click Repeat again to disable the repeat setting and clear the check mark.
•Repeat cycle - Every day: Repeat every day (default setting). - Every week: Repeat every day on a selected day. (multiple days are possible.)
- Every month: Repeat every month on a selected date.•Repeat Until
- Click the icon and select an end date. - Initially, the end date is set to the cell value of the current schedule by default.
8 To save the schedule, click the [Save] button.• Select Redistribution automatically to automatically revise and save the distributed sched-
ule. If you select Redistribution automatically, the revised schedule is redistributed to the player that is playing the latest revised schedule.

ENG
LISH
24
Copying Schedule Cells
1 In the Schedule Edit mode, select a schedule cell to copy, and press <Ctrl+C>.
2 Select an area to copy to, and press <Ctrl+V>.• The schedule cell is copied to the selected area.
• Pressing <Ctrl+V> without selecting a copy area after pressing <Ctrl+C>, displays a pop-up that prompts the user to select a copy location. Be sure to select a copy location, and then press <Ctrl+V> .
NOTE

25EN
GLIS
H
Moving Schedule Cells
1 In the Schedule Edit mode, select a schedule cell to move, and drag-and-drop it onto a de-sired position.• The schedule cell is moved to the selected area.
Deleting Schedule Cells
1 In schedule edit mode, select a schedule cell to delete, and press the <Delete> key or click the [X] icon at the schedule cell top.
2 WhentheConfirmDeletepop-upappears,clickthe[OK] button.• The selected schedule cell is deleted.

ENG
LISH
26
Adjusting the Schedule Cell Time
1 In the Schedule Edit mode, select a schedule cell to adjust the time, and drag the tail end to a desired time area.• When you place the mouse over the bottom of the schedule cell, the mouse cursor
changes. Drag the schedule cell to increase or decrease the time.

27EN
GLIS
H
Schedule Management
Viewing Schedules
1 Select a Sort By category you want at the top of the Schedule window.
2 Select a schedule to view in the Schedule list.• Items included in the selected schedule are shown in the item list.
Menu DescriptionSort Sort by various categories (e.g., last date updated).
Sort in ascending or descending order.
Display Setthenumberofitemstodisplaybypressingthe[▼]button.
/ List view/Normal view
① ②

ENG
LISH
28
Approving Schedules
1 Click the Non-approved category in the schedule list.• Schedules not been approved appear in the item list.• Alternatively, select a schedule item with shown in the item list.
2 Select a schedule you want to approve in the schedule details list.• The selected schedule is shown with a check mark.
3 Click the [Approved] button to approve the selected schedule.• Once the approval is complete, changes to .
Rejecting Schedules
1 Select a schedule you want to reject in the schedule details list.• The selected schedule is shown with a check mark.
2 Click the [Rejected] button to reject the selected schedule.• Once the rejection is complete, or changes to .
Deleting Schedules
1 Select a schedule you want to delete in the schedule details list.• The selected schedule is shown with a check mark.
2 Click the [Delete] button to delete the selected schedule.
3 WhentheConfirmDeletewindowappears,clickthe[OK] button.
4 Whenthedeletionconfirmationwindowappears,clickthe[OK] button.• Once the deletion is complete, the deleted schedule will disappear from the item list.
No. Name Function① Summary •Displays the schedule title/period, and the player to which the
schedule is applied, and schedule approval status• , , and buttons are enabled when you click the
mouse. - button: Switches to schedule editing screen - button: Exports the schedule - button: Copy schedule (only schedules for the video wall schedule can be copied)
② Thumbnail Displaysthethumbnailimageandthefilenameofthecontentincluded in the schedule.

29EN
GLIS
H
Editing Schedules
1 Select a schedule to edit in the Schedule List.• The selected schedule appears in the item list.
2 Select a schedule to edit using your mouse.• The , , and buttons will be enabled.
3 Click the button.• The window switches to an edit mode. When switching to editing mode, the current date
is displayed by default.
• Whenyoueditaschedule,itisauto-locked.Auto-lockedschedulefilescannotbeaccessedby other users.
NOTE
Copy Schedule
• Copy Schedule is provided only with SuperSign W. To use this function, purchase Super-Sign W.
NOTE
1 Click a schedule category to copy from the schedule list.• A schedule list appears in the item list.
2 Select a schedule to copy with your mouse.• The , , and buttons will be enabled.
3 Click the button.• The videowall schedule will be copied.
4 To edit the copied videowall schedule, select the copied videowall schedule, and then click the button.
• When editing the videowall schedule, you can only replace content. You cannot delete content or change the play time of the content within the schedule.

ENG
LISH
30
Copying or Moving Multiple Schedules
1 On the schedule list, select schedules to copy or move.
2 Click the [Copy] button to copy or move the selected schedules.
3 When moving schedules, select the Delete Original option at the bottom of the Copy or Move screen.
4 Select a workgroup and a folder to copy or move and click the [Apply] button. • When moving, schedules can only be moved to another folder within the same work-
group.
• Copying and moving multiple schedules is only provided with SuperSign W. To use this function, purchase SuperSign W.
NOTE

31EN
GLIS
H
AutoPlaying schedule filesYoucanauto-playschedulefilesintheSuperSignPlayerbysavingthemonaUSBdevice.
1 In the Schedule menu, click . - Thefileexportwindowappears.
2 DownloadtheAutoPlay.zipfileandunzipit. - Use a compression program that supports UTF-8 encoding, such as ALZip and WinRAR.
3 Move the AutoPlay folder to a USB device.
4 Connect the USB device, where schedule (AutoPlay) is stored, to the USB port of the media player.
- The content begins auto-playing.
• Content created using a template or layout provided by SuperSign will be displayed normally only on a 16:9 monitor. Otherwise, it will not be played correctly.
NOTE
ENG
LISH
32
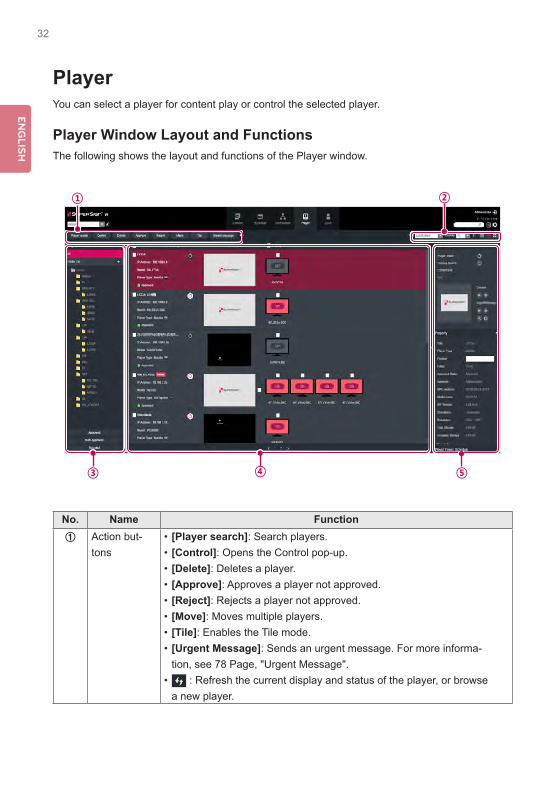
PlayerYou can select a player for content play or control the selected player.
Player Window Layout and FunctionsThe following shows the layout and functions of the Player window.
No. Name Function① Action but-
tons •[Player search]: Search players.•[Control]: Opens the Control pop-up.•[Delete]: Deletes a player.•[Approve]: Approves a player not approved. •[Reject]: Rejects a player not approved.•[Move]: Moves multiple players.•[Tile]: Enables the Tile mode.•[Urgent Message]: Sends an urgent message. For more informa-
tion, see 78 Page, "Urgent Message".• : Refresh the current display and status of the player, or browse
a new player.
① ②
④ ⑤③

33EN
GLIS
H
No. Name Function② Sorting •Sort: Sort by various categories (e.g., last date updated).
•Display:Setthenumberofitemstodisplaybypressingthe[▼]button.
• : Sort in ascending or descending order.• / / : List view/Normal view/Thumbnail view
③ Player List View the list of players saved.•All: View the list of all players.•Group: Shows the player list in a group•Approved: View the list of approved players.•Non-approved: View the list of unapproved players.•Rejected: View the list of rejected players.
④ Details list •Summary - Displays player name, IP address, model name, player type, and approval status
- Player Power([On]/[Off]) buttons •Thumbnail
- Title and display of the content currently being played. - List of displays (up to 225 items) connected to, and recognized, in the player.
⑤ Details Provides the player details and control functions.•General Control: Power management, player screen history view,
content preview, zoom, and capture, and management of playing content and urgent message play
•Property:Playerproperties(Title,PlayerType,Location,ModifiedBy, Approval Status, Approved By, Serial Number, Model Name, Software Version, Display Orientation, Resolution, CPU, Total Space, Available Space, Descriptions, Tags, The person in charge, and Contact Information)
•Player Power Schedule: schedules the time to power players on/off (Supported only by the SetTop Box Type player)
* Properties can be edited by the Administrator.
• AftereditingthepropertiesunderDetails,ifyoufindthechangesarenotreflected,config-ure Internet browser options as follows: Go to Tools > Internet Options > Browsing History > Settings and click "Every time I visit the webpage" under "Check for newer versions of stored pages".
CAUTION
ENG
LISH
34
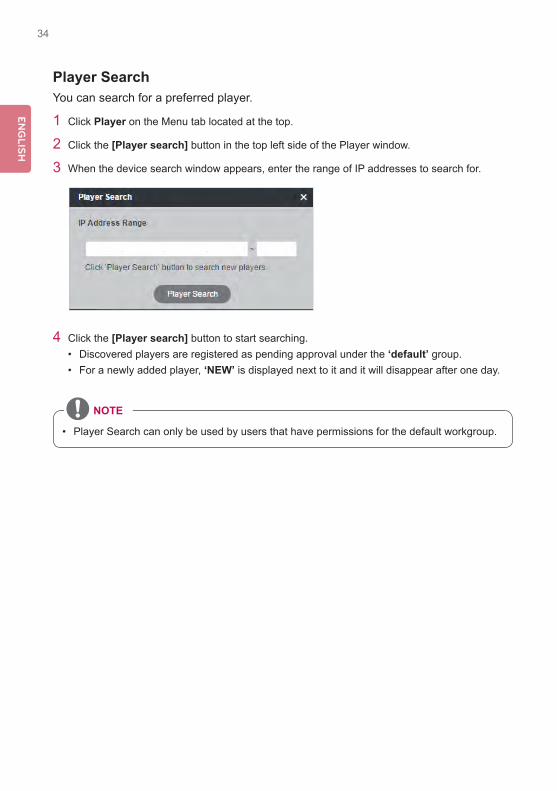
Player SearchYou can search for a preferred player.
1 Click Player on the Menu tab located at the top.
2 Click the [Player search] button in the top left side of the Player window.
3 When the device search window appears, enter the range of IP addresses to search for.
4 Click the [Player search] button to start searching.• Discovered players are registered as pending approval under the ‘default’ group. • For a newly added player, ‘NEW’ is displayed next to it and it will disappear after one day.
• Player Search can only be used by users that have permissions for the default workgroup.
NOTE

35EN
GLIS
H
Player ControlYou can control the power and detail functions of player and display.
Turning Players On/Off
Turns the player power on/off.
1 You can control the power by clicking the ON/OFF buttons in the player details list.• The white button is displayed for players whose power is on; click the button to turn it off. • The gray button is displayed for players whose poser is off; click the button to turn it on.
• TV supports only the power-off feature.
NOTE

ENG
LISH
36
Turning the Display On/OffTurns the display power on/off.
1 You can control the power by clicking the ON/OFF buttons of the display area in the player details list. If the power is on, [ON] is displayed. Click the button to turn the power off.
2 If the power is off, [OFF] is displayed.3 Powering the display on/off is different depending on the player type.
• Set top box: If the player is powered on, click [OFF] of the display to turn it on. If the playerispoweredoff,turnonthedisplay'spowerfirstandfollowthesameprocedureasabove.
• Monitor: For a monitor type player, turn on the player's power.
Controlling the Device DetailsYou can control a player and display in details.
1 Select a player you want to control in the player details list.• The selected player is shown with a check mark.• To control individual displays under the player, click the checkbox next to the display you
want to control in the Display list.
2 Click the [Control] button at the top of the Player List.• The Control pop-up window appears.

37EN
GLIS
H
3 In the Control pop-up, select a player, or display, and specify the control settings.
No. Name Function① Player/Display List List of the selected player and its displays.
•If you select both the player and display, the display name is right-indented under the player name.
•If you only select displays, their names are displayed with no indent.
- : Player/display are turned on. - : Player/display are turned off. - : Player/display have errors.
② General Control •Player Power: Controls the player power. - : Turns the power on. - : Turns the power off.
•Display Power: Controls the power of displays under the player.
- : Turns the power on. - : Turns the power off.
•Content Title: Name of the content currently playing.•Content: Play or stop the current content.
- : Play the content. - : Stop the content.
•Urgent Message: Play or stop the current urgent message. - : Play the content. - : Stop the content.
• : Enlarges the content• : Click the button to capture the current display.(Only
set top box type players are able to capture the current display.)
②
③
①

ENG
LISH
38
No. Name Function③ Advanced Control •Device Information: displays detailed information for each device
andnetworkconfigurationstatus. - Player: device, status and network connection information. - Display: device, status, self-diagnosis, and network information.
•Video: input, aspect ratio, power-saving mode, picture mode, back-light, contrast, brightness, sharpness, tint, color temperature, screen off, OSD menu etc.
•Audio: sets the current time of the device and controls the power schedule.
•Time: Changes the standard time of the device.•Option: ISM mode, DPM Select, factory reset, remote control/local
key lock, sleep time, power-on delay, advanced control etc.•Settings: Changes TV channel (only on TV).•3D: Enables/disables the 3D mode and changes the 3D settings.
(The 3D options are available only for a monitor or TV that supports 3D.) •Time Synchronization: sets the time sync for players.•Software Update:updatessoftwareupdateafterafiletoupdatehas
been selected.• SuperSign Server Setup:AllowsmodificationtotheIPad-
dress setting, of the SuperSign Server
• ThenameofthesoftwareupdatefilemuststartwithSuperSignPlayer_setup.• After the player updates the software, it is automatically rebooted.
NOTE
Controlling the player power in details
If you control the player power settings in the control pop-up window, you can verify the detailed information for the connected player in the pop-up window.
Controlling power settings after selecting multiple players

39EN
GLIS
H
Restrictions on Connecting the Player/DisplaySome functions cannot be controlled in the control window depending on the player/display connection status.See the table below.
* STB: set top box type player/MNT: monitor type player
Device Combination
OPTION Settings
Player Display ContentInstant Mes-
sageSnapshot
On Off On Off Plays Stop Plays Stop Capture ZoomSTB: 1 MNT: 0, Display: 0 O O O O O O O OSTB: 0 MNT: 1, Display: 0 O O O O O OSTB: n MNT: 0, Display: 0 O O O O O OSTB: 0 MNT: n, Display: 0 O O O O O OSTB: m MNT: n, Display: 0 O O O O O OSTB: 0 MNT: 0, Display: 1 O OSTB: 0 MNT: 0, Display: n O OSTB: m MNT: 0, Display: n O O O O O O O O O OSTB: 0 MNT: m, Display: n O O O O O O O OSTB: m MNT: n, Display: N O O O O O O O O
Device Combination
Advanced Command
Device info
Pic-ture
Sound HoursGen-eral
Time Syn-chroniza-
tion
Software Up-date
STB: 1 MNT: 0, Display: 0 O O O
STB: 0 MNT: 1, Display: 0 O
STB: n MNT: 0, Display: 0 O O O
STB: 0 MNT: n, Display: 0 O
STB: 0 MNT: 0, Display: n O O O O O O
STB: m MNT: n, Display: N O O O O O O

ENG
LISH
40
Advanced Command line
The Advanced Command line menu located in the general tab of display allows you to remotely control the LG Electronics monitor or TV.
1 Enter the RS232C control command supported by the connected monitor or TV, along with the set ID and click the [OK] button.• The control command does not work if the set ID is invalid.
• TofindoutwhichMonitororTVandcontrolcommandsaresupportedbySuperSign,seethe appendix Monitor or TV Models Supported by SuperSign.
• The RS232C control command is dependent on the type of Monitor or TV; see the RS232C protocol in the user’s Monitor or TV manual.
• When controlling a monitor individually, enter the same set ID as the one set for the moni-tor.
• Advanced Command line does not work if the set ID you entered is invalid.• When controlling a group of monitors, select the group and enter “00” for the set ID in the
Advanced Command line box. In this case, no acknowledgement is returned.
NOTE

41EN
GLIS
H
Player Screen History Management
1 Select the player in the player list whose screen history you want to view.2 Click the preview image or the button under the General Settings tab in the Player Details
pane.3 Now you can view the history of the player screen.
• ToenablePlayerScreenHistoryManagement,set[HistoryManagement]underthe[Set]-[Systems]tabtoAuto.
NOTE

ENG
LISH
42
Creating Tiles1 Click the [Tile] button. The Create Tile window appears.
No. Name Function① Player List Shows a list of monitors to be displayed in tile mode.
You can drag & drop the monitors to change the order.② Order of Monitors Shows the order of monitors.
③ Tile Size Sets the number of tile columns and rows.
④ Monitor Selection Area
When selected, the area is displayed in red. Click again to release it.
⑤ Group Input Click monitors in the monitor selection area ( ) to choose a tile group. Select an option in the Group Input dropdown list and click the [Set] button to apply the change.
Tile Mode Click monitors in the monitor selection area ( ) to choose a tile group. Select an option in the Tile Mode dropdown list and click the [Set] button to apply the change.
Tile ID Click the monitor for which you want change the tile ID.Change the tile ID and click the [Set] button.
① ③ ⑤④
⑥
②

43EN
GLIS
H
Player Management
Approving Players
1 Click Player on the Menu tab located at the top of the program.
2 Click the Non-Approved category in the Player List.• Unapproved players appear in the details list.• Alternatively, select a player with shown in the item list.
3 Select a player you want to approve in the player details list.• The selected player is shown with a check mark.
4 Click the [Approved] button to approve the selected player.• Once the approval is complete, changes to .
Rejecting Players
1 Select a player you want to reject in the player details list.• The selected player is shown with a check mark.
2 Click the [Rejected] button to reject the selected player.• Once the rejection is complete, or changes to .
No. Name Function⑥ Apply Click the [Apply] button to apply the tile settings to the monitors
and a message window pops up to confirm it.Close Click the [Close] button or the [X] button at the top right of the
window to go back to the player list.
• Creating tiles is only available in the Normal view. • The tile creation feature is not available on TVs.
NOTE

ENG
LISH
44
• If a player is rejected, the connection with the player is cut off. However, it may take a while to disconnect completely.
• You can delete only players that are powered off.
NOTE
Deleting Players
1 Select a player you want to delete in the player details list.• The selected player is shown with a check mark.
2 Click the [Delete] button to delete the selected player.
3 WhentheConfirmDeletewindowappears,clickthe[OK] button.
4 Whenthedeletionconfirmationwindowappears,clickthe[OK] button.• Once the deletion is complete, the deleted player will disappear from the details list.
Moving Multiple Players
1 On the player details list, select players to move.
2 Click the [Move] button to move the selected players.
3 Select a workgroup and a folder to move and click the [Apply] button.
• Moving multiple players is available on SuperSign W only. To use this additional function, please purchase SuperSign W.
NOTE

45EN
GLIS
H
UserYou can view or manage (approve, reject, and delete) all user accounts. You can also edit each workgroup, role, password, and the auto approval setting of each user.
User Window Layout and FunctionsThe following shows the layout and functions of the User window.
NOTE
• The User menu is provided only to administrators of SuperSign W. To use this additional function, purchase SuperSign W.
No. Name Function① Action buttons •[Create New]: Creates a user account.
•[Delete]: Deletes a user account. (all information related to the user ID will also be deleted.)
•[Approve]: Approves a user account not approved. •[Reject]: Rejects a user account not approved.
① ②
④ ⑤③

ENG
LISH
46
No. Name Function② Sorting •Filter: Filter by role.
•Sort: Sort by various categories (e.g., last date updated).• : Sort in ascending or descending order.•Display: Set the number of items to display by pressing the [▼]button.
• / / : List view/Normal view/Thumbnail view
③ User List View the list of user accounts saved.•All: View the list of all accounts.•Approved: View the list of approved accounts.•Non-Approved: View the list of unapproved accounts.•Rejected: View the list of rejected accounts.
④ Details list •Summary - Shows user ID, roles, and approval status.
•Workgroup: Shows the user’s workgroups for editing, etc.⑤ Details Details page of the selected user ID
•Thumbnail: Shows the user’s image.•Property: Shows all information (personal information, lan-
guage setting, and auto approval setting) entered by the user ontheregisterpageortheprofiletabonsetting.
•User log information: Shows the user’s status information (firstcreateddate,creator,lastediteddate,editor,approvalstatus, approver, last login, and last logout).
• AftereditingthepropertiesunderDetails,ifyoufindthechangesarenotreflected,config-ure Internet browser options as follows: Go to Tools > Internet Options > Browsing History > Settings and click "Every time I visit the webpage" under "Check for newer versions of stored pages".
CAUTION

47EN
GLIS
H
User Account RegistrationYou can create accounts to use in the program.
1 Click User on the Menu tab located at the top.
2 Click the [Create New] button in the top left side of the User window.
3 Enter all required information.
4 Click the [Save] button in the top right corner of the screen to save the information.
5 Click the [OK] button when The account is created successfully message appears in a pop-up
• Adding user accounts on the User tab is carried out in the same way as on the Login screen.
NOTE
Editing User’s WorkgroupYou can edit a program user’s workgroup.
1 Click User in the Menu tab at the top of the program.
2 Click a user whose role is not administrator and click the icon that appears.
3 Select a workgroup to allocate to the user.
4 Click the [Save] button at the bottom center of the Select Workgroup pop-up to save the information you have entered.

ENG
LISH
48
User Account ViewYou can view details of registered user accounts.
1 Click User on the Menu tab located at the top.
2 Select a user group you want in the User List.
3 Select a user to view the information in the details list.• You can view the information of the selected user account in the More Details box.
No. Name Function①
Personal information Displays the user's name, ID, Password, Phone number, Mobile phone number, E-mail, Role, and Description.
②
Language setting
•Displays the preferred language of the account user There are 20 languages available.
•Date format (e.g., MM/DD/YYYY)
•Sets the time display format③ Auto approval Shows the auto approval setting information.④ User Log Information Displays the Create Date, Creator, Last Edited, Editor, Approved
Status, Approver, Last Login, and Last Logout information
①
②
③
④

49EN
GLIS
H
User Account Management
Approving User Accounts
1 Click User on the Menu tab located at the top.
2 Click the Non-Approved category in the User List.• Unapproved user accounts appear in the details list.• Alternatively, select a user account with shown in the item list.
3 Select an account you want to approve in the user details list.• The selected account is shown with a check mark.
4 Click the [Approved] button to approve the selected account.• Once the approval is complete, changes to .
Rejecting User Accounts
1 Select an account you want to reject in the user details list.• The selected account is shown with a check mark.
2 Click the [Rejected] button to reject the selected account.• Once the rejection is complete, or changes to .
Deleting User Accounts
1 Select an account you want to delete in the user details list.• The selected account is shown with a check mark.
2 Click the [Delete] button to delete the selected account.
3 WhentheConfirmDeletewindowappears,clickthe[OK] button.
4 Whenthedeletionconfirmationwindowappears,clickthe[OK] button.• Once the deletion is complete, the deleted player will disappear from the details list.

ENG
LISH
50
DistributionYou can distribute content to players.
Distribution Window Layout and FunctionsThe following shows the layout and functions of the Distribution window.
No. Name Function① Action buttons •[New Distribution]: Creates a new distribution.
•[Delete]: Deletes a distribution.•[Approve]: Approves a distribution. •[Folder approval]: Approves the entire folder.•[Reject]: Rejects a distribution.•[Restart sync]: Restarts distribution sync.
② Sorting •Sort: Sort by various categories (e.g., last date updated).• : Sort in ascending or descending order.•Display:Setthenumberofitemstodisplaybypressingthe[▼]
button.• / : List view/Normal view
③ Distribution list Shows the stored distribution list•All: Shows all the distribution list•Approved: Shows approved distribution list•Non-Approved: Shows non-approved distribution list•Rejected: Shows rejected distribution list
① ②
④ ⑤③

51EN
GLIS
H
Creating Content Distribution FilesYou can transmit content to a player.
1 In the Menu tab at the top of the program screen, click Distribution.
2 Click the [New Distribution] button in the top left of the Distribution window.
3 When the drop-down menu appears, click Distribute content.
4 Select the content category to distribute in the content list. - The approved content appears in the details list.
• Once video wall content is distributed, it can not be redistributed.• Expired content and schedules cannot be distributed or redistributed.
NOTE
No. Name Function
④ Details list •Summary - Displaystheimageandfilenameforcontentdistribution.Dis-playinformationincludingthefilenameforscheduledistribution.
- Display the player type•Player
- Displays the selected player names (‘…’ is shown if there is not enough space) /the number of all players
- Displays the player icon per player type•Type/Date
- Provides distribution method, time, and distribution status - Displays the reservation time
•Status: Provides distribution status information - The distribution status can be checked on the status display bar : Distribution is being processed : Distribution is complete
- [Cancel] button: Distribution is cancelled. - [Retry] button: Redistribution of distributed items
* A newly created distribution is registered as non-approved status.⑤ Details Allows the user to check the information page for distribution selec-
tions and edit its information•Preview:Thumbnailimageandfilenameofcontenttodistribute•Property: Provides the property values for the distribution (distri-butionfilename,distributiontime,distributionstatus)
•Player: Displays the player name, IP address, model name, and player type
ENG
LISH
52
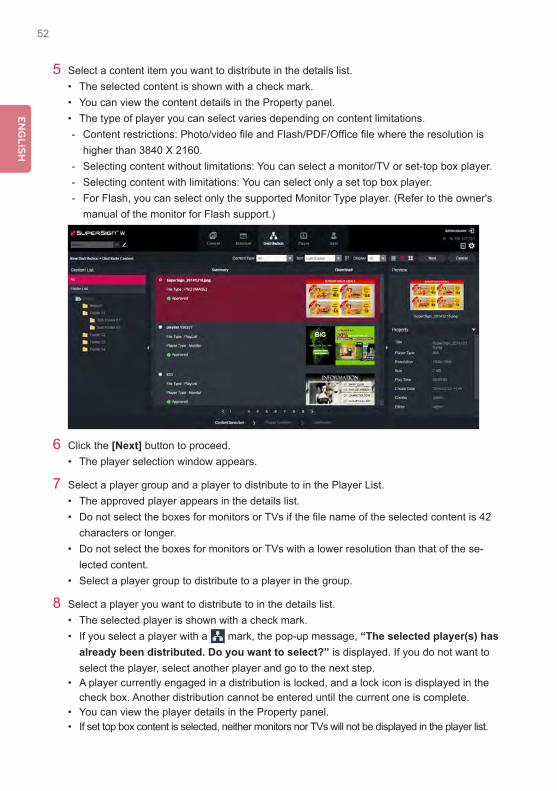
5 Select a content item you want to distribute in the details list.• The selected content is shown with a check mark.• You can view the content details in the Property panel.• The type of player you can select varies depending on content limitations.
- Contentrestrictions:Photo/videofileandFlash/PDF/Officefilewheretheresolutionishigher than 3840 X 2160.
- Selecting content without limitations: You can select a monitor/TV or set-top box player. - Selecting content with limitations: You can select only a set top box player. - For Flash, you can select only the supported Monitor Type player. (Refer to the owner's
manual of the monitor for Flash support.)
6 Click the [Next] button to proceed.• The player selection window appears.
7 Select a player group and a player to distribute to in the Player List.• The approved player appears in the details list.• DonotselecttheboxesformonitorsorTVsifthefilenameoftheselectedcontentis42
characters or longer.• Do not select the boxes for monitors or TVs with a lower resolution than that of the se-
lected content.• Select a player group to distribute to a player in the group.
8 Select a player you want to distribute to in the details list.• The selected player is shown with a check mark.• If you select a player with a mark, the pop-up message, “The selected player(s) has
already been distributed. Do you want to select?” is displayed. If you do not want to select the player, select another player and go to the next step.
• A player currently engaged in a distribution is locked, and a lock icon is displayed in the check box. Another distribution cannot be entered until the current one is complete.
• You can view the player details in the Property panel.• If set top box content is selected, neither monitors nor TVs will not be displayed in the player list.

53EN
GLIS
H
9 Click the [Next] button to proceed.• The distribution setting window appears.• If there is not enough free space on the player, the warning message, “The free space of
player is not enough.” is displayed and the next screen does not appear.
10 Confirmthecontenttodistribute,confirmtheplayerinformation,andthenspecifydistributionsettings.
• If monitor-type content is selected, only monitors or set-top box players are shown on the player list.
• If TV content is selected, only TVs or set-top box players are shown on the player list.
ENG
LISH
54
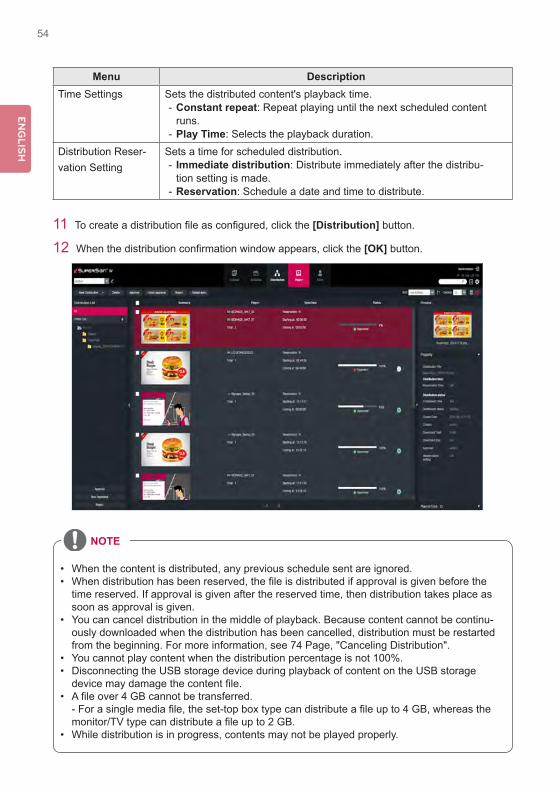
11 Tocreateadistributionfileasconfigured,clickthe[Distribution] button.
12 Whenthedistributionconfirmationwindowappears,clickthe[OK] button.
Menu DescriptionTime Settings Sets the distributed content's playback time.
- Constant repeat: Repeat playing until the next scheduled content runs.
- Play Time: Selects the playback duration.Distribution Reser-vation Setting
Sets a time for scheduled distribution. - Immediate distribution: Distribute immediately after the distribu-tion setting is made.
- Reservation: Schedule a date and time to distribute.
• When the content is distributed, any previous schedule sent are ignored.• Whendistributionhasbeenreserved,thefileisdistributedifapprovalisgivenbeforethe
time reserved. If approval is given after the reserved time, then distribution takes place as soon as approval is given.
• You can cancel distribution in the middle of playback. Because content cannot be continu-ously downloaded when the distribution has been cancelled, distribution must be restarted from the beginning. For more information, see 74 Page, "Canceling Distribution".
• You cannot play content when the distribution percentage is not 100%.• Disconnecting the USB storage device during playback of content on the USB storage devicemaydamagethecontentfile.
• Afileover4GBcannotbetransferred. -Forasinglemediafile,theset-topboxtypecandistributeafileupto4GB,whereasthemonitor/TVtypecandistributeafileupto2GB.
• While distribution is in progress, contents may not be played properly.
NOTE

55EN
GLIS
H
Creating Schedule Distribution FilesYou can send scheduled content to players.
1 In the Menu tab at the top of the program screen, click Distribution.
2 Click the [New Distribution] button in the top left of the Distribution window.
3 When the drop-down menu appears, click Distribute schedule.
4 In the schedule list, select a schedule category to distribute.• The approved schedule appears in the details list.
5 Select a schedule you want to distribute in the details list.• The selected schedule is shown with a check mark.• You can view the schedule details in the Property panel.
6 Click the [Next] button to proceed.• The player selection window appears.
7 Select a player group and a player to distribute to in the Player List.• The approved player appears in the details list.• Select a player group to distribute to a player in the group.
8 Select a player you want to distribute to in the details list.• The selected player is shown with a check mark.• If you select a player with the mark, the pop-up message, “The selected player(s)
has already been distributed. Do you want to select?” is displayed. If you do not want to select the player, select another player and go to the next step.
• A player currently engaged in a distribution is locked, and a lock icon is displayed in the check box. Another distribution cannot be entered until the current one is complete.
• You can view the player details in the Property panel.• If you select set top box schedule, monitor players will not be displayed in the player list.• If monitor-type content is selected, only monitors or set-top box players are shown on the
player list.• If TV content is selected, only TVs or set-top box players are shown on the player list.

ENG
LISH
56
9 Click the [Next] button to proceed.• The distribution setting window appears.• If there is not enough free space on the player, the warning message, “The free space of
player is not enough.” is displayed and the next screen does not appear.
10 Confirmthescheduletodistribute,confirmtheplayerinformation,andthenspecifydistribu-tion settings.
Menu DescriptionDistribution Reservation Setting
Sets a time for scheduled distribution. - Immediate distribution: Distribute immediately after the distribution setting is made.
- Reservation: Schedule a date and time to distribute.

57EN
GLIS
H
11 Tocreateadistributionfileasconfigured,clickthe[Distribution] button.
12 Whenthedistributionconfirmationwindowappears,clickthe[OK] button.
• When the content is distributed, any previous schedule sent are ignored.• Afileover4GBcannotbetransferred.• Whendistributionhasbeenreserved,thefileisdistributedifapprovalisgivenbeforethe
time reserved. If approval is given after the reserved time, then distribution takes place as soon as approval is given.
• You can cancel distribution in the middle of playback. Because content download cannot be resumed on a monitor type player when the distribution has been canceled, distribution must be restarted from the beginning. For more information, see 74 Page, "Canceling Distribution". (It is possible to resume downloads on a set top box type player.)
• You cannot play content when the distribution percentage is not 100%.• Afileover4GBcannotbetransferred. -Forasinglemediafile,theset-topboxtypecandistributeafileupto4GB,whereasthemonitor/TVtypecandistributeafileupto2GB.
NOTE

ENG
LISH
58
Creating VideoWall Distribution FileAny content that requires synchronized video playback can be distributed as VideoWall content for VideoWall players.
Distribute Videowall - Basic
• Distribute Videowall is available on SuperSign W only. If you want to use this feature, pur-chase SuperSign W.
NOTE
If the desired videowall of monitors has a single-direction grid layout (vertical or horizontal to the floor), select [Distribute Videowall] > [Basic].
Creating Content Videowall Distribution Files
1 Click the [Distribution] tab in the Menu tab at the top of the program.
2 Click the [New Distribution] button at the top left of the screen.
3 Click the [Distribute Sync] button when a dropdown menu appears.
4 Click [Basic] under Distribute VideoWall.
5 On the [Create Tile Mode] screen, select a tile type for Videowall..

59EN
GLIS
H
At this point, when you click the [Open] button on the [New Distribution] screen, the [Open] pop-up window will appear. Select the item you want to open and click [OK] to load the saved Distribute Regular VideoWall. You can delete saved regular VideoWall distribution items using the [Delete] button at the bottom of the [Open] pop-up window.
6 When you have completed the tile set-up, click the [Next] button.Select a Content type from the videowall type.

ENG
LISH
60
7 On the [Content Selection] screen, assign content to a cell of the tile you want. ·You can assign either by selecting a cell of the tile and then selecting content, or by dragging and dropping. If you drag and drop a folder, the entire content of the folder are assigned to the cell in alphabetical order. ·You can delete the assigned content by selecting the cell in the tile and then pressing the <Delete> key or the [X] button. ·The following conditions should be met for content to be applicable for sync playback: - The types of content applicable for sync playback are regular content, and videos. - Each cell in the tile must contain the same type of content. Regular content, and videos
cannot be assigned together with different types of content. - With regard to videos, files assigned to all the cells should have the same file exten-
sion. - In regards to content, there should be only one region within the canvas and only video
media can be contained.
8 When you have completed the content set-up, click the [Next] button.
61EN
GLIS
H
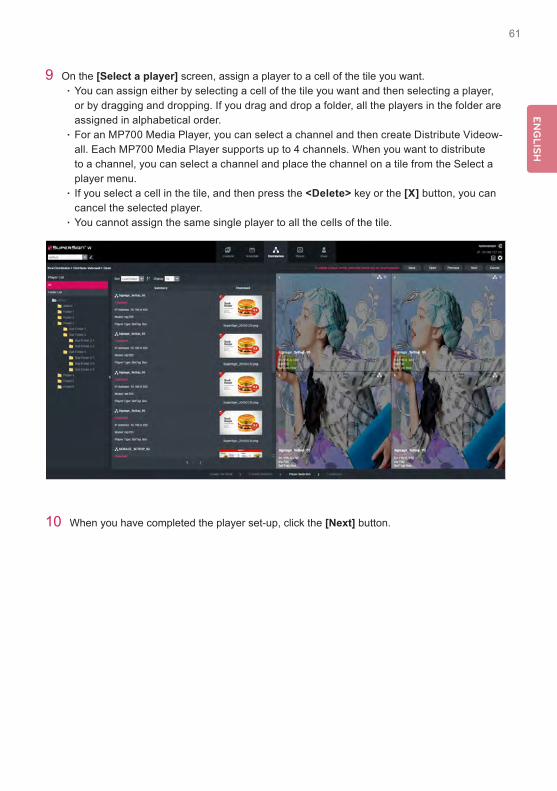
9 On the [Select a player] screen, assign a player to a cell of the tile you want. ·You can assign either by selecting a cell of the tile you want and then selecting a player, or by dragging and dropping. If you drag and drop a folder, all the players in the folder are assigned in alphabetical order. ·For an MP700 Media Player, you can select a channel and then create Distribute Videow-all. Each MP700 Media Player supports up to 4 channels. When you want to distribute to a channel, you can select a channel and place the channel on a tile from the Select a player menu. ·If you select a cell in the tile, and then press the <Delete> key or the [X] button, you can cancel the selected player. ·You cannot assign the same single player to all the cells of the tile.
10 When you have completed the player set-up, click the [Next] button.

ENG
LISH
62
11 On the [Distribution] screen, [Master-player Setting], [Time Setting] and [Distribution Reservation Setting] can be adjusted. ·Master-player Setting: By default, the first cell of the tile becomes the master player. You can change the master player by clicking the tile on the left. ·Time Setting: You can set the playback time of content you want to distribute. ·Distribution Reservation Setting: You can schedule the distribution time. For [Time Set-ting] and [Distribution Reservation Setting], see 54 page.

63EN
GLIS
H
12 When you have completed the distribution set-up, you can save it by clicking the [Save] but-ton. Enter a name you want and then click the [OK] button to complete saving. When saving is completed, the [Save as] button will be activated.
- Save: Saves with the existing file name. - Save as: You can save with a new name.
13 Tocreateadistributionfileasconfigured,clickthe[Distribution] button.
14 When you click the [Distribution] button, a new distribution folder will be created under the videoWall folder. At this point, the status of the distribution item is [Not Approved]. If you select an item that you want to distribute in the same way as general distribution and then approve it, it will start being distributed to the player.

ENG
LISH
64
Creating Schedule Videowall Distribution Files
1 Click the [Distribution] tab in the Menu tab at the top of the program.
2 Click the [New Distribution] button at the top left of the screen.
3 Click the [Distribute Sync] button when a dropdown menu appears.
4 Click [Basic] under Distribute VideoWall.
5 On the [Create Tile Mode screen, select a tile type for Videowall..

65EN
GLIS
H
At this point, when you click the [Open] button on the [New Distribution] screen, the [Open] pop-up window will appear. Select the item you want to open and click [OK] to load the saved Distribute Regular VideoWall. You can delete saved regular VideoWall distribution items using the [Delete] button at the bottom of the [Open] pop-up window.
6 When you have completed the tile set-up, click the [Next] button.Select a Schedule type from the videowall type.

ENG
LISH
66
7 At the [Schedule Selection] screen, assign the schedule to a cell in the tile you want. ·You can assign a schedule either by selecting a cell in the tile you want and then selecting a schedule, or by dragging and dropping items. If you drag and drop a folder, all of the schedules in the folder will be assigned in alphabetical order. ·You can delete the assigned schedule by selecting the cell in the tile, and then pressing the <Delete> key or the [X] button. ·The following conditions must be met for schedules to be applicable for synchronization play: - The numbers of the content in the schedules assigned to all of the cells must be the
same. - The start times and play times in the schedules assigned to all of the cells must be the
same. - The types of content assigned to the same time in the schedules assigned to all of the
cells must be the same. Regular content, and video cannot be assigned together. - The types of content that can be used in a schedule for synchronization play are regu-
lar content, and video. - For video among the content in the schedules assigned to all cells, the file extensions
must be the same. - When all cells have content set up in the set schedule, the playing times of the videos
within the content should be same, and only one video is available per region within the canvas.

67EN
GLIS
H
8 When you have completed the schedule set-up, click the [Next] button.
9 On the [Select a player] screen, assign a player to a cell of the tile you want. ·You can assign either by selecting a cell of the tile you want and then selecting a player, or by dragging and dropping. If you drag and drop a folder, all the players in the folder are assigned in alphabetical order. ·For an MP700 Media Player, you can select a channel and then create Distribute Videow-all. Each MP700 Media Player supports up to 4 channels. When you want to distribute to a channel, you can select a channel and place the channel on a tile from the Select a player menu. ·If you select a cell in the tile, and then press the <Delete> key or the [X] button, you can cancel the selected player. ·You cannot assign the same single player to all the cells of the tile.
10 When you have completed the player set-up, click the [Next] button.

ENG
LISH
68
11 On the [Distribution] screen, [Master-player Setting], [Time Setting] and [Distribution Reservation Setting] can be adjusted. ·Master-player Setting: By default, the first cell of the tile becomes the master player. You can change the master player by clicking the tile on the left. ·Time Setting: You can set the play time for the schedule you want to distribute. ·Distribution Reservation Setting: You can schedule the distribution time. For [Time Set-ting] and [Distribution Reservation Setting], see 54 page.

69EN
GLIS
H
12 When you have completed the distribution set-up, you can save it by clicking the [Save] but-ton. Enter a name you want and then click the [OK] button to complete saving. When saving is completed, the [Save as] button will be activated.
- Save: Saves with the existing file name. - Save as: You can save with a new name.
13 Tocreateadistributionfileasconfigured,clickthe[Distribution] button.
14 When you click the [Distribution] button, a new distribution folder will be created under the videoWall folder. At this point, the status of the distribution item is [Not Approved]. If you select an item that you want to distribute in the same way as general distribution and then approve it, it will start being distributed to the player.

ENG
LISH
70
Distribute Videowall - Advanced (Media Editor)
If the desired videowall has a layout that was uploaded after being edited in the Media Editor, select [Distribute Videowall] > [Advanced (Media Editor)].
1 Click the [Distribution] tab in the Menu tab at the top of the program.
2 Click the [New Distribution] button in the top left of the screen.
3 Click the [Distribute Videowall] button when a dropdown menu appears.
4 Click the [Advanced (Media Editor)] button in the Distribute Videowall screen.
5 On the Layout&Content Selection screen, select the desired layout. - You can import information about each layout that has been uploaded or exported to the
server via SuperSign Media Editor by using the Import feature on the server.
6Layoutsareintwofiletypes:Image( ) and Video ( ).
• Distribute Videowall is available on SuperSign W only. If you want to use this feature, purchase SuperSign W.
NOTE
At this point, when you click the [Open]buttononthe[New Distribution] screen, the [Open] pop-up window will appear. Select the item you want to open and click [OK] to open the saved Distribute Irregular VideoWall. You can delete saved Distribute Irregular VideoWall items using the [Delete] button at the bottom of the [Open] pop-up window.

71EN
GLIS
H
7 Select the desired layout from the layout list and the monitor and content will be placed in the workspace on the right.
8 You can zoom in/out your workspace using the drop box or slider on the right. Drag or scroll to move around the zoomed-in workspace.
9 When you have imported the layout information by selecting a layout, click the [Next] button.

ENG
LISH
72
10 On the [Select a player] screen, assign a player to a cell of the tile you want. ·You can assign players either by selecting a cell of the tile you want and then selecting a player, or by dragging and dropping. If you drag and drop a folder, all the players in the folder are assigned in alphabetical order. ·For an MP700 Media Player, you can select a channel and then create Distribute Videow-all. Each MP700 Media Player supports up to 4 channels. When you want to distribute to a channel, you can select a channel and place the channel on a tile from the Select a player menu. ·If you select a cell in the tile, and then press the <Delete> key or the [X] button, you can cancel the selected player. ·You cannot assign a single player to all the cells in the tile.
11 When you have completed the player setup, click the [Next] button.

73EN
GLIS
H
12 On the [Distribution] screen, [Master-Player Setting], [Time Setting] and [Distribution Reservation Setting] can be adjusted. ·Master Player Setting: By default, the first cell of the tile becomes the master player. You can change the master player by clicking the tile on the left. ·Time Setting: You can set the playback time for content you want to distribute. ·Distribution Reservation Setting: You can schedule the distribution time. As for [Time Setting] and [Distribution Reservation Setting], see 54 page.
13 When you have completed the distribution setup, you can save it by clicking the [Save] button. Enter the name you want and then click the [OK] button to complete saving. When saving is completed, the [Save as] button will be activated.
- Save: Saves with the existing file name. - Save as: Saves with a new name.
14 Ifyouwanttocreateadistributionfilewiththesetcontent,clickthe[Distribution] button.
15 When you click the [Distribution] button, a new distribution folder will be created under the videoWall folder. At this point, the status of the distribution item is [Non-Approved]. If you select an item that you want to distribute in the same way as general distribution and then approve it, it will start being distributed to the player.
• For an image layout, you do not need to set the master player because it does not include the sync information.
• The image layout does not support multi-channels.• For advanced videowall distribution, a layout can include expired content and be distrib-
uted.
NOTE
ENG
LISH
74
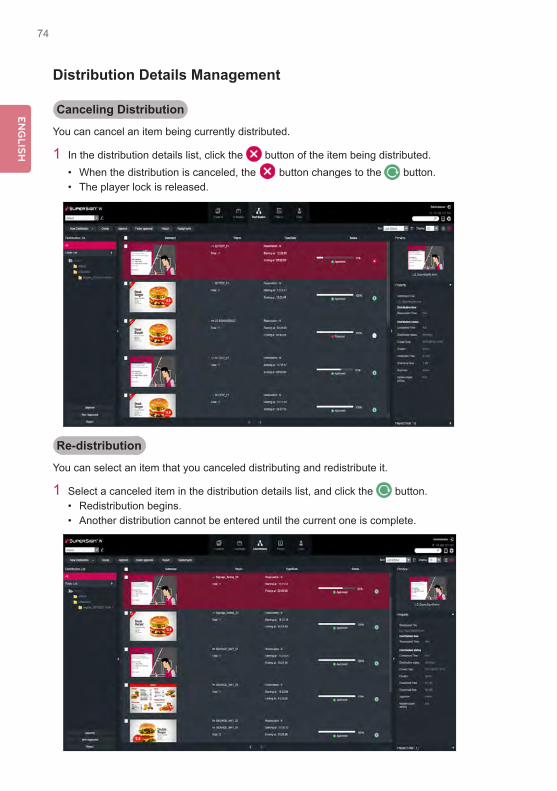
Distribution Details Management
Canceling Distribution
You can cancel an item being currently distributed.
1 In the distribution details list, click the button of the item being distributed.• When the distribution is canceled, the button changes to the button.• The player lock is released.
Re-distribution
You can select an item that you canceled distributing and redistribute it.
1 Select a canceled item in the distribution details list, and click the button.• Redistribution begins.• Another distribution cannot be entered until the current one is complete.

75EN
GLIS
H
Approving Distribution
1 Click the Non-Approved category in the Distribution List.• Unapproved distributions appear in the details list.• Alternatively, select a distribution item with shown in the details list.
2 Select a distribution item you want to approve in the distribution details list.• The selected item is shown with a check mark.
3 Click the [Approved] button to approve the selected item.• Once the approval is complete, changes to .• Another distribution cannot be entered until the current one is complete.• Furthermore, because the check box for a player currently distributing content is changed
to a lock icon, you cannot select the player.• When the distribution is complete, the player lock is released and the distribution screen
appears automatically.
How to Approve a Folder
1 Select the folder you want to approve from the folder list.2 To approve the distribution item in the selected folder, click the [Folder Approval] button.
• Once the approval is complete, changes to .and the distribution begins.
• The player currently engaged in a distribution is locked, and another distribution is prohib-ited until the current distribution is complete.
• Furthermore, because the check box of a player currently distributing content changes to a lock icon, you cannot select the player.
Rejecting Distribution
1 Select a distribution item you want to reject in the distribution details list.• The selected item is shown with a check mark.
2 Click the [Rejected] button to reject the selected item.• Once the rejection is complete, or changes to .• The player lock is released.

ENG
LISH
76
Restarting Sync
You can restart sync playback that is already distributed to the player.
1 Please click the subfolder in the videowall folder. ·The distribution list for the selected distribution folder will appear in the details list.
2 If you want to restart sync playback of the selected distribution folder, click the [Restart Sync] button.
·Restart messages are sent to all the players of the selected distribution folder. ·If the connection is lost or if any of the players are switched off, the Message Send Failure pop-up window appears. ·If there is any sync folder under the selected distribution folder, messages are also sent to the players in all the subfolders.
y The Restart Sync feature is available only in SuperSign W. If you want to use this feature, purchase SuperSign W.
NOTE
Deleting Distribution
1 Select a distribution item you want to delete in the distribution details list.• The selected item is shown with a check mark.
2 Click the [Delete] button to delete the selected item.
3 WhentheConfirmDeletewindowappears,clickthe[OK] button.
4 Whenthedeletionconfirmationwindowappears,clickthe[OK] button.• Once the deletion is complete, the deleted distribution will disappear from the details list.• The player lock is released.

77EN
GLIS
H
Sync Server Notification
Players that are performing sync playback send notifications to the server when situations such as playback stoppage or connection loss occur. Users can check notification messages through their web browsers that are connected to the server.
y Instant messages cannot be sent to players that are performing sync playback. y Players that are performing sync playback are unable to perform the content and instant
message playback management. y To enable sync playback, the default time zone of the players you want to sync should be
identical. y Sync playback uses the TCP/IP network technology. y The IP address assigned to the Master Player must be the same as the one assigned to the
parent network of the slave or the network of the slave. y For the Master Player, it is recommended that you use a static IP. y If the Master Player's IP is changed after distribution, the slave cannot be connected to
the Master Player. In that case, do not click the [Sync Restart] button, but click the [Sync Distribution] button, and try connecting the slave again.
NOTE
Situation Notification Message Abnormal shutdown of the sync playback program
The sync playback program has shut down abnormally. Please check your sync program.
User shutdown of the sync play-back program
Sync playback was stopped by the user. If you want to restartsyncplayback,clickthe[RestartSync]button.
Connection loss of the sync play-back program
The network connection between sync playback programs was lost. Please check your network.
Connection standby timeout of the sync playback program
The sync master exceeded the slave connection standby time. Please check your network.
y The Sync Server Notification feature is available only in SuperSign W. If you want to use this feature, purchase SuperSign W.
NOTE

ENG
LISH
78
Urgent MessageYou can send messages to players connected with the Server using a Web-based message application.
1 Select a player you want to send a message to in the Player List.• To send the message to multiple players at once, click the checkbox beside the player
you want.
2 Click the [Urgent Message] button at the top of the player list.• The Urgent Message screen appears.
3 Compose a message you want to send and click the [Next] button.• Click the [Save] button to save an urgent message you've written.• Click the [Open] button to load your desired pre-stored urgent message.
② ⑥
①
④
③
⑤
⑦⑧
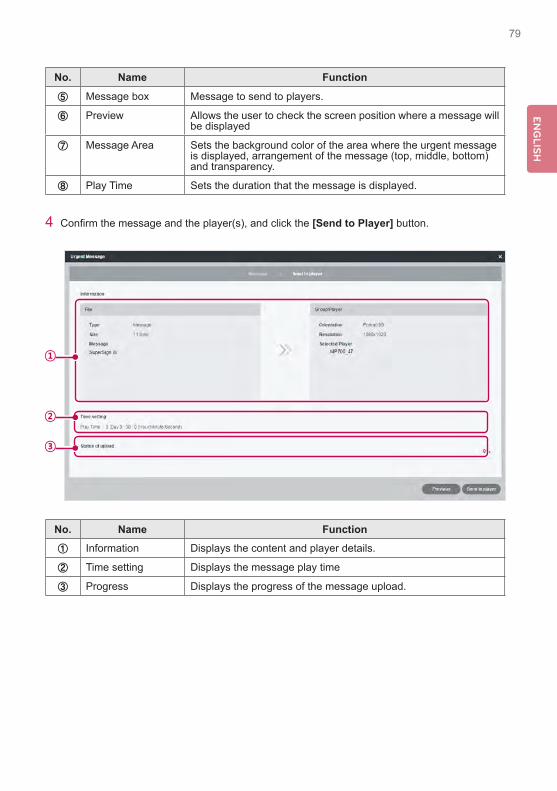
No. Name Function
① Player list Displays a list of players to which an urgent message is sent.
② Summary Displays the player name, IP address, player type (portrait, land-scape) and resolution.
③ Font Property Font,size,color,align(left,justified,right,)style(bold,italic,underline,) line space, and spacing.
④ Text scroll Sets the text, scroll direction (left/right/up/down/no effect), and scroll speed
79EN
GLIS
H
4 Confirmthemessageandtheplayer(s),andclickthe[Send to Player] button.
No. Name Function
⑤ Message box Message to send to players.
⑥ Preview Allows the user to check the screen position where a message will be displayed
⑦ Message Area Sets the background color of the area where the urgent message is displayed, arrangement of the message (top, middle, bottom) and transparency.
⑧ Play Time Sets the duration that the message is displayed.
No. Name Function
① Information Displays the content and player details.
② Time setting Displays the message play time
③ Progress Displays the progress of the message upload.
①
③
②

ENG
LISH
80
• When you compose an emergency message, if you enter a large amount of text at once, the text may not be displayed on the Internet Explorer temporarily.
• The length of an emergency message is limited to 1024 bytes, and the length limit may be different depending on the language and the player.
• The play time of an emergency message cannot be set to 0 day, 0 hour, 0 minute, and 0 second. If it is 0 day, 0 hour, 0 minute and 0 second, the play time is automatically set to 30 seconds.
• A message can only be displayed horizontally. • When you transfer a message to a monitor or TV player, the available message editing
options are limited. - Font: Fixed - Style: Only underline is available. - Special characters: Only special characters which can be entered by a keyboard are al-
lowed: (`, !, @, #, $, %, ^, &, *, (, ), -, +, =, |, \, :, ;, “, ‘, <, >, /, ? etc)• Messages in languages other than those supported by the monitor or TV player may look
different from the transmitted message.
NOTE

81EN
GLIS
H
Log reportYou can view logs recorded in the database with a web browser.
1 Click in the top right side of the screen.• The Log report window appears.
No. Name Function① Log catego-
ries •User: Records a user log when a user or an administrator connects
to the Server to change system resources (e.g., media, or content,) or system settings.
•Device Event: Records a Device Event log for the player's server connection information and device information.
•Distribution: Records a distribution log (transfer time, transfer result, etc.) when a user distributes content to players.
•PlayBack: Records a play log (content title, repeat number, etc.) when a media player runs content.
② Sort and Search
•Number of list: Select a number of rows to show on a page.•Log Level: Select a desired level from ALL ,FATAL, ERROR, or INFO.•User ID: Search for User ID.•Select Period: Click the date box to select a date from the calen-
dar, click the [▼]buttontoselectatime,andviewtheloginforma-tion.
•Search: Shows the log report by pressing Search after selecting a search condition.
•Export logs: Clicking the button saves your desired log asanExcelfile.
③
②
④
①

ENG
LISH
82
2 Select a log category you want at the top.• The Log report window appears for the selected category.
3 Select a period to view the log in the top side of the window.• Eventdetailscreatedduringthespecifiedperiodaredisplayed.
4 To close the Log report window, click the [Close] button or the [X] button at the top right of the screen.
SetupProfileYou can view user information or modify user account details except the User ID and role.
1 Click in the top right corner of the screen.• The Setup window appears.
2 Click the Profile tab.• WhentheProfilepop-upwindowappears,youcanviewormodifytheuserinformation.
3 To modify the account details, select an item you want to modify and make changes.
4 To save the changes, click the [Apply] button.
5 To close the Setup window, click the [X] icon in the top right corner of the screen.
No. Name Function③ Log details Viewthelogrecordedduringthespecifiedperiod.④ Action buttons •[Refresh]: Reload the log.
•[Close]: Close the Log Report window.
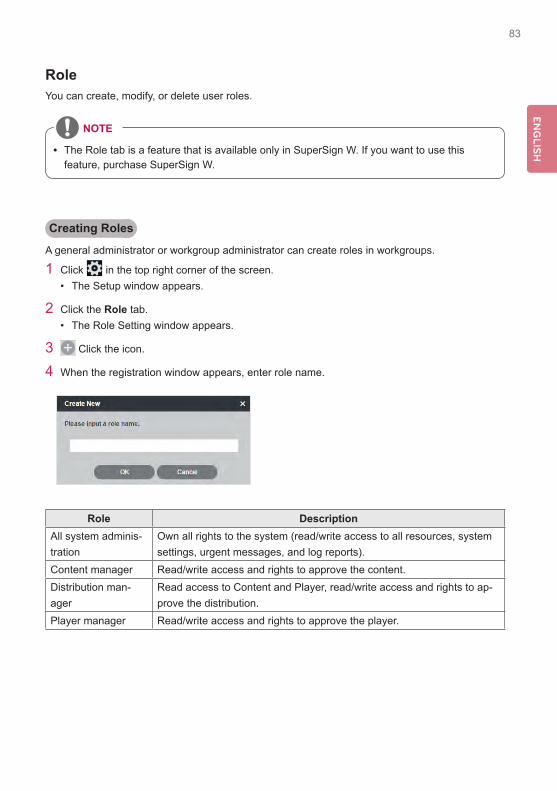
83EN
GLIS
H
RoleYou can create, modify, or delete user roles.
Creating Roles
A general administrator or workgroup administrator can create roles in workgroups.
1 Click in the top right corner of the screen.• The Setup window appears.
2 Click the Role tab.• The Role Setting window appears.
3 Click the icon.
4 When the registration window appears, enter role name.
y The Role tab is a feature that is available only in SuperSign W. If you want to use this feature, purchase SuperSign W.
NOTE
Role DescriptionAll system adminis-tration
Own all rights to the system (read/write access to all resources, system settings, urgent messages, and log reports).
Content manager Read/write access and rights to approve the content.Distribution man-ager
Read access to Content and Player, read/write access and rights to ap-prove the distribution.
Player manager Read/write access and rights to approve the player.

ENG
LISH
84
5 Click the [OK] button.
6 Specify the role information and rights under the Role Details and Rights.
7 To save the settings, click the [Apply] button.
8 To close the Setup window, click the [X] icon in the top right corner of the screen.
Name FunctionRole Details Role name, description, created date, and last updated date.
Authority
Specify the user rights (read, write, read-only).•Scope: Entire system•Edit: Select read, write or read-only for Content, Schedule, Player,
User, and Distribution.•Etc.: Select right for Shared group/Content approval/Schedule ap-
proval/Player approval/User approval/Message transmission/Log view/Distribution

85EN
GLIS
H
Modifying Roles
You can modify roles previously created in a workgroup.
1 Click in the top right corner of the screen.• The Setup window appears.
2 Click the Role tab.• The Role Setting window appears.
3 Select a role you want to modify in the Role List.
4 Specify the role details and rights as needed.
5 To save the settings, click the [Apply] button.
6 To close the Setup window, click the [X] icon in the top right corner of the screen.
Name FunctionRole Details Role name, description, created date, and last updated date.
Authority
Specify the user rights (read, write, read-only).•Scope: Entire system.•Edit: Select read, write or read-only for Content, Schedule, Player, and
Distribution.•Etc.: Select right for Shared group/Content approval/Schedule approv-
al/Player approval/Message transmission/Log view/Distribution

ENG
LISH
86
Deleting Roles
You can delete existing roles.
1 Click in the top right corner of the screen.• The Setup window appears.
2 Click the Role tab.• The Role Setting window appears.
3 Click a role item you want to delete in the role list.
4 Click the [Delete] button.
5 Whenthedeletionconfirmationpop-upwindowappears,clickthe[OK] button.
6 Whenthedeletionconfirmationwindowappears,clickthe[OK] button.• The selected role is deleted.
7 To close the Setup window, click the [X] icon in the top right corner of the screen.

87EN
GLIS
H
ServerYou can view the server operations.
1 Click in the top right corner of the screen.• The Setup window appears.
2 Click the Server tab.• The server window appears. You can view the server details, such as the server IP
address, server port, memory usage, CPU usage, etc.
3 To close the Setup window, click the [X] icon in the top right corner of the screen.
• The Server tab is a feature that is available only in SuperSign W. If you want to use this feature, purchase SuperSign W.
NOTE

ENG
LISH
88
SystemYou can enable or disable the approved systems and specify the settings for system management.
1 Click in the top right corner of the screen.• The Setup window appears.
2 Click the Systems tab.• The current settings are displayed in the System window.
3 Specify the system environment as needed.
4 To apply the settings, click the [Apply] button.
5 To close the Setup window, click the [X] icon in the top right corner of the screen.
Role DescriptionArchive Period of Log data Setanumberofdaystokeepalogfile.Enable Log Backup Select to enable or disable a log backup.History Management Manage the history of player screenshots.Set screenshot interval Set a screenshot interval (10, 30, or 60 minutes).Storage Set a storage period (7, 15, 30, or 90 days).
• The System tab is a feature that is available only in SuperSign W. If you want to use this feature, purchase SuperSign W.
NOTE

89EN
GLIS
H
Trouble NoticeYoucanconfigureTroubleNoticetobesenttoyoubyemail.
Configuring Trouble NoticeYoucanenable/disabletheTroubleNoticefunction,configurethemailaccountsettingsoredittherecipient.
1 Click the at the top right of the program screen.• The Setting pop-up window appears.
2 Click the Trouble Notice tab.• The Trouble Notice setting screen appears, showing the current settings.
3 Enter the administrator’s mail settings in E-mail Account Settings.
4 Click the [E-mail Account Setting Test] button.
5 When the Trouble Notice Settings menu is activated, enter the Trouble Notice settings.
6 Click the [Edit] button.
7 Select a recipient for Trouble Notice mails and click the [OK] button.
8 Click the [Apply] button to apply the settings.
9 Click the [X] button at the top right of the screen to close the Setting screen.
• The Trouble Notice tab is provided to users with administrator privileges only.
NOTE

ENG
LISH
90
SuperSign NSuperSignNcanbeusedtoconfiguredataservicesthatcollectinformationonexternalsystems.Suchdataservicescollectdataatcollectioncyclesspecifiedbytheuserandconvertthedynamicdata to usable content using the SuperSign Editor.
YoucanconfiguretheSuperSignNserversettingssothatSuperSignWcanusedataservices.
1 Click the at the top right of the program screen.• The Setting pop-up window appears.
2 Click the SuperSign N tab.• The SuperSign N Setting screen appears, showing the current settings.
3 Click the button.
• SuperSignNconfigurationisavailableonSuperSignWonly.Tousetheapplicationfunc-tion, purchase SuperSign W and SuperSign N.
NOTE

91EN
GLIS
H
4 When the Add Server pop-up window appears, enter a SuperSign N Server Name and its IP Address.
5 Click the [Save] button.
6 Check workgroups that will use SuperSign N.
7 Click the [Apply] button to apply the settings.
8 Click the [X] button at the top right of the screen to close the Setting screen.

KOREA
N
92
About SuperSign
1 Click the at the top right of the program screen.• The Setting pop-up window appears.
2 Click the Information tab.• The SuperSign information screen appears and displays the current software version
information, new features, supported models, Release Notes, etc.
3 Click the button.• Release Notes for SuperSign W can be viewed.

93KOREA
N
New features for SuperSignThe range of use for the new features in SuperSign 3.0 or later may differ depending on the moni-tor/TV.(The following features are available on some models only.)
S/W Features
SuperSign Editor
42 content templates were added.Content playlist
External input zone No signal Editing MediaQR Code
Data service zone
SuperSign ServerWorkgroup
Trouble Notice Firmware update
SuperSign N Connection with external system
• Some new features can be in SuperSign W only. To use those features, please purchase SuperSign W.
• Display devices supported in the Media Player are subject to change without prior notice to improve the product performance.
• Somemodelsmaynotsupportthecontrolfunctiondependingonthefirmwareversionofthe monitor.
NOTE

ENG
LISH
94
AppendixSuperSign Network ConnectionRefer to the information below when establishing network connections for the SuperSign Server and SuperSign Player.
LAN ConnectionYou can choose the LAN connection when the SuperSign Server and SuperSign Player are in the same network.
• The same network means the same gateway and subnet address for IP communications.• TheSuperSignServercanfindtheSuperSignPlayersinthesamenetworkusingthe
scan feature.• For 1:1 connections, use a crossover cable that allows communications without network
equipment.• Features such as the Web, widgets, and RSS are not available in closed networks with-
out an external connection to the Internet.• If the network does not have a DHCP server, you should manually set the IP addresses of
the SuperSign Server and the SuperSign Player.
1:1 Connections
1:N Connections

95EN
GLIS
H
Internet ConnectionYou can choose the Internet connection when the SuperSign Server and the SuperSign Player are in two different networks.
• TheSuperSignServercannotfindtheSuperSignPlayerapplicationsusingthescanfeature.
• The SuperSign Player can be connected to the SuperSign Server by using the manual scan mode.
• If the SuperSign Server is in a private network, the SuperSign Player may not be properly connected.
• Ifthenetworkhasafirewall,sometransmissionfeaturesmaynotworkproperly.• Features such as the Web, widgets, and RSS are not available in closed networks with-
out an external connection to the Internet.• If the network does not have a DHCP server, you should manually set the IP addresses of
the SuperSign Server and the SuperSign Player.
Hierarchical Connection
Internet Connection
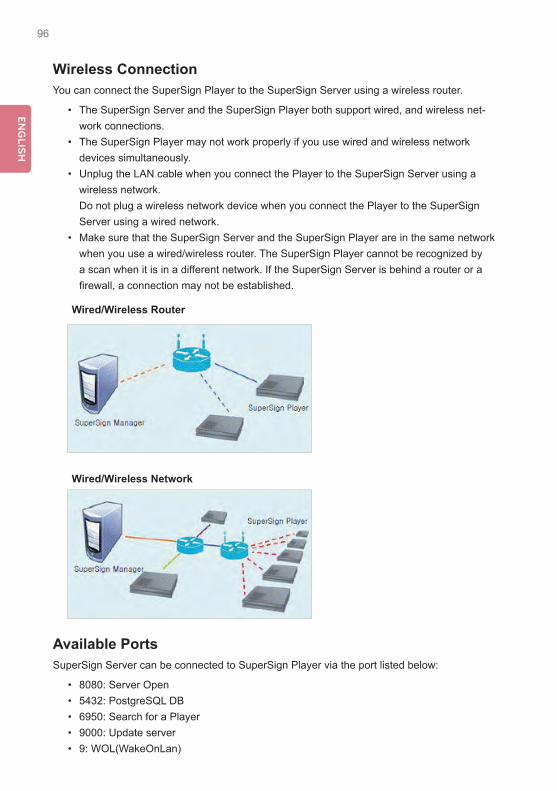
ENG
LISH
96
Wireless ConnectionYou can connect the SuperSign Player to the SuperSign Server using a wireless router.
• The SuperSign Server and the SuperSign Player both support wired, and wireless net-work connections.
• The SuperSign Player may not work properly if you use wired and wireless network devices simultaneously.
• Unplug the LAN cable when you connect the Player to the SuperSign Server using a wireless network. Do not plug a wireless network device when you connect the Player to the SuperSign Server using a wired network.
• Make sure that the SuperSign Server and the SuperSign Player are in the same network when you use a wired/wireless router. The SuperSign Player cannot be recognized by a scan when it is in a different network. If the SuperSign Server is behind a router or a firewall,aconnectionmaynotbeestablished.
Available Ports SuperSign Server can be connected to SuperSign Player via the port listed below:
• 8080: Server Open• 5432: PostgreSQL DB• 6950: Search for a Player• 9000: Update server• 9: WOL(WakeOnLan)
Wired/Wireless Router
Wired/Wireless Network

97EN
GLIS
H
Frequently Asked QuestionsIf the program is not working properly, refer to the information below before contacting the Service Center.
Question Troubleshooting
I clicked Scan, but I cannotfindplayers.
•Check that the SuperSign Player is turned on.•Check that the SuperSign Player is working.•Check the network cable of the SuperSign Player. Check the
network IP settings of the SuperSign Player. Set the network IP of the SuperSign Player manually.
The media player and the display are not automatically connected.
•When you connect the media player to a display, check the se-rial cable connection between the player and the display.
•If the Set ID of the display is set to Off, then set the Set ID value.
•When you connect the media player to a display, reboot the player after setup is complete.
Data saved in the local disk (C:) of the SuperSign Player disap-peared.
The SuperSign Player uses the Enhanced Write Filter (EWF) to protect the program. If the EWF is set to “Enable”, the user can only temporarily save data onto the local disk. When the SuperSign Player restarts, the EWF deletes the data that was temporarily saved. If you don't want to use the EWF, set it to “Disable” on the Player menu.
I cannot open Microsoft OfficefilesintheSuper-Sign Player.
CheckthattheMicrosoftOfficeprogramisinstalledproperly.IftheEWF is set to “Enable”, the installation may not continue prop-erly. Set EWF to “Disable”, and retry installing the program. It is recommended that you set EWF to “Enable” once the installation is complete.
The schedule transmit-ted to the player does not start playing at the scheduled time.
Check that the system time set in the SuperSign Server and the SuperSign Player are the same. If the time is different, synchronize the settings and re-transmit the schedule.
Characters in the RSS, text and message arenot displayed properly in the SuperSign Player.
If using a set-top box player, refer to the Regional and Language Options, and change the system language accordingly.
Characters in the text and message arenot displayed properly.
If using a monitor or TV player, change the language option to match the language of the added text.

ENG
LISH
98
Question Troubleshooting
PictureandPDFfilesare not displayed.
•Refer to the settings under the Regional and Language Options ofthemediaplayer'soperatingsystem,changethefilenameinthespecifiedlanguage,andre-registerittotheLibrary.Forinstance,ifthelanguageissettoEnglishandthepicturefileisnamed in Korean, the image may fail to display.
The focus disappears from the "SuperSign Player menu" or "Content List" window while working with the SuperSign Player.
If the keyboard and mouse are connected to the player, you can make the focus appear again by moving the cursor to the window and clicking it. If you are using a remote control only, use S.Menu or the blue button to close the "SuperSign Player menu" or "Content List" window and run again.
The time changes on its own even after synching the time on the Windows where the SuperSign Player is installed.
•Make sure that the EWF is set to “Disable” before you change the system time.
•If the EWF was set to “Enable” when you set the time, change it to “Disable” and retry setting the time.
•On the Windows taskbar, right-click to open the Adjust Date/Time menu (Date and Time dialog) and check the Time syn-chronization option. If this option is checked, the time is peri-odically set to the Time zone selected by the user. If you don't want to use this option, click the Internet Time tab on the menu and clear the “Automatically synchronize with an Internet time server” checkbox.
I sent content to the SuperSign Player while playing a video, but the video stops playing.
Network conditions may affect the video play. Retry sending the content when the SuperSign Player is not playing a video.
Where can I obtain the SuperSign Player pro-gramordriverfiles?
They are available at the SuperSign support website (www.lgecom-mercial.com).
Flashfilesplayslowly. A large size of Flash displayed on the screen, multiple objects using the animation function, or the animation applied to a large area, may all affect the slow play.

MODEL
SERIAL
To obtain the source code under GPL, LGPL, MPL and other open source licenses, that is contained in this product, please visit http://opensource.lge.com.In addition to the source code, all referred license terms, warranty disclaimers and copy-right notices are available for download.LG Electronics will also provide open source code to you on CD-ROM for a charge cover-ing the cost of performing such distribution (such as the cost of media, shipping and handling) upon email request to [email protected]. This offer is valid for three (3) years from the date on which you pur-chased the product.


![USER MANUAL LG SuperSign CMS › us › business › display-solutions › supersign-w-lit… · 11 English Starting SuperSign Server This section describes [Login], [Logout] and](https://static.documents.pub/doc/80x56/5f1b9e875419b325dd2917b6/user-manual-lg-supersign-cms-a-us-a-business-a-display-solutions-a-supersign-w-lit.jpg)