51
Owner'sManual The Steyr Universal Sporting Rifle Mannlicher STEYR USR
Owner'sManualThe Steyr Universal Sporting Rifle
Mannlicher
STEYR USR

Owner's ManualSteyr Universal Sporting Rifle
This manual and the warnings contained herein mustbe read and understood before using your rifle. Thismanual familiarizes the user with the function and thehandling of the rifle and warns of the potential dangers ofmisuse that may lead to accidents or injuries. This manualshould always accompany this firearm and be transferredwith it upon change of ownership, or when the firearm isloaned or presented to another person. THIS MANUAL ISNOT A SUBSTITUTE FOR A HUNTING SAFETY COURSEOR A FIREARMS SAFETY COURSE!
Mannlicher
Steyr Mannlicher AG & Co KGP.O. Box 1000, A-4400 Steyr, Austria
2
Dear Customer!With your purchase ofthe new USR rifle, manufactured
by Steyr Mannlicher AG & Co KG, you have acquired asporting rifle that meets the highest quality standards.This rifle has been conceived to the state-of-the-art requirements oftoday's sportsman. Unsurpassed performance,superb quality, optimum user comfort, and long servicelife were the design goals for the new USR.
Steyr Mannlicher AG & Co KG has been certifiedaccording to ISO 9001 since 1994. As a result of ourthorough quality assurance system, you can be certainthat you have purchased an exclusive product of trUlyoutstanding quality.
Please read this manual and the warnings containedherein carefully to familiarize yourself with the functionand operation of this firearm.
Before you attempt to use or shoot your new USR rifle,learn and understand the following basic rules. Your safetyand the safety of others depends upon safe and carefulhandling of your new rifle.
Any firearm must be considered a potentially dangerous object requiring particular caution in storage, handlingand use.
Make sure to always handle and treat every rifle as if itwere loaded.
NEVER place your finger on the trigger unless you wantto fire a shot. ALWAYS load your rifle so as to avoid any dangerfor by-standers. Adequate rifle safety can only be ensured withthe rifle in clean and mechanically sound condition.
Inexpert handling as well as improper or negligent caremay impair function and safety of the rifle. Unauthorizedalterations, modifications or adjustments to the rifles as well asdamage to the rifle through carelessness will void any claimsunder the manufacturer's service agreement.
Any work on the rifle must be done by qualified andauthorized gunsmiths, armorers, or factory authorized servicefacilities.
Rifles must always be stored out of the reach ofpersons not familiar with firearms, particulary children.
3
4
NEVER store ammunition with a firearm.
In order to avoid damage during transport, the rifleshould always be transported in the original packing carton orin a commercially available carrying case.
ALWAYS keep the muzzle of your rifle pointed in a safedirection. NEVER point any firearm at anything you do notintend to shoot. Stay alert and be aware of all persons andproperty within shooting range.
NEVER give a loaded firearm to another person. Always open the action and inspectthe chamberfor ammunition,and unload any firearm before giving the firearm to anotherperson for inspection. Always unload firearms after use toprevent the occurrence of an accidental discharge.
KEEP the barrel, chamber and bore free of all obstructions. Firing a firearm with a barrel, chamber or bore obstruction can cause damage and injury to both the firearm and theshooter, and could result in death. Keep the barrel, chamberand bore free and clean of mud, snow, cleaning patches, orany other materials which may clog the barrel.
NEVER drink alcohol or take medications while handling a firearm. Responsible firearm handling requires a state ofmental alertness.
ALWAYS seek a doctor's advice if you are takingmedication to be sure you are fit to shoot and handle a firearmsafely.
DO NOT totally and blindly rely on the mechanicalsafety devices on any firearm.
The mechanical safety's function is to block searengagement to prevent accidental discharge of the firearm.However, should this device fail, it is possible to fire a rifle evenwhen the safety is in the non-firing position. NEVER place yourfinger on the trigger when you do not intend to shoot. NEVERplace your finger on the trigger or test any safety device whenthe muzzle of a rifle is pointed in an unsafe direction.
NEVER transport a loaded rifle.
ALWAYS wear and encourage others to wear protective shooting glasses. Flying particles could damage eyes andcause blindness; but protective shooting glasses could prevent such injury.
ALWAYS wear and encourage others to wear earprotection when shooting, especially on a range, Without earprotection, the noise of even one shot from a firearm, or otherfirearms close to you, could leave a ringing in your ears forsome time after firing while the cumulative long term effectcould be permanent hearing loss.
ALWAYS use only clean, dry, original high qualitycommercially manufactured ammunition in good conditionloaded in accordance with factory standards. Do not useammunition that has been exposed to prolonged periods ofdampness or moisture. Gun and ammunition manufaturersdesign their products within exacting engineering safety limits.Handloads and remanufactured ammunition are sometimesoutside those limits and can be so unsafe as to blow up orotherwise damage a firearm, and cause injury, death ordamage to property.
5

6
Ifthere are any questions concerning the proper caliberfor your sporting rifle, call or contact GSI, Inc., 108 MorrowAvenue, P.O. Box 129, Trussville, Alabama 35173, Tel. (205)655-8299. STEYR MANNLlCHER AG & Co KG specificallydisclaims any responsibility for damage or injury whatsoeveroccurring in connection with, or as a result of, the use of faulty,or non-standard, or "remanufactured" or handloaded (reloaded) ammunition.
DO NOT put your finger on the trigger while unloading,loading or any other time before you are ready to shoot. Do notdry fire on an empty chamber - the chamber may not be emptyeven if you think it is not loaded! TREAT EVERY FIREARM ASIF IT WERE LOADED!
KNOW your target and backdrop area. Be sure it is safeto fire at your target. Think! What will you HIT if you MISS yourintended target? Know the potential range of your rifle andammunition, and consider this danger for persons and properltywithin that range. NEVER fire a rifle in the direction of people,non-game animals or property that could be injured ordestroyed.
MAKE SURE your firearm is unloaded before crossingfences, climbing trees, jumping over ditches, or passing throughor across other obstacles. DO NOT place or lean a loadedfirearm on or against a tree, fence, automobile, or similarobjects.
FAILURE TO FIRE: Ifyour rifle fails to fire when you pullthe trigger, keep the rifle pointed toward the target or a safeopen area and wait for at least 30 seconds. If hangfire (slowignition) has occurred, the round will probably fire within 30seconds.
If the round does not fire, open the breech of the rifleand remove the cartridge. If the primer of the cartridge isindented, discard the cartridge in a safe manner. If the primerof the cartridge is not indented, or is lightly indented, or offcenter, have the rifle examined by a competent gunsmithbefore the rifle is fired again.
USE caution to avoid dropping a loaded gun. Droppingthe rifle may cause an accidental discharge even if the safetyis in the on-safe position. Be extremely careful while hunting orduring any other activity to avoid dropping any firearm. Anaccidental discharge could result in serious injury, or death.
TAKE EVERY PRECAUTION to prevent unsafe gunhandling practices around yourself and others. If you witnessany unsafe gun handling practices by other shooters, politelysuggest safe procedures for future use.
NEVER DISCHARGE a firearm near flammable material. Flame and sparks erupt from the firearm when discharged. They could start a fire or cause flammable liqUids andgases to explode.
NEVER SHOOT at a hard surface as a rock, or a liquidsurface such as water. A bullet may ricochet and travel in anydirection to strike you, or an object you cannot see, causinginjury, death or damage to property.
NEVER WALK, CLIMB OR FOLLOW a companionwith your rifle loaded and a catrtridge chambered. Whenwalking, climbing or following a companion, MAKE SURE thechamber of the rifle is empty, and the safe is in the "safe"position.
7
8
ALWAYS instruct children to respect firearms. If youteach your children to shoot, teach them or get them trained bya qualified instructor to treat and use firearms properly, andalways supervise them closely.
NEVER abuse your rifle by using it for any purposeother than shooting.
NEVER fire your firearm near an animal unless it istrained to accept the noise. An animal's startled reaction couldinjure it or cause an accident.
READ,UNDERSTAND, AND PRACTICE all safety procedures and warnings in this manual. READ,UNDERSTAND,AND PRACTICE all safety procedures and warnings oncommercial ammunition cartons and containers. It is YOURRESPONSIBILITY to collect, understand and practice themost up-to-date safe handling procedures for your STEYRUSR rifle. NEITHER STEYR MANNLlCHER AG & Co KG NORGSI, INC. are responsible for injury, death or damage toproperty resulting from either intentional or accidental discharge of this firearm, or from its function when used for purposesor subjected to treatment for which it was not designed.
KEEP this instruction manual on hand for future reference. Please include this manual with the firearm in the eventyou lend, give or sell this firearm to any other person.
BEFORE SHOOTING YOUR NEW STEYR
Usually, your Steyr franchised dealer will furnish yourrifle in completely assembled condition. You need only cleanthe barrel bore of oil and wipe the bore dry before shooting.
BORE OBSTRUCTION WARNING!
ANY OBSTRUCTION IN THE BORE OF THE RIFLEMAYRESULTIN DAMAGE TO THE RIFLEOR INJURYOR DEATH TO THE SHOOTER AND OR OTHERPERSONS NEARBY. BEFORE LOADING THE RIFLE,MAKE CERTAIN THE BORE IS CLEAR AND UNOBSTRUCTED
If you suspect the rifle may have a bore obstruction resultingfrom excess oil, grease or cosmoline, or from condensation orrain or snow in the barrel, orfrom any other source whatsoever,inspect the bore to be sure it is clear and unobstructed.
WHENEVER YOU INSPECT THE BORE MAKE CERTAIN THE RIFLE IS NOT LOADED AND THAT THECHAMBER AND MAGAZINEARE EMPTY! THE BOREMAY BE INSPECTED BY REMOVING THE BOLT ASDESCRIBED ELSEWHERE IN THIS MANUAL ANDVISUALL Y INSPECTING THE BARREL FROM THERECEIVER END, NOT THE MUZZLE!REMEMBER, NEVER LOOK DOWN THE MUZZl..E OFTHE RIFLE!
Also, remember that a lodged bullet is a commonform of bore obstruction. Bullets may become lodged in
9
the bore if (assuming the trigger has been pUlled with a livecartridge in the chamber) the cartridge contains no powder, orthe powder fails to ignite, and only the primer charge ignites,resulting in insufficientforce to propel the bullet out ofthe bore.Whenever an obstruction occurs, keep the rifle pointing in asafe direction and proceed as follows:
* Any cartidges in the magazine should be removed.
* Insert a proper size cleaning rod (without a tip or brush) intothe bore from muzzle and remove the bullet. If the bullet doesnot readily dislodge, it may be necessary to lightly tap thehandle end of the cleaning rod. Do not attempt to remove alodged bullet using a blank cartridge from which the bullet hasbeen removed, or by any other means other than the use of acleaning rod. Be certain all loose powder has been removedfrom the bore and action before inserting the rod. If you areunable to remove the obstruction, take the rifle to the nearestrepair facility, or call GSllnc., 108 Morrow Avenue, P.O.Box129, Trussville, Alabama 35173, Tel. (205) 655-8299.
* IAfter removing the obstruction, reinspect the bore to becertain it is free of powder particles or other debris. Clean themechanism of unburned powder grains.
10
11

Table of contents1. GENERAL 13
2. TECHNICAL DATA 14
3. DESCRIPTION 15
4. ACCESSORIES 16
5. HOW TO USE THE RIFLE 17
6. DISASSEMBLY AND ASSEMBLy ....... 22
7. IMMEDIATE CLEARING OF JAMSAND MALFUNCTIONS 35
8. TROUBLESHOOTING 36
9. CLEANING AND MAINTENANCE ........ 38
10. PARTS AND DIAGRAMS 39
12
STEYR UNIVERSAL SPORTING RIFLEUSR
Caliber .223 Rem.
1. GENERAL
- Universal Sporting Rifle (USR)
- Ammunition: Cartridge cal. .223 Rem.
- Interchangable Barrel
- Sights: optical sightopen sights
- Feeding: Magazine of synthetic material for a maximum
capacity of 10 rounds
13

14
2. TECHNICAL DATA
Caliber: 5.56x45 mm (.223 Rem.)
Length of barrel: 508 mm (20")
Length of twist: 228 mm (9" right)
Chamber and barrel bore Chrome plated
Overall length: 765 mm (30")
Height: 231 mm (9")
Weight of weaponwith empty magazine: 3980 g (8.8 Ibs)
Weight of weaponwith filled magazine: 4100g (9.0Ibs)
Weight of empty magazine 80 g (0.17 Ibs)
Magazine capacity 10 rounds---..
Fig.] Steyr USR, with special Picatinnystyle mounting rail, total view, left side
3. DESCRIPTION
The USR is comprised of 6 main groups:
1 , Barrel - group
2 Receiver - group
3 Hammer - group
4 Bolt - group
5 Magazine - group
6 Stock - group
1
2
4==----......!111-
Fig. 2 Steyr USR. main groups
3
15
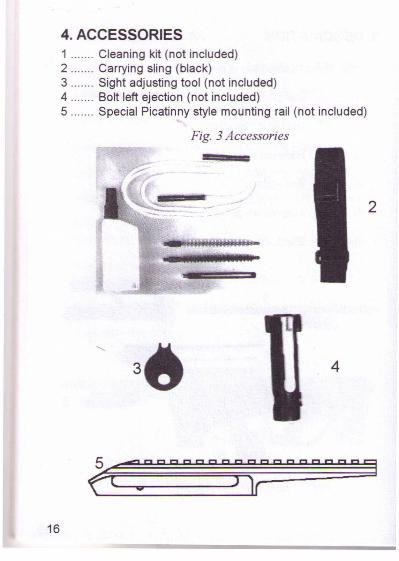
4. ACCESSORIES1 Cleaning kit (not included)2 Carrying sling (black)3 Sight adjusting tool (not included)4 Bolt left ejection (not included)5 Special Picatinny style mounting rail (not included)
Fig. 3 Accessories
4
2
16
5 ..... nnnnnnn;t=nnnnnnn g(2 .,
5. HOW TO USE THE RIFLE
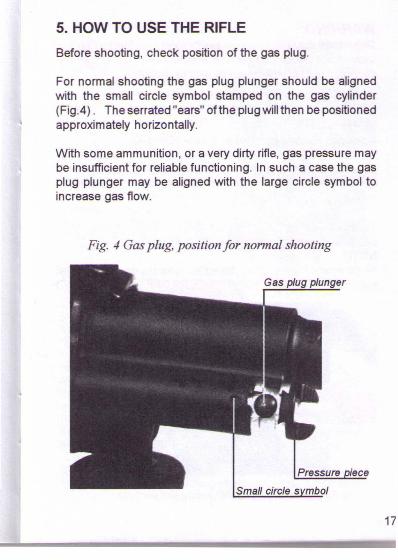
Before shooting, check position of the gas plug.
For normal shooting the gas plug plunger should be alignedwith the small circle symbol stamped on the gas cylinder(Fig.4). The serrated "ears" ofthe plug will then be positionedapproximately horizontally.
With some ammunition, or a very dirty rifle, gas pressure maybe insufficient for reliable functioning. In such a case the gasplug plunger may be aligned with the large circle symbol toincrease gas flow.
Fig. 4 Gas plug, positionfor normal shooting
17
18
WARNING:Make sure that the ejection port cover is mounted on thesame side as the shooter's cheek rests, and that thecorrect (right or left-handed) bolt is installed.
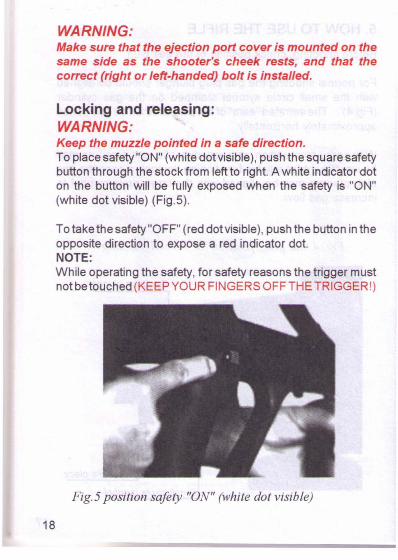
Locking and releasing:WARNING: .Keep the muzzle pointed in a safe direction.To place safety "ON" (white dot visible), push the square safetybutton through the stock from left to right. A white indicator doton the button will be fUlly exposed when the safety is "ON"(white dot visible) (Fig.5).
To take the safety "OFF" (red dot visible), push the button in theopposite direction to expose a red indicator dot.NOTE:While operating the safety, for safety reasons the trigger mustnot betouched (KEEP YOUR FINGERS OFF THE TRIGGER!)
Fig. 5 position safety "ON" (white dot visible)
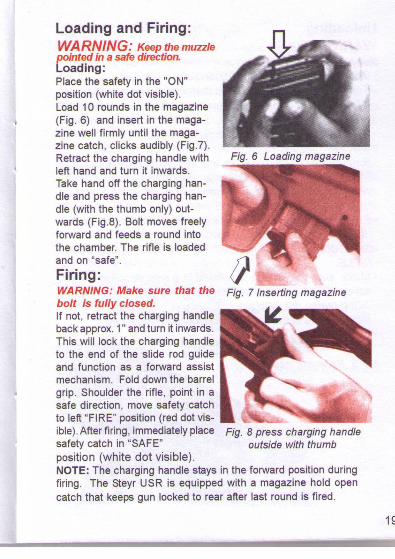
Loading and Firing:WARNING: Keep the muzzlepointed in a safe direction.Loading:Place the safety in the "ON"position (white dot visible).Load 10 rounds in the magazine(Fig. 6) and insert in the magazine well firmly until the magazine catch, clicks audibly (Fig.?).Retract the charging handle with Fig. 6 Loading magazineleft hand and turn it inwards.Take hand off the charging handle and press the charging handle (With the thumb only) outwards (Fig.8). Bolt moves freelyforward and feeds a round intothe chamber. The rifle is loadedand on "safe".
Firing:WARNING: Make sure that the Fig.? Inserting magazinebolt is fully closed.If not, retract the charging handleback approx. 1" and turn it inwards.This will lock the charging handleto the end of the slide rod guideand function as a forward assistmechanism. Fold down the barrelgrip. Shoulder the rifle, point in asafe direction, move safety catchto left "FIRE" position (red dot visible). After firing, immediately place Fig. 8 press charging handlesafety catch in "SAFE" outside with thumbposition (white dot visible).NOTE: The charging handle stays in the forward position duringfiring. The steyr USR is equipped with a magazine hold opencatch that keeps gun locked to rear after last round is fired.
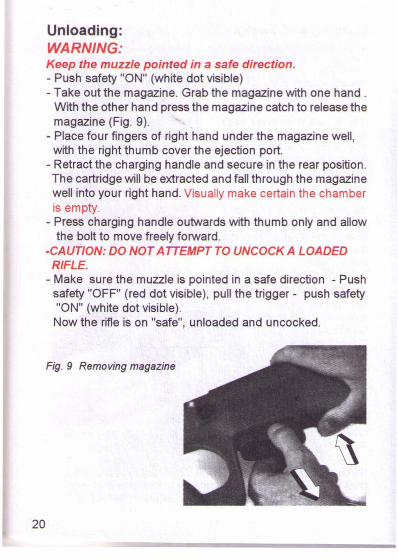
Unloading:WARNING:Keep the muzzle pointed in a safe direction.- Push safety "ON" (white dot visible)- Take out the magazine. Grab the magazine with one hand.
With the other hand press the magazine catch to release themagazine (Fig. 9).
- Place four fingers of right hand under the magazine well,with the right thumb cover the ejection port.
- Retract the charging handle and secure in the rear position.The cartridge will be extracted and fall through the magazinewell into your right hand. Visually make certain the chamberis empty.
- Press charging handle outwards with thumb only and allowthe bolt to move freely forward.
·CAUTlON: DO NOT A TTEMPT TO UNCOCK A LOADEDRIFLE.
- Make sure the muzzle is pointed in a safe direction - Pushsafety "OFF" (red dot visible), pull the trigger - push safety"ON" (white dot visible).Now the rifle is on "safe", unloaded and uncocked.
20
Fig. 9 Removing magazine
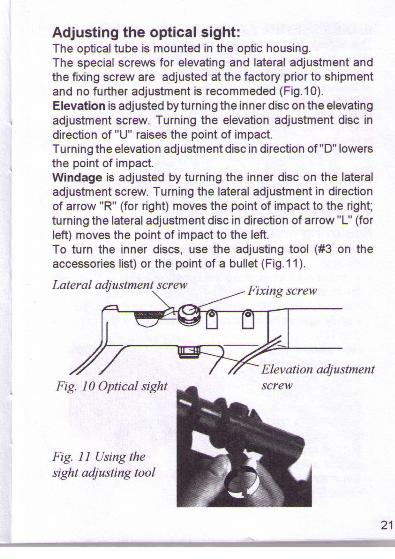
Elevation adjustmentscrewFig. 10 Optical sight
Adjusting the optical sight:The optical tube is mounted in the optic housing.The special screws for elevating and lateral adjustment andthe fixing screw are adjusted at the factory prior to shipmentand no further adjustment is recommeded (Fig.1 0).Elevation is adjusted by turning the inner disc on the elevatingadjustment screw. Turning the elevation adjustment disc indirection of "U" raises the point of impact.Turning the elevation adjustment disc in direction of "0" lowersthe point of impact.Windage is adjusted by turning the inner disc on the lateraladjustment screw. Turning the lateral adjustment in directionof arrow "R" (for right) moves the point of impact to the right;turning the lateral adjustment disc in direction of arrow "L" (forleft) moves the point of impact to the left.To turn the inner discs, use the adjusting tool (#3 on theaccessories list) or the point of a bullet (Fig.11).
Lateral adjustment screw
Fig. 11 Using thesight adjusting tool
21
22
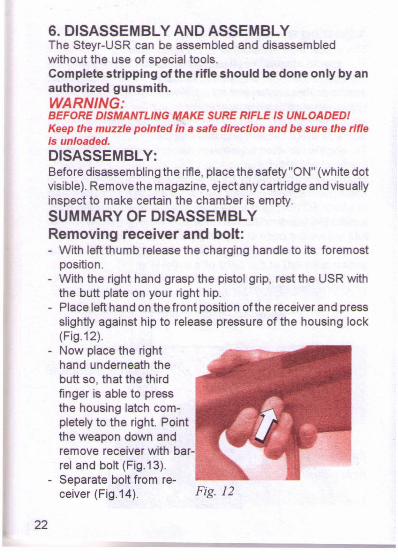
6. DISASSEMBLY AND ASSEMBLYThe Steyr-USR can be assembled and disassembledwithout the use of special tools.Complete stripping of the rifle should be done only by anauthorized gunsmith.WARNING:BEFORE DISMANTLING MAKE SURE RIFLE IS UNLOADEDlKeep the muzzle pointed in a safe direction and be sure the rifleis unloaded.
DISASSEMBLY:Before disassembling the rifle, place the safety "ON" (white dotvisible). Remove the magazine, eject any cartridge and visuallyinspect to make certain the chamber is empty.
SUMMARY OF DISASSEMBLYRemoving receiver and bolt:- With left thumb release the charging handle to its foremost
position.- With the right hand grasp the pistol grip, rest the USR with
the butt plate on your right hip.- Place left hand on the front position ofthe receiver and press
slightly against hip to release pressure of the housing lock(Fig.12).
- Now place the righthand underneath thebutt so, that the thirdfinger is able to pressthe housing latch completely to the right. Pointthe weapon down andremove receiver with barrel and bolt (Fig.13).
- Separate bolt from re-ceiver(Fig.14). Fig.I2
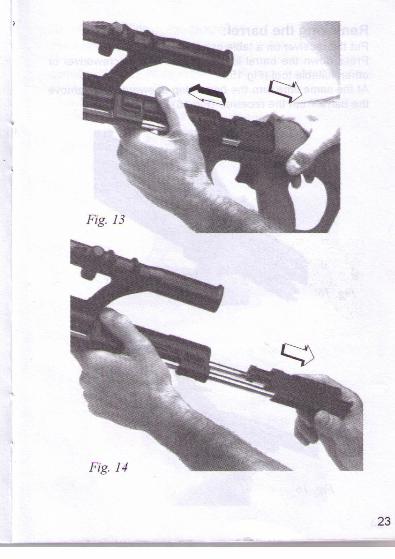
Fig. 13
Fig. 14
23
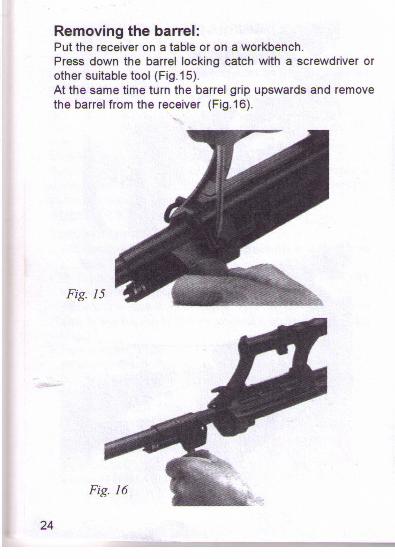
Removing the barrel:Put the receiver on a table or on a workbench.Press down the barrel locking catch with a screwdriver orother suitable tool (Fig.15).At the same time turn the barrel grip upswards and removethe barrel from the receiver (Fig.16).
Fig. 15
Fig. 16
24
I1
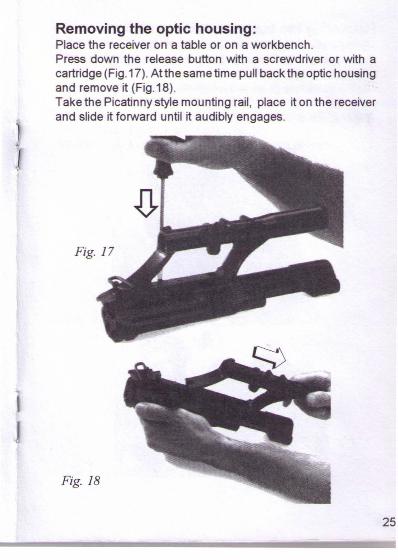
Removing the optic housing:Place the receiver on a table or on a workbench.Press down the release button with a screwdriver or with acartridge (Fig.17). Atthe same time pull back the optic housingand remove it (Fig.18).Take the Picatinny style mounting rail, place it on the receiverand slide it forward until it audibly engages.
Fig. 17
Fig. 18
25
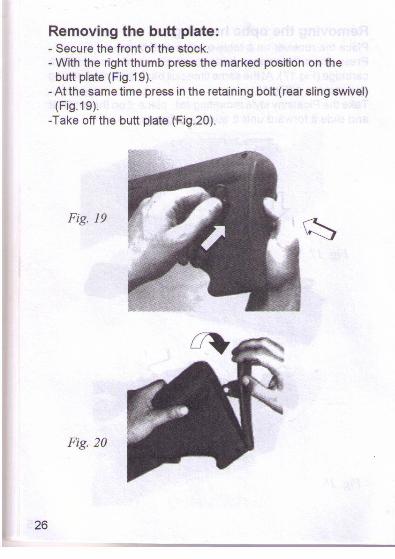
Removing the butt plate:- Secure the front of the stock.- With the right thumb press the marked position on the
butt plate (Fig.19).- At the same time press in the retaining bolt (rear sling swivel)
(Fig.19).-Take off the butt plate (Fig.20).
Fig. 19
Fig. 20
26
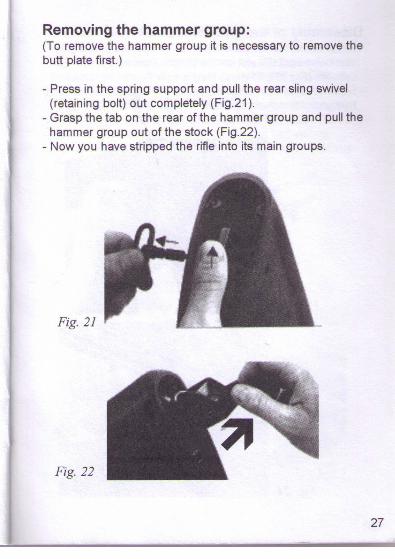
Removing the hammer group:(To remove the hammer group it is necessary to remove thebutt plate first.)
- Press in the spring support and pUll the rear sling swivel(retaining bolt) out completely (Fig.21).
- Grasp the tab on the rear of the hammer group and pUll thehammer group out of the stock (Fig.22).
- Now you have stripped the rifle into its main groups.
Fig. 21
Fig. 22
27

Dissembly of the gas mechanism:- Press down the serrated "ears" on the gas plug and turn
clockwise until the slot on the plug is lined up with the gascylinder (Fig.23). The gas plug is now free to be removed.
- Remove the piston and spring with the right thrust piece ofbolt group or other suitable tool (Fig.24).
DO NOT ADJUST WHILE BARREL IS HOT.
Fig. 23
Fig. 24
28
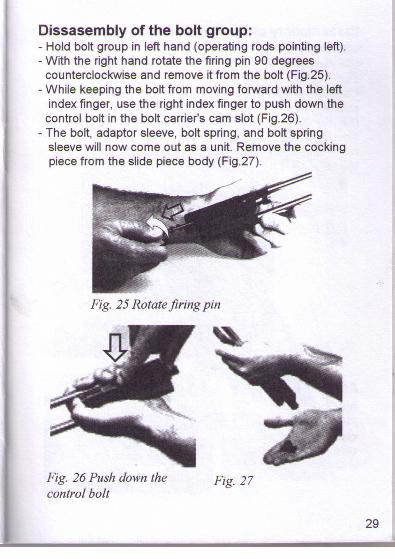
Dissasembly of the bolt group:- Hold bolt group in left hand (operating rods pointing left).- With the right hand rotate the firing pin 90 degrees
counterclockwise and remove it from the bolt (Fig.25).- While keeping the bolt from moving forward with the left
index finger, use the right index finger to push down thecontrol bolt in the bolt carrier's cam slot (Fig.26).
- The bolt, adaptor sleeve, bolt spring, and bolt springsleeve will now come out as a unit. Remove the cockingpiece from the slide piece body (Fig.27).
Fig. 25 Rotate firing pin
Fig. 26 Push down thecontrol bolt
Fig. 27
29
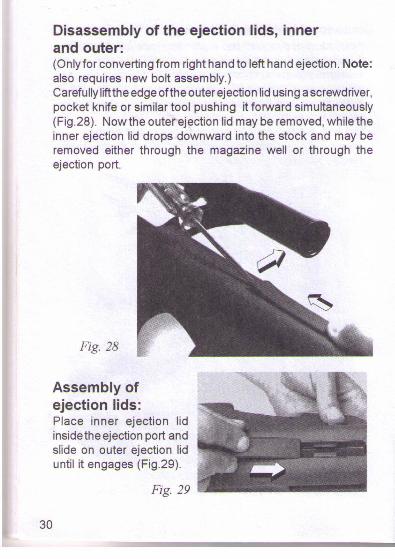
Disassembly of the ejection lids, innerand outer:(Only for converting from right hand to left hand ejection. Note:also requires new bolt assembly.)Carefullyliftthe edge ofthe outer ejection lid using ascrewdriver.pocket knife or similar tool pushing it forward simultaneously(Fig.28). Nowthe outer ejection lid may be removed, while theinner ejection lid drops downward into the stock and may beremoved either through the magazine well or through theejection port.
Fig. 28
30
Assembly ofejection lids:Place inner ejection lidinsidethe ejection port andslide on outer ejection liduntil it engages (Fig.29).
Fig. 29

Inserting the hammer group:Insert hammer group in stock (Fig. 3D). Press in the hammergroup tab until the holes in the tab, the hammer group and thestock are all aligned. Insert the retaining bolt (rear sling swivel)and push it all the way in. DO NOT FORCE (Fig.31). It willassemble easily when correctly aligned.
Fig. 30 Inserting hammer group
Fig. 31 Pushing in sling swivel
31
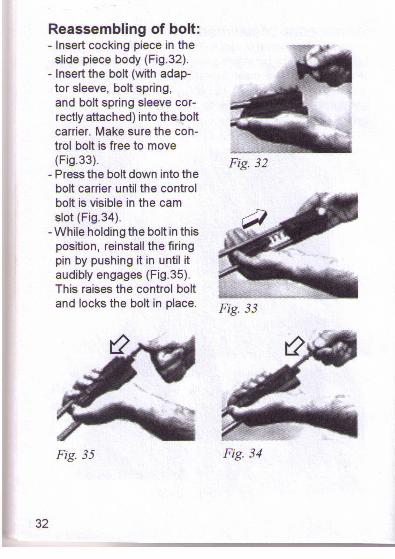
Reassembling of bolt:- Insert cocking piece in the
slide piece body (Fig.32).- Insert the bolt (with adap
tor sleeve, bolt spring,and bolt spring sleeve correctly attached) into the boltcarrier. Make sure the control bolt is free to move(Fig.33).
- Press the bolt down into thebolt carrier until the controlbolt is visible in the camslot (Fig.34).
- While holding the bolt in thisposition, reinstall the firingpin by pushing it in until itaudibly engages (Fig.35).This raises the control boltand locks the bolt in place.
Fig. 35
32
Fig. 32
Fig. 33
Fig. 34
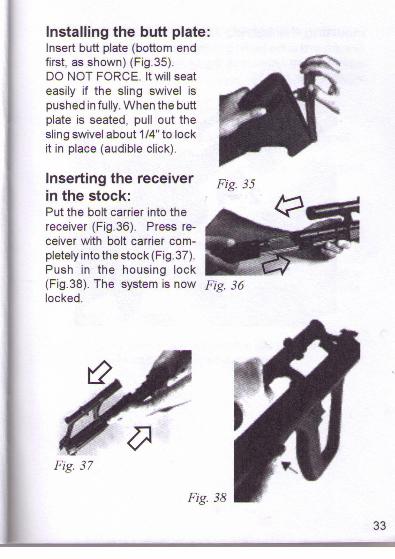
Installing the butt plate:Insert butt plate (bottom endfirst, as shown) (Fig.35).DO NOT FORCE. It will seateasily if the sling swivel ispushed in fully. When the buttplate is seated, pull out thesling swivel about 1/4" to lockit in place (audible click).
Inserting the receiver Fig. 35in the stock:Put the bolt carrier into thereceiver (Fig.36). Press receiver with bolt carrier completely into the stock (Fig. 37).Push in the housing lock(Fig.38). The system is now Fig. 36locked.
Fig. 37
Fig. 38
33

34
Inserting the barrel:Grasp barrel atthe barrel grip. insert barrel completely into thereceiver. Turn barrel until the barrel retaining pin is lockedautomatically (Fig.39).
Fig. 39
7. IMMEDIATE CLEARING OF JAMSAND MALFUNCTIONS:
If the rifle is kept clean and given proper care, it will functionvery reliably. However, if ajam occurs, follow these procedures:
- Keep the muzzle pointed in a safe direction.
- Put the rifle on safe and remove the magazine.
- Pull back charging handle entirely, in order to ejectjammed cartridge.
WARNING:Be sure there is no obstruction in the barrel beforeattempting to chamber another cartidge.
- Release charging handle allowing the bolt to glidefreely forward. Insert magazine again; load again.
- Continue firing.
- If the jam recurs, unload the rifle and have itchecked by a qualified gunsmith.
35
8. TROUBLESHOOTING:
INCORRECT FEEDING AND LOADING
CAUSEmagazine is inserted incorrectly
damaged magazine
REMEDIAL ACTIONremove magazine andany loose cartridges,reinsert magazineuntil magazine releasebutton locks audibly
inspect magazine andchange it, if necessary
incomplete cycling(low gas pressure)
align gas plug with thelarge circle symbol toincrease gas flow*,clean gun.
* NOT RECOMMENDED UNDER NORMAL CONDITIONS
BOLT DOES NOT LOCK
36
dirty chamber
defective or dirty cartridge
CAUSEdirty chamber or dirty bolt
defective cartridge
extractor jams
clean the chamber
discard cartridge (cleanthe chamber)
REMEDIAL ACTIONclean
change
clean and oil
MISFIRE
CAUSEdefective cartridge(primer is struck, fail to fire)
defective or broken firing pin(primer is not or insufficientlystruck)
dirty bolt
defective hammer mechanism
REMEDIAL ACTIONwait 30 sec. in firing position, unload
wait 30 sec.in firing position, unload and returnthe rifle to be serviced.
clean
change hammer mechanism
INCORRECT EXTRACTING
CAUSEextractor jams
defective extractor
weak spring
REMEDIAL ACTIONclean and oil theextractor
change the extractor
change
INCORRECT EJECTING
(cartidge or empty brass are extracted but not ejected)
CAUSEejector defective
REMEDIAL ACTIONchange the ejector orejector spring
37
9. CLEANING AND MAINTENANCE:NEVER CLEAN LOADED FIREARMS! REMOVEAMMUNITION FROM CHAMBER AND MAGAZINEBEFORE CLEANING YOUR RIFLE!Cleaning by user:Be aware of the fact that proper handling and maintenance isnecessary to guarantee it's perfect functional performance.
Clean the rifle after each usage.
Only proper cleaning devices and gun-oil areto be used forthispurpose. The wire and bustle brushes are meant only forinterior of the barrel.
Maintenance of the barrel:The barrel must be free of oil prior to each firing.
Maintenance of rifle surface and other metalparts:The rifle surface should be cleaned with a rag.
The following parts from the bolt group are to be oiled:operating rods: 2 drops eachcam slot for control bolt: 1 drop
The gas plug and the gas piston are hard-chrome plated andit is not necessary to oil them.
Maintenance of optic:Clean the lens with a dry clean rag or plain water only. Noadditional maintenance is required.
38
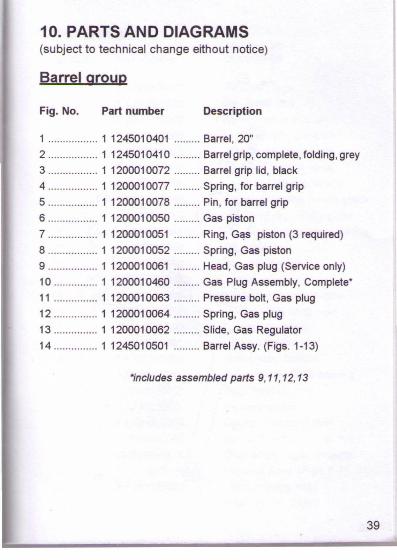
10. PARTS AND DIAGRAMS(subject to technical change eithout notice)
Barrel group
Fig. No. Part number Description
1 1 1245010401 Barrel, 20"
2 1 1245010410 Barrel grip, complete, folding, grey
3 1 1200010072 Barrel grip lid, black
4 1 1200010077 Spring, for barrel grip
5 1 1200010078 Pin, for barrel grip
6 1 120001 0050 Gas piston
7 1 1200010051 Ring, G'!s piston (3 required)
8 1 1200010052 Spring, Gas piston
9 1 1200010061 Head, Gas plug (Service only)
10 1 1200010460 Gas Plug Assembly, Complete*
11 1 1200010063 Pressure bolt, Gas plug
12 1 1200010064 Spring, Gas plug
13 1 1200010062 Slide, Gas Regulator
14 1 1245010501 Barrel Assy. (Figs. 1-13)
*includes assembled parts 9,11,12,13
39
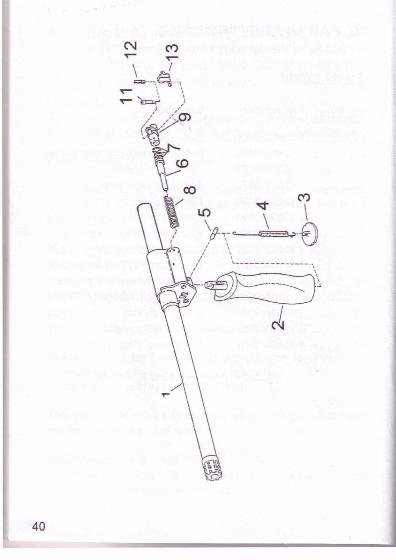
40
Receiver group
Fig. No.
1
2
3
45
6
7
8
9
10
11
12
13
14
15
16
17
18
19
20
21
22
23
24
25
26
Part number
1 1245020401
1 1200020026
1 1200020027
1 1245020003
1 1200020023
1 1240020010
1 1200020096
1 1200020048
190003990099
190003909600
1 1200020098
1 1200020087
1 1200020083
1 1200020462
190003909606
1 1200020089
1 1200020091
1 1200020062
1 1200020558
1 1245020002
1 1240020011
1 1200010064
1 1200020568
190003900059
1 1245020501
1 1245020502
Description
Receiver, Only
Pin, barrel lock
Spring, barrel lock pin
Pressure pin, complete
Grub screw, barrel lock
Charging handle, black
GUides, Charging handle
Spring, Charging handle guide
Pin, Charging handle guide
Pin, Charging handle retaining
Pin, coupling
Link, folding grip
Spring, coupling pin
Sling ring, complete front
Pin, retaining sling front
Spring, link piece
Cylindrical pin
Optic/circle, CHICH
Fixing screw, Optic housing
Optic housing only
Release button
Spring, Release button
Screw, Elevation & Lat. Adj
Grub screw, Optic Housing
Receiver Assy. (Figs. 1-17,21,22)
Optic Housing Assy.
(Figs. 19, 20, 23,24)
41
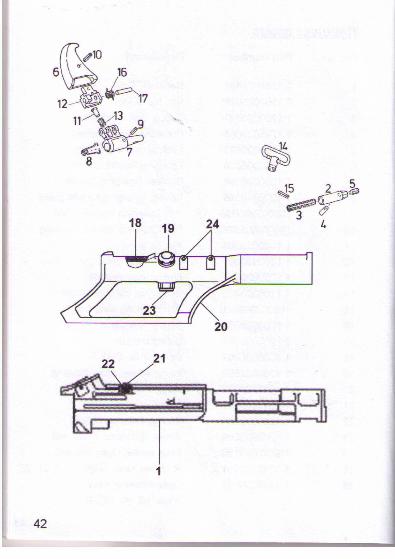
~10
0" 16
6 < a-'~1712 -(\~311~ 9
o <
678
24
~515 ~@
~~3 ~
t.
42
1
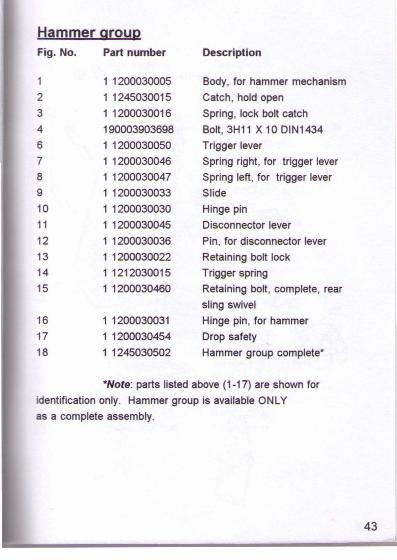
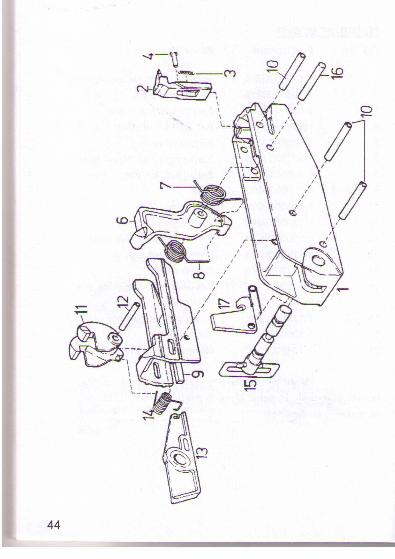
Hammer groupFig. No.
1
2
3
4
6
78
9
10
11
12
13
14
15
16
17
18
Part number
1 1200030005
1 1245030015
1 1200030016
190003903698
1 1200030050
1 1200030046
1 1200030047
1 1200030033
1 1200030030
1 1200030045
1 1200030036
1 1200030022
1 1212030015
1 1200030460
1 1200030031
1 1200030454
1 1245030502
Description
Body, for hammer mechanism
Catch, hold open
Spring, lock bolt catch
Bolt, 3H11 X 10 DIN1434
Trigger lever
Spring right, for trigger lever
Spring left, for trigger lever
Slide
Hinge pin
Disconnector lever
Pin, for disconnector lever
Retaining bolt lock
Trigger spring
Retaining bolt, complete, rear
sling swivel
Hinge pin, for hammer
Drop safety
Hammer group complete'
*Note: parts listed above (1-17) are shown for
identification only. Hammer group is available ONLY
as a complete assembly.
43
~t1!f~
,:11./ ,I
'-t-'IJN-tfii!+ 7 cry
CC5l' ' ,\\I
'--
44

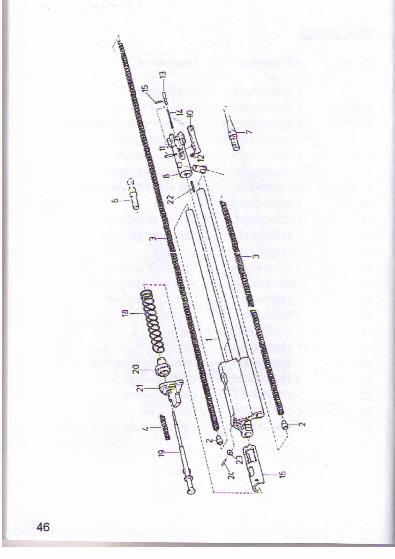
Bolt group
Fig. No.
1
234
6
7
8
10
11
12
13
14
15
16
17
18
19
20
21
2223
24
Part number
1 1200040412
1 1200040025
1 1200040026
1 1200040091
1 1200040029
1 1200040030
1 1200040070
1 1200040042
1 1200040037
1 1200040438
1 1200040045
1 1200040046
190003909598
1 1200040063
1 1200040061
1 1200040093
1 1200040090
1 1200040092
1 1200040075
190003909685
1 1200040005
190003900000
Description
Bolt Carrier
Spring loaded bolt
Lock spring, long, for recoil
Spring, firing pin
Thrust piece, left
Thrust piece, right
Bolt body (RH ejection)
Extractor
Pin, for extractor
Spring, for extractor
Ejector
Spring, for ejector
Adaptor sleeve
Locking piece, bolt
Control bolt
Spring, bolt
Firing pin
Sleeve, Firing pin lock
Cocking piece
Adaptor sleeve
Roller, Slide
Pin, Slide roller
45
46
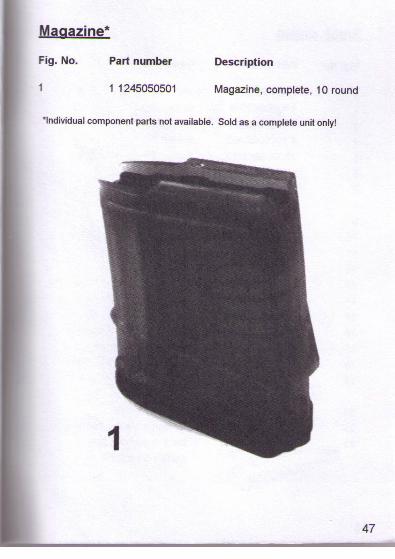
Magazine*
Fig. No. Part number
1 1245050501
Description
Magazine, complete, 10 round
'Individual component parts not available. Sold as a complete unit only!
47

Stock group
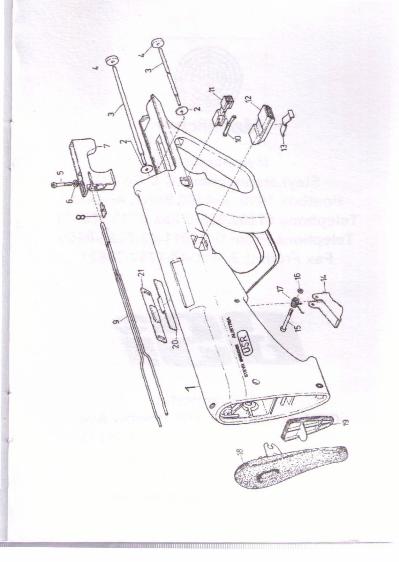
Fig. No.
1
2
3
4
5
67
8
9
10
11
12
13
14
15
16
17
18
19
20
21
22
48
Part number
1 1245060401
1 1200060046
1 120006005t
1 1200060052
190003862112
1 1200060018
1 1200060029
1 1200060017
1 1200060035
1 1200060019
1 1200060065
1 1200060028
1 1200060021
1 1200060066
1 1200060041
1 1200060013
1 1200060077
1 1200060450
1 1200060023
1 1200060010
1 1200060006
1 12450606001
Description
Stock, grey (Figs. 2, 3, & 4)
Buffer plate
Guide rod
Buffer
Screw, Trigger-sear lever
Washer
Trigger, black
Nut, for trigger
Sear lever
Spring, for safety catch
Safety catch, black
Housing lock
Spring, for housing lock
Magazine catch, black
Screw, magazine catch
Hexagon nut, stock screw
Spring, for magazine catch
Butt plate, complete, black
Lid, for cleaning kit
compartment
Ejection lid, inner
Ejection lid, outer, black
Stock Assembly, grey
(parts 1-21 above)
"'''''''hiiDiilillJJllllllliIii1il I

•Mannlicher
Manufactured bySteyr Mannlicher AG & Co KG
Postbox 1000, A-4400 Steyr, AustriaTelephone 07252/896-0 Fax 07252178621Telephone From U.S. 011-43-7252-8960
Fax From U.S. 011-43-7252-78621
IISIU.S. Importer
GSI Incorporated, 108 Morrow Ave.,P.O. Box 129, Trussville, AI 35173.
Telephone (205) 655-8299Fax (205) 655-7078
E-Mail [email protected]


