Page | 1 PREMIER + is a trademark of Singer Sourcing Limited LLC. C 2017 Singer Sourcing Limited LLC. All rights reserved. PREMIER+™ – Personalized Mandala Circle Art By Ashleigh Stabbert-VanSkike Use any level of PREMIER+™ Embroidery System to make fun personalized Mandala. This lesson will focus on how to use available tools and features to create one of a kind embroideries. We will use letters, tools within letters, rotation and mirroring tools to create this project. We will be working in ‘pie slices’ to make these. No need to get overwhelmed as this is simpler to create than it looks. You will want to make one for everyone. Will your mandala look Nautical, Celtic, Asian or Retro? Let’s see! Before you start, think of a few names or words you would like to use for the project. Words with more letters have the most interesting outcomes, so try full names, not just a short name. Think of colors that represent this person, thing or felling to you. What kind of font would represent this word? Would block letters, script letters or bubble letters be more appropriate? Grab your inspiration journal or a scrap of paper and write down these ideas. Maybe you might even have a sketch idea. Reset All Modules 1. Double click to open the PREMIER+ ™ Embroidery System. 2. Double Click to open PREMIER+ ™ Configure. 3. Click the Reset All Modules button. 4. Click OK through the prompts to return all modules to their original configuration. 5. Click OK to close PREMIER+ ™ Configure. Frame Setup 1. Double click on PREMIER+ TM Embroidery . 2. Click the View tab.
Transcript
P a g e | 1
PREMIER + is a trademark of Singer Sourcing Limited LLC. C 2017 Singer Sourcing Limited LLC. All rights reserved.
PREMIER+™ – Personalized Mandala Circle Art
By Ashleigh Stabbert-VanSkike
Use any level of PREMIER+™ Embroidery System
to make fun personalized Mandala. This lesson
will focus on how to use available tools and
features to create one of a kind embroideries.
We will use letters, tools within letters, rotation
and mirroring tools to create this project. We will
be working in ‘pie slices’ to make these. No need
to get overwhelmed as this is simpler to create
than it looks. You will want to make one for
everyone.
Will your mandala look Nautical, Celtic, Asian or
Retro? Let’s see!
Before you start, think of a few names or words you would like to use for the project. Words with
more letters have the most interesting outcomes, so try full names, not just a short name.
Think of colors that represent this person, thing or felling to you. What kind of font would
represent this word? Would block letters, script letters or bubble letters be more appropriate?
Grab your inspiration journal or a scrap of paper and write down these ideas. Maybe you might
even have a sketch idea.
Reset All Modules
1. Double click to open the PREMIER+™ Embroidery System.
2. Double Click to open PREMIER+™ Configure.
3. Click the Reset All Modules button. 4. Click OK through the prompts to return all modules to their original configuration. 5. Click OK to close PREMIER+™ Configure.
Frame Setup
1. Double click on PREMIER+TM Embroidery . 2. Click the View tab.
P a g e | 2
PREMIER + is a trademark of Singer Sourcing Limited LLC. C 2017 Singer Sourcing Limited LLC. All rights reserved.
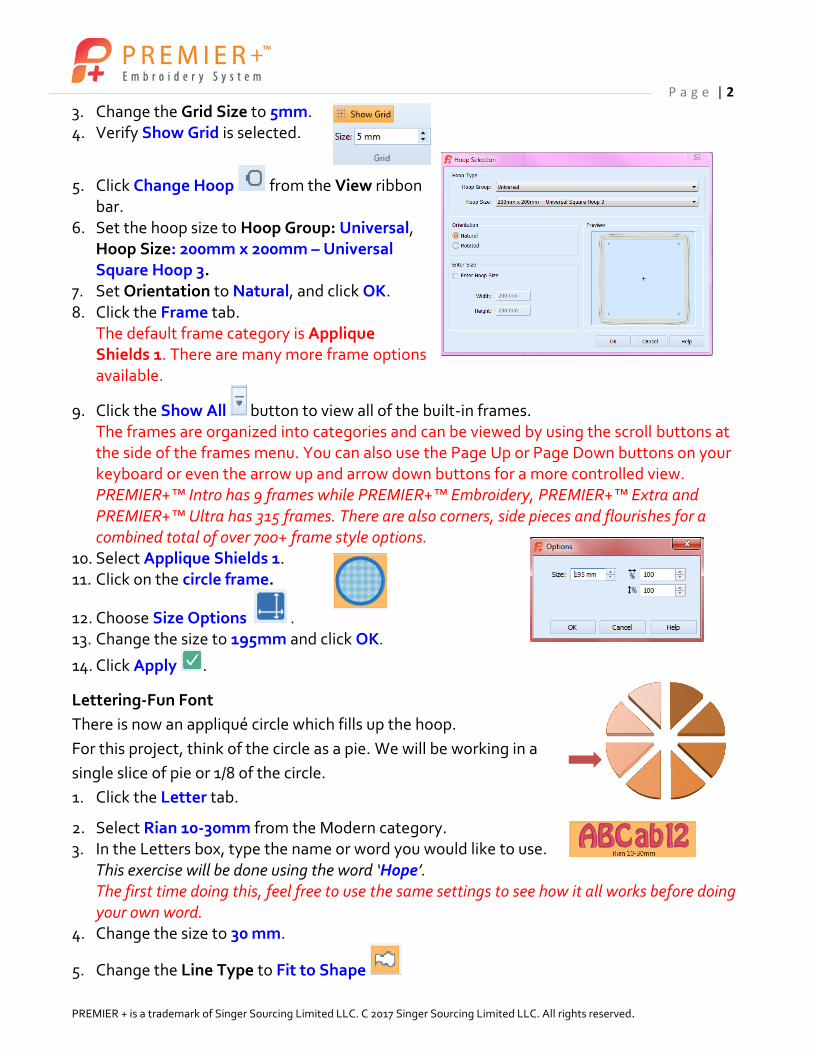
3. Change the Grid Size to 5mm. 4. Verify Show Grid is selected.
5. Click Change Hoop from the View ribbon bar.
6. Set the hoop size to Hoop Group: Universal, Hoop Size: 200mm x 200mm – Universal Square Hoop 3.
7. Set Orientation to Natural, and click OK. 8. Click the Frame tab.
The default frame category is Applique Shields 1. There are many more frame options available.
9. Click the Show All button to view all of the built-in frames. The frames are organized into categories and can be viewed by using the scroll buttons at the side of the frames menu. You can also use the Page Up or Page Down buttons on your keyboard or even the arrow up and arrow down buttons for a more controlled view. PREMIER+™ Intro has 9 frames while PREMIER+™ Embroidery, PREMIER+™ Extra and PREMIER+™ Ultra has 315 frames. There are also corners, side pieces and flourishes for a combined total of over 700+ frame style options.
10. Select Applique Shields 1. 11. Click on the circle frame.
12. Choose Size Options . 13. Change the size to 195mm and click OK.
14. Click Apply .
Lettering-Fun Font
There is now an appliqué circle which fills up the hoop.
For this project, think of the circle as a pie. We will be working in a
single slice of pie or 1/8 of the circle.
1. Click the Letter tab.
2. Select Rian 10-30mm from the Modern category. 3. In the Letters box, type the name or word you would like to use.
This exercise will be done using the word ‘Hope’. The first time doing this, feel free to use the same settings to see how it all works before doing your own word.
4. Change the size to 30 mm.
5. Change the Line Type to Fit to Shape
P a g e | 3
PREMIER + is a trademark of Singer Sourcing Limited LLC. C 2017 Singer Sourcing Limited LLC. All rights reserved.
6. Uncheck ColorSort, if it is checked. Changing this option will separate each letter so different colors can be selected for individual letters.
7. Click Apply . 8. Move the word to the lower left quadrant of the circle. Keep
the top edge of the word on the bold horizontal grid line, as shown.
9. Move all of the nodes (green boxes) so they create a single slice of the ‘pie’ (a 1/8th slice of the pie).
The far left bottom node, at the base of the first letter, may need to become your middle left end node. This node has been circled in the both images to the right to show what needs done.
If you are having a hard time creating the slice of pie, consider holding a straight edge of a ruler or pencil against the screen to help visualize the pie slice.
When shifting the nodes to change the shape of the word, look at the individual letters, not the nodes. On certain letters, the node needed moved quite a distance above the line in order to get the word to be shaped like a pie. Note how the nodes on ‘Hope’ look in the example across the top of the word.
Your word may look a bit wonky now, but this is our intention. Most importantly, you are making a slice of pie. Some words will look more legible than others at this point in the design process.
10. Right-click on your word and choose Fix as Stitches from the menu. Once this option has been selected, the individual nodes can no longer be moved or adjusted. It turns the lettering into a fixed embroidery design. The green node boxes go away and are now replaced by white boxes on each corner.
Lettering-Saving the Word
Before we finish creating the rest of the design, it is a good idea to save our work.
1. Click Save As from the Quick Access Toolbar. 2. In the Save As window, browse to Documents/Premier+/My Designs. 3. Choose New Folder to create a subfolder in My Designs called Classes and press Enter.
If you already have a folder called Classes, skip this step and select the Classes folder. 4. In the File Name box, type ‘Circle Art Slice HOPE’
and verify the file type is .vp4.
5. Click Save .
P a g e | 4
PREMIER + is a trademark of Singer Sourcing Limited LLC. C 2017 Singer Sourcing Limited LLC. All rights reserved.
Duplicating the Word – Creating a Word Pie
Now that we have created and saved one slice of our word pie, it is time to duplicate, mirror, rotate and arrange the word so we have all 8 slices of the word pie in place. 1. Click the Home tab. 2. Verify that there is a box around the word.
If there is not a box around the word, use the Previous Design or Next Design tools on the Home tab to get a box around your word.
3. Double click on the first color block in the Design Panel. 4. Utilizing the Quick Color options, change the color of the first
letter. Try clicking on the arrow button in the Quick Colors area for more themed color choices.
5. Click OK to close the Color Selection window. 6. Continue changing the colors of each letter until they are all a different color.
7. Click Duplicate 3 times so there are a total of 4 word pie slices.
8. Move the extra 3 word pie slices around so you can see them clearly, leaving the first one where it was originally placed. If you are having trouble selecting the individual word pie slices, be sure to use the
Previous Design or Next Design tools (or a keyboard shortcut would be to use the Tab or Shift+Tab keys) to change the selection box around the word.
9. Utilizing the triangle at the top of the selection box around the word, mirror horizontally two of the word pie slices, as shown.
10. Zoom to 80% using one of the zoom options. A quick way of zooming to 80% is to click in the Zoom % box in the bottom right corner of the window and type 80. Your screen will zoom in or zoom out to 80% automatically.
11. Place one of the mirrored slices above the original word pie slice. Align the letters and make fine movements using the arrow keys on the keyboard.
12. Select the other mirrored word pie slice and click Rotate 45 a total of 6 times.
P a g e | 5
PREMIER + is a trademark of Singer Sourcing Limited LLC. C 2017 Singer Sourcing Limited LLC. All rights reserved.
13. Place the word pie slice that was just rotated next to the original word slice. If you do not like the positioning you get from the word slice being rotated, you can use the rotation handle (the circle on the side of the selection box) to rotate one degree at a time.
Do not cross over the bold vertical grid line or the center line with the selection box.
Don’t forget that using the arrows keys on the keyboard will allow for very fine adjustments.
14. Select the last word pie slice. 15. Click Rotate 45 a total of 2 times.
16. Move the last word pie slice into position to complete this half of the pie.
Do not cross over the bold vertical grid line or the center line with the selection box.
Don’t forget that using the arrows keys on the keyboard will allow for very fine adjustments.
You may notice some overlaps and odd spacing. This is to be expected and just adds to the unique character of your personal Mandala.
17. Continue to make adjustments to all four of the word pie slices to verify they are lined up on the center point.
18. Select the applique circle.
19. Click Delete from the Home tab ribbon bar.
20. Click Select All from the Home tab ribbon bar. 21. Click Combine and then Combine Selected.
22. Click Duplicate one time. 23. Click on the triangle on the left edge of
the selection box to mirror the design vertically.
24. Using the horizontal and vertical grid lines as a guide, align the new half of the pie on the right side of the gridded area. This will create an entire pie of words.
Be sure to use the arrow keys for fine adjustments.
Feel free to zoom in and out as needed for precise placement.
P a g e | 6
PREMIER + is a trademark of Singer Sourcing Limited LLC. C 2017 Singer Sourcing Limited LLC. All rights reserved.
Saving & Exporting the Design
It is always a good idea to Save your project as a VP4 file and then when you are ready to embroider your design, choose to Export the design into the format your machine requires. When a design is exported, all of the separate design elements are combined together into one element. You can also ColorSort, remove any overlapping stitches and optimize the design for the best stitch results.
1. Click Save As from the Quick Access Toolbar. 2. In the Save As window, browse to Documents/Premier+/My Designs/Classes (or wherever
you have saved the files created for this exercise).
3. Name the file ‘Circle Art HOPE’
4. Verify the file type is .vp4 and click Save .
5. Click the Export icon from the Quick Access Toolbar.
6. Verify the file format is .vp3. Notice how all of the options are checked which will make the design embroidery better on the final project.
7. Click OK . 8. In the Save As box, the file name should automatically
be generated to say ‘Circle Art HOPEExported’. 9. Browse to: Documents/Premier+/MyDesigns/Classes (or wherever you have been saving
the files for this exercise).
10. Click Export to place the exported design in the Classes folder. 11. When ready to embroider this design, simply save the exported version to USB stick.
There are many more design possibilities as you apply this Mandala technique to other words. Be sure to try different fonts, words, colors, all lower case, all upper case, etc. and see what you come up with. If you have the Modify module, you may want to take this design into the Modify module and reduce the density, add trim commands and make other adjustments so it will stitch in a cleaner fashion. What does this one say? Are you inspired? What are you going to create next?