30
STUDENT DELIVERY SYSTEM MANUAL (Field Trial) Doc.: CY7_1611_SDS_FTStudentDeliverySystemManual_2revSV.docx Version 1 – 1 November 2016 Produced by ETS, Core A Contractor P 2 I S A 0 1 8

STUDENT DELIVERY
SYSTEM MANUAL (Field
Trial)
Doc.:
CY7_1611_SDS_FTStudentDeliverySystemManual_2revSV.docx
Version 1 – 1 November 2016
Produced by ETS, Core A Contractor
P
2
I S A
0 1 8

CY7_1611_SDS_FTStudentDeliverySystemManual_2revSV.docx
1
Contents PISA 2018 STUDENT DELIVERY SYSTEM MANUAL (FIELD
TRIAL) ............................................................................................ 2
1. Introduction ..................................................................................................... 2
2. Downloading the SDS ..................................................................................... 2
3. Setting up the USB .......................................................................................... 3
4. Preparing to Launch the Test .......................................................................... 5
5. Launching the Test ........................................................................................ 10
6. Escape Sequence ......................................................................................... 13
7. Troubleshooting and addressing problems .................................................... 14
8. Managing assessment results ....................................................................... 15
9. Customization of the SDS .............................................................................. 16
PISA Menu Configuration .................................................... 17
Language Configuration ...................................................... 18
Localization of the PISAMenu Control Panel and Systems Diagnostic ............................................... 19
10. Retrieving Result Files ................................................................................. 26
Annex A: PISA 2018 Field Trial CBA Test Flow ................................................. 28

CY7_1611_SDS_FTStudentDeliverySystemManual_2revSV.docx
2
PISA 2018 STUDENT DELIVERY SYSTEM
MANUAL (FIELD TRIAL)
1. Introduction
The PISA Field Trial Student Delivery System (SDS) is a self-contained set of applications for
delivery of the PISA 2018 computer-based assessments (CBA) and student questionnaires. The
SDS is intended to run from a USB flash drive but can also be run from a local hard drive. Each
national SDS includes all national language versions of the CBA tests and the Student
Questionnaires. Where appropriate, the SDS also includes the optional assessment of Financial
Literacy and associated questionnaire, the optional questionnaires, including the optional
Information and Communications Technology (ICT) Familiarity, Educational Career (EC), and
Well-Being Questionnaires, as well as the optional UH version of the CBA tests and Student
Questionnaire.
This document serves two purposes. It describes how to download and install the software,
launch and run the SDS, troubleshoot problems when using the SDS, and configure the SDS
and translate the interface. Additionally, Sections 4-7 can be integrated into the Test
Administrator manual with only minor adaptations.
The PISA SDS has the following minimum hardware requirements:
CPU Speed: 1500MHz
Operating System: Windows XP, Vista, 7, 8 or 10
Installed memory: Windows XP = 512 MB, other Windows versions = 1024 MB
Available memory: 358 MB for Windows XP = 358 MB, other Windows versions = 717
MB
Screen resolution: 1024 x 768 pixels
USB transfer rate: 7.5MB/s
2. Downloading the SDS
The SDS includes all relevant languages in one download package. For the international master, the package includes English and French source versions of the assessments, and English versions of the questionnaires and Financial Literacy assessment. National versions include the same set of instruments but offered in the national languages that will be used for the Field Trial. See Section 8 below for information on how to limit which languages are available to test takers.

CY7_1611_SDS_FTStudentDeliverySystemManual_2revSV.docx
3
The SDS comes compressed in the 7-zip format. To extract 7-zip files, 7-zip software must be installed on your computer. 7-zip is freeware and can be downloaded from http://www.7-zip.org/. Please install this software onto the computer where you will be configuring the SDS before proceeding.
The 7-zip compressed files can be obtained from the PISA Portal in the Documents tab. The source version is located at Materials/2018 Field Trial Resources/CBA Delivery Software. National versions are available in the Tasks tab, where each country will have a workflow task for receiving the SDS and reporting their results from testing it.
3. Setting up the USB
As noted above, the CBA will typically be delivered using a USB flash drive, although it can also be run from the local hard drives on the school computers. The software runs much faster from the hard drive than the USB drives due to the higher transfer rates.
To install the SDS software, download the 7-zip archive and expand it locally. If you wish to run the SDS from a USB drive, copy the contents of the ZIP archive to the USB by completing the following steps:
Insert a blank USB flash drive into your computer and open it in Windows Explorer. The drive letter assigned will vary depending on what drives you have on your computer. We assume for the explanation below that the USB drive is assigned to the F drive.
Format the USB drive by going to File > Removable Disk (F:) > Format…. This will delete the existing contents of the flash drive. When you format the USB, make sure the format type is FAT32 (usually this is the default). Select the “Quick Format” option to perform this task faster.
Copy the extracted files onto the root directory of the blank USB flash drive. NOTE: Do not copy the 7-zip file to the USB, only the extracted files and folders. Please make sure to copy all files and folders as shown in Figure 1 below:
Figure 1: Extracted SDS Files

CY7_1611_SDS_FTStudentDeliverySystemManual_2revSV.docx
4
After this procedure, your USB drive is set up to administer the CBA test. Additional USB drives should be set up following the same procedure.
It is important to use high-quality USB drives for your data collection. The USB drive is the primary factor in determining the performance of the SDS software. We recommend testing the SDS on different models of USB drives before making a large purchase. The speed ratings of USB drives provided by the manufacturers are not a good indicator of how the SDS will perform.
In previous PISA cycles, some countries have purchased inexpensive USB drives and had a high rate of failure. There is no perfect way to test a USB drive to know if it will fail when used, so the best preventative measure is to purchase high-quality USB drives from a known vendor. This is not a place to look for cutting costs. A useful utility for testing USB drives can be downloaded from http://www.vconsole.com/client/?page=page&id=13. The System Diagnostics within the SDS also contains a test of USB drive performance. USB drives that fail this test should be avoided.
As noted previously, it is possible to run the SDS from a local hard drive. It is possible to avoid USB drives altogether by downloading a compressed ZIP file of the SDS software to a school computer, extract and run the software from there, and then copy the results data after the testing is completed. This would require appropriate permissions on the school computers, though.
It is also possible to run the SDS from network drives, for example in a Terminal Server environment. One important thing to note in such a deployment is that each student requires his or her own copy of the SDS software. It is NOT possible to have multiple students share the software from a network drive and run the SDS simultaneously. This will result in data corruption and loss of results data.

CY7_1611_SDS_FTStudentDeliverySystemManual_2revSV.docx
5
4. Preparing to Launch the Test
Note to NPM
It is important to prepare the school computers prior to administering the PISA assessments and questionnaires. The System Diagnostics plays an important role in this. In the months before the Field Trial, after schools have been selected, the System Diagnostics should be used to evaluate whether school computers are capable of delivering the PISA tests. More information can be found in the System Diagnostic Manual [Doc. Ref.: CBAManual_SysDiagnostic_FT18.docx]. The System Diagnostics should also be run on the day of the test to make sure that the school computers have not been changed since the initial check.
The SDS does not require administrator rights to run. However, school computers could have Windows policies configured in a way that prevents the SDS from starting up. For instance, a school may prohibit normal users from running programs contained on USB drives. In such cases, it would be necessary to be logged in to the computer with greater access rights, typically an administrator account.
The System Diagnostics tool uses the same mechanisms and software packages to run. By executing the System Diagnostics as a normal user, you will verify whether the SDS will run without problems.
Please remove this box when adaptation of this manual is complete.
Note to NPM
The following sections, 4-8, are written so that they can be integrated into the Test Administrator manual.
Please remove this box when adaptation of this manual is complete.
To run the PISA tests, insert a USB drive into each computer to be used for the assessment. Ensure all applications are closed on the computer. Then open Windows Explorer and locate and run the executable file in the root of the USB called “PISAmenu.exe”. The window shown in Figure 2 will appear when you double click that file.

CY7_1611_SDS_FTStudentDeliverySystemManual_2revSV.docx
6
Figure 2: SDS control panel
The SDS package includes a copy of the PISA System Diagnostics, which you should use to check the compatibility of a computer with the SDS. Running the PISA assessments and questionnaires on a computer that does not meet the minimum requirements as measured by the System Diagnostics is not supported. More information about the System Diagnostics can be found on the PISA Portal at
Documents / Materials / 2018 Field Trial Resources / CBA Delivery Software / CBAManual_SysDiagnostic_FT15.docx
Click the Start Diagnosis button shown in Figure 2 to launch the application. The first step in the System Diagnostics is to run a memory scan to check for any viruses. If one is found, a message will be displayed and the process will stop.
Please note that while the virus scan is running, the computer’s local antivirus software may detect the virus scan software being used for PISA (ClamWin Free Antivirus) as a virus. This is normal and should be ignored. Figure 3 is an example of the screen that appears when Trend MicroTM OfficeScanTM is the local antivirus software. Dialogue screens and options will vary depending on the type of antivirus software installed locally.

CY7_1611_SDS_FTStudentDeliverySystemManual_2revSV.docx
7
Figure 3: Trend Micro OfficeScan detecting ClamWin as virus
In this example, the local virus scanner (Trend Micro OfficeScan) has detected the Systems Diagnostic virus scanner (ClamWin Free Antivirus) as a virus. If this occurs, click “OK” and the virus scan will continue.
Next, in the background, programs will be started to support the diagnosis process. On some computers, warnings from the Windows Firewall or virus detection software may appear (Figure 4).

CY7_1611_SDS_FTStudentDeliverySystemManual_2revSV.docx
8
Figure 4: Windows Firewall warning message
You should allow the program to continue executing by clicking the “Allow” access button. If you cannot due to lack of administrator rights, click “Cancel” and the SDS should still work correctly.
After the program has started, a screen similar to the one shown in Figure 5 will display in a web browser:
Figure 5: System Diagnostic initial page

CY7_1611_SDS_FTStudentDeliverySystemManual_2revSV.docx
9
On this screen you are asked to enter the School ID for the school where the test is being administered. This code is mandatory and provided to you by <NC>.
Note to NPM
The System Diagnostics is intended to be run on computers in schools that have been sampled for the Field Trial. They should have School IDs assigned by the KeyQuest software. It is possible to run the System Diagnostics on computers without a valid School ID. While it is necessary to provide an ID value, this value is not checked, so you can use any numbers you like.
Please remove this box when adaptation of this manual is complete.
Click on the “Validate Computer” button to check the current computer. This will run a test of the CPU, memory, Operating System, and other hardware and software factors. Once the checks are completed, a report similar to the one in Figure 6 will be shown.
Figure 6: Diagnosis interface – successful basic check
If all tests in the check are highlighted in green and labeled “OK,” the computer is suitable for running the PISA 2018 Student Delivery System. If any of the tests appear in red and are labeled “Failed,” the computer may not be suitable. An example of the diagnosis interface when the computer has failed a test is shown in Figure 7.

CY7_1611_SDS_FTStudentDeliverySystemManual_2revSV.docx
10
Figure 7: Diagnosis interface - memory test failed
In such cases, you may be able to take actions such as closing running programs to free up memory, or changing the display settings to increase the screen resolution. You should discuss this with technical support staff from the school.
5. Launching the Test
After the System Diagnostics are completed, the next step is to run the assessments and questionnaires by clicking the PISA Assessment button, shown previously in Figure 2. This will start up the components of the SDS. At this point you may again get warnings from your Windows Firewall or your antivirus software about these programs. You should select the response that allows the software to continue running. Please do not block parts of the SDS software or the system will not run properly.
When the SDS starts, you will first be requested to enter a password (Figure 8):
Figure 8: SDS password prompt

CY7_1611_SDS_FTStudentDeliverySystemManual_2revSV.docx
11
This password is used for the decryption of the test content that is stored in the SDS database. This password will be provided to you by <NC>. The password will be different for each PISA country. For <country> the password is
<XXX XXX XXX XXX>
Enter this password (with or without the spaces; it does not matter) and click the OK button. Next a copy of Firefox will be launched. This is Firefox Portable, a standalone version of Firefox that is bundled with the SDS software. This web browser will launch full screen (in “kiosk” mode) and you will not be able to close it in the normal way. See below in Section 6 for instructions for escaping from this window.
When Firefox starts, it launches the beginning of the Test Flow. See Annex A for a full diagram of the Test Flow. The first screen of the Test Flow is where you choose a session (Figure 9):
Figure 9: Session launch screen
Note to NPM
This image and other images from the Test Flow should be replaced with one from your national version.
Please remove this box when adaptation of this manual is complete.
While students could be instructed on which session to run, we recommend that the Test Administrator make this choice before the students arrive. After the session is selected, students will be asked to log in using the ID and password provided on their student login forms (Figure 10).
CY7_1611_SDS_FTStudentDeliverySystemManual_2revSV.docx
12
Figure 10: Student login screen
Students should enter their student ID and password and then click the “Login” button.
Note to NPM
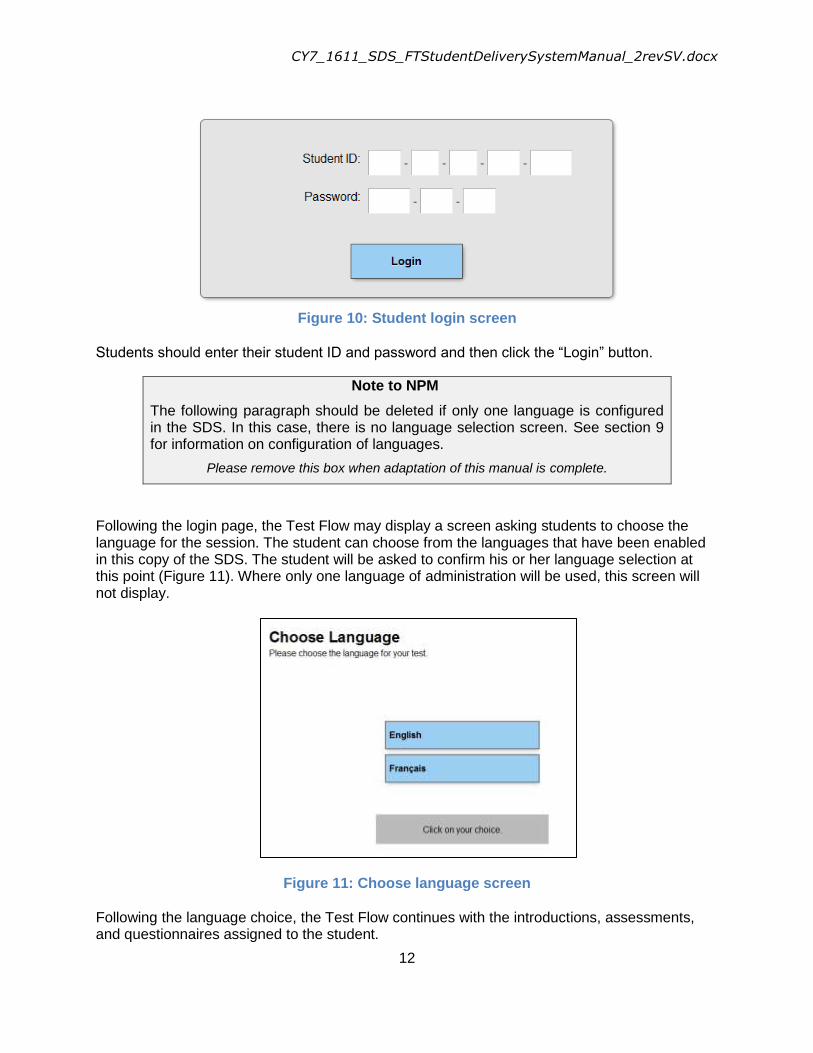
The following paragraph should be deleted if only one language is configured in the SDS. In this case, there is no language selection screen. See section 9 for information on configuration of languages.
Please remove this box when adaptation of this manual is complete.
Following the login page, the Test Flow may display a screen asking students to choose the language for the session. The student can choose from the languages that have been enabled in this copy of the SDS. The student will be asked to confirm his or her language selection at this point (Figure 11). Where only one language of administration will be used, this screen will not display.
Figure 11: Choose language screen
Following the language choice, the Test Flow continues with the introductions, assessments, and questionnaires assigned to the student.

CY7_1611_SDS_FTStudentDeliverySystemManual_2revSV.docx
13
In Session 1, after the General Introduction, a pause screen will be displayed preventing students from continuing to the first section of the tests prematurely. Students will need to enter a password to continue. At the appropriate time, please instruct all students to enter the following password:
8421
Additionally, after the first hour of the assessment, a break screen will be displayed preventing students from continuing to the next section. Please instruct all students to enter the following password:
3435
Figure 12 shows an example of the break screen.
Figure 12: Break screen with password
Once the testing session is complete, the Test Administrator should use the escape sequence (see Section 6 below) to unlock the keyboard, press ALT+TAB to access the PISA 2018 control panel, click on the “Exit” button, and remove the USB drive from the computer.
6. Escape Sequence
The Student Delivery System runs with a locked-down keyboard that prevents students from using Alt-Tab and other means to exit the test. This is not an absolute keyboard lock. For

CY7_1611_SDS_FTStudentDeliverySystemManual_2revSV.docx
14
instance, Ctrl-Alt-Del still works. However, the lock will prevent casual mischief. There is a way to bypass this lock, using the emergency escape sequence.
Press F7 at any time and you will be prompted for a password.
Use 7472, and after clicking OK, the keyboard will be unlocked.
After that, you can use Alt-Tab to switch to another program. You can switch to the PISA application (the window above) and exit all parts if you want by clicking the Exit button.
To re-enable the keyboard locking, press the F8 key.
7. Troubleshooting and addressing problems
If for some reason the system stops responding or the screen gets corrupted, you can use the following methods to resolve the problem. (All of these require you to use the emergency escape sequence to unlock the keyboard first.)
a) Click anywhere in the testing window, and then press the F5 key. This will cause the web browser to reload the page. This is the fastest method and usually works.
b) Use Alt-Tab to switch to the PISA Menu application. Click the “Exit” button to shut down the components of the SDS. Then run the PISA Menu application again, going through the normal start-up steps. If you use the same ID and password as before, you will return to the place you last left (after going through the Test Flow steps to start the test or questionnaire).
c) If all else fails, use Ctrl-Alt-Del. This will allow you to shut down and restart the computer. After restarting, you can launch the PISA Menu application again. If you use the same ID and password as before, you will return to the place you last left.

CY7_1611_SDS_FTStudentDeliverySystemManual_2revSV.docx
15
8. Managing assessment results
Note to NPM
This section contains information about extracting and uploading of results of the assessment. Uploading results to a central server over the internet can be disabled (see section 9 below). If it is disabled, that part of this section should be removed and replaced with information about how to manage the results in your national context.
The results of the assessments are stored in ZIP files (one for each session) in the following location within the SDS:
xamp/htdocs/Export
If desired, national centers may implement processes to copy results from this location for data processing. Core A will be releasing a program for extracting results from USB drives that could be used as part of such a process.
Please remove this box upon completion of this section.
When a session is completed, the SDS automatically extracts the results of the survey to a ZIP file for further processing. For various reasons, this extraction may not run, such as when the session is not completed. When the SDS is shut down (by exiting the PISAMenu program), another attempt will be made to extract these result files. To see the status of the results on a USB drive, and to manually trigger the extraction of results, you can use the Manage Results feature of the SDS. To begin the results management process, the test administrator launches the PISAMenu.exe application and clicks the “Manage Results” button. A webpage like the one shown in Figure 13 will be shown.
Figure 13: Results management screen with Export Option
If any student IDs are listed with the status of “Data must be exported before uploading” (shown in Figure 13), select the ID(s), enter your country-specific 12-digit ID into the text box labeled “Encryption Key,” and then click the “Export Result Key” button. This will extract any necessary

CY7_1611_SDS_FTStudentDeliverySystemManual_2revSV.docx
16
files and create the session-specific ZIP files. Once this step is completed, the page will reload and the option to archive files will no longer be present. Please note, if no files need to be archived, you will not see this view initially.
After results have been exported, the SDS will attempt to upload the results of the session to a central server over the internet. Where this is not possible, perhaps because the computer is not connected to the internet or the school’s firewall blocks the upload operation, the result files are still saved on the USB drive. It is recommended that at the end of each day, the test administrator attempt to synchronize the results on the USB drives with the central server.
Figure 14: Results management screen with Upload Option
When starting the Manage Results page, a view like in Figure 14 will be seen. Select those results that are listed as “Not uploaded” by checking the box next to each option. Then click the “Upload Selected Files” button to send them to the server. If the upload succeeds, you will receive a message saying “Upload successful.” If there is an error in the upload process, the message will state “File could not be uploaded.” In this case, you should try uploading at a later time.
9. Customization of the SDS
Note to NPM
This section contains information about the customization options for the SDS. Please make sure that these instructions are given to the IT specialist who will be responsible for configuration and duplication of the SDS within your country.
Please remove this box upon completion of this section.

CY7_1611_SDS_FTStudentDeliverySystemManual_2revSV.docx
17
For the PISA 2018 Field Trial, several customization options exist. They include allowing administrators to enable/disable the memory virus scan, physical drive virus scan, diagnostics tool, Manage Results tool, which languages are offered to the student in each section, and the ability to save assessment results locally or attempt to submit the results to a centralized server. The following is a list of files that can be used to configure this functionality. The configuration files are simple INI format files, with name/value pairs. They can be edited with any text editor.
PISA Menu Configuration
This section describes how to configure the virus scanning, PISAMenu.exe buttons and the results management server location.
File Name: PISAmenu.ini
File Location: root folder
Configurable Content:
Line Purpose Possible Values
SkipMemoryVirusScan = <False/True>
Determines if the memory should be scanned for viruses when starting the diagnostics tool or SDS. We recommend setting this to False, so the virus scan runs.
True – The memory scan will not be performed
False – The memory scan will be performed
SkipStickVirusScan = <True/False>
Determines if the physical disk (typically the USB drive) should be scanned for viruses when starting the diagnostics tool or SDS. We recommend setting this to True, so the virus scan does not run.
True – The virus scan will not be performed
False – The virus scan will be performed
DiagnosisButton = <True/False>
Determines if the “Start Diagnosis” button is enabled in the PISA menu. Disabling this is not recommended if the SDS is used with school computers. If you are using dedicated laptops, this can be disabled.
True – The button is enabled
False – The button is not enabled

CY7_1611_SDS_FTStudentDeliverySystemManual_2revSV.docx
18
Line Purpose Possible Values
PisaButton = <True/False> Determines if the “PISA Assessment” button is enabled in the PISA menu. This is typically only disabled if just the System Diagnostics are to be used.
True – The button is enabled
False – The button is not enabled
UploadButton = <True/False> Determines if the “Submit Results” button is displayed in the PISA menu
True – The button is displayed
False – The button is not displayed
uploadURL="http://xxx.yyy.zz/PISAUpload"
The URL to use for uploading result files. It is possible to host the upload site on a server at the national center. This will improve performance and provide more control over the files that have been collected. The software requires PHP on the server and sufficient storage for the uploaded files. If you are interested in exploring this possibility, please contact [email protected].
A valid URL in double quotes
Language Configuration
The national SDS packages come with all national languages that will be used in the Field Trial. If more than one language is available for a given session, the student will be asked to choose the language at the beginning of the testing session. Through configuration options, it is possible to limit the languages that are offered to the student. If only one language is configured, the language choice screen in Figure 11 is not shown.
In most cases, the language to be used is known ahead of time based on the participating school. If this is the case, countries may use the language-specific BAT files included in the SDS package. For countries with multiple languages, the SDS will include a BAT file for each language included in the package. For instance, in the source version of the SDS, we have two languages, English (eng-ZMS) and French (fra-ZZZ). The SDS has two BAT files, eng-ZMS.bat and fra-ZZZ.bat (see Figure 1). Using one of these BAT files will limit the SDS to the given language and not allow the student to choose the language.
Languages are configured through the languages.ini file on the SDS. The language BAT files manipulate copies of this file. You can also customize the file if needed.

CY7_1611_SDS_FTStudentDeliverySystemManual_2revSV.docx
19
File Name: languages.ini
File Location: root folder
Configurable Content:
Line Purpose Possible Values
cognitive = <comma separated list of languages>
Determines which languages are shown for Session 1, the PISA Assessments.
A comma-separated list of language and country codes (e.g., eng-ZZZ, fra-ZZZ)
questionnaires = <comma separated list of languages>
Determines which languages are shown for Session 2, the PISA Questionnaires.
A comma-separated list of language and country codes (e.g., eng-ZZZ, fra-ZZZ)
initial = <comma separated list of languages>
Determines which language to use for the session selection, login and language selection pages. Only the first language in the list is used.
A list of languages, but only the first is used (e.g., eng-ZZZ).
Localization of the PISAMenu Control Panel and Systems Diagnostic
Note to NPM
This section contains some information about the localization of the Student Delivery System. Please make sure that these instructions are given to your national adapter.
This section can be removed before the manual is given to Test Administrators for reference when they are running the SDS on their computers.
Please remove this box upon completion of this section.
For the PISA 2018 Field Trial, most of the text in the PISAMenu control panel, the System Diagnostics interface, the file upload page, and the related message boxes is localizable but will not be internationally verified.
The translation of the interface and messages is managed via an XLIFF file, which is manipulated just like the XLIFF files for the CBA units in the tests. The English source versions of the XLIFF files are included in the USB drive image. The file is in the top level directory of the USB drive and is named “translations.xlf” as shown in Figure 1. Note that there is no French source version of the XLIFFs—all localization of these widgets must be done based on the English source version.

CY7_1611_SDS_FTStudentDeliverySystemManual_2revSV.docx
20
The process for localization is as follows:
The English source version of the XLIFF is taken from the USB drive.
The national adapter opens the XLIFF in the Open Language Tool (OLT). (OLT can be downloaded from the Documents tab of the PISA Portal, in Materials/2018 Field Test Resources/Translation.) The English source version of the text will appear in the left panel and the right panel of the OLT.
The national adapter overwrites the text in the right panel with the national version.
When all text has been translated, the national adapter saves the XLIFF file.
The translated XLIFF file should be copied to the USB drive using the same name as the original. When the SDS and System Diagnostics applications start up, it will read the new XLIFF file and integrate the new translations.
If you are translating to a language that is right to left, you will need to edit the file \CBA\conf\properties.ini.orig.txt. Change the setting for “direction” to the value “rtl.”
The SDS XLIFF file is the same as the file used for the System Diagnostics software. You should be able to share the translations between the two applications.
Table 1 includes information about texts that are localizable. It includes screenshots and comments about specific aspects of them.

CY7_1611_SDS_FTStudentDeliverySystemManual_2revSV.docx
21
Table 1: Screenshots with text that is localizable
Element of Widget Screenshot Comment
Diagnostic delivery control panel
All text in screenshot can be localized
Diagnostics start page
The School ID and “Validate” button label can be localized
Diagnostics report page after systems diagnosis has been run
The “Thank you” message and the elements of the report can be localized
Results submission page for after students have completed the assessments
The column headers, buttons, and status text can be localized

CY7_1611_SDS_FTStudentDeliverySystemManual_2revSV.docx
22
Table 2 lists all the text included in the XLIFF file, along with a description of where it is displayed in the SDS.
Table 2: Text included in the XLIFF file
XLIFF Text Description
Please enter your school ID and press
‘Validate Computer’ to validate this computer
Message displayed on the Diagnostics start page
Unable to save your information: Displayed if the collected information cannot be saved
to the USB drive. This is not a critical error, as the
information is saved only for debugging purposes.
Thank you! Based on the information you
submitted your hardware is
Statement shown above the report of the status of the
tests
School ID (required) Label for the school ID fields on the start page
Validate Computer Button on the start page to begin the diagnostics
OK: CPU speed is %s MHz Message if CPU processor speed is OK. DO NOT
CHANGE %s. The actual speed will be substituted.
Failed: CPU speed is %s MHz Message if CPU processor speed is NOT OK. DO NOT
CHANGE %s. The actual speed will be substituted.
OK: Operating system is Message if operating system is OK
Failed: Operating system %s is other than
Win XP, Win Vista, or Win 7
Message if operating system is NOT OK
OK: System Memory Message if computer memory is OK
Failed: Insufficient memory installed (required
768 MB)
Message if computer memory is NOT OK under
Windows XP
Failed: Insufficient memory installed (required
1280 MB)
Message if computer memory is NOT OK under
Windows Vista, 7 or 8
OK: Available System Memory Message if available computer memory is OK
Caution: Memory available is borderline Message if available computer memory is NOT OK
under Windows XP

CY7_1611_SDS_FTStudentDeliverySystemManual_2revSV.docx
23
XLIFF Text Description
Failed: Insufficient system memory available
(required %s MB)
Message if available computer memory is NOT OK
under Windows Vista, 7 or 8. DO NOT CHANGE %s.
The actual available memory amount will be substituted
for %s.
OK: Visual C++ Runtime installed Message if the Visual C++ runtime was found installed
on the computer
Failed: Visual C++ Runtime is required to be
installed
Message if the Visual C++ runtime was NOT found
installed on the computer
Caution: Could not determine Visual C++
Runtime install directory
Message if the Visual C++ runtime was not found
installed on the computer
OK: Screen: Message if screen resolution is OK. Actual resolution
will be appended to this text
Failed: Screen: Message if screen resolution is NOT OK. Actual
resolution will be appended to this text
OK: Skype is not running Message if Skype is not found to be running
Failed: Skype should not be running Message if Skype is found to be running
OK: USB Speed %s MB/s Message if USB read speed is OK. DO NOT CHANGE
%s. Actual speed will be appended to this text
Failed: USB Speed %s MB/s Message if USB read speed is NOT OK. DO NOT
CHANGE %s. Actual speed will be appended to this
text
Not checked: USB Speed Message if USB read speed was not checked.
Export Information
Export
PISA 2018 Control Panel - Version The title at the top of the control panel window. The
actual version number will be appended to this text.
PISA 2018, Field Trial The title shown inside the control panel window

CY7_1611_SDS_FTStudentDeliverySystemManual_2revSV.docx
24
XLIFF Text Description
PISA Assessment The label of the button for launching the PISA
assessments. This will be disabled until the actual Field
Trial.
Start Diagnosis The label of the button for starting the system
diagnostics
Submit Results The label of the button for starting the administrator site
for uploading student test results
Exit The button to exit the PISA 2018 menu application
Virus detected Message shown if the virus scan detects a problem
Virus detected on the USB key. Message shown if the virus scan detects a virus on the
USB key
Virus detected in the computer’s memory. Message shown if the virus scan detects a virus in the
computer memory
See the log file Message shown if a virus is found. The actual location
of the log file will be appended to this text.
Start the assessment anyway? If a virus is found, the diagnostics or assessment can
still be run. This message will be shown.
Password For the PISA Field Trial, the Test Administrator will
need to enter a password before starting the test
Please enter a valid password Message shown if the password is not valid
Error General message if an error is encountered
The local database could not be started.
Please ensure the application has not been
blocked by an antivirus program, and then
restart the application and try again.
Error message displayed if the MySQL database could
not be started
Scanning memory for viruses. Please wait... Message shown while the virus scan is running
Scanning USB key for viruses. Please wait... Message shown while the virus scan is running
USB drive has been unexpectedly removed Message shown if the USB drive was removed during
the virus scan

CY7_1611_SDS_FTStudentDeliverySystemManual_2revSV.docx
25
XLIFF Text Description
Wrong password, please try again Message shown if an incorrect password is entered
File File column header on the results submission page
Size Size column header on the results submission page
Status Status column header on the results submission page
Upload Selected Files Message displayed on the submit button of the results
submission page
Upload All Files Message displayed on the submit button of the results
submission page
Not Uploaded Status message displayed on the results submission
page when the file has not yet been uploaded
Previously Uploaded Status message displayed on the results submission
page when the file has already been uploaded
successfully
Uploaded Successfully Status message displayed on the results submission
page when the file has been uploaded successfully
File Could Not Be Uploaded Message displayed on the results submission page
when the file could not be uploaded successfully. The
most likely cause is the upload server could not be
reached due to connectivity issues.
Invalid File
Message displayed on the results submission page
when the file is not named correctly or is not a ZIP file
Country ID Not Set Message displayed on the results submission page
when the results file name is not in the correct format
School ID Not Set Message displayed on the results submission page
when the results file name is not in the correct format
Checking status… please wait Message displayed while the results page checks the
submission status of a file
Uploading… please wait Message displayed while a results file is being uploaded
No files exist in the export directory Message displayed on the results submission page if no
results exist in the local directory

CY7_1611_SDS_FTStudentDeliverySystemManual_2revSV.docx
26
XLIFF Text Description
Export Result Data Button displayed on the results submission page if one
or more student files need to be compressed prior to
upload.
Data must be exported before uploading Status displayed on the results submission page if the
student ID listed requires one or more files to be
compressed prior to upload
You have results that have not been
exported. Would you like to export them now?
Shown when shutting down the SDS and there are
results that have not yet been fully exported.
Encryption Key Textbox label displayed on the results submission page
requiring users to enter their country-specific encryption
key before exporting the file(s)
Please enter your country’s encryption key Error message displayed on the results submission
page when the Export Result Data button is clicked and
the archive key has not been entered
Invalid Encryption Key Error message displayed on the results submission
page when the Export Result Data File button is clicked
and the archive key has been entered incorrectly
10. Retrieving Result Files
If you have configured the SDS to upload results to a central server, it is necessary to download these files at a later time for import into the Data Management Expert (DME) software system. Assuming that the SDS has been configured with the default server supported by Core A-ETS, you can connect to the following URL for downloading:
http://pisa.ets.org/PISAUpload/server/download.php
You will be prompted for a country code and password as shown in Figure 15:

CY7_1611_SDS_FTStudentDeliverySystemManual_2revSV.docx
27
Figure 15: Screen for downloading SDS result files
The following steps should take place:
1. Complete the field “Country Code” by entering your three-letter country code in all capital letters (e.g., LUX).
2. Complete the field “Password” by entering the 12-digit SDS password that is used when starting the PISA assessments.
3. Choose from the dropdown menu whether to download the Complete Zip File, with all the student results, or a CSV file with a list of the result files that have been uploaded.
4. Use the checkbox to indicate whether duplicate result files (those with the same ID, file size, and timestamp) should be ignored.
5. Click the “Download” button to retrieve a ZIP archive (called “results.zip”) containing all the results that have been uploaded to this point and save it to the hard drive.
6. Unzip this file and copy the individual ZIP files to the DME import directory. Further information about the DME import is in the Data Management Manual.

CY7_1611_SDS_FTStudentDeliverySystemManual_2revSV.docx
28
Annex A: PISA 2018 Field Trial CBA Test Flow

CY7_1611_SDS_FTStudentDeliverySystemManual_2revSV.docx
29


