276
User’s Manual ENGLISH OS Ver. 1.1 MAN0010038 4 E
User
’s M
anua
l
ENGLISHOS Ver. 1.1
MAN0010038
4E
• Read these instructions.• Keep these instructions.• Heed all warnings.• Follow all instructions.• Do not use this apparatus near water.• Clean only with dry cloth.• Do not block any ventilation openings, install in accordance with the manu-
facturer’s instructions.• Do not install near any heat sources such as radiators, heat registers, stoves, or
other apparatus (including amplifiers) that produce heat.• Do not defeat the safety purpose of the polarized or grounding-type plug. A
polarized plug has two blades with one wider than the other. A groundingtype plug has two blades and a third grounding prong. The wide blade or thethird prong are provided for your safety. If the provided plug does not fit intoyour outlet, consult an electrician for replacement of the obsolete outlet. (forU.S.A. and Canada)
• Protect the power cord from being walked on or pinched particularly at plugs,convenience receptacles, and the point where they exit from the apparatus.
• Only use attachments/accessories specified by the manufacturer.• Unplug this apparatus during lightning storms or when unused for long peri-
ods of time.• Refer all servicing to qualified service personnel. Servicing is required when
the apparatus has been damaged in any way, such as power-supply cord orplug is damaged, liquid has been spilled or objects have fallen into the appara-tus, the apparatus has been exposed to rain or moisture, does not operate nor-mally, or has been dropped.
• WARNING – This apparatus shall be connected to a mains socket outlet witha protective earthing connection.
• Turning off the power switch does not completely isolate this product fromthe power line so remove the plug from the socket if not using it for extendedperiods of time, or before cleaning. Please ensure that the mains plug or appli-ance couple remains readily accessible.
• Mains powered apparatus shall not be exposed to dripping or splashing andthat no objects filled with liquids, such as vases, shall be placed on the appara-tus.
• Install this product near the wall socket and keep the power plug easily acces-sible.
• Do not install this equipment on the far position from wall outlet and/or con-venience receptacle.
• WARNING – Date/time Lithium button cell battery inside. Danger of explo-sion if battery is incorrectly replaced. The internal date/time Lithium buttoncell battery is not user replaceable. The unit should be returned to a KorgAuthorized Service Center when the date/time Lithium button cell batteryneeds replacing.
• CAUTION – Battery Pack NiMH (Nickel Metal Hydride). Danger of explo-sion if NiMH battery-pack is incorrectly replaced. Replace only with the sametype (KORG BAT0001002).
• Do not expose batteries to excessive heat, such as direct sunshine, fire or thelike.
• Dispose of used batteries according to the battery manufacturer’s instructions.• Do not install this equipment in a confined space such as a box for the convey-
ance or similar unit.• Do not put your fingers under the display while it is moving, or you will risk
to pinch them under the display!• When a cart is used, use caution when moving the cart/apparatus combina-
tion to avoid injury from tip-over.
The lightning flash with arrowhead symbol within an equi-lateral triangle, is intended to alert the user to the presence ofuninsulated “dangerous voltage” within the product’s enclo-sure that may be of sufficient magnitude to constitute a riskof electric shock to persons.
The exclamation point within an equilateral triangle isintended to alert the user to the presence of important oper-ating and maintenance (servicing) instructions in the litera-ture accompanying the product.
Important safety instructions
THE FCC REGULATION WARNING (for U.S.A.)This equipment has been tested and found to comply with the limits for a Class B digital device, pursuant to Part 15 of the FCC Rules. These limits are designed to provide reasonable protection against harmful interference in a residential installation. This equipment generates, uses, and can radiate radio frequency energy and, if not installed and used in accordance with the instructions, may cause harmful interference to radio communications. However, there is no guarantee that interference will not occur in a particular installation. If this equipment does cause harmful interference to radio or television reception, which can be determined by turning the equipment off and on, the user is encouraged to try to correct the interference by one or more of the following measures:• Reorient or relocate the receiving antenna.• Increase the separation between the equipment and receiver.• Connect the equipment into an outlet on a circuit different from that to which the
receiver is connected.• Consult the dealer or an experienced radio/TV technician for help.Unauthorized changes or modification to this system can void the user’s authority to operate this equipment.
CE mark for European Harmonized StandardsCE mark which is attached to our company’s products of AC mains operated apparatus until December 31, 1996 means it conforms to EMC Directive (89/336/EEC) and CE mark Directive (93/68/EEC).And, CE mark which is attached after January 1, 1997 means it conforms to EMC Directive (89/336/EEC), CE mark Directive (93/68/EEC) and Low Voltage Directive (73/23/EEC).Also, CE mark which is attached to our company’s products of Battery operated apparatus means it conforms to EMC Directive (89/336/EEC) and CE mark Directive (93/68/EEC).
IMPORTANT NOTICE TO CONSUMERSThis product has been manufactured according to strict specifications and voltage requirements that are applicable in the country in which it is intended that this product should be used. If you have purchased this product via the internet, through mail order, and/or via a telephone sale, you must verify that this product is intended to be used in the country in which you reside.WARNING: Use of this product in any country other than that for which it is intended could be dangerous and could invalidate the manufacturer's or distributor's warranty.Please also retain your receipt as proof of purchase otherwise your product may be disqualified from the manufacturer's or distributor's warranty.

Data HandlingData in memory may sometimes be lost due to incorrect useraction. Be sure to save important data to the internal hard diskor to an external USB device. Korg will not be responsible fordamages caused by data loss.
Example screensSome pages of the manuals show LCD screens along with anexplanation of functions and operations. All sound names,parameter names, and values are merely examples and may notalways match the actual display you are working on.
Cleaning the displayUse a soft cotton cloth to clean the screen. Some materials, suchas paper towels, could cause scratches and damage it. Computerwipes are also suggested, provided they are specifically designedfor LCD screens.
Do not spray any liquids on the LCD screen directly. Alwaysapply the solution to your cloth first, then clean the screen.
TrademarksAkai is a registered trademark of Akai Professional Corporation.Mac is a registered trademark of Apple, Inc. MS-DOS and Win-dows are registered trademarks of Microsoft Corporation. TC-Helicon is a registered trademark of TC-Helicon Vocal Technol-ogies Ltd. PurePath is a registered trademark of Texas Instru-ments Incorporated. Waves and Maxx are registered trademarksof Waves Audio Ltd. All other trademarks or registered trade-marks are the property of their respective holders.
DisclaimerThe information contained in this manual have been carefullyrevised and checked through. Due to our constant efforts toimprove our products, the specifications might differ to those inthe manual. Korg is not responsible for any eventual differencesfound between the specifications and the contents of the instruc-tion manual – the specifications being subject to change withoutprior notice.
LiabilityKorg products are manufactured under strict specifications andvoltages required by each country. These products are warrantedby the Korg distributor only in each country. Any Korg productnot sold with a warranty card or carrying a serial number dis-qualifies the product sold from the manufacturer's/distributor'swarranty and liability. This requirement is for your own protec-tion and safety.
Service and User’s AssistanceFor service, please contact your nearest Authorized Korg ServiceCenter. For more information on Korg products, and to findsoftware and accessories for your keyboard, please contact yourlocal Authorized Korg distributor. For up-to-date information,please point your web browser to www.korg.com.
Copyright © 2011 KORG Italy Spa. Printed in Italy.
Notice regarding disposal (for EU only)If this “crossed-out wheeled bin” symbol is shown on the product or in the operating manual, you must dispose of the product in an appropriate way. Do not dis-pose of this product along with your household trash. By disposing of this product correctly, you can avoid environmental harm or health risk. The correctmethod of disposal will depend on your locality, so please contact the appropriate local authorities for details.

WarningThe 76-key model features a motorized display that includes moving parts. The motorized display includes a safety system that prevents the display from closing (and automatically
raises it) when fingers or an external object are detected in its path. However, inadver-tently activating the motorized display may cause physical harm, in particular to children. Be very careful when using the motorized display, and keep children away while using it.
This instrument is not a toy, so please don't let children play with the display.
Keep your keyboard up-to-dateYour instrument can be constantly updated as new versions of the operating system are released by Korg. You can download the operating system from www.korg.com. Please,
read the instructions supplied with the operating system.
The BALANCE and X-FADER slidersWhen turning the instrument on, please be assured the BALANCE and X-FADER slider
are set to the center position. This sets both Player 1 and Player 2 to their maximum level, and balances between the keyboard and Style/Song tracks. This will prevent that you start
a Style or Song, or to play the keyboard, without hearing anything.

1Table of Contents
Intr
oduc
tion
IntroductionOverview . . . . . . . . . . . . . . . . . . . . . . . . . . . . . . . . . . . . . . . . . . . . 6Front Panel . . . . . . . . . . . . . . . . . . . . . . . . . . . . . . . . . . . . . . . . . . . . .7Rear Panel . . . . . . . . . . . . . . . . . . . . . . . . . . . . . . . . . . . . . . . . . . . 19
Welcome! . . . . . . . . . . . . . . . . . . . . . . . . . . . . . . . . . . . . . . . . . . . 22Live Performing . . . . . . . . . . . . . . . . . . . . . . . . . . . . . . . . . . . . . . 23Easy Mode . . . . . . . . . . . . . . . . . . . . . . . . . . . . . . . . . . . . . . . . . . . 23Useful links . . . . . . . . . . . . . . . . . . . . . . . . . . . . . . . . . . . . . . . . . . 23What’s in the box . . . . . . . . . . . . . . . . . . . . . . . . . . . . . . . . . . . . . 24About this manual . . . . . . . . . . . . . . . . . . . . . . . . . . . . . . . . . . . . 24Making a backup . . . . . . . . . . . . . . . . . . . . . . . . . . . . . . . . . . . . . . 24Restoring the original data . . . . . . . . . . . . . . . . . . . . . . . . . . . . . 24Loading the Operating System . . . . . . . . . . . . . . . . . . . . . . . . . . 24
Start up . . . . . . . . . . . . . . . . . . . . . . . . . . . . . . . . . . . . . . . . . . . . 25Connecting the AC power cord . . . . . . . . . . . . . . . . . . . . . . . . . 25Turning the instrument on and off . . . . . . . . . . . . . . . . . . . . . . 25Controlling the Volume . . . . . . . . . . . . . . . . . . . . . . . . . . . . . . . . 25The X-Fader slider . . . . . . . . . . . . . . . . . . . . . . . . . . . . . . . . . . . . 26Headphones . . . . . . . . . . . . . . . . . . . . . . . . . . . . . . . . . . . . . . . . . . 26Loudspeakers . . . . . . . . . . . . . . . . . . . . . . . . . . . . . . . . . . . . . . . . . 26Audio Outputs . . . . . . . . . . . . . . . . . . . . . . . . . . . . . . . . . . . . . . . . 26Audio Inputs . . . . . . . . . . . . . . . . . . . . . . . . . . . . . . . . . . . . . . . . . 26MIDI connections . . . . . . . . . . . . . . . . . . . . . . . . . . . . . . . . . . . . . 26Damper pedal . . . . . . . . . . . . . . . . . . . . . . . . . . . . . . . . . . . . . . . . 27Assignable pedal . . . . . . . . . . . . . . . . . . . . . . . . . . . . . . . . . . . . . . 27Demo . . . . . . . . . . . . . . . . . . . . . . . . . . . . . . . . . . . . . . . . . . . . . . . 27The music stand . . . . . . . . . . . . . . . . . . . . . . . . . . . . . . . . . . . . . . 27
Glossary of Terms . . . . . . . . . . . . . . . . . . . . . . . . . . . . . . . . . . . 28Sound . . . . . . . . . . . . . . . . . . . . . . . . . . . . . . . . . . . . . . . . . . . . . . . 28Style . . . . . . . . . . . . . . . . . . . . . . . . . . . . . . . . . . . . . . . . . . . . . . . . . 28Pad . . . . . . . . . . . . . . . . . . . . . . . . . . . . . . . . . . . . . . . . . . . . . . . . . . 28Keyboard tracks . . . . . . . . . . . . . . . . . . . . . . . . . . . . . . . . . . . . . . 28Performance . . . . . . . . . . . . . . . . . . . . . . . . . . . . . . . . . . . . . . . . . 29Sequencer . . . . . . . . . . . . . . . . . . . . . . . . . . . . . . . . . . . . . . . . . . . . 29Player . . . . . . . . . . . . . . . . . . . . . . . . . . . . . . . . . . . . . . . . . . . . . . . 29The LOGO decoder . . . . . . . . . . . . . . . . . . . . . . . . . . . . . . . . . . . 29
Interface basics . . . . . . . . . . . . . . . . . . . . . . . . . . . . . . . . . . . . . 30The Color TouchView™ graphical user interface . . . . . . . . . . . 30Operative modes . . . . . . . . . . . . . . . . . . . . . . . . . . . . . . . . . . . . . . 32Selected, highlighted items . . . . . . . . . . . . . . . . . . . . . . . . . . . . . 32Non-available, grayed-out parameters . . . . . . . . . . . . . . . . . . . 32Shortcuts . . . . . . . . . . . . . . . . . . . . . . . . . . . . . . . . . . . . . . . . . . . . 32
Easy Mode . . . . . . . . . . . . . . . . . . . . . . . . . . . . . . . . . . . . . . . . . . 33The Style Play page in detail . . . . . . . . . . . . . . . . . . . . . . . . . . . . 34The Song Play page in detail . . . . . . . . . . . . . . . . . . . . . . . . . . . . 35
Quick GuideTurning the instrument on and listening to the demos . 38Turning the instrument on, and viewing the main screen . . . 38Playing the demos . . . . . . . . . . . . . . . . . . . . . . . . . . . . . . . . . . . . . 39
Playing Sounds . . . . . . . . . . . . . . . . . . . . . . . . . . . . . . . . . . . . . 40Selecting a Sound and playing it on the keyboard . . . . . . . . . . 40Playing two or three Sounds at the same time . . . . . . . . . . . . . 42Playing different Sounds with your left and right hand . . . . . . 45Changing the split point . . . . . . . . . . . . . . . . . . . . . . . . . . . . . . . . 46Raising or lowering the Upper octave . . . . . . . . . . . . . . . . . . . . 48Digital Drawbars . . . . . . . . . . . . . . . . . . . . . . . . . . . . . . . . . . . . . . 48
Selecting and saving Performances . . . . . . . . . . . . . . . . . . . 51Selecting a Performance . . . . . . . . . . . . . . . . . . . . . . . . . . . . . . . . 51Saving your settings to a Performance . . . . . . . . . . . . . . . . . . . . 52
Selecting and playing Styles . . . . . . . . . . . . . . . . . . . . . . . . . 55Selecting and playing a Style . . . . . . . . . . . . . . . . . . . . . . . . . . . . 55Tempo . . . . . . . . . . . . . . . . . . . . . . . . . . . . . . . . . . . . . . . . . . . . . . . 57Intro, Variation, Fill, Break, Ending . . . . . . . . . . . . . . . . . . . . . . 57Single Touch Settings (STS) . . . . . . . . . . . . . . . . . . . . . . . . . . . . . 58The Pads . . . . . . . . . . . . . . . . . . . . . . . . . . . . . . . . . . . . . . . . . . . . . 60Adjusting balance between the Style and the keyboard . . . . . . 60Adjusting the volume of each track . . . . . . . . . . . . . . . . . . . . . . 61Turning the Style tracks on/off . . . . . . . . . . . . . . . . . . . . . . . . . . 62Adding harmony notes to your right-hand melody with
the ENSEMBLE function . . . . . . . . . . . . . . . . . . . . . . . . . . . . . 63The Chord Sequence . . . . . . . . . . . . . . . . . . . . . . . . . . . . . . . . . . . 65
Song Play . . . . . . . . . . . . . . . . . . . . . . . . . . . . . . . . . . . . . . . . . . . 67Selecting a Song to play . . . . . . . . . . . . . . . . . . . . . . . . . . . . . . . . 67Playing back a Song . . . . . . . . . . . . . . . . . . . . . . . . . . . . . . . . . . . . 69Changing the tracks’ volume . . . . . . . . . . . . . . . . . . . . . . . . . . . . 70Turning the Song tracks on/off . . . . . . . . . . . . . . . . . . . . . . . . . . 73Soloing a track . . . . . . . . . . . . . . . . . . . . . . . . . . . . . . . . . . . . . . . . 73Removing the voice from an MP3 file . . . . . . . . . . . . . . . . . . . . 73Removing the Melody track from a Standard MIDI File . . . . 75Mixing two Songs . . . . . . . . . . . . . . . . . . . . . . . . . . . . . . . . . . . . . 76
The SongBook . . . . . . . . . . . . . . . . . . . . . . . . . . . . . . . . . . . . . . 77Selecting the desired entry from the Main List . . . . . . . . . . . . . 78Displaying Artist or Genre . . . . . . . . . . . . . . . . . . . . . . . . . . . . . . 78Sorting entries . . . . . . . . . . . . . . . . . . . . . . . . . . . . . . . . . . . . . . . . 79Searching entries . . . . . . . . . . . . . . . . . . . . . . . . . . . . . . . . . . . . . . 80Adding entries . . . . . . . . . . . . . . . . . . . . . . . . . . . . . . . . . . . . . . . . 82Creating a Custom List . . . . . . . . . . . . . . . . . . . . . . . . . . . . . . . . . 84Selecting and using a Custom List . . . . . . . . . . . . . . . . . . . . . . . 87Selecting a SongBook STS . . . . . . . . . . . . . . . . . . . . . . . . . . . . . . 87
Table of Contents

2 Table of Contents
Singing with a microphone . . . . . . . . . . . . . . . . . . . . . . . . . . .88Connecting a microphone . . . . . . . . . . . . . . . . . . . . . . . . . . . . . . 88Setting up your voice tone . . . . . . . . . . . . . . . . . . . . . . . . . . . . . . 90Choosing a Voice Processor Preset . . . . . . . . . . . . . . . . . . . . . . . 92Applying harmony to your voice . . . . . . . . . . . . . . . . . . . . . . . . . 93Applying doubling to your voice . . . . . . . . . . . . . . . . . . . . . . . . . 94Soloing your voice (Talk) . . . . . . . . . . . . . . . . . . . . . . . . . . . . . . . 95Locking the Voice Processor settings . . . . . . . . . . . . . . . . . . . . . 95
Recording a new Song (Standard MIDI File) . . . . . . . . . . . .96Accessing the Backing Sequence (Quick Record) mode . . . . . 96Preparing to record . . . . . . . . . . . . . . . . . . . . . . . . . . . . . . . . . . . . 97Recording . . . . . . . . . . . . . . . . . . . . . . . . . . . . . . . . . . . . . . . . . . . . 98Second-take recording (Overdubbing) . . . . . . . . . . . . . . . . . . . . 99Saving a Song to disk . . . . . . . . . . . . . . . . . . . . . . . . . . . . . . . . . . . 99
Recording a new Song (MP3 file) . . . . . . . . . . . . . . . . . . . . 101
ReferenceSelecting elements . . . . . . . . . . . . . . . . . . . . . . . . . . . . . . . . 104Sound Select window . . . . . . . . . . . . . . . . . . . . . . . . . . . . . . . . . . 104Performance Select window . . . . . . . . . . . . . . . . . . . . . . . . . . . . 104Style Select window . . . . . . . . . . . . . . . . . . . . . . . . . . . . . . . . . . . 105Pad Select window . . . . . . . . . . . . . . . . . . . . . . . . . . . . . . . . . . . . 105STS Select . . . . . . . . . . . . . . . . . . . . . . . . . . . . . . . . . . . . . . . . . . . 106Song Select window . . . . . . . . . . . . . . . . . . . . . . . . . . . . . . . . . . . 106
Searching files and musical resources . . . . . . . . . . . . . . . 109How to use the Search function . . . . . . . . . . . . . . . . . . . . . . . . . 109Notes on searching . . . . . . . . . . . . . . . . . . . . . . . . . . . . . . . . . . . . 110
Style Play operating mode . . . . . . . . . . . . . . . . . . . . . . . . . 111Start-up settings . . . . . . . . . . . . . . . . . . . . . . . . . . . . . . . . . . . . . . 111How Styles, Variations, Performances and STSs are
linked together . . . . . . . . . . . . . . . . . . . . . . . . . . . . . . . . . . . . . 111Master Volume and Balance . . . . . . . . . . . . . . . . . . . . . . . . . . . 111Factory, User and Favorite Styles . . . . . . . . . . . . . . . . . . . . . . . 111Main page (Normal view) . . . . . . . . . . . . . . . . . . . . . . . . . . . . . . 112Style Tracks view page . . . . . . . . . . . . . . . . . . . . . . . . . . . . . . . . . 114STS Name panel . . . . . . . . . . . . . . . . . . . . . . . . . . . . . . . . . . . . . . 115Volume panel . . . . . . . . . . . . . . . . . . . . . . . . . . . . . . . . . . . . . . . . 115Pad panel . . . . . . . . . . . . . . . . . . . . . . . . . . . . . . . . . . . . . . . . . . . . 117Split panel . . . . . . . . . . . . . . . . . . . . . . . . . . . . . . . . . . . . . . . . . . . 118Mic panel . . . . . . . . . . . . . . . . . . . . . . . . . . . . . . . . . . . . . . . . . . . . 118Sub-Scale panel . . . . . . . . . . . . . . . . . . . . . . . . . . . . . . . . . . . . . . . 119Edit menu . . . . . . . . . . . . . . . . . . . . . . . . . . . . . . . . . . . . . . . . . . . 119Edit page structure . . . . . . . . . . . . . . . . . . . . . . . . . . . . . . . . . . . . 119Mixer/Tuning: Volume/Pan . . . . . . . . . . . . . . . . . . . . . . . . . . . . 120Mixer/Tuning: FX Send . . . . . . . . . . . . . . . . . . . . . . . . . . . . . . . 121Mixer/Tuning: EQ Gain . . . . . . . . . . . . . . . . . . . . . . . . . . . . . . . 122Mixer/Tuning: EQ Control . . . . . . . . . . . . . . . . . . . . . . . . . . . . 122Mixer/Tuning: Tuning . . . . . . . . . . . . . . . . . . . . . . . . . . . . . . . . 123Mixer/Tuning: Sub Scale . . . . . . . . . . . . . . . . . . . . . . . . . . . . . . . 123Effects: A/B FX Configuration . . . . . . . . . . . . . . . . . . . . . . . . . . 125Effects: IFX 1…3, Master 1…3 . . . . . . . . . . . . . . . . . . . . . . . . . . 127Track Controls: Mode . . . . . . . . . . . . . . . . . . . . . . . . . . . . . . . . . 127Track Controls: Drum Edit . . . . . . . . . . . . . . . . . . . . . . . . . . . . 128Track Controls: Easy Edit . . . . . . . . . . . . . . . . . . . . . . . . . . . . . . 129Keyboard/Ensemble: Keyboard Control 1 . . . . . . . . . . . . . . . . 130Keyboard/Ensemble: Keyboard Control 2 . . . . . . . . . . . . . . . . 131Keyboard/Ensemble: Key/Velocity Range . . . . . . . . . . . . . . . . 131Keyboard/Ensemble: Ensemble . . . . . . . . . . . . . . . . . . . . . . . . . 132Pad/Switch: Pad . . . . . . . . . . . . . . . . . . . . . . . . . . . . . . . . . . . . . . 133Pad/Switch: Switch . . . . . . . . . . . . . . . . . . . . . . . . . . . . . . . . . . . . 133Style Controls: Drum/Fill . . . . . . . . . . . . . . . . . . . . . . . . . . . . . . 134
Style Controls: Keyboard Range On/Off / Wrap Around . . .135Preferences: Style Preferences . . . . . . . . . . . . . . . . . . . . . . . . . . .135Preferences: Style Play Setup . . . . . . . . . . . . . . . . . . . . . . . . . . . .136Page menu . . . . . . . . . . . . . . . . . . . . . . . . . . . . . . . . . . . . . . . . . . .137Write Performance dialog box . . . . . . . . . . . . . . . . . . . . . . . . . .138Write Single Touch Setting dialog box . . . . . . . . . . . . . . . . . . .139Write Style Settings dialog box . . . . . . . . . . . . . . . . . . . . . . . . . .139Write Global-Style Play Setup dialog box . . . . . . . . . . . . . . . . .139The Favorite banks . . . . . . . . . . . . . . . . . . . . . . . . . . . . . . . . . . . .140
Song Play operating mode . . . . . . . . . . . . . . . . . . . . . . . . . 141Transport controls . . . . . . . . . . . . . . . . . . . . . . . . . . . . . . . . . . . .141MIDI Clock . . . . . . . . . . . . . . . . . . . . . . . . . . . . . . . . . . . . . . . . . .141Tempo Lock . . . . . . . . . . . . . . . . . . . . . . . . . . . . . . . . . . . . . . . . . .141Master Volume, Balance, X-Fader . . . . . . . . . . . . . . . . . . . . . . .141Track parameters . . . . . . . . . . . . . . . . . . . . . . . . . . . . . . . . . . . . .141Standard MIDI Files and Sounds . . . . . . . . . . . . . . . . . . . . . . . .141Keyboard, Pad and Player tracks . . . . . . . . . . . . . . . . . . . . . . . .142Main page (Normal view) . . . . . . . . . . . . . . . . . . . . . . . . . . . . . .143Song Tracks 1-8 and 9-16 pages . . . . . . . . . . . . . . . . . . . . . . . . .145STS Name panel . . . . . . . . . . . . . . . . . . . . . . . . . . . . . . . . . . . . . .146Volume panel . . . . . . . . . . . . . . . . . . . . . . . . . . . . . . . . . . . . . . . .146Pad panel . . . . . . . . . . . . . . . . . . . . . . . . . . . . . . . . . . . . . . . . . . . .148Split panel . . . . . . . . . . . . . . . . . . . . . . . . . . . . . . . . . . . . . . . . . . .148Mic panel . . . . . . . . . . . . . . . . . . . . . . . . . . . . . . . . . . . . . . . . . . . .148Sub-Scale panel . . . . . . . . . . . . . . . . . . . . . . . . . . . . . . . . . . . . . . .148Jukebox panel . . . . . . . . . . . . . . . . . . . . . . . . . . . . . . . . . . . . . . . .148Edit menu . . . . . . . . . . . . . . . . . . . . . . . . . . . . . . . . . . . . . . . . . . .149Edit page structure . . . . . . . . . . . . . . . . . . . . . . . . . . . . . . . . . . . .149Switching between players during editing . . . . . . . . . . . . . . . .150Mixer/Tuning: Volume/Pan . . . . . . . . . . . . . . . . . . . . . . . . . . . .150Mixer/Tuning: FX Send . . . . . . . . . . . . . . . . . . . . . . . . . . . . . . . .151Mixer/Tuning: EQ Gain . . . . . . . . . . . . . . . . . . . . . . . . . . . . . . .152Mixer/Tuning: EQ Control . . . . . . . . . . . . . . . . . . . . . . . . . . . . .153Mixer/Tuning: Tuning . . . . . . . . . . . . . . . . . . . . . . . . . . . . . . . . .154Effects: A/B FX Configuration . . . . . . . . . . . . . . . . . . . . . . . . . .154Effects: IFX 1…3, Master 1…3 . . . . . . . . . . . . . . . . . . . . . . . . . .155Track Controls: Mode . . . . . . . . . . . . . . . . . . . . . . . . . . . . . . . . .155Track Controls: Drum Edit . . . . . . . . . . . . . . . . . . . . . . . . . . . . .155Track Controls: Easy Edit . . . . . . . . . . . . . . . . . . . . . . . . . . . . . .155Keyboard/Ensemble: Keyboard Control . . . . . . . . . . . . . . . . . .155Keyboard/Ensemble: Keyboard Control 2 . . . . . . . . . . . . . . . .155Keyboard/Ensemble: Key/Velocity Range . . . . . . . . . . . . . . . .156Keyboard/Ensemble: Ensemble . . . . . . . . . . . . . . . . . . . . . . . . .156Pad/Switch: Pad . . . . . . . . . . . . . . . . . . . . . . . . . . . . . . . . . . . . . .156Pad/Switch: Assignable Switch . . . . . . . . . . . . . . . . . . . . . . . . . .156Jukebox Editor . . . . . . . . . . . . . . . . . . . . . . . . . . . . . . . . . . . . . . .156Preferences: General Setup . . . . . . . . . . . . . . . . . . . . . . . . . . . . .157Preferences: Play Setup . . . . . . . . . . . . . . . . . . . . . . . . . . . . . . . .157Page menu . . . . . . . . . . . . . . . . . . . . . . . . . . . . . . . . . . . . . . . . . . .158Write Global-Song Play Setup dialog box . . . . . . . . . . . . . . . . .159
SongBook . . . . . . . . . . . . . . . . . . . . . . . . . . . . . . . . . . . . . . . . . 160Book . . . . . . . . . . . . . . . . . . . . . . . . . . . . . . . . . . . . . . . . . . . . . . . .160Custom List . . . . . . . . . . . . . . . . . . . . . . . . . . . . . . . . . . . . . . . . . .163List Edit . . . . . . . . . . . . . . . . . . . . . . . . . . . . . . . . . . . . . . . . . . . . .163Book Edit 1 . . . . . . . . . . . . . . . . . . . . . . . . . . . . . . . . . . . . . . . . . .164Book Edit 2 . . . . . . . . . . . . . . . . . . . . . . . . . . . . . . . . . . . . . . . . . .166Book Edit 3 . . . . . . . . . . . . . . . . . . . . . . . . . . . . . . . . . . . . . . . . . .166Info . . . . . . . . . . . . . . . . . . . . . . . . . . . . . . . . . . . . . . . . . . . . . . . . .167Page menu . . . . . . . . . . . . . . . . . . . . . . . . . . . . . . . . . . . . . . . . . . .168
Lyrics, Score, Markers . . . . . . . . . . . . . . . . . . . . . . . . . . . . . . 169Lyrics page . . . . . . . . . . . . . . . . . . . . . . . . . . . . . . . . . . . . . . . . . . .169Score page . . . . . . . . . . . . . . . . . . . . . . . . . . . . . . . . . . . . . . . . . . .171

3Table of Contents
Intr
oduc
tion
Markers page . . . . . . . . . . . . . . . . . . . . . . . . . . . . . . . . . . . . . . . . 172
Sequencer operating mode . . . . . . . . . . . . . . . . . . . . . . . . . 173Transport controls . . . . . . . . . . . . . . . . . . . . . . . . . . . . . . . . . . . 173The Songs and the Standard MIDI File format . . . . . . . . . . . 173Sequencer mode and the MP3 . . . . . . . . . . . . . . . . . . . . . . . . . 173Songs and Voice Processor Presets . . . . . . . . . . . . . . . . . . . . . 173Sequencer Play - Main page . . . . . . . . . . . . . . . . . . . . . . . . . . . 173Entering Record mode . . . . . . . . . . . . . . . . . . . . . . . . . . . . . . . . 176Record mode: Multitrack Sequencer page . . . . . . . . . . . . . . . 176Record mode: Step Record page . . . . . . . . . . . . . . . . . . . . . . . . 178Record mode: Backing Sequence (Quick Record) page . . . . 181Record mode: Step Backing Sequence page . . . . . . . . . . . . . . 183Edit menu . . . . . . . . . . . . . . . . . . . . . . . . . . . . . . . . . . . . . . . . . . . 186Edit page structure . . . . . . . . . . . . . . . . . . . . . . . . . . . . . . . . . . . 186Mixer/Tuning: Volume/Pan . . . . . . . . . . . . . . . . . . . . . . . . . . . 186Mixer/Tuning: FX Send . . . . . . . . . . . . . . . . . . . . . . . . . . . . . . . 187Mixer/Tuning: EQ Gain . . . . . . . . . . . . . . . . . . . . . . . . . . . . . . . 187Mixer/Tuning: EQ Control . . . . . . . . . . . . . . . . . . . . . . . . . . . . 188Mixer/Tuning: Tuning . . . . . . . . . . . . . . . . . . . . . . . . . . . . . . . . 188Mixer/Tuning: Sub Scale . . . . . . . . . . . . . . . . . . . . . . . . . . . . . . 188Effects: A/B FX Configuration . . . . . . . . . . . . . . . . . . . . . . . . . 189Effects: IFX 1…3, Master 1…3 . . . . . . . . . . . . . . . . . . . . . . . . . 189Track Controls: Mode . . . . . . . . . . . . . . . . . . . . . . . . . . . . . . . . 189Track Controls: Drum Edit . . . . . . . . . . . . . . . . . . . . . . . . . . . . 189Track Controls: Easy Edit . . . . . . . . . . . . . . . . . . . . . . . . . . . . . 189Event Edit: Event Edit . . . . . . . . . . . . . . . . . . . . . . . . . . . . . . . . 190Event Edit: Filter . . . . . . . . . . . . . . . . . . . . . . . . . . . . . . . . . . . . . 191Song Edit: Quantize . . . . . . . . . . . . . . . . . . . . . . . . . . . . . . . . . . 192Song Edit: Transpose . . . . . . . . . . . . . . . . . . . . . . . . . . . . . . . . . 192Song Edit: Velocity . . . . . . . . . . . . . . . . . . . . . . . . . . . . . . . . . . . 193Song Edit: Cut/Insert Measures . . . . . . . . . . . . . . . . . . . . . . . . 193Song Edit: Delete . . . . . . . . . . . . . . . . . . . . . . . . . . . . . . . . . . . . . 194Song Edit: Copy . . . . . . . . . . . . . . . . . . . . . . . . . . . . . . . . . . . . . . 194Song Edit: Move . . . . . . . . . . . . . . . . . . . . . . . . . . . . . . . . . . . . . 195Song Edit: RX Convert . . . . . . . . . . . . . . . . . . . . . . . . . . . . . . . . 195Preferences: Sequencer Setup . . . . . . . . . . . . . . . . . . . . . . . . . . 196Page menu . . . . . . . . . . . . . . . . . . . . . . . . . . . . . . . . . . . . . . . . . . 196Write Global-Sequencer Setup dialog box . . . . . . . . . . . . . . . 197Song Select window . . . . . . . . . . . . . . . . . . . . . . . . . . . . . . . . . . 197Save Song window . . . . . . . . . . . . . . . . . . . . . . . . . . . . . . . . . . . 197
Global edit mode . . . . . . . . . . . . . . . . . . . . . . . . . . . . . . . . . . . 200What is it, and how the Global is structured . . . . . . . . . . . . . 200Main page . . . . . . . . . . . . . . . . . . . . . . . . . . . . . . . . . . . . . . . . . . . 200Edit menu . . . . . . . . . . . . . . . . . . . . . . . . . . . . . . . . . . . . . . . . . . . 201Edit page structure . . . . . . . . . . . . . . . . . . . . . . . . . . . . . . . . . . . 201General Controls: Basic . . . . . . . . . . . . . . . . . . . . . . . . . . . . . . . 201General Controls: Transpose Control . . . . . . . . . . . . . . . . . . . 202General Controls: Scale . . . . . . . . . . . . . . . . . . . . . . . . . . . . . . . 203General Controls: Lock . . . . . . . . . . . . . . . . . . . . . . . . . . . . . . . 204General Controls: Interface . . . . . . . . . . . . . . . . . . . . . . . . . . . . 206General Controls: Clock & Battery . . . . . . . . . . . . . . . . . . . . . . 207Controllers: Pedal/Switch . . . . . . . . . . . . . . . . . . . . . . . . . . . . . 208Controllers: Assignable Sliders . . . . . . . . . . . . . . . . . . . . . . . . . 209Controllers: EC5 . . . . . . . . . . . . . . . . . . . . . . . . . . . . . . . . . . . . . 209MIDI: MIDI Setup / General Controls . . . . . . . . . . . . . . . . . . 210MIDI: MIDI In Control . . . . . . . . . . . . . . . . . . . . . . . . . . . . . . . 211
MIDI: MIDI In Channels . . . . . . . . . . . . . . . . . . . . . . . . . . . . . . 212MIDI: MIDI Out Channels . . . . . . . . . . . . . . . . . . . . . . . . . . . . 212MIDI: Filters . . . . . . . . . . . . . . . . . . . . . . . . . . . . . . . . . . . . . . . . . 213Audio Setup: Style/Kbd . . . . . . . . . . . . . . . . . . . . . . . . . . . . . . . 213Audio Setup: Player 1 . . . . . . . . . . . . . . . . . . . . . . . . . . . . . . . . . 214Audio Setup: Player 2 . . . . . . . . . . . . . . . . . . . . . . . . . . . . . . . . . 214Audio Setup: Drums . . . . . . . . . . . . . . . . . . . . . . . . . . . . . . . . . . 214Audio Setup: Audio In . . . . . . . . . . . . . . . . . . . . . . . . . . . . . . . . 215Audio Setup: Metro / MP3 / Speakers . . . . . . . . . . . . . . . . . . . 216Voice Processor Setup and Preset sections . . . . . . . . . . . . . . . 216Video Interface: Video Out . . . . . . . . . . . . . . . . . . . . . . . . . . . . 217MaxxAudio: MaxxEQ . . . . . . . . . . . . . . . . . . . . . . . . . . . . . . . . . 217Maxx Master EQ: MaxxAUDIO . . . . . . . . . . . . . . . . . . . . . . . . 218Maxx Default Preset . . . . . . . . . . . . . . . . . . . . . . . . . . . . . . . . . . 219Touch Panel Calibration . . . . . . . . . . . . . . . . . . . . . . . . . . . . . . 219Page menu . . . . . . . . . . . . . . . . . . . . . . . . . . . . . . . . . . . . . . . . . . 220Write Global - Global Setup dialog box . . . . . . . . . . . . . . . . . . 220Write Global - Midi Setup dialog box . . . . . . . . . . . . . . . . . . . 220Write Global - Voice Processor Setup dialog box . . . . . . . . . . 221Write Global - Voice Processor Preset dialog box . . . . . . . . . 221Write Global - Maxx Preset dialog box . . . . . . . . . . . . . . . . . . 221Write Quarter Tone SC Preset dialog box . . . . . . . . . . . . . . . . 221
Media edit mode . . . . . . . . . . . . . . . . . . . . . . . . . . . . . . . . . . .222Storage devices and internal memory . . . . . . . . . . . . . . . . . . . 222Supported device . . . . . . . . . . . . . . . . . . . . . . . . . . . . . . . . . . . . . 222Selecting and deselecting files . . . . . . . . . . . . . . . . . . . . . . . . . . 222Searching files . . . . . . . . . . . . . . . . . . . . . . . . . . . . . . . . . . . . . . . 222File types . . . . . . . . . . . . . . . . . . . . . . . . . . . . . . . . . . . . . . . . . . . . 223Media structure . . . . . . . . . . . . . . . . . . . . . . . . . . . . . . . . . . . . . . 224Main page . . . . . . . . . . . . . . . . . . . . . . . . . . . . . . . . . . . . . . . . . . . 225Page structure . . . . . . . . . . . . . . . . . . . . . . . . . . . . . . . . . . . . . . . . 225Navigation tools . . . . . . . . . . . . . . . . . . . . . . . . . . . . . . . . . . . . . . 225Load . . . . . . . . . . . . . . . . . . . . . . . . . . . . . . . . . . . . . . . . . . . . . . . . 226Save . . . . . . . . . . . . . . . . . . . . . . . . . . . . . . . . . . . . . . . . . . . . . . . . 229Copy . . . . . . . . . . . . . . . . . . . . . . . . . . . . . . . . . . . . . . . . . . . . . . . 233Erase . . . . . . . . . . . . . . . . . . . . . . . . . . . . . . . . . . . . . . . . . . . . . . . 234Format . . . . . . . . . . . . . . . . . . . . . . . . . . . . . . . . . . . . . . . . . . . . . . 235Utility . . . . . . . . . . . . . . . . . . . . . . . . . . . . . . . . . . . . . . . . . . . . . . 235Preferences . . . . . . . . . . . . . . . . . . . . . . . . . . . . . . . . . . . . . . . . . . 237USB . . . . . . . . . . . . . . . . . . . . . . . . . . . . . . . . . . . . . . . . . . . . . . . . 238Page menu . . . . . . . . . . . . . . . . . . . . . . . . . . . . . . . . . . . . . . . . . . 239Care of mass storage devices . . . . . . . . . . . . . . . . . . . . . . . . . . . 240Merging PCM samples from various sources . . . . . . . . . . . . . 241
MIDI . . . . . . . . . . . . . . . . . . . . . . . . . . . . . . . . . . . . . . . . . . . . . . .242What is MIDI? . . . . . . . . . . . . . . . . . . . . . . . . . . . . . . . . . . . . . . . 242What is MIDI Over USB? . . . . . . . . . . . . . . . . . . . . . . . . . . . . . . 242Standard MIDI Files . . . . . . . . . . . . . . . . . . . . . . . . . . . . . . . . . . 243The General MIDI standard . . . . . . . . . . . . . . . . . . . . . . . . . . . 243The Global channel . . . . . . . . . . . . . . . . . . . . . . . . . . . . . . . . . . . 243The Chord 1 and Chord 2 channels . . . . . . . . . . . . . . . . . . . . . 243The Control channel . . . . . . . . . . . . . . . . . . . . . . . . . . . . . . . . . . 243MIDI Setup . . . . . . . . . . . . . . . . . . . . . . . . . . . . . . . . . . . . . . . . . . 243Connecting Pa3X to a Master keyboard . . . . . . . . . . . . . . . . . . 244Connecting the Pa3X to a MIDI accordion . . . . . . . . . . . . . . . 244Connecting the Pa3X to an external sequencer . . . . . . . . . . . 245Playing another instrument with the Pa3X . . . . . . . . . . . . . . . 246
4 Table of Contents
AppendixInstalling the Pa3X Amplification System (PaAS) . . . . . 248Precautions . . . . . . . . . . . . . . . . . . . . . . . . . . . . . . . . . . . . . . . . . . 248Installation . . . . . . . . . . . . . . . . . . . . . . . . . . . . . . . . . . . . . . . . . . 248
Installing the Video Interface (VIF4) . . . . . . . . . . . . . . . . . 250NTSC, PAL, SECAM . . . . . . . . . . . . . . . . . . . . . . . . . . . . . . . . . . 250Precautions . . . . . . . . . . . . . . . . . . . . . . . . . . . . . . . . . . . . . . . . . . 250Installation . . . . . . . . . . . . . . . . . . . . . . . . . . . . . . . . . . . . . . . . . . 250Connections and setup . . . . . . . . . . . . . . . . . . . . . . . . . . . . . . . . 252
Installing additional Sampling RAM (EXB-M256) . . . . . 253Precautions . . . . . . . . . . . . . . . . . . . . . . . . . . . . . . . . . . . . . . . . . . 253Installation . . . . . . . . . . . . . . . . . . . . . . . . . . . . . . . . . . . . . . . . . . 253
Installing an Hard Disk (HDIK-2) (only 61-key model) . 255Precautions . . . . . . . . . . . . . . . . . . . . . . . . . . . . . . . . . . . . . . . . . . 255Backup . . . . . . . . . . . . . . . . . . . . . . . . . . . . . . . . . . . . . . . . . . . . . . 255Installation . . . . . . . . . . . . . . . . . . . . . . . . . . . . . . . . . . . . . . . . . . 255
Formatting the Hard Disk and installing the Operating System . . . . . . . . . . . . . . . . . . . . . . . . . . . . . . . . . . . . . . . . . . . . .256
Replacing the Sample RAM backup battery . . . . . . . . . . 258Precautions . . . . . . . . . . . . . . . . . . . . . . . . . . . . . . . . . . . . . . . . . .258Installation . . . . . . . . . . . . . . . . . . . . . . . . . . . . . . . . . . . . . . . . . . .258
Installing the Korg USB MIDI Driver . . . . . . . . . . . . . . . . . 260Connecting the Pa3X to a personal computer . . . . . . . . . . . . .260KORG USB-MIDI Driver system requirements . . . . . . . . . . .260Please note before use . . . . . . . . . . . . . . . . . . . . . . . . . . . . . . . . .260Windows: Installing the KORG USB-MIDI Driver . . . . . . . .260Mac OS X: Installing KORG USB-MIDI Driver . . . . . . . . . . .261
Shortcuts . . . . . . . . . . . . . . . . . . . . . . . . . . . . . . . . . . . . . . . . . . 262
MIDI Implementation Chart . . . . . . . . . . . . . . . . . . . . . . . . 263
Troubleshooting . . . . . . . . . . . . . . . . . . . . . . . . . . . . . . . . . . . 264
Technical specifications . . . . . . . . . . . . . . . . . . . . . . . . . . . . 266
Index . . . . . . . . . . . . . . . . . . . . . . . . . . . . . . . . . . . . . . . . . . . . . 268

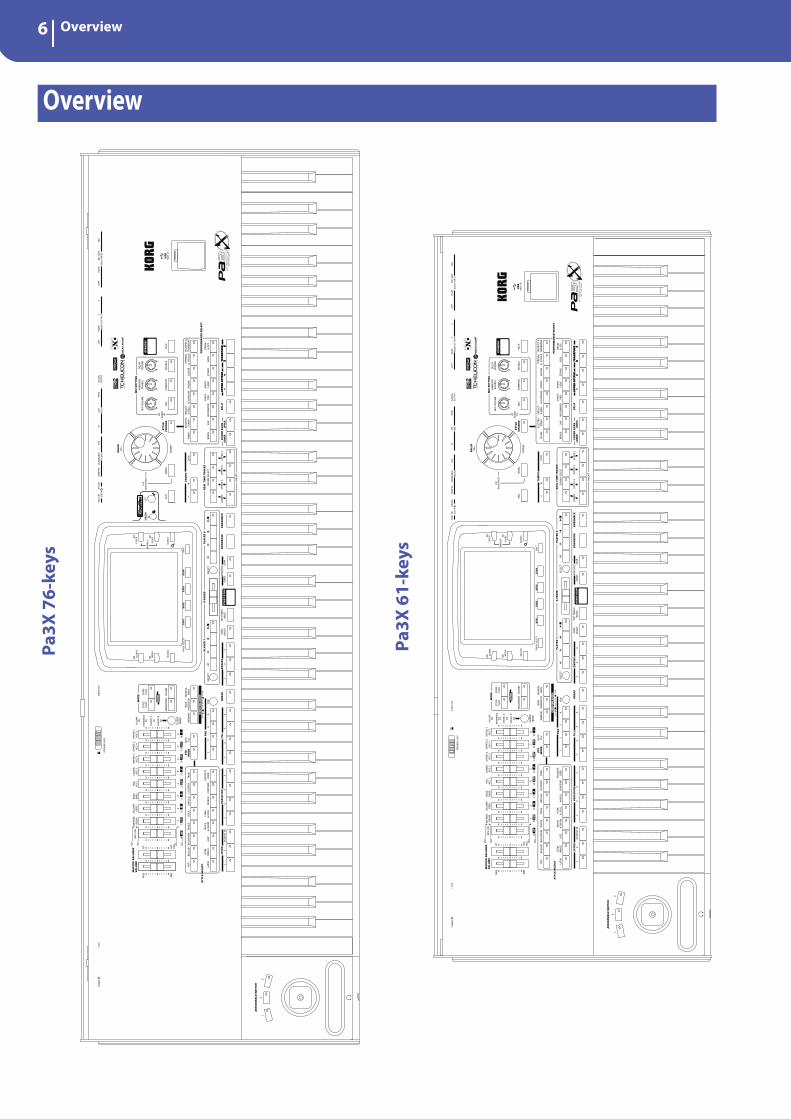
6 Overview
Overview
Pa3X
76-
keys
Pa3X
61-
keys
7OverviewFront Panel
Intr
oduc
tion
Front Panel
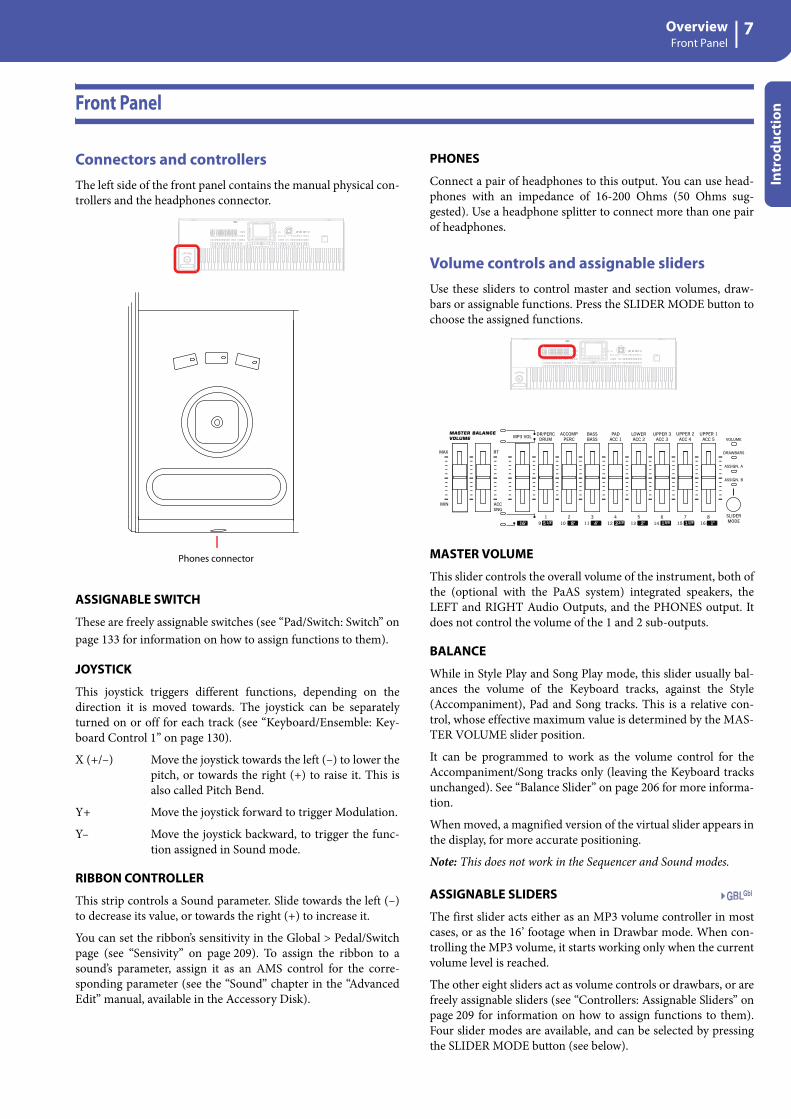
Connectors and controllersThe left side of the front panel contains the manual physical con-trollers and the headphones connector.
ASSIGNABLE SWITCH
These are freely assignable switches (see “Pad/Switch: Switch” onpage 133 for information on how to assign functions to them).
JOYSTICK
This joystick triggers different functions, depending on thedirection it is moved towards. The joystick can be separatelyturned on or off for each track (see “Keyboard/Ensemble: Key-board Control 1” on page 130).
X (+/–) Move the joystick towards the left (–) to lower thepitch, or towards the right (+) to raise it. This isalso called Pitch Bend.
Y+ Move the joystick forward to trigger Modulation.
Y– Move the joystick backward, to trigger the func-tion assigned in Sound mode.
RIBBON CONTROLLER
This strip controls a Sound parameter. Slide towards the left (–)to decrease its value, or towards the right (+) to increase it.
You can set the ribbon’s sensitivity in the Global > Pedal/Switchpage (see “Sensivity” on page 209). To assign the ribbon to asound’s parameter, assign it as an AMS control for the corre-sponding parameter (see the “Sound” chapter in the “AdvancedEdit” manual, available in the Accessory Disk).
PHONES
Connect a pair of headphones to this output. You can use head-phones with an impedance of 16-200 Ohms (50 Ohms sug-gested). Use a headphone splitter to connect more than one pairof headphones.
Volume controls and assignable slidersUse these sliders to control master and section volumes, draw-bars or assignable functions. Press the SLIDER MODE button tochoose the assigned functions.
MASTER VOLUME
This slider controls the overall volume of the instrument, both ofthe (optional with the PaAS system) integrated speakers, theLEFT and RIGHT Audio Outputs, and the PHONES output. Itdoes not control the volume of the 1 and 2 sub-outputs.
BALANCE
While in Style Play and Song Play mode, this slider usually bal-ances the volume of the Keyboard tracks, against the Style(Accompaniment), Pad and Song tracks. This is a relative con-trol, whose effective maximum value is determined by the MAS-TER VOLUME slider position.
It can be programmed to work as the volume control for theAccompaniment/Song tracks only (leaving the Keyboard tracksunchanged). See “Balance Slider” on page 206 for more informa-tion.
When moved, a magnified version of the virtual slider appears inthe display, for more accurate positioning.
Note: This does not work in the Sequencer and Sound modes.
ASSIGNABLE SLIDERS
The first slider acts either as an MP3 volume controller in mostcases, or as the 16’ footage when in Drawbar mode. When con-trolling the MP3 volume, it starts working only when the currentvolume level is reached.
The other eight sliders act as volume controls or drawbars, or arefreely assignable sliders (see “Controllers: Assignable Sliders” onpage 209 for information on how to assign functions to them).Four slider modes are available, and can be selected by pressingthe SLIDER MODE button (see below).
Phones connector
Gbl
8 OverviewFront Panel
While in Style Play or Sequencer mode, with the slidersin Volume mode, you can use the physical sliders to change thevolume of several tracks at once. Keep the SHIFT button pressed,and move one of these sliders to proportionally change the vol-ume of all similar tracks.
Note: In Song Play mode, this does not work on the Song tracks,but it still works on the Keyboard tracks.
• In Style Play and Song Play mode: Keep the SHIFT buttonpressed and move one of the UPPER sliders, to proportion-ally change the volume of all Upper tracks at the same time.
• In Style Play mode: First press the TRACK SELECT buttonto see the separate Style tracks in the display. Then keep theSHIFT button pressed and move one of the sliders, to pro-portionally change the volume of all Style tracks at thesame time.
• In Sequencer mode: Keep the SHIFT button pressed andmove one of the sliders, to proportionally change the vol-ume of all Song tracks at the same time.
SLIDER MODE
Use this button to select one of the four available operatingmodes for the sliders. The sliders can be freely programmed inGlobal mode (see “Controllers: Assignable Sliders” on page 209).
VOLUME When in this mode, each of the sliders controlsthe volume of the corresponding track or devicein the display.
DRAWBARS Each slider controls the corresponding drawbarof the selected Digital Drawbars Sound.ASSIGN.A/BTwo sets of eight freely assignable controls,that can be programmed in Global mode. Thefirst slider (labeled MP3 Vol) always controls thevolume of the MP3 player. For information onhow to program them, see “Controllers: Assign-able Sliders” on page 209.
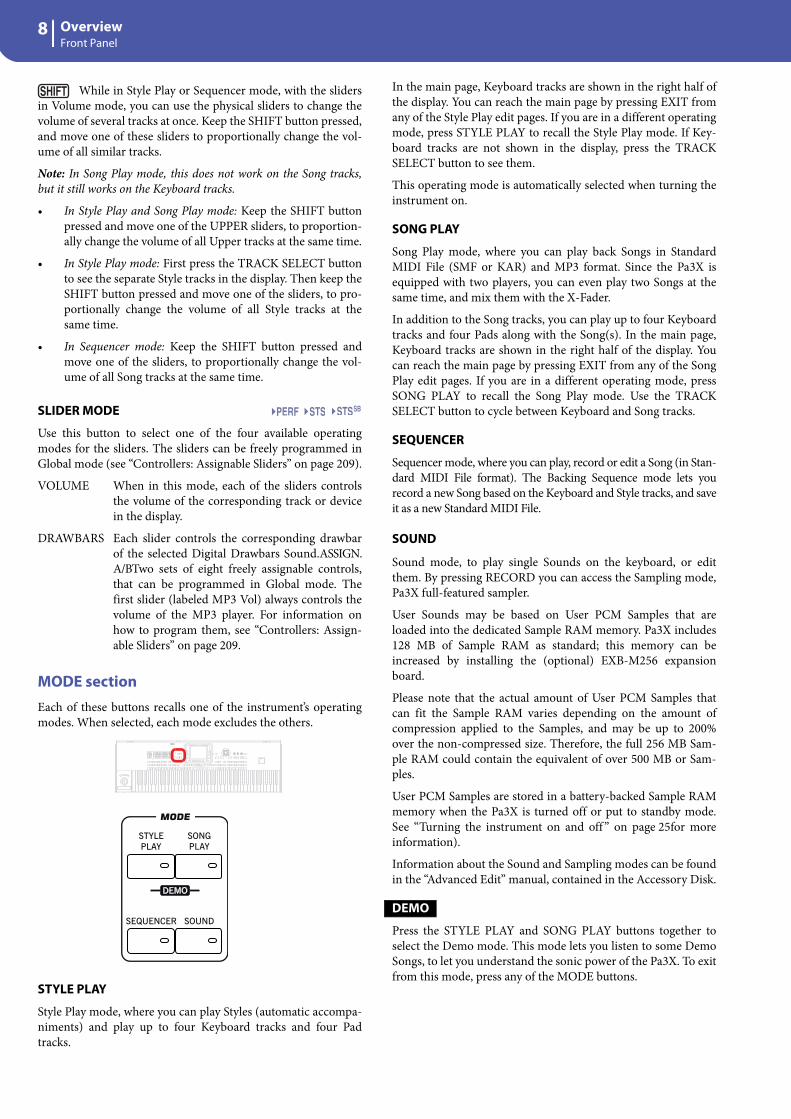
MODE sectionEach of these buttons recalls one of the instrument’s operatingmodes. When selected, each mode excludes the others.
STYLE PLAY
Style Play mode, where you can play Styles (automatic accompa-niments) and play up to four Keyboard tracks and four Padtracks.
In the main page, Keyboard tracks are shown in the right half ofthe display. You can reach the main page by pressing EXIT fromany of the Style Play edit pages. If you are in a different operatingmode, press STYLE PLAY to recall the Style Play mode. If Key-board tracks are not shown in the display, press the TRACKSELECT button to see them.
This operating mode is automatically selected when turning theinstrument on.
SONG PLAY
Song Play mode, where you can play back Songs in StandardMIDI File (SMF or KAR) and MP3 format. Since the Pa3X isequipped with two players, you can even play two Songs at thesame time, and mix them with the X-Fader.
In addition to the Song tracks, you can play up to four Keyboardtracks and four Pads along with the Song(s). In the main page,Keyboard tracks are shown in the right half of the display. Youcan reach the main page by pressing EXIT from any of the SongPlay edit pages. If you are in a different operating mode, pressSONG PLAY to recall the Song Play mode. Use the TRACKSELECT button to cycle between Keyboard and Song tracks.
SEQUENCER
Sequencer mode, where you can play, record or edit a Song (in Stan-dard MIDI File format). The Backing Sequence mode lets yourecord a new Song based on the Keyboard and Style tracks, and saveit as a new Standard MIDI File.
SOUND
Sound mode, to play single Sounds on the keyboard, or editthem. By pressing RECORD you can access the Sampling mode,Pa3X full-featured sampler.
User Sounds may be based on User PCM Samples that areloaded into the dedicated Sample RAM memory. Pa3X includes128 MB of Sample RAM as standard; this memory can beincreased by installing the (optional) EXB-M256 expansionboard.
Please note that the actual amount of User PCM Samples thatcan fit the Sample RAM varies depending on the amount ofcompression applied to the Samples, and may be up to 200%over the non-compressed size. Therefore, the full 256 MB Sam-ple RAM could contain the equivalent of over 500 MB or Sam-ples.
User PCM Samples are stored in a battery-backed Sample RAMmemory when the Pa3X is turned off or put to standby mode.See “Turning the instrument on and off ” on page 25for moreinformation).
Information about the Sound and Sampling modes can be foundin the “Advanced Edit” manual, contained in the Accessory Disk.
DEMO
Press the STYLE PLAY and SONG PLAY buttons together toselect the Demo mode. This mode lets you listen to some DemoSongs, to let you understand the sonic power of the Pa3X. To exitfrom this mode, press any of the MODE buttons.
SB

9OverviewFront Panel
Intr
oduc
tion
Special Mode ButtonsThese buttons are used to recall settings, file management andrecord modes.
GLOBAL
This button recalls the Global edit environment, where you canadjust various global settings. This edit environment overlapsany operating mode, that still remains active in the background.Press EXIT to go back to the underlying operating mode.
MEDIA
This button recalls the Media edit environment, where you canexecute various operations on files and storage devices (Load,Save, Format, etc…). This edit environment overlaps any operat-ing mode, that still remains active in the background. PressEXIT to go back to the underlying operating mode.
Please note that the 76-key model is fitted with a hard disk asstandard, while the 61-key model includes a flash-memory mod-ule, that can be replaced with a hard disk by using the (optional)HDIK-2 kit. Both storage devices are shown as “HD” inside theMedia and Song Select pages.
The internal hard disk or flash-memory module contain boththe Factory data (inside the SYS area) and User-editable data(inside the HD area).
RECORD
This button sets the instrument to the Record or Sampling mode(which one depends on the current operating mode).
You can keep the SHIFT button pressed and press thisbutton to open the “MP3 Record” dialog box (see “Recording anew Song (MP3 file)” on page 101).
Style SectionHere you can select a Style, and activate the automatic selectionof STSs and/or Fills.
STYLE SELECT section
Use these buttons to open the Style Select window and select aStyle. See “Style Select window” on page 105.
The USER button gives access to three User Style banks andtwelve Favorite Style banks. You can use User locations to loadnew Styles from an external device, or save newly created oredited Styles.
Favorite locations, too, can be used to load new Styles from anexternal device, or to save newly created or edited Styles, but inaddition you can edit the names of these Sound banks, so thatyou can create a custom set of Styles. See “The Favorite banks”on page 140.
Each button (Style banks) contains five pages, each with up toeight Styles. Repeatedly press a STYLE SELECT button to cyclebetween the available pages.
You can keep the SHIFT button pressed and press one ofthe buttons of this section, to make the “Write Style Settings”window appear in the display. Then, you can save the currentStyle Setup (see “Write Style Settings dialog box” on page 139).
STS MODE
This button cycles between the following functions.
On When a different Style (or the same again) isselected, STS 1 is automatically selected. TheKeyboard sounds and effects will change, alongwith the Style sounds and effects.
Flashing Variation/STS Link function activated. This func-tion makes each Variation recall the correspond-ing STS when selected. For example, selectVariation 2, and STS 2 will be automaticallyrecalled; select Variation 3, and STS 3 will beautomatically recalled.
Off When you select a different Style (or the sameagain), the Style sounds and effects will change.The Keyboard sounds and effects will not change.
AUTO FILL
This button allows to turn the Auto Fill function on or off.
Note: This function is automatically turned off when turning theinstrument off.
On When selecting a different Variation, the Fill hav-ing the same number of the previous Variation isautomatically selected. For example, if going from

10 OverviewFront Panel
Variation 2 to Variation 3, Fill 2 is automaticallyselected.
Off When choosing a Variation, no fill is automati-cally selected.
Memory, Bass Controls, Chord SequencerThese buttons lets you decide what should remain in memory,and how the bass is played back.
MEMORY
This button allows you to choose if the Lower track and/or theaccompaniment chords must remain in memory even after rais-ing your hand from the keyboard.
On Depending on the setting of the “Memory Mode”in the “Preferences: Style Preferences” page (StylePlay mode, see page 136), the sound on the left ofthe split point (Lower), and/or the chords for theautomatic accompaniment can kept in memoryeven when you raise your hand from the key-board.
Off The sound and chords are released as soon as youraise your hand from the keyboard.
Note: This function can be automatically activated by playing thekeyboard harder. See “Velocity Control” on page 136.
You can jump to the Style Play > Style Preferences pageby keeping SHIFT pressed, and pressing the MEMORY button.
BASS INVERSION
This button turns the Bass Inversion function on or off.
On The lowest note of a chord played in invertedform will always be detected as the root note ofthe chord. Thus, you can specify to the arrangercomposite chords such as “Am7/G” or “F/C”.
Off The lowest note is scanned together with theother chord notes, and is not always consideredas the root note.
Note: This function can be automatically activated by playing thekeyboard harder. See “Velocity Control” on page 136.
MANUAL BASS
This button turns the Manual Bass function on or off.
On The automatic accompaniment stops playing(apart for the Drum and Percussion tracks), andyou can manually play the Bass track on theLower part of the keyboard. You can start theautomatic accompaniment again by pressing this
button again, or one of the CHORD SCANNINGbuttons.
Off The bass track is automatically played by the Style.
Note: When you press the MANUAL BASS button, the Bass trackvolume is automatically set to its maximum value. The volume isautomatically set back to the original value when the MANUALBASS button is deactivated.
CHORD SEQUENCER (PLAY/STOP AND RECORD)
While a Style is in play, you can use this section as a ChordSequencer and record a looping sequence of chords. The chordswill drive the arranger, leaving your hands free for solo playing.
RECORD (BASS INVERSION + MANUAL BASS): Press thesebuttons together to start recording the Chord Sequence (startingfrom the next measure). Press these buttons again to stoprecording.
PLAY/STOP (MEMORY + BASS INVERSION): Press these but-tons together to let the Chord Sequence play in loop, and drivethe arranger. Press them again to stop the sequence.
The Chord Sequence will remain in memory up until you recorda new Chord Sequence, or you turn the Pa3X off.
PadsHere you can play (and stop) the Pads, i.e. single sounds or loop-ing sequences.
PAD 1-4 STOP
Each Pad button corresponds to a dedicated Pad track. Use thesebuttons to trigger up to four sounds or sequences at the sametime.
• Press a single PAD button to trigger a single sound orsequence.
• Press more PAD buttons to trigger several sounds orsequences.
The sequences will play up to the end. Then, they will stop orcontinue repeating, depending on their “One Shot/Loop” status(see the “Pad Type” parameter in the Pad Record mode).
You can stop all sequences, or just some of them, by pressing theSTOP button of the PAD section:
• Press STOP to stop all sequences at once.
• Keep STOP pressed and press one (or more) of the PADbuttons to stop the corresponding sequence(s).
• Press one of the ENDING buttons to stop both the accom-paniment and the Pads at the same time.
SB
SB
SB

11OverviewFront Panel
Intr
oduc
tion
Note: Pads share polyphony voices with the other tracks, so avoidusing too many of them together with a dense Style or Songarrangement.
About Pad synchronization. In Style Play mode, Pads are syn-chronized to the Style’s Tempo. In Song Play mode, they are syn-chronized to the latest Player you set to play. For example,assume you pressed PLY2-PLAY; when pressing one of the PADbuttons, it will play in sync with Player 2.
Note: There is no synchronization with MP3 files. Pads can onlybe synchronized to the Tempo of the last selected Standard MIDIFiles. Therefore, when an MP3 file is assigned to the last selectPlayer, Pads will synchronize to the Tempo of the last StandardMIDI File that has been played back.
About Pads’ and the Players’ Play command. When you pressone of the PLAY buttons to start the corresponding Player, allPads will stop playing.
You can jump to the Style Play > Pad/Assignable Switchpage by keeping SHIFT pressed, and pressing one of the PADbuttons.
Style ElementsThis section contains the separate elements of a Style (Fill, Varia-tion, etc.).
INTRO 1-3/COUNT IN buttons These buttons turn the corresponding Intro on. After pressingone of these buttons, start the Style, and it will begin with theselected intro. The INTRO LED automatically goes off at the endof the intro.
Press them twice (LED blinking) to let them play in loop, andselect any other Style element (Fill, Intro, Variation…) to exit theloop (or press the same button again).
Note: Intro 1 plays a short sequence with different chords, whileIntro 2 plays on the latest recognized chord. Intro 3 is usually aone-bar Count In.
VARIATION 1-4 buttons Each of these buttons selects one of the four Variations of thecurrent Style. The higher the Variation number, the denser thearrangement.
You can jump to the Style Play > Drum/Fill page bykeeping SHIFT pressed, and pressing one of the VARIATIONbuttons.
FILL 1-4 buttons
These buttons trigger a fill-in. Press them twice (LED blinking)to let them play in loop, and select any other Style element (Fill,Intro, Variation…) to exit the loop (or press the same buttonagain).
Note: This function can be automatically activated by playing thekeyboard harder. See “Velocity Control” on page 136.
Note: If the Auto Fill function is activated, a Fill will be automati-cally selected when choosing the corresponding Variation.
You can jump to the Style Play > Drum/Fill page bykeeping SHIFT pressed, and pressing one of the FILL buttons.
BREAK
This button triggers a break. Press it twice (LED blinking) to letit play in loop. Press it again or select any other Style Element(Fill, Intro, Variation, Ending) to exit from the loop.
ENDING 1-3 buttons
While the Style is running, these three buttons trigger an End-ing, and stop the Style. Press one of them, and the Style will stoprunning with an Ending.
Press them twice (LED blinking) to let them play in loop, andselect any other Style element (Fill, Intro, Variation…) to exit theloop (or press the same button again).
Note: Ending 1 plays a short sequence with different chords, whileEnding 2 plays on the latest recognized chord. Ending 3 startsimmediately, and is just two measures long.
Style ControlsUse these buttons to start/stop the accompaniment.
FADE IN/OUT
When the Style or Song is not playing, press this button to start itwith a volume fade-in (the volume goes from zero to the maxi-mum).
When the Style or Song is playing back, press this button to stopit with a volume fade-out (the volume gradually decreases).
You don’t need to press START/STOP or PLAY/STOP to start orstop the Style or Song.
Note: This does not work in Sequencer mode.
You can jump to the Global > Basic page by keepingSHIFT pressed, and pressing the FADE IN/OUT button.
TAP TEMPO/RESET
This is a double-function button, acting in a different waydepending on the Style status (Start/Stop).
Note: This button only works while in Style Play mode.
Tap Tempo: When the Style is not playing, you can “beat” thetempo on this button. Tap as many times as the Time Signature’snumerator (for example, four times with a 4/4 Time Signature, or
Set
Set
Set
Set

12 OverviewFront Panel
three times with a 3/4 one). At the end, the accompanimentstarts playing, using the “tapped in” tempo.
Reset: When you press this button while the Style is playingback, the Style pattern goes back to the beginning of measure 1.
START/STOP
Starts or stops the Style.
Note: This function can be automatically activated by playing thekeyboard harder. See “Velocity Control” on page 136.
You can reset all ‘frozen’ notes and controllers on the Pa3Xand any instrument connected to its MIDI OUT or the USBDevice port, by using the “Panic” (SHIFT + START/STOP) keycombination. Just press SHIFT + START/STOP to stop all notesand reset all controllers.
SYNCHRO START / STOP buttons
These buttons turn the Synchro Start and Synchro Stop func-tions on or off. This lets you decide if you must press START/STOP to start and/or stop a Style, or just play the keyboard in theChord Scan area.
Start On, Stop Off
In this situation, just play a chord in the chordrecognition area (usually under the split point,see “Chord Scan and Keyboard Split” on page 17)to automatically start the Style. If you like, turnone of the INTROs on before starting the Style.
Start Off, Stop On
In this case, raising your hands from the keyboardstops the Style running.
Start On, Stop On
When both LEDs are lit, raising your hands fromthe keyboard momentarily stops the Style running.If you play a chord again, the Style starts again.
Start Off, Stop Off
All Synchro functions are turned off.
Display and controlsIn the 76-key model, the display tilt angle can be adjusted eitherusing the motor, or manually.
COLOR TOUCHVIEW™ GRAPHICAL DISPLAY
Use this display to interact with the instrument. To set the dis-play brightness, keep the MENU button pressed, and turn theDIAL counter-clockwise to decrease the brightness, or clockwiseto increase it.
In the 76-key model, you can use the UNLOCK and LIFT but-tons to change the display tilt angle by using the motorized dis-play controls (see below).
Warning: Before moving the Pa3X, always lower the display com-pletely down, or you will risk to damage it!
Warning: Do not put anything over or under the display, or youwill risk to damage the motor or the display!
Warning: Do not put your fingers under the display while it ismoving, or you will risk to pinch them under the display!
UNLOCK
(76-key model only) Use this button to disconnect the displayfrom the motor. Keep it pressed while gently adjusting the tiltmanually, then release the button to reconnect the motor. This isparticularly useful when you turned the instrument off, and for-got to lower the display down.
Warning: Do not force the display if it does not move! Press thebutton and try again.
Note: The last position is recalled when turning the instrument onagain.
LIFT
(76-key model only) Use this button to alternatively tilt the dis-play up or down. Keep it pressed until the display is in thedesired position.
Warning: Do not force the display while the motor is engaged!

13OverviewFront Panel
Intr
oduc
tion
Second Function ControlsUse the TRACK SELECT and SHIFT buttons to choose alternatefunctions.
TRACK SELECT
Depending on the operating mode, this button switches betweenthe various track views.
STYLE PLAY MODE
Toggles between Keyboard and Style tracks.
SONG PLAY MODE
Toggles between Keyboard tracks, Song tracks 1-8, and Song tracks 9-16.
SEQUENCER MODE
Toggles between Song tracks 1-8 and Song tracks9-16.
SHIFT
With this button held down, pressing certain other buttons givesaccess to a second function. For a list of the available shortcuts,see “Shortcuts” on page 262.
STS SectionUse the STS (Single Touch Settings) buttons to select sounds forthe keyboard.
STS 1-4 buttons
These buttons allow to select up to four Single Touch Settings(abbreviated as STS). Each of the Styles and SongBook entriesincludes four Single Touch Settings (STS), to automatically con-figure Keyboard tracks and effects, and the Voice Processor, atthe touch of a finger. When the STS MODE LED is lit, an STS isautomatically selected when selecting a Style.
If you keep the SHIFT button pressed, and press one ofthe buttons of this section, the “Write Single Touch Setting (STS)”window appears in the display, with the current STS already
selected, and you can save the current keyboard track settings in aSTS (see “Write Single Touch Setting dialog box” on page 139).
Players ControlsPa3X is equipped with two players (Player 1 and Player 2), eachwith its own set of transport controls. The Player 1 group is alsoused for the Sequencer mode.
SELECT
Press this button to open the Song Select window and choose aSongs.
<< and >>
Rewind and Fast Forward commands. If you use them while theSong is in play, they make it scroll back or forward.
When pressed once, these buttons move the Song to the previousor following measure (with a Standard MIDI File) or to the previ-ous or next second (with an MP3 file). When kept pressed, theymake the Song scrolling continuously, until you release them.
In Sequencer mode, if you set a Locate Measure other than 1,when pressing the << button the Song rewinds up to that mea-sure instead of the first one (see “Locate measure” on page 174).
In Jukebox mode (Player 1), keep the SHIFT buttonpressed, and press these buttons to scroll to the previous or nextSong in the Jukebox list (see “Jukebox Editor” on page 156).
(HOME)
Sends the Song Position back to measure 1 (i.e., the beginning ofthe Song).
In Sequencer mode, if you set a Locate Measure other than 1, theSong Position goes back to that measure (see “Locate measure”on page 174).
(PLAY/STOP)
Starts or stops the Song from the current Song Position.
In Song Play mode, pressed while keeping SHIFTpressed, starts both players at the same time.
X-FADER
In Song Play mode, this slider balances the volume of the twoon-board Players. When fully on the left, only Player 1 can beheard. When fully on the right, only Player 2 can be heard.When in the middle, both Players play at full volume.
This slider also selects the Lyrics, Score and Markers from one ofthe Players.
Note: This slider does not work in Style Play, Sequencer or Soundmode.

14 OverviewFront Panel
SongBookThe SongBook is the music database of the Pa3X.
SONGBOOK
Press this button to recall the SongBook mode. While in thismode, you can browse through the music database.
You can jump to the SongBook > Custom List page bykeeping SHIFT pressed, and pressing the SONGBOOK button.
Lyrics, Score, Markers, SearchUse these buttons to access the Lyrics, Markers or Search pages.
LYRICS
This button recalls the Lyrics page for the active Player, the Styleor the SongBook entry. You can use the X-Fader to select eitherPlayer 1 or Player 2.
SCORE
Press this button to open the Score page (in Song Play or Song-Book mode). You can use the X-Fader to select either Player 1 orPlayer 2.
MARKERS
Press both the LYRICS and SCORE buttons together to open theMarkers page. You can use the X-Fader to select either Player 1or Player 2.
SEARCH
Press this button to open the Search window, and look for aspecified file or musical resource. The Search window appearsslightly different depending on the current context. For informa-tion on how to use this function, see “Searching files and musicalresources” on page 109.
Data Entry and NavigationThe VALUE DIAL and the DOWN/- and UP/+ buttons can beused to assign a different value to the selected parameter in thedisplay, or to scroll a list of files in the Song Select, Search andMedia pages.
VALUE DIAL
Turn the dial clockwise to increase the value of the selectedparameter. Turn it counter-clockwise to decrease its value.
When used while pressing the MENU button, this con-trol always acts as a Display Brightness control.
UP/+ and DOWN/-
UP/+ increases the value; DOWN/- decreases it.
EXIT
Use this button to perform various actions, leaving from the cur-rent status:• exit the edit menu page, without selecting any item• make the page menu disappear, without selecting any
item• return to the main page of the current operating mode• exit the Global or Media edit environment, and return to
the current page of the current operating mode• exit from the SongBook mode• exit from the Lyrics, Score and Marker pages• exit from a Style, Pad, Performance or Sound Select win-
dow
MENU
This button opens the edit menu page for the current operatingmode or edit mode. After opening an edit menu, you can jumpto one of the edit sections by touching the corresponding buttonin the display.
Otherwise, press EXIT to return to the main page of the currentoperating mode, or the current page of the underlying operatingmode.
See the relevant chapter devoted to each operating mode or editenvironment, to see their “maps” in detail.

15OverviewFront Panel
Intr
oduc
tion
Tempo SectionThe TEMPO– and TEMPO+ buttons can be used to control theTempo.
TEMPO +/– buttons
TEMPO– decreases the Tempo value; TEMPO+ increases it.
Press both buttons together to reset the Tempo to the valuememorized in the selected Style, Standard MIDI File or MP3.
TEMPO LOCK
This button turns the Tempo Lock function on or off.
On When you select a different Style or Performance,or select a different Song, the Tempo does notchange. You can still manually change it, by usingthe TEMPO +/– buttons, or select the Tempovalue and change it using the VALUE controls.
Off When you select a different Style or Performance,or select a different Song, the memorized Tempois automatically selected.
Note: This button does not work with MP3 files.
You can jump to the Global > Lock page by keepingSHIFT pressed, and pressing this button.
Mic Setting SectionUse these buttons to check the microphone input level, set thevolume of the various sections, and turn the various voice sec-tions on or off in the Voice Processor.
AUDIO IN LED
This LED shows the level of the audio signal entering theAUDIO INPUT connectors (both MIC and LEFT/RIGHT linein connectors, see “Audio Input Section” on page 19). Three dif-ferent colors (green, orange, red) show the level. Try to keep the
level so that this LED remains on green most of the time, withorange appearing at signal peaks. Never go to red.
Off: No signal entering.
Green: Low- to mid-level signal entering. If the LEDturns off too often, the input gain is too low. Usethe MIC GAIN control and/or the source device’svolume to increase the input level.
Orange: Slight overload in the signal path. This is fine if itturns on only on signal peaks.
Red: Clipping is occurring in the signal path. Use theMIC GAIN control and/or the source device’svolume to lower the input level.
See “Audio Input Section” on page 19 for moreinformation on the AUDIO INPUTs.
MIC VOLUME
Use this knob to set the volume of the [lead voice].
HARMONY/DOUBLE
Use this knob to set the volume of the Harmony and Double sec-tions of the Voice Processor.
DELAY/REVERB
Use this knob to set the volume of the Delay and Reverb sectionsof the of the Voice Processor.
MIC ON/OFF
Press this button to turn the microphone input on or off. TheLED shows the status of the microphone section.
If you keep the SHIFT button pressed, and press this but-tons, the Voice Processor Setup > Mic Setup page will appear(see “Voice Processor Setup: Setup” in the Advanced Edit Man-ual).
HARMONY
Turns the Voice Harmony effect on or off. This adds up to fourharmonization voice to the lead voice.
If you keep the SHIFT button pressed, and press this but-ton, the Voice Processor Preset > Harmony page will appear (see“Voice Processor Preset: Easy Preset” in the Advanced Edit Man-ual). This adds choir voices in unison to the lead voice.
DOUBLE
Turns the Double effect on or off.
If you keep the SHIFT button pressed, and press this but-ton, the Voice Processor Preset > Double page will appear (see“Voice Processor Preset: Double” in the Advanced Edit Manualcontained in the Accessory Disk).
Set

16 OverviewFront Panel
StandbyUse the Standby function to “pause” the instrument, rather thanturning it off.
STANDBY
When the instrument is in standby (LED colored red), press thisbutton to exit from standby mode (the LED becomes green).When the instrument is completely turned off (LED off), pressthe POWER button, then press the STANDBY button to turn theinstrument on.
To turn the instrument off, you can keep the STANDBY buttonpressed for 2 seconds to put it in standby mode, or you can pressthe POWER button to completely disconnect it from the power.
When the Pa3X is completely turned off via the POWER button,the internal battery preserving the Sample RAM memory is notrecharged, and will discharge after three-four days. When thebattery is discharged, turning on will take a longer time (since allSamples will have to be reloaded).
Note: It is advisable to put the instrument in standby mode insteadof turning it off, if you want the internal battery to recharge, andlet the Pa3X start-up quickly. On the contrary, it is advisable tocompletely turn it off to save power.
Warning: When the instrument is in standby mode, it is still con-nected to the power line. Accessing the inside of the instrument canbe dangerous.
Hint: You can check the battery charge level by going to the Global> General Controls > Clock & Battery page (see “General Con-trols: Clock & Battery” on page 207).
STANDBY LED and battery status
The STANDBY LED let you see the status of the backup battery.
Off No power. Instrument completely turned off.
Green Power on, battery fully charged.
Green flashing Power on, battery charging.
Red Standby, battery fully charged.
Red flashing Standby, battery charging.
Red and green alternating (even in standby mode)
Malfunctioning, or batteries exhausted and to bereplaced. Please read the error messages in the
“General Controls: Clock & Battery” page (seepage 207).
HelpThe multi-language context-sensitive Help lets you learn aboutthe current page, and more.
HELP
Press this button to open the context-sensitive Help.
Real Time Tracks SectionUse these buttons to select and turn on/off the Sounds assignedto the keyboard (Real Time tracks).
SOUND SELECT
Press the button corresponding to the Upper 1-3 or Lower trackto open the Sound Select window, and assign a Sound to the cor-responding track.
Sounds of the “FACTORY” type are standard sounds, that can-not be modified.
Sounds of the “LEGACY” type are standard sounds allowinggreater compatibility with older Pa-Series instruments.
Sounds of the “GM/XG” type allow for compatibility with Gen-eral MIDI sounds and XG Drum Kits.
Sounds of the “USER” type are locations where you can load newSounds from an external device, or save new or edited Sounds.
The “USER DK” type is where you can load new Drum Kits, orsave new or edited Drum Kits.
For each type of Sounds there are several Sound banks, that canbe selected using the side tabs.
Each Sound bank contains various pages, each with up to eightSounds, that can be selected using the lower tabs.
ON/OFF
Use these buttons to turn on/off the corresponding track.
On The track can play.
Off The track is muted.
Standby Power Off
Battery Recharged Discharged after three-four days
With battery charged Fast boot-up time
With battery discharged Slow boot time

17OverviewFront Panel
Intr
oduc
tion
EnsembleThe Ensemble function automatically harmonizes the right handmelody.
ENSEMBLE
This button turns the Ensemble function on or off. When on, theright-hand melody is harmonized with the left-hand chords.
Note: The Ensemble function works only when the keyboard is inSPLIT mode, and the LOWER Chord Scan mode is selected.
You can jump to the Style Play > Ensemble page bykeeping SHIFT pressed, and pressing the ENSEMBLE button.
Performance Select SectionUse these buttons to select a Performance.
STYLE CHANGE
This button turns the Style Change function on or off.
On When you select a Performance, the Style mightchange, according to which Style is memorizedonto the Performance.
Off When you select a Performance, the Style andStyle track settings remain unchanged. Only Key-board track settings are changed.
PERFORMANCE SELECT section
Use these buttons to open the Performance Select window, andselect a Performance. See “Performance Select window” onpage 104.
Each Performance bank contains four pages, each with up toeight Performances. Repeatedly press a PERFORMANCESELECT button to cycle between the available pages.
All Performances can be freely customized. See the “Style Playoperating mode” for more information.
If you keep the SHIFT button pressed, and press one ofthe buttons of this section, the “Write Performance” windowappears in the display, and you can save the current track set-tings into a Performance (see “Write Performance dialog box”on page 138).
Chord Scan and Keyboard SplitUse these buttons to choose chord recognition and keyboardsplitting.
CHORD SCAN section
In Style Play, Song Play and Sequencer-Backing Sequence mode,use these buttons to define the way chords are recognized.
LOWER Chords are detected below the split point. Thenumber of notes you should play to form a chordis defined by the Chord Scan Mode parameter(see “Chord Recognition Mode” on page 135).
UPPER Chords are detected above the split point. Youmust always play three or more notes to let thearranger recognize a chord.
FULL (both LEDs On)Chords are detected on the full keyboard range.You must always play three or more notes to letthe arranger recognize a chord. (You can use thismode even when the Split keyboard mode isselected). The “Fingered 3” Chord RecognitionMode is automatically selected (see “Chord Rec-ognition Mode” on page 135).
OFF No chords detected. After pressing START/STOP,only the Drum and Percussion accompanimenttracks will play.
SPLIT
In Style Play, Song Play and Sequencer-Backing Sequence mode,use this button to define how the four Keyboard tracks are posi-tioned on the keyboard, and how chords are recognized by thearranger.
Note: One of the Chord Scan options must be selected for theaccompaniment to play.
On The Lower track plays below the split point, whilethe Upper 1, Upper 2 and Upper 3 tracks playabove it. This is called the Split keyboard mode.
By default, turning on the Split mode automati-cally selects the Lower chord scanning mode (seeabove). In this mode, chords are detected belowthe split point. The number of notes you shouldplay to form a chord is defined by the “ChordRecognition Mode” parameter (see page 135).
SB
Gbl
Set SB
SB
SB

18 OverviewFront Panel
Off The Upper 1, Upper 2 and/or Upper 3 tracks playover the whole keyboard range. The Lower trackdoes not play. This is also called the Full key-board mode.
By default, turning off the Split mode automati-cally selects the Full chord scanning mode (seeabove). In this mode, chords are detected over thefull keyboard range. You must always play threeor more notes to let the arranger recognize achord (see “Chord Recognition Mode” onpage 135).
You can jump to the Style Play > Key/Velocity Rangepage by keeping SHIFT pressed, and pressing the SPLIT button.See “Keyboard/Ensemble: Key/Velocity Range” on page 131.
TransposeUse these buttons to transpose the Sounds.
UPPER OCTAVE section
Use these buttons to transpose the selected track in steps of onewhole octave (12 semitones; max ±3 octaves). The octave trans-position value is always shown (in octaves) next to the Sound’sname.
Press both buttons together, to reset the Octave Transpose to thesaved value.
– Lowers the selected track by one octave.
+ Raises the selected track by one octave.
You can jump to the Style Play > Tuning page by keepingSHIFT pressed, and pressing one of the UPPER OCTAVE but-tons. See “Mixer/Tuning: Tuning” on page 123.
TRANSPOSE section
These buttons transpose the whole instrument in steps of onesemitone (Master Transpose). The transpose value is usuallyshown on the page header in the display.
Press both buttons together, to reset the Master Transpose to zero.
Note: You can also transpose MP3 files. Keep in mind, however,that transposition always remains inside the range -5…+6 semi-tones. This range is enough to cover all keys, but allows to avoidexcessive audio degradation. Any further transposing will bereversed to fit the range. So, you might see a +7 transpose value
(Just Fifth Up) shown in the display, but the MP3 will actually play5 semitones lower (Just Fourth Down).
♭ Lowers the Master Transpose in steps of onesemitone.
♯ Raises the Master Transpose in steps of one semi-tone.
You can jump to the Global > Transpose Control page bykeeping SHIFT pressed, and pressing one of the TRANSPOSEbuttons. See “General Controls: Transpose Control” on page 202.
Front USB connectorUse this connector to connect USB mass storage devices.
USB HOST(F) CONNECTOR
This is a USB Type A (Master/Host) connector, USB 2.0 compli-ant (High Speed). Use it to connect to the Pa3X an USB FlashMemory stick, an external CD-ROM drive, an USB hard disk. Toaccess the connected device, go to the Media edit mode (see“Media edit mode” on page 222).
SB
Set

19OverviewRear Panel
Intr
oduc
tion
Rear Panel
Music stand and speakers
Music stand / Amplification bar support
This guide can be used to connect either the supplied musicstand or the optional PaAS amplification system.
A music stand comes standard with your Pa3X. For instructionson how to install it, see on page 27.
The (optional) PaAS – Amplification System can be installed,adding a three-way amplification system, a pair of integratedspeakers and a bass-reflex box. For instructions on how to installit, see “Installing the Pa3X Amplification System (PaAS)” onpage 248.
Speakers connector and pin hole
The connector and pin hole are used when the (optional) PaAS –Amplification System is installed. See “Installing the Pa3XAmplification System (PaAS)” on page 248.
Note: Since the Pa3X must recognize the new circuit, the inte-grated speakers will start operating only a few seconds after thespeaker box has been installed.
The output volume of the integrated loudspeakers can be con-trolled via the MASTER VOLUME slider.
Note: Speakers are automatically deactivated when connecting theheadphones. You can manually deactivate them by using the“Speakers On/Off ” parameter of the “Audio Setup” section of theGlobal mode (see “Speakers On/Off ” on page 216).
Audio Input SectionUse these connectors to connect a microphone, another key-board/synthesizer, or a CD player.
MIC
Only active when the “Input Routing” parameter is set to “Mic Into Voice Processor” (Global > Audio Setup > Audio In page, seepage 215).
Connect your microphones, guitars, or any other musical instru-ment, to the AUDIO INPUTs on the back of the instrument. Amicrophone connected to the MIC input is also sent to the VoiceProcessor for sophisticate processing.
This is a combo connector, featuring an XLR and a 1/4” jack onthe same connector. Use the balanced XLR jack to connect acondenser microphone, or the 1/4” jack to connect a dynamicmicrophone.
The internal +48V Phantom Power on the MIC input also allowsto connect any condenser microphone. After having connected acondenser microphone, use the “+48V Phantom Power” softswitch to turn the +48V phantom power on (in the Global mode,
Pa3X 76-keys
Pa3X 61-keys
(a) (b)

20 OverviewRear Panel
see page 215). Phantom power is only supplied to the balancedXLR jack.
When disconnecting a microphone from the XLR jack, thephantom power is automatically turned off. Phantom power isalso automatically turned off each time you turn the Pa3X off.
Use the MIC GAIN knob to adjust the input gain, and set thevolume level using the MIC VOLUME knob, while watching atthe AUDIO IN LED on the control panel (see “Mic Setting Sec-tion” on page 15).
MIC GAIN
Use this controls to adjust the input sensitivity of the MIC con-nector (from 20 to 55dB). You can check the input level bywatching at the AUDIO IN LED on the control panel (see “MicSetting Section” on page 15).
LEFT, RIGHT
Always active. Use these balanced/unbalanced connectors toconnect a line-level input source, such as a CD player or a syn-thesizer. Depending on the status of the “Input Routing” param-eter (Global > Audio Setup > Audio In page, see page 215), thesignal goes directly to the Left and Right outputs or to the MP3Recorder. In the latter case, the volume is controlled by theMASTER VOLUME slider.
Set the input level by adjusting the source’s output volume. Youcan check the input level by watching at the AUDIO IN LED onthe control panel (see “Mic Setting Section” on page 15).
Note: The MIC VOLUME knob has no effect on these inputs.
Audio Output SectionUse these balanced/unbalanced connectors to send the audiosignal (sound) to a mixer, a PA system, a set of powered moni-tors, or your hi-fi system.
To assign an audio output to each track, or set the routing for theaudio inputs, see the “Audio Output” section, starting frompage 213.
LEFT, RIGHT
These are the main stereo outputs. Use them to send the finalstereo mix to an external device. Connect either of them to out-put the signal in mono. Adjust the output level with the MAS-TER VOLUME slider.
Stereo audio connection. Connect two mono cables to the main(LEFT, RIGHT) OUTPUTs. Connect the other end of the cablesto a stereo channel of your mixer, two mono channels, two pow-ered monitors, or the CD, LINE IN or TAPE/AUX input of youraudio system. Don’t use the PHONO inputs of your audio sys-tem!
Mono audio connection. Connect a mono cable to either the LEFTor RIGHT OUTPUT alone. Connect the other end of the cable to a
mono channel of your mixer, a powered monitor, or a single chan-nel of your CD, LINE IN or TAPE/AUX input of a hi-fi system (youwill hear that channel only, unless you can set the amplifier to Monomode).
OUT 1, 2
These are the sub outputs. Use them to create a stereo sub-mix ofjust some tracks, or to output just a single instrument to bemixed alone, or to be processed or amplified externally. Adjustthe volume of these outputs with the mixer’s or external speaker’slevel controls.
Multitrack audio connection. You can connect your Pa3X tofour channels of a mixer. This is very useful when recording, orif you want to send a player’s or backing track to a separate chan-nel. For example, by using the separate outputs, you may sendthe Drum or Bass track to an external compressor or reverb unit,or mix the separate tracks on an external mixer.
Connect four mono cables to each of the main (LEFT, RIGHT)and sub (1, 2) outputs. To feed the sub-outputs (1, 2) you mustprogram the track(s) you wish to send them (see the “Audio Out-put” section in the Global, starting from page 213).
Note: When a track is sent to OUTPUT 1 or 2, it is removed fromthe main mix going to the LEFT & RIGHT OUTPUTS.
Note: OUTPUTs 1 & 2 carry a dry sound with no effects applied.The volume of these outputs cannot be controlled with the MAS-TER VOLUME slider.
Note: The MASTER VOLUME slider has no effect on these out-puts. Signal is sent dry, with no effects applied.
DIGITAL OUTPUT
Use this 48 kHz S/PDIF output to digitally connect the Pa3X tothe S/PDIF input connector of another digital device, like a digi-tal mixer, audio card, or stand-alone recorder. The same signaloutput from the internal speakers (with the optional PaASAmplification System) or the Left and Right connectors is sentby this connector.
MIDI InterfaceThe MIDI interface allows your Pa3X to be connected to exter-nal controllers (master keyboard, MIDI guitar, wind controller,MIDI accordion…), to a series of expanders, or to a computerrunning a sequencer. For more information on how to use theMIDI interface, see the “MIDI” chapter.
IN
This connector receives MIDI data from a computer or a con-troller. Connect it to an external controller’s or computer’s MIDIOUT.

21OverviewRear Panel
Intr
oduc
tion
OUT
This connector sends MIDI data generated by Pa3X’s keyboard,controllers, and/or the internal player. Connect it to anexpander’s or computer’s MIDI IN.
THRU
This connector sends an exact copy of the data received on theIN connector. Use it to cascade the Pa3X with other MIDIinstruments.
PedalsUse these connectors to connect various types of pedals.
EC5
This connects to an (optional) Korg EC5 multiswitch pedal-board, to control many functions in realtime. To program theEC5, see “EC5-A…E” on page 209.
ASSIGNABLE
Use this port to connect a continuous- or footswitch-type pedal,like the (optional) Korg EXP-2, XVP10, or PS-1. To program andcalibrate it, see “Pedal/Footswitch” on page 208.
DAMPER
Use this to connect a Damper pedal, like the (optional) Korg PS-1 or DS1H. To change its polarity and calibrate it, see “Damper”on page 209.
Note: Half-pedalling on Piano Sounds is available when connect-ing a DS1H damper pedal.
USB ConnectorsUse these connectors to connect USB devices, or a personalcomputer.
DEVICE
This is a USB Type B (Slave/Device) connector, USB 1.1 compli-ant (Full Speed). Use it to connect the Pa3X to a personal com-puter, and transfer data to/from its internal devices (Hard Disk,Flash-memory SSD). See “HD Connection” on page 238 formore information.
MIDI over USB is supported, so you can use this connectorinstead of the MIDI ports (see “What is MIDI Over USB?” onpage 242). The drivers for PC and Mac needed for full use of thisfunction are supplied in the Accessory Disk that comes with theinstrument, or can be downloaded from our web site(www.korg.com).
HOST(R)
This is a USB Type A (Master/Host) connector, USB 2.0 compli-ant (High Speed). Use it to connect to the Pa3X an USB FlashMemory stick, an external CD-ROM drive, an USB hard disk. Toaccess the connected device, go to the Media edit mode (see“Media edit mode” on page 222).
Video
VIDEO OUT (optional)
If an optional VIF4 video interface is fitted, you can connect thePa3X to a TV or video monitor. See “Installing the Video Inter-face (VIF4)” on page 250 for more information.
PowerThis section is where you connect the Pa3X to the power line.
ACV cable connector
Plug the supplied AC cable into this connector.
POWER switch
Use this switch to supply power to the instrument, or to discon-nect it from the power circuit. This does not turn the instrumenton: after pressing it, press the STANDBY button to boot the sys-tem.
To turn the instrument off, either keep the STANDBY buttonpressed for 2 seconds to put it in standby mode (STANDBY LEDcolored red), or press the POWER button to completely turn itoff (STANDBY LED off).
For more information about how the POWER and STANDBYbuttons are related, see “STANDBY” on page 16.

22 Welcome!
Welcome to the world of Korg Pa3X Professional Arranger!Pa3X is the most powerful arranger available today, both for pro-fessional and home entertainment use.
Here are some of the features of your new instrument:
• Two keyboard version, 61 and 76 semi–weighted keys withvelocity and aftertouch.
• New aluminum cabinet with elegant design.
• TFT graphic touch screen display. Motorized tilting for the76 and fixed for the 61 keys.
• Professional TouchView™ graphic interface with a Searchfacility for quickly find files and musical resources.
• High quality optional PaAS – Amplification System withEasy Connection systems (no support, no cables, no powersupply needed).
• RX (Real eXperience) Technology, the cutting edge enginethat drives every aspect of the Pa3X – from the synthesis tothe display and how it all works together.
• Powerful EDS (Enhanced Definition Synthesis) Korgsound generation system, as seen in our best professionalsynthesizers.
• DNC (Dynamic Nuance Control) Sounds, more realisticand vivid than ever including Ambience Drums and Pianosfrom the acclaimed SV-1 Stage Vintage Piano.
• Up to 256 MB of User PCM Samples, equivalent to 512 MB(with compression), together with the huge internal mem-ory provides one of the most powerful sound engine avail-able for the best sound quality possible.
• Self refresh memory backup battery for User PCM Sam-ples, supported by an Intelligent re-charging system,ensures fast startup operations.
• Onboard sampling to create and edit new sounds and audiogrooves.
• General MIDI Level 2 Sound-compatible. Enhanced Soundcompatibility for GM Songs.
• More than 1100 Sounds, plus 90 Drum Kits.
• 512 Performance locations, and more than preloaded Sin-gle Touch Settings (STS), for fast setting of keyboardsounds and effects.
• 120 voices of polyphony.
• OPOS (Objective Portable Operating System) multitaskingoperating system, to let you load data while playing yourinstrument.
• Operating System updates, to load new features andenhancements from disk. Don’t let your instrument get old!
• Eight fully-programmable sliders, plus one MP3 Volumeslider, can be used as volume control or organ drawbars.
• Three assignable switches, joystick and ribbon strip ensuretotal control for all the various levels of articulation of thesound.
• Improved Style and Performance selection. Over 400 Fac-tory Styles with 4 Variations and 4 Fill In + Break, plus 15Favorite and User Style banks for unlimited storage of yourcustom Styles and settings.
• Style and Pad Record, including the enhanced “GuitarMode 2” for even more realistic guitar parts.
• “Chord Sequencer” function to record on-the-fly any chordprogression.
• Double MP3/Standard MIDI File player and recorder withAdvanced Vocal Remover.
• Enhanced compatibility with Lyrics in graphical format(+G) for Standard MIDI Files and MP3 files.
• New “Audio Chord Detection” function that automaticallyextracts chords to send to the Vocal Processor from MP3files.
• Double MP3 player and MP3 recorder as standard.
• XDS Double Player with X-Fader. Lyrics, Score and Markerdisplay.
• Full-featured 16-track sequencer.
• Fully editable music database, for fast song retrieving, sup-plied by the SongBook.
• Up to 8 Stereo Effects including flexible Master and Insertrouting for styles and songs. New vintage effects from theacclaimed SV-1 Stage Vintage Piano.
• Sophisticated TC-Helicon Voice Processor, with dedicatedprofessional effects, including pitch correction, doubling,and a 4-voice harmonizer.
• High-quality microphone preamplifier, with a balancedXLR/1/4” jack combo connector and +48V phantom poweron the XLR connector.
• “Adaptive Mic Setting” which provides a virtual soundengineer who automatically sets the best EQ/Compressor/Gate settings for your voice.
• Professional Final Mastering tools from Waves audioplugins Maxx Suite.
• High-quality input (ADC) and output (DAC) audio con-verters.
• Optional hardware expansions, to add a video out board,more Sample RAM and a kit to install an internal hard disk(61-key model only). Get more and more for the money!
• Standard hard disk (optional on the 61-note model), for thewidest space to your data. Standard flash-memory SSD(Solid State Disk) in the 61-note model.
• 2 x USB 2.0 High Speed Host ports, for connecting externaldevices like hard disks, CD-ROM drives, USB memorysticks, etc.
• USB 1.1 Full Speed Device port, to connect a personalcomputer to your Pa3X. This port can be used for file trans-fer, and for MIDI connection (without the need of a dedi-cated MIDI interface for the personal computer).
Welcome!
23Welcome!Live Performing
Intr
oduc
tion
Live Performing
Pa3X has been carefully designed to be used live. The “realtime”word has its full meaning in this instrument. Performancesallow the instant selection of all the tracks on the keyboard and asuitable Style; STSs allow an instant selection of the keyboardtracks; Styles are the realtime backing companions for your real-time playing; Pads are looping sequences or single hit sounds;Songs can be mixed in realtime; the SongBook is the quick wayto select a song from a sophisticated music database; the Searchfunction allows for instant localization of all the files and musi-cal resources of the instrument.
Easy Mode
If you are the kind of musician that prefers to play, more thandeal with technical matters, you can use the Pa3X in Easy Mode,and forget all its most powerful features, and let them out of yourway.
Useful links
Your preferred Korg dealer not only carries this keyboard, butalso a whole bunch of hardware and software accessories. Youshould ask him for more Sounds, Styles, and other useful musicmaterials.
Each Korg distributor can give you useful information. Just givethem a call for additional services. In the English-speakingworld, here are the relevant addresses:
USA KORG USA, 316 South Service Road, Melville,New York, 11747, USA
Tel:1-516-333-9100, Fax:1-516-333-9108
Canada KORG CANADA, a division of Jam Industries,21000 Trans-Canadienne, Baie D'Urfé, Quebec,H9X 4B7
Tel: 514-457-2555, Fax: 514-457-0055
E-mail: [email protected]
UK KORG UK Ltd, 9 Newmarket Court, Kingston,Milton Keynes, Buckinghamshire, MK10, 0AU
Tel.: 01908 857100
UK Technical Support Tel: 01908 857122, Fax:01908 857199
E-mail: [email protected]
Many Korg distributors also have their own web page on theinternet, where you can find infos and software. Useful webpages in English are the following:
Other useful information in various languages can be foundworldwide by accessing the other Korg web sites, like the follow-ing:
Korg USA www.korg.com
Korg UK www.korg.co.uk
Korg Canada www.korgcanada.com
Korg Inc. (Japan) www.korg.co.jp
Gaffarel Musique (France) www.laboitenoiredumusicien.com
Korg & More (Germany and Austria) www.korg.de
Eko Music Group (Italy) www.ekomusicgroup.com
Letusa (Spain) www.korg.es

24 Welcome!What’s in the box
What’s in the box
After you buy your Pa3X, please check all the following items areincluded in the package. If some of them are missing, immedi-ately contact your Korg dealer.
• Pa3X
• Music stand
• Power cable
• Owner’s Manual
• Accessory Disk (containing the USB driver, additionalmanuals, the Bonus Software, and various other supportfiles)
About this manual
This manual is divided in four sections:
• An Introduction, containing an overview of the instru-ment and of basic operations.
• A Quick Guide, containing a series of practical guides.
• A Reference Guide, with each page and parameterdescribed in detail.
• An Appendix, with a list of data and useful information forthe advanced user.
In addition, in the Accessory Disk and in our web site, you willfind:
• An Advanced Edit Manual, containing information on theStyle and Pad Record mode, the Sound mode, Sampling,the Voice Processor and the Effects’ editing parameters.This manual also includes tables listing all Factory data andassignable controls.
Within the manual, you will find the following abbreviations:
The parameter can be saved to a Performance byselecting the Write Performance command fromthe page menu.
The parameter can be saved to one of the SingleTouch Settings of the current Style, or to a SingleTouch Setting of a SongBook entry. To save it to aStyle, select the Write STS command from thepage menu of the Style Play mode. To save it to aSongBook entry (either of Style or Song type),check the Write STS option in the Book Edit 1page of the SongBook mode.
The parameter can be saved to the current StyleSettings by selecting the Write Style Settings com-mand from the page menu.
The parameter can be saved to the Global, byselecting one of the available Write Global com-mands from the page menu. Several Global areasare available, and a smaller symbol after the GBLabbreviation will appear for each relevant param-eter. More information is given in each Referencechapter.
The parameter can be saved to a SongBook entry.
Making a backup
In case you customize your Musical Resources (Sounds, Perfor-mances and Styles), we suggest you make frequent backup copiesof them, to avoid accidental loss. See “Full Resources Backup” onpage 235.
Restoring the original data
In case you want to restore the original data, you can use the“Factory Restore” procedure. See page 236.
Loading the Operating System
Your Pa3X can be constantly updated as new versions of theoperating system are released by Korg. You can download theoperating system from www.korg.com. Please, read the instruc-tions supplied with the operating system on the site.
You can see which version of the operating systems is installed inyour Pa3X by going to the “Utility” page of the Media mode (see“OS Version Number” on page 236).
Warning: Do not install an OS other than the official OS suppliedby Korg for the Pa3X. Trying to install an OS created for differentmodels or downloaded from unofficial web sites may cause dataloss and permanent damage to the instrument. Korg is not respon-sible for any damage caused by improper installation of the OS.
Set

25Start upConnecting the AC power cord
Intr
oduc
tion
Connecting the AC power cord
Connect the supplied powercord to the dedicated socket onthe rear of the instrument.Then, plug it into a wall socket.You don’t need to worry about
the local voltage, since the Pa3X uses a universal power adapter.
Turning the instrument on and off
Power onWhen the STANDBY LED is off, the instrument is completelyturned off. In this case, to turn the Pa3X on you must press thePOWER button on the back of the instrument, then press theSTANDBY button in the control panel.
The STANDBY LED will become green, and the display willlight up, showing the boot procedure. Loading times varydepending on the status of the battery charge:
Battery discharged (or not yet charged) – If it is the first timeyou turn the instrument on, or the internal battery has beencompletely discharged (after a power off of three-four days),Factory and User PCM Samples will be loaded from the internalstorage memory to the battery-backed Sample RAM memory.This procedure might take about two minutes, and variesdepending on the number of User PCM Samples to be loaded.
Battery charged – If Factory and User PCM Samples havealready been loaded, and the internal battery is still charged,PCM Sample will not have to be loaded again, and the boot pro-cedure will take a shorter time.
Exit from standbyWhen the STANDBY LED is red, the instrument is in standbymode. In this case, to turn the Pa3X on you must press theSTANDBY button in the control panel.
The STANDBY LED will become green, and the display willlight up, showing the boot procedure. Factory and User PCMSamples will not be loaded, since they already are in the battery-backed Sample RAM memory.
Put the instrument in standbyIf you want to let the internal battery recharge, put the instru-ment in standby instead of powering it off.
Keep the STANDBY button pressed for two seconds to put theinstrument in standby mode. The STANDBY LED become red.Factory and User PCM Samples are not removed from the bat-tery-backed Sample RAM memory.
While in standby mode, the internal battery is recharged, there-fore PCM Samples will not be deleted as long as the instrumentis connected to a power socket and the battery is charged.
Power offIf you want to save power, turn the instrument completely off.
Press the POWER button on the back of the instrument to com-pletely turn the instrument off. The STANDBY LED turns off.Factory and User PCM Samples are not deleted from the battery-backed Sample RAM memory.
While the instrument is powered off, the internal battery is notrecharged. PCM Samples in the battery-backed Sample RAMmemory will be preserved for about three or four days (depend-ing on the condition of the battery, and the size of the SampleRAM). When the battery discharges, PCM Samples are deletedfrom the Sample RAM memory, and must be reloaded the nexttime you power the instrument on.
Warning: When turning the instrument off or putting it instandby mode, all data contained in the volatile RAM area (Songrecorded or edited in Sequencer mode, PCM Samples in edit andnot yet saved) will be lost. MIDI Grooves generated by the TimeSlice function will be lost, too.
On the contrary, data contained in the SYS area of the internalstorage memory (Factory data, User Sounds, Performances, Styles,Pads and Multisamples) will be preserved. Saved PCM Sampleswill also be preserved.
Controlling the Volume
Master VolumeUse the MASTER VOLUME slider to controlthe overall volume of the instrument. Thisslider controls the volume of the sound going tothe integrated speakers (when the optionalPaAS – Amplification System is installed), themain (LEFT & RIGHT) OUTPUTs and theHEADPHONES connector.
The 1 & 2 OUTPUT connectors are not affectedby this slider. So, use the mixer’s or speaker’slevel controls to adjust the volume.
Note: Begin with a moderate level, then raise theMASTER VOLUME up. Don’t keep the volume at an uncomfort-able level for too long.
Start up

26 Start upThe X-Fader slider
Keyboard, Style and Song VolumeBy default, this slider balances the volume of theKeyboard (RT, Realtime) tracks, against theStyle (ACC, Accompaniment), Pad and Song(SEQ) tracks.
• When in Style Play mode, this slider bal-ances between the Keyboard tracks, andthe Style and Pad tracks.
• When in Song Play mode, this slider bal-ance between the Keyboard tracks, and thePlayer and Pad tracks.
As an alternative, the slider can be used to con-trol the Style/Song Volume without affecting the Keyboardtracks (see “Balance Slider” on page 206 for information on set-ting the slider’s behavior).
This is a relative control, whose effective maximum level isdetermined by the MASTER VOLUME slider position.
When moved, a magnified version of the virtual slider appears inthe display, for more accurate positioning.
Note: This slider only works in Style Play and Song Play mode; itdoes not work in Sequencer mode.
The X-Fader slider
The X-Fader slider sets the relative volume of the two onboardplayers (Player 1 and Player 2).
• Move it fully to the left to set Player 1 to the maximum leveland Player 2 to zero.
• Move it fully to the right to set Player 1 to zero and Player 2to the maximum level.
• Move it to the center to set both Players at the same level.
This slider also selects the (see “Harmony Control” onpage 157), and may select the Lyrics, Score and Markers of oneof the two players.
Note: When moving this slider fully to the right or to the left, theLyrics, Chords, Markers and Score page shown may change.
Note: When turning the instrument on, move this slider to the cen-ter, to avoid starting a Song at the minimum level.
Headphones
Connect a pair of headphones to the PHONES output, under the leftpart of the keyboard (just under the joystick). You can use head-phones with an impedance of 16-200 Ohms (50 Ohms suggested).Use a headphone splitter to connect more than one pair of head-phones.
Loudspeakers
Connect the optional PaAS – Amplification System to make itthe integrated loudspeakers of the Pa3X, adding a three-wayamplification system, a pair of dual-coil integrated speakers anda bass-reflex box.
To install the amplification system, see “Installing the Pa3XAmplification System (PaAS)” on page 248.
After installation, the overall volume can be controlled via theMASTER VOLUME slider.
Speakers can be deactivated with the “Speakers On/Off ” param-eter, that you can find in the “Audio Setup: Metro / MP3 / Speak-ers” page of the Global mode (see page 216 for moreinformation).
Note: When connecting the headphones, the speakers are automat-ically deactivated.
Audio Outputs
Audio outputs allow for connecting the Pa3X to an externalamplification system. See “Audio Output Section” on page 20 formore details.
Audio Inputs
Audio inputs allow for connecting a microphone and otheraudio source to the Pa3X. See “Audio Input Section” on page 19for more details.
Use the MIC GAIN knob next to the MIC input to set the inputsensitivity. Use the MIC SETTING section in the control panelto set the input volume and other parameters.
See the “Singing with a microphone” chapter on page 88, and the“Audio Setup: Audio In” section on page 215, for more informa-tion on connecting and setting the inputs and the audio source.
MIDI connections
You can play the internal sounds of your Pa3X with an externalcontroller, i.e. a master keyboard, a MIDI guitar, a wind control-ler, a MIDI accordion, or a digital piano.
You can also control other MIDI devices with the Pa3X, or con-nect it to a computer for use with an external sequencer.
As an alternative to the MIDI connectors, you can use the USBDevice port for direct connection to a personal computer.
See the “MIDI” chapter on page 242 for more information onMIDI connections.
Player 2Player 1

27Start upDamper pedal
Intr
oduc
tion
Damper pedal
Connect a Damper (Sustain) pedal to the DAMPER connectoron the back panel. Use an (optional) Korg PS1 or DS1H foot-switch pedal, or a compatible one. With the Korg DS1H, half-pedalling can be used on some Grand Piano Sounds. To calibrateand switch the Damper polarity, see “Damper” on page 209
Assignable pedal
Connect either a footswitch or an expression pedal to theASSIGNABLE PEDAL connector. Use an (optional) Korg PS1footswitch pedal, a Korg EXP-2 expression pedal, a Korg XVP-10volume pedal, or a compatible one,
Demo
Listen to the built-in Demo Songs to appreciate the power of thePa3X. There are several Demo Songs to choose from.
1. Press the STYLE PLAY and SONG PLAY buttons together.Their LEDs start blinking.
At this point, if you don’t press any other button, all theDemo Songs will be played back.
2. Select one of the available options, to listen to a specifiedDemo Song.
3. Stop the Demo by touching the STOP button on the display, orby exiting the Demo mode by pressing any MODE button.
The music stand
A music stand comes standard with your Pa3X.
• If the (optional) PaAS – Amplification System is not installed,insert the music stand into this dedicated guide on the back ofthe Pa3X, as shown in the illustration:
The music stand can be freely adjusted, by sliding it to the left orthe right of the standard central position.
• If the (optional) PaAS – Amplification System is installed,make it rest over the nylon supports in front of the PaAS, asshown in the illustration.

28 Glossary of TermsSound
Before you begin, take a few moments to familiarize yourselfwith the names and terms we will be using to talk about the vari-ous elements of the Pa3X.
In this section, you will find a brief description of various keyelements of the Pa3X. A professional arranger (Pa) keyboarduses different terminology than a traditional synthesizer orworkstation. By familiarizing yourself with the names and func-tions in this section, you will get a better understanding of howall the different parts of the Pa3X work together to create a real-istic musical performance. This will also help you to get the mostout of the rest of the User’s Manual.
Sound
A Sound is the most basic unit of an Arranger Keyboard perfor-mance. A Sound is basically a playable instrument timbre (piano,bass, sax, guitar…) that can be edited, saved, recalled andassigned to any track. An individual Sound can be played on thekeyboard in the Sound mode. In the Style Play, Song Play orSequencer mode, Sounds may be freely assigned to Sequencertracks, Style tracks, or Keyboard tracks.
Style
The Style is the heart of a professional arranger keyboard. At itsbasic level, a Style will consist of up to eight parts, or “Tracks”.
DrumsThe Drum track will provide a repeating rhythmic phrase,played by the standard instruments of a Drum Kit.
Percussion An additional rhythmic phrase played by various percussioninstruments (conga, shaker, cowbell, etc.) is provided by the Per-cussion track.
The Drum and Percussion tracks will play the same phraserepeatedly, regardless of the notes and chords being played onthe keyboard, although it is possible to assign a different DrumKit to either part, or to edit the Kit itself.
Bass & AccompanimentThe Bass track and the (up to) five additional Style tracks willeach play musical phrases that are musically related to and insync with the Drum and Percussion tracks. However, the notesbeing played by these tracks will change to follow the chord pro-gression that you play on the keyboard.
Again, any Sound you choose may be assigned to any track in aStyle.
VariationFor each Style, there are four Variations. In general, each Varia-tion is a slightly different version of the others. As you progressfrom Variation one to Variation four, the arrangements willbecome more complex, and more parts (Tracks) may be added.This allows your performance to have a more dynamic arrange-ment, without losing the original “feel” of the Style.
Fill-in & BreakDuring a performance, a drummer may often perform a “fill” -such as when transitioning from a verse to a chorus – addingextra dynamics and keeping the beat from getting too repetitive.The Pa3X offers four Fill-ins specifically programmed for eachStyle. A Fill-in may be drums alone or drums with instrumenta-tion. Then, there is even a silent “break”.
Intro & EndingEach Style also allows you to embellish your performance with aset of musical introductions and endings. A long and short ver-sion of the Intro and Ending are usually provided, with the for-mer more harmonically elaborated, and the latter with a fixedchord. A “count-in” style Intro is also provided, as well as thequick Ending 3.
Pad
Pads are like single-track Styles, that can be triggered by usingthe dedicated PAD buttons. They can be used to play in realtimesingle sounds, as well as short, cycling sequences that play intime with the Style or Standard MIDI File, and are transposedaccording to the recognized chords.
Keyboard tracks
In addition to the Style and Pad tracks, up to four additionalparts can be played on the keyboard in real-time. Each of theseKeyboard tracks can be limited to a particular range of keys orvelocities, but in general three can be assigned to play above thesplit point (Upper), and one below (Lower). This allows theUpper Sounds to be layered together. The split point can be setto any note on the keyboard. In addition to performing alongwith a Style, these same Keyboard tracks will allow you to playalong with the Player.
STS (Single Touch Settings)Single Touch Settings allow you to instantly change the soundsassigned to each of the Keyboard tracks with a single buttonpress, allowing for wide variation in sounds during a perfor-mance. Four STS (Single Touch Settings) can be saved with eachStyle or SongBook entry.
Glossary of Terms

29Glossary of TermsPerformance
Intr
oduc
tion
EnsembleBy turning the Ensemble feature on, a single note played on oneof the Keyboard tracks will be embellished by additional notes tocreate a complete chord voicing. The Ensemble knows whichnotes to add by looking at the chord that you are playing. Inaddition, the Ensemble parameters allow you to select the type ofvoicing that will be added – from a simple one-note harmony toa full “Brass” section – even a marimba-style trill!
Performance
The Performance is the most encompassing setting on the Pa3X– a single setting that can remember a Style (with all the appro-priate sounds), the Keyboard tracks (with all the appropriatesounds) and all their Settings, Tempo, transposition, effects,etc… A Performance can be stored in one of the Performancebank locations, or it can be saved in a “database” format usingthe SongBook function.
Sequencer
The Sequencer acts as a recorder, so you can capture and play-back your performances. The Pa3X sequencer can function indifferent modes. In the Backing Sequence mode, each Style ele-ment and each Real-Time (Keyboard and Pads) element can berecorded on a separate track in a single pass. This can be a bighelp in getting a song recorded quickly. The sequencer can alsobehave as a traditional 16-track linear sequencer, where eachtrack is recorded individually one at a time.
Player
The two Players act as two music player, so you can playbackyour performances or any Standard MIDI File or MP3 file. Likea DJ console, you can mix two songs with the X-Fader slider.
The LOGO decoder
On the front panel of your Pa3X you have probably noticed fivelogos, and may have even wondered what they stand for. Well,here is a quick explanation of each one.
RX Technology is the cutting edge enginethat drives every aspect of the Pa3X –from the synthesis to the display and howit all works together.
A variety of professionalvocal effects are provided bythe Pa3X – including reverb,
delay, compression, hard tune, doubling, modulation, filtering,and even four-part vocal harmonies! All of the vocal effects areprovided by TC-Helicon, the leader in vocal processing technol-ogy.
Waves, the celebrated maker of world-renowned professional studio effects,provides a set of mastering-level tools,
called the MaxxAudio suite. This suite increases the perceivedloudness and sizzle of the output, either amplified by the(optional with PaAS Amplification System) integrated speakersor by any external amplification system.
General MIDI (GM) is a standard thatensures the compatibility of sounds andmessages between GM compatible instru-ments available from different manufactur-
ers. For example, sequenced songs created on any GM equippedproduct and saved in the GM format will playback correctly onthe Pa3X.
General MIDI 2 extends the basic features of the General MIDI,allowing for 256 Sounds and 9 Drum Kits (instead of 128 and 1).
DNC (Defined Nuance Control) is the way offine-controlling Korg’s powerful synth soundengine. Every nuance and every detail of thesound can be assigned to a different control, be it
the keyboard velocity or a physical controller. Play the sound liveusing all of your body, as if you were interacting with an acousticinstrument.

30 Interface basicsThe Color TouchView™ graphical user interface
The Color TouchView™ graphical userinterface
Pa3X features an easy-to-use graphical user interface, based onKorg’s patented Color TouchView™ interface. Here are the basicelements of the user’s interface.
PagesParameters are grouped into separate pages, to be selected bytouching the corresponding tabs on the lower area of the display.
Menus and sectionsPages are grouped in sections, to be selected by touching the cor-responding buttons in the Edit menu that opens up when youpress the MENU button.
Overlapping windowsSeveral windows, like the Style Selection, the Global, the Media,or the Lyrics, overlap the current window. After you select anitem in the window, or press the EXIT button, the windowcloses, and the underlying page is shown again. (The followingexample is the Sound Select window).
Dialog boxesSimilar to selecting windows, dialog boxes overlap the underlay-ing page. Touch one of the button on the display to give Pa3X ananswer, and the dialog box will close.
Page menusTouch the icon on the upper right corner of each page, and amenu with suitable commands for the current page will appear.Touch one of the available commands to select it. (Or, touch any-where else on the screen to make it disappear, with no commandselected).
Interface basics

31Interface basicsThe Color TouchView™ graphical user interface
Intr
oduc
tion
Pop-up menusWhen an arrow appears next to a parameter name, touch it toopen a pop-up menu. Select any of the available options (or any-where else on the screen to make the menu disappear).
CheckboxesThis kind of parameters are on/off switches. Touch them tochange their status.
Numeric fieldsWhen a numeric value can be edited, touch it a second time toopen the Numeric Keypad.
The virtual numeric keypad works exactly as the numeric key-pad of a personal computer.
As an alternative, touch a numeric field and keep it held. Thenmove your fingers up (or right) to increase the value, or move itdown (or left) to decrease it.
This also includes the Tempo numeric field in the main page ofthe Style Play, Song Play, and Sequencer modes.
Editable names
When the (Text Edit) button appears next to a name, touchit to open the Text Edit window and edit the name.
The virtual keyboard works exactly as a personal computer’skeyboard. Some of the symbols are context-sensitive, and onlyappear when they can actually be used.
Lists and scrollbarsFiles on storage media, as well as other kinds of data, are shownas lists. Use the scrollbar to scroll the list content.
Keep the SHIFT button pressed while touching one of thearrows, to scroll to the next or previous alpha-numeric section.
Virtual slidersTo change a virtual slider’s position, select it, then use theVALUE controls to change its position. As an alternative, touch aslider with your fingers and keep it held; then move it up ordown to change its position.
The position of the virtual sliders often corresponds to that ofthe physical sliders, so move these latter to change the virtualslider’s position.
List
Scrollbar

32 Interface basicsOperative modes
Virtual knobsTo change a virtual knob’s position, select it, then use the VALUEcontrols to change its position. As an alternative, touch a knobwith your finger and keep it held; then move your fingers up (orright) to rotate it clockwise, or move it down (or left) to rotatethe knob counter-clockwise.
The position of the virtual knobs often corresponds to that of thephysical knobs, so move these latter to change the virtual knob’sposition.
Virtual drawbarsTo change a virtual drawbar’s position, use the physical sliderson the control panel (provided they are in Drawbars mode).
As an alternative, you can change a drawbar position in the dis-play. Select it, then use the VALUE controls to change its posi-tion.
Also, you can touch a drawbar with your fingers and keep inheld. Then move it up or down to change its position.
IconsVarious icons help identifying the type of a file, a Song, a folder.For example:
Folder
File of Style bank
Standard MIDI File
Operative modes
Pa3X pages are grouped into various operating modes. Eachmode is accessed by pressing the corresponding button in theMODE section on the control panel.
Each operating mode is marked with a different color code, thathelps you understand at first sight where you are.
Three special modes (Global, Media, and SongBook) overlap thecurrent operating mode, that remains active in the background.The SongBook mode can recall the Style Play or Song Playmodes.
The Record mode can be accessed from the Style Play, Sequencerand Sound modes, and allows for creating new Styles, Songs orSamples.
The MP3 Record mode can be accessed by keeping the SHIFTbutton pressed and pressing the RECORD button, and allows forrecording a Song in MP3 format.
Selected, highlighted items
Any operation carried on on parameters, data or list entries, isexecuted on highlighted items. First select the parameter or item,then execute the operation.
Non-available, grayed-out parameters
When a parameter or command is not currently available, it isshown in grey on the display. This means it cannot be selected,but may become available when a different option is selected, oryou switch to a different page.
Shortcuts
Some commands or pages can be recalled by keeping the SHIFTbutton pressed, and pressing other buttons or elements in thedisplay. See the “Shortcuts” chapter on page 262 for a list of avail-able shortcuts.

33Easy Mode
Intr
oduc
tion
If you have never used an arranger before, we suggest you toswitch to the Easy Mode. Easy Mode allows you to play Stylesand Songs with a simple user interface, free from the manyadvanced parameters that you will want to learn at a later date.
Turning the Easy Mode onTouch the little rectangle on the top right corner of the display,to open the page menu:
Touch the “Easy Mode” menu item, to make the checkmarkappear:
At this point, the Easy Mode has been activated, and the ele-ments in the display appear less cluttered:
Note: The Easy Mode will remain active even after turning theinstrument off and on again.
Turning the Easy Mode offThe instrument will stay in this mode even after having beenturned off. Repeat the above operation when you want to deacti-vate the Easy Mode.
Easy Mode
The page menu

34 Easy ModeThe Style Play page in detail
The Style Play page in detail
To see this page, press the STYLE PLAY button.
Notes:
• There are three Sounds for the right hand (Upper 1, Upper 2,Upper 3), and only one Sound for the left hand (Lower). Theirnames are abbreviated as UP1, UP2 UP3, LOW, and are shownin the right side of the display.
• Right hand (Upper) and left hand (Lower) Sounds are sepa-rated by the Split Point.
• Performances and STSs are collections of Sounds. Just chooseone of them to change all the Sounds of the keyboard (and, whenthe STYLE CHANGE LED is lit on the control panel, of theStyle).
• Choose a Style to change the musical style of the accompani-ment patterns. Touching the Style name in the display is thesame as to press one of the buttons of the STYLE section on thecontrol panel.
Sound icon and status. If the icon appears, the Sound
is in mute and cannot be heard. If the icon does not appear, the Sound is in play and can be heard. See page 42
Sounds assigned to the right hand (UP1 to UP3) and to the left hand (LOW). Touch the Sound’s name to open the Sound Select window and choose a different Sound.
See page 104
Style name and info. Touch the Style’s name toopen the Style Select window and choose a dif-
ferent Style. See page 105
Tempo. Use theTEMPO buttons to
change it.
Length of the accompaniment pat-tern, and current beat.
Performance or STS. Touch it to openthe Performance Select window and
choose a different Performance.Sounds on the keyboard will change.
See page 104
Single Touch Settings (STS). Touch one of them to choose it, or use the dedicated buttons on
the control panel. Sounds on the keyboard will change. See page 106
Split Point. Touch here and play a note to set the new split point. See page 46
Voice Processor Preset. Touch here to change preset, therefore the microphone’s effects and doubling/harmonization. See page 92
Talk On/Off. Turn it on to talk with youraudience. See page 95

35Easy ModeThe Song Play page in detail
Intr
oduc
tion
The Song Play page in detail
To see this page, press the SONG PLAY button.
Notes:
• As in Style mode, there are three Sounds for the right hand(Upper 1, Upper 2, Upper 3), and only one Sound for the lefthand (Lower). Their names are abbreviated as UP1, UP2 UP3,LOW, and are shown in the right side of the display.
• Right hand (Upper) and left hand (Lower) Sounds are sepa-rated by the Split Point.
• Performances and STSs are collections of Sounds. Just chooseone of them to change all the Sounds of the keyboard.
• Available STSs depend on the Style or SongBook entry you lastselected.
• Since there are two onboard Players, you can play two Songs atthe same time. Mix them using the X-Fader on the control panel.
• Touching a Song name in the display is the same as to press oneof the SELECT buttons on the control panel. Each Player has itsown SELECT and transport buttons.
Sound icon and status. If the icon appears, the
Sound is in mute and cannot be heard. If the icon does not appear, the Sound is in play and can be heard. See page 42
Sounds assigned to the right hand (UP1 to UP3) and to the left hand (LOW). Touch the Sound’s name to open the Sound Select window and choose a different Sound. See page 104
Song assigned to Player 1. Touch it to open theSong Select window and choose a different Song.
See page 106
Tempo. Use theTEMPO buttons to
change it.
Song assigned to Player 2. Touch it toopen the Song Select window and
choose a different Song. See page 106
Performance or STS. Touch it to openthe Performance Select window and
choose a different Performance.Sounds on the keyboard will change.
See page 104
Single Touch Settings (STS). Touch one of them to choose it, or use the dedicated buttons on the control panel. Sounds on the keyboard will change. See page 106
Split Point. Touch here and play a note to set the new split point. See page 46
Voice Processor Preset. Touch here to change preset, therefore the microphone’s effects and doubling/harmonization. See page 92
Talk On/Off. Turn it on to talk with youraudience. See page 95

36 Easy ModeThe Song Play page in detail


38 Turning the instrument on and listening to the demosTurning the instrument on, and viewing the main screen
First of all, turn the instrument on and familiarize yourself with the main screen. You can also listento the demos.
Turning the instrument on, and viewing the main screen
1 Turn the Pa3X on by pressing the POWER button, located on the back panel, then theSTANDBY button located in the control panel.
Note: The POWER buttonconnects the Pa3X to thepower line, while theSTANDBY button turns it on.
After you turn the instrument on, a welcome screen is shown for a few seconds, and then themain display appears.
2 When you want to turn the Pa3X off, keep the STANDBY button pressed for two sec-onds, and put it in standby mode.
The preferred way to turn the Pa3X off is to put it in standby mode, so that the internal batterywill continue charging and preserve the Sample RAM content intact. If you prefer to save somepower, turn the Pa3X off by pressing the POWER button instead. Please note that in the lattercase the internal battery preserving the content of the Sample RAM will discharge in three-fourdays, and loading PCM Samples with then take longer.
Turning the instrument on and listening to the demos
Power switch DisplayDemo buttons Real Time (Keyboard) Tracks

39Turning the instrument on and listening to the demosPlaying the demos
Qui
ck G
uide
Playing the demos
A variety of demo songs have been included to demonstrate the sonic power of the Pa3X.
1 To open the Demo page, press the STYLE PLAY and SONG PLAY buttons at the sametime.
2 Follow the instructions in the display. That’s it!

40 Playing SoundsSelecting a Sound and playing it on the keyboard
You can play up to three sounds at the same time on the keyboard. You can also split the keyboardinto two parts, to play up to three sounds with your right hand (Upper), and one with your left hand(Lower).
Selecting a Sound and playing it on the keyboard
1 Be sure the Upper 1 track is selected and set to play.
Note: Be sure tracksUpper 2 and Upper 3 aremuted, and are not playing. Ifyou hear more than onesound, see also page 42 forhow to mute tracks.
2 If you want to play the Sound on the whole keyboard, be sure the keyboard is in FullUpper mode (i.e., no SPLIT LED turned on). If it is split in two parts, press the SPLIT but-ton to turn its LED off.
Playing Sounds
Performance Select section
Split buttonSound Select section
i
A selected track is shown with a white back-ground. In this example, the Upper 1 track is selected. If it is not selected, touch it once to select it.
The fact that there isn’t a icon over the bank icon means that the Upper 1 track is set to play. If it is muted, touch the bank icon to set it to play, or use the ON/OFF buttons in the REAL TIME TRACKS section of the control panel.
(Full) Upper

41Playing SoundsSelecting a Sound and playing it on the keyboard
Qui
ck G
uide
3 Touch the Upper 1 track’s area in the display, to open the Sound Select window.
Note: You can also openthe Sound Select window bypressing one of the SOUNDSELECT buttons in the REALTIME TRACKS section.
4 Select a Sound from the Sound Select window, then press the EXIT button to close thewindow.
5 Play the Sound on the keyboard.
Note: Selection windowsmay automatically closeafter a selection. To do this,uncheck the “Display Hold”box in the Global > GeneralControls > Interface page. Inthis case, press the EXIT but-ton only if you don’t makeany selection but want toclose the window.
i
The selected Sound is highlighted.Touch a Sound’s name to select it.
Touch one of the side tabs to select adifferent Sound bank.
Touch one of the lower tabs to selecta different Sound page.
A Previous and Next Page pair of button may appear in this area, when more than five pages are available.
The currently selected Sound appears in the page header.
Target track for the selected Sound
Sound bank icon
Sound’s nameType of Sounds.
The Sound Select window closes, and the main screen appears again, with the selected Sound assigned to the Upper 1 track.
i

42 Playing SoundsPlaying two or three Sounds at the same time
Playing two or three Sounds at the same time
You can layer all three Upper tracks and play them on the keyboard.
1 Either press the UPPER 2 ON/OFF button in the REAL TIME TRACKS section of the con-trol panel, or touch the icon in the Upper 2 status box, to set the Upper 2 track toplay.
2 Play the keyboard.
Please note how the icon appears in the Upper 2 and Upper 3 status boxes. These tracks will not be heard.
After touching in this area, the icon disappears. The Upper 2 track will be set to play and will be heard.
Note how the ‘Dark Pad’ sound (assigned to the Upper 2 track) has been layered with the ‘Grand Piano’ (assigned to the Upper 1 track).

43Playing SoundsPlaying two or three Sounds at the same time
Qui
ck G
uide
3 Either press the UPPER 3 ON/OFF button in the REAL TIME TRACKS section of the con-trol panel, or touch Touch the icon in the Upper 3 status box, to set the Upper 3track to play.
4 Play the keyboard.
5 Either press the UPPER 3 ON/OFF button in the REAL TIME TRACKS section of the con-trol panel, or touch the bank icon in the Upper 3 status box, to mute the Upper 3 trackagain.
As above, after touching in this area, the icon disappears. The Upper 3 track will be set to play and will be heard.
Note how the ‘StringEns2’ sound (assigned to the Upper 3 track) has been added to the ‘Dark Pad’ (assigned to the Upper 2 track) and the ‘Grand Piano’ (assigned to the Upper 1 track).

44 Playing SoundsPlaying two or three Sounds at the same time
6 Play the keyboard.
7 Either press the UPPER 2 ON/OFF button in the REAL TIME TRACKS section of the con-trol panel, or touch the bank icon in the Upper 2 status box, to mute the Upper 2 trackagain.
8 Play the keyboard.
Note how the ‘StringEns2’ sound (assigned to the Upper 3 track) has been muted again. Only tracks Upper 1 and Upper 2 can be heard at this time.
Note how the ‘Dark Pad’ sound (assigned to the Upper 2 track) has been muted again. Only track Upper 1 can be heard at this time.

45Playing SoundsPlaying different Sounds with your left and right hand
Qui
ck G
uide
Playing different Sounds with your left and right hand
You can play a single Sound with your left hand, in addition to playing up to three Sounds with yourright hand.
1 Press the SPLIT button to turn its LED on, and split the keyboard into Lower (left hand)and Upper (right hand) parts.
2 Be sure the Lower track is set to play.
3 Play the keyboard.
Hint: You can select a dif-ferent Sound for the Lowerpart by pressing the LOWERSOUND SELECT button in theREAL TIME TRACKS section ofthe control panel, and follow-ing the same procedure usedfor the Upper 1 track. Seepage 40.
LowerUpper
If the Lower track is muted, touch its icon to make it disappear from this area, or press the LOWER ON/OFF button in the REAL TIME TRACKS section of the control panel (its LED must turn on).
iNote how the keyboard is split into two parts, each playing different sounds.
Lower Upper

46 Playing SoundsChanging the split point
4 Return to the full keyboard playing mode by pressing the SPLIT button to turn its LEDoff.
5 Play the keyboard.
Changing the split point
If you are not comfortable with the selected split point, you may set the split point to any key.
1 Touch the Split tab to see the Split Point panel.
(Full) Upper
Note how the keyboard once again plays the Upper tracks for the entire length of the keyboard.
Upper

47Playing SoundsChanging the split point
Qui
ck G
uide
2 Touch the keyboard in the display, then play the lowest note of the Upper section onthe keyboard.
3 As an alternative, touch the Split Point parameter to select it, and use the VALUE con-trols to select the new split point.
4 Touch the STS Name tab to go back to the STS Name panel.
LowerUpper

48 Playing SoundsRaising or lowering the Upper octave
Raising or lowering the Upper octave
If all Upper tracks sound too high or too low, you can quickly change which octave they are playingin.
1 Use the UPPER OCTAVE buttons on the control panel, to transpose all Upper tracks atthe same time.
Note: The Octave Trans-pose value for each of thekeyboard track is shownunder the Sound’s name.
2 Press both UPPER OCTAVE buttons together to reset the octave to the value saved inthe current Performance.
Digital Drawbars
A special Sound in the Pa3X is the “Digital Drawbars”. This sound emulates the classic tonewheelorgans of the past. You can use the Assignable Sliders of the Pa3X to adjust the position of each draw-bar, and then save these settings to a Performance (see “Saving your settings to a Performance” onpage 52).
1 Mute all Upper tracks, apart for the Upper 1 track. Select the Upper 1 track.
2 Touch the Sound name to open the Sound Select window.
i
Each press of this button willlower the pitch by one octave.
Each press of this button will raise the pitch by one octave.
The Upper 1 track is set to play and selected.
Upper 2 and 3 tracks are muted (they cannot be heard).

49Playing SoundsDigital Drawbars
Qui
ck G
uide
3 Select the Organ bank, then choose the Digit.DRAWBARS Sound.
Due to the nature of this Sounds, there is only one Digital Drawbar Organ Sound. Differentdrawbar settings may be stored with each Performance. So, selecting a different Performancewill select different settings for the Digital Drawbar Organ.
4 As soon as the Drawbars Setting page appears in the display, the Assignable Sliderswill function as if they were organ drawbars (the slider’s DRAWBAR LED will be lit).Move the Assignable Sliders to change the various drawbar settings.
Note: You don’t need tobe in the Digital Drawbarspage to use the AssignableSliders to change the sound.When a Drawbar Organ isassigned to a Keyboard track,the sound can also be modi-fied while in the main page,provided that the DRAWBARSLED is turned on.
After you select the Digital DrawbarsOrgan Sound, the Drawbars Setting
page appears.
i
To change the Digital Draw-bar Organ settings by using the Assignable Sliders, the DRAWBARS LED must be turned on. This automatically happens when recalling the Drawbars page.

50 Playing SoundsDigital Drawbars
5 Select different parameters in this page, and change their settings to see how each set-ting affects the sound.
Hint: As an alternative tousing Assignable Sliders tochange drawbar values, youcan touch a drawbar in thedisplay and use the VALUEcontrols to change it, or justdrag it in the display.
6 Touch the “Tone/Noise” tab, and try the sound parameters of the second page.
7 When you have found some settings that you like, you can save them to a Performance,as described later in this section.
8 Press the EXIT button to go back to the main page.
Check this checkbox to turn Per-cussion on. Percussion will make
the sound more aggressive
Experiment with thePercussion’s settings
Turn the Rotary effect on or off, and listen to how much more lively it makes the sound
Experiment with the Rotary speed
i
Leakage from adjacent tone-wheels, making the sound richer
Timbre
Volume of the noise generated when pressing or releasing the keys

51Selecting and saving PerformancesSelecting a Performance
Qui
ck G
uide
The Performance is the musical heart of the Pa3X. Unlike selecting single Sounds, selecting a Per-formance will recall several Sounds at the same time, the needed effects and transpositions, a suitableVoice Processor preset, plus many more parameters useful for playing in a musical situation.
You can save all control panel settings to a Performance memory location (including your DigitalDrawbar Organ settings). While many Performances are already supplied with the instrument, youcan customize each of them to your own taste, and then save them in their customized version.
Similar to Performances, you can also save your settings to a Single Touch Setting (STS), which willstore all the settings for the Keyboard tracks. Four STSs are supplied with each Style and SongBookentry, and can be selected with the four dedicated buttons under the display.
Note: As for Style tracks, theyare saved to a third objectcalled the Style Settings.
Please note that settings saved in Performance 1 of bank 1 are automatically selected when theinstrument is turned on. This means you can save your preferred startup settings to Performance 1-1.
Selecting a Performance
1 Touch the Performance area in the display, to open the Performance Select window.
Note: You can also openthe Performance Select win-dow by pressing one of thebuttons in the PERFOR-MANCE SELECT section. Thiswill let you jump directly tothe desired Performancebank.
Selecting and saving Performances
Performance Select sectionSingle Touch Settings (STS) section
i
The selected Performance is high-lighted. Touch a Performance name
to select it.
Touch one of the side tabs to select adifferent Performance bank.
Touch one of the lower tabs to select a different Performance page.

52 Selecting and saving PerformancesSaving your settings to a Performance
2 Select one of the Performances in the Performance Select window, then press the EXITbutton to close the window.
Note: Selection windowsmay automatically closeafter a selection. To do this,uncheck the “Display Hold”box in the Global > GeneralControls > Interface page. Inthis case, press the EXIT but-ton only if you don’t makeany selection but want toclose the window.
3 Play the keyboard.
Note: If theLED of theSTYLE CHANGEbutton isturned on,selecting a Performance mayautomatically select a differ-ent Style and its settings(Sounds, Effects, Drawbarsettings for the Styletracks…)
Saving your settings to a Performance
All the control panel settings, plus the Keyboard track settings, selected effects and Voice ProcessorPreset, can be saved to a single Performance, to be quickly recalled at a later time.
Note: To open the WritePerformance dialog box, youcan press the SHIFT + one ofthe PERFORMANCE SELECTbuttons.
1 Touch the page menu icon to open the page menu.
The Performance Select window closes, and the main screen appears again. Sounds, Effects, and other settings, change according to the setting memorized in the selected Performance.
i
iSettings memorized in the selected Performance have been selected. Sounds, effects and other settings have been recalled.
i
Page menu icon
Page menu

53Selecting and saving PerformancesSaving your settings to a Performance
Qui
ck G
uide
2 Select the ‘Write Performance’ command to open the Write Performance dialog box.
3 If you like, you may assign a new name to the Performance.
After choosing the Write Performancemenu item, the Write Performance dialog
box appears.
Touch the (Text Edit) symbol to open the
Text Edit dialog box.
Use the alphabetic characters to enter text.
Use the ‘<–’ and ‘–>’buttons or the DIAL to
move the cursor.
Use the SHIFT button to switch between capitals
and small characters.
Touch the ‘Backspace’ symbol to delete just a single character, ‘Clear’ to delete the whole string.
When done, touch OK to confirm the new name, or Cancel to abandon all changes.
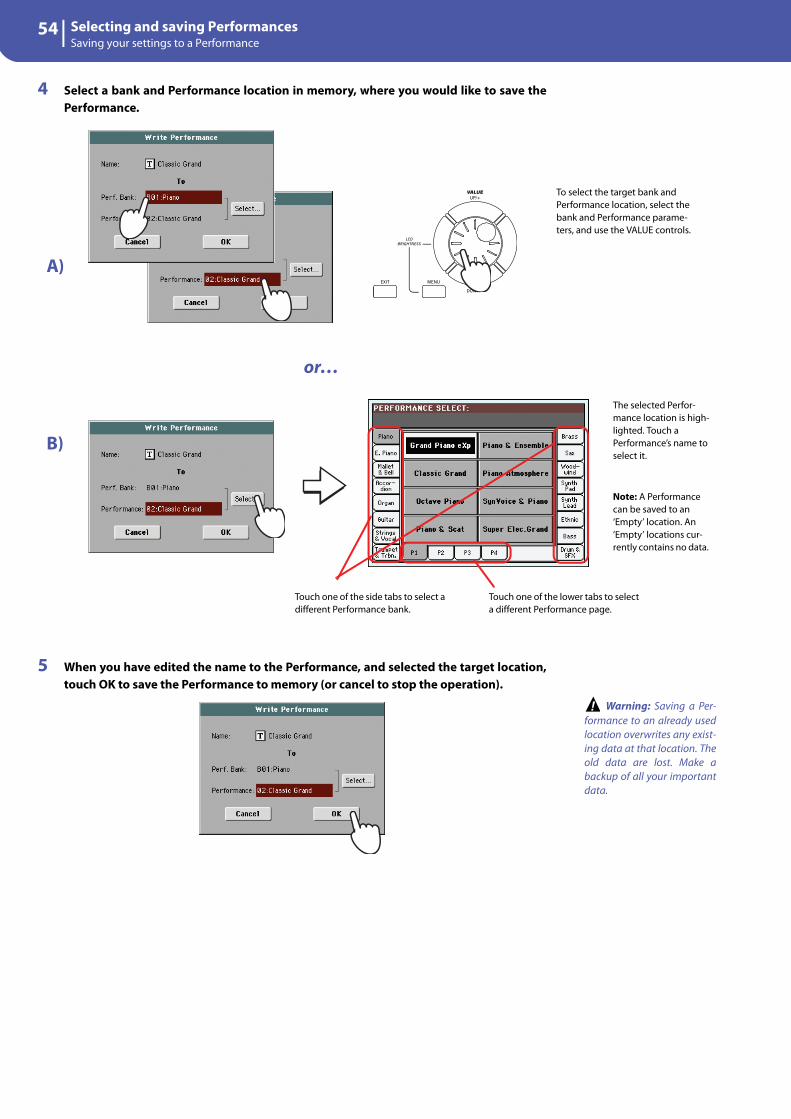
54 Selecting and saving PerformancesSaving your settings to a Performance
4 Select a bank and Performance location in memory, where you would like to save thePerformance.
5 When you have edited the name to the Performance, and selected the target location,touch OK to save the Performance to memory (or cancel to stop the operation).
Warning: Saving a Per-formance to an already usedlocation overwrites any exist-ing data at that location. Theold data are lost. Make abackup of all your importantdata.
To select the target bank and Performance location, select the bank and Performance parame-ters, and use the VALUE controls.
A)
B)
The selected Perfor-mance location is high-lighted. Touch a Performance’s name to select it.
Touch one of the side tabs to select a different Performance bank.
Touch one of the lower tabs to select a different Performance page.
or…
Note: A Performance can be saved to an ‘Empty’ location. An ‘Empty’ locations cur-rently contains no data.
!
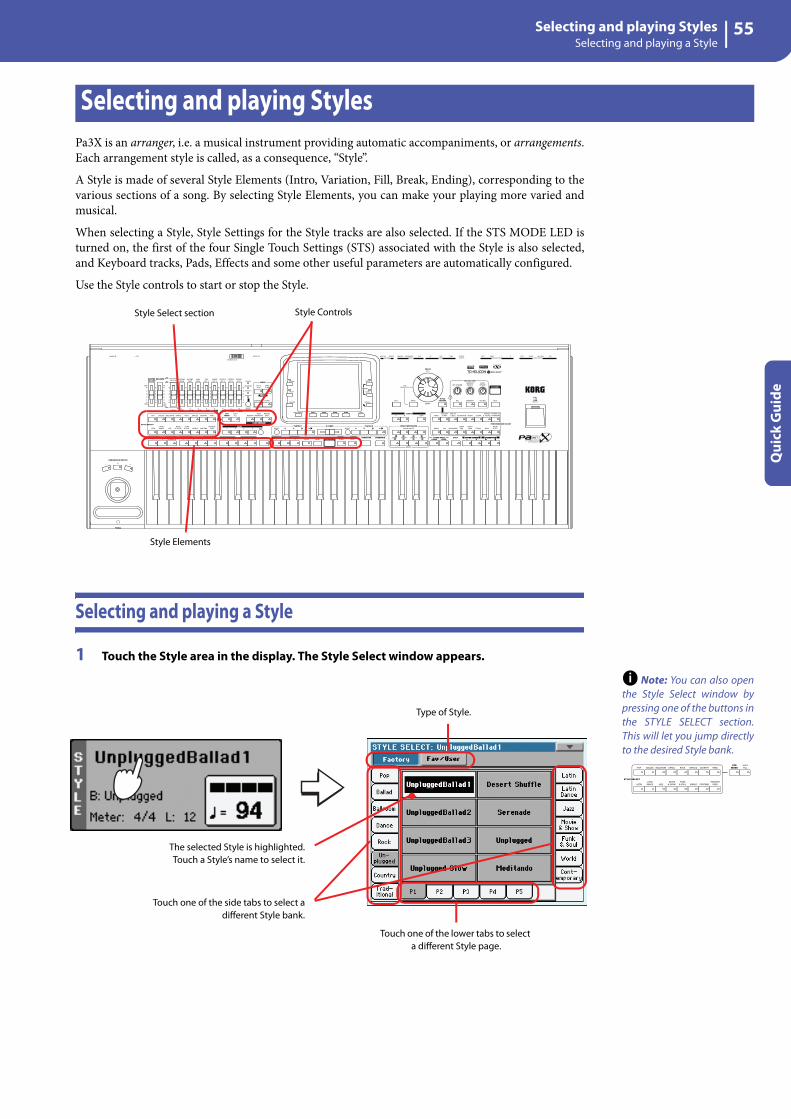
55Selecting and playing StylesSelecting and playing a Style
Qui
ck G
uide
Pa3X is an arranger, i.e. a musical instrument providing automatic accompaniments, or arrangements.Each arrangement style is called, as a consequence, “Style”.
A Style is made of several Style Elements (Intro, Variation, Fill, Break, Ending), corresponding to thevarious sections of a song. By selecting Style Elements, you can make your playing more varied andmusical.
When selecting a Style, Style Settings for the Style tracks are also selected. If the STS MODE LED isturned on, the first of the four Single Touch Settings (STS) associated with the Style is also selected,and Keyboard tracks, Pads, Effects and some other useful parameters are automatically configured.
Use the Style controls to start or stop the Style.
Selecting and playing a Style
1 Touch the Style area in the display. The Style Select window appears.
Note: You can also openthe Style Select window bypressing one of the buttons inthe STYLE SELECT section.This will let you jump directlyto the desired Style bank.
Selecting and playing Styles
Style Select section Style Controls
Style Elements
i
The selected Style is highlighted.Touch a Style’s name to select it.
Touch one of the side tabs to select adifferent Style bank.
Touch one of the lower tabs to select a different Style page.
Type of Style.

56 Selecting and playing StylesSelecting and playing a Style
2 Select a Style from the Style Select window.
Note: Selection windowsmay automatically closeafter a selection. To do this,uncheck the “Display Hold”box in the Global > GeneralControls > Interface page. Inthis case, press the EXIT but-ton only if you don’t makeany selection but want toclose the window.
3 Be sure one of the Chord Scan modes is selected.
4 Press the SYNCHRO-START button to turn its LED on.
Note: You could simplypress START/STOP to start theStyle, but the Synchro-Startfunction allows you to makethe Style start in sync withyour playing on the key-board. Therefore, it may beconsidered a “more musical”way of starting a Style.5 Play the keyboard.
6 Press START/STOP to stop the Style.
The Style Select window closes, and the main screen appears again, with the selected Style ready to go.
i
For chord scanning to work, either of both LEDs must be turned on. Lower: chords are recognized on the left of the split point; Upper: chords are recognized on the right of the split point; Full (both LEDs on): chords are recognized on the whole keyboard. Off: only the Drum track can be heard.
i
When the Syncho-Start function is turned on, the Style starts playing as soon as you play a note or chord in the chord recogni-tion area. Play chords with your left hand, and the melody with your right hand. The arranger will follow your playing.

57Selecting and playing StylesTempo
Qui
ck G
uide
Tempo
While a Tempo setting is saved with each Style or Performance, you can change it to be whatever youlike. You can use either of the following two methods.
Hint: As an alternative tousing the TEMPO buttons,hold the Tempo value in thedisplay, then move your fin-ger up/down or left/right (orchange the value with theVALUE controls).
• Use the TEMPO + or – buttons to change the Tempo value.
• Press the TEMPO– and + buttons together to recall the saved Tempo value.
• As an alternative, keep the SHIFT button pressed, and use the DIAL to change theTempo. The selected tempo will be shown in a small window.
Intro, Variation, Fill, Break, Ending
When playing Styles, you can select various “Style Elements” to make your playing richer. A Style ismade of three Intros (or two Intros and a Count-In), up to four basic patterns (Variations), four Fills,a Break, and three Endings.
1 Make sure the SYNCHRO-START LED is turned on (otherwise, press the button to turn iton).
Activating the Synchro Start function is not mandatory, but it might be handy.
2 Press one of the INTRO buttons to set the corresponding Intro to play.
i

58 Selecting and playing StylesSingle Touch Settings (STS)
3 Play the keyboard.
Hint: Turn the AUTO FILLLED on to let the Pa3X auto-matically select a Fill whenselecting a Variation.
4 While playing, press one of the FILL buttons to select a Fill.
Note: You do not need toselect a Fill before selecting adifferent Variation, butselecting a Fill makes thetransition “smoother” andmore musical.
5 Before the Fill ends, press one of the VARIATION buttons, to select a different variationof the basic pattern.
Note: You do not need toselect a Variation during aFill, since a Variation mayalready be automaticallyrecalled at the end of the Fill.See “Fill Mode (1…4, Break)”on page 134.
6 When you like to stop playing, press one of the ENDING buttons to stop the Style withan Ending.
Single Touch Settings (STS)
Each Style or SongBook entry may come with up to four Keyboard track and Voice Processor settings,called the STS (short for “Single Touch Settings”). STSs are very similar to Performances, but they arefine-tuned to the Style or SongBook entry they are associated to.
STS #1 is automatically selected when choosing a Style, provided the STS MODE LED is turned on.STS #1 is also recalled each time a SongBook entry is selected.
The Style starts with the selected Intro. When the Intro is com-pleted, the basic pattern (selected Variation) starts to play.
i
i
i
When the Fill ends, the selected Variation will start playing.
When the Ending is fin-ished, the Style automati-cally stops.

59Selecting and playing StylesSingle Touch Settings (STS)
Qui
ck G
uide
Hint: You can always seethe name of the four avail-able STSs for the currentStyle, by touching the STSName tab from any otherpanel.
1 Press one of the four STS buttons under the display, or touch the name of an STS in theSTS panel in the display.
2 Play the keyboard.
3 Try all the other STSs, and see how settings change with each of them.
4 You can also link the STSs to the Variations. First of all press the STS MODE button, tomake its LED flash.
5 Then press the various VARIATION buttons, and see how an STS is automaticallyselected when the corresponding Variation is selected.
6 Press the STS MODE again to turn its LED on (or off).
i
Settings memorized in the selected STS have been selected. Sounds, effects and other settings have been recalled.
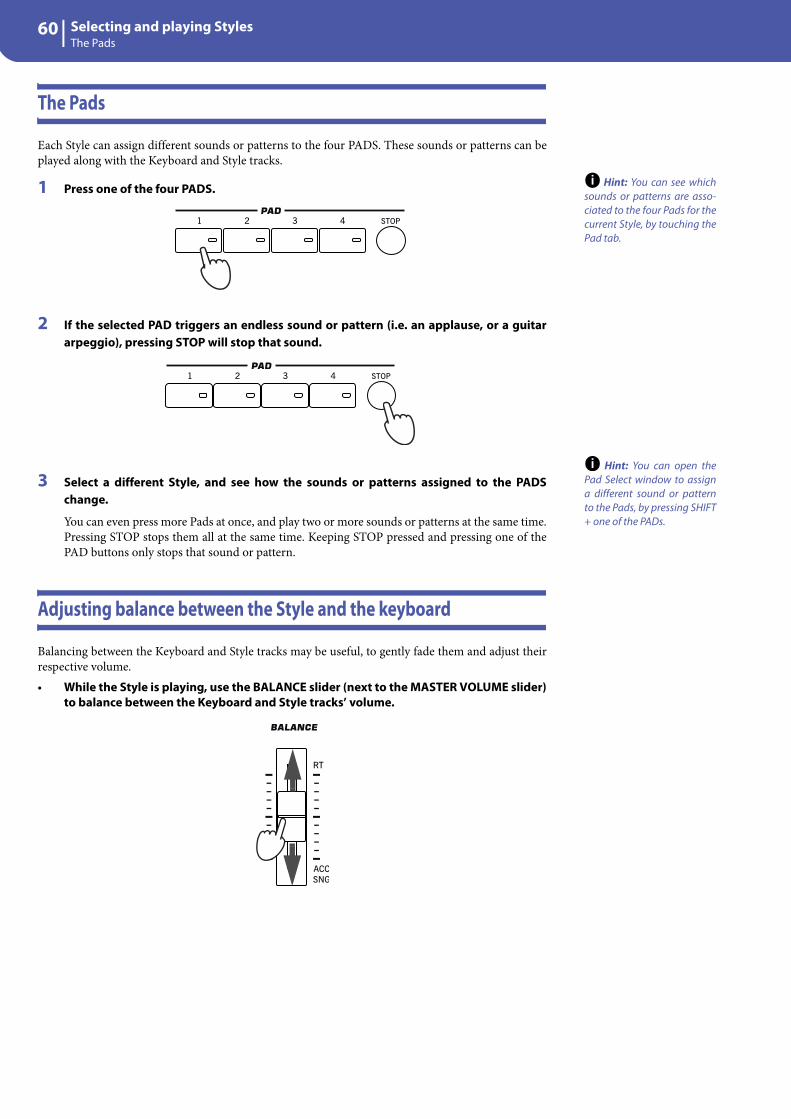
60 Selecting and playing StylesThe Pads
The Pads
Each Style can assign different sounds or patterns to the four PADS. These sounds or patterns can beplayed along with the Keyboard and Style tracks.
Hint: You can see whichsounds or patterns are asso-ciated to the four Pads for thecurrent Style, by touching thePad tab.
1 Press one of the four PADS.
2 If the selected PAD triggers an endless sound or pattern (i.e. an applause, or a guitararpeggio), pressing STOP will stop that sound.
Hint: You can open thePad Select window to assigna different sound or patternto the Pads, by pressing SHIFT+ one of the PADs.
3 Select a different Style, and see how the sounds or patterns assigned to the PADSchange.
You can even press more Pads at once, and play two or more sounds or patterns at the same time.Pressing STOP stops them all at the same time. Keeping STOP pressed and pressing one of thePAD buttons only stops that sound or pattern.
Adjusting balance between the Style and the keyboard
Balancing between the Keyboard and Style tracks may be useful, to gently fade them and adjust theirrespective volume.• While the Style is playing, use the BALANCE slider (next to the MASTER VOLUME slider)
to balance between the Keyboard and Style tracks’ volume.
i
i

61Selecting and playing StylesAdjusting the volume of each track
Qui
ck G
uide
Adjusting the volume of each track
You can adjust the volume of each of the Style and Keyboard tracks, for example to soften the bass alittle, or to make the keyboard solo louder.
1 Touch the Volume tab to see the Volume panel.
While you do not need to see the Volume panel to change the volume, doing so will let you seethe internal mixer of the Pa3X and visualize the status and volume of each track.
2 Use the Assignable Sliders (be sure the VOLUME LED is turned on) to adjust each Key-board track’s volume, as well as ‘grouped’ Style tracks.
In Normal view, all Styletracks are seen as three
‘grouped’ tracks.
To control the volume, the VOL-UME LED must be turned on. If it is off, repeatedly press the SLIDER MODE button to change it. Please note that the SLIDER MODE sta-tus is saved with each Perfor-mance or STS.
The LED indicator of“grouped” Style
tracks and Keyboardtracks turns on.

62 Selecting and playing StylesTurning the Style tracks on/off
3 To separately adjust each Style track, press the TRACK SELECT button to change thetrack’s view.
Hint: As an alternative,you can change each track’svolume, by touching a track’sarea to select it, then usingthe VALUE controls to changethe volume. Also, you can justtouch a track’s slider in thedisplay, then move your fin-ger up/down.
4 To return to the Keyboard/Grouped Style Tracks view, press the TRACK SELECT buttonagain.
Turning the Style tracks on/off
You may easily turn on or off any Style track while you are playing. For example, try muting allaccompaniment tracks, while drums and bass continue to play.
Note: While in the Nor-mal view of the Style Playmode, you can see Styletracks grouped in just three“grouped” tracks. To see eachStyle track as separate, indi-vidual tracks, just press theTRACK SELECT button.
1 Be sure the Volume panel is shown, or touch the Volume tab to show it.
i
In Style view, all separateStyle tracks are shown,and can be controlled
using the correspondingAssignable Sliders.
The LED indicator ofsingle Style tracks
turns on.
i

63Selecting and playing StylesAdding harmony notes to your right-hand melody with the ENSEMBLE function
Qui
ck G
uide
2 While the Style is playing, touch anywhere in the ACCOMP track’s channel strip toselect the track (volume value highlighted), then touch it again to set the track toMute.
3 To set the tracks back to the Play status, touch the Mute icon on the ACCOMP track.
Hint: When moving theslider of a muted track, thetrack is automatically set toOn again.
4 To mute/unmute each single Style track, first press TRACK SELECT to switch to the StyleTracks view, then repeat the above procedure.
5 Press the TRACK SELECT button again to go back to the Normal view.
Adding harmony notes to your right-hand melody with theENSEMBLE function
Chords played with your left hand may be applied to the right-hand melody.
1 Press the SPLIT button to turn its LED on and split the keyboard.
The Ensemble function only works in Split mode.
2 Press the ENSEMBLE button to turn its LED on.
Mute the ACCOMP track. All accompaniment tracks will go silent (apart from Drum, Percussion and Bass).
Set the ACCOMP track to Play. All accompani-ment tracks will return to their original vol-umes.
i

64 Selecting and playing StylesAdding harmony notes to your right-hand melody with the ENSEMBLE function
3 Play chords with the left hand and single notes in the right hand.
4 To select a different harmonization style, keep the SHIFT button pressed, and press theENSEMBLE button to open the Ensemble page.
This is a fast ‘shortcut’ to recall this page. The longer would have been entering the Edit mode bypressing the MENU button, touching the Keyboard/Ensemble section, and then going to theEnsemble page.
5 When the right harmonization type has been selected, press the EXIT button to goback to the main page.
6 Press the ENSEMBLE button again to turn its LED off. The automatic harmonization willbe turned off.
Notice how the right hand is automatically harmonized, accord-ing to the chords composed with your left hand.
While the Ensemble parameter is selected, use the VALUE controls to select one of the available harmonization types.
While in an edit page, press EXIT to go back to the main page of the current operating mode.

65Selecting and playing StylesThe Chord Sequence
Qui
ck G
uide
The Chord Sequence
In case you need both hands free for playing a solo while a Style is playing, you can record a ChordSequence and let Pa3X play the chords for you.
1 Press the START/STOP button to set the Style to play.
2 Press the BASS INVERSION and MANUAL BASS (RECORD) buttons together to startrecording.
3 Start recording your Chord Sequence at the beginning of the next measure.
While recording, you will see a red flashing icon in the display.
4 Play the chords in the Chord Scan area.
5 When the Chord Sequence is done, press the BASS INVERSION and MANUAL BASS(RECORD) buttons together again to stop recording.
6 Press the MEMORY and BASS INVERSION (PLAY/STOP) buttons to start playback.
The LED of the two buttons will start flashing. The Chord Sequence will be played back in loopstarting from the next measure. Recorded chords will be sent to the arranger, and the Style willplay with the recorded chords.
7 Play your solo part, while the Chord Sequence plays the chords for you.
During Chord Sequence looping, you can freely select any Fill or Variation, as if you where play-ing chords with your hands.

66 Selecting and playing StylesThe Chord Sequence
8 Press the MEMORY and BASS INVERSION (PLAY/STOP) buttons together again to stopplayback of the recorded Chord Sequence.
The last chord played by the Chord Sequence remains in memory. The Chord Sequence willremain in memory up until you record a new Chord Sequence, or you turn the Pa3X off.

67Song PlaySelecting a Song to play
Qui
ck G
uide
Pa3X is equipped with two onboard players that can be run at the same time to mix between differentSongs. Pa3X can read Songs in Standard MIDI File (MID), Karaoke™ (KAR) and MP3 format.
It may be of great interest to singers and guitar players to know that if a Standard MIDI File or an MP3file contains lyrics and chords, they can be seen in the display. Lyrics can also be seen on an externalvideo monitor, provided you have the (optional) VIF4 Video Interface installed.
In addition to lyrics and chords, you can also see the score and the markers of a Standard MIDI File.
Selecting a Song to play
1 Press the SONG PLAY button to switch to the Song Play mode.
Hint: In Style Play mode,you can pre-select the Songsto be assigned to both play-ers. This way, you will beready to start them, as soonas you switch to Song Playmode.
Song Play
Players controls
The SONG PLAY button
i
The Songs area of the Style Play main page.
After pressing the SONG PLAY but-ton, the main page of the Song
Play mode appears.

68 Song PlaySelecting a Song to play
2 Touch the Player 1 area to open the Song Select window.
Hint: As an alternative,you can open the Song Selectwindow by pressing theSELECT button in the PLAYER1 section on the controlpanel.
3 Scroll through the list and select the Song to play.
4 When the Song is selected, touch the Select button to confirm your selection; this willautomatically close the Song Select window.
i
The selected Song is highlighted.Touch a Song’s name to select it.
Use the scroll bar to see all Songs in the list. Keep SHIFT pressed and touch the Up/Down arrow to scroll to the next/previous alphabetic sec-tion. As an alternative, you can use the VALUE section.
Use the Open and Close buttons to browse through the folders.
Use the Device pop-up menu to select one ofthe available mass-storage devices.
Use the Sync P. (Synchronized Path) button to see the selected Song again.
Touch the Select button to select the high-lighted Song, and assign it to Player 1.
After touching the Select button in the display, the main page of the Song Play mode appears again.
Selected Song

69Song PlayPlaying back a Song
Qui
ck G
uide
Playing back a Song
Once a Song has been selected, it may be played back by the player.
1 Be sure the X-Fader is completely moved to the left (toward Player 1).
2 Press the (PLAY/STOP) button in the PLAYER 1 section to start playback.
3 Use the PLAYER 1 control section to control the Song’s playback.
4 When you want to stop the song and go back to the beginning, press the (HOME)button.
Note: In any case, theplayer will automaticallystop when the end of theSong is reached.
After pressing the (PLAY/STOP) button, the but-ton’s LED turns on, and the measure counter begins to show the current measure number.
Press the REWIND button once to go back. Keep itpressed to go back more.
Press the FAST FORWARD button once to go for-ward. Keep it pressed to go forward more.
Press the PLAY/STOP button to stop the Song at the current position. Press it again to resume playback.Press the HOME button to move the
Song to the beginning.
iWhen the Song is stopped, the LED on the PLAY/STOP button goes dark.

70 Song PlayChanging the tracks’ volume
Changing the tracks’ volume
While playing back a Standard MIDI File, you may wish to change each track’s volume, to create a mix“on the fly”.
1 Be sure the Volume panel is shown, or touch the Volume tab to show it.
2 As seen for the Styles, you can use the Assignable Sliders (when the VOLUME LED isturned on) to adjust each track’s volume. Use the TRACK SELECT button to cyclebetween track groups.
To control the volume, the VOLUME LED must be turned on. If it is off, repeatedly press the SLIDER MODE button to change it. Please note that the SLIDER MODE status is saved with each Performance or STS.
The LED indicator ofthe controlled group
of tracks turns on.
Use the TRACKSELECT button to
cycle between differ-ent groups of tracks

71Song PlayChanging the tracks’ volume
Qui
ck G
uide
3 Otherwise, you can use the display to change each track’s volume. In Normal view, youcan adjust each Keyboard track’s volume. Touch a track and use the VALUE controls tochange its volume.
Hint: As an alternative tousing the VALUE controls,hold the track slider in thedisplay, then move your fin-ger up/down.
4 Press the TRACK SELECT button once to see tracks 1-8 (Track 1-8 view).
Note: Changes to Songtracks will not be saved, andwill be reset each time youpress the (Home) button.They may also be reset whilepressing the << (Rewind)button. To save changes, youmust edit the Song inSequencer mode.
5 Press TRACK SELECT once again to see tracks 9-16 (Track 9-16 view).
i
Keyboard tracks
i
In Track 1-8 view, the first 8 tracksof the selected Song are shown.
In Track 9-16 view, the secondgroup of 8 tracks of the selected
Song are shown.

72 Song PlayChanging the tracks’ volume
6 Press TRACK SELECT again, to return to the Normal view (Keyboard tracks).
7 Press the (PLAY/STOP) button to start the Song.
8 While listening to the Song, switch from Normal view to Track 1-8 and Track 9-16 view,to see which tracks are playing.
To see if a track is playing, look at its name, and see if it changes color.
• Touch each track’s channel strip, to see each track’s detail in the Track Info line.
Keyboard tracks
Selected track Assigned Sound. Touch it to open the Sound Select window.
Sound bank Program Change

73Song PlayTurning the Song tracks on/off
Qui
ck G
uide
• Alternatively, you can see which type of Sound is assigned to each track in the Soundarea of the Track 1-8 and Track 9-16 views.
Turning the Song tracks on/off
Note: These changes willnot be saved to the Song. Tosave changes, edit the Songin Sequencer mode.
While playing back a Standard MIDI File, you may wish to mute one or more tracks, for example tosing along with the Song, or play an instrumental part live on the keyboard.
To mute/unmute Song tracks you simply touch the Play/Mute icon in the Volume panel, as seen forthe Style tracks. See “Turning the Style tracks on/off ” on page 62 for more information.
Soloing a track
Contrary to the above, you may want to make a single track of a Standard MIDI File play alone. Thisis called the Solo function.
1 While the Song is playing, keep the SHIFT button pressed and touch the track you wantto listen to in Solo mode.
2 To set all tracks back to the Play status, keep the SHIFT button pressed again, andtouch the track that is currently in Solo mode.
Please remember that you can also use the Solo function in Style Play and Sequencer mode. TheSolo command can also be selected from the page menu.
Removing the voice from an MP3 file
If you want to sing along with a Song in MP3 format, you can try to remove the vocal part from theMP3 file. This features may be more or less effective, depending on the Song.
1 Program one of the Assignable Switches as the Vocal Remover.
Octave Transpose
Sound bank icons. Touch to open the Sound Select window.
i

74 Song PlayRemoving the voice from an MP3 file
Press the MENU button, and choose the “Pad/Assignable Switch” section. Then touch theSwitch tab to open the “Switch” page. While in this page, assign the Vocal Remover function tothe ASSIGNABLE SWITCH 2:
2 Press the EXIT button to return to the main page of the Song Play mode.
3 Assign an MP3 file to one of the players.
Note: The Vocal Removeronly works on a single playerat a time. To switch from aplayer to the other, please usethe X-FADER.
4 Start the player with the MP3 Song assigned.
5 Press the ASSIGNABLE SWITCH 2 to activate the Vocal Remover, and remove the origi-nal singer’s voice.
Listen to how the original singer’s voice is reduced or totally removed.
6 Keep the SHIFT button pressed and press the SONG PLAY button to open the “Prefer-ences: General Setup” page.
7 Experiment with the various settings of the “MP3 Vocal Remover Preset”.
Each setting is optimized for a particular kind of voice. Find the one that better fit the originalsinger’s voice.
8 When done, press the ASSIGNABLE SWITCH 2 to deactivate the Vocal Remover, andmake the original singer’s voice appear again.
9 Stop the player.
i

75Song PlayRemoving the Melody track from a Standard MIDI File
Qui
ck G
uide
Removing the Melody track from a Standard MIDI File
If you want to sing along with a Song in Standard MIDI File format, you can remove the Melody trackfrom the Song.
1 Assign a Standard MIDI File with a Melody track to one of the players.
2 Start the player with the Standard MIDI File Song assigned.
3 Press the ASSIGNABLE SWITCH 3 to mute the Melody track.
The Melody track disappears. If it is the wrong track, continue to the following step to select adifferent track.
4 Keep the SHIFT button pressed and press the SONG PLAY button to open the “Prefer-ences: General Setup” page.
5 Choose a different Melody track.
6 When done, you can press the ASSIGNABLE SWITCH 3 switch to unmute the Song’s Mel-ody track and let the original MIDI instrument play the Melody line again.
7 Stop the player.

76 Song PlayMixing two Songs
Mixing two Songs
You can select two Songs at the same time, and mix between them using the X-FADER slider.
1 Touch the Player 1 area to open the Song Select window and select the Song to beplayed by Player 1. Touch Select to confirm.
2 Once a Song is assigned to Player 1, touch the Player 2 area once to select it, and a sec-ond time to open the Song Select window. Select a Song to be assigned to Player 2, andtouch Select to confirm.
3 Keep the SHIFT button pressed, and press any of the two (PLAY/STOP) buttons, tostart both Players at the same time.
Hint: You don’t need tostart both players at thesame time. You can start thefirst Song – then start the sec-ond one when the first one isnear to the end. This way, youcan use the X-FADER slider togently crossfade between theend of one Song and thebeginning of the followingone.
4 During playback, move the X-Fader, to mix between the two Songs.
5 During playback, you may control each Player separately, by using the dedicatedPlayer controls.
6 Press the relevant (PLAY/STOP) button to stop the corresponding Player.
i

77The SongBookMixing two Songs
Qui
ck G
uide
One of the most powerful features of the Pa3X is the onboard music database, that allows you to orga-nize your Styles and Songs (in the MID, KAR and MP3 formats) for easy retrieving. Each entry of thisdatabase may include the artist, title, genre, number, key, tempo, and meter (time signature) of a spec-ified song. When selecting one of the entries, the associated Style, Standard MIDI File or MP3 file – aswell as the Style Play or Song Play mode – is automatically recalled.
In addition to helping you organize your shows, the SongBook allows you to associate up to four Pads,and up to four STSs to each Standard MIDI File or MP3 file. This way, it is easy to recall a completesetup for Keyboard tracks, effects, and the Voice Processor, for realtime playing over a Standard MIDIFile or MP3 file.
Also, you can link a text file to a Standard MIDI File, MP3 file or to a Style, to read the Lyrics in thedisplay or on an external monitor, even if there are no Lyrics events in the Standard MIDI File or MP3file, or if you prefer to play the song live with the help of the Styles.
You can add your own entries to the SongBook, as well as edit the existing ones. Korg has already sup-plied some hundred entries as standard. Furthermore, the SongBook allows you to create various cus-tom lists, that may suit your different shows.
The SongBook
The SONGBOOK button

78 The SongBookSelecting the desired entry from the Main List
Selecting the desired entry from the Main List
A large database is already included with the instrument, and you can later customize it. You maybrowse through this database in a variety of ways.
1 While you are in Style Play or Song Play mode, press the SONGBOOK button to openthe SongBook window.
2 Browse through the entries.
Icons in the Type column will help you identify the type of the entry. The Genre column isshown by default, but you can switch to the Artist column (see “Displaying Artist or Genre”below).
3 When the entry you are looking for becomes visible in the display, select it and touchthe Select button in the display.
After selecting an entry, the corresponding Style, MID, KAR or MP3 file will be recalled,together with the relevant operating mode (Style Play or Song Play). Up to four STSs will also berecalled. Any TXT file associated with the entry can be seen in the Lyrics page.
The selected Style, MID, or KAR file, or MP3 is shown in the higher part of the screen.
Displaying Artist or Genre
For space matters, either the Genre or Artist column can be seen in the display. You cannot see both atthe same time.
1 Touch the page menu icon to open the page menu.
Note: The Artist and Keyfields of all supplied entrieshave been intentionally leftempty.
Touch this checkboxto turn the view filter
on.
Touch this button toedit the view filter.
Adds the selected entry to the Custom List (if acti-vated – see page 84).
Touch this button to select the current entry to play.
Use the scroll bar to see all Songs in the list. Keep SHIFT pressed and touch the Up/Down arrow to scroll to the next/previous alphabetic section. As an alternative, you can use the VALUE DIAL.
SongBook Main List
Style, Standard MIDI File(s) or MP3 file(s) currently assigned to the arranger or player(s)
i

79The SongBookSorting entries
Qui
ck G
uide
2 Choose Show Artist (now Genre) to switch from Genre to Artist in the List view. The Art-ist column will be shown.
3 Open the page menu again, and choose the Show Genre (now Artist) item. The Genrecolumn will be shown again.
Sorting entries
You can change the order entries are shown in the display.
1 You can change the sorting order by touching one of the labels in a list of names.
You can do the same by touching the Type, Name, Genre, Artist, Key, Number, Tempo or Meterlabel.
2 Each time you touch the same label again, the order changes between ascending anddescending.
Touch the Name label…
…to alphabetically reorder the names in thelist. Each time you touch the same label, the
order changes between Ascending andDescending.

80 The SongBookSearching entries
Searching entries
The SongBook database may be really huge. You can, however, look for (say) specific artists or songtitles, using the filtering functions.
1 Touch the Filter button in the display, to open the Filter dialog box.
2 Touch the (Text Edit) button next to the search criteria (even more than one) youwant to enter.
For example, you may want to find all songs containing the word “love” in the title (in any posi-tion in the string). If so, select the ‘Name’ criterion, and enter the word ‘love’. Capitals are not rel-evant for the search.
3 Touch OK in the display, and close the Text Edit dialog box. The entered text is now thesearch criteria.
Available search criteria. “Genre” and “Artist” are both consid-ered, even though only one of them may be shown in the List

81The SongBookSearching entries
Qui
ck G
uide
4 Touch OK to close the Filter dialog box and return to the SongBook page.
Once the Filter dialog box has been closed by touching OK, the Filtered check box is automati-cally checked, and the filter is activated. Only entries matching the entered criterion are seen inthe Main List.
5 To see the whole SongBook database again, touch the Filtered check box again, tomake the check mark disappear.

82 The SongBookAdding entries
Adding entries
You can add your own entries to the SongBook database.
1 Go to the Style Play or Song Play mode, depending on the type of entry you want toadd to the SongBook database.
2 Select the Style, Standard MIDI File or MP3 file to be added to the SongBook.
Assign the selected Song to Player 1. (Only Songs assigned to Player 1 will be saved in the Song-Book entry. Songs assigned to Player 2 will not be saved).
3 Edit Keyboard and Style tracks as you prefer, by selecting different Sounds and Effects,or editing any other parameter.
Please note that changes to Standard MIDI File’s tracks will not be saved as SongBook data. Onlydata included in the Standard MIDI File will always be used.
4 If you like, select a different Voice Processor Preset.
The Voice Processor Preset selection will be saved in a SongBook entry, only if you will also savean STS. So, please don’t forget to check the “Write” checkbox in the “STS” area.
5 When your entry is ready, press the SONGBOOK button, then the Book Edit 1 tab to seethe Book Edit 1 page and link a Musical Resource to the SongBook entry.
6 Touch the New Song button in the display to add a new item to the SongBook list.
Entry’s name Name of the Style, MID, or KAR or MP3 file, memorized with the entry.
When checked, current settings for Style tracks,or the path for the MID, KAR or MP3 file, are
saved with the entry. If unchecked, the originalStyle track settings are saved with the entry.
This parameter is mandatory when creating anew entry by touching the New Song button.
When checked, you can save the current Key-board tracks and Voice Processor settings into
one of the four STSs available for each entry, orsave all the current Style STSs to the SongBook
entry.
One of the four STS available for each entry, where you can save the current settings for Keyboard tracks and the Voice Processor.
Touch New Song to cre-ate a new entry.
Currently selected resource. If a dif-ferent Style, MID, KAR or MP3 file has been selected, it may differ from the saved resource (shown on top of the page).
Song Selection number (ID number for numeric selection)
Choose All Current Style STS to save the four STSs (recalled by the latest selected Style) with the new entry.

83The SongBookAdding entries
Qui
ck G
uide
7 When done with this page, press the Book Edit 2 tab to see the Book Edit 2 page andedit the SongBook database details.
8 Touch the (Text Edit) button next to the field(s) you want to edit. Set all otherparameters.
You can write the genre and artist name. If you are saving a single STS, you can assign it a name(this is not possible if you are saving all STSs). Select a Tempo matching the song’s tempo, andselect the Meter (time signature) and Key of the song. You can also specify a Master Transposevalue, to be automatically selected when selecting the entry.
9 When done with this page, touch the tab to go to the Book Edit 3 page, where you canand set the Synchro and Memory parameters, link a text file to the entry, and choosethe Harmony Control.
10 After having filled up all the desired fields (be as comprehensive as you can), touch theWrite button in the display to open the Write dialog box.
Database entry’s parameters
Track from which to take notes to be sentto the Voice Harmony.
Text file linked to the entry. This text will be seen as Lyrics in the dis-play (or in the external monitor, with the VIF4 option installed). See “Viewing lyrics and chords in the Song Play and SongBook modes” on page 169.
Synchro (for Style) and Memory (for Styleand Songs) On/Off status

84 The SongBookCreating a Custom List
11 Touch the (Text Edit) button to assign a name to the new entry, then touch OK tosave the entry to the SongBook database.
Creating a Custom List
You can create several Custom Lists in the SongBook, to make a set of entries suitable for your variousshows. Before starting a new Custom List, be sure you have added all needed entries to the SongBookmain database (see “Adding entries” above).
1 While in SongBook mode, open the page menu and check the ‘Enable List Edit’ item.
2 Select a Custom List to be edited.
To edit an existing list, touch the Custom List tab to open the Custom List page, and select one ofthe available Custom Lists. To create a new list, touch the List Edit tab to open the List Edit page,and touch the New List button to create a new, blank list.
Entry’s name. By default it is the same name of the associated Standard MIDI File of MP3 file, or the associated Style. The name can be up to 16 char-
acters long.
Select Rename/Overwrite to overwritean existing entry. Warning: the older
entry will be deleted!
Select New Song to add a new entry tothe SongBook database. This option is
automatically selected when a new entryhas been created (by touching the New
Song button while in the Edit 1 page).
After you check the ‘EnableList Edit’ item, the List Edit
page becomes available.

85The SongBookCreating a Custom List
Qui
ck G
uide
3 Touch the Book tab to open the Book page and see the full database. Use the varioussorting, searching and filtering options (seen above) to find the entries you are lookingfor. Touch the Add to List button when the desired entry has been selected.
4 When finished adding entries to the Custom List, touch the List Edit tab to go to the ListEdit page, and use the various commands to edit the list.
Touch this checkboxto turn the view filter
on (if any).
Touch this button to edit the view filter.
Use the scroll bar to see all Songs in the list. Keep SHIFT pressed and touch the Up/Down arrow to scroll to the next/pre-vious alphabetic sec-tion. As an alternative, you can use the VALUE DIAL.
SongBook list
Adds the highlighted entry to the Custom List.
Use the vertical arrowsto move the selected
entry up or down in thelist.
Touch Del Song to deletethe selected entry.
Touch New List to create a new Custom List. Touch Del List to delete the current Custom List. Warning: Del List will delete the current Custom List.
Touch Write to save the cur-rent Custom List.
Select an entry on the list to edit
List name Scrollbar

86 The SongBookCreating a Custom List
5 When the Custom List is ready, touch the Write button in the display to save it to mem-ory. Assign a new name to the Custom List.
Touch the (Text Edit) symbol to open the
Text Edit dialog box.
Use alphabetic char-acters to enter text.
Use the arrows or the DIAL to move the cur-
sor.
Use the SHIFT but-ton to switch
between capitals and small charac-
ters.
Touch Delete to delete just a single character, Clear to delete the whole string.
When done, touch OK to confirm the new name,
or Cancel to abandon all changes.

87The SongBookSelecting and using a Custom List
Qui
ck G
uide
Selecting and using a Custom List
After creating one or more Custom Lists, you can select one and use it for your show.
1 Touch the Custom List tab to select the Custom List page.
2 Use the List pop-up menu to select one of the available Custom Lists.
3 Select one of the entries in the list (it turns dark red), then touch the Select button inthe display to confirm selection (the selected entry turns green). Press the PLAY buttonto start playing back the selected Song.
Selecting a SongBook STS
Up to four STSs can be associated to any SongBook entry. It doesn’t matter if it is based on a Style, aStandard MIDI File or an MP3 file.
1 Press the LYRICS button to open the Lyrics/STS page and see the four STSs associatedto the current SongBook entry.
2 Select the desired STS by pressing the corresponding STS button on the control panel.As an alternative, touch its name in the display.
The STS is selected. Keyboard tracks and Voice Processor settings may change.
Use the List pop-up menu to selectone of the available Custom Lists.
Touch Next to select the next entry in the list. (This command can also be assigned to an Assignable Switch).
Touch Select to set the highlighted entry to play (if different than the one auto-matically selected).
Entry in play. To select a dif-ferent one, highlight it and touch the Select button in the display.
STSs associated to the current entry.

88 Singing with a microphoneConnecting a microphone
Pa3X is fitted with a powerful digital voice processor, based on technologies developed by TC Heli-con, including innovative effects and four-part harmonization. While very powerful, the Pa3X’s voiceprocessor is also extremely easy to use, automatically adjusting its settings to your particular voice andthe way you sing at different times of your performance.
Connecting a microphone
To sing along with the Pa3X, you must first connect a suitable microphone to the MIC input (the onethat goes into the Voice Processor). Both dynamic and condenser microphones are directly sup-ported. Phantom power is available to condenser microphones.
1 Lower the Mic volume by using the dedicated MIC VOLUME knob on the control panel.
Note: Lowering the Micvolume helps avoiding feed-back. Feedback is caused byaudio generated by the Pa3X,returning to the audio cir-cuitry via the microphone.
2 Connect a microphone.
Singing with a microphone
Microphone inputMicrophone controls
Microphone, Harmony and Double switches
i

89Singing with a microphoneConnecting a microphone
Qui
ck G
uide
3 In case you are using a condenser microphone connected to the XLR MIC input, pressthe GLOBAL button, choose the Audio Setup section, then go to the Audio In page tosee the microphone settings, and turn the phantom power on.
4 Press the EXIT button to return to the main page of the Style Play or Song Play mode.
5 Touch the Mic tab to see the Mic panel, then touch the Talk button in the display toremove all the effects from the microphone.
You can also check the status of buttons, and the status of the Talk function, in the Mic panel.Press the EXIT button to go to the main page of the Style Play or Song Play mode, then select theMic tab.
6 Sing into the microphone, and adjust the input gain and the Microphone volume, untilyou achieve the correct settings.
Note: You have a correctmicrophone volume settingwhen the AUDIO IN LED staysgreen most of the time. TheMIC VOLUME knob must beset accordingly, to compen-sate a too loud or weakincoming signal.
Touch this checkbox to turnphantom power on on the
XLR MIC input, and switch acondenser microphone on.
Mic panel. To test the micro-phone level, be sure the “Talk” button is ‘pressed in’ (On).
iAdjust the input level by using the MIC GAIN knob next tothe MIC input. Sing into the microphone, and watch at the
AUDIO IN LED on the control panel – it ought to stay green. Ifit goes orange too often (or even red), turn down the input
gain; if it turns off too often, increase the input gain. No hintof distortion should be heard in the audio system when you
sing.
While you adjust the gain,gradually increase the Micro-phone volume, by using the
MIC VOLUME knob.

90 Singing with a microphoneSetting up your voice tone
7 Try the MIC ON/OFF button in the MIC SETTING section, to turn the whole microphonesection on/off.
8 If you like, start a Style or Song. Adjust the microphone’s final volume by using thededicated MIC VOLUME knob.
9 Touch the Talk button in the Mic panel to reactivate all the effects.
10 Adjust the other settings, balancing the Style/Song and microphone with the BAL-ANCE slider and the MIC VOLUME knob.
The settings for the BALANCE slider and the MIC VOLUME knob are not saved in memory, sothey remain consistent when selecting different Styles, Performances, Songs or Voice Processorsettings.
Setting up your voice tone
You can add pitch correction, equalization, compression and gate to the microphone signal, to makeyour voice perfectly in tune, tonally pleasant and dynamically even. In case your microphone empha-sizes them, de-essing will remove sibilants. While these effects cannot be considered a replacementfor some good training, they can fix a few common problems in a live context.
1 Press the GLOBAL button, then touch the Voice Processor Setup button in the display,and then (if it is not selected) touch the Mic Setup tab.
Hint: You can keep the SHIFTbutton pressed, and press theMIC ON/OFF button, to jumpto the Voice Processor Setuppage.
The Mic Setup page appears in the display.
Be sure the “Talk” button is ‘pressed out’ (Off ).

91Singing with a microphoneSetting up your voice tone
Qui
ck G
uide
2 Check the “Auto-Chromatic Amount” box, and adjust the correction amount whilesinging and listening to your tuning.
Try first with a setting of 50%, that should work in most situations. A lower value will make cor-rection less effective, a higher value will make the correction more evident.
3 Touch the Mic Tone tab.
The Mic Tone page appears.
4 Be sure that the “Adaptive” box in the EQ section is checked, and use the Shape knob toadjust the brightness of your voice, and the Warmth checkbox to add warmth to thesound.
The Adaptive setting automatically adjusts the EQ parameters. The Shape control adds an airybrightness, or “sizzle” to your voice while reducing “mud” due to the proximity effect from sing-ing closely into a cardioid microphone. The Warmth control further reduces the mud, whileadding warmth to the sound.
5 Be sure that the “Adaptive” box in the Compress/DeEss section is checked, and use theCompress knob to adjust the amount of compression while singing and listening toyour dynamics.
The Adaptive setting automatically adjusts the Compressor parameters. In this mode, the com-pressor listens to your singing over time and adjusts the internal parameters accordingly. Youcan use the Compress knob to increase or decrease the amount of compression.
6 In case you also want to keep the sibilants under control, play with the DeEss knob tofix them.
There is a side effect that comes from adding high frequencies and compression to your voice,and that’s excessive sibilance. The DeEss control monitors the level of sibilance and, when it isdetected, will quickly and transparently reduce it.
To reduce the risk of feedback and the amount of environmental noise (from other musicians onstage, from the audience…) use the Gate control. Be sure the “Adaptive” option is selected in the

92 Singing with a microphoneChoosing a Voice Processor Preset
Gate section. Use the “Lead Atten.” and “Harm. Atten.” to separately control the amount of gat-ing in your voice and in the harmony voices.
The Gate analyzes your singing style to automatically reduce the other noises or the feedbackfrom the loudspeakers.
7 Press the EXIT button to return to the main page.
Choosing a Voice Processor Preset
You can add several effects to your voice, and you can set them up quickly through the Voice Proces-sor Presets. These are memories containing all the settings for the Voice Processor effects. You cancustomize these memories at will.
1 Touch the Mic tab to see the Mic panel, and select one of the available Voice ProcessorPresets.
Voice Processor Presets are settings for the various Voice Processor sections. By selecting a Pre-set, all processing parameters may change.
A Voice Processor Preset is assigned to each Performance or STS. When selecting a differentPerformance or STS, the Voice Processor Preset may change (depending on the Mic panel lockstatus), changing the type of processing applied to your voice.
2 Sing into the microphone to listen to the effects.
3 Adjust the level of the Reverb or Delay effect, by using the REVERB/DELAY knob in theMIC SETTING section of the control panel.
4 Choose a different Preset, and listen to how the effects changed.
Use this pop-up menu to select a Voice Processor Preset
Mic panel lock

93Singing with a microphoneApplying harmony to your voice
Qui
ck G
uide
5 Use the “Filter”, “HardTune”, “uMod” and “Delay” buttons to turn the various effect sec-tions on/off, and listen to the resulting sound.
Applying harmony to your voice
You can let Pa3X add automatically-generated harmonize your lead voice with up to four backingvoices. Each Voice Processor Preset may contain a different harmonization style (for example, chang-ing the number of voices, or the way notes from the keyboard, the Style or the Song are received).
1 Select a Voice Processor Preset containing the desired harmonization style.
By default,
• Preset #1 expects you play chords, and receives notes from the keyboard (the recognition zonedepends on the Chord Scan section);
• Preset #2 expects notes from a track of the Standard MIDI File. To choose the track go to theSong Play mode, press the MENU button, touch the Preferences item, be sure the “GeneralSetup” page is selected, and choose a track from the “Harmony Control” parameter. (Usually,harmony notes are contained in Track #5).
• Preset #3 is meant for use with an MP3 Song. Choose this preset when playing an MP3, and thePa3X will recognize chords by analyzing the file.
2 Press the HARMONY button in the control panel to turn its LED on.
3 Play some chords, to let the Voice Processor create new voices based on their notes.
Contrary to doubling, harmonizing adds chord notes, or counterpoint notes, to the note yousing.
4 Sing along with the chords and melody you play on the keyboard.
5 Adjust the level of the harmony voices by using the HARMONY/DOUBLE knob in theMIC SETTING section of the control panel.
6 While in the Mic panel, choose the various Voice Processor Presets to test the variousharmonization styles.
7 If it is playing, stop the Style.
8 Press the HARMONY button again, to turn its LED off.
Use these buttons to turn the effect sections on/off

94 Singing with a microphoneApplying doubling to your voice
Applying doubling to your voice
You can let Pa3X add automatically-generated unison chorus voices to your lead voice. Each VoiceProcessor Preset may contain a different doubling style (usually changing the number of doublingvoices and the spread between them in the stereo panorama).
1 Press the DOUBLE button in the control panel to turn its LED on.
2 Sing into the microphone, and listen to how other voices are added in unison to yourmelody line.
Doubling does not play chords: it just adds the other voices (in unison) to the same note yousing.
3 While singing, adjust the level of the choir voices by using the HARMONY/DOUBLEknob in the MIC SETTING section of the control panel.
4 Press the DOUBLE button again, to turn its LED off.

95Singing with a microphoneSoloing your voice (Talk)
Qui
ck G
uide
Soloing your voice (Talk)
Sometimes, during a live show, you might like to talk to your audience. Use the Talk function to atten-uate the music, and let your voice pass through clean and clear.
1 While in the main page of the Style Play or Song Play mode, touch the Mic tab to seeVoice Processor’s settings.
2 During playback, touch the Talk button to turn the TalkBack function on.
3 Sing or talk into the microphone.
You’ll hear that background music has been made softer, while your voice will be heard loud andproud.
4 To turn the TalkBack function off, touch the Talk button again.
The background music returns to the original volume.
Locking the Voice Processor settings
If you like the selected Voice Processor Preset, you can “lock” them, to prevent them from changingeach time you select a Performance, Style or STS that may be saved using different settings.
1 While the Mic panel is shown in the display, touch the lock icon to freeze it.
2 To unlock the settings, touch the lock icon again.
The lock status can be saved into the Global Setup (see “Write Global - Global Setup dialog box”on page 220).
Lock on. Voice Processor settings will not change when selecting a differ-ent Performance or STS.
Lock off. Voice Processor settings will change when selecting a new Performance or STS.

96 Recording a new Song (Standard MIDI File)Accessing the Backing Sequence (Quick Record) mode
There are several ways to create a Song on the Pa3X. The easiest and fastest is to use the Styles torecord what you are playing in realtime on the keyboard, while the arranger gives you the accompani-ment tracks.
Accessing the Backing Sequence (Quick Record) mode
1 Press the SEQUENCER button to switch to the Sequencer mode.
2 Press the RECORD button to open the Song Record Mode Select dialog box.
Recording a new Song (Standard MIDI File)
Style Select section
Style ControlsStyle Elements
Player 1 controlsSEQUENCER button
After pressing theSEQUENCER button, the mainpage of the Sequencer mode
appears.
Press the RECORD button, to openthe Song Record Mode Select dia-
log box

97Recording a new Song (Standard MIDI File)Preparing to record
Qui
ck G
uide
3 Select the Backing Sequence (Quick Record) option and touch OK to enter the BackingSequence Record mode.
Preparing to record
When you enter Backing Sequence Record, the most recently used Style is already selected, and alltracks are ready to record. You could simply start recording as if you were playing in realtime with theStyles. However, there are some settings that you may wish to edit.• If you like, adjust any editable parameter in the display.
After choosing the Backing Sequence(Quick Record) option, the Backing
Sequence Record page appears.
Touch the Style parame-ter (or one the STYLE but-
tons) to open the StyleSelect window, and
select a different Style (asseen on page 55).
Track(s) status. ‘Rec’ means they are ready to record. ‘Play’ means they are recorded and you
can hear them. ‘Mute’ means they cannot be heard.
Measure counter. Nega-tive numbers (-2, -1) are the precount, after which you can start recording.
Style’s Tempo. Change it, if you like.
Grouped tracks. During Quick Record, you cannot access each separate Songtrack. For ease of use, just two ‘master’ tracks are provided: Kbd/Pad (Key-
board/Pads) and Ch/Acc (Chord/Accompaniment). Use the ASSIGNABLE SLID-ERS to separately adjust the volume of the Keyboard tracks.
Style’s Meter (time signa-ture). You cannot change it.
Touch the Perf/STS parameter to open the Performance Select win-dow, and select a differ-ent Performance (as seen on page 51). As an alter-native, you use the PER-FORMANCE or STS buttons.

98 Recording a new Song (Standard MIDI File)Recording
Recording
1 Select the Style Element you wish to use before starting to play.
2 Start recording, by pressing the START/STOP button.
Note: If you do not wishto start the Song with theStyle playing, you can simplystart recording by pressing
the PLAY/STOP buttonin the PLAYER 1 section, andstart the Style only later. TheStyle will start at the nextbeginning of the measure.3 Play as if you were performing live with the Styles.
During recording, select any Style Element (Intro, Variation, Fill, Break, Ending…) you like. Youcan also press START/STOP to stop the Style, and press it again to start the Style up again!
Please remember that, while recording in Backing Sequence Record mode, you cannot use theSYNCHRO, TAP TEMPO/RESET, BALANCE controls.
4 When finished recording your Song, press the (PLAY/STOP) button in the PLAYER1 section to exit recording, and return to the main page of the Sequencer mode.
5 While in the main page of the Sequencer mode, press the (PLAY/STOP) button inthe PLAYER 1 section to listen to the recorded Song.
The Backing Sequence Song has been converted to an ordinary Song (in Standard MIDI File, or“MID”, format). If you like it, you can save it, and read it in Song Play mode, or with any externalsequencer.
6 To edit the Song, press MENU to enter Edit mode (see instructions starting frompage 186).
Select one of the Intros to start with an introduction. Select any of the Variations before starting to record.
i
After pressing the PLAY/STOP button, the mainpage of the Sequencer mode appears again.

99Recording a new Song (Standard MIDI File)Second-take recording (Overdubbing)
Qui
ck G
uide
Second-take recording (Overdubbing)
You may wish to re-record, and add one of the two “grouped” tracks, or overwrite a bad recordingwith a new one. Usually, you will record all chord and Style Element changes during the first take, andrecord Keyboard tracks and Pads during the second take.
1 Press the RECORD button to enter Record mode again. When the Song Record ModeSelect dialog box appears, select Backing Sequence (Quick Record) again.
2 If you are recording just one of the “grouped” tracks, set the track to be preserved tothe Play mode.
3 Repeat the recording process, and press the (PLAY/STOP) button in the PLAYER 1section to stop recording and to return to the main page of the Sequencer mode.
4 While in the main page of the Sequencer mode, press the (PLAY/STOP) button inthe PLAYER 1 section to listen to the recorded Song.
Again, the Backing Sequence Song has been converted to an ordinary Song.
Saving a Song to disk
After recording a Song that you like, it is a good idea to save it to disk, to avoid losing it when theinstrument is turned off (or put in standby).
1 While in the main page of the Sequencer mode, touch the page menu icon to open thepage menu.

100 Recording a new Song (Standard MIDI File)Saving a Song to disk
2 Select the Save song command to open the Save Song window.
3 Select a device and folder where you want to save your Song.
4 Touch the Save button in the display to open the Save Song dialog box.
5 Touch OK in the display to save the Song, or Cancel to stop the Save operation.
After you select the Save songcommand, the Save Song page
appears.
If a Song is selected (highlighted) itwill be overwritten. If no Song is
selected, a new Song file will be cre-ated on the target device.
To deselect a selected Song, touchanywhere else in the Song list, or
select the same storage deviceagain.
Use the scroll bar to see all Songs in the list. Keep SHIFT pressed and touch the Up/Down arrow to scroll to the next/pre-vious alphabetic section. As an alterna-tive, you can use the VALUE DIAL.
Use the Open and Close buttons to browse through the folders.
Use the Device pop-up menu to select one ofthe available storage devices
Touch the Save button to save the Song to the current folder.
In case you prefer to exit this page without saving the Song, press the EXIT button.
Touch the Text Editicon to edit the Song’s
name.

101Recording a new Song (MP3 file)Saving a Song to disk
Qui
ck G
uide
With Pa3X, you can record your performance as an MP3 file. Keep in mind what follows:Note: You cannot enter MP3Record mode while inSequencer or Media mode.
• All you play on the keyboard, the Styles and the Standard MIDI Files performed by the Players willbe recorded.
• Any audio signal entering the Audio Inputs is recorded (single microphone input with the “Mic Into Voice Processor” option selected, or the Left and Right line inputs with the “L+R to MP3 (no Mic)”option selected. See “Audio Setup: Audio In” on page 215). Harmony voices generated by the VoiceProcessor will be recorded as well.
• You will not be able to load MP3 files while recording an MP3 Song, and you will not be able torecord an MP3 Song while an MP3 file is playing.
You will then be able to play the resulting MP3 files using the Pa3X Players, as with any other MP3file.
1 To access recording, keep the SHIFT button pressed, and press the RECORD button.
The MP3 Record dialog box will appear.
When not recording, the shown status is Idle.
Note: MP3 files recorded withlower sampling rates maynot sound very good. This is aproblem that cannot beavoided with MP3 files.
2 Choose the preferred MP3 audio quality option, by means of the “Quality” pop-upmenu.
The higher the sound quality, the larger the MP3 file that will be generated.
3 Use the “Device” parameter to choose a location where to temporary store therecorded MP3 file.
This is not the final destination of your file, since you will be able to choose a different locationafter recording. However, be sure there is space enough for the temporary file, by reading the“Free space” parameter.
The default device is automatically selected as the recording unit; use the Device pop-up menuto choose a different one. You can record to the internal storage memory, or to a device con-nected to one of the USB ports.
4 When done, touch the “Rec” button in the display to start recording.
The “Rec” button changes to “Stop”, and can be touched again to stop recording. Also, the “Idle”label changes to “Recording”.
Recording a new Song (MP3 file)

102 Recording a new Song (MP3 file)Saving a Song to disk
5 Start playing and singing your Song.
You can record everything you play with the Pa3X; in addition, you can record your vocals. Inother words, you can record your whole performance. However, you cannot record other MP3files.
6 If you like, you can press the EXIT button to exit this dialog box and navigate throughthe Style Play and Song Play pages.
7 To access the dialog box again, and see the file length or stop recording, pressSHIFT+REC again.
During recording, if you exit from the MP3 Record dialog box while still recording, ared recorder icon will flash in the display.
During recording, you can use this dialog box to see the Recording time, file length,and the remaining space on disk. Maximum recording time depends on the available space inthe selected device.
8 Touch “Stop” to stop recording.
After touching “Stop”, recording will stop, and the following dialog box will appear:
9 Touch the (Text Edit) button to give the MP3 file a name.
10 Touch the “Browse” button to select a device and directory where to save the file.
11 Touch the “Save” button to save the file.
After saving, you can listen to the MP3 file in Song Play mode, as you do with any other Song.
The MP3 file can also be moved to a personal computer for further editing, via the USB inter-face.


104 Selecting elementsSound Select window
The following windows are shown in the various operatingmodes, whenever you try to select a Sound, Performance, Styleor Song.
Sound Select window
Touch the Sound area whereas it appears in the display, or one ofthe SOUND SELECT buttons in the REAL TIME TRACKS sec-tion of the control panel to open the Sound Select window.
Press EXIT to exit from this page and go back to the previouspage without choosing any Sound.
Sound sets
Selected set of Sounds. Factory Sounds are the Sounds suppliedas standard. Legacy Sounds are Sounds compatible with olderPa-Series models. GM2/XG DK are Drum Kits mapped accord-ing to the General MIDI 2 or XG standards. User Sounds arecustom-created or edited Sounds.
Side tabs (banks)
Use these tabs to select a bank of Sounds.
Lower tabs (pages)
Use these tabs to select one of the available pages in the selectedbank.
Previous/Next tabs
Scroll the lower tabs to the left or the right, when additional tabsare available but cannot be seen in the display.
Sounds
Touch one of these buttons in the display to select a Sound.Unless the “Display Hold” parameter (see page 207) is turnedon, the window automatically closes shortly after you select aSound.
Program Change
Program Change number. Shown only when the “Show” param-eter is turned on in Global mode. (See page 206).
Performance Select window
Touch the Performance area whereas it appears in the display, orone of the PERFORMANCE SELECT buttons on the controlpanel, to open the Performance Select window. Use the PER-FORMANCE SELECT buttons to go directly to the selectedbank.
Press EXIT to exit from this page and go back to the previouspage without selecting any Performance.
Note: Depending on the status of the “Auto Select” parameter (seepage 207), a Performance may be immediately selected whenpressing one of the PERFORMANCE SELECT buttons. The latestselected Performance for that bank will be selected.
Side tabs (banks)
Use these tabs to select a bank of Performance. Each tab corre-sponds to one of the PERFORMANCE SELECT buttons on thecontrol panel.
Lower tabs (pages)
Use these tabs to select one of the available pages in the selectedbank.
If you press again the same PERFORMANCE SELECT buttonon the control panel, the next page in the same bank is selected.This way, you do not need to touch one of the correspondingtabs in the display in order to select a different page.
Performances
Touch one of these buttons in the display to select a Perfor-mance. Unless the “Display Hold” parameter (see page 207) isturned on, the window automatically closes shortly after youselect a Performance.
Selecting elements
Side tabs (banks)
Lower tabs (pages)
Type of Sound
Sounds
If more than four pages are available, the Previous/Next tabs are shown in this area
Side tabs (banks)
Lower tabs (pages)
Perfor-mances

105Selecting elementsStyle Select window
Refe
renc
e
Style Select window
Touch the Style area whereas it appears in the display, or one ofthe STYLE SELECT buttons on the control panel, to open theStyle Select window. Use the STYLE SELECT buttons to godirectly to the selected bank.
Press EXIT to exit from this page and go back to the previouspage without selecting any Style.
Note: Depending on the status of the “Auto Select” parameter (seepage 207), a Style may be immediately selected when pressing oneof the STYLE SELECT buttons. The latest selected Style for thatbank will be selected.
Style sets
Selected set of Styles. Factory Styles are Styles supplied as stan-dard. Fav/User are Favorite Styles (locations for custom-madeStyles with editable names) and User Styles (locations for cus-tom-made Styles with fixed names).
Side tabs (banks)
Use these tabs to select a bank of Styles. Each Factory tab corre-sponds to one of the STYLE SELECT buttons on the controlpanel. Favorite tabs can be renamed (see “Renaming the Favoritebanks” on page 140).
Lower tabs (pages)
Use these tabs to select one of the available pages in the selectedbank.
If you press again the same STYLE SELECT button on the con-trol panel, the next page in the same bank is selected. This way,you do not need to touch one of the corresponding tabs in thedisplay in order to select a different page.
Styles
Touch one of these buttons in the display to select a Style. Unlessthe “Display Hold” parameter (see page 207) is turned on, thewindow automatically closes shortly after you select a Style.
After selecting a Style from this window, and another Style isplaying, the name of the new Style name begins to flash, mean-ing it is ready to start playing at the beginning of the next mea-sure.
Style Select page menuTouch the page menu icon to open the menu. Touch a commandto select it. Touch anywhere in the display to close the menuwithout selecting a command.
Rename Favorite bank
Choose this command from the page menu, and assign theFavorite Style banks any name you like.
The assigned name can be spanned over two lines, by separatingthem with the paragraph character (¶). For example, to write“World Music” on two lines, enter “World¶Music”.
In any case, the Pa3X will try to automatically put on two linestwo words separated by two spaces.
Be careful not to write words exceeding the width of the side tabsof the Style Select window.
Pad Select window
Touch the Pad area whereas it appears in the display, to open thePad Select window.
Press EXIT to exit from this page and go back to the previouspage without selecting any Pad.
Side tabs (banks)
Lower tabs (pages)
Type of Styles
Styles
Side tabs (banks)
Lower tabs (pages)
Type of Pads
Pads

106 Selecting elementsSTS Select
Pad sets
Selected set of Pads. Hit are single-note, pre-programmed fac-tory Pads. Sequence are sequence-based, pre-programmed fac-tory Pads. Locale are like Factory Pads, but contain Padscustomized for the music of your Country. User can be eithersingle-note or sequence-based Pads, and can be user-recorded ormodified.
Side tabs (banks)
Use these tabs to select a bank of Pads.
Lower tabs (pages)
Use these tabs to select one of the available pages in the selectedbank.
Pad
Touch one of these buttons in the display to select a Pad. Unlessthe “Display Hold” parameter (see page page 207) is turned on,the window automatically closes short after you select a Pad.
STS Select
Use the four STS buttons on the control panel, to select one ofthe four STS associated with the current Style or the selectedSongBook entry.
Touch the STS name tab in the main page of the Style Play orSong Play mode to see the name of the available STSs.
• In Style Play and Song Play mode:
• In Lyrics mode:
Song Select window
This page appears when you touch one of the Song areas in thedisplay, or one of the SELECT buttons in one of the PLAYERsections on the control panel.
Press EXIT to exit from this page and go back to the main pageof the Song Play operating mode without selecting a Song.
While in this page, select a Standard MIDI File, Karaoke or MP3file for the selected Player. A Jukebox file may only be assignedto Player 1.
Note: There is a separate working directory for each of the onboardplayers.
Directory
This is the list of the selected device’s content.
Use the scrollbar to scroll the list items.
As an alternative, you can use the VALUE controls to scroll.
Keep the SHIFT button pressed, and touch one of the arrows, tojump to the previous or next alphabetical section.
You can touch one of the labels on top of the list, to reorder thelist items accordingly. By touching the label again, the order ofthe files switches between ascending and descending.
Song path
Directory
Storage device
Page menu icon
Type of the fileor folder
File status
File or folder name

107Selecting elementsSong Select window
Refe
renc
e
A list can contain several different types of files or folders.
A file or folder may be in one of the following status. (See “Pro-tect” and “Unprotect” on page 239 for information on how tochange the file status).
Page menu icon
Touch the page menu icon to open the menu. See “Song Selectpage menu” on page 107 for more information.
Storage device
Use this menu to select one of the available storage devices.
The actual name (label) of the device may appear within squarebrackets ([]).
Song path
This line shows the current device path.
Open
Opens the selected folder (item whose icon looks like this one:).
Close
Closes the current folder, returning to the parent (“upper”)folder.
Sync P. (Synchronized Path)
Touch this button to see the Song assigned to the selected Player.This is useful to quickly return to it, after you have browsedthrough long directories and “dug” into different folders.
Select
Selects the highlighted item in the display. If a Song is alreadyplaying, it stops, and the new Song is ready to play. You arereturned to the main page.
Play All
When this button is touched, all Standard MIDI Files and MP3files contained in the current directory are added to a new Juke-box list, that is automatically assigned to Player 1. The order inwhich they are played depends on the current sorting method,i.e., how the files are shown in the display.
You can use this Jukebox list as any other list of this type (i.e.,start the playback with SEQ1 PLAY/STOP, jump to the nextSong in the list with SHIFT + >>, edit it in the Jukebox page…).
Note: A Jukebox list can include up to 127 Songs. If your foldercontains more items, only the first 127 will be considered.
Hint: If you don’t want to lose the list when turning the instrumentoff, go to the Jukebox page and save it to disk as a “.JBX” file.
Selecting a Song by its ID numberEach Song in a folder on a device (up to 9,999) has a progressiveID number assigned. When the “Show Song Number” option isselected in the Song Select page menu (see below), you can seethis number before the Song’s name in the Song Select window.You can use this number to select the Song by composing thecorresponding number, speeding up the Song retrieval when youare using an hard disk filled with midifiles.
While in the Song Select window, press the SELECT button toopen the keypad, and enter the number corresponding to theSong to be selected.
While in any page of the Song Play mode, press the SELECT but-ton twice to open the keypad.
Note: If no Song corresponds to the dialed number, the “Song notavailable” message will appear.
Warning: While the directory may contain more than 9999 files,you can’t select Songs outside the 0001-9999 range when using thenumeric keypad.
Song Select page menuTouch the page menu icon to open the menu. Touch a commandto select it. Touch anywhere in the display to close the menuwithout selecting a command.
Export Song List
Select this command to save the current list as a text file to theinternal storage memory, or to a device connected to one of the
Type icon File/folder type
Standard MIDI File (MID)
Karaoke file (KAR)
MPEG Layer 3 (MP3)
Jukebox file (JBX)
Folder
Status icon File/folder status
Protected
– Unprotected
Device Type
HD Internal hard drive (76-key version, 61-key version with the HDIK-2 kit installed) or SSD flash-memory (61-key version)
USB-F Device connected to the front USB Host port
USB-R Device connected to the rear USB Host port

108 Selecting elementsSong Select window
HOST USB ports. This way, you will be able to print a list ofSongs, to see which number matches each Song.
1. While in the Song Select window, select the folder whoseSong list you wish to save as a text file.
2. Select the Export Song List command from the page menu.
3. A dialog box will appear, asking you to select either theinternal storage memory, or one of the HOST USB ports.
4. Select an option, and touch OK to confirm.
Note: The text file will contain a list of “*.mid”, “*.kar”, “.mp3”and “*.jbx” files only. Folders and different kinds of files will not beincluded.
When saved, the text file will be named after the selected folder.For example, a folder named “Dummy” will generate a“Dummy.txt” file. If a file with the same name already exists in thetarget, it will be overwritten without waiting for any confirmation.A file containing the list of all valid files contained into the root ofthe disk will generate a “Root.txt” file.
The list will include the progressive number assigned to each Song,file names, the total number of files in the list.
For the correct display and printing of the list on a personal com-puter, use a fixed size (i.e., non-proportional) character in yourtext editor.
Show Song Number
Check this option to make the Song’s progressive ID numberappear in the list, next to each Song.
Show Song Extension
Check this option to make the file extension (“*.mid”, “*.kar”,“*.jbx”, “*.mp3”) appear in the list, at the end of each Song’sname.
Create New Folder
This command lets you create a new generic folder in the root ofany device, or inside any other generic folder. You can’t create a“.SET” folder with this command, since this type of folder isreserved to the Save operations (and can be created with theNew SET button in any Save page).
By touching the (Text Edit) button you can open the TextEdit window. Enter the name, then touch OK to confirm andclose the Text Edit window.
Rename
Available only when an item is selected in a list.
Use this function to change the name of an existing file or folder.You cannot change the 3-character extension of files and “.SET”folders, since they are used to identify the type of file or folder.
Touch the (Text Edit) button to open the Text Edit window.Enter the new name, then touch OK to confirm and close theText Edit window.
Erase
Use this command to delete the selected file or folder.

109Searching files and musical resourcesHow to use the Search function
Refe
renc
e
With Pa3X, you can press the SEARCH button to search for filesor musical resources.
How to use the Search function
Depending on the page you are in, you can search for differenttypes of data. For example, while in Media mode you can onlysearch for files, while in Style Play or Song Play mode you cansearch for several different types of data (Styles, Songs, Lyr-ics…).
There are some pages where the Search function is not available,since there are no relevant data to search for that page (for exam-ple, the pages of the Global mode).
Here is the general procedure.
1. Press the SEARCH button to open the Search window.
2. If needed, touch the “Type” pop-up menu, and choose thetype of item you are looking for.
When choosing Files, Songs or Lyrics, the “Browse” buttonwill be activated, to allow for searching files in the disks.
3. In case you are searching for a file in a disk, touch the“Browse” button to open the Media window.
• Use the “Device” menu to choose the device containingthe file you are looking for.
• Use the “Open” and “Close” buttons to browse throughthe directories.
• In case you are lost among the directories, touch the“Root” button to go to the root of the selected device.
• When you see the directory containing the file you arelooking for, touch it, then touch the “Select” button to selectit and close the Media window. The name of the selecteddirectory will be shown in the title bar of the Search win-dow.
4. Type the name of the file to be searched. There is no differ-ence between upper and lower cases (“LOVE” is the sameas “Love” or “love”).
5. When finished entering the name, touch the “Search” but-ton. After a while, the list of files found begins appearing inthe display.
After you have touched the “Search” button, its namechanges to “Stop”. If needed, touch this button to stop theongoing search. The name of the button reverts to “Search”.Any file found will remain in the display, until you do anew search.
The time needed to complete a search depends on the sizeof the device(s) and the number of files.
Note: Only one search a-time can be carried on. Please waitfor the current search to be completed, or touch the Stop but-ton in the display to stop the current search and do a newone.
Hint: You can touch the Cancel button in the display, or pressthe EXIT button in the control panel, to exit from this win-dow and carry on other operations. The search will go on inthe background.
Searching files and musical resources
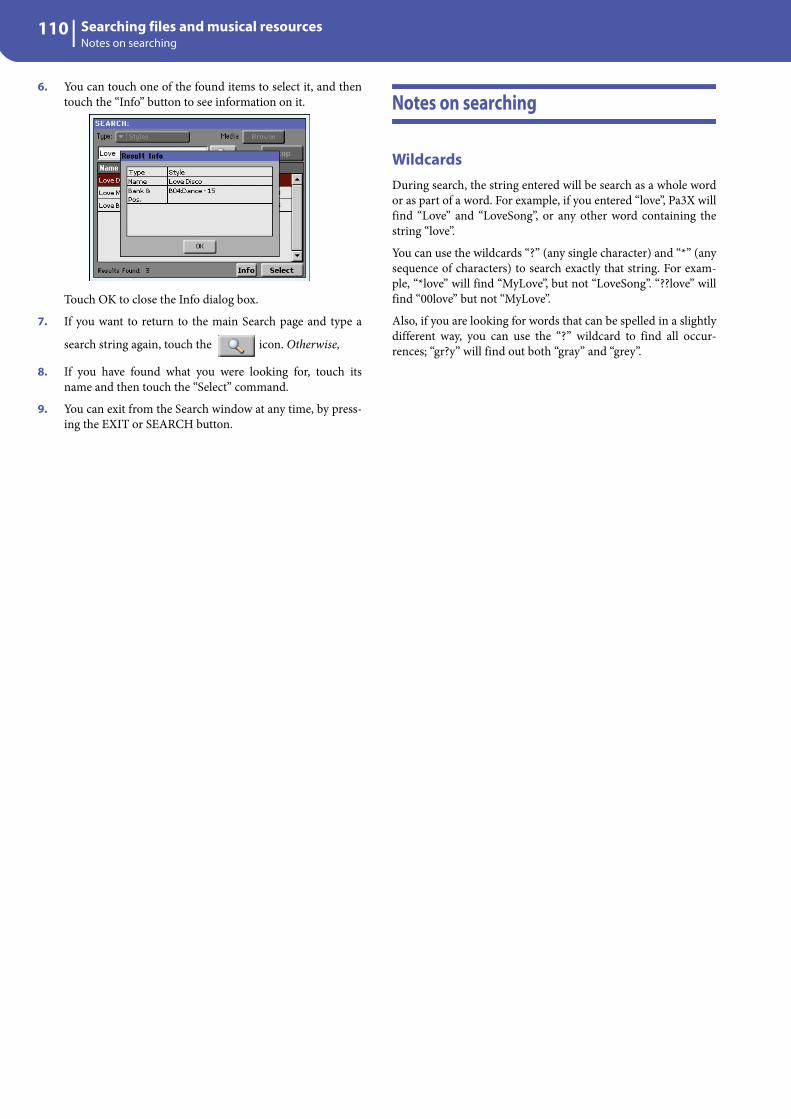
110 Searching files and musical resourcesNotes on searching
6. You can touch one of the found items to select it, and thentouch the “Info” button to see information on it.
Touch OK to close the Info dialog box.
7. If you want to return to the main Search page and type a
search string again, touch the icon. Otherwise,
8. If you have found what you were looking for, touch itsname and then touch the “Select” command.
9. You can exit from the Search window at any time, by press-ing the EXIT or SEARCH button.
Notes on searching
WildcardsDuring search, the string entered will be search as a whole wordor as part of a word. For example, if you entered “love”, Pa3X willfind “Love” and “LoveSong”, or any other word containing thestring “love”.
You can use the wildcards “?” (any single character) and “*” (anysequence of characters) to search exactly that string. For exam-ple, “*love” will find “MyLove”, but not “LoveSong”. “??love” willfind “00love” but not “MyLove”.
Also, if you are looking for words that can be spelled in a slightlydifferent way, you can use the “?” wildcard to find all occur-rences; “gr?y” will find out both “gray” and “grey”.

111Style Play operating modeStart-up settings
Refe
renc
e
The Style Play mode is the boot-up operating mode. When inthis mode, you can play with Styles (i.e. automatic accompani-ments), while playing with one to four tracks (Upper 1-3 andLower) on the keyboard. You can select different Sounds andEffects by selecting Performances and STSs. A different VoiceProcessor Preset may be selected by a Performance or STS. Youcan also use the SongBook to automatically select Styles for adesired music genre.
Style Play mode can also be used in Easy Mode (see page 33).
Start-up settings
Since Performance 1 of bank 1 (Performance 1-1) is automati-cally selected when turning the instrument on, you can save to ityour preferred start-up settings.
Select the Sounds, Effects, Voice Processor Preset, and other set-tings you would like to see automatically selected when turningthe instrument on. Then select the “Write Performance” com-mand from the page menu. When the Write Performance win-dow appears, save the settings to Performance 1 of Bank 1. (See“Write Performance dialog box” on page 138).
Note: If you like some settings to be preserved even when choosingdifferent Performances, STSs and Styles, turn on the desired“locks” to avoid changes to the selected parameters (see “GeneralControls: Lock” on page 204). Save these locks to the Global (see“Write Global - Global Setup dialog box” on page 220).
How Styles, Variations, Performances andSTSs are linked together
Styles, Variations, Performances and STSs are linked in manyways.
• When the STS MODE LED is steadily on or blinking, selectinga Style also changes Keyboard tracks (STS 1 is automaticallyselected). Performance settings are overridden.
• When the STS MODE LED is blinking, selecting a Variationalso select the corresponding STS.
• When the STYLE CHANGE LED is on, selecting a Perfor-mance also selects a Style (the one memorized with the Perfor-mance).
• Current track settings can be saved either to a Performance, anSTS, or a Style Setup, depending on the page menu commandyou select.
Master Volume and Balance
While the MASTER VOLUME slider controls the general vol-ume of the instrument, you can use the BALANCE slider to bal-ance the Style Accompaniment and Pad tracks against theKeyboard tracks.
Note: As an alternative, the BALANCE slider can also work as avolume control. See “Balance Slider” on page 206.
Factory, User and Favorite Styles
There are three different types of Style locations:
• Factory Style banks (from “Pop” to “Contemporary”, i.e.,from BANK01.STY to BANK15.STY) are the preloadedStyles, that you can’t usually edit (unless you don’t want todo so, by turning the protection off, see “Factory Style andPad Protect” on page 237).
• Favorite Style banks (by default, from “Favorite 1” to“Favorite 10”, i.e., from FAVORITE01.STY toFAVORITE12.STY) are similar to User Styles, but you canrename the tabs in the Style Select window to create placesfor custom banks, or for additional music genres that arenot already included among the supplied banks. See “TheFavorite banks” on page 140 for information on how tomanage these Styles.
• User Style banks (from “User 1” to “User 3”, i.e., fromUSER01.STY to USER03.STY) are Styles loaded from anexternal device, created or edited by yourself (the User).These are banks conceived as a ‘workbench’ – a place whereto manage Styles and banks before saving them to a finallocation. See the “Style Record mode” chapter in theAdvanced Edit Manual for information on how to edit orcreate Styles.
Style Play operating mode
Overall instrument’svolume
Balance of Style and Pad tracks against RealTime (Keyboard) tracks

112 Style Play operating modeMain page (Normal view)
Main page (Normal view)
This is the page you see after you turn the instrument on.
To access this page from another operating mode, press theSTYLE PLAY button.
To return to this page from one of the Style Play edit pages, pressthe EXIT button.
Individual tracks can be seen in detail by pressing the Volumetab. Use the TRACK SELECT button to switch between Nor-mal view (Keyboard tracks, grouped Style tracks, Pad trackscontrols) and Style view (individual Style tracks). (See “StyleTracks view page” and “Volume panel” starting frompage 114).
Page headerThis line shows the current operating mode, transposition andrecognized chord.
Operating mode name
Name of the current operating mode.
Master transpose
Master transpose value in semitones. This value can be changedusing the TRANSPOSE buttons on the control panel.
Note: Transpose may be automatically changed when selecting adifferent Performance or Style. It may also be changed when load-ing a Standard MIDI File generated with an instrument of theKorg Pa series.
To avoid transposing, the Master Transpose is “locked” by default.If you want to lock or unlock it, change the Master Transpose Lockparameter’s status (see “General Controls: Lock” on page 204),then write the Global to memory (see “Write Global - Global Setupdialog box” on page 220).
Recognized chord
Displays the recognized chord, when you play a chord on thekeyboard. If no chord abbreviation is shown, no chord recogni-tion mode has been selected by using the CHORD SCAN but-tons (see page 17).
Page menu iconTouch the page menu icon to open the menu. See “Page menu”on page 137 for more information.
Style areaThis is where the Style name is shown, together with its Tempoand Meter (Time Signature) parameters.
Style name
Currently selected Style. Touch the Style name to open the StyleSelect window. As an alternative, use the STYLE SELECT sec-tion on the control panel.
Style bank
bank the current Style belongs to.
Style Element meter
Meter (time signature) of the current Style Element.
Measure number
While the Style is playing, an ‘M’ appears, and it shows the cur-rent measure number of the current Style Element playing.While it is in stop, an ‘L’ appears, and it shows the length (totalnumber of measures) of the current Style Element.
Current beat
Beat number of the current measure, that is currently playing.
Current Tempo
Metronome Tempo (from 30 to 250). Use the TEMPO buttons tochange the Tempo.
As an alternative, keep the SHIFT button pressed and use theDIAL to change the tempo. Also, you can touch the Tempo fieldand drag it with your finger, or change it with the VALUE con-trols.
To recall the Tempo stored in the current Style, press theTEMPO– and + buttons together.
Note: Tempo may change while a Style Element is playing. EachStyle Element may contain Tempo Change data.
Style area Page header Page menu icon
Player 1/2area
Perfor-mance/
STS area
Key-board tracks area
Panels
Operating modename
Master Transpose (in semitones)
Recognized chord
Set
Style name
Style Element meter
Style bank
Measure number
Current tempo
Current beat
Set

113Style Play operating modeMain page (Normal view)
Refe
renc
e
Player 1/2 areaThis is where Songs assigned to the two onboard players areshown.
Song name
Name of Songs assigned to Player 1 (P1) and Player 2 (P2). Youcan select Songs while playing Styles, to have them ready whenswitching to Song Play mode.
The icon shows the type of the selected Song.
Standard MIDI File, often abbreviated as SMF(file extension: *.MID or *.KAR).
MPEG Layer-3 format, or MP3 (file extension:*.MP3). This is a compressed audio file, that maybe generated on any personal computer, or on thePa3X itself.
Only assignable to Player 1. A Jukebox file (fileextension: *.JBX) is a list of Songs. It can beassigned to Player 1, but its name is not shown inthis area. The JBX icon appears, together with thename of the currently selected Song in the Juke-box list.
Performance/STS areaThis is where the latest selected Performance or STS name isshown.
Selected Performance or STS
This is the latest selected Performance (PERF) or Single TouchSetting (STS).
Touch the name to open the Performance Select window (see“Performance Select window” on page 104). As an alternative,use the PERFORMANCE SELECT section to select a differentPerformance.
To select a different STS, use the four STS buttons under the dis-play.
Keyboard tracks areaThis is where Keyboard tracks are shown.
Sound name
Name of the Sound assigned to the corresponding Keyboardtrack.
• If the track is already selected (white background), touch theSound name to open the Sound Select window.
• If the track is not selected (dark background), first select it,then touch the Sound name to open the Sound Select window.
You can also open the Sound Select window by using theSOUND SELECT buttons in the REAL TIME TRACKS sectionof the control panel.
For more information about the Sound Select window, see“Sound Select window” on page 104.
Keyboard track octave transpose
Non editable. Octave transpose of the corresponding track. Toindividually edit the octave transpose for each track, go to the“Mixer/Tuning: Tuning” edit page (see page 123).
You can also transpose all Upper tracks by using the UPPEROCTAVE buttons on the control panel.
Bass & Lower Backing icon
When the Bass & Lower Backing function isactive, the Backing icon appears in the Lowertrack Sound area (see “Bass & Lower Backing” on page 137).
Keyboard track name
Non editable. Name of the corresponding track:
Sound bank’s icon
This picture illustrates the bank the current Sound belongs to.
Keyboard track status
Play/mute status of the current track. Select the track, then touchthis area to change the track status.
Song name
Selected Performance or STS
Abbreviation Track Hand
UP1 Upper 1 Right hand
UP2 Upper 2
UP3 Upper 3
LOW Lower Left hand
Soundname Track name
Track’s octave transpose
Sound bank’s icon
Track status
Sty

114 Style Play operating modeStyle Tracks view page
No icon Play status. The track can be heard.
Mute status. The track cannot be heard.
PanelsThe lower half of the main page contains the various panels, youcan select by touching the corresponding tabs. See more infor-mation in the relevant sections, starting from page 115.
Style Tracks view page
Press the TRACK SELECT button to switch from the Normalview to the Style Tracks view. With the Volume tab selected,individual Style tracks are shown in the lower half of the display,while the upper half of the main page changes to show parame-ters for the selected Style track.
Press TRACK SELECT again to return to the Normal view (Key-board tracks, grouped Style tracks, Mic/In controls).
Original Style Sounds
This parameter lets you assign different Sounds to the Styletracks, overriding the Sounds recorded into each Style Elementpattern. These Sounds can be saved into a Performance or StyleSetup with the “Write Performance” or “Write Current Style Set-tings” commands (see page 137).
Assigned Sounds, with this parameter turned on, are shown inthe Sounds area of this page.
Note: When assigning a Sound to a Style track, the “Original StyleSounds” parameter is automatically turned off.
Note: This parameter can be saved with the Performance or StyleSetup, and is automatically set to On or Off when you select a dif-ferent Performance or Style, depending on the saved status.
On Style tracks always use the original Soundsrecorded in each Style Element. If you assign a
different Sound to a Style track, this parameter isautomatically set to Off.
Off You can assign different Sounds to each Styletrack, and save them in a Performance or StyleSettings. The selected Sounds are the same for allStyle Elements (there are no different Sounds foreach Style element).
Selected Track Info areaThis line lets you see the Sound assigned to the selected track. Itappears both in the main page, and in several edit pages.
Track name
Name of the selected track.
Sound name
Sound assigned to the selected track. Touch anywhere in thisarea to open the Sound Select window, and select a differentSound.
Sound bank
Bank of the selected Sound.
Program Change
Program Change number sequence (Bank Select MSB, BankSelect LSB, Program Change).
Sounds areaThis area lets you see the Sound’s bank, and octave transpositionfor the eight Style tracks.
Style track’s octave transpose icon
Non editable. Octave transpose of the corresponding track. Tochange the octave transpose, use the UPPER OCTAVE buttons,or go to the “Mixer/Tuning: Tuning” edit page (see page 123).
Sound bank’s icon
This picture illustrates the bank the current Sound belongs to.Touch an icon a first time to select the corresponding track(detailed information are shown on the Selected Track Info area,see above). Touch it a second time to open the Sound Select win-dow.
Volume panel
Tabs
Selected trackinfo area
Sounds area
Set
Track name
Sound name
Sound bank
Program Change
Set
Set
Set
Style track’s octave transpose icon
Sound bank’s icon
Set

115Style Play operating modeSTS Name panel
Refe
renc
e
STS Name panel
Touch the STS Name tab to select this panel. Single Touch Set-tings (STS) are memory locations for quickly choosing KeyboardSounds, contained in each Style or SongBook entry. While inthis panel, you can see the name of the four STSs belonging tothe latest selected Style or SongBook entry. Touch one of thenames to select the corresponding STS.
Note: You cannot edit STS names in this panel. To edit a name,select the STS to be renamed, then select the Write Single TouchSetting command from the page menu (see “Write Single TouchSetting dialog box” on page 139).
Volume panel
Touch the Volume tab to select this panel. This is where you canset the volume of each track, and mute/unmute tracks.
Note: The volume of Keyboard tracks (Normal view) may be savedto a Performance or STS. The volume of the grouped Style tracks(Normal view) can be memorized to the Style Play Setup. The vol-ume of the separate Style tracks (Style Tracks view) can be memo-rized to the current Style Settings.
Sliders and volume of the tracks
You can change the volume of each track by using the AssignableSliders in the control panel. To make them act as volume con-trols, be sure the VOLUME LED over the SLIDER MODE but-ton is lit:
The Assignable Sliders correspond to the ‘virtual sliders’ in thedisplay. These are a graphical representation of each track’s vol-ume.
You can also change the volume by touching the virtual slider ofa track, and using the VALUE controls, or by touching a trackand dragging it in the display.
Hint: You can proportionally change the volume of all Keyboard orStyle tracks at once by using the Assignable Sliders. Select a track ofthe same type of the tracks whose volume you want to change (e.g.,the Upper 1 track to modify all Keyboard tracks). Then keep theSHIFT button pressed, and move one of the Assignable Sliders. See“ASSIGNABLE SLIDERS” on page 7.
Use the TRACK SELECT button to switch betweenthe Normal (grouped Style tracks, Pad tracks, Key-
Set
Assignable sliders
Virtual sliders

116 Style Play operating modeVolume panel
board tracks) and Style Tracks view (separate Style tracks). TheAssignable Sliders LEDs show which view is currently selected:
The Normal view shows grouped Style tracks, Mic/In controls,Keyboard tracks:
The Style Tracks view shows the separate Style tracks:
Here you can change the volume of each individual Style track.This mix is saved into the Style Settings of the selected Style andinto a Performance, and can change when choosing a differentStyle.
Grouped Style tracks
These special sliders of the Normal view control several Styletracks at the same time.
Changing the volume of the grouped Style tracks (Dr/Perc,Accomp, Bass) is a global offset. When you choose a differentStyle, this offset does not change, and the average volume of theStyle tracks remains the same.
These controls allows you to globally set the balance between theDrum/Percussion, Bass and Accompaniment tracks. For exam-ple, if you prefer Drums and Bass to be prominent to make themhave more ‘punch’, you can lower the grouped Accompanimenttracks.
Changes are not memorized to a Performance or to the currentStyle Settings. They can be memorized to the Global-Style PlaySetup, i.e., the preferences of the Style Play mode (see “WriteGlobal-Style Play Setup” on page 137).
Slider Mode button status
The function assigned to the Assignable Sliders depends on thestatus of the SLIDER MODE button. Note that this may changewhen selecting a different Performance or STS.
For details about the various Slider Modes, see “SLIDER MODE”on page 8.
Track status icons
Play/mute status of the current track. Select the track, then touchthis area to change its status.
Play status. The track can be heard.
Mute status. The track cannot be heard.
Volume LED
Assignable Sliders LEDs
VPp
Grouped Style Tracks
Set
Track status icons

117Style Play operating modePad panel
Refe
renc
e
Saving the track’s status
• The status of Keyboard tracks can be saved to a Performanceor STS, and can be changed when choosing a different Perfor-mance or STS (see “Write Performance” on page 137 and “WriteSingle Touch Setting” on page 137).
• The status of the separate Style tracks can be saved to the cur-rent Style Settings (see “Write Current Style Settings” onpage 137).
• The status of the grouped Style tracks can be saved to theGlobal-Style Play Setup (see “Write Global-Style Play Setup” onpage 137).
Track names
Under the sliders, a label for each track is shown. Use theTRACK SELECT button to switch between the various trackviews.
Pad panel
Touch the Pad tab to select this panel. This is where you canassign a different Hit or Sequence Pad to each of the four pads,and see at a glance how pads are programmed. For more options,go to the “Pad/Switch: Pad” page (see page 133).
Pad assignment
Name of the Hit or Sequence assigned to each Pad. Touch thebox to make the Pad Select window appear (see “Pad Select win-dow” on page 105).
Note: Each Style or SongBook entry can change the Pad assign-ment.
Pads lock icon
When locked, assignments to the pads remain unchanged whenselecting a different Style or SongBook entry.
This lock is reset when turning the instrument off, unless youwrite Global settings to memory (see “Write Global - GlobalSetup dialog box” on page 220).
For more information on parameter locks, see “General Con-trols: Lock” on page 204.
Track Description
Normal View
DR/PERC (*)
(*).Volume for these grouped tracks is a global offset and can be memorized when choosing the “Write Global-Style Play Setup” command form the page menu.
Grouped Drum and Percussion tracks.
ACCOMP (*) Grouped Accompaniment tracks (Acc1-5).
BASS (*) Grouped Bass Style track.
MIC/IN Microphone (Voice Processor). Sources con-nected to the Left and Right Audio Inputs are not controlled by this slider. The volume is set via the MIC VOLUME knob in the MIC SET-TINGS section of the control panel.
LOWER Lower track.
UPPER1…3 Upper tracks.
Style Tracks View
DRUM Drum Style track.
PERC Percussion Style track.
BASS Bass Style track.
ACC1…5 Accompaniment Style tracks.
Set
Gbl

118 Style Play operating modeSplit panel
Split panel
Touch the Split tab to select this panel. This is where you can setthe split point and Chord Recognition mode.
Split Point
Use this parameter to select a different split point. A full-rangepiano keyboard is shown in the display, divided at the selectedsplit point. Upper tracks play on the right of this point, while theLower track plays on the left.
Keyboard diagram
Touch anywhere on the keyboard diagram. A message willappear, asking you to press the new split point on the keyboardof your Pa3X (or to press the EXIT button to close the messagewith no changes).
Chord Recognition Mode
This parameter allows you to decide how chords are recognizedby the auto-accompaniment engine. Please note that when inFull or Upper Chord Scan mode, the Fingered 3 or Expert modeis selected, and you must always play at least three notes, to let achord be recognized.
For more information on the various options, see “Chord Recog-nition Mode” on page 135.
Note: This parameter is the same you can find in the “Preferences:Style Preferences” page (see page 135).
Split Point and Chord Recognition lock icons
When locked, Split Point and Chord Recognition mode remainunchanged when selecting a different Performance or STS.
These locks are reset when turning the instrument off, unlessyou write Global settings to memory (see “Write Global - GlobalSetup dialog box” on page 220).
For more information on parameter locks, see “General Con-trols: Lock” on page 204.
Mic panel
Touch the Mic tab to select this panel. This is where you can setthe various Voice Processor options.
Note: Depending on the audio input routing, the microphone inputmight not work, whichever the status of the switches in this page.See “Audio Setup: Audio In” on page 215.
VP Preset
Use this pop-up menu to select one of the available Voice Proces-sor Presets. Selecting a Preset may change all the above parame-ters, as well as other Voice Processor parameters. Presets can befreely edited (see “Voice Processor Preset: Easy Preset” onpage 99).
VP lock icon
This lock avoids changing the Voice Processor Preset whenselecting a different Performance, STS or SongBook entry. Thisis useful if you want to use the same Preset while selecting differ-ent Performances, STSs or SongBook entries.
This lock is reset when turning the instrument off, unless youwrite Global settings to memory (see “Write Global - GlobalSetup dialog box” on page 220).
For more information on parameter locks, see “General Con-trols: Lock” on page 204.
Talk On/Off
Use this switch to soften all music generated by the Pa3X, andspeak in the microphone at normal level. This is useful toaddress your audience, while automatically lowering the back-ground music volume.
On While this switch is turned on, all Voice Proces-sor modules are momentarily turned off. Settingfor the Talk function can be programmed in theTalk page of the Global > Voice Processor Setupsection (see “Voice Processor Setup: Talk” in theAdvanced Edit Manual, contained in the Acces-sory Disk).
Off Turn this switch off to return to the original set-tings (the same that you were using before press-ing the TALK button).
Filter On/Off
Use this switch to add steep filters to emulate the sound ofradios, phones and devices that generally degrade the audio sig-nal.
HardTune On/Off
Use this switch to add a pitch corrector (octave up/down) thathas been optimized to produce corrective pitch correction aswell as obvious effects made popular by a number of artists.
Gbl
Gbl
Tlk

119Style Play operating modeSub-Scale panel
Refe
renc
e
uMod On/Off
Use this switch to add subtle thickening to the voice. This effectdoes a faithful job of emulating classic detune, chorus, flangerand thickening sounds.
Delay On/Off
Use this switch to add a delay effect to the voice. The delay issimilar to an echo, and can have short or long repetitionsdepending on the selected Voice Processor Preset.
Sub-Scale panel
Touch the Sub-Scale tab to select this panel. This panel replicatesthe “Mixer/Tuning: Sub Scale” edit page of the Global mode (seepage 123).
With the “Quarter Tone” button non-pressed
With the “Quarter Tone” button pressed
Edit menu
From any page, press the MENU button to open the Style Playedit menu. This menu gives access to the various Style Play editsections.
When in the menu, select an edit section, or press EXIT orSTYLE PLAY to exit the menu and return to the main page. Toreturn to the main page, you can also select the Main Page menuitem.
When in an edit page, press EXIT or the STYLE PLAY button toreturn to the main page of the Style Play operating mode.
Each item in this menu corresponds to an edit section. Each editsection groups various edit pages, that may be selected by touch-ing the corresponding tab on the lower part of the display.
Edit page structure
All edit pages share some basic elements.
Operating mode
This indicates that the instrument is in Style Play mode.
Edit section
This identifies the current edit section, corresponding to one ofthe items of the edit menu (see “Edit menu” on page 119).
Page menu icon
Touch this icon to open the page menu (see “Page menu” onpage 137).
Operating mode Edit section
Selected track info
Page menu icon
Parameters area
Tabs

120 Style Play operating modeMixer/Tuning: Volume/Pan
Parameters area
Each page contains various parameters. Use the tabs to selectone of the available pages. For detailed information on the vari-ous types of parameters, see sections starting below.
Tabs
Use tabs to select one of the edit pages of the current edit section.
Mixer/Tuning: Volume/Pan
This page lets you set the volume and pan for each of the Key-board or Style tracks. Volume settings are the same as in the Vol-ume panel of the main page.
Use the TRACK SELECT button to switch from the Keyboard tothe Style tracks, and vice versa.
Upper Volume Link
This parameter allows you to define if changing the volume forone of the Upper tracks, proportionally changes also the otherUpper tracks.
Note: This parameter is the same you can find in the “Preferences:Style Play Setup” page (see page 136).
On When changing volume to one of the Uppertracks, volume for the other Upper tracks changesin proportion.
Off When changing volume to one of the Uppertracks, only that track’s volume is changed. OtherUpper tracks are left unchanged.
Dry
Use this checkbox to turn the dry (direct) track signal on or offfrom the Master FX Send. To hear the direct signal, also set theFX Send Level of the relevant Master FX to a value different thanzero (see “Mixer/Tuning: FX Send” below).
Note: If the track is sent to a separate output, no FX is sent to anyoutput. To program the output status for each track, see “AudioSetup: Style/Kbd” on page 214.
On When checked, the direct, dry signal comingfrom the track is sent to the output, mixed withthe Master FXs.
Off When unchecked, the direct, dry signal comingfrom the track is removed from the audio output,and only sent to the Master FXs. The effected sig-nal will still be panned (in stereo FXs only)according to the Pan value.
Pan
Track position in the stereo field.
L-64…L-1 Left stereo channel.
C 00 Center.
R+1…R+63 Right stereo channel.
Volume of grouped Style tracks
This parameter is a general offset applied to all Styles. Changingthe volume of the grouped Style tracks (Dr/Perc, Accomp, Bass)is a global offset. When you choose a different Style, this offsetdoes not change.
These controls allows you to globally set the balance between theDrum/Percussion, Bass and Accompaniment tracks. For exam-ple, if you prefer Drums and Bass to be prominent to make themhave more ‘punch’, you can lower the grouped Accompanimenttracks.
To save this setting, choose the “Write Global-Style Play Setup”command from the page menu (see page 137).
0…127 Volume level.
Volume of individual tracks
Track’s volume. This is the relative volume of each track, as savedin the Style (Style Settings), Performance or STS. It may changewhen choosing a different Style, Performance or STS.
0…127 MIDI value of the track’s volume.
Grouped Style tracks Keyboard tracks
Individual Styletracks
Sty
Set
Track L/R Out
Master FX
Track L/R Out
Master FX
Set
Sty
Set

121Style Play operating modeMixer/Tuning: FX Send
Refe
renc
e
Play/Mute icon
Track’s play/mute status.
Play status. The track can be heard.
Mute status. The track cannot be heard.
Mixer/Tuning: FX Send
Pa3X includes two groups of effects (FX A and FX B). While inStyle Play mode, the A group is reserved to the Style and Padtracks, the B group to the Realtime (Keyboard) tracks.
Choosing and editing the effects is done in the dedicated Effectsection (see “Effects: A/B FX Configuration” on page 125).
This page lets you set the level of the track’s direct (dry, unef-fected) signal going to the Master FX processors. The Master FXprocessors are connected in parallel with the dry/direct signal,so you can decide the amount of direct signal that will be sent tothe Master FX processors.
In case you do not want to hear the direct signal, just set the Dryparameter to Off (see “Dry” above).
You can assign to the Master FXs any kind of available effects,but we found it convenient to arrange them in the following way,for most of the Styles, STS and Performances included with thePa3X:
A-Master 1 Reverb processor for the Style and Pad tracks.
A-Master 2 Modulating FX processor for the Style and Padtracks.
A-Master 3 Freely assignable.
B-Master 1 Reverb processor for the Realtime (Keyboard)tracks.
B-Master 2 Modulating FX processor for the Realtime (Key-board) tracks.
B-Master 3 Freely assignable (it could not be available,depending on how many Insert FX are used).
Use the TRACK SELECT button to switch from Keyboard toStyle tracks, and vice-versa.
FX Group
This indicates the FX group (A or B) assigned to the group oftracks shown.
Send level
0…127 Level of the track (direct) signal sent to the corre-sponding Master FX effect processor.
Play/Mute icon
Track’s play/mute status.
Play status. The track can be heard.
Mute status. The track cannot be heard.
Set
Set
Set
Set

122 Style Play operating modeMixer/Tuning: EQ Gain
Mixer/Tuning: EQ Gain
In this page you can set the three-band equalization (EQ) foreach individual track.
Use the TRACK SELECT button to switch from the Keyboard tothe Style tracks, and vice-versa.
Hi (High) Gain
This parameter lets you adjust the high frequencies equalizationon each individual track. This is a shelving curve filter. Valuesare shown in decibels (dB).
-18…+18dB High gain value in decibels.
Mid (Middle) Gain
This parameter lets you adjust the middle frequencies equaliza-tion on each individual track. This is a bell curve filter. Valuesare shown in decibels (dB).
-18…+18dB Middle gain value in decibels.
Low Gain
This parameter lets you adjust the low frequencies equalizationon each individual track. This is a shelving curve filter. Valuesare shown in decibels (dB).
-18…+18dB Low gain value in decibels.
Play/Mute icon
Track’s play/mute status.
Play status. The track can be heard.
Mute status. The track cannot be heard.
Mixer/Tuning: EQ Control
This page lets you reset or bypass the track’s equalization, pro-grammed in the previous page.
Use the TRACK SELECT button to switch from the Keyboard tothe Style tracks, and vice-versa.
Reset All Tracks button
Touch this button to reset (i.e., “flatten”) equalization for alltracks (both Realtime and Style tracks).
Track Reset buttons
Use these buttons to reset (i.e., “flatten”) equalization for the cor-responding track.
Bypass
Check any of these checkboxes to bypass the equalization for thecorresponding track. When bypassed, equalization has no effect onthe track, but all parameters are preserved. When the box isunchecked, equalization is activated again with the original settings.
On The bypass function is engaged, so no equaliza-tion is active on the corresponding track.
Off The bypass function is not engaged, so the equal-ization is active on the corresponding track.
Input Trim
This knob allows you to limit the level of the signal passingthrough the equalizer. Extreme equalization values can overloadthe audio circuits and lead to distortion. This control lets you setequalization as desired, and at the same time avoid overloading.
0…99 Limiting value. The higher, the most effective it is.
Play/Mute icon
Track’s play/mute status.
Play status. The track can be heard.
Mute status. The track cannot be heard.
Set
Set
Set
Set
Set
Set
Set

123Style Play operating modeMixer/Tuning: Tuning
Refe
renc
e
Mixer/Tuning: Tuning
This page is where you can set the octave transpose and fine tun-ing for each track. Plus, you can program the Pitch Bend rangefor each track.
Use the TRACK SELECT button to switch from the Keyboard tothe Style tracks, and vice-versa.
PB Sensitivity
These parameters show the Pitch Bend range for each track, insemitones.
1…12 Maximum up/down pitch bend range (in semi-tones). 12 = ±1 octave.
0 No pitch bend allowed.
Octave Transpose
This is the octave transpose value.
-3 Lowest octave.
0 Standard tuning.
+3 Highest octave.
Detune
This is the fine tuning value.
-64 Lowest pitch.
00 Standard tuning.
+63 Highest pitch.
Play/Mute icon
Track’s play/mute status.
Play status. The track can be heard.
Mute status. The track cannot be heard.
Mixer/Tuning: Sub Scale
This page lets you program an alternative scale for the tracksselected with the “Scale Mode” parameter (see page 136). Theremaining tracks (if any) use the basic scale set in Globalmode (see “Main Scale” on page 203).
With the “Quarter Tone” button non-pressed
With the “Quarter Tone” button pressed
Note: A different Scale can be associated to each Performance orSTS.
Note: Quarter Tone selection can be received by MIDI (i.e., by anexternal sequencer or controller). Conversely, selection of QuarterTone settings can be sent by the Pa3X to an external MIDIrecorder as System Exclusive data.
Scale
Selected scale. See “Scales” on page 244 for a list of the availablescales. When selecting the User scale, the keyboard diagram onthe right becomes active, letting you program a custom scale (see“How to create a custom scale by fine-tuning each note of theUser scale” below).
Key This parameter is needed by some scales to set the preferredkey (see “Scales” on page 244).
Quarter Tone
Press the Quarter Tone button to make the keyboard diagramactive. In the display, touch any note you want to lower a quartertone, making a big dot appear on the note diagram. Touch thenote again to make the dot disappear.
Set
Set
Set
Set
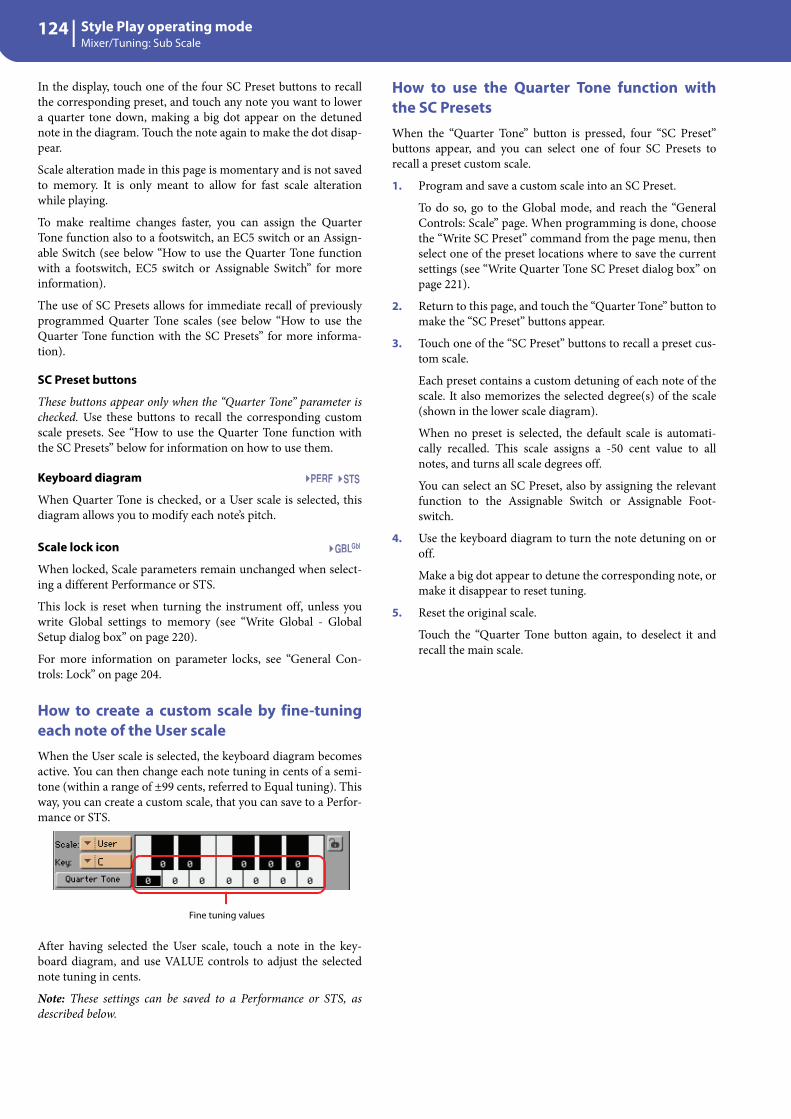
124 Style Play operating modeMixer/Tuning: Sub Scale
In the display, touch one of the four SC Preset buttons to recallthe corresponding preset, and touch any note you want to lowera quarter tone down, making a big dot appear on the detunednote in the diagram. Touch the note again to make the dot disap-pear.
Scale alteration made in this page is momentary and is not savedto memory. It is only meant to allow for fast scale alterationwhile playing.
To make realtime changes faster, you can assign the QuarterTone function also to a footswitch, an EC5 switch or an Assign-able Switch (see below “How to use the Quarter Tone functionwith a footswitch, EC5 switch or Assignable Switch” for moreinformation).
The use of SC Presets allows for immediate recall of previouslyprogrammed Quarter Tone scales (see below “How to use theQuarter Tone function with the SC Presets” for more informa-tion).
SC Preset buttons
These buttons appear only when the “Quarter Tone” parameter ischecked. Use these buttons to recall the corresponding customscale presets. See “How to use the Quarter Tone function withthe SC Presets” below for information on how to use them.
Keyboard diagram
When Quarter Tone is checked, or a User scale is selected, thisdiagram allows you to modify each note’s pitch.
Scale lock icon
When locked, Scale parameters remain unchanged when select-ing a different Performance or STS.
This lock is reset when turning the instrument off, unless youwrite Global settings to memory (see “Write Global - GlobalSetup dialog box” on page 220).
For more information on parameter locks, see “General Con-trols: Lock” on page 204.
How to create a custom scale by fine-tuningeach note of the User scaleWhen the User scale is selected, the keyboard diagram becomesactive. You can then change each note tuning in cents of a semi-tone (within a range of ±99 cents, referred to Equal tuning). Thisway, you can create a custom scale, that you can save to a Perfor-mance or STS.
After having selected the User scale, touch a note in the key-board diagram, and use VALUE controls to adjust the selectednote tuning in cents.
Note: These settings can be saved to a Performance or STS, asdescribed below.
How to use the Quarter Tone function withthe SC PresetsWhen the “Quarter Tone” button is pressed, four “SC Preset”buttons appear, and you can select one of four SC Presets torecall a preset custom scale.
1. Program and save a custom scale into an SC Preset.
To do so, go to the Global mode, and reach the “GeneralControls: Scale” page. When programming is done, choosethe “Write SC Preset” command from the page menu, thenselect one of the preset locations where to save the currentsettings (see “Write Quarter Tone SC Preset dialog box” onpage 221).
2. Return to this page, and touch the “Quarter Tone” button tomake the “SC Preset” buttons appear.
3. Touch one of the “SC Preset” buttons to recall a preset cus-tom scale.
Each preset contains a custom detuning of each note of thescale. It also memorizes the selected degree(s) of the scale(shown in the lower scale diagram).
When no preset is selected, the default scale is automati-cally recalled. This scale assigns a -50 cent value to allnotes, and turns all scale degrees off.
You can select an SC Preset, also by assigning the relevantfunction to the Assignable Switch or Assignable Foot-switch.
4. Use the keyboard diagram to turn the note detuning on oroff.
Make a big dot appear to detune the corresponding note, ormake it disappear to reset tuning.
5. Reset the original scale.
Touch the “Quarter Tone button again, to deselect it andrecall the main scale.
Gbl
Fine tuning values

125Style Play operating modeEffects: A/B FX Configuration
Refe
renc
e
How to use the Quarter Tone function with afootswitch, EC5 switch or Assignable SwitchYou can assign the “Quarter Tone” function to a footswitch, aKorg EC5 switch, or an Assignable Switch, to program a customscale in realtime, for example to allow for those sudden scalechange typical of Arabic music. These changes are not saved any-where, so the scale is easily “wiped-out” when selecting a differ-ent Performance or STS, or when pressing the Quarter Tonepedal again.
Note: While in Style Play mode, you can create a custom scale, tobe assigned to a Performance or STS, simply by selecting and edit-ing a User scale, and saving any change to a Performance or STS.See “How to create a custom scale by fine-tuning each note of theUser scale” above.
While in Global mode, you can create a custom scale and save it toone of the four SC Presets, and recall it by touching one of the SCPreset buttons in the display. Then, you can start your realtimescale editing from the selected preset. See “How to use the QuarterTone function with the SC Presets” above.
1. Program a footswitch, one of the EC5 pedals, or an Assign-able Switch, to be the Quarter Tone switch.
Simply go to the Global mode, and reach the “Controllers:Pedal/Switch” or “Controllers: EC5” page. There, you willfind the “Pedal/Footswitch” and “EC5-A…E” parameters,to which you can assign the Quarter Tone function.
While still in Global mode, select the Write Global-GlobalSetup command from the page menu, to save these settingsto the Global (see “Write Global - Global Setup dialog box”on page 220).
2. Lower some note pitches.
Keep the Quarter Tone pedal pressed. The keyboard willnot play at this time. Press the notes you want to lower aquarter tone. Release the pedal.
3. Play with your new scale.
Notes you pressed on step 2 are now lowered of a quartertone.
4. Reset the original scale.
Press and release the Quarter Tone pedal again, withoutplaying any note. All pitches will be reset, and the scaleselected by the Performance, STS will be recalled.
Effects: A/B FX Configuration
This page allows you to select the A (Style and Pads) and B (Key-board) groups of effects. Please use the “FX A” and “FX B” sidetabs to switch from one group to the other one.
FX Groups: FX A and FX BPa3X includes two groups of effects (FX A and FX B). In StylePlay mode, the A group is reserved to the Style and Pad tracks,the B group to the Realtime (Keyboard) tracks.
While there are virtually six FXs for group A, and four FXs forgroup B, they cannot be all active at the same time (as you cansee in the following table). The maximum number of active FXsis five FXs for the Style tracks, and three FXs for the Keyboardtracks:
• Group A (Style) can include either three Insert FXs and twoMaster FXs, or two Insert FXs and three Master FXs.
• Group B (Keyboard) can include either one Insert FXs and twoMaster FXs, or no Insert FXs and three Master FXs.
If you need one more effect of a kind, please turn off the last oneof the effects of the other kind.
Double size FXsYou can assign “double size” effects to the Insert FX 1 of the Agroup, or to the Master FX 2 of the A or B groups. This kind ofeffect takes two FX processing units, so the following FX proces-sor becomes unavailable.
To check for double size effects, see the list of the available effectsin the “Advanced Edit” manual in the Accessory Disk.
VocoderYou can assign a Vocoder effect to the Master FX 2 of the Bgroup. When the Vocoder effect is selected, the MIC input signalgoes to the Vocoder and the Voice Processor is deactivated.
FX A (Style/Pad) FXB (Keyboard)
IFX 1IFX 2IFX 3
MFX 1MFX 2
–
IFX 1 MFX 1MFX 2
–
IFX 1IFX 2
–
MFX 1MFX 2MFX 3
– MFX 1MFX 2MFX 3
FX group

126 Style Play operating modeEffects: A/B FX Configuration
Insert and Master FXThere are two different types of effects for each of the groups:Insert, and Master FXs.
• Insert FXs completely process the dry signal coming from atrack, and are especially useful for effects like compression ordistortion. These effects are applied to a single track. Insert FXsinclude Korg REMS™ effects, carefully modeled after real guitaramps and stompbox effects.
• On the contrary, Master FXs are mixed in parallel with the drysignal coming from a track (in case, pre-processed by the InsertFXs), and can be mixed in via the “FX Send” parameter of theMixer/Tuning section (see “Mixer/Tuning: FX Send” onpage 121). These effects are applied to all tracks of the samegroup (A/B) at once. Master FXs are most often modeled afterstudio rack effects, to be used to refine and polish the sound andgive it a produced quality.
Insert FX section
On/Off/Dis
Use this button to turn the effect on or off.
Note: FX processors that cannot be activated (for lack of free pro-cessors) exhibit the “Dis” label (for “Disabled”). To activate a dis-abled processor, first deactivate another processor.
W/D (Wet/Dry)
Use this parameter to set the amount of the effect against the drysignal coming from the track.
To edit the value, either use the VALUE controls or drag withyour finger. As an alternative, touch the parameter a second timeto open the numeric keypad, and enter the two-digit effect per-centage.
Dry No effect applied. Only the dry signal from thetrack can be heard.
01:99…99:01 Mix between the effect and the dry signal, in per-centage.
Wet Only the effect can be heard.
FX Name
Use this pop-up menu to choose one of the available effects. Fora list of the available effects, see the “Advanced Edit” manual inthe Accessory Disk.
Track
Track to which the effect is applied. If you choose Drum or Perc,the “Category” parameter on the right is also considered.
Note: If the “Chain” parameter is turned on on the IFX 1 effect,this parameter cannot be edited for the following IFX effects.
Category
Drum/Perc category of instruments inside the Drum or Percus-sive instrument set. You can apply effects to each separate cate-gory (Bass Drums, Snare Drums, Cymbals…), instead ofapplying them to the drum kit as a whole.
Chain
When this button is pressed down, the Insert FX goes into (“ischained to”) the following Insert FX. If not, it goes directly to theMaster FXs.
Master FX section
On/Off/Dis
Use this button to turn the effect on or off.
Note: FX processors that cannot be activated (for lack of free pro-cessors) exhibit the “Dis” label (for “Disabled”). To activate a dis-abled processor, first deactivate another processor.
W/D (Wet/Dry)
Use this parameter to set the amount of the effect against the drysignal coming from the tracks (the “FX Send” stream). This is ageneral adjustment for all tracks; individual adjustment for eachtrack can be done via the “FX Send” parameter of the Mixer/Tuning section (see “Mixer/Tuning: FX Send” on page 121).
To edit the value, either use the VALUE controls or drag withyour finger. As an alternative, touch the parameter a second timeto open the numeric keypad, and enter the two-digit effect per-centage.
Dry No effect applied. Only the dry signal from thetrack can be heard.
01:99…99:01 Mix between the effect and the dry signal, in per-centage.
Wet Only the effect can be heard.
FX Name
Use this pop-up menu to choose one of the available effects. Fora list of the available effects, see the “Advanced Edit” addendumin the Accessory Disk.
M.T. (Modulating Track)
Source track for modulating MIDI messages. You can modulatean effect parameter with a MIDI message generated by an inter-nal physical controller.
Note: Insert FXs are modulated by the track they are applied to.
to MFX1
Amount of the Master FX going back to the input of the MasterFX 1 (MFX1). This is usually called the “feedback loop”.
Set
Set
Set
Set
Set
Set
Set
Set
Set
Set
Set

127Style Play operating modeEffects: IFX 1…3, Master 1…3
Refe
renc
e
Effects: IFX 1…3, Master 1…3
These pages contain the editing parameters for the effect proces-sors. Here is an example of the Master 1 page, with the ReverbWet Plate effect assigned.
Selected effect
Select one of the available effects from this pop-up menu. This isequivalent to the “FX Name” parameters found in the “Effects:A/B FX Configuration” page (see above).
Note: Effects can be different for each one of the editing pages.
FX parameters
Parameters may be different, depending on the selected effect.See the “Advanced Edit” addendum in the Accessory Disk for alist of available parameters for each effect type.
Wet/Dry
Use this parameter to set the amount of the effect against the drysignal coming from the track. This is the same setting found inthe “Mixer/Tuning: FX Send” page (see above).
Src (Source)
Modulation source. To select the track generating this message,for Master FXs see the “M.T. (Modulating Track)” parametersfound in the “Effects: A/B FX Configuration” page (see above).Modulating messages for the Insert FXs are generated by thetrack the effect is applied to.
For a list of modulation source, see the “Advanced Edit” adden-dum in the Accessory Disk.
Amt (Amount)
Volume of the effect, that is added to the dry (uneffected) signal.
Track Controls: Mode
This page lets you connect each track to the internal sound gen-erator and to external MIDI devices. This is very useful to let aStyle track drive an external expander, or play a digital pianowith one of Pa3X’s Keyboard tracks. In addition, here you can setthe polyphony mode for each track.
Int./Ext. (Internal/External)
Internal The track plays the sounds generated by theinternal sound engine. It does not play an exter-nal instrument connected to the MIDI OUT.
External The track plays an external instrument connectedto the MIDI OUT. The connected device mustreceive on the MIDI channel associated with thistrack on the Pa3X (see “MIDI: MIDI Out Chan-nels” on page 212).
A track set to this status does not play the internalsounds, therefore saving polyphony.
Instead of the assigned Sound name, the <E: aaa.bbb.ccc> indicator is shown on a track’sarea in the Main page:
This indicator begins with a remark saying thetrack is in External (”E”) mode, and continueswith a strings of transmitted Control Change andProgram Change data. This will let you knowwhat the track is transmitting to the MIDI OUT.In the following example, CC#0 is the ControlChange 0 (Bank Select MSB), CC#32 is the Con-
Selected effect
FX parameters
FX group
Set SB
Set SB
Set SB
Set SB
Set
Set
Control Change/Program Change area

128 Style Play operating modeTrack Controls: Drum Edit
trol Change 32 (Bank Select LSB), PC is the Pro-gram Change:
When touching the Sound area, the numeric key-pad appears, instead of the Sound Select window.You can enter the Control Change/ProgramChange bundle shown above, separating the threeparts with a dot (.).
Both The track plays both the internal sounds and anexternal instrument connected to the MIDI OUT.
Type
Drum Drum/Percussion track. Set a track to Drummode if you wish to separately adjust the volumeand set a different output for each percussivefamily of the assigned Drum Kit Sound. (See“Track Controls: Drum Edit” on page 128, and“Audio Setup: Style/Kbd” on page 213).
Note: Tracks set to Drum or Percussion mode whilein Style Record (see “Track Type” on page 27), can-not be edited here. This option appears in grey.Other Style tracks cannot be set to Drum modehere.
Poly Tracks of this kind are polyphonic, i.e. they canplay more than one note at the same time.
Mono Tracks of this kind are monophonic, i.e. each newnote stops the previous note.
Mono Right A Mono track, but with priority assigned to therightmost (highest) note.
Mono Left A Mono track, but with priority assigned to theleftmost (lowest) note.
Play/Mute icon
Track’s play/mute status.
Play status. The track can be heard.
Mute status. The track cannot be heard.
Track Controls: Drum Edit
In this page you can adjust the volume and edit the main param-eters for each family of Drum and Percussion instrument for theselected track. A list of families is shown below.
These parameters can be accessed only on tracks set to the Drummode (see above). Use them on tracks with a Drum Kit assigned,or you will not be able to hear any change.
Hint: Use the TRACK SELECT button to cycle between the trackgroups. After selecting a track, choose the “Solo Track” commandfrom the page menu to avoid listening to the other tracks duringediting.
Note: All values are referred to the value of the original Sounds.
Family Select
Use these icons/buttons to select the drum family you want toedit. These buttons are only accessible when you select a Drumtrack.
Overview of the current parameter
Under the icons of the Drum families you can see the value ofthe selected parameter for all the families. This will let you com-pare the value of the selected family with all the others. The val-ues are shown in grey (non editable).
CC#0 value CC#32 value PC value
Set
Set
Drum family icon Drum family
Kick drums
Snare drums
Toms
Hi-Hat cymbals
Ride, Crash and other cymbals
Low-pitched percussions
High-pitched percussions
Special effects

129Style Play operating modeTrack Controls: Easy Edit
Refe
renc
e
Drum Edit parameters
Use these parameters to adjust the offset value.
0…127 Volume (see above).
-64…0…+63 Offset value for all sound generation parameters. ‘0’means no change to the original value memorized inthe Drum or Percussive instrument, while any othervalue means a decrease or increase to the originalvalue.
Select
Use these buttons to select the track to edit. The button corre-sponding to the selected track turns green.
Reset Family
Touch this button to reset all changes to the selected family.
Reset Track
Touch this button to reset all changes to percussive instrumentvolumes in the selected track.
Play/Mute icon
Track’s play/mute status.
Play status. The track can be heard.
Mute status. The track cannot be heard.
How to edit a single Drum FamilyHere is a quick example of the use of the Drum Volume func-tion.
1. While in this page, press TRACK SELECT to see individualStyle tracks.
2. Touch the “Select” button, in the display, corresponding tothe Drum track to edit.
3. Press START/STOP to let the Style go.
4. If you like, choose the “Solo Track” command from thepage menu to solo the Drum track.
5. While listening to the Style, select the Snare family, thenselect the Volume parameter, and use the VALUE controlsto turn the volume completely off.
You’ll notice how all snares stops sounding.
6. Touch the Reset Track button in the display to recall theoriginal Snare’s volume.
Track Controls: Easy Edit
In this page you can edit the main parameters of the Soundsassigned to each track.
Hint: Use the TRACK SELECT button to cycle between the trackgroups. After selecting a track, choose the “Solo Track” commandfrom the page menu to avoid listening to the other tracks duringediting.
Note: All values refer to the value of the original Sound.
Sound parameters Meaning
Attack Attack time. This is the time during which the sound goes from zero (at the moment when you strike a key) to it’s maximum level.
Decay Decay time. Time to go from the final Attack level to the beginning of the Sustain.
Cutoff Filter cutoff. This sets the sound brightness.
Resonance Use the Filter Resonance to boost the cutoff fre-quency.
Fine Tune Fine instrument tuning.
Coarse Tune Coarse instrument tuning.
EQ Hi Equalization, High band.
EQ Mid Equalization, Middle band.
EQ Low Equalization, Low band.
MFX 1 Send Scales the Send level to the Master FX 1.
MFX 2 Send Scales the Send level to the Master FX 2.
MFX 3 Send Scales the Send level to the Master FX 3.
Ambience Vol Volume of the Ambience effects (environment and mechanical noise).
Ambience T Tone, or Brightness, of the Ambience effects (envi-ronment and mechanical noise).
Set
Set

130 Style Play operating modeKeyboard/Ensemble: Keyboard Control 1
Easy Sound Edit parameters
Use these knobs to adjust the offset value.
-64…0…+63 Offset value. ‘0’ means no change to the original valuememorized in the Sound, while any other valuemeans a decrease or increase to the original value.
Portamento knob and switch
Use the Time knob to adjust the speed of the portamento (a slidebetween notes). Check the box to turn portamento on, oruncheck it to turn portamento off.
Select
Use these buttons to select the track to edit. The button corre-sponding to the selected track turns green.
Reset Track
Touch this button to reset all changes to Sound parameters in theselected track.
Reset All Tracks
Touch this button to reset all changes to Sound parameters in alltracks.
Play/Mute icon
Track’s play/mute status.
Play status. The track can be heard.
Mute status. The track cannot be heard.
How to adjust sound parameters for a singleSoundHere is a quick example of the use of the Easy Sound Edit func-tion.
1. If needed, while in this page press TRACK SELECT to seeKeyboard tracks.
2. Touch the “Select” button, in the display, corresponding tothe Upper 1 track.
3. While playing on the keyboard to hear the Sound, selectthe Cutoff knob, and use VALUE controls to turn its valuecompletely off.
You’ll notice how the filter progressively cuts out high fre-quencies, making the sound darker and mellower.
4. Touch the Reset Track button in the display to recall theoriginal Cutoff value.
Keyboard/Ensemble: Keyboard Control 1
This page lets you enable/disable the Damper and Expressionpedals, plus the Joystick, for each of the Keyboard tracks.
Damper
On When you press the Damper pedal and releasethe keys, the track’s sound is kept sustained.
Off The Damper pedal is not active on any track setto this status.
Joystick X
This enables/disables the left/right movement of the Joystick(Pitch Bend, and sometimes a Sound parameter’s control; forPitch Bend settings, see “Mixer/Tuning: Tuning” on page 123).
Joystick Y
This enables/disables the front/rear movement of the Joystick(Y+: Modulation, and sometimes a different Sound parameter’scontrol; Y-: Various controls, or non-active).
Expression
This parameter allows you to switch the Expression control on/off on each individual Keyboard track. The Expression control isa relative level control, always subtracted from the Volume valueof the track.
As an example, imagine you have a Piano sound assigned toUpper 1, and a Strings sound assigned to Upper 2. If you turnthe Expression switch on on Upper 2, and off on Upper 1, youcan use a continuous pedal to control only the Strings’ volume,while the Piano remains unchanged.
To program a pedal or Assignable Slider to act as an Expressioncontrol, see “Controllers: Pedal/Switch” on page 208 or “Con-trollers: Assignable Sliders” on page 209. You can only assign thisfunction to a volume-type pedal, not to a switch-type one.Assign the “KB Expression” option to the pedal or AssignableSlider, then select Write Global-Global Setup from the pagemenu to save the setting to the Global.
Sound parameters Meaning
Attack Attack time. This is the time during which the sound goes from zero (at the moment when you strike a key) to it’s maximum level.
Decay Decay time. Time to go from the final Attack level to the beginning of the Sustain.
Release Release time. This is the time during which the sound goes from the sustaining phase, to zero. The Release is triggered by releasing a key.
Cutoff Filter cutoff. This sets the sound brightness.
Resonance Use the Filter Resonance to boost the cutoff fre-quency.
LFO Depth Intensity of the Vibrato (LFO).
LFO Speed Speed of the Vibrato (LFO).
LFO Delay Delay time before the Vibrato (LFO) begins, after the sound starts.
Set
Set
Set

131Style Play operating modeKeyboard/Ensemble: Keyboard Control 2
Refe
renc
e
Play/Mute icon
Track’s play/mute status.
Play status. The track can be heard.
Mute status. The track cannot be heard.
Keyboard/Ensemble: Keyboard Control 2
This page lets you enable/disable the Ribbon Controller and theAfter Touch for each of the Keyboard tracks.
Ribbon Controller On/Off
Use these checkboxes to enable/disable the ribbon controller forthe corresponding Keyboard track.
After Touch On/Off
Use these checkboxes to enable/disable the After Touch for thecorresponding Keyboard track.
Play/Mute icon
Track’s play/mute status.
Play status. The track can be heard.
Mute status. The track cannot be heard.
Keyboard/Ensemble: Key/Velocity Range
This page lets you program a key and dynamic (velocity) rangefor each of the Keyboard tracks.
Key range is useful to create a set of Keyboard tracks playing indifferent zones of the keyboard. For example, you may havefrench horns and woodwinds playing in the center range of thekeyboard, while only woodwinds play on the higher range.
Velocity range is useful to create a sound made of up to threedynamic layers, assigning each of the Upper tracks to a differentdynamic range.
As an example, you may assign the El.Piano 1 Program to theUpper 1, and the El.Piano 2 Program to the Upper 2 track. Then,set Upper 1 to [Bottom=0, Top=80], and Upper 2 to [Bot-tom=81, Top=127]. The El.Piano 1 will play when playing softer,the El.Piano 2 when playing louder.
Top/Bottom Key (Key Range)
This parameter pair sets the Top and Bottom key range for thetrack.
C-1…G9 Selected key.
Top/Bottom Vel. (Velocity Range)
This parameter pair sets the Top and Bottom dynamic range forthe track.
0 Lowest velocity value.
127 Highest velocity value.
Play/Mute icon
Track’s play/mute status.
Play status. The track can be heard.
Mute status. The track cannot be heard.

132 Style Play operating modeKeyboard/Ensemble: Ensemble
Keyboard/Ensemble: Ensemble
This page lets you program the Ensemble function. This func-tion harmonizes the right-hand melody (played in realtime)using the recognized chords of the left-hand.
Note: The Ensemble function also works in Song Play mode (withthese same settings). Chords are recognized in the Lower ChordScan area.
Ensemble
Harmonization type.
Duet Adds a single note to the melody.
Close Adds a closed-position chord to the melody.
Open 1 Adds an open-position chord to the melody.
Open 2 As the above, but with a different algorithm.
Block Block harmonization – very typical of jazz music.
Power Ensemble
Adds a fifth and an octave to the melody, as heardin hard rock.
Third Up This option adds a third over the melody note(depending on the recognized chord).
Fourths LO Typical of jazz, this option adds two perfectfourths under the melody.
Fourths UP As the above, but with notes added over the mel-ody.
Fifths This adds a series of fifths below the originalnote.
Octave Adds one or more octaves to the melody.
Dual This option adds to the melody line a secondnote, at a fixed interval set with the “Note”parameter. When selecting this option, a transpo-sition value appears (-24…+24 semitones to theoriginal note).
Brass Typical Brass section harmonization.
Reed Typical Reed section harmonization.
Trill When two notes are played on the keyboard, thisoption trills them. If three or more notes areplayed, only the last two are trilled. You can setthe trill speed by using the Tempo parameter (seebelow).
Repeat The played note is repeated in sync with theTempo parameter (see below). When playing achord, only the last note is repeated.
Echo As the Repeat option, but with the repeated notesfading away after the time set with the Feedbackparameter (see below).
AutoSplit1 If more than a single Upper track is in play, theUpper 1 track plays the melody in mono, whilethe other Upper tracks play the chord notes.
If only the Upper 1 track is in play, it plays poly-phonically all the chord notes.
AutoSplit2 Similar to AutoSplit1, but the Upper 1 trackalways plays the uppermost note.
Note Velocity
This parameter sets the velocity difference between the right-hand melody and the added harmonization notes.
-10…0 Subtracted velocity value.
Tempo
Note: This parameter only appears when the Trill, Repeat or Echooptions are selected.
Note value for the Trill, Repeat or Echo Ensemble options. Thisis in sync with the Metronome Tempo.
Feedback
Note: This parameter only appears when the Echo option isselected.
This parameter sets how many times the original note/chord isrepeated by the Echo option.
Ensemble Track Assign
Use these parameters to separately set Upper tracks for theEnsemble function.
Off There is no harmonization on this track.
Normal This track is included in the harmonization.
Mute This track only plays the Ensemble notes, but notthe original note.
Play/Mute icon
Track’s play/mute status.
Play status. The track can be heard.
Mute status. The track cannot be heard.

133Style Play operating modePad/Switch: Pad
Refe
renc
e
Pad/Switch: Pad
This page lets you select a different hit sound or sequence foreach of the four PAD buttons.
Assignments can be saved into the current Style Setup or Song-Book entry. The Pads share the B FX group with the Style tracks.
Note: You can also assign different Hits or Sequences from the Padpanel of the main page.
Note: Each Style or SongBook entry can change the Pad assign-ment.
Pad assignment
Name of the Hit or Sequence assigned to each Pad. Touch thebox to make the Pad Select window appear (see “Pad Select win-dow” on page 105).
Volume
Volume for each of the four Pad tracks.
0…127 Volume level.
Pan
Pan for each of the four Pad tracks.
-64…-1 Left stereo channel.
0 Center.
+1…+63 Right stereo channel.
FX Send (Master 1…3)
Send level to the Master FX processors for each of the four Padtracks.
0…127 Level of the Pad track (direct) signal sent to theeffect processor.
EQ Gain [dB] (Hi, Mid, Low)
Equalization for each of the four Pad tracks.
-18.0…+0.0…18.0Gain value of the High, Middle, or Low band.
Pad lock icon
This lock avoids selecting a different Style or SongBook entrychanges also the Hit or Sequence Pads assigned to the Pads.
This lock is reset when turning the instrument off, unless youwrite Global settings to memory (see “Write Global - GlobalSetup dialog box” on page 220).
For more information on parameter locks, see “General Con-trols: Lock” on page 204.
Pad/Switch: Switch
This page lets you select a different function for each of the threeASSIGNABLE SWITCH buttons, located near the joystick.
Assignable Switches can be saved into a Performance, STS orSongBook entry.
Switch 1-3
Each of the ASSIGNABLE SWITCH buttons. Use these pop-upmenus to assign a function to each switch. See “List of Assign-able Switch functions” on page 241.
Assignable Switch lock icon
This lock avoids selecting a different Performance or STSchanges also the functions assigned to the switches.
This lock is reset when turning the instrument off, unless youwrite Global settings to memory (see “Write Global - GlobalSetup dialog box” on page 220).
For more information on parameter locks, see “General Con-trols: Lock” on page 204.
Set
Set
Set
Set
Gbl
Gbl

134 Style Play operating modeStyle Controls: Drum/Fill
Style Controls: Drum/Fill
In this page you can select various general parameters for theStyle.
Drum Mapping (Var.1…Var.4)
The Drum Mapping lets you select an alternative arrangement ofpercussive instruments for the selected Drum Kit, without anyadditional programming. Just select a Drum Map, and some per-cussive instruments will be replaced with different instruments.
Off Standard mapping.
Drum Mapping 1…7
Drum Map number. Mapping 1 is “soft-sound-ing”, while mapping 7 is “loud-sounding”.
Kick and Snare Designation
The Kick Designation replaces the original Kick (Bass Drum)sound with a different Kick of the same Drum Kit, while theSnare Designation replaces the original Snare Drum sound witha different Snare of the same Drum Kit.
Hint: Select different Designations while listening to the Style, andsee how they affect the Style. When you like the result, save yoursetting to a Performance or Style Setup.
Off Original Kick or Snare.
Type 1…3 Kick or Snare replacing the original one.
Fill Mode (1…4, Break)
These parameters set a Variation to be automatically selected atthe end of each of the Fills.
Off The same Variation, playing before selecting aFill, will be selected again.
V1&V2 … V3&V4The specified Variations will be alternativelyselected, when one of them is selected. For exam-ple, with the “V1&V2” option, if Variation 1 isselected, Variation 1 and Variation 2 will be alter-natively selected after the end of the Fill.
Var.Up/Var.DownThe next higher/lower numbered Variation isselected, in cycle. After Variation 4, an Up com-mand will select Variation 1. After Variation 1, aDown command will select Variation 4.
Var.Inc/Var.DecThe next higher/lower numbered Variation isselected. When Variation 4 is reached, an Inccommand will select Variation 4 again. WhenVariation 1 is reached, a Dec command will selectVariation 1 again.
To Var.1…To Var.4“Fill to Variation” (->1, ->2, ->3, ->4) automati-cally selects one of the four available Style Varia-tions at the end of the fill.
Fill Mode lock icon
This lock prevents the Fill Mode being changed when selecting adifferent Performance or Style.
This lock is reset when turning the instrument off, unless youwrite Global settings to memory (see “Write Global - GlobalSetup dialog box” on page 220).
For more information on parameter locks, see “General Con-trols: Lock” on page 204.
Track status
Track play/mute status. Touch these icons to change it.
Play status. The track can be heard.
Mute status. The track cannot be heard.
Set
Set
Set
Gbl
Set
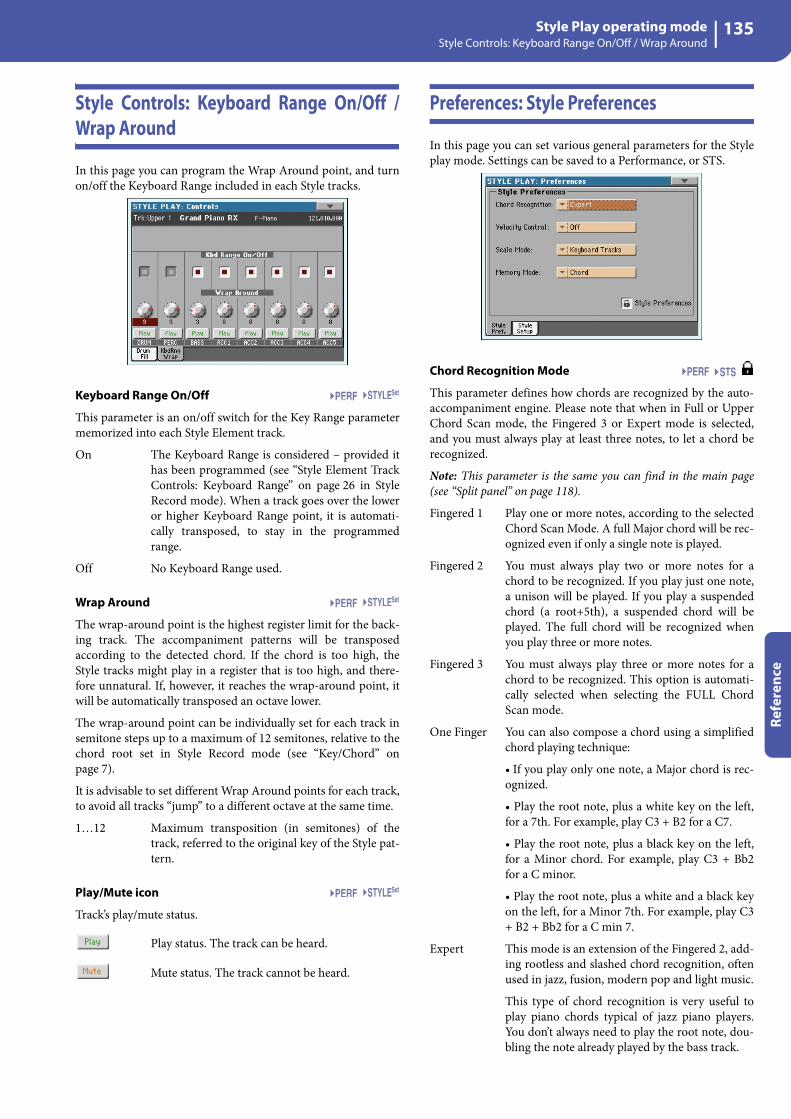
135Style Play operating modeStyle Controls: Keyboard Range On/Off / Wrap Around
Refe
renc
e
Style Controls: Keyboard Range On/Off /Wrap Around
In this page you can program the Wrap Around point, and turnon/off the Keyboard Range included in each Style tracks.
Keyboard Range On/Off
This parameter is an on/off switch for the Key Range parametermemorized into each Style Element track.
On The Keyboard Range is considered – provided ithas been programmed (see “Style Element TrackControls: Keyboard Range” on page 26 in StyleRecord mode). When a track goes over the loweror higher Keyboard Range point, it is automati-cally transposed, to stay in the programmedrange.
Off No Keyboard Range used.
Wrap Around
The wrap-around point is the highest register limit for the back-ing track. The accompaniment patterns will be transposedaccording to the detected chord. If the chord is too high, theStyle tracks might play in a register that is too high, and there-fore unnatural. If, however, it reaches the wrap-around point, itwill be automatically transposed an octave lower.
The wrap-around point can be individually set for each track insemitone steps up to a maximum of 12 semitones, relative to thechord root set in Style Record mode (see “Key/Chord” onpage 7).
It is advisable to set different Wrap Around points for each track,to avoid all tracks “jump” to a different octave at the same time.
1…12 Maximum transposition (in semitones) of thetrack, referred to the original key of the Style pat-tern.
Play/Mute icon
Track’s play/mute status.
Play status. The track can be heard.
Mute status. The track cannot be heard.
Preferences: Style Preferences
In this page you can set various general parameters for the Styleplay mode. Settings can be saved to a Performance, or STS.
Chord Recognition Mode
This parameter defines how chords are recognized by the auto-accompaniment engine. Please note that when in Full or UpperChord Scan mode, the Fingered 3 or Expert mode is selected,and you must always play at least three notes, to let a chord berecognized.
Note: This parameter is the same you can find in the main page(see “Split panel” on page 118).
Fingered 1 Play one or more notes, according to the selectedChord Scan Mode. A full Major chord will be rec-ognized even if only a single note is played.
Fingered 2 You must always play two or more notes for achord to be recognized. If you play just one note,a unison will be played. If you play a suspendedchord (a root+5th), a suspended chord will beplayed. The full chord will be recognized whenyou play three or more notes.
Fingered 3 You must always play three or more notes for achord to be recognized. This option is automati-cally selected when selecting the FULL ChordScan mode.
One Finger You can also compose a chord using a simplifiedchord playing technique:
• If you play only one note, a Major chord is rec-ognized.
• Play the root note, plus a white key on the left,for a 7th. For example, play C3 + B2 for a C7.
• Play the root note, plus a black key on the left,for a Minor chord. For example, play C3 + Bb2for a C minor.
• Play the root note, plus a white and a black keyon the left, for a Minor 7th. For example, play C3+ B2 + Bb2 for a C min 7.
Expert This mode is an extension of the Fingered 2, add-ing rootless and slashed chord recognition, oftenused in jazz, fusion, modern pop and light music.
This type of chord recognition is very useful toplay piano chords typical of jazz piano players.You don’t always need to play the root note, dou-bling the note already played by the bass track.
Set
Set
Set

136 Style Play operating modePreferences: Style Play Setup
Velocity Control
Set this parameter to trigger one of the following functions sim-ply by playing louder with your left hand. When playing with avelocity value higher than the value set by the “Velocity ControlValue” parameter (see page 137), the selected function will beactivated.
• This function only works when the SPLIT LED is turned on,and the LOWER or no Chord Scan mode selected.
• It does not work in FULL Chord Scan mode, with the SPLITLED turned off, or with the UPPER Chord Scan mode selected.
Off The function is turned off.
Break, Fill In 1…4When playing with a velocity higher than thetrigger value on the Lower track, the selected ele-ment is automatically triggered.
Start/Stop You can start or stop the Style by playing harderon the keyboard.
Bass InversionWhen playing with a velocity higher than thetrigger value, the Bass Inversion function will beactivated or deactivated.
Memory When playing with a velocity higher than thetrigger value, the Memory function will be acti-vated or deactivated.
Scale Mode
This parameter defines which tracks are affected by the selectedalternative scale (see “Scale” on page 123).
Keyboard tracks
The scale will only affect Keyboard tracks.
Upper tracks The scale will only affect Upper 1-3 Keyboardtracks.
All Tracks The scale will affect all tracks (Keyboard, Style,Pads).
Memory Mode
This parameter sets the way the MEMORY button works.
Chord When the MEMORY LED is on, recognizedchords are kept in memory even when raisingyour hand from the keyboard. When the LED isoff, chords are reset when raising your hand.
Chord + Lower
When the MEMORY LED is on, recognizedchords are kept in memory, and the Lower soundis held until the next note or chord is played.When the LED is off, both the chord (and there-fore the accompaniment) and Lower sound arecut when raising the hand from the keyboard.
Fixed Arr. + Lower
When the MEMORY LED is on, recognizedchords are kept in memory, and the Lower soundis held until the next note or chord is played.When the LED is off, the Lower sound is cutwhen raising the hand from the keyboard; on thecontrary, the chord is kept in memory (so the
accompaniment continues to play), up until youselect a different Style.
Lock icon
All parameters in this page may be protected from selecting adifferent Performance or STS.
This lock is reset when turning the instrument off, unless youwrite Global settings to memory (see “Write Global - GlobalSetup dialog box” on page 220).
For more information on parameter locks, see “General Con-trols: Lock” on page 204.
Preferences: Style Play Setup
In this page you can set various general parameters for the StylePlay mode.
Note: These settings are stored in the Style Play Setup area of theGlobal file (together with all the other parameters marked with the
abbreviation through the manual). After changing thesesettings, select the Write Global-Style Play Setup command fromthe page menu to save them to the Global.
Midi Setup
MIDI channels for the Style Play mode can be automaticallyconfigured by selecting a MIDI Setup with this parameter. See“MIDI Setup” on page 210 for more information on using MIDISetups.
Note: To automatically select a MIDI Setup when entering theStyle Play mode, select the Write Global-Style Setup commandfrom the page menu.
For detailed information on preloaded MIDI Setup settings, see“MIDI Setup” on page 238.
Note: After selecting a MIDI Setup, you can go to the Global modeand apply any change to each channel setting. To store thesechanges to a MIDI Setup, while still in Global mode select theWrite Global-Midi Setup command from the page menu. All MIDISetup can be freely customized and overwritten.
Hint: To restore the original MIDI Setups, use the “FactoryRestore” command (page “Utility” of the Media mode, seepage 236). Warning: This procedure will erase all Factory andUser data from the internal memory.
Gbl
Sty
Sty

137Style Play operating modePage menu
Refe
renc
e
Style Change On By Default
This parameter allows you to define the status of the STYLECHANGE button at startup.
On At startup, the LED of the STYLE CHANGE but-ton will automatically turn on.
Off At startup, the LED of the STYLE CHANGE but-ton will stay off.
Velocity Control Value
Use this parameter to set a velocity value over which to automat-ically trigger the Style Start/Stop or select a Style Element (see“Velocity Control” above).
Upper Volume Link
This parameter allows you to define if changing the volume forone of the Upper tracks, proportionally changes also the otherUpper tracks.
On When changing volume to one of the Uppertracks, volume for the other Upper tracks changesin proportion.
Off When changing volume to one of the Uppertracks, only that track’s volume is changed. OtherUpper tracks are left unchanged.
Bass & Lower Backing
With this function, you can play a simple accompaniment withyour left hand. For this to work, the SPLIT LED must be turnedon, and the Style must not be running. By default, this functionis turned on.
On When the Style is not running, and you play achord with your left hand, the chord is played bythe Lower Sound (even if it is muted), while thechord root is played by the Bass Sound. Whenyou start the Style, the normal behavior isrestored.
When the Bass & Lower Backingfunction is active, the Backingicon appears in the Lower track Sound’s area.
Off No Bass Sound is added when the Style is notrunning. The Lower track can be heard only if itis not muted.
Page menu
Touch the page menu icon to open the menu. Touch a commandto select it. Touch anywhere in the display to close the menuwithout selecting a command.
Write Performance
Select this command to open the Write Performance dialog box,and save most of the current control panel settings to a Perfor-mance.
See “Write Performance dialog box” on page 138 for more infor-mation.
Write Single Touch Setting
Select this command to open the Write Single Touch Setting(STS) dialog box, and save Keyboard track settings to one of theSingle Touch Settings (STS) of the current Style.
See “Write Single Touch Setting dialog box” on page 139 formore information.
Write Current Style Settings
Select this command to open the Write Current Style Settingsdialog box, and save Style track settings to the current Style.
See “Write Single Touch Setting dialog box” on page 139 formore information.
Write Global-Style Play Setup
Select this command to open the Write Global-Style Setup dia-log box, and save global settings that are unique to the Style Playmode. These settings are programmed on the “Preferences: StylePlay Setup” page (see page 136).
See “Write Global-Style Play Setup dialog box” on page 139 formore information.
Solo Track
Select the track to be soloed, and check this item. You will hearonly the selected track, and the ‘Solo’ warning will flash on thepage header.
Uncheck this item to exit the Solo function.
Sty
Sty
Sty
Sty

138 Style Play operating modeWrite Performance dialog box
The Solo function works in a slightly different way, dependingon the selected track:
• Keyboard track: The selected Keyboard track is the only trackyou can hear when playing on the keyboard. All other Keyboardtracks are muted. The status of the Style tracks is unaffected.
• Style track: The selected track is the only Style track you canhear. All other Style tracks are muted. The status of the Keyboardtracks is unaffected.
• Grouped Style tracks: The Solo function does not work on thesespecial tracks.
Keep the SHIFT button pressed and touch one of thetracks to solo it. Do the same on a soloed track to deactivate theSolo function.
Copy/Paste FX
You can copy a single effect, or all effects of an FX group (A orB). You can copy them between different Styles, Performances orSTSs. The copy operation can only be carried on while remain-ing in Style Play mode (you cannot copy the effects to a Song).
Note: This operation only copies the effect settings of the “Effects”section. Parameters contained in other sections, like “Dry” or “FXSend”, are not copied. Please note that these parameters canchange the way effects change the sound.
To copy a single effect:
1. Select the source Performance, Style or STS, then
• go to the page of the single effect you want to copy (IFX 1,IFX 2, IFX 3, Master 1, Master 2, Master 3), or
• go to the Effects > A/B FX Config page, to copy all foureffects. This may be useful if you want to copy two or threeof the four effects into different Performances, Styles orSTSs.
2. Choose the “Copy FX” command from the page menu.
3. Select the target Performance, Style or STS, then go to thepage of the single effect you want to paste (IFX 1, IFX 2,IFX 3, Master 1, Master 2, Master 3).
4. Choose the “Paste FX” command from the page menu.
To copy all effects:
1. Select the source Performance, Style or STS, then go to theEffects > A/B FX Config page, to copy all effects.
2. Choose the “Copy FX” command from the page menu.
3. Select the target Performance, Style or STS, then go to thepage of the Effects > A/B FX Config page.
4. Choose the “Paste FX” command from the page menu.
Easy Mode
Easy Mode allows you to use the Style Play and Song Play modeswith an easier-to-use user interface. It is recommended to begin-ners, and to professionals alike that do not want to deal with theextra parameters of the Advanced mode.
At any time, you can manually turn the Easy Mode on/off withthe Easy Mode command in the page menu of the Style Play andSong Play modes.
See “The Style Play page in detail” on page 34 for more informa-tion.
Write Performance dialog box
Open this window by selecting the Write Performance item fromthe page menu. Here, you can save all track settings, the selectedStyle, various Style settings, and the selected Voice ProcessorPreset, to a Performance.
Parameters saved in the Performance are marked with the symbol through the user’s manual.
Keep the SHIFT button pressed and press one of thePERFORMANCE SELECT buttons to open this window.
Name
Name of the Performance to be saved. Touch the (Text Edit)button next to the name to open the Text Edit window.
Perf Bank
Target bank of Performances. Each bank corresponds to one ofthe PERFORMANCE SELECT buttons. Use the VALUE controlsto select a different bank.
Performance
Target Performance location in the selected bank. Use theVALUE controls to select a different location.
Select… button
Touch this button to open the Performance Select window, andselect a target location.

139Style Play operating modeWrite Single Touch Setting dialog box
Refe
renc
e
Write Single Touch Setting dialog box
Open this window by selecting the Write Single Touch Settingitem from the page menu. Here, you can save Keyboard tracksettings, and the selected Voice Processor Preset, to one of thefour single Touch Settings (STS) belonging to the current Style.
Parameters saved in the STS are marked with the symbolthrough the user’s manual.
Keep the SHIFT button pressed and press one of the STSbuttons to open this window.
Note: When the “Factory Style and Pad Protect” option is checkedin the Media > Preferences page, you cannot write any STS (SingleTouch Setting). The “Write Single Touch Setting” command in thepage menu is greyed out and cannot be selected. All original set-tings of the Factory Styles will be left untouched.
Name
Name of the STS to be saved. Touch the (Text Edit) buttonnext to the name to open the Text Edit window.
Current Style
Non editable. Settings are saved in one of the four STSs belong-ing to the current Style. This parameter displays the name of the“parent” Style.
STS
Target STS location. The name of the STS currently saved at thetarget location is shown. Use the VALUE controls to select a dif-ferent location.
Write Style Settings dialog box
Open this window by selecting the Write Style Settings itemfrom the page menu. Here, you can save Style track settings tothe Style Settings of the current Style.
Parameters saved in the Style Settings are marked with the symbol through the user’s manual.
Keep the SHIFT button pressed and press one of theSTYLE SELECT buttons to open this window.
Note: When the “Factory Style and Pad Protect” option is checkedin the Media > Preferences page, you cannot write any Style Set-tings onto Factory Styles. The “Write Current Style Settings” com-mand in the page menu is greyed out and cannot be selected. Alloriginal settings of the Factory Styles will be left untouched.
Style bank
Non editable. Bank of Styles the current Style belongs to. Eachbank corresponds to one of the STYLE SELECT buttons.
Current Style
Non editable. Name of the current Style.
Write Global-Style Play Setup dialog box
Open this window by selecting the Write Global-Style play Setupitem from the page menu. Here, you can save various Style Pref-erence settings (see “Preferences: Style Play Setup” on page 136),that are saved to the Global file.
Parameters saved in the Style Play Setup area of the Global aremarked with the symbol through the user’s manual.
Set
Sty

140 Style Play operating modeThe Favorite banks
The Favorite banks
You can create a custom set of Styles, made of up to twelveFavorite banks. You can assign a different name to the tabs thatappear in the Style Select window, in order to add musical genresnot included among the Factory Styles.
The Favorite Styles are contained in twelve files, automaticallycreated by the Pa3X inside the Style folder in the SYS area of theinternal storage memory. Even if different bank names canappear in the display, these files have fixed names:
Hint: New Styles are released from time to time on our web site(www.korg.com).
Creating the Favorite banksThere are two ways to create the Favorite banks:
• While in Style Record mode, you can write the new oredited Style in the Favorite banks, as an alternative to theUser Style banks. See the Style Record chapter for moreinformation on saving a Style.
• While in Media mode, you can load any Style into theFavorite banks, as an alternative to the User Style banks.See the Media chapter for more information on the Loadoperations.
Renaming the Favorite banksWhile the Style Select window is in the display, you can choosethe “Rename Favorite bank” command from the page menu, andassign the Favorite Style tabs any name you like.
The assigned name can be spanned over two lines, by separatingthem with the paragraph character (¶). For example, to write“World Music” on two lines, enter “World¶Music”.
Be careful not to write words exceeding the width of the side tabsof the Style Select window.
File Name FAVORITE Banks
FAVORITE01…12.STY Bank 1…12

141Song Play operating modeTransport controls
Refe
renc
e
The Song Play operating mode is where you can listen to Songs.Since the Pa3X is equipped with two onboard players, you canplay two Songs at the same time. This is very useful to mixbetween two Songs during a live performance. Songs can be inStandard MIDI File, Karaoke™ or MP3 format.
You can play along with the Song with up to four Keyboardtracks (Upper 1-3, Lower) and four Pads. You can select differentSounds and Effects for Keyboard tracks by selecting Perfor-mances and STSs. A different Voice Processor Preset may beselected by a Performance or STS.
While in Song Play mode, you can use the SongBook to auto-matically select Songs for a desired music genre. With each Songentry in the SongBook, up to four STSs are associated.
Song Play mode can also be used in Easy Mode (see page 33).
Transport controls
You can use a separate set of transport controls for each of thetwo onboard players. Use the PLAYER 1 controls for Player 1,and PLAYER 2 controls for Player 2. See “SELECT” on page 13for more information).
If you want both players to play together, keep the SHIFT buttonpressed and press one of the (PLAY/STOP) controls tomake both players start in sync.
If one of the players is already playing, you can start the otherplayer by pressing the other (PLAY/STOP) control; thesecond player will start at the next measure.
The two players’ Tempo value is linked together. The Tempodata written into the Songs are ignored. Adjust the Tempo usingthe TEMPO buttons.
MIDI Clock
In Song Play mode the MIDI Clock is always generated by theinternal player, even if the Clock parameter is set to MIDI orUSB mode (see “Clock Source” on page 210). While in thismode, Pa3X cannot receive MIDI Clock messages from theMIDI IN.
Pa3X only transmits to the MIDI OUT and USB port the MIDIClock messages generated by Player 1. For MIDI Clock messagesto be sent, the “Clock Send” parameter must be activated (see“Clock Send” on page 210).
Tempo Lock
If you don’t want the Tempo to change when selecting a newSong, turn on the Tempo Lock function by using the TEMPOLOCK buttons on the control panel. When the LED of this but-ton is turned on, you can still manually change the Tempo with
the TEMPO +/– buttons, or by touching the Tempo field andusing the VALUE controls. As an alternative, you can keep theSHIFT button pressed and use the VALUE DIAL to change theTempo.
Master Volume, Balance, X-Fader
While the MASTER VOLUME slider controls the general vol-ume of the instrument, you can use the BALANCE slider to bal-ance the Song and Pad tracks against the Keyboard tracks.
Use the X-Fader to mix between Player 1 and Player 2. Move it tothe center for the maximum volume of both players.
Note: When this slider is fully moved to the right or the left, differ-ent Lyrics, Chords, Score and Markers can be shown, and a differ-ent can be selected.
Track parameters
Keyboard track settings made in Song Play mode may be savedto a Performance. You can then recall different settings by justselecting a single Performance.
Settings for Song tracks, like pan, volume and FX sends, dependon the Standard MIDI File.
Changes to Song tracks made in Song Play mode cannot besaved to a Standard MIDI File, and are only intended for real-time control. To permanently save changes to the various Songparameters, edit and save the Standard MIDI File in Sequencermode.
Standard MIDI Files and Sounds
The native Song file format of the Pa3X is the Standard MIDIFile (SMF), an universal standard set by all manufacturers. File-name extension is .MID, but Pa3X can also read files with the.KAR extension. You can read these files with any musicalinstrument or computer.
Song Play operating mode
Overall instrument’svolume
Balance of Songs and Pads against RealTime (Keyboard) tracks
Player 1 Player 2

142 Song Play operating modeKeyboard, Pad and Player tracks
Even if the Standard MIDI File format is standard, differencesmay appear in sounds when playing the various files. If yourecorded a Song on the Pa3X (Sequencer mode), using onlyGeneral MIDI sounds (i.e., those of the “GM/XG” type), you canbe confident you can play the same Song on virtually any othermusical instrument or computer. If you used Korg nativesounds, you may not find the same sounds on instruments fromother manufacturers.
When you read Standard MIDI Files in Song Play mode, there isno problem reading files made using only General MIDI sounds.Sounds could be different when playing a Song made on a differ-ent instrument: despite the wide compatibility of Pa3X withother standards (like GS or XG), differences may arise.
If so, go to the Sequencer operating mode and load the StandardMIDI File. Then, manually reassign the non-matching Sounds,replacing them with similar Sounds on the Pa3X. Finally, savethe Standard MIDI File again, and you will be able to play it inSong Play mode with the correct Sounds.
Keyboard, Pad and Player tracks
The Pa3X is equipped with a double player. Each Song can playup to a maximum of 16 tracks, for a total of 32 tracks.
In addition, you can play the keyboard with four additional Key-board tracks (Upper 1-3 and Lower). When the Volume panel isshown in the main page of the Song Play mode (see illustrationbelow), you can change the Volume and Play/Mute status ofthese tracks, but please keep in mind that these changes will notbe saved in the Standard MIDI File.
While in Song Play mode, you can still select Performances orSTSs from the latest selected Style. To select a different set ofSTSs, you must first select a different Style. You can see the nameof the available STSs when the STS Name panel is shown in themain page of the Song Play mode (see illustration):
In addition to Keyboard tracks, selecting a different Style orSongBook entry may change sounds assigned to the PADs.
When entering Song Play mode from the Style Play mode, Key-board and Pad tracks remain the same as in Style Play mode.
Touch here toselect a Style
Touch here toselect a Perfor-
mance
Keyboard (i.e.,Real Time) traks
STS names

143Song Play operating modeMain page (Normal view)
Refe
renc
e
Main page (Normal view)
Press the SONG PLAY button to access this page from anotheroperating mode.
Note: When switching from Style Play to Song Play mode, the SongSetup is automatically selected, and various track parameters andsettings may change.
To return to this page from one of the Song Play edit pages, pressthe EXIT or SONG PLAY button.
Individual tracks can be seen in detail by pressing the Volumetab. To switch between Keyboard tracks (Normal view) and Songtracks (Song Tracks views), use the TRACK SELECT button.Pressed a first time, you will see tracks 1-8; a second press willshow tracks 9-16; pressed again, you will go back to Keyboardtracks. (See “Song Tracks 1-8 and 9-16 pages” and “Volumepanel” starting from page 145).
Page headerThis line shows the current operating mode, transposition andrecognized chord.
Operating mode name
Name of the current operating mode.
Master Transpose
Master Transpose value in semitones. This value can be changedusing the TRANSPOSE buttons on the control panel.
Note: You can also transpose MP3 files. Keep in mind, however,that transposition always remains inside the range -5…+6 semi-tones. This range is enough to cover all keys, but allows to avoidexcessive audio degradation. Any further transposing will bereversed to fit the range. So, you might see a +7 transpose value(Just Fifth Up) shown in the display, but the MP3 will actually play5 semitones lower (Just Fourth Down).
Note: Transpose may be automatically changed when selecting adifferent Performance. It may also be changed when loading a
Standard MIDI File generated with an instrument of the Korg Paseries.
To avoid transposing, “lock” the Master Transpose parameter inthe Global (see “General Controls: Lock” on page 204), then writethe Global to memory (see “Write Global - Global Setup dialogbox” on page 220).
Recognized chord
Displays the recognized chord, when you play a chord on thekeyboard. If no chord abbreviation is shown, no chord recogni-tion mode has been selected by using the CHORD SCANNINGbuttons (see page 17).
Page menu iconTouch the page menu icon to open the menu. See “Page menu”on page 158 for more information.
Songs areaThis is where Song names are shown, together with parametersdepending on the selected type of Song.
This is how a Song’s area appears when a Standard MIDI File orKaraoke file has been selected:
And this is how it appears when an MP3 File has been selected:
Ply. 1/2
A different Song may be assigned to each of the two onboardplayers (Ply.1 and Ply.2). Each player has its own parameters.
Songs area Page header Page menu icon
Stylearea
Perf./STS area
Key-board tracks area
Panels
Operating modename
Master Transpose (in semitones)
Recognized chord
SB
Player 2
Player 1
Song name
Meter Current measure
Song type icon
Tempo
Song name
Total time Elapsed time
Song type icon
Tempo variation

144 Song Play operating modeMain page (Normal view)
Song type icon
Songs of different types can be assigned to the players. This iconshows the file type.
Standard MIDI File, often abbreviated as SMF(file extension: *.MID or *.KAR). The SMF(*.MID) is the industry standard song format,used by Pa3X as its basic Song format whenrecording a new Song. A MIDI Karaoke File(*.KAR) is an extension of the SMF format.
MPEG Layer-3 format, or MP3 (file extension:*.MP3). This is a compressed audio file, that maybe generated on any personal computer, or on thePa3X itself.
Only assignable to Player 1. A Jukebox file (fileextension: *.JBX) can be assigned to Player 1, butits name is not shown in this area. The JBX iconappears, together with the name of the currentlyselected Song in the Jukebox list.
Note: To create or edit a Jukebox file, go to theJukebox Edit page (see page 156).
Song name
Displays the name of the Song assigned to the correspondingplayer.
• If the player is already selected (white background), touch theSong name to open the Song Select window.
• If the player is not selected (dark background), first select it,then touch the Song name to open the Song Select window.
When the Song Select window appears, you can select a singleSong or a Jukebox file (see “Song Select window” on page 106).
If you select another Song while a Song is playing with the samePlayer, the previous Song stops, and the new Song will beselected, ready to play.
To select a Song, an alternative is to press the SELECT button(on the control panel) corresponding to the desired player. PressSELECT a second time to select a Song by dialing in its ID num-ber (see “Selecting a Song by its ID number” on page 107).
Meter
This parameter only appears when a Standard MIDI File or Kara-oke file has been selected.
Current Song’s meter (time signature).
Measure number
This parameter only appears when a Standard MIDI File or Kara-oke file has been selected.
Current measure number.
Tempo
This parameter only appears when a Standard MIDI File or Kara-oke file has been selected.
Metronome Tempo. Select this parameter and use the TEMPO+and TEMPO– buttons to change the Tempo. As an alternative,touch this parameter and drag with your finger.
Hint: While in the main page, the Tempo parameter of Player 2can be “on focus” while Player 1 is selected. In this situation, youcan use the VALUE controls to change the Tempo for Player 2, andSHIFT + VALUE DIAL to change Tempo for Player 1.
Total time
This parameter only appears when an MP3 file has been selected.
Total length (in minutes:seconds) of the selected MP3 file.
Elapsed time
This parameter only appears when an MP3 file has been selected.
Elapsed time (in minutes:seconds) of the MP3 file currently inplay.
Tempo variation
This parameter only appears when an MP3 file has been selected.
Variation of the original MP3 file’s tempo, inside a range of±30% of the original tempo. When Tempo is changed, MP3 filesare smoothly accelerated or slowed down (inside a range of±30% of the original tempo). This may seem trivial, but it isreally rocket-science instead, and it is made possible by Korgsophisticated time-stretching algorithms.
Style areaCurrently selected Style. You can select a Style while playingSongs, to have it ready when switching to Style Play mode. Also,this lets you change the Pad and STS settings (since Pads andSTSs are recalled by a Style).
Touch the Style name to open the Style Select window. As analternative, use the STYLE SELECT section on the control panel.
Performance/STS areaThis is where the Performance or STS name is shown.
Selected Performance or STS
This is the latest selected Performance (PERF) or Single TouchSetting (STS).
Touch the name to open the Performance Select window. As analternative, use the PERFORMANCE SELECT section to select adifferent Performance.
To select a different STS from the latest selected Style, use thefour STS buttons under the display.
Selected Style
Selected Performance or STS

145Song Play operating modeSong Tracks 1-8 and 9-16 pages
Refe
renc
e
Keyboard tracks areaThis is where Keyboard tracks are shown.
Sound name
Name of the Sound assigned to the corresponding Keyboardtrack.
• If the track is already selected (white background), touch theSound name to open the Sound Select window.
• If the track is not selected (dark background), first select it,then touch the Sound name to open the Sound Select window.
You can also open the Sound Select window by using theSOUND SELECT buttons in the REAL TIME TRACKS sectionof the control panel.
For more information about the Sound Select window, see“Sound Select window” on page 104.
Keyboard track octave transpose
Non editable. Octave transpose of the corresponding track. Toindividually edit the octave transpose for each track, go to the“Mixer/Tuning: Tuning” edit page of the Song Play mode (see“Mixer/Tuning: Tuning” on page 123 for more details).
You can also transpose all Upper tracks by using the UPPEROCTAVE buttons on the control panel.
Keyboard track name
Non editable. Name of the corresponding track:
Sound bank’s icon
This picture illustrates the bank the current Sound belongs to.
Keyboard track status
Play/mute status of the current track. Touch this icon to changethe status.
No icon Play status. The track can be heard.
Mute status. The track cannot be heard.
PanelsThe lower half of the main page contains the various panels, youcan select by touching the corresponding tabs. See more infor-mation in the relevant sections, starting from page 146.
Song Tracks 1-8 and 9-16 pages
Repeatedly press the TRACK SELECT button to cycle betweenthe Normal, Song Tracks 1-8 and Song Tracks 9-16 view. In SongTrack views, the upper half of the main page changes, to showparameters for the Song tracks. With the Volume tab selected,the lower half shows each single track.
Press TRACK SELECT again to return to Normal view (Key-board tracks). (See “Main page (Normal view)” on page 143).
Songs areaDespite a different layout, it works as the Song area in the Nor-mal view.
Abbreviation Track Hand
UP1 Upper 1 Right hand
UP2 Upper 2
UP3 Upper 3
LOW Lower Left hand
Soundname Track name
Track’s octave transpose
Sound bank’s icon
Track status
Volume panel
Tabs
Selected trackinfo area
Sounds area
Track name
Songs area
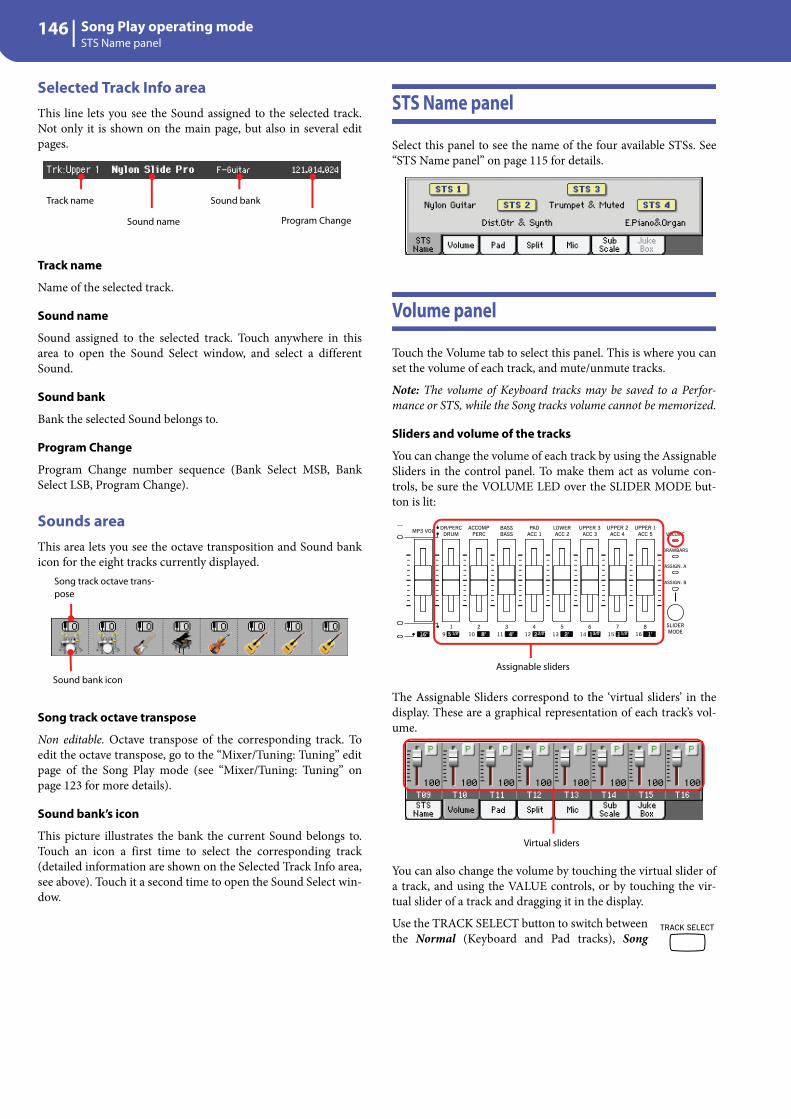
146 Song Play operating modeSTS Name panel
Selected Track Info areaThis line lets you see the Sound assigned to the selected track.Not only it is shown on the main page, but also in several editpages.
Track name
Name of the selected track.
Sound name
Sound assigned to the selected track. Touch anywhere in thisarea to open the Sound Select window, and select a differentSound.
Sound bank
Bank the selected Sound belongs to.
Program Change
Program Change number sequence (Bank Select MSB, BankSelect LSB, Program Change).
Sounds areaThis area lets you see the octave transposition and Sound bankicon for the eight tracks currently displayed.
Song track octave transpose
Non editable. Octave transpose of the corresponding track. Toedit the octave transpose, go to the “Mixer/Tuning: Tuning” editpage of the Song Play mode (see “Mixer/Tuning: Tuning” onpage 123 for more details).
Sound bank’s icon
This picture illustrates the bank the current Sound belongs to.Touch an icon a first time to select the corresponding track(detailed information are shown on the Selected Track Info area,see above). Touch it a second time to open the Sound Select win-dow.
STS Name panel
Select this panel to see the name of the four available STSs. See“STS Name panel” on page 115 for details.
Volume panel
Touch the Volume tab to select this panel. This is where you canset the volume of each track, and mute/unmute tracks.
Note: The volume of Keyboard tracks may be saved to a Perfor-mance or STS, while the Song tracks volume cannot be memorized.
Sliders and volume of the tracks
You can change the volume of each track by using the AssignableSliders in the control panel. To make them act as volume con-trols, be sure the VOLUME LED over the SLIDER MODE but-ton is lit:
The Assignable Sliders correspond to the ‘virtual sliders’ in thedisplay. These are a graphical representation of each track’s vol-ume.
You can also change the volume by touching the virtual slider ofa track, and using the VALUE controls, or by touching the vir-tual slider of a track and dragging it in the display.
Use the TRACK SELECT button to switch betweenthe Normal (Keyboard and Pad tracks), Song
Track name
Sound name
Sound bank
Program Change
Sound bank icon
Song track octave trans-pose
Assignable sliders
Virtual sliders
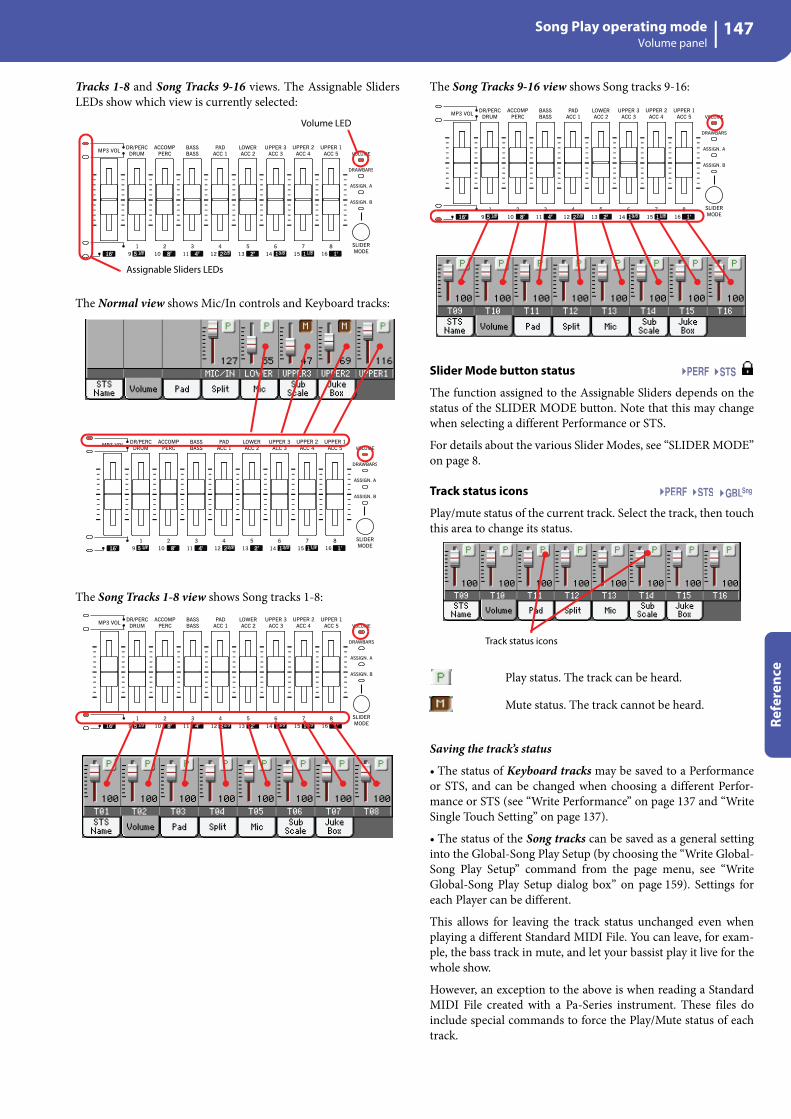
147Song Play operating modeVolume panel
Refe
renc
e
Tracks 1-8 and Song Tracks 9-16 views. The Assignable SlidersLEDs show which view is currently selected:
The Normal view shows Mic/In controls and Keyboard tracks:
The Song Tracks 1-8 view shows Song tracks 1-8:
The Song Tracks 9-16 view shows Song tracks 9-16:
Slider Mode button status
The function assigned to the Assignable Sliders depends on thestatus of the SLIDER MODE button. Note that this may changewhen selecting a different Performance or STS.
For details about the various Slider Modes, see “SLIDER MODE”on page 8.
Track status icons
Play/mute status of the current track. Select the track, then touchthis area to change its status.
Play status. The track can be heard.
Mute status. The track cannot be heard.
Saving the track’s status
• The status of Keyboard tracks may be saved to a Performanceor STS, and can be changed when choosing a different Perfor-mance or STS (see “Write Performance” on page 137 and “WriteSingle Touch Setting” on page 137).
• The status of the Song tracks can be saved as a general settinginto the Global-Song Play Setup (by choosing the “Write Global-Song Play Setup” command from the page menu, see “WriteGlobal-Song Play Setup dialog box” on page 159). Settings foreach Player can be different.
This allows for leaving the track status unchanged even whenplaying a different Standard MIDI File. You can leave, for exam-ple, the bass track in mute, and let your bassist play it live for thewhole show.
However, an exception to the above is when reading a StandardMIDI File created with a Pa-Series instrument. These files doinclude special commands to force the Play/Mute status of eachtrack.
Volume LED
Assignable Sliders LEDs
Sng
Track status icons

148 Song Play operating modePad panel
Track names
Under the sliders, a label for each track is shown. Use the TRK.SEL button to switch between the various track views.
Pad panel
Select this panel to see which Hit or Sequence Pads are assignedto the four Pads. See “Pad panel” on page 117 for details.
Split panel
Select this panel to adjust the split point for the Keyboard tracks.See “Split panel” on page 118 for details.
Mic panel
Select this panel to set parameters for the microphone input. See“Mic panel” on page 118 for details.
Sub-Scale panel
Select this panel to select a secondary scale for the Keyboardtracks. See “Mixer/Tuning: Sub Scale” on page 123 for details.
Jukebox panel
When a Jukebox (JBX) file is assigned to Player 1, you can usethe list shown in this panel to browse the Jukebox list, and touchthe Select button in the display to select a Song to play. This way,you can select any Song in the list as your starting Song, andmanually change the order of the Songs to play.
Note: A Jukebox file can be assigned to Player 1 only.
Note: This panel is only available after loading a Jukebox file.
Hint: To create or edit a Jukebox file, go to the Jukebox Edit page(see page 156). A quick way to create a Jukebox list is to touch the“Play All” button in the Song Select window (see page 107).
Warning: If you delete a Song included in the Jukebox list cur-rently in play, the player will stop, and the “No Song” message willappear. At this point, you can select the JukeBox tab to open theJukebox panel, and select a different Song.
As an alternative, you can select the next Song by pressing SHIFT+ >> (FAST FORWARD) in the PLAYER 1 section of the controlpanel, then press (PLAY/STOP) in the PLAYER 1 sectionagain.
Song list
Use this list to browse through the Songs in the Jukebox list. Usethe scrollbar to scroll the list.
Selected Song
Name of the Song currently in play. You can select a differentSong from the list, and touch the Select button in the display toselect it for playback.
Abbreviation Track
MIC/IN Microphone (Voice Processor). Sources connected to the Left and Right Audio Inputs are not controlled by this slider. The volume is set via the MIC VOLUME knob in the MIC SETTINGS section of the control panel.
UPPER1…3 Upper tracks. Volume and play/mute status memo-rized into a Performance or STS.
LOWER Lower track. Volume and play/mute status memorized into a Performance or STS.
T01…T16 Song tracks. Volume memorized into a Standard MIDI File. Play/mute status memorized as a general setting into the Global – Song Play Setup (different for each Player).
Song list Jukebox fileSelected Song

149Song Play operating modeEdit menu
Refe
renc
e
Select button
Touch this button to select the Song highlighted in the list, andassign it to Player 1. If a Song is already playing, it will bestopped, and the selected Song will start playing back.
Jukebox file
Name of the selected Jukebox file. To edit this file, see “JukeboxEditor” on page 156.
Transport controls for the JukeboxWhen you select a Jukebox file, Player 1 transport controls workin a slightly different way than with single Songs.
<< and >> Pressed alone, these buttons are the Rewind andFast Forward commands.
Keep the SHIFT button pressed, and pressthese buttons to scroll to the previous or nextSong in the Jukebox list.
(HOME) Returns to measure 1 of the current Song.
(PLAY/STOP)
Starts or stops the current Song. When you stopthe Song, it is stopped at the current position.Press HOME to go back to measure 1 of the cur-rent Song.
If the Jukebox panel is open, you can select theSong from which to start. See “Jukebox panel”above.
Edit menu
From any page, press the MENU button to open the Song Playedit menu. This menu gives access to the various Song Play editsections for the currently selected player (see “Songs area” onpage 145).
When in the menu, select an edit section, or press EXIT orSONG PLAY to exit the menu.
When in an edit page, press the EXIT or SONG PLAY button togo back to the main page of the Song Play operating mode.
Each item in this menu corresponds to an edit section. Each editsection groups various edit pages, that may be selected by touch-ing the corresponding tab on the lower part of the display.
Note: Some of the edit parameters are only meant for realtime. Asa general rule, Keyboard track parameters can be saved in a Per-formance or SongBook STS, while some Song track parametersand FX settings could be saved in the Global-Song Play Setup.
Edit page structure
All edit pages share some basic elements. See the followingexample:
Operating mode
This indicates that the instrument is in Song Play mode.
Selected player
Before entering edit, select one of the two players, by using theSong area of the main page (see “Switching between players dur-ing editing” below).
Operating modeSelected player
Selected track info
Page menu icon
Parameters area
Tabs
Edit section

150 Song Play operating modeSwitching between players during editing
Edit section
This identifies the current edit section, corresponding to one ofthe items of the edit menu (see “Edit menu” on page 149).
Page menu icon
Touch this icon to open the page menu (see “Page menu” onpage 158).
Parameters area
Each page contains various parameters. Use the tabs to selectone of the pages. For detailed information on the various typesof parameters, see sections starting below.
Tabs
Use tabs to select one of the edit pages of the current edit section.
Switching between players during editing
When you enter Edit mode, you can edit the parameters of theselected Player. The selected Player is always shown on the pageheader.
To select a player, go to the main page of the Song Play mode,and select the players you wish to edit. The selected player isshown with a white background.
Mixer/Tuning: Volume/Pan
This page lets you set the volume and pan for each of the Key-board or Song tracks.
Note: Song parameters cannot be saved when saving to a Perfor-mance or STS.
Note: The play/mute status of a Song track may be reset whenselecting a Song made on a Pa-Series instrument.
Use the TRACK SELECT button to switch from the Keyboard tothe Song tracks, and vice versa.
Upper Volume Link
This parameter allows you to define if changing the volume forone of the Upper tracks, proportionally changes also the volumefor the other Upper tracks.
To save this parameter’s status, go to the Style Play mode, thenselect the Write Global-Style Play Setup from the page menu (see“Write Global-Style Play Setup dialog box” on page 139).
Note: This parameter is the same you can find in the “Preferences:Style Play Setup” page of the Style Play mode (see page 137).
On When changing volume to one of the Uppertracks, volume for the other Upper tracks changesin proportion.
Off When changing volume to one of the Uppertracks, only that track’s volume is changed. OtherUpper tracks are left unchanged.
Dry
Use this checkbox to turn the dry (direct) track signal on or offfrom the Master FX Send. To hear the direct signal, also set theFX Send Level of the relevant Master FX to a value different thanzero (see “Mixer/Tuning: FX Send” below).
Sty

151Song Play operating modeMixer/Tuning: FX Send
Refe
renc
e
Note: If the track is sent to a separate output, no FX is sent to anyoutput. To program the output status for each track, see “AudioSetup: Player 1” and “Audio Setup: Player 2” on page 214.
On When checked, the direct, dry signal comingfrom the track is sent to the output, mixed withthe Master FXs.
Off When unchecked, the direct, dry signal comingfrom the track is removed from the audio output,and only sent to the Master FXs. The effected sig-nal will still be panned (in stereo FXs only)according to the Pan value.
Pan
Track position in the stereo field.
-64…-1 Left stereo channel.
0 Center.
+1…+63 Right stereo channel.
Volume
Track’s volume.
0…127 MIDI value of the track’s volume.
Play/Mute icon
Track’s play/mute status. See “Keyboard track status” onpage 145 for more information.
Play status. The track can be heard.
Mute status. The track cannot be heard.
Mixer/Tuning: FX Send
Pa3X includes two groups of effects (FX A and FX B). While inSong Play mode, the A group is reserved to the Song and Padtracks, the B group to the Realtime (Keyboard) tracks.
However, Songs created in Sequencer mode could also assign theB group to the Song tracks (see “Effects: A/B FX Configuration”on page 189).
Choosing and editing the effects is done in the dedicated Effectsection (see “Effects: A/B FX Configuration” on page 154).
This page lets you set the level of the track’s direct (uneffected)signal going to the Master FX processors. The Master FX proces-sors are connected in parallel with the dry/direct signal, so youcan decide the amount of direct signal will be sent to the MasterFX processors.
In case you do not want to hear the direct signal, just set the Dryparameter to Off (see the “Dry” parameter above).
You can assign to the Master FXs any kind of available effects,but we suggest you assign the effects based on this scheme:
A-Master 1 Reverb processor for the Song tracks (Player 1and 2).
A-Master 2 Modulating FX processor for the Song tracks(Player 1 and 2).
A-Master 3 Freely assignable.
B-Master 1 Reverb processor for the Realtime (Keyboard)tracks.
B-Master 2 Modulating FX processor for the Realtime (Key-board) tracks.
B-Master 3 Freely assignable.
Use the TRACK SELECT button to switch from Keyboard toSong tracks, and vice-versa.
Note: When you stop, then start the Song again, or select a differ-ent Song, the default Song track settings are selected again. Youcan, however, pause the Song, change the effects, then exit frompause and start the Song again. Edit the Song in Sequencer modeto permanently change the effects.
Note: Track FX setting can be memorized in the general prefer-ences of the Song Play mode (they are named Song Play–GlobalSetup). This will help adapting the Pa3X’s sound to personal taste
Track L/R Out
Master FX
Track L/R Out
Master FX
Sng

152 Song Play operating modeMixer/Tuning: EQ Gain
for any Standard MIDI File (excluding those saved by a Pa-Seriesinstrument, that may override the general preferences).
FX Group
(Non editable) This indicates the FX group (A or B) assigned tothe group of tracks shown.
Send level
0…127 Level of the track (direct) signal sent to the Mas-ter FX effect processor.
Play/Mute icon
Track’s play/mute status. See “Keyboard track status” onpage 145 for more information.
Play status. The track can be heard.
Mute status. The track cannot be heard.
Mixer/Tuning: EQ Gain
In this page you can set the three-band equalization (EQ) foreach individual track.
Use the TRACK SELECT button to switch from the Keyboard tothe Song tracks, and vice-versa.
Note: The EQ is different for Player 1 and Player 2.
Hint: Track EQ can be memorized in the general preferences for theSong Play mode (they are named Song Play–Global Setup). This willhelp adapting the Pa3X's sound to personal taste for any StandardMIDI File you will ever play (excluding those saved by a Pa-Seriesinstrument, that may override the general preferences). Need alighter Bass track? Save the right equalization, and the Bass will staylight with all the subsequent Songs.
Hi (High) Gain
This parameter lets you adjust the high frequencies equalizationon each individual track. This is a shelving curve filter. Valuesare shown in decibels (dB).
-18…+18dB High gain value in decibels.
Sng
Sng

153Song Play operating modeMixer/Tuning: EQ Control
Refe
renc
e
Mid (Middle) Gain
This parameter lets you adjust the middle frequencies equaliza-tion on each individual track. This is a bell curve filter. Valuesare shown in decibels (dB).
-18…+18dB Middle gain value in decibels.
Low Gain
This parameter lets you adjust the low frequencies equalizationon each individual track. This is a shelving curve filter. Valuesare shown in decibels (dB).
-18…+18dB Low gain value in decibels.
Play/Mute icon
Track’s play/mute status. See “Keyboard track status” onpage 145 for more information.
Play status. The track can be heard.
Mute status. The track cannot be heard.
Mixer/Tuning: EQ Control
This page lets you reset or bypass track equalization, pro-grammed in the previous page.
Use the TRACK SELECT button to switch from the Keyboard tothe Song tracks, and vice-versa.
Track Reset buttons
Use these buttons to reset (i.e., “flatten”) equalization for the cor-responding track.
Reset All Tracks button
Touch this button to reset (i.e., “flatten”) equalization for alltracks (both Realtime and Song tracks).
Bypass
Check any of these checkboxes to bypass equalization for thecorresponding track. When bypassed, equalization has no effecton the track, but all parameters are preserved. When the box isunchecked, equalization is activated again with the original set-tings.
On The bypass function is engaged, so no equaliza-tion is active on the corresponding track.
Off The bypass function is not engaged, so the equal-ization is active on the corresponding track.
Sng
Sng
Sng

154 Song Play operating modeMixer/Tuning: Tuning
Input Trim
This knob allows you to limit the level of the signal passingthrough the equalizer. Extreme equalization values can overloadthe audio circuits and lead to distortion. This control lets you setequalization as desired, and at the same time avoid overloading.
0…99 Limiting value. The higher, the most effective itis.
Play/Mute icon
Track’s play/mute status. See “Keyboard track status” onpage 145 for more information.
Play status. The track can be heard.
Mute status. The track cannot be heard.
Mixer/Tuning: Tuning
Parameters in this page let you set various tuning settings. Allparameters in this page are the same found in Global mode. See“Mixer/Tuning: Tuning” on page 123 for details.
Parameters
Note: Song track values edited in this page are not saved, and areonly intended for realtime use.
Effects: A/B FX Configuration
This page allows you to select the effects for the A (Song) and B(Keyboard) FX groups. You can use the “FX A” and “FX B” sidetabs to switch from one group to the other one. (Songs created inSequence mode on a Pa-Series instrument can also use the B FXgroup).
The effect types and the FX matrix are the same seen for theStyle Play mode (see “Effects: A/B FX Configuration” onpage 125).
Note: The default effect settings can be memorized in the Global-Song Play Setup, by choosing the “Write Global-Song Play Setup”command from the page menu (see page 158).
Note: When you stop the Song, or select a different Song, thedefault effects are selected again. You can, however, stop the Song,change the effects, then start the Song again with the new effects.Edit the Song in Sequencer mode to permanently change theeffects.
FX A/B side tabs
Use these side tabs to choose the FX group (A or B) to edit.
FX Name
Use this pop-up menu to choose one of the available effects. Fora list of the available effects, see the “Advanced Edit” manual inthe Accessory Disk.
Insert FX - Track
Use this pop-up menu to choose the Song track the correspond-ing Insert FX is assigned to. Choosing either P1 (Player 1) or P2(Player 2) tracks makes no difference, since the effect is alwaysapplied to both Players, depending on the Song currently in play(the P1/P2 options are there for compatibility issues).
Here is an example of how Insert FX assignment works:
You can add a different Insert FX to any track of one of the twoPlayers. For example:
When you press the PLAY button on one of the Players, theInsert FX assigned to the other Player is assigned to the currentPlayer. So, in case Player 1 is set in play, this becomes the actualFX configuration:
If, on the contrary, you set Player 2 to play, this configuration istransferred to Player 2:
FX parameters
All other parameters in this page are the same seen for the StylePlay mode (see “Effects: A/B FX Configuration” on page 125).
Effects in Song Play modePa3X is equipped with two groups of effect processors (A and B),In Song Play mode, these groups can be used to process Key-board, Pad and MIDI tracks.
• Keyboard tracks always use the effects of the B group.
• Pad tracks always use the effects of the A group.
• Standard MIDI Files and Karaoke files can only use theeffects of the A group.
• Standard MIDI Files created on a Pa-Series instrument (inSequencer mode) can use effects of the A and B groups.
Sng
FX group
Insert FX (for both Players) Assigned to
IFX A1 Player 1, Track 1
IFX A2 Player 2, Track 3
Insert FX (for Player 1) Assigned to
IFX A1 Player 1, Track 1
IFX A2 Player 1, Track 3
Insert FX (for Player 2) Assigned to
IFX A1 Player 2, Track 1
IFX A2 Player 2, Track 3
Sng
Sng
Sng

155Song Play operating modeEffects: IFX 1…3, Master 1…3
Refe
renc
e
Effects: IFX 1…3, Master 1…3
These pages contain the editing parameters for the effect proces-sors. Here is an example of the FX A page, with the Reverb Halleffect assigned.
Selected effect
Select one of the available effects from this pop-up menu. This isthe same as the “FX Name” parameters found in the “Effects: A/B FX Configuration” page (see above).
FX parameters
Parameters may differ, depending on the selected effect. See the“Advanced Edit” addendum in the Accessory Disk for a list ofavailable parameters for each effect type.
Wet/Dry
Use this parameter to set the amount of the effect against the drysignal coming from the track. This is the same setting found inthe “Mixer/Tuning: FX Send” page (see above).
Src (Source)
Modulation source. To select the track generating this message,for Master FXs see the “M.T. (Modulating Track)” parametersfound in the “Effects: A/B FX Configuration” page (see above).Modulating messages for the Insert FXs are generated by thetrack the effect is applied to.
For a list of modulation sources, see the “Advanced Edit” adden-dum in the Accessory Disk.
Amt (Amount)
Volume of the effect, that is added to the dry (uneffected) signal.
Track Controls: Mode
These parameters let you set the Internal/External, and the Poly/Mono status of Song tracks. See “Track Controls: Mode” onpage 127.
Parameters
Note: These parameters can be saved to the Global-Song PlaySetup, by selecting the Write Global-Song Play Setup commandfrom the page menu.
Track Controls: Drum Edit
These parameters let you adjust the volume and edit the mainparameters for each percussive instrument family. See “TrackControls: Drum Edit” on page 128.
Drum Edit parameters
Note: Song track values edited in this page are not saved, and areonly intended for realtime use.
Track Controls: Easy Edit
These parameters let you “fine-tune” edit parameters for Soundsassigned to the tracks. See “Track Controls: Easy Edit” onpage 129.
Easy Sound Edit parameters
Note: Song track values edited in this page are not saved, and areonly intended for realtime use.
Keyboard/Ensemble: Keyboard Control
These parameters let you set parameters for the Keyboard tracks.See “Keyboard/Ensemble: Keyboard Control 1” on page 130.
Parameters
Keyboard/Ensemble: Keyboard Control 2
These parameters let you set the Ribbon Controller and AfterTouch for the Keyboard tracks. See “Keyboard/Ensemble: Key-board Control 2” on page 131.
Parameters
Selected effect
FX parameters
FX group
Sng
Sng
Sng
Sng
Sng
Sng

156 Song Play operating modeKeyboard/Ensemble: Key/Velocity Range
Keyboard/Ensemble: Key/Velocity Range
These parameters let you select a note and velocity range for theKeyboard tracks. See “Keyboard/Ensemble: Key/Velocity Range”on page 131.
Parameters
Keyboard/Ensemble: Ensemble
See “Keyboard/Ensemble: Ensemble” on page 132.
Parameters
Pad/Switch: Pad
See “Pad/Switch: Pad” on page 133.
Parameters
Pad/Switch: Assignable Switch
See “Pad/Switch: Switch” on page 133.
Parameters
Jukebox Editor
The Jukebox function lets you play a list of Songs (127 max), atthe simple touch of a button. You can play a Jukebox file byassigning it to Player 1, after having selected it in the Song Selectpage, just as if it was an ordinary Song (see “Jukebox panel” onpage 148).
In this page, you can create, edit and save a Jukebox file. A Juke-box list can contain Standard MIDI Files, Karaoke™ files, andMP3 files.
If a Jukebox file is already selected into a Player, you will enterthis page with that file ready to be edited. Otherwise, you willenter this page with an empty list.
To create a new Jukebox file, touch Del All to remove all Songsfrom the current list. Add new Songs, then touch Save and entera different name before confirming. A new Jukebox file will besaved to the storage device.
Move Up/Down
Use these button to move the selected item up or down in thelist.
Add
Adds a Song at the end of the current list. You can add up to 127Songs in a list. When this button is pressed, a standard file selec-tor opens up in the display.
Note: A Jukebox list can include only Songs contained in the samefolder.
Hint: Instead of a single Song, you can select a Jukebox file, andadd its whole content to the current Jukebox list.
Insert
Inserts a Song at the current position (i.e., between the selecteditem and the preceding one). All subsequent Songs are moved tothe next higher-numbered slot. You can add up to 127 Songs in alist.
Note: A Jukebox list can include only Songs contained in the samefolder.
Hint: Instead of a single Song, you can select a Jukebox file, andinsert its whole content to the current Jukebox list.
Delete
This command lets you delete the selected Song from the list.
Del All
Select this command to delete the whole Jukebox list.
Save
Touch this button to save the Jukebox file. The Save Jukebox Filedialog box appears, allowing you to edit the name and save yourfile.
Touch the (Text Edit) button to open the Text Edit window,and edit the name.
If you are editing an existing list, and do not change its name, theold file is overwritten. If you change it, a new file will be createdin the storage device.
If you are saving a new list, the “NEWNAME.JBX” name is auto-matically assigned, and you can edit it.
Note: You can save your “.JBX” file only in the same folder as theSong files included in the list.

157Song Play operating modePreferences: General Setup
Refe
renc
e
Preferences: General Setup
In this page, you can set various general parameters referred toSong tracks.
Note: These settings are stored in the Song Play Setup area of theGlobal file (together with all the other parameters marked with the
abbreviation in the manual). After changing these settings,select the Write Global-Song Play Setup command from the pagemenu to save them to the Global.
Melody/Vocal Remover
MP3 Vocal Remover Preset
Use this pop-up menu to choose a preset for the Vocal Remover(i.e., the processor removing or attenuating the singer’s voicefrom an MP3 file). To activate the Vocal Remover, you must pressa switch or a footswitch with the “Vocal Remover On/Off” func-tion assigned.
Try the different presets, and see which one is the most effectiveon the MP3 files you will play during the show.
Use the “Depth” parameter to adjust the intensity of the removal.Higher values are usually more effective, but they may removeother parts of the frequency spectrum (like solo instruments).
SMF Melody Track
This parameter selects the Song’s Melody track for StandardMIDI Files. This track can be muted using the “Song-Melody”function, assignable to an Assignable Switch, Footswitch or EC5pedal.
Drum & Bass Mode
Drum
This parameter selects the Song’s Drum track. This track is leftset to play (together with the Bass track) when selecting the“Drum&Bass” function, assignable to an Assignable Switch,Footswitch or EC5 pedal.
Bass
This parameter selects the Song’s Bass track. This track is left setto play (together with the Drum track) when selecting the“Drum&Bass” function, assignable to an Assignable Switch,Footswitch or EC5 pedal.
Voice Processor Harmony Mode
Harmony Control
This parameter allows you to choose if notes or chords for theVoice Processor’s Harmonizer should be received from a Songtrack, the keyboard, or none of them.
Whether actual notes or recognized chords are received by theHarmonizer depends on the “Harmony Type” parameter of theGlobal > Voice Processor Preset > Harmony page (see theAdvanced Edit Manual for more information).
The Harmornizer only works with MP3 Songs when the chosenHarmony Type is MP3.
Note: The SongBook’s “Harmony Control” parameter can changethis setting. So, depending on the chosen SongBook entry, theseoptions can be considered or not (see page 167) .
Hint: The use of Voice Processor Presets lets you quickly switchfrom an Harmony Type to the other (see “Voice Processor Preset:Easy Preset” in the “Voice Processor” chapter of the Advanced EditManual).
Off Nor the keyboard, nor any Song track can sendnotes or chords to the Harmonizer of the VoiceProcessor. Chords can still be received from theMIDI IN.
Ply 1/2 Track 1…16
Notes or chords are received from the selectedtrack of the Standard MIDI File.
Note: When both players are in play, the Voice Pro-cessor only receives notes from Player 1 when theX-Fader slider is fully on the left, and only fromPlayer 2 when the X-Fader slider is fully on theright.
Keyboard Notes or chords received by the Voice Processordepend on the “(Harmony) Type” parameter (seethe Advanced Edit Manual ):
• if the Chords option is selected, chords are sentfrom the Chord Scan area of the keyboard.
• if the Notes option is selected, notes are sent(instead of chords).
• if the Shift or Scalic options are selected, notesor chords are ignored.
Preferences: Play Setup
In this page, you can set various general parameters.
Sng
Sng
Sng
Sng
Sng
Sng

158 Song Play operating modePage menu
Note: These settings are stored in the Song Play Setup area of theGlobal file (together with all the other parameters marked with the
abbreviation through the manual). After changing thesesettings, select the Write Global-Song Play Setup command fromthe page menu to save them to the Global.
Midi Setup
MIDI channels for the Song Play mode can be automaticallyconfigured by selecting a MIDI Setup with this parameter. See“MIDI Setup” on page 210 for more information on using MIDISetups.
Note: To automatically select a MIDI Setup when entering theSong Play mode, select the Write Global-Song Play Setup com-mand from the page menu.
For detailed information on preloaded MIDI Setup settings, see“MIDI Setup” on page 238.
Note: After selecting a MIDI Setup, you can go to the Global modeand apply any change to each channel setting. To store thesechanges to a MIDI Setup, while still in Global mode select theWrite Global-Midi Setup command from the page menu. All MIDISetups can be freely customized and overwritten.
Hint: To restore the original MIDI Setups, use the “FactoryRestore” command (page “Utility” of the Media mode, seepage 236). Warning: This procedure will erase all Factory andUser data from the internal memory.
Fast Play
When checked, this function allows to skip the empty setupbeats at the beginning of a Standard MIDI File, and immediatelystart from the first note. However, any setup data are read andconsidered.
Please note that, being recorded as audio data, any empty spaceat the beginning of an MP3 file cannot be skipped.
Note: When Pa3X is driving an external musical instrument, thefast transfer of MIDI data to the MIDI OUT or USB port maycause a delay to the Song’s start. Therefore, we suggest to turn thisfunction off when Pa3X is hooked to other instruments.
Get Hard Disk Path
Touch this button to see the current file path of the Songassigned to each of the players. This lets you know where cur-rently selected Songs are located in the storage device.
If you save these paths to the Global, by selecting the “WriteGlobal-Song Play Setup” command from the page menu, thefirst time you will open the Song Select window, after turningthe instrument on, the selected path will be selected by default.
Page menu
Touch the page menu icon to open the menu. Touch a commandto select it. Touch anywhere in the display to close the menuwithout selecting a command.
Write Performance
Select this command to open the Write Performance dialog box,and save most of the current control panel settings to a Perfor-mance.
See “Write Performance dialog box” on page 138 for more infor-mation.
Write Global-Song Play Setup
Select this command to open the Write Global-Song Play Setupdialog box, and save global settings that are unique to the SongPlay mode.
See “Write Global-Song Play Setup dialog box” on page 159 formore information.
Save Song Marker Ply.1/2
Select this command to save the markers created in the corre-sponding player (see “Markers page” on page 172).
Export Jukebox List
Only available when a Jukebox list is selected. Select this com-mand to save the current Jukebox list as a text file to a storagedevice. Here is how it works.
1. While a Jukebox file is assigned to the player, select theExport Jukebox List command from the page menu.
2. A dialog box will appear, asking you to select either theinternal disk or a storage device connected to one of theUSB Host ports.
3. Select an option, and touch OK to confirm.
Sng
Sng
Sng
Sng

159Song Play operating modeWrite Global-Song Play Setup dialog box
Refe
renc
e
Note: When saved, the text file will be named after the selectedJukebox file. For example, a Jukebox file named “Dummy.jbx” willgenerate a “Dummy.txt” file. A new, unnamed Jukebox file willgenerate a “New_name.txt” file. If a file with the same namealready exists on the target device, it will be overwritten withoutwaiting for any confirmation.
The list will include the progressive number assigned to each Song,the file names, the total number of files in the list.
For the correct display and printing of the list on a personal com-puter, use a fixed size (i.e., non-proportional) character in yourtext editor.
Solo Track
Select the track of the current Player to be soloed, and check thisitem. You will hear only the selected track, and the ‘Solo’ warningwill flash on the page header.
Uncheck this item to exit the Solo function.
The Solo functions works in a slightly different way, dependingon the selected track:
• Keyboard track: The selected Keyboard track is the only trackyou can hear when playing on the keyboard. All other Keyboardtracks are muted. Player tracks are left in play status.
• Song track: The selected track is the only Song track you canhear. All other Song tracks are muted. Keyboard tracks are left inplay status.
Keep the SHIFT button pressed and touch one of thetracks to solo it. Do the same on a soloed track to deactivate theSolo function.
Copy/Paste FX
You can copy a single effect, or all effects of an FX group (A orB). You can copy them between different Songs. The copy opera-tion can only be carried on while remaining in Song Play mode.
Note: This operation only copies the effect settings of the “Effects”section. Parameters contained in other sections, like “Dry” or “FXSend”, are not copied. Please note that these parameters canchange the way effects change the sound.
To copy a single effect:
1. Select the source Song, Performance, Style or STS, then
• go to the page of the single effect you want to copy (IFX 1,IFX 2, IFX 3, Master 1, Master 2, Master 3), or
• go to the Effects > A/B FX Config page, to copy all effects.This may be useful if you want to copy various effects intodifferent Songs, Performances, Styles or STSs.
2. Choose the “Copy FX” command from the page menu.
3. Select the target Song, Performance, Style or STS, then goto the page of the single effect you want to paste (IFX 1, IFX2, IFX 3, Master 1, Master 2, Master 3).
4. Choose the “Paste FX” command from the page menu.
To copy all effects:
1. Select the source Song, Performance or STS, then go to theEffects > A/B FX Config page, to copy all effects.
2. Choose the “Copy FX” command from the page menu.
3. Select the target Song, Performance or STS, then go to thepage of the Effects > A/B FX Config page.
4. Choose the “Paste FX” command from the page menu.
Easy Mode
Easy Mode allows you to use the Style Play and Song Play modeswith an easier-to-use user interface. It is recommended to begin-ners, and to professionals alike that do not want to deal with theextra parameters of the Advanced mode.
At any time, you can manually turn the Easy Mode on/off withthe Easy Mode command in the page menu of the Style Play andSong Play modes.
See “The Song Play page in detail” on page 35 for more informa-tion.
Write Global-Song Play Setup dialog box
Open this dialog box by selecting the Write Global-Song PlaySetup item from the page menu. Here, you can save various SongPreference settings (see “Preferences: General Setup” onpage 157), that are saved to the Global file.
Parameters saved in the Song Play Setup area of the Global are
marked with the symbol through the user’s manual. Sng

160 SongBookBook
The SongBook is an onboard database that allows you to orga-nize various “musical resources” (Style, Standard MIDI Files,KAR files, and MP3 files) for easy retrieving.
The SongBook mode overlaps the Style Play and Song Play oper-ating modes. When you select an entry from the database, theStyle Play or Song Play mode is automatically selected, depend-ing on the type of file associated with the entry.
In addition to helping you organize your shows, the SongBookallows you to associate four Pads, and up to four STSs to eachStandard MIDI File or MP3 file, played back in Song Play mode.This way, it is easy to recall a complete setup for Keyboardtracks, effects, and the Voice Processor, for realtime playing overa Standard MIDI File or MP3 file.
Note: SongBook entries do not include actual data, but only apointer to a Style in memory, a Standard MIDI File, or an MP3file. When you copy a SongBook file, referenced files are not copiedwith it.
Hint: Use the SongBook Editor (freely available from our web site)to edit your SongBook with a PC.
Warning: If you load a SongBook list from a storage device(“.SBD” file), the existing one in memory is deleted. Save your oldSongBook list before loading a new one.
Book
The Book page contains the full database of song entries. Whilein this page, you can select an entry, and touch the Select buttonin the display to load it. Then, press the PLAY or START buttonto start the Song or Style.
Each entry of this database may include the song’s author, name,genre, original key, tempo and meter (time signature). Whenselecting one of the entries, the associated Style, Standard MIDIFile or MP3 file is automatically recalled. Also, STSs and Padsmay be recalled (if present).
List HeaderThe List Header may change, depending on the type of dataassociated with the selected entry.
• When a Style is associated to the entry, the currentlyselected entry’s name is shown on the left (“N:”), and theassociated Style is shown on the right (“Style:”):
• When a Standard MIDI File or MP3 file is associated to theentry, the list header is split into two parts, with the left halfreferring to Player 1, and the right one referring to Player 2.
Information for the selected entry’s name (“N:”) and asso-ciated Standard MIDI File or MP3 file (“P1:” or “P2:”) isgiven for each player:
Note: If you select a different Style or Standard MIDI File orMP3 file, the entry’s name field (“N:”) returns blank (---),meaning the entry has been modified.
Main listFull list of the SongBook database. Use the scrollbar (or theTEMPO/VALUE controls) to browse through the list.
You can touch one of the heading labels above the list to changethe order in which entries are shown. For example, by touchingthe “Name” label, the list is alphabetically re-ordered accordingto the entry names. The selected label turns red, showing thecurrently selected ordering.
By touching the label again, the order of the files switchesbetween ascending and descending. The small arrow next to thelabel name shows the selected order.
ScrollbarUse the scrollbar (or the TEMPO/VALUE controls) to scroll theentries.
Commands
Filtered
When this box is checked, only entries matching the selected fil-ter criteria are shown in the Main list. The box is automaticallychecked when you exit from the Filter dialog box by touchingOK (see below).
SongBook
Main list
Commands
List Header
Scrollbar

161SongBookBook
Adv
ance
d
Filter…
Touch this button to open the Filter dialog box, and select one ormore filter criteria, to show a restricted set of entries in the mainlist.
Touch the (Text Edit) button next to the search criteria youwant to edit (Name, Genre, or Artist). You can also select aMeter, or a range of Tempo values.
Touch the Clear button next to the search criterion you want todelete or set to a default value.
Touch Clear All to reset all search criteria.
Note: You can also find items in the SongBook database by press-ing the SEARCH button, and using the Search function. The Filterfunction allows, however, for a more refined search.
Add to list
If the “Enable List Edit” command is selected in the page menu,the “Add to list” button becomes available, to let you add entriesto the selected Custom List.
Select an entry, then touch this button to add the selected entryto the current Custom List (see “Custom List” on page 163).
Select
Touch this button to confirm selection of the highlighted entryin the main list. After touching this button, the name of theselected entry appears in the left upper corner of the display(“N:”).
When you highlight a song in any of the SongBook lists, its nameappears in reversed text, over a dark-red background. While inthis situation, the song is highlighted, but not yet loaded.
When you touch the Select button in the display, the song will beloaded. The dark red background turns to green, and the text isturned to boldface, to show the Song has been loaded and readyto play.
To start playback of the Song or Style, press (respectively) eitherthe PLAY or START button.
Numeric selection of entriesWhen in SongBook mode, you can select a SongBook entry bymeans of an unique number. Numbers associated with eachentry can be programmed in the Book Edit 2 page (see “BookEdit 3” on page 166).
To see the numbers while in the Book page, select the “ShowSong Numbers (now Key)” command from the page menu:
After you select this command, the “Num” column appears:
To see the “Key” column again, select the “Show Key (now SongNumbers)” command from the page menu.
To select a SongBook entry by entering its number, press theSONGBOOK button again while you are in any page of theSongBook mode. The numeric keypad will appear, allowing youto enter the number corresponding to the desired entry.
Hint: You can export a list of SongBook entries in TXT format,including the assigned selection number. You can print this list onpaper as a memo. (See “Export as text file” on page 168).
Selecting SongBook entries via MIDISongBook entries can be selected via MIDI (through the specialControl channel), by using the dedicated NRPN Control Changemessages #99 (MSB, with value 2) and #98 (LSB, with value 64).See “Selecting SongBook entries via MIDI” on next page.
Setting the special Control MIDI channel
A special MIDI channel used as the “Control” channel is neededto send MIDI messages to select the SongBook entries.
First of all, choose a MIDI Setup to quickly configure the Con-trol channel. Go to the Global > MIDI > Setup/General Controlpage and choose a MIDI Setup where to save your settings.
Then, choose a MIDI channel as the “Control” channel. Go tothe Global > MIDI > Midi In Channel page, and assign the Con-trol option to one of the sixteen available MIDI channels (usuallyone of the higher-numbered ones, for example 16).
When done, save this setting to the current MIDI Setup bychoosing the “Write Global-Midi Setup” command from thepage menu.
If you plan to use a different MIDI channel for the Style Play andSong Play modes, repeat the above to create a second MIDISetup.

162 SongBookBook
Assigning a MIDI Setup to the Style Play and Song Playmodes
Since SongBook entries dynamically recall the Style Play or theSong Play modes, it is advisable to assign them the same MIDISetup, or two different MIDI Setups with the Control channelassigned to the same MIDI channel. This way, the same MIDIchannel will be used to select a SongBook entry in either theStyle Play or Song Play mode.
When one of the operating modes is recalled, the MIDI Setupmemorized in the Style Play Setup or in the Song Play Setup willbe automatically selected, and MIDI channels will be automati-cally configured.
To assign a MIDI Setup to each of the two operating modes:
• In Style Play mode, go to the Style Play > Preferences > StyleSetup page, and select a MIDI Setup. Select the Write Global-Style Setup command from the page menu.
• In Song Play mode, go to the Song Play > Preferences > Gen-eral Control page, and select the same MIDI Setup assigned tothe Style Play mode. Select the Write Global-Song Play Setupcommand from the page menu.
Selecting SongBook entries via MIDI
When you are ready to remotely select SongBook entries, switchto the Style Play or Song Play mode.
At this point, Pa3X must receive on the special Control channelthe NRPN Control Change messages #99 (MSB, with value 2)and #98 (LSB, with value 64) in fast succession, as an initializa-tion string. This string must be sent only once, unless anotherNRPN control is sent on the same MIDI channel before selectinga different SongBook entry.
After the initialization string has been sent, you must send theselection string, made of two Control Change messages: CC#06(Data Entry MSB) for the thousands and hundreds, and CC#38(Data Entry LSB) for the tens and units. The range of the DataEntry controls, in this case, is 0~99 (instead of the typical0~127).
The following examples show some typical situations.
• Send the following string to select SongBook entry #77:
• Send the following string to select SongBook entry #100:
• Send the following string to select SongBook entry #2563:
Initialization string (CC#99, 98)
Thousands and hundreds (00xx)
Tens and units (xx77)
Initialization string (CC#99, 98)
Thousands and hundreds (01xx)
Tens and units (xx00)
Initialization string (CC#99, 98)
Thousands and hundreds (25xx)
Tens and units (xx63)

163SongBookCustom List
Adv
ance
d
Custom List
Use this page to select and use one of the available Custom Lists(contained in the “LISTDB.SBL” file saved in the same folder asthe “.SBD” SongBook file). Custom Lists are lists made of entriesextracted from the main SongBook list (as seen in the Bookpage). They allow the use of smaller, customized SongBook lists,suitable for a single gig or your own music tastes.
Hint: You can jump to this page by keeping SHIFT pressed, andpressing the SONGBOOK button.
List headerSee “List Header” on page 160.
Custom listList of files contained in the selected Custom List. Use the scroll-bar to browse through the list. As an alternative, use theTEMPO/VALUE controls.
ScrollbarUse the scrollbar (or the TEMPO/VALUE controls) to scroll theentries.
Commands
List pop-up menu
Use this pop-up menu to select one of the available lists.
Next
Touch this button to select the next entry in the list.
Hint: You can assign this command to an Assignable Switch orAssignable Footswitch.
Select
Touch this button to confirm selection of the highlighted entryin the list. After touching this button, the name of the selectedentry appears in the left upper corner of the display (“N:”).
Hint: This command is useful to browse through the list, and selectan entry different than the following one in the list.
List Edit
This page is only available after checking the “Enable List Edit”command in the page menu (see page 168).
Use this page to edit the available Custom Lists. A Custom List isa set of SongBook entries, created by selecting items from theMain List.
To add entries to a Custom List, first create or select the list to beedited in this page. Then, go to the Book page, select the entry tobe added, and touch the “Add to list” button. When finished add-ing entries, return to this page and edit the selected list.
List NameName of the selected list. To select a Custom List, go to the “Cus-tom List” page and use the List pop-up menu.
Custom listList of songs contained in the selected Custom List. Use the scroll-bar or the TEMPO/VALUE controls to browse through the list.
ScrollbarUse the scrollbar (or the TEMPO/VALUE controls) to scroll theentries.
Commands
Move
Use these buttons to move the selected song entry up or down inthe list.
Del Song
Touch this button to delete the selected song entry from the list.
New List
Touch this button to create a new, empty Custom List.
Note: The maximum number of Custom Lists in a SongBook file is256 lists.
Warning: Any unsaved Custom List is lost when creating a newlist using this command.
Custom list
Commands
List Header
Scrollbar
Custom list
Commands
List Name
Scrollbar

164 SongBookBook Edit 1
Del List
Touch this button to delete the current list.
Write
Touch this button to save changes to the selected Custom List.
To assign a different name to the selected list, touch the (Text Edit) button to open the Text Edit window.
Select an option to save the edited Custom List:
• Select Rename/Overwrite to overwrite an existing list,optionally changing its name. Warning: The older list willbe deleted!
• Select New List to save a new Custom List in memory. Thislist will be available in the “Custom List” page.
Book Edit 1
The Book Edit 1 page is where you link a Musical Resource(Style or Song) to the SongBook entry.
Hint: Use the Filter in the Book page, to quickly find an entry to beedited.
The Book Edit 1 page with a Style-based entry:
The Book Edit 1 page with a Song-based entry:
Header
Name
Name of the selected song entry. The name is assigned after youtouch the Write button to save the entry to the SongBook list.
Number (Song Selection Number)
Here you can select a unique number (up to 9,999) to be associ-ated to the current SongBook entry. By typing this number (byusing the Numeric Keypad) after pressing the SONGBOOK but-ton again, you will be able to quickly recall an entry from theBook page (see “Numeric selection of entries” on page 161).
Assigning a number is not mandatory, but may help you to orga-nize your entries. For example, you can use the different 100s tocreate a different way of categorizing your entries by genre orage.
Entry Resource
Style, Standard MIDI File or MP3 file associated with the savedentry.
Warning: If you replace this resource with a different one, carryingthe same media path and name (in case of a Standard MIDI Fileor MP3 file) or memory location number (in case of a Style), theSongBook entry will no longer point to the right data. Be careful

165SongBookBook Edit 1
Adv
ance
d
not to delete or move a Style or a file associated with a SongBookentry from the original location.
STS
ecked,nto ans.
gBook in the
name/ten at
gBooktracks, a Per-r after
name/rwrit-
ch the
it win-
ailableurrente Pro-
d fromFile or
ill be
d save
s 3,000
SongBook.fm Page 165 Wednesday, February 1, 2012 3:31 PM
Current Resource
Write
When checked, here is what is saved in the entry when touchingthe Write button:
• When you are saving a Style-based entry, a reference to thelatest selected Style, whose name is shown on the right ofthis parameter, is saved.
A reference to the selected Pads (whose name you can seeby touching the Pad tab in the main page of the Style Playmode) is also saved.
The Style Settings and the Pad Settings for the referencedStyle and Pads are saved. If you edited these Settings (bychanging Sounds, Effects, Transpose…), the modified datawill be saved instead of the original.
• When you are saving a Song-based entry, a reference to theMID, KAR or MP3 file assigned to Player 1, whose name isshown on the right of this parameter, is saved.
A reference to the selected Pads (whose name you can seeby touching the Pad tab in the main page of the Song Playmode) is also saved.
The Pad Settings for the referenced Pads are saved. If youedited these Settings, the modified data will be savedinstead of the original.
Note: Only the MID, KAR or MP3 file assigned to Player 1 will besaved in the SongBook entry. However, when recalling the entry,the Song will be assigned to either Player, depending on which oneis currently free and not in play.
When unchecked, no new resource will be saved with the entry.The original resource associated with the entry will be preservedwhen touching Write.
When touching New Song to create a new, blank entry, thisparameter is automatically checked, and cannot be modified. Areference to the associated resource will be saved with the newentry.
Resource Name
Name of the currently selected Style, Standard MIDI File or MP3file. It may differ from the name of the resource already saved inthe entry, shown on top of the page (see “Entry Resource”above).
You can select a different resource by going back to the Style Playor Song Play mode, and selecting resources from there. Then,press the SONGBOOK button to return to the Book Edit page.
When you touch Write, a link to the selected resource(s) is savedwith the entry (provided the “Write” option is selected when sav-ing). The resource(s) will be recalled when you selected theentry it is associated to.
Write
When saving a SongBook entry, and this parameter is chyou can save the current settings of the Keyboard tracks iSTS, or all settings of the latest Style STSs into all four STS
All Current Style STS
All four STSs are saved to the current Sonentry. The source STSs are those containedStyle currently selected in Style Play mode.
When you touch Write and choose the ReOverwrite option, all STSs are overwritonce.
Current A single STS is saved to the chosen SonSTS. The source are the current Keyboard as they have been configured by selectingformance, Style STS, SongBook STS, omanual editing.
When you touch Write and choose the ReOverwrite option, only the new STS is oveten, while the others are left untouched.
• STS Name: Name of the current STS. Tou
(Text Edit) button to open the Text Eddow, and modify the name.
• To STS Location: One of the four STS avfor each entry, where you can save the csettings for Keyboard tracks and the Voiccessor.
Buttons
New Song
Touch this button to create a new entry. Settings are copiethe currently selected Style, or from the Standard MIDI MP3 file assigned to Player 1. The selected resource wshown in the “Resource Name” field (see above).
Del Song
Touch this button to delete the current entry.
Write
Touch this button to open the Write Song dialog box, anthe current entry to the main list of the SongBook.
Note: The maximum number of entries in a SongBook file ientries.

166 SongBookBook Edit 2
To assign a different name to the entry, touch the (TextEdit) button to open the Text Edit window.
Tempo/BPM
Basic tempo of the Style, or starting tempo of the Standard MIDIempo
Stan-ue.
to the
of thehange,ource.
Trans-. Therrides
Song.
Master
ons tof Har-
gBook
SongBook.fm Page 166 Wednesday, February 1, 2012 3:31 PM
Select an option to add the new entry to the SongBook:
• Select Rename/Overwrite to overwrite an existing entry,optionally changing its name. Warning: The older entry willbe deleted!
• Select New Song to save a new entry to the SongBook data-base.
Book Edit 2
The Book Edit 2 page is where you enter information on theGenre, Artist, Key, etc. to the SongBook entry.
The Book Edit 2 page with a Style-based entry:
The Book Edit 2 page with a Song-based entry:
HeaderThis are includes the same Name, Number and Entry Resourcefields found in the “Book Edit 1” page (see above).
Database
Genre
Music genre associated with the entry.
Artist
Name of the artist of the song associated with the entry.
Key Info
Original key of the entry. The first field is the key name, the sec-ond one is the mode (major or minor).
File associated with the entry. This may change, if a TChange event is included with the associated resource.
Note: Even if you can edit this value, the starting value of adard MIDI Files is always considered, and overrides this val
Note: You can edit this value even if an MP3 is associatedSongBook entry. However, this is just an indicative value.
Meter Info
Basic meter (time signature) of the Style, or starting meterStandard MIDI File associated with the entry. This may cif a Meter Change event is included with the associated res
M.Transp. (Master Transpose)
Master Transpose. When the entry is selected, the Master pose of the whole instrument is automatically changedMaster Transpose value saved in the SongBook entry oveany Master Transpose setting contained in the referenced
Note: If the Master Transpose is locked, however, the Transpose does not change.
Book Edit 3
This page is where you select the Style and Memory optibe memorized, link a “.TXT” file, and choose the source omony notes for the associated Song.
The Book Edit 3 page with a Style-based entry:
The Book Edit 3 page with a Song-based entry:
Synchro Start / Synchro Stop / Memory
The status of these functions can be memorized in a Sonentry.

167SongBookInfo
Adv
ance
d
Note: If the SongBook entry is based on a Song, Synchro Start andSynchro Stop are greyed out and cannot be modified, since they Info
e asso-Book,ustom
I File
blanktry has
lected
in theilter is Song-
ts.
SongBook.fm Page 167 Wednesday, February 1, 2012 3:31 PM
have no effect on a Song.
Unchanged When selecting this SongBook entry, the status ofthe corresponding function is left unchanged.
Off When selecting this SongBook entry, the status ofthe corresponding function is turned off.
On When selecting this SongBook entry, the status ofthe corresponding function is turned on.
Linked .TXT
You can select a text (.TXT) file, and link it to the Style or Songassociated with the current SongBook entry. When you selectthis entry, the text file is automatically loaded.
Text files can be seen in the display and in an external monitor(provided the VIF4 Video Interface has been installed). Sincethere is no automatic synchronization between this kind of lyricsand the associated songs, you must scroll them manually. Thiscan be accomplished in either of two ways:
• When a “.TXT” file is selected, a special vertical scrollbarappears in the “Lyrics” page. Touch it to scroll through thetext during the performance. See the “Lyrics, Score, Mark-ers” chapter on page 169.
• Scrolling is also possible by means of the Text Page Down/Up command, that can be assigned to a Footswitch, ECSwitch or Assignable Switch.
This section of the Book Edit 3 page contains two buttons:
Reset Touch this buttons to unlink the text file from theentry.
Browse Touch this button to open a standard File Selec-tor, and select a “.TXT” file to be linked to thecurrent SongBook entry.
After selection, the name of the linked text fileappears above the two buttons.
Harmony Control
(Only editable if a Standard MIDI File is assigned to the SongBookentry) The Voice Processor will get the chord notes from thetrack selected with this parameter.
Hint: Go to the Voice Processor Preset section of the Global mode totry different Voice Processor Presets while creating or editing a Song.
Unchanged The Harmony Control set by the previous entry isnot changed.
Off No Song track, nor the keyboard, sends notes tothe Harmony module of the Voice Processor.Chords can still be received from the MIDI IN.
Ply. Track 1…16 Notes are sent from one of the Players tracks.
Keyboard Chords are received from the keyboard.
Use the Info page to see the name of the selected entry, thciated resource(s), the total number of Songs in the Songthe number of filtered entries, the number of available CLists, and the number of Songs in the current list.
• In case of an entry based on a Style:
• In case of an entry based on a Song in Standard MIDor MP3 format:
Selected entry
This parameter shows the currently selected entry. If it is(---), the latest selected entry has been modified, or no enbeen selected.
Associated resource
Style, Standard MIDI File or MP3 file associated to the seentry.
Songs
Total number of entries in the SongBook list.
Songs after filtering
This parameter shows the number of entries shown “Book” page, after applying the selected filter. If no fselected, this matches the total number of entries in theBook list (see previous parameter).
Custom Lists
This parameter shows the number of available Custom Lis
Songs in the Current List
Number of entries in the selected Custom List.
Linked text file
Seq
Selected entry
Associatedresource
Selected entryAssociated resource(s)
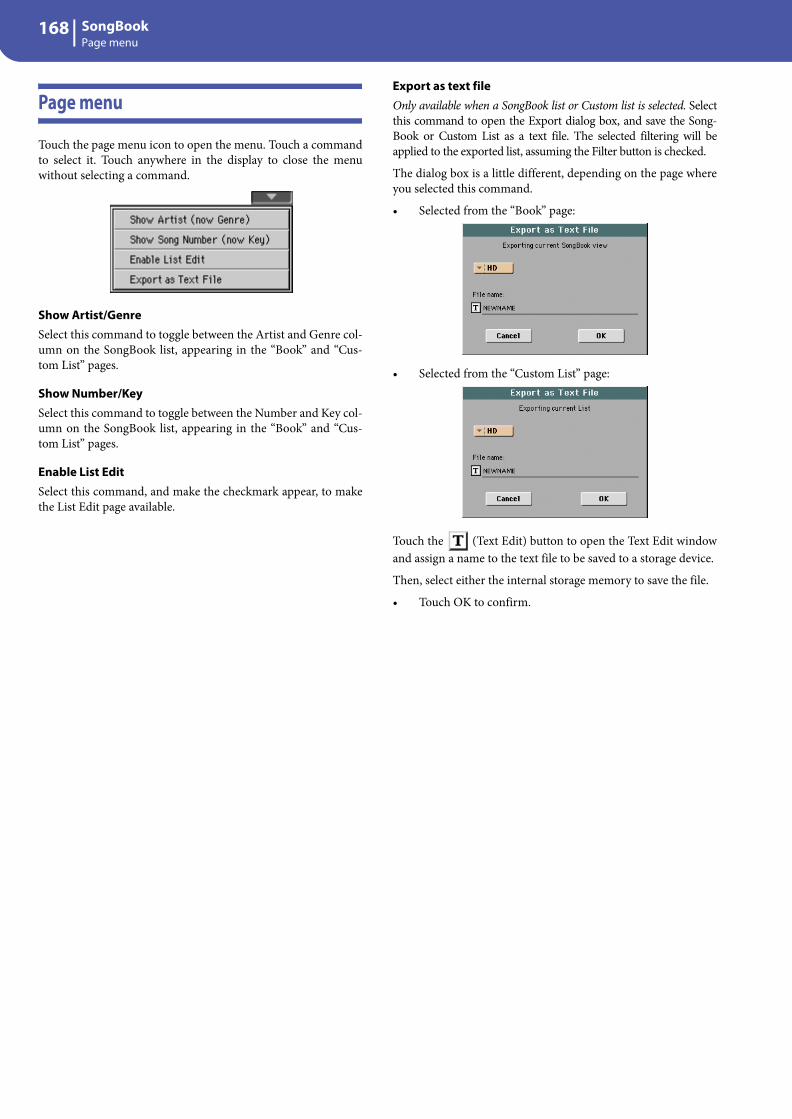
168 SongBookPage menu
Page menuExport as text fileOnly available when a SongBook list or Custom list is selected. Select
Song-will beked.
where
indowevice.
file.
SongBook.fm Page 168 Wednesday, February 1, 2012 3:31 PM
Touch the page menu icon to open the menu. Touch a commandto select it. Touch anywhere in the display to close the menuwithout selecting a command.
Show Artist/GenreSelect this command to toggle between the Artist and Genre col-umn on the SongBook list, appearing in the “Book” and “Cus-tom List” pages.
Show Number/KeySelect this command to toggle between the Number and Key col-umn on the SongBook list, appearing in the “Book” and “Cus-tom List” pages.
Enable List EditSelect this command, and make the checkmark appear, to makethe List Edit page available.
this command to open the Export dialog box, and save theBook or Custom List as a text file. The selected filtering applied to the exported list, assuming the Filter button is chec
The dialog box is a little different, depending on the pageyou selected this command.
• Selected from the “Book” page:
• Selected from the “Custom List” page:
Touch the (Text Edit) button to open the Text Edit wand assign a name to the text file to be saved to a storage d
Then, select either the internal storage memory to save the
• Touch OK to confirm.

169Lyrics, Score, MarkersLyrics page
Refe
renc
e
By using the LYRICS and SCORE buttons, you can see lyrics andchord abbreviations in the Style Play, Song Play and SongBookmodes, and the score and markers in the Song Play and Song-Book modes.
Lyrics page
Open the Lyrics page by pressing the LYRICS button. This pageshows the lyrics and chord abbreviations in the Style Play, SongPlay and SongBook modes.
Viewing lyrics and chords in the Song Playand SongBook modesYou can see the following types of lyrics and chords:
• Lyrics contained in a Standard MIDI File or Karaoke™ fileas Lyrics events, or in an MP3 with Lyrics file (in ID3 for-mat – see www.id3.org).
• Lyrics contained in a “.CDG” file, loaded with an MP3 filewith the same name. When a “.CDG” file exists in the samedirectory as an MP3 file, and shares exactly the same name,it will be loaded with the “MP3” file.
• Lyrics contained in a “.TXT” file, loaded with a StandardMIDI File, Karaoke™ or MP3 file with the same name.When a “.TXT” file exists in the same directory as a Stan-dard MIDI File or MP3 file, and shares exactly the samename, it will be loaded with the “.MID” or “MP3” file (see“Text files loaded with Standard MIDI Files and MP3 files”on page 170).
• Lyrics contained in a “.TXT” file linked to the latest-selected Song-based SongBook entry (see “Linked .TXT”on page 167).
• When no lyrics data is contained in the Song, or linked to aSongBook entry, you can see lyrics contained in a “.TXT”file loaded after selecting a Song (see “On-the-fly TXTloading” below).
This is the priority of lyrics data shown in the display:
i) CDG file contained in the same folder as the MP3 file, over-riding…
ii) TXT file linked to a SongBook entry, overriding…iii) TXT file contained in the same folder as the Standard
MIDI File or MP3 file, recalled by a SongBook entry, over-riding…
iv) Lyrics events contained in the Standard MIDI File or MP3 file.
Hint: If you do not want to see the TXT file or the CDG file, andprefer to see the Lyrics data, rename the TXT or CDG file, or moveit to a different folder.
Viewing lyrics and chords in the Style PlaymodeLyrics can be associated to a Style as a “.TXT” file. When in thispage, you can see:
• lyrics contained in a “.TXT” file linked to the latest-selectedStyle-based SongBook entry (see “Linked .TXT” on page 167).
• lyrics contained in a “.TXT” file loaded after selecting a Style(see “On-the-fly TXT loading” below).
Note: You cannot access Markers or the Score while you are inStyle Play mode.
The Lyrics page in detailLyrics will be shown only if they are compatible with a standardformat that Pa3X can understand.
While the Song is playing, Lyrics contained in a Standard MIDIFile or MP3 file flow in the display. Chord abbreviations (if any)will appear above the lyrics, in time with the music (dependingon the status of the “CHORD” button). Lyrics at the currentposition are highlighted.
If the text has been loaded as a “.TXT’ file, it will not scroll auto-matically while the Song is playing back. You must scroll it withthe VALUE controls or the vertical scrollbar. As an alternative,you can use an assignable switch or footswitch, with the TextPage Up or Text Page Down functions assigned, to scroll (respec-tively) to the previous or next text page.
If both player are playing, you can choose the Lyrics page eitherusing the dedicated Player buttons in the top right corner of thepage, or by moving the X-FADER slider fully to the left (Player1) or to the right (Player 2).
To exit from this page, press either the LYRICS or the EXIT/NObutton.
Song chords
Chords contained in the Standard MIDI File (if any). This indi-cator may be easier to read than chords shown within the lyrics.
When changing the Master Transpose, chord abbreviations con-tained in a Standard MIDI File are transposed, and correctly
Lyrics, Score, Markers
Song chords Current beat
Current measure
Touch here to see the lyrics and chords of the cor-responding Player.
Master Transpose
STS
Display option

170 Lyrics, Score, MarkersLyrics page
shown in the display. Master Transpose must be activated on theSequencer, but not on the Keyboard.
Master Transpose
Master transpose value in semitones. This value can be changedusing the TRANSPOSE buttons on the control panel.
Current beat
Standard MIDI Files only. Beat number of the current measure,that is currently playing.
Current measure
Standard MIDI Files only. Current measure number.
Selected player (Ply 1/Ply 2)
Use these buttons to select a player whose Song to show. Player 1is orange, while Player 2 is blue.
Note: You can have Player 2 selected in the Main page of the SongPlay mode, and Player 1 selected in the Lyrics page, or vice-versa.This way, you can select a Song whose lyrics, score or markers todisplay on the external video monitor, while selecting a differentplayer for editing operations.
STS
Name of the four selected Single Touch Settings (STS). Touchone of them to select it.
CHORD
If this button is depressed, chords are shown above lyrics in thedisplay – provided the Standard MIDI File contains them.
Abc
Size of the fonts. You can choose between a smaller and a biggerfont.
CGD
Touch this button to show the lyrics contained in the associatedCDG file.
Text in MP3+CGD filesWhen a “.CDG” file exists in the same directory as an MP3 file,and shares exactly the same name, it will be loaded with the“MP3” file, and can be seen in the Lyrics page.
As an example, if the file “MYSONG.CDG” exists in the samedirectory as the “MYSONG.MP3” file, it is loaded together withthe matching “.MP3” file.
The text will scroll automatically while the Song is playing back.
Note: When a “.CDG” file is loaded with the Song, it overrides anyincluded Lyrics data.
Text files loaded with Standard MIDI Files andMP3 filesWhen a “.TXT” file exists in the same directory as a StandardMIDI File or MP3 file, and shares exactly the same name, it willbe loaded with the “.MID” or “MP3” file, and can be seen in theLyrics page.
As an example, if the file “MYSONG.TXT” exists in the samedirectory as the “MYSONG.MID” or “MYSONG.MP3” file, it isloaded together with the matching “.MID” or “.MP3” file.
However, unlike ordinary Lyrics, the text will not scroll automat-ically while the Song is playing back. You must scroll it with theVALUE controls. As an alternative, you can use an assignableswitch or footswitch, with the Text Page Up or Text Page Downfunctions assigned, to scroll (respectively) to the previous ornext text page.
Note: When a “.TXT” file is loaded with the Song, it overrides anyincluded Lyrics data.
On-the-fly TXT loadingWhen a Song or a SongBook entry does not contain any Lyricsmetadata or has no “.TXT” file linked, the “No lyrics. PressSHIFT and touch here to load a TXT file” message appears in thedisplay when you go to a Seq. Lyrics page.
The same can be done while in Style Play mode.
When this message appears, and you want to load a “.TXT” file,keep the SHIFT button pressed and touch the center of the dis-play. A standard file selector appears, and lets you look for“.TXT” file to be loaded while the current Song is playing.
Hint: You can use the Search function to search a “.TXT” file in thevarious storage devices. See the “Searching files and musicalresources” chapter on page 109 for more information.
Sng
Sng

171Lyrics, Score, MarkersScore page
Refe
renc
e
Score page
Open the Score page by pressing the SCORE button. This pageshows the Song’s score in the Song Play and SongBook modes.
After having chosen either Player 1 or Player 2, the Score page of
the corresponding Song appears.
If both player are playing, you can choose the Score page eitherusing the dedicated Player buttons in the top right corner of thepage, or by moving the X-FADER slider fully to the left (Player1) or to the right (Player 2).
To exit from this page, press either the SCORE or the EXIT/NObutton.
Note: Master or Track Transpose do not affect the Score display.
Selected Player/Song
This is the name of the currently selected Player (and Song). Toselect a different Player, touch the button corresponding to theother Player.
When moving the X-FADER, the shown score may change.When the X-FADER is fully moved to the left, the score forSequencer 1 is shown; when the X-FADER is fully moved to theright, the score for Sequencer 2 is shown instead.
Song title
Name of the Song.
Tempo
Current Tempo of the Song (in BPM, Beats Per Minute).
Staff
The selected track is shown as traditional music notation.Depending on the content of the track, either notes or chords areshown. Pa3X takes care for you of ‘cleaning-up’ the score, so thatit is always easy to read.
Several automatic operations are carried on to clean-up thescore: Pa3X automatically quantizes to 1/16 notes, detects trip-lets, avoids note overlaps, understands syncopation, and drawsbeams according to the time signature. In addition, spacing andmeasure length are dynamic, and single, double and end mea-sure bars are automatically added.
If a KeySign (Key Signature) event is found at position‘001.01.000’ of the Song’s Master track, the correct key signatureis also shown.
Currently selected staff marker
This red vertical line shows the approximate position of the play-back, by indicating the current staff in play.
Current measure indicator
This red triangle shows the current measure in play.
Lyrics button
Touch this button to make the lyrics (if available) appear or dis-appear.
Chord button
Touch this button to make the chord symbols (if available)appear or disappear. Chords are shown either in the English orItalian system, depending on the selected Help language (see“General Controls: Interface” on page 206).
Note button
Touch this button to make the note name appear or disappearnext to each note. Note names are shown either in the English orItalian system, depending on the selected Help language (see“General Controls: Interface” on page 206).
Clef
Touch here to open a pop-up menu, where to choose a clef from.Available clefs are:
Treble Standard Treble clef ( ).
Treble+8 Treble clef with transposition one octave upper.
Treble-8 Treble clef with transposition one octave lower.
Bass Standard Bass clef ( ).
Bass-8 Bass clef with transposition one octave lower.
Play/Mute
Use this button to let the selected track play, or to mute it. If thetrack is muted, the score is still shown, so that you can play orsing it.
Hint: The “Melody Mute” function, that can be assigned to anassignable switch, footswitch or EC5 pedal, allows for muting themelody track of a Song (default: Track 4, see “SMF Melody Track”
Touch here to see the score of the cor-responding Player.
SelectedPlayer/Song Song title Tempo
Currently selectedstaff (in red)
Current measureindicator
Touch here to turnlyrics on/off Touch here to turn
chord symbols on/off
Touch here to turn notenames on/off
Selected track
Play/Mute
Clef
Chord symbols
Lyrics
Measure number

172 Lyrics, Score, MarkersMarkers page
on page 157). If your song has the melody part assigned to thesame track, you can mute or unmute it by using this button, or theassigned switch/pedal.
Selected track
Touch here to open a pop-up menu where to chose the track tobe shown from.
Hint: The vocals part is often assigned to Track 4.
Markers page
Open the Marker page by pressing both the LYRICS and SCOREbuttons together. This page shows the Song Markers in the SongPlay and SongBook modes.
Standard Song Markers contained in a Standard MIDI File canbe read with the Pa3X, to quickly jump to a given position in theSong. Additionally, you can set your own marker points on-the-fly.
If both player are playing, you can choose the Marker page eitherusing the dedicated Player buttons in the top right corner of thepage, or by moving the X-FADER slider fully to the left (Player1) or to the right (Player 2).
To exit from this page, press the EXIT/NO button.
Note: It is not advisable to program them with a Jukebox fileassigned to Player 1, since pressing PLAY/STOP would delete themarkers.
How to add a marker:
1. Press the LYRICS and SCORE buttons together to open theMarkers page.
2. Touch the Player 1 (Player 2) button in the top right cornerof the display to see the markers contained in the corre-sponding Song.
3. Start the Song by pressing the PLAYER 1 (PLAYER 2)PLAY/STOP button (however, markers can be added evenwhile the player is not running).
4. When you reach the position you want to save as a marker,touch the Add button in the display.
• If you touch Add within the first beats of the measure, thebeginning of the current measure is saved as a marker.
• If you touch Add within the last beat of the measure, thebeginning of the following measure is saved as a marker.
5. Do the same for any following marker.
6. Stop the Song by pressing the PLAYER 1 (PLAYER 2)PLAY/STOP button.
How to jump to a saved marker:
1. Start the Song again.
2. When you want to jump to a saved marker, touch it in thedisplay. The Song will jump to the saved position at thebeginning of the next measure.
How to edit a marker:
1. Touch the marker to be edited in the display.
2. Touch the Edit button in the display to set the marker toedit. The Edit Marker window will appear.
3. While in Edit Marker window, you can edit the name andposition of the marker being edited.
4. Save the markers (as described below).
How to delete a marker:
1. Touch the marker to be deleted in the display.
2. Touch the Delete button in the display to delete the selectedmarker.
3. Save the markers (as described below).
How to save the markers:
Touch the “Save Mk” button in the display to save all markers.
If you are not in the Lyrics/Score page, choose from the pagemenu the “Save Song Marker Ply.1” or “Save Song Marker Ply.2”(depending on the player where you created the markers). Themarkers will be saved into the Standard MIDI File.
Auto Scroll
Check this parameter if you want the current marker to bealways visible in the display during playback, by making the listof markers scroll automatically.
Don’t check this parameter, if you prefer to prevent the list fromscrolling. This is useful if you want a marker to remain in thedisplay, ready to be selected as soon as you want to jump to itsposition, with no need to scroll the list to catch it out.
STS
Name of the four selected Single Touch Settings (STS). Touchone of them to select it.
Touch here to see the markers of the corresponding Player.

173Sequencer operating modeTransport controls
Refe
renc
e
The Sequencer operating mode is the full-featured onboardsequencer, where you can create a Song from scratch, or edit it.You can also use this mode to edit the initial parameters of aStandard MIDI File, either made with an external sequencer orwith Pa3X’s own sequencer.
You can save the new or edited Song as a Standard MIDI File(SMF, i.e., a file with the “.MID” extension), and play it backeither in Song Play or Sequencer mode – or on any externalsequencer.
Transport controls
To play back a Song, use the PLAYER 1 transport controls (i.e.,the one on the left side of the PLAYER area). While in Sequencermode, you can only use Player 1 controls. Player 2 controls aredeactivated. See “SELECT” on page 13 for more information.
The Songs and the Standard MIDI Fileformat
The native Song format for Pa3X is the Standard MIDI File.
When saving a Song as a SMF, a setup measure is automaticallyinserted to the beginning of the Song. This measure containsvarious Song initialization parameters.
When an SMF is loaded, the setup measure is automaticallyremoved.
Sequencer mode and the MP3
While in Sequencer mode, you cannot load nor record MP3files. This mode only allows for editing of the Standard MIDIFiles.
Songs and Voice Processor Presets
You can use the Voice Processor while in Sequencer mode. Forthis, just two settings are needed:
• Select the Song track where you are recording chords forthe Voice Processor (see “Harmony Track” on page 196).
• Select the desired Voice Processor Preset (in the Voice Pro-cessor Preset section of the Global mode, see the “VoiceProcessor” chapter in the Advance Manual).
Sequencer Play - Main page
Press the SEQUENCER button to access this page from anotheroperating mode. In this page you can load a Song, and play itback using the transport controls for PLAYER 1 (see “Transportcontrols” above).
Note: When switching from Style Play to Sequencer mode, theSequencer Setup is automatically selected, and various trackparameters may change.
To return to this page from one of the Sequencer edit pages,press the EXIT or SEQUENCER button.
To switch between Song tracks 1-8 and 9-16, use the TRACKSELECT button.
Page headerThis line shows the current operating mode, transposition andrecognized chord.
Operating mode name
Name of the current operating mode.
Master Transpose
Master transpose value in semitones. This value can be changedusing the TRANSPOSE buttons on the control panel.
Note: Transpose may be automatically changed when loading aStandard MIDI File generated with an instrument of the Korg Paseries. The Master Transpose Lock parameter in the Global (see“General Controls: Lock” on page 204) has no effect on theSequencer.
Sequencer operating mode
Song area Page header Page menu icon
Selectedtrack info
area
Soundsarea
Track volume/status area
Operating modename
Master Transpose (in semitones)

174 Sequencer operating modeSequencer Play - Main page
Page menu iconTouch the page menu icon to open the menu. See “Page menu”on page 196 for more information.
Song areaThis is where the Song name is shown, together with its tempoand meter (time signature) parameters, and the current measure.
Song name
Displays the name of the selected Song. “NEWSONG” meansthat a new (blank) Song is selected, and you can record it.
Touch the Song name to make the Song Select window appear,allowing for selection of a different Song (see “Song Select win-dow” on page 106).
To select a Song, you can also press the SELECT button in thePLAYER 1 section of the control panel. Press SELECT a secondtime to select a Song by dialing in its ID number (see “Selecting aSong by its ID number” on page 107).
Note: Only Standard MIDI Files can be loaded. MP3 files cannotbe loaded in Sequencer mode.
Meter
Current meter (time signature).
Measure number
Current measure number.
Tempo
Metronome tempo. Select this parameter and use the TEMPObuttons to change the tempo. As an alternative, when a differentparameter is selected, or you are in a different page, keep theSHIFT button pressed and use the DIAL to change the tempo ofthe sequencer.
Locate measure
When checked, the measure shown by this parameter is a tem-porary start point of the song, instead of measure 1. When youpress the (HOME) button, or use the << (REWIND) buttonto go back to the beginning, the Song returns to this point.
Metro
Check this box to turn the metronome on during playback.
Tempo (Tempo mode)
Use this menu to select the Tempo change mode.
Manual In this mode, you can change the Tempo usingTEMPO/VALUE section controls. The Song willbe played back using the manually selectedtempo.
Auto The Tempo recorded to the Song will be used.
Selected track info areaThis line lets you see the Sound assigned to the selected track.Not only it is shown on the main page, but also in several editpages.
Track name
Name of the selected track.
Sound name
Sound assigned to the selected track. Touch anywhere in thisarea to open the Sound Select window, and select a differentSound.
Sound bank
Bank the selected Sound belongs to.
Program Change
Program Change number sequence (Bank Select MSB, BankSelect LSB, Program Change).
Sounds areaThis area lets you see Sounds and octave transposition for theeight tracks currently displayed.
Song track octave transpose
Non editable. Octave transpose of the corresponding track. Toedit the octave transpose, go to the “Mixer/Tuning: Tuning” editpage (see page 123 for programming information).
Sound bank’s icon
This picture illustrates the bank the current Sound belongs to.Touch an icon a first time to select the corresponding track(detailed information are shown on the Selected Track Info area,see above). Touch it a second time to open the Sound Select win-dow.
Song name TempoMeasure number
Beat counter
Track name
Sound name
Sound bank
Program Change
Song track octave transpose icon
Sound bank’s icon

175Sequencer operating modeSequencer Play - Main page
Refe
renc
e
Track volume/status areaThis area is where you can set the volume of each Song track,and mute/unmute tracks.
Sliders and volume of the tracks
You can change the volume of each track by using the first eightAssignable Sliders in the control panel. To make them act as vol-ume controls, be sure the VOLUME LED over the SLIDERMODE button is lit:
The Assignable Sliders correspond to the ‘virtual sliders’ in thedisplay. These are a graphical representation of each track’s vol-ume.
You can also change the volume by touching the virtual slider ofa track, and using the VALUE controls, or by touching a trackand dragging it in the display.
Use the TRACK SELECT button to switch betweenthe Song Tracks 1-8 and Song Tracks 9-16 views.The Assignable Sliders LEDs show which view iscurrently selected:
The Song Tracks 1-8 view shows Song tracks 1-8:
The Song Tracks 9-16 view shows Song tracks 9-16:
Slider Mode button status
Usually, the function assigned to the Assignable Sliders dependson the status of the SLIDER MODE button. While in Sequencermode, you cannot save the SLIDER MODE status to a Perfor-mance or STS, since Performances and STSs are disabled whilein this mode.
For details about the various Slider Modes, see “SLIDER MODE”on page 8.
Track status icon
Play/mute status of the current track. Select the track, then touchthis area to change the track status. The status of Song tracks issaved when saving the Song.
Play status. The track can be heard.
Mute status. The track cannot be heard.
Track names
Under the sliders, a label for each track is shown. Use theTRACK SELECT button to switch between tracks 1-8 and 9-16.
Assignable sliders
Virtual sliders
Volume LED
Assignable Sliders LEDs
Abbreviation Track
T01…T16 Song tracks. Volume memorized into a Standard MIDI File. Play/mute status memorized into the Standard MIDI File as well, and can be read in Song Play mode.
Seq

176 Sequencer operating modeEntering Record mode
Entering Record mode
To enter Record mode, press the RECORD button while you arein Sequencer mode. The following dialog box will appear:
Select one of the three available recording options and touch OK(or Cancel if you don’t want to enter Record mode).
Multitrack Sequencer
Full-featured sequencer. Select this option forclassic multitrack recording. (See “Record mode:Multitrack Sequencer page” on page 176).
Backing Sequence (Quick Record)
Easy way of recording. Just play with Styles, andrecord your realtime performance.
Step Backing Sequence
Step-record. Edit chords and controls for theStyle. Very useful if you are not a keyboard player.
Record mode: Multitrack Sequencer page
While in Sequencer mode, press the RECORD button and selectthe “Multitrack Sequencer” option. The Multitrack Sequencerpage appears.
See “Multitrack recording procedure” on page 178 for informa-tion on the record procedure.
Page headerSee “Page header” on page 173.
Page menu iconSee “Page menu icon” on page 174.
Page sub-headerThis area shows some performing info on the Song.
Song name
Name of the Song in record.
Free memory %
Percentage of remaining memory available for recording.
Beat counter
This indicator shows the current beat inside the current mea-sure.
Measure number
Current measure you are recording.
Recording parameters area
Rec mode (Recording mode)
Set this parameter before starting record, to select a recordingmode.
Page header Page menu icon
Selectedtrack info
area
Soundsarea
Tracks volume/status area
Recordingparameters
area
Page sub-header
Song name Beat counter Measure numberFree memory %

177Sequencer operating modeRecord mode: Multitrack Sequencer page
Refe
renc
e
Overdub The newly recorded events will be mixed to anyexisting events.
Overwrite The newly recorded events will replace any exist-ing events.
Auto Punch Recording will automatically begin at the “Start”position, and stop at the “End” position.
Note: The Auto Punch function will not work onan empty Song. At least one track must already berecorded.
PedalPunch Recording will begin when pressing a pedal set tothe “Punch In/Out” function, and will finishwhen pressing the same pedal again.
Note: The Pedal Punch function will not work on anempty Song. At least one track must already be recorded.
Locate measure
When checked, the measure shown by this parameter is a tem-porary start point of the song, instead of measure 1. When youpress the (PLAY/STOP) button to stop recording, or usethe << (REWIND) button to go back to the beginning, the Songreturns to this point.
Resolution
Use this parameter to set the quantization during recording.Quantization is a way of correcting timing errors; notes playedtoo soon or too late are moved to the nearest axis of a rhythmic“grid”, set with this parameter, thus playing perfectly in time.
High No quantization applied.
(1/32)… (1/8)
Grid resolution, in musical values. For example,when you select 1/16, all notes are moved to thenearest 1/16 division. When you select 1/8, allnotes are moved to the nearest 1/8 division.
Start/End
Start and End locators. These parameters area available onlywhen the “Auto Punch” recording mode is selected. They set thestarting and ending points of the Punch recording.
Metro (Metronome)
This is the metronome heard during recording.
Off No metronome click will be heard during record-ing. A one-bar precount will be played beforestarting recording.
On1 Metronome on, with a one-bar precount beforestarting recording.
On2 Metronome on, with a two-bar precount beforestarting recording.
Tempo
Select this parameter, and use the TEMPO or VALUE controls toset the tempo.
Note: You can always change the Tempo, when other parametersare selected, by keeping the SHIFT button pressed, and rotating theDIAL.
Meter
This is the basic meter (or time signature) of the Song. You canedit this parameter only when the Song is empty, i.e., before youbegin recording anything. To insert a meter change in the mid-dle of the Song, use the “Insert Measure” function (seepage 193).
Tempo (Tempo mode)
This parameter sets the way tempo events are read or recorded.
Manual Manual reading. The latest manual Tempo setting(made using the TEMPO controls) is consideredthe current Tempo value. No Tempo changeevents will be recorded. This is very useful whenyou want to record the Song at a much slowerspeed than the actual Tempo.
Auto Auto reading. The Sequencer plays back allrecorded Tempo events. No Tempo change eventsare recorded.
Record All Tempo changes made during recording willbe recorded to the Master Track.
Note: Tempo is always recorded in overwrite mode(old data is replaced by the new data).
Selected track info areaThis line lets you see the Sound assigned to the selected track.See “Selected track info area” on page 174 for more information.
Sounds areaThis area lets you see Sounds and octave transposition for theeight tracks currently displayed. See “Sounds area” on page 174for more information.
Track volume/status areaThis area is where you can set the volume of each Song track,and change track status. See “Track volume/status area” onpage 175.
Track status icons
Play/mute/record status of the current track. Select the track,then touch this area to change its status.
Play status. The track can be heard.
Mute status. The track cannot be heard.
Record status. After pressing (PLAY/STOP) to start recording, the track will receivenotes from the keyboard and the MIDI IN orUSB Device connector.
No quantiza-tion
1/16
1/8

178 Sequencer operating modeRecord mode: Step Record page
Multitrack recording procedureHere is the general procedure to follow for the MultitrackRecording.
1. Press the SEQUENCER button to enter Sequence mode.
2. Press the RECORD button, and select the “MultitrackSequencer” option to enter the Multitrack Record mode.Now you can prepare your recording parameters. (Formore details, see “Record mode: Multitrack Sequencerpage” on page 176).
3. Be sure the Overdub or Overwrite recording options isselected (see “Rec mode (Recording mode)” on page 176).
4. Set the tempo. There are two ways of changing tempo:
• Use the TEMPO controls to change the tempo
• Move the cursor to the “Tempo” parameter, and use theVALUE controls to change tempo.
5. Use the TRACK SELECT button to switch between SongTracks 1-8 and Song Tracks 9-16, and assign the rightSound to each track (see “Sound bank’s icon” on page 174).
6. Select the track to record. Its status icon will automaticallychange to Record (see “Track status icons” on page 177).
7. Use the “Locate measure” parameter to enter a measurewhere you want to start recording.
8. Press (PLAY/STOP) to start recording. Dependingon the Metro option you selected, a 1- or 2-bars precountmay play before the recording actually begins. After pre-count, play freely.
• If you selected the Auto Punch recording mode, therecording will begin only when reaching the Start point.
• If you selected the Pedal Punch recording mode, press thepedal when you want to begin recording. Press it again tofinish recording.
Note: The Punch functions will not work on an empty Song.At least one track must already be recorded.
9. When finished recording, press (PLAY/STOP) tostop the sequencer. Select a different track, and go onrecording the whole Song.
10. When finished recording the new Song, either press theRECORD button, or select the “Exit from Record” com-mand from the page menu (see page 197).
Warning: Save the Song to a storage device, to avoid losing itwhen turning the instrument off.
Note: When exiting the Record mode, the Octave Transposeis automatically reset to “0”.
11. If you wish, edit the new Song, by pressing the MENU but-ton, and selecting the various edit pages.
Record mode: Step Record page
The Step Record allows you to create a new Song by entering sin-gle notes or chords to each track. This is very useful when tran-scribing an existing score, or needing a higher grade of detail,and is particularly suitable to create drum and percussion tracks.
To access this page, select the “Overdub Step Recording” or“Overwrite Step Recording” command from the page menu.
In Overdub Step Recording mode you will add to existingevents, while in Overwrite Step Recording mode you will over-write all existing events.
See “Step Record procedure” below, for information on therecord procedure.
Page headerThis line shows the current operating mode.
Page sub-header
Track
Name of the selected track in record.
S1Tr01…Tr16
Player 1 track. In Sequencer mode, you alwayswork with Player 1.
Pos (Position)
This is the position of the event (note, rest or chord) to beinserted.
Step Time area
Step Time
Length of the event to be inserted.
… Note value.
Standard (–) Standard value of the selected note.
Dot (.) Augments the selected note length by one half ofits value.
Triplet (3) Triplet value of the selected note.
Page header Note parameters
Steptime
Buttons
Page sub-header
Event list

179Sequencer operating modeRecord mode: Step Record page
Refe
renc
e
Note parameter area
Meter
Meter (time signature) of the current measure. This parametercannot be edited. You can set a Meter change by using the Insertfunction of the Edit menu, and inserting a new series of mea-sures with a different Meter (see “Song Edit: Cut/Insert Mea-sures” on page 193).
Free Memory
Available memory for recording.
Duration
Relative duration of the inserted note. The percentage is alwaysreferred to the step value.
50% Staccato.
85% Ordinary articulation.
100% Legato.
Velocity
Set this parameter before entering a note or chord. This will bethe playing strength (i.e., velocity value) of the event to beinserted.
Kbd Keyboard. You can select this parameter, by turn-ing all counter-clockwise the dial. When thisoption is selected, the playing strength of theplayed note is recognized and recorded.
1…127 Velocity value. The event will be inserted withthis velocity value, and the actual playingstrength of the note played on the keyboard willbe ignored.
Event list area
List of inserted events
Previously inserted events. You may delete the last of theseevents, and make it ready for a new event, by touching the Backbutton in the display.
Position Position where the event has been inserted. Thevalue is shown in the “measure.beat.tick” format.
Note/RX Noise
Name of the inserted Note or RX Noise. Whenentering a chord, a series of dots is shown afterthe name of the root note.
Vel. Velocity of the inserted event.
Dur.% Percentage duration of the inserted event.
Buttons
Rest
Touch this button to insert a rest.
Tie
Touch this button to tie the note to be inserted to the previousone. A note with the same pitch, and the specified length, will becreated, and tied to the previous one.
Back
Goes to the previous step, erasing the inserted event.
Next M. (Next Measure)
Goes to the next measure, and fills the remaining space withrests.
Done
Exits the Step Record mode.
Step Record procedureHere is the general procedure to follow for the Step Recording.
1. Press the SEQUENCER button to enter Sequencer mode.
2. Press the RECORD button, and select the “MultitrackSequencer” option to enter the Multitrack Record mode.From the page menu, select the “Overdub Step Recording”or “Overwrite Step Recording” mode. At this point, theStep Record window will appear in the display.
3. The next event will be entered at the position shown by thePos indicator in the upper right corner of the display.
• If you don’t want to insert a note at this position, insert arest instead, as shown in step 5.
• To jump to the next measure, filling the remaining beatswith rests, touch the Next M. button in the display.
4. To change the step value, use the Step Time parameters.
5. Insert a note, rest or chord at the current position.
• To insert a single note, just play it on the keyboard. Theinserted note length will match the step length. You maychange the velocity and relative duration of the note, byediting the Velocity and Duration parameters. See “Veloc-ity” and “Duration” on page 179.
• To insert a rest, just touch the Rest button in the display.Its length will match the step value.
• To tie the note to be inserted to the previous one, touchthe Tie button in the display. A note will be inserted, tied tothe previous one, with exactly the same pitch. You don’tneed to play it on the keyboard again.
• To insert a chord or a second voice, see “Chords and sec-ond voices in Step Record mode” on page 180.
6. After inserting a new event, you may go back by touchingthe Back button in the display. This will delete the previ-ously inserted event, and set the step in edit again.
7. When finished recording, touch the Done button in thedisplay. A dialog box appears, asking you to either cancel,discard or save the changes.
If you touch Cancel, exit is canceled, and you can continueediting. If you choose No, changes are not saved, and the

180 Sequencer operating modeRecord mode: Step Record page
Step Record window is closed. If you choose Yes, changesare saved, and the Step Record window is closed.
8. From the main page of the Multitrack Recording mode,either select the “Exit from Record” command from thepage menu, or press the RECORD button to exit the Recordmode.
9. While in the main page of the Sequencer mode, you maypress the (PLAY/STOP) button in the PLAYER 1 sec-tion to listen to the Song, or select the Save Song commandfrom the page menu to save the Song to a storage device(see “Save Song window” on page 197).
Chords and second voices in Step RecordmodeYou are not obliged to insert single notes in a track. There areseveral ways to insert chords and double voices. Lets look atsome.
Entering a chord. Simply play a chord instead of a single note.The event name will be the first note of the chord you pressed,followed by the “…” abbreviation.
Entering a chord made of notes with different velocity values.You can make the upper or lower note of a chord, for example,louder than the remaining ones, to let the most important stand out from the chord. Here is how to insert a three-note chord:
1. Edit the first note’s Velocity value.
2. Press the first note and keep it pressed.
3. Edit the second note’s Velocity value.
4. Press the second note and keep it pressed.
5. Edit the third note’s Velocity value.
6. Press the third note, then release all notes.
Entering a second voice. You can insert passages where onenote is kept pressed, while another voice moves freely.
Ex. 1:
Ex.2:
Ex.3:
Step Time =
Step Time =
On
Press E and C
On
Press G
Off
Off
Release G and C
Release E (continue holding C)
Step Time = Step Time = Step Time =
Press F and C Press G
(continue holding C)
OffOn OnRelease F
(continue holding C)
Step Time = Step Time =
Press E
(continue holding C)
OffOnRelease E and C
Step Time = Step Time =
Press D
(continue holding C)
Off OnRelease G
(continue holding C)
Step Time =
OffRelease D
(continue holding C)
Step Time = Step Time =
On
Press C
On
Press G (continue holding C)
Off
Release G and C
Tie

181Sequencer operating modeRecord mode: Backing Sequence (Quick Record) page
Refe
renc
e
Record mode: Backing Sequence (QuickRecord) page
Backing Sequence (Quick Record) mode allows you to quicklyrecord your live performance with the Styles. To make thingseasier, just two grouped tracks are provided: Kbd/Pad (Key-board and Pads) to record keyboard and pads, and Ch/Acc(Chords/Accompaniment) to record Style commands andchords played on the keyboard.
While in Sequencer mode, press the RECORD button and selectthe “Backing Sequence (Quick Record)” option. The BackingSequence (Quick Record) page appears.
See “Backing Sequence (Quick Record) recording procedure” onpage 182 for information on the record procedure.
Page headerSee “Page header” on page 173.
Page menu iconSee “Page menu icon” on page 174.
Page sub-headerSee “Page sub-header” on page 176.
Recording parameters area
Style
This parameter shows the selected Style. Either touch it, or pressone of the STYLE SELECT buttons, to open the Style Select win-dow and select a different Style (see “Style Select window” onpage 105).
Free memory
Percentage of remaining memory for recording.
Resolution
Use this parameter to set the quantization during recording.Quantization is a way of correcting timing errors; notes playedtoo soon or too late are moved to the nearest axis of a rhythmic“grid”, set with this parameter, thus playing perfectly in time.
High No quantization applied.
(1/32)… (1/8)
Grid resolution, in musical values. For example,when you select 1/8, all notes are moved to thenearest 1/8 division. When you select 1/4, allnotes are moved to the nearest 1/4 division.
Chord/Acc Track, Kbd/Pad Track
These parameters let you define grouped track status duringrecording. This status is reflected by the big status indicatorabove the track sliders.
Play The Backing Sequence track is set to play. If thereare recorded data, they will be heard whilerecording the other Backing Sequence track.
Mute The Backing Sequence track is muted. If thistracks has already been recorded, it will not beheard during recording of the other BackingSequence track.
Rec The Backing Sequence track is in record. All pre-viously recorded data will be deleted. After press-ing (PLAY/STOP) to start recording, thetrack will receive notes from the keyboard andthe MIDI IN connector.
Chord/Acc: This Backing Sequence track groups all Style tracks,together with recognized chords and Style controls and StyleElements selection. After finishing recording, they will be savedas Song tracks 9-16, as in the following table:.
Page header Page menu icon
Selectedtrack info
area
B.S. groupedtracks area
Track volume/status area
Recordingparameters
area
Page sub-header
Chord/Acc track Song track/Channel
Bass 9
Drum 10
Percussion 11
Accompaniment 1 12
Accompaniment 2 13
Accompaniment 3 14
Accompaniment 4 15
Accompaniment 5 16
High (noquantization)
1/16
1/8

182 Sequencer operating modeRecord mode: Backing Sequence (Quick Record) page
Kbd/Pad: This Backing Sequence track includes the four Key-board tracks and the four Pads. After finishing recording, theywill be saved as Song tracks 1-8, as in the following table:
Metro (Metronome)
This parameter sets the metronome mode during recording.
Off No metronome click will be heard during record-ing. A one-bar precount will be played beforestarting recording.
On1 Metronome on, with a one-bar precount beforestarting recording.
On2 Metronome on, with a two-bar precount beforestarting recording.
Tempo
Metronome tempo. Select this parameter and use the TEMPO orVALUE controls to change the tempo.
Meter
(Non Editable). This parameter shows the meter (or time signa-ture) of the selected Style for reference.
PERF or STS (Performance or STS)
This parameter shows the selected Performance or STS (depend-ing on the latest item selected).
To select a Performance, either touch it, or press one of the PER-FORMANCE SELECT buttons to open the Style Select windowand select a different Performance (see “Style Select window” onpage 105).
To select an STS (Single Touch Setting), use the four STS buttonsunder the display.
Backing Sequence grouped tracks area
Grouped tracks status indicators
These giant indicators show the status of the Backing Sequencegrouped tracks. They reflect the status of the Kbd/Pad and Ch/Acc parameters (see “Chord/Acc Track, Kbd/Pad Track” above).
Selected track info areaThis line lets you see the Sound assigned to the selected track.See “Selected track info area” on page 174 for more information.
Track volume/status areaThis area is where you can set the volume of each single Key-board track, and mute/unmute tracks.
Virtual sliders (track volume)
Graphical display of each track’s volume. See “Sliders and vol-ume of the tracks” on page 175 for more information.
Assignable Sliders function
See “Slider Mode button status” on page 175 for more informa-tion.
Individual track status icons
While you can change the status of all Keyboard tracks at once,by using the Kbd/Pad Backing Sequence track, you can alsochange the status of each single track. Touch this icon to changethe status of the corresponding individual track.
Play status. The track can be heard.
Mute status. The track cannot be heard.
Track names
Under the sliders, a label for each track is shown.
Backing Sequence (Quick Record) recordingprocedureHere is the general procedure to follow for the Backing Sequence(Quick) Recording.
1. Press the SEQUENCER button to enter the Song mode.
2. Press the RECORD button, and select the “BackingSequence (Quick Record)” option to enter the BackingSequence (Quick Record) mode. Now you can prepare yourrecording parameters. (For more details, see “Recordmode: Backing Sequence (Quick Record) page” onpage 181).
3. The latest selected Style is currently selected. If it is not theright one, select a different Style to start recording with.(See “Style Select window” on page 105).
4. The latest selected Performance or STS is currentlyselected. If you prefer, select a different Performance orSTS. (See “Performance Select window” on page 104, and“STS Select” on page 106).
Kbd/Pad track Song track/Channel
Upper 1 1
Upper 2 2
Upper 3 3
Lower 4
Pad 1 5
Pad 2 6
Pad 3 7
Pad 4 8
Abbreviation Track
MIC/IN Mic audio input.
UPPER1…3 Upper tracks.
LOWER Lower track.

183Sequencer operating modeRecord mode: Step Backing Sequence page
Refe
renc
e
5. Select the status of the Backing Sequence grouped tracks,using the Kbd/Pad and Ch/Acc parameters. (Kbd/Pad staysfor Keyboard and Pads; Ch/Acc stays for Chord andAccompaniment, i.e. the Style tracks). To record all youplay on the keyboard, plus the automatic accompaniment,leave their status to Rec (see “Track status icons” onpage 177).
Warning: Tracks set to REC are automatically overwrittenwhen starting recording. Set a track to the PLAY or MUTEstatus, when you don’t want to delete it. For example, if youare recording a keyboard part on an existing Style track, setthe Ch/Acc parameter to PLAY, and the Kbd/Pad track toREC.
6. Start recording by pressing the left (PLAY/STOP)button (or the START/STOP button, if you want the Styleto start immediately).
• By pressing the left (PLAY/STOP) button (or theSTART/STOP button), you can record a keyboard introwith no Style playing. After a count-in (see “Metro (Metro-nome)” on page 182), you can start recording.
Play a solo intro, then start the auto-accompaniment bypressing the START/STOP button.
• By pressing the START/STOP button you can start theStyle right at the beginning of the Song.
Since you can use any Style control, you could start with theusual combinations (INTRO, ENDING, FILL… see“Selecting and playing a Style” on page 55 for more infor-mation).
Note: While in Backing Sequence mode, you can’t record theSYNCHRO, TAP TEMPO/RESET, MANUAL BASS,ACCOMPANIMENT VOLUME controls.
7. Play your music. While recording you can even change theStyle, or stop it by pressing START/STOP or one of theENDINGs. While recording you can even start the styleagain, by pressing START/STOP.
8. When finished recording your performance, press the (PLAY/STOP) button in the PLAYER 1 section. You
will go back to the Sequencer Play Main page (see“Sequencer Play - Main page” on page 173).
At this point, you may press the (PLAY/STOP) but-ton in the PLAYER 1 section to listen to the new Song.
You may also edit the Song by pressing the MENU button(see “Edit menu” on page 186).
9. Save the song to a storage device (see “Save Song window”on page 197).
Warning: The recorded Song will be deleted when turningthe instrument off, switching to the Style Play or Song Playmode, or entering Record again. If you wish to preserve it,save the Song to a storage device.
Record mode: Step Backing Sequence page
The Step Backing Sequence mode allows you to enter singlechords, to create or edit the Style (Chord/Acc) part of a Song.This mode lets you enter chords even if you are not a keyboardplayer, or fix any error made playing chords or selecting Stylecontrols, during a Backing Sequence (Quick Record) recording.
In this mode, you can only edit Songs created using the BackingSequence (Quick Record) recording mode. When saving a Songcreated using the Backing Sequence (Quick Record) recordingmode, all Chord/Acc data is preserved, and can be loaded later,to be edited again by using the Step Backing Sequence mode.
While in Sequencer mode, press the RECORD button and selectthe “Step Backing Sequence” option. The Step Backing Sequencewindow appears.
See “Step Backing Sequence procedure” on page 185 for infor-mation on the record procedure.
Page menu iconTouch the page menu icon to open the menu. See “Step BackingSequence page menu” on page 185 for more information.
Parameters area
Side arrow ( )
The small arrow next to a parameter means that its value is effec-tive at the current position. For example, if you are at the“003.01.000” position, and an arrow lights up next to the Chordparameter, this means that a chord change happens at the“003.01.000” position.
Measure
This parameter shows the current position of the Step Editor. Togo to a different position within the Song, use one of the follow-ing systems:
• Select this parameter, then use the VALUE controls to go toa different measure.
• Use the Measure buttons in the display to move to a differ-ent measure. Use the Step buttons in the display to move insteps of 1/8 (192 ticks). Use the Event buttons in the displayto jump to the next event.
The locator value is shown in the “measure.beat.tick” format.
Measure Measure or bar number.
Parameters area
“Soft” transport buttons
Page menu icon

184 Sequencer operating modeRecord mode: Step Backing Sequence page
Beat Divider in the Time Signature ratio (e.g., a quar-ter in a 3/4 time).
Tick Smallest position value. Both Pa3X internal play-ers feature a resolution of 384 ticks per quarter.
Style
This is the latest selected Style. To insert a Style change at thecurrent position, touch the Style name to open the Style Selectwindow, or follow the standard selecting procedure using thebuttons of the STYLE SELECT section.
Note: Any Style Change inserted after the beginning of the mea-sure (i.e., to a position other than Mxxx.01.000) will be effective atthe following measure. For example, if a Style Change event hasbeen inserted at M004.03.000, the selected Style will be effectivelyselected at M005.01.000. (This works exactly as in Style Playmode).
Note: When inserting a Style Change, you may also insert aTempo Change at the same position. A Style Change will not auto-matically insert the Style’s Tempo.
Performance
This is the latest selected Performance. Select a Performance torecall the Style it links to. To insert a Performance change at thecurrent position, touch the Performance name to open the Per-formance Select window, or follow the standard selecting proce-dure using the PERFORMANCE SELECT section.
Note: The STYLE CHANGE LED is automatically turned onwhen entering the Chord/Acc Step Mode. This means that selectinga Performance automatically selects the Style memorized in thePerformance.
The STS MODE and STS buttons are automatically disabled,meaning that you can’t change Keyboard tracks while in Chord/Acc Step Mode.
Tempo
This is the Tempo Change parameter. To insert a Tempo Changeevent at the current position, select this parameter and use theVALUE controls to change its value.
Chord
The chord parameter is divided in four separate parts:
Select one of the parts, then use the VALUE controls to modifyit. As an alternative, you can play a chord, and it will be automat-ically recognized. While recognizing a chord, the status of theBASS INVERSION button will be considered.
The lack of a chord (--) means that the accompaniment will notplay at the current position (apart for the Drum and Percussiontracks). To select the “--” option, select the Name part of theChord parameter, then use VALUE controls to select the verylast value (C…B, Off).
Note: If you replace a chord with a different one, please rememberthat the Lower track (if recorded) will not be automaticallychanged, and may cause a dissonance against the accompaniment.
Style Element
This is the Style Element (i.e., a Variation, Fill, Intro, or Ending).The length of the selected Style Element is always shown by the“Length” parameter (see below).
“Off ” means that the accompaniment will not play at theselected position – only Keyboard and Pad tracks will play.
Hint: Insert a Style Element Off event exactly where the automaticaccompaniment must stop (at the end of the Song).
Length
This parameter will let you know where to place the followingStyle Element Change. For example, if you inserted an Introevent lasting for 4 measures, you can insert 4 empty measureafter this event, and a Variation event at the end of the Intro,beginning at the 4th empty measure.
Del (Delete) button
When a side arrow ( ) is shown next to a parameter, there is anevent at the current position. You can touch the Del button nextto it, to delete the event at the current position.
Hint: To delete all events starting from the current position, selectthe “Delete All from Selected” command from the page menu (seebelow).
“Soft” transport buttons
Previous or Next Event
Use these buttons to move to the previous or next recordedevent.
Previous or Next Step
Use these buttons to go to the previous or next step (1/8, or 192ticks). If an event is located before the previous or next step, thelocator stops on that event. For example, if you are positioned onM001.01.000, and no event exists before M001.01.192, the > but-ton moves to the M001.01.192 location. If an event exists onM001.01.010, the > button stops to the M001.01.010 location.
These commands are effective even if the Measure parameter isnot selected.
Previous or Next Measure
Use these buttons to move to the previous or following measure.These commands are effective even if the Measure parameter isnot selected.
Name Type Tension Extension

185Sequencer operating modeRecord mode: Step Backing Sequence page
Refe
renc
e
Done button
Done
Touch this button to exit the Step Backing Sequence mode. Allchanges will be saved to memory.
Hint: Save the Song to a storage device, by selection the “SaveSong” command from the page menu, to avoid losing it when turn-ing the instrument off.
Step Backing Sequence page menuTouch the page menu icon to open the menu. Touch a commandto select it. Touch anywhere in the display to close the menuwithout selecting a command.
Insert Measure
Use this command to insert an empty measure starting from thecurrent measure. All Chord/Acc events contained in the currentmeasure will be moved to the following measure. The event atthe Mxxx.01.000 position (i.e., exactly at the beginning of themeasure, like a Time Signature or Style change) will not bemoved.
Cut Measure
Use this command to delete the current measure. All Chord/Accevent contained in the following measures will be moved onemeasure back.
Delete All from Selected
Use this command to delete events of all types, starting from thecurrent position.
Note: All events on the very first tick (M001.01.000), like Perf,Style, Tempo, Chord, Style Element selection, cannot be deleted.
Delete All Styles/Perfs from SelectedDelete All Styles Elements from SelectedDelete All Chords from SelectedDelete All Tempos from Selected
Select one of these commands to delete all events of the corre-sponding type, starting from the current position to the end ofthe Song. To delete all events of the same type from the wholeSong, go back to the M001.01.000 position, and select one ofthese commands.
Note: All events on the very first tick (M001.01.000), like Perf,Style, Tempo, Chord, Style Element selection, cannot be deleted.
Step Backing Sequence procedureHere is the general Step Backing Sequence recording procedure.
Hint: Before entering Step Backing Sequence mode to edit an exist-ing Song, select the “Save Song” command from the page menu,and save the Song to a storage device. This way, you will have acopy of the Song, in case you don’t like the results of your editing.
1. While in Sequencer mode, press the RECORD button, andchoose the “Step Backing Sequence” recording option.
2. Select the Measure parameter, and go to the desired posi-tion in the Song, by using the VALUE controls. Alterna-tively, you can move the locator using the “soft” transportbuttons in the display. See ““Soft” transport buttons” onpage 184.
3. Select the parameter type (Style, Performance, Tempo…) toinsert, edit or delete at the current position. If an arrow ( )appears next to a parameter, the shown event has beeninserted at the current position.
4. Use the VALUE controls to modify the selected event.Delete it by touching the Del button next to the event.When editing a parameter without the arrow ( ) next to it,a new event is inserted at the current position.
5. Exit the Step Backing Sequence recording mode, by touch-ing the Done button in the display.
6. Press (PLAY/STOP) in the PLAYER 1 section to lis-ten to the consequence of your editing. If they are fine, savethe Song to a storage device.

186 Sequencer operating modeEdit menu
Edit menu
From any page, press the MENU button to open the Sequencer editmenu. This menu gives access to the various Sequencer edit sections.
When in the menu, select an edit section, or press EXIT to exitthe menu.
When in an edit page, press EXIT or the SEQUENCER button togo back to the main page of the Sequencer operating mode.
Each item in this menu corresponds to an edit section. Each editsection groups various edit pages, that may be selected by touch-ing the corresponding tab on the lower part of the display.
Edit page structure
All edit pages share some basic elements.
Operating mode
This indicates that the instrument is in Sequencer mode.
Edit section
This identifies the current edit section, corresponding to one ofthe items of the edit menu (see “Edit menu” on page 186).
Page menu icon
Touch this icon to open the page menu (see “Page menu” onpage 196).
Parameters area
Each page contains various parameters. Use the tabs to selectone of the pages. For detailed information on the various typesof parameters, see sections starting below.
Tabs
Use tabs to select one of the edit pages of the current edit section.
Mixer/Tuning: Volume/Pan
This page lets you set the volume and pan for each Song track.
Use the TRACK SELECT button to switch between Song tracks1-8 and 9-16.
Parameters
All parameters in this page are the same found in the same pageof the Song Play mode (see “Mixer/Tuning: Volume/Pan” onpage 150).
Operating mode Edit section
Selected track info
Page menu icon
Parameters area
Tabs

187Sequencer operating modeMixer/Tuning: FX Send
Refe
renc
e
Mixer/Tuning: FX Send
This page lets you set the level of the track’s direct (uneffected)signal going to the Internal FX processors.
Use the TRACK SELECT button to switch between Song tracks1-8 and 9-16, and vice-versa.
FX Groups
Use this pop-up menu to select one of the two FX groups (A orB).
Pa3X includes two groups of effects (FX A and FX B). While inSong Play mode, the A group is reserved to the Song and Padtracks, the B group to the Realtime (Keyboard) tracks.
However, Songs created in Sequencer mode could also assign theB group to the Song tracks.
Parameters
All parameters in this page are the same found in the same pageof the Song Play mode (see “Mixer/Tuning: FX Send” onpage 151).
Mixer/Tuning: EQ Gain
In this page you can set the three-band equalization (EQ) foreach individual track.
Use the TRACK SELECT button to switch between Song tracks1-8 and 9-16, and vice-versa.
Parameters
All parameters in this page are the same found in the same pageof the Song Play mode (see “Mixer/Tuning: EQ Gain” onpage 152).

188 Sequencer operating modeMixer/Tuning: EQ Control
Mixer/Tuning: EQ Control
This page lets you reset or bypass track equalization, pro-grammed in the previous page.
Use the TRACK SELECT button to switch between Song tracks1-8 and 9-16, and vice-versa.
Parameters
All parameters in this page are the same found in the same pageof the Song Play mode (see “Mixer/Tuning: EQ Control” onpage 153).
Mixer/Tuning: Tuning
Parameters
All parameters in this page are the same found in Global mode.See “Mixer/Tuning: Tuning” on page 123).
Mixer/Tuning: Sub Scale
This page lets you program an alternative scale for the selectedtracks (via the “Track Assign” parameter). The remaining tracks(if any) use the basic scale set in Global mode (see “Main Scale”on page 203).
Note: Quarter Tone selection and activation of the Sub-Scale oneach track of a Song, can be received by MIDI (i.e., by an externalsequencer or controller). Conversely, selection of Quarter Tone set-tings, or activation of the Sub-Scale on each track of the Song, canbe sent by the Pa3X to an external MIDI recorder as System Exclu-sive data.
Parameters
All parameters in this page are the same found in Global mode.See “Mixer/Tuning: Sub Scale” on page 123.
Track Assign
Check the parameter corresponding to each track where theSub-Scale must be used.
Play/Mute icon
Track’s play/mute status.
Play status. The track can be heard.
Mute status. The track cannot be heard.

189Sequencer operating modeEffects: A/B FX Configuration
Refe
renc
e
Effects: A/B FX Configuration
This page allows you to select the A (usually Song) and B (Key-board, optionally Song) groups of effects. Please use the “FX A”and “FX B” side tabs to switch from one group to the other one.
The effect types and the FX matrix are the same seen for theStyle Play mode (see “Effects: A/B FX Configuration” onpage 125).
Note: When you stop the Song, or select a different Song, thedefault effects are selected again. You can, however, stop the Song,change the effects, then start the Song again. Save the Song to per-manently change the effects.
FX Group
Use these side tabs to choose the FX group (A or B) for the cor-responding track.
Pa3X includes two groups of effects (FX A and FX B). While inSong Play mode, the A group is reserved to the Song and Padtracks, the B group to the Realtime (Keyboard) tracks.
However, Songs created in Sequencer mode could also assign theB group to the Song tracks.
Parameters
All parameters in this page are the same found in the same pageof the Song Play mode (see “Effects: A/B FX Configuration” onpage 154).
Effects: IFX 1…3, Master 1…3
These pages contain the editing parameters for the effect proces-sors. Here is an example of the FX A page, with the Reverb Halleffect assigned.
Selected effect
Select one of the available effects from this pop-up menu. This isequivalent to the “FX Group” parameters found in the “Effects:A/B FX Configuration” page (see above).
Parameters
Parameters may differ, depending on the selected effect. See the“Advanced Edit” addendum in the Accessory CD for a list ofavailable parameters for each effect type.
Track Controls: Mode
Parameter
See “Track Controls: Mode” on page 127.
Track Controls: Drum Edit
Parameter
See “Track Controls: Drum Edit” on page 128.
Track Controls: Easy Edit
Parameter
See “Track Controls: Easy Edit” on page 129.

190 Sequencer operating modeEvent Edit: Event Edit
Event Edit: Event Edit
The Event Edit is the page where you can edit each single MIDIevent of the selected track. You can, for example, replace a notewith a different one, or change its playing strength. See also“Event Edit procedure” on page 191 for more information on theevent editing procedure.
Position
Position of the event, expressed in the form ‘aaa.bb.ccc’:
• ‘aaa’ is the measure
• ‘bb’ is the beat
• ‘ccc’ is the tick (each quarter beat = 384 ticks)
You can edit this parameter to move the event to a different posi-tion. You can edit a position in either of the following ways:
(a) select the parameter, and use the VALUE controls to changethe value, or
(b) select the parameter, then touch it again; the numeric key-pad will appear. Enter the new position by dialing in thethree parts of the number, separated by a dot. Zeroes at thebeginning can be omitted, as well as the least importantparts of the number. For example, to enter position002.02.193, dial “2.2.193”; to enter position 002.04.000 dial“2.4”; to enter position 002.01.000, simply dial “2”.
Type
Type of the event shown in the display. To edit it, select the param-eter and use the VALUE controls to change its value.
This parameter also shows the (non editable) “End Of Track”marking, when the end of the track is reached.
Value 1 and 2
Values of the event shown in the display. Depending on theselected event, the meaning may change.
Here are the events contained in ordinary tracks (1-16).
And here are the events contained in the Master track.
To edit the event Type and Values, select the parameter and usethe VALUE controls to change their value. In case of numericvalues, you can also press them twice to open the numeric key-pad.
Length
Length of the selected Note event. The value format is the sameas the Position value. Edit it in the same way.
Note: If you change a length of “000.00.000” to a different value,you can’t go back to the original value. This rather uncommonzero-length value may be found in the drum and percussion tracksof Songs made in Backing Sequence mode.
Track
Use this pop-up menu to select the track to edit.
Track 1…16 One of the ordinary tracks of the Song. Thesetracks contains musical data, like notes and con-trollers.
Master This is a special track, containing Tempochanges, Meter changes, Scale and Transposedata, and the effect parameters.
Scrollbar
Use the scrollbar to browse the event through the list. You canalso scroll by using the SHIFT + DIAL combination.
Type First value Second value
Note Note name Velocity
RX Noise Note name Velocity
Prog Program Change number –
Ctrl Control Change number Control Change value
Bend Bending value –
Aftt Mono (Channel) Aftertouch value –
PAft Note to which the Aftertouch is applied
Poly Aftertouch value
Scroll-bar
Type First value Second value
Tempo Tempo change –
Volume Master Volume value –
Meter Meter (time signature)
change(*)
(*). Meter changes can’t be edited or inserted separately from a measure. To inserta Meter change, use the Insert function in the Edit section and insert a series ofmeasures with the new meter. Existing data can then be copied or entered to thesemeasures
–
KeySign Key Signature(†)
(†). This is the key signature shown in the Score. If this event is missing, the Scorewill be shown as if it was in the key of C Major.
–
Scale One of the available preset Scales
Root note for the selected Scale
UScale (User Scale) Altered note Note alteration(‡)
(‡). To edit User Scale and Quarter Tone settings, select the first value, then selectthe scale’s degree to edit. Edit the second value to change the tuning of the selectednote of the scale.
QT (Quarter Tone) Altered note Note alteration (0,
50)(b)
QT Clear (Quarter Tone Clearing)
Reset of all Quarter Tone (QT) changes
–

191Sequencer operating modeEvent Edit: Filter
Refe
renc
e
Go/Catch
This is a dual-function command.
• While the sequencer is not running, it works as a Go to Mea-sure command. Touch it to open the Go to Measure dialog box:
When in this dialog box, select a target measure, and touch OK.The first event available in the target measure will be selected.
• While the sequencer is running, it works as a Catch Locatorcommand. Touch it to show the event that is currently playing.
Insert
Touch the Insert button in the display to insert a new event at thecurrent shown Position. The default values are Type = Note,Pitch = C4, Velocity = 100, Length = 192.
Note: You can’t insert new events in an empty, non-recorded Song.To insert an event, you must first insert some empty measures byusing the Insert Measure function (see “Song Edit: Cut/Insert Mea-sures” on page 193).
Delete
Touch the Delete button in the display to delete the eventselected in the display.
Note: The “End of Track” event cannot be deleted.
Event Edit procedureHere is the general event editing procedure.
1. While in the Event Edit page, press (PLAY/STOP) inthe PLAYER 1 section to listen to the Song. Press it again tostop the Song.
2. Select the Filter page, and turn “Off ” the filter for the eventtypes you wish to see in the display (see “Event Edit: Filter”on page 191 for more information).
3. Return to the Event Edit page.
4. Use the “Track” pop-up menu to select the track to edit.The list of events contained in the selected track will appearin the display.
For more information on the event types and their values, seeabove.
5. Select the “Position” parameter. Use the VALUE controls(or touch the parameter again to open the numeric keypad)to change the event’s position.
6. Select the “Type” parameter and use the VALUE controls tochange the event type. Select the “Value 1 and 2” parame-ters and use the VALUE controls (or touch the parameteragain to open the numeric keypad) to modify the selectedvalue.
7. In the case of a Note event, select the Length parameter,and use the VALUE controls (or touch the parameter againto open the numeric keypad) to change the event’s length.
• While the sequencer is not running, you may touch theGo/Catch button in the display to go to a different measure(see “Go/Catch” above)
• While the sequencer is running, you may use the Go/Catch button in the display to see the currently playingevent in the display (see “Go/Catch” above).
• Use PLAYER 1 transport controls to listen to the Song.
8. Touch the Insert button in the display to insert an event atthe Position shown in the display (a Note event with defaultvalues will be inserted). Touch the Delete button in the dis-play to delete the selected event.
9. When the editing is complete, you may select a differenttrack (go to step 4).
10. When finished editing the whole Song, select the Save Songcommand from the page menu to save the Song to a storagedevice. See “Save Song window” on page 197 for moreinformation on saving a Song.
Event Edit: Filter
This page is where you can select the event types to be shown inthe Event Edit page.
Turn On the filter for all event types you do not wish to see inthe Event Edit page.
Note/RX Noise
Notes and RX Noises.
Program Program Change events.
Control Control Change events.
Tempo/Meter Tempo and Meter (time signature) changes (Mas-ter Track only).
After Touch Mono (Channel) Aftertouch events.
Poly After Touch
Poly Aftertouch events.
Pitch Bend Pitch Bend events.

192 Sequencer operating modeSong Edit: Quantize
Pa Controls Controls exclusive of the Pa3X, like the Scale set-tings. These controls are recorded to the MasterTrack, and saved as System Exclusive data.
Song Edit: Quantize
The quantize function corrects any rhythm error after recording.
After setting the various parameters, touch Execute to start theoperation.
Track
Use this parameter to select a track.
All Quantize will apply to all tracks.
Track 1…16 Quantize will apply only to the selected track.
Resolution
This parameter sets the quantization value. For example, whenyou select e (1/8), all notes are moved to the nearest 1/8 division.When you select 1/4, all notes are moved to the nearest 1/4 divi-sion.
(1/32)… (1/4)
Grid resolution, in musical values. A “b…f ” char-acter added after the value means swing-quanti-zation. A “3” means triplet.
Start / End Tick
Use these parameters to set the starting and ending points of therange to be quantized.
If you wish to select a four-measure sequence starting at thebeginning of the Song, the Start will be positioned at 1.01.000,and the End at 5.01.000.
Bottom / Top Note
Use these parameters to set the bottom and top note of the key-board range to quantize. If you select the same note as the Bot-tom and Top parameters, you can select a single percussiveinstrument in a Drum track.
Note: These parameters are available only when a Drum track isselected.
Song Edit: Transpose
Here you can transpose the Song, a track or a part of a track.
After setting the various parameters, touch Execute to start theoperation.
Track
Use this parameter to select a track.
All All tracks selected (apart for Drum tracks).
Track 1…16 Selected track.
Value
Transpose value (±127 semitones).
Start / End Tick
Use these parameters to set the starting and ending points of therange to transpose.
If you wish to select a four-measure sequence starting at thebeginning of the Song, the Start will be positioned at 1.01.000,and the End at 5.01.000.
Bottom / Top Note
Use these parameters to set the bottom and top of the keyboardrange to transpose. If you select the same note as the Bottom andTop parameters, you can select a single note, or a single percus-sive instrument in a Drum track.
No quantiza-tion
1/8
1/4

193Sequencer operating modeSong Edit: Velocity
Refe
renc
e
Song Edit: Velocity
Here you can change the Velocity value for the notes. AnAdvanced mode is available, allowing you to select a velocitycurve for the selected range. This is useful to create fade-ins orfade-outs.
After setting the various parameters, touch Execute to start theoperation.
Track
Use this parameter to select a track.
All All tracks selected.
Track 1…16 Selected track.
Value
Velocity change value.
Start / End Tick
Use these parameters to set the starting and ending points of therange to edit.
If you wish to select a four-measure sequence starting at thebeginning of the Song, the Start will be positioned at 1.01.000,and the End at 5.01.000.
Bottom / Top Note
Use these parameters to set the bottom and top of the keyboardrange to edit. If you select the same note as the Bottom and Topparameters, you can select a single percussive instrument in aDrum track.
Advanced
When this checkbox is checked, the “Intensity”, “Curve”, “StartVelocity Value” and “End Velocity Value” parameters can beedited.
Intensity
(Only available in Advanced mode). Use this parameter to specifythe degree to which the velocity data will be adjusted toward thecurve you specify in “Curve”.
0…100% Intensity value. With a setting of 0 [%], the veloc-ity will not change. With a setting of 100 [%], thevelocity will be changed the most.
Curve
(Only available in Advanced mode). Use this parameter to selectone of the six curves, and to specify how the velocity will changeover time.
Start / End Vel. Value
(Only available in Advanced mode). Velocity change at the start-ing and ending ticks of the selected range.
0…100 Velocity change in percentage.
Song Edit: Cut/Insert Measures
In this page you can cut or insert measures from the Song.
After selecting the Start and Length parameters, touch Executeto start the operation.
After the Cut, the following measures are moved back, to fill thecut measures.
After the Insert, the following measures are pushed forward toaccommodate the inserted measures.
Start
First measure where to begin cutting/inserting.
Length
Number of measures to be cut/inserted.
Meter
Meter (time signature) of the measures to be inserted.
StartValue
Curve 1
Velocity
Start Value = 0%, End Value = 100%
127
1EndValue
StartValue
Curve 2
Velocity
127
1EndValue
StartValue
Curve 3
Velocity
127
1EndValue
StartValue
Curve 4
Velocity
127
1EndValue
StartValue
Curve 5
Velocity
127
1EndValue
StartValue
Curve 6
Velocity RANDOM
127
1EndValue

194 Sequencer operating modeSong Edit: Delete
Song Edit: Delete
This page is where you can delete MIDI events from the Song.
After setting the various parameters, touch Execute to start theoperation.
Track
Use this parameter to select a track.
All All tracks selected.
Track 1…16 Selected track.
Master Master track. This is where the Tempo, Scale andEffect events are recorded.
Event
Type of MIDI event to delete.
All All events. Measures will not be removed fromthe Song, and will remain empty.
Note All notes in the selected range.
Dup.Note All duplicate notes. When two notes with thesame pitch are encountered on the same tick, theone with the lowest velocity is deleted.
After Touch After Touch events.
Pitch Bend Pitch Bend events.
Prog.Change Program Change events, excluding the bundledControl Change #00 (Bank Select MSB) and #32(Bank Select LSB).
Ctl.Change All Control Change events, for example BankSelect, Modulation, Damper, Soft Pedal…
CC00/32…CC127Single Control Change events. Double ControlChange numbers (like 00/32) are MSB/LSB bun-dles.
Start / End Tick
Use these parameters to set the starting and ending points of therange to edit.
If you wish to select a four-measure sequence starting at thebeginning of the Song, the Start will be positioned at 1.01.000,and the End at 5.01.000.
Bottom / Top Note
Use these parameters to set the bottom and top of the keyboardrange to delete. If you select the same note as the Bottom and
Top parameters, you can select a single note, or a single percus-sive instrument in a Drum track.
Note: These parameters are available only when the All or Noteoptions are selected.
Song Edit: Copy
Here you can copy tracks or phrases.
After setting the various parameters, touch Execute to start theoperation.
Note: If you copy too many events on the same “tick”, the “Toomany events!” message appears, and the copy operation is aborted.
Mode
Use this parameter to select the Copy mode.
Merge Copied data are merged with the data at the tar-get position.
Overwrite Copied data replace all data at the target position.
Warning: Deleted data cannot be recovered!
From Track… To Track
Use these parameters to select the source and target track tocopy.
All All tracks. The target track cannot be selected.
Track 1…16 Selected source and target tracks.
Start Measure… End Measure
These parameters are the starting and ending measure to copy.For example, if From Measure=1 and To Measure=4, the firstfour measures are copied.
To Measure
This parameter is the first of the target measures.
Repeat Times
Number of times the copy must be executed. Copies will be con-secutive.

195Sequencer operating modeSong Edit: Move
Refe
renc
e
Song Edit: Move
Here you can shift a track forward or backward by just a fewticks or whole measures.
After setting the various parameters, touch Execute to completethe operation.
Track
Use these parameters to select the track you want to move.
Track 1…16 Selected track.
Start / End Tick
These parameters set the starting and ending point of the rangeto move.
To Tick
This parameter allows you to set the target starting point of themoved track.
Song Edit: RX Convert
You can use the RX Convert page to convert notes of the midifileinto RX Noises, and vice-versa. This will help programmingSongs on an external sequencer.
After having chosen a track to convert, touch Execute to com-plete the operation.
Track
Use these parameters to select the track containing the notes orRX Noises you want to convert.
RX Note Velocity
Use this parameter to adjust the volume level of the RX Noises inthe selected track(s).
Add RX Noises to Guitar track
Use this parameter to automatically analyze the Standard MIDIFile, and add RX Noises to Guitar tracks. This command scans asingle track or the whole Standard MIDI File, looking for guitarstrumming played by nylon, steel or electric guitars.
After scanning, a suitable Guitar sound will be automaticallyassigned to the relevant tracks, and RX Noises automaticallyadded where needed.
This means that you can transform any flat SMF into an ultra-realistic song with a real guitar player inside – at the touch of abutton!

196 Sequencer operating modePreferences: Sequencer Setup
Preferences: Sequencer Setup
In this page, you can select a MIDI Setup and the Harmony trackfor the Sequencer mode.
Note: These settings are stored in the Sequencer Setup area of theGlobal file. (Parameter of this kind are marked with the abbreviation through the manual). After changing these settings,select the Write Global-Sequencer Setup command from the pagemenu to save them to the Global.
Midi Setup
MIDI channels for the Sequencer mode can be automaticallyconfigured by selecting a MIDI Setup with this parameter. See“MIDI Setup” on page 210 for more information on using MIDISetups.
Note: To automatically select a MIDI Setup when entering theSequencer mode, select the Write Global-Sequencer Setup com-mand from the page menu.
For detailed information on preloaded MIDI Setup settings, see“MIDI Setup” on page 238.
Note: After selecting a MIDI Setup, you can go to the Global modeand apply any change to each channel setting. To store thesechanges to a MIDI Setup, while still in Global mode select theWrite Global-Midi Setup command from the page menu. All MIDISetups can be freely customized and overwritten.
Hint: To restore the original MIDI Setups, use the “FactoryRestore” command (page “Utility” of the Media mode, seepage 236). Warning: This procedure will erase all Factory andUser data from the internal memory.
Harmony Track
The Voice Processor gets the chord notes from the track selectedwith this parameter.
Hint: Go to the Voice Processor Preset section of the Global modeto try different Voice Processor Presets while creating or editing aSong.
Off No track sends notes to the Harmony module ofthe Voice processor. Chords can still be receivedfrom the MIDI IN.
Ply.1-Track 1…16
Chords are sent from one of Player 1 tracks.
Page menu
Touch the page menu icon to open the menu. Touch a commandto select it. Touch anywhere in the display to close the menuwithout selecting a command.
Write Global-Player Setup
Select this command to open the Write Global-Player Setup dia-log box, and save global settings that are unique to the Sequencermode. (See “Write Global-Sequencer Setup dialog box” onpage 197).
Load Song
Select this command to open the Song Select window, and load aSong to the sequencer. (See “Song Select window” on page 197).
Save Song
Select this command to save the new or edited Song to a storagedevice as a Standard MIDI File. The file is automatically addedthe “.MID” extension. After selecting this command, the SaveSong page appears (see “Save Song window” on page 197).
Warning: Turning the instrument off will delete the Song frommemory. Save your Song to a storage device to avoid losing it.
Warning: The Song is also lost when switching from Sequencer toStyle Play or Song Play mode, without previously saving the Songto a storage device.
Undo
When selecting this command, the latest operation is canceled,and data are reverted to the previous situation.
Overdub Step Recording
Only available in Record mode. Select this command to enterOverdub Step Record mode. This recording mode lets you enterevents one at a time, adding events to the existing events. (See“Record mode: Step Record page” on page 178).
Overwrite Step Recording
Only available in Record mode. Select this command to enterOverwrite Step Record mode. This recording mode lets youenter events one at a time, overwriting all existing events. (See“Record mode: Step Record page” on page 178).
Seq
Seq
Seq

197Sequencer operating modeWrite Global-Sequencer Setup dialog box
Refe
renc
e
Delete Song
Select this command to delete the Song and create a new, blankSong.
Delete Current Track
Select this command to delete the track currently selected in theTrack area (see “Track volume/status area” on page 177).
Solo Track
Select the track to be soloed, and check this item. You will hearonly the selected track, and the ‘Solo’ warning will flash on thepage header.
Uncheck this item to exit the Solo function.
Keep the SHIFT button pressed and touch one of thetracks to solo it. Do the same on a soloed track to deactivate theSolo function.
Copy/Paste FX
You can copy a single effect, or all effects of an FX group (A orB). You can copy them between different Songs. The copy opera-tion can only be carried on while remaining in Sequencer mode.
Note: This operation only copies the effect settings of the “Effects”section. Parameters contained in other sections, like “Dry” or “FXSend”, are not copied. Please note that these parameters canchange the way effects change the sound.
To copy a single effect:
1. Load the source Song, then
• go to the page of the single effect you want to copy (IFX 1,IFX 2, IFX 3, Master 1, Master 2, Master 3), or
• go to the Effects > A/B FX Config page, to copy all effects.This may be useful if you want to copy various effects intodifferent Songs, Performances, Styles or STSs.
2. Choose the “Copy FX” command from the page menu.
3. Load the target Song, then go to the page of the single effectyou want to paste (IFX 1, IFX 2, IFX 3, Master 1, Master 2,Master 3).
4. Choose the “Paste FX” command from the page menu.
To copy all effects:
1. Load the source Song, then go to the Effects > A/B FX Con-fig page, to copy all effects.
2. Choose the “Copy FX” command from the page menu.
3. Load the target Song, then go to the page of the Effects > A/B FX Config page.
4. Choose the “Paste FX” command from the page menu.
Exit from Record
Only available in Record mode. Select this command to exit theRecord mode, and go back to the Main page of the SequencerPlay mode (see “Sequencer Play - Main page” on page 173).
Write Global-Sequencer Setup dialog box
Open this window by selecting the Write Global-Song Setupitem from the page menu. Here, you can save MIDI Setups (see“Midi Setup” on page 196), that are saved to the Global file.
Parameters saved in the Sequencer Setup area of the Global aremarked with the symbol through the user’s manual.
Song Select window
This window appears when you select the “Load Song” com-mand from the page menu, or press the SONG SELECT buttonin the PLAYER 1 sections on the control panel. See “Song Selectwindow” on page 106 for details.
Save Song window
The recorded Song is lost when turning the instrument off. TheSong is also lost when you overwrite it in Record mode, or ifyou confirm the warning message when switching to the StylePlay or Song Play mode. You must save to a storage device anySong you wish to preserve.
This window appears when you select the “Save Song” commandfrom the page menu.
Seq
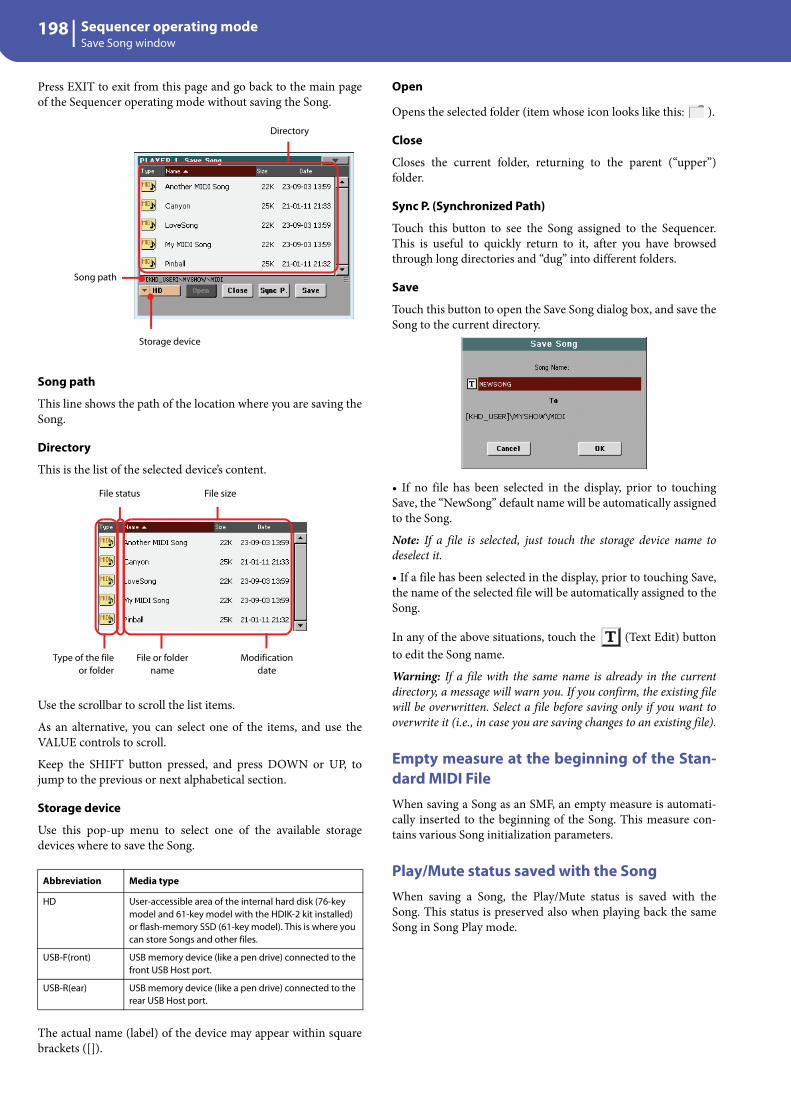
198 Sequencer operating modeSave Song window
Press EXIT to exit from this page and go back to the main pageof the Sequencer operating mode without saving the Song.
Song path
This line shows the path of the location where you are saving theSong.
Directory
This is the list of the selected device’s content.
Use the scrollbar to scroll the list items.
As an alternative, you can select one of the items, and use theVALUE controls to scroll.
Keep the SHIFT button pressed, and press DOWN or UP, tojump to the previous or next alphabetical section.
Storage device
Use this pop-up menu to select one of the available storagedevices where to save the Song.
The actual name (label) of the device may appear within squarebrackets ([]).
Open
Opens the selected folder (item whose icon looks like this: ).
Close
Closes the current folder, returning to the parent (“upper”)folder.
Sync P. (Synchronized Path)
Touch this button to see the Song assigned to the Sequencer.This is useful to quickly return to it, after you have browsedthrough long directories and “dug” into different folders.
Save
Touch this button to open the Save Song dialog box, and save theSong to the current directory.
• If no file has been selected in the display, prior to touchingSave, the “NewSong” default name will be automatically assignedto the Song.
Note: If a file is selected, just touch the storage device name todeselect it.
• If a file has been selected in the display, prior to touching Save,the name of the selected file will be automatically assigned to theSong.
In any of the above situations, touch the (Text Edit) buttonto edit the Song name.
Warning: If a file with the same name is already in the currentdirectory, a message will warn you. If you confirm, the existing filewill be overwritten. Select a file before saving only if you want tooverwrite it (i.e., in case you are saving changes to an existing file).
Empty measure at the beginning of the Stan-dard MIDI FileWhen saving a Song as an SMF, an empty measure is automati-cally inserted to the beginning of the Song. This measure con-tains various Song initialization parameters.
Play/Mute status saved with the SongWhen saving a Song, the Play/Mute status is saved with theSong. This status is preserved also when playing back the sameSong in Song Play mode.
Abbreviation Media type
HD User-accessible area of the internal hard disk (76-key model and 61-key model with the HDIK-2 kit installed) or flash-memory SSD (61-key model). This is where you can store Songs and other files.
USB-F(ront) USB memory device (like a pen drive) connected to the front USB Host port.
USB-R(ear) USB memory device (like a pen drive) connected to the rear USB Host port.
Song path
Directory
Storage device
Type of the fileor folder
File status
File or folder name
File size
Modification date

199Sequencer operating modeSave Song window
Refe
renc
e
Master Transpose saved with the SongWhen saving a Song, the Master Transpose value is saved withthe Song. Since this value is saved as System Exclusive data, it ispreserved also when playing back the Song in Song Play mode.
Hint: Since the Master Transpose is a global parameter, loading aSong with a non-standard transposition may result in unwantedtransposing when loading other Songs that do not contain theirown transposition data. To transpose a Song it is advisable to usethe Transpose function in the Edit section of the Sequencer mode(see “Song Edit: Transpose” on page 192).
You may also lock the Master Transpose, to avoid unwanted trans-position. See “General Controls: Lock” on page 204 of the Globalchapter.
As a general rule, you should use the Master Transpose (TRANS-POSE buttons on the control panel) when you need to transposeKeyboard tracks together with the Song. You should use the Editmode Transpose function (see “Song Edit: Transpose” on page 192)when only the Song has to be transposed.
Note: The Master Transpose value is always shown on the pageheader:
Save Song procedure1. If you are in Record mode, stop the sequencer and exit
from the Record mode. Then go back to the main page ofthe Sequencer Play mode (see “Sequencer Play - Mainpage” on page 173).
2. Select the Save Song command from the page menu. TheSave Song page appears.
3. Select the folder where you want to save the Song into. Usethe Open and Close commands to browse open or closefolders. Use the scrollbar to browse through the files.
4. When you are in the directory where you want to save yourSong to, touch the Save button in the display.
• To overwrite an existing file, select it before touchingSave.
• To create a new file, do not select any file before touchingSave. The “NewSong” (“NEWSONG.MID” on a storagedevice) name will be automatically assigned to the Song.
5. After touching the Save button, the Save Song dialog boxwill appear.
6. If you like, touch the (Text Edit) button to edit thename.
7. Touch OK to confirm saving, or Cancel to stop the Saveoperation.

200 Global edit modeWhat is it, and how the Global is structured
The Global edit environment is the place where you can setglobal functions. This edit environment overlaps the currentoperating mode (Style Play, Song Play, Sequencer, Sound Edit).
What is it, and how the Global is structured
The Global is a file that can be written to memory (and may sub-sequently be saved to a storage device), containing global param-eters for the whole instrument or each single operating mode.
Global parameters can be written to memory by selecting thevarious “Write Global…” commands from the page menus –each dedicated to one of the areas of the Global file. They can besaved to a storage device by using the ordinary Media opera-tions.
Note: Saving or loading a “.SET” folder may also save or load theGlobal file. Parameter changing may be avoided by turning theLock on for any single parameter (or groups of parameters in theLock page of the Global mode, see “General Controls: Lock” onpage 204).
There are separate areas in the Global file, that may be separatelywritten to memory, to avoid writing all global parameters at oncewhen not needed:
• Global Setup, containing global parameters not linked toany single operating mode.
• Style Play Setup, containing global parameters for the StylePlay mode, not linked to the single Performance, STS orStyle.
• Song Play Setup, containing global parameters for the SongPlay mode, not linked to the single Song.
• Sequencer Setup, containing global parameters for theSequencer mode, not linked to the single Song.
• Media Preferences, containing preferences for the Mediamode.
• MIDI Setup, containing the available MIDI Setups, i.e., set-tings for MIDI communication.
• Voice Processor Setup, containing basic microphone set-tings for the Voice Processor and the Talk function.
• Voice Processor Presets, containing single presets for theVoice Processor.
• Auto Select Setup, containing the preferred items for eachSTYLE SELECT and PERFORMANCE SELECT button.
• MaxxAudio Presets, containing all the presets for theMaxxAudio processors.
• Quarter Tone SC Preset, containing single Scale Presets.
Main page
There is no main page in the Global edit mode. When pressingEXIT, you exit the Global mode, and the underlying operatingmode in the background is recalled.
Global edit mode

201Global edit modeEdit menu
Refe
renc
e
Edit menu
From any page of the Global mode, press the MENU button toopen the Global edit menu. This menu gives access to the vari-ous Global edit sections.
When in the menu, select an edit section, or press EXIT to exitthe Global mode.
When in a page, press EXIT to go back to current operatingmode in the background (Style Play, Song Play, Sequencer,Sound).
Each item in this menu corresponds to an edit section. Each editsection groups various edit pages, that may be selected by touch-ing the corresponding tab on the lower part of the display.
Note: The Global mode is not available while in Record mode(Style Record, Pad Record, Song Record, Sampling).
Edit page structure
All edit pages share some basic elements.
Edit mode
This indicates that the instrument is in Global mode.
Edit section
This identifies the current edit section, corresponding to one ofthe items of the edit menu (see below).
Page menu icon
Touch this icon to open the page menu (see below).
Parameters area
Each page contains various parameters. Use the tabs to selectone of the available pages. For detailed information on the vari-ous types of parameters, see sections starting below.
Tabs
Use tabs to select one of the edit pages of the current edit section.
General Controls: Basic
This page contains various general parameters, setting the statusof the keyboard, the fade in/out, and the accelerando/ritardando.
Keyboard Settings
Velocity Curve
This parameter sets the sensitivity of the keyboard to your touch.
Fix No dynamic control available. Dynamic valuesare fixed, as in a classic organ.
Soft1 … Hard3
Curves, from the lightest one to the hardest one.
A.Touch Curve
This parameter sets the sensitivity of the keyboard to the pres-sure you apply after first pressing a key.
Soft1 … Hard3
Curves, from the lightest to the hardest one.
Off The aftertouch is turned off.
Global Tuning/Reverb
Master Tuning
This is the master tuning of the instrument (in cents of a semi-tone). Use it to adapt your keyboard tuning to an acoustic instru-ment, for example an acoustic piano.
-50 Lowest pitch.
0 Standard pitch (A4=440Hz).
+50 Highest pitch.
Reverb Offset
This is the master offset for all reverbs. Use it to adjust reverbtails to the room where you are playing. Use negative values
Edit mode Edit section Page menu icon
Parameters area
Tabs
Gbl
Gbl
Gbl
Gbl

202 Global edit modeGeneral Controls: Transpose Control
when you are in a very reverberant room, positive values if theroom is too dry.
By using this global control, you are not obliged to change thereverb time in each single Performance, STS, Style Settings, orSong.
-50 Less reverb.
0 Standard reverb.
+50 More reverb.
Fade In/Out TimeThese parameters allows you to set the speed for the Fade In/Outfunction.
Fade In Time
Time for a full fade in (from zero to maximum volume), afteryou press the FADE IN/OUT button.
5…20 Fade time (in seconds).
Fade Out Time
Time for a full fade out (from maximum volume to zero), afteryou press the FADE IN/OUT button.
5…20 Fade time (in seconds).
Accelerando/RitardandoThese parameters lets you adjust the speed of the Accelerandoand Ritardando functions.
Step
Speed of the Tempo change (from 1 to 6). With higher values,the step change is greater, and the speed will change faster. Withlower values, the step change is smaller, and the speed willchange more slowly.
Curve
Accelerando/ritardando curves (from 1 to 3). Experiment thevarious options, to see the one that best fit your taste.
GlideGlide is a function you can assign to a footswitch. When thepedal is pressed, affected notes on Upper tracks are bent down,according to settings for the Pitch Bend on the same tracks.When the pedal is released, notes return to the normal pitch, atthe speed defined by the “Time” parameter.
To change Pitch Bend values for each Upper track, see the “PBSensitivity” parameter in the Style Play mode (see page 123)
Time
Time needed to notes affected by the Glide to return to the nor-mal pitch.
General Controls: Transpose Control
This page is where you can select to which tracks the MasterTranspose is applied to, and adjust some related parameter.
Transpose Control
Transpose applies to Style and Kbd tracks
Use this parameter to turn the Master Transpose on or off, anddefine the way it is applied, to Style and Keyboard tracks.
Off No Master Transpose is applied to Style and Key-board tracks. Chords shown in the Lyrics pageare, however, transposed.
In Sync When you press either the TRANSPOSE [ ] or[ ] buttons, the new transpose setting will nottake effect until the first beat of the next measureis reached.
In Realtime When you press either the TRANSPOSE [ ] or[ ] buttons, the new transpose setting will occurwhen the next note is played for both the Styleand Keyboard tracks individually.
The next key or chord you press will sound withthe new transpose setting applied. (Note that ifyou play a Keyboard track prior to a new chord,the Keyboard track will play in the new key as theStyle will continue to play in the old key until anew chord is entered).
Transpose applies to Player 1 & 2
This flag lets you turn the Master Transpose on or off for the twoonboard Players.
Transpose applies to Midi In notes
This flag lets you turn the Master Transpose on or off for Notemessages received from MIDI IN.
Gbl
Gbl
Gbl
Gbl
Gbl

203Global edit modeGeneral Controls: Scale
Refe
renc
e
Position
Scale and Transpose position
The Scale and Transpose Position allows you to define the rela-tion between the Scale and the Master Transpose.
Post-KB/Pre-Scale
When this option is selected, notes will be trans-posed immediately after they leave the keyboard.The Scale will be applied to the transposed notes.For example, if you altered an E, and then set theMaster Transpose to +1, the E key will play F, andthe altered key will be E (that will play analtered E).
Post-KB & Scale
When this option is selected, all notes are trans-posed immediately before they enter the internaltone generator, or are sent to the MIDI OUT, butafter the Scale. For example, if you altered an E,and set the Master Transpose to +1, the alteredkey will still be E (that will play an altered F).
Standard MIDI File and chord transposeWhen changing the Master Transpose, chord abbreviations con-tained in a Standard MIDI File are transposed, and correctlyshown in the display. Master Transpose must be activated on theSequencer, but not on the Keyboard.
Note: Chords contained in a linked TXT file or shown when load-ing a CDG file are not transposed.
General Controls: Scale
This page lets you select the main (or basic) scale of the instrument.
Main Scale
This parameter sets the main scale (or temperament) for thewhole instrument, apart for tracks where a different sub-scalehas been selected by a Performance or STS (see “Scale Mode” onpage 136, Style Play mode).
See “Scales” in the “Assignable parameters” chapter of theAdvanced Edit Manual for a list of available scales.
Note: You cannot select a User scale in Global mode.
Key
This parameter is needed by some scales to set the preferred key(see “Scales” in the Advanced Edit Manual).
SC Preset buttons
Touch these buttons to recall the corresponding presets. Each pre-set contains a custom detuning of each note of the scale (shown inthe upper scale diagram). It also memorizes the selected degree(s)of the scale (shown in the lower scale diagram).
When no preset is selected, the default scale is automaticallyrecalled. This scale assigns a -50 cent value to all notes, and turnsall scale degrees off.
You can select an SC Preset, also by assigning the relevant func-tion to the Assignable Switch or Assignable Footswitch.
To save the current scale programming to a preset, while in thispage choose the “Write Quarter Tone SC Preset” command fromthe page menu, then select one of the preset locations where tosave the current settings (see “Write Quarter Tone SC Preset” onpage 220).
Upper scale diagram
Use this diagram to set the detuning of each note of the scale.
-99…0…+99 Note detuning in cents. Zero is no detuning, ±50is a full quarter tone up or down, ±99 is nearlyone whole semitone up or down.
Lower scale diagram
Use this scale to turn detuning on or off. Applied detuning willdepend on the programming set with the Upper scale diagram,or recalled by selecting one of the SC Presets.
When a note is detuned, a black dot appears in the correspond-ing note of the diagram.
ScaleTone
generatorTranspose
ScaleTone
generatorTranspose
Gbl
Gbl

204 Global edit modeGeneral Controls: Lock
General Controls: Lock
This page, split in four panes that can be selected by means of thecorresponding side tabs, contains all the available locks, some-times grouped under just a single lock. Locks prevent parametervalues to be changed when loading data from a storage device, orselecting a different Performance, Style or STS.
Locks
All the available locks. Lock them to prevent changes due toloading or selecting different elements. These locks are alsofound in various other pages, next to the locked parameter.
Hint: To save the status of the various parameters as a fixed statusfor the Pa3X, save all the parameters to Performance 1 of Bank 1(automatically selected when turning on the instrument), and savethese locks to the Global.
• Lock–Tuning pane
Master Transpose
When locked, master transpose is not automati-cally changed when selecting a different Perfor-mance or Style.
(See “Master transpose” on page 112).
Master Transpose from Performance
When closed, this lock prevents a Performancechange to modify the Master Transpose. Whenopen, changing a Performance may also changethe Master Transpose.
(See “Master transpose” on page 112).
Hint: In order to avoid having the Master Trans-pose settings change when selecting a differentStyle, use the general Master Transpose Lock (thefirst parameter in this page).
Note: When the Master Transpose Lock is closed,this parameter has no effect. However, the MasterTranspose Lock also locks the Performance Trans-pose.
Master Transpose from Style Settings
When closed, this lock prevents a Style change tomodify the Master Transpose. When open,changing a Style may also change the MasterTranspose.
(See “Master transpose” on page 112).
Hint: In order to avoid having the Master Trans-pose setting change when selecting a new Perfor-mance or STS, use the general Master TransposeLock (the first parameter in this page).
Note: When the Master Transpose Lock is closed,this parameter has no effect. However, the MasterTranspose Lock also locks the Style Settings Trans-pose.
Sub Scale/Quarter Tone
When locked, selecting a Performance or STSwill not change the Sub-Scale or Quarter Tonevalue.
(See “Sub-Scale panel” on page 119).
SubScale/Quarter Tone from STS
When closed, this lock prevents an STS change tomodify the SubScale/Quarter Tone settings,allowing for changing sounds and effects but notthe scale. When open, changing an STS may alsochange these settings.
(See “Sub-Scale panel” on page 119).
Auto Octave This lock lets you decide if the instrument willautomatically transpose the Upper tracks whenturning the SPLIT button on and off.
• If On, when turning the SPLIT button or off,the Upper tracks transposition is left unchanged.
• If Off, when turning the SPLIT button off (Fullkeyboard mode), the Upper tracks Octave Trans-pose is automatically set to “0”. When turning theSPLIT button on (Split keyboard mode), theUpper tracks Octave Transpose is automaticallyset to “-1”.
• Lock–Control pane
Assignable Switches
When locked, selecting a Performance or STSwill not change the Assignable Switch assign-ment.
(See “Pad/Switch: Switch” on page 133).
Slider Mode When locked, selecting a Performance or STSwill not change the selected status of the SLIDERMODE button.
(See “SLIDER MODE” on page 8).
Split Point When locked, selecting a Performance or STSwill not change the split point.
(See “Split Point” on page 118).
Gbl

205Global edit modeGeneral Controls: Lock
Refe
renc
e
Pad When locked, selecting a Style or SongBook entrywill not change the Pad assignment.
(See “Pad/Switch: Pad” on page 133).
Lower When this lock is closed, the Lower track remainsunchanged when a different Style, Performanceor STS is selected.
This is useful if, for example, you prefer to alwaysplay with the left hand muted and reserved onlyto playing chords for the arranger.
Hint: If you want the same Lower settings to beused during all your shows, save your preferredLower settings to Performance 1-1 (automaticallyselected on startup), then close this lock and choosethe “Write Global-Global Setup” from the pagemenu.
Keyboard Mode (Split)/Chord Scanning
When this lock is closed, the status of the SPLITbutton (i.e., of the keyboard mode) and theCHORD SCAN section remain unchanged whena different Performance or STS is selected.
This is useful if, for example, you prefer to alwaysplay in Full Keyboard, with chords recognized onthe whole keyboard range.
Note: The Split (Keyboard Mode) and Chord Scansettings are reset when switching to a differentoperating mode.
Hint: If you want the same Keyboard Mode andLower Scanning settings to be used during all yourshows, save your preferred settings to Performance1-1 (automatically selected on startup), then closethis lock and choose the “Write Global-GlobalSetup” from the page menu.
• Lock–FX & Voice Processor pane
Voice Processor Preset
When locked, selecting a Performance or STSwill not change the Voice Processor Preset.
(See “VP Preset” on page 118).
Upper 1 FXs In Sound mode, you can assign a Sound to the FXB Group. When you assign a new Sound to theUpper 1 track, the FX B settings and Master FXsend levels saved with that Sound can be auto-matically selected, overriding Performance/STSsettings for this track. Whether Sound or Perfor-mance/STS effect parameters will be considered,it depends on the status of this lock.
• If the Upper 1 FX Lock is turned on, whenassigning a new Sound to the Upper 1 track, Per-formance/STS parameters are left untouched;selected effects, and FX Send values, are notchanged.
• If the Upper 1 FX Lock is turned off, whenassigning a new Sound to the Upper 1 track,Sound parameters are considered; selectedeffects, and FX Send values, are changed accord-ing to the Sound’s stored data.
Note: If effects associated to the selected Sound arenot compatible with effects already assigned to theFX B block, the Master FX Send values on the otherKeyboard tracks will be automatically set to zero.
For example, assume a chorus effect is assigned tothe Master 2 FX processor. If the new Soundassigns a distortion effect to the Master 2 FX pro-cessor, the Master 2 FX Send value on the Upper 2,Upper 3, and Lower tracks will be set to zero, toavoid these tracks sound in the wrong way. Thisway, the Upper 1 track (usually the most importantone for solo playing) will sound with the neededeffect, while the other Keyboard tracks will justsound dry.
• Lock–Style pane
Style Preferences
When locked, selecting a Performance or STSwill not change the value of parameters containedin the Style Preferences pages. By default, it isturned on.
(See “Preferences: Style Preferences” on page 135,and “Preferences: Style Play Setup” on page 136).
Bass Inversion
When locked, selecting a Performance or STSwill not change the Bass Inversion status. BassInversion can also be assigned to one of theAssignable Switches or the Assignable Pedal.
(See “BASS INVERSION” on page 10).
Manual Bass When locked, selecting a Performance or STSwill not change the Manual Bass status.
(See “MANUAL BASS” on page 10).
Fill Mode When locked, the selected Fill Mode will notchange when selecting a different Performance orStyle.
(See “Fill Mode (1…4, Break)” on page 134).

206 Global edit modeGeneral Controls: Interface
Style Element When locked, choosing a different Style does notcause selecting the Style Element memorized inthe Style Settings (i.e., a Variation).
This lock has no effect on the Styles automaticallyselected when choosing a SongBook entry. In thiscase, the Style Element memorized in the entry isalways selected.
Style Tracks Play/Mute Lock
When closed, this lock prevents a Style or Perfor-mance change to modify the Play/Mute status ofthe Style tracks. This way, you can, for example,turn the bass track off during a whole show, toallow your bassist to play it live. Also, you couldmute all Acc tracks, to only play with the Drumand Bass tracks.
(See “Track status icons” on page 116).
Style Tracks Volume
When this lock is closed, the volume of the Styletracks remains unchanged when a different Styleor Performance is selected.
This is useful if you create your own Styles, andlike to dynamically adjust the volume by usingthe sliders as a mixer. It is not recommended withFactory Styles, each one already mixed at its bestright at the factory.
General Controls: Interface
This page contains parameters related to the way messages areshown in the display.
Language
Language
Use this pop-up menu to select one of the available languages forthe online help system and the on-screen keyboard.
Note: Some of the characters cannot be used when editing MusicalResouce names.
Change button
Touch this button to apply the selected language to the user’sinterface. Note that the new language appears when turning theinstrument off, then on again.
How to select the Help language
1. Since Pa3X must be restarted at the end of this procedure,be sure to first save all unsaved data.
2. While in this page, select a language from the pop-upmenu.
3. The “Change” word will start flashing in red. Touch it.
4. You will be asked if you want to save the Global, and selectthe new language. Touch Yes to confirm. The Global will beautomatically saved, and the language selected.
5. A message will advice you to reboot the Pa3X. Touch OK toclose the message window.
6. Turn the Pa3X off, then on again.
Background color
Color
Use this parameter to choose a different background color forthe display. Possible choices are indicated as numbers.
Balance slider as the Acc/Seq-RT Volume
Balance Slider
The BALANCE slider can either be used to mix between theKeyboard and Accompaniment/Song tracks, or to control theAccompaniment/Song Volume without changing the Keyboardtracks. This is always a relative control, whose effective maxi-mum value is determined by the MASTER VOLUME sliderposition.
Note: The BALANCE slider only works in Style Play and SongPlay modes. It does not work in Sequencer or Sound mode.
Acc/Sng - RT/Kbd Balance
While in Style Play and Song Play mode, theBALANCE slider balances the volume of the Key-board (RT/Kbd) tracks, against the Style (Accom-paniment), Pad and Song tracks.
Acc/Sng Volume
While in Style Play and Song Play mode, theBALANCE slider controls the volume of the Style(Accompaniment), Pad and Song tracks.
Program Change
Show
Check this parameter to show Program Change numbers next toSound names in the Sound Select window. By default, thisparameter is turned on.
Note: Program Change numbers are always shown in Sound Editmode, and in the various Track Info areas.
Gbl
Gbl
Gbl
Gbl

207Global edit modeGeneral Controls: Clock & Battery
Refe
renc
e
Track Activity
Show
Use this parameter to turn on/off the Track Activity display.When it is turned on, you can monitor events coming from thetracks or the MIDI inputs. Incoming events are shown by thechanging color of each track’s label.
Here is the list of colors and their meaning:
Green Internal data, generated by the keyboard, pads,the Arranger or one of the Players.
Red Data coming from the MIDI IN ports (MIDI orUSB).
Orange Either internally or externally generated data (orboth at the same time).
Dark Grey No data received.
Display Hold
On/Off
When this parameter is checked, if you open a temporary win-dows (like the Sound Select window), it remains in the displayuntil you press EXIT or an operating mode button. When it isnot checked, any temporary window closes after a certain time.
Auto Select
StylePerformance
When one of these parameters is checked, the latest selectedStyle or Performance selected in a bank is immediately selectedwhen pressing the STYLE or PERFORMANCE button corre-sponding to the bank.
This way, you can assign your preferred Style or Performance toeach control panel’s button, and select it just with a single press.
However, the Style/Performance Select window still appearswhen you press one of the STYLE or PERFORMANCE buttoncorresponding to the bank, so you can select a different item ifdesired.
Note: Unless you save your settings by means of the “Write Global-Auto Select Setup” page menu command, the memorized Style orPerformance is reset to the first one in each bank, when turning theinstrument off and then on again.
Hint: You can save your preferred Performances into the first loca-tion of each bank. This way, by turning on this parameter, you willselect your preferred Performance at the touch of a single button.
Also note that, by turning the “Factory Style and Pad Protect”parameter off, you can do the same with the Styles.
General Controls: Clock & Battery
Date & TimeThe Pa3X includes a battery-backed system calendar and clock.This allows for automatically adding a time-stamp to the files,when they are created or edited.
Note: When you edit a resource file (Sounds, Styles…), all items inthe same bank have their modification date changed. For example,if you edit a single Style in the “Pop” bank, all Styles in that bankwill take the new modification date.
Month
Use this pop-up menu to choose a month.
Day
Use this numeric field to input the day of the month.
Year
Use this numeric field to input the year.
Time
Use these numeric fields to input the time, in the “hour:min-ute:second” format.
Apply
When edited all calendar and time fields, touch this button toapply the changes.
BatteryWhen the instrument is turned off or in standby, all PCM Sam-ples are preserved in the internal memory. They are lost whenthe internal battery is discharged (after a few days with thePOWER switch off or disconnected from the power line).
After turning the instrument on the first time, all Factory andUser PCM Samples are loaded from the internal storage memoryto the Sample RAM memory.
When the instrument is turned off or set to standby mode, thismemory is preserved from deletion by an internal battery, that ischarged while the Pa3X is in standby mode and connected to apower socket. When turning the instrument on again, loading ofall PCM Samples is much faster than loading from disk.
The content of the Sample RAM memory is lost when the Pa3Xis not connected to a power socket for a few days, and the battery
Gbl
Gbl
Gbl
Gbl

208 Global edit modeControllers: Pedal/Switch
discharges. When turning the instrument on again, PCM Sam-ples are loaded again from the internal storage memory.
Please note that all other data contained in RAM (Songs, MIDIGrooves, Samples that have not yet been saved) are not pre-served by the battery, so please remember to save any new ormodified data before turning the instrument off.
Use this page to check the level of charge of the battery preserv-ing the PCM Sample RAM, and the remaining charge time. Thebattery is charged when the instrument is turned on (or inStandby mode), and discharges when turned off or entirely dis-connected from a power outlet.
Charge
This bar shows the current level of the battery.
Duration
This indicator shows the remaining charge time. Please note thisis just a forecast average, and not the exact time.
Wipe
Use this button to completely discharge the PCM-memorybackup battery, after replacing the battery pack or installing thePCM Sample memory expansion.
Error messages
(Only appears in case of malfunctioning.) When the STANDBYred and green LEDs are flashing, there is a malfunctioning in thebackup battery. The following messages appear in this page.
Unplugged battery: The battery is disconnected. Please check ifit can be reinserted.
Battery is damaged, please replace it: The battery is damaged orexhausted, and can no longer be recharged. Please replace it withthe same type and model.
Controllers: Pedal/Switch
This page lets you select a function to the Assignable Pedal/Foot-switch, and select the polarity for the Damper and AssignablePedal/Footswitch.
The following (optional) Korg pedals are compatible with Pa3X:
Pedal/Footswitch
Function
Function assigned to a continuous (i.e., volume/expression)pedal, or to a footswitch, connected to the ASSIGNABLE PDL/SW connector. See page 242 for a list of the assignable functions.The first functions are switch-type functions, while the remain-ing (starting from Master Volume) are continuous-like func-tions.
Calibration
Use this button to calibrate and choose the polarity of the pedal/footswitch.
1. Connect the pedal or footswitch to the ASSIGN PEDAL/SW connector on the back of the instrument.
2. Go to this page, and touch the “Calibration” button in thedisplay. The following dialog box appears:
3. You are asked to set the pedal to the maximum value. Pressthe footswitch, or press the pedal to the maximum position(usually front pressed).
Type Model
Continuous (Volume/Expression)
EXP-2, XVP-10
Switch PS-1
Damper DS1H (supporting half-pedalling)
Gbl
Gbl

209Global edit modeControllers: Assignable Sliders
Refe
renc
e
4. Touch the “Push” button in the display to confirm the max-imum value. The following dialog box appears:
5. You are now asked to set the pedal to the minimum value.Release the footswitch, or press the pedal to the minimumposition (usually back pressed).
6. Touch the “Push” button in the display to confirm the min-imum value.
7. Check if the pedal or footswitch is working properly, assignit a function, then save by choosing the “Write Global-Global Setup” command from the page menu.
Note: After loading a new Operating System, an older Global file,a “SET” folder containing an older Global file, or a Backup file,you might need to re-calibrate the pedal/footswitch.
Damper
Calibration
Use this button to calibrate the action of the Damper pedal, andset its polarity. See above for details about the procedure.
Ribbon
Sensivity
Use this parameter to adjust the sensitivity of the ribbon control-ler.
Controllers: Assignable Sliders
This page lets you program the first eight Assignable Sliders.Two sets are available (Assignable A and Assignable B). Twoother modes (Volume and Drawbars) are hard-wired to the vol-ume and drawbars control. You can assign the preferred set byusing the SLIDER MODE button on the control panel, cyclingbetween the four available modes. The status of the SLIDERMODE button can be saved with a Performance or STS.
Assignable Sliders A/B
Functions assigned to the corresponding sliders on the controlpanel, when the selected mode is ASSIGNABLE A or B.
See “List of Assignable Footswitch / Pedal functions” onpage 239 for a list of the assignable functions.
Controllers: EC5
This page lets you program each of the five switches of the(optional) KORG EC5 multiswitch pedalboard.
See “List of EC5 functions” on page 242 for a list of the assign-able functions.
EC5-A…E
Each of the switches of a KORG EC5 multiswitch pedalboard.
Gbl
Gbl
Gbl
Gbl
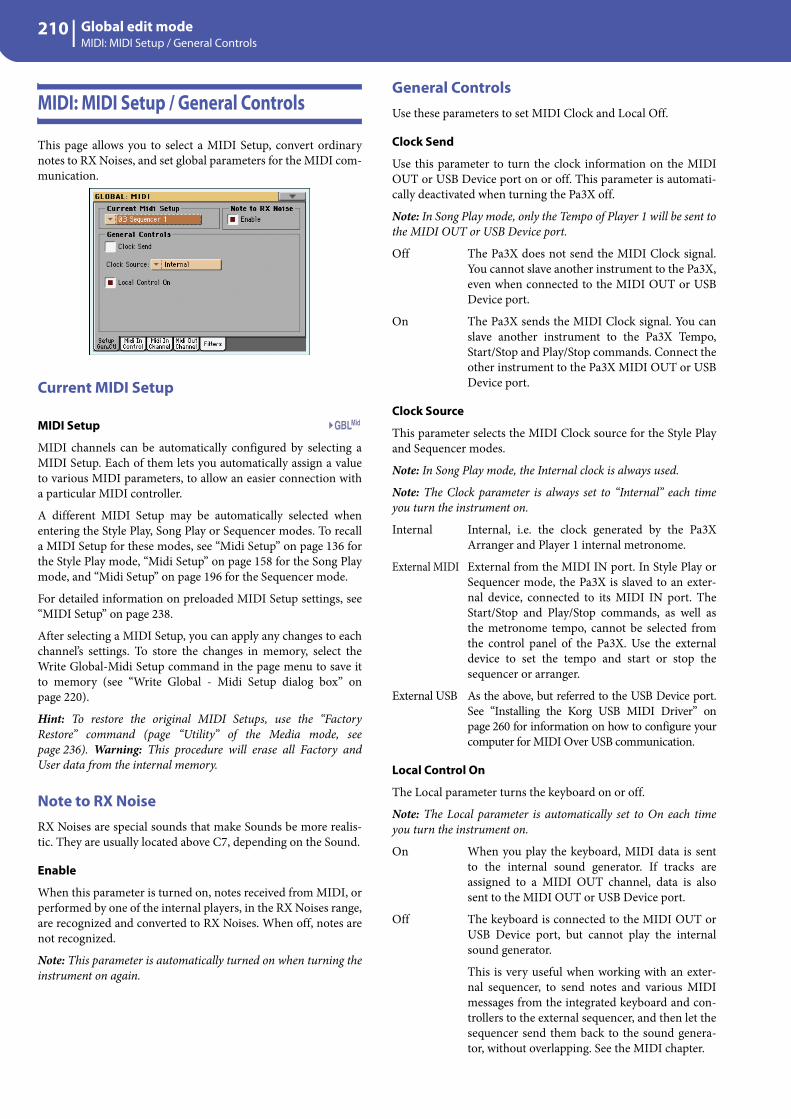
210 Global edit modeMIDI: MIDI Setup / General Controls
MIDI: MIDI Setup / General Controls
This page allows you to select a MIDI Setup, convert ordinarynotes to RX Noises, and set global parameters for the MIDI com-munication.
Current MIDI Setup
MIDI Setup
MIDI channels can be automatically configured by selecting aMIDI Setup. Each of them lets you automatically assign a valueto various MIDI parameters, to allow an easier connection witha particular MIDI controller.
A different MIDI Setup may be automatically selected whenentering the Style Play, Song Play or Sequencer modes. To recalla MIDI Setup for these modes, see “Midi Setup” on page 136 forthe Style Play mode, “Midi Setup” on page 158 for the Song Playmode, and “Midi Setup” on page 196 for the Sequencer mode.
For detailed information on preloaded MIDI Setup settings, see“MIDI Setup” on page 238.
After selecting a MIDI Setup, you can apply any changes to eachchannel’s settings. To store the changes in memory, select theWrite Global-Midi Setup command in the page menu to save itto memory (see “Write Global - Midi Setup dialog box” onpage 220).
Hint: To restore the original MIDI Setups, use the “FactoryRestore” command (page “Utility” of the Media mode, seepage 236). Warning: This procedure will erase all Factory andUser data from the internal memory.
Note to RX NoiseRX Noises are special sounds that make Sounds be more realis-tic. They are usually located above C7, depending on the Sound.
Enable
When this parameter is turned on, notes received from MIDI, orperformed by one of the internal players, in the RX Noises range,are recognized and converted to RX Noises. When off, notes arenot recognized.
Note: This parameter is automatically turned on when turning theinstrument on again.
General ControlsUse these parameters to set MIDI Clock and Local Off.
Clock Send
Use this parameter to turn the clock information on the MIDIOUT or USB Device port on or off. This parameter is automati-cally deactivated when turning the Pa3X off.
Note: In Song Play mode, only the Tempo of Player 1 will be sent tothe MIDI OUT or USB Device port.
Off The Pa3X does not send the MIDI Clock signal.You cannot slave another instrument to the Pa3X,even when connected to the MIDI OUT or USBDevice port.
On The Pa3X sends the MIDI Clock signal. You canslave another instrument to the Pa3X Tempo,Start/Stop and Play/Stop commands. Connect theother instrument to the Pa3X MIDI OUT or USBDevice port.
Clock Source
This parameter selects the MIDI Clock source for the Style Playand Sequencer modes.
Note: In Song Play mode, the Internal clock is always used.
Note: The Clock parameter is always set to “Internal” each timeyou turn the instrument on.
Internal Internal, i.e. the clock generated by the Pa3XArranger and Player 1 internal metronome.
External MIDI External from the MIDI IN port. In Style Play orSequencer mode, the Pa3X is slaved to an exter-nal device, connected to its MIDI IN port. TheStart/Stop and Play/Stop commands, as well asthe metronome tempo, cannot be selected fromthe control panel of the Pa3X. Use the externaldevice to set the tempo and start or stop thesequencer or arranger.
External USB As the above, but referred to the USB Device port.See “Installing the Korg USB MIDI Driver” onpage 260 for information on how to configure yourcomputer for MIDI Over USB communication.
Local Control On
The Local parameter turns the keyboard on or off.
Note: The Local parameter is automatically set to On each timeyou turn the instrument on.
On When you play the keyboard, MIDI data is sentto the internal sound generator. If tracks areassigned to a MIDI OUT channel, data is alsosent to the MIDI OUT or USB Device port.
Off The keyboard is connected to the MIDI OUT orUSB Device port, but cannot play the internalsound generator.
This is very useful when working with an exter-nal sequencer, to send notes and various MIDImessages from the integrated keyboard and con-trollers to the external sequencer, and then let thesequencer send them back to the sound genera-tor, without overlapping. See the MIDI chapter.
Mid

211Global edit modeMIDI: MIDI In Control
Refe
renc
e
MIDI: MIDI In Control
This page lets you program general parameters for the MIDI INand USB Device port, like the Chord Recognition channel andMIDI parameters for the Voice Processor.
Midi In Controls
Midi In Octave Transpose
Use this parameter to determine if the Octave Transpose isapplied also to notes received on the MIDI IN or USB Deviceport.
On Notes received on the MIDI IN or USB Deviceport are transposed according to the OctaveTranspose setting for each track.
Off Data received on the MIDI IN or USB Deviceport are not transposed.
Track Mute Active
Use this parameter to determine if a muted track can still playdata received on the MIDI IN or USB Device port.
On No data received on the MIDI IN or USB Deviceport on a muted track can be played by Pa3X.
Off Data received on the MIDI IN or USB Deviceport on a muted track can still play on the Pa3X.
Chord 1 Midi Channel
Chord 2 Midi Channel
Notes entering these channels on the MIDI IN or USB Deviceport, are sent to the Chord Recognition engine.
There are two separate Chord channels. This is very useful whenyou must send chords to Pa3X on two different channels (likewith some MIDI accordions).
Off Data received on the MIDI IN or USB Deviceport is not sent to the Chord Recognition engine.
1…16 Data received on these channels via the MIDI INor USB Device port is sent to the Chord Recogni-tion engine.
Upper Octave Transp (Transpose)
Octave transposition of data received on the MIDI IN or USBDevice port for the Upper tracks. For example, if you select the+1 value, a received C4 will play a C5 on the Pa3X.
This parameter may be useful to many MIDI accordion players,whose MIDI interface may transmit on an unexpected octave.
-2…+2 Octave transpose value.
Lower Octave Transp (Transpose)
Octave transposition of data received on the MIDI IN or USBDevice port for the Lower track. For example, if you select the +1value, a received C4 will play a C5 on the Pa3X.
This parameter may be useful to many MIDI accordion players,whose MIDI interface may transmit on an unexpected octave.
-2…+2 Octave transpose value.
Midi In Velocity Value
Use this parameter to set a fixed velocity (dynamics) value for allreceived MIDI notes. This is useful when playing the Pa3X withan organ or a MIDI Accordion.
Normal Received velocity values are left unchanged.
40…127 All received velocity values are converted to theselected value.
Voice Processor Midi controls
Midi In Channel
Notes received on this channel are sent to the Harmony sectionof the Voice Processor.
Off No data is sent to the Voice Processor.
1…16 Data received on this channel via the MIDI IN orUSB Device port is sent to the Voice Processor.
Octave Transpose In
Octave transpose for all notes received via MIDI by the Har-mony section of the Voice Processor.
-2…+2 Octave transpose value.
In Note Range-High
This is the highest note that can be received by the Harmony sec-tion of the Voice Processor. Notes received over this note are notrecognized.
B-1…G9 Highest note.
In Note Range-Low
This is the lowest note that can be received by the Harmony sec-tion of the Voice Processor. Notes received under this note arenot recognized.
C-1…G#8 Highest note.
Mid
Mid
Mid
Mid
Mid
Mid
Mid
Mid
Mid
Mid
Mid

212 Global edit modeMIDI: MIDI In Channels
MIDI: MIDI In Channels
In this page, you can assign Pa3X tracks to any of the MIDIchannels received on the MIDI IN and USB Device ports.
Channels
You can assign to each channel one of the following tracks:
Off No track assigned.
Lower Lower track.
Upper 1…3 One of the Upper tracks.
Pad 1…4 One of the Pad tracks.
Drum Drum track.
Percussion Percussion track.
Bass Bass track.
Acc 1…5 One of the Auto-accompaniment tracks.
Ply.1 Tr 01…16
One of Player 1 tracks.
Ply.2 Tr 01…16
One of Player 2 tracks.
Global Special channel to simulate the Pa3X’s integratedcontrols (keyboard, pedals, joystick) with anexternal keyboard or controller. MIDI messagescoming on this channel are seen as if they weregenerated by Pa3X’s integrated controllers.
Control On this special channel, the Pa3X receives MIDImessages to remotely select Styles, Performances,STS, Style Elements and SongBook entries. Seetables on page 183 and following for more infor-mation on the received data
MIDI: MIDI Out Channels
In this page, you can assign Pa3X tracks to any of the MIDIchannels sent to the MIDI OUT and USB Device ports.
Channels
You can assign to each channel one of the following tracks:
Off No track assigned.
Lower Lower track.
Upper 1…3 One of the Upper tracks.
Pad 1…4 One of the Pad tracks.
Drum Drum track.
Percussion Percussion track.
Bass Bass track.
Acc1…5 One of the Auto-accompaniment tracks.
Ply.1 Tr 01…16
One of Player 1 tracks.
Ply.2 Tr 01…16
One of Player 2 tracks.
Ply.1/2 Tr 01…16
Use these channels to send data generated by atrack with the same name on either or bothonboard players at the same time.
Chord Use this channel to send notes recognized by theChord Recognition engine to the MIDI OUT andUSB Device port. This is useful, for example, tocontrol an external Harmonizer from the Pa3X,using the Lower track to play chords, even if thetrack is muted.
Mid Mid

213Global edit modeMIDI: Filters
Refe
renc
e
MIDI: Filters
Use this page to set up to 8 filters for the MIDI data received orsent by the Pa3X on the MIDI and USB Device ports.
Midi In Filters
Selected MIDI IN filters.
Off No filter.
Pitch Bend Pitch Bend.
MonoTouch Mono (or Channel) After Touch.
PolyTouch Poly After Touch.
PrgChange Program Change.
SysExcl System Exclusive.
All CC All Control Change messages.
0…127 Control Change message #0…127. See “MIDIData” on page 245 for a list of available ControlChange messages.
Notes Note events.
Midi Out Filters
Selected MIDI OUT filters. See above for information on eachfilter type.
Audio Setup: Style/Kbd
This page lets you connect Style, Keyboard and Pad tracks to theaudio outputs.
Tracks
Use these parameters to assign an audio output (OUTPUT sec-tion, on the back of the instrument) to each track.
Left + Right The selected track is connected to the Left &Right outs, in stereo. The track is also sent to theInternal FX processors. You can use the MASTERVOLUME slider to set the volume.
The track is also sent to the S/PDIF Digital Out.However, the MASTER VOLUME slider has noeffect on this output.
Out 1 + 2 The track is connected to the 1 & 2 sub-outs, instereo. It is not sent to the Internal FX processors.The MASTER VOLUME slider has no effect onit.
The track is not sent to the S/PDIF Digital Out.
Out 1 The selected track is connected to the sub-out 1.It is mixed to mono. It is not sent to the InternalFX processors. The MASTER VOLUME sliderhas no effect on it.
The track is not sent to the S/PDIF Digital Out.
Mid
Mid
Gbl
Track
Internal FX
Track
Internal FX
Track
Internal FX

214 Global edit modeAudio Setup: Player 1
Out 2 The selected track is connected to the sub-out 2.It is mixed to mono. It is not sent to the InternalFX processors. The MASTER VOLUME sliderhas no effect on it.
The track is not sent to the S/PDIF Digital Out.
Audio Setup: Player 1
This page lets you connect Player 1 tracks to the audio outputs.These setting are also applied to the Sequencer mode.
Tracks
Use these parameters to assign an audio output (OUTPUT sec-tion, on the back of the instrument) to each track.
See “Audio Setup: Style/Kbd” on page 213 for more informationon the available audio outputs.
Audio Setup: Player 2
This page lets you connect Player 2 tracks to the audio outputs.
Tracks
Use these parameters to assign an audio output (OUTPUT sec-tion, on the back of the instrument) to each track.
See “Audio Setup: Style/Kbd” on page 213 for more informationon the available audio outputs.
Audio Setup: Drums
This page lets you route Drum Kit Sounds to the audio outputs.
See “Audio Setup: Style/Kbd” on page 213 for more informationabout the available audio outputs.
Drum Kit Output
This parameter lets you decide if Drum Kit Sounds will be sentto the single output (or output pair) defined for the track theyare assigned to, or each drum category will be sent to a differentoutput.
As Track When this option is selected, Drum Kits will besent to the output selected in one of the previouspages for the tracks they are assigned to.
As Drum Category
When this option is selected, you can select a dif-ferent output for each category of Drum Kitsounds. Use the “Drum Kit Category” box below,to select an output for each category of percussivesounds.
Drum Kit Category
Kick Bass Drum category.
Snare Snare Drum category.
Tom Tom category.
Hi-Hat Hi-Hat category.
Cymbal Cymbal category.
Perc.1 Low-pitched percussion category.
Perc.2 High-pitched percussion category.
Special FX Sound FX category.
Track
Internal FX
Gbl
Gbl
Gbl
Gbl

215Global edit modeAudio Setup: Audio In
Refe
renc
e
Audio Setup: Audio In
This page lets you route the Audio Inputs and the Voice Proces-sor to the audio outputs and to the MP3 Recorder. Also, it letsyou turn phantom power on or off for the MIC input.
Microphone to Voice Processor
Microphone off
Input Routing
Use this pop-up menu to choose the routing of the Audio Inputsignals.
Mic In to Voice Processor
The Mic input goes to the Voice Processor, thento the main or sub outputs (depending on the“Mic Out” parameter, see below). The Left andRight inputs go directly to the main outputs.
The Mic input can be recorded into an MP3 file,while the Left and Right inputs cannot berecorded.
L+R to MP3 Rec (No Mic)
The Left and Right inputs go to the final mix,together with the sounds generated by the Pa3X.The Mic input is deactivated. No Voice Processoreffect is applied.
The Left and Right inputs can be recorded into anMP3, while the Mic input (that is deactivated)cannot be recorded.
+48V Phantom Power
After having connected a condenser microphone, use this switchto turn the +48V phantom power on. Phantom power is sup-plied to the balanced XLR jack only, and not to the 1/4” MICjack.
When disconnecting a microphone from the XLR jack, thephantom power is automatically turned off. Phantom power isalso automatically turned off each time you turn the Pa3X off.
Mic On/Off
The status of this switch depends on the input routing (seeabove).
On When the switch appears closed (i.e., non inter-rupted) the Mic input is active, and goes to theVoice Processor and then to the outputs. To turnthe microphone on, choose the “Mic In to VoiceProcessor” input routing option.
Off When the switch appears open (i.e., interrupted)the Mic input is deactivated. To turn the micro-phone off, choose the “L+R to MP3 Rec (NoMic)” input routing option.
Mic Out
Use this pop-up menu to choose an output for the microphone.
L+R (MP3 Rec)
The microphone goes to the Voice Processor,then to the main outputs (Left and Right) and tothe MP3 recorder.
1+2 (No MP3 Rec)
The microphone goes to the Voice Processor,then to the sub outputs (1 and 2). It cannot berecorded into an MP3 file.
Left+Right Inputs to Out
Non editable. The Left and Right inputs always go to the mainoutputs (Left and Right). They cannot be routed to the sub-out-puts (1 and 2). The indicator shows if they can be recorded intoan MP3 or not (this depends on the input routing, see above).
Gbl
Gbl
Gbl
Gbl

216 Global edit modeAudio Setup: Metro / MP3 / Speakers
Audio Setup: Metro / MP3 / Speakers
This page lets you define various parameters for the Metronome,the MP3 player and digital output.
Metronome
Mode
Use this parameter to activate the metronome for the Style Playand/or Song Play operating modes.
Off No metronome is heard.
Style The metronome is always activated when playinga Style.
Song The metronome is always activated when playinga Song.
Style+Song The metronome is always activated when playinga Style or Song.
Volume
Use this parameter to set the volume of the metronome.
0…127 Volume level.
Click Out
The metronome’s click can be routed to any audio output.
Hint: When sending the click to your drum or bass player, we sug-gest to select one of the sub-outs Out 1 and 2, to avoid it is sent tothe audience through the Left+Right outputs.
Note: The selected Metronome Mode must not be Off, in order forthe click to be sent to an audio output during playback.
See “Tracks” on page 213 for detailed information on the avail-able outputs.
Left+Right Left and Right outputs.
Out 1+2 Sub Outputs 1 and 2.
Out 1 Sub Output 1.
Out 2 Sub Output 2.
MP3 Player
Max Volume
Use this parameter to set the maximum volume of the MP3Player. This control lets you balance MP3 files against SMFSongs and Styles.
0…100 Max volume in percentage.
Audio Out
Use this parameter to select the audio output for the MP3 Player.See “Tracks” on page 213 for detailed information on the avail-able outputs.
Speakers
Speakers On/Off
Use this checkbox to turn the speakers on or off. The speakerscan be installed by adding the (optional) PaAS – AmplificationSystem.
Voice Processor Setup and Preset sections
See the relevant “Voice Processor” chapter in the Advanced EditManual.
Gbl
Gbl
Gbl
Gbl
Gbl
Gbl

217Global edit modeVideo Interface: Video Out
Refe
renc
e
Video Interface: Video Out
If your Pa3X is fitted with an (optional) VIF4 Video InterfaceBoard, use this page to adjust its parameters.
System
Selects the video standard (PAL or NTSC).
PAL Used in most European, South American, Asianand African Countries. This setting can be usedalso with SECAM TV sets (used in France, Rus-sia, and some Countries of Africa); in this lattercase, however, the picture is shown in black &white.
NTSC Used in North America, Central America andpart of South America. It is also used in Japan,Korea, Taiwan, Philippines and Burma.
Mode
Experiment with this parameter to see if your external monitorproduces better results with an interlaced or non-interlacedvideo signal.
Interlaced Mostly useful for CRT TV sets.
Non-Interlaced Mostly useful for LCD and Plasma TV sets ormonitors.
Character
Select the character size.
Big Bigger font.
Small Smaller font.
Colors
Selects a color set for the lyrics and background.
1…5 Color set. Try them to find the one you feel mostcomfortable with.
External Display
Reset to Text Only at startup. Use this parameter to decide whatto show in the monitor connected to the Video Out port.
Text Only Only Lyrics and Chords (if any) are shown in theexternal display.
Mirror The internal display of the Pa3X is duplicated(“mirrored”) to the external display.
MaxxAudio: MaxxEQ
MaxxEQ is a full spectrum frequency equalization, positioned atthe end of the signal chain, just before the Left & Right audiooutputs. It gives you the power to design EQ curves and shapeyour sound. Based on Waves professional audio equalizers,MaxxEQ features seven fully programmable bands with fullyadjustable gain, frequency, and Q parameters.
To edit a parameter, touch it and drag it to change its value (ortouch it and use the VALUE controls to change its value).
Maxx Preset
Use this pop-up menu to choose one of the available MaxxAudioPresets, and automatically reconfigure the EQ and AUDIOparameters.
On/Off (MaxxAudio)
This is the master on/off switch for all the MaxxAudio sections(EQ+AUDIO).
On/Off (MaxxEQ)
This is the on/off switch for the MaxxEQ section.
EQ Diagram
This diagram shows the EQ curve. Its shape changes dependingon the various parameter values.
Gain
Gain of the corresponding band. Use it to make the frequenciesstronger or weaker.
Freq
Center frequency of the corresponding band. Center it on theproblematic frequency, or the harmonics you want to emphasizeor attenuate.
Q
‘Quality’ of the EQ filter; higher values correspond to narrower,more accurate filters. Use higher values for near-surgical correc-tion on isolated frequencies, lower values for more musical,softer equalization.
On/Off
Use these buttons to turn the corresponding bands on or off.
Gbl
Gbl
Gbl
Gbl
VPsMax
VPsMax
VPsMax
VPsMax

218 Global edit modeMaxx Master EQ: MaxxAUDIO
Maxx Master EQ: MaxxAUDIO
The Maxx AUDIO collection from Waves™ includes the MaxxBass, Maxx Treble, Maxx Stereo and Maxx Volume effects. It ispositioned at the end of the signal chain, just before the audiooutputs, adds to the sound deeper, richer bass, and cleaner,warmer, more articulate treble with no loss of RMS (i.e., averageperceived volume). Processing also results in a stereo imagethat’s wider and more accurate.
Warning: Summing-up all levels could cause distortion in thePaAS Amplification System or in external amplification systems.Be careful not to max-out all sliders.
Maxx Preset
Use this pop-up menu to choose one of the available MaxxAudioPresets, and automatically reconfigure the EQ and AUDIOparameters.
On/Off (MaxxAudio)
This is the master on/off switch for all the MaxxAudio sections(EQ+AUDIO).
IN/OUT indicators
Use these indicators to check the level of the audio entering andcoming out of the Maxx AUDIO processor. Be sure the indica-tors never go to the red area (since this means distortion).
• If the input level is too high, decrease the level of the Sounds,Styles, Songs and/or MP3 files that are playing.
• If the output level is too high, decrease the level of the variousMaxx AUDIO controls (in particular, of the Volume control).
Bass
MaxxBass is for low frequency response beyond what your loud-speakers can deliver. You will hear low frequencies as much as1.5 octaves below the limits of your loudspeakers.
MaxxBass isolates the low bass frequencies that can’t be repro-duced by the loudspeakers. The low frequencies are analyzed tocreate a complex set of higher frequency harmonics, which theloudspeakers can reproduce.
These harmonics are added back to the rest of the audio, replac-ing the original low frequencies. Your loudspeakers then repro-duce the harmonic series, which are perceived by the brain as theoriginal low frequencies. Finally, MaxxBass uses dynamic com-pression to focus and clarify the lower frequencies.
The result is larger, more powerful sound, with extended bassresponse up to 1.5 octaves below the roll-off frequency of theloudspeaker.
Treble
MaxxTreble is for enhanced high frequencies; it is ideal for one-way driver systems.
Using technologies originally developed for Waves professionalaudio plug-ins, MaxxTreble is a non-linear dynamic processorthat enhances high frequency response, delivering a clean andpleasant high end, while minimizing distortion.
Using MaxxTreble technology you will be able to deliver louder,crisper and better defined high end without having to worryabout clipping or peak-limiting.
Stereo
MaxxStereo is for more realistic, wider stereo imaging. You willhear a wide, exciting stereo image, similar to what you’d hear in amodern movie theatre.
MaxxStereo spatial imaging technology improves the stereo sep-aration of closely placed loudspeakers. With loudspeakers thatare very close the one to the other (like in the optional PaAS –Amplification System), MaxxStereo increases perceived separa-tion for optimal imaging, with natural sound and a generous lis-tening position.
Volume
MaxxVolume is for dynamics compensation. It increases (ordecreases) RMS levels, delivering louder sound with no audibledistortion.
It relies on Peak Limiting, that increases volume without clippingor audible distortion; Low Level Compression, that increases theclarity of soft sounds, especially in noisy environments and atquiet volumes; and Noise Gating, that eliminates background sig-nal and system noise.
VPs Max
VPs Max
VPs Max
VPs Max

219Global edit modeMaxx Default Preset
Refe
renc
e
Maxx Default Preset
Whether you are sending audio to the Audio Output connectors,are listening through the PaAS Amplification System or throughheadphones, Pa3X automatically selects the correct Maxx Preset.You can choose a default preset for the different situations.
Output/Headphone Preset
Use this parameter to choose a default Maxx Preset for the AudioOutputs and the Headphones.
Amplification System Preset
Use this parameter to choose a default Maxx Preset for the PaASAmplification System.
Touch Panel Calibration
From time to time (for example, after loading a new operatingsystem), calibrating your Color TouchView™ display may be nec-essary to make pointing more precise. If so, use this page.
1. When in this page, first touch exactly inside the set ofarrows in the upper left corner of the display.
2. The arrows will subsequently move to the other corners ofthe display. Touch exactly inside them.
3. Finally, touch Save to confirm the new calibration.
• In case you want to exit and cancel the calibration, pressEXIT before completing the procedure.
Hint: To quickly reach this page from any other page, pressGLOBAL to enter the Global mode, then press it again and keep itpressed, until this page appears.
VPs Max
VPs Max

220 Global edit modePage menu
Page menu
Touch the page menu icon to open the menu. Touch a commandto select it. Touch anywhere in the display to close the menuwithout selecting a command.
Note: In each Global page, the only available Write Global optionsfrom the page menu are the ones relevant to the content of the cur-rent page. All other Write Global options are greyed out.
Write Global-Global Setup
Select this command to open the Write Global-Global Setup dia-log box, and save global settings that are not tied to a single oper-ative mode. These settings are programmed in the Global editmode.
See “Write Global - Global Setup dialog box” below for informa-tion on the dialog box.
Write Global-Midi Setup
Select this command to open the Write Global-Midi Setup dia-log box, and save the current MIDI settings to a MIDI Setup. Upto eight MIDI Setups are available.
See “Write Global - Midi Setup dialog box” on page 220 for moreinformation.
Write Global-Voice Processor Setup
Select this command to open the Write Global-Voice ProcessorSetup dialog box, and save the current Voice Processor Setupsettings (see from page 216).
See “Write Global - Voice Processor Setup dialog box” onpage 221 for more information.
Write Global-Voice Processor Preset
Select this command to open the Write Global-Voice ProcessorPreset dialog box, and save the current Voice Processor Presetsettings (see from page 99).
See “Write Global - Voice Processor Preset dialog box” onpage 221 for more information.
Write Global-Auto Select Setup
Choose this command to save the preferred Styles, Sounds andPerformances assigned to the control panel STYLE and PER-FORMANCE buttons, via the Auto Select functions (seepage 207).
This way, the next time you will turn the Pa3X on, the preferredStyles and Performances will be still assigned to the relevant but-tons.
Write Global Maxx Preset
Choose this command to save the Maxx settings to one of thesixteen available Maxx Presets.
See “Write Global - Maxx Preset dialog box” on page 221 formore information.
Write Quarter Tone SC Preset
Choose this command to open the Write SC Preset dialog box,and save the current scale settings in one of the four available SCPresets.
See “Write Quarter Tone SC Preset dialog box” on page 221 formore information.
Write Global - Global Setup dialog box
Open this dialog box by selecting the Write Global-Global Setupitem from the page menu. Here, you can save most settings, pro-grammed in the Global edit mode, to the Global file in memory.
Parameters saved in the Global Setup area of the Global aremarked with the symbol through the user’s manual.
Write Global - Midi Setup dialog box
Open this dialog box by selecting the Write Global-Midi Setupitem from the page menu. Here, you can save all MIDI settingsto a MIDI Setup, that is included in the Global file in memory.
Parameters saved in the MIDI Setup area of the Global aremarked with the symbol through the user’s manual.
Name
Name of the MIDI Setup to be saved. Touch the (Text Edit)button next to the name to open the Text Edit window and mod-ify the name.
Gbl
Mid

221Global edit modeWrite Global - Voice Processor Setup dialog box
Refe
renc
e
Midi Setup
One of the 8 available MIDI Setup locations, where to save cur-rent MIDI settings.
Write Global - Voice Processor Setup dialogbox
Open this dialog box by selecting the Write Global-Voice Pro-cessor Setup item from the page menu. Here, you can save cur-rent settings for the Voice Processor Setup edit section,including the Talk Configuration (see starting from page 216).
Parameters saved in the Voice Processor Setup area of the Globalare marked with the symbol through the user’s manual.
Write Global - Voice Processor Presetdialog box
Open this dialog box by selecting the Write Global-Voice Pro-cessor Preset item from the page menu. Here, you can save cur-rent settings for the Voice Processor Preset edit section (seestarting from page 99).
Parameters saved in the Voice Processor Preset area of theGlobal are marked with the symbol through the user’smanual.
Name
Name of the VP Preset to be saved. Touch the (Text Edit)button next to the name to open the Text Edit window and mod-ify the name.
Voice Preset
One of the 128 available Voice Preset locations, where to savecurrent VP Preset settings.
Write Global - Maxx Preset dialog box
Open this dialog box by selecting the Write Global-Maxx Presetitem from the page menu. Here, you can save current settings forthe Maxx Master EQ edit section (see starting from page 217).
Parameters saved in the Maxx Preset area of the Global aremarked with the symbol through the user’s manual.
Name
Name of the Maxx Preset to be saved. Touch the (Text Edit)button next to the name to open the Text Edit window and mod-ify the name.
Maxx Preset
One of the 16 available Maxx Preset locations, where to save cur-rent Maxx Preset settings.
Write Quarter Tone SC Preset dialog box
Open this dialog box by selecting the Write Quarter Tone SCPreset item from the page menu. Here, you can save the currentscale settings in one of the four available SC Presets.
To
One of the 4 available SC Preset locations, where to save currentscale settings.
VPs
VPsVPp
VPsMax
Gbl

222 Media edit modeStorage devices and internal memory
The Media edit mode is the place where you can manage files.This edit environment overlaps the current operating mode(Style Play, Song Play, Sequencer, Sound Edit).
Storage devices and internal memory
User-accessible storage devicesDuring a Media operation, files are usually exchanged between astorage device and the internal memory. You can access the fol-lowing mass storage device types:
A device can be selected by using the Device pop-up menu,shown in the lower left corner of most Media pages:
Supported device
External devices, like hard disks or pen drives, support theFAT16 and FAT32 formats with long file names. NTSF (Win-dows NT/2000/XP/Vista/7), HFS (Mac OS 9) and HFS+ (MacOS X) formats are not supported.
Selecting and deselecting files
While a file list is shown in the display, you can select any itemby touching it. The selected item is highlighted.
You can deselect all items in any of the following ways:
• Touch an empty area in the file list (if available).
• Touch the Device pop-up icon, and select the currentdevice again.
Searching files
By using the Search function, you can search files and musicalresources in all internal and external devices. For more informa-tion, see the “Searching files and musical resources”chapter onpage 109.
Media edit mode
Abbreviation Media type
SYS Factory area of the internal hard disk (76-key model and 61-key model with the HDIK-2 kit installed) or flash-memory SSD (61-key model). Only accessible when updating the Operating System and Musical Resources, or when exchanging Factory Sound, Styles and Pads.
HD User-accessible area of the internal hard disk (76-key model and 61-key model with the HDIK-2 kit installed) or flash-memory SSD (61-key model). This is where you can store Songs and other files.
USB-F(ront) USB memory device (like a pen drive) connected to the front USB Host port.
USB-R(ear) USB memory device (like a pen drive) connected to the rear USB Host port.
Device pop-up menu
Device name

223Media edit modeFile types
Refe
renc
e
File types
The following tables describe all the file and folder types thePa3X can manage. Here are the files you can read or write withthe Pa3X.
Pa3X can also read (but not write) the following types of data.
Extension File/folder type
SET All the User data. (This is a folder containing other fold-ers)
BKP Backup file, created with the “Full Resources Backup” function of the Media > Utility page
PKG Operating System and Musical Resource files
GBL Global Setup
VOC Voice Processor Presets
MXP MaxxAudio Presets
PRF Performance
PCG Sound (Korg Pa-Series)
KMP Multisample
PCM Sample
AIF AIFF audio files
WAV WAVE audio files
STY Style
PAD Pad
SBD SongBook
SBL SongBook’s Custom List
JBX Jukebox
MID Standard MIDI File, SMF
MP3 MP3 file
TXT Plain text file
Extension File type
KAR Karaoke file
CDG CD+Graphics file
PCG Korg Triton Programs
KSF Korg Trinity/Triton Sample
S Akai Sample
P Akai Program

224 Media edit modeMedia structure
Media structure
Each device (and the internal memory) can contain files and folders. Data in the Pa3X is slightly more rigidly structured than in a com-puter, due to the pre-configured type of data inside the instrument’s memory. The diagram below shows the global structure of a Pa3Xdevice.
Note: Style banks from 1 to 15 (Factory Styles) can be seen in Media mode only when the “Factory Style and Pad Protect” parameter is set toOff (see page 237), and only when loading or saving a single Style bank, or when erasing something.
MYDIR.SET
GLOBAL
PERFORM
SETUP.GBL
BANK01.PRF
1-1 Grand Piano…1-32 Full Strings
BANK02.PRF
2-1 Jazz Brass…2-32 Jazz Strings
BANK….PRF
BANK16.PRF
16-1 Rock Brass…16-32 Rock Strings
VPPRESET.VOCMXPRESET.MXP
SONGBOOK
LISTDB.SBL
SONGDB.SBD
SOUND
USER01.PCG
USERDK.PCG
STYLE
BANK01.STY
1-1 Pop 1…1-40 Pop 40
BANK….STY
USER01.STY
U1-1 User 1…U1-40 User 40
USER02.STY
U2-1 User 1…U2-40 User 40
USER03.STY
U3-1 User 1…U3-40 User 40
BANK15.STY
15-1 Contemp. 1…15-40 Contemp. 40
1 Piano 1…128 SynBrass22
1 Standard Kit…128 Orchestral Kit
USER04.PCG
USER….PCG
1 SopranoSax…128 Noise
FAVORITE01.STY
FAVORITE12.STY
1 Favorite 1…40 Favorite 40
1 Favorite 1…40 Favorite 40
FAVORITE….STY
1 Favorite 1…40 Favorite 40
PAD
BANK01.PAD
1 Cowbell 1…32 Drumkit F
BANK….PAD
1 Agogo 11…32 Windchimes 3
BANK20.PAD
1 Military 1…32 Circus 2
USER01.PAD
U1-1 User 1…U1-32 User 32
USER….PAD
U…-1 User 1…U…-32 User 32
USER10.PAD
U10-1 User 1…U10-32 User 32

225Media edit modeMain page
Refe
renc
e
Main page
There is no main page in the Media edit mode. When pressingEXIT, you exit the Media mode, and the underlying operatingmode in the background is recalled.
Page structure
All edit pages share some basic elements.
Edit mode
This indicates that the instrument is in Media mode.
Page menu icon
Touch this icon to open the page menu (see “Page menu” onpage 239).
Path
Full path of the directory currently shown in the display.
List of files
This area shows the files and folder contained in the selecteddevice.
You can touch one of the heading labels above the list to changethe order in which files are shown. For example, by touching the“Name” label, the list is alphabetically re-ordered according tothe file names. The selected label turns red, showing the cur-rently selected ordering.
If you touch the red label again, the alphabetic order changesfrom ascending to descending, or vice-versa. The small arrownext to the label name shows the selected order.
Scrollbar
Use the scrollbar to scroll the list. Touching the arrows will scrollone step at a time, while touching the bar will scroll one page at atime.
Touching the arrows while SHIFT is kept pressed jumps to theprevious or next alphabetical section, or file/folder type(depending on the selected display order).
Device pop-up menu
Use this menu to select one of the available storage devices.
Commands
Commands may be different depending on the shown page.They are detailed in each relevant section.
Tabs
Use tabs to select one of the edit pages of the current edit section.
Navigation tools
When in a Media page, you can use any of the following com-mands to browse through the files and folders.
Scrollbar
See “Scrollbar” above.
VALUE controls
Use the VALUE DIAL and UP/+ or DOWN/- controls to scrollthe list up or down.
Device pop-up menu
See “Device pop-up menu” above.
Load/Save/Copy/Erase button
Executes the media operation.
Open button
Opens the selected folder or directory (whose name begins with
the “ ” icon).
Close button
Closes the current folder or directory, returning to the parent(“upper”) level.
Edit mode
Path
Page menu icon
List of files
Tabs
Commands
Device menu
Scrollbar

226 Media edit modeLoad
Load
In this page you can load User data files (Performances, UserSounds, User Styles, the SongBook, User PCM, the Global) froman internal or external storage device to the internal memory.
Note: While in this page, only data allowed for loading are shown.All other files are hidden.
Warning: When loading a “.SET” folder containing Sounds associ-ated with PCM data (samples), all existing PCM data in memoryare deleted. Save the data already in memory, before loading thenew data.
To see if a “.SET” folder contains PCM data, open it and look for a“PCM” folder.
Hint: Load single Sounds, if you want to load new PCM datawithout deleting the ones already contained in memory. This willmerge the existing data with the new ones.
Merging when loading dataWhen loading all User data, or all data of a specified type, mostdata loaded from a storage device is merged with data alreadyexisting in memory. For example, if there is data in all threeUSER Style banks in memory (USER01, USER02, USER03), andthere is only the USER01 Style bank in the storage device, theUSER01 bank is overwritten, while USER02 and USER03 banksare left unchanged.
As a result, you will have a STYLE folder in memory containingthe USER01 bank you just loaded, and the old USER02 andUSER03 banks.
Loading all the User dataYou can load all the User data with a single operation.
1. If loading from an external device, connect the device toone of the USB Host ports.
2. Select the source device, by using the Device pop-up menu.When the device is selected, its content will appear in thedisplay.
3. If the folder you are looking for is inside another folder,select this latter and touch the Open button to open it.Touch the Close button to go back to the parent folder.
4. Select the “.SET” folder containing the data you wish toload, and touch Load to confirm the selection.
Warning: When loading a “.SET” folder containing PCMdata, all existing PCM data in memory are deleted. Savethem before loading the folder, by selecting the “PCM” optionduring a Save All operation (see “Saving the full memorycontent” on page 230).
To see if a “.SET” folder contains PCM data, open it and lookfor a “PCM” folder.
To create a new .SET folder with PCM samples from differentsources, see “Merging PCM samples from various sources” onpage 241.
Loading all data of a specified typeYou can load all data of a specified type with a single operation.
1. If loading from an external device, connect the device toone of the USB Host ports.
2. Select the source device, by using the Device pop-up menu.When the device is selected, its content will appear in thedisplay.
3. If the folder you are looking for is inside another folder,select the latter and touch the Open button to open it.Touch the Close button to go back to the parent folder.
4. Select the “.SET” folder containing the data you wish toload, and touch Open to open the “.SET” folder. A list ofUser data appears (Global, Performance, SongBook,Sounds, Style…).
5. Select the folder containing the type of data you are lookingfor, and touch Load to confirm your selection.
Warning: When loading PCM data, all existing PCM data inmemory are deleted. Save them before loading, by selectingthe “PCM” option during a Save All operation (see “Savingthe full memory content” on page 230).

227Media edit modeLoad
Refe
renc
e
Loading a single bankYou can load a single bank of data (Sounds, Styles, Perfor-mances) with a single operation. A bank corresponds to aSTYLE SELECT or PERFORMANCE SELECT button.
1. If loading from an external device, connect the device toone of the USB Host ports.
2. Select the source device, by using the Device pop-up menu.When device is selected, its content will appear in the dis-play.
3. If the folder you are looking for is inside another folder,select this latter and touch the Open button to open it.Touch the Close button to go back to the parent folder.
4. Select the “.SET” folder containing the data you wish toload, and touch Open to open the “.SET” folder. A list ofUser data appears (Global, Performance, SongBook,Sounds, Style…).
5. Select the folder containing the type of data you are lookingfor, and touch Open to open the selected folder. A list ofFavorite/User banks appears.
6. Select the bank file you are looking for, and touch Load toconfirm the selection. A dialog box appears, asking you toselect one of the available User (or Favorite/User Style)banks in memory.
In the example above, the previously selected Style bankwill be loaded into the bank USER 1 in memory. The exist-ing Styles in memory will be deleted and overwritten.
7. Select the target bank, and touch OK to load the sourcebank.
Warning: After confirming, all User data contained in thebank in memory is deleted.
Note: If Sounds or Drum Kits based on external PCM sam-ples are deleted, choose the “Delete” command from the pagemenu of the Sampling mode to delete the unused samples (seethe “Advanced Edit” addendum in the Accessory Disk).
Note: If you are loading a bank of Sounds, and one or moreSounds or Drum Kits use an external PCM sample, the sam-ples are automatically loaded (unless they are already inmemory). This way, all needed samples are always loadedtogether with the Sounds or Drum Kits making use of them.
Loading a single itemYou can load a single item with a single operation.
1. If loading from an external device, connect the device toone of the USB Host ports.
2. Select the source device, by using the Device pop-up menu.When device is selected, its content will appear in the dis-play.
3. If the folder you are looking for is inside another folder,select this latter and touch the Open button to open it.Touch the Close button to go back to the parent folder.
4. Select the “.SET” folder containing the data you wish toload, and touch Open to open the “.SET” folder. A list ofUser data appears (Global, Performance, SongBook,Sounds, Style…).
5. Select the folder containing the type of data you are lookingfor, and touch Open to open the selected folder. A list ofbanks appears.

228 Media edit modeLoad
6. Select the bank file you are looking for, and touch Open toopen it. A list of items appears.
7. Select the item you are looking for, and touch Load to con-firm the load. A dialog box appears, asking you to selectone of the available locations in memory.
In the dialog box above, the previously selected Style will beloaded into location 01 of the bank U01 in memory. Theexisting Style at the same memory location will be deletedand overwritten.
Empty locations are named “- - - “.
8. Select the target location, and touch OK to load the sourcefile.
Warning: After confirming, the item you are overwriting inmemory will be deleted.
Note: If a Sound or Drum Kit based on external PCM sam-ples is deleted, choose the “Delete” command from the pagemenu of the Sampling mode to delete the unused samples (seethe “Advanced Edit” addendum in the Accessory Disk).
Note: If you are loading a Sound or Drum Kit making use ofan User PCM Sample, the Sample is automatically loaded(unless it is already in memory). This way, all needed Sam-ples are always loaded together with the Sound or Drum Kitmaking use of them.
Loading Pa2X/Pa800 dataYou can load Pa2X/Pa800 data exactly as if they were Pa3X data,apart for the Global (GLB) and Voice Processor Presets (VOC)files. Global files are not loaded. Due to the different order inmemory, Styles must be reassigned to SongBook entries by usingthe SB Editor software (freely available on www.korg.com).
It is not possible to load Pa3X data into a Pa2X/Pa800.
Loading Pa1X dataYou can load Pa1X data exactly as if they were Pa3X data, apartfor the Global (GLB) and Voice Processor Presets (VOC) files.Global files are not loaded. Major differences might existbetween effect parameters. Due to the different order in mem-ory, Styles must be reassigned to SongBook entries by using theSB Editor software (freely available on www.korg.com).
It is not possible to load Pa3X data into a Pa1X.
Loading Pa80/60/50 dataYou can load Pa80/60/50 data exactly as if they were Pa3X data.The only difference is that the “SOUND” folder of Pa3X is called“PROGRAM” in the Pa80/60/50. Therefore, to load Soundsfrom Pa80/60/50 disks, you must accomplish one of the follow-ing operations:
• Either rename the “PROGRAM” folder “SOUND” (byusing a personal computer) before loading a “.SET” folder;or
• First load the “.SET” folder, then separately load the “.PCG”file from the “PROGRAM” folder.
Loading i-Series dataPa3X is compatible with the Styles of the older i-Series instru-ments. You can load them as if they were ordinary Pa3X data.
1. Copy the old i-Series data into an USB device, or transferthem to the internal storage memory of the Pa3X.
2. Press MEDIA to go to the Media mode. Select the Loadpage if needed.
3. While in the Load page, select the device containing the i-Series data from the Device pop-up menu.
4. If you are reading an i30 file, select the “.SET” folder andtouch the Open button in the display.
5. Select the “.STY” folder.
6. At this point, you can load the whole “.STY” folder, or openit and select a single Style.
• To load the whole folder, touch the Load button in thedisplay. If it contains more than 40 Styles, they will beloaded into the USER banks sequentially, otherwise youwill be prompted to select one of the three USER Stylebanks or the twelve FAVORITE Style banks in memory.Once the target bank is selected, touch Load to load thebank. The “Are you sure?” message will appear. Touch OKto confirm, or Cancel to abort.
• To load a single Style, touch Open in the display to openthe “.STY” folder. Since a conversion will be started at thispoint, please wait some seconds for the operation to becompleted.
Select the Style to load, then touch Load. You will beprompted to select a target location in memory. Once thetarget location is selected, touch Load to load the Style. The“Are you sure?” message will appear. Touch OK to confirm,or Cancel to abort.
Note: Loading a whole “.SET” folder from an i30 file maytake some time due to format conversion.

229Media edit modeSave
Refe
renc
e
7. Go to the Style Play mode, and select (one of) the loadedStyle. Adjust the Tempo, then select the “Write CurrentStyle Settings” to write changes. Touch OK twice to con-firm.
8. Due to the difference in Sounds, you will probably want tomake some adjustments to the old Styles, once they areloaded in Pa3X (changing the Sound, Volume, Pan, Tempo,Drum Mapping, Wrap Around…).
9. To make the Sound assignment to the Style tracks effective,be sure the “Original Style Sounds” parameter is notchecked (see page 114).
10. Save the Style Settings again. Select the “Write CurrentStyle Settings” to write changes. Touch OK to confirm.
Save
In this page, you can save User data from the internal memory toa mass storage device (like an hard disk or an USB pen drive).You can save single files, banks, or all the User and Favorite Stylefiles of the internal memory.
Note: While in this page, only data allowed for saving are shown.All other files are hidden.
Here are the various types of files contained in the internalmemory:
The file/folder type…
…contains……and will create on the target device…
All All the User data in memory A .SET folder
Style The FAVORITE 01-12 Styles and the USER 01-03 Styles
A STYLE folder inside a .SET folder
Sound The USER Sounds and Drum Kits
A SOUND folder inside a .SET folder
Pad The USER Pads A PAD folder inside the .SET folder
Perform (Perfor-mances)
The Performances A PERFORM folder inside a .SET folder
SongBook The SongBook database A SONGBOOK folder inside a .SET folder
PCM All the Multisamples con-tained in the internal stor-age memory, and the Samples contained in RAM
A PCM folder inside a .SET folder
Global The Global. All parameters
marked with through the various chapters are saved in the Global. Voice Processor and MaxxAudio presets are also saved.
A GLOBAL folder inside a .SET folder. Inside the GLOBAL folder will be created a .VOC file, con-taining Voice Processor presets, and an .MXP file containing the Maxx Pre-sets.

230 Media edit modeSave
Saving the full memory contentYou can save the full memory content with a single operation.
1. If saving to an external device, connect the device to one ofthe USB Host ports.
2. The full content (“All”) of the internal memory is alreadyshown. Select it, and touch Save to confirm the selection.The list of files in the target device is shown.
3. If needed, select a different target device, by using theDevice pop-up menu. When the target device is selected, itscontent will appear in the display.
4. At this point, you can:
• Touch the New SET button and create a new “.SET” folder(see “Creating a new “.SET” folder” on page 232), or
• Select an existing “.SET” folder.
5. Touch Save to confirm. A dialog box appears, asking you toselect the type of data to save:
In the above dialog box, check all data type you wish to saveto a storage device.
6. Touch OK to confirm, or Cancel to abort.
Warning: After confirming, all data of the selected type in thetarget folder is deleted.
Saving all data of a specified typeIn addition to the above, you can save all data of a specified typeby selecting the corresponding folder.
1. If saving to an external device, connect the device to one ofthe USB Host ports.
2. The full content (“All”) of the internal memory is alreadyshown. Select it, and touch Open to open it. A list of Userdata types appear (each type is a separate folder).
3. Select the folder containing the type of data you wish tosave, and touch Save To to confirm the selection. The list offiles of the target device is shown.
4. If needed, select a different target device, by using theDevice pop-up menu. When the target device is selected, itscontent will appear in the display.
5. At this point, you can:
• Touch the New SET button and create a new “.SET” folder(see “Creating a new “.SET” folder” on page 232), or
• Select an existing “.SET” folder, and touch Save to con-firm.
Warning: After confirming, all data of the selected type in thetarget folder is deleted.

231Media edit modeSave
Refe
renc
e
Saving a single bankYou can save a single User bank with a single operation. A bankcorresponds to a button on the control panel of the instrument(i.e. a button of the STYLE section).
1. If saving to an external device, connect the device to one ofthe USB Host ports.
2. The full content (“All”) of the internal memory is alreadyshown. Select it, and touch Open to open it. A list of Userdata types appear (each type is a separate folder).
3. Select the folder containing the type of data you wish tosave, and touch Open to open it. The list of contained bankfiles is shown.
4. Select the bank file to be saved, and touch Save To to con-firm the selection. The list of files of the target device isshown.
5. If needed, select a different target device, by using theDevice pop-up menu. When the target device is selected, itscontent will appear in the display.
6. At this point, you can:
• Touch the New SET button and create a new “.SET” folder(see “Creating a new “.SET” folder” on page 232), or
• Select an existing “.SET” folder, and touch Save to con-firm.
7. A dialog box appears, asking you to select one of the avail-able User (or Favorite/User Style) locations inside thefolder:
In the above dialog box, the previously selected bank ofStyles will be saved to bank User 01 inside the selectedfolder. Three User banks are available.
8. Touch OK to confirm, or Cancel to abort.
Warning: After confirming, the same bank in the targetfolder is deleted.
Saving a single itemYou can save a single User item with a single operation.
1. If saving to an external device, connect the device to one ofthe USB Host ports.
2. The full content (“All”) of the internal memory is alreadyshown. Select it, and touch Open to open it. A list of Userdata types appear (each type is a separate folder).
3. Select the folder containing the type of data you wish tosave, and touch Open to open it. The list of contained bankfiles is shown.

232 Media edit modeSave
4. Select the desired bank file, and touch Open to gain accessto the single items.
5. Once you have selected the file that you want to save, touchSave To to confirm the selection. The list of files of the tar-get device is shown.
6. If needed, select a different target device, by using theDevice pop-up menu. When the target device is selected, itscontent will appear in the display.
7. At this point, you can:
• Touch the New SET button and create a new “.SET” folder(see “Creating a new “.SET” folder” on page 232), or
• Select an existing “.SET” folder, and touch Save to con-firm.
8. A dialog box appears, asking you to select one of the avail-able User (or Favorite Style) locations inside the selectedfolder
In the above dialog box, the previously selected Style will besaved to location 01 inside the bank U01 inside the selectedfolder.
9. Touch OK to confirm, or Cancel to abort.
Warning: After confirming, the same item in the target folderis deleted.
Creating a new “.SET” folderPa3X proprietary data must be saved in special folders with the“.SET” extension. These special folders can be saved inside ordi-nary folders.
When saving, you can save onto existing “.SET” folders, or youcan create a new folder of this type. Here is how to do it.
1. When the directory of the target device is shown in the dis-play, the “New SET” button appears among the buttonsbelow the file list.
2. Touch the New SET button. A dialog box appears, askingyou to enter a name for the new “.SET” folder.
3. Touch the (Text Edit) button to open the Text Editwindow. Enter the name, then touch OK to confirm andclose the Text Edit window. Note: The “.SET” file nameextension is added automatically.
4. Touch OK to create the new folder and exit the dialog box.

233Media edit modeCopy
Refe
renc
e
Copy
In this page you can copy files and folders. Folders can begeneric or “.SET” folders. In addition, you can copy the contentof the generic folder you are in. You can copy inside the samedevice, or from a device to a different one (both devices must beconnected to the Pa3X during the copy operation).
To preserve data structure integrity, during Copy operations youcan’t open “.SET” folders and copy only one of the files it con-tains. You can only open and go inside generic folders.
Contrary to the Load and Save pages, in this page you can see alltypes of files, and not only Pa-Series supported files.
Copying a folder’s contentIf nothing is selected while a folder is open in the display, youcan copy the folder’s content, without copying the folder itself.
Note: During the Copy procedure, you can’t open a “.SET” folder.You can, however, open any generic folder.
1. If copying from or to an external device, connect the deviceto one of the USB Host ports.
2. Select the source device, by using the Device pop-up menu.
3. If the folder you are looking for is inside another folder,select this latter and touch the Open button to open it.Touch the Close button to go back to the parent folder.
4. To copy the current folder’s content, without copying thefolder itself, do not select anything in the display.
5. Touch Copy To to confirm. The target device appears.
Note: If the selected device is not available, the “Device notfound, or unknown format” message will appear. A differentdevice will be automatically selected.
6. If needed, select the target device, by using the Device pop-up menu.
7. If you want to select a different folder, use the Open andClose buttons to move through the directories.
• To copy into an existing generic folder (not a “.SET”folder), select that folder.
• To copy into the current folder, do not select anything.
8. Once the target is selected, touch Copy.
If a file or folder with the same name of the source dataalready exists at the target location, the “Overwrite” dialogbox will appear (see “Overwriting existing files or folders”on page 234).
During Copy, a dialog box shows the progress of the opera-tion.
Copying a single file or folderYou can copy a single file or folder, from the root or a genericfolder to a different one. You can’t copy single files or foldersfrom inside a “.SET” folder.
1. If copying from or to an external device, connect the deviceto one of the USB Host ports.
2. Select the source device, by using the Device pop-up menu.
3. Select the folder containing the file or folder you wish tocopy. If it is contained in another folder, touch the Openbutton to open it. Touch Close to go back to the previoushierarchic level.
4. Touch Open to open the folder containing the file or folderto be copied.
5. Select the file or folder to be copied, then touch Copy To toconfirm its selection. The target device appears.
Note: If the selected device is not available, the “Device notfound, or unknown format” message will appear. A differentdevice will be automatically selected.
6. If needed, select the target device, by using the Device pop-up menu.
7. When the target device content appears in the display,select the target folder. Touch Open to open a folder, orClose to close it.
8. Once the target is selected, touch Copy.
If a file or folder with the same name of the source dataalready exists at the target location, the “Overwrite” dialogbox will appear (see “Overwriting existing files or folders”below).
Multiple file selectionWhile in the Copy and Erase pages of the Media mode, you canselect several files or folders at the same time before executingthe operation. Files or folders can be selected consecutively (i.e.,in a row), or discontinuously (i.e., with other files or folders inthe middle).
To choose either to select files in a consecutive or discontinueway, use the Mode button on the right of the page command but-tons, to choose an option for the SHIFT button:
Choose this option to select files or folders con-secutively (i.e., in a row).
Choose this option to select files or folders dis-continuously (i.e., with other files or folders inthe middle).
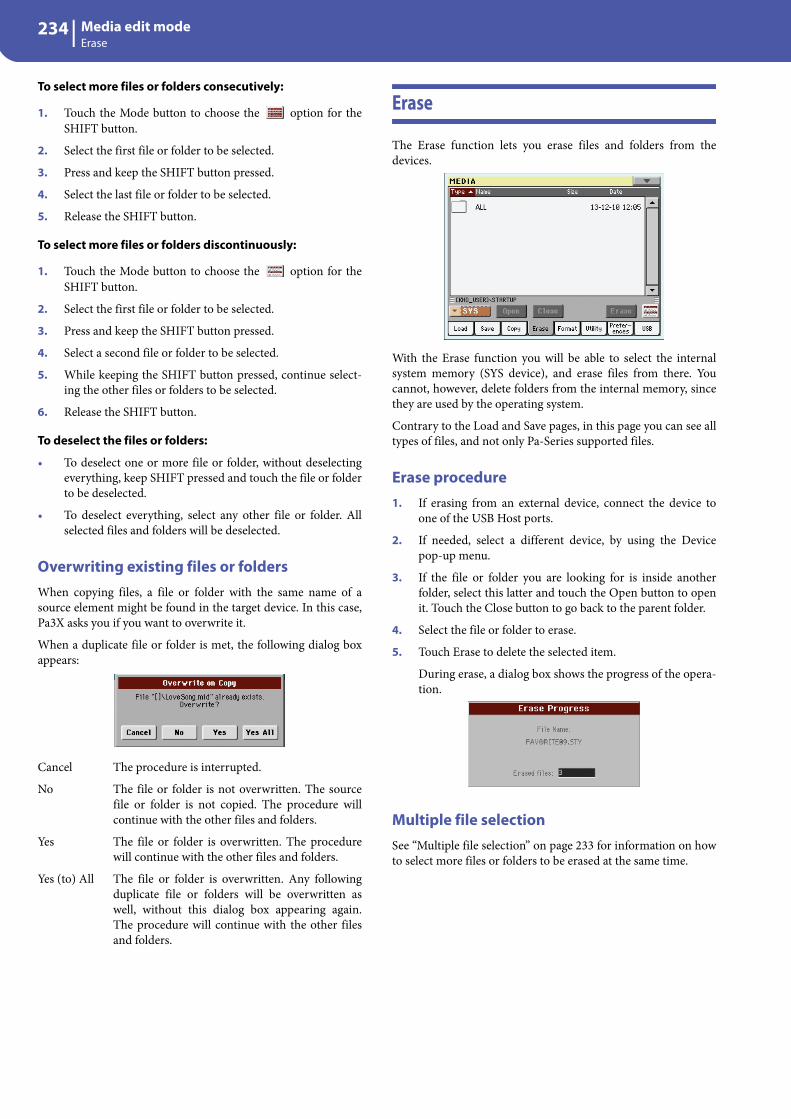
234 Media edit modeErase
To select more files or folders consecutively:
1. Touch the Mode button to choose the option for theSHIFT button.
2. Select the first file or folder to be selected.
3. Press and keep the SHIFT button pressed.
4. Select the last file or folder to be selected.
5. Release the SHIFT button.
To select more files or folders discontinuously:
1. Touch the Mode button to choose the option for theSHIFT button.
2. Select the first file or folder to be selected.
3. Press and keep the SHIFT button pressed.
4. Select a second file or folder to be selected.
5. While keeping the SHIFT button pressed, continue select-ing the other files or folders to be selected.
6. Release the SHIFT button.
To deselect the files or folders:
• To deselect one or more file or folder, without deselectingeverything, keep SHIFT pressed and touch the file or folderto be deselected.
• To deselect everything, select any other file or folder. Allselected files and folders will be deselected.
Overwriting existing files or foldersWhen copying files, a file or folder with the same name of asource element might be found in the target device. In this case,Pa3X asks you if you want to overwrite it.
When a duplicate file or folder is met, the following dialog boxappears:
Cancel The procedure is interrupted.
No The file or folder is not overwritten. The sourcefile or folder is not copied. The procedure willcontinue with the other files and folders.
Yes The file or folder is overwritten. The procedurewill continue with the other files and folders.
Yes (to) All The file or folder is overwritten. Any followingduplicate file or folders will be overwritten aswell, without this dialog box appearing again.The procedure will continue with the other filesand folders.
Erase
The Erase function lets you erase files and folders from thedevices.
With the Erase function you will be able to select the internalsystem memory (SYS device), and erase files from there. Youcannot, however, delete folders from the internal memory, sincethey are used by the operating system.
Contrary to the Load and Save pages, in this page you can see alltypes of files, and not only Pa-Series supported files.
Erase procedure1. If erasing from an external device, connect the device to
one of the USB Host ports.
2. If needed, select a different device, by using the Devicepop-up menu.
3. If the file or folder you are looking for is inside anotherfolder, select this latter and touch the Open button to openit. Touch the Close button to go back to the parent folder.
4. Select the file or folder to erase.
5. Touch Erase to delete the selected item.
During erase, a dialog box shows the progress of the opera-tion.
Multiple file selectionSee “Multiple file selection” on page 233 for information on howto select more files or folders to be erased at the same time.

235Media edit modeFormat
Refe
renc
e
Format
The Format function lets you initialize a device. Pa3X uses a PCcompliant device format:
Warning: When formatting a device, all data it contains is lost for-ever!
Volume Label
Use this parameter to assign a name to an external device to beformatted.
Note: You cannot rename the label (name) of the internal volumes.When formatting an internal disk, the label cannot be edited.
Touch the (Text Edit) button to open the Text Edit window.Enter the name, then touch OK to confirm and close the TextEdit window.
Note: When changing the name to a device containing StandardMIDI Files or MP3 files used by the SongBook, the links are bro-ken. We suggest to give the device the same name it had before for-matting.
Warning: Do not change the label (name) of any volume of theinternal disk when Pa3X is connected to a PC through the USBport. This would prevent Pa3X to recognize the internal disk andto boot. In case you changed the label, and the instrument cannotbe reboot, please use the Factory Restore procedure; please find theneeded file and instructions in our web site (www.korg.com). Allcustom data inside the disk will be lost.
Execute button
Touch this button, after setting all the options in this page, toexecute the Format command.
Format procedure
Here is how to format a device.
1. If formatting an external device, connect the device to oneof the USB Host ports.
2. Choose the device to be formatted by using the Devicepop-up menu in the lower-left corner of the display.
3. Touch the Execute button in the display to confirm format-ting.
4. The “If you confirm, all data in the media will be lost. Areyou sure?” message appears in the display. Touch Yes toconfirm, or No to cancel.
Note: When formatting the hard disk or an external USBdevice, an additional warning appears, to avoid accidentaldata loss.
Utility
This page includes a set of backup and restore utilities.
Full Resources Backup
This command allows you to make a full backup of all the inter-nal data on a target device. A “.BKP” file will be created.
Hint: This command cannot be used to save single items (like asingle Style, a bank of Performances…). To do that, use the Saveoperations instead.
Note: In case you want to restore the original data, use the “Fac-tory Restore” command (see below).
Note: You will not be able to load data from this file using the nor-mal Media > Load operations. This file is used for archiving pur-pose only. To save data that must remain accessible, for example toload User data after updating the Musical Resources, use theMedia > Save operations instead.
1. In case you are making the backup on an external USBdevice, connect the device to one of the USB Host ports.
Be sure there is enough free space in your target device, orthe Backup procedure will not be completed.
2. Select the “Full Resources Backup” command, then touchthe Execute button in the display. The target deviceappears.
3. If needed, select a different device, by using the Devicepop-up menu.
4. If you wish to save data inside another folder, select this lat-ter and touch the Open button to open it. Touch the Closebutton to go back to the parent folder.
5. Select the folder where to save data, and touch Backup tosave it. If nothing is selected, data will be saved to the cur-rent directory.

236 Media edit modeUtility
After touching Backup, a dialog box will appear, asking youto select a name for the backup file, and whether compres-sion must be turned on or off during the backup.
Touch the (Text Edit) button to open the Text Editwindow. Enter the name, and confirm by touching OK.
6. Touch OK to start the backup.
7. When finished, save the (removable) storage device in asafe place.
Full Resources Restore
This command fully restores the backup of the internal Factoryand User data, created with the “Full Resources Backup” com-mand.
Warning: This command deletes all modified data in memory.
Hint: This command cannot be used to load single items (like asingle Style, a bank of Performances…). Backups are compactarchives, that can only be restored as a full package.
Note: Loading a backup file created with previous Pa-Series (Pa80,Pa60, Pa50, Pa1X, Pa2X, Pa800, Pa500) and i-Series instrumentsis not allowed.
Warning: Don’t play the keyboard while restoring data, and stayin the Media mode. Wait until the “Wait” message disappears.
1. In case you are restoring from an external USB device, con-nect the device to one of the USB Host ports.
2. Select the Full Restore Resources command, then touchExecute. The source device appears.
3. If needed, select a different device, by using the Devicepop-up menu.
4. Browse through the files to find the backup file.
5. When the backup file (“.BKP” file) is in the display, select itand touch the Restore command.
6. When done, a message appears asking you to restart theinstrument (“Data Restored. Please switch off ”). Turn theinstrument off, then on again (you can use either theSTANDBY or POWER buttons).
Factory Restore
In case you want to erase all changes to your Factory and Userdata, and restore your Pa3X to the same condition it was when itwas new, you can use the Factory Restore procedure.
Warning: This command deletes all modified data in memory.
1. Select the Factory Restore command, then touch Execute.
A message appears, asking you if you want to erase all thedata in the internal memory:
2. Touch Yes to confirm (or No to cancel). The original datawill be restored.
OS Version Number
This line shows the installed Operating System version. Fromtime to time, check our web site (www.korg.com), to see if anewer, free version has been released.

237Media edit modePreferences
Refe
renc
e
Preferences
This page includes various settings for the Media mode.
Hard Disk Protect
When on, this parameter protects the hard disk or flash-memorySSD (HD device) from writing.
Note: This parameter is saved to memory, but not to a storagedevice.
Global Protect
When loading a “.SET” file (see “Loading all the User data” onpage 226), this parameter (if On) prevents Global parametersfrom being reprogrammed when loading all data. All Globalparameters are therefore left unchanged.
When loading a single “.GLB” file, this parameter is ignored, andthe Global is overwritten by the loaded data.
Note: This parameter is saved to memory, but not to a storagedevice.
Factory Style and Pad Protect
When On, this parameter protects the Factory Styles (from the“POP” to the “CONTEMP.” bank) and Factory Pads (named“Hit” and “Sequence” in the Pad Select window) from beingoverwritten when loading data from a device. Furthermore, youcan’t access these banks when saving data.
Also, when this option is checked, you cannot write any STS(Single Touch Setting) or Style Settings onto Factory Styles. The“Write Single Touch Setting” and “Write Current Style Settings”command in the page menu are greyed out and cannot beselected. All original settings of the Factory Styles will be leftuntouched.
When Off, you can load or save User Styles or Pads even into theFactory Style banks (from “POP” to “CONTEMP.”) and FactoryPad banks (named “Hit” and “Sequence” in the Pad Select win-dow). This way, you customize personalize your Factory Styleand Pad banks.
Please note that the Save All procedure always saves only theUSER and FAVORITE Style banks.
Note: This parameter is automatically set to On when turning theinstrument off.
Note: Should you accidentally delete some Factory Data, reloadthe Backup data or use the Factory Restore procedure (Media >Utility).
Factory Sound Protect
When On, this parameter prevents writing edited Sounds fromthe Edit Sound mode. When Off, you can freely save editedSounds either in the Factory or User Sound area.
Warning: Use this feature with great care! Reorganizing the Fac-tory Sounds may make both Styles and Standard MIDI Files soundwith the wrong Sounds!
Note: This parameter is automatically set to On when turning theinstrument off.
Note: Should you accidentally delete some Factory Data, reloadthe Backup data or use the Factory Restore procedure (Media >Utility).
Hide Unknown Files
When this option is checked, non-proprietary files are hiddenwhen using Media operations, therefore making browsing direc-tories easier.
Force PCM Reload
When the backup battery gets discharged, or in any case inwhich you notice Samples are not sounding good, you shoulduse this command to force reloading of PCM Samples.
Med
Med

238 Media edit modeUSB
USB
Use this page to enable or disable the USB Device port for filetransfer.
The USB Device port allows you to access the internal storagememory from a personal computer (PC or Mac), by just con-necting the Pa3X to the computer’s USB interface. This way, youcan exchange files between the user-accessible area of the inter-nal storage memory of the Pa3X (HD device) and a personalcomputer.
Note: Windows 2000, XP and Vista/7, as well as Mac OS X, can bedirectly connected to the Pa3X. No additional driver must beinstalled on your PC or Mac (the drivers supplied in the AccessoryDisk are only for MIDI Over USB connection).
Note: While USB file transfer is enabled, you cannot access otherfunctions on the Pa3X. MIDI Over USB is also disabled.
Warning: Do not change the label (name) of any volume of theinternal disk when Pa3X is connected to a PC through the USBport. This would prevent Pa3X to recognize the internal disk andto boot. In case you changed the label, and the instrument cannotbe reboot, please use the Factory Restore procedure; please find theneeded file and instructions in our web site (www.korg.com). Allcustom data inside the disk will be lost.
HD Connection
Normally, the USB Device port is not enabled for file transfer onthe Pa3X (it is always on, however, for MIDI connection). Touchthe Enable button to turn it on, or the Disable button (with allthe caveats) to turn it off.
Enable After connecting Pa3X to a personal computer byusing a standard USB cable, touch this button toenable file transfer. In this case, Pa3X is the BUSB device (called Device or Slave), while thepersonal computer is the A USB device (calledHost or Master).
The MEDIA LED will start blinking, while thepersonal computer reads the internal storagememory of the Pa3X. When finished, the icon ofthe hard drive will appear among the other stor-age devices connected to the computer:
Caveat: Do not modify “.SET” folders, or you willno longer be able to use them on the Pa3X. Onlyuse the USB connection for data exchange purpose,or to modify ordinary folders.
Note: After starting the USB connection, accessingPa3X data from the computer may take some time,depending on the size of the hard drive and thedata contained in the hard drive.
Disable Touch this button to disconnect the USB filetransfer. Be careful to touch it only when you areabsolutely sure data transfer has been completed.
Note: USB connection is also automatically discon-nected when disconnecting the USB communica-tion on the personal computer side.
To disconnect USB communication on a PC, youusually select the dedicated command by clickingon the USB device icon with the right mouse but-ton. On the Mac, select the USB device icon, thenselect the Eject command or drag it to the ejecticon in the Dock.
Hint: We suggest to disconnect the USB connectionfrom the personal computer, instead of touchingthis button on the Pa3X.
Caveat: Do not disconnect the USB communica-tion before the personal computer has really fin-ished transferring files. Sometimes, the on-screenindicator tells the procedure has been completed,BEFORE it is actually finished.
Disconnecting USB communication (or discon-necting the USB cable) before data transfer hasbeen completed may cause loss of data.
HD
Windows
Macintosh

239Media edit modePage menu
Refe
renc
e
Page menu
Touch the page menu icon to open the menu. Touch a commandto select it. Touch anywhere in the display to close the menuwithout selecting a command.
Create New Folder
This command lets you create a new generic folder. You can’tcreate a “.SET” folder with this command, since this type offolder is reserved to the Save operations (and can be created withthe New SET button in any Save page).
By touching the (Text Edit) button you can open the TextEdit window. Enter the name, then touch OK to confirm andclose the Text Edit window.
Rename
Available only when an item is selected in a file list.
Use this function to change the name of an existing generic fileor folder. To preserve consistency through the data structure,you cannot rename folders and files inside a “.SET” folder. Also,you cannot change the 3-character extension of files and “.SET”folders, since they are used to identify the type of file or folder.
Touch the (Text Edit) button to open the Text Edit window.Enter the new name, then touch OK to confirm and close theText Edit window.
Object(s) info
Select this command to see the size of any selected file or folder.Also, the number of files and directories (folders) it contains areshown.
Note: The single file size is always shown to the right of the filename in any file list:
Device Info
Select this command to see various info on the selected device.To select a different device, use the Device pop-up menu on thelower left corner of most Media pages.
By touching the (Text Edit) button you can open the TextEdit window. Enter the name (label) of the selected device, thentouch OK to confirm and close the Text Edit window.
Warning: If you change the name of a device connected to theUSB-F or USB-R port, and it contains midifiles used by someSongBook entries, these entries will be damaged (due to brokenlinks to the resources contained in the device).
This does not affect resources contained in the internal storagememory.
Protect
Select this command to protect the selected file or folder fromwriting/erasing. The lock icon will appear next to the file orfolder name.
Unprotect
Select this command to unprotect the selected file or folder – ifprotected.

240 Media edit modeCare of mass storage devices
Write Global-Media Preference
Select this command to open the Write Global-Media Prefer-ences dialog box, and save settings made in the Preferences page(see “Preferences” on page 237).
Parameters saved in the Media Preferences area of the Global aremarked with the symbol through the user’s manual.
Care of mass storage devices
The Pa3X can save most of the data contained in memory to theinternal hard drive or flash-memory SSD, or to external devices(like hard drives or pen drives) connected to one of the USBHost ports. Here are some precautions when handling thesedevices.
Hard disk write protectionYou can protect your internal hard drive or flash-memory SSDfrom writing, by using the software protection found in Mediamode (see “Hard Disk Protect” on page 237).
Precautions• Do not remove a device or move the instrument while the
device is operating.
• Make a backup copy of the data contained in a device, inorder not to lose data forever in case of damage. You canbackup your data to a personal computer, and from there toa CD or DVD. The internal hard drive can be backed up ona personal computer’s hard drive, by using the USB Deviceconnection.
• Do not leave a USB device connected to the USB portswhile carrying the instrument, or it may be damaged.
• Keep the memory devices or the instrument away fromsources of magnetic fields, for example televisions, refriger-ators, computers, monitors, speakers, cellular phones andtransformers. Magnetic fields can alter the contents of thedevices.
• Do not keep memory devices in very hot or wet places, donot expose them to direct sunlight and do not store themwithout use in dusty or dirty places.
• Do not place heavy objects on top of the devices.
• Regular care is recommended with your devices. Defrag-menting and repairing internal devices can be made withany computer utility, while the Pa3X is connected via USB.
Possible problems• Magnetic fields, dirt, humidity and usage can damage data
in a device. You can try to recover the data with disk repairutilities for personal computers. It is, however, advisable toalways make a backup copy of your data.
Med

241Media edit modeMerging PCM samples from various sources
Refe
renc
e
Merging PCM samples from varioussources
When you load a .SET folder, all User PCM Samples in memoryare deleted. So, there is no way to merge different samples byloading complete .SET folders.
To merge samples from several sources, you must load singleSounds or Drum Kits based on User PCM Samples.
Delete all samples and multisamples1. If you want to delete all samples and multisamples already
in memory, press the SOUND button to access the Soundmode, then press the RECORD button to access the Sam-pling mode.
2. While in Sampling mode, choose the “Delete Sample” com-mand from the page menu. Choose the “All Samples, Multi-Sample, DrumSamples” option, and touch OK to delete allsamples and multisamples.
Warning: Before deleting, be sure to have a copy of anyimportant data you don’t want to lose.
3. To exit from the Sampling mode, choose the “Exit fromRecord” command from the page menu.
Create a new .SET of samples1. Press the MEDIA button to access the Media mode. Go to
the Load page.
2. Open a first .SET folder containing some of the PCM sam-ples to merge. Open the SOUND folder, then one of theUSER banks, and choose the first of the Sounds or DrumKits based on samples you would like to load. Touch Load,and choose a target User location in memory.
The Sound or Drum Kit is loaded, together with the PCMsamples it is based on.
3. Do the same with any subsequent Sound or Drum Kitwhose samples you would like to load.
4. When finished loading, save a new .SET folder, being surethe PCM option is checked in the Save All dialog (see “Sav-ing the full memory content” on page 230, or “Saving alldata of a specified type” on page 230).

242 MIDIWhat is MIDI?
What is MIDI?
Here is a brief overview of MIDI, as related to the Pa3X. If inter-ested, you may find more information on the general use ofMIDI in the various specialized magazines and dedicated books.
In generalMIDI stands for Musical Instruments Digital Interface. Thisinterface lets you connect two musical instruments, or a com-puter and various musical instruments.
From a software point of view, MIDI is a protocol that describesmessages for playing notes and controlling them. It is sort of agrammar to let different instruments and computers speak thesame language, and let the one tell the other what to do.
From a physical point of view, MIDI messages can travel acrosstwo different types of connectors on the Pa3X:
• The MIDI interface, that is composed of three different con-nectors. The MIDI IN receives data from another device; theMIDI OUT sends data to another device; the MIDI THRU sendsto another device exactly what was received on the MIDI IN(this is useful to daisy-chain more instruments).
• The USB Device port, that replaces both the MIDI IN andOUT connectors with a single port and cable. To use it for MIDIconnection, it is advisable to install the KORG USB-MIDIDriver supplied in the Accessory Disk, or downloadable fromour web site (www.korg.com).
Both these devices are active at the same time. So, you can con-nect the Pa3X to a computer via the USB port, and connectanother instrument’s MIDI IN port to the MIDI THRU port ofthe Pa3X.
Channels and messagesBasically, a MIDI or USB cable transmits 16 channels of data.Think to each MIDI channel as a TV channel: the receiver mustbe set on the same channel of the transmitter. The same happenswith MIDI messages: when you send a Note On message onchannel 1, it will be received on channel 1 only. This allows formultitimbricity: you can have more than one sound playing onthe same MIDI instrument.
There are various messages, but here are the most commonlyused:
Note On – This message instructs an instrument to play a noteon a specific channel. Notes have both a name (C4 standing forthe center C) and a number (60 being the equivalent for C4). ANote Off message is often used to say the note has been released.In some case, a Note On with value “0” is used instead.
Together with the Note On message, a Velocity value is alwayssent. This value tells the instrument how loud the note must play.
After Touch – This message is generated by pressing on the key-board, after the note has been struck. It usually activates vibrato,or other sound parameters.
Pitch Bend (PB) – You can generate this message acting on thejoystick (X direction). The pitch is translated up or down.
Program Change (PC) – When you select a Sound, a ProgramChange message is generated on the channel. Use this message,together with Control Change 00 and 32, to remotely select Pa3Xdata from a sequencer or a master keyboard.
Control Change (CC) – This is a wide array of messages, con-trolling most of the instrument parameters. Some examples:
• CC00, or Bank Select MSB, and CC32, or Bank Select LSB.This message pair is used to select a Sound Bank. Togetherwith the Program Change message, they are used to select aSound.
• CC01, or Modulation. This is the equivalent of pressing upthe joystick. A vibrato effect is usually triggered on.
• CC07, or Master Volume. Use this controller to set thechannel’s volume.
• CC10, or Pan. This one sets the channel’s position on thestereo front.
• CC11, or Expression. Use this controller to set the relativevolume of tracks, with the maximum value matching thecurrent setting of the CC07 control.
• CC64, or Damper Pedal. Use this controller to simulate theDamper pedal.
TempoTempo is a global MIDI message, that is not tied to a particularchannel. Each Song includes Tempo data.
LyricsLyrics are non-standard MIDI events, made to display texttogether with the music. Pa3X can read many of the availableLyrics format on the market.
What is MIDI Over USB?
You can let the Pa3X communicate MIDI data with a computerusing the USB Device port instead of the MIDI ports. This way,you can connect your Pa3X to a personal computer without theneed of a dedicated MIDI interface.Most Pa3X MIDI features can be used on a Windows XP/Vistaor Mac OS X computer with no need of special software. Howev-er, for full and easy use of all MIDI features, we suggest you to in-stall the “KORG USB MIDI Driver”, a special software that youcan find in the CD that comes with your Pa3X. Relevant instruc-tions come with the software itself. See “Installing the Korg USBMIDI Driver” on page 260.
MIDI

243MIDIStandard MIDI Files
Refe
renc
e
Standard MIDI Files
Standard MIDI Files (a.k.a. SMF) are a practical way of exchang-ing songs between different instruments and computers. Pa3Xuses the SMF format as its default song format, so reading a songfrom a computer, or saving a song that a computer software canread, is not a problem at all.
The Pa3X players are compatible with the SMF in format 0 (alldata in one track; it is the most common format) and 1 (multi-track). It can read the SMF in Song Play mode and modify/savethem in Sequencer mode. It can save a song in SMF 0 format inthe Sequencer mode.
When in Song Play mode, the Pa3X can also display SMF lyricsin Solton, M-Live (Midisoft), Tune1000, Edirol, GMX, HitBit,and XF formats, and the chord abbreviations of SMF in Solton,M-live (Midisoft), GMX, and XF format.
Note: The above trademarks are the property of their respectiveholders. No endorsement is intended by inclusion in this list.
Standard MIDI Files usually have the “.MID” or “.KAR” filenameextension.
The General MIDI standard
Some years ago, the musical instruments world felt a need forsome further standardization. Then, the General MIDI Standard(GM) was born. This extension of the basic MIDI sets new rulesfor compatibility between instruments:
• A minimum of 16 MIDI channels was required.
• A basic set of 128 Sounds, correctly ordered, was mandatory.
• The Drum Kit had a standard order.
• Channel 10 had to be devoted to the Drum Kit.
A most recent extension is the GM2, that further expands theSounds database. The Pa3X is soundwise-compatible with theGM2 standard.
The Global channel
Any channels with the Global option assigned (see “MIDI: MIDIIn Channels” on page 212) can simulate the Pa3X integrated key-board. When the Pa3X is connected to a master keyboard, trans-mission should take place over the Global channel of the Pa3X.
The MIDI messages received over a Global channel and not overa standard channel are affected by the status of the SPLIT button,as well from the split point. Therefore, if the SPLIT button LEDis lit up, the notes that arrive to the Pa3X over this channel willbe divided by the split point into the Upper (above the splitpoint) and Lower (below the split point) parts.
The notes that arrive to a Global channel are used for the chordrecognition of the automatic accompaniment. If the SPLIT LEDis turned on, only the notes below the split point will be used.These notes will be combined with the ones of the special Chord1 and Chord 2 channels.
The Chord 1 and Chord 2 channels
You can set two special Chord channels (see page 212) to send tothe Pa3X notes for the chord recognition. The notes will be com-bined with the notes that go through the channel set as Global(Global notes are recognized only under the split point, if theSPLIT LED is lit up).
The Chord channels are not affected by the split point and thestatus of the SPLIT button in the control panel. All the notes –both above and below the split point – will be sent to the chordrecognition.
The buttons of the CHORD SCANNING section have a particu-lar effect on the Chord channels:
• if you have selected LOWER, the chord recognition modewill be set by the “Chord Recognition Mode” parameter inthe Style Play mode (see page 135);
• if you have selected UPPER or FULL, the chord recognitionmode will always be Fingered 3 (you need to play at leastthree notes in order for the chord to be detected). If Expertwas selected before choosing UPPER or FULL, it willremain selected.
These two channels are especially useful for accordion players toassign a different Chord channel to the chords and the bassplayed with the left hand. In this way, chords and bass will par-ticipate to the creation of chords for the chord recognition of theautomatic accompaniment.
The Control channel
You can set a MIDI IN channel as the Control channel (seepage 212), to select Styles and Performance from an externaldevice. See the Appendix for a list of messages corresponding toPa3X internal data.
MIDI Setup
You can play Pa3X with an external controller, and use it simplyas a powerful sound generator. To help you configure the MIDIchannels, we have provided a set of MIDI Setups (see “MidiSetup” on page 136 for the Style Play mode, “Midi Setup” onpage 158 for the Song Play mode, and “MIDI Setup” on page 210for the Global mode).
We recommend you to consider each MIDI Setup as a startingpoint you can freely tweak. Once you have selected the mostappropriate MIDI Setup for the connection to be made, you canmodify the parameters as necessary and save them in a MIDISetup (see “Write Global - Midi Setup dialog box” on page 220).

244 MIDIConnecting Pa3X to a Master keyboard
Connecting Pa3X to a Master keyboard
You can control the Pa3X with a master keyboard or any otherMIDI keyboard. You only need to connect the MIDI OUT con-nector of the master keyboard to the MIDI IN connector of thePa3X. The master keyboard will become the integrated keyboardof the Pa3X if it transmits over the same channel programmed asGlobal in the Pa3X.
If the master keyboard transmits over the Global channel of thePa3X, the split point and the status of the SPLIT button in thecontrol panel will affect the notes received from the master key-board.
Connections and settingsTo connect the master keyboard to the Pa3X follow this proce-dure:
1. Connect the MIDI OUT connector of the master keyboardto the MIDI IN connector of the Pa3X.
2. Program the master keyboard to transmit over the Globalchannel of the Pa3X (see “MIDI: MIDI In Channels” onpage 212).
For information on the master keyboard programming, seethe master keyboard own user’s manual.
3. Select the MIDI Setup parameter. You can do this by goingto the “MIDI: MIDI Setup / General Controls” page of theGlobal mode, or in the dedicated page of the Style Play,Song Play or Sequencer mode (see “Midi Setup” onpage 136, “Midi Setup” on page 158, and “Midi Setup” onpage 196).
Note: A different MIDI Setup may be selected for the StylePlay, Song Play and Sequencer modes. The “1-Default”MIDI Setup is automatically selected when entering theSound Edit mode. MIDI settings are therefore modified whenswitching to a different operating mode. The current MIDISetup is also shown in the Global mode.
4. Select the “Master Keyboard” MIDI Setup.
Note: Settings may change when new Global data is loadedfrom disk. To protect settings from loading, use the GlobalProtect function (see “Global Protect” on page 237).
5. To save the assigned MIDI Setup for the selected operativemode into the Global, select the “Write Global-Style PlaySetup”, the “Write Global-Song Play Setup”, the “WriteGlobal-Player Setup”, or the “Write Global-Global Setup”command from the page menu.
6. If needed, press one of the buttons in the MODE section togo to the desired operative mode.
Connecting the Pa3X to a MIDI accordion
There are various types of MIDI accordions, each one requiringdifferent MIDI settings. Pa3X is provided with a series of“Accordion” MIDI Setups, each one suitable for a different MIDIaccordion (see page 210).
Connection and settingsTo connect the accordion to the Pa3X follow this procedure:
1. Connect the MIDI OUT connector of the accordion to theMIDI IN connector of the Pa3X.
2. Select the MIDI Setup parameter. You can do this by goingto the “MIDI: MIDI Setup / General Controls” page of theGlobal mode, or in the dedicated page of the Style Play,Song Play or Sequencer mode (see “Midi Setup” onpage 136 and “Midi Setup” on page 158).
Note: A different MIDI Setup may be selected for the StylePlay, Song Play and Sequencer modes. The “1-Default”MIDI Setup is automatically selected when entering theSound Edit mode. MIDI settings are therefore modified whenswitching to a different operating mode. The current MIDISetup is also shown in the Global mode.
3. Select one of the available “Accordion” MIDI Setups.
Note: Settings may change when new Global data is loadedfrom disk. To protect settings from loading, use the GlobalProtect function (see “Global Protect” on page 237).
4. To save the assigned MIDI Setup for the selected operativemode into the Global, select the “Write Global-Style PlaySetup”, the “Write Global-Song Play Setup”, the “WriteGlobal-Player Setup”, or the “Write Global-Global Setup”command from the page menu.
5. If needed, press one of the buttons in the MODE section togo to the desired operative mode.
MIDI IN
MIDI OUT

245MIDIConnecting the Pa3X to an external sequencer
Refe
renc
e
Connecting the Pa3X to an externalsequencer
You can program a new song on an external sequencer, usingPa3X as a multi-timbral expander.
Connections and settingsIn order to connect the Pa3X to a computer, you need to have acomputer with either a MIDI interface or a USB port.
1. In case you will connect the computer and the Pa3X via theUSB port, install the Korg USB MIDI Driver, as explainedin “Installing the Korg USB MIDI Driver” on page 260.
2. Connect the Pa3X and the computer either via the USBDevice port, or via the MIDI ports and a MIDI interface, asshown in the following diagram.
3. Activate the “MIDI Thru” function on the externalsequencer. Please refer to the user’s manual of thesequencer.
4. Press GLOBAL, and go to the “MIDI: MIDI Setup / Gen-eral Controls” page. Uncheck the “Local Control On”parameter (see page 210). This is called the “Local Off sta-tus”.
5. Press SEQUENCER to go to the Sequencer mode. Go to the“Preferences: Sequencer Setup” page (see page 196). Selectthe “Extern.Seq.” MIDI Setup.
Note: Settings may change when new Global data is loadedfrom disk. To protect settings from loading, use the GlobalProtect function (see “Global Protect” on page 237).
6. Select the “Write Global-Player Setup” command from thepage menu to save the assigned MIDI Setup to the Global.
7. Play the keyboard. Notes played on the keyboard go fromthe MIDI OUT of the Pa3X to the MIDI IN of the com-puter/MIDI interface (or go from the USB port of thePa3X, to the USB port of the computer).
Notes generated by the computer (i.e. a song played by itssequencer) are sent through the MIDI OUT of the MIDIinterface to the MIDI IN connector of the Pa3X (or go fromthe USB port of the computer, to the USB port of thePa3X).
The Local OffWhen the Pa3X is connected to an external sequencer, we rec-ommend you to set the Pa3X in Local Off mode (see “LocalControl On” on page 210) to avoid that the notes are simultane-ously played by the keyboard and by the MIDI events sent by theexternal sequencer.
When the Pa3X is in Local Off, the Pa3X keyboard transmitsdata to the external sequencer, but not to the internal sound gen-eration. The sequencer will receive the notes played on the Pa3Xkeyboard and send them to the selected track of the song. Thetrack will transmit the data to the internal sound generation ofthe Pa3X.
Note: In order to send data to the Pa3X sound generation, the“MIDI Thru” function must be activated in the external sequencer(normally active; the name may be different according to the typeof sequencer). For more information refer to the instructions man-ual of the sequencer.
The SoundsThe song that is played back by the computer sequencer canselect Pa3X Sounds through the MIDI messages Bank SelectMSB, Bank Select LSB (bank selection, two messages), and Pro-gram Change (Sound selection). For a list of Sounds and MIDIvalues, see “Sounds (Program Change order)” in the “Factorydata” chapter of the Advanced Edit Manual.
A suggestion for those who program songs on computer: eventhough it is not essential, you usually set the bass on channel 2,melody on channel 4, drum kit on channel 10, control of thePa3X voice harmonizer on channel 5.
MIDI OUT
MIDI IN
MIDI OUT USB DeviceMIDI IN

246 MIDIPlaying another instrument with the Pa3X
Playing another instrument with the Pa3X
You can use the Pa3X as the master controller for your MIDIsetup.
1. Connect the Pa3X MIDI OUT connector to the otherinstrument’s MIDI IN.
2. Set the other instrument to the same channels you want toplay from Pa3X. For example, if you wish to play the Upper1 and Upper 2 tracks with sounds of the other instrument,enable the other instrument to receive on the same chan-nels Pa3X is transmitting from tracks Upper 1 and Upper 2(by default, channels 1 and 2).
3. Set the master volume of the other instrument with its ownvolume controls.
4. Mute/unmute any track right from the Pa3X. Adjust eachtrack’s volume by using Pa3X sliders.
5. Play the keyboard of the Pa3X.
The KeyboardPa3X’s keyboard can drive up to four tracks via the MIDI OUT(Upper 1-3 and Lower). MIDI output channels are set in Globalmode (see “MIDI: MIDI Out Channels” on page 212).
As a default situation (“1-Default” MIDI Setup), each of Pa3XKeyboard tracks transmit on the following channels:
When a track is muted, it cannot transmit any MIDI data to anexternal expander or sequencer connected Pa3X’s MIDI OUT.
To hear only the expander’s sounds, you can lower the MASTERVOLUME control on the Pa3X, or set the Keyboard tracks to theExternal status (see “Track Controls: Mode” on page 189).
The PlayerAny Player’s track can drive a channel on an external instru-ment. To set each track’s MIDI output channel, see “MIDI: MIDIOut Channels” on page 212.
To hear only the expander’s sounds, you can lower the MASTERVOLUME control on the Pa3X, or set the Song tracks to theExternal status (see “Track Controls: Mode” on page 189).
Select the “Player 1” or “Player 2” MIDI Setup (depending on thePlayer you are using on the Pa3X) to set the channels as follows.
The ArrangerOne of the most interesting aspect of MIDI, is that you can useyour Pa3X to play an external instrument with its onboardarranger. Yes, it’s hard to beat the audio quality of Pa3X, but youcould wish to use that old faithful synth you are still accustomedto…
To assign some of Pa3X Style tracks to an external instrument,set them to the External status (see “Track Controls: Mode” onpage 189).
Select the “Default” MIDI Setup to set the channels as follows(this is the default status of Pa3X).
Track Out Channel
Upper1 1
Upper2 2
Upper3 3
Lower 4
Track Out Channel
Song 1…16 1…16
Track Out Channel
Bass 9
Drums 10
Percussion 11
Acc1…5 12…16


248 Installing the Pa3X Amplification System (PaAS)Precautions
The (optional) PaAS – Amplification System can be installed,adding to the instrument a three-way amplification system, apair of integrated speakers and a bass-reflex box.
Precautions
• Installation of the Amplification System is done at the user’sown risk. Korg will assume no responsibility for any damage orinjury resulting from its improper installation or use.
• Be very careful not to make the speaker box fall when installingit, or it can be damaged.
Installation
1. Remove the protective cap (b) from the connector (c) onthe back of the instrument (a), by gently pulling it andmaking it turn down.
2. Now locate the front (d1) and the rear (d2) side of thespeaker box, to be sure you will place it in the right way.
3. Lift the speaker box (d) by making the back side (d2) looktoward you and the front side (d1) toward the Pa3X. Alignits extruding guide (e) to the matching slot (f) on the backof the instrument (a). Slightly tilt the speaker box (d) for-ward, to prevent the fixing pin (k, see below) to damage theback of the instrument. To align them correctly, use one ofthe two plastic stoppers/delimiters (h) as a reference point,making one of the flanks or the speaker box’s guide (e)touch it.
Installing the Pa3X Amplification System (PaAS)
b a
b
ac
d2
d1
ef h
d
a

249Installing the Pa3X Amplification System (PaAS)Installation
App
endi
x
4. Insert the speaker box’s extruding guide (e) entirely intothe slot (f) on the back of the instrument, being sure thespeaker box is perfectly horizontal.
Be sure the nylon supports (i) for the music stand are per-fectly resting on the control panel of the instrument (a).
5. When the speaker box (d) is perfectly aligned to the stop-pers/delimiters, and the fixing pin (j) is over the corre-sponding hole (k) on the back of the instrument (a), tiltdown the speaker box (d), to make the fixing pin (j) enterthe hole (k).
6. Use the SPEAKER LOCK slider (l) next to the display tolock (or later unlock) the speaker box (d). When the box islocked, you must see the closed lock icon ( ). This willfirmly join the speaker box (d) to the instrument (a).
7. At this point, the speaker box is correctly installed. Toremove it, reverse the above instructions.
fe
i
a
d
jk
a
a
ld
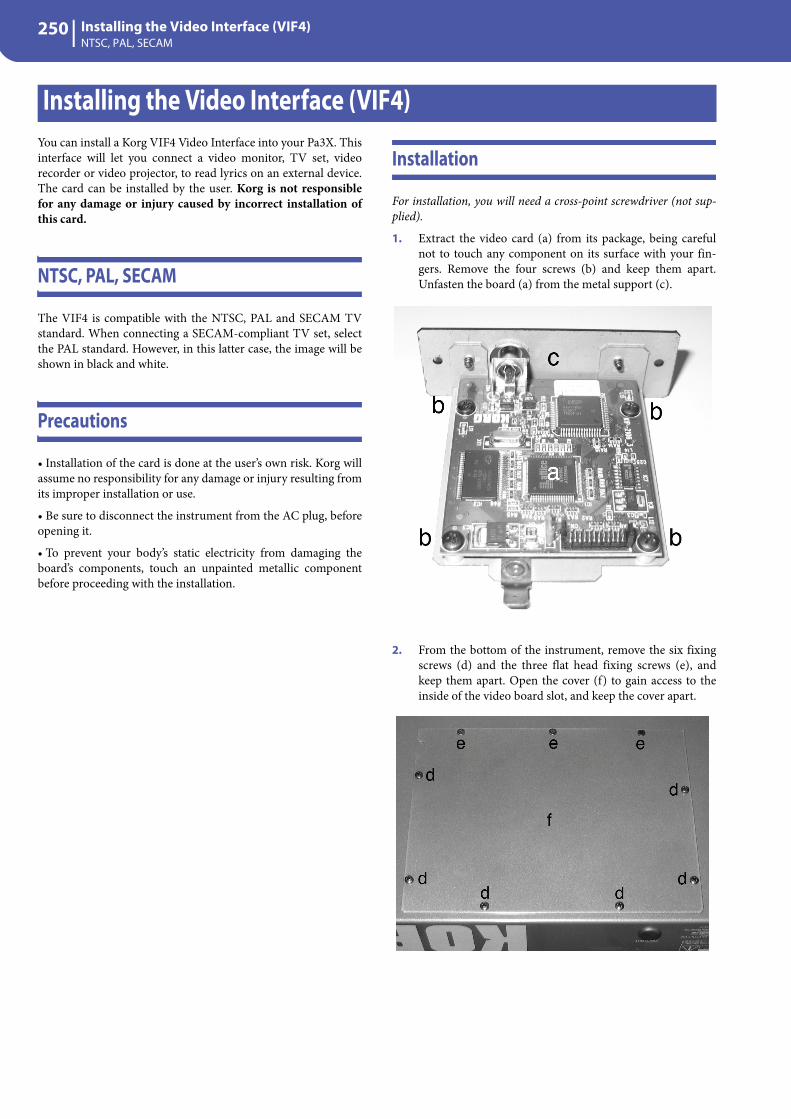
250 Installing the Video Interface (VIF4)NTSC, PAL, SECAM
You can install a Korg VIF4 Video Interface into your Pa3X. Thisinterface will let you connect a video monitor, TV set, videorecorder or video projector, to read lyrics on an external device.The card can be installed by the user. Korg is not responsiblefor any damage or injury caused by incorrect installation ofthis card.
NTSC, PAL, SECAM
The VIF4 is compatible with the NTSC, PAL and SECAM TVstandard. When connecting a SECAM-compliant TV set, selectthe PAL standard. However, in this latter case, the image will beshown in black and white.
Precautions
• Installation of the card is done at the user’s own risk. Korg willassume no responsibility for any damage or injury resulting fromits improper installation or use.
• Be sure to disconnect the instrument from the AC plug, beforeopening it.
• To prevent your body’s static electricity from damaging theboard’s components, touch an unpainted metallic componentbefore proceeding with the installation.
Installation
For installation, you will need a cross-point screwdriver (not sup-plied).
1. Extract the video card (a) from its package, being carefulnot to touch any component on its surface with your fin-gers. Remove the four screws (b) and keep them apart.Unfasten the board (a) from the metal support (c).
2. From the bottom of the instrument, remove the six fixingscrews (d) and the three flat head fixing screws (e), andkeep them apart. Open the cover (f) to gain access to theinside of the video board slot, and keep the cover apart.
Installing the Video Interface (VIF4)

251Installing the Video Interface (VIF4)Installation
App
endi
x
3. After having opened the cover, unfasten the power cable (g)by removing the screw (h) and the clip (i). Be very carefulnot to let the power cable (g) fall inside the instrument.Inside the compartment, you will see the four spacers (j)where to place the video board.
4. Remove the protective stopper (k) by pushing it frominside the slot.
5. Place the video board (a) over the four spacers inside theinstrument, and make the video connector (l) protrudefrom the back of the instrument by making it pass throughthe corresponding hole. Attach the video card (a) to thefour spacers by using the four previously removed screws(b). Connect the power cable (g) to the circuit board, asshown in the illustration.
6. Replace the cover (f) to the original position. Attach thecover to the bottom of the instrument by using the six fix-ing screws (d) and the three flat head fixing screws (e) youhad previously removed.
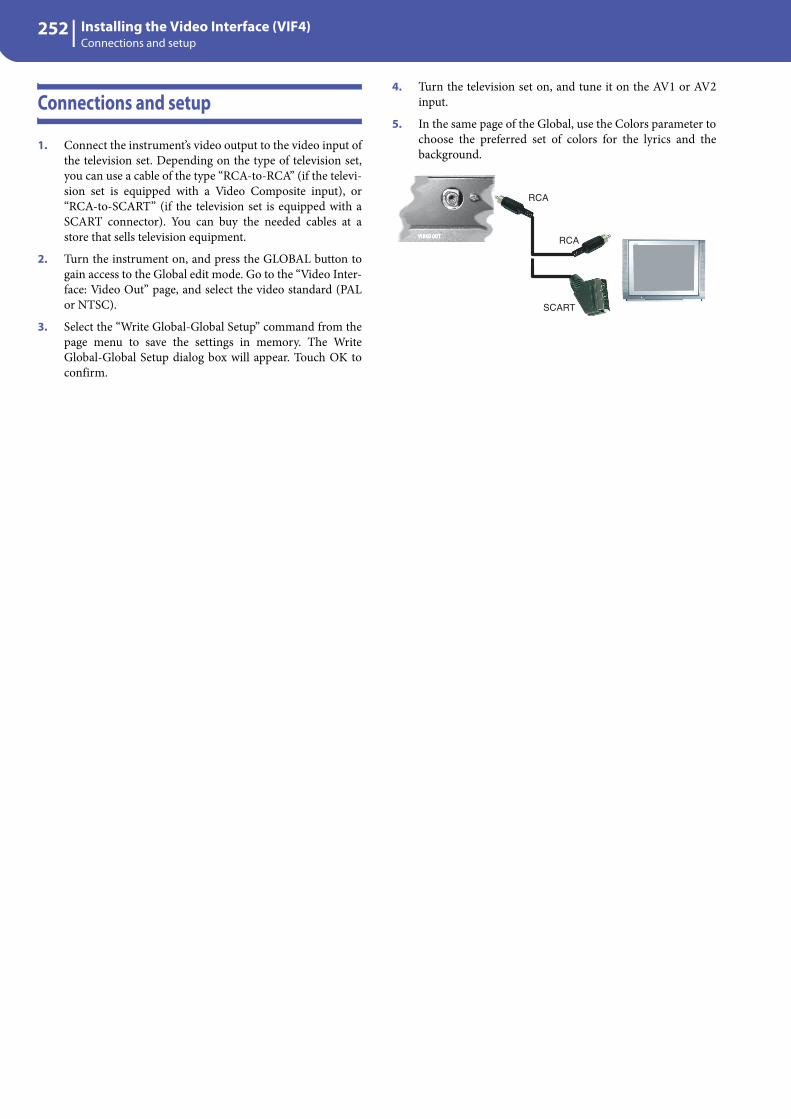
252 Installing the Video Interface (VIF4)Connections and setup
Connections and setup
1. Connect the instrument’s video output to the video input ofthe television set. Depending on the type of television set,you can use a cable of the type “RCA-to-RCA” (if the televi-sion set is equipped with a Video Composite input), or“RCA-to-SCART” (if the television set is equipped with aSCART connector). You can buy the needed cables at astore that sells television equipment.
2. Turn the instrument on, and press the GLOBAL button togain access to the Global edit mode. Go to the “Video Inter-face: Video Out” page, and select the video standard (PALor NTSC).
3. Select the “Write Global-Global Setup” command from thepage menu to save the settings in memory. The WriteGlobal-Global Setup dialog box will appear. Touch OK toconfirm.
4. Turn the television set on, and tune it on the AV1 or AV2input.
5. In the same page of the Global, use the Colors parameter tochoose the preferred set of colors for the lyrics and thebackground.
RCA
RCA
SCART

253Installing additional Sampling RAM (EXB-M256)Precautions
App
endi
x
Pa3X comes equipped with 128MB of Sample RAM alreadyinstalled. You can replace the internal RAM with an (optional)board of 256MB of RAM, for increased sampling space. Korg isnot responsible for any damage or injury caused by incorrectinstallation of this module.
Precautions
• Installation of the module is done at the user’s own risk. Korgwill assume no responsibility for any damage or injury resultingfrom its improper installation or use.
• Be sure to disconnect the instrument from the AC plug, beforeopening it.
• To prevent your body’s static electricity from damaging theboard’s components, touch an unpainted metallic componentbefore proceeding with the installation.
Installation
For installation, you will need a cross-point screwdriver (not sup-plied).
1. From the bottom of the instrument, remove the two fixingscrews (b), and keep them apart. Open the cover (a) to gainaccess to the inside of the RAM slot.
2. Before removing the RAM module, slide the switch (d) tothe OFF position, and remove the protective duct tape (e)from the RAM module (c). Be careful not to tear away theduct tape from the main board,
3. Then lightly pull out, one after the other, the two securingclamps (f) (one on each end). After the last one is pushed
out, the RAM module (c) will be released, and will auto-matically jump out.
4. Insert the new RAM module (g) into the free slot, as shownin the diagram. Line up the connector side of the modulewith the slot base, using the dent between the connectors asa guide. Then rotate the module down, and delicately pushuntil the two securing clamps (f) jump back to the lockedposition, and the RAM module is firmly seated in place.
Installing additional Sampling RAM (EXB-M256)

254 Installing additional Sampling RAM (EXB-M256)Installation
5. Be sure the module is correctly inserted. If not, extract itand repeat the operation.
6. Place the duct tape (e) in the same position it was beforereplacing the RAM module, and slide the switch (d) to theON position.
7. Close and secure the compartment cover (a) by using thetwo previously removed screws (b).

255Installing an Hard Disk (HDIK-2) (only 61-key model)Precautions
App
endi
x
The HDIK-2 kit allows you to install a standard 2.5” S-ATA harddisk drive in your Pa3X (61-key version). The hard disk drive isnot supplied with the kit, so you should purchase it separately.Warning: Korg is not responsible for any damage or injurycaused by incorrect installation of this kit.
Before beginning with the installation, be sure to have all theparts listed in the following table. You also need a cross-pointscrewdriver (not supplied).
Precautions
• Installation of the kit is done at the user’s own risk. Korgwill assume no responsibility for any damage or injury result-ing from its improper installation or use.
• Be sure to disconnect the instrument from the AC plug,before opening it.
• To prevent your body’s static electricity from damaging theboard’s components, touch an unpainted metallic componentbefore proceeding with the installation.
Backup
Before installing or replacing the hard disk, please bakup orsave your User data to an USB storage device. If you do notknow how to do, please read the relevant instructions con-tained in the “Media” chapter.
Installation
1. Extract the hard disk kit from its package, being careful notto touch any component on its surface with your fingers.
2. Use two screws (c) each to attach the hard disk (not suppliedwith the kit) to the interface board (a) and the metal support
(b), as shown in the illustration. Use the two screws (d) tosecure the hard disk to the support (b).
Installing an Hard Disk (HDIK-2) (only 61-key model)
a HDD interface × 1
b HDD support × 1
c M3x6 TC screws × 6
m M3x4 TC screws × 2

256 Installing an Hard Disk (HDIK-2) (only 61-key model)Formatting the Hard Disk and installing the Operating System
3. From the bottom of the instrument, remove the six fixingscrews (e) and the three flat head fixing screws (f), and keepthem apart. Open the cover (g) to gain access to the insideof the video board compartment, and keep the cover apart.
4. Disconnect the USB key (h) from the cable (i), and removethe board (h) by unscrewing the two fixing screws (j).
5. Place the previously assembled hard drive over the four ded-icated spacers inside the instrument (the drive can only beinstalled in a way). Fix it with the last four screws (c) foundin the installation kit. Connect the hard drive to the cable (i)you previously disconnected from the USB key.
6. Place the cover (g) to close the instrument, being careful notto damage the cable, by following in reversal the openinginstructions.
7. When the installation is finished, please connect the powercord, and turn the instrument on again. You must now for-mat the hard disk, before accessing it for data storage.
Formatting the Hard Disk and installingthe Operating System
When the installation is finished, you must format the harddisk and install the operating system.1. Copy the “Pa3X_RES.pkg” operating system file to the root
of an USB storage device. The file can be found on our website (www.korg.com). Please note that the name of the fileshould not be changed.
2. Connect the power cord and turn the instrument on bypressing the POWER, then the STANDBY button.
3. After a few seconds, the “Touch Panel Calibration” pageappears. Execute the calibration of the display by followingthe onscreen instructions, then confirm by touching theSave button in the display.

257Installing an Hard Disk (HDIK-2) (only 61-key model)Formatting the Hard Disk and installing the Operating System
App
endi
x
4. The following message appears, warning that this operationwill delete all data from the hard disk. Touch the OK buttonto continue.
5. After confirming, the following message appears, askingyou to connect the USB storage device containing the oper-ating system. Connect the USB storage device to the FrontHOST USB port of your Pa3X.
6. When the USB storage device containing the operating sys-tem has been connected, touch the OK button to confirm.
In case the operating system file is not found in the USBstorage device, the “Package not found” dialog box appears,warning you of the missing file. Touch the OK button toclose the dialog box.
If the USB storage device contains both the “Pa3X_OS.pkg”and the “Pa3X_RES.pkg” files, the following messageappears. Please select the “Pa3X_RES.pkg” file and touchOK.
7. The “Wait Please” message appears while formatting thehard disk. While the operating system file is being loaded, aprogress bar appears, showing the advancement of loading.
8. When the formatting and loading procedure ends, the“Updated Completed!” message appears, inviting you torestart the instrument.
9. Turn the Pa3X off, and then on again, by using the POWERbutton on the back of the instrument.
Then make it come out of the standby status by pressing theSTANDBY button.
The Pa3X will ask you again for a new Touch Panel Calibra-tion.

258 Replacing the Sample RAM backup batteryPrecautions
You can replace the Sample RAM backup battery with a replace-ment model (Korg BAT0001002). Do not use replacements dif-ferent than the one supplied or suggested by Korg, or you riskto damage the instrument! The battery can be replaced by theuser. Korg is not responsible for any damage or injury causedby incorrect installation of this part.
Precautions
• Installation of the battery is done at the user’s own risk. Korgwill assume no responsibility for any damage or injury resultingfrom its improper installation or use.
• Be sure to disconnect the instrument from the AC plug, beforeopening it.
• To prevent your body’s static electricity from damaging theboard’s components, touch an unpainted metallic componentbefore proceeding with the installation.
Installation
For installation, you will need a cross-point screwdriver (not sup-plied).
1. Extract the battery from its package.
2. From the bottom of the instrument, remove the six fixingscrews (a) and the three flat head fixing screws (b), andkeep them apart. Open the cover (c) to gain access to theinside of the battery slot, and keep the cover apart.
3. Remove the exhausted battery (d) from its slot (e), and dis-connect it from its connector (f).
Replacing the Sample RAM backup battery

259Replacing the Sample RAM backup batteryInstallation
App
endi
x
4. Connect the new battery (g) to the connector (f), and placeit into the empty battery slot (e).
5. Replace the cover (c) to the original position. Attach thecover to the bottom of the instrument by using the six fix-ing screws (a) and the three flat head fixing screws (b) youhad previously removed.

260 Installing the Korg USB MIDI DriverConnecting the Pa3X to a personal computer
The USB Device port can be used to transfer MIDI data betweenthe Pa3X and a personal computer (this is called the MIDI OverUSB function). This is useful when your computer is not fittedwith a MIDI interface.
USB can be used in parallel with the MIDI ports. For example,you can connect your Pa3X to a sequencer running on yourcomputer, and at the same time control another MIDI instru-ment connected to the MIDI ports of the Pa3X.
Connecting the Pa3X this ways makes it, at the same time, aMIDI input device, a controller, and a sound generator.
Connecting the Pa3X to a personalcomputer
Please install the KORG USB-MIDI Driver, before connectingthe Pa3X to a personal computer. Be sure your personal com-puter meets the requirement shown on “KORG USB-MIDIDriver system requirements” below.
KORG USB-MIDI Driver systemrequirements
WindowsComputer: A computer with an USB port, that satisfies therequirements of Microsoft Windows XP, Vista or 7.
Operating system: Microsoft Windows XP Home Edition / Pro-fessional / x64 Edition, Vista, 7.
MacComputer: An Apple Mac with an USB port that satisfies therequirements of Mac OS X.
Operating system: Mac OS X version 10.3 or later.
Please note before use
Copyright to all software included in this product is the propertyof Korg Inc.
The license agreement for this software is provided separately.You must read this license agreement before you install this soft-ware. Your installation of this software will be taken to indicateyour acceptance of this agreement.
Windows: Installing the KORG USB-MIDIDriver
Please connect the Pa3X to the computer via an USB cable onlyafter having installed the KORG USB-MIDI Driver Tools.
Note: You must install a separate driver for each USB port you willuse.
1. Connect the DEVICE USB port of your Pa3X to one of theUSB ports of your Windows PC by using a standard USBcable.
2. Insert the included Accessory Disk into the optical drive ofyour Windows PC.
3. Normally, the “KORG Pa3X Application Installer” will startup automatically.
If your computer is set so that the installer does not runautomatically, double-click “KorgSetup.exe” on the Acces-sory Disk.
4. Please follow the installation instructions appearing on-screen.
Driver’s portsAfter installation, the following ports will be shown in you MIDIapplication (e.g., sequencer) among the other MIDI devices:
Pa3X KEYBOARD: This allows for reception of MIDI messagesfrom the Pa3X (keyboard and controller’s data) to the MIDIapplication running on the computer.
Pa3X SOUND: This allows for transmission of MIDI messagesfrom the MIDI application running on the computer, to theinternal tone generator of the Pa3X.
Installing the Korg USB MIDI Driver

261Installing the Korg USB MIDI DriverMac OS X: Installing KORG USB-MIDI Driver
App
endi
x
Mac OS X: Installing KORG USB-MIDI Driver
1. Connect the DEVICE USB port of your Pa3X to one of theUSB ports of your Mac by using a standard USB cable.
2. Insert the included Accessory Disk into the optical drive ofyour Mac.
3. Please double click on the “KORG USB-MIDI Driver.pkg”in the “KORG USB-MIDI Driver” folder inside the CD-ROM, to run the installer. Install it according to theinstructions appearing on-screen.
Driver’s portsAfter installation, the following ports will be shown in you MIDIapplication (e.g., sequencer) among the other MIDI devices:
Pa3X KEYBOARD: This allows for reception of MIDI messagesfrom the Pa3X (keyboard and controller’s data) to the MIDIapplication running on the Mac.
Pa3X SOUND: This allows for transmission of MIDI messagesfrom the MIDI application running on the Mac, to the internaltone generator of the Pa3X.

262 Shortcuts
You can keep the SHIFT button pressed, and press another but-ton on the control panel to directly jump to an edit page. Here isthe list of “shortcuts”.
Other available shortcuts are the following, not requiring theSHIFT button to be pressed.
Shortcuts
Shift + Functions
Any operating modes
Dial Tempo Change
Scroll Arrows, orUp/Down
When a list of Songs or SongBook entries is shown: Next/Previous alphabetical section.It also works in Media mode.
Sound Sends the Sound assigned to the selected track to the Sound mode
Global Selects the Setup/General Controls page, MIDI sec-tion, of the Global mode. This is a quick way to jump to MIDI editing pages.
Media Selects the Preferences page of the Media mode
Start/Stop Panic
Slider Mode Selects the Assignable Sliders page, Controllers sec-tion, of the Global mode
Fade In/Out Selects the Fade In/Out parameter in the Basic page, Preferences section, of the Global mode
Synchro (either) Selects the MIDI Setup parameter in the Setup/General Controls page, MIDI section, of the Global mode
Tempo Lock Selects the Lock page, General Controls section, of the Global mode
SongBook Selects the Custom List page of the SongBook mode
Transpose (either) Selects the Transpose Control page, General Con-trols section, of the Global mode
Mic On/Off Selects the Voice Processor Setup page of the Global mode
Harmony Selects the Voice Processor Preset page of the Global mode
Double Selects the Voice Processor Effects page of the Global mode
Style Play mode
Style Play Selects the Style Setup page (Preferences section)
Memory Selects the Style Preferences page (Preferences sec-tion)
Variation or Fill Selects the corresponding Style Element in the Drum/Fill page (Style Controls section)
Chord Scan (either) Selects the Chord Recognition parameter in the Split panel, Main Page
Split Selects the Key Velocity page (Keyboard/Ensemble section)
Ensemble Selects the Ensemble Type parameter in the Ensem-ble page, (Keyboard/Ensemble section)
Pad (any) Selects the Pad page (Pad/Assignable Switches sec-tion)
Assignable Switch (any)
Selects the Switch page (Pad/Assignable Switches section)
Upper Octave (either) Selects the Tuning page (Mixer/Tuning section)
Style Opens the “Write Current Style Settings” window.
Performance Opens the “Write Performance” window.
STS Opens the “Write STS” window.
Song Play mode
Song Play Selects the General Control page (Preferences sec-tion)
Play/Stop–Ply 1 or 2
Sync Start of either players
Upper Octave (either) Selects the Tuning page (Mixer/Tuning section)
Split Selects the Key Velocity page (Keyboard/Ensemble section)
Pad (any) Selects the Pad page (Pad/Assignable Switches sec-tion)
Assignable Switch (any)
Selects the Switch page (Pad/Assignable Switches section)
Sound/Performance Opens the “Write Performance” window.
JukeBox mode
>> Play the next Song in the JukeBox list
<< Play the previous Song in the JukeBox list
Sequencer mode
Sequencer Selects the Sequencer Setup page (Preferences sec-tion)
Upper Octave (either) Selects the Tuning page (Mixer/Tuning section)
Style Play mode
Tempo +/– (together) Original Tempo
Global mode
Global (keep it pressed)
Touch Panel Calibration
Shift + Functions

263MIDI Implementation Chart
App
endi
x
MIDI Implementation Chart
Function Transmitted Recognized Remarks
Basic ChannelDefault 1–16 1–16 Memorized
Changed 1–16 1–16
Mode
Default 3
Messages X X
Altered ****************
Note Number:
0–127 0–127
True Voice **************** 0–127
VelocityNote On O 9n, V=1–127 O 9n, V=1–127
Note Off O 8n, V=0–127 O 8n, V=0–127
AftertouchPoly (Key) O O Player data only *1
Mono (Channel) O O *1
Pitch Bend O O
Control Change
0, 32 O O Bank Select (MSB, LSB) *1
1, 2 O O Modulations *1
6 O O Data Entry MSB *1
38 O O Data Entry LSB *1
7, 11, 16 O O Volume, Expression, Ribbon *1
10, 91, 93, 94 O O Panpot, A/B Master FX 1/2/3 Send *1
64, 66, 67 O O Damper, Sostenuto, Soft *1
65, 5 O O Portamento On/Off, Portamento Time *1
71, 72, 73 O O Harmonic Content, EG time (Release, Attack) *1
74, 75 O O Brightness, Decay Time *1
76, 77, 78 O O Vibrato Rate, Depth, Delay *1
98, 99 O O NRPN (LSB, MSB) *1, 2
100, 101 O O RPN (LSB, MSB) *1, 3
120, 121 X O All sounds off, Reset all controllers *1
Program Change
O 0–127 O 0–127 *1
True # **************** 0–127
System Exclusive O O *4
SystemCommon
Song Position X X
Song Select X X
Tune X X
SystemReal Time
Clock O O *5
Commands O O *5
AuxMessages
Local On/Off X X
All Notes Off X O (123-124)
Active Sense O O
Reset X X
Notes
*1: Sent and received when MIDI Filters In and Out are set to Off in Global mode.*2: Drawbars settings, Sound parameters, Selection of SongBook entries, Drum Kit Family settings.*3: LSB, MSB = 00,00: Pitch Bend range, =01,00: Fine Tune, =02,00: Coarse Tune.*4: Includes Inquiry and Master Volume messages, FX settings, Quarter Tone settings. GM Mode On.*5: Transmitted only when the Clock Send parameter (Global mode) is set to on.
Mode 1:OMNI ON, POLYMode 3:OMNI OFF, POLY
Mode 2:OMNI ON, MONOMode 4:OMNI OFF, MONO
O: YesX: No
KORG Pa3XOS Version 1.0 - March 01, 2011

264 Troubleshooting
TroubleshootingProblem Solution Page
General problems
Power does not turn on Make sure that (1) the power cable is plugged into the outlet, (2) the cable is plugged into the connector on the back of the instrument, (3) and is not damaged, (4) there are no problems with the mains.
Is the POWER switch turned ON?
Is the STANDBY switch turned ON and its LED green?
If the power still does not turn on, contact your dealer or the nearest KORG Service Center.
No sound Check the connections to your amp or mixer. 26
Make sure that all the components of the amplifying system are turned on.
Is the amplification bar correctly installed? 248
Is the MASTER VOLUME slider of the Pa3X set to a position other than “0”? 25
Is the Local parameter set to Off? Turn it On. 210
Is the Attack parameter value too high? Set it to a lower value, to let the sound start faster. Is the Volume parameter too low? Set it to a higher value.
120, 129
Lowest note are not played When the SPLIT button is lit up, the keyboard will be divided into the Lower part (low notes, below the split point) and the Upper part (high notes, above the split point). Is the Lower track muted? Unmute it.
40
Wrong sounds Do the USER banks contain modified data? Load the appropriate data for the Song or the Style you wish to playback.
226
Has one of the USER Drum Kits been modified? Load the appropriate Drum Kits. 226
Have the Styles or Performances been modified? Load the appropriate data (Styles or Performances). 226
Sound does not stop Make sure that the damper switch calibration parameter is set correctly. 209
The selected Style or Song cannot start
Make sure that the Clock parameter is set to Internal. If you are using the MIDI Clock of another device, you must set the MIDI Clock parameter to MIDI or USB (depending on the port the Pa3X is hooked to the other device through) and make sure that the external device transmits MIDI Clock data.
210
Does not respond to MIDI messages Make sure that all MIDI or USB cables are connected correctly. 242
Make sure that the external device is transmitting through MIDI channels enabled to receive in the Pa3X. 212
Make sure that the MIDI IN Filters of the Pa3X do not prevent the reception of messages. 213
Percussive instruments are not played correctly
Make sure that the Drum track is set to Drum Mode and the external device has not transposition applied. 127, 190
Some “clicks” can be heard when playing a percussive instrument
This is part of the sound, and not a problem.
A background noise can be heard after selecting a Performance, Style or STS
The selected Performance, Style or STS recalled the effect “17 St. Analog Record”, simulating the noise of a old vinyl recording.
The Voice Processor cannot be heard The Vocoder effect has been assigned to the FX processor. This deactivates the Voice processor.
Voice Processor effects can only be applied to the microphone input

265Troubleshooting
App
endi
x
Media related problems
Cannot format a device Is the USB cable correctly connected?
Is the USB device correctly powered?
Is the device inserted correctly?
Is the write protect tab of the disk in the protect position?
Cannot save data to a device Is the device formatted? 235
Is the device inserted correctly?
Is the write protect tab of the disk in the protect position?
Cannot load data from a device Is the device inserted correctly?
Does the device contain data compatible with the Pa3X? 223
The message “Over Current Condition Detected on USB port: please remove the USB media” appears in the display
The USB device is probably defective, due to a short circuit, and cannot be used. While this will not damage the Pa3X, it is advisable to remove the device.
Problem Solution Page

266 Technical specifications
Technical specificationsKORG Pa3X Features 76-key Model 61-key Model
PHYSICAL DATA
Cabinet Aluminium (top), metal (bottom), plastic (other parts)
Keyboard 76 semi-weighted keys with velocity and aftertouch 61 semi-weighted keys with velocity and aftertouch
SOUNDS
Tone Generator KORG EDS (Enhanced Definition Synthesis) sound generator, 120 Voices, 120 Oscillators, Three band EQ for each track, Filters with resonance, DNC (Defined Nuance Control)
Multitimbral-Parts Internal: 40 channels - Midi: 16 channels
Factory Sounds More than 1100, including Stereo Piano and GM Level 1 & 2 compatible sounds; more than 90 Drum Kits (with Real Drum Ambience)
User Sounds 512 Sounds, 128 Drum Kits
Digital Drawbars 9 Footages
Sound Edit On-board full editing for Sounds and DrumKits
PCM Sample RAM 128 MB standard (equivalent to 256 MB linear data), expandable up to 256 MB (equivalent to 512MB linear data) with the optional EXB-M256 memory expansion board
Sampling Record, Edit, Time Slice, Compression Tool, Load/Import of Korg, Wav, AIFF and Akai files; Export of Wav and AIFF files
Effects Up to 8 Stereo Digital Multi-Effects block system, 140 Effects types (including VOCODER);Final Mastering Effects by WAVES (MaxxEQ™, MaxxBass™, MaxxTreble™, MaxxStereo™, MaxxVolume™);Vocal FX Voice Processor Technology by TC-Helicon® with 7 Effects (Four-part Harmonizer, Double, μMod, Reverb, Delay, Filter, HardTune, Pitch Correction plus Compressor, EQ, Gate (Adaptive Mic Setting on the Mic input)
Real Time Tracks Four Keyboard tracks (Upper 1, 2, 3, Lower) with dedicated on/off and sound select buttons
Performances / STS 512 Realtime Performance locations, User Programmable; STS: Memorize Realtime tracks and Voice Processor settings, up to 4 x 1200 Styles, up to 4 x SongBook entries
STYLES
Factory Styles More than 450 preloaded Styles, freely reconfigurable
Favorite/User Styles 12 Favorite banks, plus 3 User banks, for a total of 1200 available Style locations
Arranger Tracks Eight Style tracks, 4 Single Touch Settings, 4 Pads and one Style Performance per Style, Guitar Track Mode 2, Parallel and Fixed NTT
Style Edit Style Record with Step Record, Track and Event Edit functions, Guitar Mode 2, Import/Export SMF
Patterns/Chord Variations Up to 46 patterns for each style including 3 Intros, 3 Endings, 4 Fills, 1 Break
PCM Style Grooves Using the PCM Sample RAM memory
Style controls 4 Variations, 3 Intros, 4 Fills, Break, 3 Endings, Synchro Start/Stop, Tap Tempo/Reset, Fade In/Out, Bass Inversion, Auto Fill, Man-ual Bass, Tempo Lock, Memory, Accompaniment/Real Time Track Balance Volume, Accompaniment Mute, Drum Mapping, Snare & Kick Designation, Single Touch
Chord Sequencer Realtime Style Chord Sequencer Recorder
PLAYER/SEQUENCER
XDS Double Player 2 Players with separate Select, Start/Stop, Home, Rewind, Fast Forward, X-Fader Balance controls; Patented XDS Crossfade Dual Sequencer Player (Supported formats: MID, MID+G, KAR, MP3 + lyrics, MP3+G); Lyrics, Score, and Chord data can be dis-played on screen, or on external video monitor (with VIF4 option installed) ; Markers; Jukebox function
4 STS saved with the Song In SongBook Mode
Tracks 16 + 16
Sequencer Edit Record & Edit functions; SMF native format
Backing Sequence (Quick Record) Real Time Record - Step Record & Edit
Lyrics/Chords On-Screen (compatible with most popular formats) - CDG format supported
Score View On-Screen
Markers On-Screen
SONGBOOK
SongBook and SongBook List Fully programmable music database, based on Styles, SMF, Karaoke, MP3 with automatic selection of Style Play and Song Play modes; User-definable custom lists; Filtering and Ordering options
OTHER FEATURES
MP3 Dual MP3 Player with X-Fader; Vocal Remover; Records MP3 files, and plays two MP3 files at the same time; Tempo change ±30%, Transpose -5~+6 semitones
Arabic Scale Programmable, with up to 4 SC Presets

267Technical specifications
App
endi
x
Specifications and appearance are subject to change without notice for improvement.
Pads 4 + Stop button
Compatibility i-Series: Styles (some adjustments may be needed); Pa-series: Style, Perf., Sound, Song, Song Book
Operating System OPOS (Objective Portable Operating System), RX (Real eXperience) , DNC (Defined Nuance Control), Multitasking system, Load while play feature, Upgradable, Self-Refresh Battery for PCM data, Internal clock
DATA STORAGE
Hard Disk Standard 4GB USB memory – Optional Hard Disk with the HDIK-2 kit
DVD-CD Player / Floppy Disk Optional using standard USB DVD/CD/FD Drives connected via USB Host ports
USB Ports for Memory Devices Yes (2 slots - 1 Host Rear, 1 Host Front)
USER INTERFACE
Display 320 × 240 TFT Graphical Color Touch Screen Display, with Motorized Lift System
320 × 240 TFT Graphical Color Touch Screen Display
Controls Joystick - Ribbon - Dial - Up/+, Down/- - Tempo +/-
Programmable Controls 3 Switches - 8 Sliders - MP3 Volume/Drawbars Sliders
Cursors Real Time: Master Volume - Accompaniment/Player/Real Time Volume Balance - X-Fader
Switches Transpose, Memory, Bass Inversion, Manual Bass, Fade, Tap, Synchro, Ensemble, Auto Fill, Real Time Track controls, Tempo
Mic Settings Mic Volume, Harmony/Double Level, Delay/Reverb Level, Mic On/Off, Harmony On/Off, Double On/Off
Help System Context-Sensitive Multilanguage Hypertext
CONNECTIONS
MIDI IN - OUT - THRU
USB 2 Host (2.0 Hi Speed) and 1 Device (1.1 Full Speed)
Outputs 4 Analog Balanced/Unbalanced (Left/Right/Out1/Out2), 1 Digital (S/PDIF 48kHz)
Inputs 3 Inputs: 1 Mic XLR/jack combo connector with gain control and +48V Phantom Power - 2 Balanced/Unbalanced Line jacks
Headphone 1 Front jack connection
Pedals 1 Damper - 1 Assignable Footswitch/Pedal - EC5
Power Supply AC - Universal Voltage
ACCESSORIES
Supplied Accessories Manual, AC Power Cable, Music Stand, Accessory Disk
OPTIONS
Amplification and Speakers Pa AS - Pa Amplification System for Pa3X; 3 Channel Amplification System; 2x20 Watt (Middle/High Frequency) + 1x40 Watt (Sub Woofer); 5 Speakers: 2 Middle range (80 mm) + 2 Tweeters + Dual Coil Subwoofer (130 mm); Aluminum case with Bass Reflex System; Extremely Simple Connection - Power and the audio signal from the Pa3X are via a special connector that is automatically attached to the keyboard. No Cable, No Power supply needs to be attached to the Pa3XDimensions (W x D x H): 992 x 173 x 137 mm / 39.06 x 6.81x 5.39 inchWeight: 5.7 kg / 12.57 lbs
USB Memory Yes
CD / FD Through USB Host
Sampling RAM 256 MB Sampling Memory Board EXB-M256. The actual Sample memory varies depending on PCM compression.
Video Interface Graphic Video Interface VIF4 - NTSC/PAL board
Expression/Volume Pedal Korg EXP-2 - Korg XVP-10
Multi-Switch Pedal Korg EC5
Damper Pedal Korg DS-1H, DS-2H (both upporting half-pedaling)
Switch Pedal Korg PS-1
PHYSICAL DATA
Consumption Normal operation with no PaAS speakers: 35 Watt - Normal operation with PaAS speakers: 50 Watt (max) - Standby not recharging: 1 ~ 1.5 Watt - Standby recharging: 7 ~ 9 Watt
Dimensions (W × D × H) 1192 x 366 x 145 mm / 49.93 x 14.41 x 5.71 inch without music stand and with the display fully lowered
980 x 366 x 145 mm / 38.58 x 14.41 x 5.71 inch without music stand
Weight 17.5 kg / 38.58lbs 14.7 kg / 32.4 lbs
KORG Pa3X Features 76-key Model 61-key Model
268 Index
AAftertouch Curve 201Arabic Scale 119, 123Assignable Sliders 7Audio Inputs 26, 215Audio Outputs 26, 213–216, ??–216Auto Style/Perf/Sound Select 207
Write 220
BBackup 24Balance (Keyboard/Style or Ply) 7, 26Balance (Player) 26Bank Select 245Bass & Lower Backing 137
CChord Scanning 17
Lock 205Contrast 12, 14
DDamper 27, 130Demo 27Display contrast 12, 14Double Player 13, 150Drum tracks 128, 134, 214
EEC5 209Effects
Copy 138, 159, 197Sequencer mode 187, 189Song Play mode 151, 154Style Play mode 121, 125, 189
Ending 11Ensemble 132
FFade In/Out 202Favorite Styles 140Fill 11Footswitch 208Format 235
GGeneral MIDI 243Global 200–221
WriteGlobal Setup 220MIDI Setup 220, 221Sequencer Setup 197Song Play Setup 159
Style Play Setup 139Voice Processor Preset 221Voice Processor Setup 221
Global channel 243
HHarmony track (Voice Processor) 157, 167, 196
in SongBook entries 167MIDI channel 211
IInputs 26, 215Intro 11
JJukebox 148, 156
KKeyboard Mode (Split) 17
Lock 205
LLocal Off 210, 245Lower Lock 205
MMarkers 172Master Transpose 18, 202Master Tune 201Master Volume 25Media 222–241
Format 235Menu 14MIDI
Clock 141, 210General MIDI 243Global channel 243IN channels 212Interface 245OUT channels 212Setup 136, 158, 196, 210, 243Standard MIDI File 141, 173
MIDI interface 245MIDI Setup 136, 158, 196, 210, 243
Write 220, 221Midifile 141, 173, 243Mode
Sequencer 173–199Song Play 141–144SongBook 160–168Style Play 111–140
Index

269Index
Inde
x
MP3 77, 113, 144, 156, 160, 169
OOctave Transpose 18, 123
Auto Octave 204Midi In 211
Operating Modes 8OS (Operating System)
Backup 24Update 24
Outputs 26, 213–216, ??–216
PPads 10, 133Pan
Pads 133Song tracks 151Style tracks 120
PANIC (SHIFT+START/STOP) 12Pedals 208Performance 111
Selecting 104Writing 138
Pitch Bend 123, 188Player
Transport controls 13Program Change 245
QQuarter Tone 119, 123
RRX 195
SScale
Main scale 203Sequencer mode 173–199Shift 13Single Touch 9, 13Single Touch Setting (STS) 13
Selecting 13, 106Writing 139
SongMarkers 172Play from disk 106, 197Recording 176–185Selecting 106, 197Standard MIDI File 243
Song Play mode 141–144SongBook 160–168Sound
Editing 129, 155, 189Selecting 104
Split (Keyboard Mode) 17Lock 205
Split Point 118, 243Standard MIDI File 141, 173, 243STS, See Single Touch SettingStyle
Ending 11Fill 11Intro 11Selecting 9, 105Style Performance 111Variation 11
Style PerformanceSelecting, see StyleWriting 139
Style Play mode 111–140Synchro Start/Stop 12
TTalk
On/Off 118Tap Tempo 11Tempo/Value section 15Touch Panel
Calibration 219Track Select 13Tracks
Drum/Percussion 128, 134, 214Keyboard tracks 111, 142Octave Transpose 18Volume 120, 150, 186
Transpose 18, 123Auto Octave 204Midi In 211
UUpper Volume Link 120, 137USB 238
VVariation 11Velocity Curve 201Video Interface 21, 217, 250Voice Processor
Harmony Track 157, 167, 196MIDI channel 211
Voice Processor PresetLock 205Writing 221
Voice Processor SetupEditing 216Writing 221
VolumeBalance 111, 141Balance (Keyboard/Style or Ply) 7, 26Balance (Player) 26Individual tracks
Sequencer 186Song Play 150Style Play 120
Master 25, 111, 141

270 Index


© KORG Italy 2012. All rights reservedPART NUMBER: MAN0010038
AddressKORG ITALY SpAVia Cagiata, 85I-60027 Osimo (An)Italy
Webwww.korg.comwww.korg.co.jpwww.korg.co.uk


