Page 1
Page 1 of 50
PAA file Creation Best Practices Author: Dr. Esmond Walshe
Abstract
The WebSphere Portal Solution Installer (SI) is the recommended technology for installing add-ons to
your WebSphere Portal server application. To use this functionality, developers need to provide their
deployment resources in the Portal Application Archive (PAA) format that is consumed by the SI. The
decisions you make when you build the PAA file will determine how easy it will be to troubleshoot
any deployment issues and to maintain your application into the future. This document outlines best
practices that you should adhered to when you create your PAA file. Also highlighted are some of the
more common mistakes encountered when you build PAA files and the recommendations on how
these issues can be resolved.
Page 2
1 Contents Introduction ............................................................................................................................................................... 4
Terminology ............................................................................................................................................................... 7
Building a PAA file ...................................................................................................................................................... 8
The Assembly Name ................................................................................................................................................... 9
Adding PAA file components.................................................................................................................................... 10
Component naming schemes ......................................................................................................................... 10
Separating your resources in to multiple components .................................................................................. 11
Using additional properties in a PAA file ................................................................................................................. 12
SDD file generation .................................................................................................................................................. 12
Assembly level sdd.xml file ............................................................................................................................. 12
Component level sdd.xml file ......................................................................................................................... 13
Component dependencies ............................................................................................................................. 14
Server dependencies ...................................................................................................................................... 17
PAA file dependencies .................................................................................................................................... 17
Adding custom code ................................................................................................................................................ 18
Adding unless="isSecondNode” attribute ...................................................................................................... 19
Installing non-portlet war files ....................................................................................................................... 20
Using ant properties in xmlaccess scripts ....................................................................................................... 21
Referencing locations inside of the PAA file ................................................................................................... 22
EAR file deployment ....................................................................................................................................... 22
Invoking Jython scripts from custom code ..................................................................................................... 23
Catching Errors ............................................................................................................................................... 25
Extension Points Best Practice ................................................................................................................................. 26
Page 3
Page 3 of 50
Which extension points to use for a given scenario ....................................................................................... 27
Removing items during the deployment phase ............................................................................................. 27
The deploy-apps-applySIFeaturePack and remove-apps-removeSIFeaturePack extension points ............... 28
List of available extension points ................................................................................................................... 29
Including WCM libraries in a PAA file ....................................................................................................................... 36
Theme deployment .................................................................................................................................................. 38
Upload of content to the WebDav Store ........................................................................................................ 38
Deleting WebDav content .............................................................................................................................. 39
Registering a theme with WebSphere Portal ................................................................................................. 41
PAA file life cycle ...................................................................................................................................................... 44
Two step deployment process ....................................................................................................................... 44
Enabling PAA file for updates ......................................................................................................................... 45
Overwriting the existing PAA file .................................................................................................................... 45
Deploying PAA files to a clustered environment ..................................................................................................... 47
Advantages of running SI with Portal stopped. .............................................................................................. 47
Reducing deployment times on a cluster ....................................................................................................... 48
Acknowledgements .................................................................................................................................................. 50
Page 4
2 Introduction
You created an application that you want to run on WebSphere Portal and now need a mechanism to
deploy it to the server. For example, you have an application that consists of a war file that contains
a portlet. You also created an xmlaccess script to configure the portlet and place it on a web page.
The war file has a dependency on a number of external jar files that need to be added to the server-
wide class-path. In addition, the portlet depends on an imported WCM library and extra
personalization rules to define what content the user is presented based on whether they are logged
in or viewing the portlet anonymously.
Before the development of the SI, the following steps were required to manage the installation of
such content:
1. Use the xmlaccess tool to run the script to install and configure the war file
2. Copy the jar files to a location where they can be picked up by the class-path
3. Run a ConfigEngine task to import the WCM library
4. Import the personalization rules through the user interface or the command line
Since the introduction of the SI, the deployment of all these resources can be automated without the
developer adding any deployment code. The resources must be packaged in the PAA format. The SI
also provides functionality to manage the installation of the resources in the correct order. It also
allows the developer to extend the functionality using additional configuration scripts when the
default functionality of the SI does not cover the required outcome.
Starting with WebSphere Portal 8.0, the SI using the PAA format is the recommended method for
packaging and deploying your content. The SI in WebSphere Portal version 8.0 and 8.0.0.1 is purely a
command line tool run through the configuration framework (ConfigEngine). However, in
WebSphere Portal 8.5 most of the functionality is now available through the Configuration Wizard,
which is the primary mechanism for performing WebSphere Portal configuration steps.
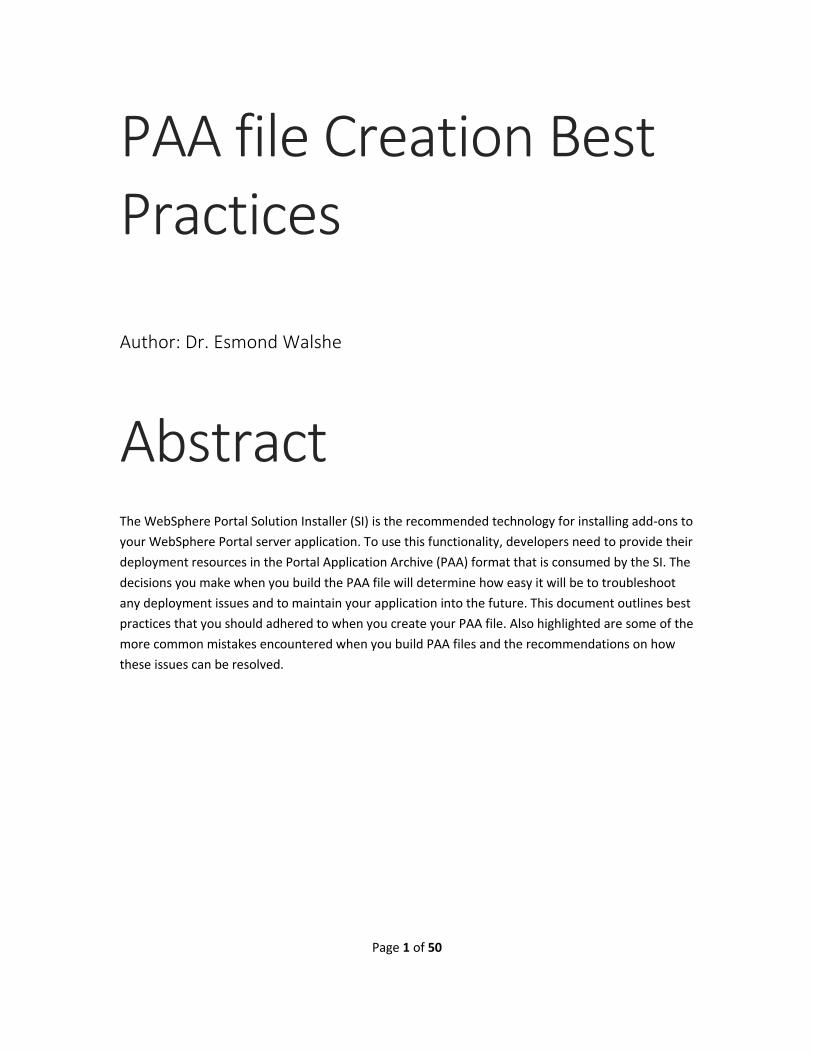
This paper will concentrate on best practices for creating the PAA file to deploy using the SI. It is
assumed that the reader has prior knowledge of the PAA file structure (See Figure 1). This paper is
intended as a complementary document to the PAA specification documentation found in the
product documentation and is not a replacement for the SI documentation. These best practices,
when followed, will ensure that the update procedure for your PAA content is simplified. Although
not strictly related to PAA creation, the final sections discuss the SI itself and best practices that
should be followed when using this functionality to install and deploy add-ons to WebSphere Portal.
Page 5
Page 5 of 50
Not covered by this document is how the different resources are extracted from a running portal
server. Some of the resources such as war files and shared jar files will be produced by the chosen
build mechanism, however, others such as WCM libraries and xmlaccess scripts need to be extracted
from the running portal. Methods to do the extraction can be found in the WebSphere portal
documentation. Some additional editing of the resources may be required to ensure that the
resource can be applied to multiple systems, for example it is often necessary to edit xmlaccess
scripts to ensure that they are not server specific. As this paper describes best practices for using the
PAA file format, extracting/editing of individual resources was deemed to be out of scope, but may
be the subject of a separate document.
Because the SI has evolved over the last few years, there are some differences in how certain
resources are handled between versions. When these differences are encountered throughout this
paper, they will be highlighted. For example, with a PAA file created to be deployed on WebSphere
Portal 8.0/8.0.0.1, the developer must supply an assembly level sdd.xml file; however, in 8.5,
providing an sdd.xml file may not be necessary, as in certain circumstances, the sdd.xml file can
be automatically generated.
Page 6
FIGURE 1: PAA FILE
Page 7
Page 7 of 50
3 Terminology
Term Description
Component Smallest level of granularity for ConfigEngine install, can range from large
application to a number of resource types. For example, Unified Task List.
Assembly Group of components, for example the PortalServer ap or base
directories
Offering
A group of assemblies, for example PortalServer
Extension point Provides ConfigEngine with knowledge of type of functionality being
provided, e.g. create-ear-applySIFeaturePack informs
ConfigEngine that an ear file is being installed. Allows ConfigEngine to
group resources to install. (not to be confused with Eclipse extension
points)
sdd.xml Software Definition Descriptor, file containing information about the
application to install, found at all levels, e.g. component, assembly and
offering.
<SCU> elements Smallest configurable unit, added to component level sdd.xml files to
inform ConfigEngine of extension points available for the component.
PAA Portal Application Archive: structured zip file consumed by SI
Table 1 Terminology
Page 8
4 Building a PAA file
A PAA file is a .zip file with a specific structure that denotes the types of resources it contains. SI uses
a combination of the directory structure and the resource file types to denote functionality when
generating code to do the deployment. SI expects PAA files to conform to the java.util.zip
format. If a different compression format is encountered it might throw an error. To be sure that
your PAA file conforms to this format you can either use a compression tool that specifically
generates this output or build the PAA file using ant or Java. An example of how to build using ant is
as follows:
<zip destfile=”sample1.PAA” basedir=”/tmp/sample1” />
You can also use the Java jar utility to build the .zip file. If using this tool, you need to ensure that no
manifest file is added to the output. Adding additional content to the top level of the PAA file is
problematic. The SI PAA validation code expects only one root directory at the top level of the PAA
file. If any additional files/directories exist at this level, an error will be thrown, as the PAA file is
deemed to be invalid. For this reason, the manifest file must be excluded.
When using the Java jar tool to build your PAA file you can use the ‘M’ option to ensure that no
manifest information is generated, leaving just the root directory at the top level of the PAA file. The
following is an example of how to build your PAA file using Java and Jar:
/opt/IBM/WebSphere/AppServer/java/bin/jar -Mcvf Sample1.PAA Sample1
Before Java 7, the java.util.zip classes were restricted to 32 bit encoding of .zip files.
Therefore, SI was unable to handle PAA files greater than 2GB in size. Because Portal 8.5 can run on
Java 7, this restriction should no longer be the case. However, if the server is running on Java 6 or
earlier, this restriction must be considered.
However, for the most part, a PAA file should never reach the size limits posed by the 32 bit
java.util.zip class. In general the only resource type that is typically large enough to cause a
PAA file to grow to this size would be a WCM library. For small libraries it makes sense to include
them in a PAA file. But for a large library, due to the time required to export the content and
subsequently import again on a new system, it is not recommended that the PAA file be used to
transfer this content. Instead, another means for transferring the content should be found. See the
section discussing the inclusion of WCM libraries in a PAA file for alternative methods of transferring
WCM content.
Page 9
Page 9 of 50
5 The Assembly Name
The assembly name for your PAA file is an important consideration as it is for the most part what the
user will use when interacting with the PAA file after installation. The assembly name is also the root
directory name of the PAA file. That is, both the root directory name and the name of the assembly
in the assembly level sdd.xml file must be the same. ConfigEngine is also case sensitive, so ensure
that both the root directory name and the name references in the sdd.xml file match the correct
capitalization. A mismatch in capitalization between the assembly and root directory names is one of
the most common errors encountered with creating PAA files. When the case of the name and root
directory do not match, ConfigEngine is unable to resolve the correct path to the PAA content.
In Portal 8.5, SI can generate a basic assembly level sdd.xml file by using the root directory name,
and the list of available components. See the SI 8.5 documentation for further details.
The ConfigEngine enforces a strict unique assembly name policy. That is, your assembly name cannot
conflict with an existing core Portal assembly so SI will first check if a conflict exists, before allowing
the PAA file to install. If the assembly name is already part of the PortalServer offering, SI will
not install the PAA file.
As all PAA files are installed to a separate PAA offering, as opposed to the PortalServer offering,
the existing assembly would not be overwritten. However, the situation could occur where two
assemblies of the same name appear in the registry, once in the PortalServer offering and again
in the paa offering. As assemblies are referenced directly by their name and not restricted by the
offering name, an issue would arise when invoking tasks for an assembly as ConfigEngine will be
unable to resolve which assembly is required. Therefore the PAA based version of the assembly
cannot be installed where an assembly of that name already exists in the PortalServer offering.
If the assembly has already been installed with another PAA file, then SI will register the components
inside of the existing assembly of that name in the registry, which might pose issues further down
the line. For example, when the user attempts to deploy the PAA file using the advanced scenario of
the install add-ons workflows of the config wizard, all components for this assembly will be
presented to the user. A worst case scenario would be in the typical case where no selection choices
will be provided to the user for the components they want to install. That is, all components
registered would be deployed. Therefore, adding the components to a current assembly can cause
adverse effects for existing PAA files. The reason for not blocking the assembly from being
overwritten is to be able to support the update scenario for PAA files.
For this reason when naming your assembly you should choose something that is unique. But as the
customer is going to need to remember it, the recommendation is to ensure it reflects the type of
functionality provided by the application in the PAA file.
Page 10
6 Adding PAA file components
There are a number of things to consider when adding resources to your PAA file. Do you place all
resources in a single component? Or spread them out over multiple components? How to select a
name for your component, and how the SI and ConfigEngine use that name? What potential is there
for clashes in component names?
6.1 Component naming schemes
As with the assembly names discussed in the previous section, each PAA component must also have
a unique name. There is less of a chance of the component name clashing with a Portal component
as each PAA component has the word components/ in its name. However, to ensure that existing
PAA files that were initially released on the catalog, whose functionality has moved into the core
Portal offering, cannot be installed and overwrite the core component, SI will check to see whether
the component name minus the components/ already exists in the PortalServer offering. If it is
found, then the component will not be registered as part of the assembly.
There is potential though for component names to clash between PAA files. Observations have
shown a tendency for some PAA developers to name their components based on functionality, such
as, components/wcm for WCM content and components/theme for theme content. Following
such a naming scheme can cause problems for the install. If more than one PAA file containing
components with the same name are installed, then due to the ConfigEngine restriction for unique
component names, only one component will be registered. The SI default behaviour on installation is
not to register the new component, instead it will leave the existing one, and assume that the
existing version is a shared component. That is, the existing version of the component can be used by
both PAA files. The user can overwrite the default functionality by setting the property in the
wp_profile/PAA/<assemblyName>/components.properties for the component to true
and then run the update-PAA-components task. However, this task will remove the existing
component from the registry and then register the new component. In cases where it is intended
that components are shared across PAA files an issue should not arise. That is, if the component is a
later version of the previous one and is still compatible with the installed application. However, for
most situations, these components are intended to be unique to the application in the PAA file in
which they are included, so overwriting a previously installed component might break existing
applications.
It is therefore recommended that you choose a name specific to the PAA file for your component, for
example, include the assembly name in the component name e.g. an assembly name of
government could have a component name of components/government.wcm or
components/gov.wcm. Although potentially there could be two different government PAA files,
there is less likely to be a component name clash as there would otherwise be.
Page 11
Page 11 of 50
6.2 Separating your resources in to multiple components
A PAA file must have at least one component, however there are no upper limits on the number of
components that can be included. So it is often a matter of choice how many components a PAA file
should have.
For smaller applications it makes sense to have only one component as the entire application must
be installed or deployed. Where there are optional pieces of an application, or if the developer wants
to offer alternative content; for example, different WCM libraries, or an alternative page structure, it
is advised that the separate optional pieces be placed in additional components. The user can then
select at deploy time the components they want to deploy. For example, you might have an
application with some additional demo content. If the user wants to evaluate the application they
might decide to deploy the demo content to the server. But when using the application on a
production system, deploying the demo content might not be appropriate.
Similarly many PAA file developers want to include content specifically to be run on a virtual Portal,
with the other pieces still running on the base server. SI can only deploy to a single target Portal at a
time, either the base or a virtual Portal, so it makes sense to move the virtual Portal content to its
own component. So the other components can be deployed to the base Portal, and on a subsequent
run of the SI deploy-PAA task, the virtual Portal content can be deployed separately.
Another reason for adding multiple components to your PAA file is to separate resources based on
functionality. For example, putting all theme related resources in a separate component. The
advantage of using multiple components is that it makes it easier to only update a specific piece of
the application. It also makes it easier to debug issues as you can limit the deployment to an
individual component.
For these reasons it is a best practice to split resources of large applications into multiple
components. These components would include separate components for demo content, virtual
Portal specific content or alternative page structures/WCM content. However, for maintainability
purposes it is often beneficial to separate out other resources into functional components. It is not
recommended to do the separation on a resource by resource basis, as the Extension point approach
will already achieve the same result. However, splitting your application into components based on
functionality makes more sense. As these components can be deployed/removed separately from
other components making it easier to test the content, or apply changes to the resources.
Page 12
7 Using additional properties in a PAA file
The WebSphere Portal configuration framework through which the WebSphere Portal SI is run,
requires unique names for globally set properties. The unique names requirement for global
properties is a general feature with ant based projects. When the ConfigEngine is run (either through
the config wizard or from the command line) all ant tasks and properties in components registered
with the framework are loaded into the ConfigEngine project. Once loaded all ant properties are
immutable meaning once instantiated they cannot be changed, unless they go out of scope. If the
same property exists in multiple components registered with the configuration, then the first
instance of the property encountered by the framework will be instantiated and its value will be
used throughout the framework. Therefore, the use of non-unique property names can potentially
cause some unpredictable results. This restriction applies primarily to global properties declared
outside of an ant task.
As all ant tasks and properties that are registered with the framework through a PAA file install are
all loaded as part of the overall ConfigEngine project, this restriction will also apply to PAA files. For
this reason, it is recommended that global property names reflect either the PAA assembly name or
the name of the component where they are created. It will ensure that the property name will not
clash with existing properties. For example a component named components/sample1 could
have a property name of components/sample1.property1.
8 SDD file generation
8.1 Assembly level sdd.xml file
Since WebSphere Portal 8.5, SI can automatically generate a basic assembly level sdd.xml file. It uses
the PAA file root directory name as the assembly name and retrieves the list of components from the
components directory. If an order.properties file is found in the components directory, the
list of components set in this file will be used as the component list and any additional directories
will be ignored. Limiting the list of components to those listed in the order.properties file allows for
additional directories to be included in the PAA file but not to be part of the deployment. For
example a directory containing content that must be added to a different server than Portal, but is
packaged as part of the PAA file. As the order.properties file governs the order in which
components are deployed, all components that must be deployed should be included in this file,
otherwise they won’t be added to the sdd.xml file.
Page 13
Page 13 of 50
Consider adding an assembly level sdd.xml file if you have additional components in your PAA file
such as those intended to be deployed on a virtual Portal, or containing demo content. If such a
component is added to the order.properties file, a dependency will be added between it and
other components. The dependency assignment results in dependent components being run during
the deployment of the virtual Portal component, which would have unpredictable results. If there is
no need for an order between the components you can leave out the order.properties file and
the assembly level sdd.xml file can be generated from the full list of the components. However, it
would prevent the inclusion of additional directories in the components directory.
Finally if you need to add either a dependency on a specific server version or on the presence of
another PAA assembly, then a developer provided assembly level sdd.xml file is necessary. You can
use the PAA files in the wp_profile/doc/PAA-samples directory for examples of how to add
the assembly level sdd.xml file.
8.2 Component level sdd.xml file
All versions of SI since WebSphere Portal 8.0 can generate the component level sdd.xml file. It
derives the component name by extracting the path from the root directory of the PAA file to the
component directory and will generate a basic sdd.xml file based on this value. It will only perform
this step if no component level sdd.xml file exists.
Whether the sdd.xml file is automatically generated or supplied as part of the component, the next
steps remain the same. SI will generate any default code necessary for the deployment of resources.
It will first check if an existing implementation task exists before generating code. Once this step is
complete, the full list of extension point implementation tasks is examined and <SCU> elements to
register the tasks are automatically generated and added to the sdd.xml file. Therefore, when you
add a custom implementation task, there is no need to add a <SCU> element to the sdd.xml file
because SI does it automatically. However, if an existing <SCU> element for a specific extension
point exists, then SI will not overwrite it because it might set dependencies on another component.
For Portal 8.0 and 8.0.0.1, the only time you need to manually add an <SCU> element is when you
add a dependency on another component. In this case a developer provided component level
sdd.xml file is necessary. However, if there are no dependencies between components, for
example, you do not need component ‘A’ installed before component ‘B’, then it is recommended
that you let SI automatically generate the component level sdd.xml file.
For Portal 8.5, you can still add component dependencies by manually adding <SCU> elements to
the component level sdd.xml file, however, as dependency generation can now be automated it is
Page 14
no longer the recommended method for adding such dependencies. Therefore, it is best practice to
let SI create the component level sdd.xml file and allow SI to generate any component
dependencies. The method for setting component dependencies in 8.5 is discussed in the next
section.
8.3 Component dependencies
SI relies on the mechanism built into the config framework to set the order in which components are
deployed. It is achieved by setting a requirement from one implementation of an extension point
task to another implementation of that extension point included in another component. See the
section on ‘adding custom code’ for more details of how to implement an extension point. Although
it is possible that different extension points of a component will have dependencies on different
components, it is normally the case that either there are no dependency requirements or that only
one component is required.
The dependency is set by adding a <requirements> element to a <SCU> element as follows:
<SCU id="deploy-apps-applySIFeaturePack" targetRef="OS">
<Identity>
<name>Do Configuration Task</name>
<version>1.0.0.0</version>
<displayName key="keyInBundle" default="Executes Configuration for
this component" />
<description key="keyInBundle" default="This section runs
configuration for this component" />
</identity>
<unit>
<configArtifact type="ConfigEngine">
<parameters>
<parameter name="targetName" value="deploy-apps-
applySIFeaturePack" />
</parameters>
</configArtifact>
</unit>
Page 15
Page 15 of 50
<!—register a dependency on a previous component-->
<requirements>
<requirement name=" deploy-apps-applySIFeaturePack">
<alternative name="components/component1"/>
</requirement>
</requirements>
</SCU>
The <requirements> element can contain one or more <requirement> elements, each one
representing a component on which the current component depends on being previously installed.
The name attribute of the <requirement> element can be set to whatever value the developer
chooses. The name attribute of the <alternative> element must equal the full name of the
component on which the current extension point depends. The dependency link is between
extension points. If you add the <requirements> element to the <SCU> element for the deploy-
apps-applySIFeaturePack, register an equivalent deploy-apps-applySIFeaturePack
extension point for the dependent component.
Prior to Portal 8.5, a developer was required to manually add these items to the component level
sdd.xml file where there was a dependency on having a component previously installed. See the
section of the official SI documentation concerning ‘The component level sdd.xml file’ for more
details on how to edit the <SCU> element and its sub elements.
Since 8.5, although the mechanism used for setting the requirements is the same, this step can now
be automated as part of the code generation phase.
To ensure that the dependencies can be automatically set between components on Portal 8.5, add
an order.properties file to the assemblyName/components directory. This file should
contain a comma separated list of components in the order in which they should be deployed. If
there is no need for a dependency on a specific component, there is no need to include it in the
order.properties file, unless it is required for generating the assembly level sdd.xml file, see
previous section for more details. The following is an example of the content of the
order.properties file:
Components/component1,components/component2,components/component3,…
The SI will then generate dependencies between the extension points shared between components.
If there is no shared extension points between two components in the order in which they appear in
the order.properties file, then the dependency is created on the next component in the list
that does have an instance of the extension point. Dependency generation occurs after all code
Page 16
generation has taken place so all custom and auto generated extension point implementation tasks
are available.
For example, if the dependency is being created on the deploy-apps-applySIFeaturePack
extension point for components/component3, SI will check components/component2 to see if
this component has an implementation task for this extension point. If so, it will set the dependency
on the <SCU> element for the extension point in the component level sdd.xml file of
components/component3 to point to components/component2. If there is no implementation
of the extension point in components/component2, then it will check for such a task for
components/component1. If the extension point is implemented there, then the <SCU> element
for the extension point in components/component3 will have the dependency on
components/component1. If all three components implement the extension point, then a chain
of dependencies for the extension point will be set between the 3 components i.e.
components/component3 will depend on components/component2 and
components/component2 will depend on components/component1.
The order is set on a per extension point basis, so that the deploy-apps-applySIFeaturePack
of components/component3 might depend on components/component2, but the create-
ear-applySIFeaturePack of components/component3 could depend on
components/component1.
Not all extension points allow for dependencies to be set in this way. It is generally the case for
extension points that interact with the application server, such as, create-ear-
applySIFeaturePack or create-library-applySIFeaturePack, however, extension
points that are Portal server specific, do not have this flexibility. It is due to not being called directly
by the config framework, but from a task generated by SI. This task is the implementation of the
deploy-apps-applySIFeaturePack extension point. It will call any Portal related tasks such as
deploy-portlets-applySIFeaturePack and any SI specific extension points such as
import-wcm-applySIFeaturePack, install-content-xmlaccess-
applySIFeaturePack, etc. If you have a dependency on such tasks then the dependency should
be set on the deploy-apps-applySIFeaturePack extension point and not on the individual
extension points.
In the section discussing extension point best practices, a table showing the full list of supported
extension points in the order in which they are invoked by SI is included. Also included in the table is
information on whether a dependency is allowed for that extension point. If no dependency is
allowed, then the dependency must be assigned to the deploy-apps-applySIFeaturePack
extension point instead.
Page 17
Page 17 of 50
8.4 Server dependencies
Since Portal 8.0 it has been possible to add a check to your PAA file to restrict the server versions to
which your PAA file deployment is compatible. It is done by adding a
<serverVersionDependency> tag to your assembly level sdd.xml file. You can find out more
information on how to set these dependencies in the topic ‘Checking server dependency’ in the SI
documentation.
Although it is not strictly necessary that this information be added to a PAA file, it will prevent SI
installing the PAA file and registering it with the ConfigEngine if the current WebSphere portal
version is not supported by the PAA based application. If you are deploying the PAA file regularly as
part of a maintenance cycle, with incremental changes then adding server dependencies may be
unnecessary. However, if you are producing a PAA file to be released to a third party, it is
recommended that you ensure that the PAA file cannot be installed on server versions with known
incompatibility issues. It will ensure that defects are not raised where problems have arisen due to
incompatibility issues between your PAA version and an unsupported WebSphere Portal version.
Since Portal 8.5, you can also add a restriction based on the cumulative fix level. That is if you have a
dependency on a specific fix level to be installed prior to the PAA install, you can ensure that the PAA
file will not be installed without this prerequisite.
8.5 PAA file dependencies
It is often the case that a PAA file might require that one or more additional PAA files be installed
prior to its deployment. When such files are not available, it can cause errors during the deployment
phase. It usually means that the application is unable to function correctly. In Portal 8.5, the ability to
set a dependency from one PAA file to another was introduced. The reason for introducing this
functionality is to allow for a PAA file to be able to verify if another PAA file on whose functionality it
depends has already been installed. Therefore, at install time SI can now check that the prerequisite
PAA file has already been installed before proceeding with the registration of the current file.
To set a dependency on another PAA file, a <PAADependencies> element must be included in the
sdd.xml file. For each PAA file on which there is a dependency, add a <PAADependency> sub
element. For example:
<PAADependencies>
<PAADependency name=”dependency1”/>
<PAADependency name=”dependency2”>
Page 18
</PAADependencies>
As with the server version dependencies, PAA file dependencies also must be set in the assembly
level sdd.xml file. For more information on the element and its attributes see the topic ‘PAA
dependencies for deployment and removal’ in the SI documentation.
This setting serves a dual purpose. As well as preventing a PAA file from installing when its
prerequisites are unavailable, it can help in providing an order to the install of multiple PAA files. The
facility exists to install multiple PAA files at once, when installing/deploying your PAA content
through the config wizard. Providing a comma separated list of PAA files in the install location of the
install add-ons workflow will ensure that multiple PAA files are installed. When deciding what
order in which the PAA files are to be installed/deployed, The PaaDependency tags are taken into
account. If there are no such elements then the order of the install/deployment doesn’t matter,
however, if a dependency exists, then it is important that SI has a mechanism to be able to
determine the order for deployment.
9 Adding custom code
There are many situations where it might be necessary to add custom deployment code to your PAA
file. Although SI does generate code to deploy a number of resource types, there are others for
whom the deployment is not so easily automated. In these situations custom code provided by the
developer is required. Another scenario where custom code might be necessary is when SI auto
generated code does not cover the requirements for deploying your resources, so a custom
implementation task is necessary. However, it is recommended best practice where SI automatically
produces code to deploy a resource type, it should be used instead of adding custom code to handle
these resources. Unless limitations in the auto generated code prevent the configuration of the
resources being accurately completed. This will help with the maintainability of the PAA file, as
changes in the underlying configuration tasks will be reflected in the auto generated code.
No matter which extension point you want to implement, you can create an ant task meeting the
extension point task naming scheme and place it in an xml file in the config/includes directory
of the component. This task is then picked up by SI at installation time and registered with the
ConfigEngine. The following is an example of a task following the required naming scheme:
‘Action’+ extension point Name + componentName.
In the case of a PAA file with a component name components/component1 a task implementing
the create-ear-applySIFeaturePack extension point would look like:
<target Name=”action-create-ear-applySIFeaturePack-
components/component1”>
Page 19
Page 19 of 50
…
</target>
The SI will search the config/includes directory of each component and retrieve the list of
extension point implementation tasks. It then does a look up against the resource types included in
the PAA file and determines if there is already an implementation task for the extension point
assigned to a specific resource. If so it will not try to generate code for that resource, instead, it will
move on to the next resource type. Therefore, if you are adding a custom task to handle the install of
a resource in a component, the same task should be used to deploy all resources of that type. For
example, if you are implementing the create-ear-applySIFeaturePack extension point, the
task will need to deploy all ear files in the installableApps/ear directory of the component. Ear
files in another component will not be affected and can still be deployed with auto generated code.
For a full list of SI supported extension points, see the section ‘Extension Points Best Practice’ below.
SI will automatically create <SCU> elements for any detected extension point implementation tasks
and add them to the sdd.xml file. Therefore, unless you need to apply a component dependency to
the <SCU> element, there is no need to manually add such content. It is best practice to allow SI
handle <SCU> element creation as part of the sdd.xml file generation. In 8.5, the dependencies
can be also generated, see previous section for further details.
NOTE: Any tasks included in the config/includes directory that do not adhere to the naming
scheme will be ignored by SI, unless they are called from other extension point implementation
tasks.
9.1 Adding unless="isSecondNode” attribute
As is discussed in the section on deploying PAA files to a Portal cluster environment, the PAA file
must be installed and deployed to each node of the cluster. It will ensure that all resources that
cannot be replicated across all the nodes can be installed on each node. An extension point
implementation task should only be run on additional nodes to the primary node if the resource
type, such as a shared jar file cannot be replicated by the deployment manager. Therefore, to
prevent your custom task from running on every node, the unless=”isSecondNode” attribute
must be set on the task definition. The following example shows how to set the attribute:
<target Name=”action-create-ear-applySIFeaturePack-
components/component1” unless=”isSecondNode”/>
…
</target>
Page 20
9.2 Installing non-portlet war files
When installing non-portlet war files they can be included in the installableApps/war
directory. These files will then be copied across to the ${WasUserHome}/installableApps
directory, e.g. wp_profile/installableApps where they can be referenced by the custom
deployment code. There are a number of options for how the war file can be deployed.
You can use a Jython / jacl script to perform the deployment. It can be invoked through the use of
the <wsadmin> task. There is currently no extension point specifically set aside for this
functionality, however, you are free to include this functionality under one of the more general
extension points such as pre-apply-PTF-applySIFeaturePack
You can also use the wplc-create-ear task to do the deployment. This task will wrap the war file
in an ear before deploying it to the server. For example:
<wplc-create-ear
appname="SampleWar"
earfile="${WasUserHome}/installableApps/SampleWar.war"
wasuser="${WasUserid}"
waspassword="${WasPassword}"
cell="${CellName}"
node="${NodeName}"
server="${ServerName}"
startingweight="25"
conntype="${wsadminConnType}">
<option key="usedefaultbindings"/>
</wplc-create-ear>
IMPORTANT: The <option key="usedefaultbindings"/> nested element is necessary to
ensure that WebSphere application server uses the default bindings for items such as the
MapWebModToVH setting etc. Otherwise, they will need to be set separately as <option>
elements nested inside of the task.
Page 21
Page 21 of 50
An alternative to adding custom code would be to wrap the war file inside of an ear file. The default
SI ear file deployment code can then be used to do the deployment. That is, once the ear file is
placed in the installableApps/ear directory of the component.
9.3 Using ant properties in xmlaccess scripts
You can reference ant build properties in your xmlaccess scripts by placing the property name in
between ‘@’ signs in the xmlaccess script. For example:
http://@WasRemoteHostName@:@WpsHostPort@/@WpsContextRoot@/Portal
These properties can be substituted by the ConfigEngine/SI when the script is run. Placing the script
containing properties in the content/xmlaccess/install or
content/xmlaccess/uninstall directories of the component will ensure that the SI will
replace the property place holders with the actual property values from the ant build. You can set
the properties in properties files inside of the PAA file or on the command line and SI will do the
substitution automatically.
To ensure that such properties can be substituted in the scripts when the script is invoked from
custom code, you need to add the following lines of code to your custom ant task:
<si-set-xmlaccess-url/>
<filtersetall />
<copy toDir="${work.dir}/componentName" file="${xmlaccesspath}"
filtering="true" overwrite="true" encoding="UTF-8"/>
<xmlaccess user="${PortalAdminId}"
password="${PortalAdminPwd}"
url="${si-XMLAccessUrl}"
srcfile="${work.dir}/componentName/${xmlaccessFileName}" />
The si-set-xmlaccess-url macro creates a property containing the correct URL that will
include any virtual Portal information if present for the call to xmlaccess. Include it only if you are
overwriting the deploy-apps-applySIFeaturePack task. If the deploy-portlets-
applySIFeaturePack or install-content-xmlaccess-applySIFeaturePack tasks are
being overwritten, then there is no need to include this macro call. The action-deploy-apps-
applySIFeaturePack-components/componentName task, that is auto generated to handle
calls to the other 2 extension points, will already include this line.
Page 22
The substitution of the properties is performed during the copy task. It is recommended that the file
is copied over to a sub directory of the ConfigEngine work directory, ${work.dir}. The
<xmlaccess> task should load the script file from this location.
9.4 Referencing locations inside of the PAA file
When a PAA file is installed to the ConfigEngine a number of properties to denote the location on the
server of the expanded PAA file assembly and its components are auto generated. These properties
have a naming scheme that once followed, custom code can directly reference these locations during
the deployment without needing to extrapolate them from the ${WasUserHome} and
${wp.si.offeringName} properties.
In the case of the assembly, the property is derived by taking the assembly name, capitalising the
first letter and appending the word ‘Home’ to the end. For example an assembly name of sample1
would be referenced through the property ${Sample1Home}. This property will contain the path to
the expanded PAA file in the PAA directory under the profile.
Similarly for components, the property is generated using the componentName with the first letter
capitalised followed by the word ‘Home’. For example, a component called
components/Component1 would be referenced using ${Components/component1Home}.
9.5 EAR file deployment
When overwriting the SI auto generation of code for deploying ear files, take care that any code
changes are compatible with deploying applications to a Portal cluster environment. There are three
separate extension point implementation tasks generated by SI for ear file deployment. Overwriting
one of these tasks with a custom task will not prevent SI from generating code for the other two.
create-ear-applySIFeaturePack: This extension point handles the deployment of ear files
to the server. If you overwrite the default code for this task, make sure that you include all of the ear
files in the directory of your component. When SI detects the presence of an implementation task, it
will assume that the developer has already provided install code for all instances of the resource type
for that component and will move on to the next resource type.
modify-ear-applySIFeaturePack: This extension point task is used by SI to modify the server
mappings assigned to a web module. When the ear file is installed using the wplc-create-ear or
wplc-update-ear tasks, the default server mapping is assigned to the server to which the
deployment takes place. In the case of a Portal cluster environment, the mapping of the web module
is assigned to the deployment manager by default and not the WebSphere Portal servers. Similarly if
Page 23
Page 23 of 50
there are multiple servers on a single node, then the mappings are only applied to the WebSphere
Portal server to which it was deployed and not replicated out to the other servers. To alleviate this
issue, SI applies the same mappings to the web modules that are assigned to the wps.ear web
modules. In this way the web modules are then correctly mapped to the same set of servers as the
Portal core applications.
If you want to assign different mappings to the web modules or require that no mappings are to be
assigned, then you need to overwrite this task. Once the implementation task is detected, even if it is
an empty task, SI will assume that the developer does not want to automatically create web module
mapping code.
start-ear-application: In this extension point implementation task, SI will attempt to start
the ear file applications. This task can fail to start the applications if there are dependencies on
external jar files that are not on the class-path of the running server. Therefore if you want SI not to
attempt to start the ear file, then you need to overwrite the task, for example:
<target name=”action-start-ear-application-applySIFeaturePack-
components/componentName”/>
If SI fails to start the application, the build will not terminate but will continue to process the rest of
the deployment. In most cases, it will have no adverse effect on the deployment process. Restarting
the server after the deployment has completed will ensure that the ear file applications are started,
as any jar files included in the PAA will be added to the class-path. Alternatively, if you start the
deployment phase when the Portal server is stopped, the jar files will be added to the class-path
before SI starts the server to perform the credential validation, so when the ear file is deployed, the
jar files in the shared/app directory of the components will already be available. See the section on
running SI with the Portal server stopped for more details.
Deploying the PAA file when the server is stopped will not help in the case where there are jar files in
the components/componentName/shared/common directory because the shared library will
not be created until after the Portal server has been started. Therefore, they will not be available on
the class-path until the next server restart.
It should also be remembered that portlets contained within an ear file are not automatically
registered with the Portal server during the ear file deployment, therefore an xmlaccess script is
necessary to perform the registration.
9.6 Invoking Jython scripts from custom code
A Jython wsadmin script can be invoked from custom code using the wsadmin task provided by the
WebSphere application server team. It can be run directly from the ConfigEngine, for example:
Page 24
<wsadmin
script="${Sample1Home}/config/templates/test-sample.py"
conntype="SOAP"
host="${WasRemoteHostName}"
port="${WasSoapPort}"
user="${WasUserid}"
password="${WasPassword}"
failonerror="yes"
lang="jython">
</wsadmin>
If a wsadmin script encounters an error and does not throw an exception, the SI and ConfigEngine
will continue with the deployment. There is no mechanism for automatic feedback between the
process that runs the script and the ConfigEngine. However, if an exception is thrown by the
wsadmin script, it can be processed by the si-trycatch statement and a build failure can be
produced. Stopping the deployment at the point of failure will ensure that the deployment fails at
the stage where the error occurred and not at a later point when the resource is that failed to
configure is needed by the deployment process. It will ensure that the issue is easier to debug
because the termination of the deployment process will be at the point where the original issue
arose.
The following is an example of how to throw an exception in a Jython wsadmin script:
def isConnected():
try:
conntype = AdminControl.getType()
except:
#print "Not connected to server"
return 0
#print "conntype=%s" % conntype
return 1
isConnected()
Page 25
Page 25 of 50
The error information from the exception thrown can be accessed by using the si-trycatch
statement. See further details on how to handle the exception in the next section.
It is important to remember that if you make a change to the application server master configuration
inside of a jython script, you will need to ensure that you save your changes. SI will not do this
automatically after the wsadmin task has completed.
9.7 Catching Errors
Since Portal 8.5, SI uses a different try-catch statement that provides better access to the actual
error message and stack trace from errors thrown by the application server during the deployment
of resources. It has resulted in improved logging of error information, making it easier to debug
issues. You can also include the new try catch statement in your custom code to ensure that you
receive more accurate information about the errors being thrown.
<si-trycatch>
<try>
…
</try>
<catch>
<echo>ExceptionMessage is: ${exceptionMessage}</echo>
<echo>StackTrace is: ${stackTrace}</echo>
</catch>
<finally>
</finally>
</si-trycatch>
Page 26
10 Extension Points Best Practice
The first thing to note on the use of extension points is how the ConfigEngine and SI order the tasks
during the deployment. The deployment works on a per extension point basis, meaning that all
implementation tasks for a specific extension point are run consecutively before moving on to the
next extension point. All the create-ear-applySIFeaturePack tasks for the components in
the PAA file are run together before moving on to the next resource type. For more details on how to
implement an extension point, see the section on ‘adding custom code’. The grouping of extension
point tasks allows ConfigEngine to manage the interaction with the application server and save the
configuration in a single step, saving on the time it would take to deploy and save after each task
separately.
It is strongly recommended that extension points are implemented to drive the deployment of
resources, and not to use a set of many custom targets called from a single extension point. The
latter removes the ability of the ConfigEngine to optimise the deployment procedure. Calling all tasks
from a single extension point would also mean that the tasks would need to save the configuration
themselves as the deployment is progressing. New tasks looking up the configuration will still be
reading from the master configuration. If the changes have not been committed and saved, then the
resources that prior tasks have configured might not be reachable by later tasks.
The SI specific extension points, for example import-wcm-applySIFeaturePack or install-
-content-xmlaccess-applySIFeaturePack as these are called by the deploy-apps-
applySIFeaturePack extension point and not managed directly by the framework. However, all
instances of the deploy-apps-applySIFeaturePack extension point will be grouped together.
These tasks tend to deal directly with the Portal server installation tools such as WCM import and the
xmlaccess tool. These tasks will not run into the same issues with saving to the application server
configuration because the tools on which they rely save the content automatically.
When implementing an extension point task, ensure that you cover all resources covered by that
extension point for that component. If you are overwriting an extension point for which SI can auto
generate code, make sure all resources in the component mapping to that extension point are
covered by your task. SI does not parse the tasks to ensure that all resources are handled.
It is also important to use extension points for their intended purposes and do not overwrite to
handle unrelated resource types. The temptation may occur to overwrite an unused extension point
by the PAA file when a resource type doesn’t map easily to one of the named extension points. This
is not recommended as the extensions are designed around individual resource types and adding
unrelated resources may cause issues during the saving of the configuration. Any save to the
configuration occurs after all the extension point tasks for a specific extension have completed.
Page 27
Page 27 of 50
Where there are no direct mappings for a resource to an extension point, one of the following
general extension points can be used:
Pre-apply-PTF-applySIFeaturePack: Run at the start of the deployment process.
post-apply-PTF-applySIFeaturePack: Run at the end of the deployment process.
Pre-remove-PTF-removeSIFeaturePack: Run at the start of the remove-paa task.
post-remove-PTF-removeSIFeaturePack: Run at the end of the remove-paa task.
These extension points are intended to handle generic configuration tasks and should be used where
an equivalent resource specific extension point does not exist. Note that if you are invoking a jython
script that makes changes to the application server master configuration you will need to add a save
command to the script to ensure that your changes are stored.
10.1 Which extension points to use for a given scenario
There are 4 groupings of tasks for the SI whose invocation depends on the scenario being employed.
In general terms, extension points ending with applySIFeaturePack are called during the
deployment, whereas those ending in removeSIFeaturePack are called during the removal of
resources. Those ending with updateSIFeaturePack and rollbackSIFeaturePack are run
during an install or rollback of an update to your PAA file.
The set of tasks available for the updateSIFeaturePack extension is the same as for the
applySIFeaturePack, and the rollbackSIFeaturePack are the same as for the
removeSIFeaturePack tasks. The only difference is the suffix appended to the end of the
extension point.
NOTE: SI does not auto generate any updateSIFeaturePack or rollbackSIFeaturePack
tasks. They need to be added by a developer as custom code.
10.2 Removing items during the deployment phase
During the deployment phase, the SI will run any tasks that have the applySIFeaturePack
extension. In general, these tasks are for creating, modifying, updating, and deploying content.
However, you can also run remove tasks. These tasks differ from the tasks that have the
removeSIFeaturePack extension which are run during the remove-PAA task and will not be
invoked during the deployment. However, if one of the remove tasks has an extension of
Page 28
applySIFeaturePack for example remove-ear-applySIFeaturePack then it will be
invoked prior to the tasks to deploy ear related resources. In this way individual resources can be
removed before new versions are deployed.
It is still recommended to use the removeSIFeaturePack extension for remove tasks. However, if
a PAA file is being run as a maintenance task for an existing PAA file then it might be necessary to
remove specific resources before deploying newer versions. You must have some mechanism in
place to determine what resources exist prior to removal. If the PAA file is being installed on a clean
server, the lack of a resource, when SI attempts to remove it, might throw errors. It might even
result in the PAA file failing to deploy. Because the task is an applySIFeaturePack, there is no
simple way to have the task skipped during the deployment phase.
Not all extension points have this facility built into the ConfigEngine. Those extension points that are
called by the deploy-apps task will not be called in this manner. Therefore, if it is necessary to
remove Portal specific items you will need to implement the remove-apps-
applySIFeaturePack extension point to remove these resources.
10.3 The deploy-apps-applySIFeaturePack and remove-apps-removeSIFeaturePack extension points
Both of these extension points have great significance for the SI deployment and PAA removal
processes. These are the 2 extension points used by SI to run WebSphere portal specific
configuration tasks such as for deploying/removing portlets and running xmlaccess scripts. The auto
generated tasks for the deploy-apps-applySIFeaturePack and remove-apps-
applySIFeaturePack extension points invoke any extension points that are included that do not
have a direct mapping to a ConfigEngine extension point, for example, deploy-portlets-
applySIFeaturePack and install-content-xmlaccess-applySIFeaturePack. Once
tasks for handling the deployment of these resources are found, calls to the extension point tasks are
added to the higher level deploy-apps-applySIFeaturePack and remove-apps-
applySIFeaturePack extension point implementation tasks. These higher level tasks are also
responsible for checking that the server is currently started before deploying portal resources, and
sets some additional configuration properties such as the xmlaccess url to use when invoking the
<xmlaccess> task. Therefore, it is not advisable to overwrite these tasks. Instead one of the other
generic extension points should be considered such as the pre-apply-PTF-
applySIFeaturePack for custom tasks.
If it is a case that you need to overwrite the deploy-apps-applySIFeaturePack or remove-
apps-applySIFeaturePack extension points, you should ensure that you add any calls to any
portal related extension point implementation tasks that are included in the PAA. This is the case for
both custom tasks and for those that are auto generated
Page 29
Page 29 of 50
10.4 List of available extension points
The following table shows the list of extension points invoked during a deployment in the order in
which they are called:
Extension point name Description Mapping Component
Dependencies
Auto-
generated
pre-apply-PTF-
applySIFeaturePack
Extension point run at
start of deployment.
suitable for pre-
deployment setup
yes No
remove-application-library-
references-
applySIFeaturePack
Removes shared
library references
shared/common yes No
remove-ear-
applySIFeaturePack
Remove EAR file installableApps/ear yes No
remove-resource-
environment-entry-
applySIFeaturePack
remove resource
environment provider
entry
yes No
remove-resource-
environment-provider-
referenceable-
applySIFeaturePack
remove resource
environment provider
reference
yes No
remove-resource-
environment-provider-
custom-property-
applySIFeaturePack
remove resource
environment provider
custom property
yes No
remove-resource-
environment-provider-
applySIFeaturePack
remove resource
environment provider
yes No
remove-dataSource-
applySIFeaturePack
Remove the
datasource
content/database yes No
Page 30
Extension point name Description Mapping Component
Dependencies
Auto-
generated
remove-jdbc-provider-
applySIFeaturePack
Remove the JDBC
provider
content/database yes No
remove-j2c-auth-
applySIFeaturePack
Remove J2C
authentication alias
content/database yes No
remove-app-server-library-
references-
applySIFeaturePack
Removes shared
library to server
classpath
shared/common yes No
remove-library-
applySIFeaturePack
Removes shared
library
shared/common yes No
remove-app-server-
classloader-
applySIFeaturePack
Remove appserver
classloader
yes No
remove-host-alias-
applySIFeaturePack
remove host alias yes No
create-host-alias-
applySIFeaturePack
Create new host alias yes No
create-app-server-
classloader-
applySIFeaturePack
Create new appserver
classloader
yes No
create-library-
applySIFeaturePack
Creates shared library shared/common yes Yes
create-app-server-library-
references-
applySIFeaturePack
Adds shared library to
server classpath
shared/common yes Yes
Create J2C authentication
alias
content/database Yes yes
create-jdbc-provider-
applySIFeaturePack
Create the JDBC
provider in the
WebSphere
application server
content/database yes Yes
Page 31
Page 31 of 50
Extension point name Description Mapping Component
Dependencies
Auto-
generated
configuration
create-dataSource-
applySIFeaturePack
Create a datasource content/database yes Yes
create-resource-
environment-provider-
applySIFeaturePack
Create new resource
environment provider
yes No
create-resource-
environment-provider-
custom-property-
applySIFeaturePack
Create new resource
environment provider
custom property
yes no
create-resource-
environment-provider-
referenceable-
applySIFeaturePack
Create new resource
environment provider
reference
yes No
create-resource-
environment-entry-
applySIFeaturePack
Create new resource
environment provider
entry
yes No
update-ear-
applySIFeaturePack
update ear file installableApps/ear yes No
create-ear-
applySIFeaturePack
Deploy ear file installableApps/ear yes Yes
modify-ear-
applySIFeaturePack
modify deployed ear
file, Default code
resets mappings on
web modules
installableApps/ear yes Yes
edit-ear-applySIFeaturePack edit ear file installableApps/ear yes No
create-application-library-
references-
applySIFeaturePack
Creates shared library
references
shared/common yes Yes
Page 32
Extension point name Description Mapping Component
Dependencies
Auto-
generated
remove-apps-
applySIFeaturePack
runs Portal specific
remove tasks
yes No
deploy-apps-
applySIFeaturePack
s Portal specific
deployment tasks
yes Yes
start-ear-application-
applySIFeaturePack
starts any ear based
applications deployed
in the component
installableApps/ear no Yes
Delete-wcm-
applySIFeaturePack
Delete wcm libraries,
used to remove
libraries found with
the -
Dwcmdetect=true
parameter, before
newer versions
imported
content/wcm no yes
import-wcm-
applySIFeaturePack
Imports WCM
Libraries
content/wcm no Yes
deploy-portlets-
applySIFeaturePack
Deploy portlets from
WAR file
installableApps/port
lets
no Yes
create-personalisation-rules-
applySIFeaturePack
Imports the
personalization rules.
content/pzn no Yes
start-portlet-application-
applySIFeaturePack
starts any deployed
portlets found in the
component
installableApps/port
lets
no Yes
install-content-xmlaccess-
applySIFeaturePack
Runs XML install
scripts
content/xmlaccess/i
nstall
no Yes
Copy-war-files-
applySIFeaturePack
Copy war files to the
Profile_dir/installable
Apps directory
installableApps/war no Yes
Import-WebDav –
applySIFeaturePack
Uploads WebDav
artefacts to the IBM®
WebSphere® Portal
content/WebDav no Yes
Page 33
Page 33 of 50
Extension point name Description Mapping Component
Dependencies
Auto-
generated
WebDav file store
add-templates-
applySIFeaturePack
Installs template templates no Yes
deploy-pages-
applySIFeaturePack
Deploys pages yes No
post-apply-PTF-
applySIFeaturePack
Extension point run at
end of deployment.
suitable for post-
deployment config
yes No
Table 2 List of available extension points
The following table shows the extension points SI invokes during the uninstall. The set of extension
points is the same as for the deployment, the primary difference is the removeSIFeaturePack
suffix. Therefore the create extensions listed above can also be called during the removal,
however, SI does not generate any implementation tasks for these extension points automatically.
The following table only shows the list of extensions specific for removing your PAA file from the
Portal server.
Extension point
name
Description Mapping Component
Dependencies
Auto-
generated
pre-remove-PTF-
removeSIFeaturePack
Extension point run
at start of removal.
suitable for pre-
removal setup
yes no
remove-application-
library-references-
removeSIFeaturePack
Removes shared
library references
shared/common yes yes
remove-ear-
removeSIFeaturePack
Remove EAR file installableApps/ear yes yes
remove-resource-
environment-entry-
remove resource
environment
yes no
Page 34
Extension point
name
Description Mapping Component
Dependencies
Auto-
generated
removeSIFeaturePack provider entry
remove-resource-
environment-
provider-
referenceable-
removeSIFeaturePack
remove resource
environment
provider reference
yes no
remove-resource-
environment-
provider-custom-
property-
removeSIFeaturePack
remove resource
environment
provider custom
property
yes no
remove-resource-
environment-
provider-
removeSIFeaturePack
remove resource
environment
provider
yes no
remove-dataSource-
removeSIFeaturePack
Remove the
datasource
content/database yes yes
remove-jdbc-
provider-
removeSIFeaturePack
Remove the JDBC
provider
content/database yes yes
remove-j2c-auth-
removeSIFeaturePack
Remove J2C
authentication alias
content/database yes yes
remove-app-server-
library-references-
removeSIFeaturePack
Removes shared
library to server
classpath
shared/common yes yes
remove-library-
removeSIFeaturePack
Removes shared
library
shared/common yes yes
remove-app-server-
classloader-
removeSIFeaturePack
Remove appserver
classloader
yes no
remove-host-alias- remove host alias yes no
Page 35
Page 35 of 50
Extension point
name
Description Mapping Component
Dependencies
Auto-
generated
removeSIFeaturePack
remove-apps-
removeSIFeaturePack
runs Portal specific
remove tasks
yes no
remove-wcm-
removeSIFeaturePack
removes WCM
Libraries
content/wcm no yes
remove-portlets-
removeSIFeaturePack
remove portlets installableApps/por
tlets
no yes
uninstall-content-
xmlaccess-
removeSIFeaturePack
Runs XML uninstall
scripts
content/xmlaccess/
uninstall
no yes
delete-war-files-
removeSIFeaturePack
delete war files from
the
Profile_dir/installabl
eApps directory
installableApps/war no yes
delete-templates-
removeSIFeaturePack
Installs template Templates no yes
remove-pages-
removeSIFeaturePack
remove pages yes no
post-remove-PTF-
removeSIFeaturePack
Extension point run
at end of PAA
removal. suitable for
post-removal config
Yes no
Table 3 List of tasks specific for removing your PAA file
Page 36
11 Including WCM libraries in a PAA file
There are a number of considerations to be taken into account when adding WCM libraries to a PAA
file. One such consideration is the size of the library. It is expected that some WCM content will be
transferred using PAA files, especially if the libraries in question are related to an application
included in the PAA file. However, PAA files should not be used to transfer large WCM libraries from
one server to another as in the case of staging to production, or if populating the server with large
quantities of test content. The reasons are two-fold. The first is the time it will take to export the
libraries and then import to the new server. For large libraries the import is quite time consuming, so
alternative methods such as syndicating the content between the servers, or performing a database
transfer would be much quicker alternatives. The second is related to a size limitation on a PAA file.
Prior to Java 7, the java.util.Zip class on which SI has a dependency, has a size limit of 32 bits.
The limitation means that a PAA file of close to 2GB in size will pose issues for the installer because it
will not be able to do verification checking on the PAA file, and ant might have issues extracting the
content to the files system.
For these reasons, it is recommended that if you want to distribute an application with an associated
WCM library, you should enclose the library along side the application in the PAA file. However, if
you are maintaining your systems, for example, transferring content from one server to another,
alternative methods for transferring the WCM data should be found.
Although SI provides the capability to delete and import newer versions of WCM libraries, the way
you organise your WCM content inside of the PAA file will determine how useful this functionality
will be for your deployment scenario. The PAA file format requires that a WCM library be enclosed in
a sub directory of the /rootdir/components/componentName/content/wcm directory.
For example /sample1/components/compSample1/content/wcm/lib1/554ee7f5.
However, for the WCM import, there can be multiple libraries included in this directory, depending
whether multiple libraries are exported at the same time.
The WCM detect functionality of SI retrieves the list of libraries included in a PAA file and does a
look-up on the Portal server to establish if the libraries already exist. If so, Boolean properties based
on the library names are generated in the rootdir/assemblyName.properties file in the
expanded PAA. If the properties file already exists, the properties are appended to the current
content, otherwise a new properties file is generated with the WCM properties included. The
properties are all set to ‘false’ by default, so that no libraries are replaced unless the user specifically
decides to do so. Setting the property for a library to true will ensure that the current library on the
server is deleted, and the new version of the library is imported in its place.
Page 37
Page 37 of 50
The problem arises where there are multiple libraries included in the same sub directory of the
content/wcm directory. The import task for the WCM content takes as input the path to the
directory containing the files. For example,
/sample1/components/compSample1/content/wcm/lib1. It will then import all libraries
included in this directory sub tree. If you select to replace one of the libraries, all libraries in the
associated directory will be imported. Therefore, to replace any of the libraries on the system with a
newer version of one of the libraries, you will need to ensure that you replace all of the libraries
included in that directory sub tree. The WCM import functionality will try to overwrite the libraries
on the server with the ones found in the PAA file. If the libraries have different node structures, it
can pose inconsistency issues for the import causing it to fail.
If you would like to take advantage of the detect/delete functionality for WCM libraries included in
SI, the scenario outlined above could pose issues. However, if it makes sense to have all the libraries
removed and replaced with newer versions, for example, if the library you are replacing has
dependencies placed on it by other libraries, then this solution will suffice. Although it is important
to notify the user in the documentation for your PAA file that all libraries found by the WCM detect
functionality should be selected to be replaced, otherwise the import could fail.
If you want your libraries to be removed and replaced individually, then it is recommended that they
are placed in separate subdirectories in the content/wcm directory. For example,
/sample1/components/compSample1/content/wcm/lib1 or
/sample1/components/compSample1/content/wcm/lib2 etc.
This way there is a direct correlation between the properties in the assemblyName.properties
file and the individual libraries to be imported. If there is a requirement for a specific order to be
imposed on the import, then add a comma separated list of the library sub directories in an
order.properties file in the content/wcm directory. SI uses the presence of the
order.properties file to determine the order in which resources are to be deployed throughout
the PAA file.
NOTE: lib1 and lib2 are just sample directory names. SI imposes no restrictions on the names of
these directories.
Page 38
12 Theme deployment
In terms of SI, a theme can have three different resource types associated with it. They include an
ear file containing the web module for the theme, WebDav content where skins, page layouts and
theme resources are stored, and finally an xmlaccess script to register the theme resources with
WebSphere Portal. The creation of theme artefacts is out of scope for this document, however,
developers of PAA content will require some knowledge of how SI handles these resources.
Therefore their deployment is discussed in some detail.
There is nothing special about the deployment of a theme ear file in terms of SI. That is, the ear file is
treated exactly like any other ear file. If placed in the installableApps/ear directory it will be
deployed to the server with any other ear files in the PAA file. However, uploading WebDav content
and registering the theme require a little more work.
12.1 Upload of content to the WebDav Store
Although WebSphere Portal supports multiple types of content to be uploaded to the WebDav store,
SI support for uploading such content is primarily targeted at deploying theme related content. Thus
this discussion will primarily centre on uploading theme related artefacts.
SI allows for content to be automatically uploaded to the WebDav store. The code automatically
generated during the install-PAA task is limited to the handling of theme related resources,
however, custom code can be added to a PAA file to handle additional resource types. The reason for
limiting the auto generated code to only handle theme related artefacts is due to the complexity of
other types and the ability to update/remove the content.
SI, when it installs WebDav content, writes directly to the WebDav file store. The content will not be
automatically registered with the Portal server, so an xmlaccess script to register the theme content
must be included in the PAA file to ensure that all files are accurately registered with the server.
After which a server restart is required to ensure that the Portal can load all the resources. An
example script illustrating how to register a theme that references items in the WebDav store is
included below.
According to the SI documentation, the content to be uploaded to the WebDav store will be
uploaded directly to the directory mapped to the type of functionality assigned to the resources in
the PAA file i.e. files in the content/WebDav/theme directory will be uploaded to dav:fs-
type1/themes/, if there is a root directory contained in the .zip file for the content. If no root
directory exists, then the name of the .zip file without the .zip suffix will be used as the context root.
Page 39
Page 39 of 50
For example a theme with a context root of myTheme will have a targetURI of dav:fs-
type1/themes/myTheme. Therefore, be careful if adding custom code to upload a file. The upload
task places the content of the zip file in the directory set in the targetURI which might be
problematic if there is no root directory in the .zip file, especially when you want to have the content
deleted.
The structure that you apply to your WebDav content will determine how difficult it will be to update
the deployed files in the WebDav store in the future through the SI. The reason is primarily due to
the webdav-deploy-zip-file task and how it handles the content. This task is the method used
by SI to interact with the WebDav store.
To ensure that the content can be easily updated or deleted in the future, separate your WebDav
content out into its own directory. That is, upload to a subdirectory of the directory to which you are
deploying the content, and not add it to the top level directory in the WebDav store. For example, a
theme that should be uploaded to the Portal WebDav file store. You should ensure that when the
theme is uploaded to the fs1/types/themes/ directory that all content is enclosed in a
subdirectory relating to that theme.
For the same reason it would be better to create your own theme artifacts rather than modifying
existing files. SI sets the UpdateMode parameter of the webdav-deploy-zip-file task to
merge. It means that the content of the zip file will be copied to the target directory. Existing files of
the same name will be overwritten but any additional files in the directory will not be modified.
However, there are no facilities to back up the existing content, so replacing with a newer version
means that if the PAA file is uninstalled with the WebDav content deleted, the files that are
contained in the zip will be removed, and there will be no way to restore the previous version of the
file. The default setting of the UpdateMode property is replace which will replace the current
WebDav directory set in the targetURI parameter with what is in the .zip file. All other content of
that directory will be deleted. Therefore, this setting is not recommended.
12.2 Deleting WebDav content
It is now possible to remove the content from the WebDav store programmatically, however, SI does
not generate code to remove any WebDav content. This functionality can be added using custom
code, see examples of how it can be achieved below.
In the task below, the first example has a parameter named TargetURI with a value of dav:fs-
type1/themes/. And the second example contains a TargetURI of dav:fs-type1/layout-
templates/milestone/. The difference between the two zip files specified in both is that the
first example has a root directory, and the second does not. Therefore, you should take care when
deleting that the full path can be made up out of the TargetURI and the paths in the zip file.
Page 40
The following example task illustrates how to remove content from the WebDav store:
<?xml version="1.0" encoding="UTF-8"?>
<target name="action-post-remove-PTF-removeSIFeaturePack-
components/testTheme" unless="isSecondNode">
<antcall target="WebDav -deploy-zip-file">
<param name="TargetURI" value="dav:fs-type1/themes/"/>
<param name="ZipFilePath"
value="${Components/testThemeHome}/content/WebDav /themes/newzip.zip"/>
<param name="UpdateMode" value="delete"/>
<param name="VirtualPortalContext" value="${VirtualPortalContext}"/>
<param name="VirtualPortalHostName" value="${VirtualPortalHostName}"/>
<param name="WasPassword" value="${WasPassword}"/>
<param name="WasUserid" value="${WasUserid}"/>
<param name="PortalAdminId" value="${PortalAdminIdShort}"/>
<param name="PortalAdminPwd" value="${PortalAdminPwd}"/>
</antcall>
<antcall target="WebDav -deploy-zip-file">
<param name="TargetURI" value="dav:fs-type1/layout-
templates/milestone/"/>
<param name="ZipFilePath"
value="${Components/testThemeHome}/content/WebDav /layout-
templates/milestone.zip"/>
<param name="UpdateMode" value="delete"/>
<param name="VirtualPortalContext" value="${VirtualPortalContext}"/>
<param name="VirtualPortalHostName" value="${VirtualPortalHostName}"/>
<param name="WasPassword" value="${WasPassword}"/>
<param name="WasUserid" value="${WasUserid}"/>
<param name="PortalAdminId" value="${PortalAdminIdShort}"/>
Page 41
Page 41 of 50
<param name="PortalAdminPwd" value="${PortalAdminPwd}"/>
</antcall>
</target>
Parameters:
TargetURI: target location in WebDav store for content
ZipFilePath: Path to zip file containing the content to be uploaded
UpdateMode: values can be delete, merge or replace
VirtualPortalContext: points to the context for a virtual Portal, can be left blank
VirtualPortalHostName: points to the hostname for a virtual Portal, can be left blank
WasPassword: WAS password
WasUserid: WAS userId
PortalAdminId: administrator id for Portal user
PortalAdminPwd: Portal administrator password
NOTE: The ZipFilePath parameter is still necessary when deleting content from the WebDav
store. The task will remove any files found in the zip file from the store, rather than delete
directories/files pointed to by the TargetURI.
12.3 Registering a theme with WebSphere Portal
After a theme web module has been deployed to WebSphere Portal, and the theme WebDav content
uploaded to the WebDav store, there is one final step required to enable the theme in WebSphere
Portal. An xmlaccess script must be invoked to configure any theme resources on the server. The SI
does not automatically generate an xmlaccess script to configure theme resources so a custom script
must be supplied by the developer. However, if the script is placed in the
components/compName/content/xmlaccess/install directory, it will be run automatically
during the deploy-PAA command.
Page 42
The following is a script taken from the government industry template for WebSphere Portal sample
application which illustrates how a theme, referencing WebDav content, can be registered with
WebSphere Portal:
<?xml version="1.0" encoding="UTF-8"?>
<request build="wp8001_194_01" type="update" version="8.0.0.1"
xmlns:xsi="http://www.w3.org/2001/XMLSchema-instance"
xsi:noNamespaceSchemaLocation="PortalConfig_8.0.0.xsd">
<Portal action="locate">
<skin action="update" active="true" context-root="/Government_Theme"
default="false" domain="rel" objectid="ZK_J9HCH080JOU8D0I7JR46EU0JF3"
resourceroot="Hidden" type="default" uniquename="GovSkin">
<localedata locale="en">
<title>Government Skin</title>
<description/>
</localedata>
<parameter name="com.ibm.Portal.skintype" type="string"
update="set"><![CDATA[template]]></parameter>
<parameter name="com.ibm.Portal.friendly.name" type="string"
update="set"><![CDATA[GovSkin]]></parameter>
<parameter name="com.ibm.Portal.skin.template.ref" type="string"
update="set"><![CDATA[dav:fs-type1/skins/GovSkin/]]></parameter>
</skin>
<theme action="update" active="true" context-root="/Government_Theme"
default="false" domain="rel" objectid="ZJ_J9HCH080JOU8D0I7JR46EU0D22"
resourceroot="dynamicSpots" uniquename="GovernmentTheme">
<localedata locale="en">
<title>Government Theme</title>
</localedata>
<allowed-skin skin="ZK_J9HCH080JOU8D0I7JR46EU0JF3" update="set"/>
<parameter name="com.ibm.Portal.friendly.name" type="string"
update="set"><![CDATA[GovernmentTheme]]></parameter>
<parameter name="com.ibm.Portal.theme.dnd.sources" type="string"
update="set"><![CDATA[ibmDndColumn:com.ibm.pb.dnd.layout.LayoutColumnSo
Page 43
Page 43 of 50
urce:vertical,ibmDndRow:com.ibm.pb.dnd.layout.LayoutRowSource:horizonta
l]]></parameter>
<parameter name="com.ibm.Portal.layout.template.href" type="string"
update="set"><![CDATA[dav:fs-type1/themes/government.theme/layout-
templates/2ColumnEqual/]]></parameter>
<parameter name="com.ibm.Portal.themetype" type="string"
update="set"><![CDATA[CSA2]]></parameter>
<parameter name="com.ibm.Portal.theme.aggregationmodes" type="string"
update="set"><![CDATA[ssa]]></parameter>
<parameter name="com.ibm.Portal.theme.template.ref" type="string"
update="set"><![CDATA[dav:fs-
type1/themes/government.theme/]]></parameter>
<parameter name="resourceaggregation.profile" type="string"
update="set"><![CDATA[profiles/profile_gov_deferred.json]]></parameter>
</theme>
</Portal>
<status element="all" result="ok"/>
</request>
Page 44
13 PAA file life cycle
One of the most common discussions that the SI development team has with new PAA developers
and customers, centres on the expected lifecycle of a PAA file; for example, how to maintain their
applications deployed using PAA files into the future. The answer is not a simple one because it
depends on what functionality is required and how often changes are made to the PAA content.
If you are constantly updating your PAA content or releasing a PAA-based application to a third party
on a periodic basis, the strategy might be different. For the first scenario, the changes are usually
incremental and require the full deployment. Whereas for the second scenario, the changes often
require an upgrade step for a new feature or a patch to fix a defect.
13.1 Two step deployment process
When you deploy a PAA file, there are two steps to the deployment. The first is the installation step
that expands the PAA file under the PAA offering directory, for example
/opt/IBM/WebSphere/wp_profile/PAA, and registers the assembly with its components to
the ConfigEngine. Any code generation is also performed at this stage. The second step is to run the
deployment tasks registered with the ConfigEngine as part of the installation, which deploys the
resources found in the PAA file.
Similarly in terms of the uninstall, there are also two distinct steps. The first is to remove the
resources from the Portal server and the second is to uninstall them from the ConfigEngine.
Throughout this document when install and uninstall are mentioned, it refers to the registration of
PAA files with the ConfigEngine. Where the terms deploy and remove are used, they refer to the
deployment and removal of resources from the Portal server.
Whether you use the command line or the Configuration Wizard to install or deploy your PAA file,
there are 2 steps involved. However, when you use the Configuration Wizard, an additional ‘typical’
install or uninstall scenario is included that wraps both tasks. This scenario was added to handle the
deployment of simple PAA files for which there is no optional content. For more control over which
resources are installed, select the ‘advanced’ option.
NOTE: For Portal 8.5 both the command line and config wizard deployment methods are available.
Page 45
Page 45 of 50
13.2 Enabling PAA file for updates
Since the release of WebSphere Portal 8.5, it is possible to enable a PAA file to update a previously
installed version. The expected use case scenario for this functionality is where there are a number
of updates required to upgrade a version of an application. The Update task allows you to update
the existing application rather than to replace the entire application. The PAA file itself would also
function as a regular PAA file that if deployed on a clean server would deploy as normal. However, if
an existing version exists on the server, then the update scenario would be called into play.
The install-PAA-update task will back-up the existing version of the PAA file to the
wp_profile/PAA/backup directory. It will then uninstall the existing PAA file from the
ConfigEngine and all resources from the older version are deleted. After this step is complete the
newer version will be installed. The deployment can then proceed as normal; however, the PAA file
will be marked in the registry as an update so only the extension points with the
updateSIFeaturePack suffix will be invoked during the deployment.
The SI does not auto generate code in this situation. Leaving any updates up to the developer to
generate using custom code. The tasks from the previous version of the PAA file are still present and
can be invoked by the custom tasks.
Rolling back the changes in this scenario is also possible. The resources from the backup PAA file can
be restored and the changes undone from the server by redeploying the resources. In this scenario,
the tasks with the rollbackSIFeaturePack suffix are invoked. It is completely up to the
developer to script the removal and redeployment of artefacts. However, the existing set of tasks for
the PAA deployment will be available to be invoked by the custom code.
13.3 Overwriting the existing PAA file
There are some situations where the install-PAA-update approach will not work for the type of
scenario that a developer is trying to implement. For example, new resources were added and the
code generation is not available. These new resources are not covered by existing tasks and must be
handled by custom code.
At times it might be necessary to replace the existing PAA file and redeploy the full application. In
this scenario, the PAA resources will not be removed from the Portal server using the remove-PAA
task because they might break the configuration of other applications. Therefore, if deploying a new
PAA file over a previously deployed version, the following steps are recommended:
Page 46
1. Uninstall the PAA file either through the uninstall-PAA task or through the uninstall
add-ons workflow of the configuration wizard.
NOTE: If you use the Configuration Wizard, uninstall but do not remove the content. Therefore,
select the advanced setting. Otherwise the resources will also be removed from Portal. The
uninstall step is necessary to ensure that existing registered tasks are removed from the
registry.
2. Delete the PAA file content from the PAA offering directory; for example,
wp_profile/PAA/sample1. Delete the PAA file content either through the delete-PAA
task or through the file explorer functionality of your operating system.
NOTE: Deleting the content is necessary because there might be a mismatch between the
resources of both PAA files. Deleting the content ensures that all auto generated code has been
removed. If the SI detects an extension point implementation task, it will move on to the next
resource type. Therefore, the tasks from the previous PAA file could pose issues because they
might not cover all of the resources for the new version.
3. Install and deploy the new PAA file.
At times there will be situations where certain resources must be removed during the deployment of
the new version of the PAA file because they cannot be easily overwritten or updated. In this
situation, add a custom task to the PAA file that can be called outside of the SI. For example, this task
could be called after the new version is installed, but before the deployment.
NOTE: Any task installed with a PAA file can be called directly through the ConfigEngine. If the task
does not match the extension point naming scheme, the task will not run during the deployment or
removal of content.
An alternative option would be to implement one or more of the remove applySIFeaturePack
extension points that will be invoked during the deployment phase. Read the section on extension
point best practices for more information.
Page 47
Page 47 of 50
14 Deploying PAA files to a clustered environment
When you install a PAA file to a Portal cluster environment, there are a few important things to be
aware of. Many of the resources included in a PAA file will replicate across the nodes. However,
there are certain resource types that cannot be replicated; therefore, it is necessary to install and
deploy the PAA file on each node in the cluster. These resources include shared jar files that must be
added to the class-path, custom classes required to support personalisation rules, and help plugins
that are found in IBM released PAA files for Portal 8.5. In these cases, it is necessary to have these
files local to each server so that they can be picked up by the class-path.
If a PAA file does not contain one or more of the named types, it might not be necessary to deploy
the PAA file on each node. However, it is recommended to do so unless you are sure that this will not
have any adverse effects on the deployed application.
Deploying a PAA file to a secondary node will take less time than for the primary node. The SI only
deploys resources that cannot replicate during synchronisation. Any extension point implementation
ant task, whether it is a SI generated task or a custom task provided in the PAA file, will only run on a
secondary node if it does not have an unless=”isSecondNode” attribute on the target element.
Therefore, any custom tasks that a developer wants not to be run on a secondary node should also
include this attribute. See the section on custom code for more details of how to add custom tasks.
Currently, it is not possible to remotely deploy a PAA file to a secondary node. The ConfigEngine on
each node is a separate instance. There is no mechanism to remotely activate the ConfigEngine to
install or deploy a PAA file on each secondary node.
14.1 Advantages of running SI with Portal stopped.
When the SI detects that the server is stopped during the deploy-PAA task, it will automatically start
it because it is necessary to verify the Portal administrative credentials. However, before you start
the server, it will run the tasks for building the SI shared library. Therefore if there are any shared jar
files included in the shared/app directory of a component in the PAA file, they will be automatically
loaded on the class-path when the server starts. This process ensures that any applications that
depend on these jar files can be started automatically by SI.
Page 48
This process also resolves an issue where a secondary node server fails to start when an application
has replicated from a primary node but the jar files are missing from the server class-path. In this
case, the server might fail to start due to class not found errors. Allowing SI to deploy to a stopped
Portal server alleviates this issue because the shared.app.jar file is already generated.
You might still be required to restart the server after the deployment has completed on the primary
node because some of the resources will not be activated until the server reloads the configuration.
For example, custom code is used to generate resource environment provider custom properties.
These custom properties might not be picked up by the server configuration until the server has
been restarted.
14.2 Reducing deployment times on a cluster
Since CF08 for 8.0.0.1 and 8.5 Gold, SI can deploy to a cluster with auto synchronisation turned off.
The SI will check the auto sync settings before attempting to wait for the applications to sync across
the nodes. If the value of the setting is set to off, SI will proceed with the deployment as if it was on a
standalone server. In other words, it will not wait for synchronisation to complete before proceeding
with the deployment.
Running a PAA deployment with the auto sync functionality turned off is similar to deploying a
cumulative fix to a node in a Portal cluster. The administrator of the cluster will have to manually
synchronise the nodes after the deployment has completed because SI does not do this
automatically. In addition, the deployment of the PAA file will also need to be separately applied to
each node in the cluster, to ensure that all dependent resources exist on the secondary nodes.
One issue that sometimes arises when you perform a PAA deployment on a cluster with auto sync
enabled, is an application that has failed to fully synchronise across nodes will not be started if you
set active=”true” on the web-app element for the web module of the deployment xmlaccess
script. The xmlaccess tool does not wait for the sync to complete after it has finished the deployment
of the web module and directly attempts to start the application. If the sync has not completed,
possibly due to a slow network or a large war file has not fully replicated, the application will not be
started.
To avoid this situation, activate the application separately from the deployment script. SI now adds a
separate extension point to start the portlet web modules. The extension point start-portlet-
application-applySIFeaturePack was added to start the applications that were deployed
with the deploy-portlet-applySIFeaturePack extension point. On a clustered environment,
it checks the auto synchronization status before it activates the applications. In this way, the
applications are started by the deploy-PAA task.
Page 49
Page 49 of 50
If you are regularly deploying to a cluster with auto synchronization turned off and the deployment
times are a concern, then it is recommended that the xmlaccess scripts do not activate the portlets
automatically. Where auto sync is turned off, the xmlaccess tool attempts to start the application,
but times out after a certain length of time, because it cannot start an application that has not fully
synchronized. To prevent SI from trying to activate the portlets for war files in the
rootDir/components/componentName/installableApps/portlets directory, you can
overwrite the action-start-portlet-applications-components/componentName
target for your component. Add an empty ant target to ensure that no code is generated during the
install-PAA task to start the portlets. For example:
<target name=”action-start-portlet-applications-
components/componentName”/>
Adding this task to a file in the config/includes directory of the component will ensure that SI will not
start the portlets for that component.
If you are using a custom xmlaccess script to deploy the portlets and placed your portlet war files in
the components/componentName/installableApps/war directory to ensure default scripts
are not generated during the deployment, you must add active=”false” to the web-app and
portlet elements for the deployment in the xmlaccess script. It ensures that the portlets are
deployed and referenceable by the script, but the applications will not attempt to start. As the
timeout for xmlaccess tool in starting the application can be quite large, it can save time during a
deployment with many war files.
Once the deployment has completed, the web modules in the PAA file can be activated separately.
Use the WebSphere application server administration console or, since Portal 8.0.0.1 CF14 and 8.5
CF03, the following SI command can be used to activate the web modules:
./ConfigEngine.sh activate-PAA-portlets -
DassemblyList=assemblyName1,assemblyName2, …
The assemblyList parameter is a comma separated list of PAA assemblies containing portlet web
modules that you want to start.
Starting the applications outside of the PAA deployment process can be useful if you are deploying a
large application with multiple PAA files, and only want to turn on synchronization when the
deployment work has completed.
The activate-PAA-portlets task starts portlet war files found in both the
installableApps/portlets and installableApps/war directories of a component. Any
portlet web modules found in these directories are added to an activate-webmodules.xml
script generated at install time. These scripts are then invoked by the activate-PAA-portlets
task to start the portlets.
Page 50
For this task to be effective, the manual synchronization of the nodes must be completed and the
auto synchronization turned on, before you run this task.
15 Acknowledgements
I would like to thank the following people for agreeing to review the document and for providing
helpful feedback and suggestions on how the content could be improved:
Una Phillips, Jerh O’Connor, Stefan Koch and Megan Crouch.