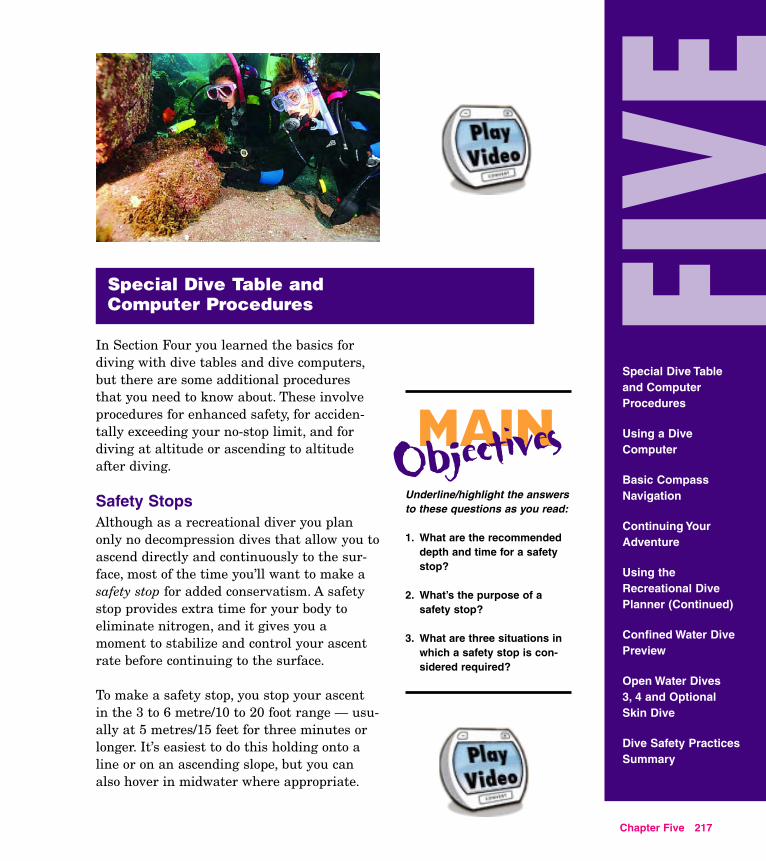
In Section Four you learned the basics for diving with dive tables and dive computers, but there are some additional procedures that you need to know about. These involve procedures for enhanced safety, for acciden- tally exceeding your no-stop limit, and for diving at altitude or ascending to altitude after diving. Safety Stops Although as a recreational diver you plan only no decompression dives that allow you to ascend directly and continuously to the sur- face, most of the time you’ll want to make a safety stop for added conservatism. A safety stop provides extra time for your body to eliminate nitrogen, and it gives you a moment to stabilize and control your ascent rate before continuing to the surface. To make a safety stop, you stop your ascent in the 3 to 6 metre/10 to 20 foot range — usu- ally at 5 metres/15 feet for three minutes or longer. It’s easiest to do this holding onto a line or on an ascending slope, but you can also hover in midwater where appropriate. FIVE Special Dive Table and Computer Procedures Special Dive Table and Computer Procedures Using a Dive Computer Basic Compass Navigation Continuing Your Adventure Using the Recreational Dive Planner (Continued) Confined Water Dive Preview Open Water Dives 3, 4 and Optional Skin Dive Dive Safety Practices Summary Chapter Five 217 Underline/highlight the answers to these questions as you read: 1. What are the recommended depth and time for a safety stop? 2. What’s the purpose of a safety stop? 3. What are three situations in which a safety stop is con- sidered required? MAIN Objectives
Transcript
In Section Four you learned the basics fordiving with dive tables and dive computers,but there are some additional proceduresthat you need to know about. These involveprocedures for enhanced safety, for acciden-tally exceeding your no-stop limit, and fordiving at altitude or ascending to altitudeafter diving.
Safety StopsAlthough as a recreational diver you planonly no decompression dives that allow you toascend directly and continuously to the sur-face, most of the time you’ll want to make a
FIVE
Special Dive Table and Computer Procedures
Special Dive Tableand ComputerProcedures
Using a DiveComputer
Basic CompassNavigation
Continuing YourAdventure
Using theRecreational DivePlanner (Continued)
Confined Water DivePreview
Open Water Dives3, 4 and Optional Skin Dive
Dive Safety Practices
Underline/highlight the answersto these questions as you read:
1. What are the recommendeddepth and time for a safetystop?
2. What’s the purpose of asafety stop?
3. What are three situations inwhich a safety stop is con-sidered required?
MAINObjectives
OWDM_217_250.qxd 3/29/06 3:01 PM Page 217
To make a safety stop, you stop your ascentin the 3 to 6 metre/10 to 20 foot range — usu-ally at 5 metres/15 feet for three minutes orlonger. It’s easiest to do this holding onto a
safety stop for added conservatism. A safetystop provides extra time for your body toeliminate nitrogen, and it gives you amoment to stabilize and control your ascentrate before continuing to the surface.
line or on an ascending slope, but you canalso hover in midwater where appropriate.
Summary
Chapter Five 217
You plan your dive so you can make a safety stop andstill reach the surface with 20-40 bar/300-500 psi ormore air remaining in your cylinder.
You may make a safety stop at the end of any dive,and in fact, you should consider it a standard practice
218
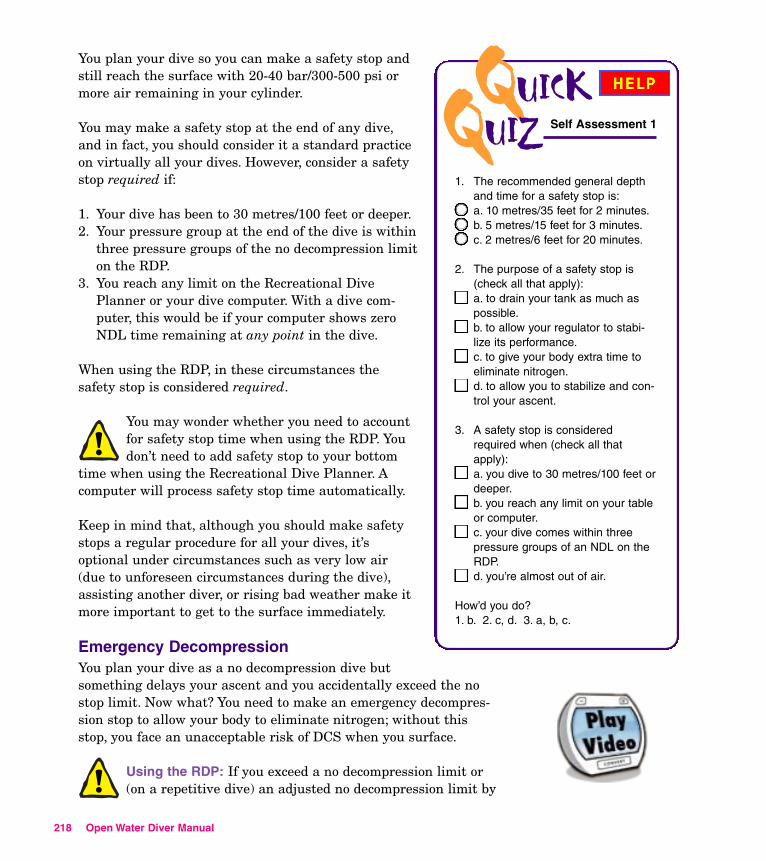
1. The recommended general depthand time for a safety stop is:a. 10 metres/35 feet for 2 minutes.b. 5 metres/15 feet for 3 minutes.c. 2 metres/6 feet for 20 minutes.
2. The purpose of a safety stop is(check all that apply):a. to drain your tank as much aspossible.b. to allow your regulator to stabi-lize its performance.c. to give your body extra time toeliminate nitrogen.d. to allow you to stabilize and con-
QUICKQUIZ Self Assessment 1
OWDM_217_250.qxd 3/29/06 3:01 PM Page 218
on virtually all your dives. However, consider a safetystop required if:
1. Your dive has been to 30 metres/100 feet or deeper.2. Your pressure group at the end of the dive is within
three pressure groups of the no decompression limiton the RDP.
3. You reach any limit on the Recreational DivePlanner or your dive computer. With a dive com-puter, this would be if your computer shows zeroNDL time remaining at any point in the dive.
When using the RDP, in these circumstances thesafety stop is considered required.
You may wonder whether you need to accountfor safety stop time when using the RDP. Youdon’t need to add safety stop to your bottom
time when using the Recreational Dive Planner. Acomputer will process safety stop time automatically.
Keep in mind that, although you should make safetystops a regular procedure for all your dives, it’soptional under circumstances such as very low air(due to unforeseen circumstances during the dive),assisting another diver, or rising bad weather make itmore important to get to the surface immediately.
Emergency DecompressionYou plan your dive as a no decompression dive butsomething delays your ascent and you accidentally exceed the nostop limit. Now what? You need to make an emergency decompres-sion stop to allow your body to eliminate nitrogen; without thisstop, you face an unacceptable risk of DCS when you surface.
trol your ascent.
3. A safety stop is consideredrequired when (check all thatapply):a. you dive to 30 metres/100 feet ordeeper.b. you reach any limit on your tableor computer.c. your dive comes within threepressure groups of an NDL on theRDP.d. you’re almost out of air.
How’d you do?1. b. 2. c, d. 3. a, b, c.
Using the RDP: If you exceed a no decompression limit or(on a repetitive dive) an adjusted no decompression limit by
Open Water Diver Manual
five minutes or less, slowly ascend at arate not faster than 18 metres/60 feetper minute to 5 metres/15 feet andremain there for eight minutes prior tosurfacing. After reaching the surface, donot dive for at least six hours becauseyou will have extremely high levels of
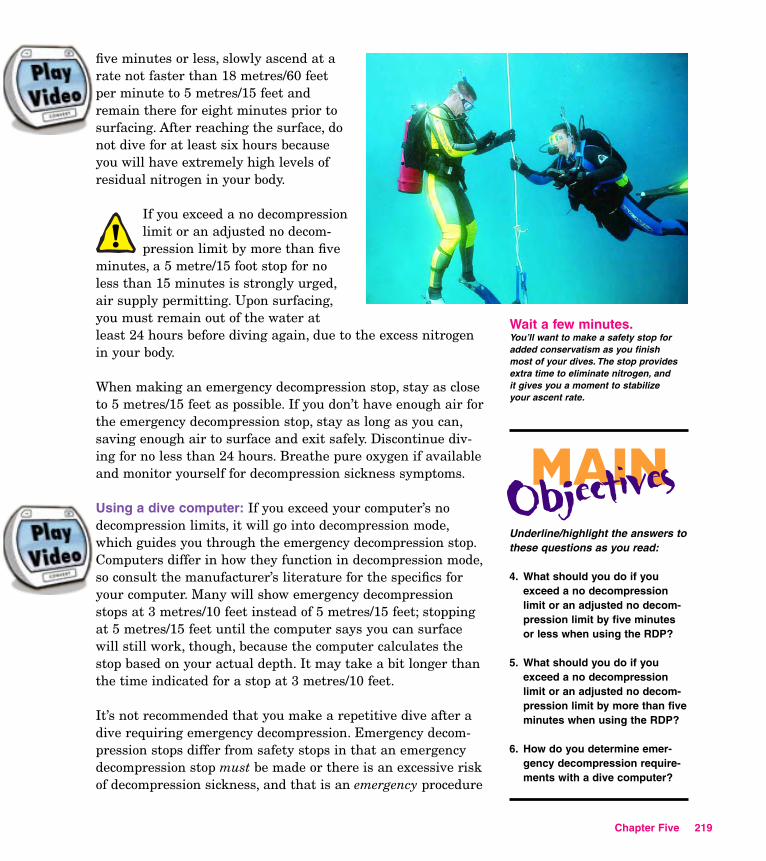
Wait a few minutes.You’ll want to make a safety stop foradded conservatism as you finishmost of your dives. The stop provides
OWDM_217_250.qxd 3/29/06 3:01 PM Page 219
residual nitrogen in your body.
If you exceed a no decompressionlimit or an adjusted no decom-pression limit by more than five
minutes, a 5 metre/15 foot stop for noless than 15 minutes is strongly urged,air supply permitting. Upon surfacing,you must remain out of the water atleast 24 hours before diving again, due to the excess nitrogenin your body.
When making an emergency decompression stop, stay as closeto 5 metres/15 feet as possible. If you don’t have enough air forthe emergency decompression stop, stay as long as you can,saving enough air to surface and exit safely. Discontinue div-ing for no less than 24 hours. Breathe pure oxygen if availableand monitor yourself for decompression sickness symptoms.
Using a dive computer: If you exceed your computer’s nodecompression limits, it will go into decompression mode,which guides you through the emergency decompression stop.Computers differ in how they function in decompression mode,so consult the manufacturer’s literature for the specifics foryour computer. Many will show emergency decompressionstops at 3 metres/10 feet instead of 5 metres/15 feet; stoppingat 5 metres/15 feet until the computer says you can surfacewill still work, though, because the computer calculates thestop based on your actual depth. It may take a bit longer thanthe time indicated for a stop at 3 metres/10 feet.
Underline/highlight the answers tothese questions as you read:
4. What should you do if youexceed a no decompressionlimit or an adjusted no decom-pression limit by five minutesor less when using the RDP?
5. What should you do if youexceed a no decompressionlimit or an adjusted no decom-
MAINObjectives
extra time to eliminate nitrogen, andit gives you a moment to stabilizeyour ascent rate.
It’s not recommended that you make a repetitive dive after adive requiring emergency decompression. Emergency decom-pression stops differ from safety stops in that an emergencydecompression stop must be made or there is an excessive riskof decompression sickness, and that is an emergency procedure
pression limit by more than fiveminutes when using the RDP?
6. How do you determine emer-gency decompression require-ments with a dive computer?
Chapter Five 219
only in recreational diving. The Recreational DivePlanner was designed for recreational, no decom-pression diving only. It should never be used incommercial/military/technical diving situationsthat require planning for decompression dives.
Altitude Diving, Flying After Diving, andCold/Strenuous DivesAltitude Diving. Thinking back to Section One, yourecall that as you ascend in air, pressuredecreases. Dive tables and most computers giveyou their no decompression limits based on a diveending at sea level; if you’re under less pressure ataltitude, nitrogen comes out of solution more easilyfollowing a given dive, making decompression sick-ness more likely.
220 Open Water Diver Manual
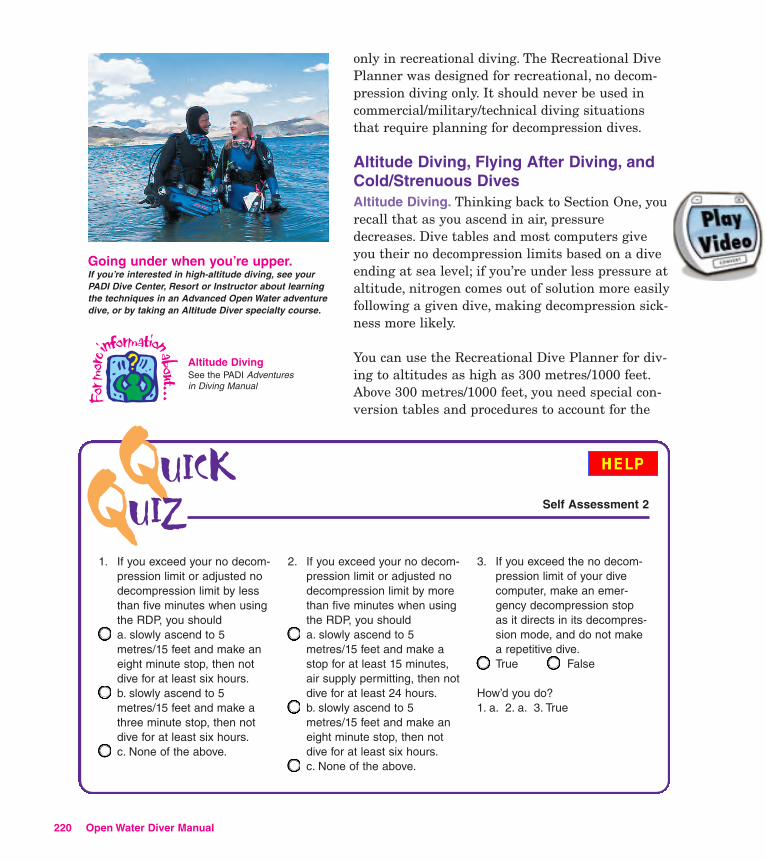
1. If you exceed your no decom-pression limit or adjusted nodecompression limit by lessthan five minutes when usingthe RDP, you shoulda. slowly ascend to 5metres/15 feet and make aneight minute stop, then notdive for at least six hours.b. slowly ascend to 5metres/15 feet and make athree minute stop, then notdive for at least six hours.c. None of the above.
2. If you epressiondecompthan fivthe RDPa. slowlmetres/stop forair suppdive forb. slowlmetres/eight mdive forc. None
QUICKQUIZ
Form
oreinformationabout...
Altitude DivingSee the PADI Adventuresin Diving Manual
Going under when you’re upper.If you’re interested in high-altitude diving, see yourPADI Dive Center, Resort or Instructor about learningthe techniques in an Advanced Open Water adventuredive, or by taking an Altitude Diver specialty course.
OWDM_217_250.qxd 5/12/06 2:53 PM Page 220
You can use the Recreational Dive Planner for div-ing to altitudes as high as 300 metres/1000 feet.Above 300 metres/1000 feet, you need special con-version tables and procedures to account for the
xceed your no decom- limit or adjusted noression limit by more
e minutes when using, you should
y ascend to 515 feet and make a at least 15 minutes,ly permitting, then not
at least 24 hours.y ascend to 515 feet and make aninute stop, then not at least six hours. of the above.
3. If you exceed the no decom-pression limit of your divecomputer, make an emer-gency decompression stopas it directs in its decompres-sion mode, and do not makea repetitive dive.True False
How’d you do?1. a. 2. a. 3. True
Self Assessment 2
Underline/highlight the answers tothese questions as you read:
7. Above what altitude do youneed to use special dive proce-dures?
8. What are the recommendationsfor flying in a commercial air-liner after diving?
9. What are the procedures forplanning a dive in cold water orunder strenuous conditions?
MAINObjectives
Wing your way carefully.You’re responsible for your own dive safety. Flying afterdiving recommendations change over time; stay up todate and follow the most current recommendations.
Flying After DivingFlying after diving recom-mendations change overtime. These are current atthe time of printing. Alwayscheck with your instructorto stay apprised of themost current ones.
OWDM_217_250.qxd 3/29/06 3:01 PM Page 221
decreased atmospheric pressure or you can run anunacceptable risk of DCI.
The procedures for diving at altitude with a divecomputer vary with the computer. Some automati-cally compensate for altitude, whereas with othersyou’ll need to tell the computer your altitude. Thereare a few older models that you can’t use at altitude.
If you’re interested in high-altitude diving, seeyour PADI Dive Center, Resort or Instructor aboutlearning the techniques in an Advanced OpenWater adventure dive, or by taking an Altitude Diverspecialty course (usually takes less than a day).
Flying After Diving. You also need to think aboutlowered atmospheric pressure if you plan to flyafter diving. While this concern is similar to alti-tude diving, it’s not identical. When you dive ataltitude, you dive and return to reduced atmos-pheric pressure. When you fly after diving, you diveand return to normal atmospheric pressure, thenexpose yourself to further pressure reduction.
The dive medical community offers the fol-lowing general recommendations for flyingafter diving, whether you’re using the RDP,
another table or a dive computer:
For Dives within the No-Decompression Limits• Single Dives – A minimum preflight surface
interval of 12 hours is suggested.
• Repetitive Dives and/or Multiday Dives –A minimum preflight surface interval of 18hours is suggested.
For Dives Requiring Decompression Stops• A minimum preflight surface interval greater
than 18 hours is suggested.
Chapter Five 221
As with dive tables and computers, no flying after divingrecommendation can guarantee that decompression sick-ness will never occur. These guidelines represent the bestestimate presently known for a conservative, safe surfaceinterval for the vast majority of divers. There always maybe an occasional diver whose physiological makeup or spe-cial dive circumstances result in decompression sicknessdespite following the recommendations.
You’re responsible for your own dive safety andbehavior. Flying after diving recommendationschange as we learn more about how pressurechanges affect the body; stay current and followthe most current recommendations.
There are currently no recommendations for dri-ving to altitude after diving, so the most prudentpractice is to be conservative. The longer you waitbefore you go, the lower your risk. You may checkwith a local dive center, resort or instructor to seeif divers in the area follow a particular recommen-dation or protocol.
Cold and Strenuous Conditions. If you get cold orexercise a lot during a dive, you may end your
222 Op
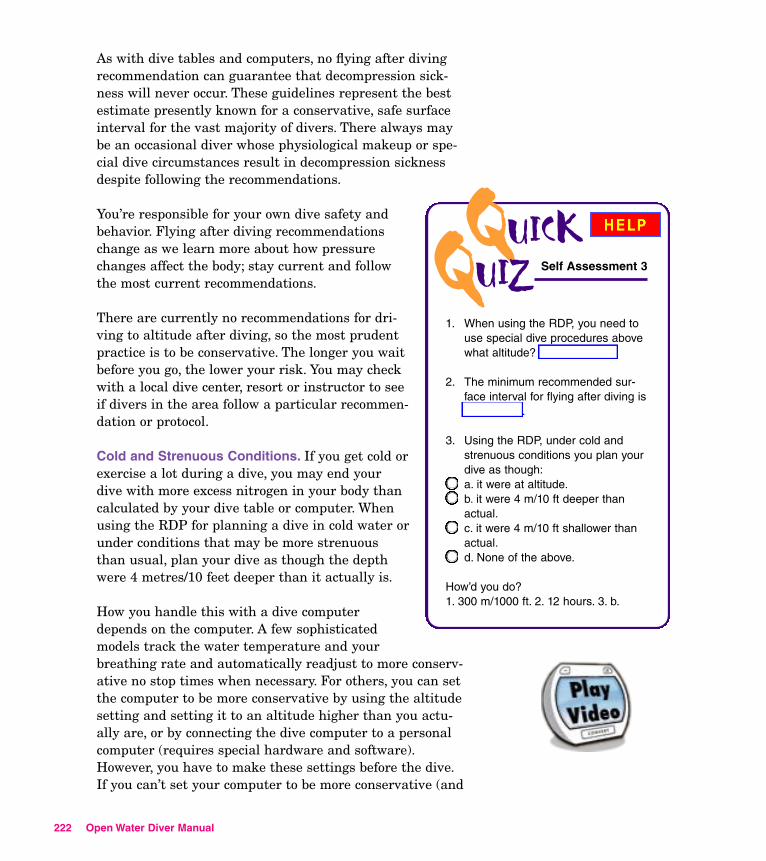
1. When using the RDP, you need touse special dive procedures abovewhat altitude? ____________
2. The minimum recommended sur-face interval for flying after diving is_________.
3. Using the RDP, under cold andstrenuous conditions you plan yourdive as though:a. it were at altitude.b. it were 4 m/10 ft deeper thanactual.c. it were 4 m/10 ft shallower thanactual.d. None of the above.
How’d you do?
QUICKQUIZ Self Assessment 3
OWDM_217_250.qxd 3/29/06 3:01 PM Page 222
dive with more excess nitrogen in your body thancalculated by your dive table or computer. Whenusing the RDP for planning a dive in cold water orunder conditions that may be more strenuousthan usual, plan your dive as though the depthwere 4 metres/10 feet deeper than it actually is.
How you handle this with a dive computerdepends on the computer. A few sophisticatedmodels track the water temperature and yourbreathing rate and automatically readjust to more conserv-ative no stop times when necessary. For others, you can setthe computer to be more conservative by using the altitudesetting and setting it to an altitude higher than you actu-ally are, or by connecting the dive computer to a personalcomputer (requires special hardware and software).However, you have to make these settings before the dive.If you can’t set your computer to be more conservative (and
en Water Diver Manual
1. 300 m/1000 ft. 2. 12 hours. 3. b.
it doesn’t do it automatically), or if you didn’t expect cold/strenu-ous conditions, you’ll need to be more conservative by makingsure you always have plenty of no decompression time remainingthroughout the dive.
It’s especially prudent to make a safety stop when diving in coldwater or under strenuous conditions.
Using a Dive ComputerUnderline/highlight the answersto these questions as you read:
10. What procedures and general recommendationsapply to diving with a computer?
MAINObjectives
OWDM_217_250.qxd 3/29/06 3:01 PM Page 223
As you learned in Section Four, you’re probably going to be divingwith a computer more often than not. The basic principles andguidelines that apply to the RDP apply, for the most part, to div-ing with your computer. Keep these points and procedures inmind:
1. Computers are sophisticated calculators with depthgauges and timers that calculate theoretical nitrogen inthe body. They’re no more or less valid than dive tables, andthey don’t track anything physical in your body. The recommen-dations for conservative diving with tables apply to computerdiving.
2. Don’t share your computer. Each diver needs an individualcomputer. A computer tracks theoretical body nitrogen as it rises
Chapter Five 223
In this subsection on Special Dive Table andComputer Procedures, you learned:
▲ You should make a safety stop at the end ofvirtually all dives (except when an emergencyprohibits it).
▲ A safety stop is a pause in your ascentbetween 3 and 6 metres/10 and 20 feet forthree minutes or longer.
▲ Consider a safety stop mandatory if you divedeeper than 30 metres/100 feet or reach anylimit on the RDP or your computer.
▲ For recreational divers, decompression isonly an emergency procedure.
▲ You need to follow special procedures whendiving at an altitude greater than 300metres/1000 feet.
▲ Follow the recommendations for flying afterdiving conservatively, and stay up to datewith the most current recommendations.
▲ Plan cold/strenuous dives with the RDP asthough the depth were 4 metres/10 feetdeeper than actual. With a computer, be con-servative using the most appropriate methodfor your computer.
Summary PointsSummary Points
1. Procedures for diving with a com-puter include (check all that apply):a. sharing a computer with no morethan one other diver.b. following the most conservativecomputer — yours or your buddy’s.c. keeping your computer turned onbetween all dives.d. making your deepest dive first,and each subsequent dive progres-sively shallower.
2. Any dive that your computer pro-vides no decompression dive timefor is acceptable.True False
How’d you do?1. b, c, d. 2. False. Your computer mayprovide data for dives that aren’t rec-ommended.
QUICKQUIZ Self Assessment 4
OWDM_217_250.qxd 3/29/06 3:01 PM Page 224
and falls with each dive and surface interval, so itmust stay with one diver for the entire dive day — youcan’t swap between dives. You can’t share a computerwithin a buddy team either because it tracks depthquite closely. It will only be accurate for the diver wear-ing the computer.
3. Follow the most conservative computer. Surfaceor ascend when either computer — yours or yourbuddy’s — approaches its no decompression limit. Ifyou follow the least conservative, you’re in effect shar-ing that computer, which you shouldn’t do.
4. Don’t turn your computer off between dives.Most won’t let you, but if you take out the battery orshut the computer down, it loses its memory of yourprevious dives and your residual nitrogen. You’ll haveto allow all residual nitrogen to leave your body beforeresuming use of the computer. Your computer will shutitself off when it calculates no significant residualnitrogen remaining.
5. Make your deepest dive first and plan succes-sive dives to progressively shallower depths.During a dive, start at the deepest point andwork your way shallower. The medical communityrecommends avoiding going from shallow to deepbecause there’s little test data about this kind of div-ing. Minor up and down variations (a few metres/feet)are not likely an issue, but there are some theoreticalconcerns if a successive dive is significantly deeperthan a previous dive. Note that if you accidently don’tfollow this guideline, for safety, dive computers stillprovide no stop times.
6. Stay well within computer limits. Always try tohave five or more minutes no decompression timeremaining. If you let it near or reach zero, you’vepushed the limits even though you’ll have plenty of nostop time when you ascend to a shallower depth.
7. If your computer quits, you may need to stopdiving for 12 to 24 hours. If it quits during a dive
224 Open Water Diver Manual
Think.Don’t blindly accept everything your computer says,especially when it appears way out of line with abuddy’s computer or your previous experience. Readthe manufacturer’s instructions completely beforeusing your computer, and follow what they say.
and you’ve been staying well within the no decompressionlimits, ascend immediately to 5 metres/15 feet, make asafety stop for five minutes or more and surface. You can’tsimply grab another computer because it won’t know howmuch residual nitrogen you have. Follow the manufacturer’sinstructions.
8. Take the RDP with you when you go diving.Although computer failure has become vary, very rare, it stillhappens once in awhile. If you’ve been noting your depthsand times (in your logbook, perhaps) and your dives havebeen RDP limits, you can continue diving using the RDP.Otherwise, you’ll probably have to wait until the next day forresidual nitrogen to clear before you resume diving.
Although it’s common for dive resorts to have scuba equip-ment including regulators and computers that you can rentin case of a problem, that’s not always the case. Take yourRDP so you don’t miss out. Many active divers invest in asecond computer (and other gear) so there’s a spare forthemselves or a partner.
9. Keep thinking. Dive computers can fail just like anyother piece of equipment. Don’t blindly accept everythingyour computer says, especially when it appears way out ofline with a buddy’s computer or your previous experience.Read the manufacturer’s instructions completely beforeusing your computer, and follow what they say. You can learnmore about the theory and use of dive computers in thePADI Multilevel Diver course.
Navigation can seem pretty overwhelming when you con-sider that you’re trying to keep up with where the rest of theworld is. And that’s without mentioning how it feels to getlost and realize you just lost track of an entire planet. Bylearning to navigate underwater you’ll minimize how oftenyou get disoriented, and if it does happen, you’ll morequickly figure out where you mislaid the whole of existence.Don’t let it intimidate you – there are two kinds of divers:those who have been lost underwater, and those who won’tadmit it.
Basic Compass Navigation
Chapter Five 225
Underline/highlight the answersto these questions as you read:
11. What are the four basic fea-tures of an underwater com-pass?
12. What is the proper hand andarm position when using acompass mounted on thewrist?
13. What is the proper method ofholding a compass when it ismounted in an instrumentconsole?
14. How do you set an underwa-ter compass to navigate astraight line from a beginninglocation to a predetermineddestination?
15. How do you set an underwa-ter compass for a reciprocalheading?
MAINObjectives
Basic CompassNavigationSee the PADI UnderwaterNavigator Manual
OWDM_217_250.qxd 3/29/06 3:01 PM Page 225
Navigation makes your underwater adventure morefun in several ways. It lets you plan your dive soyou don’t waste time and air trying to find the bestparts of the reef, and so you end your dive nearyour exit point with ample reserve air left. Byknowing where you are at all times, you can headstraight for the boat or shore if a problem crops up,and you know where you haven’t explored yet. Ifthere’s anything in the area you want to avoid, nav-igation helps you do so. Compass navigation helpsyou swim a straight line — when you’re lost, youtend to swim in a circle.
With experience you’ll learn to navigate by follow-ing cues you find in the environment (a diver whohas been there a gazillion times is a great cue tofollow), but an underwater compass makes navigat-ing easier and more accurate, and the more you useit, the more true this is.
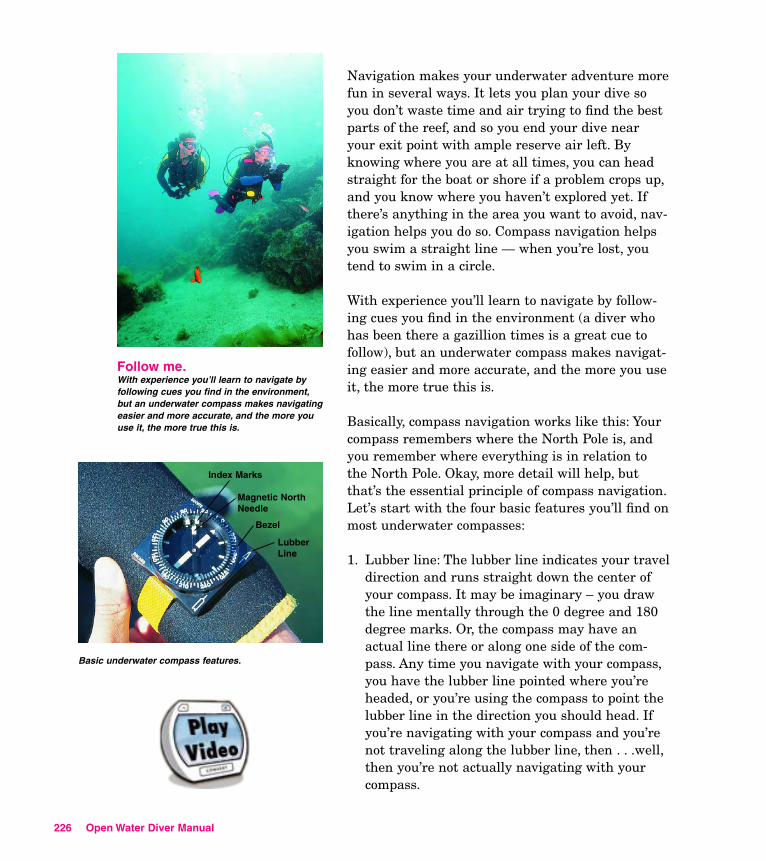
Basically, compass navigation works like this: Yourcompass remembers where the North Pole is, andyou remember where everything is in relation tothe North Pole. Okay, more detail will help, butthat’s the essential principle of compass navigation.Let’s start with the four basic features you’ll find onmost underwater compasses:
1. Lubber line: The lubber line indicates your traveldirection and runs straight down the center ofyour compass. It may be imaginary – you drawthe line mentally through the 0 degree and 180degree marks. Or, the compass may have anactual line there or along one side of the com-pass. Any time you navigate with your compass,
226
Follow me.With experience you’ll learn to navigate byfollowing cues you find in the environment,but an underwater compass makes navigatingeasier and more accurate, and the more youuse it, the more true this is.
OWDM_217_250.qxd 3/29/06 3:01 PM Page 226
Basic underwater compass features.
Index Marks
LubberLine
Bezel
Magnetic NorthNeedle
you have the lubber line pointed where you’reheaded, or you’re using the compass to point thelubber line in the direction you should head. Ifyou’re navigating with your compass and you’renot traveling along the lubber line, then . . .well,then you’re not actually navigating with yourcompass.
Open Water Diver Manual
2. Magnetic north needle: In the center of the com-pass is a needle (or an arrow printed on a disk)that is free to rotate inside the compass. Thismagnetic north needle, or compass needle,always points to magnetic north. By doing this, itcreates an angle with the lubber line that youuse to maintain a straight line as you swim.
3. Bezel: Most underwater compasses have a rotat-ing bezel. To set the compass, align the twosmall, parallel index marks on the bezel over thecompass needle. These help you maintain astraight direction of travel.
4. Heading References: Most underwater compasseshave numbers so you can record your heading(your direction of travel as measured in degreesfrom magnetic north). A few compasses haveonly general markings for north, south, east andwest; you can use these for general navigation,but for precision you’ll want one with degreeheadings.
Electronic compasses provide the same informationand functions, but use digital readouts. See themanufacturer instructions if you’re using an under-water electronic compass.
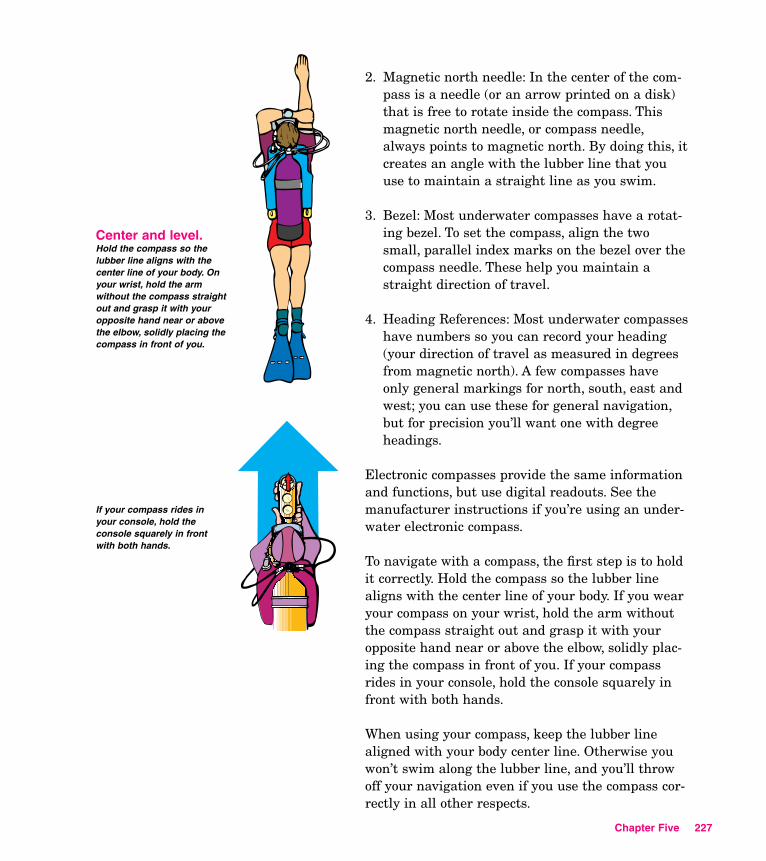
Center and level.Hold the compass so thelubber line aligns with thecenter line of your body. Onyour wrist, hold the armwithout the compass straightout and grasp it with youropposite hand near or abovethe elbow, solidly placing thecompass in front of you.
If your compass rides inyour console, hold theconsole squarely in frontwith both hands.
OWDM_217_250.qxd 3/29/06 3:01 PM Page 227
To navigate with a compass, the first step is to holdit correctly. Hold the compass so the lubber linealigns with the center line of your body. If you wear
your compass on your wrist, hold the arm withoutthe compass straight out and grasp it with youropposite hand near or above the elbow, solidly plac-ing the compass in front of you. If your compassrides in your console, hold the console squarely infront with both hands.
When using your compass, keep the lubber linealigned with your body center line. Otherwise youwon’t swim along the lubber line, and you’ll throwoff your navigation even if you use the compass cor-rectly in all other respects.
Chapter Five 227
228
OWDM_217_250.qxd 3/29/06 3:01 PM Page 228
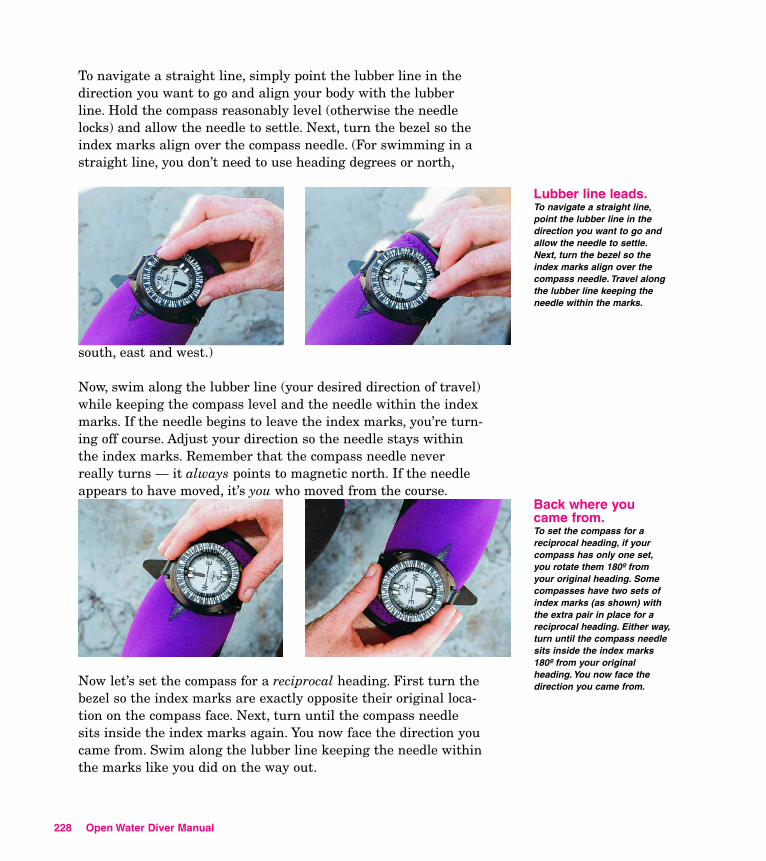
To navigate a straight line, simply point the lubber line in thedirection you want to go and align your body with the lubberline. Hold the compass reasonably level (otherwise the needlelocks) and allow the needle to settle. Next, turn the bezel so theindex marks align over the compass needle. (For swimming in astraight line, you don’t need to use heading degrees or north,
south, east and west.)
Now, swim along the lubber line (your desired direction of travel)while keeping the compass level and the needle within the indexmarks. If the needle begins to leave the index marks, you’re turn-ing off course. Adjust your direction so the needle stays withinthe index marks. Remember that the compass needle neverreally turns — it always points to magnetic north. If the needleappears to have moved, it’s you who moved from the course.
Lubber line leads.To navigate a straight line,point the lubber line in thedirection you want to go andallow the needle to settle.Next, turn the bezel so theindex marks align over thecompass needle. Travel alongthe lubber line keeping theneedle within the marks.
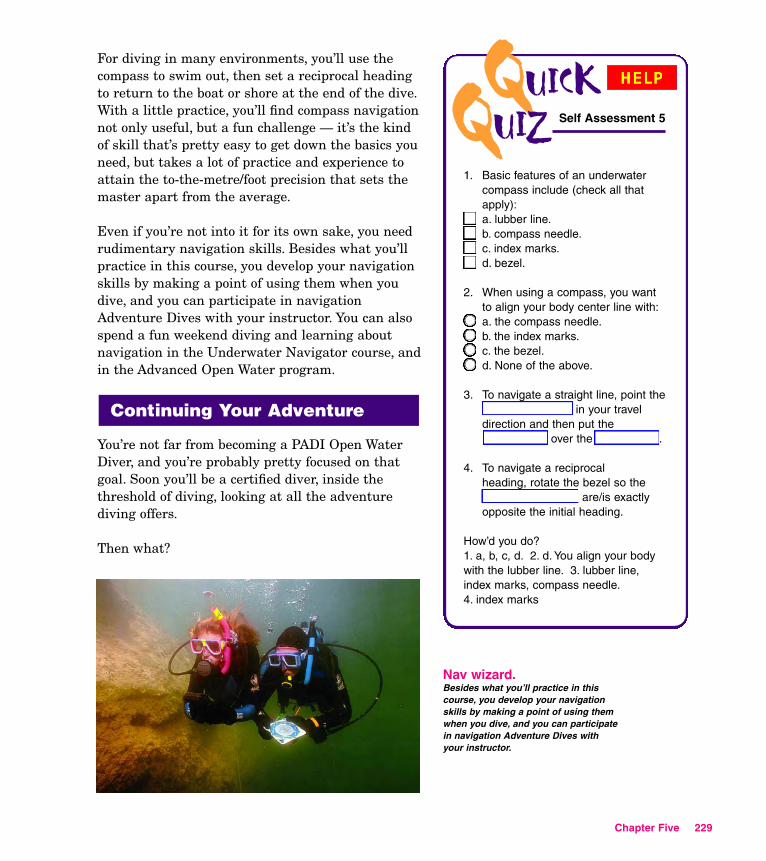
Now let’s set the compass for a reciprocal heading. First turn thebezel so the index marks are exactly opposite their original loca-tion on the compass face. Next, turn until the compass needlesits inside the index marks again. You now face the direction youcame from. Swim along the lubber line keeping the needle withinthe marks like you did on the way out.
Back where youcame from.To set the compass for areciprocal heading, if yourcompass has only one set,you rotate them 180º fromyour original heading. Somecompasses have two sets ofindex marks (as shown) withthe extra pair in place for areciprocal heading. Either way,turn until the compass needlesits inside the index marks180º from your originalheading. You now face thedirection you came from.
Open Water Diver Manual
For diving in many environments, you’ll use thecompass to swim out, then set a reciprocal headingto return to the boat or shore at the end of the dive.With a little practice, you’ll find compass navigationnot only useful, but a fun challenge — it’s the kindof skill that’s pretty easy to get down the basics youneed, but takes a lot of practice and experience toattain the to-the-metre/foot precision that sets themaster apart from the average.
Even if you’re not into it for its own sake, you needrudimentary navigation skills. Besides what you’llpractice in this course, you develop your navigationskills by making a point of using them when youdive, and you can participate in navigationAdventure Dives with your instructor. You can alsospend a fun weekend diving and learning aboutnavigation in the Underwater Navigator course, andin the Advanced Open Water program.
You’re not far from becoming a PADI Open WaterDiver, and you’re probably pretty focused on thatgoal. Soon you’ll be a certified diver, inside thethreshold of diving, looking at all the adventure diving offers.
Then what?
Continuing Your Adventure
Chapter Five 229
1. Basic features of an underwatercompass include (check all thatapply):a. lubber line.b. compass needle.c. index marks.d. bezel.
2. When using a compass, you wantto align your body center line with:a. the compass needle.b. the index marks.c. the bezel.d. None of the above.
3. To navigate a straight line, point the______________ in your traveldirection and then put the__________ over the __________.
4. To navigate a reciprocal heading, rotate the bezel so the_______________ are/is exactlyopposite the initial heading.
How’d you do?1. a, b, c, d. 2. d. You align your bodywith the lubber line. 3. lubber line,index marks, compass needle.4. index marks
QUICKQUIZ Self Assessment 5
Nav wizard.Besides what you’ll practice in thiscourse, you develop your navigationskills by making a point of using themwhen you dive, and you can participatein navigation Adventure Dives withyour instructor.
OWDM_217_250.qxd 3/29/06 3:01 PM Page 229
Maybe it’s time you think about it. It’s such a loss when a diver becomes certified and then. . . and then nothing. No adventure. No chal-lenge. It’s like someone hands the diver a newworld, and not knowing what to do with it, thediver says, “No thank you,” and walks away.
Surely you didn’t take the time and effort toearn your certification just so you can say,“been there, done that.” But you may notknow where to go, or what to do with this newworld at your grasp. So let’s look at what youneed to do now so that when you look back ina year, or ten, you won’t look back on “. . . andthen nothing.” You need to: 1. meet people,2. go places and 3. do things.
Meet People.Since you can’t dive alone, the more divingfriends you have, the more dive opportunitiesyou’ll have. Not having someone to dive withis one of the most common reasons why somedivers don’t keep diving after getting certified.Maybe you already have friends who dive, butif you don’t orwant more, whatdo you do?
You’re off to a good start, if you thinkabout it. Don’t leave your final con-fined water dive and open water divefor this course without getting thename, telephone number and addressfor everyone in the class. You knowthese divers, and like you, they wantsomeone to dive with.
Next, join a dive club. Your PADI DiveCenter or Resort probably has one orknows of one, which is probably a localchapter of the PADI Diving Society(which you’ll also want to join). Most ofthese organizations coordinate activi-
Summary PointsSummary Points
230 Open Water Diver Manual
In the subsections on Using a DiveComputer and Basic Compass Navigation,you learned:
▲ You should have your own computerwhile diving — don’t try to share one.
▲ Keep your computer turned on all the time.
▲ The dive medical community recom-mends that you make your deepestdive first and plan successive dives toprogressively shallower depths.
▲ Stay well within computer limits.
▲ Back up your computer with divetables.
▲ Underwater navigation skills add todive fun and safety.
▲ The compass lubber line always indi-cates your travel direction; the com-pass needle always points north.
.
Underline/highlight the answers tothese questions as you read:
16. What is the purpose of thePADI System of diver educa-tion?
17. What are three benefits ofcontinuing your diver educa-tion beyond PADI Open WaterDiver?
18. What dive adventure do youwant next?
MAINObjectives
OWDM_217_250.qxd 3/29/06 3:01 PM Page 230
ties, dives, events and other dive-related fun — andyou’ll meet other people to dive with. Don’t worrythat you’re new to diving — every dive group hasmembers at all experience levels and they planactivities accordingly.
Go Places.A great way to meet people is to go on a dive triporganized by your PADI Dive Center or Resort.Plus, it takes you diving — which is what you’retrying to accomplish. Although an exotic dive desti-nation has the most appeal, don’t let time andmoney limit your thinking. Most dive operationsoffer local dive adventures close to home — and youmay be surprised just how much fun you can have.
Do Things.Diving isn’t just about swimming around underwater sightseeing.Diving should be personal. It’s about gaining the skills you need tovisit new dive sites you want to see. It’s about having the gear youwant so that diving takes you on the adventures that you thinkworthwhile, so that it presents you with the challenges that youthink deserving, and so that diving grows with you and alwaysrewards you.
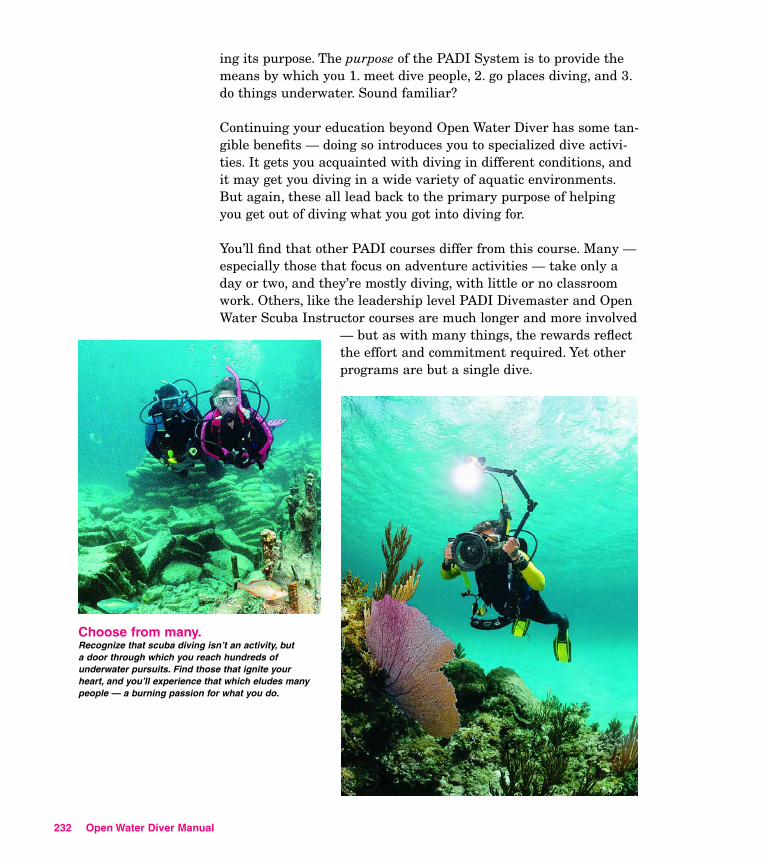
Only you can say whether this means taking on artistic challengeslike underwater photography and videography, skill challenges likenavigating or finding and recovering lost objects, or technical chal-lenges like deep diving or enriched air diving. But recognize thatscuba diving isn’t an activity, but a door through which you reachhundreds of underwater pursuits. Find those that ignite yourheart, and you’ll experience that which eludes many people — aburning passion for what you do.
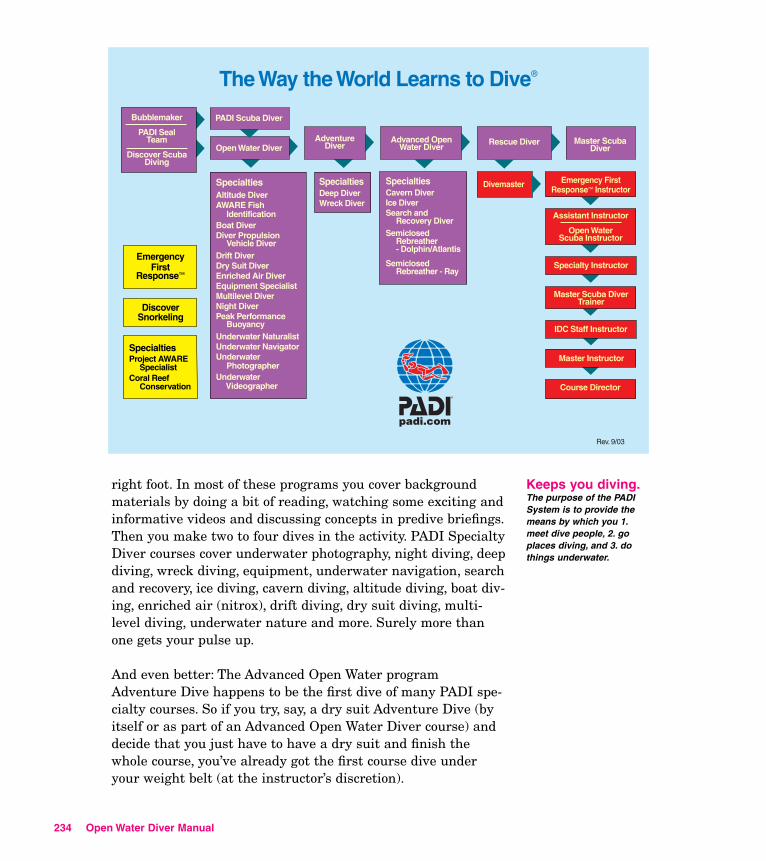
The PADI System of Diver EducationLooking at a flow chart for the PADI System of diver education,one might conclude that its purpose is to take you to Master ScubaDiver, or to PADI Open Water Scuba Instructor. But that’s not it at all.
Becoming a PADI Master Scuba Diver, or Divemaster, or Instructor,or whatever isn’t the purpose of the system, but a result of achiev-
Chapter Five 231
People like you.Your PADI Dive Center or Resort probably has a diveclub or knows of one. Most of these organizationscoordinate activities, dives, events and other dive-related fun — and you’ll meet other people to dive with.
OWDM_217_250.qxd 3/29/06 3:01 PM Page 231
ing its purpose. The purpose of the PADI System is to provide themeans by which you 1. meet dive people, 2. go places diving, and 3.do things underwater. Sound familiar?
Continuing your education beyond Open Water Diver has some tan-gible benefits — doing so introduces you to specialized dive activi-ties. It gets you acquainted with diving in different conditions, andit may get you diving in a wide variety of aquatic environments.But again, these all lead back to the primary purpose of helpingyou get out of diving what you got into diving for.
You’ll find that other PADI courses differ from this course. Many —especially those that focus on adventure activities — take only aday or two, and they’re mostly diving, with little or no classroomwork. Others, like the leadership level PADI Divemaster and OpenWater Scuba Instructor courses are much longer and more involved
— but as with many things, the rewards reflectthe effort and commitment required. Yet otherprograms are but a single dive.
232 Open Water Diver Manual
Choose from many.Recognize that scuba diving isn’t an activity, but a door through which you reach hundreds ofunderwater pursuits. Find those that ignite yourheart, and you’ll experience that which eludes manypeople — a burning passion for what you do.
OWDM_217_250.qxd 3/29/06 3:01 PM Page 232
Regardless, by continuing to learn, you meet and get to know otherdivers. You visit new dive sites (perhaps including dive travel), andyou get to try new activities and to develop new skills, helping youfind the aspects of diving that mean the most to you. Related tothis, you see what types of equipment best suit your preferencesand interests.
In other words, it assures that you meet people, go places and do things.
PADI Adventure Dives. What’s it like to dive to 30 metres/100 feet?How hard is it to shoot a camera underwater? Is night diving asscary as it sounds?
You get the answers to questions like these by going on PADIAdventure Dives, which introduce you to the basics of specialunderwater activities. It’s a great way to see what interests you,whether it’s deep diving, night diving, wreck diving, and so on. Yourinstructor shows you what you need to know during a predivebriefing and review, and then you’re off doing it. The best part is,it’s fun.
Adventures in Diving Program. Know what they call someonewho’s made five Adventure Dives? A PADI Advanced Open WaterDiver. You make an underwater navigation dive and a deep dive,plus three other Adventure Dives that appeal to you. The back-ground info you need you cover by reading short chapters inAdventures in Diving and during some predive briefings, but aswith Adventure Dives, what you really do is meet divers, go placesdiving and do new things underwater. You can earn the AdvancedOpen Water Diver certification over time by going on AdventureDives, or you usually can sign up for it as a program. It usuallytakes a weekend, but the schedule is incredibly flexible. Some peo-ple have done it in afternoons after work.
If you can’t complete all five Adventure Dives you need for thePADI Advanced Open Water Diver certification, you can still earnthe PADI Adventure Diver rating after completing any threeAdventure Dives. PADI Adventure Diver certification dives can becompleted in just one day.
Specialty Diver Courses. Once you start figuring out what typesof diving you love, PADI Specialty Diver courses get you off on the
Chapter Five 233
OWDM_217_250.qxd 3/29/06 3:01 PM Page 233
right foot. In most of these programs you cover backgroundmaterials by doing a bit of reading, watching some exciting andinformative videos and discussing concepts in predive briefings.Then you make two to four dives in the activity. PADI SpecialtyDiver courses cover underwater photography, night diving, deepdiving, wreck diving, equipment, underwater navigation, searchand recovery, ice diving, cavern diving, altitude diving, boat div-ing, enriched air (nitrox), drift diving, dry suit diving, multi-level diving, underwater nature and more. Surely more thanone gets your pulse up.
And even better: The Advanced Open Water programAdventure Dive happens to be the first dive of many PADI spe-cialty courses. So if you try, say, a dry suit Adventure Dive (byitself or as part of an Advanced Open Water Diver course) anddecide that you just have to have a dry suit and finish thewhole course, you’ve already got the first course dive underyour weight belt (at the instructor’s discretion).
234 Open Water Diver Manual
Keeps you diving.The purpose of the PADISystem is to provide themeans by which you 1.meet dive people, 2. goplaces diving, and 3. dothings underwater.
OWDM_217_250.qxd 3/29/06 3:01 PM Page 234
It works the other way, too. If you know now that you love,say, underwater photography and go straight into theUnderwater Photographer course (which is a really great pro-gram, by the way . . . but we digress), the first dive from thecourse counts toward your AdvancedOpen Water certification (at theinstructor’s discretion).
Discover Local Diving. Not a course,and you already know about thisfrom the discussion on getting alocal orientation when diving in anew area. The Discover Local Divingexperience provides a single, super-vised open-water experience to someplace new, with a briefing coveringlocal conditions, hazards and pointsof interest, as well as an orientation to special procedures andtechniques used in the area. During the dive, you’ll see someof the interesting points, as well as the potential hazards toavoid. It’s a good way to plug into the local dive communitywhen you go some place new, and find out what activities suitthe local environment. Meet people, go places and do things.
Scuba Review. Ditto, you already learned about this, but it’sworth a reminder: If you go several months or longer withoutdiving (it happens, best laid plans notwithstanding), you’llwant to brush up your dive skills and knowledge. In ScubaReview, you complete some short self-study (with a workbookor CD-ROM) and review it with a PADI Divemaster, AssistantInstructor or Instructor. Then you make a confined water diveto put the polish back on your skills. Usually takes only a cou-ple hours — easy way to limber up mentally and physically for diving.
Rescue Diver Course. Serious fun. You learn a pile of skills,most of which you hope you’ll never use. It’s a demanding andchallenging course. You’ll love it. Virtually all who take thiscourse cite it as one of the most rewarding courses they’vetaken. Though challenging, you don’t have to be an athlete –you learn rescue techniques suited to your physical character-istics and fitness level – what works for you.
Chapter Five 235
Good things to know.The Rescue Diver courserefines and further developsyour accident prevention andhandling skills, plus teachesyou to manage an emergency.
OWDM_217_250.qxd 3/29/06 3:01 PM Page 235
During the Rescue Diver course you learn to refine and furtherdevelop your accident prevention and handling skills, pluslearn to manage an emergency if you’re ever faced with one.Good things to know.
Emergency First Response. Like the Rescue Diver course, inthe Emergency First Response program you learn skills youhope you never need, but will be glad you did if you ever do.Emergency First Response combines CPR and first aid into asingle course, teaching you (at a lay level) the same emergencyprotocols used by paramedics and doctors. Your nondivingfriends can take this course with you, and it can make a bigdifference — even when you’re not diving.
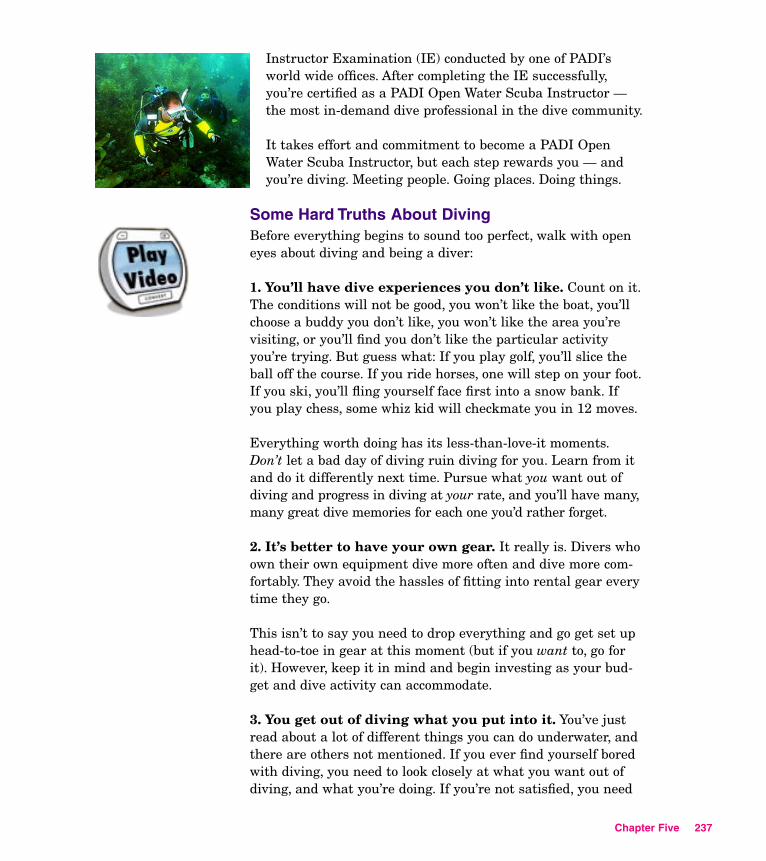
Master Scuba Diver. The PADI Master ScubaDiver rating is the highest nonprofessionalrating in recreational diving. This prestigiousrating means you’ve developed skills andexperience in a broad number of dive activi-ties and environments. What makes a MasterScuba Diver? Earn the PADI Advanced OpenWater Diver, the PADI Rescue Diver and fivePADI Specialty Diver certifications.
Turn Pro. At some point, you may decide to make diving a fullor part time profession. For a lot of people, it beats working ata desk, and if you love working at a desk, you can still turnpro. Does all this seem too far off? No worries — you don’t needto look this far ahead yet. But this will give you some idea howyour instructor and the instructor’s staff got where they are.
After Rescue Diver, your next step is PADI Divemaster. Duringthe Divemaster course, you sharpen your dive skills to demon-stration quality, develop a professional-level understanding ofdive theory, learn to organize and conduct diving activities, andlearn how to assist with divers in training.
After Divemaster comes the PADI Assistant Instructor course.The Assistant Instructor course begins developing the basicknowledge and skills needed to teach diving. Next, you attenda PADI Open Water Scuba Instructor Course (OWSI). In thisinstructor-training course, you learn how to teach scuba diving.After completing the OWSI course, you must pass a two-day
236 Open Water Diver Manual
Rewards = efforts.It takes effort andcommitment to become aPADI Open Water ScubaInstructor, but it is asrewarding as it isdemanding.
OWDM_217_250.qxd 3/29/06 3:01 PM Page 236
Instructor Examination (IE) conducted by one of PADI’sworld wide offices. After completing the IE successfully,you’re certified as a PADI Open Water Scuba Instructor —the most in-demand dive professional in the dive community.
It takes effort and commitment to become a PADI OpenWater Scuba Instructor, but each step rewards you — andyou’re diving. Meeting people. Going places. Doing things.
Some Hard Truths About DivingBefore everything begins to sound too perfect, walk with openeyes about diving and being a diver:
1. You’ll have dive experiences you don’t like. Count on it.The conditions will not be good, you won’t like the boat, you’llchoose a buddy you don’t like, you won’t like the area you’revisiting, or you’ll find you don’t like the particular activityyou’re trying. But guess what: If you play golf, you’ll slice theball off the course. If you ride horses, one will step on your foot.If you ski, you’ll fling yourself face first into a snow bank. Ifyou play chess, some whiz kid will checkmate you in 12 moves.
Everything worth doing has its less-than-love-it moments.Don’t let a bad day of diving ruin diving for you. Learn from itand do it differently next time. Pursue what you want out ofdiving and progress in diving at your rate, and you’ll have many,many great dive memories for each one you’d rather forget.
2. It’s better to have your own gear. It really is. Divers whoown their own equipment dive more often and dive more com-fortably. They avoid the hassles of fitting into rental gear everytime they go.
This isn’t to say you need to drop everything and go get set uphead-to-toe in gear at this moment (but if you want to, go forit). However, keep it in mind and begin investing as your bud-get and dive activity can accommodate.
3. You get out of diving what you put into it. You’ve justread about a lot of different things you can do underwater, andthere are others not mentioned. If you ever find yourself boredwith diving, you need to look closely at what you want out ofdiving, and what you’re doing. If you’re not satisfied, you need
Chapter Five 237
OWDM_217_250.qxd 3/29/06 3:01 PM Page 237
to turn your diving in a new direction. There arepeople who have made more than 1000 dives overmore than 30 years – and they’re still meetingnew people. Going new places. Doing new things.Only you can make yourself reach for what’s newand exciting in diving.
Your Next Dive AdventureOkay, so you won’t look back in a year and won-der why you haven’t been diving, before you fin-ish this course, go to your PADI Dive Center orResort and do one or more of the following:
1. Sign up for a dive trip.2. Sign up for a local dive with the store or the
store’s dive club/Diving Society Chapter.3. Sign up for a PADI specialty course, Advanced
Open Water course, or Adventure Dive.4. Invest in a regulator/BCD package, or expo-
sure suit package.
Do not leave until you do one of these. Nojoke — because research shows that people whodo one of these when they finish their OpenWater Diver course are more likely to get out ofdiving what they got into diving for. Plan yournext step now.
Meet people.
Go places.
Do things.
Underwater.
Finish the rest of the Instructions for Use bookletthat comes with your RDP.
Then come back to this manual and pick up withthe Confined Water Dive Preview.
Using the Recreational Dive Planner (Continued)
238 Open Water Diver Manual
By the time you complete theassigned reading in Instructionsfor Use booklet assignment forthe RDP (Table or Wheel), youshould be able to answer the fol-lowing questions:
19. How do you find the minimumsurface interval required tocomplete a series of nodecompression dives usingthe Recreational Dive Planner?
20. How do you plan a multileveldive with The Wheel? [TheWheel only.]
MAINObjectives
1. What dive adventure do you want next?
Answer: Your choice — but choose, or . . .or nothing.
QUICKQUIZ Self Assessment 6
OWDM_217_250.qxd 3/29/06 3:01 PM Page 238
Dive Tables DefinitionsYou’ve learned the following terms in the discus-sions on dive computers and in learning to usethe RDP (if you learned to use The Wheel, youmay not have run into some of these because you don’t need them with The Wheel). This listprovides a convenient and quick reference and review.
Actual Bottom Time (ABT) — In repetitivediving, the total time actually spent under water(in minutes) from the beginning of descent untilleaving the bottom for a direct continuous ascentto the surface or safety stop.
Adjusted No Decompression Limit — Thetime limit for a repetitive dive that accounts forresidual nitrogen. Found on Table 3 of the RDPTable; The Wheel automatically adjusts for resid-ual nitrogen. Actual Bottom Time should neverexceed the adjusted no decompression limit.
Ascent Rate — The proper speed for ascending,which is no faster than 18 metres/60 feet perminute. A rate slower is acceptable, and appropriate.
Bottom Time — The time from the beginning ofdescent until the beginning of a direct, continu-ous ascent to the surface or safety stop.
Decompression Diving — Diving that requiresplanning stops during ascent to avoid decompres-sion sickness. In recreational diving (no decom-pression diving), a decompression stop is consid-ered an emergency procedure only, and is neveran intentional part of the dive plan.
Dive Profile — A drawing of your dive plan,used to avoid confusion and omissions whenusing the dive tables.
Chapter Five 239
The PADI Diving Society
The PADI Diving Society is anorganization for people like you –scuba divers, snorkelers and otherwater enthusiasts. Emphasizing thediving lifestyle, the Society con-nects you with what’s happeningunderwater, by the water and onthe water. PADI Diving Societymember benefits vary to fit the dif-ferent needs divers have aroundthe world, but include travel advan-tages, involvement with environ-mental efforts, and the officialDiving Society publication, SportDiver.
The PADI Diving Society immersesyou in the diving lifestyle. See yourPADI Dive Center, Resort orInstructor about diving into it.
OWDM_217_250.qxd 3/29/06 3:01 PM Page 239
Multilevel Diving — Planning profiles that credit you for slower nitro-gen absorption when you ascend to a shallower depth. This providesmore no-stop dive time. The Wheel version of the Recreational DivePlanner can be used for multilevel diving.
No decompression Limit (NDL) — The maximum time that can bespent at a depth before decompression stops are required. Also called“no-stop time.”
No-Stop Dive — A dive made within no decompres-sion limits because you don’t have any requiredemergency decompression stops.
Pressure Group — A letter used on theRecreational Dive Planner to designate the amountof theoretical residual nitrogen in your body.
Repetitive Dive — A dive that follows another while there’s still a sig-nificant amount of residual nitrogen in your body. Using the RecreationalDive Planner, this is a dive made within six hours of a previous dive.
Residual Nitrogen — The higher-than-normal amount of nitrogenremaining in your body after a dive.
Residual Nitrogen Time (RNT) — An amount of nitrogen, expressedin minutes (found on Table 3 by using a pressure group letter) for a spe-cific depth, that you add to the actual bottom time of a dive to accountfor residual nitrogen from a previous dive. Not needed with The Wheel.
Safety Stop — A stop made between 3 and 6 metres/10-20 feet — usu-ally 5 metres/15 feet for three or more minutes at the end of a dive foradditional safety. The safety stop is recommended after all dives (air sup-ply and other considerations allowing), and required on those to 30metres/100 feet or greater, and those coming within three pressuregroups of the no decompression limit.
Surface Interval (SI)— The amount of time spent on the surfacebetween two dives. It is usually recorded in hours:minutes (e.g. 3:25 — 3hours, 25 minutes).
Total Bottom Time (TBT) — The sum of Residual Nitrogen Time andActual Bottom Time after a repetitive dive, used on Table 1 to determinethe pressure group. Not needed with The Wheel.
240 Open Water Diver Manual
OWDM_217_250.qxd 3/29/06 3:01 PM Page 240
This is the last confined water dive in the Open Water Diver course. Asin the previous sessions, you’ll practice skills you’ve already learned, andlearn some new ones.
Weight System HandlingThere may be times when you’ll need to remove or replace your weightsystem on the surface or underwater. Your weight belt may have becometangled with other equipment, you may need to adjust your gear, or youmay need to take it off before entering small boats or climbing onto aplatform without a ladder.
To remove a weight belt, release thebuckle with one hand and grasp thefree end, like you did during ConfinedWater Dive Three, pulling it clear ofyour body. Since you’re not ditchingthe belt, keep it close to your bodybecause holding it away tends to pullyou over in the water. If you wereditching it, you would hold it wellaway before letting go. Keep in mindthat once you release your weight belt,your center of buoyancy changes andyou’ll probably feel yourself trying toorient differently in the water. Whenworking with your weight belt,remember to hold the free end (theend without the buckle) so the weightscan’t slide off.
Whether you’re at the surface or onthe bottom, you can use two methodsto replace a weight belt. Breathethrough your regulator even if you’reat the surface so you can maneuver inthe water without having to worryabout flooding your snorkel.
To use the first method, stretch outhorizontally face up. Hold the free end
Confined Water Dive Preview
Chapter Five 241
Here’s what you’ll be able to do whenyou successfully complete ConfinedWater Dive Five:
1. Remove, replace, adjust andsecure the scuba unit and weightsat the surface, with minimal assis-tance, in water too deep to standup in.
2. Remove, replace, adjust andsecure the scuba unit on the bot-tom, with minimal assistance, inwater too deep to stand up in.
3. Remove, replace, adjust andsecure weight belt on the bottom inwater too deep to stand in, or forstudents using weight integratedBCDs or weight harness systems,in shallow water, remove weightswhile underwater.
Skill RequirementsConfined Water
Dive Five
Skill Requirements
OWDM_217_250.qxd 3/29/06 3:01 PM Page 241
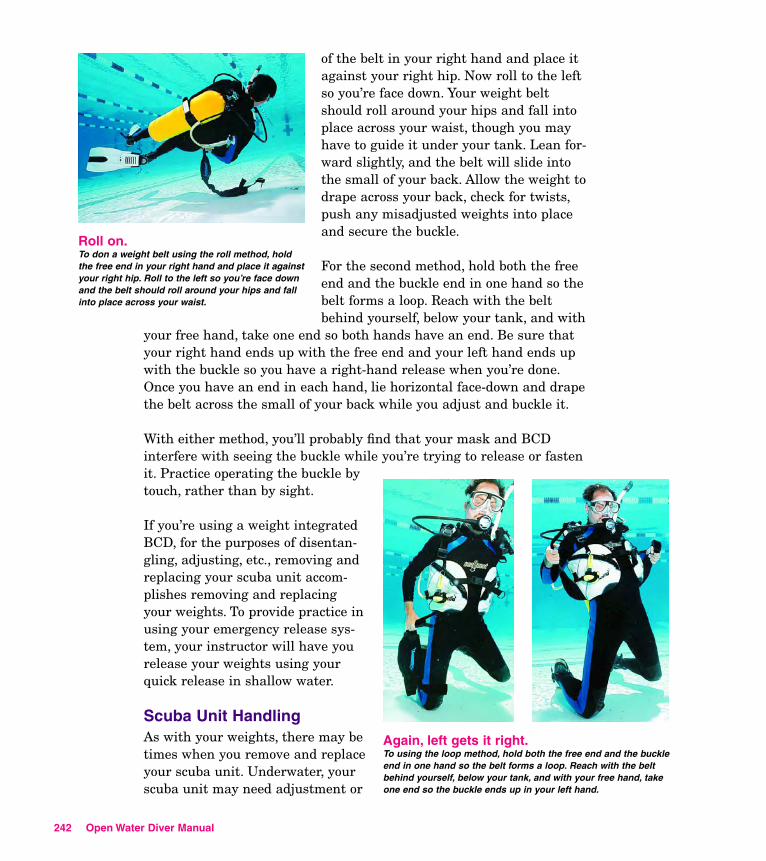
of the belt in your right hand and place itagainst your right hip. Now roll to the leftso you’re face down. Your weight beltshould roll around your hips and fall intoplace across your waist, though you mayhave to guide it under your tank. Lean for-ward slightly, and the belt will slide intothe small of your back. Allow the weight todrape across your back, check for twists,push any misadjusted weights into placeand secure the buckle.
For the second method, hold both the freeend and the buckle end in one hand so thebelt forms a loop. Reach with the beltbehind yourself, below your tank, and with
your free hand, take one end so both hands have an end. Be sure thatyour right hand ends up with the free end and your left hand ends upwith the buckle so you have a right-hand release when you’re done.Once you have an end in each hand, lie horizontal face-down and drapethe belt across the small of your back while you adjust and buckle it.
With either method, you’ll probably find that your mask and BCDinterfere with seeing the buckle while you’re trying to release or fastenit. Practice operating the buckle bytouch, rather than by sight.
If you’re using a weight integratedBCD, for the purposes of disentan-gling, adjusting, etc., removing andreplacing your scuba unit accom-plishes removing and replacingyour weights. To provide practice inusing your emergency release sys-tem, your instructor will have yourelease your weights using yourquick release in shallow water.
Scuba Unit HandlingAs with your weights, there may betimes when you remove and replaceyour scuba unit. Underwater, yourscuba unit may need adjustment or
242 Open Water Diver Manual
Roll on.To don a weight belt using the roll method, holdthe free end in your right hand and place it againstyour right hip. Roll to the left so you’re face downand the belt should roll around your hips and fallinto place across your waist.
Again, left gets it right.To using the loop method, hold both the free end and the buckleend in one hand so the belt forms a loop. Reach with the beltbehind yourself, below your tank, and with your free hand, takeone end so the buckle ends up in your left hand.
OWDM_217_250.qxd 3/29/06 3:01 PM Page 242
may be slightly entangled and need to befreed. On the surface, you may put your scubaunit on after entering the water and (as youmay have already practiced) take it off before exiting.
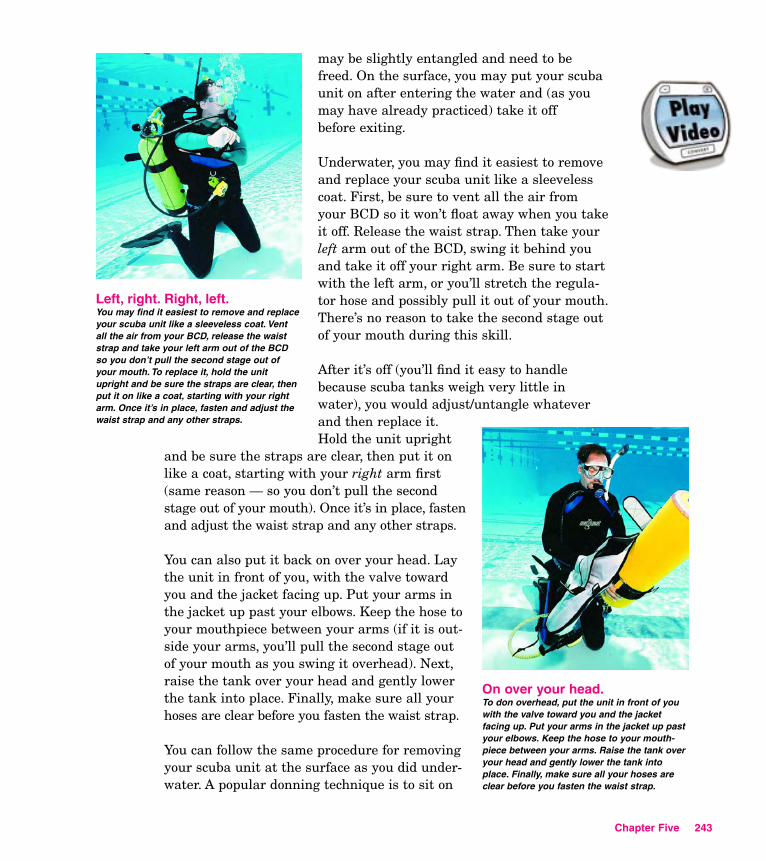
Underwater, you may find it easiest to removeand replace your scuba unit like a sleevelesscoat. First, be sure to vent all the air fromyour BCD so it won’t float away when you takeit off. Release the waist strap. Then take yourleft arm out of the BCD, swing it behind youand take it off your right arm. Be sure to startwith the left arm, or you’ll stretch the regula-tor hose and possibly pull it out of your mouth.There’s no reason to take the second stage outof your mouth during this skill.
After it’s off (you’ll find it easy to handlebecause scuba tanks weigh very little inwater), you would adjust/untangle whateverand then replace it.Hold the unit upright
and be sure the straps are clear, then put it onlike a coat, starting with your right arm first(same reason — so you don’t pull the secondstage out of your mouth). Once it’s in place, fastenand adjust the waist strap and any other straps.
You can also put it back on over your head. Laythe unit in front of you, with the valve towardyou and the jacket facing up. Put your arms inthe jacket up past your elbows. Keep the hose toyour mouthpiece between your arms (if it is out-side your arms, you’ll pull the second stage outof your mouth as you swing it overhead). Next,raise the tank over your head and gently lowerthe tank into place. Finally, make sure all yourhoses are clear before you fasten the waist strap.
You can follow the same procedure for removingyour scuba unit at the surface as you did under-water. A popular donning technique is to sit on
Chapter Five 243
Left, right. Right, left.You may find it easiest to remove and replaceyour scuba unit like a sleeveless coat. Vent all the air from your BCD, release the waiststrap and take your left arm out of the BCDso you don’t pull the second stage out ofyour mouth. To replace it, hold the unitupright and be sure the straps are clear, thenput it on like a coat, starting with your rightarm. Once it’s in place, fasten and adjust thewaist strap and any other straps.
On over your head.To don overhead, put the unit in front of youwith the valve toward you and the jacketfacing up. Put your arms in the jacket up pastyour elbows. Keep the hose to your mouth-piece between your arms. Raise the tank overyour head and gently lower the tank intoplace. Finally, make sure all your hoses areclear before you fasten the waist strap.
OWDM_217_250.qxd 3/29/06 3:01 PM Page 243
the slightly buoyant unit with the tankbetween your legs. Put the bottom of the tankin front of you, the valve behind you, and thejacket open beneath you. Put your arms intothe jacket sleeves on each side, and then letyourself slip forward. The unit slides up, youslide down and presto! You’re in the jacket.
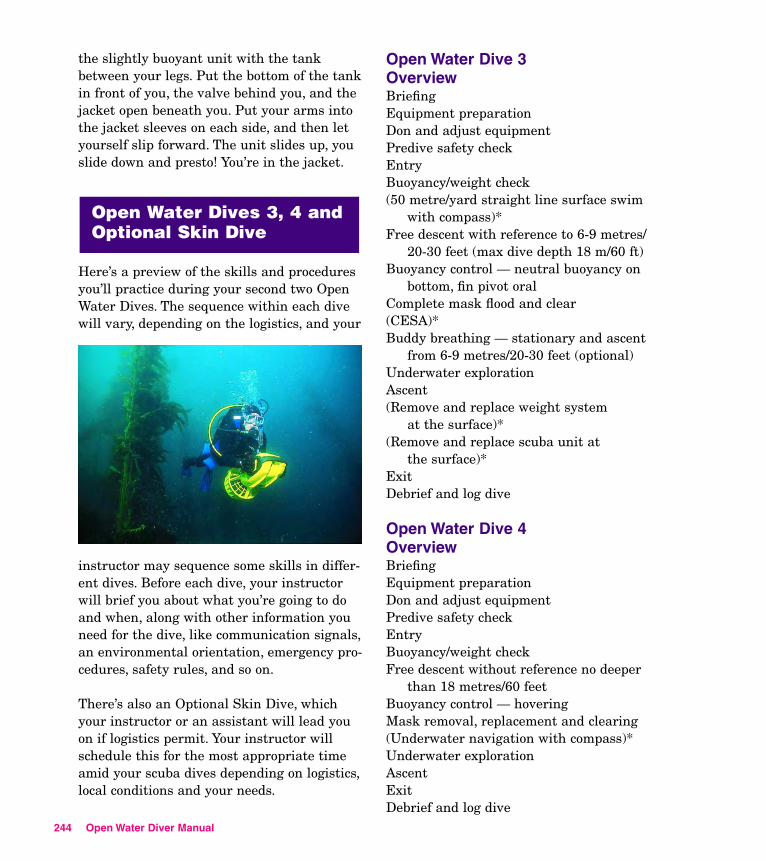
Here’s a preview of the skills and proceduresyou’ll practice during your second two OpenWater Dives. The sequence within each divewill vary, depending on the logistics, and your
instructor may sequence some skills in differ-ent dives. Before each dive, your instructorwill brief you about what you’re going to doand when, along with other information youneed for the dive, like communication signals,an environmental orientation, emergency pro-cedures, safety rules, and so on.
There’s also an Optional Skin Dive, whichyour instructor or an assistant will lead youon if logistics permit. Your instructor willschedule this for the most appropriate timeamid your scuba dives depending on logistics,local conditions and your needs.
Open Water Dives 3, 4 andOptional Skin Dive
244 Open Water Diver Manual
Open Water Dive 3OverviewBriefingEquipment preparationDon and adjust equipmentPredive safety checkEntryBuoyancy/weight check(50 metre/yard straight line surface swim
with compass)*Free descent with reference to 6-9 metres/
20-30 feet (max dive depth 18 m/60 ft)Buoyancy control — neutral buoyancy on
bottom, fin pivot oralComplete mask flood and clear(CESA)*Buddy breathing — stationary and ascent
from 6-9 metres/20-30 feet (optional)Underwater explorationAscent(Remove and replace weight system
at the surface)*(Remove and replace scuba unit at
the surface)*ExitDebrief and log dive
Open Water Dive 4OverviewBriefingEquipment preparationDon and adjust equipmentPredive safety checkEntryBuoyancy/weight checkFree descent without reference no deeper
than 18 metres/60 feetBuoyancy control — hoveringMask removal, replacement and clearing(Underwater navigation with compass)*Underwater explorationAscentExitDebrief and log dive
swimmingDisplacement snorkel clearUnderwater explorationExitDebrief and log dive
Dive Safety Practices Summary
The following summarizes the safe diving practices you’ve learnedduring this course. Review it periodically and keep them in mindwhen diving.
Preparation1. Stay healthy and fit for diving. Eat right, exercise regularly and
get adequate rest.2. Have approval for diving from a physician who has given you a
thorough medical examination and have one every two years.3. Be recently trained in first aid and cardiopulmonary resuscita-
tion (CPR). To acquire training in these areas, take theEmergency First Response program offered by PADI Instructors,Dive Centers and Resorts.
4. Maintain your dive skills by diving as often as you can, by con-tinuing your diver education. Refresh your knowledge and skillswith Scuba Review after long periods of inactivity.
* These skills may be sequenced inother dives, depending on logistics.
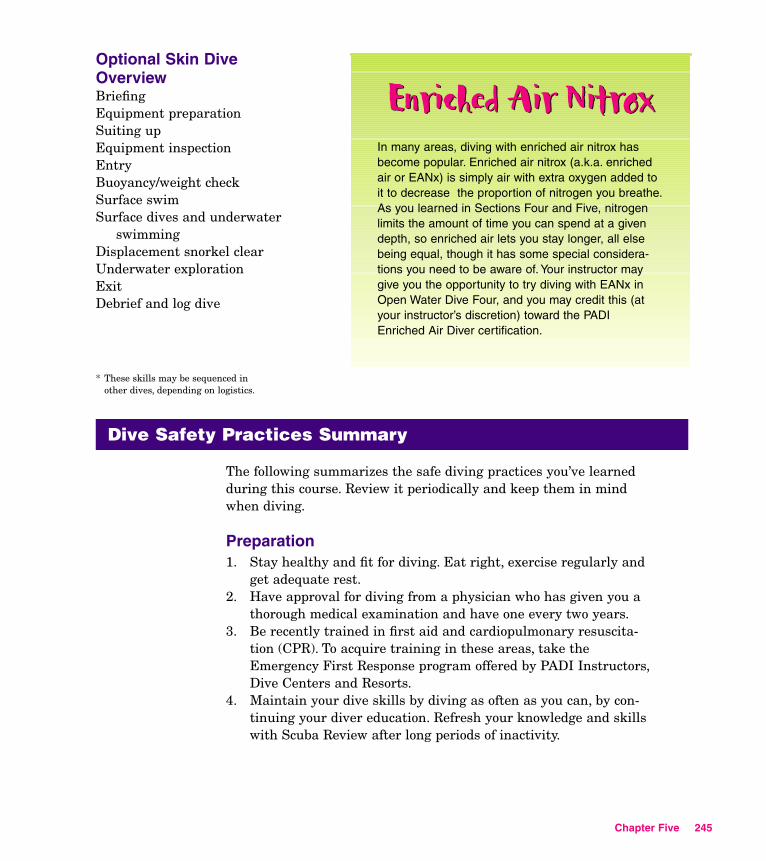
In many areas, diving with enriched air nitrox hasbecome popular. Enriched air nitrox (a.k.a. enrichedair or EANx) is simply air with extra oxygen added toit to decrease the proportion of nitrogen you breathe.As you learned in Sections Four and Five, nitrogenlimits the amount of time you can spend at a givendepth, so enriched air lets you stay longer, all elsebeing equal, though it has some special considera-tions you need to be aware of. Your instructor maygive you the opportunity to try diving with EANx inOpen Water Dive Four, and you may credit this (atyour instructor’s discretion) toward the PADIEnriched Air Diver certification.
Enriched Air NitroxEnriched Air Nitrox
OWDM_217_250.qxd 3/29/06 3:01 PM Page 245
5. Get an orientation to new diving conditions, activities or areas.When planning a dive in a new, unfamiliar area, participate in aDiscover Local Diving experience. Remember that you should havespecial training for some activities.
6. Always have and use all the equipment needed for the conditionsand environment.
7. Have your scuba equipment serviced annually, or as recommendedby the manufacturer. Have scuba tanks visually inspected regu-larly and pressure tested at required intervals. Maintain yourequipment in good condition and inspect it before diving.
8. Only fill scuba tanks with pure, dry compressed air from reputableair stations.
Predive1. Dive only when feeling well, both physically and mentally. You
should feel confident about the dive. Be sure the dive and its activ-ities are within your capabilities. Remember — diving is supposedto be fun. If you don’t think it will be safe or fun, don’t make the dive.
2. Know the dive site. Evaluate conditions and check for possible hazards.
3. Check the weather forecast before diving. Evaluate the dive condi-tions, those present and expected, and dive only when the condi-tions are as good as or better than those in which you have experi-ence and/or training. Don’t dive in poor conditions.
4. Refrain from alcohol, smoking or dangerous drugs before or imme-diately after diving.
5. Plan your dives with your buddy. Agree on objectives, direction,and depth and time limits. Review underwater communications,emergency procedures and what to do if you become separated.
6. Always plan for no decompression diving. Consult the RecreationalDive Planner and allow for a margin of safety. Avoid diving to themaximum time limits of the RDP or your computer. Make yourdeepest dive of the day first. Know how to perform an emergencydecompression stop, but avoid having to do so. Plan to make safetystops whenever possible. Be aware of the effects of flying after div-ing and diving at altitudes greater than 300 metres/1000 feet.
7. Inspect both your and your buddy’s equipment. Know how to oper-ate each other’s equipment. Always conduct a predive safety check:Begin With Review And Friend (BWRAF — BCD, Weights,Releases, Air, Final okay).
8. Be prepared for emergencies. Have local emergency contact infor-mation on hand, just in case.
246 Open Water Diver Manual
OWDM_217_250.qxd 3/29/06 3:01 PM Page 246
Chapter Five 247
Diving1. Properly weight yourself for neutral buoyancy. Check your buoy-
ancy at the surface and avoid being overweighted. If you checkbuoyancy with a full cylinder, add enough weight to offset the airyou use (typically about 2.5 kg/5 lbs with a single cylinder).
2. Always wear a proper buoyancy control device (BCD). Use yourbuoyancy control device to regulate your buoyancy. Avoid contactwith the bottom by staying neutrally buoyant — for your benefitand the benefit of the aquatic environment. Inflate your BCD atthe surface to provide ample positive buoyancy.
3. Display the appropriate local dive flag and stay near it.4. Begin dives against the current, and/or take into consideration the
effect the current will have during the dive. Plan your dive so youdon’t have to fight the current to reach your exit point.
5. Equalize pressure early and often during descents. If you feel discomfort in a body air space, ascend until the discomfort goesaway, equalize, then continue the dive. If you can’t equalize, abortthe dive.
6. Stay with your buddy throughout the dive. Know how to reunite ifyou accidentally separate.
7. Limit your depth to 18 metres/60 feet or less as a new diver.Remember that 18 metres/60 feet is the recommended limit fornew divers. Shallower diving conserves your air, increases yourbottom time and helps reduce the risk of decompression sickness.
8. Spear guns are dangerous weapons. Do not load them out of waterand always unload them before leaving the water. Treat them as though they’re always loaded – never point them at another person.
9. Avoid contact with unfamiliar aquatic plants and animals.10. Be alert for possible problems and avoid them. Check your equip-
ment frequently while underwater, especially your gauges: depthgauge, timing device and submersible pressure gauge, compass anddive computer.
11. Exit the water with a minimum of 20-40 bar/300-500 psi in yourtank, or more if the dive plan or conditions warrant an extra mar-gin of conservatism.
12. Pace yourself. Avoid overexertion and breathlessness. If youbecome breathless, stop, rest and recover before proceeding.
13. Breathe properly — slowly, deeply and continuously. Never holdyour breath while scuba diving. Exhale slowly and continuouslyany time the regulator is not in your mouth. Avoid excessive hyper-ventilation when skin (breath-hold) diving.
OWDM_217_250.qxd 3/29/06 3:01 PM Page 247
248 Open Water Diver Manual
14. In an emergency, stop, think, get control and then take action. Actbased on your training, don’t react based on instinct.
15. Ascend carefully and correctly. Reach up and look up during theascent. Come up no faster than 18 metres/60 feet per minute. Plana 3-minute safety stop at 5 metres/15 feet whenever possible.Listen for boats as you come up, and establish buoyancy as soon asyou reach the surface. Be a S.A.F.E. Diver — Slowly Ascend FromEvery dive.
16. Stop diving when you’re cold or tired. Don’t overextend yourself.17. Stick to your dive plan underwater. Don’t revise a dive plan under-
water.18. Stay out of overhead environments unless you’re properly trained
and equipped for that overhead environment.
General Dive Safety Practices1. Be an active diver. Dive frequently to maintain your proficiency.2. Build your experience and capabilities gradually under safe condi-
tions.3. Keep a dive log. This records your training and experience and is a
valuable reference for future dives.4. Don’t lend your equipment to untrained persons. Never attempt to
teach another person how to dive. Teaching diving requires special-ized training and skills. Leave instruction to trained professionals.
5. Continue your diver education. Remember that a good diver neverstops learning.
OWDM_217_250.qxd 3/29/06 3:01 PM Page 248
Chapter Five 249
Knowledge Review—Chapter 5(Answer all questions, regardless of which Recreational DivePlanner you are using — The Wheel or table version.)
Knowledge Review—
1. Describe the three required situations in which a safety stop should be made.
a. ____________________________________________________________________________
2. Check one. If you accidentally exceed a no-decompression limit or an adjusted no-decompression limit by no more than 5 minutes, you should slowly ascend at a ratenot faster than 18 metres/60 feet per minute to 5 metres/15 feet and remain there for_____ minutes prior to surfacing. After reaching the surface, do not dive for at least_____ hours.
a. 8 minutes, 6 hours b. 15 minutes, 24 hours
3. State the altitude (metres/feet) above which the Recreational Dive Planners shouldnot be used unless special procedures are followed.
____________ metres/feet
4. True or False: To reasonably assure you remain symptom free from decompression sickness when flying in a commercial jet airliner after diving,wait 12 hours. ______________
5. Explain the procedure you must follow when planning a dive in cold water or understrenuous conditions using the Recreational Dive Planner.
6. What is the minimum surface interval required between a dive to 18 metres/60 feetfor 40 minutes followed by a dive to 14 metres/50 feet for 60 minutes?
Minimum Surface Interval = ______________
OWDM_217_250.qxd 3/29/06 3:01 PM Page 249
7. What is the minimum surface interval required between a dive to 20 metres/70 feetfor 29 minutes followed by a dive to 14 metres/50 feet for 39 minutes?
Minimum Surface Interval = ______________
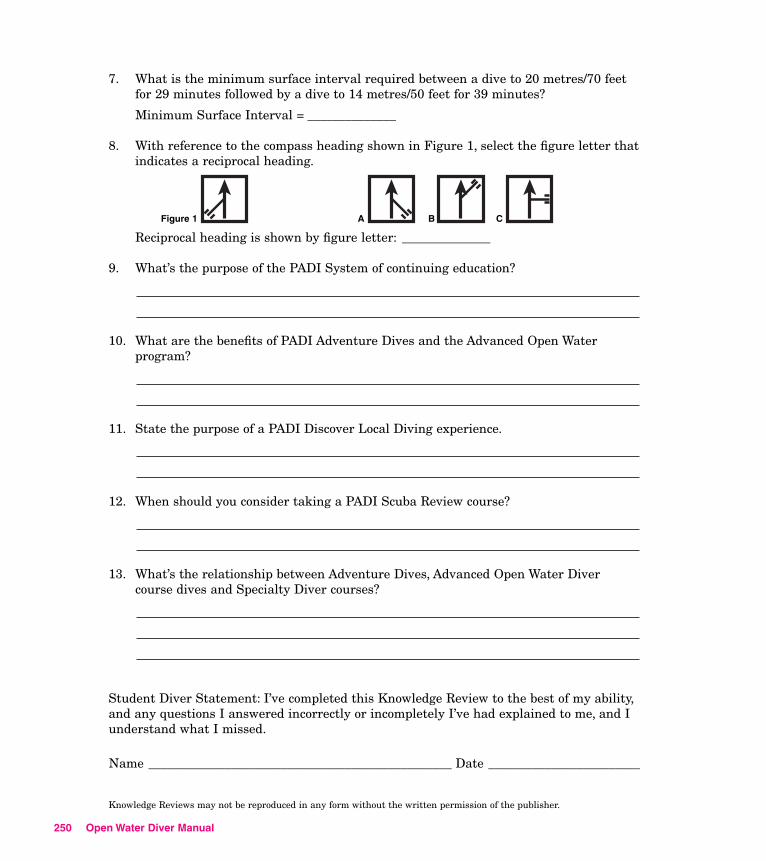
8. With reference to the compass heading shown in Figure 1, select the figure letter thatindicates a reciprocal heading.
Reciprocal heading is shown by figure letter: ______________
9. What’s the purpose of the PADI System of continuing education?
10. What are the benefits of PADI Adventure Dives and the Advanced Open Water program?
11. State the purpose of a PADI Discover Local Diving experience.
12. When should you consider taking a PADI Scuba Review course?
13. What’s the relationship between Adventure Dives, Advanced Open Water Divercourse dives and Specialty Diver courses?
Student Diver Statement: I’ve completed this Knowledge Review to the best of my ability,and any questions I answered incorrectly or incompletely I’ve had explained to me, and Iunderstand what I missed.
Name ________________________________________________ Date ________________________
250 Open Water Diver Manual
Figure 1 A B C
Knowledge Reviews may not be reproduced in any form without the written permission of the publisher.