76
Page: 1 Back Forward Index Exit Version 1.5 July 5, 2002
| Date post: | 26-Dec-2015 |
| Category: |
Documents |
| Upload: | joel-taylor |
| View: | 220 times |
| Download: | 0 times |

Page: 1Back Forward Index Exit
Version 1.5
July 5, 2002

Page: 2Back Forward Index Exit
Version 1.5
July 5, 2002
Define session organization
Session Manual Key
Discussion: Look, listen, interact, and learn! These pages will focus on concepts, highlight certain topics/items, or even ask for your feedback.
Procedure: Look, listen. That’s basically it…watch the demonstration and follow along in your manual.
On Your Own Activity: The instructor talked about it, you’ve seen it…now perform the task following the steps provided.
Exercise: Test your knowledge and skills! Complete the exercise per the instructions. If you need help…just ask! We want you to succeed.
This session was designed to be instructor led and follows traditional classroom activities you may have been previously exposed to. In this course, the instructor will present information about how to use the Holds module of the Student Information System. You will be asked to complete activities/exercises in this manual. Following along in the manual will help you complete this course successfully.
Please avoid using your computer until the instructor has asked you to do so.

Page: 3Back Forward Index Exit
Version 1.5
July 5, 2002
Define course pre-requisites
The following is a recommended course sequence:• Student Overview
The following is a recommended course sequence:• Student Overview

Page: 4Back Forward Index Exit
Version 1.5
July 5, 2002
Define session agenda
Lesson 1: HoldsTopic 1: Viewing a holdTopic 2: Placing a hold Topic 3: Releasing a hold
Lesson 2: Academic StatusTopic 1: Querying for students who have a specific academic
status.Topic 2: Determine a student’s overall academic status.
Lesson Introduction & Review of Banner Commands

Page: 5Back Forward Index Exit
Version 1.5
July 5, 2002
Define Banner’s Student Information System
Banner 2000 supports the integrated flow of information throughout Wayne State University. It assists the user in resource management. Banner continues this tradition with the Student Information System. The Student Information System supports the full range of functions necessary for student administration, including: class schedule administration, admissions, academic history, degree audit reporting, registration, academic status, and holds.
Banner 2000 supports the integrated flow of information throughout Wayne State University. It assists the user in resource management. Banner continues this tradition with the Student Information System. The Student Information System supports the full range of functions necessary for student administration, including: class schedule administration, admissions, academic history, degree audit reporting, registration, academic status, and holds.

Page: 6Back Forward Index Exit
Version 1.5
July 5, 2002
Define the features of Holds and Academic Status
The Holds and Academic Status module identifies business processes and the appropriate Banner forms used to process holds and academic status information.
The Holds and Academic Status module identifies business processes and the appropriate Banner forms used to process holds and academic status information.
Page: 7Back Forward Index Exit
Version 1.5
July 5, 2002
Review basic Banner commandsDirect Access: From the File menu enables you to go directly to a form using the forms’ acronym.
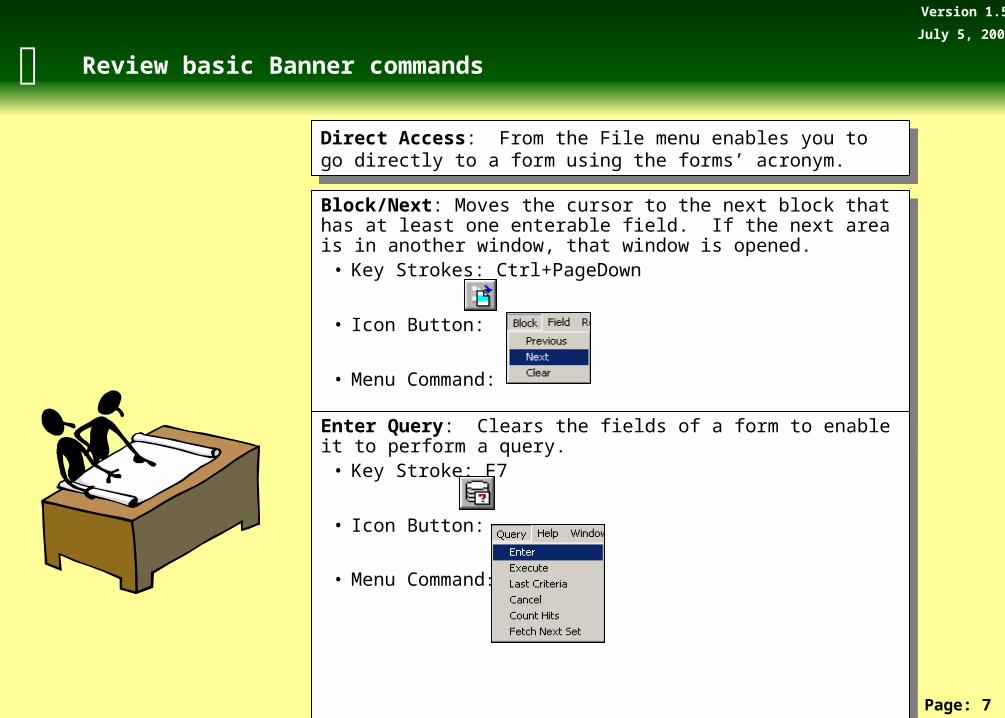
Direct Access: From the File menu enables you to go directly to a form using the forms’ acronym.
Block/Next: Moves the cursor to the next block that has at least one enterable field. If the next area is in another window, that window is opened.
• Key Strokes: Ctrl+PageDown
• Icon Button:
• Menu Command:
Block/Next: Moves the cursor to the next block that has at least one enterable field. If the next area is in another window, that window is opened.
• Key Strokes: Ctrl+PageDown
• Icon Button:
• Menu Command:
Enter Query: Clears the fields of a form to enable it to perform a query.• Key Stroke: F7
• Icon Button:
• Menu Command:
Enter Query: Clears the fields of a form to enable it to perform a query.• Key Stroke: F7
• Icon Button:
• Menu Command:

Page: 8Back Forward Index Exit
Version 1.5
July 5, 2002
Review basic Banner commandsExecute Query: Executes a query based on the information provided.
• Key Stroke: F8
• Icon Button:
• Menu Command:
Execute Query: Executes a query based on the information provided.• Key Stroke: F8
• Icon Button:
• Menu Command:
Rollback:• Application and inquiry forms: Clears all information (except key information)
and returns you to the first enterable field in the key block.• Validation forms: Returns you to the first enterable field on the form.• Query forms: Returns you to the first enterable field on the calling form.
o Key Stroke: Shift + F7o Icon Button:

Page: 9Back Forward Index Exit
Version 1.5
July 5, 2002
Review basic Banner commandsExit: This command provides one of three functions based where one is at in Banner: cancels a query, exits the current form, or exits Banner.
• Key Stroke: Ctrl + q
• Icon Button:
• Menu Command:
Exit: This command provides one of three functions based where one is at in Banner: cancels a query, exits the current form, or exits Banner.
• Key Stroke: Ctrl + q
• Icon Button:
• Menu Command:
Page: 10Back Forward Index Exit
Version 1.5
July 5, 2002
Review forms
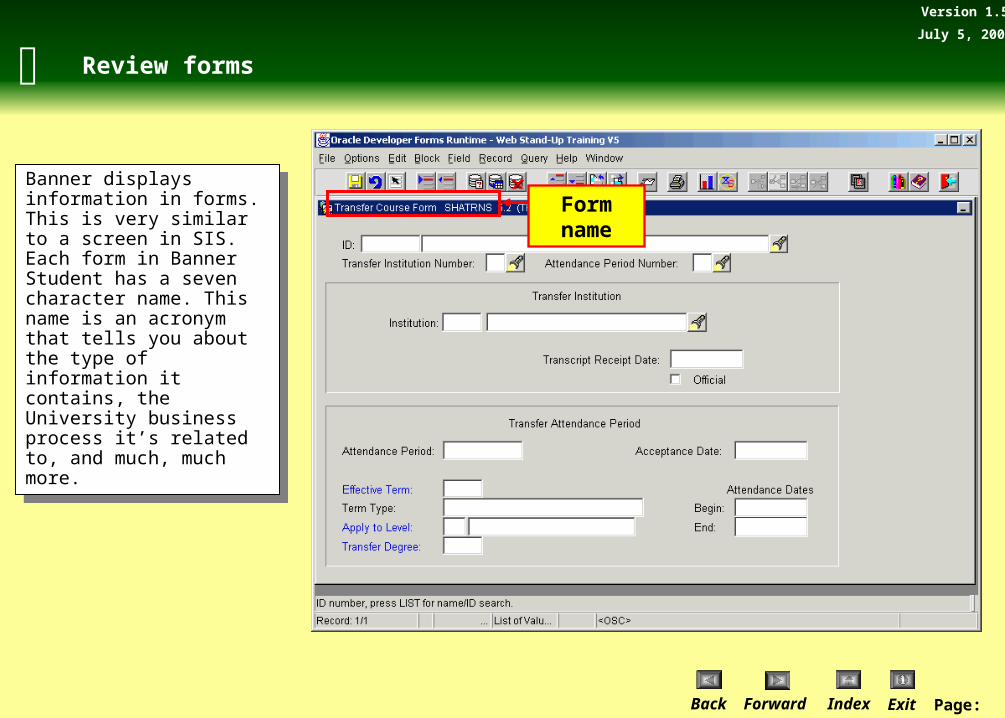
Banner displays information in forms. This is very similar to a screen in SIS. Each form in Banner Student has a seven character name. This name is an acronym that tells you about the type of information it contains, the University business process it’s related to, and much, much more.
Banner displays information in forms. This is very similar to a screen in SIS. Each form in Banner Student has a seven character name. This name is an acronym that tells you about the type of information it contains, the University business process it’s related to, and much, much more.
Form name
Page: 11Back Forward Index Exit
Version 1.5
July 5, 2002
Review forms
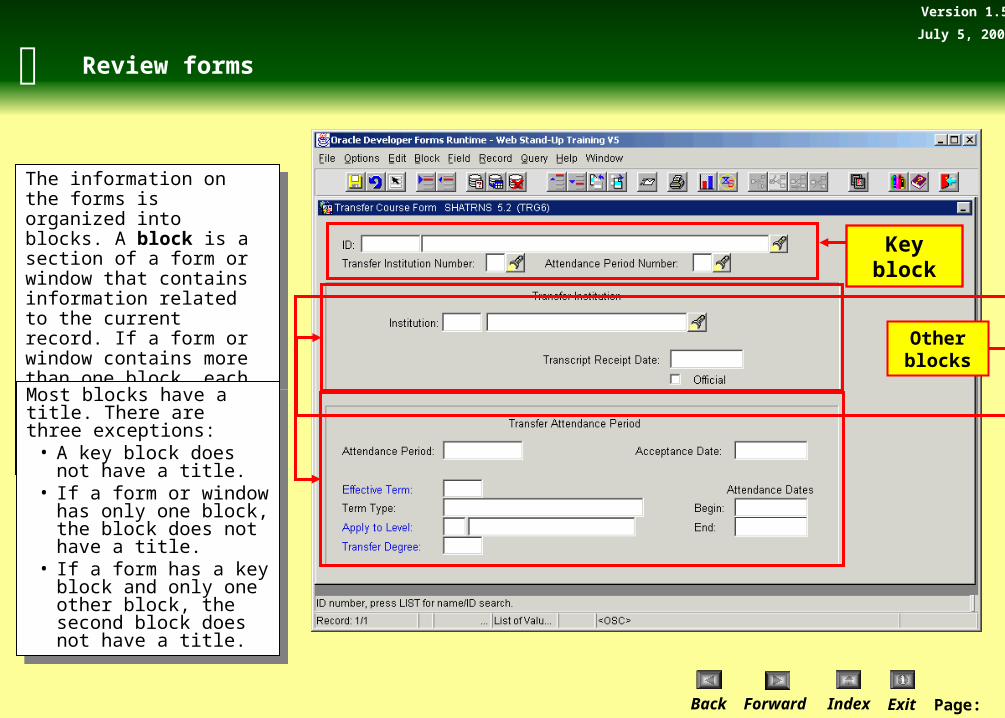
The information on the forms is organized into blocks. A block is a section of a form or window that contains information related to the current record. If a form or window contains more than one block, each block (except the key block) may be enclosed in a solid line box.
The information on the forms is organized into blocks. A block is a section of a form or window that contains information related to the current record. If a form or window contains more than one block, each block (except the key block) may be enclosed in a solid line box.
Most blocks have a title. There are three exceptions:
• A key block does not have a title.
• If a form or window has only one block, the block does not have a title.
• If a form has a key block and only one other block, the second block does not have a title.
Most blocks have a title. There are three exceptions:
• A key block does not have a title.
• If a form or window has only one block, the block does not have a title.
• If a form has a key block and only one other block, the second block does not have a title.
Key block
Other blocks

Page: 12Back Forward Index Exit
Version 1.5
July 5, 2002
Review forms
The first block on most forms contains key information. (Some forms, especially validation forms and certain list forms, do not have a Key block.) This Key block determines what is entered or displayed on the rest of the form. All information on the form refers to the Key block.
The first block on most forms contains key information. (Some forms, especially validation forms and certain list forms, do not have a Key block.) This Key block determines what is entered or displayed on the rest of the form. All information on the form refers to the Key block.
The Key block has at least one field and typically more. For example, a form that maintains financial information may have Key block fields for both a chart of accounts and a fiscal year. The Key block stays on the form as subsequent blocks appear. Occasionally, another window may appear on top of the Key block if the window is unusually large or if the key block is not pertinent to the window.
The Key block has at least one field and typically more. For example, a form that maintains financial information may have Key block fields for both a chart of accounts and a fiscal year. The Key block stays on the form as subsequent blocks appear. Occasionally, another window may appear on top of the Key block if the window is unusually large or if the key block is not pertinent to the window.
When the cursor is in the key block, enterable fields in the key block are enabled. These same fields are disabled when the cursor leaves the key block
When the cursor is in the key block, enterable fields in the key block are enabled. These same fields are disabled when the cursor leaves the key block
Key block

Page: 13Back Forward Index Exit
Version 1.5
July 5, 2002
Lesson 1: Holds & Academic Status
Lesson 1: Holds

Page: 14Back Forward Index Exit
Version 1.5
July 5, 2002
Lesson 1: Overview and Agenda
Lesson 1: Holds Overview and Agenda
Lesson Overview
The purpose of this lesson is to access information regarding holds.
Lesson Overview
The purpose of this lesson is to access information regarding holds.
Lesson Agenda
Topic 1: Viewing a hold Topic 2: Placing a holdTopic 3: Releasing a hold
Lesson Agenda
Topic 1: Viewing a hold Topic 2: Placing a holdTopic 3: Releasing a hold

Page: 15Back Forward Index Exit
Version 1.5
July 5, 2002
Topic 1: Viewing a hold
What you will learn in this topic:
• How to view a hold for a specific student using the Hold Information Form (SOAHOLD)
Assume you need to view a hold and other information about the hold. Banner can assist you in determining who placed the hold, why it was placed, what the hold restricts, and which office can better discuss and assist the student in remedying the hold.
Using the Hold Information Form (SOAHOLD) you can view the following holds information for a specific student:
View whether a student has a hold attached to his/her account, who placed it, and when it was placed.
Holds that have been removed, thereby keeping a record of the a student’s holds activities.
Holds are listed alphabetically by hold type.
Lesson 1: Holds Topic 1: Viewing a Hold

Page: 16Back Forward Index Exit
Version 1.5
July 5, 2002
Procedure: Viewing a hold
1) Type SOAHOLD into the Direct Access field on the Banner Main Menu and touch the Enter key. The Hold Information Form will appear.
2) Enter the Student’s Banner ID number by typing the student’s ID number into the ID field. The student’s name will appear.
3) Click on the Next Block button or press the Ctrl+PageDown keys. Data will appear in the next block.
Lesson 1: Holds Topic 1: Viewing a Hold
2
3
Page: 17Back Forward Index Exit
Version 1.5
July 5, 2002
Discussion: Viewing a hold
Lesson 1: Holds Topic 1: Viewing a Hold
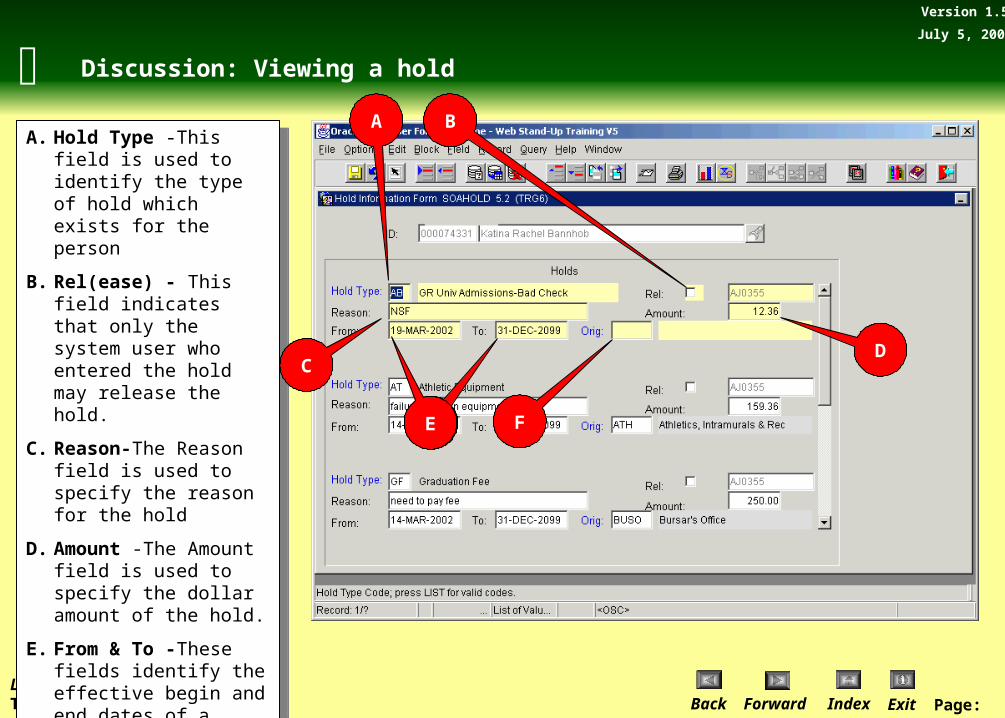
A. Hold Type -This field is used to identify the type of hold which exists for the person
B. Rel(ease) - This field indicates that only the system user who entered the hold may release the hold.
C. Reason-The Reason field is used to specify the reason for the hold
D. Amount -The Amount field is used to specify the dollar amount of the hold.
E. From & To -These fields identify the effective begin and end dates of a hold.
F. Orig(inator)-This field identifies person/office who authorized the hold status.
A B
CD
E F

Page: 18Back Forward Index Exit
Version 1.5
July 5, 2002
Procedure: Viewing a hold
Lesson 1: Holds Topic 1: Viewing a Hold
Note: If a student has more than 3 holds, a scroll bar will appear. Clicking on the down arrow of the scroll bar will display the student’s other holds.
Note: If a student has more than 3 holds, a scroll bar will appear. Clicking on the down arrow of the scroll bar will display the student’s other holds.

Page: 19Back Forward Index Exit
Version 1.5
July 5, 2002
Discussion: Viewing a hold
There are multiple Hold Types available. To see a list of other available Holds and their descriptions. Double-click in any Hold Type field to display the Hold Codes/Indicators Form.
The Hold Type Codes/Indicators Form STVHLDD describes what the Hold Code is and what it restricts.
There are multiple Hold Types available. To see a list of other available Holds and their descriptions. Double-click in any Hold Type field to display the Hold Codes/Indicators Form.
The Hold Type Codes/Indicators Form STVHLDD describes what the Hold Code is and what it restricts.
Lesson 1: Holds Topic 1: Viewing a Hold

Page: 20Back Forward Index Exit
Version 1.5
July 5, 2002
Discussion: Viewing a hold
A. Code-Alphabetically lists the hold type codes.
B. Description-The description field is used to maintain the text description of each hold type code.
C. R- Specifies that the hold type should prevent any registration activity(original registrations, adds, drops, withdrawals, etc.)
D. T- Specifies that the associated hold type should prevent the request of a transcript.
E. Gt- Specifies that the hold type should prevent a change to a student’s degree record to a status that indicates a degree has been awarded.
Lesson 1: Holds Topic 1: Viewing a Hold
A B C D E

Page: 21Back Forward Index Exit
Version 1.5
July 5, 2002
Discussion: Viewing a hold
F. Gr- (Not Used) Specifies that the associated hold type should prevent any type of grade mailer from being printed.
G. Ar- specifies that the associated hold type should prevent entry to a variety of accounts receivable module processing forms.
H. E-specifies that the associated hold type should prevent the request of enrollment verification.
I. VR Msg- specifies the number of a specific voice response message which will be used to “speak” holds that are in effect for the caller at the time.
J. Web Ind- specifies the hold types which can be displayed in Banner Web applications.
Lesson 1: Holds Topic 1: Viewing a Hold
F G H I J
Page: 22Back Forward Index Exit
Version 1.5
July 5, 2002
Procedure: Viewing a hold
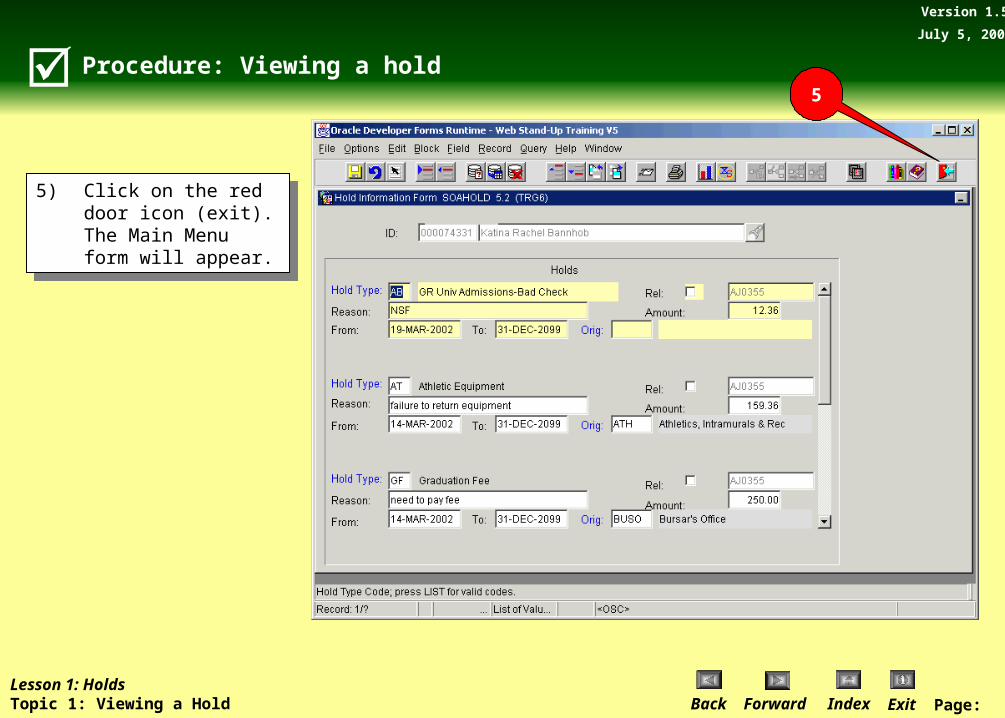
5) Click on the red door icon (exit). The Main Menu form will appear.
5) Click on the red door icon (exit). The Main Menu form will appear.
Lesson 1: Holds Topic 1: Viewing a Hold
5

Page: 23Back Forward Index Exit
Version 1.5
July 5, 2002
On Your Own Activity: Viewing a hold
Lesson 1: Holds On Your Own Activity: Viewing a Hold
Steps: Actions:
1) At Banner’s Main Menu, enter the name of the form.
Type SOAHOLD into the Direct Access field and touch the Enter key. The Hold Information form will appear.
2) Enter the Student’s Banner ID number by typing the student’s ID number into the ID field.
Type 000321122. The student’s name will appear.
3) Move to the next block. Click on the Next Block button or press the Ctrl+PageDown keys.
4) View the information. Review the fields to understand the student’s hold information. (Use the scroll bar if necessary)
5) Click on the red door icon (Exit) The Main Menu form will appear.

Page: 24Back Forward Index Exit
Version 1.5
July 5, 2002
On Your Own Activity Review: Viewing a hold
Lesson 1: Holds On Your Own Activity: Viewing a Hold

Page: 25Back Forward Index Exit
Version 1.5
July 5, 2002
Topic 2: Placing a hold
What you will learn in this topic:
• How to place a hold on a specific student using the Hold Information Form (SOAHOLD)
The ability to place a hold is determined by the Banner access level of the user. Placing a hold, is similar to viewing a hold, with the difference being attaching a hold to the student, rather than simply looking at a student’s hold status.
Using the Hold Information Form (SOAHOLD) you can place a hold on a specific student.
Lesson 1: Holds Topic 2: Placing a Hold
Page: 26Back Forward Index Exit
Version 1.5
July 5, 2002
Procedure: Placing a hold
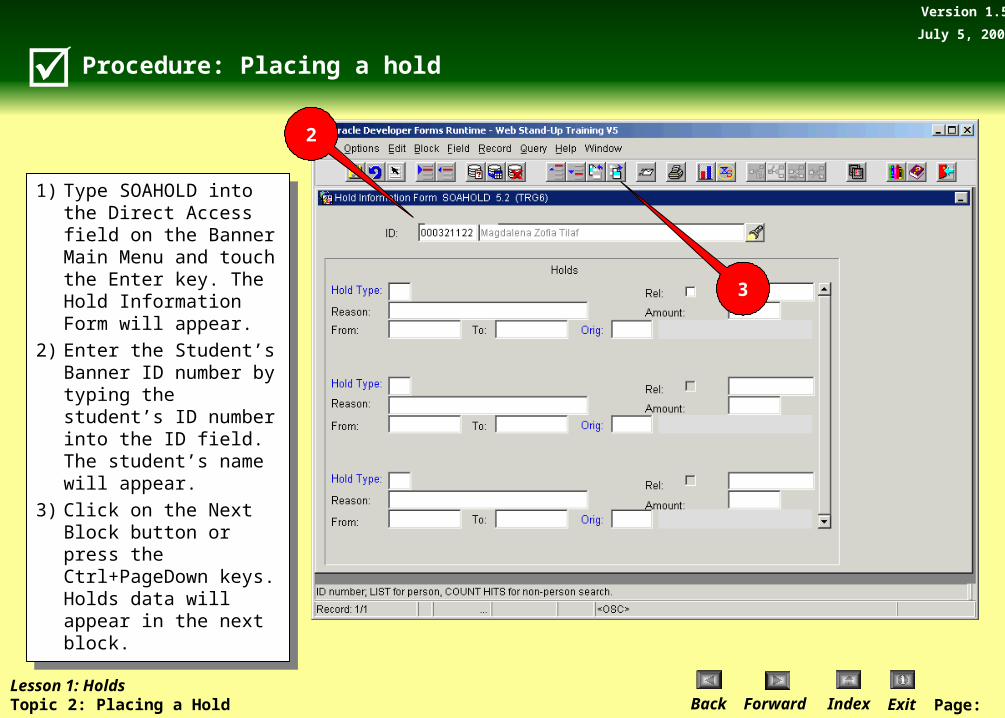
1) Type SOAHOLD into the Direct Access field on the Banner Main Menu and touch the Enter key. The Hold Information Form will appear.
2) Enter the Student’s Banner ID number by typing the student’s ID number into the ID field. The student’s name will appear.
3) Click on the Next Block button or press the Ctrl+PageDown keys. Holds data will appear in the next block.
Lesson 1: Holds Topic 2: Placing a Hold
2
3
Page: 27Back Forward Index Exit
Version 1.5
July 5, 2002
Discussion: Placing a hold
Lesson 1: Holds Topic 2: Placing a Hold
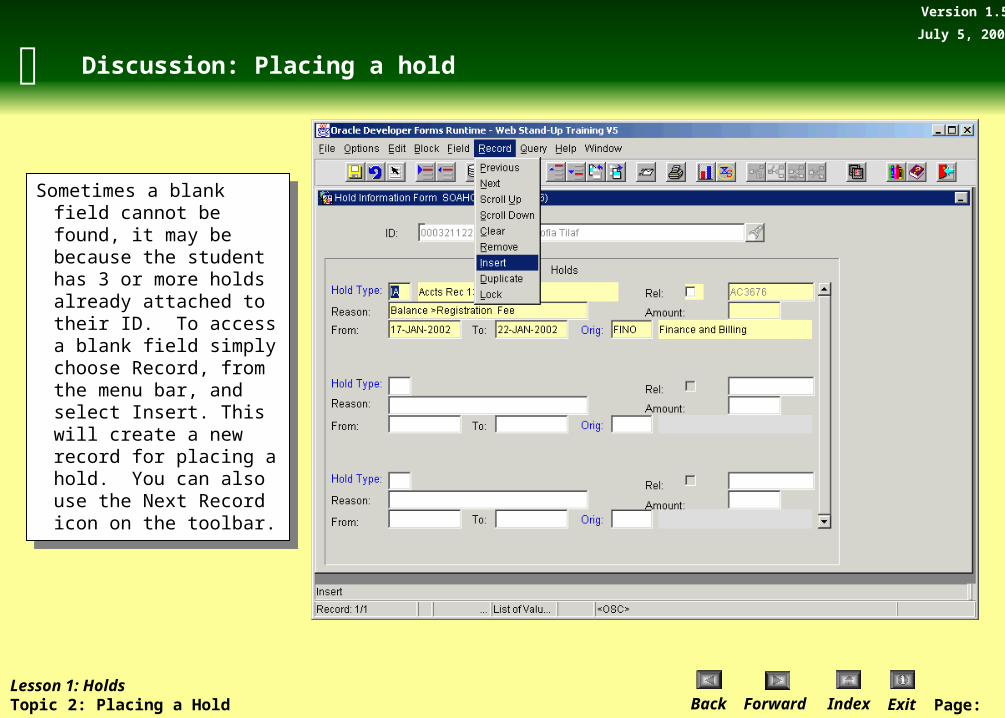
Sometimes a blank field cannot be found, it may be because the student has 3 or more holds already attached to their ID. To access a blank field simply choose Record, from the menu bar, and select Insert. This will create a new record for placing a hold. You can also use the Next Record icon on the toolbar.
Sometimes a blank field cannot be found, it may be because the student has 3 or more holds already attached to their ID. To access a blank field simply choose Record, from the menu bar, and select Insert. This will create a new record for placing a hold. You can also use the Next Record icon on the toolbar.

Page: 28Back Forward Index Exit
Version 1.5
July 5, 2002
Procedure: Placing a hold
4) Double-click in the Hold type field to select the desired hold type code. The Hold Codes/Indicators form will appear. Click OK to place the code in the field.
5) Click in the Reason field and type the reason for the hold.
4) Double-click in the Hold type field to select the desired hold type code. The Hold Codes/Indicators form will appear. Click OK to place the code in the field.
5) Click in the Reason field and type the reason for the hold.
Lesson 1: Holds Topic 2: Placing a Hold
4
5

Page: 29Back Forward Index Exit
Version 1.5
July 5, 2002
Discussion: Placing a hold
The Release field is not to be used when placing a hold. This field, when selected, will prevent the hold from being released. It locks out all users. As a rule this field should be disregarded.
There may be times when you will see this field selected (a check will appear in the box). This is rare and could be selected by Accounts Receivable to prevent overriding a financial hold.
Lesson 1: Holds Topic 2: Placing a Hold

Page: 30Back Forward Index Exit
Version 1.5
July 5, 2002
Procedure: Placing a hold
6) Click in the amount field and enter a financial amount that may be attached to the hold. – (Double-clicking in the field
brings up a calculator to assist with calculating the amount.)
7) If necessary, double-click in the From & To fields to select the dates for which the hold shall be in place and click OK. – By default, today’s date will
be placed in the From field and 31-DEC-2099 will be placed in the To field. This means that the hold will take effect upon saving and will end 31-DEC-2099, unless otherwise told.
Lesson 1: Holds Topic 2: Placing a Hold
7
6

Page: 31Back Forward Index Exit
Version 1.5
July 5, 2002
Procedure: Placing a hold
8) Double-click in the Orig field to select the originator of the hold. The Originator Validation form will appear. – Select an originator to
make it easier to refer a student to the source of the hold.
9) Click the Save button on the toolbar (or F10) to save your hold and place it into effect.
8) Double-click in the Orig field to select the originator of the hold. The Originator Validation form will appear. – Select an originator to
make it easier to refer a student to the source of the hold.
9) Click the Save button on the toolbar (or F10) to save your hold and place it into effect.
Lesson 1: Holds Topic 2: Placing a Hold
8
9
Page: 32Back Forward Index Exit
Version 1.5
July 5, 2002
Procedure: Placing a hold
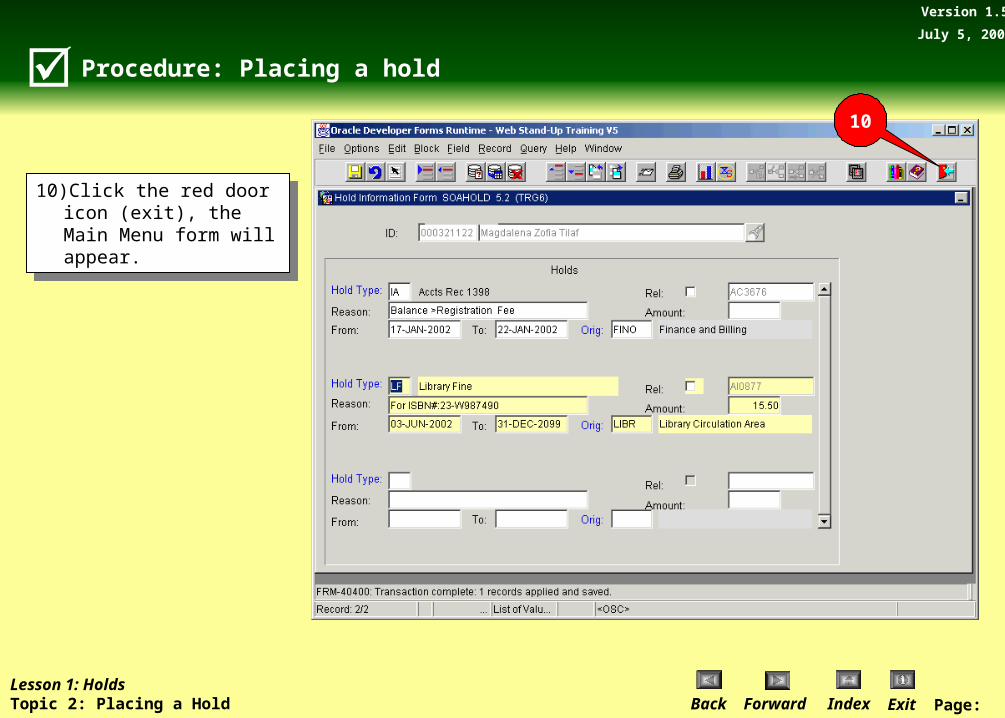
10) Click the red door icon (exit), the Main Menu form will appear.
10) Click the red door icon (exit), the Main Menu form will appear.
Lesson 1: Holds Topic 2: Placing a Hold
10
Page: 33Back Forward Index Exit
Version 1.5
July 5, 2002
On Your Own Activity: Placing a hold
Lesson 1: HoldsOn Your Own Activity: Placing a Hold
Steps: Actions:
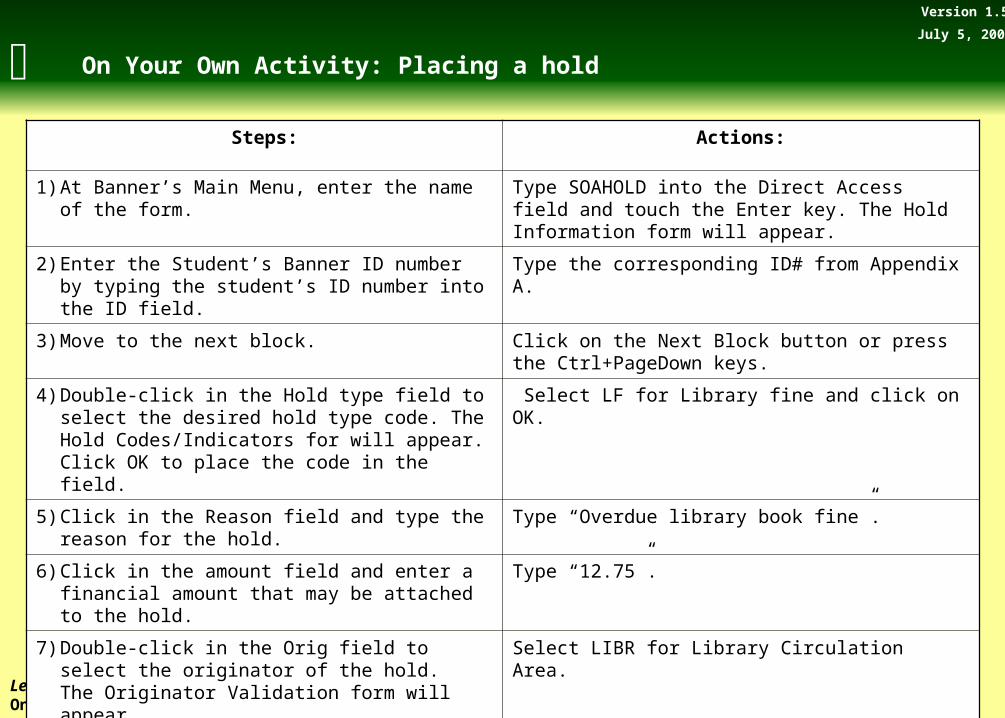
1) At Banner’s Main Menu, enter the name of the form. Type SOAHOLD into the Direct Access field and touch the Enter key. The Hold Information form will appear.
2) Enter the Student’s Banner ID number by typing the student’s ID number into the ID field.
Type the corresponding ID# from Appendix A.
3) Move to the next block. Click on the Next Block button or press the Ctrl+PageDown keys.
4) Double-click in the Hold type field to select the desired hold type code. The Hold Codes/Indicators for will appear. Click OK to place the code in the field.
Select LF for Library fine and click on OK.
5) Click in the Reason field and type the reason for the hold. Type “Overdue library book fine”.
6) Click in the amount field and enter a financial amount that may be attached to the hold.
Type “12.75”.
7) Double-click in the Orig field to select the originator of the hold. The Originator Validation form will appear.
Select LIBR for Library Circulation Area.
8) Save your work to put the hold in place. Click on the Save button on the toolbar.
9) Click on the red door icon (exit). The Main Menu form will appear.

Page: 34Back Forward Index Exit
Version 1.5
July 5, 2002
On Your Own Activity Review: Placing a hold
Lesson 1: HoldsOn Your Own Activity Review: Placing a Hold
Take a moment to review the hold you created. If you had difficulty creating the hold, or would like to create another record, review the procedure discussed earlier in this topic and/or consult the instructor.
Take a moment to review the hold you created. If you had difficulty creating the hold, or would like to create another record, review the procedure discussed earlier in this topic and/or consult the instructor.

Page: 35Back Forward Index Exit
Version 1.5
July 5, 2002
Topic 3: Releasing a hold
What you will learn in this topic:
• How to release a hold on a specific student using the Hold Information Form (SOAHOLD)
The person or department responsible for creating the hold, should be the only one to release it. Holds are released by simply changing the “To” date field to the date in which it is to be released. This will tag the hold to be released on the desired date. The hold will remain in the student’s holds record, but will no longer prevent the student from doing what the hold otherwise would have prevented.
Using the Hold Information Form (SOAHOLD) you can also release a hold on a specific student.
Lesson 1: Holds Topic 3: Releasing a Hold

Page: 36Back Forward Index Exit
Version 1.5
July 5, 2002
Procedure: Releasing a hold
1) Type SOAHOLD into the Direct Access field on the Banner Main Menu and touch the Enter key. The Hold Information Form will appear.
2) Enter the Student’s Banner ID number by typing the student’s ID number into the ID field or search for the student’s ID number using SOAIDEN . The student’s name will appear. – The student’s information
will populate the hold information screen.
3) Click on the Next Block button or press the Ctrl+PageDown keys. Holds data will appear in the next block.
Lesson 1: Holds Topic 3: Releasing a Hold
2
3

Page: 37Back Forward Index Exit
Version 1.5
July 5, 2002
Procedure: Releasing a hold
4) In the To date field of the desired hold, double-click to change the date to today’s date using the Calendar. – By selecting today’s date,
the hold, upon saving your changes, will instantly be released.
4) In the To date field of the desired hold, double-click to change the date to today’s date using the Calendar. – By selecting today’s date,
the hold, upon saving your changes, will instantly be released.
Lesson 1: Holds Topic 3: Releasing a Hold
4
Page: 38Back Forward Index Exit
Version 1.5
July 5, 2002
Procedure: Releasing a hold
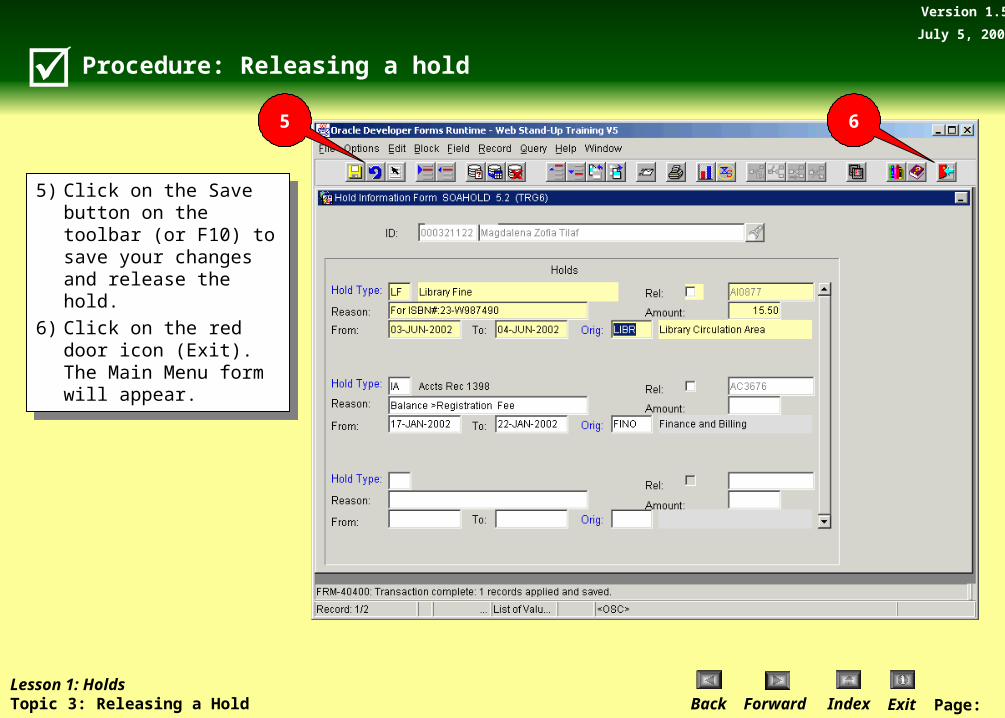
5) Click on the Save button on the toolbar (or F10) to save your changes and release the hold.
6) Click on the red door icon (Exit). The Main Menu form will appear.
5) Click on the Save button on the toolbar (or F10) to save your changes and release the hold.
6) Click on the red door icon (Exit). The Main Menu form will appear.
Lesson 1: Holds Topic 3: Releasing a Hold
5 6

Page: 39Back Forward Index Exit
Version 1.5
July 5, 2002
On Your Own Activity: Release a hold
Lesson 1: Holds On Your Own Activity: Release a hold
Steps: Action:
1) On the Banner Main Menu, enter the name of the form.
Type SOAHOLD into the Direct Access field and touch the Enter key. The Hold Information form will appear.
2) Enter the Student’s Banner ID number by typing the student’s ID number into the ID field.
Type the corresponding ID# from Appendix A.The student’s name will appear.
3) Move to the next block. Click on the Next Block button or press the Ctrl+PageDown keys.
4) Release the hold you placed in the previous topic.
Change the date in the To field by double-clicking in the field and selecting Today then click Ok.
5) Save changes. Click on the Save button to save the changes.
6) Exit the form. Click on the red door icon (exit). The Main Menu form will appear.

Page: 40Back Forward Index Exit
Version 1.5
July 5, 2002
On Your Own Activity Review: Release a hold
Lesson 1: Holds On Your Own Activity Review: Release a hold
Take a moment to review the hold you released. If you had difficulty releasing the hold, or would like to release another record review the procedure discussed earlier in this topic…or consult the instructor.
Take a moment to review the hold you released. If you had difficulty releasing the hold, or would like to release another record review the procedure discussed earlier in this topic…or consult the instructor.

Page: 41Back Forward Index Exit
Version 1.5
July 5, 2002
Exercise: Matching
Lesson 1: HoldsExercise: Matching
Match the following fields from SOAHOLD with their matching functions.
1) Indicates that only the system user who entered the hold may release it.
2) Identifies the effective begin and end dates of a hold.
3) Identifies the person/office authorizing the hold status.
4) Used to identify the type of hold which exists for the person.
A) Rel
B) Orig
C) Hold Type
D) To

Page: 42Back Forward Index Exit
Version 1.5
July 5, 2002
Exercise Review: Matching
Match the following fields from SOAHOLD with their matching functions.
1) Indicates that only the system user who entered the hold may release it. (A. Rel)
2) Identifies the effective begin and end dates of a hold. (D. To)
3) Identifies the person/office authorizing the hold status. (B. Orig)
4) Used to identify the type of hold which exists for the person. (C. Hold Type)
Lesson 1: HoldsExercise Review: Matching
Page: 43Back Forward Index Exit
Version 1.5
July 5, 2002
Exercise: True/False
Lesson 1: Review Holds & Academic StatusExercise: True/False
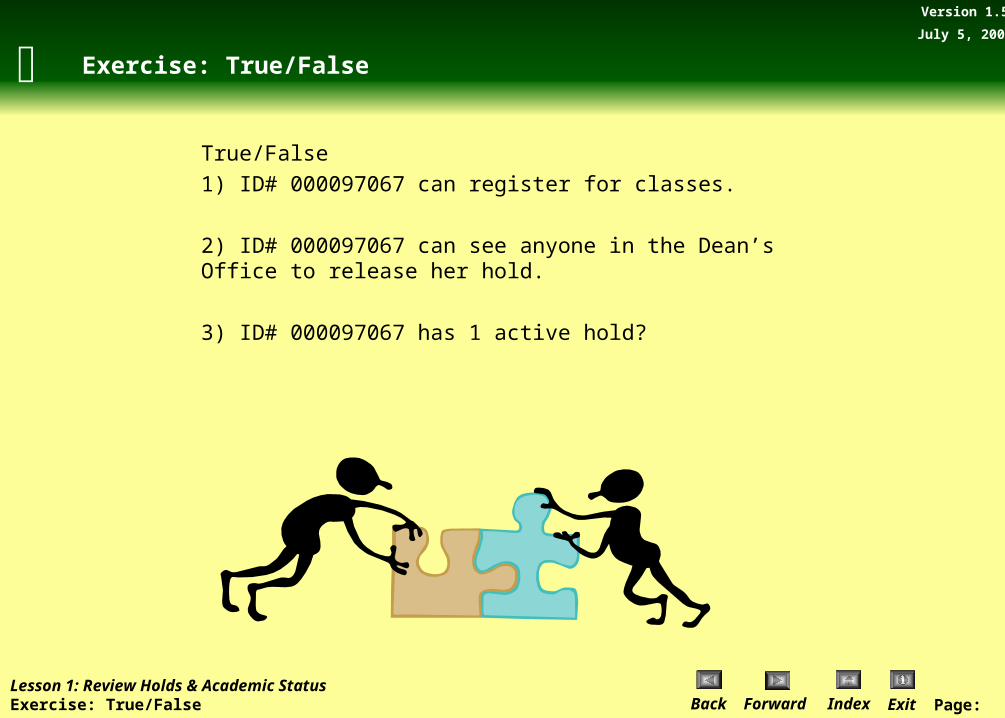
True/False1) ID# 000097067 can register for classes.
2) ID# 000097067 can see anyone in the Dean’s Office to release her hold.
3) ID# 000097067 has 1 active hold?

Page: 44Back Forward Index Exit
Version 1.5
July 5, 2002
Exercise Review: True/False
Lesson 1: Review Holds & Academic StatusExercise Review: True/False
True/False1) ID# 000097067 can register for classes. False.
2) ID# 000097067 can see anyone in the Dean’s Office to release her hold. True.
3) ID# 000097067 has 1 active hold? True.

Page: 45Back Forward Index Exit
Version 1.5
July 5, 2002
Exercise: Fill in the blank
Using STVHLDD, identify what restrictions the following hold type codes place on a student:
1. Housing hold.______________________________________________________________________________________________________________________________________
2. Orientation hold.______________________________________________________________________________________________________________________________________
3. Library Fine hold.______________________________________________________________________________________________________________________________________
4. UG Univ Admissions-Bad Check hold.______________________________________________________________________________________________________________________________________
Lesson 1: Review Holds & Academic StatusExercise: Fill in the blank

Page: 46Back Forward Index Exit
Version 1.5
July 5, 2002
Exercise Review: Fill in the blank
Lesson 1: Review Holds & Academic StatusExercise Review: Fill in the blank
Using STVHLDD, identify what restrictions the following hold type codes place on a student:
1. Housing hold: Registration, Transcript, Graduation
2. Orientation hold: Registration
3. Library Fine hold: Transcript, Graduation
4. UG Univ Admissions-Bad Check hold: Transcript, Graduation
Using STVHLDD, identify what restrictions the following hold type codes place on a student:
1. Housing hold: Registration, Transcript, Graduation
2. Orientation hold: Registration
3. Library Fine hold: Transcript, Graduation
4. UG Univ Admissions-Bad Check hold: Transcript, Graduation

Page: 47Back Forward Index Exit
Version 1.5
July 5, 2002
Lesson Review: Holds & Academic Status
Lesson 1: Review Holds & Academic StatusLesson Review
Form Uses
Hold Information Form (SOAHOLD)SIS Equivalent: None
Used to view, place and release holds attached to a student.

Page: 48Back Forward Index Exit
Version 1.5
July 5, 2002
Lesson 2: Academic Status
Lesson 2: Academic Status

Page: 49Back Forward Index Exit
Version 1.5
July 5, 2002
Lesson 2: Overview and Agenda
Lesson 2: Academic StatusOverview and Agenda
Lesson Overview
The purpose of this lesson is to access information regarding academic status.
This lesson will help you perform inquiries for a group of students who have a specific academic status as well as determine a specific student’s overall academic status.
Lesson Overview
The purpose of this lesson is to access information regarding academic status.
This lesson will help you perform inquiries for a group of students who have a specific academic status as well as determine a specific student’s overall academic status.
Lesson Agenda
Topic 1: Querying for students with a specific academic status.Topic 2: Determine a student’s overall academic status.
Lesson Agenda
Topic 1: Querying for students with a specific academic status.Topic 2: Determine a student’s overall academic status.

Page: 50Back Forward Index Exit
Version 1.5
July 5, 2002
Banner can be used to easily look at a group of students who have a specific academic status. The Academic Standing Query Form (SHASTAT) can be used to query for students with a specific academic status using any combination of the following criteria:
• Academic status• Level• College• Major
Topic 1: Querying for students with a specific academic status
What you will learn in this topic:
• How to view all students who have a specific academic status using the Academic Standing Query Form (SHASTAT).
Lesson 2: Academic Status Topic 1: Querying for students with a specific academic status
Information found on SHASTAT is similar to the GENI and Student Status screens in SIS.
Information found on SHASTAT is similar to the GENI and Student Status screens in SIS.

Page: 51Back Forward Index Exit
Version 1.5
July 5, 2002
Procedure: Querying for students with a specific academic status
1) Type SHASTAT into the Direct Access field on the Banner Main Menu and touch the Enter key. The Academic Status Query Form will appear.
2) Enter the Term date by double-clicking on the Term field to acquire a term validation code.
3) Click on the OK button. The code will be placed in the Term field.
4) Click on the Next Block button or press the Ctrl+PageDown keys.
Lesson 2: Academic Status Topic 1: Querying for students with a specific academic status
2
3
4

Page: 52Back Forward Index Exit
Version 1.5
July 5, 2002
Procedure: Querying for students with a specific academic status
5) Choose a Status by double-clicking in the Status field. This will open STVASTD form. – It allows you to select the
academic status you wish to query.
5) Choose a Status by double-clicking in the Status field. This will open STVASTD form. – It allows you to select the
academic status you wish to query.
Lesson 2: Academic Status Topic 1: Querying for students with a specific academic status
5

Page: 53Back Forward Index Exit
Version 1.5
July 5, 2002
Discussion: Querying for students with a specific academic status
The academic status codes are listed and the benefits/restrictions column headings are listed along the top of the form. These column headings, with a “Y” beneath them, signify what the status will (or will not) prevent.
The academic status codes are listed and the benefits/restrictions column headings are listed along the top of the form. These column headings, with a “Y” beneath them, signify what the status will (or will not) prevent.
AE (Academic Exclusion) places a student on probation, and prohibits registration. The “Y” beneath these columns shows what the academic standing code AE entails.
AE (Academic Exclusion) places a student on probation, and prohibits registration. The “Y” beneath these columns shows what the academic standing code AE entails.
Lesson 2: Academic Status Topic 1: Querying for students with a specific academic status
Page: 54Back Forward Index Exit
Version 1.5
July 5, 2002
Discussion: Querying for students with a specific academic status
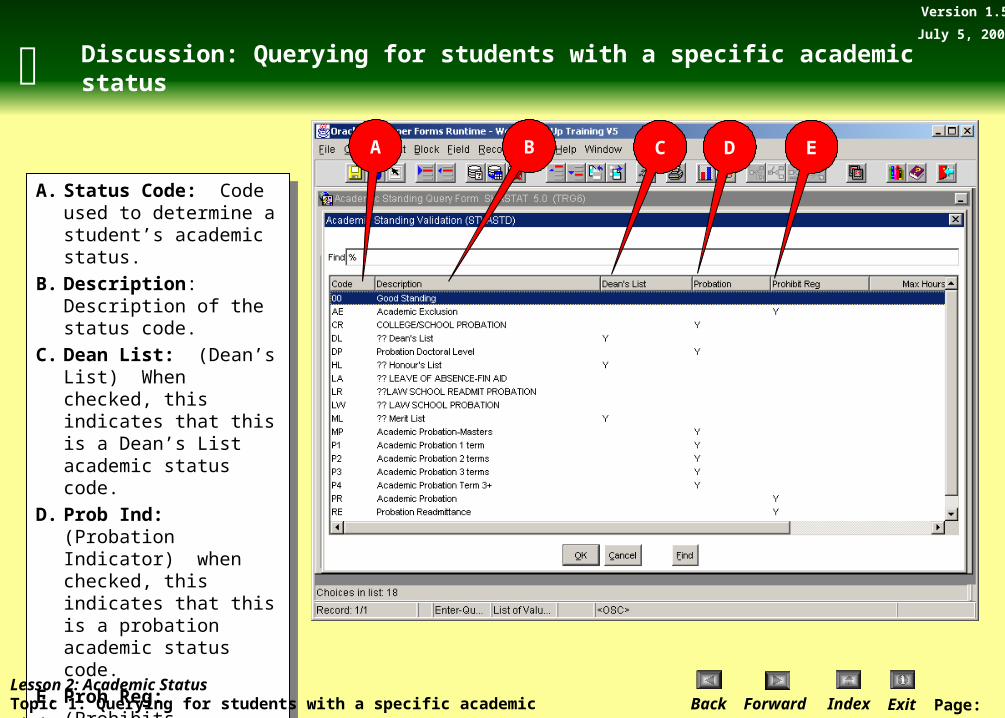
A. Status Code: Code used to determine a student’s academic status.
B. Description: Description of the status code.
C. Dean List: (Dean’s List) When checked, this indicates that this is a Dean’s List academic status code.
D. Prob Ind: (Probation Indicator) when checked, this indicates that this is a probation academic status code.
E. Proh Reg: (Prohibits Registration Indicator) when checked, this indicates that this academic status will not allow the student to continue to register.
Lesson 2: Academic Status Topic 1: Querying for students with a specific academic status
A B C D E

Page: 55Back Forward Index Exit
Version 1.5
July 5, 2002
Procedure: Querying for students with a specific academic status
6) Choose a Level by double-clicking on the Level field. The Level Code Validation form will appear.
6) Choose a Level by double-clicking on the Level field. The Level Code Validation form will appear.
Lesson 2: Academic Status Topic 1: Querying for students with a specific academic status
6

Page: 56Back Forward Index Exit
Version 1.5
July 5, 2002
Procedure: Querying for Students with a Specific Academic Status
7) Choose the College by double-clicking on the College field. The College Validation form will appear.
7) Choose the College by double-clicking on the College field. The College Validation form will appear.
Lesson 2: Academic Status Topic 1: Querying for students with a specific academic status
7
Page: 57Back Forward Index Exit
Version 1.5
July 5, 2002
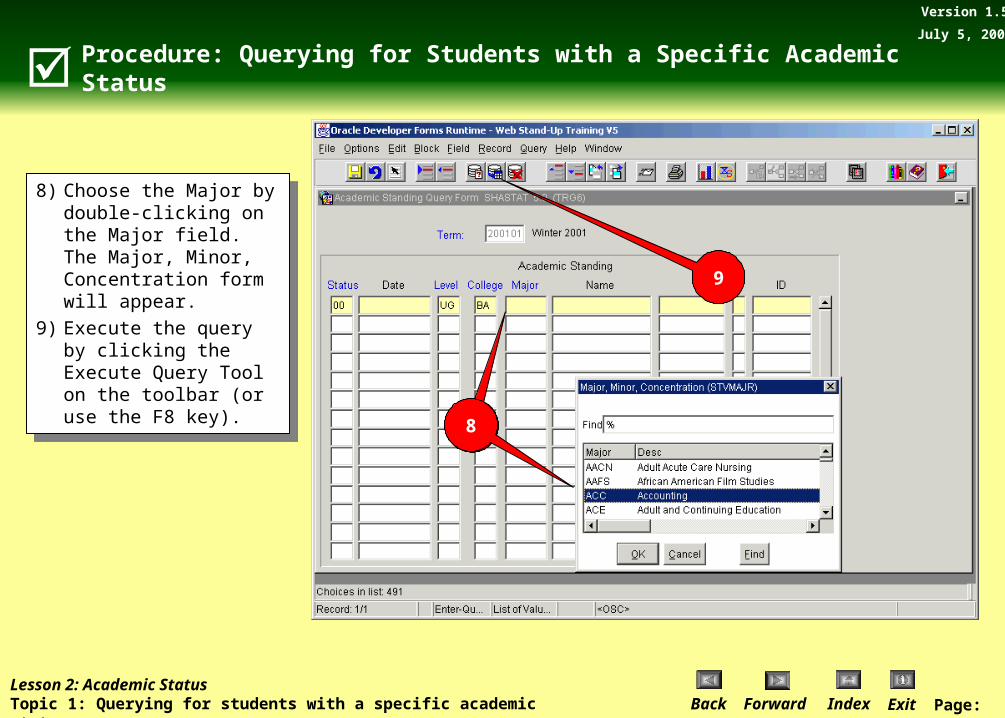
Procedure: Querying for Students with a Specific Academic Status
8) Choose the Major by double-clicking on the Major field. The Major, Minor, Concentration form will appear.
9) Execute the query by clicking the Execute Query Tool on the toolbar (or use the F8 key).
8) Choose the Major by double-clicking on the Major field. The Major, Minor, Concentration form will appear.
9) Execute the query by clicking the Execute Query Tool on the toolbar (or use the F8 key).
Lesson 2: Academic Status Topic 1: Querying for students with a specific academic status
8
9
Page: 58Back Forward Index Exit
Version 1.5
July 5, 2002
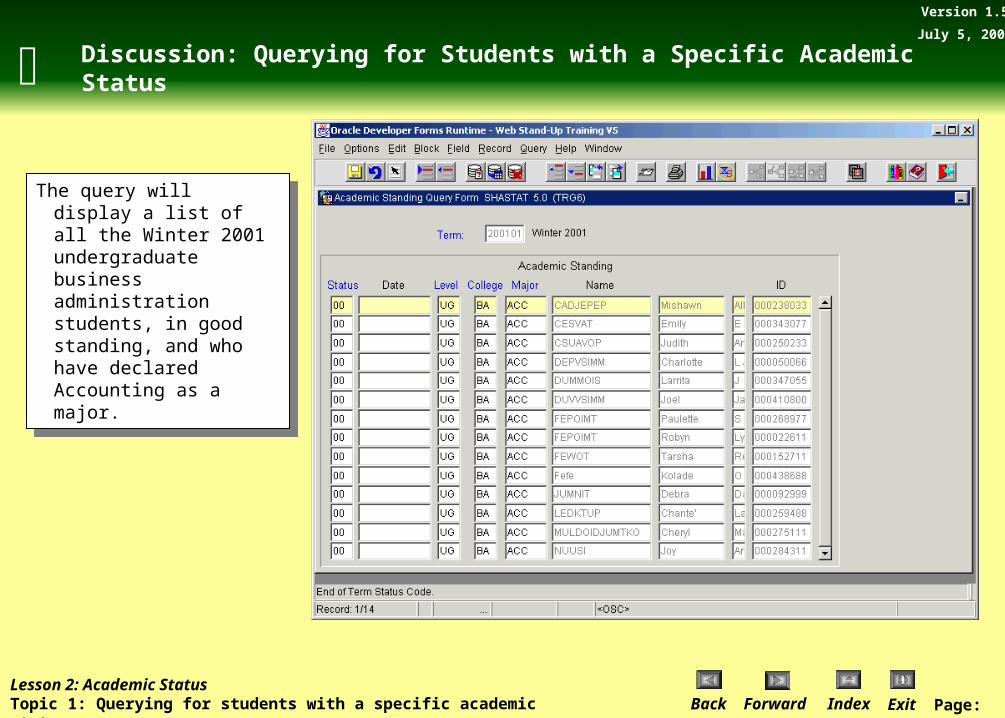
Discussion: Querying for Students with a Specific Academic Status
The query will display a list of all the Winter 2001 undergraduate business administration students, in good standing, and who have declared Accounting as a major.
The query will display a list of all the Winter 2001 undergraduate business administration students, in good standing, and who have declared Accounting as a major.
Lesson 2: Academic Status Topic 1: Querying for students with a specific academic status

Page: 59Back Forward Index Exit
Version 1.5
July 5, 2002
Procedure: Querying for students with a specific academic status
10) Click on the red door icon to return to the Banner main menu.
10) Click on the red door icon to return to the Banner main menu.
Lesson 2: Academic Status Topic 1: Querying for students with a specific academic status
10

Page: 60Back Forward Index Exit
Version 1.5
July 5, 2002
On Your Own Activity: Querying for students with a specific academic status
Lesson 2: Academic StatusOn Your Own Activity: Querying for Student’s with a Specific Academic Status
Steps: Action:
1) At Banner’s Main Menu, enter the name of the form
Type SHASTAT into the Direct Access field and touch the Enter key. The Hold Information form will appear.
2) Enter the Term date by double clicking on the Term field to acquire a term validation code.
Select 200101 code for the Winter 2001 term.
3) Move to the next block. Click on the Next Block button or press the Ctrl+PageDown keys.
4) Enter the Status information by double clicking on the Status field.
Select 00 for Good Status.
5) Enter the Level information by double clicking on the Level field.
Click on the GR code for Graduate
6) Enter the College information by double clicking on the College field.
Click on the ED code for Education.
7) Enter the Major information by double clicking on the Major field.
Scroll through the list and select ECED for Early Childhood Education.
8) Execute the query. Press the F8 function to retrieve the records.
9) Exit the form. Click on the red door icon (exit). The Main Menu form will appear.

Page: 61Back Forward Index Exit
Version 1.5
July 5, 2002
On Your Own Activity Review: Querying for students with a specific academic status
Lesson 2: Academic StatusOn Your Own Activity Review: Querying for students with a specific academic status

Page: 62Back Forward Index Exit
Version 1.5
July 5, 2002
Topic 2: Determine a student’s overall academic standing
What you will learn in this topic:
• How to view a student’s overall GPA and academic standing using the Term Sequence Course History Form (SHATERM).
Assume you may want to determine a student’s overall GPA and academic standing for general advising. Using the Term Sequence Course History Form (SHATERM) you will be able to view a student’s overall GPA and current academic standing.
The purpose of this form is to provide a tool to be used by advisors to determine the student's progress on a term-by-term basis. It displays the student's current status and GPA information. Scrolling institutional, transfer, and overall GPA totals are displayed on this form each time the term changes. Institutional and transfer work are displayed separately.
Lesson 2: Academic StatusTopic 2: Determine a student’s overall academic standing
The information on this form is similar to the old SIS SGPA screen
The information on this form is similar to the old SIS SGPA screen

Page: 63Back Forward Index Exit
Version 1.5
July 5, 2002
Procedure: Determine a student’s overall academic standing
1) Type SHATERM into the Direct Access field on the Banner Main Menu and press the Enter key. The Term Sequence Course History Form will appear.
2) Enter the Student’s Banner ID number by typing the student’s ID number into the ID field. The student’s name will appear.
3) Double click on the Level field. The Level Codes by Person window will appear.
4) Scroll down the list to the desired level and click on it.
5) Click on the OK button. The code will be placed in the Level field.
6) Click on the Next Block button or press the Ctrl+PageDown keys. Data will appear in the next block.
23
4
5
6
NOTE: Using the Start Term field in this you can also specify a beginning term that is other than the first term the student attended.
NOTE: Using the Start Term field in this you can also specify a beginning term that is other than the first term the student attended.
Lesson 2: Academic StatusTopic 2: Determine a student’s overall academic standing

Page: 64Back Forward Index Exit
Version 1.5
July 5, 2002
Discussion: Determine a student’s overall academic standing
A. Academic Standing
B. Override: Overrides will not be used at WSU.
• A hold will be placed on a student and would have to be released to allow the student to register. If Academic Status rules still apply to a student at the end of the term for which he/she is registered when the “End of Term” process is run, another Standing will be updated and another hold placed automatically.
A
B
Lesson 2: Academic StatusTopic 2: Determine a student’s overall academic standing

Page: 65Back Forward Index Exit
Version 1.5
July 5, 2002
Discussion: Determine a student’s overall academic standing
C. Attempted Hours: Formerly known as “Res Enrolled Hours” in SIS
D. Passed Hours: Formerly known as “Res Total Earned Hours” in SIS
E. Earned Hours: Formerly known as “Cumulative Total Earned Hours ” in SIS
F. GPA Hours: Formerly known as “Res GPA Attempted Hours” in SIS
C. Attempted Hours: Formerly known as “Res Enrolled Hours” in SIS
D. Passed Hours: Formerly known as “Res Total Earned Hours” in SIS
E. Earned Hours: Formerly known as “Cumulative Total Earned Hours ” in SIS
F. GPA Hours: Formerly known as “Res GPA Attempted Hours” in SIS
DC E F
NOTE: If attempted hours is less than Earned hours this is usually the case where Transfer Credit, Credit by Exam or other advanced standing credit has been added.
NOTE: If attempted hours is less than Earned hours this is usually the case where Transfer Credit, Credit by Exam or other advanced standing credit has been added.
Lesson 2: Academic StatusTopic 2: Determine a student’s overall academic standing
Page: 66Back Forward Index Exit
Version 1.5
July 5, 2002
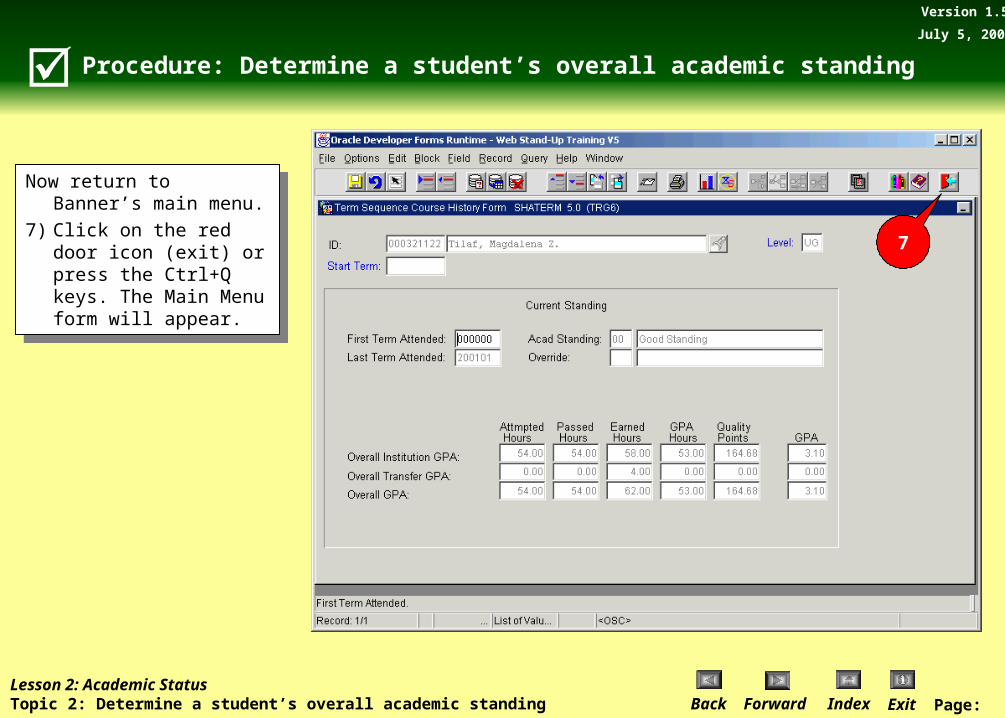
Procedure: Determine a student’s overall academic standing
Now return to Banner’s main menu.7) Click on the red door icon (exit)
or press the Ctrl+Q keys. The Main Menu form will appear.
Now return to Banner’s main menu.7) Click on the red door icon (exit)
or press the Ctrl+Q keys. The Main Menu form will appear.
7
Lesson 2: Academic StatusTopic 2: Determine a student’s overall academic standing

Page: 67Back Forward Index Exit
Version 1.5
July 5, 2002
On Your Own Activity: Determine a student’s overall academic standing
Lesson 2: Academic StatusOn Your Own Activity: Determine a student’s overall academic standing
Steps: Action:
1) On the Banner Main Menu, enter the name of the form.
Type SHATERM into the Direct Access field on the Banner Main Menu. The Term Sequence Course History Form will appear.
2) Enter the Student’s Banner ID number by typing the student’s ID number into the ID field.
Type 000259677. The student’s name will appear.
3) Double click on the Level field. The Level Codes by Person window will appear.
4) Select the desired item on the list. Scroll down the list and click on UG code for Undergraduate.
5) Click on the OK button. The UG code will be placed in the Level field.
6) Click on the Next Block button or press the Ctrl+PageDown keys.
Data will appear in the next block.
7) Review the information. Identify relevant information.
8) Return to Banner’s main menu. Click on the red door icon (exit) or press the Ctrl + Q keys. The Main Menu form will appear.
Page: 68Back Forward Index Exit
Version 1.5
July 5, 2002
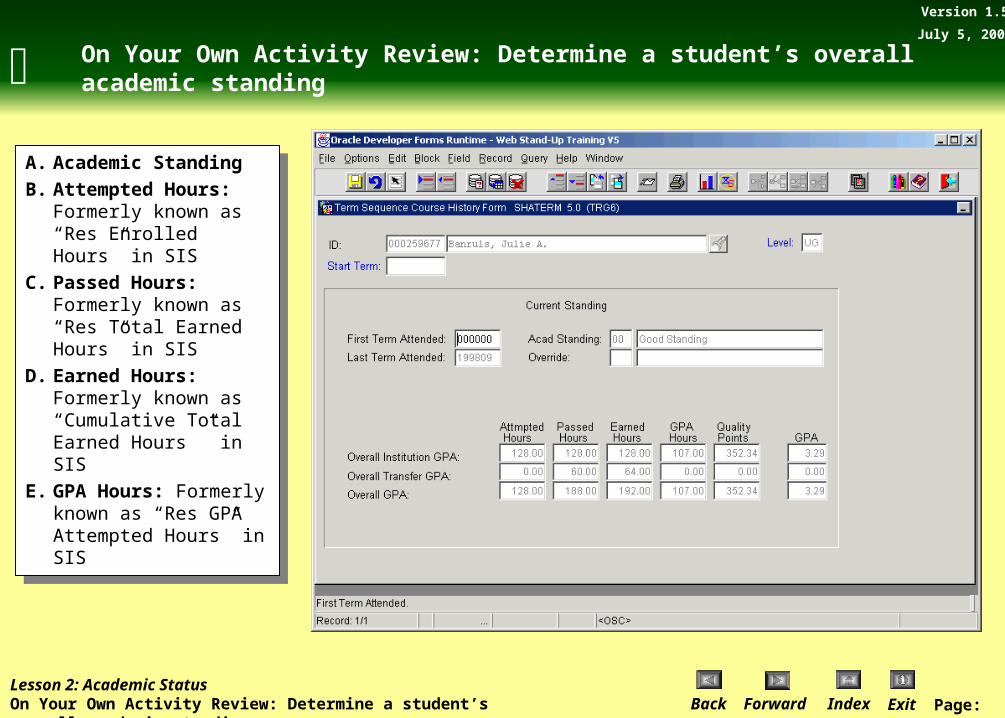
On Your Own Activity Review: Determine a student’s overall academic standing
A. Academic Standing
B. Attempted Hours: Formerly known as “Res Enrolled Hours” in SIS
C. Passed Hours: Formerly known as “Res Total Earned Hours” in SIS
D. Earned Hours: Formerly known as “Cumulative Total Earned Hours ” in SIS
E. GPA Hours: Formerly known as “Res GPA Attempted Hours” in SIS
A. Academic Standing
B. Attempted Hours: Formerly known as “Res Enrolled Hours” in SIS
C. Passed Hours: Formerly known as “Res Total Earned Hours” in SIS
D. Earned Hours: Formerly known as “Cumulative Total Earned Hours ” in SIS
E. GPA Hours: Formerly known as “Res GPA Attempted Hours” in SIS
Lesson 2: Academic StatusOn Your Own Activity Review: Determine a student’s overall academic standing
Page: 69Back Forward Index Exit
Version 1.5
July 5, 2002
Exercise: Matching
Lesson 2: Review Academic StatusExercise: Matching
Match the following functions with their matching Banner forms.
1) Form used to query for students with a particular academic status
2) 00 found in the Status field of SHASTAT
3) Form used to view a particular student’s academic status.
A)Good Standing
B) SHATERM
C) SHASTAT

Page: 70Back Forward Index Exit
Version 1.5
July 5, 2002
Exercise Review: Matching
Lesson 2: Review Academic StatusExercise Review: Matching
Match the following functions with their matching Banner forms.
1. Form used to query for students with a particular academic status. C. SHASTAT
2. 00 found in the Status field of SHASTAT. A. Good Standing
3. Form used to view a particular student’s academic status. B. SHATERM

Page: 71Back Forward Index Exit
Version 1.5
July 5, 2002
Exercise: Fill in the blank
Lesson 2: Review Academic StatusExercise: Fill in the blank
Using SHATERM determine the academic status for the following students (try
searching with different terms and levels):
1) ID # 000291877 (for Undergraduate level)______________2) ID # 000321122 (for Undergraduate level)______________3) ID # 000463722 (for Undergraduate level)______________

Page: 72Back Forward Index Exit
Version 1.5
July 5, 2002
Exercise Review: Fill in the blank
Lesson 2: Review Academic StatusExercise Review: Fill in the blank
Using SHATERM determine the academic status for the following students (try searching with different terms and levels):
1) ID # 000291877 (for Undergraduate level) Good Standing2) ID # 000321122 (for Undergraduate level) Good Standing3) ID # 000463722 (for Undergraduate level) Good Standing

Page: 73Back Forward Index Exit
Version 1.5
July 5, 2002
Exercise: Fill in the blank
Using STVASTD (found by double clicking in the Status field in SHASTAT, describe what the following academic statuses place on a student:
1) CR _________________________________________________________2) MP ________________________________________________________3) RE ________________________________________________________
Lesson 2: Review Academic StatusExercise : Fill in the blank

Page: 74Back Forward Index Exit
Version 1.5
July 5, 2002
Exercise Review: Fill in the blank
Using STVASTD (found by double clicking in the Status field in SHASTAT, describe what the following academic statuses place on a student:
1) CR: College/School Probation
2) MP: Academic Probation Masters
3) RE: Probation Readmittance
Lesson 2: Review Academic StatusExercise Review: Fill in the blank
Page: 75Back Forward Index Exit
Version 1.5
July 5, 2002
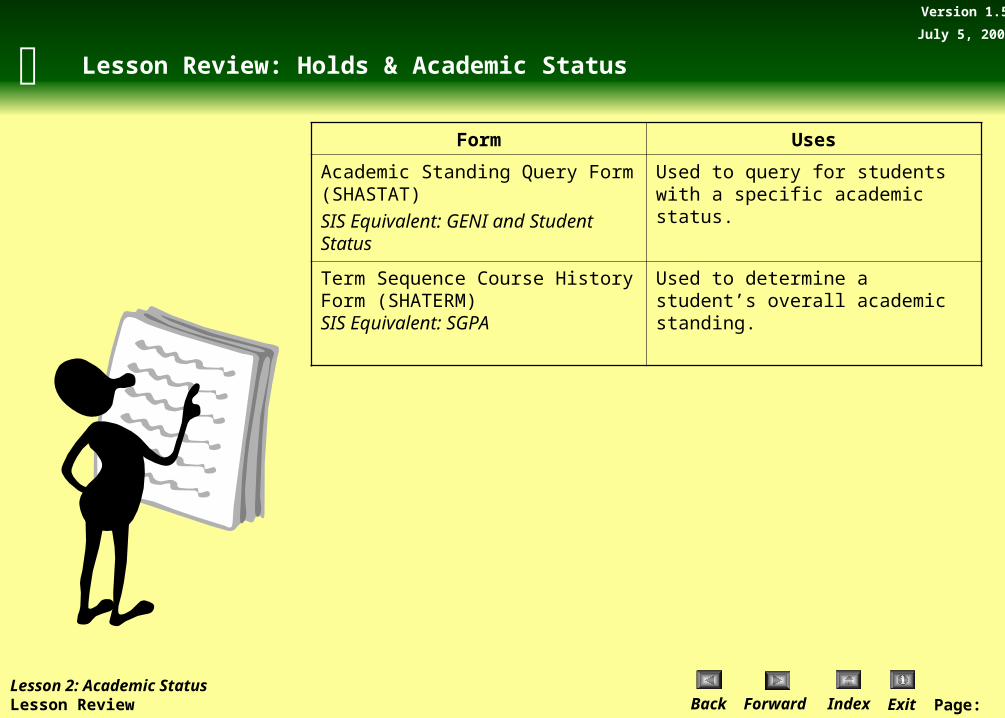
Lesson Review: Holds & Academic Status
Lesson 2: Academic StatusLesson Review
Form Uses
Academic Standing Query Form (SHASTAT)SIS Equivalent: GENI and Student Status
Used to query for students with a specific academic status.
Term Sequence Course History Form (SHATERM)SIS Equivalent: SGPA
Used to determine a student’s overall academic standing.

Page: 76Back Forward Index Exit
Version 1.5
July 5, 2002
Appendix A: Student ID Numbers for Exercises
• Use the ID’s listed on the right to complete the exercises which require you to update a record/file.
• When in the classroom, use the Banner ID that corresponds to your Classroom Seat #.
• Use the ID’s listed on the right to complete the exercises which require you to update a record/file.
• When in the classroom, use the Banner ID that corresponds to your Classroom Seat #.
Classroom Seat
#:
Banner ID #:
Name:
1 000000355 Michael Bannone
2 000000455 Jabari Banntwo
3 000000666 Rafic Bannthree
4 000001544 Min-Xiang Bannfour
5 000002177 Mohamad Bannfive
6 000002200 Dilipkaran Bannsix
7 000002422 Christopher Bannseven
8 000002822 Maria Banneight
9 000003000 Wan Bannnine
10 000003633 Yimin Bannten
11 000003988 Gailann Banneleven
12 000004488 Winston Banntwelve
Classroom Seat
#:
Banner ID #:
Name:
13 000005022 Fern Bannthirteen
14 000005155 Dianne Bannfourteen
15 000005311 Joanne Bannfifteen
16 000005344 Barbara Bannsixteen
17 000005666 Gwendolyn Bannseventeen
18 000005933 Cassandra Banneighteen
19 000006344 Joyce Bannnineteen
20 000006611 Harry Banntwenty
21 000006655 Barbara Banntwentyone
22 000007022 George Banntwentytwo
23 000007522 Sam Banntwentythree
24 000007799 David Banntwentyfour


