49
Page 1 of 49

Page 1 of 49

Page 2 of 49
SAFETY INSTRUCTIONS
For safety and protection, please read the user guide before using the iSaviTM terminal. In particular, do read this safety section carefully. Keep this safety information where you can refer to it, if necessary. The following general safety precautions must be observed during all phases of operation, service and repair of this equipment. Failure to comply with these precautions or with specific warnings elsewhere in this user guide violates safety standards of design, manufacture and intended use of the equipment. Addvalue Innovation Pte Ltd assumes no liability for the customer’s failure to comply with these requirements. Hazard Symbols Avoid touching the metal plate of the Transceiver (bottom/rear) during continuous operation that are marked with this symbol, otherwise it may result in injury. Evitez de toucher la plaque métallique de l'émetteur-récepteur (bas / arrière) pendant le fonctionnement continu qui sont marqués par ce symbole, sinon il peut causer des blessures.
“HOT”
Antenna Radiation Warning During transmission the embedded antenna in the radiates high power levels of radio frequency energy. This radiation is considered a health hazard to any personnel that come close to the antenna. It is important to maintain a distance of at least 1 metre between the transmitting antenna and any personnel.
Service Users should not attempt to access the interior of the transceiver. Only qualified personnel authorized by its manufacturer may service the device. Failure to comply with this rule will result in the warranty being void.

Page 3 of 49
Battery Safety Use only Addvalue-supplied or approved AC adapters with the terminal and for recharging the batteries.
The use of batteries that are not Addvalue-supplied or approved may pose increased safety risks.
Do not dispose of batteries in a fire, as they may explode.
Batteries may burn or explode if damaged.
Do not dismantle, open, bend or cut cells or batteries.
Do not attempt to modify or remanufacture the battery.
Do not immerse or expose the battery to water or other liquids.
In the event of a battery leak, avoid the contents coming into contact with the skin or the eyes. If this does happen, flush the affected areas with water and seek medical help as appropriate.
CAUTION RISK OF EXPLOSION IF BATTERY IS REPLACED BY AN INCORRECT TYPE DISPOSE OF USED BATTERIES ACCORDING TO THE INSTRUCTIONS
ATTENTION IL Y A DANGER D’EXPLOSION S’IL Y A REMPLACEMENT INCORRECT DE LA BATTERIE, REMPLACER UNIQUEMENT AVEC UNE BATTERIE DU MEME TYPE OU D’UN TYPE ÉQUIVALENT RECOMMANDÉ PAR LE CONSTRUCTEUR. METTRE AU REBUT LES BATTERIES USAGÉES CONFORMÉMENT AUX INSTRUCTIONS DU FABRICANT.

Page 4 of 49
COPYRIGHT © Copyright 2014 Addvalue Innovation Pte Ltd. All rights reserved. This publication and its contents are proprietary to Addvalue Innovation Pte Ltd. No part of this publication may be reproduced in any form or by any means without the written permission of Addvalue Innovation Pte Ltd., 8, Tai Seng Link, Level 5 (Wing 2), Singapore 534158.
WARRANTY
Addvalue Innovation Pte Ltd has made every effort to ensure the correctness and completeness of the material in this document. Addvalue Innovation Pte Ltd shall not be liable for errors contained herein. The information in this document is subject to change without notice. Addvalue Innovation Pte Ltd makes no warranty of any kind with regard to this material, including, but not limited to, the implied warranties of merchantability and fitness for a particular purpose.
TRADEMARKS
All trademarks, marks, names, or product names referenced in this publication are the property of their respective owners, and Addvalue Innovation Pte Ltd neither endorses nor otherwise sponsors any such products or services referred to herein.
Wideye, the Wideye logo, iSavi and iSavi logo are either trademarks or registered trademarks of Addvalue Technologies Ltd and/or its affiliates in Singapore and/or other countries. Microsoft, Windows and Internet Explorer are registered trademarks of Microsoft Corporation in the U.S.A. and/or other countries INMARSAT is a trademark of the International Mobile Satellite Organization. The Inmarsat LOGO and the trademark IsatHub are trademarks of Inmarsat (IP) Company Limited. All trademarks are licensed to Inmarsat Limited. IOS is a trademark or registered trademark of Cisco in the U.S. and other countries. Android and Google Chrome are either trademarks or registered trademarks of Google Inc. Macintosh, Mac OS, iPhone, iPad and Safari are trademarks or registered trademarks of Apple Inc., registered in the U.S. and other countries. Java is registered trademark of Oracle and/or its affiliates. Firefox is registered trademark of Mozilla Foundation All other company and product names may be the registered trademarks or trademarks of their respective owners. iSaviTM User’s Guide [June 2014]

Page 5 of 49
REGULATORY INFORMATION
Federal Communication Commission Notice
FCC Identifier: QO4-ISAVISH100
USE CONDITIONS:
This device complies with part 15 of the FCC Rules. Operation is subject to the following two conditions: This device may not cause harmful interference, and this device must accept any interference received, including interference that may cause undesired operation. NOTE: This equipment has been tested and found to comply with the limits for a Class B digital device, pursuant to Part 15 of the FCC Rules. These limits are designed to provide reasonable protection against harmful interference in a residential installation. This equipment generates, uses and radiates radio frequency energy and, if not installed and used in accordance with the instructions, may cause harmful interference to radio communications. However, there is no guarantee that interference will not occur in a particular installation. If this equipment does cause harmful interference to radio or television reception, which can be determined by turning the equipment off and on, the user is encouraged to try to correct the interference by one of the following measures:
· Reorient or relocate the receiving antenna. · Increase the separation between the equipment and receiver. · Connect the equipment into an outlet on a circuit different from that to which the receiver
is connected. · Consult the dealer or an experienced radio/TV technician for help.
IMPORTANT NOTE: EXPOSURE TO RADIO FREQUENCY RADIATION
This Device complies with FCC & IC radiation exposure limits set forth for an uncontrolled environment. The Antenna used for this transmitter must be installed to provide a separation distance of at least 1 metre from all persons and must not be co-located or operating in conjunction with any other antenna or transmitter.
FCC CAUTION: Any Changes or modifications not expressly approved by the manufacturer could void the user’s authority, which is granted by FCC, to operate this smart device connectivity terminal iSaviTM.

Page 6 of 49
Industry Canada Statement:
IC Identifier: 5023B-SH100ISAVI
This device complies with Industry Canada license-exempt RSS-170 and RSS-GEN210 standard(s). Operations subject to the following two conditions: (1) this device may not cause interference, and (2) this device must accept any interference, including interference that may cause undesired operation of the device.
Le présent appareil est conforme aux CNR d'Industrie Canada applicables aux appareils radio exempts de licence. L'exploitation est autorisée aux deux conditions suivantes : (1) l'appareil ne doit pas produire de brouillage, et (2) l'utilisateur de l'appareil doit accepter tout brouillage radioélectrique subi, même si le brouillage est susceptible d'en compromettre le fonctionnement.
IMPORTANT NOTE: Radiation Exposure Statement
This equipment complies with IC radiation exposure limits set forth for an uncontrolled environment. This antenna used for this transmitter must be installed to provide a separation distance of at least 1 metre from all persons and must not be co-located or operating in conjunction with any other antenna or transmitter.
NOTE IMPORTANTE: l'exposition aux radiations Cet appareil est conforme aux limites d'exposition aux rayonnements définies pour un environnement non contrôlé. Cette antenne utilisée pour ce transmetteur doit être installé pour fournir une distance de séparation d'au moins 100cm de toutes les personnes et ne doit pas être co-localisées ou opérant en conjonction avec une autre antenne ou émetteur. Under Industry Canada regulations, this radio transmitter may only operate using an antenna of a built-in patch and maximum 8dBi gain (or lesser) approved for the transmitter by Industry Canada. To reduce potential radio interference to other users, the antenna type and its gain should be so chosen that the equivalent isotropically radiated power (e.i.r.p.) is not more than that necessary for successful communication. Conformément à la réglementation d'Industrie Canada, le présent émetteur radio peut fonctionner avec une antenne d'un type et d'un 8dBi gain maximal (ou inférieur) approuvé pour l'émetteur par Industrie Canada. Dans le but de réduire les risques de brouillage radioélectrique à l'intention des autres utilisateurs, il faut choisir le type d'antenne et son gain de sorte que la puissance isotrope rayonnée quivalente (p.i.r.e.) ne dépassepas l'intensité nécessaire à l'établissement d'une communication satisfaisante.

Page 7 of 49
Declaration of Conformity: Addvalue Innovation Pte Ltd., 8, Tai Seng Link, Level 5 (Wing 2), Singapore 534158. declares under our sole responsibility that the Product, brand name as Wideye and model: iSaviTM, Smart Device Connective terminal to which this declaration relates, is in conformity with the following standards and/or other normative documents: ETSI EN 301 489-1, -17, -19, -20, ETSI EN 301 681, ETSI EN 300 328, EN 50385, EN 50371, ITU-R M.1480, IEC 60950 – 1 AND EN 60950-1, We hereby declare that all essential radio test suites have been carried out and that the above named product is in conformity to all the essential requirements of Directive 1999/5/EC. The Conformity Assessment procedure referred to Article 10 and detailed in Annex [III] or [IV] of Directive 1999/5/EC has been followed with involvement of the following notified body(ies): TIMCO ENGINEERING, INC., P.O BOX 370, NEW BERRY, FLORIDA 32669. Identification mark: 1177 (Notified Body number)
The technical documentation relevant to the above equipment are held at:
· Addvalue Innovation Pte Ltd., 8, Tai Seng Link, Level 5 (Wing 2), Singapore 534158.
· Signed by
Mr. Tan Khai Pang (Chief Technology Officer, June 17, 2014) and
Mr. Prabakar Kuttaniseeri (Manager-Quality Engineering, June 17, 2014).

Page 8 of 49
SAFETY INSTRUCTIONS .......................................................................................................................... 1
COPYRIGHT ................................................................................................................................................. 4
WARRANTY ................................................................................................................................................. 4
TRADEMARKS ............................................................................................................................................ 4
REGULATORY INFORMATION(TBC) ..................................................................................................... 5
1 INTRODUCTION .................................................................................................................................. 9
Key Features ........................................................................................................................................... 9
Configuration Interface ........................................................................................................................... 9
System Requirements ............................................................................................................................ 10
2 GETTING STARTED ......................................................................................................................... 11
Point the terminal and connect to the network ...................................................................................... 13
Accessing data and calls ....................................................................................................................... 15
3 NAVIGATING THE WEB CONSOLE ............................................................................................. 17
Menu Overview ..................................................................................................................................... 17
Status of Terminal ................................................................................................................................ 17
Data .......................................................................................................................................................... 19
Data Profile Setting ............................................................................................................................... 19
Firewall Protection Setting .................................................................................................................... 21
Access Rights Setting according to MAC address ................................................................................ 24
Telephony ............................................................................................................................................... 26
SIP Setting............................................................................................................................................. 26
SMS .......................................................................................................................................................... 27
Compose a new SMS ............................................................................................................................ 27
View Received SMS ............................................................................................................................. 28
View Sent SMS ..................................................................................................................................... 28
View Draft SMS .................................................................................................................................... 29
Settings ................................................................................................................................................... 30
Create Account for Web Console Access ............................................................................................. 30
Change SSID and Wi-Fi Password ....................................................................................................... 31
Configure SIM Security ........................................................................................................................ 33
Terminal Settings .................................................................................................................................. 34
Firmware Upgrade ................................................................................................................................ 35
Important Information and Log File ..................................................................................................... 36
Language ............................................................................................................................................... 36
Support .................................................................................................................................................. 36
4 TROUBLESHOOTING AND FAQ ................................................................................................... 37
5 CARE AND MAINTAINENCE .......................................................................................................... 42
Appendix A: Antenna Pointing LED Status Table ........................................................................... 43
Appendix B: Technical Specifications ............................................................................................... 47
Appendix C: IsatHub Coverage Map ................................................................................................... 49

Page 9 of 49
1 INTRODUCTION
Your iSaviTM satellite terminal is specially designed to be compact and easy to use with a standby battery lifespan that is comparable to laptops and smart phones. Together with a corresponding service package from Inmarsat, your iSaviTM can meet the data and voice communications needs for the modern global business traveler, NGO field workers and many more types of user.
KKeeyy FFeeaattuurreess
• Built-in 802.11 b/g/n access point with 30 metre range (with built in Wi-Fi antenna).
• Data connectivity using Wi-Fi
• Voice connectivity using VoIP over Wi-Fi
• iSaviTM terminal management via web console or smart phone and tablet Control app
• Detachable rechargeable battery compartment with built-in charging circuit
• Single unit with integrated antenna (all-in-one)
• Easy antenna pointing (with audio tone and LED feedback )
• Lightweight, robust, reliable
• IP65 Compliant (dust tight and protected against water jets)
CCoonnffiigguurraattiioonn IInntteerrffaaccee
The user may configure the iSaviTM terminal via three different configuration interfaces:
1) Web Console
2) Smart phone and tablet Control app*
3) Voice app* (VoIP configuration for voice calls)*
*Supplied separately- Search for IsatHub on your iOS or Android device (App Store or Google
Play).

Page 10 of 49
SSyysstteemm RReeqquuiirreemmeennttss
Network
Requirements
• IEEE 802.11b/g/n wireless clients
• Inmarsat iSatHub Micro-SIM card
Browser based Web
Console
Requirements
Smart devices or personal computer with the following
operating systems:
• iOS or Android TM,
• Windows®, Macintosh ® , or Linux-based operating system
Recommended Browsers:
• Google ChromeTM
• Safari®
• Internet Explorer ®
• Firefox ®
Users have to ensure they have the latest version of JavaTM installed where necessary. Visit www.java.com to download the latest version.
IsatHub Control app
and
Voice app
Requirements
Smart phone or tablet:
iOS 6 or higher (minimum requirement: iPhone 4 / iPad 3 )
Android 4.1 or higher

Page 11 of 49
2 GETTING STARTED
Note: The antenna is embedded inside the transceiver.

Page 12 of 49
iSavi terminal control Your iSaviTM can be controlled in 2 ways:
1. Web console: Any browser provides access to configure and operate the terminal. See Section 3 NAVIGATING THE WEB CONSOLE.
2. IsatHub Control app: The application is designed for everyday administration of your iSavi terminal including managing data usage and sharing the data connection with other devices. It provides a more limited set of functionality than the web console functionality. The app for smart phones and tablets is available from App Store or Google Play for iOS or Android devices respectively.

Page 13 of 49
PPooiinntt tthhee tteerrmmiinnaall aanndd ccoonnnneecctt ttoo tthhee nneettwwoorrkk
Make sure you place your iSaviTM outside with a clear view of the sky. Your iSaviTM needs be pointed towards the sky in the correct direction to ensure connection to the Inmarsat satellite network. Turn on the terminal by pressing the Power Button for five seconds. It takes around one to two minutes for your iSaviTM to power up and enter antenna pointing mode. There are three methods for antenna pointing:
1. LED visual pointing mode 2. Audio assisted pointing mode 3. Control app pointing assist
LED Visual Pointing Mode
By default, the antenna pointing is in LED Mode.
Note: Once the network is available, all the four tilt and turn LEDs will turn off after one minute. The LEDs of ‘Power’ button and ‘Exit Pointing Mode’ button may sometimes hard to see under bright sunlight. Use the signal strength indicator in the Control app or web console in bright environments. If LEDs display any other pattern of illumination, please refer to Appendix A: Antenna Pointing LED Status Table
For safety reasons, never stand closer than one metre in front of your iSaviTM terminal’s transceiver when it is connected to the network.

Page 14 of 49
Audio Assisted Pointing Mode
1. The terminal is in LED visual pointing mode by default. To switch into Audio assisted
pointing mode, press and hold ‘Exit Pointing Mode’ button for 5 seconds.
2. The four arrow LEDs will change into flashing green pattern when antenna pointing audio
mode is activated, refer Appendix A: Antenna Pointing LED Status Table.
3. The beeping sound indicates the signal strength. The frequency of the beeping will become
higher when the signal is stronger.
4. First, tilt the terminal up to 45 degrees from the horizontal.
5. Now turn the terminal slowly until the beeping frequency is maximized.
6. Finally, tilt the terminal up or down and fine tune the position onto further increase the
beeping frequency.
7. ‘Exit Pointing Mode’ button will turn to flashing green when the signal strength is good
enough for network registration.
8. Press the ‘Exit Pointing Mode’ button to exit antenna pointing mode and start network
registration.
9. Once the network is registered, all the four tilt and turn LEDs will turn off after one minute
and ‘Exit Pointing Mode’ button is green colour.
Note: You can switch back to LED Visual Pointing Mode when the global beam is not acquired by pressing the ‘Exit Pointing Mode” button for five seconds before registered to network. You are recommended to use Appendix A: Antenna Pointing LED Status Table as a guideline. Once the network is available, all the four tilt and turn LEDs will turn off after one minute. The LEDs of ‘Power’ button and ‘Exit Pointing Mode’ button may sometimes hard to see under bright sunlight.
Antenna Pointing using the IsatHub Control app
1. Before using this method, download the application from App Store or Google Play for iOS
or Android devices respectively. Data downloaded over the iSavi is chargeable, so use a
free data service to acquire these apps where possible.Refer to GETTING STARTED.
2. Open the Control app with smart phone or tablet.
3. Follow the on screen instructions and press ‘Pointing assist’ for specific help.

Page 15 of 49
AAcccceessssiinngg ddaattaa aanndd ccaallllss
When you first access data over the network, you may need to enter the APN username and password supplied to you with your SIM card by your service provider. Please make sure you have these available. Refer to the Data Profile section for the setting if required.

Page 16 of 49
Refer to the section Status of Terminal.
Note: Signal strength need to be at least 42dBHz and above for an acceptable service to commence. You may check the signal strength and registration status using home page of web console or the smart phone Control app.
If the signal strength level indicated in the web console is low under registered condition, you can slowly adjust the terminal angle and monitor the signal strength displayed in web console.
Turn off the terminal by pressing the ‘Power’ button for five seconds.

Page 17 of 49
3 NAVIGATING THE WEB CONSOLE
Menu Overview
DATA TELEPHONY SMS SETTING
Data Profile SIP Setting Compose Accounts Terminal Settings
- Reboot Terminal
Firewall Inbox Wi-Fi - Factory Reset
- Setup
- System Info - Firmware Upgrade
- Incoming Rule Sent - Wireless Setting
- Outgoing Rule
- Security Setting Terminal Info
Drafts
- Information
Device Management
SIM Security - Logs
-SIM PIN - Call Log
-Terminal to SIM
Language
Support
Status of Terminal
The Home page provides the status information of the terminal, pointing information and allows a data connection to be established. Navigate to Home page in order to check for the following status:

Page 18 of 49
Status Indicates registration and data connection status.
Signal Indicates terminal received signal strength.
GPS Indicates GPS information
Battery Indicates available capacity of the battery.
Temperature Indicates current operating temperature status.
Click “Activate Data Connection” or “Deactivate Data Connection” in order to activate or deactivate data connection. Note: Signal strength must be 42 dB or above for the iSaviTM terminal to successfully connect or register to the network. Signal strength can be improved by pointing more accurately. If the signal strength level indicated in the web console is low under registered condition, you can slowly adjust the terminal angle and monitor the signal strength displayed in web console.

Page 19 of 49
Data
DDaattaa PPrrooffiillee SSeettttiinngg
Navigate to Data > Data Profile in order to modify the connection type.
Connection profile defines the connection type. User can select from a list of profiles to be the default primary profile and connection type.
Note: From a smart phone or tablet, the Control app will always use the connection profile defined as default
You can create your customized primary profile.
Profile Name
Change the profile name as desired.
Access Point Name (APN)
By default, the APN from your SIM card will be selected.
Follow these steps to change the Access Point Name (APN):
i. Select User Defined.
ii. Enter the new APN in the field space provided (e.g. BGAN.INMARSAT.COM).
iii. Enter the username and password if required (these details have been supplied by your service provider).

Page 20 of 49
IP Configuration
By default, a Dynamic IP Address is selected.
To use a Static IP Address:
i. Select Static IP Address and enter the IP Address in the space provided.
Limited Connection
You can control the data usage of the user by setup the limited connection time or volume.
Note: The data connection will be automatically deactivated when the volume had reached the defined limit.

Page 21 of 49
FFiirreewwaallll PPrrootteeccttiioonn SSeettttiinngg
The firewall function is disabled by default and users need to navigate to the firewall setup page to enable it.
Setup
Navigate to Data > Firewall > Setup to change the Firewall protection profile setup .
Follow these steps to change the profile setting.
i. Select profile name.
ii. Click Edit to modify the setting.
iii. By default, your iSaviTM accept all the incoming packets.
You can edit the profile name and define the rules to allow or reject incoming packets.

Page 22 of 49
iv. By default, your iSaviTM reject all the outgoing packets
You can enable the packet by select the rule name.
Note: The incoming and outgoing rules in the profiles are predefined in the general rules. If you would like to add in new rule for specific profile, click Add and fill in the details.

Page 23 of 49
Incoming Rule
To define general incoming rule, navigate to Data > Firewall > Incoming Rule to add and define up to 10 rules to allow or reject incoming packets.
Outgoing Rule
To define general outgoing rule, navigate to Data > Firewall > Outgoing Rule to add and define up to 10 rules to allow or reject outgoing packets.

Page 24 of 49
AAcccceessss RRiigghhttss SSeettttiinngg aaccccoorrddiinngg ttoo MMAACC aaddddrreessss
Navigate to Data > Device Management to set the allowed MAC address and the access rights. MAC address is a number that uniquely identifies any device connected to a network. Once the device is connected to the terminal, the MAC address will be shown in the page. From this page, you can also check the number of connected devices, their MAC addresses and the data usage of the terminal.

Page 25 of 49
You can add a new MAC address by clicking Add or create a nickname for the existing MAC address by
clicking on the Edit button. Data usage of the device is available in the bottom of the page.
i. Define a nickname for the device. ii. Key in the allowed MAC address (for newly added). iii. Check if the MAC address belongs to the smart phone or tablet used to host the Control
app. Only one device is allowed to use the Control app each time. iv. You can define access rights selecting the relevant permission options. v. The settings are stored temporary and not available after terminal is rebooted. If you plan
to keep the same access rights settings, deselect ☑ Temporary entry so that the access rights are still valid even after the terminal is rebooted.

Page 26 of 49
Telephony
SSIIPP SSeettttiinngg
Navigate to Telephony > Call Setting > SIP setting> SIP Server to change the RTP Codec.
Note: SIP calls with the iSaviTM terminal require a special SIP client application on your smart phone or tablet. The IsatHub Voice app is available from the App Store or Google Play. SIP calls from a Windows or Macintosh PC are not supported. Use of any other SIP application will not benefit from the voice connection to the Inmarsat network and may suffer technical issues in congested areas.
Page 27 of 49
SMS
CCoommppoossee aa nneeww SSMMSS
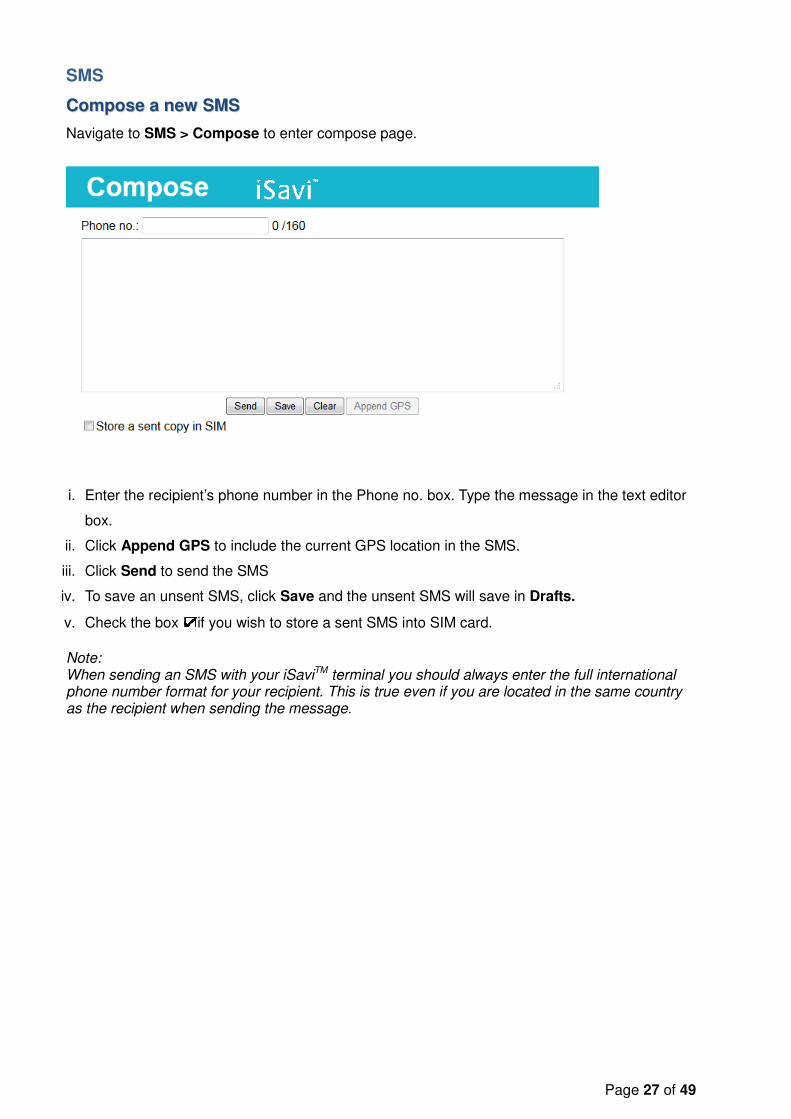
Navigate to SMS > Compose to enter compose page.
i. Enter the recipient’s phone number in the Phone no. box. Type the message in the text editor
box.
ii. Click Append GPS to include the current GPS location in the SMS.
iii. Click Send to send the SMS
iv. To save an unsent SMS, click Save and the unsent SMS will save in Drafts.
v. Check the box ☑☑☑☑if you wish to store a sent SMS into SIM card.
Note: When sending an SMS with your iSaviTM terminal you should always enter the full international phone number format for your recipient. This is true even if you are located in the same country as the recipient when sending the message.

Page 28 of 49
VViieeww RReecceeiivveedd SSMMSS
Navigate to SMS > Folders> Inbox to view received SMS.
Reply to an SMS from Inbox:
i. Select the SMS you plan to reply to by clicking the particular SMS by clicking the ☑☑☑☑
ii. Click Reply.
iii. The inbox console will switch over to Compose mode. Enter your reply in text box. Click Send
to send the SMS.
Forward an SMS from Inbox:
i. Select the SMS you plan to forward and click Forward..
ii. The inbox console will switch over to Compose mode. Enter your reply in text box. Click Send
to send the SMS.
Delete an SMS from Inbox:
i. Select the SMS you plan to delete and click Delete.
ii. A single SMS or multiple SMSs can be deleted based on the selection.
iii. Click OK to confirm the deletion, or Cancel to abort.
To Refresh the Inbox list:
i. Click Refresh and the list will be refreshed.
VViieeww SSeenntt SSMMSS
Navigate to SMS > Folders> Sent to view Sent SMS.
Resend a sent SMS:
i. Select the SMS you plan to resend and click Resend.
ii. The SMS will be sent to the recipient.
Forward a sent SMS:
i. Select the SMS you plan to forward and click Forward.
ii. The Sent console will switches over to the Compose mode.
iii. Enter the recipient’s number in the Phone No. field.
iv. Click Send.
v. The SMS will be sent to the recipient.
Delete a sent SMS:
i. Select the SMS you plan to delete.
ii. Click Delete.
iii. Click OK to confirm the deletion, or Cancel to abort.

Page 29 of 49
VViieeww DDrraafftt SSMMSS
Stored SMS are saved inside draft folder.
Navigate to SMS > Folders> Draft to view Draft SMS.
Send a draft SMS:
i. Select the draft SMS you plan to send and click Send
ii. The SMS will be sent to the recipient.
Forward a draft SMS to other recipient:
i. Select the draft SMS you plan to send and click Send.
ii. Click Forward.
iii. The draft console will switches over the Compose console.
iv. Enter the recipient’s number in the Phone No. field.
v. Click Send.
vi. The SMS will be sent to the recipient.
Delete a draft:.
i. Select the draft SMS you plan to send and click Send.
ii. Click Delete.
iii. Click OK to confirm the deletion, or Cancel to abort.

Page 30 of 49
Settings
CCrreeaattee AAccccoouunntt ffoorr WWeebb CCoonnssoollee AAcccceessss
Navigate to Settings > Security> Account to create or edit an account for Web Console and Control app access. Only one User and one Admin account are allowed for your iSaviTM.
Add a new account:
i. Click Add.
ii. Fill in New Password and Re-type Password.
iii. Click Add.
iv. The new account will be added into the account list.
Delete an account:
i. Select the account which you want to delete.
ii. Click Delete.
iii. Account name is deleted successfully it is removed from the account list.

Page 31 of 49
Change account password:
i. Select the account which you want to change the password (example: admin).
ii. Fill in the Old Password, New Password and Re-type Password.
iii. Click Update for the new password to take effect.
Note: SSID network name is the Wi-Fi network name that other users will see on their smart phone, tablets or personal computers when they view a list of available networks. You can get the default SSID of your iSaviTM
from product label.
CChhaannggee SSSSIIDD aanndd WWii--FFii PPaasssswwoorrdd
Navigate to Settings > Security> Wi-Fi> Wireless Settings to change network mode and network name.

Page 32 of 49
Navigate to Settings > Security> Wi-Fi> Security Settings to set password of your Wi-Fi network.
Security Mode: Disabled or select the security mode for the wireless local area network. Three different security modes are available:
• Wired Equivalent Privacy (WEP) For 64-bit encryption - You can enter either 5 ASCII characters or 10 hexadecimal digits (any combination of 0-9, a-f, A-F, empty string is not permitted). For 128-bit encryption - You can enter either 13 ASCII characters or 26 hexadecimal digits (any combination of 0-9, a-f, A-F, empty string is not permitted)
• Wi-Fi Protected Access® Personal (WPA) You can enter 8-63 characters of keys for the password.
• Wi-Fi Protected Access® 2 Personal (WPA2) You can enter 8-63 characters of keys for the password.
WPA2 is highly recommended over WEP for a higher level of security. Note: The default SSID password of your iSaviTM is configured under WPA2 mode. To help safeguard your data connection and the associated bill, please change the default SSID password printed on the product label of the your iSaviTM to your preferred password as soon as possible.

Page 33 of 49
CCoonnffiigguurree SSIIMM SSeeccuurriittyy
SIM PIN
If the security feature is enabled, a prompt requests you to enter the SIM PIN each time you power up your iSaviTM. This helps prevent unauthorised use of your SIM. Disable this feature to skip PIN entry process.
Navigate to Settings > Security> SIM Security> SIM PIN to enable SIM PIN.
1. Click SIM PIN to configure the SIM PIN settings.
2. Select Disabled if you do not need to set the SIM PIN.
3. Select Enabled to set the SIM PIN.
4. Enter the PIN number in the space provided and click Apply.
Note: The SIM PIN depends on the SIM card. Consult your service provider if necessary.
Terminal to SIM
Once Terminal to SIM locking is activated, your iSaviTM will prompt for the password if a different SIM Card is inserted into the terminal. Navigate to Settings > Security> SIM Security> Terminal to SIM to enable Terminal to SIM PIN.
1. Click Terminal to SIM to configure the Terminal to SIM settings.
2. Select Disabled if you do not need to enable Terminal to SIM.
3. Select Enabled to enable Terminal to SIM locking.
4. Enter the PIN number in the space provided and click Update PIN.

Page 34 of 49
TTeerrmmiinnaall SSeettttiinnggss
Navigate to Settings > Terminal Settings> Reboot Terminal to reboot the terminal.
Navigate to Settings > Terminal Settings> Factory Reset to factory reset the terminal.
Enter default security code 0000 for factory reset.
You can also perform factory reset by referring to the following step:
i. With the terminal off, remove the SIM card. ii. Press the ‘Power’ button for 5 seconds. iii. Once the ‘Power’ button turn into red colour, press and release the ‘Exit Pointing Mode’
button for 3 times. iv. Press and hold the ‘Exit Pointing Mode’ button for 5 seconds. v. All the LEDs will flashing in red once the factory reset is triggered. vi. Your iSaviTM will reboot automatically once the factory reset is completed.
Navigate to Settings > Terminal Settings> Firmware Upgrade to perform firmware upgrade.

Page 35 of 49
FFiirrmmwwaarree UUppggrraaddee
Firmware upgrade allows you to update your iSaviTM with the latest operating software. There are two methods for upgrading the iSaviTM firmware.
Firmware upgrade by Safe Mode over Wi-Fi vii. With the terminal off, press and hold ‘Exit Pointing Mode’ button. viii. Press the ‘Power’ button for 5 seconds. ix. Release both ‘Exit Pointing Mode’ button and ‘Power’ button. x. If the Safe Mode is enabled successfully, all the four Antenna Pointing LEDs will turn to
Amber colour, refer to Appendix A: Antenna Pointing LED Status Table. xi. Log in to Web Console by typing http://192.168.1.35 or http://192into the address bar of
any web browser. xii. Browse to the location of the new firmware, select and click Upload. xiii. Firmware upgrade will take approximately 10 to 12 minutes to complete.
You will be prompted with the Result: Firmware Upgrade Completed message.
Note: You are highly recommended to perform firmware upgrade over Wi-Fi. Firmware upgrade by safe mode over Micro USB is only required when the firmware is corrupted.
Firmware upgrade by Safe Mode over Micro USB
i. With the terminal off, press and hold ‘Exit Pointing Mode’ button. ii. Press ‘Power’ button for 5 seconds. iii. Release both ‘Exit Pointing Mode’ button and ‘Power’ button. iv. If the Safe Mode is enabled successfully, all the four Antenna Pointing LEDs will turn to
Amber colour, refer to Appendix A: Antenna Pointing LED Status Table. v. RNDIS USB driver file is available in the USB drive which is included in the iSaviTM
packaging box. You are required to copy the file into your personal computer (Windows XP or Windows 7).
vi. Unzip the attached file and select the .inf as the driver file vii. Connect the Micro USB cable to your personal computer. viii. The USB installation should complete with a new network adapter created as USB Remote
NDIS device. ix. Disconnect or remove any physical ethernet/ Wi-Fi connections of your personal PC and left
only the Micro USB cable which is connected between your PC and your iSaviTM . x. Change the IP address of the USB network adapter to “192.168.1.100” xi. By having the USB connection, iSaviTM is accessible at “192.168.1.37”.
xiv. Log in to Web Console by typing http://192.168.1.37 into the address bar of any web browser.
xv. Browse to the location of the new firmware, select and click Upload. xvi. Firmware upgrade will take approximately 10 to 12 minutes to complete. xii. You will be prompted with the Result: Firmware Upgrade Completed message

Page 36 of 49
IImmppoorrttaanntt IInnffoorrmmaattiioonn aanndd LLoogg FFiillee
Navigate to Setting > Terminal Info> Information in order to check for the detail of the terminal. You may need to supply this information when contacting your service provider.
Event Logs and Error Logs
Navigate to Setting > Terminal Info> Logs to view the Event Log of Error Log of the terminal.
Click Export all Logs in order to export the logs.
Call Log and Data Log
Navigate to Setting > Terminal Info> Call Log to view the Call Log and Data Log of the terminal
Click Export all Logs in order to export the logs.
LLaanngguuaaggee
Select the desired language for the Web Console. The default language is English.
SSuuppppoorrtt
Navigate to Settings > Support to get the contact information of your service provider’s support team.

Page 37 of 49
4 TROUBLESHOOTING AND FAQ
Terminal Fail to Power Up Problem Possible Root Cause Solution
My iSaviTM does not switch on successfully
Battery not connected properly to the iSaviTM transceiver.
Check if the battery is attached correctly. Press and hold the Power Button for 5 seconds.
Battery pack is in low charge condition.
Check if the battery needs charging. Charging for 20 minutes should provide enough power to switch the terminal on.
Battery end of life. If the battery does not charge it has probably
exceeded its useable life and you will need to replace it with a new one.
SIM Card Problem Possible Root Cause Solution
LED Situation 19: Fatal error (‘Power’ button LED colour turn to red)
SIM card not inserted Ensure SIM card is inserted before turning on your iSaviTM.
Incorrect SIM card Ensure that a correct SIM card is inserted.
Contact your service provider if you are unable to resolve the problem.
My iSaviTM and/or SIM has been lost or stolen
- Contact your service provider as soon as possible so your iSaviTM and/or SIM can be barred

Page 38 of 49
Antenna Pointing Problem Possible Root Cause Solution
LED Situation 14: Azimuth and Elevation are correct but low signal strength- LED visual pointing mode. (All the four Antenna Pointing LEDs flashing in green ; ‘Exit Pointing Mode’ button flashing in red) LED Situation 20: Global Beam is not available- LED visual pointing mode (All the four Antenna Pointing LEDs flashing in amber, ‘Exit Pointing Mode’ button flashing in red) LED Situation 22: GPS not available after timeout. (All the four Antenna Pointing LEDs flashing in amber, ‘Exit Pointing Mode’ button flashing in red) LED Situation 23: Global Beam not available- Audio assisted pointing mode (All the four Antenna Pointing LEDs flashing in green, ‘Exit Pointing Mode’ button flashing in red)
Terminal is blocked by building or wrong locating position. Terminal is using inaccurate or out of date GPS fix location
LED visual pointing mode is using magnetometer and GPS to do the pointing. When there is blockage between your iSaviTM and the Inmarsat satellite, the terminal is unable to connect to the network even though the azimuth and elevation are correct. Ensure your iSaviTM is placed outside with a clear, unobstructed view of the sky. Adjust the elevation so that your iSaviTM is flat, facing straight upwards. Switch the terminal on and leave for a minimum of 3 minutes. Your iSaviTM.will automatically enter LED visual pointing mode once GPS coordinates are acquired. Check Web Console or Control app to check GPS fix status.
Ensure the iSaviTM terminal is placed outside,
with an unobstructed view of the sky. Tilt the Terminal flat so that it is facing straight up and leave the terminal for a minimum of 3 minutes to refresh GPS fix information.
Switch into audio assisted pointing mode by press and hold the ‘Exit Pointing Mode’ button for 5 seconds.
Contact your service provider if you are
unable to resolve the problem.
Refer to Appendix A: Antenna Pointing LED Status Table for LED situation.

Page 39 of 49
Antenna Pointing Problem Possible Root Cause Solution
LED Situation 16: Registration Failure(All the four LEDs flashing in amber, ‘Exit Pointing Mode’ button flashing in red)
Registration time-out Press and hold ‘Exit Pointing Mode’ button for 3 seconds to enter Antenna Pointing Mode again.
LED Situation 21: Magnetic interference detected. (Left and Up LEDs flashing in Red, Down and Right LEDs flashing in Amber; ‘Exit Pointing Mode’ button flashing in red)
Interference by electrical devices
LED pointing mode relies on GPS fix information along with the output of a magnetometer. Local electrical interference can impact the reliability of the magnetometer. Ensure the iSaviTM is placed outside away from electrical devices or appliances that generate RF noise, and with an unobstructed view of the sky.
Data Connection Problem Possible Root Cause Solution
LED Situation 18: iSaviTM terminal is registered to the network but fail in data activation.
Low signal strength. Ensure that the signal strength is good. Signal strength need to be at least 42dBHz and above for an acceptable service to commence.
Not enough credit for prepaid card.
If you have a prepay subscription, check your prepay balance to ensure you have sufficient credit to make a data connection.
No access rights for internet access.
Ensure no firewall settings are preventing access to the internet.
Contact your service provider if you are unable to resolve the problem

Page 40 of 49
SMS Problem Possible Root Cause Solution
My Web Console cannot receive a text message
SMS inbox is full. Maximum SMS storage is dependent on SIM card memory. If the memory is full, delete a few texts to free up memory for new messages. Ensure the sender tries another network to send messages.
Some local networks do not have agreements in place to send SMS to the Inmarsat network
Web Console Problem Possible Root Cause Solution
Unable to access Web Console
Wi-Fi connection. Make sure that there is no problem with the Wi-Fi connectivity.
Wrong IP address Make sure that the IP address is entered correctly. http://192.168.1.35
Try to refresh the web page after ensuring the IP address is correct.

Page 41 of 49
Safe Mode and Firmware Upgrade Problem Possible Root Cause Solution
Unable to enter safe mode. Terminal continues to start in normal mode.
Incorrect steps for button pressing
Ensure the ‘Exit Pointing Mode’ button is pressed and held. Press and hold ‘Power’ button for 3 seconds. Release ‘Exit Pointing Mode’ button and ‘Power’ button.
Firmware Upgrade Failure
Incorrect upgrade package/file is selected.
Ensure that correct firmware upgrade package is used.
Wi-Fi connection is lost.
Ensure the Wi-Fi connection is stable. Perform firmware upgrade after restarting iSaviTM terminal.
Interruption on power supply.
Ensure that there is no interruption of power supply during firmware upgrade. Retry firmware upgrade.
Voice call
Problem Possible Root Cause Solution
Unable to make outgoing call
Wrong contact number.
Make sure that a correct number format is dialed including full international prefix.
No access rights for outgoing calls.
Make sure the device used for VoIP calls is given the correct access rights for outgoing call functionality.
Not enough credit for prepaid SIM. Wrong SIP client
If you have a prepay subscription, check your prepay balance to ensure you have sufficient credit to make a call. SIP calls on the iSaviTM are only supported with the IsatHub Voice app available on App Store and Google Play for Macintosh and Android devices respectively.
Call Barring is activated.
If the phone has sufficient signal strength and cannot make or receive calls, check if Call barring has been activated in call settings.
Unable to receive incoming call
No access rights for incoming call.
Make sure that the user account is given the access right for receiving call.
Wrong SIP client
SIP calls on the iSaviTM are only supported with the IsatHub Voice app available on App Store and Google Play for Macintosh and Android devices respectively
Call Barring is activated.
If the phone has sufficient signal strength and cannot make or receive calls, check if call barring has been activated in call setting.

Page 42 of 49
5 CARE AND MAINTAINENCE
Caring for your iSaviTM Your iSaviTM is a highly sophisticated electronic device. Complying with the following recommendations will help you to protect your warranty coverage and extend your terminal’s life: • Keep your terminal dry. Liquids or moisture can contain minerals that will damage electronic circuits. If your phone does get wet, dry it with a soft absorbent cloth as soon as possible, remove the battery module and allow your transceiver and battery to dry completely before reassembling it.
• The connector covers are intended to protect your terminal. Keep these covers firmly closed at all times. Ensure that the connectors are free from dust or dirt before connecting any accessory. When closing the connector cover, ensure the area around the connectors, and the rubber sealing surfaces of the cover are clean and free from dirt. Ensure that the cover is fully closed to give maximum protection to your terminal.
• Do not store your terminal in dusty, dirty or damp areas as this may shorten its life. • Do not store your transceiver and battery in extreme cold and hot areas exceeding a certain temperature range. Storage temperature range for the transceiver is -40°C to +80°C (-40°F to +176°F) whereas for the battery it is -20°C to +40°C (-4°F to +104°F). Extreme temperatures can shorten the life of your terminal and damage the battery.
• Your terminal’s operating temperature range is -25°C to +55°C (-13°F to +131°F). The charging temperature range is 0°C to +40°C (+32°F to +104°F). • Avoid often use in high or low temperature environments. Lithium ion batteries have an optimal working and storage temperature. If they are continually used an extreme temperature environment, it will negatively affect the battery’s use time and useful cycles.
• If you don't need to use your iSaviTM for a long time where the lithium ion battery might be left unused for 3 months or more, partially recharge the lithium ion battery, then store the device (recharge the battery to around 30-70% of capacity) to prevent battery damage. You may need to take the device out of storage and charge again after a few months.

Page 43 of 49
APPENDIX A: ANTENNA POINTING LED STATUS TABLE
LED Legend * Flashing in sequential pattern. Note: Flashing LED is represented by symbol with zebra stripes

Page 44 of 49
LED Legend * Flashing in sequential pattern CW: Clockwise CCW: Counterclockwise Note: Flashing LED is represented by symbol with zebra stripes
Situation Power Button
Arrow LED Exit Button Status
1
Terminal is OFF.
2
*
Powering up (firmware loading).
3
* Acquiring GPS.
4
Tilt UP and Turn CLOCKWISE for correct pointing.
5
Tilt UP and Turn COUNTERCLOCKWISE for correct pointing.
6
Tilt DOWN and CLOCKWISE for correct pointing.
7
Tilt DOWN and COUNTERCLOCKWISE for correct pointing.
8
Elevation is correct. Turn CLOCKWISE for correct pointing.
9
Elevation is correct. Turn COUNTERCLOCKWISE for correct pointing.
10
Azimuth is correct. Tilt UP for correct pointing.

Page 45 of 49
LED Legend * Flashing in sequential pattern Note: Flashing LED is represented by symbol with zebra stripes
Situation Power Button Arrow LED Exit Button Status
11
Azimuth is correct. Tilt DOWN for correct pointing.
12
Azimuth and Elevation are correct. Press Exit Button to exit Antenna Pointing and register to network.
13
* Registering to network.
14
Azimuth and Elevation are correct but Low signal strength.
†
15
Registered to network successfully.
16
Network Registration Failure. †
17
* Data activated successfully.
18
*
Data activation failure. †
19
Fatal Error. †
20
Global Beam is not available. †
† : Refer to TROUBLESHOOTING AND FAQ

Page 46 of 49
LED Legend * Flashing in sequential pattern Note: Flashing LED is represented by symbol with zebra stripes
21
Magnetic interference detected. †
22
GPS not available after timeout. †
23
Audio Pointing Mode ON- Global beam is not available.
†
24
Audio Pointing Mode ON- Global beam is available.
25
Safe Mode is enabled.
26
Powering down.
† : Refer to TROUBLESHOOTING AND FAQ

Page 47 of 49
APPENDIX B: TECHNICAL SPECIFICATIONS
Operating Frequency: Satellite Transmit: 1626.5 – 1660.5 MHz and 1668 – 1675 MHz Satellite Receive: 1518 – 1559 MHz GPS Frequency: 1574.42 – 1576.42 MHz
Weight
Overall Terminal
900g 1.98lbs
Transceiver
640g 1.41lbs
Standard Battery Pack
260g 0.57lbs
Environmental: Operating Temperature: -25 °C to +55 °C, -13°F to +131°F (with DC supply) -20 °C to +55 °C, -4°F to +131°F (with battery) Storage Temperature: -40 °C to +80 °C, -40°F to +176°F (Transceiver) -20 °C to +40 °C, -4°F to +104°F (Battery) -20 °C to +40 °C, -4°F to +104°F (Transceiver with battery) Battery Charging Temperature: 0 °C to +40 °C, +32°F to +104°F Storage Humidity: 95% RH (non-condensing at +40 °C or +104°F) Ingress Protection: IP65 Compliant UV resistant Services Standard IP: Up to 240/384kbps (send & receive) SMS: Using VoIP Apps or WebMMI; Standard 3G (up to 160 characters) Voice Connectivity: SIP server using Apps on Smart Devices Data Connectivity: Wi-Fi 802.11 b/g/n Access Point with internal Wi-Fi Antenna Power Requirement Power adaptor: 110/230 volts AC, o/p +18V, 65 watt
Dimensions (L x W x H )
Overall Terminal
180 x 170 x 30 mm 7.09 x 6.69 x 1.18 in
Transceiver
130 x 170 x 30 mm 5.12 x 6.69 x 1.18 in
Standard Battery Pack
50 x 170 x 30 mm 1.97 x 6.69 x 1.18 in

Page 48 of 49
Battery Standard: 10.8V @ 3Ah (3S1P) Li-ion Battery Pack High Capacity (Optional accessory): 10.8V @ 6Ah (3S2P) Li-ion Battery Pack
Item Specification Battery Type Lithium ion, rechargeable Nominal Voltage 10.8V Standard Battery Capacity 3Ah Charging temperature 0°C to +40°C Operating temperature -20 °C to +55 °C, -4°F to +131°F Min. charge cycles 300
Storage Temperature 1 month -20 °C to +45 °C, -4°F to +113°F 6 months -20 °C to +40 °C, -4°F to +104°F 1 year -20 °C to +35 °C, -4°F to +95°F
Page 49 of 49
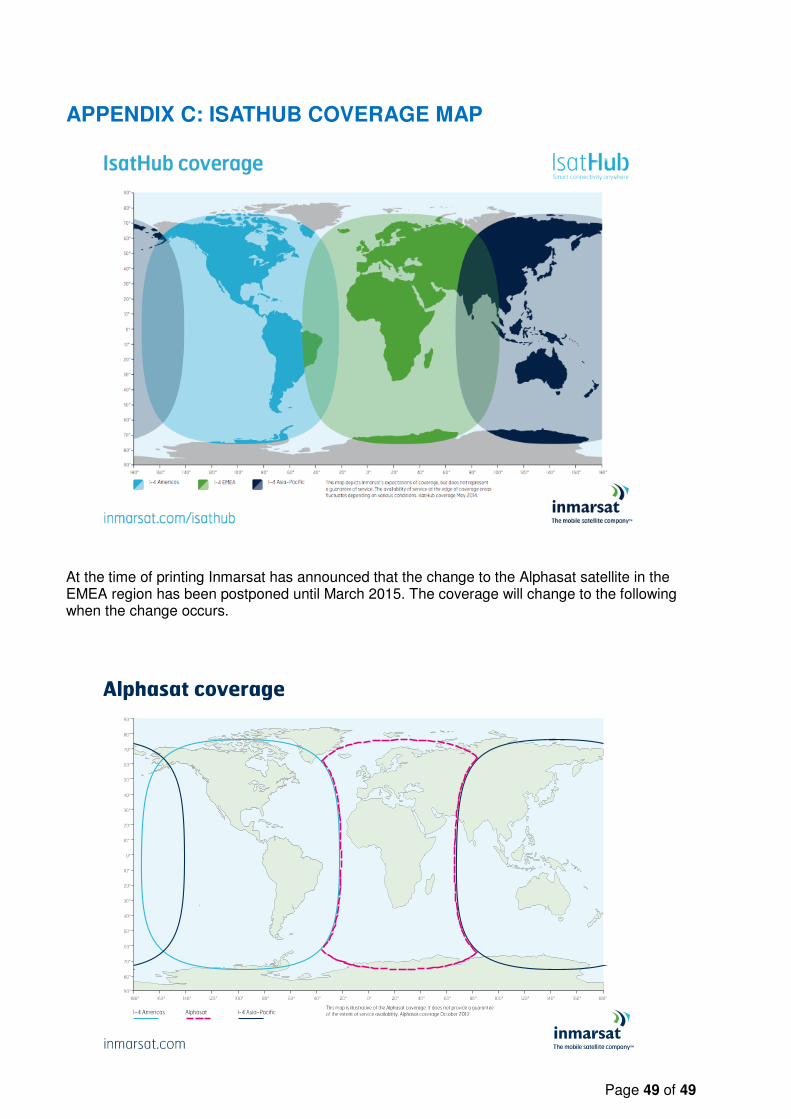
APPENDIX C: ISATHUB COVERAGE MAP
At the time of printing Inmarsat has announced that the change to the Alphasat satellite in the EMEA region has been postponed until March 2015. The coverage will change to the following when the change occurs.


