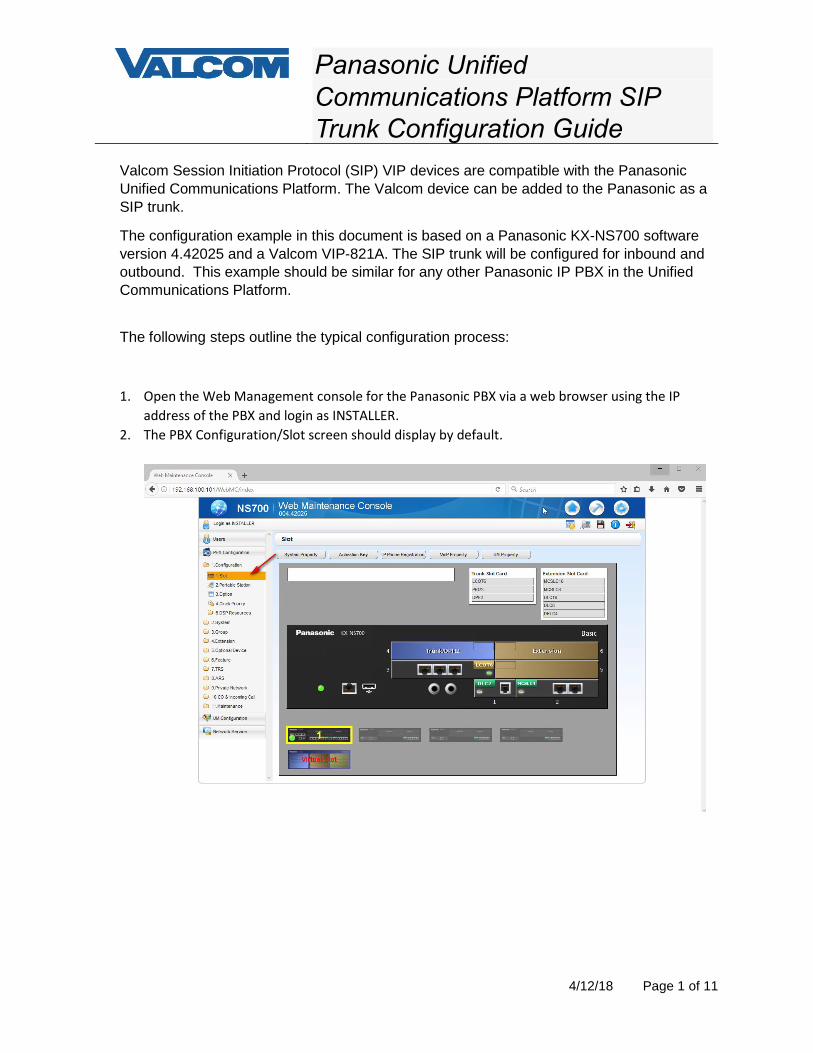
Panasonic Unified Communications Platform SIP Trunk Configuration Guide 4/12/18 Page 1 of 11 Valcom Session Initiation Protocol (SIP) VIP devices are compatible with the Panasonic Unified Communications Platform. The Valcom device can be added to the Panasonic as a SIP trunk. The configuration example in this document is based on a Panasonic KX-NS700 software version 4.42025 and a Valcom VIP-821A. The SIP trunk will be configured for inbound and outbound. This example should be similar for any other Panasonic IP PBX in the Unified Communications Platform. The following steps outline the typical configuration process: 1. Open the Web Management console for the Panasonic PBX via a web browser using the IP address of the PBX and login as INSTALLER. 2. The PBX Configuration/Slot screen should display by default.
Transcript
Panasonic Unified
Communications Platform SIP
Trunk Configuration Guide
4/12/18 Page 1 of 11
Valcom Session Initiation Protocol (SIP) VIP devices are compatible with the Panasonic
Unified Communications Platform. The Valcom device can be added to the Panasonic as a
SIP trunk.
The configuration example in this document is based on a Panasonic KX-NS700 software
version 4.42025 and a Valcom VIP-821A. The SIP trunk will be configured for inbound and
outbound. This example should be similar for any other Panasonic IP PBX in the Unified
Communications Platform.
The following steps outline the typical configuration process:
1. Open the Web Management console for the Panasonic PBX via a web browser using the IP
address of the PBX and login as INSTALLER.
2. The PBX Configuration/Slot screen should display by default.
Panasonic Unified
Communications Platform SIP
Trunk Configuration Guide
4/12/18 Page 2 of 11
3. Hover the mouse over the Virtual Slot and click on Select Shelf.
4. Virtual Slot screen should display and have at least 1 V-SIPGW16 Trunk Slot Card.
If not, drag and drop one from the Trunk Slot card window into the next available trunk Slot.
Panasonic Unified
Communications Platform SIP
Trunk Configuration Guide
4/12/18 Page 3 of 11
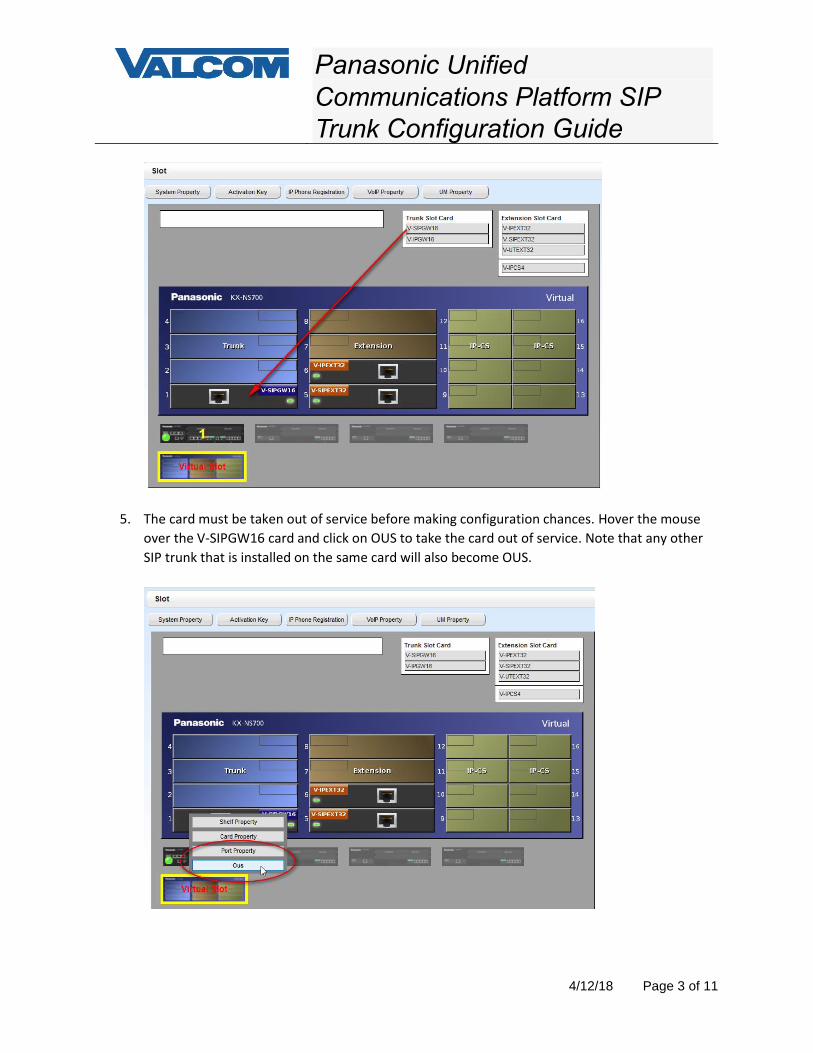
5. The card must be taken out of service before making configuration chances. Hover the mouse
over the V-SIPGW16 card and click on OUS to take the card out of service. Note that any other
SIP trunk that is installed on the same card will also become OUS.
Panasonic Unified
Communications Platform SIP
Trunk Configuration Guide
4/12/18 Page 4 of 11
6. Hover the mouse over the V-SIPGW16 card and click on Shelf Property
Panasonic Unified
Communications Platform SIP
Trunk Configuration Guide
4/12/18 Page 5 of 11
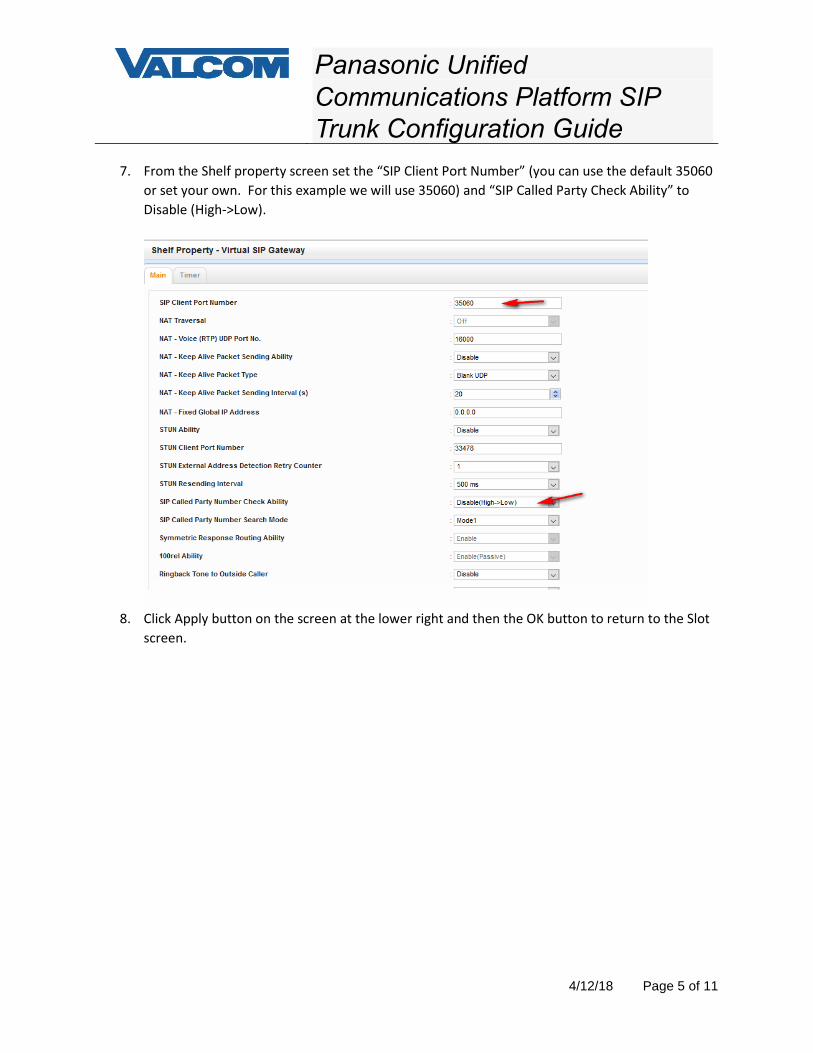
7. From the Shelf property screen set the “SIP Client Port Number” (you can use the default 35060
or set your own. For this example we will use 35060) and “SIP Called Party Check Ability” to
Disable (High->Low).
8. Click Apply button on the screen at the lower right and then the OK button to return to the Slot
screen.
Panasonic Unified
Communications Platform SIP
Trunk Configuration Guide
4/12/18 Page 6 of 11
9. Hover the mouse over the V-SIPGW16 card and click on “Port Property”.
10. At this point, the cards should still be out of service. However, if not, click on the Connection
field for the port being configured. A Command window will come up. Click OUS.
Panasonic Unified
Communications Platform SIP
Trunk Configuration Guide
4/12/18 Page 7 of 11
11. On the Main tab of the Port Property screen, choose Basic Channel from the Channel Attribute
column, then add a Provider Name (eg. Valcom) SIP Server IP address (eg 192.168.100.71), and
change the SIP server port number to the setting from step 7 (SIP Client Port Number). (Do not
click on OK at this point)
12. On the Account tab of the Port Property screen set the “User Name” to any value (Valcom
devices do not accept registration. This info is required by Panasonic PBX but not required by
Valcom devices). Likewise the Authentication ID and password can be any value. (Do not click
on OK at this point)
13. On the Register tab of the Port Property screen set “Register Ability” to “Disable”. (Do not click
on OK at this point)
14. On the Calling Party tab of the Port Property screen set the “From Header – User Part” to “PBX-
CLIP”. (Do not click on OK at this point)
15. On the Called Party tab of the Port Property screen set the “Type” to “To Header”. Click Apply.
16. Click on the Connection field for the port being configured. A Command window will come up.
Click on INS to place the SIP Trunk port back in service. If you had taken the card OUS, go to the
next step.
17. Click OK to save all changes and return to the Slot Screen. If you had the card still OUS, hover
over the SIPGW card and choose INS.
Panasonic Unified
Communications Platform SIP
Trunk Configuration Guide
4/12/18 Page 8 of 11
18. From the PBX Configuration menu tree click on 3. Group to configure Trunk information.
a. Click on 1. Trunk Group-
i. Click on 1. TRG Settings – Select an available Trunk Group and provide a “Group
Name” and an unused Dialing Plan Table number. (e.g. Trunk Group 3 for the
Group Name, 3 for the Dialing Plan Table.
ii. Click OK to continue
iii. Click on 4. Dialing Plan – Select the Dialing plan table number chosen previously
iv. and set Digits dialed pattern. (e.g. table #3 “Leading Number” 767XXXX where
anything dialed outgoing that starts with 767 will be directed to this SIP trunk).
19. Click OK to continue
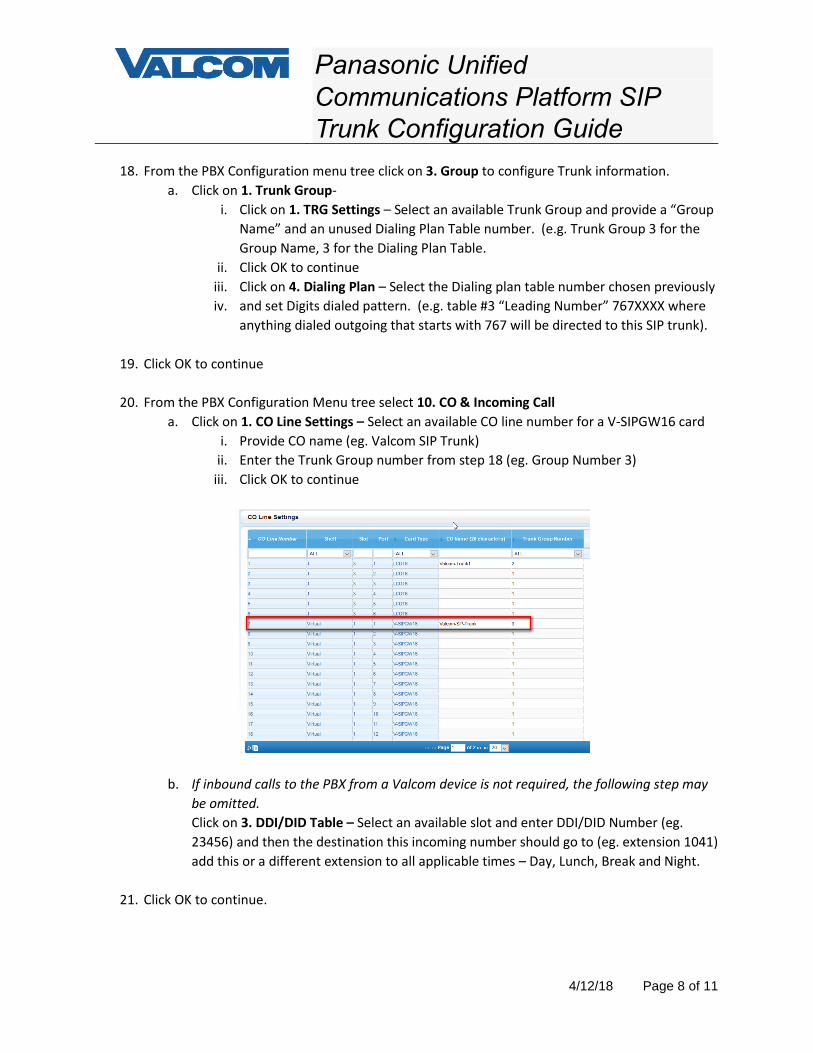
20. From the PBX Configuration Menu tree select 10. CO & Incoming Call
a. Click on 1. CO Line Settings – Select an available CO line number for a V-SIPGW16 card
i. Provide CO name (eg. Valcom SIP Trunk)
ii. Enter the Trunk Group number from step 18 (eg. Group Number 3)
iii. Click OK to continue
b. If inbound calls to the PBX from a Valcom device is not required, the following step may
be omitted.
Click on 3. DDI/DID Table – Select an available slot and enter DDI/DID Number (eg.
23456) and then the destination this incoming number should go to (eg. extension 1041)
add this or a different extension to all applicable times – Day, Lunch, Break and Night.
21. Click OK to continue.
Panasonic Unified
Communications Platform SIP
Trunk Configuration Guide
4/12/18 Page 9 of 11
22. At this point we can now configure the VIP Device in the VIP-102B tool. The latest version of the
VIP-102B IP Solutions Setup Tool may be downloaded from our website at
http://www.valcom.com/vipsetuptool .
23. After installing the VIP-102B tool, launch it and select “Scan using the current network settings”
if you have already predefined the subnet the VIP device is on. Otherwise if you are on the
same subnet you can select “Use the default settings to perform a new scan”. Then click OK to
start the scan.
24. If successful, the device should appear in the discovery window. Click Continue.
25. If you need to assign an IP address to this device or set it to DHCP refer to the VIP-102B
Reference manual on our website http://www.valcom.com/vipsetuptool .
26. After assigning the IP address and rescan there will be additional tabs to program. Specifically
for this example with the VIP device we will focus on the SIP tab to configure the device for the
SIP Trunk that was created on the Panasonic IP PBX.