1 SAS709-2017 Getting Started with Designing and Implementing a SAS® 9.4 Metadata and File System Security Design Angie Hedberg, Philip Hopkins, SAS Institute Inc. ABSTRACT SAS® has been installed at your organization – now what? How do you approach configuring groups, roles, folders, and permissions in your environment? This presentation is built on best practices used within the U.S. SAS® Consulting division and aims to equip new and seasoned SAS administrators with the knowledge and tools necessary to design and implement a SAS metadata and file system security model. We start by covering the basic building blocks of the SAS® Intelligence Platform authorization framework. We discuss the SAS® Metadata authorization facility, and highlight the differences between groups and roles, permissions and capabilities, access control entries and access control templates, and what content can be stored within metadata folders versus in file system folders. We review the various authorization layers in a SAS deployment that must work together to create a secure environment, including the metadata layer, the file system, and the data layer. We highlight key design best practices for securing metadata and the file system. Then, we present a 10-step best practice approach for how to design your SAS metadata security model. We provide an introduction to basic metadata and file system security design templates that have been used extensively by SAS Consulting in helping customers secure their SAS environments. INTRODUCTION This paper is the result of refining SAS®9 authorization design best practices over many years of working with SAS customers to create authorization models for both the metadata and file system layers. The goal of this paper is to empower you, as the SAS Administrator, with a set of best practices for defining a SAS authorization model to secure your SAS content and business data in accordance with your organization’s policies. Such a model comprises the SAS application layer authorizations and the underlying file system authorizations, controlled by the operating system, to achieve an integrated system of secured SAS content. The models shown here are focused on securing the types of content most common across SAS deployments; such as libraries, data, reports, stored processes, and more. There are also techniques for certain solutions, however not all SAS solutions are covered. Considerations for collectively designing and securing multiple SAS environments (such as Development, Test, and Production) are not addressed in this paper; however the modeling best practices presented here can generically be applied to any environment. In addition, securing all facets of your SAS environment is a broader topic than what we attempt to cover. At a minimum, additional considerations such as, authentication, encryption, infrastructure security, and auditing should be considered. The focus here is on authorization. SAS AUTHORIZATION FRAMEWORK Before you can start working on a design, you must understand the fundamental concepts and components of the SAS authorization framework. This framework is not a single product but the combination of disparate elements, including: Metadata objects representing the content that can be restricted and the identities to which access is permitted Metadata objects used to define rules governing access to content and application features Centralized authorization facility providing access control decisions to client applications Distributed, client application level governance of application specific capabilities
Transcript
1
SAS709-2017
Getting Started with Designing and Implementing a SAS® 9.4 Metadata and File System Security Design
Angie Hedberg, Philip Hopkins, SAS Institute Inc.
ABSTRACT SAS® has been installed at your organization – now what? How do you approach configuring groups, roles, folders, and permissions in your environment? This presentation is built on best practices used within the U.S. SAS® Consulting division and aims to equip new and seasoned SAS administrators with the knowledge and tools necessary to design and implement a SAS metadata and file system security model. We start by covering the basic building blocks of the SAS® Intelligence Platform authorization framework. We discuss the SAS® Metadata authorization facility, and highlight the differences between groups and roles, permissions and capabilities, access control entries and access control templates, and what content can be stored within metadata folders versus in file system folders. We review the various authorization layers in a SAS deployment that must work together to create a secure environment, including the metadata layer, the file system, and the data layer. We highlight key design best practices for securing metadata and the file system. Then, we present a 10-step best practice approach for how to design your SAS metadata security model. We provide an introduction to basic metadata and file system security design templates that have been used extensively by SAS Consulting in helping customers secure their SAS environments.
INTRODUCTION
This paper is the result of refining SAS®9 authorization design best practices over many years of working with SAS customers to create authorization models for both the metadata and file system layers. The goal of this paper is to empower you, as the SAS Administrator, with a set of best practices for defining a SAS authorization model to secure your SAS content and business data in accordance with your organization’s policies. Such a model comprises the SAS application layer authorizations and the underlying file system authorizations, controlled by the operating system, to achieve an integrated system of secured SAS content. The models shown here are focused on securing the types of content most common across SAS deployments; such as libraries, data, reports, stored processes, and more. There are also techniques for certain solutions, however not all SAS solutions are covered.
Considerations for collectively designing and securing multiple SAS environments (such as Development, Test, and Production) are not addressed in this paper; however the modeling best practices presented here can generically be applied to any environment.
In addition, securing all facets of your SAS environment is a broader topic than what we attempt to cover. At a minimum, additional considerations such as, authentication, encryption, infrastructure security, and auditing should be considered. The focus here is on authorization.
SAS AUTHORIZATION FRAMEWORK
Before you can start working on a design, you must understand the fundamental concepts and components of the SAS authorization framework. This framework is not a single product but the combination of disparate elements, including:
Metadata objects representing the content that can be restricted and the identities to which access ispermitted
Metadata objects used to define rules governing access to content and application features
Centralized authorization facility providing access control decisions to client applications
Distributed, client application level governance of application specific capabilities
2
BUILDING BLOCKS OF AN AUTHORIZATION MODEL
Modeling is the process of translating specific authorization requirements into a design that describes how to implement the required solution within the SAS authorization framework. It is essential to have a clear set of concepts, and a vocabulary to describe them. SAS provides certain concepts and terms, and the best practices described in this paper augment them modestly, usually defining broader abstractions to more clearly organize the terminology.
Personas
The term persona describes a type of user who performs specific business functions; for example an Administrator, Analyst or Developer. Many authorization systems use the term “role” in this context, however in SAS, the term role has a more narrow focus. Initially, personas should be used to elicit the types of business users in your organization, without concern for how they will be implemented in SAS. Eventually, the personas are implemented in SAS metadata using a combination of Identity based objects: Person, Group, or Role.
Privileges
SAS authorization privileges come in two distinct forms: metadata permissions governing types of access to metadata objects, and application specific capabilities governing access to specific features within an application.
Permissions and Access Controls
A distinct set of permissions is defined in metadata. Some key permissions that are referenced in this paper include: ReadMetadata, WriteMetadata, WriteMemberMetadata, Read, Write, Create, Delete, and Administer1. Permissions are context sensitive, and therefore not all permissions are applicable to all object types. ReadMetadata and WriteMetadata permissions are however enforced on every single metadata object.
Access controls are rules specifying a set of permissions assigned to an identity. The rule is then mapped to an object to define which identities have access to the object. Multiple access controls, or rules, can also be grouped together to define a specific type of access pattern. For example, if multiple identities require the same type of access to certain objects, it is best to group multiple rules together to form a single unit that can be applied to those objects. This grouping of rules creates a metadata object known as an Access Control Template. When an access control is used as a single rule, it is identified as an Access Control Entry. Access Control Entries (ACEs) and Access Control Templates (ACTs) can only be defined using a Person or Group identity, they cannot be constructed using Role identity objects. A Role is reserved strictly for defining application capabilities.
Capabilities
Distinct sets of application features are defined in metadata as capabilities, and are highly context sensitive given that capabilities are application specific. Capabilities control the features and functions available to an end user within SAS client applications. Some applications have similar capabilities and some applications do not define any capabilities.
Capabilities are surfaced as statements describing an application specific feature, such as the ability to create a new report. Without the ‘Create Report’ capability in the SAS® Visual Analytics application, a user would not have access to the appropriate menu options required to build a report. Capabilities can be collected into logical groups, spanning multiple applications, by assigning them to a Role. For some
1 The CheckInMetadata permission should be included in an authorization model if using project repositories and the change management functionality available in SAS® Data Integration Studio. Additional metadata permissions that are more minimally used include: ManageMemberMetadata, ManageCredentialsMetadata, Insert, Update, Select, Create Table, Drop Table, Alter Table, and Execute. Reference the SAS®9.4 Intelligence Platform: Security Administration Guide for descriptions and usage of permissions.
3
applications, capabilities may be implicitly tied to a pre-defined role and not customizable. An example is the set of capabilities defined by the Metadata Server’s Unrestricted Role.
Implicit Identities
Custom group identity objects can be defined in order to facilitate different types of access to objects. Person objects representing the end users must be explicitly assigned to custom groups in accordance with the access to objects they require.
However, there are two groups where the users are implicit, namely the PUBLIC and SASUSERS groups. When a user who logs into the SAS platform is represented by a Person object in metadata (that is their authenticated user ID matches the user ID stored on a Person object), then he or she is automatically a member of the SASUSERS group. When a user who successfully logs in but has no Person object associated with their authenticated user ID, then the user is given the PUBLIC identity. All SASUSERS are also implicit members of the PUBLIC group.
SAS AUTHORIZATION FACILITY
You can create authorization rules through access controls and capabilities in metadata, however a decision engine is required to evaluate and enforce these rules. That engine is the authorization facility, which exists as functionality within the SAS® Metadata Server2. The goal of this facility is to determine a user’s effective permissions to an object or a user’s effective capabilities within an application.
When SAS client applications need to determine whether to surface or withhold certain application features to a user, they query the authorization facility within the metadata server to find out the set of effective capabilities the user has been granted.
When client applications attempt to access any metadata object on behalf of some user, the facility must evaluate all access controls mapped to the object, resolve any conflicts and determine the effective permissions that the user has to the object. Only if the effective permissions grant the action being requested, will access be granted. When evaluating effective permissions the facility considers both the rule itself and its origin. It evaluates all relevant access controls, including those directly applied to the object using an ACE (which have the highest precedence), those originating from ACTs applied to the object (of slightly lower precedence), and those inherited from parent objects (which have the least precedence). If there is a permission conflict due to a user belonging to multiple groups with conflicting access controls that are directly applied to an object (either through conflicting ACEs or conflicting access controls applied using ACTs), then identity precedence is evaluated. Identity precedence gives a higher precedence to groups a user is directly a member of, and lesser precedence to indirect group memberships. The implicit memberships in SASUSERS and PUBLIC get the lowest level of identity precedence.
There is one aspect of effective permissions that warrants further explanation. A special access control template exists to specify permissions to all objects in the event that no explicit permissions exist. This is the Repository ACT, so named because its access rules apply to every object in the foundation metadata repository. In every out of the box configuration of the metadata server, a repository ACT named ‘Default ACT’ is provided. This ACT ensures ReadMetadata privilege to the foundation repository and the ability to add new objects, via WriteMetadata, to the repository, for every user needing access to the system. This system requirement effectively means that access to objects is inherently optimistic – users have access to everything and custom authorization models must be implemented to reduce access in accordance with the restrictions dictated by security policies.
AUTHORIZATION LAYERS
2 There are technically multiple decision engines, but the primary one is within the SAS Metadata Server for evaluating capabilities and a specific subset of metadata permissions (namely the permissions ending with “Metadata”, such as ReadMetadata and WriteMetadata). Details of additional authorization facilities is beyond the scope of this paper, but can be found in the SAS®9.4 Intelligence Platform: Security Administration Guide.
4
Authorization is about controlling access to content. For a SAS environment, content exists either as objects in the SAS metadata repository, or as objects in the persistence layer. The persistence layer consists of files on the file system, data in third-party databases, or objects stored in the SAS® Content Server (physically maintained within an internal database known as the SAS® Web Infrastructure Platform Data Server). In some cases content is represented by an object from a single layer, and in other cases content is comprised of multiple connected objects from a combination of these layers.
Objects in metadata are often only references to some other persistence layer object, such as files on the file system or elements within SAS Content Server. However, some objects in metadata have no physical reference. Conversely, not all physical files have a representation in metadata. It is beyond the scope of this paper to cover all of these relationships fully. However, some common examples are as follows:
A SAS data set is a file, and a database table is an object within an RDBMS product, however end users typically interact only with a metadata object referencing the physical file or database object. Regardless of the metadata authorizations applied to the data objects, the physical data files must be explicitly secured3.
A SAS report exists as a metadata object, and a corresponding file within SAS Content Server representing the report’s content; end users interact only with the metadata object and no consideration needs to be given to securing the underlying report content.
A metadata Tree object is used for representing folders to organize metadata objects; the folders created in metadata will sometimes have a directory counterpart on the file system and other times will not. When metadata folders have no representation in the file system layer, such as reports, it does not make sense to have a corresponding directory on the file system.
SAS Application Server Contexts are metadata collections describing how a variety of different SAS server types should be launched in session-specific ways; this metadata is tied directly to the relevant SAS server launch script on the file system for each server component described by the entire context. All access is controlled strictly in the metadata layer.
SAS user defined formats are physically saved in a SAS catalog file on the file system. Formats do not have a corresponding metadata object, and therefore only file system authorizations apply to catalog files.
For a more thorough discussion of the types of objects that can be controlled, see the Authorization section of the SAS®9.4 Intelligence Platform: Security Administration Guide.
MODEL PRESENTATION
Expression of a model has to take some form – in its most primitive form it might be a hand drawn rendering, in its most advanced form it might be through a sophisticated software tool that can automatically translate the model into its implementation. In lieu of a metadata modeling tool, our approach is to use Microsoft Visio diagrams, based on a well-defined set of symbols (which represent many of the building blocks discussed in the previous sections) to describe the SAS authorization model. A Microsoft Excel spreadsheet is used to describe file system security rules in a tabular format.
To get you started, there are downloadable modeling templates referenced in the Recommended Reading section of this paper.
METADATA SECURITY DESIGN BEST PRACTICES
The SAS Metadata Server is home to the SAS authorization facility and therefore a focal point in our design. The majority of our authorization modeling is finding the most elegant way to represent core business functions and privileges in terms of metadata objects, and the metadata centric authorization tools available as part of this authorization facility.
3 For an alternative approach to lock down direct access to SAS data sets and SAS views stored on the file system, reference the SAS®9.4 Guide to Metadata-Bound Libraries.
5
DEFINE AND IMPLEMENT PERSONAS
For authorization purposes we are interested in implementing a persona in metadata such that it has the requisite privileges to allow the users assigned to the persona to carry out their responsibilities. A persona is implemented in SAS through a combination of a metadata group object, which is granted specific metadata permissions, and a metadata role object, which has specific capabilities enabled. Individual users are added to a functional group and the group is then assigned to a corresponding role.
CREATE CUSTOM GROUPS AND ROLES FOR SIMPLICITY
Depending on the SAS software that has been licensed, there will be a corresponding number of default groups and roles defined within the “out of the box” SAS metadata that are application specific. For the most part, these default groups and roles are narrowly focused on individual products and often too granular in definition to map directly to your organization’s personas and security requirements. For this reason, it is recommended to create custom metadata groups and roles for simplicity that directly implement requisite personas. Creating custom roles enables you to consolidate capabilities across SAS applications for the core functional groups. For example, if you require a Developer persona, you can create a Developers group and a Developer role. Users would be members of the group and the group would be assigned to the role. The implementation of the group and role would collectively grant the requisite object permissions and capabilities across all applicable SAS applications used by a Developer – such as SAS® Enterprise Guide®, SAS® Studio, and SAS Visual Analytics.
Creating custom functional groups and consolidated roles based on business personas is much easier to manage over time and it greatly simplifies the on-boarding of new users into the SAS environment. Instead of having to add a single user to multiple groups and roles, you simply add them to the appropriate functional group and all applicable permissions and capabilities are automatically established.
USE ACTS INSTEAD OF ACES
The use of explicit Access Control Entries (ACEs) to implement metadata permissions almost always leads to confusion and incorrect effective permissions due to user error, and a security model that is difficult to understand. It is also a daunting task to locate all the ACEs in metadata to reverse engineer a model if necessary. Access Control Templates (ACTs) on the other hand are readily available via SAS® Management Console’s Authorization Manager plug-in; and if defined and implemented correctly they are easier to design, implement, understand, and maintain over time. Updating an ACT’s definition will automatically be reflected on all objects where the ACT has been applied. In addition, contrary to ACEs, it is easy to build a report that shows where ACTs have been applied in the metadata. ACEs should be avoided in favor of ACTs, even if the ACT will only be applied to one object.
ONLY USE GROUPS FOR ACTS
Only identity groups should be used for building the rules within ACTs, never individual users. This is a general best practice in any security model that exists, even outside the scope of SAS. Using groups in ACT definitions is dynamic; it allows for users to be easily added and removed from the system without impacting the security implementation. This practice greatly simplifies an administrator’s job in onboarding new users and managing authorizations.
DENY BROADLY AND GRANT SPECIFICALLY
A general rule of thumb when designing ACTs is to deny permissions to the broadest identity level possible and grant permissions more precisely to functional or organizational groups. This is implemented by denying PUBLIC or SASUSERS permissions within an ACT and then granting back the same permissions to only the groups that require the access.
This practice meets two goals: directly counteracting the permissive permissions set for SASUSERS on the repository (Default) ACT, and avoiding potential permission conflicts. Permission conflicts typically arise if a user is in more than one group – with one group granted access and the other group denied access. The metadata authorization facility will ultimately determine what effective permission a user has, but this conflict of permissions and resulting effective permission might not be immediately obvious to an administrator. By only ever denying permissions to PUBLIC or SASUSERS and then granting
6
permissions more specifically to functional or organizational identity groups, you avoid all cases that would result in confusing permission conflicts. It is important to keep in mind that when you broadly deny permissions to PUBLIC or SASUSERS you might inadvertently include certain privileged identities, such as system identities and administrators; therefore you must also grant back permissions to these privileged identities within the ACT.
IDENTIFY BUSINESS ACCESS PATTERNS AND DEFINE ACTS TO ENCAPSULATE THE PATTERNS
ACTs should be defined and named according to business access patterns. Having a well-defined set of patterns, along with a clear and consistent ACT naming convention, is an essential element of making a security model easy to understand and manage over time. The encapsulation of a business access pattern into a single ACT makes applying the pattern as simple as applying a single ACT, rather than multiple ACTs, to each object. The name of the ACT should clearly identify the access pattern, and make the intent of the ACT so intuitive that it potentially can be fully understood without requiring inspection of the detailed rules comprising it.
For example, if a Report Creators group requires exclusive WriteMemberMetadata permission to a Reports folder in metadata, define an ACT by broadly denying WriteMetadata to SASUSERS, and then granting WriteMemberMetadata to the Report Creators group. In order to not exclude system accounts and administrators from also having write access, grant WriteMetadata to SAS Administrators and WriteMetadata to the SAS System Services group. All of these rules are defined within a single ACT that can then easily be applied on the Reports metadata folder.
As a best practice, we have defined read access patterns separately from write access patterns – the resulting ACTs work together to allow a broad community of like users to view objects, while keeping the write privileges restricted to a smaller subset of the same community. The metadata authorization facility enforces that a user must have ReadMetadata permission to an object in order to view or update the object; therefore your security design must consider where to apply read access patterns and write access patterns so that they correctly work together. Here are four key access patterns that are common across the majority of authorization models.
Private pattern: This pattern is used to restrict access to a specific group of users. It is implemented as follows:
<Organizational Group>: grant ReadMetadata, Read (RM, R)
SAS Administrators: grant ReadMetadata, Read (RM, R)
SAS System Services: grant ReadMetadata, Read (RM, R)
Register pattern: This pattern is only relevant on metadata folder objects. It enables users to add, or “register”, new objects into a metadata folder, but not update the folder itself – such as changing the name of the folder or deleting it. This pattern is primarily applied on the lowest level metadata folders to allow users to create new objects within folders, but not manage the top level metadata folder structure. In the implementation of this pattern, both WriteMemberMetadata and WriteMetadata permissions are used. A grant of the WriteMetadata permission inherently means that you have WriteMemberMetadata as well. The Register pattern is implemented as follows:
4 SASUSERS may also optionally be denied WriteMetadata in the Private ACT Pattern. While denying WriteMetadata here is optional (given if users do not have ReadMetadata permission to an object, they inherently cannot update the object), it does improve the readability of the Authorization properties of an object within SAS Management Console and may minimize confusion for an Administrator.
7
<Functional Group>: grant WriteMemberMetadata (WMM)
SAS Administrators: grant WriteMetadata (WM)
SAS System Services: grant WriteMetadata (WM)
SASUSERS: deny WriteMetadata (d-WM)
Write pattern: This pattern enables exclusive full write access to objects. The Write, Create, Delete, Update, and Administer reference permissions have relevance only on certain types of metadata objects and their meaning changes somewhat relative to the object type. Combining these reference permissions with the WriteMetadata permission in a single pattern is acceptable because in cases where only WriteMetadata is required for some object type, the additional reference permissions will be ignored by the authorization facility if they are not relevant. These reference permissions are used primarily for defining access controls on library and data objects. The Administer permission is included because it is a required permission on a SAS® LASR™ Analytic Server library in order to load or import a table to the SAS LASR Analytic Server. The Write pattern is implemented as follows:
<Functional Group>: grant WriteMetadata, Write, Create, Delete, Update, and Administer (WM, W, C, D, U, A)
SAS Administrators: grant Write, Create, Delete, Update, and Administer (WM, W, C, D, U, A)
SAS System Services: grant WriteMetadata (WM)
SASUSERS: deny WriteMetadata, Write, Create, Delete, Update, and Administer (d-WM, d-W, d-C, d-D, d-U, d-A)
Update pattern: This pattern uses only the WriteMetadata permission to enable users to modify metadata objects. It can be minimally used in favor of using the Register or Write patterns exclusively. The Update pattern is implemented as follows:
<Functional Group>: grant WriteMetadata (WM)
SAS Administrators: grant WriteMetadata (WM)
SAS System Services: grant WriteMetadata (WM)
SASUSERS: deny WriteMetadata (d-WM)
Each ACT pattern above can be repeated according to the number of functional and organizational groups required within your organization.
If all users identified as SAS Administrators also require “unrestricted” metadata access, then it is recommended to simply add the SAS Administrators group to the Metadata Server: Unrestricted role. With this approach, you can remove the SAS Administrators group from all ACT definitions, given this group will have unrestricted full metadata permissions that are immutable.
APPLY PERMISSIONS AT THE HIGHEST OBJECT LEVEL POSSIBLE
ACTs should be applied on the highest object level possible to achieve the desired restrictions. The metadata folder structure should be defined with this best practice in mind so that permissions can be applied on a parent folder and inherited down to subfolders and objects created within the folders. For example, it is more manageable to apply an ACT on a Reports folder and have those permissions inherit down to all reports created within the folder versus applying ACTs on each individual report object.
FILE SYSTEM SECURITY DESIGN BEST PRACTICES
It is important that the metadata authorization rules and file system authorizations work together to collectively secure the SAS environment. In the metadata layer, an end user’s access is always based on his or her individual identity. However, access to the file system layer can be based on the individual identity or a mediated, shared identity. An understanding of the usage scenarios giving rise to these different file system security contexts must be understood and modeled accordingly.
8
UNDERSTAND TOUCHPOINTS BETWEEN SAS METADATA AND THE FILE SYSTEM
As users work with SAS applications to write code, create data integration jobs, build analytical models, create stored processes, build reports, and more – they will be creating both new metadata objects and new files stored on the file system. However, not all metadata objects have a corresponding physical file, and not all files on the file system have a corresponding metadata object. The objects and files being created by SAS applications might not always be obvious to the end user. As an administrator, you need to understand the associations between metadata objects and files so that you can intelligently define and properly secure the file system directory structure. Some examples of associations between metadata objects and persisted files are documented in the Authorization Layers section.
MIMIC THE METADATA FOLDER STRUCTURE
The metadata folder structure and the file system directory structure should mirror one another at the higher levels, but may diverge at lower levels. If the metadata folder structure is defined according to an organizational hierarchy, the same organizational hierarchy should be used to define the file system directory structure. However, subfolders defined in metadata for specific object types might not all map to subdirectories on the file system, and vice versa for physical files that do not exist in metadata.
In addition, permissions should be mimicked between metadata and the file system. Understandably not all metadata permissions will translate to file system permissions, but at a high level replicate read and write permissions to the extent possible.
Using a similar metadata folder and file system directory structure will greatly simplify the end-user experience – allowing users to learn one folder structure with a consistent navigation path.
DEFINE SERVICE ACCOUNTS BASED ON THE REQUIRED SECURITY GRANULARITY
A single service account for stored process execution or scheduling of batch jobs is not always adequate to meet security requirements of the system. This is especially true in a multi-tenant environment with users across lines of business using the same SAS software deployment. Sharing one logical Stored Process Server definition and single service account opens the possibility for stored process developers from one line of business to execute code against any data files available to the common service account. When a single service account will not suffice, it is recommended to define multiple service accounts in accordance with the granularity required to implement the correct degree of separation. For example, you can implement a unique service account per Business Unit or Department.
Service accounts should be granted appropriate read and write file system access, and on UNIX systems, it is recommended that line of business service accounts be used as the directory owner of their respective line of business directory (and subdirectories). It is often the case that in multiple environment deployments (with separate Production and non-Production environments), only service accounts have write privileges on the file system in Production. For UNIX systems, it is recommended that designated administrators have privileges to use relevant service accounts for command line access.
USE SETGID PERMISSION ON DIRECTORIES (FOR UNIX)
File sharing on UNIX systems presents unique challenges and needs to be properly designed. One such challenge is to ensure that all new files created within a shared line of business (LOB) directory are viewable to all members of the LOB (and sometimes also writable depending on security requirements.) To address this, specify the setgid permission on each directory to ensure that all new files created within the directory will inherit the same group owner as the parent directory. The setgid permission will also inherit down to newly created subdirectories. This greatly improves the end-user experience and facilitates file sharing.
10-STEP PROCESS FOR CREATING A SAS SECURITY MODEL
The following 10-step process pulls together the best practice information documented in this paper and steps through how to create a SAS metadata and file system security design. Steps 1 and 2 would be performed as part of a requirements (or definition) phase. Steps 3 through 9 outline the metadata security modeling process. Step 10 is to model the file system authorizations.
9
STEP 1: IDENTIFY KEY FUNCTIONAL PERSONAS AND THEIR SAS SOFTWARE PRIVILEGES
First, define personas by categorizing all SAS users in your organization based on their job function and usage of SAS software. Define tasks that each persona will perform within SAS and list all SAS client applications that each persona can use. At a high-level there are three primary categories of SAS users: Administrators, Developers, and Consumers. Each of these personas may be sub-divided as necessary.
Administrators: SAS Administrators can be defined at the Enterprise level or based on some line of business (for example, Business Unit Admins). Most often these users have access to all features and functions of all SAS client applications. If there are line of business (LOB) Administrators, determine what restrictions they might have. For example, they might be limited to managing metadata folders, scheduled jobs, and group membership only relevant to their LOB.
Developers: In every SAS deployment, there exists some form of Developers who create data, perform analysis, and share content with others. Developers might be categorized more specifically based on their function as follows:
Data Management (DM) Developers: DM Developers use various data management tools to manage data quality and build data integration jobs to extract data from source systems, transform data, and load data into analytical or reporting data sources. SAS clients typically used by this persona might include: SAS® Data Integration Studio, SAS® Data Management Studio and SAS Enterprise Guide.
Business Intelligence (BI) Developers: BI Developers are responsible for developing, integrating, automating, and distributing reports and analyses to others using both web-based and desktop applications. BI Developers generally use tools such as: SAS Enterprise Guide, SAS® Add-In for Microsoft Office, SAS Visual Analytics, SAS Studio, SAS® OLAP Cube Studio, SAS® Information Delivery Portal, SAS® Web Report Studio, and SAS® Information Map Studio.
Analysts: Members of this persona are most often statisticians performing advanced analytical functions. Analysts will use various SAS tools to perform ad hoc reporting, analysis, and exploration of data. They will build analytical models, perform forecasting, and ultimately generate model code that will be integrated into production data processing. SAS client applications used by this persona might include: SAS Enterprise Guide, SAS Studio, SAS Visual Analytics, SAS® Enterprise Miner™, SAS® Forecast Studio, and SAS® Model Manager.
Report Creators: Report Creators perform report development using web-based tools. Members of this persona might have responsibility to generate and share reports with others within their LOB. SAS clients used by this persona might include: SAS Visual Analytics, SAS Web Report Studio, and SAS Information Delivery Portal.
Consumers: Consumers are read-only users typically using web-based or mobile applications to consume reports created by others. Consumers might have privileges to create reports for their own personal use, but not shared reports. Consumers typically use the following SAS applications: SAS Visual Analytics, SAS Information Delivery Portal, SAS Web Report Studio, and SAS® Mobile BI.
STEP 2: IDENTIFY THE ORGANIZATIONAL HIERARCHY AND SECURITY RESTRICTIONS BETWEEN LINES OF BUSINESS
Within the scope of all SAS users, define the organizational hierarchy which at a minimum will be used for organizing content in metadata and on the file system. An example organizational hierarchy might be: Business Unit Department Project Team. Then determine what security restrictions exist between each level in the hierarchy. Do Business Units share any content, or do they function independently and therefore should be totally secured from each other? Are there security restrictions between Departments? Do Project Teams have read-write access to their own Project content, but read-only to all other Project Teams’ content within their respective Department? Or should Project Teams be completely restricted from each other? How do these security restrictions translate to the physical data? The answers to these types of questions will help craft your security requirements, which are an essential input to the actual design.
10
STEP 3: DESIGN TOP-LEVEL FUNCTIONAL IDENTITY GROUPS
Design metadata groups required to implement the defined personas. This should be a one-to-one mapping of a functional group for each persona. We use the term “top-level” functional group to identify a single core group representing all users performing some function across all lines of business. In a multi-tenant environment, this top-level functional group will be comprised of multiple nested groups, which is addressed in Step 5. The top-level functional groups are used for granting permissions and will also be assigned to role objects to grant capabilities for the personas.
A recommended naming convention for the top-level functional groups is an underscore “_” followed by the persona name, such as _Analysts or _Report Creators. With this convention, all top-level functional groups will sort to the top when viewing group identities within SAS Management Console. The underscore is not only a visual aid, but it also serves as a reminder of the group’s purpose and a flag to administrators to not directly add users to these groups. The following image illustrates top-level functional groups.
Figure 1. Top-Level Functional Groups Design
STEP 4: DESIGN GROUPS BASED ON ORGANIZATIONAL HIERARCHY
Design metadata groups for each level in the organizational hierarchy. If the organizational hierarchy is Business Unit Department Project Team, then metadata groups will be required for each Business Unit, for each Department, and for each Project Team. Each of these organizational units can generically be referred to as a line of business (LOB).
A standard naming convention is important for these groups to ensure that they are sorted and viewable together within SAS Management Console. It is recommended to include each level of the organizational hierarchy within the name of the group. For example, if there exists a Northeast Business Unit that is comprised of a Customer Service Department and a Marketing Department, then create three metadata groups named as follows: Northeast, Northeast Marketing, and Northeast Customer Service.
It is more efficient to model only abstract organizational metadata groups instead of representing each and every line of business. With this method, the abstract representation of the groups becomes a template that is easily substituted with each actual LOB during implementation.
Figure 2: Organizational Metadata Group Design
_Consumers_Developers_Business Unit
Administrators
NE - Northeast
NE Marketing NE Customer
Service
<Business Unit>
<BU> <DEPT>
Abstract Metadata Group Design Actual Metadata Groups
11
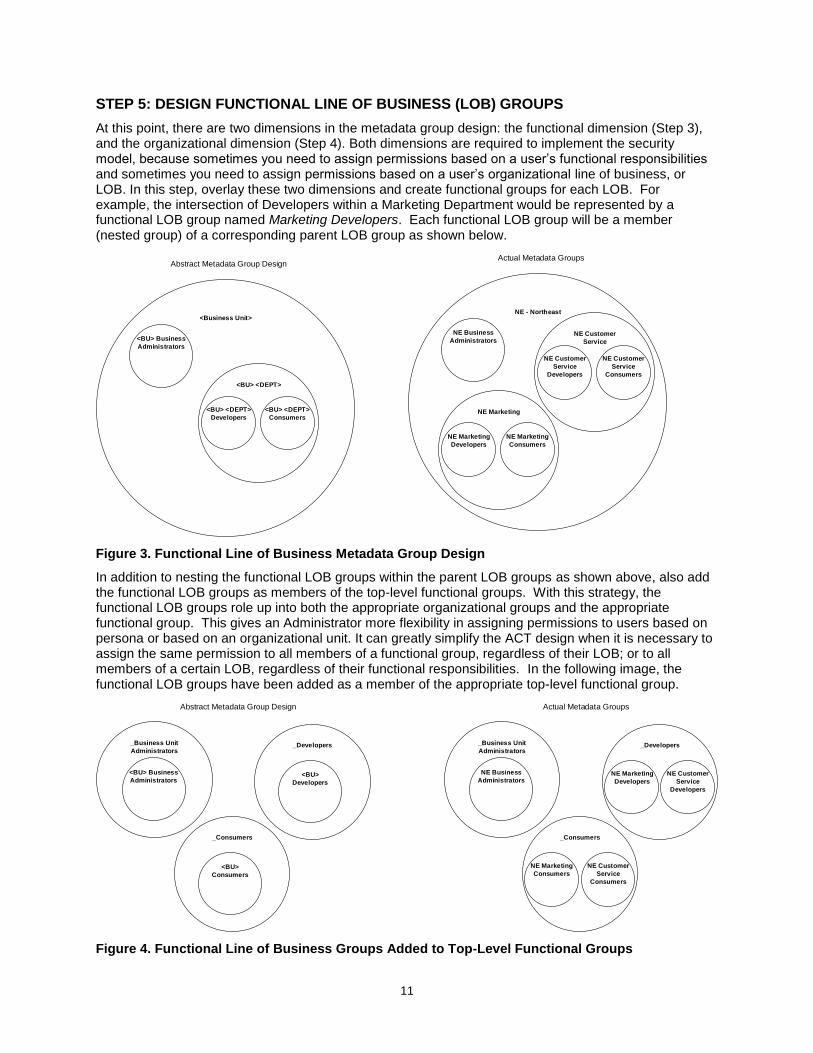
STEP 5: DESIGN FUNCTIONAL LINE OF BUSINESS (LOB) GROUPS
At this point, there are two dimensions in the metadata group design: the functional dimension (Step 3), and the organizational dimension (Step 4). Both dimensions are required to implement the security model, because sometimes you need to assign permissions based on a user’s functional responsibilities and sometimes you need to assign permissions based on a user’s organizational line of business, or LOB. In this step, overlay these two dimensions and create functional groups for each LOB. For example, the intersection of Developers within a Marketing Department would be represented by a functional LOB group named Marketing Developers. Each functional LOB group will be a member (nested group) of a corresponding parent LOB group as shown below.
Figure 3. Functional Line of Business Metadata Group Design
In addition to nesting the functional LOB groups within the parent LOB groups as shown above, also add the functional LOB groups as members of the top-level functional groups. With this strategy, the functional LOB groups role up into both the appropriate organizational groups and the appropriate functional group. This gives an Administrator more flexibility in assigning permissions to users based on persona or based on an organizational unit. It can greatly simplify the ACT design when it is necessary to assign the same permission to all members of a functional group, regardless of their LOB; or to all members of a certain LOB, regardless of their functional responsibilities. In the following image, the functional LOB groups have been added as a member of the appropriate top-level functional group.
Figure 4. Functional Line of Business Groups Added to Top-Level Functional Groups
NE - Northeast
NE Marketing
NE Marketing
Developers
NE Marketing
Consumers
NE Customer
Service
NE Customer
Service
Developers
NE Customer
Service
Consumers
NE Business
Administrators
<Business Unit>
<BU> <DEPT>
<BU> <DEPT>
Developers
<BU> <DEPT>
Consumers
<BU> Business
Administrators
Abstract Metadata Group DesignActual Metadata Groups
Abstract Metadata Group Design Actual Metadata Groups
_Business Unit
Administrators
<BU> Business
Administrators
_Consumers
<BU>
Consumers
<LOB>
Developers
_Developers
<BU>
Developers
_Business Unit
Administrators
NE Business
Administrators
_Consumers
<LOB>
Developers
_Developers
NE Marketing
Developers
NE Customer
Service
Developers
NE Marketing
Consumers
NE Customer
Service
Consumers
12
Users should only be made a direct member of the LOB functional group corresponding to the lowest level of the organizational hierarchy. Users should not be made a direct member of the top-level functional groups nor should they be direct members of the parent LOB groups. When onboarding users into the environment, you will only need to add a user to a single LOB functional group in order for them to attain the correct privileges for their persona. If a user has responsibilities in multiple LOBs, the user should be onboarded to each separate functional LOB group.
STEP 6: DESIGN ROLES AND CAPABILITIES
Design a custom role for each functional persona that grants capabilities across all applicable SAS applications. Most often this results in a one-to-one mapping of custom roles to each top-level functional group. Use a naming convention for custom roles so that they are easily identifiable within SAS Management Console and distinguished uniquely from group names. A recommended convention is to prefix the custom roles with some organization identifier followed by a colon and then the persona name. For example, if there is an Analyst persona, create a custom role named <Company>: Analyst. The _Analyst top-level functional group would be made a member of the role. The role would grant Analysts capabilities across all applicable applications, such as SAS Enterprise Guide, SAS Add-In for Microsoft Office, SAS Forecast Studio, SAS Visual Analytics, and SAS Studio.
This role design is built on the assumption that for any given persona, users across different lines of business need access to the same features within SAS applications. This principle almost always holds true across organizations. However, if this design approach does not meet your security requirements, then define custom roles uniquely based on the granularity required, such as a custom role for each functional LOB group.
In addition to custom roles, there will still be a few default roles with implicit capabilities to incorporate into the security design. At a minimum, the Metadata Server roles have implicit capabilities and are typically required in any security design. This includes the following roles: Metadata Server: Unrestricted, Metadata Server: Operation, and Metadata Server: User Administration.
The image below shows a high-level summary of an example role design. In addition, capabilities (not shown here) must be defined for each custom role and included in the security design.
Figure 5. Metadata Role Design
During the security implementation phase, also consider capabilities granted to PUBLIC or SASUSERS on default roles. Simply remove these groups from default roles to enforce capabilities as granted according to the custom role design.
Metadata Server:
Unrestricted
SAS Environment
Manager Service
Account
Search Interface to
SAS Content User
SAS Administrator
Default Metadata Roles
Custom Metadata Roles
Metadata Server:
User Administration
Metadata Server:
Operation
Comments: Administrator
SAS
Administrators
SAS
Administrators
SAS System
Services
<COMPANY>: Business
Unit Administrator
_Business Unit
Administrators
<COMPANY>: Developer
_Developers
<COMPANY>: Consumer
_Consumers
13
STEP 7: DESIGN METADATA FOLDER STRUCTURE
Design the metadata folder structure according to how metadata objects will be organized and secured. The top levels of the metadata folder structure should map to the organizational hierarchy so that permissions can be applied at the folder level and be inherited by all subfolders and child objects. Within each line of business folder, define subfolders based on the types of metadata objects that can be created given the SAS software licensed. For example, if SAS Visual Analytics is licensed, create the following subfolders at a minimum: Data, Reports, and Explorations. An example metadata folder structure design is shown below.
Figure 6. Example Metadata Folder Structure Design
STEP 8: DESIGN SERVER METADATA
Evaluate the default SAS server metadata to determine if it meets the needs of your organization, or if additional servers are required to meet your security requirements. For example, in a multi-tenant environment where there is no sharing of data or content across Business Units, it is most often beneficial to configure an additional server context and SAS LASR Analytic Server for each Business Unit. In this way, each Business Unit has more control of their SAS server configuration, monitoring of their own server processes on the server, better isolated memory management of the SAS LASR Analytic Server, and shared server processes (such as the Stored Process Server and Pooled Workspace Server) can be configured to run as a unique service account specific to the Business Unit. While configuring additional servers has many benefits, there is also the obvious trade-off of additional administration and complexity. Determine what will work best for your organization and design the server metadata accordingly.
<Business Unit>
Example Line of Business (LOB) folder
<Department>
Department level folder
_Shared
BU content shared across Departments
Create subfolders for content that needs to be shared
across all Departments within the Business Unit
Data
Create subfolders for each data source (examples shown)
SAS Data
Create subfolders for each SAS Data library
Stored Processes
Location for stored process objects
Explorations
Location for Visual Analytics exploration objects
Hadoop
Hadoop Hive library and registered tables
LASR Data
Location for registered in-memory LASR tables
Reports
Location for Visual Analytics reports
Data Integration
Subfolders may be organized for DI specific data and jobs
Scheduled Jobs
Location for deployed jobs and flows scheduled with SAS
SASFolders
14
Another important property of server metadata to account for is the File Navigation Root property of the Workspace Server. This setting can be found in SAS Management Console when viewing the properties of the Workspace Server component. Click the Options tab Advanced Options File Navigation. The path specified here is the root path for users to navigate the file system of the SAS compute server using tools such as SAS Enterprise Guide and SAS Studio.
Include all ServerContext objects in the metadata design, including the default SASMeta and SASApp contexts. Document key properties such as File Navigation Root, Extended Attributes, and Multiuser Credentials. An example abstract Business Unit ServerContext is modeled below.
Figure 7. Example Business Unit Server Metadata Design
Database Server Metadata
It is also important to include database servers and your database credential management strategy in the security design. Even if the details of all database servers are not yet known during the modeling phase, the strategy for managing database credentials should be known and documented. For example, you should know if users will use shared database credentials, or if they will connect to databases using their own ID. If using shared credentials (which is a common practice), design database groups in metadata that will store the shared ID. Members of the database groups will then have access to use the shared credential stored in metadata and seamlessly connect to each database. Alternatively (and optionally), users can store their own personal database credentials in the metadata, defined as an additional Login ID on their Person object. If individual database credentials are stored in metadata, users should manger their personal database user ID and password using the SAS® Personal Login Manager application.
STEP 9: DESIGN ACCESS CONTROL TEMPLATES AND WHERE THEY ARE APPLIED IN METADATA
Design Access Control Templates (ACTs) using the ACT patterns documented in the Metadata Security Design Best Practices section of this paper. To illustrate this, consider the following metadata folder structure and security requirements.
ServerContext: <BU>App
LogicalServer: <BU>App – Logical Workspace Server
LogicalServer: <BU>App – Logical Pooled Workspace Server
LogicalServer: <BU>App – Logical Stored Process Server
ServerComponent: <BU>App – Stored Process ServerMultiuser Credentials: <bu>srv
ServerComponent: <BU>App – Pooled Workspace ServerMultiuser Credentials: <bu>srv
LogicalServer: <BU>App – Logical Data Step Batch Server
ServerComponent: <BU>App – Data Step Batch Server
15
Figure 8. Example Metadata Folder Structure with Security Requirements
Use the Private pattern to define the following line of business ACTs, which will secure the BU and Department folders only to members of the respective BU or Department. The BU and Department names are abstracted out of the ACT representations but will ultimately be implemented for each Business Unit and Department. The “BP” and “DP” circle images are defined here and then referenced on other metadata design objects as a visual indicator to document where ACTs should be applied.
Figure 9. ACTs Implementing the Private Pattern
Use the Write pattern to define the following ACT, which will grant Developers for each Department the permissions required to create, modify, and delete library and table metadata.
Figure 10. ACT Implementing the Write Pattern
<Business Unit>
Example Line of Business (LOB) folder
<Department>
Department level folder
_Shared
BU content shared across Departments
Data
Create subfolders for each data source (examples shown)
SAS Data
Create subfolders for each SAS Data library
Stored Processes
Location for stored process objects
Explorations
Location for Visual Analytics exploration objects
Hadoop
Hadoop Hive library and registered tables
LASR Data
Location for registered in-memory LASR tables
Reports
Location for Visual Analytics reports
Data Integration
Subfolders may be organized for DI specific data and jobs
Scheduled Jobs
Location for deployed jobs and flows scheduled with SAS
SASFolders
<BU> Private<Business Unit>: RM, R
SAS Administrators: RM, RSAS System Services: RM
SASUSERS: d-RM, d-R
<Department> Private<Department>: RM, R
<BU> Administrators: RM, RSAS Administrators: RM, RSAS System Services: RM
SASUSERS: d-RM, d-R
<Dept> Developers Write<Dept> Developers: WM, W, C, D, A
<BU> Administrators: WM, W, C, D, ASAS Administrators: WM, W, C, D, A
SAS System Services: WMSASUSERS: d-WM, d-W, d-C, d-D, d-A
Everyone in the BU has read access. BU Admins have read-write access to all folders and will promote Department developed content into _Shared BU subfolders as appropriate.
Only members of the Department and Admins have read access. BU Admins have read-write access to all folders.
Department Developers will create and manage data that is viewable to all members of the Department.
Only Department Developers and Admins requires read access. Department Developers will create and
Only Department Developers and Admins requires read access. Department Developers will create and manage DI content and scheduled jobs.
Department Developers will create stored processes that are viewable to everyone in the Dept.
Only Department Developers and Admins requires read access. Department Developers will create and
All Department Developers and Report Creators can create reports and explorations to share with all members of the Dept.
Only SAS Administrators have privileges to create subfolders within the root SASFolders folder.
16
Use the Register pattern to define the following ACTs, which will grant Developers and Report Creators for each Department the permissions required to create and modify objects within relevant folders.
Figure 11. ACTs Implementing the Register Pattern
Use the Update pattern to define the following ACTs which will grant Administrators exclusive access to update objects.
Figure 12. ACTs Implementing the Update Pattern
After defining the ACTs, document where ACTs are applied throughout the metadata. The design convention presented here uses the ACT reference images (small circle images with abbreviated ACT names) to document where ACTs are applied in the metadata folder structure.
Create subfolders for each data source (examples shown)
SAS Data
Create subfolders for each SAS Data library
Stored Processes
Location for stored process objects
Explorations
Visual Analytics exploration objects
Hadoop
Hadoop Hive library and registered tables
LASR Data
Location for registered in-memory LASR tables
Reports
Visual Analytics reports
Data Integration
DI specific data and jobs
Scheduled Jobs
Location for deployed jobs and flows
SASFolders
17
ACT Modeling Shortcut
For the ACTs defined above, we created both granular read and write ACTs for all levels of the organizational hierarchy. This can result in numerous ACTs depending on the breadth of your organization. This is a perfectly acceptable and straightforward design, however one alternative approach to modeling ACTs is to define granular read (Private) ACTs for all levels of the organization, and then use top-level functional groups for the write (Write, Register, or Update) ACTs. For example, the following ACTs use top-level functional groups in the ACT definition.
Figure 14. ACTs Defined Using Top-Level Functional Groups
By applying the granular read ACTs with the write ACTs that have broader scope, you achieve the same desired end result in that only the subset of users with both read and write permissions will be granted the desired access. This works based on the principle that you must have ReadMetadata access to an object in order to view or modify the object. This approach results in far fewer ACTs being created. One limitation of this approach however is that it does not work if you have any users with different functional responsibilities across multiple lines of business. For example, if a user is a Consumer for one Business Unit and a Developer for another Business Unit, this shortcut would result in granting Developer privileges within both BUs. In this case, you must create granular write ACTs for each functional LOB group to ensure the user’s permissions vary in each BU.
Securing Additional Metadata Objects
In addition to securing the metadata folder structure (and objects stored within folders), other metadata objects to secure include: groups, roles, servers, and access control templates. A generic best practice is to apply the SAS Administrators Update ACT on all groups, roles, and access control templates to secure these objects so that only SAS Administrators can modify them.
Certain SAS application functionality requires users to have WriteMetadata permission on server metadata objects. The primary use cases for WriteMetadata on a ServerContext object are the following:
Assign a metadata library to a ServerContext
Create a stored process that is saved to a directory associated with the ServerContext. (However, this can be adverted by enabling WriteMetadata permission on the Directory metadata object directly, or by storing stored process code in the metadata and not as a SAS program file on the file system).
In addition, SAS Enterprise Miner requires WriteMetadata access on the Logical Workspace Server in order to create and save an Enterprise Miner project associated with the server.
Design the server metadata and apply the necessary ACTs to enable functionality for users that require it, while limiting who can update server metadata properties (where possible given the above considerations). The following image shows ACTs applied on the server metadata.
_ Developers Write_Developers: WM, W, C, D, A
SAS Administrators: WM, W, C, D, ASAS System Services: WM
At this point the organization of content and corresponding metadata authorizations have been defined and modeled. In this step, translate the same high-level security design to the file system.
First, document key SAS directories and subdirectories to mimic how business content is organized within the metadata folder structure. Include additional directories on the file system for file types that do not have a corresponding object and folder in metadata, such as SAS macro code or custom formats. Conversely, if some type of developed content exists in metadata but does not have a corresponding physical file stored on the file system, then no file system directory is required for that object type. Some examples of objects that don’t have a corresponding file on the file system are SAS Visual Analytics reports and explorations.
In accordance with recommendations documented in the File System Security Design Best Practices section, define service accounts based on the security granularity required for your organization. Commonly this results in a unique service account per line of business (or in the example shown below, per Business Unit). This account can be used as the directory owner on UNIX systems. Define relevant operating system permissions that mimic the metadata authorizations to the extent possible.
There are various approaches to file system authorizations. What ultimately works for your organization will depend on various factors, including who has direct server access, if Access Control Lists (ACLs) can be used on UNIX systems or not, who are the administrators and what accounts they have access to use, what the default umask settings are (for UNIX), if your operating system is integrated with Active Directory (AD) or LDAP and if so, can you use the same AD/LDAP groups for both metadata and file system authorizations. In addition, considerations for multiple environments (such as Development, Test, and Production) must be considered and modeled appropriately given authorizations are most often more permissive in Development versus in Production.
As part of the design, include the path configured for the implicit SASUSER library. Most often system administrators do not want users to save files within the default operating system home directories. On Windows, this would be C:\Users\<userid>. On UNIX, this is /home/<userid>. Especially in SAS® Grid Manager environments, the SASUSER implicit library needs to be on a shared file system location accessible to all SAS compute servers.
ServerContext: <BU>App
LogicalServer: <BU>App – Logical Data Step Batch Server
ServerComponent: <BU>App – Data Step Batch Server
LogicalServer: <BU>App – Logical Workspace Server
LogicalServer: <BU>App – Logical Pooled Workspace Server
LogicalServer: <BU>App – Logical Stored Process Server
ServerComponent: <BU>App – Stored Process ServerMultiuser Credentials: <bu>srv
ServerComponent: <BU>App – Pooled Workspace ServerMultiuser Credentials: <bu>srv
ServerContext: SASMeta ServerContext: SASApp
LogicalServer LogicalServer
19
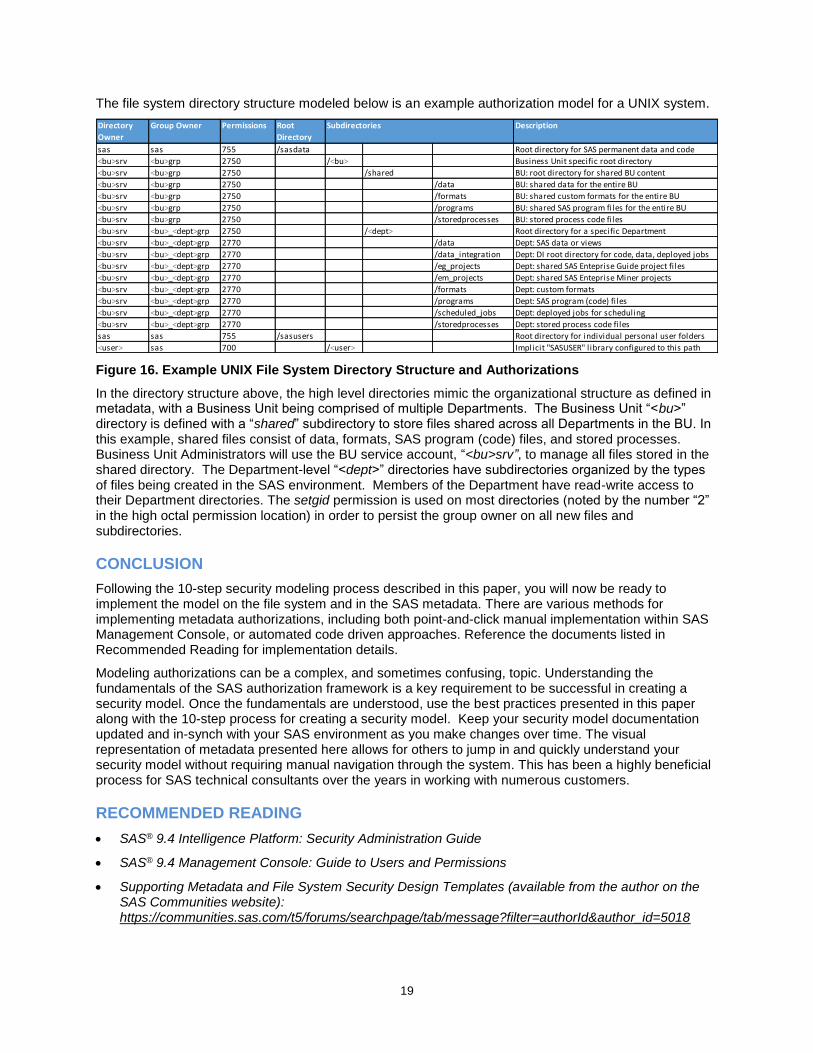
The file system directory structure modeled below is an example authorization model for a UNIX system.
Figure 16. Example UNIX File System Directory Structure and Authorizations
In the directory structure above, the high level directories mimic the organizational structure as defined in metadata, with a Business Unit being comprised of multiple Departments. The Business Unit “<bu>” directory is defined with a “shared” subdirectory to store files shared across all Departments in the BU. In this example, shared files consist of data, formats, SAS program (code) files, and stored processes. Business Unit Administrators will use the BU service account, “<bu>srv”, to manage all files stored in the shared directory. The Department-level “<dept>” directories have subdirectories organized by the types of files being created in the SAS environment. Members of the Department have read-write access to their Department directories. The setgid permission is used on most directories (noted by the number “2” in the high octal permission location) in order to persist the group owner on all new files and subdirectories.
CONCLUSION
Following the 10-step security modeling process described in this paper, you will now be ready to implement the model on the file system and in the SAS metadata. There are various methods for implementing metadata authorizations, including both point-and-click manual implementation within SAS Management Console, or automated code driven approaches. Reference the documents listed in Recommended Reading for implementation details.
Modeling authorizations can be a complex, and sometimes confusing, topic. Understanding the fundamentals of the SAS authorization framework is a key requirement to be successful in creating a security model. Once the fundamentals are understood, use the best practices presented in this paper along with the 10-step process for creating a security model. Keep your security model documentation updated and in-synch with your SAS environment as you make changes over time. The visual representation of metadata presented here allows for others to jump in and quickly understand your security model without requiring manual navigation through the system. This has been a highly beneficial process for SAS technical consultants over the years in working with numerous customers.
SAS® 9.4 Management Console: Guide to Users and Permissions
Supporting Metadata and File System Security Design Templates (available from the author on the SAS Communities website): https://communities.sas.com/t5/forums/searchpage/tab/message?filter=authorId&author_id=5018
Directory
Owner
Group Owner Permissions Root
Directory
Description
sas sas 755 /sasdata Root directory for SAS permanent data and code
<bu>srv <bu>grp 2750 /<bu> Business Unit specific root directory
<bu>srv <bu>grp 2750 /shared BU: root directory for shared BU content
<bu>srv <bu>grp 2750 /data BU: shared data for the entire BU
<bu>srv <bu>grp 2750 /formats BU: shared custom formats for the entire BU
<bu>srv <bu>grp 2750 /programs BU: shared SAS program files for the entire BU
<bu>srv <bu>grp 2750 /storedprocesses BU: stored process code fi les
<bu>srv <bu>_<dept>grp 2750 /<dept> Root directory for a specific Department
<bu>srv <bu>_<dept>grp 2770 /data Dept: SAS data or views
<bu>srv <bu>_<dept>grp 2770 /data_integration Dept: DI root directory for code, data, deployed jobs
<bu>srv <bu>_<dept>grp 2770 /eg_projects Dept: shared SAS Enteprise Guide project fi les
<bu>srv <bu>_<dept>grp 2770 /em_projects Dept: shared SAS Enteprise Miner projects
SAS and all other SAS Institute Inc. product or service names are registered trademarks or trademarks of SAS Institute Inc. in the USA and other countries. ® indicates USA registration.
Other brand and product names are trademarks of their respective companies.