First Start ........................................................................................................................................... 5
Upper Area ................................................................................................................................................................... 6
Operation Area ............................................................................................................................................................. 7
Manage Partitions and Disks ........................................................................................ 11
Partition a Disk ................................................................................................................................. 11
Create a Partition ........................................................................................................................................................ 11
Format a Partition ....................................................................................................................................................... 12
Delete a Partition ........................................................................................................................................................ 13
Change a Volume Label .............................................................................................................................................. 14
Move/Resize a Partition ............................................................................................................................................. 14
Convert a File System ................................................................................................................................................. 15
Change a GPT Type ..................................................................................................................................................... 16
Convert a Partition Table ............................................................................................................................................ 17
Get Disk/Partition Properties ..................................................................................................................................... 18
Wipe Data ........................................................................................................................................ 19
Wipe a Disk or Partition .............................................................................................................................................. 19
Clear Free Space ......................................................................................................................................................... 20
Copy Data ......................................................................................................................................... 21
Copy a Disk.................................................................................................................................................................. 21
Copy a Partition .......................................................................................................................................................... 22
Check a Partition for Problems .......................................................................................................... 24
Correct Boot Record ................................................................................................................................................... 27
Adjust to Dissimilar Hardware .................................................................................................................................... 29
Set Active/Inactive ...................................................................................................................................................... 30
Mount/Unmount a Partition ...................................................................................................................................... 30
Change Partition ID ..................................................................................................................................................... 31
Protect System and Data ............................................................................................. 32
Create a Full Backup Image ............................................................................................................... 32
Create an Incremental Update ................................................................................................................................... 36
Mount a Backup Image ............................................................................................................................................... 38
Restore a Backup Image ............................................................................................................................................. 39
Merge an Incremental Image with Its Parent ............................................................................................................. 42
Hard Disk Manager for Mac (HDM for Mac) is a port of the best-selling Paragon’s storage management solution for Windows. It covers all aspects of a Mac computer life cycle: drive partitioning, file system optimization and repair functions, data backup capabilities, and irreversible data wiping. Unlike Disk Utility or similar Mac tools, the program supports all file systems of OS X, Windows, and Linux. Besides, it can back up system and data volumes through a patent-pending snapshot technology, which is several times more effective and user-friendly than the popular Time Capsule.
Among other strong benefits the following features are worth mentioning: redistribution of free space between volumes without the system restart, conversion of a file system that contains data, conversion from MBR to GPT and vice versa, recovery of an accidentally deleted volume, and irreversible destruction of not only all on-disk information, but remnants of deleted files without affecting the used data.
Getting Started
System Requirements
An Intel-based Mac computer
OS X 10.7 and later
2 GB of RAM
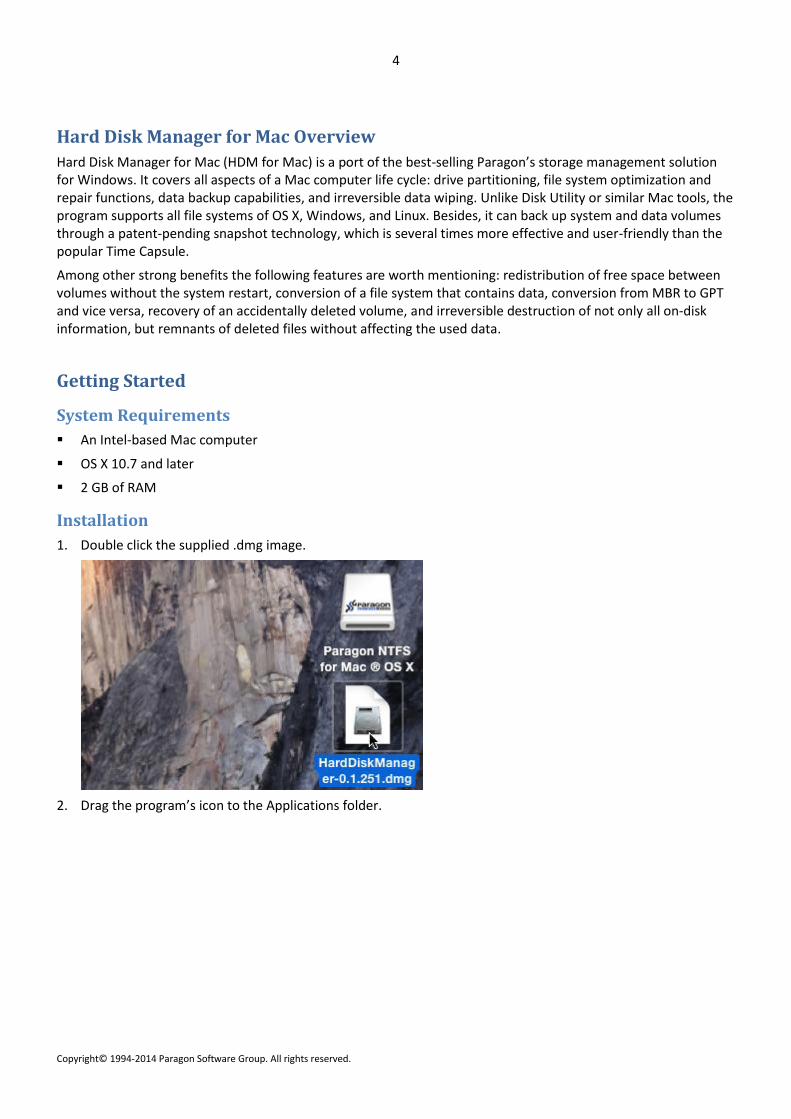
Installation
1. Double click the supplied .dmg image.
2. Drag the program’s icon to the Applications folder.
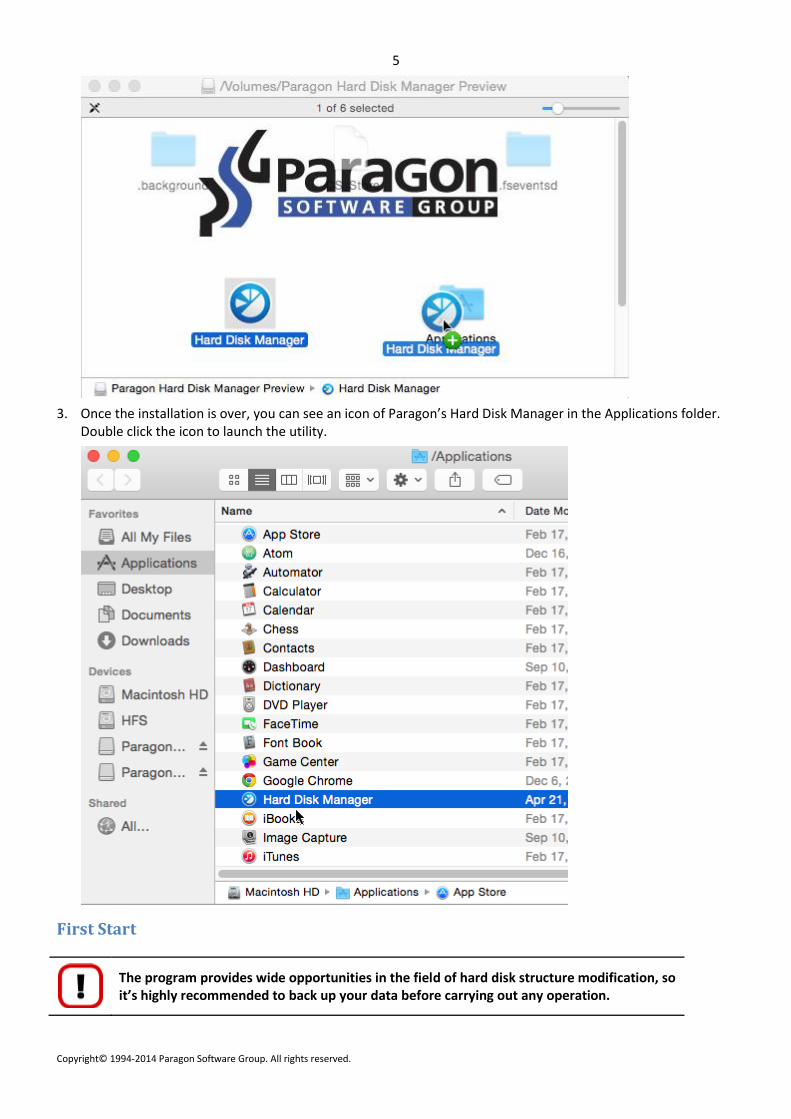
3. Once the installation is over, you can see an icon of Paragon’s Hard Disk Manager in the Applications folder. Double click the icon to launch the utility.
First Start
The program provides wide opportunities in the field of hard disk structure modification, so it’s highly recommended to back up your data before carrying out any operation.
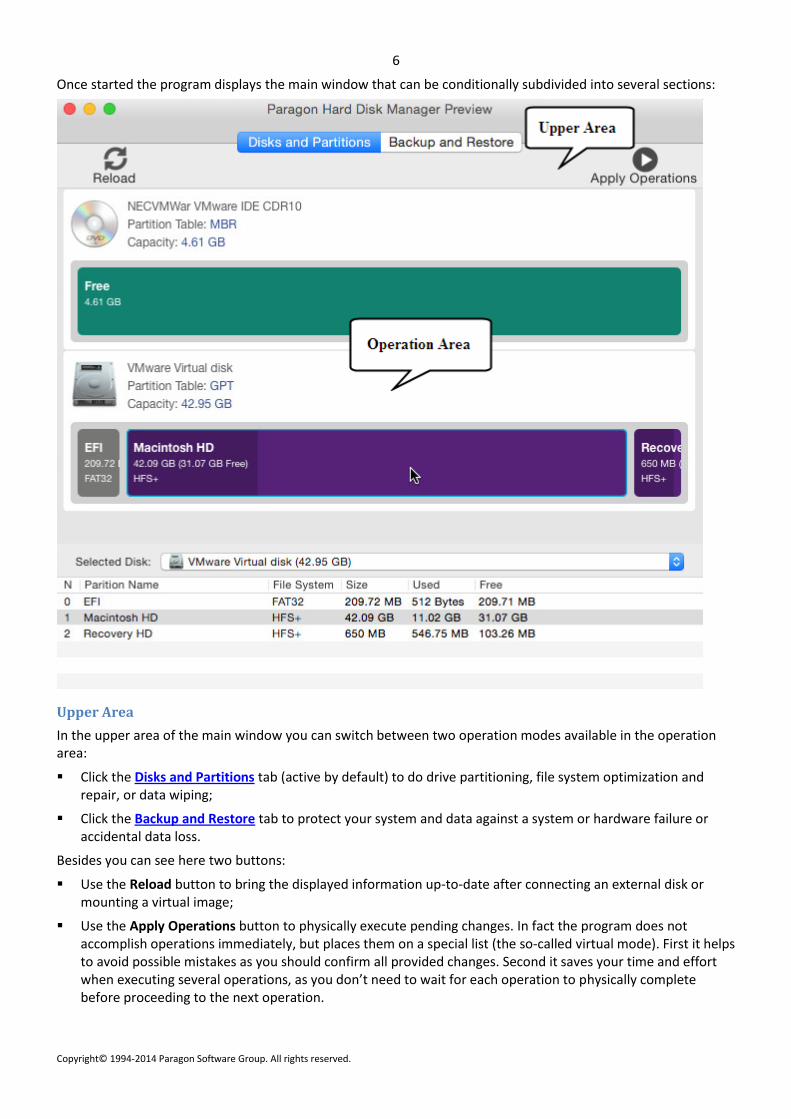
Once started the program displays the main window that can be conditionally subdivided into several sections:
Upper Area
In the upper area of the main window you can switch between two operation modes available in the operation area:
Click the Disks and Partitions tab (active by default) to do drive partitioning, file system optimization and repair, or data wiping;
Click the Backup and Restore tab to protect your system and data against a system or hardware failure or accidental data loss.
Besides you can see here two buttons:
Use the Reload button to bring the displayed information up-to-date after connecting an external disk or mounting a virtual image;
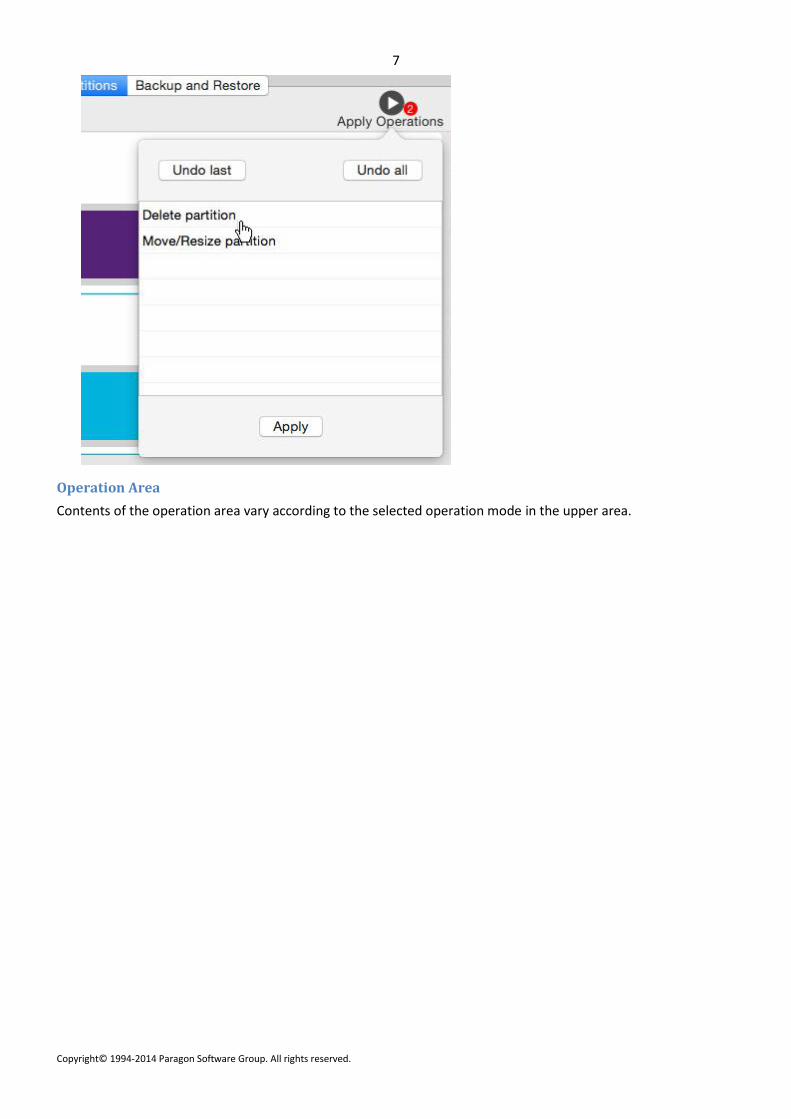
Use the Apply Operations button to physically execute pending changes. In fact the program does not accomplish operations immediately, but places them on a special list (the so-called virtual mode). First it helps to avoid possible mistakes as you should confirm all provided changes. Second it saves your time and effort when executing several operations, as you don’t need to wait for each operation to physically complete before proceeding to the next operation.
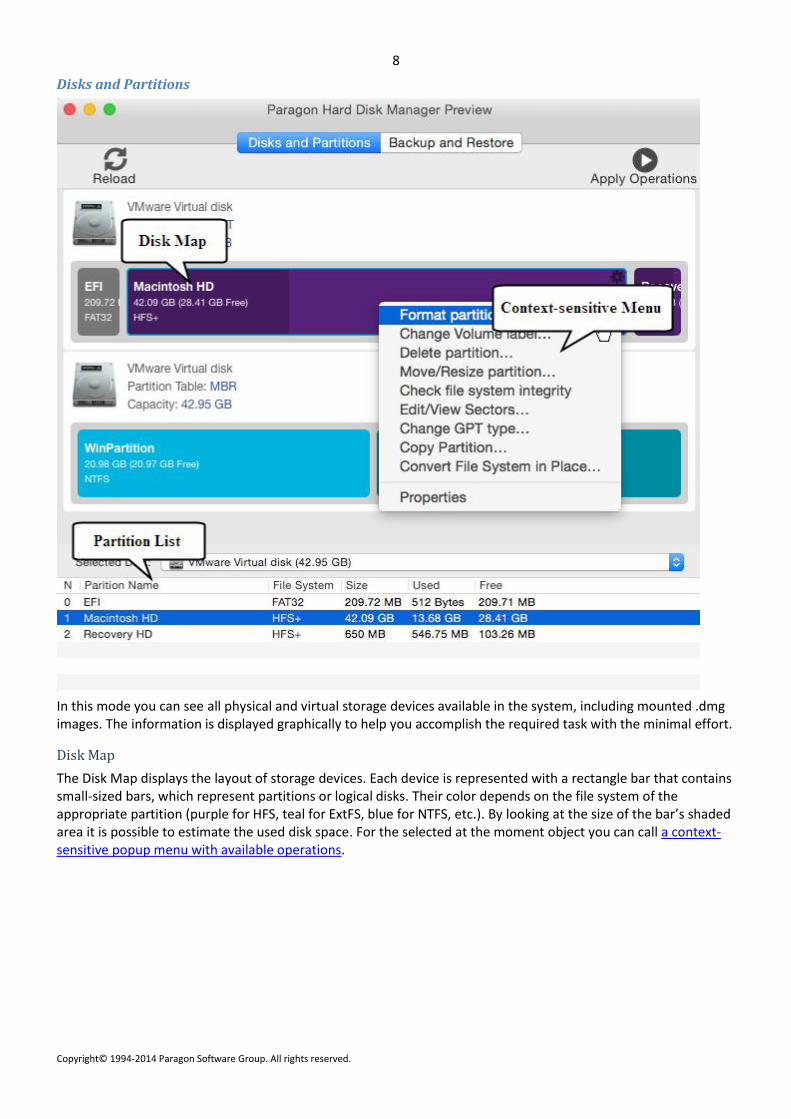
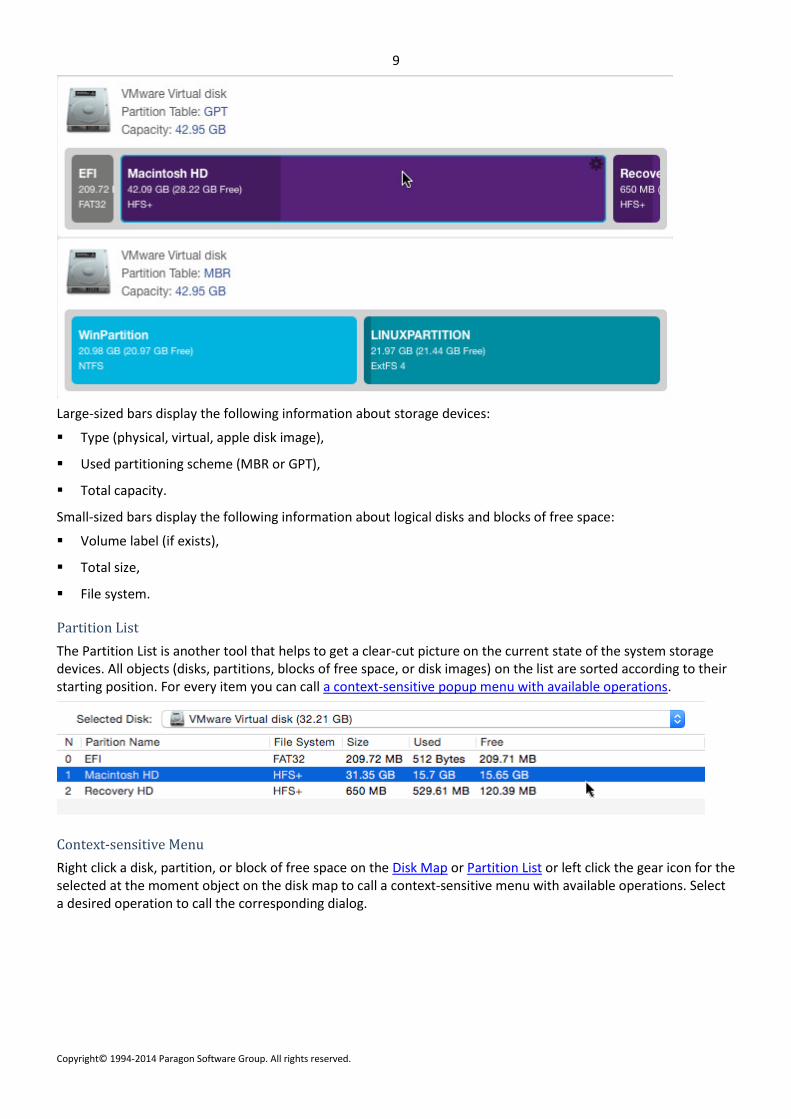
In this mode you can see all physical and virtual storage devices available in the system, including mounted .dmg images. The information is displayed graphically to help you accomplish the required task with the minimal effort.
Disk Map
The Disk Map displays the layout of storage devices. Each device is represented with a rectangle bar that contains small-sized bars, which represent partitions or logical disks. Their color depends on the file system of the appropriate partition (purple for HFS, teal for ExtFS, blue for NTFS, etc.). By looking at the size of the bar’s shaded area it is possible to estimate the used disk space. For the selected at the moment object you can call a context-sensitive popup menu with available operations.
Large-sized bars display the following information about storage devices:
Type (physical, virtual, apple disk image),
Used partitioning scheme (MBR or GPT),
Total capacity.
Small-sized bars display the following information about logical disks and blocks of free space:
Volume label (if exists),
Total size,
File system.
Partition List
The Partition List is another tool that helps to get a clear-cut picture on the current state of the system storage devices. All objects (disks, partitions, blocks of free space, or disk images) on the list are sorted according to their starting position. For every item you can call a context-sensitive popup menu with available operations.
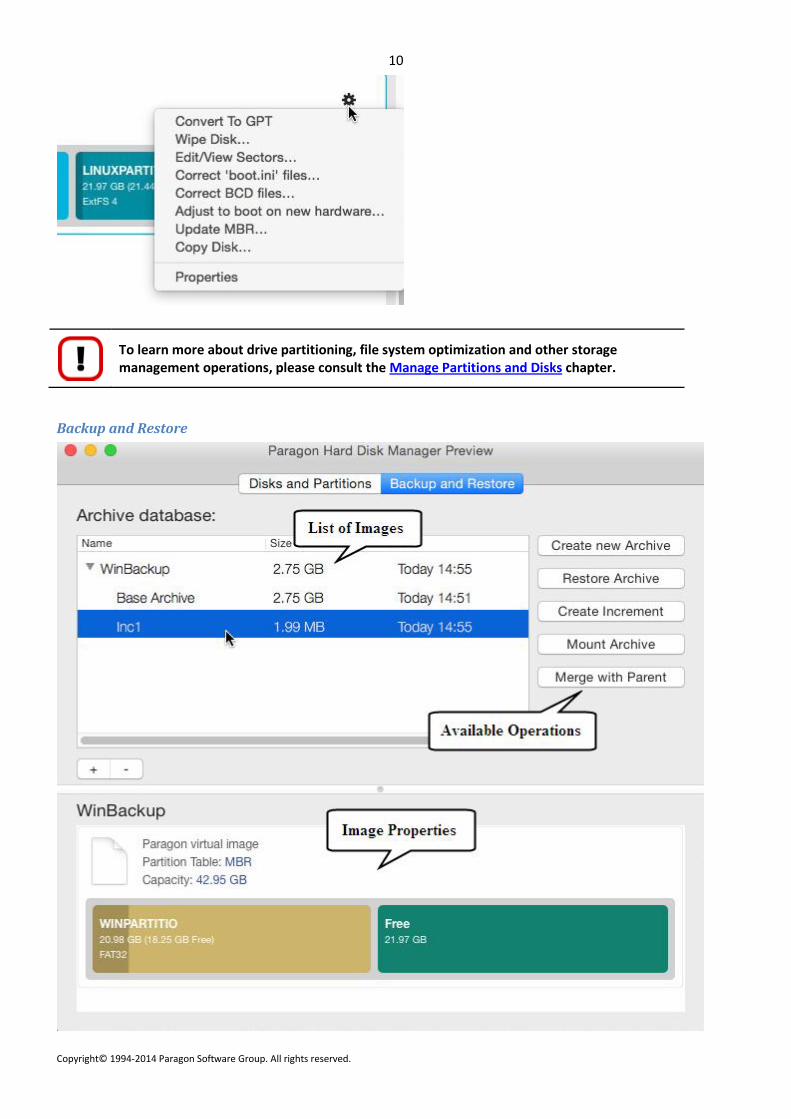
Context-sensitive Menu
Right click a disk, partition, or block of free space on the Disk Map or Partition List or left click the gear icon for the selected at the moment object on the disk map to call a context-sensitive menu with available operations. Select a desired operation to call the corresponding dialog.
To learn more about drive partitioning, file system optimization and other storage management operations, please consult the Manage Partitions and Disks chapter.
In this mode you can see a list of created backup images. Left click an image to get detailed information on its properties in the lower panel. Depending on the selected object you’re allowed to initiate one of the available operations.
To learn more about backup and restore operations, please consult the Protect System and Data chapter.
Manage Partitions and Disks
Partition a Disk
Partitioning lets you divide a single physical drive into a number of logical drives, each of which serves as a container with its own drive letter and volume label, thus enabling the operating system to process data more efficiently. Besides partitioning makes it possible to organize data so that it is easy to find and manage. By detaching the OS from the rest of the data you can tackle one more crucial issue – in case of a system malfunction, you can get the system back on track in minutes by recovering it from a backup image located on the other partition of the hard drive. At last partitioning is a necessity if you’re planning to run several OSs on a single hard drive to effectively delineate the boundaries of each OS.
Create a Partition
1. Select Disk and Partitions in the upper area.
2. Right click a block of free space, then select Create partition…
3. Define a partition size and its position relative to the beginning and the end of the selected block of free space by manually entering desired values or through dragging the corresponding sliders.
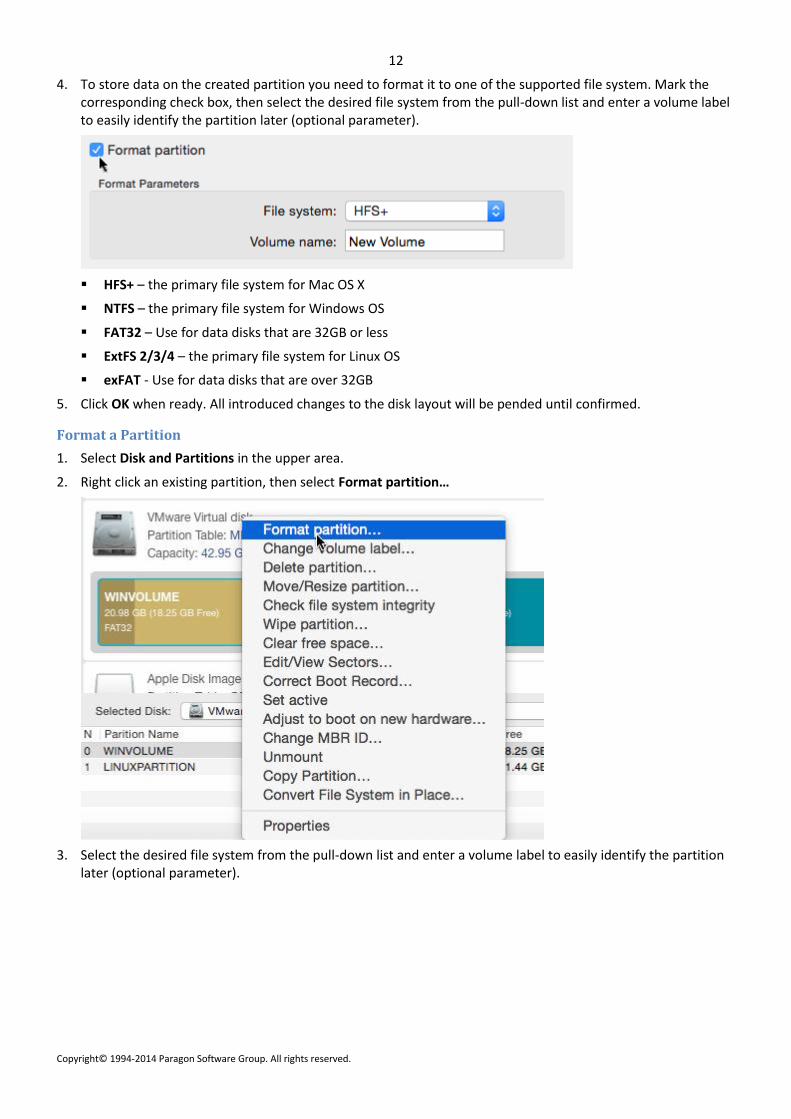
4. To store data on the created partition you need to format it to one of the supported file system. Mark the corresponding check box, then select the desired file system from the pull-down list and enter a volume label to easily identify the partition later (optional parameter).
HFS+ – the primary file system for Mac OS X
NTFS – the primary file system for Windows OS
FAT32 – Use for data disks that are 32GB or less
ExtFS 2/3/4 – the primary file system for Linux OS
exFAT - Use for data disks that are over 32GB
5. Click OK when ready. All introduced changes to the disk layout will be pended until confirmed.
Format a Partition
1. Select Disk and Partitions in the upper area.
2. Right click an existing partition, then select Format partition…
3. Select the desired file system from the pull-down list and enter a volume label to easily identify the partition later (optional parameter).
As a result of this operation contents of the selected partition will be lost. You can recover the deleted partition however through the undelete operation.
4. Click OK when ready. All introduced changes to the disk layout will be pended until confirmed.
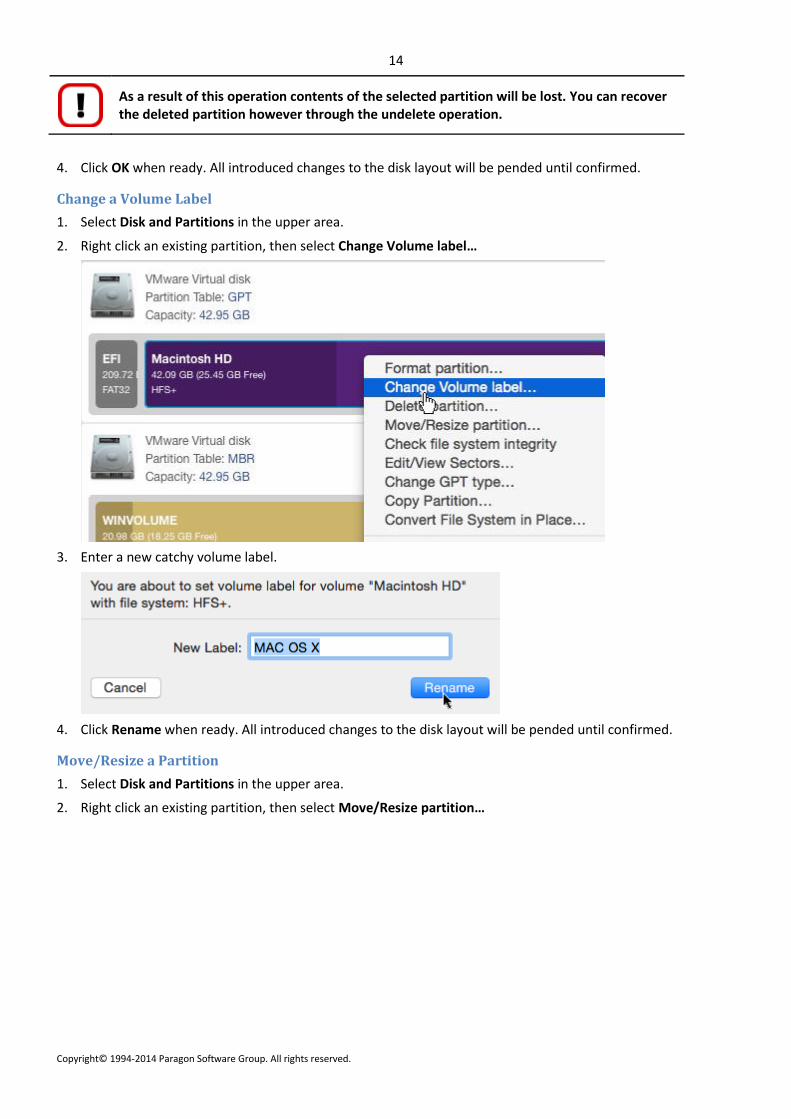
Change a Volume Label
1. Select Disk and Partitions in the upper area.
2. Right click an existing partition, then select Change Volume label…
3. Enter a new catchy volume label.
4. Click Rename when ready. All introduced changes to the disk layout will be pended until confirmed.
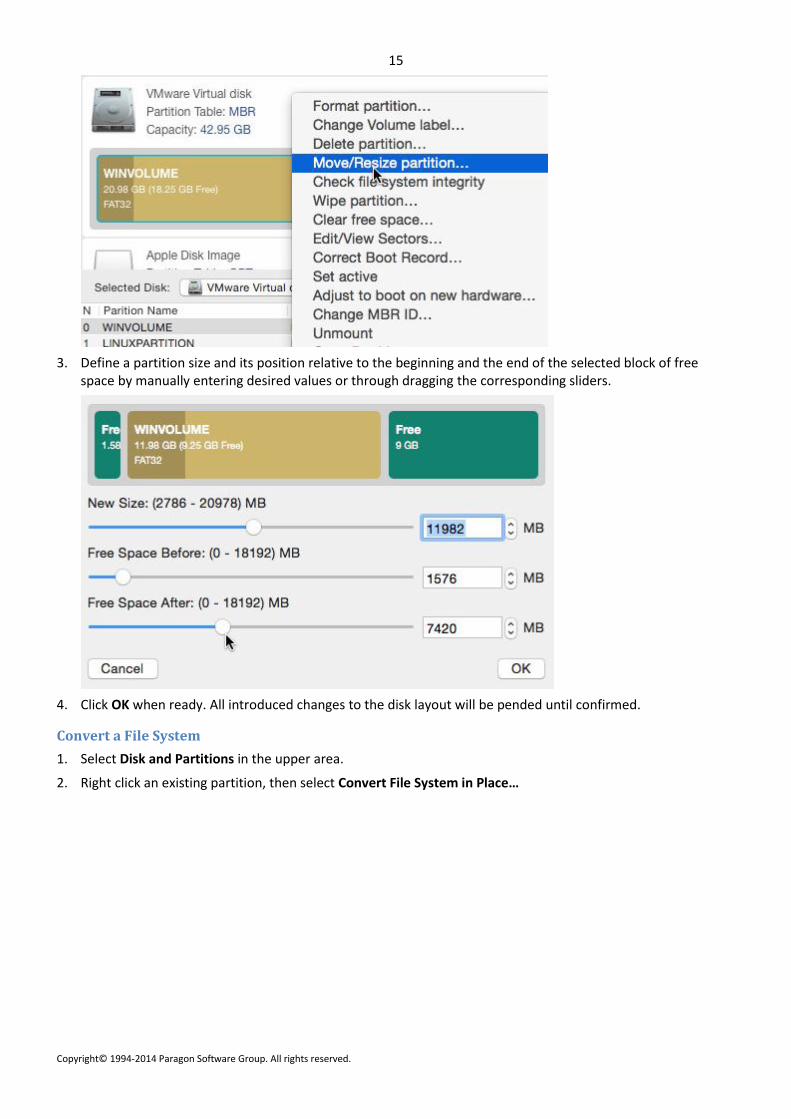
Move/Resize a Partition
1. Select Disk and Partitions in the upper area.
2. Right click an existing partition, then select Move/Resize partition…
3. Define a partition size and its position relative to the beginning and the end of the selected block of free space by manually entering desired values or through dragging the corresponding sliders.
4. Click OK when ready. All introduced changes to the disk layout will be pended until confirmed.
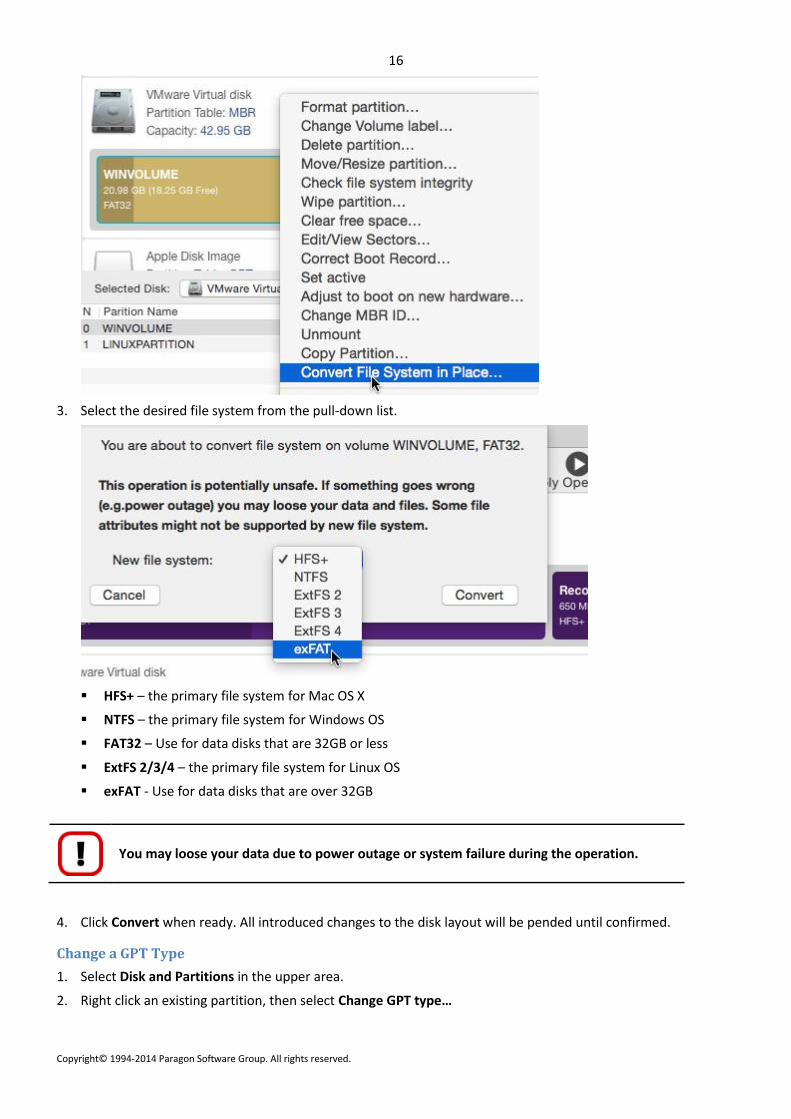
Convert a File System
1. Select Disk and Partitions in the upper area.
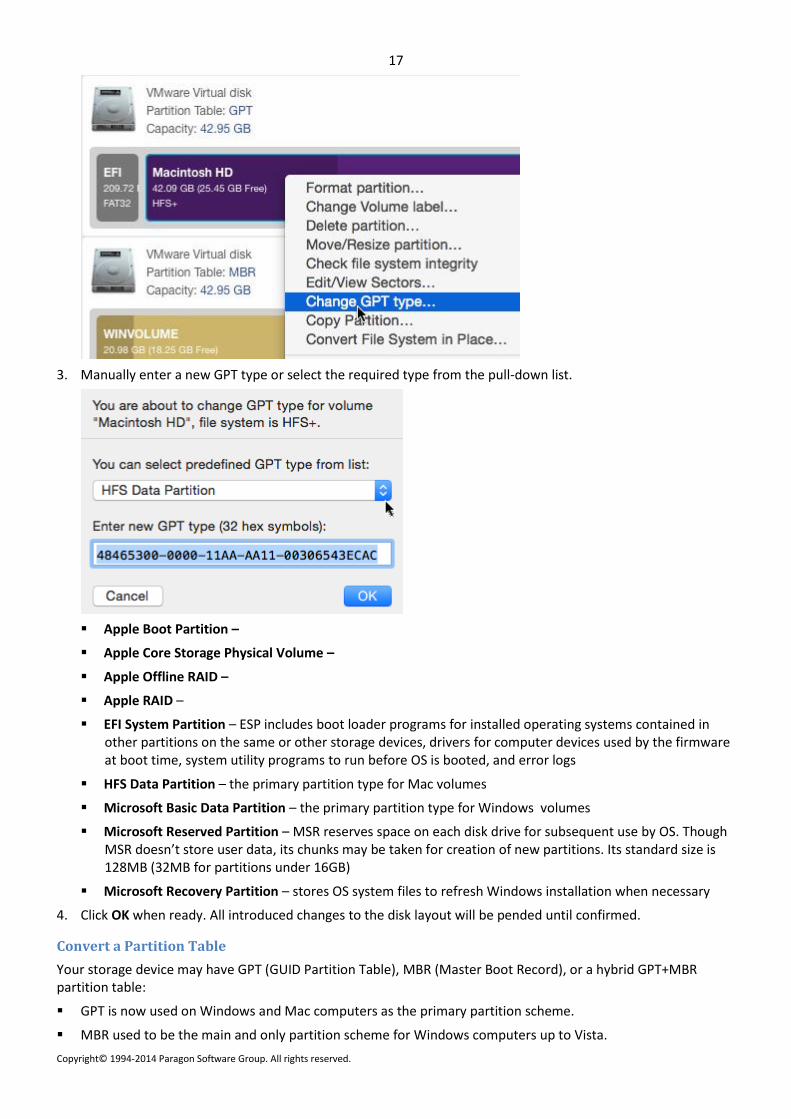
2. Right click an existing partition, then select Convert File System in Place…
3. Manually enter a new GPT type or select the required type from the pull-down list.
Apple Boot Partition –
Apple Core Storage Physical Volume –
Apple Offline RAID –
Apple RAID –
EFI System Partition – ESP includes boot loader programs for installed operating systems contained in other partitions on the same or other storage devices, drivers for computer devices used by the firmware at boot time, system utility programs to run before OS is booted, and error logs
HFS Data Partition – the primary partition type for Mac volumes
Microsoft Basic Data Partition – the primary partition type for Windows volumes
Microsoft Reserved Partition – MSR reserves space on each disk drive for subsequent use by OS. Though MSR doesn’t store user data, its chunks may be taken for creation of new partitions. Its standard size is 128MB (32MB for partitions under 16GB)
Microsoft Recovery Partition – stores OS system files to refresh Windows installation when necessary
4. Click OK when ready. All introduced changes to the disk layout will be pended until confirmed.
Convert a Partition Table
Your storage device may have GPT (GUID Partition Table), MBR (Master Boot Record), or a hybrid GPT+MBR partition table:
GPT is now used on Windows and Mac computers as the primary partition scheme.
MBR used to be the main and only partition scheme for Windows computers up to Vista.
A hybrid GPT+MBR partition scheme is a necessity for Boot Camp users.
HDM allows easy non-destructive conversion between these three partition schemes.
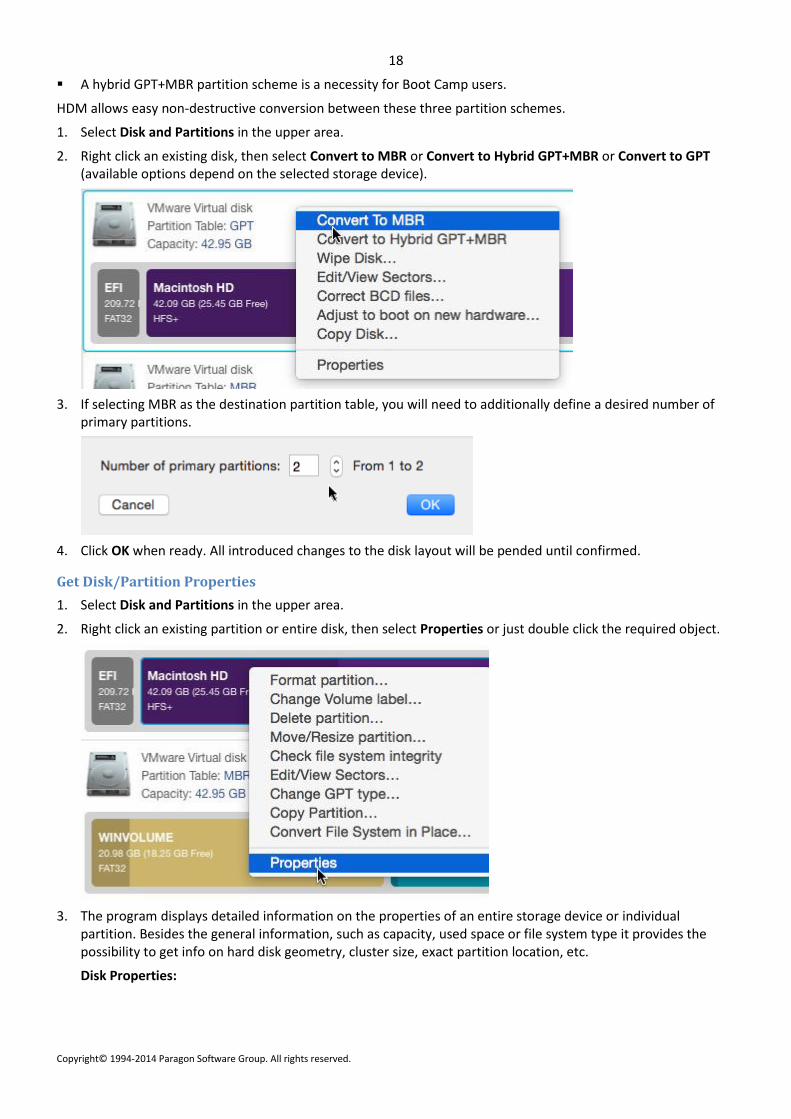
1. Select Disk and Partitions in the upper area.
2. Right click an existing disk, then select Convert to MBR or Convert to Hybrid GPT+MBR or Convert to GPT (available options depend on the selected storage device).
3. If selecting MBR as the destination partition table, you will need to additionally define a desired number of primary partitions.
4. Click OK when ready. All introduced changes to the disk layout will be pended until confirmed.
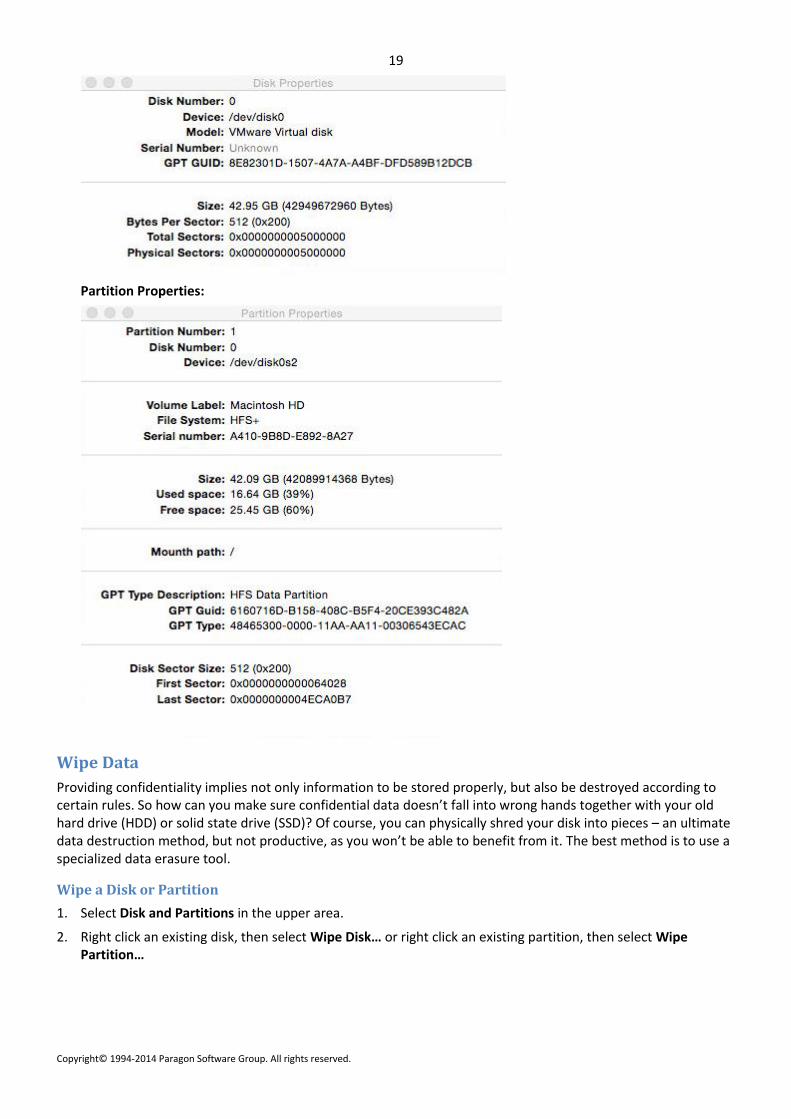
Get Disk/Partition Properties
1. Select Disk and Partitions in the upper area.
2. Right click an existing partition or entire disk, then select Properties or just double click the required object.
3. The program displays detailed information on the properties of an entire storage device or individual partition. Besides the general information, such as capacity, used space or file system type it provides the possibility to get info on hard disk geometry, cluster size, exact partition location, etc.
Providing confidentiality implies not only information to be stored properly, but also be destroyed according to certain rules. So how can you make sure confidential data doesn’t fall into wrong hands together with your old hard drive (HDD) or solid state drive (SSD)? Of course, you can physically shred your disk into pieces – an ultimate data destruction method, but not productive, as you won’t be able to benefit from it. The best method is to use a specialized data erasure tool.
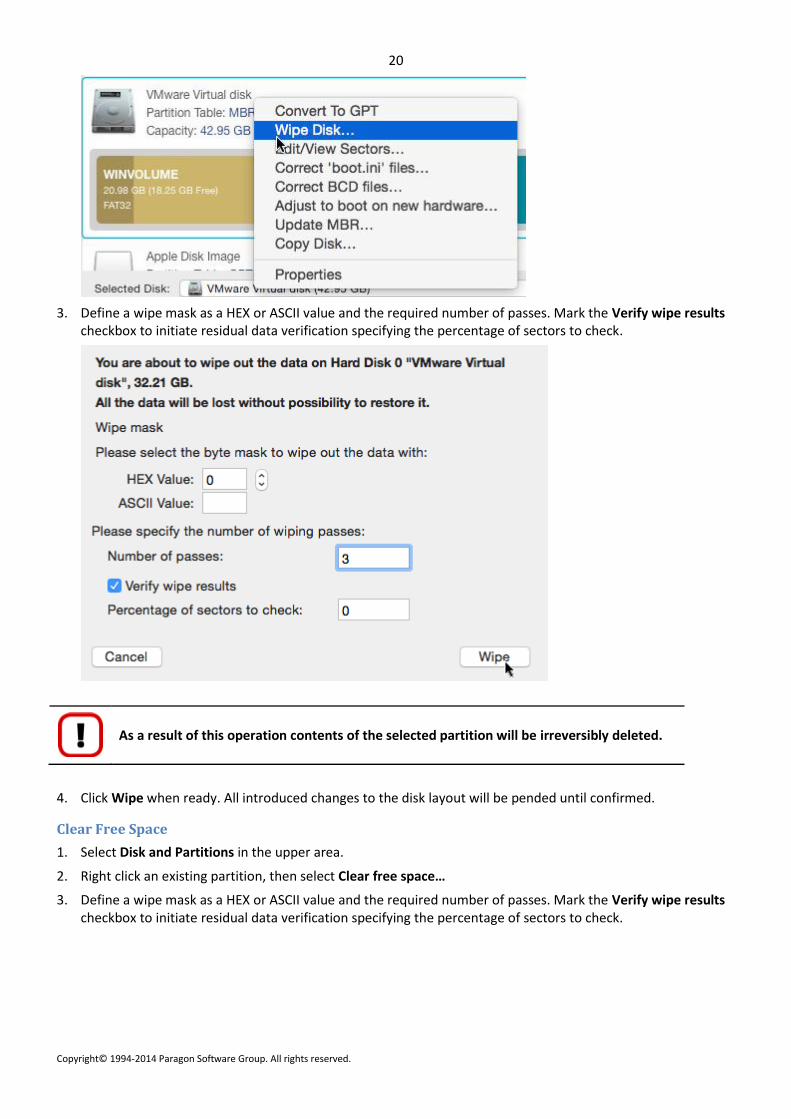
Wipe a Disk or Partition
1. Select Disk and Partitions in the upper area.
2. Right click an existing disk, then select Wipe Disk… or right click an existing partition, then select Wipe Partition…
3. Define a wipe mask as a HEX or ASCII value and the required number of passes. Mark the Verify wipe results checkbox to initiate residual data verification specifying the percentage of sectors to check.
As a result of this operation contents of the selected partition will be irreversibly deleted.
4. Click Wipe when ready. All introduced changes to the disk layout will be pended until confirmed.
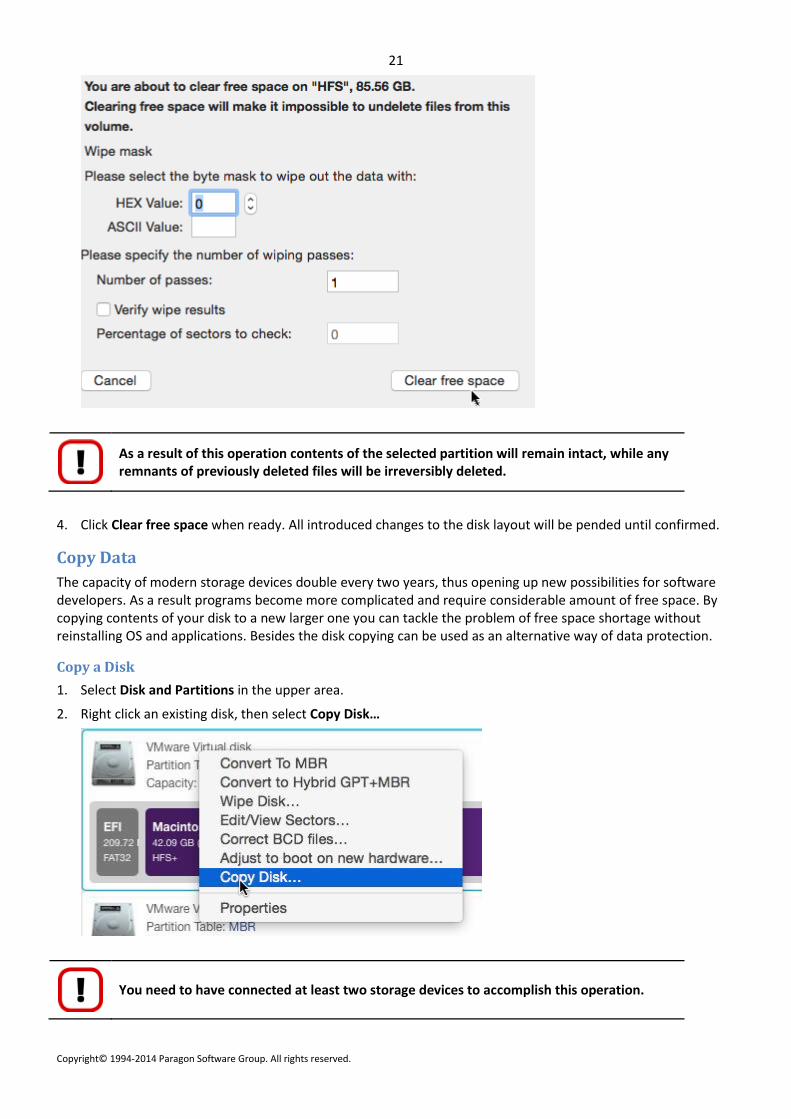
Clear Free Space
1. Select Disk and Partitions in the upper area.
2. Right click an existing partition, then select Clear free space…
3. Define a wipe mask as a HEX or ASCII value and the required number of passes. Mark the Verify wipe results checkbox to initiate residual data verification specifying the percentage of sectors to check.
As a result of this operation contents of the selected partition will remain intact, while any remnants of previously deleted files will be irreversibly deleted.
4. Click Clear free space when ready. All introduced changes to the disk layout will be pended until confirmed.
Copy Data
The capacity of modern storage devices double every two years, thus opening up new possibilities for software developers. As a result programs become more complicated and require considerable amount of free space. By copying contents of your disk to a new larger one you can tackle the problem of free space shortage without reinstalling OS and applications. Besides the disk copying can be used as an alternative way of data protection.
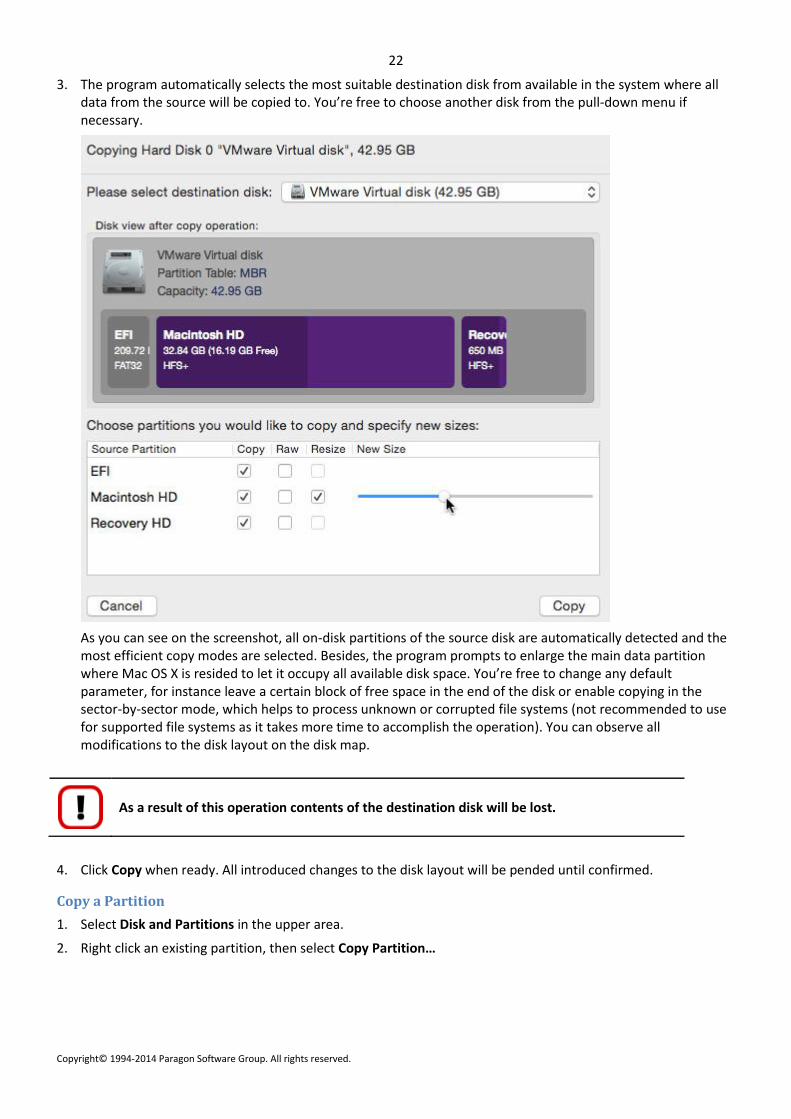
Copy a Disk
1. Select Disk and Partitions in the upper area.
2. Right click an existing disk, then select Copy Disk…
You need to have connected at least two storage devices to accomplish this operation.
3. The program automatically selects the most suitable destination disk from available in the system where all data from the source will be copied to. You’re free to choose another disk from the pull-down menu if necessary.
As you can see on the screenshot, all on-disk partitions of the source disk are automatically detected and the most efficient copy modes are selected. Besides, the program prompts to enlarge the main data partition where Mac OS X is resided to let it occupy all available disk space. You’re free to change any default parameter, for instance leave a certain block of free space in the end of the disk or enable copying in the sector-by-sector mode, which helps to process unknown or corrupted file systems (not recommended to use for supported file systems as it takes more time to accomplish the operation). You can observe all modifications to the disk layout on the disk map.
As a result of this operation contents of the destination disk will be lost.
4. Click Copy when ready. All introduced changes to the disk layout will be pended until confirmed.
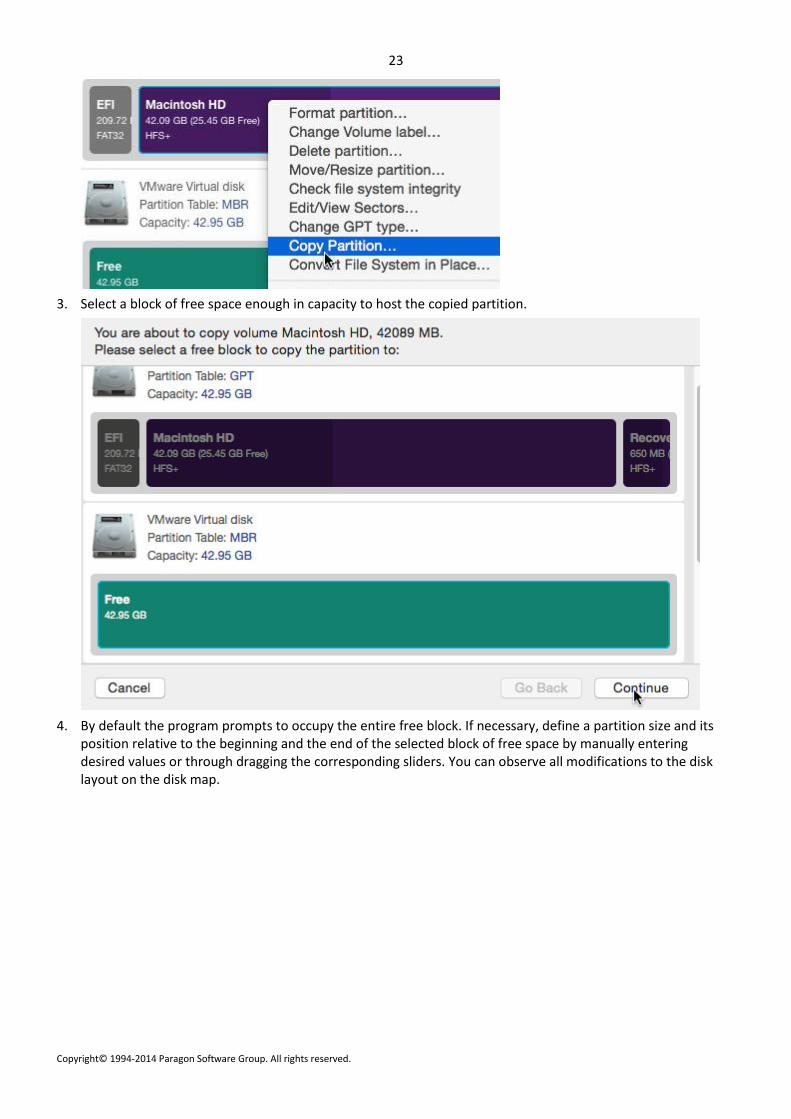
Copy a Partition
1. Select Disk and Partitions in the upper area.
2. Right click an existing partition, then select Copy Partition…
3. Select a block of free space enough in capacity to host the copied partition.
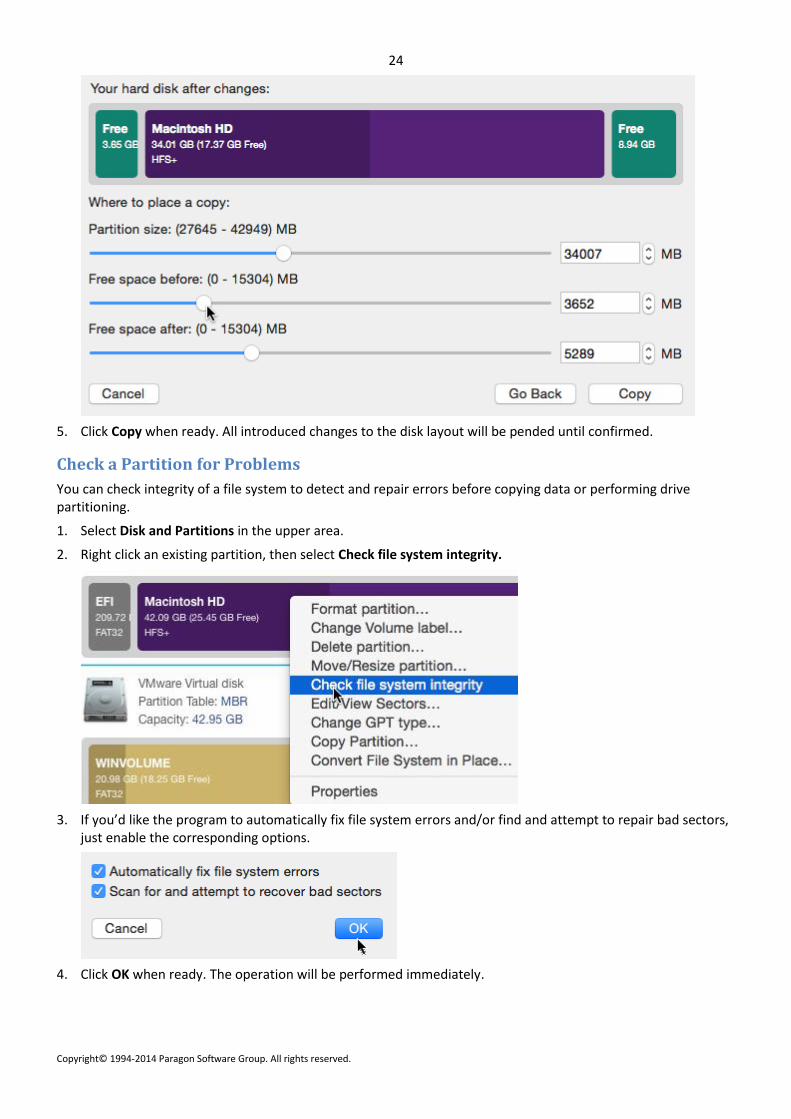
4. By default the program prompts to occupy the entire free block. If necessary, define a partition size and its position relative to the beginning and the end of the selected block of free space by manually entering desired values or through dragging the corresponding sliders. You can observe all modifications to the disk layout on the disk map.
5. Click Copy when ready. All introduced changes to the disk layout will be pended until confirmed.
Check a Partition for Problems
You can check integrity of a file system to detect and repair errors before copying data or performing drive partitioning.
1. Select Disk and Partitions in the upper area.
2. Right click an existing partition, then select Check file system integrity.
3. If you’d like the program to automatically fix file system errors and/or find and attempt to repair bad sectors, just enable the corresponding options.
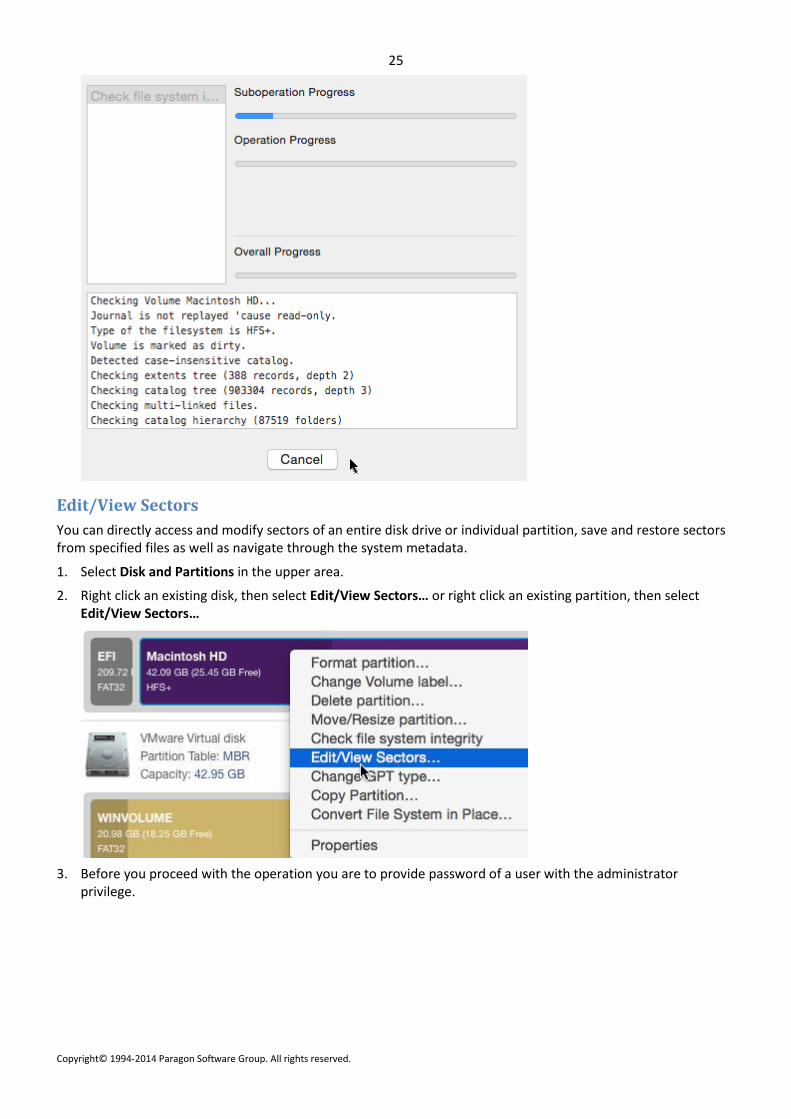
4. Click OK when ready. The operation will be performed immediately.
You can directly access and modify sectors of an entire disk drive or individual partition, save and restore sectors from specified files as well as navigate through the system metadata.
1. Select Disk and Partitions in the upper area.
2. Right click an existing disk, then select Edit/View Sectors… or right click an existing partition, then select Edit/View Sectors…
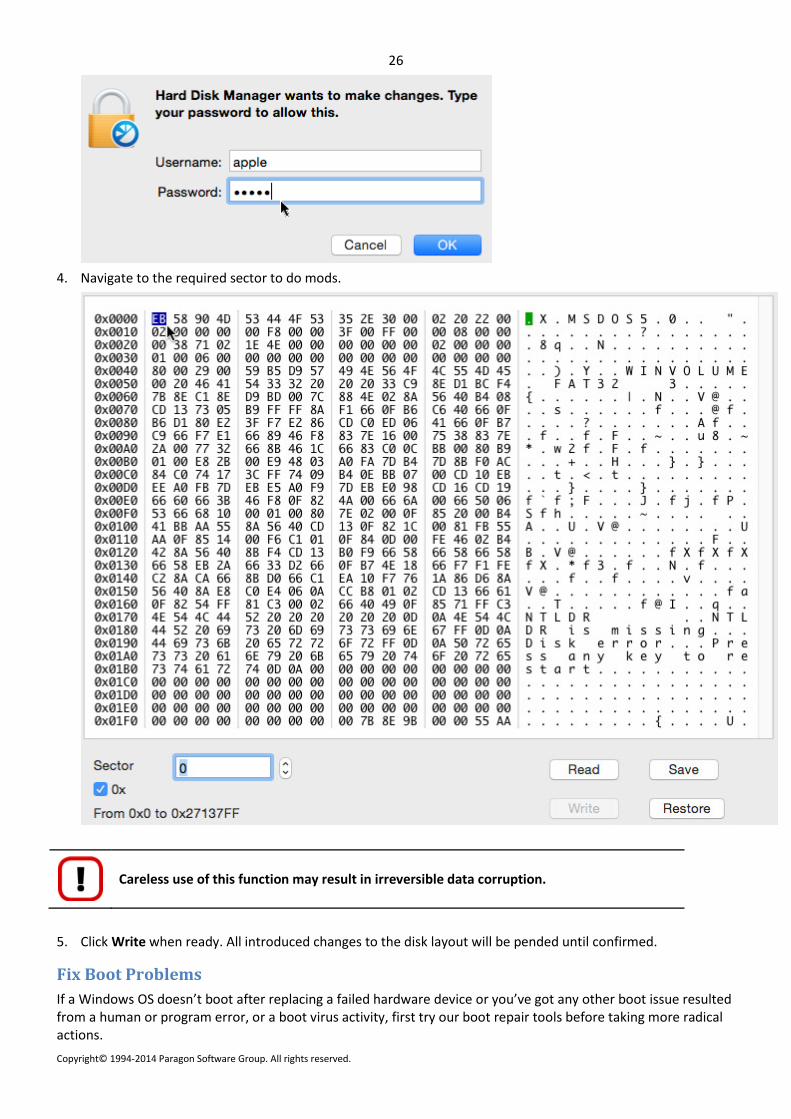
3. Before you proceed with the operation you are to provide password of a user with the administrator privilege.
Careless use of this function may result in irreversible data corruption.
5. Click Write when ready. All introduced changes to the disk layout will be pended until confirmed.
Fix Boot Problems
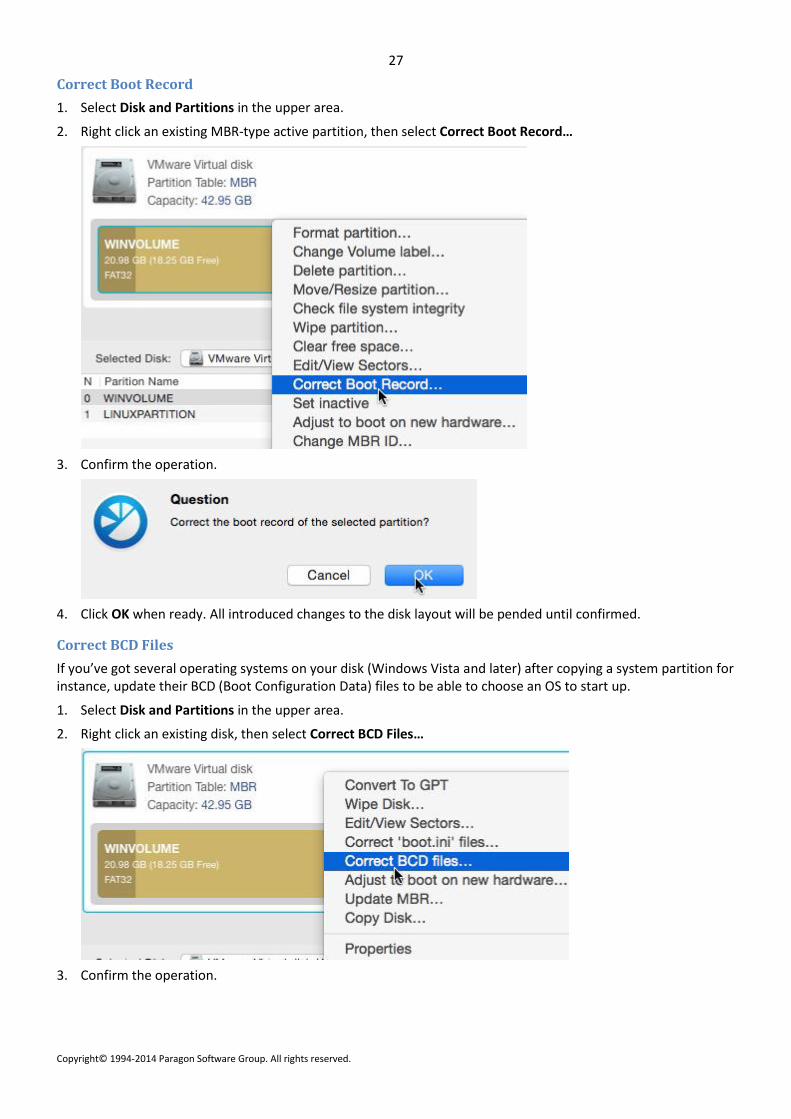
If a Windows OS doesn’t boot after replacing a failed hardware device or you’ve got any other boot issue resulted from a human or program error, or a boot virus activity, first try our boot repair tools before taking more radical actions.
2. Right click an existing MBR-type active partition, then select Correct Boot Record…
3. Confirm the operation.
4. Click OK when ready. All introduced changes to the disk layout will be pended until confirmed.
Correct BCD Files
If you’ve got several operating systems on your disk (Windows Vista and later) after copying a system partition for instance, update their BCD (Boot Configuration Data) files to be able to choose an OS to start up.
1. Select Disk and Partitions in the upper area.
2. Right click an existing disk, then select Correct BCD Files…
4. Click OK when ready. All introduced changes to the disk layout will be pended until confirmed.
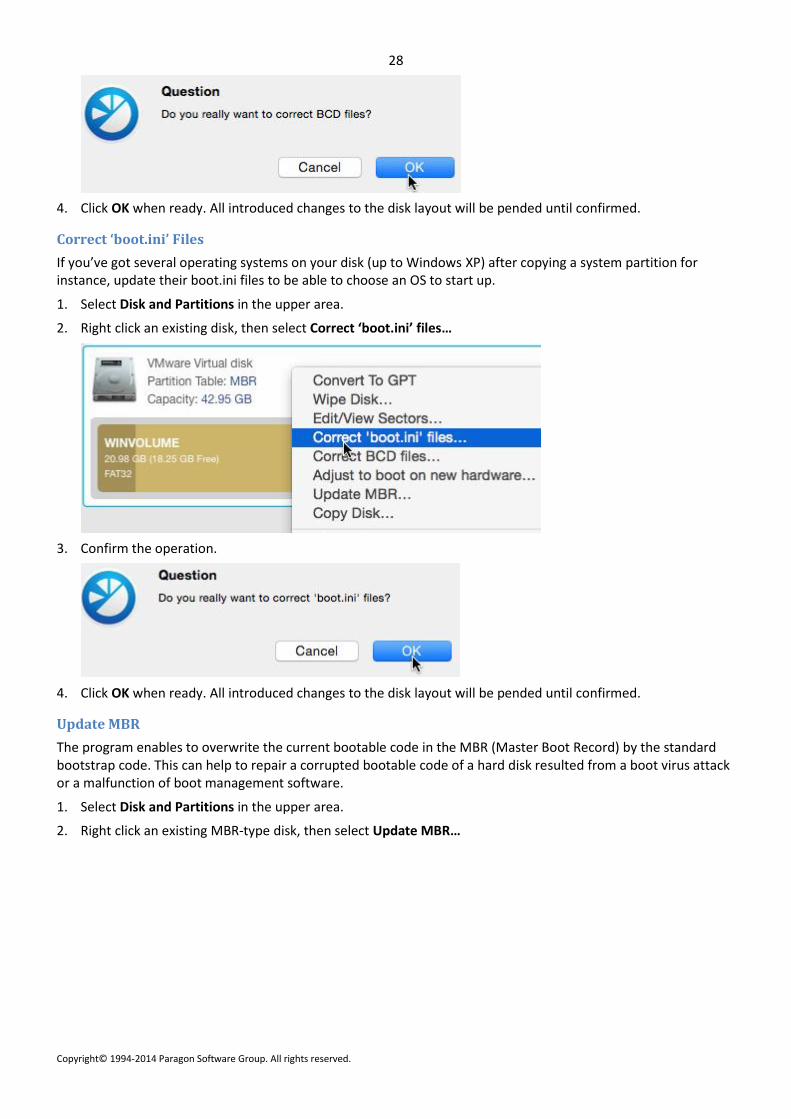
Correct ‘boot.ini’ Files
If you’ve got several operating systems on your disk (up to Windows XP) after copying a system partition for instance, update their boot.ini files to be able to choose an OS to start up.
1. Select Disk and Partitions in the upper area.
2. Right click an existing disk, then select Correct ‘boot.ini’ files…
3. Confirm the operation.
4. Click OK when ready. All introduced changes to the disk layout will be pended until confirmed.
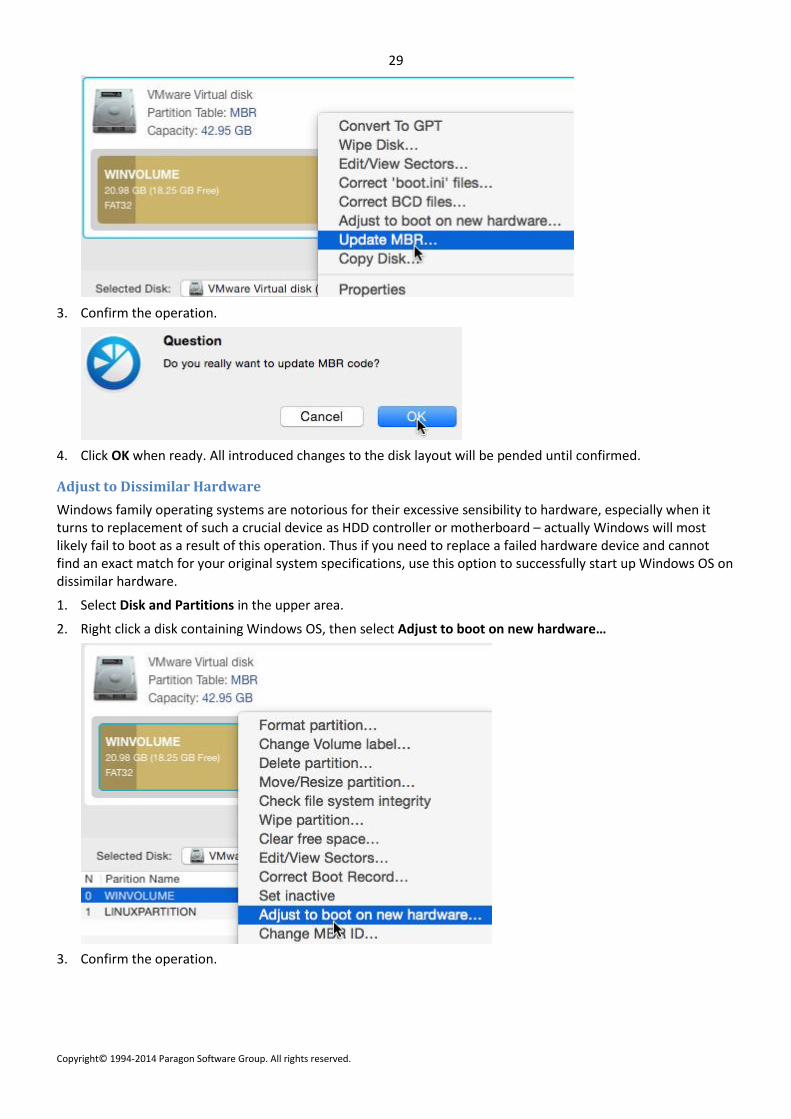
Update MBR
The program enables to overwrite the current bootable code in the MBR (Master Boot Record) by the standard bootstrap code. This can help to repair a corrupted bootable code of a hard disk resulted from a boot virus attack or a malfunction of boot management software.
1. Select Disk and Partitions in the upper area.
2. Right click an existing MBR-type disk, then select Update MBR…
4. Click OK when ready. All introduced changes to the disk layout will be pended until confirmed.
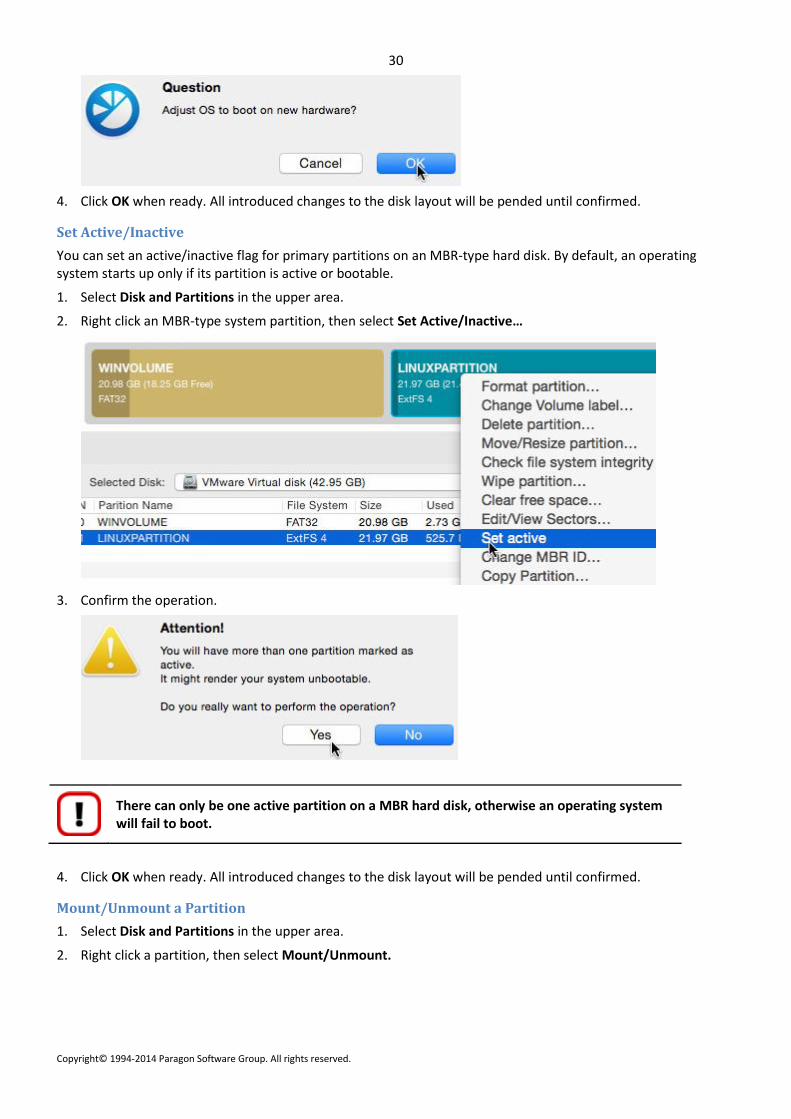
Adjust to Dissimilar Hardware
Windows family operating systems are notorious for their excessive sensibility to hardware, especially when it turns to replacement of such a crucial device as HDD controller or motherboard – actually Windows will most likely fail to boot as a result of this operation. Thus if you need to replace a failed hardware device and cannot find an exact match for your original system specifications, use this option to successfully start up Windows OS on dissimilar hardware.
1. Select Disk and Partitions in the upper area.
2. Right click a disk containing Windows OS, then select Adjust to boot on new hardware…
4. Click OK when ready. All introduced changes to the disk layout will be pended until confirmed.
Set Active/Inactive
You can set an active/inactive flag for primary partitions on an MBR-type hard disk. By default, an operating system starts up only if its partition is active or bootable.
1. Select Disk and Partitions in the upper area.
2. Right click an MBR-type system partition, then select Set Active/Inactive…
3. Confirm the operation.
There can only be one active partition on a MBR hard disk, otherwise an operating system will fail to boot.
4. Click OK when ready. All introduced changes to the disk layout will be pended until confirmed.
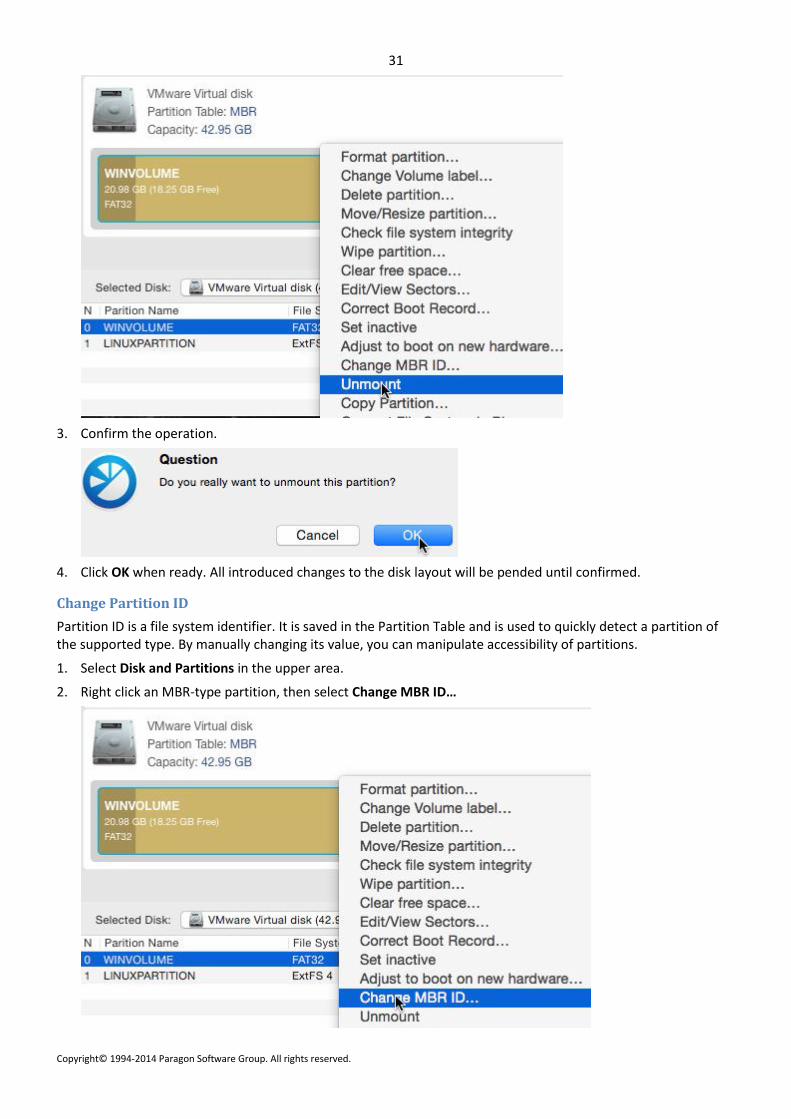
Mount/Unmount a Partition
1. Select Disk and Partitions in the upper area.
2. Right click a partition, then select Mount/Unmount.
4. Click OK when ready. All introduced changes to the disk layout will be pended until confirmed.
Change Partition ID
Partition ID is a file system identifier. It is saved in the Partition Table and is used to quickly detect a partition of the supported type. By manually changing its value, you can manipulate accessibility of partitions.
1. Select Disk and Partitions in the upper area.
2. Right click an MBR-type partition, then select Change MBR ID…
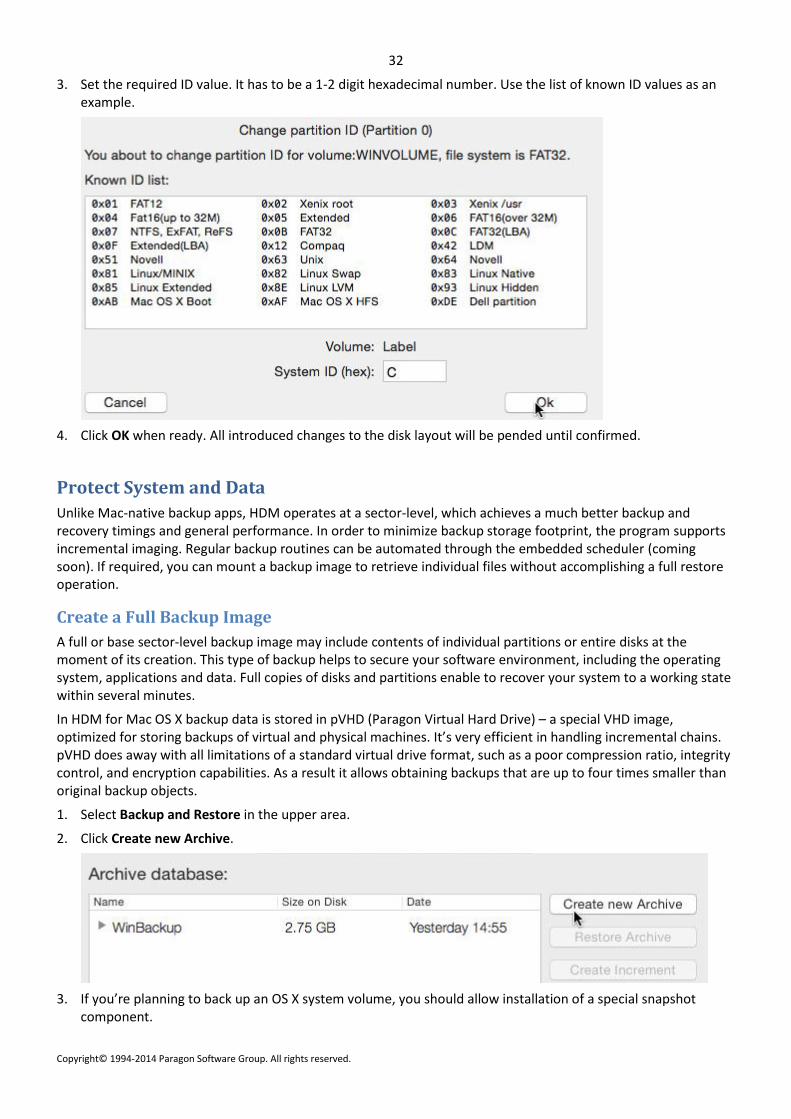
3. Set the required ID value. It has to be a 1-2 digit hexadecimal number. Use the list of known ID values as an example.
4. Click OK when ready. All introduced changes to the disk layout will be pended until confirmed.
Protect System and Data
Unlike Mac-native backup apps, HDM operates at a sector-level, which achieves a much better backup and recovery timings and general performance. In order to minimize backup storage footprint, the program supports incremental imaging. Regular backup routines can be automated through the embedded scheduler (coming soon). If required, you can mount a backup image to retrieve individual files without accomplishing a full restore operation.
Create a Full Backup Image
A full or base sector-level backup image may include contents of individual partitions or entire disks at the moment of its creation. This type of backup helps to secure your software environment, including the operating system, applications and data. Full copies of disks and partitions enable to recover your system to a working state within several minutes.
In HDM for Mac OS X backup data is stored in pVHD (Paragon Virtual Hard Drive) – a special VHD image, optimized for storing backups of virtual and physical machines. It’s very efficient in handling incremental chains. pVHD does away with all limitations of a standard virtual drive format, such as a poor compression ratio, integrity control, and encryption capabilities. As a result it allows obtaining backups that are up to four times smaller than original backup objects.
1. Select Backup and Restore in the upper area.
2. Click Create new Archive.
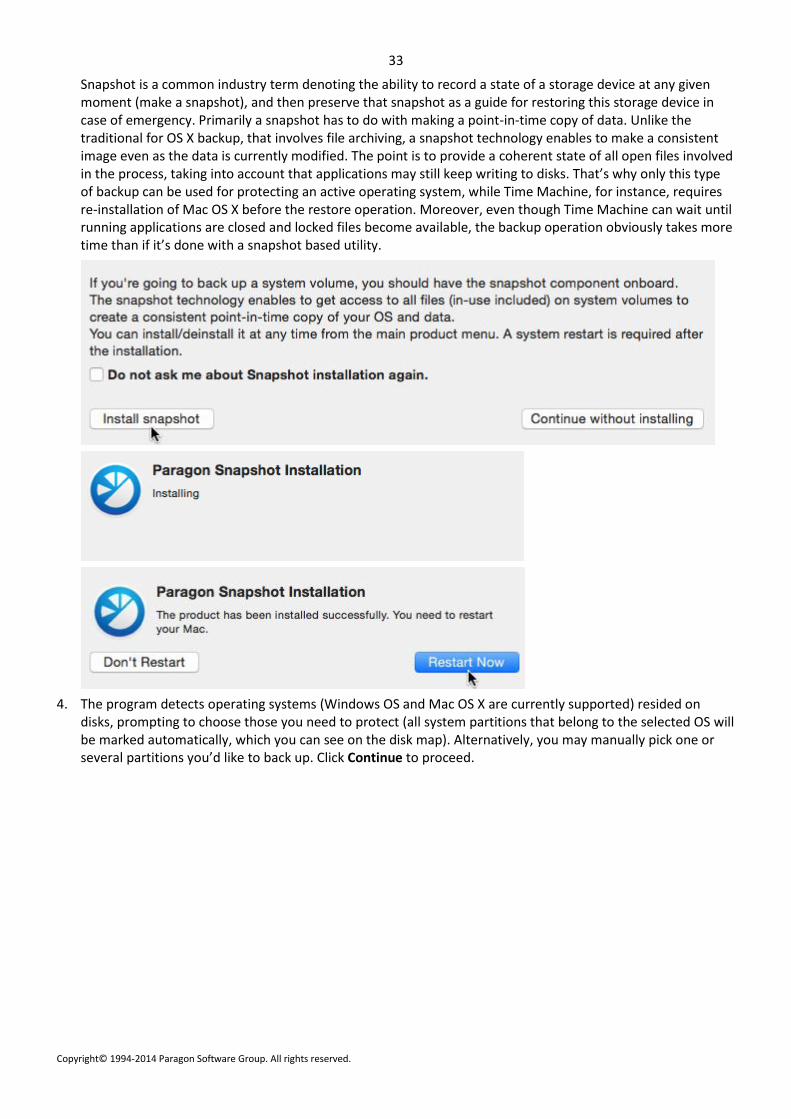
3. If you’re planning to back up an OS X system volume, you should allow installation of a special snapshot component.
Snapshot is a common industry term denoting the ability to record a state of a storage device at any given moment (make a snapshot), and then preserve that snapshot as a guide for restoring this storage device in case of emergency. Primarily a snapshot has to do with making a point-in-time copy of data. Unlike the traditional for OS X backup, that involves file archiving, a snapshot technology enables to make a consistent image even as the data is currently modified. The point is to provide a coherent state of all open files involved in the process, taking into account that applications may still keep writing to disks. That’s why only this type of backup can be used for protecting an active operating system, while Time Machine, for instance, requires re-installation of Mac OS X before the restore operation. Moreover, even though Time Machine can wait until running applications are closed and locked files become available, the backup operation obviously takes more time than if it’s done with a snapshot based utility.
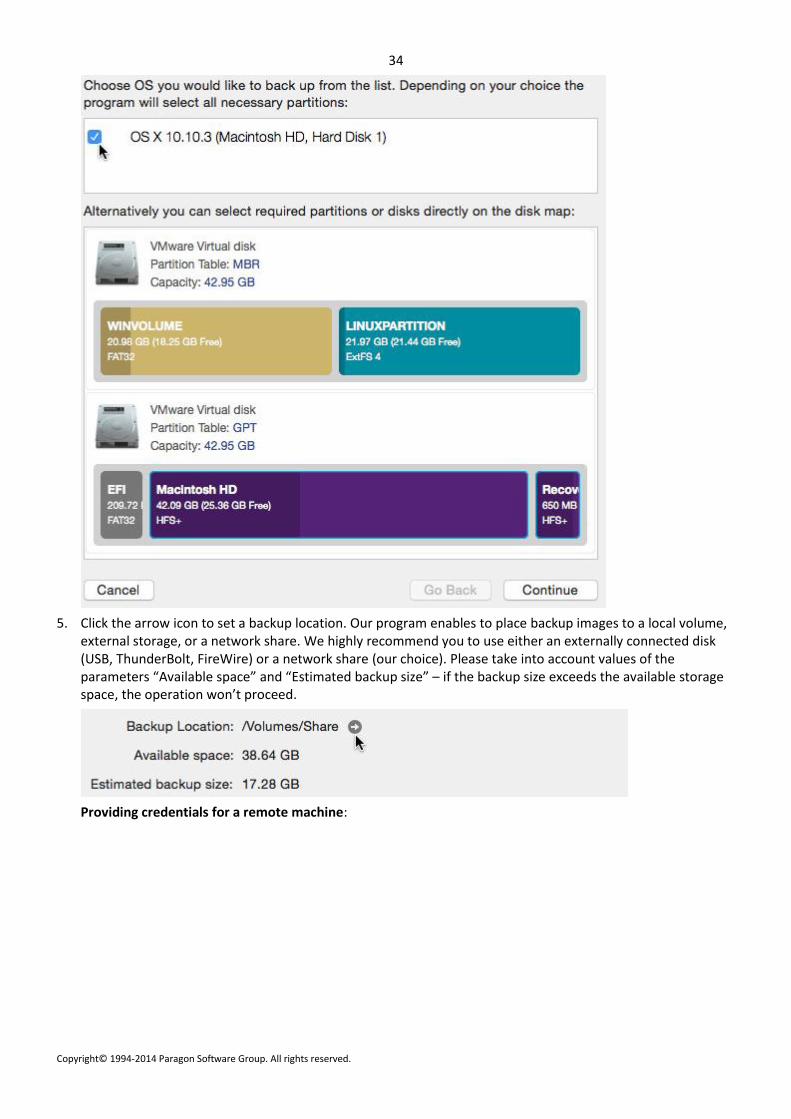
4. The program detects operating systems (Windows OS and Mac OS X are currently supported) resided on disks, prompting to choose those you need to protect (all system partitions that belong to the selected OS will be marked automatically, which you can see on the disk map). Alternatively, you may manually pick one or several partitions you’d like to back up. Click Continue to proceed.
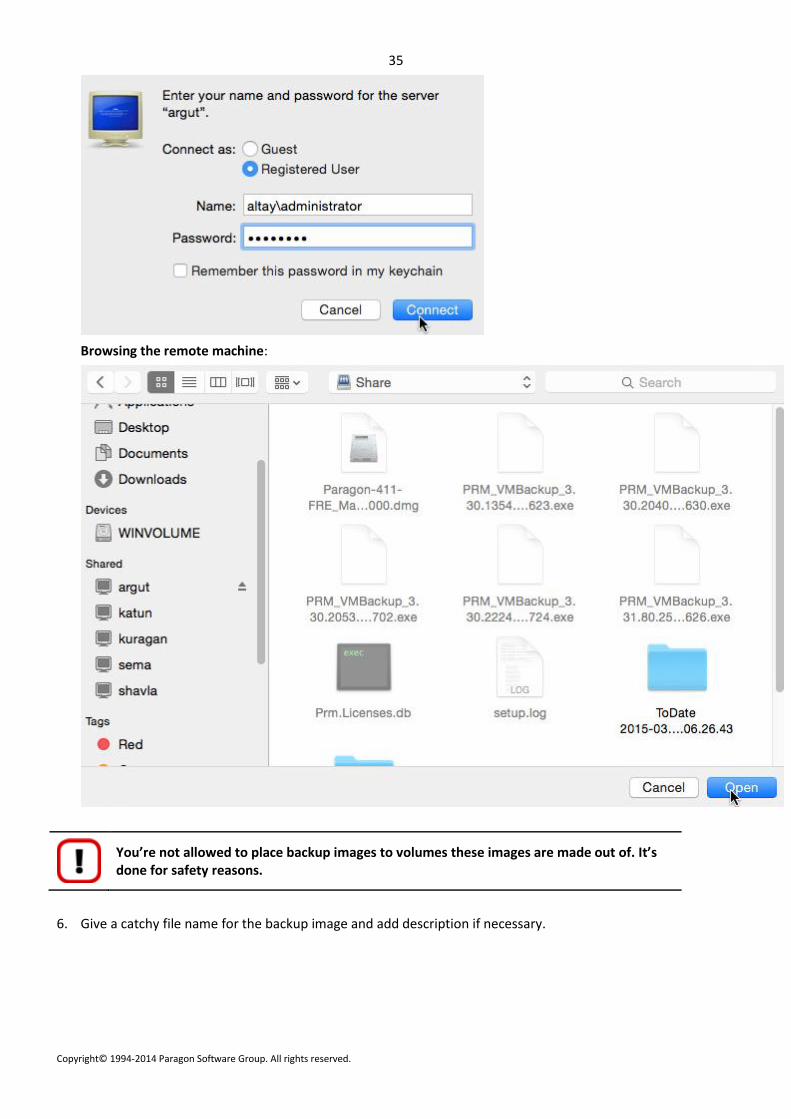
5. Click the arrow icon to set a backup location. Our program enables to place backup images to a local volume, external storage, or a network share. We highly recommend you to use either an externally connected disk (USB, ThunderBolt, FireWire) or a network share (our choice). Please take into account values of the parameters “Available space” and “Estimated backup size” – if the backup size exceeds the available storage space, the operation won’t proceed.
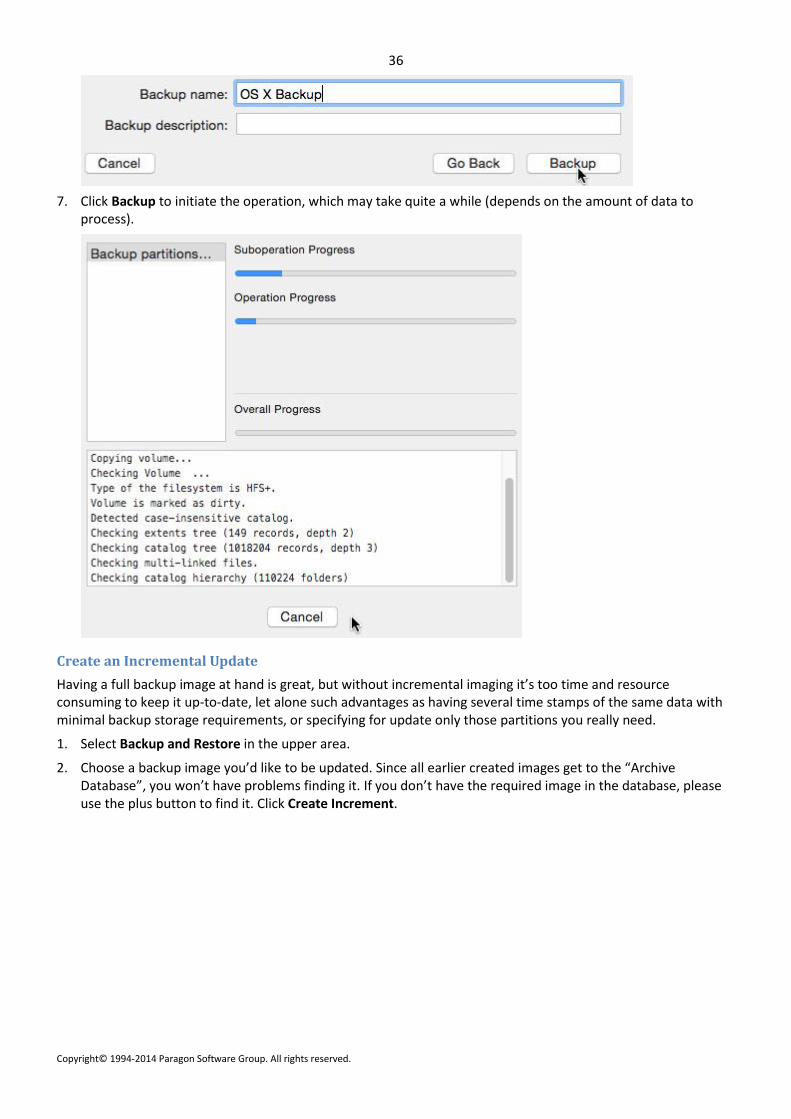
7. Click Backup to initiate the operation, which may take quite a while (depends on the amount of data to process).
Create an Incremental Update
Having a full backup image at hand is great, but without incremental imaging it’s too time and resource consuming to keep it up-to-date, let alone such advantages as having several time stamps of the same data with minimal backup storage requirements, or specifying for update only those partitions you really need.
1. Select Backup and Restore in the upper area.
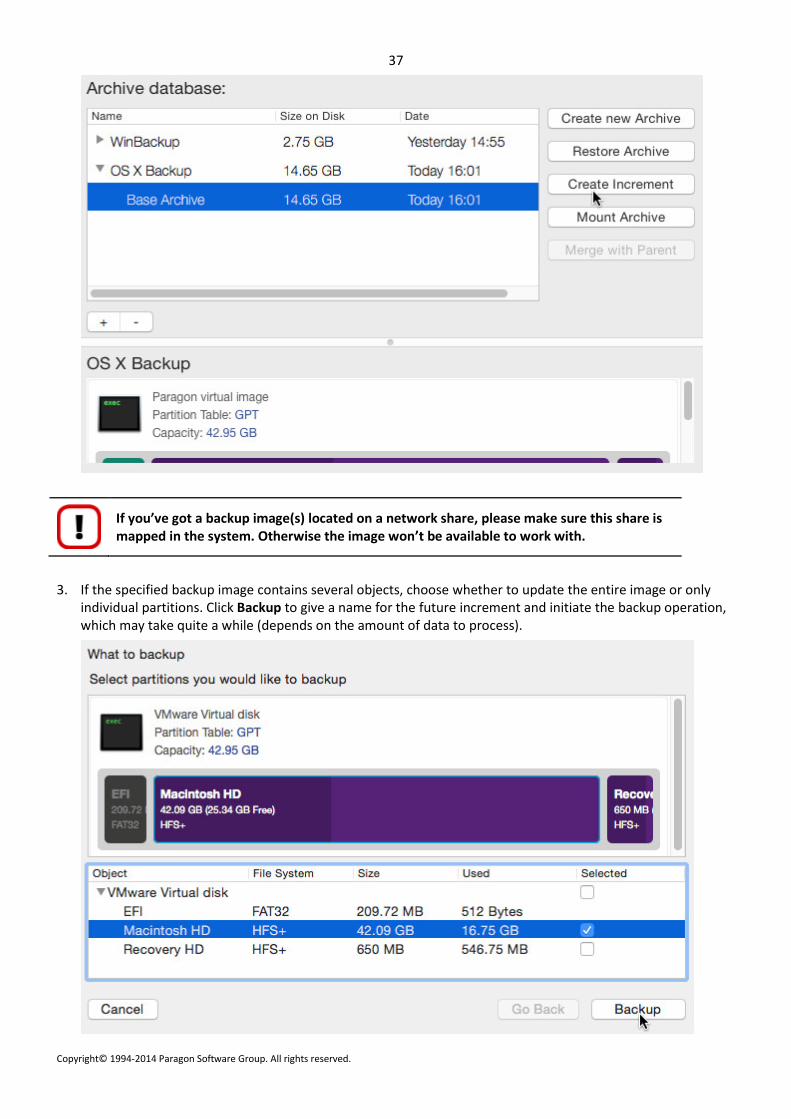
2. Choose a backup image you’d like to be updated. Since all earlier created images get to the “Archive Database”, you won’t have problems finding it. If you don’t have the required image in the database, please use the plus button to find it. Click Create Increment.
If you’ve got a backup image(s) located on a network share, please make sure this share is mapped in the system. Otherwise the image won’t be available to work with.
3. If the specified backup image contains several objects, choose whether to update the entire image or only individual partitions. Click Backup to give a name for the future increment and initiate the backup operation, which may take quite a while (depends on the amount of data to process).
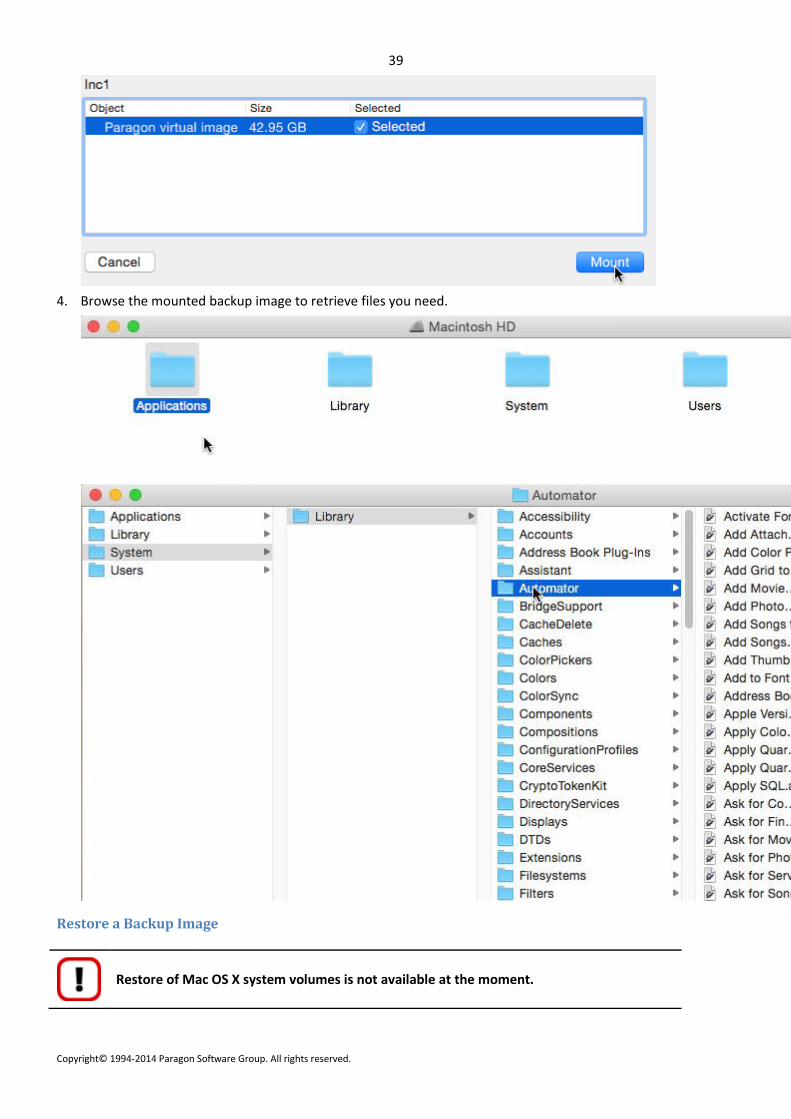
You can mount an existing backup image in the read-only mode, thus getting access to its contents through the Finder. This option can help to quickly retrieve individual files without accomplishing a full restore operation.
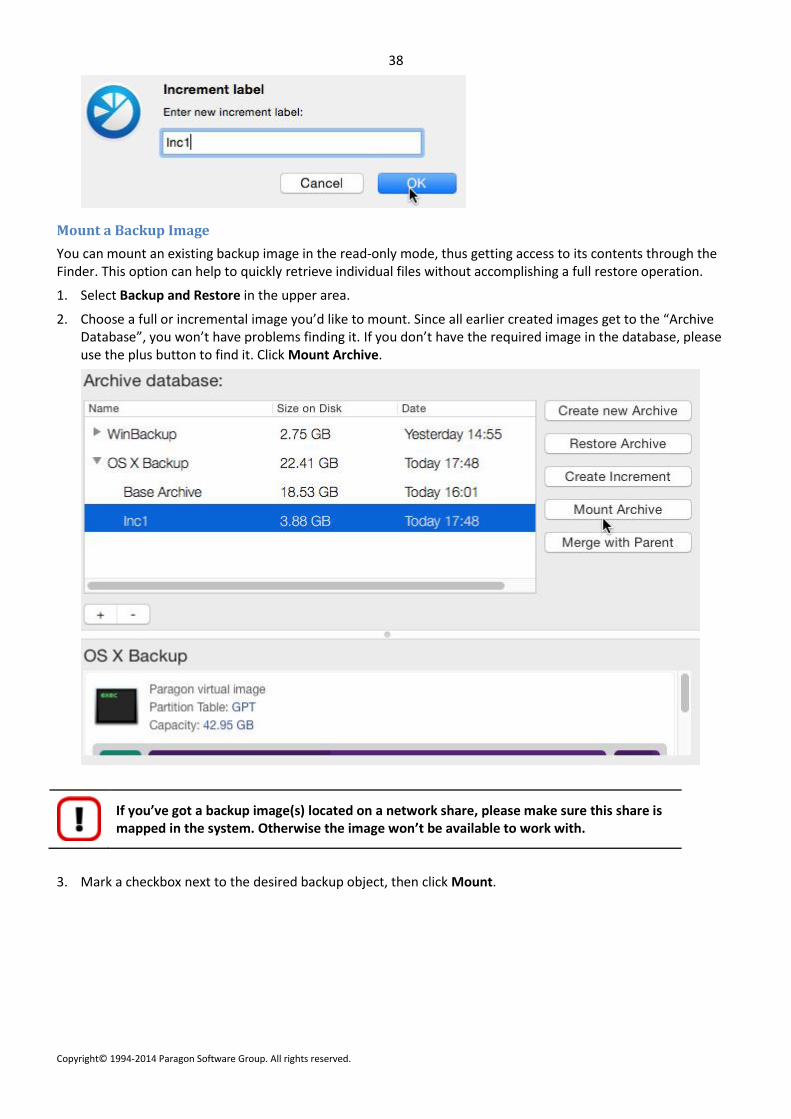
1. Select Backup and Restore in the upper area.
2. Choose a full or incremental image you’d like to mount. Since all earlier created images get to the “Archive Database”, you won’t have problems finding it. If you don’t have the required image in the database, please use the plus button to find it. Click Mount Archive.
If you’ve got a backup image(s) located on a network share, please make sure this share is mapped in the system. Otherwise the image won’t be available to work with.
3. Mark a checkbox next to the desired backup object, then click Mount.
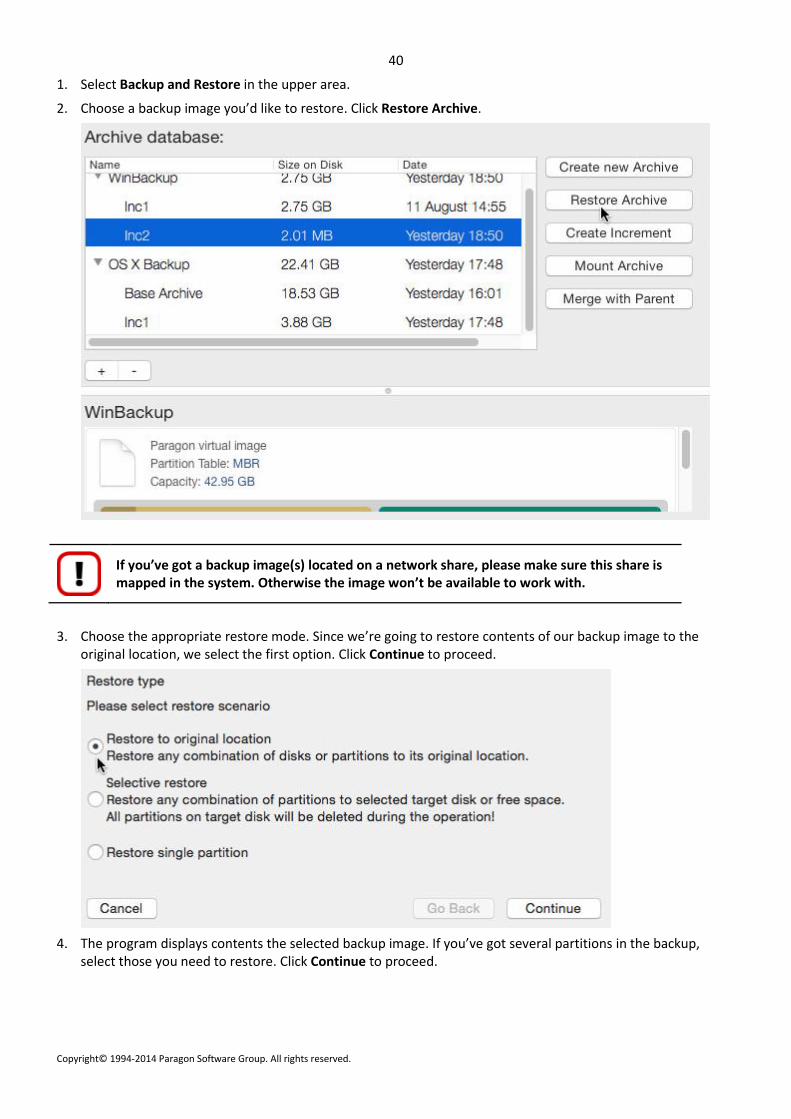
2. Choose a backup image you’d like to restore. Click Restore Archive.
If you’ve got a backup image(s) located on a network share, please make sure this share is mapped in the system. Otherwise the image won’t be available to work with.
3. Choose the appropriate restore mode. Since we’re going to restore contents of our backup image to the original location, we select the first option. Click Continue to proceed.
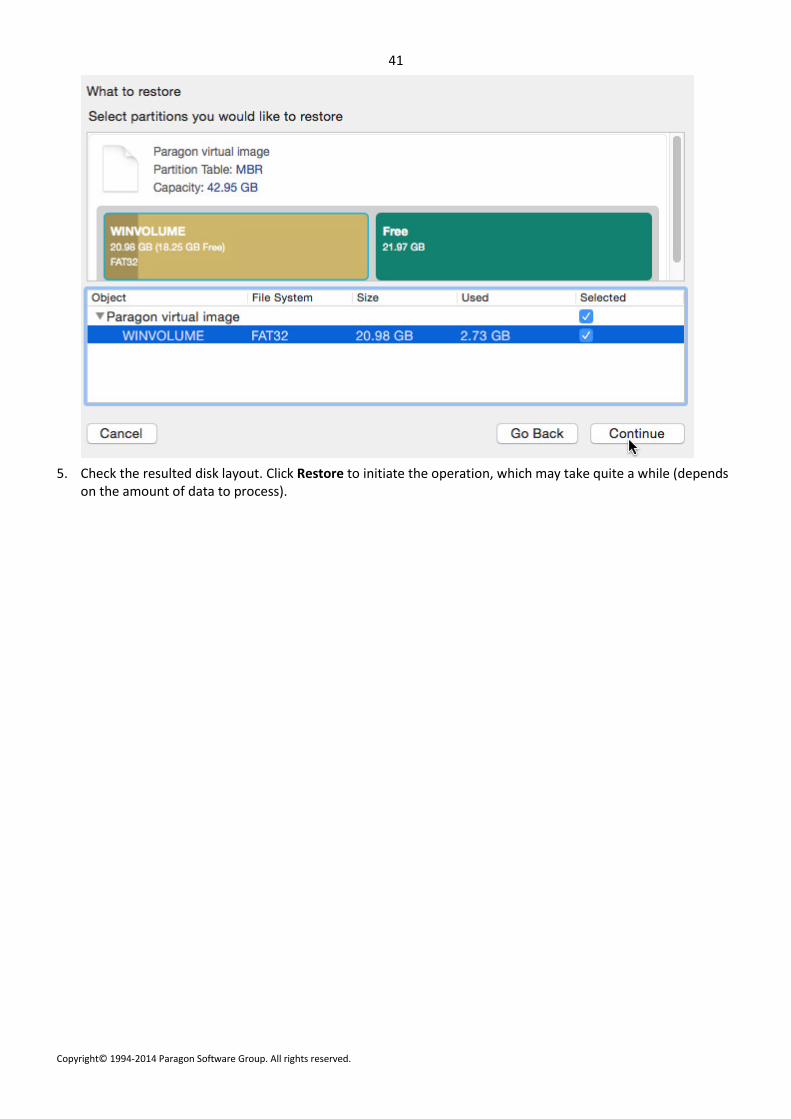
4. The program displays contents the selected backup image. If you’ve got several partitions in the backup, select those you need to restore. Click Continue to proceed.
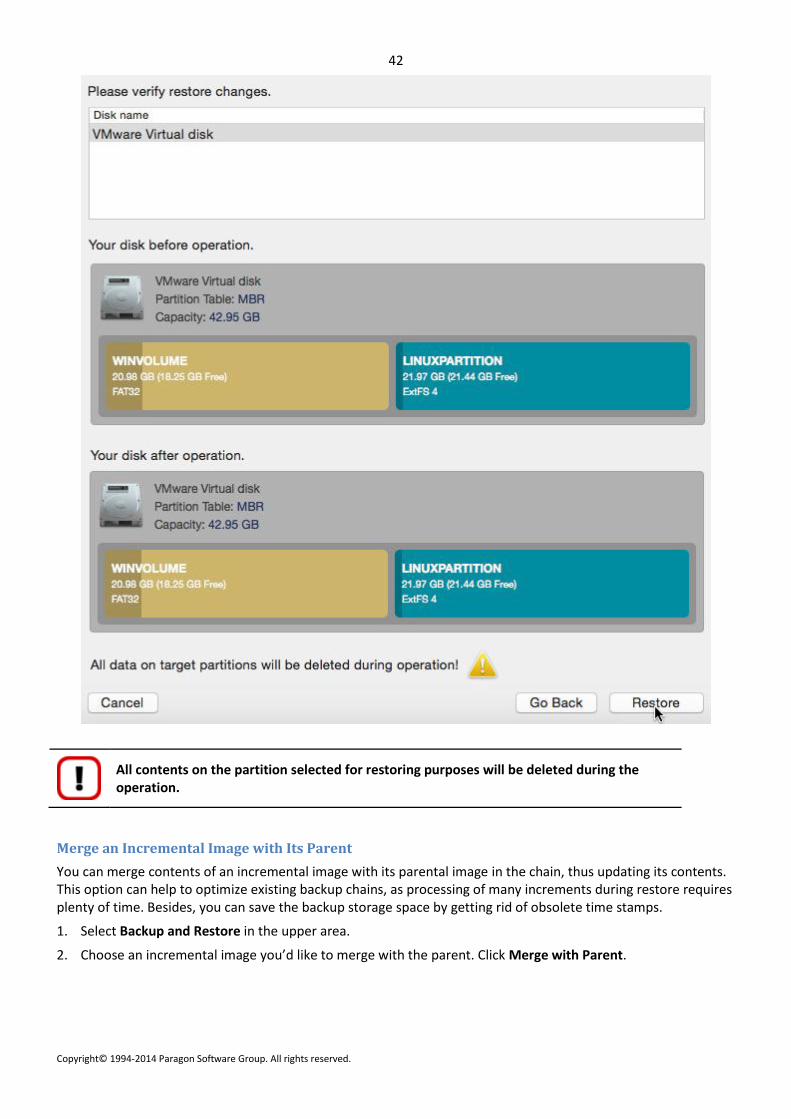
All contents on the partition selected for restoring purposes will be deleted during the operation.
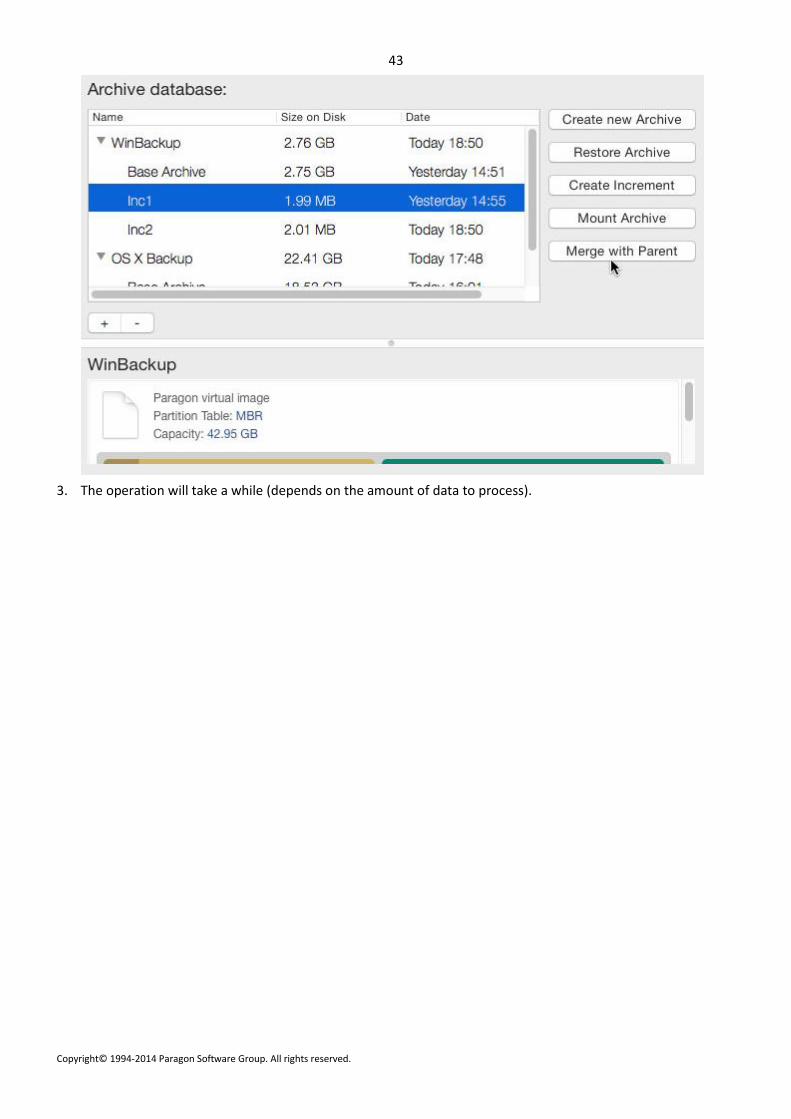
Merge an Incremental Image with Its Parent
You can merge contents of an incremental image with its parental image in the chain, thus updating its contents. This option can help to optimize existing backup chains, as processing of many increments during restore requires plenty of time. Besides, you can save the backup storage space by getting rid of obsolete time stamps.
1. Select Backup and Restore in the upper area.
2. Choose an incremental image you’d like to merge with the parent. Click Merge with Parent.