A guide for new-to-district selected applicants to Choices programs (Magnet, Permits With Transportation, Dual Language Education, Schools for Advanced Studies, Admission Criteria Schools, Affiliated Charters); Open Enrollment; and Zones of Choice online applicants who have received a school assignment. Note: parent must have applied online, and accepted a placement prior to pre-enrollment. Parent Guide to:
Transcript
A guide for new-to-district selected applicants to Choices
programs (Magnet, Permits With Transportation, Dual
Language Education, Schools for Advanced Studies, Admission
Criteria Schools, Affiliated Charters); Open Enrollment; and
Zones of Choice online applicants who have received a school
assignment. Note: parent must have applied online, and
accepted a placement prior to pre-enrollment.
Parent Guide to:
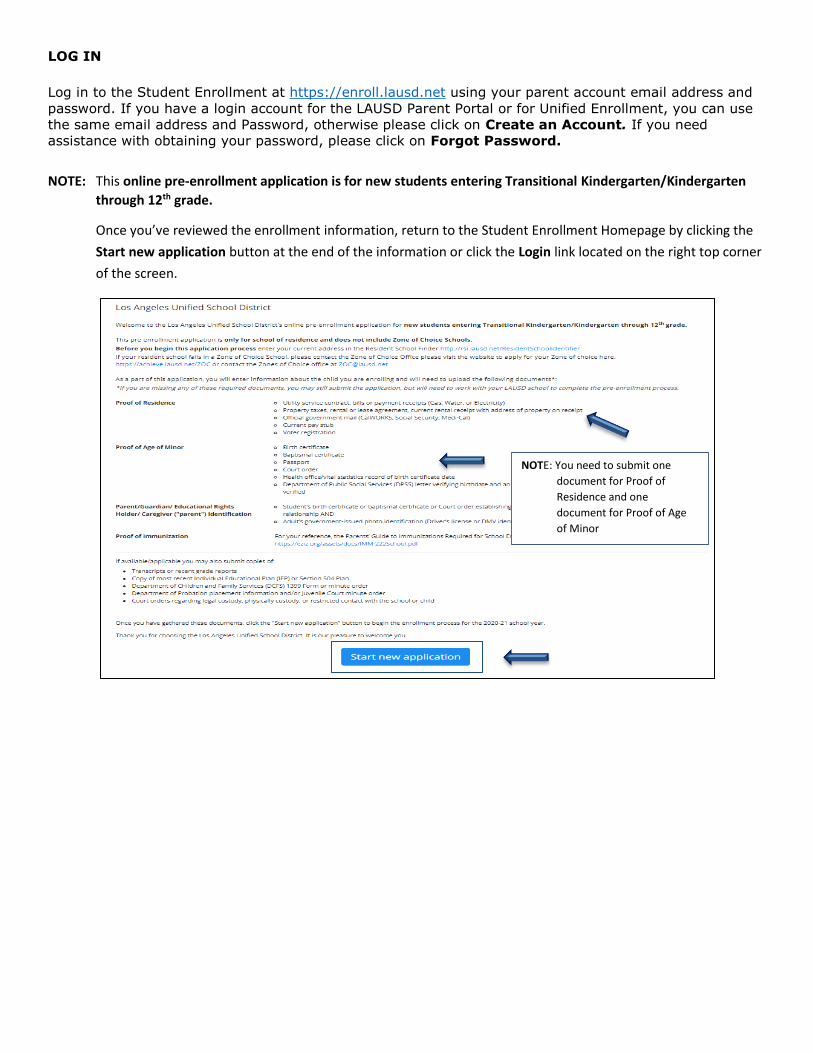
LOG IN
Log in to the Student Enrollment at https://enroll.lausd.net using your parent account email address and
password. If you have a login account for the LAUSD Parent Portal or for Unified Enrollment, you can use
the same email address and Password, otherwise please click on Create an Account. If you need
assistance with obtaining your password, please click on Forgot Password.
NOTE: This online pre-enrollment application is for new students entering Transitional Kindergarten/Kindergarten
through 12th grade.
Once you’ve reviewed the enrollment information, return to the Student Enrollment Homepage by clicking the
Start new application button at the end of the information or click the Login link located on the right top corner
of the screen.
NOTE: You need to submit one
document for Proof of
Residence and one
document for Proof of Age
of Minor
Step 1 Click the LAUSD Parent/Guardian icon.
Step 2 Type your email address and password in the corresponding fields.
Step 3 Click the Login button to open the Student Enrollment Homepage or click Create an account.
Step 4 Enter all the information in the fields marked with an asterisk (*). Check the box, I’m not a robot and then click
on Register.
1
2
3
4
4
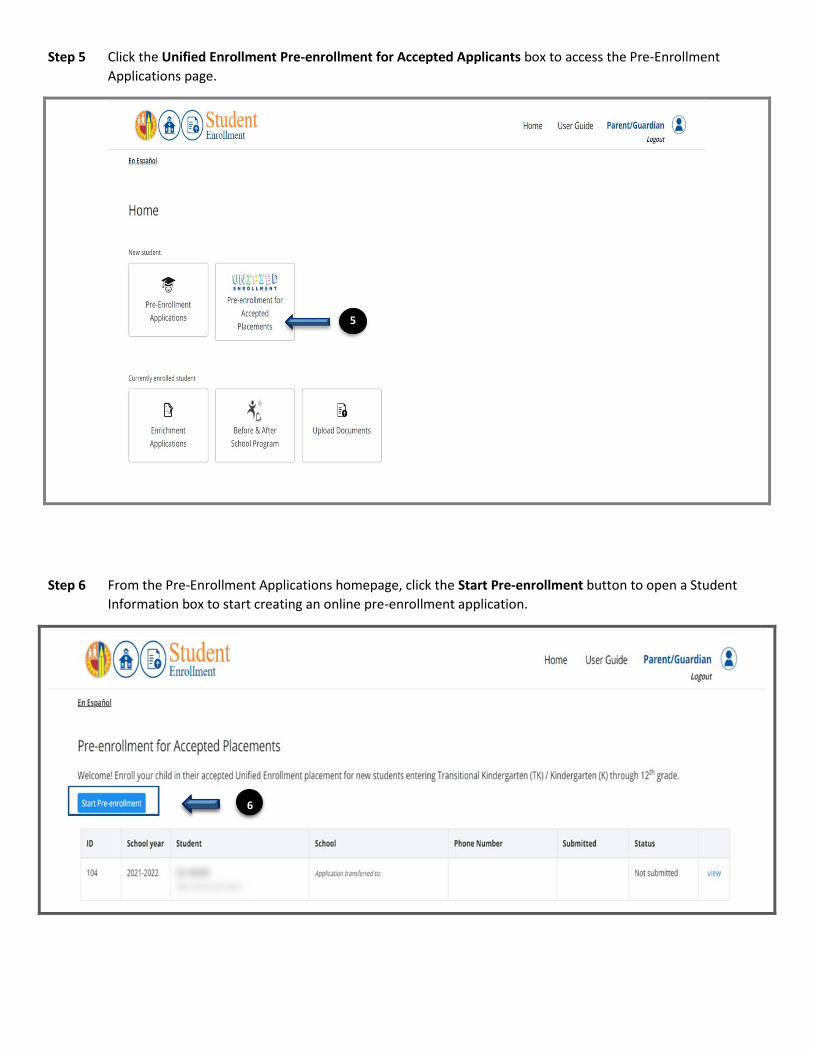
Step 5 Click the Unified Enrollment Pre-enrollment for Accepted Applicants box to access the Pre-Enrollment
Applications page.
Step 6 From the Pre-Enrollment Applications homepage, click the Start Pre-enrollment button to open a Student
Information box to start creating an online pre-enrollment application.
5
6
Step 7 Select your Student’s Accepted Placement.
Step 8: Save and continue at the end of each page.
Note: Please remember to click Save and continue at the end of each page. This pre-enrollment application allows the
ability for users to save any entered information and resume at a future date.
Section 1 – School & Address Tab
Step 9 Verify and complete the Student Information fields. Fields marked with a red asterisk (*) are required and
must be completed.
Step 10 Verify your accepted placement selection. Click the Save and continue button to save the answers and to
access the next section tab.
7 & 8
NOTE: The school that you select will receive this application once you have completed and submitted.
Section 2 – Student Information Tab
Step 11 Verify the student’s Legal name. If the student has a preferred name, enter in this section.
Step 12 Verify the Date of Birth, Enrolling grade and Home phone number.
Step 13 Click the radio button for legal sex and gender. Remember any field marked with and asterisk (*) is
required.
10
11
13
12
9
Step 14 The Student Housing Questionnaire information is required. Schools are required to remove barriers to
enrollment, attendance, and academic success for students experiencing homelessness.
Step 15 Once the Student Housing Questionnaire is completed, click Save and continue.
Section 3 – Parent/Legal Guardian tab
Step 16 Select/enter all applicable answers, especially in the required fields (*).
Click the link at the bottom of the page to enter additional parent/legal guardian/caregiver information.
Step 17 Click the Save and continue button.
11
15
14
17
16
Section 4 – Home Language and Ethnicity tab
Step 18 Enter all required fields (*) regarding the home language of the student.
Step 19 Click the Yes or No radio button to answer if the Student’s Ethnicity is Hispanic or Latino (required*).
Step 20 Click the Select hyperlink to indicate the race/ethnicity/cultural heritage (may enter up to 5).
Step 21 Click the Save and continue button.
18
20
21
19
19
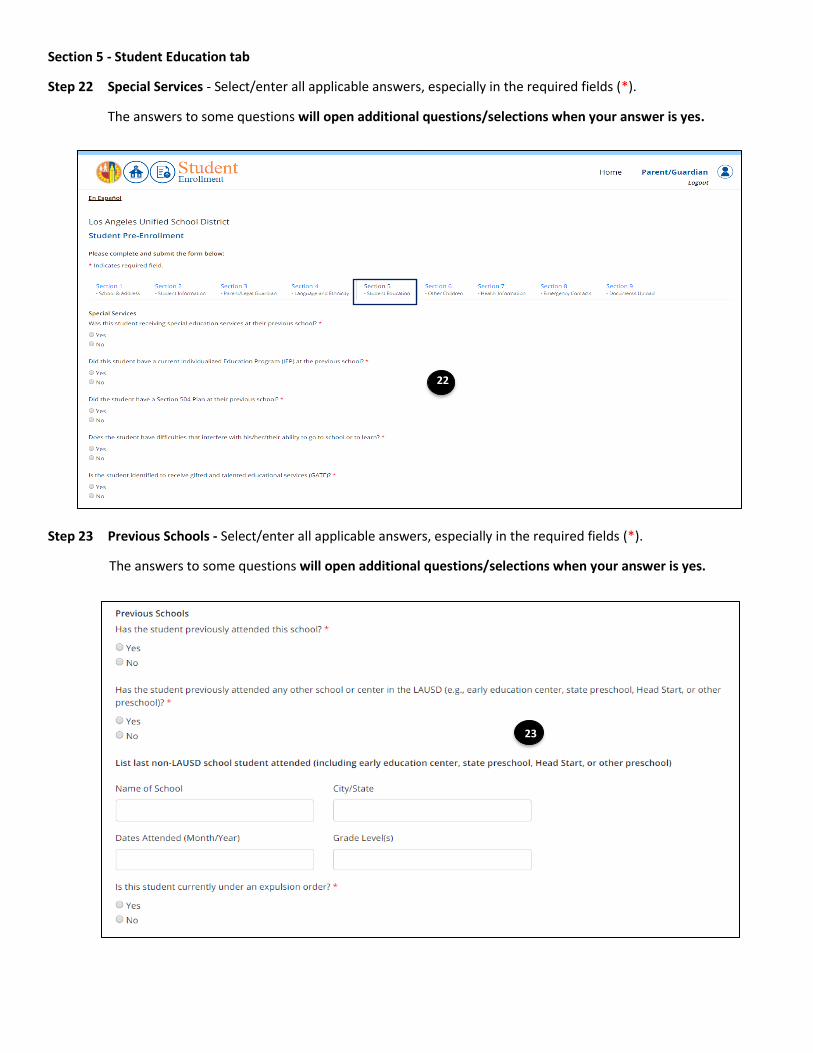
Section 5 - Student Education tab
Step 22 Special Services - Select/enter all applicable answers, especially in the required fields (*).
The answers to some questions will open additional questions/selections when your answer is yes.
Step 23 Previous Schools - Select/enter all applicable answers, especially in the required fields (*).
The answers to some questions will open additional questions/selections when your answer is yes.
22
23
Step 24 Additional Student Information - Select/enter all applicable answers, especially in the required fields (*).
The answers to some questions will open additional questions/selections when your answer is yes.
Step 25 Click the Save and continue button.
Section 6 – Children Living in Household tab
Step 26 If applicable, click the link provided under this tab to access fields that will allow you to enter information for
school-aged children living in the household.
Step 27 Click the Save and continue button.
25
24
26
27
Section 7 – Health Information tab
Step 28 Select/enter all applicable answers, especially in the required fields (*).
The answers to some questions will open additional questions/selections.
Step 29 Click the Save and continue button.
Section 8 – Emergency Contacts tab
Step 30 In a major emergency, it is school district policy to retain students at school for their safety. In case the Principal or another staff member is unable to reach you during any emergency, you need to authorize to
Contact and, if necessary, release your child to any person of your trust. Enter contact information, especially in the required fields (*). Click the link provided under this tab to add additional emergency contacts.
Step 31 Click the Save and continue button.
28
29
30
31
30
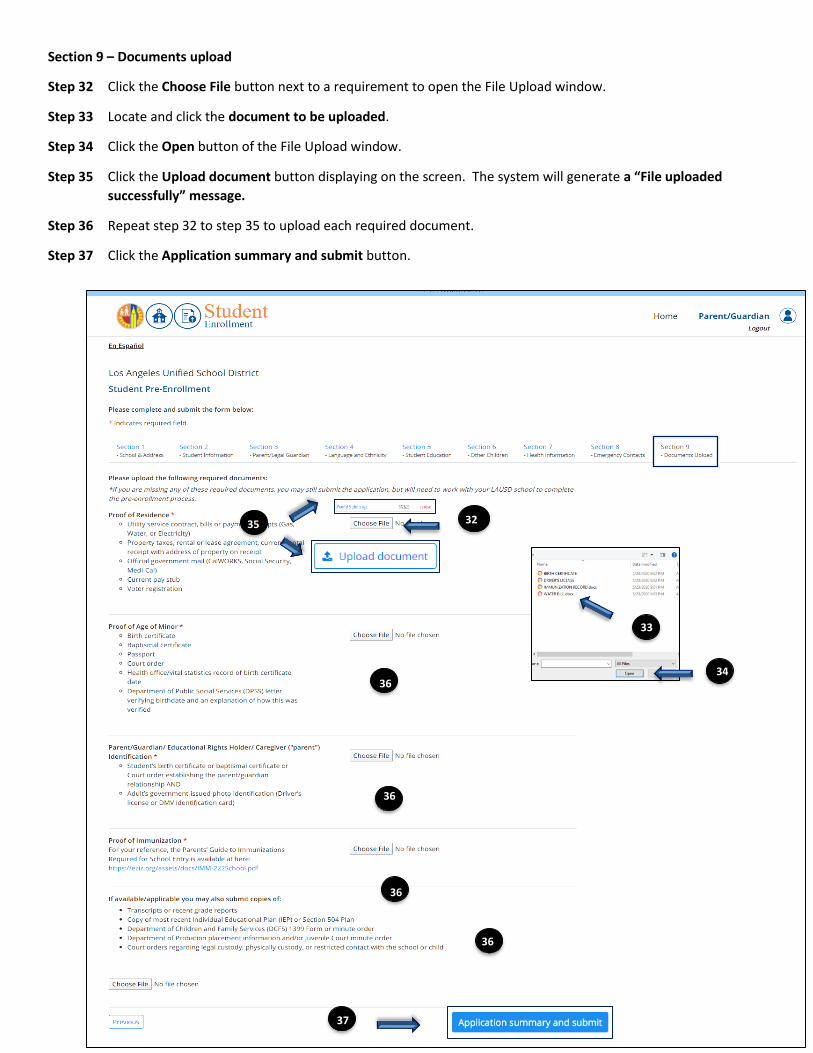
Section 9 – Documents upload
Step 32 Click the Choose File button next to a requirement to open the File Upload window.
Step 33 Locate and click the document to be uploaded.
Step 34 Click the Open button of the File Upload window.
Step 35 Click the Upload document button displaying on the screen. The system will generate a “File uploaded
successfully” message.
Step 36 Repeat step 32 to step 35 to upload each required document.
Step 37 Click the Application summary and submit button.
32
33
34
34
36
36
34
35
36
37
36
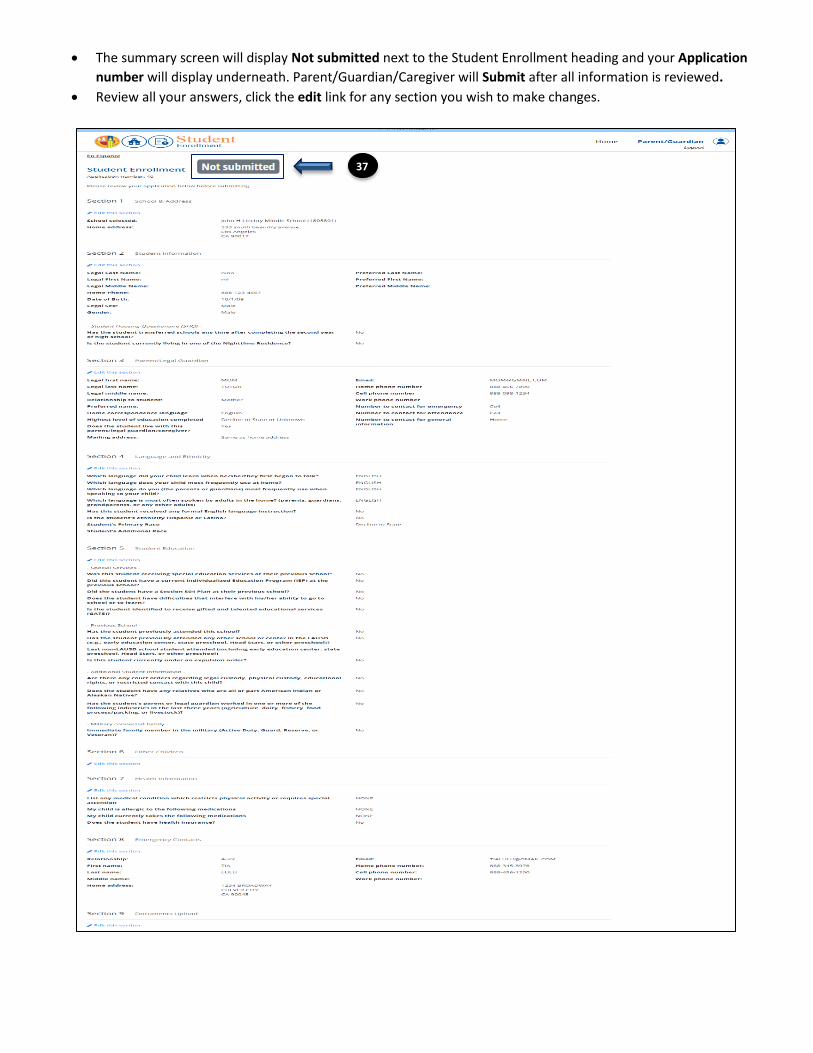
The summary screen will display Not submitted next to the Student Enrollment heading and your Application
number will display underneath. Parent/Guardian/Caregiver will Submit after all information is reviewed.
Review all your answers, click the edit link for any section you wish to make changes.
37
Step 38 Complete the required AUTHORIZATION FOR EMERGENCY MEDICAL TREATMENT by placing a checkmark in
each of the three boxes, typing your full name and relationship to the student in the required fields.
Step 39 Click the Submit button.
The word Submitted will display next to Student Enrollment and the submitted date and time will display at the bottom
of the screen. The pre-enrollment application is then sent electronically to the school selected at the beginning of the
application process. You will receive an email confirmation at the email provided.
Click the Return home page link to start a new application or click the Logout link to exit the portal.
39
38
Note: If you are enrolling another student, please click Start New Application.