81
ParentCONNECTxp Version 4.1 Installation and Setup Guide

Installation and Setup Guide
ParentCONNECTxpVersion 4.1

Released May 2012
This edition applies to Version 4.1 of the ParentCONNECTxp software and to all subsequent releases and modifications until otherwise indicated in new editions or updates.
The data and names used to illustrate the reports and screen images may include names of individuals, companies, brands, and products. All of the data and names are fictitious; any similarities to actual names are entirely coincidental.
PowerSchool SMS and PowerTeacher are trademarks, in the U.S. and/or other countries, of Pearson Education, Inc. or its affiliates. All trademarks that are not owned or licensed by Pearson Education, Inc. or its affiliates, are the property of their respective owners.
Copyright © 2012 Pearson Education, Inc. or its affiliate(s). All rights reserved.
Contents
List of Tables . . . . . . . . . . . . . . . . . . . . . . . . . . . . . . . . . . . . . . . . . . . . vi
Chapter 1: Overview. . . . . . . . . . . . . . . . . . . . . . . . . . . . . . . . . . 1About ParentCONNECTxp . . . . . . . . . . . . . . . . . . . . . . . . . . . . . . . . . . . 1ParentCONNECTxp Applications . . . . . . . . . . . . . . . . . . . . . . . . . . . . . . . 2How it Works with Student Information Systems . . . . . . . . . . . . . . . . . . . 3Hardware and Software Requirements . . . . . . . . . . . . . . . . . . . . . . . . . . 3
Chapter 2: Product Architecture. . . . . . . . . . . . . . . . . . . . . . . . . 4Components in a ParentCONNECTxp Environment . . . . . . . . . . . . . . . . . . 4Operational Guidelines . . . . . . . . . . . . . . . . . . . . . . . . . . . . . . . . . . . . . 7Deployment Scenarios . . . . . . . . . . . . . . . . . . . . . . . . . . . . . . . . . . . . . 8
Small District . . . . . . . . . . . . . . . . . . . . . . . . . . . . . . . . . . . . . . . . . 8Medium District . . . . . . . . . . . . . . . . . . . . . . . . . . . . . . . . . . . . . . . . 9Large District . . . . . . . . . . . . . . . . . . . . . . . . . . . . . . . . . . . . . . . . 10
Chapter 3: Windows Server and SQL Server Installation. . . . . 11Installing Windows Server . . . . . . . . . . . . . . . . . . . . . . . . . . . . . . . . . . 11
General Guidelines . . . . . . . . . . . . . . . . . . . . . . . . . . . . . . . . . . . . 11Network and Internet Connections . . . . . . . . . . . . . . . . . . . . . . . . . 12Required Operating System Components . . . . . . . . . . . . . . . . . . . . . 13Additional Setup for all SQL Servers . . . . . . . . . . . . . . . . . . . . . . . . 15
Creating Windows User Accounts for ParentCONNECTxp . . . . . . . . . . . . . 16Installing Microsoft SQL Server . . . . . . . . . . . . . . . . . . . . . . . . . . . . . . 18
Chapter 4: Installation . . . . . . . . . . . . . . . . . . . . . . . . . . . . . . . 19Performing a New Installation . . . . . . . . . . . . . . . . . . . . . . . . . . . . . . . 20Performing an Update . . . . . . . . . . . . . . . . . . . . . . . . . . . . . . . . . . . . 23Additional Installation Steps . . . . . . . . . . . . . . . . . . . . . . . . . . . . . . . . 25
Setting Up MSDTC for all SQL Servers . . . . . . . . . . . . . . . . . . . . . . . 25Sharing the Central Authentication Path Folder . . . . . . . . . . . . . . . . . 25
Repairing or Uninstalling ParentCONNECTxp . . . . . . . . . . . . . . . . . . . . . 26
Chapter 5: Website Security and SMTP Server. . . . . . . . . . . . . 27Securing Data Display Operations with SSL Certificates . . . . . . . . . . . . . 28
ParentCONNECTxp Installation and Setup Guide iii

Contents
Configuring the SMTP Virtual Server . . . . . . . . . . . . . . . . . . . . . . . . . . 29About IIS security . . . . . . . . . . . . . . . . . . . . . . . . . . . . . . . . . . . . . . . 31
Chapter 6: Initial Configuration Using AdminApp . . . . . . . . . . 32Using the Administration Application . . . . . . . . . . . . . . . . . . . . . . . . . . 33Changing the ADMIN User Login Password . . . . . . . . . . . . . . . . . . . . . . 34Verify the Website URL . . . . . . . . . . . . . . . . . . . . . . . . . . . . . . . . . . . . 34Configuring Basic Processing Parameters . . . . . . . . . . . . . . . . . . . . . . . 35Verifying the Global Configuration Settings . . . . . . . . . . . . . . . . . . . . . . 36
Verifying the Database Connection and Global Settings . . . . . . . . . . . 37Verifying the PowerTeacher Gradebook Settings . . . . . . . . . . . . . . . . 38
Importing Schools . . . . . . . . . . . . . . . . . . . . . . . . . . . . . . . . . . . . . . . 39Configuring Alert and Gradebook Settings for Individual Schools . . . . . . . 41Adding and Registering DataRefreshers . . . . . . . . . . . . . . . . . . . . . . . . 42Assigning Schools to DataRefreshers . . . . . . . . . . . . . . . . . . . . . . . . . . 44Adding Web Users and Assigning Students . . . . . . . . . . . . . . . . . . . . . . 45
Adding Web Users Manually in AdminApp . . . . . . . . . . . . . . . . . . . . . 45Auto-Generating Web Users . . . . . . . . . . . . . . . . . . . . . . . . . . . . . . 46
Running DataRefreshers . . . . . . . . . . . . . . . . . . . . . . . . . . . . . . . . . . . 48Testing the Website . . . . . . . . . . . . . . . . . . . . . . . . . . . . . . . . . . . . . . 48
Chapter 7: Process Server Setup . . . . . . . . . . . . . . . . . . . . . . . 49About Process Servers . . . . . . . . . . . . . . . . . . . . . . . . . . . . . . . . . . . . 49Installing SQL Server . . . . . . . . . . . . . . . . . . . . . . . . . . . . . . . . . . . . . 49Installing the Process Database and DataRefresher . . . . . . . . . . . . . . . . 50
Chapter 8: Alert Notifier . . . . . . . . . . . . . . . . . . . . . . . . . . . . . . 51Starting the Alert Notifier Service . . . . . . . . . . . . . . . . . . . . . . . . . . . . 52Managing Alert Operations in AdminApp . . . . . . . . . . . . . . . . . . . . . . . . 52
Managing Alerts at the School Level . . . . . . . . . . . . . . . . . . . . . . . . 52Configuring Alert Processing Options . . . . . . . . . . . . . . . . . . . . . . . . 54Alert Record Management . . . . . . . . . . . . . . . . . . . . . . . . . . . . . . . 55
End-User Alert Selection . . . . . . . . . . . . . . . . . . . . . . . . . . . . . . . . . . . 55
Chapter 9: Online Course Requests Overview . . . . . . . . . . . . . 56About the ParentCONNECTxp Course Requests Website . . . . . . . . . . . . . 57PowerSchool SMS Setup . . . . . . . . . . . . . . . . . . . . . . . . . . . . . . . . . . . 57PowerSchool SMS Operation . . . . . . . . . . . . . . . . . . . . . . . . . . . . . . . . 58ParentCONNECTxp Setup and Operation . . . . . . . . . . . . . . . . . . . . . . . . 58
ParentCONNECTxp Installation and Setup Guide iv

Contents
Appendix A: Central Authentication and PCXP.ini . . . . . . . . . . 60PCXP.ini Parameter Settings . . . . . . . . . . . . . . . . . . . . . . . . . . . . . . . . 63Central Authentication Illustrations . . . . . . . . . . . . . . . . . . . . . . . . . . . 66
Appendix B: Microsoft Certificate Services . . . . . . . . . . . . . . . 69Configuring Certificate Services to Automatically Issue Certificates . . . . . 70Creating the Server Certificate Request File . . . . . . . . . . . . . . . . . . . . . 70Processing the Server Certificate Request File . . . . . . . . . . . . . . . . . . . . 71Applying the Certificate and Enabling Secure Communications . . . . . . . . 73Renewing a ParentCONNECTxp Website SSL Certificate . . . . . . . . . . . . . 74
ParentCONNECTxp Installation and Setup Guide v

ParentCONNECTxp Installation and Setup Guide vi
List of TablesRefer to the following tables for installation and setup parameters.
Table 1. Tables that list installation parameters
Table and Page Table Name
Table 3-1 on page 14 Additional Windows Server components
Table 3-2 on page 17 Windows user account properties
Table 3-3 on page 18 SQL Server installation parameters
Table A-1 on page 66 PCXP.ini parameter settings

1Overview
This guide shows how to set up the ParentCONNECTxp™ parent access solution.
About ParentCONNECTxpParentCONNECTxp is a Web-based application that allows parents to view information about their child in a secure environment. You can use ParentCONNECTxp to make information from PowerSchool SMS® and PowerTeacher™ gradebook available to parents. ParentCONNECTxp copies student data from these databases to populate its own database.
Parents can be given access to the following information and features in ParentCONNECTxp:
• Student Information – A summary of the student’s attendance, grades, assignments, and discipline. Personal information may also be displayed.
• Course Plan and Requests - On the ParentCONNECTxp website, the Course Plan pencil provides a view of the student’s course requests for the upcoming year and their Academic Plan progress. Parents will approve their child’s course requests on this pencil if required to do so by the school. Counselors will approve courses in PowerSchool SMS if required to do so. A separate website is used for students to search for courses and submit their course requests.
• Assignments – With PowerTeacher gradebook, information regarding assignments is available. The type of assignment, course name, and due date can be displayed. Grades for classes that the student is currently taking can be listed with links to details of the tasks that were used to determine the current class grade.
• Grades – Parents can view and print unofficial report cards and transcripts from PowerSchool SMS. Grades for each Reporting Period can be listed with the details of how the grades were achieved. Students’ course history and current schedule are also available.
• Attendance – Attendance records are displayed with all absences and tardies. Attendance views are provided in calendar, report, and summary totals formats.
ParentCONNECTxp Installation and Setup Guide 1

Overview
• Discipline – Discipline incidents are listed with partial details. Date, location, the person who reported the incident, and what action was taken can be displayed. The school decides what policy to use in publishing this information to parents.
• School Information – The staff directory displays names and contact information such as telephone numbers and e-mail addresses. You can post school announcements by using the website as a school bulletin board.
• E-mail Alerts – Parents can request to receive an e-mail notification when their children are absent, have a recorded discipline incident, or are missing or failing a class assignment. Parents can select the types of alerts they want to receive.
ParentCONNECTxp ApplicationsParentCONNECTxp consists of the following applications:
• The Administration application (or AdminApp) handles system setup and maintenance. Use it to customize the Web display, create user accounts, assign students to these accounts, and configure and control data population operations performed by the DataRefresher.
• The DataRefresher application refreshes the ParentCONNECTxp database at specified intervals by extracting data from the PowerSchool SMS database and gradebook data.
• The PCxp Alert Notifier service manages the processing of e-mail alerts sent to parents. It scans parent requests for the types of alerts requested and creates an e-mail message to send to parents when their children’s PowerSchool SMS data is marked with an action that falls into a requested alert category (unexcused absence, tardy, discipline, and so on). The Alert Notifier Service is also used to process e-mail messages generated by AdminApp and DataRefreshers.
• The ParentCONNECTxp website provides secure (SSL) display of student information to those Web users authorized to view a particular student’s data.
• The ParentCONNECTxp COM+ Components Package provides the database connectivity and business logic used to create the dynamic display portions of the ParentCONNECTxp web pages. These components are also used by the Alert Notifier service to generate alert e-mail messages to parents.
• The Online Course Request website allows students to request courses for scheduling. This website is accessed from a link on the Course Plan pencil in ParentCONNECTxp or via its own URL (the same as the URL for ParentCONNECTxp followed by /OCR).
ParentCONNECTxp Installation and Setup Guide 2

Overview
How it Works with Student Information SystemsThe school and teacher information and most of the student information comes from data maintained in your student information system. The student information includes:
• Attendance
• Discipline
• Emergency contacts
• Grades
• Report Cards
• Immunization
• Student schedules
• Student pictures
Student assignments and current class grades come from PowerTeacher gradebook.
Hardware and Software RequirementsSee the ParentCONNECTxp Hardware and Software Requirements guide for a list of hardware and software requirements.
ParentCONNECTxp Installation and Setup Guide 3

2Product Architecture
This chapter provides guidelines and examples of ParentCONNECTxp product architecture.
Components in a ParentCONNECTxp EnvironmentYou can split your ParentCONNECTxp system into a display server subsystem and one or more process server subsystems to improve performance. As with previous versions of ParentCONNECTxp, you can also run everything on one server. See Figure 2-1 on page 6 for an illustration of a ParentCONNECTxp environment.
Display Server Subsystem. The display server subsystem includes the primary SQL Server database for ParentCONNECTxp operations and may be used to provide the website to end users. Use only one display server per district. This gives all end users in the district one website for all activities. If you don’t want to add process servers, the display server subsystem will perform both the display and processing functions.
The display server subsystem contains the following additional components:
• IIS Websites. ParentCONNECTxp provides two websites for use in accessing the product. A simple HTTP site facilitates initial site access and an HTTPS (SSL) site provides for secure display of student information to the end user.
• Microsoft SMTP Virtual Server. This service is used for the delivery of e-mail messages from the Alert Notifier service as well as internally generated e-mail messages from the end user to someone included in the ParentCONNECTxp Contact List.
• ParentCONNECTxp COM+ Services. These components are used by the ParentCONNECTxp websites and the Alert Notifier service to obtain the requested data from the display server database.
ParentCONNECTxp Installation and Setup Guide 4

Product Architecture
Process Server Subsystem. The process server subsystem includes a secondary SQL Server database and the DataRefresher application. Process servers can be used to spread out the business logic processing across multiple systems. You can add one or more process servers to manage data processing and improve performance.
DataRefresher. DataRefreshers manage the population of data from PowerSchool SMS to the SQL Server database in the process servers and, finally, the display server subsystem. Each process server typically runs one DataRefresher.
Important: For best performance, Pearson recommends that the number of DataRefreshers/process servers used should not be greater than 50% of the number of CPU cores on the PowerSchool SMS database server. For example, if the PowerSchool SMS database server has a quad-core processor, ParentCONNECTxp should not have more than two Data Refreshers/process servers.
Administration Application (AdminApp). System administration operations are performed through the AdminApp application. AdminApp can be run on any supported Windows platform but must always reference the SQL Server database used for display server operations.
ParentCONNECTxp Installation and Setup Guide 5

Product Architecture
The following diagram illustrates a ParentCONNECTxp system.
Figure 2-1. ParentCONNECTxp system
33.3333%
33.3333%
33.3333%
33.3333%
33.3333%
33.3333%
PCxpDisplay
Database
SQL Server
COM+Services
End-User
AdminApp(Remote Deployment Possible)
Web Services
PCxpDisplay Subsystem
ASPWeb Site
SMTPMail Server
AlertNotifierService
Data Connectors
PCxpProcess Subsystem
1 - n
Data Connectors
Direct Data Connection
SIS Data Store 1 SIS Data Store 2 SIS Data Store 3SIS
Data Store n
DataRefresher 1-n
PCxpProcess
Database
SQL Server
Linked Server Data Connection
ParentCONNECTxp Installation and Setup Guide 6

Product Architecture
Operational Guidelines Follow these guidelines when designing a ParentCONNECTxp environment:
• Depending on factors such as the size of data, network capacity, and server scaling, data can be refreshed as often as hourly, but the data is only as fresh as your source data.
• The most important question to answer when designing a ParentCONNECTxp environment is how fresh you want your data for each school. This determines how many process servers you need, the refresh times, DataRefresher assignments, and the hardware you will use.
• Display and process server subsystems can run on one server or can be split into one display server with one or more process servers. To improve performance of data population operations, add additional process servers or increase the processing capabilities of an individual process server.
• Typically, a single DataRefresher will run on each process server; however, multiple instances of DataRefresher are supported on each process server. Each DataRefresher can support the execution of up to 25 concurrent threads. Each thread within a DataRefresher instance is dedicated to the processing of data from a single school. Adjusting the number of concurrent processing threads in the Administration application can improve performance but the optimum number of threads a server can support without system degradation is dependant on the processing capabilities of the server.
• The number of schools a process server/DataRefresher can process depends on the size of the schools, the server hardware specifications, the data capacity of the network infrastructure, and the frequency at which you want to update the data to be on the display server. You may put a large number of elementary schools that update once daily on a single DataRefresher. You may put just a few high schools that refresh several times daily on another DataRefresher.
Important: For best performance, Pearson recommends that the number of DataRefreshers/process servers used should not be greater than 50% of the number of CPU cores on the PowerSchool SMS database server. For example, if the PowerSchool SMS database server has a quad-core processor, ParentCONNECTxp should not have more than two Data Refreshers/process servers.
ParentCONNECTxp Installation and Setup Guide 7

Product Architecture
Deployment ScenariosParentCONNECTxp has a modular design to allow flexibility in how the environment is implemented. All of the modules can be on one server in a small environment, or can be spread across multiple Web and database servers. This section describes a few installation scenarios, but there are many possible solutions.
Small DistrictA small district is defined here as fewer than 50,000 students. The entire ParentCONNECTxp system is run on a single computer that performs both the display and processing functions and runs a single instance of DataRefresher. While the processing functions can be split across multiple DataRefresher applications, this size of district will rarely require more than one DataRefresher application.
DataRefresher requires all computing resources when it is processing data. If the DataRefresher resides on the display server, website performance will be significantly impacted while DataRefresher is running. In this scenario, DataRefresher should be run only during hours when website activity is at a minimum. If you want to refresh data multiple times daily, it is strongly recommended that the display and process operations run on separate servers.
Figure 2-2. Small district, fewer than 50,000 students
ParentCONNECTxp Installation and Setup Guide 8

Product Architecture
Medium DistrictA medium district is defined here as 50,000–100,000 students. The display server and process server subsystems are split, with one or more process servers each running one or more DataRefresher application.
Figure 2-3. Medium district, 50,000–100,000 students
ParentCONNECTxp Installation and Setup Guide 9

Product Architecture
Large DistrictA large district is defined here as 100,000–200,000 students. The display server and process server subsystems are split, with multiple process servers each running one or more DataRefresher application. The display server is split into multiple Web servers (for both failover and performance purposes) and a SQL database server.
For districts with greater than 200,000 students, contact Pearson for design recommendations.
Figure 2-4. Large district, 100,000–200,000 students
ParentCONNECTxp Installation and Setup Guide 10

3Windows Server and SQL Server Installation
This chapter provides guidelines for the installation of Windows Server and SQL Server for use with ParentCONNECTxp.
IMPORTANT Only the ParentCONNECTxp website may run on the display server; do not run additional websites on this server.
Installing Windows ServerPlease consult the Microsoft Windows Server installation documentation for detailed explanations of installation and configuration procedures.
General GuidelinesFollow these guidelines when installing and setting up the Windows Server software:
• Make sure that your systems meet the minimum hardware and software requirements for use as a display server and/or process server(s).
• Only the 32-bit versions of Windows Server 2003 or 2008 are supported for use with ParentCONNECTxp.
• Only NTFS file-system formatting is supported for use with ParentCONNECTxp.
• Sufficient free disk space must be available to accommodate the following:
• Application of operating system service packs, security patches, and other updates prior to placing the system in a production environment.
• Growth of the ParentCONNECTxp database to accommodate the storage of increasing amounts of data throughout the school year.
ParentCONNECTxp Installation and Setup Guide 11

Windows Server and SQL Server Installation
• Storage of the ParentCONNECTxp database and transaction log backups to ensure the ability to restore the system to use in the event of a system failure. These backup files must be moved to a different system to ensure protection.
Network and Internet Connections• Static TCP/IP addressing is required on all display and process servers.
• The system on which you are installing ParentCONNECTxp must have Internet connectivity and inbound connection privileges defined to provide for external access to ParentCONNECTxp data.
• A public Fully Qualified Domain Name (FQDN) is required for the ParentCONNECTxp server to be accessible from the Internet. A DNS entry linking this name to the assigned public IP address—either actual or redirected (NAT/PAT)—must be added to the DNS server you are using to provide for inbound system name resolution (such as Public DNS Server). This server may be housed internally or with your Internet service provider (ISP).
• You must register a public domain name with a company such as Network Solutions or through the assistance of your ISP.
• Two IIS websites are created as part of the ParentCONNECTxp installation. One site supports HTTP communications and the other site supports HTTPS (secure) communications. Unique TCP Port assignments must be assigned to each website to provide for communications across the Internet. Also, you will need to create the appropriate firewall redirect rules to permit communications between Internet-connected users and the ParentCONNECTxp Web server (the display server).
• ParentCONNECTxp can provide e-mail messaging capabilities to allow parents to send messages to select staff and teachers. ParentCONNECTxp can also use this messaging system to send alerts to parents for selected events that may occur with their children. This messaging system uses the SMTP Virtual Server functionality of IIS Server to handle the delivery of the messages. Enabling these messaging features requires that network infrastructure support the delivery of SMTP network traffic on TCP/IP port 25 to the Internet and/or the internal network. For delivery of messages destined for internal personnel, an A (host) and MX (mail exchange) record for the internal mail server must exist on the DNS Server assigned to the ParentCONNECTxp server.
• The secure (HTTPS) portion of the ParentCONNECTxp Web services requires an SSL certificate. SSL certificates provide a form of digital authentication to software security systems. They verify that the entity you are communicating with is, in fact, who you think it is. Certificates also provide the method necessary to conduct private communications and prove the origin of communications. The need for privacy and authentication over nonsecure networks, like the Internet, requires some form of data encryption and decryption as part of a software security system. If you do not have an existing security certificate or do not subscribe to a third-party certificate provider, you will need to install Microsoft Certificate Server services on the ParentCONNECTxp server so that the required SSL certificates can be generated.
• If Certificate Server services need to be installed, this service should not be installed until the system has been placed in the desired workgroup or domain and only after SQL Server and its associated Service Packs have been installed.
• Perform routine checks for updates to Root Authority Certificates using Windows Update to ensure the system can validate public security certificates properly.
ParentCONNECTxp Installation and Setup Guide 12

Windows Server and SQL Server Installation
Required Operating System ComponentsIn addition to the basic components required for Windows Server, Table 3-1 on page 14 identifies additional operating system components required for ParentCONNECTxp. If you want to install components not identified as required, please ensure that you understand the impact they may have on the operation, performance, and security of the operating system and ParentCONNECTxp.
You can install these components as part of the initial installation or after the initial installation has been completed.
To install the required components in Windows Server 2003 after the initial installation has been performed:
1. Open Windows Control Panel, and then click Add or Remove Programs.
2. Click Add/Remove Windows Components.
3. Locate the configuration options for IIS on the Internet Information Services (IIS) component selection is in the Application Server item in the main list.
4. Click the Details button to locate and enable/disable the individual component options outlined in Table 3-1 on page 14.
5. When all options have been configured and installed, complete the wizard and close the Add or Remove Programs dialog box.
For Windows Server 2008:
• For Windows Server 2008, you can add and manage IIS in the Roles and Features area of Server Manager.
• All IIS 6 Management Compatibility features are required with Windows Server 2008.
• Set up the individual component options outlined in Table 3-1 on page 14 (the locations may be different).
Required for all versions of Web display servers:
• Latest version of Microsoft .NET Framework 2.0.
• Latest version of Microsoft .NET Framework 3.5.
ParentCONNECTxp Installation and Setup Guide 13

Windows Server and SQL Server Installation
Table 3-1. Additional Windows Server components
Operating System Component Windows Server 2003/2008
Internet Information Services (click the Details button to view the components below)
BITS Server Extensions
Common Files
Documentation Not applicable
FTP Service
Front Page Server Extensions
IIS Manager Snap-in (MMC)
Internet Printing
NNTP Service
SMTP Service
Visual InterDev RAD Rapid Deployment Support Not applicable
Internet Service Manager (HTML) Not applicable
World Wide Web Service (click the Details button to view the components below)
Active Server Pages <default>
Remote Administration (HTML)
Internet Data Connector
Remote Desktop Web Connection
Server Side Includes <default>
WebDAV Publishing
World Wide Web Service
ASP.NET
ParentCONNECTxp Installation and Setup Guide 14

Windows Server and SQL Server Installation
Additional Setup for all SQL ServersFollow these steps to ensure that MSDTC works properly on all ParentCONNECTxp SQL Servers and PowerSchool SMS SQL Servers (these steps refer to Windows Server 2008).
1. Open Server Manager.
2. Expand Roles and click Application Server.
3. On the right side of your screen, click Add Role Service.
4. If Distributed Transactions (Incoming/Outgoing Remote) is not installed, you must install the Distributed Transaction Role Service. To do so, expand Distributed Transactions and select only Incoming Remote Transactions and Outgoing Remote Transactions.
5. Select the role services shown here, and then click Next, Install, and Close.
6. Expand Roles > Application Server > Component Services > Distributed Transactions.
7. Right-click Local DTC and click Properties.
8. Select the following properties, and then click OK.
ParentCONNECTxp Installation and Setup Guide 15

Windows Server and SQL Server Installation
Creating Windows User Accounts for ParentCONNECTxpPlease consult the Microsoft Windows Server documentation for detailed explanations of system administration tasks and procedures.
Pearson School System strongly recommends that you create two Windows user accounts (PCXP and PCXPSVCS) for ParentCONNECTxp operations. Follow these guidelines:
• The PCXP account is used for general console-based activities such as running AdminApp or DataRefresher.
• The PCXPSVCS account is used for service or background activities such as the ParentCONNECTxp COM+ component authentication and as the service account for AlertNotifier service and SQL Server.
• If multiple ParentCONNECTxp systems are used, such as multiple process servers, each system should have identical accounts and passwords.
• The user accounts should be local accounts on the ParentCONNECTxp system(s).
• Domain-based accounts can be used. Because domain-based account use is specific to each network environment, this guide does not provide documentation for the creation and use of domain-based accounts. Please consult with your network administrator to configure the ParentCONNECTxp systems to use domain-based accounts.
To create the local PCXP and PCXPSVCS user accounts:
1. On the Windows taskbar, click Start, point to Administrative Tools, and then click Computer Management.
2. Under System Tools, expand Local Users & Groups.
3. Create the user accounts:
a. Right-click the Users folder, and then click New User. The New User dialog appears.
b. Create the PCXP user (don’t choose parameters yet—you will do this in the next step).
c. Complete steps (a) and (b) for the PCXPSVCS accounts, and then click Close.
4. Modify the user account properties for each user as follows.
a. Right-click the PCXP user, and then click Properties.
b. Configure the properties as shown in Table 3-2 on page 17.
c. Repeat these steps for the PCXPSVCS account.
5. Close the Computer Management utility.
ParentCONNECTxp Installation and Setup Guide 16

Windows Server and SQL Server Installation
Table 3-2. Windows user account properties
User Account Property PCXP PCXPSVCS
User name PCXP PCXPSVCS
Full name PCxp User PCxp Service
Description ParentCONNECTxp User Account
ParentCONNECTxp Service Account
User must change password at next logon
<customer choice>
Password never expires <customer choice>
Important: Member of local Administrators group (use the Member Of tab)
Allow "Logon As a Service"*
* The "Logon As a Service" permission should be applied automatically when the account is used as the authentication account for a service such as SQL Server or PCxpAlertNotifierSrv. No user configuration is necessary. This information is provided simply to identify that this permission exists.
ParentCONNECTxp Installation and Setup Guide 17
Windows Server and SQL Server Installation
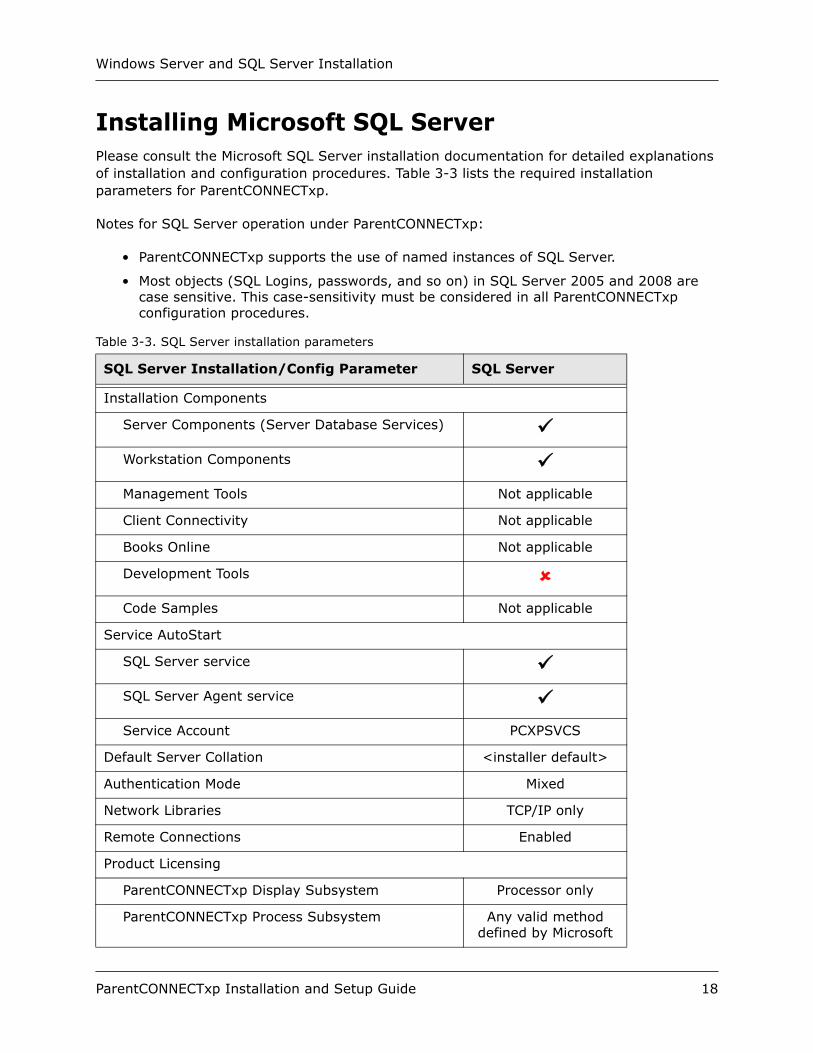
Installing Microsoft SQL ServerPlease consult the Microsoft SQL Server installation documentation for detailed explanations of installation and configuration procedures. Table 3-3 lists the required installation parameters for ParentCONNECTxp.
Notes for SQL Server operation under ParentCONNECTxp:
• ParentCONNECTxp supports the use of named instances of SQL Server.
• Most objects (SQL Logins, passwords, and so on) in SQL Server 2005 and 2008 are case sensitive. This case-sensitivity must be considered in all ParentCONNECTxp configuration procedures.
Table 3-3. SQL Server installation parameters
SQL Server Installation/Config Parameter SQL Server
Installation Components
Server Components (Server Database Services)
Workstation Components
Management Tools Not applicable
Client Connectivity Not applicable
Books Online Not applicable
Development Tools
Code Samples Not applicable
Service AutoStart
SQL Server service
SQL Server Agent service
Service Account PCXPSVCS
Default Server Collation <installer default>
Authentication Mode Mixed
Network Libraries TCP/IP only
Remote Connections Enabled
Product Licensing
ParentCONNECTxp Display Subsystem Processor only
ParentCONNECTxp Process Subsystem Any valid method defined by Microsoft
ParentCONNECTxp Installation and Setup Guide 18

4Installation
This chapter shows how to install or upgrade the ParentCONNECTxp application. See the preceding chapter for SQL Server and Windows Server installation parameters. At the display server, do one of the following:
• “Performing a New Installation” on page 20
• “Performing an Update” on page 23
Note: If you are upgrading from ParentCONNECTxp 2.x, upgrade to version 3.2 first, and then run the installer to upgrade to version 4.0 or later. Use the 4.x installer to upgrade from any version of ParentCONNECTxp 3.x.
ParentCONNECTxp Installation and Setup Guide 19

Installation
Performing a New InstallationTo install ParentCONNECTxp on the display server:
1. Download the PCXP_Setup.exe file from PowerSource and save it to a convenient location.
2. Double-click PCXP_Setup.exe.
3. Click OK to the warning or click Cancel and back up your previous environment.
4. On the welcome screen, click Next.
5. Accept the default installation location, or click Change to modify it, and then click Next.
6. Click Install.
7. On the Add/Maintain screen, select the appropriate item to install as needed on each server. These may include:
• Display Server - install and create the database.
• Process servers (as needed) - install an create the database. Chapter 7, “Process Server Setup,” on page 49.
• Web server - install and configure the Web server (this may be on the same server as the Display Server).
• Admin Application workstation or server - install AdminApp.
8. For Database Installation and Configuration:
a. Select Database Installation and Configuration, and then click Next.
ParentCONNECTxp Installation and Setup Guide 20

Installation
b. Ensure that the SQL Server computer name is correct, type the SQL Server sa-level Login Name and Login Password, and then click Next.
c. Click Add Database.
d. Click Create Display Database, and then click Next. (Note that you should only use the option create a Process Server Database on a separate server when adding process servers to an existing ParentCONNECTxp system.)
e. Modify the Database Name as needed.
f. Type and confirm the password for both the PCXPADMIN and PCXPDATA database logins, and then click Next.
g. Change the Database Size and Database Location as needed.
h. Select the Number of DataRefreshers to be used on the display server (you can add more later as needed). See “Operational Guidelines” on page 7 and “Deployment Scenarios” on page 8.
i. Select whether to Enable DataRefreshers for this server (the current display server). This option is typically enabled only for smaller districts that will not use separate process servers. Larger districts that will use separate process servers to run DataRefreshers should leave this option unselected. DataRefreshers can be enabled or disabled at any time in AdminApp.
j. Click Next.
k. On the Confirm Database Information screen, verify and record your information, and then click Next. Click Back to modify any information.
l. Click Next. The PCXP database is created.
m.Click OK after the database has been created.
n. Optionally: On the database connection screen, under PowerSchool SMS DB Connection Info, select or type the SMS DB Server name and type the DB User Name and Password for the PowerSchool SMS database. (You can click Cancel to proceed to the next step, but will need to enter or change this information later in AdminApp.)
o. Click Scan Databases, and then select the PowerSchool SMS database.
p. Select whether to Connect to a PowerTeacher Database and enter the appropriate information.
q. Click Next.
r. You will be instructed to share the C:\[PCXP_installation]\PCXP_DB folder using the share name PCXP_CentralAuth. See “Sharing the Central Authentication Path Folder” on page 25 for step-by-step instructions. Click OK after sharing the folder.
s. Click Done. The installer returns to the Add/Maintain screen.
9. For Web Server Installation and Configuration:
a. Select Web Server Installation and Configuration, and then click Next.b. Ensure that the Display Server name is correct.
c. Type the DB Admin Login Password (for the PXCPADMIN login).
ParentCONNECTxp Installation and Setup Guide 21
Installation
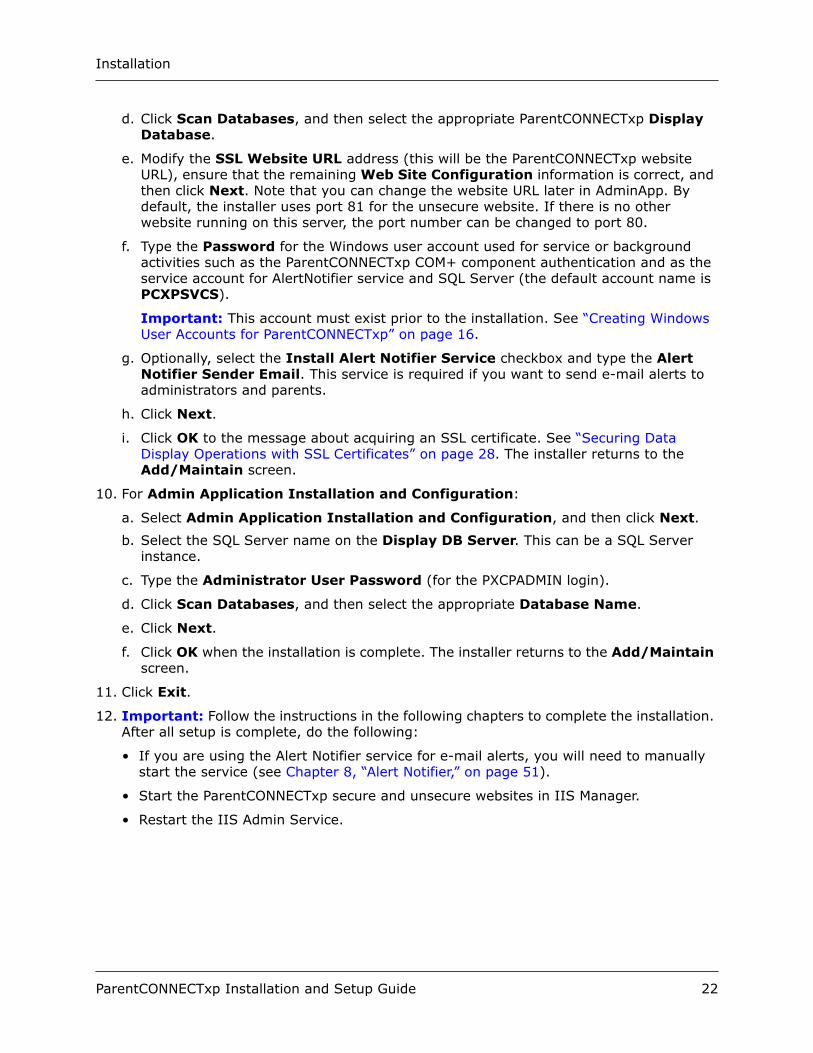
d. Click Scan Databases, and then select the appropriate ParentCONNECTxp Display Database.
e. Modify the SSL Website URL address (this will be the ParentCONNECTxp website URL), ensure that the remaining Web Site Configuration information is correct, and then click Next. Note that you can change the website URL later in AdminApp. By default, the installer uses port 81 for the unsecure website. If there is no other website running on this server, the port number can be changed to port 80.
f. Type the Password for the Windows user account used for service or background activities such as the ParentCONNECTxp COM+ component authentication and as the service account for AlertNotifier service and SQL Server (the default account name is PCXPSVCS).
Important: This account must exist prior to the installation. See “Creating Windows User Accounts for ParentCONNECTxp” on page 16.
g. Optionally, select the Install Alert Notifier Service checkbox and type the Alert Notifier Sender Email. This service is required if you want to send e-mail alerts to administrators and parents.
h. Click Next.
i. Click OK to the message about acquiring an SSL certificate. See “Securing Data Display Operations with SSL Certificates” on page 28. The installer returns to the Add/Maintain screen.
10. For Admin Application Installation and Configuration:
a. Select Admin Application Installation and Configuration, and then click Next.b. Select the SQL Server name on the Display DB Server. This can be a SQL Server
instance.
c. Type the Administrator User Password (for the PXCPADMIN login).
d. Click Scan Databases, and then select the appropriate Database Name.
e. Click Next.
f. Click OK when the installation is complete. The installer returns to the Add/Maintain screen.
11. Click Exit.
12. Important: Follow the instructions in the following chapters to complete the installation. After all setup is complete, do the following:
• If you are using the Alert Notifier service for e-mail alerts, you will need to manually start the service (see Chapter 8, “Alert Notifier,” on page 51).
• Start the ParentCONNECTxp secure and unsecure websites in IIS Manager.
• Restart the IIS Admin Service.
ParentCONNECTxp Installation and Setup Guide 22

Installation
Performing an UpdateTo update ParentCONNECTxp:
1. Back up your current ParentCONNECTxp environment before performing an update.
2. If you are upgrading from ParentCONNECTxp 3.x, perform the following steps at the server hosting Web server operations to prepare for the update. You will not need to perform these steps for future updates.
• Delete the Alert Notifier service (PCxpAlertNotifierSrv). To do so, run the uninstallsvc.bat file in the AlertNotifierSrv folder.
• In IIS Manager, delete the ParentCONNECTxp and ParentCONNECTxp Secure websites.
• In Component Services, delete the PCXP COM+ Application for the display server.
• Delete the Web folder and its subfolders in the ParentCONNECTxp installation.
• Restart the server.
3. Download the PCXP_Setup.exe file from PowerSource and save it to a convenient location.
4. Double-click PCXP_Setup.exe.
5. Click OK to the warning or click Cancel and back up your previous environment.
6. On the Add/Maintain screen, select the appropriate item to install as needed on each server. These may include:
• Display Server - install and create the database.
• Process servers (as needed) - install an create the database. Chapter 7, “Process Server Setup,” on page 49.
• Web server - install and configure the Web server (this may be on the same server as the Display Server).
7. Admin Application workstation or server - install AdminApp.
ParentCONNECTxp Installation and Setup Guide 23

Installation
8. For Database Installation and Configuration:
a. Select Database Installation and Configuration, and then click Next.b. Ensure that the SQL Server computer name is correct, type the SQL Server sa-level
Login Name and Login Password, and then click Next.
c. Select the existing ParentCONNECTxp database, and then click Update Database.
d. Type the password for both the PCXPADMIN and PCXPDATA database logins, and then click Next.
e. Click Next, and then click OK after the database has been updated.
f. Click OK after the database has been updated.
g. You will be prompted to share the C:\[PCXP]\PCXP_DB folder using the share name PCXP_CentralAuth. See “Sharing the Central Authentication Path Folder” on page 25 for step-by-step instructions. Share the folder if you haven’t already done so, and then, click OK after sharing the folder.
h. Click Done. The installer returns to the Add/Maintain screen.
9. For Web Server Installation and Configuration:
a. Select Web Server Installation and Configuration, and then click Next.b. Ensure that the Display Server name is correct.
c. Type the DB Admin Login Password (for the PXCPADMIN login).
d. Click Scan Databases, and then select the appropriate ParentCONNECTxp Display Database.
e. Ensure that the Web Site Configuration information is correct, and then click Next.
f. Type the Password for the Windows user account used for service or background activities such as the ParentCONNECTxp COM+ component authentication and as the service account for AlertNotifier service and SQL Server (the default account name is PCXPSVCS).
Important: This account must exist prior to the installation. See “Creating Windows User Accounts for ParentCONNECTxp” on page 16.
g. Optionally, select the Install Alert Notifier Service checkbox and type the Alert Notifier Sender Email. This service is required if you want to send e-mail alerts to administrators and parents.
h. Click Next.
i. Click OK to the message about acquiring an SSL certificate. See “Securing Data Display Operations with SSL Certificates” on page 28. The installer returns to the Add/Maintain screen.
10. For Admin Application Installation and Configuration:
a. Select Admin Application Installation and Configuration, and then click Next.b. Select the SQL Server name on the Display DB Server. This can be a SQL Server
instance.
c. Type the Administrator User Password (for the PXCPADMIN login).
d. Click Scan Databases, and then select the appropriate Database Name.
ParentCONNECTxp Installation and Setup Guide 24

Installation
e. Click Next.
f. Click OK when the installation is complete. The installer returns to the Add/Maintain screen.
11. Click Exit.
12. If you are using the Alert Notifier service for e-mail alerts, you will need to manually start the service (see Chapter 8, “Alert Notifier,” on page 51).
13. Restart the IIS Admin Service.
The following chapters show how to complete a new installation of ParentCONNECTxp. If you upgraded from a previous version, you do not need to follow the steps in these chapters unless you want to revise our check your installation (except for the steps noted below). See the ParentCONNECTxp Administrator’s Guide for information on new and updated features in AdminApp.
Additional Installation Steps
Setting Up MSDTC for all SQL ServersEnsure that the steps in “Additional Setup for all SQL Servers” on page 15 are completed for all servers to ensure that the Distributed Transaction Coordinator (MSDTC) works correctly. These steps must be performed on all ParentCONNECTxp SQL Servers and PowerSchool SMS SQL Servers.
Sharing the Central Authentication Path Folder
To share the central authentication path folder:
1. Log on to the display server.
2. Browse to the PCXP_DB folder in the ParentCONNECTxp installation; for example, C:\PCXP\PCXP_DB.
3. Right-click the PCXP_DB folder, and click Properties.
4. On the Sharing tab, select the Share this folder option.
5. In the Share name field, type PCXP_CentralAuth.
6. Click Apply.
ParentCONNECTxp Installation and Setup Guide 25

Installation
Repairing or Uninstalling ParentCONNECTxpTo repair corrupted files or uninstall ParentCONNECTxp on the display server:
1. Double-click PCXP_Setup.exe.
2. On the Add/Maintain screen, select the appropriate option.
3. Follow the instructions in the wizard.
Note: The database and DataRefreshers will not be deleted by the installer when uninstalling ParentCONNECTxp.
ParentCONNECTxp Installation and Setup Guide 26

5Website Security and SMTP Server
This chapter discusses how to:
• Apply a security certificate to the ParentCONNECTxp secure website.
• Configure the SMTP virtual server for e-mail services.
• Use IIS Security
The guidelines in this chapter are not specific to a particular version of Microsoft Internet Information Services (IIS) except where necessary due to changes in IIS itself. Although the user interface may differ for these products, the concepts and configuration requirements described here are identical.
ParentCONNECTxp uses Microsoft IIS for the hosting of its websites. The websites use Active Server Pages (ASP) technologies to provide dynamic data display of Web pages based on user input. The COM+ components provide the database operations required for the ASP pages to acquire and display the requested data in the web pages.
Internet access to ParentCONNECTxp is provided through two websites. The first website provides initial, nonsecure (HTTP) access into the ParentCONNECTxp environment. The second website provides secure (HTTPS), authenticated access to the information displays of the students assigned to the users after they login.
If the display server also acts as a certificate server, the Default Web Site created by IIS is used to provide the web interface for certificate requests. Otherwise, the Default Web Site can be disabled.
ParentCONNECTxp Installation and Setup Guide 27

Website Security and SMTP Server
Securing Data Display Operations with SSL Certificates Because of the nature of the information made available by the ParentCONNECTxp secure website, this website is intended to operate only in a secure, encrypted manner. HTTPS operations are enabled by acquiring and applying an SSL certificate to the website that allows it to encrypt the communications between the website and the end user.
The SSL certificate can be provided in one of two ways:
• A certificate provided by an internal Microsoft Certificate Services
• A certificate provided by a public authority
SSL certificate processing is accomplished in four basic steps:
• A certificate request is generated on the system hosting the ParentCONNECTxp secure website.
• The request is submitted and processed by the certificate authority.
• The certificate authority generates the certificate and makes the certificate file available to the system that initiated the request.
• The certificate is downloaded to the system and applied to the ParentCONNECTxp secure website.
The process for submitting a request, processing the request, and downloading the certificate are dependant on the certificate authority that is used to acquire the certificate. See Appendix B, “Microsoft Certificate Services,” on page 69 for instructions to use Microsoft Certificate Services.
If you are using any other type of certificate authority, please consult with the certificate authority for instructions on acquiring the certificate file.
ParentCONNECTxp Installation and Setup Guide 28

Website Security and SMTP Server
Configuring the SMTP Virtual ServerThe IIS SMTP virtual server is used to deliver e-mail messages created in the ParentCONNECTxp environment.
If you will be using the e-mail messaging capabilities of ParentCONNECTxp, configure the global SMTP server delivery options to handle e-mail messages to be delivered outside of your organization. These types of messages are usually those generated by the Alert Notifier service.
If you want to allow end users to send e-mail messages to staff and teachers that are included in the Contact Lists, configure a custom domain delivery configuration so that the SMTP server can communicate with your internal mail server.
To configure the SMTP virtual server global settings on the display server:
1. On the Windows taskbar, click Start, point to Administrative Tools, and then click Internet Information Services (IIS) Manager.
2. Expand your server, right-click Default SMTP Virtual Server, then click Properties.
3. Click the Access tab, and then click the Connection button.
4. On the Connection screen, select the Only the list below option and click the Add button.
5. On the Computer screen, select the Single computer option and type the TCP/IP address of the display server.
6. Click OK twice.
7. Click the Relay button.
8. On the Relay Restrictions screen, clear the Allow all computers which successfully authenticate to relay, regardless of the list above check box.
9. Select the Only the list below option, and then click the Add button.
10. On the Computer screen, select the Single computer option and type the TCP/IP address of the display server.
11. Click OK twice, and then click the Apply button.
12. Click the Delivery tab, and then click the Advanced button.
13. Type the FQDN of the display server in the Fully-qualified domain name field.
14. By default, the SMTP server will attempt direct delivery of its e-mail messages to the recipient’s mail server. If you want an alternate mail server to perform the actual delivery of the messages, you will need to specify the Smart host setting.
• A Smart Host is an alternate e-mail server that is configured to accept relay messages from the display server’s SMTP service.
• In the Smart host field, type the TCP/IP address of the alternate mail server with the address in brackets. For example, [192.168.2.22].
• If you want the SMTP server to attempt direct delivery before using the Smart host, select the option for Attempt direct delivery before sending to smart host. Otherwise, clear this selection.
ParentCONNECTxp Installation and Setup Guide 29

Website Security and SMTP Server
15. Clear the Perform reverse DNS lookup on incoming messages check box.
16. Click OK.
17. Click Apply, and then click OK.
18. Close IIS Manager.
To configure the SMTP virtual server custom delivery settings for an internal mail server:
1. On the Windows taskbar, click Start, point to Administrative Tools, and then click Internet Information Services (IIS) Manager.
2. Expand your server and the Default SMTP Virtual Server.
3. Right-click the Domains folder, point to New, and then click Domain.
4. In the New SMTP Domain Wizard, select the Remote option and click Next.
5. Type the domain name used as part of your organization’s mail address. For example, if your e-mail address is [email protected], type mydistrict.edu.
6. Click Finish.
7. Click Domains.
8. In the right-hand portion of the screen, right-click the domain that you created and click Properties.
9. Select the Allow incoming mail to be relayed to this domain check box.
10. Clear the Send HELO instead of EHLO check box.
11. Select the Forward all mail to smart host check box.
12. In the Smart host field, type the TCP/IP address of your internal mail server with the address in brackets. For example, [192.168.2.22].
13. Click Apply, then click OK.
14. Close IIS Manager.
ParentCONNECTxp Installation and Setup Guide 30
Website Security and SMTP Server
About IIS securityThe instructions and configuration guidelines found in this guide are provided only to ensure the operational integrity of the ParentCONNECTxp system. Because of constantly changing concerns over and approaches to ensuring security of an IIS web site environment, no attempt is made in this document to address security requirements or configuration practices required for ensuring that undesired access to the IIS websites does not occur.
Also, no attempt is made to ensure that the configuration adheres to the particular security policy of the organization that is deploying ParentCONNECTxp in their environment. Ensuring IIS security is an action that must be practiced, monitored, and administered as part of an ongoing process of ensuring compliance with an organization’s security policy.
Ensuring that all available operating system patches and security updates are continuously applied (either through the Windows Update website or the Automatic Updates feature of Windows) is critical to maintaining a secure ParentCONNECTxp environment.
Information is readily available to assist you with ensuring IIS security is applied to the ParentCONNECTxp environment in a manner that is acceptable to you. The best place to start is to search the Microsoft website for discussions regarding IIS security.
Please keep in mind that, from the basic IIS website layer, the ParentCONNECTxp websites are typically accessed via anonymous login through the IWAM_xxx network user account (the actual IWAM user name is system dependant). One of the most critical elements to securing your system from undesired access is to control what portions of your Windows server (disk, registry, and so on) are accessible to the IWAM_xxx user.
In that ParentCONNECTxp also uses COM+ technologies to access data in the ParentCONNECTxp database, you should also exercise the same precautions over what portions of the Windows server are accessible to the network user assigned to execute the PCXP COM+ component package.
Pearson School Systems recommends that you ensure the security settings you apply to your server and the IIS subsystems are suitable for the security requirements of your environment. These configurations should be applied prior to placing ParentCONNECTxp in your production environment.
ParentCONNECTxp Installation and Setup Guide 31

6Initial Configuration Using AdminApp
This chapter shows how perform the initial configuration of ParentCONNECTxp using the Administration application (AdminApp).
This chapter shows how to:
• Change the ADMIN user login password
• Configure the basic processing parameters
• Configure the display server processing paths
• Configure the connection to PowerSchool SMS
• Import the school list and select the desired data modules
• Create DataRefresher configurations
• Assign schools to a DataRefresher
• Configure the website parameters
• Add users and assign students
• Run DataRefresher
• Test website operations
ParentCONNECTxp Installation and Setup Guide 32

Initial Configuration Using AdminApp
Using the Administration ApplicationThe ParentCONNECTxp Administration application is the utility used to configure and administer a ParentCONNECTxp environment.
To open the AdminApp:
1. In Windows Explorer, navigate to the folder containing AdminApp.exe (for example, C:\PCxp\AdminApp).
2. Double-click adminapp.exe.
3. In the Login dialog box, type ADMIN for both the user ID and password, and then click OK. The AdminApp user interface appears.
Figure 6-1. AdminApp user interface
The AdminApp user interface uses a tree hierarchy for navigation to the desired configuration screen. Click an object on the left side of the application to display that configuration screen on the right side of the application. Some configuration screens provide additional controls or buttons that display additional windows for configuring the application.
Please refer to the ParentCONNECTxp Administrator’s Guide for additional tips on using the user interface features in AdminApp.
ParentCONNECTxp Installation and Setup Guide 33

Initial Configuration Using AdminApp
When using AdminApp, it is assumed that the system from which AdminApp is running has automatic or pass-through authentication to the display server and its file system. Please ensure that these permissions exist before running AdminApp because it does not attempt to authenticate to any display or process server when performing its operations.
Changing the ADMIN User Login PasswordTo change the ADMIN user password:
1. In AdminApp, click the Administrative Logins icon under User Administration.
2. Click the ADMIN user, and then click the Edit button.
3. Type and confirm the new password for the ADMIN login.
4. Click OK.
Verify the Website URLThe ParentCONNECTxp installer prompts you to enter the website URL for ParentCONNECTxp during the installation process. To verify or changes the URL, follow these steps.
To verify or changes the website URL:
1. Click the System Configuration icon under System Administration.
2. Expand ParentCONNECTxp System Settings > Connectivity Settings > ParentCONNECTxp Web Site URL.
3. Type the Fully Qualified Domain Name (FQDN) you are using for the website.
4. Configure other settings as needed. See the ParentCONNECTxp Administrator’s Guide for information on other options.
5. Click Save to save any changes.
NOTE If you are using the ParentCONNECTxp Course Request system, the URL is the same as the ParentCONNECTxp website followed by /OCR. Student can also access the website from the Course Plan pencil.
ParentCONNECTxp Installation and Setup Guide 34

Initial Configuration Using AdminApp
Configuring Basic Processing ParametersTo configure the basic processing parameters:
1. Click the Data Control icon.
2. Use the Login areas to modify the PCXPDATA or PCXPADMIN passwords as needed. (These passwords are created during the initial installation of ParentCONNECTxp.)
3. In the Refresh Allowed area, define the default window of time that DataRefreshers will be permitted to run each day. You can also set the frequency that the DataRefreshers will run.
4. If you want the website to display a common name on its Web pages (such as the name of your school district), type this information in the Web Site Banner Name field.
5. Click Save.
6. If prompted to save the login information, click Yes and save the file to the DataExtractApps folder (or, if using central authentication, the path configured in the CentralAuthenticationPath parameter).
NOTE The School Year is taken from the current year in PowerSchool SMS after connecting to the database.
ParentCONNECTxp Installation and Setup Guide 35

Initial Configuration Using AdminApp
Verifying the Global Configuration SettingsUse the Admin System Global Info Setup screen to verify or change the location of the PowerSchool SMS data and configure other global settings. This information is entered during the initial ParentCONNECTxp installation.
UNC specifications are preferred over mapped drives because the use of mapped drives requires that all systems interacting with the ParentCONNECTxp database have identical mapped drives created on them prior to executing any ParentCONNECTxp application.
NOTE In PowerSchool SMS, the Upload to Parent Portal check box on the School Specific tab of the Demographics page must be selected for student data to be shared with ParentCONNECTxp. This option is selected for all students by default.
Figure 6-2. SMS Global Configuration
ParentCONNECTxp Installation and Setup Guide 36

Initial Configuration Using AdminApp
Verifying the Database Connection and Global Settings
To set up a connection to the PowerSchool SMS database:
1. In AdminApp, click the Data Control icon.
2. Click the Admin System Global Info Setup button.
3. Verify or change the information in the SMS Database Server Info area as needed.
a. Type the Server Name.
b. Type the Login ID and Login Pwd for the Windows server account used to install the PowerSchool SMS database server.
c. Click the Refresh DB button.
d. In the SQL Authentication dialog, type an ‘sa’-level Login ID and Password for the SQL Server installation running the PowerSchool SMS database.
e. Click OK. The databases that match the criteria to work with ParentCONNECTXp are populated in the Database list.
f. Select the appropriate PowerSchool SMS database, such as CSL_SMS.
4. If you are using e-mail alerts, select the Process Enabled Alerts check box, and then select the appropriate options. To disable an alert type, select a delay value of -1.
5. If you are using PowerTeacher gradebook with ParentCONNECTxp, click the Configure Gradebook Processing button and follow the instructions in “Verifying the PowerTeacher Gradebook Settings” on page 38. Note that the setup can be performed during the initial installation, or at any time after that.
6. Click Save and close the screen.
ParentCONNECTxp Installation and Setup Guide 37
Initial Configuration Using AdminApp
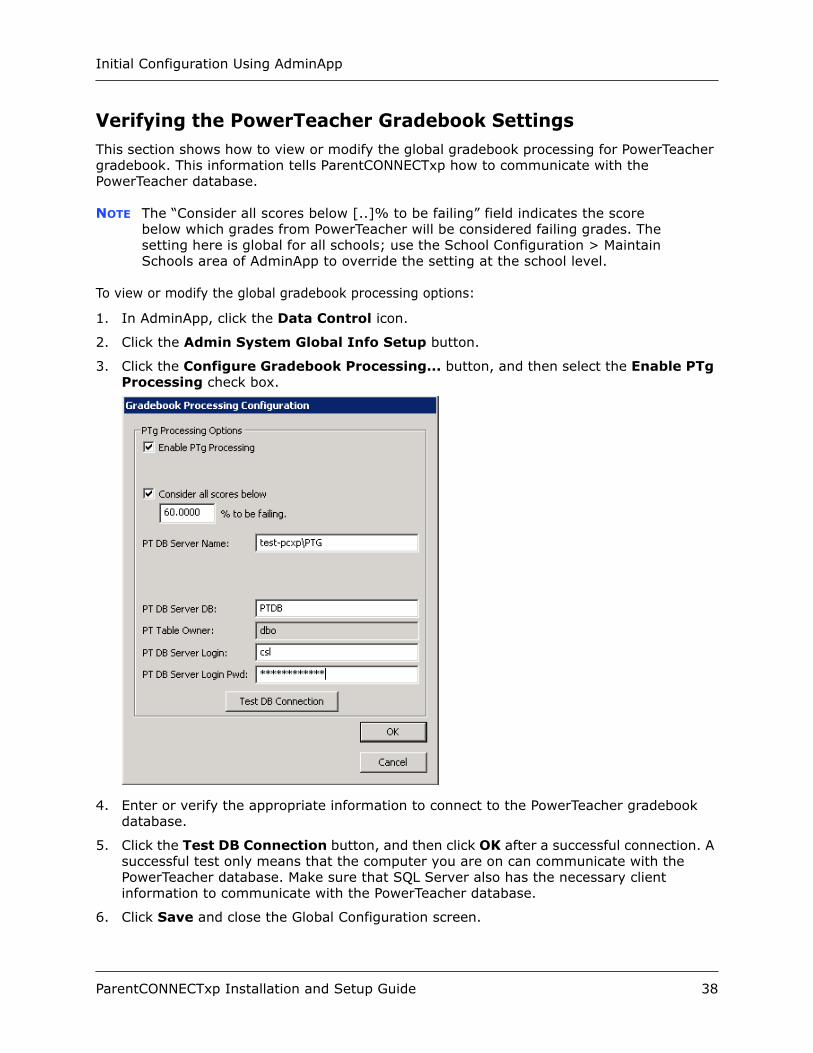
Verifying the PowerTeacher Gradebook SettingsThis section shows how to view or modify the global gradebook processing for PowerTeacher gradebook. This information tells ParentCONNECTxp how to communicate with the PowerTeacher database.
NOTE The “Consider all scores below [..]% to be failing” field indicates the score below which grades from PowerTeacher will be considered failing grades. The setting here is global for all schools; use the School Configuration > Maintain Schools area of AdminApp to override the setting at the school level.
To view or modify the global gradebook processing options:
1. In AdminApp, click the Data Control icon.
2. Click the Admin System Global Info Setup button.
3. Click the Configure Gradebook Processing... button, and then select the Enable PTg Processing check box.
4. Enter or verify the appropriate information to connect to the PowerTeacher gradebook database.
5. Click the Test DB Connection button, and then click OK after a successful connection. A successful test only means that the computer you are on can communicate with the PowerTeacher database. Make sure that SQL Server also has the necessary client information to communicate with the PowerTeacher database.
6. Click Save and close the Global Configuration screen.
ParentCONNECTxp Installation and Setup Guide 38

Initial Configuration Using AdminApp
Importing SchoolsYou will need to define the schools that ParentCONNECTxp is permitted to interact with. This is done by importing schools into ParentCONNECTxp and enabling those that will use ParentCONNECTxp. You will need to import the list of schools into ParentCONNECTxp before you can perform any end-user configuration or assign DataRefreshers.
Figure 6-3. Importing schools in School Maintenance
ParentCONNECTxp Installation and Setup Guide 39

Initial Configuration Using AdminApp
To import schools:
1. Click the School Maintenance icon under School Administration.
2. Click the Import button.
3. In the Import Schools dialog box, select (check) the schools you want to import, and then click OK.
4. In the School Name list that is now populated, select the appropriate schools using the standard SHIFT+click or CTRL+click Windows operations to highlight them.
You can define the type of data (or Module) that will be processed for each school. The data module selection for a single school or a group of schools can be set in a single operation.
5. Select the Enable check box for the modules you want DataRefresher to process for the selected schools. This controls what data is brought in to ParentCONNECTxp. The Web Display screen of AdminApp is used to control what parts of the populated data will be displayed on the website.
6. Select the Enable check box on the right side of the screen. If you do not enable a school, DataRefresher will not process data for that school.
7. If you will run DataRefresher more than once a day, select the Run Once check box for the data modules that you do not want to process every time DataRefresher runs. All selected modules will be processed only during the first data refresh of each day.
8. Click Save.
9. Click Yes to save the module settings. This saves ONLY the modules you have assigned.
10. Click Yes to save the processing settings. This saves only changes made to the Enable check box.
ParentCONNECTxp Installation and Setup Guide 40

Initial Configuration Using AdminApp
Configuring Alert and Gradebook Settings for Individual SchoolsIf you want to change alert processing options or gradebook parameters for an individual school, clear the Use Global Settings check box, and then click Gradebook processing.
PowerSchool SMS schools may need to do this to override the global setting for the “Consider all scores below [..]% to be failing” field, which indicates the score below which grades from PowerTeacher will be considered failing grades.
To change custom alert and gradebook settings:
1. Click the School Maintenance icon in AdminApp.
2. Select a school.
3. Clear the Use Global Settings check box,
4. Change alert processing options as needed.
5. Click the Gradebook Processing button.
6. Clear the Use Global Gradebook Settings check box.
7. Types a new % to be failing value.
8. Click OK.
ParentCONNECTxp Installation and Setup Guide 41

Initial Configuration Using AdminApp
Adding and Registering DataRefreshersParentCONNECTxp supports the use of up to five instances of DataRefresher on one or multiple systems to improve the processing performance of ParentCONNECTxp. You can use multiple DataRefreshers to control when a group of schools will have their data refreshed or split the workload of the data processing across multiple systems to decrease the overall time required to update the ParentCONNECTxp database.
A DataRefresher instance is defined as a unique combination of a computer (based on the computer’s NETBIOS name) and a local directory path of where the DataRefresher.exe application exists. Only one copy of each DataRefresher instance can be running at a time.
A ParentCONNECTxp installation provides one or more DataRefresher applications that are created in the PCXP_DB\DataExtractApps folders where ParentCONNECTxp was installed (for example, C:\PCXP\DataExtractApps-1). The folders are numbered based on the number of DataRefreshers creating during installation.
IMPORTANT All computers running a DataRefresher must be able to resolve the hostname of the sever that holds the PowerSchool SMS database, and vice versa. If one computer cannot see the other, you will need to edit the Hosts and Lmhost files (these are the filenames) by inserting an entry for the other computer’s server name and IP address. If there is still an issue running the DataRefresher, you will need to make sure that network DTC is installed on both machines. To enable network DTC, go to Add or Remove Programs > Add/Remove Windows Components > click to highlight Application Server > Details > and then select Enable Network DTC access.
To create an additional process server with DataRefresher, see Chapter 7, “Process Server Setup,” on page 49.
To create additional DataRefreshers on the display server:
1. Double-click the ParentCONNECTxp installer PCXP_Setup.exe.
2. On the Add/Maintain screen, select Database Installation and Configuration.
3. Select Database Installation and Configuration, and then click Next.
4. Ensure that the SQL Server computer name is correct, type the SQL Server sa-level Login Name and Login Password, and then click Next.
5. Select the existing ParentCONNECTxp database, and then click Create New DR.
6. Select the Number of DataRefreshers to create.
7. Select whether to Enable DataRefreshers for this server. The DataRefresher can also be enabled for operation later using AdminApp. Note that DataRefreshers installed on the display server are automatically registered and visible in AdminApp, even if they were not enabled for operation during installation.
ParentCONNECTxp Installation and Setup Guide 42

Initial Configuration Using AdminApp
To register a DataRefresher:
1. Click the Data Control icon.
2. Click the DataRefresher Configuration button.
3. Click the Add New... button under DataRefreshers. [ ]
4. In the System Name box, type the name of the computer on which the DataRefresher will run. You can find this by clicking Start, right-clicking My Computer, clicking Properties, and then clicking the Computer Name tab.
5. In the Application Path box, type the local path of DataRefresher.exe. For example, C:\PCxp\DataExtractApps.
6. If you want this instance of DataRefresher to run on its own processing cycle, clear the Use Default Refresh Settings check box and configure the options.
7. Click the Save Entry... button. The DataRefresher appears in the list on the left.
8. Click Close.
NOTE The Use CONNECTxp for SQL Server Processing area is used for DataRefreshers running on other machines, usually for additional process servers. If you are setting up this DataRefresher on a separate process server, see Chapter 7, “Process Server Setup,” on page 49.
Figure 6-4. DataRefresher Configuration
ParentCONNECTxp Installation and Setup Guide 43

Initial Configuration Using AdminApp
Assigning Schools to DataRefreshersTo assign schools to DataRefreshers:
1. Click the Data Control icon.
2. Click the DataRefresher Assignment button.
3. In the DataRefresher Type area, leave the PCxp option selected to view all ParentCONNECTxp DataRefreshers. (PTg DataRefreshers are used with PowerTeacher gradebook.)
4. Click the DataRefresher you want to assign schools to.
5. In the Filter list, click All Schools.
6. Select the schools you want to assign to the DataRefresher.
7. Assign schools to additional DataRefreshers as needed.
8. Click Save and close the screen.
NOTE The school names change colors as follows: Black = unassigned, Green = assigned to current DataRefresher, Blue = assigned to another DataRefresher, Red = change pending.
Figure 6-5. DataRefresher Assignment Properties
ParentCONNECTxp Installation and Setup Guide 44
Initial Configuration Using AdminApp
Adding Web Users and Assigning StudentsYou can use the Web User Login screen in AdminApp to manually add Web at any time. With PowerSchool SMS, you can also auto-generate Web user login accounts. See “Auto-Generating Web Users” on page 46.
ParentCONNECTxp Web users are automatically assigned to the default Web Display Group for a school to determine what they can view on the ParentCONNECTxp website. Web users can belong to different display groups for different schools. You can override a user’s Web display group on the Web User Information screen (click New or Edit on the Web User Login screen).
ParentCONNECTxp prevents the clear-text display of passwords in the AdminApp user interface. Printing the user’s information from End User Registration is the only way to view user passwords.
Adding Web Users Manually in AdminApp
To add users and assign students to those users:
1. Click the Web User Logins icon under User Administration.
2. Click the New button.
3. Optionally, click the Query button to populate the list with any pending registration requests from the ParentCONNECTxp website. Then select a user and click Create Login. The information entered on the website is populated automatically.
4. Type the required information and any additional information as needed.
5. Click the Generate button to generate a password. You can view the password by printing the user record on the Groups and Activation page of the wizard. You can change the password by editing the user record after it is created, typing the new password, and then clicking Apply.
6. If you want to override the user’s default Web Display Group for a school (which determines what they can view on the ParentCONNECTxp website) click the Assign School Display Overrides button. Then, select the school and select the appropriate Override Group (Web Display Group).
New users are automatically assigned to the default Web Display Group for each school. Note that users can be assigned to different groups for different schools. For example, a user may be a parent in one school, and a counselor in another. In this situation the user could be assigned an override to the COUNSELOR group for the second school (the COUNSELOR group would first need to be created and permissions assigned).
7. Click Next.
8. In the School list, click the school that the student attends.
9. Click the Query Students button. The list of students appears.
Note that for registration requests from the ParentCONNECTxp website, a list of students entered by the parent will appear in the Requested Student Assignments list.
ParentCONNECTxp Installation and Setup Guide 45

Initial Configuration Using AdminApp
10. Select the appropriate student or students (using CTRL+click or SHIFT+click), and then click the Assign Student button.
Note: You can assign multiple students from different schools to the same user.
11. Click Next.
12. Optionally, click Print if you want to print the user’s information. This printout shows the user’s unencrypted password.
13. Click Finish.
Auto-Generating Web UsersFor PowerSchool SMS, you can use the Web Login Account Auto-Generation utility to import and generate Web user accounts for parents or custodians associated with student records that have been uploaded to ParentCONNECTxp.
When you initiate the mass account creation, a ParentCONNECTxp Web account is created for PowerSchool SMS custodial contacts of students in the specified schools who do not already have ParentCONNECTxp Web accounts (and those students are automatically linked to the newly created accounts). After creating the accounts, use AdminApp to view and edit the new accounts to correct any discrepancies.
Note that generating Web user accounts with this process does not update student information in ParentCONNECTxp. You must run DataRefresher to update student information (see “Running DataRefreshers” on page 48).
NOTE With ParentCONNECTxp 3.2 or later, you do not need to have Web Display Groups (user groups) defined in AdminApp before running the account generation utility; however, the school-to-group associations must be completed in AdminApp before Web users can access the ParentCONNECTxp website.
To mass create Web user accounts in PowerSchool SMS environments:
1. Make sure that a correctly configured PCXP.ini file exists in the PCXPtools folder (you can copy the file from the AdminApp folder).
2. Double-click PCXPtools.exe in the PCXPtools folder.
ParentCONNECTxp Installation and Setup Guide 46
Initial Configuration Using AdminApp
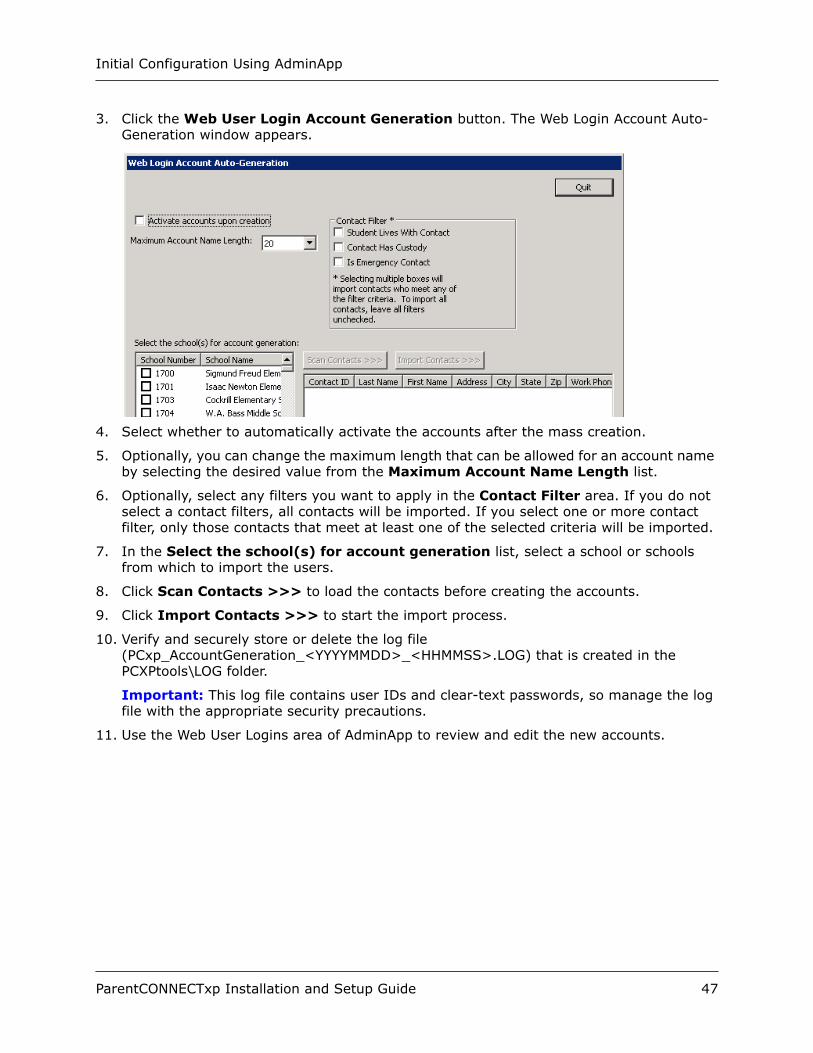
3. Click the Web User Login Account Generation button. The Web Login Account Auto-Generation window appears.
4. Select whether to automatically activate the accounts after the mass creation.
5. Optionally, you can change the maximum length that can be allowed for an account name by selecting the desired value from the Maximum Account Name Length list.
6. Optionally, select any filters you want to apply in the Contact Filter area. If you do not select a contact filters, all contacts will be imported. If you select one or more contact filter, only those contacts that meet at least one of the selected criteria will be imported.
7. In the Select the school(s) for account generation list, select a school or schools from which to import the users.
8. Click Scan Contacts >>> to load the contacts before creating the accounts.
9. Click Import Contacts >>> to start the import process.
10. Verify and securely store or delete the log file (PCxp_AccountGeneration_<YYYYMMDD>_<HHMMSS>.LOG) that is created in the PCXPtools\LOG folder.
Important: This log file contains user IDs and clear-text passwords, so manage the log file with the appropriate security precautions.
11. Use the Web User Logins area of AdminApp to review and edit the new accounts.
ParentCONNECTxp Installation and Setup Guide 47

Initial Configuration Using AdminApp
Running DataRefreshersRunning a DataRefresher updates information in ParentCONNECTxp.
To run DataRefresher:
1. In the DataRefresher folder (such as PCxp\DataExtractApps), double-click DataRefresher.exe.
If the system time of the computer running DataRefresher falls within the processing start and stop times configured for this instance of DataRefresher, processing will start automatically. You can manually force a replication by clicking Start Replication on the Process menu.
2. Resolve any errors as needed.
3. Leave DataRefresher running. It will automatically continue running based on the schedule you have defined in AdminApp.
You can view a consolidated copy of the last activity of all DataRefresher instances in the Data Table Management Tool dialog of the Administration application (click the Data Maintenance button on the Data Control screen).
If you want to save the log files of a single DataRefresher’s activity to disk, click Save Log Displays on the File menu of the DataRefresher application window. Dated logs will be saved to the LOG folder in the folder from which DataRefresher is running.
If you want continuous log files saved, add the following parameter to the [PCXP] section of the PCXP.ini file in the folder that contains the DataRefresher application:
WriteLogFiles = True
Testing the WebsiteIMPORTANT The website cannot be tested accurately until DataRefresher has
populated the Display Server database.
To test the ParentCONNECTxp website:
1. Open a Web browser and type the Web address (FDQN) of your ParentCONNECTxp website.
2. On the Welcome screen, click the Login button.
3. Type the appropriate end-user ID and password, and then click the Login button. The ParentCONNECTxp secure website appears.
ParentCONNECTxp Installation and Setup Guide 48
7Process Server Setup
Follow the instructions in this chapter if you choose to add additional process servers to your ParentCONNECTxp environment to improve performance. If you are using at least one additional process server, you do not need to run a DataRefresher on the display server. If you do run a DataRefresher on the display server, configure it to refresh only at times of low website usage.
About Process ServersA ParentCONNECTxp process server is a unique combination of one or more DataRefresher applications and an installation of any of the supported SQL Server products. The DataRefresher applications and SQL Server must be installed on the same physical computer system.
The SQL Server used for the process server will hold a database that must be identical to the database (in terms of its database schema) used for the display server. The PCXPADMIN and PCXPDATA SQL logins on this server must also be identical to those on the display server.
Installing SQL ServerProcess servers require a fully-licensed version of SQL Server 2005 or 2008. See the Microsoft documentation and “Installing Microsoft SQL Server” on page 18 to install the software.
ParentCONNECTxp Installation and Setup Guide 49

Process Server Setup
Installing the Process Database and DataRefresherThe login account used on the process server to run DataRefresher must have pass-through authentication to the display server. It must also have share and file permissions to the path referenced by the CentralINIPath parameter in the PCXP.ini file. The PCXP.ini file in the path referenced by the CentralINIPath parameter must have a CentralAuthenticationPath parameter that uses a UNC path format.
To install ParentCONNECTxp on the display server:
1. Download the PCXP_Setup.exe file from PowerSource and save it to a convenient location.
2. Double-click PCXP_Setup.exe.
3. On the welcome screen, click Next.
4. Accept the default installation location, or click Change to modify it, and then click Next.
5. Click Install.
6. On the Add/Maintain screen, select Database Installation and Configuration, and then click Next.
7. Ensure that the SQL Server computer name is correct, type the SQL Server sa-level Login Name and Login Password, and then click Next.
8. Click Add Database.
9. Click Create Process Database, and then click Next.
10. Follow the instructions in the wizard to complete the installation. The DataRefresher will automatically be available in AdminApp on the display server. [ correct? I can’t verify ]
11. Use AdminApp on the display server to assign schools to the new DataRefresher. In AdminApp, go to Data Control > DataRefresher Assignment.
ParentCONNECTxp Installation and Setup Guide 50

8Alert Notifier
This chapter shows how to set up the Alert Notifier service. This Windows service manages the processing and delivery of e-mail messages for alertable events (selected by Web users) and AdminApp-generated messages.
Follow these guidelines:
• The PCxpAlertNotifierSrv service is installed only on the system hosting the ParentCONNECTxp website and COM+ component package. (This is done during the installation process.)
• End-users must select the type of alerts they want to receive by choosing them on the ParentCONNECTxp website. These selections are accessed through the Settings button on the website after logging in to the system. Alerts are generated only for those students assigned to an end-user who has selected to receive alert messages (and only for the types of alerts selected).
• DataRefresher creates the alert records in the ParentCONNECTxp display server database as part of its processing operations.
• DataRefresher follows the alert generation and delay configurations of the schools assigned to it in AdminApp when creating the alert records.
• The default SMTP Virtual Server of IIS is used to send alert e-mail messages.
• The Alert Notifier service operates as an elapsed-time trigger to submit a request to the PCXP COM+ components to process available alert records. The COM+ components perform all processing of the alert records and create the e-mail messages that the COM+ components then submit to the SMTP Virtual Server of IIS for delivery.
• Administrators can use AdminApp to configure alerts and manage records. Please see the ParentCONNECTxp System Administrator’s Guide for details.
ParentCONNECTxp Installation and Setup Guide 51

Alert Notifier
Starting the Alert Notifier ServiceRun the Alert Notifier service only on the ParentCONNECTxp display server. The Alert Notifier service is installed during the initial installation, but is not started.
IMPORTANT Do not start the Alert Notifier service until you have performed any required alert configuration and/or record maintenance required. These operations are performed in AdminApp.
To start the service:
1. On the Start menu, point to Administrative Tools, and then click Services.
2. Scroll to and click the PCxpAlertNotifierSrv service.
3. Right-click the service, and then click Properties.
4. On the Log On tab, select the This account option and type the login information required for the PCXPSVCS network account.
5. On the General tab, select Automatic in the Startup type list.
6. Click Start.
7. Click OK.
8. Close the Services management application.
Managing Alert Operations in AdminAppAdminApp provides the following management features to control and administer alert and administrative-messaging operations within ParentCONNECTxp:
• Enable/disable/delay configuration of alert processing at the school level.
• These options can be configured at a global level or for an individual school.
• School-level alert generation can be enabled, disabled, or delayed for each alert type.
• AlertNotifier/DataRefresher alert processing configuration.
• Alert record management.
Managing Alerts at the School LevelAlerts for schools can be enabled, disabled, or delayed. These settings can be applied at a global level or an individual school level depending on your ParentCONNECTxp configuration. These configuration settings control the way DataRefresher generates alerts for its assigned schools. The configuration settings are found in the AdminApp user interface in the following locations:
• Data Control – Admin System Global Info Setup
• School Configuration – Maintain Schools
ParentCONNECTxp Installation and Setup Guide 52

Alert Notifier
Figure 8-1. Alert configuration
The Process Enabled Alerts check box globally enables or disables alert processing for the selected school.
The Attendance Delay, Assignment Delay, and Discipline Delay lists allow the immediate creation of the alert record, but creation and delivery of the associated e-mail message is delayed for that alert type by the selected number of days.
NOTE Selecting a value of -1 in any of the alert type lists disables the processing of alerts for that alert type.
ParentCONNECTxp Installation and Setup Guide 53

Alert Notifier
Configuring Alert Processing OptionsAlert Processing configuration and basic alert management is performed through the Data Control - Alert Processing Maintenance screen in AdminApp.
The Delete Alert Records options delete all alert records in the system or only those for a selected list of schools. The Set Last Alert Process Date options control the point in time from which DataRefresher will alert records based on the date stamp of the corresponding records in PowerSchool SMS. You can use these options to skip the generation of past alerts (…to Current Date) or to reprocess past alerts (…to Specific Date). These operations can be performed for all schools or for a selected list of schools.
Figure 8-2. Alert Processing Maintenance
Use the Set Alert Processing Options to control options that are applied globally to ParentCONNECTxp alert operations:
• Configure the time interval that PCxpAlertNotifierSrv waits before checking to see if any new alerts are available for processing. The time interval is in minutes.
• Enable administrator e-mail processing and define how often admin e-mails are sent out.
• Configure the number of days that pass before PCxpAlertNotifierSrv attempts to automatically delete old alert records that have been processed. This setting has no effect on alert records that have not been processed.
ParentCONNECTxp Installation and Setup Guide 54

Alert Notifier
Alert Record ManagementAlert record management is performed through the Data Control - Data Maintenance screen in AdminApp. Please see to the ParentCONNECTxp System Administrator’s Guide for details.
End-User Alert SelectionEnd users must sign up to receive the alerts they want. You may want to include the following instructions in the documentation you provide to end users.
To sign up to receive alerts:
1. Sign in to the ParentCONNECTxp website.
2. Click the Settings button on the top-right of your screen.
3. Type your e-mail address and select the Alert Notifications you want to receive. If you type a secondary e-mail address, alerts will be sent to both addresses.
4. Click the Submit button.
Figure 8-3. Alert selection on the ParentCONNECTxp website
ParentCONNECTxp Installation and Setup Guide 55

9Online Course Requests Overview
[[[ UPDATE AFTER Tech Bulletin Finished ]]]]]]
This chapter provides an overview of how to set up and use the ParentCONNECTxp Course Request system with PowerSchool SMS.
For complete setup and operation instructions, refer to the following documentation:
• PowerSchool SMS 7.7 eDocs (for information specific to PowerSchool SMS setup and operation)
• Earlier chapters in this guide.
• ParentCONNECTxp Administrator’s Guide
• PCXP Tools Guide
• ParentCONNECTxp Course Request system eDocs (online help for students and parents using the course request system)
The following software is required:
• PowerSchool SMS 7.7 or later
• ParentCONNECTxp 4.0 or later
IMPORTANT It is highly recommended that the Academic Plan functionality in PowerSchool SMS be used in conjunction with the Online Course Request system. Student academic plans are used to filter the courses available to them when making course requests, and to provide the Academic Plan Progress report to both the ParentCONNECTxp website and the Course Requests website.
ParentCONNECTxp Installation and Setup Guide 56

Online Course Requests Overview
About the ParentCONNECTxp Course Requests WebsiteStudents can access the Course Requests website from the ParentCONNECTxp Course Plan pencil or from the ParentCONNECTxp URL with /OCR added; for example, https://DistrictPCXP/OCR.
Students will use the same login credential for both the ParentCONNECTxp website and the Course Requests website.
The Help link on the website provides instructions for students and parents, though note that only students can access the Course Requests website.
PowerSchool SMS SetupFollow these guidelines to set up online course requests in PowerSchool SMS:
• Install PowerSchool SMS 7.7.
• Districts: To allow prerequisite courses to be requested in the same year, in the planning calendar select the Course Catalog > Course Scheduling > Allow Prerequisites in the Same Year checkbox for a course. This setting rolls over with each calendar year. Corequisite courses are not supported.
• Schools: Set the permissions for the appropriate roles.
• Online Course Request Setup in the School Setup node: School administrators require Edit or View permission to view or manage online course request settings.
• Course Recommendations and Requests in the Student node: Counselors and teachers require Edit permission to make course recommendations for students.
• Course Requests Approval in the Student node: School administrators and counselors require Edit permission to approve courses if required by the school.
• Student Academic Plan in the Academic Planning node: Even if your district does not use Academic Plans, the Delete, Edit, or View permission is required for counselors and administrators to make individual course recommendations and approve student course requests in the Academic Plan area of PowerSchool SMS.
• Schools: In the planning calendar, enable the online course request system and appropriate options for each grade level on the School Setup > Online Course Request Setup page. Select the “Include” checkbox for a grade level only after all options are set up as needed; consider this action as publishing the selected options. After the first counselor or teacher course recommendation is made, many of the options are locked down. Note that the Submission End Date is one of the few options that can be changed later to extend the submission period.
ParentCONNECTxp Installation and Setup Guide 57

Online Course Requests Overview
PowerSchool SMS Operation• Follow these guidelines to manage online course requests in PowerSchool SMS:
• Counselors and teachers make course recommendations in the active calendar after the planning calendar is set up for the next year.
• Course recommendations must be completed by 9:00 pm before the start of the student submission window to allow for server time discrepancies.
• Teachers can assign course recommendations to multiple students on the My Classes > Recommendations page.
• Counselors can assign course recommendations to multiple students on their home page.
• Course recommendations for individual students are made on the Academic Plan > Next Year Recommendations page. This is typically done by counselors.
• If required by the school, counselors approve student course requests on the Academic Plan > Next Year Requests page.
• Where there are pending counsellor approvals, administrators can force those approvals in order to publish the course requests to student planning schedules (School Setup > Force Course Request Approval).
• Administrators can use audit logs to find modifications and deletions to Online Course Recommendations and Online Course Requests (School Setup > Audit Log > Database).
ParentCONNECTxp Setup and Operation• Follow these guidelines to work with online course requests in ParentCONNECTxp:
• Obtain an SSL security certificate for ParentCONNECTxp if you do not already have one.
• Note that there are now two types of user accounts in ParentCONNECTxp: Web Users and Students. Only students can access the Course Requests website. You can create additional Web Display Groups as needed to define which elements of the ParentCONNECTxp website that group can view, and then assign the appropriate default display groups for a school for both Students and Web Users.
• Install ParentCONNECTxp 4.0. Version 4.0 has a new installer, so ensure that you follow the steps in the installation guide.Important: Restart your server before installing version 4.0 if you have uninstalled an older version.
• AdminApp: Ensure that the Alert Notifier Service is enabled in Data Control > Alert Processing Maintenance. See Chapter 8, “Alert Notifier,” on page 51 for details.
• AdminApp: Enable Admin Message Processing Options in Data Control > Alert Processing Maintenance > Admin Message Processing Options.
• AdminApp: Set the OCR Processing Interval to an appropriate time in Data Control > Alert Processing Maintenance > Admin Message Processing Options. The processing interval can be up to 360 minutes. More time (60 minutes or greater) is best when
ParentCONNECTxp Installation and Setup Guide 58
Online Course Requests Overview
course recommendations and requests are ongoing (to prevent needless synchronization between ParentCONNECTxp and PowerSchool SMS). A shorter time, such as five minutes, may be preferred when forcing pending course requests to PowerSchool SMS after the submission window closes.
• AdminApp: Set the System Configuration > ParentCONNECTxp System Settings > Feature Settings > ParentCONNECTxp Features selection to ParentCONNECTxp /Online Course Requests or Online Requests Only.
• AdminApp: Ensure that the PowerSchool SMS URL and login credentials are entered in System Configuration > SMS Web Data Access > URL and SMS login. Note: If the ParentCONNECTxp Web server(s) are on a network that is separated from the PowerSchool SMS Web server by a firewall, each ParentCONNECTxp Web server requires a firewall rule that permits http traffic to flow between the ParentCONNECTxp Web server and the PowerSchool SMS Web server.
• AdminApp: Enter district support information in System Configuration > ParentCONNECTxp Web Site Configuration Settings > Support Web Page Options.
• PCXP Tools: Import students from PowerSchool SMS. See the PCXP Tools Guide.Important: After importing user accounts from PowerSchool SMS, a log file is generated and stored in the PCxp\PCXPtools\LOG folder with all account information, including passwords, in clear text format to assist in troubleshooting. Make sure this folder is not shared and that the log file is properly deleted or secured.
• AdminApp: Manage Student and Web User (parent/counselor) accounts, including setting their default Display Groups (Web Display Groups > User Group Association). Note that there is now a function to link student accounts to a PowerSchool SMS contact in AdminApp > Edit Web User Login > Add/Delete Students > SMS Relationships. The selected contact will be the one that defines the ParentCONNECTxp permissions for that user, for example the “lives with” or “has custody” flag.
• AdminApp: After the submission window for a grade level has closed, force any pending course requests (those that are incomplete or pending parent/guardian approval) to PowerSchool SMS in the AdminApp > School Maintenance area.
ParentCONNECTxp Installation and Setup Guide 59

ACentral Authentication and PCXP.ini
This appendix provides an overview of the ParentCONNECTxp database authentication process and the configuration of the ParentCONNECTxp applications to use one common set of files for connecting to the ParentCONNECTxp display server database. It also describes the PCXP.ini file parameters that can be used for troubleshooting
Each ParentCONNECTxp application requires a PCXP.ini file to point to a central location for a PCXP.ini and PCXP.req file that provide common settings and database authentication for all applications.
For the purposes of this overview, the ParentCONNECTxp applications include the following executable files:
• AdminApp.exe
• DataRefresher.exe
• PCxpAlertNotifierSrv.exe
• PCXP COM+ component package
All information required by the ParentCONNECTxp applications resides in the SQL Server database that is configured to be the display server database.
ParentCONNECTxp applications use the contents of two files to obtain the information required to access the Display Server database:
• PCXP.ini
• The PCXP.ini file contains the names of the SQL server and database name of the Display Server database.
• The parameters used for this information are SvrName and DBName.
• There are two sections file that require the SQL server and database name to be defined. The PCXPDATA section is used when any application logs on to the
ParentCONNECTxp Installation and Setup Guide 60

Central Authentication and PCXP.ini
SQL Server as the PCXPDATA login. The PCXPADMIN section is used when any application logs on to the SQL Server as the PCXPADMIN login.
• The SvrName and DBName parameters of both sections must point to the same SQL Server and database.
• PCXP.req
• The PCXP.req file contains the encrypted login information (SQL login and password) used by the PCXPADMIN and PCXPDATA SQL Server logins when authenticating to the SQL Server used for display server operations.
Each ParentCONNECTxp application requires its own copy of PCXP.ini to access the PCXP.ini files used for central authentication. With the exception of the COM+ component package, these files must reside in the same directory as the ParentCONNECTxp application. The COM+ package uses the System32 folder of the Windows folder (such as C:\Windows\System32) as its home folder.
ParentCONNECTxp central authentication provides a mechanism where all ParentCONNECTxp applications can use a single set of PCXP.ini and PCXP.req files to provide the required authentication information.
IMPORTANT Although one set of these files is used to obtain the actual authentication information, each application still requires a PCXP.ini file with a CentalAuthenticationPath parameter that tells the application that it is to use the central authentication mechanism. With ParentCONNECTxp 4.0 or later, all PCXP.ini files are set up automatically during installation.
Provided the network and server infrastructure is configured properly, central authentication can also be implemented in a manner where multiple computers (such as the display server, process server, and AdminApp administrative workstations) can use a single set of these files for authentication to the display server database.
Central authentication uses a combination of two parameters that are placed in the [PCXP] section of the applications’ PCXP.ini files.
• CentralINIPath = <fully-qualified path to a common PCXP.ini file>
• CentralINIPath directs the application to load the processing information from the PCXP.ini file that resides in the path defined by this parameter.
• This parameter has no effect on the following parameters. These parameters are specific to each individual combination of DataRefresher and PCXP.ini.
•UseIGPPeriodMatching
•RetainInterimData
•RetainSQLScripts
•WriteLogFiles
• The path is a folder path only. Do not include the text PCXP.ini in this parameter.
ParentCONNECTxp Installation and Setup Guide 61

Central Authentication and PCXP.ini
• It is expected that the PCXP.ini file in the defined path is correctly configured and will not have a CentralINIPath entry in it. Only one level of redirection is permitted with CentralINIPath.
• CentralAuthenticationPath = <fully qualified path to a common PCXP.req file>
• CentralAuthenticationPath directs the application to load the login information from the PCXP.req file that resides in the path defined by this parameter.
• The path is a folder path only. Do not include the text PCXP.req in this parameter.
• Enabling this parameter allows each application to locate the common PCXP.req file by using a fully-qualified path to the file instead of using the relative path of where the application is running.
• CentralAuthenticationPath should be enabled only in the common PCXP.ini file that all applications will reference.
Central authentication can be extended to multiple systems within a network provided the following conditions are met:
• All basic central authentication requirements are met.
• The CentralINIPath and CentralAuthenticationPath parameters use only UNC paths to the desired folder.
• The network account used by the ParentCONNECTxp applications has automatic or pass-through network authentication to the system defined in the UNC path.
• The network share and file/folder security permissions to the UNC path provide, at a minimum, read permissions to the network account used by the ParentCONNECTxp applications.
ParentCONNECTxp Installation and Setup Guide 62

Central Authentication and PCXP.ini
PCXP.ini Parameter SettingsThe following table describes the parameters that can be used in PCXP.ini. Modify only the PCXP.ini file found in the PCXP_DB folder (the one used for central authentication).
Important: With ParentCONNECTxp 4.0 or later, all PCXP.ini files are configured automatically by the installer. The only manual step needed to configure PCXP.ini files is to share the central authentication path folder.
Table A-1. PCXP.ini parameter settings
Parameter Value Used By Description
[PCXP] Section
RetainInterimData TRUE / FALSE DataRefresher Used for troubleshooting only. Retains all interim data files on process server that would normally be deleted as part of normal operation. Should not beenabled for normal operation.Retains datafiles used for display data processing in two locations for each school that DataRefresherprocesses.• <DataRefresher Application
Folder> \<SchoolNumber>• <Process Server UNC
Processing Path>\<SchoolNumber>
RetainSQLScripts TRUE / FALSE DataRefresher Used for troubleshooting only. Writes a copy of the executed SQLscripts to file. Should not be enabled for normal operation.Creates a file-based representation of the SQL queriesexecuted during DataRefresher processing. These script files are written to <DataRefresher Application Folder>\ <SchoolNumber>.
PTGModuleMsg TRUE / FALSE DataRefresher Shows expanded information regarding the processing state of the DataRefresher.
ParentCONNECTxp Installation and Setup Guide 63

Central Authentication and PCXP.ini
WriteLogFiles TRUE / FALSE DataRefresher Enables the automatic creation of a log file after each data population cycle. Log files are written to a LOG folder in the folder where DataRefresher is running.WriteLogFiles saves a copy of the individual DataRefresher processing responses (both Statusand Error) for each job cycle that DataRefresher processes. The log files are saved to <DataRefresher Application Folder> \LOG.
CentralAuthenticationPath <folder path> AdminAppDataRefresherAlertNotifierCOM+
Part of the central authentication mechanism that allows multiple ParentCONNECTxp applications toshare a common set of display server authentication information.
CentralINIPath <folder path> AdminAppDataRefresherAlertNotifierCOM+
SQLUserID SQL Server login used to access PCXP database
AdminAppDataRefresherAlertNotifierCOM+
Used for emergency database access only. Should not be usedfor normal operation.
SQLPassword SQL Server password used to access PCXP database
AdminAppDataRefresherAlertNotifierCOM+
Used for emergency database access only. Should not be usedfor normal operation.
CleanProcSvrTables TRUE / FALSE DataRefresher Pre-cleans work tables on ProcessServer prior to DataRefresher datapopulation.
[PCXPDATA] Section
SvrName Name of SQL Server hosting PCXP display database
AdminAppDataRefresherAlertNotifierCOM+
Named instances are supported inthe form of <svrname>\<instance>.
DBName Name of database on SQL Server referenced by SvrName that contains PCXP display data
AdminAppDataRefresherAlertNotifierCOM+
[PCXPADMIN] Section
Table A-1. PCXP.ini parameter settings (continued)
Parameter Value Used By Description
ParentCONNECTxp Installation and Setup Guide 64

Central Authentication and PCXP.ini
SvrName Name of SQL Server hosting PCXP display databaseAdminAppDataRefresherAlertNotifierCOM+
Named instances are supported inthe form of <svrname>\<instance>.
DBName Name of database on SQL Server referenced by SvrName that contains PCXP display data
AdminAppDataRefresherAlertNotifierCOM+
Note: Lines beginning with a semicolon (;) are treated as a comments. Adding a semicolon to the beginning of a line disables the line in PCXP.ini. Removing the semicolon from the beginning of a line enables the line in PCXP.ini.
Table A-1. PCXP.ini parameter settings (continued)
Parameter Value Used By Description
ParentCONNECTxp Installation and Setup Guide 65

Central Authentication and PCXP.ini
Central Authentication IllustrationsThe following figure illustrates the central authentication configuration for use by applications on one system.
Figure A-1. ParentCONNECTxp central authentication – local system
AdminApp.exe
AdminApp
DataRefresher .exe
DataExtractApps
PCXP.REQ
PCxpAlertNotifierSrv .exe
AlertNotifierSrv
PCXP COM+Components
MTS<windir >\System32
PCXP.INI
[PCXP ]CentralINIPath = C:\CONNECTxp\DataExtractApps
PCXP .INI
[PCXP ]CentralAuthenticationPath = C: \CONNECTxp\DataExtractApps
PCXP.INI
[PCXP ]CentralINIPath = C:\CONNECTxp\DataExtractApps
PCXP .INI
[PCXP]CentralINIPath = C:\CONNECTxp \DataExtractApps
CONNECTxp
ParentCONNECTxp Installation and Setup Guide 66

Central Authentication and PCXP.ini
The following figure illustrates the central authentication configuration for use by applications on multiple systems.
Figure A-2. ParentCONNECTxp central authentication – multiple systems
AdminApp.exe
AdminApp
DataRefresher .exe
DataExtractAppsShared as
CentralAuthPCXP.REQ
PCxpAlertNotifierSrv .exe
AlertNotifierSrv
PCXP COM+Components
MTS<windir >\System32
PCXP .INI
[PCXP]CentralINIPath = \\System1\CentralAuth
PCXP.INI
[PCXP]CentralAuthenticationPath = \\System1\CentralAuth
PCXP .INI
[PCXP]CentralINIPath = \\System1\CentralAuth
PCXP.INI
[PCXP ]CentralINIPath = \\System 1\CentralAuth
CONNECTxp
SYSTEM1
Process Servers
PCXP .INI
[PCXP]CentralINIPath = \\System1\CentralAuth
PCXP.INI
[PCXP ]CentralINIPath = \\System 1\CentralAuth
AdminAppAdministrativeWorkstation
ParentCONNECTxp Installation and Setup Guide 67

Central Authentication and PCXP.ini
The following figure illustrates a non-standard authentication mechanism where each application uses its own PCXP.ini and PCXP.req files.
Figure A-3. ParentCONNECTxp non-standard authentication mechanism
AdminApp.exe
AdminApp
PCXP .INI
[PCXPADMIN]SvrName =DBName =
PCXP.REQ
DataRefresher .exe
DataExtractApps
PCXP .INI
[PCXPADMIN]SvrName =DBName =
PCXP.REQ
PCxpAlertNotifierSrv .exe
AlertNotifierSrv
PCXP .INI
[PCXPADMIN]SvrName =DBName =
PCXP.REQ
PCXP COM+Components
MTS
PCXP.INI
[PCXPADMIN]SvrName =DBName =
PCXP .REQ
<windir >\System32
CONNECTxp
ParentCONNECTxp Installation and Setup Guide 68
BMicrosoft Certificate Services
Follow these step only if you are not using a publicly purchased SSL certificate. Most districts will NOT need to follow the steps in this appendix. Please consult the Microsoft Windows Server installation documentation for detailed explanations of installation and configuration procedures.
To install Certificate Services after the initial operating system installation has been performed:
1. On the Windows taskbar, click Start, point to Control Panel, and then click Add or Remove Programs.
2. Click Add/Remove Windows Components.
3. Select the Certificate Services component from the main list.
4. Use the Details button to locate and enable/disable the individual component options listed in Table B-1.
5. After all required options have been selected, continue with the wizard to complete the component installation process.
Table B-1. Certificate Server installation parameters
Certificate Server Installation Parameter Windows Server
Install Certificate Services CA
Install Certificate Services Web Enrollment Support
Installation Mode Stand-alone Root CA
Validity Period <user defined>
Data Storage Locations <installer defaults>
ParentCONNECTxp Installation and Setup Guide 69
Microsoft Certificate Services
Configuring Certificate Services to Automatically Issue CertificatesOptionally, you can configure Certificate Services to issue certificates immediately after a request has been received.
To configure Certificate Services to automatically issue certificates:
1. On the Windows taskbar, click Start, point to Administrative Tools, and then click Certification Authority. The Certification Authority utility appears.
2. Under Certification Authority (Local), right-click your server, and then click Properties.
3. Click the Policy Module tab, and then click the Properties button.
4. Select the Follow the settings in the certificate template... option.
5. Click OK in all open dialog boxes, and then close the Certification Authority utility.
6. Restart the server to enable the changes to Certificate Server.
Creating the Server Certificate Request FileTo create the server certificate request file:
1. In IIS Manager, expand your server and the Web Sites folder to display the list of websites.
2. Right-click the ParentCONNECTxpSecure website, and then click Properties.
3. On the Directory Security tab, click the Server Certificate button.
4. In the wizard, click Next.
5. Select Create a new certificate, and then click Next.
6. Select Prepare the request now, but send it later, and then click Next.
7. Accept the Name for the certificate and the Bit length, and then click Next.
8. Type the name of your organization and organizational unit, and then click Next.
9. In the Common Name box, type the name that has been registered on the Internet for the ParentCONNECTxp display server. This is your Fully Qualified Domain Name (FQDN). Record this name for later use.
FQDN: _________________________________________________________
10. Provide the full name of your state and your city, and then click Next.
11. Type C:\Certificates\pcxpreq.txt. This is the name of the certificate request file that is created. The folder is created during this step if it doesn’t currently exist.
12. Review the summary information, and then click Next.
13. Click Finish to create the server certificate request.
14. Click OK.
ParentCONNECTxp Installation and Setup Guide 70

Microsoft Certificate Services
Processing the Server Certificate Request File To process the server certificate request file:
1. Start Internet Explorer or another browser that is supported by Microsoft Certificate Services.
2. In the Address field, type http://localhost:81/certsrv and press the Enter key. The Certificate Services website appears.
If you are using a Microsoft Certificate Server that is not on the ParentCONNECTxp display server, substitute localhost:81 with the host name of the actual Certificate Server you want to use for certificate requests.
3. On the Welcome screen, click the Request a certificate link.
4. Click the advanced certificate request link.
5. Click the Submit a certificate request by using a base-64-encoded CMC… link.
6. Open Windows Notepad, and then click Open on the File menu.
7. Browse to and open the certificate request file that you created in the previous section.
8. Copy and paste the contents of the request file into the Saved Request box in the browser.
9. Depending on the version of Certificate Services you are connected to, your browser window may also present an option for a Certificate Template type. If this option is available, select the Web Server template.
10. Click Submit.
11. Depending on the configuration of Certificate Services, it may be necessary to manually issue the certificate before you continue with this procedure.
If the Certificate Server is configured to automatically issue certificates, the browser window will immediately take you to the certificate download page. Go to step 12.
If the Certificate Server does not automatically issue certificates:
a. Make a note of your request ID number.
b. Click the Home link in the top-right corner of the Certificate Pending screen.
c. On the Windows taskbar, click Start, point to Administrative Tools, and then click Certification Authority.
d. Expand your organization folder and click the Pending Requests folder.
e. Right-click the request that matches your request ID number, point to All Tasks, and then click Issue.
f. Close the Certificate Authority application.
g. In the browser window, click the View the status of a pending certificate request link.
h. Click the Saved-Request Certificate (<date>) link. The browser window will display the certificate download page.
ParentCONNECTxp Installation and Setup Guide 71

Microsoft Certificate Services
12. If the server is the same as the one running directly on the ParentCONNECTxp display server then skip to step 13. If you have requested the certificate from a Certificate Server other than one running directly on the ParentCONNECTxp display server, you will also have to download and apply the certificate chain as follows for the certificate to be valid:
a. Click the Download certificate chain link.
b. Click Save.
c. Navigate to the C:\Certificates folder, type pcxpcertca.p7b as the filename, and then click Save.
d. Click Close in the dialog box. (Don’t close your Web browser yet.)
e. In Windows Explorer, navigate to the C:\Certificates folder, right click pcxpcertca.p7b, and click Install Certificate. The Certificate Import Wizard appears.
f. Complete the wizard using default values provided by the wizard.
g. The certificate chain is now installed and the requested web server certificate can be applied to the ParentCONNECTxp secure website.
13. In the browser window displaying the Certificate Services website, click the Download certificate link.
14. In the File Download dialog box, click Save.
15. Browse to the C:\Certificates folder you created earlier, type pcxpcert.cer as the file name, and then click Save.
16. Close the Download complete dialog box and your Web browser.
ParentCONNECTxp Installation and Setup Guide 72

Microsoft Certificate Services
Applying the Certificate and Enabling Secure CommunicationsTo enable secure communications on the website:
1. In IIS Manager, right-click the ParentCONNECTxpSecure website, and then click Properties.
2. On the Directory Security tab, click the Server Certificate button. The Certificate Wizard starts.
3. Click Next.
4. On the Pending Certificate Request page, select Process the pending request and install the certificate, and then click Next.
5. Browse to the folder containing the certificate file for the secure web site and select the server certificate file. If you are following the instructions for a Microsoft Certificate Server certificate, this file is C:\Certificates\pcxpcert.cer.
6. Click Next.
7. Accept the default SSL port of 443, and then click Next.
8. Review the Certificate Summary, and then click Next.
9. Click Finish.
10. On the Directory Security tab, click Edit in the Secure communications area.
11. Select the Require secure channel (SSL) check box.
12. Click OK.
13. On the Web Site tab, make sure that the SSL port field contains 443.
14. Click Apply, and then click OK.
15. Restart the server.
ParentCONNECTxp Installation and Setup Guide 73

Microsoft Certificate Services
Renewing a ParentCONNECTxp Website SSL Certificate SSL certificates are valid for a specific period of time defined within the certificate. When a certificate is used beyond the valid time period, end users will receive certificate warning messages when accessing the ParentCONNECTxp secure website. When this occurs, renew the SSL certificate with the certificate authority that issued the original certificate or replace the existing certificate with a new certificate.
If you are using a public certificate authority, please contact that authority for instructions on renewing your certificate.
If you are using Microsoft Certificate Server to renew the ParentCONNECTxp Secure Website Server Certificate, follow these instructions:
1. In IIS Manager, expand your server and the Web Sites folder to display the list of websites.
2. Right-click the ParentCONNECTxpSecure website, and then click Properties.
3. On the Directory Security tab, click the Server Certificate button.
4. In the wizard, click Next.
5. Select Renew the current certificate, and then click Next.
6. Select Prepare the request now, but send it later, and then click Next.
7. Type C:\Certificates\pcxpreqrenew.txt. This is the name of the certificate request file. The folder is created during this step if it doesn’t already exist.
8. Review the summary information, and then click Next.
9. Click Finish to create the server certificate request.
10. Click OK to close the dialog box.
11. Click OK to close the dialog box.
12. Complete the procedures previously documented for processing the certificate request and applying the certificate provided by a Microsoft Certificate Server. Substitute the name of the new request file for the name identified in those procedures.
ParentCONNECTxp Installation and Setup Guide 74

www.PearsonSchoolSystems.com


