38
Part II : Rotator Cuff Repair, Day of Surgery and Postoperative Course Benjamin W. Sears, MD 303-321-1333 western-ortho.com denvershoulder.com
| Date post: | 16-May-2018 |
| Category: |
Documents |
| Upload: | truongkien |
| View: | 217 times |
| Download: | 0 times |

Part II: Rotator Cuff Repair, Day of Surgery and
Postoperative Course Benjamin W. Sears, MD
303-321-1333
western-ortho.com
denvershoulder.com

Day of Surgery
• Most patients will undergo outpatient surgery in which they are allowed to return home after surgery
• Plan on arriving to the surgery center about 1-2 hours before the planned procedure start time
• Plan on leaving for home about 1-2 hours after the conclusion of the surgery to allow for recovery from anesthesia

Preoperative Nerve Block • Most patients are administered a peripheral
nerve block by the anesthesiologist before the start of surgery
• This provides postoperative pain control for 18-24 hours
• This also allows for less anesthesia to be used during the surgery, thereby improving safety
• Patients are also administered general anesthesia and are asleep during the procedure

Preoperative Nerve Block • The nerve block consists of an injection of
anesthetic pain medicine around the nerves that innervate the arm
• This is commonly done with ultrasound to make it more precise and safer
• Patients are given a calming medication before the procedure. Most patients report they do not remember the nerve block

Patient Position during Surgery
• During surgery, patients are positioned sitting upright in what is known as the “beach chair position”
• This allows for the shoulder to remain in its anatomic position during repair

Arthroscopic Rotator Cuff Repair • Most rotator cuff tears are able to be repaired
using arthroscopic techniques
• Several small incisions are made around the shoulder, these are approximately 1 cm in length
• This allows for a camera to be placed into the shoulder. The surgeon can then visualize the inside of the shoulder and the rotator cuff on a television screen without making a large, invasive incision

Intraoperative Instruments • Specially designed instruments are placed into
the shoulder through the portal incisions that allow for evaluation and manipulation of the structures of the shoulder
• Some commonly used instruments include:
– Probe to palpate structures
– Grasper to move and hold tissues, as well as grab suture
– Suture passer to pass suture through the cuff tendon
Grasper/Retriever

Intraoperative Setup
• These are some other common arthroscopic instruments, including
– Orange cannula
– Shaver to debride tissue
– Pump tubing to deliver saline to the joint
– Knife
– Arthroscope

Intraoperative Setup
• This is what the set up looks like after the patient has been positioned, the arthroscope has been set up and sterile drapes have been placed around the surgical site

Intraoperative Setup • This is the setup during the actual procedure.
The team is looking at the projection of the shoulder from the arthroscope on the TV monitor
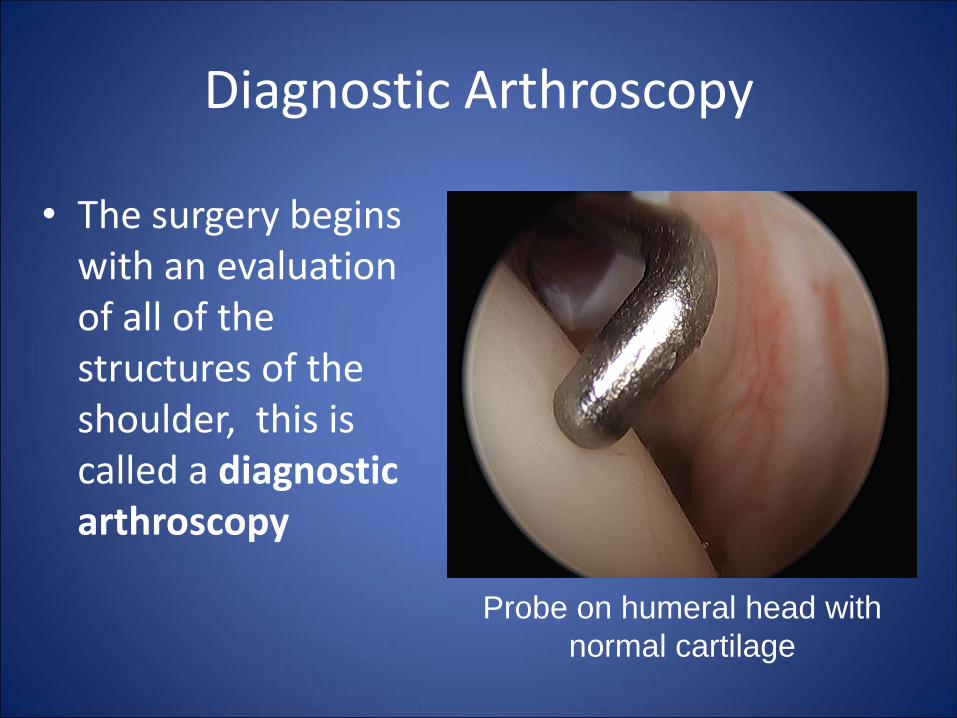
Diagnostic Arthroscopy
• The surgery begins with an evaluation of all of the structures of the shoulder, this is called a diagnostic arthroscopy
Probe on humeral head with
normal cartilage

Diagnostic Arthroscopy
Probe on glenoid with normal cartilage (small fray)

Diagnostic Arthroscopy
• Pulling the long head of the biceps into the joint for evaluation
• This biceps is normal

Diagnostic Arthroscopy
This is a normal appearing subscapularis rotator cuff tendon

Diagnostic Arthroscopy
This is a torn subscapularis rotator cuff tendon (the tearing sometimes looks like crab meat)

Case - Patient KY
• KY is a patient with a bursal sided, high grade partial rotator cuff tear on preoperative MRI – This appears as a white
spot where the normally black tendon should be
– This particular tear does not involve the entire tendon, but most of the top width of the tendon
• The patient still had pain after therapy and one steroid injection and elected to have this tear surgically repaired

Patient KY The rotator cuff
appears normal when viewing from the joint. A marking stitch (purple) is placed near the biceps where the tear is located on MRI to guide evaluation in the subacromial space (top of cuff)
Rotator cuff tendon
Biceps

Patient KY
The bursal sided (top side) of the rotator cuff is completely torn
Rotator cuff tear

Patient KY
The tear is then prepared for repair by removal of any scar or diseased tissue. Additionally, the bone to which the tendon will be attached is roughened and made to bleed, which allows for cuff healing directly to the bone
Bleeding bone

Patient KY
This is a suture anchor, which is essentially a screw that can be screwed into the bone. The anchor has suture strands which then can be placed through the tendon in order to draw the tendon down to the bone

Patient KY
This shows the suture strands that are attached to the imbedded anchor, ready for passing through the rotator cuff tendon

Patient KY - Rotator Cuff Repair • After passing the sutures
through the rotator cuff, the tendon is brought down to the bone and secured with knots
• The suture strands are then brought over the top of the tendon repair and secured again along the outside of the humeral bone
• This is what the repair looks like. The suture brings the cuff down to the bone to allow for tendon to bone healing

Patient KY - Rotator Cuff Repair
This is the repair viewed from the back of the shoulder looking to the front of the shoulder

Patient KY
This patient had a large bone spur on the undersurface of the acromion. This is not always the case
Bone spur

Patient KY
Using a specialized burr, the bone spur can be removed

Other Rotator Cuff Repair Images
Rotator cuff tear

Rotator Cuff Repair
Rotator cuff tear

Rotator Cuff Repair
Rotator cuff tear

Rotator Cuff Repair
Rotator cuff tear

Immediate Postoperative
• After surgery, the skin is closed with suture that is absorbable and steri strips (adhesive bandage strips) which cover the skin
• A sterile dressing is placed over the skin portals to allow for healing
• This dressing is water proof and allows for immediate showering even with the dressing in place
– This dressing may be removed 5 days after surgery, no further dressing is necessary

Sling
• Patients are placed into a sling which maintains the arm at the side and helps protect the repair
• Since the cuff functions to move the arm away from the body, the sling is crucial to protect the cuff from firing and stressing the surgical repair

Post Operative Protocol • Post repair biologic considerations
– The tensile strength of the repaired tendon remains weak during the first 6 months after surgery • Strength of repaired tendon is only around 30% of
normal at 6 weeks, 50% normal at 3 months, and 80% normal at 6 months
– 80% of repair failures occur during the first 12 weeks postoperatively • After 6 months postoperatively, the risk of repair failure
returns to that of the native tendon – However, the reported rate of stiffness following
arthroscopic rotator cuff repair after 6 months is only about 3%
• Therefore, the postoperative course is purposely conservative to reduce the risk of repair failure with the understanding that a stiff postoperative shoulder occurs only rarely

Postoperative Timeline - Early 1) Initially, the patient will remain in the sling only with
no motion exercises
– It is ok to bend and straighten the elbow, wrist, and fingers during this time
– Pool therapy
• For interested patients, this is ok to start as soon as the incisions are healed (2 weeks)
• Pool therapy allows for gravity free and passive shoulder ROM
2) Depending on the tear repair, the sling will be removed at 4-6 weeks postoperatively
– Passive or active assisted ROM is initiated at this time

Postoperative Timeline - Intermediate
• Active range of is initiated at 8-12 weeks postoperatively (still depending on repair integrity) – Arm motion is allowed including reaching and
reaching behind the back
– A 5 lbs weight bearing restriction is initiated
– We do not want patients using free weights or using an arm bike during the intermediate phase
– Shoulder blade and body balance exercises are helpful

Postoperative Timeline - Late
• After 4 ½ months post repair, strengthening of the cuff can be initiated – Patients will have a 10 lbs restriction during this
phase
– No repetitive lifting over 5 lbs
• At 6 months post repair, all restrictions are lifted and patients are encouraged to slowly and gradually return to normal activities including sport, gym, hobbies
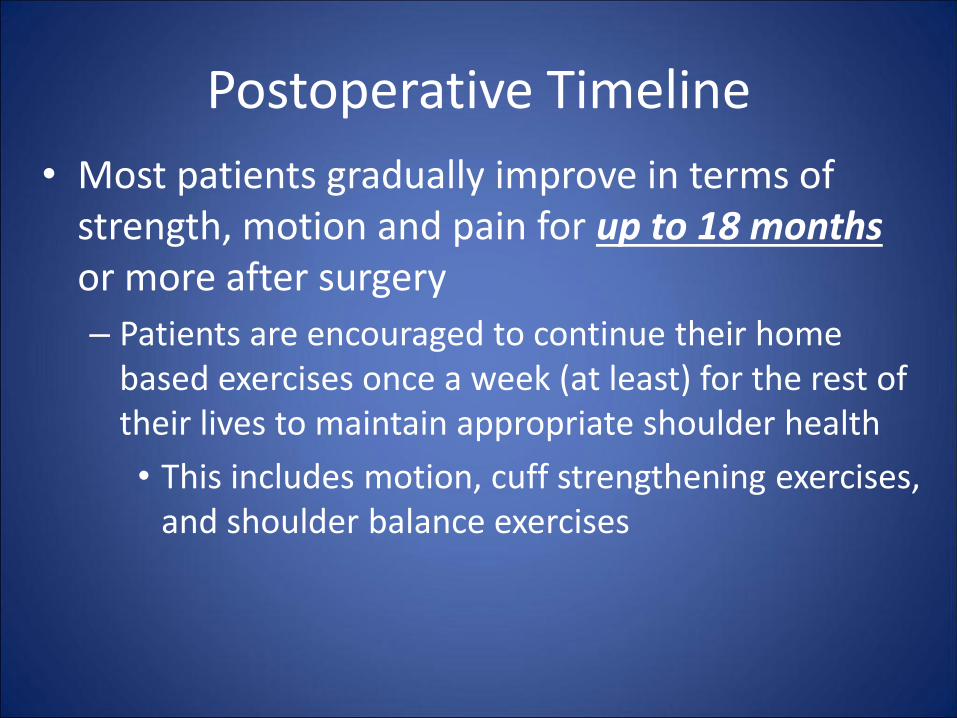
Postoperative Timeline
• Most patients gradually improve in terms of strength, motion and pain for up to 18 months or more after surgery
– Patients are encouraged to continue their home based exercises once a week (at least) for the rest of their lives to maintain appropriate shoulder health
• This includes motion, cuff strengthening exercises, and shoulder balance exercises

Common Questions • How long after surgery can I shower?
– You can shower with the dressing on after surgery. The dressing is removed at 5 days after surgery, then shower with no dressing
• What do I take after surgery to prevent blood clots? – We recommend taking one adult aspirin (325 mg) daily for 2 weeks
following surgery
• What is the most comfortable position to sleep in after surgery? – Most patients report sleeping upright in a recliner is the most
comfortable position after surgery. However, there are no restrictions on sleeping position. You also may sleep on the operative shoulder if comfortable immediately after surgery
• How long after surgery can I drive? – Patients are not allowed to drive when they have their sling on, so
typically no driving for the first 6 weeks after surgery
• Do I need antibiotics before seeing the dentist? – You do not need to take antibiotics before seeing the dentist after cuff
repair surgery
Thank You!
Phone 303-321-1333
Fax 303-321-0620
Websites www.western-ortho.com
www.denvershoulder.com


