® 01 PARTS INCLUDED INSTALL TIME 2–3 HOURS INSTALL DIFFICULTY DISCLAIMER • Raise vehicle only on jack stands or on a vehicle lift. • Allow vehicle to cool completely prior to attempting installation. • Do not run the engine or drive the vehicle while overheating; serious damage can occur. • Please dispose of any liquids properly. • Mishimoto is not responsible for any vehicle damage or personal injury due to installation errors, misuse, or removal of Mishimoto products. • Mishimoto suggests that a trained professional install all Mishimoto products. CAUTION Never work on the cooling system when it is hot. The coolant temperature in the radiator can be considerably higher than boiling, and the system may be under pressure. Opening a cooling system that is hot or under pressure can result in serious injury. Always wait until the system has cooled completely before servicing it in any way. INSTALL PROCEDURE 01. Set the vehicle on an automotive lift or raise it with a jack and place it securely on jack stands. Refer to your owner’s manual for safe lifting points if you are unsure. 02. Loosen the clamp that secures the air intake to the turbocharger inlet. (1x worm gear clamp) 03. Disconnect the CCV hose from the intake by sliding the locking tab over and pulling the hose off the port. CONTINUED ON FOLLOWING PAGE T20 TORX SOCKET 7MM SOCKET 10MM SOCKET 13MM SOCKET 1/4" DRIVE RATCHET 1/4" DRIVER 1/4" DRIVE EXTENSION(S) FLATHEAD SCREWDRIVER SMALL PICK TOOLS NEEDED 2016+ CHEVY CAMARO 2.0T INTERCOOLER PIPE KIT PARTS LIST AND INSTALLATION GUIDE 2PC | ALUMINUM PIPES W/ CNC-MACHINED QUICK-DISCONNECTS 1PC | ALUMINUM PIPE W/ CNC-MACHINED 2-BOLT FLANGE 2PC | QUICK-DISCONNECT SPRING CLIPS 1PC | 2.75" 90° SILICONE COUPLER 1PC | 2.25" TO 2.5" SILICONE TRANSITION COUPLER 1PC | 2.5" T-BOLT CLAMP 1PC | 2.75" T-BOLT CLAMP 2PC | 3" T-BOLT CLAMPS MOUNTING HARDWARE
Transcript
®
01
PARTS INCLUDED
INSTALL TIME 2–3 HOURSINSTALL DIFFICULTY
DISCLAIMER• Raise vehicle only on jack stands or on a vehicle lift.
• Allow vehicle to cool completely prior to attempting installation.
• Do not run the engine or drive the vehicle while overheating; serious damage can occur.
• Please dispose of any liquids properly.
• Mishimoto is not responsible for any vehicle damage or personal injury due to installation errors, misuse, or removal of Mishimoto products.
• Mishimoto suggests that a trained professional install all Mishimoto products.
CAUTION Never work on the cooling system when it is hot. The coolant temperature in the radiator can be considerably higher than boiling, and the system may be under pressure. Opening a cooling system that is hot or under pressure can result in serious injury. Always wait until the system has cooled completely before servicing it in any way.
INSTALL PROCEDURE01. Set the vehicle on an automotive lift or raise it with a jack and
place it securely on jack stands. Refer to your owner’s manualfor safe lifting points if you are unsure.
02. Loosen the clamp that secures the air intake to the turbocharger inlet. (1x worm gear clamp)
03. Disconnect the CCV hose from the intake by sliding the locking tab over and pulling the hose off the port.
CONTINUED ON FOLLOWING PAGE
T20 TORX SOCKET
7MM SOCKET
10MM SOCKET
13MM SOCKET
1/4" DRIVE RATCHET
1/4" DRIVER
1/4" DRIVE EXTENSION(S)
FLATHEAD SCREWDRIVER
SMALL PICK
TOOLS NEEDED
2016+ CHEVY CAMARO 2.0T INTERCOOLER PIPE KIT PARTS LIST AND INSTALLATION GUIDE
04. Disconnect the mass airflow (MAF) sensor, and release the harness from the intake tubing. To release the connector, slide the red locking tab up, depress the black tab and pull the connector off the sensor.
05. Separate the intake from the turbocharger, and remove the intake by lifting it upward. The airbox is held in by three pegsand grommets.
06. Remove the five screws that secure the air diverter to the driver side of the vehicle, and remove the air diverter. Repeat this process on the passenger side. (10x 7mm screws)
07. Remove the eight screws that secure the lower edge of the bumper. (8x 7mm screws)
08. Remove the four screws and eight bolts that secure the splash panel to the underside of the vehicle. Then removethe splash panel. (4x 7mm screws, 8x 10mm bolts)
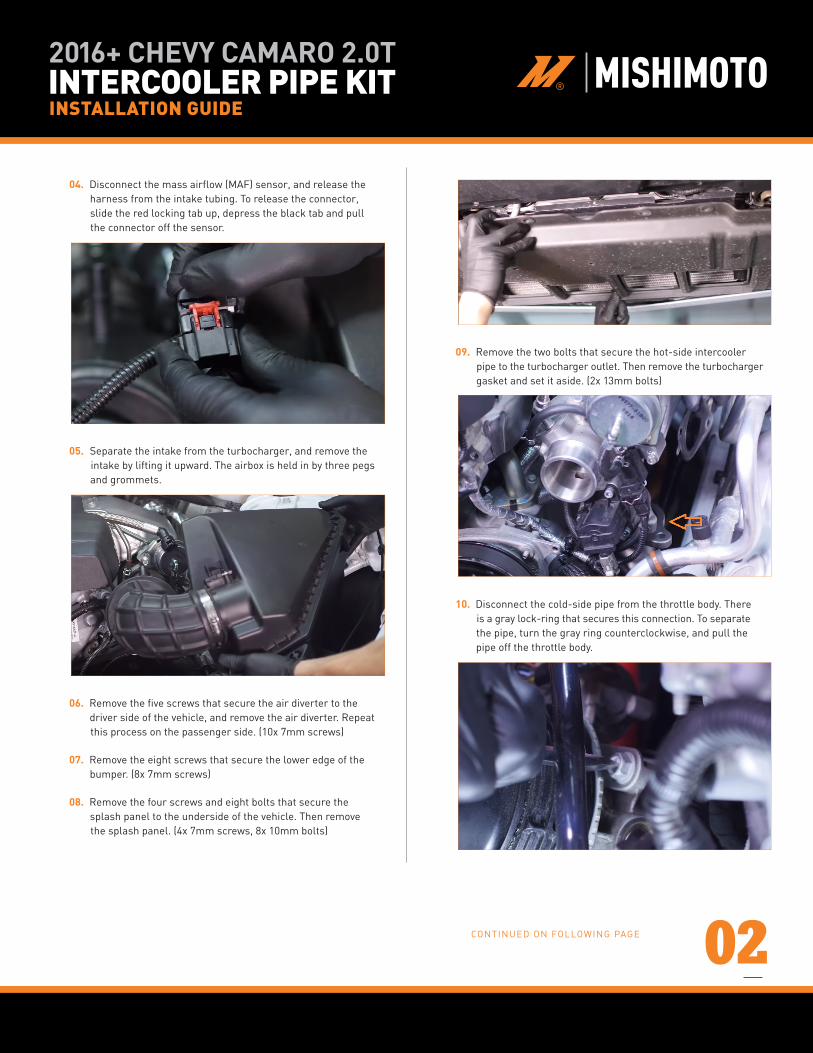
09. Remove the two bolts that secure the hot-side intercooler pipe to the turbocharger outlet. Then remove the turbocharger gasket and set it aside. (2x 13mm bolts)
10. Disconnect the cold-side pipe from the throttle body. There is a gray lock-ring that secures this connection. To separate the pipe, turn the gray ring counterclockwise, and pull the pipe off the throttle body.
11. Disconnect the sensor from the cold-side pipe. To release this connector, slide the locking mechanism upward. You will feel the connector start to slide off. Once the locking mechanism is disengaged, the connector will be easy to separate.
12. Reach down through the engine bay on the passenger side, and use a pick to lift the circlip on the cold-side pipe until it locks into the detent, as shown here. This detent will hold the circlip in the unlocked position.
13. Reach down through the engine bay on the driver side, and use a pick to lift the circlip on the hot-side pipe until it locks into the detent. This detent will hold the circlip in the unlocked position.
14. Reach up from underneath the vehicle on the passenger side, and use a pick to unseat the other side of the circlip on the hot-side pipe. Then remove the circlip and separate the pipe from the intercooler.
15. Reach up from underneath the vehicle, and pull down on the circlip to lock it into the detent. Then separate the pipefrom the intercooler. Here you can see the channel on the intercooler where the circlip locks into place. Keep that in mind for when you install the Mishimoto pipes.
16. Remove the hot-side pipe from the vehicle. The pipe can be separated into two pieces by loosening the worm gear clamp. To remove it in one piece, slide it back toward the firewall, and feed the intercooler connection past the turbo first.
17. Remove the cold-side pipe from the vehicle. Here you can see the locking ring that holds the pipe onto the throttle body, and the plastic piece that houses the circlip ends and detents.
18. Remove the screw that secures the sensor to the cold-side pipe. Then remove the sensor by pulling it directly outward. Transfer the sensor to the Mishimoto cold-side pipe, and secure it with the provided bolt. Do not reuse the original screw on the Mishimoto cold-side pipe. (1x T20 screw, 1x 10mm bolt)
19. Inside the quick-disconnect fitting on each pipe, there is a rubber seal. Transfer the seals from the stock pipes to theMishimoto pipes, taking care not to reverse the direction of the seals.
20. Lower the cold-side pipe into place, and slide the quick-disconnect fitting over the intercooler outlet until it locks. You will hear an audible click when the circlip drops into the channel on the intercooler.
21. Locate the silicone elbow and clamps in your kit. The end of the elbow with the Mishimoto logo will attach to the throttle body. This is important for a good seal due to the ridge on the inside of the elbow.
22. Slip one of the provided T-bolt clamps over the silicone elbow. Lubricate the inside of the coupler, and install it to the cold-side pipe. Install the other clamp over the silicone elbow, and attach the coupler to the throttle body. Make sure that the ridge on the coupler engages the channel on the throttle body to ensure a tight seal. (2x T-bolt clamps)
23. Make sure the coupler is fully seated over both the pipe and the throttle body, and then tighten the clamps to secure the coupler.
24. Connect the wiring harness to the sensor on the cold-side pipe, and push down the locking mechanism to secure the connection.
25. Locate the coupler and clamps in your hot-side pipe kit. There are two different sizes of the clamps included to accommodate each side of the coupler.
26. Install the lower section of the hot-side pipe by sliding it downpast the turbocharger and feeding it toward the front of the vehicle. Push the pipe over the quick-disconnect fitting on the intercooler until the circlip locks into place.
27. Lubricate the transition coupler, and install the wider end over the lower section of the hot-side pipe. Then slip the wider clamp over the coupler, followed by the smaller clamp. Lubricate the upper section of the hot-side pipe and lower it into place. Slip it into the coupler, and turn the pipe until the two-bolt flange aligns with the turbo outlet flange. (2x T-bolt clamps)
28. Reinstall the turbo charger gasket between the hot-side pipe and the turbocharger outlet. Then install the two original bolts to secure the pipe and tighten them completely. (2x 13mm bolt)
29. Adjust the coupler on the hot-side pipe so that both sections are engaged, and then tighten the clamps to secure the coupler.
30. Reinstall the air intake. Slip the fresh air duct of the airbox into place under the radiator support. Install the intake hose to the turbocharger inlet, and tighten the clamp that secures it. Align the pegs on the airbox with the grommets on the body of the car, and push the airbox down to engage them. Reinstall the CCV hose to the intake. Connect the MAF harness to the intake tube and reconnect the MAF sensor. Lock the connector with the red tab. (1x worm gear clamp)
31. Install the splash panel to the underside of the vehicle, and secure it with the original hardware. (8x 10mm bolts, 4x 7mm screws)
32. Secure the lower edge of the front bumper with the original hardware. (8x 7mm screws)
33. Install both air diverters to the vehicle and secure them with the original hardware. If you forgot which side is which, look on the underside of the diverters. The driver side will be marked LH and the passenger side will be marked RH. (10x 7mm screws)
Congrats! You just finished installing the 2016+ Chevy Camaro 2.0T Intercooler Pipe Kit.