Page 1
Passport Installation Guide
Document Version 2/18/2014 Page 1 of 52
ASAP Systems
Passport
Installation Guide
Administrator privileges are required
for the server and PC(s) that you’ll be installing on.
Do not attempt installation from a network or shared drive. All installer files must be on the local machine you are installing on.
You will need to turn off MS Windows 7 UAC in some situations. Specifically if a MS Windows 7 PC is hosting the Passport Web Service
which is part of the Wireless Sync option.
You might need to turn off firewall, security, and virus software as part of the startup process. Once Passport is running then
re-enabling and configuring those components can take place.
Page 2
Passport Installation Guide
Document Version 2/18/2014 Page 2 of 52
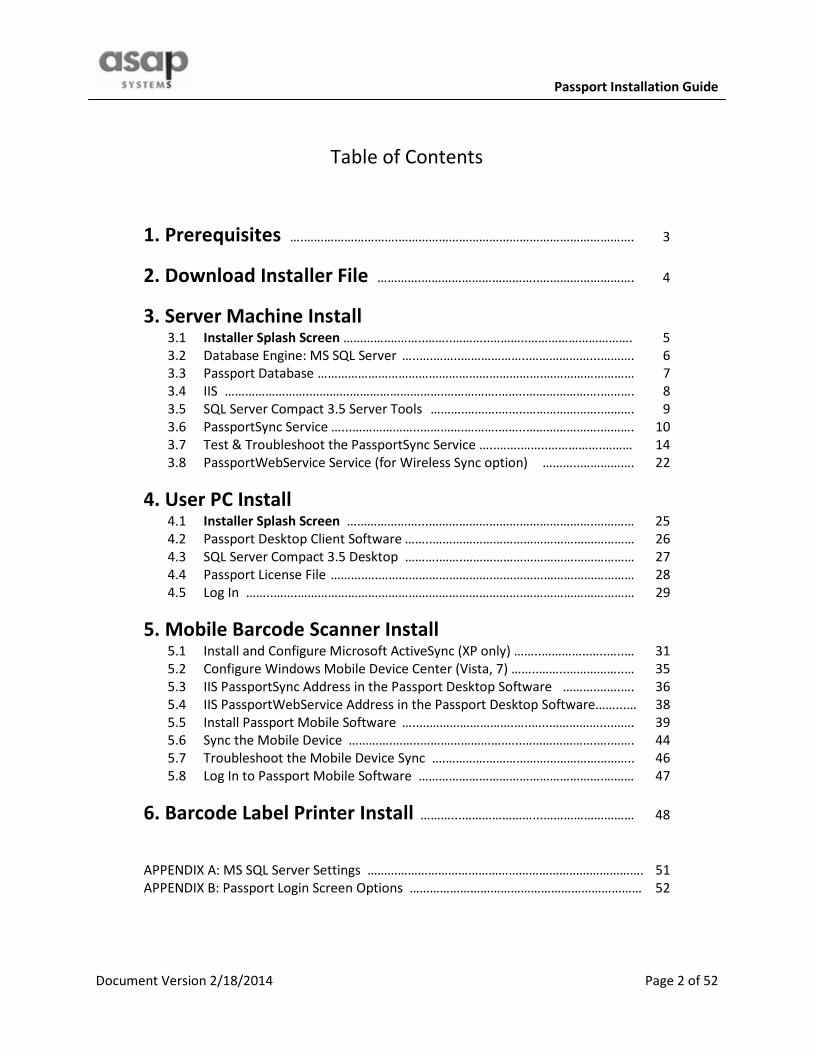
Table of Contents
1. Prerequisites ….……………………….……………………………………………………………. 3
2. Download Installer File ………….……………………………..………………………. 4
3. Server Machine Install 3.1 Installer Splash Screen ………….………..……..………..………..…………………………. 5
3.2 Database Engine: MS SQL Server …..….……..………………..………………...………. 6
3.3 Passport Database ………………………………………………………….……………………… 7
3.4 IIS …………………….………………………………….…………….……..………………….………. 8
3.5 SQL Server Compact 3.5 Server Tools ……….……….……..………………….………. 9
3.6 PassportSync Service …...………………..………….……….……..………………….………. 10
3.7 Test & Troubleshoot the PassportSync Service …..…….……..…………….……… 14
3.8 PassportWebService Service (for Wireless Sync option) ………..……………. 22
4. User PC Install
4.1 Installer Splash Screen …………………...………………………………………….………… 25
4.2 Passport Desktop Client Software ……..…………………………………………………… 26
4.3 SQL Server Compact 3.5 Desktop ……….…….…………………………………………… 27
4.4 Passport License File ……….….…………………………….…………………………………… 28
4.5 Log In ……..…….………………………………………………………….…………………………… 29
5. Mobile Barcode Scanner Install 5.1 Install and Configure Microsoft ActiveSync (XP only) ……..…………..…..…..… 31
5.2 Configure Windows Mobile Device Center (Vista, 7) ……..……..……………..… 35
5.3 IIS PassportSync Address in the Passport Desktop Software ……….…….…. 36
5.4 IIS PassportWebService Address in the Passport Desktop Software……...… 38
5.5 Install Passport Mobile Software …..……………………….…..…..……………...……. 39
5.6 Sync the Mobile Device ………….……..…………………….…..………………….….……. 44
5.7 Troubleshoot the Mobile Device Sync .………………………………………………….. 46
5.8 Log In to Passport Mobile Software ……………………………………………….……… 47
6. Barcode Label Printer Install ………...…………………...……………………… 48
APPENDIX A: MS SQL Server Settings ………………………………………………………………………. 51
APPENDIX B: Passport Login Screen Options …………………………………………………………… 52
Page 3
Passport Installation Guide
Document Version 2/18/2014 Page 3 of 52
1. Prerequisites
Standalone PC Installation • Windows Vista Business-Enterprise-Ultimate (32-bit & 64-bit), or
• Windows 7 Professional-Enterprise-Ultimate (32-bit & 64-bit), or
• Windows 8 Professional-Enterprise (32-bit & 64-bit).
• Microsoft .NET Framework 3.5 or higher
• Microsoft OS installation CD/DVD for enabling IIS
Client-Server Installation Server machine
• Windows Vista Business-Enterprise-Ultimate (32-bit & 64-bit), or
• Windows 7 Professional-Enterprise-Ultimate (32-bit & 64-bit), or
• Windows 8 Professional-Enterprise (32-bit & 64-bit), or
• Windows Server 2008 (32-bit & 64-bit), or
• Windows Server 2008 R2 (32-bit & 64-bit), or
• Windows Server 2012 (32-bit & 64-bit).
• Microsoft .NET Framework 3.5 or higher
• Microsoft OS installation CD/DVD for enabling IIS
Client machine(s) / User PC(s)
• Windows Vista Business-Enterprise-Ultimate (32-bit & 64-bit), or
• Windows 7 Professional-Enterprise-Ultimate (32-bit & 64-bit), or
• Windows 8 Professional-Enterprise (32-bit & 64-bit).
• Microsoft .NET Framework 3.5 or higher
Notes � For standalone PC installations please run the installer twice:
- First for the Server components Section 3 of this guide,
- Second for the User PC components Section 4 of this guide.
� Administrator privileges are required for software installation.
� Do not attempt installation from a network or shared drive. All installer files must be on the local
machine you are installing on.
� For MS Windows 7 machines that are hosting the Passport Web Service (such as in standalone
situations or if the Windows 7 machine is the server) you’ll need to turn off UAC.
� You might need to turn off firewall, security, and virus software as part of the startup process. Once
Passport is running then re-enabling and configuring those components can take place.
� The installer includes Microsoft SQL Server Express however the installer accommodates bypassing
that portion of the installation and allowing the Passport database to be created on your own
existing licensed MS SQL Server.
Page 4
Passport Installation Guide
Document Version 2/18/2014 Page 4 of 52
2. Download Software Installer File(s)
Using a web browser go to www.asapsystems.com/delivery.php where you select the OS dependent
installer file for each machine in play.
• For Standalone PC installations you only have one PC in play, thus you’ll download the installer
file to your PC.
• For Client-Server installations you might have two server machines in play if you have dedicated
environments for MS SQL Server and IIS/Web Services. Otherwise a singular server machine can
typically host all server roles required by Passport. Additionally each user PC will need an
installer file.
1. Select an OS Edition,
2. Select an OS Version,
3. Press the Download button,
4. Save the installer file to a known location.
(The .zip files range in size from 180MB -
320MB)
Page 5
Passport Installation Guide
Document Version 2/18/2014 Page 5 of 52
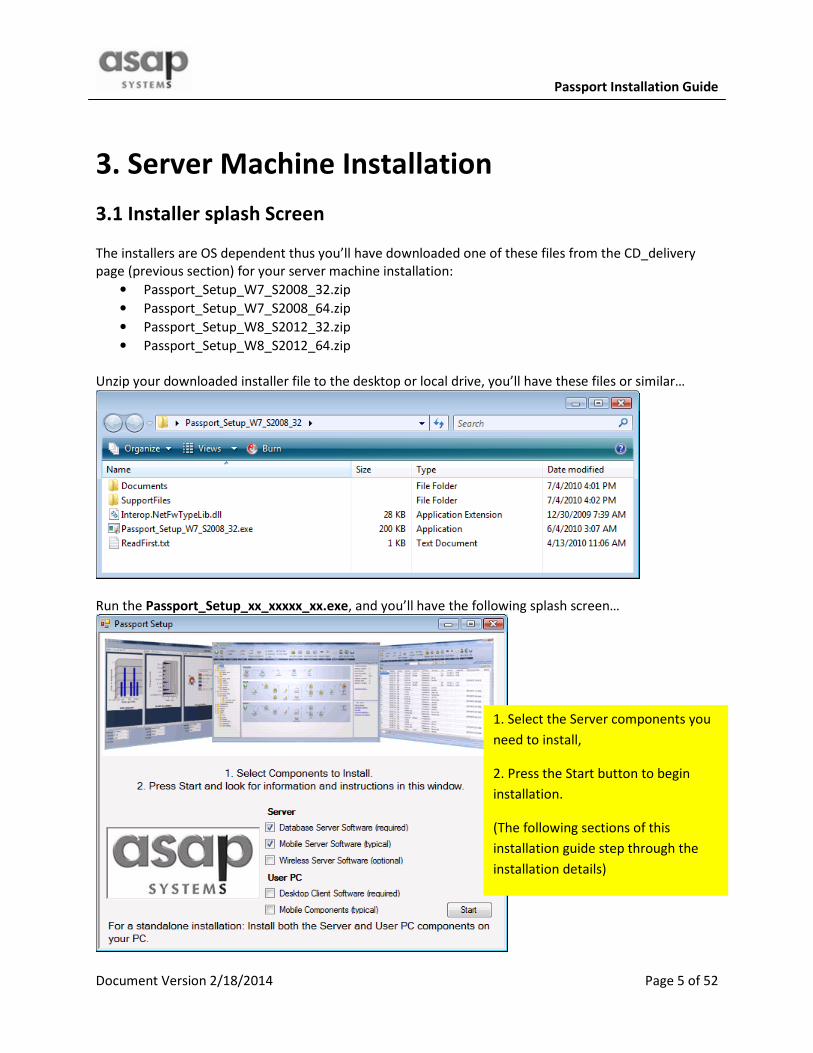
3. Server Machine Installation
3.1 Installer splash Screen
The installers are OS dependent thus you’ll have downloaded one of these files from the CD_delivery
page (previous section) for your server machine installation:
• Passport_Setup_W7_S2008_32.zip
• Passport_Setup_W7_S2008_64.zip
• Passport_Setup_W8_S2012_32.zip
• Passport_Setup_W8_S2012_64.zip
Unzip your downloaded installer file to the desktop or local drive, you’ll have these files or similar…
Run the Passport_Setup_xx_xxxxx_xx.exe, and you’ll have the following splash screen…
1. Select the Server components you
need to install,
2. Press the Start button to begin
installation.
(The following sections of this
installation guide step through the
installation details)
Page 6
Passport Installation Guide
Document Version 2/18/2014 Page 6 of 52
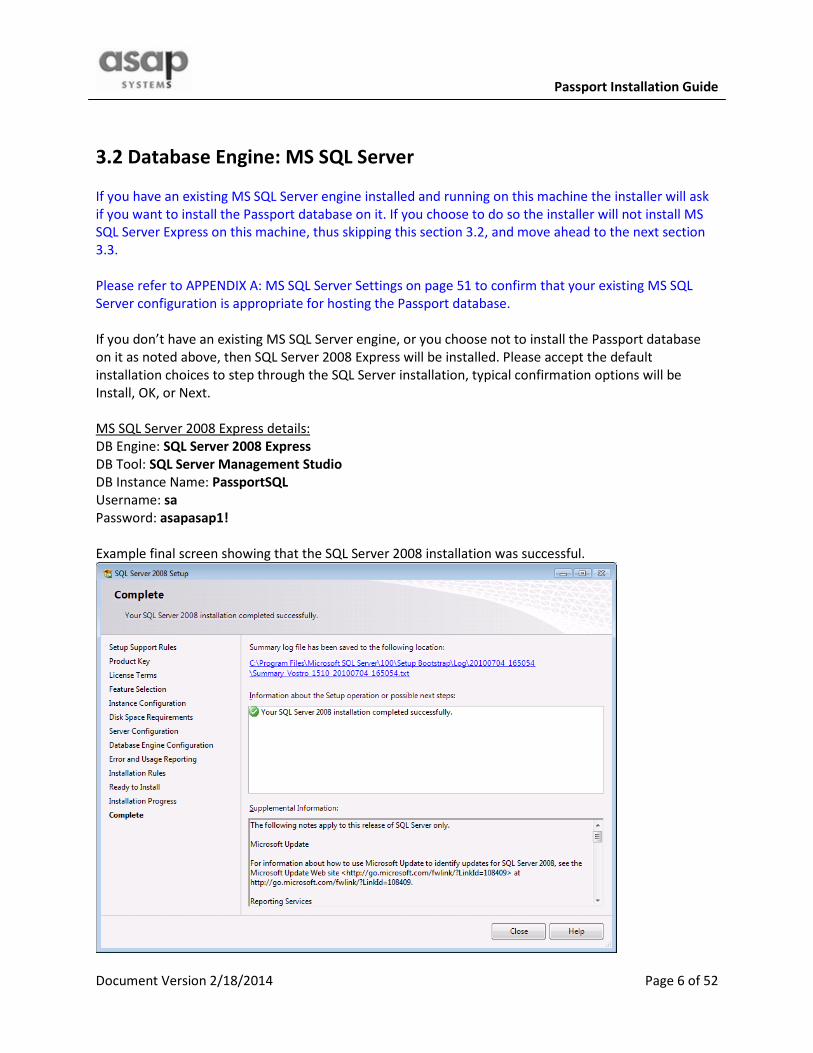
3.2 Database Engine: MS SQL Server
If you have an existing MS SQL Server engine installed and running on this machine the installer will ask
if you want to install the Passport database on it. If you choose to do so the installer will not install MS
SQL Server Express on this machine, thus skipping this section 3.2, and move ahead to the next section
3.3.
Please refer to APPENDIX A: MS SQL Server Settings on page 51 to confirm that your existing MS SQL
Server configuration is appropriate for hosting the Passport database.
If you don’t have an existing MS SQL Server engine, or you choose not to install the Passport database
on it as noted above, then SQL Server 2008 Express will be installed. Please accept the default
installation choices to step through the SQL Server installation, typical confirmation options will be
Install, OK, or Next.
MS SQL Server 2008 Express details:
DB Engine: SQL Server 2008 Express
DB Tool: SQL Server Management Studio
DB Instance Name: PassportSQL
Username: sa
Password: asapasap1!
Example final screen showing that the SQL Server 2008 installation was successful.
Page 7
Passport Installation Guide
Document Version 2/18/2014 Page 7 of 52
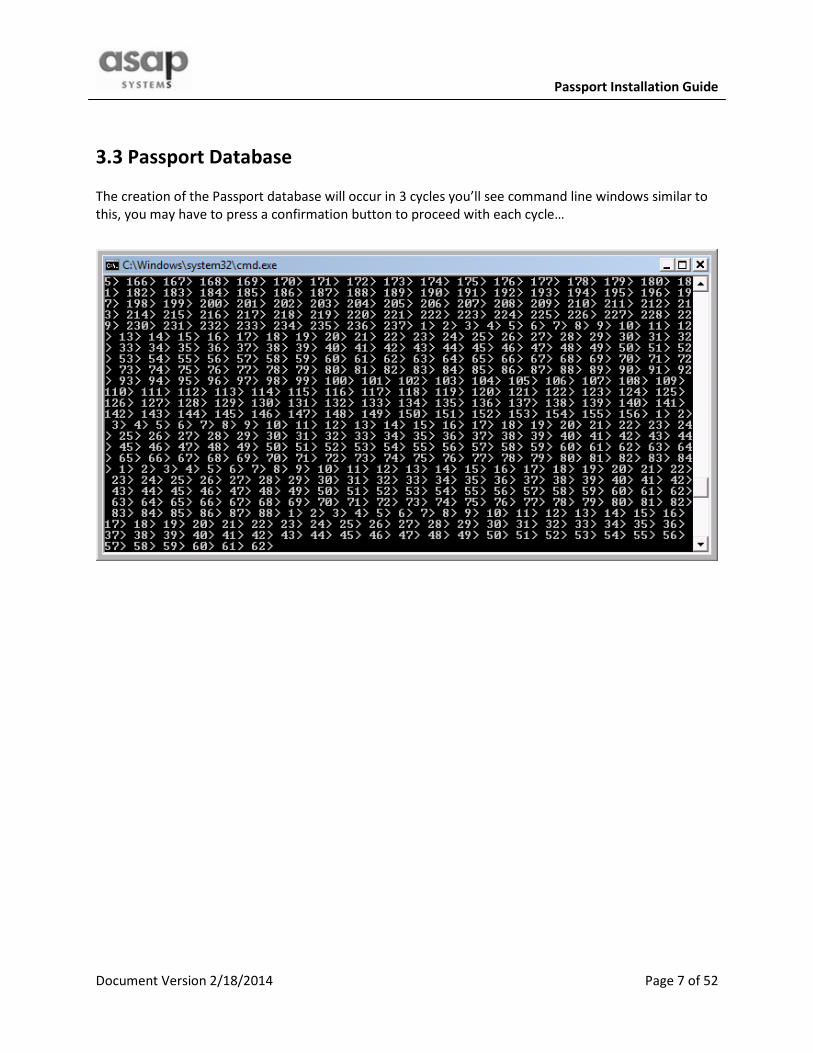
3.3 Passport Database
The creation of the Passport database will occur in 3 cycles you’ll see command line windows similar to
this, you may have to press a confirmation button to proceed with each cycle…
Page 8
Passport Installation Guide
Document Version 2/18/2014 Page 8 of 52
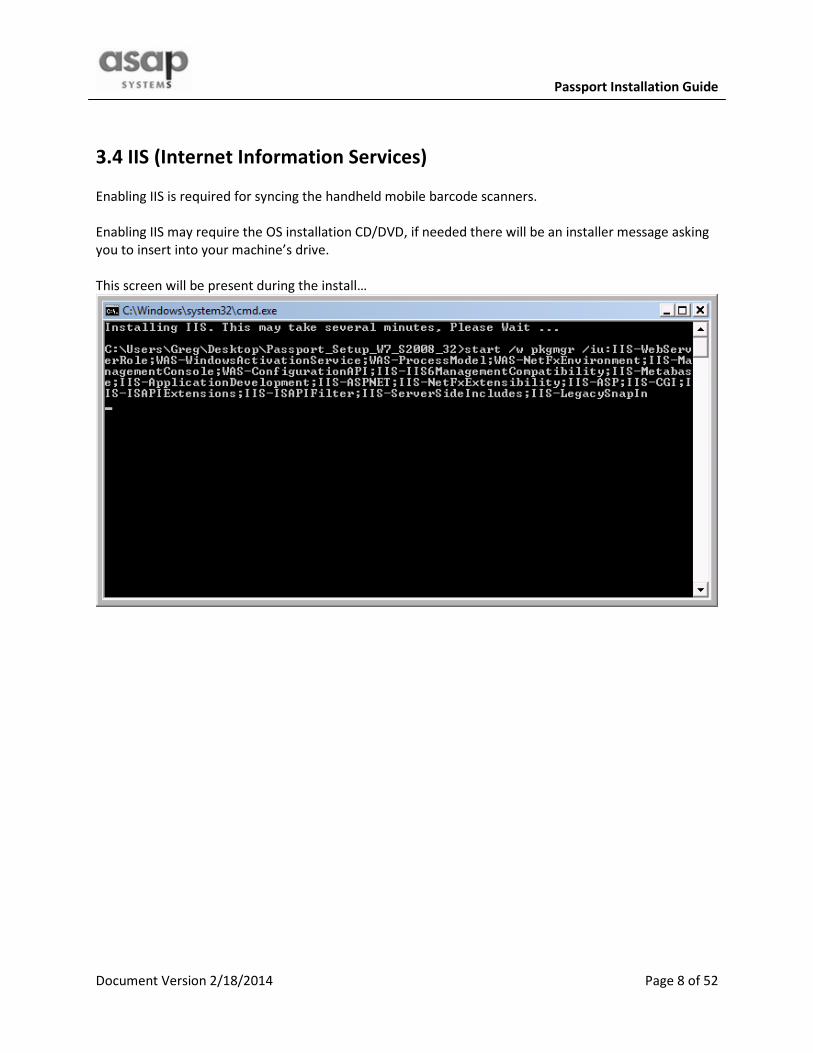
3.4 IIS (Internet Information Services)
Enabling IIS is required for syncing the handheld mobile barcode scanners.
Enabling IIS may require the OS installation CD/DVD, if needed there will be an installer message asking
you to insert into your machine’s drive.
This screen will be present during the install…
Page 9
Passport Installation Guide
Document Version 2/18/2014 Page 9 of 52
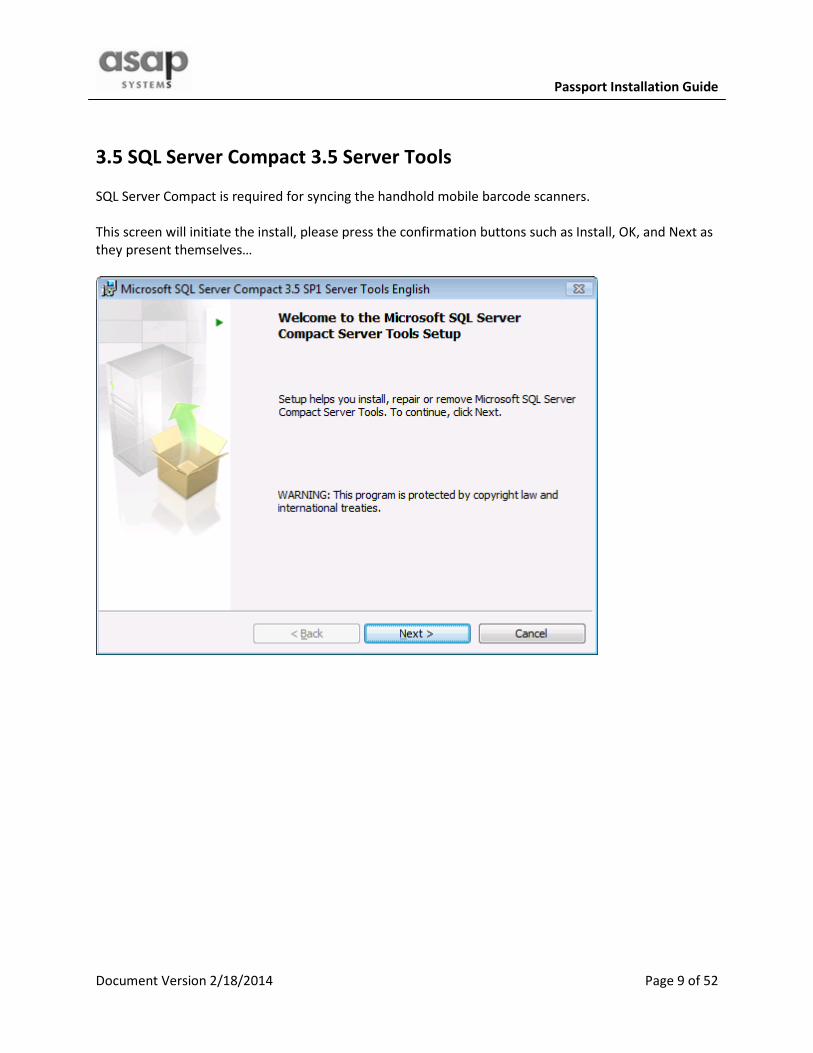
3.5 SQL Server Compact 3.5 Server Tools
SQL Server Compact is required for syncing the handhold mobile barcode scanners.
This screen will initiate the install, please press the confirmation buttons such as Install, OK, and Next as
they present themselves…
Page 10
Passport Installation Guide
Document Version 2/18/2014 Page 10 of 52
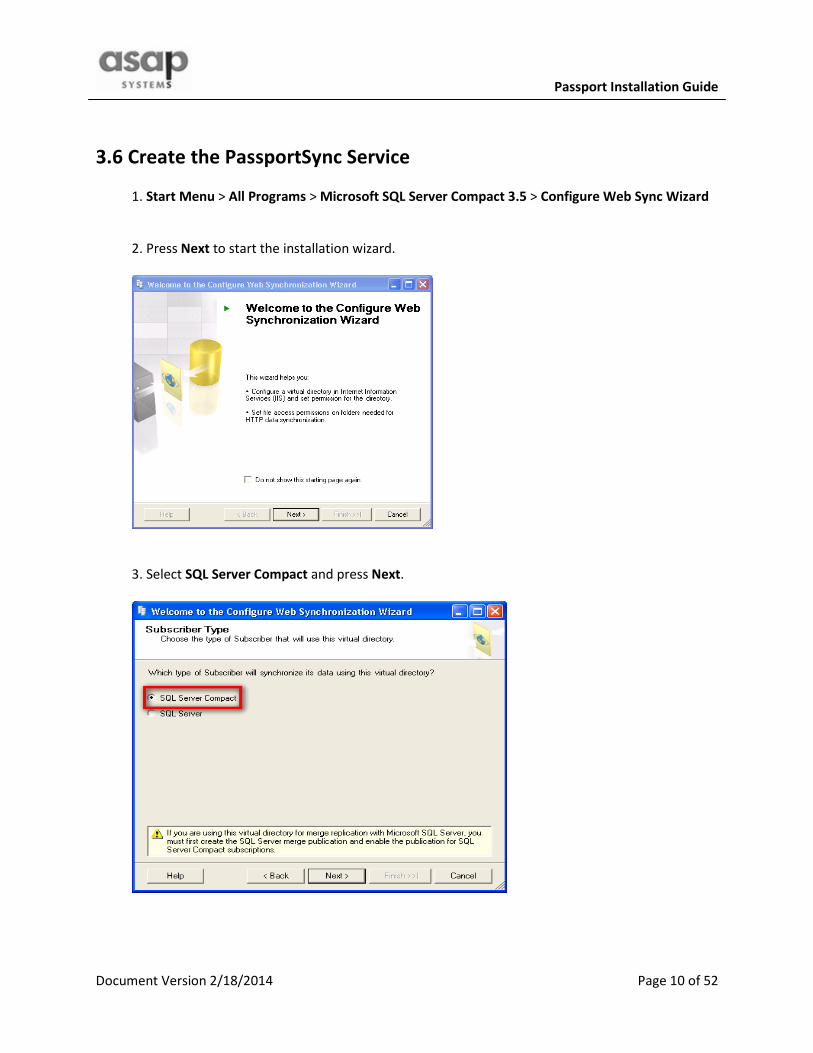
3.6 Create the PassportSync Service
1. Start Menu > All Programs > Microsoft SQL Server Compact 3.5 > Configure Web Sync Wizard
2. Press Next to start the installation wizard.
3. Select SQL Server Compact and press Next.
Page 11
Passport Installation Guide
Document Version 2/18/2014 Page 11 of 52
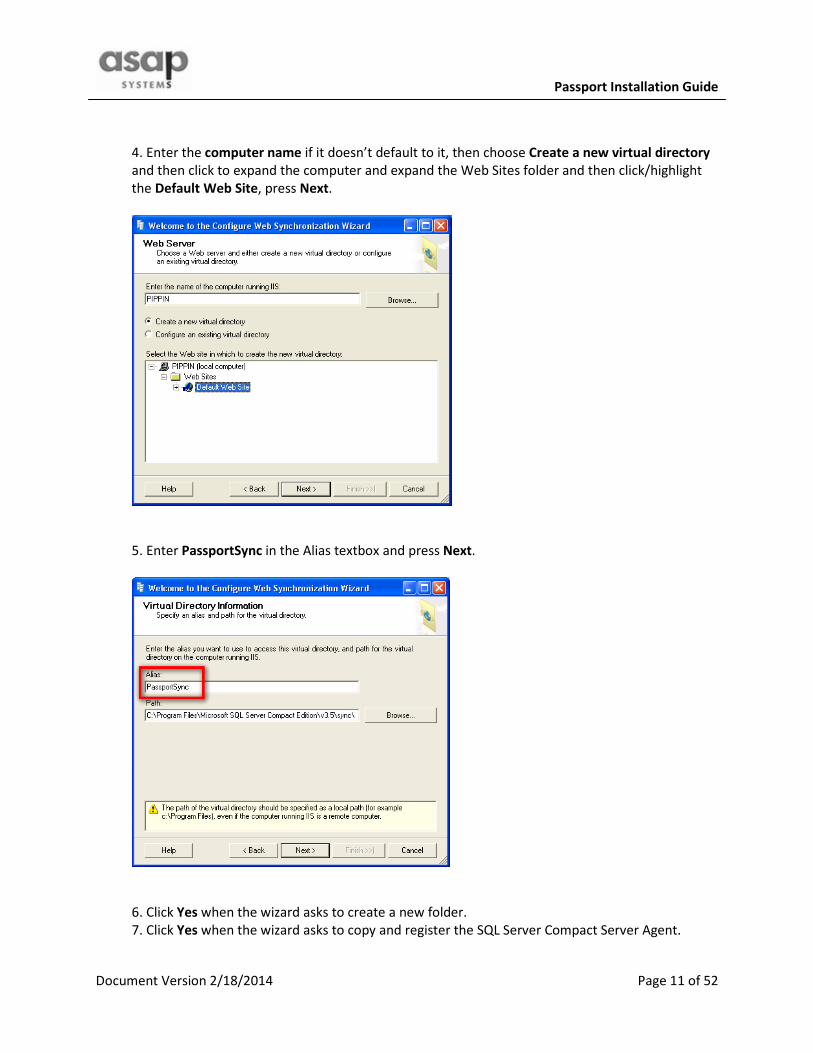
4. Enter the computer name if it doesn’t default to it, then choose Create a new virtual directory
and then click to expand the computer and expand the Web Sites folder and then click/highlight
the Default Web Site, press Next.
5. Enter PassportSync in the Alias textbox and press Next.
6. Click Yes when the wizard asks to create a new folder.
7. Click Yes when the wizard asks to copy and register the SQL Server Compact Server Agent.
Page 12
Passport Installation Guide
Document Version 2/18/2014 Page 12 of 52
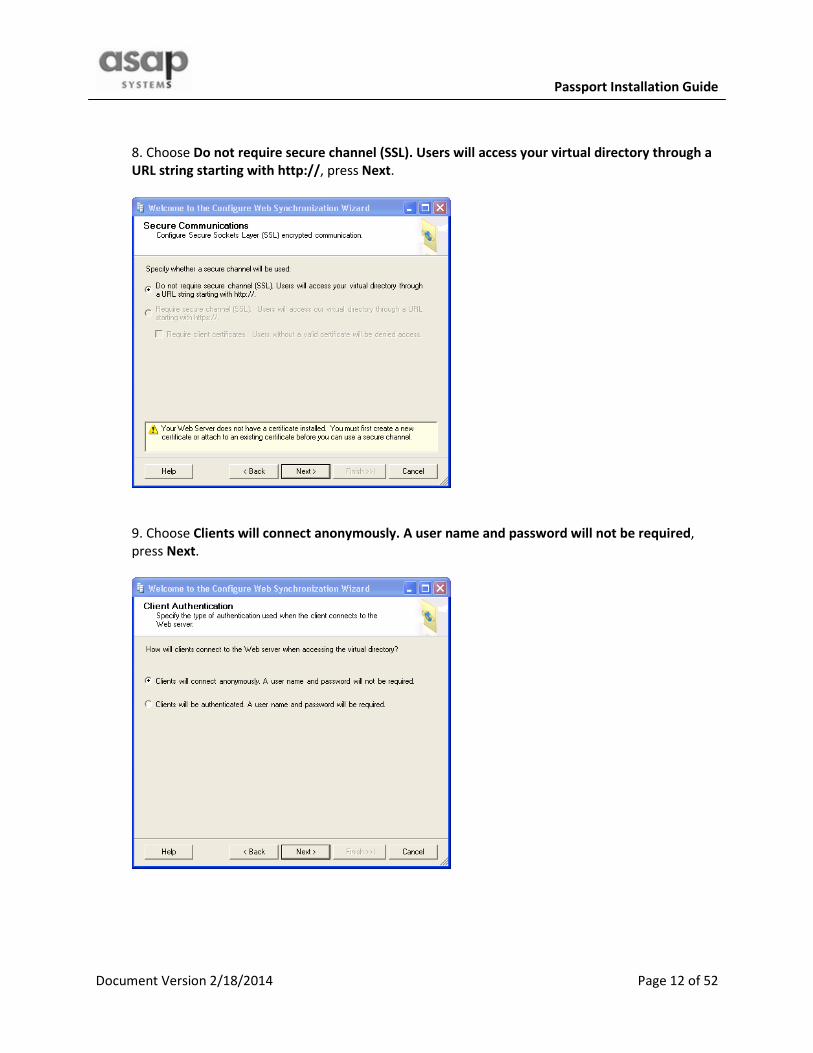
8. Choose Do not require secure channel (SSL). Users will access your virtual directory through a
URL string starting with http://, press Next.
9. Choose Clients will connect anonymously. A user name and password will not be required,
press Next.
Page 13
Passport Installation Guide
Document Version 2/18/2014 Page 13 of 52
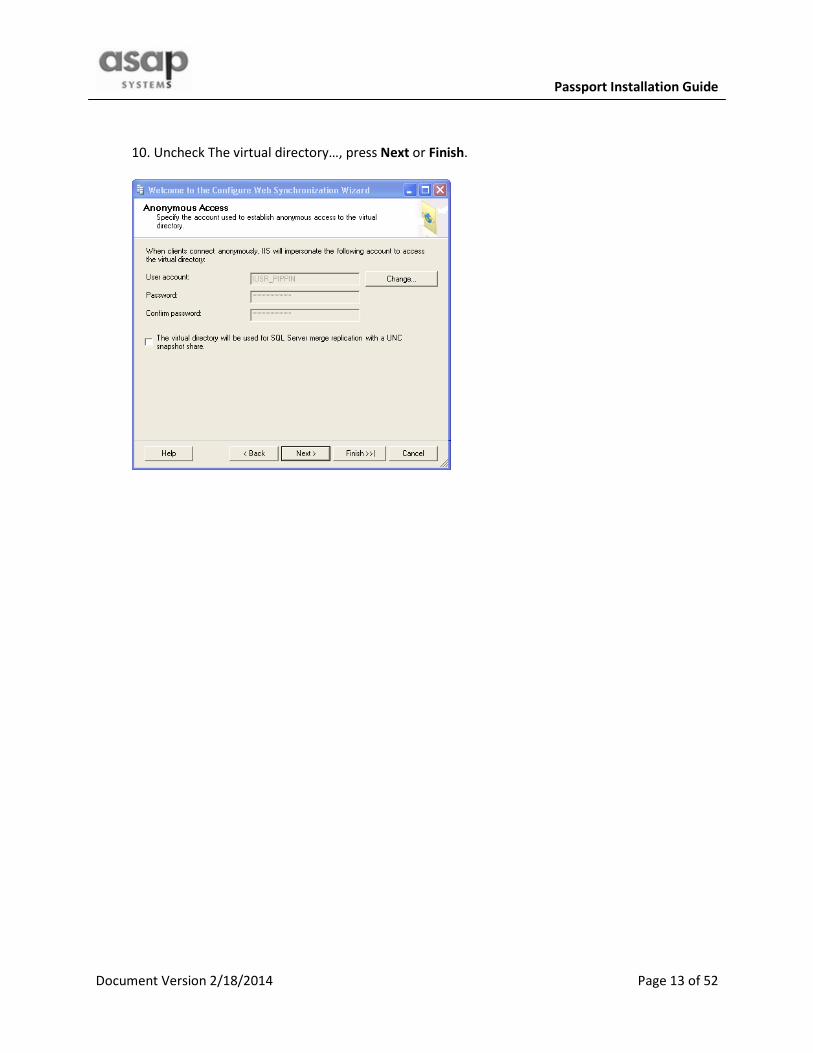
10. Uncheck The virtual directory…, press Next or Finish.
Page 14
Passport Installation Guide
Document Version 2/18/2014 Page 14 of 52
3.7 Testing the PassportSync Service
1. Open a Web Browser
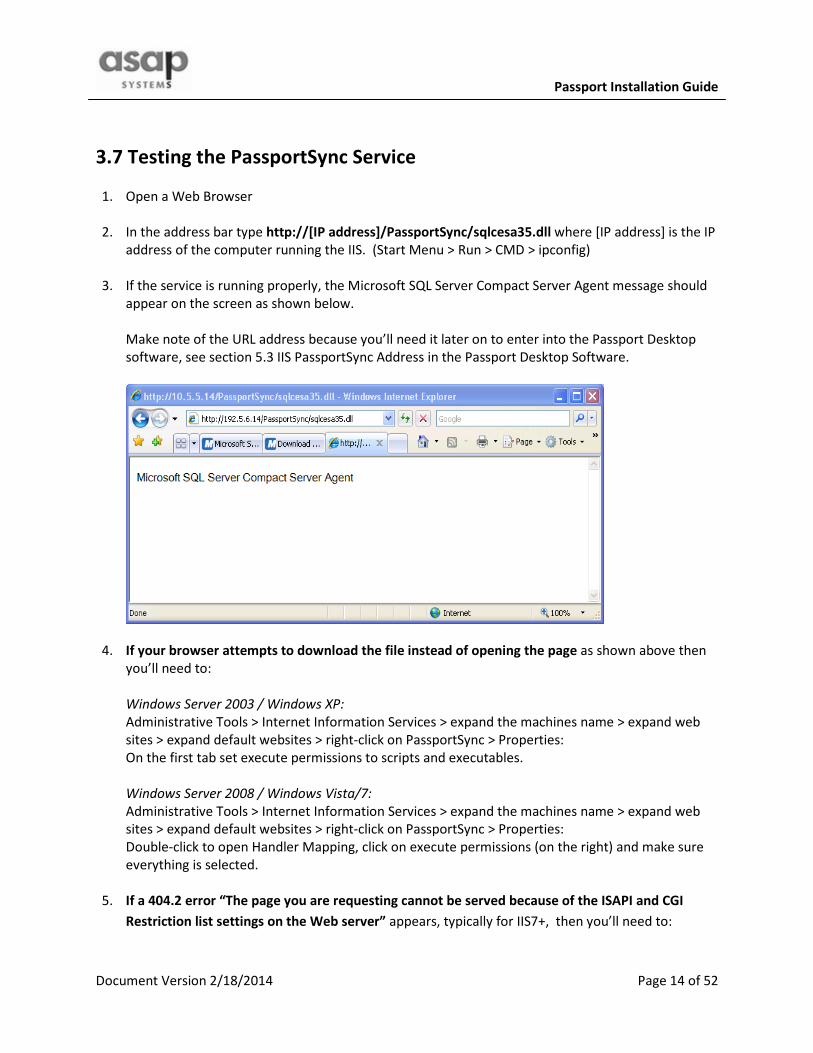
2. In the address bar type http://[IP address]/PassportSync/sqlcesa35.dll where [IP address] is the IP
address of the computer running the IIS. (Start Menu > Run > CMD > ipconfig)
3. If the service is running properly, the Microsoft SQL Server Compact Server Agent message should
appear on the screen as shown below.
Make note of the URL address because you’ll need it later on to enter into the Passport Desktop
software, see section 5.3 IIS PassportSync Address in the Passport Desktop Software.
4. If your browser attempts to download the file instead of opening the page as shown above then
you’ll need to:
Windows Server 2003 / Windows XP:
Administrative Tools > Internet Information Services > expand the machines name > expand web
sites > expand default websites > right-click on PassportSync > Properties:
On the first tab set execute permissions to scripts and executables.
Windows Server 2008 / Windows Vista/7:
Administrative Tools > Internet Information Services > expand the machines name > expand web
sites > expand default websites > right-click on PassportSync > Properties:
Double-click to open Handler Mapping, click on execute permissions (on the right) and make sure
everything is selected.
5. If a 404.2 error “The page you are requesting cannot be served because of the ISAPI and CGI
Restriction list settings on the Web server” appears, typically for IIS7+, then you’ll need to:
Page 15
Passport Installation Guide
Document Version 2/18/2014 Page 15 of 52
a) Open IIS Manager
b) Click on the server name
c) Go to ISAPI and CGI restrictions
d) Make sure the first 2 options are allowed
e) Make sure the 3rd
option (which is SQL Server Compact [sqlcesa35.dll]) exists and if not, click
Add from the actions menu, navigate to it and add it and make sure it is also allowed
6. If “error: page cannot be found” appears instead of the above message, please see the following
pages for troubleshooting.
Troubleshooting (1) the PassportSync Service
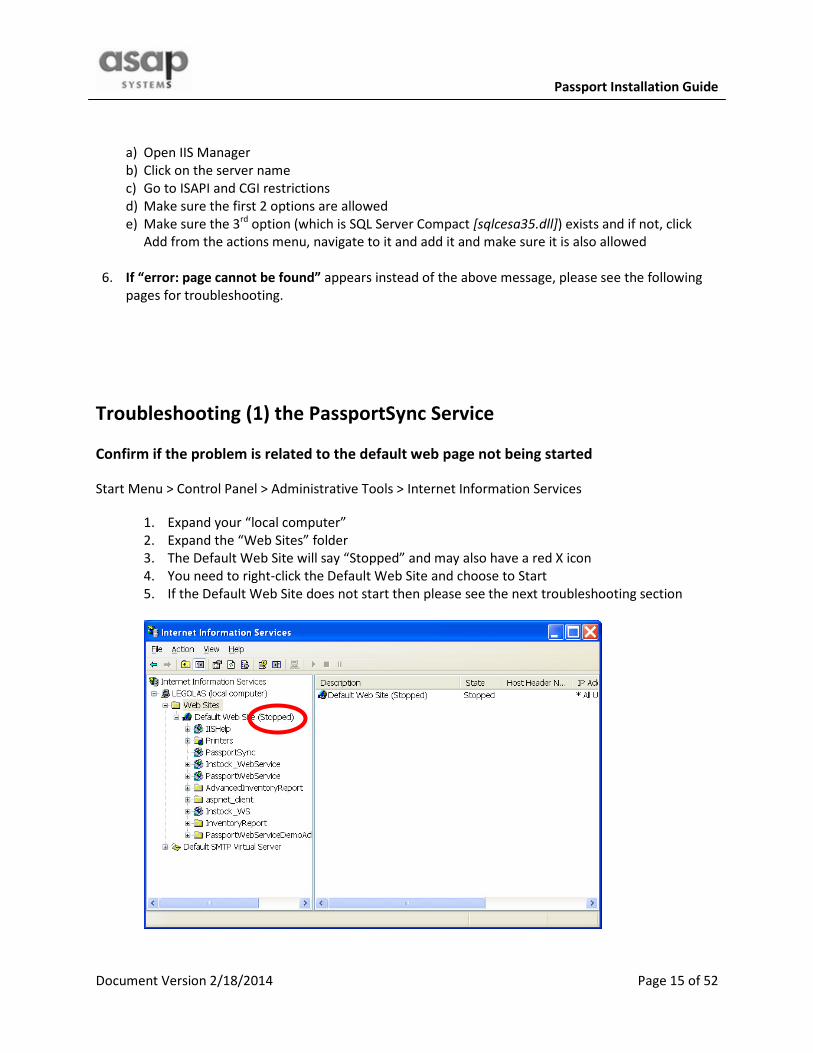
Confirm if the problem is related to the default web page not being started
Start Menu > Control Panel > Administrative Tools > Internet Information Services
1. Expand your “local computer”
2. Expand the “Web Sites” folder
3. The Default Web Site will say “Stopped” and may also have a red X icon
4. You need to right-click the Default Web Site and choose to Start
5. If the Default Web Site does not start then please see the next troubleshooting section
Page 16
Passport Installation Guide
Document Version 2/18/2014 Page 16 of 52
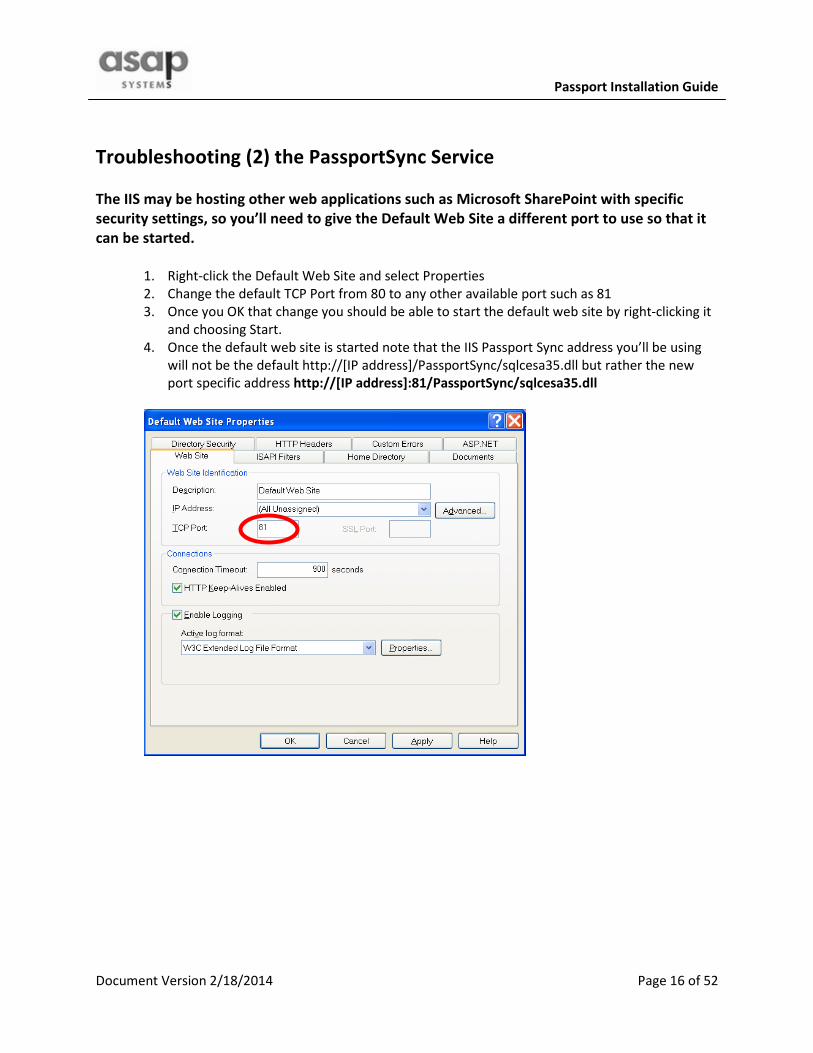
Troubleshooting (2) the PassportSync Service
The IIS may be hosting other web applications such as Microsoft SharePoint with specific
security settings, so you’ll need to give the Default Web Site a different port to use so that it
can be started.
1. Right-click the Default Web Site and select Properties
2. Change the default TCP Port from 80 to any other available port such as 81
3. Once you OK that change you should be able to start the default web site by right-clicking it
and choosing Start.
4. Once the default web site is started note that the IIS Passport Sync address you’ll be using
will not be the default http://[IP address]/PassportSync/sqlcesa35.dll but rather the new
port specific address http://[IP address]:81/PassportSync/sqlcesa35.dll
Page 17
Passport Installation Guide
Document Version 2/18/2014 Page 17 of 52
Troubleshooting (3) the PassportSync Service
If you are not able to specify a new TCP Port for the Default Web Site so that it can be started,
or if there are other programs or services that are specifically blocking you from using the
Default Web Site then you’ll need to create a new web site to host the IIS PassportSync
service
1. Right-click the Web Sites directory and choose to Create another web site.
2. A wizard will take you through the steps, first Name the Instance (such as Passport.)
3. Locate a directory by Navigating to My Computer > C: > Inetpub > wwwroot.
4. Give it permissions the first and second boxes should only need to be checked.
5. Re-run SQL Server Compact’s Configure Web Sync Wizard as you did in section 3.6 which is
previous to this… this time you’ll use this new web site you created here to host the IIS
PassportSync service.
6. Now go in and change the default TCP Port from 80 to another available port such as 81 as
per the Troubleshooting (2) section immediately before this one.
7. And as noted in the previous section the IIS Passport Sync address you’ll be using will not be
the default http://[IP address]/PassportSync/sqlcesa35.dll but rather the new port specific
address http://[IP address]:81/PassportSync/sqlcesa35.dll
a. Make sure the port is open on your network and the firewall is not blocking it
b. Make sure no other devices or programs are using that port
Troubleshooting (4) the PassportSync Service
Depending on your network, group policy, domain, and firewall settings you might need to
add exceptions or adjust rules to not block the default TCP Port 80 or whichever port you
defined.
Troubleshooting (5) the PassportSync Service
Confirm that Microsoft SQL Server Compact 3.1 is not installed
Some machines may already have MS SQL Server Compact 3.1 installed which causes problems for v3.5
which is needed for Passport. Please uninstall v3.1 and then reinstall v3.5 as needed.
Page 18
Passport Installation Guide
Document Version 2/18/2014 Page 18 of 52
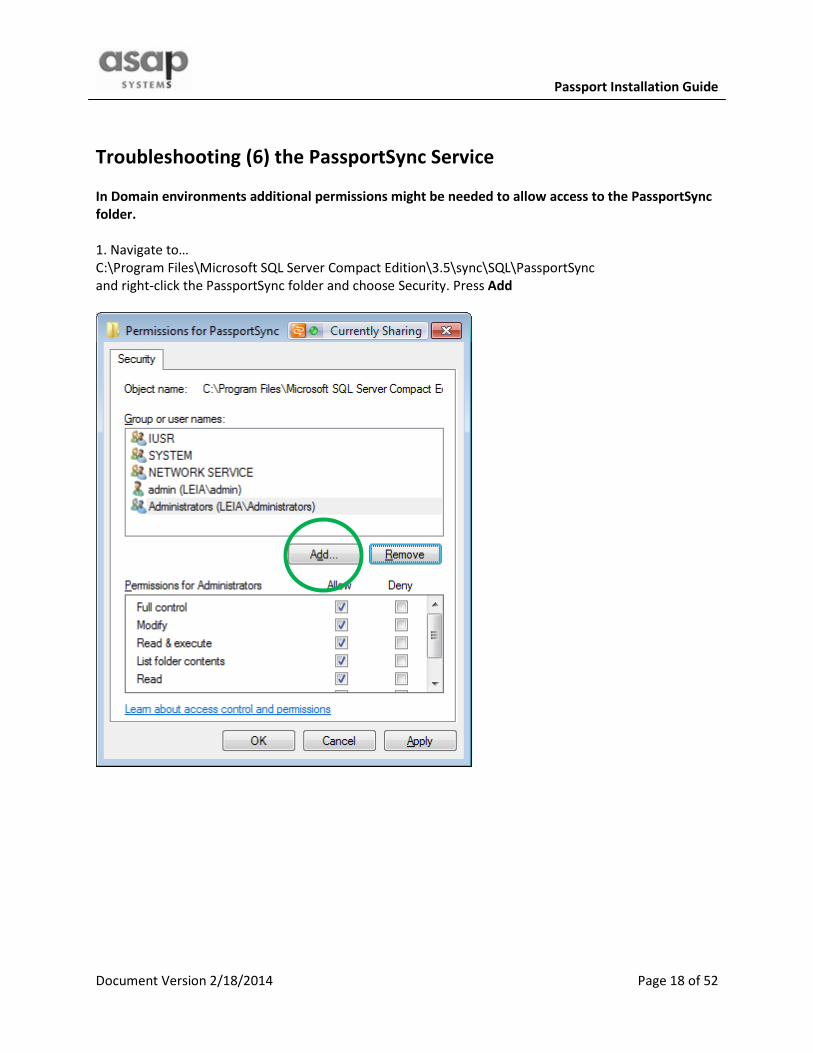
Troubleshooting (6) the PassportSync Service
In Domain environments additional permissions might be needed to allow access to the PassportSync
folder.
1. Navigate to…
C:\Program Files\Microsoft SQL Server Compact Edition\3.5\sync\SQL\PassportSync
and right-click the PassportSync folder and choose Security. Press Add
Page 19
Passport Installation Guide
Document Version 2/18/2014 Page 19 of 52
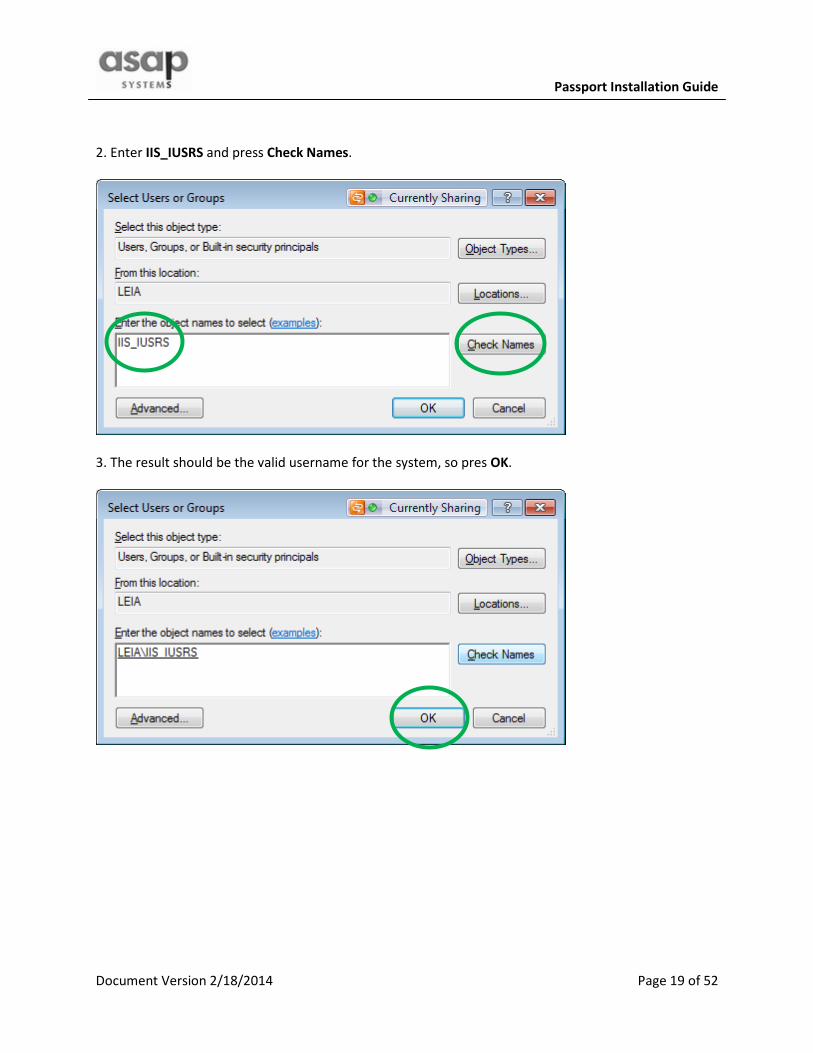
2. Enter IIS_IUSRS and press Check Names.
3. The result should be the valid username for the system, so pres OK.
Page 20
Passport Installation Guide
Document Version 2/18/2014 Page 20 of 52
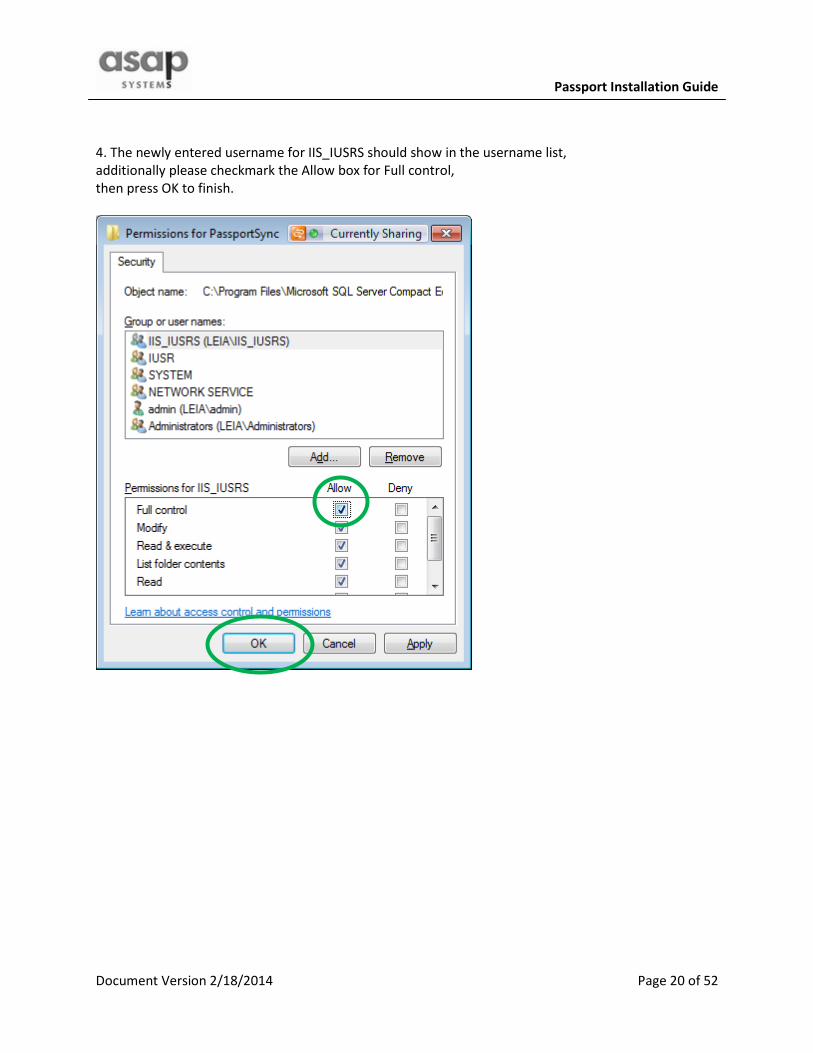
4. The newly entered username for IIS_IUSRS should show in the username list,
additionally please checkmark the Allow box for Full control,
then press OK to finish.
Page 21
Passport Installation Guide
Document Version 2/18/2014 Page 21 of 52
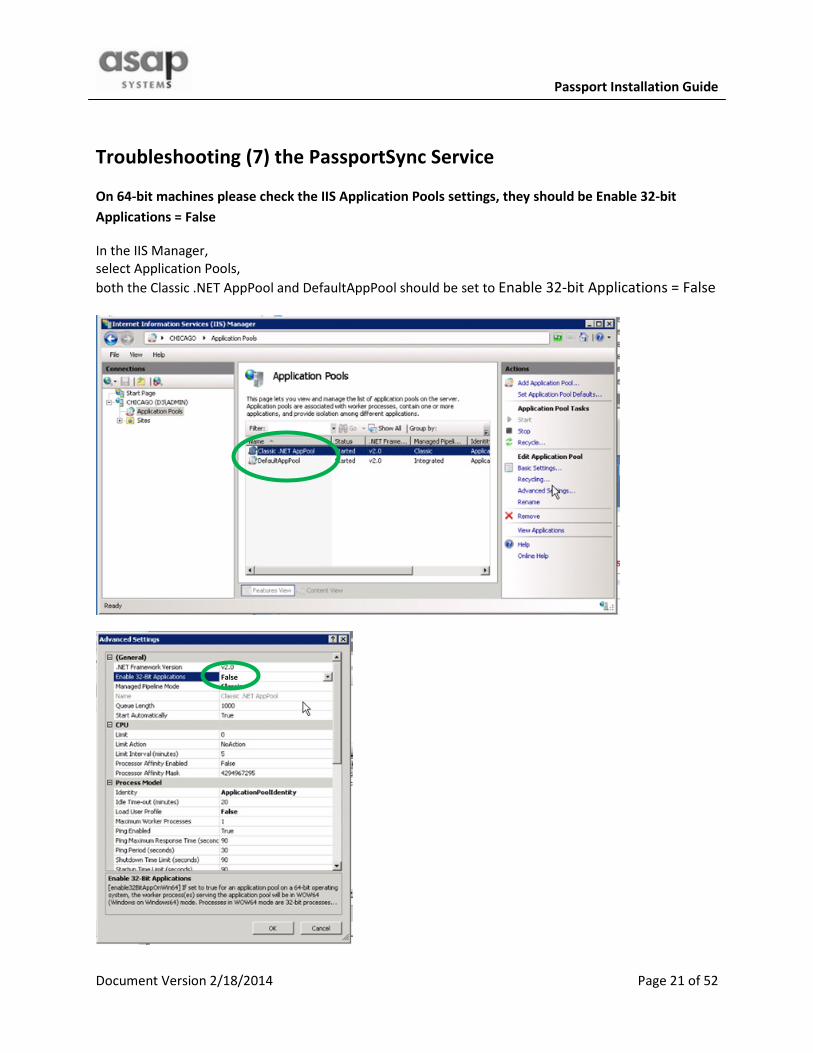
Troubleshooting (7) the PassportSync Service
On 64-bit machines please check the IIS Application Pools settings, they should be Enable 32-bit
Applications = False
In the IIS Manager,
select Application Pools,
both the Classic .NET AppPool and DefaultAppPool should be set to Enable 32-bit Applications = False
False
Page 22
Passport Installation Guide
Document Version 2/18/2014 Page 22 of 52
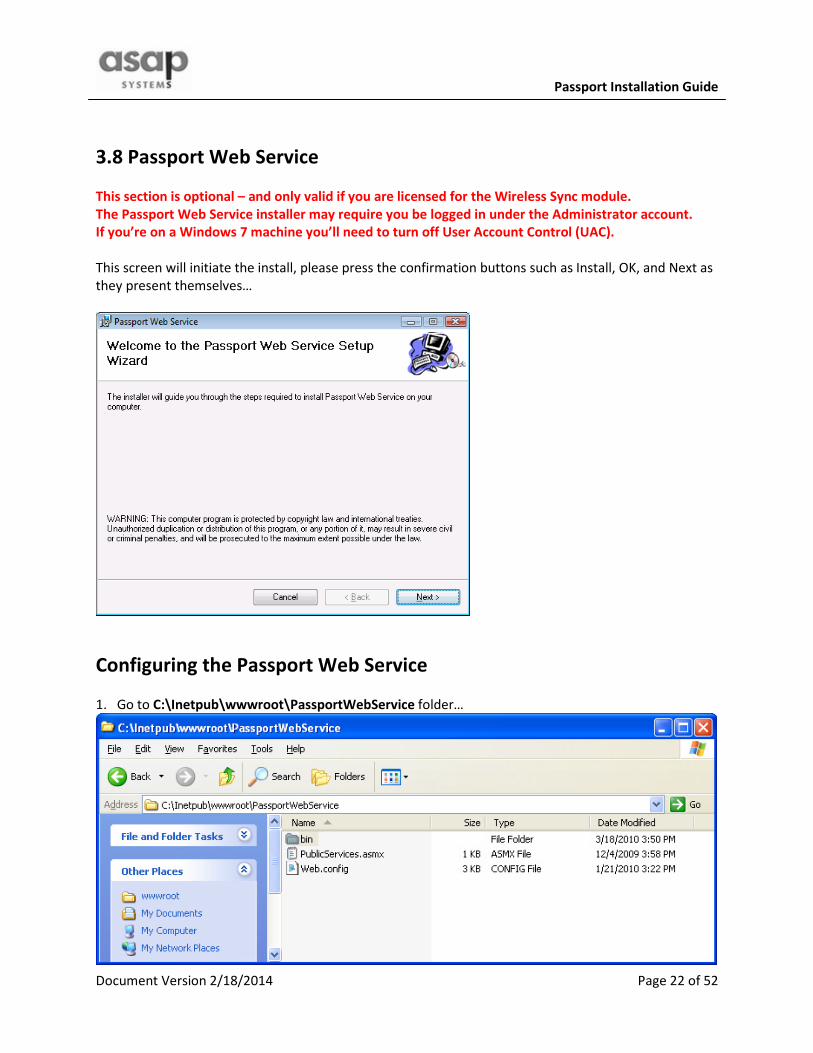
3.8 Passport Web Service
This section is optional – and only valid if you are licensed for the Wireless Sync module.
The Passport Web Service installer may require you be logged in under the Administrator account.
If you’re on a Windows 7 machine you’ll need to turn off User Account Control (UAC).
This screen will initiate the install, please press the confirmation buttons such as Install, OK, and Next as
they present themselves…
Configuring the Passport Web Service
1. Go to C:\Inetpub\wwwroot\PassportWebService folder…
Page 23
Passport Installation Guide
Document Version 2/18/2014 Page 23 of 52
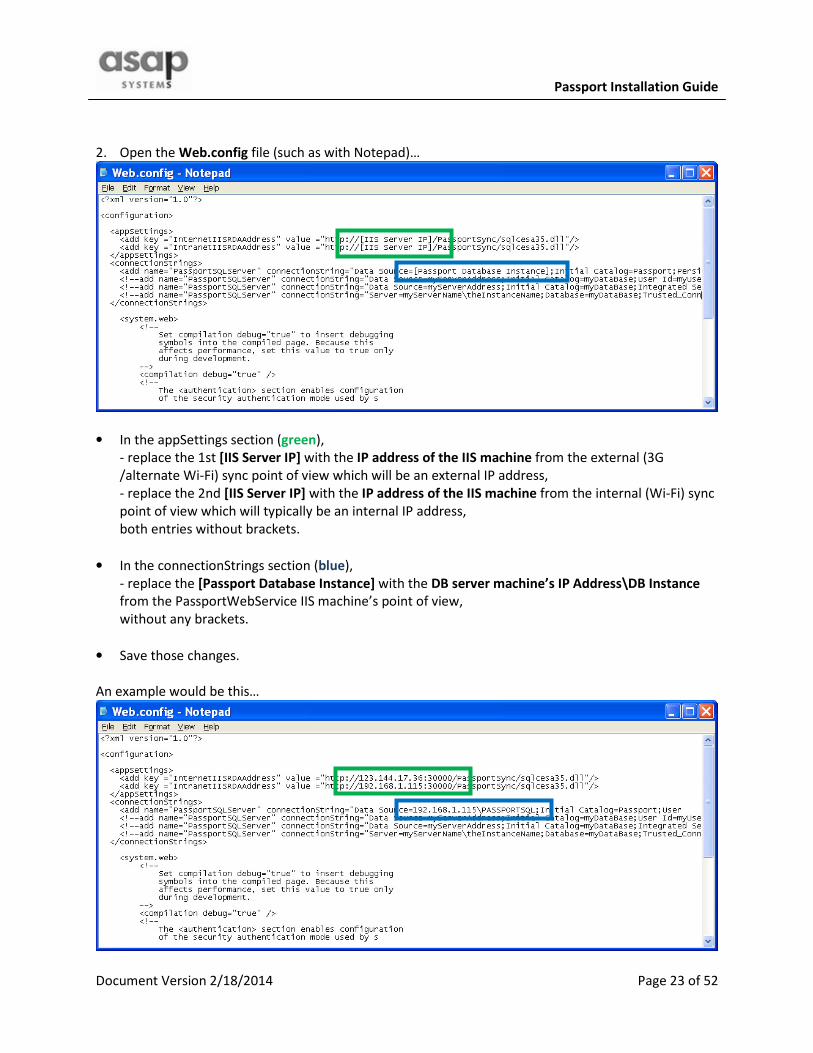
2. Open the Web.config file (such as with Notepad)…
• In the appSettings section (green),
- replace the 1st [IIS Server IP] with the IP address of the IIS machine from the external (3G
/alternate Wi-Fi) sync point of view which will be an external IP address,
- replace the 2nd [IIS Server IP] with the IP address of the IIS machine from the internal (Wi-Fi) sync
point of view which will typically be an internal IP address,
both entries without brackets.
• In the connectionStrings section (blue),
- replace the [Passport Database Instance] with the DB server machine’s IP Address\DB Instance
from the PassportWebService IIS machine’s point of view,
without any brackets.
• Save those changes.
An example would be this…
Page 24
Passport Installation Guide
Document Version 2/18/2014 Page 24 of 52
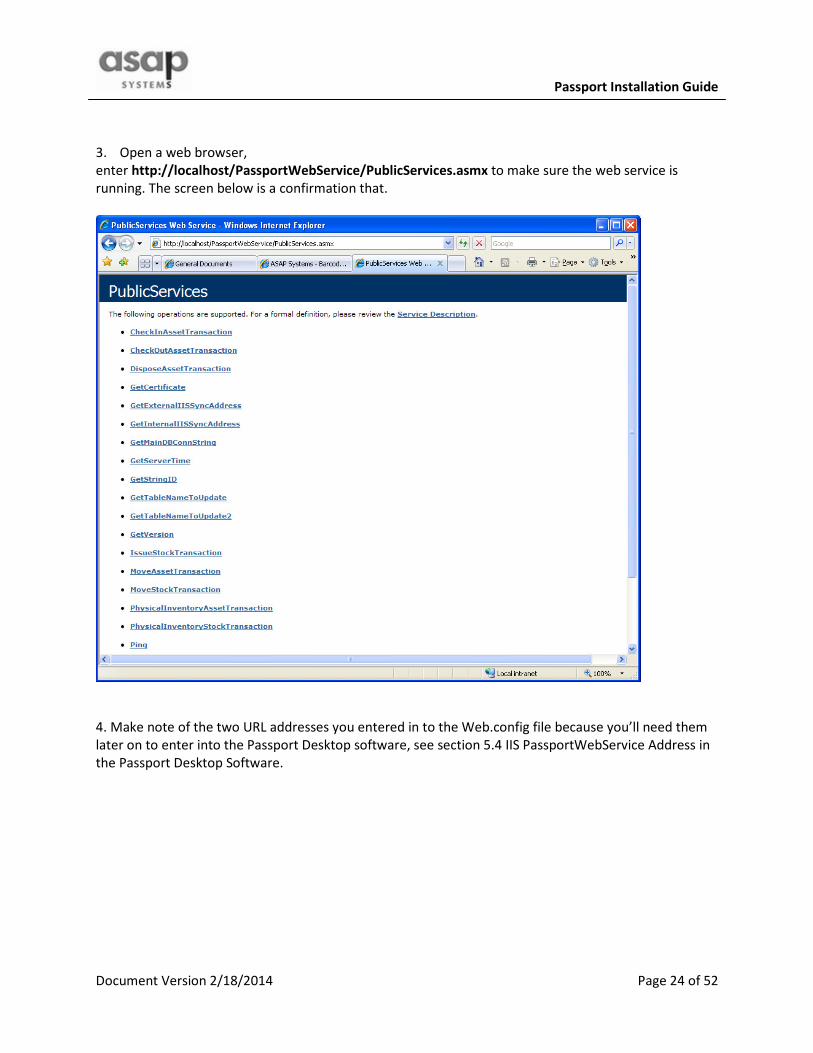
3. Open a web browser,
enter http://localhost/PassportWebService/PublicServices.asmx to make sure the web service is
running. The screen below is a confirmation that.
4. Make note of the two URL addresses you entered in to the Web.config file because you’ll need them
later on to enter into the Passport Desktop software, see section 5.4 IIS PassportWebService Address in
the Passport Desktop Software.
Page 25
Passport Installation Guide
Document Version 2/18/2014 Page 25 of 52
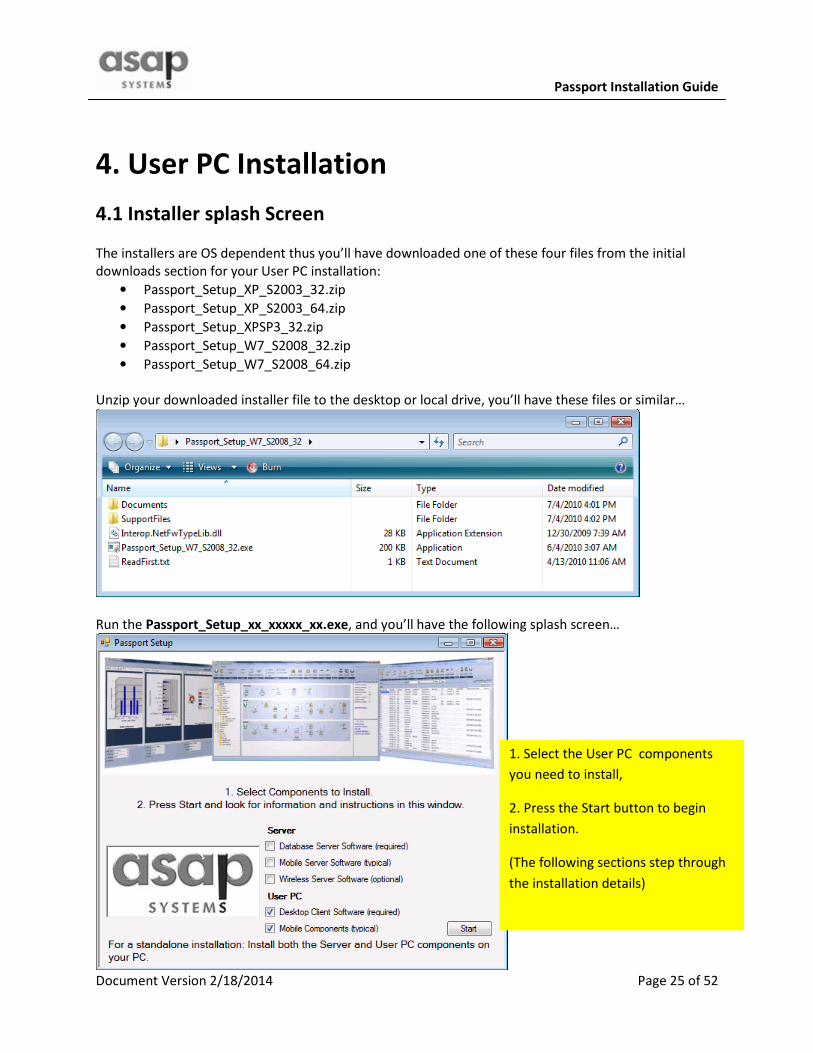
4. User PC Installation
4.1 Installer splash Screen
The installers are OS dependent thus you’ll have downloaded one of these four files from the initial
downloads section for your User PC installation:
• Passport_Setup_XP_S2003_32.zip
• Passport_Setup_XP_S2003_64.zip
• Passport_Setup_XPSP3_32.zip
• Passport_Setup_W7_S2008_32.zip
• Passport_Setup_W7_S2008_64.zip
Unzip your downloaded installer file to the desktop or local drive, you’ll have these files or similar…
Run the Passport_Setup_xx_xxxxx_xx.exe, and you’ll have the following splash screen…
1. Select the User PC components
you need to install,
2. Press the Start button to begin
installation.
(The following sections step through
the installation details)
Page 26
Passport Installation Guide
Document Version 2/18/2014 Page 26 of 52
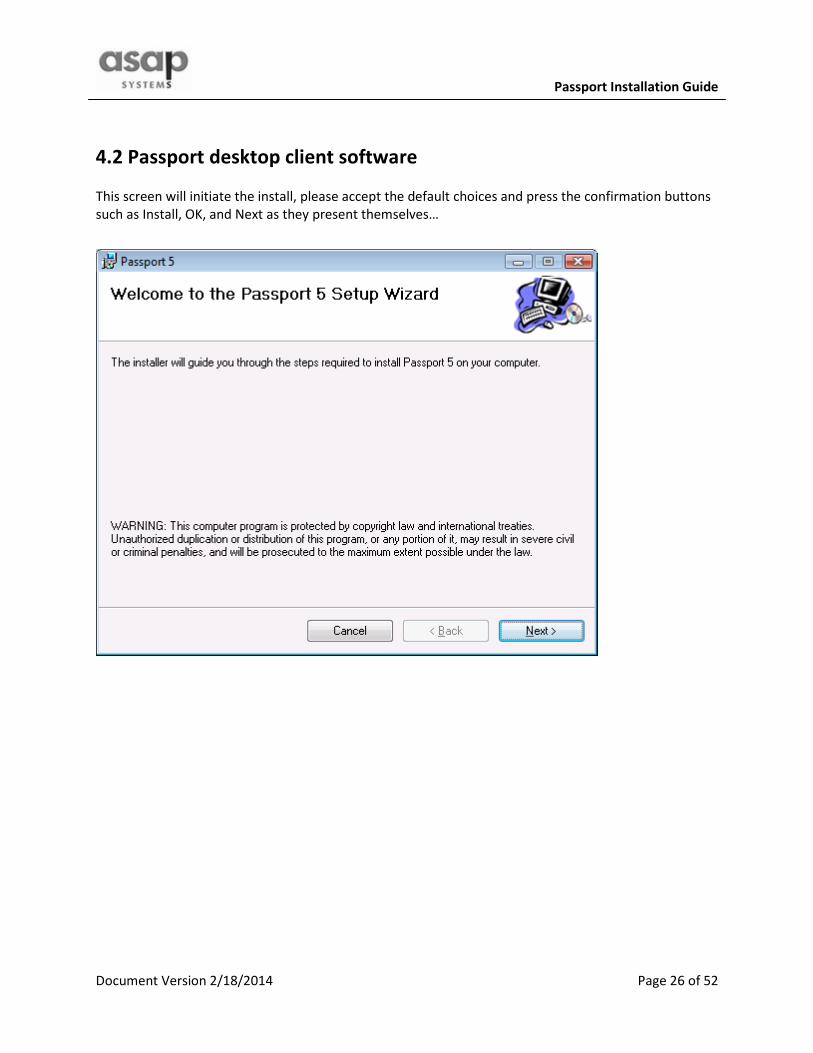
4.2 Passport desktop client software
This screen will initiate the install, please accept the default choices and press the confirmation buttons
such as Install, OK, and Next as they present themselves…
Page 27
Passport Installation Guide
Document Version 2/18/2014 Page 27 of 52
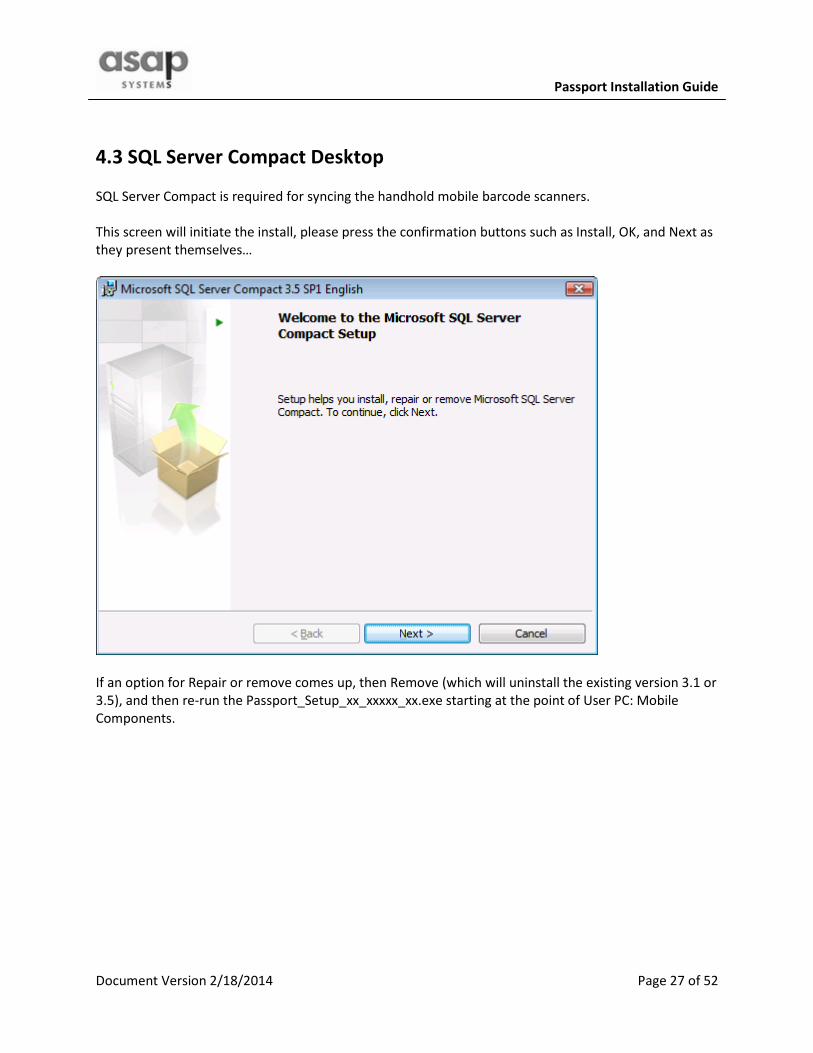
4.3 SQL Server Compact Desktop
SQL Server Compact is required for syncing the handhold mobile barcode scanners.
This screen will initiate the install, please press the confirmation buttons such as Install, OK, and Next as
they present themselves…
If an option for Repair or remove comes up, then Remove (which will uninstall the existing version 3.1 or
3.5), and then re-run the Passport_Setup_xx_xxxxx_xx.exe starting at the point of User PC: Mobile
Components.
Page 28
Passport Installation Guide
Document Version 2/18/2014 Page 28 of 52
4.4 License File
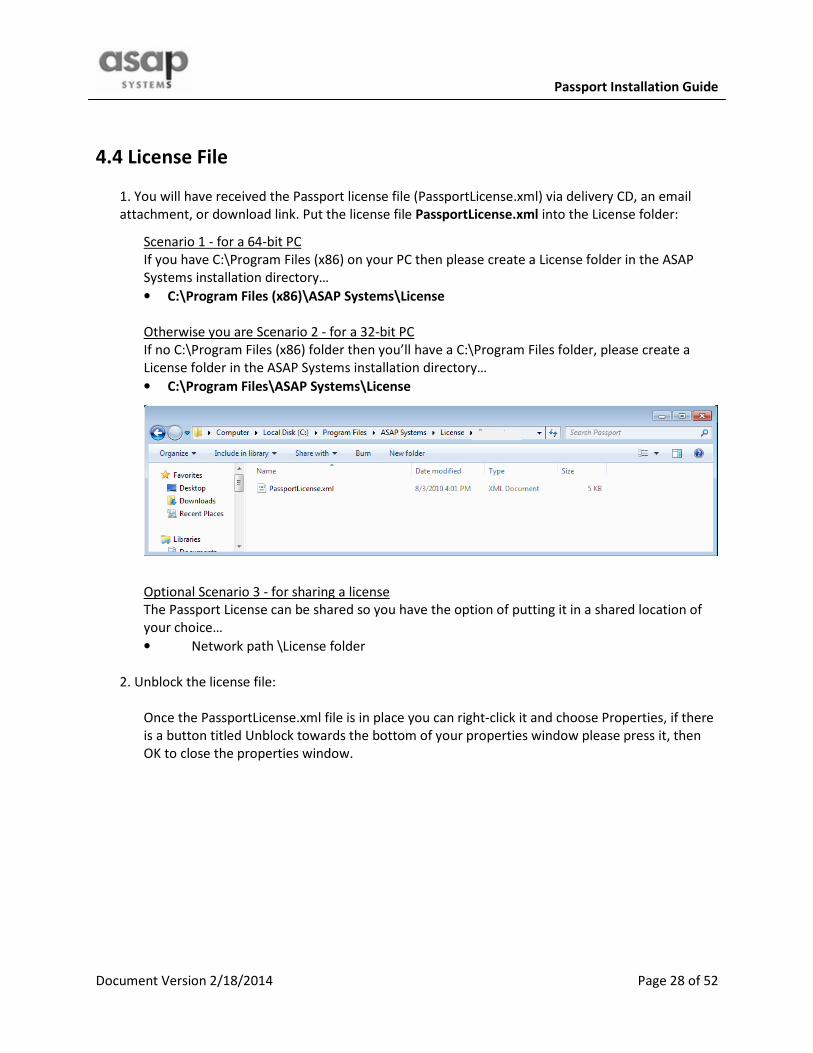
1. You will have received the Passport license file (PassportLicense.xml) via delivery CD, an email
attachment, or download link. Put the license file PassportLicense.xml into the License folder:
Scenario 1 - for a 64-bit PC
If you have C:\Program Files (x86) on your PC then please create a License folder in the ASAP
Systems installation directory…
• C:\Program Files (x86)\ASAP Systems\License
Otherwise you are Scenario 2 - for a 32-bit PC
If no C:\Program Files (x86) folder then you’ll have a C:\Program Files folder, please create a
License folder in the ASAP Systems installation directory…
• C:\Program Files\ASAP Systems\License
Optional Scenario 3 - for sharing a license
The Passport License can be shared so you have the option of putting it in a shared location of
your choice…
• Network path \License folder
2. Unblock the license file:
Once the PassportLicense.xml file is in place you can right-click it and choose Properties, if there
is a button titled Unblock towards the bottom of your properties window please press it, then
OK to close the properties window.
Page 29
Passport Installation Guide
Document Version 2/18/2014 Page 29 of 52
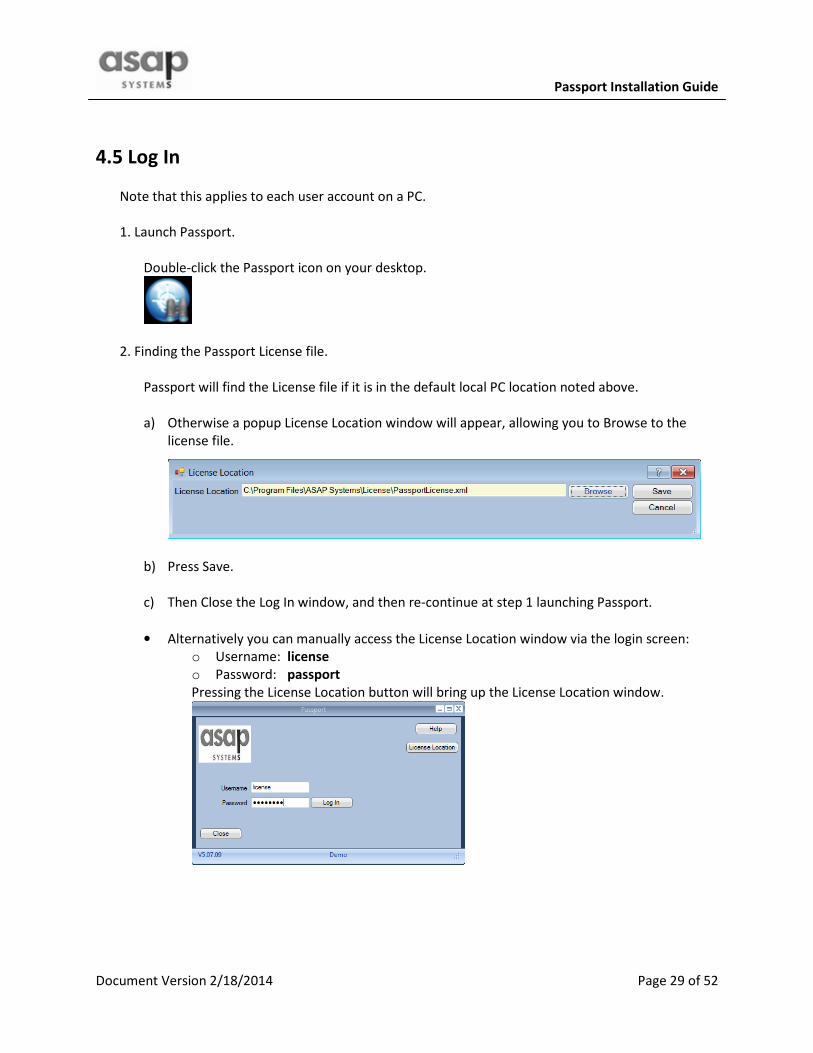
4.5 Log In
Note that this applies to each user account on a PC.
1. Launch Passport.
Double-click the Passport icon on your desktop.
2. Finding the Passport License file.
Passport will find the License file if it is in the default local PC location noted above.
a) Otherwise a popup License Location window will appear, allowing you to Browse to the
license file.
b) Press Save.
c) Then Close the Log In window, and then re-continue at step 1 launching Passport.
• Alternatively you can manually access the License Location window via the login screen:
o Username: license
o Password: passport
Pressing the License Location button will bring up the License Location window.
Page 30
Passport Installation Guide
Document Version 2/18/2014 Page 30 of 52
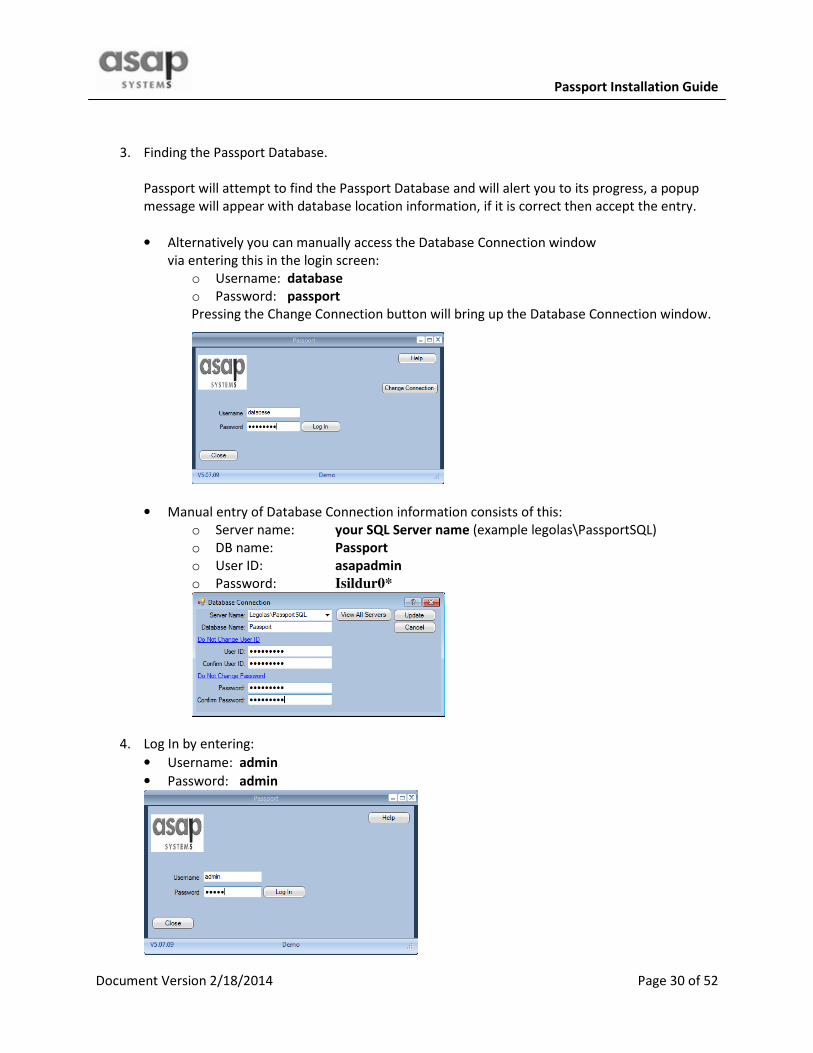
3. Finding the Passport Database.
Passport will attempt to find the Passport Database and will alert you to its progress, a popup
message will appear with database location information, if it is correct then accept the entry.
• Alternatively you can manually access the Database Connection window
via entering this in the login screen:
o Username: database
o Password: passport
Pressing the Change Connection button will bring up the Database Connection window.
• Manual entry of Database Connection information consists of this:
o Server name: your SQL Server name (example legolas\PassportSQL)
o DB name: Passport
o User ID: asapadmin
o Password: Isildur0*
4. Log In by entering:
• Username: admin
• Password: admin
Page 31
Passport Installation Guide
Document Version 2/18/2014 Page 31 of 52
5. Mobile Barcode Scanner Install
5.1 Install Microsoft ActiveSync 4.5 (XP Only)
Windows Vista and 7 do not need ActiveSync installed because they have a built-in equivalent called
Windows Mobile Device Center. The next section 5.2 addresses that.
Download the ActiveSync 4.5 installer from Microsoft:
Go to www.microsoft.com/downloads and then search for ActiveSync 4.5, the installer file is titled
setup.msi
Upon completion of the install, your PC will need to be restarted.
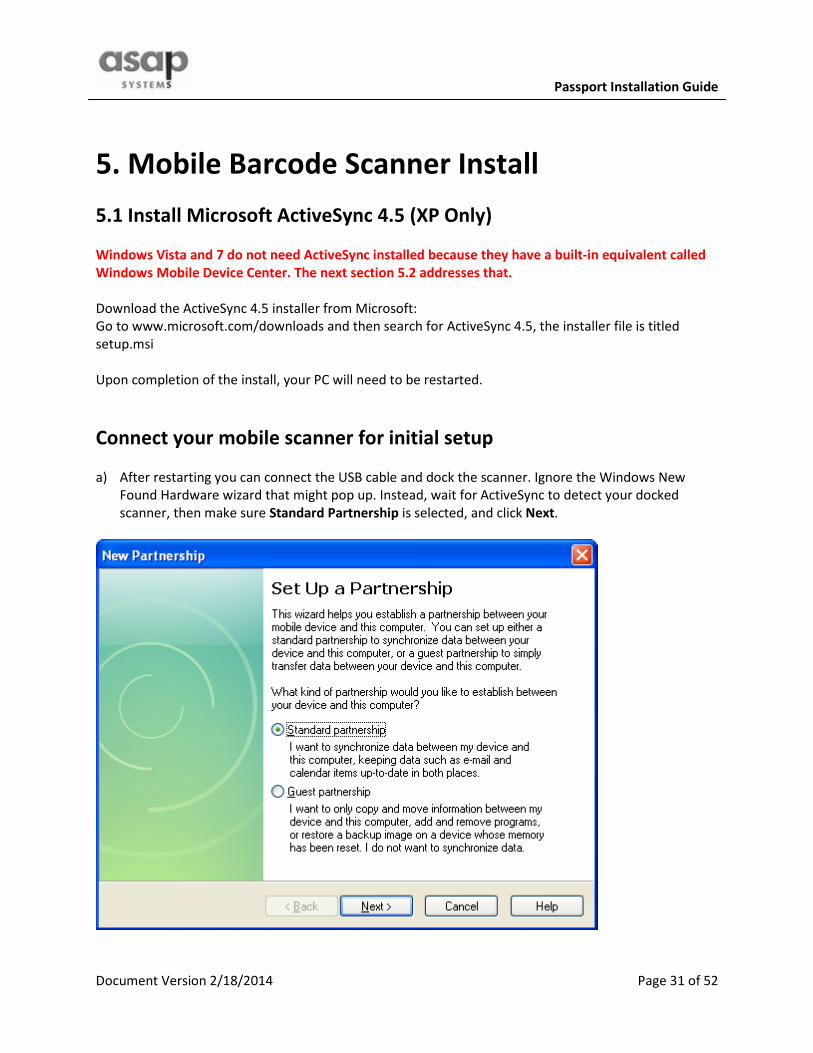
Connect your mobile scanner for initial setup
a) After restarting you can connect the USB cable and dock the scanner. Ignore the Windows New
Found Hardware wizard that might pop up. Instead, wait for ActiveSync to detect your docked
scanner, then make sure Standard Partnership is selected, and click Next.
Page 32
Passport Installation Guide
Document Version 2/18/2014 Page 32 of 52
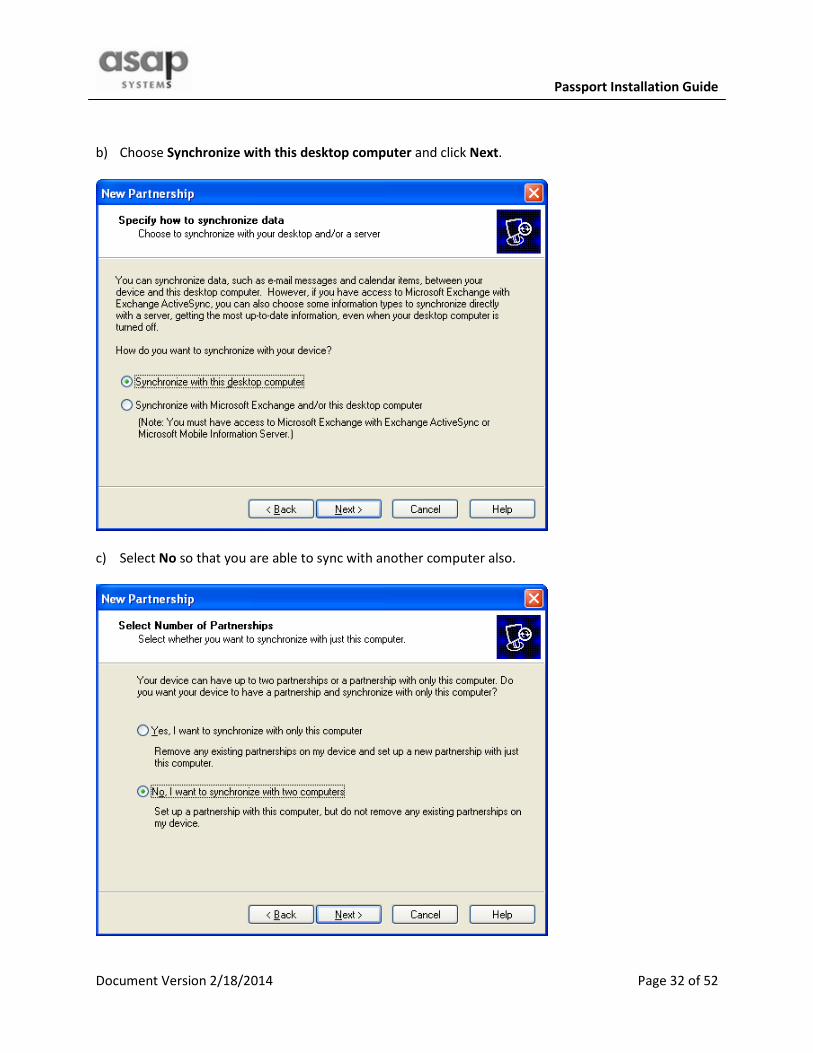
b) Choose Synchronize with this desktop computer and click Next.
c) Select No so that you are able to sync with another computer also.
Page 33
Passport Installation Guide
Document Version 2/18/2014 Page 33 of 52
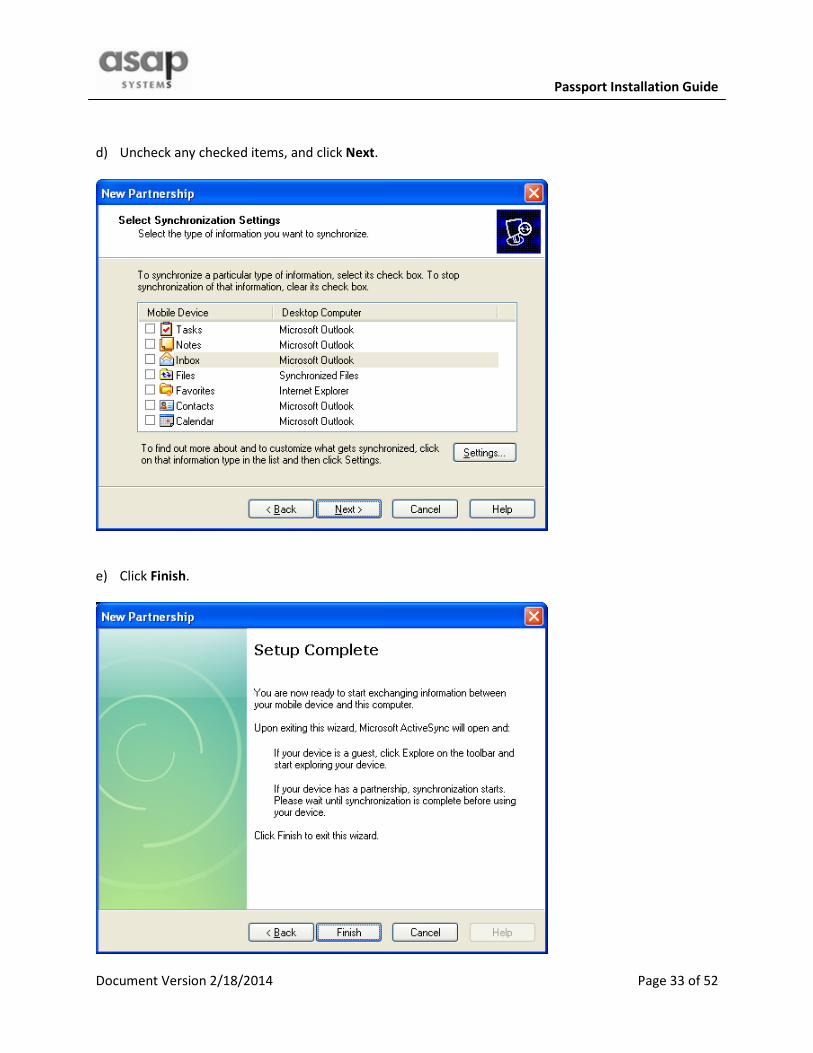
d) Uncheck any checked items, and click Next.
e) Click Finish.
Page 34
Passport Installation Guide
Document Version 2/18/2014 Page 34 of 52
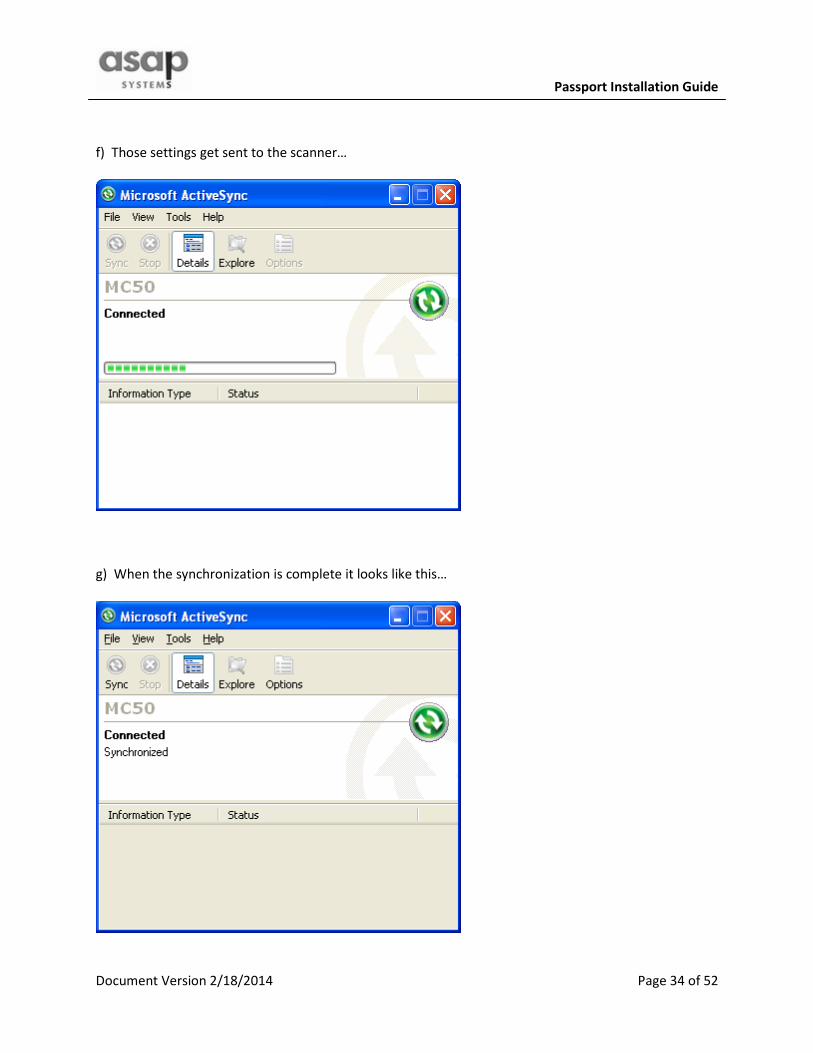
f) Those settings get sent to the scanner…
g) When the synchronization is complete it looks like this…
Page 35
Passport Installation Guide
Document Version 2/18/2014 Page 35 of 52
5.2 Configure Windows Mobile Device Center (Vista and 7)
1. Upon initial docking of your Motorola mobile device, Windows will automatically install drivers which
takes a few minutes. Once completed the Windows Mobile Device Center window will appear.
2. Choose to Set up your device:
• Uncheck all items listed to be synced because Passport does not use any of these items,
• You won’t be connecting to a Microsoft Exchange server,
• You don’t need a shortcut icon on your desktop.
4. Note that you’ll need to repeat that process for other user accounts on the PC
5. On subsequent docking of the mobile device the Microsoft Sync Center will activate confirming that
you are ready to proceed.
Page 36
Passport Installation Guide
Document Version 2/18/2014 Page 36 of 52
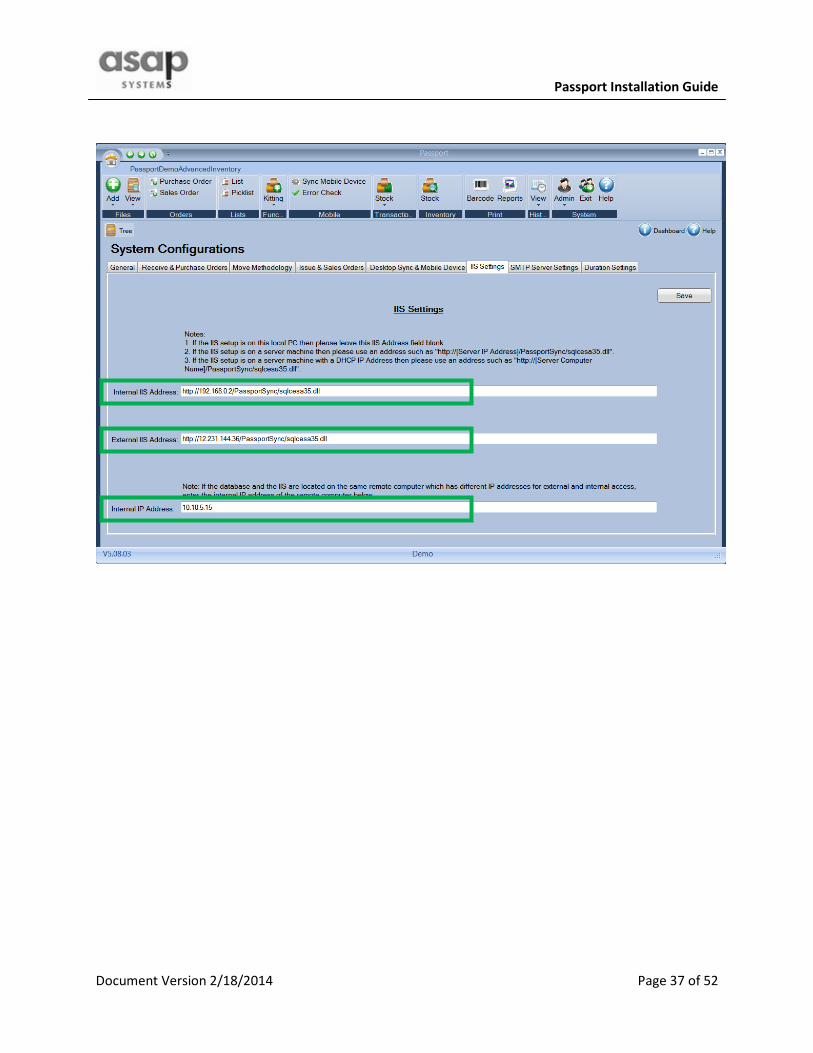
5.3 IIS PassportSync Address in the Passport Desktop Software
Log in to the Passport Desktop software at the admin level and go to…
Admin > System Configuration > IIS Settings tab.
Please reference the screenshot on the next page.
1. Enter an Internal IIS Address as per your installation scenario below:
Scenario 1 – If you have a standalone PC installation then you can leave the IIS Address field
blank.
Scenario 2 - In an intranet-networked installation, if the IIS and the SQL Server Compact Server
Tools are installed on a Server machine with a static IP address then enter this into
the IIS Address field…
http://[server ip address]/PassportSync/sqlcesa35.dll
Scenario 3 - In an intranet-networked installation, if the IIS and the SQL Server Compact Server
Tools are installed on a Server machine with a dynamic IP address then enter this
into the IIS Address field…
http://[server computer name]/PassportSync/sqlcesa35.dll
2. Enter an External IIS Address if you will have laptops and PCs outside of your intranet that are not
connecting to your intranet via VPN, or if the Passport Database/IIS/SQL Server Compact Server Tools is
externally hosted then the same situation applies.
• Note that if you do not have any intranet-networked laptops and PCs then you can go ahead
and enter this external IIS Address into the internal IIS Address field above. In other words
the internal IIS address has first priority and external IIS address field has second priority for
the connection attempts.
3. Enter an Internal IP Address if you entered an external IIS address in #2 above. This typically means
that you’ll do port forwarding of the traffic that hits the external IP address in #2 above to a server
machine which will have its own IP address relative to the internal network it is on, and that is the
Internal IP Address that needs to be entered here.
• Please check your router’s NAT settings to guarantee that the outbound traffic IP address
matches the incoming external IP address of #2 above.
4. Press the Save button to save your entry.
Page 37
Passport Installation Guide
Document Version 2/18/2014 Page 37 of 52
Page 38
Passport Installation Guide
Document Version 2/18/2014 Page 38 of 52
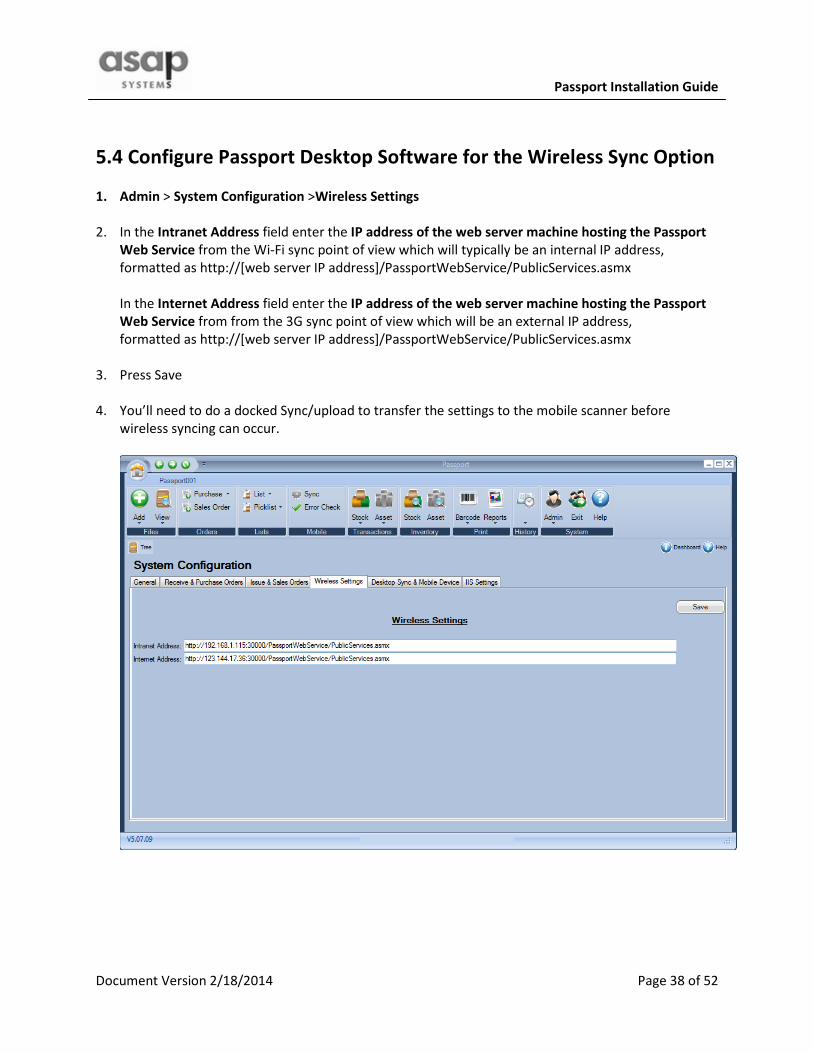
5.4 Configure Passport Desktop Software for the Wireless Sync Option
1. Admin > System Configuration >Wireless Settings
2. In the Intranet Address field enter the IP address of the web server machine hosting the Passport
Web Service from the Wi-Fi sync point of view which will typically be an internal IP address,
formatted as http://[web server IP address]/PassportWebService/PublicServices.asmx
In the Internet Address field enter the IP address of the web server machine hosting the Passport
Web Service from from the 3G sync point of view which will be an external IP address,
formatted as http://[web server IP address]/PassportWebService/PublicServices.asmx
3. Press Save
4. You’ll need to do a docked Sync/upload to transfer the settings to the mobile scanner before
wireless syncing can occur.
Page 39
Passport Installation Guide
Document Version 2/18/2014 Page 39 of 52
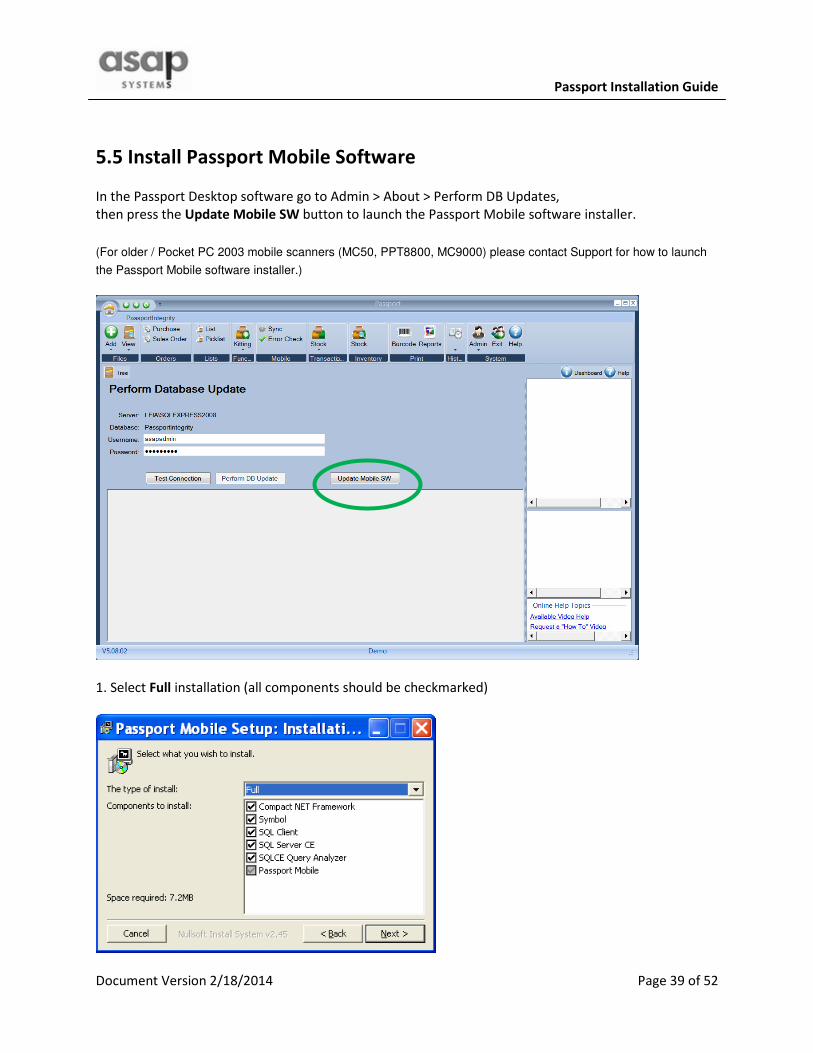
5.5 Install Passport Mobile Software
In the Passport Desktop software go to Admin > About > Perform DB Updates,
then press the Update Mobile SW button to launch the Passport Mobile software installer.
(For older / Pocket PC 2003 mobile scanners (MC50, PPT8800, MC9000) please contact Support for how to launch
the Passport Mobile software installer.)
1. Select Full installation (all components should be checkmarked)
Page 40
Passport Installation Guide
Document Version 2/18/2014 Page 40 of 52
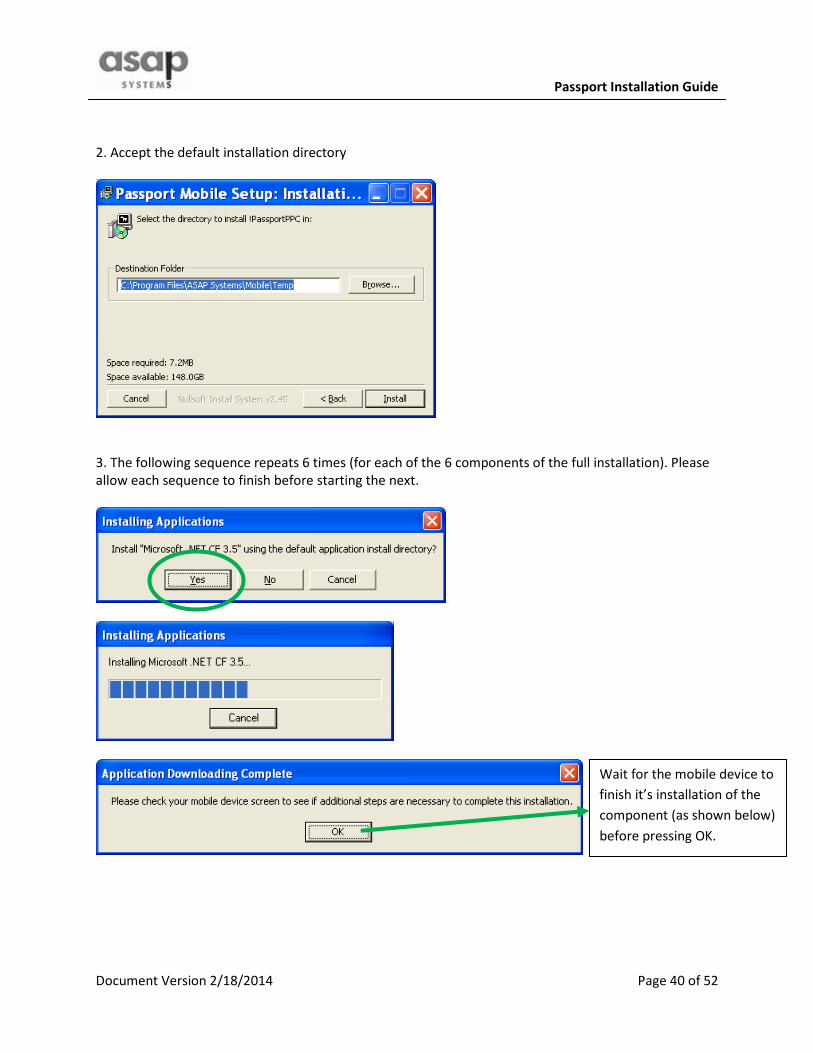
2. Accept the default installation directory
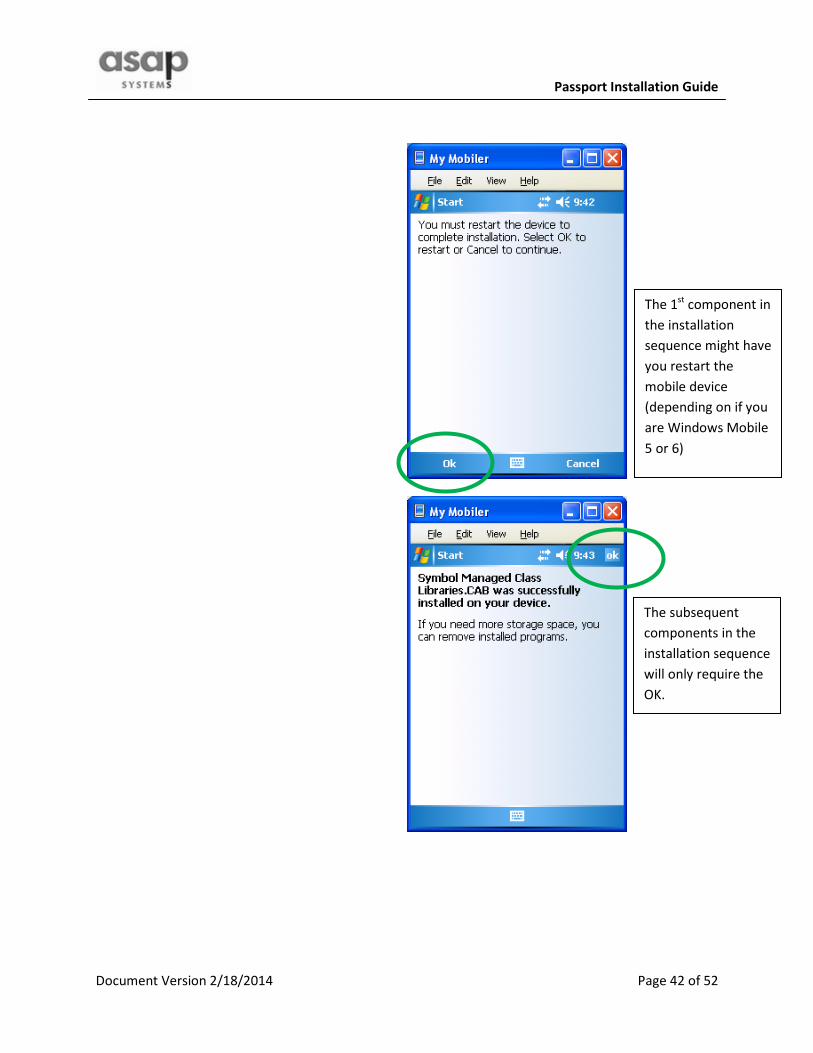
3. The following sequence repeats 6 times (for each of the 6 components of the full installation). Please
allow each sequence to finish before starting the next.
Wait for the mobile device to
finish it’s installation of the
component (as shown below)
before pressing OK.
Page 41
Passport Installation Guide
Document Version 2/18/2014 Page 41 of 52
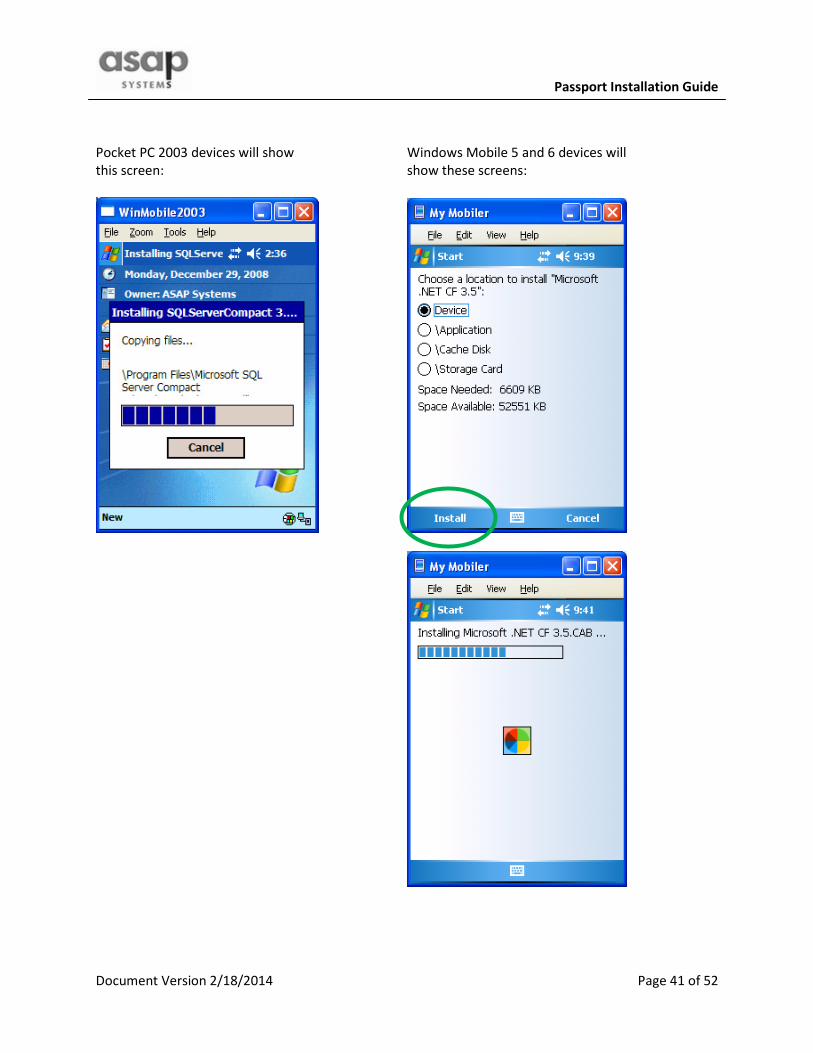
Pocket PC 2003 devices will show Windows Mobile 5 and 6 devices will
this screen: show these screens:
Page 42
Passport Installation Guide
Document Version 2/18/2014 Page 42 of 52
The 1st
component in
the installation
sequence might have
you restart the
mobile device
(depending on if you
are Windows Mobile
5 or 6)
The subsequent
components in the
installation sequence
will only require the
OK.
Page 43
Passport Installation Guide
Document Version 2/18/2014 Page 43 of 52
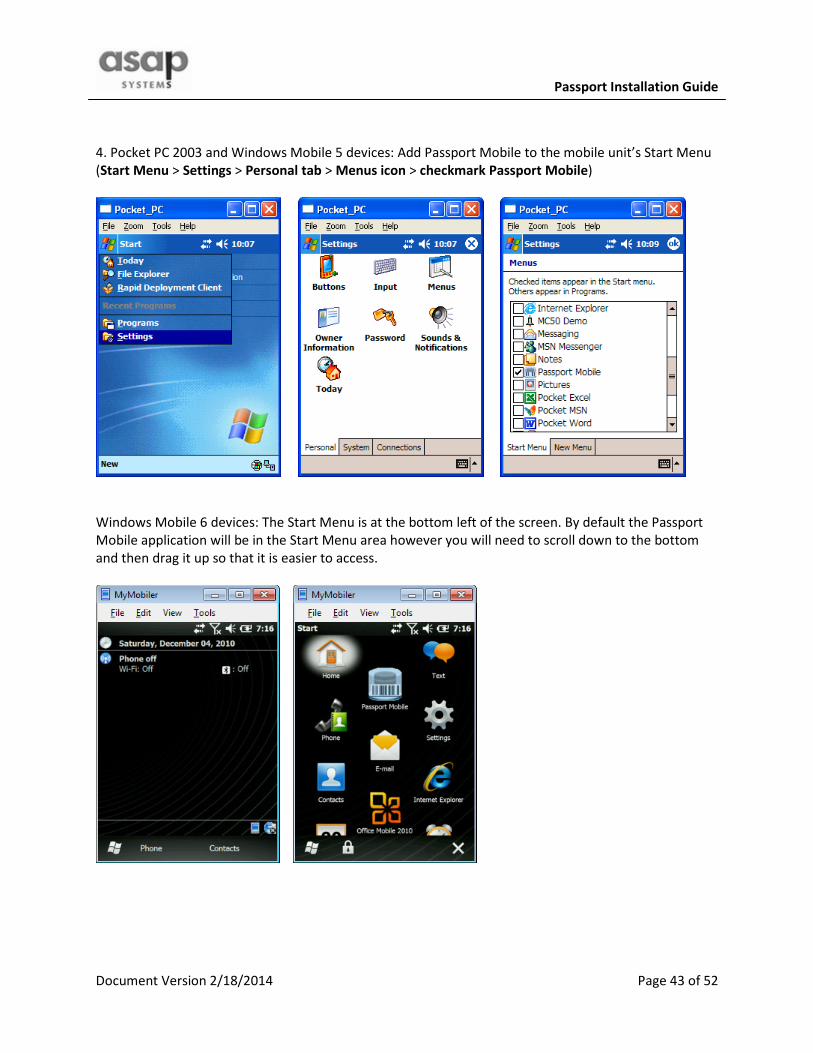
4. Pocket PC 2003 and Windows Mobile 5 devices: Add Passport Mobile to the mobile unit’s Start Menu
(Start Menu > Settings > Personal tab > Menus icon > checkmark Passport Mobile)
Windows Mobile 6 devices: The Start Menu is at the bottom left of the screen. By default the Passport
Mobile application will be in the Start Menu area however you will need to scroll down to the bottom
and then drag it up so that it is easier to access.
Page 44
Passport Installation Guide
Document Version 2/18/2014 Page 44 of 52
5.6 Sync the Mobile Device
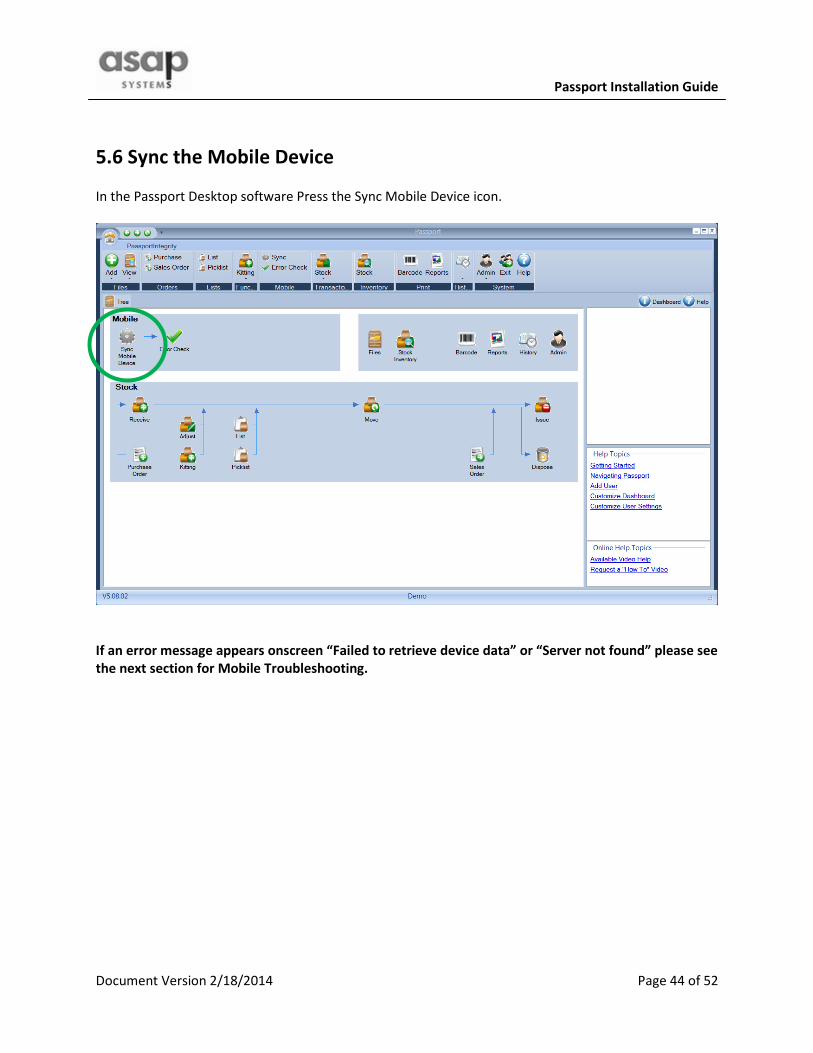
In the Passport Desktop software Press the Sync Mobile Device icon.
If an error message appears onscreen “Failed to retrieve device data” or “Server not found” please see
the next section for Mobile Troubleshooting.
Page 45
Passport Installation Guide
Document Version 2/18/2014 Page 45 of 52
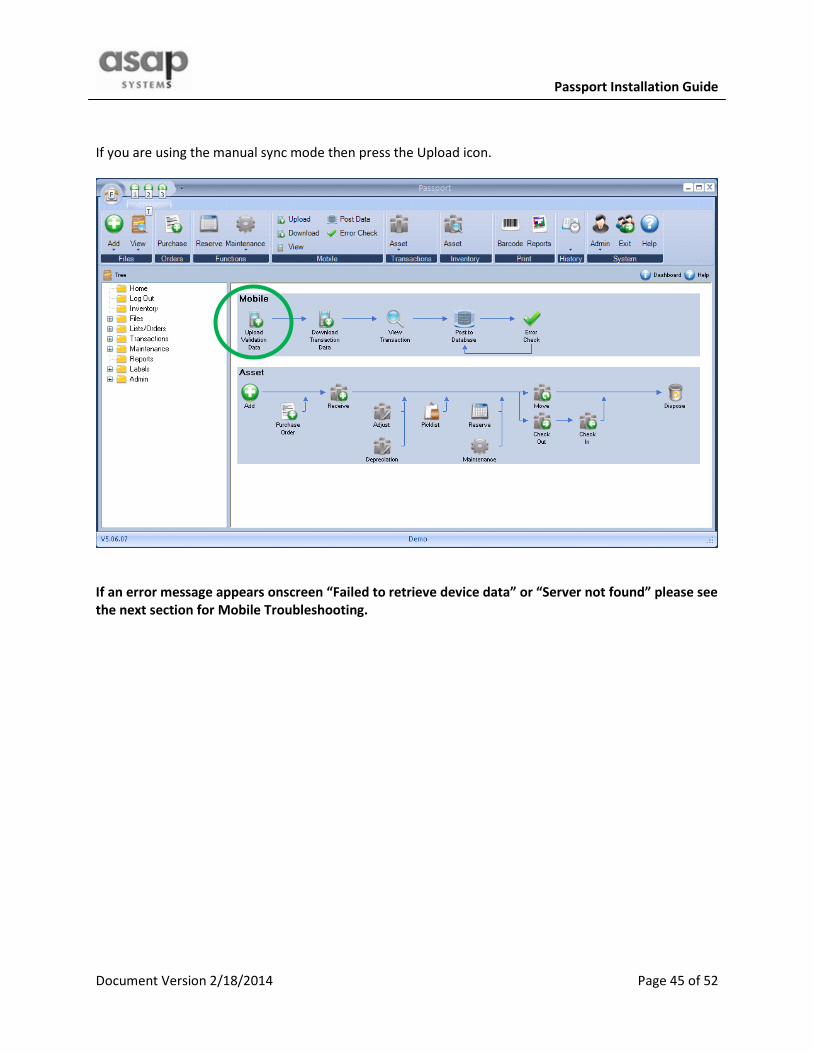
If you are using the manual sync mode then press the Upload icon.
If an error message appears onscreen “Failed to retrieve device data” or “Server not found” please see
the next section for Mobile Troubleshooting.
Page 46
Passport Installation Guide
Document Version 2/18/2014 Page 46 of 52
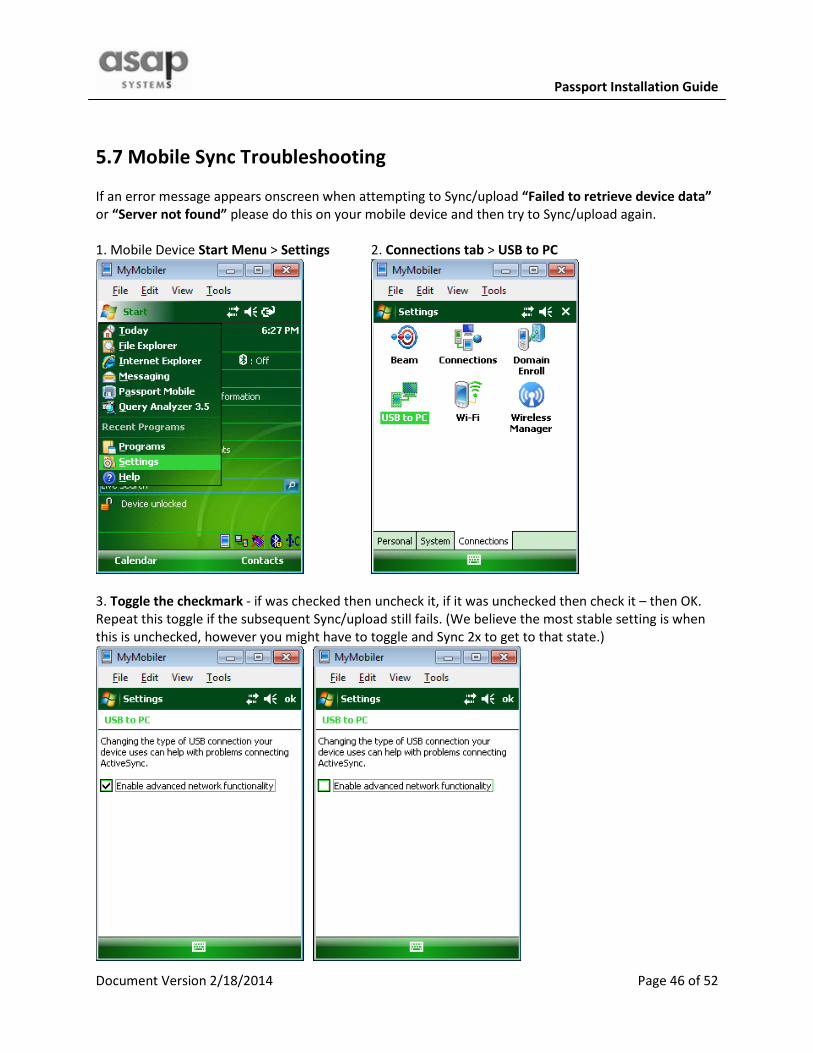
5.7 Mobile Sync Troubleshooting
If an error message appears onscreen when attempting to Sync/upload “Failed to retrieve device data”
or “Server not found” please do this on your mobile device and then try to Sync/upload again.
1. Mobile Device Start Menu > Settings 2. Connections tab > USB to PC
3. Toggle the checkmark - if was checked then uncheck it, if it was unchecked then check it – then OK.
Repeat this toggle if the subsequent Sync/upload still fails. (We believe the most stable setting is when
this is unchecked, however you might have to toggle and Sync 2x to get to that state.)
Page 47
Passport Installation Guide
Document Version 2/18/2014 Page 47 of 52
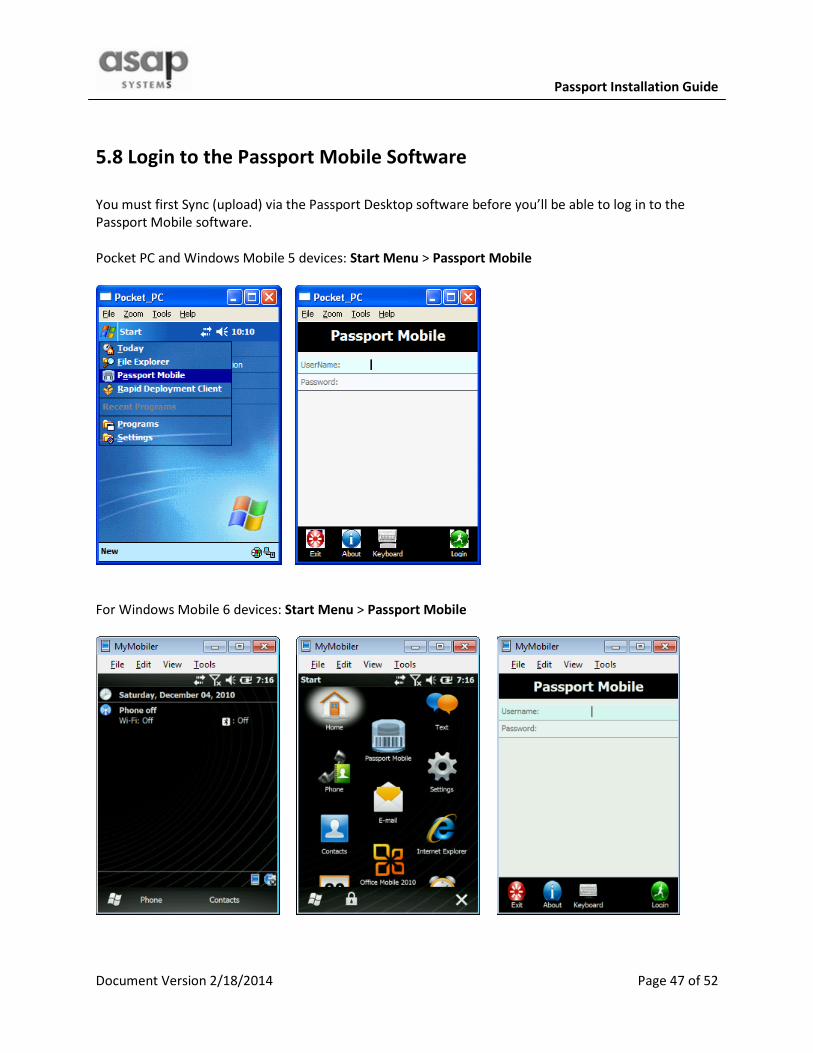
5.8 Login to the Passport Mobile Software
You must first Sync (upload) via the Passport Desktop software before you’ll be able to log in to the
Passport Mobile software.
Pocket PC and Windows Mobile 5 devices: Start Menu > Passport Mobile
For Windows Mobile 6 devices: Start Menu > Passport Mobile
Page 48
Passport Installation Guide
Document Version 2/18/2014 Page 48 of 52
6. Zebra Barcode Label Printer Installation
Background: Your Passport system prints to Zebra Technologies thermal barcode label printers. Your
Zebra printer is similar to any standard Windows printer in that it connects to your PC via USB cable or
network via Ethernet cable (for network-ready printers). You need to install a Zebra printer driver so
that the printer shows up in your Control Panel > Printers and Faxes (XP), or Control Panel > Printers
(Vista), or Control Panel > Devices and Printers (7).
6.1 Driver Installation
The print driver must be installed while logged in as the Administrator and not just a user who has
administrator rights.
You can use the drivers from the Zebra Install CD that was delivered with your Zebra printer, or you can
download from the Zebra website.
• Zebra Install CD drivers: Insert the Zebra Install CD into the CD drive and the splash screen should
appear automatically. Choose to install Windows drivers, then follow the install wizard for your
particular model.
You can ignore the Windows Found New Hardware Wizard when it pops up during the driver install.
• Zebra website drivers: There is typically more than one download choice so make sure to choose
ZD1452Certified which will have a description such as this: Zebra Designer Driver (32 bit/64 bit,
Windows Certified)
Once the driver is installed you can plug in and power up the Zebra printer, the Windows Found
New Hardware Wizard will kick in and you’ll choose to Install the software automatically
(recommended).
In rare cases the Zebra driver does not work as expected, i.e. barcodes are not printing properly, and
you’ll need to try drivers from:
www.seagullscientific.com
www.nicelabel.com
Page 49
Passport Installation Guide
Document Version 2/18/2014 Page 49 of 52
6.2 Network Installation
When the network-ready Zebra printer is connected to your Ethernet network it will be assigned an IP
address by the (DHCP) network. With the IP address you can use a web browser to access the printer,
the point being that you can choose to View Printer Configuration where at the bottom of the page you
can press the Print Test Page button which confirms that you can connect to the printer through its
Ethernet port and the printer is working.
If it is not known what the IP address of the printer is then you can do either of these to get the IP
address of the printer…
• Print a network/configuration settings printout from the Zebra barcode label printer which
includes the network-provided (DHCP) IP address. Depending on the printer model you’ll
need to navigate via the printer’s display screen and menu buttons to accomplish this.
• Install the ZebraNet Print Server software (from the Zebra CD) on a PC, then Run ZebraNet
View (in multicast mode). Your Zebra printer(s) with their IP addresses will be listed once
the ZebraNet View software utility finds them on your network
Once the IP address is known you Add A Printer in your Control Panel > Printer and Faxes (XP) or Control
Panel > Printers (Vista). The key to this is that you will be adding a local / LPT printer. It may ask for the
printer driver and it is on the CD, when the window pops up it usually defaults to the root of the CD and
there is a file listed that would be the one to select. Once the LPT printer (such as Zebra TLP2844-Z) is in
your Printers area you choose Properties for it, and on the Ports tab you configure it correctly with its IP
address.
Once that is done you will be able to use Passport to print barcode labels.
6.3 Printer Properties
Depending on the method of printer driver installation, you may or may not have entered your label size
as part of the driver installation. In any case it is necessary to check the printer properties for the
preferred label size and the default label size. Instructions are available on our downloads page in the
FAQ area, and at this link:
www.asapsystems.com/instructions/FAQ_Zebra_Barcode_Label_Printer_Properties.pdf
Page 50
Passport Installation Guide
Document Version 2/18/2014 Page 50 of 52
6.4 Calibration
Upon initial delivery and each time after changing labels to a different size, do a calibration in order to
print labels correctly:
• Zebra TLP2844-Z barcode label printer calibration:
Instructions available on our downloads page in the FAQ area, and at this link:
www.asapsystems.com/instructions/FAQ_LP_TLP2844-Z_Calibration.pdf
Basic instructions for Auto Calibration “4-flash sequence”
1. Load the labels and ribbon and close the printer cover.
2. Turn on the printer power.
3. Allow the printer to feed or error out.
4. Press and hold the feed button until after the four flash sequence. For example the green
status LED flashes once, then twice, then three flashes, then four flashes. Release the feed
button.
6. The printer will set the media sensor for the label backing being used and then automatically
feed until a label is positioned at the print head.
7. Upon completion, the printer will save the new settings in memory and the printer is ready
for normal operation.
8. Press the feed button. One entire blank label will feed.
In some circumstances the Manual Calibration “2-flash sequence” might be needed.
• Zebra GK420t barcode label printer calibration:
Instructions available on our downloads page in the FAQ area, and at this link:
www.asapsystems.com/instructions/FAQ_GK420d_t_Calibration.pdf
Basic instructions for Standard Calibration “2-flash sequence”
1. Load the labels and ribbon and close the printer cover.
2. Turn on the printer power.
3. Allow the printer to feed or error out.
4. Press and hold the feed button until after the two flash sequence. For example the green
status LED flashes once, then twice. Release the feed button.
6. The printer will set the media sensor for the label backing being used and then automatically
feed until a label is positioned at the print head.
7. Upon completion, the printer will save the new settings in memory and the printer is ready
for normal operation.
8. Press the feed button. One entire blank label will feed.
In some circumstances the Manual Calibration “7-flash sequence” might be needed.
Page 51
Passport Installation Guide
Document Version 2/18/2014 Page 51 of 52
APPENDIX A: MS SQL Server Settings
SQL Server 2008 ___________________________________________________________________
Mixed-Mode & Remote Connections
Start Menu > All Programs > Microsoft SQL Server 2008 > SQL Server Management Studio
In the Object Explorer pane,
right-click your named SQL Server,
select Properties,
select the Security page,
• the Server Authentication should be SQL Server and Windows Authentication Mode.
select the Connections page,
• the Remote Server Connections should have a checkmark for Allow remote connections to
the server.
Browser Service & TCP/IP Protocols
Continuing from above, in the Registered Servers pane,
right-click your named SQL Server,
select SQL Server Configuration Manager,
In the left pane select SQL Server Services,
• the SQL Server Browser State should be Running.
• the SQL Server Browser Start Mode should be Automatic,
In the left pane select SQL Server Network Configuration,
then Protocols for your named database engine
• TCP/IP should be Enabled
In the left pane select SQL Native Client 10.0 Configuration,
then Client Protocols
• TCP/IP should be Enabled
Page 52
Passport Installation Guide
Document Version 2/18/2014 Page 52 of 52
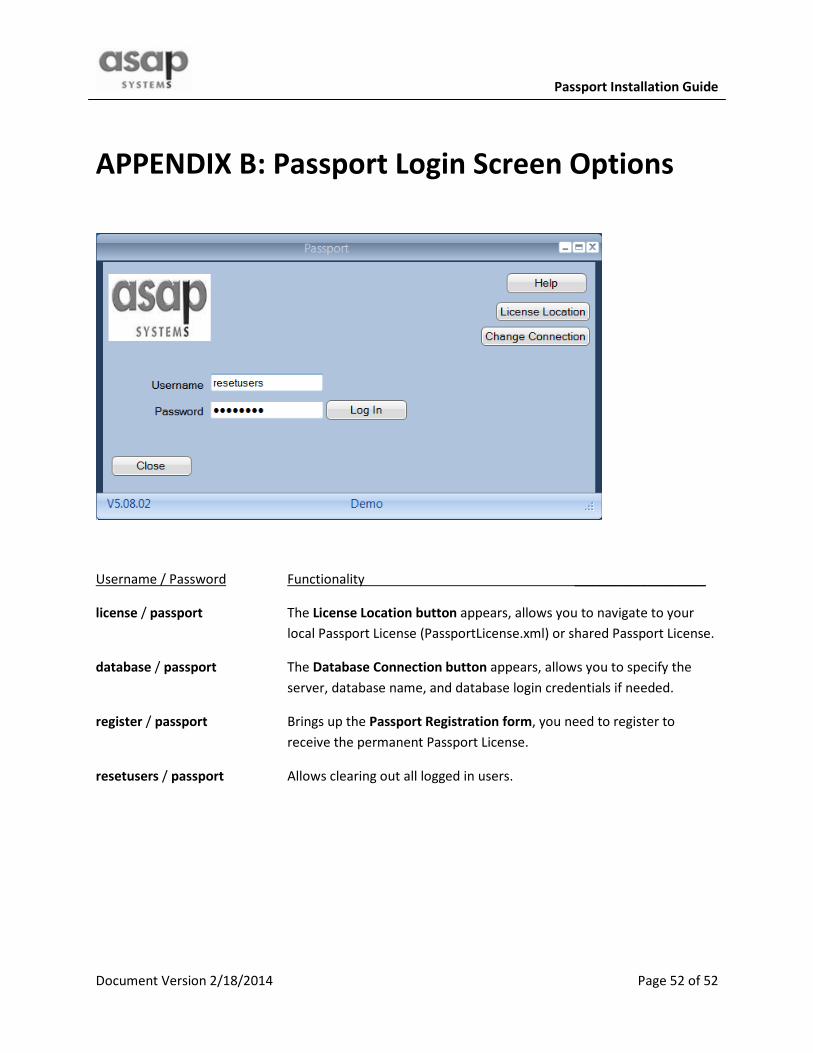
APPENDIX B: Passport Login Screen Options
Username / Password Functionality __________________
license / passport The License Location button appears, allows you to navigate to your
local Passport License (PassportLicense.xml) or shared Passport License.
database / passport The Database Connection button appears, allows you to specify the
server, database name, and database login credentials if needed.
register / passport Brings up the Passport Registration form, you need to register to
receive the permanent Passport License.
resetusers / passport Allows clearing out all logged in users.