24
1 Patient Discharge Guide to Total Knee Replacement Orthopedic and Spine Unit Norman Regional HealthPlex (405) 515-3700 3300 HealthPlex Parkway Norman, OK 73072

1
Patient Discharge Guide to Total Knee Replacement
Orthopedic and Spine Unit Norman Regional HealthPlex
(405) 515-3700 3300 HealthPlex Parkway
Norman, OK 73072

2
Knee Replacement: Aftercare at Home
When you are discharged, your healthcare team will provide you with information to
support your recovery at home. Although the complication rate after total knee
replacement is low, when complications occur they can prolong or limit full recovery.
Here are some tips on managing pain as well the warning signs of an infection and blood
clots to watch for and report to your physician.
Managing Your Pain
Pain medication will be prescribed for you; with pain under control, you’ll be able to get
back to an active life sooner. Use pain medication only as directed, taking each dose
before pain becomes severe; plan ahead by taking pain medication an hour prior to
physical therapy or strenuous activities such as bathing. Tell your health care provider if
the medication does not adequately control your pain, or if you suddenly feel worse. All
pain medications are constipating; be sure to drink 6-8 glasses of water daily, unless your
physician instructs you otherwise. A daily stool softener is recommended and use of
laxative if it has been more then 2 days since your last bowel movement.
Warning Signs of Infection
Notify physician if you have any of the following symptoms.
Persistent fever (greater than 101.5 degrees)
Shaking chills
Increasing redness, heat, tenderness or swelling of your wound
Yellow or green drainage from your wound
Increasing pain with both activity and rest
Warning Signs of a Blood Clot
Take your blood thinners as prescribed. If unable to get prescriptions, notify your
physician. Notify physician if you have any of the following symptoms.
Blood clots can occur in the operative leg as well as non operative leg.
Pain or tenderness in your leg or calf unrelated to your incision.
Tenderness or redness above or below your knee
Severe swelling of your thigh, calf, ankle or foot
In very rare cases, a blood clot may travel to your lungs and become life-threatening.
Seek medical attention immediately if you develop any of the following symptoms.
Shortness of breath
Sudden onset of chest pain
Localized chest pain with coughing
Never place a pillow under your operative knee, doing so will increase your risk of
developing a blood clot as well as lead to the shortening of the muscle and connective
tissues limiting the ability to fully straighten your knee.

3
Acetaminophen, frequently known as Tylenol® is found in many post-operative knee
replacement pain medicines. Acetaminophen may be combined with a narcotic medicine
to increase its effectiveness. Examples of these medicines include Norco®, Lortab®,
Percocet®. Additionally, many over-the-counter (OTC) medicines also contain
acetaminophen. These medicines include sleep aids, fever reducers, pain relievers, as
well as cold and allergy medicines.
It’s important to know that while acetaminophen is safe and effective when used as
directed, there is a limit to how much can be taken in one day: 4,000 milligrams (mg)
daily limit for most adults. Taking more acetaminophen than directed is an overdose
and can lead to liver damage or even cause death.
It is important to always read and follow medication labels. Please note that when
checking labels acetaminophen may also be list as Tylenol®, APAP® or Acetam®). To help you take acetaminophen safely, please follow medication labels and avoid
making these common acetaminophen dosing mistakes:
Medication Precautions
To consider after Total Knee Replacement.

4
Total Knee Replacement Exercise Guide
Regular exercise to restore your normal knee motion and strength and a gradual return to
everyday activities are an important part in your full recovery. These exercises are important for increasing circulation to your legs and feet in order to prevent blood clots
and decrease swelling. These exercises also are important to strengthen muscles and improve your knee movement.
You will begin these exercises the day after surgery. It may feel uncomfortable at first, but these exercises will speed your recovery and help reduce your post-operative pain.
Your orthopedic surgeon and physical therapist recommend that you continue to perform this exercise program twice a day (once in the morning and once in afternoon/evening) at
home during your early recovery.
It is important to keep legs elevated to continue to decrease swelling and improve circulation. Do not sit with feet on the floor for more than 30 minutes at a time.
Change positions frequently, do not sit still too long. It is better to get up more often for
short periods then to wait and get up less, but for longer periods.
Do not forget to apply ice to your knee for no more then 15min following each exercise session.
Please do these exercises _40_ Times each Twice daily.
If you have any questions once you are home, please feel free to contact the Physical Therapy Department at 515-1712
Norman Regional HealthPlex
Total Joint Replacement Program

5
1. Ankle Pumps
Gently “pump” both ankles up and down, so that your toes point
first up and toward you, then down.
2. Ankle Circles
Circle foot clockwise. Circle foot counter clockwise.

6
3. Terminal Knee Extension
With a towel rolled under your heel, push your knee into the bed
with your legs straight hold for five seconds, relax and repeat.
4. Heel Slides
Slide your heel up toward your body by bending your knee. Keep
your heel in contact with the bed. You may place a plastic bag or
cookie sheet under one foot to help it slide (Figure 1) and use a bed
sheet or dog leash around your foot to aid in bending your knee.
(Figure 2)
(Figure 1)
(Figure 2)

7
5. Hip Abduction
With your knee straight and keeping your toes pointed toward the
ceiling. Slide your leg out to the side as far as possible then back
in. Do not cross midline of the body.
6. Straight Leg Raises
Straighten leg as much as possible by tightening the muscles on
top of your thigh, Raise your heel approximately 4 inches, relax
and repeat. Remember to keep your leg straight during this
exercise.

8
7. Short Arc Quads
Place a rolled towel or blanket roll under your knee. Raise the
lower part of your leg until your knee is straight. Lower your foot,
relax and repeat.
8. Long Arc Quads
While sitting, fully straighten your operative leg, relax and repeat.

9
9. Ham Set – Sitting
While sitting with your legs bent, pull your operative leg back into
the chair. Hold for a three to five seconds.
10. Terminal Knee Extension – Sitting
While sitting, lift operative leg up and place your heel in the chair
in front of you. Push the back of the knee down toward the floor
with your knee straight. Hold for a count of three, relax and repeat.

10
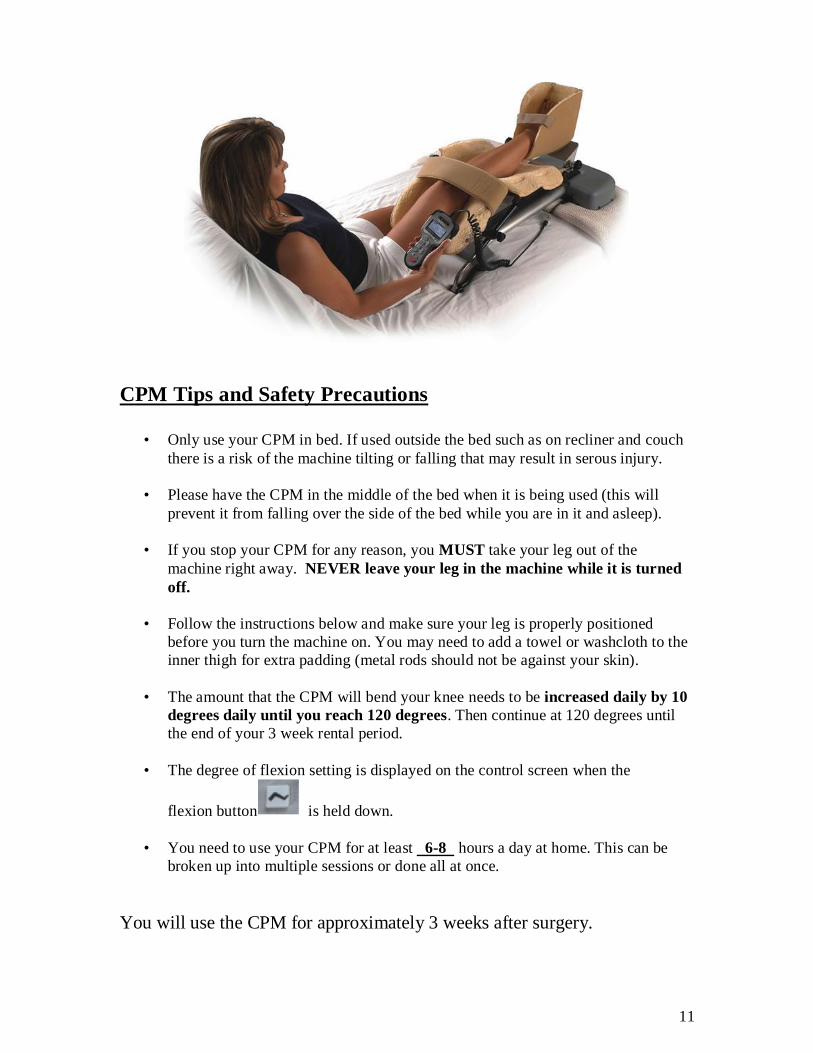
NORMAN REGIONAL HOSPITAL HOME PROGRAM
FOR Continuous Passive Motion (CPM) Machine
What is a CPM?
The continuous passive motion (CPM) machine is used to help you recover from total
knee replacement surgery. CPM is believed to discourage the formation of scar tissue,
decrease swelling and prevent the abnormal shortening of the muscles surrounding your
joints. As your incision heals, scar tissue forms. This tissue can be less elastic than
normal tissue. Without movement, adhesions (improperly healed tissue) may occur. Once
movement starts, adhesions may break, causing pain and swelling. CPM can help prevent
these problems. During the healing period, it guides tissue growth that permits motion.
What to Expect
Your leg rests in the CPM padded frame. The machine gently moves your joint.
Patient Education
What You Need to Know
How to set up your CPM at home.
How to properly place your leg in the CPM frame.
How to start and stop the CPM machine.
How to increase the flexion or how much the CPM bends your knee.
11
CPM Tips and Safety Precautions
• Only use your CPM in bed. If used outside the bed such as on recliner and couch
there is a risk of the machine tilting or falling that may result in serous injury.
• Please have the CPM in the middle of the bed when it is being used (this will
prevent it from falling over the side of the bed while you are in it and asleep).
• If you stop your CPM for any reason, you MUST take your leg out of the
machine right away. NEVER leave your leg in the machine while it is turned
off.
• Follow the instructions below and make sure your leg is properly positioned
before you turn the machine on. You may need to add a towel or washcloth to the
inner thigh for extra padding (metal rods should not be against your skin).
• The amount that the CPM will bend your knee needs to be increased daily by 10
degrees daily until you reach 120 degrees. Then continue at 120 degrees until
the end of your 3 week rental period.
• The degree of flexion setting is displayed on the control screen when the
flexion button is held down.
• You need to use your CPM for at least 6-8 hours a day at home. This can be
broken up into multiple sessions or done all at once.
You will use the CPM for approximately 3 weeks after surgery.

12
How to set up your CPM at home.
Locating the power switch
• Place CPM on the middle of the bed and plug outlet into unit.
• Turn machine on at switch beside plug outlet. (Shown by green arrow).
• If possible, avoid lifting CPM on and off bed, if able, keep CPM on bed and out
of way.
• Also, place electrical cord under bed to avoid tripping.

13
How to properly place your leg in the CPM frame.
• The most important thing is for your leg to be properly positioned in the CPM.
• With your foot completely in contact with the foot plate and secured with the
velcro strap, the middle of your knee joint (where it bends) should line up with the
metal circle on the outside bar of the CPM. This is illustrated by the green double
arrow.
• You may need to add a towel or washcloth to the inner thigh for extra padding
(metal rods should not be against your skin).
• When properly positioned in the CPM, secure one strap below the knee and one
strap above the knee.

14
How to start and stop the CPM machine.
• You will use the hand controls to start and stop the machine as well as to increase
how much the CPM will bend your knee.
• To start the CPM, simply press the red start/stop button on the bottom
of the control (shown by the green oval).
• To stop the CPM, simply press the same red start/stop button the bottom
of the control (shown by the green oval).
• Remember; do not keep your leg in the machine if it is not running.

15
How to increase the how flexion or how much the CPM bends
your knee.
• You must also use the hand controls to increase how much the CPM will bend
your knee.
• Begin by pressing the flexion button (shown by the green circle) and while
holding that button down, also press the up button (shown by the yellow
circle) until you reach the desired number.
• You will want to increase the number by 10 degrees a day. The machine will go
up to 120 degrees; increase the machine each night until you reach 120.
• When the CPM machine is adjusted to increase the amount of bending, you may
have some discomfort. If you have some discomfort, you may place the CPM in a
warm up mode. To do so, increase your flexion degree and start the CPM when
you begin experience discomfort press the button above the start button
(shown by the blue oval) The CPM will gradually increase the degree of flexion a
few degrees at a time till the flexion setting is reached.

16
Never place a pillow under your operative knee, doing so increae your risk of
deveolping a blood clot as well as lead to shorting of the muscle and connective tissues
limiting the ability to fully straighten your knee.
After knee replacement surgery you may experience a feeling of numbness on the
outside portion of the knee.
This is common and will not have any detrimental effect on the knee replacement.
This occurs because of the location of the incision for surgery and the path of the nerves
in the skin. Specifically, the infrapatellar branch of the saphenous nerve travels down the
inside of the thigh toward your calf. It has a small branch called the infrapatellar branch
that goes across the front of the knee and provides sensory input from the skin in that
area. The incision for a total knee replacement is typically in the middle of the front of
the knee and disrupts the branches of this nerve.
This will usually leave an area that has diminished sensation. Most patients notice this
when they kneel down or when their cloths rub up against the knee. Frequently, as
healing occurs, some or all of this loss of sensation will improve
Sexual Activity and Intimacy
Generally, most people wait to resume sexual activity for a few weeks after surgery. Your
incision, muscles and body need time to heal. When you feel ready to resume sexual
activity the bottom or missionary position is usually the most safe and comfortable. If
you have specific or additional questions please feel free to ask your occupational or
physical therapist.
Incision
Nerve

17
After Knee Replacement: Home Safety
Becoming more aware of hazards in your home can help make your recovery safer. You
might want to have furniture rearranged so it’s easier to get around. Don’t forget to watch
out for hazards like wet floors or uneven surfaces.
1. Clear away throw rugs, cords and anything else that could cause you to trip, slip or fall.
2. Be very careful around pets and small children. They can be unpredictable and get in
your path when you least expect it.
3. Keep hallways clear.
4. Have good lighting; a night light can make a big difference use them in the bedroom,
bathroom and hallways.
5. Avoid long pants, night robes or nightgowns; these could cause you to trip.
6. Do not wear loose fitting or backless shoes. Wear well fitting shoes, with backs and
non skid soles.
Have an emergency plan in case of a fall. Consider keeping a telephone close by or
carrying a cell phone.

18
After Knee Replacement: Getting out of Bed
Step 1 Bend your non-operative leg (strong leg).
Step 2 Push with your hands and using you non-operative leg (strong leg) lift your buttocks up off the bed and move toward the edge
of the bed.
Step 3 Using your arms and non-operative leg (strong leg), lift your
buttocks and turn toward the side of the bed until both your feet
are on the ground.
If needed you may cross your ankles with the non-operative leg (strong leg),
supporting the operative leg (weak leg) to help raise and perform a slow
controlled lowering of the operative leg (weak leg) to the floor.
This technique can also be used to aid you in lifting your leg back on to the
bed or into the CPM machine.

19
After Knee Replacement: Walking
Step 1 Place the walker a few inches in front on you and hold on
to the walker firmly with both hands. Do not lean . Your first step forward should ALWAYS be with operative leg (weak leg) into the
center of the walker.
Step 2 Push down on the walker and let it support your weight. Next step
forward with your non-operative (strong leg), bringing it even to your
operative leg. Be careful to keep your feet inside of the walker.

20
After Knee Replacement: Sitting
Step 2 Release your hands from the walker and reach
down and hold onto the arm rests. Slowly lower yourself
keeping your operated leg straight out in front.
Step 3 Sit then slide back in the chair bending your
unoperated leg first. You use this technique when using
a toilet with arm rails as well.
Step 1 Sit in firm, straight- backed chairs with high seats
and armrests. You should avoid low, overstuffed chairs.
When walking backwards ALWAYS step backward
with your non-surgical (strong leg). Back your walker
up until you feel the chair touching the back of your legs.

21
After Knee Replacement: Bathroom Safety
Becoming more aware of hazards in your bathroom can help make your recovery safer.
Aids like a shower hose and a raised toilet seat can help you stay safe. Don’t forget to
watch out for hazards like wet floors or uneven surfaces.
1. Place non-skid decals or mats in shower or tub. It may be helpful to install grab
bars. Shower benches and elevated toilet seat can be very helpful as well.
2. Do not use she soap or towel holder as a grab bar or handrail: it is not designed to
hold the weight of a human being.

22
After Knee Replacement: Bathing
Special shower chairs and tub benches are available for use while bathing. These chairs
help you bathe safely.
Note: Try to make sure surfaces are dry before you walk on them. Non-skid mats can
help prevent falls.
Getting Into a Shower Stall
1. Back up over the lip of the shower
stall with your non-surgical leg
(strong leg) first until you feel the
shower chair behind you. Reach back
for the shower chair first with one
hand, then the other, as you begin to
sit down.
2. Lower yourself onto the
chair. Lift each foot and turn to
face the faucet.
Getting Into a Tub
3. Back up with your non-
surgical leg (strong leg) first
until you feel the tub bench
behind you. Reach back for the
bench first with one hand, then
the other, as you begin to sit
down.
4. Lower yourself onto the bench
and turn to face the faucet. Use
your hands to help lift each leg
over the side of the tub. A hand-
held shower nozzle can make
bathing on a bench easier.

23
After Knee Replacement: Kitchen Tips and Safety
DO NOT carry items in your hands when walking
with your walker. Use a walker bag, walker tray, small
handled plastic/paper bag or apron. Be cautious not to
overload bags, this can cause the walker to tip and you
to fall. Liquids and food should be carried in watertight
containers.
Keep your walker with you.
Get as close as you can to the counter, sink or refrigerator.
Do not reach beyond arm’s length or lean on your walker.
This can cause the walker to tip and you to fall.
Slide items along counter to stove or microwave if needed.
Sit down to open containers, prepare or mix food.
Keep frequently used or heavy items on the counter or
lower cabinet shelves.
Do not bend over to pick up items from lower cabinets or
floor.
To use the refrigerator:
Position the walker at the side of refrigerator so that you
are facing the door. Place one hand on the counter or
side of appliance then reach to open the door with the
other hand.
You may need to move your walker inside the door
slightly, so that you are close enough to reach items and
so that the door does not shut before you retrieve your
items.
Have a friend or family member organize your most
frequently used items on the top shelves so that they are
within easy reach prevent you from bending over to far.
24
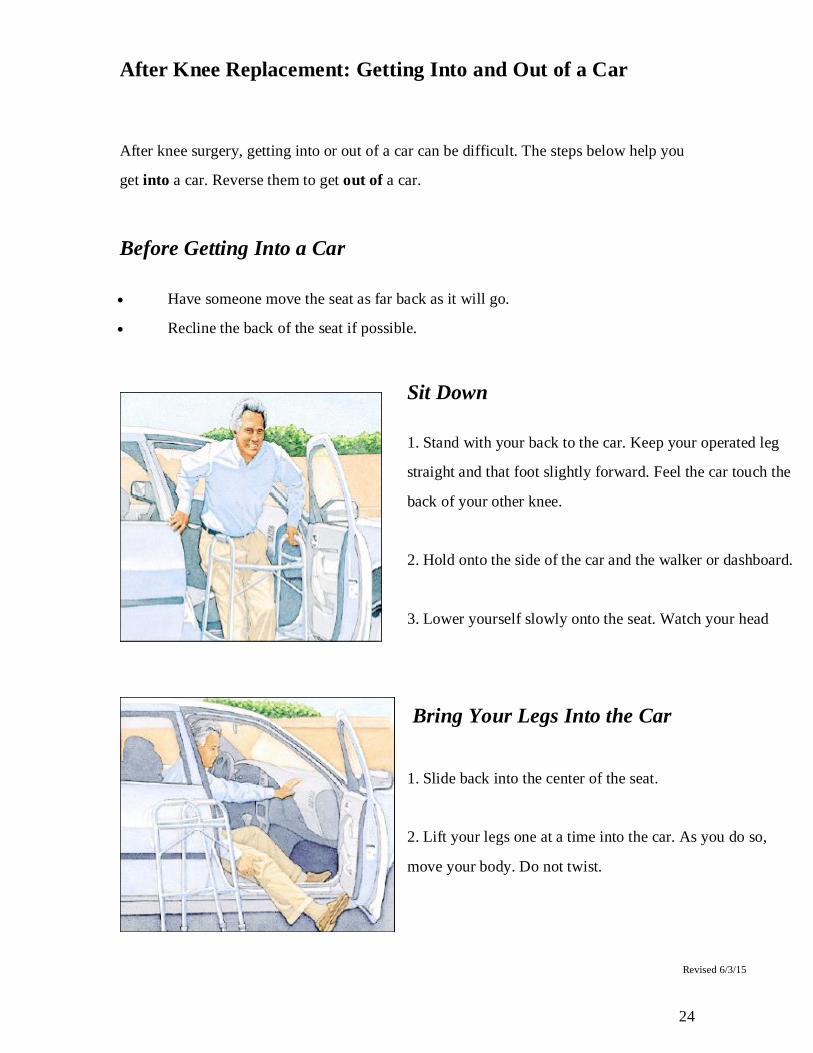
After Knee Replacement: Getting Into and Out of a Car
After knee surgery, getting into or out of a car can be difficult. The steps below help you
get into a car. Reverse them to get out of a car.
Before Getting Into a Car
Have someone move the seat as far back as it will go.
Recline the back of the seat if possible.
Sit Down
1. Stand with your back to the car. Keep your operated leg
straight and that foot slightly forward. Feel the car touch the
back of your other knee.
2. Hold onto the side of the car and the walker or dashboard.
3. Lower yourself slowly onto the seat. Watch your head
Bring Your Legs Into the Car
1. Slide back into the center of the seat.
2. Lift your legs one at a time into the car. As you do so,
move your body. Do not twist.
Revised 6/3/15


