95
Pavement Marking Handbook Revised August 2004 © 2004 by Texas Department of Transportation (512) 302-2453 all rights reserved

Pavement Marking Handbook
Revised August 2004
© 2004 by Texas Department of Transportation
(512) 302-2453 all rights reserved

Manual Notice 2004-1
From: Carlos A. Lopez, P.E
Manual: Pavement Marking Handbook
Effective Date: August 01, 2004
Purpose
This handbook provides information on material selection, installation, and inspection guidelines for pavement markings. It is targeted for two audiences — engineering personnel and field person-nel. The portion for engineering personnel provides information on selecting pavement marking materials for various applications. The portion for field personnel provides information on pave-ment marking installation and inspection. Additional information about TxDOT specifications, procedures, and standards applicable to pavement markings are included in an appendix. The man-ual may be used by designers to help with pavement marking material selection and inspectors in the field.
Instructions
This is a new manual, and it does not replace any existing documents.
Contents
Cover
Table of Contents
Chapters 1 through 3
Appendix A & B
Review History
This manual is the product of a Texas Department of Transportation (TxDOT) research project. The TxDOT project director is Greg Brinkmeyer of the Traffic Operations Division. The research supervisor is Gene Hawkins of the Texas Transportation Institute (TTI). Tim Gates and Liz Rose of TTI developed most of the material in the handbook. Wade Odell was the research liaison engineer for the TxDOT Research and Technology Implementation Office.
This handbook became a reality because numerous individuals were willing to contribute their time, ideas, and comments during the development process. Special credit should be given to a

group of TxDOT staff who meet on a regular basis to review drafts and develop material for the handbook. Through the life of this project, these individuals have included the following:
Greg Brinkmeyer, TxDOT, Traffic Operations Division, Project Director
Susan Atkins, TxDOT, San Antonio District
Larry Colclasure, TxDOT, Waco District
Rick Collins, TxDOT, Research and Technology Implementation Office
Rodney Cox, TxDOT, Abilene District
Mickey Dammann, TxDOT, Construction Division, Materials Section
Peter Eng, TxDOT, Tyler District
Paul Frerich, TxDOT, Yoakum District
Dock Gee, TxDOT, Houston District
Tommy Holcomb, TxDOT, Childress District
Jerry Howell, TxDOT, Construction Division, Materials Section
Catarino Mendoza, TxDOT, San Antonio District
Johnnie Miller, TxDOT, Construction Division, Materials Section
Wade Odell, TxDOT, Research and Technology Implementation Office
Bart Sherrill, TxDOT, Childress District
Herb Smart, TxDOT, Construction Division, Materials Section
Matt Smith, TxDOT, Wichita Falls District
Brian Stanford, TxDOT, Traffic Operations Division
Sally Wegmann, TxDOT, Houston District
Larry White, TxDOT, Tyler District.
Contact
Address questions concerning information in this manual notice to Greg Brinkmeyer, Traffic Oper-ations Division (TRF), 512-416-3120.
Archives
Past manual notices are available in a pdf archive.

Table of Contents
Chapter 1 — Introduction
Section 1 — Overview. . . . . . . . . . . . . . . . . . . . . . . . . . . . . . . . . . . . . . . . . . . . . . . . . . . . . . 1-2Introduction . . . . . . . . . . . . . . . . . . . . . . . . . . . . . . . . . . . . . . . . . . . . . . . . . . . . . . . . . . . . . 1-2Structure of this Handbook . . . . . . . . . . . . . . . . . . . . . . . . . . . . . . . . . . . . . . . . . . . . . . . . . 1-2
Section 2 — Handbook Information . . . . . . . . . . . . . . . . . . . . . . . . . . . . . . . . . . . . . . . . . . . 1-3Purpose of Handbook . . . . . . . . . . . . . . . . . . . . . . . . . . . . . . . . . . . . . . . . . . . . . . . . . . . . . 1-3Status of Handbook . . . . . . . . . . . . . . . . . . . . . . . . . . . . . . . . . . . . . . . . . . . . . . . . . . . . . . . 1-3Application of Handbook Guidelines . . . . . . . . . . . . . . . . . . . . . . . . . . . . . . . . . . . . . . . . . 1-3Handbook Content . . . . . . . . . . . . . . . . . . . . . . . . . . . . . . . . . . . . . . . . . . . . . . . . . . . . . . . . 1-3
Section 3 — Relation to Other Documents . . . . . . . . . . . . . . . . . . . . . . . . . . . . . . . . . . . . . . 1-5References to Other Documents . . . . . . . . . . . . . . . . . . . . . . . . . . . . . . . . . . . . . . . . . . . . . 1-5Other TxDOT Documents . . . . . . . . . . . . . . . . . . . . . . . . . . . . . . . . . . . . . . . . . . . . . . . . . . 1-5
Chapter 2 — Material Selection
Section 1 — Overview. . . . . . . . . . . . . . . . . . . . . . . . . . . . . . . . . . . . . . . . . . . . . . . . . . . . . . 2-2Introduction . . . . . . . . . . . . . . . . . . . . . . . . . . . . . . . . . . . . . . . . . . . . . . . . . . . . . . . . . . . . . 2-2Additional Information . . . . . . . . . . . . . . . . . . . . . . . . . . . . . . . . . . . . . . . . . . . . . . . . . . . . 2-2
Section 2 — External Factors that Influence Marking Performance . . . . . . . . . . . . . . . . . . . 2-4Introduction . . . . . . . . . . . . . . . . . . . . . . . . . . . . . . . . . . . . . . . . . . . . . . . . . . . . . . . . . . . . . 2-4Roadway Surface Characteristics . . . . . . . . . . . . . . . . . . . . . . . . . . . . . . . . . . . . . . . . . . . . 2-4Traffic . . . . . . . . . . . . . . . . . . . . . . . . . . . . . . . . . . . . . . . . . . . . . . . . . . . . . . . . . . . . . . . . . 2-9Environmental . . . . . . . . . . . . . . . . . . . . . . . . . . . . . . . . . . . . . . . . . . . . . . . . . . . . . . . . . . . 2-9
Section 3 — Pavement Surface Preparation . . . . . . . . . . . . . . . . . . . . . . . . . . . . . . . . . . . . 2-11Introduction . . . . . . . . . . . . . . . . . . . . . . . . . . . . . . . . . . . . . . . . . . . . . . . . . . . . . . . . . . . . 2-11Compatibility of Materials for Restripe Situations . . . . . . . . . . . . . . . . . . . . . . . . . . . . . . 2-11Marking Removal Methods . . . . . . . . . . . . . . . . . . . . . . . . . . . . . . . . . . . . . . . . . . . . . . . . 2-12Primer-Sealers . . . . . . . . . . . . . . . . . . . . . . . . . . . . . . . . . . . . . . . . . . . . . . . . . . . . . . . . . . 2-13
Section 4 — Pavement Marking Material Descriptions . . . . . . . . . . . . . . . . . . . . . . . . . . . 2-14Introduction . . . . . . . . . . . . . . . . . . . . . . . . . . . . . . . . . . . . . . . . . . . . . . . . . . . . . . . . . . . . 2-14Summary of Material Use . . . . . . . . . . . . . . . . . . . . . . . . . . . . . . . . . . . . . . . . . . . . . . . . . 2-15Supplemental Material Performance Information . . . . . . . . . . . . . . . . . . . . . . . . . . . . . . . 2-16Thermoplastic Markings . . . . . . . . . . . . . . . . . . . . . . . . . . . . . . . . . . . . . . . . . . . . . . . . . . 2-16Thermoplastic Marking Material Characteristics . . . . . . . . . . . . . . . . . . . . . . . . . . . . . . . 2-17Thermoplastic Marking Application Methods. . . . . . . . . . . . . . . . . . . . . . . . . . . . . . . . . . 2-18Thermoplastic Marking — Surface Preparation . . . . . . . . . . . . . . . . . . . . . . . . . . . . . . . . 2-19Thermoplastic Marking — Effect of Pavement Surface on Performance. . . . . . . . . . . . . 2-20Thermoplastic Marking — Effect of Traffic on Performance. . . . . . . . . . . . . . . . . . . . . . 2-21
Pavement Marking Handbook i TxDOT 08/2004
Thermoplastic Marking — Environmental Effects on Performance. . . . . . . . . . . . . . . . . 2-22Thermoplastic Marking Use Summary . . . . . . . . . . . . . . . . . . . . . . . . . . . . . . . . . . . . . . . 2-22Water-Based Paint . . . . . . . . . . . . . . . . . . . . . . . . . . . . . . . . . . . . . . . . . . . . . . . . . . . . . . . 2-23Water-Based Paint — Material Characteristics. . . . . . . . . . . . . . . . . . . . . . . . . . . . . . . . . 2-23Water-Based Paint Application . . . . . . . . . . . . . . . . . . . . . . . . . . . . . . . . . . . . . . . . . . . . . 2-24Water-Based Paint Performance . . . . . . . . . . . . . . . . . . . . . . . . . . . . . . . . . . . . . . . . . . . . 2-25Water-Based Paint Use Summary . . . . . . . . . . . . . . . . . . . . . . . . . . . . . . . . . . . . . . . . . . . 2-26Preformed Tapes . . . . . . . . . . . . . . . . . . . . . . . . . . . . . . . . . . . . . . . . . . . . . . . . . . . . . . . . 2-26Preformed Tapes — Material Characteristics . . . . . . . . . . . . . . . . . . . . . . . . . . . . . . . . . . 2-27Preformed Tapes — Application . . . . . . . . . . . . . . . . . . . . . . . . . . . . . . . . . . . . . . . . . . . . 2-28Preformed Tapes — Removal . . . . . . . . . . . . . . . . . . . . . . . . . . . . . . . . . . . . . . . . . . . . . . 2-28Preformed Tapes — Performance . . . . . . . . . . . . . . . . . . . . . . . . . . . . . . . . . . . . . . . . . . . 2-29Preformed Tapes — Use Summary . . . . . . . . . . . . . . . . . . . . . . . . . . . . . . . . . . . . . . . . . . 2-29Epoxy. . . . . . . . . . . . . . . . . . . . . . . . . . . . . . . . . . . . . . . . . . . . . . . . . . . . . . . . . . . . . . . . . 2-30Epoxy Performance . . . . . . . . . . . . . . . . . . . . . . . . . . . . . . . . . . . . . . . . . . . . . . . . . . . . . . 2-30Epoxy Use Summary . . . . . . . . . . . . . . . . . . . . . . . . . . . . . . . . . . . . . . . . . . . . . . . . . . . . . 2-32Other Materials . . . . . . . . . . . . . . . . . . . . . . . . . . . . . . . . . . . . . . . . . . . . . . . . . . . . . . . . . 2-32Polyurea . . . . . . . . . . . . . . . . . . . . . . . . . . . . . . . . . . . . . . . . . . . . . . . . . . . . . . . . . . . . . . . 2-32Modified Urethane. . . . . . . . . . . . . . . . . . . . . . . . . . . . . . . . . . . . . . . . . . . . . . . . . . . . . . . 2-34Ceramic Buttons . . . . . . . . . . . . . . . . . . . . . . . . . . . . . . . . . . . . . . . . . . . . . . . . . . . . . . . . 2-34Methyl Methacrylate (MMA) . . . . . . . . . . . . . . . . . . . . . . . . . . . . . . . . . . . . . . . . . . . . . . 2-35Profiled Thermoplastic . . . . . . . . . . . . . . . . . . . . . . . . . . . . . . . . . . . . . . . . . . . . . . . . . . . 2-36Contrast Markings . . . . . . . . . . . . . . . . . . . . . . . . . . . . . . . . . . . . . . . . . . . . . . . . . . . . . . . 2-37Heated-in-Place Thermoplastic (Shortline Applications) . . . . . . . . . . . . . . . . . . . . . . . . . 2-39Retroreflective Raised Pavement Markings . . . . . . . . . . . . . . . . . . . . . . . . . . . . . . . . . . . 2-40
Section 5 — Glass Beads . . . . . . . . . . . . . . . . . . . . . . . . . . . . . . . . . . . . . . . . . . . . . . . . . . . 2-41Introduction . . . . . . . . . . . . . . . . . . . . . . . . . . . . . . . . . . . . . . . . . . . . . . . . . . . . . . . . . . . . 2-41Bead Types . . . . . . . . . . . . . . . . . . . . . . . . . . . . . . . . . . . . . . . . . . . . . . . . . . . . . . . . . . . . 2-41Bead Coatings . . . . . . . . . . . . . . . . . . . . . . . . . . . . . . . . . . . . . . . . . . . . . . . . . . . . . . . . . . 2-41Bead Application Properties . . . . . . . . . . . . . . . . . . . . . . . . . . . . . . . . . . . . . . . . . . . . . . . 2-42Bead Manufacturing-Controlled Properties. . . . . . . . . . . . . . . . . . . . . . . . . . . . . . . . . . . . 2-42Bead Size . . . . . . . . . . . . . . . . . . . . . . . . . . . . . . . . . . . . . . . . . . . . . . . . . . . . . . . . . . . . . . 2-42Refractive Index. . . . . . . . . . . . . . . . . . . . . . . . . . . . . . . . . . . . . . . . . . . . . . . . . . . . . . . . . 2-43Clarity and Roundness. . . . . . . . . . . . . . . . . . . . . . . . . . . . . . . . . . . . . . . . . . . . . . . . . . . . 2-43
Section 6 — Retroreflectivity Performance Specifications for Contracts . . . . . . . . . . . . . . 2-45Introduction . . . . . . . . . . . . . . . . . . . . . . . . . . . . . . . . . . . . . . . . . . . . . . . . . . . . . . . . . . . . 2-45Performance Factors . . . . . . . . . . . . . . . . . . . . . . . . . . . . . . . . . . . . . . . . . . . . . . . . . . . . . 2-45Basis for Specification Compliance. . . . . . . . . . . . . . . . . . . . . . . . . . . . . . . . . . . . . . . . . . 2-45
Section 7 — Material Selection Guide . . . . . . . . . . . . . . . . . . . . . . . . . . . . . . . . . . . . . . . . 2-47
Pavement Marking Handbook ii TxDOT 08/2004

Introduction . . . . . . . . . . . . . . . . . . . . . . . . . . . . . . . . . . . . . . . . . . . . . . . . . . . . . . . . . . . . 2-47Material Selection Tables . . . . . . . . . . . . . . . . . . . . . . . . . . . . . . . . . . . . . . . . . . . . . . . . . 2-47
Chapter 3 — Installation and Inspection
Section 1 — Overview. . . . . . . . . . . . . . . . . . . . . . . . . . . . . . . . . . . . . . . . . . . . . . . . . . . . . . 3-2Introduction . . . . . . . . . . . . . . . . . . . . . . . . . . . . . . . . . . . . . . . . . . . . . . . . . . . . . . . . . . . . . 3-2
Section 2 — Preliminary Items . . . . . . . . . . . . . . . . . . . . . . . . . . . . . . . . . . . . . . . . . . . . . . . 3-3Pre-construction Meeting. . . . . . . . . . . . . . . . . . . . . . . . . . . . . . . . . . . . . . . . . . . . . . . . . . . 3-3Field Documentation Items . . . . . . . . . . . . . . . . . . . . . . . . . . . . . . . . . . . . . . . . . . . . . . . . . 3-3
Section 3 — Pre-installation Inspections . . . . . . . . . . . . . . . . . . . . . . . . . . . . . . . . . . . . . . . . 3-5Introduction . . . . . . . . . . . . . . . . . . . . . . . . . . . . . . . . . . . . . . . . . . . . . . . . . . . . . . . . . . . . . 3-5Surface Moisture . . . . . . . . . . . . . . . . . . . . . . . . . . . . . . . . . . . . . . . . . . . . . . . . . . . . . . . . . 3-5Dirt and Debris . . . . . . . . . . . . . . . . . . . . . . . . . . . . . . . . . . . . . . . . . . . . . . . . . . . . . . . . . . 3-5Air and Pavement Temperature . . . . . . . . . . . . . . . . . . . . . . . . . . . . . . . . . . . . . . . . . . . . . . 3-6Material Temperature . . . . . . . . . . . . . . . . . . . . . . . . . . . . . . . . . . . . . . . . . . . . . . . . . . . . . 3-6Lateral Placement Guides for New Pavement Surfaces . . . . . . . . . . . . . . . . . . . . . . . . . . . 3-6Striping Equipment . . . . . . . . . . . . . . . . . . . . . . . . . . . . . . . . . . . . . . . . . . . . . . . . . . . . . . . 3-7Traffic Control . . . . . . . . . . . . . . . . . . . . . . . . . . . . . . . . . . . . . . . . . . . . . . . . . . . . . . . . . . . 3-8
Section 4 — Inspection During Application . . . . . . . . . . . . . . . . . . . . . . . . . . . . . . . . . . . . . 3-9Introduction . . . . . . . . . . . . . . . . . . . . . . . . . . . . . . . . . . . . . . . . . . . . . . . . . . . . . . . . . . . . . 3-9Thickness . . . . . . . . . . . . . . . . . . . . . . . . . . . . . . . . . . . . . . . . . . . . . . . . . . . . . . . . . . . . . . . 3-9Width . . . . . . . . . . . . . . . . . . . . . . . . . . . . . . . . . . . . . . . . . . . . . . . . . . . . . . . . . . . . . . . . . 3-10Color . . . . . . . . . . . . . . . . . . . . . . . . . . . . . . . . . . . . . . . . . . . . . . . . . . . . . . . . . . . . . . . . . 3-11Glass Bead Application Properties . . . . . . . . . . . . . . . . . . . . . . . . . . . . . . . . . . . . . . . . . . 3-11Nighttime Appearance . . . . . . . . . . . . . . . . . . . . . . . . . . . . . . . . . . . . . . . . . . . . . . . . . . . . 3-14Material Disposal. . . . . . . . . . . . . . . . . . . . . . . . . . . . . . . . . . . . . . . . . . . . . . . . . . . . . . . . 3-16Solutions to Common Problems Associated with Various Striping Applications . . . . . . 3-17
Section 5 — Final Acceptance. . . . . . . . . . . . . . . . . . . . . . . . . . . . . . . . . . . . . . . . . . . . . . . 3-18
Section 6 — Determining When To Restripe . . . . . . . . . . . . . . . . . . . . . . . . . . . . . . . . . . . 3-19Introduction . . . . . . . . . . . . . . . . . . . . . . . . . . . . . . . . . . . . . . . . . . . . . . . . . . . . . . . . . . . . 3-19Determining End-of-Service Life . . . . . . . . . . . . . . . . . . . . . . . . . . . . . . . . . . . . . . . . . . . 3-19Minimum In-Service Retroreflectivity Guidelines . . . . . . . . . . . . . . . . . . . . . . . . . . . . . . 3-20
Appendix A — Visibility and Retroreflectivity
Section 1 — Overview. . . . . . . . . . . . . . . . . . . . . . . . . . . . . . . . . . . . . . . . . . . . . . . . . . . . . . A-2
Section 2 — General Retroreflectivity Concepts. . . . . . . . . . . . . . . . . . . . . . . . . . . . . . . . . . A-3Introduction . . . . . . . . . . . . . . . . . . . . . . . . . . . . . . . . . . . . . . . . . . . . . . . . . . . . . . . . . . . . . A-3Factors Influencing Retroreflectivity. . . . . . . . . . . . . . . . . . . . . . . . . . . . . . . . . . . . . . . . . . A-3
Section 3 — Driver Needs . . . . . . . . . . . . . . . . . . . . . . . . . . . . . . . . . . . . . . . . . . . . . . . . . . . A-5
Pavement Marking Handbook iii TxDOT 08/2004

Introduction . . . . . . . . . . . . . . . . . . . . . . . . . . . . . . . . . . . . . . . . . . . . . . . . . . . . . . . . . . . . . A-5Factors Related to Driver Retroreflectivity Needs . . . . . . . . . . . . . . . . . . . . . . . . . . . . . . . A-5Suggestions from Research Literature. . . . . . . . . . . . . . . . . . . . . . . . . . . . . . . . . . . . . . . . . A-6
Section 4 — Portable Retroreflectometers. . . . . . . . . . . . . . . . . . . . . . . . . . . . . . . . . . . . . . . A-7Introduction . . . . . . . . . . . . . . . . . . . . . . . . . . . . . . . . . . . . . . . . . . . . . . . . . . . . . . . . . . . . . A-7Handheld vs. Mobile Units . . . . . . . . . . . . . . . . . . . . . . . . . . . . . . . . . . . . . . . . . . . . . . . . . A-7
Section 5 — Pavement Marking Management Programs . . . . . . . . . . . . . . . . . . . . . . . . . . . A-9Introduction . . . . . . . . . . . . . . . . . . . . . . . . . . . . . . . . . . . . . . . . . . . . . . . . . . . . . . . . . . . . . A-9Advantages . . . . . . . . . . . . . . . . . . . . . . . . . . . . . . . . . . . . . . . . . . . . . . . . . . . . . . . . . . . . . A-9Current Circumstances. . . . . . . . . . . . . . . . . . . . . . . . . . . . . . . . . . . . . . . . . . . . . . . . . . . . . A-9
Appendix B — Specifications, Test Methods, and Standard SheetsIntroduction . . . . . . . . . . . . . . . . . . . . . . . . . . . . . . . . . . . . . . . . . . . . . . . . . . . . . . . . . . . . . B-1TxDOT Pavement Marking Material Specifications. . . . . . . . . . . . . . . . . . . . . . . . . . . . . . B-1TxDOT Pavement Marking Construction Specifications . . . . . . . . . . . . . . . . . . . . . . . . . . B-1TxDOT Test Methods for Pavement Marking Inspection. . . . . . . . . . . . . . . . . . . . . . . . . . B-2TxDOT Pavement Marking Standard Sheets . . . . . . . . . . . . . . . . . . . . . . . . . . . . . . . . . . . B-2Traffic Control Standard Sheets for Pavement Marking Operations. . . . . . . . . . . . . . . . . . B-3
Pavement Marking Handbook iv TxDOT 08/2004

Chapter 1 — Introduction
Contents:
Section 1 — Overview
Section 2 — Handbook Information
Section 3 — Relation to Other Documents
Pavement Marking Handbook 1-1 TxDOT 08/2004

Chapter 1 — Introduction Section 1 — Overview
Section 1 — Overview
Introduction
Pavement markings provide important information to road users. There are several sources of information that TxDOT engineers, designers, and inspectors can use to obtain the information needed to effectively select, specify, and inspect markings. This handbook attempts to tie all of that information together, supplementing it with additional information to help TxDOT staff involved with pavement markings. The handbook was developed as a single source of information for any-one involved with pavement markings in Texas.
Structure of this Handbook
The handbook is divided into two main chapters: pavement marking material selection (Chapter 2) and pavement marking installation and inspection (Chapter 3). Each chapter is designed to serve as a stand-alone document. The handbook provides TxDOT engineers and inspectors with informa-tion that will help them better select pavement marking materials and inspect the installation of markings. This chapter (Chapter 1) describes the different parts of the handbook and how it relates to TxDOT pavement marking activities. The chapter also includes additional information about the scope of the handbook.
Pavement Marking Handbook 1-2 TxDOT 08/2004

Chapter 1 — Introduction Section 2 — Handbook Information
Section 2 — Handbook Information
Purpose of Handbook
The Pavement Marking Handbook contains guidance, procedures, and recommendations address-ing many different aspects of pavement marking selection, installation, and inspection. The objectives of the Pavement Marking Handbook are to:
harmonize statewide practices
implement research
provide a single “go-to” resource for striping.
Status of Handbook
This handbook presents information as guidance for use by design personnel. This handbook does not establish any standards, specifications, or regulations. This handbook carries no legal authority.
In some cases, the information presented in this handbook exceeds the minimum guidelines con-tained in the Texas Manual on Uniform Traffic Control Devises (TMUTCD) or other TxDOT documents. This handbook does not supersede or modify the minimum guidelines contained in other TxDOT documents. In situations where the guidelines presented in this handbook cannot be satisfied, designers should try to meet the minimum guidelines contained in other TxDOT documents.
Application of Handbook Guidelines
This handbook is intended for use by office personnel in the selection and specification of materials and by field personnel associated with the installation and inspection of markings. Although this handbook addresses the selection, specification, installation, and inspection of markings, it does not establish any criteria, warrants, or standards associated with the use of pavement markings.
Handbook Content
This handbook describes various aspects of pavement markings, providing information on both selection and installation of pavement marking materials. The chapters of this handbook address the following topics:
Chapter 1 — describes the handbook and its relation to other pavement marking documents.
Chapter 2 — provides information intended to help the engineer or designer select the appro-priate marking material for a given roadway and to develop the appropriate specifications.
Pavement Marking Handbook 1-3 TxDOT 08/2004

Chapter 1 — Introduction Section 2 — Handbook Information
Chapter 3 — provides inspectors with necessary guidance in the field inspection of pavement markings before, during, and after application.
Appendix A — provides general information about pavement marking visibility and retroreflectivity.
Appendix B — provides lists of and links to:
the most significant TxDOT pavement marking material specifications
some of the most pertinent TxDOT pavement marking construction specifications
two of the key TxDOT test methods for pavement marking inspection
some of the most pertinent TxDOT pavement marking standard sheets
some of the most pertinent traffic control standard sheets for pavement marking operations.
Pavement Marking Handbook 1-4 TxDOT 08/2004

Chapter 1 — Introduction Section 3 — Relation to Other Documents
Section 3 — Relation to Other Documents
References to Other Documents
This handbook combines information contained in numerous other documents to assist in the design, specification, and inspection of pavement markings. In some cases, information from other documents is repeated in this handbook with appropriate citations to the source of the information. This typically occurs where information from several documents is combined in a section of the handbook. In other cases, this handbook refers the user to a specific document for guidance on pavement marking issues.
Whenever practical, the handbook refers the reader to other documents so that the handbook will not be out of date when these documents are revised. When information from other documents is repeated in the handbook, the reader should check to make sure the source document has not been revised.
Other TxDOT Documents
This handbook presents guidance information that may support or expand upon information con-tained in other TxDOT documents. The guidance contained in this handbook does not supersede standards, recommended practices, or requirements established by other TxDOT documents. The following documents also contain information related to the application, design, placement, instal-lation, and maintenance of pavement markings.
Texas Manual on Uniform Traffic Control Devises (TMUTCD) — The TMUTCD estab-lishes practices for the selection, design, placement, operation, and maintenance of traffic control devices. The TMUTCD is the document that establishes the legal requirements for the selection, application, design, installation, and maintenance of traffic control devices. The TMUTCD is available on-line at: http://www.dot.state.tx.us/publications/traffic.htm
Traffic Engineering Standard Sheets — The standard sheets developed by the Traffic Oper-ations Division contain additional guidance for the design, specification, and installation of pavement markings. The Traffic Engineering Standard Sheets are available on-line at: http://www.dot.state.tx.us/insdtdot /orgchart/cmd/cserve/standard/toc.htm
Signs and Markings Volume of the Traffic Operations Manual — This document sets forth TxDOT standard practices and procedures regarding signs, markings, and other traffic control devices. This manual supplements the information contained in the TMUTCD. The Novem-ber 1997 version of the Signs and Markings Volume (with the May 2000 revision of Chapter 10) was used to prepare this handbook.
Pavement Marking Handbook 1-5 TxDOT 08/2004

Chapter 2 — Material Selection
Contents:
Section 1 — Overview
Section 2 — External Factors that Influence Marking Performance
Section 3 — Pavement Surface Preparation
Section 4 — Pavement Marking Material Descriptions
Section 5 — Glass Beads
Section 6 — Retroreflectivity Performance Specifications for Contracts
Section 7 — Material Selection Guide
Pavement Marking Handbook 2-1 TxDOT 08/2004

Chapter 2 — Material Selection Section 1 — Overview
Section 1 — Overview
Introduction
This chapter provides guidance to engineers and technicians involved with the selection of pave-ment marking materials for a given roadway. This includes selecting marking materials, specifying application properties, specifying surface preparation, applying retroreflective performance specifi-cations to contracts, and determining if restriping is necessary.
Many materials can be used for pavement markings. However, the performance and cost of the dif-ferent materials vary greatly. It is also important to recognize that some materials are more appropriate for a given set of circumstances than other materials. The useful life of a pavement marking material often varies widely based on many factors. This handbook includes information on many materials that are used for striping in jurisdictions other than TxDOT. Some of these materials have been used within TxDOT on an experimental basis. Special permission from TxDOT’s Traffic Operations Division (TRF) or the Construction Division’s Materials Section (CST-MAT) is required to use materials for which no TxDOT specification exists. Materials should be selected that will meet or exceed the performance requirements at the lowest cost. To maximize cost-effectiveness, material selection should be based on roadway surface type, traffic volumes, and expected remaining service life of the pavement.
This chapter provides information intended to help the engineer or designer select the appropriate marking material for a given roadway and to develop the appropriate specifications. It must be noted that engineering judgment should always apply in the material selection process. Appendix A contains supporting information on pavement marking visibility and retroreflectivity. Appendix B lists and provides links to pertinent TxDOT specifications, test methods, and standard sheets.
Additional Information
This chapter supplements TxDOT Specification Items 666, 668, 677, and 678 and Material Specifi-cations DMS-8200, DMS-8220, DMS-8240, DMS-8241, and DMS-8290. In addition to the links provided in the text, the following web addresses can be used to access current TxDOT specifica-tions or test methods:
All TxDOT on-line manuals Internet: http://www.dot.state.tx.us/services/general_services/manuals.htm
TxDOT Crossroads (internal only): http://txdot-manuals/dynaweb
TxDOT’s Standard Specifications for Construction and Maintenance of Highways, Streets, and Bridges (2004)
To view entire book: ftp://ftp.dot.state.tx.us/pub/txdot-info/des/specs/specbook.pdf
To view or print individual specifications: http://www.dot.state.tx.us/apps/specs/SearchForm.asp?type=7
Pavement Marking Handbook 2-2 TxDOT 08/2004
Chapter 2 — Material Selection Section 1 — Overview
TxDOT’s Material Specifications http://www.dot.state.tx.us/services/construction/test_procedures/
TxDOT’s Manual of Testing Proce-dures (test methods)
http://www.dot.state.tx.us/services/construction/test_procedures/
Pavement Marking Handbook 2-3 TxDOT 08/2004

Chapter 2 — Material Selection Section 2 — External Factors that Influence Marking Performance
Section 2 — External Factors that Influence Marking Performance
Introduction
Many factors influence the performance of a given pavement marking material. The major factors can be grouped into three categories:
roadway surface
traffic
environmental.
Each category plays a factor in the performance of nearly every pavement marking material. Therefore, each of the categories should play a role in the material selection process. For any mate-rial, it is absolutely necessary that the pavement surface be clean and dry prior to marking placement to achieve proper pavement marking performance.
Roadway Surface Characteristics
The roadway surface that a given material is placed upon is one of the most important factors influ-encing pavement marking performance. In Texas, pavement markings are placed upon three general types of roadway surfaces:
hot-mix asphalt concrete (HMAC)
hydraulic cement concrete (HCC, also known as Portland cement concrete)
open-graded bituminous pavements (referred to as surface treatments in this handbook, but also known as seal coats).
Engineers can expect a given pavement marking material to perform differently on each of the dif-ferent surface types. Three major pavement surface characteristics that affect marking performance are:
surface roughness
heat sensitivity
surface porosity.
Surface Roughness. Surface roughness can play a major role in the way a marking performs over time. Pavement markings on rough pavement surfaces, such as surface treatments, commonly lower retroreflectivity and shorten service lives when compared to identical markings on smooth pavement surfaces. Figure 2-1 shows a typical thermoplastic marking on a new surface treatment. Table 2-1 lists some of the negative effects that rough pavement surfaces have on standard pave-ment markings. Applying a thicker pavement marking or allowing sufficient time for traffic to
Pavement Marking Handbook 2-4 TxDOT 08/2004

Chapter 2 — Material Selection Section 2 — External Factors that Influence Marking Performance
compact the pavement surface are the usual countermeasures to the problems associated with rough surface treatments, especially for thermoplastic materials.
Figure 2-1. Typical 100-mil thermoplastic marking on new grade-3 surface treatment.
Table 2-1. Problems with Pavement Markings on Rough Surfaces
Problem Cause
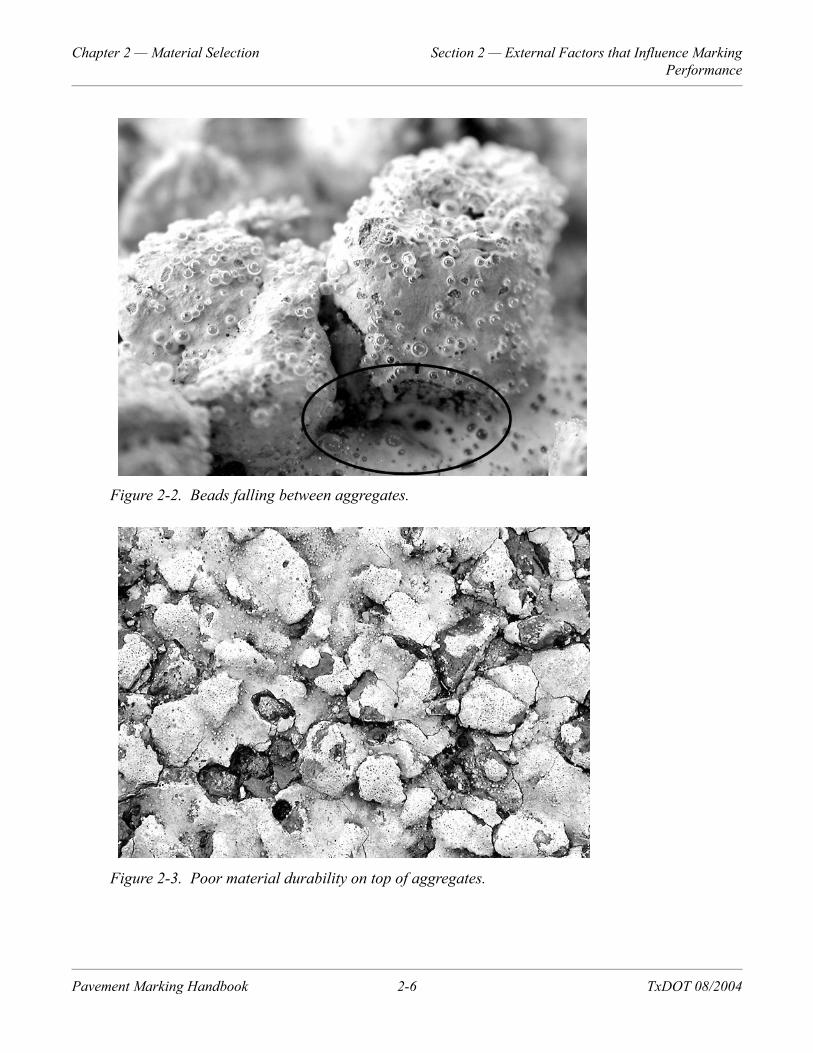
Lower overall retroreflectivity Because of irregular pavement surface characteristics, a high percentage of the binder and beads fall into the surface voids and crevices, greatly reducing the retroreflectivity of the marking (Figure 2-2).
Low material durability on top of aggregates Exposed binder material on top of aggregate results in mate-rial wearing off quickly (Figure 2-3).
Poor retroreflectivity on backside of aggregate Momentum of the striping truck causes the front sides of the aggregates to receive ample binder and bead coverage, while the backsides remain uncoated (Figure 2-4).
Bead loss on top of aggregates Thin binder material on top of the aggregates results in poor bead embedment and adhesion (Figure 2-5).
Pavement Marking Handbook 2-5 TxDOT 08/2004
Chapter 2 — Material Selection Section 2 — External Factors that Influence Marking Performance
Figure 2-2. Beads falling between aggregates.
Figure 2-3. Poor material durability on top of aggregates.
Pavement Marking Handbook 2-6 TxDOT 08/2004

Chapter 2 — Material Selection Section 2 — External Factors that Influence Marking Performance
Figure 2-4. Poor material coverage on backside of aggregate.
Figure 2-5. Poor bead retention on top of aggregates.
Pavement Marking Handbook 2-7 TxDOT 08/2004

Chapter 2 — Material Selection Section 2 — External Factors that Influence Marking Performance
Heat Sensitivity. The heat sensitivity of a pavement surface determines the bonding characteristics between the surface and most hot-applied marking materials. At temperatures greater than 160°F, asphalt behaves as a viscous liquid, which allows for thermal bonding with many hot-applied pave-ment marking materials. For example, thermoplastic materials bond to asphalt surfaces by melting and fusing with the asphalt. Thermal bonding provides for a tight bond between the surface and the marking. Concrete pavements do not react to hot-applied pavement markings in this way, and as such thermal bonding does not occur. In these cases, other bonding mechanisms are relied upon, which are often inferior to thermal bonding. It is for this reason that some hot-applied marking materials, such as thermoplastic, are not recommended for use on concrete surfaces.
Prior to being fully cured, asphalt-based surface treatments are especially susceptible to bleeding under high temperatures. When asphalt bleeding occurs, the asphalt material is often tracked onto the pavement markings, causing permanent discoloration. In addition, thermoplastics are applied at such high temperatures that they sometimes boil the asphalt to the surface of the marking. Table 2-2 lists some of the negative effects that asphalt bleeding may have on standard pavement markings.
Surface Porosity. The surface porosity of a pavement surface determines the mechanical bonding characteristics for pavement markings with the surface. Mechanical bonding occurs when the pavement marking material seeps into the pores of the pavement surface and creates a tight mechanical bond upon drying. Thermoplastics and other hot-applied pavement markings adhere to concrete through mechanical bonding.
Figure 2-6. Asphalt boiling through hot thermoplastic.
Table 2-2. Problems with Pavement Markings on Uncured Surface Treatments
Problem CauseSpots of asphalt on markings On surface treatments with emulsified asphalt, the extreme heat of
sprayed hot thermoplastic may boil the emulsion to the surface of the marking (Figure 2-6).
Markings covered with asphalt Insufficiently cured asphalt bleeds to the pavement surface and is tracked onto markings (Figure 2-7).
Pavement Marking Handbook 2-8 TxDOT 08/2004

Chapter 2 — Material Selection Section 2 — External Factors that Influence Marking Performance
Figure 2-7. Asphalt tracked onto markings.
Traffic
Traffic volumes greatly influence the performance of a pavement marking regardless of the pave-ment surface. The service lives of nearly all pavement marking materials are decreased when exposed to higher traffic volumes. However, some materials are clearly more resistant to traffic than others. Some agencies base pavement marking material selection primarily on traffic volume levels. Standard water-based paint often provides suitable performance on low volume roadways, thereby making it cost-effective. Durable pavement markings, such as thermoplastics, preformed tapes, and epoxies are often recommended for use on roadways with medium to high traffic vol-umes because paints often deteriorate rapidly under high-traffic conditions, and frequent restriping is not desirable. Under extremely high-traffic conditions or other locations where a high number of wheel hits on the markings are likely to occur, such as weaving areas or transverse markings, mate-rials of the utmost durability are desirable.
Environmental
Environmental conditions can have a major influence on the performance of a pavement marking material. The effect of environmental conditions on performance can be broken in two separate categories:
weather conditions when the marking is placed
Pavement Marking Handbook 2-9 TxDOT 08/2004

Chapter 2 — Material Selection Section 2 — External Factors that Influence Marking Performance
year-round climate.
The weather conditions when the marking is placed are often said to be one of the most influential factors in the performance of the marking. This is especially true for environmentally sensitive materials such as thermoplastics and tapes. Factors that should be considered include:
temperature (air and pavement)
humidity
wind velocity
surface moisture at the time of application.
Each of the above factors may affect marking performance. Air and pavement temperatures are important because most pavement marking materials require a minimum temperature for proper drying or curing. Humidity also affects the drying and curing times. Wind velocity affects drying times, but more importantly it affects the drop-on bead dispersion. Strong winds can prevent a high percentage of the drop-on beads from uniformly reaching the binder material. Pavement surface moisture at the time of application can have a severe effect on the bonding capabilities of the mark-ing material to the pavement surface. Most materials require that the pavement surface be devoid of surface moisture prior to application to achieve bonding (see TxDOT Specification Item 666 4.2).
Year-round climatic conditions can also affect the long-term performance of a pavement marking material. Regions that receive heavy snowfall are often exposed to heavy abrasion on their pave-ment markings due to snowplow, sanding, and chemical activity. States in sun-belt regions may experience color fading and cracking of certain pavement marking materials due to intense ultravi-olet exposure.
Pavement Marking Handbook 2-10 TxDOT 08/2004

Chapter 2 — Material Selection Section 3 — Pavement Surface Preparation
Section 3 — Pavement Surface Preparation
Introduction
For all pavement marking materials, the pavement surface must be clean and dry to achieve proper bonding. Proper pavement surface preparation is absolutely critical to achieve good thermoplastic performance. A properly cleaned and dried surface is absolutely critical for maximum durability performance of nearly all markings — especially thermoplastic. A broom truck is often used to clean the pavement surface prior to striping as shown in Figure 2-8.
Figure 2-8. Typical brooming operation for surface cleaning prior to striping.
Special pavement heating devices are now available that are effective for removing pavement sur-face moisture and elevating the pavement surface temperature. These devices are especially effective on concrete surfaces.
Surface preparation must be performed in accordance with TxDOT Specification Item 678. If restriping over old markings, follow “Table 2-3. Material Compatibility Matrix” or manufacturer recommendations for material compatibility. Most materials can be used as restripe over materials of the same type, except preformed tapes and ceramic buttons, which should always be removed prior to restriping.
Compatibility of Materials for Restripe Situations
All pavement marking materials will at some point reach the end of their useful life. On many occasions, rather than obliterating the existing stripe, it is more cost-effective and convenient to
Pavement Marking Handbook 2-11 TxDOT 08/2004

Chapter 2 — Material Selection Section 3 — Pavement Surface Preparation
simply restripe over the old markings without removing them, assuming that the old markings still adhere well to the roadway. However, for restriping to be effective, the material that is to be applied must be compatible with the existing pavement marking material. Table 2-3 shows a matrix of material compatibilities.
Marking Removal Methods
Existing markings should be removed if they are: too thick, losing adhesion to the pavement sur-face, of an incompatible material (Table 2-3), or if the marking layout must be reconfigured. Removal should be performed in accordance with TxDOT Specification Item 677. Approved methods include:
flailing
waterblasting
sandblasting.
“Painting out” markings by covering over old pavement markings with black paint is not an acceptable removal technique. Note that the previous list of removal methods does not apply to buttons or tape. Figure 2-9 shows a properly removed marking using the flailing technique (prior to final brooming).
Table 2-3. Material Compatibility Matrix
Existing Restripe (New) Material
(Old) Material
Thermo WB Paint
Tape Epoxy Polyurea Mod. Ureth.
MMA Buttons
Thermo Y Y N N N N N Y
WB Paint Y Y N N N N N Y
Tape N N N N N N N N
Epoxy Y Y N Y – – – Y
Polyurea Y Y N – Y – – Y
Mod. Ureth. Y Y N – – Y – Y
MMA Y Y N – – – Y Y
Buttons N N N N N N N N
Pavement Marking Handbook 2-12 TxDOT 08/2004

Chapter 2 — Material Selection Section 3 — Pavement Surface Preparation
Figure 2-9. Properly removed marking using flailing technique.
Primer-Sealers
TxDOT Specification Item 666 requires the application of an acrylic or water-based paint primer prior to the application of most thermoplastic materials on concrete surfaces and oxidized asphalt surfaces where no marking exists. However, most transportation agencies favor the use of an epoxy primer in these situations. Primer is used on concrete surfaces because it penetrates into the concrete surface better than thermoplastic; thus the adhesion strength should be stronger. It does not act as a moisture barrier or eliminate the need for a dry surface at the time of pavement marking application. Primer-sealers are not required for restripe situations, as the existing marking will serve as the sealer. Note that restripe marking materials must be compatible with the existing marking material. Refer to “Table 2-3. Material Compatibility Matrix” or manufacturer recom-mendations for material compatibility.
Refer to TxDOT Specification Item 666 and manufacturer recommendations for specific informa-tion on the use of primer-sealers. Refer to Section 4 of this chapter or to manufacturer information for a detailed description of recommended application procedures for various pavement marking materials. If an uncommon or experimental pavement marking material is to be used, refer to spe-cific manufacturer instructions for surface preparation and application of this material.
Pavement Marking Handbook 2-13 TxDOT 08/2004

Chapter 2 — Material Selection Section 4 — Pavement Marking Material Descriptions
Section 4 — Pavement Marking Material Descriptions
Introduction
A majority of the pavement markings placed on TxDOT roadways over the past five years fall into one of three categories: thermoplastic, water-based paint, and preformed tape. However, other materials exist that have shown positive performance either in Texas or elsewhere, which warrants their discussion in this handbook.
Each material contains three primary components: binder (glue), surface glass beads (reflectors), and pigment (color). For thermoplastic markings, glass beads are also intermixed into the material and often become exposed as the binder material is worn down by traffic. The various pavement marking materials are often categorized by the type of binder material used.
Table 2-4 shows materials and their uses described in this section.
This section includes in-depth descriptions of commercially available materials and typical uses. Information on pavement marking material selection based on characteristics of a given roadway can be found in Section 7 of this chapter. Although every attempt was made to include descriptions of all commercially available materials, new materials and formulations frequently become avail-able. Therefore, materials that are not described herein may be used with approval from TRF or CST-MAT on an experimental basis until substantial performance data is obtained. Use of experi-
Table 2-4. Pavement Marking Materials Described in this Section
Material Brief Usage NoteSpecial Approval
Required*
thermoplastic See DMS-8220 -
water-based paint See DMS-8200 -
preformed tapes See DMS-8240 -
epoxy experimental use in Texas Yes
polyurea experimental use in Texas Yes
modified urethane experimental use in other states Yes
methyl methacrylate (MMA) extensive use in other states Yes
profiled thermoplastic experimental use in Texas -
contrast markings experimental use in Texas -
heated-in-place thermoplastic transverse lines, words, and symbols only -
ceramic buttons previously used extensively in Texas -
* Materials designated here as experimental require special approval from TRF or CST-MAT for use.
Pavement Marking Handbook 2-14 TxDOT 08/2004

Chapter 2 — Material Selection Section 4 — Pavement Marking Material Descriptions
mental materials may be considered for problem areas where other typical materials may not have provided the desired performance.
Summary of Material Use
Each of the materials, with the exception of heated-in-place thermoplastic, may be used as either a transverse (shortline) or longitudinal (longline) application, although performance in either case may vary. Further details on the performance of these materials are provided later in this chapter. Ceramic buttons are currently not an approved marking material due to the fact that they are not a retroreflective material and therefore provide poor nighttime visibility. Table 2-5 provides a sum-mary comparison of the characteristics of each material described in this section.
Table 2-5. Summary of Material Use
- Use Based on Pavement Surface - - -
Material Conc. Asp. Seal. Lane Closure Required
TxDOT Specifications
See Table #
Thermoplastic L Y Y No Yes 2-6, 2-7, 2-8
Water-Based Paint
Y* Y* Y* No Yes 2-9, 2-10
Preformed Tape Y Y N Yes Yes 2-11
Epoxy Y Y L Yes Yes** 2-12, 2-13
Polyurea Y Y L Yes Yes** 2-14
Modified Urethane
L L L Yes Yes** 2-15
Methyl Methacrylate
L L L Yes No 2-17
Profiled Thermoplastic
Y Y N No Yes -
Contrast Markings
Y Y L No No -
Heated-in-Place Thermoplastic (not for use in longlines)
Y Y Y Yes Yes -
Ceramic Buttons
L N N Yes No 2-15
Pavement Marking Handbook 2-15 TxDOT 08/2004

Chapter 2 — Material Selection Section 4 — Pavement Marking Material Descriptions
Supplemental Material Performance Information
The National Transportation Product Evaluation Program (NTPEP) performs performance evalua-tions on a number of different pavement marking materials on various pavement surface types and under various traffic volume levels and environmental conditions. Reports documenting these evaluations are available through NTPEP or the American Association of State Highway and Transportation Officials (AASHTO). TxDOT also maintains similar field test decks used for per-formance comparison of various marking materials.
Thermoplastic Markings
Thermoplastics have been used as a pavement marking material in the United States since the late 1950s and have been the most common pavement marking material used on roadways in Texas for years. Thermoplastic is so named because the mixture of plasticizer and resins that serves to hold all of the other ingredients together exists as a solid at room temperature, but becomes liquid when heated. The popularity of thermoplastic markings can be attributed to several factors including:
readiness for immediate use
high durability
good retroreflectivity
relatively low cost.
When properly formulated for a given roadway surface and correctly applied, thermoplastic pave-ment markings have been known to last from 5 to 8 years depending on traffic volumes, but research has shown that usual service lives range from 2 to 3 years depending on traffic volumes.
Thermoplastic materials are very sensitive to the variables governing application, warranting strict quality control during application. The following are the key variables that influence the durability and retroreflectivity performance of thermoplastic markings:
material composition
application procedure
roadway surface
Y = Suitable for use.
N = Not recommended.
L = Limited use.
* = Refer to Table 2-10 for traffic volume conditions.
** = Refer to Multipolymer Specification SS 1513.
Table 2-5. Summary of Material Use
- Use Based on Pavement Surface - - -
Pavement Marking Handbook 2-16 TxDOT 08/2004

Chapter 2 — Material Selection Section 4 — Pavement Marking Material Descriptions
traffic
environment.
If applied properly, thermoplastic materials provide durability and retroreflective performance that far surpass that of standard traffic paints. However, because thermoplastic materials are very sensi-tive to the variables involved with application, they may not be the most suitable material for certain situations. The following segments describe the types, application, performance, and sug-gested uses of thermoplastic materials.
Thermoplastic Marking Material Characteristics
Thermoplastic materials are classified by TxDOT as a Type I pavement marking material, with material specifications falling under DMS-8220 and tested using Test Method Tex-863-B. Ther-moplastic materials consist of four general components: binder, pigment, glass beads, and filler material (usually calcium carbonate, sand, or both). Thermoplastic materials are classified into two basic categories based on the type of binder: hydrocarbon and alkyd. Hydrocarbon thermoplastic is made from petroleum-derived resins, while alkyd thermoplastics are made from wood-derived res-ins. Alkyd thermoplastics are currently the standard thermoplastic allowed for use by TxDOT as a pavement marking material under DMS 8220. Hydrocarbon thermoplastics are currently only allowed for use by TxDOT through a special provision to DMS 8220. A side-by-side comparison of the two types of thermoplastic materials is shown in Table 2-6.
The ability for thermoplastic materials to bond to the roadway surface is based on the thermal prop-erties of the thermoplastic binder and the roadway surface along with the porosity of the surface. Thermoplastic is well suited for use on asphalt surfaces because the thermoplastic develops a ther-mal bond with the asphalt via heat fusion. When applied to hydraulic cement concrete surfaces, bond formation occurs by the liquid thermoplastic seeping into the pores of the concrete and form-
Table 2-6. Comparison of Thermoplastic Material Types
- Type of Thermoplastic
Characteristic Hydrocarbon Alkyd
Binder Source Petroleum Wood
Application Temperature Approximately 420° Approximately 420°
Oil Soluble? Yes No
Heat Stability More Less
Sensitivity to Changes in Applica-tion Properties
Better Suited Not As Well Suited
Durability Less More
Expected Life Under Normal Conditions
Up to 5 years Up to 5 years
Pavement Marking Handbook 2-17 TxDOT 08/2004

Chapter 2 — Material Selection Section 4 — Pavement Marking Material Descriptions
ing a mechanical lock to the concrete surface. Primers are recommended prior to thermoplastic application on all hydraulic cement concrete surfaces and asphalt surfaces that are more than two years old, heavily oxidized, or have exposed aggregates.
Thermoplastic Marking Application Methods
Most of the thermoplastic longlines placed on TxDOT roadways are applied by spraying the hot thermoplastic onto the surface. Therefore, sprayed applications are the major focus of the informa-tion in this segment. However, it is worth noting that there are other methods of applying thermoplastic markings to the roadway surface, such as gravity extrusion and ribbon application.
Gravity Extrusion. Gravity extrusion was the application method of choice for many years, and is well suited for application of thicker markings. Extrusion occurs by pouring hot thermoplastic into a trough or shoe, which has a gate set to produce a desired thickness. However, extrusion is a rela-tively slow process (3 mph).
Ribbon Application. Ribbon application uses a pressurized gun to apply thermoplastic in the same manner as the gravity extrusion method.
Hot-Sprayed. Hot-sprayed thermoplastic is the most common application method used for strip-ing on TxDOT roadways and provides many advantages over other application types. The main difference between sprayed thermoplastic and the other application methods is that the hot thermo-plastic is combined with pressurized air in spray applications. The primary advantage to sprayed application is that striping can occur at higher speeds (2–8 mph) and markings are ready for traffic in one minute. Sprayed applications often produce a better surface bond than extrusion and ribbon applications. However, sprayed thermoplastic markings are not as well suited for applying mark-ings thicker than 100 mils when compared to extrusion and ribbon applications. Figure 2-10 shows a typical sprayed thermoplastic application.
Figure 2-10. Typical sprayed thermoplastic operation.
Pavement Marking Handbook 2-18 TxDOT 08/2004

Chapter 2 — Material Selection Section 4 — Pavement Marking Material Descriptions
Thermoplastic Marking — Surface Preparation
The temperature of the thermoplastic material is a very important factor in the performance of the thermoplastic-roadway surface bond. Suitable application temperatures range from 400–450°F, with 420°F as the recommended temperature for most applications. For proper bonding, the fol-lowing conditions must exist:
The pavement surface must be free of dirt, dust, and other contaminants.
The pavement surface must be free of poorly adhered existing markings, glass beads, and cur-ing compound.
The pavement surface must be free of moisture.
Pavement and air temperatures must be at least 50°F and 55°F, respectively, to ensure proper rate of cooling.
It must be emphasized that a clean and dry pavement surface is critical for thermoplastic materials to achieve proper bonding with the pavement surface. If primers are used, they must be given proper cure time (until tacky) prior to applying the marking material. Special pavement heating devices are now available that are effective for removing pavement surface moisture and elevating the pavement surface temperature, allowing for better thermoplastic bonding.
Table 2-7 describes problems and solutions associated with the application of thermoplastic markings.
Table 2-7. Tips and Trips for Thermoplastic Application
Trips Tips
Debonding Unclean road surface
Low temperatures
Moisture in pavement
Defective material
Marking speed too fast
Bubbles in line Moisture in pavement
Overheated material
Flowing Line (i.e., no defined edge), line with excessive rounded edges
Material too hot
Cracks in line Temperature stress from overheating
Low temperatures
Material applied too thin
Rough line surface or crumbly edges Material temperature too low
Material has been scorched
Moisture in pavement
Smooth, shiny, glossy line No or insufficient glass beads or beads too deeply embedded
Pavement Marking Handbook 2-19 TxDOT 08/2004

Chapter 2 — Material Selection Section 4 — Pavement Marking Material Descriptions
Thermoplastic Marking — Effect of Pavement Surface on Performance
Because of the thermal bonding characteristics between thermoplastic and asphalt, nearly all ther-moplastic materials are well suited for application on new HMAC surfaces. This includes both hydrocarbon and alkyd thermoplastics. As HMAC surfaces wear and become more brittle through traffic exposure and oxidization, the use of a primer is suggested when applying thermoplastic directly to the pavement surface. Suitable minimum thickness of thermoplastic on new HMAC sur-faces is 90 mils. Suitable restripe thickness on HMAC surfaces is 60 mils.
Not all thermoplastic materials have been shown to provide suitable durability on concrete sur-faces. In other words, thermoplastics that are suitable on asphalt surfaces may not be suitable for concrete surfaces. Because the thermal bond is not available between thermoplastic materials and concrete surfaces, mechanical bonding is relied upon. For mechanical bonding to occur, the con-crete surface must be porous enough to allow the liquid thermoplastic to seep into the pores and create a tight mechanical bond after cooling. This is often not the case with new concrete pave-ments, suggesting the use of primers. A major thermoplastic bonding failure on concrete is shown in Figure 2-11.
Smooth line with slight dimples Glass beads too low
Bead gun too close to application shoe
Cratered line Glass beads have popped out
Material is too cool or bead gun located too far back
Greenish yellow appearance Material has been scorched
Material reheated too many times or inadequate cleaning of application pots
Splattering Material too hot or too cold
Dingy or dull white color Material has been scorched
Material reheated too many times or inadequate cleaning of application pots
Yellow thermoplastic not completely removed before white was added to the application pots
Lumps in line Material is either overheated or underheated
Charred material has been overheated where unblended pig-ments and fillers have been underheated
Table 2-7. Tips and Trips for Thermoplastic Application
Trips Tips
Pavement Marking Handbook 2-20 TxDOT 08/2004

Chapter 2 — Material Selection Section 4 — Pavement Marking Material Descriptions
Figure 2-11. Major thermoplastic failure on concrete.
Certain thermoplastic products have been identified that provide suitable bonding with concrete either with or without a primer. Suitable minimum thickness of thermoplastic on new HCC sur-faces is 90 mils. Suitable restripe thickness on HCC surfaces is 60 mils.
When thermoplastic markings are applied to coarse surfaces such as surface treatments, thickness plays a major role in the durability and retroreflective performance over time. As with all asphalt surfaces, suitable thermal bonding is achieved. However, much of the thermoplastic material seeps into the voids between the aggregates, leaving very little material on the top of the aggregates. This lack of material at the top of the aggregate leads to accelerated wear of the thermoplastic and pre-mature bead loss. Research has shown that thermoplastic thicknesses of 100 mils or greater provide better performance than thinner applications on surface treatments. In most cases, a restripe thickness of 60 mils is suitable on surface treatments, although a greater thickness may sometimes be necessary.
Thermoplastic Marking — Effect of Traffic on Performance
Durable pavement markings, such as thermoplastic, are desirable on high-traffic-volume roadways because they require fewer restripe cycles, reducing the amount of worker exposure and delay to traffic. However, on very low-volume roads, paint may provide comparable performance to dura-ble materials at a much lower cost.
Thermoplastic materials provide suitable performance for a broad range of traffic volumes. Because thermoplastic dries very quickly, it is well suited for higher traffic volume roadways. However, thermoplastics may not be the most durable marking in areas where very high-traffic vol-umes or heavy weaving result in increased tire wear. Other two-component materials or permanent tapes may provide better durability under extreme traffic conditions.
Pavement Marking Handbook 2-21 TxDOT 08/2004
Chapter 2 — Material Selection Section 4 — Pavement Marking Material Descriptions
Thermoplastic Marking — Environmental Effects on Performance
One drawback to thermoplastic materials is that they are sensitive to environmental changes — especially the alkyd materials used extensively throughout Texas. Many sources state that surface moisture and air temperature are the two most important factors that influence the long-term dura-bility of thermoplastic markings. Thermoplastics are especially susceptible to moisture-associated bonding failures. Therefore, thermoplastic materials may not be the best material for pavement markings in locations that are very humid or susceptible to dew formation during times that would affect striping operations, such as striping at night. Thermoplastics should also not be used unless the pavement temperature is 50°F and the air temperature is 55°F. Thermoplastics perform better than standard traffic paints in areas where snowplowing is common but still suffer some loss in durability depending on the number of snowplow passes.
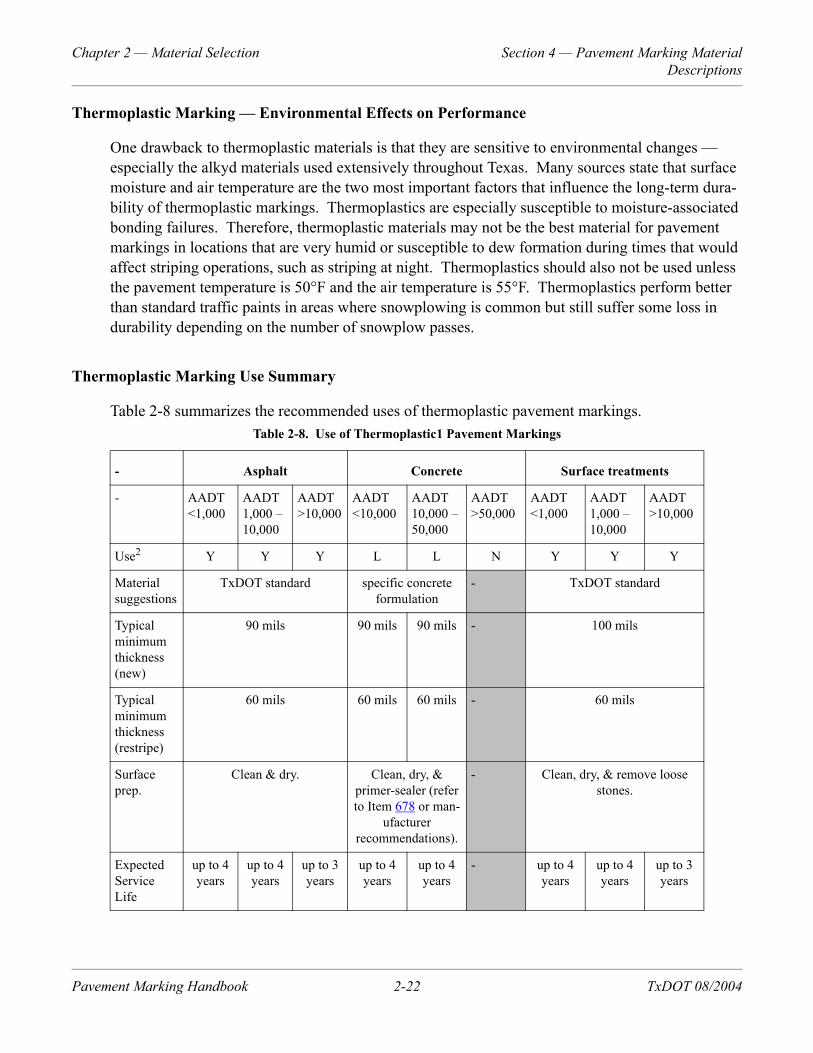
Thermoplastic Marking Use Summary
Table 2-8 summarizes the recommended uses of thermoplastic pavement markings.
Table 2-8. Use of Thermoplastic1 Pavement Markings
- Asphalt Concrete Surface treatments
- AADT <1,000
AADT 1,000 –10,000
AADT >10,000
AADT <10,000
AADT 10,000 –50,000
AADT >50,000
AADT <1,000
AADT 1,000 –10,000
AADT >10,000
Use2 Y Y Y L L N Y Y Y
Material suggestions
TxDOT standard specific concrete formulation
- TxDOT standard
Typical minimum thickness (new)
90 mils 90 mils 90 mils - 100 mils
Typical minimum thickness (restripe)
60 mils 60 mils 60 mils - 60 mils
Surface prep.
Clean & dry. Clean, dry, & primer-sealer (refer to Item 678 or man-
ufacturer recommendations).
- Clean, dry, & remove loose stones.
Expected Service Life
up to 4 years
up to 4 years
up to 3 years
up to 4 years
up to 4 years
- up to 4 years
up to 4 years
up to 3 years
Pavement Marking Handbook 2-22 TxDOT 08/2004

Chapter 2 — Material Selection Section 4 — Pavement Marking Material Descriptions
Water-Based Paint
Traffic paints are the oldest and most widely used pavement marking materials in existence. Paint is a common pavement marking material used by TxDOT, although its use has recently declined as thermoplastic has become more popular. Paint still remains the most inexpensive of all pavement marking materials, although its cost has increased slightly as new formulations have been intro-duced. Paint is almost exclusively used for longline applications, often in maintenance projects, and is currently the only longline material applied by state forces.
Water-Based Paint — Material Characteristics
Paints are classified by TxDOT as Type II pavement markings, with material specifications falling under DMS-8200, WPT-12, and YPT-12 for white and yellow, respectively. The current DMS-8200 specification specifically calls for Rohm-Haas Fast Track HD-21A or Dow DT-400 acrylic emulsion resins. Check with TxDOT materials laboratory for approved formulations, as they are subject to change.
Conventional traffic paint consists of three interwoven elements: pigment, binder, and glass beads. Each element is important because different paints react differently to different pavement surfaces, traffic wear, and environmental wear. Binder materials (or resins) are usually latex or acrylic mate-rials that provide the adhesive and cohesive properties of the material.
A myriad of traffic paint formulations exists, including solvent-based and water-based. Increased environmental awareness in the late 1980s and early 1990s led to a decline in use of volatile organic compounds (VOCs) in the United States. This awareness also led to a decline in the use of
Approx. bid price for new surface in 2002 (per lf)
$0.20 $0.35 - $0.20
Estimated cost per year of ser-vice life (per lf)
$0.05 $0.05 $0.07 $0.07 $0.09 - $0.05 $0.05 $0.07
Footnotes:
1. TxDOT Specification Thermoplastic unless noted otherwise.
2. Y = suitable for use; N = not recommended; L = limited use.
Table 2-8. Use of Thermoplastic1 Pavement Markings
- Asphalt Concrete Surface treatments
Pavement Marking Handbook 2-23 TxDOT 08/2004

Chapter 2 — Material Selection Section 4 — Pavement Marking Material Descriptions
solvent-based paints and an increase in the use of water-based paints, which contain far fewer VOCs. TxDOT has not allowed solvent-based paint for many years, relying exclusively on water-based formulations. In addition, most state DOTs have disallowed solvent-based paints.
Water-based paints are environmentally friendly, are much easier to handle than solvent-based paints, and greatly decrease the safety hazards to workers. Water-based paints also become track-free much quicker than solvent-based paints. Humidity has very little effect on the track-free times of water-based paints because these paints begin to set as a result of the drop in pH due to evapora-tion of the ammonia.
Water-Based Paint Application
Most of the water-based paint placed for longline applications is applied by spraying the paint onto the surface using a striping truck. Paint adheres to the pavement surface through mechanical bond-ing within the pores of the pavement surface. Although paints are less sensitive to changes in temperature, moisture, or other environmental characteristics than thermoplastic materials, surface preparation is still important. To achieve proper bonding, the following conditions must exist:
The pavement surface must be free of dirt, dust, and other contaminants.
The pavement surface must be free of poorly adhered existing markings, glass beads, and cur-ing compound.
The pavement surface must be free of moisture.
Pavement and air temperatures (including wind chill) must be at least 40°F.
Paints are often applied at a thickness ranging from 15–25 mils. As a rule of thumb, the optimal speed of a striping truck applying 15-mil markings is 10–12 mph. Paint thickness can influence drying time and therefore should be specified with discretion depending on the drying time needed. TxDOT Specification Item 666.4.4 contains more information on paint application rates. Applica-tion of a primer material is not necessary on any roadway surface, although a double application of paint is sometimes specified. Table 2-9 summarizes problems that have been encountered with the use of paint as a striping material and suggests solutions for these problems.
Table 2-9. Trips and Tips for Paint Applications
Trips Tips
Thick centers Decrease paint tank pressure.
Close control screw slightly.
Increase atomizing air pressure.
Reduce pump pressure.
Increase temperature of material.
Pavement Marking Handbook 2-24 TxDOT 08/2004

Chapter 2 — Material Selection Section 4 — Pavement Marking Material Descriptions
Water-Based Paint Performance
A number of external factors — including traffic volume, pavement surface roughness, and envi-ronmental wear — greatly affect paint performance. Research has shown that paints often have lower initial retroreflectivity values and degrade at a much faster rate than other marking materials, which is why they are usually not classified as a durable marking material. Paints also experience decreased performance on coarse roadway surfaces such as surface treatments because the paint is applied thinly.
On low-volume roadways, paints have been known to provide service lives of up to 2 years. How-ever, a reasonable target value for service life, under “normal” conditions is approximately 6 to 12 months. Three months is often the paint service life on roads that have a very high ADT. Because of their relatively short service lives, most paints are only used on low-volume highways, although the new acrylic resin formulations have shown promise as a durable marking on high-volume road-ways within TxDOT.
Thin centers Decrease atomizing air pressure or clean paint screens.
Increase paint tank pressure.
Decrease temperature of material.
Marking is thick on one side and thin on the other Replace tips or clean them out.
Marking is too wide Lower application gun.
Select proper tip size.
Adjust tip angle.
Marking is too narrow Raise application gun.
Select proper tip size.
Adjust tip angle.
Clean spray nozzle.
Marking is too thin Open the control screw slightly.
Increase the pump pressure.
Increase the air pressure.
Decrease the application vehicle speed.
Marking is too thick Close the control screw slightly.
Decrease the pump pressure.
Decrease the air pressure.
Increase the application vehicle speed.
Discoloration of paint on new asphalt roadway Apply a second coat of paint.
Table 2-9. Trips and Tips for Paint Applications
Trips Tips
Pavement Marking Handbook 2-25 TxDOT 08/2004

Chapter 2 — Material Selection Section 4 — Pavement Marking Material Descriptions
The thinner applications and lack of opacity of the pigments often cause paints to have a tendency to appear dull or faded in color when compared to other materials. Some organic pigments used in yellow paint or two-component materials have a tendency to appear white at night under headlamp illumination. Lead-chromate-based yellow markings usually do not experience this phenomenon.
Water-Based Paint Use Summary
Table 2-10 summarizes the recommended uses of paint pavement markings.
Preformed Tapes
Preformed tapes are cold-applied, preformed pavement marking materials that are supplied in con-tinuous rolls of various lengths and widths. Preformed tapes have the advantage over sprayed or extruded materials because they do not require expensive application equipment or experienced operators to place, and they require no drying or curing times. While tapes have a significantly higher initial cost than most other materials, the service lives are usually superior to most other materials, including thermoplastics, often making them a cost-effective choice in locations with
Table 2-10. Use of Paint Pavement Markings
- Concrete Asphalt Surface Treatments
- AADT <1,000
AADT 1,000 –10,000
AADT >10,000
AADT <10,000
AADT 10,000 –50,000
AADT >50,000
AADT <1,000
AADT 1,000 –10,000
AADT >10,000
Use1 Y Y L Y L N Y L N
Thickness 15–25 mils 15–25 mils 15–25 mils
Surface prep.
Clean & dry. Clean & dry. Clean, dry, & remove loose
stones.
Expected service life
Up to 1 year Up to 1 year Up to 1 year2
Approx. bid price (per lf)
$0.08 $0.08 $0.08
Estimated cost per year of ser-vice life (per lf)
$0.08 $0.08 $0.08
Footnotes:
1. Y = suitable for use; N = not recommended; L = limited use.
2. On new surface treatments, paint should only be used as a temporary marking for up to 6 months.
Pavement Marking Handbook 2-26 TxDOT 08/2004

Chapter 2 — Material Selection Section 4 — Pavement Marking Material Descriptions
high traffic volumes. A myriad of preformed tapes exist, although only a small number are described here. Preformed tapes should be installed according to TxDOT Specification Item 668.
Preformed tapes are frequently used for transverse markings, but are often used for longitudinal lines in high-traffic areas. Tapes are highly durable and abrasion resistant in most applications. Because of their high installation costs and slow application procedure, they are often used only in locations with the most severe traffic conditions that require frequent replacement of standard pave-ment markings.
Preformed Tapes — Material Characteristics
Preformed tapes can be classified by the expected service life and by material composition. There are only two classifications for service life: permanent and temporary.
Permanent. A permanent preformed tape is any material that bonds with the pavement surface so that it cannot be removed by hand and has a service life of at least 1 year. This includes any inlayed installations and thick overlaid installations that have achieved good bond with the surface. Perma-nent preformed tapes must conform to DMS-8240 and are classified by TxDOT in this specification as Types A and B based on application procedures and expected service life. Perma-nent preformed tapes are usually made of a plastic binder material with glass beads embedded onto the surface. Two of the common types of plastics binders used for permanent tapes are urethane and pliant polymer, contrasted as follows:
Temporary. Temporary tapes are typically used for short-term applications such as work zones. These tapes are much thinner than permanent tapes, have foiled backs, and are pre-coated with a self-bonding adhesive. The preformed tape material consists of a single layer pigmented binder and glass beads that are applied to a metal foil backing.
Two forms of temporary marking tapes are available and vary based on their adhesive strengths. The first is intended for use in projects where marking removal will not be required. The use may be short- or long-term, but the markings cannot be easily removed. The other type is intended for easy removability and can be removed by hand leaving no trace of a marking. This type is most often used in construction zones and is preferred when markings must be removed. Removable preformed tapes must conform to DMS-8241.
Urethane: Pliant Polymer:
Typically 60 or 90 mils thick.
Cold-extruded plastic with intermixed and sur-face glass beads.
Often pre-coated with pressure-sensitive adhesive.
Typically 30 or 60 mils thick.
More flexible than urethane tapes.
Intermixed and surface glass beads.
Often pre-coated with pressure-sensitive adhesive.
Pavement Marking Handbook 2-27 TxDOT 08/2004

Chapter 2 — Material Selection Section 4 — Pavement Marking Material Descriptions
Preformed Tapes — Application
The manufacturer’s application procedures for preformed tape must be strictly followed. A clean pavement surface is very important for tapes to achieve a good bond. Preformed tapes may be inlaid or overlaid. Inlaid markings will outperform overlaid markings if a good bond is achieved. Tire traffic over the tape installation will help achieve a good bond. Tapes should not be installed on tine-textured concrete pavement, as the materials will be easily removed by tire wear. Installation of the tape on a deteriorated asphalt pavement surface will accelerate abrasion and adhesion failures.
Inlay Method. The inlay method is preferred on newly constructed or resurfaced asphalt pave-ment. The asphalt should still be warm, approximately 130°F. Application usually follows the pavement breakdown roller. The tape is then rolled into the pavement surface with a steel drum roller during the final rolling of the pavement. The roller fuses the plastic into the hot asphalt sur-face creating an excellent bond and sealing out moisture.
Overlay Method. On existing pavement and concrete pavement, the overlay method is used. The overlay method is also often used on new pavement surfaces, although the inlay method is pre-ferred due to superior performance. The tape is applied directly on and bonded to the surface with an adhesive. Pressure-sensitive adhesives work best when overlaying permanent tapes on new asphalt pavement surfaces. The use of contact cement is recommended when installing the tape on concrete or over older markings. Manufacturers suggest 2 coats on the pavement surface and 1 coat on the tape. This is also true for all surfaces with heavy turning or weaving movements over the markings. Markings are initially bonded with a light hand roller or vehicle tire and permanently bonded by traffic wear.
Preformed Tapes — Removal
If properly installed, all permanent and some temporary marking tapes achieve and maintain bond-ing to the pavement surface that will last for the life of the pavement. Tapes should always be removed prior to placement of new markings. Therefore, removal of these markings becomes a challenge and is the major drawback to their use.
Removal of permanent tapes can only be achieved by a small number of methods, which are often destructive to the pavement surface. Burning and scraping of the marking materials with an oxygen torch is one method. Often, however, the permanent tapes have achieved such a tight bond to the surface that they must be ground off, which scars the pavement. This is especially true of perma-nent markings that have been inlayed into the pavement surface.
Most of the temporary tapes that are in use are easily removed by hand or by a mechanical roller with no special equipment required.
Pavement Marking Handbook 2-28 TxDOT 08/2004

Chapter 2 — Material Selection Section 4 — Pavement Marking Material Descriptions
Preformed Tapes — Performance
Preformed plastic tapes generally have good durability and abrasion resistance. Preformed tape typically exhibits better performance on bituminous asphalt pavement than on hydraulic cement concrete because of the adhesive characteristics. Inlaid tapes almost always outperform overlaid tapes. Tapes are known to distort in areas that have a high amount of turning movements or weav-ing over the markings. A clean surface is more important for tapes than for any other material. Therefore, tapes must be applied in areas where good bonding can be ensured. If applied properly, tapes can provide durability and visibility for many years. In most cases these materials are so durable that the tape material will typically outlast its retroreflective properties.
Preformed plastic tapes are most commonly used for shortline markings, including: crosswalks, stop bars, and words and symbols. However, their use as a longline application is increasing nationwide. Permanent tapes are well suited for severe conditions where frequent replacement is required due to their ease of application. Temporary preformed tapes can be used in construction or maintenance jobs requiring temporary delineation or altered travel lanes. Preformed tapes require little or no equipment to apply and the roadway is open almost immediately after installation.
Preformed Tapes — Use Summary
Table 2-11 summarizes the recommended uses of permanent preformed tape pavement markings. Temporary preformed tapes should only be used for short-term applications such as in work zones.
Table 2-11. Use of Permanent Preformed Tape Pavement Markings
- Asphalt Concrete Surface Treatments
- AADT <1,000
AADT 1,000 –10,000
AADT >10,000
AADT <10,000
AADT 10,000 –50,000
AADT >50,000
AADT <1,000
AADT 1,000 –10,000
AADT >10,000
Use1 N Y Y N Y Y N N N
Surface prep.
- Remove existing markings, clean,
dry, & apply adhesive
- Remove existing markings, clean, dry,
& apply adhesive
- - -
Expected service life
- Up to 4 years - Up to 4 years - - -
Approx. bid price (per lf)2
- $2.57 - $2.57 - - -
Estimated cost per year of ser-vice life (per lf)
- $0.43 - $0.43 - - -
Pavement Marking Handbook 2-29 TxDOT 08/2004

Chapter 2 — Material Selection Section 4 — Pavement Marking Material Descriptions
Epoxy
Researchers first introduced two-component epoxy-resin paints as a pavement marking material in the 1970s and have since developed it into a common pavement marking material used by many agencies. Epoxy materials are durable, sprayable materials that provide exceptional adhesion to both bituminous surfaces and hydraulic cement concrete surfaces with good abrasion resistance. Epoxies are more expensive than standard paints and are about the same cost or slightly more expensive than most thermoplastics. A variety of formulations are available on the market from many vendors.
Epoxy Performance
Epoxy pavement markings are durable markings recognized for exceptional durability on asphalt and concrete surfaces alike. This exceptional durability is a result of tight bonding to the pavement surface that results from the chemical reaction that occurs when the two components are mixed. Research has shown that epoxy paints are generally less sensitive to application factors than ther-moplastic materials, allowing epoxy to have exceptional durability under many different roadway conditions. Epoxies can be applied at surface temperatures as low as 35°F and when pavement sur-faces are slightly wet. On low-mid-volume roadways, epoxies have been known to provide service lives in excess of four years. Epoxies require proper cleaning of the pavement surface to achieve the best bond. Application of a primer material is not necessary on any roadway surface. Epoxies are often applied at thicknesses of 15 mils.
One drawback associated with epoxies is that they often take much longer to dry than other materi-als. Some formulations take over 40 minutes to dry. If a two-component marking material, like epoxy, does not dry within the manufacturer’s recommended drying time, the components likely did not react properly and will not cure. In this case, the two component products must be removed and the road must be restriped. Newer formulations exist that provide no-track drying times as low as 30 seconds depending on weather conditions, but are often slightly more expensive than slow cure epoxies. Fading due to color instability under ultraviolet lighting is also an issue with some epoxy paints. Epoxies also cannot be placed over markings made from other materials, limiting
Footnotes:
1. Y = suitable for use; N = not recommended.
2. Price includes required removal of existing markings.
Table 2-11. Use of Permanent Preformed Tape Pavement Markings
- Asphalt Concrete Surface Treatments
Pavement Marking Handbook 2-30 TxDOT 08/2004

Chapter 2 — Material Selection Section 4 — Pavement Marking Material Descriptions
their use as a restripe material. Table 2-12 summarizes some problems that have been encountered using epoxy striping materials and potential remedies of those problems.
Table 2-12. Trips and Tips for Epoxy Application
Trips Tips
Thick centers Replace tip.
Decrease tip size.
Increase pressure.
Thin centers Replace tip.
Increase tip size.
Surging pattern Leaks or restrictions in supply hose may be causing pulsating application.
Check hydraulics.
Marking is thick on one side and thin on the other Replace tips or clean them out.
Marking is too wide Lower application gun.
Select proper tip size.
Adjust tip angle.
Marking is too narrow Raise application gun.
Select proper tip size.
Adjust tip angle.
Marking is too thin Increase tip size.
Slow down application vehicle.
Increase pressure.
Marking is too thick Decrease tip size.
Speed up application vehicle.
Decrease pressure.
Dark marking Decrease hardener amount.
Rebuild high pressure pumps.
Marking takes too long to cure Increase hardener amount.
Rebuild high pressure pumps.
Some spots didn’t cure properly Clean or change check valves.
Check accumulator pressures.
Railroad tracking Increase temperature of material.
Replace tips.
Adjust material pressure.
Pavement Marking Handbook 2-31 TxDOT 08/2004

Chapter 2 — Material Selection Section 4 — Pavement Marking Material Descriptions
Epoxy Use Summary
Table 2-13 summarizes the recommended uses of epoxy pavement markings.
Other Materials
Other materials that have been used by TxDOT on an experimental basis or have seen substantial use by other transportation agencies warrant discussion here. These other materials include epoxy paints, polyurea, modified urethane, methyl methacrylate, and heated-in-place thermoplastic. Each material is available from multiple vendors. Discussions of these materials follow.
Polyurea
Polyurea markings are a sprayed, two-component durable pavement marking material that is rela-tively new to the pavement marking market. Various formulations of polyurea markings exist on the market and are available from a number of vendors. Polyurea pavement markings have been used on an experimental basis by TxDOT.
Table 2-13. Use of Epoxy Pavement Markings1
- Asphalt Concrete Surface Treatments
- AADT <1,000
AADT 1,000 –10,000
AADT >10,000
AADT <10,000
AADT 10,000 –50,000
AADT >50,000
AADT <1,000
AADT 1,000 –10,000
AADT >10,000
Use2 Y Y Y Y Y Y Y Y Y
Thickness 15–25 mils 15–25 mils 15–25 mils
Surface prep.
Remove old mkgs, clean, & dry
Remove old mkgs, clean, & dry
Remove old mkgs, clean, & dry
Expected service life
Up to 4 years
Up to 4 years
Up to 3 years
Up to 4 years
Up to 4 years
Up to 3 years
Up to 4 years
Up to 4 years
Up to 3 years
Approx. bid price (per lf)
$0.40 $0.40 $0.40
Estimated cost per year of ser-vice life (per lf)
$0.10 $0.10 $0.13 $0.10 $0.10 $0.13 $0.10 $0.10 $0.13
Footnotes:
1. A wide variety of epoxy materials are currently available, possessing varying degrees of quality. The infor-mation in this table is based on the cost and performance of special formulations of epoxy that are designed for high-quality and high-durability pavement markings commonly used by state DOTs nationwide.
2. Y = suitable for use.
Pavement Marking Handbook 2-32 TxDOT 08/2004

Chapter 2 — Material Selection Section 4 — Pavement Marking Material Descriptions
Polyurea materials are marketed as durable pavement markings that provide exceptional color sta-bility, resistance to abrasion, and adhesion to all pavement surfaces. Polyurea markings appear to be less sensitive to pavement surface moisture than thermoplastics and can be applied at tempera-tures as low as freezing. Most of these materials are marketed as fast curing materials, achieving proper bonding and no-track conditions in 2 minutes or less. Polyurea markings have been reported to have service lives of up to 5 years, although limited data exist to support this statement.
One of the drawbacks associated with polyurea materials is that some must be applied by a special striping apparatus, which limits the number of contractors available to apply the material. Other polyurea materials, however, can be applied by a standard epoxy truck. The type of truck required is based on the resin-catalyst mix ratio. Polyurea mixes with a 2:1 mix ratio can be applied with a standard epoxy truck. Table 2-14 summarizes the recommended uses of polyurea pavement markings.
Table 2-14. Use of Polyurea Pavement Markings1
- Asphalt Concrete Surface Treatments
- AADT <1,000
AADT 1,000 –10,000
AADT >10,000
AADT <10,000
AADT 10,000 –50,000
AADT >50,000
AADT <1,000
AADT 1,000 –10,000
AADT >10,000
Use2 Y Y Y Y Y Y Y Y Y
Thickness 15–25 mils 15–25 mils 15–25 mils
Surface prep.
Remove existing markings, clean, & dry
Remove existing markings, clean, & dry
Remove existing markings, clean, & dry
Expected service life
Up to 4 years
Up to 4 years
Up to 3 years
Up to 4 years
Up to 4 years
Up to 3 years
Up to 4 years
Up to 4 years
Up to 3 years
Approx. bid price (per lf)
$1.00 $1.00 $1.00
Estimated cost per year of ser-vice life (per lf)3
$0.25 $0.25 $0.33 $0.25 $0.25 $0.33 $0.25 $0.25 $0.33
Footnotes:
1. The cost and performance of polyurea is based on limited experimentation both in Texas and nationwide.
2. Y = suitable for use.
3. Prices include a proprietary retroreflectivity-enhancing ceramic element embedded into the marking sur-face. Polyurea materials applied without the proprietary ceramic element may be less expensive.
Pavement Marking Handbook 2-33 TxDOT 08/2004

Chapter 2 — Material Selection Section 4 — Pavement Marking Material Descriptions
Modified Urethane
Modified urethanes are a two-component, durable marking material with similar performance char-acteristics to those of polyurea and epoxy. Material costs are reported to be slightly more expensive than epoxy but less than polyurea. This product is marketed as being slightly more durable than epoxy but with much quicker cure times (2 minutes) and better ultraviolet color stability. This material can be sprayed from any standard epoxy truck.
Because so little experience exists with modified urethane pavement marking materials, they should be used only on an experimental basis within Texas, although this material seems to have promise on concrete roadways. More data are needed before conclusive recommendations can be made. Table 2-15 summarizes the recommended uses of modified urethane pavement markings.
Ceramic Buttons
TxDOT has used ceramic buttons extensively over the years. Until the recent change to TxDOT’s Signs and Markings Manual, which strongly discouraged the use of buttons, they were the third most often used pavement marking material in Texas behind thermoplastic and paint. While but-tons often last for at least 2 years under the heaviest traffic conditions on concrete, the major
Table 2-15. Use of Modified Urethane Pavement Markings1
- Asphalt Concrete Surface Treatments
- AADT <1,000
AADT 1,000 –10,000
AADT >10,000
AADT <10,000
AADT 10,000 –50,000
AADT >50,000
AADT <1,000
AADT 1,000 –10,000
AADT >10,000
Use2 L L L L L L L L L
Thickness Manuf. Recommendations Manuf. Recommendations Manuf. Recommendations
Surface prep.
Remove Existing Markings, Clean & Dry
Remove Existing Markings, Clean & Dry
Remove Existing Markings, Clean & Dry
Expected service life
Up to 4 years
Up to 4 years
Up to 3 years
Up to 4 years
Up to 4 years
Up to 3 years
Up to 4 years
Up to 4 years
Up to 3 years
Approx. bid price (per lf)
$0.63 $0.63 $0.63
Estimated cost per year of ser-vice life (per lf)
$0.16 $0.16 $0.21 $0.13 $0.16 $0.21 $0.16 $0.16 $0.21
Footnotes:
1. Based on use in other states.
2. L = limited use.
Pavement Marking Handbook 2-34 TxDOT 08/2004

Chapter 2 — Material Selection Section 4 — Pavement Marking Material Descriptions
complaint against their use is the lack of retroreflectivity provided by the materials rendering them nearly invisible under headlamp conditions on unlit roadways. While retroreflective raised pave-ment markings (RRPMs) are always used with buttons to supplement the lack of retroreflectivity, RRPMs generally have short service lives making for poor nighttime visibility conditions when the RRPMs fail. Buttons do provide a tactile and audible sensation when driven over, similar to that of rumble strips, which may be considered a safety benefit.
Ceramic buttons are very different in appearance and application from all other marking materials. If used, they must be supplemented by RRPMs to provide nighttime visibility. Due to the fact that they are a non-retroreflective material, they are somewhat unpopular as a pavement marking mate-rial. The availability of application equipment and labor, especially in Texas, makes them an attractive material choice, although they are comparatively expensive. Table 2-16 shows recom-mendations pertaining to the use of ceramic button pavement markings on concrete.
Methyl Methacrylate (MMA)
Methyl Methacrylate is a nonhazardous, two-component, durable pavement marking material. The material exists as a solid that is mixed in a static mixer immediately prior to application. MMA can be sprayed or extruded onto the pavement. The material forms a strong bond to the pavement sur-face by exothermic reaction (release of heat) that occurs during the mixing process.
Methyl methacrylate was originally marketed as an environmentally friendly alternative to solvent-borne paints. However, MMA has been shown to provide much longer service life than standard traffic paint. A service life of greater than three years is common. In addition, the material is designed to be resistant to oils, antifreeze, and other common chemicals found on the roadway sur-face. MMA reportedly bonds well to concrete pavements. MMA materials are usually applied at thicknesses of 40 mils. Because MMA does not rely on the addition of heat to cure, it is an attrac-tive material in cold-weather climates. Research in cold-weather climates has shown very good
Table 2-16. Use of Ceramic Button Pavement Markings on Concrete
- Traffic Condition
- AADT <10,000 ADDT 10,000–50,000 AADT > 50,000
Use Limited use Limited use Limited use
Service prep. Clean, dry, & apply epoxy adhesive
Clean, dry, & apply epoxy adhesive
Clean, dry, & apply epoxy adhesive
Expected service life Up to 5 years Up to 4 years Up to 3 years
Approx. bid price (per button)1 $1.40 $1.40 $1.40
Estimated cost per year of ser-vice life (per lf)
$0.28 $0.35 $0.47
Footnotes:
1. Price includes required removal of existing markings or buttons.
Pavement Marking Handbook 2-35 TxDOT 08/2004
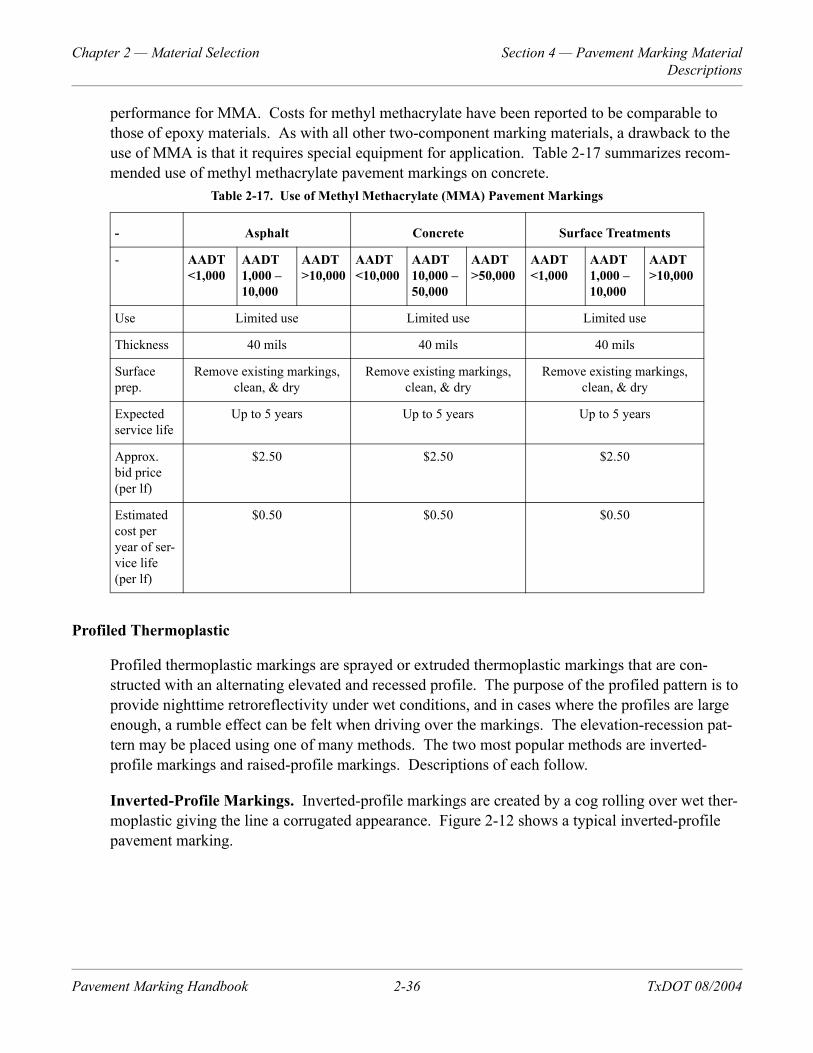
Chapter 2 — Material Selection Section 4 — Pavement Marking Material Descriptions
performance for MMA. Costs for methyl methacrylate have been reported to be comparable to those of epoxy materials. As with all other two-component marking materials, a drawback to the use of MMA is that it requires special equipment for application. Table 2-17 summarizes recom-mended use of methyl methacrylate pavement markings on concrete.
Profiled Thermoplastic
Profiled thermoplastic markings are sprayed or extruded thermoplastic markings that are con-structed with an alternating elevated and recessed profile. The purpose of the profiled pattern is to provide nighttime retroreflectivity under wet conditions, and in cases where the profiles are large enough, a rumble effect can be felt when driving over the markings. The elevation-recession pat-tern may be placed using one of many methods. The two most popular methods are inverted-profile markings and raised-profile markings. Descriptions of each follow.
Inverted-Profile Markings. Inverted-profile markings are created by a cog rolling over wet ther-moplastic giving the line a corrugated appearance. Figure 2-12 shows a typical inverted-profile pavement marking.
Table 2-17. Use of Methyl Methacrylate (MMA) Pavement Markings
- Asphalt Concrete Surface Treatments
- AADT <1,000
AADT 1,000 –10,000
AADT >10,000
AADT <10,000
AADT 10,000 –50,000
AADT >50,000
AADT <1,000
AADT 1,000 –10,000
AADT >10,000
Use Limited use Limited use Limited use
Thickness 40 mils 40 mils 40 mils
Surface prep.
Remove existing markings, clean, & dry
Remove existing markings, clean, & dry
Remove existing markings, clean, & dry
Expected service life
Up to 5 years Up to 5 years Up to 5 years
Approx. bid price (per lf)
$2.50 $2.50 $2.50
Estimated cost per year of ser-vice life (per lf)
$0.50 $0.50 $0.50
Pavement Marking Handbook 2-36 TxDOT 08/2004

Chapter 2 — Material Selection Section 4 — Pavement Marking Material Descriptions
Figure 2-12. Typical inverted-profile thermoplastic marking (profile view).
Raised-Profile Markings. Raised-profile markings are created by extruding a thermoplastic marking of normal thickness with a raised thermoplastic “bump” (approximately 300 mil) at uni-form spacing (often 3 ft). Figure 2-13 shows a typical raised profile pavement marking.
Figure 2-13. Typical raised-profile thermoplastic marking (overhead view).
Performance and Use. Profiled thermoplastic generally performs well on all types of pavement surfaces. These markings often cost significantly more than standard thermoplastic (up to six times as much), but are often warranted by the contractor. The good performance may be attributed to the stringent contractor-supplied on-site inspection provided during most applications.
It should be noted that profiled markings are not necessarily limited to thermoplastic materials. Profiled markings may be constructed from materials other than thermoplastic as long as the same visual-tactile benefit is provided.
Contrast Markings
Human vision is tuned to detect edges of contrasting color or brightness. Many concrete and heav-ily oxidized asphalt pavements are so light in color that during the day, white pavement markings appear to blend in with the pavement surface. To improve the visibility of pavement markings on
Pavement Marking Handbook 2-37 TxDOT 08/2004
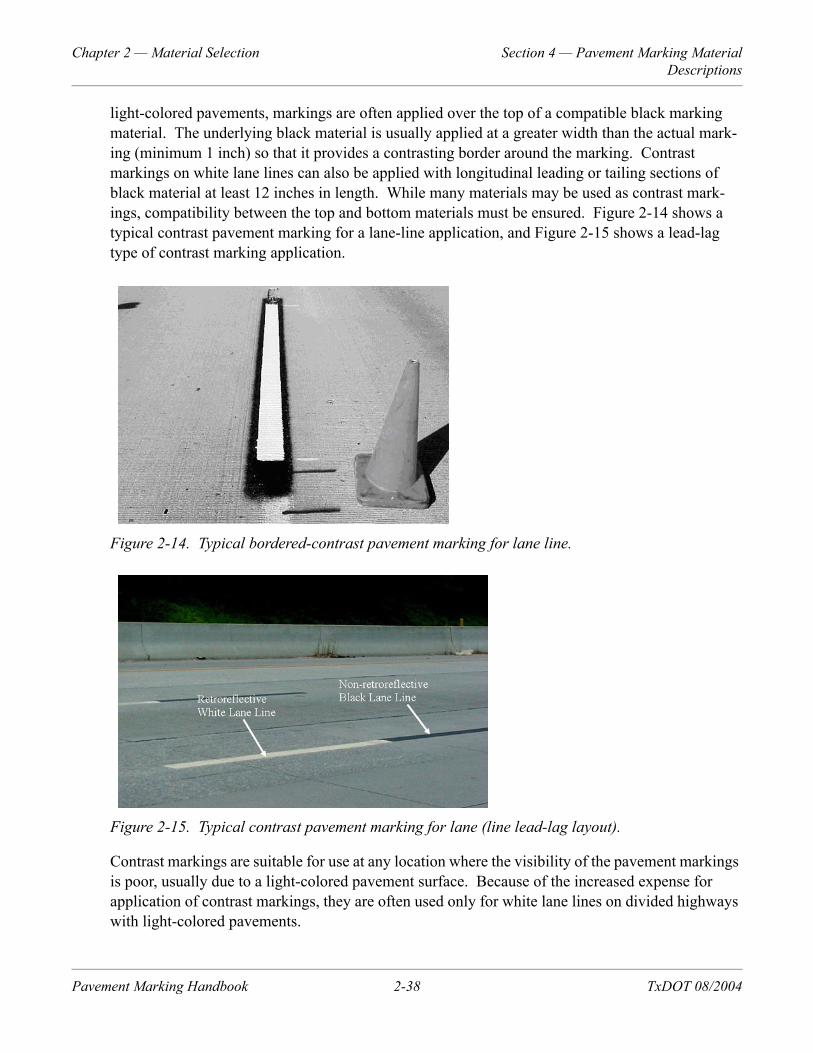
Chapter 2 — Material Selection Section 4 — Pavement Marking Material Descriptions
light-colored pavements, markings are often applied over the top of a compatible black marking material. The underlying black material is usually applied at a greater width than the actual mark-ing (minimum 1 inch) so that it provides a contrasting border around the marking. Contrast markings on white lane lines can also be applied with longitudinal leading or tailing sections of black material at least 12 inches in length. While many materials may be used as contrast mark-ings, compatibility between the top and bottom materials must be ensured. Figure 2-14 shows a typical contrast pavement marking for a lane-line application, and Figure 2-15 shows a lead-lag type of contrast marking application.
Figure 2-14. Typical bordered-contrast pavement marking for lane line.
Figure 2-15. Typical contrast pavement marking for lane (line lead-lag layout).
Contrast markings are suitable for use at any location where the visibility of the pavement markings is poor, usually due to a light-colored pavement surface. Because of the increased expense for application of contrast markings, they are often used only for white lane lines on divided highways with light-colored pavements.
Pavement Marking Handbook 2-38 TxDOT 08/2004

Chapter 2 — Material Selection Section 4 — Pavement Marking Material Descriptions
Heated-in-Place Thermoplastic (Shortline Applications)
Heated-in-place thermoplastic is a preformed thermoplastic that has been shaped by the manufac-turer into its final shape and thickness and includes a top layer of beads. These materials must conform to DMS-8240 and are classified by TxDOT in this specification as Type C. They are very durable markings and are used primarily for shortline applications, including transverse lines, words, and symbols. These materials do not have any pre-applied adhesive, and bonding to the pavement is achieved by placing the material in the desired location and heating the material with a torch. A manufacturer recommended sealer should be used on hydraulic cement concrete or old asphalt. Application includes five general steps:
1. Cleaning the surface.
2. Removal of moisture.
3. Layout of the material.
4. Heating the material (in some cases the pavement surfaces must also be heated).
5. Checking for proper bond using a chisel or similar device.
Figure 2-16 shows a typical preformed thermoplastic application.
Figure 2-16. Typical preformed thermoplastic application.
Specific application requirements may vary with manufacturer, and therefore manufacturer specifi-cations should always be followed. As with any thermoplastic application, the presence of pavement surface moisture or an improperly cleaned surface will cause insufficient bonding lead-ing to failures.
Pavement Marking Handbook 2-39 TxDOT 08/2004

Chapter 2 — Material Selection Section 4 — Pavement Marking Material Descriptions
Retroreflective Raised Pavement Markings
Reflectorized raised pavement markers (RRPMs) are high-impact plastic markers approximately 4 inches square and 3/4 inch high with one or two retroreflective faces. RRPMs are used to provide retroreflectivity, delineation, and guidance and to enhance the reflectivity of pavement markings.
RRPMs may serve as a positioning guide or a supplement to pavement markings. The TxDOT standard is to install RRPMs using position guidance on all roadways with centerlines. Position guidance placement is used to show the driver where the centerline or lane lines of the roadway are located. Supplemental markings are installed along the outside of the solid centerline. The spacing and location of the markings are intended to inform the driver if passing is allowed and also mark the lane line location. The spacing and location of the RRPMs can be seen on the PM and FPM standard sheets.
The RRPMs should be maintained and replaced periodically to ensure that the driver is getting the expected benefits of the markers. Routine maintenance of the markers should be performed when fewer than two markers are visible when spaced at 80 feet or fewer than three markers are visible when spaced at 40 feet. Table 2-18 shows TxDOT’s suggested replacement cycle for RRPMs.
RRPMs should be applied to the roadway surface using either bitumen or epoxy adhesives. Bitu-men adhesives are normally used on asphalt surfaces, and epoxy is normally used on concrete roadways. Any adhesives used must meet TxDOT DMS specifications for epoxy or bitumen and must be installed in accordance with the manufacturer’s recommendations.
Table 2-18. Suggested Replacement Cycle for RRPMs
Roadway ADT Replacement Cycle
greater than 50,000 ADT 1 year
greater than or equal to 10,000 ADT 2–3 years
less than 10,000 ADT 3–4 years
Pavement Marking Handbook 2-40 TxDOT 08/2004

Chapter 2 — Material Selection Section 5 — Glass Beads
Section 5 — Glass Beads
Introduction
Pavement-marking retroreflectorization is accomplished through the use of glass beads partially embedded on the surface of the marking binder material. Glass beads play the most important role in pavement-marking retroreflectivity. Markings without beads are virtually useless at night. The bead returns light from a headlamp back to a driver, as shown in Figure 2-17.
Figure 2-17. 2-17. Pavement-marking retroreflectivity using glass beads.
Bead Types
TxDOT requires that beads be manufactured to conform to DMS-8290. Three types of bead grada-tions are specified under DMS 8290 and are tested using Tex-831-B. Type I beads are the smallest of the three types and are used only as intermix beads for thermoplastic. Type II beads are com-monly referred to as “Texas standard” beads because they have historically been the typical drop-on beads used by TxDOT for many years. Type III beads are drop-on beads of a larger gradation. Type III beads are relatively new to the market and are marketed for their ability to provide wet-night visibility under certain conditions. Check with TxDOT’s Materials Laboratory for approved use of each bead type.
Bead Coatings
With some types of beads and marking materials, optimal bead application is difficult to achieve. Bead coatings are available that assist applicators in achieving proper bead embedment depths. Because Type III beads are more difficult to properly embed than Type II beads, Type III beads are coated with an adhesion or floatation coating prior to application. Type II beads are usually not
Pavement Marking Handbook 2-41 TxDOT 08/2004
Chapter 2 — Material Selection Section 5 — Glass Beads
coated. Adhesion coating is inspected according to Test Method Tex-833-B. Check with the glass bead manufacturer or TxDOT Materials Laboratory for current bead coating information.
Bead Application Properties
Bead application properties are controlled during striping through adjustments made by the appli-cator in the field. The two most important field-controlled properties are the amount and dispersion of exposed beads across a line and the depth of embedment of the beads. These properties are influenced by such characteristics as: bead drop rate, speed of the striping truck, temperature, and viscosity of the binder material, etc. Beads must be applied according to TxDOT specifications. Bead drop rates usually range from 6 to 12 pounds per 100 square feet for thermoplastics and are often higher for paints and epoxies. For details see “Glass Bead Application Properties” in Chapter 3, Section 4.
Bead Manufacturing-Controlled Properties
Bead properties that are controlled during the manufacturing process include those that are chemi-cal and physical in nature. The chemical and physical properties of beads have a major influence on how well the beads reflect light. These properties include:
bead size
refractive index
clarity
roundness.
For beads to be used on TxDOT roadways, these properties must be in conformance with DMS-8290. These properties are controlled by manufacturing factors, such as: type, quality, and clarity of the glass; furnace type and temperature; and sieve size.
Discussions of each of these manufacturing-controlled properties follow under separate subheadings.
Bead Size
The size of a glass bead can affect retroreflectivity, especially under wet conditions. Larger beads (Type III) have slightly higher retroreflectivity than standard beads (Type II) under dry conditions. Bead size is influenced by the size of the raw materials sent into the furnace. Note that bead size has no effect on refractive index. Bead size is determined in the lab using Tex-831-B.
When markings are wet, beads are often rendered useless because the film of water that covers the marking causes light to scatter before it can enter the bead. This causes the wet markings to be nearly invisible at night. Large beads may be more effective when roads are slightly wet because
Pavement Marking Handbook 2-42 TxDOT 08/2004

Chapter 2 — Material Selection Section 5 — Glass Beads
their higher profile protrudes through the film of water better than small beads. Note that as the thickness of the water film increases, large beads begin to lose their effectiveness as well. Figure 2-18 shows light refracting through a dry glass bead versus the same glass bead with a film of water covering it.
Figure 2-18. Light refraction for dry glass bead vs. glass bead covered with water film.
Refractive Index
The refractive index (RI) is a function of the chemical makeup of the beads, which is determined by the raw material used to make the bead. The higher the refractive index, the more light is retrore-flected. Refractive index is tested by using Test Method Tex-822-B.
Most beads used in roadway striping nationwide have a refractive index of 1.50. A bead with a 1.50 refractive index is made from recycled windowpane glass. Beads with higher refractive indi-ces, including 1.65 and 1.90, are made from virgin glass and have a different chemical makeup. Higher refractive index beads are not frequently used because they are more expensive and may be slightly less durable than 1.50 RI beads. Some agencies use a blend of higher and lower refractive index beads.
Clarity and Roundness
Clarity and roundness are the two essential properties that all beads must possess to retroreflect light. The need for transparency and roundness can be explained by examining the path of light as it enters a bead embedded in a marking. The glass bead must be transparent so that light passes through the sphere. Clarity is strongly affected by the type of raw material used. Beads that are less than transparent block a portion of the light from entering.
Pavement Marking Handbook 2-43 TxDOT 08/2004

Chapter 2 — Material Selection Section 5 — Glass Beads
The rounded surface of the bead causes the light ray to bend downward to a point below where the bead is embedded in the paint. Light striking the back of the embedded portion of the bead is reflected back to the path of entry. Roundness is greatly influenced by the properties of the blast furnace. Beads that are less than perfectly round have diminished retroreflective properties. Roundness is tested in the lab by Test Method Tex-832-B.
Pavement Marking Handbook 2-44 TxDOT 08/2004

Chapter 2 — Material Selection Section 6 — Retroreflectivity Performance Specifications for Contracts
Section 6 — Retroreflectivity Performance Specifications for Contracts
Introduction
Final contract acceptance is a quality-assurance measure that involves inspecting the markings a certain amount of time after all markings have been placed to ensure long-term performance. Ret-roreflectivity performance-based pavement marking contracts have been used successfully in other states for years as a final acceptance measure. Such contracts are attractive because they shift spec-ifications away from the traditional recipe process to an objective performance process, placing greater responsibility on contractors and manufacturers. In addition, retroreflectivity measurement provides a numeric comparison of how efficiently a marking returns light to the driver’s eyes, thereby reducing the subjectivity that exists when performing nighttime visual evaluations.
Final acceptance for TxDOT pavement marking contracts is usually based on whether the markings meet a specified minimum level of retroreflective performance. Compliance is often determined by a series of retroreflectivity measurements, which are taken a specified number of days after place-ment of the markings to allow for removal of loosely adhered glass beads. The purpose of using retroreflectivity measurements for final acceptance is to provide a reasonable amount of assurance that newly applied markings will meet or exceed service life expectations.
Performance Factors
All retroreflective performance specifications include three important factors:
minimum retroreflectivity values
timing of measurements
number of measurements.
Basis for Specification Compliance
Upon collection of retroreflectivity data, compliance with the specification is usually based on both of the following:
The retroreflectivity average for a given pavement marking section is greater than the specified minimum value.
The percentage of measurements that are less than the specified minimum retroreflectivity value for a given pavement marking section is below the specified minimum percentage.
The final acceptance period and performance of the corresponding retroreflectivity measurements should be in accordance with TxDOT specifications. Test Method Tex-828-B should only be used
Pavement Marking Handbook 2-45 TxDOT 08/2004

Chapter 2 — Material Selection Section 6 — Retroreflectivity Performance Specifications for Contracts
as a guide in determining the nighttime brightness and appearance of the markings, not for final acceptance purposes.
Pavement Marking Handbook 2-46 TxDOT 08/2004

Chapter 2 — Material Selection Section 7 — Material Selection Guide
Section 7 — Material Selection Guide
Introduction
This section serves as a pavement marking material selection guide for designers and others engaged in the selection of pavement marking materials. The data and recommendations reported in this section are based on research findings, literature, manufacturer recommendations, and prac-tice of other agencies.
Material Selection Tables
Although every attempt was made to make the material selection tables as comprehensive as possi-ble, new materials and formulations frequently become available. Therefore, materials that are not listed in the following tables may be used on an experimental basis with approval of TRF or CST-MAT.
“Table 2-19. Pavement Marking Materials for HOT-MIX ASPHALT CONCRETE PAVEMENTS1,” applies to pavement markings on hot-mix asphalt surfaces, Table 2-20, applies to pavement markings on hydraulic cement concrete surfaces, and Table 2-21 applies to pavement markings on surface treatments. Each table is broken down by traffic volume category and remain-ing service life of the pavement surface.
NOTE: Materials may be used for either shortline or longline application — with the exception of two-component materials (e.g., epoxy, modified urethane, polyurea), which should only be used for longlines.
The highest recommended pavement marking material and alternate materials for each category are given in the following tables along with additional application information. Material thickness should be applied according to TxDOT Specification Item 666 or according to manufacturer rec-ommendations if no TxDOT specification exists.
Table 2-19. Pavement Marking Materials for HOT-MIX ASPHALT CONCRETE PAVEMENTS1
(The highest-recommended material is emphasized.)
- Pavement Remaining Service Life
Traffic Characteristic 0–2 years 2–4 years > 4 years
AADT2 < 1,000 Thermo, Water-Based Paint
Thermo, Water-Based Paint
Thermo, Water-Based Paint, Epoxy3, 4, Modified Urethane4, Polyurea4, MMA4
Pavement Marking Handbook 2-47 TxDOT 08/2004

Chapter 2 — Material Selection Section 7 — Material Selection Guide
1,000 < AADT < 10,000 Thermo, Water-Based Paint
Thermo, Epoxy3, 4, Modi-fied Urethane4, Polyurea4, MMA4
Thermo, Preformed Tape, Epoxy3, 4, Polyurea4, Mod-ified Urethane4, MMA4
AADT > 10,000 Thermo, Epoxy3, 4, Modified Urethane4
Thermo, Preformed Tape, Epoxy3, 4, Polyurea4, Mod-ified Urethane4, MMA4
Preformed Tape, Thermo, Epoxy3, 4, Polyurea4, Modified Urethane4, MMA4
Heavy Weaving or Turning
Thermo, Epoxy3, 4, Modified Urethane4
Thermo, Epoxy3, 4, Polyurea4, Modified Urethane4, MMA4
Thermo, Epoxy3, 4, Polyurea4, Modified Urethane4, MMA4
Footnotes:
1. Materials may be used for shortlines or longlines — with the exception of two-component materials, which should only be used for longlines. Other materials may be used on an experimental basis with approval of TRF or CST-MAT. Contrast markings may be used to improve visibility and safety as needed.
2. AADT = Average Annual Daily Traffic.
3. Epoxies specially formulated as high-quality, high-durability permanent markings.
4. Experimental material.
Table 2-20. Pavement Marking Materials for HYDRAULIC CEMENT CONCRETE PAVEMENTS1
(The highest-recommended material is emphasized.)
- Pavement Remaining Service Life
Traffic Characteristic 0–2 years 2–4 years > 4 years
AADT2 < 10,000 Thermo3, Epoxy4, 6, Modified Urethane, Water-Based Paint
Epoxy4, 6, Thermo5 (concrete formulation), Modified Urethane6, Water-Based Paint, Polyurea6, MMA6
Epoxy4, 6, Thermo5 (concrete formulation), Modified Urethane6, Polyurea6, Water-Based Paint, MMA6
10,000 < AADT < 50,000 Thermo3, Epoxy4, 6, Modified Urethane6, Water-Based Paint, Polyurea6
Epoxy4, 6, Thermo5 (concrete formulation), Modified Urethane6, Polyurea6, Water-Based Paint, MMA6
Epoxy4, 6, Thermo5 (concrete formulation), Preformed Tape, Polyurea6, Modified Urethane6, MMA6
Table 2-19. Pavement Marking Materials for HOT-MIX ASPHALT CONCRETE PAVEMENTS1
(The highest-recommended material is emphasized.)
- Pavement Remaining Service Life
Traffic Characteristic 0–2 years 2–4 years > 4 years
Pavement Marking Handbook 2-48 TxDOT 08/2004

Chapter 2 — Material Selection Section 7 — Material Selection Guide
AADT > 50,000 Epoxy4, 6, Thermo5 (concrete formulation), Modified Urethane6
Epoxy4, 6, Thermo5 (concrete formulation), Preformed Tape, Polyurea6, Modified Urethane6, MMA6
Preformed Tape, Thermo5 (concrete for-mulation), Polyurea6, Modified Urethane6, Epoxy6, MMA6
Heavy Weaving or Turning
Epoxy4, 6 , Thermo5 (concrete formulation), Polyurea6, Modified Urethane6
Epoxy4, 6, Thermo5 (concrete formulation), Preformed Tape, Polyurea6, Modified Urethane6, MMA6
Epoxy4, 6, Thermo5 (concrete formulation), Preformed Tape, Polyurea6, Modified Urethane6, MMA6
Footnotes:
1. Materials may be used for shortlines or longlines — with the exception of two-component materials, which should only be used for longlines. Other materials may be used on an experimental basis with approval of TRF or CST-MAT. Contrast markings may be used to improve visibility and safety as needed.
2. AADT = Average Annual Daily Traffic.
3. Primer-sealer required prior to application of current TxDOT spec. thermoplastic on concrete.
4. Epoxies specially formulated for use as high-quality, high-durability pavement markings.
5. See manufacturer’s recommendations for use of primer-sealer.
6. Experimental material.
Table 2-21. Pavement Marking Materials for SURFACE TREATMENTS1
(The highest-recommended material is emphasized.)
- Pavement Remaining Service Life
Traffic Characteristic 0–2 years 2–4 years > 4 years
AADT2 < 1,000 Thermo3,4, Water-Based Paint
Thermo3,4, Epoxy5, 6, Modified Urethane6, Water-Based Paint
Thermo3,4, Epoxy5, 6, Modified Urethane6, Polyurea6, Water-Based Paint
1,000 < AADT < 10,000 Thermo3,4, Water-Based Paint, Epoxy5, 6
Thermo3,4, Epoxy5, 6, Modified Urethane6, Polyurea6
Thermo3,4, Epoxy5, 6, Polyurea6, Modified Urethane6
AADT > 10,000 Thermo3,4, Epoxy5, 6, Modified Urethane6
Thermo3,4, Epoxy5, 6, Polyurea6, Modified Urethane6
Thermo3,4, Epoxy5, 6, Polyurea6, Modified Urethane6
Table 2-20. Pavement Marking Materials for HYDRAULIC CEMENT CONCRETE PAVEMENTS1
(The highest-recommended material is emphasized.)
- Pavement Remaining Service Life
Traffic Characteristic 0–2 years 2–4 years > 4 years
Pavement Marking Handbook 2-49 TxDOT 08/2004

Chapter 2 — Material Selection Section 7 — Material Selection Guide
Heavy Weaving or Turning
Thermo3,4, Epoxy5, 6, Modified Urethane6
Thermo3,4, Epoxy5, 6, Polyurea6, Modified Urethane6
Thermo3,4, Epoxy5, 6, Polyurea6, Modified Urethane6
Footnotes:
1. Materials may be used for shortlines or longlines — with the exception of two-component materials, which should only be used for longlines. Other materials may be used on an experimental basis with approval of TRF or CST-MAT. Contrast markings may be used to improve visibility and safety as needed.
2. AADT = Average Annual Daily Traffic.
3. If bleeding or aggregate loss on a new surface treatment is common, consider the use of a temporary pave-ment marking (for example, paint or thin thermo) prior to standard thermoplastic application until the pavement surface has stabilized.
4. For surface treatments with Grade 3 aggregates or larger, thermoplastic thicknesses greater than 100 mil may be necessary to achieve proper durability.
5. Epoxies specially formulated for use as high-quality, high-durability pavement markings.
6. Experimental material.
Table 2-21. Pavement Marking Materials for SURFACE TREATMENTS1
(The highest-recommended material is emphasized.)
- Pavement Remaining Service Life
Traffic Characteristic 0–2 years 2–4 years > 4 years
Pavement Marking Handbook 2-50 TxDOT 08/2004

Chapter 3 — Installation and Inspection
Contents:
Section 1 — Overview
Section 2 — Preliminary Items
Section 3 — Pre-installation Inspections
Section 4 — Inspection During Application
Section 5 — Final Acceptance
Section 6 — Determining When To Restripe
Pavement Marking Handbook 3-1 TxDOT 08/2004

Chapter 3 — Installation and Inspection Section 1 — Overview
Section 1 — Overview
Introduction
The key to high-quality pavement markings lies in proper installation. To assure high-quality installation, proper inspection procedures are essential. The intent of this chapter is to provide inspectors with necessary guidance in the field inspection of pavement markings before, during, and after application. The objective is to achieve quality control and quality assurance of pavement markings so that the desired service lives are achieved. This chapter supplements TxDOT Test Methods Tex-828-B and Tex-854-B and other inspection-related specifications.
Field inspection by properly trained personnel is necessary to ensure that high-quality pavement markings are being placed on the roadway. Field inspection of pavement marking construction can be divided into three parts:
inspection of roadway and weather conditions prior to application
inspection of the pavement markings application process
inspection of the finished work for final acceptance.
End-of-service-life inspection is used to determine when markings must be restriped.
This chapter provides information on conducting inspections of pavement marking installation. Appendix A provides supporting information on pavement marking visibility and retroreflectivity. Appendix B lists and provides links to pertinent TxDOT specifications, test methods, and standard sheets.
TxDOT provides access to many resources on-line. The following web addresses provide access to current specifications and test methods:
All TxDOT on-line manuals Internet: http://www.dot.state.tx.us/services/general_services/manuals.htm
TxDOT Crossroads (internal only): http://txdot-manuals/dynaweb
TxDOT’s Standard Specifications for Construction and Maintenance of Highways, Streets, and Bridges
http://www.dot.state.tx.us/business/specifications.htm
TxDOT’s Material Specifications http://manuals.dot.state.tx.us/dynaweb/colmates/dms
TxDOT’s Manual of Testing Proce-dures (test methods)
http://www.dot.state.tx.us/services/construction/test_procedures/
Pavement Marking Handbook 3-2 TxDOT 08/2004

Chapter 3 — Installation and Inspection Section 2 — Preliminary Items
Section 2 — Preliminary Items
Pre-construction Meeting
Most construction contracts involve a pre-construction meeting at the local TxDOT office. For contracts involving pavement markings, specific marking items should be discussed at this meeting in an attempt to eliminate confusion and disputes during the striping operation. At minimum, these items should include:
estimated dates when striping will occur
marking materials that will be used
minimum marking thicknesses
estimated striping quantities
retroreflectivity requirements (if included in contract).
Field Documentation Items
This section supplements Chapter 10, Section 8, of the Signs and Markings Volume of the Traffic Operations Manual.
Inspector’s Diary. Documentation of pavement marking field inspections is important. Inspectors should maintain a daily field diary of information relevant to a pavement marking operation. The diary is primarily for informal documentation of events as they occur on a job site. This includes, but is not limited to:
date
roadways striped
line types striped
start and stop times for striping
equipment failures and other problems
conversations
material manufacturers
material quantities
material temperature (if necessary)
air and pavement temperatures
line width and thickness
Pavement Marking Handbook 3-3 TxDOT 08/2004

Chapter 3 — Installation and Inspection Section 2 — Preliminary Items
line retroreflectivity.
Contractor Documentation. TxDOT requires the pavement marking contractor to produce docu-mentation of certain items. The inspector is usually responsible for obtaining documentation for such items, which include:
material invoice (all jobs)
material certification (only for special materials that are not currently tested by TxDOT)
warranty documentation (only if a warranty is specified in the contract).
Daily Inspection Report. Some offices require that inspectors file a formal daily inspection report for each day’s work. See your immediate supervisor for more details. A typical pavement marking inspection report may include:
date,
maintenance section
supervisor’s signature
inspector’s signature
roadways inspected
all required documentation
pay quantities
inspection findings
immediate action taken
future action needed
comments.
Pavement Marking Handbook 3-4 TxDOT 08/2004

Chapter 3 — Installation and Inspection Section 3 — Pre-installation Inspections
Section 3 — Pre-installation Inspections
Introduction
Pre-installation inspection includes the inspection of the roadway and weather conditions, striping equipment, and marking layout immediately prior to installation of the pavement markings. Pre-installation inspection is important to ensure proper bonding between the marking and the roadway surface.
Surface Moisture
The presence of moisture on the pavement surface prior to marking placement will likely have a negative effect on the bond formed between the pavement marking and the pavement surface. The presence of moisture on the pavement should be checked whenever conditions are questionable. Presence of pavement surface moisture can be determined using either of the following two meth-ods in accordance with TxDOT Specification Item 666.4.2:
Asphalt or Concrete Surfaces — Place a 12×12 inch square piece of plastic wrap on the pavement surface using duct tape to affix the edges. Let stand approximately 15 minutes and check for moisture bubbles on the inside surface of the plastic. If moisture bubbles on the plas-tic are larger than a pencil eraser, then the pavement contains too much excess water. Notify the contractor of this condition and postpone all marking operation until the pavement is dry enough to prevent the large moisture bubbles from forming on the plastic.
Thermoplastic Applications on Asphalt Only — Using roofing felt paper, place a 12×12 inch square of felt on the asphalt and install the thermoplastic material directly onto the felt paper. Let it cool for approximately 10 seconds, then lift the paper to check for moisture on the back side. If moisture bubbles larger than a pencil eraser are present on the backside of the roofing paper, then the pavement contains too much excess water. Notify the contractor of this condition and postpone all marking operations until the pavement is dry enough to prevent the large moisture bubbles from forming on the back of the felt paper.
Dirt and Debris
Debonding of pavement marking materials is most often caused by an unclean pavement surface. The pavement surface must be free of dirt, debris, curing compound (new concrete only), grease, oil, mud, dust, grass, loose gravel, and other deleterious material that could affect the bonding capa-bilities of the material to the pavement. In addition, if the material is being placed as restripe over old markings, glass beads and loose or flaking marking materials should be removed from the exist-ing markings. A number of approved methods exist for cleaning of the roadway surface. These methods include: brushing, washing, compressed air, and high-pressure water. Pavement surface preparation should be performed in accordance with TxDOT Specification Item 678.
Pavement Marking Handbook 3-5 TxDOT 08/2004

Chapter 3 — Installation and Inspection Section 3 — Pre-installation Inspections
Air and Pavement Temperature
Under questionable temperature or weather conditions, the temperature of the pavement surface and ambient air temperature must be checked to ensure that the temperatures are in accordance with manufacturers’ specifications. Pavement temperature should be measured in accordance with Test Method Tex-829-B. Pavement temperature is often measured with an infrared thermometer. Dif-ferent materials require different surface and air temperatures to achieve proper bonding or curing. Wind chills should always be considered when determining ambient air temperature. Wind speed also affects the accuracy of the drop-on bead application. Markings using drop-on beads should not be placed on days with excessively high winds.
Table 3-1 presents general guidelines taken from manufacturer or research recommendations. Note that these are general suggestions. Always refer to specific manufacturer’s temperature require-ments if discrepancies arise.
Material Temperature
Many pavement marking materials are applied at elevated temperatures and have strict temperature requirements for proper application. Application temperatures vary among materials. Most ther-moplastic materials must be heated in the kettles to approximately 410–430°F, although optimum material temperatures vary based on formulation. Material temperature should be verified with the striping contractor shortly before striping. Thermoplastic will scorch if kettle temperatures are too high. It may be less durable or may not retain beads if kettle temperatures a re too low.
Lateral Placement Guides for New Pavement Surfaces
Guides to mark the lateral location of pavement markings on pavement surfaces with no existing marking should be established according to TxDOT Specification Item 666.4.1:. Establishment of lateral guides is usually the responsibility of the contractor and should be performed in accordance with the plans or as directed by the Engineer. The location of the guides must be inspected for
Table 3-1. Minimum Air and Pavement Surface Temperatures
Material Minimum Air and Pavement Temperature
Water-Based Paint 40°F
Thermoplastic 55°F
Preformed Tapes Varies with manufacturer and adhesive
Epoxy 35°F
Polyurea 32°F
Methyl Methacrylate 35°F
Pavement Marking Handbook 3-6 TxDOT 08/2004
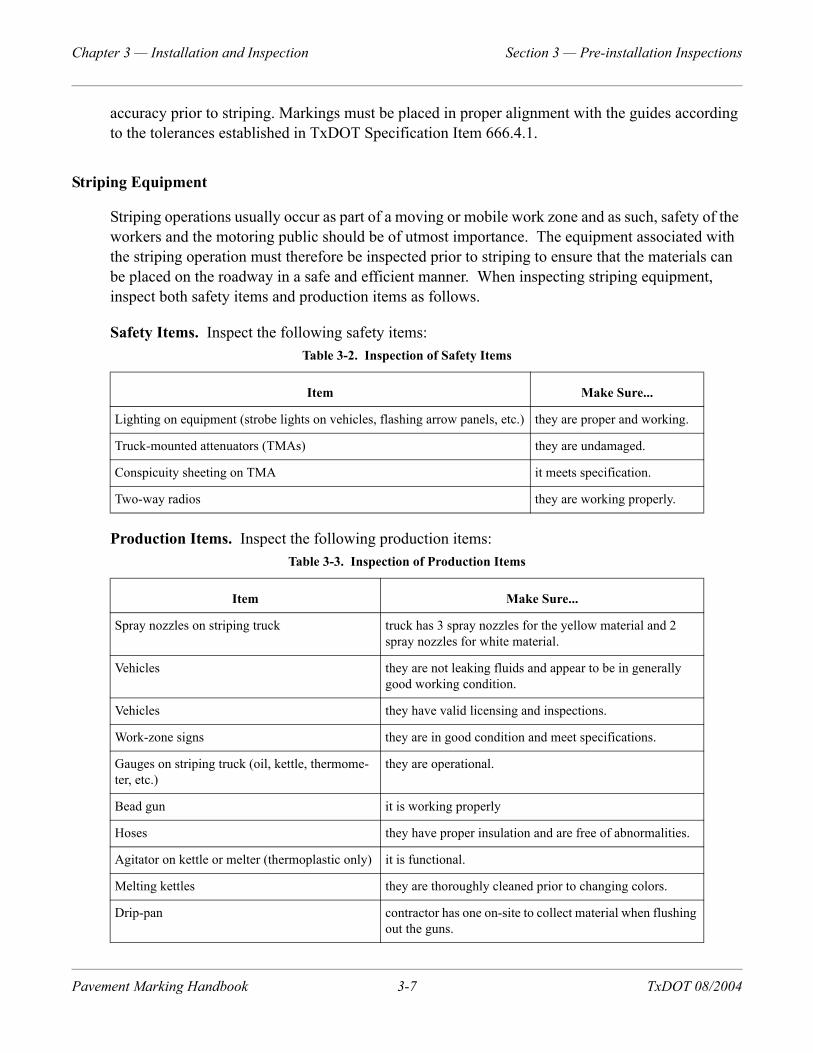
Chapter 3 — Installation and Inspection Section 3 — Pre-installation Inspections
accuracy prior to striping. Markings must be placed in proper alignment with the guides according to the tolerances established in TxDOT Specification Item 666.4.1.
Striping Equipment
Striping operations usually occur as part of a moving or mobile work zone and as such, safety of the workers and the motoring public should be of utmost importance. The equipment associated with the striping operation must therefore be inspected prior to striping to ensure that the materials can be placed on the roadway in a safe and efficient manner. When inspecting striping equipment, inspect both safety items and production items as follows.
Safety Items. Inspect the following safety items:
Production Items. Inspect the following production items:
Table 3-2. Inspection of Safety Items
Item Make Sure...
Lighting on equipment (strobe lights on vehicles, flashing arrow panels, etc.) they are proper and working.
Truck-mounted attenuators (TMAs) they are undamaged.
Conspicuity sheeting on TMA it meets specification.
Two-way radios they are working properly.
Table 3-3. Inspection of Production Items
Item Make Sure...
Spray nozzles on striping truck truck has 3 spray nozzles for the yellow material and 2 spray nozzles for white material.
Vehicles they are not leaking fluids and appear to be in generally good working condition.
Vehicles they have valid licensing and inspections.
Work-zone signs they are in good condition and meet specifications.
Gauges on striping truck (oil, kettle, thermome-ter, etc.)
they are operational.
Bead gun it is working properly
Hoses they have proper insulation and are free of abnormalities.
Agitator on kettle or melter (thermoplastic only) it is functional.
Melting kettles they are thoroughly cleaned prior to changing colors.
Drip-pan contractor has one on-site to collect material when flushing out the guns.
Pavement Marking Handbook 3-7 TxDOT 08/2004

Chapter 3 — Installation and Inspection Section 3 — Pre-installation Inspections
In addition to the preceding equipment inspection items, TxDOT Specification Item 666.3: describes minimum production capabilities for striping equipment, which also must be a part of the inspection process.
Traffic Control
One of the most important safety aspects to a pavement marking operation is the level of traffic control that is provided at the job site. Consult the contract for the level of traffic control required at a given job site. Appendix B lists and provides a link to the traffic control standard sheets. The traffic control equipment, devices, and operation should be inspected before and during application to ensure functionality and safety.
Pavement Marking Handbook 3-8 TxDOT 08/2004

Chapter 3 — Installation and Inspection Section 4 — Inspection During Application
Section 4 — Inspection During Application
Introduction
Inspection of pavement markings during application involves the on-site inspection of the pave-ment marking during the striping operation. This inspection includes measuring the thickness, width, color, bead dispersion and depth, and nighttime appearance. Inspection during application is important because it allows for problems to be fixed immediately, greatly benefiting all involved. Proper material disposal by the contractor should also be verified.
Thickness
Inspection of marking thickness is important to ensure that the specified amount of material is being placed on the roadway. Experience has shown that marking thickness is a major factor in the long-term performance of the marking, especially on pavements with surface treatments. Thicker thermoplastic markings on a new surface treatment have been shown to provide better retroreflec-tive performance over time.
Inspection of pavement marking thickness should be performed in accordance with Test Method Tex-854-B “Determining Thickness of Thermoplastic Stripe.” The recommended method of mea-suring thermoplastic thickness is by mechanical measurement of a sample with a needlepoint micrometer during the striping operation (Figure 3-1).
Measurements should be made to the top of the binder material, excluding the bead. While calipers have been used in the past, they are no longer considered an approved measurement device for measuring the thickness of pavement markings and should not be used. This is because calipers are unable to measure between the beads, creating artificially high measurements.
Samples should be taken from the striping operation using a metal plate or duct tape. It is abso-lutely necessary that the duct tape or plate be placed on the pavement surface in a covert manner. This placement prevents the striping contractor from slowing the truck prior to the tape or plate to create an artificially thicker sample.
Sampling should occur at maximum 2,000-foot intervals according to Test MethodTex-854-B. A minimum of three measurements should be taken diagonally across each sample as shown in Figure 3-2. All measurements should meet or exceed the thickness specified in the contract. If measure-ments are less than the thickness specified in the contract, notify the contractor immediately.
Pavement Marking Handbook 3-9 TxDOT 08/2004

Chapter 3 — Installation and Inspection Section 4 — Inspection During Application
Figure 3-1. Needlepoint micrometer measuring thermoplastic sample.
Figure 3-2. Recommended thickness measurement locations.
Width
Although no test method exists in the TxDOT Manual of Testing Procedures for measuring width, inspection of width should occur. Pavement marking width should be inspected at approximately
Pavement Marking Handbook 3-10 TxDOT 08/2004

Chapter 3 — Installation and Inspection Section 4 — Inspection During Application
the same intervals as for marking thickness. Minimum specified widths should be maintained at all times.
Color
The inspection of daytime pavement marking color is performed in the laboratory according to Test Methods Tex-863-B and Tex-839-B. The CIE chromaticity coordinates of thermoplastic materials must fall into the range specified in DMS-8220. No specification for field measurement of daytime or nighttime pavement marking color is currently in use by TxDOT.
When heat-sensitive materials are applied, such as thermoplastics, marking color should be moni-tored for changes in color. A greenish-yellow or a dingy-dull white appearance of thermoplastic materials upon application is usually a sign that the materials have been scorched. Another com-mon discoloration problem occurs when the melting kettle is not completely cleaned out when changing material colors. If marking discoloration occurs, stop striping immediately and discard the material.
Glass Bead Application Properties
During field striping applications, beads are applied either by spraying (pressure drop) or dropping (gravity drop) onto the wet marking material. Retroreflectivity can be controlled to some degree by drop-on bead application procedures.
Important: The two most important field-controlled properties that require on-site inspection are:
the amount and dispersion of exposed beads across a line
the depth of embedment of the beads.
Separate discussions of these properties follow.
Table 3-4 summarizes some problems that have been encountered during glass bead application and potential remedies of those problems.
Table 3-4. Trips and Tips for Bead Applications
Trips Tips
Concentration of beads on one side Unclog bead gun
Adjust alignment of bead gun
Concentration of beads in middle of line Increase bead tank pressure
Adjust bead gun control screw
Adjust alignment of bead gun cap deflector
Increase tip size
Pavement Marking Handbook 3-11 TxDOT 08/2004

Chapter 3 — Installation and Inspection Section 4 — Inspection During Application
Amount and Dispersion of Beads. Inspection of bead coverage across the marking is necessary to assure uniform retroreflectivity across the surface of the marking. In general, the more beads on a surface, the greater the retroreflectivity, although too many beads may cause retroreflectivity to decrease.
Glass bead dispersion may be visually checked by close-up visual examination or by the sun-over-shoulder method described in Test Method Tex-828-B. Beads should be uniformly applied over the surface of the markings. If they appear otherwise, notify the operator that his bead gun or pump is likely not functioning properly. Figure 3-3 shows an example of a thermoplastic stripe with well-dispersed glass beads.
Using excessive amounts of beads Replace gun or repair gun parts
Decrease bead tank pressure
Beads are buried in material Adjust height of bead gun
Adjust angle of bead gun
Check material thickness
Lower temperature of material
Beads are partially covered with material (thin-film binders only)
Decrease speed of striping truck
Beads are not imbedded sufficiently Adjust alignment of bead gun
Increase temperature of material
Surging pattern of beads Raise bead tank pressure
Replace applicator
Excessive amount of beads off the material and on the pavement
Move bead gun closer to material
Table 3-4. Trips and Tips for Bead Applications
Trips Tips
Pavement Marking Handbook 3-12 TxDOT 08/2004

Chapter 3 — Installation and Inspection Section 4 — Inspection During Application
Figure 3-3. Good glass-bead dispersion for Type III beads in thermoplastic.
When placing a thin-film marking (i.e., water-based paint, epoxy, and other thin-film materials), inspectors should ensure that beads are not “rolling” when dropped onto a marking, which often occurs when the striping truck is traveling faster than 10 mph. When beads roll through a wet thin-film marking material, they become coated with binder, making them useless as retroreflectors.
Bead Embedment Depth. Bead depth can be estimated by close-up visual examination. Beads should be embedded into the pavement marking material at 60 percent of the bead diameter for maximum retroreflective performance. Because the material that is “behind” the bead is the actual image that is reflected back to the driver, it is important that proper embedment depth is achieved. Figure 3-4 shows the effect of bead embedment depth on retroreflectivity.
Figure 3-4. Effect of bead embedment depth on retroreflectivity.
clearly shows that beads not embedded deeply enough will cause the light to be reflected in many directions instead of back to the driver, greatly reducing the retroreflectivity. In addition, beads that are under embedded will be easily worn away after very little traffic wear. Beads that are embed-ded too deep will still reflect light, but not as much. Therefore, if errors in embedment are made, it is better for the beads to be too deep than too shallow, as can be observed in Figure 3-4.
Pavement Marking Handbook 3-13 TxDOT 08/2004
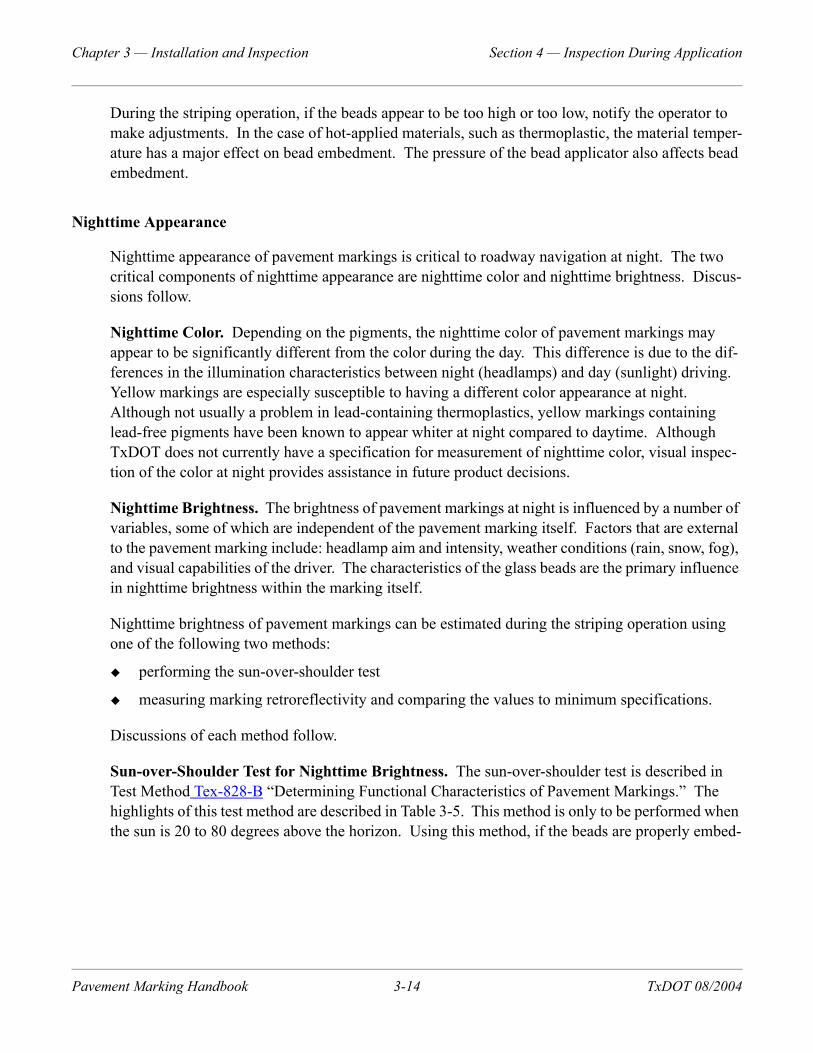
Chapter 3 — Installation and Inspection Section 4 — Inspection During Application
During the striping operation, if the beads appear to be too high or too low, notify the operator to make adjustments. In the case of hot-applied materials, such as thermoplastic, the material temper-ature has a major effect on bead embedment. The pressure of the bead applicator also affects bead embedment.
Nighttime Appearance
Nighttime appearance of pavement markings is critical to roadway navigation at night. The two critical components of nighttime appearance are nighttime color and nighttime brightness. Discus-sions follow.
Nighttime Color. Depending on the pigments, the nighttime color of pavement markings may appear to be significantly different from the color during the day. This difference is due to the dif-ferences in the illumination characteristics between night (headlamps) and day (sunlight) driving. Yellow markings are especially susceptible to having a different color appearance at night. Although not usually a problem in lead-containing thermoplastics, yellow markings containing lead-free pigments have been known to appear whiter at night compared to daytime. Although TxDOT does not currently have a specification for measurement of nighttime color, visual inspec-tion of the color at night provides assistance in future product decisions.
Nighttime Brightness. The brightness of pavement markings at night is influenced by a number of variables, some of which are independent of the pavement marking itself. Factors that are external to the pavement marking include: headlamp aim and intensity, weather conditions (rain, snow, fog), and visual capabilities of the driver. The characteristics of the glass beads are the primary influence in nighttime brightness within the marking itself.
Nighttime brightness of pavement markings can be estimated during the striping operation using one of the following two methods:
performing the sun-over-shoulder test
measuring marking retroreflectivity and comparing the values to minimum specifications.
Discussions of each method follow.
Sun-over-Shoulder Test for Nighttime Brightness. The sun-over-shoulder test is described in Test Method Tex-828-B “Determining Functional Characteristics of Pavement Markings.” The highlights of this test method are described in Table 3-5. This method is only to be performed when the sun is 20 to 80 degrees above the horizon. Using this method, if the beads are properly embed-
Pavement Marking Handbook 3-14 TxDOT 08/2004
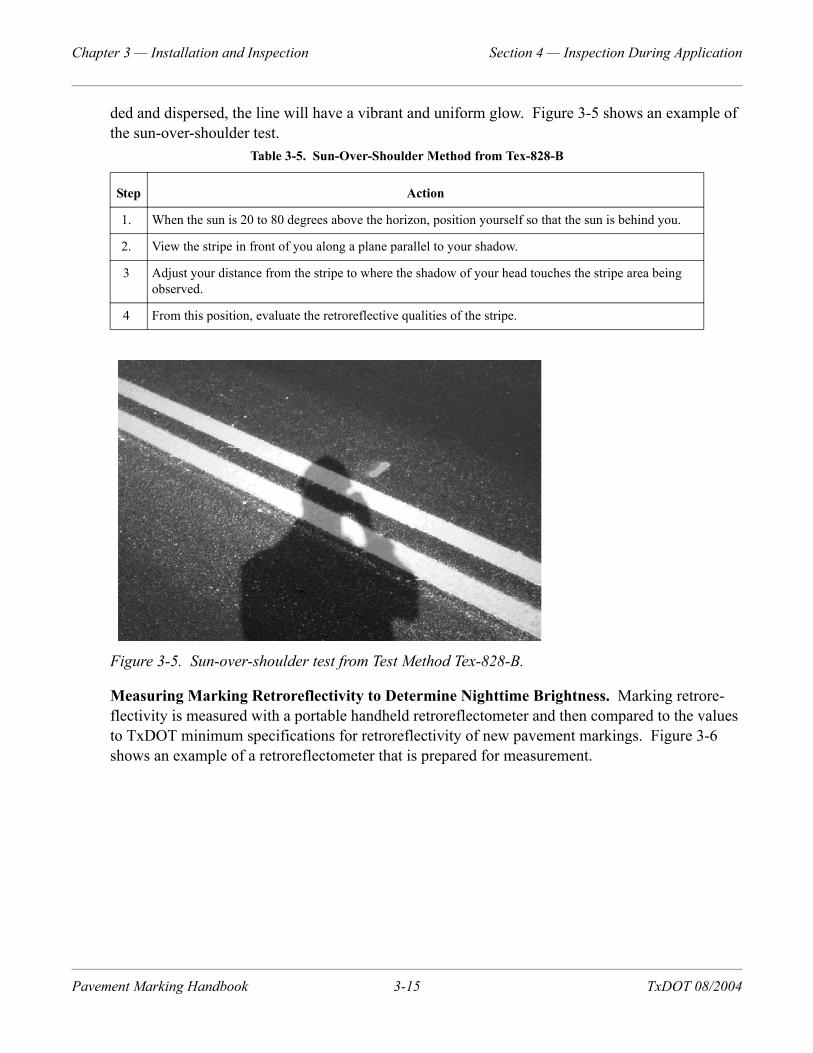
Chapter 3 — Installation and Inspection Section 4 — Inspection During Application
ded and dispersed, the line will have a vibrant and uniform glow. Figure 3-5 shows an example of the sun-over-shoulder test.
Figure 3-5. Sun-over-shoulder test from Test Method Tex-828-B.
Measuring Marking Retroreflectivity to Determine Nighttime Brightness. Marking retrore-flectivity is measured with a portable handheld retroreflectometer and then compared to the values to TxDOT minimum specifications for retroreflectivity of new pavement markings. Figure 3-6 shows an example of a retroreflectometer that is prepared for measurement.
Table 3-5. Sun-Over-Shoulder Method from Tex-828-B
Step Action
1. When the sun is 20 to 80 degrees above the horizon, position yourself so that the sun is behind you.
2. View the stripe in front of you along a plane parallel to your shadow.
3 Adjust your distance from the stripe to where the shadow of your head touches the stripe area being observed.
4 From this position, evaluate the retroreflective qualities of the stripe.
Pavement Marking Handbook 3-15 TxDOT 08/2004
Chapter 3 — Installation and Inspection Section 4 — Inspection During Application
Figure 3-6. Handheld instrument prepared for retroreflectivity measurement.
Results of Nighttime Brightness Measurements. Notify the operator immediately if the mark-ings are not passing the nighttime brightness measures. In some cases, instrument measurements may not provide an accurate measurement of the actual retroreflectivity of the marking. This dis-parity typically occurs where the surface is not flat (i.e., when the marking is located on a steep crown or joint in the concrete). Care should be taken when selecting a location to take retroreflec-tivity readings. Whenever possible, retroreflectivity measurements should be made where the pavement surface is flat.
Material Disposal
Typically, unused materials are carried over to the next striping job. However, situations often arise that require a test spray or a complete flush of the kettle and guns. Contractors often perform test sprays prior to thermoplastic striping to warm up the guns and verify that the guns are spraying properly. In addition, contractors often flush out their kettle and guns when switching to material of a different color or after finishing for the day.
Inspectors should verify that contractors are properly disposing of marking materials when per-forming test sprays or flushes. Although not a standard requirement, some districts require that contractors collect all excess striping material into a pan instead of spraying on the ground.
Contractors will often capture flushed-out paint material for re-mixing with new material, which is allowed only if detergents are not used. Two-component materials should never be reused once sprayed.
Flushing of the entire truck should not be allowed at the job site for any material. Contractors are also not allowed to dispose of any material into storm sewer drains.
Pavement Marking Handbook 3-16 TxDOT 08/2004

Chapter 3 — Installation and Inspection Section 4 — Inspection During Application
Solutions to Common Problems Associated with Various Striping Applications
Occasionally during the application of a pavement marking material, problems may be encountered that will cause the marking to have an abnormal appearance and reduce the service life. The fol-lowing tables in Chapter 2 describe problems that may be observed during the application of various marking materials and corresponding remedies to these problems:
For Tips on: See:
Thermoplastic Application Table 2-7
Paint Applications Table 2-9
Epoxy Application Table 2-12
Pavement Marking Handbook 3-17 TxDOT 08/2004
Chapter 3 — Installation and Inspection Section 5 — Final Acceptance
Section 5 — Final Acceptance
Final acceptance is a quality assurance measure that involves inspecting the markings a certain amount of time after all markings have been placed. It is recommended that a striping quantity be measured and accepted on a daily basis. TxDOT Specification Item 666 requires that markings meet all specification requirements for a minimum of 15 calendar days after installation. Final acceptance generally includes two inspection tasks:
measurement of quantities for contract pay items
measurement of marking retroreflectivity (if specified in contract).
Pay quantities should be measured and documented on a daily basis for each contract. These quan-tities should also be periodically confirmed with the pavement marking contractor to help avoid future quantity disputes.
Many TxDOT pavement marking contracts now require markings to comply with minimum levels of retroreflectivity a specified number of days after placement for the markings to be accepted. Compliance is often determined by comparing a series of retroreflectivity measurements taken with a handheld or mobile retroreflectometer to minimum levels specified in the contract.
The purpose of final acceptance is to provide a reasonable amount of assurance that newly applied markings will meet or exceed service life expectations for retroreflectivity. Because loosely adhered glass beads are often removed from the marking soon after the markings are open to traffic, retroreflectivity may change rapidly during the first few days after placement. Therefore, retrore-flectivity should be measured after markings are applied and retroreflectivity has stabilized, which usually occurs a number of days after striping.
Retroreflectivity measurement for final acceptance should be performed in accordance with TxDOT Special Specification 8975. The sun-over-shoulder method described in Test Method Tex-828-B should only be used as a guide to determine the nighttime appearance of the markings, not for final acceptance purposes.
Pavement Marking Handbook 3-18 TxDOT 08/2004

Chapter 3 — Installation and Inspection Section 6 — Determining When To Restripe
Section 6 — Determining When To Restripe
Introduction
Eventually all pavement markings degrade to the point where they reach the end of their useful ser-vice life. The end-of-service life of a pavement marking may be defined as the point when the marking has deteriorated so that it no longer provides suitable visibility to drivers. This end-of-ser-vice life, which may be anywhere from a few weeks to many years after placement of the marking, determines when the markings need to be restriped.
Because pavement marking visibility is critical at night, end-of-service life is often determined by nighttime visibility characteristics of the markings. The nighttime performance is then compared to the minimum amount of brightness that drivers need to safely navigate. Daytime performance evaluation measures also exist, but are not as critical.
Determining End-of-Service Life
TxDOT uses three methods for determining the end-of-service life of pavement markings:
subjective daytime visual evaluation
subjective nighttime visual evaluation
retroreflectivity evaluation.
Explanations of each follow.
Subjective Daytime Visual Evaluation. Subjective daytime visual evaluation can be performed according to Test Method Tex-828-B under the section titled “Characteristics for Replacement Scheduling” using the daytime inspection method. This method involves determining the maxi-mum daytime visibility distance of existing markings when viewed from a vehicle. Daytime visual inspection of pavement markings should occur at least once per year. Refer to the TxDOT Manual of Testing Procedures for detailed information.
Subjective Nighttime Visual Evaluation. Subjective nighttime visual evaluation can be per-formed according to Test Method Tex-828-B under the section titled “Characteristics for Replacement Scheduling” using the nighttime inspection method. This method involves determin-ing the maximum nighttime visibility distance of existing markings when viewed from a vehicle with the headlamps on. Nighttime visual inspection of pavement markings should occur at least once per year. Refer to the TxDOT Manual of Testing Procedures for detailed information.
Retroreflectivity Evaluation. Retroreflectivity evaluation can be performed by taking a series of retroreflectivity measurements of the markings and comparing them to guidelines for minimum in-service retroreflectivity.
Pavement Marking Handbook 3-19 TxDOT 08/2004

Chapter 3 — Installation and Inspection Section 6 — Determining When To Restripe
Minimum In-Service Retroreflectivity Guidelines
The Texas Manual on Uniform Traffic Control Devises (TMUTCD) requires that all pavement markings be retroreflective if they are to be visible at night. At present, no numerical values are associated with this requirement; however, minimum retroreflectivity standards are currently in development by the FHWA, as directed by the United States Congress.
As a result of this directive, the FHWA has developed draft recommendations for minimum levels of in-service retroreflectivity for pavement markings. These draft recommendations currently do not constitute a standard and exist for purposes of providing guidance to agency personnel. It is not yet known when nationwide compliance with federal minimum retroreflectivity standards will go into effect, although many state transportation agencies have already begun monitoring the retrore-flectivity of their pavement markings. Establishment of minimum standards will occur through the federal rulemaking process.
Suggested Minimum Value. Based on the FHWA draft recommendations, TxDOT has suggested that as a rule-of-thumb, average pavement marking retroreflectivity values of 80–100 mcd/m2/lux measured with a 30 meter geometry retroreflectometer indicate that markings should be considered for replacement. Note that retroreflectivity levels shown here are for guidance purposes only and are subject to change. Where additional roadway visibility is provided at night by retroreflective raised pavement markings or continuous roadway lighting, lower retroreflectivity levels may be acceptable. Pavement marking retroreflectivity under wet conditions is often much lower than dur-ing dry conditions. Retroreflective raised pavement markings are provided on most TxDOT roadways to improve visibility under wet conditions.
Locations for measurement of in-service retroreflectivity should be selected based on those sec-tions where markings display poor nighttime visibility observed during nighttime inspections. Remember that retroreflectivity is only one of several factors to consider when determining whether or not markings should be replaced.
Pavement Marking Handbook 3-20 TxDOT 08/2004

Appendix A — Visibility and Retroreflectivity
Appendix A — Visibility and Retroreflectivity
Contents:
Section 1 — Overview
Section 2 — General Retroreflectivity Concepts
Section 3 — Driver Needs
Section 4 — Portable Retroreflectometers
Section 5 — Pavement Marking Management Programs
Pavement Marking Handbook A-1 TxDOT 08/2004

Appendix A — Visibility and Retroreflectivity
Section 1 — Overview
In general, for pavement markings to be effective, they must be visible both day and night. The Texas Manual on Uniform Traffic Control Devises (TMUTCD) clearly states “Markings which must be visible at night shall be retroreflective unless ambient illumination assures adequate visi-bility.” During the day, drivers receive critical navigation information from the roadway and surroundings and do not necessarily need to rely heavily on pavement markings to provide such information. At night, however, the visibility of the roadway and surroundings drops dramatically. Because pavement markings contain glass beads that make them visible at night, drivers rely heav-ily on marking visibility to provide them with short-range and long-range navigation information. The ability to actually see a pavement marking at night is not solely a function of the reflective characteristics of the pavement marking, but is dependent upon several factors, including:
the amount and pattern of light produced by a vehicle’s headlights
the amount of light reaching the pavement marking
the visual characteristics of the observer
the retroreflective characteristics of the pavement marking.
While transportation agencies can do little to control the first three items in the above list, the ret-roreflective characteristics of the pavement marking can be controlled and are the focus of this chapter:
Section 1 presents an overview of pavement marking visibility and retroreflectivity.
Section 2 describes general retroreflectivity concepts pertaining to pavement markings.
Section 3 describes the retroreflectivity needs of drivers.
Section 4 describes portable retroreflectivity measurement devices.
Section 5 provides guidance in the use of mobile retroreflectometers as tools for management of pavement markings.
Pavement Marking Handbook A-2 TxDOT 08/2004

Appendix A — Visibility and Retroreflectivity
Section 2 — General Retroreflectivity Concepts
Introduction
The visibility of a pavement marking is determined by the amount of light reflected off the mark-ing’s surface to a driver’s eye. During daylight hours, marking visibility is achieved through light from the sun striking the marking surface and scattering in all directions, some of which reaches the driver’s eyes. However, in dark environments at night (without roadway lighting), vehicle head-lamps produce most of the light striking a pavement surface, and therefore the retroreflective properties of the pavement marking govern the amount of light that reaches the driver’s eyes.
Retroreflectivity in pavement markings is a measure of the amount of light from the vehicle’s head-lamps that is reflected back to the driver’s eyes.
Retroreflectivity is a measure of how efficiently the pavement marking returns light from the head-lamps back to the driver. In mathematical terms it is a ratio of the reflected luminance to the headlamp illuminance at a certain viewing geometry. Figure A-1 shows a simple illustration of pavement marking retroreflectivity.
Figure A-1. Pavement Marking Retroreflectivity at Different Geometries.
Factors Influencing Retroreflectivity
While glass beads are responsible for most of the retroreflectivity in pavement markings, retrore-flectivity is influenced by numerous characteristics of the marking, including properties of the glass
Pavement Marking Handbook A-3 TxDOT 08/2004

Appendix A — Visibility and Retroreflectivity
beads themselves. Table A-1 shows some of the major factors that influence the amount of retrore-flectivity that a marking produces.
Clearly, pavement marking retroreflectivity is a complex phenomenon that is influenced by many factors.
Table A-1. Factors that Influence Pavement Marking Retroreflectivity
Glass Beads Amount and Dispersion
Embedment Depth
Refractive Index
Size
Clarity
Roundness
Binder Material Color
Type
Thickness
Other Pavement Surface Roughness
Dirt or Other “Blinding” Material
Type of Retroreflectometer Used for Measurements
Pavement Marking Handbook A-4 TxDOT 08/2004

Appendix A — Visibility and Retroreflectivity
Section 3 — Driver Needs
Introduction
Requirements for pavement marking visibility are not based on characteristics of the roadway or the roadway geometry, but rather on the driver’s need for visual information in order to maneuver safely and effectively. To be effective, pavement markings must:
present the appropriate visual clues far enough in advance of a given situation to allow for suit-able reaction time to occur
be visible in the periphery to aid in moment-to-moment lane navigation.
For visibility at night in a dark environment, the amount of light returned by pavement markings must meet or exceed these requirements. The amount of light returned is largely dependent on the retroreflective properties of pavement markings. But how much retroreflectivity is necessary for drivers to safely navigate at night? This question has been the focus of numerous research projects and has proven to be difficult to answer, partially due to the numerous factors involved with such an analysis.
Factors Related to Driver Retroreflectivity Needs
Factors that influence the amount of retroreflectivity necessary for a given driver to navigate a given roadway at night may be categorized as either driver related or roadway related. Some of these factors include:
driver related (each of which often decline with age):
visual capabilities
cognitive processing capabilities
motor skills
roadway related:
speed of the vehicle
presence of continuous roadway lighting
presence of retroreflective raised pavement markers.
Not all drivers need the same amount of light from pavement markings to safely navigate. For example, older drivers or drivers with visual impairments often need more light to see the same dis-tance as a younger driver. Cognitive capabilities, which include attention and information processing, also decline with age. Cognitive declines often result in drivers’ having longer reaction times and increased driver workload. Declines in motor skills increase the amount of time needed to react to stimuli and perform driving maneuvers.
Pavement Marking Handbook A-5 TxDOT 08/2004
Appendix A — Visibility and Retroreflectivity
Similarly, roadway characteristics influence the amount of light needed. The speed of the vehicle influences the amount of light needed because at higher speeds a greater distance is needed to make a maneuver, thereby requiring earlier detection. Roadway lighting and retroreflective raised pave-ment markers both aid in the navigation tasks and reduce the amount of light needed from the pavement markings for safe navigation.
Suggestions from Research Literature
Human factors research investigating the retroreflectivity needs of drivers includes three main types of evaluations: subjective evaluations, objective evaluations, and visibility models:
Subjective Evaluations include studies where drivers are asked to evaluate pavement mark-ings while they navigate through a roadway course.
Objective Evaluations include studies where drivers are asked to detect pavement markings of varying retroreflectivity levels while driving through a course.
Visibility Models are computer software packages used to predict necessary levels of retrore-flectivity based on actual data.
The research literature contains numerous recommendations for minimum levels of retroreflectiv-ity. When measured at 30 meter geometry, these minimum levels found in the literature fall in the approximate range of 80–620 mcd/m2/lx for high-speed roadways in a dark environment, with the range of 100–150 mcd/m2/lx encompassing most of the recommendations. Most of the subjective evaluations produced minimum values in the lower range, while the objective evaluations and mod-eling analyses suggested much higher minimum values. The research has aided the FHWA in development of recommended minimum in-service values for pavement marking retroreflectivity.
Pavement Marking Handbook A-6 TxDOT 08/2004

Appendix A — Visibility and Retroreflectivity
Section 4 — Portable Retroreflectometers
Introduction
A critical issue associated with the retroreflectivity of pavement markings is the ability to measure retroreflectivity. Most pavement markings are manufactured on-site, and it is not practical to remove a pavement marking so that the retroreflectivity can be measured with a high level of accu-racy. Instead, agencies and contractors rely on portable retroreflectometers to measure the retroreflectivity of pavement markings.
Portable pavement marking retroreflectometers have been available for many years. Pavement markings are currently measured according to 30-meter geometry, which represents retroreflectiv-ity at a distance typical of that which drivers view markings. Pavement markings were previously measured at 15-meter geometry, and no simple conversion exists between 15- and 30-meter mea-surements. Retroreflectometer geometry is described in further detail in ASTM E 1710. Contact TxDOT’s Materials Laboratory for a description of approved retroreflectivity measurement devices. Note that different manufacturers’ retroreflectometers will produce different retroreflec-tivity values for a given stripe, and no accurate conversion factor exists.
Handheld vs. Mobile Units
Portable pavement marking retroreflectometers come in two basic types: handheld and mobile. Examples of both types of retroreflectometers are shown in Figure A-2.
Handheld retroreflectometers are much less expensive than mobile units and are much easier to use and require very little training. However, handheld units are inconvenient when a large number of measurements are required or when measuring on roads with high-traffic volumes. There are also safety issues related to the use of handheld units as workers are often exposed to traffic while mea-suring the retroreflectivity of a marking. Taking handheld measurements often requires lane closures, increasing delay to motorists.
Mobile units on the other hand are much more expensive than handheld units and require a signifi-cant amount of maintenance. They also require a highly trained operator to take measurements. However, mobile retroreflectometers produce a very large number of measurements and allow for measurements to be taken at highway speeds without exposure of personnel to traffic or lane clo-sures. Some state transportation agencies own mobile retroreflectometers, although most agencies hire qualified contractors to perform mobile retroreflectivity measurements if the measurements are taken to determine contractor compliance with a performance or warranty specification.
Pavement Marking Handbook A-7 TxDOT 08/2004
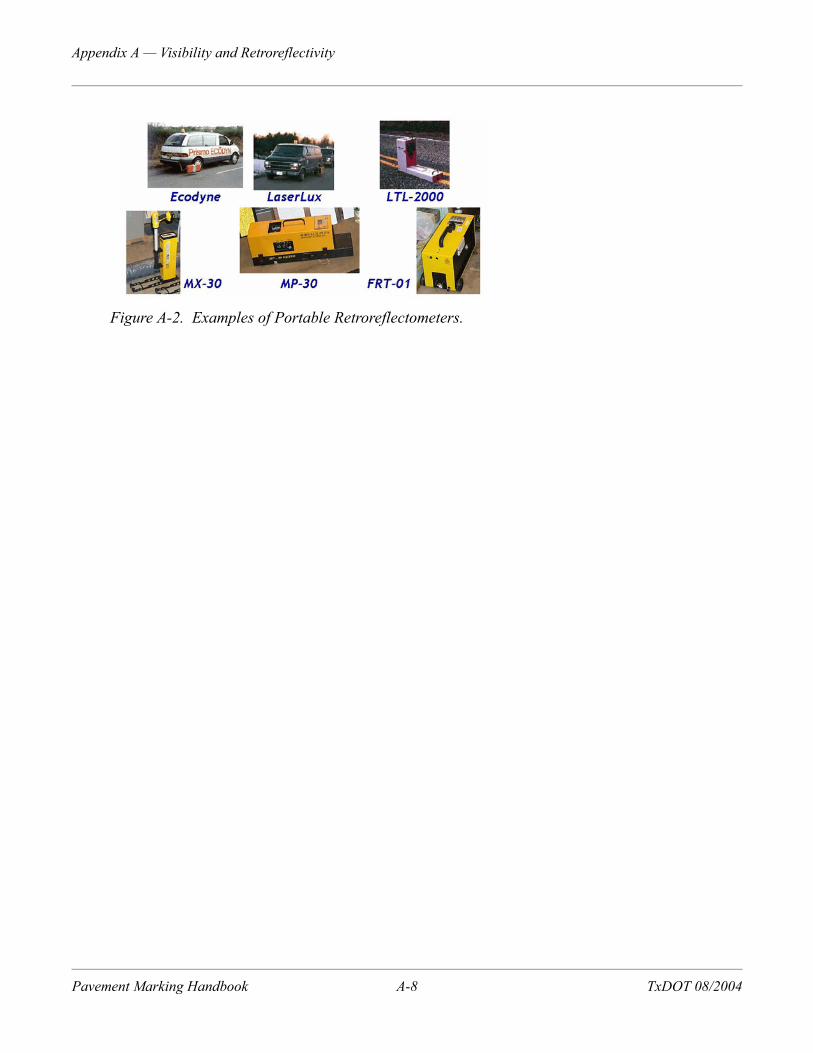
Appendix A — Visibility and Retroreflectivity
Figure A-2. Examples of Portable Retroreflectometers.
Pavement Marking Handbook A-8 TxDOT 08/2004

Appendix A — Visibility and Retroreflectivity
Section 5 — Pavement Marking Management Programs
Introduction
Recent advancement in mobile retroreflectometer technology has provided transportation agencies with an objective field measurement tool to evaluate nighttime pavement marking brightness. As a result, some state agencies have initiated pavement marking management programs using mobile pavement marking retroreflectometers to provide an objective measure of marking quality, assist-ing in the optimization of material selection and restriping cycles.
Advantages
Because TxDOT spends millions of dollars on pavement markings each year, markings should be looked upon as a manageable asset. Pavement marking management can be viewed simply as a method of managing resources to optimize the cost-effectiveness of a pavement marking program. Pavement marking management is based largely on retroreflectivity performance over time. If used correctly, pavement marking management provides a comprehensive approach to designing, constructing, maintaining, and rehabilitating pavement markings in the most cost-effective manner.
Current Circumstances
TxDOT currently does not have an objective statewide pavement marking management program, although one may be developed in the near future. Very little engineering is currently involved with the selection and construction of pavement marking materials and the maintenance and reha-bilitation of markings. Most districts base restripe decisions on visual observations performed on an annual basis, while some restripe based on a regular cycle. On many occasions, markings are restriped before or after their end of service life, wasting monetary resources and presenting safety issues. In addition, activities at the federal level suggest that in the future markings will be required to meet minimum in-service levels of retroreflectivity.
Pavement Marking Handbook A-9 TxDOT 08/2004
Appendix B — Specifications, Test Methods, and Standard Sheets
Appendix B — Specifications, Test Methods, and Standard Sheets
Introduction
This section lists and provides links to:
the most significant TxDOT pavement marking material specifications
some of the most pertinent TxDOT pavement marking construction specifications
two of the key TxDOT test methods for pavement marking inspection
some of the most pertinent TxDOT pavement marking standard sheets
some of the most pertinent traffic control standard sheets for pavement marking operations.
TxDOT Pavement Marking Material Specifications
Specifications for pavement marking materials in the current version of TxDOT’s Material Specifi-cations Manual are as follows (each specification number is a link):
DMS-8200, “Traffic Paint”
DMS-8220, “Hot Applied Thermoplastic”
DMS-8240, “Permanent Prefabricated Pavement Markings”
DMS-8241, “Removable Prefabricated Pavement Markings”
DMS-8242, “Temporary Flexible-Reflective Roadway Marker Tabs”
DMS-8290, “Glass Traffic Beads”
NOTE: These specifications are subject to change at any time. Check the online manual or contact TRF or CST-MAT for the latest.
TxDOT Pavement Marking Construction Specifications
TxDOT pavement marking construction specifications (both standard and special) are listed below.
Standard specifications. To access individual specifications online, go to
ftp://ftp.dot.state.tx.us/pub/txdot-info/des/specs/specbook.pdf
Click the “Bookmarks” tab at the left, open the “600 Items,” and then click on the desired item number from the following list:
Item 662, “Work Zone Pavement Markings”
Pavement Marking Handbook B-1 TxDOT 08/2004

Appendix B — Specifications, Test Methods, and Standard Sheets
Item 666, “Reflectorized Pavement Markings”
Item 668, “Fabricated Pavement Markings”
Item 672, “Raised Pavement Markers”
Item 677, “Eliminating Existing Pavement Markings and Markers”
Item 678, “Pavement Surface Preparation for Marking”
Special Specifications:
Special Specification 1513, “Reflectorized Multipolymer Pavement Markings”
Special Specification 8975, “Reflectorized Pavement Markings with Retroreflective Require-ments” (view PDF or download Word file)
NOTE: These specifications are subject to change at any time. Check the web site or contact TRF or CST for the latest.
TxDOT Test Methods for Pavement Marking Inspection
Test methods related to pavement markings contained in the TxDOT Manual of Testing Procedures are as follows (links included):
Tex-828-B, “Determining Functional Characteristics of Pavement Markings”
Tex-854-B, “Determining Thickness of Thermoplastic Stripe”
NOTE: These test methods are subject to change at any time. Check the online manual or contact TRF or CST-MAT for the latest.
TxDOT Pavement Marking Standard Sheets
The following TxDOT standard sheets pertain to pavement marking:
PM(1): Typical Standard Markings
PM(2): Position Guidance Using Raised Markers Reflectorized Profile Markings
PM(3): Supplemental Marking Using Raised Pavement Markings Reflectorized Profile Markings
PM(4): Pavement Markings for Two-Way Left Turn Lanes, Divided Highways, and Rural Left Turn Bays
FPM(1): Typical Standard Freeway Pavement Markings with Raised Pavement Markings
FPM(2): Typical Standard Freeway Pavement Markings Entrance and Exit Ramps
FPM(3): Typical Standard Freeway Pavement Markings Lane Drop (Exit Only) Exit Ramps
Pavement Marking Handbook B-2 TxDOT 08/2004

Appendix B — Specifications, Test Methods, and Standard Sheets
FPM(4): Typical Standard Freeway Pavement Markings Lane Drop (Exit Only) Details
PM(5): Standard Pavement Markings (Words)
PM(6): Standard Pavement Markings (Arrows)
RCSS(6): Railroad Crossing Signs and Signals
RCAWSS: Railroad Crossing Advance Warning Signs and Signals
RCPM: Railroad Crossing Pavement Markings Typical Detail
PM(AP): Pavement Markings and Signing for Accessible Parking
NOTE: These standard sheets are subject to change at any time. To access PDF and DGN files of the most current standard sheets, refer to http://www.dot.state.tx.us/insdtdot/orgchart/ cmd/cserve/standard/toc.htm or contact TRF for updated standard sheets.
Traffic Control Standard Sheets for Pavement Marking Operations
The following TxDOT traffic control standard sheets pertain to pavement markings operations:
TCP(1-1): Traffic Control Plan
TCP(2-1): Traffic Control Plan
TCP(1-3): Traffic Control Plan
TCP(1-4): Traffic Control Plan
TCP(3-1): Traffic Control Plan Mobile Operations Undivided Highways
TCP(3-2): Traffic Control Plan Mobile Operations Divided Highways
TCP(3-3): Traffic Control Mobile Operations Raised Pavement Marker Installation
TCP(6-1): Traffic Control Plan Freeway Lane Closure
TCP(6-2): Traffic Control Plan Work Area Near Ramp
TCP(6-3): Traffic Control Plan
TCP(6-4): Traffic Control Plan
TCP(6-5): Traffic Control Plan
TCP(6-6): Traffic Control Plan
TCP(6-7): Traffic Control Plan Freeway Closure
TCP(6-8): Traffic Control Plan Freeway (Daytime Only) Closure Sequence
NOTE: These standard sheets are subject to change at any time. To access PDF and DGN files of the most current standard sheets, refer to http://www.dot.state.tx.us/insdtdot/orgchart /cmd/cserve/standard/toc.htm or contact TRF for updated standard sheets.
Pavement Marking Handbook B-3 TxDOT 08/2004

Appendix B — Specifications, Test Methods, and Standard Sheets
Pavement Marking Handbook B-4 TxDOT 08/2004


