43
PaymentStream TM AFT Guide for File Upload July 2019

PaymentStreamTM AFT Guide for File Upload
July 2019

PaymentStream™ AFT — Guide for File Upload /2
© 2015 - 2019 CENTRAL 1 CREDIT UNION. ALL RIGHTS RESERVED. FORM 5600 (R.07/19)
Table of Contents 1 Overview .......................................................................................................................................... 3
1.1 PaymentStreamTM AFT User Permissions .............................................................................. 3 1.2 Viewing Originator Information ................................................................................................ 3 1.3 Navigation Menu ..................................................................................................................... 5 1.4 Selecting a Different Originator ID ........................................................................................... 5
2 Uploading AFT Files ....................................................................................................................... 6 2.1 Rules for Uploading AFT Files ................................................................................................ 6 2.2 Testing an AFT File ................................................................................................................. 6 2.3 Production Validation Testing .................................................................................................. 9 2.4 Uploading AFT Files .............................................................................................................. 10 2.5 AFT File Validation ................................................................................................................ 12 2.6 Errors, Warnings, and Notices .............................................................................................. 13
3 Approving, Rejecting, or Cancelling Files.................................................................................. 15 3.1 Approving or Rejecting an Uploaded AFT File ...................................................................... 15 3.2 Cancelling an Unapproved File ............................................................................................. 18
4 AFT Deadlines, Record Entry Limits, and Data Purge Schedule ............................................. 21 4.1 AFT File Delivery Deadlines .................................................................................................. 21 4.2 Time Limits for Backdating and Future Dating AFT Transactions ........................................ 21 4.3 Purge Schedule for Report and Activity Logs ....................................................................... 22
5 Reports .......................................................................................................................................... 22 5.1 Accessing Reports ................................................................................................................ 22 5.2 Activity Log Report ................................................................................................................ 22 5.3 File History Report ................................................................................................................. 23 5.4 Transaction History Report .................................................................................................... 25 5.5 Originator Change Report ..................................................................................................... 26
6 Settlement Reports for Business Members ............................................................................... 28 6.1 Accessing Settlement Reports .............................................................................................. 28 6.2 Consolidated Returns, Recalls, Rejects, and Error Corrections Report (ICRR/UCRR) ........ 29 6.3 Summary of Data Received Report (ICRM/UCRM) .............................................................. 31 6.4 Incoming AFT Transactions List (ICTI/UCTI) ........................................................................ 32 6.5 Transaction Account Warning List (ICRW/UCRW) ............................................................... 33 6.6 Notice of Change Detailed Listing (NCDL/NUDL) ................................................................. 34
7 AFT Processing and Exception Items ........................................................................................ 35 7.1 Recalling AFT Transactions and AFT Files ........................................................................... 35 7.2 Requesting AFT Error Corrections ........................................................................................ 35 7.3 Handling Returned AFT Transactions ................................................................................... 36 7.4 Handling Rejected AFT Transactions ................................................................................... 37
Appendix A — Central 1’s AFT File Specifications ........................................................................... 38 Copyright and Disclaimer .................................................................................................................... 43

PaymentStream™ AFT — Guide for File Upload /3
1 Overview 1.1 PaymentStreamTM AFT User Permissions
PaymentStream AFT users can be set up with the following permissions:
• Read Only – This is the default user permission that allows a user to view records, reports, and Originator information. All PaymentStream AFT users must have read-only permissions before any additional permissions can be assigned.
• Perform Tasks and Transactions – This permission allows a user to upload files.
• Requires Approval – Users who have this permission set to Yes in User Management require approval for the tasks and transactions that they initiate. This applies to all the Originator IDs for which the users can perform tasks and transactions.
• Approver for this Originator ID – This permission allows a user to approve files uploaded by users who require approval.
1.2 Viewing Originator Information Users can view Originator information on PaymentStream AFT (e.g., Contact Information and Limits), but they cannot edit the information.
A user proceeds as follows to view Originator Information on PaymentStream AFT:
1. Navigate to PaymentStream AFT.
2. Select the appropriate Originator ID. See Figure 1.1.
3. Use the Select Action drop-down menu to select Originator Information, and select Submit.
Figure 1.1: Selecting to View Originator Information
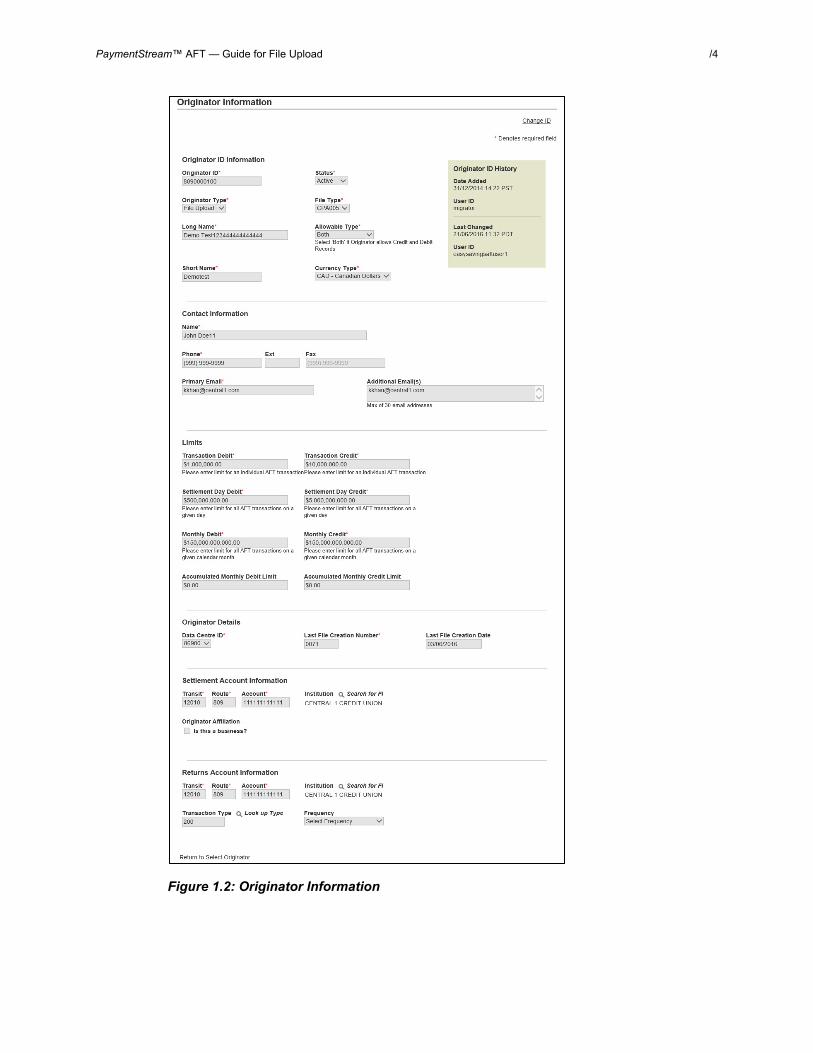
4. View Originator Information. See Figure 1.2.
PaymentStream™ AFT — Guide for File Upload /4
Figure 1.2: Originator Information
PaymentStream™ AFT — Guide for File Upload /5
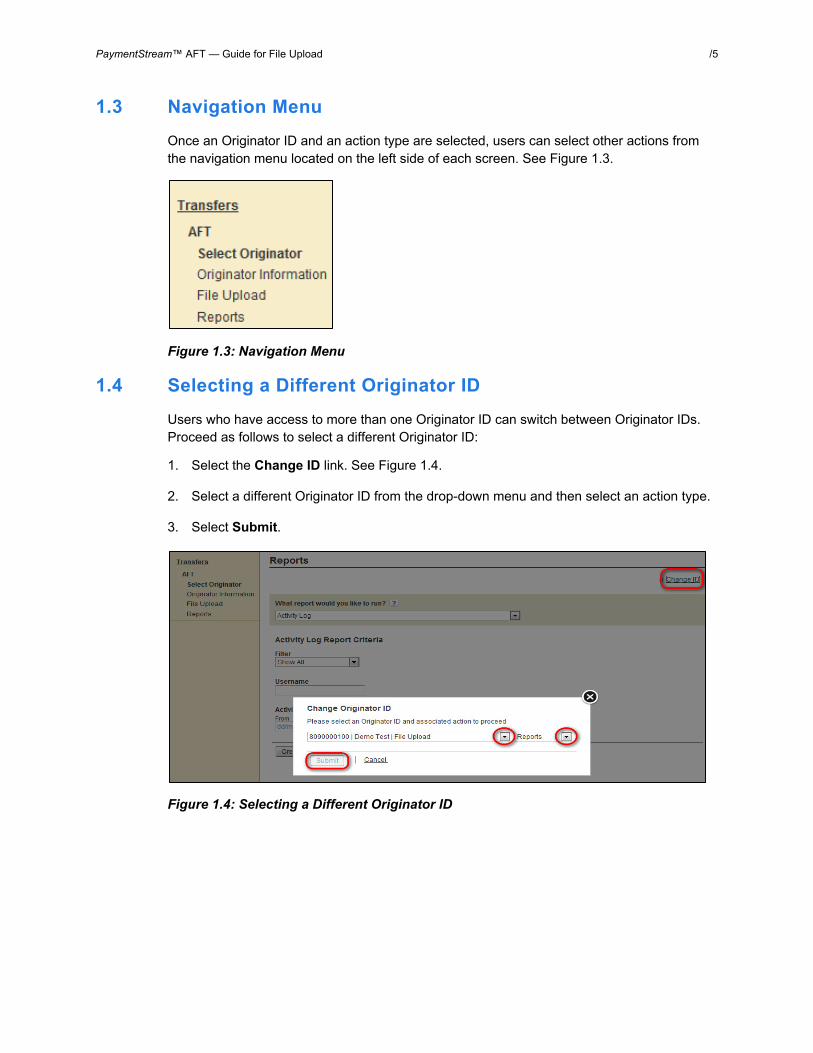
1.3 Navigation Menu Once an Originator ID and an action type are selected, users can select other actions from the navigation menu located on the left side of each screen. See Figure 1.3.
Figure 1.3: Navigation Menu
1.4 Selecting a Different Originator ID Users who have access to more than one Originator ID can switch between Originator IDs. Proceed as follows to select a different Originator ID:
1. Select the Change ID link. See Figure 1.4.
2. Select a different Originator ID from the drop-down menu and then select an action type.
3. Select Submit.
Figure 1.4: Selecting a Different Originator ID

PaymentStream™ AFT — Guide for File Upload /6
2 Uploading AFT Files 2.1 Rules for Uploading AFT Files
The following characters are valid on PaymentStreamTM AFT: 0-9, a-z, A-Z, comma, dash, period, and forward slash. All other special characters are invalid (e.g., !, @, #, $, %, ^, &, *, (, ), +, [, ], {, }, |). Use of an invalid character generates an error message. Originators that create AFT files on external software and upload the files to PaymentStream AFT must comply with the following rules:
• AFT files must conform to Central 1’s AFT file specifications. These specifications are based on CPA Standard 005, Standards for the Exchange of Financial Data on AFT Files, with some modifications. Files with an invalid format will be rejected. Files sent in other formats cannot be validated or processed and a confirmation email will not be generated. See Appendix A — Central 1’s AFT File Specifications, for details.
• AFT Files must be received at Central 1 before the deadline. See Section 4.1, AFT File Delivery Deadlines.
• The file creation date cannot be more than 7 calendar days before or after the date the file is validated.
• Each AFT file must be uploaded in sequential order starting with file creation number 0001.
• Multiple AFT files can be uploaded in a day. Each file must have its own file creation number and must be sent in sequential order.
• Credit records cannot be dated more than 30 calendar days prior to the file creation date or more than 45 calendar days in the future.
• Debit records cannot be dated more than 173 calendar days prior to the file creation date or more than 45 calendar days in the future.
• The total amount of the AFT file cannot exceed the Originator’s settlement day limit or monthly limit.
• The amount of an AFT transaction cannot exceed the Originator’s transaction limit.
2.2 Testing an AFT File It is recommended that users conduct a test run prior to uploading their first AFT file to PaymentStream AFT. File upload testing helps to ensure that the AFT files generated from the source data application of Originators are compatible with PaymentStream AFT. The purpose of the test run is to confirm the validity of the AFT file delivered by the user. Users create an AFT test file in their source data application, using Central 1’s AFT File Specifications (see Appendix A — Central 1’s AFT File Specifications), and upload the file directly to PaymentStream AFT.
The test file results are displayed on the Activity Log. No other reports are generated and there are no email confirmations. The file creation number is not incremented during the testing process.

PaymentStream™ AFT — Guide for File Upload /7
A user proceeds as follows to test an AFT file:
1. Navigate to PaymentStream AFT. See Figure 2.1.
2. Select the appropriate Originator ID.
3. Use the Select Action drop-down menu to select File Upload and select Submit.
Figure 2.1: Selecting the File Upload Action
4. Select Browse to locate the AFT file. See Figure 2.2.
5. Select the applicable file.
6. Select Test an AFT File.
Figure 2.2: Selecting and Testing the AFT File
7. If the file contains any warnings or notices, the system alerts the user. If an error message appears, the error must be corrected before the file can be tested. See Section 2.6, Errors, Warnings, and Notices, for more information. To proceed, select Proceed with Warnings/Notices. See Figure 2.3.
PaymentStream™ AFT — Guide for File Upload /8
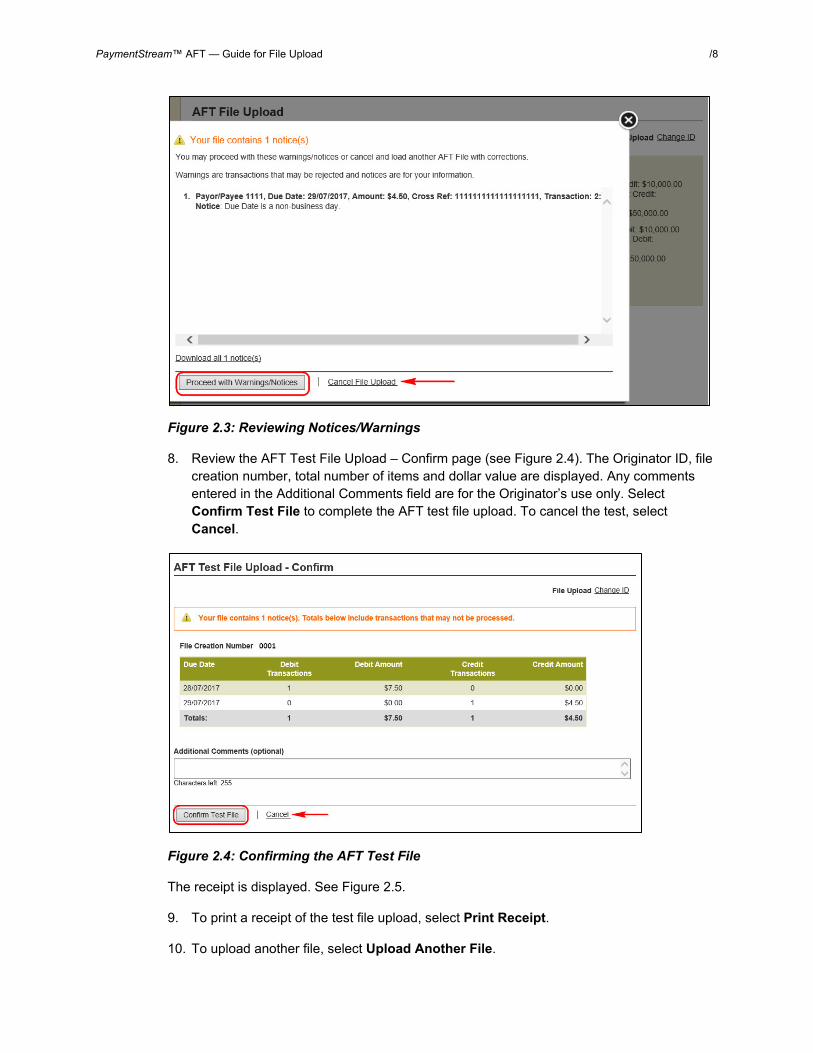
Figure 2.3: Reviewing Notices/Warnings
8. Review the AFT Test File Upload – Confirm page (see Figure 2.4). The Originator ID, file creation number, total number of items and dollar value are displayed. Any comments entered in the Additional Comments field are for the Originator’s use only. Select Confirm Test File to complete the AFT test file upload. To cancel the test, select Cancel.
Figure 2.4: Confirming the AFT Test File
The receipt is displayed. See Figure 2.5.
9. To print a receipt of the test file upload, select Print Receipt.
10. To upload another file, select Upload Another File.
PaymentStream™ AFT — Guide for File Upload /9
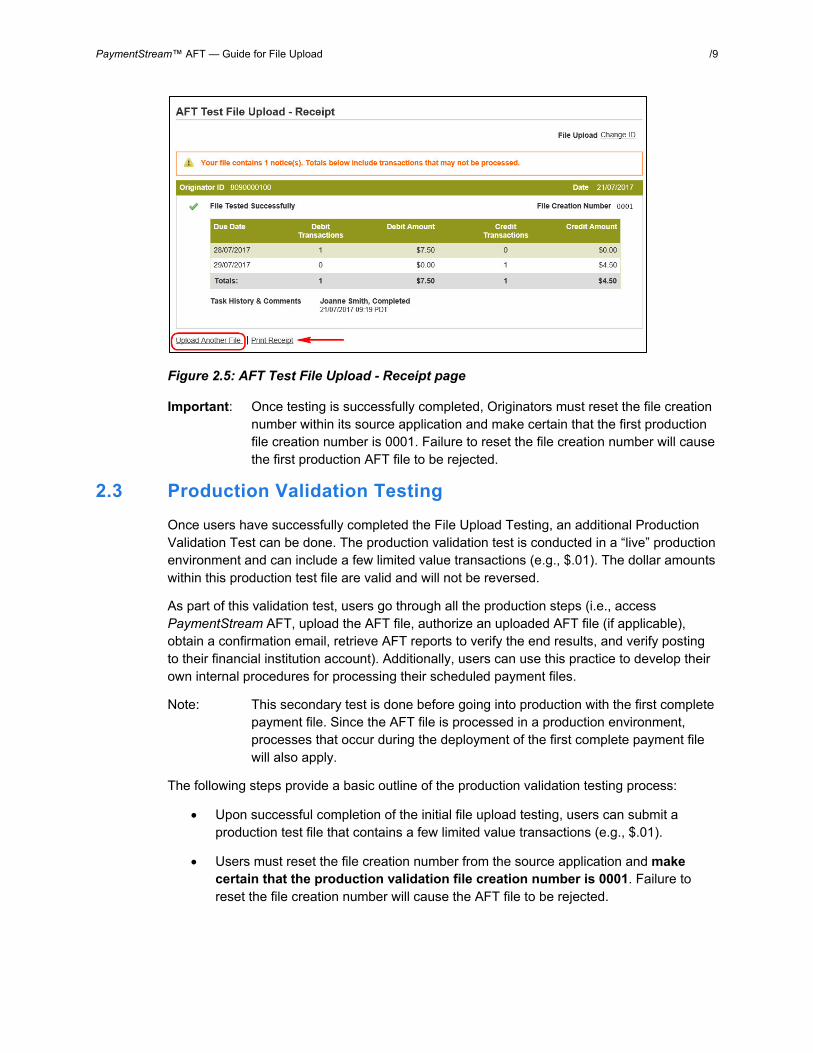
Figure 2.5: AFT Test File Upload - Receipt page
Important: Once testing is successfully completed, Originators must reset the file creation number within its source application and make certain that the first production file creation number is 0001. Failure to reset the file creation number will cause the first production AFT file to be rejected.
2.3 Production Validation Testing Once users have successfully completed the File Upload Testing, an additional Production Validation Test can be done. The production validation test is conducted in a “live” production environment and can include a few limited value transactions (e.g., $.01). The dollar amounts within this production test file are valid and will not be reversed.
As part of this validation test, users go through all the production steps (i.e., access PaymentStream AFT, upload the AFT file, authorize an uploaded AFT file (if applicable), obtain a confirmation email, retrieve AFT reports to verify the end results, and verify posting to their financial institution account). Additionally, users can use this practice to develop their own internal procedures for processing their scheduled payment files.
Note: This secondary test is done before going into production with the first complete payment file. Since the AFT file is processed in a production environment, processes that occur during the deployment of the first complete payment file will also apply.
The following steps provide a basic outline of the production validation testing process:
• Upon successful completion of the initial file upload testing, users can submit a production test file that contains a few limited value transactions (e.g., $.01).
• Users must reset the file creation number from the source application and make certain that the production validation file creation number is 0001. Failure to reset the file creation number will cause the AFT file to be rejected.

PaymentStream™ AFT — Guide for File Upload /10
• Following procedures outlined in the PaymentStream AFT File Upload User Guide, users can access and upload their production test file to the PaymentStream AFT system.
• Users can validate the results of their production testing by reviewing the confirmation email notification, downloading and reviewing AFT reporting available through PaymentStream AFT, and verifying the posting entries made to their account.
Note: During this secondary test phase, results are not monitored. If there are issues or questions, users can contact their Financial Institution.
• Once the production validation test is complete, users can send their first complete payment file.
Important: The production validation test file, using file creation number 0001 was processed in a “live” environment. The first complete payment file must contain a file creation number sequentially incremented by one (i.e., file creation number 0002).
2.4 Uploading AFT Files A user proceeds as follows to upload an AFT file:
1. Navigate to PaymentStream AFT. See Figure 2.6.
2. Select the appropriate Originator ID.
3. Use the Select Action drop-down menu to select File Upload and select Submit.
Figure 2.6: Selecting the File Upload Action
4. Select Browse to locate the AFT file. See Figure 2.7.
5. Select the applicable file.
6. Select Upload File.

PaymentStream™ AFT — Guide for File Upload /11
Figure 2.7: Locate and Upload AFT File
7. Review the Upload AFT File - Confirm page. See Figure 2.8. The Originator ID, file creation number, total number of items, and dollar values are displayed. Any comments entered in the Additional Comments field are for the Originator’s use only.
8. Select Confirm File Upload to complete the file upload process.
Note: If an error message appears, the error must be corrected before the file can be uploaded. If a warning or notice appears, either proceed with the upload or cancel it. See Section 2.6, Errors, Warnings, and Notices.
9. Alternatively, select Cancel to return to the Upload AFT File page where you can browse for another AFT file to upload.
Note: Files must be uploaded in sequential order.
Figure 2.8: Details of AFT File - Confirm
10. The receipt is displayed. See Figure 2.9.
11. To print the receipt page, select Print Receipt.

PaymentStream™ AFT — Guide for File Upload /12
12. To continue uploading AFT files, select Upload Another File.
Figure 2.9: Upload AFT File - Receipt
13. If required, have another user approve the uploaded file. See Chapter 3, Approving, Rejecting, or Cancelling Files.
2.5 AFT File Validation After an AFT file is uploaded to PaymentStream AFT, Central 1 validates the AFT file and sends an email notification to the Originator. See Figure 2.10 for a sample email that confirms successful validation of an AFT file.
Note: Emails are sent to the address(es) specified by the Originator during enrollment. The email addresses are displayed on the Originator Information page. See Section 1.2, Viewing Originator Information.
Figure 2.10: Email Confirming Successful AFT File Validation

PaymentStream™ AFT — Guide for File Upload /13
If the AFT file is successfully validated,
• the AFT transactions are sent to the other financial institutions;
• the file creation number saved in PaymentStream AFT increases by 1; and
• the transactions are listed in the Transaction History Report for 18 months (see Section 5.4, Transaction History Report).
2.6 Errors, Warnings, and Notices While uploading AFT files in PaymentStream AFT, some files may show warnings, notices, or error messages.
If a file contains an error, the user will not be able to proceed with the upload process until the error is corrected. The error is displayed on the screen with the option to download the message in a text file by selecting Download all errors. See Figure 2.11.
Figure 2.11: Error Message
Warnings apply to transactions that may be rejected, and notices are for the user’s information only. Warnings or notices appear on the screen when a file is selected for upload. The user can download the warnings/notices in a text file by selecting Download all notices. See Figure 2.12.
Note: If the file contains a large number of warnings/notices, the user must download the list to view the contents.

PaymentStream™ AFT — Guide for File Upload /14
Figure 2.12: Warnings and Notices
A user can upload a file even if it contains warnings/notices. To continue with the upload, select Proceed with Warnings/Notices.
Note: If files are uploaded with Warnings/Notices, the totals presented on the Upload AFT File – Confirm page and the Upload AFT File – Receipt page may include transactions that will not be processed.
To cancel the upload, select Cancel File Upload.
PaymentStream™ AFT — Guide for File Upload /15
3 Approving, Rejecting, or Cancelling Files If approvals are required, an AFT file must be approved after a user has uploaded the file. AFT files pending approval are displayed as pending tasks on the Tasks page. If a file cannot be approved (e.g., an error is identified), an authorized user rejects the task. When a task is rejected, a notification email is sent to the initiator who will make the appropriate corrections and, if applicable, upload the file again. Alternatively, the initiator can cancel the file but only if it is pending approval. See Section 3.2, Cancelling an Unapproved File, for procedures.
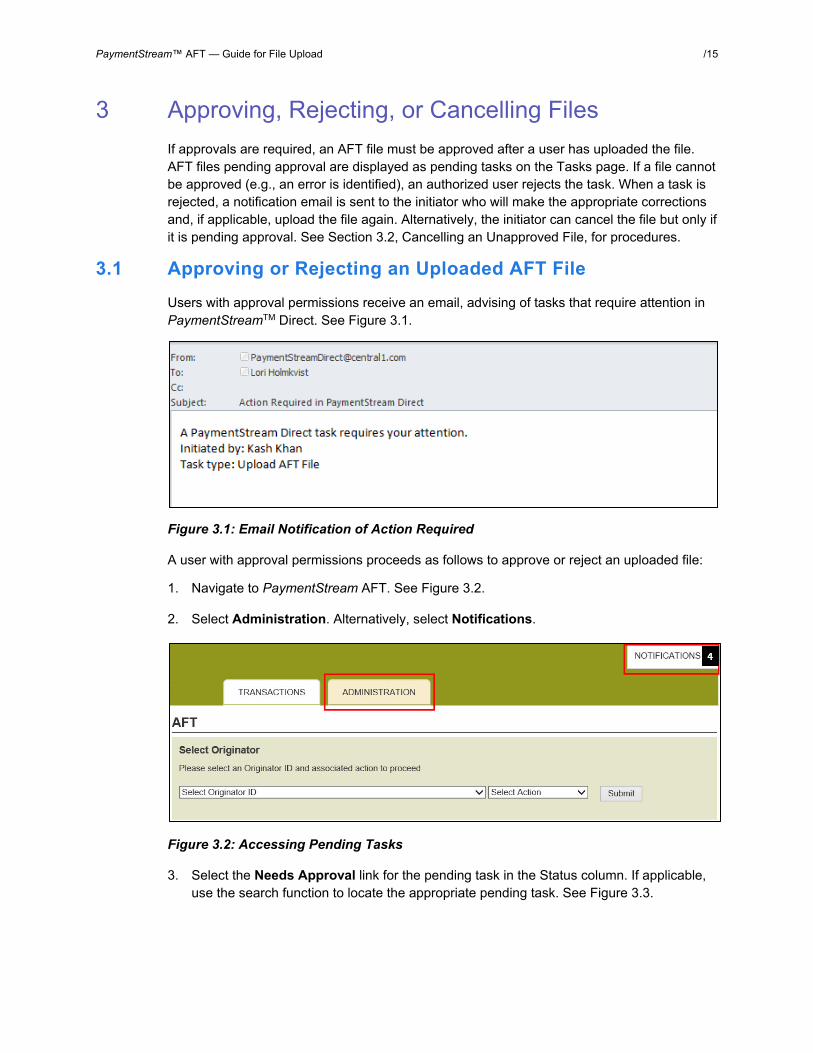
3.1 Approving or Rejecting an Uploaded AFT File Users with approval permissions receive an email, advising of tasks that require attention in PaymentStreamTM Direct. See Figure 3.1.
Figure 3.1: Email Notification of Action Required
A user with approval permissions proceeds as follows to approve or reject an uploaded file:
1. Navigate to PaymentStream AFT. See Figure 3.2.
2. Select Administration. Alternatively, select Notifications.
Figure 3.2: Accessing Pending Tasks
3. Select the Needs Approval link for the pending task in the Status column. If applicable, use the search function to locate the appropriate pending task. See Figure 3.3.

PaymentStream™ AFT — Guide for File Upload /16
Figure 3.3: Pending Tasks
4. A summary of the file is displayed on the AFT File Upload – Details screen. See Figure 3.4. To view the details of the file, select the View Details link in the Transaction Summary section. The file can be approved or rejected from this page regardless of whether the file summary or file details are displayed.
Note: If the user selects Return to Tasks without approving or rejecting the file, the AFT file will remain as a pending task until approved, rejected, or cancelled. Pending tasks expire after 7 calendar days.
5. To approve the file, use the Action drop-down menu to select Approve. See Figure 3.4.
6. To reject the file, use the Action drop-down menu to select Reject.
7. Select Submit.

PaymentStream™ AFT — Guide for File Upload /17
Figure 3.4: Approving or Rejecting a File
8. View the confirmation page. If the file was approved, the status shows as Approved & Complete. See Figure 3.5. If the file was rejected, the status shows as rejected and closed.
9. To return to the Tasks screen, select Return to Tasks.
10. To print the page, select Print Receipt.

PaymentStream™ AFT — Guide for File Upload /18
Figure 3.5: Receipt
3.2 Cancelling an Unapproved File The user who uploaded the file can cancel the file, but only if the file is pending approval.
The user proceeds as follows to cancel an unapproved file:
1. Navigate to PaymentStream AFT. See Figure 3.6.
2. Select Administration. Alternatively, select Notifications.
Figure 3.6: Accessing Submitted Tasks
3. Ensure the Submitted Tasks view is selected. See Figure 3.7.
Note: Since the user who created the file is cancelling the file, the task will not appear as a pending task to that user. Instead, it will be displayed as a submitted task.

PaymentStream™ AFT — Guide for File Upload /19
4. Select the Needs Approval link for the submitted task in the Status column. If applicable, use the search function to locate the appropriate submitted task.
Figure 3.7: Selecting a File to Cancel
5. A summary of the file is displayed on the Tasks details screen. See Figure 3.8. To view the details of the file, select the View Details link in the Transaction Summary section. The file can be cancelled from this page regardless of whether the file summary or file details are displayed.
Note: If the user selects Return to Tasks, the AFT file will remain as a pending task until approved, rejected, or cancelled. Pending tasks expire after 7 calendar days.
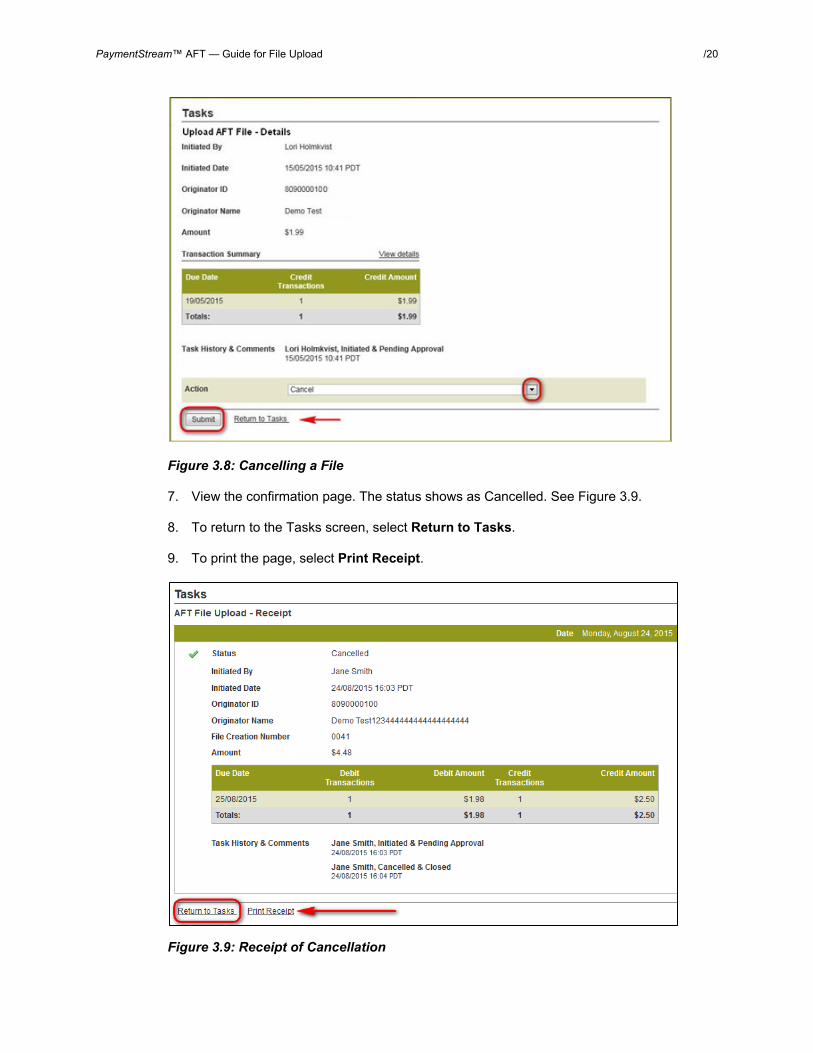
6. Use the Action drop-down menu to select Cancel, and then select Submit.
PaymentStream™ AFT — Guide for File Upload /20
Figure 3.8: Cancelling a File
7. View the confirmation page. The status shows as Cancelled. See Figure 3.9.
8. To return to the Tasks screen, select Return to Tasks.
9. To print the page, select Print Receipt.
Figure 3.9: Receipt of Cancellation

PaymentStream™ AFT — Guide for File Upload /21
4 AFT Deadlines, Record Entry Limits, and Data Purge Schedule
4.1 AFT File Delivery Deadlines AFT files must be sent to Central 1 before the applicable deadline. See the following table for details.
AFT File Delivery Type AFT File Delivery Deadline
Recommended Optional
File Upload to PaymentStreamTM AFT
2:00 pm PT/5:00 pm ET, two business days before the due date. The validation process on PaymentStream AFT is immediate upon the upload of a successful AFT file.
Note:
Files may be validated outside of business hours, but transactions are only delivered to financial institutions during business hours.
One Business Day before the Due Date, by 4:00 pm PT/7:00 pm ET Important: If you choose to deliver AFT files by 4:00 pm PT/7:00 pm ET, one day before the due date, note the following:
• Central 1 may not have enough time to resolve AFT file errors.
• AFT Originators will be unable to request a recall of a credit transaction or an AFT file recall from Central 1.
4.2 Time Limits for Backdating and Future Dating AFT Transactions The due date of an AFT transaction can be backdated or future dated. See the following table for time limits.
Description Time Limit for PADs (Debits) Time Limits for Direct Deposits (Credits)
Backdated AFT transactions Up to 173 calendar days Up to 30 calendar days
Future dated AFT transactions Up to 45 calendar days Up to 45 calendar days

PaymentStream™ AFT — Guide for File Upload /22
4.3 Purge Schedule for Report and Activity Logs After a certain time, report and activity logs are deleted from the system. See the following table for details.
Report Purge Schedule (after last due date) Activity Log Report 3 months
File History Report 18 months
Transaction History Report 18 months
Originator Change Report 12 months
5 Reports 5.1 Accessing Reports
A user proceeds as follows to access PaymentStreamTM AFT reports:
1. Navigate to PaymentStream AFT. See Figure 5.1.
2. Select the appropriate Originator ID.
3. Use the Select Action drop-down menu to select Reports and select Submit.
Figure 5.1: Selecting the Report Action
5.2 Activity Log Report The Activity Log report allows users to search for and view activity on PaymentStream AFT. For example, the activity log shows the date and time that a file was successfully validated, approved, rejected, etc. If the file contains warnings, the user can select a link on the report to view the details. Data is available for 18 months.
A user proceeds as follows to view the Activity Log report:
1. Go to the Reports page as directed in Section 5.1, Accessing Reports.
2. Use the ‘What report would you like to run’ drop-down menu to select Activity Log. See Figure 5.2.
3. Select report criteria and select Create Report.

PaymentStream™ AFT — Guide for File Upload /23
Note: If no search criteria are entered, the last 90 days of data is displayed. If data is required outside of this time frame, edit the “From” and “To” date fields in the Activity Date Range.
4. View the Activity Log report at the bottom of the page.
5. To print the report, select the print icon.
6. To view warnings or errors, select the link of the appropriate file in the Description column.
Figure 5.2: Creating a Report
5.3 File History Report The File History allows users to search for and view a list of the files that were successfully validated by PaymentStream AFT. Data is available for 18 months.
A user proceeds as follows to view the File History report:
1. Go to the Reports page as directed in Section 5.1, Accessing Reports.
PaymentStream™ AFT — Guide for File Upload /24
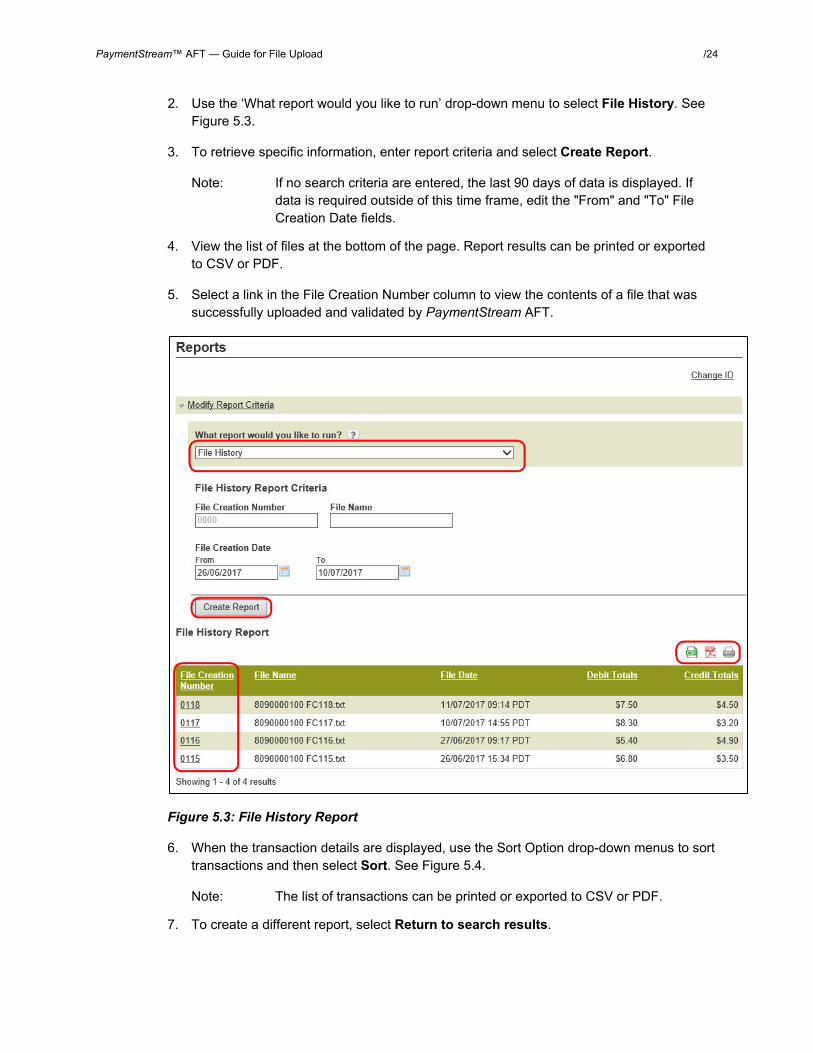
2. Use the ‘What report would you like to run’ drop-down menu to select File History. See Figure 5.3.
3. To retrieve specific information, enter report criteria and select Create Report.
Note: If no search criteria are entered, the last 90 days of data is displayed. If data is required outside of this time frame, edit the "From" and "To" File Creation Date fields.
4. View the list of files at the bottom of the page. Report results can be printed or exported to CSV or PDF.
5. Select a link in the File Creation Number column to view the contents of a file that was successfully uploaded and validated by PaymentStream AFT.
Figure 5.3: File History Report
6. When the transaction details are displayed, use the Sort Option drop-down menus to sort transactions and then select Sort. See Figure 5.4.
Note: The list of transactions can be printed or exported to CSV or PDF.
7. To create a different report, select Return to search results.

PaymentStream™ AFT — Guide for File Upload /25
Figure 5.4: Specific File Content
5.4 Transaction History Report The Transaction History report allows users to view transactions that were validated successfully by PaymentStream AFT. Data is available for 18 months.
A user proceeds as follows to view the Transaction History report:
1. Go to the Reports page as directed in Section 5.1, Accessing Reports.
2. Use the ‘What report would you like to run’ drop-down menu to select Transaction History. See Figure 5.5.
3. To retrieve specific information, enter report criteria and select Create Report.
Note: If no search criteria are entered, the last 90 days of data is displayed. If data is required outside of this time frame, edit the “From” and “To” Due Date fields.
4. View the Transaction History Report at the bottom of the page.
5. Use the Sort Option drop-down menus to sort the transactions and then select Sort.
Note: The list of transactions can be printed or exported to CSV or PDF.

PaymentStream™ AFT — Guide for File Upload /26
Figure 5.5: Transaction History Results
5.5 Originator Change Report The Originator Change report allows users to search for and view changes made to the Originator information.
A user proceeds as follows to view the Originator Change report:
1. Go to the Reports page as directed in Section 5.1, Accessing Reports.
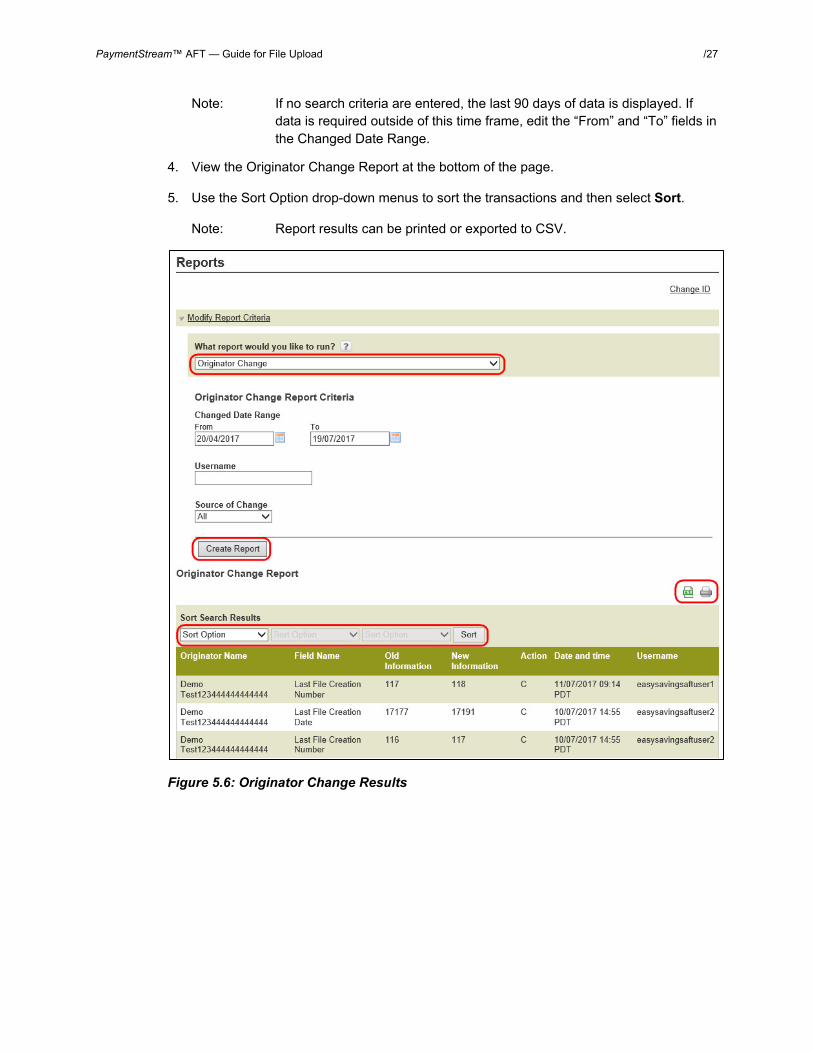
2. Use the ‘What report would you like to run’ drop-down menu to select Originator Change. See Figure 5.6.
3. To retrieve specific information, enter report criteria and select Create Report.
PaymentStream™ AFT — Guide for File Upload /27
Note: If no search criteria are entered, the last 90 days of data is displayed. If data is required outside of this time frame, edit the “From” and “To” fields in the Changed Date Range.
4. View the Originator Change Report at the bottom of the page.
5. Use the Sort Option drop-down menus to sort the transactions and then select Sort.
Note: Report results can be printed or exported to CSV.
Figure 5.6: Originator Change Results
PaymentStream™ AFT — Guide for File Upload /28
6 Settlement Reports for Business Members Settlement reports are produced after AFT transactions are delivered from PaymentStreamTM AFT to Central 1. Each report lists accepted, rejected, and returned AFT transactions. Reports are automatically deleted from PaymentStream AFT after 30 days. It is strongly recommended that business member Originators print the reports and/or save the report files on a regular basis.
6.1 Accessing Settlement Reports A business user proceeds as follows to access PaymentStream AFT settlement reports:
1. Navigate to PaymentStream AFT.
2. Select the appropriate Originator ID. See Figure 6.1.
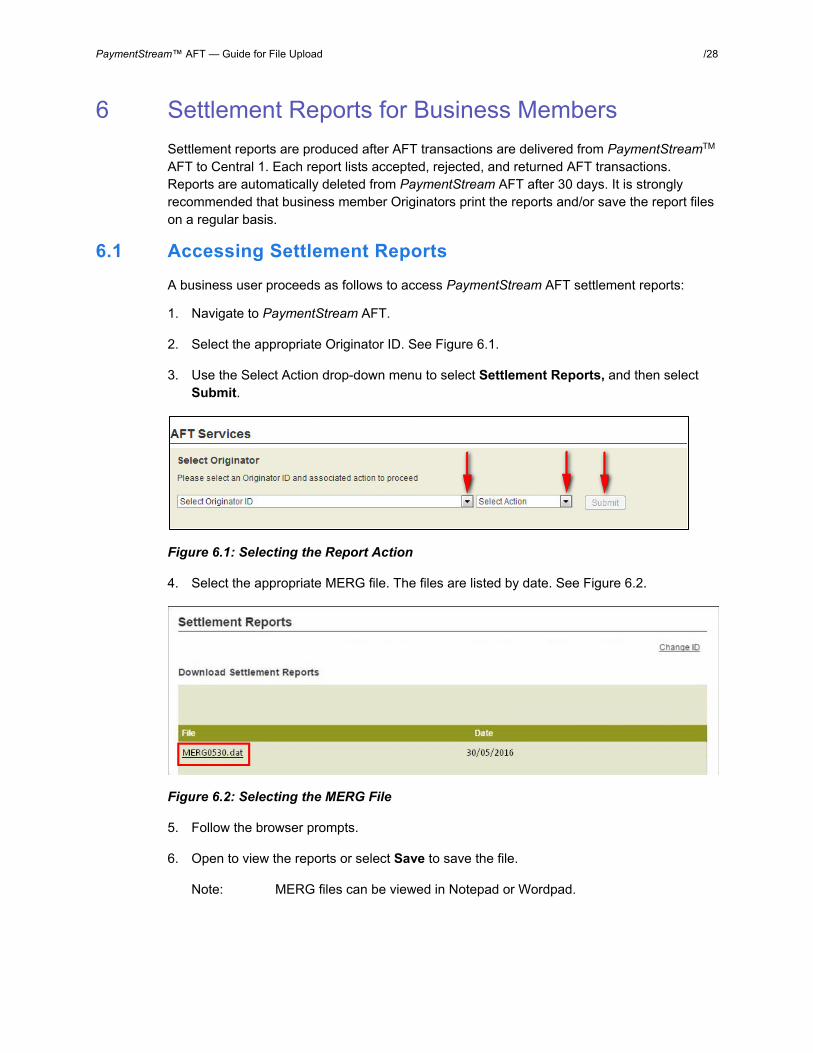
3. Use the Select Action drop-down menu to select Settlement Reports, and then select Submit.
Figure 6.1: Selecting the Report Action
4. Select the appropriate MERG file. The files are listed by date. See Figure 6.2.
Figure 6.2: Selecting the MERG File
5. Follow the browser prompts.
6. Open to view the reports or select Save to save the file.
Note: MERG files can be viewed in Notepad or Wordpad.
PaymentStream™ AFT — Guide for File Upload /29
6.2 Consolidated Returns, Recalls, Rejects, and Error Corrections Report (ICRR/UCRR) Description
This report lists the following types of transactions:
• Rejects – Transactions rejected by Central 1 and/or the receiving data centre.
• Returns – Transactions the Originator created that are electronically returned by the other financial institution.
• Recalls – Transactions recalled by the Originator before Central 1 sent the transaction to the other data centre. If a transaction is sent to the destination financial institution but has not been posted, it will also appear on this report if it is successfully recalled.
Canadian dollar transactions are reported on the ICRR and US dollar transactions are reported on the UCRR.
Purpose
Use this report to identify rejected and returned transactions, to determine the reason for return, and to confirm that the Originator’s recall requests were processed.
Organization
Each Originator is listed separately. The report is structured as follows (see Figure 6.3):
• Transaction Details – The top portion of the report lists the details of the AFT transactions. The TRAN column provides the reasons for return and recall items while the Invalid Field No. column gives the reason for a reject item. Compare this number to the legend provided below the transaction details.

PaymentStream™ AFT — Guide for File Upload /30
Figure 6.3: Consolidated Returns, Recalls, Rejects, and Error Corrections Report (ICRR/UCRR)
• Summary – The bottom portion of the report is divided into two columns: one for the total number of Debits (D, E, J) and one for the total number of Credits (C, F, I). The total Rejects, Returns, and Recalls are then listed, followed by the Grand Total.
The Invalid Field No. column indicates the reason for rejection. Compare the number to the legend provided below the transaction details. The following table describes the reasons that each type of reject may have occurred.

PaymentStream™ AFT — Guide for File Upload /31
Reason for Reject Reject Code (Field Number)
Field Reason
04 Transaction Type TRANSACTION TYPE is invalid or blank.
05 Amount AMOUNT is blank, or not greater than zero.
06 Due date/Date Funds to be Available
DUE DATE is invalid or blank.
07 Institutional identification No.
INSTITUTION (route and/or transit) is not in the correct format, does not exist or is blank.
08 Payor/Payee Account No. ACCOUNT NUMBER is not a valid format for the specified INSTITUTION.
09 Item Trace Number ITEM TRACE NO. is invalid.
10 Stored transaction Type STORED TRANSACTION TYPE is invalid or blank.
11 Originator Short Name ORIGINATOR SHORT NAME is blank.
12 Payor/Payee Name PAYOR/PAYEE NAME is blank.
13 Originator Long Name ORIGINATOR LONG NAME is blank.
14 Originating Direct Clearer User ID
Originating Direct Clearer ID is invalid or blank.
15 Cross Reference No. CROSS REFERENCE is blank.
16 Institutional ID number for returns
INSTITUTION FOR RETURNS (route and/or transit) is invalid or blank. It should specify your credit union.
19 Original Item Trace Number Original item trace number is invalid or blank.
21 Invalid Data Element ID DATA ELEMENT ID is invalid or blank.
Distribution
This report is available the day after Central 1 has processed the file.
6.3 Summary of Data Received Report (ICRM/UCRM) Description
This report lists an Originator’s AFT transactions by file creation number and includes the total item count and dollar value. Canadian dollar transactions are reported on the ICRM and US dollar transactions are reported on the UCRM.

PaymentStream™ AFT — Guide for File Upload /32
Purpose
Use this report as acknowledgement that Central 1 processed the AFT file. Compare the data on this report to your own records.
Organization
The report is divided into four parts (see Figure 6.4):
• Payment Details – Displays the total number and dollar value of transactions in the file. Figures are divided into debits and credits and each line is separated by Direct Clearer.
• Error Correction Details – Always shows zeros.
• Totals – Displays the total dollar value and item count of AFT transactions.
• Destination Statistics – Displays the number of transactions by the destination Direct Clearer. Figures are divided into debits and credits.
Figure 6.4: Summary of Data Received Report (ICRM/UCRM)
Distribution
The report is available the day after Central 1 processes the file. It is produced each time an Originator uploads a file to PaymentStream AFT or releases transactions from PaymentStream AFT.
6.4 Incoming AFT Transactions List (ICTI/UCTI) Description
This report provides a detailed list of an Originator’s AFT transactions by file creation number. The report also shows any offsetting transactions that Central 1 created. Canadian dollar transactions are listed on the ICTI and US dollar transactions are listed on the UCTI.
Purpose
Use the report to view individual transactions sent to the receiving financial institutions and to view offsetting transactions created by Central 1.
PaymentStream™ AFT — Guide for File Upload /33
Organization
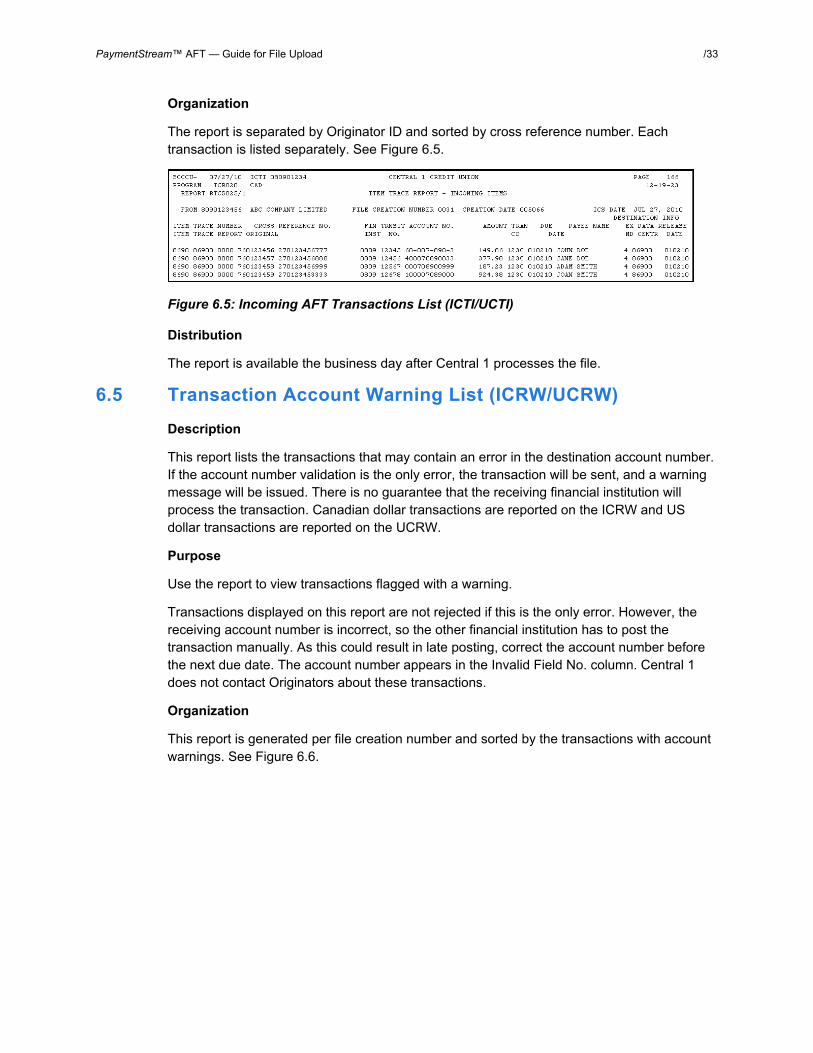
The report is separated by Originator ID and sorted by cross reference number. Each transaction is listed separately. See Figure 6.5.
Figure 6.5: Incoming AFT Transactions List (ICTI/UCTI)
Distribution
The report is available the business day after Central 1 processes the file.
6.5 Transaction Account Warning List (ICRW/UCRW) Description
This report lists the transactions that may contain an error in the destination account number. If the account number validation is the only error, the transaction will be sent, and a warning message will be issued. There is no guarantee that the receiving financial institution will process the transaction. Canadian dollar transactions are reported on the ICRW and US dollar transactions are reported on the UCRW.
Purpose
Use the report to view transactions flagged with a warning.
Transactions displayed on this report are not rejected if this is the only error. However, the receiving account number is incorrect, so the other financial institution has to post the transaction manually. As this could result in late posting, correct the account number before the next due date. The account number appears in the Invalid Field No. column. Central 1 does not contact Originators about these transactions.
Organization
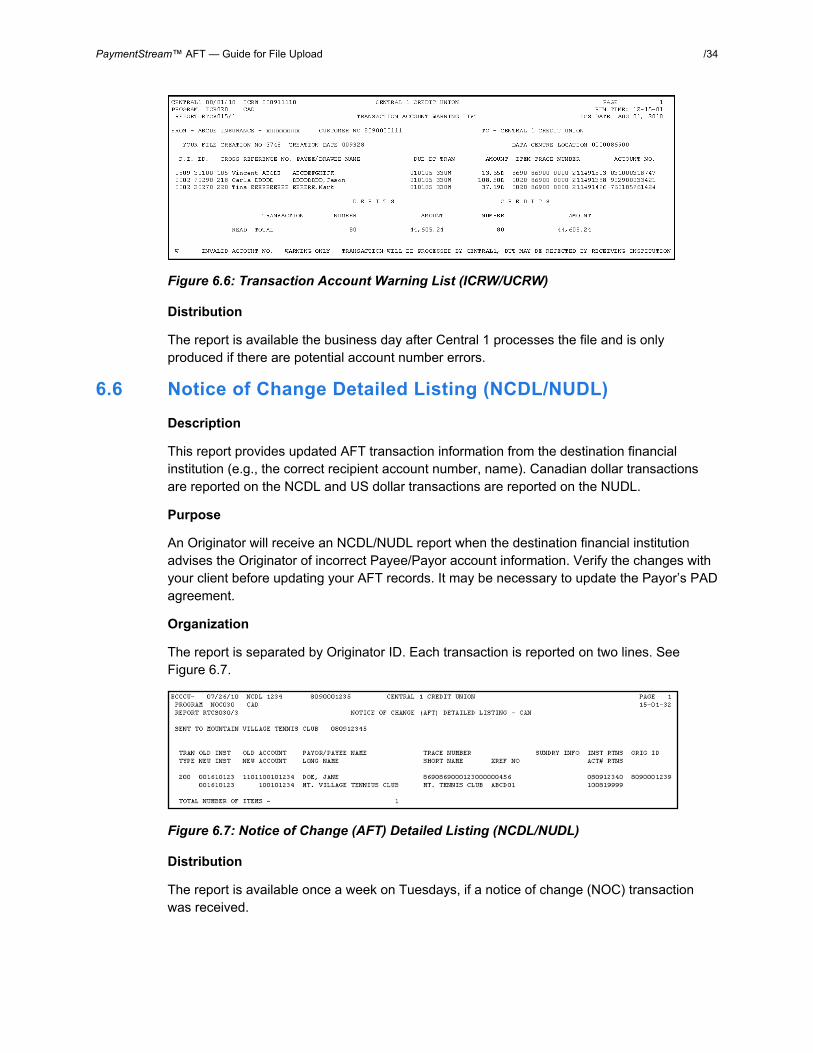
This report is generated per file creation number and sorted by the transactions with account warnings. See Figure 6.6.
PaymentStream™ AFT — Guide for File Upload /34
Figure 6.6: Transaction Account Warning List (ICRW/UCRW)
Distribution
The report is available the business day after Central 1 processes the file and is only produced if there are potential account number errors.
6.6 Notice of Change Detailed Listing (NCDL/NUDL) Description
This report provides updated AFT transaction information from the destination financial institution (e.g., the correct recipient account number, name). Canadian dollar transactions are reported on the NCDL and US dollar transactions are reported on the NUDL.
Purpose
An Originator will receive an NCDL/NUDL report when the destination financial institution advises the Originator of incorrect Payee/Payor account information. Verify the changes with your client before updating your AFT records. It may be necessary to update the Payor’s PAD agreement.
Organization
The report is separated by Originator ID. Each transaction is reported on two lines. See Figure 6.7.
Figure 6.7: Notice of Change (AFT) Detailed Listing (NCDL/NUDL)
Distribution
The report is available once a week on Tuesdays, if a notice of change (NOC) transaction was received.

PaymentStream™ AFT — Guide for File Upload /35
7 AFT Processing and Exception Items If an AFT file is uploaded or records are released on PaymentStreamTM AFT that the Originator does not want processed, the Originator can correct these records without affecting other transactions in the file. If an entire file includes duplicate transactions, is sent in error, or contains incorrect data on each record, the business member Originator can cancel the file. Corrections are processed as recalls or error corrections depending on whether the transactions have been posted to the recipients’ accounts.
7.1 Recalling AFT Transactions and AFT Files A recall is used to return a transaction or a file that has not yet been posted to the recipient’s account. A recall is not an AFT transaction. It is a request to return unposted transactions or files. Recalls are processed on a best efforts basis and are subject to the following parameters:
• Debit Transactions – Individual debit transactions cannot be recalled after Central 1 releases the transaction to the other financial institution.
• Credit Transactions – Credit transactions can be recalled if they have not been posted to the recipients’ accounts and the request is received the business day before the due date. Initiate an error correction if the transaction has been posted to the recipient’s account.
• Credit or Debit Files – A business member Originator’s AFT file can be recalled if Central 1 has not released the file to another financial institution.
Note: If the file was released to the receiving financial institution but the transactions have not been posted to the recipients’ accounts, recall each credit transaction individually. If the transactions were posted to the recipients’ accounts, request an error correction.
Contact your financial institution to request an AFT recall.
7.2 Requesting AFT Error Corrections An error correction is used to reverse an AFT transaction or AFT file that is posted to the recipients’ accounts in error. Error corrections have the following constraints:
• Error corrections do not guarantee the permanent return of funds since they can be disputed within 90 days of the posting date.
• Original AFT transactions are still eligible for return despite error correction requests. As a result, AFT returns will be posted to the business member Originator’s account.
• Error corrections are handled on a best effort basis.
To request an error correction, business member Originators contact their financial institution. Financial institutions must submit error correction requests to Central 1 by the following deadlines:
• 2:00 pm PT/5:00 pm ET, three business days after delivery of the original credit or debit transaction,

PaymentStream™ AFT — Guide for File Upload /36
• 2:00 pm PT/5:00 pm ET, two business days after the date funds are to be made available of the original credit transaction, or
• 2:00 pm PT/5:00 pm ET, two business days after the due date of the original debit transaction, whichever is later.
7.3 Handling Returned AFT Transactions The receiving financial institution can return AFT transactions for various reasons (e.g., the payment is NSF, the account number is invalid or closed). Returned AFT transactions are reported on the Consolidated Returns, Recalls, Rejects, and Error Corrections Report (ICRR/UCRR), usually one or two days after the due date.
The business member Originator proceeds as follows each business day:
1. Refer to the Consolidated Returns, Recalls, Rejects, and Error Corrections Report (ICRR/UCRR) to determine if any transactions were returned.
See Section 6.2, Consolidated Returns, Recalls, Rejects, and Error Corrections Report (ICRR/UCRR). The Tran Code column displays the return code and the Amount field indicates whether the transaction is a credit or debit. “J” indicates a returned debit and “I” indicates a returned credit. The table below lists the reason that corresponds to each return code.
Code Reason Code Reason 901 Not Sufficient Funds (Debits Only) 914 Incorrect Payor/Payee Name
902 Account Not Found 915* No Agreement Existed
903 Payment Stopped/Recalled 916* Not According to Agreement – Personal
905 Account Closed 917* Agreement Revoked – Personal
907 No Debit Allowed 918* No Confirmation/Pre-Notification – Personal
908 Funds Not Cleared (Debits Only) 919* Not According to Agreement – Business
909 Currency/Account Mismatch 920* Agreement Revoked –Business
910 Payor/Payee Deceased 921* No Confirmation/Pre-Notification – Business
911 Account Frozen 922 Customer Initiated Return
912 Invalid/Incorrect Account Number 990 Institution in Default
*The Payor must complete a Reimbursement Claim. This document is retained by the Payor’s financial institution and must be provided to the Payee’s financial institution upon request.
2. Investigate the reason for return and take appropriate action.

PaymentStream™ AFT — Guide for File Upload /37
3. Obtain the correct account information from the customer and update the record on PaymentStream AFT or on the software used to create the transaction (if applicable).
4. Contact the recipient to resolve the problem and arrange for payment of the returned item (if applicable).
5. Contact the financial institution regarding settlement issues.
7.4 Handling Rejected AFT Transactions AFT transactions are subject to a validation check at Central 1 and at the data centre of the receiving financial institution. Transactions that fail either validation check are rejected.
The business member Originator proceeds as follows each business day:
1. Review the Consolidated Returns, Recalls, Rejects, and Error Corrections Report (ICRR/UCRR) to determine if any transactions rejected. See Section 6.2, Consolidated Returns, Recalls, Rejects, and Error Corrections Report (ICRR/UCRR), for an example.
2. Credit transactions have a “C” in the Amount field and debit transactions have a “D”. The reason for rejection is recorded in the Invalid Field No. column. Compare this numeric code to the legend below the transaction details.
3. Obtain the correct account information (if applicable).
4. Update the record on PaymentStream AFT or on the software used to create the transaction (if applicable).
5. If applicable, arrange for payment of the rejected item or, with authorization from the recipient, create another transaction.
6. Contact the financial institution regarding settlement issues.

PaymentStream™ AFT — Guide for File Upload /38
Appendix A — Central 1’s AFT File Specifications Ensure that the AFT file is structured as follows:
• Header Record – The file contains one header record (“A” Record). This record consists of one segment containing the “A” record. Leave other segments blank. See Table 1.
• Detail Record(s) – The file can contain any number of detail records. Each detail record consists of 7 segments, as follows:
− Segment 0 – Consists of data elements 01 to 03 of the detail record, which are common to all detail transactions.
− Segments 1 to 6 – Each segment consists of data elements 04 to 21 of the detail record.
Individual transactions are made up of segments 0 and 1, 0 and 2, and so on. A block is made up of segments 0 to 6. The block contains information on 6 individual transactions.
Enter a carriage return line feed at the end of your last segment.
See Table 2.
• Trailer Record – The file contains one trailer record (“Z” Record). This record consists of one segment containing the “Z” record. Leave other segments blank. See Table 3.
Format of Records and Segments
• If one record, leave unused segments blank (spaces).
• If one segment is blank, all subsequent segments in that record must be blank.
• The presence of one detail record containing unused segments does not preclude the occurrence of subsequent detail records containing data.
Format of Data Elements
• Data elements are a fixed length.
• Numeric data elements must be right-justified and zero filled. Alphanumeric data elements do not require justification, but must be space filled.
• Enter zeros for numeric fields or spaces for alphanumeric fields to leave a data element blank.
PaymentStream™ AFT — Guide for File Upload /39
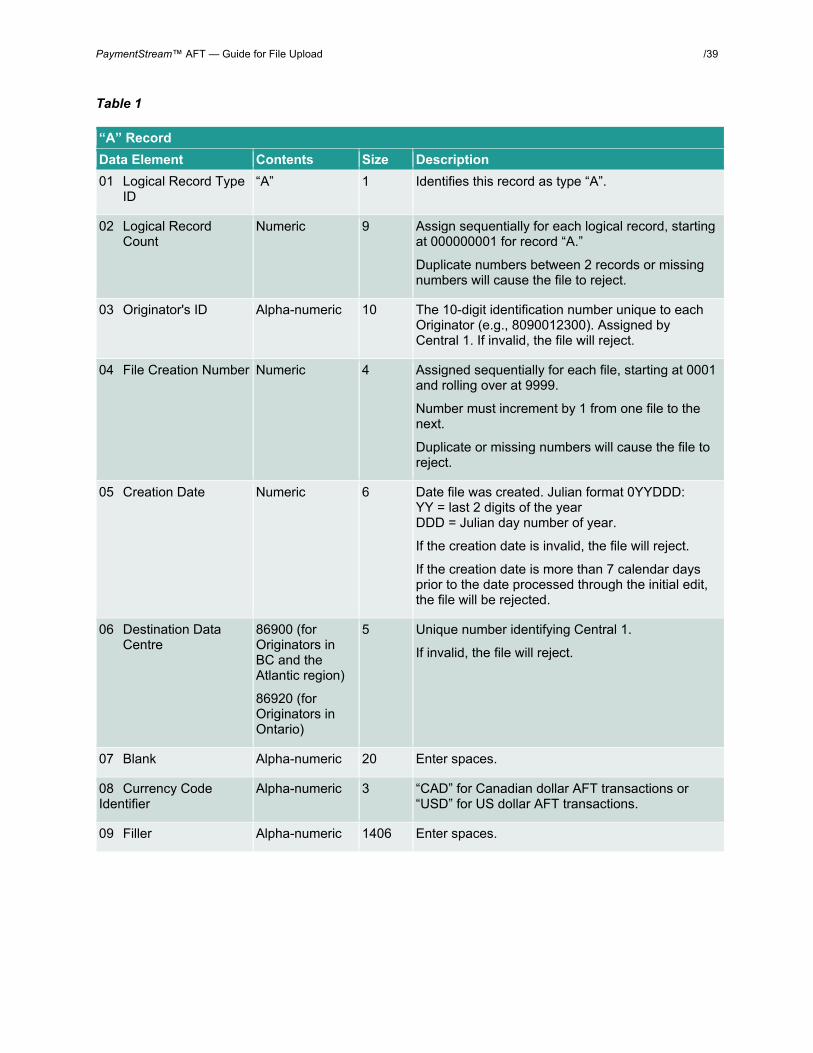
Table 1
“A” Record Data Element Contents Size Description 01 Logical Record Type ID
“A” 1 Identifies this record as type “A”.
02 Logical Record Count
Numeric 9 Assign sequentially for each logical record, starting at 000000001 for record “A.”
Duplicate numbers between 2 records or missing numbers will cause the file to reject.
03 Originator's ID Alpha-numeric 10 The 10-digit identification number unique to each Originator (e.g., 8090012300). Assigned by Central 1. If invalid, the file will reject.
04 File Creation Number Numeric 4 Assigned sequentially for each file, starting at 0001 and rolling over at 9999.
Number must increment by 1 from one file to the next.
Duplicate or missing numbers will cause the file to reject.
05 Creation Date Numeric 6 Date file was created. Julian format 0YYDDD: YY = last 2 digits of the year DDD = Julian day number of year.
If the creation date is invalid, the file will reject.
If the creation date is more than 7 calendar days prior to the date processed through the initial edit, the file will be rejected.
06 Destination Data Centre
86900 (for Originators in BC and the Atlantic region)
86920 (for Originators in Ontario)
5 Unique number identifying Central 1.
If invalid, the file will reject.
07 Blank Alpha-numeric 20 Enter spaces.
08 Currency Code Identifier
Alpha-numeric 3 “CAD” for Canadian dollar AFT transactions or “USD” for US dollar AFT transactions.
09 Filler Alpha-numeric 1406 Enter spaces.

PaymentStream™ AFT — Guide for File Upload /40
Table 2
Detail Record Data Element Contents Size Description 01 Logical Record Type ID
“C” or “D” 1 C = Direct credit D = Direct debit
02 Logical Record Count
Numeric 9 Assign sequentially for each logical record, starting at 000000001 for record “A”.
Number must increment by 1 from one record to the next within the file.
Duplicate numbers between 2 records or missing numbers will cause the file to reject.
03 Origination Control Data
Alpha-numeric 14 Combination of data elements 03 and 04 in “A” record.
If invalid, the file will reject.
04 Transaction Type Numeric 3 For a list of valid codes, see CPA Standard 007, Standards for the Use of Transaction Codes and Return Reason Codes in AFT Files, at www.payments.ca. If the code is invalid, the transaction will reject.
05 Amount Numeric 10 Omit commas and decimal points. For example, enter $4456.00 as “445600.” Right-justified.
06 Due Date or Date Funds to be Available
0YYDDD 6 Julian format 0YYDDD: YY = last 2 digits of the year DDD = Julian day number of year.
If the date is invalid, the file will reject.
If backdating, the date cannot be more than 173 calendar days (for debits) or 30 calendar days (for credits) before the date you created the file. If future dating, the date cannot be more than 45 calendar days after the date you created the file.
07 Institutional ID Number
Numeric 9 The financial institution to be debited or credited.
Format 1 222 33333 where 1 = 0 2 = Transit institution number (e.g., 809 for BC and 828 for ON) 3 = Charter/branch number of the financial institution and centre where item will clear.
For example: 000102180.
If the ID is invalid, the transaction will reject.
08 Payee/Payor Account Number
Alpha-numeric 12 Account to be debited or credited. Omit embedded blanks and dashes. Left justified.
If the account is invalid, the transaction may reject.

PaymentStream™ AFT — Guide for File Upload /41
Detail Record 09 Item Trace Number Numeric 22 Enter zeros or spaces.
For Central 1’s use.
10 Stored Transaction Type
Numeric 3 Zero fill.
11 Originator's Short Name
Alpha-numeric 15 Short name for the Originator, abbreviated as necessary.
The abbreviation should clearly identify the Originator, in case the processing Direct Clearer chooses this data element (instead of the long name) to identify the Originator to the recipient.
If blank, the transaction will reject.
12 Payee/Payor's Name Alpha-numeric 30 Name of account to be debited or credited.
If blank, the transaction will reject.
13 Originator's Long Name
Alpha-numeric 30 Long name of the Originator company.
If blank, the transaction will reject.
14 Originating Direct Clearer's User ID
Alpha-numeric 10 Same as data element 03 in “A” record.
15 Originator's Cross Reference
Alpha-numeric 19 19 characters for the internal cross reference for this transaction, if any (for example, employee number, policy number).
Field may be blank or contain zeros.
16 Institutional ID Number for Returns
Numeric 9 Your credit union branch.
Format 1 222 33333: 1 = 0 2 = Transit institution number (e.g., 809 for BC and 828 for ON) 3 = Charter/branch number of the financial institution and centre where item will clear.
For example: 080912310.
If the ID is invalid, the transaction will reject.
17 Account Number for Returns
Alpha-numeric 12 Originator’s account number at the branch identified in data element 16. Returns will be posted to this account.
18 Originator's Sundry Information
Alpha-numeric 15 Enter information to further identify the transaction to the recipient (e.g., enter pay period, insurance policy #).
19 Filler Alpha-numeric 22 Enter spaces.

PaymentStream™ AFT — Guide for File Upload /42
Detail Record 20 Originator Direct Clearer Settlement Code
Alpha-numeric 2 Enter spaces.
21 Invalid Data Element ID
Numeric 11 Must contain zeros. If other data is present, the transaction will reject.
Table 3
“Z” Record Data Element Contents Size Description 01 Logical Record Type ID
“Z” 1 Identifies this record as type “Z”.
02 Logical Record Count
Numeric 9 Assign sequentially for each logical record, starting at 000000001 for record “A”.
Duplicate numbers between 2 records, or missing numbers will cause the file to reject.
03 Origination Control Data
Alpha-numeric 14 Combination of data elements 03 and 04 in Header “A”.
If invalid, the file will reject.
04 Total Dollar Value of Debit Transactions
Numeric 14 Decimal is assumed. For example, enter $4456.00 as “445600.”
05 Total Number of Debit Transactions
Numeric 8 Total for this batch.
06 Total Dollar Value of Credit Transactions
Numeric 14 Decimal is assumed. For example, enter $4456.00 as “445600.”
07 Total Number of Credit Transactions
Numeric 8 Total for this batch.
08 Zero Filler Numeric 14 Enter zeros.
09 Zero Filler Numeric 8 Enter zeros.
10 Zero Filler Numeric 14 Enter zeros.
11 Zero Filler Numeric 8 Enter zeros.
12 Filler Alpha-numeric 1352 Enter spaces.

PaymentStream™ AFT — Guide for File Upload /43
Copyright and Disclaimer Except as expressly permitted in this publication, or by the provisions of the Copyright Act, no part of this publication may be reproduced in any form by any means without the written permission of Central 1 Credit Union.
Central 1 is not responsible for any errors or omissions contained in this publication and expressly disclaims liability, whether under contract or in negligence or otherwise, to any user, including subscribers and other persons who may use this publication and to members, clients, and customers of such subscribers and other persons.
Central 1 expressly disclaims liability for loss or damage, whether direct or indirect, resulting from any use of this publication, including, without limitation, any loss or damage arising as a result of the procedures or forms contained in this publication being determined not to be valid or enforceable or not attaining the end desired by the user.
PaymentStream™ and PaymentStream Design are trademarks owned by Central 1 Credit Union.


